FS38 E • FS38 S
8651250_030824 enUS
Keep this Owner’s Manual for future reference, thoroughly read
through it, and if you have any questions please contact us today.
NG Owner’s Manual
REGISTER TODAY
Register your gas grill and receive special content to make
you the ultimate backyard hero.
Scan the QR Code or register online at weber.registria.com
Serial Number
Write your grill's serial number in the box above for future reference.
The serial number is on the grill's data label.
FEATURES OF THIS GRILL
To access complete
user information, scan
the QR Code and enter
your serial number,
or browse online at
weber.com/literature-online.
2
m DANGER
If you smell gas:
• Shut o gas to the appliance
(grill).
• Extinguish any open flame.
• Open lid.
• If odor continues, keep away
from the appliance (grill)
and immediately call your
gas supplier or your fire
department.
m WARNING
• Do not store or use gasoline
or other flammable liquids
or vapors in the vicinity
of this (grill) or any other
appliance.
• An LP cylinder (tank) not
connected for use shall
not be stored in the vicinity
of this (grill) or any other
appliance.
USE OUTDOORS ONLY.
READ THE INSTRUCTIONS BEFORE USING
THE APPLIANCE (GRILL).
NOTICE TO INSTALLER: These instructions
must be left with the consumer.
NOTICE TO CONSUMER: Retain these
instructions for future reference.
Important
SafetyInformation
DANGER, WARNING, and CAUTION
statements are used throughout this
Owner's Manual to emphasize critical and
important information. Read and follow
these statements to help ensure safety and
prevent property damage. Thestatements
are defined below.
m DANGER: Indicates a hazardous
situation which, if not avoided,
will result in death or seriousinjury.
m WARNING: Indicates a hazardous
situation which, if not avoided,
could result in death or seriousinjury.
m CAUTION: Indicates a hazardous
situation which, if not avoided,
could result in minor or moderateinjury.
Installation and Assembly
m DANGER: This grill is not intended to be installed in or on
recreational vehicles or boats.
m WARNING: Do not use this grill unless all parts are in
place and the grill was properly assembled according to
the assembly instructions.
m WARNING: Do not build this model of grill in any built-in
or slide-in construction.
m WARNING: Do not modify the appliance (grill). Liquid
propane gas is not natural gas. The conversion or
attempted use of natural gas in a liquid propane gas unit
or liquid propane gas in a natural gas unit is unsafe and
will void your warranty.
m WARNING: Do not route the ten-foot hose under a deck.
The hose must be visible.
• WE RECOMMEND THAT THE INSTALLATION OF
THIS NATURAL GAS GRILL BE PERFORMED BY A
PROFESSIONAL.
• Confirm that the branch supply line from the house to
the grill is properly installed before using the grill.
• In the United States, installation must conform with
local codes or, in the absence of local codes, with
either the National Fuel Gas Code, ANSI Z223.1/
NFPA 54, Natural Gas and Propane Installation Code,
CSA B149.1; or Propane Storage and Handling Code,
B149.2; or the Standard for Recreational Vehicles,
ANSI A119.2/NFPA 1192, and CSA Z240 RV Series,
Recreational Vehicle Code, as applicable.
• InCanada, the installation of this grill must comply
with local codes and/or the latest edition of Standard
CAN/CSA-B149.2 (Propane Storage and Handling
Code). These instructions, while generally acceptable,
do not necessarily comply with the Canadian
installation codes, particularly with piping above and
below ground.
• In Mexico, if there are local codes that apply to portable
gas appliances, you must comply with the latest edition
of Ocial Mexican Standard (NOM).
• If an external electrical source is utilized (such as
a rotisserie) it must be electrically grounded in
accordance with local codes or, in the absence of local
codes, with the National Electrical Code, ANSI/NFPA 70,
or the Canadian Electrical Code, Part 1, CSA C22.1.
Operation
m DANGER: Only use the grill outdoors in a well-ventilated
area. Do not use in a garage, building, breezeway,
tent, any other enclosed area, or beneath overhead
combustibleconstruction.
• An appliance is considered to be outdoors if installed
with shelter no more inclusive than with walls on three
sides, but with no overhead cover; all openings must be
permanently open; sliding doors, garage doors, windows,
or screened openings are not considered as permanent
openings.
• An appliance is considered to be outdoors if installed with
shelter no more inclusive than within a partial enclosure
that includes an overhead cover and no more than two
sidewalls. The sidewalls may be parallel, as in a breeze-
way, or at right angles to each other; all openings must be
permanently open; sliding door, garage doors, windows,
or screened openings are not considered as permanent
openings.
• An appliance is considered to be outdoors if installed with
shelter no more inclusive than within a partial enclosure
that included an overhead cover and three sidewalls, as
long as 30% or more of the horizontal periphery of the
enclosure is permanently open. All openings must be
permanently open; sliding doors, garage doors, windows,
or screened openings are not considered as permanent
openings.
• The minimum ambient operating temperature for safe use
of the appliance shall be 0° F (-17° C).
m DANGER: Do not use the grill in any vehicle or in any
storage or cargo area of any vehicle. This includes, but
is not limited to, cars, trucks, station wagons, mini-vans,
sport utility vehicles, recreational vehicles, andboats.
m DANGER: Do not use the grill within 24 inches (61 cm)
of combustible materials. This includes the top, bottom,
back and sides of the grill.
m DANGER: Keep the cooking area clear of flammable
vapors and liquids such as gasoline, alcohol, etc., and
combustible materials.
m DANGER: This appliance (grill) must be kept away from
flammable materials during use.
m DANGER: Do not put a grill cover or anything flammable
on, or in the storage area under the grill while it is in
operation or is hot.
Safety Information
3
Electrical Supply
m WARNING: This applliance is not intended for
use by persons (including children) with reduced
physical, sensory or mental capabilities, or lack of
experience and knowledge, unless they have been
given supervision or instruction concerning use of the
appliance by a person responsible for their safety.
m WARNING: Children should be supervised to ensure that
they do not play with the appliance.
m WARNING: Only use the power supply unit provided with
this appliance.
m WARNING: This appliance incorporates an earth
connection for fuctional purposes only.
m WARNING: To protect against risk of electric shock, do
not immerse cord or plugs in water or other liquid.
m WARNING: Unplug from outlet when not in use and
before cleaning. Allow to cool before putting on or
taking o parts.
m WARNING: Do not opperate any outdoor cooking gas
appliance with a damaged cord, plug, or after the
appliance malfunctions or has been damaged in any
manner. Contact the Customer Service Representative
in your area using the contact information on our web
site. Log onto www.weber.com.
m WARNING: Do not let the cord hang over the edge of a
table or touch hot surfaces.
m WARNING: Do not use an outdoor cooking gas appliance
for purposes other than intended.
m WARNING: When connecting, first connect the plug to
the outdoor cooking gas appliance then plug appliance
into the outlet.
m WARNING: Use only a Ground Fault Interrupter (GFI)
protected circuit with this outdoor cooking gas
appliance.
m WARNING: Never remove the grounding plug or use with
an adapter of 2 prongs.
m WARNING: Use only extension cords with a 3 prong
grounding plug, rated for the power of the equipment,
and approved for outdoor use with a W-A marking.
• Do not connect two or more extension cords together.
m DANGER: Should a grease fire occur, turn o all burners
and leave lid closed until fire is out.
m WARNING: Accessible parts may be very hot. Keepyoung
children away.
m WARNING: The use of alcohol, prescription drugs,
non-prescription drugs, or illegal drugs may impair the
consumer’s ability to properly and safely assemble,
move, store, or operate thegrill.
m WARNING: Never leave the grill unattended during pre-
heating or use. Exercise caution when using this grill.
The entire cookbox gets hot when in use.
m WARNING: Do not move the appliance (grill) duringuse.
m WARNING: Keep any electrical supply cord and the fuel
supply hose away from any heated surfaces.
m CAUTION: This product has been safety-tested and
is only certified for use in a specific country. Refer to
country designation located on outside of box.
• Do not use charcoal or lava rock in the grill.
• This natural gas grill is factory built to operate using
natural gas only. Never attempt to operate your grill
on gases other than the type specified on the grill
ratingplates.
Storage and/or Nonuse
m WARNING: Turn o the gas at the natural gas supply
valve when the grill in not in use.
m WARNING: After a period of storage and/or nonuse,
the grill should be checked for gas leaks and burner
obstructions before use.
• Storage of the grill indoors is permissible only if the
grill is disconnected from the gas supply.
California Proposition 65
m WARNING: Combustion byproducts produced when
using this product contain chemicals known to the state
of California to cause cancer, birth defects, or other
reproductive harm.
m PROPOSITION 65 WARNING: Handling the brass material
on this product exposes you to lead, a chemical known to
the state of California to cause cancer, birth defects, or
other reproductive harm. Wash hands after handling this
product.
Limited Warranty
Thank you for purchasing a WEBER product. Weber-Stephen
Products LLC, 1415 S. Roselle Road, Palatine, Illinois 60067
(“WEBER”) prides itself on delivering a safe, durable, and
reliableproduct.
This is WEBER’s Limited Warranty (" Warranty") provided to you
at no extra charge. It contains the information you will need to
have your WEBER product repaired in the unlikely event of a
failure or defect.
Pursuant to applicable laws, the customer has several
rights in case the product is defective. Those rights include
supplementary performance or replacement, abatement of
the purchasing price, and compensation. These and other
statutory rights remain unaffected by this warranty provision.
In fact, this warranty grants additional rights to the Owner
that are independent from statutory warranty provisions.
WEBER’S LIMITED WARRANTY
WEBER warrants, to the purchaser of the WEBER product (or
in the case of a gift or promotional situation, the person for
whom it was purchased as a gift or promotional item) ("Owner"),
that the WEBER product is free from defects in material and
workmanship for the period(s) of time specified below when
assembled and operated in accordance with the accompanying
Owner’s Manual, normal wear and tear excluded . (Note: If you
lose or misplace your WEBER Owner’s Manual, a replacement is
available online at www.weber.com.) WEBER agrees within the
framework of this warranty to repair or replace the part that is
defective in material or workmanship subject to the limitations,
and exclusions listed below. TO THE EXTENT ALLOWABLE BY
APPLICABLE LAW, THIS WARRANTY IS EXTENDED ONLY TO
THE ORIGINAL PURCHASER AND IS NOT TRANSFERABLE TO
SUBSEQUENT OWNERS, EXCEPT IN THE CASE OF GIFTS AND
PROMOTIONAL ITEMS AS NOTED ABOVE.
WEBER stands by its products and is happy to provide you with
the Warranty described for material defects in the grill or its
relevant components, normal wear and tear excepted.
• ‘Normal wear and tear’ includes cosmetic and other immaterial
deterioration that may come with ownership of your grill over
time, such as surface rust, dents / scratches, etc.
However, WEBER will honor this Warranty for the grill or its
relevant components where damage or dysfunction results from
a material defect.
• ‘Material defect’ includes rust through or burn through of
certain parts, or other damage or failure inhibiting your ability
to safely / properly use your grill.
OWNER’S RESPONSIBILITIES UNDER THIS WARRANTY
To ensure trouble-free warranty coverage, it is important (but it
is not required) that you register your WEBER product online at
www.weber.com. Please also retain your original sales receipt
and/or invoice. Registering your WEBER product confirms your
warranty coverage and provides a direct link between you and
WEBER in case we need to contact you. If you have not had time
to register your grill before calling for Warranty service, please
have the following information available when you do call:
Name – Address – Phone Number – Email – Serial Number –
Purchase Date – Purchase Dealer – Model – Color – Primary
Issue
The above warranty only applies if the Owner takes reasonable
care of the WEBER product by following all assembly
instructions, usage instructions, and preventative maintenance
as outlined in the accompanying Owner’s Manual, unless the
Owner can prove that the defect or failure is independent of
non-compliance with the above mentioned obligations. If you
live in a coastal area, or have your product located near a
pool, maintenance includes regular washing and rinsing of the
exterior surfaces as outlined in the accompanying Owner’s
Manual.
WARRANTY HANDLING / EXCLUSION OF WARRANTY
If you believe that you have a part which is covered by this
Warranty, please contact WEBER Customer Service using the
contact information on our website (www.weber.com, or such
country-specific website to which Owner may be redirected).
WEBER will, upon investigation, repair or replace (at its option)
a defective part that is covered by this Warranty. In the event
that repair or replacement are not possible, WEBER may choose
(at its option) to replace the grill in question with a new grill of
equal or greater value. WEBER may ask you to return parts for
inspection, shipping charges to be pre-paid by owner.
When you contact Customer Service, please have the following
information available:
Name – Address – Phone Number – Email – Serial Number –
Purchase Date – Purchase Dealer – Model – Color – Primary
Issue
This WARRANTY lapses if there are damages, deteriorations,
discolorations, and/or rust for which WEBER is not responsible
caused by:
• Abuse, misuse, alteration, modification, misapplication,
vandalism, neglect, improper assembly or installation, and
failure to properly perform normal and routine maintenance;
• Insects (such as spiders) and rodents (such as squirrels),
including but not limited to damage to burner tubes and/or gas
hoses;
• Exposure to salt air and/or chlorine sources such as swimming
pools and hot tubs/spas;
• Severe weather conditions such as hail, hurricanes,
earthquakes, tsunamis or surges, tornadoes or severe storms.
• Acid rain and other environmental factors.
Using third party parts will not void this Warranty. However, any
parts that are used and/or installed on your WEBER product that
are not genuine WEBER parts are not covered by this Warranty.
In addition, any damages that result from the use and/or
installation of parts on your WEBER product that are not genuine
WEBER parts are not covered by this Warranty. Any conversion of
a gas grill not authorized by WEBER and performed by a WEBER
authorized service technician will void this Warranty.
PRODUCT WARRANTY PERIODS
Cookbox:
15 years, no rust through/burn through
(2 years paint excluding fading or discoloration)
Lid assembly:
15 years, no rust through/burn through
(2 years paint excluding fading or discoloration)
Burners:
10 years, no rust through/burn through
Stainless steel cooking grates:
10 years, no rust through/burn through
Stainless steel FLAVORIZER BARS:
10 years, no rust through/burn through
Electronics and WEBER CONNECT Components:
3 years
All remaining parts:
5 years
DISCLAIMERS
APART FROM THE WARRANTY AND DISCLAIMERS AS
DESCRIBED IN THIS WARRANTY STATEMENT, THERE ARE
EXPLICITLY NO FURTHER WARRANTY OR VOLUNTARY
DECLARATIONS OF LIABILITY GIVEN HERE WHICH GO
BEYOND THE STATUTORY LIABILITY APPLYING TO WEBER.
THE PRESENT WARRANTY STATEMENT ALSO DOES NOT
LIMIT OR EXCLUDE SITUATIONS OR CLAIMS WHERE WEBER
HAS MANDATORY LIABILITY AS PRESCRIBED BY STATUTE.
NO WARRANTIES SHALL APPLY AFTER THE APPLICABLE
PERIODS OF THIS WARRANTY. NO OTHER WARRANTIES
GIVEN BY ANY PERSON, INCLUDING A DEALER OR RETAILER,
WITH RESPECT TO ANY PRODUCT (SUCH AS ANY “EXTENDED
WARRANTIES”), SHALL BIND WEBER. THE EXCLUSIVE
REMEDY OF THIS WARRANTY IS REPAIR OR REPLACEMENT
OF THE PART OR PRODUCT.
IN NO EVENT UNDER THIS WARRANTY SHALL RECOVERY
OF ANY KIND BE GREATER THAN THE AMOUNT OF THE
PURCHASE PRICE OF THE WEBER PRODUCT SOLD.
YOU ASSUME THE RISK AND LIABILITY FOR LOSS, DAMAGE,
OR INJURY TO YOU AND YOUR PROPERTY AND/OR TO
OTHERS AND THEIR PROPERTY ARISING OUT OF THE MISUSE
OR ABUSE OF THE PRODUCT OR FAILURE TO FOLLOW
INSTRUCTIONS PROVIDED BY WEBER IN THE ACCOMPANYING
OWNER’S MANUAL.
PARTS AND ACCESSORIES REPLACED UNDER THIS
WARRANTY ARE WARRANTED ONLY FOR THE BALANCE OF
THE ABOVE MENTIONED ORIGINAL WARRANTY PERIOD(S).
THIS WARRANTY APPLIES TO PRIVATE SINGLE FAMILY HOME
OR APARTMENT USE ONLY AND DOES NOT APPLY TO WEBER
GRILLS USED IN COMMERCIAL, COMMUNAL OR MULTI-UNIT
SETTINGS SUCH AS RESTAURANTS, HOTELS, RESORTS, OR
RENTAL PROPERTIES.
WEBER MAY FROM TIME TO TIME CHANGE THE DESIGN OF
ITS PRODUCTS. NOTHING CONTAINED IN THIS WARRANTY
SHALL BE CONSTRUED AS OBLIGATING WEBER TO
INCORPORATE SUCH DESIGN CHANGES INTO PREVIOUSLY
MANUFACTURED PRODUCTS, NOR SHALL SUCH CHANGES
BE CONSTRUED AS AN ADMISSION THAT PREVIOUS DESIGNS
WERE DEFECTIVE.
Weber-Stephen Products LLC
Customer Service Center
1415 S. Roselle Road
Palatine, IL 60067
U.S.A.
For replacement parts, call:
1-800-446-1071
Safety Information
4
Important Information about
NaturalGas & Gas Connections
What is Natural Gas?
Natural gas (NG) is a combustible, gaseous mixture
of simple hydrocarbon compounds, usually found in
deep underground reservoirs formed by porous rock.
It is a fossil fuel composed almost entirely of methane.
Natural gas is delivered by your local utility through an
underground pipeline system.
General Specifications
• This grill is designed to operate at 4.5" of water column
pressure (0.16245 psi).
• The quick-disconnect fitting can be installed
horizontally or pointing downward, but never pointing
upward. Installing it with the open end pointing upward
can result in water and debris collecting in the quick-
disconnect fitting.
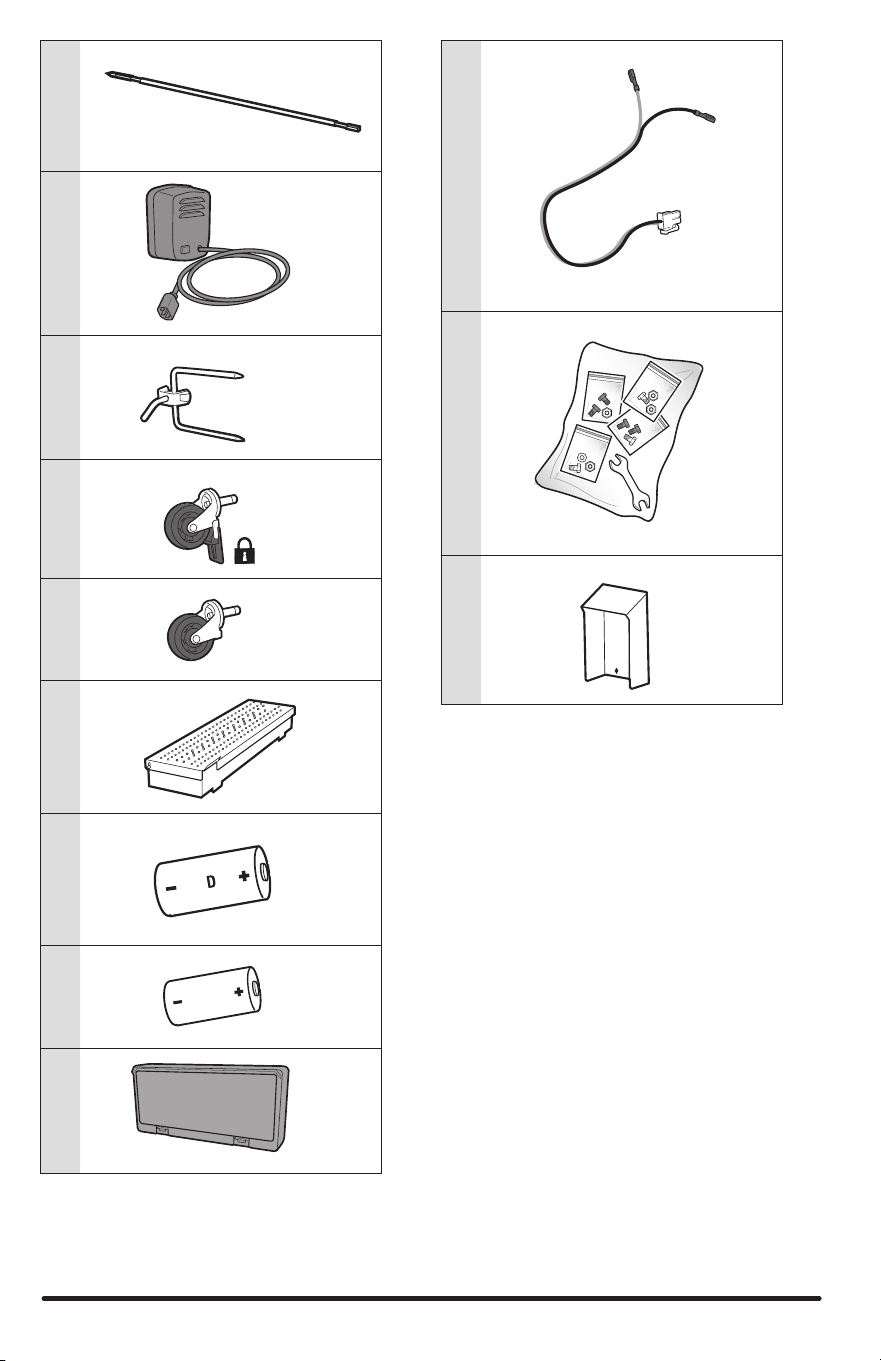
• The dust covers (plastic plugs supplied with your grill)
help keep the open ends of the quick-disconnect fitting
clean while disconnected.
Hose Requirements
• The grill is equipped with a model specific hose that
was attached during the manufacturing process. This
specific hose must be used for proper performance.
• If the hose becomes worn or damaged, contact the
Customer Service Representative in your area using
the contact information on our website.
Pressure Testing the Gas Supply
• Disconnect the gas grill when the gas supply is being
tested at high pressures. This appliance and its
individual shuto valve must be disconnected from the
gas supply piping system during any pressure testing
of that system at test pressures in excess of 1/2 psig
(3.5 kPa).
• Turn o the gas grill when the gas supply is being
tested at low pressures. This appliance must be
isolated from the gas supply piping system by closing
its individual manual shuto valve during any pressure
testing of the gas supply piping system at test
pressures equal to or less than 1/2psig (3.5 kPa).
Typical NG Grill Pipe Installation
INSIDE HOUSE
Gas supply
Shuto
OUTSIDE HOUSE
1/2" Quick-disconnect
1/2" pipe nipple
Locking shuto
Local codes may require
dierent installations.
Flare fittings should never
be used.
C
Hose Connection
Connect the Hose to the GasSupply
A quick-disconnect fitting connects your grill to the gas
supply. Gas will not flow unless the quick-disconnect is
properly engaged.
1) Check that all burner control knobs are in the o
position. Check by pushing in and turning knobs
clockwise (A).
2) Starting from inside the cabinet, route the flexible gas
hose out of the opening in the rear panel (B).
3) Slide the collar of the quick-disconnect back (C).
4) Push male fitting of the hose into the quick-disconnect
and maintain pressure. Slide the collar closed (D). If it
does not engage or lock, repeat procedure. Proceed to
”CHECKING FOR GAS LEAKS”.
m DANGER: Do not line the slide-out grease tray or
cookbox with aluminum foil.
m DANGER: Check the slide-out grease tray and
catch pan for grease build-up before each use.
Remove excess grease to avoid a grease fire.
m WARNING: Use caution when removing catch pan
and disposing of hot grease.
m WARNING: Use heat-resistant barbecue mitts or
gloves when operating grill.
m WARNING: Grill brushes should be checked for
loose bristles and excessive wear on a regular
basis. Replace brush if any loose bristles are
found on cooking grates or brush. WEBER
recommends purchasing a new stainless steel
bristle grill brush at the beginning of every spring.
m WARNING: Keep ventilation openings around tank
clear and free of debris.
m WARNING: Keep any electrical supply cord and the
fuel supply cord away from heated surfaces.
D
Getting Started
B
5
Getting Started
D
C
Inspect the Hose
Routine inspection of the hose is necessary.
1) Confirm that the grill is o and cool.
2) Check hose for any signs of cracking, abrasions,
or cuts(A). If the hose is found to be damaged in
any way, do not use the grill.
m WARNING: If the hose is found to be damaged in
any way, do not use the grill. Replace using only
WEBER authorized replacement hose.
LeakChecking
What is a Leak Check?
Once the hose is properly connected, it is necessary to
perform a leak check. A leak check is a reliable way to
verify that gas is not escaping after you connect the hose
to the gas supply. The fuel system in your grill features
factory-made connections that have been thoroughly
checked for gas leaks and the burners have been flame-
tested.
WEBER recommends performing a thorough leak check
after assembly, as well as annually. The following fittings
should be tested:
• Where the gas hose connects to the gas supply.
• Where the gas hose connects to the bulkhead.
• Where the bulkhead connects to the corrugated gas
line.
Checking for Gas Leaks
1) Wet fittings (A) with a soap and water solution, using a
spray bottle, brush or rag. You can make your own soap
and water solution by mixing 20% liquid soap with 80%
water; or, you can purchase leak check solution in the
plumbing section of any hardware store.
2) Turn the gas supply valve on.
3) If bubbles appear there is a leak:
a) If the leak is at the gas supply (B). Turn o the gas.
DO NOT OPERATE THE GRILL.
b) If the leak is at any fittings indicated in
illustration (C), re-tighten fitting with a wrench and
recheck for leaks with soap and water solution. If
leak persists, turn o the gas. DONOT OPERATE THE
GRILL.
c) If the leak is at any fittings indicated in
illustration (D), turn o the gas. DO NOT OPERATE
THE GRILL.
If a leak is present, contact the Customer Service
Representative in your area using the contact
information on our website.
4) If bubbles do not appear, leak checking is complete.
Turn gas supply valve o and rinse connections
withwater.
NOTE: Since some leak test solutions, including soap and
water, may be slightly corrosive, all connections should be
rinsed with water after checking for leaks.
Disconnect the Hose from the GasSupply
1) Slide the collar back and pull out the plug.
Thisautomatically shuts o the gas.
m DANGER: Do not use a flame to check for gas
leaks. Besure there are no sparks or open flames
in the area while you check for leaks.
m DANGER: Leaking gas may cause a fire or
explosion.
m DANGER: Do not operate the grill if there is a gas
leak present.
A
B
A
6
Using the Top-Down Infrared Broiler
Top-down infrared broiler directs blazing high heat onto
the top of meat, searing the surface evenly and creating
an edge-toedge caramelized crust with juicy insides. As
the heat comes from above, grease flows downward,
minimizing flare ups. The broiler is thoughtfully sized
to fit two New York strip or four filet mignon steaks
perfectly, and the cooking grate below it adjusts to
accommodate larger cuts of meat, casseroles, créme
brûlée, and more.
1) Open the lid. Using heat-resistant barbecue gloves,
adjust the level of the upper cooking surface to one
of the three positions (A).
2) Push in the infrared broiler control knob. Slowly turn
it counterclockwise toward the ignite
position
until you hear ticking. Once ticking starts, hold
the knob in that position for 1-2 seconds. Continue
turning knob counterclockwise, stopping halfway
between the ignite and high heat position (B).
Hold down the knob in this position for 20 – 30
seconds as the burner ignites and establishes a
continuous flow of gas across the surface of the
infrared broiler. Once the infrared broiler is glowing
orange, then it is ignited. Now turn the control knob
to desired heat level and release the knob.
3) Keep the lid open while using the infrared broiler in
the high heat setting for searing (C). Use the infrared
broiler on the low heat setting for rotisserie/keep
warm.
Note: Always keep the lid OPEN while using the infrared
broiler on the high heat setting, and turn food frequently for
even searing.
To Extinguish Infrared Broiler
1) Push the control knob in and then turn clockwise all
the way to the o position.
Operation
m WARNING: Open lid during ignition.
m WARNING: Do not lean over open grill while
igniting or cooking.
m WARNING: Each burner must be ignited
individually by pushing the electronic ignition
button.
m WARNING: If ignition does not occur within four
seconds of attempting to light the first burner,
turn the burner control knob to the o position.
Wait five minutes to allow accumulated gas to
dissipate, and then repeat the lighting procedure.
A
D
C
Igniting the Main Burners
Using the One-Handed Ignition to
Ignite the Main Burners
Each control knob operates an individual burner, and each
burner ignites independently. Ignite the main burners
starting from left to right. All burners should be lit for
preheating, however, all burners do not have to be lit while
grilling.
1) Open the grill lid (A).
2) Check that all burner control knobs (including side
burner control knob) are in the o
position. Check by
pushing in and turning knobs clockwise.
3) Turn the gas supply valve on (B).
4) Begin with the burner furthest to the left.
Pushthe burner control knob in and slowly turn it
counterclockwise toward the ignite
position until you
hear ticking(C). Once ticking starts, hold the knob in
that position for 1-2 seconds and then slowly continue
turning counterclockwise. The burner should ignite
before the high
position (D).
5) Check that the burner is lit by looking through
the cooking grates and through the cutout in the
FLAVORIZER bar.
6) If the burner does not ignite within 4 seconds, turn
burner control knob to the o
position and wait five
minutes to allow the gas to clear before attempting to
light the burner again.
7) If the burner ignites, repeat steps 4 through 5 to ignite
the remaining main burners.
Should the burners fail to ignite using the electronic
ignition, refer to the TROUBLESHOOTING section.
Thereyou will find instructions on igniting the grill with a
match to help determine the exact problem.
Preheat the Grill
Preheating the grill is critical to successful grilling.
Preheating helps to prevent food from sticking to the grate
and gets the grate hot enough to sear properly. Italso
burns o residue of a previously cooked meal.
1) Open the grill lid.
2) Ignite your grill according to the ignition instructions in
this Owner's Manual.
3) Close lid.
4) Preheat the grill with all burners on the high
position
for 15 minutes(D).
To Extinguish Main Burners
1) Push each burner control knob in and then turn
clockwise all the way to the o position.
2) Turn gas supply valve o.
C
B
B
O
Control Knob Settings
Ignite High Medium Low
7
Operation
m CAUTION: Inspect power cord before each use.
If cord is damaged, do not use. Contact the
Customer Service Representative in your area
using the contact information on our web site. Log
onto www.weber.com.
m CAUTION: Failure to properly store the rotisserie
power cord may result in damage to the power
cord when opening and closing the retractable
rotisserie panel.
m WARNING: Use heat-resistant grilling mitts or
gloves when operating grill.
Operating the Rotisserie
Preparing the Grill
Prepare grill for rotisserie cooking by removing
the warming rack and removing cooking grates.
RECOMMENDATION: Place a fresh foil pan (sold separately)
directly under food on top of the FLAVORIZER BARS (A).
NOTE: Set up the rotisserie with food before igniting the
infrared broiler.
1) To set up rotisserie motor, push the button on the
retractable rotisserie panel (B). Pull rotisserie panel
upwards. Push locking tab until it snaps into place.
Unwind power cord. Route the power cord through the
hole in the bottom of the rotisserie panel and plug into
power source.
2) To prepare the rotisserie for food, slide one spit fork
into the rotisserie shaft (C). Push the rotisserie shaft
through the center of the food. Slide the second spit
fork into the shaft and insert the tines of both spit forks
into the food. The food should be centered on the shaft.
Securely tighten both spit fork screws.
3) Insert the pointed end of the rotisserie shaft into the
motor. Lower the rotisserie spit into the grooves on the
cookbox (D).
4) Set infrared broiler on the low heat setting.
5) Switch on the motor and close the lid.
Cooking Tips
• Before cooking, make sure that the food is centered
and able to rotate. If food is too heavy or irregular in
shape, it may not rotate well and should not be cooked
using the rotisserie. In such cases, use the indirect
method of cooking on the grill.
• Truss meat or poultry with string, if necessary, to
make the shape as uniform as possible before putting
it on the spit.
Use and Care
• Unplug the motor from outlet when not in use, or
before cleaning.
• Use a soft cloth to clean the rotisserie motor. Do not
use any chemicals or abrasive cleaners.
• Do not submerge motor, cord, or plug in water or other
liquid.
• Hand wash spit and forks using mild dish detergent
and then dry using soft cloth.
• When not in use, unplug the motor from outlet, remove
from the grill and store in a dry place out of the reach
of children.
• In absence of local codes the rotisserie motor must be
grounded electrically in accordance with the National
Electric Code, ANSI / NFPA 70, or Canadian Electrical
Code, CSA C22.1.
Rotisserie Motor Storage
1) Before retracting rotisserie back into the side table,
unplug the power cord and carefully place plug/power
cord into the storage area of the retractable rotisserie
assembly (E).
2) Using your index finger, disengage retractable
rotisserie panel. Push panel down until it snaps
securely in place.
Rotisserie Fork Storage
1) Remove forks from rotisserie shaft.
2) Store rotisserie forks by placing them on the hooks
located within the grill cabinet (F).
Rotisserie Shaft Storage
1) Store the rotisserie shaft on the hooks on the back of
the grill (G).
A
F
C
G
D
B
E
8
m WARNING: Open side burner lid during ignition.
m WARNING: Do not lean over side burner while
igniting or cooking.
m WARNING: If ignition does not occur within four
seconds of attempting to light the side burner,
turn the burner control knob to the o position.
Wait five minutes to allow accumulated gas to
dissipate, and then repeat the lighting procedure.
B
Operation
Cleaning and Maintenance
Cleaning the Inside of the Grill
Over time, the performance of your grill can diminish if
it has not been maintained properly. Low temperatures,
uneven heat, and food sticking to cooking grates are all
signs that cleaning and maintenance are overdue. When
your grill is o and cool, start by cleaning the inside, from
the top down. A thorough cleaning is recommended at
least twice a year. Consistent use may require quarterly
cleanings.
Cleaning the Lid and the Upper Cooking Surfaces
From time to time you may notice “paint-like” flakes on
the inside of the lid. During use, grease and smoke vapors
slowly change into carbon and deposit on the inside of
your lid. These deposits will eventually peel, and looks
very similar to paint. These deposits are non-toxic, but the
flakes could fall onto your food if you do not clean the lid
regularly.
1) Brush the carbonized grease from the inside of the lid
and upper surfaces with a stainless steel bristle grill
brush (A). To minimize further build-up, the inside of
the lid can be wiped with a paper towel after grilling
while the grill is still warm (nothot).
IMPORTANT: Do not brush the ceramic surface of the infrared
broiler.
Cleaning the Cooking Grates
Cleaned grates will prevent your next meal from sticking. If
you are cleaning your cooking grates regularly, the debris
on your grates will be minimal.
1) With grates installed, brush the debris o your cooking
grate with a stainless steel bristle grill brush (B).
2) Take the grates out and set aside.
Cleaning the FLAVORIZERBARS
FLAVORIZER BARS catch drippings that smoke and sizzle,
adding flavor to your food. Any drippings that are not
vaporized by the FLAVORIZER BARS are funneled away
from the burners. This helps prevent flare-ups inside of
your grill, and protects the burners from getting clogged.
1) Scrape the FLAVORIZER BARS with a plastic scraper
(C).
2) If necessary, brush the FLAVORIZER BARS with a
stainless steel bristle grill brush.
3) Remove FLAVORIZER BARS and set aside.
Cleaning the Burners
Two areas on the burners that are key to optimum
performance are the ports (small raised openings running
along the length of the burners) and the spider/insect
screens on the ends of the burner. Keeping these areas
clean is essential for safe operation.
Cleaning the Burner Ports
1) Use a clean stainless steel bristle grill brush to clean
the outside of the burners by brushing across the top of
the burner ports (D).
2) When cleaning the burners, avoid damaging the ignition
electrode by carefully brushing around it.
Cleaning the Spider Screens
1) Locate the ends of the burners on the underside of the
control panel where they meet the valves.
2) Clean the spider/insect screens on each of the burners
using a soft bristle brush (E).
Cleaning the Heat Deflectors
Located under the burners, the heat deflectors distribute
heat evenly throughout the cookbox while cooking.
Keeping heat deflectors clean will enhance the cooking
performance of your grill.
1) Scrape the heat deflectors with a plastic scraper.
2) If necessary, brush the heat deflectors with a stainless
steel bristle grill brush.
3) Remove heat deflectors and set aside.
Cleaning the Cookbox
Look inside the cookbox for any grease accumulation or
leftover food particles. Excessive accumulation can cause
a fire.
1) Use a plastic scraper to scrape debris o the sides and
bottom of the grill into the opening in bottom of the
cookbox. This opening leads debris into the slide-out
grease tray.
Igniting the Side Burner
Using the One-Handed Ignition to
Ignite the Side Burner
If one or more of the main burners on your grill are already
lit and you would like to ignite the side burner, skip to step
3. If none of the main burners are lit and you are only using
the side burner, start with step 1.
1) Check that the side burner control knob is in the
o
position. Check by pushing in and turning knob
clockwise (A). Also check that all main burner control
knobs are in the o
position.
2) Turn the gas supply valve on.
3) Open the side burner lid (B).
4) Pushthe side burner control knob in and slowly turn
it counterclockwise towards the ignite
position
until you hear ticking(C). Once ticking starts, hold the
knob in that position for 1-2 seconds and then slowly
continue turning counterclockwise. The burner should
ignite at the high position (D).
5) Check that the side burner is lit. The side burner flame
may be dicult to see on a bright sunny day.
6) Once side burner is ignited, continue turning the knob
counterclockwise until you reach the desired position.
7) If the side burner does not ignite within 4 seconds, turn
side burner control knob to the o
position and wait
five minutes to allow the gas to clear before attempting
to light the burner again.
Should the side burner fail to ignite using the electronic
ignition, refer to the TROUBLESHOOTING section.
Thereyou will find instructions on igniting the side burner
with a match to help determine the exact problem.
To Extinguish Side Burner
1) Push side burner control knob in and then turn
clockwise all the way to the o position.
2) Turn gas supply valve o.
C
D
9
Product Care
Cleaning the Grease ManagementSystem
The grease management system consists of an angled
slide-out grease tray and a catch pan. These components
were designed to be easily removed, cleaned, and
replaced; an essential step every time you prepare to grill.
Cleaning the Outside of theGrill
The outside of your grill may include stainless steel,
porcelain-enameled, and plastic surfaces. WEBER
recommends the following methods based on the
surfacetype.
Cleaning Stainless Steel Surfaces
Clean stainless steel using a non-toxic, non-abrasive
stainless steel cleaner or polish designed for use on
outdoor products and grills. Use a microfiber cloth to clean
in the direction of the grain of the stainless steel. Donot
use paper towels.
Note: Do not risk scratching your stainless steel with abrasive
pastes. Pastes do not clean or polish. They will change the
color of the metal by removing the top chromium oxide film
coating.
Cleaning Painted, Porcelain-Enameled Surfaces and
PlasticComponents
Clean painted, porcelain-enameled and plastic
components with warm soapy water, and paper towels
or cloth. After wiping down the surfaces, rinse and dry
thoroughly.
Cleaning the Outside of Grills that are in Unique
Environments
If your grill is subject to a particularly harsh environment,
you will want to clean the outside more often. Acid rain,
pool chemicals, and salt water can cause surface rusting
to appear. Wipe down the outside of your grill with warm
soapy water. Follow up with a rinse and thorough drying.
Additionally, you may want to apply a stainless steel
cleaner weekly to prevent surface rust.
Cleaning the Inside of theCabinet
Use a soft, damp cloth to wipe the interior of the cabinet.
Be careful not to pull any of the wire connections when
cleaning around the electronic components.
Replacing Batteries for the Battery Pack
Use alkaline batteries only. Do not mix old and new
batteries or dierent types of batteries (standard, alkaline,
or rechargeable). If you do not plan to use the grill for a
month or more, remove the batteries.
1) Locate the battery housing on the inside of the cabinet
on the bottom right side.
2) Press the tabs on the battery door to open (F).
3) Replace six size D batteries.
CAUTION: NEVER SPRAY THE GRILL WITH A STEADY WATER
STREAM SUCH AS FROM A GARDEN HOSE OR POWER
WASHER. ELECTRONIC COMPONENTS COULD BECOME
DAMAGED.
m WARNING: Turn your grill o and wait for it to cool
before thoroughly cleaning.
m WARNING: Over time, the development of rough
surfaces can form on the FLAVORIZER BARS.
Wearing gloves is recommended when handling.
Do not clean FLAVORIZER BARS or cooking grates
in a sink, dishwasher, or self-cleaning oven.
m WARNING: When cleaning the burners, never use
a brush that has already been used to clean the
cooking grates. Never put sharp objects into the
burner port holes.
m CAUTION: Do not place any grill components onto
the side tables as they may scratch the paint or
stainless steel surfaces.
m CAUTION: Do not use any of the following to clean
your grill: abrasive stainless steel polishes or
paints, cleaners that contain acid, mineral spirits
or xylene, oven cleaner, abrasive cleansers
(kitchen cleansers), or abrasive cleaning pads.
A
B
C
D
E
F
REPLACEMENT PARTS
To obtain replacement parts,
contact the local retailer
in your area or log onto weber.com.
Adjust Door Alignment
Each soft-close hinge is capable of adjustment in case it is
necessary to align the cabinet doors.
1) The front screw on the hinge body adjusts the door
horizontally, left and right (1).
2) The rear screw on the hinge body adjusts the depth of
the door, back and forth (2).
3) To adjust the door vertically, loosen the two screws on
the hinge bracket to slide the door up and down, then
retighten the screws (3).
Door Removal
To remove the door, it is not necessary to remove any
screws from the hinges. Pull the small release lever
located behind the body of the hinge. The hinge bracket
remains installed to the frame as the door is removed.
Reattach Door
To reattah the door, hook the base of the hinge to the
bracket on the cabinet frame. Then, push the body of the
hinge until it snaps into the bracket.
1
3
3
2

10
C
Troubleshooting
MAIN BURNER(S), SIDE BURNER or INFRARED BROILER WILL NOT IGNITE
SYMPTOM
• Main burners, side burner or infrared broiler do(es) not ignite when following the electronic ignition instructions in the “Operation” section of
this owner's manual.
CAUSE SOLUTION
There is a problem with gas flow. If any burner does not ignite, the first step is to determine if there is gas flowing to the burner(s). Tocheck this, follow
the instructions below for “Lighting Your Grill with a Match.”
If match lighting IS NOT successful, check if the fuel hose is bent or kinked or if the burner ports are dirty.
There is a problem with the electronic ignition system. If any burner does not ignite, the first step is to determine if there is gas flowing to the burner(s). Tocheck this, follow the
instructions below for “Lighting Your Grill with a Match.”
If match lighting IS successful, check the condition of the battery and check the wire connections of the Electronic
IgnitionSystem.
Did you hold the infrared broiler control knob in for 20
seconds after burner ignited, and wait to see the entire
ceramic surface of the infrared broiler become alight?
Try to relight burner by holding burner control knob in; continue holding in until 20 seconds after burner has ignited, and
wait to see the entire ceramic surface become alight.
Lighting Your Grill with a Match
Using a Match to Determine if there is Gas Flow to
the Main Burners
1) Open the grill lid.
2) Check that all burner control knobs (including side
burner control knob) are in the o
position. Check by
pushing in and turning knobs clockwise.
3) Turn the gas supply valve on.
4) Begin with the burner furthest to the left. Put match
in the matchstick holder and strike match. (Matchstick
holder is located under left side table.) Insert lit match
down through the cooking grates, past the FLAVORIZER
bars and next to the burner(A).
5) Pushthe burner control knob in and slowly turn it
counterclockwise toward the high
position.
6) Check that the burner is lit by looking through
the cooking grates and through the cutout in the
FLAVORIZER bar.
7) If the burner does not ignite within 4 seconds, turn
burner control knob to the o
position and wait five
minutes to allow the gas to clear before attempting to
light the burner again.
8) If the burner ignites, the problem lies in the ignition
system. Check the condition of the battery and check
the wire connections of the Electronic Ignition System.
9) Replace the matchstick holder by hanging underneath
left side table.
Using a Match to Determine if there is Gas Flow to
the Side Burner or Infrared Broiler
1) Open the side burner lid and the grill lid.
2) Check that the side burner control knob and infrared
broiler control knob are in the o
position. Check by
pushing in and turning knob clockwise. Also check that
all main burner control knobs are in the o
position.
3) Turn the gas supply valve on.
4) Put match in the matchstick holder and strike match.
(Matchstick holder is located under left side table.)
Hold lit match by the side burner(B) or by the infrared
broiler(C).
5) Pushthe side burner control knob or infrared broiler
control knob in and slowly turn it counterclockwise
toward the high
position. For the infrared broiler,
hold down the knob in this position for 20 – 30 seconds
as the burner ignites and establishes a continuous flow
of gas across the surface of the infrared broiler. Once
the infrared broiler is glowing orange, then it is ignited.
Now turn the control knob to desired heat level and
release the knob.
6) Check that the side burner or infrared broiler is lit. The
flame may be dicult to see on a bright sunny day.
7) If the burner does not ignite within 4 seconds, turn side
burner control knob to the o
position and wait five
minutes to allow the gas to clear before attempting to
light the burner again.
8) If the burner ignites, the problem lies in the ignition
system. Check the condition of the battery and check
the wire connections of the Electronic Ignition System.
A
B
CALL CUSTOMER
SERVICE
If you are still experiencing any
problems, contact the CustomerService
Representative in your area using the
contact information on weber.com.
11
Troubleshooting
Proper Burner Flame Pattern
The burners in your grill were factory set for the
correct air and gas mixture. When the burners are
performing correctly, you will see a specific flame
pattern. The tips may occasionally flicker yellow
(A), with a descending light blue (B) to dark blue
flame (C).
m WARNING: Do not attempt to make any repair to
gas carrying, gas burning, ignition components
or structural components without contacting
Weber-Stephen Products LLC, Customer Service
Department.
m CAUTION: The burner tube openings must be
positioned properly over the valve orifices.
Spider Screens
The combustion air openings of the burners(D)
are fitted with stainless steel screens to prevent
spiders and other insects from spinning webs
and building nests inside the venturi section of
the burners. These nests can obstruct the normal
gas flow, and can cause gas to flow back out of the
combustion air opening. Symptoms of this kind of
obstruction include the odour of gas in conjunction
with burner flames that appear yellow and lazy.
This obstruction could result in a fire in and around
the gas valve, causing serious damage to your grill.
Additionally, dust and debris can accumulate on the
outside of the spider/insect screen and obstruct the
oxygen flow to the burners. Keep the spider screens
clean. Refer to “Cleaning the Spider Screens” in the
Product Care section.
D
A
B
C
GAS FLOW
SYMPTOM
• Grill does not reach desired temperature or heatsunevenly.
• One or more of the burners fail to ignite.
• Flame is low when burner is on high position.
• Flames do not run the whole length of the burner.
• Burner flame pattern is erratic.
CAUSE SOLUTION
Fuel hose is bent or kinked. Straighten fuel hose.
Burner ports are dirty. Clean burner ports. Refer to “Cleaning the BurnerPorts.”
SYMPTOM
• Gas is smelled in conjunction with burner flames that appear yellow andlazy.
CAUSE SOLUTION
Spider screens on the burners are obstructed. Clean spider screens. Refer to “Cleaning the Spider
Screens” in the Product Care section. Also refer to the
illustrations and information in this section about proper
flame pattern and spiderscreens.
12
U.S.:
1-800-446-1071
Mexico:
01 800 0093237
Canada:
1-800-446-1071
PROBLEMS? QUESTIONS? Do Not Return Product to the Store. We Can Help.
If you have questions about the assembly, use, or maintenance of your grill or need replacement parts, please contact Weber
Customer Service. The serial number and model number can be
found on the cover of your owner’s manual and will be necessary for all service calls.
© 2024 Designed and engineered by Weber-Stephen Products LLC, 1415 S. Roselle Road,
Palatine, Illinois 60067 USA.
Using the Lighted Control Knobs
The burner control knobs light up with the push of a button.
To turn on or o, simply push the power button located on
the right side of the control panel.
Grilling
atNight
This feature is only available on select models.
Using the NIGHTVISION Lighting
To activate the NIGHTVISION lighting, press the awake
button. The grill light has a tilt sensor that will turn
on the light if the grill lid is opened and turn o the
light when the grill lid is closed. If the lid is left open
or closed for more than 30 minutes, the grill light will
automatically deactivate. To turn the light back on, press
the awakebutton.
Replacing Batteries for the NIGHTVISION
Lighting
Use alkaline batteries only. Do not mix old and new
batteries or dierent types of batteries (standard,
alkaline, or rechargeable). If you do not plan to use
the grill for a month or more, remove the batteries.
1) Close the lid. Locate the battery housing on the
side of the lid handle and unscrew the cap (A). Do
not change batteries with the lid open.
2) Remove the battery sleeve.
3) Replace three size C batteries (B).
4) Line up graphic indicators (C) on the sleeve and
handle as you reinstall the sleeve. Tighten cap.
NOTE: Periodically wipe the lenses with a damp cloth to
keep the lights illuminating brightly.
A
C
weber.com
