HS67G2PMX/IT/1

IT
ITALIANO
Is
t
r
u
z
i
o
ni
p
e
r
la sicurezza,
Guida rapida,
Istruzioni per l'installazione,
3
8
34
EN
ENGLISH
Health and Safety guide
Quick guide
Installation guide
23
34
19
2
IT
SAFETYINSTRUCTIONS
IMPORTANTE:DALEGGEREEOSSERVARE
Questeistruzionisonovalidese
sull'apparecchioèriportatoilsimbolodelpaese.
Seilsimbolononcomparesull'apparecchio, è
necessariofareriferimentoalleistruzioniper
l'installazione,chedovrebberofornireleistruzioni
necessarieperlamodificadell'apparecchioalle
condizionidiutilizzodelPaese.
ATTENZIONE:l'usodiapparecchidicottura
agascausalaproduzionedicalore,umiditàe
prodottidicombustionenellocalediinstallazione.
Lacucinadeveesserebenventilata,soprattutto
durantel'usodell'apparecchio:tenereapertii
canalidiventilazionenaturalioinstallareun
dispositivodiventilazionemeccanica(unacappa
diestrazionemeccanica).Unusointensivoe
prolungatodell'apparecchiopuòrichiedereuna
ventilazioneaggiuntiva,comel'aperturadiuna
finestra,ounaventilazionepiùefficace,ad
esempio aumentandoillivellodiventilazione
meccanica(sepossibile),perrimuovereinmodo
sicuroiprodottidellacombustioneversol'aria
esterna(esterna),fornendoalcontempoun
ricambiod'arianellastanzaconunaventilazione
aggiuntiva.Consultareunprofessionistaprimadi
installareunaventilazioneaggiuntiva.
Lamancataosservanza delleinformazioni
contenuteinquestomanualepuòcausarerischi
diincendiooesplosione,conconseguentidanni
materialiolesionipersonali.
Primadiutilizzarel'apparecchio,leggerele
seguentinormedisicurezza.Conservarleper
eventualiconsultazionisuccessive.
Questoapparecchiodeveessereinstallatonel
rispettodellenormevigentiedeveessereutilizzato
esclusivamenteinunlocalebenventilato.Leggere
leistruzioniprimadiinstallareoutilizzarequesto
apparecchio.
Se lefiammedel bruciatore sispengono
accidentalmente,portarelamanopoladicontrollo
delbruciatoreinposizioneoffenoncercaredi
riaccenderloperalmeno1minuto.
Questomanualeel'apparecchiosonocorredatida
importantiavvertenzedisicurezza,daleggeree
rispettaresempre.Ilfabbricantedeclinaqualsiasi
responsabilitàchederividallamancataosservanza
dellepresentiistruzionidisicurezza,dausi
impropridell'apparecchioodaerrateimpostazioni
deicomandi.
AVVERTENZA:Selasuperficiedelpianodi
cotturaèincrinata,nonutilizzarel'apparecchio
perevitareilrischiodifolgorazione.
AVVERTENZA:Pericolodiincendio:non
appoggiareoggettisullesuperficidicottura.
ATTENZIONE:Ilprocessodicotturadeveessere
sorvegliato.Iprocessidicotturabrevirichiedono
unasupervisionecontinua.
AVVERTENZA:Lamancatasorveglianzadel
pianodicotturadurantepreparazioniconl'uso
digrassoeoliopuòesserepericolosaegenerare
incendi.NontentareMAIdispegnerelefiamme
conl'acqua.Alcontrario,spegnerel'apparecchio
esoffocarelefiammeconuncoperchioouna
copertaignifuga.
Nonutilizzareilpianodicotturacome
superficiedilavoroodiappoggio.Nonavvicinare
all'apparecchiostoffeoaltrimaterialiinfiammabili
finoachetuttiicomponentinonsisiano
completamenteraffreddati,perevitareilrischiodi
incendi.
Tenerel'apparecchiofuoridallaportatadei
bambini dietàinferiorea3anni.Senzala
sorveglianzacostantediunadultotenereanche
l'apparecchiofuoridallaportatadeibambinidietà
compresatra3e8anni.Ibambinidietàsuperiore
agli8anni,lepersoneconridottecapacità
fisiche,sensorialiomentalielepersonechenon
abbianoesperienzaoconoscenzadell'apparecchio
potranno utilizzarlo solo sotto sorveglianza,o
quandosianostateistruitesull'utilizzosicuro
dell'apparecchioesianoconsapevolideirischidel
suoutilizzo.Ibambininondevonogiocare
conl’apparecchio.Ibambininondevono
eseguireoperazionidipuliziae manutenzione
dell'apparecchiosenzalasorveglianzadiun
adulto.
ATTENZIONE: In caso dirottura del vetro
dellapiastra:spegnereimmediatamentetuttii
bruciatorieleresistenzeelettricheescollegare
l'apparecchiodall'alimentazione;nontoccare
lasuperficiedell'apparecchio;nonutilizzare
l'apparecchio.
Ilcoperchiodivetropuòrompersiseviene
riscaldato.Primadichiudereilcoperchio,
spegneretuttiibruciatorielepiastre
elettriche.Nonchiudereilcoperchio
quandoilbruciatoreèacceso.
AVVERTENZA:L'apparecchioeisuoi
componentiaccessibilipossonodiventaremolto
caldidurantel'uso.Fareattenzioneanontoccare
glielementiriscaldanti.Tenerelontaniibambini
dietàinferioreagli8anni,amenochenonsiano
costantementesorvegliati.
L'alimentonondeveesserelasciatonelosul
prodottoperpiùdiun'oraprimaodopolacottura.
Mailasciarel'apparecchioincustoditodurante
l'uso.Sel'apparecchioèpredispostoperl'usodi
unatermosonda,usaresoloitipiditermosonda
raccomandatiperquestofornoperevitareilrischio
diincendi.
Nonavvicinareall'apparecchiostoffeoaltri
materialiinfiammabilifinoachetuttiicomponenti
nonsisianocompletamenteraffreddati,perevitare
3
ilrischiodiincendi.Sorvegliarecontinuamente
lacotturadeglialimentiricchidigrassooolioo
lecottureconaggiuntadialcolici,perchéqueste
preparazionicomportanounrischiodiincendio.
Usareguantidafornoperestrarretegamie
accessori.Allafinedellacottura,aprirelosportello
concautela,lasciandodefluiregradualmentel'aria
oilvaporeprimadiaccederealvanodelfornoper
evitarepossibilirischidiustioni.Nonostruirele
aperturedisfiatodell'ariacaldasullatoanteriore
delfornoperevitareilrischiodiincendi.
Porreladovutaattenzioneconlaportadel
fornoinposizioneabbassataodiapertura,per
evitarediurtarla.
Quandosiposizionalagrigliaall'interno,verificare
cheilfermosiarivoltoversol'altoesulretrodella
cavità.
AVVERTENZA:Ilgaschefuoriescepuò
incendiarsi.Ildispositivonondeveessereazionato
perpiùdi15secondi.Sedopo15secondiil
bruciatorenon è ancora acceso,interrompere
l'usodeldispositivoeaprirelaportadelcomparto
e/oattenderealmeno1minutoprimadiriprovare
l'accensione.
USOCONSENTITO
ATTENZIONE:l'apparecchiononèdestinatoad
esseremessoinfunzionemedianteundispositivo
esterno oun sistemadi comando adistanza
separato.
L'apparecchioèdestinatoall'usodomestico
eadapplicazionianaloghe,quali:areedicucina
perilpersonaledinegozi,ufficiealtricontesti
lavorativi;agriturismi;cameredihotel,motel,bed
&breakfastealtriambientiresidenziali.
ATTENZIONE:Questoapparecchioèdestinato
esclusivamenteallacottura.Nondeveessere
utilizzatoperaltriscopi,adesempioperil
riscaldamentodegliambienti.
Questoapparecchiononèdestinatoall'uso
professionale.Nonutilizzarel'apparecchio
all'aperto.
Nonconservaresostanzeesplosiveoppure
infiammabili(ades.tanichedibenzinao
bombolettespray)all'internooinprossimità
dell'apparecchio,perevitareilpericolodiincendi.
Utilizzarepentoleetegamididiametropario
leggermentesuperiorealdiametrodeibruciatori
(vederelatabella).Evitarechelepentole,
posizionatesullegriglie,fuoriescanodalperimetro
delpianodicottura.
L'usoimpropriodellegrigliepotrebbe
danneggiareilpiano:evitarediappoggiarele
grigliecapovolteoditrascinarlesulpiano.
Nonlasciarechelafiammadelbruciatoresiestendaoltreilbordodella
pentola.
Nonutilizzare:bistecchiereinghisa,supportiinpietranaturale,tegami
opentoleinterracotta.dissipatoridiretemetallicaodialtrotipo.due
bruciatorisimultaneamenteperlacotturaconunsolorecipiente(ad
esempiounapesciera).
Qualoraparticolaricondizionidelgaserogatolocalmenterendessero
difficoltosal'accensionedelbruciatore,siconsigliadiripetere
l'operazioneconlamanopolaruotatasullaposizionedellafiamma
piccola.
incasodiinstallazionediunacappasulpianodicottura,fareriferimento
allerelativeistruzioniperladistanzacorretta.
Ipiediniprotettividigommapostisullegrigliepossonocostituireun
rischiodisoffocamentoperibambinipiùpiccoli.Dopoavererimossole
griglie,controllarechetuttiipiedinisianomontaticorrettamente.
Ilcaricopostosulvassoiopertortenondeveessere
superiorea3kg.
INSTALLAZIONE
Perevitareilrischiodilesionipersonali,
leoperazionidimovimentazioneeinstallazione
dell'apparecchiodevonoessereeseguiteda
almenoduepersone.Perleoperazionidi
disimballaggioeinstallazioneutilizzareiguanti
protettivipernonprocurarsitagli.
Icollegamentidigasedelettricitàdevono
essereconformiallenormelocali.
Leoperazionidi installazione,compresigli
eventualiallacciallareteidricaeicollegamenti
elettrici, egliinterventidiriparazionedevono
essereeseguitida personalequalificato.Non
ripararenésostituirealcunapartedell’apparecchio
amenocheciònonsiaespressamenteindicato
nelmanualed’uso.Tenereibambiniadistanzadal
luogodiinstallazione.Dopoaverdisimballato
l’apparecchio,assicurarsichenonsiastato
danneggiato durante il trasporto.In caso di
problemi, contattareilrivenditoreoilServizio
Assistenza.Ainstallazionecompletata,conservare
ilmaterialediimballaggio(partiinplastica,
polistirolo,ecc.)fuoridellaportatadeibambini
perevitarepotenzialirischidisoffocamento.
Primadiprocedere all'installazione,scollegare
l'apparecchiodallareteelettricapernoncorrereil
rischiodiscosseelettriche.Perevitareilrischiodi
incendioodifolgorazione,durantel'installazione
assicurarsichel'apparecchionondanneggiilcavo
dialimentazione.Attivarel’apparecchiosolodopo
averecompletatolaproceduradiinstallazione.
L'apparecchiodeveessereinstallatoin
un'abitazionedomesticaperletipichefunzioni
dipuliziadellacasa.
AVVERTENZA:lamodificadell'apparecchioe
delmetododiinstallazionesonoessenzialiperil
suoutilizzosicuroecorrettoinognipaese.
Utilizzareregolatoridipressioneadattialla
pressionedelgasindicatanelleistruzioni.
Illocaledeveessereprovvistodiunsistema
diestrazionedell'ariaingradodiespellereifumi
prodottidallacombustione.
Illocaledeveinoltreconsentireun'adeguata
circolazionedell'aria,inquantol'ariaènecessaria
perlanormalecombustione.Ilflussod'arianon
deveessereinferiorea2m³/hperognikWdi
potenzainstallata.
Ilsistemadicircolazionepuòaspirarel'aria
direttamentedall'esternomedianteunatubazione
4
con sezioneinterna noninferiore a100cm²;
l'aperturanondeveesseresoggettaaostruzioni.
Ilsistemapuòfornirel'arianecessariaper
lacombustioneancheinmodoindiretto,ad
esempiodalocaliadiacentiprovvistiditubazioni
dicircolazionedell'ariadeltiposopradescritto.Tali
locali,tuttavia,nondevonoesserespazicomuni,
cameredalettoostanzechepossanopresentare
rischid'incendio.
Ilgasdipetrolioliquido(GPL)sispostaverso
terraperchéèpiùpesantedell'aria.Perquesta
ragione,ilocalichecontenganobombolediGPL
devonoessereprovvistidisfiaticheconsentanoal
gasdifuoriuscireincasodiperdite.Lebombole
diGPL,anchesesoloparzialmentepiene,non
devonoessereinstallateoconservateinlocalio
areedidepositosituatesottoillivellodelsuolo
(cantine,ecc.).Èconsigliabiletenerenellocale
sololabombolainuso,posizionandolainmodo
chenonsiaespostaafontidicaloreesterne(forni,
camini,stufe,ecc.)chepossanoinnalzarela
temperaturadellabombolaoltre50°C.
Selarotazionedellemanopoledeibruciatoridovesserisultaredifficoltosa,
contattareil ServizioAssistenza,che incasodirubinettodifettoso
provvederàasostituirlo.
Leapertureutilizzateperlaventilazioneeladispersionedelcalorenon
devonomaiesserecoperte.
Nonrimuoverel'apparecchiodallabasedi
polistirolofinoalmomentodell'installazione.
Collegamentocontuborigido(rameoacciaio).
Selapressionedelgasdialimentazioneèdiversa
dalvaloreconsigliato,ènecessarioinstallareun
regolatoredipressioneidoneosultubodimandata
inconformitàallenormenazionalivigenti.
Usareunmobileappropriatopergarantireun
correttofunzionamentodell'apparecchio:per
installareilfornosottoilpianodilavoro(vedereil
diagramma)oinungruppocucina,ilmobiledeve
avereledimensioniriportateinfigura.
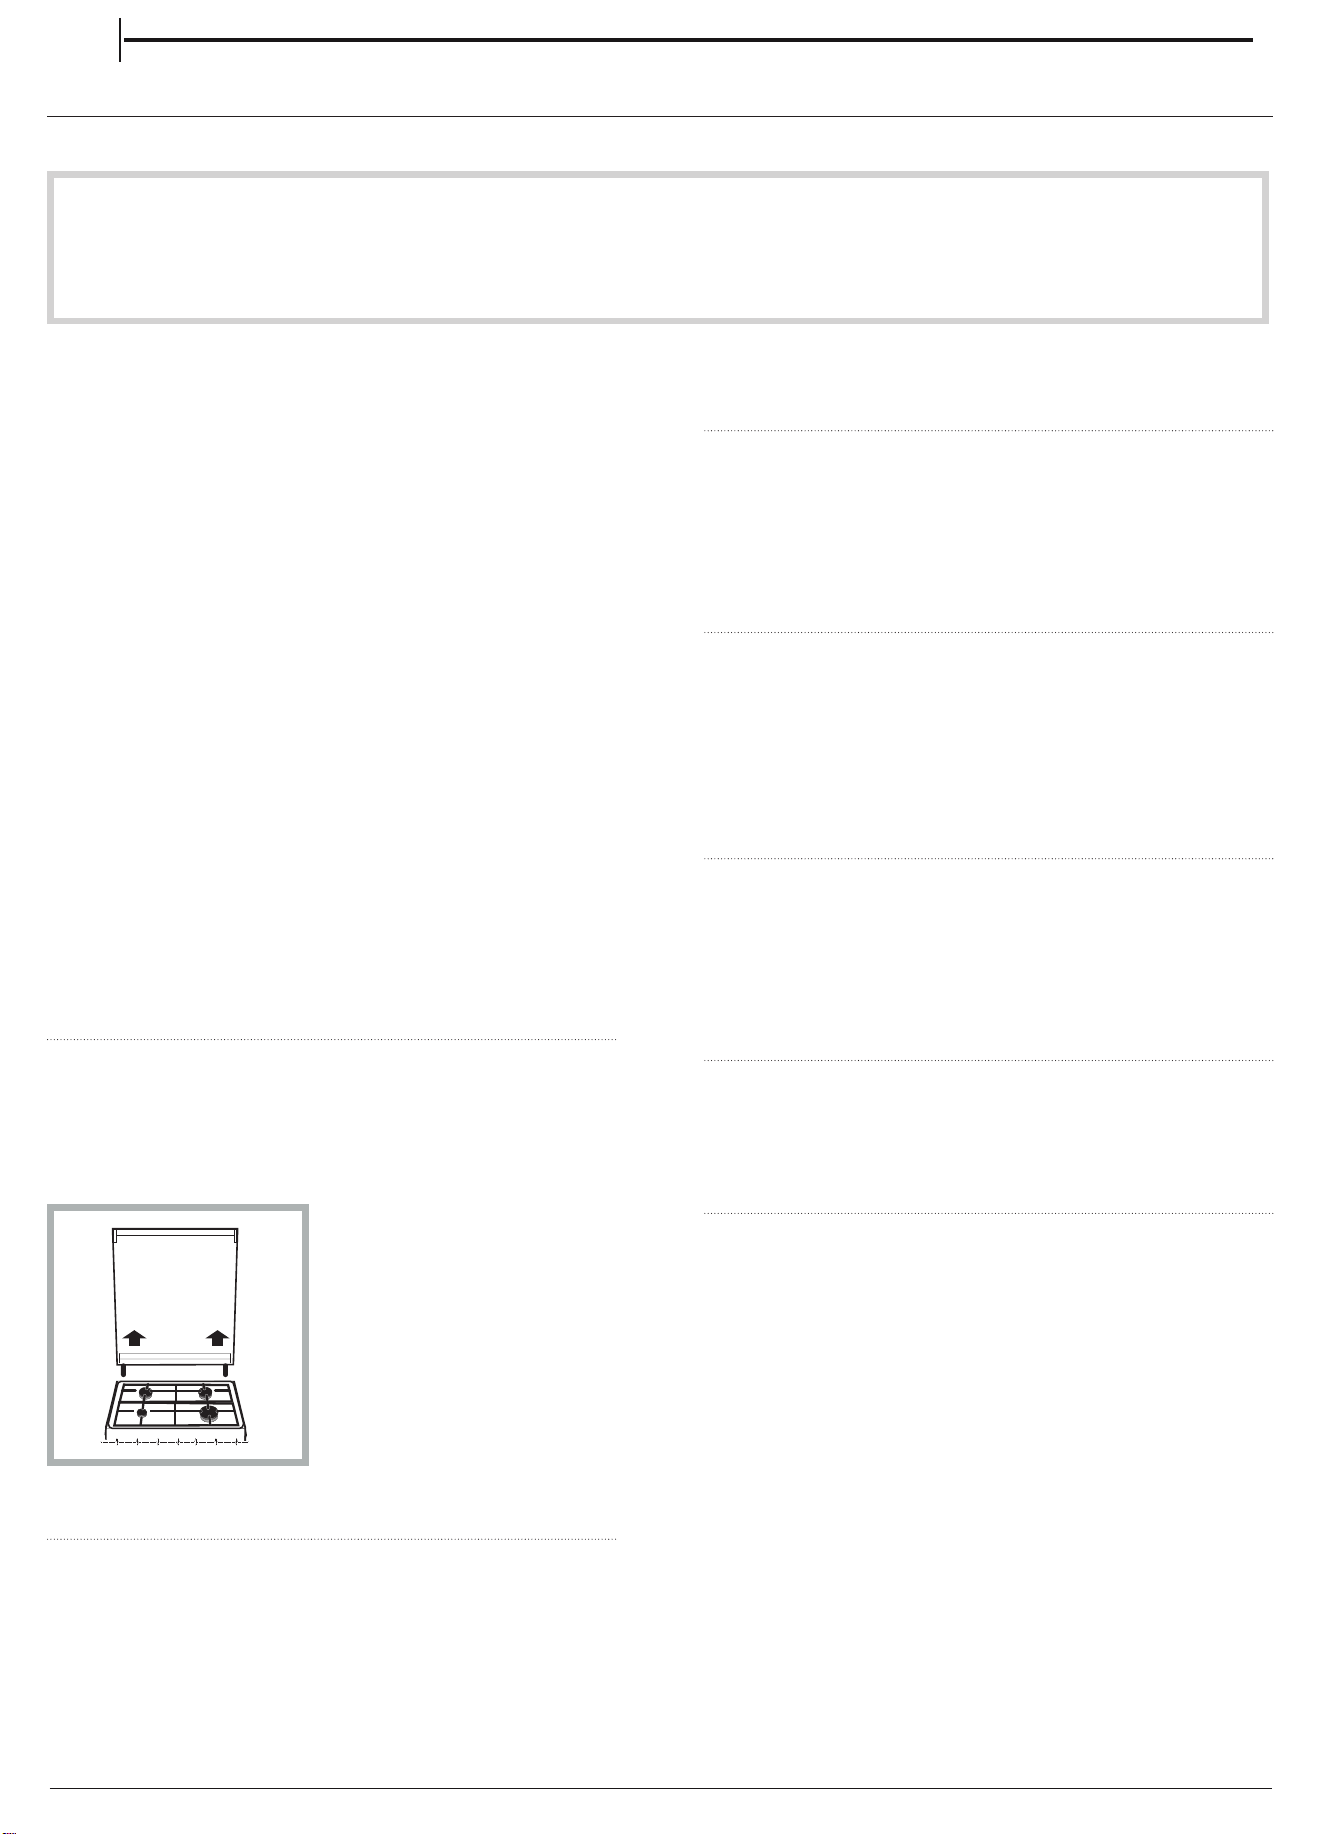
Perassicurareun'adeguataventilazionesidovrà
rimuovereilpannelloposterioredelmobile.Si
consigliadiinstallareilfornoinmodochepoggi
suduestriscedilegno,osuunasuperficie
completamentepianaconun'aperturadialmeno
45x560mm,comenellafoto.
Noninstallarel'apparecchiodietrounpannello
decorativo-possibilerischiodiincendio.
Sel'apparecchioèinappoggiosuuna
base,deveesserelivellatoefissatoalla
paretepermezzodellacatenaditenuta
indotazione,perimpedirechepossa
scivolaredallabase.*
AVVERTENZA:Perevitarechel'apparecchio
siribalti,ènecessarioinstallareil
dispositivodifissaggio.Fareriferimento
alleistruzionidiinstallazione.*
*Disponibilesolosualcunimodelli
COLLEGAMENTODELGAS
AVVERTENZA:Primadell'installazione,
controllarechelecondizionididistribuzionedel
locale(tipoepressionedelgas)sianocompatibili
conlaconfigurazionedell'apparecchio.
AVVERTENZA: lecondizioni di regolazione
dell'apparecchiosonoriportatesull'etichetta(o
sullatarghettamatricola).
Controllarechelapressionedell'alimentazione
delgassiacoerenteconivaloriindicatinella
Tabella"Specifichedibruciatorieugelli".
AVVERTENZA:questoapparecchiononè
collegatoaundispositivodievacuazione
deiprodottidicombustione.l'installazione
el'allacciamentodevonoessereeseguitiin
conformitàallenormevigenti.Prestareparticolare
attenzioneairequisitiinmateriadiventilazione.
Sel'apparecchioècollegatoaunimpianto
agasliquido,lavitediregolazionedeveessere
serrataconlamassimaforzapossibile.
IMPORTANTE:sesiutilizzaunabomboladigas
oèinstallatounserbatoiodigas,questidevono
essereposizionaticorrettamente(orientamento
verticale).
AVVERTENZA:questaoperazionedeveessere
eseguitadauntecnicoqualificato.
Perl'allacciamentodelgas,utilizzaresoloun
tubodimetalloflessibileorigido.
Collegamentocontuborigido(rameoacciaio):
Ilcollegamentoall'impiantodelgasdeveessere
eseguitoinmododaevitarequalsiasiforma
dicompressioneoditrazionesull'apparecchio.
Sullarampadialimentazionedell'apparecchio
si trova un raccordoa Lregolabile,provvisto
diunaguarnizioneditenutacontroleperdite.
Laguarnizionedeveessereriapplicatadopo
ogni rotazione del raccordo (laguarnizione è
indotazioneconl'apparecchio).Ilraccordoper
iltubodimandatadelgasèunattaccomaschio
cilindrico1/2filettato.
Collegamento diun tuboinacciaioinox
flessibilesenzasaldatureaunattaccofilettato:
Ilraccordoperiltubodimandatadelgasèun
attaccomaschiocilindrico1/2filettato.Questi
tubidevonoessereinstallatiinmodochelaloro
estensionecompletanonsuperii2000mmdi
lunghezza.Unavoltaeseguitoilcollegamento,
controllarecheiltuboinmetalloflessibilenonentri
acontattoconpartimobilienonsiacompresso.
Usaresolotubieguarnizioniconformiallenorme
nazionalivigenti.
IMPORTANTE:nelcasosiutilizziuntuboin
acciaioinox,questodovràessereinstallatoin
mododanonentrareincontattoconpartimobili
(es.cassetti).Iltubodevepassareinunpunto
liberodaingombriedeveessereispezionabilesu
tuttalalunghezza.
L'apparecchiodeveesserecollegato
all'impiantodelgasoaunabomboladelgasin
conformitàallenormenazionalivigenti.Prima
diprocederealcollegamento,verificareche
l'apparecchiosiacompatibileconiltipodigas
5
chesiintendeutilizzare.Incasocontrario,
seguireleistruzionidelparagrafo“Adattamento
dell'apparecchioaltipodigas”.
Dopoilcollegamentoall'alimentazionedelgas,
verificareconunasoluzionediacquasaponata
chenonvisianoperdite.Conibruciatoriaccesi,
ruotarelemanopoledallaposizionemassima1*
allaposizioneminima2*perverificarelastabilità
dellafiamma.
L'allacciamento all'impianto del gas o alla
bomboladelgaspuòessereeseguitoconuntubo
diacciaioodigommaflessibile,nelrispettodelle
normenazionalivigenti.
ADATTAMENTODELL'APPARECCHIOALTIPODI
GAS
(Questaoperazionedeveessereeseguitadaun
tecnicoqualificato.)
Peradattarel'apparecchioauntipodigas
diversodaquelloperilqualeèstatoprodotto
(indicatosull'etichetta),seguirelaprocedura
riportatadopoidisegnidiinstallazione.
AVVERTENZEELETTRICHE
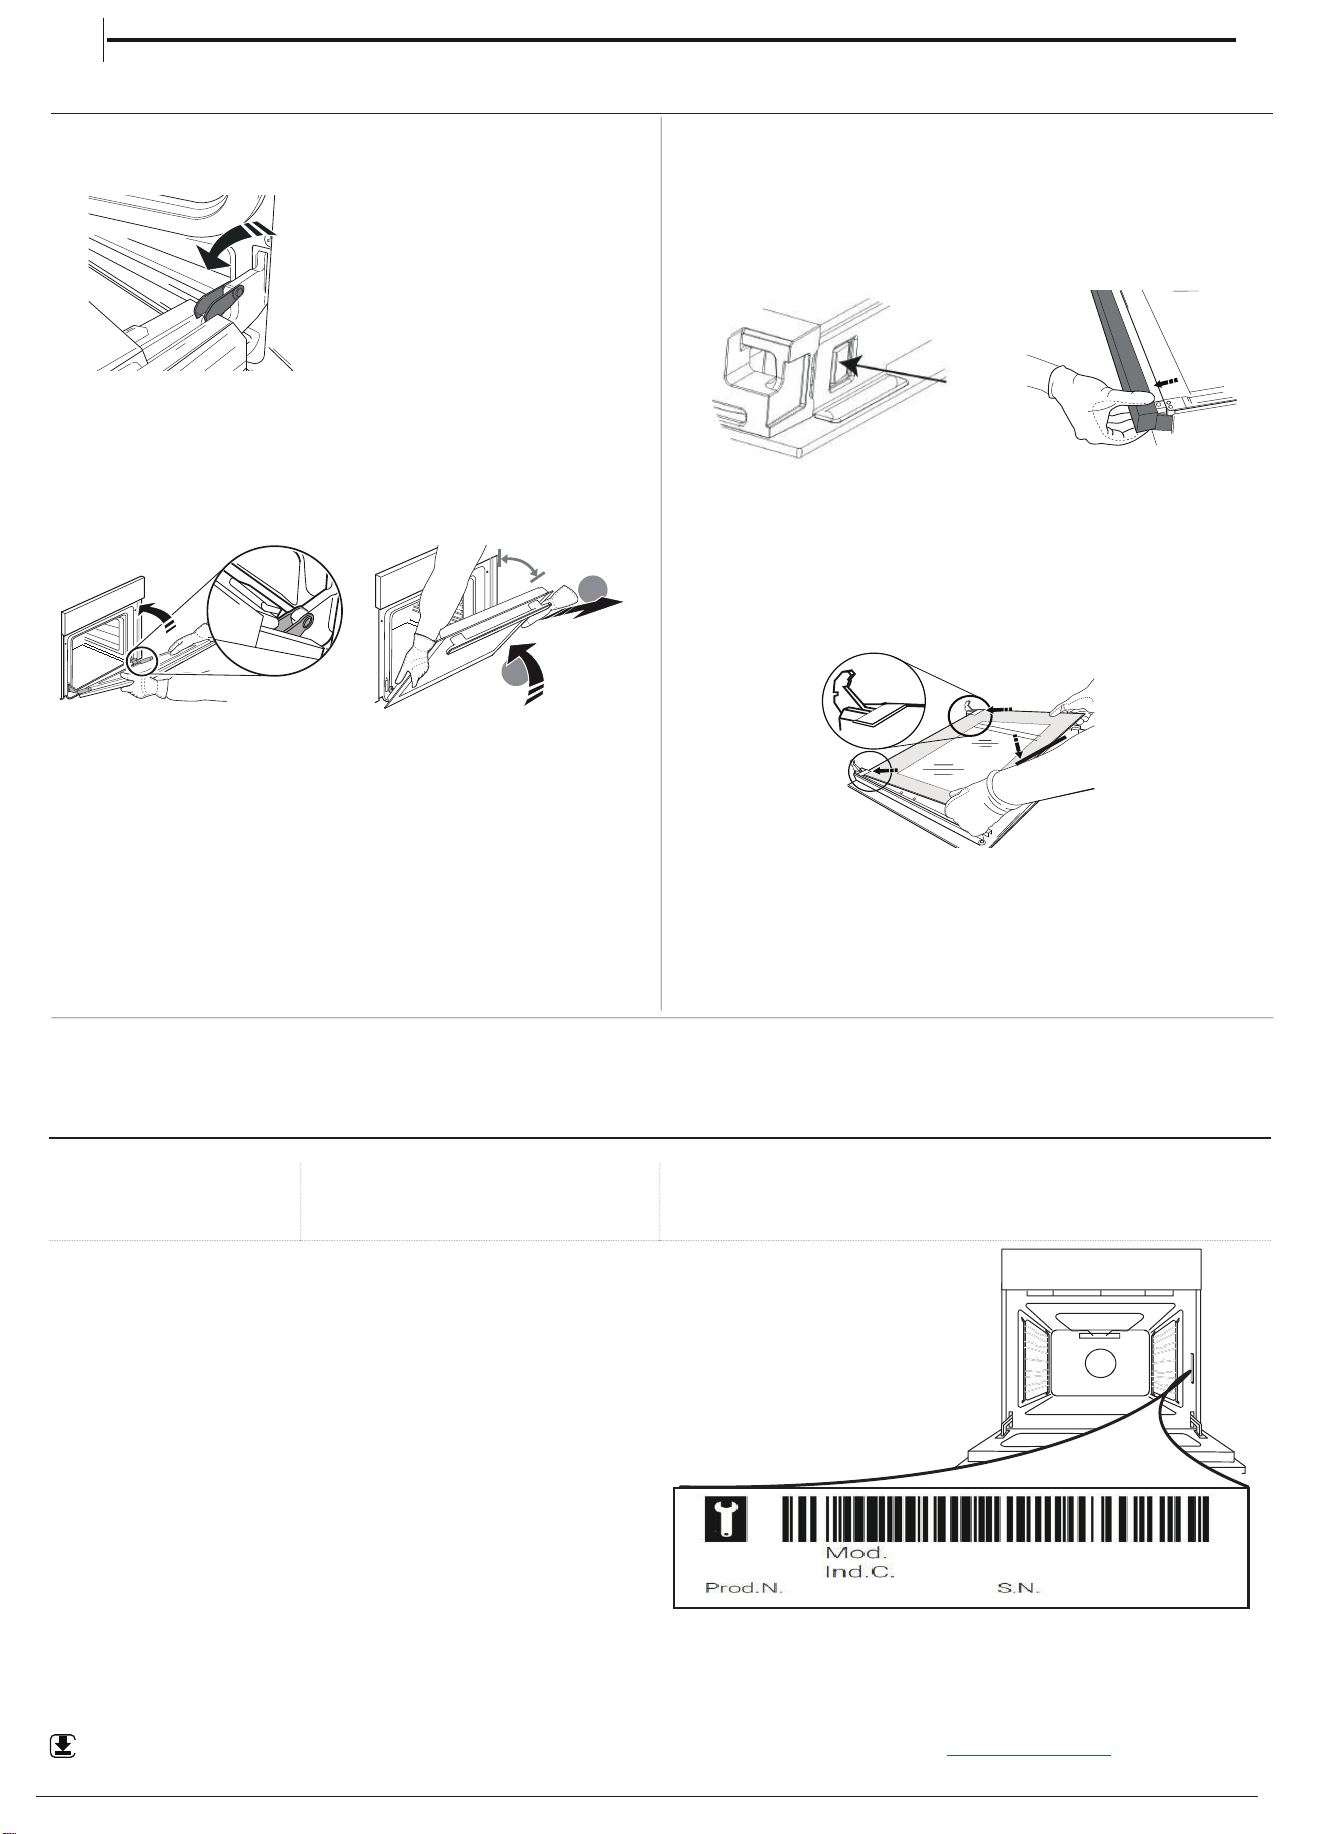
IMPORTANTE:Leinformazionisuiconsumidi
correnteetensionesonoriportatesullatarghetta
matricola.
Latarghettamatricola sitrovasulbordo
anterioredelforno(visibileaportaaperta).
Deveesserepossibilescollegarel'apparecchio
dallareteelettricadisinserendolaspina,sequesta
èaccessibile,otramiteuninterruttoremultipolare
installatoamontedellapresanelrispettodei
regolamentielettricivigenti;inoltre,l'apparecchio
deveesseremessoaterrainconformitàallenorme
disicurezzaelettricanazionali.
Ilcavodialimentazionedeveesseresufficientementelungoda
consentire ilcollegamentodell'apparecchio,unavoltaposizionato
nell'ubicazionedefinitiva,allapresadicorrente.Nontirareilcavodi
alimentazione.
Nonutilizzarecavidiprolunga,presemultiple
oadattatori.Alterminedell'installazione,
icomponentielettricinondovrannopiù
essereaccessibiliall'utilizzatore.Nonutilizzare
l'apparecchioquandosièbagnatioppureapiedi
nudi.Nonaccenderel'apparecchioseilcavo
dialimentazioneolaspinasonodanneggiati,
sesiosservanoanomaliedifunzionamentoose
l'apparecchioècadutooèstatodanneggiato.
Seilcavodialimentazioneèdanneggiato,
deveesseresostituitoconunodellostessotipodal
produttore,dauncentrodiassistenzaautorizzato
odauntecnicoqualificatoperevitaresituazionidi
pericoloorischidiscosseelettriche.
Seilcavodialimentazionedeveessere
sostituito,rivolgersi a uncentro di assistenza
autorizzato.
AVVERTENZA:Perevitareilrischiodiscossa
elettrica,assicurarsichel'apparecchiosiaspento
primadisostituirelalampadina.
L'installazioneconuncavodialimentazionea
innestononèconsentita,amenocheilprodotto
nonsiagiàdotatodiquellofornitodalProduttore.
PULIZIAEMANUTENZIONE
AVVERTENZA:Perevitarerischidifolgorazione,
primadiqualsiasiinterventodi manutenzione
accertarsichel'apparecchiosiaspentoescollegato
dall'alimentazioneelettrica.Perevitareilrischio
di lesionipersonali,utilizzare guanti protettivi
(rischiodilacerazione)escarpedisicurezza
(rischiodicontusione); assicurarsichequalsiasi
movimentazionesiaeseguitadaduepersone
(ridurreilcarico);maiutilizzarepulitriciagettodi
vapore(rischiodiscosseelettriche).Leriparazioni
nonprofessionalinonautorizzatedalproduttore
potrebberocomportareunrischioperlasalutee
lasicurezza,perilqualeilproduttorenonpuò
essereritenutoresponsabile.Qualsiasidifetto
odannocausatodariparazioniointerventidi
manutenzionenonprofessionalinonsaràcoperto
dallagaranzia,i cuitermini sonodescrittinel
documentoconsegnatoconl'unità.
Nonutilizzaredetergentiabrasivioraschietti
metalliciperpulireilvetrodellaportadelforno,
inquantopotrebberograffiarelasuperficieconil
rischiodirotturadelvetro.
Nonutilizzareprodottiabrasiviocorrosivi,
prodottiabasedicloroopagliette.
Primadieseguirequalsiasioperazione,
assicurarsichel’apparecchiosi siaraffreddato.
-Rischiodiustioni.
AVVERTENZA:Spegnerel'apparecchioprima
disostituirelalampadina,perevitareilrischiodi
scosseelettriche.
Perevitaredanniall’accensioneelettrica,nonutilizzarlaquandoi
bruciatorinonsononellalorosede.
Indossareguantiprotettiviperleoperazionidi
puliziaemanutenzione.
SMALTIMENTODELMATERIALEDIIMBALLAGGIO
Ilmaterialediimballaggioèriciclabileal100%edècontrassegnato
dalsimbolodelriciclaggio
. Levariepartidell'imballaggiodevono
pertantoesseresmaltiteresponsabilmenteeinstrettaosservanzadelle
normestabilitedalleautoritàlocali.
SMALTIMENTODEGLIELETTRODOMESTICI
Questoapparecchioèstatofabbricatoconmaterialericiclabileo
riutilizzabile.Smaltireilprodottorispettandolenormativelocaliin
materia.Perulterioriinformazionisultrattamento, ilrecuperoeil
riciclaggiodeglielettrodomestici,contattarel’ufficiolocalecompetente,
ilserviziodiraccoltadeirifiutidomesticioilnegoziopressoilqualeil
prodottoèstatoacquistato.Questoapparecchioècontrassegnatoin
conformitàalladirettivaeuropea2012/19/UE,RifiutidiApparecchiature
ElettricheedElettroniche(RAEE)eallenormeRifiutidiApparecchiature
ElettricheedElettroniche2013(comemodificate).Provvedendoal
correttosmaltimentodelprodottosicontribuiràadevitarepotenziali
conseguenzenegativesull’ambienteesullasaluteumana.Ilsimbolo
sulprodottoosulladocumentazionediaccompagnamentoindicache
questoapparecchionondeveesseresmaltitocomerifiutodomestico,
bensìconferitopressouncentrodiraccoltaprepostoalritirodelle
apparecchiatureelettricheedelettroniche.
CONSIGLIPERILRISPARMIOENERGETICO
Preriscaldareilfornosolosespecificatonellatabelladicotturaonella
ricetta.Usareteglielaccateosmaltateincoloriscuri,inquantoassorbono
ilcaloreinmodopiùefficiente.
Utilizzarelapentolaapressioneperridurreilconsumodienergiaeil
tempodicottura.
6

DICHIARAZIONEDICONFORMITÀ
Questoapparecchiosoddisfaquantosegue:RequisitidiEcodesigndel
regolamentoeuropeo66/2014;Regolamento65/2014sull’etichettatura
energetica;Ecodesignperiprodotticonnessiall’energiaeinformazioni
sull’energia(emendamento)(UscitaUE)Regolamenti2019,inconformità
conlanormaeuropeaEN60350-1.
QuestoapparecchiosoddisfairequisitidiEcodesigndelregolamento
europeo66/2014el'Ecodesignperiprodotticonnessiall'energiaele
informazionisull'energia(emendamento)(UscitaUE)Regolamenti2019
inconformitàconlanormaeuropeaEN60350-2.
QuestoapparecchiosoddisfairequisitidiEcodesigndelregolamento
europeo66/2014el'Ecodesignperiprodotticonnessiall'energiaele
informazionisull'energia(emendamento)(UscitaUE)Regolamenti2019
inconformitàconlanormaeuropeaEN30-2-1.
Questoapparecchiosoddisfaquantosegue:RequisitidiEcodesigndel
regolamentoeuropeo66/2014;Regolamento65/2014sull’etichettatura
energetica;Ecodesignperiprodotticonnessiall'energiaeinformazioni
sull'energia(emendamento)(UscitaUE)Regolamenti2019,inconformità
conlanormaeuropeaEN15181.
7
In linea con la normativa vigente, questo modello è dotato di una valvola
di sicurezza che interrompe il flusso di gas quando il coperchio in vetro è
chiuso.
Perché il forno funzioni è necessario che il coperchio in vetro sia aperto.
Se il coperchio in vetro si chiude mentre il piano cottura e/o il forno sono
accesi, entrambi smetteranno di funzionare.
Se il coperchio in vetro è già chiuso non sarà possibile attivare né il piano
cottura né il forno.
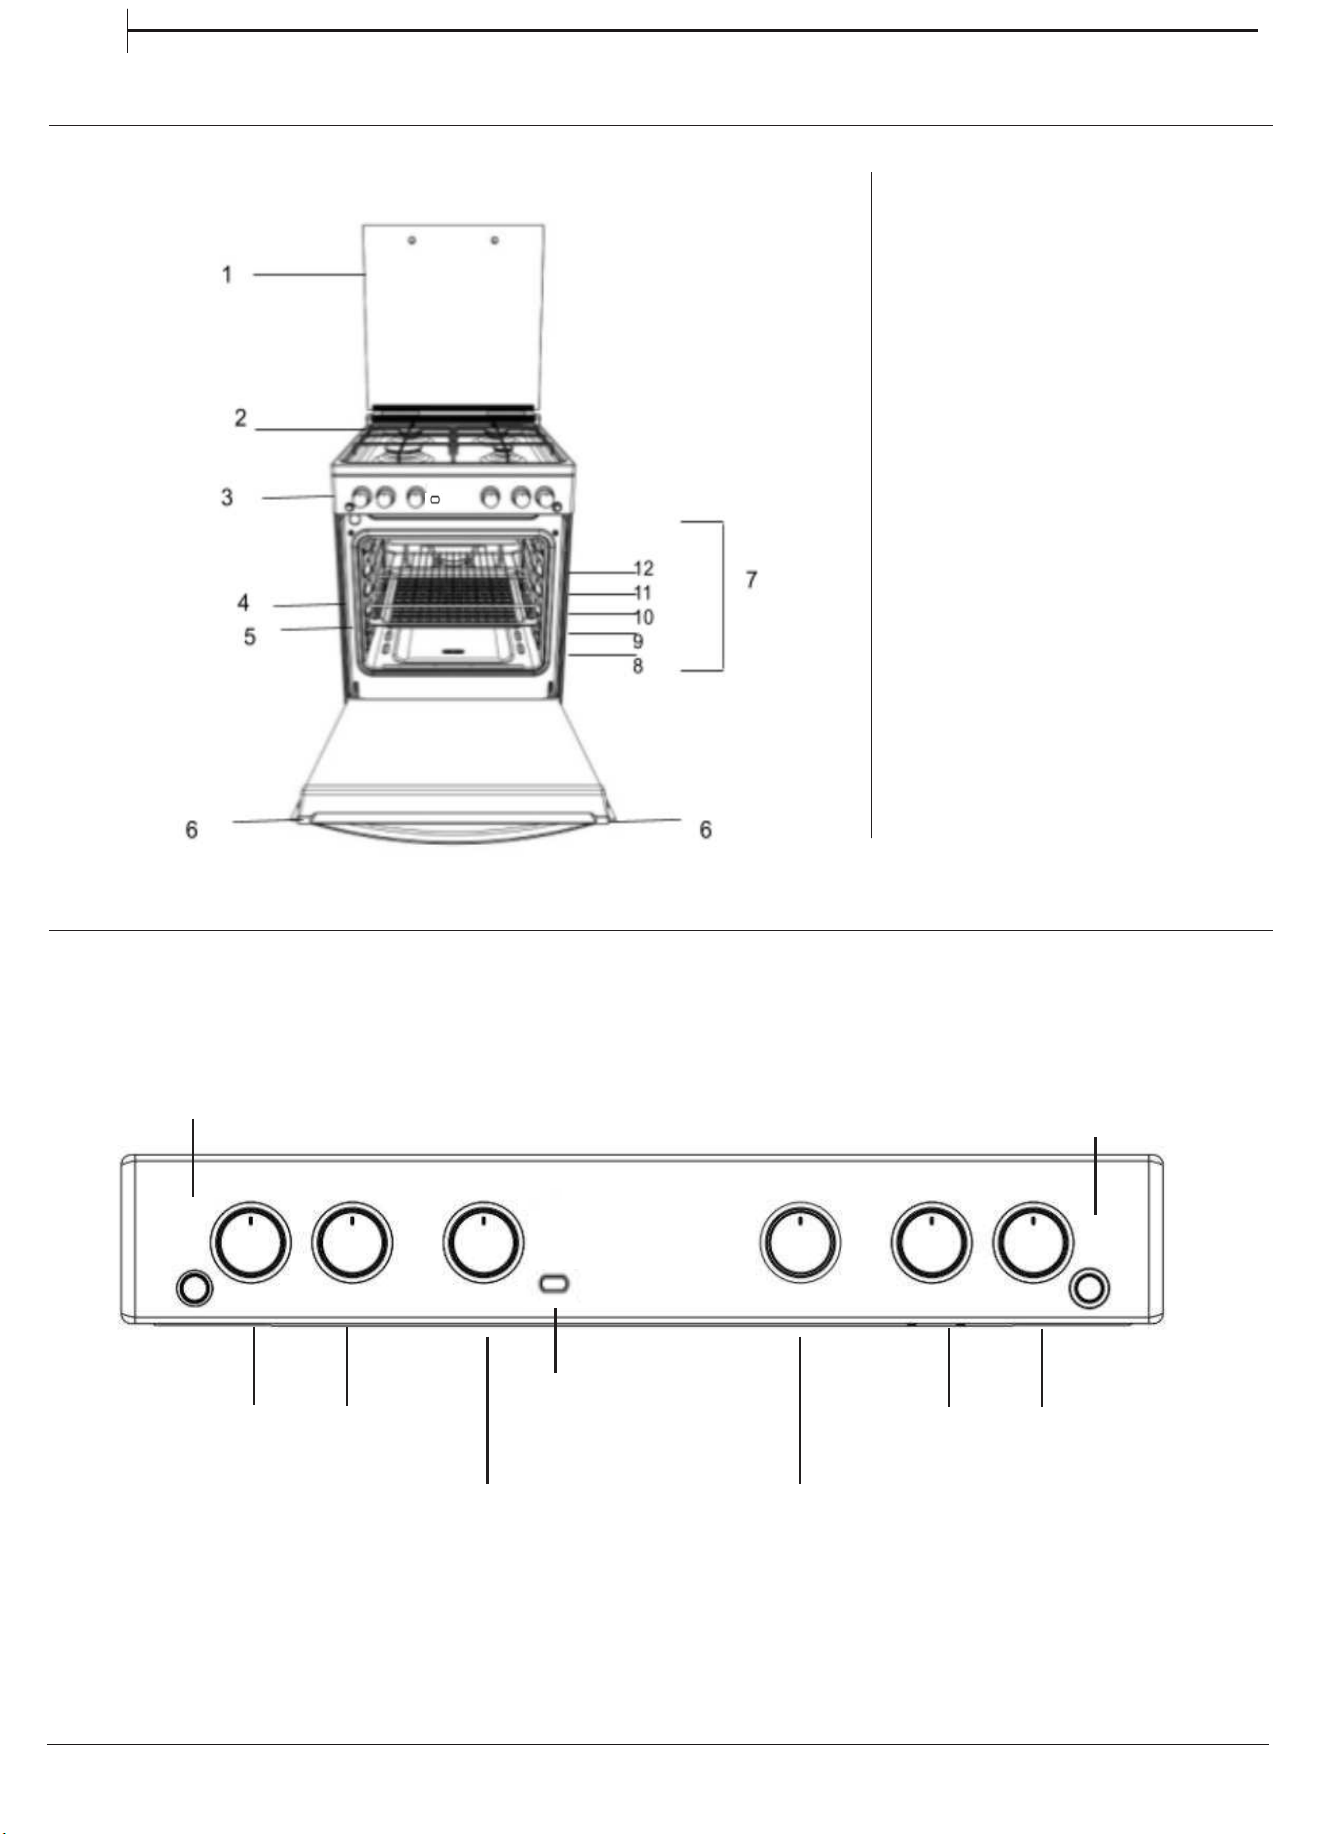
DESCRIZIONE DEL PRODOTTO
1.Coperchio di vetro
2.Bruciatore del piano di cottura
3.Pannello Comandi
4.Griglia metallica
5.Leccarda
6.Porta
7.Binari di guida per rack scorrevoli
8.Posizione 1
9.Posizione 2
10.Posizione 3
11.Posizione 4
12.Posizione 5
PANNELLO COMANDI
Timer
Bruciatore
posteriore
sinistro del
piano di
cottura
Bruciatore
del piano di
cottura
anteriore
destro
Bruciatore
anteriore
destro del
piano di
cottura
Bruciatore
posteriore
destro del
piano di
cottura
IT
forno/griglia
Lampada da forno
Accensione del bruciatore
lampada da griglia
8
AVVERTENZA: questa operazione deve essere
eseguita da un tecnico qualicato
IT
INSTALLAZIONE
Prima di azionare il nuovo apparecchio, si prega di leggere
attentamente il libretto d'istruzioni. Contiene informazioni importanti
riguardanti installazione e funzionamento sicuri dell'apparecchio.
Si prega di conservare le presenti istruzioni operative per poterle
consultare in un secondo momento. Assicurarsi che le istruzioni
vengano conservate con l'apparecchio nel caso in cui venga venduto,
ceduto o spostato.
L'apparecchio deve essere installato da un professionista qualicato
secondo le istruzioni fornite.
Prima di eseguire qualunque intervento di regolazione o
manutenzione necessario, occorre scollegare l'apparecchio
dall'alimentazione elettrica.
Il tecnico qualicato che eseguirà l'operazione dovrà aver letto le
istruzioni seguenti per fare in modo che l'apparecchio vengo installato,
regolato e sottoposto a manutenzione tecnicamente corretta in
conformità alle norme vigenti.
Posizionamento e livellamento
È possibile installare l'apparecchio a anco di armadi la cui altezza
non superi quella della supercie del piano di cottura.
Questo fornello deve essere installato direttamente sul pavimento.
Non installarlo su basi articiali di nessun genere.
Assicurarsi che la parete a contatto con il retro dell'apparecchio sia
costituita da materiale non inammabile, termoresistente (T 90°C).
Importante: Non installare l'apparecchio accanto a porte o ad
altri mezzi di accesso per ridurre al minimo la probabilità che le
persone che li utilizzano possano farli venire contatto con le pentole
posizionate sulla supercie del piano di cottura.
L'apparecchio non deve essere installato dietro pannelli
decorativi al ne di evitarne il surriscaldamento
Questo apparecchio non deve essere montato su una
piattaforma.
Il fornello è progettato per essere inserito tra i mobiletti della cucina
mantenendo una distanza di 600 mm. Lo spazio su entrambi i lati
deve essere suciente per consentirne l'estrazione a scopo di
manutenzione. Può essere installato prevedendo armadietti su un
lato o su entrambi, ma anche in una nicchia ad angolo. Può anche
essere utilizzato in modo indipendente.
Le pareti laterali adiacenti che sporgono sopra il livello del piano di
cottura non devono essere più vicine al fornello di 150 mm o 65 mm
e devono essere protette da materiale resistente al calore. Qualsiasi
supercie sporgente o cappa non dovrebbe essere più vicina di 750
mm.
a. Il fornello può essere installato in un locale cucina, una cucina/sala
da pranzo o soggiorno, ma non in toilette o stanze da bagno.
b. Installare le cappe conformemente ai requisiti di cui nel relativo
manuale d'uso.
c. La parete a contatto con il retro del fornello deve essere realizzata
in un materiale ignifugo.
d. Il fornello è dotato di una catena di sicurezza che deve essere
attaccata a un gancio, ssata alla parete dietro l'apparecchio.
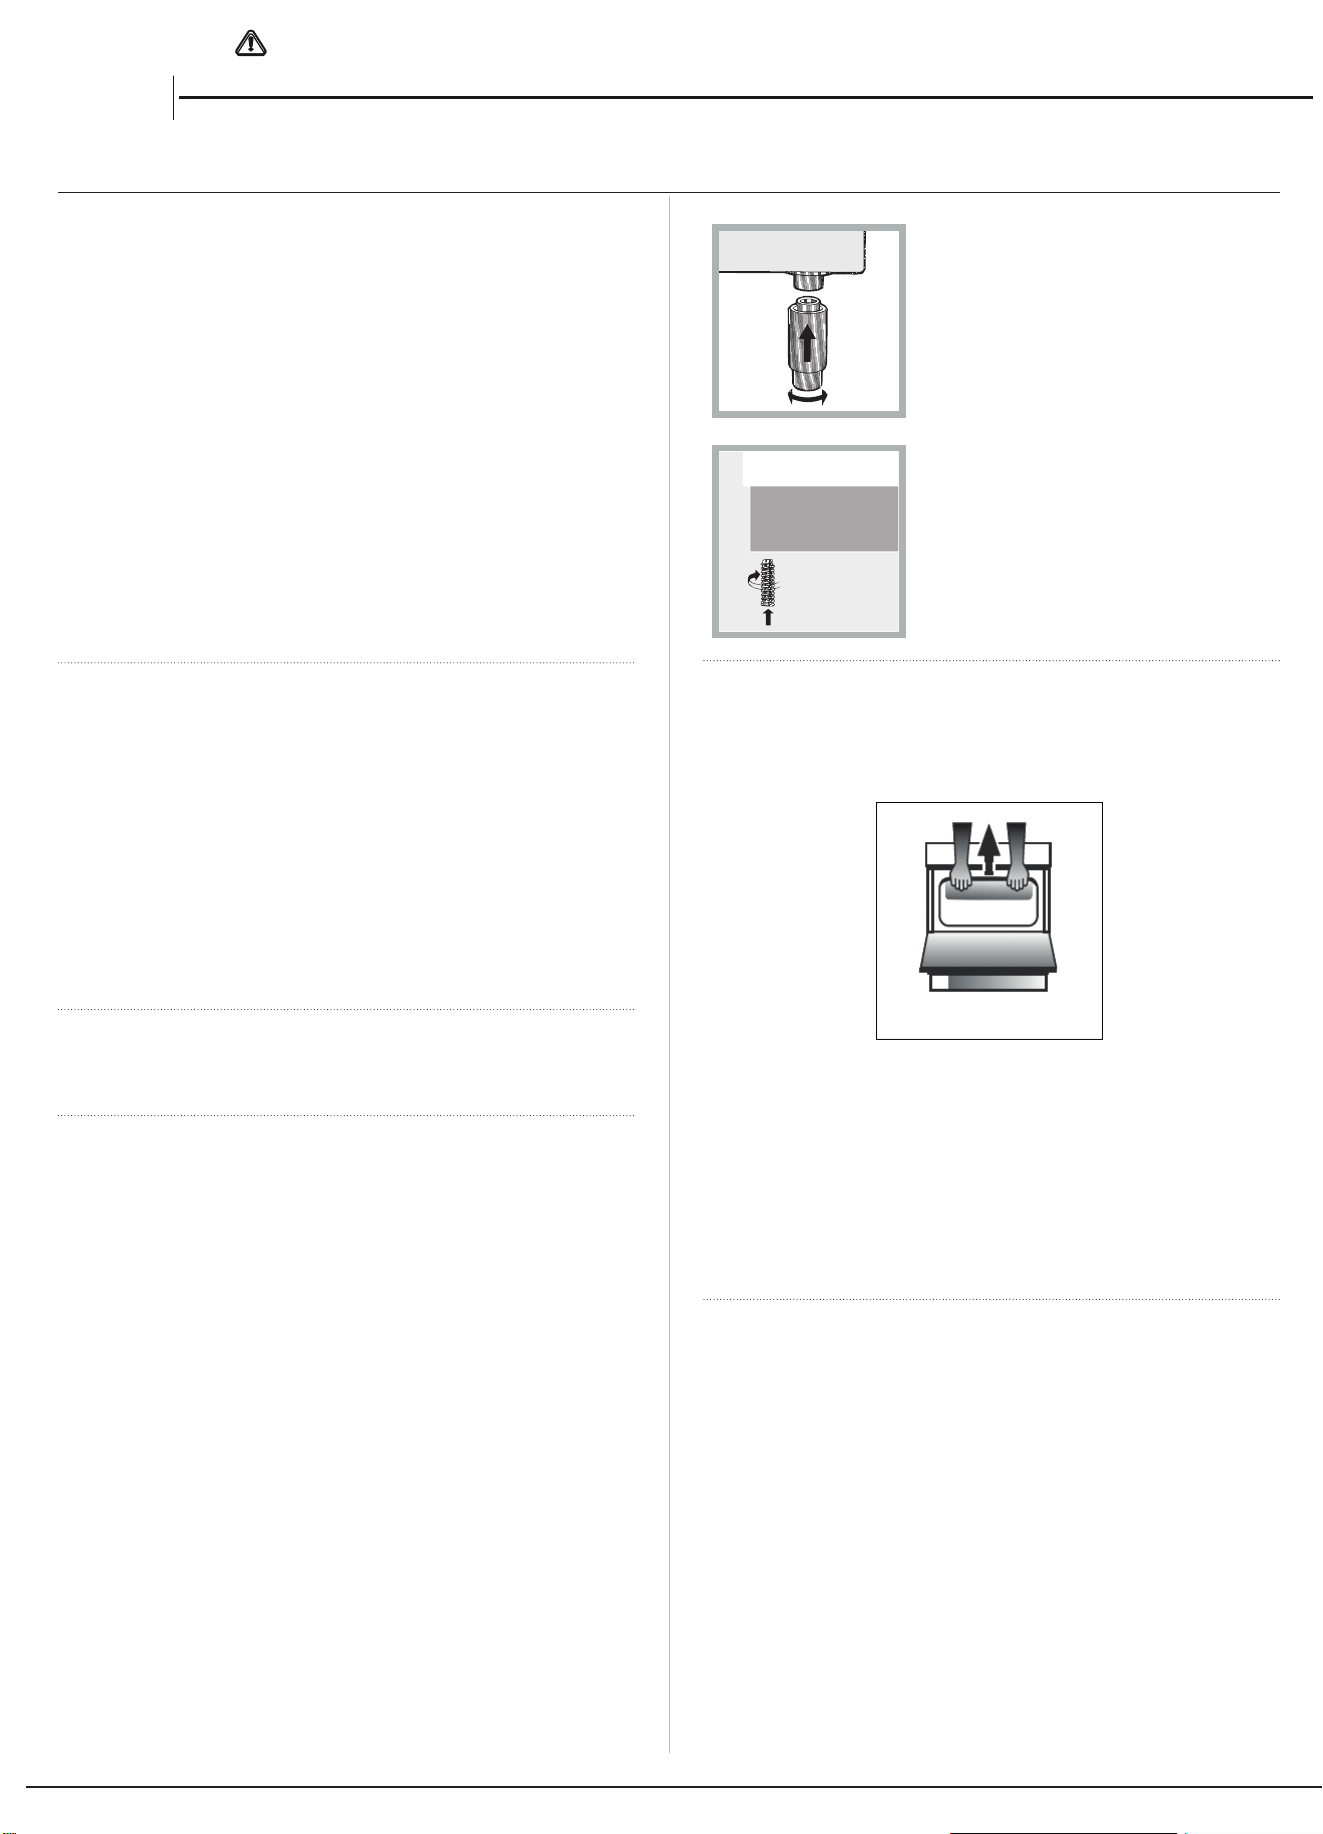
LivellamentoSe è necessario
livellare l'apparecchio, avvitare i
piedini regolabili* nelle apposite sedi
su ogni angolo della base del fornello
(vedere gura).
I piedini* forniti con l'apparecchio si
inseriscono nelle scanalature sul lato
inferiore della base del fornello.
Prima di spostare il fornello, assicurarsi che sia freddo e spegnerne
l'unità di comando. Per spostare il fornello, si consiglia di sollevarlo
dalla parte anteriore come segue:
Spostamento del fornello
Fig. A
Aprire la porta della griglia quanto basta per consentire di aerrare
comodamente il bordo frontale sulla parte bassa del tetto del forno,
evitando qualsiasi elemento della griglia. (FIG.A)
Prestare massima attenzione durante lo spostamento del forno,
perché è pesante.
Fare in modo di non danneggiare il rivestimento del pavimento.
Collegamento elettrico
Tensione e frequenza di alimentazione: 230-240V a.c. 50/60 Hz.
! Il cavo di alimentazione deve essere posizionato in modo da
non raggiungere mai una temperatura di 50°C superiore alla
temperatura ambiente. Il cavo deve essere instradato lontano dalle
bocchette posteriori. In caso di necessità, è possibile utilizzare un
cavo più lungo; tuttavia, occorre assicurarsi che il cavo fornito con
l'apparecchio venga sostituito con uno di pari caratteristiche, in
conformità alle norme e alle leggi vigenti.
9
AVVERTENZE: QUESTO APPARECCHIO DEVE ESSERE
COLLEGATO A TERRA.
Il fornello deve essere collegato alla rete di alimentazione tramite una
presa (a doppio polo) commutata inserita correttamente con capacità
appropriata a quella riportata sulla targhetta identicativa. Tutti i cavi
elettrici dall'unità di consumo al fornello, attraverso la presa bipolare
commutata, devono essere di tipo accettabile e di corrente nominale
come sopra. Il cavo di alimentazione deve essere posizionato in
modo da non raggiungere mai, in nessun punto, una temperatura
superiore di 50°C rispetto alla temperatura ambiente. Il cavo deve
essere instradato lontano dalle bocchette posteriori.
Catena di sicurezza
Al ne di evitare
che l'apparecchio
si ribalti
accidentalmente,
ad esempio
nel caso in cui
un bambino si
arrampichi sulla
porta del forno, È
INDISPENSABILE
INSTALLARE
la catena di
sicurezza fornita in
dotazione!
Il fornello dispone di una catena di sicurezza da ssare tramite una
vite (non fornita con il fornello) alla parete dietro all'apparecchio alla
stessa altezza alla quale la catena viene ssata all'apparecchio.
Scegliere la vite e il tassello in base al tipo di materiale della parete
dietro l'apparecchio. Se la testa della vite ha un diametro inferiore a 9
mm, utilizzare una rondella. Per le pareti di cemento occorre una vite
con diametro di almeno 8 mm e lunghezza di 60 mm.
Assicurarsi che la catena sia ssata al retro del fornello e alla
parete, come mostrato in gura, in modo che dopo l'installazione
venga messa in tensione e sia parallela al suolo.
Collegamento da gas
Il fornello deve essere collegato all'alimentazione del gas da
un installatore registrato per la sicurezza del gas. Durante
l'installazione di questo prodotto è essenziale montare un
rubinetto del gas approvato in modo da isolare l'alimentazione
dall'apparecchio per comodità in caso di successiva rimozione
o manutenzione. L'allacciamento dell'apparecchio alla rete del
gas o al gas liquido deve essere eettuato secondo la normativa
vigente prescritta, e solo dopo essersi accertati che sia adattabile
al tipo di gas da usare. In caso contrario, seguire le istruzioni
indicate nel paragrafo "Adattamento a diversi tipi di gas". Su
alcuni modelli l'alimentazione del gas può essere collegata a
sinistra o a destra, a seconda delle necessità; per cambiare il
collegamento, invertire la posizione del portagomma con quella
del tappo e sostituire la guarnizione (fornita con l'apparecchio).
In caso di collegamento al gas liquido, tramite serbatoio,
utilizzare regolatori di pressione conformi alla normativa in
vigore. L'alimentazione del gas deve essere collegata a sinistra
dell'apparecchio. Assicurarsi che il tubo essibile non passi
attraverso la parte posteriore del fornello toccando parti calde.
Adattamento dell'apparecchio al tipo di gas
È possibile adattare l'apparecchio ad un tipo di gas diverso
da quello predenito (questo è indicato sull'etichetta di
classicazione sul coperchio).
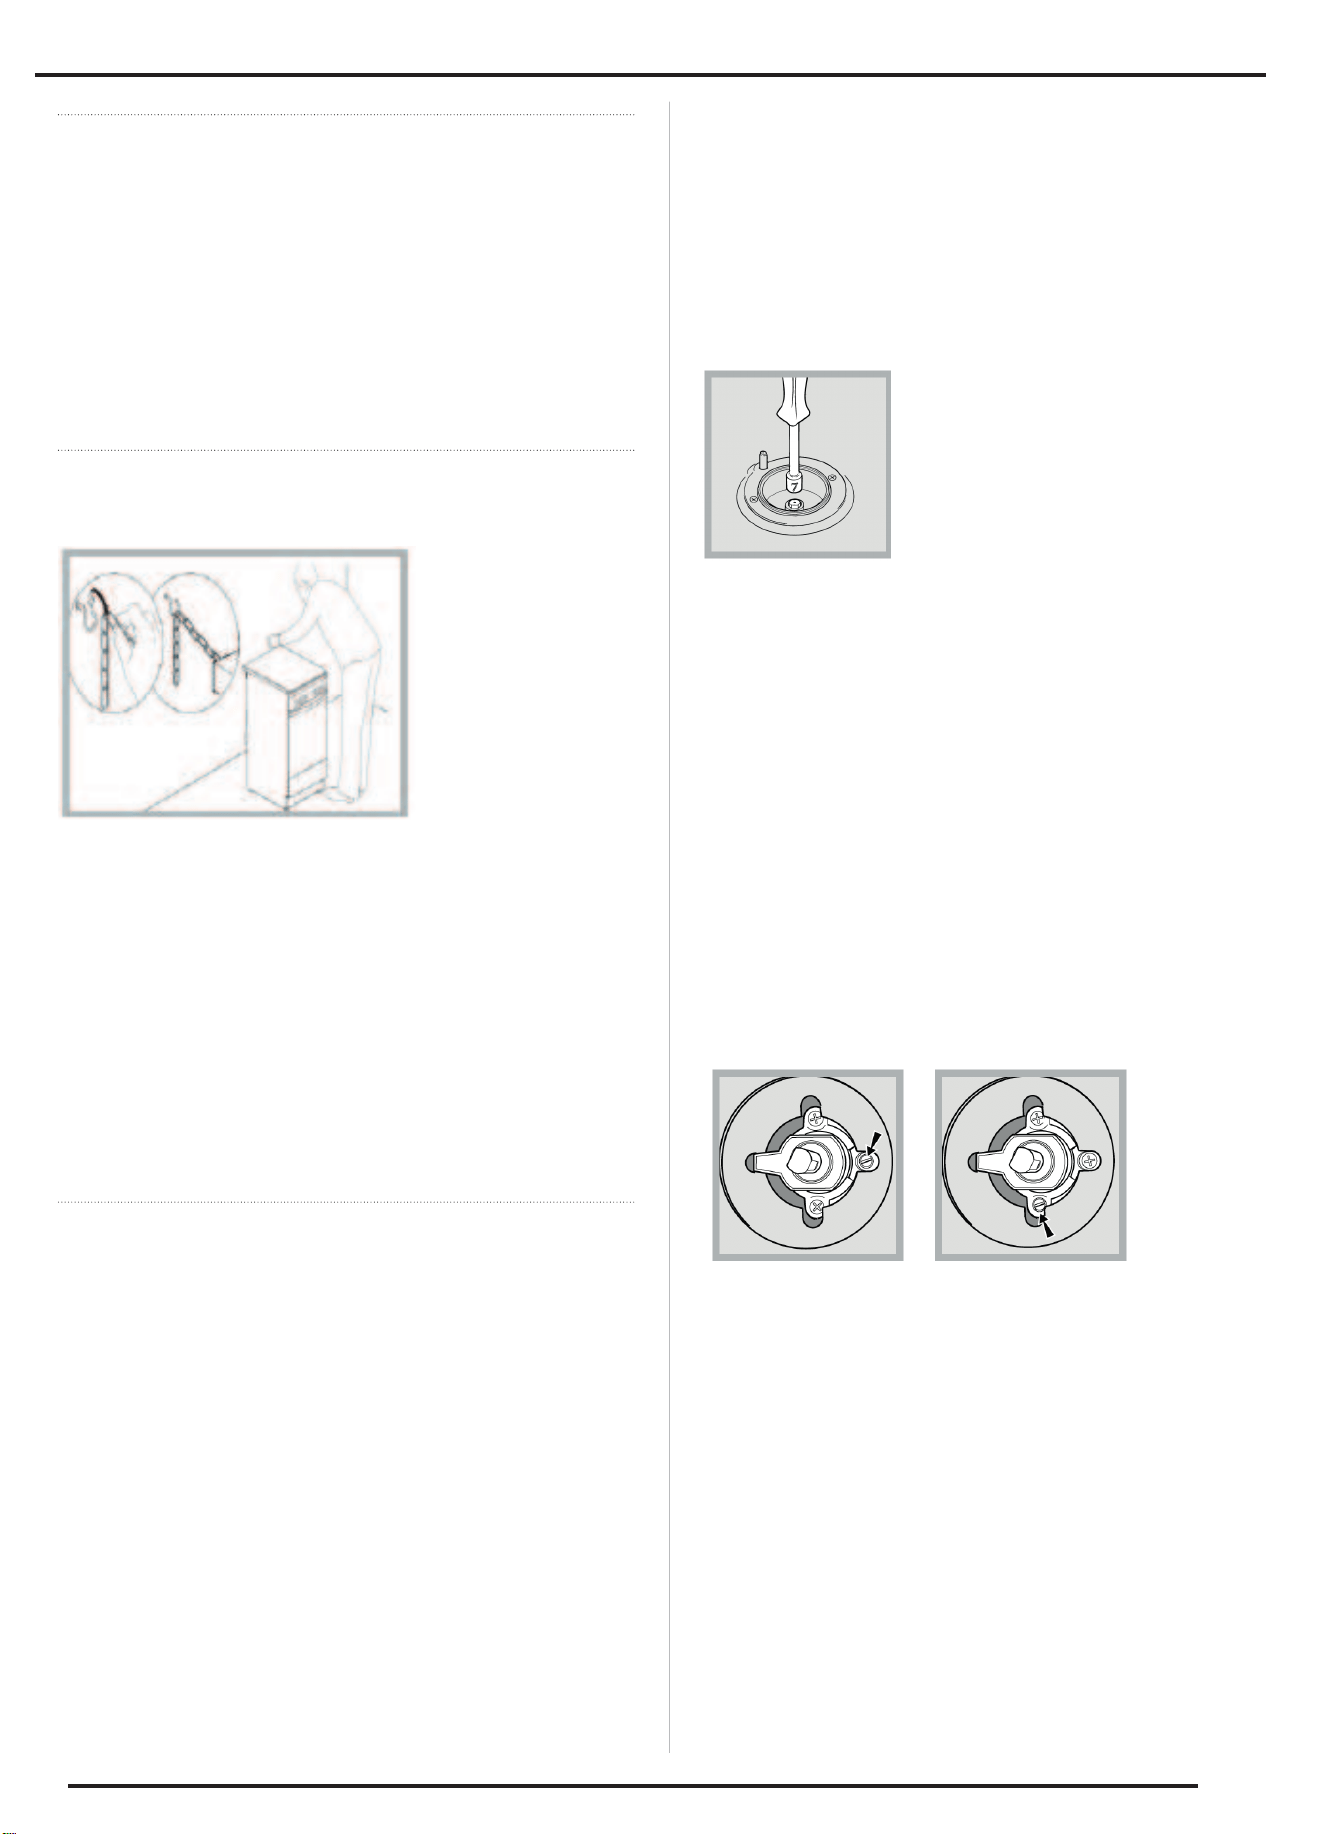
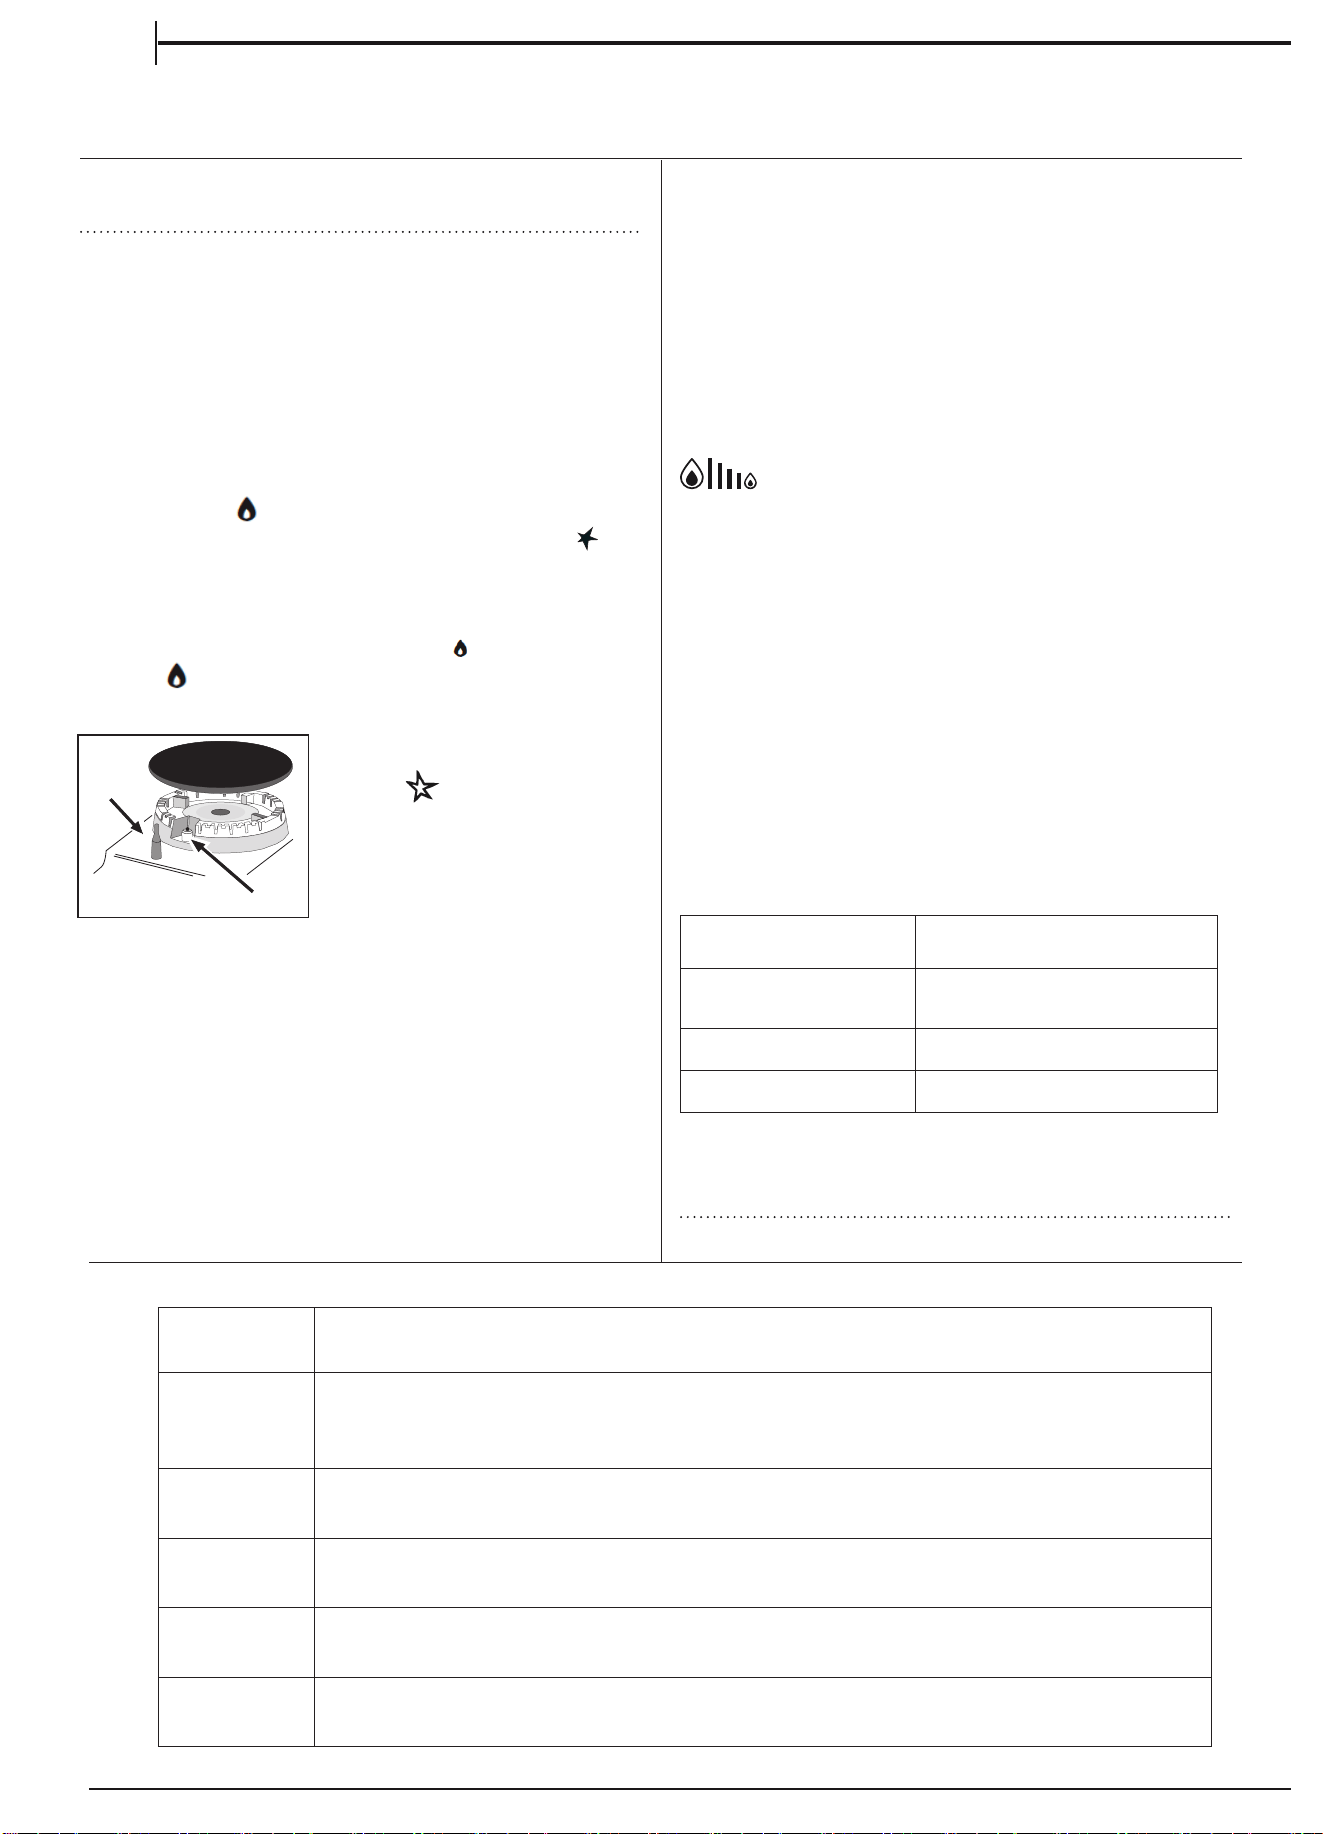
Adattamento del piano di cottura
Sostituzione degli ugelli per i bruciatori del
piano di cottura:
1. Rimuovere le griglie del piano di cottura
e far scivolare i bruciatori dalle loro sedi.
2. Svitare gli ugelli con una chiave a
bussola da 7 mm (vedere gura) e
sostituirli con ugelli
adatti al nuovo tipo di gas (vedere la
tabella delle speciche del bruciatore e dell'ugello).
3. Sostituire tutti i componenti seguendo le istruzioni di cui sopra
al contrario.
Regolazione dell'impostazione minima dei bruciatori del piano di
cottura:
1. Ruotare il rubinetto nella posizione minima.
2. Rimuovere la manopola e regolare la vite di regolazione,
posizionata all'interno o accanto al perno del rubinetto, nché la
amma è piccola ma costante.
! Se l'apparecchio è collegato ad una fornitura di gas liquido, la
vite di bypass deve essere impostata su un minimo.
3. Mentre il bruciatore è acceso, cambiare rapidamente la
posizione della manopola da minimo a massimo e viceversa
diverse volte, controllando che la amma non si spenga.
Terminata la regolazione, ripristinare i sigilli con ceralacca o
materiale equivalente.
I bruciatori del piano di cottura non richiedono la regolazione
dell'aria primaria.
Dopo aver regolato l'apparecchio in modo che possa essere
usato con un diverso tipo di gas, sostituire la vecchia etichetta con
una nuova che corrisponda al nuovo tipo di gas (queste etichette
sono disponibili presso i Centri di Assistenza Tecnica Autorizzati).
Se la pressione del gas utilizzata dovesse essere diversa (o
variare leggermente) da quella raccomandata, è necessario
montare un regolatore di pressione adeguato sul tubo essibile
d'ingresso in conformità alle norme vigenti EN 88-1 e EN 88-2
relative ai "regolatori per gas canalizzato".
10
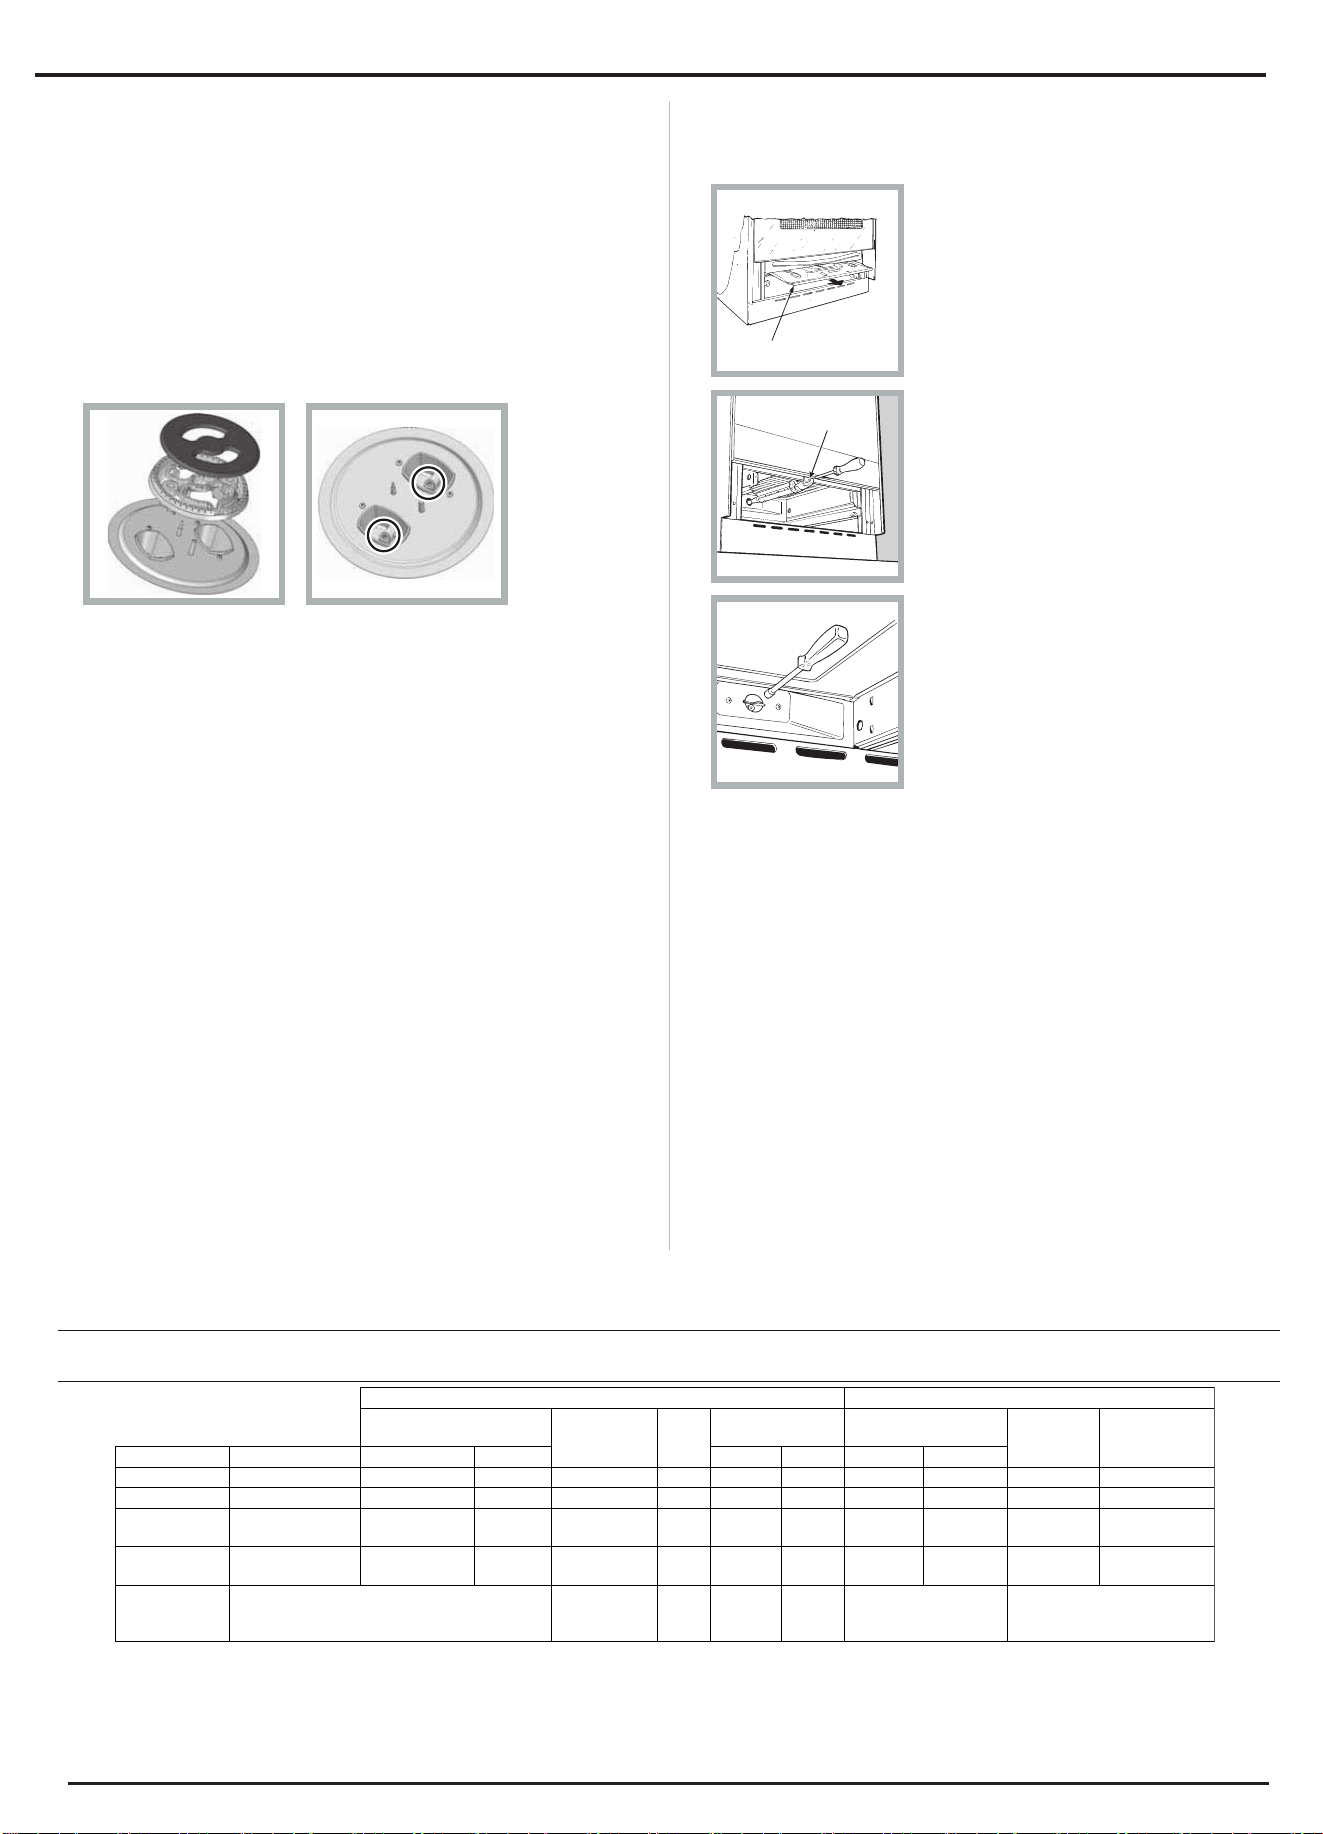
Tabella delle speciche del bruciatore e dell'ugello
*con gas secco 15°C 1013 mbar
** Propano P.C.S. = 50,37 MJ/Kg
*** Butano P.C.S. = 49,47 MJ/Kg
Naturale G20 = 37,78 MJ/m³
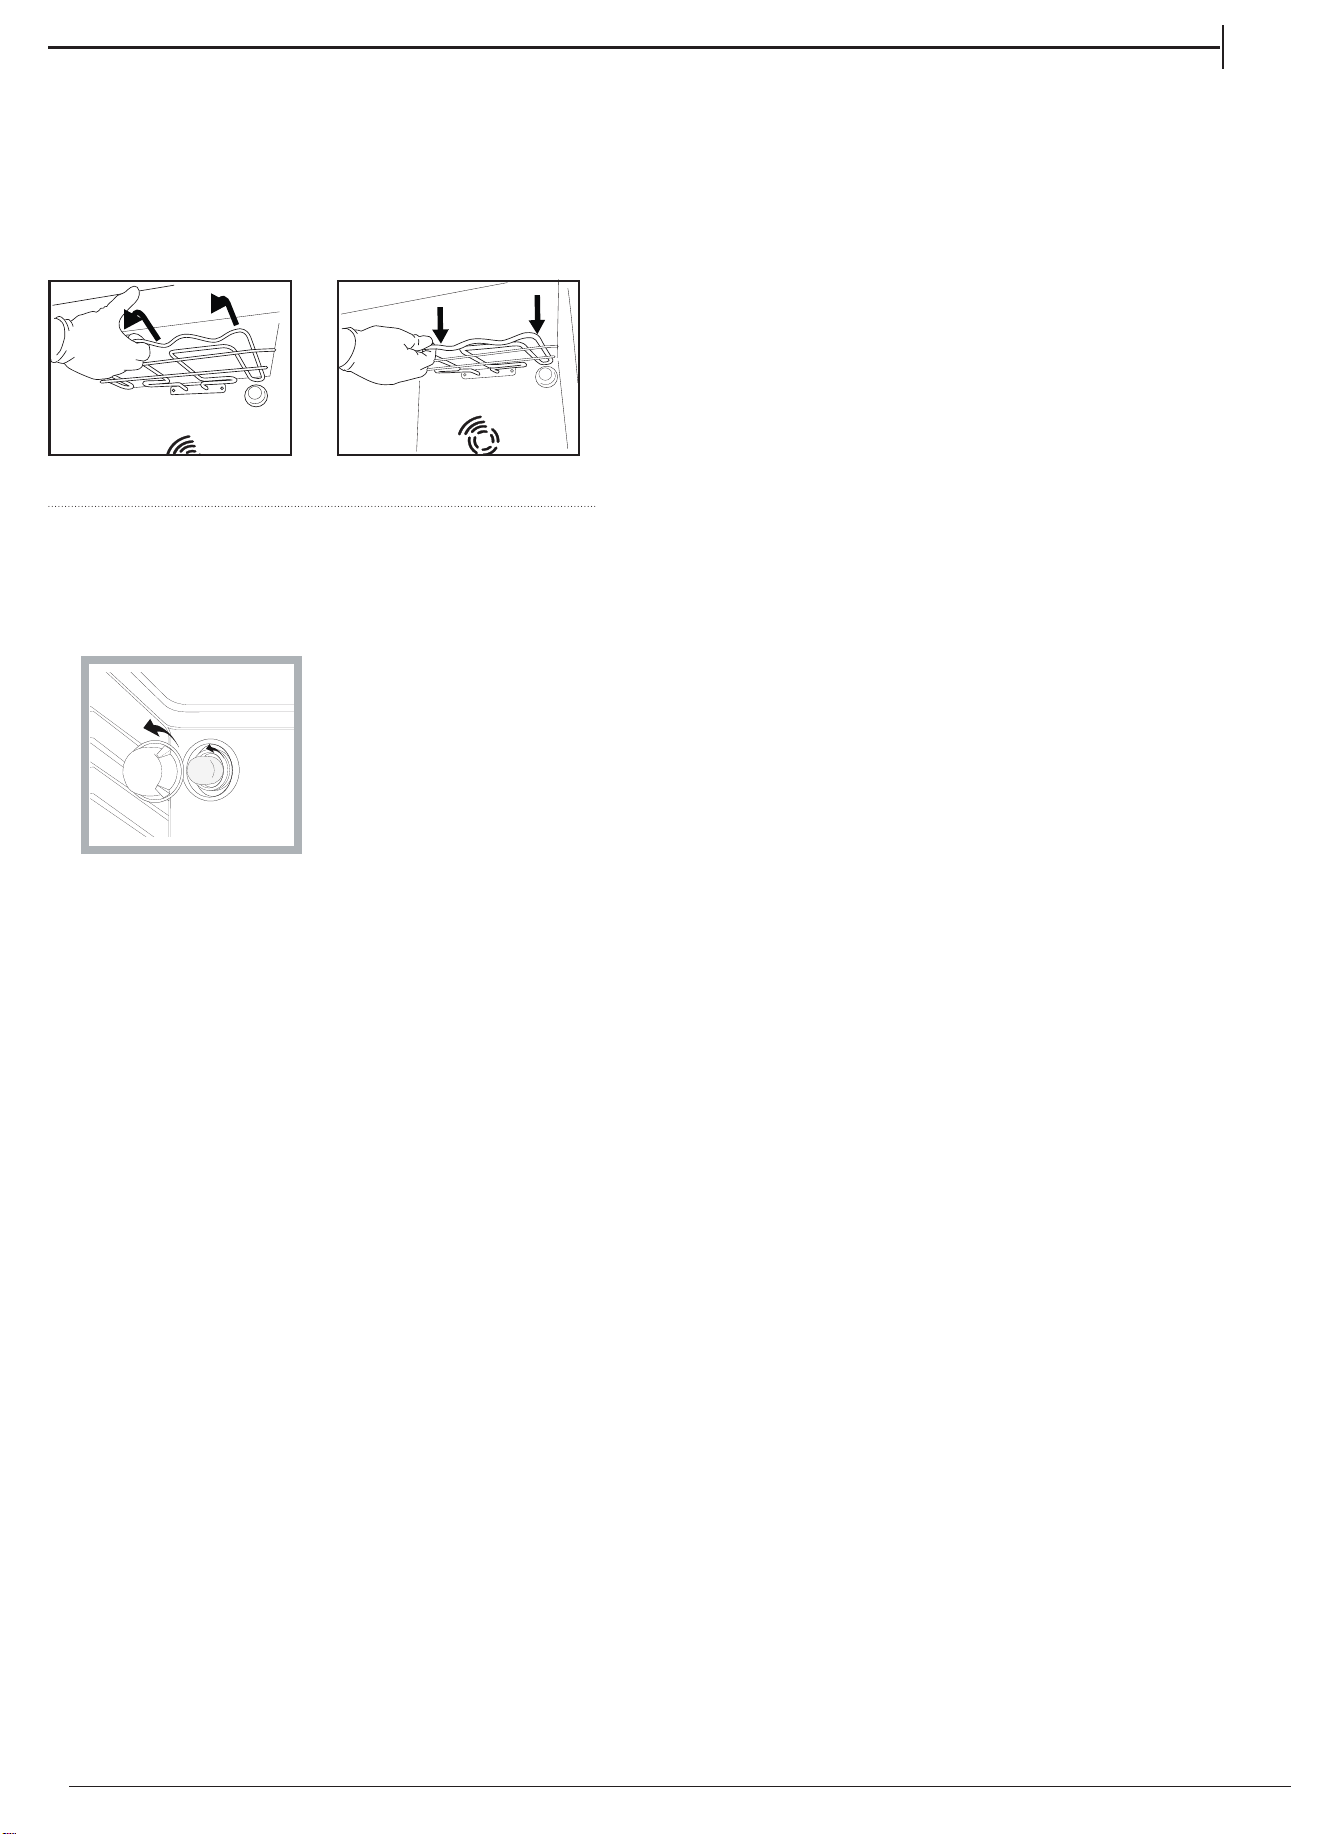
Sostituzione degli ugelli del bruciatore a triplo anello
1. Rimuovere le griglie e sollevare i bruciatori dal relativo
alloggiamento. Il bruciatore è composto da due parti separate
(vedere immagini).
2. Svitare gli ugelli con una chiave a bussola da 7 mm. Sostituire
gli ugelli con modelli congurati per l'uso con il nuovo tipo di gas
(vedere Tabella 1). I due ugelli hanno lo stesso diametro del foro.
3. Sostituire tutti i componenti completando le operazioni sopra
descritte in ordine inverso.
• Regolazione dell'aria di regolazione dei bruciatori:
Non necessita di regolazione.
• Impostazione dei bruciatori al minimo:
1. Portare il rubinetto in posizione di amma minima.
2. Rimuovere la manopola e regolare la vite di regolazione,
posizionata all'interno o accanto al perno del rubinetto, nché la
amma è piccola ma costante.
3. Dopo aver regolato la amma al minimo desiderato, mentre il
bruciatore è acceso, cambiare rapidamente la posizione della
manopola da minimo a massimo e viceversa più volte, controllando
che la amma non si spenga.
Adattamento del forno
Sostituzione dell'ugello del bruciatore del forno:
1. Rimuovere il comparto del forno.
A
2. Estrarre il pannello di prote-
zione A
(vedere diagramma).
V
3. Rimuovere il bruciatore del
forno dopo aver svitato le viti V
(vedere gura).
L'intera operazione sarà più
semplice se si rimuove lo spor-
tello del forno.
4. Svitare l'ugello utilizzando
una speciale chiave a bussola
per ugelli (vedere gura) o con
una chiave a bussola da 7 mm,
e sostituirlo con un nuovo ugel-
lo adatto al nuovo tipo di gas
(vedere tabella delle speciche
del bruciatore e dell'ugello).
Regolazione del minimo per i bruciatori del piano di cottura
a gas
1. Accendere il bruciatore (vedere Accensione e utilizzo).
2. Ruotare la manopola sulla posizione di minima potenza (MIN) dopo
averla lasciata accesa alla posizione di massima potenza (MAX) per
circa 10 minuti.
3. Rimuovere la manopola.
4. Stringere o allentare le viti di regolazione sul lato esterno del perno del
termostato (vedere la gura) nché la amma appare piccola ma stabile.
! Se l'apparecchio è collegato al gas liquido, la vite di bypass deve essere
regolata al minimo.
5. Ruotare velocemente la manopola dalla posizione MAX alla posizione
MIN, oppure aprire e chiudere la porta del forno, per vericare che il
bruciatore non si spenga.
Gas liquido Gas naturale
Potenza termica
kW (p.c.s*)
By-Pass
1/100
(mm)
Ugello
1/100
(mm)
Portata
g/h
Potenza termica
kW (p.c.s*)
Ugello
1/100
(mm)
Portata
g/h
Bruciatore Diametro (mm) Nominale Portata *** ** Nominale Portata
Forno
- 2.60 1.00 50 79T2A 189 186
2.60 0.70
112 T2 248
TC
130 3.30 1.50 61 2x65 240 236 3.30 1.50 2x99 314
Semirapido
(Medio) (S)
75 2.00 0.40 30 69 145 143 2.00 0.40 104 190
Ausiliario
(Piccolo) (A)
55 1.00 0.40 30 50 73 71 1.00 0.40 78 95
Alimentazione
Pressioni
Nominale (mbar)
Minima (mbar)
Massima
28-30
20
35
37
25
45
20
17
25
Gli ugelli per metano sono disponibili su richiesta ma non come accessori
Avvitare gli ugelli utilizzando una chiave a tubo da 7 mm e una coppia massima di 4 Nm
11
IT
LIVELLO METODO DI COTTURA
"consigliato per"
1 - 2 - 3
Ideale per ammorbidire il burro, fondere delicatamente il cioccolato a bagnomaria,
scongelare piccole porzioni, mantecare risotti, mantenere in caldo piccole porzioni di
preparazioni appena cotte
4 - 5
Ideale per cuocere a fuoco lento (riso, sughi, arrosti, pesce) con l'uso di liquidi (acqua,
vino, brodo) e mantecare la pasta mantenendo un leggero bollore
6 - 7
Ideale per rosolare e stufare le verdure, effettuare cotture prolungate, preriscaldare gli
accessori, addensare
8 - 9
Ideale per rosolare, iniziare la cottura, portare a ebollizione rapidamente, friggere
prodotti surgelati, grigliare carne e pesce, mantenere un bollore vivace
10
Ideale per aumentare rapidamente la temperatura degli alimenti o per riscaldare i liquidi
(acqua)
PRIMO UTILIZZO
USO QUOTIDIANO
Utilizzo del piano di cottura
Accensione dei bruciatori
Per ogni manopola del BRUCIATORE è presente un anello
completo che mostra la forza della amma per il relativo
bruciatore.
Per accendere uno dei bruciatori del piano di cottura:
1. Premere la manopola del BRUCIATORE e ruotarla in senso
antiorario in modo che sia rivolta verso l'impostazione della
amma massima
.
Per i modelli dotati di pulsante di accensione elettronica (
),
premere il pulsante, quindi ruotare la manopola.
2. Regolare l'intensità della amma al livello desiderato
ruotando la manopola del BRUCIATORE in senso antiorario.
Questa può essere l'impostazione minima
, l'impostazione
massima
o qualsiasi posizione tra le due.
Se l'apparecchio è dotato di un dispositivo di accensione
elettronico* (C), premere il pulsante
di accensione, contrassegnato dal
simbolo
, quindi tenere premuta
la manopola BRUCIATORE e
ruotarla in senso antiorario, verso
l'impostazione della amma
massima, nché il bruciatore non si
accende.
Per spegnere il bruciatore, rilasciare la manopola. Se ciò
accade, ripetere l'operazione, tenendo premuta la manopola per
un periodo di tempo più lungo.
! Se la amma si spegne accidentalmente, spegnere il
bruciatore e aspettare almeno 1 minuto prima di tentare di
riaccenderlo.
Se l'apparecchio è dotato di un dispositivo di sicurezza contro
la rottura della amma (X)*, tenere premuta la manopola del
BRUCIATORE per circa 2-3 secondi per mantenere la amma
accesa e per attivare il dispositivo.
Per spegnere il bruciatore, ruotare la manopola nché non
raggiunge la posizione di arresto •.
Regolazione della amma secondo i livelli
l'intensità della amma del bruciatore può essere regolata con la
manopola secondo 10 livelli di potenza, dal massimo al minimo
con 5 posizioni intermedie:
un clic indicherà il passaggio da un livello all'altro quando
si ruota la manopola. Il sistema garantisce una regolazione
più precisa, permette di replicare l'intensità della amma e di
identicare facilmente il livello preferito per diverse operazioni di
cottura.
Consigli pratici sull'utilizzo dei bruciatori
Anché i bruciatori funzionino nel modo più eciente possibile
e per risparmiare la quantità di gas consumata, si raccomanda
di utilizzare solo pentole che abbiano un coperchio e un fondo
piatto. Dovrebbero anche essere adatte alle dimensioni del
bruciatore.
Bruciatore Diametro delle pentole
(cm)
Tripla Corona (TC) /
Rapido (R)
24 - 26
Ausiliario (A)
10 - 14
Semi-veloce (S)
16 - 20
Per identicare il tipo di bruciatore, fare riferimento ai diagrammi
contenuti nelle "Speciche del bruciatore e dell'ugello".
X
C
12
PRIMO UTILIZZO DEL FORNO - USO QUOTIDIANO
! La prima volta che si utilizza l'apparecchio, riscaldare il
forno vuoto con la porta chiusa alla temperatura massima per
almeno mezz'ora. Assicurarsi che il locale sia ben ventilato
prima di spegnere il forno e aprirne la porta. L'apparecchio
può emettere un odore leggermente sgradevole causato
dalla combustione delle sostanze protettive utilizzate durante
il processo di fabbricazione.
! Non mettere mai oggetti direttamente sul fondo del forno;
ciò eviterà il danneggiamento del rivestimento dello smalto.
Utilizzare solo la posizione 1 nel forno quando si cucina con
lo spiedo da rosticceria.
Accensione del forno
Premere la manopola del BRUCIATORE e ruotarla in senso
antiorario in modo che sia rivolta verso l'impostazione della
amma massima
Per i modelli con pulsante di accensione elettronico (
),
premere il pulsante e ruotare la manopola.
Se dopo 15 secondi il bruciatore non è ancora acceso,
rilasciare la manopola, aprire la porta del forno e attendere
almeno 1 minuto prima di provare a riaccenderlo.
! Il forno è dotato di un dispositivo di sicurezza ed è pertanto
necessario tenere premuta la manopola comando del
FORNO per circa 6 secondi.
! Se la amma si spegne accidentalmente, spegnere il
bruciatore e aspettare almeno 1 minuto prima di
tentare di riaccenderlo.
Regolazione della temperatura
Per impostare la temperatura di cottura desiderata, ruotare la
manopola comando del FORNO in senso antiorario.
Le temperature sono visualizzate sul pannello di controllo e
possono variare tra MIN (145°C) e MAX (250°C).
Una volta raggiunta la temperatura impostata, il forno
la manterrà costante grazie al suo termostato.
Luce forno
La luce può essere accesa in qualsiasi momento
premendo il pulsante LUCE FORNO.
Timer
Per attivare il Timer procedere come segue:
1. Ruotare la manopola del TIMER in senso orario
per quasi
un giro completo per impostare il cicalino.
2. Ruotare la manopola del TIMER in senso antiorario
per
impostare la durata desiderata.
Grill
Per accendere il grill, premere la manopola comando del
FORNO mentre la si gira in senso orario nché non
raggiunge la posizione
. Il grill consente di dorare
uniformemente la supercie degli alimenti ed è
particolarmente adatto per arrosti, cotolette e salsicce.
Posizionare la griglia in posizione 4 o 5 e la leccarda in
posizione 1 per raccogliere il grasso ed evitare la formazione
di fumo.
13
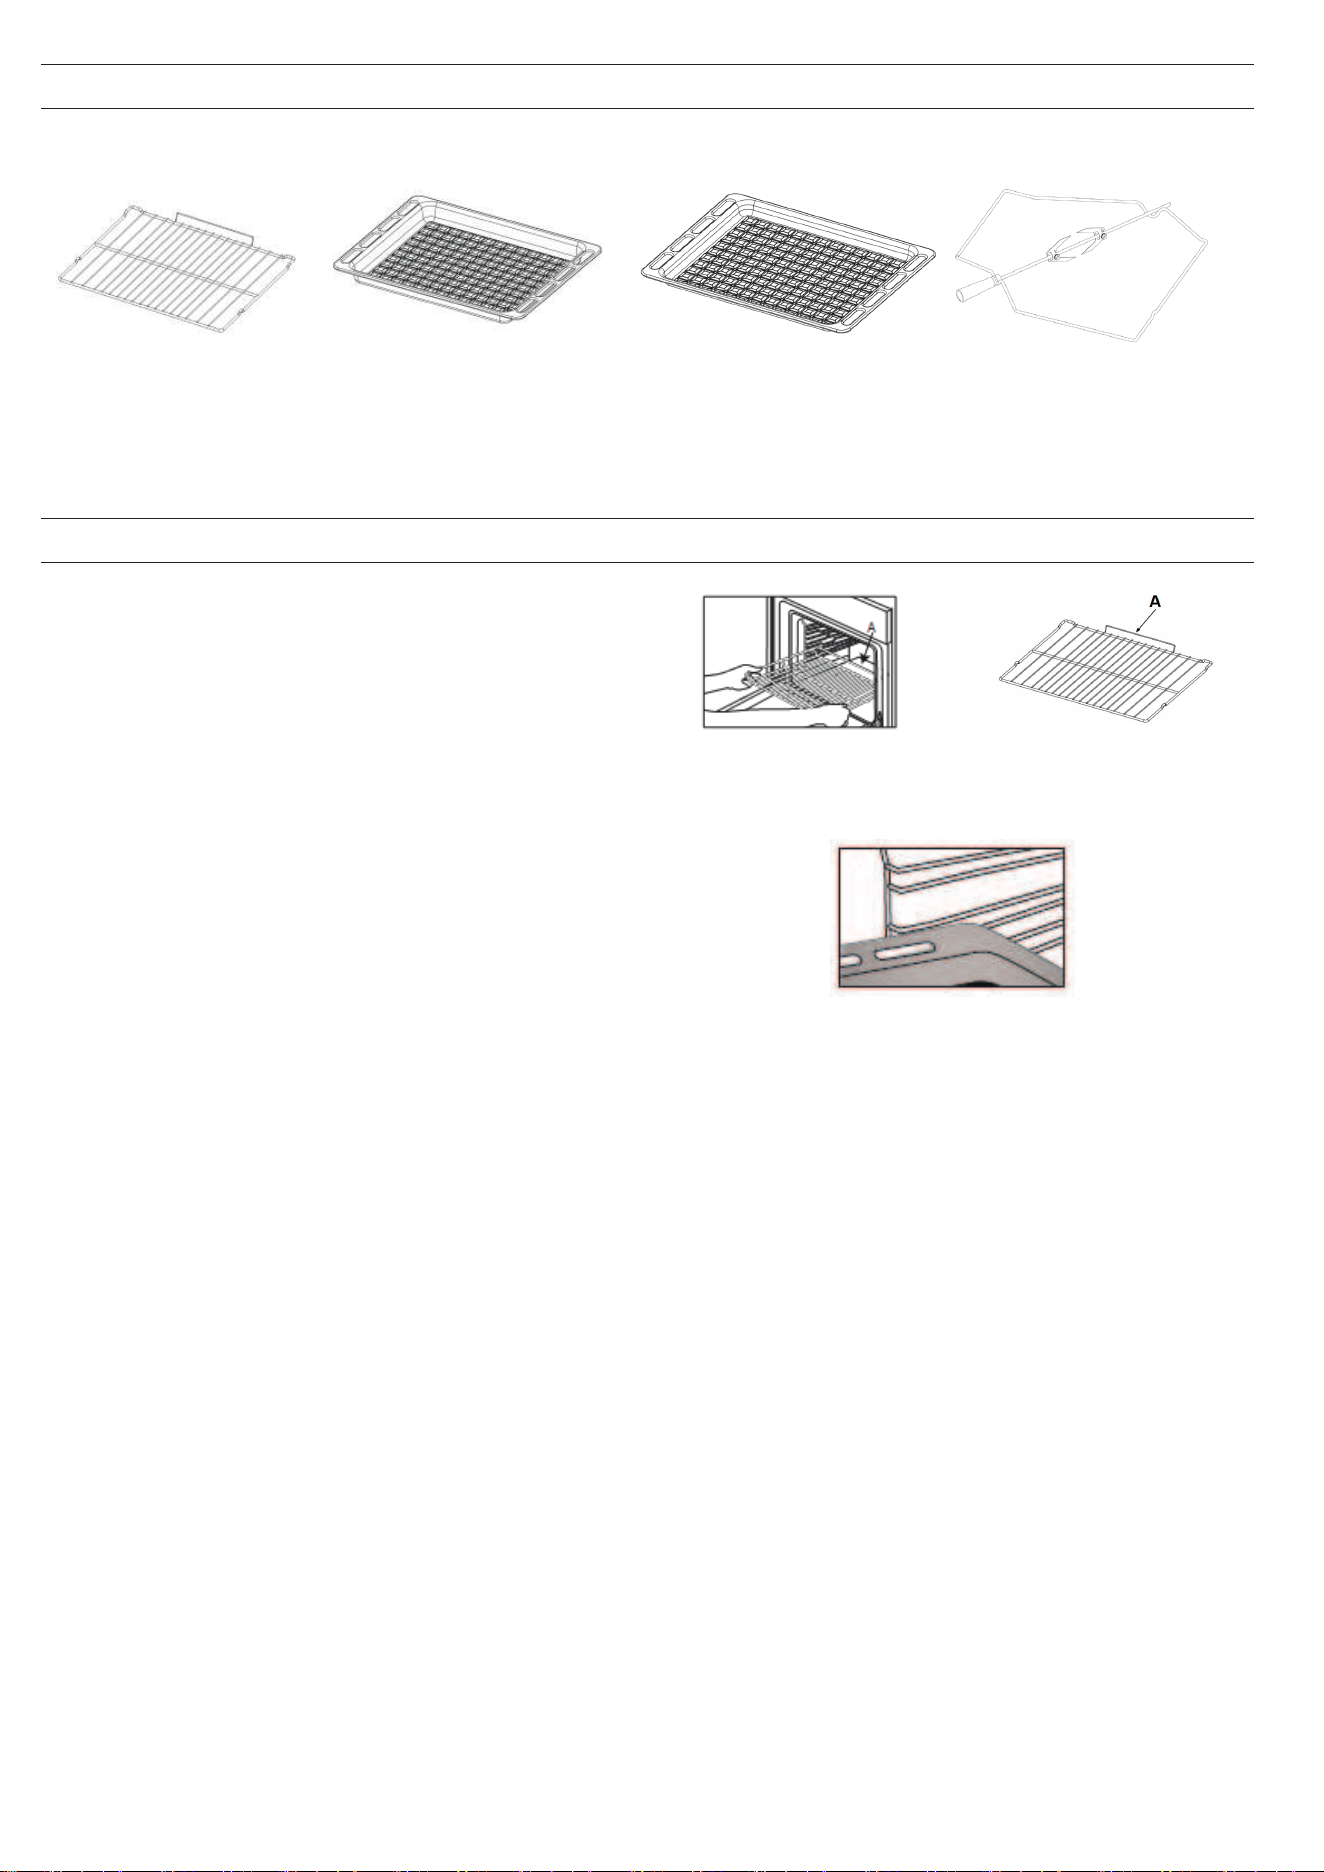
ACCESSORI
GRIGLIA VASSOIO PROFONDO TEGLIA KIT TORNELLO
Il numero e il tipo di accessori può variare a seconda del modello
acquistato. Gli altri accessori non in dotazione possono essere
acquistati separatamente presso il Servizio Assistenza Tecnica.
INSERIMENTO DI GRIGLIE E ALTRI ACCESSORI NEL FORNO
1. Inserire la griglia orizzontalmente, con la parte
rialzata “A” orientata verso l’alto (Fig. 1A, Fig. 1B)
Fig. 1A
Fig. 1B
2. Altri accessori, come la leccarda e la piastra dolci, si
inseriscono come la griglia (Fig. 2).
Fig. 2
14
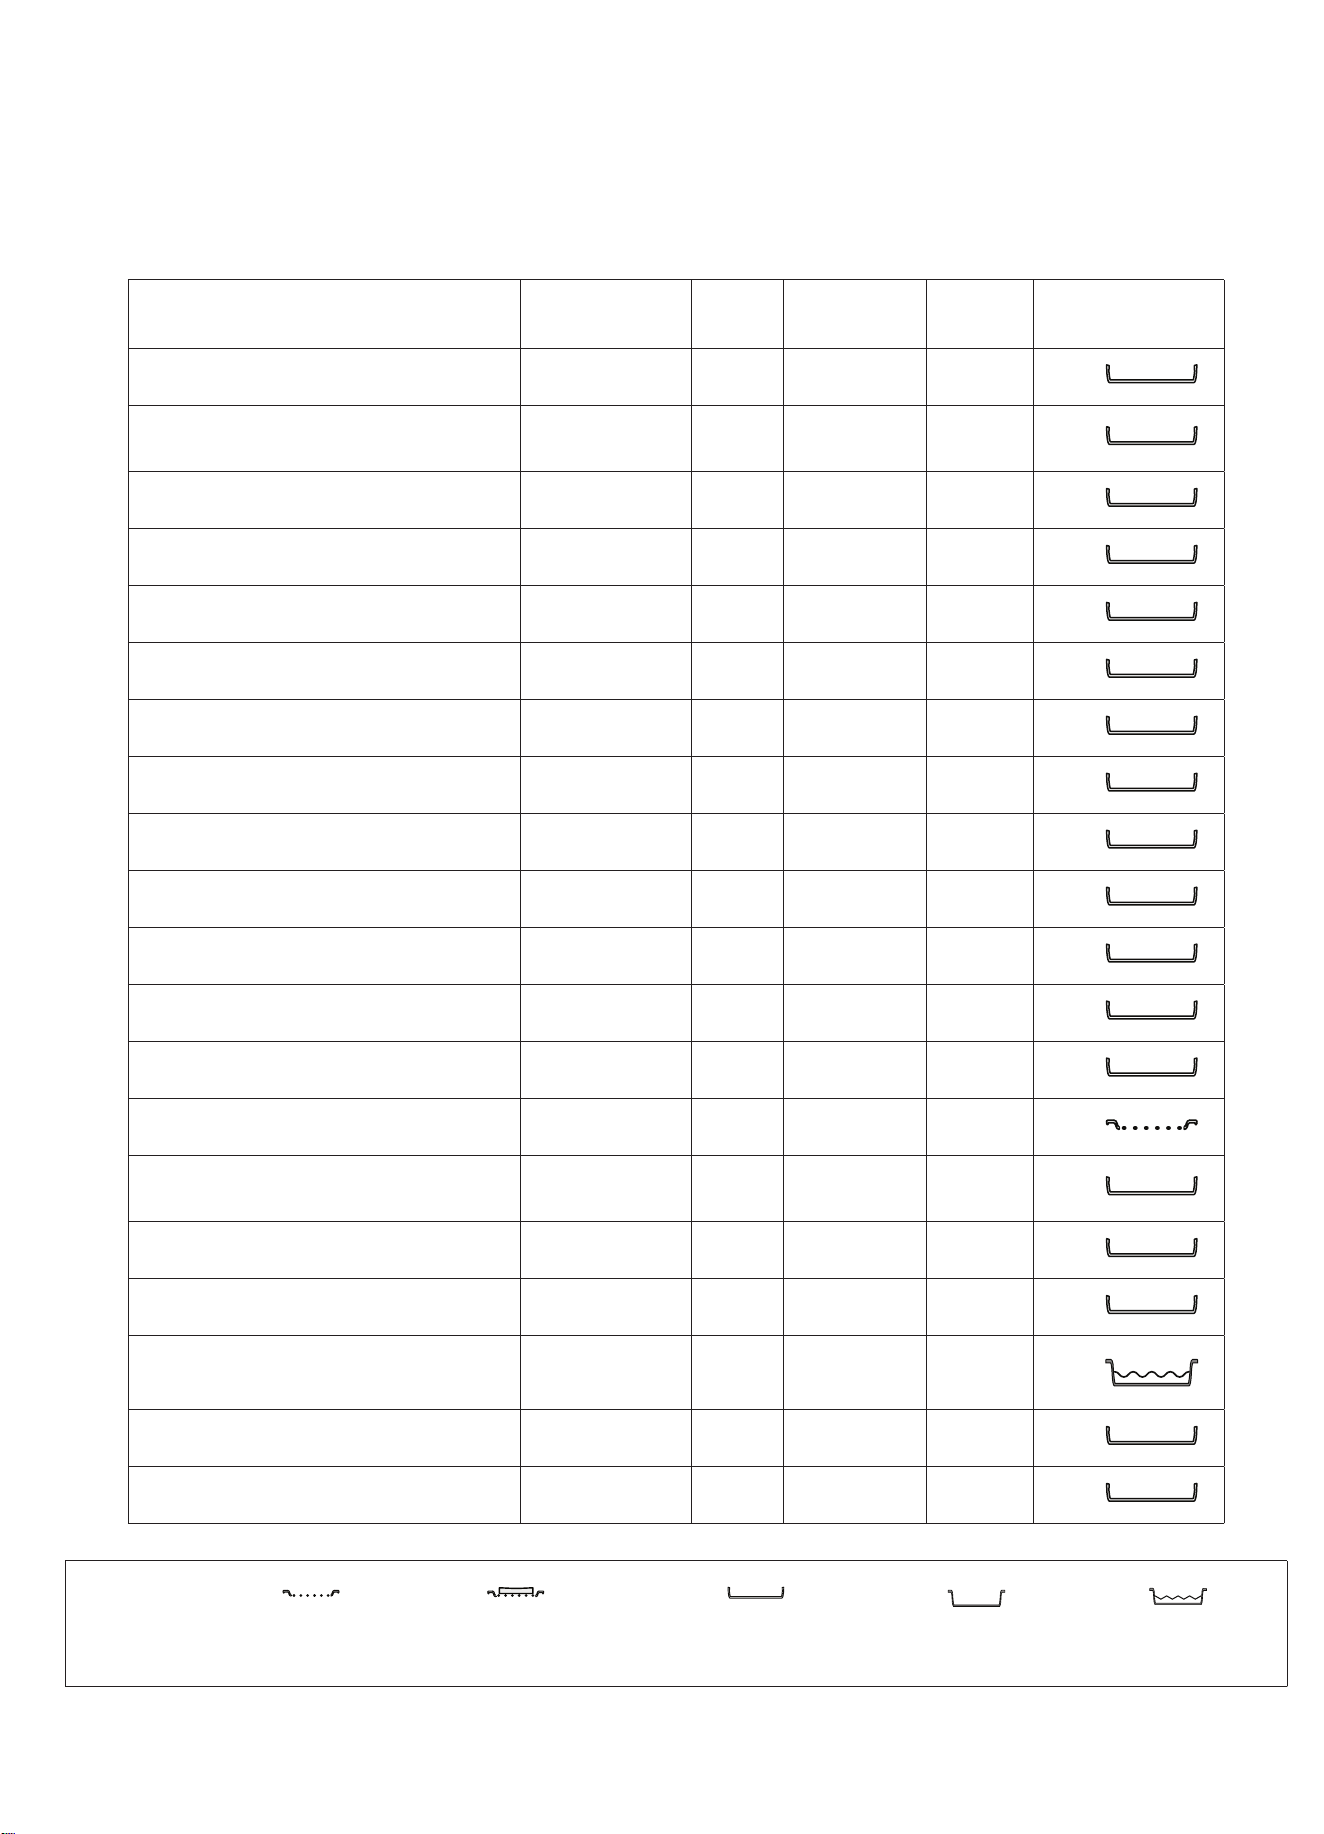
La tabella indica la funzione, gli accessori e il livello migliore da utilizzare per cuocere svariati tipi di cibo. I tempi di cottura
si intendono dall’introduzione degli alimenti nel forno, escluso il preriscaldamento (dove richiesto). Le temperature e i tempi
di cottura sono indicativi e dipendono dalla quantità di cibo e dal tipo di accessori. Utilizzare inizialmente i valori più bassi
consigliati e, se il risultato della cottura non è quello desiderato, passare a quelli più alti.
Si consiglia di utilizzare gli accessori in dotazione e tortiere o teglie possibilmente in metallo scuro. È possibile utilizzare
anche tegami e accessori in pyrex o in ceramica, ma occorre considerare che i tempi di cottura si allungheranno
leggermente.
RICETTA FUNZIONE
PRERI-
SCALDA-
MENTO
TEMPERATURA
(°C) /
ALIMENTAZIONE
LIVELLO
DURATA (Min)
LIVELLO (numero L) E
ACCESSORI
Torte lievitate / Pan di Spagna STATICO 15' 160 35 - 60 L-3
Torte ripiene
(cheesecake, strudel, torta di frutta)
STATICO 15' 170 40 - 60 L-3
Biscotti / Pasta frolla STATICO 15' 150 30 - 60 L-3
Tortine / Muffin STATICO 15' 160 30 - 40 L-3
Bigné STATICO 15' 170 20 - 40 L-3
Pizza / Pane / Focaccia sottile STATICO 15' 220 - 250 15 - 30 L-3
Pizza / Pane / Focaccia spessa STATICO 10' 190 - 220 20 - 40 L-3
Torte salate (torta di verdure, quiche) STATICO 10' 170 - 180 35 - 60 L-3
Vols-au-vent / Salatini di pasta sfoglia STATICO 15' 170 - 180 15 - 30 L-3
Lasagne / Flan / Cannelloni / Sformati STATICO 15' 170 - 190 40 - 60 L-3
Agnello / Vitello / Manzo / Maiale (1 kg) STATICO 10' 170 - 190 70 - 90 L-3
Pollo / Coniglio / Anatra 1 kg STATICO 15' 170 - 190 25 - 50 L-3
Tacchino / Oca 3 kg STATICO 10' 150 - 170 130 - 170 L-3
Filetti / Tranci di pesce GRILL 5' MAX 15 - 35 L-4
Verdure ripiene (pomodori, zucchine,
melanzane)
GRILL - MAX 30 - 60 L-3
Verdure gratin GRILL - MAX 15 - 40 L-3
Pane tostato GRILL 5' MAX 1 - 2 L-4
Salsicce / Spiedini / Costine / Hamburger GRILL - MAX 20 - 40 L-4
Patate arrostite STATICO 10' 180 - 220 35 - 60 L-3
Coscio d'agnello / Stinco STATICO 10' 170 - 200 50 - 100 L-3
ACCESSORI
Griglia Teglia o tortiera su griglia
Teglia / leccarda o teglia su
griglia
Leccarda / teglia
Leccarda / teglia con 500
ml d'acqua
15
IT
* Disponibile solo in alcuni modelli
PULIZIA E MANUTENZIONE
SPEGNERE L'INTERRUTTORE PRINCIPALE E ASSICURARSI CHE LA PENTOLA SIA FREDDA PRIMA DELLA PULIZIA.
PRIMA DI RIACCENDERE, ASSICURARSI CHE TUTTI I COMANDI SIANO IN POSIZIONE DI SPEGNIMENTO.
Non usare pulitrici a getto di
vapore.
Utilizzare guanti protettivi du-
rante tutte le operazioni.
Eseguire le operazioni indicate a
forno freddo.
Scollegare l'apparecchio dall'ali-
mentazione.
Non usare pagliette metalli-
che, panni abrasivi e detergenti
abrasivi o corrosivi che possano
danneggiare le superci dell'ap-
parecchio.
Scollegare l’apparecchio dalla rete elettrica.
Rispetto e tutela dell'ambiente
• Se possibile, evitare di preriscaldare il forno e cercare sempre
di riempirlo. Aprire la porta del forno il meno possibile, in quanto
il calore si disperde ogni volta che viene aperta. Per risparmiare
una notevole quantità di energia, è suciente spegnere il forno
da 5 a 10 minuti prima della ne del tempo di cottura previsto e
utilizzare il calore che il forno continua a generare.
• Mantenere le guarnizioni pulite e in ordine per evitare perdite di
energia della porta
• In caso di contratto elettrico a taria oraria, l'opzione “cottura ri
-
tardata” consente di risparmiare più facilmente passando a fasce
orarie più convenienti.
•
Il fondo della pentola o del tegame dovrebbe coprire la piastra di
cottura.
In caso di dimensioni ridotte, si spreca energia preziosa e le
pentole che ribollono r
ilasciano resti incrostati che possono
essere dicili da rimuovere.
• Cuocere i cibi in pentole o padelle chiuse con coperchi ben ade-
renti e utilizzare meno acqua possibile. La cottura senza coper-
chio comporta un consumo di energia notevolmente superiore
•
Utilizzare pentole e padelle esclusivamente piatte
• Se si
cucina qualcosa che richiede tempi lunghi, è consigliabile
utilizzare una pentola a pressione, due volte più rapida e con un
risparmio di un terzo dell'energia.
Spegnimento dell'apparecchio
Scollegare l'apparecchio dalla rete elettrica prima di eettuare qual-
siasi intervento.
Il coperchio *
Se la pentol
a è dotata di un coper-
chio in vetro, questo deve essere
pu
lito con acqua tiepida. N
on uti-
lizzare prodotti abrasivi.
È possibile rimuov
ere il coperchio
per facilitare la pulizia dell'area
dietro il piano di cottura. Aprire
completamente il coperchio e ti
-
rarlo verso l'alto (vedere gura).
! Non chiudere il coperchio quan-
do i bruciatori sono accesi o anco-
ra caldi.
Ispezione delle guarnizioni del forno
Controllare periodicamente le guarnizioni della porta intorno al for-
no. Se le guarnizioni sono danneggiate, rivolgersi al più vicino Ser-
vizio Assistenza Tecnica autorizzato. Si consiglia di non utilizzare il
f
orno no alla sostitu
zione delle guarnizioni.
Manutenzione del rubinetto del gas
Con il tempo, i rubinetti possono incepparsi o diventare dicili da
ruotare. In questo caso, il rubinetto deve essere sostituito.
SUPERFICI INTERNE
• Dopo ogni uso, lasciare rareddare il forno e pulirlo preferibilmente
quando è ancora tiepido per rimuovere incrostazioni e macchie
dovute a residui di cibo. per asciugare la condensa dovuta alla
cottura di alimenti con un elevato contenuto di acqua, usare a forno
freddo un panno o una spugna.
• Pulire il vetro della porta con detergenti liquidi specici.
SUPERFICI ESTERNE
• Pulire le superci con un panno in microbra umido. Se molto
sporche, aggiungere qualche goccia di detergente con pH neutro.
Asciugare con un panno asciutto.
• Non usare detergenti corrosivi o abrasivi. Se
inavvertitamente uno di questi prodotti dovesse venire a contatto
con le superci, pulire subito con un panno in microbra umido.
Non usare prodotti a base di alcol come l'alcol denaturato.
SUPERFICI INTERNE
• Dopo ogni uso, lasciare rareddare il forno e pulirlo preferibilmente
quando è ancora tiepido per rimuovere incrostazioni e macchie
dovute a residui di cibo. per asciugare la condensa dovuta alla
cottura di alimenti con un elevato contenuto di acqua, usare a forno
freddo un panno o una spugna.
• Pulire il vetro della porta con detergenti liquidi specici.
ACCESSORI
Mettere a bagno gli accessori con detersivo per piatti dopo l’uso,
maneggiandoli con guanti da forno, se ancora caldi. I residui di
cibo possono essere rimossi con una spazzola per piatti o con una
spugna.
16
IT
SPOSTAMENTO DELLA RESISTENZA SUPERIORE
1. Rimuover
e le griglie portaccessori laterali.
2. Estrar
re leggermente l'elemento riscaldante (
Fig. 1
)
e abbassarlo (
Fig. 2
).
3. Per r
iposizionare la resistenza, sollevarla e tirarla
leggermente verso di sé, assicurandosi che poggi
sulle apposite sedi laterali.
Fig. 1 Fig. 2
SOSTITUZIONE DELLA LAMPAD
A
1. Scollegare il forno dalla rete elettrica
2. Svitare la copertura della lampada, sostituire la lampada e
avvitare di nuovo il coperchio della lampada.
3. Ricollegare il f
orno alla rete elettrica.
Nota: Utilizzare il tipo 40 W/230 V G9
La lampada utilizzata nel prodotto è specica per elettrodomestici e
non è adatta per l’illuminazione di ambienti domestici (Regolamento
(CE) 244/2009).
Le lampade sono disponibili presso il Servizio Assistenza.
- Non maneggiarle le lampade a mani nude, per evitare
che vengano danneggiate dalle impronte digitali. Non far funzionare
il forno senza prima aver riposizionato il coperchio.
Questo prodotto contiene una sorgente luminosa con classe
di ecienza energetica G
16
17
RIMOZIONE E RIMONTAGGIO DEL VETRO DELLA PORTA DEL FORNO
1. Per rimuovere la porta, aprirla completamente e abbassare i fermi
no alla posizione di sblocco.
2. Chiudere la porta no a quando è possibile.
Prendere saldamente la porta con entrambe le mani, evitando di tenerla
per la maniglia.
Per estrarla facilmente, continuare a chiuderla e contemporaneamente
tirarla verso l’alto (a) nché non esce dalle sedi (b).
~60°
a
b
~15°
Togliere la porta e appoggiarla su un piano morbido.
3. Per rimontare la porta, avvicinarla al forno allineando i ganci delle
cerniere alle proprie sedi e ancorare la parte superiore agli alloggiamen-
ti.
4. Abbassare la porta e poi aprirla completamente.
Abbassare i fermi nella posizione originale: Fare attenzione che siano
completamente abbassati.
5. Provare a chiudere la porta, vericando che sia allineata al pannello
di controllo. Se non lo fosse, ripetere tutte le operazioni.
PULIZIA DEL VETRO
1. Dopo aver smontato la porta e averla appoggiata su un ripiano mor-
bido con la maniglia verso il basso, premere contemporaneamente le
due clip di ssag
gio ed estrarre il prolo superiore della porta tirandolo
verso di sé.
2. Sollevare e prendere saldamente il vetro interno con due mani, ri-
muoverlo e appoggiarlo su un piano morbido prima di eseguire la puli-
zia.
3.
Quando si rimonta il vetro della porta interna, inserire il pannello di
vetro correttamente in modo che il testo scritto sul pannello non sia in
-
vertito e possa essere facilmente leggibile.
4.
Rimontare il prolo superiore: un clic indica il corretto posizionamen-
to. Vericare che la tenuta sia salda prima di rimontare la porta.
RISOLUZIONE
DEI PROBLEMI
Cosa fare se... Possibili cause Soluzioni
Il forno non funziona. Interruzione di corrente elettrica.
Disconnessione dalla rete principale
Vericare che ci sia tensione in rete e che il forno sia collegato
all’alimentazione elettrica. Spegnere e riaccendere il forno e ve-
ricare se il problema persiste.
SERVIZIO ASSISTENZA
Per ricevere assistenza, telefonare al numero indicato sul libretto di
garanzia allegato al prodotto o seguire le istruzioni presenti sul sito.
Prepararsi a fornire:
• una breve descrizione del problema;
• il modello esatto del prodotto;
• il codice di assistenza (il numero che segue la parola SERVI-
CE sulla targhetta matricola applicata al prodotto, visibile sul
bordo interno con la porta del forno aperta);
• il proprio indirizzo completo;
• un contatto telefonico.
XXX
XXX
XXX XXX
Nota: qualora si renda necessaria una riparazione, contattare un
servizio di assistenza autorizzato a garanzia dell’utilizzo di pezzi di
ricambio originali e di una corretta riparazione. Per ulteriori informa-
zioni sulla garanzia fare riferimento al libretto delle garanzie allegato.
La scheda del prodotto con i dati sul consumo energetico può essere consultata e scaricata dal sito www.hotpoint.com
WWW
IT
18
EN
SAFETYINSTRUCTIONS
IMPORTANTTOBEREADANDOBSERVED
Theseinstructionsarevalidifthecountry
symbolappearsontheappliance.Ifthe
symboldoesnotappearontheappliance,itis
necessarytorefertotheinstructionsforinstallation
whichshouldprovidethenecessaryinstructions
concerningmodificationoftheappliancetothe
conditions of use of the country.
CAUTION:Useofthegascookingappliance
resultsintheproductionofheat,moistureand
productsofcombustionintheroominwhich
itisinstalled.Ensurethatthekitcheniswell
ventilated,especiallywhentheapplianceisin
use:keepnaturalventilationholesopenor
installamechanicalventilationdevice(mechanical
extractorhood).Prolongedintensiveuseofthe
appliance maycallfor additionalventilation,such
asopeningawindow,ormoreeffectiveventilation,
forexampleincreasingthelevelofmechanical
ventilation(ifpossible),tosafelyremovethe
productsofcombustiontooutside(external)
airwhilstalsoprovidingroomairchangeswith
additionalventilation.Consultaprofessional
before installation of additional ventilation.
Failuretofollowtheinformationinthismanual
exactlymaycauseafireorexplosion,resultingin
property damage or personal injury.
Beforeusingtheappliance,readthesesafety
instructions.Keepthemnearbyforfuture
reference.
This appliance shallbe installedin accordance
withtheregulationsinforceandonlyusedina
wellventilatedspace. Readtheinstructionsbefore
installing or using this appliance.
Iftheburnerflamesareaccidentallyblown
out,turnthecontrolknoboftheburnertothe off
positionanddonottrytorelightitforatleast1
minute.
Theseinstructionsand theapplianceitself provide
importantsafetywarnings,tobeobservedatall
times.Themanufacturerdeclinesanyliabilityfor
failuretoobservethesesafetyinstructions,for
inappropriateuseoftheapplianceorincorrect
setting of controls.
WARNING:If the hobsurface iscracked, do not
use the appliance – risk of electric shock.
WARNING:Dangeroffire:Donotstoreitems
on the cooking surfaces.
CAUTION:Thecookingprocesshastobe
supervised.Ashortcookingprocesshastobe
supervised continuously.
WARNING: Leavingthehobunattended when
cookingwithfatoroilcanbedangerous– riskof
fire.NEVERtrytoextinguishafirewithwater,but
switchoff theapplianceandthencovertheflames
e.g. with a lid or a fire blanket.
Donotusethehobasaworksurfaceorsupport.
Keepclothesorotherflammablematerialsaway
from the appliance, until all the components have
cooled down completely – risk of fire.
Very young children (0-3years) should bekept
awayfromtheappliance.Youngchildren(3-8
years)shouldbekeptawayfromtheappliance
unlesscontinuouslysupervised.Childrenfrom8
yearsoldandaboveandpersonswithreduced
physical,sensoryormentalcapabilitiesorlackof
experience and knowledge can usethisappliance
onlyiftheyaresupervisedorhavebeengiven
instructionsonsafeuseandunderstandthe
hazards involved.Childrenmust notplay withthe
appliance.Cleaningandusermaintenancemust
notbecarriedoutbychildrenwithoutsupervision.
CAUTION:Incaseofhotplateglassbreakage:
shut immediately off all burners and any electrical
heatingelementandisolatetheappliancefrom
thepowersupply;donottouchtheappliance
surface; do not use the appliance.
The glass lid can break in if it is heated up.
Turn off all the burners and the electric
plates before closing the lid. Do not shut
down lid when burner alight.
WARNING:Theapplianceanditsaccessible
partsbecomehotduringuse.Careshouldbetaken
to avoidtouchingheating elements.Children less
than8yearsofagemustbekeptawayunless
continuously supervised.
The food mustnot beleft inor ontheproduct
for more than one hour before or after cooking.
Neverleavetheapplianceunattendedduring
use.Iftheapplianceissuitableforprobeusage,
onlyuseatemperatureproberecommendedfor
this oven - risk of fire.
Keepclothesorotherflammablematerials
awayfrom theappliance,until allthecomponents
have cooled down completely - risk of fire.Always
bevigilantwhencookingfoodsrichinfat,oilor
when adding alcoholic beverages - risk of fire. Use
ovenglovestoremovepansandaccessories.At
theendofcooking,openthedoorwithcaution,
allowinghotairorsteamtoescapegradually
beforeaccessingthecavity-riskofburns.Donot
obstructhot air vents atthe frontof the oven -risk
of fire.
Exercisecautionwhentheovendoorisinthe
open or down position, to avoid hitting the door.
Whenyouplacetherackinside,makesurethat
thestopis directedupwardsand inthebackofthe
cavity.
WARNING: Escaping gas can ignite. The device
shall not beoperated for more 15s.If after 15s the
burnerhasnotlit,stopoperatingthedeviceand
openthecompartmentdoorand/orwaitatleast
19
1minbeforeattemptingafurtherignitionofthe
burner.
PERMITTEDUSE
CAUTION:Theapplianceisnotintendedto
beoperatedbymeansofanexternalswitching
device,suchasatimer,orseparateremote
controlled system.
Thisapplianceisintendedtobeusedin
householdandsimilarapplicationssuchas:staff
kitchenareasinshops,officesandotherworking
environments;farmhouses;byclientsinhotels,
motels,bed&breakfastandotherresidential
environments.
CAUTION:Thisapplianceisforcookingpurpose
only.Itshallnotbeusedforotherpurposes,for
example room heating.
Thisapplianceisnotforprofessionaluse.Do
not use the appliance outdoors.
Donotstoreexplosiveorflammable
substances(e.g. gasolineor aerosolcans) insideor
near the appliance - risk of fire.
Usepotsandpanswithbottomsthesame
widthasthatoftheburnersorslightlylarger(see
specifictable).Makesurepotsonthegratesdo
not protrude beyond the edge of the hob.
Improperuseof thegridscan resultin damage
to the hob: do not position the grids upside down
or slide them across the hob.
Do not let the burner flame extend beyond the edge of the pan.
Donotuse:Castirongriddles,ollarstones,terracottapotsandpans.
Heatdiffuserssuchasmetalmesh,oranyothertypes.Twoburners
simultaneously for one receptacle (e.g. Fish kettle).
Should particular local conditions of the delivered gas make the ignition
ofburnerdifficult,itisadvisabletorepeattheoperationwiththeknob
turned to small flame setting.
Incaseofinstallationofahoodabovethecooktop,pleaserefertothe
hood instructions for the correct distance.
Theprotectiverubberfeetonthegridsrepresentachockinghazardfor
young children.Afterremovingthegrids,pleaseensurethatallthefeet
are correctly fitted.
Theload placedon thecake trayshall notbe more
than 3 kg.
INSTALLATION
Theappliancemustbehandledandinstalled
bytwoormorepersons-riskofinjury.Use
protectiveglovestounpackandinstall-riskof
cuts.
Theelectricalandgasconnectionsmust
comply with local regulations.
Installation,includingwatersupply(ifany),
electrical connections andrepairs mustbecarried
outbyaqualifiedtechnician.Donotrepairor
replaceanypartoftheapplianceunlessspecifically
statedintheusermanual. Keepchildrenawayfrom
theinstallationsite. Afterunpackingtheappliance,
makesurethatithasnotbeendamagedduring
transport.Intheeventofproblems,contactthe
dealeroryournearestAfter-salesService.Once
installed,packagingwaste(plastic,styrofoam
partsetc.)mustbestoredoutofreachofchildren
-riskofsuffocation.Theappliancemustbe
disconnectedfromthepowersupplybeforeany
installationoperation-riskofelectricalshock.
Duringinstallation,make suretheappliancedoes
notdamagethepowercable-riskoffireor
electrical shock. Only activate the appliance when
the installation has been completed.
Theappliancemustbeinstalledindomestic
dwelling for typical housekeeping functions.
WARNING:Modificationoftheapplianceand
itsmethodofinstallationareessentialinorderto
usetheappliancesafelyandcorrectlyinallthe
additional countries.
Usepressureregulatorssuitableforthegas
pressure indicated in the instructions.
Theroommustbeequippedwithanair
extractionsystemthatexpelsanycombustion
fumes.
Theroommustalsoallowproperaircirculation,
as air is needed for combustion to occur normally.
Theflowofairmustnotbelessthan2m³/hper
kW of installed power.
The aircirculation system may takeair directly
from the outside by means of a pipe with an inner
crosssectionof atleast100cm²; theopeningmust
not be susceptible to blockages.
The system canalso provide theair neededfor
combustionindirectly,i.e.fromadjacentrooms
fittedwithaircirculationtubesasdescribedabove.
However,theseroomsmustnotbecommunal
rooms,bedrooms or rooms that may presenta fire
hazard.
Liquidpetroleumgassinkstothefloorasit
isheavierthanair.Therefore,roomscontaining
LPGcylindersmustalsobeequippedwithvents
toallowgastoescapeintheeventofaleak.
ThismeansLPGcylinders,whetherpartiallyor
completelyfull,mustnotbeinstalledorstored
inroomsorstorageareasthatarebelowground
level(cellars,etc.).Itisadvisabletokeeponlythe
cylinderbeingusedintheroom,positionedso
thatitisnotsubjecttoheatproduced byexternal
sources(ovens,fireplaces,stoves,etc.)which
couldraisethetemperatureofthecylinderabove
50°C.
Shouldyoufinditdifficulttoturntheknobsfortheburner,please
contacttheAfter-salesService,whocanreplaceoftheburnertapif
found to be faulty.
Theopeningsusefortheventilationanddispersionofheatmustnever
be covered.
Donotremovetheappliancefromits
polystyrenefoambaseuntilthetimeof
installation.
Connection with rigid pipe (copper or steel).
Ifthegaspressureisdifferentfromthe
recommendedpressure,asuitablepressure
regulatormustbefittedtotheinletpipein
accordance with the current national regulations.
Useanappropriatecabinettoensurethatthe
applianceoperatesproperly:Toinstalltheoven
underthecounter(seediagram)orinakitchen
20
unit, the cabinet must havethe dimensions as the
picture.
Toensureadequateventilation,thebackpanel
ofthecabinetmustberemoved.Itisadvisable
toinstalltheovensothatitrestsontwostrips
ofwood,oronacompletelyflatsurfacewithan
opening of at least 45 x 560 mm as the picture.
Donotinstalltheappliancebehindadecorative
door - risk of fire.
If the range is placed on a base, it must
be leveled and fixed to the wall by the
retention chain provided, to prevent the
appliance slipping from the base.*
WARNING: In order to prevent the
appliance from tipping, the retainig device
must be installed. Refer to the instructions
for installation.*
*Availableonlyoncertainmodels
GASCONNECTION
WARNING: Prior to installation, ensurethat the
localdistributionconditions(typeofgasandgas
pressure)andtheconfigurationoftheappliance
are compatible.
WARNING:Theadjustmentconditionsforthis
appliance are stated on the product data plate.
Checkthatthepressureofthegassupply
isconsistentwiththevaluesindicatedinTable
“Burner and nozzle specifications”.
WARNING:Thisapplianceisnotconnected
toacombustionproductsevacuationdevice.It
mustbeinstalledandconnectedinaccordance
withcurrentinstallationregulations.Particular
attentionmustbepaidtotherelevant
requirements regarding ventilation.
If theapplianceisconnected toliquid gas,the
regulationscrewmustbefastenedastightlyas
possible.
IMPORTANT:Whenthegascylinderorgas
containerisinstalled,itmustbeproperlysettled
(vertical orientation).
WARNING:Thisoperationmustbeperfomed
by a qualified technician.
Useonlyflexibleorrigidmetalhoseforgas
connection.
Connectionwith a rigid pipe (copper orsteel):
Connectiontothegassystemmustbecarried
outinsuchawayasnottoplaceanystrainof
anykindontheappliance.Thereisanadjustable
L-shapedpipefittingontheappliancesupply
rampandthisisfittedwithasealinorderto
preventleaks.Thesealmustalwaysbereplaced
afterrotatingthepipe fitting(the sealisprovided
withtheappliance).Thegassupplypipefittingis
a threaded 1/2 gas cylindrical male attachment.
Connectingaflexiblejointlessstainlesssteel
pipe to a threaded attachment:
Thegassupplypipefittingisathreaded1/2gas
cylindricalmaleattachment.Thesepipesmust
beinstalledsothattheyareneverlongerthan
2000mmwhenfullyextended.Onceconnection
hasbeenmade,makesurethattheflexiblemetal
pipedoesnottouchanymovingpartsandisnot
compressed.Only usepipesand seals that comply
with current national regulations.
IMPORTANT:Ifastainlesssteelhoseisused,
itmustbeinstalledsoasnottouchanymoving
partofthefurniture(e.g.drawer).Itmustpass
thorughanareawheretherearenoobstructions
andwhereitispossibletoinspectitacrossits
entire length.
Theapplianceshouldbeconnectedtothemain
gas supply orto agas cylinderin compliance with
thecurrentnationalregulations.Beforemaking
theconnection,makesurethattheapplianceis
compatiblewiththegassupplyyouwishtouse.
Ifitisnot,followtheinstructionsindicatedinthe
paragraph "Adapting to different types of gas".
Afterconnectiontothegassupply,checkfor
leakswithsoapywater.Lightuptheburnersand
turntheknobsfrommaxposition1*tominimum
position 2* to check flame stability.
Connectiontothegasnetworkorthegas
cylindermay becarried outusing aflexible rubber
orsteelhose,inaccordancewithcurrentnational
legislation.
ADAPTINGTODIFFERENTTYPESOFGAS
(Thisoperationneedstobecarriedoutbya
qualified technician.)
Inorder toadapt theappliance toa typeofgas
otherthanthe typefor whichit wasmanufactured
(indicatedontheratinglabel),followthededicated
steps provided after installation drawings.
ELECTRICALWARNINGS
IMPORTANT:Informationaboutcurrentand
voltageconsumptionisprovidedontherating
plate.
Theratingplateisonthefrontedgeofthe
oven (visible when the door is open).
Itmustbepossibletodisconnecttheappliance
fromthepowersupplybyunpluggingitif
plugisaccessible,orbyamulti-poleswitch
installedupstreamofthesocketinaccordance
withthewiringrulesandtheappliancemust
beearthedinconformitywithnationalelectrical
safety standards.
Thepowercablemustbelongenoughtoconnecttheappliance,
oncefittedinitshousing,tothemainpowersupply.Donotpullthe
power supply cable.
Donotuseextensionleads,multiplesockets
oradapters.Theelectricalcomponentsmustnot
beaccessibletotheuserafterinstallation.Donot
usetheappliancewhenyouarewetorbarefoot.
Donotoperatethisapplianceifithasadamaged
powercableorplug,ifitisnotworkingproperly,
or if it has been damaged or dropped.
Ifthesupplycordisdamaged,itmust
bereplacedwithanidenticalonebythe
21
manufacturer,itsserviceagentorsimilarly
qualifiedpersonsinordertoavoidahazard-
risk of electrical shock.
Ifthepowercableneedstobereplaced,
contact an authorised service centre.
WARNING:Ensurethattheapplianceis
switchedoffbeforereplacingthelamptoavoid
the possibility of electric shock.
Installationusingapowercableplugisnot
allowedunlesstheproductisalreadyequipped
with the one provided by the Manufacturer.
CLEANINGANDMAINTENANCE
WARNING:Ensurethattheapplianceis
switchedoffanddisconnectedfromthepower
supplybeforeperforminganymaintenance
operation.Toavoidriskofpersonalinjury
useprotectivegloves(riskoflaceration)and
safetyshoes(riskofcontusion);besureto
handlebytwopersons(reduceload);neveruse
steamcleaningequipment(riskofelectricshock).
Non-professionalrepairsnotauthorisedbythe
manufacturercouldresultinarisktohealthand
safety,forwhichthemanufacturercannotbe
heldliable.Anydefectordamagecausedfrom
non-professionalrepairsormaintenancewillnot
becoveredbytheguarantee,thetermsofwhich
areoutlinedinthedocumentdeliveredwiththe
unit.
Donotuseharshabrasivecleanersormetal
scraperstocleanthedoorglasssincetheycan
scratch thesurface, which mayresult in shattering
of the glass.
Donotuseabrasiveorcorrosiveproducts,
chlorine-based cleaners or pan scourers.
Makesuretheappliancehascooleddown
before cleaning orperforming maintenance.- risk
of burns.
WARNING:Switchofftheappliancebefore
replacing the lamp - risk of electric shock.
Toavoiddamagingtheelectricignitiondevice,donotuseitwhen
the burners are not in their housing.
Wearprotectiveglovesforcleaningand
maintenance.
DISPOSALOFPACKAGINGMATERIALS
Thepackagingmaterialis100%recyclableandismarkedwiththe
recyclesymbol
.Thevariouspartsofthepackagingmusttherefore
bedisposedofresponsiblyandinfullcompliancewithlocalauthority
regulations governing waste disposal.
DISPOSALOFHOUSEHOLDAPPLIANCES
Thisapplianceismanufacturedwithrecyclableorreusablematerials.
Disposeofitinaccordancewithlocalwastedisposalregulations.
Forfurtherinformationonthetreatment,recoveryandrecycling
ofhouseholdelectricalappliances,contactyourlocalauthority,the
collection service forhousehold wasteor the storewhere you purchased
theappliance.ThisapplianceismarkedincompliancewithEuropean
Directive 2012/19/EU, Waste Electrical andElectronic Equipment(WEEE)
andwiththeWasteElectricalandElectronicEquipmentregulations
2013(asamended).Byensuringthisproductisdisposedofcorrectly,
youwillhelppreventnegativeconsequencesfortheenvironmentand
humanhealth.Thesymbolontheproductorontheaccompanying
documentationindicates thatit shouldnot betreated asdomestic waste
butmustbetakentoanappropriatecollectioncenterfortherecycling
of electrical and electronic equipment.
ENERGYSAVINGTIPS
Onlypreheattheovenif specifiedin thecookingtableor yourrecipe. Use
dark lacquered or enamelled baking trays as they absorb heat better.
Use a pressure cooker to save even more energy and time.
DECLARATIONOFCONFORMITY
Thisappliancemeets:EcodesignrequirementsofEuropeanRegulation
66/2014;EnergyLabellingRegulation65/2014;EcodesignforEnergy-
RelatedProductsandEnergyInformation(Amendment)(EUExit)
Regulations 2019,incompliance withtheEuropeanstandardEN60350-
1.
ThisappliancemeetsEcodesignrequirementsofEuropeanRegulation
66/2014andTheEcodesignforEnergy-RelatedProductsandEnergy
Information(Amendment)(EU Exit) Regulations2019 incompliancewith
the European standard EN 60350-2.
ThisappliancemeetsEcodesignrequirementsofEuropeanRegulation
66/2014andTheEcodesignforEnergy-RelatedProductsandEnergy
Information(Amendment)(EU Exit) Regulations2019 incompliancewith
the European standard EN 30-2-1.
Thisappliancemeets:EcodesignrequirementsofEuropeanRegulation
66/2014;EnergyLabellingRegulation65/2014;EcodesignforEnergy-
RelatedProductsandEnergyInformation(Amendment)(EUExit)
Regulations 2019, in compliance with the European standard EN 15181.
®
22
In line with current regulation, this model is equipped with a
safety valve that stops gas flow when the glass lid is closed.
For the oven to function, the glass lid must be open.
If the glass lid gets closed while the cooktop and/ or the oven are
switched on, they will both stop functioning.
If the glass lid is already closed, it will not be possible to activate
either the cooktop or the oven.

PRODUCT
DESCRIPTION
CONTROL PANEL
EN
1. Glass lid
2.Hob Grid
3.Control panel
5.Baking tray
4.Whireshelf
6.Door
7.GUIDE RAILS for the sliding racks
8.position 1
9.position 2
10.position 3
11.position 4
12.position 5
Left rear
hob burner
Left front
hob burner
Right front
hob burner
Right rear
hob burner
Timer
Oven/grill
Oven lamp
Burner Ignition
Grill lamp
23

Before operating your new appliance please read
this instruction booklet carefully. It contains
important information concerning the safe installation
and operation of the appliance.
Please keep these operating instructions for future
reference. Make sure that the instructions are kept
with the appliance if it is sold, given away or moved.
The appliance must be installed by a qualified
professional according to the instructions provided.
Any necessary adjustment or maintenance must be
performed after the appliance has been
disconnected from the electricity supply.
Positioning and levelling
It is possible to install the appliance alongside
cupboards whose height does not exceed that of the
hob surface.
This cooker should be installed directly on
. Do not install this cooker on an
artificial base of any kind.
Make sure that the wall in contact with the back of
the appliance is made from a non-flammable, heat-
resistant material (T 90°C).
Important: Do not install this appliance
adjacent to the door or other means ofadjacent to the door or other means of
access to minimise the likelihood of personsaccess to minimise the likelihood of persons
using the door making contact with pans on
the hob surface.the hob surface.
WARNING:Thisoperationmustbeperfomed
by a qualified technician
Important: Do not install this appliance
INSTALLATIONINSTALLATIONINSTALLATIONINSTALLATIONINSTALLATION
EN
This appliance must not be fitted on a platform.
The cooker is designed to fit between kitchen cabinets
spaced 600mm apart. The space either side need
only be sufficient to allow withdrawal of the cooker for
servicing. It can be used with cabinets one side or
both as well as in a corner setting. It can also be used
free-standing.
Adjacent side walls which project above hob level,
must not be nearer to the cooker than 150mm or 65mm
and should be protected by heat resistant
material. Any overhanging surface or cooker hood
should not be nearer than 750mm.
a.
The cooker may be located in a kitchen, a kitchen/
diner or bed sitting room, but not in a bathroom or
shower room.
b. The hoods must be installed according to the
requirements in the hood handbook.
c. The wall in contact with the back of the cooker must
be of flameproof material.
d. The cooker is fitted with a safety chain that must be
attached to a hook, secured to the wall behind the
appliance.
The appliance must not be installed behind
a decorative door in order to avoid overheating
Open the grill door sufficiently to allow a comfortable
grip on the underside front edge of the oven roof,
avoiding any grill elements. (FIG.A)
The following instructions should be read by a
qualified technician to ensure that the appliance is
installed, regulated and technically serviced
correctly in compliance with current regulations.
Important: Do not install this appliance
adjacent to the door or other means ofadjacent to the door or other means of
access to minimise the likelihood of personsaccess to minimise the likelihood of persons
using the door making contact with pans on
the hob surface.the hob surface.
Important: Do not install this appliance Important: Do not install this appliance
adjacent to the door or other means ofadjacent to the door or other means of
access to minimise the likelihood of personsaccess to minimise the likelihood of persons
using the door making contact with pans on
the hob surface.the hob surface.
Important: Do not install this appliance
. Do not install this cooker on an. Do not install this cooker on an. Do not install this cooker on an
the floor
artificial base of any kind.artificial base of any kind.artificial base of any kind.
. Do not install this cooker on an
Moving the Cooker
Fig. A
Moving the Cooker
Fig. A
Before moving your cooker check that it is cool, and switched
off at the cooker control unit. Movement of your cooker is most
easily achieved by lifting the front as follows:
Take care in moving the cooker as it is heavy. Take care
to ensure that any floor covering is not damaged.
Electrical connection
Power supply voltage and frequency: 230-240V a.c.
50/60 Hz.
The supply cable must be positioned so that it never
reaches at any point a temperature 50°C higher than
the room temperature. The cable must be routed away
from the rear vents. Should you require it, you may
use a longer cable, however, you must ensure that the
cable supplied with the appliance is replaced by one
of the same specifications in accordance with current
standards and legislation.
Levelling
If it is necessary to level the
appliance, screw the
adjustable feet* into the places
provided on each corner of the
base of the cooker (
see figure
).
The legs* provided with the
appliance fit into the slots on
the underside of the base of
the cooker.
24
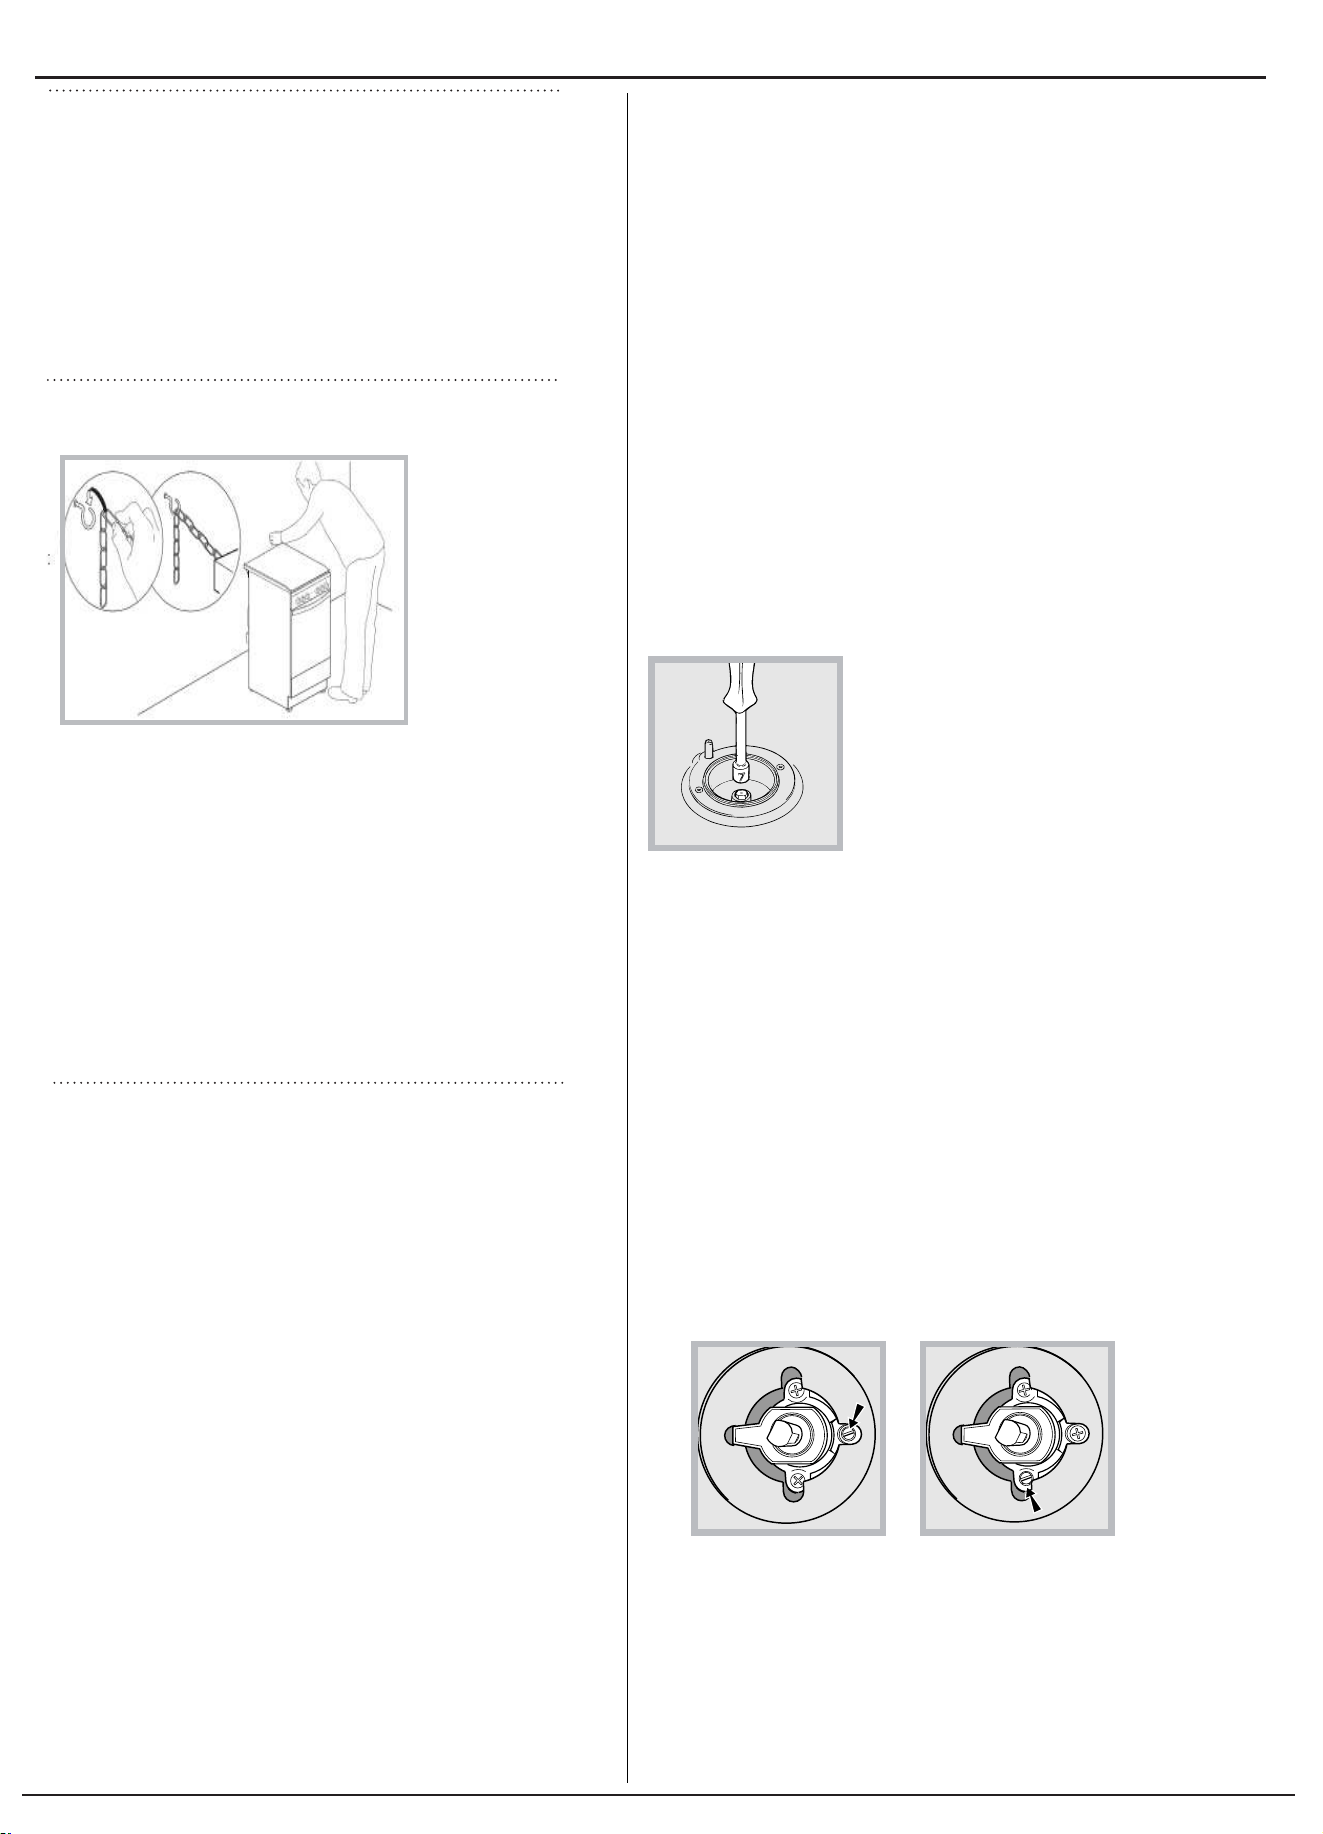
Safety Chain
In order to prevent
accidental tipping
of the appliance,
for example by
a child climbing
onto the oven door,
the supplied safety
chain MUST be
installed!
Adapting to different types of gas
Adapting the hob
Adjusting the hob burners’ minimum setting:
1. Turn the tap to the minimum position.
2. Remove the knob and adjust the regulatory screw, which is
positioned inside or next to the tap pin, until the flame is small
but steady. If the appliance is connected to a liquid gas supply,
the bypass screw must be set to a minimum.
3. While the burner is alight, quickly change the position of the
knob from minimum to maximum and vice versa several times,
checking that the flame is not extinguished.
Upon completion of adjustment, reseal using sealingwax or an
equivalent material.
The hob burners do not require primary air adjustment.
The cooker is fitted with a safety chain to be fixed by
means of a screw (not supplied with the cooker) to the
wall behind the appliance, at the same height as the
chain is attached to the appliance.
Choose the screw and the screw anchor according
to the type of material of the wall behind the appliance.
If the head of the screw has a diameter smaller than
9mm, a washer should be used. Concrete wall requires
the screw of at least 8mm of diameter, and 60mm of length.
Ensure that the chain is fixed to the rear wall of the cooker
and to the wall, as shown in figure, so that after installation
it is tensioned and parallel to the ground level.
Gas connection
The cooker should be connected to the gas-supply by a
gas safe registered installer. During installation of this
product it is essential to fit an approved gas tap to isolate
the supply from the appliance for the convenience of any
subsequent removal or servicing. Connection of the
appliance to the gas mains or liquid gas must be carried
out according to the prescribed regulation in force, and
only after it is ascertained that it is adaptable to the type
of gas to be used. If not, follow the instructions indicated
in the paragraph headed “Adaptation to different gas types”.
On some models the gas supply can be connected on the
left or on the right, as necessary; to change the connection,
reverse the position of the hose holder with that of the cap
and replace the gasket (supplied with the appliance). In the
case of connection to liquid gas, by tank, use pressure
regulators that conform to the regulation in force. The gas
supply must be connected to the left of the appliance.
Be sure that the hose does not pass through the rear of the
cooker touching hot parts.
It is possible to adapt the appliance to a type of gas other
than the default type (this is indicated on the rating label
on the cover).
Replacing the nozzles for the hob
burners:
1. Remove the hob grids and slide
the burners off their seats.
2. Unscrew the nozzles using a 7mm
socket spanner (see figure), and
replace them with nozzles suited to the
new type of gas (see Burner and nozzle specifications
table).
3. Replace all the components by following the above
instructions in reverse.
After adjusting the appliance so it may be used with a different
type of gas, replace the old rating label with anew one which
corresponds to the new type of gas (these labels are available
from Authorised Technical Assistance Centres).
Should the gas pressure used be different (or vary slightly) from
the recommended pressure, a suitable pressure regulator must
be fitted to the inlet hose in accordance with current standards
EN 88-1 and EN 88-2 relating to “regulators for channelled gas”.
WARNINGS: THIS APPLIANCE MUST BEWARNINGS: THIS APPLIANCE MUST BE
WARNINGS: THIS APPLIANCE MUST BEWARNINGS: THIS APPLIANCE MUST BE
WARNINGS: THIS APPLIANCE MUST BE
EARTHED.EARTHED.
EARTHED.EARTHED.
EARTHED.
The cooker must be connected to the mains by a
switched (double pole) cooker outlet correctly fused
with a capacity appropriate to that shown on the
cooker Rating Plate. All electrical wiring from the
consumer unit to the cooker, via the switched double
pole cooker outlet, must be of an acceptable type
and current rating as above.
25
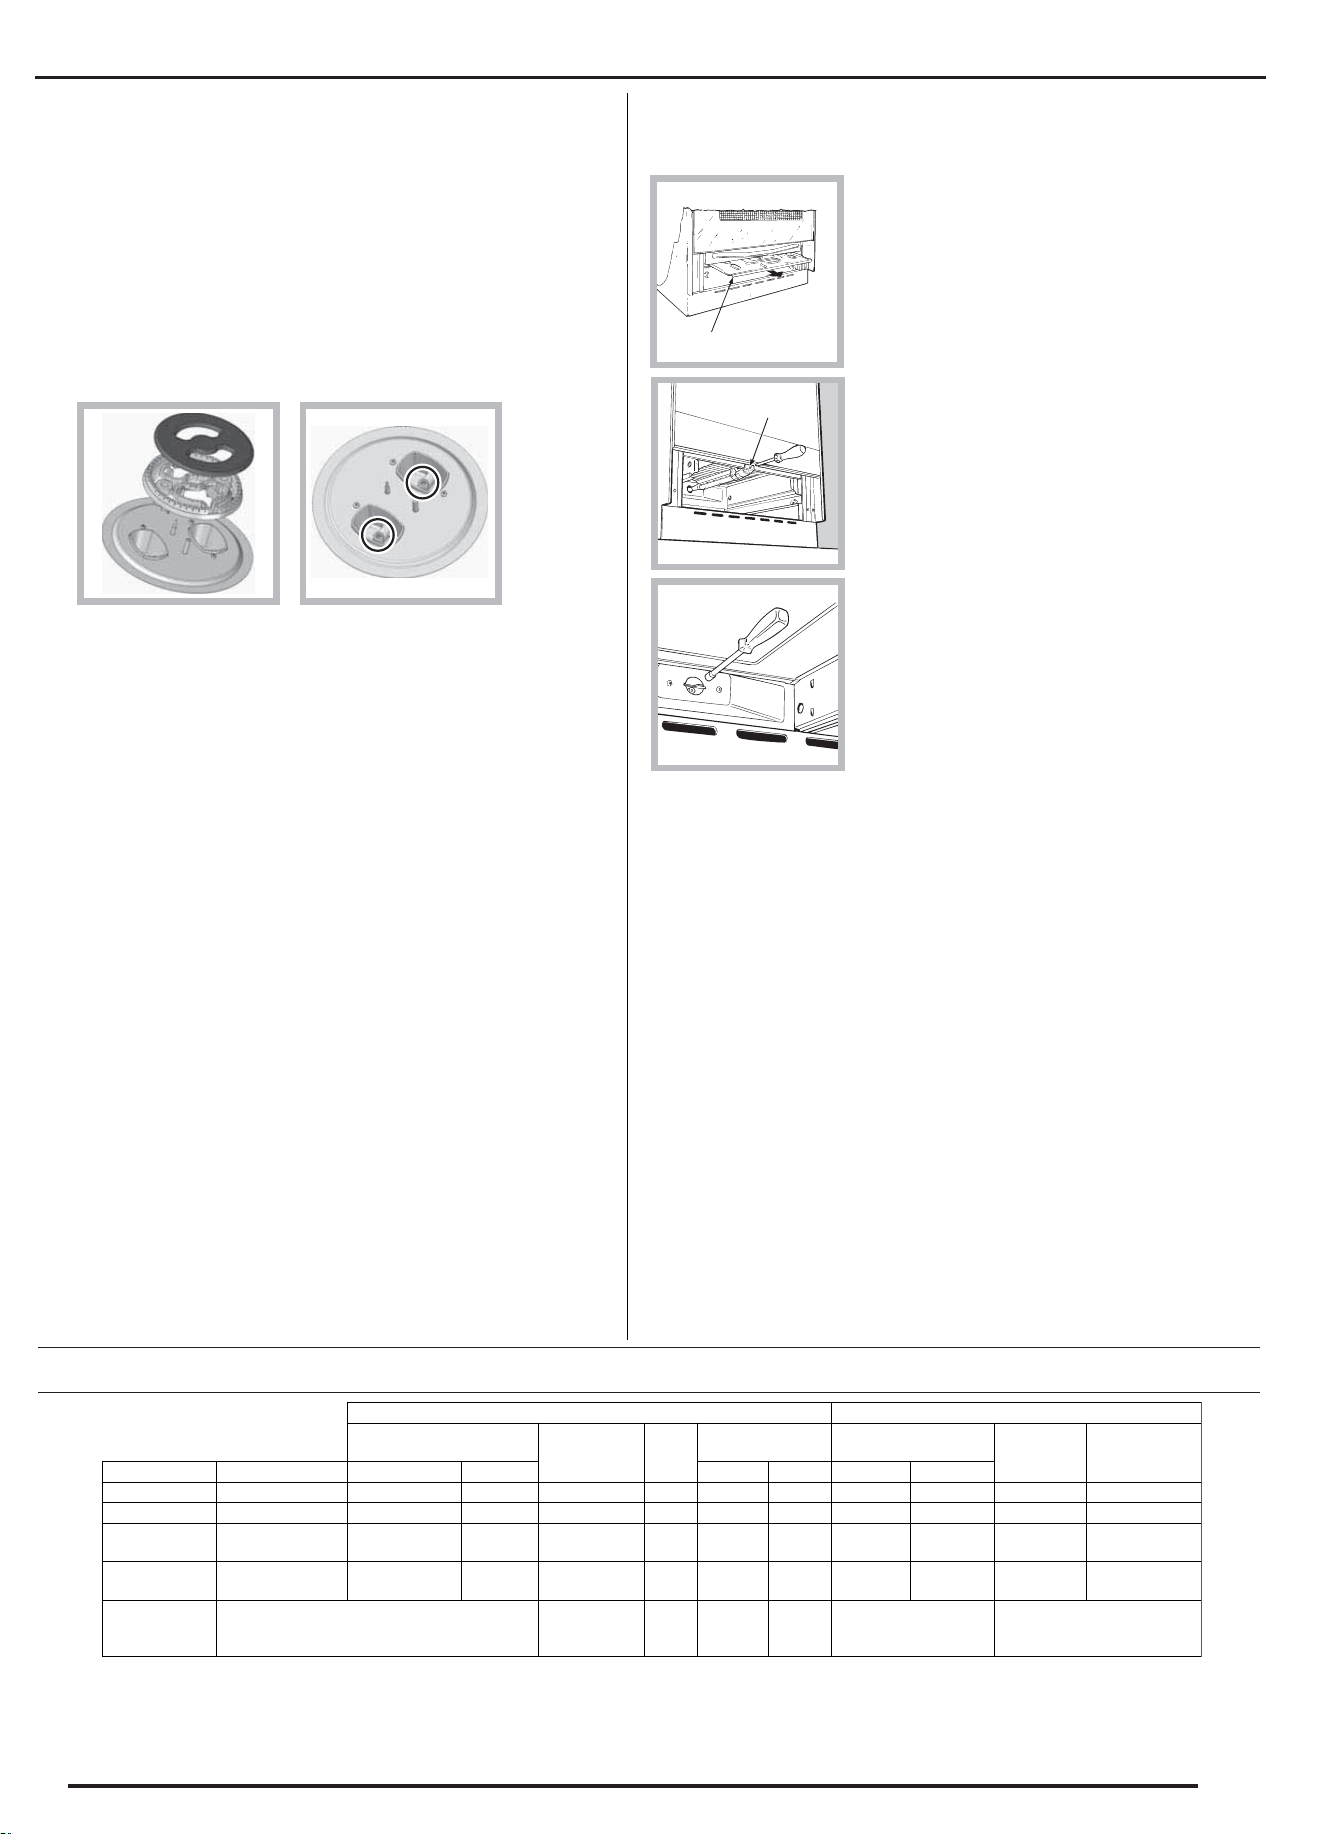
*with dry gas 15°C 1013 mbar
** Propane P
.C.S=50,37 MJ/Kg
*** Butane P.C.S=49,47MJ/kg
Natural G20 P.C.S=37,78Mj/m³
Table of burner and nozzle specifications
3. Remove the knob.
4. Tighten or loosen the adjustment screws on the
outside of the thermostat pin (
see figure
) until the
flame is small but steady.
! If the appliance is connected to liquid gas, the
bypass screw must be adjusted to minimum.
5. Turn the knob from the MAX position to the MIN
position quickly or open and shut the oven door,
making sure that the burner is not extinguished.
Adjusting the gas oven burner’s minimum setting:
1. Light the burner (
see Start-up and Use
).
2. Turn the knob to the minimum position (MIN) after
it has been in the maximum position (MAX) for
approximately 10 minutes.
Adapting the oven
Replacing the oven burner nozzle:
1. Remove the oven compartment.
2. Slide out the protection
panel A
(
see diagram
).
3. Remove the oven burner
after unscrewing the screws V
(
see figure
).
The whole operation will be
made easier if the oven door
is removed.
4. Unscrew the nozzle using a
special nozzle socket spanner
(
see figure
) or with a 7 mm
socket spanner, and replace it
with a new nozzle that is
suited to the new type of gas
(
see Burner and nozzle
specifications table
).
A
V
Replacing the Triple ring burner nozzles
1. Remove the pan supports and lift the burners out of
their housing. The burner consists of two separate
parts (see pictures).
2. Unscrew the nozzles using a 7 mm socket spanner.
Replace the nozzles with models that are configured
for use with the new type of gas (see Table 1). The
two nozzles have the same hole diameter.
3. Replace all the components by completing the
above operations in reverse order.
•
Adjusting the burners’ primary air :
Does not require adjusting.
• Setting the burners to minimum:
1. Turn the tap to the low flame position.
2. Remove the knob and adjust the adjustment screw,
which is positioned in or next to the tap pin, until the
flame is small but steady.
3. Having adjusted the flame to the required low
setting, while the burner is alight, quickly change the
position of the knob from minimum to maximum and
vice versa several times, checking that the flame
does not go out.
Liquid Gas Natural Gas
Thermal Power
kW (p.c.s*)
By-Pass
1/100
(mm)
Nozzle
1/100
(mm)
Flow
g/h
Thermal Power
kW (p.c.s*)
By-Pass
1/100
(mm)
Flow
g/h
Burner Diameter (mm) Nominal Reduced *** ** Nominal Reduced
Oven - 2.60 1.00 50 79T2A 189 186
2.60 0.70
112 T2 248
TC
130 3.30 1.50 61 2x65 240 236 3.30 1.50 2x99 314
Semi Rapid
(Medium) (S)
75 2.00 0.40 30 69 145 143 2.00 0.40 104 190
Auxiliary
(Small) (A)
55 1.00 0.40 30 50 73 71 1.00 0.40 78 95
Suppy
Pressures
Nominal (mbar)
Minimum (mbar)
Maximum
28-30
20
35
37
25
45
20
17
25
methane nozzles are available on request but not as an accessory
Screw the nozzles using a 7 mm socket spanner and maximum torque 4 Nm
26
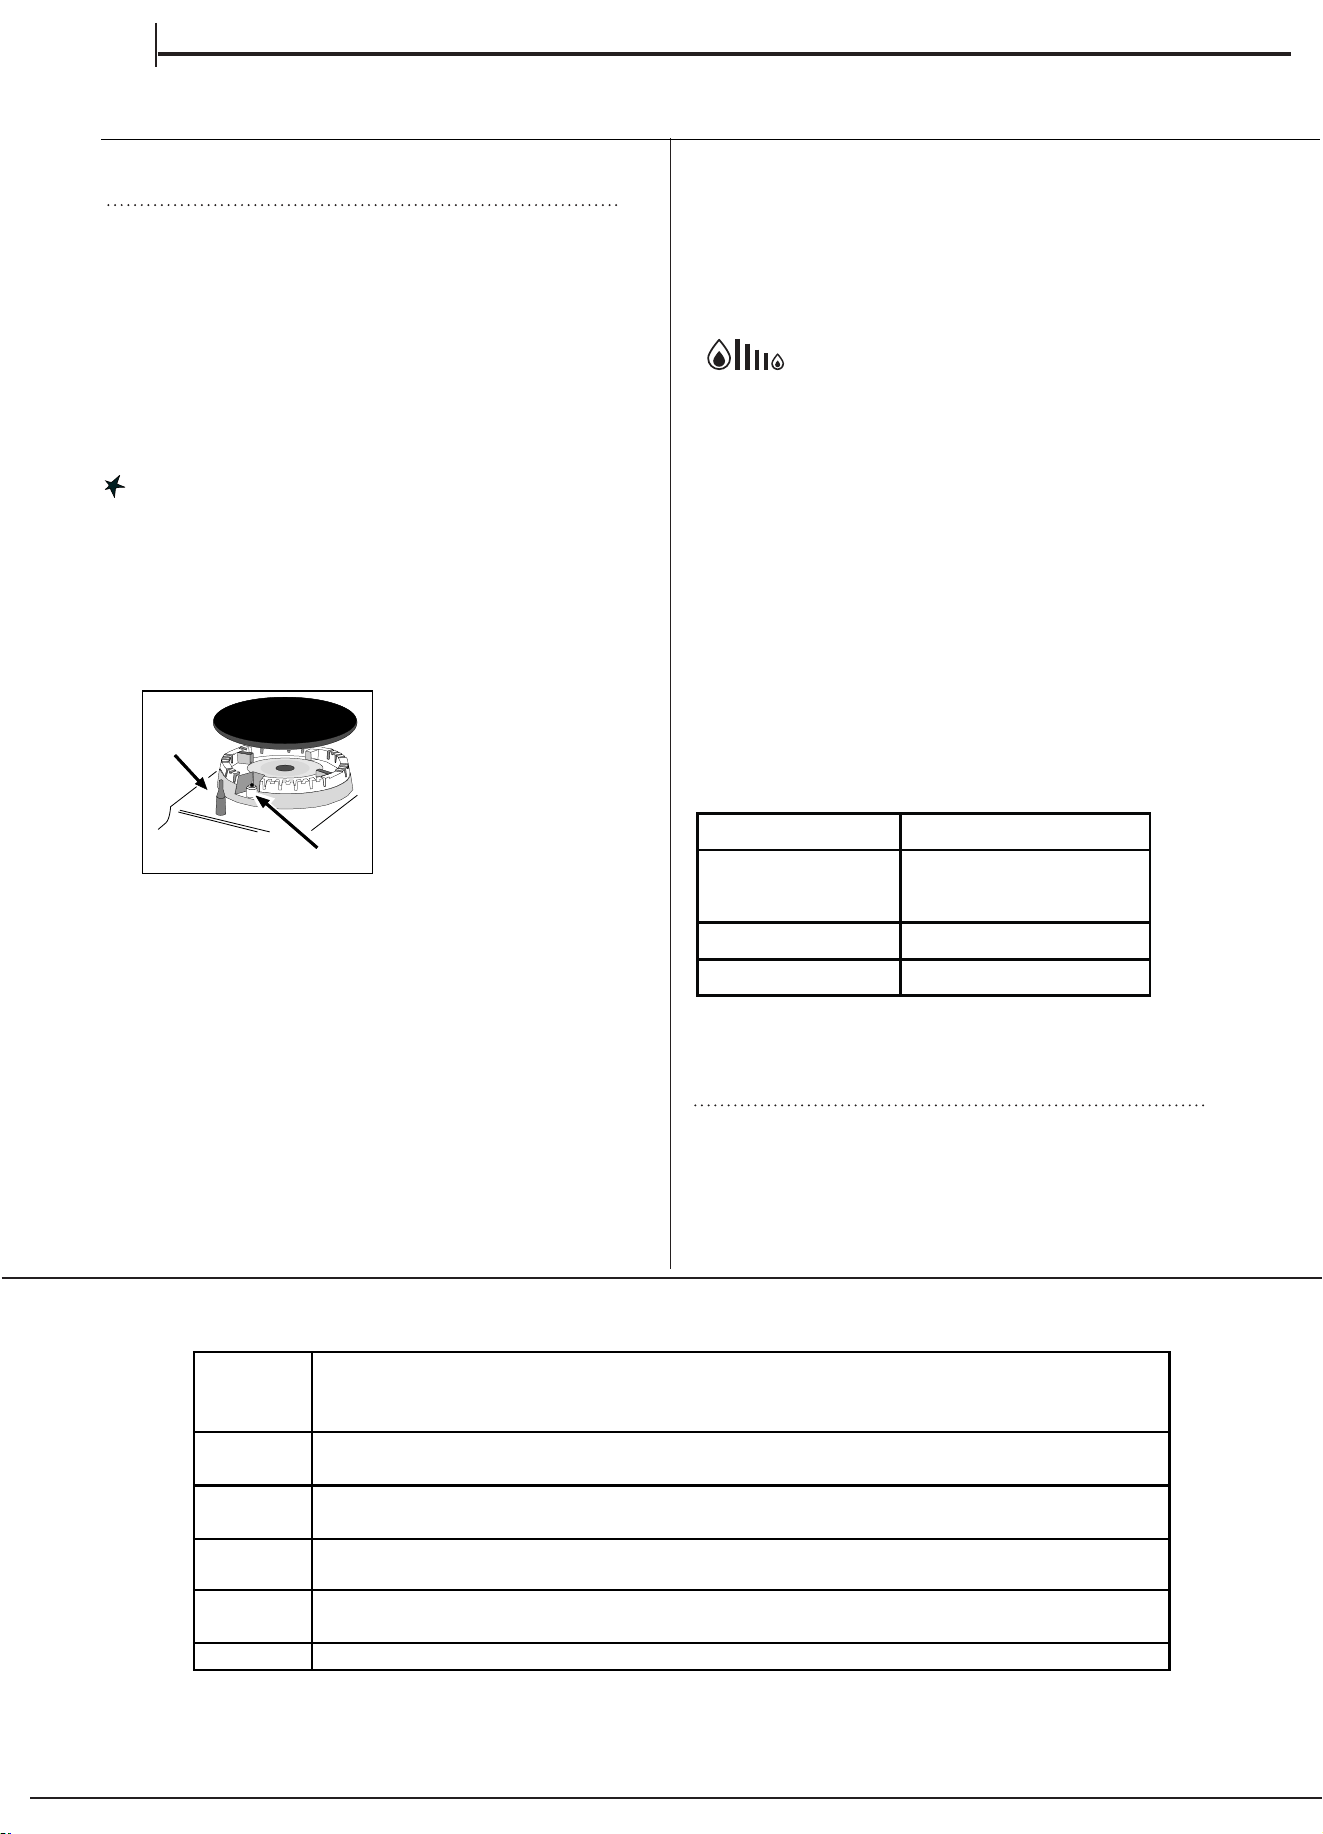
Using the hob
Lighting the burners
For each BURNER knob there is a complete ring
showing the strength of the flame for the relevant
burner.
To light one of the burners on the hob:
1. Press the BURNER knob and turn it in an
anticlockwise direction so that it is pointing to the
maximum flame setting .
2. Adjust the intensity of the flame to the desired level
by turning the BURNER knob in an anticlockwise
direction. This may be the minimum setting , the
maximum setting or any position in between the two.
If the appliance is fitted with an electronic lighting
device* (C), press the ignition button, marked with the
symbol
, then hold the
BURNER knob down and
turn it in an anticlockwise
direction, towards the
maximum flame setting,
until the burner is lit.
The burner may be
extinguished when the
knob is released. If this occurs, repeat t he operation,
holding the knob down for a longer period of time.
! If the flame is accidentally extinguished, switch off the
burner and wait for at least 1 minute before attempting
to relight it.
If the appliance is equipped with a flame failure safety
device (X)*, press and hold the BURNER knob for
approximately 2-3 seconds to keep the flame alight
and to activate the device.
To switch the burner off, turn the knob until it reaches
the stop position
•.
X
C
Flame adjustment according to levels
the burner flame intensity can be adjusted with the
knob according to 10 power levels, from maximum
to minimum with 5 intermediate positions:
a click will indicate the change from one level to
another when turning the knob. The system
guarantees a more precise adjustment, allows
to replicate the flame intensity and to identify
easily the preferred level for different cooking
operations.
Practical advice on using the burners
For the burners to work in the most efficient way
possible and to save on the amount of gas consumed,
it is recommended that only pans that have a lid and
a flat base are used. They should also be suited to the
To identify the type of burner, please refer to the
diagrams contained in the “Burner and nozzle
specifications”.
size of the burner.
EN
FIRST TIME USE
DAILY USE
Burner Cookware Diameter (cm)
Semi Fast (S) 16 - 20
Auxiliary (A) 10 - 14
Triple Crown (TC) 24 - 26
For the models with the electronic ignition button (
), press the button and then turn the knob.
Fast (R)
/
LEVEL COOKING METHOD
"suggested for"
1 - 2 - 3
Ideal for softening butter, gently melting chocolate in bagnemarie, thawing small
portions, creaming risotto, keeping warm small portions of just-cooked preparation
4 - 5
Ideal for slow-cook recipes (rice, sauces, roast, fish)using liquids (water, wine, broth),
and for creaming pasta, maintaining a gentle boiling
6 - 7
Ideal for sautéing, stewing vegetables, cooking for longer period, preheating
accessories, cooking until creamy
8 - 9
Ideal for browning, starting to cook, bringing liquids to the boil quickly, frying
deep-frozen products, grilling meat and fish, maintaining a lively boil
10 Ideal for rapidly increasing the temperature of food or for heating up liquids ( water)
27
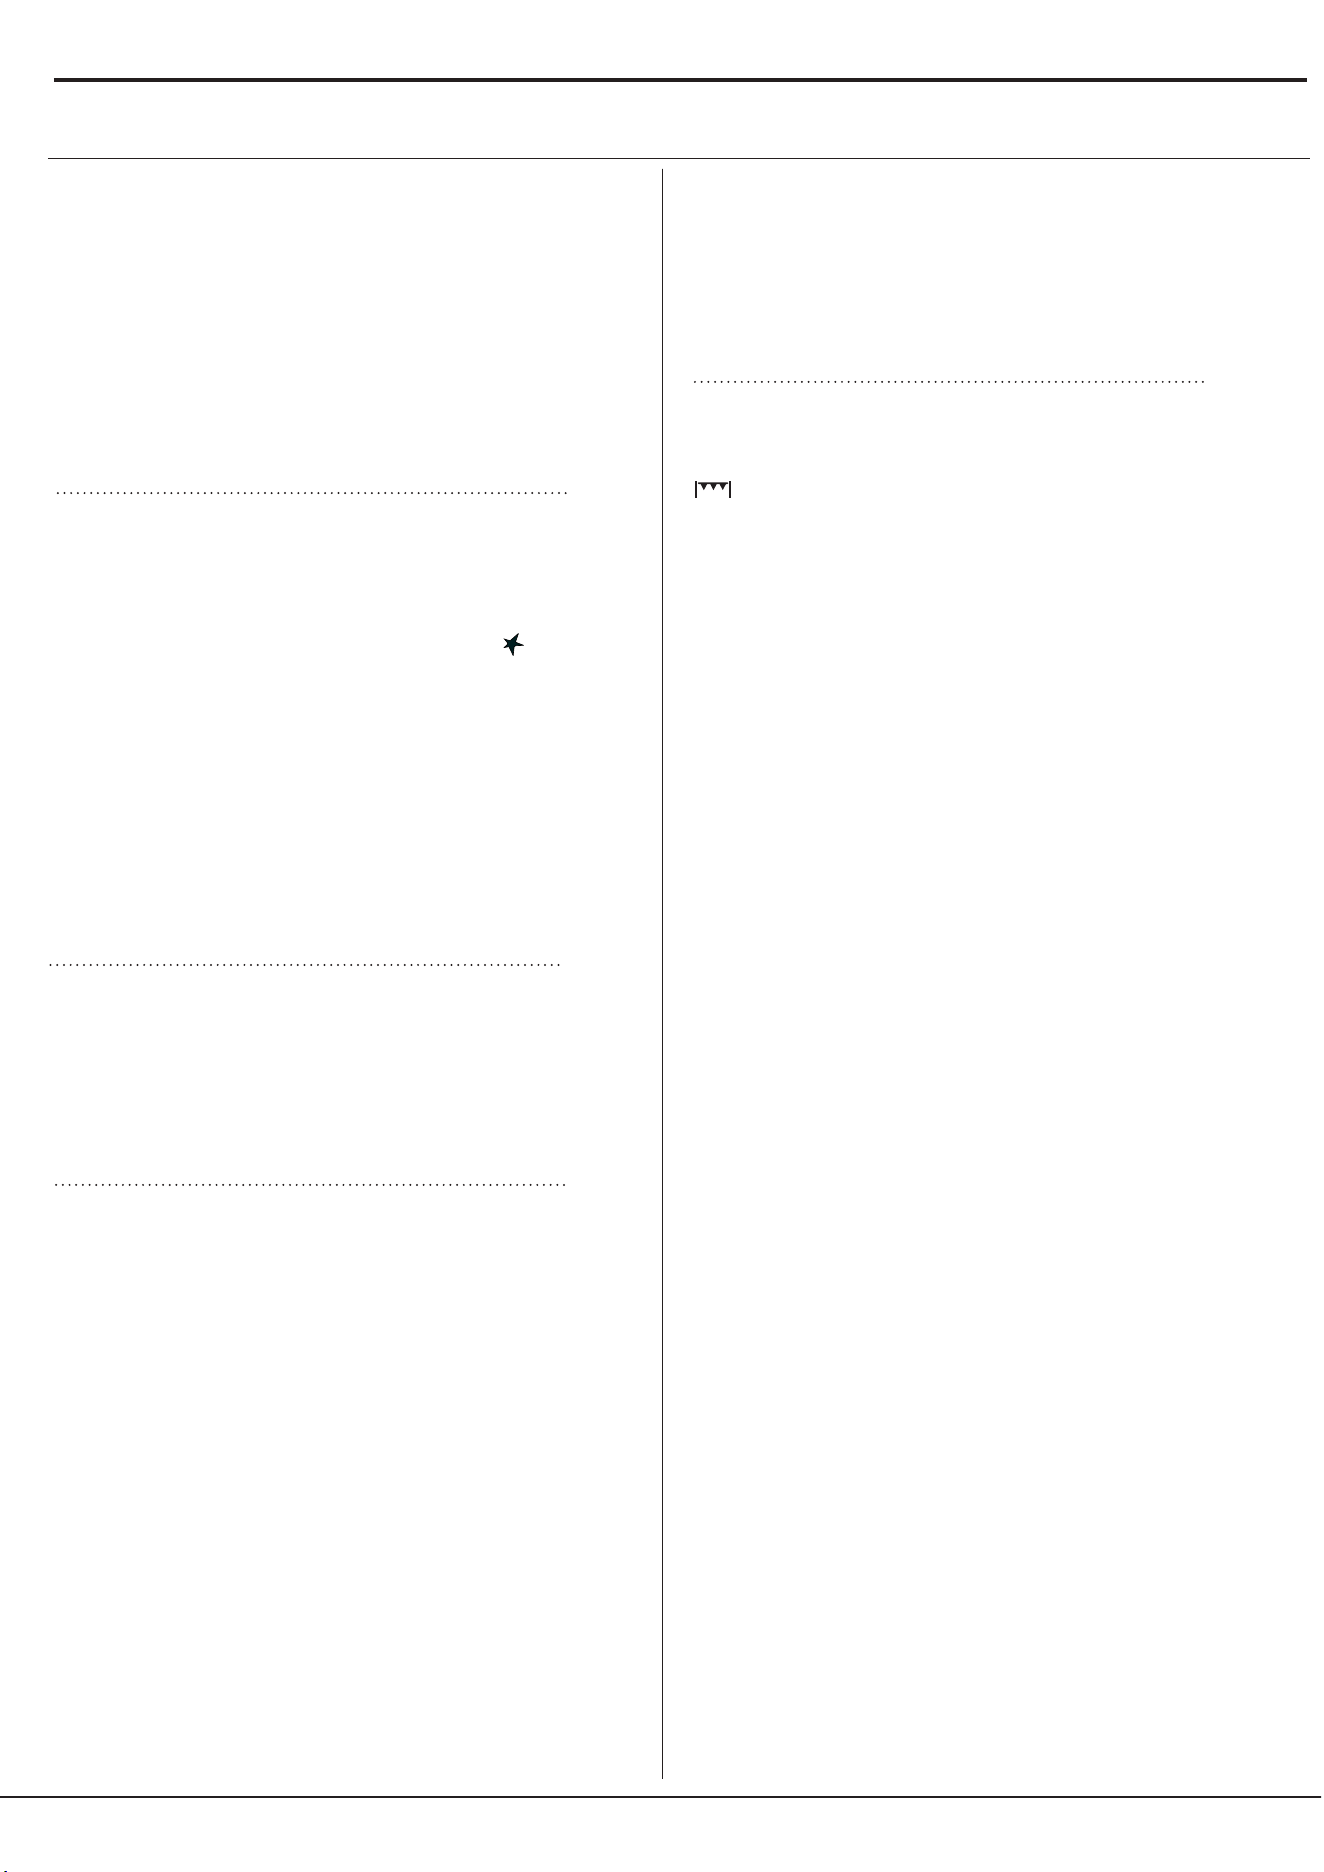
! The first time you use your appliance, heat the empty
oven with its door closed at its maximum temperature
for at least half an hour. Ensure that the room is well
ventilated before switching the oven off and opening
the oven door. The appliance may emit a slightly
unpleasant odour caused by protective substances
used during the manufacturing process burning away.
! Never put objects directly on the bottom of the oven;
this will avoid the enamel coating being damaged.
Only use position 1 in the oven when cooking with the
rotisserie spit.
Lighting the oven
Press the BURNER knob and turn it in an anticlockwise
direction so that it is pointing to the maximum flame
setting
If, after 15 seconds, the burner is still not alight, release
the knob, open the oven door and wait for at least 1
minute before trying to light it again.
! The oven is fitted with a safety device and it is
therefore necessary to hold the OVEN control knob
down for approximately 6 seconds.
! If the flame is accidentally extinguished, switch off the
burner and wait for at least 1 minute before attempting
to relight the oven.
USING THE OVEN FIRST TIME AND DAILY USE
Adjusting the temperature
To set the desired cooking temperature, turn the
OVEN control knob in an anticlockwise direction.
Temperatures are displayed on the control panel and
may vary between MIN (145°C) and MAX (250°C).
Once the set temperature has been reached, the oven
will keep it constant by using its thermostat.
Grill
To light the grill, press the OVEN control knob while
turning it in a clockwise direction until it reaches the
, position. The grill enables the surface of food
to be browned evenly and is particularly suitable for
roast dishes, schnitzel and sausages. Place the rack
in position 4 or 5 and the dripping pan in position 1 to
collect fat and prevent the formation of smoke.
Oven light
The light may be switched on at any moment
by pressing the OVEN LIGHT
button.
Timer
To activate the Timer proceed as follows:
1. Turn the TIMER knob in a clockwise direction for
almost one complete revolution to set the buzzer.
2. Turn the TIMER knob in an anticlockwise direction
to set the desired length of time.
For the models with the electronic ignition button ( ),
press the button and then turn the knob.
28
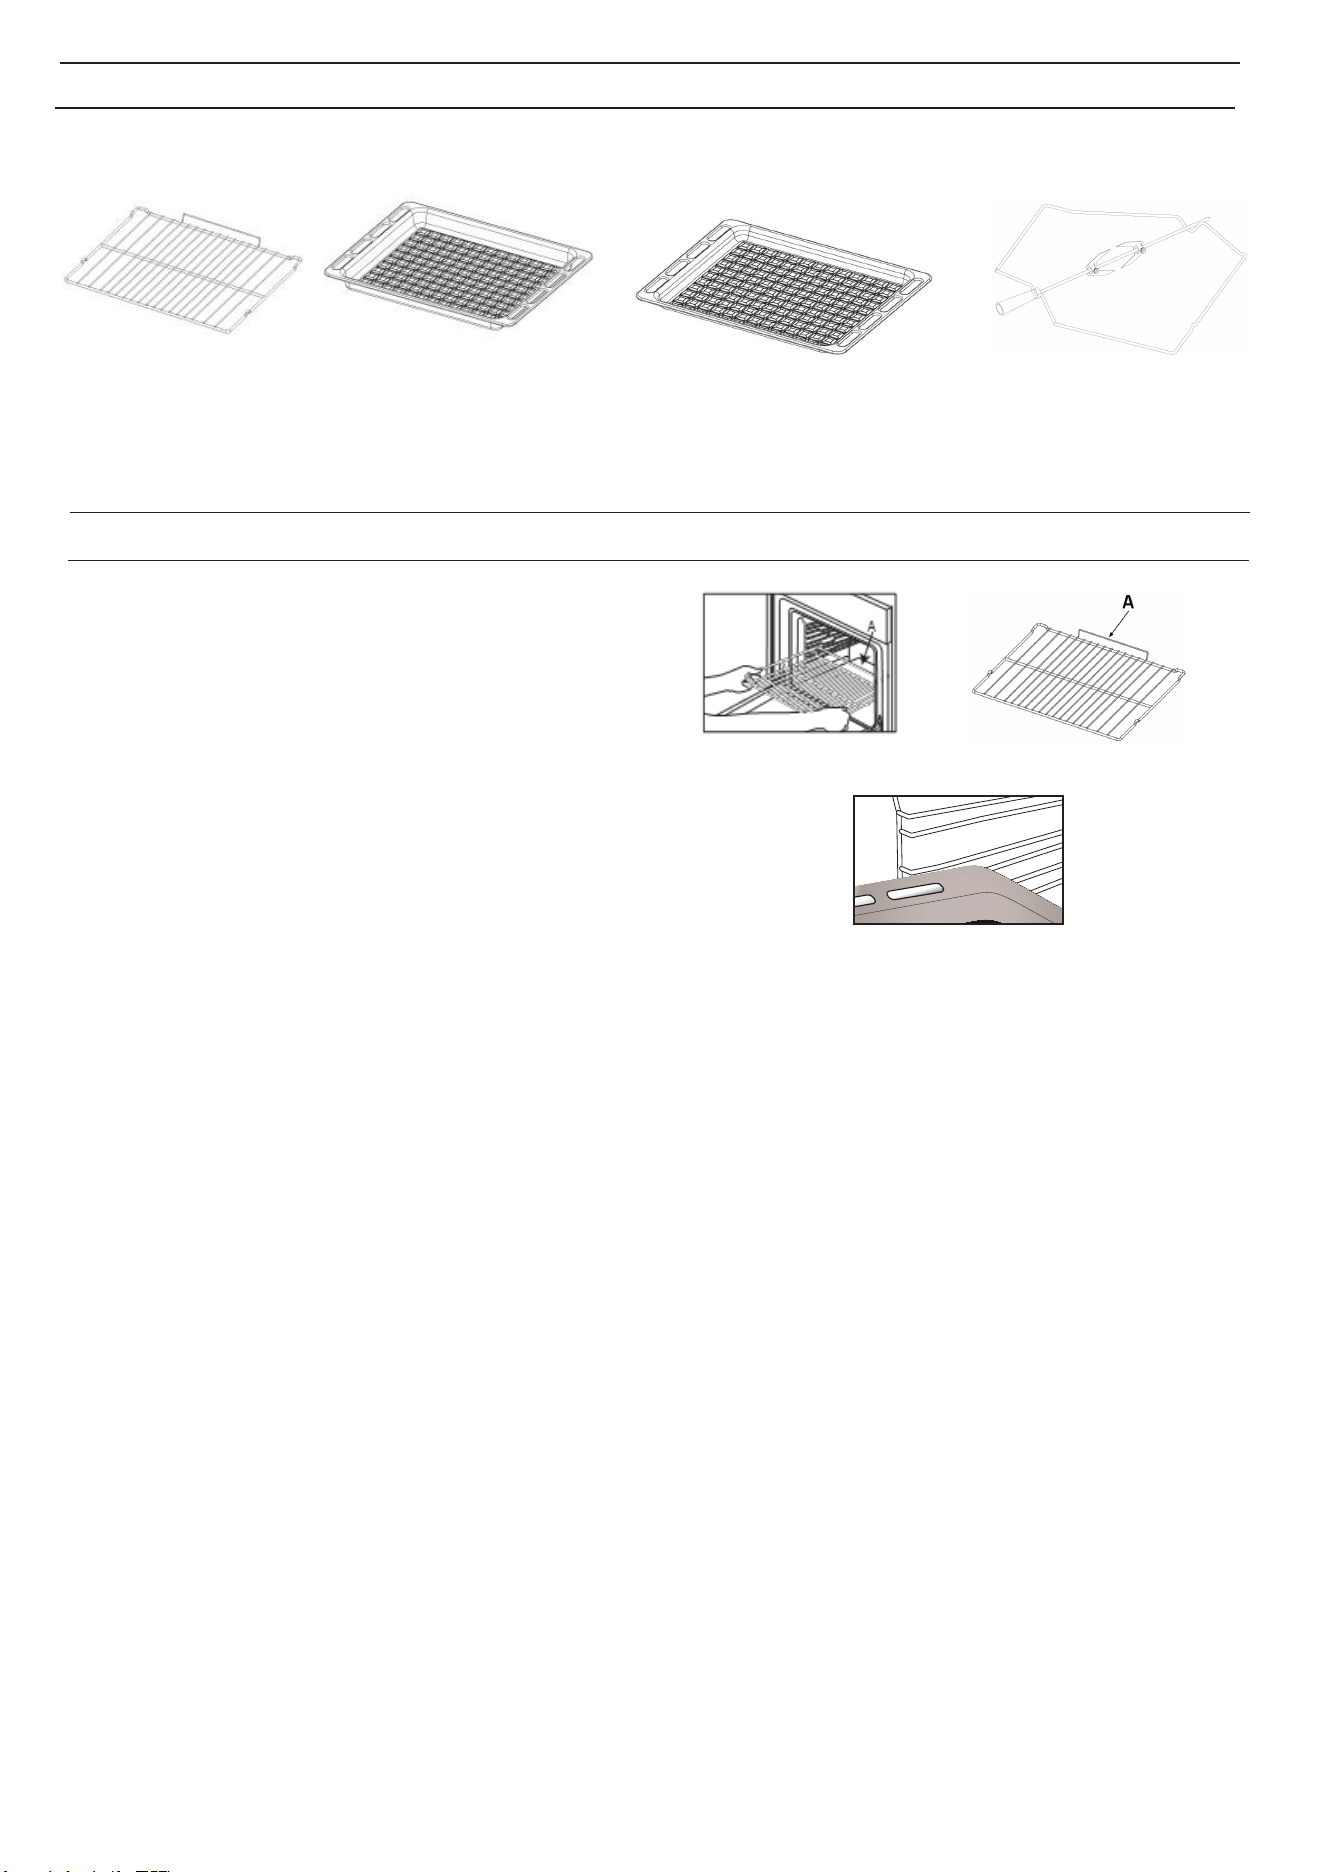
INSERTING WIRE SHELVES AND
OTHER ACCESSORIES INTO THE OVEN
1. Insert the wire shelf horizontally, with the
raised part “A” upwards
2. Other accessories, such as the drip tray and
baking tray, are inserted in the same way as
the wire shelf (Fig. 2).
Fig. 1A
Fig. 2
Fig. 1B
(Fig. 1A, Fig. 1B)
The number and type of accessories may vary depending on which model
is purchased. Other accessories that are not supplied can be purchased
separately from the After-sales Service.
The number and type of accessories may vary depending on which model
is purchased. Other accessories that are not supplied can be purchased
separately from the After-sales Service.
GRID DRIP TRAY
ACCESSORIES
KIT TURNSPITKIT TURNSPITKIT TURNSPIT
BAKING TRAYBAKING TRAYBAKING TRAY
29
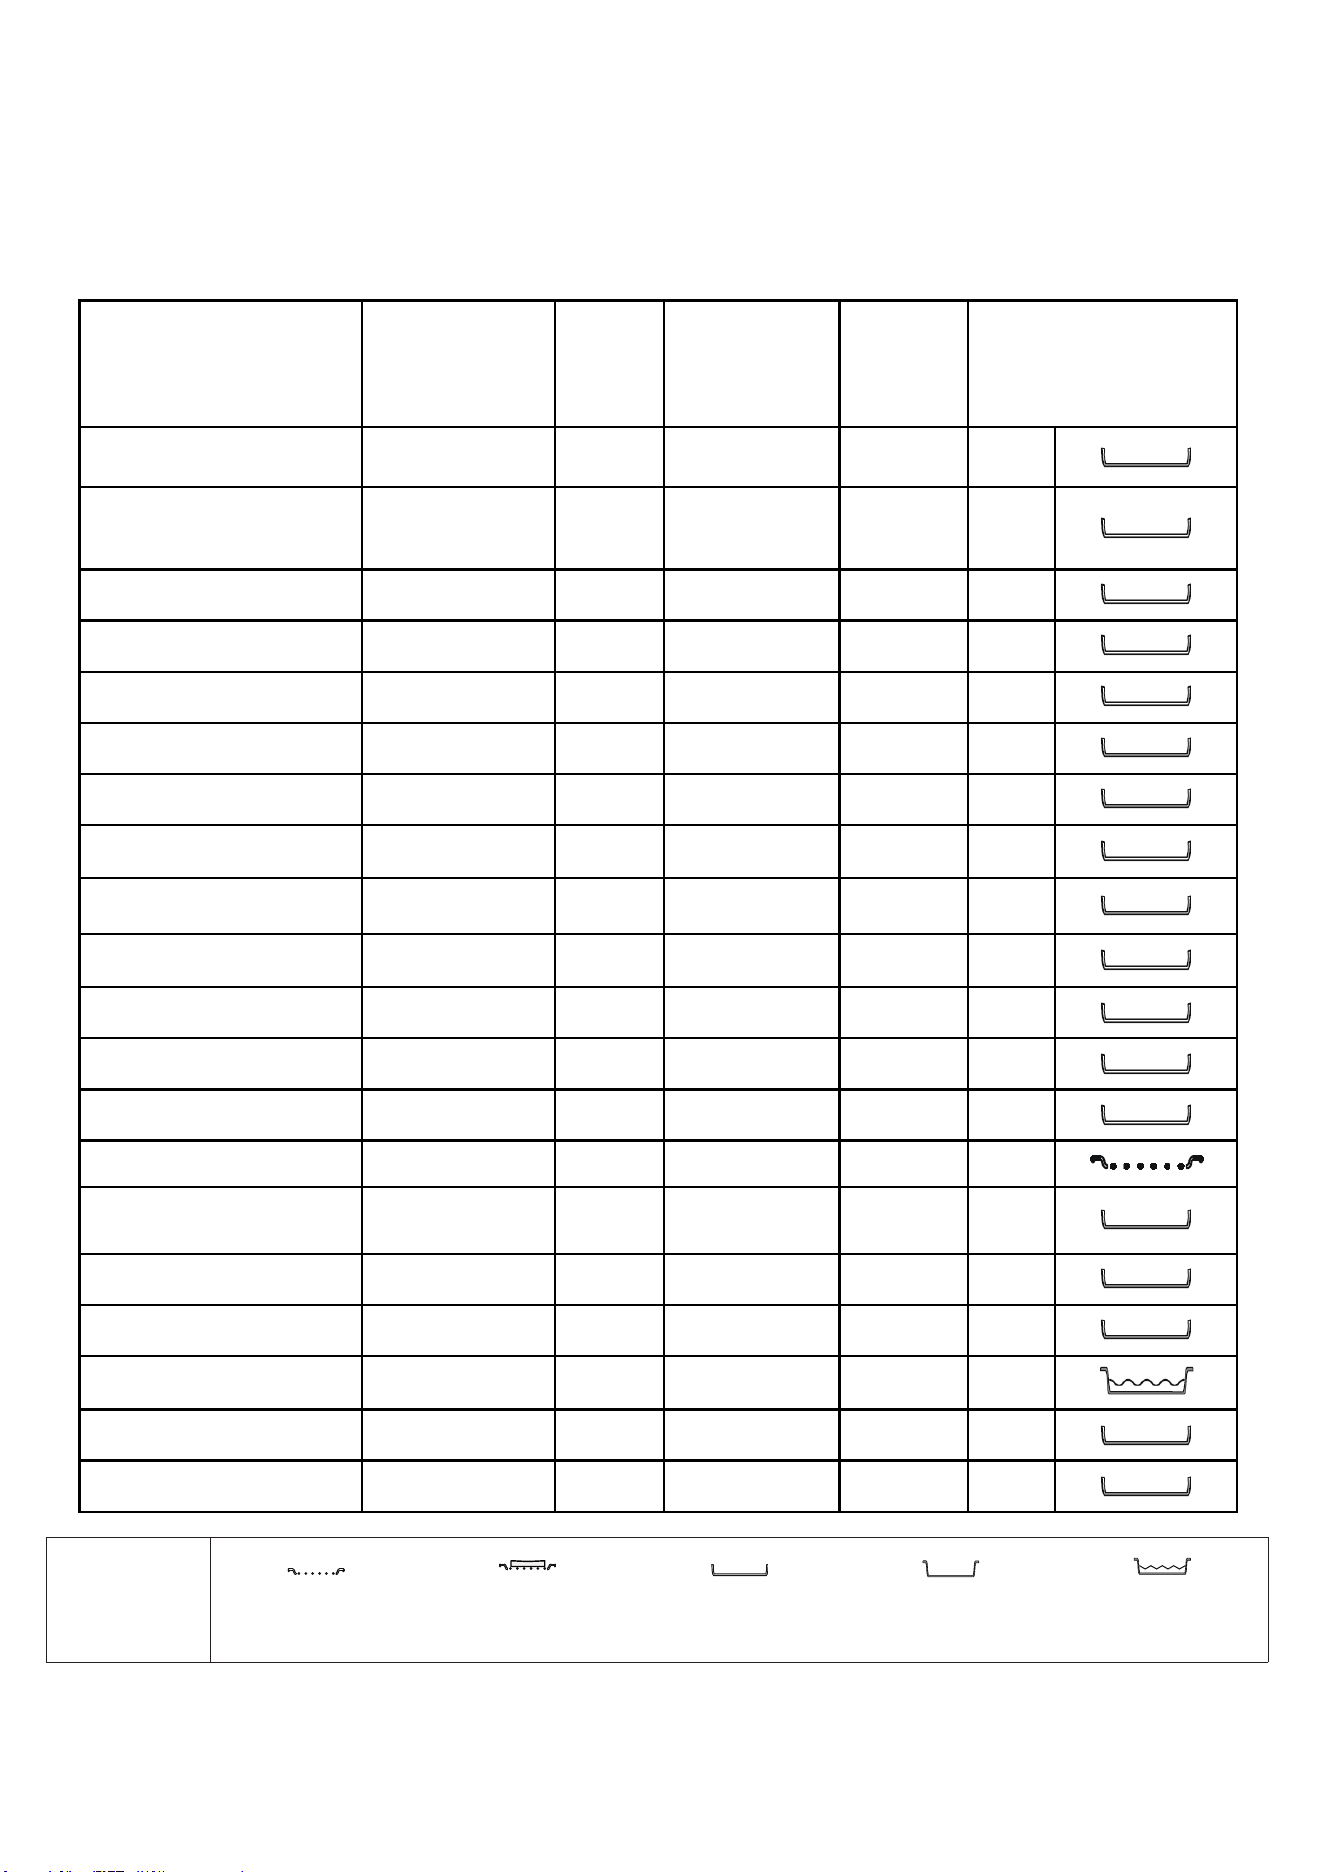
The table lists the best function, accessories and level to use to cook various types of food. Cooking times start from
the moment food is placed in the oven, excluding preheating (where required). Cooking temperatures and times are
approximate and depend on the amount of food and type of accessory used. Use the lowest recommended settings
to begin with and,if the food is not cooked enough, then switch to higher settings. Use the accessories supplied and
preferablydark-coloured metal cake tins and baking trays. You can also use Pyrex or stoneware pans and
accessories, but bear in mind that cooking times will be slightly longer.
RECIPE FUNCTION PREHEAT
TEMPERATURE
(°C) / POWER
LEVEL
DURATION
(Min)
LEVEL (L-number) AND
ACCESSORIES
Leavened cakes / Sponge
cakes
CONVENTIONAL 15' 160 35 - 60 L-3
Filled cake
(cheese cake, strudel, fruit
pie)
CONVENTIONAL 15' 170 40 - 60 L-3
Cookies / Shortbread CONVENTIONAL 15' 150 30 - 60 L-3
Small cakes / Muffin CONVENTIONAL 15' 160 30 - 40 L-3
Choux buns CONVENTIONAL 15' 170 20 - 40 L-3
Pizza / Bread / Focaccia Thin CONVENTIONAL 15' 220 - 250 15 - 30 L-3
Pizza / Bread / Focaccia Thick CONVENTIONAL 10' 190 - 220 20 - 40 L-3
Savoury pies (vegetable pie,
quiche)
CONVENTIONAL 10' 170 - 180 35 - 60 L-3
Vols-au-vent / Puff pastry
crackers
CONVENTIONAL 15' 170 - 180 15 - 30 L-3
Lasagne / Flans / Baked pasta
/ Cannelloni
CONVENTIONAL 15' 170 - 190 40 - 60 L-3
Lamb / Veal / Beef / Pork 1 kg CONVENTIONAL 10' 170 - 190 70 - 90 L-3
Chicken / Rabbit / Duck 1 kg CONVENTIONAL 15' 170 - 190 25 - 50 L-3
Turkey / Goose 3 kg CONVENTIONAL 10' 150 - 170 130 - 170 L-3
Fish fillets / Steaks GRILL 5' MAX 15 - 35 L-4
Stuffed vegetables (tomatoes,
courgettes, aubergines)
GRILL - MAX 30 - 60 L-3
Vegetable gratin GRILL - MAX 15 - 40 L-3
Toast GRILL 5 MAX 1-2 L-4
Sausages / Kebabs / Spare
ribs / Hamburgers
GRILL - MAX 20 - 40 L-4
Roast potatoes CONVENTIONAL 10' 180 - 220 35 - 60 L-3
Leg of lamb / Shanks CONVENTIONAL 10' 170 - 200 50 - 100 L-3
ACCESS
ORIES
Wire she
lf
Baking dish or cake tin on
the wire shelf
Baking tray/Drip tray or
Baking dish on the wire
shelf
Drip tray / Baking tray
Drip tray / Baking tray with
ml of water
500
30
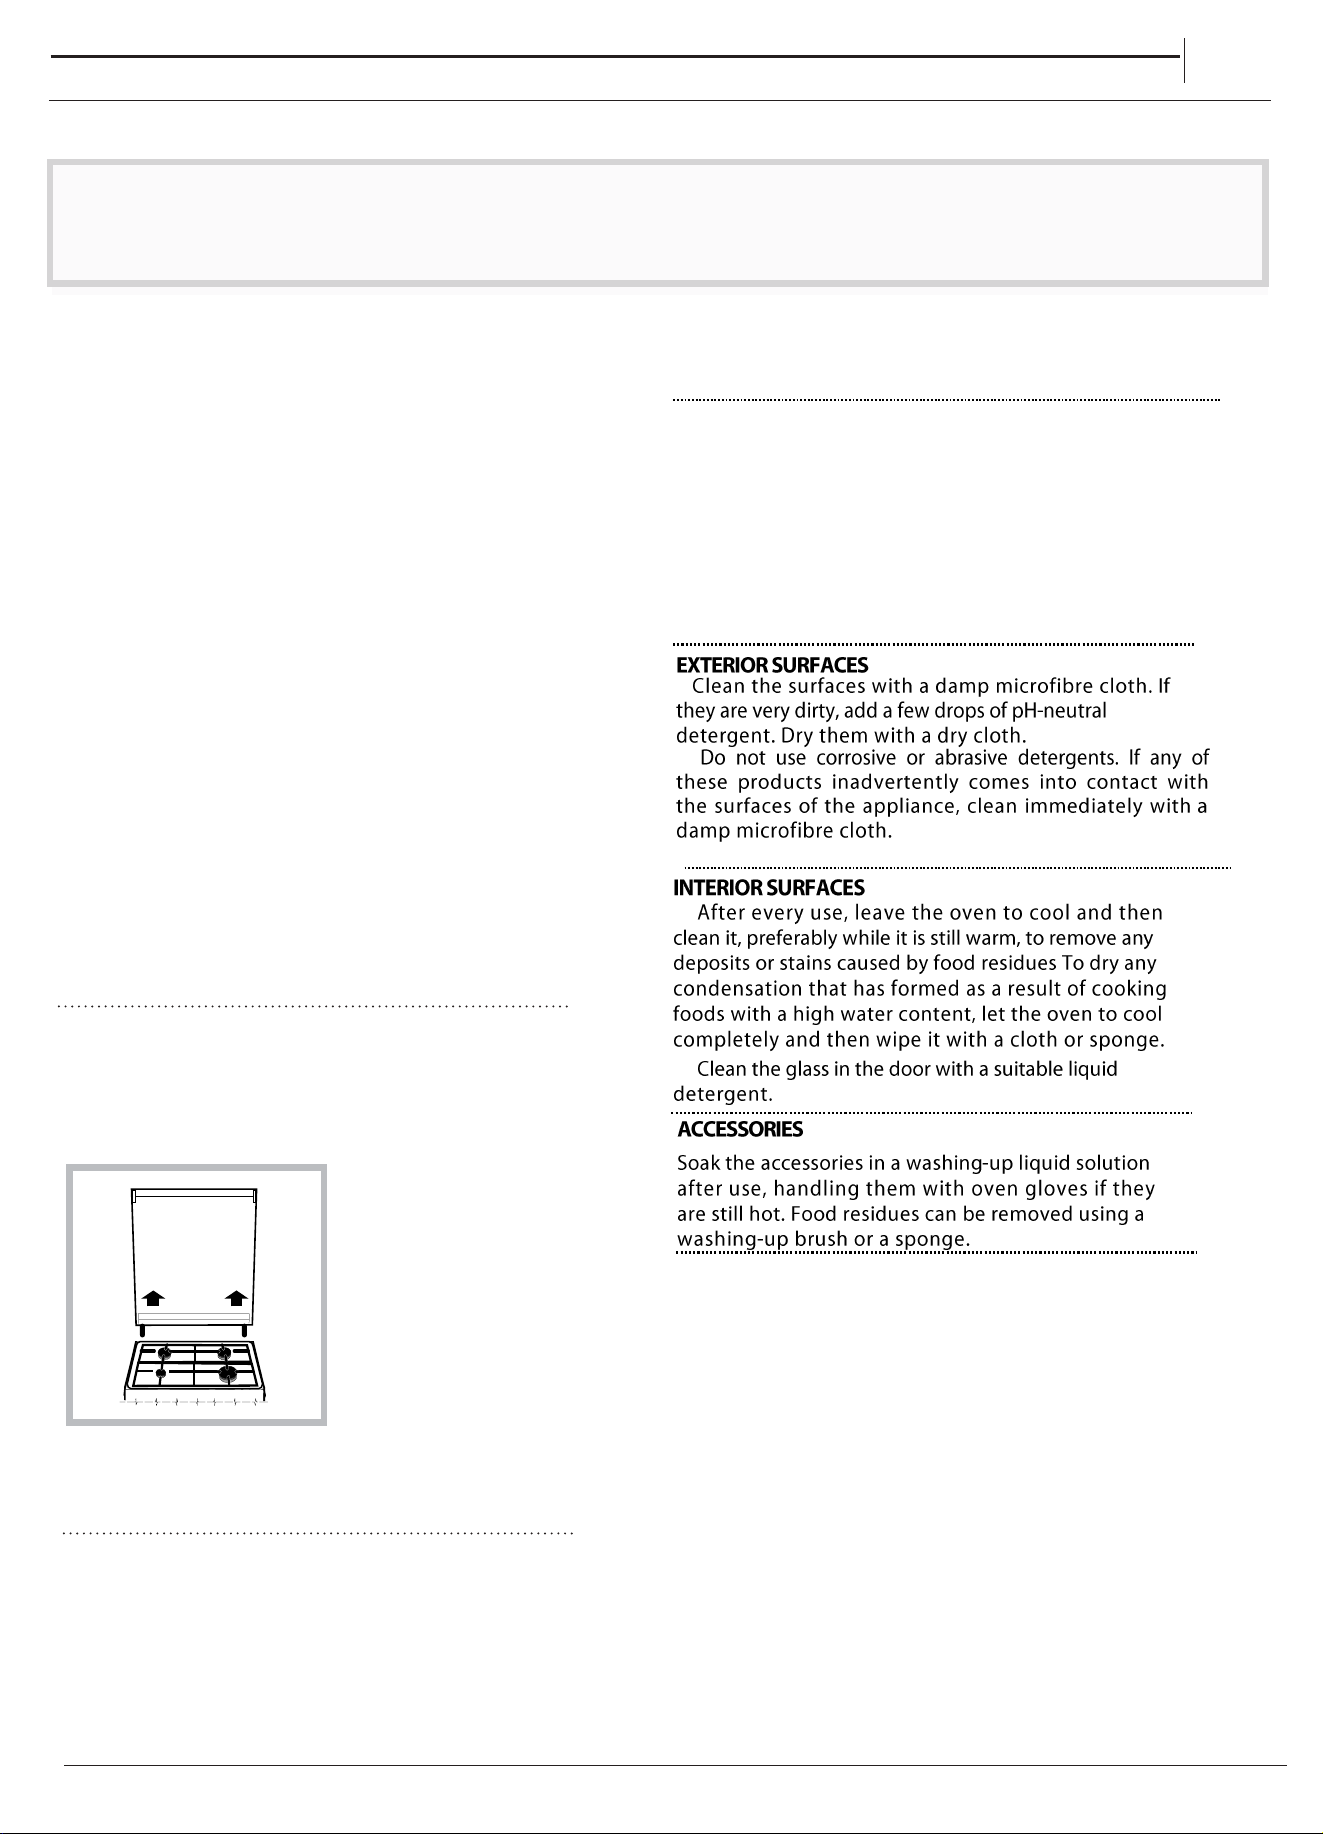
TURN OFF THE MAIN SWITCH AND ENSURE THE COOKER IS COLD BEFORE CLEANING.
BEFORE SWITCHING ON AGAIN, ENSURE THAT
ALL CONTROLS ARE IN THE OFF POSITION.
Do not use steam cl
eaning
equipment.
Use protective gloves during all
operations.
Carry out the required
operations when the oven is cold.
Disconnect the appliance from
the power supply.
Do not use wire wool, abrasive
scourers or abrasive/corrosive
cleaning agents, as these could
damage the surfaces of the
appliance.
CLEANIN
G AND MAINTENANCE
Discon
nect the appliance from the power supply
.
EN
Switching the appliance off
Disconnect your appliance from the electricity supply
before carrying out any work on it.
The cover
If the cooker is fitted with
a glass cover, this cover
should be cleaned using
lukewarm water. Do not use
abrasive products.
It is possible to remove
the cover in order to make
cleaning the area behind
the hob easier. Open
the cover fully and pull it
upwards (see figure).
! Do not close the cover
when the burners are alight or when they are still hot.
Inspecting the oven seals
Check the door seals around the oven periodically. If
the seals are damaged, please contact your nearest
Authorised After-sales Service Centre. We recommend
that the oven is not used until the seals have been
replaced.
• Cook your food in closed pots or pans with well-fitting
lids and use as little water as possible. Cooking with
the lid off will greatly increase energy consumption
• Use purely flat pots and pans
• If you are cooking something that takes a long time,
it's worth using a pressure cooker, which is twice as
fast and saves a third of the energy.
Respecting and conserving the environment
• Whenever possible, avoid pre-heating the oven
and always try to fill it. Open the oven door as little
as possible because heat is lost every time it is
opened. To save a substantial amount of energy,
simply switch off the oven 5 to 10 minutes before the
end of your planned cooking time and use the heat
the oven continues to generate.
• Keep gaskets clean and tidy to prevent any door
energy losses
• If you have a timed tariff electricity contract, the “delay
cooking” option will make it easier to save money by
moving operation to cheaper time periods.
• The base of your pot or pan should cover the hot plate.
If it is smaller, precious energy will be wasted and
pots that boil over leave encrusted remains that can
be difficult to remove.
*
Gas tap maintenance
Over time, the taps may become jammed or difficult to
turn. If this occurs, the tap must be replaced.
Do not use alcohol-based products such as
denatured alcohol.
Do not use alcohol-based products such as
denatured alcohol.
INTERIOR SURFACES
• After every use, leave the oven to cool and then
clean it, preferably while it is still warm, to remove any
deposits or stains caused by food residues To dry any
condensation that has formed as a result of cooking
foods with a high water content, let the oven to cool
completely and then wipe it with a cloth or sponge.
• Clean the glass in the door with a suitable liquid
detergent.
*Only available in ceratian models.
31
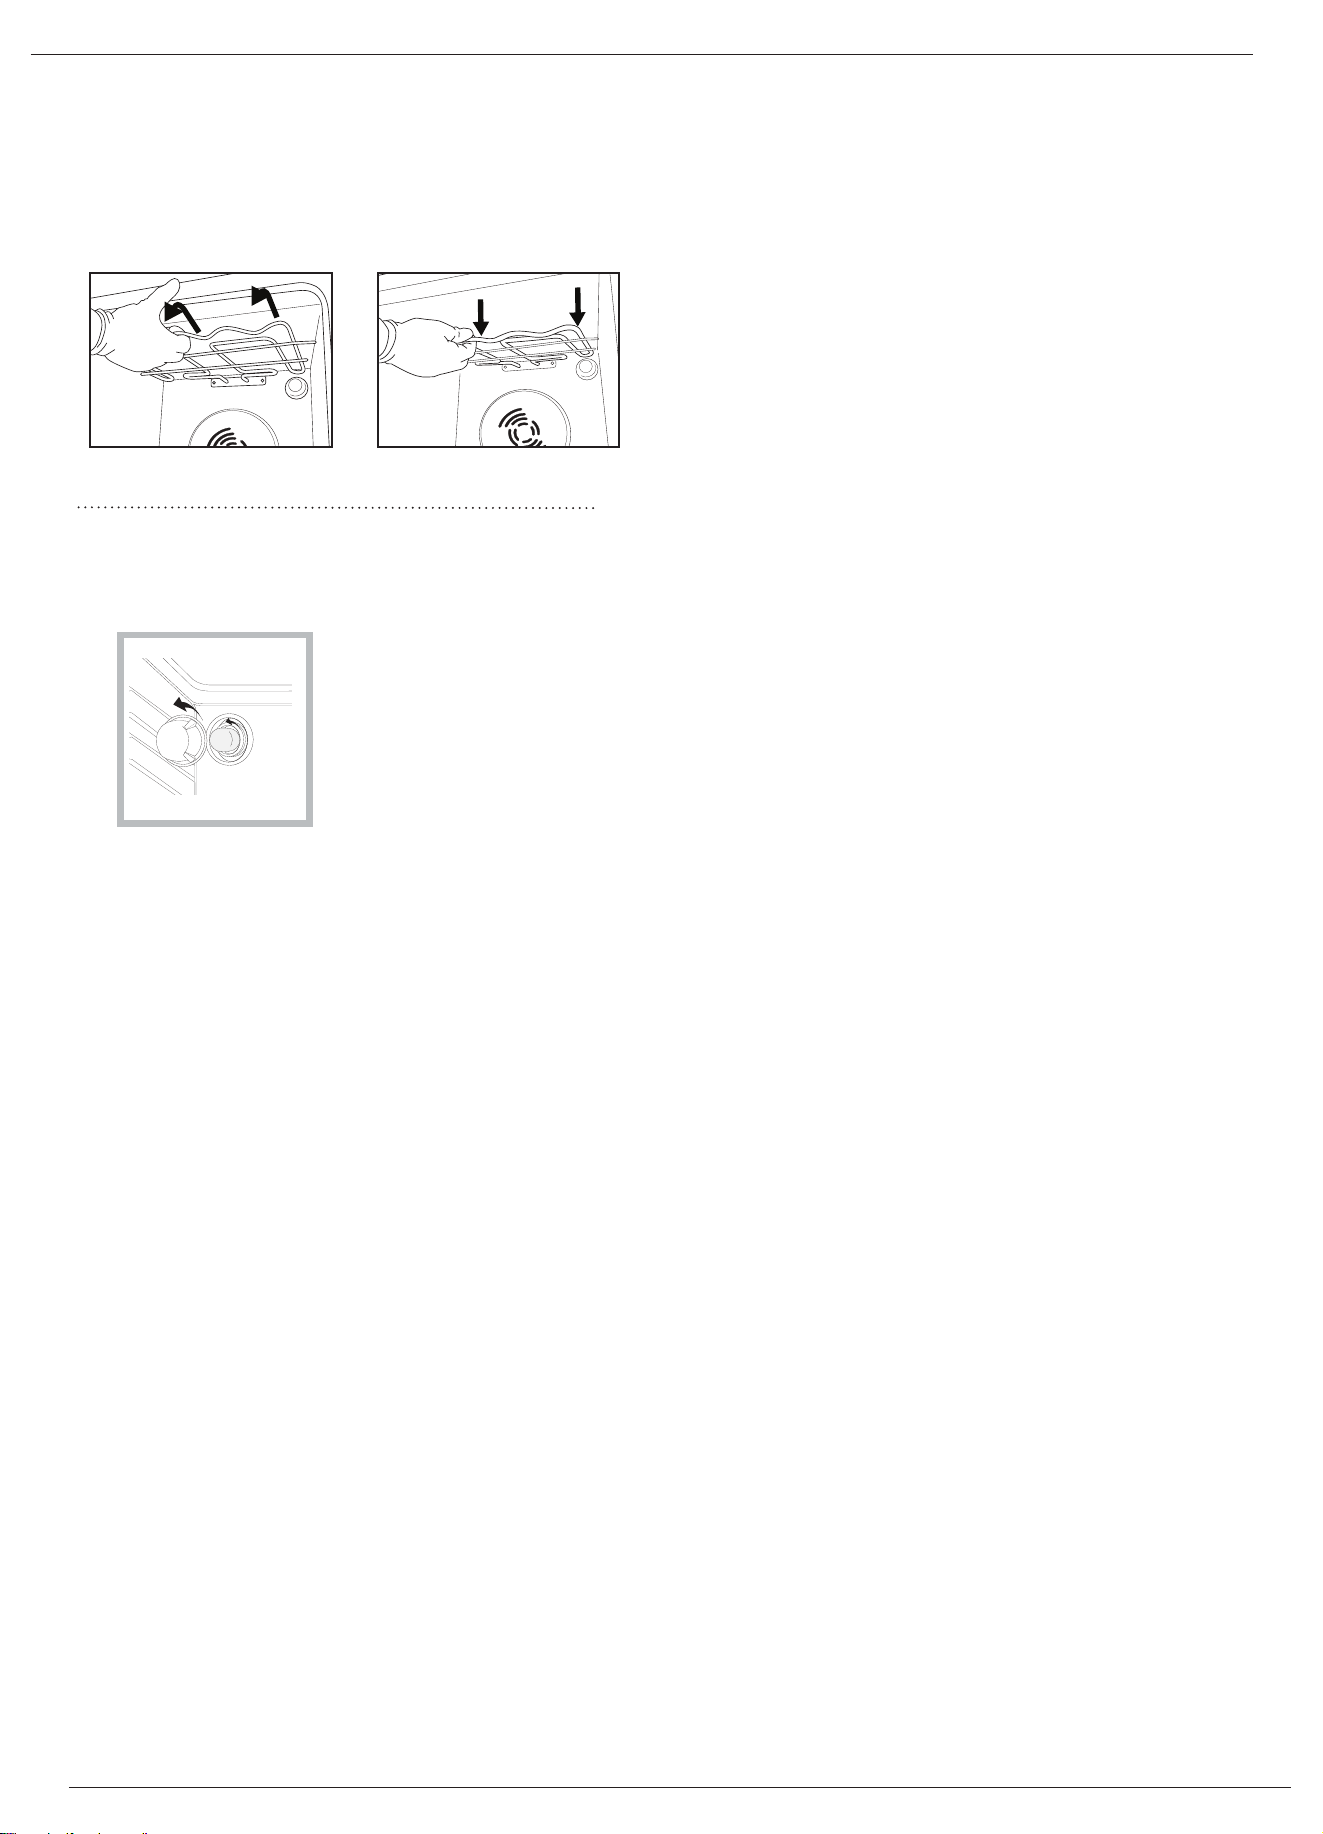
REPLAC
ING THE LIGHT
1.
Di
sc
onnec
t the oven from the power supply.
2.
Unscre
w the cover from the light, replace the bulb
and screw the cover back on the light.
3.
Re
c
o
n
n
ect the oven to the power supply.
Note: Use 40 W/230 V type
The bulb used in the pr
oduct is specically designed for
domestic appliances and is not suitable for general room
lighting within the home (EC Regulation 244/2009).
G9
Note: Use 40 W/230 V type
Light bulbs are a
vailable from our After-sales Service.
- Do not handle bulbs with your bare hands as your
ngerprints could damage them. Do not use the oven until
the light cover has been retted.
The bulb used in the product is specically designed for The bulb used in the product is specically designed for The bulb used in the product is specically designed for
domestic appliances and is not suitable for general room
lighting within the home (EC Regulation 244/2009).
Light bulbs are available from our After-sales Service.
- Do not handle bulbs with your bare hands as your
ngerprints could damage them. Do not use the oven until
the light cover has been retted.
This product contains a light source of energy
efficiency class G
MOVING THE TOP HEATING ELEMENT
1. R emove the side accessory holder grills.
2. P ull the heating element out a little ( Fig. 1) and
lower it ( Fig. 2 ).
3. To reposition the heating element, lift it up,
pulling it slightly towards you, making sure it
comes to rest on the lateral support.
Fig. 1
Fig. 2
31
32
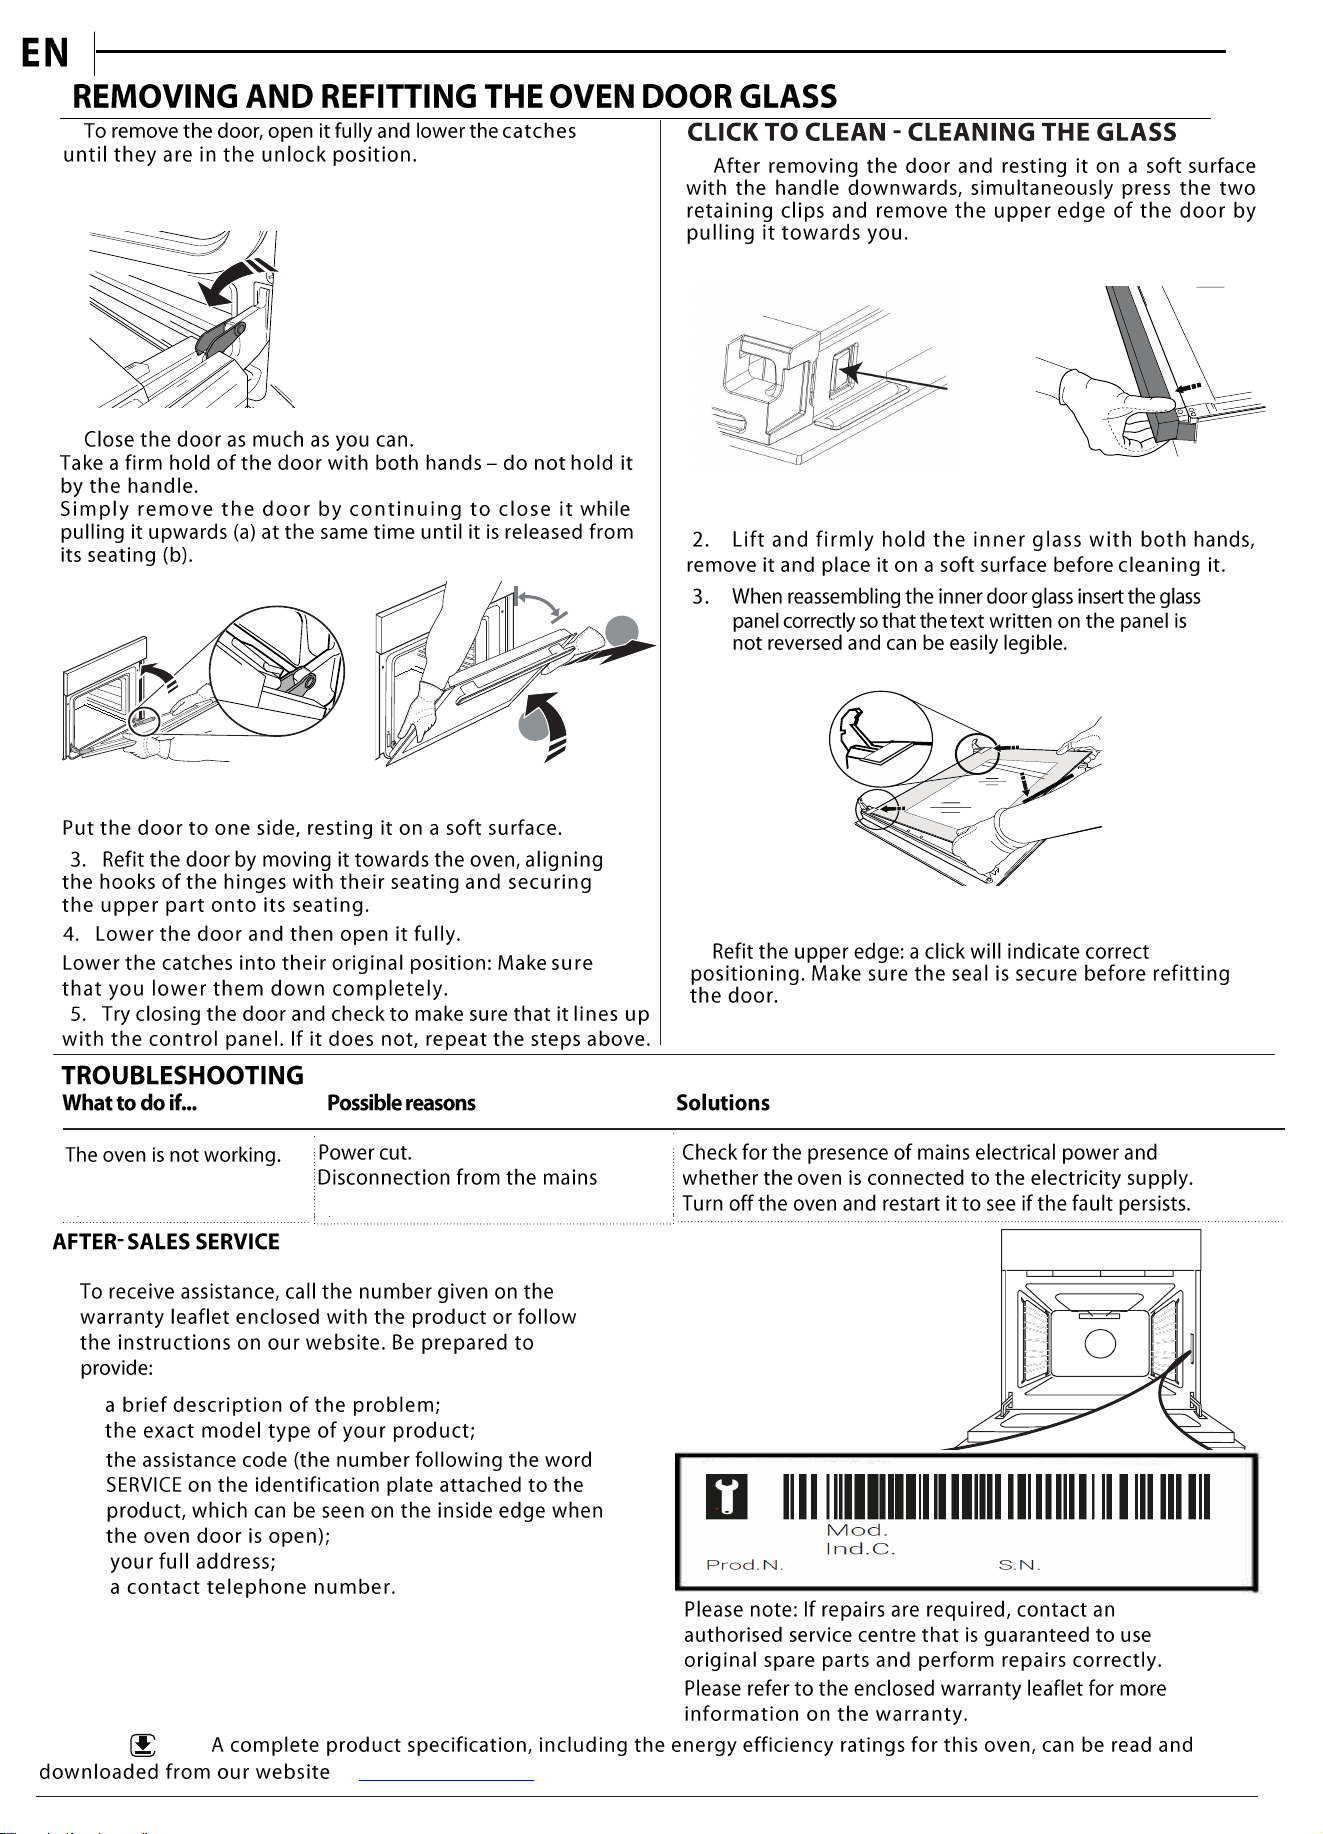
~60°
a
b
~15°
4.
2.
1.
1.
WWW
XXX
XXX
XXX
XXX
www.hotpoint.com
33
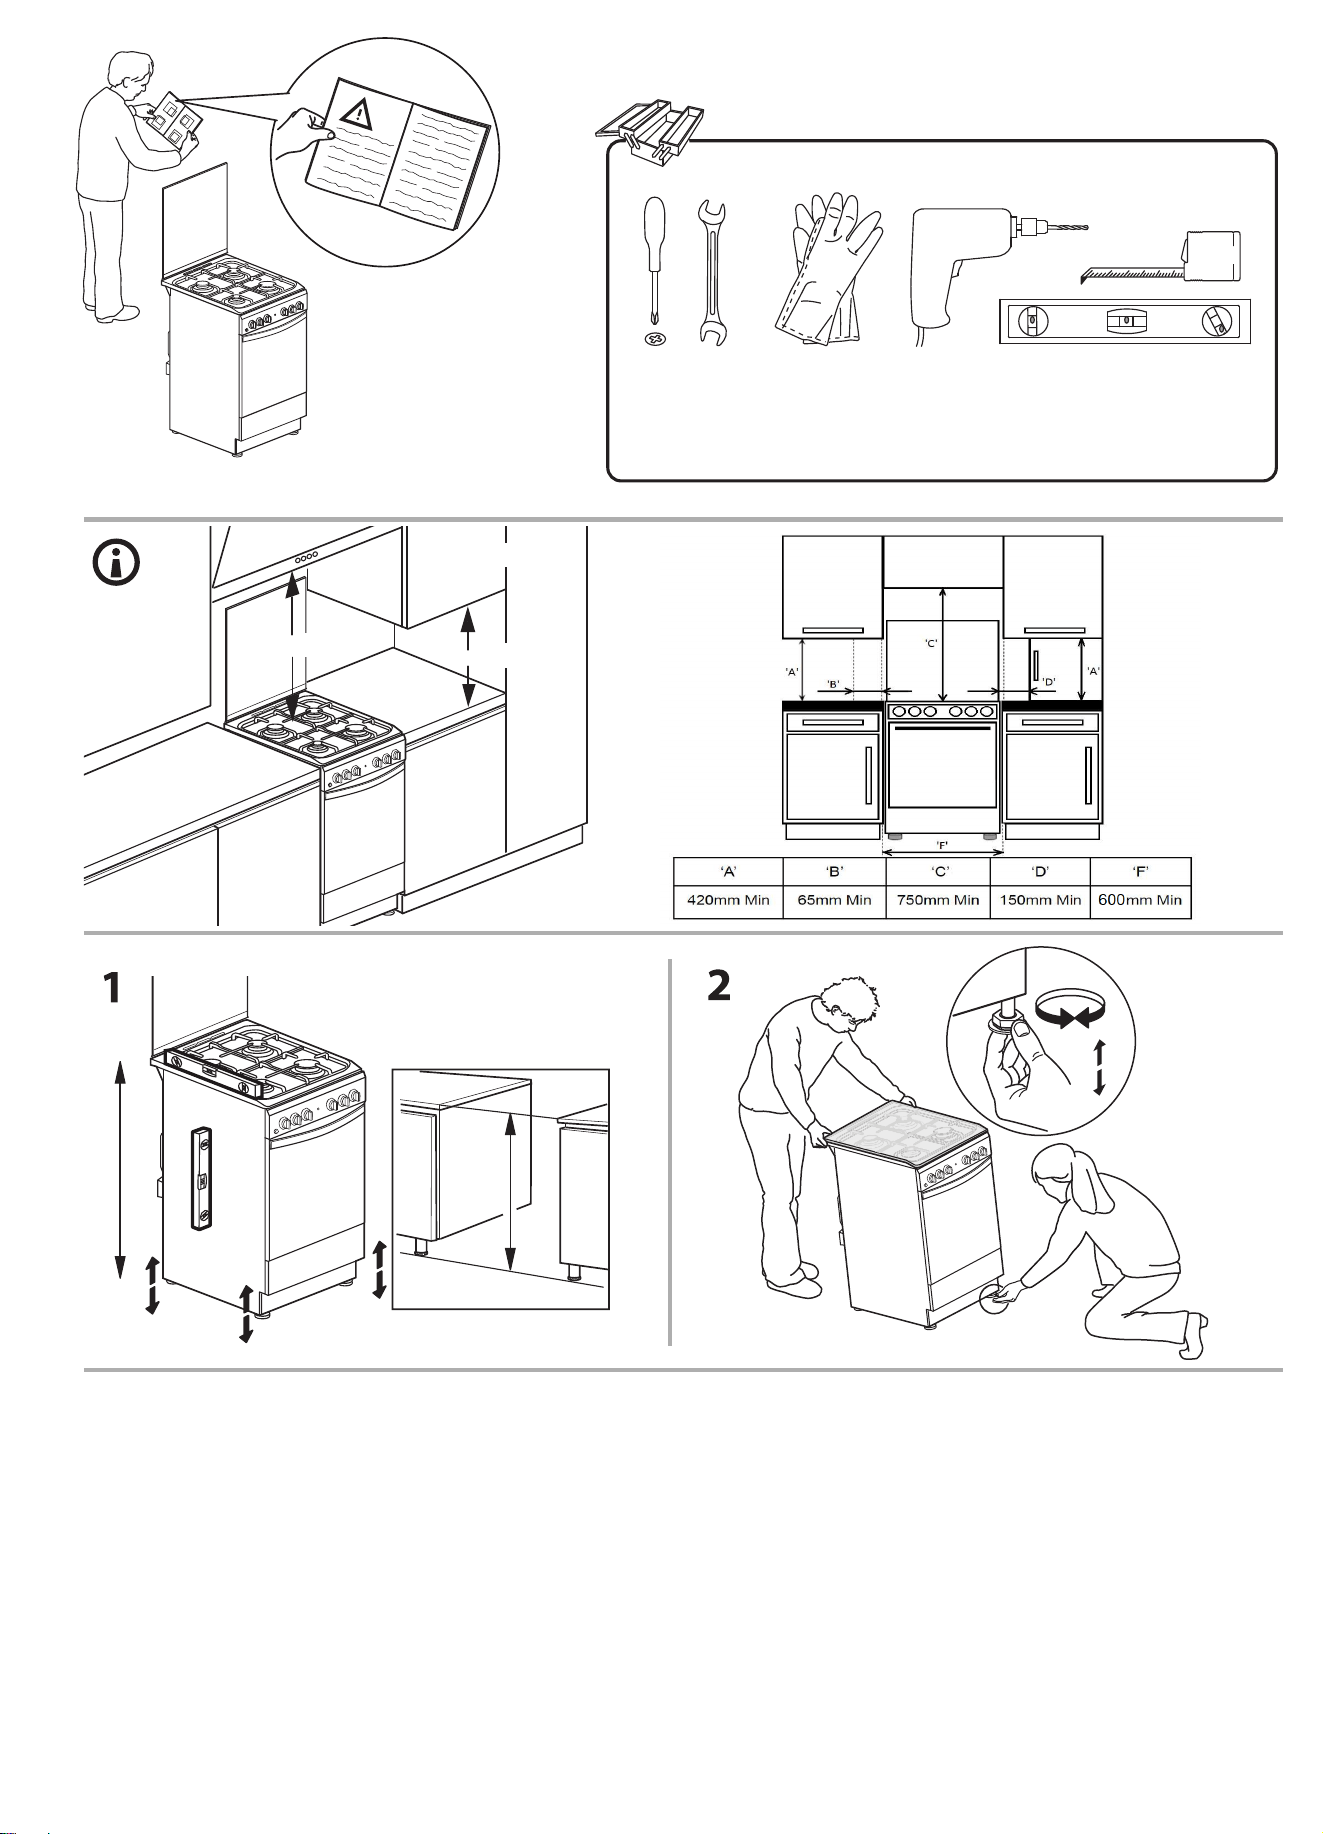
17mm - 0,67inch
max. 15 mm
Min. 420 mm
Min. 750 mm
H
H
34
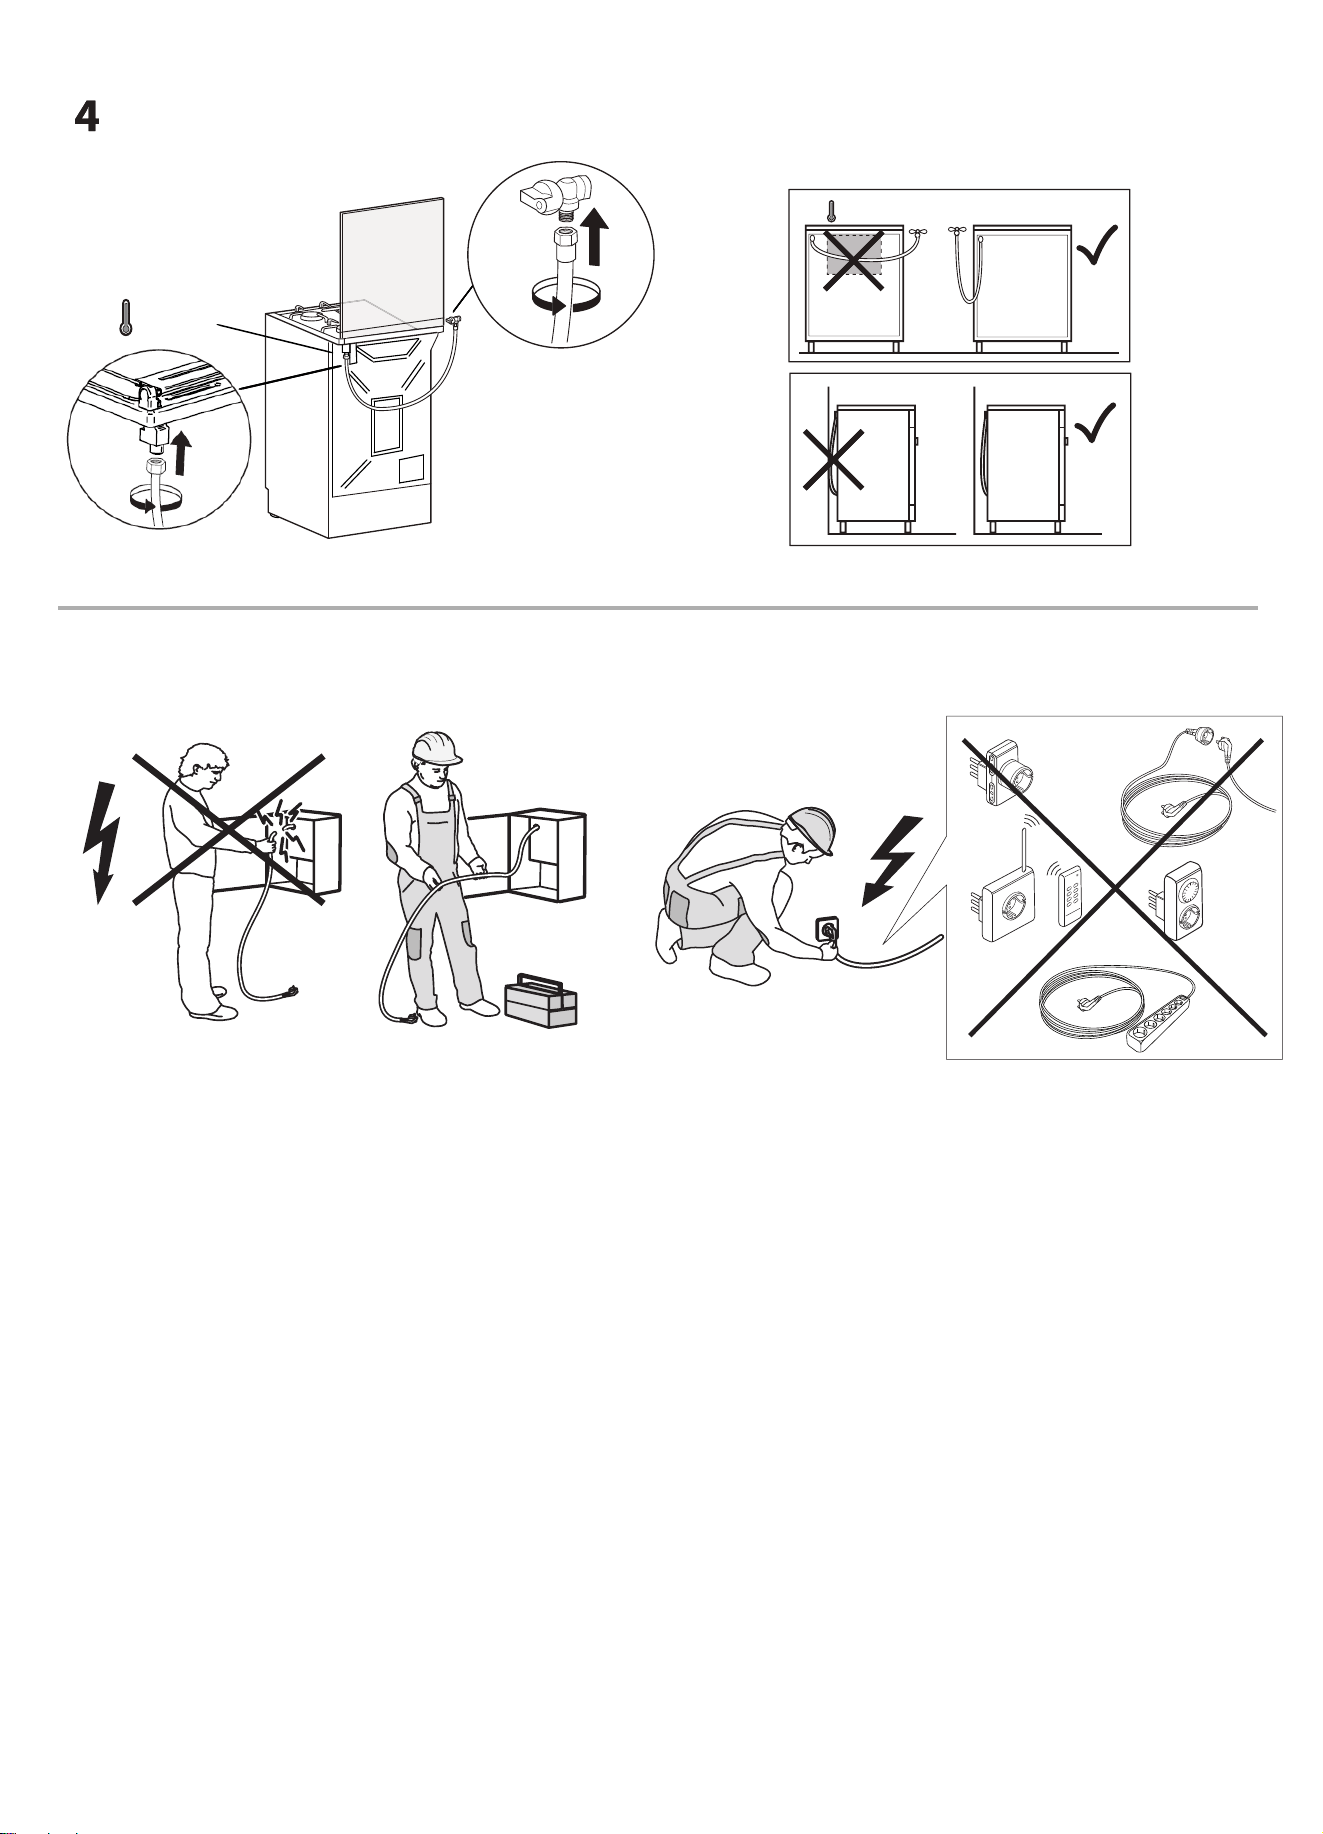
35
>50°C
>95°C
5

XEROX FABRIANO
Whirlpool Management EMEA Srl
Via Pisacane 1,
20016 Pero (MI), Italy
www.whirlpool.com
36
03/2024 -
W11723516
36