
User Guide


TOC i
Table of Contents
Introduction ................................................................................................................................ 1
Descriptions in the User Guide ........................................................................................... 1
Additional Information ......................................................................................................... 1
Location information .................................................................................................... 1
Limitations ................................................................................................................... 1
Get Started ................................................................................................................................ 2
Your Tablet at a Glance ...................................................................................................... 2
Set Up Your Tablet ............................................................................................................. 4
Charge the battery ....................................................................................................... 4
Install microSD card ..................................................................................................... 5
Turn Your Tablet On and Off ............................................................................................... 7
Setup Wizard ............................................................................................................... 8
Turn your screen on and off ......................................................................................... 8
Basic Functions .........................................................................................................................10
Touchscreen Navigation ....................................................................................................10
Function Buttons ................................................................................................................12
Your Home Screen ............................................................................................................13
Home screen overview ...............................................................................................13
Manage the Home screens .........................................................................................14
Apps launcher .............................................................................................................16
Permission ..................................................................................................................16
Quick shortcuts ...........................................................................................................17
Status bar ...................................................................................................................17
Notifications panel ......................................................................................................18
Quick settings .............................................................................................................19
Enter Text ..........................................................................................................................19
Gboard .......................................................................................................................19
Glide typing.................................................................................................................22
Google voice typing ....................................................................................................22
Copy and paste text ....................................................................................................23

ii TOC
Contacts....................................................................................................................................24
Contacts List ......................................................................................................................24
Contacts list options ....................................................................................................24
Add a Contact ....................................................................................................................24
Assign a picture to a contact .......................................................................................25
Delete a contact ..........................................................................................................25
Edit a contact ..............................................................................................................25
Contacts entry options ................................................................................................25
Add a Group Contact .........................................................................................................26
Delete a group contact ................................................................................................26
Edit a group contact ....................................................................................................26
Add a Contact to Favorites.................................................................................................27
Applications ..............................................................................................................................28
Google Apps ......................................................................................................................28
Create a Google Account ............................................................................................28
Sign in to your Google Account...................................................................................28
Chrome .......................................................................................................................29
Gmail ..........................................................................................................................29
Calendar .....................................................................................................................30
Google Play Store app ................................................................................................31
Google Maps ..............................................................................................................31
YouTube .....................................................................................................................32
YouTube Music ...........................................................................................................32
Files ............................................................................................................................32
Supported formats ......................................................................................................32
Google Duo ................................................................................................................32
Connections ..............................................................................................................................33
Wi-Fi ..................................................................................................................................33
Turn Wi-Fi on and connect to a wireless network ........................................................33
Wi-Fi settings menu ....................................................................................................34
Bluetooth ...........................................................................................................................34
Turn Bluetooth on or off ..............................................................................................34
Change the device name ............................................................................................35

TOC iii
Pairing ........................................................................................................................35
Send and receive information .....................................................................................36
Supported Bluetooth profiles .......................................................................................36
Camera .....................................................................................................................................37
Use the Camera App .........................................................................................................37
Open or close the Camera app ...................................................................................37
Viewfinder screen .......................................................................................................37
Take a picture or record a video .................................................................................39
Review screen ............................................................................................................39
Camera settings .........................................................................................................40
View Pictures and Videos Using Photos ............................................................................42
View pictures and videos ............................................................................................42
Work with Pictures .............................................................................................................42
Edit a picture ...............................................................................................................42
Share Pictures and Videos.................................................................................................43
Useful Tools ..............................................................................................................................44
Clock .................................................................................................................................44
Alarm ..........................................................................................................................44
Clock ..........................................................................................................................44
Timer ..........................................................................................................................45
Stopwatch ...................................................................................................................45
Bedtime ......................................................................................................................46
Calculator ..........................................................................................................................46
Flashlight ...........................................................................................................................46
Sound Recorder .................................................................................................................47
Record sound .............................................................................................................47
Play audio data ...........................................................................................................47
Stored sound list .........................................................................................................47
Voice Search .....................................................................................................................48
Settings .....................................................................................................................................49
Network & Internet .............................................................................................................49
Wi-Fi ...........................................................................................................................49
Airplane mode ............................................................................................................49

iv TOC
Virtual Private Networks (VPN) ...................................................................................49
Private DNS ................................................................................................................50
Connected Devices ............................................................................................................50
USB ............................................................................................................................50
Pair new device ..........................................................................................................50
Previously connected devices .....................................................................................50
Connection preferences ..............................................................................................51
Apps ..................................................................................................................................51
Recently opened apps ................................................................................................51
Default apps ...............................................................................................................51
Screen time ................................................................................................................51
Unused apps ..............................................................................................................52
Special app access .....................................................................................................52
Notifications .......................................................................................................................52
App settings ................................................................................................................52
Notification history ......................................................................................................52
Conversations .............................................................................................................52
Bubbles ......................................................................................................................52
Device & app notifications ...........................................................................................52
Notifications on lock screen ........................................................................................52
Sensitive notifications .................................................................................................52
Do Not Disturb ............................................................................................................52
Other notification settings ...........................................................................................52
Battery ...............................................................................................................................53
Battery Usage .............................................................................................................53
Battery Saver ..............................................................................................................53
Battery Manager .........................................................................................................53
Battery percentage .....................................................................................................53
Battery Care Mode ......................................................................................................53
Customize Button ..............................................................................................................54
Assign a function to the programmable key ................................................................54
Wake up device ..........................................................................................................54
Storage ..............................................................................................................................54

TOC v
Device storage ............................................................................................................54
Portable storage .........................................................................................................54
Sound ................................................................................................................................55
Volume settings ..........................................................................................................55
Do Not Disturb ............................................................................................................55
Media..........................................................................................................................55
Default notification sound ............................................................................................55
Default alarm sound ....................................................................................................56
Other sounds ..............................................................................................................56
Display ...............................................................................................................................56
Brightness level ..........................................................................................................56
Adaptive brightness ....................................................................................................56
Lock screen ................................................................................................................56
Screen timeout ...........................................................................................................56
Dark theme .................................................................................................................56
Font size .....................................................................................................................56
Display size ................................................................................................................57
Night Light ..................................................................................................................57
Glove touch mode.......................................................................................................57
Auto-rotate screen ......................................................................................................57
Screen saver ..............................................................................................................57
Tap to wake ................................................................................................................57
Wallpaper ..........................................................................................................................57
Accessibility .......................................................................................................................57
Accessibility menu ......................................................................................................58
Select to Speak ..........................................................................................................58
Switch Access ............................................................................................................58
TalkBack .....................................................................................................................59
Text and display .........................................................................................................59
Extra dim ....................................................................................................................61
Dark theme .................................................................................................................61
Magnification ..............................................................................................................61
Timing controls ...........................................................................................................62

vi TOC
System controls ..........................................................................................................62
Caption preferences ...................................................................................................63
Audio adjustment ........................................................................................................63
Accessibility shortcuts .................................................................................................64
Text-to-speech output .................................................................................................64
Security ..............................................................................................................................65
Security status ............................................................................................................65
Screen lock .................................................................................................................65
Screen lock settings ....................................................................................................65
Smart Lock .................................................................................................................66
Device admin apps .....................................................................................................66
Encryption & credentials .............................................................................................66
Trust agents................................................................................................................66
App pinning.................................................................................................................66
Privacy ...............................................................................................................................66
Privacy dashboard ......................................................................................................66
Permission manager ...................................................................................................67
Show passwords ........................................................................................................67
Notifications on lock screen ........................................................................................67
Show clipboard access ...............................................................................................67
Autofill service from Google ........................................................................................67
Google location history ...............................................................................................67
Activity controls ...........................................................................................................67
Ads .............................................................................................................................67
Usage & diagnostics ...................................................................................................67
Location .............................................................................................................................68
Use location ................................................................................................................68
Recent access ............................................................................................................68
App location permissions ............................................................................................68
Location services ........................................................................................................68
Safety & Emergency ..........................................................................................................69
Emergency information ...............................................................................................69
Emergency Location Service ......................................................................................69

TOC vii
Password & Accounts ........................................................................................................69
Passwords ..................................................................................................................69
Autofill service ............................................................................................................70
Set up a new account .................................................................................................70
Manage existing accounts ..........................................................................................70
Automatically sync app data .......................................................................................70
Digital Wellbeing & Parental Controls ................................................................................70
Your Digital Wellbeing tools ........................................................................................70
Parental controls .........................................................................................................71
Google ...............................................................................................................................71
System...............................................................................................................................72
Languages & input ......................................................................................................72
Gestures .....................................................................................................................72
Date & time .................................................................................................................73
Auto power on/off .......................................................................................................73
Backup .......................................................................................................................73
System updates ..........................................................................................................74
Reset options ..............................................................................................................74
About Tablet ......................................................................................................................75
Legal information ........................................................................................................75
Contact Us ................................................................................................................................76
Copyright & Trademarks ...........................................................................................................77


Introduction 1
Introduction
Thank you for purchasing this Kyocera product. Please read this user guide carefully before
using the device to ensure safe and proper use.
Descriptions in the User Guide
Most descriptions in this user guide are based on your device setup at the time of purchase.
Instructions for performing tasks in this guide may change depending on the version of software
or application on your tablet. The status of individual settings may affect whether certain menus
for option settings are displayed or visible.
All screens in this guide are simulated. Actual displays may vary.
All features, functionality, and other specifications, as well as the information contained in this
guide are based upon the latest available information and are believed to be accurate at the
time of issuing. Kyocera International, Inc. reserves the right to change or modify any
information or specifications without notice or obligation.
For warranty service information, please refer to the Safety & Warranty information that came
with your Kyocera tablet or call the following telephone number from anywhere in the continental
United States: 1-800-349-4478.
Additional Information
Location information
This device can determine its/your geographical location (location information) and can
associate location information with other data. For some applications, location information must
be turned on and you have to agree to its collection. Additionally, certain services, applications,
and programs are capable of accessing, collecting, storing, and using location information and
disclosing it to others. You should decide carefully when determining whether location
information should be made available to others.
Limitations
Kyocera does not authorize or approve the use or sale of its products in any country or region
subject to trade embargo by the U.S. government.
©2022 Kyocera Corporation. KYOCERA is a registered trademark of Kyocera Corporation.
DuraSlate is a trademark of Kyocera International. All other trademarks are the property of their
respective owners.
2 Get Started
Get Started
The following topics give you all the information you need to set up your tablet the first time.
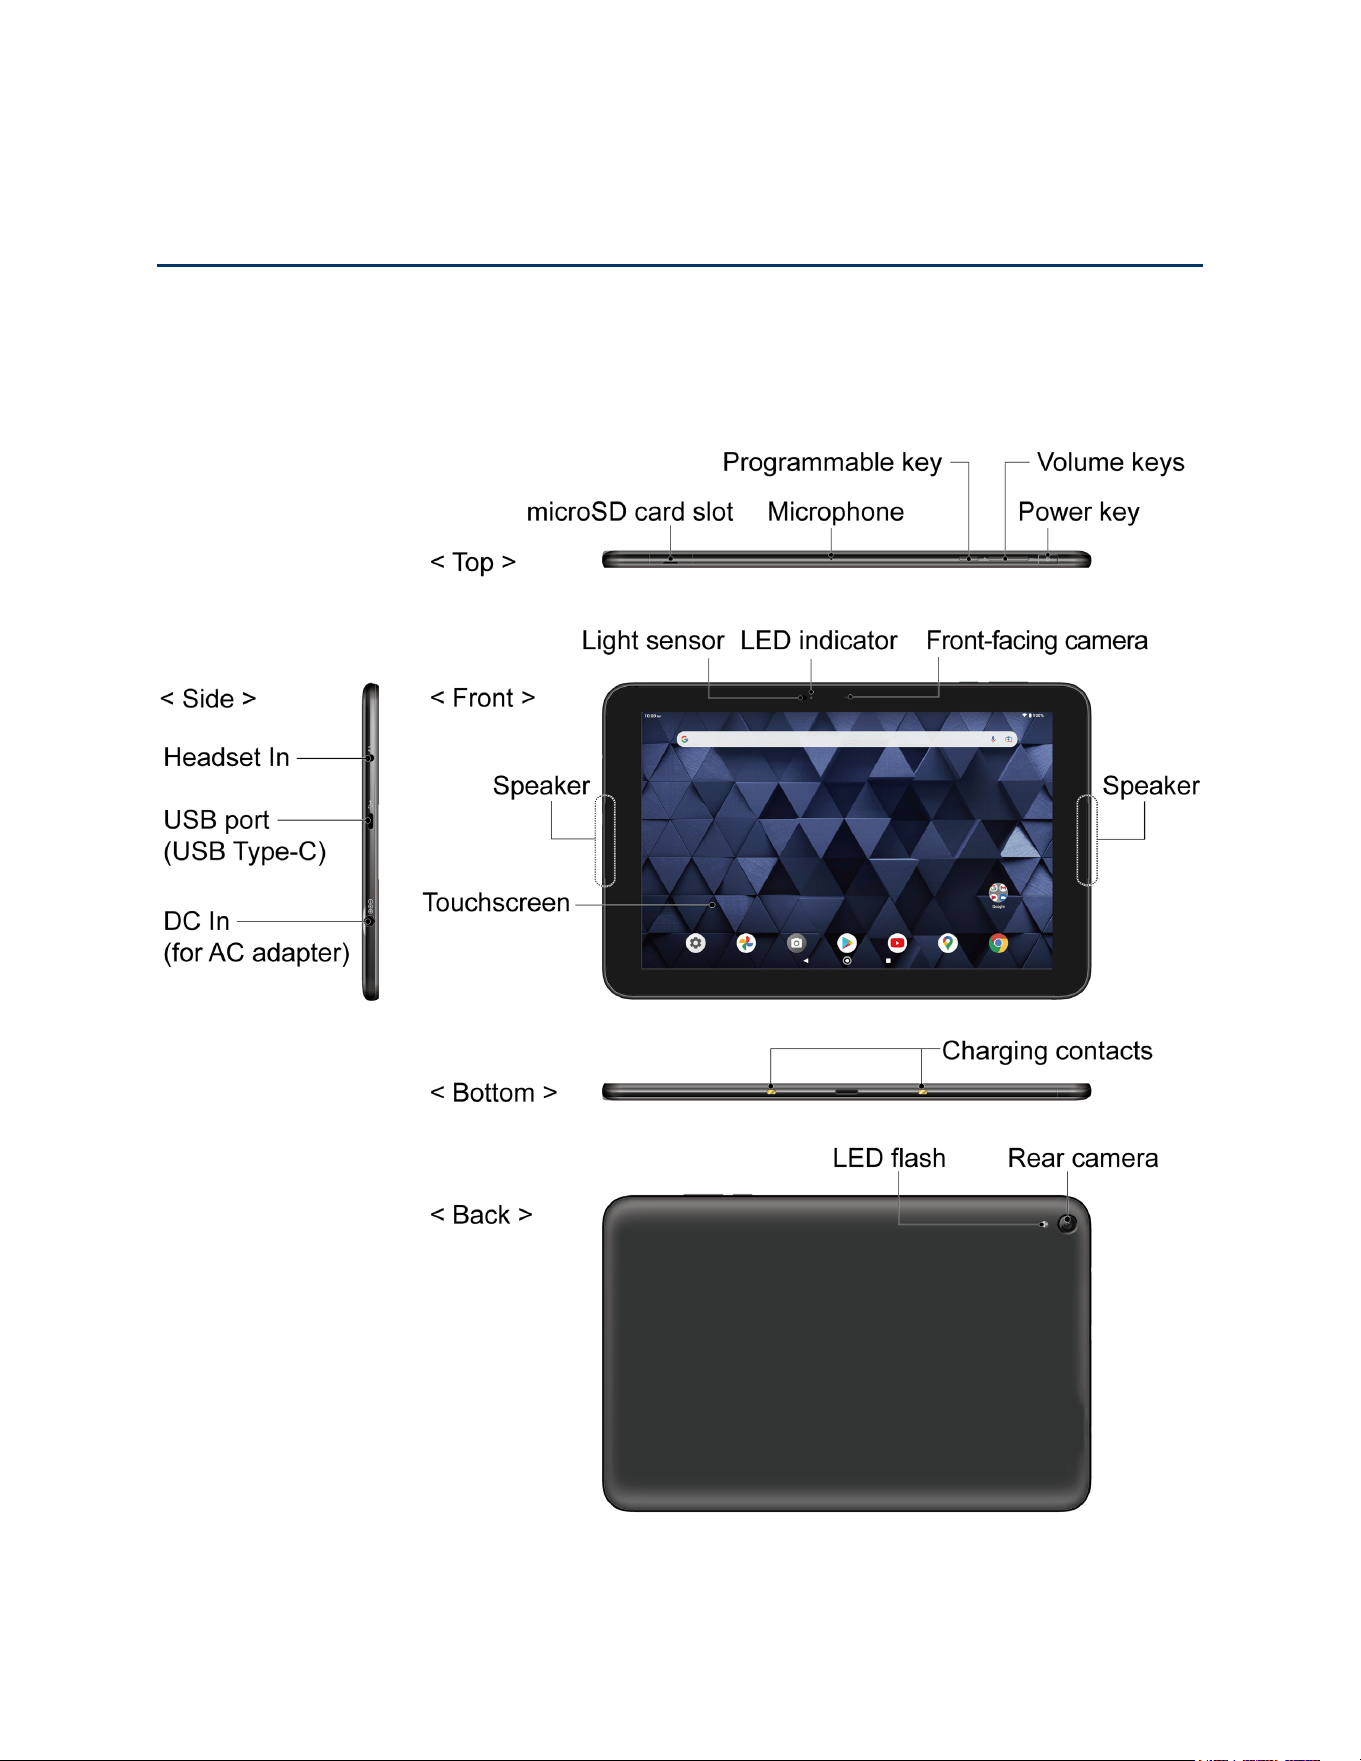
Your Tablet at a Glance
The following illustration outlines the primary external features and keys on your tablet.

Get Started 3
● Headset In allows you to plug in an optional headset for conversations or for listening to
music.
● USB port allows you to plug compatible accessories such as USB Type-C cable for data
transfer, charging, etc.
CAUTION!
Inserting an accessory into the incorrect jack may damage the tablet.
● DC In allows you to connect the supplied AC adapter for charging.
NOTE:
The DC In port cannot be used to charge the tablet when the USB port is in use.
● microSD card slot allows you to insert a microSD™ card placed on the microSD card
tray.
NOTE:
microSD cards are sold separately. Your tablet supports a microSD card up to
1 TB.
● Microphone transmits your voice for video communication or other voice-activated
functions.
● Programmable key can be assigned to frequently used applications or functions for
quick access. See Customize button.
● Volume keys allow you to adjust the media volume.
● Power key lets you turn the tablet on/off, turn the screen on/off, restart the tablet, or
capture screenshots.
● Touchscreen displays all the information needed to operate your tablet. Use finger
gestures to navigate and interact with items on the screen.
● Speakers let you hear notification alerts, automated prompts, music clip on YouTube,
and other application sounds.
● Light sensor detects the amount of light in the surrounding environment, and it is used,
for example, to adjust the screen brightness.
● LED indicator displays the charging status.
● Front-facing camera allows you to take pictures and record videos while facing the
screen and to have a video chat by setting up an app, such as Google Duo™.
● Charging contacts allow you to charge the tablet by placing it on an optional charging
stand.
NOTE:
The charging contacts cannot be used to charge the tablet when the USB port is
in use.
4 Get Started
● LED flash helps illuminate subjects in low-light environments when taking a picture or
recording a video. It can also work as an LED flashlight. See Flashlight.
● Rear camera lets you take pictures and videos.
Set Up Your Tablet
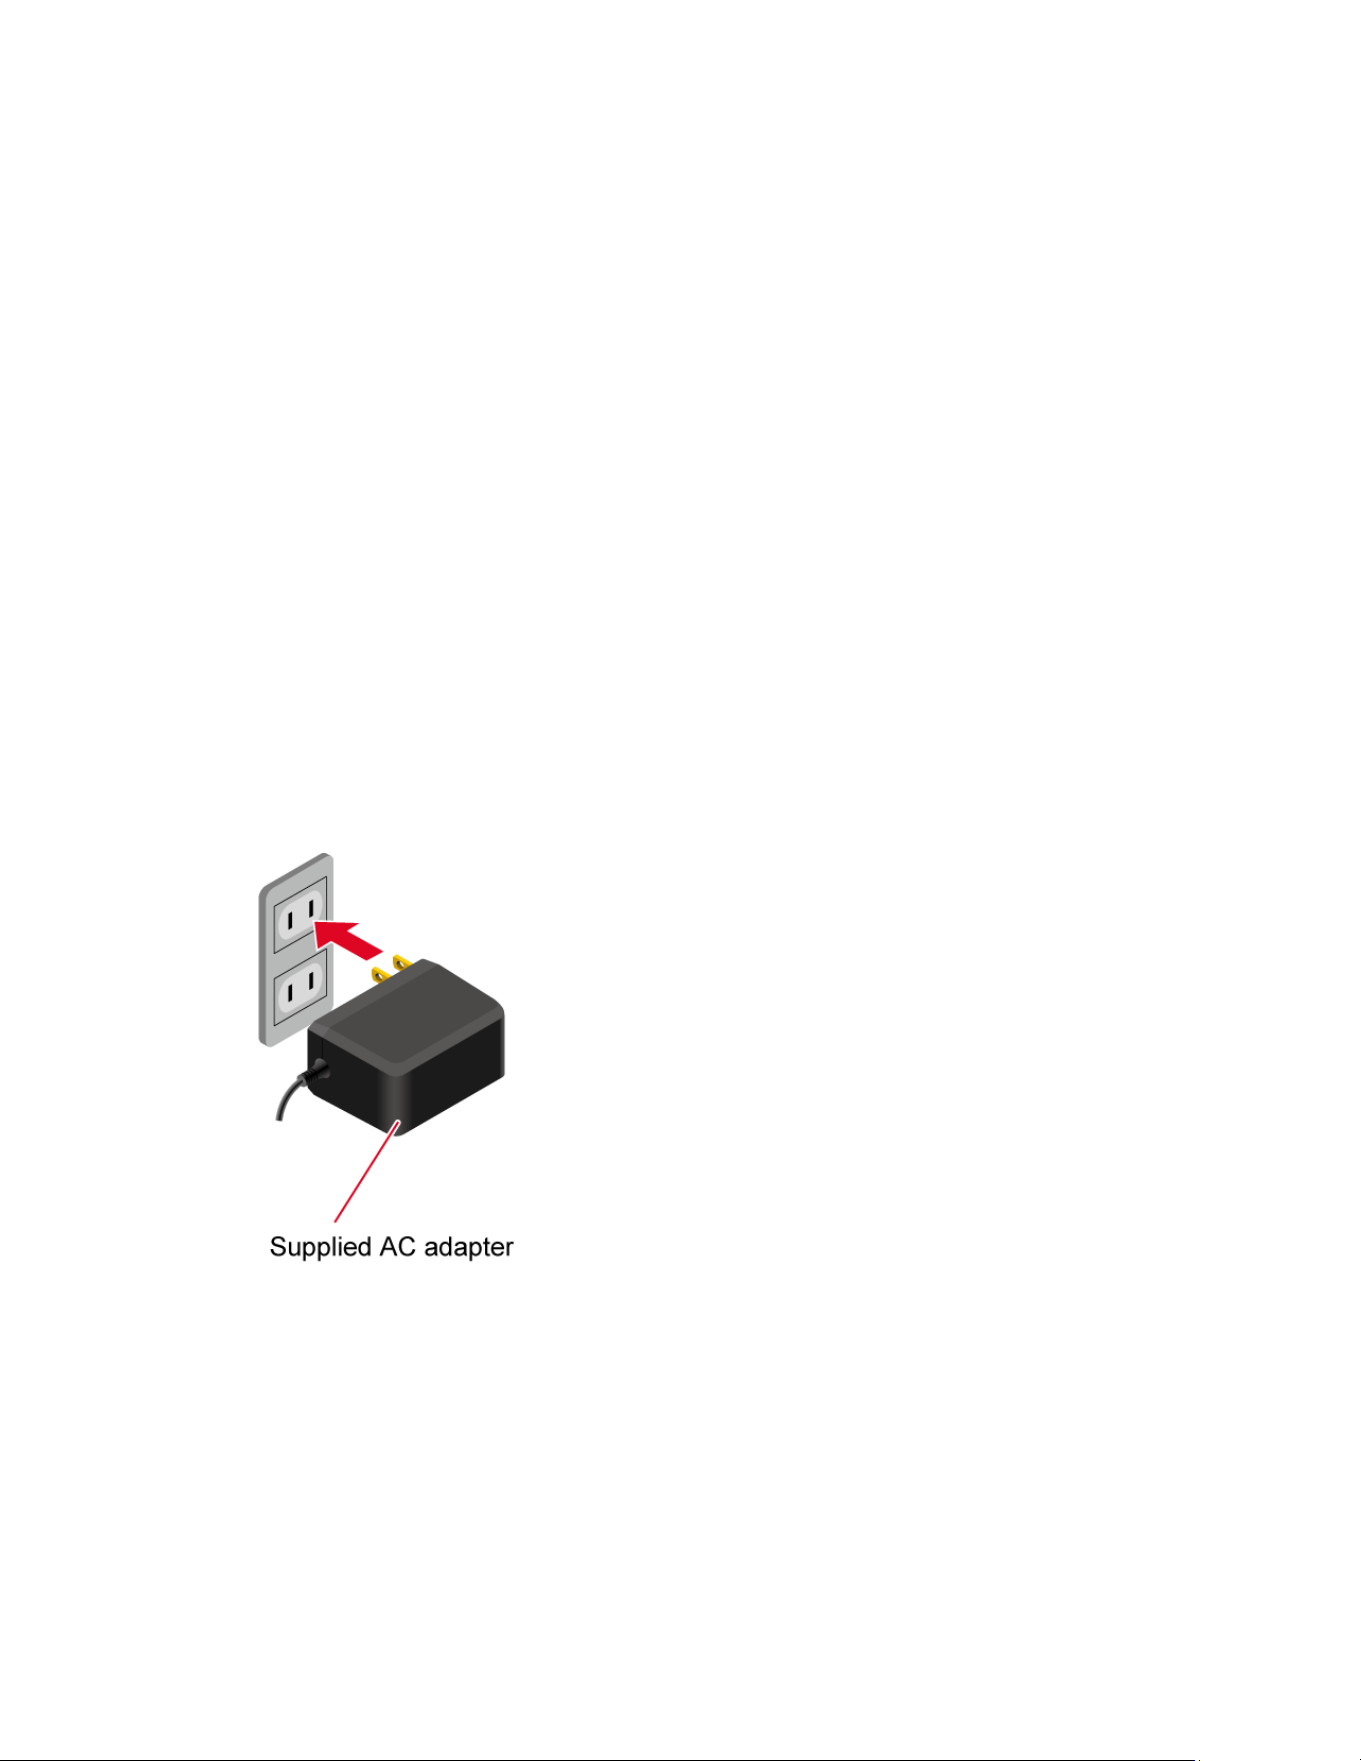
You need to charge the battery to begin setting up your tablet.
Charge the battery
Fully charge the battery before powering on the tablet.
NOTE:
The battery cannot be removed from the tablet. For replacing or disposing of the
battery, contact a KYOCERA authorized service center.
NOTE:
The AC adapter cannot be used to charge the tablet when the USB port is in use.
IMPORTANT:
Unplug the AC adapter from the electrical outlet when not in use to reduce the
environmental impact of charging.
IMPORTANT:
Use only the supplied AC adapter for this device.
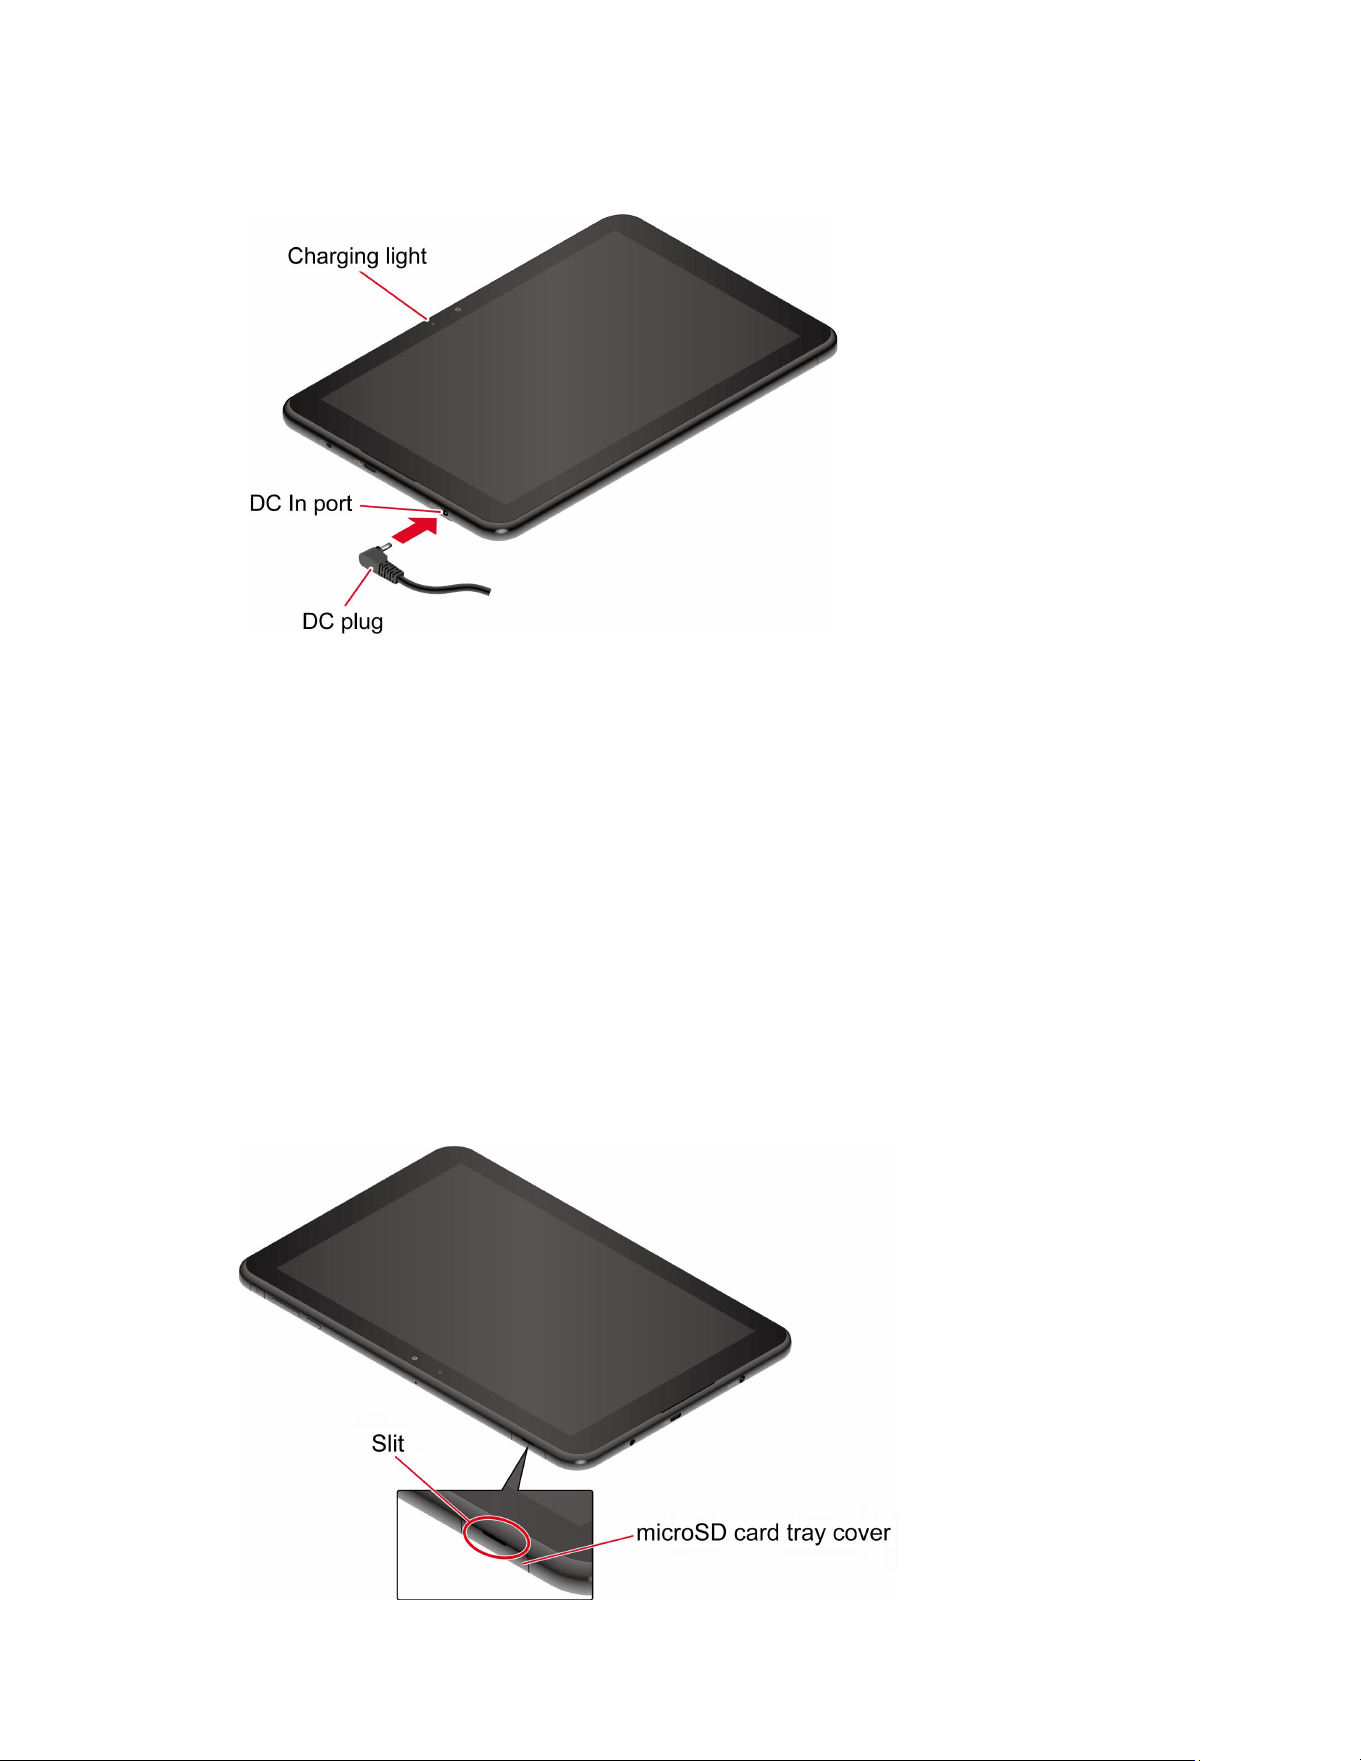
1. Plug the supplied AC adapter into an electrical outlet.
Get Started 5
2. Insert the AC adapter’s DC plug into the DC In port on the tablet.
WARNING: Use only approved AC adapter with your device. Improper handling of the
DC In port, as well as the use of an incompatible adapter, may cause
damage to your device and void the warranty.
3. When charging is complete, remove the DC plug from DC In and unplug the AC adapter
from the outlet.
Install microSD card
Inserting a compatible microSD card into your tablet will increase its storage capacity. To install
a microSD card, follow the instructions below.
NOTE:
microSD cards are sold separately.
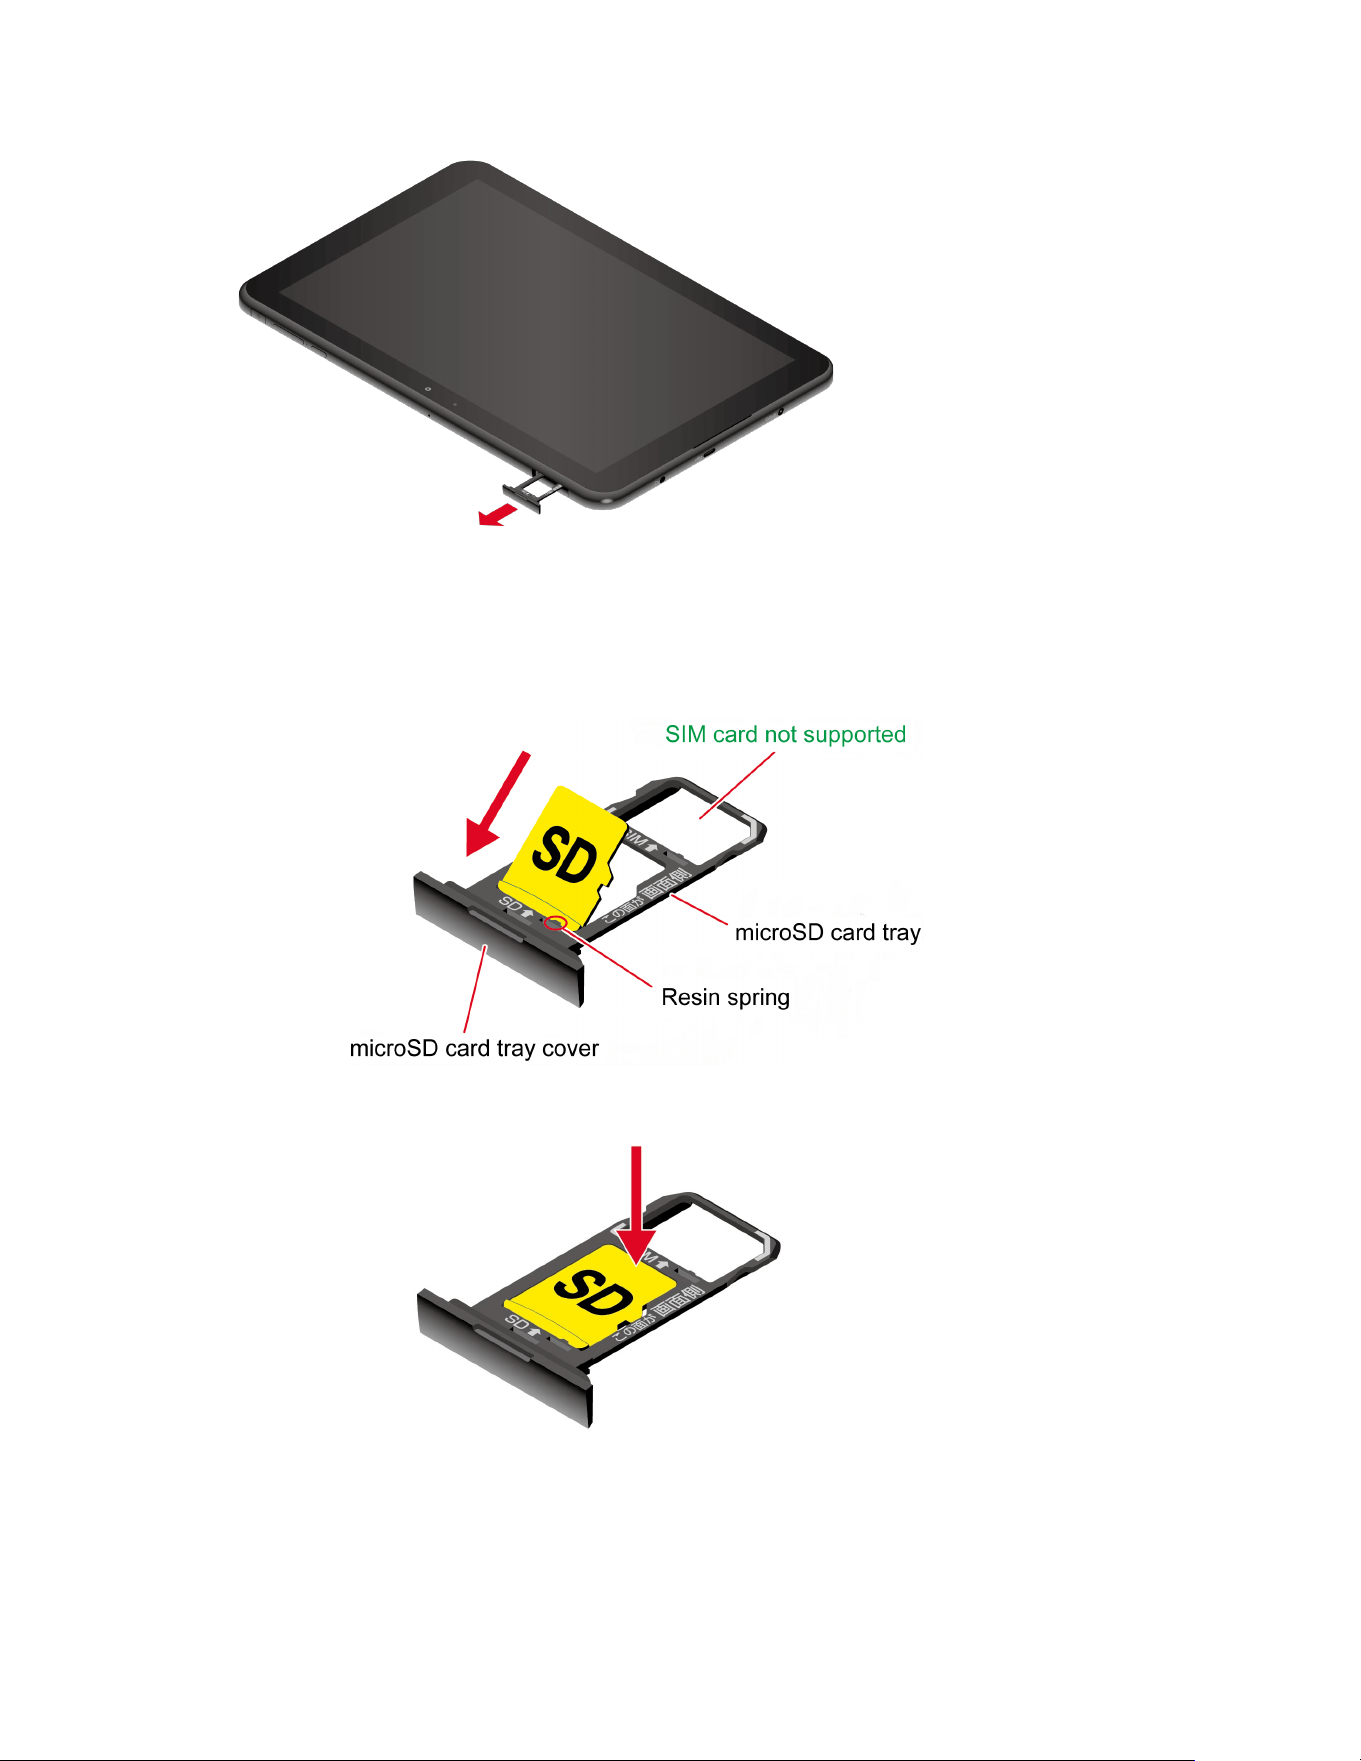
1. With the tablet facing up, insert your fingernail into the slit on the microSD card tray
cover and pull out the tray.
6 Get Started
2. Put the tray onto a flat surface and place a microSD card into the tray. Ensure the gold
contacts are facing down as shown.
Gently push the microSD card into the microSD tray at a 30 to 45 degree angle so it
presses against the resin spring as shown.
Place the card down on the tray while pushing it against the resin spring.
Get Started 7
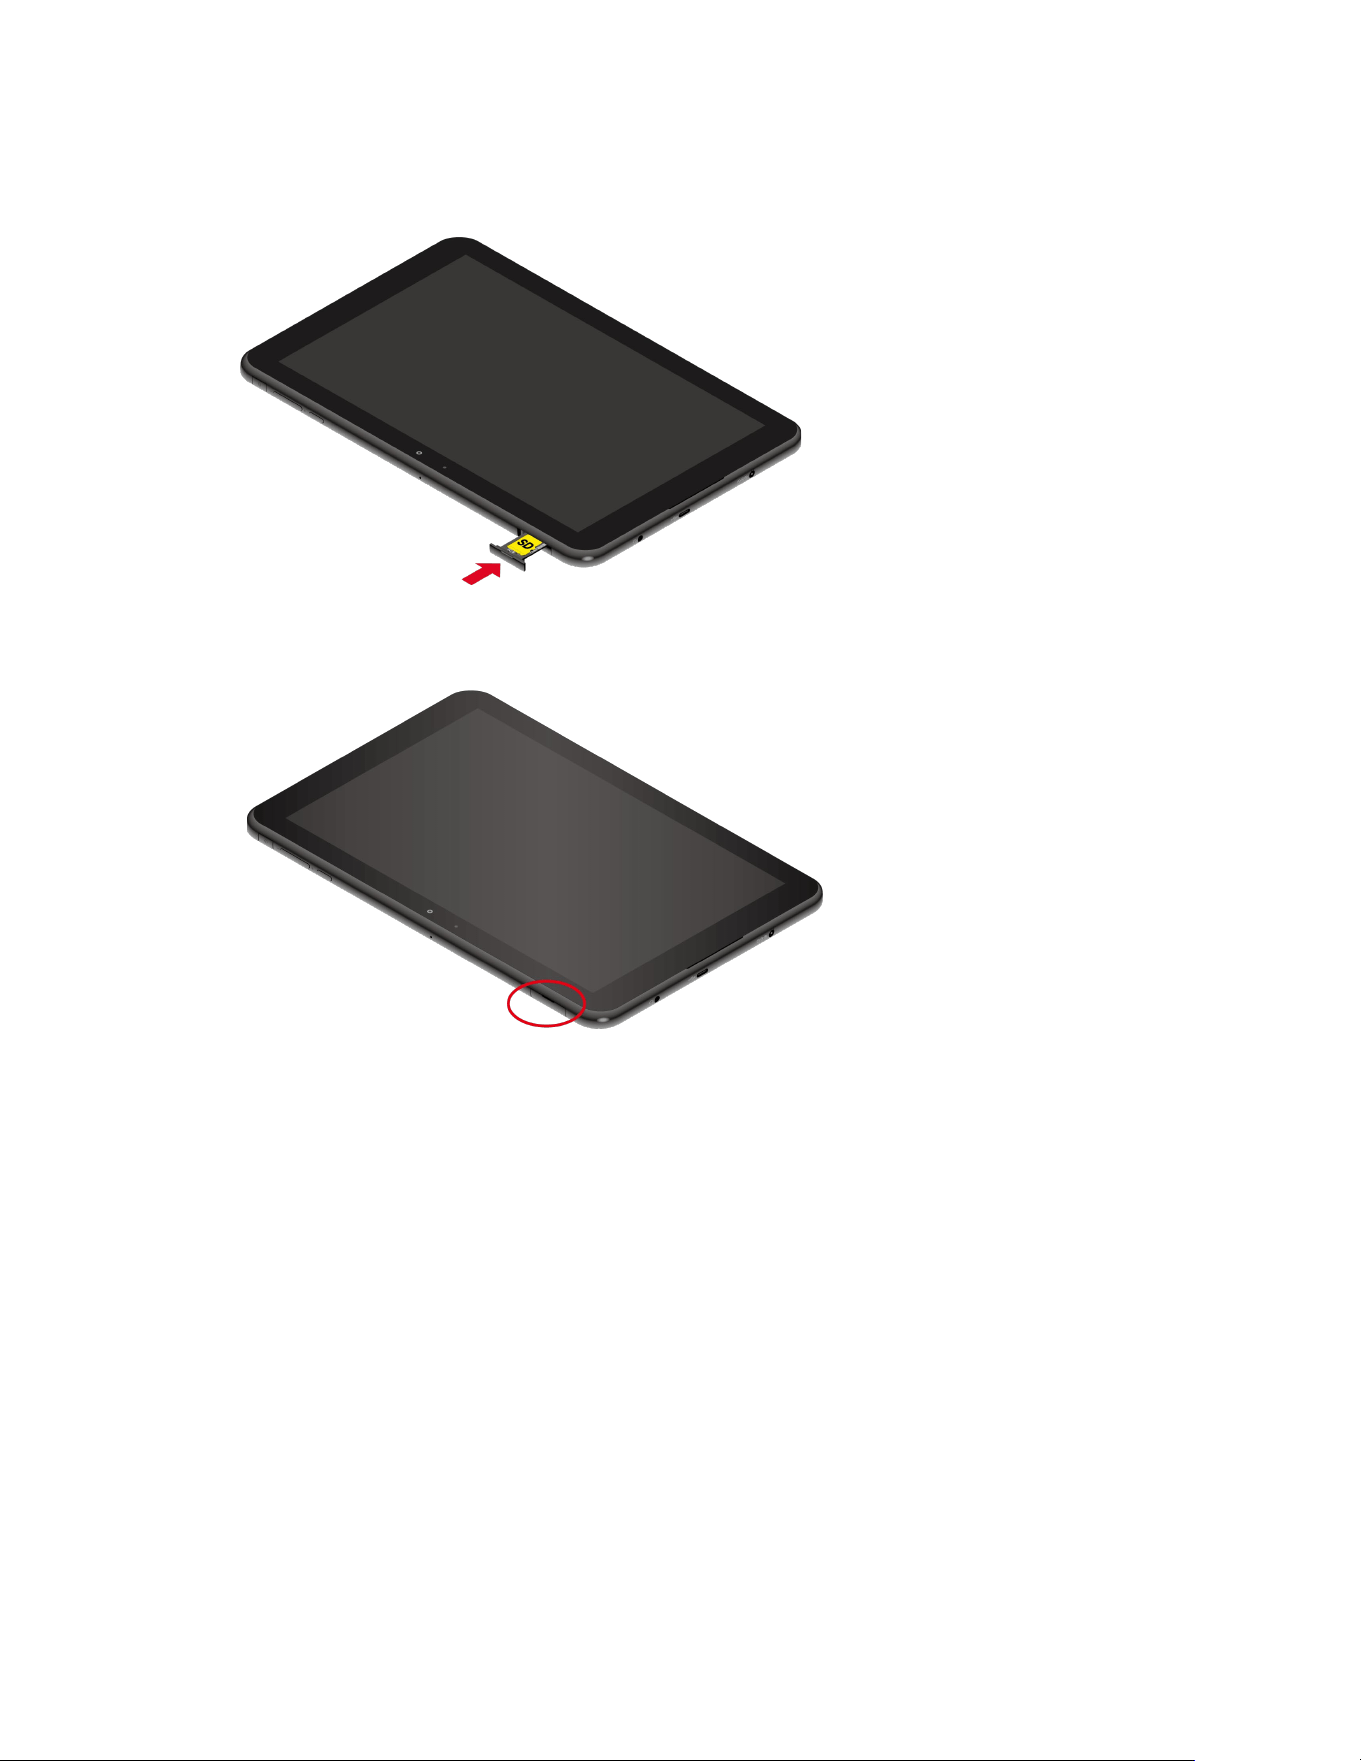
3. Insert the tray into the tablet until it seats properly, being careful not to let the card pop
out.
4. In order to maintain your tablet’s waterproof seal, confirm that the card tray cover is
securely closed.
NOTE:
You can easily damage the microSD card by improper operation. Please be
careful when inserting, removing, or handling the microSD card.
NOTE:
Make sure your battery is fully charged before using the microSD card. Your
data may become damaged or unusable if the battery runs out while using the
microSD card.
Turn Your Tablet On and Off
The instructions below explain how to turn your tablet on and off.
To turn your tablet On:
► Press and hold the Power key until the screen lights up.
To turn your tablet Off:
1. Press and hold the Power key until the Power menu screen is displayed.
2. Tap Power off to turn the tablet off.

8 Get Started
To restart your tablet:
1. Press and hold the Power key until the Power menu screen is displayed.
2. Tap Restart to restart the tablet.
To put your tablet into Lockdown mode:
NOTE:
When Lockdown mode is enabled, only
Pattern
,
Lock No.
, and
Password
can be
used to unlock the tablet and other unlock methods, such as
Smart Lock
, are
completely disabled. This option will only be shown when a screen lock method besides
None
or
Swipe
has been selected. For more information about Screen lock, see
Screen lock.
1. Press and hold the Power key until the Power menu screen is displayed.
2. Tap Lockdown to enable Lockdown mode.
Setup Wizard
When you turn on your tablet for the first time, the Setup Wizard starts automatically. Follow the
onscreen instructions to choose a default language, connect to a Wi-Fi
®
network, choose the
device protection, set up accounts, and more.
Turn your screen on and off
Your tablet allows you to quickly turn the screen off when not in use and to turn it back on when
you need it.
Turn the screen off when not in use
► To turn the screen off, quickly press the Power key. Pressing the Power key again will
turn on your tablet screen.
To save battery power, the tablet screen automatically turns off after a certain period of time
when left idle.
NOTE:
For information on how to adjust the time before the screen turns off, see Screen
timeout.
10 Basic Functions
Basic Functions
The following topics will introduce the basic features of your tablet.
Touchscreen Navigation
Your tablet’s touchscreen lets you control actions through a variety of tap gestures.
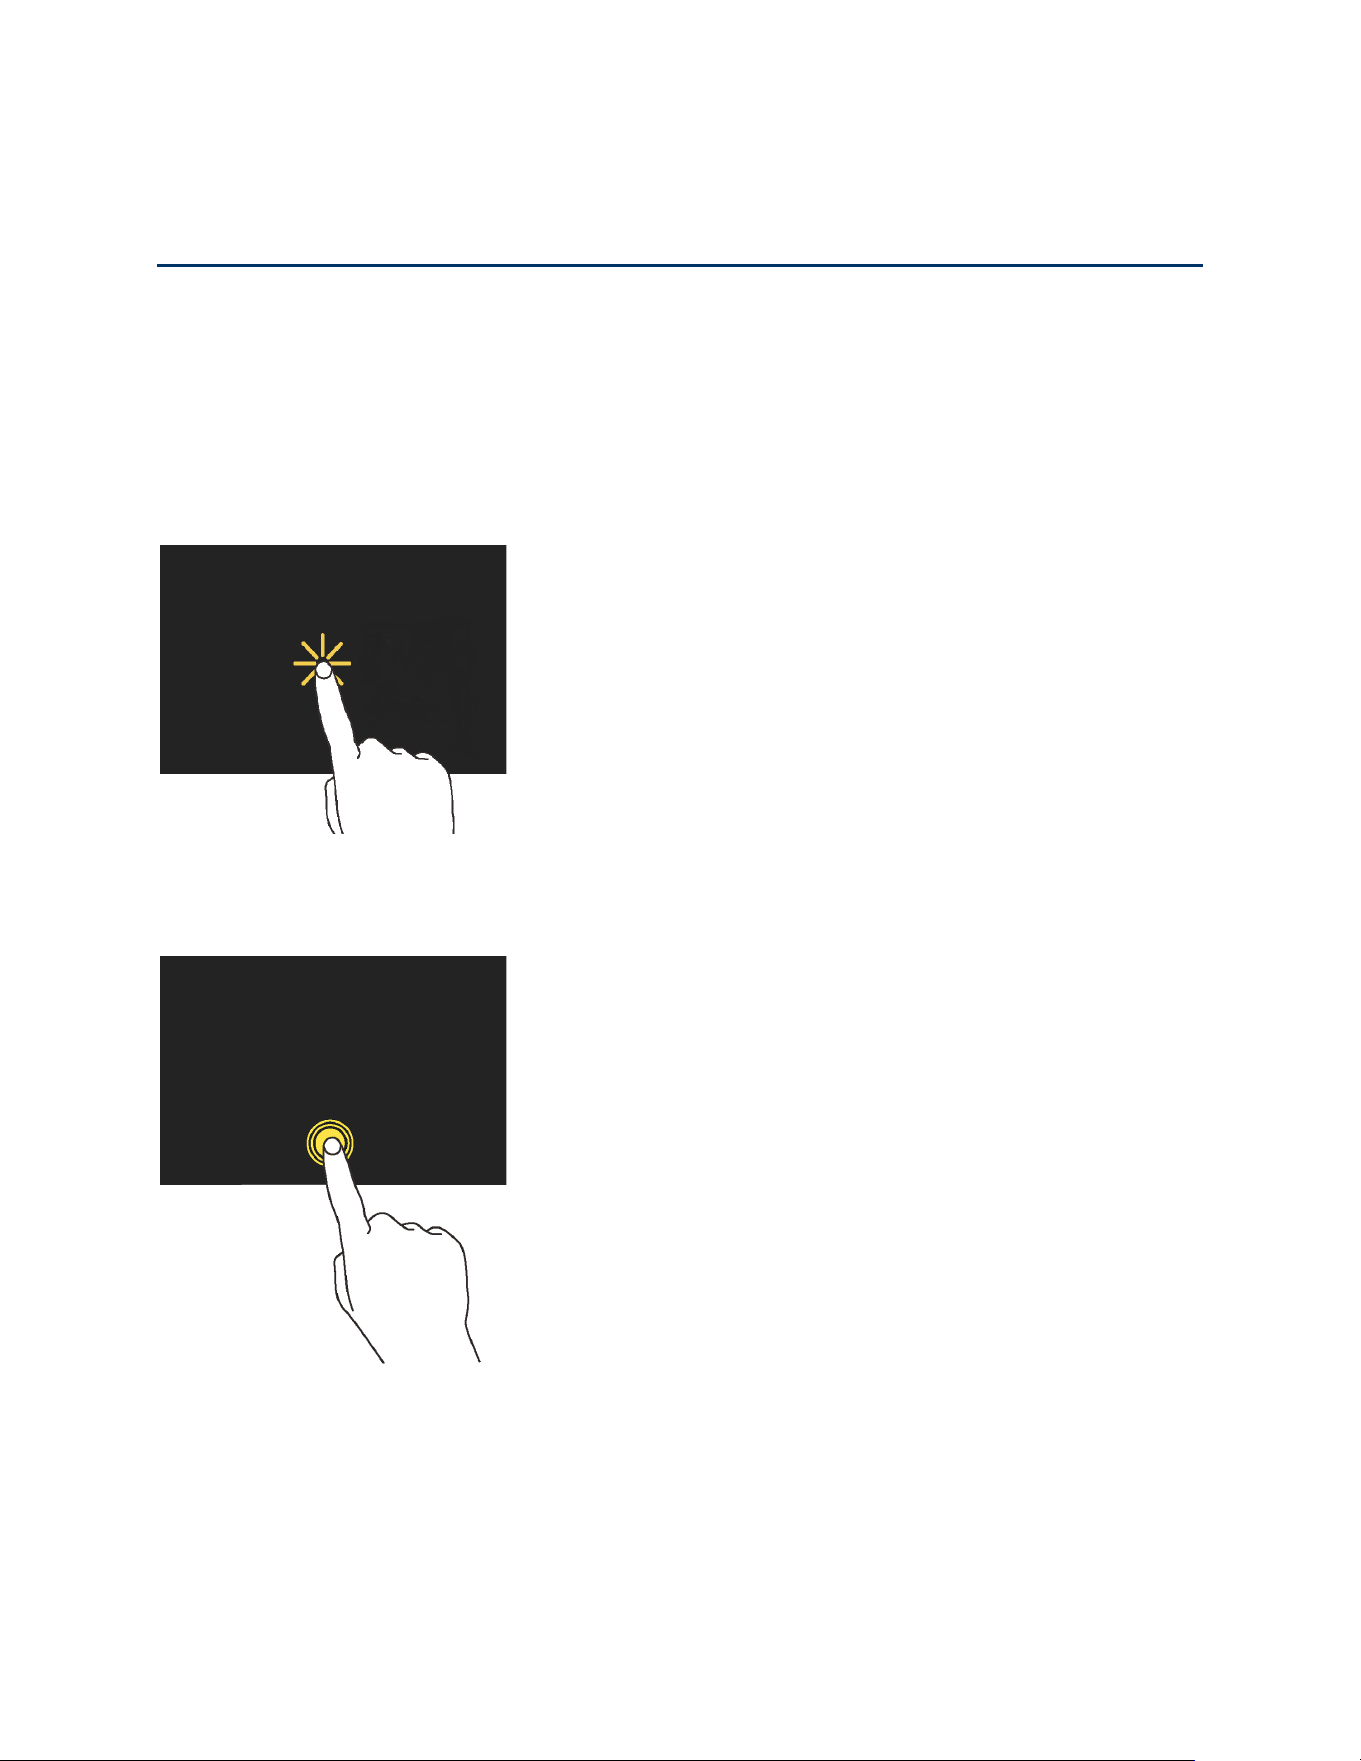
Tap:
Tap the screen with your finger to select or launch a menu, option, or application. A light
tap works best.
Touch and Hold: To open the available options for an item (for example, a keyboard), touch
and hold the item.
Basic Functions 11
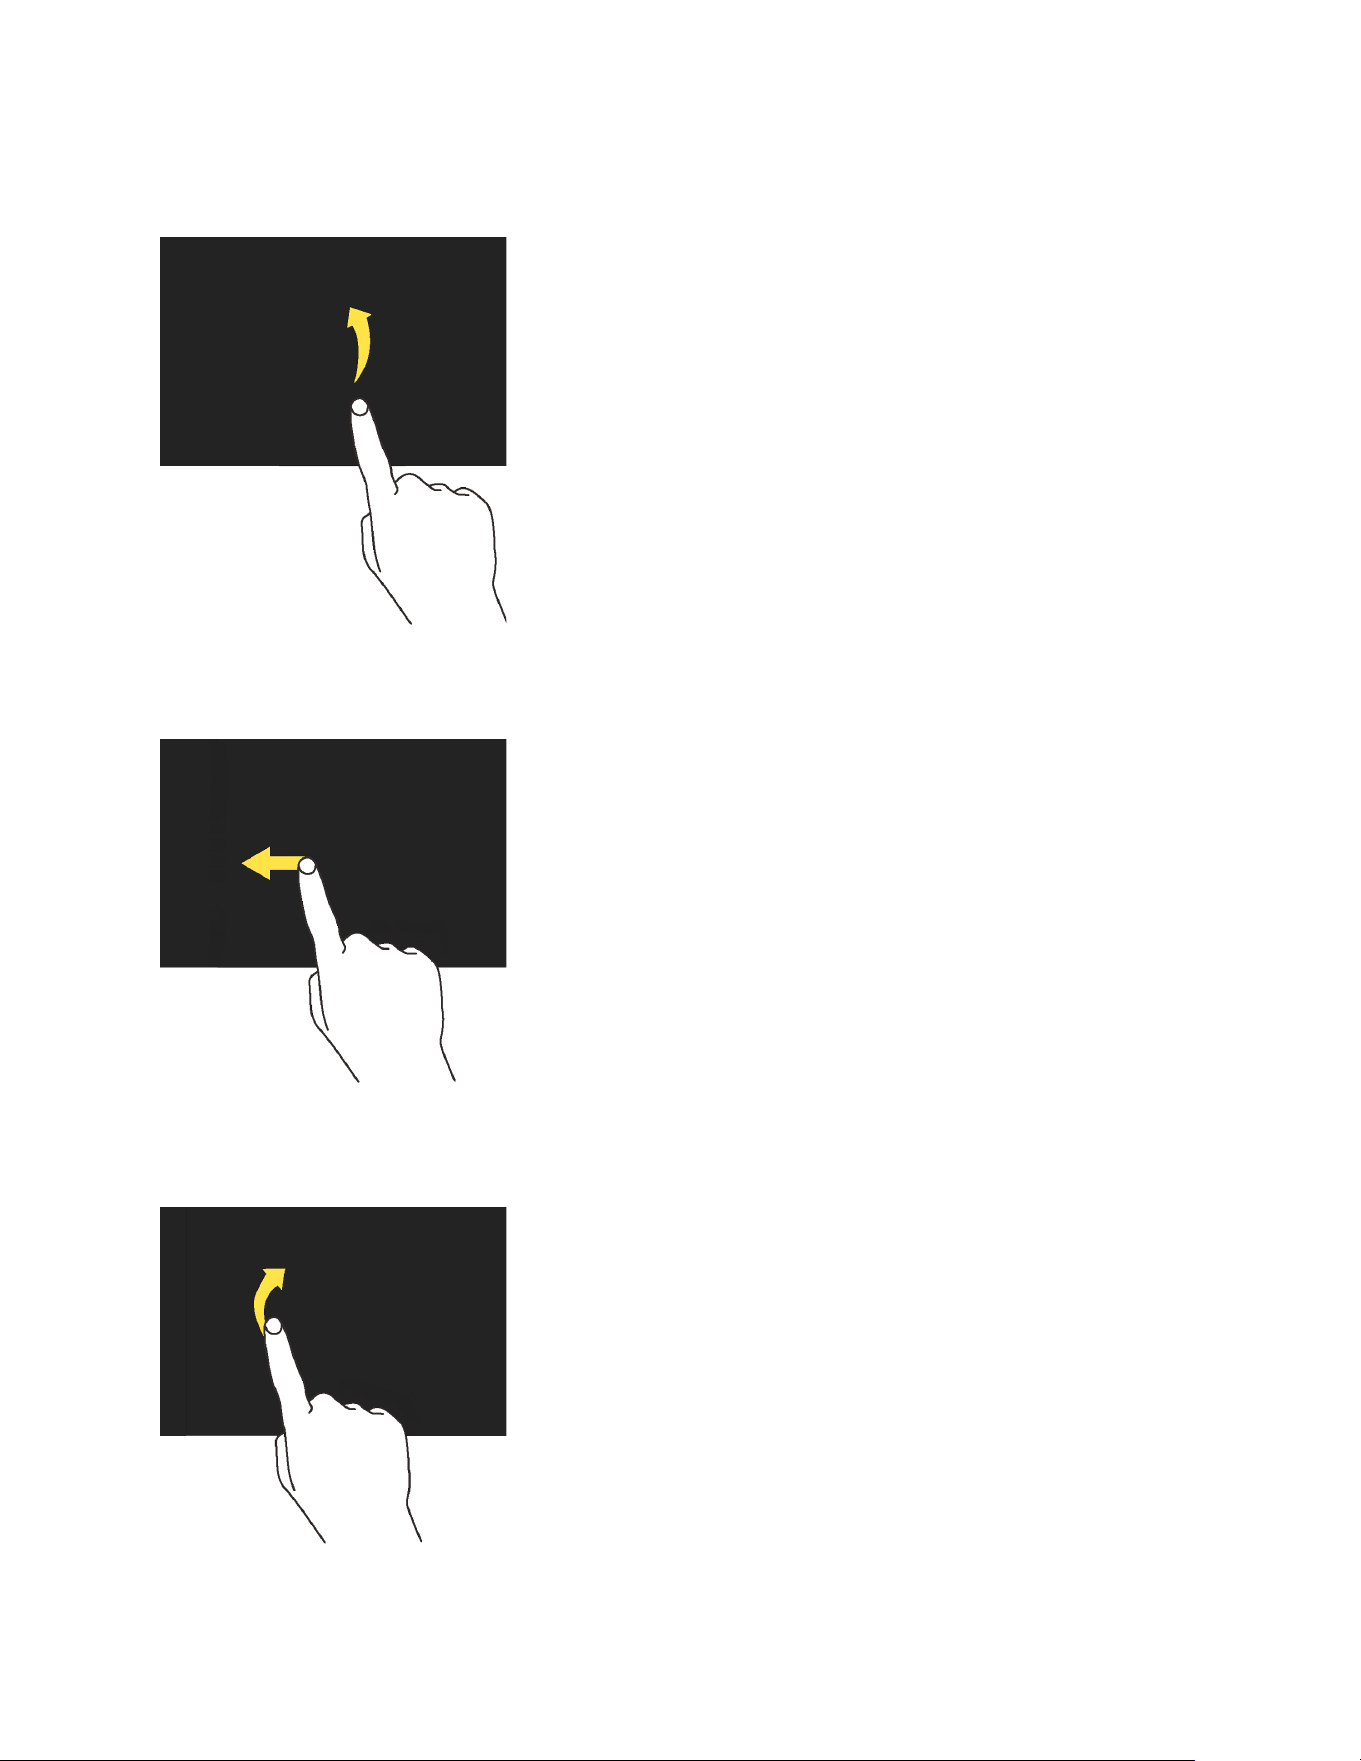
Drag: Touch and hold the item on the screen before you start to move it. Do not release your
finger until you have reached the target position.
Swipe or Slide: To swipe or slide means to quickly drag your finger vertically or horizontally
across the screen.
Flick: Flicking the screen is similar to swiping, except that you need to swipe your finger in light,
quick strokes.
12 Basic Functions
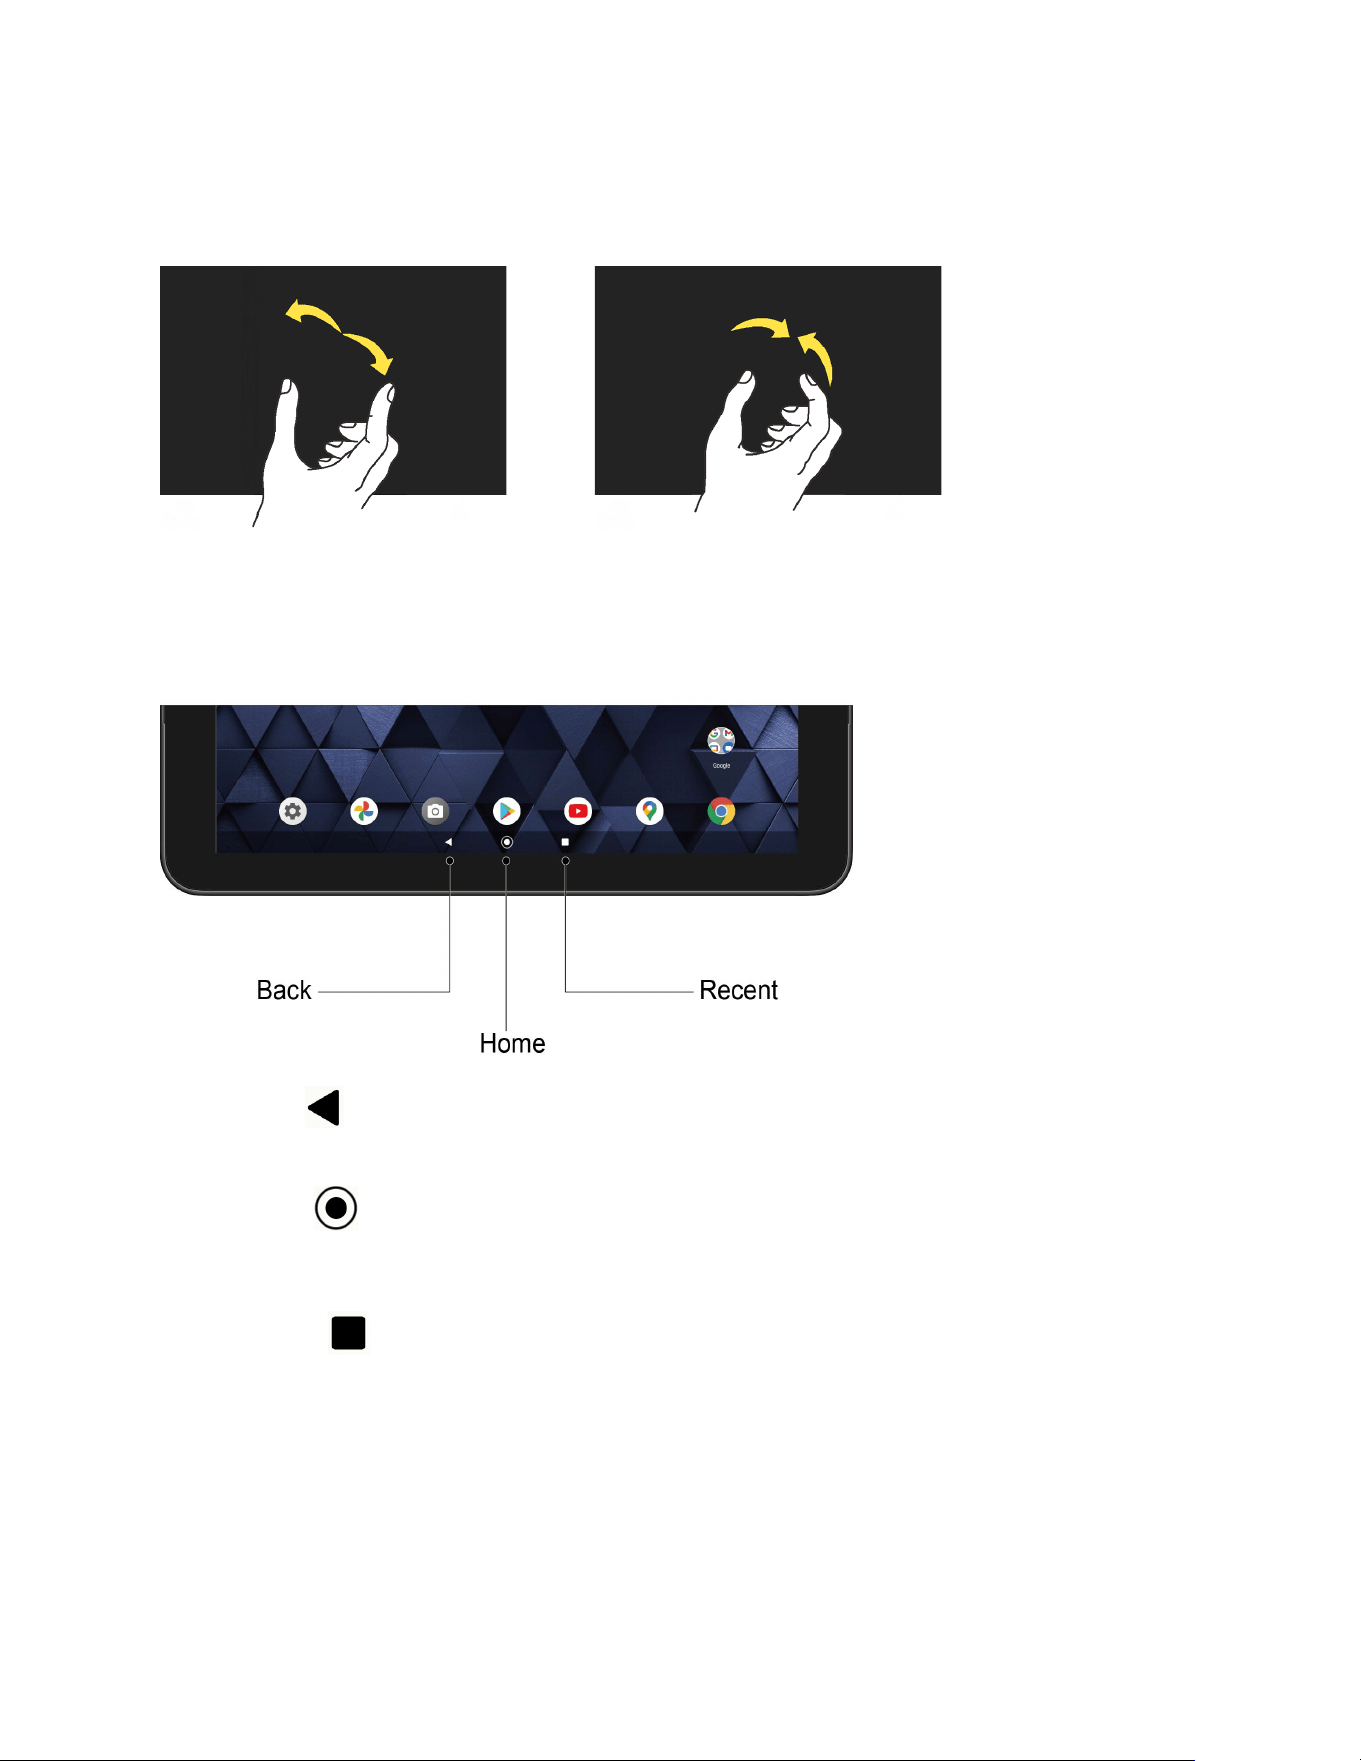
Pinch and Spread: Pinch the screen using your thumb and forefinger to zoom out, or spread
the screen to zoom in when viewing a picture or a Web page. (Move fingers inward to zoom out
and outward to zoom in.)
Function Buttons
You will find a row of three buttons that let you perform specific functions as below.
●
Back
:
Tap to return to the previous screen or close a dialog box, options menu, the
Notifications panel, or onscreen keyboard.
●
Home
:
Tap to open the Home screen.
Touch and hold to launch Google Assistant™.
●
Recent :
Tap to open a list of thumbnail images of screens you have worked with
recently. To open one, tap it. To remove a screen from the list, swipe it up. To capture a
screenshot of a listed screen, tap
Screenshot
displayed below the screen image. To
close all screens, swipe left to right to the end of the recent list and tap
CLEAR ALL
.
Basic Functions 13
Your Home Screen
The Home screen is the starting point for your tablet’s applications, functions, and menus. You
can customize your Home screen by adding application icons, shortcuts, folders, widgets,
wallpapers and more.
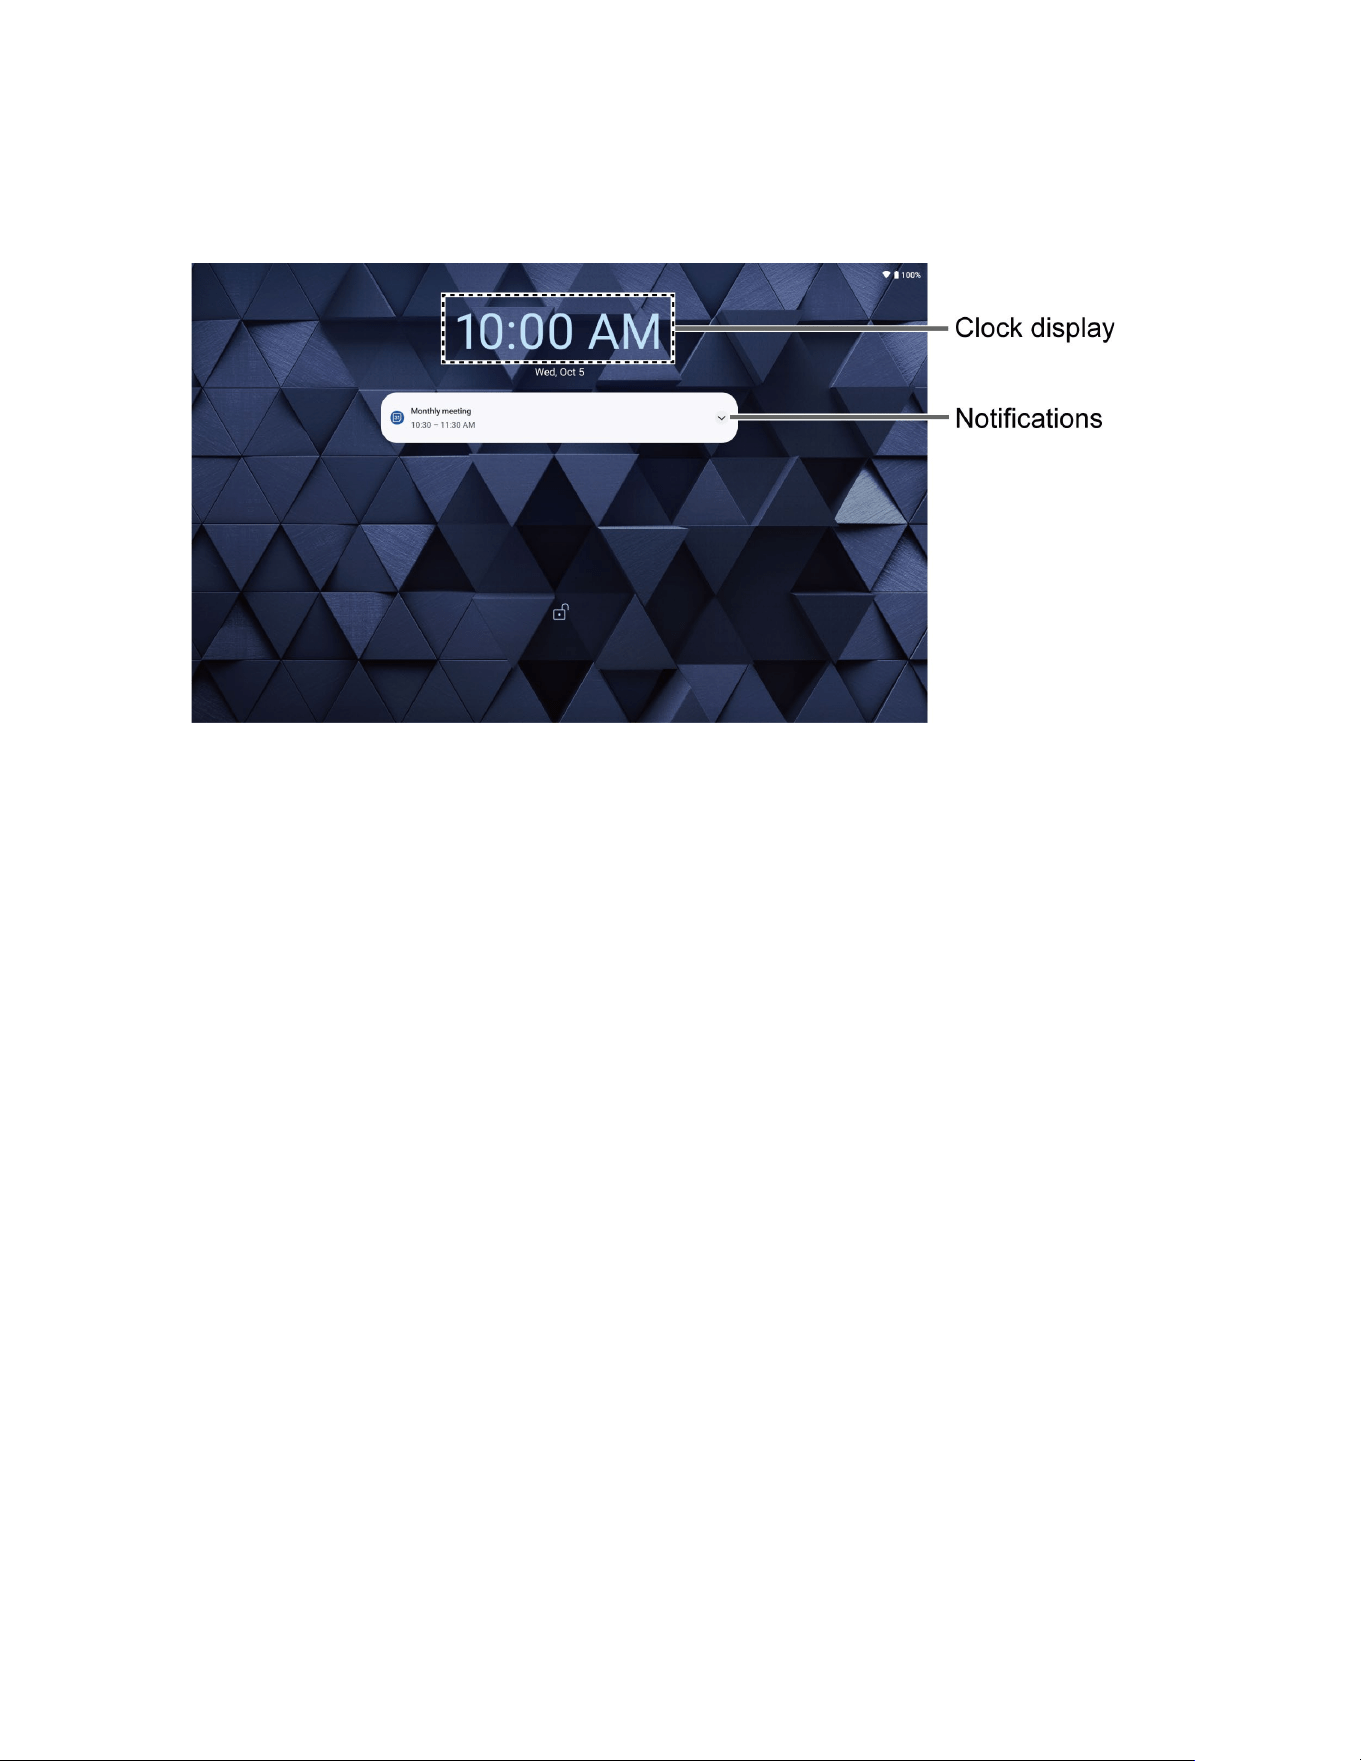
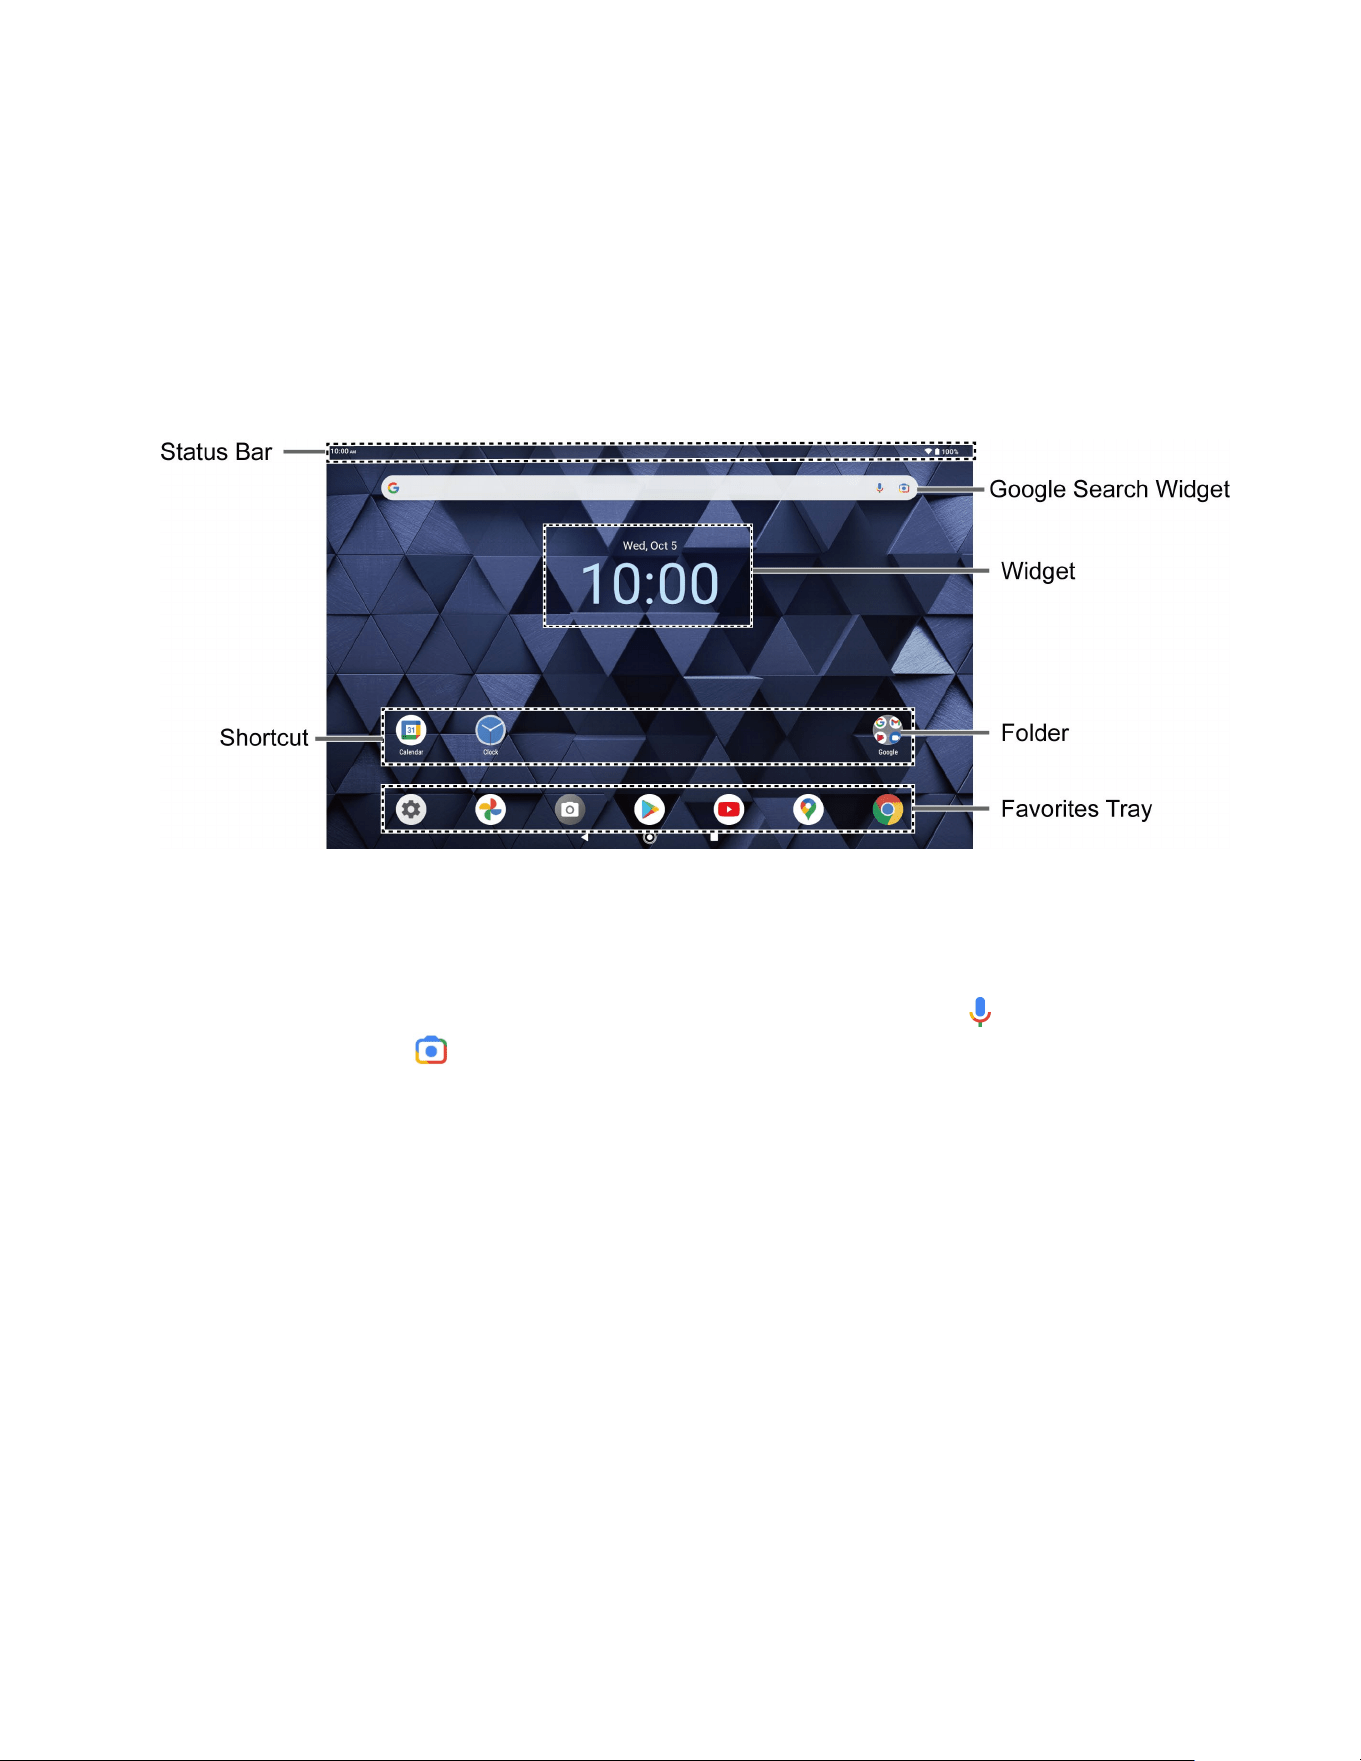
Home screen overview
The following illustration describes the basics of the Home screen.
●
Status Bar:
Displays the time, notification icons, and status icons. Slide down to display
the Notifications panel. See Status bar.
● Google Search Widget: Allows you to enter text or spoken keywords for a quick search
on the tablet or on the Internet. Tap the input field to enter text, tap to speak your
keyword, or tap to search with images by using the Google Lens™ app.
●
Widget:
Allows users to access various useful programs.
●
Folder:
Allows you to organize screen items. You can store multiple application icons as
a group. See Use folders.
● Favorites Tray: Contains up to five icons and appears on every Home screen.
●
Shortcut:
Allows you to quickly launch applications.

14 Basic Functions
Manage the Home screens
Learn how to customize the Home screens.
Add widgets
To get useful information more easily, you can add widgets to your Home screens.
1. Touch and hold any empty area on the Home screen.
2. Tap Widgets.
3. Swipe the screen and tap to find the item you want to add to the Home screen.
4. Touch and hold the item and move your finger.
TIP:
If you want to add it to a different Home screen from the one where you are, keep
moving your finger to either left or right edge of it. By holding the item on the right
edge, you can make a new Home screen if there is no further Home screen
available.
5. When you find the position to place it, release your finger.
Add shortcut icon
Place shortcuts for your favorite apps on the Home screen.
1. Swipe up on the Home screen and touch and hold the shortcut icon you want to add to
the Home screen.
2. Move your finger.
3. When you find the position to place it, release your finger.
Move or remove Items
You can change and move the Home screen items.
► Touch and hold the item on the Home screen that you want to move or remove.
To move the item, drag it to a new area and release it.
To remove the item, drag it to "
Remove
" at the top of the screen and release it.
TIP:
If you remove all widgets and shortcut icons from any Home screen which is
not the main Home screen, that Home screen will be deleted. Please note that
shortcut icons in the favorites tray are not affected.

Basic Functions 15
Favorites tray
The favorites tray displays up to seven icons and appears on every Home screen. You can
replace them with another icon you want to place there.
To add a new icon to the favorites tray:
1. Remove one of the icons from the favorites tray.
2. Touch and hold the icon of the app you wish to add, and drag it to the favorites tray.
3. Release your finger.
Use folders
Create and manage folders as necessary.
1. Touch and hold an app icon and drag it over another app icon.
2. Release your finger. Both icons are in a newly created folder.
TIP:
To add app icons to a folder, touch and hold the app icon, drag it over a folder.
3. Tap the folder > Edit Name. The keyboard opens, and you can name the folder. To
rename it, tap the name.
Change the wallpaper
Set your favorite wallpaper to personalize your tablet.
1. Touch and hold any empty area on the Home screen and then tap Wallpapers.
– or –
From the Apps launcher, tap Settings > Wallpaper.
2. Tap an app you want to use for changing the wallpaper.
If you have selected
Wallpapers
, tap
Pick image
to use your own image or browse
through the preset choices.
3. Select an image.
4. Tap Set wallpaper.
5. Select Home screen, Lock screen or Home screen and Lock screen.
Home settings menu
Use these menus to configure your Home screen.
1. Touch and hold any empty area on the Home screen.
2. Tap Home settings.

16 Basic Functions
3. The following options are available:
Notification dots
to change the Notification access setting, such as whether or not
to show the notification dots.
Add app icons to Home screen
to have the tablet automatically add a shortcut
icon to the Home screen when apps are installed.
Display Google app
to display Google News Feed by swiping right from the main
Home screen.
Apps launcher
You can find and access numerous apps installed on your tablet on the Apps launcher.
1. Swipe up from the bottom of the Home screen to open the Apps launcher.
2. Tap an app icon you want to open.
TIP:
You can change the order of the apps displayed in the Apps launcher by tapping
>
Order of the apps list
. Select
Alphabetical
or
Frequently used
, or tap
Customize
>
Change order
to change the icon position as you like.
Permission
When you launch an app or service for the first time or after an extended period of disuse, you
might be asked if you can permit its access to certain features of your device. You can choose
from WHILE USING THE APP, ONLY THIS TIME, or DON’T ALLOW for each requested
access permission. If you want to manage the whole permission settings, go to the settings
menu as mentioned below.
To check the permission status:
1. From the Home screen, tap Settings > Privacy > Permission manager.
2. Select a feature you want to check.
3. You can see a list of permission types and which apps have permission to access each
feature.
4. If you want to change the permission setting of an app, tap the app and select a
permission type you want to change. You can choose from options such as: Allow,
Allow all the time, Allow only while using the app, Ask every time, and Don’t
allow.
NOTE:
Available options vary depending on the feature.

Basic Functions 17
Quick shortcuts
By touching and holding an application icon, quick shortcuts will be displayed on the Home
screen.
1. Touch and hold an application icon to display the quick shortcuts available for that app.
2. Tap a shortcut to the menu that you want to go directly to.
TIP:
To create a quick shortcut icon and place it on the Home screen, touch and hold
instead, and put it where you want.
Status bar
The status bar at the top of the screen provides tablet status information on the right side and
notification alerts on the left.
Status icons
Icon
Status
Bluetooth
®
active
Wi-Fi active
Do not disturb
Airplane mode
Alarm set
Battery (full charge)
Battery (charging)
Battery (low)
Battery Care Mode
Notification icons
Icon
Status
New mail
Event
Alarm
18 Basic Functions
Icon
Status
Downloading
Battery (discharged)
Notifications panel
You can open the Notifications panel to view the list of notifications you received, Wi-Fi
connection status, and more.
To open the Notifications panel:
► Slide the status bar down toward the bottom of the touchscreen.
To clear a single notification, swipe it away to the left or right.
To clear all deletable notifications, tap
Clear all
.
To select a notification method, touch and hold a notification. Select from the
options displayed.
To open the main Settings app for App notifications, tap
Manage
. For details, see
Notifications.
To close the Notifications panel:
► Swipe up from the bottom of the screen.
– or –
Tap .
Basic Functions 19
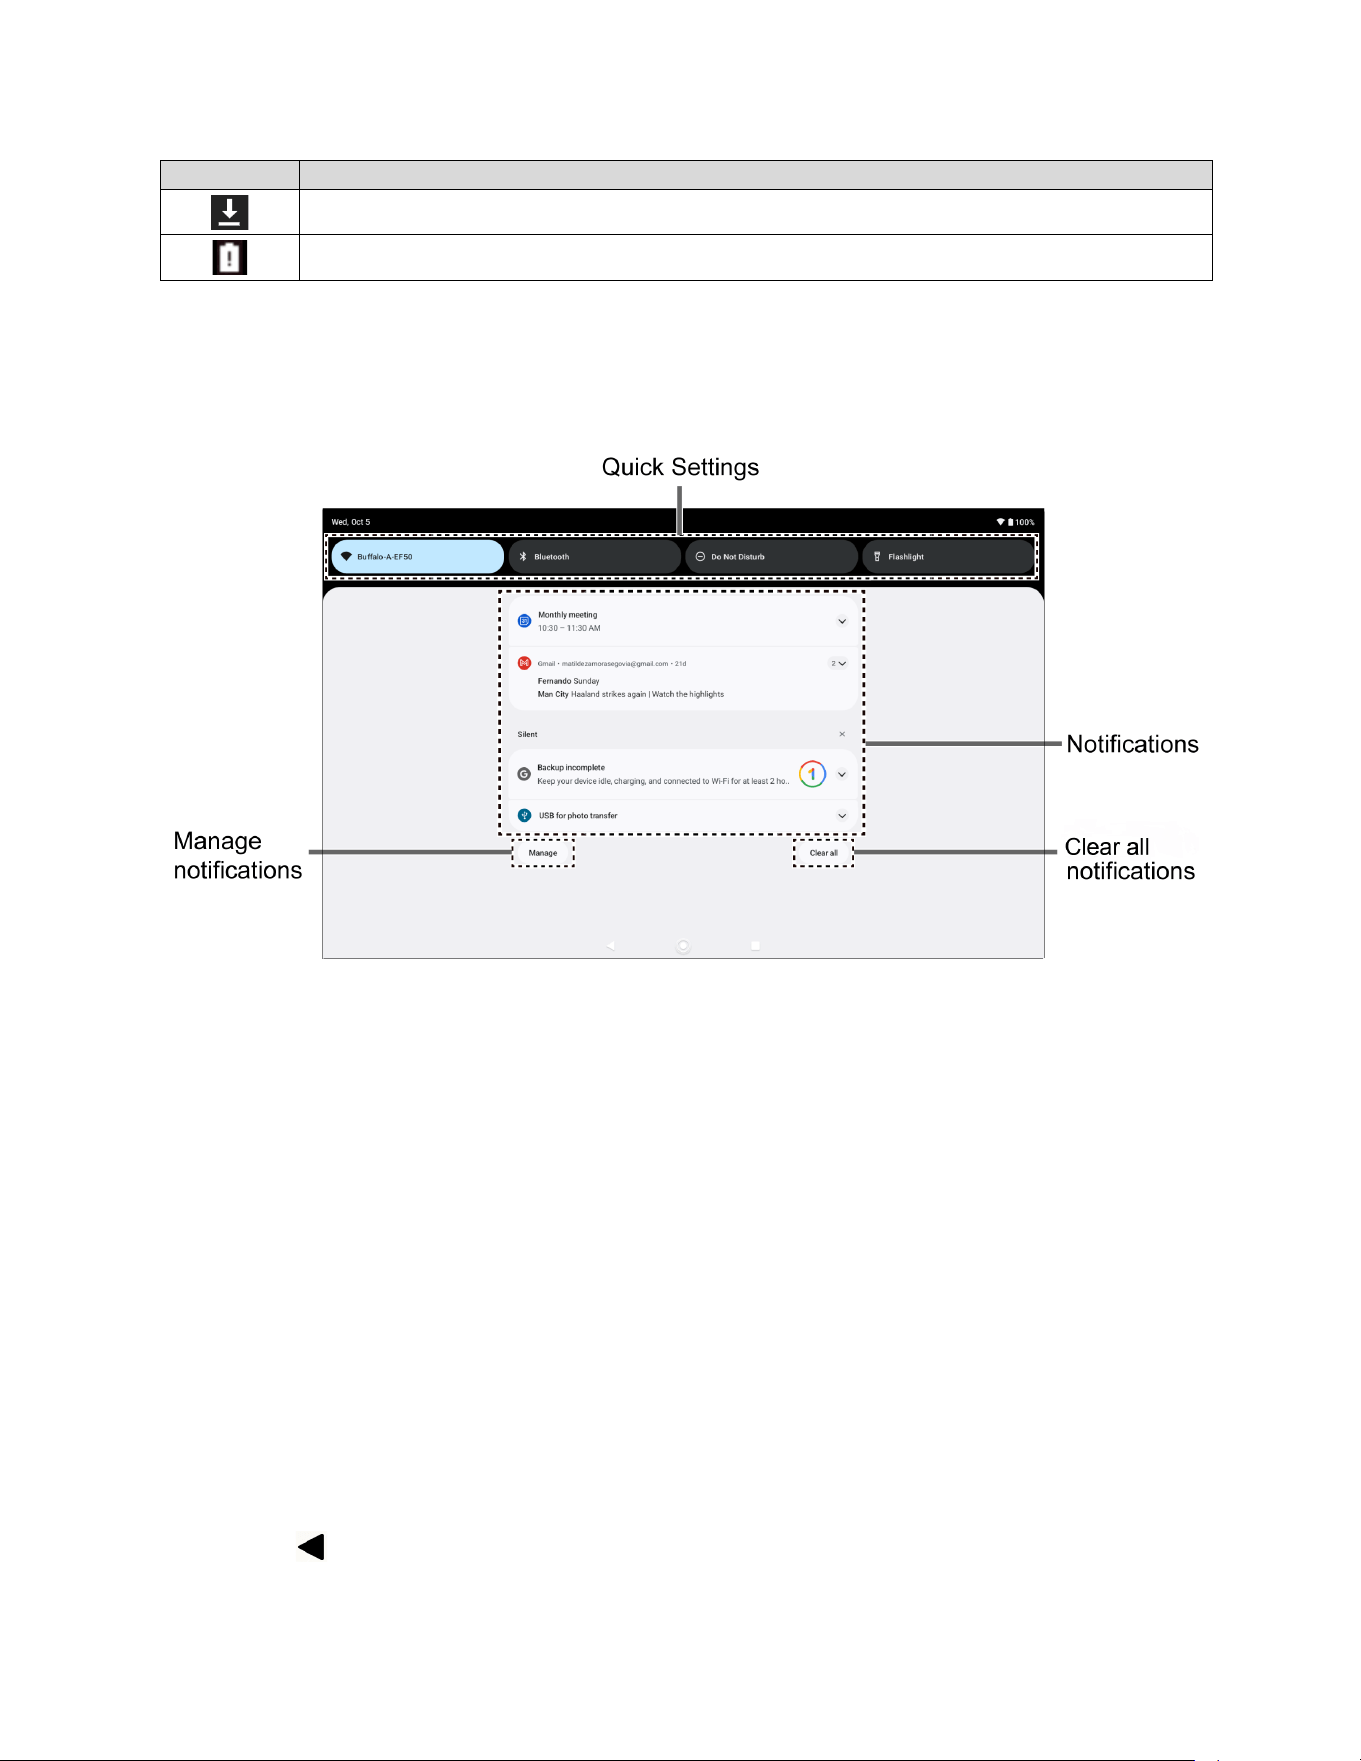
Quick settings
The quick settings panels enable you to quickly access useful menu items.
1. Slide the status bar down toward the bottom of the touchscreen. To show more tiles
(items), slide the Quick Settings panel downward.
To adjust the screen brightness, drag the knob on the brightness slider left or
right.
2. Tap on a quick setting tile to enable or disable the feature.
Touch and hold a tile to access its settings menu (if available).
To see the other panel, swipe the panel to the left.
To change the position of the tiles or add other tiles to the panel, tap to open the
Edit screen. Touch and hold the tile you want to move or add, and then drag it to a
different location and release your finger. The tiles in the area above the message
“
Hold and drag to add tiles
” will be displayed on the quick settings panels
.
Enter Text
You can type on your tablet using one of the available touchscreen keyboards or your voice.
The keyboard appears automatically onscreen when you tap a text entry field and can be used
in either portrait or landscape mode.
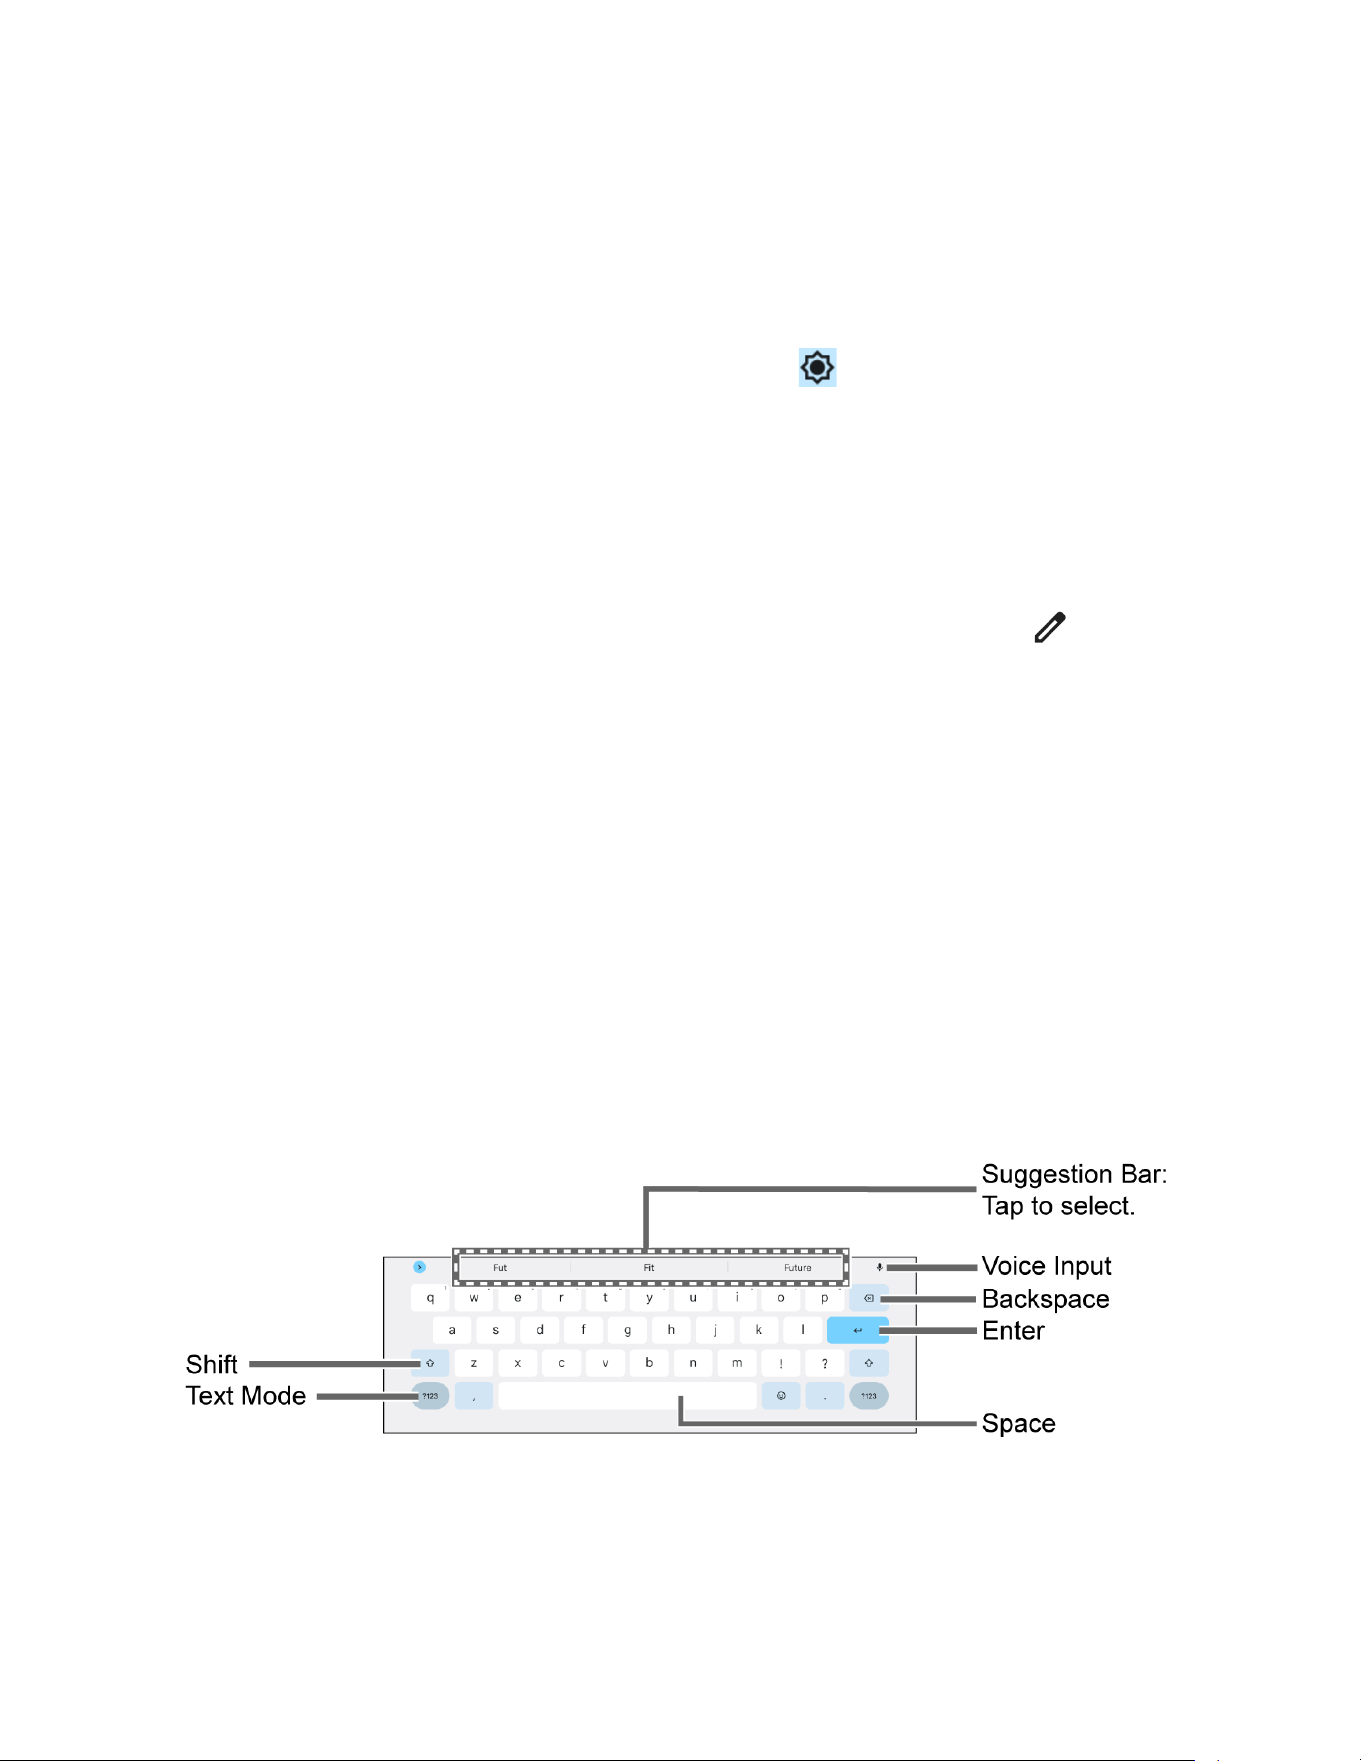
Gboard
Gboard offers a traditional QWERTY keyboard setup for entering text by tapping keys (like on a
computer), along with enhancements and options that allow you to enter text faster and more
accurately, such as continuous key input, personalized usage dictionaries, and more.
Gboard overview
NOTE:
Key appearance may vary depending on the selected application or text field.
20 Basic Functions
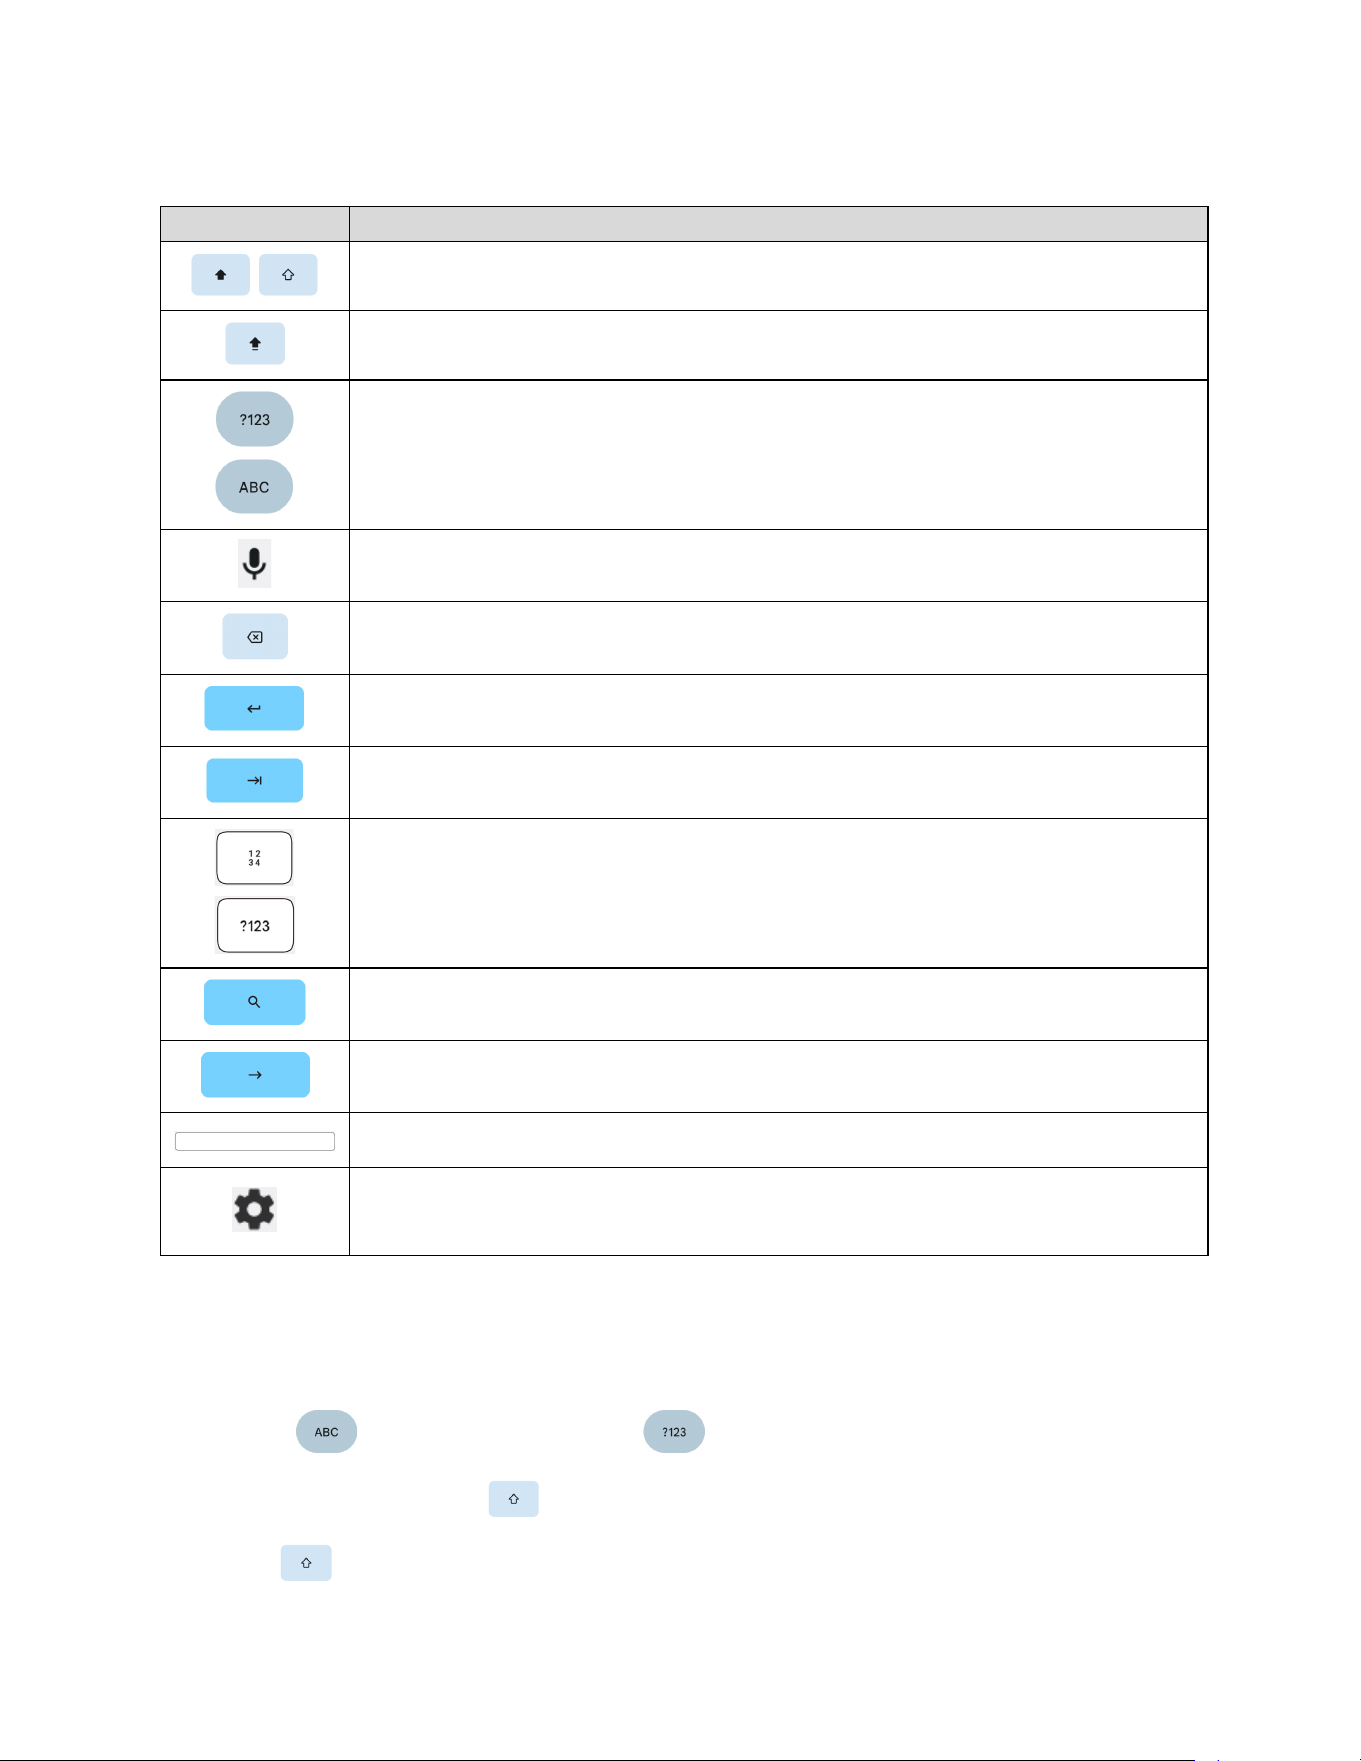
Some of the keys on the Gboard are given below:
Key
Description
Tap to toggle between lower case and upper case.
Double-tap the lower case or upper case shift key to set CAP LOCK.
Tap to toggle between the Alphabet keyboard and Number & Symbol
keyboard.
Tap to enter text using your voice.
Tap to delete a character. Touch and hold to delete multiple characters.
Tap to confirm your entry or move to a new line.
Tap to go to the next text entry field.
Tap to toggle between the default Number & Symbol keyboard and
additional Number & Symbol keyboard.
Tap to see your search results.
Tap to go to a Web address.
Tap to insert a space.
Tap to open the Gboard settings menus, such as
Preferences
,
Languages
,
etc.
Text mode
ABC mode is primarily used for entering letters while Number & Symbol mode is for numbers
and symbols.
► Tap to select ABC mode. Tap to select Number & Symbol mode.
In ABC mode, tap to alter the capitalization:
(Unshifted) to enter all letters in lowercase.
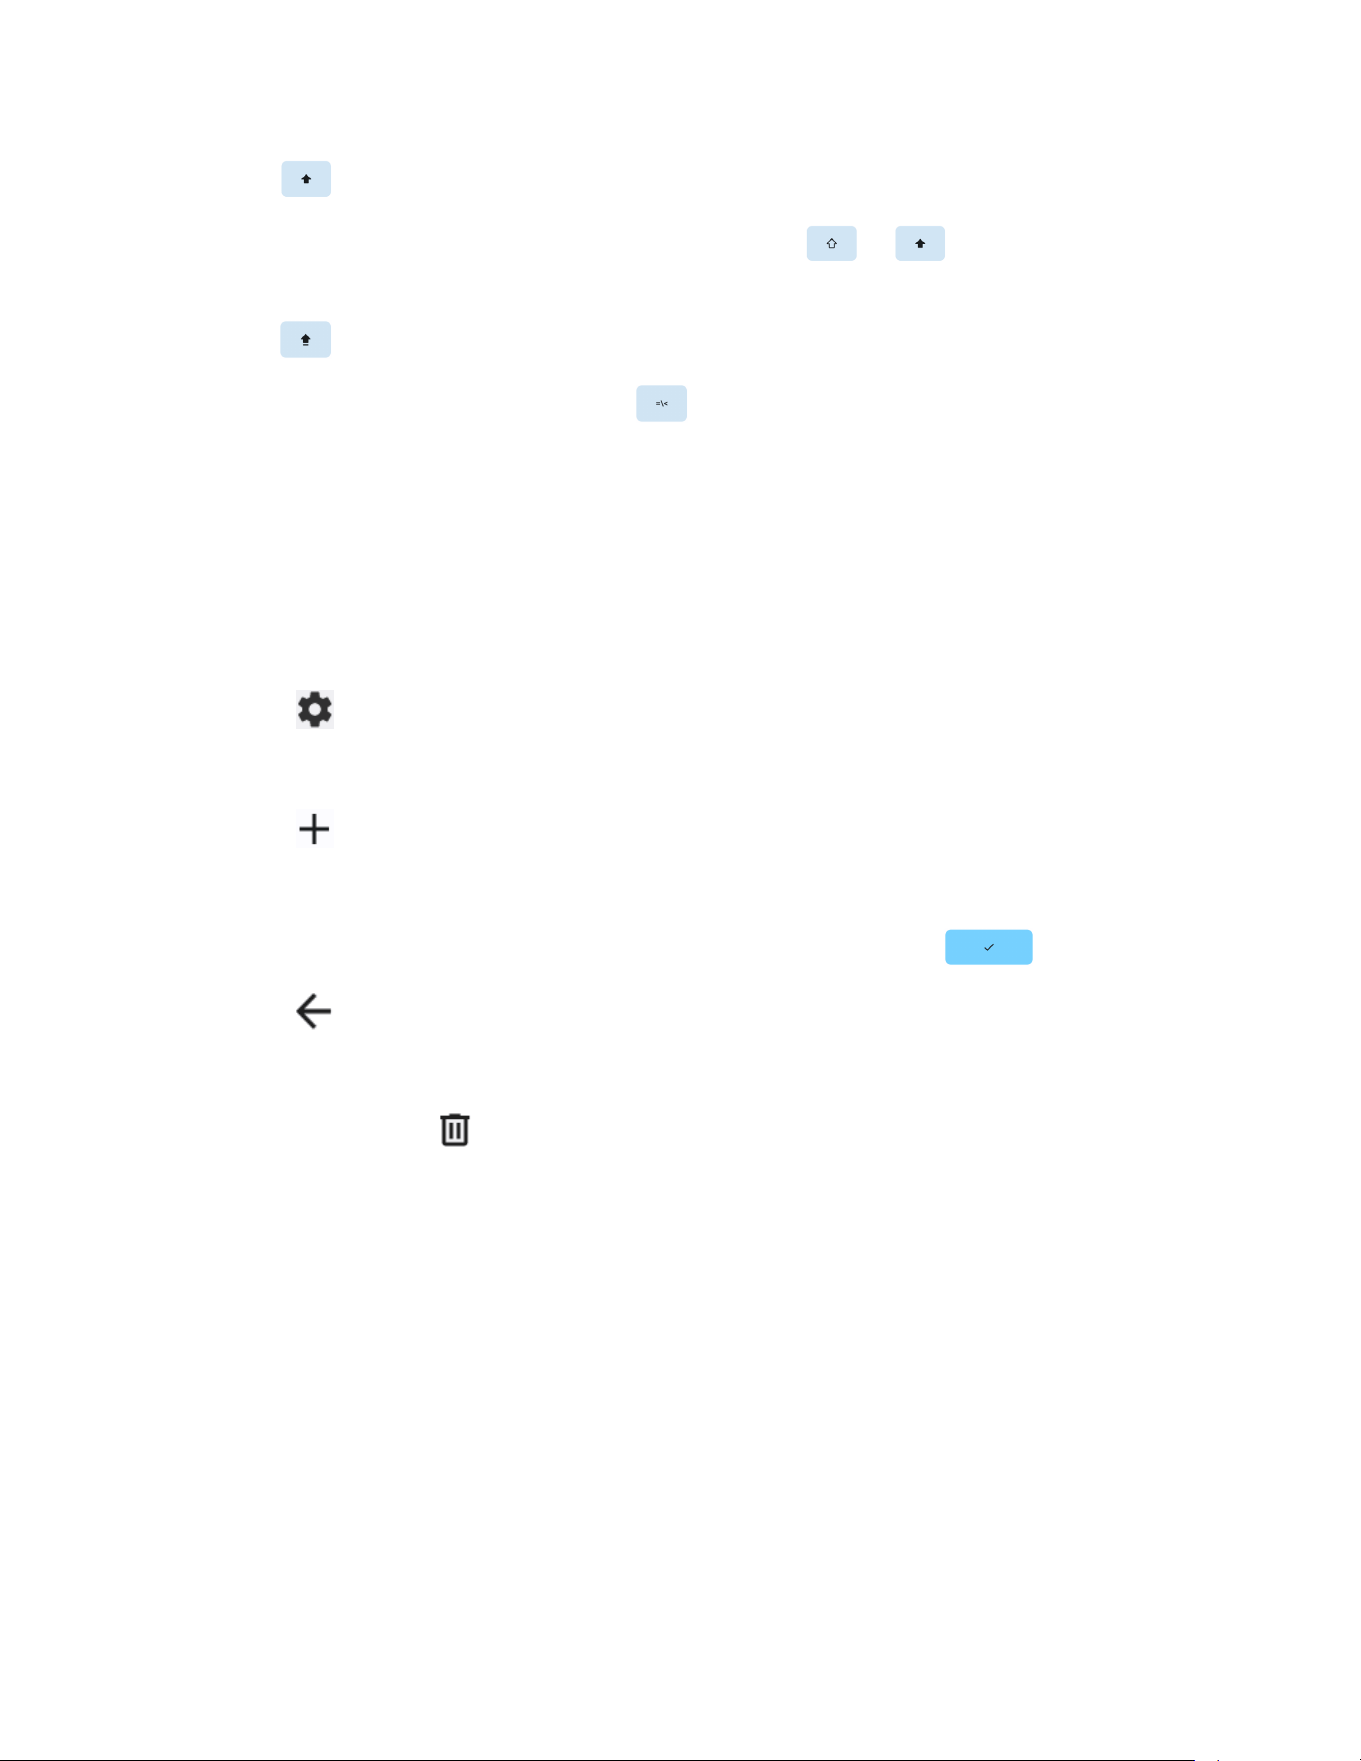
Basic Functions 21
(One-character-shifted) to capitalize only the first letter of a word.
You can select the caps lock by double-tapping or to make all letters in
uppercase.
(Caps lock) to enter all letters in uppercase.
In Number & Symbol mode, tap to display more symbols.
Some keys have alternate characters. In either mode, if a key displays an extra
character at the upper right corner, touch and hold the key to enter the character.
Or, touch and long hold a key to call up a list of all the characters available on that
key, and slide your finger to the character you want to enter on the list.
Add a word to the user dictionary
You can use the user dictionary option to add new words to the dictionary.
1. Tap on the top of the Gboard, then tap Dictionary > Personal dictionary.
2. Select the language to be applied for Personal dictionary.
3. Tap .
4. Type the word you want to add.
5. Type the shortcut to bring up the typed word if you want and tap .
6. Tap . A list of words you have added to the dictionary is displayed.
Tap a word to edit it.
Tap a word > to delete it.
22 Basic Functions
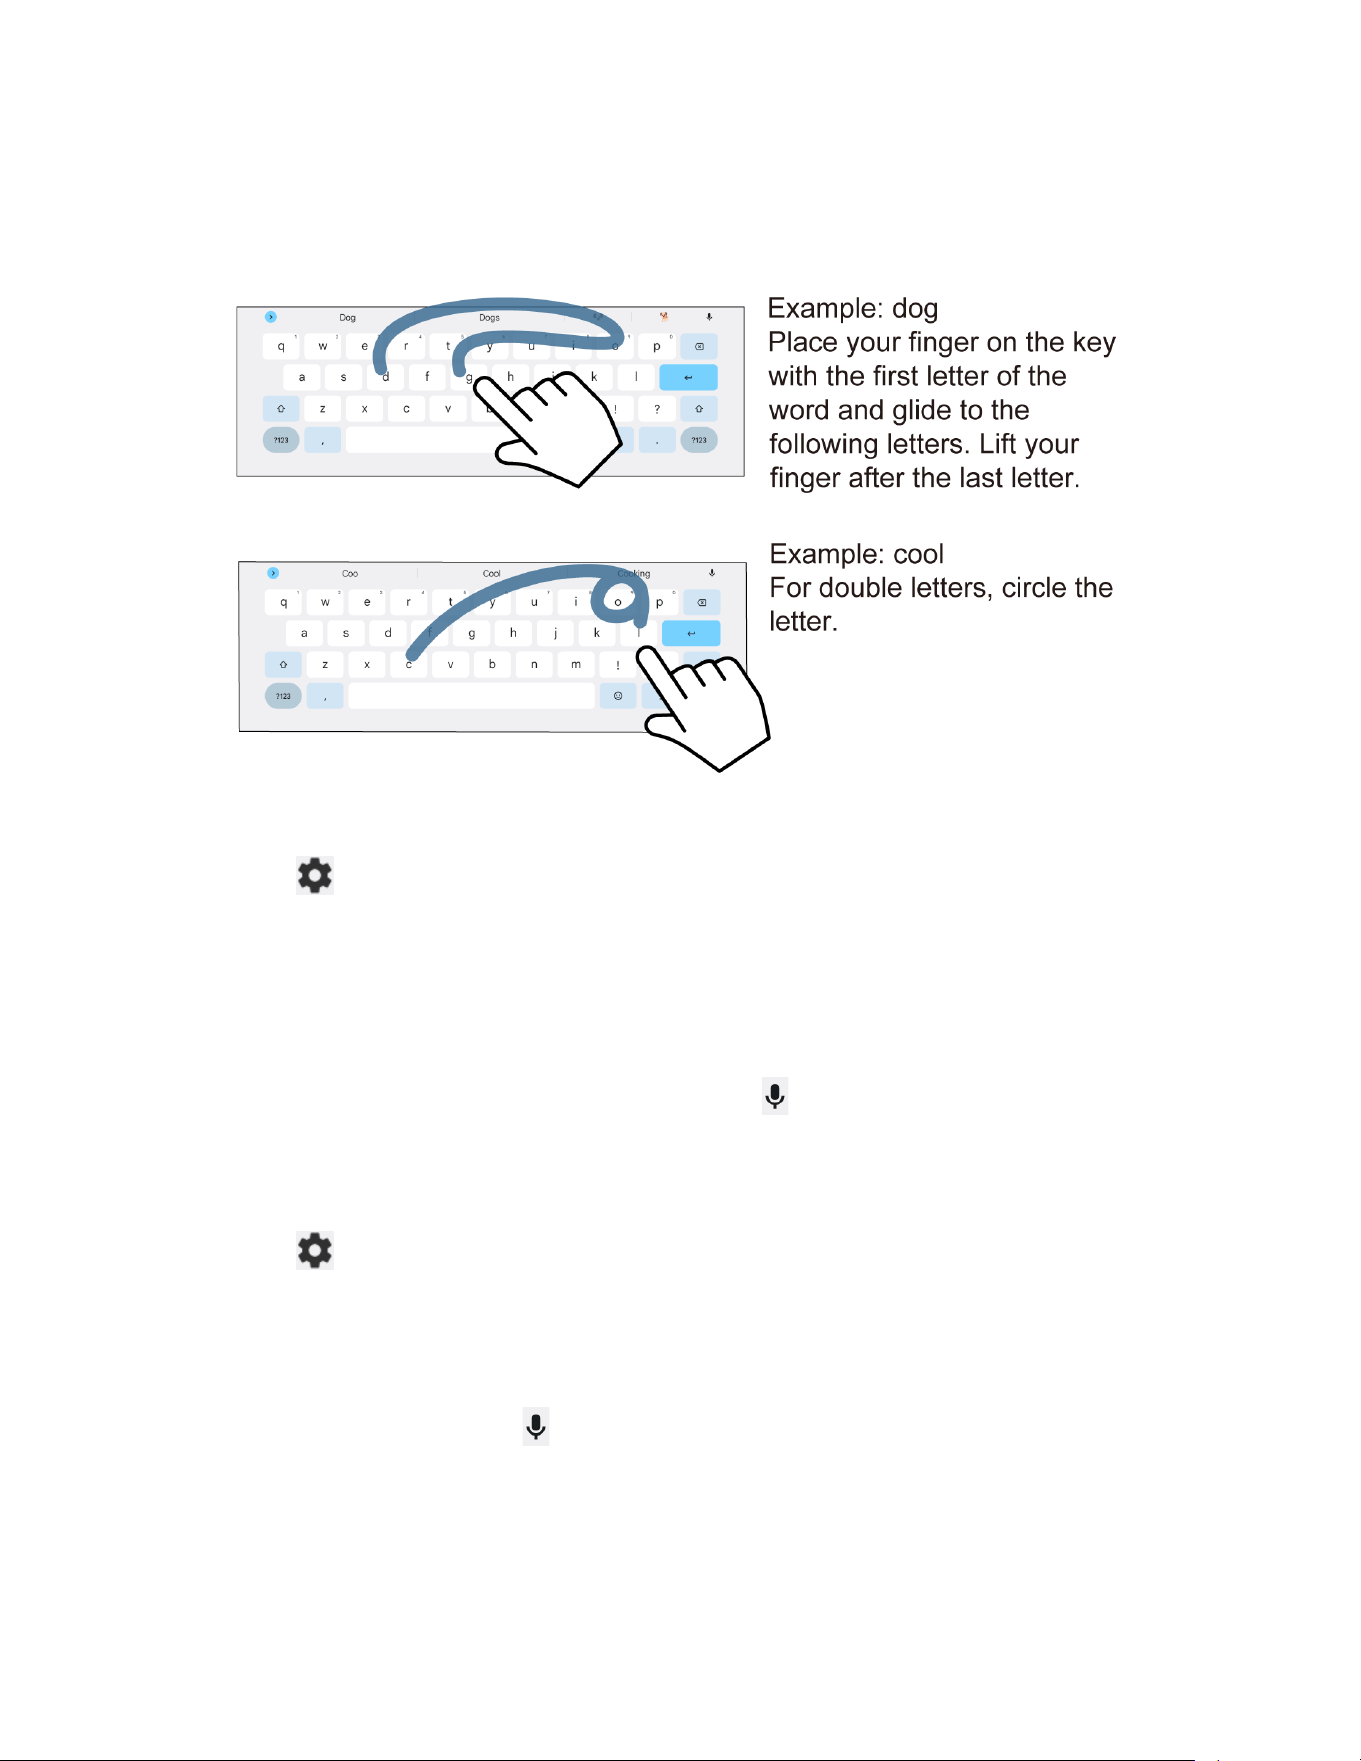
Glide typing
Glide typing lets you enter words by drawing a path from letter to letter in one continuous
motion.
To enable or disable glide typing input feature:
1. Tap on the top of the Gboard, then tap Glide typing.
2. Tap Enable glide typing to turn on or off.
Google voice typing
Google™ voice typing uses Google voice recognition to convert speech to text.
NOTE:
If Gboard does not display the microphone icon , the voice input feature is not
enabled.
To enable or disable the voice input feature:
1. Tap on the top of the Gboard, then tap Voice typing.
2. Tap Use voice typing to turn on or off.
To enter text by speaking:
1. Tap the microphone icon on the keyboard.
2. When you see Speak now, say what you want to type.
Basic Functions 23
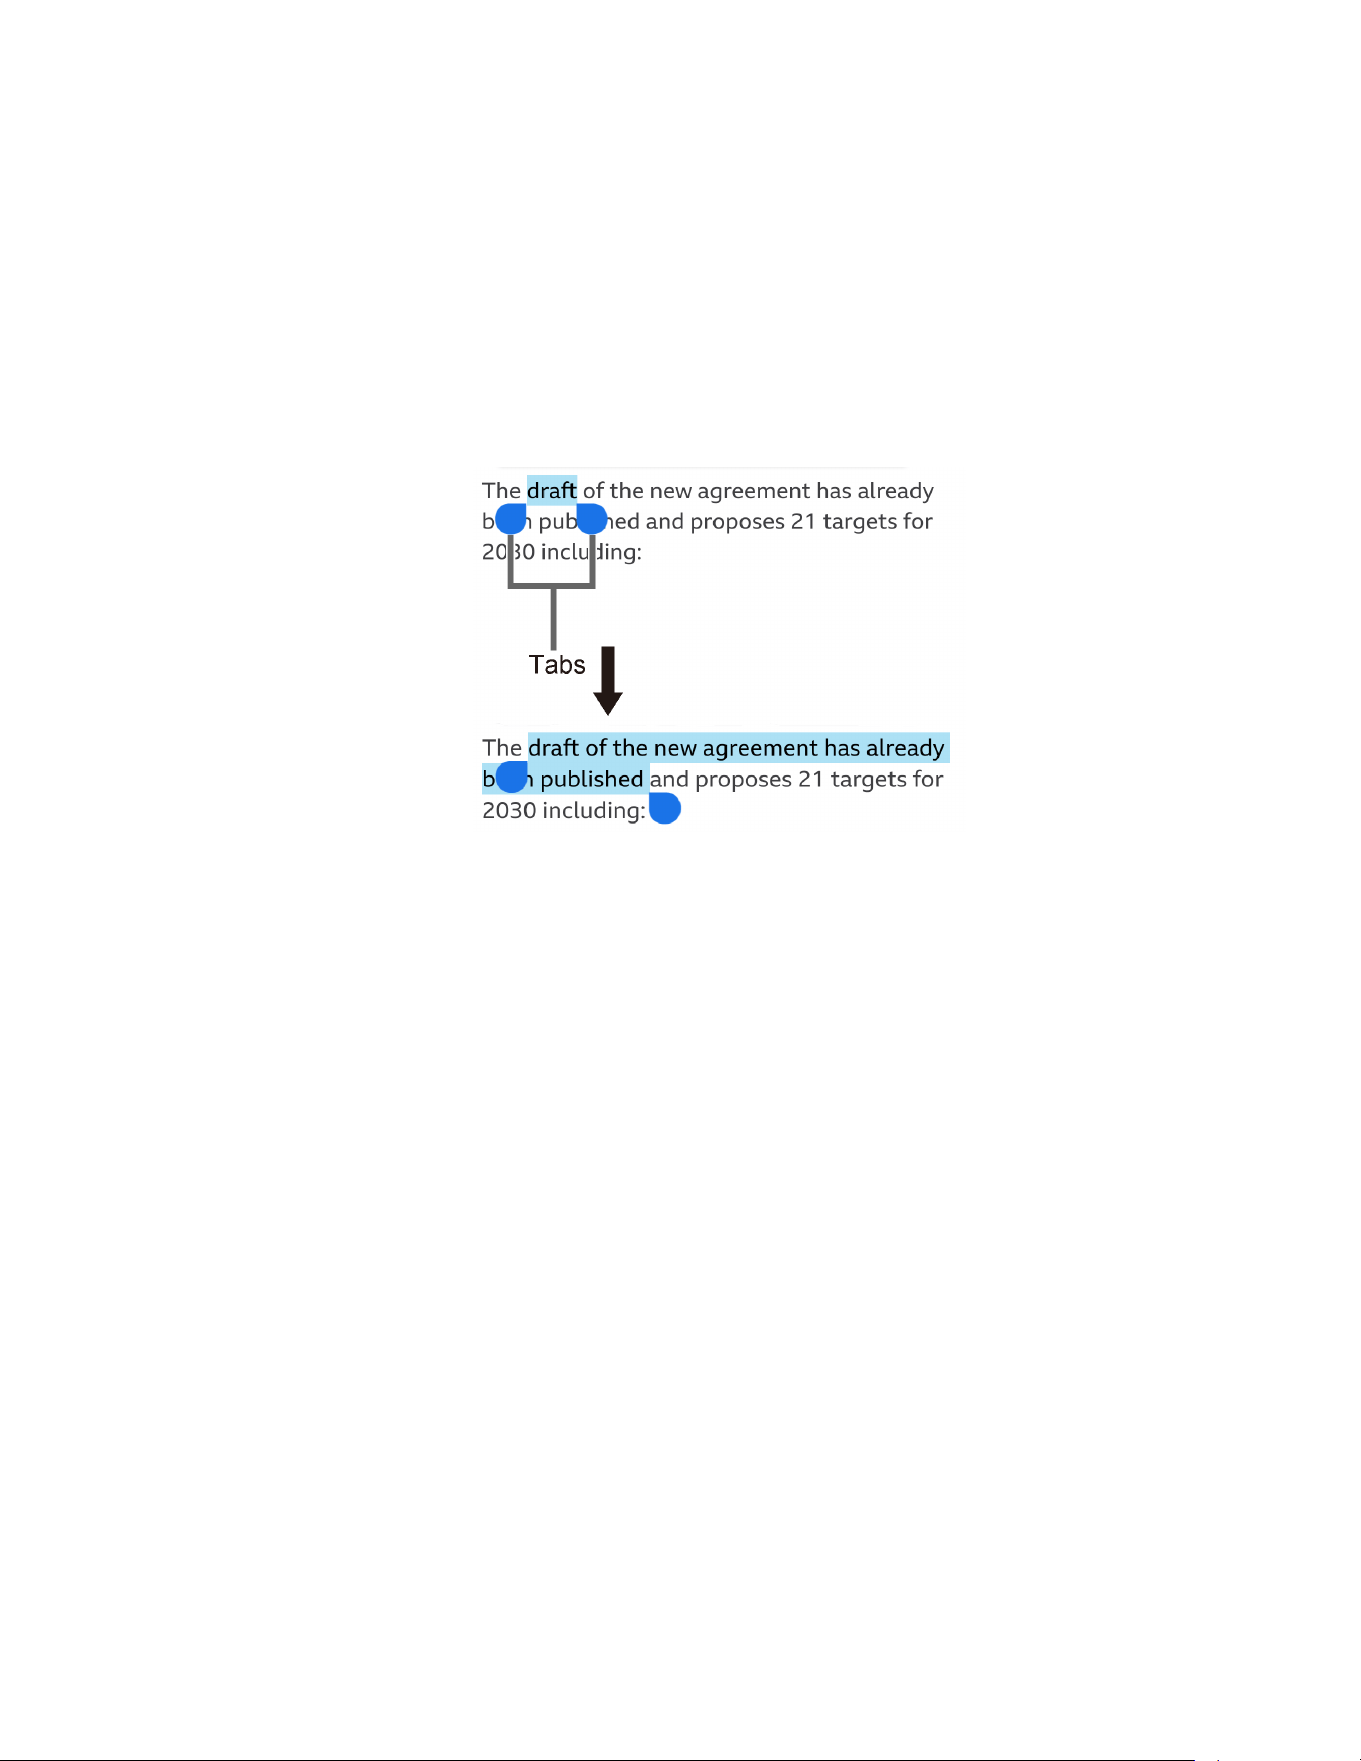
Copy and paste text
In applications that require text entry, such as Gmail, use the copy and paste functions to copy
and paste text from one application to the same application or another.
1. Open the application or received message that you want to copy text from.
2. Touch and hold the text body you want to copy. Selection tabs appear, and the selected
words or characters are highlighted. Drag the tabs to expand or reduce the range of the
selected text if necessary.
TIP:
Tap
Select all
to select all the text.
3. Tap Copy.
4. Open the application that you want to paste the text into.
5. Touch and hold the text box where you want to paste the text to and tap Paste or Paste
as plain text.

24 Contacts
Contacts
The Contacts application lets you store and manage contacts from a variety of sources,
including contacts you enter directly in your tablet as well as contacts synchronized with your
Google Account, your PC, and compatible email programs.
Contacts List
Scroll through the list to view all your contacts. To see a specific entry, tap it.
► From the Home screen, tap Google > Contacts to open the contacts list.
:
Tap to add a new contact. See Add a Contact.
Search contacts:
Enter the name, phone number, email address, etc. of the
contact you want to search in the field.
:
Tap to display the contacts list options. See Contacts list options to follow.
Contacts list options
► From the contacts list screen, tap .
Select
to select the contact(s) you want to manage.
Select all
to select all the contacts on the list.
Customize view
to select a display option.
Add a Contact
Enter details such as name, phone numbers, email addresses, mailing addresses, and more.
NOTE:
We suggest that when you add phone numbers to your contact list, you add the area
code + the 7-digit number.
1. From the contacts list screen, tap .
2. Enter the name, phone number, email address, etc. as you want.
Tap
Add photo
to assign a picture to the contact. See Assign a picture to a contact.
Tap the email account or
Device
shown next to
Save to
to choose where to save
the contact.
3. When you have finished adding information, tap Save.

Contacts 25
Assign a picture to a contact
You can assign a picture to a contact either by taking a new one or by using one stored in your
tablet’s internal storage, SD card, or Cloud. The following instructions show you how to take and
assign a new picture as an example.
1. From the contacts list screen, tap contact to display it, and tap .
2. Tap Add photo or Change photo.
3. Tap Take photo or Take new photo.
4. Tap to take a picture, edit it if necessary, and then tap Save copy.
5. Tap Save to save the contact.
Delete a contact
You can delete contacts from the Contacts screen.
1. From the contacts list screen, tap > Select and tap the contact(s) you want to delete
or tap Select all.
2. Tap > Move to Trash.
– or –
1. From the contacts list screen, tap a contact you want to delete.
2. Tap > Delete > Move to Trash.
Edit a contact
Once you’ve registered a contact, you can add or edit any of the information in the entry.
1. From the contacts list screen, tap a contact you want to edit.
2. Tap .
3. Tap any field you want to change or add.
4. Add or edit the information, and then tap Save.
Contacts entry options
1. From the contacts list screen, tap a contact you want to deal with and tap .
2. The following options are available:
Delete
to delete the entry.
26 Contacts
Share
to share the contact by using your preferred method.
Add to Home screen
to
add
a shortcut to the contact on the Home screen.
Move to another account
to change the account you stored the contact in.
Help & feedback
to visit Google Contacts Help website.
Add a Group Contact
Create a group contact with your individual contact entries in Contacts.
1. From the contacts list screen, tap on the top left of the screen.
2. Tap Create label under Labels.
3. Type a name, then tap OK.
4. Tap > > Select contacts, and then tap the entries you want to add to the group.
5. Tap .
Delete a group contact
Delete the group contacts that you have created.
1. From the contacts list screen, tap on the top left of the screen.
2. Tap the label (group) you want to delete and tap > Delete label.
3. Tap OK.
Edit a group contact
Manage the group contacts that you have created.
1. From the contacts list screen, tap on the top left of the screen.
2. Tap the label (group) you want to edit.
3. Tap to add members to the group.
– or –
Tap > Remove contacts to delete some members.
– or –
Tap > Rename label to change the group name.

Contacts 27
Add a Contact to Favorites
The favorite entries will appear at the top of the contacts list with mark so that you can
quickly access your most used or preferred contacts entries.
1. From the contacts list screen, tap a contact.
2. Tap . The icon changes to when the contact is added to Favorites.

28 Applications
Applications
You can enjoy a variety of apps installed on your tablet or discover some exciting new apps by
browsing online app stores such as the Google Play™ store. You can see all your preloaded
and downloaded apps in the App Launcher.
Google Apps
You will need a Google Account to access several features such as Gmail™ and the Google
Play store applications. Before you are able to access Google applications, you must enter your
account information. These applications sync between your tablet and your online Google
Account. Visit google.com for more information.
NOTE:
The actual display of the Google apps may vary depending on the application version
currently running on your tablet.
Create a Google Account
If you do not already have a Google Account, you can create one online or by using your tablet.
NOTE:
Although you need a Gmail account to use certain features on your tablet, such as
Google Play store, you do not need to use Gmail as the default account for your tablet.
1. From the Home screen, tap > Passwords & accounts > Add account > Google.
2. Tap Create account.
3. Follow the onscreen prompts to create your free account.
Sign in to your Google Account
If you have a Google Account but have not yet signed in with your tablet, follow these
instructions.
1. From the Home screen, tap > Passwords & accounts > Add account > Google.
2. Enter your email address, and tap Next.
3. Enter your password, and tap Next.
4. Follow the onscreen prompts to sign in to your Google Account.
Applications 29
Chrome
Your tablet’s Web browser Chrome™
gives you full access to both mobile and traditional
websites on the go, using Wi-Fi data connections.
Launch Chrome
► From the Home screen, tap .
Tap on the top right of the screen to display the option menu.
Learn to navigate Chrome
Navigating through menus and websites during a data session is easy once you have learned a
few basics.
● Scrolling: In a single motion, touch and drag across or up and down a page.
● Selecting: Tap an item or onscreen link.
● Go back: Tap to go back one page.
● Go to a specific website: Enter the Web address at the top of the browser window.
For more information, please visit https://support.google.com/chrome.
Gmail
You can use Google’s web-based mail service.
Access Gmail
► From the Home screen, tap Google > Gmail to open the Gmail screen.
Tap on the top left of the screen to display the option menu.
Send a Gmail message
1. From the Gmail screen, tap Compose.
2. Fill the To, Cc, Bcc, Subject field as necessary.
3. Compose your message and then tap .
Read and reply to Gmail messages
1. From the Gmail screen, tap a message to display it.
2. Tap Reply, Reply all, or Forward.
3. Compose your message and then tap .
For more information, please visit https://support.google.com/mail.

30 Applications
Calendar
Use Calendar to create and manage events, meetings, appointments, and tasks.
Access Calendar
► From the Home screen, tap Google > Calendar.
Tap on the top left of the screen to display the option menu.
Add an event
1. On any Calendar view, tap > Event.
2. Set event details as necessary, such as the title, date and time, its recurrence, and
more.
3. Tap Save to save the event in the calendar.
Add a task
1. On any Calendar view, tap > Task.
2. Set task details as necessary, such as the title, due date and time, and its recurrence.
3. Tap Save to save the task in the calendar.
Event reminders
If you have set notifications for your event, the upcoming event icon will appear in the
notifications area of the status bar to remind you of the upcoming event.
To view the reminder:
1. Slide the status bar down to open the Notifications panel.
2. Tap the event name to see the event.
View Calendar events
You can display the Calendar in monthly, weekly, daily, or schedule view.
To change the Calendar view:
► Tap displayed at the upper left corner, and tap Schedule, Day, Week or Month.
For more information, please visit https://support.google.com/calendar.

Applications 31
Google Play Store app
Google Play is a destination for discovering free and paid digital content, including Android™
apps, books, movies, music, and much more.
To access the Google Play store app, you must first connect to the Internet using a Wi-Fi data
connection and sign in to your Google Account.
Find and install an app
When you install apps from the Google Play store and use them on your tablet, they may
require access to your personal information (such as your location, contact data, and more) or
access to certain functions or settings of your tablet. Download and install only apps that you
trust.
1. From the Home screen, tap .
Tap the account icon on the top right of the screen to display the option menu.
2. Find an app you want and tap it to open its details screen.
3. Tap Install (for free applications) or the price button (for paid applications).
NOTE:
If you have not set up your payment method on your Google Account, you are
prompted to add a payment option to complete your account setup.
4. Read the message thoroughly every time it appears and follow the onscreen
instructions to complete the installation or purchase.
WARNING: Read the notification carefully! Be especially cautious with applications
that have access to many functions or a significant amount of your data.
Once you tap ACCEPT on this screen, you are responsible for the results
of using this item on your tablet.
For more information, please visit https://support.google.com/play.
Google Maps
Use the Google Maps™ app to determine your location, find directions, browse local businesses
and attractions, rate and review places, and more.
NOTE:
Before using any location-based services, you must enable your tablet’s GPS location
feature. See Location.
Access Google Maps
► From the Home screen, tap .
Tap the account icon on the search field to display the option menu.
For more information, please visit https://support.google.com/maps.

32 Applications
YouTube
YouTube™ is a video sharing website on which users can upload and share videos.
Access YouTube
► From the Home screen, tap .
For more information, please visit https://support.google.com/youtube.
YouTube Music
Access the YouTube Music app to enjoy your favorite music.
Access YouTube Music
► From the Home screen, tap Google > YT Music. The YouTube Music screen appears.
For more information, please visit https://support.google.com/youtubemusic.
Files
You can manage the contents stored in the tablet or on the microSD card (optional) quickly and
easily.
Access Files
► From the Home screen, tap Google > Files. The Categories menu screen appears.
For more information, please visit https://support.google.com/files.
Supported formats
The following image, video and audio formats are supported by the tablet.
● BMP, GIF, JPEG, PNG, WEBP, HEIC
● H.263, H.264 AVC, H.265 HEVC, MPEG-4 SP, VP8, VP9
● AAC-LC, AAC+, eAAC+, AAC-ELD, AMR-NB, AMR-WB, FLAC, MP3, MIDI, Vorbis,
PCM/WAVE, Opus
Google Duo
Use Google Duo to make video calls to your family, friends, and anyone else.
Access Google Duo
1. From the Home screen, tap Google > Duo.
2. Follow the onscreen instructions to set up Google Duo on your tablet.
For more information, please visit https://support.google.com/duo.

Connections 33
Connections
Your tablet’s data capabilities let you wirelessly access the Internet or your corporate network
through Wi-Fi and Virtual Private Networks (VPN).
Wi-Fi
Wi-Fi provides wireless Internet access. To use your tablet’s Wi-Fi, you need access to a
wireless access point or "hotspot."
The availability and range of the Wi-Fi signal depend on several factors, including infrastructure
and objects through which the signal passes.
IMPORTANT:
This tablet does not support the UNII-3 Wi-Fi channels in the 5 GHz band. The
tablet will lose the Wi-Fi connection if the Access point/Router tries to direct it to
those channels. To prevent this problem, disable “
Auto channel selection
” in
the settings of your Access point/Router and change the settings so that the
UNII-3 channels are not used. For more information about the Access
point/Router settings, see the Access point/Router documentation or contact the
device manufacturer.
► From the Home screen, tap > Network & internet > Wi-Fi to open the Wi-Fi
screen.
Turn Wi-Fi on and connect to a wireless network
Use the Network & internet setting menu to enable your tablet’s Wi-Fi radio and connect to an
available Wi-Fi network.
1. From the Wi-Fi screen, tap the on/off icon next to Use Wi-Fi to turn it on.
2. Tap the available network to connect.
If you selected an open network, you will be automatically connected to the network.
If you selected a network that is secured with a password, enter the password, and
then tap
CONNECT
.
NOTE:
If the wireless network you want to connect to is not in the list of detected
networks, tap
Add network
at the bottom of the list. Enter the wireless network
settings and tap
SAVE
.
If you selected the network that the tablet is currently connected to, you will see
Network details showing the Wi-Fi network name, signal strength, frequency, and
more.

34 Connections
Depending on the network type and its security settings, you may also need to enter more
information or choose a security certificate.
When your tablet is connected to a wireless network, the Wi-Fi icon appears in the status
bar and tells you the approximate signal strength. (The above icon indicates maximum signal
strength.)
NOTE:
The next time your tablet connects to a previously accessed secured wireless network,
you will not be prompted to enter the password again, unless you reset your tablet to its
factory default settings or you instruct the tablet to forget the network.
NOTE:
Wi-Fi networks are self-discoverable, which means no additional steps are required for
your tablet to connect to a Wi-Fi network. However, it may be necessary to provide a
user name and password for certain closed wireless networks.
Wi-Fi settings menu
The Wi-Fi settings menu lets you turn Wi-Fi on or off, set up and connect to available Wi-Fi
networks, and configure advanced Wi-Fi options.
► From the Wi-Fi screen, scroll down to see these items.
Add network
to add networks to the network list.
TIP:
If you want to connect to a hidden network, change the
Hidden network
to
Yes
in
Advanced options
.
Wi-Fi preferences
to display the setting options related to Wi-Fi such as
Turn on
Wi-Fi automatically
,
Notify for public networks
, and
Install certificates
.
Saved networks
to display the list of the Wi-Fi networks saved in the tablet.
Wi-Fi data usage
to show data usage through Wi-Fi connections over a period of
time.
Bluetooth
Bluetooth is a short-range communications technology that allows you to connect wirelessly to a
number of Bluetooth devices such as headsets, Bluetooth-enabled handhelds, computers,
printers, and wireless phones. The Bluetooth communication range is usually approximately 30
feet.
Turn Bluetooth on or off
Use the settings menu to enable or disable your tablet’s Bluetooth capabilities.
1. From the Home screen, tap > Connected devices > Connection preferences >
Bluetooth to open the Bluetooth settings screen.
2. Tap the on/off icon next to Use Bluetooth to turn it on or off.

Connections 35
NOTE:
Turn off Bluetooth when not in use to conserve battery power, or in places where using
a wireless device is prohibited, such as aboard an aircraft and in hospitals.
Change the device name
The device name identifies your tablet to other devices.
1. From the Bluetooth settings screen, tap the on/off icon to turn Bluetooth on, if Bluetooth
is not turned on.
2. Tap Device name.
3. Edit the name for your tablet in the dialog box, and then tap RENAME.
Pairing
Pairing with other devices makes your tablet ready for connecting to them.
Pair with other devices
NOTE:
Bluetooth on other devices must be turned on before pairing.
IMPORTANT:
Perform the pairing process at a secure location.
IMPORTANT:
Bluetooth accessories/peripherals MUST have a passkey to work with the
mobile device. If you need to pair with a device without a pre-defined passkey, it
is recommended to use a passcode of at least eight digits.
1. From the Home screen, tap > Connected devices to open the Connected devices
screen.
2. Tap Pair new device.
Bluetooth turns on and shows you a list of nearby Bluetooth devices.
3. Tap the name you want to connect to in the Available devices list.
Your tablet then automatically tries to pair with the device.
4. If necessary, tap PAIR or enter the passcode.
To change the connected device name, tap to open the Device details screen,
tap to edit it, and then tap
RENAME
.
NOTE:
The display may vary depending on the connected device.

36 Connections
Disconnect from or reconnect to other devices
Once the pairing is established, you can connect to or disconnect from the paired device easily.
► From the Connected devices screen, tap next to the paired device name >
DISCONNECT or CONNECT.
Unpair from other devices
Unpairing from other devices makes your tablet forget its pairing connection with them. To
connect to the other devices again, you may need to enter or confirm a passcode.
► From the Connected devices screen, tap next to the paired device name >
FORGET > FORGET DEVICE.
NOTE:
The display may vary depending on the connected device.
Send and receive information
You can use Bluetooth to transfer information such as images or videos between your tablet
and another Bluetooth-enabled device such as a phone or notebook computer.
To send information from your tablet to another device:
1. Pair with the receiving device.
2. On the tablet, open the application that contains the information or file you want to send.
3. Tap the item you want to send and tap or Share > Bluetooth.
4. Tap the name of the receiving device.
5. On the receiving device, accept the download.
To receive information from another device:
1. Pair with the sending device.
2. On the sending device, send one or more files to your tablet.
3. When your tablet receives a file transfer request notification, slide down the Notifications
panel, tap the notification, and then tap ACCEPT.
4. When a file is transferred, a notification is displayed. To open the file, slide down the
Notifications panel, and then tap the relevant notification.
Supported Bluetooth profiles
A2DP, AVRCP, HID, HOGP, HSP, OPP, PAN-U, PBAP, and SPP are supported.
Camera 37
Camera
You can use the camera to take and share pictures and videos. Your tablet comes with an 8.0
megapixel rear camera and 5.0 megapixel front-facing camera that let you take sharp pictures
and videos.
Use the Camera App
The following topics show you how to take pictures and record videos.
Open or close the Camera app
The first step to take a picture or record a video is to open the camera app.
To open the Camera app:
► From the Home screen, tap .
To close the Camera app:
► On the camera screen, tap or .
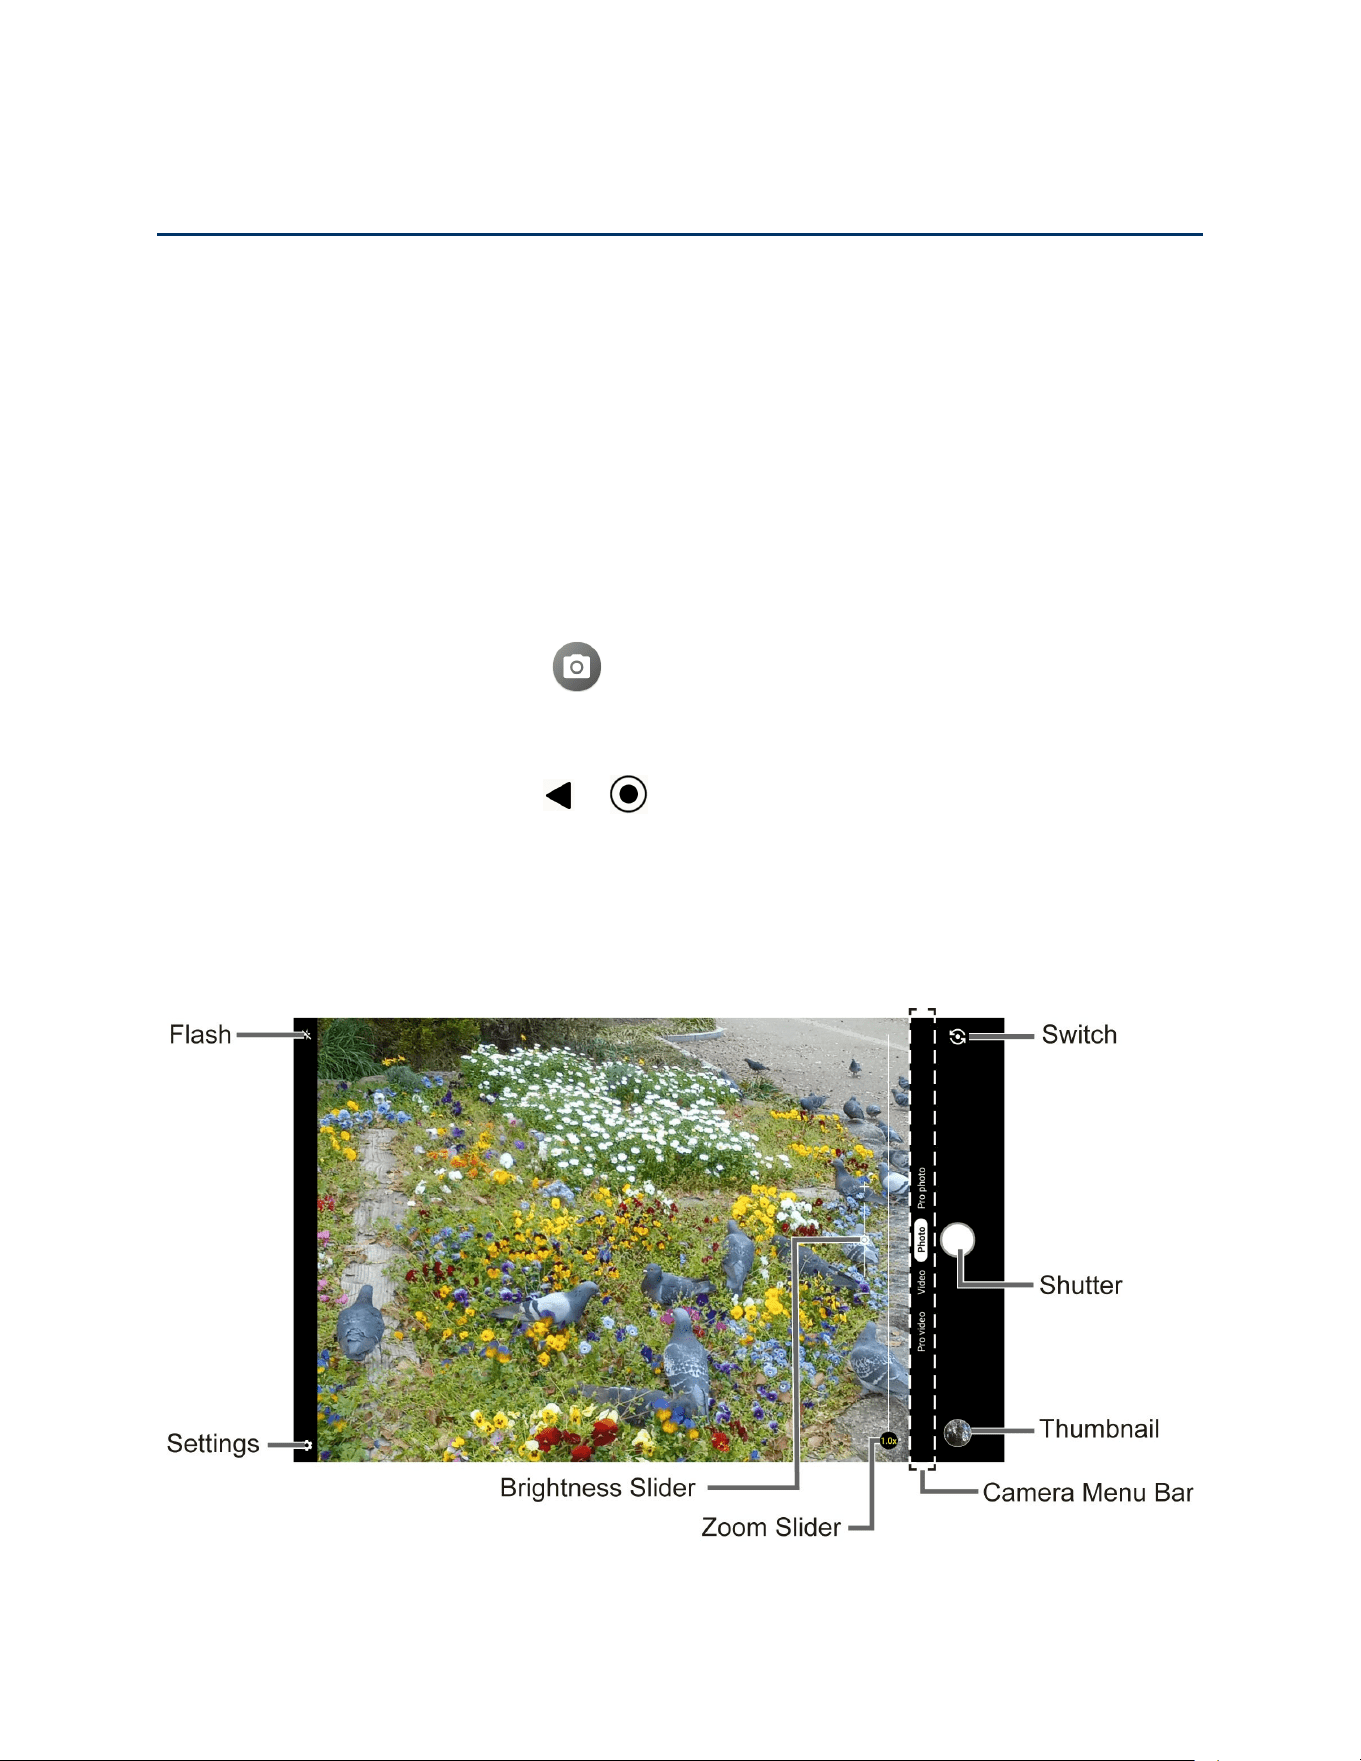
Viewfinder screen
The viewfinder screen lets you view your subject and provides controls and options for taking
pictures or recording videos.
Photo
38 Camera
● Camera Menu Bar: Select a mode such as Pro Video, Video, Photo, and Pro photo.
● Zoom Slider: Adjusts your zoom level. Pinch the screen with two fingers or tap .
● Brightness Slider: Adjusts your brightness level. Tap the screen to display the
brightness slider.
●
Thumbnail :
Displays the thumbnail of the latest image. Tap to view and manage.
●
:
Takes a picture.
●
:
Opens the camera settings menu. For more information, see Camera settings.
●
:
Helps illuminate subjects in low-light environments.
●
:
Switches between the rear camera and the front-facing camera.
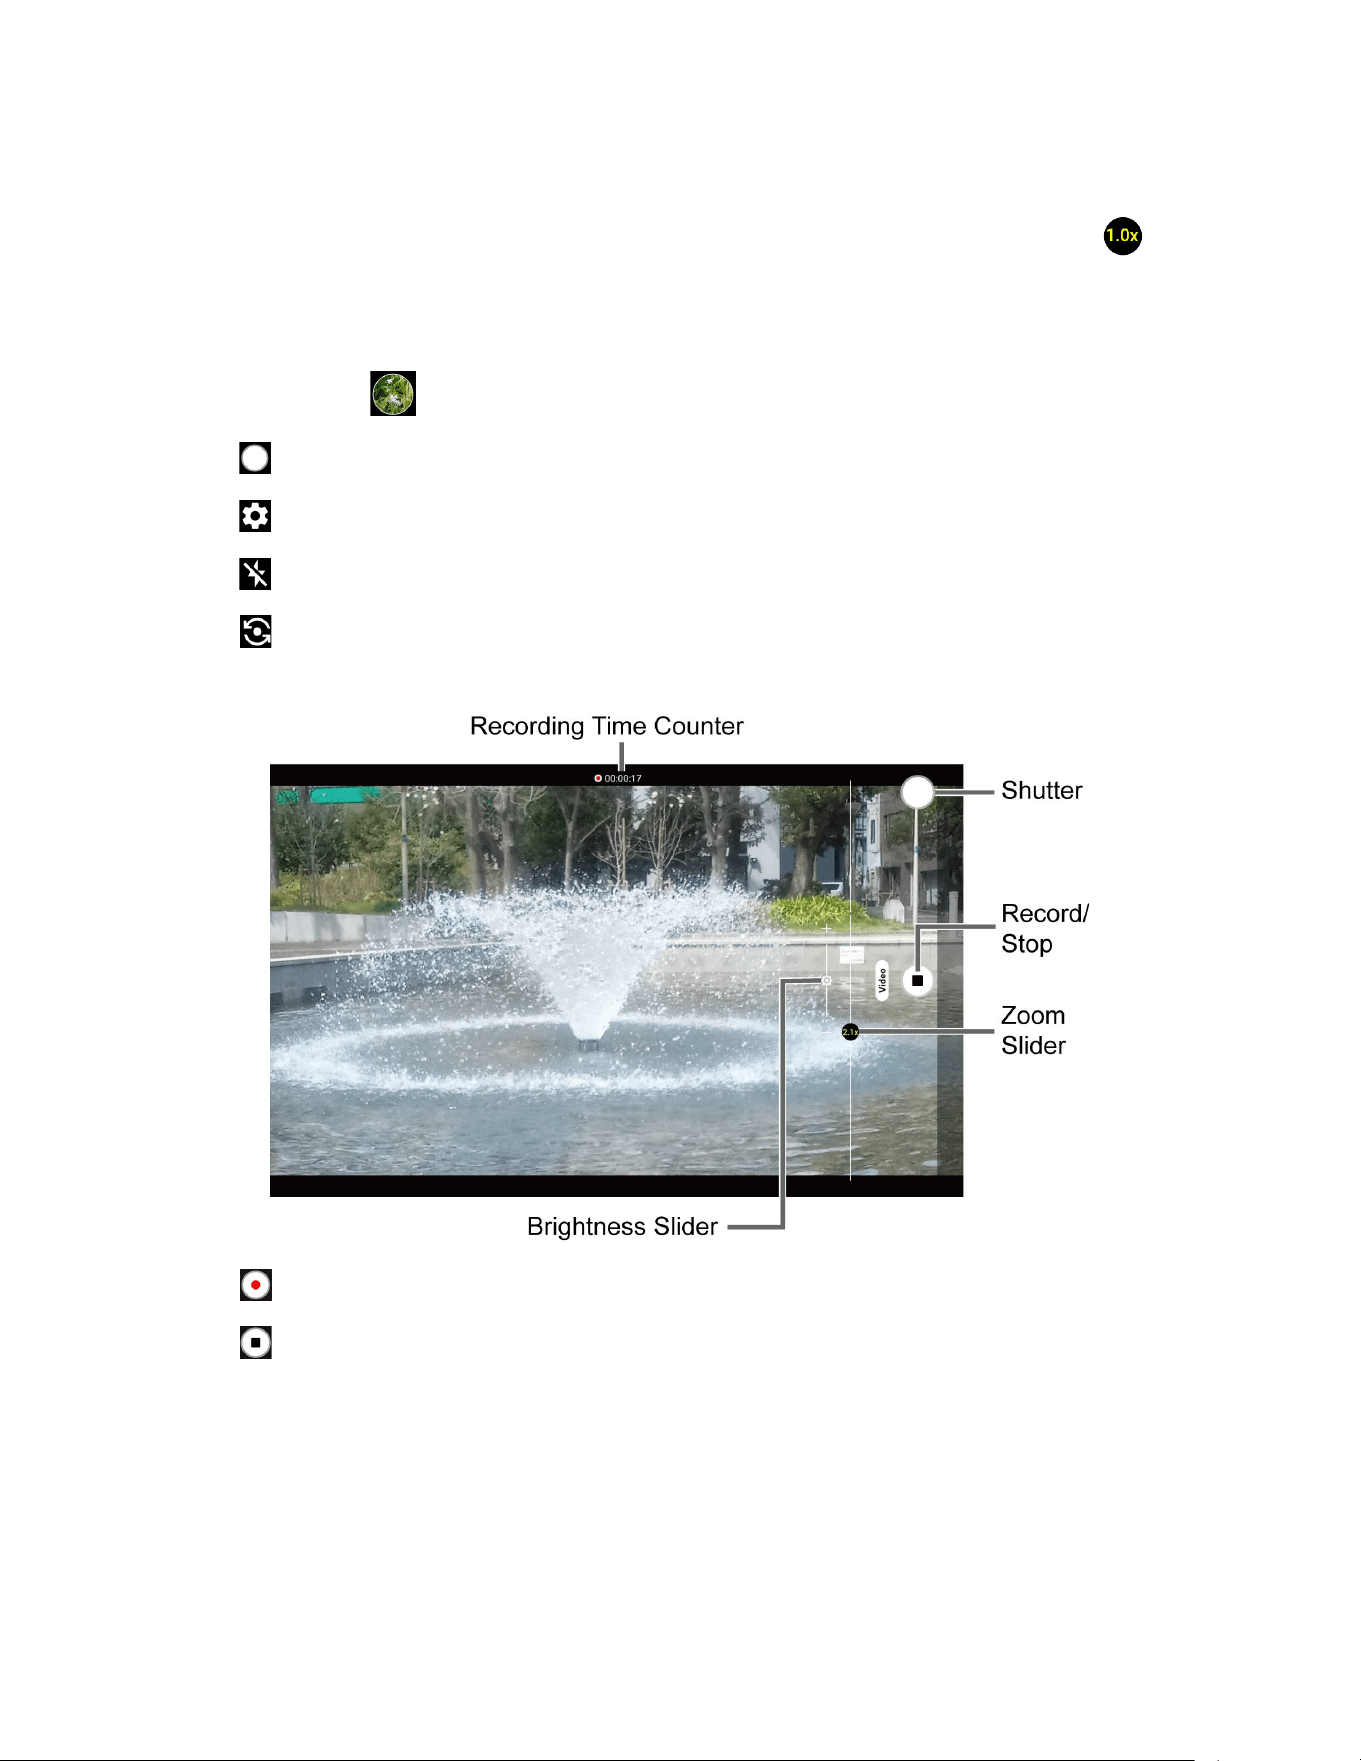
Video
●
:
Records a video.
●
:
Stops recording a video.
●
Recording Time Counter:
Displays the elapsed time while recording a video.
Camera 39
Take a picture or record a video
You can take high quality photos and videos with your tablet's camera.
1. From the Home screen, tap .
2. Select Photo or Video on the camera menu bar.
3. Do the following to change the settings:
Tap
to change the camera and video settings as desired. See Camera settings.
Tap to switch between the rear camera and the front-facing camera.
Adjust your zoom level.
Adjust your brightness level if necessary.
Tap any point to focus the area.
4. Frame your subject on the screen.
5. Tap to take a picture.
– or –
Tap to start recording. To stop recording, tap .
6. Tap thumbnail icon to view the image you’ve just taken or recorded.
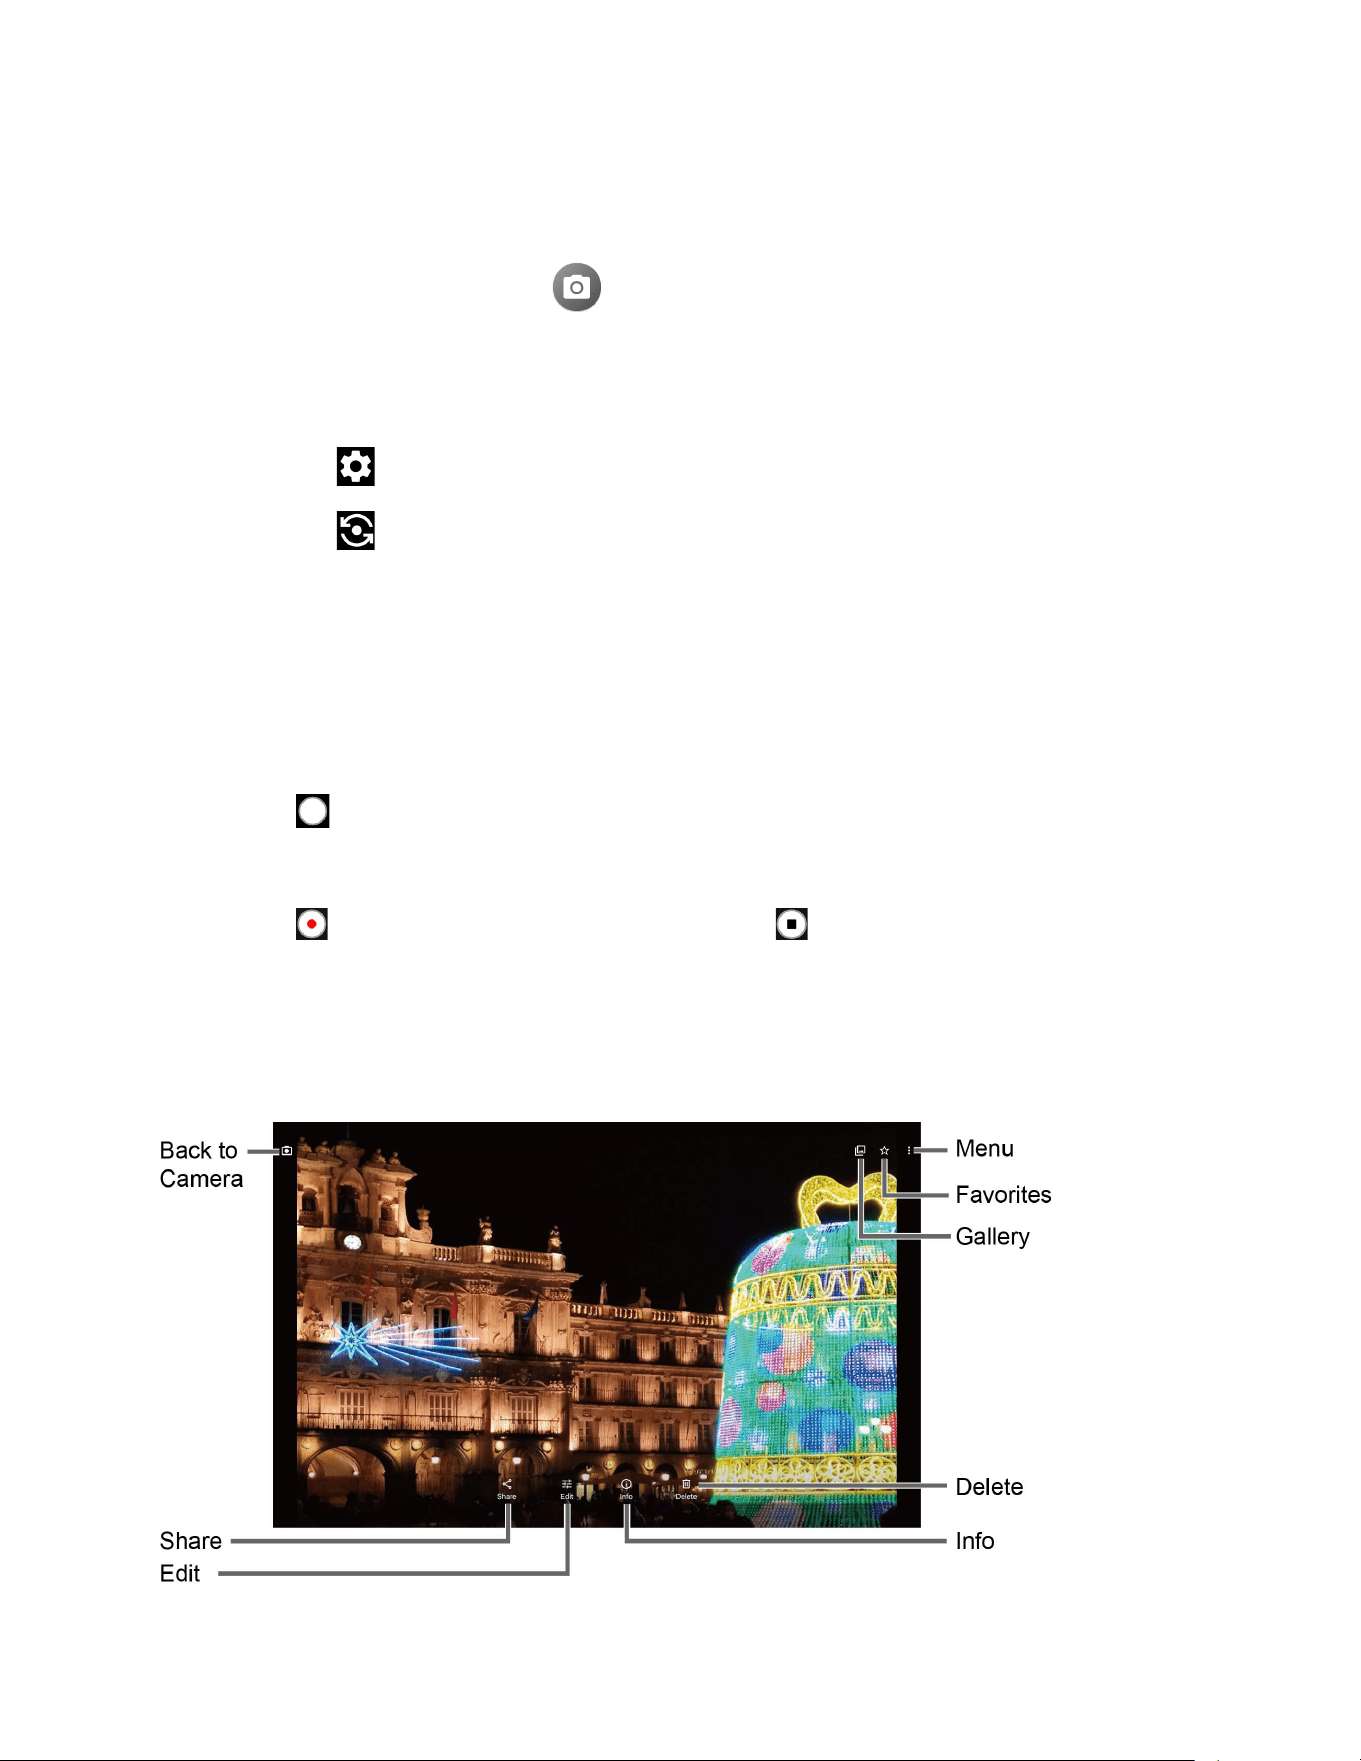
Review screen
After taking a picture or video, tap the thumbnail image to see the item in the review screen.
40 Camera
:
Displays available menus for the image. Available menus may vary:
• Back up now: Uploads the images to your Google Account. This menu displays
only for images not backed up.
• Loop video on: Select this option to see a video repeatedly. This menu displays
only when reviewing a video.
• View in: Opens the video by other apps.
• Add to album: Adds the selected picture/video to albums.
• Delete from device: Deletes the image from the device.
• Order photo: Submits a print order of your photos to pick them up later at
nearby stores.
• Use as: Sets the picture as the contact photo or wallpaper.
• Slideshow: Starts the slideshow of the pictures stored in the Photos application.
• Print: Prints the selected picture.
• Help & Feedback: Opens the Help window with the Feedback action.
:
Registers the image as Favorites.
:
Opens the
Photos
.
:
Returns to the Camera.
Share:
Displays available applications to share your image.
Edit:
Displays the editing options. For details, see Edit a picture.
Info:
Shows the photo’s information and lets you add a description if desired.
Delete:
Deletes the currently displayed image. Tap
Delete
>
Move to trash
to
confirm the deletion.
Camera settings
You can adjust the settings of your camera by tapping
on the viewfinder screen. Some
options are available for the rear camera only.
NOTE:
Available options may vary according to the subject and mode.

Camera 41
Photo
● Photo size: Select from the preferable size settings shown on the screen.
● Auto HDR: Select On to combine images automatically to prevent white spots or
blackouts.
Video
● Video size: Select from the preferable size settings shown on the screen.
● Image stabilization: Select On to reduce camera shake.
Common
● Storage: Select where to store your pictures and videos from Phone or SD card (only
available when a microSD card (optional) is inserted).
● Add location information: Stores the location information of the image. Switch On or
Off.
● Preserve last mode: Select On to preserve the mode you are in and launch Camera
application next time with the preserved mode.
Useful features
● Quick social media: Switch On or Off. If set to On, choose up to three apps for sharing.
● Self timer: Select from Off, 2 seconds, 5 seconds, or 10 seconds.
● Grid: Switch On or Off.
● Scan QR code: Switch On or Off.
Key settings
● Volume key: Select from the options shown on the screen.
Other
● Choose theme: Select from the options shown on the screen.
● Camera function guide: Displays the help information for camera.
● Reset settings: Restores all the camera settings to original state. Tap RESET to
confirm.
● Collection of the information about your use: Select AGREE or DISAGREE to the
collection of the information about your use of the Camera app.
42 Camera
View Pictures and Videos Using Photos
Using the Google Photos™ application, you can view pictures and watch videos that you’ve
taken with your tablet’s camera, as well as enjoy images and videos downloaded or copied onto
your microSD card or tablet’s internal storage.
For pictures that are on your microSD card or tablet’s internal storage, you can do basic editing
such as rotating and cropping. You can also easily assign a picture as your contact picture or
wallpaper and share pictures with your friends.
View pictures and videos
You can browse through the pictures and videos in grid view. Tap a picture or video to view.
1. From the Home screen, tap .
2. Scroll up or down to find a picture or video you want to view.
3. Tap an image of a picture or video you want to view.
For a video, it automatically starts playing. While playing, tapping the screen will
display the control options. Tap to pause or drag the dot on the timeline to
rewind or forward. Tap to resume.
For a picture, it displays the one you selected. When viewing, pinch & spread on the
screen to zoom in or out on the picture. You can also zoom in and out by tapping
quickly twice on the screen.
Work with Pictures
You can easily manage and retouch your pictures.
Edit a picture
Your tablet has a built in editing tool and you can edit your pictures easily.
1. Tap a picture > Edit.
2. Tap Suggestions, Crop, Adjust, Filters, or Markup and edit your picture as desired.

Camera 43
Suggestions:
Choose one of the suggested options for your picture.
Crop:
Crop or rotate the picture by using the available tools.
Adjust:
Apply some effects to adjust the picture.
Filters:
Apply color effects to the picture.
Markup:
Make your picture unique by drawing, highlighting, and adding text.
3. When finished, tap Save > Save or Save copy.
Share Pictures and Videos
The Photos application lets you send pictures and videos to your family or friends using email
and send them to your phone or computer using Bluetooth. You can also share pictures on your
social networks.
1. Touch and hold the picture or video to place a check mark on it. Tap multiple pictures
and videos to select them.
2. Tap .
3. Tap one of the available sharing tools, such as Gmail, Bluetooth, and NEARBY.
4. Follow the onscreen instructions to share.
44 Useful Tools
Useful Tools
Learn how to use many of your tablet’s productivity-enhancing features.
Clock
The Clock application functions as a world clock that shows the date and time. You can also use
it to turn your tablet into an alarm clock, a countdown timer, or a stopwatch.
Alarm
You can use your tablet as an alarm clock.
1. From the Home screen, tap Google > Clock > Alarm.
NOTE:
When you first open the alarms, two alarms are set up by default and ready for
you to customize. These alarms are turned off by default.
2. Tap an existing alarm time to change the settings.
– or –
Tap to add a new alarm.
3. Set the time and tap OK. You will see the on/off icon set to on next to the time you have
set.
4. Set repeat option, add a label, select an alarm sound, and set Google Assistant
Routine.
Tap on the top right of the screen to display the option menu.
Clock
You can add the time from around the globe on the Clock screen.
1. From the Home screen, tap Google > Clock > Clock.
2. Tap and enter the city name in the search field. As you type, any matching city
from the list are displayed. Tap the city you want to display on the Clock screen.
Tap on the top right of the screen to display the option menu.
Useful Tools 45
Timer
You can use your tablet as a countdown timer.
1. From the Home screen, tap Google > Clock > Timer.
2. Set the countdown time and tap to start the countdown.
3. The following options are available:
Label
to add a description to the timer.
+ 1:00
to add an additional minute to the remaining time.
Reset
to return to the start of the countdown.
to add a timer.
to stop the countdown.
to resume the countdown.
to delete the timer.
Tap on the top right of the screen to display the option menu.
Stopwatch
You can use your tablet as a stopwatch.
1. From the Home screen, tap Google > Clock > Stopwatch.
2. Tap to start the stopwatch.
3. The following options are available:
to record the lap time.
to stop timing.
to resume timing.
to reset the stopwatch.
Tap on the top right of the screen to display the option menu.
46 Useful Tools
Bedtime
Manage a healthy sleep schedule by using some convenient menus.
1. From the Home screen, tap Google > Clock > Bedtime.
2. Set a wake-up time and the days to apply it.
3. Set a bedtime and the days to apply it.
4. The following options are available:
See recent bedtime activity
to see your estimated time spent in bed.
Listen to sleep sounds
to choose a sound which can help you to fall asleep.
See your upcoming events
to check your events on the next day.
Tap on the top right of the screen to display the option menu.
Calculator
Your tablet has a convenient calculator that lets you perform basic mathematical equations.
1. From the Home screen, tap Google > Calculator.
2. The following options are available:
Tap to clear a digit. To clear an entire number, tap .
Tap for more options.
Flashlight
Your tablet’s camera flash can work as a flashlight.
WARNING: Do not shine the flashlight into anyone’s eyes, as doing so may compromise their
vision and cause an accident.
1. Slide the status bar down toward the bottom of the touchscreen.
2. Tap to turn the light on.
3. Tap to turn it off.
Useful Tools 47
Sound Recorder
The Sound Recorder app lets you record sound and save it as an audio file on your tablet or
inserted microSD card.
Record sound
1. From the Apps launcher, tap Sound Recorder to open the Sound Recorder screen.
2. Tap > File format to select the format type.
3. Tap > Storage to select where to save the recorded data.
4. Tap to start recording.
Tap to pause recording. Tap to resume recording.
5. Tap to stop recording.
Play audio data
1. On the screen where you finished recording, tap .
– or –
From the Apps launcher, tap Sound Recorder > and then tap a file.
2. The following options are available:
Drag the bar to rewind or fast-forward the data.
Tap to display the list of the stored files.
Tap to fast-forward the data. Tap to rewind.
Stored sound list
1. From the Sound Recorder screen, tap to display the list of the stored files.
2. The following options are available:
Tap to delete a file or files. Tap a file or files to select the file(s) you want to
delete and tap
OK
>
OK
. To select all files on the list, tap
SELECT ALL
.
Tap to display the option menu.

48 Useful Tools
Voice Search
Voice Search allows you to find information on the Web as well as items and information on
your tablet by speaking your search terms.
1. Tap on the Google Search Widget.
2. Speak clearly into the tablet’s microphone when you see Listening... on the screen. If
an error occurs, try again.
– or –
Tap Search a song and play, sing or hum a song.
3. Tap a matching item from the onscreen list.

Settings 49
Settings
The following topics provide an overview of items you can change using your tablet’s
Settings
menus.
Network & Internet
You can set up a function or change the settings of the features related to Network and Internet
such as Wi-Fi, Airplane mode, and VPN.
► From the Home screen, tap > Network & internet to open the Network & internet
screen.
Wi-Fi
The Wi-Fi settings menu lets you turn Wi-Fi on or off, set up and connect to available Wi-Fi
networks, and configure advanced Wi-Fi options. For more information about the Wi-Fi settings,
see Wi-Fi.
Airplane mode
Airplane mode disconnects your tablet from all networks. When Airplane mode is turned on, you
cannot send/receive emails, and your tablet's wireless functions, such as Wi-Fi and Bluetooth,
will automatically be disabled.
► From the Network & internet screen, tap the on/off icon next to Airplane mode to turn
Airplane mode on or off. While in Airplane mode, the status bar will display .
NOTE:
You can still turn on and use Wi-Fi and Bluetooth while Airplane mode is on. If you are
in an aircraft, healthcare facility, or other such location, follow instructions from the
crew/staff about enabling and using Wi-Fi and Bluetooth.
Virtual Private Networks (VPN)
From your tablet, you can add, set up, and manage virtual private networks (VPNs) that allow
you to connect and access resources inside a secured local network, such as your corporate
network. Depending on the type of VPN you are using at work, you may be required to enter
your login credentials or install security certificates before you can connect to your company’s
local network. You can get this information from your network administrator.
1. From the Network & internet screen, tap VPN.
2. Tap
ADD
and enter VPN profile >
SAVE
.
3. Tap the VPN connection you have added.
4. When prompted, enter your login credentials, and then tap CONNECT.
When you are connected, a VPN connected icon appears in the notification area.

50 Settings
Private DNS
Private DNS is a way to secure queries and responses between your tablet and a website when
your tablet tries to get information from the website. You can configure your tablet to connect to
a private host.
1. From the Network & internet screen, tap Private DNS.
2. Tap one of available Private DNS modes.
NOTE:
If you selected
Private DNS provider hostname
, enter the hostname you want
to use.
3. Tap SAVE.
Connected Devices
Your tablet can connect to other devices as follows.
► From the Home screen, tap > Connected devices to open the Connected devices
screen.
USB
Select which device will control the USB connection and the USB mode to be used during the
connection.
NOTE:
This menu appears only when the USB cable is connected between your tablet and
another device such as a PC.
NOTE:
You cannot use the AC adapter, DC In port, or charging contacts to charge the tablet at
the same time the USB port is in use. The USB port is the prioritized connection and
overrides other methods of charging.
1. From the Connected devices screen, tap USB.
2. Tap the item you want to set.
Pair new device
You can pair your tablet with other Bluetooth enabled devices via Bluetooth. For details on your
tablet’s Bluetooth settings, see Bluetooth.
Previously connected devices
View the list of devices to which the tablet has previously connected via Bluetooth.

Settings 51
Connection preferences
You can see the status or configure the settings of listed devices or features.
Bluetooth
Your tablet’s Bluetooth capabilities let you use wireless headsets, send and receive pictures and
files, and more. For details on your tablet’s Bluetooth settings, see Bluetooth.
Cast
You can connect your tablet to devices that support Miracast to share displayed images via a
connected Wi-Fi network.
Printing
You can print data from your tablet.
Files received via Bluetooth
You can see the transfer history of files received via Bluetooth.
Chromebook
You can see the connection status between your tablet and your Chromebook™ if you have
one.
Nearby Share
Share photos, links, files, and more with a friend or family member using a compatible device
nearby, by simply tapping the share button. For more information, please visit
https://support.google.com/android.
Apps
You can configure the settings for the applications used on your tablet.
► From the Home screen, tap > Apps.
Recently opened apps
Shows the list of apps which you have used recently. Through this menu you can access the
App info screen and change the settings of each app.
Default apps
If you have more than one app that does the same thing, you can pick which app to use by
default.
Screen time
Allows you to check screen time and set app timers to limit daily usage.

52 Settings
Unused apps
Displays the list of apps you have not used recently.
Special app access
This menu allows you to set the special access right for some apps.
Notifications
You can manage the notification settings on this tablet.
► From the Apps launcher, tap Settings > Notifications.
App settings
Allows you to activate or deactivate notifications from individual applications.
Notification history
Shows recent and snoozed notifications.
Conversations
Allows you to configure notifications for new messages in your priority conversations.
Bubbles
Set whether or not to display conversations as floating icons on top of other apps.
Device & app notifications
Allows you to control which apps and devices can access notifications.
Notifications on lock screen
Select whether to display the contents of your notifications on the locked screen.
Sensitive notifications
Set whether or not sensitive contents will be shown when the tablet is locked.
Do Not Disturb
Set to allow only selected contacts or apps to notify you based on an optional predefined
schedule. See Do Not Disturb.
Other notification settings
You can set other notification functions such as Hide silent notifications in status bar, and
Allow notification snoozing.

Settings 53
Battery
Monitor your tablet’s battery usage through this settings menu. View which functions are
consuming your battery’s charge and at what percentage. Also, shows you a message about
how well your apps are using the battery. If apps use too much battery, your tablet will suggest
actions you can take.
► From the Home screen, tap > Battery.
Battery Usage
Shows how many hours and minutes the screen has been active since the last full charge.
Battery Saver
Allows you to control your tablet’s battery usage by offering some useful setting options.
Battery Manager
Detects apps that are draining battery and allows you to restrict those apps.
WARNING: Restricted apps may not work properly and result in unwanted behavior such as
delayed notifications.
Battery percentage
Set to display or not display the remaining battery percentage in status bar.
Battery Care Mode
Allows you to extend the overall life span of your tablet’s battery by preventing it from being
charged above 75% of capacity.
IMPORTANT:
If the battery is frequently charged when it is nearly full, it will wear out faster,
reducing its cycle life. Battery cycle life is significantly increased when it is only
char
ged to 75%. When Battery Care Mode is "On", the tablet will limit its fully
charged state to 75%. When Battery Care Mode is “Off”, the tablet will charge
the battery to 100%. Note that when Battery Care Mode is “On”, it reduces the
available battery time per charge. Battery Care Mode is recommended to extend
the battery cycle life if you have no problem with the battery lasting throughout
the day or you usually connect your tablet to a charger.
NOTE:
When Battery Care Mode is On, a battery icon accompanied by a heart will display
in the Status bar. When this icon is displayed, it indicates that the battery
is considered
fully (100%) charged when it reaches 75% of capacity.

54 Settings
Customize Button
You can set what the programmable key will do for a single press, a double press, and a long
press.
Assign a function to the programmable key
1. From the Home screen, tap > Customize button.
2. Select Single press, Double press, or Press and hold.
3. Select a function or application you want to assign to the key.
Tap
Do nothing
if you do not want to assign any function to the key.
NOTE:
When you select
Do nothing
in step 3, the Wake up device function below will not be
available.
Wake up device
If you turn this on, a single press, a double press, or a long press on the programmable key will
launch the function or application assigned to that pressing type even in sleep mode.
Storage
The Storage settings menu lets you manage the storage on your tablet and provides options for
your microSD card.
1. From the Home screen, tap > Storage to open the Storage screen.
2. Tap next to THIS DEVICE, SD CARD, or other to open the pull-down menu.
Tap
Free up space
to see some suggestions for freeing up space in your device
and portable storage.
Device storage
You can see the availability and usage details of storage on your tablet.
► From the Storage screen, select THIS DEVICE from the pull-down menu (if not
selected) to see your internal storage information.
Portable storage
Manage your portable storage media, such as SD cards. You can see the card’s size and
available space, unmount or mount, view the card information and format (erase) the SD card.
1. From the Storage screen, select SD CARD from the pull-down menu to see your
microSD card storage information.

Settings 55
2. Tap to access the following options:
Rename
to change the name.
Eject
to unmount the microSD card.
NOTE:
It is important to unmount the card before removing it from your tablet to
avoid corrupting the data on the card.
Format
to format the SD card.
IMPORTANT:
The formatting procedure erases all the data on the microSD card, after which
the files CANNOT be retrieved. To prevent the loss of important data, please
check the contents before you format the card.
Sound
The Sound settings menu lets you control your tablet’s sound.
► From the Home screen, tap > Sound to open the Sound screen.
Volume settings
Drag the slider to left or right as desired to adjust the Media volume, Notification volume, and
Alarm volume.
Do Not Disturb
Sets some or all sounds and notifications to be silenced for a certain period of time you
schedule.
1. From the Sound screen, tap Do Not Disturb.
2. Set available options if necessary.
Media
Sets to show media player in the Quick Settings panel.
Default notification sound
Select a sound for notifications.
1. From the Sound screen, tap Default notification sound.
2. Tap a sound in the available list.
– or –
Tap + Add notification to select a sound file. After being added to the available list, tap
it.

56 Settings
3. The sound briefly plays when selected.
4. Tap OK to assign the notification sound.
Default alarm sound
Select a sound for alarms. See Default notification sound for setting procedure.
Other sounds
Set your tablet’s notification tones.
● Tap the on/off icon to turn on or off such items as Screen locking sounds, Charging
sounds, and Touch sounds.
Display
Adjusting your tablet’s display settings not only helps you see what you want, but it can also
help increase battery life.
► From the Home screen, tap > Display.
Brightness level
Manually adjust the screen brightness for the current lighting conditions by dragging the slider to
left or right.
Adaptive brightness
Enable or disable Adaptive brightness. If Adaptive brightness is enabled, it will automatically
adjust the brightness depending on the amount of light in your surroundings. If you adjust the
brightness manually, Adaptive brightness will learn from your selection and take that into
account for the future.
Lock screen
You can configure the lock screen display settings.
Screen timeout
Select the delay time before the screen automatically turns off.
Dark theme
See Dark theme.
Font size
Choose the font size on the screen.

Settings 57
Display size
Adjust the display size by dragging the slider to left or right.
Night Light
Tints your screen amber and allows you to schedule the time when to turn on or off.
Glove touch mode
When Glove touch mode is turned ON, the tablet increases the sensitivity of the screen in order
to improve touch detection through glove materials.
NOTE:
Depending on the thickness and material of your glove, you may be unable to operate
the touch screen even with this mode ON.
Auto-rotate screen
Your tablet is capable of automatically changing the orientation of some onscreen content. With
this feature, you can view the screen in either portrait or landscape orientation by turning the
tablet sideways.
Screen saver
You can select a screen saver for your tablet.
Tap to wake
This function allows you to turn the screen on by simply double tapping your tablet’s screen.
NOTE:
Even if Glove touch mode is ON, this function cannot be used while you are wearing
gloves.
Wallpaper
Select and assign your tablet’s background wallpaper. See Change the wallpaper.
Accessibility
The Accessibility menu lets you enable and manage accessibility-related applications.
► From the Home screen, tap > Accessibility to open the Accessibility screen.
NOTE:
After selecting each Accessibility menu, scroll down to find information about
the feature and read it carefully before turning on the feature.

58 Settings
Accessibility menu
Provides a large onscreen menu to control your tablet.
1. From the Accessibility screen, tap Accessibility Menu.
2. To turn it on, tap the Accessibility Menu shortcut on/off icon, read the confirmation
message, and tap ALLOW > GOT IT.
Tap
Accessibility Menu shortcut
to change the shortcut item.
Tap
Settings
to configure its settings.
Select to Speak
Select to Speak reads aloud any text that you can tap on such as documents, emails, text on
websites and text labels throughout the device interface.
1. From the Accessibility screen, tap Select to Speak.
2. To turn it on, tap the Select to Speak shortcut on/off icon, read the confirmation
message, and tap ALLOW > GOT IT.
3. Tap and then tap the item you want to be read out. To hear multiple items, drag
your finger across the screen. Tap if you want to hear everything on the screen.
Tap
Select to Speak shortcut
to change the shortcut item.
Tap
Settings
to configure its settings.
Switch Access
Switch Access allows you to interact with your tablet using one or more switches instead of the
touchscreen. Switch Access can be helpful if you cannot interact directly with the device. Use
switches to select items, scroll, type, and more.
1. From the Accessibility screen, tap Switch Access.
2. To turn it on, tap the Use Switch Access on/off icon, read the confirmation message,
and tap ALLOW.
3. The setup guide automatically shows up, then follow the onscreen instructions to finish
set up.
4. Tap the Switch Access shortcut on/off icon, read the confirmation message, and tap
GOT IT.
Tap
Switch Access shortcut
to change the shortcut item.
Tap
Settings
to configure its settings.

Settings 59
TalkBack
TalkBack provides spoken feedback to help visually impaired users.
NOTE:
When TalkBack is turned on, you need to take different actions to operate the
touchscreen. When you tap on an item, a green outline appears. Then, double tap the
item to select it. To slide the screen, slide with two fingers instead of one.
1. From the Accessibility screen, tap TalkBack.
2. To turn it on, Use TalkBack on/off icon.
3. The first time you activate the feature, a series of informational screens may be shown.
Tap on Next to outline the button, then double tap it to proceed to the next page. When
you select Finish in the same manner on the last screen, the TalkBack feature will be
set to on.
4. To turn TalkBack off, tap the Use TalkBack on/off icon, double tap it, tap STOP, then
double tap it.
– or –
Press and hold both volume keys for a few seconds when the TalkBack shortcut is
turned on with the Hold volume keys option enabled (default).
– or –
Tap and double tap it when the TalkBack shortcut is turned on with the Tap
accessibility button option enabled.
Tap
TalkBack shortcut
to change the shortcut item.
Tap
Settings
to configure its settings.
Text and display
► From the Accessibility screen, tap Text and display to open the Text and display
screen.
Font size
Adjust the font size on the screen.
1. From the Accessibility screen, tap Font size.
2. Drag the slider left or right to adjust the font size.

60 Settings
Display size
Adjust the display size on the screen.
1. From the Accessibility screen, tap Display size.
2. Drag the slider left or right to adjust the display size.
Bold text
Changes to bold font to improve visibility.
Color correction
Allows you to select a correction mode to adjust the color of the screen to suit your preference.
1. From the Accessibility screen, tap Color correction.
2. To turn it on, Use color correction on/off icon.
3. Tap the desired correction mode.
4. Tap the Color correction shortcut on/off icon, read the confirmation message, and tap
GOT IT.
Tap
Color correction shortcut
to change the shortcut item.
Color inversion
Allows you to exchange the colors of the items on the screen. Light areas will appear dark and
dark areas appear light. For example, black text on a white screen becomes white text on a
black screen.
1. From the Accessibility screen, tap Color inversion.
2. To turn it on, tap the Use color inversion on/off icon.
3. Tap the Color inversion shortcut on/off icon, read the confirmation message, and tap
GOT IT.
Tap
Color inversion shortcu
t to change the shortcut item.
Remove animations
Removes animations, for example, screens will no longer fade in and out when transitioning
from one app to another.
Large mouse pointer
Enlarges the size of the mouse pointer to make it easier to see.
High contrast text
Changes the color of all on-screen text to either dark or light to make it easier to read. The
specific text color shown will depend on the original text color.

Settings 61
Extra dim
Dims your screen beyond your tablet's typical minimum brightness level in order to be more
comfortable to read.
1. From the Accessibility screen, tap Extra dim.
2. To turn it on, tap the Make screen extra dim on/off icon.
3. Drag the intensity slider left or right to adjust the light dimmer or brighter.
4. Tap the Keep on after device restarts on/off icon to maintain this setting even after
restarting the tablet.
5. Tap the Extra dim shortcut on/off icon, read the confirmation message and tap GOT
IT.
Tap
Extra dim shortcut
to change the shortcut item.
Dark theme
Allows you to make your tablet’s background darker. Some of the possible benefits of the dark
theme include conserving battery power, reducing eye strain, and facilitating use in low-light
environments.
1. From the Accessibility screen, tap Dark theme.
2. To turn it on, tap the Use Dark theme on/off icon.
3. Tap Schedule to set to switch the Dark theme on or off automatically based on a
schedule. The following options are available:
None
to turn it on or off manually.
Turns on at custom time
to set a
Start time
and an
End time
to suit your needs.
Turns on from sunset to sunrise
to turn it on every night.
Magnification
Allows you to zoom the screen in and out by tapping, long pressing, pinching, or dragging with
two fingers.
1. From the Accessibility screen, tap Magnification.
2. To turn it on, tap the Magnification shortcut on/off icon, read the confirmation
message, and tap GOT IT.
Tap
Magnification shortcut
to change the shortcut item.
Tap
Magnification type
to switch between full and partial screen to magnify.

62 Settings
Timing controls
► From the Accessibility screen, tap Timing controls to open the Timing controls screen.
Touch & hold delay
Set the length of delay to be used in the touch and hold operation.
1. From the Accessibility screen, tap Touch & hold delay.
2. Select your desired setting.
Time to take action (Accessibility timeout)
Choose how long to show messages asking you to take action.
1. From the Accessibility screen, tap Time to take action (Accessibility timeout).
2. Select your desired setting.
NOTE:
This setting does not apply in all apps.
Autoclick (dwell timing)
You can set the cursor to take action automatically when the cursor stops moving for a certain
amount of time if you are using a mouse.
1. From the Accessibility screen, tap Autoclick (dwell timing).
2. Select your desired setting.
When you select
Custom
, tap the or icon at each end of the slider to set the
delay time longer or shorter.
System controls
► From the Accessibility screen, tap System controls to open the System controls
screen.
System navigation
Configure the system navigation options for your tablet, such as how to display your Home
screen.
1. From the System controls screen, tap System navigation.
2. Select Gesture navigation or 3-button navigation.
Tap to set
Digital assistant
and
Back Sensitivity
for
Gesture navigation
.

Settings 63
One-handed mode
Shrinks the screen size and allows you to use your tablet with just one thumb.
NOTE:
To use this feature, make sure that
Gesture navigation
is turned on in System
navigation settings. See System navigation.
1. From the System controls screen, tap One-handed mode.
2. To turn it on, tap the Use one-handed mode on/off icon.
3. Swipe down from the bottom edge of the screen to use the one-handed mode.
4. Tap the One-handed mode shortcut on/off icon, read the confirmation message, and
tap GOT IT.
Select which action you want to take by using the shortcut,
Pull screen into reach
or
Show notifications
.
Tap
One-handed mode shortcut
to change the shortcut item.
Auto-rotate screen
Set whether or not to rotate the screen automatically when you change your tablet’s orientation.
NOTE:
In some apps or menus, the screen may not rotate regardless of this setting.
Caption preferences
You can customize the language and the style of the displayed captions.
1. From the Accessibility screen, tap Caption preferences.
2. Tap the Show captions on/off icon to turn it on.
3. Configure the settings under Caption size and style and More options according to
your needs.
Audio adjustment
► From the Accessibility screen, tap Audio adjustment.
Mono audio
Set the audio output to mono when playing audio.
Audio balance
Adjust the audio balance by using the on-screen slider and by hearing a sound clip which will
play when you tap on the slider.

64 Settings
Accessibility shortcuts
► From the Accessibility screen, tap Accessibility shortcuts to open the Accessibility
shortcuts screen.
Accessibility button
Allows you to quickly access accessibility features from any screen.
1. From the Accessibility shortcuts screen, tap Accessibility button.
2. Configure the following settings:
Location
to select
Floating over other apps
or
Navigation bar
.
Size
to select
Small
or
Large
.
Fade when not in use
to set the button to become dim when not in use.
Transparency when not in use
to adjust the degree of the transparency of the
button when not in use.
Shortcut from lock screen
Set this on to allow the volume key shortcut to turn on the accessibility feature from the lock
screen.
Text-to-speech output
Your tablet can convert text into speech in certain downloaded applications. You may select the
language you hear or adjust its speed.
1. From the Accessibility screen, tap Text-to-speech output.
– or –
From the Home screen, tap > System > Languages & input > Text-to-speech
output.
2. Set Preferred engine, Language, Speech rate and Pitch.
PLAY:
Play a short demonstration of the set speech synthesis.
RESET:
Reset both Speech rate and Pitch to default.
Tap to configure its settings if necessary.

Settings 65
Security
The security settings menu lets you set encryption options, password visibility, administrator
settings, and credential storage options.
► From the Home screen, tap > Security to open the Security screen.
Security status
Shows you the status of your security apps.
Screen lock
Allows you to lock your tablet’s screen and enhance the security feature through various
options.
► From the Security screen, tap Screen lock.
IMPORTANT:
Highest security level protection (password protection) and frequent change of
password are recommended to protect your tablet and data from unauthorized
access.
NOTE:
When you change the screen lock option, you may be asked to choose how you want
notifications to show on the lock screen depending on the previous screen lock settings.
In that case, follow the onscreen instructions.
None:
There is no security.
Swipe
:
There is no security using the Swipe option.
Pattern
:
There is medium security using a Pattern. Follow the onscreen instructions
to set.
Lock No.
: There is medium to high security using a number of 4 or more digits.
Follow the onscreen instructions to set.
Password
: There is high security using a strong password. Follow the onscreen
instructions to set.
Screen lock settings
You can increase the security of your tablet by creating a screen lock.
NOTE:
This menu will not be displayed when
None
or
Swipe
is selected. The available
settings menus may vary depending on the screen lock option you have selected.
► From the Security screen, tap next to Screen lock.

66 Settings
Make pattern visible
You can hide the trace of your pattern as you draw it. This setting appears only when you set
Screen lock type to Pattern.
Lock after screen timeout
Sets the time delay to activate the screen lock feature after the device enters sleep mode. This
setting is available only when you have enabled one of the lock settings.
Power button instantly locks
Activates the screen lock feature by pressing the Power key. This setting appears only when
you set one of the lock settings.
Smart Lock
You can automatically unlock your tablet without using your Lock No., Pattern, or Password.
Device admin apps
You can enable or disable the authority of certain applications to be a device administrator. If
disabled, you will typically lose some functionality in those applications, such as the ability to
sync new email or calendar events with your tablet.
Encryption & credentials
You can view the credentials stored in the tablet, remove them, or install other credentials from
SD card.
NOTE:
The system data stored in the internal storage of this tablet are encrypted as default in
order to protect the device data.
Trust agents
Manages trust agents for features like Smart Lock.
App pinning
Turn on to keep your current app in view on your tablet.
Privacy
You can access and adjust all your privacy preferences from this menu.
► From the Home screen, tap > Privacy.
Privacy dashboard
Shows which apps have used permissions recently.

Settings 67
Permission manager
Shows a list of permission types and which apps have or do not have that permission. You can
change an app’s permission setting through this menu. See Permission.
Show passwords
Set whether or not to briefly display the numbers or letters as you are entering a PIN or
Password.
Notifications on lock screen
Select whether to display the contents of your notifications on the locked screen.
Show clipboard access
Notifies you when apps access contents you have copied, such as text or images.
Autofill service from Google
Lets you fill in passwords, addresses, and other information from your Google Account with a
single tap.
Google location history
Launches the location history settings in your Google account, so that you can modify them.
Activity controls
Launches the activity controls within your Google account, so that you choose whether or not it
will save your activity on Google sites and apps.
Ads
Allows you to control Ad behavior and to avoid being targeted by ads based on your activity on
your tablet.
Usage & diagnostics
Control whether or not your tablet automatically sends diagnostic, device, and app usage data
to Google.

68 Settings
Location
The Location services settings menu lets you decide whether to allow your tablet to collect and
use your tablet’s location information. Some apps may require location services be turned on for
full functionality.
IMPORTANT:
Your wireless device can determine its (and your) physical, geographical
location ("Location Information") and can associate Location Information with
other data. Additionally, certain applications, services and programs are capable
of accessing, collecting, storing and using Location Information and disclosing
Location Information to others. You should use caution when determining
whether or not Location Information should be made available to others and you
should review any applicable third party privacy policies before providing access.
► From the Home screen, tap > Location to open the Location screen.
Use location
Tap the on/off icon to turn location on or off.
Recent access
Shows the list of apps which have recently requested access to your location information.
App location permissions
For each app installed on your tablet, you can select whether or not the app can access the
tablet’s location information.
Location services
Manage your tablet’s location-based services provided by Google.
► From the Location screen, tap Location services.
Emergency Location Service
See Emergency Location Service.
Wi-Fi scanning/Bluetooth scanning
You can let your tablet scan for nearby Wi-Fi networks or Bluetooth devices in order to help
apps and services get better location information.
You can also access other Google Location menus such as Google Location Accuracy,
Google Location History
™, and Google Location Sharing.
For more information about Google Location Services, visit
https://support.google.com/android/location.

Settings 69
Safety & Emergency
Use this feature to save and share your emergency information.
► From the Apps launcher, tap Settings > Safety & emergency to open the Safety &
emergency screen
Emergency information
Registering emergency information might help rescue workers, such as paramedics,
police, and hospital personnel, identify your primary contact or special medical needs
you might have in case of emergency.
1. From the Safety & emergency screen, tap OPEN EMERGENCY INFORMATION or
Emergency information.
2. Add or edit your emergency information.
Tap
Add information
to enter/edit your personal data, such as
Name
,
Address
,
Blood type
, and
Allergies
.
Tap
Add contact
to register your emergency contacts.
Tap >
Clear all
to remove all registered information and contacts.
Emergency Location Service
When the Emergency Location Service (ELS) feature is activated, your device will automatically
send your location to emergency responders when you text an emergency number.
1. From the Safety & emergency screen, tap Emergency Location Service.
2. Tap the Use Emergency Location Service on/off icon to turn it on or off.
Password & Accounts
Add and manage all your email, social networking, and picture and video sharing accounts and
save and manage your passwords.
► From the Apps launcher, tap Settings > Password & accounts to open the Password
& accounts screen.
Passwords
You can manage and protect your passwords you saved in your Google Account by using
Google Password Manager.
► From the Password & accounts screen, tap Google under Passwords and choose your
Google account.

70 Settings
For more information about Google Password Manager, visit
https://support.google.com/android/password.
Autofill service
You can fill in passwords, addresses, and other information saved to your Google Account with
a single tap.
Set up a new account
1. From the Password & accounts screen, tap Add account.
2. Tap an account type such as Google.
3. Follow the onscreen instructions to set up an account.
Depending on the account type, you may need to enter an email address or user
address, password, domain name, or other information. For corporate accounts,
contact your server administrator to determine what information you will need.
Manage existing accounts
► From the Password & accounts screen, tap the existing accounts.
NOTE:
Available settings menus may vary according to the account type.
Tap
Account
sync
to turn auto-sync on or off for each app in the list.
Tap
REMOVE ACCOUNT
to delete the account from your tablet.
Automatically sync app data
Set whether or not to sync the data in your tablet with the data stored on the Web.
Digital Wellbeing & Parental Controls
You can find some useful menus to create healthy and effective digital habits for you and your
family. It shows how you use your tablet and how often you check it and offers some measures
to help you to disconnect from the tablet or focus on what’s in front of you by minimizing
distractions.
► From the Home screen, tap > Digital Wellbeing & parental controls to open the
Digital Wellbeing & parental controls screen.
Your Digital Wellbeing tools
Get a daily view of your digital habits, such as how frequently you use different apps, how many
notifications you receive, or how often you check your tablet or unlock your device.
Dashboard
You can set daily timers to limit your use of each app.

Settings 71
1. From the Digital Wellbeing & parental controls screen, tap Dashboard.
2. Tap next to the app you want to limit.
If you don’t find it right away, tap
Show all
[xx]
apps
([xx] is the total number of
apps).
3. Choose how much time you can spend in that app, then tap OK.
Bedtime mode
This function allows you to silence your tablet and fade your screen to grayscale based on your
set bedtime schedule.
Focus mode
Focus mode lets you pause distracting apps with a single tap so you can better focus your
attention. You can also set a schedule to turn on Focus mode automatically and reduce
distractions while you’re at work, school, or home.
Manage notifications
Configure notification settings for individual apps.
Do Not Disturb
See Do Not Disturb.
Heads Up
If you’re walking while using your tablet, the tablet warns you to stop using your tablet and focus
on what’s around you.
Show icon in the app list
To find Digital Wellbeing on the Apps launcher as an app, turn this on.
Parental controls
You can manage a child’s account by setting the content restrictions or supervising their tablet
remotely with the Family Link™ app. For more information, please visit
https://support.google.com/families.
Google
You can see your Google Account and a variety of information, such as security,
personalization, and other topics related to Google services.
► From the Home screen, tap > Google.
Tap to display the option menu.
Tap to display the help menu.

72 Settings
System
You can configure the settings for languages, time, and backup.
► From the Home screen, tap > System to open the System screen.
Languages & input
The language and input settings let you select a language for the tablet’s menus and keyboards,
select and configure keyboard settings, configure speech input settings, and more. For details,
see Enter Text.
► From the System screen, tap Languages & input.
Languages
You can set a language to use on your tablet by selecting from the onscreen languages.
On-screen keyboard
You can select on-screen keyboards to be used and change their settings.
Physical keyboard
You can configure the settings for using a physical keyboard with your tablet.
Spell checker
This feature allows you to spell check text as you type it.
Personal dictionary
See Add a word to the user dictionary.
Pointer speed
You can set the pointer speed of a mouse being used with your tablet.
Text-to-speech output
See Text-to-speech output.
Gestures
This menu allows you to interact with your tablet using gestures.
► From the System screen, tap Gestures.
Quickly open camera
You can open the camera app by pressing the Power key twice when this function is set to on.
System navigation
See System navigation.
One-handed mode
See One-handed mode.

Settings 73
Date & time
Use the Date & time settings menu either to automatically use the network-provided date and
time or manually set these values, as well as select time and date format options.
1. From the System screen, tap Date & time.
2. Tap Set time automatically to turn off if necessary.
If set to on, you cannot set the date or time values manually.
3. Tap Time zone. Tap Region, select a region from the onscreen list, and then select a
time zone if necessary.
4. Tap Date. Tap the date on the onscreen calendar and tap OK.
5. Tap Time. Adjust the hour and minute by using the onscreen clock and tap AM or PM.
Tap OK when finished.
6. Tap Use locale default to turn off if you do not want to use locale default.
7. Tap Use 24-hour format to turn on to use the 24-hour format or turn it off to use 12-
hour format.
Auto power on/off
Use an automatic power on/off feature that helps you to schedule the time for turning off your
tablet and then turning it on at a certain time.
1. From the System screen, tap Auto power on/off.
2. Tap the on/off icon for the Power on or Power off time to turn it on.
3. Tap the current set time. Adjust the hour and minute by using the onscreen clock and
tap AM or PM. Tap OK when finished.
4. Set the days to use Auto power on/off function.
Backup
Back up your tablet’s data and settings with Google One™. Google Account is required.
► From the System screen, tap Backup.
To turn on the automatic backup function, tap the on/off icon next to
Backup by
Google One
.
NOTE:
To back up your pictures and videos, tap
Photos & videos
under
Backup
details
and tap the on/off icon next to
Back up & sync
to turn it on.

74 Settings
To see backup storage details of your account or access Google One screen, tap
Manage storage
.
For more information on Google One, please visit https://one.google.com.
System updates
You can check for available software updates of your tablet.
Reset options
Some or all of the data in your tablet’s internal storage will be reset to default.
► From the System screen, tap Reset options to open the Reset options screen.
Reset Wi-Fi & Bluetooth
1. From the Reset options screen, tap Reset Wi-Fi & Bluetooth.
2. Follow the onscreen instructions.
Reset app preferences
1. From the Reset options screen, tap Reset app preferences.
2. Follow the onscreen instructions.
Erase all data (factory reset)
All the data in your tablet's internal storage will be reset to default.
TIP:
Before performing a factory data reset on your tablet, you may want to unmount the
microSD card to avoid losing any data you may have stored on it. To unmount the SD
card, from the Home screen, tap >
Storage
>
THIS DEVICE
>
SD CARD
, then tap
>
Eject
.
1. From the Reset options screen, tap Erase all data (factory reset).
2. Read the factory data reset information and tap Erase all data.
3. Enter your Lock No. (PIN), Password, or Pattern if required.
4. Tap Erase all data. Your tablet will power down and reset itself, which may take up to
10 minutes.
NOTE:
Deleted data CANNOT be retrieved.

Settings 75
About Tablet
The About tablet menu lets you access important tablet information including device name, legal
information, IP address, and more.
► From the Home screen, tap > About tablet.
Legal information
Shows legal information on the screen.
► From the About tablet screen, tap Legal information.

76 Contact Us
Contact Us
You can quickly access useful information for your tablet by visiting the URLs below.
Find out more about Kyocera:
https://kyoceramobile.com/
Support & Registration:
https://kyoceramobile.com/support/phone/
Learn about our white glove service for businesses:
https://kyoceramobile.com/business/business-select/
Find accessories:
https://kyoceramobile.com/accessories/

Copyright & Trademarks 77
Copyright & Trademarks
© 2022 Kyocera Corporation. All rights reserved. KYOCERA is a registered trademark of
Kyocera Corporation. All other trademarks are the property of their respective owners.
Google, Android, Google Play, YouTube and other marks are trademarks of Google LLC.
The Bluetooth
®
word mark and logos are registered trademarks owned by Bluetooth SIG, Inc.
and any use of such marks by Kyocera Corporation is under license. Other trademarks and
trade names are those of their respective owners.
microSD, microSDHC and micr
oSDXC Logos are
trademarks of SD
-3C, LLC.

78 Index
Index
Accessibility, 57
audio balance, 63
bold text, 60
button settings, 64
caption, 63
color correction, 60
color inversion, 60
display size, 60
dwell timing, 62
extra dim, 61
font size, 59
high contrast text, 60
large mouse, 60
large onscreen menu, 58
magnification, 61
mono audio, 63
one-handed mode, 63
remove animations, 60
select to speak, 58
system navigation, 62
TalkBack, 59
time to take action, 62
touch & hold delay, 62
use switches, 58
Accessibility Menu, 58
Account, 69
create, 70
manage, 70
passwords, 69
Airplane Mode, 49
Alarm, 44
Applications, 28
Apps, 51
screen time, 51
Apps Launcher, 16
Backup, 73
Battery, 53
battery care mode, 53
battery manager, 53
battery saver, 53
charge, 4
percentage, 53
status information, 53
Bedtime, 46
Bluetooth, 34
connect, 36
device name, 35
disconnect, 36
pair, 35
pairing, 35
receive, 36
send, 36
supported profiles, 36
turn on or off, 34
unpair, 36
Calculator, 46
Calendar, 30
access, 30
add a task, 30
add an event, 30
event reminders, 30
view events, 30
Camera, 37
flash, 4
front-facing, 3
rear, 4
review, 39
settings, 40
viewfinder, 37
Chrome, 29
launch, 29
navigate, 29
Clock, 44
Connections, 33

Index 79
Contact Us, 76
Contacts, 24
add, 24
add to Favorites, 27
assign a picture, 25
delete, 25
delete group, 26
edit, 25
edit group, 26
group, 26
list, 24
Customize Button, 54
Date & Time, 73
Digital Wellbeing, 70
focus mode, 71
heads up, 71
Display, 56
adaptive brightness, 56
auto-rotate screen, 57
bold text, 60
brightness level, 56
cast, 51
dark theme, 56, 61
display size, 57, 60
font size, 56, 59
glove touch mode, 57
night light, 57
screen saver, 57
screen timeout, 56
tap to wake, 57
wallpaper, 15
Drag, 11
Emergency Information, 69
Emergency Location Service (ELS), 69
Factory Reset, 74
Favorites Tray, 13
Files, 32
supported formats, 32
Flashlight, 46
Flick, 11
Gboard, 19
text mode, 20
user dictionary, 21
Gestures, 72
Gmail, 29
access, 29
read and reply, 29
send, 29
Google Account, 28, 71
create, 28
sign in to, 28
Google Duo, 32
Google Maps, 31
Google Play Store, 31
install apps, 31
Google Voice Typing, 22
Home Screen, 13
add shortcut, 14
add widgets, 14
favorites tray, 15
function buttons, 12
manage, 14
move items, 14
overview, 13
remove items, 14
settings, 15
use folders, 15
In Case of Emergency
emergency information, 69
Keyboard
Gboard, 19
glide typing, 22
Language, 72
Languages & Input Settings, 72
LED Indicator, 3
Legal Information, 75
Light Sensor, 3
Location, 68
settings, 68
Microphone, 3
microSD Card
install, 5
Music
YouTube Music, 32
Notification Panel, 18

80 Index
Notifications, 52
app settings, 52
conversations, 52
history, 52
Parental Controls, 71
Permission, 16
check, 16
Photos, 42
edit pictures, 42
share, 43
view, 42
Picture
take pictures, 39
view, 42
Pinch, 12
Power Key, 3
Print, 51
Privacy, 66
permission manager, 67
Programmable Key, 3, 54
wake up device, 54
Quick Settings, 19
Quick Shortcuts, 17
Safety & Emergency, 69
Screen Lock, 65
settings, 65
SD Card
format, 54
storage, 54
Security, 65
device administrators, 66
encryption, 66
status, 65
Select to Speak, 58
Settings, 49
Setup Wizard, 8
Slide, 11
Smart Lock, 66
Sound, 55
alarm sound, 56
do not disturb, 55
notification sound, 55
others, 56
volume, 55
Sound Recorder, 47
Spread, 12
Status Bar, 17
Stopwatch, 45
Storage, 54
device, 54
SD card, 54
Swipe, 11
Switch Access, 58
Tablet
auto power on/off, 73
back up, 73
illustration, 2
information, 75
reset, 74
restart, 8
turn off, 7
turn on, 7
TalkBack, 59
Tap, 10
Text
copy and paste, 23
enter, 19
Text-to-Speech Output, 64
Timer, 45
Touch and Hold, 10
Touchscreen, 3
auto-rotate, 63
navigation, 10
turn off, 8
turn on and start, 9
USB
port, 3
settings, 50
Useful Tools, 44
Video
record videos, 39
view, 42
viewfinder, 38
Virtual Private Networks (VPN), 49
Voice Search, 48
Volume Keys, 3
Wallpaper, 15

Index 81
Wi-Fi, 33
connect, 33
settings, 34
turn on, 33
YouTube, 32