
1
ORIGINAL INSTRUCTION MANUAL
Gasoline Earth Auger
WB52CCEA
MADE IN CHINA
IMPORTANT: Read this manual thoroughly before using this product. Follow all instructions.
2
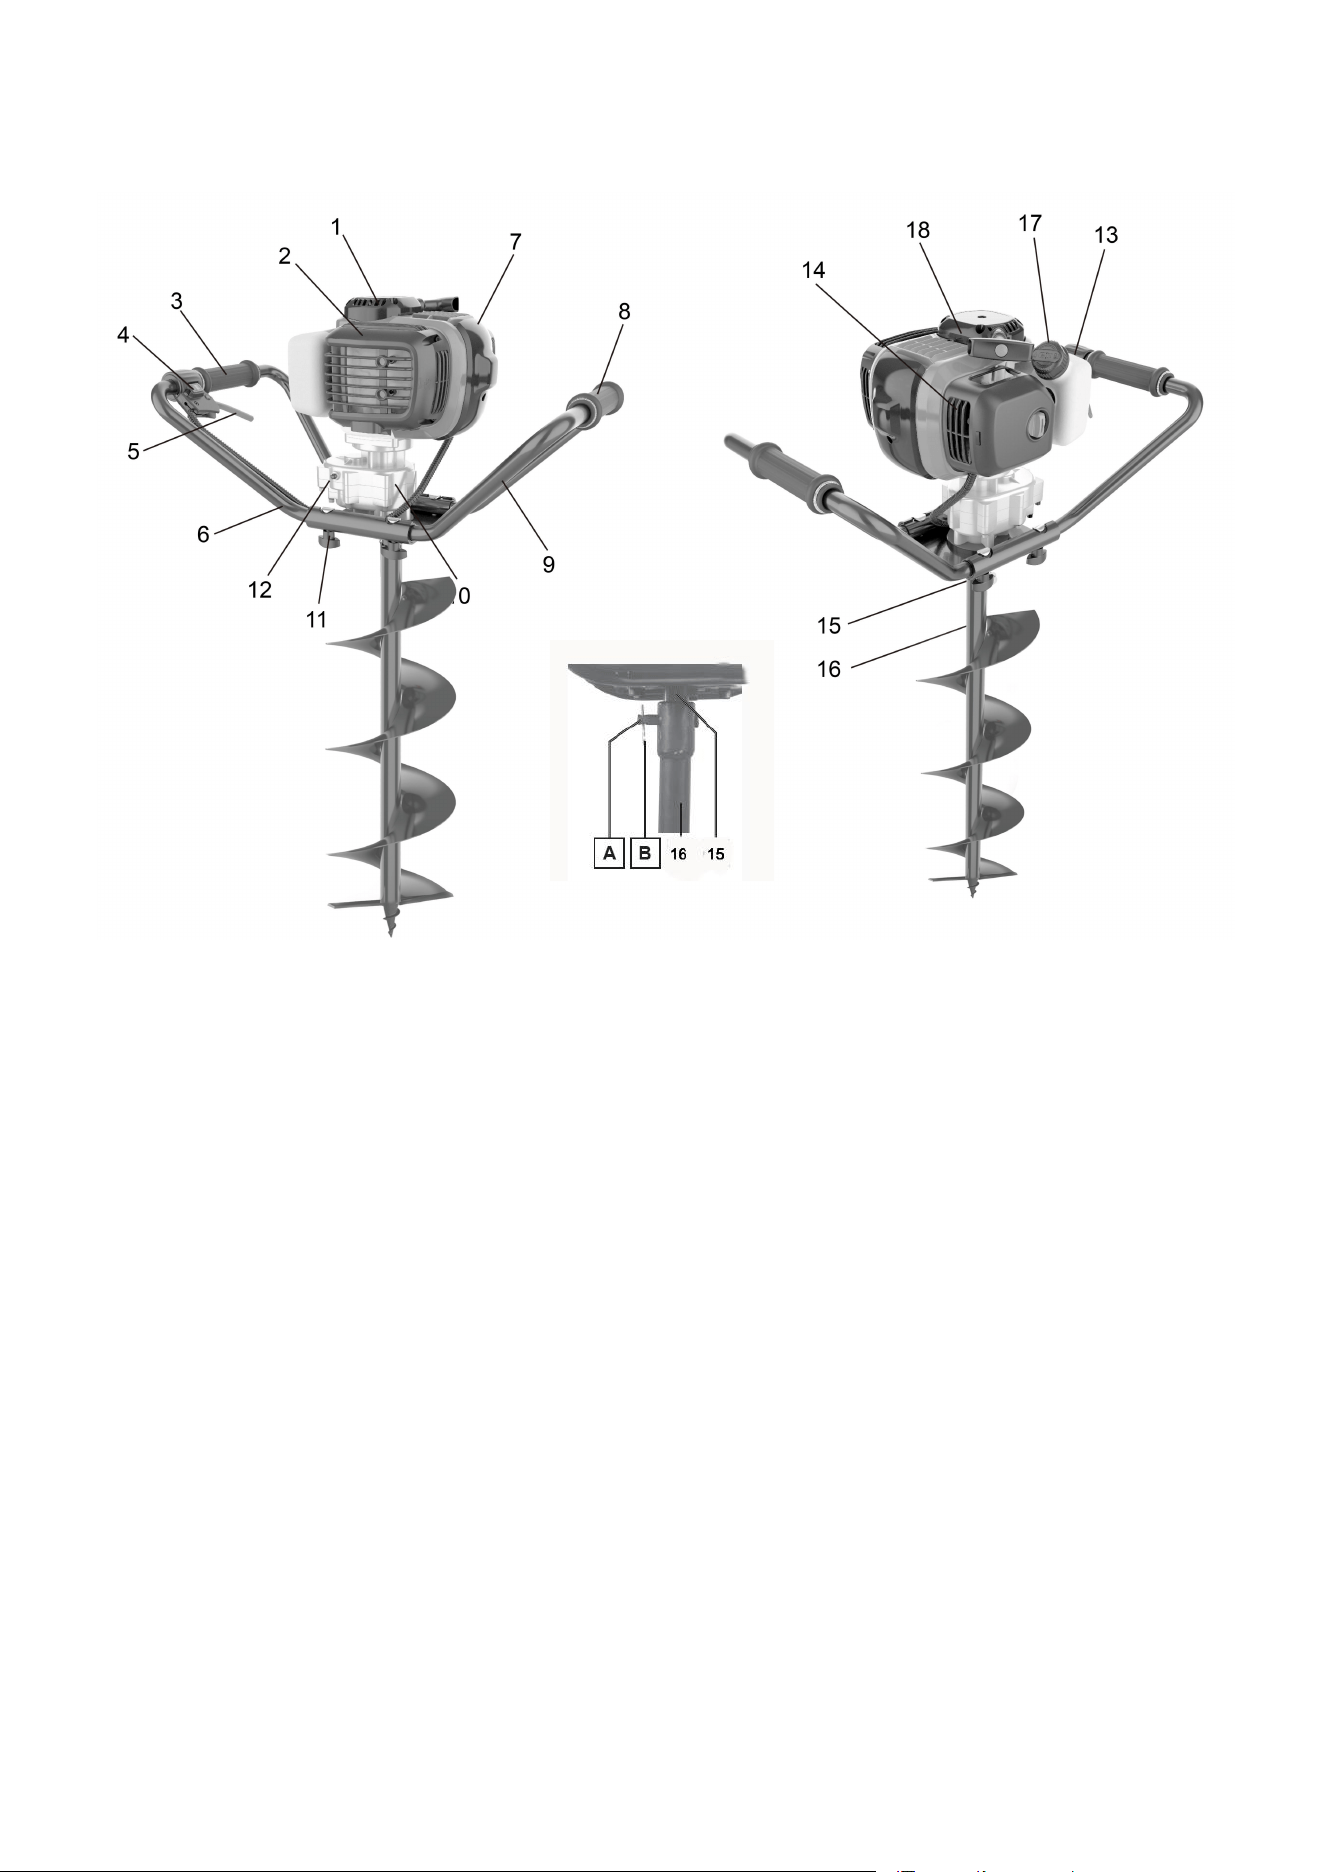
COMPONENT LIST
1. Starter 2.Muffler cover 3. Right grip 4. Trigger box
5. Trigger 6. Right handle 7. Engine cover 8. Left grip
9. Left handle 10. Gear box 11. Handle tighten knob 12. Lubricating nipple
13. Fuel tank 14. Filter cover 15.Motor shaft 16. Drill shaft
17. Fuel tank cap 18. Starter cord
A: Drill connector pin B. Connector pin
3
Drills:
Earth Auger: 200mm (diameter) x800mm length
Open the packaging and remove the device carefully.
Remove the packaging material as well as the packaging and transport bracing .
Check that the delivery is complete.
Check the device and accessory parts for transport damage.
If possible, store the packaging until the warranty period has expired.
Attention! The device and packaging materials are not toys! Children must not be allowed to play
with plastic bags, film and small parts! There is a risk of swallowing and suffocation!
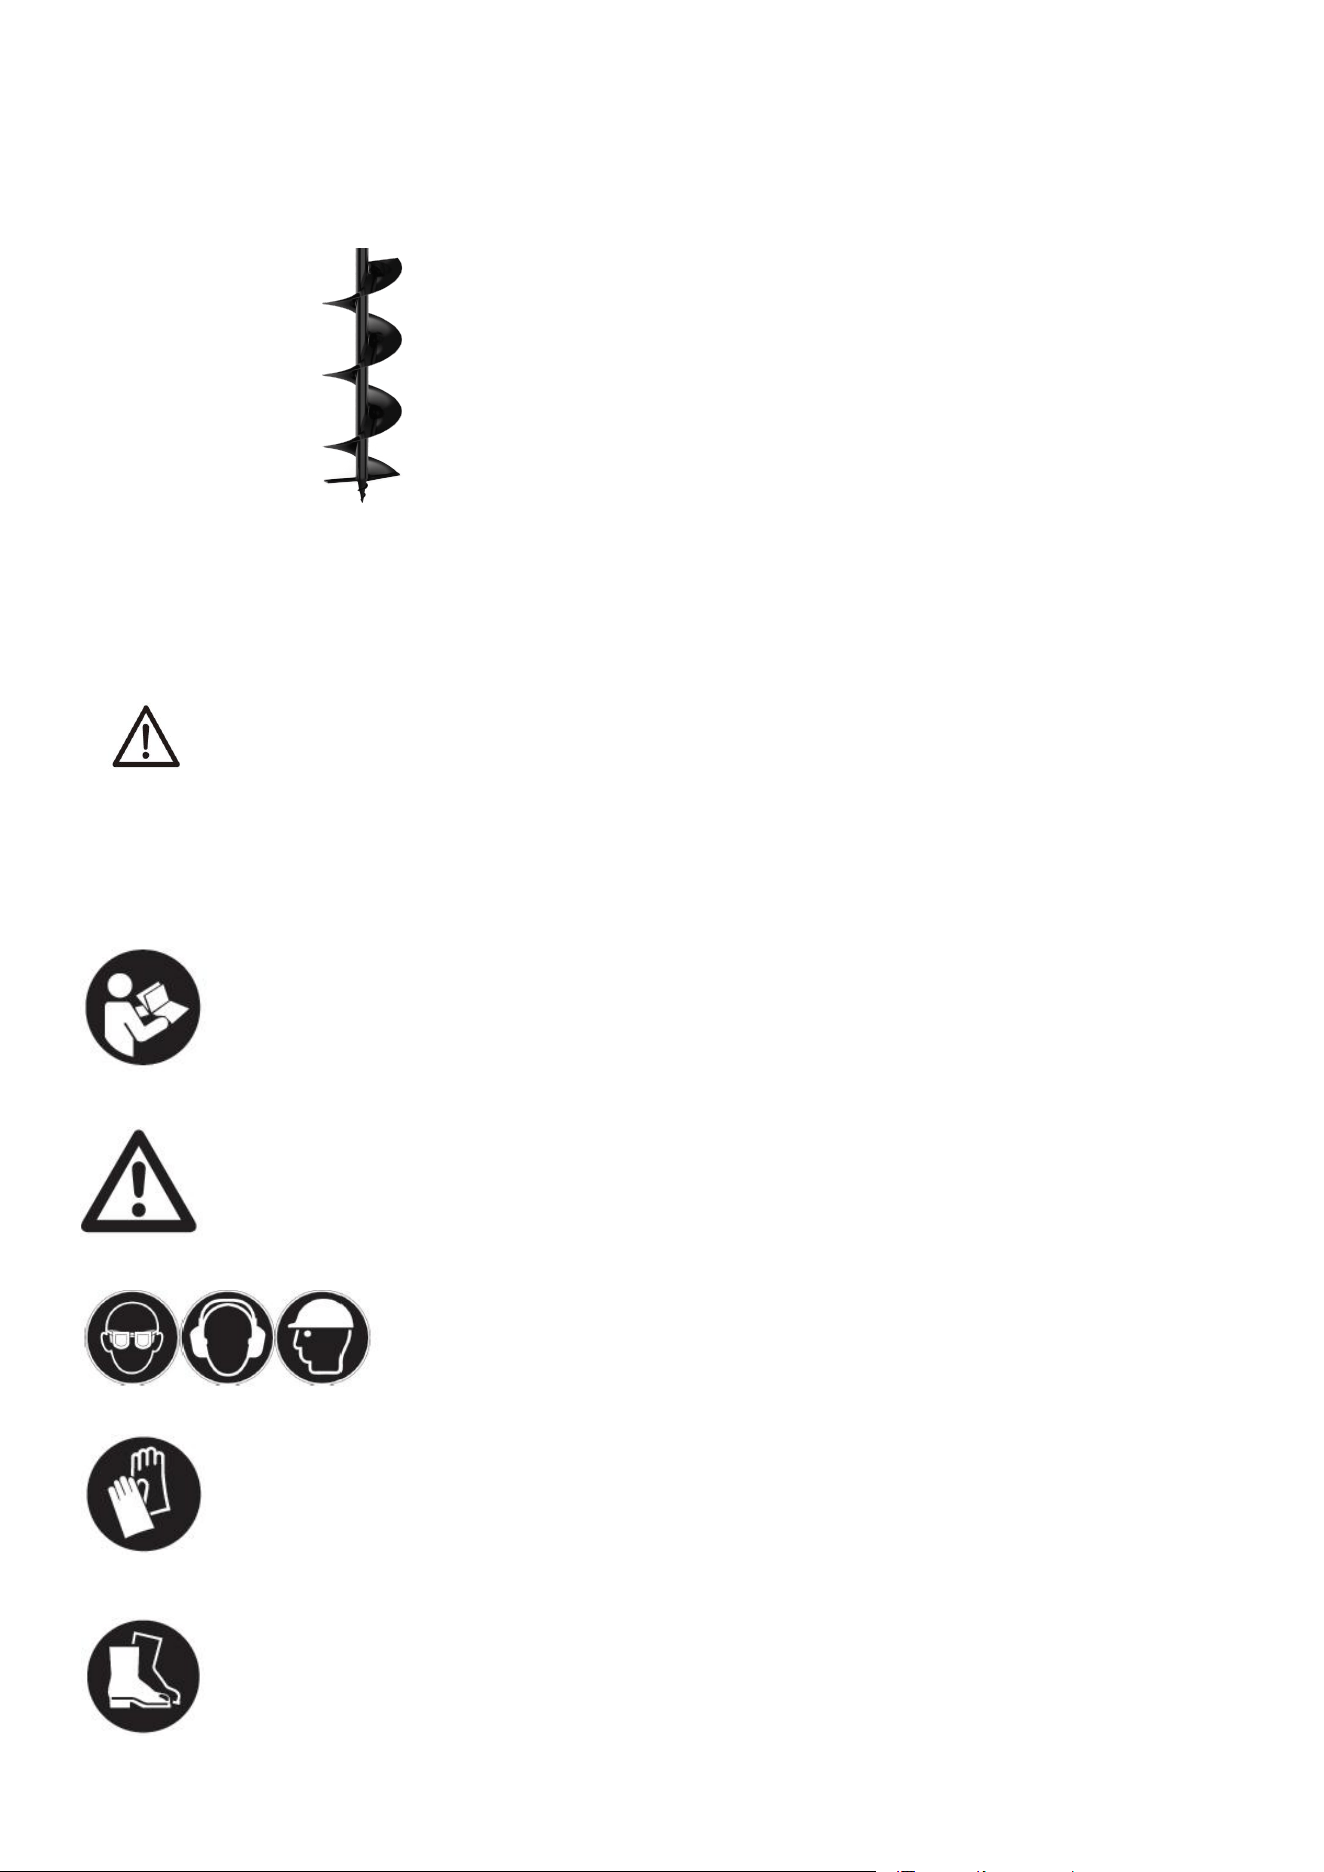
DESCRIPTION OF SYMBOLS
Read the complete user guide before using the appliance
Read, understand and follow all warnings
Always wear safety glasses, hearing protection and a safety helmet
Wear security and anti-vibration gloves when you use the device
Always wear non-skid safety shoes with cut protection when using this product
4
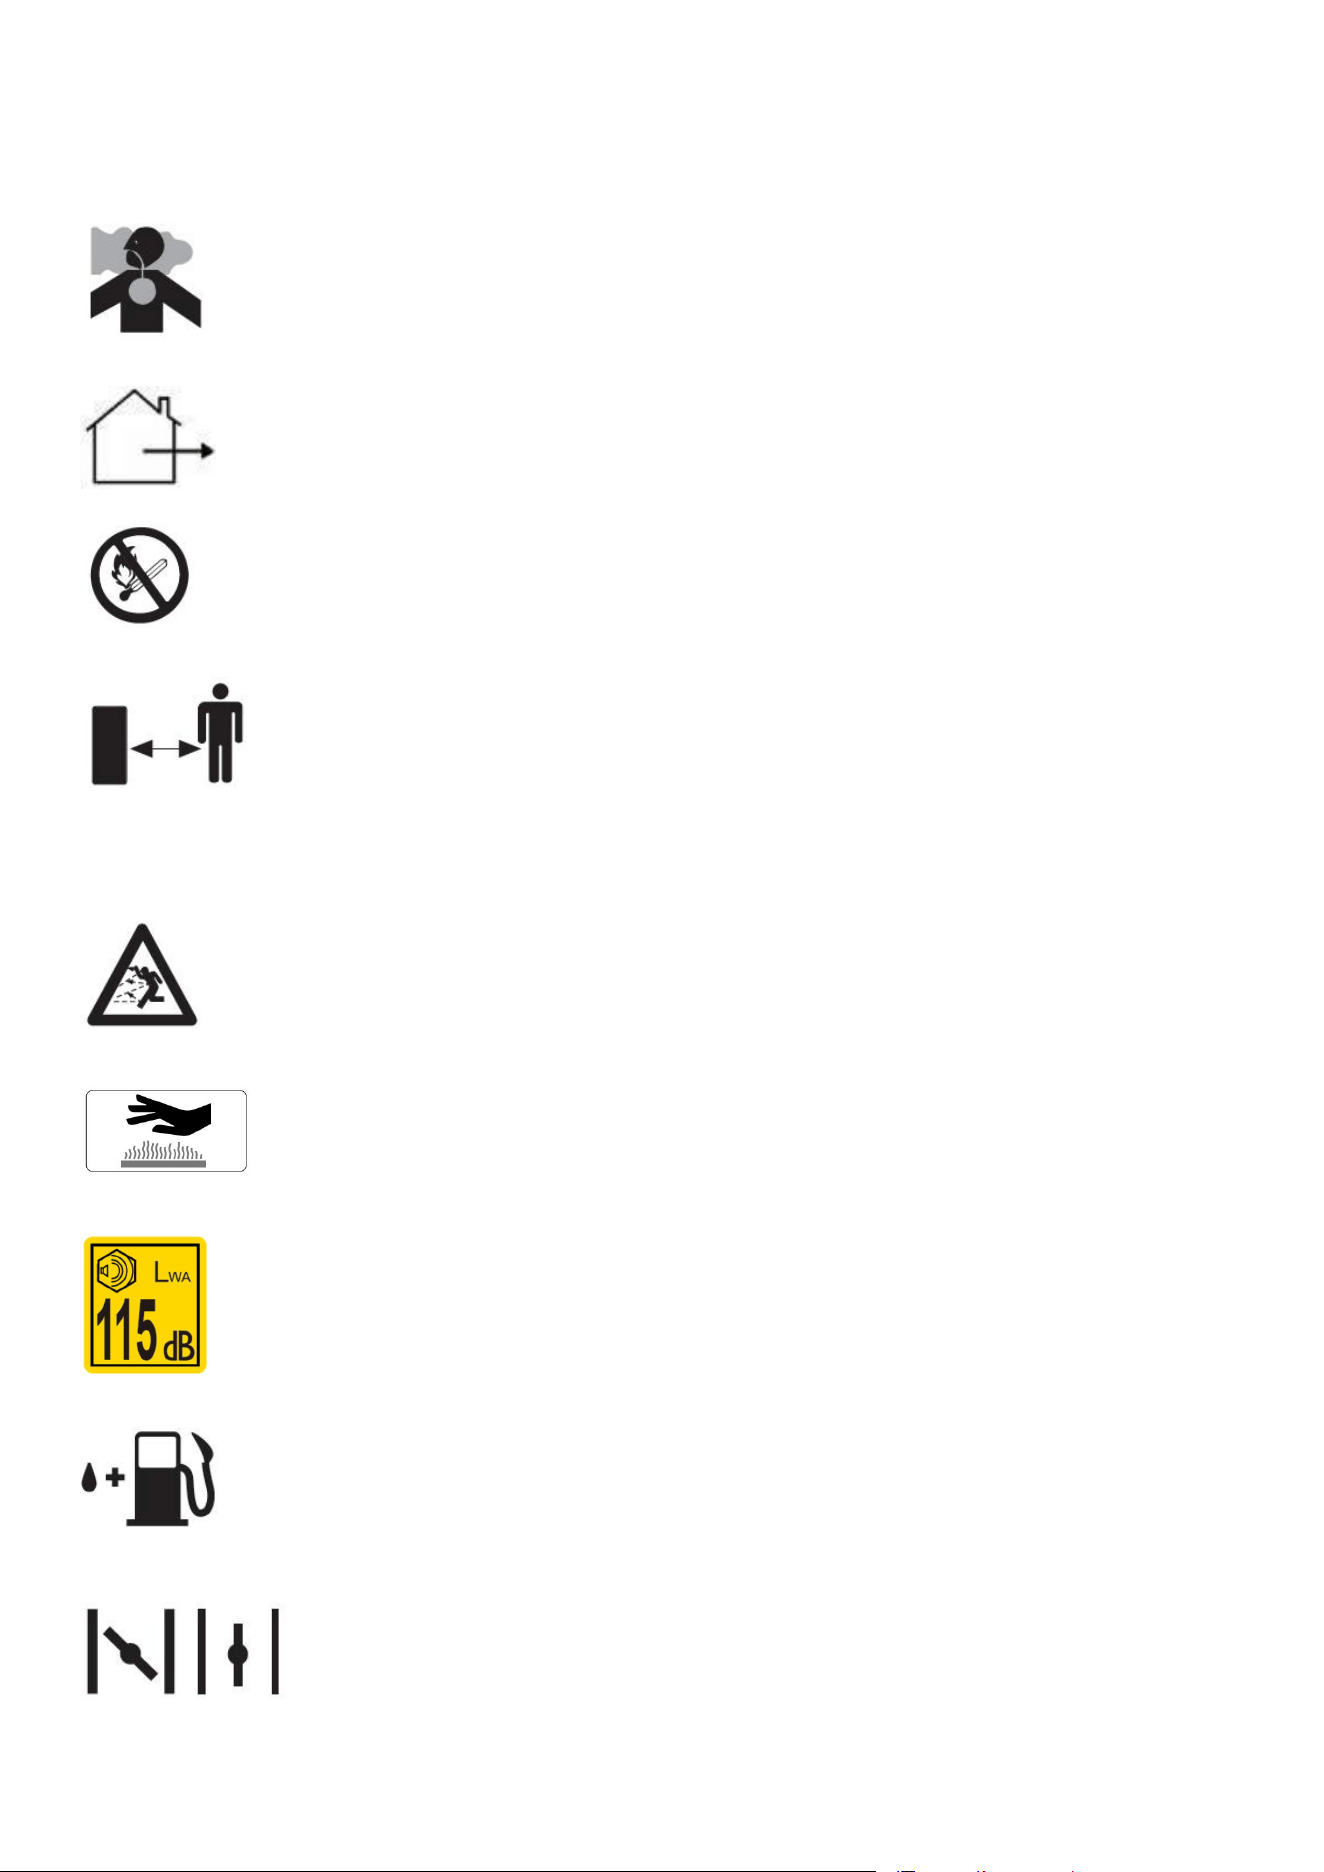
Engines give off carbon monoxide, an odorless, colorless, poison gas.
Breathing carbon monoxide can cause nausea, fainting or death.
For outdoor use only.
Open flames at your workplace are prohibited!
Keep bystanders away!
There is a risk of debris being ejected when the engine is running. Make sure you keep a safe distance.
Caution thrown objects when operating.
Danger - Hot surface!
Guaranteed sound power level of the device.
Fuel filler cap.
Choke

5
Rotary drill is dangerous, be cautious and not let the hand touch drill.
Drill is dangerous, be cautious and not let the foot touch it, and be cautious of falling drill
SAFETY INSTRUCTIONS
The machine complies with the relevant EC Machine Guideline.
Before starting any work, all protective and safety devices must be in place on the earth auger.
The earth auger has been designed to be operated by one person.
The earth auger has been designed for excavating planting holes, for pergolas and fences in light soil. It has only
limited use on ground that is hard and stony and has many roots.
The operator is responsible for third parties in the area of operations.
All safety and hazard notices on the machine must be observed.
All safety and hazard notices on the machine must be kept in a completely legible condition.
Use the machine in a technically flawless condition only, as well as for its intended purpose, in a safe manner and
being aware of dangers, in compliance with the operating instructions!
Disruptions which can affect safety in particular must be eliminated straight away!
• The manufacturer’s stipulations concerning safety, work and maintenance as well as the measurements specified in
Technical Data, must be com-plied with.
• The relevant accident prevention stipulations and other widely recognized safety rules must be observed.
• The machine may only be used, maintained or repaired by people who are familiar with it and its dangers.
Unauthorized changes to the machine negate the manufacturer’s liability for damages resulting from this.
• The machine may only be used for work for which it has been built and which is described in the operating manual.
• The machine may only be used with the manufacturer’s original accessories and original tools.
The equipment is allowed to be used only for its prescribed purpose. Any other use is deemed to be a case of misuse.
The user/operator and not the manufacturer will be liable for any damage or injuries of any kind resulting from such
misuse.
Please note that our equipment has not been designed for use in commercial, trade or industrial applications. Our
warranty will be voided if the equipment is used in commercial, trade or industrial businesses or for equivalent
purposes.
Remaining risks:
The machine has been built according to the latest technology and recognized safety rules. However, there is still a
chance of residual risks whilst working.
Furthermore, despite all measures taken, remaining risks can occur that are not obvious.
Remaining risks can be minimised by complying with the „Safety notices“ and the „Intended use“ as well as the
operating instructions overall.

6
1. Safety information
Caution!
Read all safety regulations and instructions. Any errors made in following the safety regulations and
instructions may result in an electric shock, fire and/or serious injury. Keep all safety regulations and
instructions in a safe place for future use.
Please note
Read the manual before commissioning
Use hearing protection, safety goggles and a hard hat
Use safety gloves
Wear safety boots
Removing or changing protective devices and guards is prohibited
Smoking is prohibited in the working environment
Do not touch rotating parts
Do not touch hot parts
Keep third parties away from the working environment
Do not use the machine in a wet environment
Risk from ejected objects
Warning: electric current
Caution: do not run the machine in a closed area; fumes will accumulate
Petrol is flammable and explosive
Keep motor away from heat and sparks
Hazards and safety measures
Human behaviour, misbehaviour. Always concentrate fully when working.
Wrapping around and entangling of work clothes. The auger drill can catch clothes, string or wire and
draw them in.
Wear tight-fitting clothing and safety boots with a non-slip sole and steel toe caps.
Wear long hair in a hair net.
Warning! In the event of unseen foreign objects.
Recoil by the auger drill If the ground is stony, hard or has many roots, strong recoil may occur at the
handles.
Avoid working with this machine on ground that is stony, hard or has many roots.
Warning! Hold on to handles tightly, wear protective clothing.
Burns Touching the exhaust/casing can lead to burns.
Warning! Leave the power tool to cool down. Wear work gloves.
Contact, inhalation The fumes from the machine can damage your health. Only ever use the machine
outside
Warning! Take a break
Electrical contact Touching the spark plug cap can lead to an elec-tric shock when the motor is running.
Warning! Never touch the spark plug connector or the spark plug when the motor is running.
Hearing damage Long-term unprotected work with the earth auger can cause hearing damage.
Warning! Always use hearing protection.
Fire, explosion The machine‘s fuel mix is flammable.
Warning! Smoking and open fires are prohibited during work and refuelling.

7
People slipping, tripping or falling On unstable ground, you can be injured if you trip.
Warning! Be aware of obstacles in the working environ-ment. Always ensure a safe standing position
and wear non-slip shoes.
Ejected roots, rocks or other foreign objects During drilling, ejected rocks or pieces of wood can injure
people and animals.
Warning! Ensure that neither people nor animals are present in the hazardous area and that you wear
appropriate safety clothing as well as eye and hearing protection.
Pass on the safety notices to everyone working with the machine. Staff commissioned to work with the
machine must read the operating manual before st-arting work and, in particular, the chapter „Safety notices“.
It is too late during work. This particularly applies to staff only occasionally working with the machine, such
as during set-up or maintenance. All safety and hazard notices on the machine must be observed.
All safety and hazard notices on the machine must be kept in a completely legible condition.
Be aware of environmental conditions at the work place.
Ensure sufficient lighting at and around the machine.
Never work in closed or badly-ventilated rooms.
When the motor is running, be aware of fumes. These may be odourless and invisible.
When the weather is bad, the ground is uneven or in the event of slopes, ensure secure footing.
When working with the machine, all protective devices and covers must be attached.
Keep people, especially children, away from the working environment.
Prevent unauthorized people from coming in contact with the machine.
Ensure that children do not have access to the machine when it is not in use.
Always pay attention and concentrate on what you are doing. Be sensible at work. Do not use the power
tool when you are not concentrating.
Do not work with the machine when you are tired or under the influence of alcohol, drugs or medication.
The operator must be at least 18 years old. Apprentices have to be at least 16 years old and may only
work with the machine under supervision.
People working with the machine must not be distracted.
Store the machine safely so that nobody can get injured by the machine or put it into operation.
Only ever use the machine according to its intended purpose.
Do not use power tools where there is a risk of fire or explosions.
Wear appropriate work clothing that does not hinder your work.
During work, wear hearing protection and goggles.
Wear safety boots with steel toe caps, steel soles and a non-slip profile.
Wear tough work gloves.
The machine‘s safety devices must not be removed or made unusable.
Carry out work such as retooling, adjusting, measuring and cleaning only when the motor is switched
off.
Installations, repairs and maintenance must be carried out by specialists.
All protective and safety equipment must be re-attached immediately after completing repairs and
maintenance.
Always turn off the motor before fixing faults.
Look out for damaged parts and protective devices.
Faulty parts must be repaired or replaced by an authorized specialist.
Only ever use original spare parts. Using spare parts that are not original can be a risk for people or
cause material damage.

8
The machine may only be used for its intended purpose. The user alone is responsible for unintended
use of the machine. The manufacturer is not liable in the event of unintended use.
Safety notices for petrol powered machines
Internal combustion engines are a particular danger during operation and refuelling.
Always observe warning notices and additionally specified safety instructions.
Non-compliance can lead to severe and even lethal injuries.
When the motor is running, be aware of fumes. These may be odourless and invisible. The motor fumes
contain toxic carbon monoxide. Being in an environment with carbon monoxide can lead to
unconsciousness and death.
Never operate the machine close to an open flame.
Do not smoke during refuelling.
Do not spill fuel during refuelling.
Always close the tank filler cap properly after refuelling.
Do not touch the exhaust when the motor is running (risk of burning).
Do not touch the spark plug cap when the motor is running (electric shock).
Leave the machine to cool down before carrying out modifications or repairs and always remove the
spark plug cap.
Do not use petrol or solvents for cleaning. Risk of explosion!
Refuelling:
Note: Two-stroke motor, mixing ratio 1:50 (oil:gasoline)
FOLLOW THE SAFETY PRECAUTIONS!
Be careful and cautious when handling fuels.
The engine must be switched off !
Thoroughly clean the area around the caps, to prevent dirt from getting into the fuel tank.
Unscrew the cap and fill the tank with fuel (fuel/oil mixture). Fill up to the bottom edge of the filler neck.
Be careful not to spill fuel !
Tighten the tank cap as far as it will go.
After refuelling, clean the tank cap and surroundings and make sure the cap is sealed!
NOTE:
Always premix the intended oil volume in half of the fuel volume to produce the fuel/oil mixture and then add
the remaining fuel volume. Shake the finished mixture well before filling the mixture into the auger.
It is not wise to add more engine oil than specified to ensure safe operation. This will only result in a higher
production of combustion residues which will pollute the environment and clog the exhaust channel in the
cylinder as well as the muffler. In addition, fuel consumption will rise and performance will decrease.
The storage of fuel
Fuels have a limited storage life. Fuel and fuel mixtures age through evaporation, especially at high
temperatures. Aged fuel and fuel mixtures can cause starting problems and damage the engine.Purchase
only that amount of fuel, which will be consumed over the next few months. At high temperatures, once fuel
has been mixed it should be used up in 6-8 weeks.
Store fuel only in proper containers, in dry, cool, secure locations!
Avoid skin and eye contact!
Mineral oil products degrease your skin. If your skin comes in contact with these substances repeatedly and

9
for an extended period of time, it will desiccate. Various skin diseases may result. In addition, allergic
reactions are known to occur.
Eyes can be irritated by contact with oil. If oil comes into your eyes, immediately wash them with clear water.
If your eyes are still irritated, see a doctor immediately!
Check fuel lines, fuel tank cap and fuel tank for leakages or tears.
Do not start the machine with such damage.
Do not refuel the machine when the motor is still hot or running.
Never refuel the machine close to an open flame.
Period of use:
Using the earth auger can lead to poor circulation in the fingers, hands or wrists. Symptoms such as pins
and needles, pain, stinging and changes in the skin can occur. If these symptoms occur, seek medical help.
Use appropriate gloves and take regular breaks.
Keep this safety information in a safe place.
Subject to technical changes!
Limit the noise and vibration to a minimum!
Only use appliances which are in perfect working order.
Service and clean the appliance regularly.
Adapt your working style to suit the appliance.
Do not overload the appliance.
Have the appliance serviced whenever necessary.
Switch the appliance off when it is not in use.
Wear protective gloves.
Technical data
Model
EAK553
Motor design
1 cylinder/2-stroke
Max. motor performance kW
1.9
Displacement cm
52.8
Volumes of fuel tank
950ml
Idle speed /min-1
3000
±
300
Max. engine speed/ min-1
10500
Max drill speed / min-1
400
Rotation direction of output shaft
Clockwise
Mixing ratio of 2-stroke motor gasoline:oil
50 :1
Gearbox ratio
26:1
Sound pressure level
LpA:
103dB(A); K=3 dB(A)
Sound power level, LWA
LwA:115dB(A)
Vibration level
Max. 5.04 m/s²; K=1.5m/s²
Drills
Earth Auger
200mm (diameter) x800/1000mm
Noise Information

10
Measured sound values determined according to 2000/24/EC
The noise figures quoted are emission levels and are not necessarily safe working levels. Whilst
there is a correlation between the emission and exposure levels, this cannot be used reliably to
determine whether or not further precautions are required. Factors that influence the actual level of
exposure of work-force include the characteristics of the work room, the other sources of noise, etc.
i.e. the number of machines and other adjacent processes, and the length of time for which an
operator is exposed to the noise. Also the permissible exposure level can vary from country. This
information, however, will enable the user of the machine to make a better evaluation of the hazard
and risk.
Wear hearing protection!
Vibration total values (triax vector sum) determined according to ISO 11806-1:
The vibration emission level given in this information sheet has been measured in accordance with
a standardized test given in ISO 11806-1 and may be used to compare one tool with another.
It may be used for a preliminary assessment of exposure.
The declared vibration emission level represents the main applications of the tool. However if the
tool is used for different applications, with different accessories or poorly maintained, the vibration
emission may differ. This may significantly increase the exposure level over the total working
period.
An estimation of the level of exposure to vibration should also take into account the times when the
tool is switched off or when it is running but not actually doing the job. This may significantly reduce
the exposure level over the total working period.
Identify additional safety measures to protect the operator from the effects of vibration such as:
maintain the tool and the accessories, keep the hands warm, organization of work patterns
Before operation
Assembly
For packaging reasons, your machine has not been assembled completely. Some assembly need to do
before operation.
Assemble the handle
Put the left handle tube (9) with base flatly, when the hole of the handle tube align with hole of base(9),
11
tighten them with screw 20, knob 11, and washer 21;
Put the right handle tube (6) with base flatly, when the hole of the right handle tube align with hole of base(9),
tighten them with screw 20, knob 11, and washer 21;
Attention: The fuel tank directs to the trigger handle, do not assemble opposite.
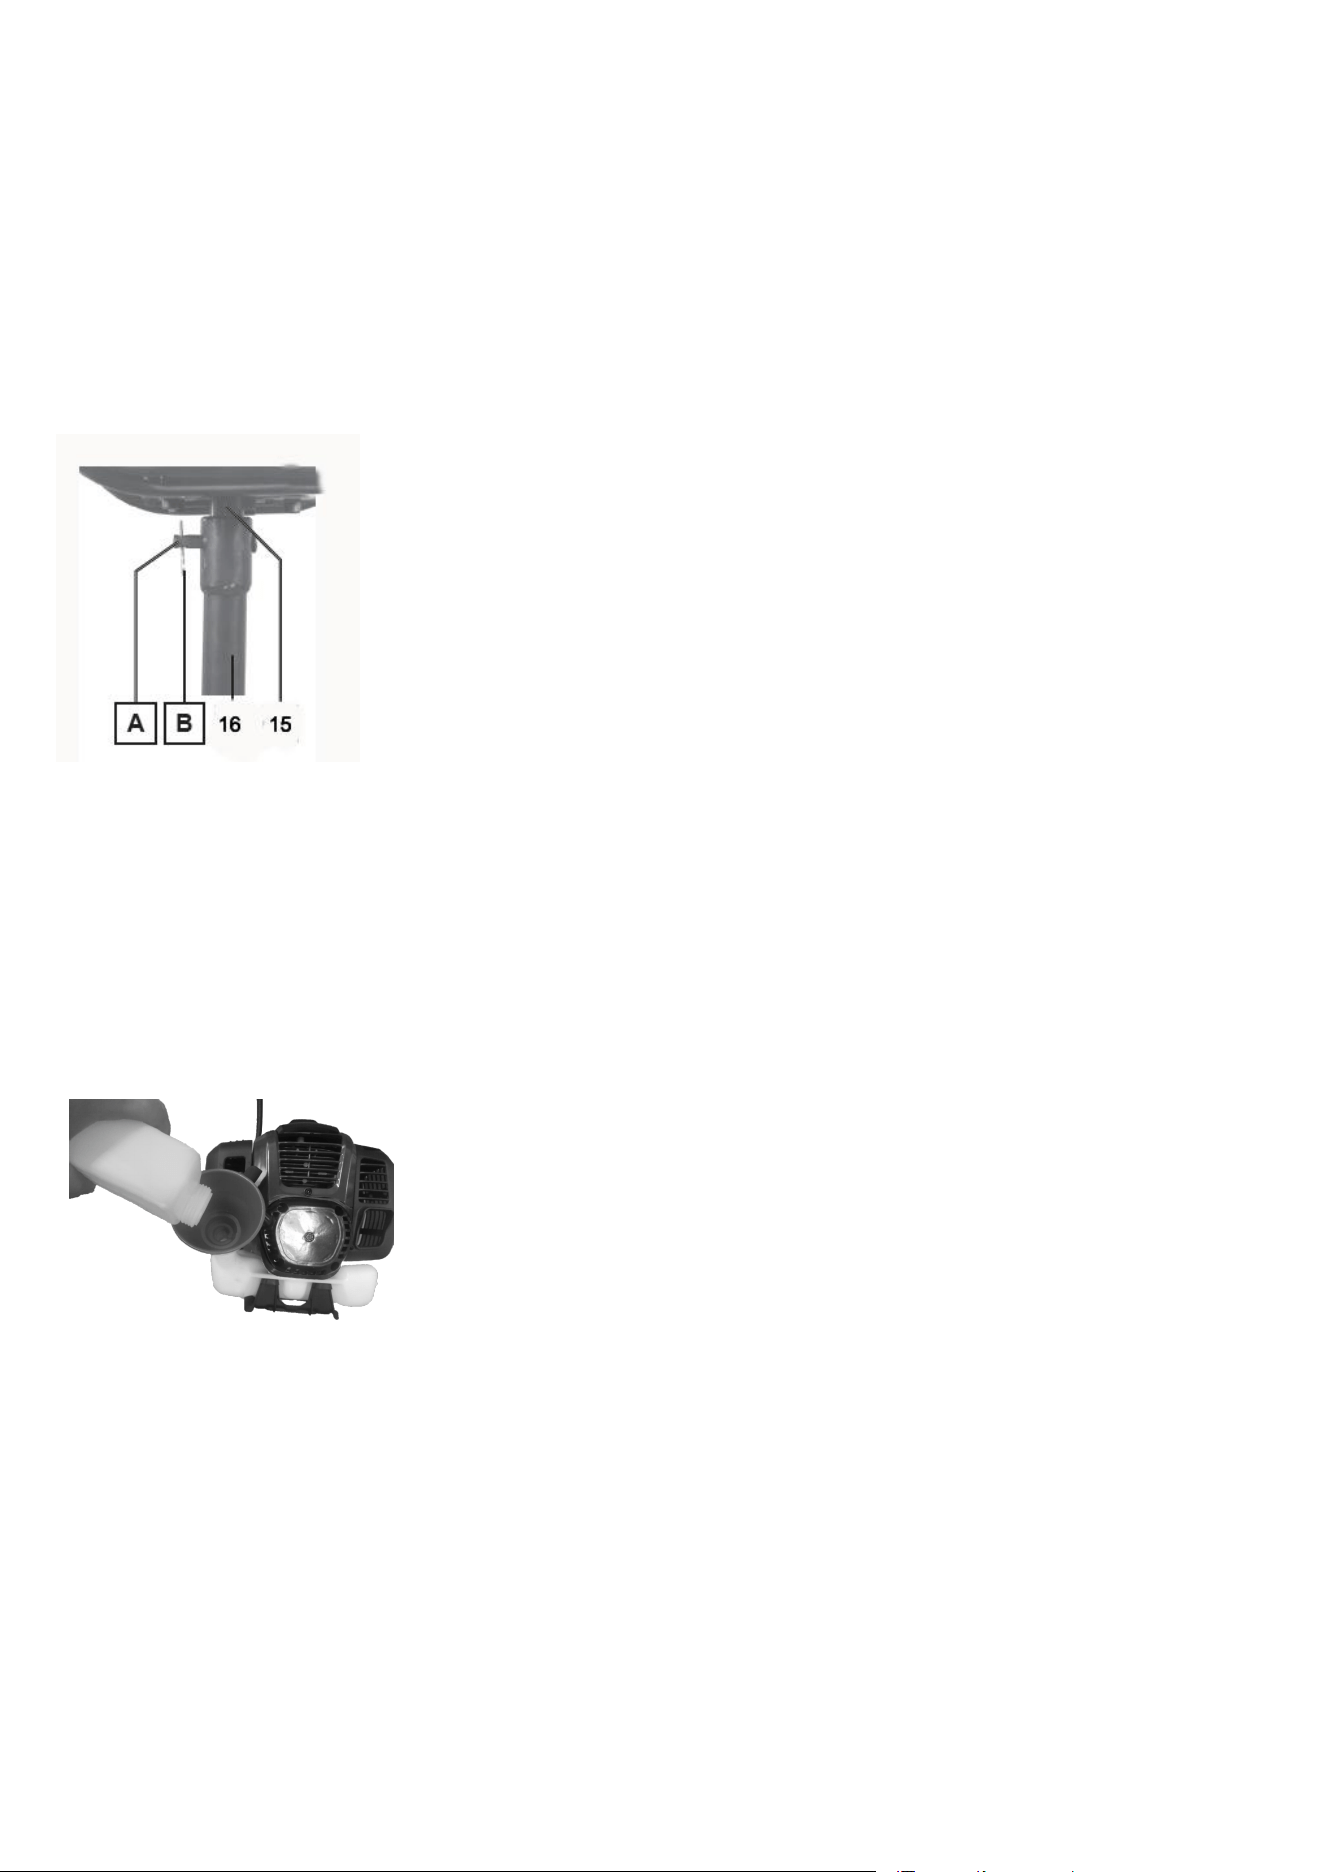
Assemble the engine and drill
Fig.2
Place the motor casing on a work bench. Place the earth auger (15) on the drive shaft (16), ensuring
that both holes are aligned.
Insert the driving pin (A).
Secure with split pin (B) and slightly bend it.
ATTENTION: THIS ASSEMBLY STEP IS APPLIABLE FOR 4 KINDS OF EARTH ARUGER AND 1 KIND
OF ICE EARTH.
Fuelling Fig. 2
Open the fuel tank cap .
Pour in the fuel mixture using a funnel.
Do not fill the tank completely as fuel expands.
Close the fuel tank cap tightly and clean the area from possibly spilled fuel mixture.
Fuel mixture
The auger‘s motor is a two-stroke motor. It is driven by a 50:1 (gasoline:oil) fuel mixture made up of
two-stroke oil and fuel. The fuel requires unleaded ordinary petrol with a research octane count of at least 91.
Lubrication of the motor takes place by adding premium two-stroke oil.
Do not mix the fuel mixture in the fuel tank. Use the mixing container supplied or another appropriate
container. Only pour the fuel mixture into the fuel tank after previously mixing and stirring it well.
12
Use fresh, clean fuel. Water and contaminants in the petrol damage the fuel system.
Refuel in a well-ventilated area with the motor not running. If the motor was in use directly prior to
refuelling, leave it to cool down first. Never refuel the machine in a building where the petrol fumes can reach
flames or sparks.
Petrol is highly flammable and explosive. When handling fuel, you may suffer burns or other severe
injuries.
Turn off the motor and keep away from heat, sparks and flames.
Only ever refuel outside.
Wipe up spilled petrol straight away.
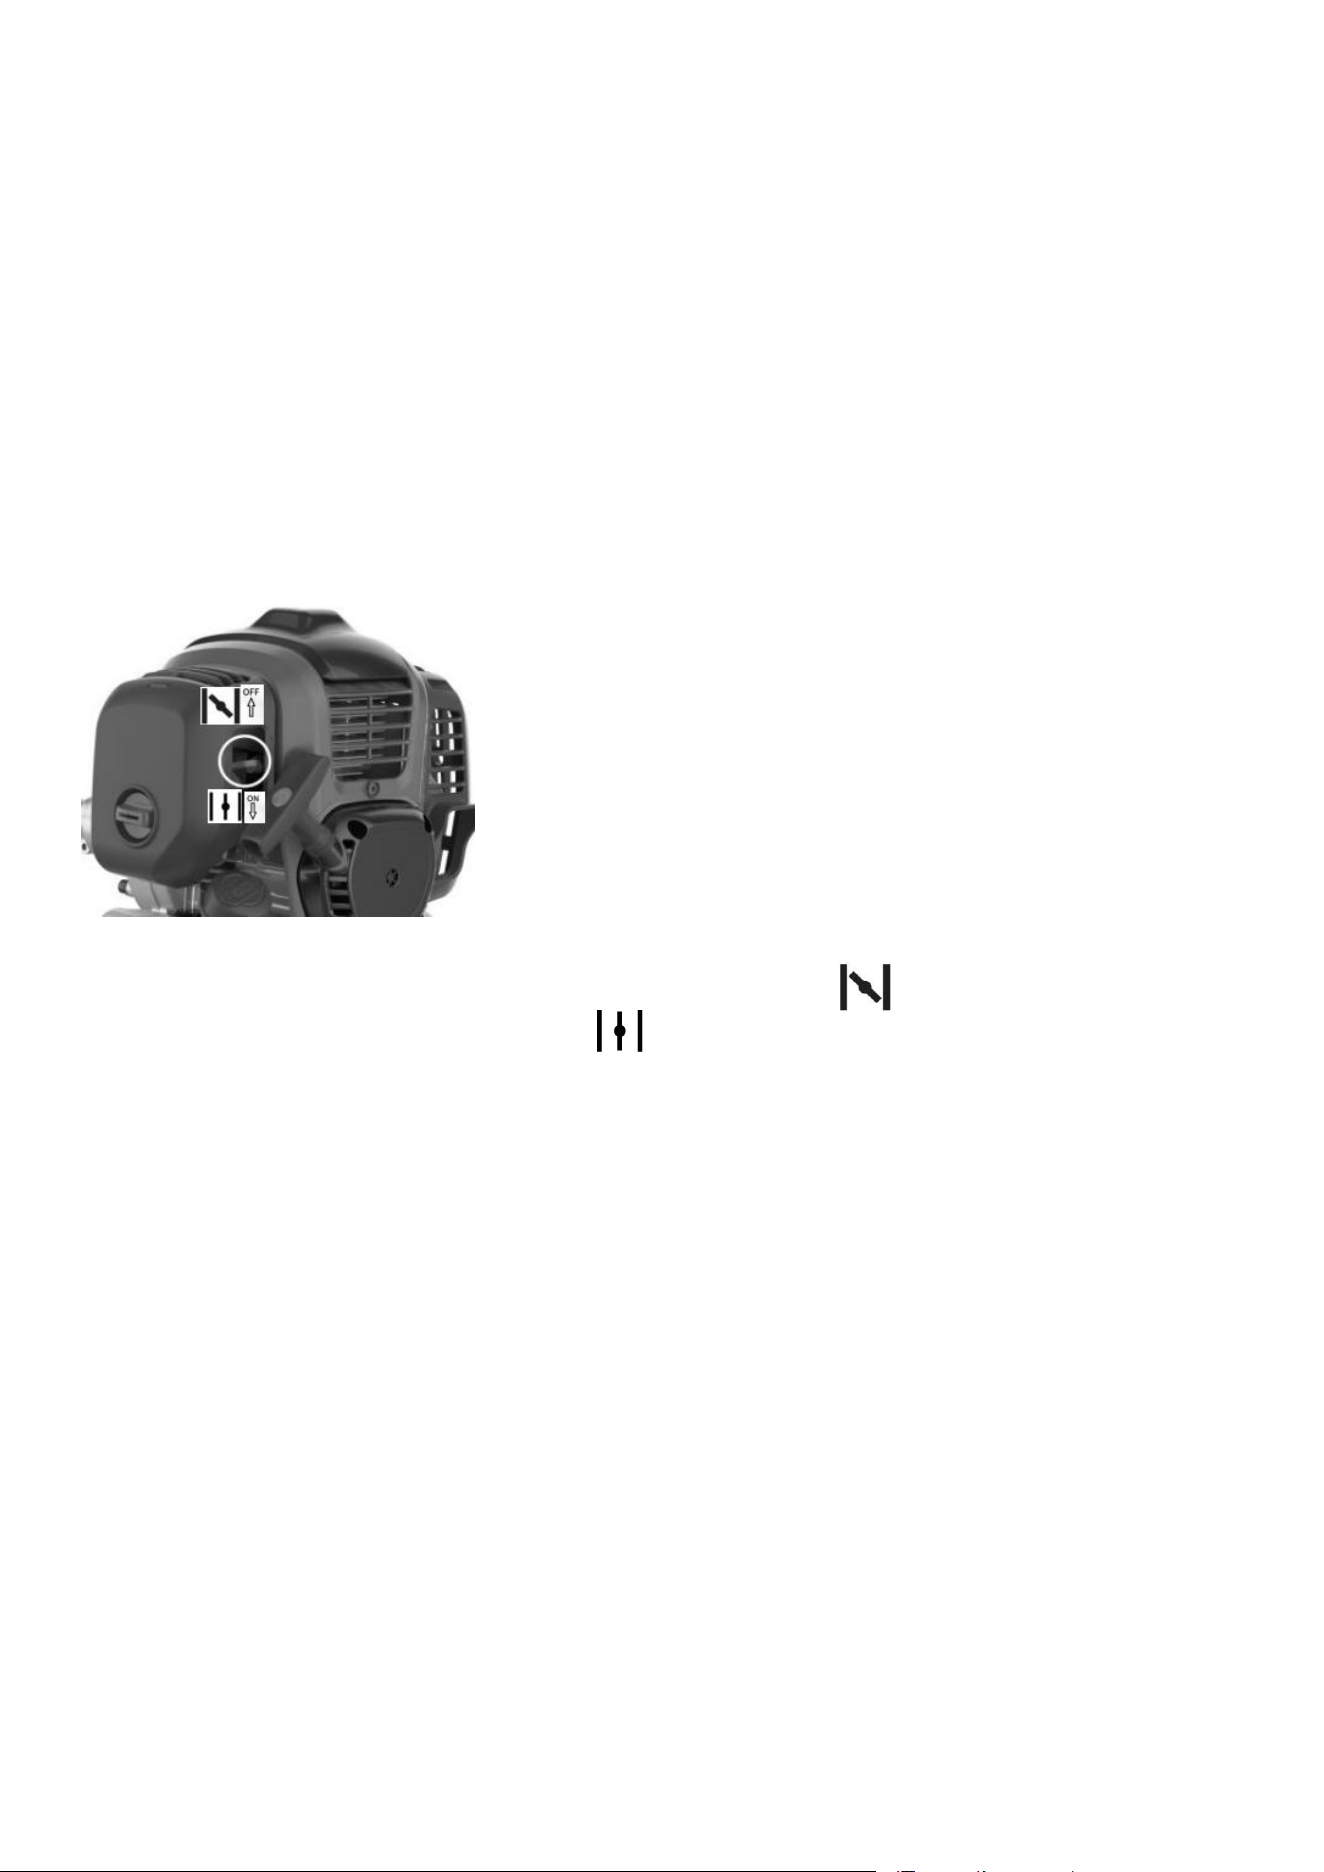
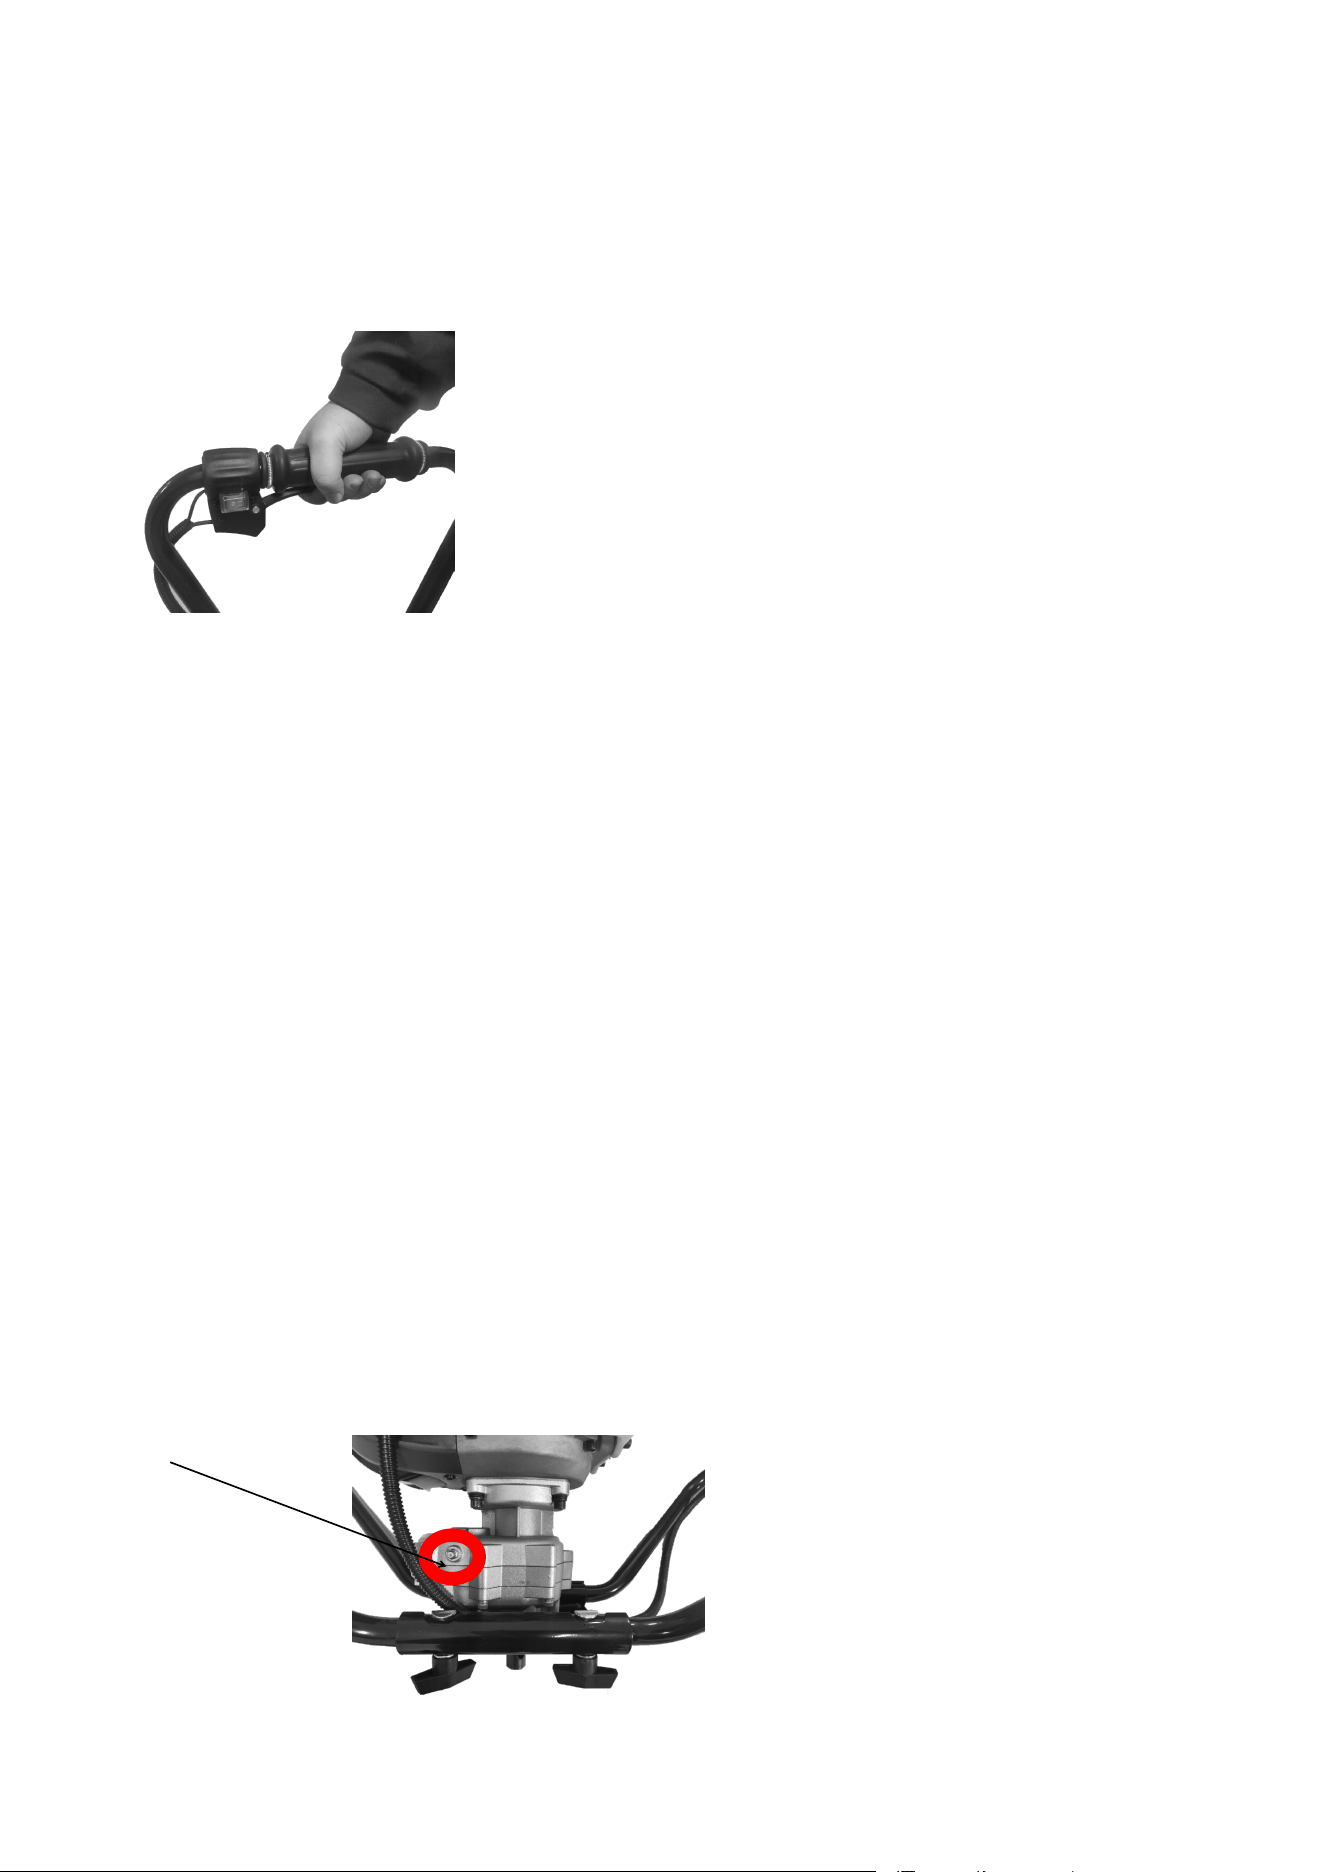
Choke lever
The choke lever closes and opens the choke in the carburetor. In the position, the air-petrol-mixture is
off and enriched for the motor‘s cold start. The position is used when machine is under operation or for
a warm start.
Operation
Before commissioning, it is important that you know and follow the safety notices.
For all work on the earth auger, you must turn off the motor, disconnect the spark plug connector and wear
safety gloves. Start the auger only after complete assembly and checking it.
WARNING! Carefully read the safety notices (see „Safety notices“ and additional notices for
petrol-powered machines).
Warning! Wear safety boots and tight-fitting clothes in order to prevent injuries.
Before commissioning, it is important that you know and follow the safety notices
Observe national stipulations during work when using the auger on public property or paths.
Keep adults, children and animals away from the hazardous area.
Check the working environment for foreign bodies and remove them.
When leaving the machine, the motor must always be turned off.
Check the earth auger for correct functioning and its safe operating condition.
Do not work by yourself, someone has to be close in case of emergencies.
Hold on to the earth auger with both hands when working.
Ensure you have a safe position, during the drilling process as well.
13
Do not lean too far forwards when working.
Check for a flawless idling mode. The auger must not rotate in idling mode when the motor is warm.
Immediately turn off the motor when you can feel changes to the machine‘s behaviour.
Do not place the hot auger in dry grass or on flammable objects (fire risk!).
Drill the hole in the ground in several sections so you can remove the soil in between.
Keep the auger vertical, do not twist it!
Always secure bore holes, otherwise there is a risk of injury!
Exclusively drill holes in soil with the earth auger.
Other applications are not permitted.
Starting the motor:
If the motor is cold, turn the choke lever to the position.
If the motor is warm, turn the choke lever to the position.
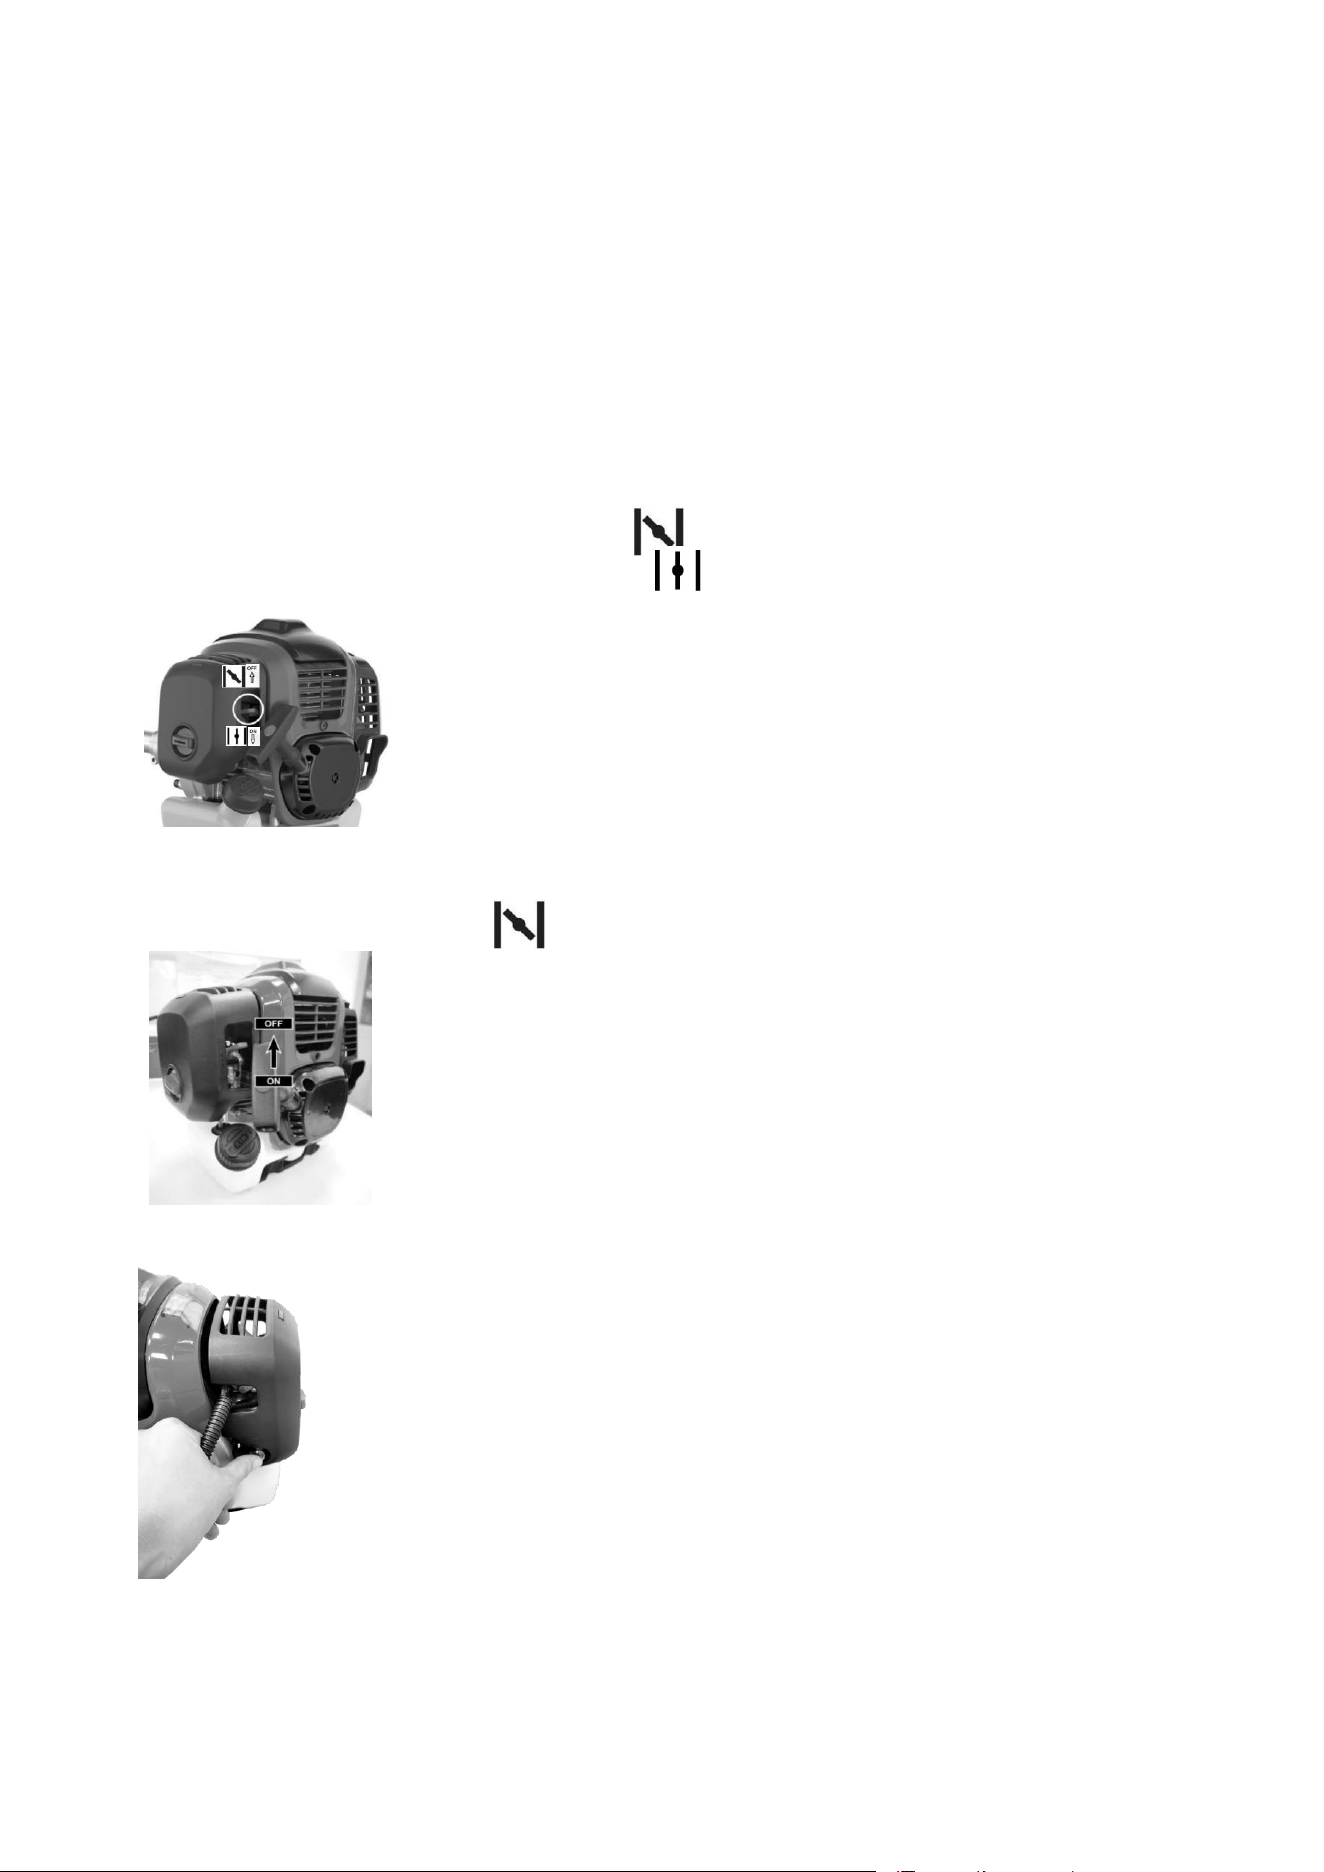
Cold start
1. turn the choke lever to the off position.
2. Prime the fuel pump by pressing it 5-7 times until you can see fuel in the pump.
14
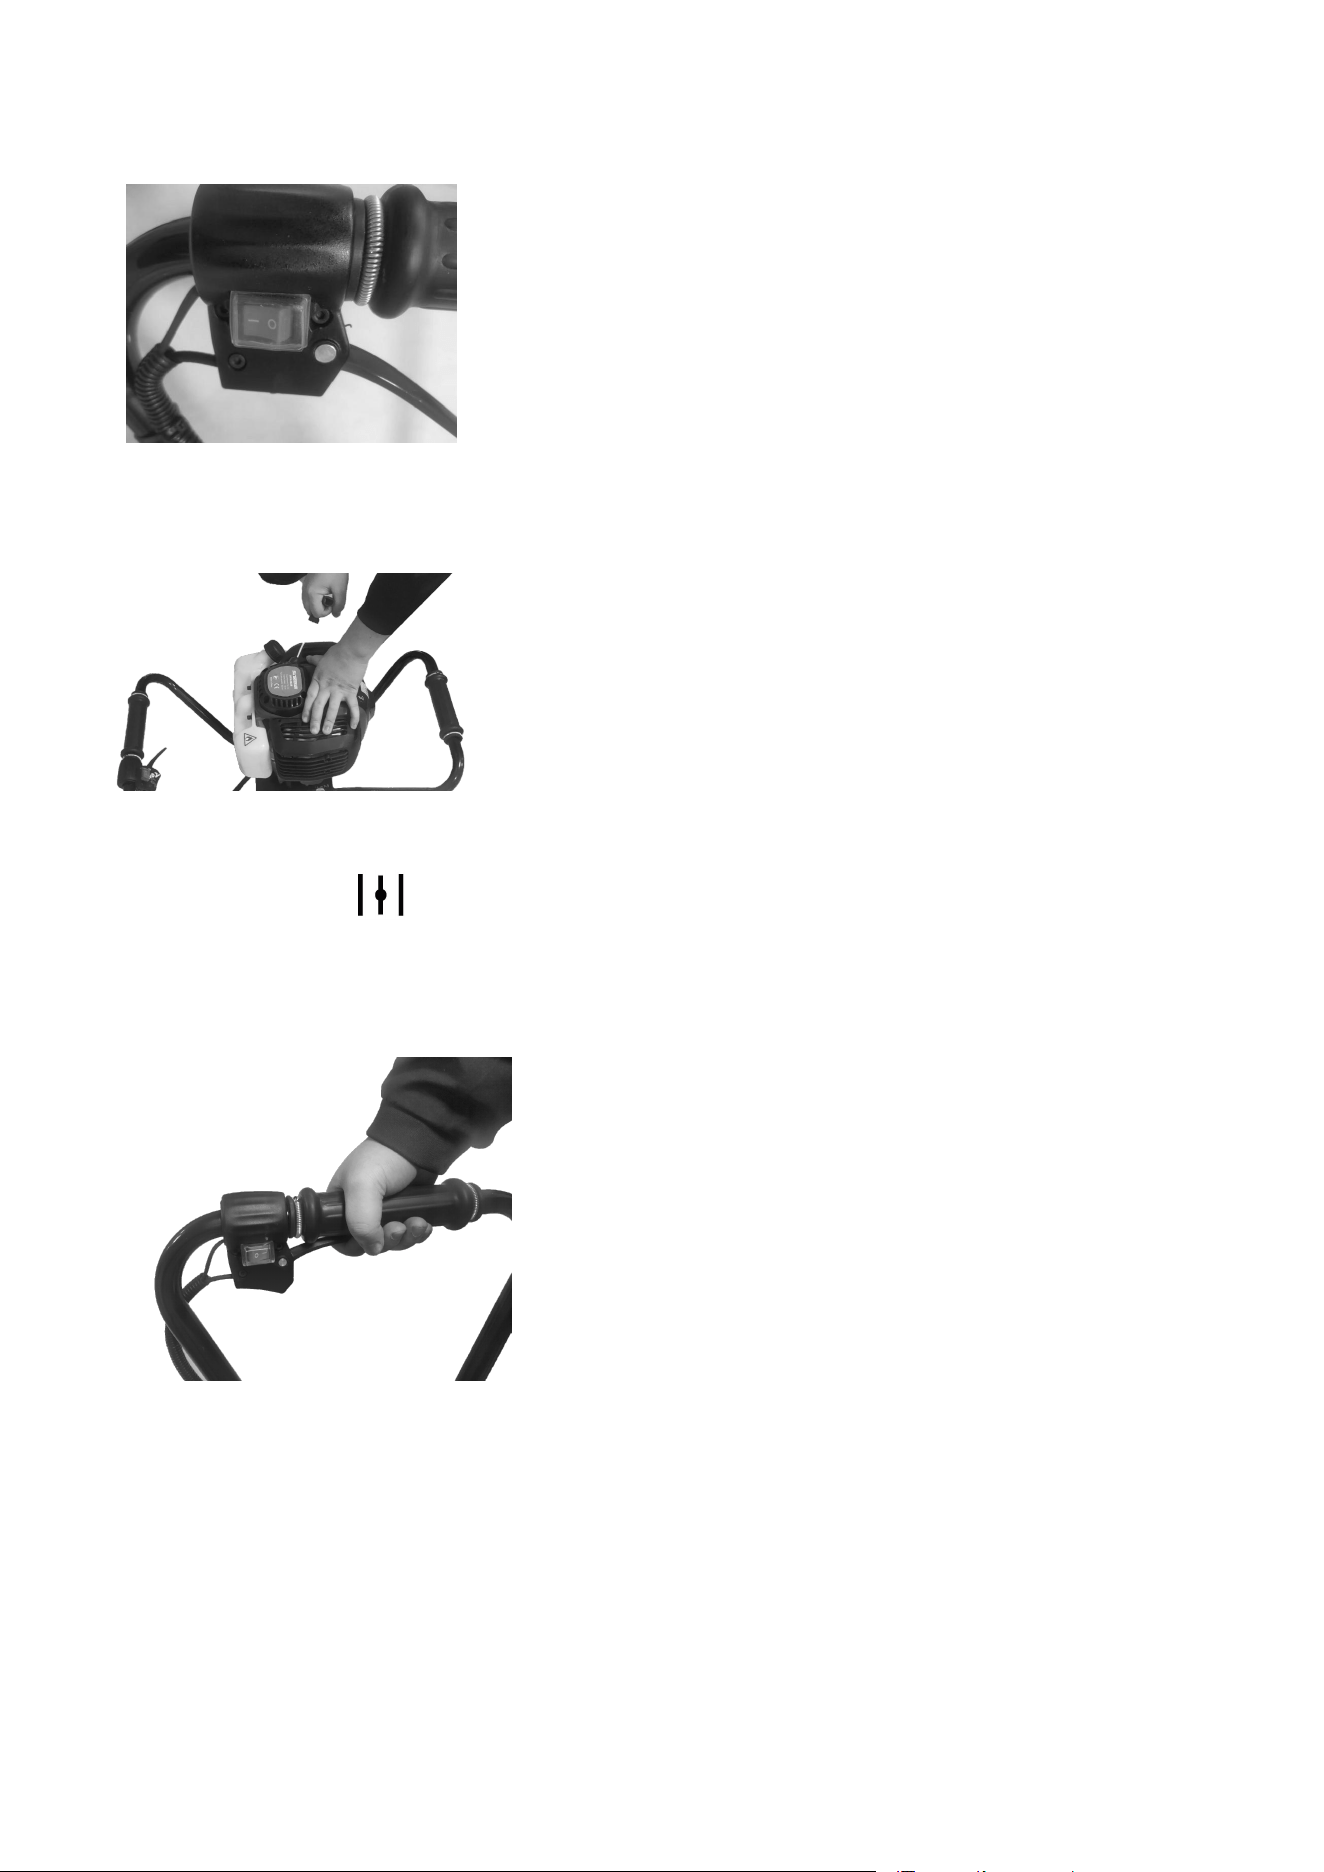
3. Put the stop switch (11) in the “I“ (Start) position.
NOTICE: The switch is auto-returned, it would always return back to “I” after user press it to “O”,
if user want to stop it, press the switch to “O”.
4. Lightly pull on the starter cord until you it pops.
CAUTION!: Do not pull out the starter cable more than approx. 50 cm, and lead it back by hand. For efficient
starting, it is important to pull the starter cable quickly and powerfully.
5.Turn the choke lever to position.
6.Pull the starter cord again until the motor starts, and runs in idle mode.
Warning! The earth auger only begins to rotate when the throttle lever is used.
NOTICE: Before working, let the engine running idling for 30-60s to warm up
6. Press the trigger to make the drill rotary and works
Stop the engine
Press the stop switch in the ‘O’ position if any emergency
Before starting the motor, check the following:
Fuel level - the fuel tank should be at least half full
All screws are tighten enough and products are well assembled.
Outer screw couplings for tight fit
The earth auger has to be able to run freely
15
Hot Start:
When engine is hot, to start the machine, user can only repeat steps 2,5,6
Operating
Set the auger down and actuate the throttle control lever
Adjust the power according to the ground conditions in order to be able to proceed ideally.
When leaving the auger, the motor must always be turned off.
1. Cleaning and maintenance
Cleaning
We recommend that you clean the device immediately each time you have finished using it.
Clean the equipment regularly with a moist cloth and some soft soap. Do not use cleaning agents or
solvents; these could attack the plastic parts of the equipment. Ensure that no water can seep into the
device.
Maintenance
For all work on the machine, the spark plug cap and the spark plug have to be removed (high voltage).
Please adhere to the maintenance schedule.
Daily before beginning work
Check fuel tank and fuel lines for tightness.
Check mounting parts, exhaust cover, air filter cover, oil, position of the auger and functioning of the
ope-rating elements.
After 20 operating hours
Clean air filter and check spark plug
Lubricating the gearcase
Lubrication nipple
16
Lubricate with lithium-based grease.Use a grease gun to add the grease through the grease nozzle (in
above cycle) into gearbox to lubricating it. Do the lubrication every 20h working.
After 100 operating hours
Clean fuel tank and replace spark plug
After 300 operating hours
Replace air filter
Important notice in the event of repairs:
When sending earth augers to be repaired, please note that, for safety reasons, they must be delivered to
the service station free from oil and petrol.
Warning! No smoking and no open fire.
Risk of explosion.
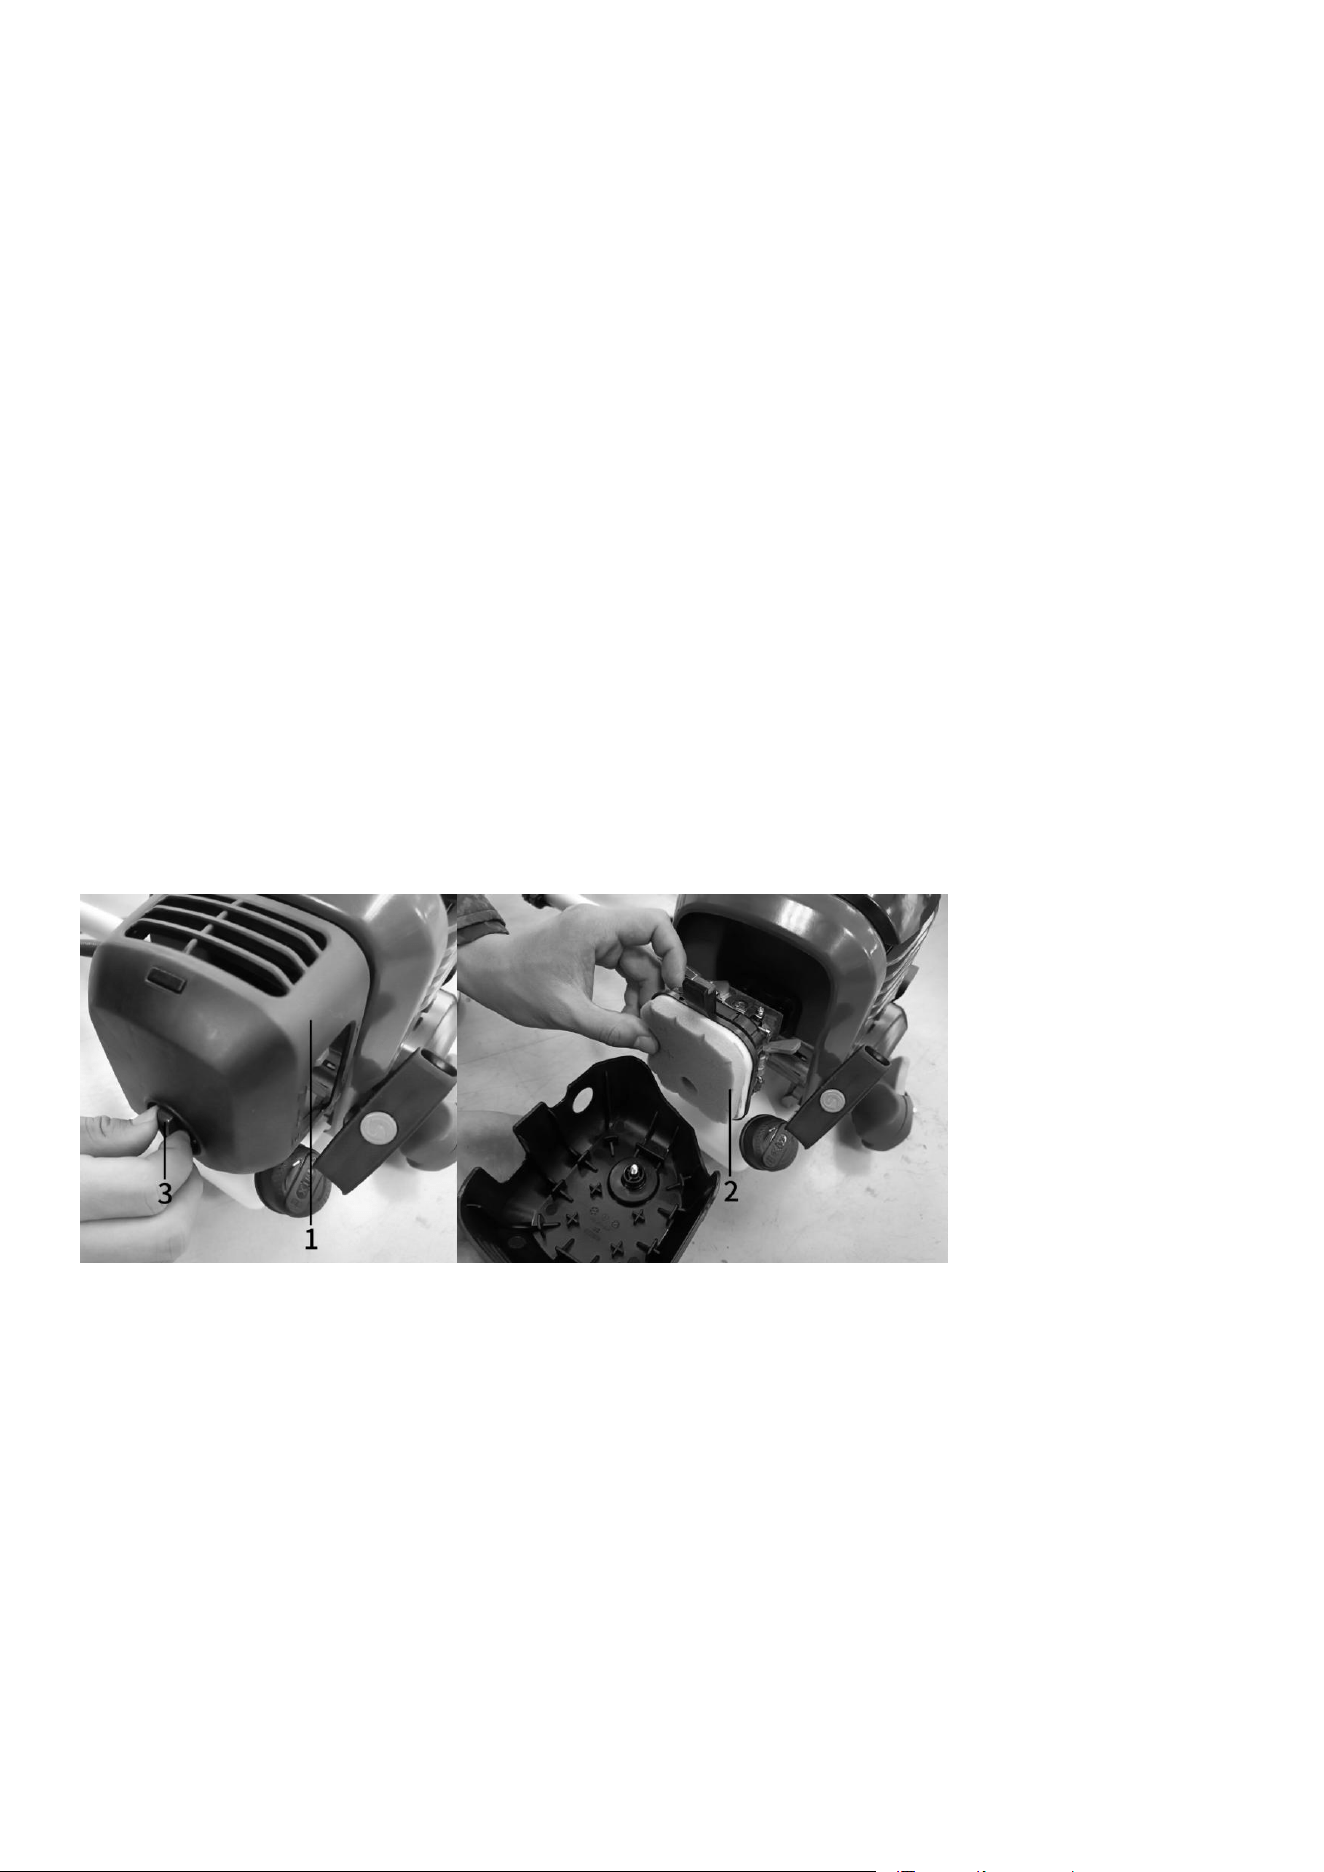
Air filter
Clean the filter as follows:
- Loosen the knob (3), remove the cover (1) and the filter element (2).
- Wash the filter element (2) with soap water. Do not use petrol or other solvents.
-
Leave the filter to dry in the open air.
- Fit the filter element (2) and the cover (1) back on, tightening the knob (3) again.
Warning!
Do not use petrol or cleanser.
Risk of explosion.
Do not run the motor without an air filter insert or when it is damaged. This can cause motor damage. In this
case: The manufacturer is not liable for damage resulting from this; the risk lies exclusively with the user.
Spark plug
RECOMMENDED SPARK PLUG: L8RTC
To ensure proper engine operation, the spark plug must be properly gapped and free of deposits.
1. Remove the spark plug cap.

17
2. Clean any dirt around the spark plug base.
3. Use the socket spanner which provided to remove the spark plug.
4. Visually inspect the spark plug. Remove carbon deposits using a wire brush.
5. Check for discoloration on the top of the spark plug. The standard color should be a tan color.
6. Check the spark plug gap. The acceptable gap should be between 0,6~0,7mm.
7. Install /reinstall the spark plug carefully by hand.
8. Once the spark plug has been seated, tighten it with a socket spanner.
9. Reinstall the spark plug cap on top of the spark plug.
Replacing the fuel filter
The felt filter of the fuel filter can become clogged. It is recommended to replace the fuel filter once every
three months in order to ensure unimpeded fuel flow to the carburetor.
To remove the fuel filter for replacement, pull it out through the tank filler neck using a piece of wire bent at
one end to form a hook.
Cleaning
- Keep your machine clean, the outside of the machine can be cleaned using a damp soft cloth
with a mild detergent if required, never use water to clean the machine as it may cause damage
to internal parts.
-
Some maintenance products and solvents may damage the plastic parts, these include
products containing benzene. Trichloroethylene, chloride and ammonia.
- Take special care to keep the ventilation inlets /outlets free from obstruction. Cleaning with a
soft brush followed by a compressed air jet will usually be sufficient to ensure acceptable
internal cleanliness.
-
Wear eye protection when carrying out cleaning.

18
Storage/Transport
Transport
Leave the motor to cool down before transporting the machine or storing it indoors in order to prevent
burning and fire hazards.
Turn off the motor even for short distances when changing locations during work.
Carry the auger exclusively by the handle. Do not touch the casing (risk of burning).
When transporting the auger in a vehicle, it must be stored safely.
The fuel tank must be emptied completely before transport.
Storage
Never store an auger for longer than 30 days without carrying out the following steps.
Follow the cleaning instructions and maintenance instructions before storing the device!
Storing the auger
If you store an auger for longer than 30 days, it must be prepared ahead of time. Unless the storage
instructions are followed, fuel remaining in the carburetor will evaporate, leaving gum-like deposits. This
could lead to difficult starting and result in costly re-pairs.
Remove the fuel tank cap slowly to release any pressure in tank. Carefully drain the fuel tank.
Start the engine and let it run until the engine stops in order to remove the fuel from the carburetor.
Allow the engine to cool (approx. 5 minutes).
Remove the spark plug.
Pour 1 teaspoon of clean 2-cycle oil into the combustion chamber. Pull starter rope slowly several times
to coat internal components. Replace spark plug.
Store the auger in a dry location, far away from potential sources of ignition, such as furnaces, hot water
boilers with gas, gas dryers, etc.
Recommissioning the auger
Remove spark plug.
Pull starter rope briskly to clear excess oil from combustion chamber.
Clean the spark plug and check that the electrode gap is correct.
Prepare unit for operation.
Fill fuel tank with proper fuel / oil mixture.
Disposal and recycling
The equipment is supplied in packaging to prevent it from being damaged in transit. The raw materials in this
packaging can be reused or recycled. The equipment and its accessories are made of various types of
material, such as metal and plastic. Never place defective equipment in your household refuse. The
equipment should be taken to a suitable collection center for proper disposal. If you do not know the
whereabouts of such a collection point, you should ask in your local council offices.

19
Troubleshooting
Problem
Possible Cause
Action
Motor does not start
-Spark plug cable is loose
-No fuel or old fuel
-Throttle lever not in the
correct position
-Choke not in „ON“ position
-Blocked fuel line
-Dirty spark plug
-Motor is wet
-Fix the spark plug cable securely on the
spark plug
-Refuel with clean, fresh fuel
-Push the throttle lever into the starting
position
-During a cold start, the throttle has to rest
against the choke
-Clean the fuel line
-Clean it, adjust gap or replace spark plug
-Wait a few minutes before starting it again
Motor does not run
smoothly
-Spark plug cable is loose
-The machine is running on
the CHOKE
-Blocked fuel line or stale
fuel
-Ventilation is blocked
-Water or dirt in the fuel
system
-Dirty air filter
-Connect the spark plug cable tightly
-Push the choke lever to „OFF“
-Clean the fuel line Fill the tank with fresh,
clean fuel
-Clean the ventilation
-Empty the fuel tank Refuel with fresh fuel
-Clean the air filter or replace it
Motor has overheated
-Too little oil in the motor
-Dirty air filter
-Air flow restricted
-Fill the fuel tank with the correct fuel mixture
-Clean the air filter or replace it
-Remove the ventilation casing and clean it
Motor does not stop
when the throttle is on
STOP, or the speed does
not increase when the
throttle is adjusted
Dirt on the throttle
Remove the dirt

MANUFACTURER’S LIMITED WARRANTY
The limited warranty set forth below is given by Badger with respect to new merchandise purchased and used
in the United States, its possessions and territories .
Badger warrants this product against defects in material and workmanship for a period of one (1) years
commencing on the date of original purchase and will, at its option, repair or replace, free of charge, any part
found to be de
fective in material or workmanship. This limited warranty shall only apply if thi
s product has been
operated and maintained in accordance with the Operator’s Manual furnished with the product, and has not been
subject to misuse, abuse, commercial use, neglect, accident, improper maintenance, alteration, vandalism,
theft, fire, water or damage because of other peril or natural disaster. Damage resulting from the installation or
use of any
accessory or attachment not approved by Badger for use with the product(s) covered by this
manual will void your warranty as to any resulting damage.
HOW TO OBTAIN SERVICE: Warranty service is available, WITH PROOF OF PURCHASE THROUGH YOUR
LOCAL AUTHORIZED SERVICE DEALER. To locate the dealer in your area, call 1-844-786-7335. No product
returned directly to the factory will be accepted unless prior written permission has been extended by
the
Customer Service Department of Badger.
This limited warranty does not provide coverage in the following cases:
A. Tune-ups - Spark Plugs, Carburetor Adjustments, Filters
B. Wear items - Bump Knobs, Outer Spools, Cutting Line, Inner Reels, Starter Pulley, Starter Ropes, Drive Belts,
Saw Chains, Guide Bars, Cultivator Tines, Blades.
C. Badger does not extend any warranty for products sold or exported outside of the United Stat
es of America,
its possessions and territories, except those sold through Badger’s authorized channels of export distribution.
Badger reserves the right to change or improve the design of any Badger Product without assuming any
obligation to modify any product previously manufactured.
No implied warranty, including any implied warranty of merchantability or fitness for a particular purpose,
applies after the applicable
period of express written warranty above as to the parts as identified. No
other express warranty or guaranty, whether written or oral, except as mentioned above, given by any
person or entity, including a dealer or retailer, with respect to any product shall bind Badger. During
the period of the Warranty, the exclusive remedy is repair or replacement of the product as set forth
above. (Some states do not allow limitations on how long an implied warr
anty lasts, so the above limitation may
not apply to you.)
The provisions as set forth in this Warranty provide the sole and exclusive remedy arising from the sales.
Badger shall not be liable for incidental or consequential loss or damages including, without
limitation, expenses incurred for substitute or replacement lawn care services, for transportation or for
related expenses, or for rental expenses to temporarily replace a warranted pr
oduct. (Some states do not
allow limitations on how long an implied warranty lasts, so the above limitation may not apply to you.)
In no event shall recovery of any kind be greater than the amount of the purchase price of the product sold.
Alteration of the safety features of the product shall voi
d this Warranty. You assume the risk and liability for loss,
damage, or injury to you and your property and/or to others and their property arising out o
f the use or misuse or
inability to use the product.
This limited warranty shall not extend to anyone other than the original purchaser, original lessee or the person
for whom it was purchased as a gift.
How State Law Relates to this Warranty: This
warranty gives you specific legal rights, and you may also have
other rights which vary from state to state.
To locate your nea
rest service dealer, dial 1-844-786-7335 in the United States.