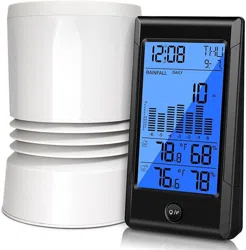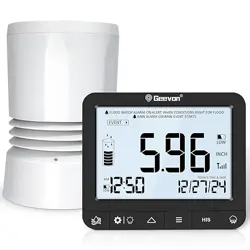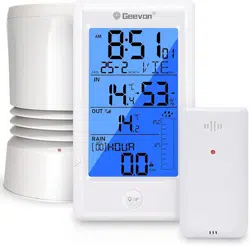
GEEVON Rain Gauge
Item No.W208708
User Manual
Thank you for purchasing W208708 Rain Gauge.
Please take a moment to read this guide and store it for future
reference
14
15
16
17
18
19
20
1
8
2
23
24
21
22
25
3
4
5
6
7
9
10
11
12
13
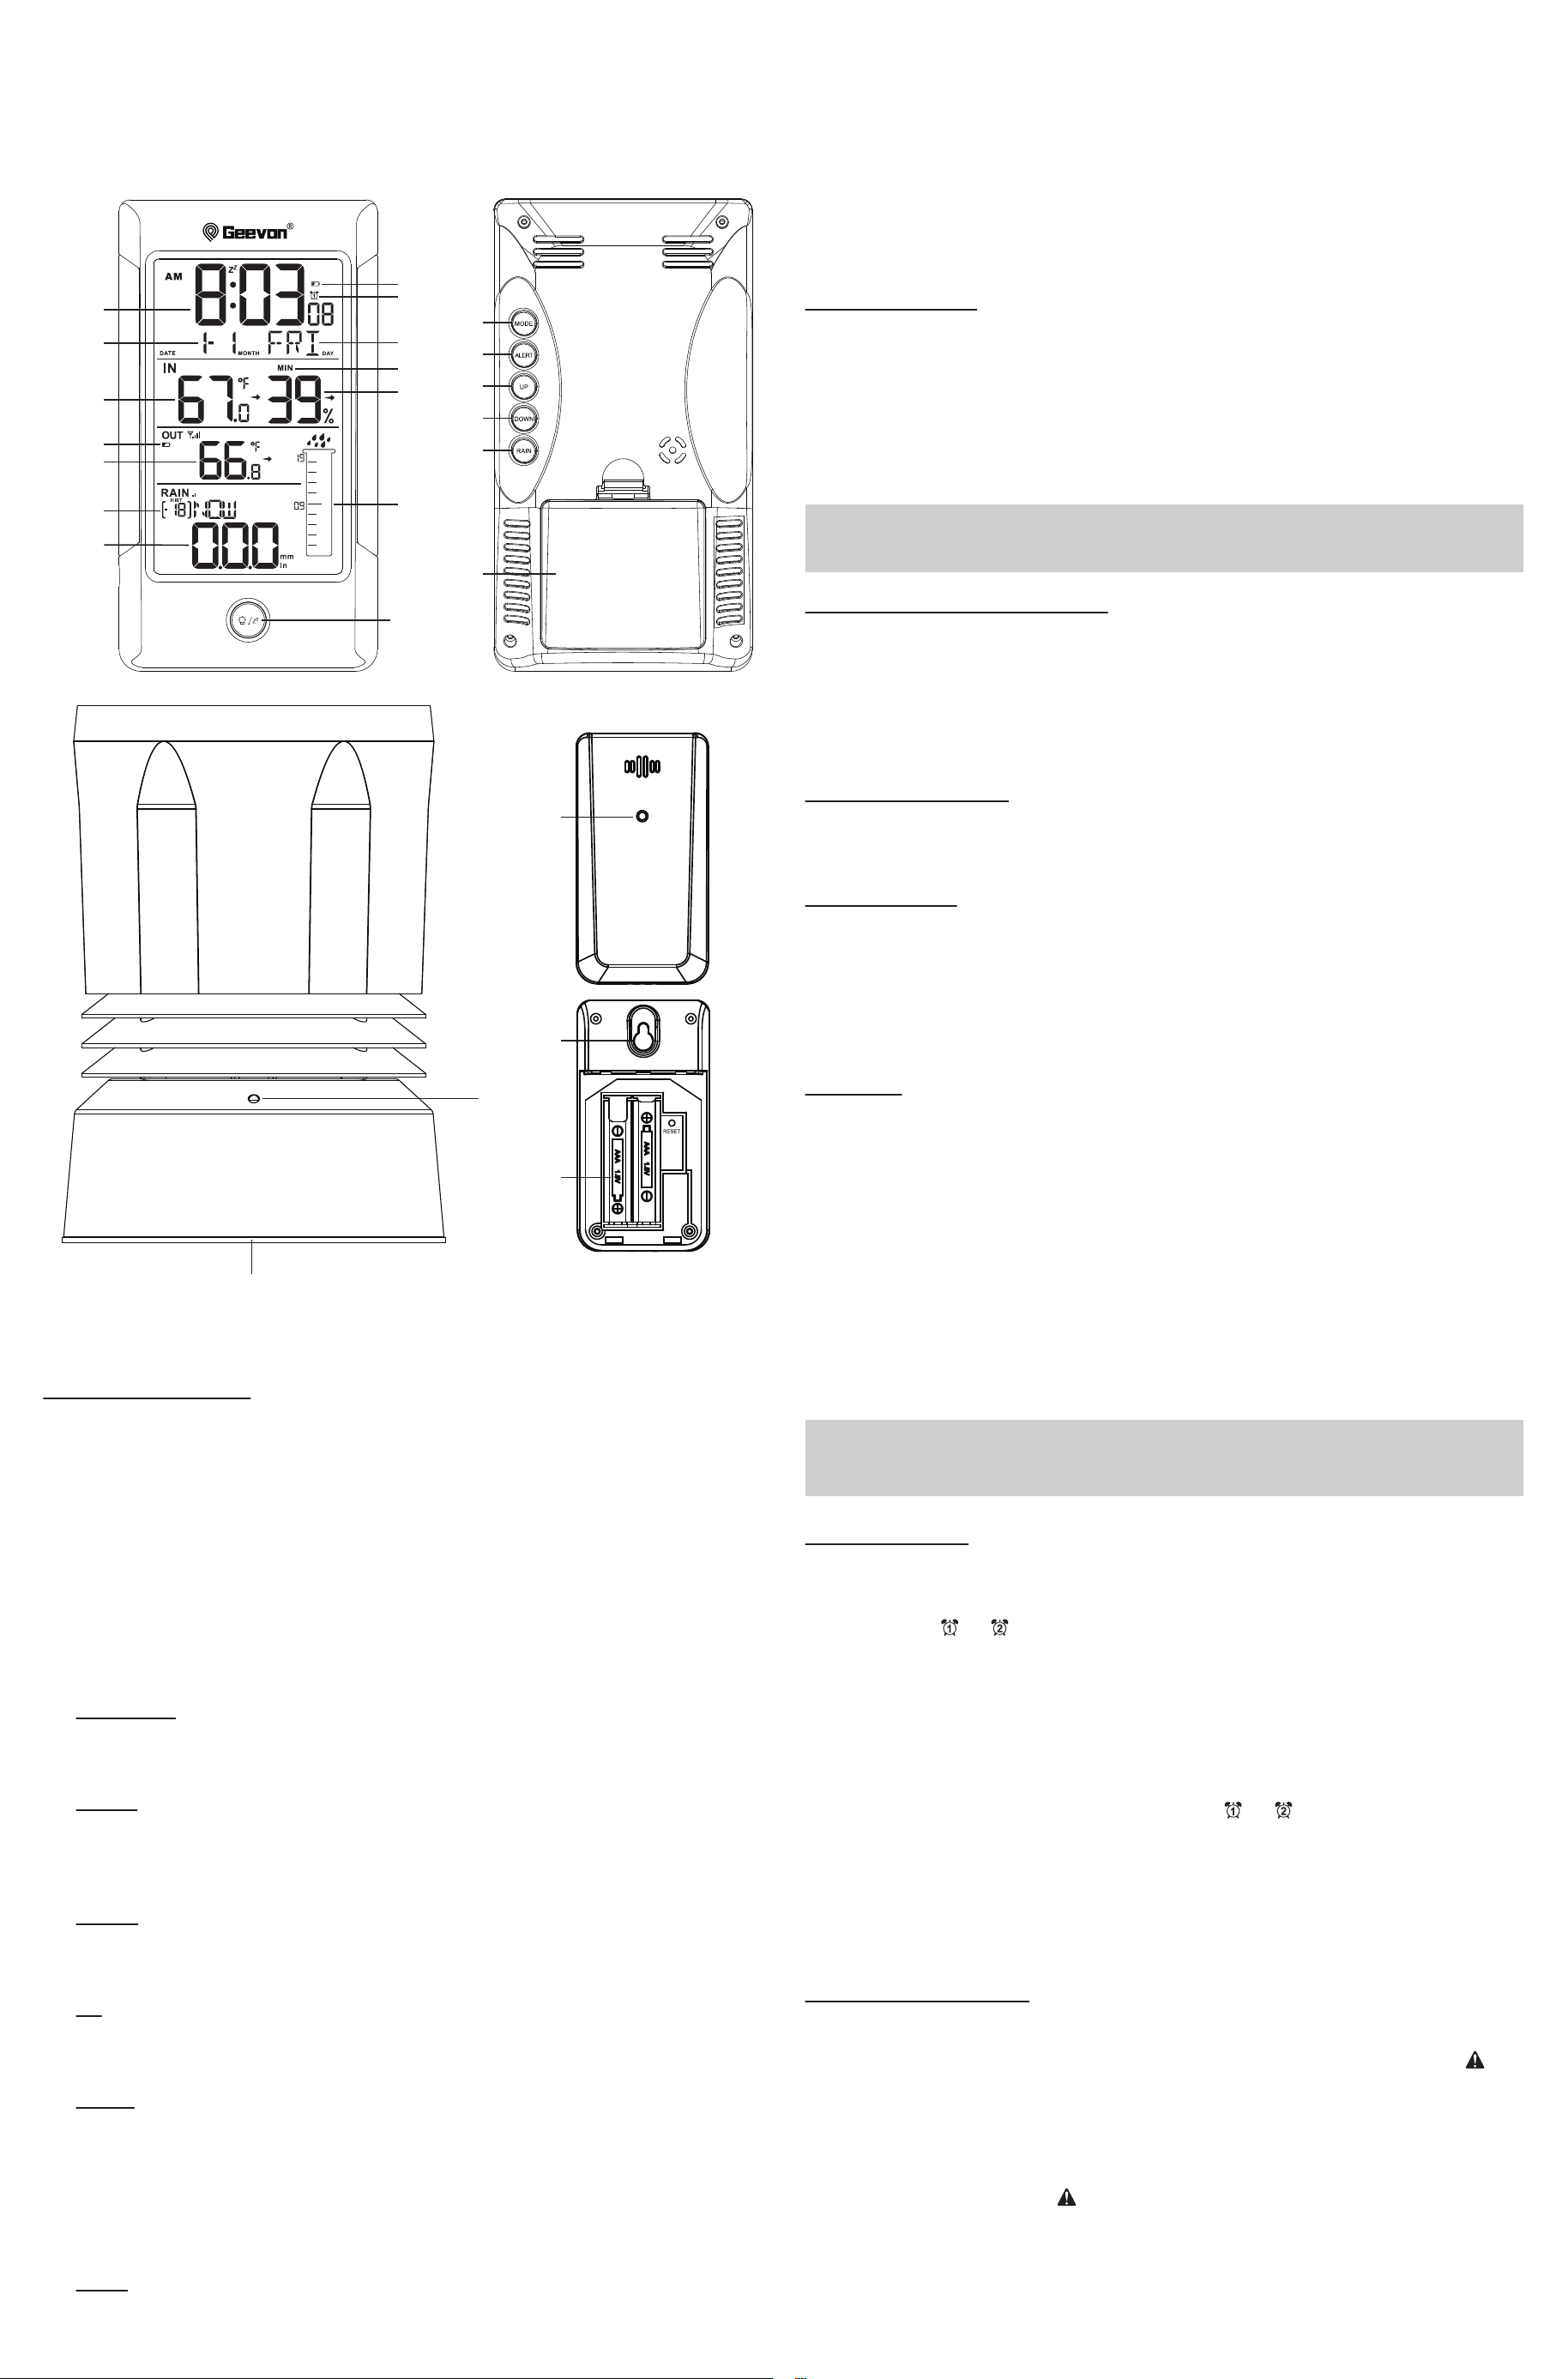
Controls and displays:
1. Time display
2. Calendar
3. Indoor temperature
4. Outdoor sensor low battery displayicon
5. Outdoor temperature
6. Rainfall history display
7. Rainfall display
8. Main unit low battery display
9. Alarm icon
10. Weekday
11. Temperature/humidity MAX/MIN records
12. Indoor humidity
13. Rainfall alert
14. LIGHT/SNZ button
a. In normal mode, press this button to turn on/off the backlight for 5 seconds.
b. In the setting mode, press this button to exit the settings.
c.Press this button to enter the snooze mode when the Alarm rings.
15. MODE button
a. In normal mode, press this button to switch time format 12H/24H.
b. In ALARM or ALERT display mode, press this button to turn on/off ALARM/ ALERT.
c. In normal mode, press and hold this button to enter time setting mode.
d. In the setting mode, press this button to confirm the selection.
16. ALERT button
a. In normal mode, press this button to select ALARM1, ALARM2, rainfall ALERT.
b. In the alert mode, press and hold this button to set ALARM1, ALARM2, rainfall
ALERT.
17. UP button
a. In normal mode, press this button to view the rainfall history (except NOW, TOTAL).
b. In the setting mode, press this button to increase in value.
c. In the setting mode, press and hold this button to increase in value quickly.
18. DOWN button
a. In normal mode, press this button to switch to display MAX/MIN temperature and
humidity
record.
b. In MAX/MIN display mode, press and hold this button to clear MAX/MIN memory.
c. In normal mode, press and hold this button to receive RF.
d. In the setting mode, press this button to increase in value.
e. In the setting mode, press and hold this button to increase in value quickly.
19. RAIN button
a. In normal mode, press this button to switch rainfall display mode(NOW, HOUR,
DAY, WEEK, MONTH, YEAR, TOTAL).
b. In the current display mode, press and hold this button to clear this group of data
(RESET).
20. Battery Compartment 3xAA (batteries not included)
21. Wireless signal indicator (Flashes when data is being sent to the display unit)
22. Compartment 2xAA batteries (batteries not included)
23. Wireless signal indicator(Flashes when data is being sent to the display unit)
24. Integrated hang hole
25. Compartment 2xAAA batteries (batteries not included)
Package Contents:
1. Display Unit
2. Outdoor Sensor
3. Wireless rain gauge
4. Instructions Manual
Getting started:
1.Place 3xAA batteries into the display unit.
2. Place 2xAA batteries into the wireless rain gauge.
3. Place 2xAAA batteries into the outdoor sensor.
• The range is 200 ft. (60m) unobstructed. The wireless range may be reduced
by trees, walls, windows, etc.
Note:
Setting the alarm:
• In standard mode, press ALERT button to enter the alarm mode. The setting order
is ALARM1 > ALARM2 > ALERT > Exit.
• In “ALARM1/ALARM2” mode, press MODE button to turn on/off ALARM1/ALARM2.
The alarm icon or will appear or disappear. Press and hold the ALERT button
to enter the alarm setting mode, the setting order is Hour > Minute > Exit. Use the
UP and DOWN button to set the required hour and minute.
• Press ALERT to exit and save the setting.
• To select individual values, press UP button or DOWN button and confirm each
selection by pressing the ALERT button.
• The automatically exit settings mode if no buttons are pressed for 20 seconds.
Stopping the alarm/snooze function
• When the alarm is triggered, the alarm symbol or begins to flash and an
alarm sounds.
• The alarm will stop ringing by pressing any button (except the LIGHT/SNOOZE button).
Note:
While the alarm is sounding, press the LIGHT/SNOOZE button to activate the
snooze function. The alarm will sound again after 5 minutes. In snooze mode, the
backlight will be on for 5 seconds.
Setting the rainfall alert:
• In standard mode, press ALERT button to enter the alarm mode. The setting order
is ALARM1 > ALARM2 > ALERT > Exit.
• In “ALERT” mode, press MODE button to turn on/off ALERT. The alert icon will
appear or disappear. Use the UP and DOWN button to set the required rainfall alert
value.
• The rainfall alert refers to 24-hour rainfall alert, not affected by other modes.
• The rainfall alert will sound for 5 seconds every minute, until the conditions for
stopping the alert are met, the alert will stop. Pressing any key will stop the rainfall
alert beeping. The alert icon flash until the data of the alert rainfall is cleared or
the alert function is turned off.
• During the rainfall alert, if the alarm sounds, the rainfall alert will be suspended
and will continue after the alarm is over; entering the SNZ mode does not affect the
rainfall alert.
Installing or Replacing Batteries:
• We recommend using high quality alkaline batteries for the best product
performance.
• Heavy duty or rechargeable batteries are not recommended.
•The outdoor sensor requires high quality alkaline batteries in low temperature
conditions. Cold temperatures could cause other batteries to function improperly.
• Do not mix old and new batteries. Do not mix alkaline, standard, and/or
rechargeable batteries.
Low Battery Indicator:
If the low battery indicator is displayed on the LCD for either the outdoor sensor or
the display unit, please immediately install the new batteries to prevent disruptions
in communications of the devices.
Default settings:
1. Default time: 12:00 (Time form: 12H)
2. Default date: 01/01 (Year: 2021, date form: D/M- unchangeable)
3. Default week: FRI (Language: EN, 7 languages can be selected)
4. Default temperature: °F
6. Rainfall unit: IN
7. Default alarm: AM 6:00(ALARM1), AM 8:00(ALARM2), default: off, default snooze
time: 5min.
Operation:
Manually Setting the Time, Date & Units:
• Press and hold the MODE button for 3 seconds until the display begins to flash.
• Set the following information in the order listed:
• BEEP(button sound)
• Rainfall unit
• Temperature unit
• Year
• Month
• Date
• Hour
• Minute
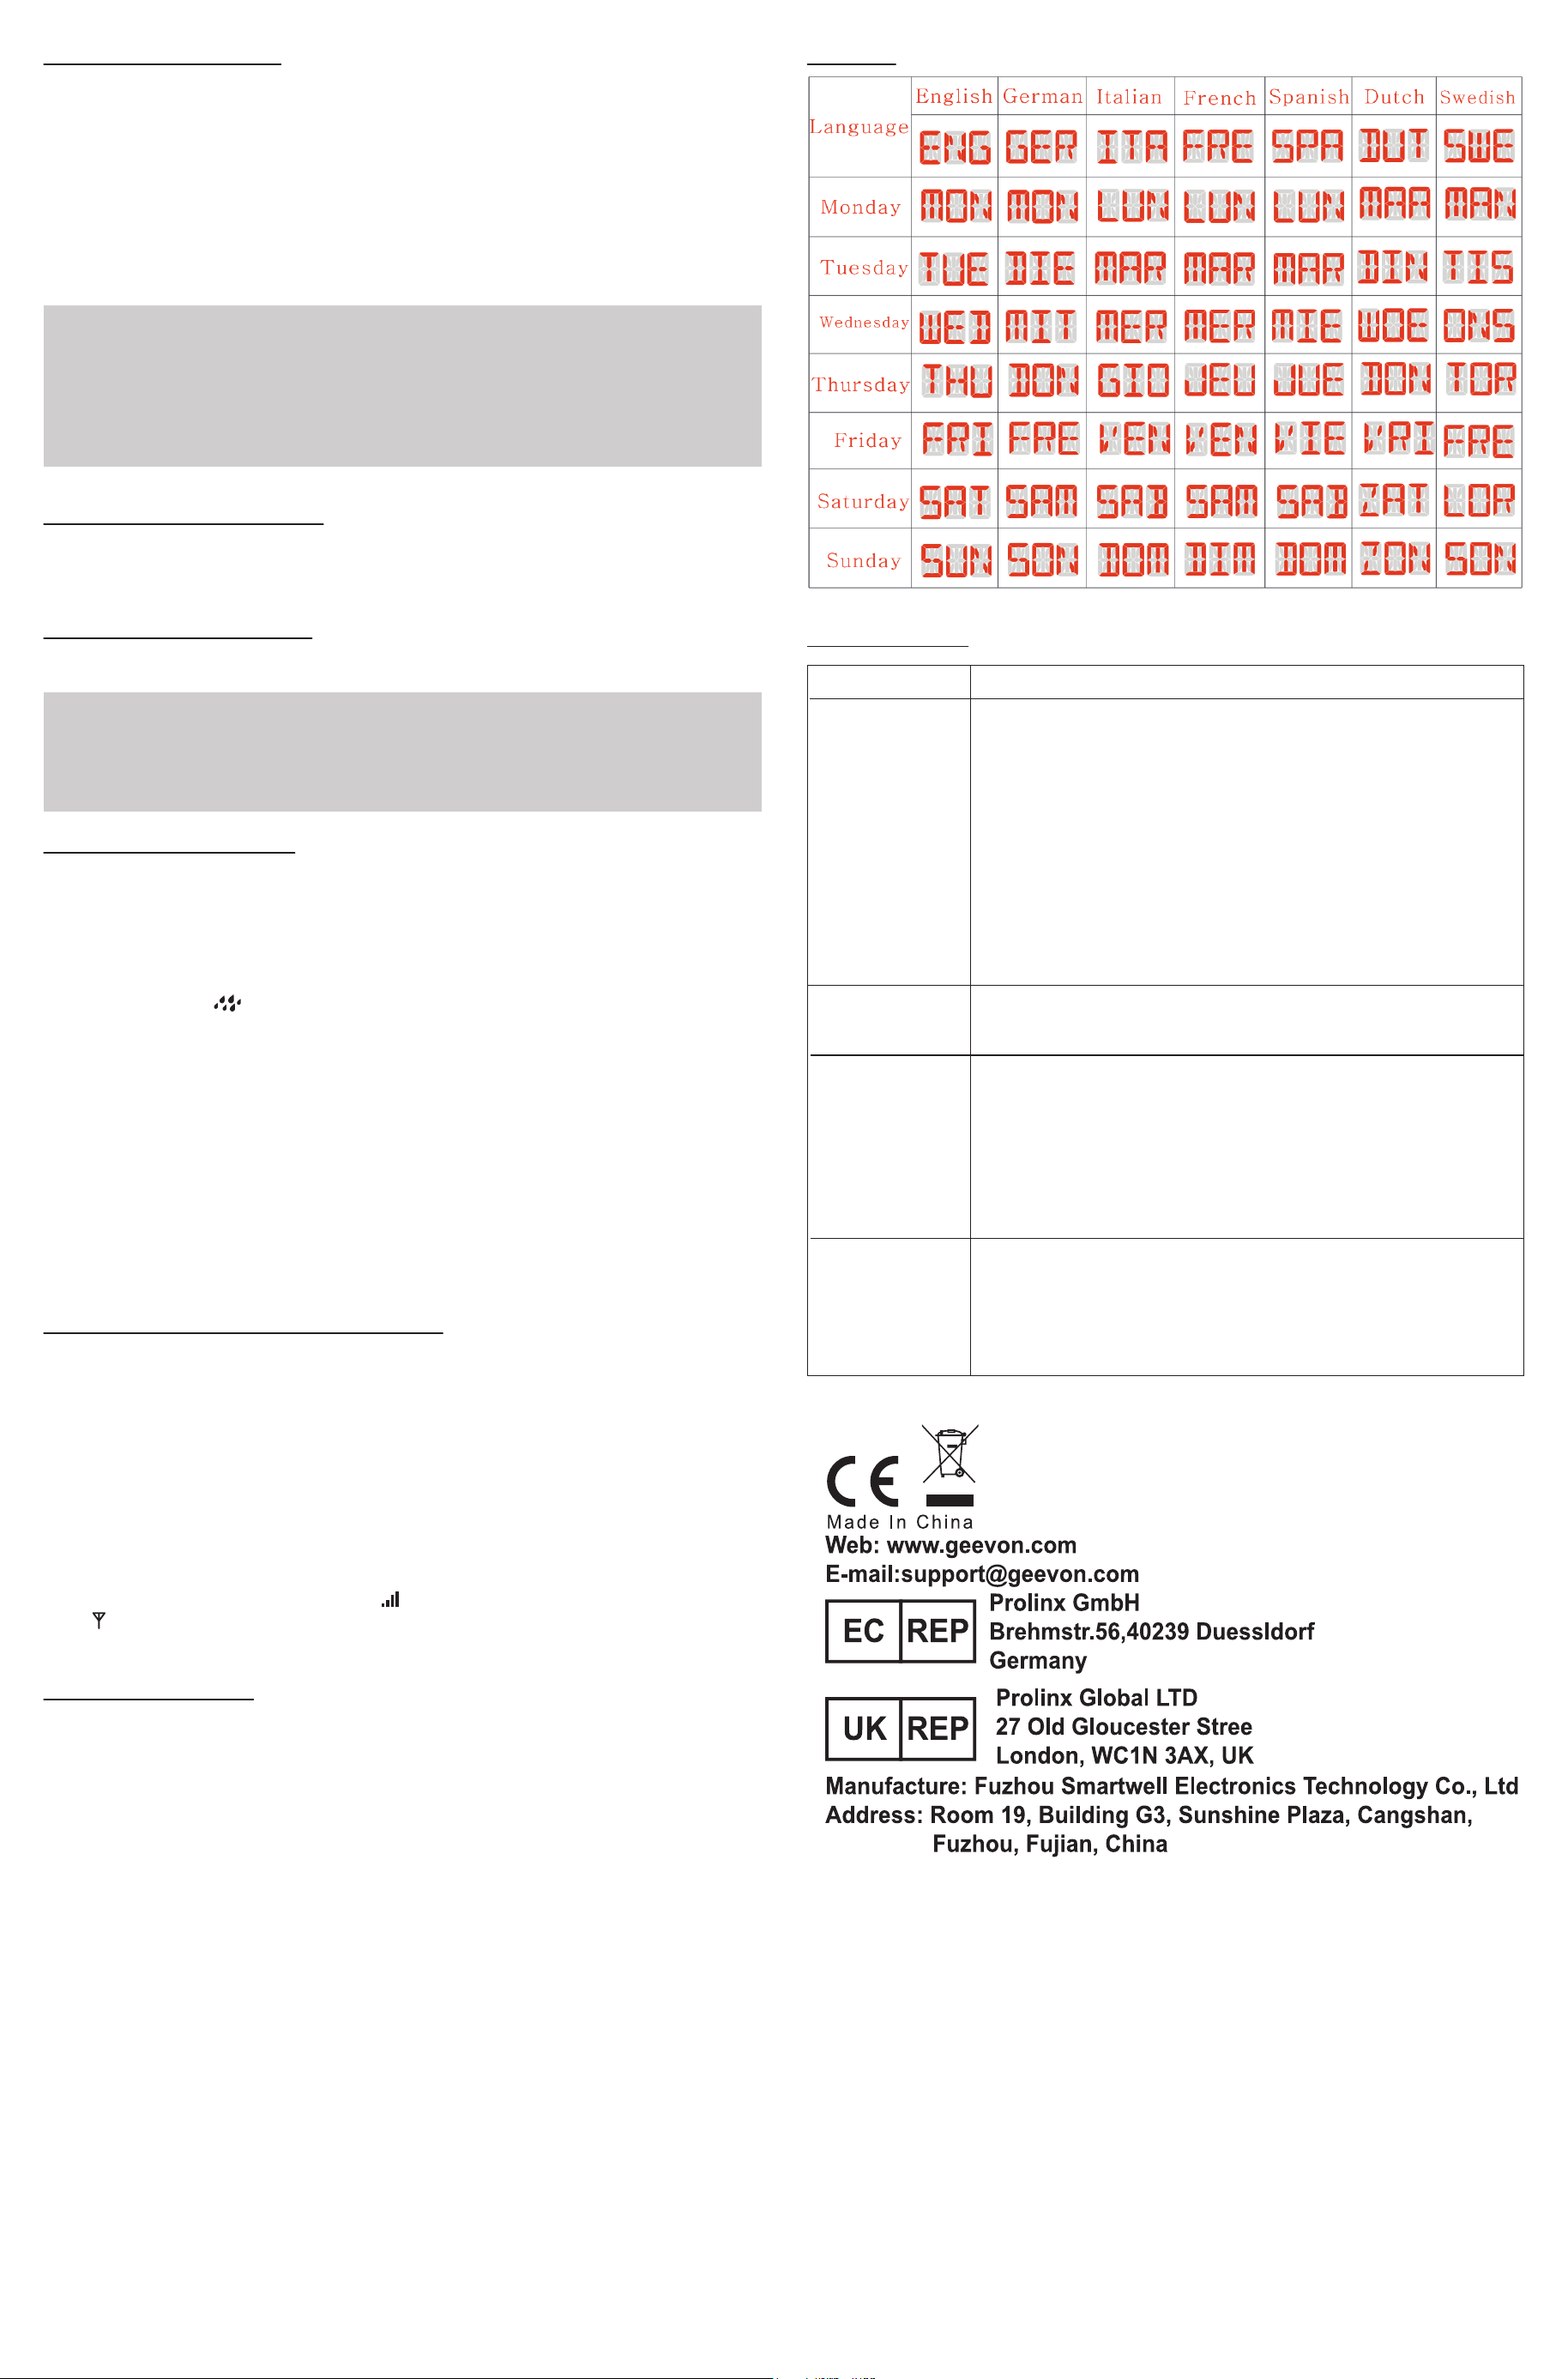
• Day of the week language: English, German, French, Italian, Spanish, Dutch and
Swedish(Display the first 6 letters of the word).
• To select individual values, press UP button or DOWN button and confirm each
selection by pressing the MODE button.
The dispaly unit will automatically exit settings mode if no buttons are pressed for
20 seconds.
Note:
Rainfall function operation:
• In standard mode, press RAIN button to enter rainfall display mode. The setting
order is NOW > HOUR > DAY > WEEK > MONTH > YEAR > TOTAL (Whichever
mode you switch to, this mode will always be displayed).
• NOW: The amount of rainfall from the time it started raining to the time it rained f
or 30 minutes. The reading will be reset to zero after 30 minutes of no rain. At the
start of rain, the raindrop icon will flash until the rain reaches zero, but there will be
no sound. The icon flashes dynamically until the rainfall has now dropped to zero.
• HOUR: The amount of rainfall in the current hour, for example, it starts at 5:50, and
the data will be the amount of the rainfall of the time after 6:00. A total of 24hours.
Press the UP button to view -1 ~ -24 hours in the past, hourly rainfall records.
• DAY: The amount of rainfall of the current day (0:00-23:59), press the UP button
to view -1 ~ -31days in the past, the daily rainfall record.
• WEEK: The amount of rainfall from Sunday to Saturday.press the UP button to
view -1 ~ -52 weeks in the past, the weekly rainfall record.
• MONTH:The amount of rainfall of the current month, press the UP button to
view -1 ~ -12 months in the past, the monthly rainfall records.
• YEAR: The amount of rainfall of the current year.Press the UP button to view
-1 ~ -5 years in the past, the annual total rainfall record.
• TOTAL: The total amount of rainfall since the product is powered on.
Outdoor temperature and rainfall reception:
• After power-on, the product will automatically enter RF reception to detect temperature
and humidity. (This process will last for 3 minutes.) It will exit RF reception immediately
after successful reception of outdoor temperature, humidity and rainfall.
• The data of temperature and rainfall will be displayed within 3-minute RF reception
after being disconnected for 1 hour.If the signal is still not received, "--.-" will be
displayed, and the original ,
the RF reception will still be turned on for 3 minutes every hour.
• If the receiver does not receive a signal within 3 minutes after power-on, it will not
automatically receive the signal unless it is powered on again, reset or manually
forced to receive.
• In the normal time display mode, press and hold the DOWN button for 5 seconds
to start RF reception, and the RF icon will flash. If no signal is received, the
icon will be displayed.
• The RF reception interval is 57 seconds.
Care and maintenance:
Placement of the Device
Proper placement of both the display unit and the outdoor sensor are critical to the
accuracy and performance of this product.
Display unit placement
Place the display unit in a dry area free of dirt and dust. The display unit is suitable
for use on the desktop/countertop.
Important Placement Guidelines
• Display unit and outdoor sensor must be within 150 ft. (50m) of each other.
• To maximize wireless range, place units away from large metallic items, thick walls,
metal surfaces, or other objects that may limit wireless communication.
• To prevent wireless interference, place both units at least 3ft (1 m) away from
electronic devices (TV, computer, microwave, radio, etc.
• Place the wireless rain gauge away from equipment that generates magnetic
fields such as mobile phones, televisions etc.
• In case of no receipt of the signal, "--" will be displayed on the screen. Press and
hold the DOWN button for 3 seconds to receive RF signal.
Notes:
Setting the Temperature Units:
To switch the temperature unit between °C and °F , press and hold the MODE
button for 3 seconds, the BEEP will flash, press the Mode button, the temperature
units will flash. Press the UP and DOWN button to select °C or °F.
Remote sensor transmission:
• Power the wireless rain gauge, outdoor sensor and the display by installing new
batteries, the data will be automatically transmitted.
Week display;
TROUBLE SHOOTING:
Problem Possible Solution
If the wireless signal indicator shows no bars:
• Relocate the display and/or the rain gauge.
The units must be within 200 ft (60 m) of each other.
• Make sure both units are placed at least 3 feet(.9 m) away from
electronics that may interfere with
the wireless communication (such as TVs, microwaves,computers, etc).
• Use standard alkaline batteries (or lithium batteries in sensor when
temperature is below -4ºF/-20ºC). Do not use heavy duty or recharge-
able batteries.
NOTE: It may take a few minutes for display and sensor to synchronize
after batteries are replaced.
• Check if the batteries are installed correctly or if the battery power is
sufficient.
Display screen
not working
No wireless
sensor or rain
gauge reception
Flashing of the outdoor temperature and/or humidity is generally an
indication of wireless interference.
1. Bring the rain gauge and display indoors.
2. Reinstall the battery in the rain gauge.
3. Reinstall the battery in the display.
4. Place the units within a couple feet of each other for a few minutes to
gain a strong connection.
Outdoor
temperature
and/or humidity
flashing or
showing dashes
No, the rain gauge should be brought indoors when there is a possibili-
ty of freezing temperatures.When the surrounding environment reaches
freezing temperature, water vapor will enter the interior of the equip-
ment, causing it to malfunction. And the freezing temperature may also
cause crack the plastic casing of the rain gauge.
Can the rain
gauge
remain outdoors
in freezing
temperatures?
0°C ~ 40°C : ± 1°C
Accuracy
• Indoor temperature accuracy:
0°C ~ -40°C: ± 1°C
-9.9°C ~ 0°C, 40°C ~ 50°C : ± 1.5°C
• Outdoor temperature accuracy:
-40°C ~ 0°C, +40°C ~ +60°C: ± 2°C
Note:
Temperatue and humidity:
Temperature
• Indoor temperature -9.9°C ~ 50°C (49.82°F ~ 122°F), display LL.L when below
-9.9°C and display HH.H when higher than 50°C.
• Outdoor temperature -40°C ~ 60°C (-104°F ~ 140°F)
• Temperature resolution: 0.1°C
Humidity
• Indoor humidity range: 20%-95%, display 20% when below 20% and display 95%
when higher than 95%.
• Humidity resolution: 1 %RH
• When alarm rings, temperature and humidity test will be stopped.