EN
USER’S GUIDE
AP
-
7
50
AP750-E-2A
Initial Setup
Preparation of power
supply
Turning the Power On/Off Using the Pedals Using headphones
Playing the Digital Piano
Selecting a Tone Layering Two Tones
(Layer)
Splitting Left and Right
Keys (Split)
Using the metronome
Changing Sound Reverberation and Ambiance Changing the Pitch
Using Sound Mode
Effects (Hall Simulator/
Reverb and Surround)
Applying Chorus Adjusting the Sound
Characteristics of the
Acoustic Piano Presets
(Acoustic Simulator)
Changing the Pitch in
Semitone Steps
(Transpose)
Recording Performances in Real-Time
Check the Sound of
Your Performance
Connecting with a
Smart Device
Recording a
Performance with the
MIDI Recorder
Recording a
Performance with the
Audio Recorder
Listening back to a
Performance
Immediately (Instant
RePlayer)
Using the Dedicated App
Cover

EN-1
Overview of the Digital Piano EN-7
Part Names and Functions . . . . . . . . . . . . . . . . . . . . . . . . . . . . . . . . . . . . . . . . . . . . . . . . . . . EN-7
Preparation before Playing EN-10
Preparation of power supply . . . . . . . . . . . . . . . . . . . . . . . . . . . . . . . . . . . . . . . . . . . . . . . . . EN-10
The Keyboard Cover. . . . . . . . . . . . . . . . . . . . . . . . . . . . . . . . . . . . . . . . . . . . . . . . . . . . . . . EN-11
Opening the Keyboard Cover . . . . . . . . . . . . . . . . . . . . . . . . . . . . . . . . . . . . . . . . . . . . . . . . . . . . . . . EN-11
Closing the Keyboard Cover. . . . . . . . . . . . . . . . . . . . . . . . . . . . . . . . . . . . . . . . . . . . . . . . . . . . . . . . EN-12
Turning the Power On/Off . . . . . . . . . . . . . . . . . . . . . . . . . . . . . . . . . . . . . . . . . . . . . . . . . . . EN-13
Turning the Power On . . . . . . . . . . . . . . . . . . . . . . . . . . . . . . . . . . . . . . . . . . . . . . . . . . . . . . . . . . . . . EN-13
Turning the Power Off . . . . . . . . . . . . . . . . . . . . . . . . . . . . . . . . . . . . . . . . . . . . . . . . . . . . . . . . . . . . . EN-14
Adjusting the Volume . . . . . . . . . . . . . . . . . . . . . . . . . . . . . . . . . . . . . . . . . . . . . . . . . . . . . . EN-14
Using the Supplied Wireless MIDI & Audio Adaptor . . . . . . . . . . . . . . . . . . . . . . . . . . . . . . . EN-15
Using headphones . . . . . . . . . . . . . . . . . . . . . . . . . . . . . . . . . . . . . . . . . . . . . . . . . . . . . . . . EN-16
Using the music stand. . . . . . . . . . . . . . . . . . . . . . . . . . . . . . . . . . . . . . . . . . . . . . . . . . . . . . EN-17
Piano Top Panels . . . . . . . . . . . . . . . . . . . . . . . . . . . . . . . . . . . . . . . . . . . . . . . . . . . . . . . . . EN-18
Opening the Top Panel of the Piano . . . . . . . . . . . . . . . . . . . . . . . . . . . . . . . . . . . . . . . . . . . . . . . . . . EN-18
Closing the Top Panel of the Piano. . . . . . . . . . . . . . . . . . . . . . . . . . . . . . . . . . . . . . . . . . . . . . . . . . . EN-19
Read This First (Basic Operations and Settings) EN-20
Notation in this Document. . . . . . . . . . . . . . . . . . . . . . . . . . . . . . . . . . . . . . . . . . . . . . . . . . . EN-20
Touch Button Operation . . . . . . . . . . . . . . . . . . . . . . . . . . . . . . . . . . . . . . . . . . . . . . . . . . . . EN-21
Operation using just the Touch Buttons . . . . . . . . . . . . . . . . . . . . . . . . . . . . . . . . . . . . . . . . . . . . . . . EN-22
Touch Button and Keyboard Combination Operation . . . . . . . . . . . . . . . . . . . . . . . . . . . . . . . . . . . . . EN-23
Notification Tones . . . . . . . . . . . . . . . . . . . . . . . . . . . . . . . . . . . . . . . . . . . . . . . . . . . . . . . . . EN-28
Notification Tone Types. . . . . . . . . . . . . . . . . . . . . . . . . . . . . . . . . . . . . . . . . . . . . . . . . . . . . . . . . . . . EN-28
How the Visual Information Bar Displays for Various Settings . . . . . . . . . . . . . . . . . . . . . . . EN-29
Piano acoustic setting and demo performance EN-31
Select the acoustic setting appropriate for the installation location (piano position) . . . . . . . EN-31
Playing the Demo Performance . . . . . . . . . . . . . . . . . . . . . . . . . . . . . . . . . . . . . . . . . . . . . . EN-32
Operations Possible during a Demo Performance . . . . . . . . . . . . . . . . . . . . . . . . . . . . . . . . . . . . . . . EN-32
Ending Demo Performance. . . . . . . . . . . . . . . . . . . . . . . . . . . . . . . . . . . . . . . . . . . . . . . . . . EN-33
Playing EN-34
Selecting a Tone . . . . . . . . . . . . . . . . . . . . . . . . . . . . . . . . . . . . . . . . . . . . . . . . . . . . . . . . . . EN-34
Selecting a Single Tone . . . . . . . . . . . . . . . . . . . . . . . . . . . . . . . . . . . . . . . . . . . . . . . . . . . . . . . . . . . EN-37
Layering Two Tones (Layer) . . . . . . . . . . . . . . . . . . . . . . . . . . . . . . . . . . . . . . . . . . . . . . . . . . . . . . . . EN-39
Splitting Left and Right Keys (Split). . . . . . . . . . . . . . . . . . . . . . . . . . . . . . . . . . . . . . . . . . . . . . . . . . . EN-41
Splitting the Keyboard into Left and Right for Two-Person Performance (Duet). . . . . . . . . . EN-42
What is a Duet?. . . . . . . . . . . . . . . . . . . . . . . . . . . . . . . . . . . . . . . . . . . . . . . . . . . . . . . . . . . . . . . . . . EN-42
Using the Duet Function . . . . . . . . . . . . . . . . . . . . . . . . . . . . . . . . . . . . . . . . . . . . . . . . . . . . . . . . . . . EN-43
Changing the Pitch Range . . . . . . . . . . . . . . . . . . . . . . . . . . . . . . . . . . . . . . . . . . . . . . . . . . . . . . . . . EN-44
Using the Pedals. . . . . . . . . . . . . . . . . . . . . . . . . . . . . . . . . . . . . . . . . . . . . . . . . . . . . . . . . . EN-45
Adjust the position of where the half pedal is applied (half pedal position). . . . . . . . . . . . . . . . . . . . . EN-46
Contents

Contents
EN-2
Using the metronome EN-47
Metronome On/Off . . . . . . . . . . . . . . . . . . . . . . . . . . . . . . . . . . . . . . . . . . . . . . . . . . . . . . . . EN-47
Setting the Beat . . . . . . . . . . . . . . . . . . . . . . . . . . . . . . . . . . . . . . . . . . . . . . . . . . . . . . . . . . EN-48
Setting a Tempo . . . . . . . . . . . . . . . . . . . . . . . . . . . . . . . . . . . . . . . . . . . . . . . . . . . . . . . . . . EN-49
Adjusting the Volume . . . . . . . . . . . . . . . . . . . . . . . . . . . . . . . . . . . . . . . . . . . . . . . . . . . . . . EN-50
Applying Effects to Sound EN-51
Using Sound Mode Effects (Hall Simulator/Reverb and Surround) . . . . . . . . . . . . . . . . . . . EN-51
Turning on/off Hall Simulator/Reverb and Surround . . . . . . . . . . . . . . . . . . . . . . . . . . . . . . . . . . . . . . EN-51
Selecting Hall Simulator/Reverb Presets . . . . . . . . . . . . . . . . . . . . . . . . . . . . . . . . . . . . . . . . . . . . . . EN-52
Adjusting Applied Hall Simulator/Reverb. . . . . . . . . . . . . . . . . . . . . . . . . . . . . . . . . . . . . . . . . . . . . . . EN-53
Selecting Surround Presets. . . . . . . . . . . . . . . . . . . . . . . . . . . . . . . . . . . . . . . . . . . . . . . . . . . . . . . . . EN-54
Applying Chorus . . . . . . . . . . . . . . . . . . . . . . . . . . . . . . . . . . . . . . . . . . . . . . . . . . . . . . . . . . EN-55
Adjusting Brilliance . . . . . . . . . . . . . . . . . . . . . . . . . . . . . . . . . . . . . . . . . . . . . . . . . . . . . . . . EN-56
Adjusting the Sound Characteristics of the Acoustic Piano Presets (Acoustic Simulator) . . EN-57
Setting the String Resonance . . . . . . . . . . . . . . . . . . . . . . . . . . . . . . . . . . . . . . . . . . . . . . . . . . . . . . . EN-57
Setting Damper Resonance . . . . . . . . . . . . . . . . . . . . . . . . . . . . . . . . . . . . . . . . . . . . . . . . . . . . . . . . EN-58
Setting Damper Noise . . . . . . . . . . . . . . . . . . . . . . . . . . . . . . . . . . . . . . . . . . . . . . . . . . . . . . . . . . . . . EN-59
Set open String Resonance . . . . . . . . . . . . . . . . . . . . . . . . . . . . . . . . . . . . . . . . . . . . . . . . . . . . . . . . EN-60
Set the aliquot resonance . . . . . . . . . . . . . . . . . . . . . . . . . . . . . . . . . . . . . . . . . . . . . . . . . . . . . . . . . . EN-61
Set pedal action noise . . . . . . . . . . . . . . . . . . . . . . . . . . . . . . . . . . . . . . . . . . . . . . . . . . . . . . . . . . . . . EN-62
Setting Key On Action Noise . . . . . . . . . . . . . . . . . . . . . . . . . . . . . . . . . . . . . . . . . . . . . . . . . . . . . . . . EN-63
Setting Key Off Action Noise . . . . . . . . . . . . . . . . . . . . . . . . . . . . . . . . . . . . . . . . . . . . . . . . . . . . . . . . EN-64
Setting the Lid Simulator . . . . . . . . . . . . . . . . . . . . . . . . . . . . . . . . . . . . . . . . . . . . . . . . . . . . . . . . . . . EN-65
Adjusting Key Touch EN-66
Changing the Volume Made by the Strength of Pressure Placed on a Key
(Touch Response) . . . . . . . . . . . . . . . . . . . . . . . . . . . . . . . . . . . . . . . . . . . . . . . . . . . . . . . EN-66
Changing the sensitivity of Touch Response . . . . . . . . . . . . . . . . . . . . . . . . . . . . . . . . . . . . . . . . . . .EN-67
Adjust the Timing of Key Press to Sound (Hammer Response) . . . . . . . . . . . . . . . . . . . . . . EN-68
Adjusting the Hammer Response . . . . . . . . . . . . . . . . . . . . . . . . . . . . . . . . . . . . . . . . . . . . . . . . . . . . EN-68
Adjust the Timing of Mute During Key Release (Key Off Response) . . . . . . . . . . . . . . . . . . EN-70
Adjusting Key Off Response . . . . . . . . . . . . . . . . . . . . . . . . . . . . . . . . . . . . . . . . . . . . . . . . . . . . . . . . EN-70
Adjusting the Pitch of Sound EN-71
Changing the Pitch in Semitone Steps (Transpose) . . . . . . . . . . . . . . . . . . . . . . . . . . . . . . . EN-71
Transpose . . . . . . . . . . . . . . . . . . . . . . . . . . . . . . . . . . . . . . . . . . . . . . . . . . . . . . . . . . . . . . . . . . . . . . EN-71
Fine-tuning (A-tuning) . . . . . . . . . . . . . . . . . . . . . . . . . . . . . . . . . . . . . . . . . . . . . . . . . . . . . . EN-72
Tuning . . . . . . . . . . . . . . . . . . . . . . . . . . . . . . . . . . . . . . . . . . . . . . . . . . . . . . . . . . . . . . . . . . . . . . . . . EN-72
Shifting by Octaves (Octave Shift) . . . . . . . . . . . . . . . . . . . . . . . . . . . . . . . . . . . . . . . . . . . . EN-73
Shifting a Upper1 Part by an Octave. . . . . . . . . . . . . . . . . . . . . . . . . . . . . . . . . . . . . . . . . . . . . . . . . . EN-73
Shifting Upper2 Part by an Octave . . . . . . . . . . . . . . . . . . . . . . . . . . . . . . . . . . . . . . . . . . . . . . . . . . . EN-73
Changing the Scale Tuning (Temperament) of the Keyboard. . . . . . . . . . . . . . . . . . . . . . . . EN-74
Changing the Scale Tuning. . . . . . . . . . . . . . . . . . . . . . . . . . . . . . . . . . . . . . . . . . . . . . . . . . . . . . . . . EN-74
Setting the Scale Tuning Base Note . . . . . . . . . . . . . . . . . . . . . . . . . . . . . . . . . . . . . . . . . . . . . . . . . . EN-75
Switching Stretch Tuning On/Off . . . . . . . . . . . . . . . . . . . . . . . . . . . . . . . . . . . . . . . . . . . . . . . . . . . . . EN-75

Contents
EN-3
Select the appropriate setting for the song or scene to be played (Scene) EN-76
Preset Scenes and User Scenes . . . . . . . . . . . . . . . . . . . . . . . . . . . . . . . . . . . . . . . . . . . . . EN-76
Calling up a Scene . . . . . . . . . . . . . . . . . . . . . . . . . . . . . . . . . . . . . . . . . . . . . . . . . . . . . . . . EN-76
Listen to the sound atmosphere of the scene to confirm (Scene Song) . . . . . . . . . . . . . . . . EN-77
Create your own scenes (User Scenes) . . . . . . . . . . . . . . . . . . . . . . . . . . . . . . . . . . . . . . . . EN-78
Store in User Scenes . . . . . . . . . . . . . . . . . . . . . . . . . . . . . . . . . . . . . . . . . . . . . . . . . . . . . . . . . . . . . EN-78
Songs that can be stored in user scenes (Scene Songs) . . . . . . . . . . . . . . . . . . . . . . . . . . . . . . . . . . EN-79
Listening to Songs EN-80
Types of Data that Can Be Played Back. . . . . . . . . . . . . . . . . . . . . . . . . . . . . . . . . . . . . . . . EN-80
Playing MIDI Data . . . . . . . . . . . . . . . . . . . . . . . . . . . . . . . . . . . . . . . . . . . . . . . . . . . . . . . . . EN-80
Switching to MIDI Recorder. . . . . . . . . . . . . . . . . . . . . . . . . . . . . . . . . . . . . . . . . . . . . . . . . . . . . . . . . EN-81
Selecting Songs for Playback from the Music Library. . . . . . . . . . . . . . . . . . . . . . . . . . . . . . . . . . . . . EN-81
Select a MIDI Recorder Song for Playback. . . . . . . . . . . . . . . . . . . . . . . . . . . . . . . . . . . . . . . . . . . . .EN-82
Selecting a USB Flash Drive Song for Playback. . . . . . . . . . . . . . . . . . . . . . . . . . . . . . . . . . . . . . . . . EN-82
Changing the Tempo. . . . . . . . . . . . . . . . . . . . . . . . . . . . . . . . . . . . . . . . . . . . . . . . . . . . . . . . . . . . . . EN-84
Song Playback Part. . . . . . . . . . . . . . . . . . . . . . . . . . . . . . . . . . . . . . . . . . . . . . . . . . . . . . . . . . . . . . . EN-85
Playing Audio Data (WAV, MP3). . . . . . . . . . . . . . . . . . . . . . . . . . . . . . . . . . . . . . . . . . . . . . EN-86
Data that can be played back . . . . . . . . . . . . . . . . . . . . . . . . . . . . . . . . . . . . . . . . . . . . . . . . . . . . . . . EN-86
Switching to Audio Recorder . . . . . . . . . . . . . . . . . . . . . . . . . . . . . . . . . . . . . . . . . . . . . . . . . . . . . . . . EN-86
Selecting a Song for Playback . . . . . . . . . . . . . . . . . . . . . . . . . . . . . . . . . . . . . . . . . . . . . . . . . . . . . . EN-87
Recording a Performance EN-88
MIDI Recorder and Audio Recorder Features. . . . . . . . . . . . . . . . . . . . . . . . . . . . . . . . . . . . EN-88
Recording Features. . . . . . . . . . . . . . . . . . . . . . . . . . . . . . . . . . . . . . . . . . . . . . . . . . . . . . . . . . . . . . . EN-88
Playback Features. . . . . . . . . . . . . . . . . . . . . . . . . . . . . . . . . . . . . . . . . . . . . . . . . . . . . . . . . . . . . . . . EN-90
Recording a Performance with the MIDI Recorder . . . . . . . . . . . . . . . . . . . . . . . . . . . . . . . . EN-91
Main Content Recorded by the MIDI Recorder . . . . . . . . . . . . . . . . . . . . . . . . . . . . . . . . . . . . . . . . . . EN-91
Preparing to Use the MIDI Recorder . . . . . . . . . . . . . . . . . . . . . . . . . . . . . . . . . . . . . . . . . . . . . . . . . . EN-91
Recording . . . . . . . . . . . . . . . . . . . . . . . . . . . . . . . . . . . . . . . . . . . . . . . . . . . . . . . . . . . . . . . . . . . . . . EN-92
Deleting the Recording of a Track. . . . . . . . . . . . . . . . . . . . . . . . . . . . . . . . . . . . . . . . . . . . . . . . . . . . EN-95
Recording a Performance with the Audio Recorder . . . . . . . . . . . . . . . . . . . . . . . . . . . . . . . EN-96
Preparing To Use the Audio Recorder . . . . . . . . . . . . . . . . . . . . . . . . . . . . . . . . . . . . . . . . . . . . . . . . EN-96
Recording an Audio Recorder song (WAV). . . . . . . . . . . . . . . . . . . . . . . . . . . . . . . . . . . . . . . . . . . . . EN-97
Recording to the Audio Recorder while playing back data recorded to the MIDI Recorder . . . . . . . . EN-99
Deleting audio files from a USB Flash Drive . . . . . . . . . . . . . . . . . . . . . . . . . . . . . . . . . . . . . . . . . . . EN-102
Erase the last audio file numbered in the internal memory . . . . . . . . . . . . . . . . . . . . . . . . . . . . . . . . EN-103
Erase all audio files in internal memory. . . . . . . . . . . . . . . . . . . . . . . . . . . . . . . . . . . . . . . . . . . . . . . EN-103

Contents
EN-4
Listening back to a Performance Immediately (Instant RePlayer) EN-104
Instant RePlayer . . . . . . . . . . . . . . . . . . . . . . . . . . . . . . . . . . . . . . . . . . . . . . . . . . . . . . . . . EN-104
Instant RePlayer Features . . . . . . . . . . . . . . . . . . . . . . . . . . . . . . . . . . . . . . . . . . . . . . . . . EN-104
Preparing to Use the Instant RePlayer . . . . . . . . . . . . . . . . . . . . . . . . . . . . . . . . . . . . . . . . EN-104
Simple Usage . . . . . . . . . . . . . . . . . . . . . . . . . . . . . . . . . . . . . . . . . . . . . . . . . . . . . . . . . . . EN-105
Listen Back Using Marks. . . . . . . . . . . . . . . . . . . . . . . . . . . . . . . . . . . . . . . . . . . . . . . . . . . EN-106
What is a Mark? . . . . . . . . . . . . . . . . . . . . . . . . . . . . . . . . . . . . . . . . . . . . . . . . . . . . . . . . . . . . . . . . EN-106
Performing. . . . . . . . . . . . . . . . . . . . . . . . . . . . . . . . . . . . . . . . . . . . . . . . . . . . . . . . . . . . . . . . . . . . . EN-106
Adding Marks at Desired Points within Performances . . . . . . . . . . . . . . . . . . . . . . . . . . . . . . . . . . . EN-106
Replaying from a Mark . . . . . . . . . . . . . . . . . . . . . . . . . . . . . . . . . . . . . . . . . . . . . . . . . . . . . . . . . . . EN-106
Listen Back Using Specified Number of Seconds. . . . . . . . . . . . . . . . . . . . . . . . . . . . . . . . EN-108
Using a USB Flash Drive EN-110
Using a Commercially Available USB Flash Drive – What You Can Do . . . . . . . . . . . . . . . EN-110
Preparing a USB Flash Drive . . . . . . . . . . . . . . . . . . . . . . . . . . . . . . . . . . . . . . . . . . . . . . . EN-111
Supported USB Flash Drives . . . . . . . . . . . . . . . . . . . . . . . . . . . . . . . . . . . . . . . . . . . . . . . . . . . . . . EN-111
Types of data that can be handled by this Digital Piano . . . . . . . . . . . . . . . . . . . . . . . . . . . . . . . . . . EN-112
Inserting/Removing a USB Flash Drive from the Digital Piano . . . . . . . . . . . . . . . . . . . . . . EN-114
Formatting a USB Flash Drive . . . . . . . . . . . . . . . . . . . . . . . . . . . . . . . . . . . . . . . . . . . . . . EN-115
Operations with a USB Flash Drive. . . . . . . . . . . . . . . . . . . . . . . . . . . . . . . . . . . . . . . . . . . EN-117
Saving MIDI Recorder Songs to a USB Flash Drive . . . . . . . . . . . . . . . . . . . . . . . . . . . . . . . . . . . . . EN-117
Loading a MIDI File from a USB Flash Drive into the Digital Piano . . . . . . . . . . . . . . . . . . . . . . . . . EN-118
Deleting MIDI or audio files from a USB flash drive . . . . . . . . . . . . . . . . . . . . . . . . . . . . . . . . . . . . . EN-120
Save a batch of audio files from the internal memory to a USB flash drive . . . . . . . . . . . . . . . . . . . EN-122
Loading audio files from a USB flash drive onto the unit in batches . . . . . . . . . . . . . . . . . . . . . . . . . EN-123
Save user scenes to a USB flash drive . . . . . . . . . . . . . . . . . . . . . . . . . . . . . . . . . . . . . . . . . . . . . . . EN-124
Load a user scene file saved on a USB flash drive onto this Digital Piano . . . . . . . . . . . . . . . . . . . . EN-125
Delete user scene files on a USB flash drive . . . . . . . . . . . . . . . . . . . . . . . . . . . . . . . . . . . . . . . . . . EN-126
Copying MIDI Song Data to a USB Flash Drive Using a Computer . . . . . . . . . . . . . . . . . . EN-127
Copying Audio Data (WAV, MP3) to a USB Flash Drive Using a Computer. . . . . . . . . . . . EN-127
Connecting Wirelessly EN-128
Connecting the Digital Piano to External Devices Wirelessly . . . . . . . . . . . . . . . . . . . . . . . EN-128
Wireless (Bluetooth) Connectivity Settings . . . . . . . . . . . . . . . . . . . . . . . . . . . . . . . . . . . . . EN-128
Wireless Function On/Off . . . . . . . . . . . . . . . . . . . . . . . . . . . . . . . . . . . . . . . . . . . . . . . . . . . . . . . . . EN-128
Adjusting the Notification Tone Volume for Wireless Connection/Disconnection . . . . . . . . . . . . . . . EN-129
Bluetooth Low Energy MIDI Connectivity . . . . . . . . . . . . . . . . . . . . . . . . . . . . . . . . . . . . . . EN-130
Bluetooth Audio Connectivity . . . . . . . . . . . . . . . . . . . . . . . . . . . . . . . . . . . . . . . . . . . . . . . EN-131
Bluetooth Audio Pairing. . . . . . . . . . . . . . . . . . . . . . . . . . . . . . . . . . . . . . . . . . . . . . . . . . . . . . . . . . . EN-131
Clearing Pairing Registration. . . . . . . . . . . . . . . . . . . . . . . . . . . . . . . . . . . . . . . . . . . . . . . . . . . . . . . EN-133
Adjusting Wireless Audio Playback Volume . . . . . . . . . . . . . . . . . . . . . . . . . . . . . . . . . . . . . . . . . . . EN-134
Using the Dedicated App EN-135
Downloading the App (CASIO MUSIC SPACE) for Smart Devices . . . . . . . . . . . . . . . . . . EN-135

Contents
EN-5
Using with an External Device with a Cable Connection EN-137
Connecting to a Computer or Smart Device and Using MIDI . . . . . . . . . . . . . . . . . . . . . . . EN-137
Computer Operating Environment. . . . . . . . . . . . . . . . . . . . . . . . . . . . . . . . . . . . . . . . . . . . . . . . . . . EN-137
Connecting to a Computer . . . . . . . . . . . . . . . . . . . . . . . . . . . . . . . . . . . . . . . . . . . . . . . . . . . . . . . . EN-138
Smart Device Operating Environment. . . . . . . . . . . . . . . . . . . . . . . . . . . . . . . . . . . . . . . . . . . . . . . . EN-139
Connecting a Smart Device with USB MIDI . . . . . . . . . . . . . . . . . . . . . . . . . . . . . . . . . . . . . . . . . . . EN-139
Outputting the Digital Piano’s Sound to an Amplifier or Audio Equipment . . . . . . . . . . . . . EN-140
Connecting to Audio Equipment . . . . . . . . . . . . . . . . . . . . . . . . . . . . . . . . . . . . . . . . . . . . . . . . . . . . EN-140
Connecting to a Musical Instrument Amplifier. . . . . . . . . . . . . . . . . . . . . . . . . . . . . . . . . . . . . . . . . . EN-141
Changing Settings EN-142
Changing the settings of the Upper1 part . . . . . . . . . . . . . . . . . . . . . . . . . . . . . . . . . . . . . . EN-142
Adjust the volume of the Upper1 part . . . . . . . . . . . . . . . . . . . . . . . . . . . . . . . . . . . . . . . . . . . . . . . . EN-142
Changing the settings of the Upper2 part . . . . . . . . . . . . . . . . . . . . . . . . . . . . . . . . . . . . . . EN-143
Adjust the volume of the Upper2 part . . . . . . . . . . . . . . . . . . . . . . . . . . . . . . . . . . . . . . . . . . . . . . . . EN-143
Fine-tune the Upper2 part (Upper2 Detune) . . . . . . . . . . . . . . . . . . . . . . . . . . . . . . . . . . . . . . . . . . . EN-143
Enabling/Disabling Upper2 Part Damper Pedal Effect . . . . . . . . . . . . . . . . . . . . . . . . . . . . . . . . . . . EN-144
Change the setting of the Lower part . . . . . . . . . . . . . . . . . . . . . . . . . . . . . . . . . . . . . . . . . EN-145
Adjust the volume of the Lower part . . . . . . . . . . . . . . . . . . . . . . . . . . . . . . . . . . . . . . . . . . . . . . . . . EN-145
Fine-tune the tuning of the Lower part (Lower detune) . . . . . . . . . . . . . . . . . . . . . . . . . . . . . . . . . . . EN-145
Enabling/Disabling Lower Part Damper Pedal Effect . . . . . . . . . . . . . . . . . . . . . . . . . . . . . . . . . . . . EN-146
Saving the Digital Piano Settings (Auto Resume). . . . . . . . . . . . . . . . . . . . . . . . . . . . . . . . EN-147
Restore Factory Defaults (Factory Reset). . . . . . . . . . . . . . . . . . . . . . . . . . . . . . . . . . . . . . EN-148
Adjusting Volume Balance . . . . . . . . . . . . . . . . . . . . . . . . . . . . . . . . . . . . . . . . . . . . . . . . . EN-149
Keyboard Volume . . . . . . . . . . . . . . . . . . . . . . . . . . . . . . . . . . . . . . . . . . . . . . . . . . . . . . . . . . . . . . . EN-149
MIDI Song Volume . . . . . . . . . . . . . . . . . . . . . . . . . . . . . . . . . . . . . . . . . . . . . . . . . . . . . . . . . . . . . . EN-150
Audio Song Playback Volume . . . . . . . . . . . . . . . . . . . . . . . . . . . . . . . . . . . . . . . . . . . . . . . . . . . . . . EN-150
Wireless Audio Playback Volume . . . . . . . . . . . . . . . . . . . . . . . . . . . . . . . . . . . . . . . . . . . . . . . . . . . EN-151
Center Cancel Function . . . . . . . . . . . . . . . . . . . . . . . . . . . . . . . . . . . . . . . . . . . . . . . . . . . EN-152
Changing MIDI Settings . . . . . . . . . . . . . . . . . . . . . . . . . . . . . . . . . . . . . . . . . . . . . . . . . . . EN-153
Local Control . . . . . . . . . . . . . . . . . . . . . . . . . . . . . . . . . . . . . . . . . . . . . . . . . . . . . . . . . . . . . . . . . . . EN-153
Keyboard Channel. . . . . . . . . . . . . . . . . . . . . . . . . . . . . . . . . . . . . . . . . . . . . . . . . . . . . . . . . . . . . . . EN-153
Hi-Res Velocity MIDI OUT. . . . . . . . . . . . . . . . . . . . . . . . . . . . . . . . . . . . . . . . . . . . . . . . . . . . . . . . . EN-154
Setting the Display of the Visual Information Bar . . . . . . . . . . . . . . . . . . . . . . . . . . . . . . . . EN-155
Changing Display Settings . . . . . . . . . . . . . . . . . . . . . . . . . . . . . . . . . . . . . . . . . . . . . . . . . . . . . . . . EN-155
Brightness Setting and No Lighting . . . . . . . . . . . . . . . . . . . . . . . . . . . . . . . . . . . . . . . . . . . . . . . . . . EN-157

Contents
EN-6
Main Digital Piano Settings . . . . . . . . . . . . . . . . . . . . . . . . . . . . . . . . . . . . . . . . . . . . . . . . . EN-158
Power On Alert . . . . . . . . . . . . . . . . . . . . . . . . . . . . . . . . . . . . . . . . . . . . . . . . . . . . . . . . . . . . . . . . . EN-158
Auto Power Off . . . . . . . . . . . . . . . . . . . . . . . . . . . . . . . . . . . . . . . . . . . . . . . . . . . . . . . . . . . . . . . . . EN-158
Touch Button Luminosity. . . . . . . . . . . . . . . . . . . . . . . . . . . . . . . . . . . . . . . . . . . . . . . . . . . . . . . . . . EN-159
Left Panel Touch Button Sensitivity. . . . . . . . . . . . . . . . . . . . . . . . . . . . . . . . . . . . . . . . . . . . . . . . . . EN-159
Sensitivity of front panel touch buttons . . . . . . . . . . . . . . . . . . . . . . . . . . . . . . . . . . . . . . . . . . . . . . . EN-160
Panel Lock. . . . . . . . . . . . . . . . . . . . . . . . . . . . . . . . . . . . . . . . . . . . . . . . . . . . . . . . . . . . . . . . . . . . . EN-160
Switching Panel Light Settings . . . . . . . . . . . . . . . . . . . . . . . . . . . . . . . . . . . . . . . . . . . . . . . . . . . . . EN-161
Notification Tone Volume . . . . . . . . . . . . . . . . . . . . . . . . . . . . . . . . . . . . . . . . . . . . . . . . . . . . . . . . . EN-161
Notification Tone Set Selection . . . . . . . . . . . . . . . . . . . . . . . . . . . . . . . . . . . . . . . . . . . . . . . . . . . . . EN-162
Volume Sync Equalizer . . . . . . . . . . . . . . . . . . . . . . . . . . . . . . . . . . . . . . . . . . . . . . . . . . . . . . . . . . . EN-162
Speaker Out . . . . . . . . . . . . . . . . . . . . . . . . . . . . . . . . . . . . . . . . . . . . . . . . . . . . . . . . . . . . . . . . . . . EN-163
Headphones Mode . . . . . . . . . . . . . . . . . . . . . . . . . . . . . . . . . . . . . . . . . . . . . . . . . . . . . . . . . . . . . . EN-164
Troubleshooting EN-165
Error Display List. . . . . . . . . . . . . . . . . . . . . . . . . . . . . . . . . . . . . . . . . . . . . . . . . . . . . . . . . EN-167
Other Information EN-171
Product Specifications. . . . . . . . . . . . . . . . . . . . . . . . . . . . . . . . . . . . . . . . . . . . . . . . . . . . . EN-171
Latest Support Information . . . . . . . . . . . . . . . . . . . . . . . . . . . . . . . . . . . . . . . . . . . . . . . . . EN-174
About the Contents of this Book . . . . . . . . . . . . . . . . . . . . . . . . . . . . . . . . . . . . . . . . . . . . . EN-174
Trademarks and Registered Trademarks . . . . . . . . . . . . . . . . . . . . . . . . . . . . . . . . . . . . . . EN-174
Operating Precautions . . . . . . . . . . . . . . . . . . . . . . . . . . . . . . . . . . . . . . . . . . . . . . . . . . . . EN-175
Various Lists EN-177
Tone list. . . . . . . . . . . . . . . . . . . . . . . . . . . . . . . . . . . . . . . . . . . . . . . . . . . . . . . . . . . . . . . . EN-177
Demo Song List. . . . . . . . . . . . . . . . . . . . . . . . . . . . . . . . . . . . . . . . . . . . . . . . . . . . . . . . . . EN-178
Music Library List . . . . . . . . . . . . . . . . . . . . . . . . . . . . . . . . . . . . . . . . . . . . . . . . . . . . . . . . EN-179
Preset scene list . . . . . . . . . . . . . . . . . . . . . . . . . . . . . . . . . . . . . . . . . . . . . . . . . . . . . . . . . EN-181
List of user scene record items . . . . . . . . . . . . . . . . . . . . . . . . . . . . . . . . . . . . . . . . . . . . . . EN-181
Keyboard Function List . . . . . . . . . . . . . . . . . . . . . . . . . . . . . . . . . . . . . . . . . . . . . . . . . . . . EN-183
MIDI Implementation Chart . . . . . . . . . . . . . . . . . . . . . . . . . . . . . . . . . . . . . . . . . . . . . . . . . EN-190

Overview of the Digital Piano
EN-7
4
Overview of the Digital Piano
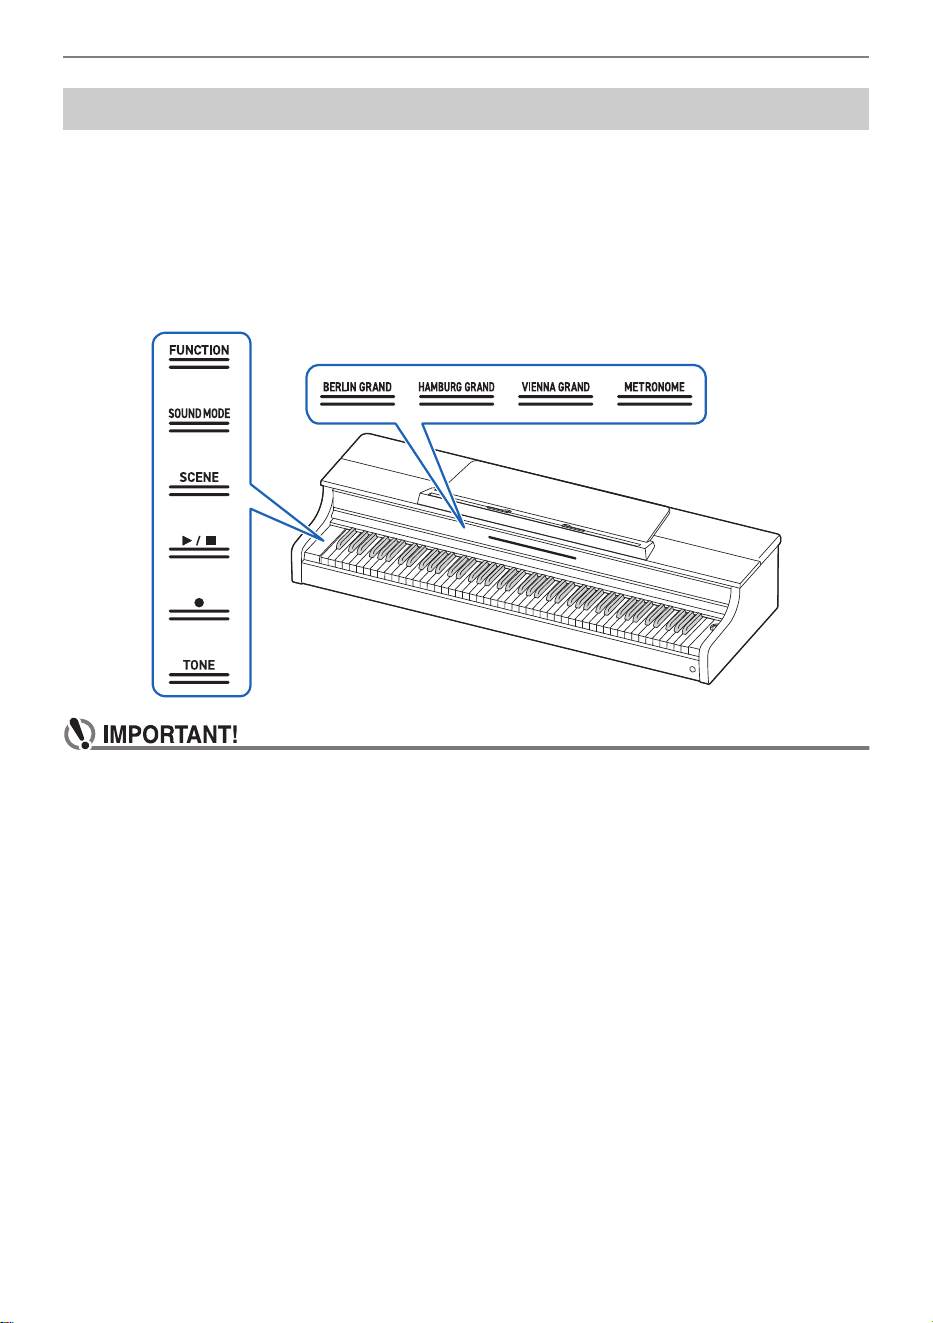
Part Names and Functions
br bs
bq
1
2
8
7
9
3
4
5
6
bk
bl
cocm
clckbt
cn
bpbobn
bm
Underside
Touch buttons

Overview of the Digital Piano
EN-8
1 FUNCTION button
Used for basic settings.
2 SOUND MODE button
Used to change settings such as [SOUND MODE].
3 SCENE button
Use to change scene and metronome settings.
4 a button
Use to play/stop a song.
5 0(REC) button
Use to record performances.
6 TONE button
Use to select tones and change tone settings.
7 Hall Simulator/Reverb Indicator
Lights up when [Hall Simulator/Reverb] is set to <On>.
8 Surround Indicator
Lights up when [Surround] is set to <On>.
9 DEMO Indicator
Lights up when a demo song is playing.
bk Beat Indicator
The left side blinks on the first beat and the right side blinks on the remaining beats in time, such as
when a song is playing.
bl Track Indicator
During Record/Playback, “L” lights up to indicate the part of the track for the left hand, and “R” lights up
to indicate the part of the track for the right hand.
bm BERLIN GRAND button
Sets the tone to <BERLIN GRAND>.
bn HAMBURG GRAND button
Sets the tone to <HAMBURG GRAND>.
bo VIENNA GRAND button
Sets the tone to <VIENNA GRAND>.
bp METRONOME button
Used to turn the metronome On/Off
bq Visual Information Bar
Notifies you of various pieces of information with a light.
br P(Power) button
Turns main power On/Off. The outer circumference of the button indicates Bluetooth
®
connection
status by the color of the light.
bs Volume Control
Adjusts the volume of the Digital Piano.

Overview of the Digital Piano
EN-9
bt PHONES terminals
ck LINE OUT R, L/MONO terminal
cl Power supply terminal (DC 24V)
cm PEDAL UNIT Terminal
cn USB Type B Terminal
co USB Type A Terminal

Preparation before Playing
EN-10
Use the AC adaptor (JEITA standard, with unified polarity plug) supplied with the Digital Piano. Use of
other AC adaptors may cause smoke or malfunction.
Model of AC adaptor included with the Digital Piano: AD-E24250LW
Connect in the order of
to
using the supplied power cord.
This AC adaptor cannot be repaired.
AC adaptor usage environment: Temperature 0 to 40°C,Humidity 10% to 90% RH
Output polarity: &
• Never connect the AC adaptor and power cord supplied with this Digital Piano to any other
device. Doing so may cause malfunction.
• Be sure to turn the power off before unplugging and plugging in the AC adaptor.
• The AC adaptor will heat up slightly after prolonged use, this is not a malfunction.
• Unplug the AC adaptor from the power outlet when not using the Digital Piano for a long
period of time.
Preparation before Playing
Preparation of power supply
Household wall outlet
AC adaptor
Power supply terminal (DC 24V)
Power cord

Preparation before Playing
EN-11
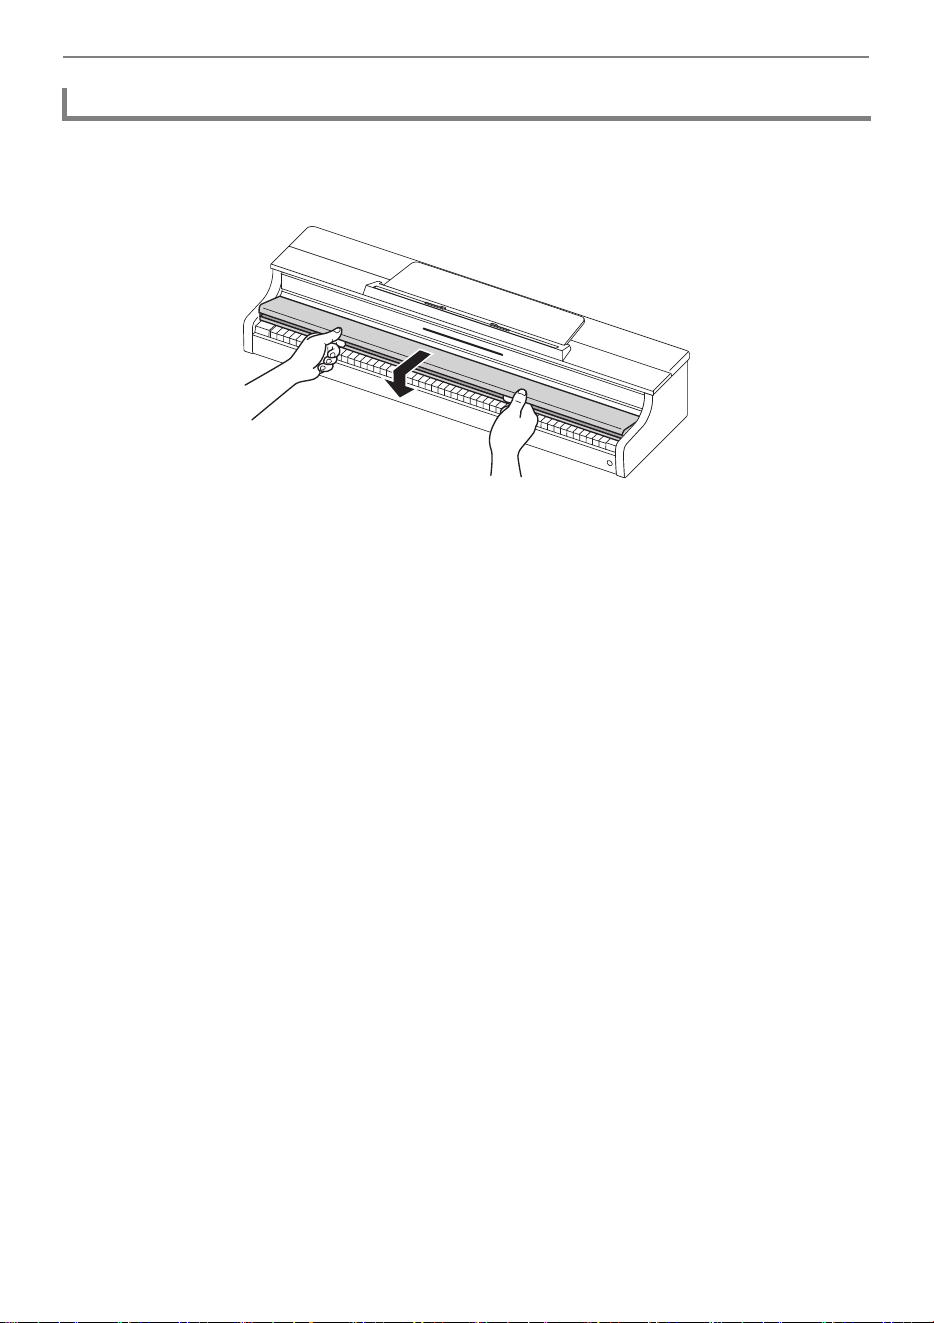
Be sure to open the keyboard cover completely before playing the piano.
• When opening and closing the keyboard cover, be careful not to get the hands or fingers of
yourself or others (especially children) caught in the keyboard cover.
• Do not let go of the keyboard cover with your hands or fingers when opening or closing it.
• Do not press down on the keyboard cover with your hand when closing it (your hand may get
caught in the gap).
• Do not place any objects on the keyboard cover. There is a risk that objects may get inside
the product when opening the keyboard cover.
• Do not play with the keyboard cover partially open.
Place both hands in the recess of the keyboard cover, lift it up slightly, and push
it towards the back.
The Keyboard Cover
Opening the Keyboard Cover
Preparation before Playing
EN-12
Place both hands in the recess of the keyboard cover and slowly pull it toward
you until it is completely closed.
Closing the Keyboard Cover.

Preparation before Playing
EN-13
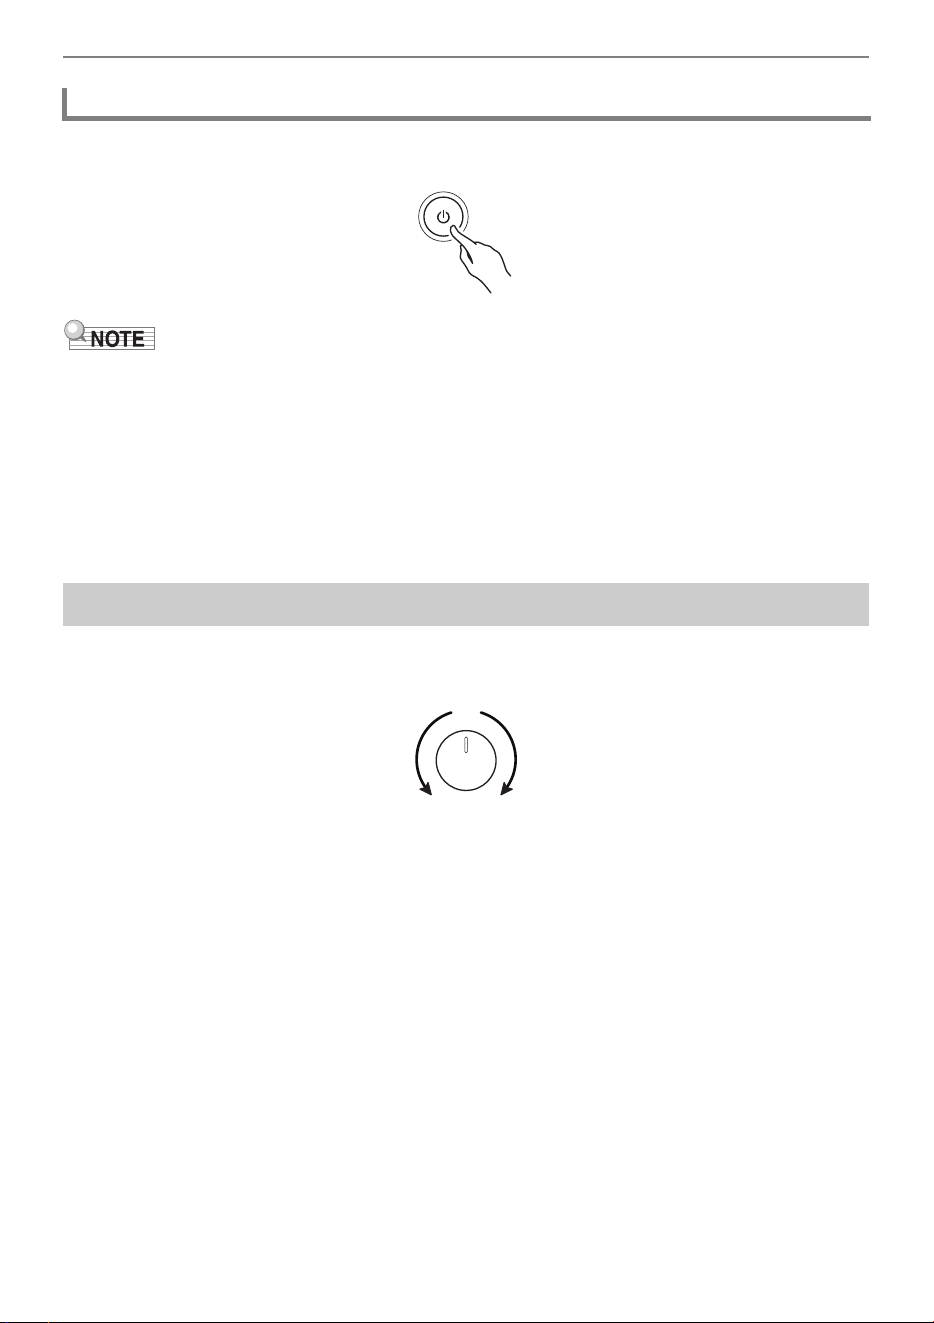
1.
Press the “P(Power)” button to turn the piano on.
• When the power is turned on, each touch button will blink while the Digital Piano is starting up.
When all touch buttons are lit up, the piano is ready for use.
• The power may not come on after pressing the “P(Power)” lightly, however, this is not a
malfunction. If this happens, firmly press the “P(Power)” button again.
• A pop may be heard when turning the power on and off, but this is not a malfunction.
• If the Digital Piano is turned on without the Wireless MIDI & audio adaptor attached, the outer
edge of the “P(Power)” button will flash blue to indicate that the wireless MIDI & audio adaptor
is not attached.
2.
Once the power is turned on, use the volume knob to adjust the volume.
Auto Power Off Function
After approximately 4 hours of inactivity, the power automatically turns off to prevent unnecessary
power consumption. To prevent the power turning off between performances at concerts, etc., set the
[Auto Power Off Function] to <Off>.
For more information, see “Auto Power Off”.
Power On Alert
After approximately 6 minutes without any operation, the touch buttons and Visual Information Bar will
automatically switch to indicate that the power is still on. When an operation, such as touching a button
or pressing a key, is performed, the Digital Piano will return to its normal state (all buttons lit up). You
can switch the [Power On Alert] to operate or not.
For details, please refer to “Power On Alert”.
Turning the Power On/Off
Turning the Power On
Preparation before Playing
EN-14
Press and hold the “P(Power)” button for about 2 seconds.
• After the power is turned off using the “P(Power)” button, the Digital Piano will still be in standby
mode, with a small current flowing through it. Always disconnect the AC adaptor from the power
outlet when you do not intend to use the Digital Piano for an extended period of time, or when there
is a risk of a lightning strike.
Saving Settings when the Power is Turned Off (Auto Resume)
When the Digital Piano is turned off, various settings such as tone numbers are reset. If [Auto Resume]
is set to <On>, most settings will be saved even when the power is turned off.
For more information, see “Saving the Digital Piano Settings (Auto Resume)”.
The volume of the entire Digital Piano is controlled by the volume knob.
Automatically Correcting Sound Quality According to Volume (Volume Sync
Equalizer)
Automatically corrects the volume quality according to the volume output from the Digital Piano’s
speakers. You will be able to hear bass and treble clearly, even at low volumes.
For more information, see “Volume Sync Equalizer”.
Muting Sound from the Digital Piano’s Speakers (Speaker Out)
If the [Speaker Out] setting is set to <Off>, no sound will be output from the speakers.
For more information, see “Speaker Out”.
Turning the Power Off
Adjusting the Volume

Preparation before Playing
EN-15
To connect the Digital Piano to an external device that supports Bluetooth
®
wireless technology, attach
the Wireless MIDI & audio adaptor to the USB Type A terminal.
Connecting to Bluetooth Audio-Enabled Devices
By making a Bluetooth audio connection between this Digital Piano and a smart device, you can
playback sound from the smart device on this Digital Piano.
For more information, see “Bluetooth Audio Connectivity”.
Connecting to Bluetooth Low Energy MIDI-enabled Devices
Bluetooth Low Energy MIDI connection
*
between this Digital Piano and a smart device enables you to
perform various operations using a dedicated app.
* Operation is not guaranteed if used with apps other than CASIO’s dedicated app.
For more information, see “Bluetooth Low Energy MIDI Connectivity”.
Using the Dedicated App (CASIO MUSIC SPACE)
Connect your smart device to the Digital Piano and use CASIO’s dedicated app.
For more information, see “Using the Dedicated App”.
• When removing the Wireless MIDI & audio adaptor, turn the Digital Piano’s power off.
Using the Supplied Wireless MIDI & Audio Adaptor
USB Type A Terminal
Wireless MIDI & audio adaptor

Preparation before Playing
EN-16
Headphones allow you to enjoy playing at night without worrying about your surroundings. Turn down
the volume on the Digital Piano before connecting headphones.
• Do not use headphones for long periods of time at high volume. This may result in hearing
impairment.
• If the headphone plug does not match the terminal, use a commercially available conversion
plug.
• When unplugging the headphone cord from the Digital Piano, be careful not to leave the
convertor plug in the Digital Piano. If the plug is left in place, Play may not produce any
sound.
• Use headphones (commercially available) that meet the following standards:
Maximum input: 150 MW or more
Impedance: 32 Ω or more
Headphones Mode
When using headphones, this reproduces the natural sound that reaches your ears when you play an
acoustic piano.
For more information, see “Headphones Mode”.
Sound from Speakers While Headphones are Connected
When the [Speaker Out] setting is set to <On>, sound will be output from the speakers even when a
plug is inserted into the PHONES terminal.
For more information, see “Speaker Out”.
Using headphones
PHONES Terminal
Stereo standard phone jacks (TRS phone)

Preparation before Playing
EN-17
Pull the music stand toward you and secure it with the hardware on the back.
Using the music stand
Music stand

Preparation before Playing
EN-18
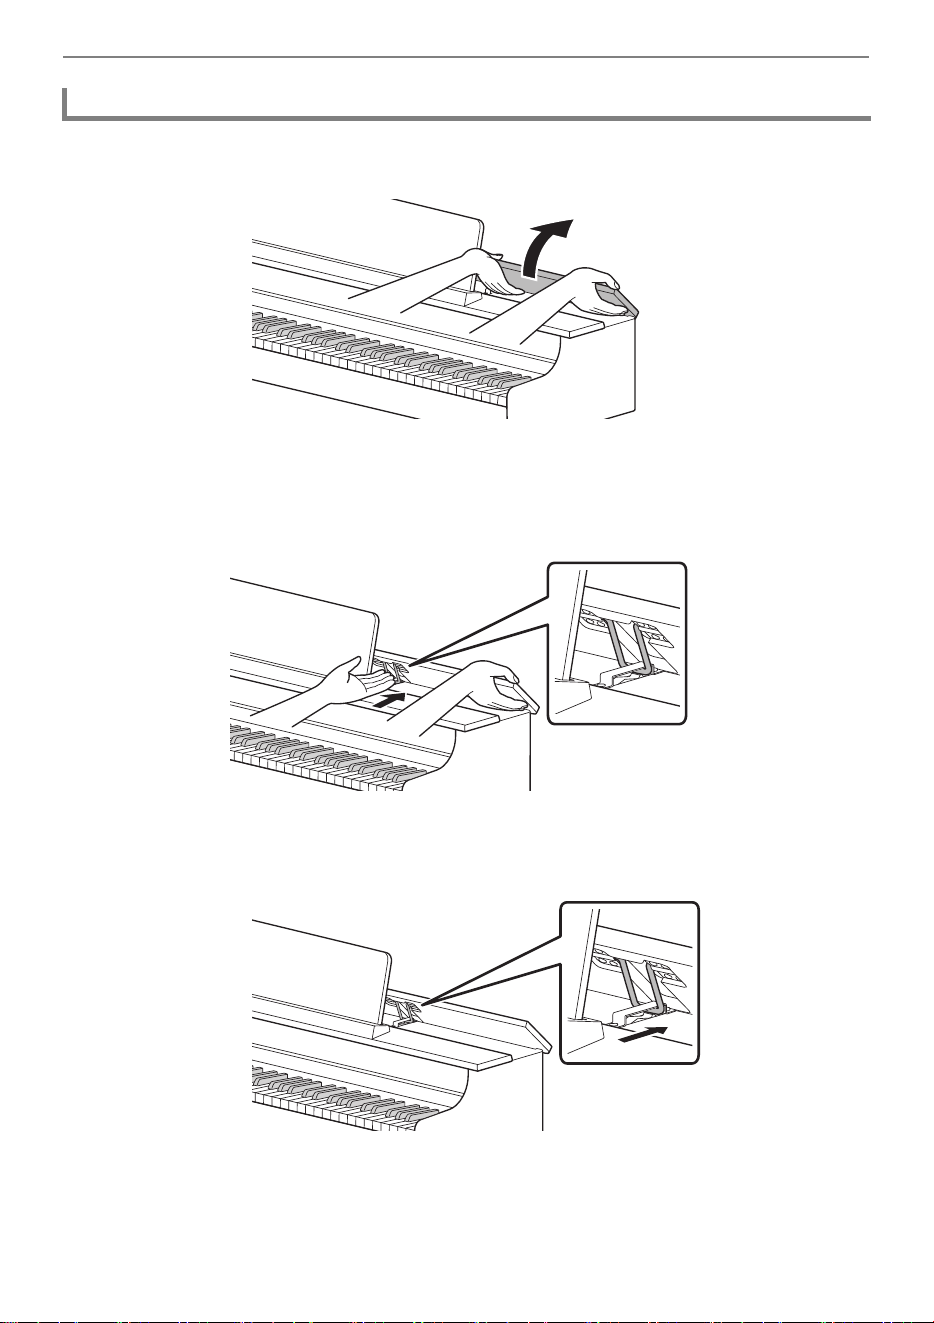
• Always open and close the top panel with both hands and be careful not to catch your fingers.
• Do not force the top panel to open further backward. This may cause damage.
• Stand to the right of the piano to open and close the piano.
1.
Lift the top panel.
2.
Check that the metal fittings that support the top panel are upright inside the top
panel.
Piano Top Panels
Opening the Top Panel of the Piano
Preparation before Playing
EN-19
1.
Lift the top panel gently upward.
2.
Slowly lower the top panel while pushing the metal fittings supporting the top
panel backward with your fingers.
• To prevent the top panel from closing too vigorously, the metal fittings may temporarily stop in
the middle area. When this happens, once again slowly lower the top panel while pushing the
metal fittings backward with your fingers.
Closing the Top Panel of the Piano

Read This First (Basic Operations and Settings)
EN-20
Notation of Function Names and their Setting Options
This manual describes how to make settings for the various functions. To make it easier to distinguish
between the names of functions and the setting options for those functions, the names of functions are
enclosed in [ ], and the setting options for those functions are enclosed in < >.
Example:
Switch the [RePlayer/Recorder] setting to <Instant RePlayerr>.
• RePlayer/Recorder: Function Name
• Instant RePlayer: One of the options of the RePlayer/Recorder function
Notation of note names and pitches on the keyboard
Note names and pitches on the keyboard are indicated by the international representation (Middle C =
“C4”), with the lowest C key named “C1” and the highest C key named “C8”.
Read This First (Basic Operations and Settings)
Notation in this Document
C1A0 C2 C3 C4 C5 C6 C7 C8
C4 D4 E4 F4 G4 A4 B4 C5
C{4E}4F{4A}4B}4
Read This First (Basic Operations and Settings)
EN-21
When the Digital Piano is turned on, the touch buttons on the panel (left and front) light up. After no
operation is performed for 15 seconds, the lights on the left panel go off. When the lights are off, the
touch buttons will light up again if you touch the left panel.
You can change the number of seconds before the lights go off on the left panel or set up the lights not
to go off.
For more information, see “Switching Panel Light Settings”.
• When operating the touch buttons, touch them firmly with bare fingers. There is no response
to gloved fingers.
• Only the touch buttons that are active at the time will light up.
When Touch Buttons Do Not Respond
1.
Turn off the power to the Digital Piano.
2.
While pressing the C8 key (the rightmost key), press the “P(Power)” button.
• Do not release the C8 key until the Digital Piano is turned on and the touch buttons start to blink.
You can release the “P(Power)” button.
• The sensitivity of the touch buttons is set to high.
Touch Button Operation
Left panel
Front panel

Read This First (Basic Operations and Settings)
EN-22
Touching a button (touching firmly with a fingertip and releasing immediately) will execute the function
of that button.
Left panel
• The “FUNCTION” button only executes a function when used in combination with the keyboard or
with the “SOUND MODE” button. The “FUNCTION” button on its own does not execute any function.
Front panel
Operation using just the Touch Buttons
Button Function
SOUND MODE Switches between <On> and <Off> for [Hall Simulator/Reverb] and
[Surround].
SCENE Recalls the settings for [SCENE] (default setting is <Preset Scene 1>).
a Play/Stop songs and recordings.
0(REC) Use to record performances.
TONE The last tone selected using the keyboard (BERLIN GRAND by default) is
selected.
Button Function
BERLIN GRAND Selects <BERLIN GRAND> tone.
HAMBURG GRAND Selects <HAMBURG GRAND> tone.
VIENNA GRAND Selects <VIENNA GRAND> tone.
METRONOME The metronome starts (or stops).

Read This First (Basic Operations and Settings)
EN-23
By using the touch buttons (except for the “0(REC)” button) and the keyboard at the same time, you
can change various settings.
• The items to be set vary depending on the touch button pressed.
• The type of keyboard operation differs depending on the item you are setting.
• The Visual Information Bar blinks according to the setting value.
• There are five operation types as set out below:
Selecting a Setting Value Directly (operation type A)
• Select the setting value assigned to the key.
Example: Selecting a tone
While holding down the “TONE” button, press one of the C{3 – E}6 keys (Tone
Selection).
•See “Tone list” for the tones available for each key.
• The Visual Information Bar will blink at the approximate position of the selected value.
Touch Button and Keyboard Combination Operation
C1A0 C2 C3 C4 C5 C6 C7 C8
C{3 - E}6

Read This First (Basic Operations and Settings)
EN-24
Using the +/– Keys to Raise or Lower the Setting Value by 1 (operation type B)
• Holding down a key changes the setting value continuously in increments.
• Pressing two keys together will return the value to the initial setting (default value).
Example: Setting the tempo
While holding down the “SCENE” button, press the B2 key (tempo –)/ C3 key
(tempo +).
• This raises or lowers the tempo setting by 1.
• The Visual Information Bar will blink at the approximate position of the selected value. (Leftmost:
Minimum value, Rightmost: Maximum value)
C1A0 C2 C3 C4 C5 C6 C7
C8
B2 C3

Read This First (Basic Operations and Settings)
EN-25
Inputting Setting Values Using the Keys 0 to 9 (operation type C)
• For example, to enter the value “2”, press the B0 key (2). To enter the value “20”, press the B0 Key
(2) and then the A0 Key (0).
Example: Setting the tempo
While holding down the “SCENE” button, press a key from A0 to F
{1 (tempo
number setting).
• Sets the tempo in the range of 20 to 255 (beats per minute).
• The Visual Information Bar will blink at the approximate position of the selected value. (Leftmost:
Minimum value, Rightmost: Maximum value)
C1A0 C2 C3 C4 C5 C6 C7
C8
4
C{1
6
E}1
9
F{1
1
B}0
7
E1
3
C1
2
B0
0
A0
5
D1
8
F1
Read This First (Basic Operations and Settings)
EN-26
Switching On/Off or Changing Setting Values Using a Single Key (operation type D)
• Each time the key is pressed, the setting is changed.
• When the key is pressed, a sound is played according to the set value.
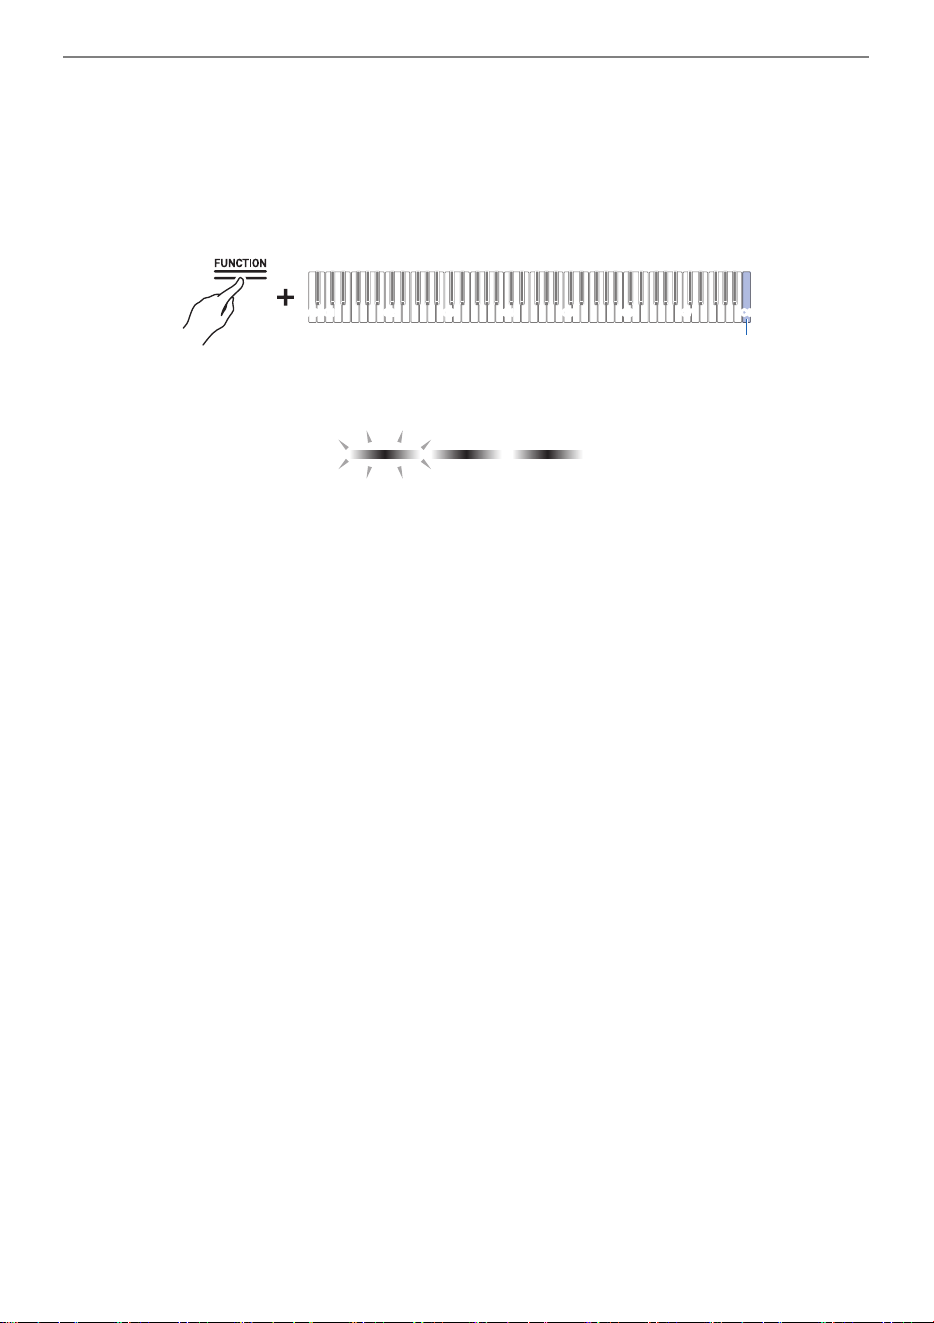
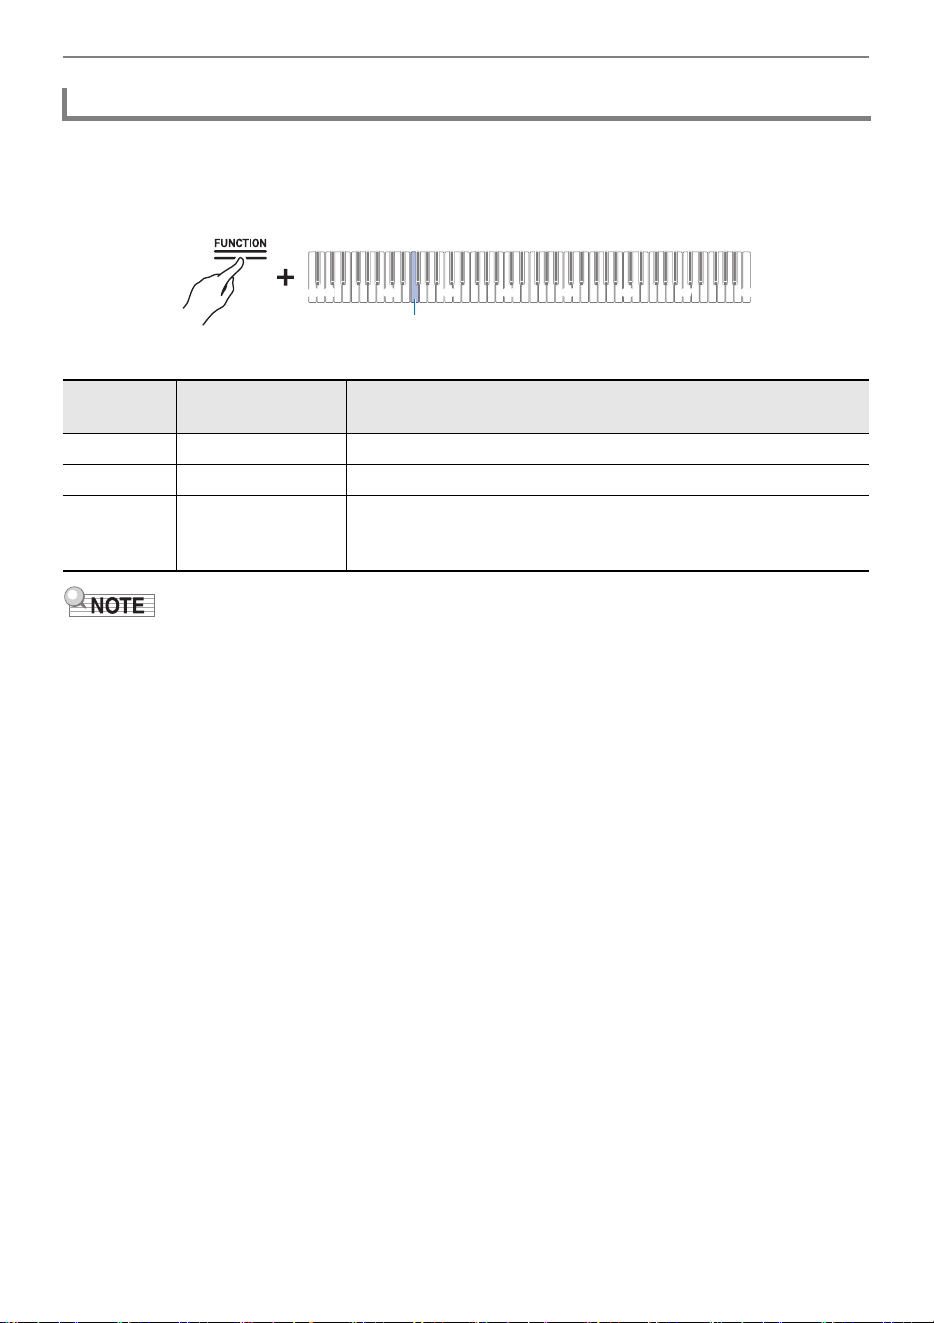
Example: Locking button operations
While holding down the “FUNCTION” button, press the C8 key (Panel Lock).
• The Visual Information Bar blinks in the position of the selected value. (Left: Off, Middle: On,
Right: Auto)
• For more information, see “Panel Lock”.
C1A0 C2 C3 C4 C5 C6 C7 C8
C8
Read This First (Basic Operations and Settings)
EN-27
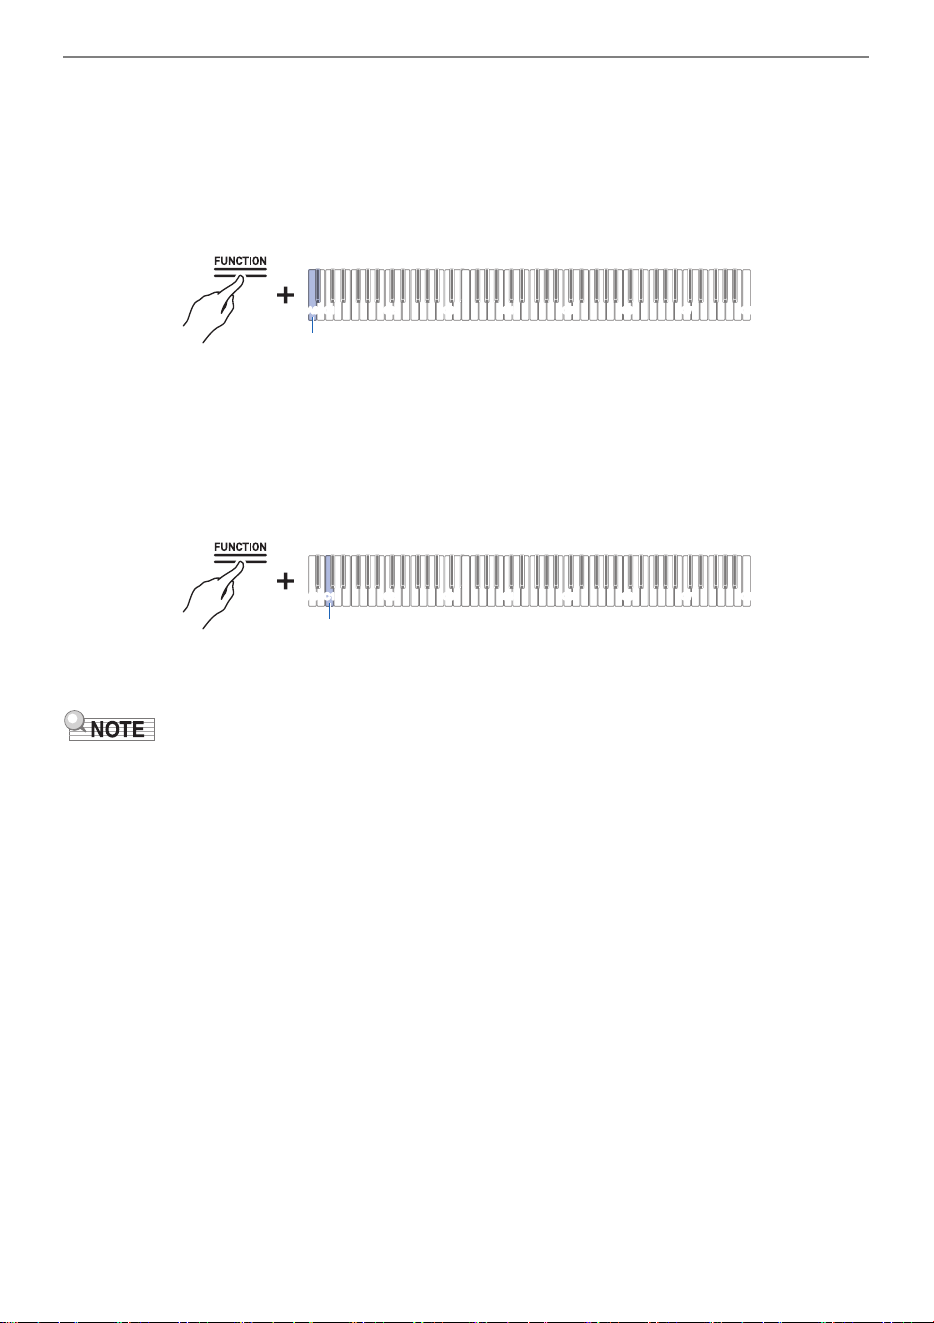
Putting in Standby Mode, and Executing on Next Key Press (operation type E)
Example: Performing a Factory Reset
1.
While holding down the “FUNCTION” button, press the A0 key (Factory Reset) to
enter standby mode.
• To execute the process, do not release the touch button, and perform the operation in step 2.
• If the touch button is released in standby mode, the function will not be executed (the operation
will be canceled).
2.
Hold down the “FUNCTION” button and press the C1 key (Execute) to execute the
process.
• After performing step 2, release the touch button.
• Processing may take some time. If so, wait until the process is complete.
• When a touch button and keyboard keys are operated in combination, a notification tone sounds to
inform the user of the result of the operation, and the Visual Information Bar displays.
• For details, see “Notification Tones” and “How the Visual Information Bar Displays for Various
Settings”.
C1A0 C2 C3 C4 C5 C6 C7 C8
A0
C1A0 C2 C3 C4 C5 C6 C7 C8
C1

Read This First (Basic Operations and Settings)
EN-28
When a touch button and keyboard keys are operated in combination, a notification tone sounds when
the key is pressed to inform the user of the result of the operation.
Changing Notification Tone Settings
You can choose one of three different notification tone sets and adjust the volume of the notification
tones.
For more information, see “Notification Tone Set Selection” and “Notification Tone Volume”.
Notification Tones
Notification Tone Types
Notification Tone
Type
Details of Notification
Tone for Accept This is the sound made when a keyboard operation is accepted. Rings when
the setting is turned on for setting items that toggle between on and off.
Tone for Invalid This is the sound made when the wrong key is pressed. Keyboard operation is
invalid when this tone sounds.
Tone for Upper and
Lower Limits
This sound is made when the upper or lower limit of the set value is exceeded.
Keyboard operation is invalid when this tone sounds.
Tone for Default
Settings
This sound is made when the settings are returned to their default values. This
sounds when the + and – keys are pressed at the same time, for example.
Tone for number
notification
When one key is pressed continuously to toggle to a different setting value, the
current setting value is indicated by the number of times the notification tone
sounds.
Tone for Off This is the sound made when the setting is switched off.
Separator Tone This sound is made when the + or – key is used to increase or decrease a
setting value and the number reaches a multiple of that value. For whole
number-only settings a notification tone will sound each time the number is a
multiple of 10. For a setting with a decimal value (e.g., 440.2), a notification
tone sounds for whole numbers (e.g., 440 or 441).
Tone for Setting
Completion
When multiple keys are pressed to set a value, this notification sound indicates
that the setting is complete when the last key is pressed. For example, when
entering a tempo setting value (3 digits), a notification tone sounds when the
key for the third digit is pressed.
Read This First (Basic Operations and Settings)
EN-29
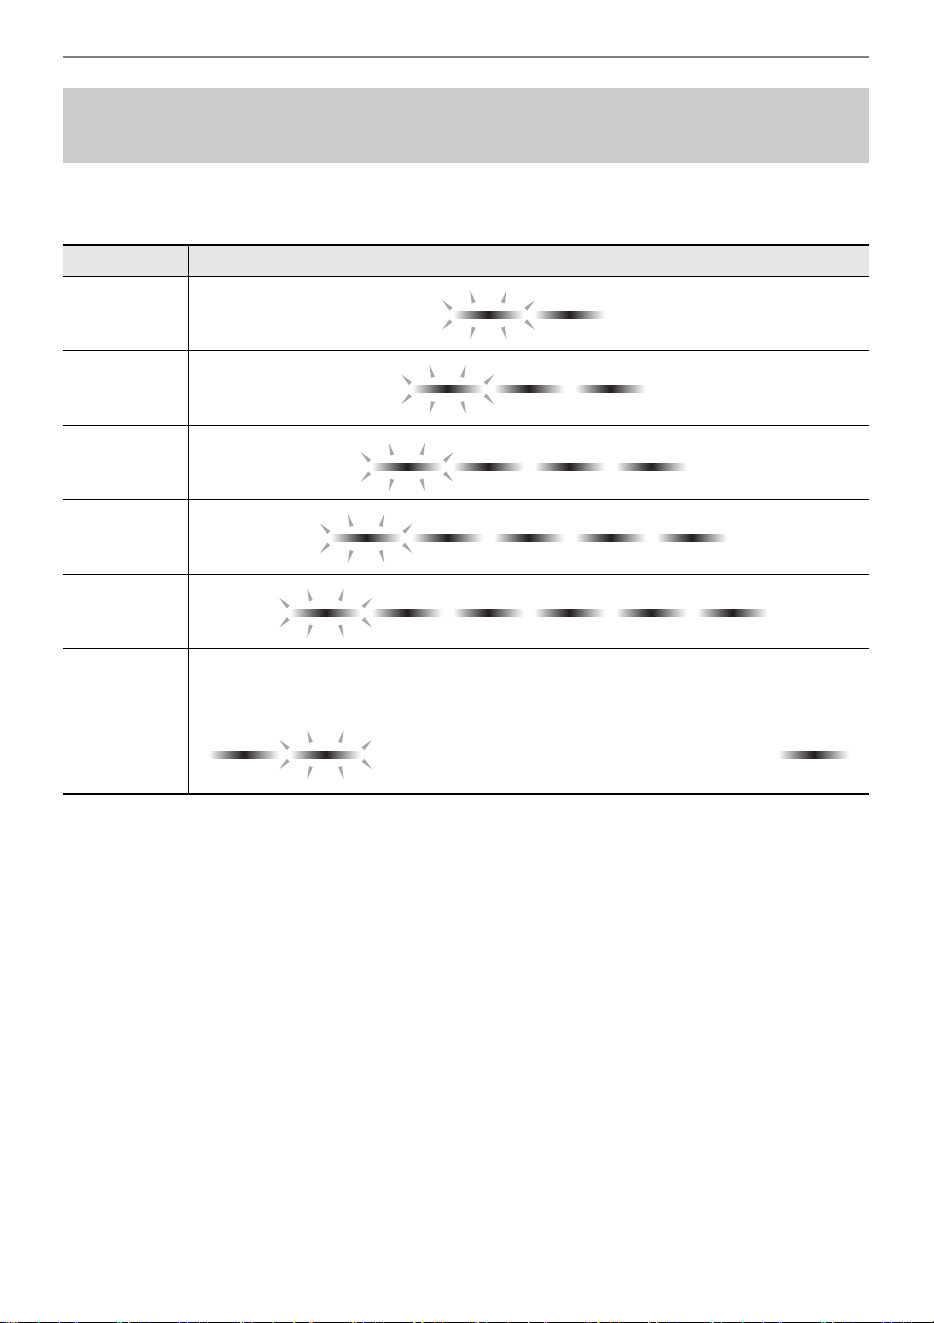
When a touch button is held down and one key is pressed in succession to switch to a different setting
value, the Visual Information Bar blinks according to the current setting value. The blinking light
indicating the setting value moves from the left side to the right.
How the Visual Information Bar Displays for Various
Settings
Setting Value Display Pattern
2 values
3 values
4 values
5 values
6 values
More than
7 values
The leftmost (min. value) and rightmost (max. value) indicators in the Visual
Information Bar light up and the approximate position of the set value blinks. On the
default value, the indicator blinks rapidly.

Read This First (Basic Operations and Settings)
EN-30
Lighting Example (when there are two options for the setting item)
Lighting Example (when there are three options for the setting item)
Setting Value
Example
Visual Information Bar Display
Off
On
Setting Value
Example
Visual Information Bar Display
Value 1
Value 2
Value 3
Piano acoustic setting and demo performance
EN-31
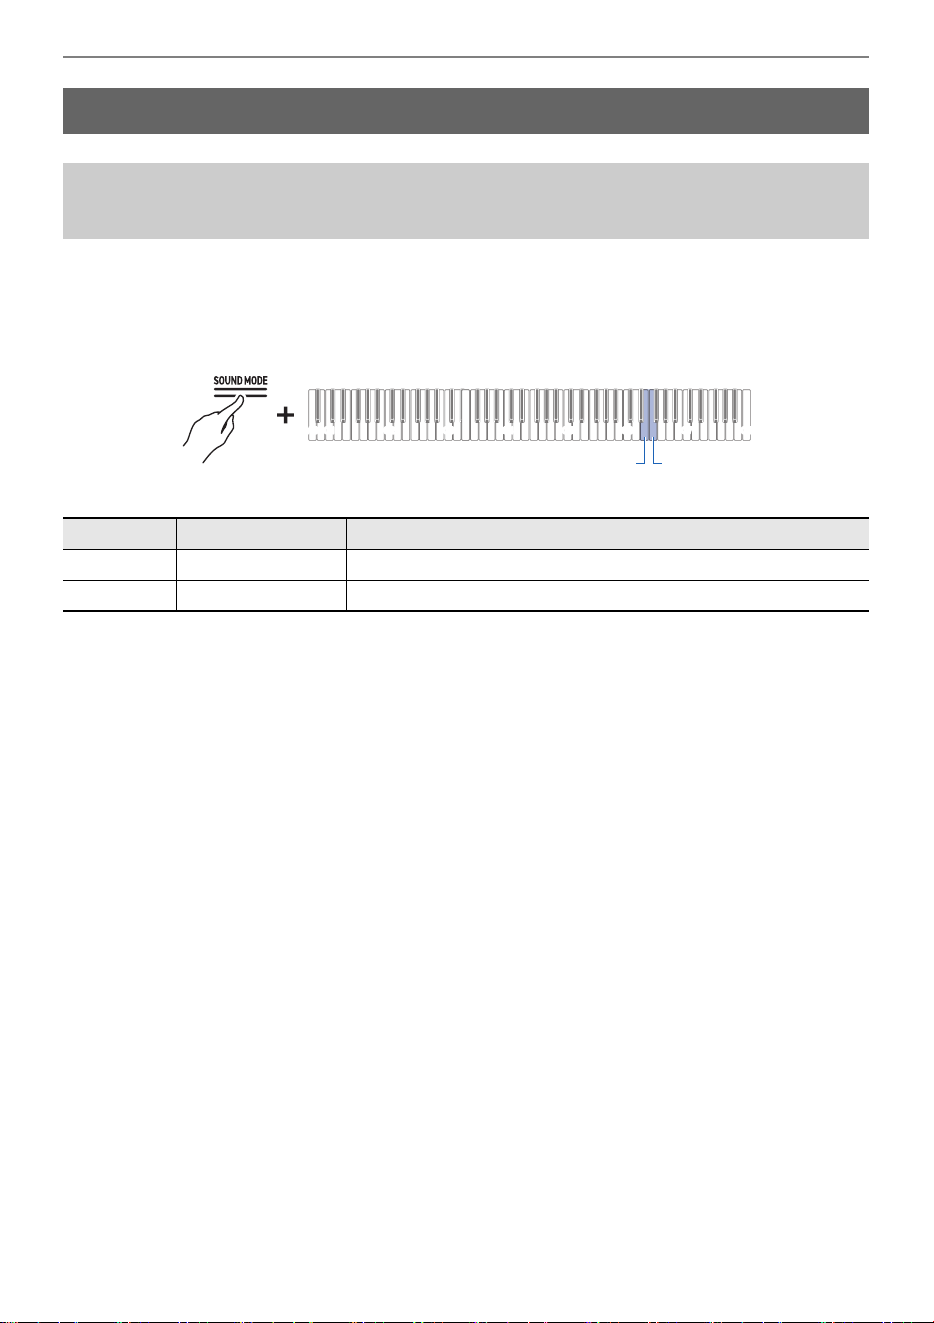
Optimize the acoustics according to the piano’s position in the room.
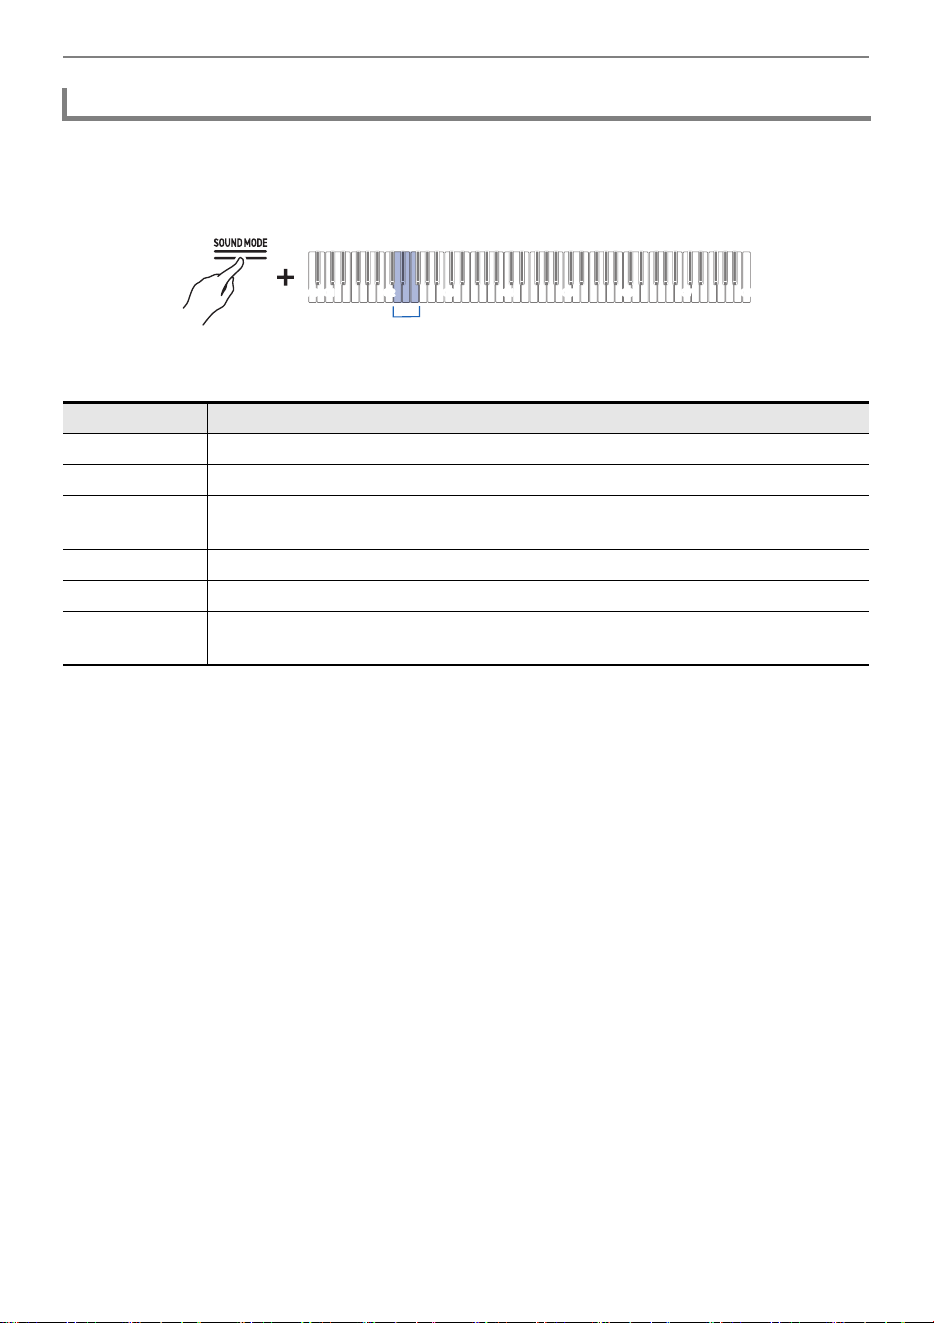
While holding down the “SOUND MODE” button, press the E6 or F6 key.
Selecting a Setting Value Directly (operation type A)
• Default value: Standard
Piano acoustic setting and demo performance
Select the acoustic setting appropriate for the installation
location (piano position)
Keyboard Setting Value Setting Details
E6 Standard Standard settings
F6 Wall Setup for installations close to the edge of a wall
C1A0 C2 C3 C4 C5 C6 C7 C8
E6 F6

Piano acoustic setting and demo performance
EN-32
Hold down the “FUNCTION” button and press the “SOUND MODE” button.
• Playback of the demo songs (3 songs) will start. Please refer to “Demo Song List” for the song
list.
• When the demo songs end, songs from the music library will play continuously from the fourth
song onward. See “Music Library List” for song listings.
• When [Auto Power Off] is set to <On>, the power will turn off after a certain period of time, even
during a demo performance.
You can change the song or [Sound Mode] Effects during a demo performance.
Skipping to Previous/Next Song
While holding down the “a” button, press the B2 key (Song Select –)/C3 key (Song Select +).
Using the +/– Keys to Raise or Lower the Setting Value by 1 (operation type B)
Skip to Specific Song
While holding down the “a” button, press one of the A0 to B0 keys (demo songs) or one of the C{3
to C8 keys (Music Library Built-in Songs).
Selecting a Setting Value Directly (operation type A)
Changing the Sound Mode Effects
You can switch between <On> and <Off> for [Hall Simulator/Reverb] and [Surround].
Using Sound Mode Effects (Hall Simulator/Reverb and Surround)
Playing the Demo Performance
Operations Possible during a Demo Performance

Piano acoustic setting and demo performance
EN-33
Touch the “a” button.
• Touch buttons that were unlit while the demo songs were playing will light again.
Ending Demo Performance

Playing
EN-34
The Digital Piano contains 28 tone types for all keys, including grand piano tones, 10 tone types from
the classical piano repertoire, and one bass tone scheme dedicated to the bass section.
• The tone names are marked on the upper side of the keyboard section of the Digital Piano (except
for the Classical Piano Repertoire tones).
For more information, see “Use the keyboard to select tones”.
• In addition to selecting a single tone to play across the keyboard, two tones can be played on top of
each other (Layer), and the bass tone can be assigned to the bass section.
For details, see “Layering Two Tones (Layer)” and “Splitting Left and Right Keys (Split)”.
Playing
Selecting a Tone
Playing
EN-35
Grand Piano Tone Features
This Digital Piano has three types of grand piano tones: BERLIN GRAND, HAMBURG GRAND, and
VIENNA GRAND. The grand piano tones each have different characteristics, so we recommend you
choose the one that best suits the music you play and your preferences.
• Three grand piano tones can be selected with a single touch of a button on the front panel. You can
also select a tone using the “Use the keyboard to select tones”.
• Each grand piano tone has two variations: BRIGHT and MELLOW (see table below). These
variations of tones can be selected by pressing “Use the keyboard to select tones”.
Tone Name Characteristic
BERLIN GRAND The sound has a clear outline, and is calm, elegant and light. The transparent
sound and resonance create a beautiful melody rich in color. Suitable for
playing impressionistic music.
BRIGHT A bright and clear BERLIN GRAND tone.
MELLOW A warm and calm BERLIN GRAND tone.
HAMBURG GRAND This is strong and powerful with a wide range of dynamic expression; an
elegant and polished sound beloved by many pianists. It can be used for all
kinds of performances.
BRIGHT A bright and clear HAMBURG GRAND tone.
MELLOW A warm and calm HAMBURG GRAND tone
VIENNA GRAND This tone has an understated sound with rich expressiveness, powerful low
frequency strings and a soft and delicate sound when notes are played gently.
It is suitable for playing classical music.
BRIGHT A bright and clear VIENNA GRAND tone
MELLOW A warm and calm VIENNA GRAND tone.

Playing
EN-36
Classical Piano Repertoire Tone Features
Tone Name Characteristic
SONATA GRAND The sound changes throughout the dynamic range from softly played
notes to strongly played notes. Suitable for playing dramatic music
such as piano sonatas.
CONCERT ETUDE GRAND The sound is shimmering and clear. Suitable for playing music that
must be clearly audible to others, such as that played at a concert.
ETUDE GRAND The sound quality is stable, granular and easy to hear, and has a solid
dynamic range. This piano tone is ideal for everyday practice.
PRELUDE GRAND The sound is soft, sparkling and full of character. Suitable for playing
freestyle pieces such as preludes.
ROMANCE GRAND The sound is soft and delicate with contours that accentuate the
melody. Suitable for playing lyrical, instrumental works.
PARTITA GRAND The sound is granular and has a light touch with moderate resonance.
Suitable for playing pieces such as music for keyboard instruments
from the Baroque period.
NOCTURNE GRAND It has a beautiful melodious expression with a soft sound. Suitable for
playing subdued and beautiful melodies reminiscent of the night, such
as nocturnes.
WALTZ GRAND The sound is bright and light, flamboyant and graceful. Suitable for
playing fun and graceful dances like waltzes.
POLONAISE GRAND The sound is imposing and powerful, with rhythmic patterns and
resonant, full chords. Suitable for playing solemn and heroic music
such as polonaises.
LITTLE PIECE UPRIGHT It is the sound of an upright piano with a rustic, nostalgic feeling.
Suitable for playing small pieces reminiscent of childhood.
Playing
EN-37
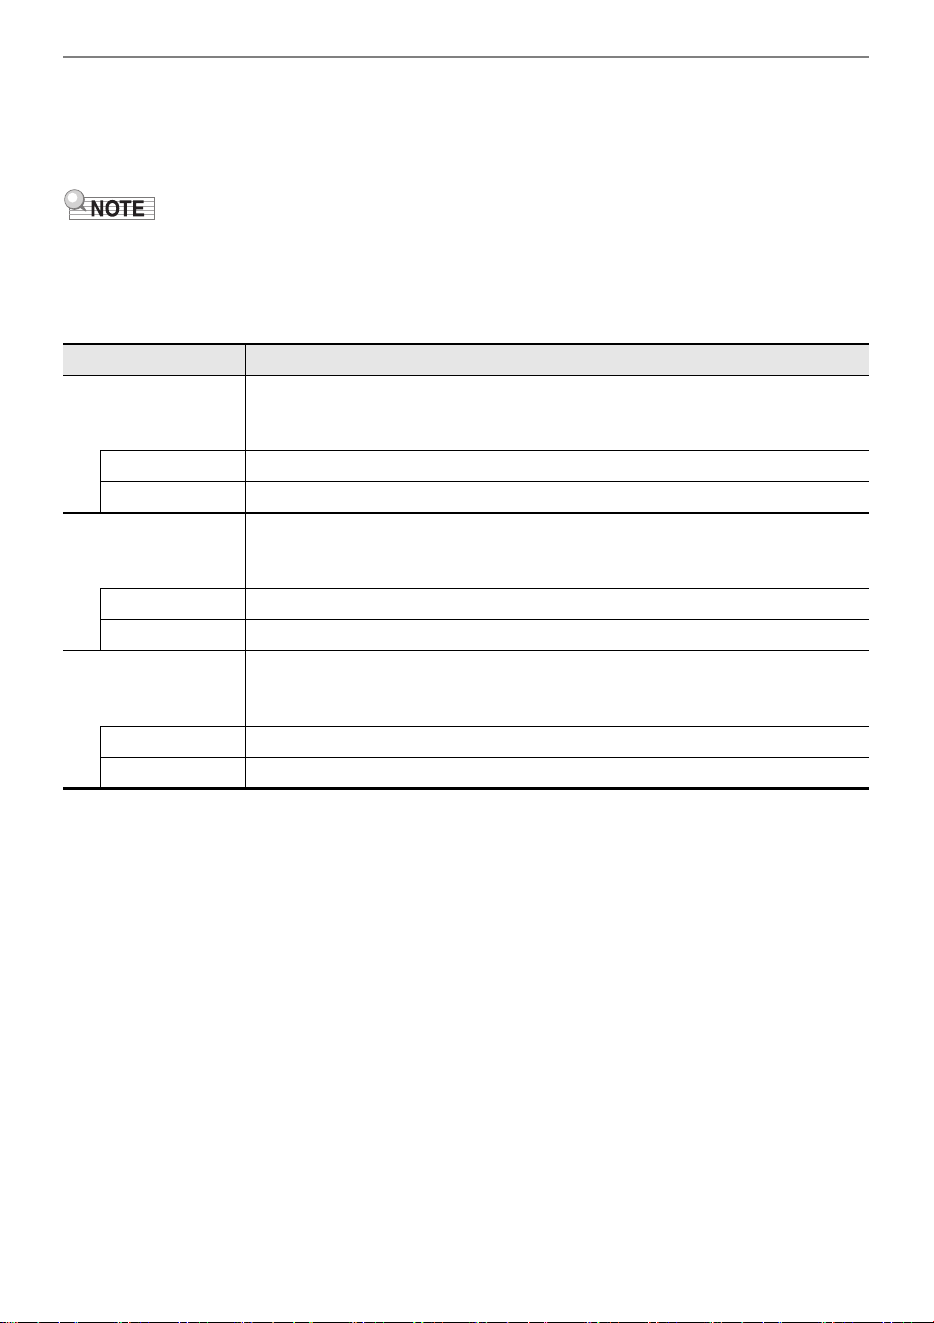
Use the keyboard to select tones
While holding down the “TONE” button, press one of the C{3 to E}6 keys.
Selecting a Setting Value Directly (operation type A)
•See “Tone list” for the tones available for each key.
• Instead of pressing the C{3 key (BERLIN GRAND) while holding down the “TONE” button, touch the
“BERLIN GRAND” button to select BERLIN GRAND. Thus, the grand piano tone (BERLIN GRAND,
and HAMBURG GRAND, and VIENNA GRAND) can be selected with a single touch using the
buttons on the front panel. Please refer to “Using the Touch Button to Select a Tone” for more
information.
Selecting Tones in Order of the Tone List
While holding down the “TONE” button, press the B2 or C3 key.
Using the +/– Keys to Raise or Lower the Setting Value by 1 (operation type B)
Selecting a Single Tone
Keyboard Setting
B2 Go to previous tone (–)
C3 Move to next tone (+)
C1A0 C2 C3 C4 C5 C6 C7 C8
C{3 - E}6
C1A0 C2 C3 C4 C5 C6 C7 C8
B2 C3

Playing
EN-38
Using the Touch Button to Select a Tone
Touch the “BERLIN GRAND” button, the “HAMBURG GRAND” button, or the
“VIENNA GRAND” button.
• The grand piano tone corresponding to the button pressed is selected.
Touch the “TONE” button.
• The last tone selected using the keyboard (BERLIN GRAND by default) is selected.
• Touching the “BERLIN GRAND” button, the “HAMBURG GRAND” button, or the “VIENNA GRAND”
button will select the top tone (non-variation tone) of the grand piano tone corresponding to the
button name. If you want to select a variation of a tone, follow the instructions under “Use the
keyboard to select tones”. For more information about grand piano tones, see “Grand Piano Tone
Features” for more information about grand piano tones.
• When [Layer] is <On>, touching the “BERLIN GRAND” button, “HAMBURG GRAND” button,
“VIENNA GRAND” button, or “TONE” button will turn [Layer] <Off>.
Playing
EN-39
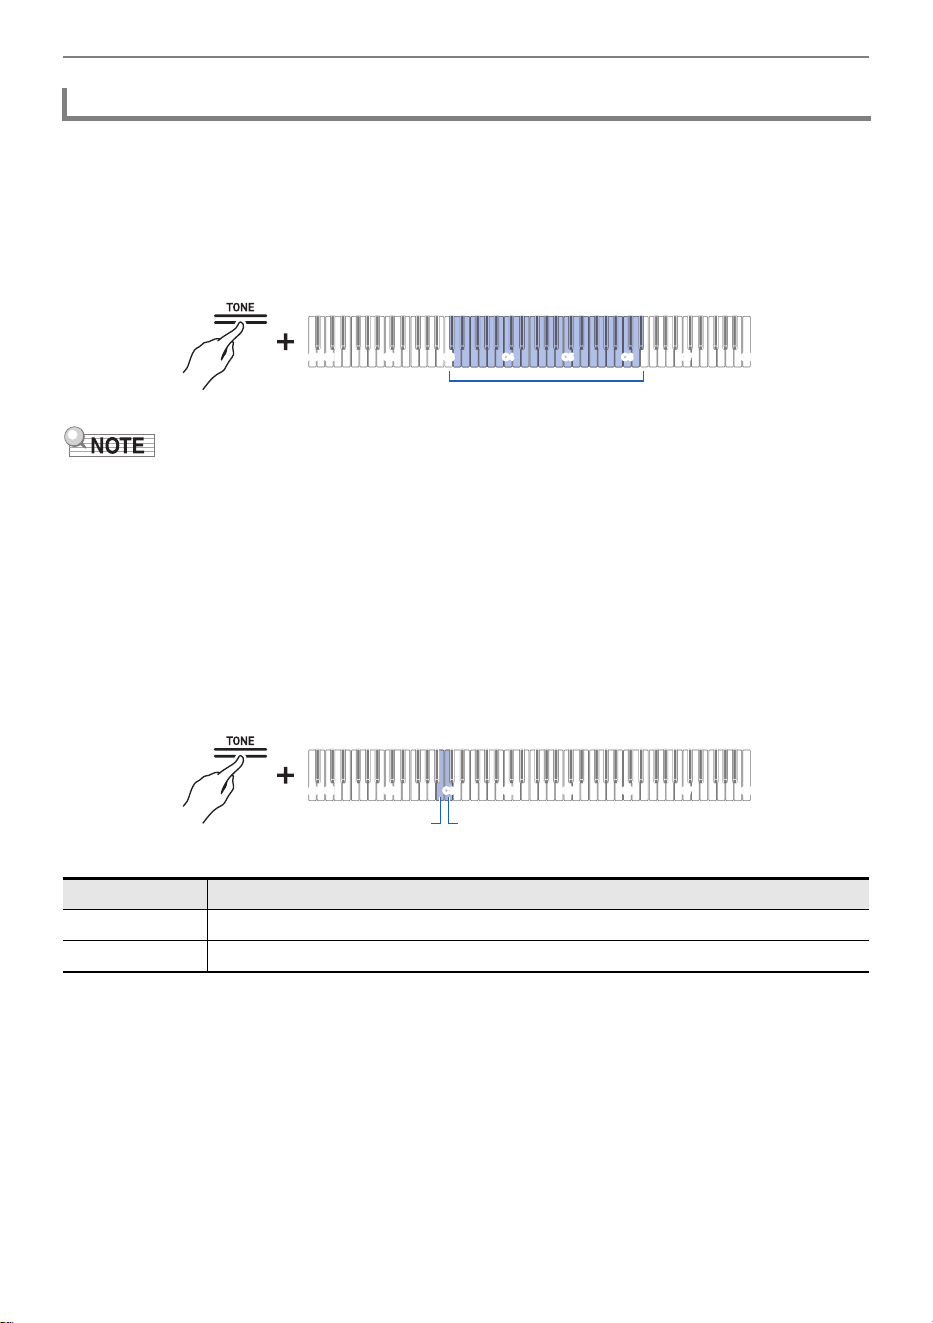
You can have two tones sounding simultaneously when playing the keyboard. Since the tones are
layered over each other, this feature is called Layer. The first tone selected is called the Upper1 part
tone and the second tone selected is called the Upper2 part tone. When [Layer] is set to <On>, Upper1
and Upper2 parts will both sound at the same time.
Turning Layers On/Off
While holding down the “TONE” button, press the C7 key (Layer).
Switching On/Off or Changing Setting Values Using a Single Key (operation type D)
• Default value: Off
• You can also touch one of the “BERLIN GRAND”, “HAMBURG GRAND”, “VIENNA GRAND”, or
“TONE” buttons to turn [Layer] <Off>.
Layering Two Tones (Layer)
Setting Value Setting Details
Off Turns off layers.
On Turns on layers.
Upper1 part
Upper2 part
C1A0 C2 C3 C4 C5 C6 C7 C8
C7

Playing
EN-40
Upper2 Selecting a Part Tone
When [Layer] is <On>, Upper2different part tones can be selected.
1.
Turn [Layer] <On>.
2.
While holding down the “TONE” button, press one of the C{3 to E5 or F{5 to E}6
keys to select the tone for the Upper2 part.
Selecting a Setting Value Directly (operation type A)
• Upper1 Part tones can be selected when [Layer] is <OFF>.
Changing the Upper1 Part Settings
You can adjust the volume and perform Upper1 octave shift.
For details, see “Changing the settings of the Upper1 part” and “Shifting a Upper1 Part by an Octave”
Octave-Shift.
Changing the Upper2 Part Settings
You can adjust the Upper2 part volume and perform octave shift.
For details, see “Changing the settings of the Upper2 part” and “Shifting Upper2 Part by an Octave”
Octave-Shift.
C1A0 C2 C3 C4 C5 C6 C7 C8
C{3 - E5 F{5 - E}6

Playing
EN-41
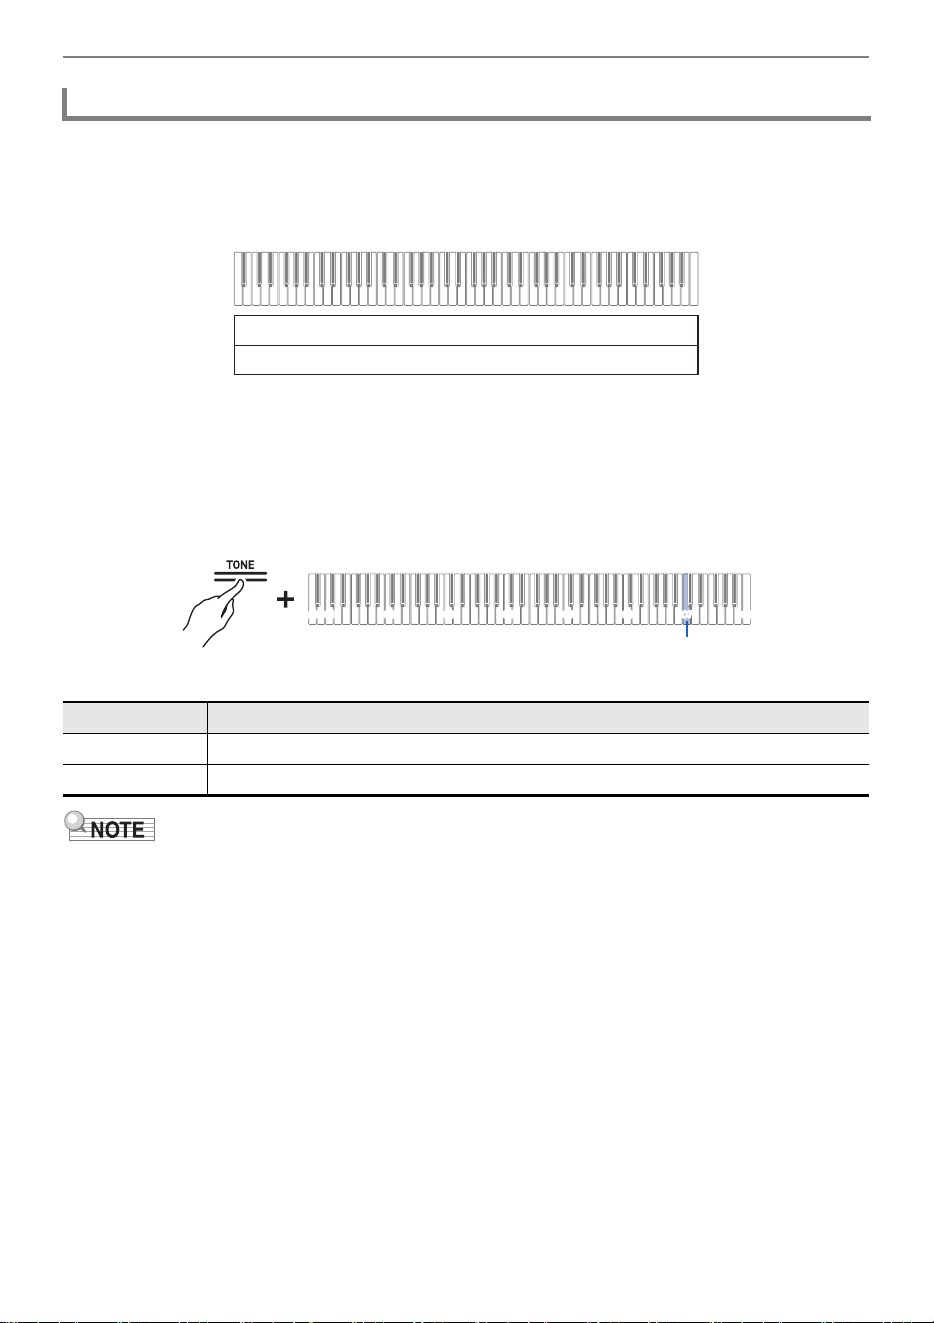
You can select a tone dedicated to the bass section <BASS (LOWER)> to play bass notes in the bass
section of the keyboard. This usage is called Split, since the entire keyboard is split into left and right.
The tone of the bass section is called Lower Tone Section, and the tone of the treble section is called
Upper1 Tone Section.
Selecting a Tone Exclusively for the Bass Section
While holding down the “TONE” button, press the F5 key (BASS).
Selecting a Setting Value Directly (operation type A)
• Only the bass section of the keyboard (left side) will have the BASS tone, while the treble
section (right side) will remain the same as the previously selected tone.
Changing the Lower Part Settings
You can change the volume and other settings for the Lower Part.
For more information, see “Change the setting of the Lower part”.
Changing the Upper1 Part Settings
You can adjust the volume and perform Upper1 octave shift.
For details, see “Changing the settings of the Upper1 part” and “Shifting a Upper1 Part by an Octave”.
Splitting Left and Right Keys (Split)
Dividing line
Bass Section Treble Section
Lower part Upper1 part
C1A0 C2 C3 C4 C5 C6 C7 C8
F5

Playing
EN-42
You can have the same pitch range on the right and left sides from the center of the keyboard. This can
be used when a teacher plays a model performance on the left side and the student plays the same
melody on the right side. In addition, you can change the pitch range of the left and right keys by
octaves.
Pedal Operation for Duets (On/Pan)
The pedals at both ends are damper pedals for the left and right keys respectively, and the center pedal
is a damper pedal for both the left and right keys.
Splitting the Keyboard into Left and Right for Two-Person
Performance (Duet)
What is a Duet?
C3 C4 C5 C6 C3 C4 C5
C6
Dividing line
Left Side Keyboard Right Side Keyboard
(Middle C) (Middle C)
Damper pedal for both left and right sides
Damper pedal for right side keysDamper pedal for left side keys
Playing
EN-43
While holding down the “FUNCTION” button, press the F2 key (Duet Mode).
Switching On/Off or Changing Setting Values Using a Single Key (operation type D)
• Default value: Off
• Some settings cannot be changed while the [Duet] function is in use.
• When the [Duet] function is set to <Pan>, [Acoustic Simulator], [Hall Simulator/Reverb], [Surround]
and [Chorus] are not available.
Using the Duet Function
Setting
Value
Notification Tone Setting Details
Disable Tone for Off Turn off Duet.
On 1 notification tone Turn on Duet.
Pan 2 notification tones The sound of the left keyboard is output from the left speaker
only, and the sound of the right keyboard is output from the right
speaker only.
C1A0 C2 C3 C4 C5 C6 C7 C8
F2

Playing
EN-44
For both the left and right keyboard, the range can be changed from –2 to +2 octaves.
While holding down the “FUNCTION” button, press the corresponding key.
Using the +/– Keys to Raise or Lower the Setting Value by 1 (operation type B)
Left-Side Keyboard Settings
• Setting value: –2 octaves to +2 octaves
• Default value: 0
Right Side Keyboard Setting
• Setting value: –2 octaves to +2 octaves
• Default value: 0
Example of Setting Range
When the G2 key is pressed once
Changing the Pitch Range
Keyboard Setting
F{2 Lowers the range by one octave (–)
G2 Raises the range by one octave (+)
F{2 + G2 Reset the range to the default setting
Keyboard Setting
A
}2 Lowers the range by one octave (–)
A2 Raises the range by one octave (+)
A
}2 + A2 Reset the range to the default setting
C1A0 C2 C3 C4 C5 C6 C7 C8
F{2 - A2
C4 C5 C6 C7 C3 C4 C5
C6
Left Side Keyboard Right Side Keyboard
One octave higher
than the initial setting
As initially set

Playing
EN-45
There are three pedals: Damper, Soft, and Sostenuto. You can enjoy expressive performances that feel
closer to that of a grand piano using the pedals.
Damper Pedal
When this pedal is pressed during a performance, a reverberation of the note remains even after the
keys are released.
When a grand piano tone is selected, you can also create a resonance effect (Damper Resonance)
similar to when using a damper pedal on an acoustic grand piano. The effect of the pedal varies
continuously with the depth at which it is pressed down.
Soft pedal
When this pedal is pressed down during a performance, it not only weakens the notes played on the
keyboard after the pedal is pressed, but also makes the tone softer. The effect of the pedal varies
continuously with the depth to which it is pressed down.
Sostenuto Pedal
The sound of the note you are holding at the time you press this pedal will remain. Even if you release
the key, this lasts until you release the pedal.
Using the Pedals
Sostenuto pedal
Damper pedal
Soft pedal
Playing
EN-46
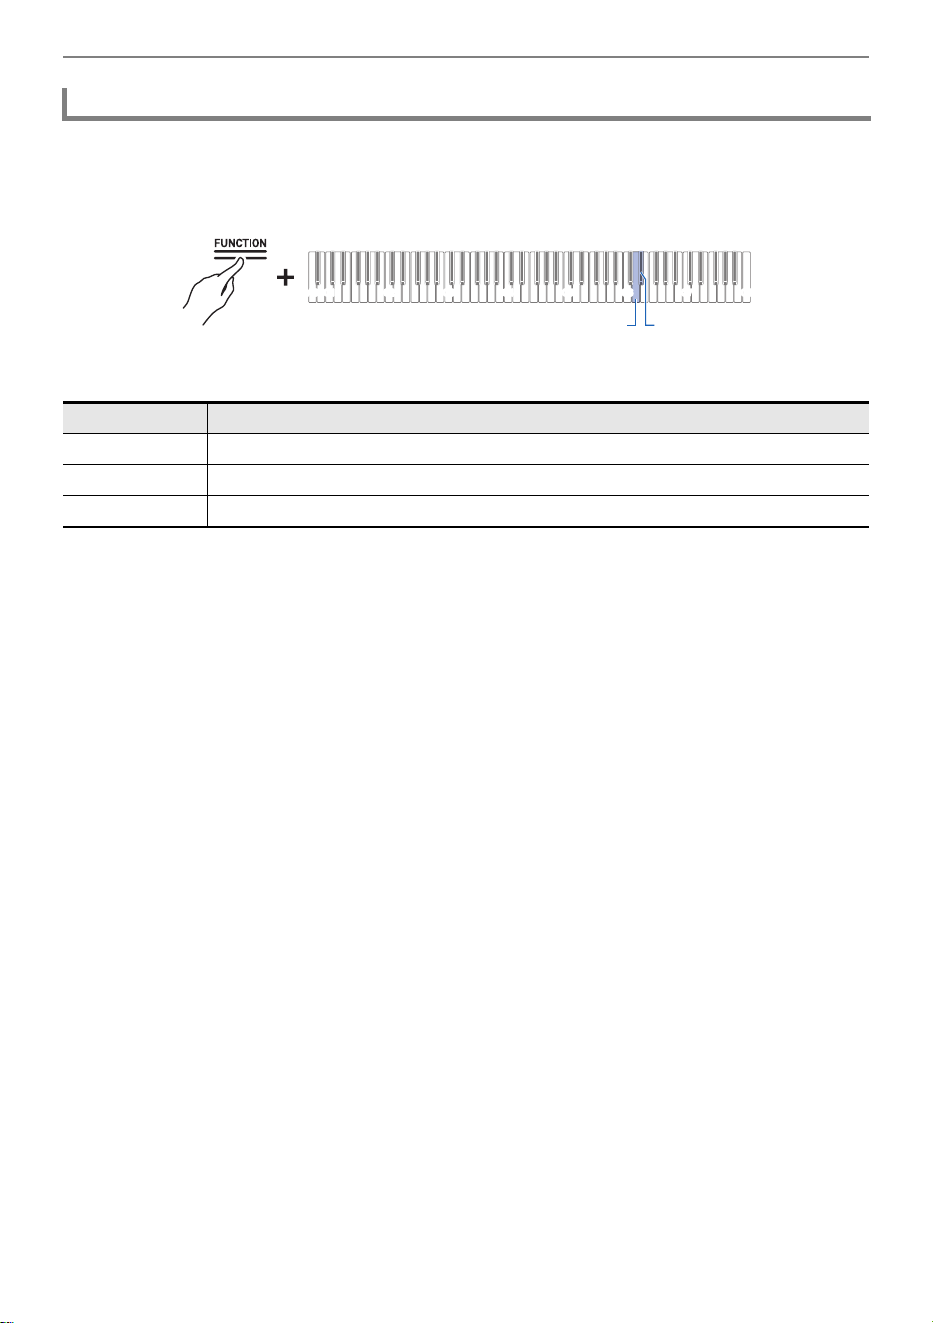
While holding down the “FUNCTION” button, press the D6 or E}6 keyboard key.
Using the +/– Keys to Raise or Lower the Setting Value by 1 (operation type B)
• Setting value: –2 (shallow) to 0 (standard) to +2 (deep)
• Default value: 0
Adjust the position of where the half pedal is applied (half pedal position)
Keyboard Setting
D6 Make the half pedal shallower by one step (–)
E}6 Increase the half-pedal starting position by one step (+)
D6 + E}6 Returns the half-pedal starting position to standard (0)
C1A0 C2 C3 C4 C5 C6 C7 C8
E}6
D6
Using the metronome
EN-47
The metronome beats at regular intervals. Using the metronome allows you to practice playing at a
constant tempo. As soon as the metronome starts, the beat indicator and Visual Information Bar light
up in time with the beat and tempo.
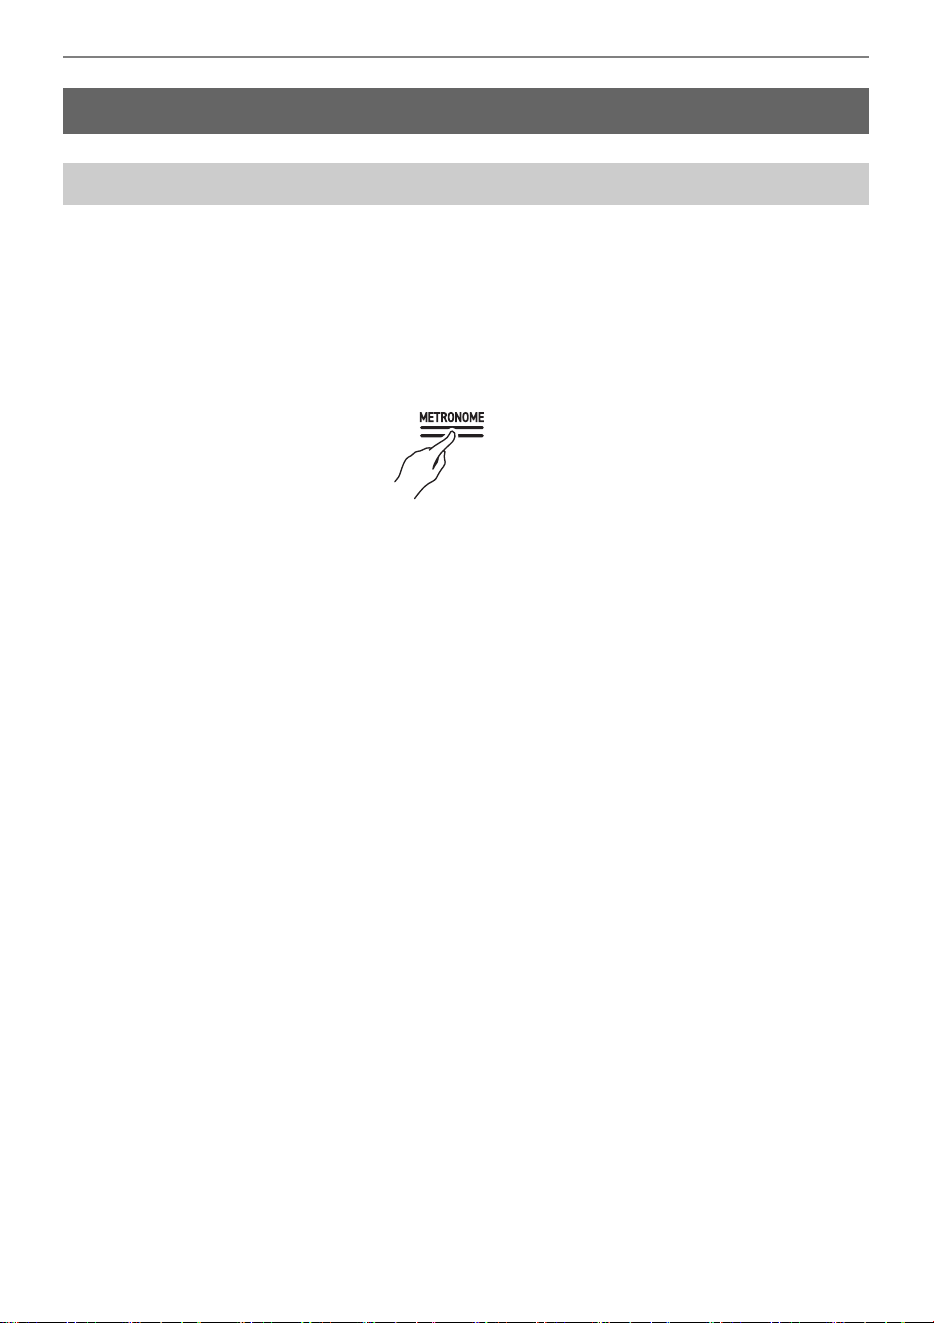
1.
Touch the “METRONOME” button. The metronome will start.
• The beat indicator lights up in time with the metronome beat (left side for the first beat, right side
for the remaining beats).
2.
To stop the metronome, touch the “METRONOME” button again.
Using the metronome
Metronome On/Off

Using the metronome
EN-48
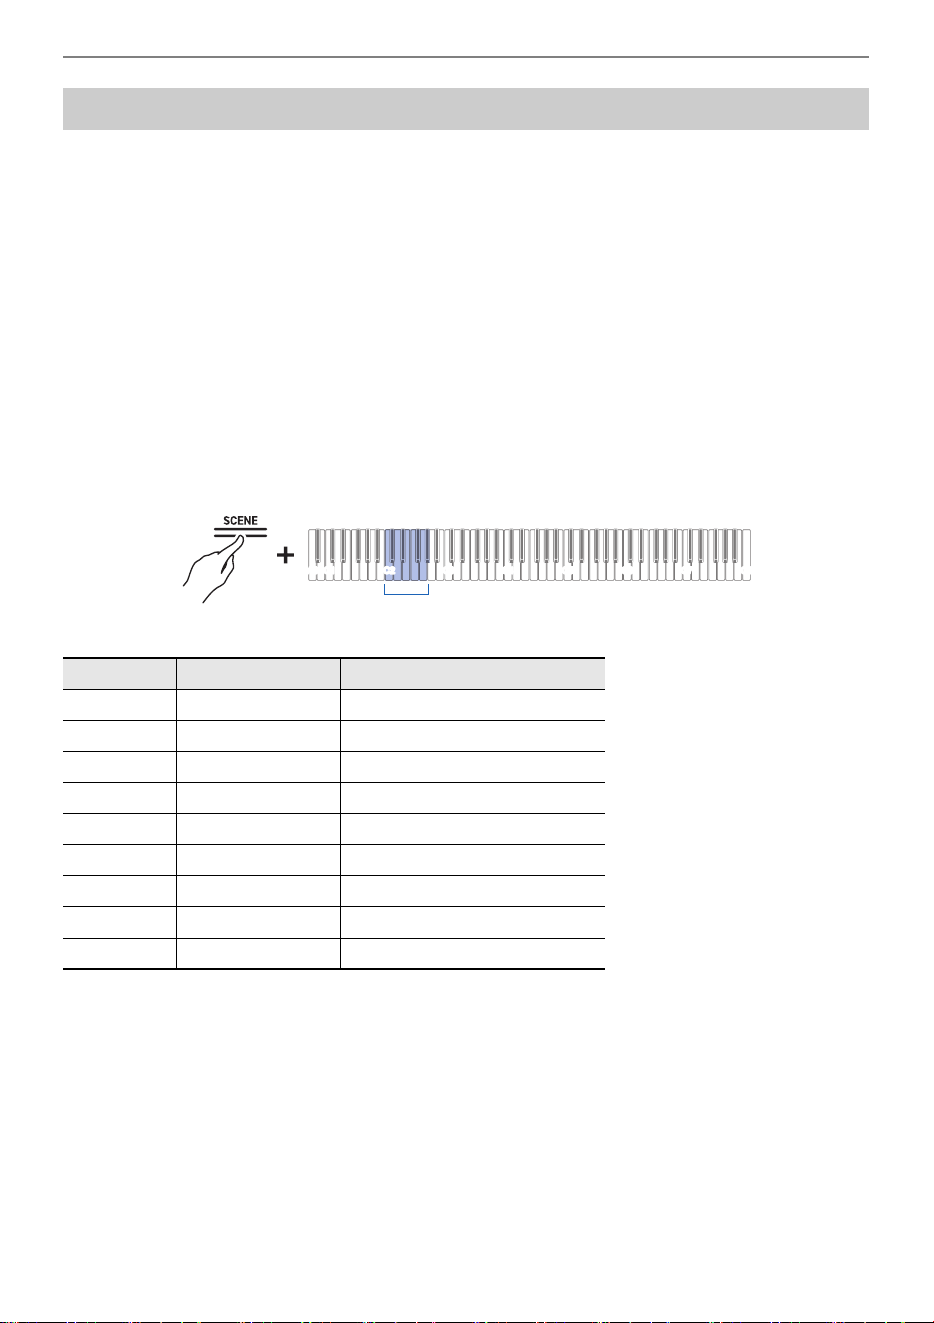
While holding down the “SCENE” button, press any one of the three C{3 to B}3
keys.
Selecting a Setting Value Directly (operation type A)
• Default value: 4
Setting the Beat
Keyboard
Setting
Value
Setting Details
C{3 Off Only a click sounds on each beat.
D3 1 A bell tone sounds on each beat.
E
}3 2 Sets the number of beats per bar to between 2 and 9. A bell tone sounds
on the first beat, and a click sound is heard on each remaining beat.
E3 3
F3 4
F{35
G3 6
A
}37
A3 8
B
}39
C1A0 C2 C3 C4 C5 C6 C7 C8
C{3 - B}3
Using the metronome
EN-49
Entering Tempo as a Number
Set the tempo for the metronome or song playback within the range of 20 to 255 (beats/minute).
While holding down the “SCENE” button, use the A0 to F
}1 keys (tempo number setting) to enter the
tempo setting value.
Inputting Setting Values Using the Keys 0 to 9 (operation type C)
Raising or Lowering the Tempo Value by 1
While holding down the “SCENE” button, press the B2 key (tempo –)/C3 key (tempo +).
Using the +/– Keys to Raise or Lower the Setting Value by 1 (operation type B)
Setting the Tempo from a Tempo Marking
Choose from a tempo marking such as Andante or Allegro.
While holding down the “SCENE” button, press one of the C2 to A
}2 keys (Tempo Setting).
Selecting a Setting Value Directly (operation type A)
Setting a Tempo
Keyboard Setting Value Tempo (beats per minute)
C2 Largo 46
C{2 Lento 52
D2 Adagio 56
E}2 Andante 72
E2 Moderato 96
F2 Allegretto 108
F{2 Allegro 132
G2 Vivace 160
A}2 Presto 184
C1A0 C2 C3 C4 C5 C6 C7 C8
C2 - A}2

Using the metronome
EN-50
Setting the Tempo Yourself By Tapping a Key (Tap Tempo)
While holding down the “SCENE” button, press the B}2 key (Tap Tempo) two or more times in
succession.
• The tempo will be set based on the interval between your key taps.
While holding down the “SCENE” button, press the A1 or B}1 key.
Using the +/– Keys to Raise or Lower the Setting Value by 1 (operation type B)
• Setting value: 0 (silence) to 42 (maximum volume)
A separator tone sounds when the set value becomes a multiple of 10.
• Default value: 25
Adjusting the Volume
Keyboard Setting
A1 Decrease volume by 1 (–)
B
}1 Increase the volume by 1 (+)
A1 + B
}1 Reset volume to default setting
C1A0 C2 C3 C4 C5 C6 C7 C8
B}2
C1A0 C2 C3 C4 C5 C6 C7 C8
B}1
A1

Applying Effects to Sound
EN-51
Each time the “SOUND MODE” button is touched, effects are switched on and off in turn.
Hall Simulator/Reverb
This effect adds reverberation to the sound.
Hall Simulator
This effect simulates the different acoustic characteristics of world-famous concert halls and buildings.
Reverb
This reproduces the reverberation of a given space, such as a room or a hall.
Surround
Surround sound (spread effect) is applied to the output sound from the piano speakers.
Touch the “SOUND MODE” button.
• Each time you touch the button, the indicators above the button will become lit or unlit as shown
below.
Applying Effects to Sound
Using Sound Mode Effects (Hall Simulator/Reverb and
Surround)
Turning on/off Hall Simulator/Reverb and Surround
Hall Simulator/Reverb
<ON>
Hall Simulator/Reverb
<OFF>
Hall Simulator/Reverb
<ON>
Hall Simulator/Reverb
<OFF>
Surround
<OFF>
Surround
<ON>
Surround
<ON>
Surround
<OFF>

Applying Effects to Sound
EN-52
While holding down the “SOUND MODE” button, press any one of the A0 to C{2
keys.
Selecting a Setting Value Directly (operation type A)
• Default value: Tone
Selecting Hall Simulator/Reverb Presets
Keyboard Setting Value Setting Details
A0 Tone The type of hall simulator/reverb that best matches the current
tone is automatically set.
B}0 Salon The various types of hall simulator. For example, “N.Y. Club”
simulates the acoustics of a Manhattan music club, while
“Berlin Hall” is an arena-style classical concert hall in Berlin.
B0 N.Y. Club
C1 Scoring Stage
C{1Opera Hall
D1 Viennese Hall
E}1 L.A. Hall
E1 Berlin Hall
F1 British Stadium
F{1 Room 1 Room-type reverb
G1 Room 2
A}1 Room 3
A1 Large Room
B}1 Hall 1 Small hall-type reverb
B1 Hall 2
C2 Hall 3
C{2 Stadium Stadium-type reverb
C1A0 C2 C3 C4 C5 C6 C7 C8
A0 - C{2
Applying Effects to Sound
EN-53
While holding down the “SOUND MODE” button, press the corresponding key.
Using the +/– Keys to Raise or Lower the Setting Value by 1 (operation type B)
• Setting value: 0 (no effect) to 42 (maximum depth)
A separator tone sounds when the set value becomes a multiple of 10.
Adjusting Applied Hall Simulator/Reverb
Keyboard Setting
D2 Reduce the depth of effect applied to built-in sound sources by 1 (–)
E}2 Increase the depth of effect applied to built-in sound sources by 1 (+)
D2+E
}2 Reset the depth of effect to the default setting for built-in sound sources (default
value: 21)
E2 Decrease the depth of effect on the wireless audio input signal by 1 (–)
F2 Increase the depth of effect on the wireless audio input signal by 1 (+)
E2+F2 Reset the depth of effect to the default setting for the wireless audio input signal
(default value: 0)
C1A0 C2 C3 C4 C5 C6 C7 C8
D2 - F2

Applying Effects to Sound
EN-54
While holding down the “SOUND MODE” button, press one of the F{2 to A}2
keys.
Selecting a Setting Value Directly (operation type A)
• Default value: Surround Type 2
Selecting Surround Presets
Keyboard Setting Value Setting Details
F{2 Surround Type 1 Light effect
G2 Surround Type 2 Medium effect
A}2 Surround Type 3 Heavy effect
C1A0 C2 C3 C4 C5 C6 C7 C8
F{2 - A}2
Applying Effects to Sound
EN-55
[Chorus] layers sounds to add depth.
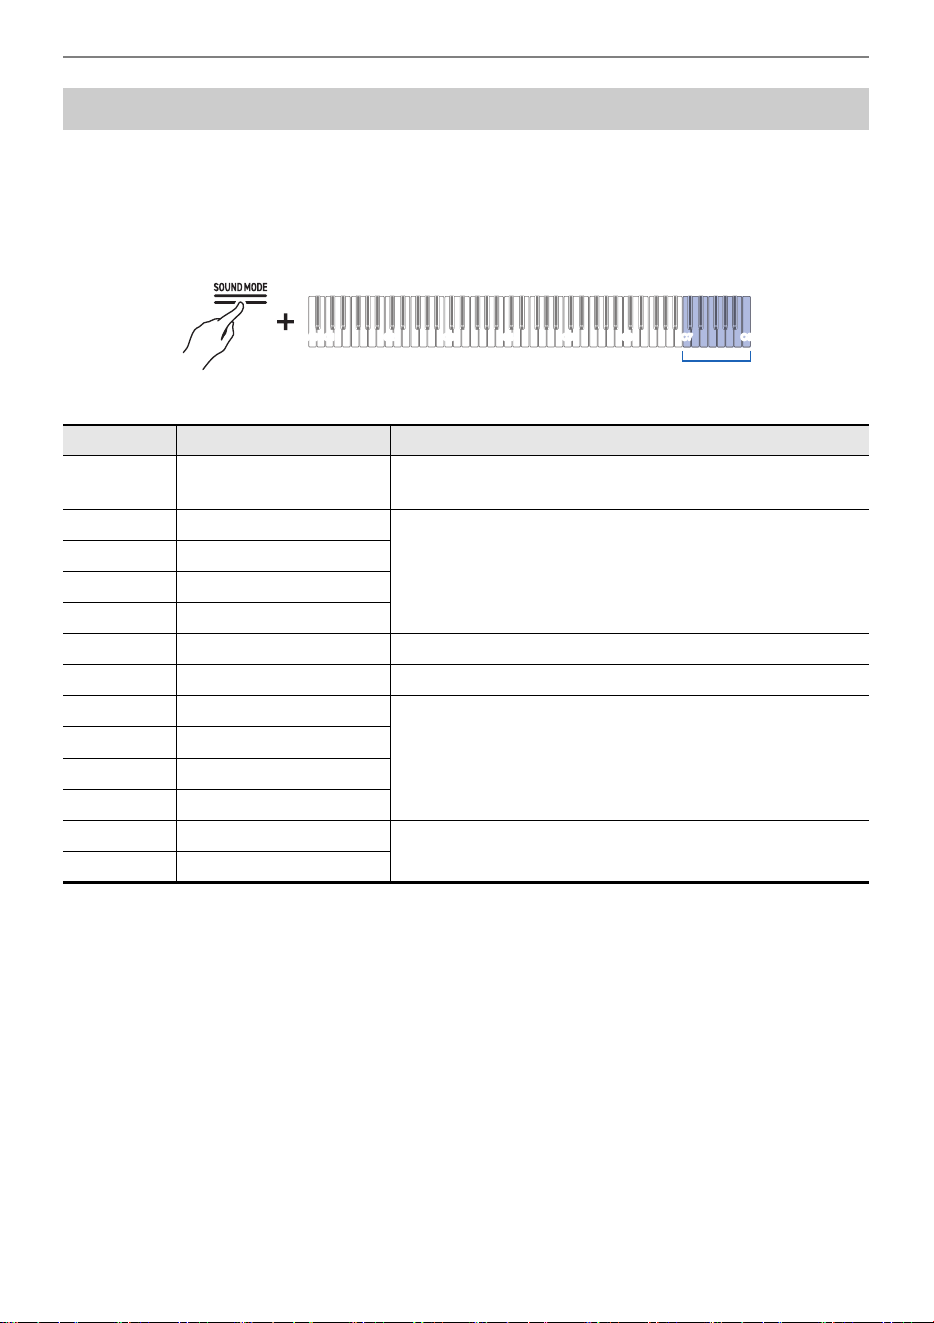
While holding down the “SOUND MODE” button, press one of the C7 to C8 keys.
Selecting a Setting Value Directly (operation type A)
• Default value: Tone
Applying Chorus
Keyboard Setting Value Setting Details
C7 Tone Automatically selects the Chorus preset appropriate for the
current tone.
C{7 Chorus 1 Four chorus types with different sound depths.
D7 Chorus 2
E}7 Chorus 3
E7 Chorus 4
F7 Feedback chorus A chorus with feedback
F{7 Deep chorus This is the chorus with the deepest sound.
G7 Flanger 1 There are four types of flanger with different sound
undulations and fluctuations.
A}7 Flanger 2
A7 Flanger 3
B}7 Flanger 4
B7 Short Delay 1 A short delay. There are two types to choose from.
C8 Short Delay 2
C1A0 C2 C3 C4 C5 C6 C7 C8
C7 - C8

Applying Effects to Sound
EN-56
[Brilliance] allows you to adjust the brightness of the sound.
While holding down the “SOUND MODE” button, press the B2 or C3 key.
Using the +/– Keys to Raise or Lower the Setting Value by 1 (operation type B)
• Setting value: –12 to +12
When set to +1 or higher, the sound is brighter, and when set to –1 or lower, the sound is mellower.
• Default value: 0
Adjusting Brilliance
Keyboard Setting
B2 Decreases the Brilliance setting by 1 (–)
C3 Increases the Brilliance setting by 1 (+)
B2+C3 Restores Brilliance to default settings
C1A0 C2 C3 C4 C5 C6 C7 C8
B2 C3

Applying Effects to Sound
EN-57
The piano tones of this Digital Piano have built-in elements that characterize the sound of an acoustic
piano. Each of the tone characteristics can be adjusted.
When playing acoustic piano, the strings, which are the overtones of the keys you play, resonate.
Adjust the resonance by setting [String Resonance].
Set [String Resonance] to <Tone> or <Off>.
While holding down the “SOUND MODE” button, press the C{3 or D3 key.
Selecting a Setting Value Directly (operation type A)
• Default value: Tone
Adjust the resonance by changing the value of the [String Resonance] setting.
While holding down the “SOUND MODE” button, press the E}3 or E3 key.
Using the +/– Keys to Raise or Lower the Setting Value by 1 (operation type B)
• Set value: Tone, Off, 1–10
The larger the number, the stronger the String Resonance effect.
• Default value: Tone
Adjusting the Sound Characteristics of the Acoustic
Piano Presets (Acoustic Simulator)
Setting the String Resonance
Keyboard
Setting
Value
Setting Details
C{3 Tone Automatically sets a value appropriate for the current tone.
D3 Off DIsables String Resonance.
Keyboard Setting Details
E}3 Decrease the resonance strength of the String Resonance by 1 (–)
E3 Increase the resonance strength of String Resonance by 1 (+)
C1A0 C2 C3 C4 C5 C6 C7 C8
3
D3C{3
C1A0 C2 C3 C4 C5 C6 C7 C8
E}3E3

Applying Effects to Sound
EN-58
When pressing the damper pedal of an acoustic piano, the strings of all 88 keys are released, meaning
all the strings that are harmonics of the played keys resonate. Adjust the degree of resonance by
setting [Damper Resonance].
Set [Damper Resonance] to <Tone> or <Off>
While holding down the “SOUND MODE” button, press the F3 or F{3 key.
Selecting a Setting Value Directly (operation type A)
• Default value: Tone
Adjust the resonance by changing the value of the [Damper Resonance] setting.
While holding down the “SOUND MODE” button, press the G3 or A}3 key.
Using the +/– Keys to Raise or Lower the Setting Value by 1 (operation type B)
• Set value: Tone, Off, 1–10
The larger the number, the stronger the Damper Resonance effect.
• Default value: Tone
Setting Damper Resonance
Keyboard
Setting
Value
Setting Details
F3 Tone Automatically sets a value appropriate for the current tone.
F{3 Off Disables Damper Resonance.
Keyboard Setting Details
G3 Lower the resonance strength of the Damper Resonance by 1 (–)
A}3 Increase the resonance strength of damper resonance by 1 (+)
F3 F{3
C1A0 C2 C3 C4 C5 C6 C7 C8
C1A0 C2 C3 C4 C5 C6 C7 C8
G3 A}3

Applying Effects to Sound
EN-59
When pressing the damper pedal on an acoustic piano, a small noise is produced when the damper
moves away from the piano wire. Adjust the volume of the noise by setting [Damper Noise].
Set [Damper Noise] to <Tone> or <Off>
While holding down the “SOUND MODE” button, press the A3 or B}3 key.
Selecting a Setting Value Directly (operation type A)
• Default value: Tone
Adjust the noise volume by changing the value of the [Damper Noise] setting.
While holding down the “SOUND MODE” button, press the B3 or C4 key.
Using the +/– Keys to Raise or Lower the Setting Value by 1 (operation type B)
• Set value: Tone, Off, 1–10
The higher the setting value, the louder the Damper Noise.
• Default value: Tone
Setting Damper Noise
Keyboard
Setting
Value
Setting Details
A3 Tone Automatically sets a value appropriate for the current tone.
B}3 Off Disables Damper Noise.
Keyboard Setting Details
B3 Lower damper noise volume by 1 (–)
C4 Increase Damper Noise volume by 1 (+)
C1A0 C2 C3 C4 C5 C6 C7 C8
A3 B}3
C1A0 C2 C3 C4 C5 C6 C7 C8
B3 C4

Applying Effects to Sound
EN-60
The high register of an acoustic piano has no damper and is always open string, which gives a unique
resonance. Adjust the resonance by setting [Open String Resonance].
Set [Open String Resonance] to <Tone> or <Off>
While holding down the “SOUND MODE” button, press the C{4 or D4 key.
Selecting a Setting Value Directly (operation type A)
• Default value: Tone
Adjust the resonance by changing the value of the [Open String Resonance]
setting.
While holding down the “SOUND MODE” button, press the E}4 or E4 key.
Using the +/– Keys to Raise or Lower the Setting Value by 1 (operation type B)
• Set value: Tone, Off, 1–10
The larger the setting value, the stronger the resonance due to Open String Resonance.
• Default value: Tone
Set open String Resonance
Keyboard
Setting
Value
Setting Details
C{4 Tone Automatically sets a value appropriate for the current tone.
D4 Off Disables Open String Resonance.
Keyboard Setting Details
E}4 Reduce the strength of the open String Resonance by 1 (–)
E4 Increase the strength of the open String Resonance by 1 (+)
C1A0 C2 C3 C4 C5 C6 C7 C8
D4C{4
C1A0 C2 C3 C4 C5 C6 C7 C8
E}4E4
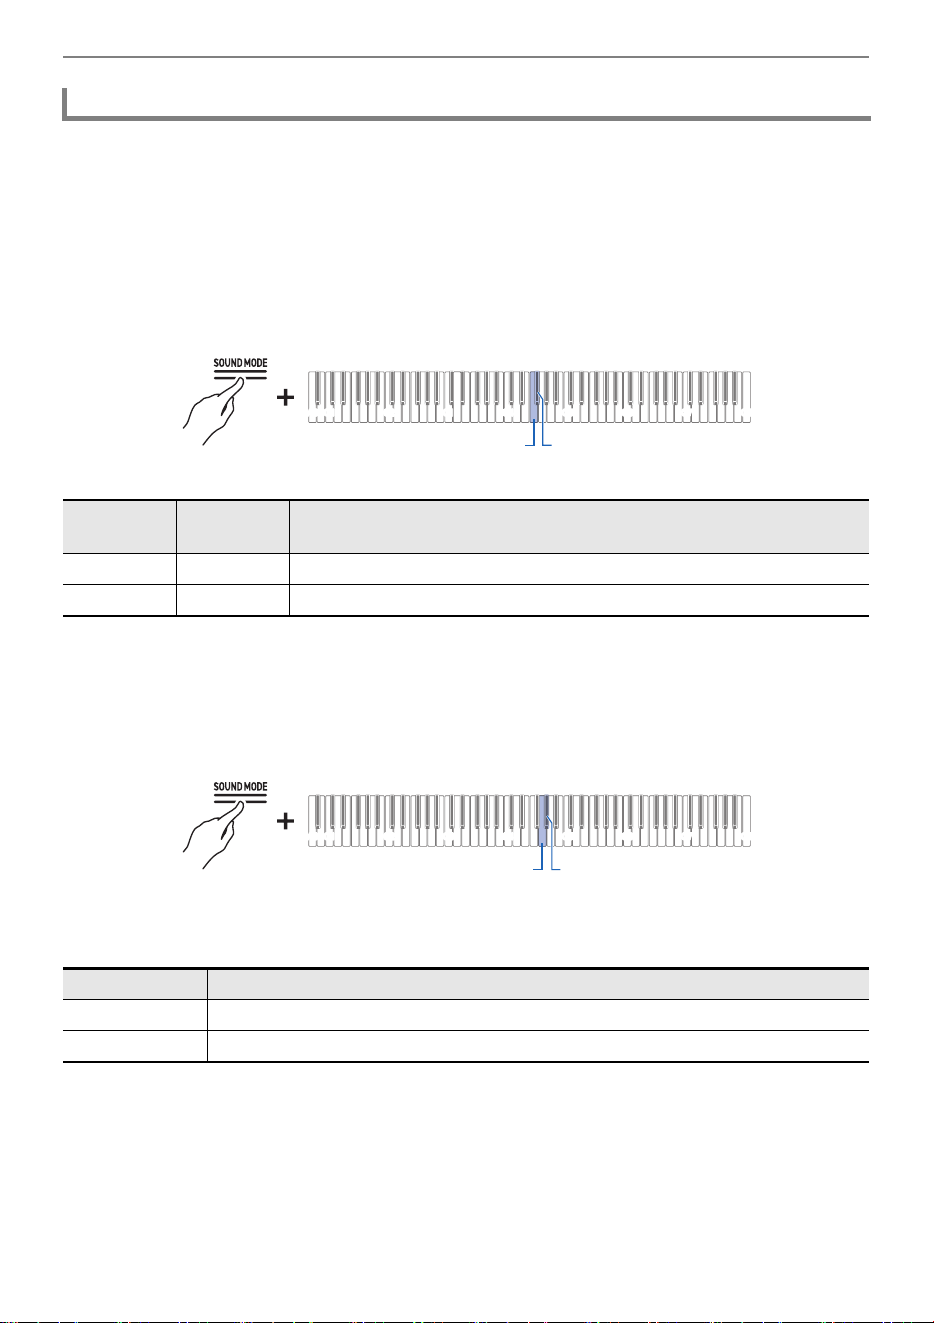
Applying Effects to Sound
EN-61
An aliquot is a resonator that is sometimes used in acoustic pianos. It uses the resonance of additional
strings in the middle and upper registers. It is sometimes referred to as the Duplex Scale. Adjust its
resonance by setting [Aliquot Resonance].
Set [Aliquot Resonance] to <Tone> or <Off>
While holding down the “SOUND MODE” button, press the F4 or F{4 key.
Selecting a Setting Value Directly (operation type A)
• Default value: Tone
Adjust the resonance by changing the value of the [Aliquot Resonance] setting.
While holding down the “SOUND MODE” button, press the G4 or A}4 key.
Using the +/– Keys to Raise or Lower the Setting Value by 1 (operation type B)
• Set value: Tone, Off, 1–10
1 to 10: The higher the value, the stronger the Aliquot Resonance.
• Default value: Tone
Set the aliquot resonance
Keyboard
Setting
Value
Setting Details
F4 Tone Automatically sets a value appropriate for the current tone.
F{4 Off Does not activate Aliquot Resonance.
Keyboard Setting Details
G4 Reduce the Aliquot Resonance strength by 1 (–)
A}4 Increase the Aliquot Resonance strength by 1 (+)
C1A0 C2 C3 C4 C5 C6 C7 C8
F4 F{4
C1A0 C2 C3 C4 C5 C6 C7 C8
G4 A}4

Applying Effects to Sound
EN-62
Using the pedals of an acoustic piano produces a mechanical sound (noise). Adjust the volume of this
noise by setting [Pedal Action Noise].
Set [Pedal Action Noise] to <Tone> or <Off>
While holding down the “SOUND MODE” button, press the A4 or B}4 key.
Selecting a Setting Value Directly (operation type A)
• Default value: Tone
Adjust the noise level by changing the value of the [Pedal Action Noise] setting.
While holding down the “SOUND MODE” button, press the B4 or C5 key.
Using the +/– Keys to Raise or Lower the Setting Value by 1 (operation type B)
• Setting value: Tone, Off, 1–10
The higher the setting value, the louder the pedal action noise.
• Default value: Tone
Set pedal action noise
Keyboard
Setting
Value
Setting Details
A4 Tone Automatically sets a value appropriate for the current tone.
B}4 Off No pedal action noise will be produced.
Keyboard Setting Details
B4 Reduce pedal action noise volume by 1 (–)
C5 Increase the volume of pedal action noise by 1 (+)
C1A0 C2 C3 C4 C5 C6 C7 C8
A4 B}4
C1A0 C2 C3 C4 C5 C6 C7 C8
B4 C5
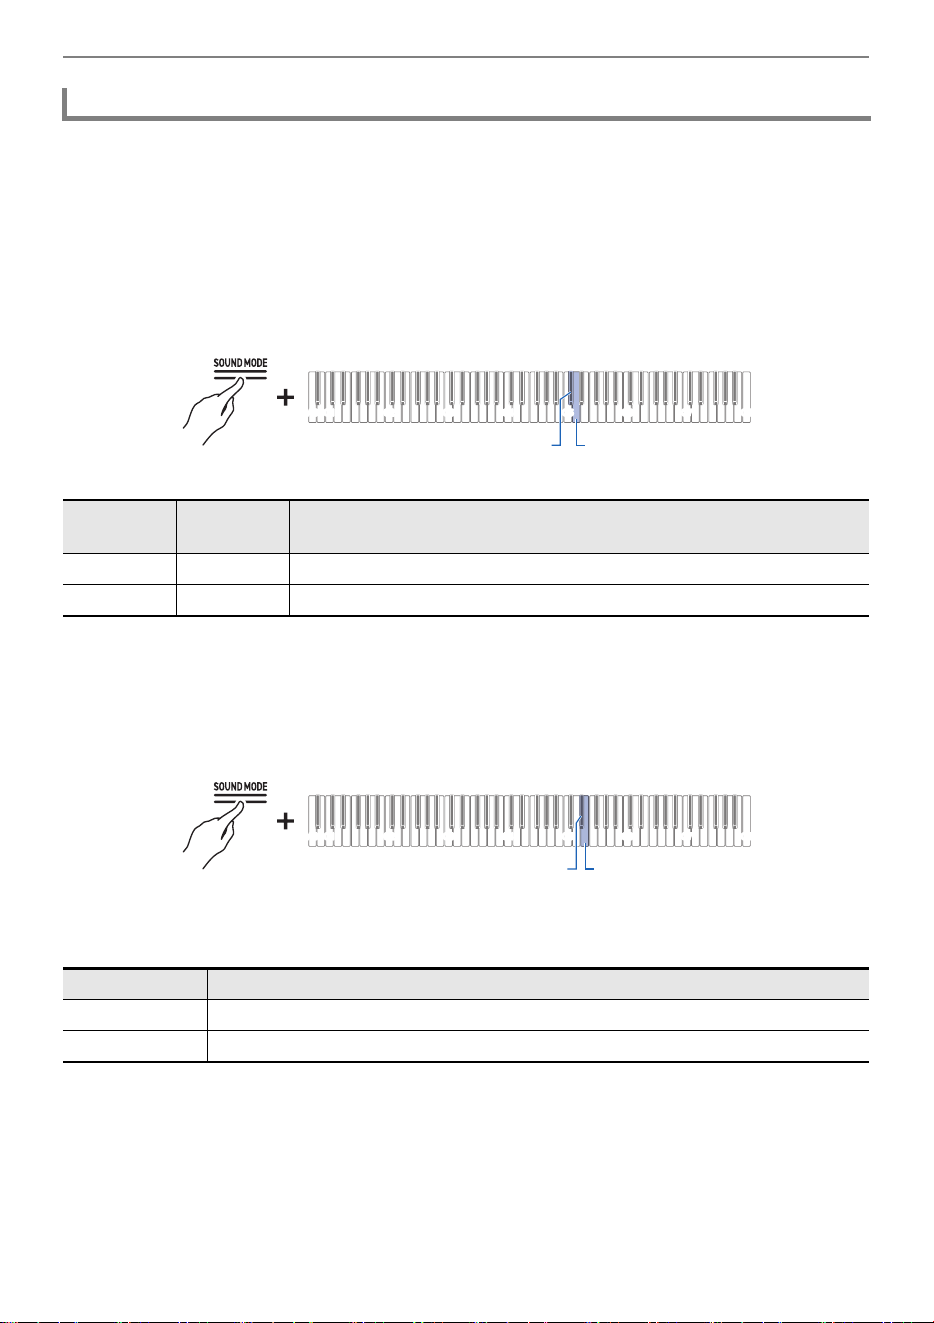
Applying Effects to Sound
EN-63
When playing the keys very softly on an acoustic piano, the hammers do not reach the strings and only
the mechanical action (noise) of the piano is heard. Adjust the volume of the noise by setting [Key On
Action Noise].
Set [Key On Action Noise] to <Tone> or <Off>
While holding down the “SOUND MODE” button, press the C{5 or D5 key.
Selecting a Setting Value Directly (operation type A)
• Default value: Tone
Adjust the noise level by changing the value of the [Key On Action Noise] setting.
While holding down the “SOUND MODE” button, press the E}5 or E5 key.
Using the +/– Keys to Raise or Lower the Setting Value by 1 (operation type B)
• Setting value: Tone, Off, 1–10
The higher the setting value, the louder the Key On Action Noise.
• Default value: Tone
Setting Key On Action Noise
Keyboard
Setting
Value
Setting Details
C{5 Tone Automatically sets a value appropriate for the current tone.
D5 Off No Key On Action Noise made.
Keyboard Setting Details
E}5 Decrease Key On Action Noise volume by 1 (–)
E5 Increase the volume of Key On Action Noise by 1 (+)
D5C{5
C1A0 C2 C3 C4 C5 C6 C7 C8
C1A0 C2 C3 C4 C5 C6 C7 C8
E}5E5
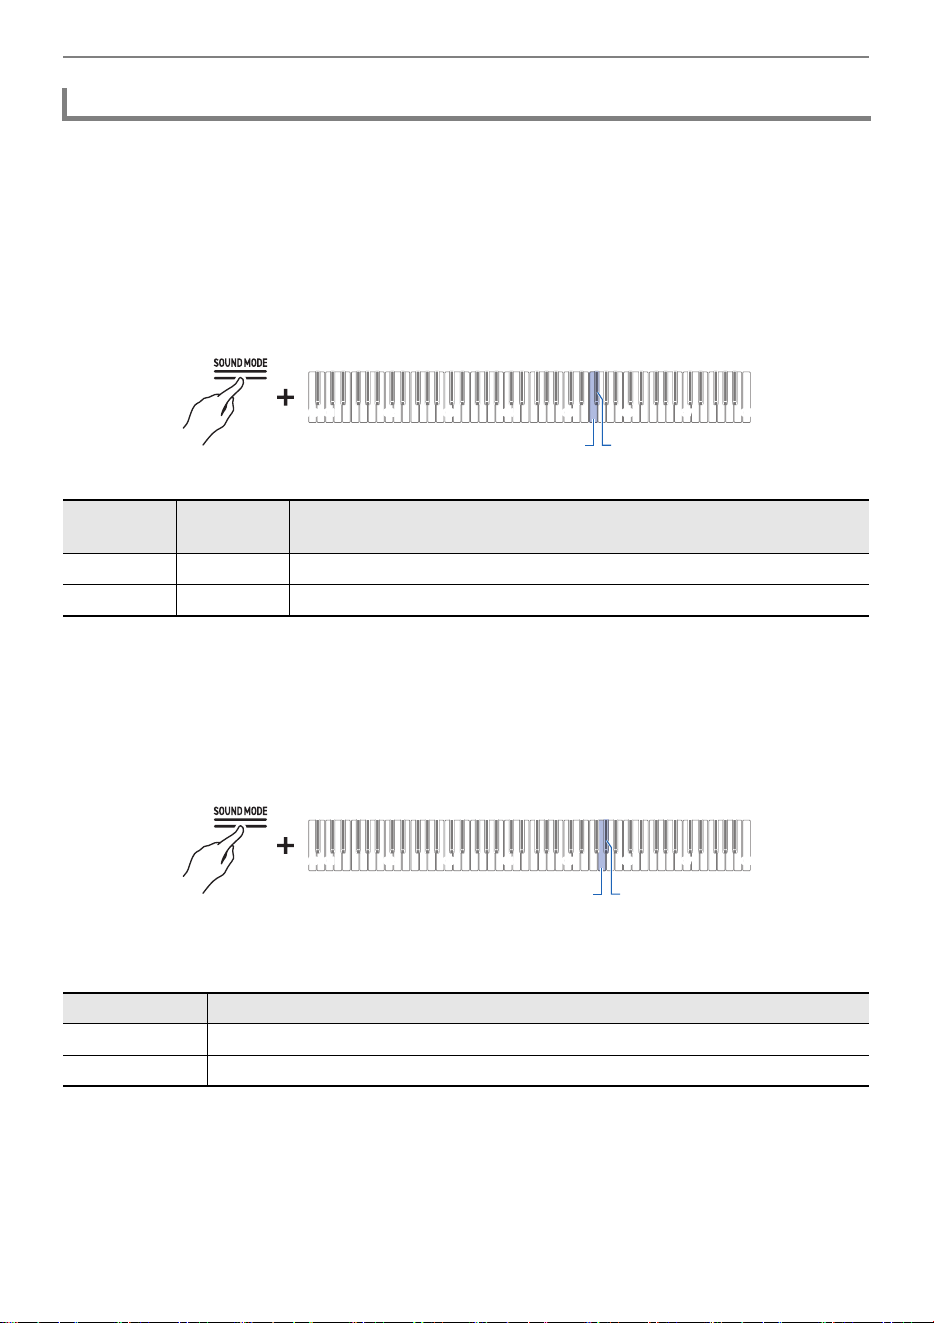
Applying Effects to Sound
EN-64
When a finger is removed from the keyboard of an acoustic piano, this generates a sound
corresponding to the mechanical piano action (noise). Adjust the volume of the noise by setting [Key
Off Action Noise].
Set [Key Off Action Noise] to <Tone> or <Off>.
While holding down the “SOUND MODE” button, press the F5 or F{5 key.
Selecting a Setting Value Directly (operation type A)
• Default value: Tone
Adjust the noise volume by changing the value of the [Key Off Action Noise]
setting.
While holding down the “SOUND MODE” button, press the G5 or A}5 key.
Using the +/– Keys to Raise or Lower the Setting Value by 1 (operation type B)
• Setting value: Tone, Off, 1–10
The higher the setting value, the louder the Key Off Action Noise.
• Default value: Tone
Setting Key Off Action Noise
Keyboard
Setting
Value
Setting Details
F5 Tone Automatically sets a value appropriate for the current tone.
F{5 Off No Key Off Action Noise is made.
Keyboard Setting Details
G5 Decrease Key Off Action Noise volume by 1 (–)
A}5 Increase the volume of Key Off Action Noise by 1 (+)
C1A0 C2 C3 C4 C5 C6 C7 C8
F5 F{5
G5 A}5
C1A0 C2 C3 C4 C5 C6 C7 C8
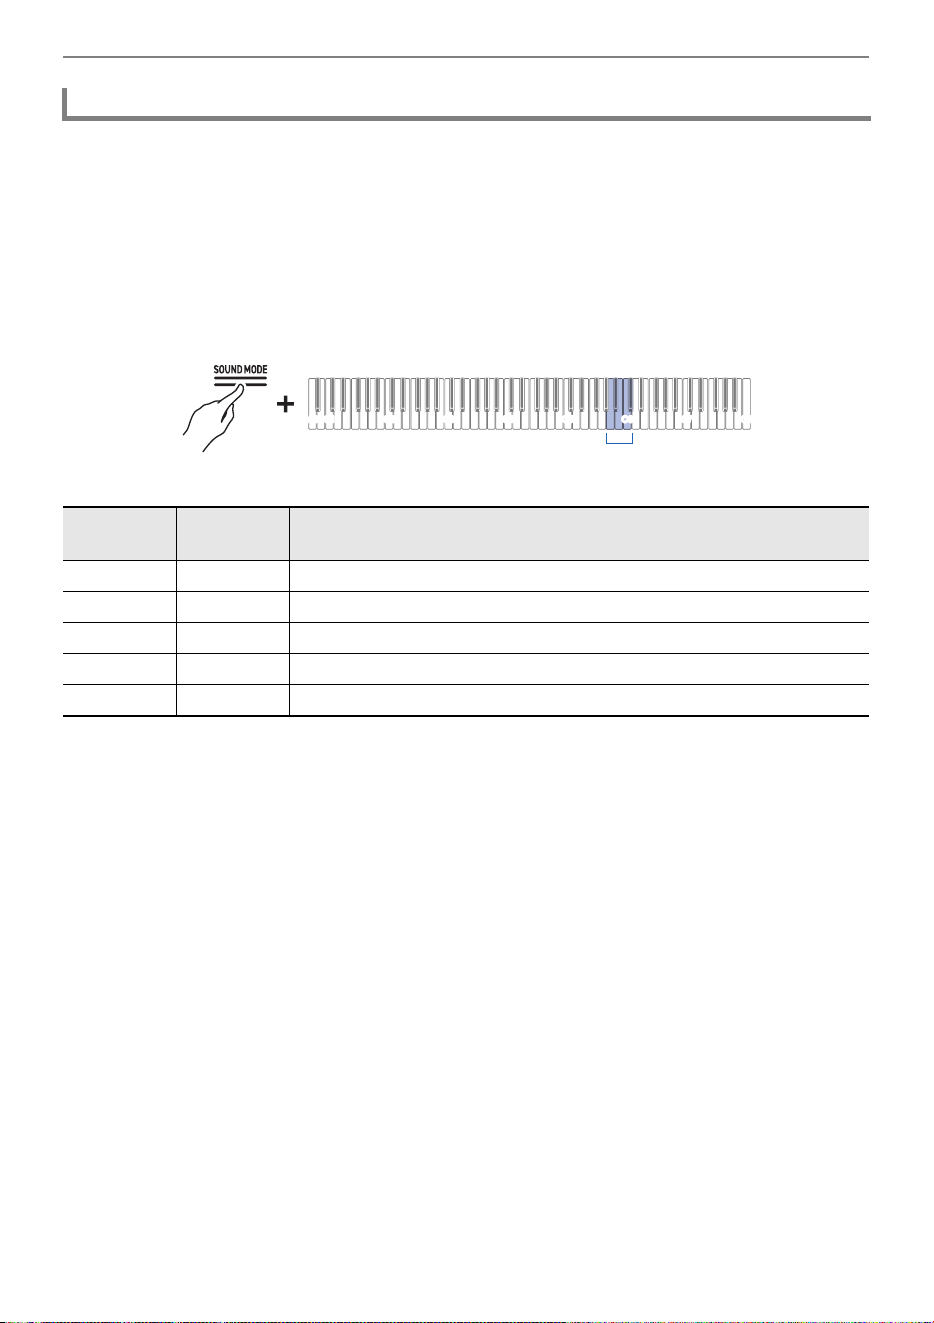
Applying Effects to Sound
EN-65
The sound quality of a grand piano changes depending on how open the lid is. With this Digital Piano,
when you adjust the opening of the lid using the [Lid Simulator], the change in sound quality is
simulated using digital processing. (The Lid Simulator is unrelated to the top panel opening/closing
mechanism of the housing.)
While holding down the “SOUND MODE” button, press any one of the A5 to C{6
keys.
Selecting a Setting Value Directly (operation type A)
• Default value: Tone
Setting the Lid Simulator
Keyboard
Setting
Value
Setting Details
A5 Tone Automatically sets a value appropriate for the current tone.
B}5 Close The lid is closed.
B5 Semi The lid is slightly open.
C6 Full The lid is fully open.
C{6 Remove The lid is removed.
A5 - C{6
C1A0 C2 C3 C4 C5 C6 C7 C8

Adjusting Key Touch
EN-66
The [Touch Response] function changes the volume according to the strength (speed) with which a
player presses a key. The [Touch Response] function enables the volume and sound quality to change
according to the strength (speed) with which a player presses a key, just like an acoustic piano,
enriching the expression of performances.
Adjusting Key Touch
Changing the Volume Made by the Strength of Pressure
Placed on a Key (Touch Response)
Press quickly to produce a loud sound.
Press slowly to produce a quiet sound.
Do not press too vigorously.
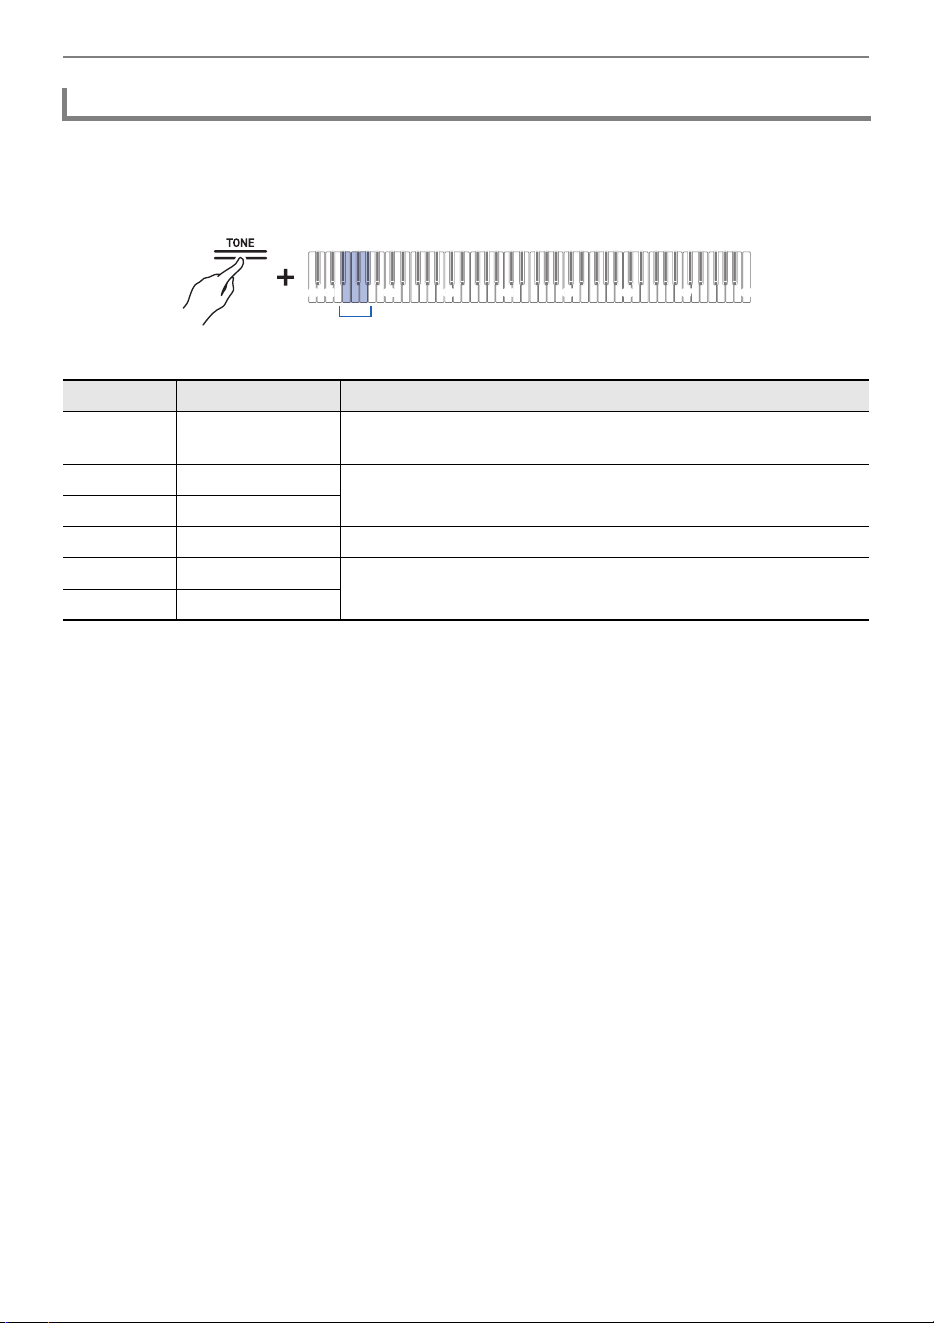
Adjusting Key Touch
EN-67
While holding down the “TONE” button, press one of the E}1 to A}1 keys.
Selecting a Setting Value Directly (operation type A)
• Default value: 3
Changing the sensitivity of Touch Response
Keyboard Setting Value Setting Details
E}1 Off Cancels Touch Response. The volume remains constant even
when key pressing speed changes.
E1 1 (Light) This setting makes it easier to produce loud sounds, and the
touch feels lighter than “Normal”.
F1 2 (Medium light)
F{1 3 (Normal) Standard setting.
G1 4 (Medium heavy) This setting makes it difficult to produce loud sounds, and the
touch feels heavier than “Normal”.
A}15 (Heavy)
C1A0 C2 C3 C4 C5 C6 C7 C8
E}1 - A}1
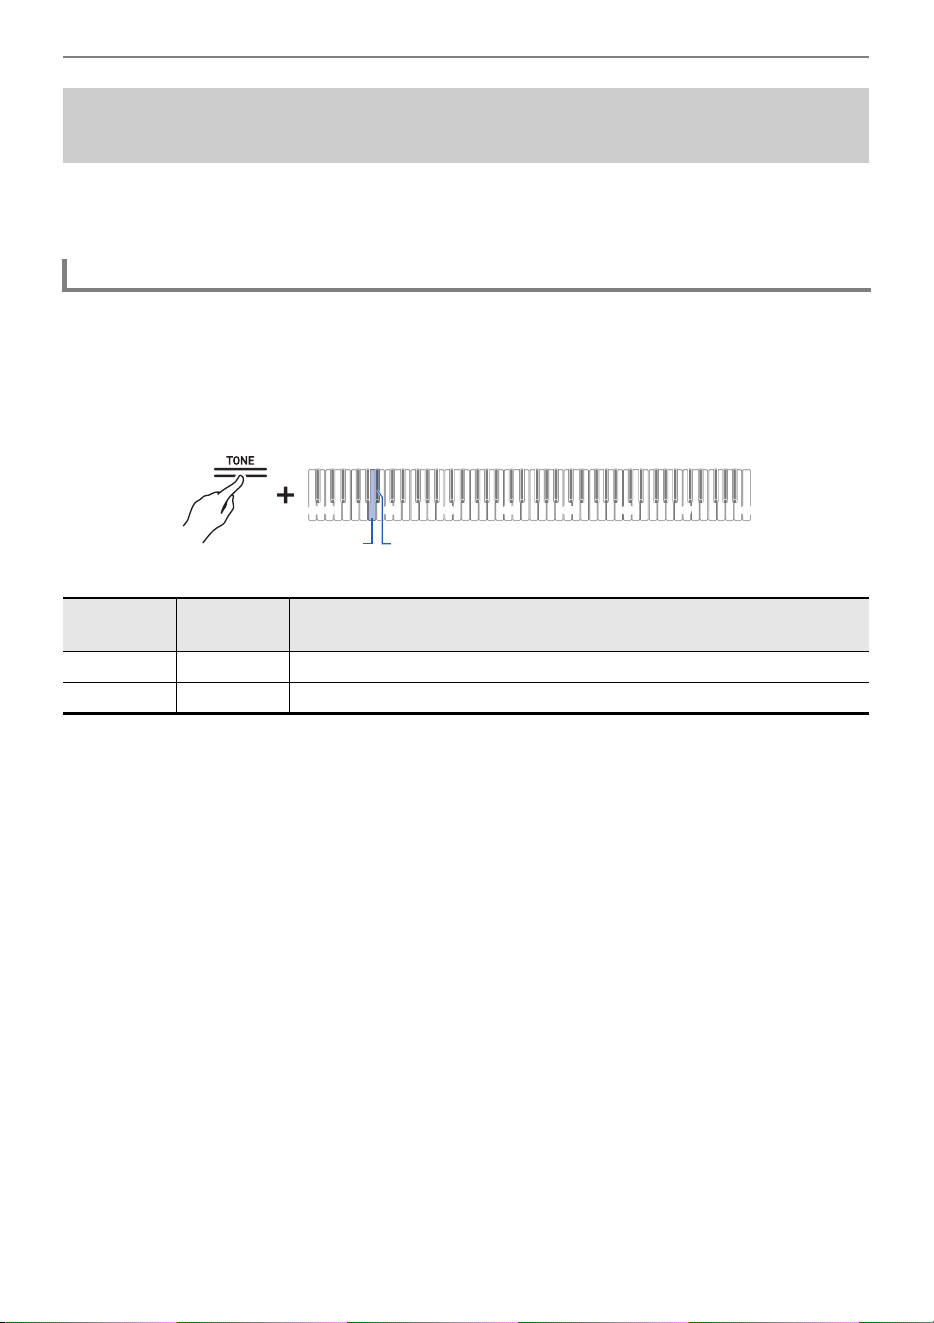
Adjusting Key Touch
EN-68
On an acoustic piano, the size of the hammer that strikes the strings is different for each key range, so
the timing of sound production differs depending on the key range. Adjusts the timing between when a
key is pressed and when a note sounds.
Set [Hammer Response] to <Tone> or <Off>.
While holding down the “TONE” button, press the A1 or B}1 key.
Selecting a Setting Value Directly (operation type A)
• Default value: Tone
Adjust the Timing of Key Press to Sound (Hammer
Response)
Adjusting the Hammer Response
Keyboard
Setting
Value
Setting Details
A1 Tone The optimum value for the current tone is set.
B}1 Off The fastest response is set for all keys.
C1A0 C2 C3 C4 C5 C6 C7 C8
A1 B}1
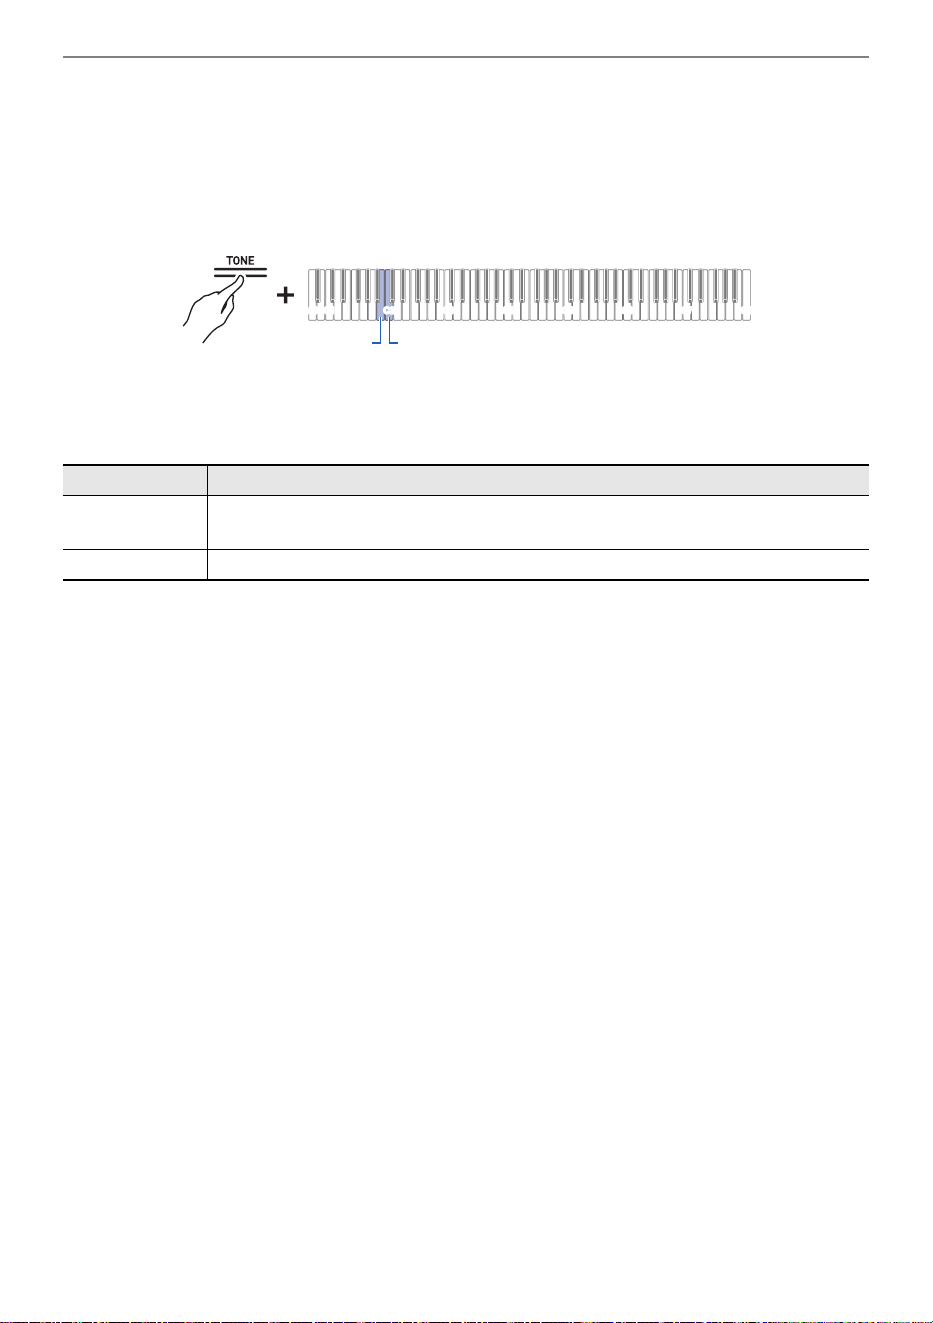
Adjusting Key Touch
EN-69
Change the value of the [Hammer Response] setting to adjust the timing from when
the key is pressed to when the note is sounded.
While holding down the “TONE” button, press the B1 or C2 key.
Using the +/– Keys to Raise or Lower the Setting Value by 1 (operation type B)
• Setting value: Tone, Off, 1–10
The smaller the setting value, the faster the timing between keyboard press and note sounding, and
the larger the value, the slower.
• Default value: Tone
Keyboard Setting Details
B1 Speed up the timing between pressing the keyboard key and the note sounding by
one step (–)
C2 Delay the timing between keyboard press and note sound by one step (+)
C1A0 C2 C3 C4 C5 C6 C7 C8
B1 C2
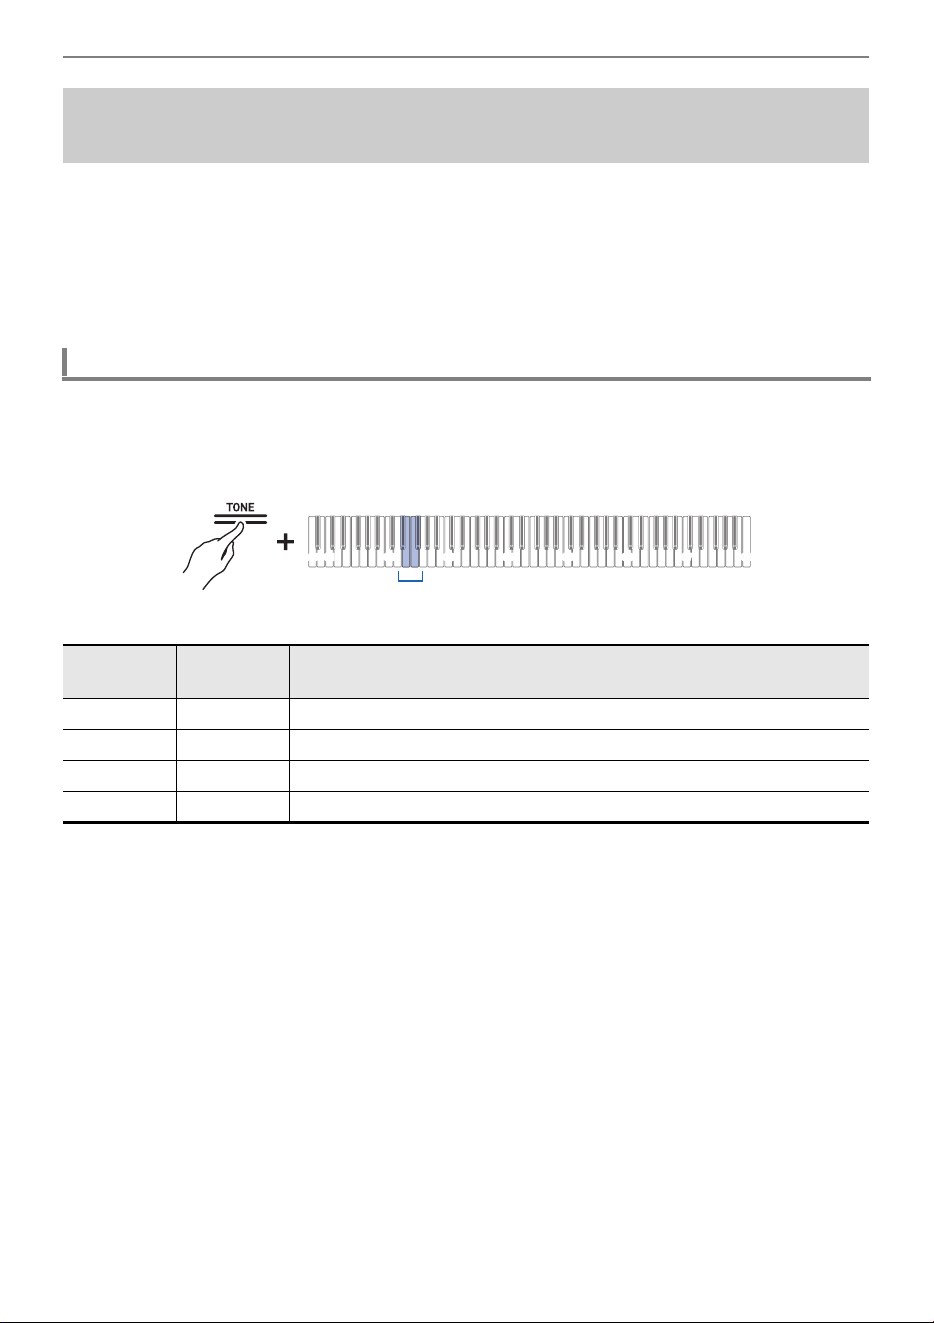
Adjusting Key Touch
EN-70
On a grand piano, when you release a key, the damper comes down on the strings and the sound
stops. The Key Off Response function digitally simulates the timing of when a note stops sounding
based on movement during key release. This function allows the next note to be sounded without
having to fully return to the key when hitting the same note in succession, as on a grand piano, and
enables detailed touch expression, such as the way notes are connected and cut off, allowing the
player to perform with a natural feel. Adjusts the timing from when the key is released until the sound
mutes.
While holding down the “TONE” button, press one of the E}2 to F{2 keys.
Selecting a Setting Value Directly (operation type A)
• Default value: Tone
Adjust the Timing of Mute During Key Release (Key Off
Response)
Adjusting Key Off Response
Keyboard
Setting
Value
Setting Details
E}2 Tone The optimum value for the current tone is set.
E2 Fast The timing until the note mutes after releasing a key is faster.
F2 Normal Standard setting.
F{2 Slow The timing until the note mutes after releasing a key is later.
C1A0 C2 C3 C4 C5 C6 C7 C8
E}2 - F{2

Adjusting the Pitch of Sound
EN-71
Raise or lower the overall pitch of the note in semitone steps. This is useful when you want to play a
difficult key in a familiar key, or when you want to raise or lower the key of the accompaniment to match
the pitch of a singer’s voice.
While holding down the “TONE” button, press the C{1 or D1 key.
Using the +/– Keys to Raise or Lower the Setting Value by 1 (operation type B)
• Setting value: –12 to +12 semitones
• Default value: 0
Adjusting the Pitch of Sound
Changing the Pitch in Semitone Steps (Transpose)
Transpose
Keyboard Setting
C{1 Lowers the pitch of the note by a semitone (–)
D1 Raises the pitch of the note by a semitone (+)
C{1 + D1 Resetting Sound Pitch to Default Setting
C1A0 C2 C3 C4 C5 C6 C7 C8
D1C{1

Adjusting the Pitch of Sound
EN-72
Shift the overall pitch of the Digital Piano slightly. Set the frequency of the A4 note in the range of 415.5
to 465.9 Hz (default 440.0 Hz).
Select 440.0 Hz or 442.0 Hz
While holding down the “FUNCTION” button, press the A4 or B}4 key.
Selecting a Setting Value Directly (operation type A)
• Default value: 440.0 Hz
Changing in 0.1Hz Increments
While holding down the “FUNCTION” button, press the B4 or C5 key.
Using the +/– Keys to Raise or Lower the Setting Value by 1 (operation type B)
• Set value: 415.5 to 465.9 Hz
A separator tone sounds when the frequency reaches a whole number (such as 440 or 441).
• Default value: 440.0 Hz
Fine-tuning (A-tuning)
Tuning
Keyboard Setting
A4 Sets the frequency of the A4 note to 440.0 Hz
B}4 Sets the frequency of the A4 note to 442.0 Hz
Keyboard Setting
B4 Decreases the frequency of the A4 note by 0.1 Hz (–)
C5 Raises the frequency of A4 sound by 0.1 Hz (+)
C1A0 C2 C3 C4 C5 C6 C7 C8
A4 B}4
C1A0 C2 C3 C4 C5 C6 C7 C8
B4 C5

Adjusting the Pitch of Sound
EN-73
The pitch of the sound can be raised or lowered in octaves.
Each part (Upper1, Upper2) can be set independently when using [Layer].
For more information about layers and their respective parts, see “Layering Two Tones (Layer)”.
While holding down the “TONE” button, press the B0 or C1 key.
Using the +/– Keys to Raise or Lower the Setting Value by 1 (operation type B)
• Setting value: –2 to +2 octaves
• Default value: 0
While holding down the “TONE” button, press the E}7 or E7 key.
Using the +/– Keys to Raise or Lower the Setting Value by 1 (operation type B)
• Setting value: –2 to +2 octaves
• Default value: 0
Shifting by Octaves (Octave Shift)
Shifting a Upper1 Part by an Octave
Keyboard Setting
B0 Lowers the pitch of the Upper1 part by one octave (–)
C1 Raises the pitch of the Upper1 part by one octave (+)
B0 + C1 Upper1 Resets the part’s pitch to the default setting
Shifting Upper2 Part by an Octave
Keyboard Setting
E
}7 Lowers the pitch of the Upper2 part by one octave (–)
E7 Raises the pitch of the Upper2 part by one octave (+)
E
}7 + E7 Upper2 Resets the part’s pitch to the default setting
C1A0 C2 C3 C4 C5 C6 C7 C8
B0 C1
C1A0 C2 C3 C4 C5 C6 C7
E}7E7

Adjusting the Pitch of Sound
EN-74
By setting the scale of the keys, you can play music (Indian, Arabic, classical, etc.) that uses a scale
other than the regular temperament (12 equal temperament). You can choose your favorite scale from
17 preset scales.
While holding down the “FUNCTION” button, press the F4 key (Scale Tuning
Selection).
Switching On/Off or Changing Setting Values Using a Single Key (operation type D)
• An initial tone sounds when the set value reaches 0, and a separator tone sounds when the set value
reaches 10.
• Default value: 0
Changing the Scale Tuning (Temperament) of the
Keyboard
Changing the Scale Tuning
Setting
Value
Scale (Temperament)
0 Equal Temperament
1 Pure Major Temperament
2 Pure Minor Temperament
3 Pythagorean Temperament
4 Kirnberger 3 Temperament
5 Werckmeister Temperament
6 Mean-Tone Temperament
7Rast
8 Bayati
9Hijaz
10 Saba
11 Dashti
12 Chahargah
13 Segah
14 Gurjari Todi
15 Chandrakauns
16 Charukeshi
C1A0 C2 C3 C4 C5 C6 C7 C8
F4

Adjusting the Pitch of Sound
EN-75
1.
While holding down the “FUNCTION” button, press the F{4 key (Scale Tuning
base note).
Putting in Standby Mode, and Executing on Next Key Press (operation type E)
• Do not release the “FUNCTION” button until the next operation is complete.
2.
While holding down the “FUNCTION” button, specify the base note (C to B) you
wish to set on the keyboard.
• Specify the base note by pressing one of the 88 keys.
Generally, on a piano, the high notes are tuned higher and the low notes are tuned lower. This tuning is
called “Stretch Tuning”.
While holding down the “FUNCTION” button, press the G4 key (stretch tuning).
Switching On/Off or Changing Setting Values Using a Single Key (operation type D)
• Default value: On
Setting the Scale Tuning Base Note
Switching Stretch Tuning On/Off
Setting Value Setting Details
Off Turns off Stretch tuning.
On Turns on Stretch tuning.
C1A0 C2 C3 C4 C5 C6 C7 C8
F{4
C1A0 C2 C3 C4 C5 C6 C7 C8
G4
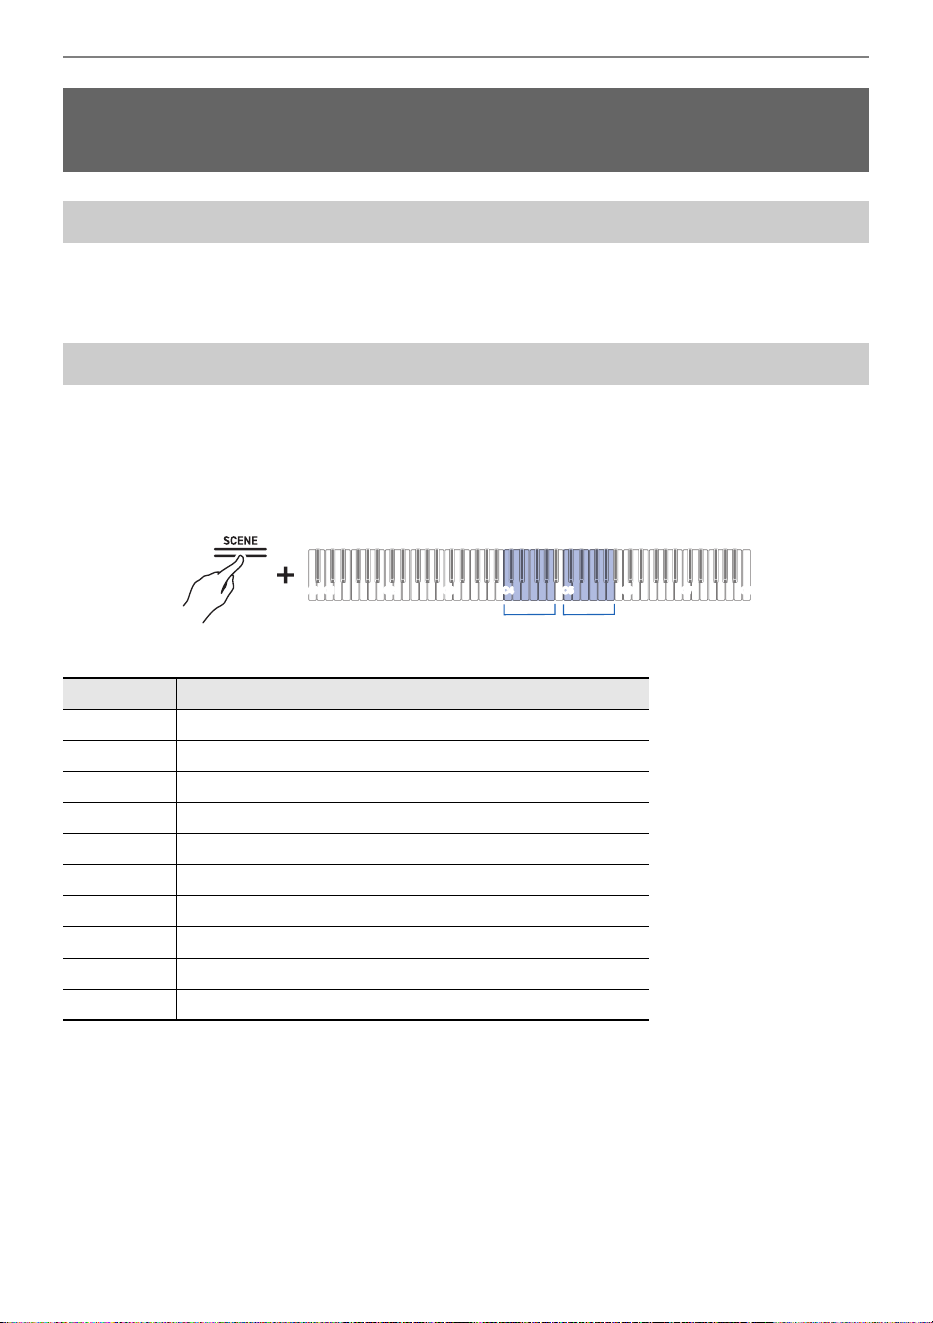
Select the appropriate setting for the song or scene to be played (Scene)
EN-76
The unit has 10 preset scenes with settings adjusted to suit the song or scene to be played. You can
select a scene and instantly change the settings of the Digital Piano. You can also create your own
favorite scenes (User Scenes) and store up to 10 of them in the memory.
While holding down the “SCENE” button, press one of the C5 to A5 keys (Preset
Scene) or C4 to A4 keys (User Scene).
Selecting a Setting Value Directly (operation type A)
• For more information on preset scenes, see “Preset scene list”.
Select the appropriate setting for the song or
scene to be played (Scene)
Preset Scenes and User Scenes
Calling up a Scene
Keyboard Setting
C5 Preset Scene 1
C{5 Preset Scene 2
D5 Preset Scene 3
E}5 Preset Scene 4
E5 Preset Scene 5
F5 Preset Scene 6
F{5 Preset Scene 7
G5 Preset Scene 8
A}5 Preset Scene 9
A5 Preset Scene 10
C1A0 C2 C3 C4 C5 C6 C7 C8
C4 - A4 C5 - A5
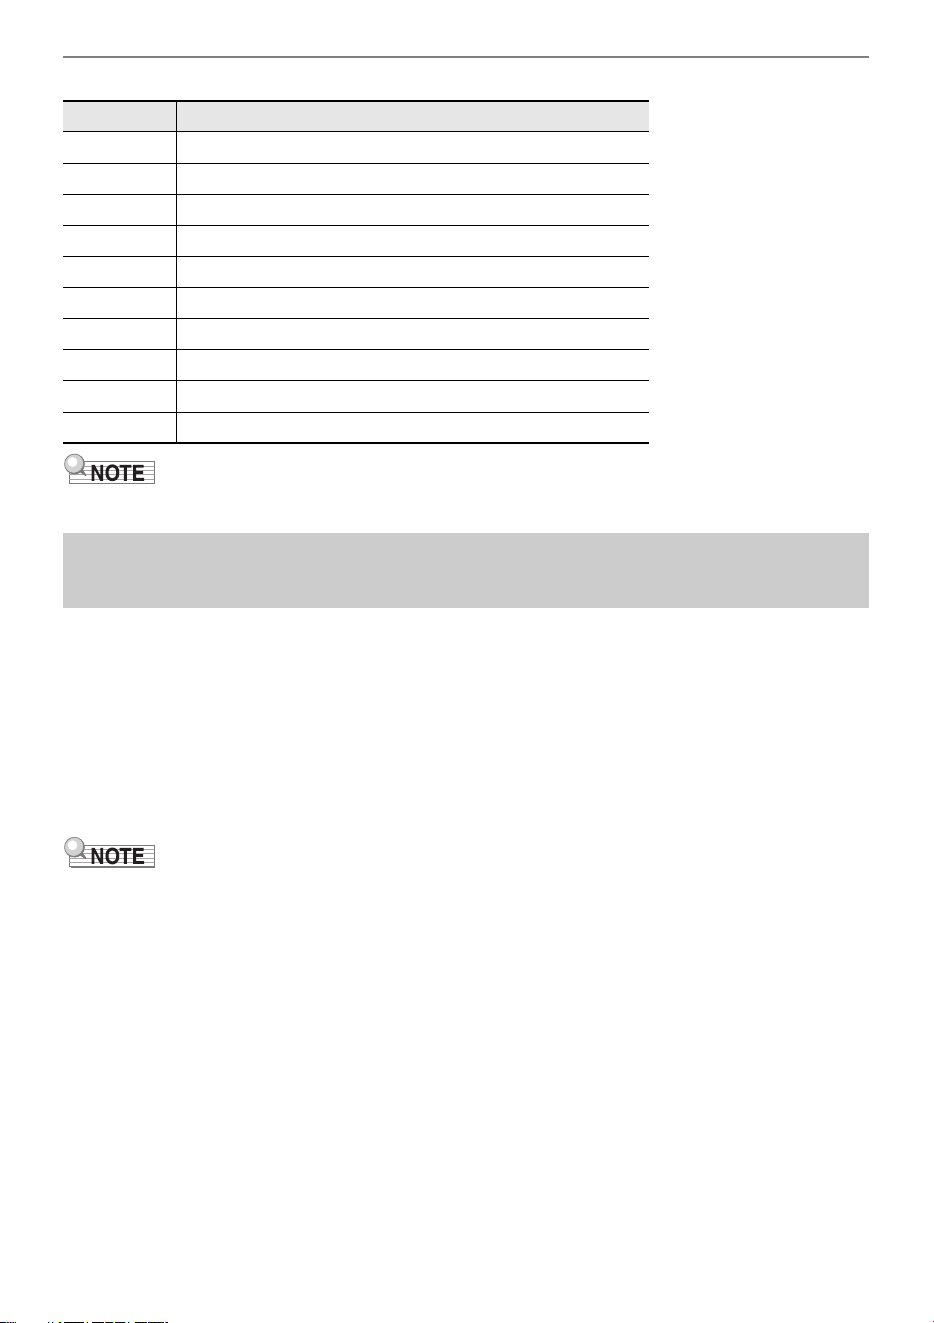
Select the appropriate setting for the song or scene to be played (Scene)
EN-77
• Pressing only the SCENE button will bring up the last recalled scene (default setting is preset scene 1).
You can play a few bars of a song appropriate for the scene so that you can listen and check the sound
atmosphere of the selected scene.
1.
Calls up a scene.
•See “Calling up a Scene”.
2.
Hold down the “SCENE” button and press the “a” button.
3.
Press the “a” button again to stop playback.
• If step 2 is performed when no scenes have been recalled since the unit was turned on, preset scene
1 will be recalled and the relevant scene song will be played.
Keyboard Setting
C4 User Scene 1
C{4 User Scene 2
D4 User Scene 3
E}4 User Scene 4
E4 User Scene 5
F4 User Scene 6
F{4 User Scene 7
G4 User Scene 8
A}4 User Scene 9
A4 User Scene 10
Listen to the sound atmosphere of the scene to confirm
(Scene Song)

Select the appropriate setting for the song or scene to be played (Scene)
EN-78
You can change the following items to create your own preferred settings and store them in the User
Scenes.
• Tone Selection (including Layer and Split settings)
See “Selecting a Tone”.
• Effects on sound (Sound Mode Effects, Acoustic Simulator, etc.)
See “Applying Effects to Sound”.
• Scene Song
See “Songs that can be stored in user scenes (Scene Songs)”.
For details on other settings stored in user scenes, see “List of user scene record items”.
1.
Select tones, effects, etc., and create your own settings.
2.
While holding down the “SCENE” button, press the B3 key (Store in User
Scenes).
Putting in Standby Mode, and Executing on Next Key Press (operation type E)
• The Hall Simulator/Reverb Indicator and Surround Indicator will blink, and the Digital Piano will
go on standby for saving to the User Scenes.
• Do not release the “SCENE” button until the next operation is complete.
3.
While holding down the “SCENE” button, press one of the C4 to A4 keys (User
Scenes) to specify the user scene number to be stored.
• If you specify a number for which a user scene has already been memorized, the user scene will
be overwritten with the current settings.
Create your own scenes (User Scenes)
Store in User Scenes
C1A0 C2 C3 C4 C5 C6 C7 C8
B3

Select the appropriate setting for the song or scene to be played (Scene)
EN-79
The song that was selected at the time of saving is stored in the user scene.
The types of songs that can be stored in a user scene are as follows
• Music library (Built-in Songs, User Songs)
• MIDI Recorder Songs
Even if the original song data is deleted, the song data remains in the user scene.
• Even if the [RePlayer/Recorder] setting is switched to a setting other than <MIDI Recorder> and
stored in the user scene, the [RePlayer/Recorder] setting will always remain as <MIDI Recorder>. In
this case, Music Library No. 1 is also stored as the scene song.
Songs that can be stored in user scenes (Scene Songs)
Listening to Songs
EN-80
This Digital Piano is equipped to play MIDI data (including built-in songs) and audio data.
MIDI Data
You can playback MIDI data stored in the Digital Piano’s internal memory or USB flash drive.
For more information, see “Playing MIDI Data”.
Audio Data
You can play back MIDI data stored in the Digital Piano’s internal memory or USB flash drive.
For more information, see “Playing Audio Data (WAV, MP3)”.
• Depending on the type of data you want to play back, you will need to switch the [RePlayer/
Recorder] setting between <MIDI Recorder>, <Audio Recorder (USB Flash Drive)>, or <Audio
Recorder (internal flash memory)>.
Music Library
Use the Music Library to listen to and practice famous piano pieces.
Built-in Songs
These are 60 built-in songs (numbers 1 to 60 in the music library).
See “Music Library List” for song listings.
User Songs
These are 10 songs (No.61 to 70 in the music library) saved to the Digital Piano’s internal memory from
an external source. Saving User Songs is executed using a smart device or via a USB Flash Drive
connected to the Digital Piano.
For details, see “Using the Dedicated App” and “Loading a MIDI File from a USB Flash Drive into the
Digital Piano”.
MIDI Recorder Songs
These songs are recorded with the Digital Piano’s MIDI Recorder.
For more information, see “Recording a Performance with the MIDI Recorder”.
USB Flash Drive Songs
A standard MIDI file (SMF format 0/1) or CASIO MIDI file (CMF format) song stored on a USB flash
drive. You can easily play these back without loading them into the Digital Piano.
For saving MIDI data that can be played on this Digital Piano to a USB Flash Drive, see “Copying MIDI
Song Data to a USB Flash Drive Using a Computer”.
Listening to Songs
Types of Data that Can Be Played Back
Playing MIDI Data

Listening to Songs
EN-81
The default setting for [RePlayer/Recorder] on this Digital Piano is <MIDI Recorder>.
While holding down the “FUNCTION” button, press the B3 key (MIDI recorder).
Selecting a Setting Value Directly (operation type A)
• The Visual Information Bar, second from left, will blink.
Operate with <MIDI Recorder>.
Switching to MIDI Recorder
1.
Hold down the “a” button and use the corresponding key to select a song.
Once you have made your selection, release the “a” button.
•See “Music Library List” for song listings.
• Select a song assigned to a key (Built-in Songs: C{3 to C8 keys, User Songs: B1 to A
}2 keys)
Selecting a Setting Value Directly (operation type A)
• Specify song numbers (Built-in Songs: 1 to 60, User Songs: 61 to 70) using the A0 to F{1 keys
Inputting Setting Values Using the Keys 0 to 9 (operation type C)
• Use keys B2/C3 (Song Select –/Song Select +) to specify previous/next song (Built-in Songs,
User Songs, MIDI Recorder Songs)
Using the +/– Keys to Raise or Lower the Setting Value by 1 (operation type B)
2.
To start playback, touch the “a” button.
• To stop playback in the middle of a song, touch the “a” button again.
• The beat indicator lights up in time with the beat of the song (left side for the first beat, right side
for the remaining beats).
• Playback ends when the end of the song is reached.
• If a song selection is made, the appropriate settings for the selected song is automatically
implemented. Also, the playback settings return to default.
Switching to MIDI Recorder
Selecting Songs for Playback from the Music Library
C1A0 C2 C3 C4 C5 C6 C7 C8
B3
C1A0 C2 C3 C4 C5 C6 C7 C8
A0 - F{1 C{3 - C8B1 - A}2
B2 C3

Listening to Songs
EN-82
Operate with <MIDI Recorder>.
Switching to MIDI Recorder
1.
While holding down the “a” button, press the A2 key (MIDI Recorder Song).
Selecting a Setting Value Directly (operation type A)
2.
To start playing a song, touch the “a” button.
• To stop playback in the middle of a song, touch the “a” button again.
• Playback ends when the end of the song is reached.
Attach the USB flash drive containing the songs to the USB Type A terminal on the Digital Piano.
For information on using USB Flash Drives, see “Inserting/Removing a USB Flash Drive from the
Digital Piano”.
Operate with <MIDI Recorder>.
Switching to MIDI Recorder
1.
While holding down the “a” button, press the B}2 key (USB Flash Drive Song).
Switching On/Off or Changing Setting Values Using a Single Key (operation type D)
• Default value: Off
Select a MIDI Recorder Song for Playback
Selecting a USB Flash Drive Song for Playback
Setting Value Setting Details
Off
Songs stored in the Digital Piano (Music Library songs, MIDI Recorder Song) are
eligible for song selection
On Songs stored on a USB flash drive (USB Flash Drive Songs) are eligible for song
selection
C1A0 C2 C3 C4 C5 C6 C7 C8
A2
C1A0 C2 C3 C4 C5 C6 C7 C8
B}2
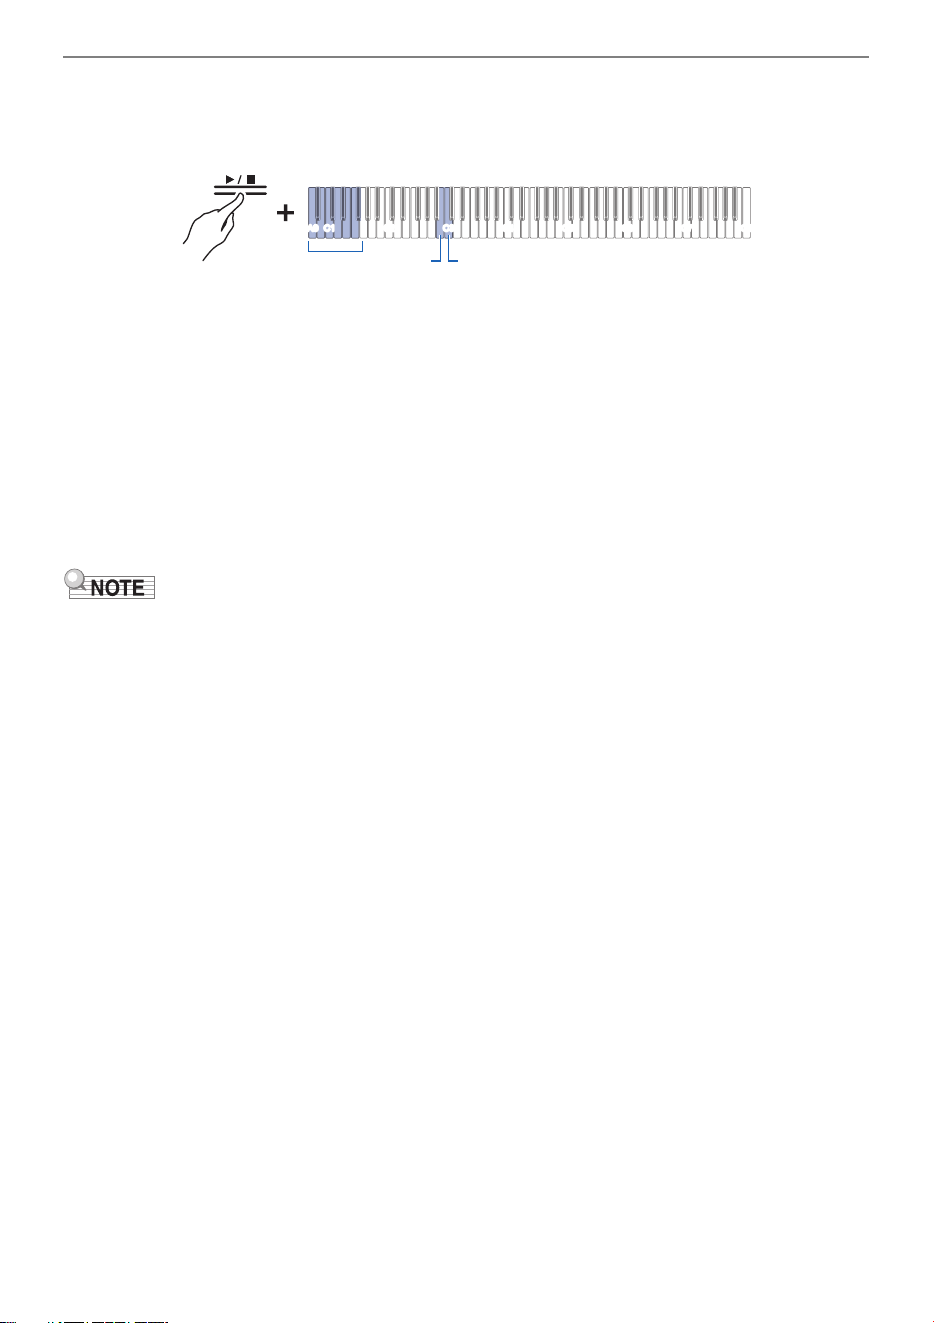
Listening to Songs
EN-83
2.
Hold down the “a” button and use the corresponding key to select a song.
After selecting a song, press the “a” button.
• Specify song numbers 0 to 99 using the A0 to F{1 keys (numbers 0 to 99 are automatically
assigned to each file in ascending order of the file name).
Inputting Setting Values Using the Keys 0 to 9 (operation type C)
• Use keys B2/C3 (Song Select – /Song Select +) to specify previous/next song number
Using the +/– Keys to Raise or Lower the Setting Value by 1 (operation type B)
3.
To start playback, touch the “a” button.
• To stop playback in the middle of a song, touch the “a” button again.
• The beat indicator lights up in time with the beat of the song (left side for the first beat, right side
for the remaining beats).
• Playback ends when the end of the song is reached.
• If the file of the specified song number does not exist, a tone will sound for invalid.
C1A0 C2 C3 C4 C5 C6 C7 C8
B2 C3
A0 - F{1
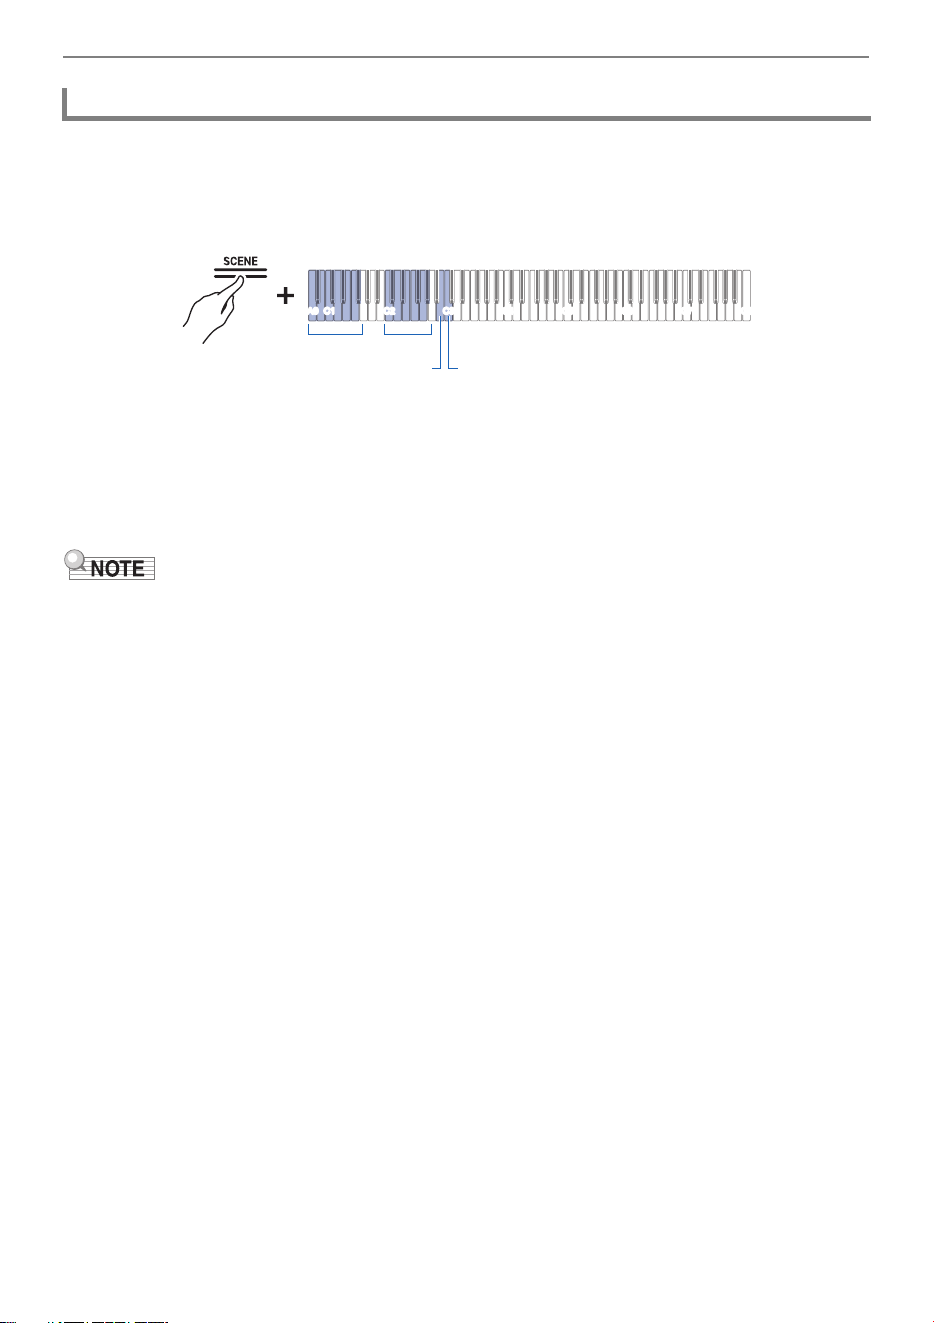
Listening to Songs
EN-84
Select the song to be played before changing the setting.
1.
While holding down the “SCENE” button, press the corresponding key.
• Sets the tempo in the range of 20 to 255 (beats per minute).
Entering Tempo as a Number
Raising or Lowering the Tempo Value by 1
Setting the Tempo from a Tempo Marking
2.
To start playback, touch the “a” button.
• The tempo setting can be changed even during playback.
• In some songs, the tempo changes in the middle of the song for expression within the performance.
Changing the Tempo
C2 - A}2A0 - F{1
C1A0 C2 C3 C4 C5 C6 C7 C8
B2 C3

Listening to Songs
EN-85
You can mute the right-hand or left-hand part of a song and practice playing it yourself.
• Select the song to be played before changing the setting.
• Set the tempo as needed.
For more information, see “Changing the Tempo”.
1.
While holding down the “a” button, press the B}1 key (Song Playback Part
selection (LR/L/R)).
Switching On/Off or Changing Setting Values Using a Single Key (operation type D)
• The “L” and “R” track indicators light up respectively.
2.
To start playback, touch the “a” button.
• When playing a standard MIDI file (SMF format), ch3 will be the left-hand part and ch4 will be the
right-hand part.
Song Playback Part
Track Indicator Setting Details
Only L lights up Plays the left-hand part and mutes the right-hand part.
Only R lights up Plays the right-hand part and mutes the left-hand part.
Both L and R light up Both left and right parts are played back.
C1A0 C2 C3 C4 C5 C6 C7 C8
B}1
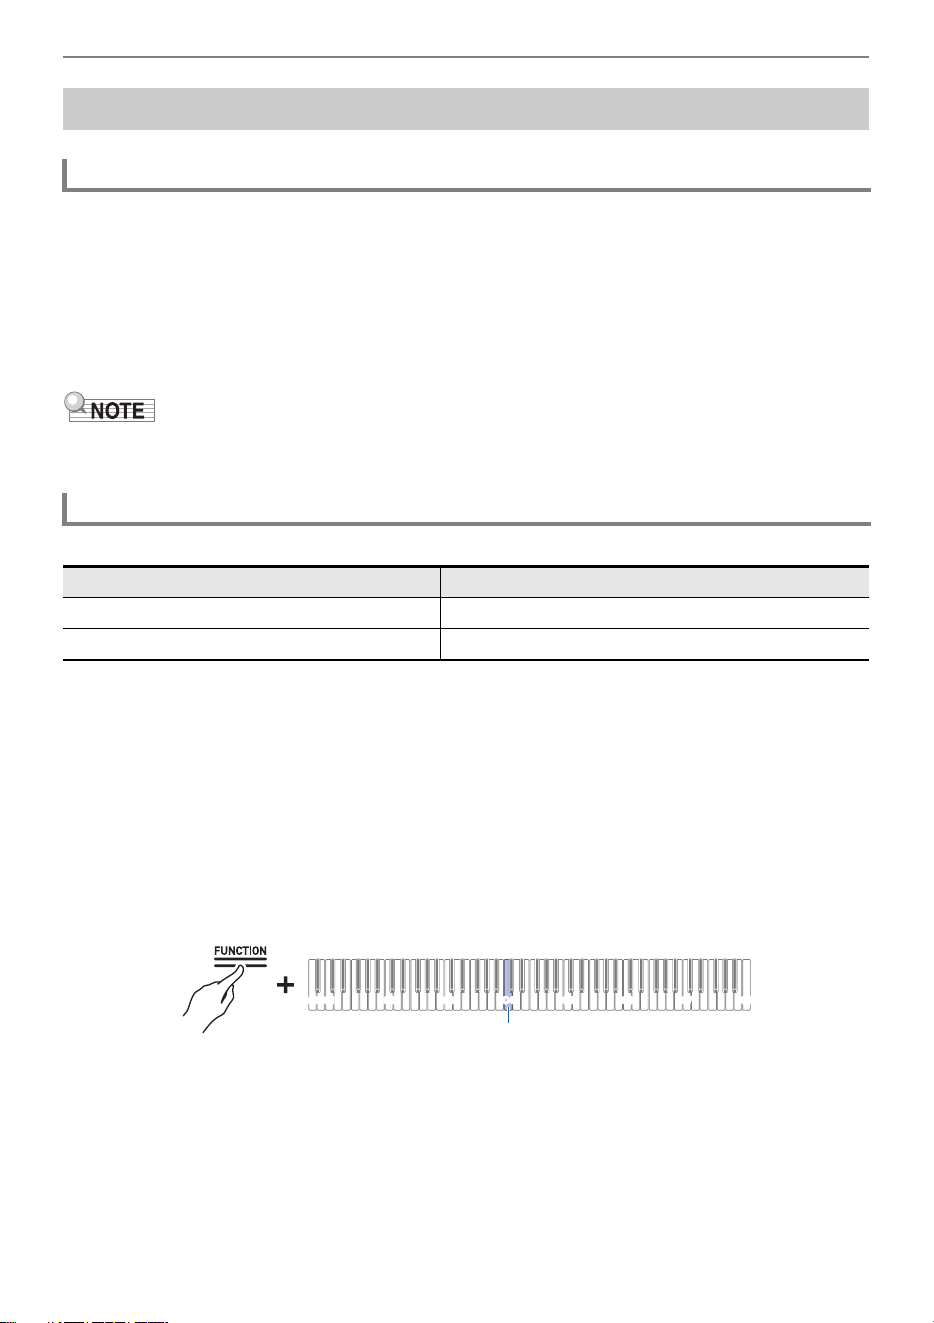
Listening to Songs
EN-86
The following audio data can be played.
• Audio data stored in the internal memory of the Digital Piano
• Audio data in the AUDIOREC folder stored on a USB flash drive can be played back.
Supported audio data formats are as follows.
• WAV files (linear PCM, 16bit, 44.1kHz, stereo, extension: .WAV), file name “TAKE
**
.WAV” (where
**
= 01-99)
• MP3 files (MPEG-1 Audio Layer3, 44.1kHz/48kHz, bit rate 32-320kbps/variable bit rate (VBR)
supported, mono/stereo, extension: .MP3), file name “TAKE
**
.MP3” (where
**
= 01-99)
• For saving audio data that can be played on this Digital Piano to a USB Flash Drive, see “Copying
Audio Data (WAV, MP3) to a USB Flash Drive Using a Computer”.
Switch the [RePlayer/Recorder] setting to one of the following.
Switch to <Audio Recorder (USB Flash Drive)>
1.
Attach the USB Flash Drive containing the songs to the USB Type A terminal on
the Digital Piano.
• For information on using USB Flash Drive, see “Inserting/Removing a USB Flash Drive from the
Digital Piano”.
2.
While holding down the “FUNCTION” button, press the C4 key.
Selecting a Setting Value Directly (operation type A)
• On the Visual Information Bar, the third light from the left will blink.
Playing Audio Data (WAV, MP3)
Data that can be played back
Switching to Audio Recorder
When playing this: Switch to this setting:
Audio data stored on USB flash drive Audio Recorder (USB flash drive)
Audio data stored in internal memory Audio recorder (built-in flash memory)
C1A0 C2 C3 C4 C5 C6 C7 C8
C4

Listening to Songs
EN-87
Switch to <Audio Recorder (Internal Flash Memory)>
• While holding down the “FUNCTION” button, press the D4 key.
Selecting a Setting Value Directly (operation type A)
• On the Visual Information Bar, the fifth light from the left will blink.
Please use <Audio Recorder (USB Flash Drive) > or <Audio Recorder (internal flash memory) >.
Switching to Audio Recorder
1.
Hold down the “a” button and use the corresponding key to select a song.
After selecting a song, release the “a” button.
• Use the A0 to F{1 keys to specify the TAKE
**
.WAV (where
**
=01-99) number.
Inputting Setting Values Using the Keys 0 to 9 (operation type C)
• Use keys B2/C3 (Song Select – /Song Select +) to specify previous/next song number
Using the +/– Keys to Raise or Lower the Setting Value by 1 (operation type B)
2.
To start playback, touch the “a” button. To stop playback in the middle of a
song, touch the “a” button again.
• Playback ends when the end of the song is reached.
• If the file of the specified song number does not exist, a tone will sound to indicate that the selection
is invalid.
• When “Audio Recorder (USB Flash Drive)” is selected and the WAV file name “TAKE
**
.WAV” (where
**
= 01–99) and the MP3 file name “TAKE
**
.MP3” (where
**
=01–99) are the same, the WAV file will
play.
Selecting a Song for Playback
C1A0 C2 C3 C4 C5 C6 C7 C8
D4
C1A0 C2 C3 C4 C5 C6 C7 C8
B2 C3
A0 - F{1

Recording a Performance
EN-88
The Digital Piano has two recording options: a MIDI Recorder and an Audio Recorder. Depending on
the type of data you want to record or play back, you will need to switch the [RePlayer/Recorder] setting
between <MIDI Recorder>, <Audio Recorder (USB Flash Drive)>, or <Audio Recorder (internal flash
memory)>.
MIDI Recorder
Performances are converted
to MIDI data* and recorded to two tracks (data domain where
performances are recorded) in the internal memory.
• Keyboard performance information (keys pressed and released, touch strength, etc.) is recorded as
MIDI data.
• MIDI data has the benefit of being extremely small in size compared to audio data, and it can be
edited later, e.g., on a computer.
• One song can be recorded. When a new recording is made, the previous recording is erased.
• The maximum number of notes that can be recorded in one song is approximately 30,000 notes as a
total for both tracks.
* MIDI
MIDI is an abbreviation for Musical Instrument Digital Interface. It is a unified standard that allows
performance information (keys pressed and released, touch strength, etc.) to be exchanged between
electronic musical instruments or between electronic musical instruments and computer equipment,
regardless of manufacturer. The performance information exchanged is called MIDI data.
You can also:
Record to the right-hand part track while playing the left-hand part track
Recording a Performance
MIDI Recorder and Audio Recorder Features
Recording Features
MIDI
Left-hand part track
Right-hand part track
Keyboard performance While playing back
Keyboard performance

Recording a Performance
EN-89
Audio Recorder
Record your performance as audio data
*
to the built-in memory or USB flash drive.
• The sound itself is recorded as audio data, similar to recording on a portable music player or tape
recorder.
• Audio data files are extremely large in size compared to MIDI data. However, they have the
advantage of being easy to listen to on a computer or portable music player.
• The internal memory can record up to approximately 18 minutes and up to 99 files (the total of all
files must not exceed 18 minutes).
• Up to 25 minutes and up to 99 files can be recorded on a USB Flash Drive.
* Audio Data
Audio data recorded with this Digital Piano is saved in WAV file format (linear PCM, 16 bit, 44.1 kHz,
stereo).
You can also:
Record a performance while playing back a song recorded using the MIDI Recorder
• For information about data file formats that are supported by this Digital Piano, see “Types of data
that can be handled by this Digital Piano”.
• Data recorded on the Digital Piano can be saved to a USB Flash Drive. See “Saving MIDI Recorder
Songs to a USB Flash Drive” and “Save a batch of audio files from the internal memory to a USB
flash drive”.
USB
Playback of a MIDI Recorder song Keyboard performance

Recording a Performance
EN-90
MIDI Recorder
Plays the left-hand part track and the right-hand part track (both or either).
• The MIDI Recorder automatically plays the internal sound source of this Digital Piano according to
the performance information recorded as MIDI data.
You can also:
Play the keyboard along with playback of the left-hand part track and the right-hand part track
Change the Tempo of a Recording
You can, for example, record at a slower tempo and play back at a faster tempo.
• The tempo set for the left-hand part track is applied to the right-hand part track.
Audio Recorder
Play audio data from internal memory or USB flash drive.
• The Audio Recorder plays back the sound of the piano recorded as audio data.
You can also:
Perform on the keyboard while playing audio data
• For information about data file formats that are supported by this Digital Piano, see “Types of data
that can be handled by this Digital Piano”.
Playback Features
Left-hand part track
Right-hand part track
While playing back
While playing back
Keyboard performance
Play audio data Keyboard Performance
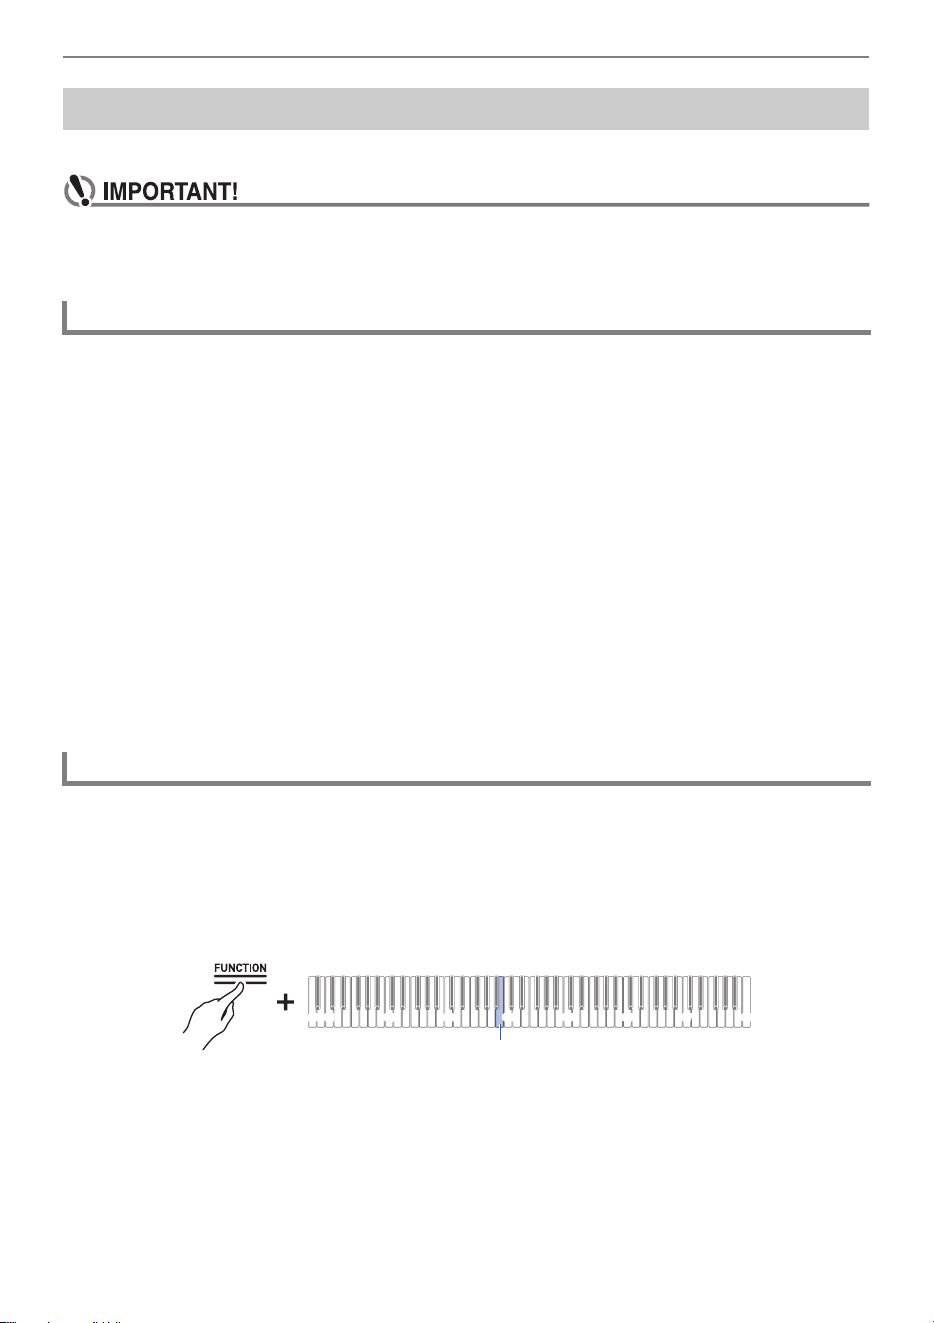
Recording a Performance
EN-91
Records keyboard performances and pedal usage as MIDI data.
• Please be aware that we will not be responsible for any damages, lost profits, or any claims
from third parties arising from the deletion of recorded content due to malfunction or repair of
this Digital Piano.
When recording with the MIDI Recorder, the following operations and settings are recorded to the
Digital Piano’s internal memory.
• Keyboard and pedal play
•Tone
•Tempo
*
• Beat
*
• Keyboard volume
*
• Layer settings (left-hand part track only)
• Split settings (left-hand part track only)
• Duet (left-hand part track only)
• Sound modes (Hall Simulator/Reverb Type, Hall Simulator/Reverb Depth for built-in sound source,
Surround Type), Chorus, Brilliance
*
• Acoustic Simulator Settings
*
• Scale tuning
*
• Stretch Tuning
*
* Left-hand part track only. However, the setting is also applied to the right-hand part track during
playback.
Switch the [RePlayer/Recorder] setting to <MIDI Recorder>.
The default setting for [RePlayer/Recorder] on this Digital Piano is <MIDI Recorder>.
While holding down the “FUNCTION” button, press the B3 key (MIDI Recorder).
Selecting a Setting Value Directly (operation type A)
• The Visual Information Bar, second from left, will blink.
Recording a Performance with the MIDI Recorder
Main Content Recorded by the MIDI Recorder
Preparing to Use the MIDI Recorder
C1A0 C2 C3 C4 C5 C6 C7 C8
B3
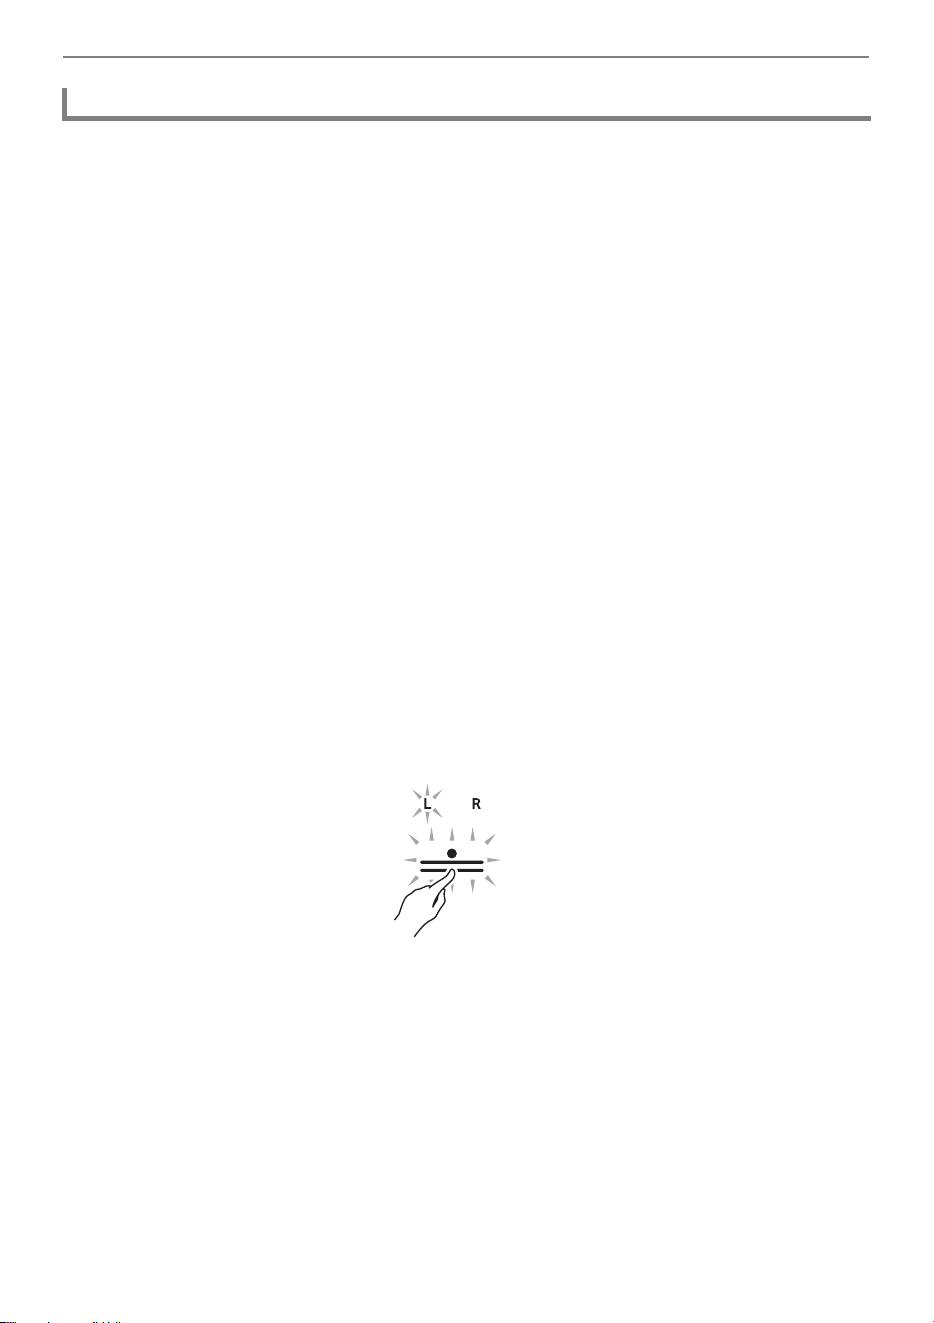
Recording a Performance
EN-92
Easy use of MIDI Recorder
1.
Touch the “0(REC)” button (lit white).
• The “0(REC)” button will start to blink red to indicate that recording is on standby.
2.
When you start to play, recording will begin automatically.
• The “0(REC)” button stops blinking red and changes to lit to indicate that recording is in
progress.
3.
To end recording, touch the “0(REC)” button.
• The “0(REC)” button will light up white again.
4.
To play the current recording, touch the “a” button.
• To stop playback, touch the “a” button again.
Recording to the Left-Hand Part Track
Switch [RePlayer/Recorder] to <MIDI Recorder> for operation.
Preparing to Use the MIDI Recorder
1.
Set tones, effects, tempo, etc. for recording as necessary.
• For setting beat and tempo, see “Setting the Beat” and “Setting a Tempo”.
• For track-by-track recording details, see “Main Content Recorded by the MIDI Recorder”.
2.
Touch the “0(REC)” button (lit white).
• Recording goes to standby, and the “0(REC)” button blinks red.
• The “L” Track Indicator blinks.
• To stop the recording, touch the “0(REC)” button again.
3.
To sound the metronome while recording, touch the “METRONOME” button.
Recording

Recording a Performance
EN-93
4.
Recording will begin when you start playing.
• You can also start recording by holding down the “0(REC)” button and touching the “a”
button.
• The “0(REC)” button switches from blinking to lit, and the “a” button goes off.
• If you want to redo your recording, see “Starting over from the beginning during a recording”.
5.
To end recording, touch the “0(REC)” button.
• The “0(REC)” button will light up white again and the “a” button will light up.
• To play back the recording immediately, touch the “a” button.
Starting over from the beginning during a recording
If you want to redo the recording due to a performance error or other reason, hold down the “0(REC)”
button until it flashes during recording. The recorded data is discarded and the process returns to a
record standby state.

Recording a Performance
EN-94
Overdub Recording (record to the right-hand part track to layer over the recording
of the left-hand part track)
Use “Recording to the Left-Hand Part Track” to enter the record standby state before proceeding.
1.
Press and hold the “0(REC)” button until the “R” Track Indicator flashes.
• The right-hand part track will be recorded.
• The “L” in the track indicator switches from a blink to lit.
2.
If you do not want the left-hand part track to play during recording, hold down the
“a” button and press the B}1 key (Song Playback Part selection).
Switching On/Off or Changing Setting Values Using a Single Key (operation type D)
• The “L” Track Indicator goes off.
• Each time B
}1 key is pressed, the “L” Track Indicator switches between lit (Playback) and unlit
(No Playback).
3.
Next, proceed from step 4, “Recording to the Left-Hand Part Track”.
• Some settings, including beat and tempo, can be set for left-hand part track recording.
C1A0 C2 C3 C4 C5 C6 C7 C8
B}1
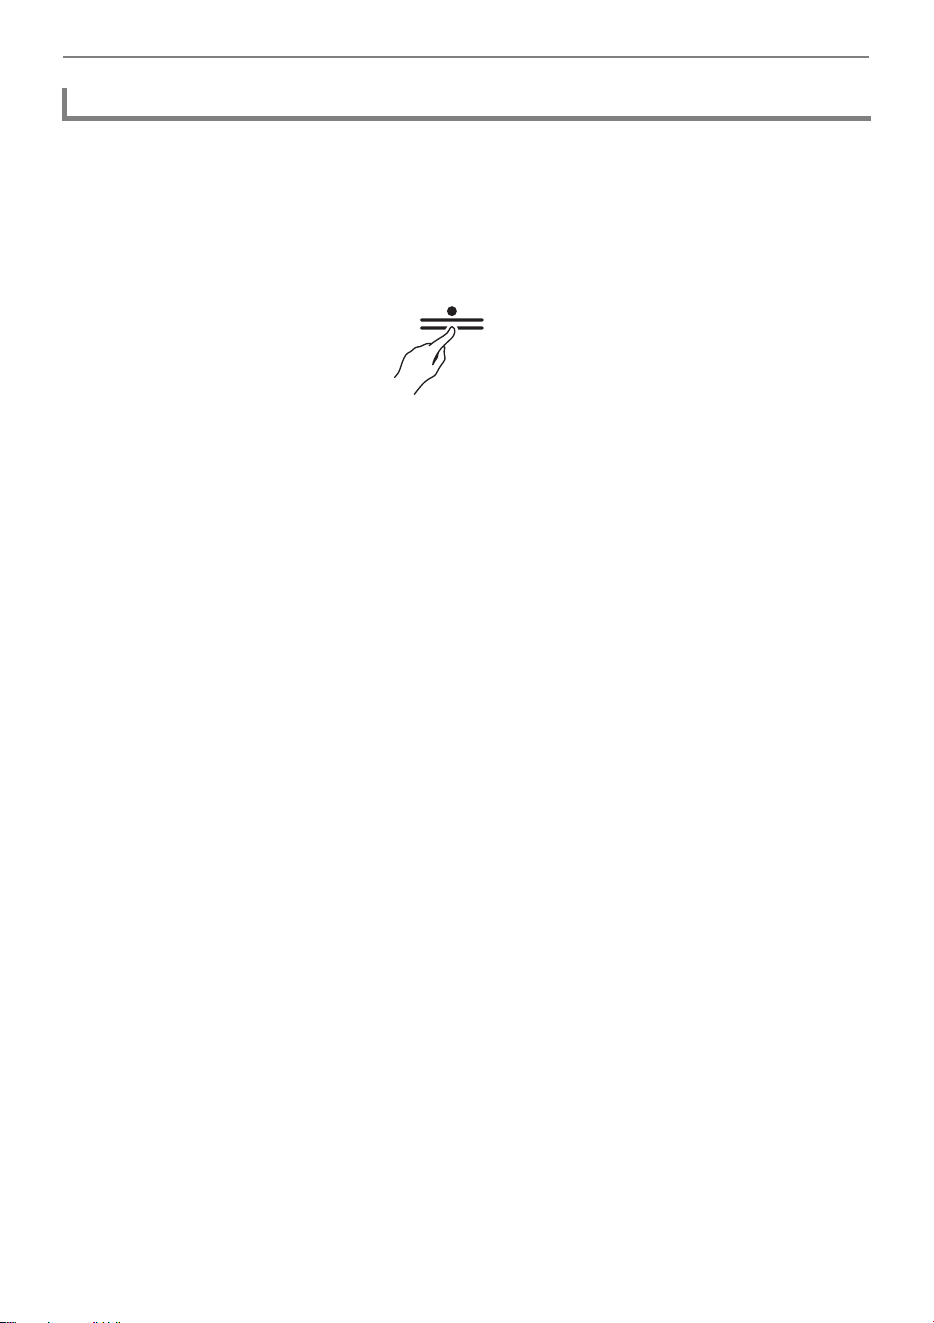
Recording a Performance
EN-95
Operate with <MIDI Recorder>.
Preparing to Use the MIDI Recorder
1.
Touch the “0(REC)” button (lit white).
• Recording goes to standby, and the “0(REC)” button blinks red.
• The “L” in the track indicator will blink, and the left-hand part track will be erased.
2.
To erase the right hand-part track, press and hold the “0(REC)” button until the
“R” Track Indicator blinks.
3.
While holding down the “0(REC)” button, touch the “a” button.
• The “0(REC)” button switches from blinking to lit.
4.
Hold down the “0(REC)” button until it blinks.
• The recording of the specified track will be erased.
5.
Touch the “0(REC)” button to exit record standby.
Deleting the Recording of a Track
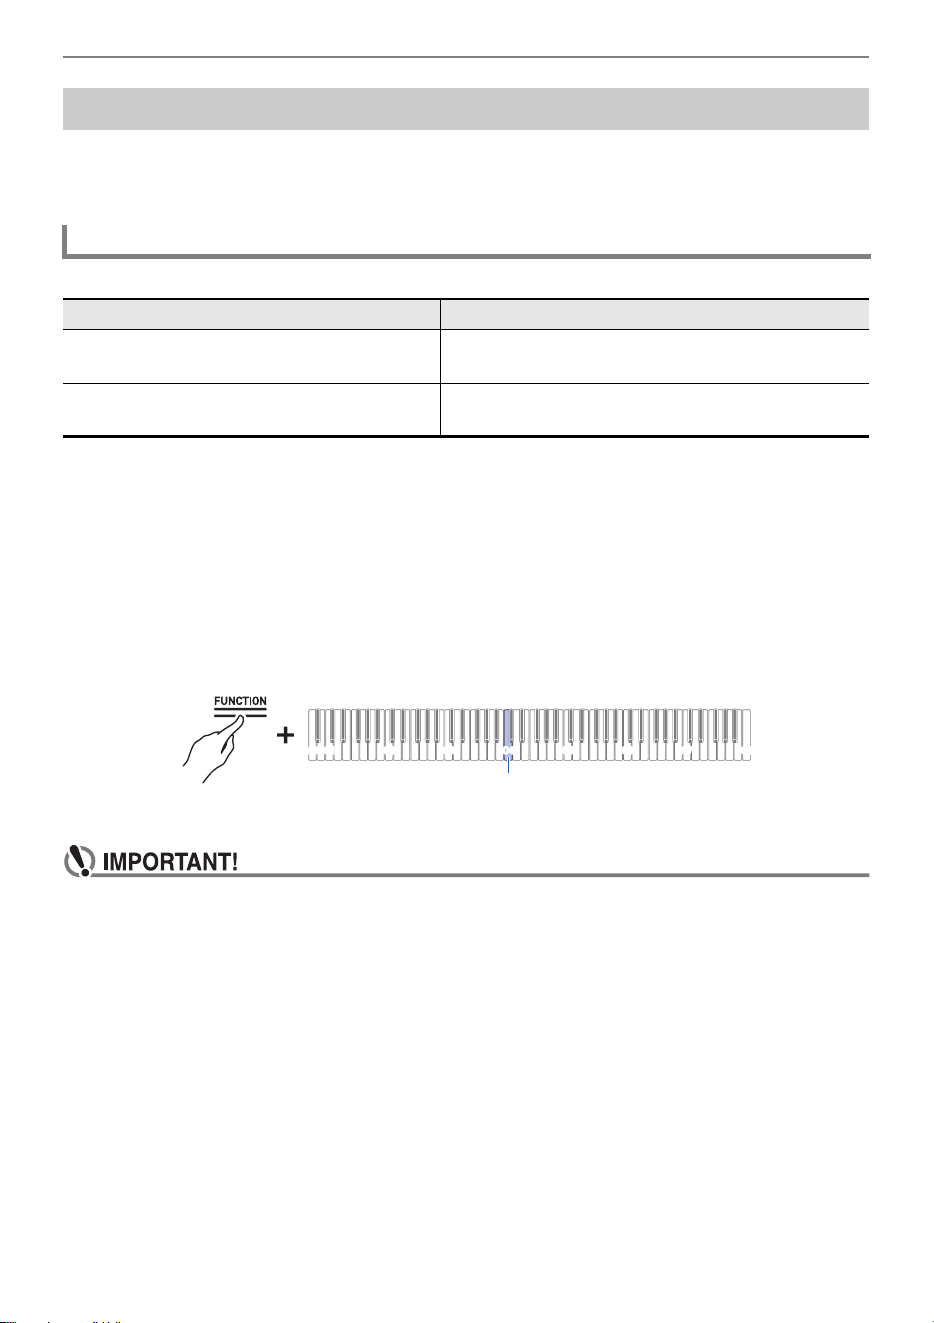
Recording a Performance
EN-96
Keyboard performances and pedal usage are recorded as audio data. Recordings are saved in WAV
file (linear PCM, 16bit, 44.1kHz, stereo) format to a USB flash drive connected to the USB Type A
terminal or to the built-in flash memory.
Switch the [RePlayer/Recorder] setting to one of the following.
Switch to <Audio Recorder (USB Flash Drive)>
1.
Attach the USB flash drive to the USB Type A terminal on the unit.
• For information on using USB flash drives, see “Inserting/Removing a USB Flash Drive from the
Digital Piano”.
2.
While holding down the “FUNCTION” button, press the C4 key.
Selecting a Setting Value Directly (operation type A)
• The Visual Information Bar, third from the left, will blink.
• If the [RePlayer/Recorder] setting is <Audio Recorder (USB Flash Drive)>, do not remove the
USB flash drive during recording or playback. Data on the USB flash drive may be corrupted
or the USB Type A terminal may fail.
• For more information on using USB flash drives, see
“Using a USB Flash Drive”.
• For supported USB Flash Drive formats, see
“Supported USB Flash Drives”.
Recording a Performance with the Audio Recorder
Preparing To Use the Audio Recorder
When doing this: Switch to this setting:
Direct Recording to USB Flash Drive
Delete USB Flash Drive Files
Audio Recorder (USB flash drive)
Recording to internal memory
Manipulating files in internal memory
Audio Recorder (built-in flash memory)
C1A0 C2 C3 C4 C5 C6 C7 C8
C4
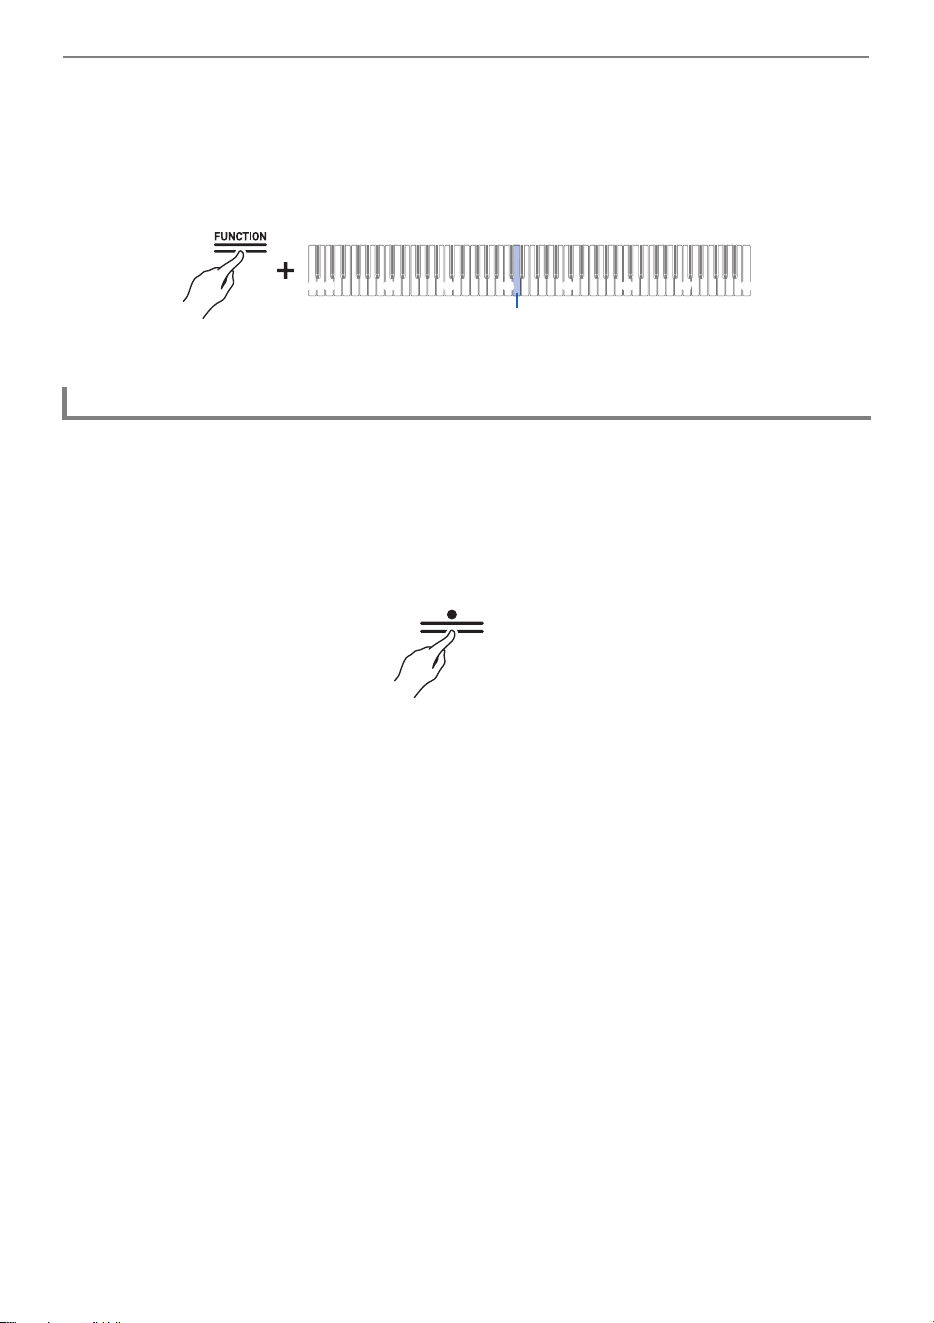
Recording a Performance
EN-97
Switch to <Audio Recorder (Internal Flash Memory)>.
While holding down the “FUNCTION” button, press the D4 key (Audio Recorder).
Selecting a Setting Value Directly (operation type A)
• On the Visual Information Bar, the fifth light from the left will blink.
Use <Audio Recorder (USB Flash Drive) > or <Audio Recorder (internal flash memory) >.
Preparing To Use the Audio Recorder
1.
Touch the “0(REC)” button (lit white).
• Recording goes to standby, and the “0(REC)” button blinks red.
• To stop the recording, touch the “0(REC)” button again.
• When the Audio Recorder (built-in flash memory) is used, the Visual Information Bar displays
the approximate amount of available recording space. Depending on the amount of memory
used, the area lit from the left side of the Visual Information Bar will increase, and when the
entire bar is lit, recording will no longer be possible.
2.
Recording will begin when you start playing.
• You can also start recording by holding down the “0(REC)” button and touching the “a”
button.
• The “0(REC)” button switches from flashing to lit, and the “a” button goes off.
3.
To end recording, touch the “0(REC)” button.
• The “0(REC)” button will light up white again and the “a” button will light up.
Recording an Audio Recorder song (WAV)
C1A0 C2 C3 C4 C5 C6 C7 C8
D4

Recording a Performance
EN-98
4.
To play the recording, touch the “a” button.
• The possible recording times and number of files are shown in the table below.
• Recording will automatically end when the available recording time has elapsed. The “0(REC)”
button will start blinking when there is limited time left for recording.
• The Digital Piano’s Audio Recorder records in WAV format. Recording in MP3 format is not
supported (playback of MP3 files copied from a computer to a USB Flash Drive or MP3 files loaded
from a USB Flash Drive to the Digital Piano’s internal memory is supported).
• Recordings are saved in the order of the destination memory (internal memory or USB Flash Drive)
with file names from “TAKE01.WAV” to “TAKE99.WAV.” The file name is the last number of either
the WAV or MP3 file in the destination memory, plus one. (e.g. If you record with two files
TAKE01.WAV and TAKE03.MP3 in the destination memory, the recording will be saved with the file
name TAKE04.WAV).
When you want to start over from the beginning during a recording
If you want to redo the recording due to a performance error or other reason, hold down the “0(REC)”
button until it flashes during recording. The recorded data is discarded and the process returns to a
record standby state.
When recording to a USB Flash
Drive
Each file can be recorded for up to approximately 25 minutes, and
up to 99 files can be recorded (however, this depends on the
available capacity of the USB Flash Drive used).
When recording to internal
memory
If there is no data already in the internal memory, the maximum
recording time is about 18 minutes. Up to 99 files can be recorded
within a total recording time range of approximately 18 minutes.

Recording a Performance
EN-99
1.
While holding down the “FUNCTION” button, press C{4 (USB Flash Drive) or E}4
key (internal flash memory).
Selecting a Setting Value Directly (operation type A)
• The Visual Information Bar will display the following.
When recording to USB Flash Drive: The third light from the right will flash.
When recording to internal flash memory: The rightmost light will flash.
2.
If you pressed the C{4 keyboard (USB Flash Drive) in step 1, attach the USB
Flash Drive to the USB Type A terminal on the Digital Piano.
3.
Touch the “0(REC)” button (lit white).
• Recording goes to standby, and the “0(REC)” button blinks red.
• The track indicator of the part being recorded with the MIDI Recorder will light up.
Recording to the Audio Recorder while playing back data recorded to the
MIDI Recorder
Keyboard Setting
C{4 Audio Rec with MIDI playback (USB Flash Drive)
E}4 Audio Rec with MIDI playback (internal flash memory)
C1A0 C2 C3 C4 C5 C6 C7 C8
E}4C{4

Recording a Performance
EN-100
4.
To set the playback part, hold down the “a” button and press the B}1 key
(Song Playback Part selection).
Switching On/Off or Changing Setting Values Using a Single Key (operation type D)
• The “L” and “R” track indicators light up respectively.
5.
Recording will begin when you start playing.
• The MIDI Recorder Song will play as recording begins.
• You can also start recording by holding down the “0(REC)” button and touching the “a”
button.
• The beat indicator lights up in time with the beat.
• If you want to redo your recording, see “When you want to start over from the beginning during a
recording”.
6.
To end recording, touch the “0(REC)” button.
• The “0(REC)” button will light up white again and the “a” button will light up.
• To play the recording immediately, touch the “a” button.
Track Indicator Setting Details
Only L lights up Plays the left-hand part and mutes the right-hand part.
Only R lights up Plays the right-hand part and mutes the left-hand part.
Both L and R light up Both left and right parts are played back.
C1A0 C2 C3 C4 C5 C6 C7 C8
B}1

Recording a Performance
EN-101
• The possible recording times and number of files are shown in the table below.
• Recording will automatically end when the available recording time has elapsed. The “0(REC)”
button will start blinking when there is limited time left for recording.
• The Digital Piano’s Audio Recorder records in WAV format. Recording in MP3 format is not
supported (playback of MP3 files copied from a computer to a USB Flash Drive or MP3 files loaded
from a USB Flash Drive to the Digital Piano’s internal memory is supported).
• Recordings are saved in the order of the destination memory (internal memory or USB Flash Drive)
with file names from “TAKE01.WAV” to “TAKE99.WAV.” The file name is the last number of either
the WAV or MP3 file in the destination memory, plus one. (e.g. If you record with two files
TAKE01.WAV and TAKE03.MP3 in the destination memory, the recording will be saved with the file
name TAKE04.WAV).
When recording to a USB Flash
Drive
Each file can be recorded for up to approximately 25 minutes, and
up to 99 files can be recorded (however, this depends on the
available capacity of the USB Flash Drive used).
When recording to internal
memory
If there is no data already in the internal memory, the maximum
recording time is about 18 minutes. Up to 99 files can be recorded
within a total recording time range of approximately 18 minutes.

Recording a Performance
EN-102
Use <Audio Recorder (USB Flash Drive)>.
Preparing To Use the Audio Recorder
1.
Hold down the “a” button and select the file to be deleted with the
corresponding key.
• Use the A0 to F{1 keys to specify the TAKE
**
.WAV (
**
is01~99) number
Inputting Setting Values Using the Keys 0 to 9 (operation type C)
• Use keys B2/C3 (Song Select – /Song Select +) to specify previous/next song number
Using the +/– Keys to Raise or Lower the Setting Value by 1 (operation type B)
2.
While holding down the “FUNCTION” button, press the B1 key (Delete SMF/MRF/
Audio).
Putting in Standby Mode, and Executing on Next Key Press (operation type E)
• Do not release the “FUNCTION” button until the next operation is complete.
3.
While holding down the “FUNCTION” button, press the C1 key (Execute).
• The file is deleted.
• The number specified for deletion applies to both WAV and MP3 files. If a WAV file and MP3 file
share the same number, they will both be deleted.
Deleting audio files from a USB Flash Drive
C1A0 C2 C3 C4 C5 C6 C7 C8
B2 C3
A0 - F{1
C1A0 C2 C3 C4 C5 C6 C7 C8
B1
C1A0 C2 C3 C4 C5 C6 C7 C8
C1

Recording a Performance
EN-103
1.
While holding down the “FUNCTION” button, press the C{2 key (internal flash
memory audio clear)
Putting in Standby Mode, and Executing on Next Key Press (operation type E)
• Do not release the “FUNCTION” button until the next operation is complete.
2.
While holding down the “FUNCTION” button, press the C1 key (Execute).
• Deletion will take place.
1.
While holding down the “FUNCTION” button, press the D2 key (internal flash
memory clear all audio).
Putting in Standby Mode, and Executing on Next Key Press (operation type E)
• Do not release the “FUNCTION” button until the next operation is complete.
2.
While holding down the “FUNCTION” button, press the C1 key (Execute).
• Deletion will take place.
Erase the last audio file numbered in the internal memory
Erase all audio files in internal memory
C1A0 C2 C3 C4 C5 C6 C7 C8
C{2
C1A0 C2 C3 C4 C5 C6 C7 C8
C1
C1A0 C2 C3 C4 C5 C6 C7 C8
D2
C1A0 C2 C3 C4 C5 C6 C7 C8
C1

Listening back to a Performance Immediately (Instant RePlayer)
EN-104
When practicing, you may be so focused on looking at the sheet music and playing the correct keys
that it is difficult to evaluate your performance as well.
The Instant RePlayer function allows you to easily listen back (replay) to a recording of a performance
you just played, making it easy to evaluate your own performances.
Performance is automatically recorded.
• You can easily listen back to a performance by simply using Replay.
• You can replay up to the last 270 seconds of a performance.
• You can specify the point from which to replay.
• If you make a mark in a performance, replay can be started from the position you marked.
• Instant RePlayer recordings will be cleared if you change anything other than the metronome
setting or turn off the Digital Piano.
• Instant RePlayer records keyboard and pedal operation and metronome sounds.
Switch the [RePlayer/Recorder] setting to <Instant RePlayer>.
While holding down the “FUNCTION” button, press the B}3 key (Instant
RePlayer).
Selecting a Setting Value Directly (operation type A)
• The Visual Information Bar blinks at the left end.
Listening back to a Performance Immediately
(Instant RePlayer)
Instant RePlayer
Instant RePlayer Features
Preparing to Use the Instant RePlayer
C1A0 C2 C3 C4 C5 C6 C7 C8
B}3

Listening back to a Performance Immediately (Instant RePlayer)
EN-105
1.
Start performing.
• Recording starts and the “0(REC)” button blinks slowly to indicate that recording is in progress.
2.
To replay, stop your performance and touch the “a” button
• Replay starts from the note played 10 seconds before the last note played. Replay stops when
replayed to the end.
• When you want to stop the replay midway, touch the “a” button. Once stopped, touch the
“a” button if you wish to start replay again.
• Although notes played within 10 seconds of the last note are played, notes played on keys
pressed more than 10 seconds ago will not be played.
3.
After replay is finished, return to step 1.
• Recording starts when the next performance begins.
• To start the replay, you can simply press the “a” button to specify 10 seconds earlier, or you can
specify a marked position and the number of seconds to go back.
For more information, see “Listen Back Using Marks” and “Listen Back Using Specified Number of
Seconds”.
• The maximum recording time is 270 seconds, and when this is exceeded, the oldest performance will
be overwritten, meaning you can only listen back to the most recent 270 seconds of a performance.
• While the Instant RePlayer is recording (the “0(REC)” button blinks slowly), press and hold the
“0(REC)” button (for 2 seconds) to clear all 270 seconds of the recording.
Simple Usage

Listening back to a Performance Immediately (Instant RePlayer)
EN-106
If you place a cue mark at the desired time during performance, you can start playback from the marked
position upon replay. You can add up to 36 marks (within270seconds), and specify from which mark
position to start replay.
Start performing.
• The “0(REC)” button blinks slowly to indicate that recording is in progress.
• When you turn on the power and use the Instant RePlayer for the first time, marks are
automatically added.
Touch the “0(REC)” button at the point you wish to cue a replay.
• The mark is added when the “0(REC)” button is touched.
• When you add a mark, recording will stop temporarily (the “0(REC)” button light will go out),
and recording begins (the “0(REC)” button blinks slowly) from the point at which the next
performance starts (key press or pedal operation).
1.
Stop playing, hold down the “a” button, and press a black key for mark
selection to specify the mark at which you wish to start replay.
Selecting a Setting Value Directly (operation type A)
• Replay starts from the specified mark position.
• For the black keys assigned to mark selection, see “Start mark and start seconds for Instant
RePlayer”.
2.
When the replay is over, start the next performance.
• When the next performance begins, a mark is automatically placed at that position.
• If you specify a mark that does not exist, the oldest mark is selected for replay.
Listen Back Using Marks
What is a Mark?
Performing
Adding Marks at Desired Points within Performances
Replaying from a Mark
C1A0 C2 C3 C4 C5 C6 C7 C8
Press any one of the black keys used for mark selection
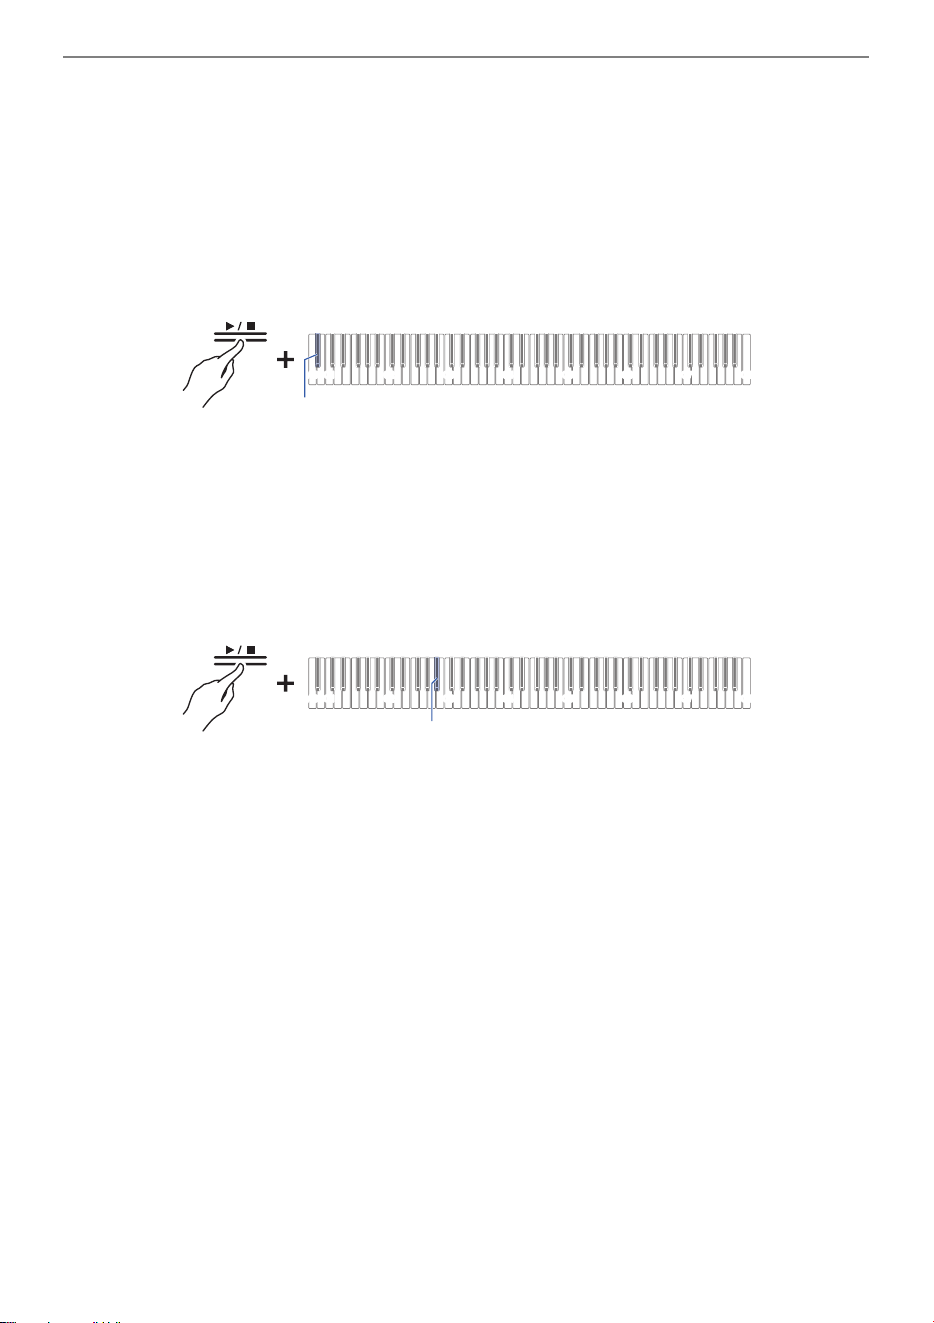
Listening back to a Performance Immediately (Instant RePlayer)
EN-107
Example of specifying a mark
When you want to start replay from the newest position (last marked position)
While holding down the “a” button, press the B}0 key (replay from start mark
(most recent)) replay from most recent cue mark.
Selecting a Setting Value Directly (operation type A)
• Starts replay with cue at the newest mark position. Replay starts from the most recent cue mark.
When you want to start replay from a marked position made 10 times earlier
While holding down the “a” button, press the B}2 key (replay from start mark
(10 times back)).
Selecting a Setting Value Directly (operation type A)
• Starts the replay with a cue for the mark position made 10 times ago.
C1A0 C2 C3 C4 C5 C6 C7 C8
B}0
C1A0 C2 C3 C4 C5 C6 C7 C8
B}2

Listening back to a Performance Immediately (Instant RePlayer)
EN-108
Touching the “a” button during replay will start replay 10 seconds before the last note you
played, but it is possible to replay from even earlier than10 seconds back. For earlier than 10
seconds, you can specify the number of seconds to start replay in 5-second increments.
1.
Start performance.
• While recording, the “0(REC)” button blinks slowly.
2.
To replay, stop playing and hold down the “a” button and press the white key
that specifies the number of seconds to return and start replay from to specify
the number of desired seconds.
Selecting a Setting Value Directly (operation type A)
• Replays the performance from the note played a specified number of seconds before to the last
note played.
• For the white keys that specify the amount of seconds to return and start from, see “Start mark
and start seconds for Instant RePlayer”.
3.
After replay, begin the next performance.
• If recording is shorter than 270 seconds, replay will start from the oldest recording position when you
specify a number of seconds that is prior the oldest recording.
Listen Back Using Specified Number of Seconds
C1A0 C2 C3 C4 C5 C6 C7 C8
Press any one of the white keys to specify how many seconds to return
and start from

Listening back to a Performance Immediately (Instant RePlayer)
EN-109
Example of specifying the number of seconds to return back to
When you want replay to start 60 seconds back in time:
While holding down the “a” button, press the C2 key (number of seconds to
return and replay from (60 seconds back in time)).
Selecting a Setting Value Directly (operation type A)
• Starts replay by cueing up 60 seconds back in time.
C1A0 C2 C3 C4 C5 C6 C7 C8
C2

Using a USB Flash Drive
EN-110
You can do the following using a commercially available USB flash drive.
(1) Using a file on a USB Flash Drive with this Digital Piano
• Direct playback of audio files from a USB flash drive
For more information, see “Playing Audio Data (WAV, MP3)”.
• Direct playback of MIDI files on a USB flash drive
For more information, see “Playing MIDI Data”.
• Load compatible files from a USB flash drive into the Digital Piano
For details, see “Loading a MIDI File from a USB Flash Drive into the Digital Piano”, “Loading audio
files from a USB flash drive onto the unit in batches”, and “Load a user scene file saved on a USB
flash drive onto this Digital Piano”.
• Deleting USB Flash Drive Files
For details, see “Deleting MIDI or audio files from a USB flash drive” and “Delete user scene files on
a USB flash drive”.
(2) Save performances or data stored on the Digital Piano to a USB flash drive
• Record Audio Recorder songs (WAV) directly to a USB flash drive
For more information, see “Recording an Audio Recorder song (WAV)”.
• Saving data from the Digital Piano to a USB flash drive
For details, see “Saving MIDI Recorder Songs to a USB Flash Drive”, “Save a batch of audio files
from the internal memory to a USB flash drive”, and “Save user scenes to a USB flash drive”.
Using a USB Flash Drive
Using a Commercially Available USB Flash Drive – What
You Can Do
(1)
(2)
USB Flash Drive This Digital Piano

Using a USB Flash Drive
EN-111
Use FAT32 or exFAT formatted USB flash drives.
• For USB flash drives with large capacities, mounting and formatting may take some time.
• Depending on the performance and characteristics of the USB flash drive, it may not be possible to
correctly perform recording/playback.
• It may not be possible to use USB flash drives that are recognized as multiple drives on a
computer.
• USB flash drives that are recognized as CD-ROMs on a computer cannot be used.
• USB flash drives with special functions, such as anti-virus or security features, cannot be
used.
Preparing a USB Flash Drive
Supported USB Flash Drives

Using a USB Flash Drive
EN-112
Audio Data
WAV format
A standard audio file format used primarily in Windows. This Digital Piano is compatible with Linear
PCM, 16 bit, 44.1 kHz, stereo WAV files (extension: .WAV).
MP3 format
A common audio file format widely used for music distribution. This Digital Piano supports 44.1/48 kHz,
32–320 kbps bitrate, and variable bitrate (VBR) compatible MP3 files (extension: .MP3).
MIDI data
MRF format (CASIO’s original file format)
MIDI data recorded by the Digital Piano’s MIDI Recorder (extension: .MRF).
CMF format (CASIO’s original file format)
CASIO’s own MIDI data to which performance information is added (extension: .CMF).
SMF (Standard MIDI File) format, Format 0/1:
Standard MIDI file format compatible with MIDI equipment from other manufacturers (extension: .MID).
*1 WAV and MP3 files loaded from a USB flash drive to the Digital Piano’s internal memory can be
saved directly from the internal memory to the USB flash drive.
*2 They can also be converted to a standard MIDI file (SMF format 0, extension: .MID) and saved.
• When saving in MRF format
Not only performance information, but also settings for functions specific to this Digital Piano (such
as Acoustic Simulator settings) are saved. When a file saved in this format is played back on the
Digital Piano, the original performance is reproduced. However, MRF files cannot be used with other
instruments.
• When saving in SMF format
Performance information is saved, but the settings for the Digital Piano-specific functions are not.
Therefore, even if a file saved in this format is played back on this Digital Piano, the Digital Piano-
specific settings of the Digital Piano’s functions are not restored to their original settings. However,
files saved in this format can be used with other SMF-compatible instruments. (It is not possible to
reproduce the same performance from this Digital Piano on other instruments.)
*3 Loaded as a User Song (song numbers 61-70). See “Loading a MIDI File from a USB Flash Drive
into the Digital Piano”.
Types of data that can be handled by this Digital Piano
Data Type
Extension
Save
(Internal
memory →
USB flash
drive)
Load
(USB flash
drive →
internal
memory)
Direct
recording to
USB flash
drive
Playback
directly from
USB flash
drive
Audio Audio Recorder
Song File
.WAV
General Audio File .WAV
*1
–
.MP3
MIDI MIDI Recorder
Song File
.MRF
*2
––
CASIO MIDI File .CMF
–
*3
–
Standard MIDI file
(SMF format)
.MID
Scene User scene file .SCS ––

Using a USB Flash Drive
EN-113
Copyrights
You are allowed to use recordings for your own personal use. Any reproduction of an audio or
music format file, without the permission of its copyright holder, is strictly prohibited under
copyright laws and international treaties. Also, making such files available on the Internet or
distributing them to third parties, regardless of whether such activities are conducted with or
without compensation, is strictly prohibited under copyright laws and international treaties. CASIO
COMPUTER CO., LTD. shall not be held in any way liable for any use of this Digital Piano that is
illegal under copyright laws.

Using a USB Flash Drive
EN-114
• Follow the precautions in the instructions that are supplied with the USB flash drive.
• Avoid storing or using the product in the places outlined below. Data on the USB flash drive may be
corrupted.
Locations with high temperature, humidity, or corrosive conditions
Locations prone to strong static electricity or electrical noise
• Do not operate the Digital Piano or remove the USB flash drive while data is being saved or loaded.
Data on the USB flash drive may be corrupted or the USB Type A terminal may fail.
• USB Type A Never plug any devices other than those specified in this manual into the terminals.
Doing so may cause a malfunction.
• When operating a USB flash drive for the first time after it is inserted into the Digital Piano, or when
operating a USB flash drive for the first time after turning on the power, the Digital Piano may
become temporarily inoperable as the system prepares to exchange data with the USB flash drive
(mounting).
• Mounting is executed each time a USB flash drive is inserted into the Digital Piano.
• During mounting, the indicators above the “SOUND MODE” and “a” buttons will light up
sequentially, and the Visual Information Bar will indicate that it is in progress (lighting sequentially
from the left). Do not operate the Digital Piano while it is mounting.
• It may take tens of seconds to several minutes for the monitoring system to complete mounting and
become operational.
Insertion
Insert the USB flash drive into the USB Type A terminal of the Digital Piano.
• Make sure to fully insert the drive. Do not insert the drive forcibly.
• USB Type A If static electricity is transferred to the terminals from your hand or a USB flash
drive, the unit may malfunction. If this happens, turn the Digital Piano off and then back on
again.
Removal
Make sure that no data is being exchanged between the Digital Piano and the
USB flash drive, before unplugging and removing the USB flash drive.
• After prolonged use, the USB flash drive, which was removed, may be warm, but this is not a
malfunction.
Inserting/Removing a USB Flash Drive from the Digital
Piano
USB Flash Drive
USB Type A Terminal

Using a USB Flash Drive
EN-115
When a USB flash drive is formatted in this Digital Piano, a folder named “CASIO” is created in the root
directory. This folder is always used when exchanging data between the Digital Piano and the USB
flash drive.
Diagram of the USB flash drive folder structure:
• Be sure to format the USB flash drive on the Digital Piano first.
• Formatting a USB flash drive will delete all data on the USB flash drive. Before formatting,
make sure that no important data is stored on the USB flash drive.
• The format operation performed by this Digital Piano is a “quick format”. To completely
delete data, format on a computer or other device before formatting on this Digital Piano.
• The exFAT format may limit the number of files that can be read if some files have long
names.
Formatting a USB Flash Drive
RECSONG.MRF
TAKE01.WAV
TAKE02.MP3
TAKE03.MP3
AAAA.MID
BBBB.CMF
\70
\62
\61
\CASIO
\MUSICLIB
\MIDIREC
\AUDIOREC
\SCENE
SCENE.SCS
TAKE04.WAV
TAKE99.WAV

Using a USB Flash Drive
EN-116
1.
Insert the USB flash drive to be formatted into the USB Type A terminal on the
Digital Piano.
2.
Press and hold the “FUNCTION” button.
Putting in Standby Mode, and Executing on Next Key Press (operation type E)
• Do not release the “FUNCTION” button until step 4.
3.
Press the C2 key (Format).
• The right side of the beat indicator blinks and the Digital Piano enters the format standby state.
4.
Press the C1 key (Execute).
• Formatting will take place. During formatting, the indicators above the “SOUND MODE” and
“a” buttons will light up sequentially, and the Visual Information Bar will indicate that it is in
progress (lighting sequentially from the left).
5.
Once formatting begins, release the “FUNCTION” button.
• When formatting is complete, the indicators return to their original state.
C1A0 C2 C3 C4 C5 C6 C7 C8
C2
C1A0 C2 C3 C4 C5 C6 C7 C8
C1

Using a USB Flash Drive
EN-117
1.
Insert the USB flash drive into the USB Type A terminal of the Digital Piano.
2.
To save in SMF format (.MID), do the following:
(1) Switch the Digital Piano to <MIDI Recorder>.
Switching to MIDI Recorder
(2) Select the User Song number that corresponds to the save destination folder (61-70).
While holding down the “a” button, press one of the A0 to F{1 keys.
Inputting Setting Values Using the Keys 0 to 9 (operation type C)
3.
Press and hold the “FUNCTION” button.
Putting in Standby Mode, and Executing on Next Key Press (operation type E)
• Do not release the “FUNCTION” button until step 5.
4.
Press either the A1 or B}1 key.
• The Hall Simulator/Reverb Indicator blinks and enters save standby.
Operations with a USB Flash Drive
Saving MIDI Recorder Songs to a USB Flash Drive
Key Setting Storage Location
A1 Saves in SMF format (.MID) Specified folder in MUSICLIB folder (61-70)
B}1 Saves in CASIO’s proprietary format
(.MRF)
MIDIREC Folder
C1A0 C2 C3 C4 C5 C6 C7 C8
A1 B}1

Using a USB Flash Drive
EN-118
5.
Press the C1 key (Execute).
• Save is executed. During processing, the indicators above the “SOUND MODE” and “a”
buttons light up sequentially, and the Visual Information Bar will indicate that it is in progress
(lighting sequentially from the left).
6.
Once saving begins, release the “FUNCTION” button.
• When saving is complete, the indicators return to their original state.
1.
Copy the data to be loaded onto the Digital Piano to the respective folders on the
USB flash drive.
• Only one song from each folder can be loaded. When there are multiple files, the first file in the
order of the file naming is loaded.
2.
Insert the USB flash drive into the USB Type A terminal of the Digital Piano.
3.
Switch the Digital Piano to <MIDI Recorder>.
Switching to MIDI Recorder
4.
Select the User Song (song numbers 61-70) or MIDI Recorder Song that
corresponds to the data to be loaded.
• To select a User Song, hold down the “a” button and press one of theA0 to F{1 keys.
Inputting Setting Values Using the Keys 0 to 9 (operation type C)
• To select a MIDI Recorder song, hold down the “a” button and press the A2 key.
Selecting a Setting Value Directly (operation type A)
Loading a MIDI File from a USB Flash Drive into the Digital Piano
Data Type Folder
User songs (CMF, MID) 61-70 in MUSICLIB folder
MIDI Recorder songs (MRF) MIDIREC Folder
C1A0 C2 C3 C4 C5 C6 C7 C8
C1

Using a USB Flash Drive
EN-119
5.
Press and hold the “FUNCTION” button.
Putting in Standby Mode, and Executing on Next Key Press (operation type E)
• Do not release the “FUNCTION” button until step 7.
6.
Press the A}1 key (Load SMF/MRF).
• The surround indicator will blink and enter load standby mode.
7.
Press the C1 key (Execute).
• Loading is executed. During processing, the indicators above the “SOUND MODE” and “a”
buttons light up sequentially, and the Visual Information Bar will indicate that it is in progress
(lighting sequentially from the left).
8.
Once loading begins, release the “FUNCTION” button.
• When loading is complete, the indicators return to their original state.
C1A0 C2 C3 C4 C5 C6 C7 C8
A}1
C1A0 C2 C3 C4 C5 C6 C7 C8
C1

Using a USB Flash Drive
EN-120
Deletes the following data from the USB flash drive.
• Songs stored in folders 61 to 70 in the MUSICLIB folder
• RECSONG.MRF stored in the MIDIREC folder
• TAKE**.WAV (**=01 - 99) or TAKE**.MP3 (where ** = 01 - 99) audio song data stored in the
AUDIOREC folder
1.
Insert the USB flash drive into the USB Type A terminal of the Digital Piano.
2.
Select the data to be deleted.
• To delete a User Song or MIDI Recorder Song:
(1) Switch the Digital Piano to <MIDI Recorder>.
Switching to MIDI Recorder
(2) Select the User Song number or MIDI Recorder Song that corresponds to the data to be
deleted.
To select a User Song, hold down the “a” button and press one of the A0 to F{1 keys.
Inputting Setting Values Using the Keys 0 to 9 (operation type C)
To select a MIDI Recorder song, hold down the “a” button and press the A2 key.
Selecting a Setting Value Directly (operation type A)
• To delete audio data:
(1) Switch the Digital Piano to <Audio Recorder (USB Memory)>.
Switching to Audio Recorder
(2) Specify the TAKE**.WAV or TAKE**.MP3 (where ** = 01 - 99) audio data to delete.
While holding down the “a” button, press one of the A0 to F{1 keys.
Inputting Setting Values Using the Keys 0 to 9 (operation type C)
3.
Press and hold the “FUNCTION” button.
Putting in Standby Mode, and Executing on Next Key Press (operation type E)
• Do not release the “FUNCTION” button until step 5.
Deleting MIDI or audio files from a USB flash drive

Using a USB Flash Drive
EN-121
4.
Press the B1 key (Delete SMF/MRF/Audio).
• The left side of the beat indicator blinks and enters the delete standby state.
5.
Press the C1 key (Execute).
• Deletion will take place. During processing, the indicators above the “SOUND MODE” and
“a” buttons light up sequentially, and the Visual Information Bar will indicate that it is in
progress (lighting sequentially from the left).
6.
Once deletion begins release the “FUNCTION” button.
• When the deletion is complete, the indicators return to their original state.
• If there are WAV and MP3 files with the same name, executing file deletion will delete both the WAV
and the MP3 files.
C1A0 C2 C3 C4 C5 C6 C7 C8
B1
C1A0 C2 C3 C4 C5 C6 C7 C8
C1

Using a USB Flash Drive
EN-122
Audio files (audio recorder songs and general audio files) stored in the internal memory of the Digital
Piano can be saved to a USB flash drive in a batch using the following operation.
1.
Insert the USB flash drive into the USB Type A terminal of the Digital Piano.
2.
While holding down the “FUNCTION” button, press the F{1 key (all audio saves).
Putting in Standby Mode, and Executing on Next Key Press (operation type E)
• The Visual Information Bar will blink except at both ends, and the Digital Piano will enter a
standby state for saving. The Hall Simulator/Reverb Indicator also blinks.
• Do not release the “FUNCTION” button until step 3.
3.
While holding down the “FUNCTION” button, press the C1 key (Execute).
• Saving will take place. During processing, the indicators above the “SOUND MODE” and “a”
buttons light up sequentially, and the Visual Information Bar will indicate that it is in progress
(lighting sequentially from the left).
4.
Once saving begins, release the “FUNCTION” button.
• When saving is complete, the indicators return to their original state.
• If an audio file of the same name (“TAKE**.WAV” or “TAKE**.MP3” (where ** = 01 - 99)) already
exists in the AUDIOREC folder on the USB flash drive, the file will be overwritten by the
“TAKE**.WAV” or “TAKE**.MP3” file.
Save a batch of audio files from the internal memory to a USB flash drive
F{1
C1A0 C2 C3 C4 C5 C6 C7 C8
C1A0 C2 C3 C4 C5 C6 C7 C8
C1
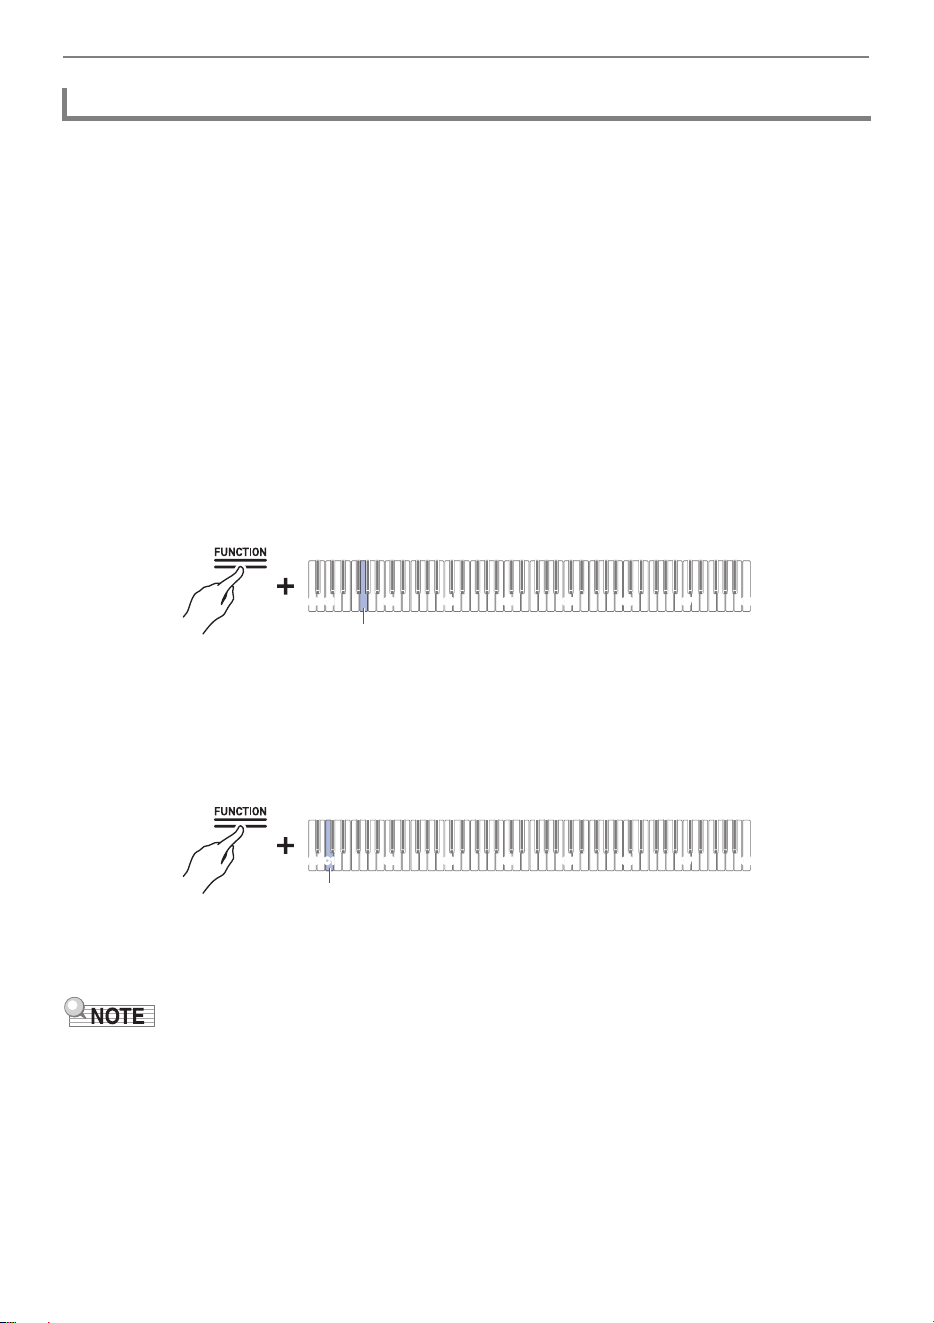
Using a USB Flash Drive
EN-123
Audio files (audio recorder songs and general audio files) stored on a USB flash drive can be loaded
into the internal memory of the Digital Piano in a batch using the following operation.
1.
Prepare a USB flash drive containing the audio files you wish to load into the
Digital Piano.
• Audio files (“TAKE
**
.WAV” (where
**
= 01 - 99)) or “TAKE
**
.MP3” (where
**
= 01 - 99)) stored in
the AUDIOREC folder on the USB flash drive are eligible for loading. If there are WAV and MP3
files of the same name in the folder, the WAV file will be loaded.
2.
Insert the USB flash drive into the USB Type A terminal of the Digital Piano.
3.
While holding down the “FUNCTION” button, press the G1 key (all audio loads).
Putting in Standby Mode, and Executing on Next Key Press (operation type E)
• The Visual Information Bar displays the approximate amount of free space in the internal
memory, and the Digital Piano enters a standby state for loading.
• Do not release the “FUNCTION” button until step 4.
4.
While holding down the “FUNCTION” button, press the C1 key (Execute).
• Loading will take place. During processing, the indicators above the “SOUND MODE” and
“a” buttons light up sequentially, and the Visual Information Bar will indicate that it is in
progress (lighting sequentially from the left).
5.
Once loading begins, release the “FUNCTION” button.
• When loading is complete, the indicators return to their original state.
• If you want to overwrite a specific song in the internal memory, confirm the number of the song you
want to overwrite in advance by “Selecting a Song for Playback”. If you save an audio file with that
song number in the AUDIOREC folder on the USB flash drive, only the songs with the corresponding
song number in the internal memory will be overwritten.
For example, if you want to overwrite song number 15 in the internal memory, save “TAKE15.WAV”
or “TAKE15.MP3” in the AUDIOREC folder of the USB flash drive.
Loading audio files from a USB flash drive onto the unit in batches
C1A0 C2 C3 C4 C5 C6 C7 C8
G1
C1A0 C2 C3 C4 C5 C6 C7 C8
C1

Using a USB Flash Drive
EN-124
User scenes stored in the unit (all user scenes 1 through 10) can be saved to a USB flash drive as
follows.
1.
Insert the USB flash drive into the USB Type A terminal of the Digital Piano.
2.
While holding down the “SCENE” button, press the A}7 key (Save).
Putting in Standby Mode, and Executing on Next Key Press (operation type E)
• The Hall Simulator/Reverb Indicator blinks and the Digital Piano enters save standby.
• Do not release the “SCENE
” button until the next operation is completed.
3.
While holding down the “SCENE” button, press the C8 key (Execute).
• Saving will take place.
• A user scene file (SCENE.SCS) is saved in the SCENE folder of the USB flash drive.
Save user scenes to a USB flash drive
C1A0 C2 C3 C4 C5 C6 C7 C8
A}7
C8
C1A0 C2 C3 C4 C5 C6 C7 C8

Using a USB Flash Drive
EN-125
The following operation will overwrite all user scenes on the Digital Piano with the contents of the user
scene file on the USB flash drive.
1.
Insert the USB flash drive containing the user scene file into the USB Type A
terminal on the Digital Piano.
• The user scene file (SCENE.SCS) stored in the SCENE folder of the USB flash drive is the
target for loading.
2.
While holding down the “SCENE” button, press the A7 key (Load).
Putting in Standby Mode, and Executing on Next Key Press (operation type E)
• The surround indicator will blink and enter load standby mode.
• Do not release the “SCENE” button until the next operation is complete.
3.
While holding down the “SCENE” button, press the C1 key (Execute).
• Loading will take place.
Load a user scene file saved on a USB flash drive onto this Digital Piano
C1A0 C2 C3 C4 C5 C6 C7 C8
A7
C8
C1A0 C2 C3 C4 C5 C6 C7 C8

Using a USB Flash Drive
EN-126
1.
Insert the USB flash drive containing the user scene file into the USB Type A
terminal on the Digital Piano.
2.
While holding down the “SCENE” button, press the B}7 key (Delete).
Putting in Standby Mode, and Executing on Next Key Press (operation type E)
• The left side of the beat indicator will blink, indicating that the Digital Piano is waiting for you to
delete the file.
• Do not release the “SCENE
” button until the next operation is completed.
3.
While holding down the “SCENE” button, press the C8 key (Execute).
• Deletion will take place.
Delete user scene files on a USB flash drive
B}7
C1A0 C2 C3 C4 C5 C6 C7 C8
C8
C1A0 C2 C3 C4 C5 C6 C7 C8

Using a USB Flash Drive
EN-127
You can save files in the following formats to the MUSICLIB folder in the CASIO folder created on a
USB flash drive and play them on this Digital Piano.
• Standard MIDI file (SMF format 0/1) or CASIO MIDI file (CMF format)
1.
Connect the USB flash drive to the computer.
2.
Create a CASIO folder in the root directory of the USB flash drive and create a
folder named MUSICLIB in the CASIO folder.
• If you already have a MUSICLIB folder, this step is not necessary.
3.
Copy the song data you want to play on the Digital Piano to the MUSICLIB folder
on the USB flash drive.
• For song data playback, see “Playing MIDI Data”.
When you record with this Digital Piano’s Audio Recorder, the recordings are stored in WAV file format
under the AUDIOREC folder in the CASIO folder on the USB flash drive from “TAKE01.WAV” to
“TAKE99. WAV”, with a new number being assigned to the new file each time a recording is made.
Connect the USB flash drive to a computer, change audio data file (WAV or MP3 file) names to
“TAKE
**
.WAV” (where
**
= 01 - 99) or MP3 file names to “TAKE
**
.MP3” (where
**
= 01 - 99) and save in
the AUDIOREC folder to play the files on this Digital Piano.
• WAV files (Linear PCM, 16 bit, 44.1 kHz, stereo, extension: .WAV)
• MP3 files (MPEG-1 Audio Layer 3, 44.1 kHz/48 kHz, bit rate 32-320 kbps/variable bit rate (VBR)
compatible, mono/stereo, extension: .MP3)
For information on audio data playback, see “Playing Audio Data (WAV, MP3)”.
Copying MIDI Song Data to a USB Flash Drive Using a
Computer
Copying Audio Data (WAV, MP3) to a USB Flash Drive
Using a Computer
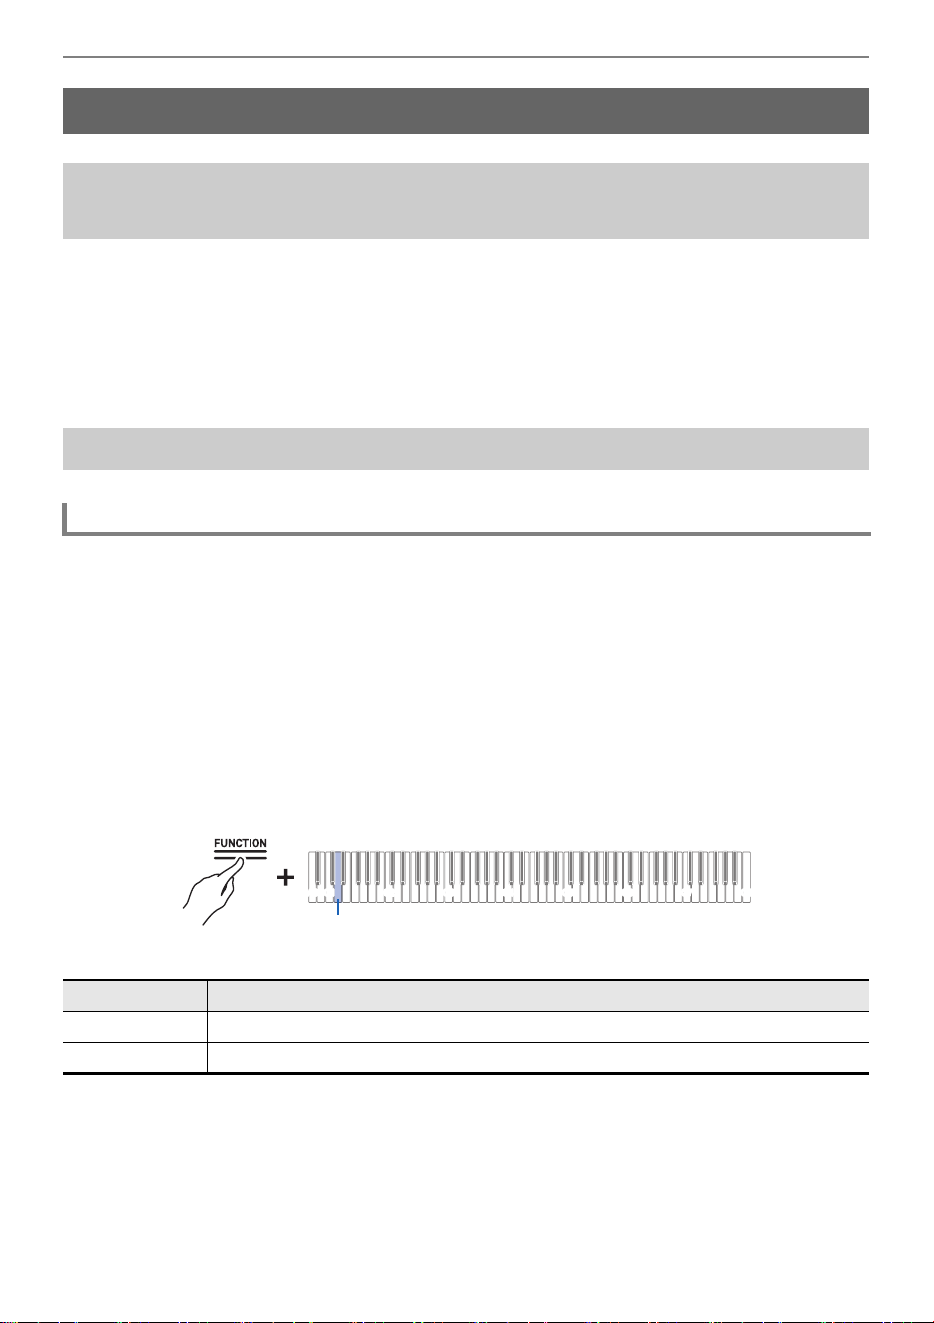
Connecting Wirelessly
EN-128
The supplied wireless MIDI & AUDIO adaptor can be used to connect the Digital Piano to external
devices wirelessly. This connection uses Bluetooth wireless technology, and the following two types of
connections are possible:
• Bluetooth Low Energy MIDI Connectivity
Sends and receives MIDI data between the Digital Piano and smart devices.
• Bluetooth audio connectivity
Plays the sound being played back from an external device on this Digital Piano.
The [Wireless Function] of the Digital Piano is set to <On> by default. When necessary, such as when
you want to stop the generation of radio waves, you can turn the [Wireless Function] <Off>.
1.
Insert the wireless MIDI & audio adaptor into the USB Type A terminal on the
Digital Piano.
2.
While holding down the “FUNCTION” button, press the D1 key (Wireless
Function).
Switching On/Off or Changing Setting Values Using a Single Key (operation type D)
• Default value: On
Connecting Wirelessly
Connecting the Digital Piano to External Devices
Wirelessly
Wireless (Bluetooth) Connectivity Settings
Wireless Function On/Off
Setting Value Setting Details
Off Turns off the Wireless Function.
On Turns on the Wireless Function.
C1A0 C2 C3 C4 C5 C6 C7 C8
D1

Connecting Wirelessly
EN-129
You can adjust the Notification Tone Volume that sounds when the wireless connection status
changes.
Notification Tones
Adjusting the Notification Tone Volume
While holding down the “FUNCTION” button, press the E}1 or E1 key.
Using the +/– Keys to Raise or Lower the Setting Value by 1 (operation type B)
• Setting value: 0 (silence) to 10 (maximum volume)
• Default value: 5
Adjusting the Notification Tone Volume for Wireless Connection/
Disconnection
Notification Details Notification Tone
Connected to Bluetooth audio-enabled
device
A piano tone with an ascending melody plays.
Disconnected from a Bluetooth audio-
enabled device
A piano tone with a descending melody plays.
Connected to a Bluetooth Low Energy
MIDI-enabled device
A vibraphone tone with a ascending melody plays.
Disconnected from a Bluetooth Low
Energy MIDI-enabled device
A vibraphone tone with a descending melody plays.
Key Setting
E}1 Lowers the volume of the connection notification tone by 1 (–)
E1 Raises the volume of the connection notification tone by 1 (+)
E}1 + E1 Resets the volume of the connection notification tone to its default setting
C1A0 C2 C3 C4 C5 C6 C7 C8
E}1E1

Connecting Wirelessly
EN-130
Bluetooth Low Energy MIDI connection between the Digital Piano and a smart device enables various
operations using a dedicated app. To connect with Bluetooth Low Energy MIDI, you need to install the
dedicated app on your smart device.
For more information about the dedicated app, see “Downloading the App (CASIO MUSIC SPACE) for
Smart Devices”.
1.
If the [Wireless Function] of the Digital Piano is <Off>, switch it to <On>.
• For more information, see “Wireless Function On/Off”.
2.
Connect the wireless MIDI & audio adaptor to the USB Type A terminal on the
Digital Piano.
3.
Open the settings screen of the smart device and check the Bluetooth function is
on.
4.
On the settings screen of the dedicated app installed on the smart device, select
“WU-BT10 MIDI” and connect it to this Digital Piano.
• For details, see the dedicated app instruction manual.
• Do not operate the Digital Piano while it is waiting to connect to a smart device.
• When connected, the left side of the “P(Power)” button lights up blue.
• Each time the dedicated app is used with a Bluetooth Low Energy MIDI connection, the operation
described in step 4 above is required.
• Connecting this Digital Piano to Bluetooth Low Energy MIDI and Bluetooth audio from an external
device at the same time may result in unstable MIDI operation depending on the external device and
OS version. If this happens, disconnect the Bluetooth audio connection using the external device.
Bluetooth Low Energy MIDI Connectivity

Connecting Wirelessly
EN-131
Using the supplied wireless MIDI & audio adaptor, you can pair the Digital Piano with a Bluetooth
audio-enabled device (smart device) to play sound from an external device through the Digital Piano’s
speakers.
• When pairing, keep the volume of the Digital Piano and the external device turned down to a
low level.
• If the sound of an external device played by the Digital Piano sounds distorted, turn down the
volume of the external device.
• Due to the characteristics of Bluetooth, sound is delayed.
1.
Connect the wireless MIDI & audio adaptor to the USB Type A terminal on the
Digital Piano.
2.
Open the settings screen of the external device and switch the Bluetooth
function to on if it is off.
3.
While holding down the “FUNCTION” button on the Digital Piano, press the C{1
key (Wireless Audio Pairing).
Selecting a Setting Value Directly (operation type A)
• The device enters pairing standby.
• The Visual Information Bar shows two bars moving left and right to indicate that the device is
standing by for pairing.
4.
Select “WU-BT10 AUDIO” on the Bluetooth settings screen of the external device
and pair it with this Digital Piano.
• When connected, a notification tone will sound and the right side of the “P(Power)” button will
light up blue.
Bluetooth Audio Connectivity
Bluetooth Audio Pairing
USB Type A Terminal
Wireless MIDI & audio adaptor
C1A0 C2 C3 C4 C5 C6 C7 C8
C{1
Connecting Wirelessly
EN-132
If the Bluetooth Audio Connection Does Not Work Properly
1.
Clear pairing registration.
• For more information, see “Clearing Pairing Registration”.
2.
If pairing registration information from this Digital Piano remains on the external
device, delete it.
• Delete “WU-BT10 AUDIO” from the Bluetooth settings screen of the external device. For how to
do this, see the external device’s instruction manual.
3.
Retry Bluetooth audio pairing.
• For more information, see “Bluetooth Audio Pairing”.
• The pairing information of the last external device connected via Bluetooth audio is registered in the
wireless MIDI & audio adaptor. From then on, a Bluetooth audio connection is automatically
established without the need for Bluetooth audio pairing.

Connecting Wirelessly
EN-133
Delete pairing registrations between the Digital Piano and external devices connected via Bluetooth
audio.
• After executing the following operation, delete pairing registration information with this Digital Piano,
even for external devices that were connected to this Digital Piano via Bluetooth audio. Delete “WU-
BT10 AUDIO” from the Bluetooth settings screen of the external device. For how to do this, see the
external device’s instruction manual.
1.
Connect the Wireless MIDI & audio adaptor to the USB Type A terminal on the
unit.
2.
Press and hold the “FUNCTION” button.
Putting in Standby Mode, and Executing on Next Key Press (operation type E)
• Do not release the “FUNCTION” button until step 4.
3.
Press the F1 key (Delete Connection History).
4.
Press the C1 key (Execute) to clear pairing registrations.
5.
Release the “FUNCTION” button.
Clearing Pairing Registration
C1A0 C2 C3 C4 C5 C6 C7 C8
F1

Connecting Wirelessly
EN-134
While holding down the “FUNCTION” button, press the B2 or C3 key.
Using the +/– Keys to Raise or Lower the Setting Value by 1 (operation type B)
• Setting value: 0 (silence) to 42 (maximum volume)
A separator tone sounds when the set value becomes a multiple of 10.
• Default value: 35
Adjusting Wireless Audio Playback Volume
Key Setting
B2 Lowers wireless audio playback volume by 1 (–)
C3 Raises wireless audio playback volume by 1 (+)
B2 + C3 Resets wireless audio playback volume to default setting
C1A0 C2 C3 C4 C5 C6 C7 C8
B2 C3
Using the Dedicated App
EN-135
When using the dedicated CASIO MUSIC SPACE app, you can enjoy numerous features linked to this
Digital Piano.
Main App Features
• Piano Remote Controller
• Piano Roll
• Music Player
See the CASIO MUSIC SPACE instruction manual for details on each function and other features.
https://web.casio.com/app/en/music_space/manual/
1.
Installing CASIO MUSIC SPACE on Your Smart Device
• See “Downloads” at the following website.
https://support.casio.com/global/en/emi/manual/AP-750/
Using the Dedicated App
Downloading the App (CASIO MUSIC SPACE) for Smart
Devices
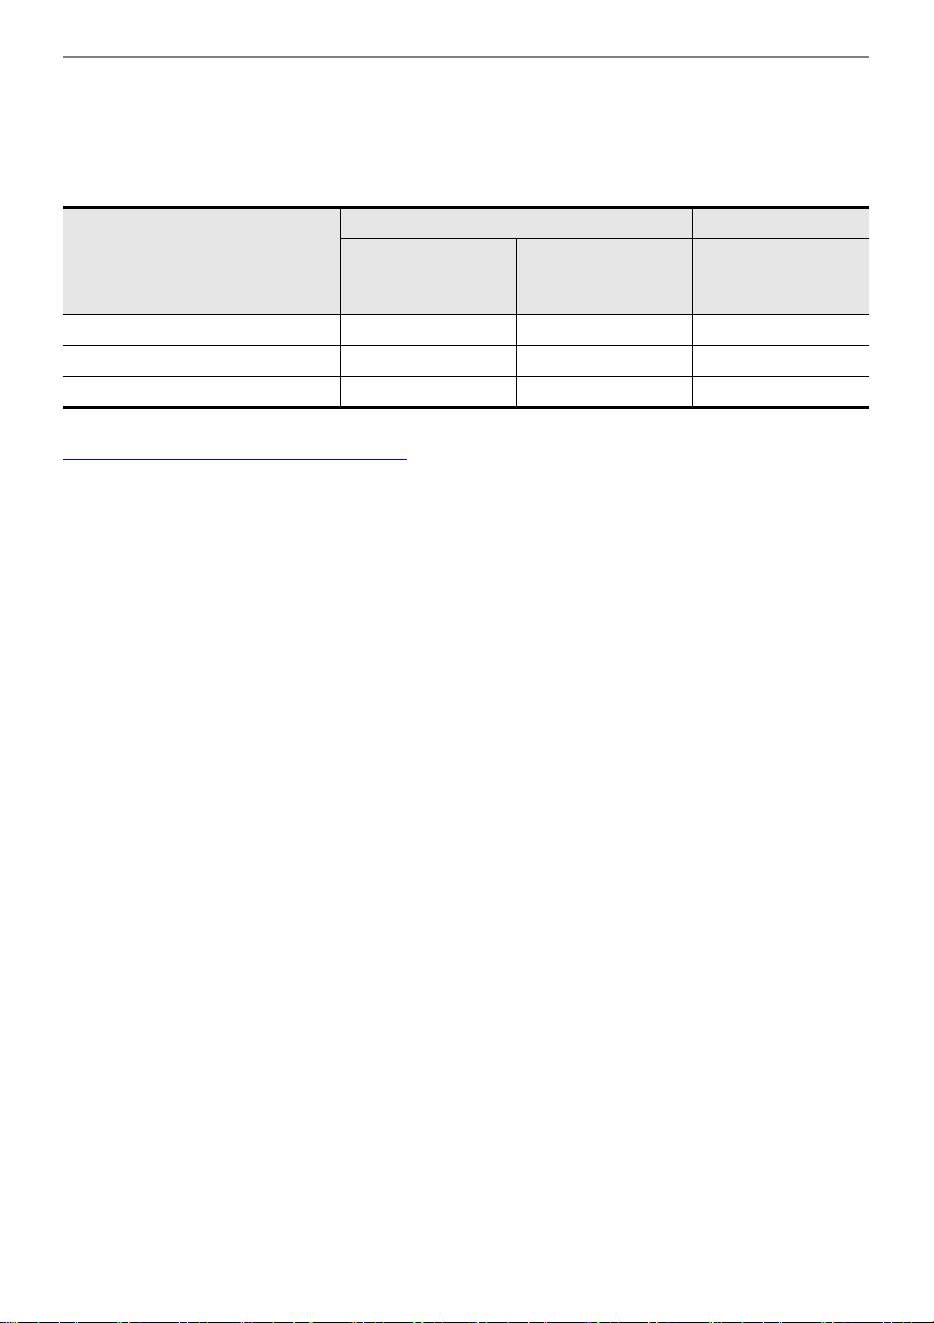
Using the Dedicated App
EN-136
2.
Connecting this Digital Piano to a Smart Device
• There are two types of connections: wireless and cable. Available features vary depending on
the connection method.
•Do not make Bluetooth Low Energy MIDI connections and USB MIDI connections at the same
time.
CASIO MUSIC SPACE website
https://web.casio.com/app/en/music_space/
*1 User Songs can be transferred to this Digital Piano using this function.
*2 See Bluetooth Low Energy MIDI Connectivity
*3 See Bluetooth Audio Connectivity
*4 See Connecting a Smart Device with USB MIDI
Main App Features
Wireless Connection Cable Connection
Bluetooth Low
E
nergy MIDI
Connection
*2
Bluetooth Audio
Connection
*3
USB MIDI
Connection
*4
Piano Remote Controller ––
Piano Roll
*1
––
Music Player – –

Using with an External Device with a Cable Connection
EN-137
You can send and receive performance information (MIDI data) by connecting this Digital Piano to a
computer or smart device. You can use music software on your computer or a smart device application
to record your performance on this Digital Piano, or send data from your computer or smart device to
this Digital Piano and play the sound.
• For detailed specifications and connection information on sending and receiving MIDI data with this
Digital Piano, see “Latest Support Information”.
• For MIDI-related settings, see “Changing MIDI Settings”.
The operating environment required to send and receive MIDI data is as follows: Always confirm the
environment of your computer in advance.
• USB terminal
• Supported OS
Windows 10
*
Windows 11
macOS 10.15, 11, 12, 13
* Windows 10 (32-bit and 64-bit versions)
• For the latest information on supported OS, see “Latest Support Information”.
Using with an External Device with a Cable
Connection
Connecting to a Computer or Smart Device and Using
MIDI
Computer Operating Environment

Using with an External Device with a Cable Connection
EN-138
• Failure to connect using the correct procedure may result in the inability to send and receive
data. Always follow the steps below to make a connection.
• After connecting, always turn on the Digital Piano before starting up music software on your
computer.
1.
Turn off the power to the Digital Piano and start up the computer.
• Do not start up any music software on your computer.
2.
Connect the computer and the Digital Piano using the USB Type B terminal of the
Digital Piano with a commercially available USB cable.
• Use a cable with USB Type B (USB 1.1 or 2.0) connector.
3.
Turn on the Digital Piano’s power.
• When connecting for the first time, the driver required to send and receive data is automatically
installed on the computer.
4.
Start the music software (commercially available) on your computer.
5.
In the settings of your computer’s music software (commercially available),
select MIDI Device.
• The device name is “CASIO AP-750 USB”.
• See the manual of your music software for information on how to select a MIDI device.
• After one successful connection, the USB cable can be left connected and the computer or this
Digital Piano can be turned on and off.
Connecting to a Computer
Digital Piano Terminal
USB Type B

Using with an External Device with a Cable Connection
EN-139
You can connect to smart devices and use apps that use MIDI standards.
See “Latest Support Information” for confirmed compatible devices.
• We recommend using the devices listed in the “Tested devices (USB-MIDI connection)” section.
• Operation confirmation results do not guarantee operation on that device.
• Depending on your environment, you may not be able to connect correctly.
• Even if the device has been tested, it may not work properly due to device or OS version upgrades,
etc.
• Use a cable that supports data communication.
• Charging cables are not compatible.
1.
Turn on the Digital Piano and the smart device.
2.
Use a cable to connect the smart device to the USB Type Bterminal of the Digital
Piano.
• For connection cables, see “Connecting via USB Cable” at the website below.
https://web.casio.com/app/en/music_space/support/connect.html
3.
Launch the MIDI-compatible app on your smart device.
• When using CASIO’s dedicated app, if a successful connection is made, the message
“Connecting” will appear on the smart device screen, followed by the message “Connected”.
Smart Device Operating Environment
Connecting a Smart Device with USB MIDI
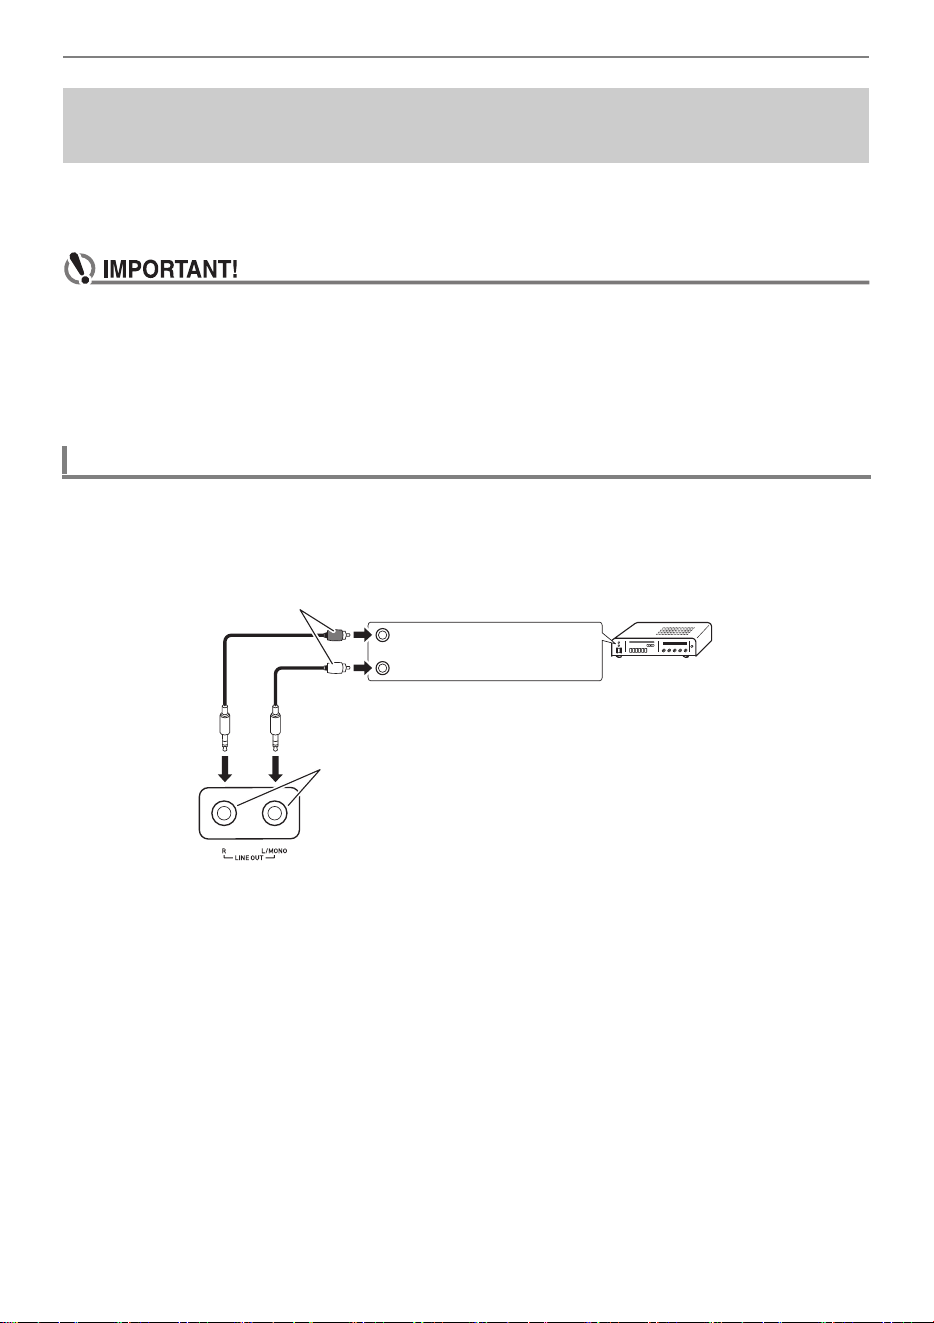
Using with an External Device with a Cable Connection
EN-140
When connected to an audio device or an amplifier for musical instruments, you can enjoy
performances with more powerful volume and sound quality in line with the speaker capabilities of
those devices. To make a connection, use a commercially available connection cord.
• Turn off all external devices when connecting. Also, keep the volume settings of the Digital
Piano and external devices turned down to minimum when turning the power On/Off.
• After connecting, turn on the power to the Digital Piano and the external device, in that order.
• If the sound of this Digital Piano played by an external device sounds distorted, turn down the
volume of the Digital Piano.
• Set [Headphones
Mode] to <Off> when connecting to an amplifier or other audio equipment.
LINE OUT R (Right) is the right channel sound and LINE OUT L/MONO (Left) is the left channel sound.
Connect both as shown in the figure with a commercially available connection cord. You will most likely
need to switch the input selector of your audio device to the connected terminal (AUX IN etc.).
Outputting the Digital Piano’s Sound to an Amplifier or
Audio Equipment
Connecting to Audio Equipment
AUX IN of audio amplifier, etc.
Pin plug
LINE OUT Terminal (Standard TS
Phone Jack)
RIGHT (red)
LEFT (white)

Using with an External Device with a Cable Connection
EN-141
If you connect only to LINE OUT L/MONO, you will get a mixture of both channels. Use a commercially
available connection cord and make a connection as shown in the diagram.
Connecting to a Musical Instrument Amplifier
INPUT 2
INPUT 1
LINE OUT L/MONOTerminal
(Standard TS Phone Jack)
Guitar amplifier
Keyboard amplifier, etc.
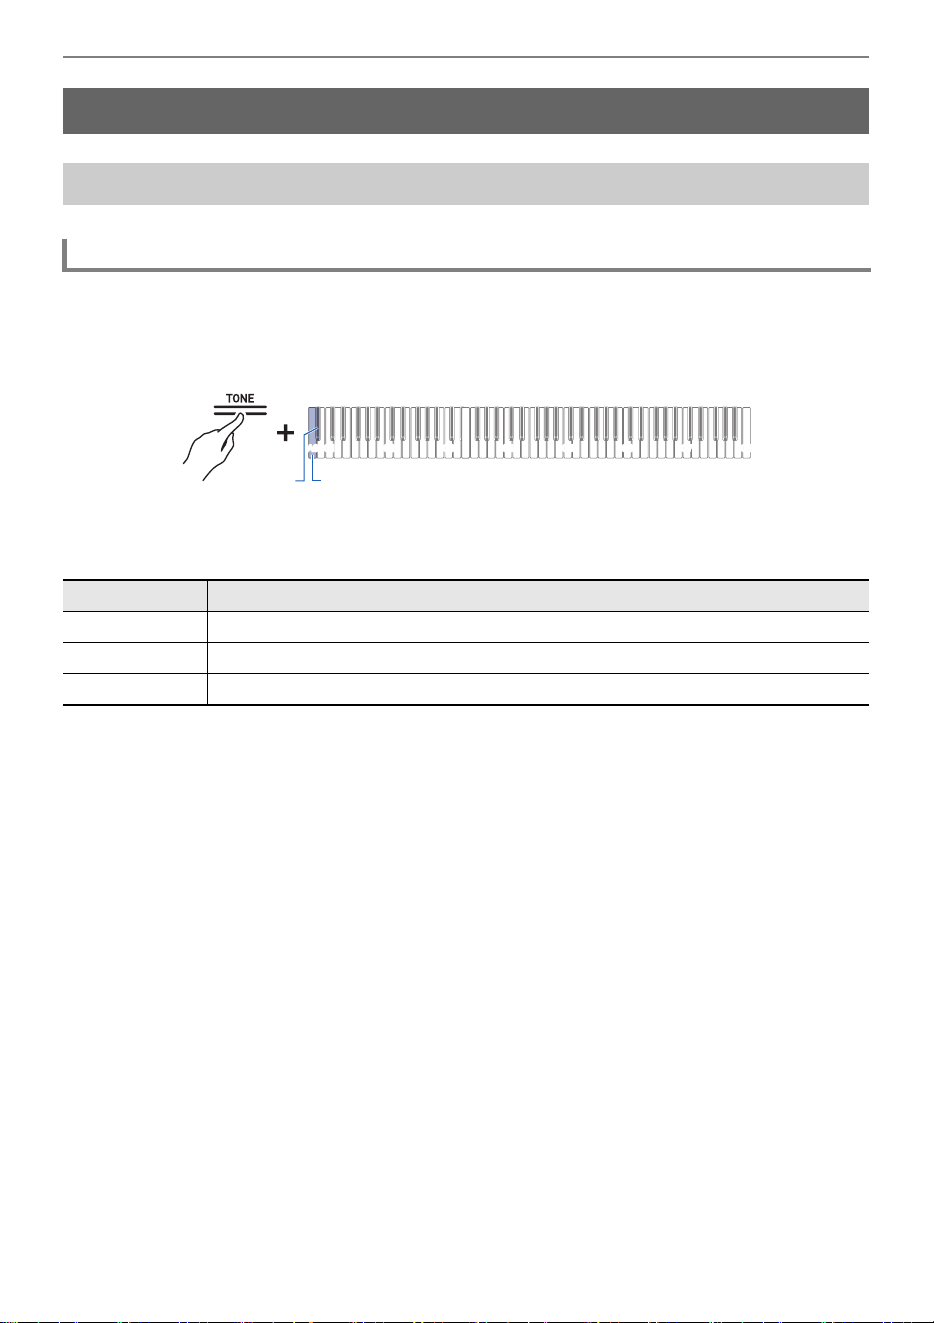
Changing Settings
EN-142
While holding down the “TONE” button, press the A0 or B}0 key.
Using the +/– Keys to Raise or Lower the Setting Value by 1 (operation type B)
• Setting value: 0 (silence) to 42 (maximum volume)
A separator tone sounds when the set value becomes a multiple of 10.
• Default value: 42
Changing Settings
Changing the settings of the Upper1 part
Adjust the volume of the Upper1 part
Key Setting
A0 Lower the volume of the Upper1 part by one level (–)
B}0 Increase the volume of the Upper1 part by one level (+)
A0 + B}0 Reset the volume of the Upper1 part to the default setting
C1A0 C2 C3 C4 C5 C6 C7 C8
B}0A0

Changing Settings
EN-143
While holding down the “TONE” button, press the C{7 or D7 key.
Using the +/– Keys to Raise or Lower the Setting Value by 1 (operation type B)
• Setting value: 0 (silence) to 42 (maximum volume)
A separator tone sounds when the set value becomes a multiple of 10.
• Default value: 26
Fine-tune the relative pitch of the Upper2 part to the Upper1 part.
While holding down the “TONE” button, press the F7 or F{7 key.
Using the +/– Keys to Raise or Lower the Setting Value by 1 (operation type B)
• Setting value: –99 cents to +99 cents (100 cents = 1 semitone)
A separator tone sounds when the set value becomes a multiple of 10.
• Default value: 0 cents
Changing the settings of the Upper2 part
Adjust the volume of the Upper2 part
Key Setting
C{7 Lower the volume of the Upper2 part by one level (–)
D7 Increase the volume of the Upper2 part by one level (+)
C{7 + D7 Reset the volume of the Upper2 part to the default setting
Fine-tune the Upper2 part (Upper2 Detune)
Key Setting
F7 Lower the pitch of the Upper2 part by 1 cent (–)
F{7 Raise the pitch of the Upper2 part by 1 cent (+)
F7 + F{7 Sets the pitch of the Upper2 part to the same as the Upper1 part (default setting)
C1A0 C2 C3 C4 C5 C6 C7 C8
C{7D7
C1A0 C2 C3 C4 C5 C6 C7 C8
F7 F{7

Changing Settings
EN-144
Sets whether the Damper Pedal Effect is applied or not to the Upper2 part.
While holding down the “TONE” button, press the G7 key (Upper2 Damper).
Switching On/Off or Changing Setting Values Using a Single Key (operation type D)
• Default value: Enabled
Enabling/Disabling Upper2 Part Damper Pedal Effect
Setting Value Setting Details
Disabled Disables the Damper Pedal Effect.
Enabled Enables the Damper Pedal Effect.
C1A0 C2 C3 C4 C5 C6 C7 C8
G7
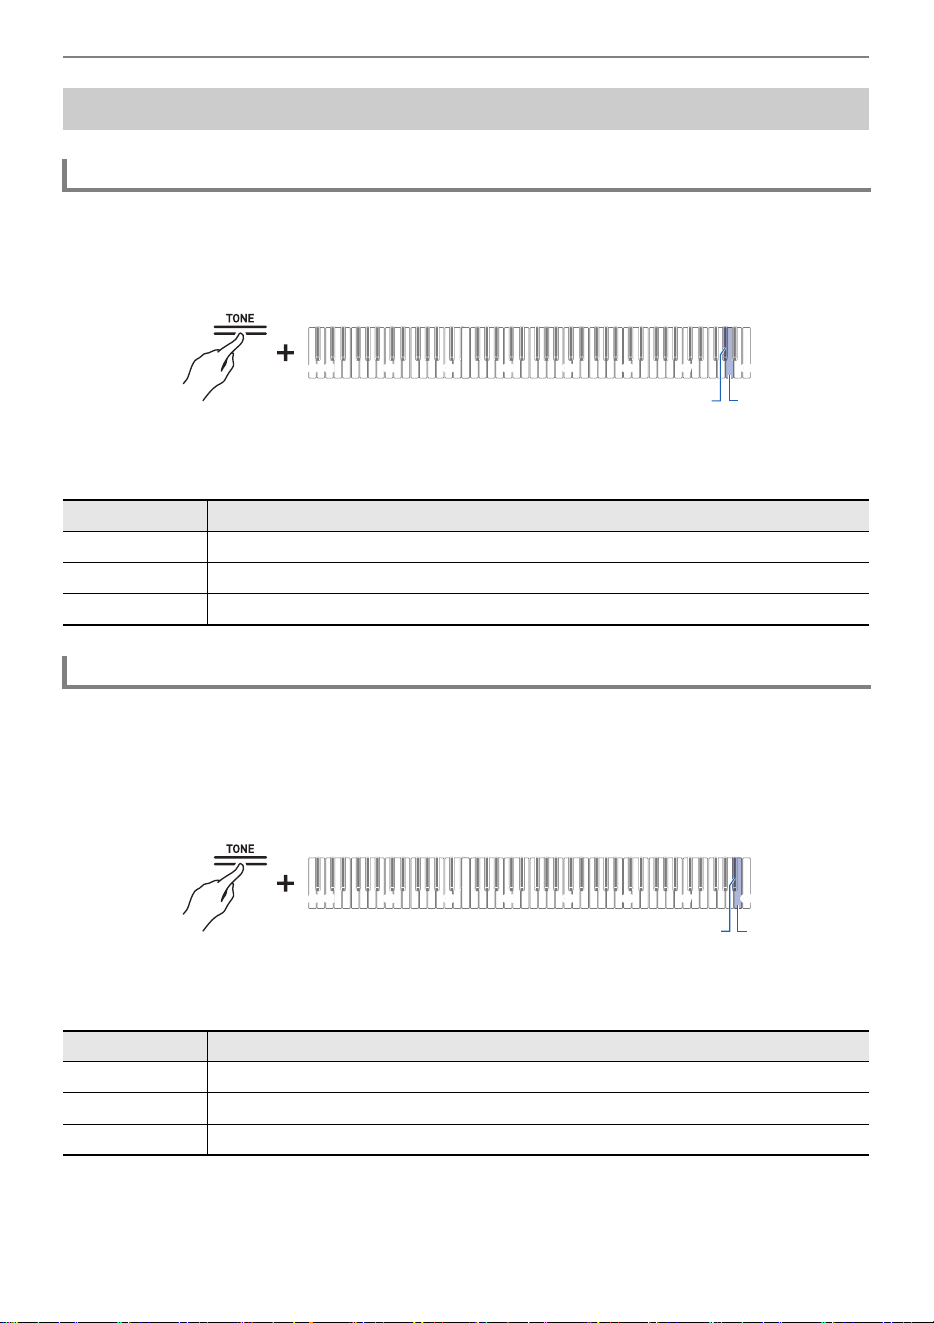
Changing Settings
EN-145
While holding down the “TONE” button, press the A}7 or A7 key.
Using the +/– Keys to Raise or Lower the Setting Value by 1 (operation type B)
• Setting value: 0 (silence) to 42 (maximum volume)
A separator tone sounds when the set value becomes a multiple of 10.
• Default value: 42
Fine-tune the relative pitch of the Lower part to the Upper1 part.
While holding down the “TONE” button, press the B}7 or B7 key.
Using the +/– Keys to Raise or Lower the Setting Value by 1 (operation type B)
• Setting value: –99 cents to +99 cents (100 cents = 1 semitone)
A separator tone sounds when the set value becomes a multiple of 10.
• Default value: 0 cents
Change the setting of the Lower part
Adjust the volume of the Lower part
Key Setting
A}7 Decrease Lower part volume by 1 level (–)
A7 Increase the volume of the Lower part by one level (+)
A}7 + A7 Reset the volume of the Lower part to the default setting
Fine-tune the tuning of the Lower part (Lower detune)
Key Setting
B}7 Decrease Lower part pitch by 1 cent (–)
B7 Increase Lower part pitch by 1 cent (+)
B}7 + B7 Sets the pitch of the Lower part to the same as the Upper1 part (default setting)
C1A0 C2 C3 C4 C5 C6 C7 C8
A}7A7
C1A0 C2 C3 C4 C5 C6 C7 C8
B}7B7

Changing Settings
EN-146
Sets whether the Damper Pedal Effect is applied or not to the Lower part.
While holding down the “TONE” button, press the C8 key (Lower Damper).
Switching On/Off or Changing Setting Values Using a Single Key (operation type D)
• Default value: Disabled
Enabling/Disabling Lower Part Damper Pedal Effect
Setting Value Setting Details
Disabled Disables the Damper Pedal Effect.
Enabled Enables the Damper Pedal Effect.
C1A0 C2 C3 C4 C5 C6 C7 C8
C8

Changing Settings
EN-147
When [Auto Resume] is set to <On>, most settings are retained, even when the Digital Piano is turned
off.
• The settings that are retained regardless of whether [Auto Resume] is set to <Enabled> or
<Disabled> are as follows:
The A Tuning setting, piano position, half pedal position, Visual Information Bar brightness/off
setting, wireless connection notification sound volume, touch button setting, notification sound
setting and auto-resume setting
While holding down the “FUNCTION” button, press the A}7 key (Auto Resume).
Switching On/Off or Changing Setting Values Using a Single Key (operation type D)
• Default value: Disabled
Saving the Digital Piano Settings (Auto Resume)
Setting Value Setting Details
Disabled Disables Auto Resume.
Enabled Enables Auto Resume.
C1A0 C2 C3 C4 C5 C6 C7 C8
A}7
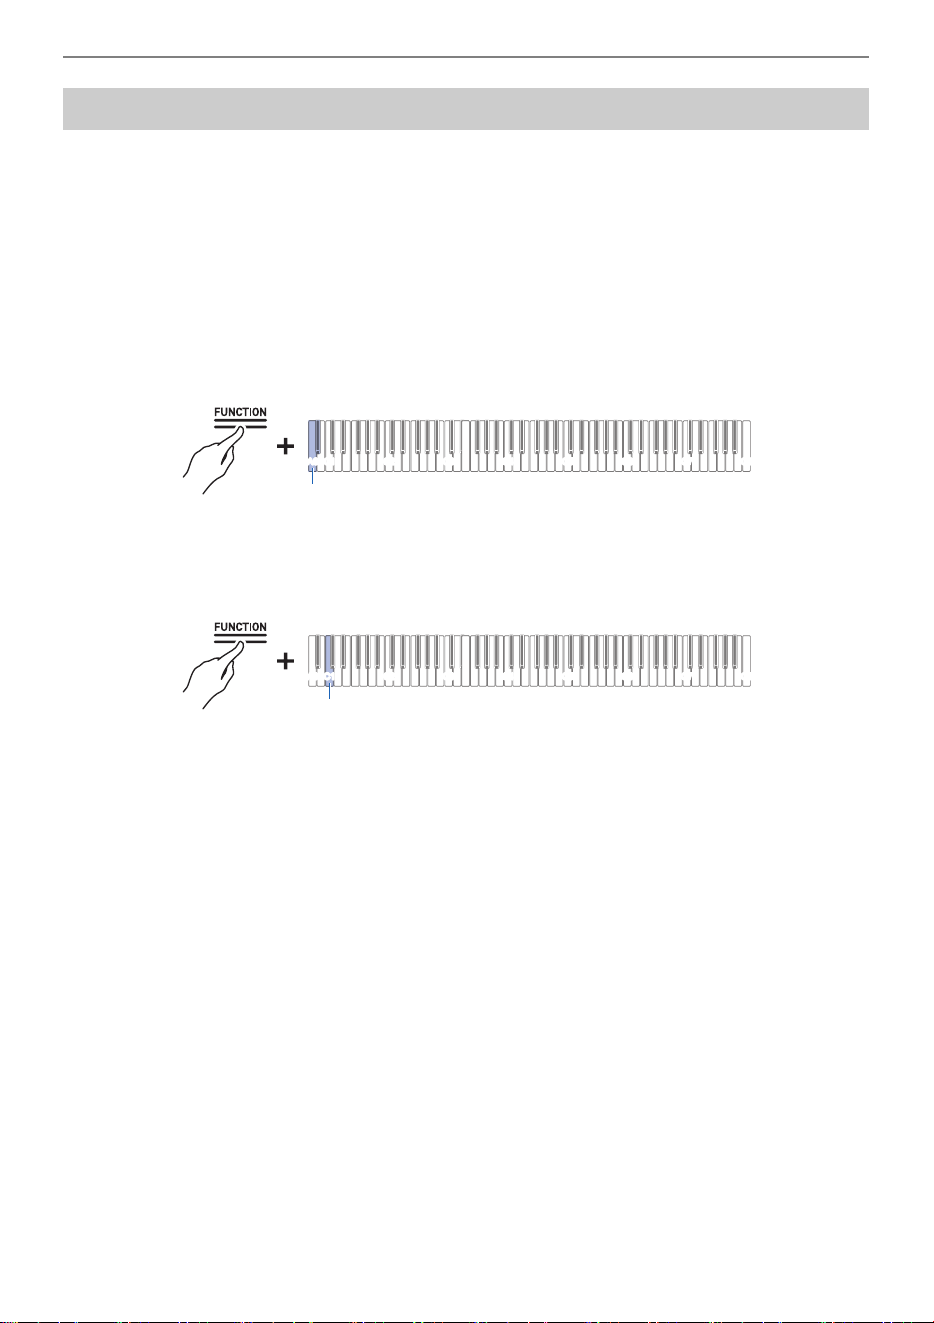
Changing Settings
EN-148
You can initialize all system content on this Digital Piano, such as data and settings, and return the
Digital Piano to the settings it had when it was shipped from the factory.
1.
Press and hold the “FUNCTION” button.
Putting in Standby Mode, and Executing on Next Key Press (operation type E)
2.
Press the A0 key (Factory Reset).
• The Digital Piano enters factory reset standby and the “FUNCTION” button blinks.
• Perform factory reset in the following way. To stop factory reset, release the “FUNCTION”
button at this point.
3.
To execute factory reset, press the C1 key (Execute).
• Factory reset starts.
4.
Release the “FUNCTION” button.
• Factory reset may take some time. Please wait until the process is complete. When factory reset
is complete, all touch buttons on the Digital Piano (FUNCTION
to TONE, BERLIN GRAND to
METRONOME) will light up.
Restore Factory Defaults (Factory Reset)
C1A0 C2 C3 C4 C5 C6 C7 C8
A0
C1A0 C2 C3 C4 C5 C6 C7 C8
C1
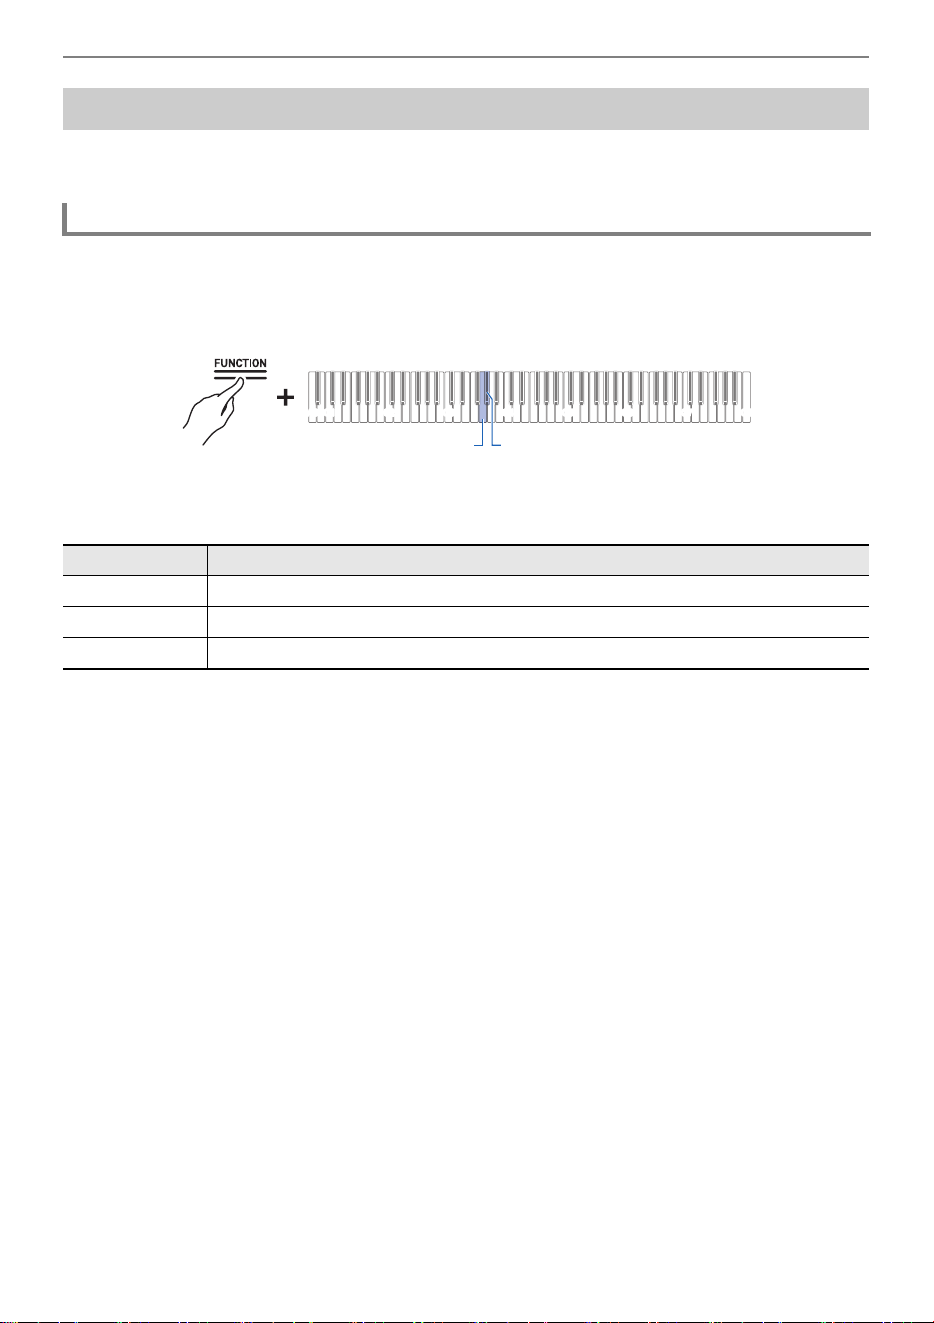
Changing Settings
EN-149
You can adjust the volume of keyboard performances, MIDI song playback, audio song playback, and
wireless audio playback individually, relative to the overall volume.
While holding down the “FUNCTION” button, press the G3 or A}3 key.
Using the +/– Keys to Raise or Lower the Setting Value by 1 (operation type B)
• Setting value: 0 (silence) to 42 (maximum volume)
A separator tone sounds when the set value becomes a multiple of 10.
• Default value: 42
Adjusting Volume Balance
Keyboard Volume
Key Setting
G3 Lowers Keyboard Volume by 1 (–)
A}3 Raises Keyboard Volume by 1 (+)
G3 + A}3 Resets Keyboard Volume to default setting
C1A0 C2 C3 C4 C5 C6 C7 C8
G3 A}3

Changing Settings
EN-150
Adjusts the playback volume of built-in songs, user songs, MIDI Recorder songs, and USB flash drive
songs.
While holding down the “FUNCTION” button, press the F3 or F{3 key.
Using the +/– Keys to Raise or Lower the Setting Value by 1 (operation type B)
• Setting value: 0 (silence) to 42 (maximum volume)
A separator tone sounds when the set value becomes a multiple of 10.
• Default value: 42
Adjusts the playback volume of audio data (WAV and MP3 files).
While holding down the “FUNCTION” button, press the D3 or E}3 key.
Using the +/– Keys to Raise or Lower the Setting Value by 1 (operation type B)
• Setting value: 0 (silence) to 42 (maximum volume)
A separator tone sounds when the set value becomes a multiple of 10.
• Default value: 35
MIDI Song Volume
Key Setting
F3 Lowers the playback volume of MIDI songs by 1 (–)
F{3 Raises the playback volume of MIDI songs by 1 (+)
F3 + F{3 Resets the playback volume of MIDI songs to the default setting
Audio Song Playback Volume
Key Setting
D3 Lowers the playback volume of an audio song by 1 (–)
E}3 Raises the playback volume of audio songs by 1 (+)
D3 + E}3 Resets the playback volume of audio songs to the default setting
C1A0 C2 C3 C4 C5 C6 C7 C8
F3 F{3
C1A0 C2 C3 C4 C5 C6 C7 C8
D3 E}3
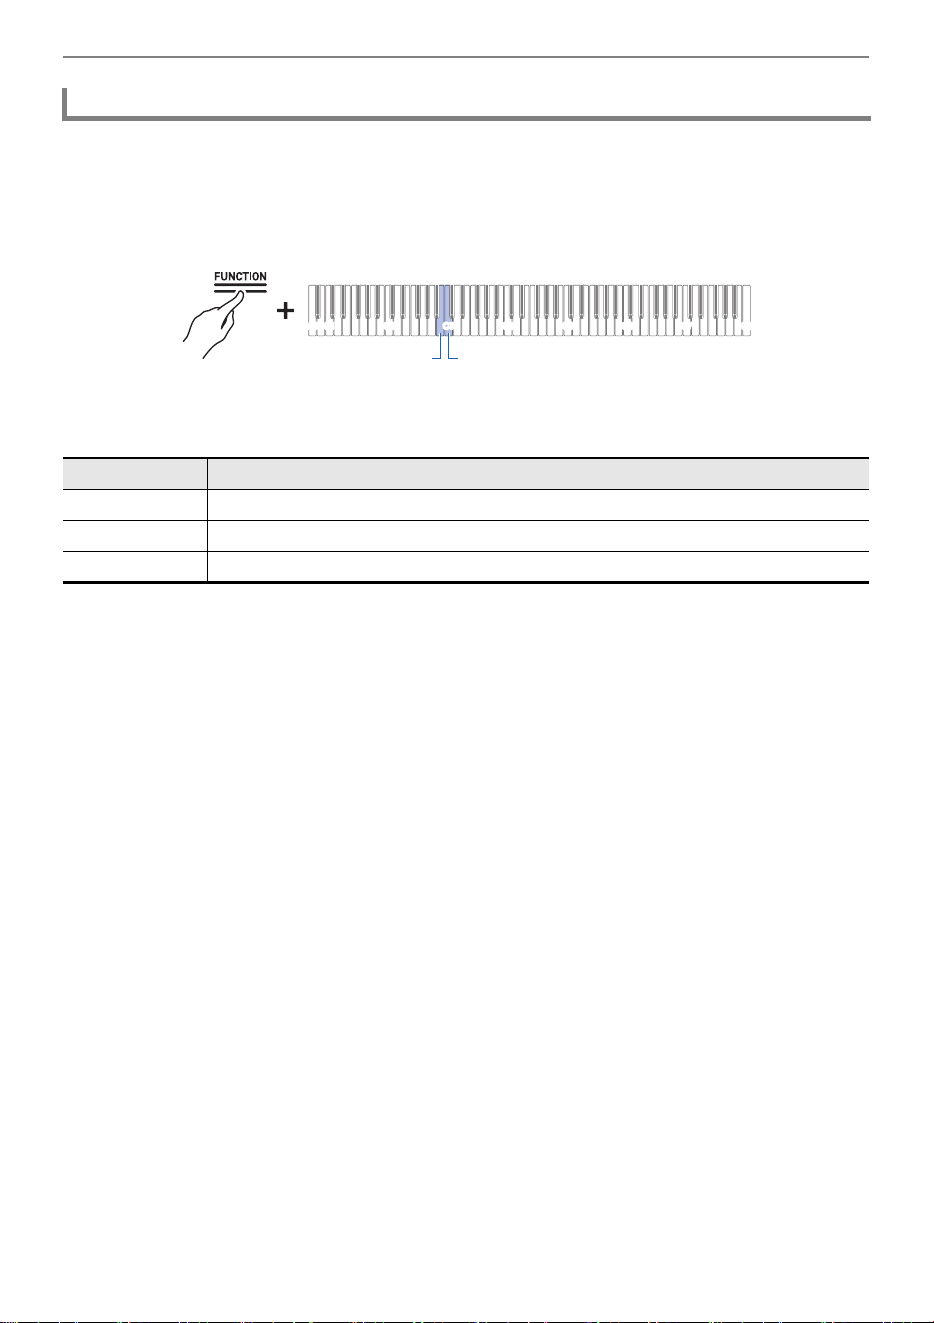
Changing Settings
EN-151
Adjust the playback volume of wireless audio.
While holding down the “FUNCTION” button, press the B2 or C3 key.
Using the +/– Keys to Raise or Lower the Setting Value by 1 (operation type B)
• Setting value: 0 (silence) to 42 (maximum volume)
A separator tone sounds when the set value becomes a multiple of 10.
• Default value: 35
Wireless Audio Playback Volume
Key Setting
B2 Lowers wireless audio playback volume by 1 (–)
C3 Raises wireless audio playback volume by 1 (+)
B2 + C3 Resets wireless audio playback volume to default setting
C1A0 C2 C3 C4 C5 C6 C7 C8
B2 C3

Changing Settings
EN-152
When [Center Cancel] is set to <On>, the vocals are cut from playback (cut or lowered). This function
cancels centrally positioned sounds, so sounds other than vocals may also be cut. The degree of the
effect depends on the audio data being played.
While holding down the “FUNCTION” button, press the C{3 or E3 key.
Switching On/Off or Changing Setting Values Using a Single Key (operation type D)
Wireless Audio Center Cancel (C{3 key)
• Default value: Off
Audio Song Center Cancel (E3 key)
• Default value: Off
Center Cancel Function
Setting Value Setting Details
Off Disables Wireless Audio Center Cancel.
On
Enables Wireless Audio Center Cancel. Cancels the center localized sound of
wireless audio.
Setting Value Setting Details
Off Turns off Audio Song Center Cancel.
On
Turns on Audio Song Center Cancel. Cancels the center localized sound of an audio
song.
C1A0 C2 C3 C4 C5 C6 C7 C8
E3C{3
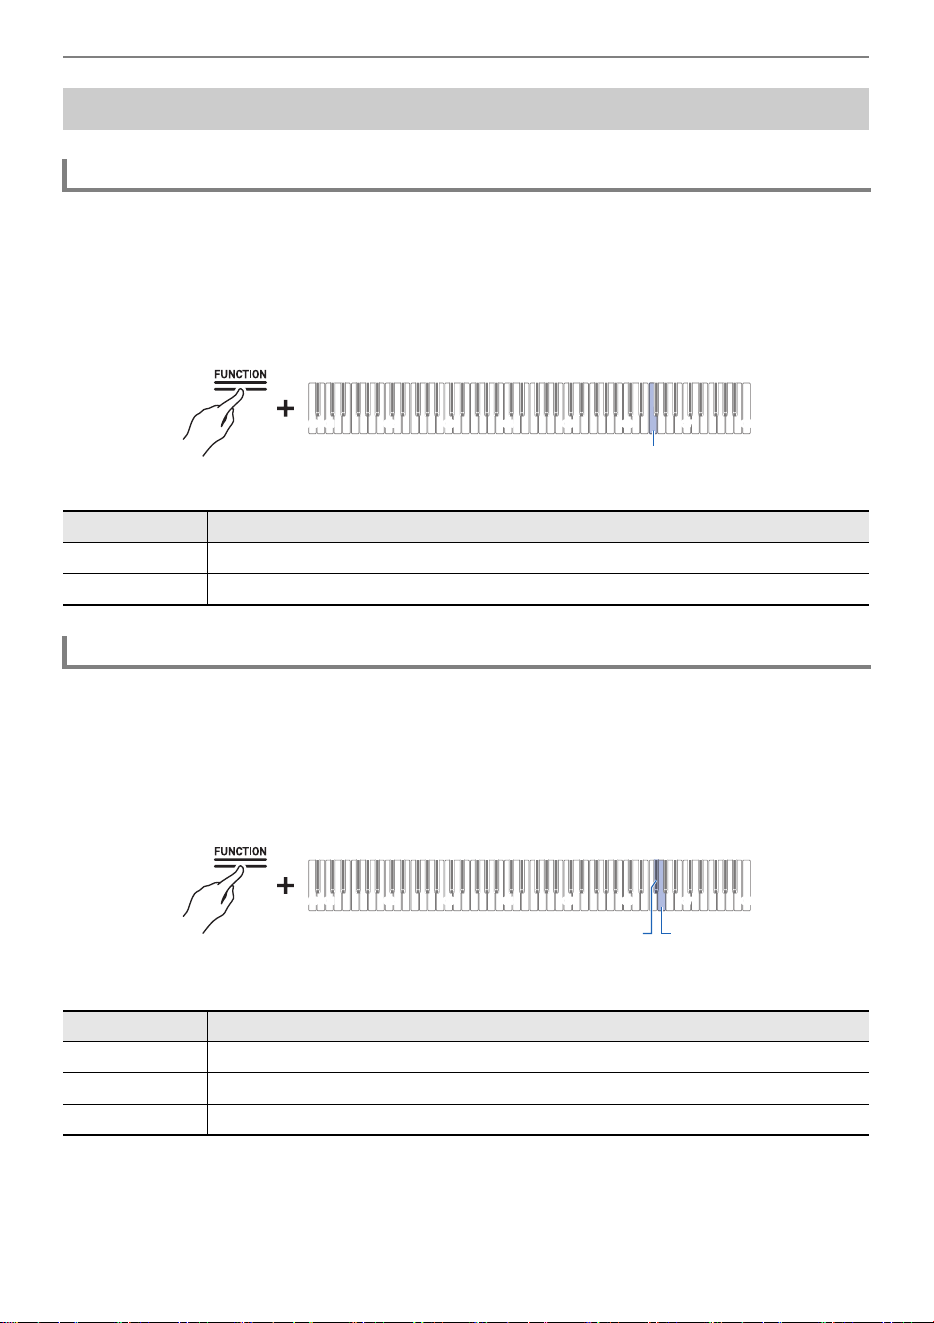
Changing Settings
EN-153
When [Local Control] is set to <Off>, MIDI data is output from this Digital Piano, but the Digital Piano
itself does not emit sound. This setting is for sending MIDI data to external devices only.
While holding down the “FUNCTION” button, press the F6 key (Local Control).
Switching On/Off or Changing Setting Values Using a Single Key (operation type D)
• Default value: On
Sets the MIDI channel to be used when sending keyboard performance information from this Digital
Piano to an external device.
While holding down the “FUNCTION” button, press the F{6 or G6 key.
Using the +/– Keys to Raise or Lower the Setting Value by 1 (operation type B)
• Setting value: 1ch to 16ch
• Default value: 1ch
Changing MIDI Settings
Local Control
Setting Value Setting Details
Off Turns off Local Control.
On Turns on Local Control.
Keyboard Channel
Key Setting
F{6 Lowers the Keyboard Channel by 1 (–)
G6 Raises the Keyboard Channel by 1 (+)
F{6 + G6 Resets the Keyboard Channel to the default setting
C1A0 C2 C3 C4 C5 C6 C7 C8
F6
C1A0 C2 C3 C4 C5 C6 C7 C8
G6F{6

Changing Settings
EN-154
Set high-resolution MIDI output for touch strength (Velocity) to <Enable> or <Disable> when playing the
keyboard.
While holding down the “FUNCTION” button, press the A}6 key (Hi-Res Velocity
MIDI OUT).
Switching On/Off or Changing Setting Values Using a Single Key (operation type D)
• Default value: Disabled
Hi-Res Velocity MIDI OUT
Setting Value Setting Details
Disabled Disables the Hi-Res Velocity MIDI OUT.
Enabled Enables Hi-Res Velocity MIDI OUT.
C1A0 C2 C3 C4 C5 C6 C7 C8
A}6

Changing Settings
EN-155
The Visual Information Bar displays various lighting patterns according to the beat of the metronome,
the touch strength (velocity) when playing the keyboard, and the depth to which the damper pedal is
pressed.
The lighting pattern of the Visual Information Bar changes depending on the display settings.
While holding down the “FUNCTION” button, press one of the F5 to A5 keys.
Selecting a Setting Value Directly (operation type A)
• Default value: Auto
• When the display is set to a setting other than <Auto>, it will light up only when the action or
operation of the selected setting is performed.
For the following operations, the Visual Information Bar lights up regardless of display settings.
• During demo song playback: Lights up in response to the velocity of the song.
• While making various settings using the keyboard: The set value or approximate value lights up.
• During Instant RePlayer playback: Lights up to indicate where the current playback position is in the
overall recording.
• When connected to CASIO MUSIC SPACE and using the “Live Concert Simulator” feature: Lights up
in response to audio input from the app.
• When the display setting is <Auto>, the Visual Information Bar does not blink in response to a
wireless audio input signal. Set the display setting to <Audio>.
Setting the Display of the Visual Information Bar
Changing Display Settings
Key
Display
Settings
Setting Details
F5 Auto The Display automatically changes in response to your performance
and operations on the Digital Piano.
F{5 Metronome Lights up to the beat only when the metronome is playing. Lighting
patterns can be switched.
G5 Keyboard Lights up in response to touch strength (velocity) when the keys are
played or according to the velocity of the song playing on the Digital
Piano.
A}5 Pedal Lights up in response to the depth to which the damper pedal is
pressed.
A5 Audio Lights up in response to the wireless audio input signal. Lighting
patterns can be switched.
C1A0 C2 C3 C4 C5 C6 C7 C8
F5 - A5

Changing Settings
EN-156
Switching Lighting Patterns
When the display settings are <Metronome> and <Audio>, you can switch the lighting pattern.
Metronome Type
The Visual Information Bar displays the beat in time with the metronome beat. You can choose from
five types of beat display using the [Metronome Type] setting.
While holding down the “FUNCTION” button, press the B}5 key (Metronome
Type).
Switching On/Off or Changing Setting Values Using a Single Key (operation type D)
Audio Illumination Type
The Visual Information Bar blinks in time with the wireless audio input signal, allowing you to enjoy the
illumination display. The Audio Illumination Type setting allows you to select from four types of
illumination display.
While holding down the “FUNCTION” button, press the B5 key (Audio
Illumination Type).
Switching On/Off or Changing Setting Values Using a Single Key (operation type D)
C1A0 C2 C3 C4 C5 C6 C7 C8
B}5
C1A0 C2 C3 C4 C5 C6 C7 C8
B5

Changing Settings
EN-157
If the brightness of the Visual Information Bar is a little too bright, you can reduce the brightness or turn
it off.
While holding down the “FUNCTION” button, press the C6 key (Brightness/Off).
Switching On/Off or Changing Setting Values Using a Single Key (operation type D)
• Default value: 2
Brightness Setting and No Lighting
Setting
Value
Notification Tone Setting Details
Off Tone for Off Turns off the Visual Information Bar.
1 1 notification tone
Displays the Visual Information Bar with reduced brightness.
2 2 notification tones
Displays the Visual Information Bar at normal brightness.
C1A0 C2 C3 C4 C5 C6 C7 C8
C6

Changing Settings
EN-158
Set whether [Power On Alert] is <Enabled> or <Disabled>.
For more information, see “Power On Alert”.
While holding down the “FUNCTION” button, press the F{7 key (Power On Alert).
Switching On/Off or Changing Setting Values Using a Single Key (operation type D)
• Default value: Enabled
Set whether or not Auto Power Off is activated <Enabled> or <Disabled>.
For more information, see “Auto Power Off Function”.
While holding down the “FUNCTION” button, press the B}0 key (Auto Power Off).
Switching On/Off or Changing Setting Values Using a Single Key (operation type D)
• Default value: Enabled
Main Digital Piano Settings
Power On Alert
Setting Value Setting Details
Disabled Disables Power On Alert.
Enabled Enables Power On Alert.
Auto Power Off
Setting Value Setting Details
Disabled Disables Auto Power Off.
Enabled Enables Auto Power Off.
C1A0 C2 C3 C4 C5 C6 C7 C8
F{7
C1A0 C2 C3 C4 C5 C6 C7 C8
B}0
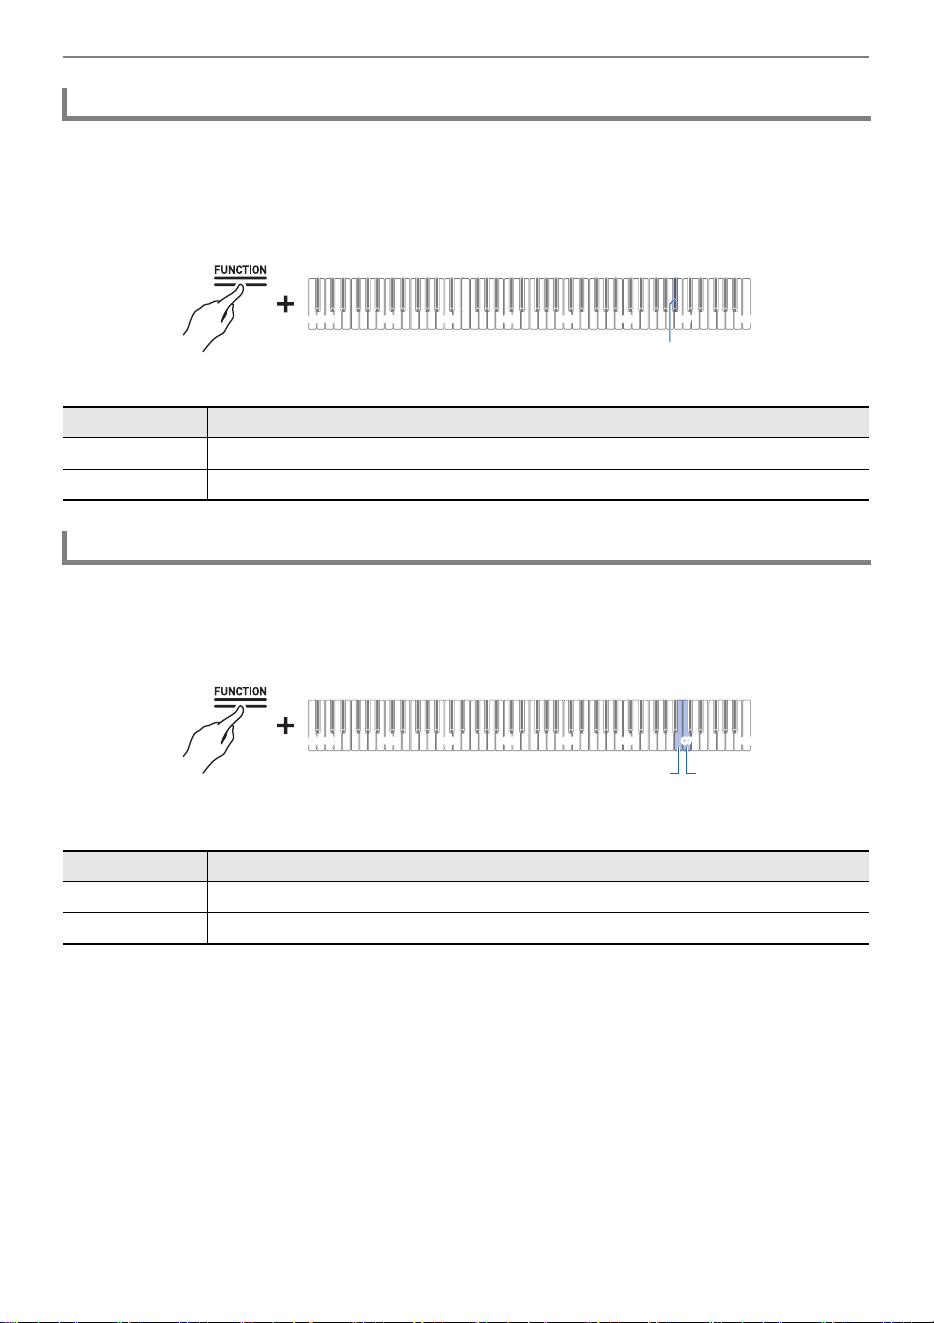
Changing Settings
EN-159
While holding down the “FUNCTION” button, press the B}6 key (Touch Button
Luminosity).
Switching On/Off or Changing Setting Values Using a Single Key (operation type D)
• Default value: 2
While holding down the “FUNCTION” button, press the B6 or C7 key.
Using the +/– Keys to Raise or Lower the Setting Value by 1 (operation type B)
• Setting value: –1 (low sensitivity) to 0 (standard) to +1 (high sensitivity)
• Default value: 0
Touch Button Luminosity
Setting Value Setting Details
1 Dims touch button luminosity.
2 Brightens touch button luminosity.
Left Panel Touch Button Sensitivity
Key Setting
B6 Lowers touch button sensitivity by 1 (–)
C7 Raises touch button sensitivity by 1 (+)
C1A0 C2 C3 C4 C5 C6 C7 C8
B}6
C1A0 C2 C3 C4 C5 C6 C7 C8
B6 C7

Changing Settings
EN-160
While holding down the “FUNCTION” button, press the C{7 or D7 key.
Using the +/– Keys to Raise or Lower the Setting Value by 1 (operation type B)
• Setting value: –1 (low sensitivity) to 0 (standard) to +1 (high sensitivity)
• Default value: 0
Setting [Panel Lock] to <Enabled> locks button operations
*
. When set to <Auto>, operation is
automatically locked during performances only, preventing accidental operation during a performance.
* Excludes the power button and the disabling of Panel Lock.
While holding down the “FUNCTION” button, press the C8 key (Panel Lock).
Switching On/Off or Changing Setting Values Using a Single Key (operation type D)
• Default value: Disabled
Sensitivity of front panel touch buttons
Key Setting
C{7 Lowers touch button sensitivity by 1 (–)
D7 Raises touch button sensitivity by 1 (+)
Panel Lock
Setting
Value
Notification Tone Setting Details
Disabled Tone for Off Disables Panel Lock.
Enabled 1 notification tone Enables Panel Lock.
Auto 2 notification tones Locks operation only during performances.
C1A0 C2 C3 C4 C5 C6 C7 C8
7
7
7
C{7D7
C8
C1A0 C2 C3 C4 C5 C6 C7 C8

Changing Settings
EN-161
While holding down the “FUNCTION” button, press the G7 key (Panel Light
setting).
Switching On/Off or Changing Setting Values Using a Single Key (operation type D)
• Default value: 15 sec.
While holding down the “FUNCTION” button, press the A7 or B}7 key.
Using the +/– Keys to Raise or Lower the Setting Value by 1 (operation type B)
• Set value: 0 (silence) to 10 (maximum volume)
• Default value: 5
Switching Panel Light Settings
Setting
Value
Notification Tone Setting Details
Off Tone for Off Touch button light does not go off.
5 sec. 1 notification tone When the set time elapses without a panel operation, all touch
buttons turn off.
15 sec. 2 notification tones
30 sec. 3 notification tones
60 sec. 4 notification tones
120 sec. 5 notification tones
Notification Tone Volume
Key Setting
A7 Lowers the notification tone volume by 1 (–)
B}7 Raises the notification tone volume by 1 (+)
A7 + B}7 Resets the notification tone volume to the default setting
C1A0 C2 C3 C4 C5 C6 C7 C8
G7
C1A0 C2 C3 C4 C5 C6 C7 C8
A7 B}7

Changing Settings
EN-162
You can choose your favorite notification tones from three different notification tone sets.
While holding down the “FUNCTION” button, press the B7 key (Notification Tone
Set selection).
Switching On/Off or Changing Setting Values Using a Single Key (operation type D)
Automatically corrects the sound quality in response to the loud or quiet setting of the volume knob.
Bass and treble will be heard clearly even at low volumes.
While holding down the “FUNCTION” button, press the F7 key (Volume Sync
Equalizer).
Switching On/Off or Changing Setting Values Using a Single Key (operation type D)
• Default value: Medium
Notification Tone Set Selection
Volume Sync Equalizer
Setting
Value
Notification Tone Setting Details
Off Tone for Off Does not compensate for sound quality.
Weak 1 notification tone Weakly compensates for sound quality.
Medium 2 notification tones Standard correction.
Strong 3 notification tones Strongly compensates for sound quality.
C1A0 C2 C3 C4 C5 C6 C7 C8
B7
C1A0 C2 C3 C4 C5 C6 C7 C8
F7

Changing Settings
EN-163
Set whether or not sound is emitted from the Digital Piano’s speakers.
While holding down the “FUNCTION” button, press the E}7 key (Speaker Out).
Switching On/Off or Changing Setting Values Using a Single Key (operation type D)
• Default value: Auto
Speaker Out
Setting
Value
Notification Tone Setting Details
Disabled Tone for Off No sound is emitted from the Digital Piano’s speakers.
Enabled 1 notification tone Sound is emitted from the Digital Piano’s speakers.
Auto 2 notification tones PHONES When a plug is inserted into the terminal, no sound is
produced from the Digital Piano speakers. When no plug is
inserted, sound is emitted from the Digital Piano.
C1A0 C2 C3 C4 C5 C6 C7 C8
E}7

Changing Settings
EN-164
When using headphones, this reproduces the natural sound that reaches your ears when you play an
acoustic piano.
While holding down the “FUNCTION” button, press the E7 key (Headphones
mode).
Switching On/Off or Changing Setting Values Using a Single Key (operation type D)
• Default value: On
• The headphones mode is turned On when a plug is inserted into one of the PHONES terminals.
• Regardless of the Headphones mode setting, the sound output from the PHONES terminals is the
same as the sound output from the LINE OUT terminal.
Headphones Mode
Setting Value Setting Details
Off Turns off headphones mode.
On Turns on headphones mode.
C1A0 C2 C3 C4 C5 C6 C7 C8
E7
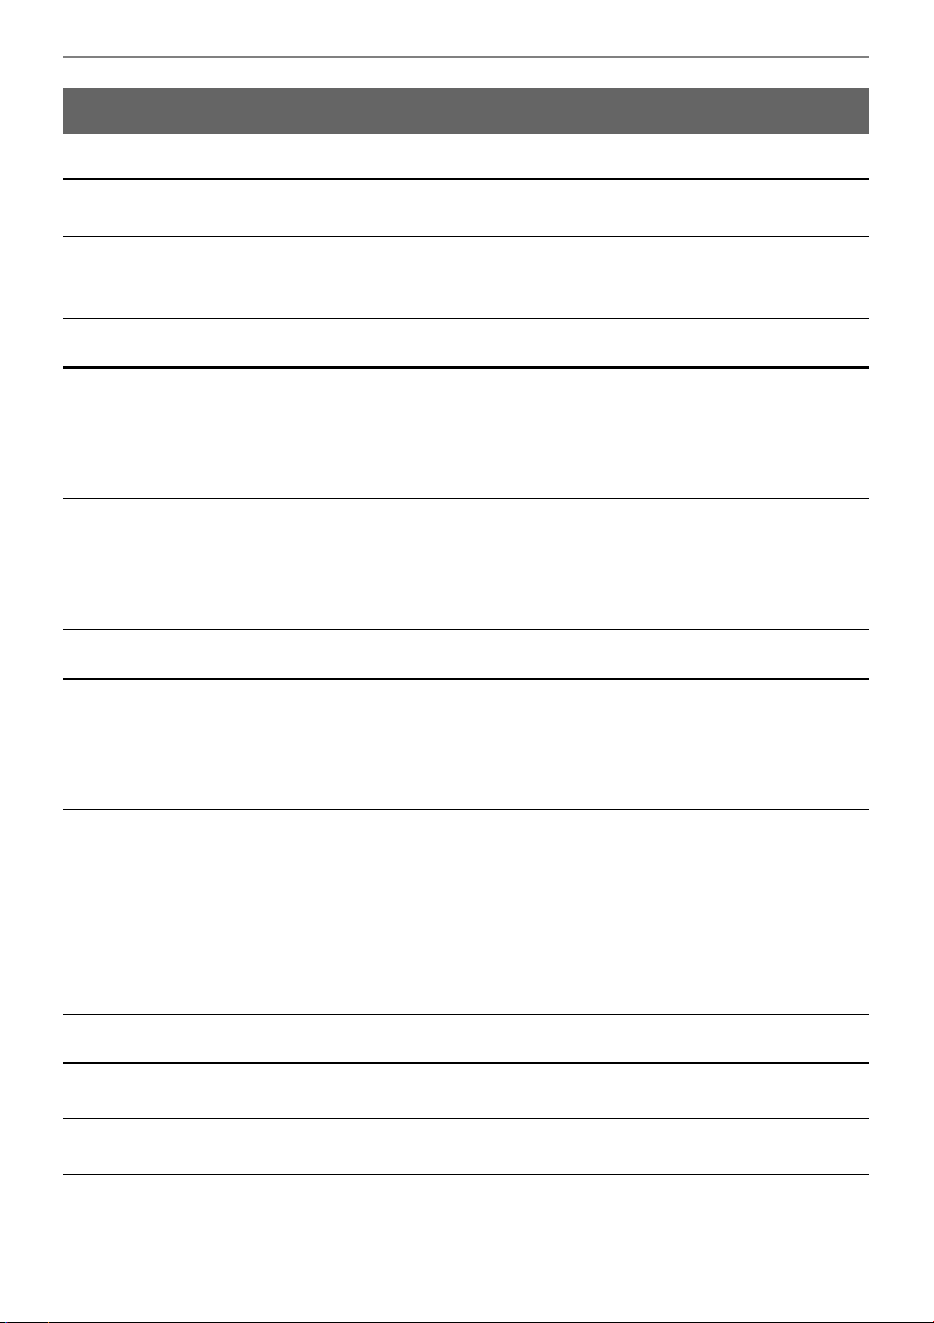
Troubleshooting
EN-165
Touch buttons are not responding.
No sound is produced when the keys are pressed.
The pitch is incorrect.
Pressing the pedal has no effect.
Troubleshooting
Cause: a. Gloved hands, fingernails, a stylus, etc. were used to touch the buttons.
b. The touch button sensitivity setting is not appropriate.
Solution: a. Firmly touch the touch buttons with bare fingers.
b. Change the touch button sensitivity setting. For more information, see “When Touch
Buttons Do Not Respond”.
Cause: a. The volume has been turned down with the volume knob.
b. Headphones are connected. Or, a headphone conversion plug has been left in the
PHONES terminal.
c. The [Local Control] setting is turned <Off>.
d. The [Speaker Out] setting is set to <Off>.
Solution: a. Turn the volume knob.
b. Unplug the headphones or conversion plug from the PHONES terminal.
c. Set the [Local Control] setting to <On>. For more information, see “Local Control”.
d. Set the [Speaker Out] setting to <Auto> or <On>. For more information, see “Speaker
Out”.
Cause: a. The keyboard key tone (Transpose) has been changed from the default setting.
b. The fine tuning (Tuning) setting for sound pitch is set to a frequency other than
440.0 Hz.
c. Octave shift is set.
d. Scale Tuning is set to something other than the equal temperament.
Solution: a. Reset [Transpose] to the default setting. Or, turn the power off and then back on. For
details, see “Changing the Pitch in Semitone Steps (Transpose)”.
b. Set the [Tuning] setting to 440.0 Hz. Upper2 Detune: Lower Restore Detune to the
default setting. For details, see “Fine-tuning (A-tuning)” and “Fine-tune the Upper2 part
(Upper2 Detune)”, “Fine-tune the tuning of the Lower part (Lower detune)” for more
information.
c. Set the Octave Shift setting to 0. For details, see “Shifting by Octaves (Octave Shift)”.
d. Set the Scale Tuning setting to equal Temperament.
Cause: The pedal cord is not properly connected to the PEDAL UNIT terminal. Or, the plug
connector is not completely plugged in.
Solution: Check that the pedal cord is properly connected and that the plug is firmly inserted into
the terminal.

Troubleshooting
EN-166
Sound does not become stronger or weaker when I change the way I play (touch).
The tone of the sound, effects, and so forth, do not change (i.e., the Digital Piano
does not return to its default settings), even after turning the power off and back on
again.
Cannot send or receive MIDI when connected to a computer.
Some tones have the same timbre but slightly different sound quality and volume
depending on keyboard position.
When pressing buttons, the sound that is being played is temporarily interrupted or
the sound quality sounds slightly different.
I don't know how to delete a User Song.
I can’t play songs recorded directly to a USB Flash Drive.
Cause: [Touch Response] is set to <Off>.
Solution: Set [Touch Response] to a setting other than <Off>. For details, see “Changing the
Volume Made by the Strength of Pressure Placed on a Key (Touch Response)”.
Cause: [Auto Resume] is set to <Enable>.
Solution: Switch [Auto Resume] to <Disabled> then turn the power off and back on again. For more
information, see “Saving the Digital Piano Settings (Auto Resume)”.
Solution: • Check that the Digital Piano is properly connected to the computer with a USB cable, or
that the correct is selected in the settings of the computer's music software.
• Turn off the power to this Digital Piano and close the music software on your computer,
then turn on the power to this Digital Piano and restart the music software on your
computer.
Cause: This is a boundary between sound ranges caused by electronic processing called digital
sampling
*
and is not a malfunction.
* This process records the original sound of the instrument in multiple ranges, including
low, mid, and high ranges, and creates a single tone in order to reproduce the sound
quality of each range of the original instrument.
Cause: When using Layer, Duet, playing a Built-in Song, or using the recording function, multiple
parts sound simultaneously. If you press buttons in such a case, the tone-specific internal
effect settings will be automatically changed, and depending on the part, this
phenomenon may occur, but it is not a malfunction.
Solution: Deletion of User Songs can be executed from a smart device connected to the Digital
Piano. For details, see the instructions for the dedicated app.
https://web.casio.com/app/en/music_space/manual/
Solution: Try formatting the USB flash drive in exFAT format on your computer and then formatting
it on the instrument. For more information, see “Formatting a USB Flash Drive”.

Troubleshooting
EN-167
When an error occurs, the Visual Information Bar uses divided bars that blink alternately (error display).
The touch buttons and indicators blink as shown in the illustration below.
Error Display List
Display Cause Solution
A USB flash drive is not properly inserted
into the USB Type A terminal of the Digital
Piano.
USB Type A Insert the USB flash drive
correctly into the terminal.
A USB flash drive was removed or
inserted during operation.
Do not move USB flash drives while the
Digital Piano is in operation.
The USB flash drive is protected. Cancel the protection of the USB flash
drive.
The USB flash drive contains antivirus
software.
Use a USB Flash Drive that does not
contain antivirus software.
There are no files in the target folder that
can be read or played.
Move the file you want to load or play to
the target folder for loading. For details,
please refer to “Copying MIDI Song Data
to a USB Flash Drive Using a Computer”
and “Copying Audio Data (WAV, MP3) to
a USB Flash Drive Using a Computer”.
Tried to save data to a USB Flash Drive
when there was no recorded data.
Record and then save.
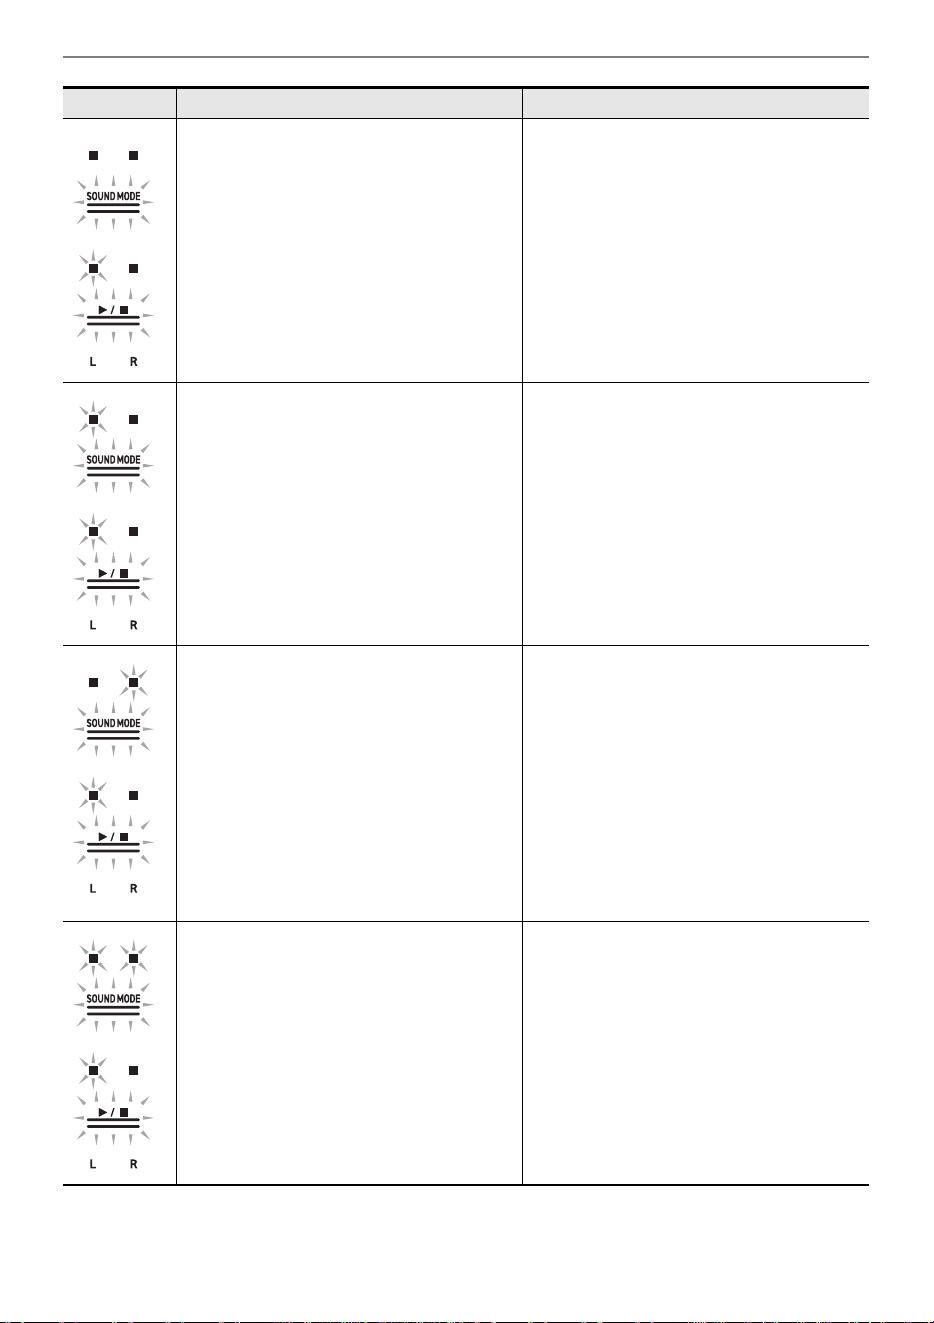
Troubleshooting
EN-168
You are trying to save different data using
the same name as a read-only file on the
USB flash drive.
• Rename the file on the USB flash drive
before saving.
• Remove the read-only attribute from the
file on the USB flash drive and overwrite
the file.
• Use a different USB flash drive.
Insufficient free space on USB flash drive. • Increase free space by deleting files
stored on the USB flash drive.
• Use a different USB Flash Drive.
When recording with the Audio Recorder,
an attempt was made to start recording
beyond the maximum number of songs
(99), or one of the following applies.
• Audio Recorder (USB Flash Drive):
TAKE99.WAV or TAKE99.MP3 already
exists in the AUDIOREC folder on the
USB flash drive.
• Audio Recorder (Internal Flash
Memory):
TAKE99.WAV or TAKE99.MP3 exists in
the internal memory.
• Audio Recorder (USB Flash Drive):
Using a computer, move
TAKE**.WAV(where ** = 01-99) or
TAKE**.MP3 (where ** = 01-99) in the
AUDIOREC folder of the USB flash
drive to another folder or drive.
• Audio Recorder (Internal Flash
Memory):
In internal memory.
Delete TAKE**.WAV (where ** = 01-99)
or TAKE**.MP3 (where ** = 01-99).
You attempted to read or play a file in
SMF format 2.
The SMF format that can be read and
played back by this Digital Piano is “0” or
“1”.
Display Cause Solution

Troubleshooting
EN-169
The size of the SMF file on the USB flash
drive is too large to play on the Digital
Piano.
This Digital Piano can play back SMF files
up to a maximum size of approximately
320 KB.
Data on the USB flash drive is corrupted. –
There is insufficient free memory space in
the Digital Piano for converting MIDI
recorder songs to SMF and saving them to
a USB flash drive.
• Reduce the data size of the song.
• Erase data tracks that are not needed.
The version of the file on the USB flash
drive is not supported by the Digital Piano.
Prepare a version of the file that is
supported by the Digital Piano.
Display Cause Solution
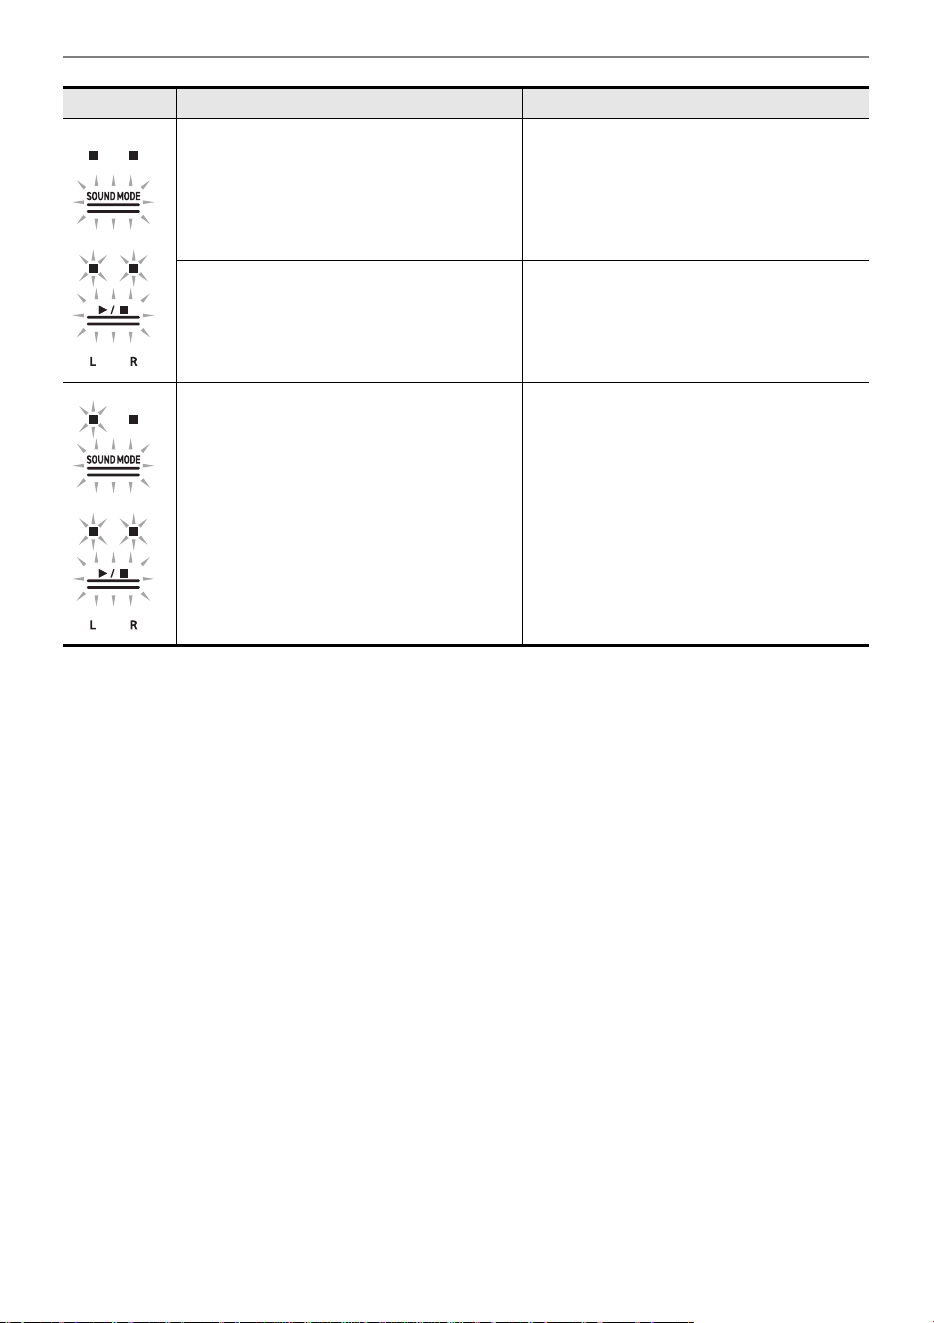
Troubleshooting
EN-170
The format of the USB flash drive is not
compatible with this Digital Piano.
• Use a computer or other device to
change the USB flash drive to a format
compatible with this Digital Piano. For
more information, see “Formatting a
USB Flash Drive”.
• Use a different USB Flash Drive.
The USB flash drive is corrupted. Use a different USB Flash Drive.
USB Type A Wireless MIDI & audio
adaptor is not attached to the terminals.
Attach the Wireless MIDI & audio adaptor
to the USB Type A terminal.
Display Cause Solution
Other Information
EN-171
Other Information
Product Specifications
Model AP-750BK
Keyboard 88 keys
Settings Hammer Response, Key-off Response
Duet Changeable range (–2 to +2 octaves)
Transpose –12 to 0 to +12 semitones
Octave Shift –2 to 0 to +2 octaves
Sound source
Number of tones 29 (28 tones for all keys + 1 bass tone for the lower part)
+ 10 classical piano repertoire tones
• Layering possible (except for bass tone)
• Splitting possible (bass tone only for low frequency)
Maximum Polyphony 256 notes
Touch Response function 5 sensitivity settings, Off
Tuning 415.5 Hz to 440.0 Hz to 465.9 Hz (in 0.1 Hz increments)
Temperament Equal Temperament + 16 types
Piano Position 2 types
Acoustic Simulator Key Off Simulator, String Resonance, Damper Resonance,
Damper Noise, Open String Resonance, Aliquot Resonance,
Pedal Action Noise, Key On Action Noise, Key Off Action Noise, Lid
Simulator
Digital Effects
Sound Mode Effects Hall Simulator (8 types), Reverb (8 types), Surround (3 types)
Other Effects
Chorus (12 types), Brilliance (–12 to 0 to +12), Headphones Mode
Demo songs 3 songs
Music Library
Built-in Songs 60 songs
User Songs 10 songs (max. approx. 320 KB per song, approx. 3.2 MB for
10 songs)
*
.
* The stated capacity is the equivalent of 1 KB = 1024 bytes,
1 MB = 1024
2
bytes.
Song volume Adjustable (also used for recording function)
Part On/Off L, R

Other Information
EN-172
MIDI Recorder Real-time recording and playback as MIDI data
Number of songs 1 song
Number of recording tracks 2 tracks
Capacity Approximately 30,000 notes total
Recording Medium Built-in flash memory
Song volume Adjustable (also used for music library)
Instant RePlayer Real-time recording and playback
Capacity 270 sec.
Recording Medium Built-in flash memory
Controller Specified number of return seconds/mark specified playback, stop
Song volume Adjustable (also used for music library)
Audio Recorder Real-time recording and playback as audio data
Number of songs 99 songs (files)
File format Recording/Playback: WAV format (linear PCM, 16 bit, 44.1 kHz,
stereo)
Playback only: MP3 format (MPEG-1 Audio Layer 3, 32 to 320 kbps/
variable bit rate (VBR) supported, 44.1 kHz / 48 kHz, mono/stereo)
Maximum recording time Recording to USB flash drive: approx. 25 min. per track
When recording to internal flash memory: approx. 18 min. (total of all
songs)
Recording Medium Built-in flash memory or USB flash drive
Metronome
Beat bell Off, 1-9 (beats)
Tempo range 20 to 255
Tempo Markings 9 types
Volume Adjustable
Scene Preset scenes (10 types), user scenes (up to 10 types)
Pedals Damper (continuously variable), Sostenuto (Off, On), Soft
(continuously variable)
Other Functions • Auto Resume
• Panel Lock
• Notification Tone settings (switchable from set 1 to set 3,
adjustable volume)
MIDI 16 ch multi-timbre reception

Other Information
EN-173
• In the interests of continued improvement, the specifications and design are subject to change
without notice.
Optional Products
For more information on optional products, see “Latest Support Information”.
About Music Score data
You can download music score data as a PDF file from the CASIO website. You will then be able to
view music scores on your smart device. You can jump from the PDF file table of contents directly to
the music score you want, and you can print out scores as needed.
Refer to “Latest Support Information” for music score PDF files.
Input-Output Terminals
PHONES terminal Stereo standard phone jack (TRS phone) × 2
Power supply terminal DC 24V
LINE OUT R, L/MONO
terminal
Standard phone jack (TS phone) × 2
(Output impedance 470Ω, output voltage 1.7V (RMS) MAX)
USB terminals Type A, Type B
Pedal Unit terminal Special shape
Acoustics
Amplifier output 10W × 2 + 10W × 2
Speakers 12cm × 4 + 3.5cm × 4
Power AC adapter AD-E24250LW
Auto Power Off Approx. 4 hours, cancelable
Power Consumption 24V = 24W
Size Piano and Stand: W 140.1 × D 44.0 × H 92.9cm
(55 3/16 × 17 5/16 × 36 9/16 inch)
Weight Piano, Stand and Music Stand: approx. 53.6kg (118.2 lbs)

Other Information
EN-174
https://support.casio.com/global/en/emi/manual/AP-750/
• Unauthorized copying of this manual, in whole or in part, is prohibited. Please note that copyright law
prohibits the use of any other information without our permission, except for personal use.
• Please be advised that we will not be liable for any loss, lost profits, or any claims from third parties
resulting from the use of this manual or this device.
• The contents of this document are subject to change without notice.
• Illustrations in this manual may differ from the actual product.
• The Bluetooth
®
word mark and logos are registered trademarks owned by Bluetooth SIG, Inc. and
any use of such marks by CASIO COMPUTER CO., LTD. is under license. Other trademarks and
trade names are those of their respective owners.
• Company and product names used in this manual may be registered trademarks of others.
Latest Support Information
About the Contents of this Book
Trademarks and Registered Trademarks

Other Information
EN-175
Environment
• Place the Digital Piano onto a stable and flat surface.
• To prevent the formation of mold, set up the product in a well-ventilated location where the
temperature and humidity ranges shown below are maintained.
– Recommended temperature range: 15 to 25°C
– Recommended humidity range: 40 to 60% RH
• Do not set up the product in locations subject to extreme variations in temperature and/or humidity.
Doing so can cause metal components to rust, coatings to degrade, and components to warp and
split.
User Maintenance
• Wipe the product with a soft, dry cloth. Do not use a tissue, which can cause scratching.
• When soiling is more serious, moisten a soft cloth with a weak solution of water and a mild neutral
detergent, wring out all excess moisture from the cloth, and then wipe the product. After that, wipe
again with a separate soft dry cloth.
• Do not use any cleaning agents, chlorine disinfectants, sanitizing wipes, or other items that include
benzene, organic solvents, alcohol, or other solvents for cleaning. Doing so can cause discoloration,
deformation, paint peeling, cracking, etc.
Sterilization and Disinfection
• After wiping the product two or three times with a non-alcohol sanitizing wipe, use a soft, dry cloth to
wipe it dry.
• Note that failure to wipe the product dry can cause streaks to remain.
• If the product is used by multiple parties, hand disinfection before each use is recommended.
Included and Optional Accessories
Use only accessories that are specified for use with this product. Use of unauthorized accessories
creates the risk of fire, electric shock, and personal injury.
Weld Lines
Lines may be visible on the exterior of the product. These are “weld lines” that result from the plastic
molding process. They are not cracks or scratches.
AC Adaptor Handling Precautions
• Never connect the AC adaptor (JEITA Standard, with unified polarity plug) that is specified with this
Digital Piano to any other device besides this Digital Piano.
Doing so creates the risk of malfunction.
• The AC adaptor cannot be repaired. If your AC adaptor malfunctions or becomes damaged, contact
your original retailer or a CASIO Service Center.
• AC adaptor operating environment: Temperature: 0 to 40°C
Humidity: 10% to 90% RH
• Output polarity: &
• Use of a different type AC adaptor can cause smoking or malfunction.
Operating Precautions
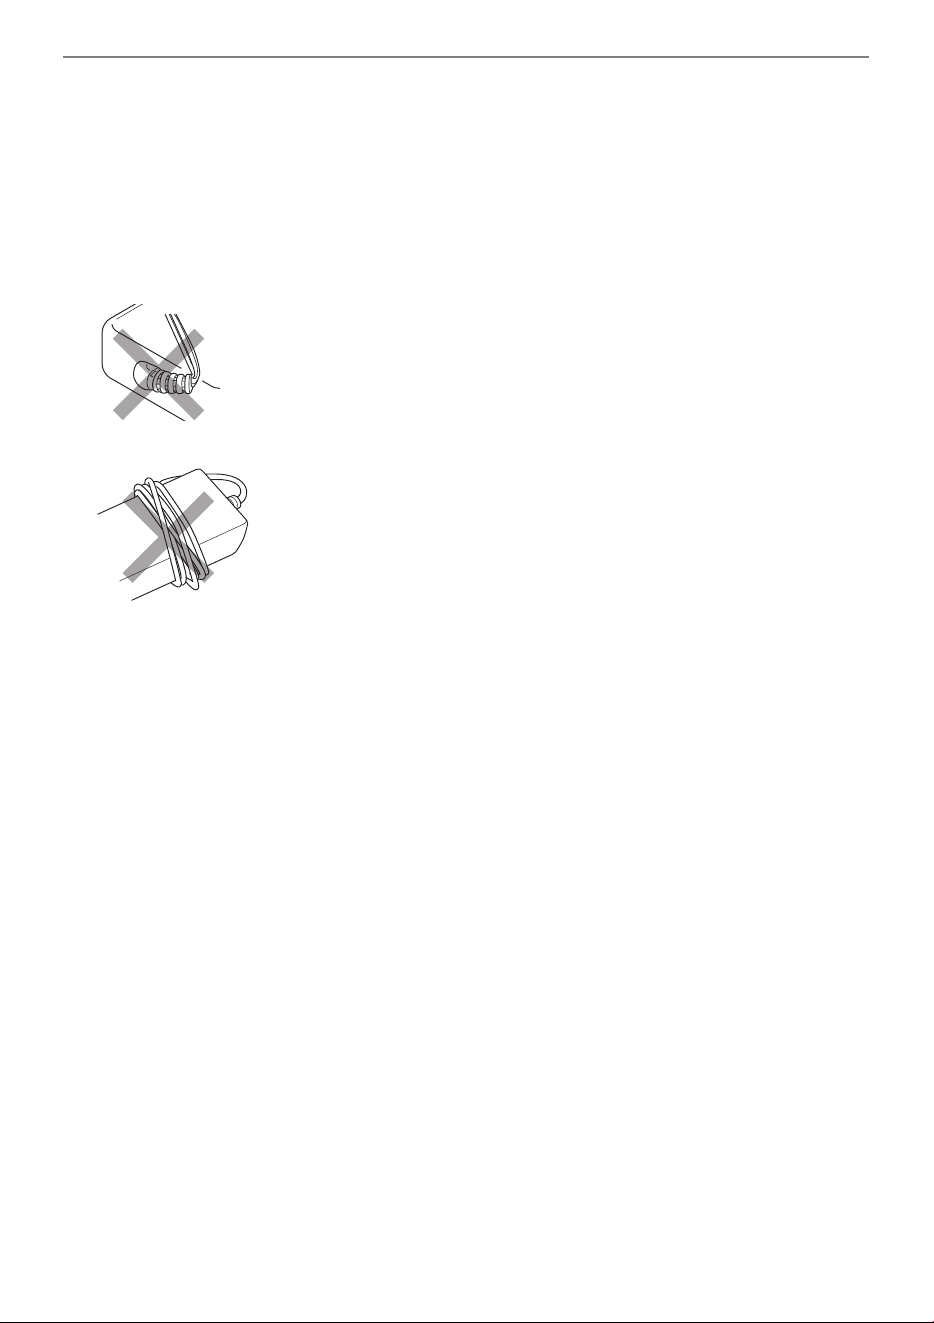
Other Information
EN-176
About the panel
Operating the panel when it is dusty or dirty may scratch it.
Gently wipe the panel with a soft, clean cloth to remove dust and dirt before use.
Use your fingers to operate the panel. Using fingernails or sharp objects may scratch the surface.
Disconnect Protection Precautions
(1) Never pull on the cord with excessive force.
(2) Never repeatedly pull on the cord.
(3) Never twist the cord at the base of the plug or connector.
(4) Loop and bundle the power cord, but never wind it around the AC adaptor.
(5) Before moving the Digital Piano, be sure to unplug the AC adaptor from the power outlet.
Locating the AC Adaptor for Use
• When using the AC adaptor, put in a location that satisfies the conditions below.
– A location free of splashing liquids.
The AC adaptor is designed for indoor use only. Do not put it in a location where it may become
wet and do not place a vase or any other container of liquid on top of it.
– A location that is not humid.
– A roomy, well ventilated location.
Do not cover the AC adaptor with newspaper, table cloth, curtain, or any other type of fabric.
– Use a power outlet that is located near the Digital Piano.
This will let you immediately unplug from the power outlet should any problem occur.
• When using the AC adaptor, place it on the floor with its label surface downwards. The AC adaptor
becomes prone to emitting electromagnetic waves when the label surface is facing upwards.

Various Lists
EN-177
Various Lists
Tone list
Timbre Name
Selection
Key
Name
Input-Output Input Only
Program
Change
Bank Select
MSB
Program
Change
Bank Select
MSB
BERLIN GRAND
C{30 16 0 0
BERLIN GRAND BRIGHT
D3 1 16 1 0
BERLIN GRAND MELLOW
E}32 16 0 1
HAMBURG GRAND
E3 3 16 0 8
HAMBURG GRAND BRIGHT
F34161 8
HAMBURG GRAND MELLOW
F{3 5 16 0 9
VIENNA GRAND
G3616012
VIENNA GRAND BRIGHT
A}3 7 16 1 12
VIENNA GRAND MELLOW
A3816013
ROCK PIANO
B}3 9 16 1 1
JAZZ PIANO
B3 10 16 0 2
BALLAD PIANO
C4 11 16 0 4
POP PIANO
C{412 16 1 2
DANCE PIANO
D4 13 16 1 4
HONKY-TONK PIANO
E}414 16 3 0
PIANO PAD
E4 15 16 0 5
ELEC.PIANO
F4 16 16 4 0
60’S E.PIANO
F{4 17 16 4 1
DIGITAL E.PIANO 1
G4 18 16 5 0
DIGITAL E.PIANO 2
A}4 19 16 5 1
HARPSICHORD
A4 20 16 6 0
VIBRAPHONE
B}4 21 16 11 0
STRINGS 1
B4 22 16 49 0
STRINGS 2
C5 23 16 48 0
PIPE ORGAN
C{5241619 0
JAZZ ORGAN
D5 25 16 17 0
ELEC.ORGAN 1
E}5261616 0
ELEC.ORGAN 2
E5 27 16 16 1
BASS (LOWER)
F5 28 16 32 0
SONATA GRAND
F{5 29 16 0 20
CONCERT ETUDE GRAND
G5 30 16 0 21
ETUDE GRAND
A}5 31 16 0 22
PRELUDE GRAND
A5 32 16 0 23
ROMANCE GRAND
B}5 33 16 0 24
PARTITA GRAND
B5 34 16 0 25
NOCTURNE GRAND
C6 35 16 0 26
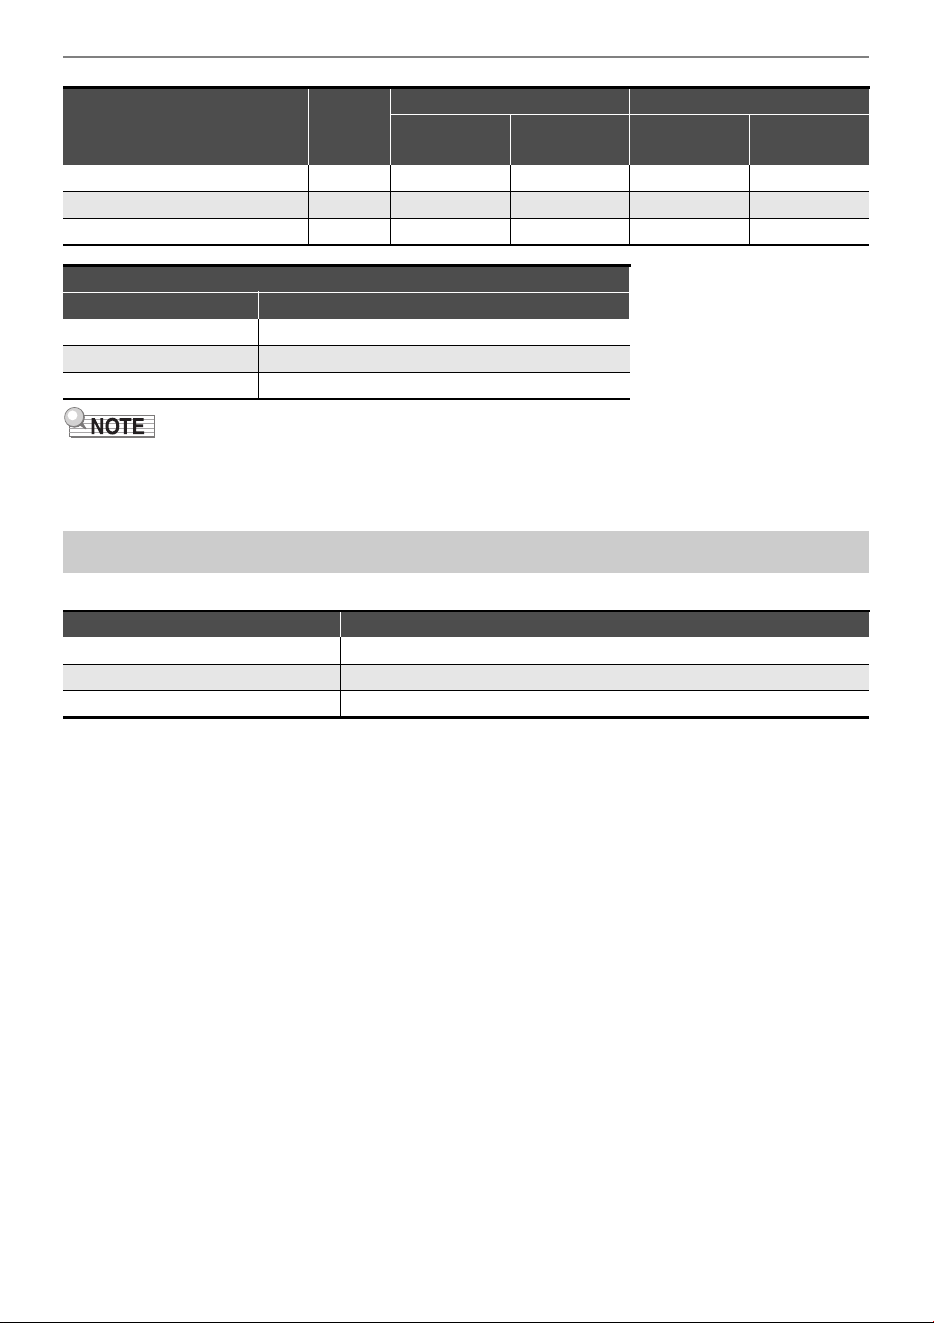
Various Lists
EN-178
• BASS (LOWER) is a tone for the bass section and cannot be sounded alone.
• BASS (LOWER) includes key ranges outside the range that can be played on the Digital Piano's
keyboard. Keys outside the range can be played via external MIDI input.
The length of a song may differ from its original.
WALTZ GRAND
C{636 16 0 27
POLONAISE GRAND
D6 37 16 0 28
LITTLE PIECE UPRIGHT
E}638 16 0 29
BASS (LOWER) Key Map
Key Sound
C-1 – G{0 Ghost Note
A0 – C5 Normal Finger w/ Off Noise
C{5 – G9 Harmonics
Demo Song List
Tone Song Title
BERLIN GRAND Widmung / R.A.Schumann=F.Liszt
HAMBURG GRAND Étude Op.10-1 / F.F.Chopin
VIENNA GRAND Duetto [Lieder Ohne Worte Heft 3] / F.Mendelssohn
Timbre Name
Selection
Key
Name
Input-Output Input Only
Program
Change
Bank Select
MSB
Program
Change
Bank Select
MSB
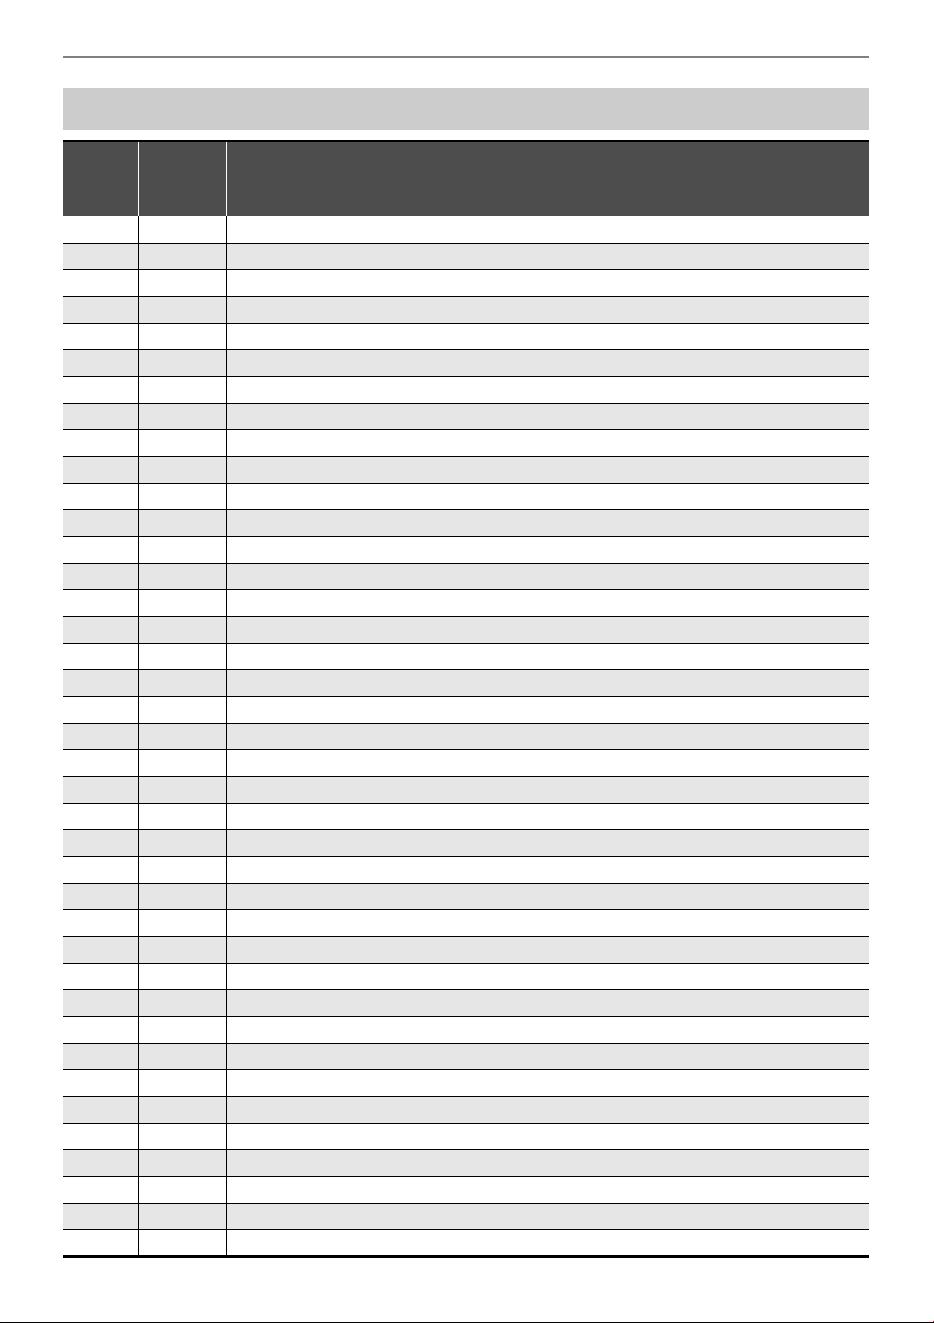
Various Lists
EN-179
Music Library List
Number
Selection
Key
Name
Song Title
1C{3 Nocturne Op.9-2
2 D3 Fantaisie-Impromptu Op.66
3E}3 Étude Op.10-3 “Chanson de l’adieu”
4 E3 Étude Op.10-5 “Black Keys”
5 F3 Étude Op.10-12 “Revolutionary”
6 F{3 Étude Op.25-9 “Butterflies”
7 G3 Prélude Op.28-7
8 A}3 Valse Op.64-1 “Petit Chien”
9 A3 Valse Op.64-2
10 B}3 Moments Musicaux 3
11 B3 Impromptu Op.90-2
12 C4 Marche Militaire 1 (Duet)
13 C{4 Frühlingslied [Lieder Ohne Worte Heft 5]
14 D4 Fröhlicher Landmann [Album für die Jugend]
15 E}4 Von fremden Ländern und Menschen [Kinderszenen]
16 E4 Träumerei [Kinderszenen]
17 F4 Tambourin
18 F{4 Menuet BWV Anh.114 [Clavierbüchlein der Anna Magdalena Bach]
19 G4 Inventio 1 BWV 772
20 A}4 Inventio 8 BWV 779
21 A4 Inventio 13 BWV 784
22 B}4 Praeludium 1 BWV 846 [Das Wohltemperierte Klavier 1]
23 B4 Le Coucou
24 C5 Gavotte
25 C{5 Sonatina Op.36-1 1st Mov.
26 D5 Sonatine Op.20-1 1st Mov.
27 E}5 Sonate K.545 1st Mov.
28 E5 Sonate K.331 3rd Mov. “Turkish March”
29 F5 Rondo K.485
30 F{5 Für Elise
31 G5 Marcia alla Turca
32 A}5 Sonate Op.13 “Pathétique” 1st Mov.
33 A5 Sonate Op.13 “Pathétique” 2nd Mov.
34 B}5 Sonate Op.13 “Pathétique” 3rd Mov.
35 B5 Sonate Op.27-2 “Moonlight” 1st Mov.
36 C6 Rhapsodie 2
37 C{6 Waltz Op.39-15 (Duet)
38 D6 Liebesträume 3
39 E}6 Blumenlied

Various Lists
EN-180
40 E6 La Prière d’une Vierge
41 F6 Csikos Post
42 F{6 Humoresque Op.101-7
43 G6 Melodie [Lyrische Stücke Heft 2]
44 A}6 Sicilienne Op.78
45 A6 Berceuse [Dolly] (Duet)
46 B}6 Arabesque 1
47 B6 La Fille aux Cheveux de Lin [Préludes]
48 C7 Passepied [Suite bergamasque]
49 C{7 Gymnopédie 1
50 D7 Je Te Veux
51 E}7 Salut d’Amour
52 E7 The Entertainer
53 F7 Maple Leaf Rag
54 F{7 L’arabesque [25 Etüden Op.100]
55 G7 La Styrienne [25 Etüden Op.100]
56 A}7 Ave Maria [25 Etüden Op.100]
57 A7 Le retour [25 Etüden Op.100]
58 B}7 La chevaleresque [25 Etüden Op.100]
59 B7 No.13 [Études de Mécanisme Op.849]
60 C8 No.26 [Études de Mécanisme Op.849]
Number
Selection
Key
Name
Song Title

Various Lists
EN-181
The setting items recorded in the user scene are as follows.
Preset scene list
Number
Name Contents Song Title
1 Default Factory default Berlin Grand tone setting Nocturne Op.9-2
2 Chopin Setting suitable for playing Romantic music
such as that of Chopin, etc.
Valse Op.64-1 “Petit Chien”
3 Beethoven Setting suitable for playing classical music
such as that of Beethoven, etc.
Sonate Op.31-2
“Tempest” 3rd Mov.
4 Mozart Setting suitable for playing light and beautiful
music such as that of Mozart, etc.
Sonate K.331 3rd Mov.
“Turkish March”
5 Debussy Setting suitable for playing impressionist
music such as that of Debussy, etc.
Arabesque 1
6 Liszt Setting for virtuosic performances such as
those of Liszt, etc.
Mephisto-Walzer 1
7 Satie Setting suitable for playing modern and
contemporary music such as that of Satie,
etc.
Le Piccadilly (Marche)
8 Baroque Setting suitable for playing music of the
Baroque period such as that of J.S. Bach,
etc.
Harmonious Blacksmith
9 Lesson Setting suitable for playing practice pieces,
etc.
No.13
[Études de Mécanisme Op.849]
10 Concert Setting suitable for practice for concerts,
recitals, etc.
Étude Op.10-12 “Revolutionary”
List of user scene record items
Function Setting items
Tone
Tone Selection
Layer
*1
Split
*1
Duet
Duet Mode
*1
Duet left part octave
*1
Duet right part octave
*1
Song Tempo Tempo Value
Sound Mode Effects
Hall Simulator/Reverb on/off
Surround on/off
Hall Simulator/Reverb type
*2
Hall Simulator/Reverb depth
*2
Surround Type
*2
Chorus Chorus type
*2
Brilliance Brilliance

Various Lists
EN-182
*1 Settings recorded in user scenes do not affect the playback of scene songs.
*2 If the scene song is a music library song, User Song or MIDI Recorder Song, the settings recorded
in the user scene will be reflected in the scene song playback.
*3 If the scene song is a MIDI Recorder Song, its song data settings are reflected in the scene song
playback.
Acoustic Simulator
String Resonance
*3
Open String Resonance
*3
Aliquot Resonance
*3
Damper Resonance
*3
Damper Noise
*3
Key-on Action Noise
*3
Key-off Action Noise
*3
Pedal Action Noise
*3
Lid Simulator
Keyboard Touch
Touch Response
Hammer Response
Key Off Response
Pitch
Transpose
A-tuning
Upper1 Octave Shift
Upper2 Octave Shift
*1
Scale tuning
Fundamental tone of the tuning
Tuning Type
Stretch Tuning
Other settings
Upper1 Volume
*1
Upper2 Volume
*1
Upper2 Detune
*1
Upper2 Damper
*1
Lower Volume
*1
Lower Detune
*1
Lower Damper
*1
Keyboard volume
*1
MIDI song volume
Audio Song Volume
Audio Song Center Cancel
Function Setting items

Various Lists
EN-183
Set basic settings such as tuning
Hold down the “FUNCTION” button and select key.
Keyboard Function List
Note name Assigned Function
A0 Factory reset
B}0 Auto Power Off disable/enable
B0
C1 Execution
C{1
Wireless MIDI & audio adaptor
Wireless Audio Pairing
D1 Wireless Function On/Off Off/On
E}1
Connection notification tone volume
(–)
E1 (+)
F1 Delete connection history
F{1
USB Flash Drive
Save All Audio
G1 Load All Audio
A}1 Load SMF/MRF
A1 Save SMF
B}1 Save MRF
B1 Delete SMF/MRF/Audio
C2 Format
C{2
Built-in flash memory
Clear Audio
D2 Clear All Audio
E}2
E2
F2
Duet
Duet Mode Off/On/Pan
F{2
Left-side keyboard Octave Shift (-)
(–)
G2 (+)
A}2
Right-side keyboard Octave Shift (+)
(–)
A2 (+)
B}2
B2
Mixer
Wireless Audio Volume
(–)
C3 (+)
C{3 Wireless Audio Center Cancel disable/enable
D3
Audio Song Volume
(–)
E}3 (+)
E3 Audio Song Center Cancel Off/On
F3
MIDI Song Volume
(–)
F{3 (+)
G3
Keyboard Volume
(–)
A}3 (+)
A3
B}3
RePlayer/Recorder
Instant RePlayer
B3 MIDI Recorder
C4 Audio Recorder (USB Drv.)
C{4 Audio Rec with MIDI playback (USB Drv.)
D4 Audio Recorder (Internal)
E}4 Audio Rec with MIDI playback (Internal)
E4
F4
Tuning
Scale Tuning Selection
F{4 Scale Tuning base note
G4 Stretch Tuning Off/On
A}4
A4
A-tuning
440.0 Hz
B}4 442.0 Hz
B4 –0.1 Hz
C5 +0.1 Hz
C{5
D5
E}5
E5
F5
Visual Information Bar
Display
Auto
F{5 Metronome
G5 Keyboard
A}5 Pedal
A5 Audio
B}5 Metronome Type 1/2/3/4/5
B5 Audio Illumination Type 1/2/3/4
C6 Brightness/Off Off/1/2
C{6
D6
Pedal Half Pedal Position
(–)
E}6 (+)
E6
F6
MIDI settings
Local Control Off/On
F{6
Keyboard Channel
(–)
G6 (+)
A}6
Hi-Res Velocity MIDI OUT disable/enable
A6
B}6 Touch Button Luminosity 1/2
B6
Left Panel Touch Button Sensitivity
(–)
C7 (+)
C{7
Front Panel Touch Button Sensitivity
(–)
D7 (+)
E}7 Speaker Out disable/enable/Auto
E7 Headphones mode Off/On
F7 Volume Sync Equalizer Off/Weak/Normal/Strong
F{7 Power On Alert disable/enable
G7 Panel Light setting Off/5 sec./15 sec./30 sec./60 sec./120 sec.
A}7 Auto Resume disable/enable
A7
Notification Tone Volume
(–)
B}7 (+)
B7 Notification Tone Set selection 1/2/3
C8 Panel Lock disable/enable/Auto
A0
C1
C2
C3
C4
C5
C6
C7
C8

Various Lists
EN-184
Change Sound Mode Effects and other settings
Hold down the “SOUND MODE” button and select key.
Note name Assigned Function
A0
Sound Mode Effects
Hall Simulator/Reverb Type
Tone
B}0 Salon
B0 N.Y. Club
C1 Scoring Stage
C{1 Opera Hall
D1 Viennese Hall
E}1 L.A. Hall
E1 Berlin Hall
F1 British Stadium
F{1 Room 1
G1 Room 2
A}1 Room 3
A1 Large Room
B}1 Hall 1
B1 Hall 2
C2 Hall 3
C{2 Stadium
D2
Hall Simulator/Reverb Depth
(–)
E}2 (+)
E2
Wireless Audio Hall Simulator/Reverb Depth
(–)
F2 (+)
F{2
Surround Type
1
G2 2
A}2 3
A2
B}2
B2
Brilliance
(–)
C3 (+)
C{3
Acoustic Simulator
String Resonance
Tone
D3 Off
E}3 (–)
E3 (+)
F3
Damper Resonance
Tone
F{
3 Off
G3 (–)
A}3 (+)
A3
Damper Noise
Tone
B}3 Off
B3 (–)
C4 (+)
C{4
Open String Resonance
Tone
D4 Off
E}4 (–)
E4 (+)
F4
Aliquot Resonance
Tone
F{4 Off
G4 (–)
A}4 (+)
A4
Pedal Action Noise
Tone
B}4 Off
B4 (–)
C5 (+)
C{5
Key On Action Noise
Tone
D5 Off
E}5 (–)
E5 (+)
F5
Key Off Action Noise
Tone
F{5 Off
G5 (–)
A}5 (+)
A5
Lid Simulator
Tone
B}5 Close
B5 Semi
C6 Full
C{6 Removed
D6
E}6
E6
Piano Position
Standard
F6 Wall
F{6
G6
A}6
A6
B}6
B6
C7
Chorus Type
Tone
C{7 Chorus 1
D7 Chorus 2
E}7 Chorus 3
E7 Chorus 4
F7 Feedback Chorus
F{7 Deep Chorus
G7 Flanger 1
A}7 Flanger 2
A7 Flanger 3
B}7 Flanger 4
B7 Short Delay 1
C8 Short Delay 2
A0
C1
C2
C3
C4
C5
C6
C7
C8
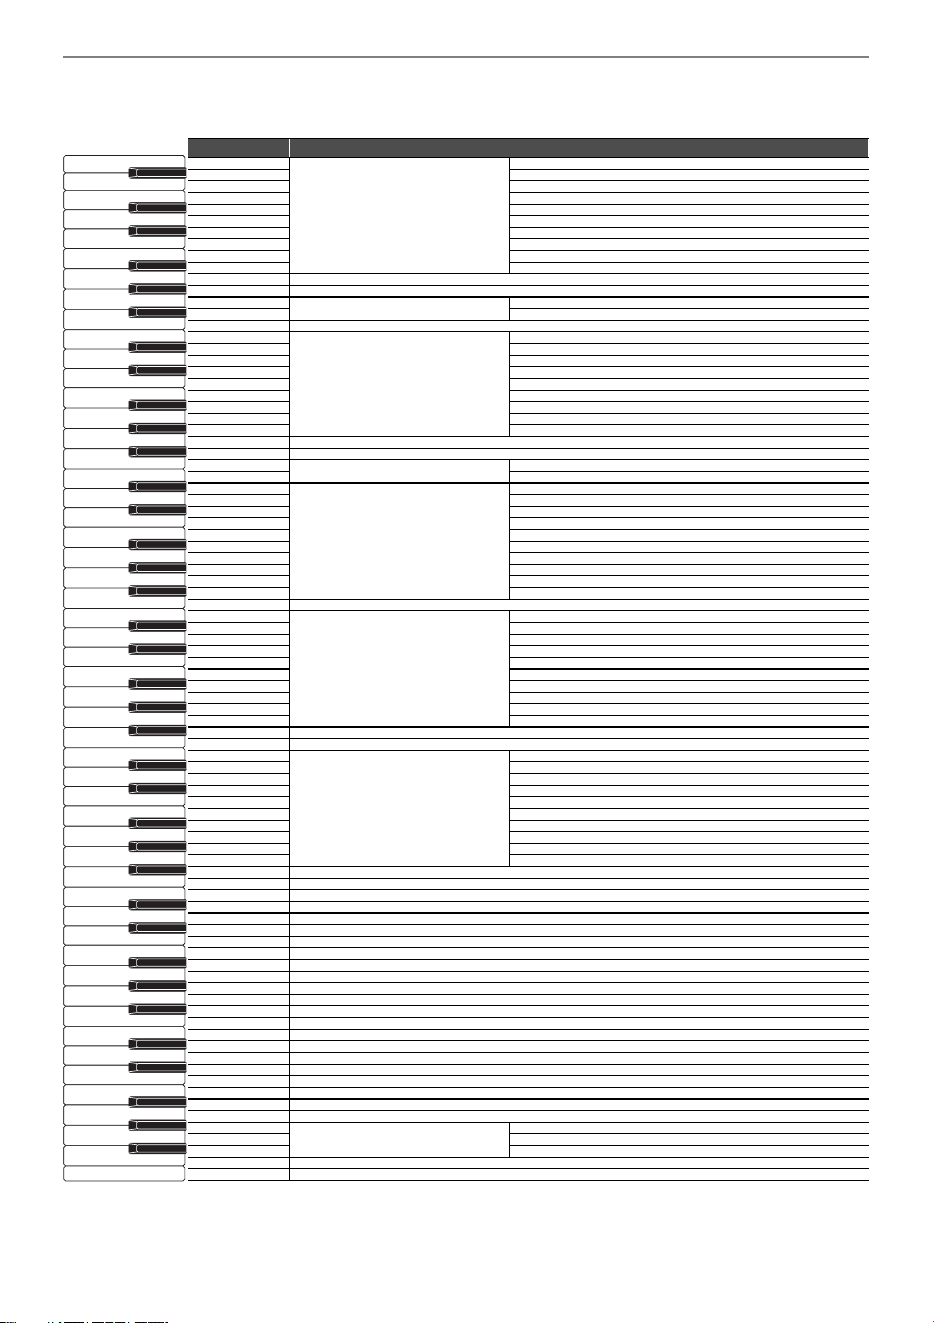
Various Lists
EN-185
Change scene and metronome settings
Hold down the “SCENE” button and select key.
Note name Assigned Function
A0
Tempo setting (using a numerical value)
0
B}0 1
B0 2
C1 3
C{1 4
D1 5
E}1 6
E1 7
F1 8
F{1 9
G1
A}1
A1
Metronome tone
(–)
B}1 (+)
B1
C2
Tempo setting (using tempo markings)
Largo
C{2 Lento
D2 Adagio
E}2 Andante
E2 Moderato
F2 Allegretto
F{2 Allegro
G2 Vivace
A}2 Presto
A2
B}2Tap Tempo
B2
Tempo Change
(–)
C3 (+)
C{3
Metronome beat bell sound
Off
D3 1 beat
E}3 2 beats
E3 3 beats
F3 4 beats
F{3 5 beats
G3 6 beats
A}3 7 beats
A3
8 beats
B}3 9 beats
B3 Store in User Scenes
C4
User Scene
1
C{4 2
D4 3
E}4 4
E4 5
F4 6
F{4 7
G4 8
A}4 9
A4 10
B}4
B4
C5
Preset scene
1
C{5 2
D5 3
E}5 4
E5 5
F5 6
F{5 7
G5 8
A}5 9
A5 10
B}5
B5
C6
C{6
D6
E}6
E6
F6
F{6
G6
A}6
A6
B}6
B6
C7
C{7
D7
E}7
E7
F7
F{7
G7
A}7
USB Flash Drive (User Scene)
Save
A7 Load
B}7 Delete
B7
C8 USB Flash Drive (User Scene) Execution
A0
C1
C2
C3
C4
C5
C6
C7
C8

Various Lists
EN-186
Select a song
Hold down the “a” button and select key.
Note name Assigned Function
A0
Song selection using song number
0
B}01
B0 2
C1 3
C{14
D1 5
E}16
E1 7
F1 8
F{19
G1
A}1
A1
B}1 Song Playback Part selection LR/L/R
B1
Music Library (User Song)
61 User 1
C2 62 User 2
C{263User 3
D2 64 User 4
E}265User 5
E2 66 User 6
F2 67 User 7
F{268User 8
G2 69 User 9
A}270User 10
A2 MIDI Recorder Song
B}2 USB flash drive song
B2
Song Select
(–)
C3 (+)
C{3
Music Library (Built-in Song)
1 Nocturne Op.9-2
D3 2 Fantaisie-Impromptu Op.66
E}3 3 Étude Op.10-3 “Chanson de l’adieu”
E3 4 Étude Op.10-5 “Black Keys”
F3 5 Étude Op.10-12 “Revolutionary”
F{3 6 Étude Op.25-9 “Butterflies”
G3 7 Prélude Op.28-7
A}3 8 Valse Op.64-1 “Petit Chien”
A3 9 Valse Op.64-2
B}3 10 Moments Musicaux 3
B3 11 Impromptu Op.90-2
C4 12 Marche Militaire 1 (Duet)
C{4 13 Frühlingslied [Lieder Ohne Worte Heft 5]
D4 14 Fröhlicher Landmann [Album für die Jugend]
E}4 15 Von fremden Ländern und Menschen [Kinderszenen]
E4 16 Träumerei [Kinderszenen]
F4 17 Tambourin
F{4 18 Menuet BWV Anh.114 [Clavierbüchlein der Anna Magdalena Bach]
G4 19 Inventio 1 BWV 772
A}4 20 Inventio 8 BWV 779
A4 21 Inventio 13 BWV 784
B}4 22 Praeludium 1 BWV 846 [Das Wohltemperierte Klavier 1]
B4 23 Le Coucou
C5 24 Gavotte
C{5 25 Sonatina Op.36-1 1st Mov.
D5 26 Sonatine Op.20-1 1st Mov.
E}5 27 Sonate K.545 1st Mov.
E5 28 Sonate K.331 3rd Mov. “Turkish March”
F5 29 Rondo K.485
F{5 30 Für Elise
G5 31 Marcia alla Turca
A}5 32 Sonate Op.13 “Pathétique” 1st Mov.
A5 33 Sonate Op.13 “Pathétique” 2nd Mov.
B}5 34 Sonate Op.13 “Pathétique” 3rd Mov.
B5 35 Sonate Op.27-2 “Moonlight” 1st Mov.
C6 36 Rhapsodie 2
C{
6 37 Waltz Op.39-15 (Duet)
D6 38 Liebesträume 3
E}6 39 Blumenlied
E6 40 La Prière d’une Vierge
F6 41 Csikos Post
F{6 42 Humoresque Op.101-7
G6 43 Melodie [Lyrische Stücke Heft 2]
A}6 44 Sicilienne Op.78
A6 45 Berceuse [Dolly] (Duet)
B}6 46 Arabesque 1
B6 47 La Fille aux Cheveux de Lin [Préludes]
C7 48 Passepied [Suite bergamasque]
C{7 49 Gymnopédie 1
D7 50 Je Te Veux
E}7 51 Salut d’Amour
E7 52 The Entertainer
F7 53 Maple Leaf Rag
F{7 54 L’arabesque [25 Etüden Op.100]
G7 55 La Styrienne [25 Etüden Op.100]
A}7 56 Ave Maria [25 Etüden Op.100]
A7 57 Le retour [25 Etüden Op.100]
B}7 58 La chevaleresque [25 Etüden Op.100]
B7 59 No.13 [Études de Mécanisme Op.849]
C8 60 No.26 [Études de Mécanisme Op.849]
A0
C1
C2
C3
C4
C5
C6
C7
C8
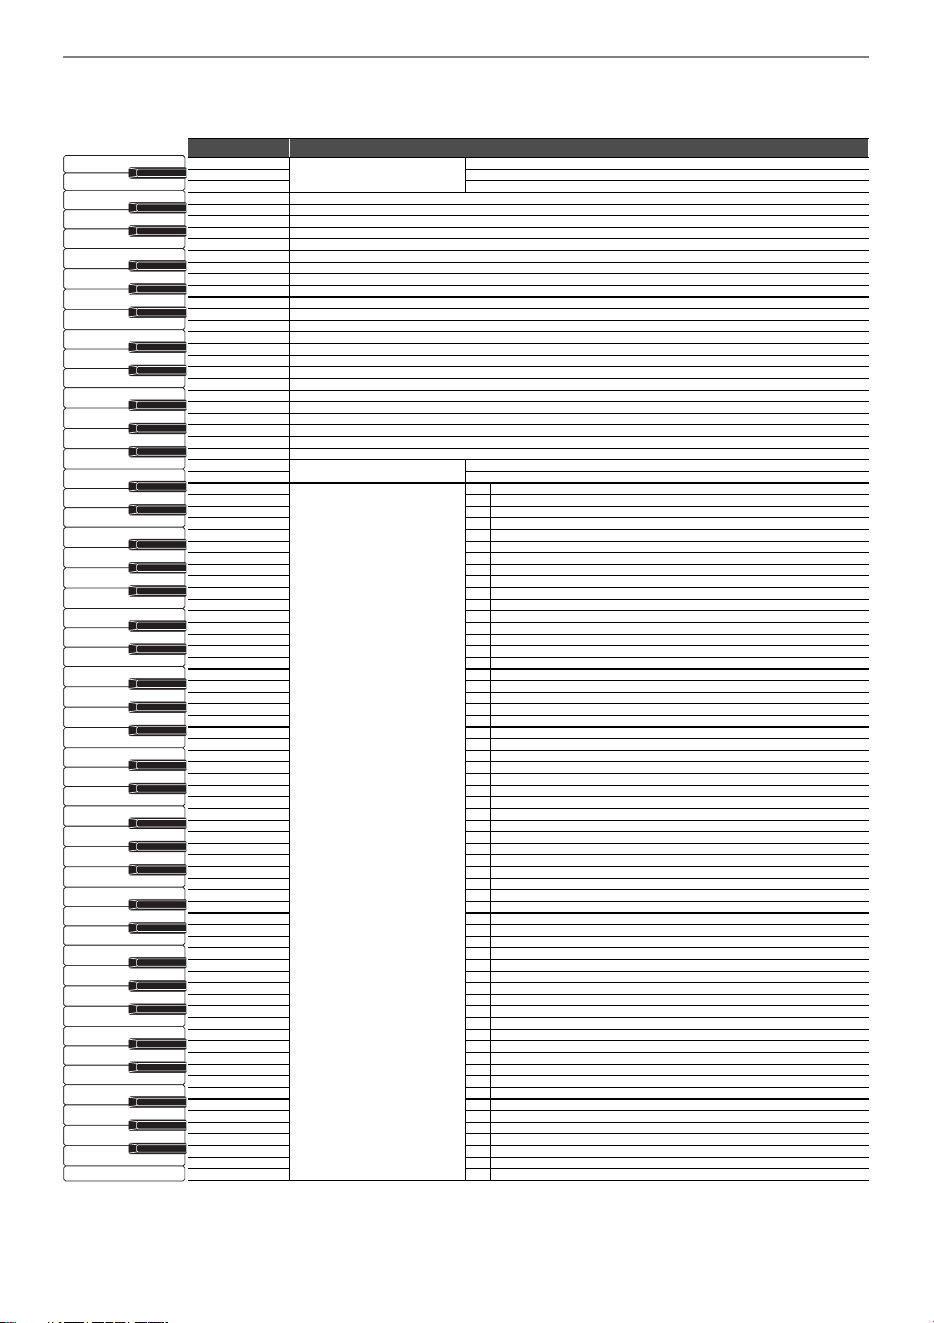
Various Lists
EN-187
Selecting Songs During Demo Playback
Hold down the “a” button and select key.
Note name Assigned Function
A0
Demo songs
1
B}02
B0 3
C1
C{1
D1
E}1
E1
F1
F{1
G1
A}1
A1
B}1
B1
C2
C{2
D2
E}2
E2
F2
F{2
G2
A}2
A2
B}2
B2
Song Select
(–)
C3 (+)
C{3
Music Library (Built-in Song)
1 Nocturne Op.9-2
D3 2 Fantaisie-Impromptu Op.66
E}3 3 Étude Op.10-3 “Chanson de l’adieu”
E3 4 Étude Op.10-5 “Black Keys”
F3 5 Étude Op.10-12 “Revolutionary”
F{3 6 Étude Op.25-9 “Butterflies”
G3 7 Prélude Op.28-7
A}3 8 Valse Op.64-1 “Petit Chien”
A3 9 Valse Op.64-2
B}3 10 Moments Musicaux 3
B3 11 Impromptu Op.90-2
C4 12 Marche Militaire 1 (Duet)
C{4 13 Frühlingslied [Lieder Ohne Worte Heft 5]
D4 14 Fröhlicher Landmann [Album für die Jugend]
E}4 15 Von fremden Ländern und Menschen [Kinderszenen]
E4 16 Träumerei [Kinderszenen]
F4 17 Tambourin
F{4 18 Menuet BWV Anh.114 [Clavierbüchlein der Anna Magdalena Bach]
G4 19 Inventio 1 BWV 772
A}4 20 Inventio 8 BWV 779
A4 21 Inventio 13 BWV 784
B}4 22 Praeludium 1 BWV 846 [Das Wohltemperierte Klavier 1]
B4 23 Le Coucou
C5 24 Gavotte
C{5 25 Sonatina Op.36-1 1st Mov.
D5 26 Sonatine Op.20-1 1st Mov.
E}5 27 Sonate K.545 1st Mov.
E5 28 Sonate K.331 3rd Mov. “Turkish March”
F5 29 Rondo K.485
F{5 30 Für Elise
G5 31 Marcia alla Turca
A}5 32 Sonate Op.13 “Pathétique” 1st Mov.
A5 33 Sonate Op.13 “Pathétique” 2nd Mov.
B}5 34 Sonate Op.13 “Pathétique” 3rd Mov.
B5 35 Sonate Op.27-2 “Moonlight” 1st Mov.
C6 36 Rhapsodie 2
C{6 37 Waltz Op.39-15 (Duet)
D6 38 Liebesträume 3
E
}6 39 Blumenlied
E6 40 La Prière d’une Vierge
F6 41 Csikos Post
F{6 42 Humoresque Op.101-7
G6 43 Melodie [Lyrische Stücke Heft 2]
A}6 44 Sicilienne Op.78
A6 45 Berceuse [Dolly] (Duet)
B}6 46 Arabesque 1
B6 47 La Fille aux Cheveux de Lin [Préludes]
C7 48 Passepied [Suite bergamasque]
C{7 49 Gymnopédie 1
D7 50 Je Te Veux
E}7 51 Salut d’Amour
E7 52 The Entertainer
F7 53 Maple Leaf Rag
F{7 54 L’arabesque [25 Etüden Op.100]
G7 55 La Styrienne [25 Etüden Op.100]
A}7 56 Ave Maria [25 Etüden Op.100]
A7 57 Le retour [25 Etüden Op.100]
B}7 58 La chevaleresque [25 Etüden Op.100]
B7 59 No.13 [Études de Mécanisme Op.849]
C8 60 No.26 [Études de Mécanisme Op.849]
A0
C1
C2
C3
C4
C5
C6
C7
C8
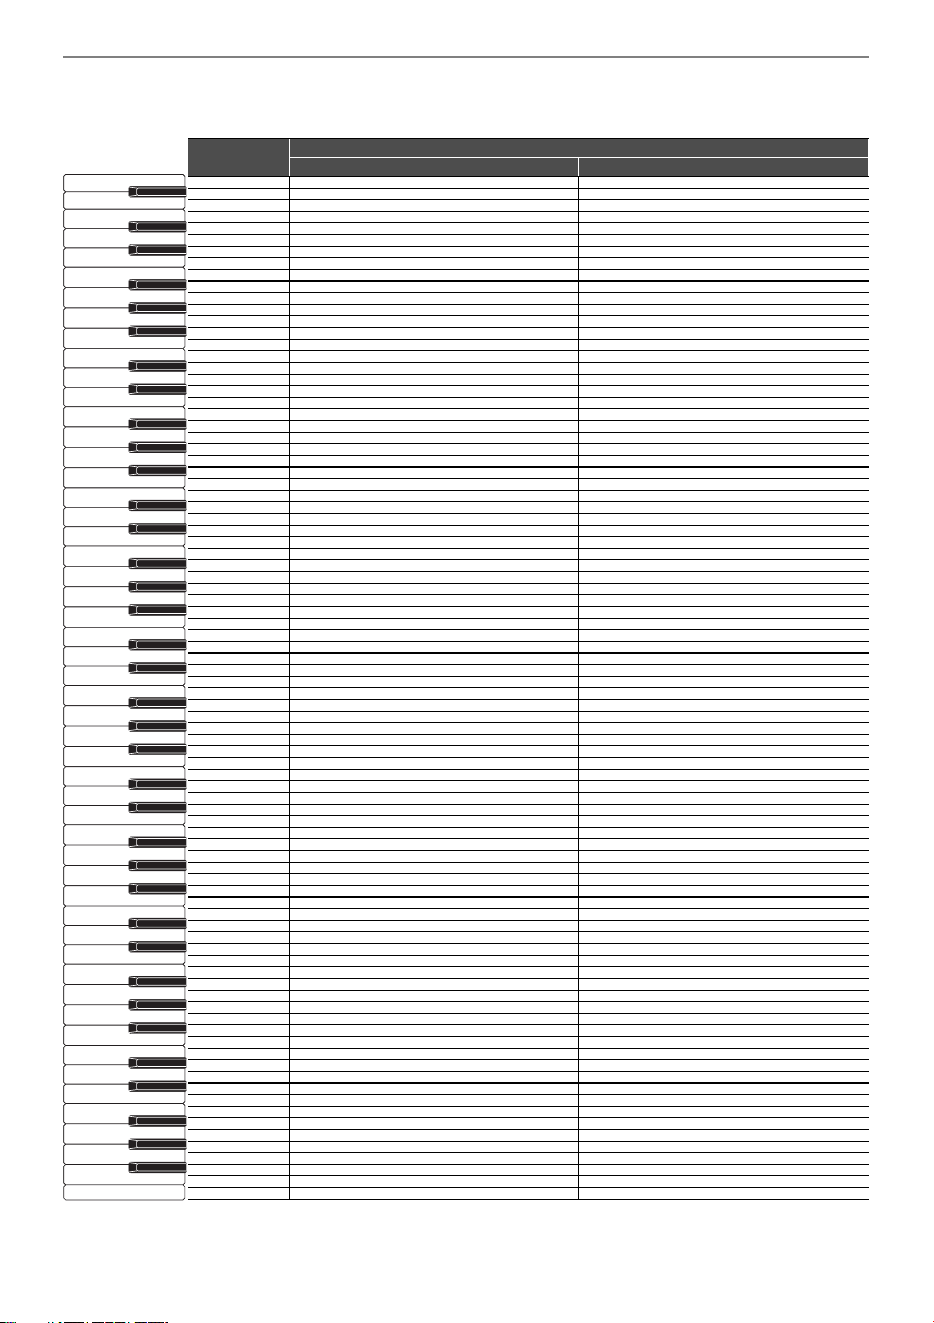
Various Lists
EN-188
Start mark and start seconds for Instant RePlayer
Hold down the “a” button and select key.
Note name
Assigned Function
Replay start second count Replay start mark
A0 15 seconds back
B}0 Most recent
B0 20 seconds back
C1 25 seconds back
C{1 1 time back
D1 30 seconds back
E}1 2 times back
E1 35 seconds back
F1 40 seconds back
F{1 3 times back
G1 45 seconds back
A}1 4 times back
A1 50 seconds back
B}1 5 times back
B1 55 seconds back
C2 60 seconds back
C{2 6 times back
D2 65 seconds back
E}2 7 times back
E2 70 seconds back
F2 75 seconds back
F{2 8 times back
G2 80 seconds back
A}2 9 times back
A2 85 seconds back
B}2 10 times back
B2 90 seconds back
C3 95 seconds back
C{3 11 times back
D3 100 seconds back
E}3 12 times back
E3 105 seconds back
F3 110 seconds back
F{3 13 times back
G3 115 seconds back
A}3 14 times back
A3 120 seconds back
B}3 15 times back
B3 125 seconds back
C4 130 seconds back
C{4 16 times back
D4 135 seconds back
E}4 17 times back
E4 140 seconds back
F4 145 seconds back
F{4 18 times back
G4 150 seconds back
A}4 19 times back
A4 155 seconds back
B}4 20 times back
B4 160 seconds back
C5 165 seconds back
C{5
21 times back
D5 170 seconds back
E}5 22 times back
E5 175 seconds back
F5 180 seconds back
F{5 23 times back
G5 185 seconds back
A}5 24 times back
A5 190 seconds back
B}5 25 times back
B5 195 seconds back
C6 200 seconds back
C{6 26 times back
D6 205 seconds back
E}6 27 times back
E6 210 seconds back
F6 215 seconds back
F{6 215 seconds back 28 times back
G6 220 seconds back
A}6 29 times back
A6 225 seconds back
B}6 30 times back
B6 230 seconds back
C7 235 seconds back
C{7 31 times back
D7 240 seconds back
E}7 32 times back
E7 245 seconds back
F7 250 seconds back
F{7 33 times back
G7 255 seconds back
A}7 34 times back
A7 260 seconds back
B}7 35 times back
B7 265 seconds back
C8 270 seconds back
A0
C1
C2
C3
C4
C5
C6
C7
C8
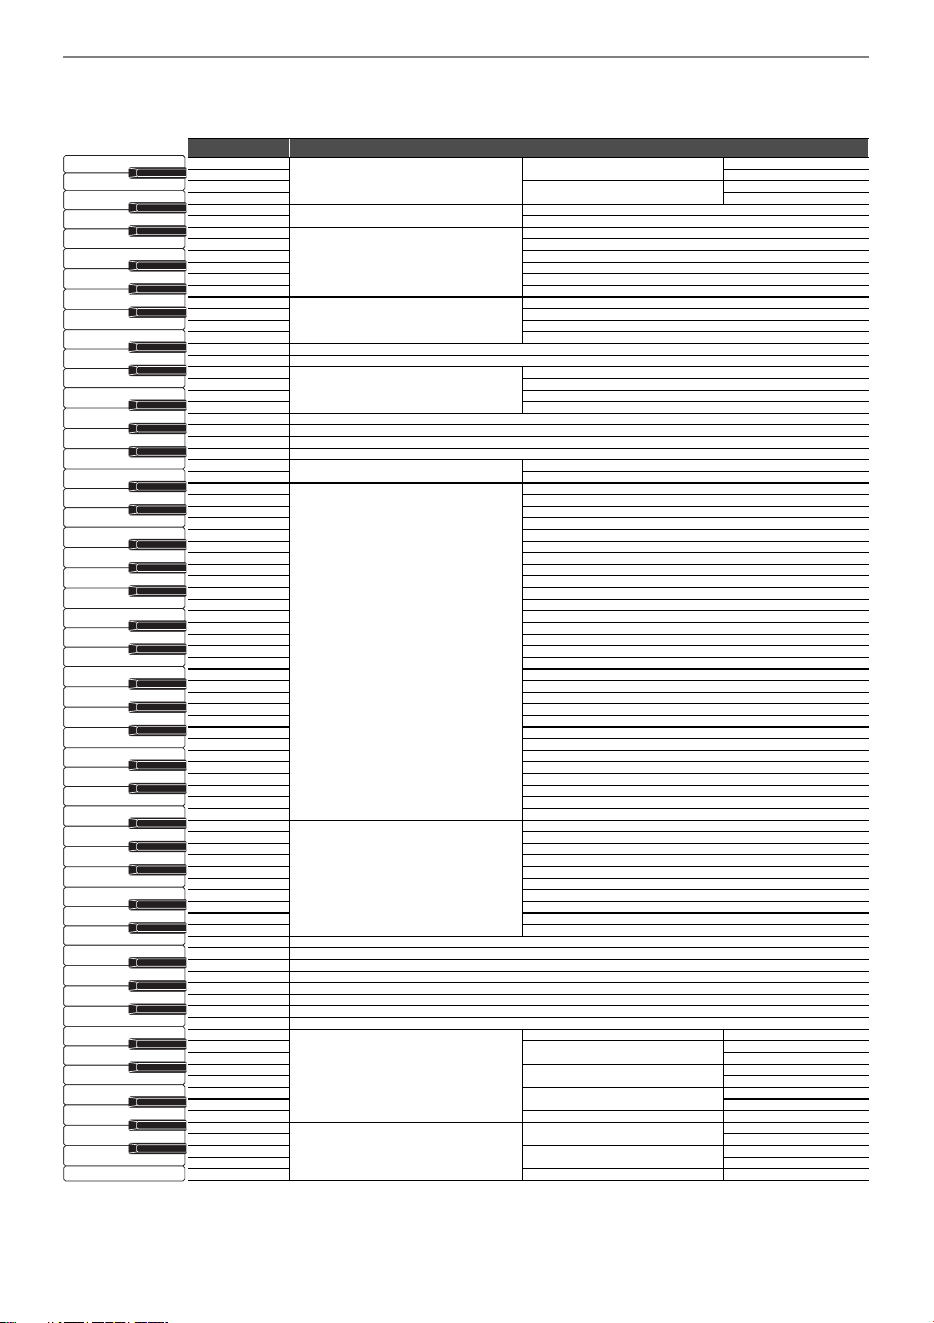
Various Lists
EN-189
Change tone and other settings
Hold down the “TONE” button and select key.
Note name Assigned Function
A0
Upper1 settings
Upper1 Volume
(–)
B}0 (+)
B0
Upper1 Octave Shift
(–)
C1 (+)
C{1
Transpose
(–)
D1 (+)
E}1
Touch Response
Off
E1 Light
F1 Medium light
F{1 Normal
G1 Medium heavy
A}1 Heavy
A1
Hammer Response
Tone
B}1 Off
B1 (–)
C2 (+)
C{2
D2
E}2
Key Off Response
Tone
E2 Fast
F2 Normal
F{2 Slow
G2
A}2
A2
B}2
B2
Tone selection
(–)
C3 (+)
C{3
Tone Selection
BERLIN GRAND
D3 BERLIN GRAND BRIGHT
E}3 BERLIN GRAND MELLOW
E3 HAMBURG GRAND
F3 HAMBURG GRAND BRIGHT
F{3 HAMBURG GRAND MELLOW
G3 VIENNA GRAND
A}
3 VIENNA GRAND BRIGHT
A3 VIENNA GRAND MELLOW
B}3 ROCK PIANO
B3 JAZZ PIANO
C4 BALLAD PIANO
C{4 POP PIANO
D4 DANCE PIANO
E}4 HONKY-TONK PIANO
E4 PIANO PAD
F4 ELEC.PIANO
F{4 60’S E.PIANO
G4 DIGITAL E.PIANO 1
A}4 DIGITAL E.PIANO 2
A4 HARPSICHORD
B}4 VIBRAPHONE
B4 STRINGS 1
C5 STRINGS 2
C{5 PIPE ORGAN
D5 JAZZ ORGAN
E}5 ELEC.ORGAN 1
E5 ELEC.ORGAN 2
F5 BASS (LOWER)
F{5
Tone Selection for Classical Piano Repertoire
SONATA GRAND
G5 CONCERT ETUDE GRAND
A}5 ETUDE GRAND
A5 PRELUDE GRAND
B}5 ROMANCE GRAND
B5 PARTITA GRAND
C6 NOCTURNE GRAND
C{6 WALTZ GRAND
D6 POLONAISE GRAND
E}6 LITTLE PIECE UPRIGHT
E6
F6
F{6
G6
A}6
A6
B}6
B6
C7
Layer settings
Layer Off/On
C{7
Upper2 Volume
(–)
D7 (+)
E}7
Upper2 Octave Shift
(–)
E7 (+)
F7
Upper2 Detune
(–)
F{7 (+)
G7 Upper2 Damper disable/enable
A}7
Split settings
Lower Volume
(–)
A7 (+)
B}7
Lower Detune
(–)
B7 (+)
C8 Lower Damper disable/enable
A0
C1
C2
C3
C4
C5
C6
C7
C8

Various Lists
EN-190
MIDI Implementation Chart
Function Transmitted Recognized Remarks
Basic
Channel
1
1 - 16
1 - 16
1 - 16
Default
Changed
Note
Number
0 - 127
0 - 127
*
1
0 - 127
True voice
Program
Change True #
After
Touch
Control
Change
X
X
X
O
Pitch Bender
OX
Exclusive
O
Key’s
Ch’s
Velocity
O
9nH v = 1 - 127
O 9nH v = 0, 8nH v = 0 - 127
O 9nH v = 1 - 127
O 8nH v = 0 - 127
Note ON
Note OFF
Mode
Mode 3
X
Mode 3
X
Default
Messages
Altered
System
Common
X
X
X
X
X
X
Song Pos
Song Sel
Tune
Aux
Messages
Remarks
X
X
X
X
X
X
O
O
X
O
O
X
All sound off
Reset all controller
Local ON/OFF
All notes OFF
Active Sense
System Reset
System
Real Time
X
X
X
X
Clock
Commands
0, 32
1
5
6, 38
7
10
11
64
65
66
67
71
72
73
74
76
77
78
84
88
91
93
94
100, 101
Mode 1 : OMNI ON, POLY
Mode 3 : OMNI OFF
,
POLY
Mode 2 : OMNI ON, MONO
Mode 4 : OMNI OFF
,
MONO
O : Yes
X
: No
O
X
X
O
O
X
X
O
X
O
O
X
X
X
X
X
X
X
X
O
X
X
X
O
*
2
*
2
O
O
O
O
O
O
O
O
O
O
O
O
O
O
O
O
O
O
O
O
O
O
O
O
*
2
*
2
OO
0 - 127
Bank select LSB/MSB
Modulation
Portamento time
Data entry LSB/MSB
Channel Volume
Pan
Expression
Damper Pedal (Sustain)
Portamento On/Off
Sostenuto
Soft pedal
Filter resonance
Release time
Attack time
Filter Cutoff Frequency
Vibrato rate
Vibrato depth
Vibrato delay
Portamento control
High resolution velocity prefix
Reverb send level
Chorus send level
Delay send level
RPN LSB/MSB
*
2
O
*
2
Model: AP-750 Version : 1.0
*1: Depends on tone.
*2: For details about RPN and system exclusive messages, see MIDI Implementation
at
https://support.casio.com/global/en/emi/manual/AP-750/
• The MIDI messages marked with “x” in the “Transmitted” column of the above chart
may be output along with certain operations.

MA2401-A
Published: 1/2024