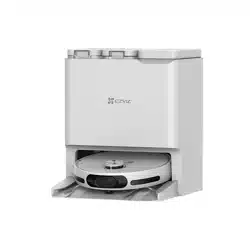
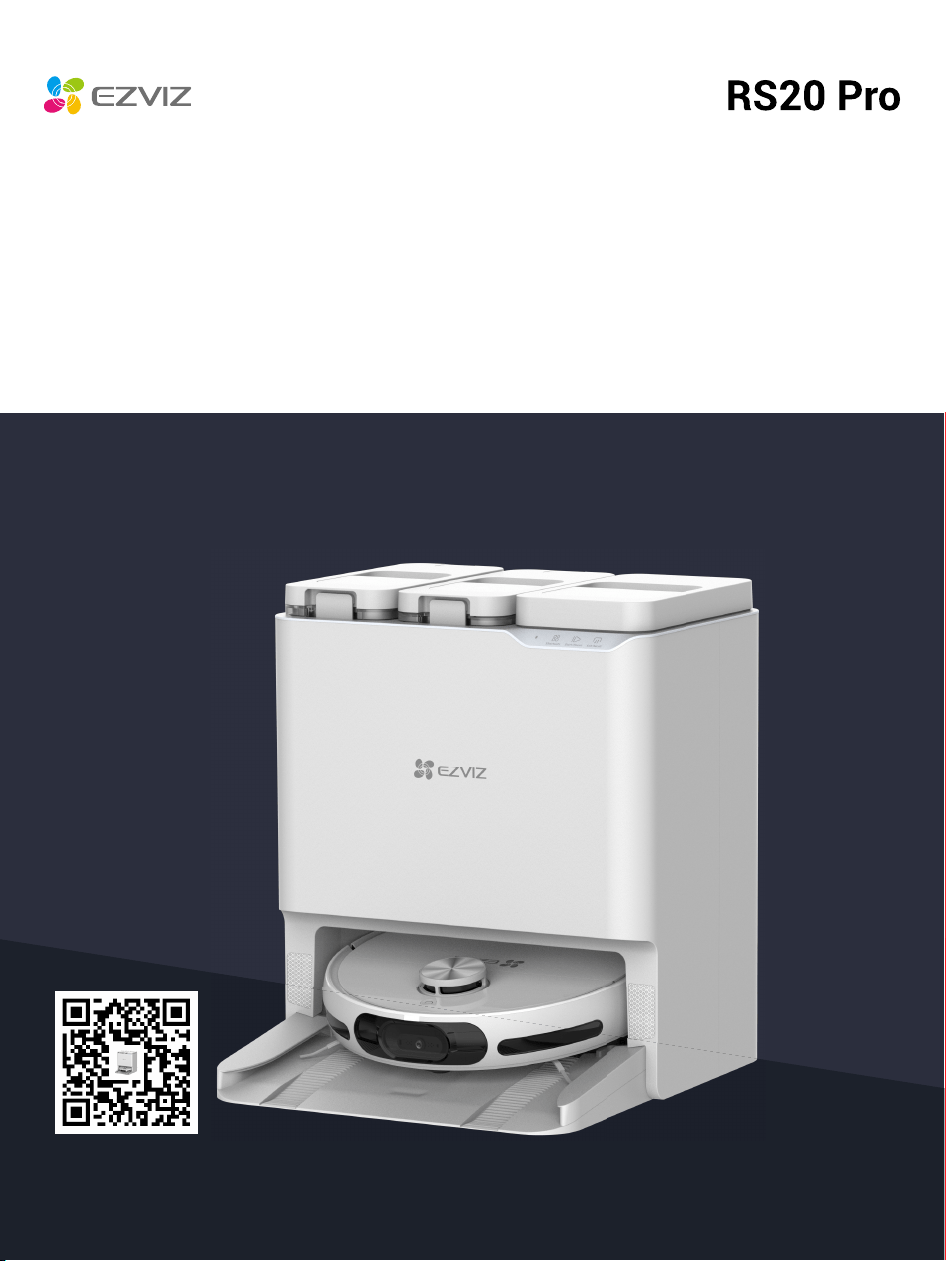
Robot Vacuum & Mop Combo
1
PRODUCT SAFETY PRECAUTIONS
Before using this product, please read all the contents of this user
manual carefully, install the device accordingly and save this manual for
future reference properly. To lower the risk of re, electric shock or other
injuries, please observe the following operation requirements:
• This appliance is not intended for use by people (including children) with
reduced physical, sensory or mental capabilities, or lack of experience
and knowledge, unless they have been given supervision or instruction
concerning use of the appliance by a person responsible for their safety.
Children should be supervised to ensure that they do not play with the
appliance.
• For European, this appliance can be used by children aged from 8
years and above and people with reduced physical, sensory or mental
capabilities or lack of experience and knowledge if they have been given
supervision or instruction concerning use of the appliance in a safe way
and understand the hazards involved. Cleaning and user maintenance
shall not be made by children without supervision. Children should not
play with the appliance.
• Please don’t suction high-temperature substances (unextinguished
cigarette butts, matches, hot ashes and etc.), superne substances (like
lime, cement, sawdust, gesso, ashes and toner), large sharp fragments
(not physically denite matters like glass).
• No action needed to shift the product between 50 and 60Hz, product can
adapt itself for both 50 and 60Hz.
• If the supply cord is damaged, it must be replaced by the manufacturer,
its service agent or similarly qualied persons in order to avoid a hazard.
• When charging, please use the Base Station offered by EZVIZ.
Robot Model Base Station Model
CS-RS20-PRO-PGA2 CS-RS20-PRO-PGA2-D
CS-RS20-PRO-PGA5 CS-RS20-PRO-PGA5-D
CS-RS20-PRO-TGA2 CS-RS20-PRO-TGA2-D
CS-RS20-PRO-TGA5 CS-RS20-PRO-TGA5-D
SAFETY WARNING
2
• WARNING: To Reduce The Risk Of Electric Shock - Do not use outdoors
or on wet surfaces, commercial or industrial environments.
• WARNING: To Reduce The Risk Of Electric Shock - Use indoors only.
• WARNING: To Reduce The Risk Of Electric Shock – Unplug Before
Servicing.
• Do not look directly at the laser radar and the line laser when the device
is working.
• The radar and line laser of this product comply with the Class 1 laser
product standard IEC 60825-1, and will not produce dangerous laser
radiation.
• CAUTION: Changing the function or performance of the optical module
arbitrarily without complying with the provisions of this manual may lead
to the danger of laser radiation.
• The Base Station can only charge lithium-ion batteries containing no
more than 8 cells with a rated capacity of no more than 5200mAh.
• The Base Station can not be charged to non-rechargeable batteries.
PROPER USE OF THE DEVICE
• The device is only used for cleaning the oor of the home environment,
and should not be used in outdoor environment (such as open
balconies), non-ground environment (such as stairs), and industrial
environment.
• Don’t use the device in suspended environment (such as duplexes, open
balconies and the top of furniture) without protective facilities.
• Children are not allowed to use the device as a toy. Please keep children
and pets away from the device when using it. Don’t put accessories
such as side brush in the place where children can reach, so as to
prevent children from eating by mistake. Don’t place children and pets
on the device body.
• Don’t use the device in an environment with open re or fragile objects.
• Don’t use the device on waterlogged oors or wet ground.

3
• Don’t use the device in an environment higher than 40°C or lower than
0°C.
• Don’t use the device to clean any ammable materials (such as gasoline,
toner). Don’t use the device in the area with ammable materials.
• Don’t use the device to clean burning items, such as matches, cigarettes
and other items that may cause re.
• Don’t use the product to absorb large stones, waste paper and other
items that may block the product. When the suction port is blocked,
please clean the product in time and remove the dust, cotton, hair, etc.
at the suction port.
• Use only the accessories recommended or sold by the manufacturer.
Don’t use the batteries or Base Station of any third party, and don’t use
damaged batteries or Base Station.
• Dispose of used batteries in accordance with local laws and regulations.
• Don’t burn the device under any circumstances, as the battery may cause
explosion.
• If the rear surface of the robot is too dusty, it will affect the recharging of
the robot. It is recommended to clean it regularly or as needed. It is also
recommended to use a paper towel or soft dry cloth to clean it.
• If the surface of the edge sensor on the side of the Robot is contaminated
with lots of dust, it will affect the posture and mapping positioning effect
of the Robot when walking along the wall. It is recommended to clean it
regularly or as needed. Since the sensor is located inside the body, it is
recommended to use the air blowing tool/ paper towel/soft dry cloth for
cleaning the camera to wipe the sensor. Don’t put your ngers into it for
cleaning.
• The bottom of the Robot is easy to be contaminated with lots of dust, so
it is recommended to clean it regularly or as needed.
• Please use the device according to the instructions in the manual. Any
loss and injury caused by improper use shall be borne by the user.
• Please don’t touch the plug or any electrified part of the product with
your wet hands in case of electric shock hazard.
• If you will not use the product for a long time, please turn off the power
and unplug the charging plug.
4
Regulatory Information
This product and - if applicable - the supplied accessories too are marked with “CE” and comply therefore with
the applicable harmonized European standards listed under the Radio Equipment Directive 2014/53/EU, the ErP
Directive 2009/125/EC, the RoHS Directive 2011/65/EU.
Products marked with this symbol cannot be disposed of as unsorted municipal waste in the European Union.
For proper recycling, return this product to your local supplier upon the purchase of equivalent new equipment, or
dispose of it at designated collection points.
This symbol means: This product contains a battery that cannot be disposed of as unsorted municipal waste in
the European Union. See the product documentation for specic battery information. The battery is marked with
this symbol, which may include lettering to indicate cadmium (Cd), lead (Pb), or mercury (Hg). For proper recycling,
return the battery to your supplier or to a designated collection point.
DECLARATION OF CONFORMITY
Hereby, Hangzhou EZVIZ Software Co., Ltd. declares that the radio equipment type [CS-RS20-PRO-PGA2, CS-RS20-PRO-PGA5,
CS-RS20-PRO-TGA2, CS-RS20-PRO-TGA5] is in compliance with EU Directive 2014/53/EU . The full text of the DECLARATION OF
CONFORMITY is available at the following web link: https://www.ezviz.com/page/declaration-of-conformity.
EXPOSURE TO RADIOFREQUENCY RF
The frequency bands and the nominal limits of transmitted power (radiated and/or conducted) applicable to this radio device are
the following:
Band Wi-Fi 2.4 GHz
Frequency Form 2.4G to 2.4835 GHz
Power transmission [EIRP] ≤100 mW
Technical Parameters
Direct current
Alternating current
For indoor use.
Before charging, read the instructions.

5
Robot Base Station
Model CS-RS20-PRO-PGA2
CS-RS20-PRO-PGA5
CS-RS20-PRO-TGA2
CS-RS20-PRO-TGA5
Model CS-RS20-PRO-PGA2-D
CS-RS20-PRO-PGA5-D
CS-RS20-PRO-TGA2-D
CS-RS20-PRO-TGA5-D
Overall Dimension 365mm * 365mm * 101mm Rated Input Voltage 220-240V~50/60Hz
Battery Capacity 5200 mAh Rated Output 20V
2.5A
Weight Approx 4.1Kg Rated Power 60 W ( in charging/mop drying state);
965 W( in collecting dust state);
1265 W( in cleaning with hot water state)
Battery Rated Voltage 14.4V
Dimensions 481mm * 452mm * 529mm
Rated Input 20V
Rated Power 65W
6
COPYRIGHT © Hangzhou EZVIZ Software Co., Ltd. ALL RIGHTS RESERVED.
Any and all information, including, among others, wordings, pictures, graphs are the properties of
Hangzhou EZVIZ Software Co., Ltd. (hereinafter referred to as “EZVIZ”). This user manual (hereinafter
referred to as “the Manual”) cannot be reproduced, changed, translated, or distributed, partially or
wholly, by any means, without the prior written permission of EZVIZ. Unless otherwise stipulated,
EZVIZ does not make any warranties, guarantees or representations, express or implied, regarding
to the Manual.
About this Manual
The Manual includes instructions for using and managing the product. Pictures, charts, images and
all other information hereinafter are for description and explanation only. The information contained
in the Manual is subject to change, without notice, due to rmware updates or other reasons. Please
nd the latest version in the ™ website (http://www.ezviz.com).
Revision Record
New release – January 2024
Trademarks Acknowledgement
™, ™, and other EZVIZ’s trademarks and logos are the properties of EZVIZ in various
jurisdictions. Other trademarks and logos mentioned below are the properties of their respective
owners.
Legal Disclaimer
TO THE MAXIMUM EXTENT PERMITTED BY APPLICABLE LAW, THE PRODUCT DESCRIBED, WITH ITS
HARDWARE, SOFTWARE AND FIRMWARE, IS PROVIDED “AS IS”, WITH ALL FAULTS AND ERRORS,
AND EZVIZ MAKES NO WARRANTIES, EXPRESS OR IMPLIED, INCLUDING WITHOUT LIMITATION,
MERCHANTABILITY, SATISFACTORY QUALITY, FITNESS FOR A PARTICULAR PURPOSE, AND
NON-INFRINGEMENT OF THIRD PARTY. IN NO EVENT WILL EZVIZ, ITS DIRECTORS, OFFICERS,
EMPLOYEES, OR AGENTS BE LIABLE TO YOU FOR ANY SPECIAL, CONSEQUENTIAL, INCIDENTAL, OR
INDIRECT DAMAGES, INCLUDING, AMONG OTHERS, DAMAGES FOR LOSS OF BUSINESS PROFITS,
BUSINESS INTERRUPTION, OR LOSS OF DATA OR DOCUMENTATION, IN CONNECTION WITH
THE USE OF THIS PRODUCT, EVEN IF EZVIZ HAS BEEN ADVISED OF THE POSSIBILITY OF SUCH
DAMAGES.
TO THE MAXIMUM EXTENT PERMITTED BY APPLICABLE LAW, IN NO EVENT SHALL EZVIZ’S TOTAL
LIABILITY FOR ALL DAMAGES EXCEED THE ORIGINAL PURCHASE PRICE OF THE PRODUCT.
EZVIZ DOES NOT UNDERTAKE ANY LIABILITY FOR PERSONAL INJURY OR PROPERTY DAMAGE AS
THE RESULT OF PRODUCT INTERRUPTION OR SERVICE TERMINATION CAUSED BY: A) IMPROPER
INSTALLATION OR USAGE OTHER THAN AS REQUESTED; B) THE PROTECTION OF NATIONAL
OR PUBLIC INTERESTS; C) FORCE MAJEURE; D) YOURSELF OR THE THIRD PARTY, INCLUDING
WITHOUT LIMITATION, USING ANY THIRD PARTY’S PRODUCTS, SOFTWARE, APPLICATIONS, AND
AMONG OTHERS.
REGARDING TO THE PRODUCT WITH INTERNET ACCESS, THE USE OF PRODUCT SHALL BE
WHOLLY AT YOUR OWN RISKS. EZVIZ SHALL NOT TAKE ANY RESPONSIBILITES FOR ABNORMAL
OPERATION, PRIVACY LEAKAGE OR OTHER DAMAGES RESULTING FROM CYBER ATTACK,
HACKER ATTACK, VIRUS INSPECTION, OR OTHER INTERNET SECURITY RISKS; HOWEVER, EZVIZ
WILL PROVIDE TIMELY TECHNICAL SUPPORT IF REQUIRED. SURVEILLANCE LAWS AND DATA
PROTECTION LAWS VARY BY JURISDICTION. PLEASE CHECK ALL RELEVANT LAWS IN YOUR
JURISDICTION BEFORE USING THIS PRODUCT IN ORDER TO ENSURE THAT YOUR USE CONFORMS
TO THE APPLICABLE LAW. EZVIZ SHALL NOT BE LIABLE IN THE EVENT THAT THIS PRODUCT IS
USED WITH ILLEGITIMATE PURPOSES.
IN THE EVENT OF ANY CONFLICTS BETWEEN THE ABOVE AND THE APPLICABLE LAW, THE LATTER
PREVAILS.

7
Table of Contents
Overview ��������������������������������������������������������������������������������������������������8
Package Contents��������������������������������������������������������������������������������������������������������������������������� 8
Basis ���������������������������������������������������������������������������������������������������������������������������������������������� 9
Quick Start Guide �����������������������������������������������������������������������������������13
Preparation ����������������������������������������������������������������������������������������������������������������������������������� 13
Connect the Power Supply to the Base Station ������������������������������������������������������������������������������ 13
Add Clean Water ��������������������������������������������������������������������������������������������������������������������������� 14
Install Cleaning Solution ��������������������������������������������������������������������������������������������������������������� 14
Remove Shields ���������������������������������������������������������������������������������������������������������������������������� 15
Install Side Brush and Mop Assembly ������������������������������������������������������������������������������������������� 16
Get the EZVIZ App ������������������������������������������������������������������������������������������������������������������������ 16
Add the Robot to EZVIZ App ���������������������������������������������������������������������������������������������������������� 16
Place the Robot ���������������������������������������������������������������������������������������������������������������������������� 17
First Cleaning ������������������������������������������������������������������������������������������������������������������������������� 18
Operations on the EZVIZ App ������������������������������������������������������������������19
Routine Maintenance ������������������������������������������������������������������������������19
Replace Mop Cloth������������������������������������������������������������������������������������������������������������������������ 20
Dump the Dust Box ����������������������������������������������������������������������������������������������������������������������� 21
Clean/replace Filter ���������������������������������������������������������������������������������������������������������������������� 22
Clean the Main Brush �������������������������������������������������������������������������������������������������������������������� 23
Clean Wheels �������������������������������������������������������������������������������������������������������������������������������� 24
Clean Important Parts ������������������������������������������������������������������������������������������������������������������� 24
Clean Clean Water Tank/Waste Water Tank ����������������������������������������������������������������������������������� 25
Replace Cleaning Solution ������������������������������������������������������������������������������������������������������������ 26
Replace Dust Bag ������������������������������������������������������������������������������������������������������������������������� 26
Replace the Side Brush ����������������������������������������������������������������������������������������������������������������� 27
Clean the Base Station ������������������������������������������������������������������������������������������������������������������ 27
Clean Inlet Air Filter ���������������������������������������������������������������������������������������������������������������������� 28
Clean Dust Collection Duct ����������������������������������������������������������������������������������������������������������� 28
FAQ ��������������������������������������������������������������������������������������������������������29
Appendix ������������������������������������������������������������������������������������������������31
Environmental Precautions ����������������������������������������������������������������������������������������������������������� 31
Rechargeable Lithium ion Battery ������������������������������������������������������������������������������������������������� 32
INFORMATION FOR PRIVATE HOUSEHOLDS ��������������������������������������������������������������������������������� 32
8
Overview
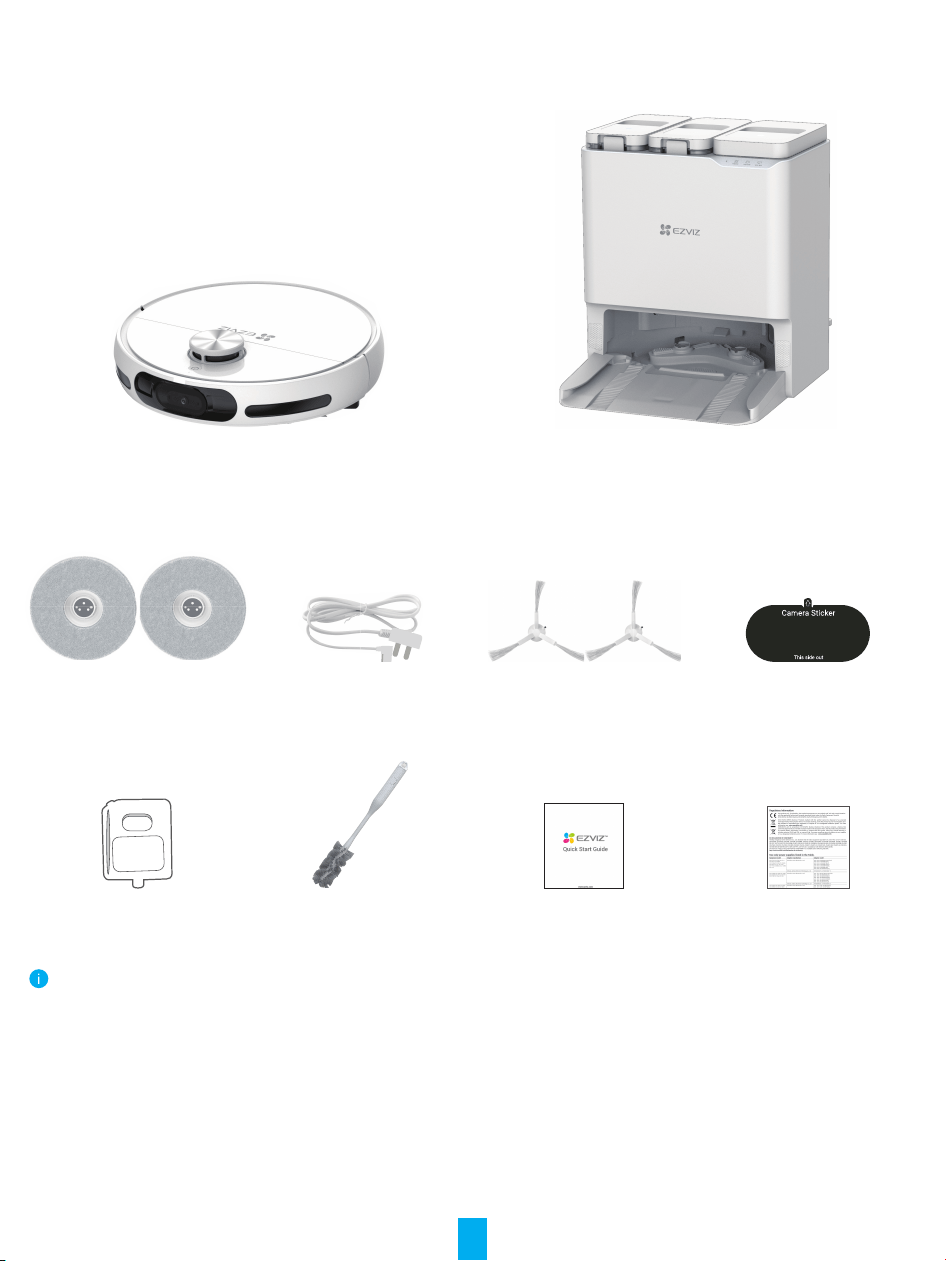
Package Contents
Robot Vacuum & Mop Cleaner *1
(hereinafter referred as to “Robot”)
Base Station *1
Mop Assembly*2 (Mop cloth
included) Power Cord *1 Side Brush *2 Camera Sticker x1
Cleaning Solution *1 Cleaning Tool *1 Quick Start Guide *2 Regulatory Information *1
The device’s appearance is subject to the actual one you have bought.
9
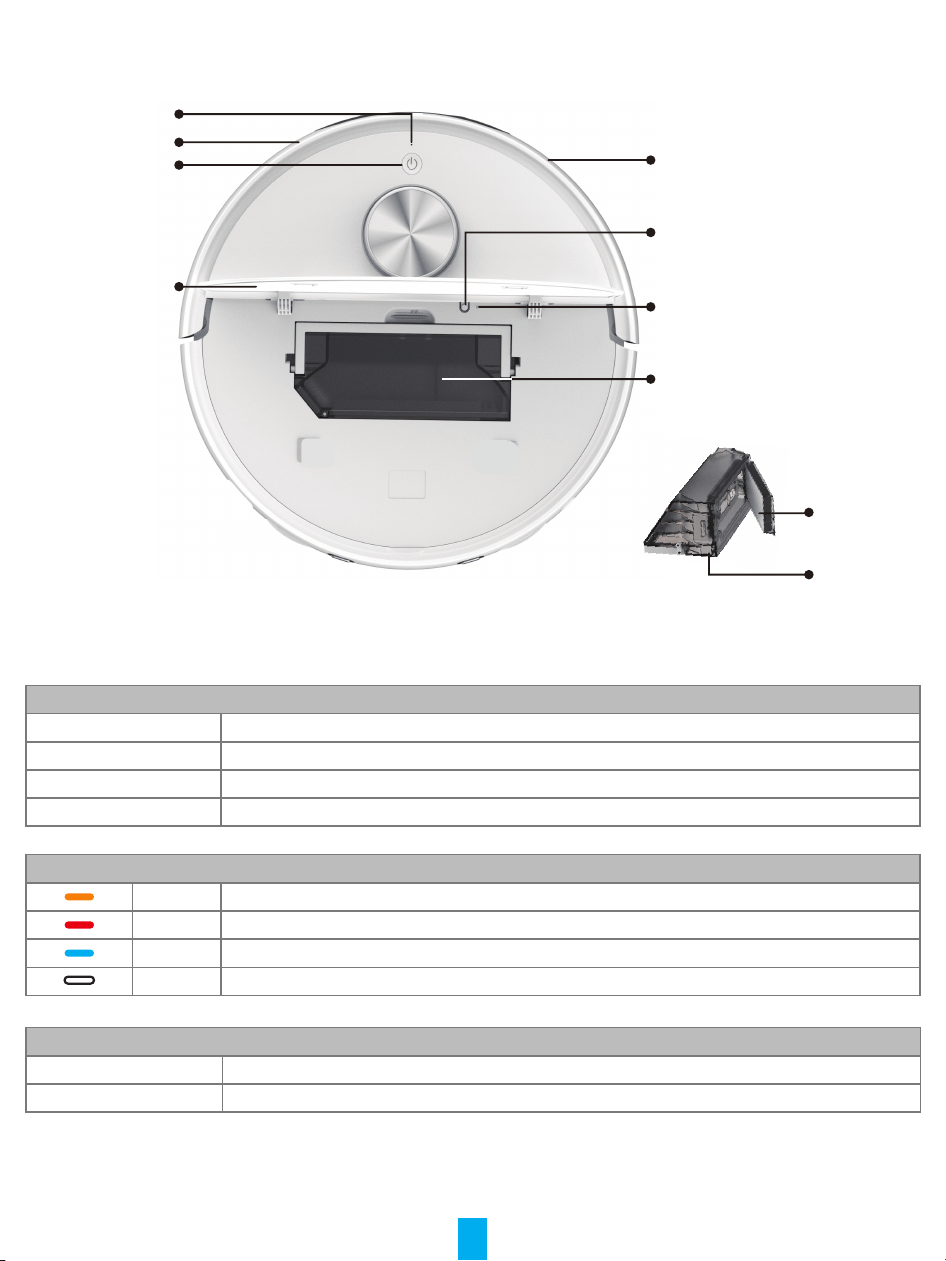
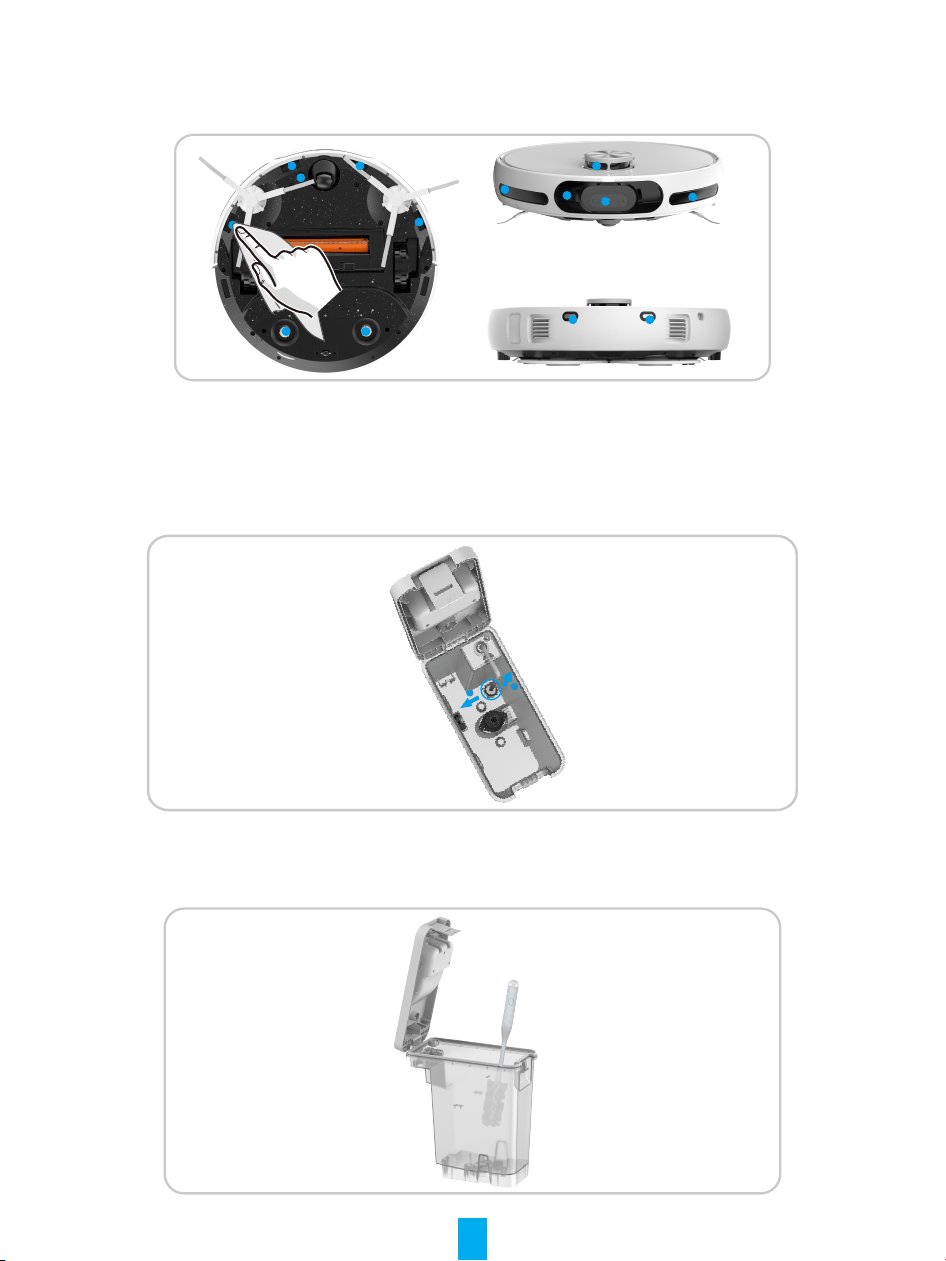
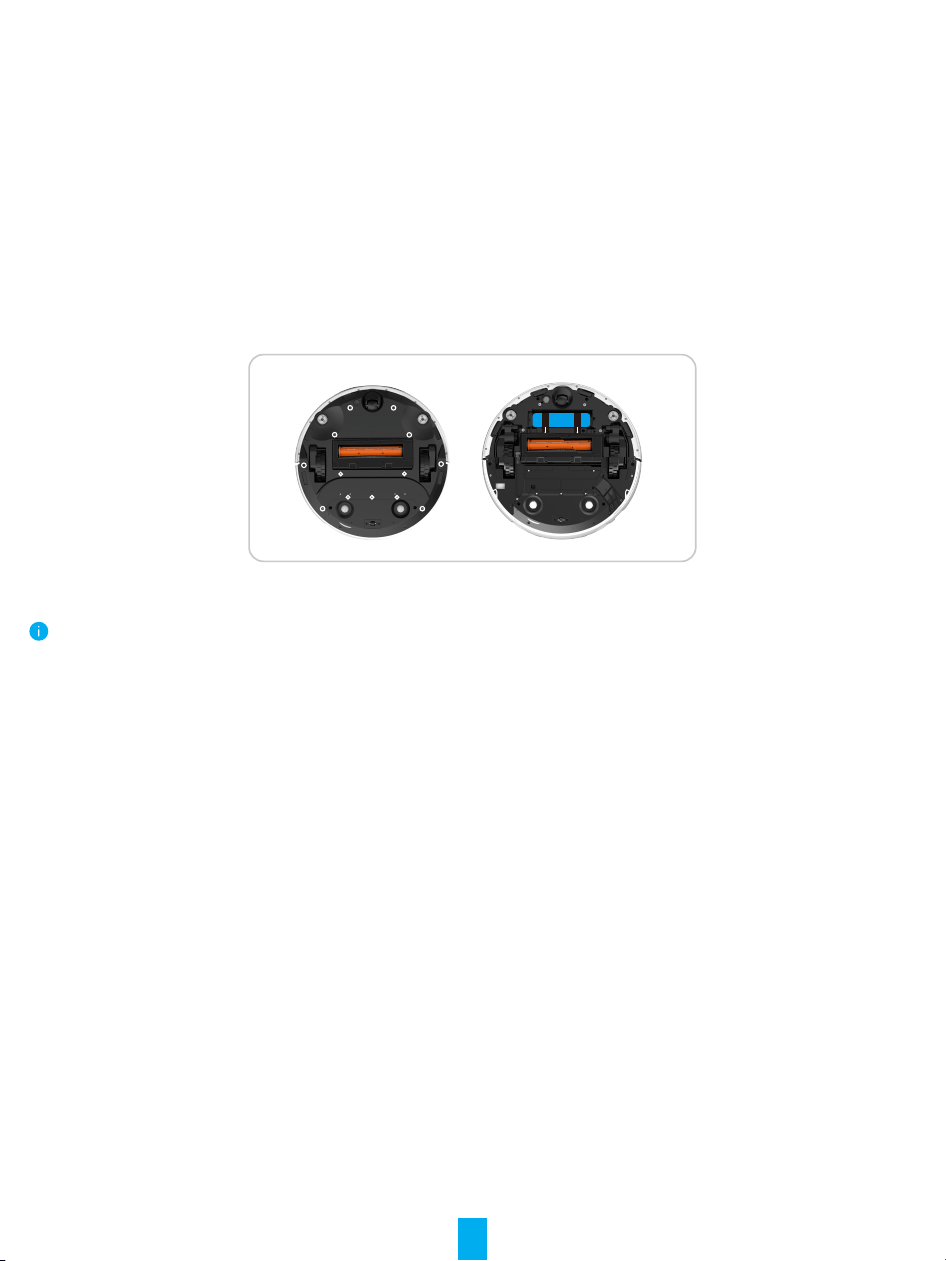
Basis
Robot
mic
Bumper
Reset Button*
Wi-Fi Indicator
Dust Box
Filter
Dust Box
Bumper
Power Button&LED
Indicator
Robot Upper Cover
Power Button
Press and hold for 4s: Turn on/off the Robot
Press once: Start/pause the task
Press twice: End the task and back to the Base Station
Press three times: Enable/disable child lock (please enable child lock feature on EZVIZ app rstly)
LED Indicator
Orange In standby mode due to low battery/ task paused
Red Fault or exceptions, please check the notication on EZVIZ app
Blue In patrol inspection/ remote video
White Working properly
Reset Button
Press and hold for 4s Enter network conguration status
Press and hold for 10s Restore to factory settings and restart the Robot
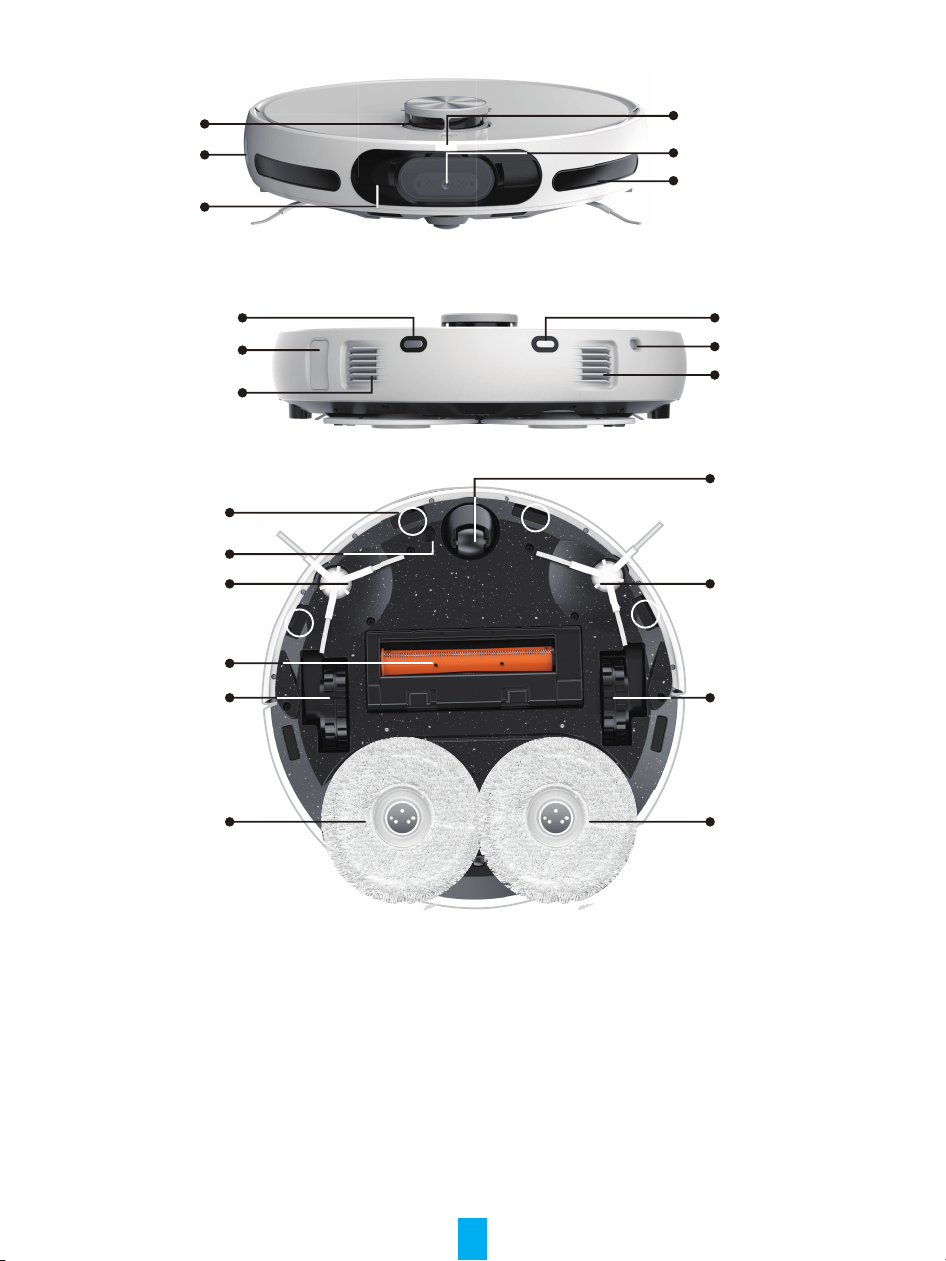
10
LDS Lidar
Spotlight
Edge Sensor
RGB Camera
Obstacle Sensor
Infrared Obstacle Sensor
Charging Contact
Charging Contact
Dust Collection Port
Water Inlet
Speaker
Air Outlet
Universal Wheel
Side Brush
Drive Wheel
Mop Assembly
Cliff Sensor*4
Material Sensor
Side Brush
Main Brush
Drive Wheel;
Mop Assembly
1
3
2
4
11
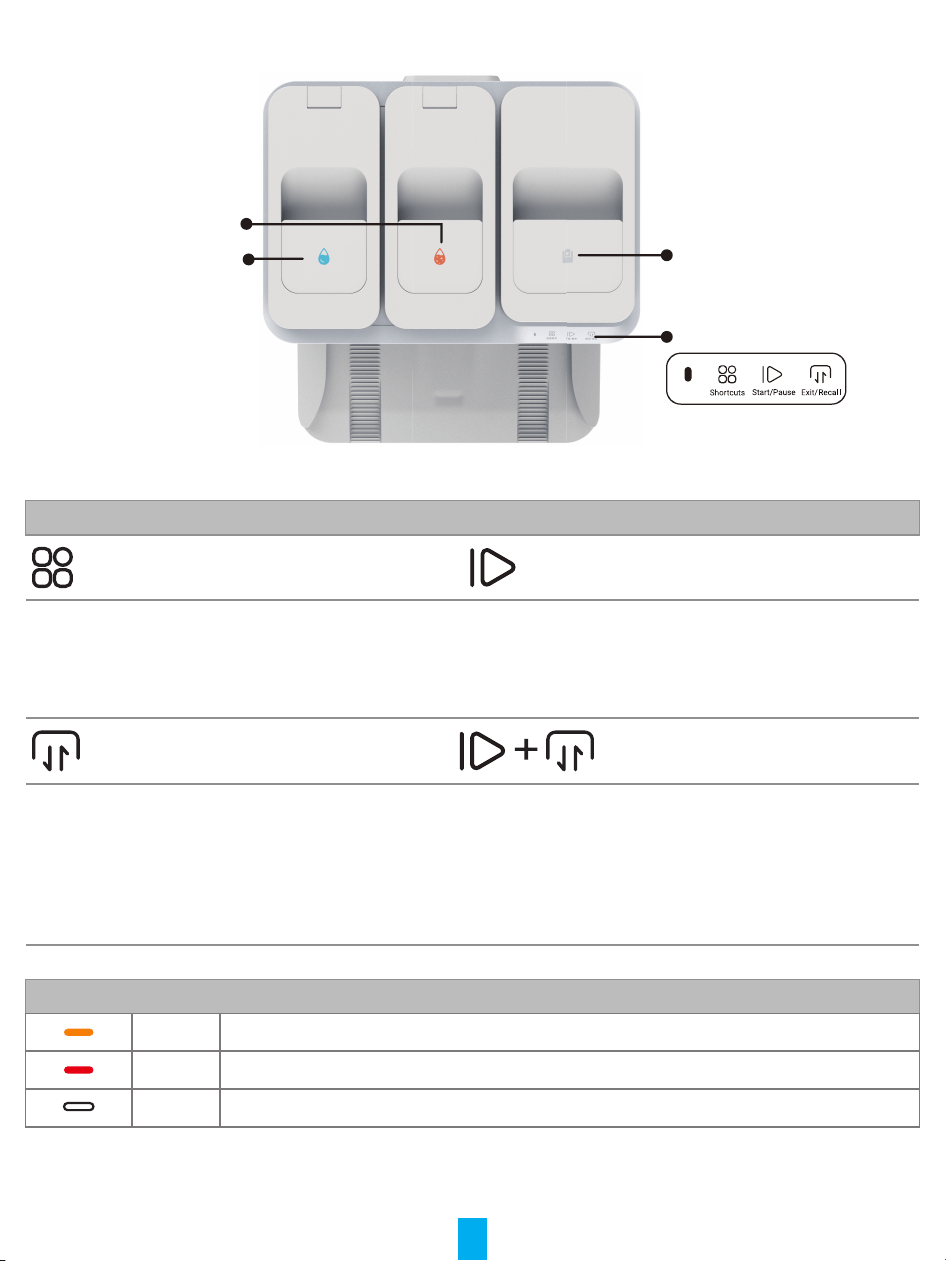
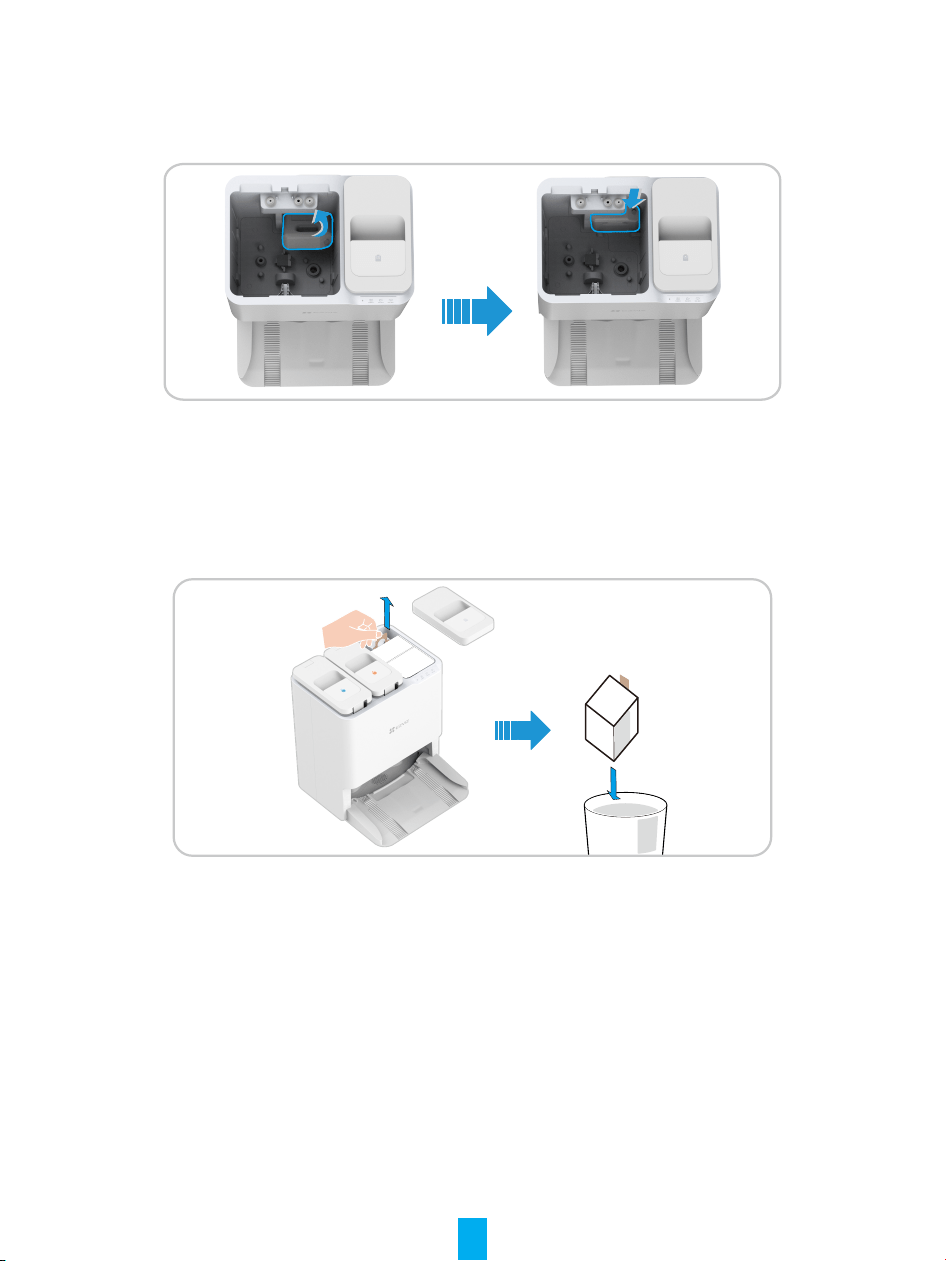
Base Station
Clean Water Tank
Waste Water Tank
Dust-collection Box
(dust bag included)
Operation Panel
Operation Panel
Shortcuts Start/Pause
The corresponding shortcut instructions
can be executed through 3 operations (press
once, press twice, press and hold for 3s).
(Please bind shortcut instructions on EZVIZ
app rstly)
Press once: Start/pause task
Press and hold for 3s: end the task
Exit/Recall Child Lock
Press once: Robot exit/return Base Station
Press and hold for 3s: Start cleaning the
cleaning sink of the Base Station, the water
sprayed after the Robot exits the Base
Station.
Press and hold for 3s again: The Base Station
extract waste water.
Press and hold for 3s: enable/disenable child lock
(Please enable child lock feature on EZVIZ app rstly)
Indicator on Base Station
Orange Slightly exceptions
Red Exceptions, please check the notication on EZVIZ app
White Working properly
12
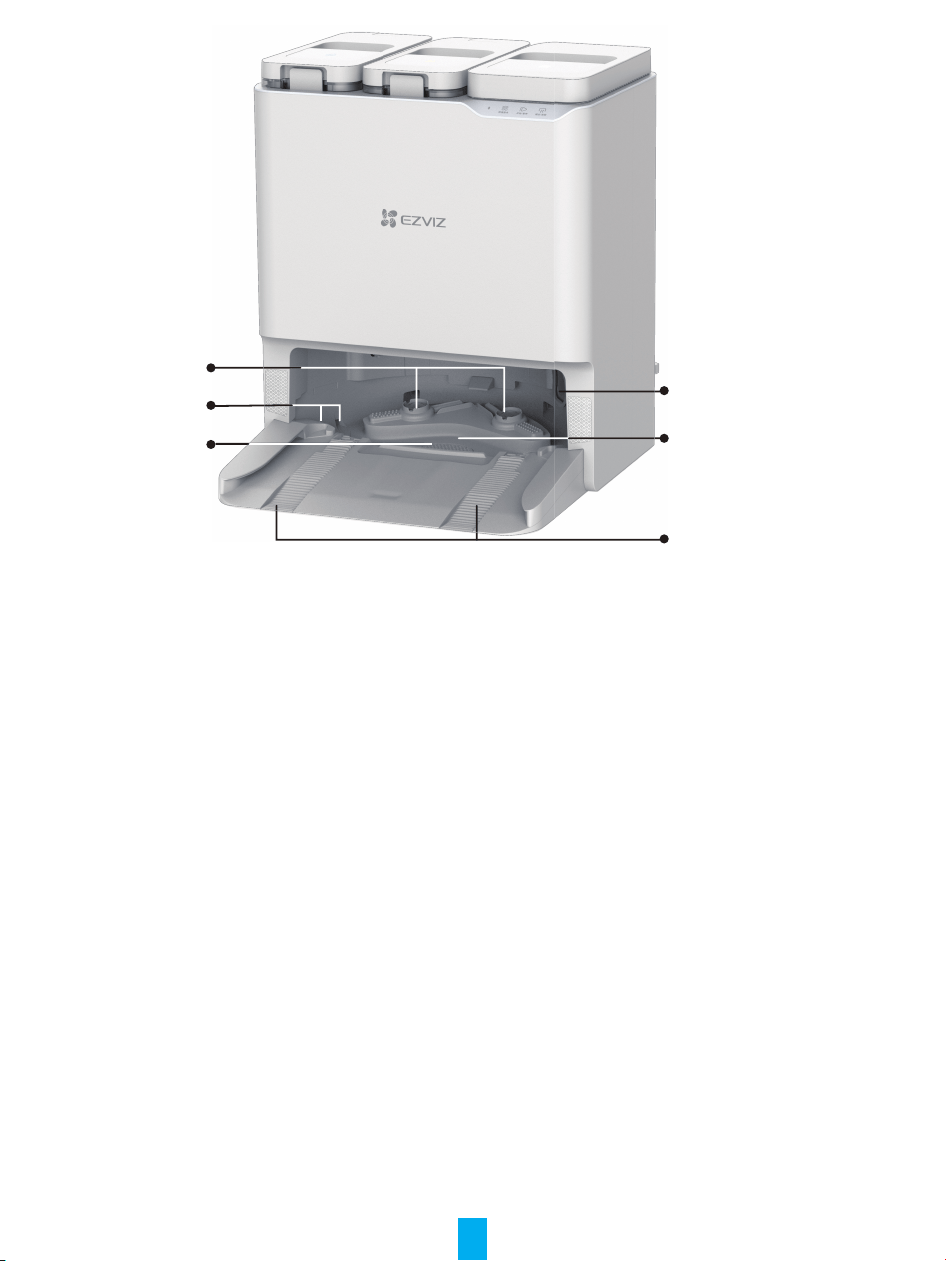
Mop Platform
Water Sensor*2
Filter Plate
Dust Collection Port
Cleaning Sink
Charging Track*2
13
Quick Start Guide
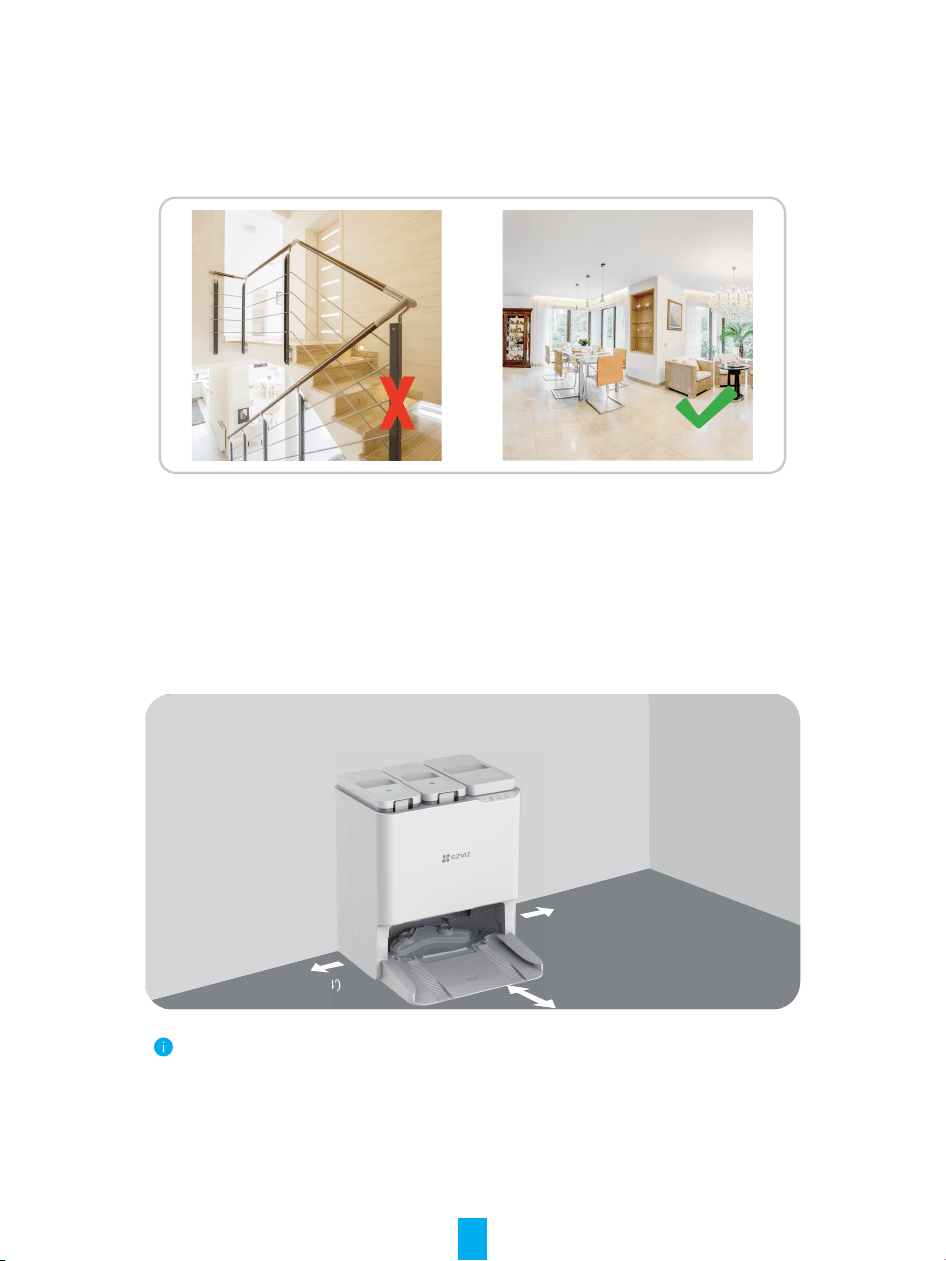
Preparation
Try to avoid using in the environment with stairs (if must, please set up a guardrail), and try to
remove the obstacles on the ground before use.
Connect the Power Supply to the Base Station
Select a proper location, place the Base Station on a horizontal oor against the wall, connect
the Base Station and the power socket with the power cord, and the Base Station will start
automatically (it is recommended to place the Base Station on a at light colored tile oor
instead of a carpet or wooden oor).
>0.5m(1.64’)
>0.5m(1.64’)
No obstacles 1�5 m (4�92 ‘) ahead
·
·
In order to avoid external heat damage to the Base Station, please do not place it next
to radiators, heaters, replaces, etc.
For a normal charging process, please do not place the Base Station in environments
subjected to direct sunlight, rain, snow or humidity, otherwise the Robot may not back
to the Base Station.
14
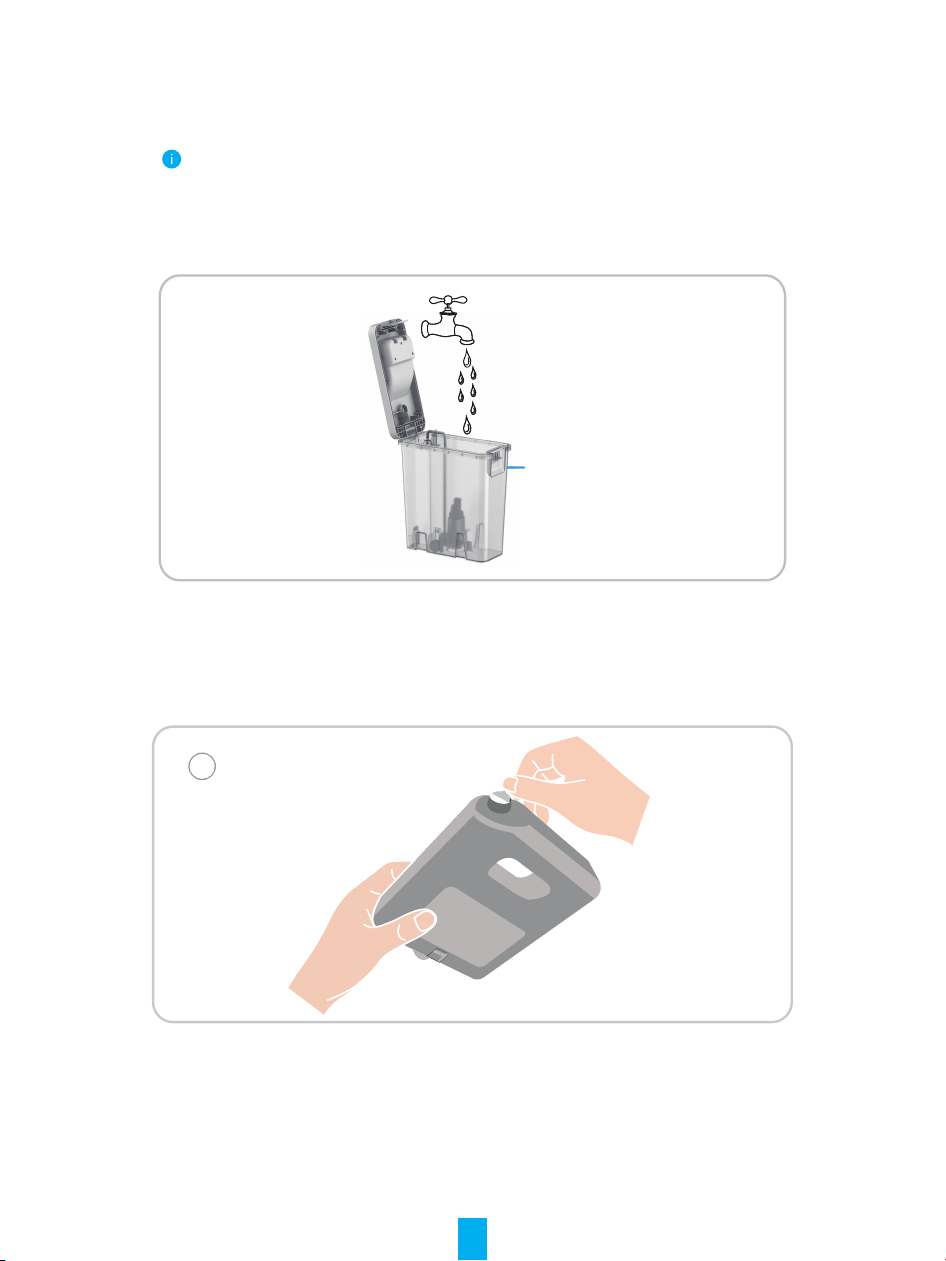
Add Clean Water
Remove the protective bags of the clean water tank and the waste water tank, ll the clean
water tank with clean water, and then install them back.
·
·
·
·
Do not ll hot water, otherwise the device may be damaged.
It is recommended to add tap water in room temperature, please do not add the water
ltered by water purier.
If you need to use cleaning solution, please use EZVIZ specialized cleaning solution.
Other cleaning solution may damage the device.
Please not the water can not exceed the max water level line.
MAX
Install Cleaning Solution
1. Remove the protective lm and the seal on top of the cleaning solution bottle.
1
2. Take the waste water tank out, and then install the cleaning solution bottle according to the
following illustration.
3. After installation, put the waste water tank into place.
15
2
·
·
Please press the cleaning solution bottle into the place when installation.
Do not use other sterilization solution or cleaning solution not produced by EZVIZ,
otherwise the device may be damaged.
Remove Shields
Before use, remove the shields on both sides of the Front Bumper and all protective lms on
both of the Robot and the Base Station.
Remove Before Use
Remove Before Use
16
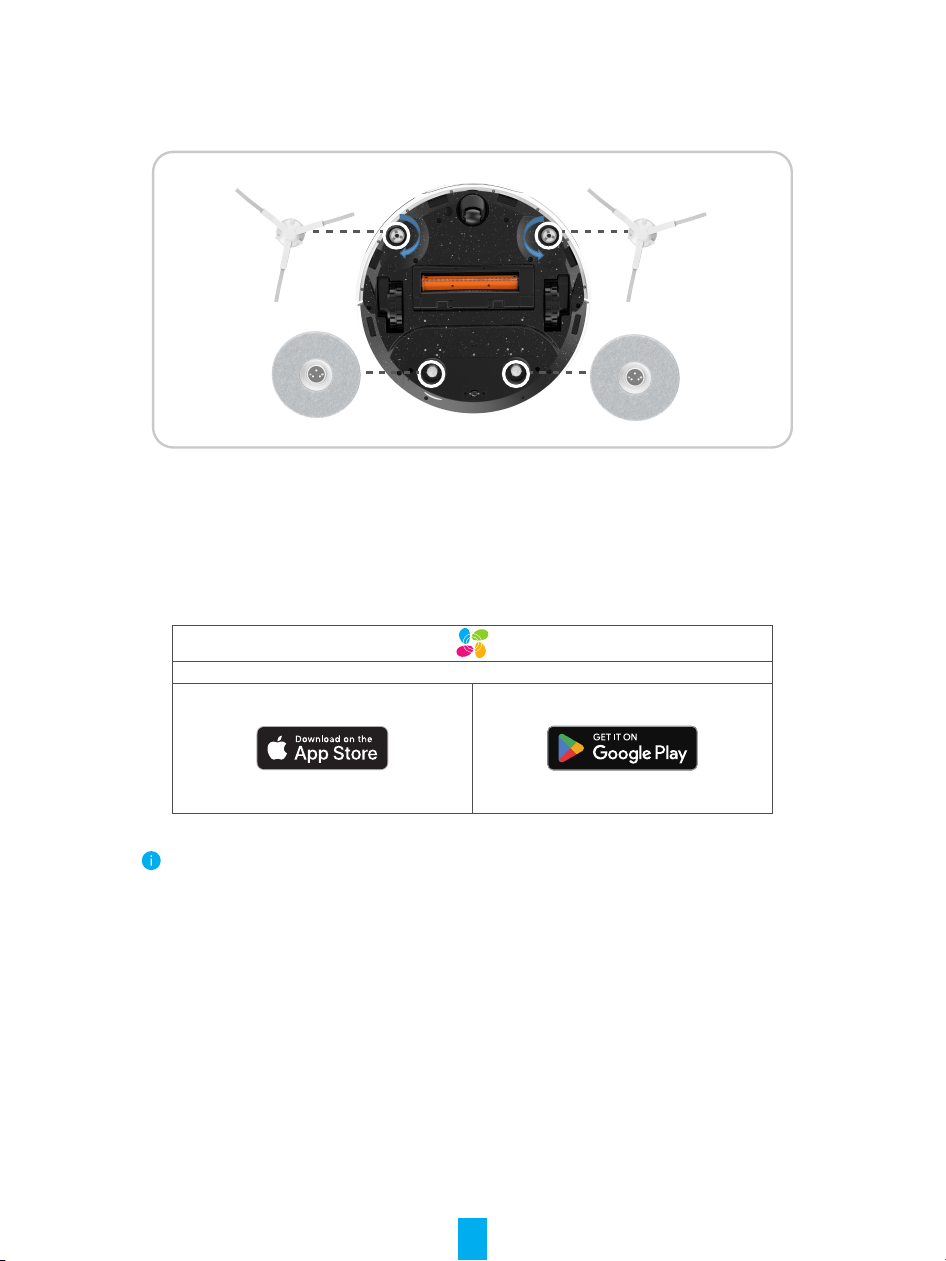
Install Side Brush and Mop Assembly
1. Align the side brushes with the point as shown in the gure and press them down. Hearing
a “click” indicates that they are installed in place.
2. Align the mop assembly with the magnetic point.
Get the EZVIZ App
1. Connect your mobile phone to Wi-Fi (only 2.4 GHz WiFi is supported).
2. Download and install the EZVIZ App by searching for “EZVIZ” in the App Store or Google
Play
TM
.
3. Launch the App and register an EZVIZ user account.
EZVIZ App
• If you have already used the App, please make sure that it is the latest version. To nd
out if an update is available, go to the App store or Google Play
TM
and search for “EZVIZ".
• The actual process may vary due to ongoing App updates. Follow the instructions
provided in the App.
Add the Robot to EZVIZ App
1. Log in to your account through EZVIZ App, tap the device adding icon and then the QR code
scanning interface will be displayed.
2. Press and hold the power button of the robot for 4 seconds until it starts.
3. Open the upper cover of the robot, scan the QR code on the robot body, and complete the
network conguration and addition of the robot according to the interface prompts.
17
If Wi-Fi connection failed, or you want to connect the robot to another Wi-Fi, you need to
press and hold the reset button for 4 seconds, and then the robot will be restarted and
you can add the robot to EZIVZ App again
.
1
2
3
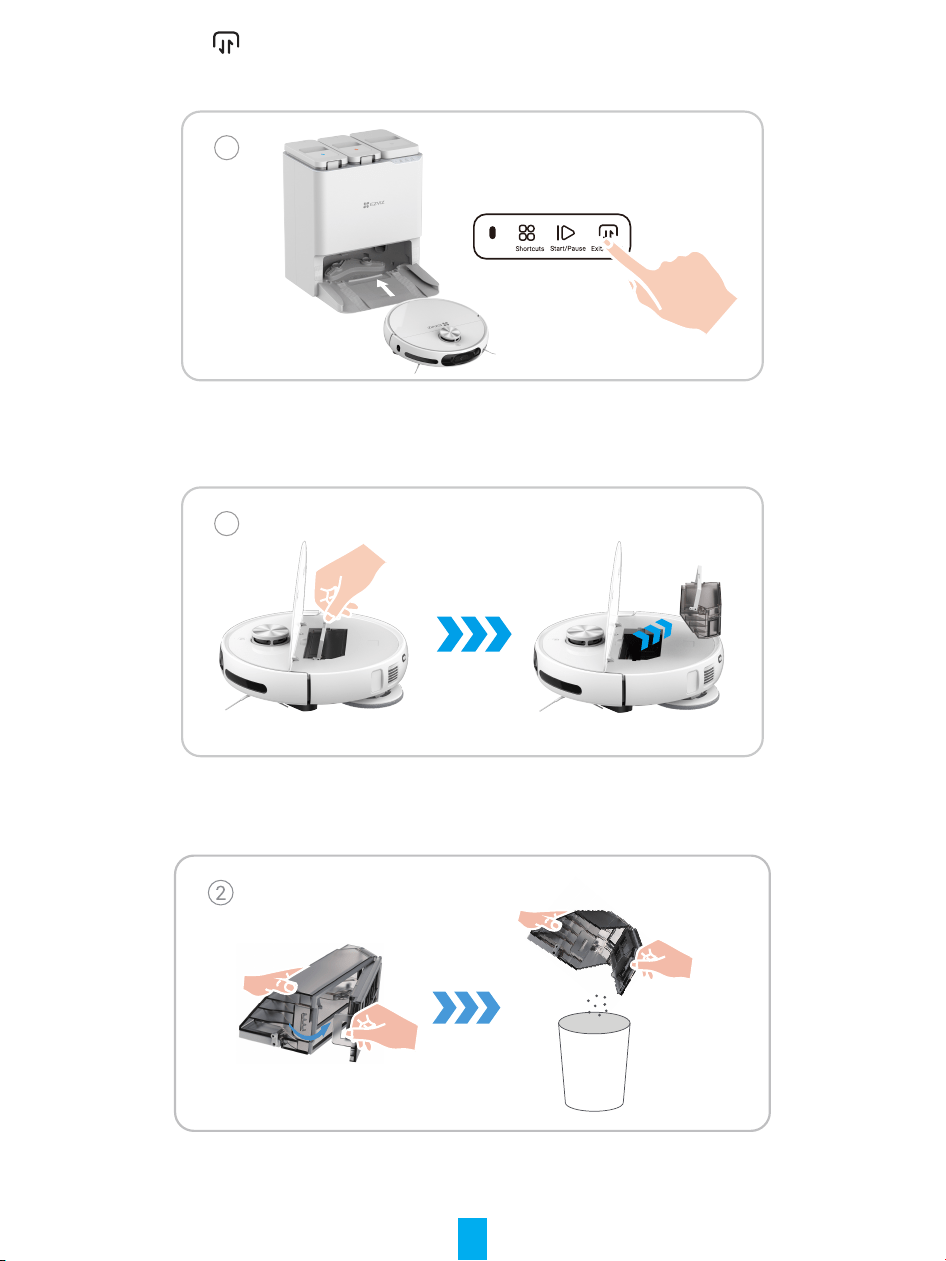
Place the Robot
Place the Robot in front of the Base Station, and then press on the operation panel. The
Robot will enter the Base Station and start charging.
It is recommended to place the Robot within 50 cm in front of the Base Station to avoid
recharging failure.
18
First Cleaning
You have three ways to operate:
1. Press
button on the Base Station to work.
1
2. Log in to your account through EZVIZ App, add device and select the cleaning
mode on the home page of the device on the App, and click
.
2
3. Press the button on the Robot to work.
3
19
Use the Camera Sticker(optional)
A camera sticker is provided if you need to cover the camera.
1. Tear off the protective lm.
2. Clean and wipe up the glass of the camera with wet tissue. Stick and press the camera
sticker to the glass of the camera
and make sure it sticks rmly.
3. The sticker can be washed and reused.
3
1
2
The visual obstacle avoidance function of this product requires the camera to be on as
one of the prerequisites, and the
image processing involved is done locally on the product and is not uploaded to EZVIZ
CloudPlay. You can mask the camera
to reject the function as needed. The product package comes with a camera sticker for
masking, which is electrostatically
adsorbed.
Operations on the EZVIZ App
The App interface may be different due to version update, and the interface of the App you installed on your phone shall
prevail.
Map for Cleaning
Map editing (area dividing, area merging, area building, room naming, no-go zone, invisible wall, rotate, threshold), map zoning,
carpet display, real-time cleaning route display and multi-map saving.
Cleaning Method
General cleaning, personalized cleaning, designated room cleaning and area cleaning.
Cleaning Settings
Suction setting, water volume setting, cleaning sequence setting, carpet boost, supplementary sweeping for carpet and self-
cleaning for main brush.
Surveillance Feature
Schduled patrol inspection, xed-point movement, snapshot/record in patrol inspection, voice intercom.
Information Display
Cleaning history, patrol inspection history, Robot power, consumables and maintenance.
More Features
Firmware upgrade, volume adjustment, scheduled cleaning, Do Not Disturb mode, night vision light compensation and etc.
20
Routine Maintenance
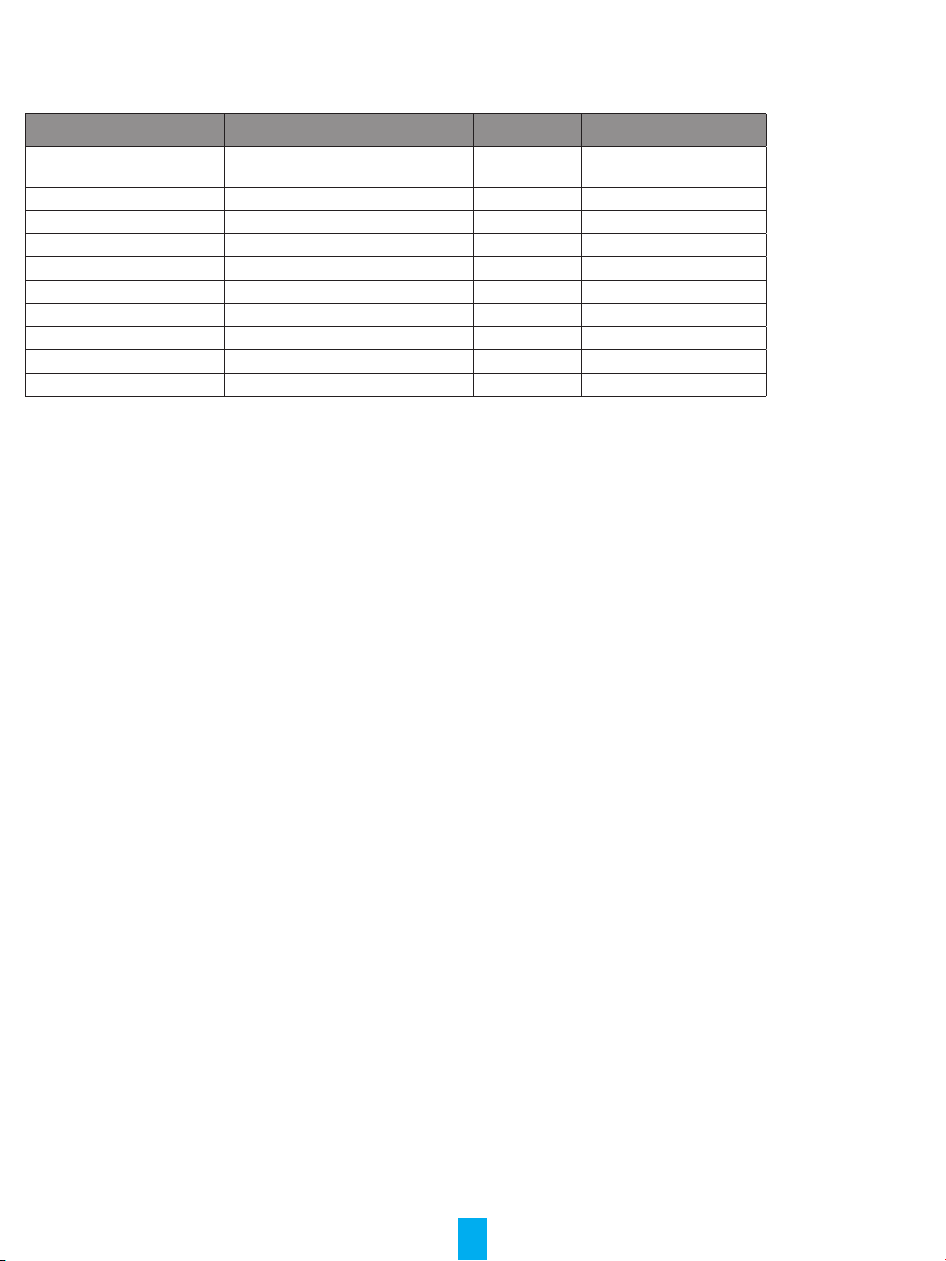
To maintain the best condition of the device, please maintain the device and replace parts with following frequencies:
Robot Part Maintenance Frequency Replacement Frequency
Mop Cloth / Every 2-3 months
Side Brush Once every 2 weeks Every 3-6 months
Main Brush Once per week Every 6-12 months
Dust Bag / Every 3-4 months
Sponge Filter/
High Eciency Filter
Once per week Every 3-6 months
LDS Lidar
RGB Camera
Edge Sensor
Obstacle Sensor
Cliff Sensor
Infrared Receiving Terminal
Bumper
Charging Contact
Universal Wheel/Drive Wheel
Once per week /
Cleaning Sink Once every 2 weeks /
Clean Water Tank Once every 3 months /
Waste Water Tank After each mopping /
Base Station Once every 2 weeks /
• Before performing cleaning and maintenance tasks on the Robot, turn the Robot OFF and unplug the Base Station.
• A multi-function Cleaning Tool is provided for easy maintenance. Handle with care, this Cleaning Tool has sharp edges.
• EZVIZ manufactures various replacement parts and fittings. Please visit www.ezviz.com for more information on
replacement parts.
21
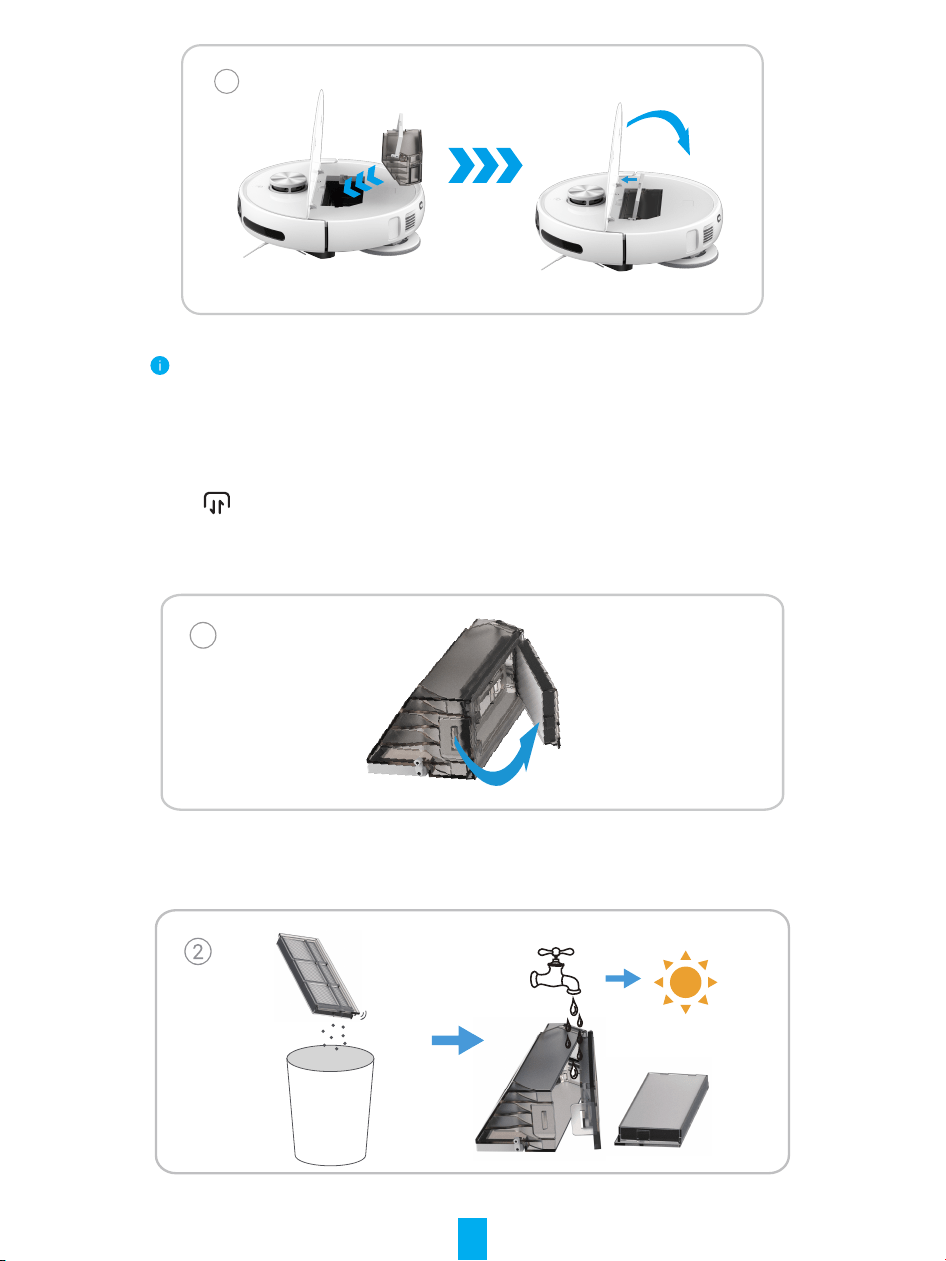
Replace Mop Cloth
Press button on operation panel of the Base Station, the Robot exits the Base Station.
1
Turn the Robot over, take off the mop assembly off.
2
Remove the old mop cloth from the mop assembly and replace a new one, and then put the
mop assembly back to the Robot.
3
22
Press
button on operation panel of the Base Station again, the Robot returns to the
Base Station.
4
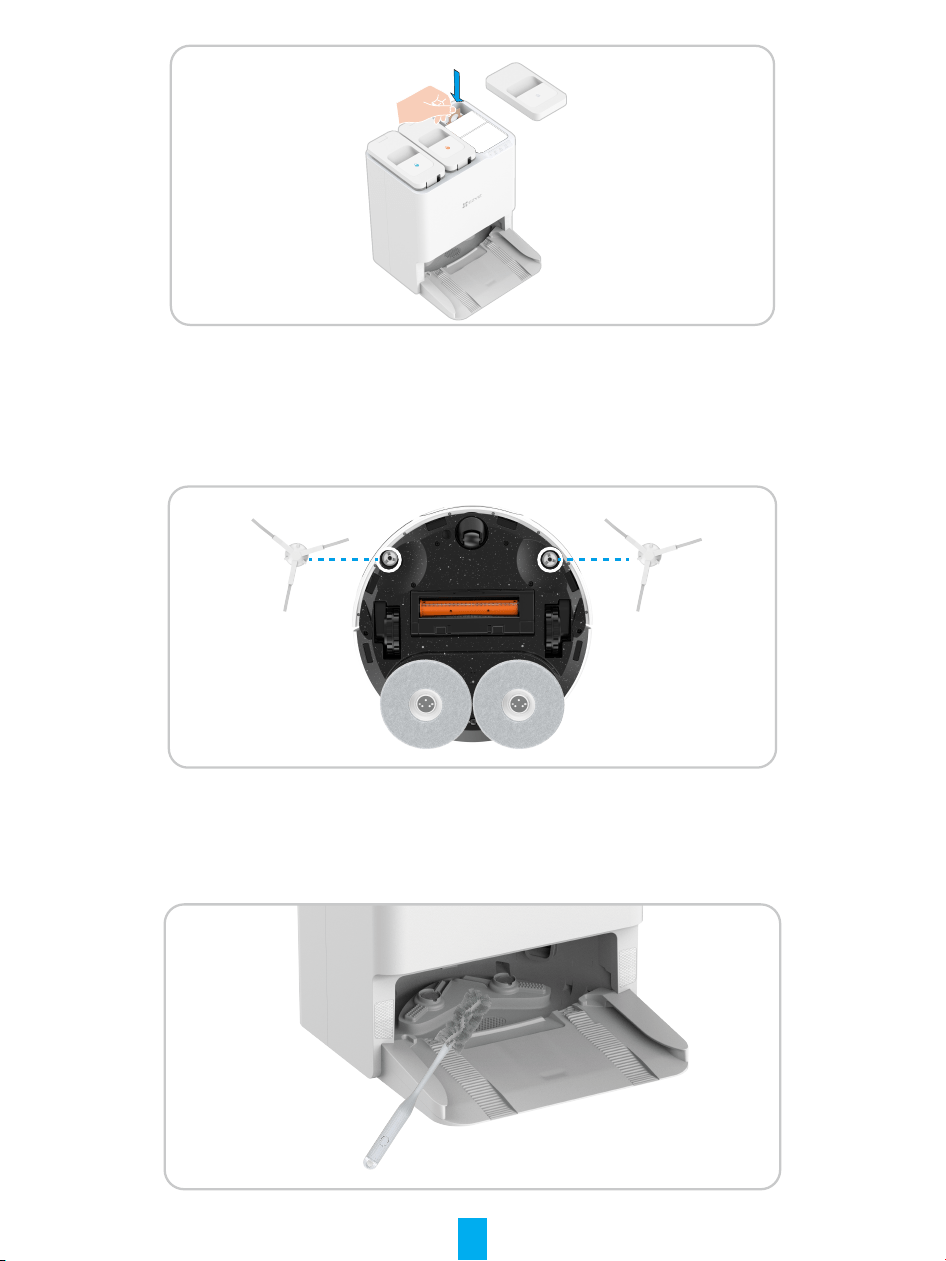
Dump the Dust Box
1
Unfasten the buckle on the side of the dust box, open the dust box cover and pour out the
garbage inside of it.
23
3
• Please make sure that the Dust Box and Filter is properly installed onto the Robot
before cleaning mission.
• Do not schedule a cleaning mission if the dust box or lter is not properly installed.
Clean/replace Filter
Press button on operation panel of the Base Station, the Robot exits the Base Station.
Open the upper cover of the Robot, take the dust box out and take off the lter assebmly.
1
Slightly pat the lter assembly or use the cleaning tool to clean the lter, and then rinse with
water and thoroughly air dry it.
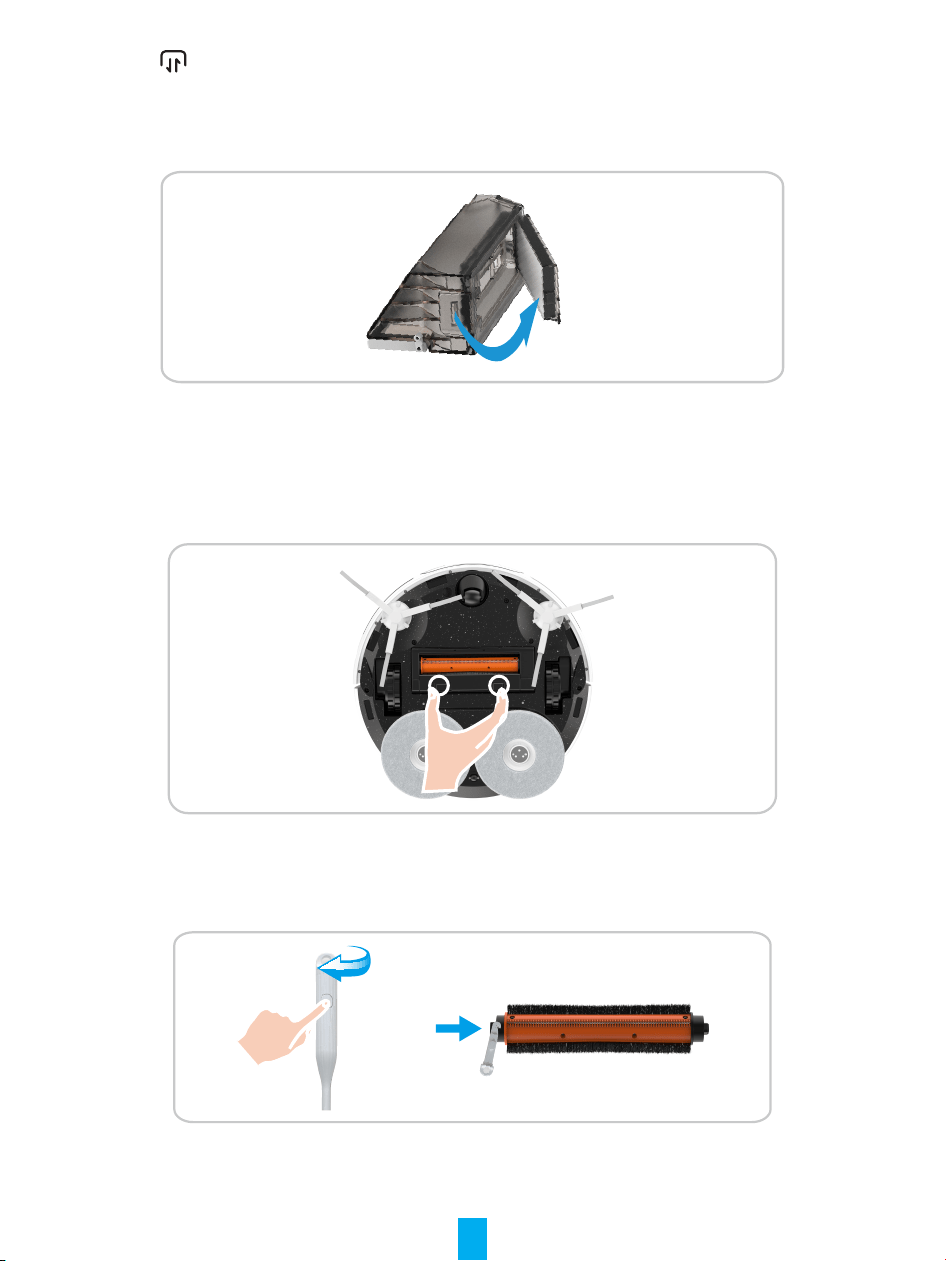
24
Install it back to the dust box, and then put it into the Robot. Close the upper cover and press
button on operation panel of the Base Station, the Robot returns to the Base Station.
If the lter is required to be replaced, please take it out from the dust box and replace a new
one into it.
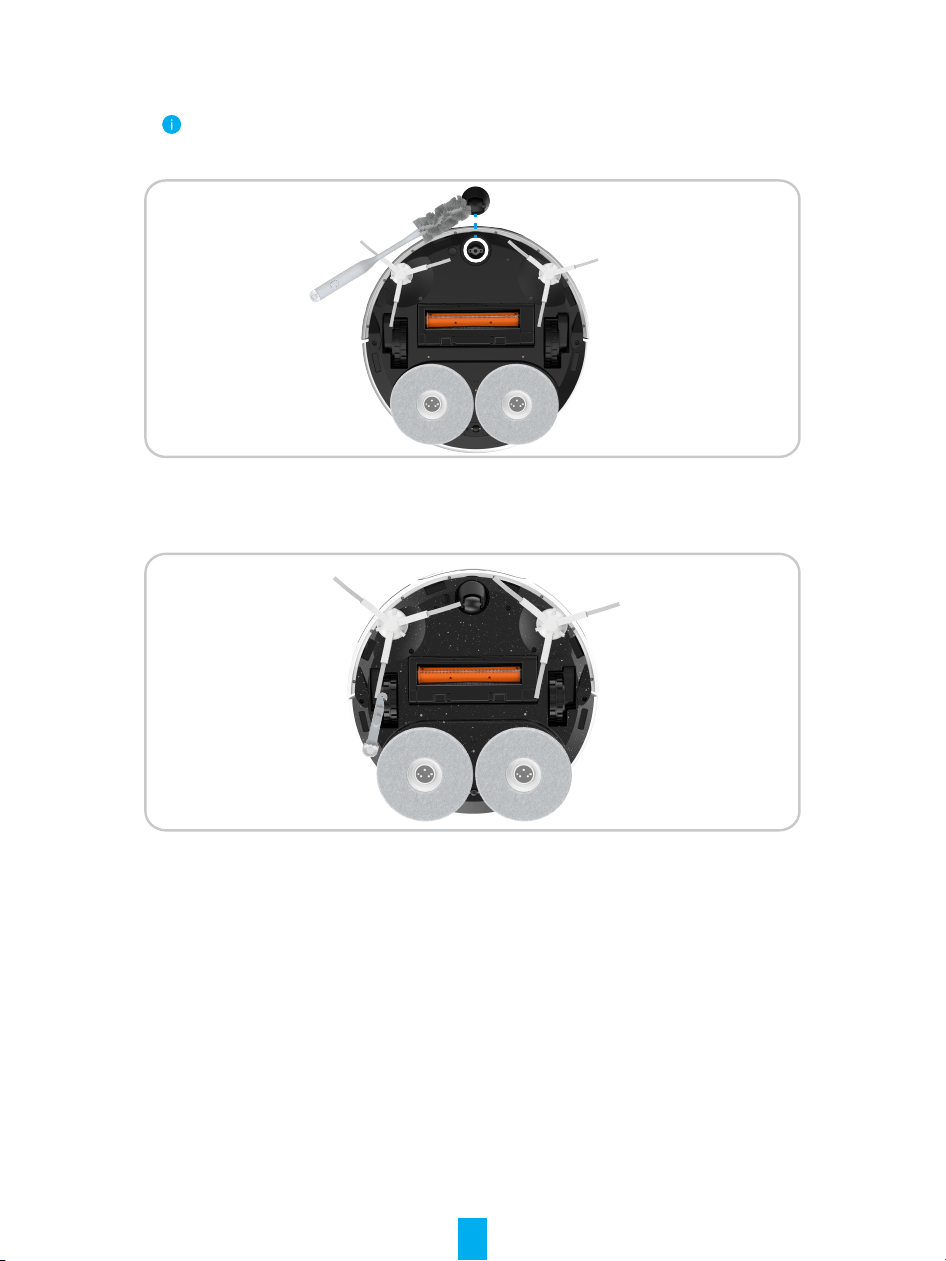
Clean the Main Brush
Press the buckles to take out the Main Brush cover and the Main Brush.
Press the button on the end of the cleaning tool and rotate it to take the blade inside of it.
Use the blade to cut off the hair entangled on the Main Brush and remove the roller at one
end of the Main Brush to clean it, and then re-install the Main Brush into place.
25
Clean Wheels
Pull up the Universal Wheel directly by hand then clean it with the hidden Cleaning Tool and
then re-install it into place.
If there is abnormal sounds happened after a long time using, please take the universal
wheel off and add lubricant into the metal shaft.
Clean the Driven Wheels with the hidden Cleaning Tool.
26
Clean Important Parts
Wipe and clean the cliff sensors, material sensor, charging contacts, RGB camera,
obstacle sensors, edge sensor and infrared receiving terminal with soft dry cloth.
Clean Clean Water Tank/Waste Water Tank
Open the cover, unfasten the buckle, take the lter upwards out to clean it.
1
2
Pour out the sewage, and use cleaning tool to remove the dirt in the waste water tank.
27
Replace Cleaning Solution
1. Take the waste water tank out, remove the protective lm and seal on the bottle.
2. Install the cleaning solution bottle according to the illustration on the Base Station.
3. After installation nished, put the waste water tank back to the Base Station.
Replace Dust Bag
Open the upper cover of the dust collection box, lift the handle of the dust bag to take out
and discard it.
Install a new dust bag into place, and then close the upper cover.
28
Replace the Side Brush
Pull out the old side brush and then press the new one into the position.
Clean the Base Station
Use cleaning tool or rags to clean the interior of the Base Station and the cleaning sink.

29
Clean Inlet Air Filter
1. Open upper cover of the dust collection box and then lift the handle of the dust bag.
Rotate and take out of the inlet air lter on the bottom of the dust collection box.
2. Rinse with clean water and dry it, and then install back to the dust collection box.
Clean Dust Collection Duct
For Robot:
After take out the dust box, use tool like a thin soft brush to stretch into the dust collection
duct to clean.
For Base Station: After take out the dust bag, use tool like
a
thin soft brush to stretch into
the dust collection port or dust collection duct to clean it.
30
FAQ
Problem Solution
Charging failure The Base Station does not connect to the power supply.
Please conrm whether the power cord of the Base Station is connected well.
Recharge failure There are lots of obstacles near the Base Station. Please clean the obstacles in front of
the Base Station.
Recommended place the Robot back to the Base Station before each cleaning task and
ensure the Robot starts working from the Base Station.
High ground resistance. It is suggested to move the Base Station to a at and light-
colored tile oor.
The oor is slippery. Recommended swipe the oor in front of the Base Station.
Incorrect Base Station location. Please check whether the location of the Base Station
on the map is correct.
Please do not place the Base Station in direct sunlight.
When in recharge, Operation
exception nearby the Base Station
There are obstacles within 1.5m in front of the Base Station and within 0.1m on the side.
Please clear the obstacles directly in front of the Base Station.
Please use soft material (tissue or soft dry cloth) to swipe the charging contact on the
tail of the Robot.
Please Swipe the driven wheels of the Robot and recharge tracks on the bottom of the
Base Station.
Please conrm whether the Base Station installation location is directly exposed to
sunlight.
Abnormal noise/shake during
cleaning
Foreign objects entangled to the wheels, side brushes or main brush, please start the
Robot after shutting down and clean it.
The rubber strip on dust collection port is scripping the oor, which is a normal
phenomenon.
If the mop cloth is rolled up, remove the mop assembly and re-install the mop cloth.
Waste water tank keeps pumping
water
Clean the Base Station. For more information, please refer to page 24.
Cannot connect to Wi-Fi Poor Wi-Fi signal, please ensure the Robot is in a area with a good Wi-Fi signal.
Wi-Fi connection exception. Please reset the Wi-Fi and download the latest EZVIZ App,
and try to scan the QR code on the Robot to reconnect it.
Cannot avoid obstacles Use air blowing tool to clean the glass on the lens, or you can use soft tissues or dry
cloth to swipe the glass on the lens.
The obstacle avoidance performance of the Robot will decline when encountering
objects with high transmittance (such as glass), high reectance (such as polished
metal), or low reectance (such as black objects) due to environmental inuences.
Abnormal obstacle avoidance Use air blowing tool to clean the glass on the lens, or you can use soft tissues or dry
cloth to swipe the glass on the lens.
Side brush fell off during cleaning Turn the Robot over and install the side brush again, make sure install it completely until
hearing a “clip” sound.
31
Anti-dropping detection has failed,
the Robot can’t avoid stairs or high
places.
Use soft tissues or dry cloth to swipe the cliff sensors.
Cannot collect dust, poor dust
collection effect or abnormal sound in
collecting dust
Please check whether the dust collection duct of the Robot and the Base Station is
stucked, if so, please refer to the cleaning method of the dust collection duct in this user
manual.
Full dust bag. If so, please replace a new disposable dust bag.
The air outlet of the Robot’s dust box is stucked, please clean it and take the foreign
matters out.
Cannot dry automatically Auto dry feature is off on APP, please check the settings on APP.
During drying, press the button on the Robot or the Robot exits the Base Station, the
drying task ended in advance.
Abnormal operation If the problem persists after the above possible causes have been considered, the
components may be abnormal. Please contact the customer service department.
For additional information about the Robot, please refer to www.ezviz.com/eu.
32
Appendix
Environmental Precautions
The chemical substances contained in the built-in lithium-ion battery of this product may cause environmental pollution. Please
remove it before scrapping and send it to a professional battery recycling station for centralized disposal.
Steps for removing the battery (the following information is only applicable when discarding the device, not the daily operation
instructions):
1.Let the Robot run to a low power state that cannot be cleaned without touching the Base Station.
2.Turn off the Robot and remove the side brush and dust box.
3.Turn the Robot over and remove the screws at the bottom.
4.Remove the battery cover.
5.Take out the battery.
1 5
7
8
11 12
2
3
4
13
6
9
10
• When disassembling the battery, please ensure that the power is exhausted and operate with the Base Station
disconnected.
• Please disassemble the whole battery pack together and do not damage the battery pack casing to avoid short circuit or
leakage of hazardous substances.
• If the battery has exudate and accidentally touches it, please ush it with plenty of water and seek medical attention
promptly.
• This product should not be discarded after the expiration date or after the repair cannot work normally, please hand it
over to an enterprise qualied to dispose of WEEE, please refer to the national or local regulations on the disposal of
WEEE for the correct method.
33
Rechargeable Lithium ion Battery
1. The battery type of the device: Portable battery.
2. The battery of this device is non-removable, which is risky to remove.
Chemical Composition Chemical Formula CAS No� Weight (%)
Cobalt lithium manganese
nickel oxide
Ni, Co, Mn
346417-97-8 36.80%
Graphite
C
7782-42-5 20.20%
Copper foil
Cu
7440-50-8 7.10%
Aluminium
Al
7429-90-5 3.30%
Electrolyte
LiFP
6
21324-40-3 11.70%
Steel shell
Fe
12597-68-1 14.40%
Steel pouring
Fe
12597-68-1 3.10%
Lead
Pb
7439-92-1 Not Detected
Cadmium
Cd
7440-43-9 Not Detected
Mercury
Hg
7439-97-36 Not Detected
INFORMATION FOR PRIVATE HOUSEHOLDS
1. Separate collection of waste equipment: Electrical and electronic equipment that has become waste is referred to as waste
equipment. Owners of waste equipment must dispose of it separately from unsorted municipal waste. In particular, waste
equipment does not belong in household waste, but in special collection and return systems.
2. Batteries and rechargeable batteries as well as lamps: Owners of waste equipment shall, as a rule, separate waste batteries
and rechargeable batteries that are not enclosed in the waste equipment, which can be removed from the waste equipment
without being destroyed, from the waste equipment before handing them in at a collection point. This does not apply if waste
equipment is prepared for reuse with the participation of a public waste management authority.
3. Options for returning waste equipment: Owners of waste equipment from private households can return it free of charge
to the collection points of the public waste management authorities or to the take-back points set up by manufacturers or
distributors within the meaning of the Electrical and Electronics Equipment Law. Stores with a sales area of at least 400 m² for
electrical and electronic equipment and those grocery stores with a total sales area of at least 800 m² that offer electrical and
electronic equipment several times a year or on a permanent basis and make it available in the market are required to take it
back. This also applies in the case of distribution using means of distance communication, if the storage and shipping areas for
electrical and electronic equipment are at least 400 m² or the total storage and shipping areas are at least 800 m². Distributors
shall, in principle, ensure take-back by providing suitable return facilities at a reasonable distance from the respective end user.
The possibility of returning waste equipment free of charge exists for distributors who are obliged to take it back, among other
things, if a new similar device that essentially fullls the same functions is delivered to an end user.
4. Privacy Notice: Waste equipment often contains sensitive personal data. This applies in particular to devices of information
and telecommunications technology such as computers and smartphones. In your own interest, please note that each end user is
responsible for deleting the data on the waste equipment to be disposed of.
5. Meaning of the symbol “crossed-out wheelie bin”: The symbol of a crossed-out wheelie bin regularly depicted on electrical and
electronic equipment indicates that the respective device is to be collected separately from unsorted municipal waste at the end
of its service life.