INSTALLER MANUAL
Wired Digital Thermostat
Model: HTRP230
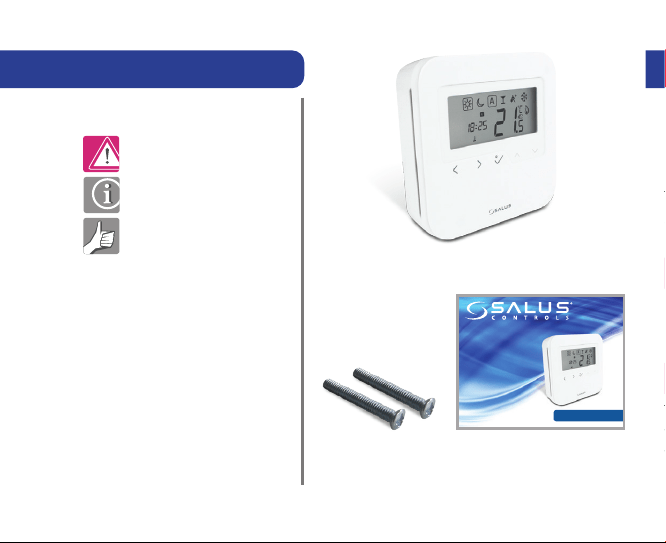
Contents of the box Product Compliance and Safety Info
Manual Contents:
Box Contents
Introduction
Product Compliance and
Safety Information
Installation
User Interface
Status/LED indication
Installers notes
Warranty
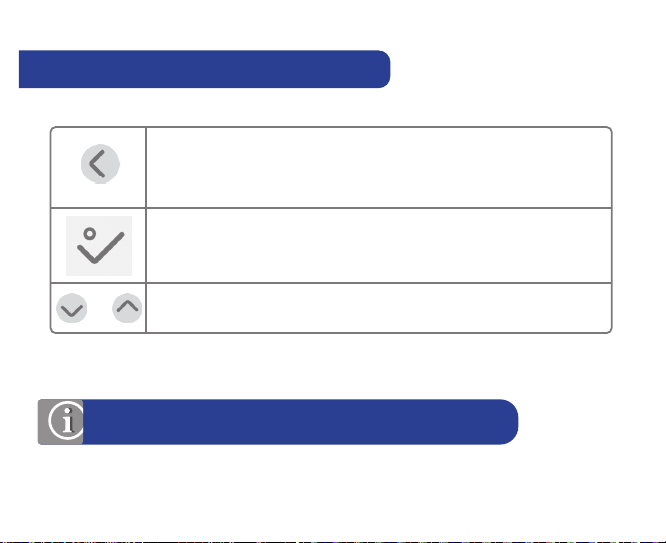
Icons used in this manual:
Safety
Important info
Your benefit
Fixing Screws 1 x Installer Manual
INSTALLER MANUAL
Wired Digital Thermostat
Model: HTRP230
HRTP230 Thermostat
Product Compliance
SALUS Controls hereby declares that the product complies with the essential
requirements of the following EC Directives: 2014/30/EU, 2014/35/EU and 2011/65/EU.
The full text of the EU Declaration of Conformity is available at the following internet
address: www.saluslegal.com.
Safety Information
Use in compliance with safety regulations. The unit is to be used for the control of
room temperature inside the house.
Installation
This accessory must be fitted by a competent person, and installation must comply
with the guidance, standards and regulations applicable to the city, country or state
where the product is installed. Failure to comply with the relevant standards could
lead to prosecution.
2 HTRP230 Instruction Manual

Product Compliance and Safety Info
Product Compliance
SALUS Controls hereby declares that the product complies with the essential
requirements of the following EC Directives: 2014/30/EU, 2014/35/EU and 2011/65/EU.
The full text of the EU Declaration of Conformity is available at the following internet
address: www.saluslegal.com.
Safety Information
Use in compliance with safety regulations. The unit is to be used for the control of
room temperature inside the house.
Installation
This accessory must be fitted by a competent person, and installation must comply
with the guidance, standards and regulations applicable to the city, country or state
where the product is installed. Failure to comply with the relevant standards could
lead to prosecution.
HTRP230 Instruction Manual 3

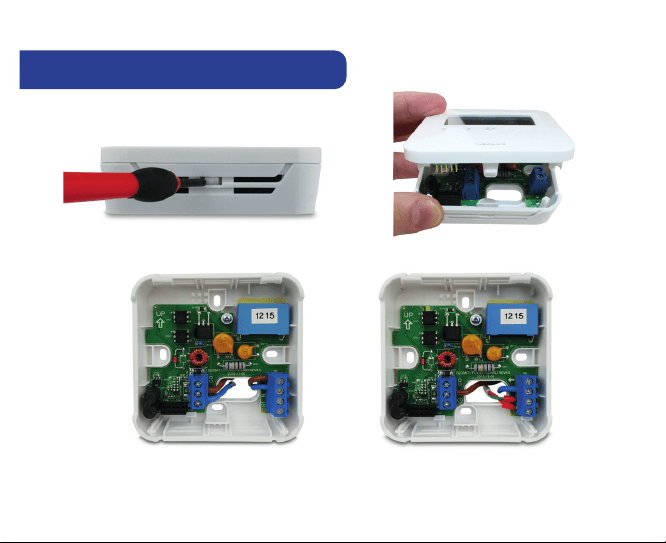
Product Description 1. Mounting the Thermostat
Installing the unit
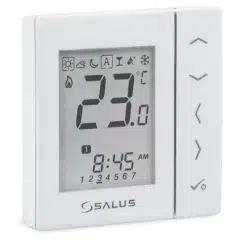
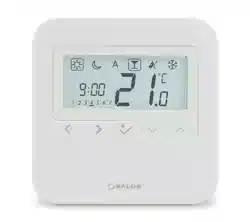
Thank you for purchasing the Salus HTRP230 Thermostat. This thermostat is a device
that lets you customize the heating and cooling of your home as needed.
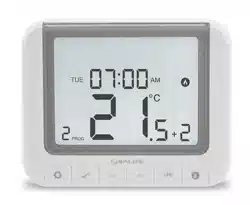
The HTRP230 device from Salus Controls is a stylish and accurate digital room
thermostat that is fitted with a large easy to read LCD screen and one touch buttons.
You can now simply adjust your home temperature as desired in order to create a
comfortable home environment.
We hope you enjoy our product.
Install the HTRP230 digital room thermostat roughly about 1.5m above floor level. It
should be mounted in a location where the thermostat is easily accessible and away
from direct sunlight. You can mount the thermostat directly on the wall or you can
install it on top of a wall-box.
Gently remove front housing.
4 HTRP230 Instruction Manual
1. Mounting the Thermostat
Thank you for purchasing the Salus HTRP230 Thermostat. This thermostat is a device
that lets you customize the heating and cooling of your home as needed.
The HTRP230 device from Salus Controls is a stylish and accurate digital room
thermostat that is fitted with a large easy to read LCD screen and one touch buttons.
You can now simply adjust your home temperature as desired in order to create a
comfortable home environment.
We hope you enjoy our product.
Install the HTRP230 digital room thermostat roughly about 1.5m above floor level. It
should be mounted in a location where the thermostat is easily accessible and away
from direct sunlight. You can mount the thermostat directly on the wall or you can
install it on top of a wall-box.
Gently remove front housing.
Without floor sensor With floor sensor
HTRP230 Instruction Manual 5
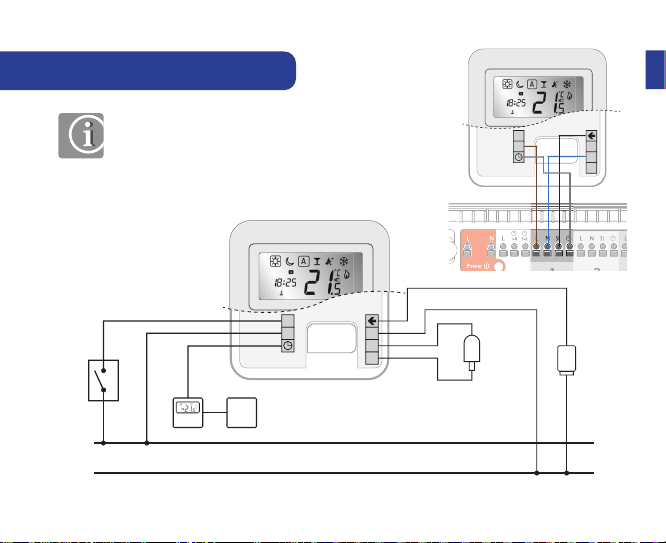
2. Terminal Connection
N
N
L
CO
L
N
S1
ACTUATOR
OPTIONAL
EXTERNAL
PROBE
E.G.
HEAT
PUMP
OUTPUT
TO MULTIPLE
DEVICES
NSB
OUTPUT
230VAC
50Hz
N
CO
L
N
S1
Note: You can wire the thermostat directly to
the KL08NSB wiring centre or to an actuator
(purchased separatly).
6 HTRP230 Instruction Manual
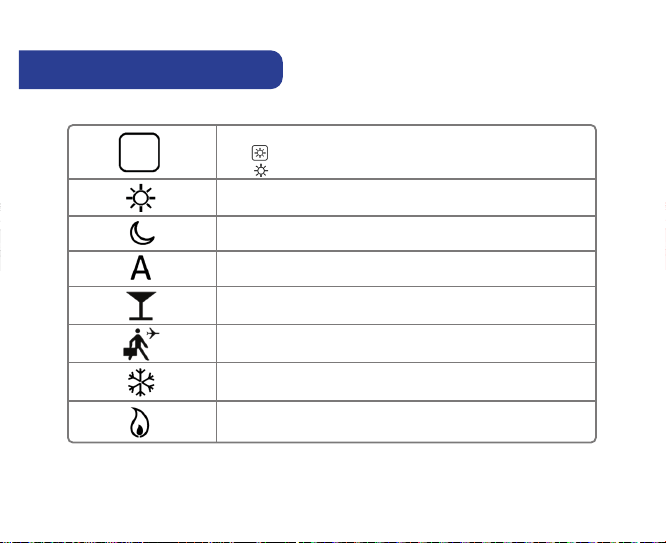
3. Thermostat Icons
N
CO
L
N
S1
BOX means to select mode.
e.g. means Hi temp is selected
means the Hi temp is not selected.
Sunny: Hi comfortable temperature
Moon: Low comfortable temperature
Indicates AUTO ON or AUTO OFF
Frost Protection Indicator:
Frost protection is active, not available in cooling mode.
Indicates that the Party Mode is active
Indicates that the Holiday Mode is ON.
Heat Mode indicator: Indicates heating is running
HTRP230 Instruction Manual 7
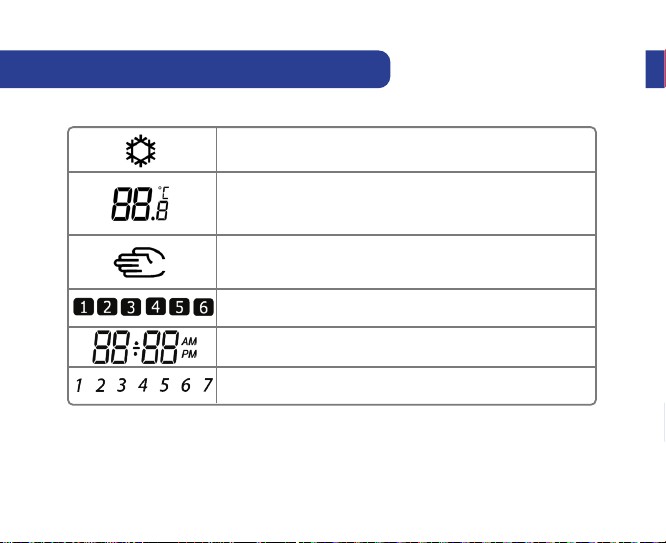
4. Thermostat Icons Continued 5. Button Functions
Programs number indicator.
Indicates the time.
Indicates the the day of the week
Temporary override indicator:
The hand will appear until the next programs starting
time.
Cool Mode indicator:
The icon is flashing when cooling mode is active
Temperature indicator
• Display the room temperature
• Display the set temp
8 HTRP230 Instruction Manual
5. Button Functions
Mode selection.
Long press to return home without saving.
OK key. Short press to confirm selection.
Long press to save and return home.
Long press to enter Temperature offset Heat/Cool.
Decrease or increase Setpoint Temperature.
OR
Note: LCD backlight is activated by pressing any key.
HTRP230 Instruction Manual 9
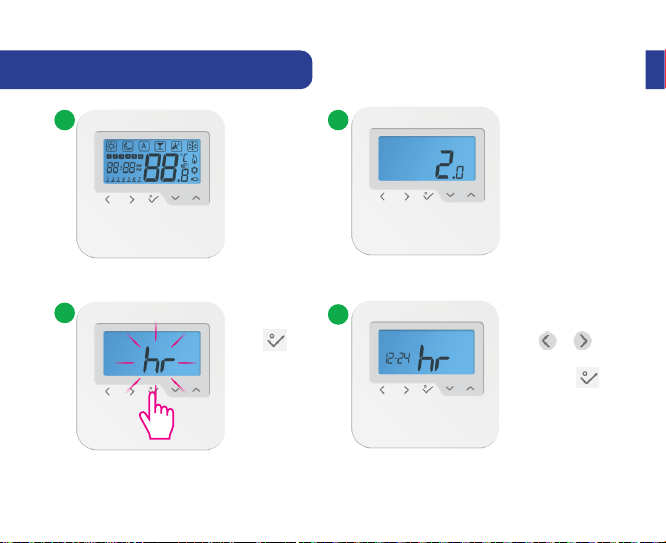
6. Setting Date and Time 6. Setting Date and Time
When you first power up your device you
will have to set up the date and time.
Press to
confirm.
Press or to
choose 12/24 hr
then press
to confirm.
3
1 2
4
10 HTRP230 Instruction Manual
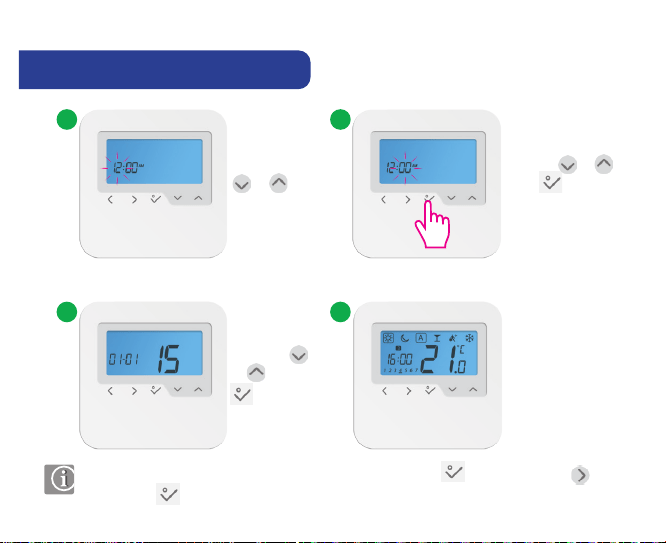
6. Setting Date and Time
When you first power up your device you
will have to set up the date and time.
Set the hour
by using
or
Set the minutes
by using or .
Press to
confirm.
5 6
Set the date
using the
or . Press
to confirm.
7 8
Note: You can access the date and hour by long pressing . After that press
and to confirm.
HTRP230 Instruction Manual 11
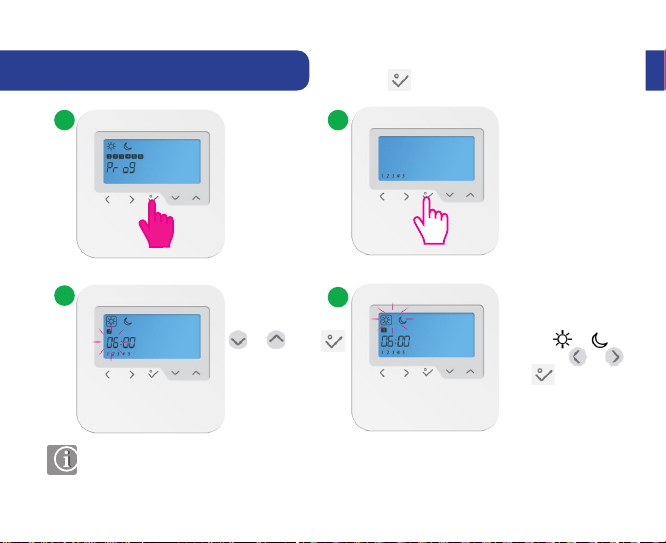
7. Setting Your Programs
You can customise your programs by long
pressing when on the program screen.
3
2
4
1
Set the hour using
or . Press
to confirm. Repeat
the procedure for
setting the minutes.
Select the desired
program or
by pressing or .
Press to confirm.
Note: If you want to select another Program Profile (from the available 5), please enter
in Installer Mode, choose option d17 and after that select the desired program.
7. Setting Your Programs
Program Prole 1
12 HTRP230 Instruction Manual
You can customise your programs by long
pressing when on the program screen.
Select the desired
program or
by pressing or .
Press to confirm.
Note: If you want to select another Program Profile (from the available 5), please enter
in Installer Mode, choose option d17 and after that select the desired program.
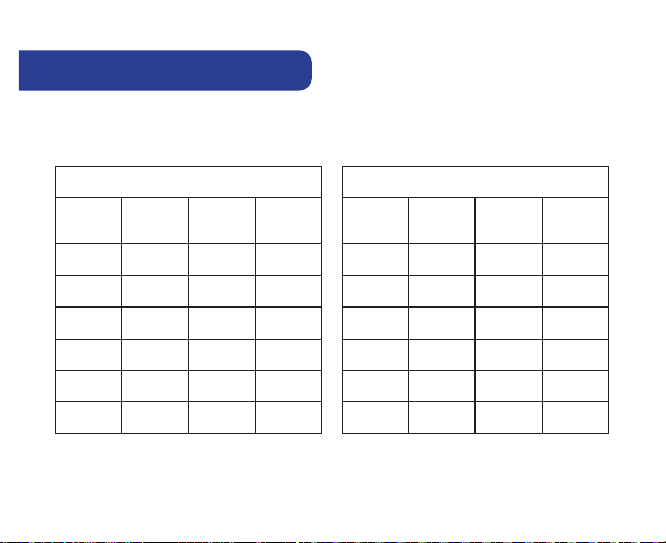
7. Setting Your Programs
You can select and customise
any of the following programs:
Program Prole 1
5 days (Monday to Friday)
Program
Program
Time
Heat set
point
Cool set
point
1 6:00 Sunny Sunny
2 9:00 Moon Moon
3 16:00 Sunny Sunny
4 23:00 Moon Moon
5 --:-- --:-- --:--
6 --:-- --:-- --:--
2 days (Saturday to Sunday)
Program
Program
Time
Heat set
point
Cool set
point
1 7:00 Sunny Sunny
2 23:00 Moon Moon
3 --:-- --:-- --:--
4 --:-- --:-- --:--
5 --:-- --:-- --:--
6 --:-- --:-- --:--
HTRP230 Instruction Manual 13
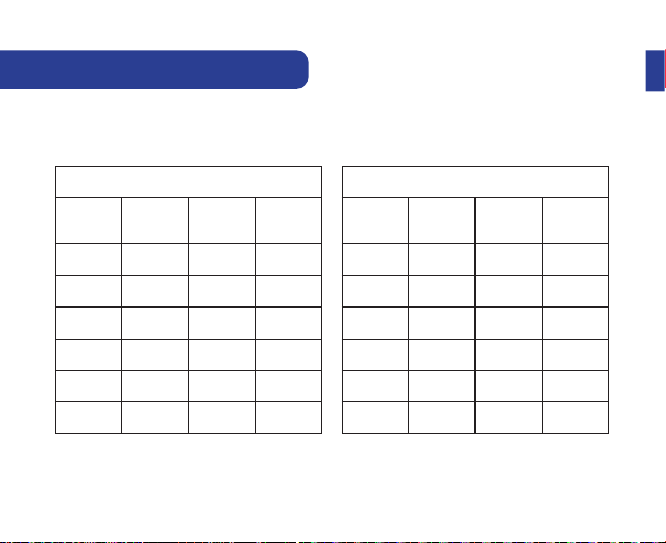
7. Setting Your Programs
Program Prole 2
5 days (Monday to Friday)
Program
Program
Time
Heat set
point
Cool set
point
1 6:00 Sunny Sunny
2 22:30 Moon Moon
3 --:-- --:-- --:--
4 --:-- --:-- --:--
5 --:-- --:-- --:--
6 --:-- --:-- --:--
2 days (Saturday to Sunday)
Program
Program
Time
Heat set
point
Cool set
point
1 7:00 Sunny Sunny
2 23:00 Moon Moon
3 --:-- --:-- --:--
4 --:-- --:-- --:--
5 --:-- --:-- --:--
6 --:-- --:-- --:--
7. Setting Your Programs
Program Prole 3
14 HTRP230 Instruction Manual
Program Prole 2
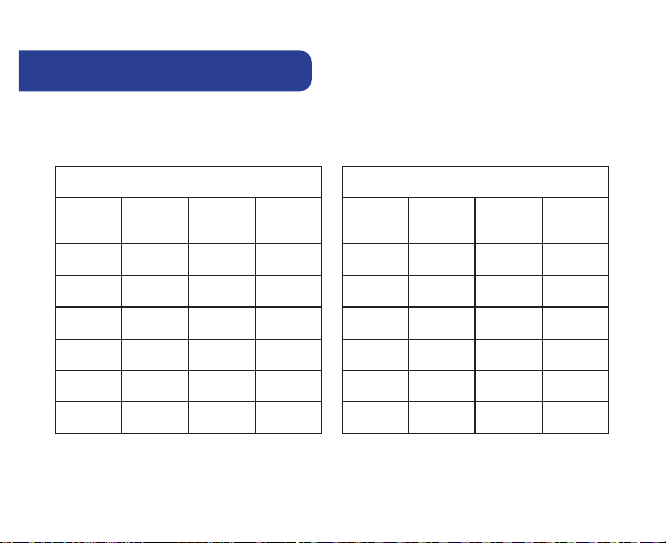
7. Setting Your Programs
Program Prole 3
5 days (Monday to Friday)
Program
Program
Time
Heat set
point
Cool set
point
1 5:00 Sunny Sunny
2 8:00 Moon Moon
3 14:00 Sunny Sunny
4 22:00 Moon Moon
5 --:-- --:-- --:--
6 --:-- --:-- --:--
2 days (Saturday to Sunday)
Program
Program
Time
Heat set
point
Cool set
point
1 7:30 Sunny Sunny
2 22:30 Moon Moon
3 --:-- --:-- --:--
4 --:-- --:-- --:--
5 --:-- --:-- --:--
6 --:-- --:-- --:--
HTRP230 Instruction Manual 15

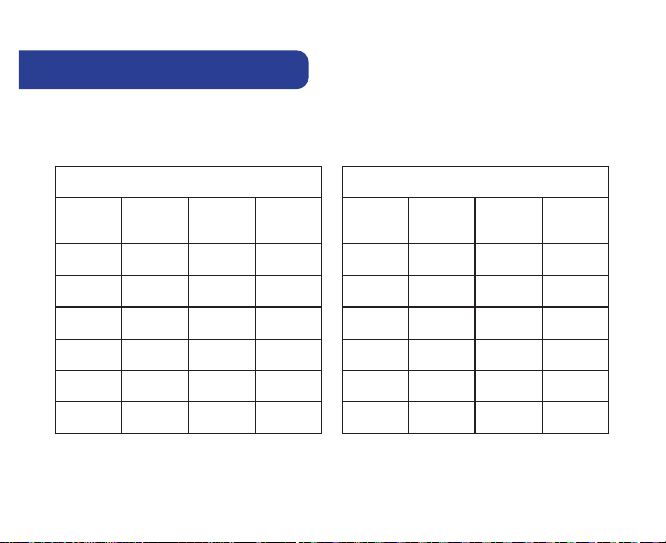
7. Setting Your Programs
Program Prole 4
5 days (Monday to Friday)
Program
Program
Time
Heat set
point
Cool set
point
1 6:00 Sunny Sunny
2 9:00 Moon Moon
3 15:00 Sunny Sunny
4 22:30 Moon Moon
5 --:-- --:-- --:--
6 --:-- --:-- --:--
2 days (Saturday to Sunday)
Program
Program
Time
Heat set
point
Cool set
point
1 7:30 Sunny Sunny
2 23:00 Moon Moon
3 --:-- --:-- --:--
4 --:-- --:-- --:--
5 --:-- --:-- --:--
6 --:-- --:-- --:--
7. Setting Your Programs
Program Prole 5
16 HTRP230 Instruction Manual
Program Prole 4
7. Setting Your Programs
Program Prole 5
5 days (Monday to Friday)
Program
Program
Time
Heat set
point
Cool set
point
1 6:00 Sunny Sunny
2 10:00 Moon Moon
3 16:00 Sunny Sunny
4 23:00 Moon Moon
5 --:-- --:-- --:--
6 --:-- --:-- --:--
2 days (Saturday to Sunday)
Program
Program
Time
Heat set
point
Cool set
point
1 7:30 Sunny Sunny
2 23:30 Moon Moon
3 --:-- --:-- --:--
4 --:-- --:-- --:--
5 --:-- --:-- --:--
6 --:-- --:-- --:--
HTRP230 Instruction Manual 17
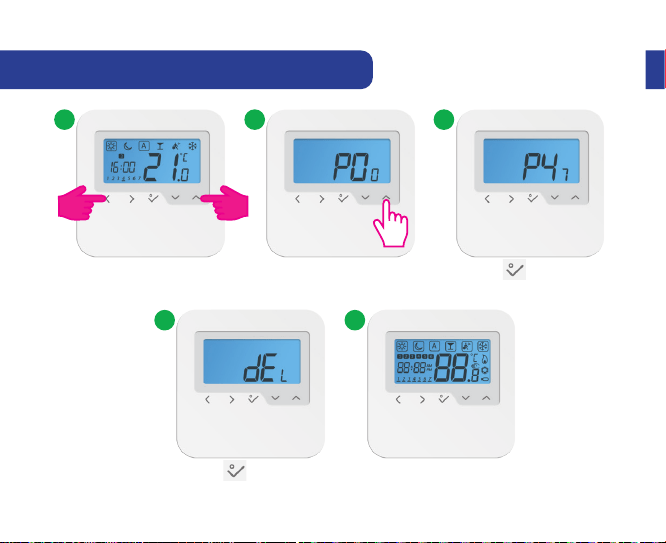
8. How to reset the thermostat 9. Installer Mode
31 2
Press the indicated keys
together for 3 seconds.
Select P47 if you want to
reset to factory settings.
Press to confirm.
18 HTRP230 Instruction Manual
4 5
Press to confirm.
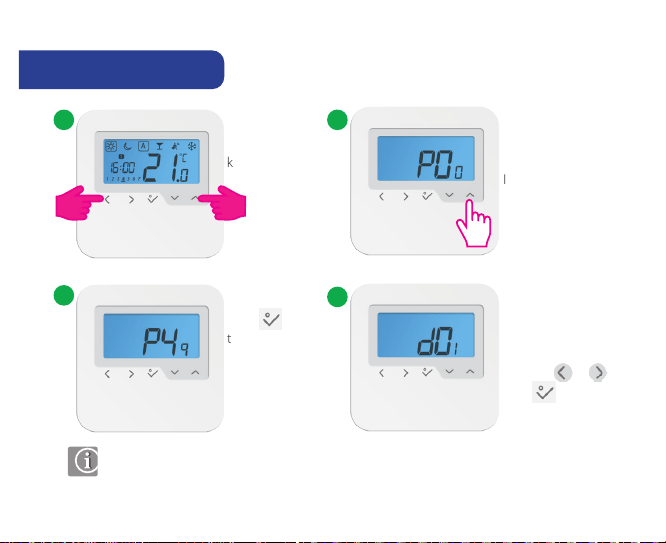
9. Installer Mode
Select P49 if you
want to enter
Installer Mode.
You have reached
the Installer Mode.
Select your option
by using or .
Press to confirm.
Press
to confirm.
Press the indicated
keys together for
3 seconds.
3
1 2
4
Note: This function allows you to customise your thermostat as you desire.
In order to do this please consult the tables on the next pages.
HTRP230 Instruction Manual 19
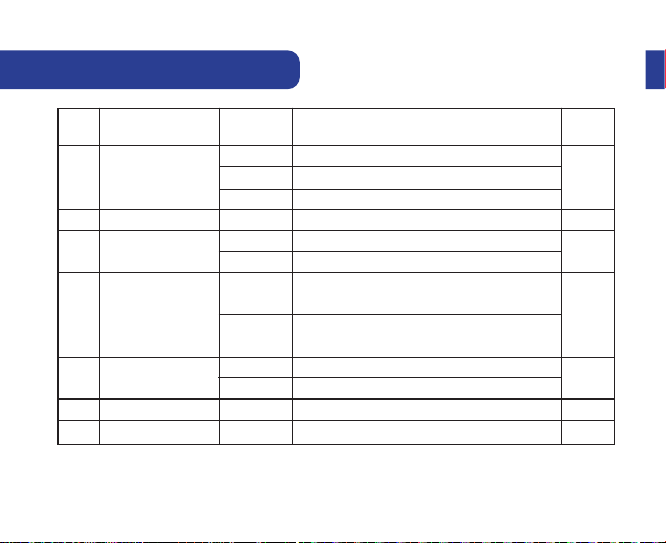
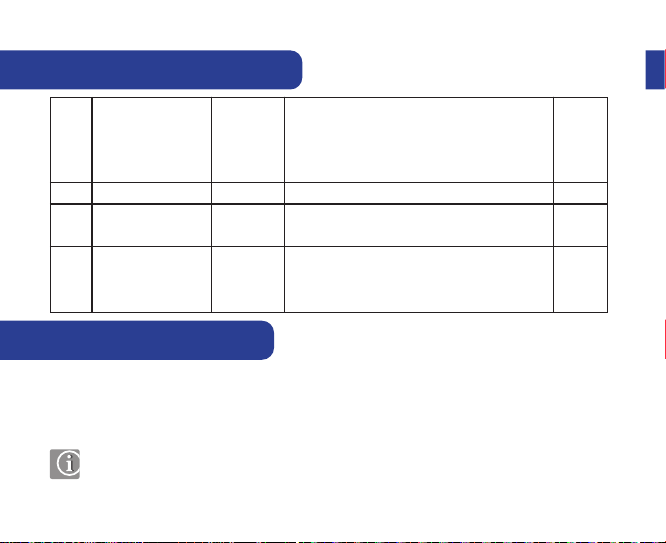
10. Functions explained
d05
dxx
d01
d02
d07
d08
d03
d04
Heating Control
Room temp. oset
Valve Protection
Frost Setpoint
OUT sensor probe (S1/S2)
Air sensor or Floor sensor
Cooling Control
0
-3.0oC to + 3.0oC
0/1
5ºC - 17ºC
0
0
1
2
1
1
1
2
PWM (Pulse-width modulation)
Oset room temp measuring error (in 0.5ºC)
0 = VP disabled 1 = Enable
Out sensor probe not connected
A: if d03 = 0, IN sensor controls Tr
ON-OFF: 0.5ºC (± 0.25ºC)
F: if d03 = 0, IN sensor controls Tr
A: if d03 = 1, IN disabled and OUT controls Tr
ON-OFF: 1.0ºC (± 0.5ºC)
F: if d03 = 1, IN disabled and OUT controls Tr Floor Protection
Out sensor probe connected
ON-OFF: 0.5C (± 0.25ºC)
ON-OFF: 1.0C (± 0.5ºC)
0
0.0ºC
1
5.0ºC
0
0
2
D setting function
Parameter/
Values
Default
value
Denition
10. Functions explained
20 HTRP230 Instruction Manual
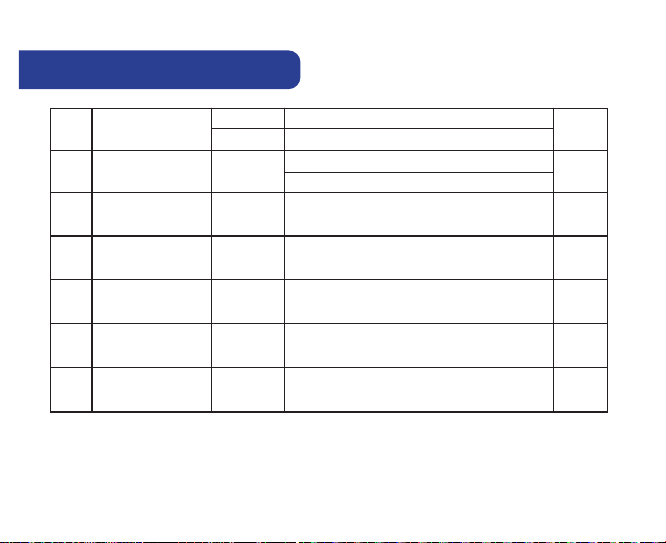
10. Functions explained
d09
d11
12/24 Hour Format
Daylight Saving Time
0
0
1
1
12hr
O
24hr
On
(DST)
1
1
d12 Maximum limitation of
heating setpoint
5ºC - 35ºC
35ºC
d13 Maximum limitation of
cooling setpoint
5ºC - 40ºC
5ºC
d14 Floor sensor protection limit
(heating high limit-HL)
11ºC - 45ºC
Turn o relay output when oor sensing temp >
27ºC
d15
d16
Floor sensor protection limit
Floor sensor protection limit
(heating low limit-LL)
(cooling)
6ºC - 40ºC
6ºC - 45ºC
Turn on relay output when oor sensing temp <
Turn o relay output when oor sensing temp <
10ºC
6ºC
protecting limit, step is 0.5ºC
protecting limit, step is 0.5ºC
protecting limit, step is 0.5ºC
HTRP230 Instruction Manual 21
10. Functions explained
d17
d18
d19
d20
Preset program selection
Heat/Cool Mode Selection
Cooling Blocked
Actuators loading selection
for dierent temperature
compensation.
1: x 1 actuator loading 2: x 2 actuators loading
3: x 3 actuators loading 4: x 4 actuators loading
5: x 5 actuators loading
1-5
0 or 1
0 or 1
1 to 5 1
0
0
0: No connection 1: Connection
1: Cooling disabled
0: Cooling allowed
Select one of these 5 default programs. Once selected,
default program will overwrite present program.
Selected default program can be edited by the user in
the User Setting Mode.
1
11. Cooling Blocked
When When the thermostat is set on Cooling Disabled (d19-->1) it will block the cooling
function for single rooms until the device will receive the heating command. During the
periods of cooling blocked no special indicator will be displayed on the LCD screen. Ice flake
will also be turned off.
Note: d19 will be available only if d18 is set on 1 (Heat/Cool Mode selection Connected).
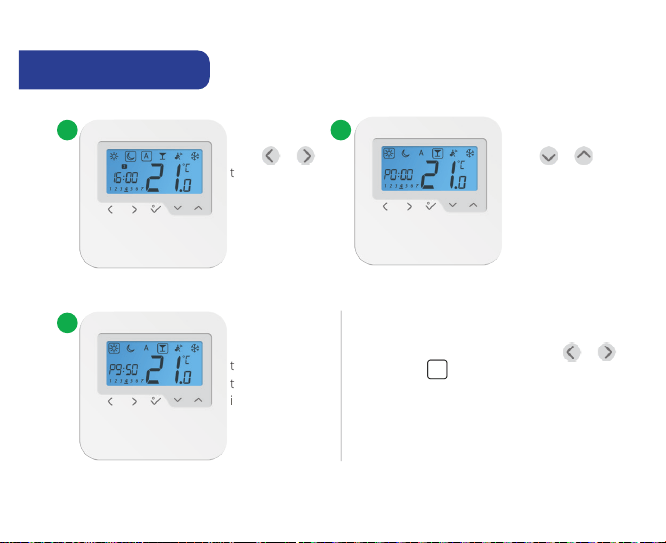
12. Party Mode
22 HTRP230 Instruction Manual
When When the thermostat is set on Cooling Disabled (d19-->1) it will block the cooling
function for single rooms until the device will receive the heating command. During the
periods of cooling blocked no special indicator will be displayed on the LCD screen. Ice flake
will also be turned off.
Note: d19 will be available only if d18 is set on 1 (Heat/Cool Mode selection Connected).
The maximum
time allowed on
the Party Mode
is 9 h 50 min and
can be set from
0-10 min.
3
If you want to exit Party Mode, press or
to move the (box) to a different program.
Once Party Mode ends the countdown
automatically resets to 0.
12. Party Mode
Press or
to select
Party Mode.
Press or to
select the time for
Party Mode.
1 2
HTRP230 Instruction Manual 23

13. Vacation Mode 15. Temperature Offset
14. Frost Mode
Press or
to select
Vacation Mode.
Press or to
select the number
of vacation days.
1 2
Note: Vacation Modes ends when it reaches day 0. After that the device goes
back to Auto Mode.
1 2
Press or
to select Frost
Mode. Press
to confirm.
Press or
if you want to
change the Frost
Mode temp. Press
to confirm.
24 HTRP230 Instruction Manual
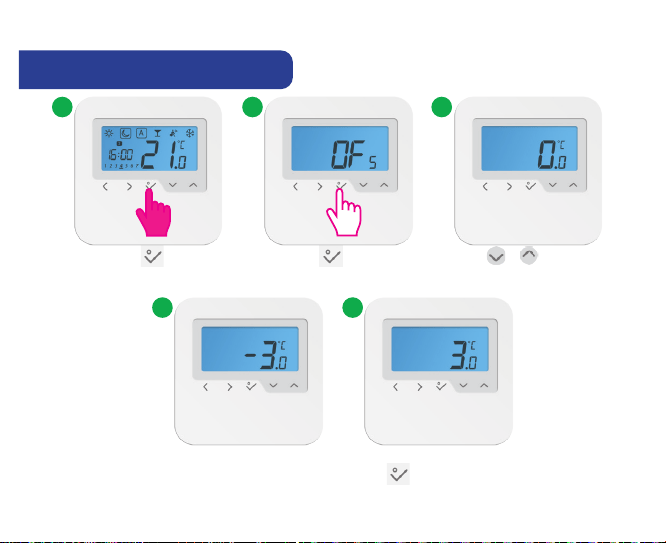
15. Temperature Offset
Note: Vacation Modes ends when it reaches day 0. After that the device goes
back to Auto Mode.
31 2
Long press in order
to enter Settings Mode.
Press to enter
Setting Mode.
Press or in order to
set the Temperature Offset.
4 5
The Temperature Offset can be set at any value
between -3ºC and +3ºC. Press to confirm.
HTRP230 Instruction Manual 25
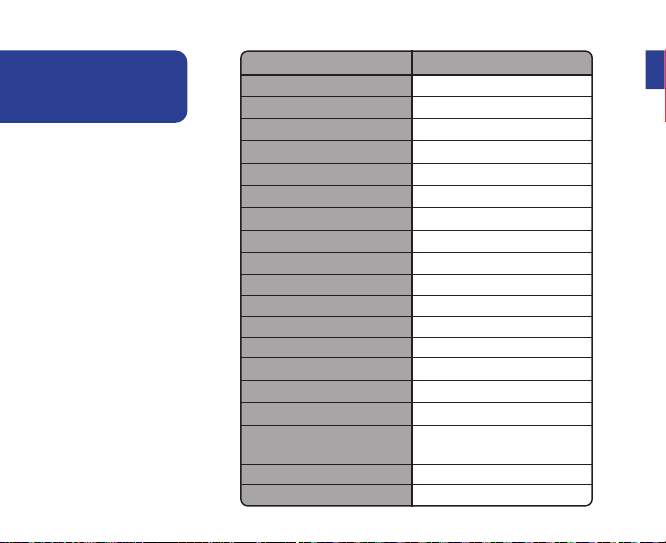
Technical
Specification
Warranty
Model: HTRP230
Voltage 230 V AC, +-10%, 50/60 Hz
Operating performance 230 V: 1,8 W
Temperature setback Adjustable
Temperature range 5°C – 35°C
Span +/- 0,5°C
Storage temperature -20°C to +60°C
Ambient temperature 0 °C up to 45 °C
Degree of protection IP 30
CE conformity according to Class II ( EN60730 )
Housing material PC, V2
Color RAL 9010 pure white
Connection Screw terminal
Weight 125 g net / 170 g gross
Puls-wide-modulation (PWM) Yes
Clock, Timer Yes, programmable
Profile Modes 3 ( Sun, Moon, Automatic)
Heating and Cooling Yes, automatically Change Over
on the Wiring Centre
Parameter adjustment Yes, in Installer Mode
Dimensions 85mm*85mm*25mm
26 HTRP230 Instruction Manual

Warranty
Customer Name: ......................................................................................................................................
Customer Address: .................................................................................................................................
.............................................................................................................................................................................
....................................................................................... Post Code: ............................................................
Tel No: ................................................................ Email: .............................................................................
Engineers Company: .............................................................................................................................
Tel No: ................................................................ Email: .............................................................................
Instalation Date: .......................................................................................................................................
Engineers Name: ......................................................................................................................................
Engineers Signature: .............................................................................................................................
SALUS Controls warrants that this product (HTRP230) will be free from
any defect in materials or workmanship, and shall perform in accordance
with its specification, for a period of five years from the date of installation.
SALUS Controls sole liability for breach of this warranty will be (at its
option) to repair or replace the defective product.
HTRP230 Instruction Manual 27

SALUS Controls plc
SALUS House
Dodworth Business Park South,
Whinby Road,
Dodworth, Barnsley S75 3SP, UK.
Sales: T: +44 (0) 1226 323961
Technical: T: +44 (0) 1226 323961
www.salus-controls.com
SALUS Controls is a member of the Computime Group
Issue Date: Feb 2016
00188
For PDF Installation guide please go to www.salus-manuals.com
Maintaining a policy of continuous product development SALUS Controls plc reserve the right to change specification,
design and materials of products listed in this brochure without prior notice.