
2
ENGLISH
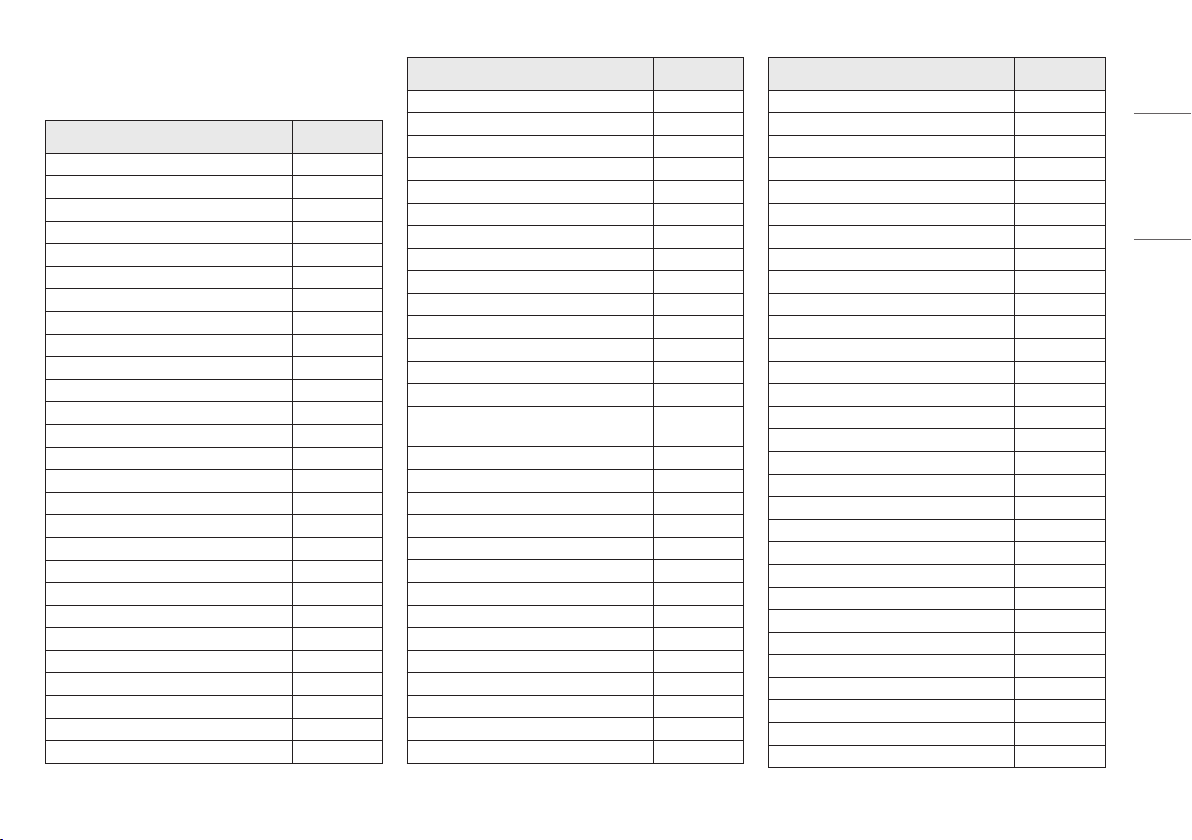
TABLE OF CONTENTS
ASSEMBLING AND PREPARING .........................................................4
- Installing ............................................................................................................................5
Moving and Lifting the Monitor .........................................................................................5
Installing on a Table ...........................................................................................................6
Using the Kensington Lock .................................................................................................6
Installing on the Wall .........................................................................................................7
- Product Description ............................................................................................................ 9
How to Use the Joystick Button ..........................................................................................9
Adjusting the Stand Height ..............................................................................................10
Adjusting the Angle .........................................................................................................10
Pivot Feature ....................................................................................................................11
- Supported Software .........................................................................................................13
USING THE MONITOR ....................................................................... 13
- Connecting to a PC ...........................................................................................................14
HDMI Connection .............................................................................................................14
DisplayPort Connection ....................................................................................................14
USB-C connection .............................................................................................................14
- Connecting AV Devices .....................................................................................................15
HDMI Connection .............................................................................................................15
- Connecting Peripherals ....................................................................................................15
USB Device connection ..................................................................................................... 15
Headphones Connection ..................................................................................................16
USER SETTINGS ...............................................................................17
- Activating the Main Menu ................................................................................................17
Main Menu Features ......................................................................................................... 17
Menu Settings .................................................................................................................. 18
[Quick Settings] ................................................................................................................18
[Input]..............................................................................................................................19
[Picture] ...........................................................................................................................19
[Sound] ............................................................................................................................22
[General] ..........................................................................................................................22

3
ENGLISH
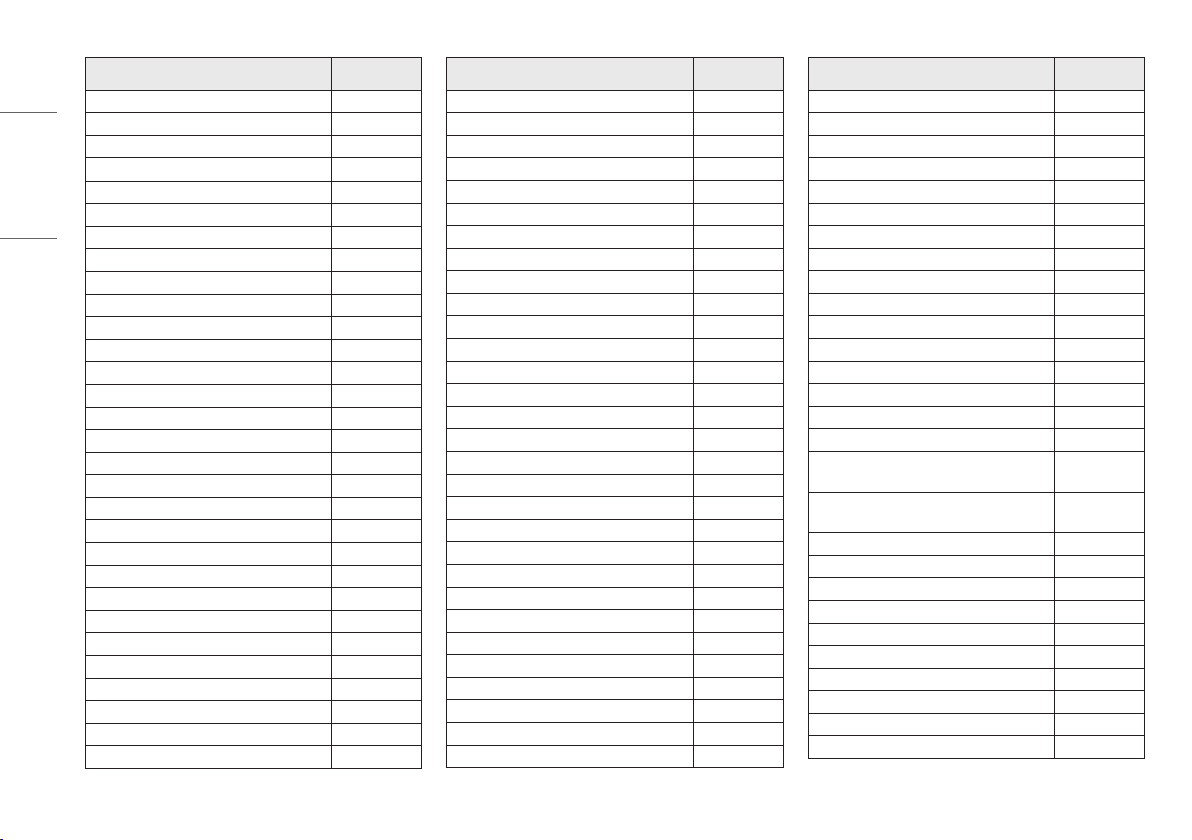
PRODUCT SPECIFICATION ................................................................ 23
- Support Mode ..................................................................................................................25
(Preset Mode, DisplayPort / USB-C) ..................................................................................25
(Preset Mode, HDMI) ........................................................................................................ 26
HDMI Timing (Video) ........................................................................................................27
TROUBLESHOOTING ........................................................................ 28
LICENSE ........................................................................................... 29
OPEN SOURCE SOFTWARE NOTICE INFORMATION .......................... 30
BEEP GUIDE .....................................................................................31

4
ENGLISH
ASSEMBLING AND PREPARING
CAUTION
•
Always use genuine LG components to ensure safety and product performance.
• The product warranty will not cover damage or injury caused by the use of unauthorized components.
• It is recommended that use the supplied components.
• If you use generic cables not certified by LG, the screen may not display or there may be image noises.
• The product figures and screen displays used in this manual are examples to help consumers use the product
and may differ from the actual product.
• Do not apply foreign substances (oils, lubricants, etc.) to the screw parts when assembling the product.
(Doing so may damage the product.)
• Applying excessive force when tightening screws may cause damage to the monitor. Damage caused in this
way will not be covered by the product warranty.
• Do not carry the monitor upside down by just holding the base. This may cause the monitor to fall off the
stand and could result in personal injury.
• When lifting or moving the monitor, do not touch the monitor screen. The force applied to the monitor screen
may cause damage to it.
NOTE
•
The components may look different from those illustrated here.
• Without prior notice, all product information and specifications contained in this manual are subject to
change to improve the performance of the product.
• To purchase optional accessories, visit an electronics store or an online shopping site, or contact the retailer
from which you purchased the product.
• The power cord provided may differ depending upon the region.
5
ENGLISH
Installing
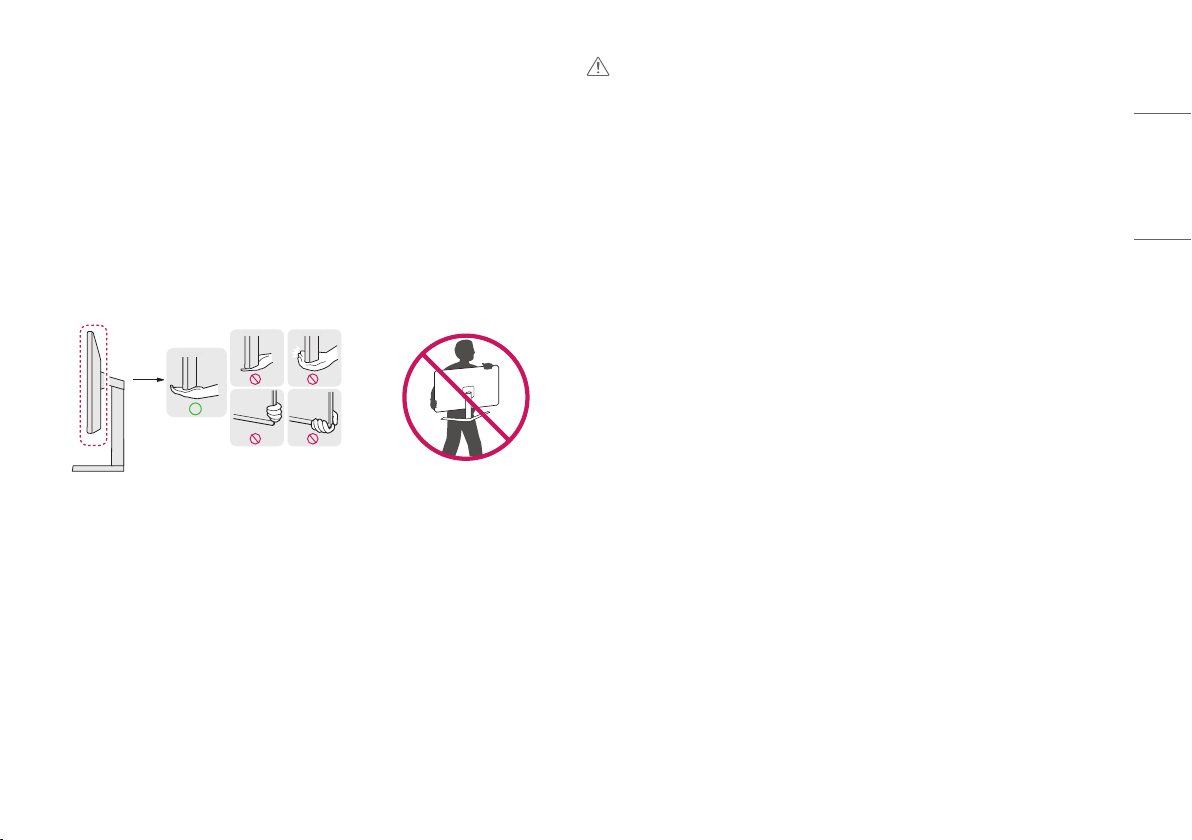
Moving and Lifting the Monitor
When moving or lifting the monitor, follow these instructions to prevent the monitor from being scratched or
damaged and to ensure safe transportation, regardless of its shape or size.
• Place the monitor in the original box or packing material before attempting to move it.
• Before moving or lifting the monitor, disconnect the power cord and all other cables.
• Hold the bottom and side of the monitor frame firmly. Do not hold the panel itself.
• When holding the monitor, the screen should face away from you to prevent it from being scratched.
• When transporting the monitor, do not expose the monitor to shock or excessive vibration.
• When moving the monitor, keep it upright and never turn the monitor on its side or tilt it sideways.
CAUTION
•
Avoid touching the monitor screen as much as possible.
- This may result in damage to the screen or some of the pixels used to create images.
• Standing the monitor panel up vertically may cause the monitor to fall due to the joystick and cause damage
or injury. In addition, this may cause the joystick button to malfunction.
6
ENGLISH
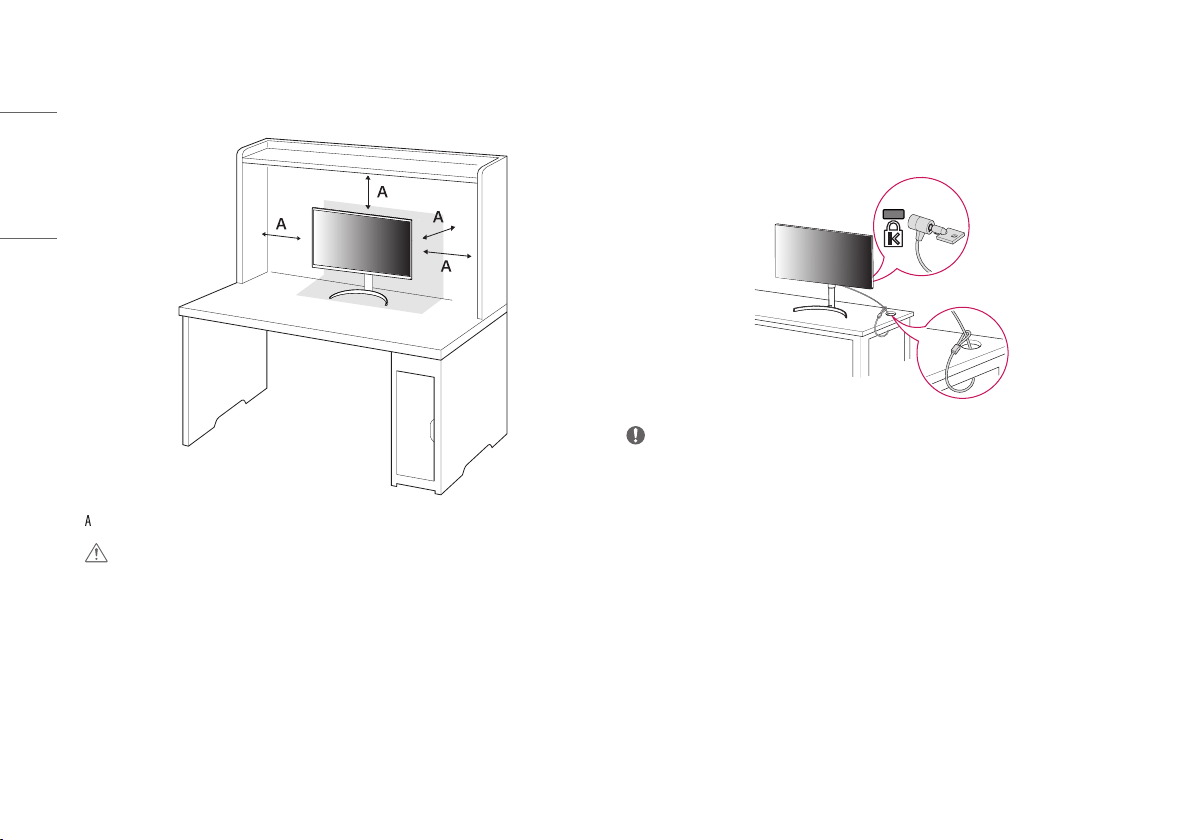
Installing on a Table
• Lift the monitor and place it on the table in an upright position. Place the monitor at least 100mm
(3.9inches) away from the wall to ensure sufficient ventilation.
: 100 mm (3.9inches)
CAUTION
•
Unplug the power cord before moving or installing the monitor. There is risk of electric shock.
• Make sure to use the power cord that is provided in the product package and connect it to a grounded power
outlet.
• If you need another power cord, please contact your local dealer or the nearest retail store.
Using the Kensington Lock
For more information on installation and usage, refer to the Kensington lock owner’s manual or visit the website
at http://www.kensington.com.
Connect the monitor to a table using the Kensington security system cable.
NOTE
•
The Kensington security system is optional. You can obtain optional accessories from most electronics stores.
7
ENGLISH
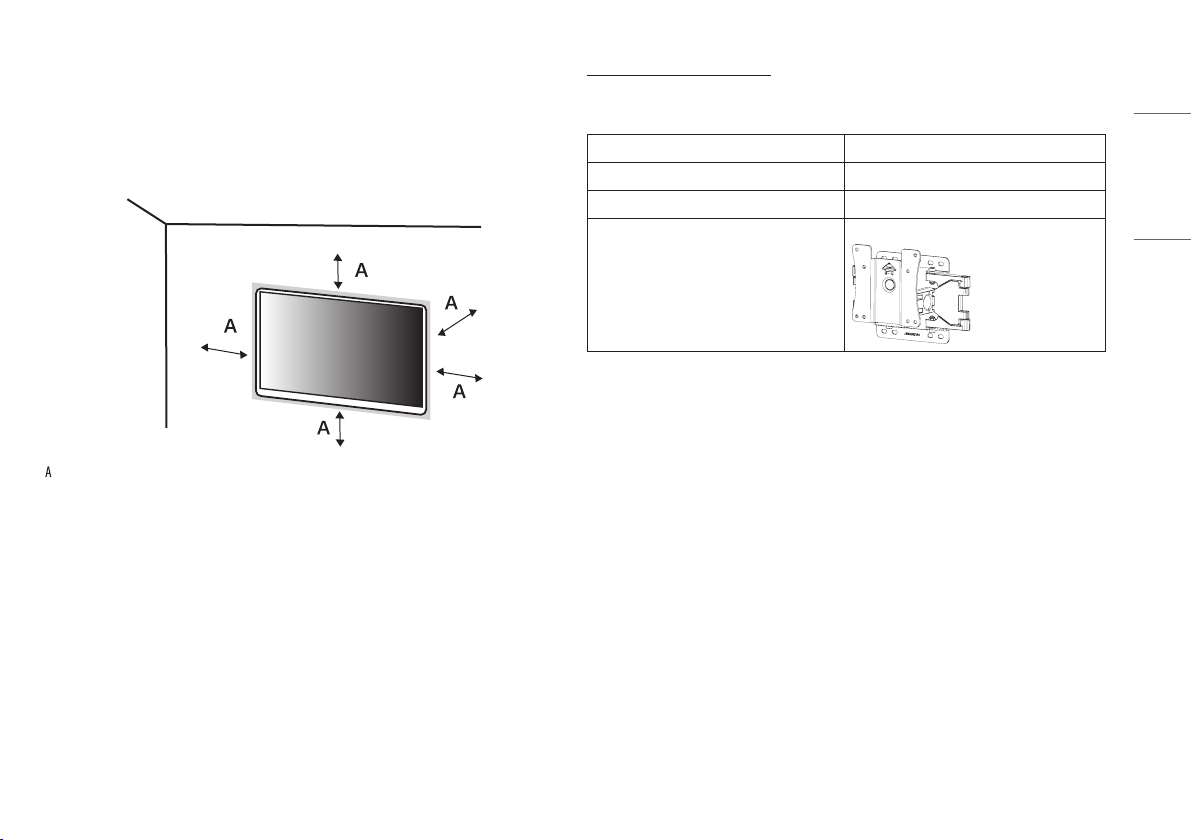
Installing on the Wall
This monitor meets the specifications for the wall mount plate or other compatible devices.
Install the monitor at least 100mm (3.9inches) away from the wall and leave about 100mm (3.9inches)
of space at each side of the monitor to ensure sufficient ventilation. Detailed installation instructions can be
obtained from your local retail store. Alternatively, please refer to the manual for how to install and set up a
tilting wall mounting bracket.
: 100mm (3.9inches)
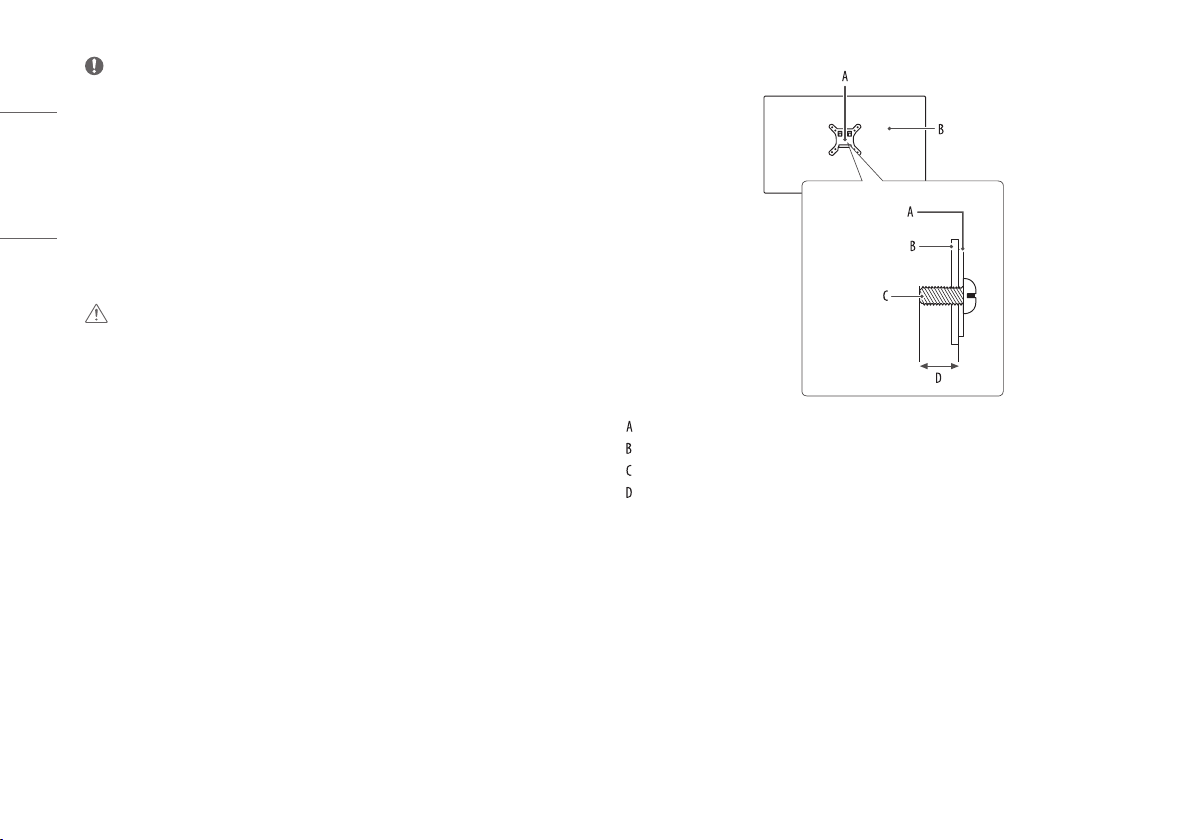
Installing the Wall Mount Plate
To install the monitor to a wall, attach a wall mounting bracket (optional) to the back of the monitor.
Make sure that the wall mounting bracket is securely fixed to the monitor and to the wall.
Wall Mount (mm) 100 x 100 (3.9 x 3.9 inches)
Standard screw M4 x L10
Number of screws 4
Wall Mount Plate (Optional) LSW149
8
ENGLISH
NOTE
•
Use the screws specified by VESA standards.
• The wall mount kit includes the installation guide and all necessary parts.
• The wall mounting bracket is optional. You can obtain optional accessories from your local dealer.
• The length of the screw may differ for each wall mounting bracket. If you use screws longer than the standard
length, it may damage the inside of the product.
• For more information, please refer to the user manual for the wall mounting bracket.
• Be careful not to apply too much force while mounting the wall mount plate as it may cause damage to the
screen.
• Remove the stand before installing the monitor on a wall mount by performing the stand attachment in
reverse.
CAUTION
•
Unplug the power cord before moving or installing the monitor to avoid electric shock.
• Installing the monitor on the ceiling or on a slanted wall may result in the monitor falling off, which could
lead to injury. Use an authorized LG wall mount and contact the local dealer or qualified personnel.
• To prevent injury, this apparatus must be securely attached to the wall in accordance with the installation
instructions.
• Applying excessive force when tightening screws may cause damage to the monitor. Damage caused in this
way will not be covered by the product warranty.
• Use the wall mounting bracket and screws that conform to VESA standards. Damage caused by the use or
misuse of inappropriate components will not be covered by the product warranty.
• When measured from the back of the monitor, the length of each installed screw must be 8mm (0.3inches)
or less.
: Wall Mount Plate
: Back of the Monitor
: Standard screw
: Max. 8mm (0.3 inches)
9
ENGLISH
Product Description
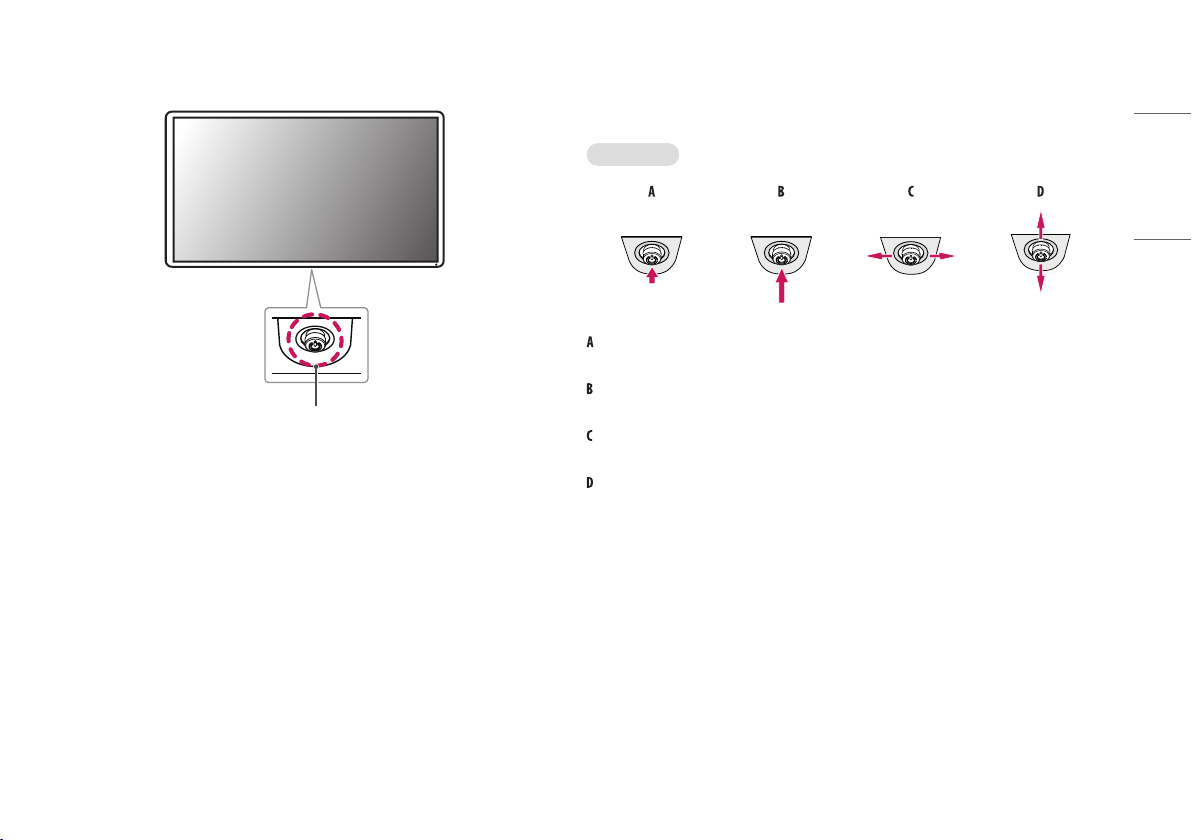
Joystick Button
How to Use the Joystick Button
You can easily control the functions of the monitor by pressing the joystick button or moving it left/right/up/
down with your finger.
Basic Functions
Power on: Press the joystick button once with your finger to turn on the monitor.
Power off: Press and hold the joystick button once more than 5 seconds with your finger to turn off the monitor.
Volume control: You can control the volume by moving the joystick button left/right.
Enters the [Accessibility] menu.
10
ENGLISH
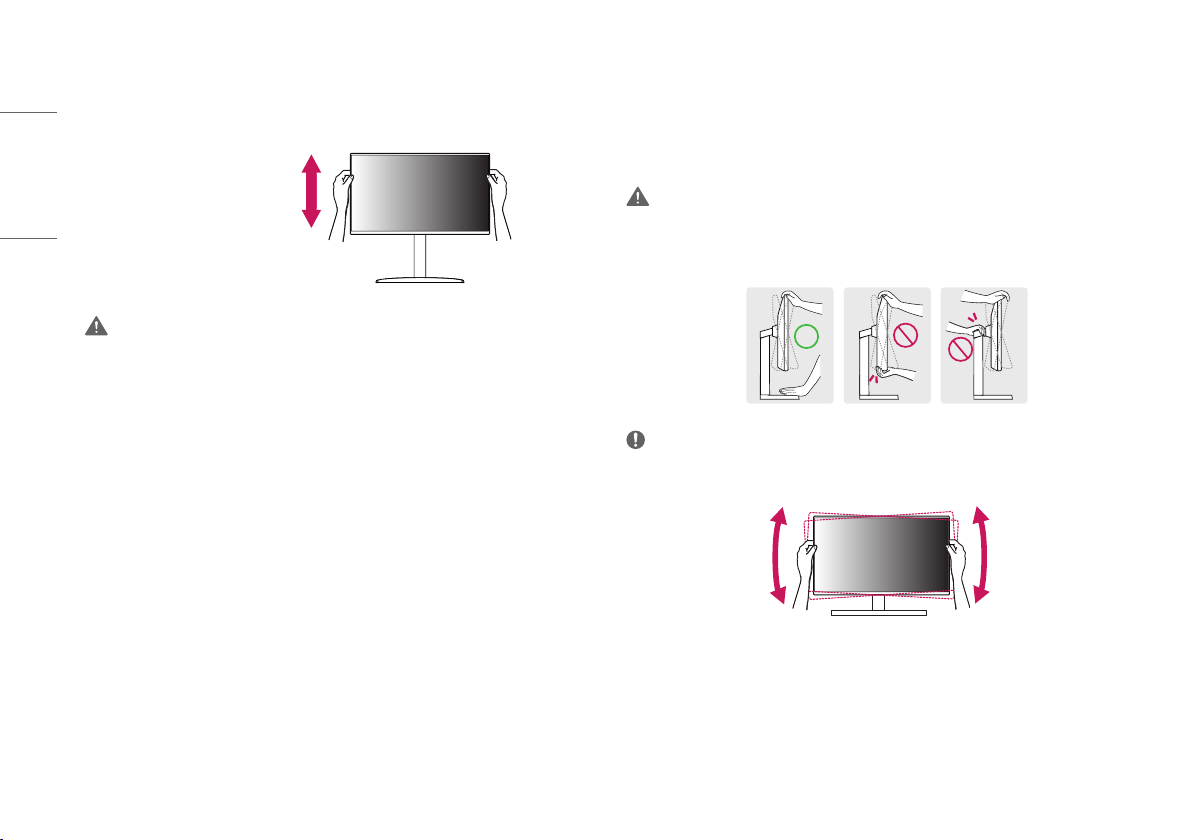
Adjusting the Stand Height
1 Place the monitor mounted on the stand base in an upright position.
2 Handle the monitor with both hands for safety.
Max 110.0mm
(4.3 inches)
WARNING
•
When adjusting the screen height, do not place your hand on the stand body to avoid injury to your fingers.
Adjusting the Angle
1 Place the monitor mounted on the stand base in an upright position.
2 Adjust the angle of the screen.
The angle of the screen can be adjusted forward or backward from -5° to 20° for a comfortable viewing
experience.
WARNING
•
To avoid injury to the fingers when adjusting the screen, do not hold the lower part of the monitor’s frame as
illustrated below.
• Be careful not to touch or press the screen area when adjusting the angle of the monitor.
NOTE
•
The left or right side of the monitor head can be slightly rotated up or down (up to 3°). Adjust the horizontal
level of the monitor head.
11
ENGLISH
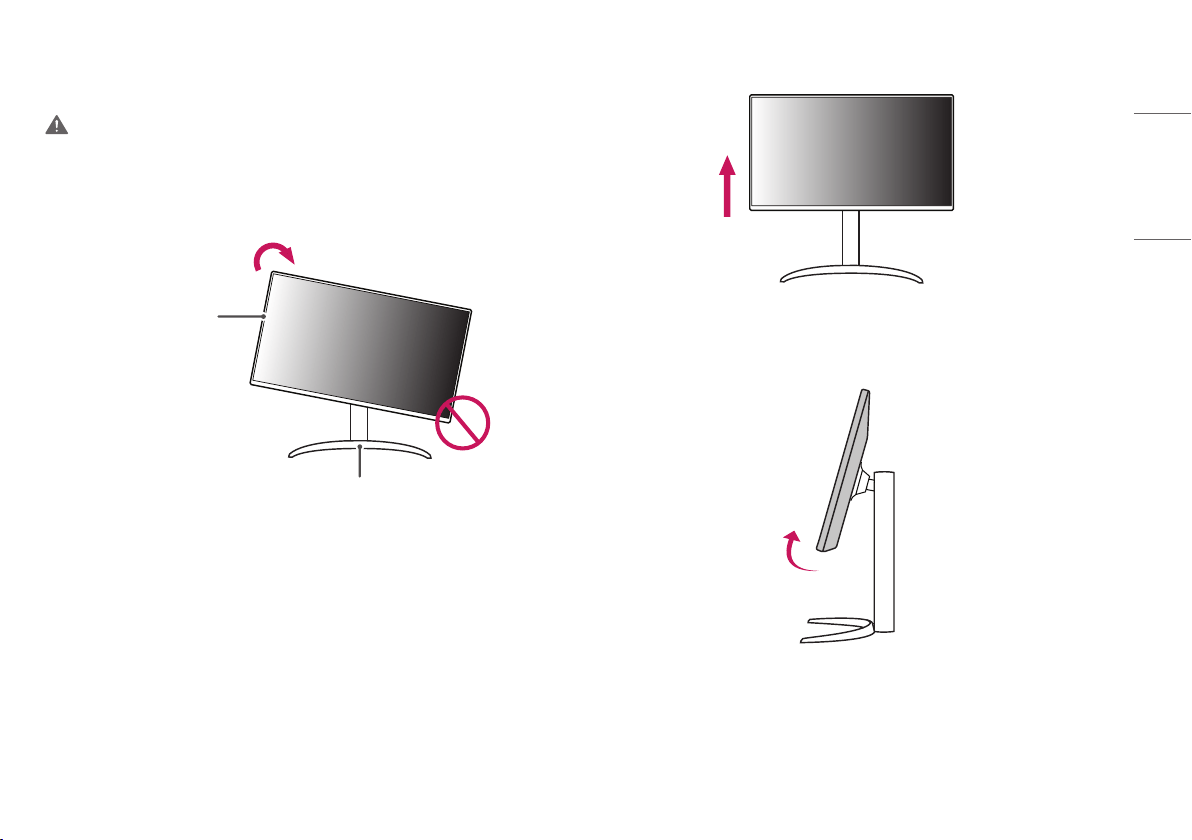
Pivot Feature
The pivot feature allows the monitor to rotate 90° clockwise.
WARNING
•
When using the Pivot function, do not rotate the monitor too fast or with excessive force. The table may be
scratched by contact with the monitor’s head.
- The head may come in contact with the stand and scratch the base.
- Be careful as you may injure your finger by jamming it between the head and the stand.
Monitor’s head
Stand
1 Raise the monitor up to the maximum height.
2 Adjust the angle of the monitor in the direction of the arrow as shown in the figure.
12
ENGLISH
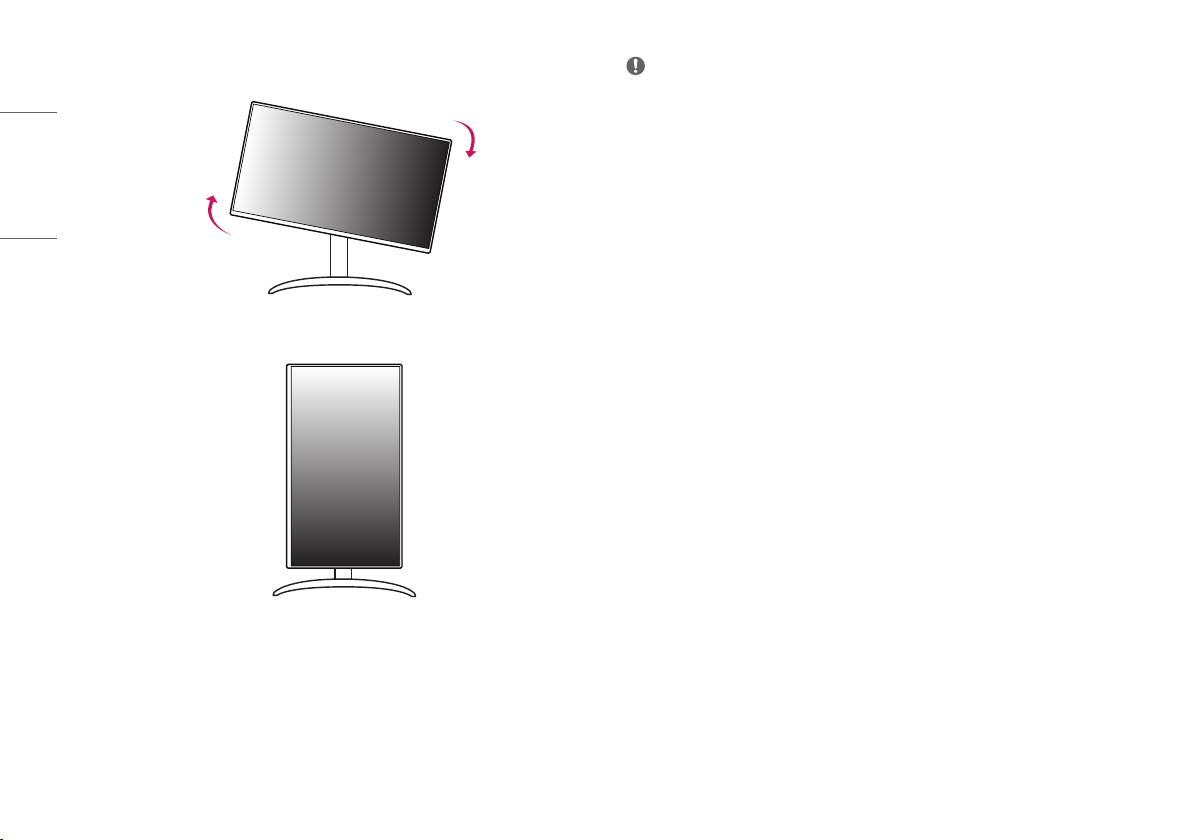
3 Rotate the monitor clockwise as shown in the figure.
4 Complete the installation by rotating the monitor 90° as shown in the figure.
NOTE
•
Auto Pivot feature of the display is not supported.
• The screen can be rotated easily using the screen pivot shortcut key provided with your Windows operating
system. Note that some Windows versions and some graphics card drivers may use different settings for the
screen pivot key or may not support the pivot key at all.
13
ENGLISH
Supported Software
You can download and install the latest version from the LGE website (www.lg.com).
• / /
USING THE MONITOR
• Illustrations in this manual may differ from the actual product.
Press the joystick button, go to [Settings] > [Input], and then select the input option.
CAUTION
•
If you use generic cables not certified by LG, the screen may not display or there may be image noises.
• Do not press the screen for a prolonged time. This may cause image distortion.
• Do not display a still image on the screen for a prolonged time. This may cause image retention. Use a PC
screensaver if possible.
• When connecting the power cord to the outlet, use a grounded (3-hole) power strip or a grounded power
outlet.
• The monitor may flicker when turned on in an area where the temperature is low. This is normal.
• Sometimes red, green, or blue spots may appear on the screen. This is normal.
14
ENGLISH
Connecting to a PC
• This monitor supports the * feature.
*
: A feature that allows you to add a device to your computer without having to reconfigure
anything or install any manual drivers.
HDMI Connection
Transmits digital video and audio signals from your PC to the monitor.
CAUTION
•
Using a DVI to HDMI / DP (DisplayPort) to HDMI cable may cause compatibility issues.
• Use a certified cable with the HDMI logo attached. If you do not use a certified HDMI cable, the screen may
not display or a connection error may occur.
• Recommended HDMI cable types
- High Speed HDMI
®
/™ cable
- High Speed HDMI
®
/™ cable with Ethernet
DisplayPort Connection
Transmits digital video and audio signals from your PC to the monitor.
NOTE
•
There may be no video or audio output depending on the DP (DisplayPort) version of the PC.
• Make sure to use the supplied DisplayPort cable of the product. Otherwise, this may cause the device to
malfunction.
• If you are using a Mini DisplayPort output graphics card, use a Mini DP to DP (Mini DisplayPort to DisplayPort)
cable or gender that supports DisplayPort1.4. (Sold separately)
USB-C connection
Transmits digital video and audio signals from your PC to the monitor.
NOTE
•
DP Alternate Mode (DP over USB-C) is supported via USB-C Port.
• Features may not work properly depending on the connected device’s specifications and the environment.
• USB-C port is not for the monitor power source but for a PC power source. Connect adapter to supply power
to the monitor.
15
ENGLISH
Connecting AV Devices
HDMI Connection
HDMI transmits digital video and audio signals from your AV device to the monitor.
CAUTION
•
Using a DVI to HDMI / DP (DisplayPort) to HDMI cable may cause compatibility issues.
• Use a certified cable with the HDMI logo attached. If you do not use a certified HDMI cable, the screen may
not display or a connection error may occur.
• Recommended HDMI cable types
- High Speed HDMI
®
/™ cable
- High Speed HDMI
®
/™ cable with Ethernet
Connecting Peripherals
USB Device connection
The USB port on the product functions as a USB hub.
NOTE
•
It is recommended you install all Windows Updates to keep your Windows up-to-date before connecting to
the product for use.
• Peripheral devices are sold separately.
• A keyboard, mouse, or USB device can be connected to the USB port.
• The charging speed may vary depending on the device.
CAUTION
•
Cautions when using a USB device.
- A USB device with an automatic recognition program installed, or that uses its own driver, may not be
recognized.
- Some USB devices may not be supported or may not work properly.
- It is recommended to use a USB hub or hard disk drive with power supplied. (If the power supply is not
adequate, the USB device may not be recognized properly.)
16
ENGLISH
HDMI/DP (DisplayPort) Input
Peripheral devices connected to the USB IN port can be controlled from the PC.
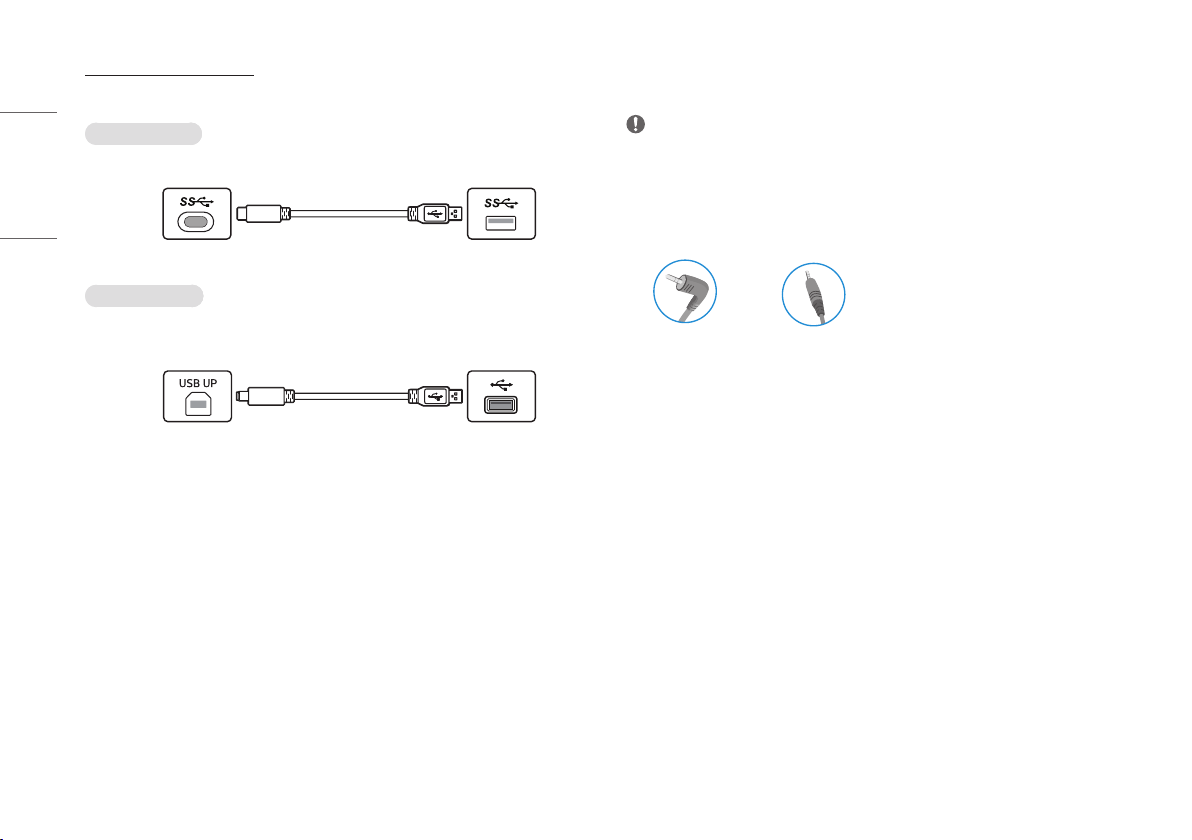
To use USB C-A cable
To use USB 3.0, connect the USB C-A cable from the monitor to your PC.
(sold separately)
PC
Monitor
To use USB A-B cable
To use USB 2.0, connect the USB A-B cable from the monitor to your PC.
Set the [USB Selection] menu in [General] to [USB-B].
PC
Monitor
Headphones Connection
Connect peripherals to the monitor via the headphones port.
NOTE
•
Peripheral devices are sold separately.
• Depending on the audio settings of the PC and external device, headphones and speaker functions may be
limited.
• If you use angled earphones, it may cause a problem with connecting another external device to the monitor.
Therefore, it is recommended to use straight earphones.
Angled Straight
(Recommend)
17
ENGLISH
USER SETTINGS
NOTE
•
Your monitor’s OSD (On Screen Display) may differ slightly from that shown in this manual.
• When [Beep Guide] is activated, pressing the joystick button will take you to [Settings] right away.
Activating the Main Menu
1 Press the joystick button on the bottom of the monitor.
2 Move the joystick up/down and left/right to set the options.
3 Press the joystick button once more to exit the main menu.
Joystick Button
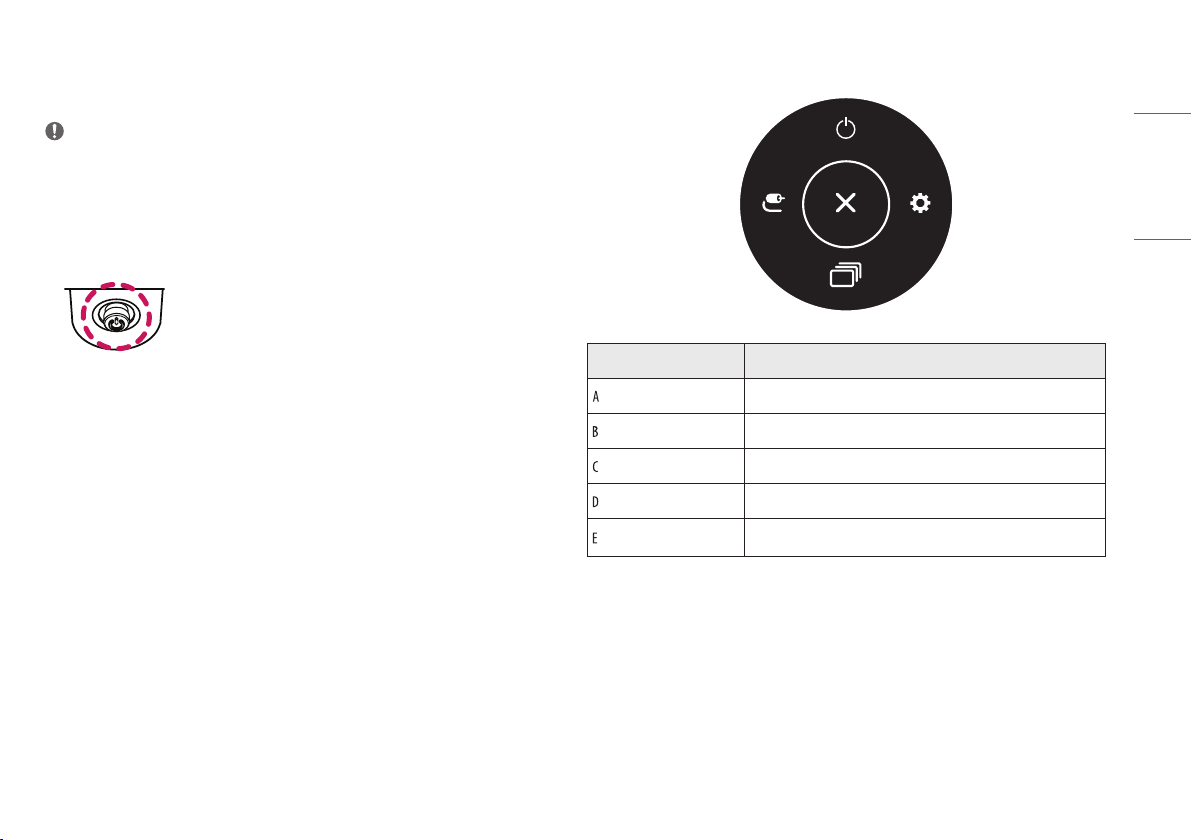
Main Menu Features
B
A
C
D
E
Main Menu Description
: [Input] Sets input mode.
: [Power Off] Turns off the monitor.
: [Settings] Configures the screen settings.
: [Picture Mode] Sets the picture mode.
: [Exit] Exits the main menu.
18
ENGLISH
Menu Settings
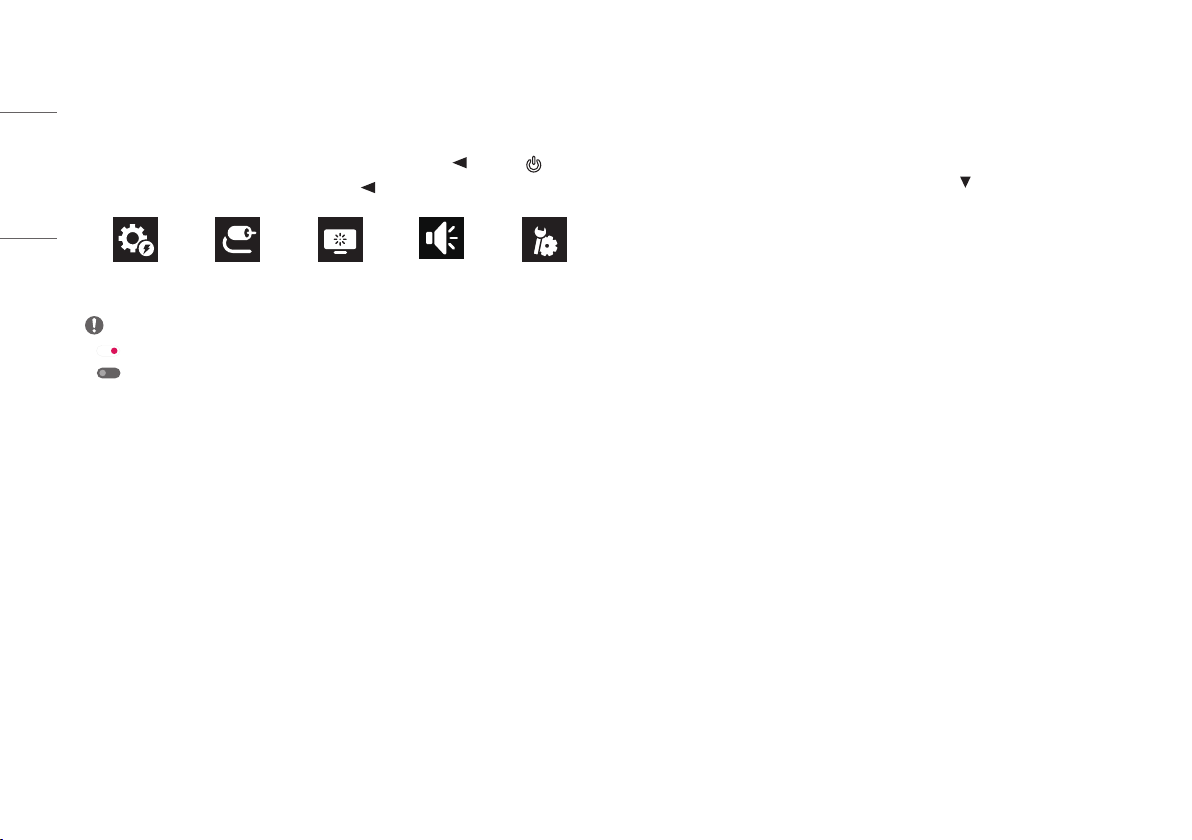
1 To view the OSD menu, press the joystick button at the bottom of the monitor and then enter the
[Settings].
2 Move the joystick up/down and left/right to set the options.
3 To return to the upper menu or set other menu items, move the joystick to or pressing ( ) it.
4 If you want to exit the OSD menu, move the joystick to until you exit.
[Quick Settings] [Input] [Picture] [Sound] [General]
NOTE
•
: On
• : Off
[Quick Settings]
[Settings] > [Quick Settings]
• [Brightness]: Adjusts the brightness of the screen.
• [Contrast]: Adjusts the contrast of the screen.
• [Volume]: Adjusts the volume level.
- You can adjust [Mute] / [Unmute] by moving the joystick button to
in the [Volume] menu.
• [Color Temp]: Set your own color temperature.
- [Custom]: The user can customize the red, green and blue color.
- [Warm]: Sets the screen color to a reddish tone.
- [Medium]: Sets the screen color to between a red and blue tone.
- [Cool]: Sets the screen color to a bluish tone.
- [Manual]: The user can fine-tune the color temperature.
• [Waves MaxxAudio
®
]
- On: MaxxAudio
®
by waves, recipient of a Technical GRAMMY Award
®
is a suite of studio-quality sound tools
for a superior listening experience.
- Off: Disables the [Waves MaxxAudio
®
] feature.
19
ENGLISH
[Input]
[Settings] > [Input]
• [Input List]: Selects the input mode.
• [Auto Input Switch]: When [Auto Input Switch] is set to On, display will automatically switch to new input
when connected.
• [Aspect Ratio]: Adjusts the aspect ratio of the screen. The display may look the same for [Full Wide], and
[Original] options at the recommended resolution (3840x2160).
- [Full Wide]: Displays the video in widescreen, regardless of the video signal input.
- [Original]: Displays video according to the aspect ratio of the video signal input.
[Picture]
[Settings] > [Picture] > [Picture Mode]
• [Picture Mode]: Select the Picture mode that suits the each standard mode; [Custom], [P3-D65], [sRGB],
[Calibration], [BT.2100 PQ].
- Installation of
for [Calibration].
- [BT.2100 PQ] can be selected when the HDR function is on, and other [Picture Mode] can be selected when
the HDR function is turned off.
NOTE
•
The [Picture Mode] that can be set depends on the Input signal.
• If the [Picture Mode] is changed, the screen may flicker or the resolution of your PC screen may be affected.
• HDR content may not display correctly depending on Windows 10 OS settings, please check HDR On/Off
settings in Windows.
• When the HDR function is turned on, the characters or picture quality may be poor according to Graphic card
performance.
• While the HDR function is on, screen flickering or cracking may occur when changing the monitor input or
power on/off according to Graphic card performance.

20
ENGLISH
[Settings] > [Picture] > [Picture Adjust]
• [Brightness]: Adjusts the brightness of the screen.
• [Contrast]: Adjusts the contrast of the screen.
• [Sharpness]: Adjusts the sharpness of the screen.
• [SUPER RESOLUTION+]: Because this is a function to increase the sharpness of low resolution pictures,
it is not recommended to use the function for normal text or for desktop icons. Doing so may result in
unnecessarily high sharpness.
- [High]: Optimizes the screen for crystal clear images. Best for high-definition video or games.
- [Middle]: Optimizes the screen for comfortable viewing, with images at the middle level between the low
and high modes.
- [Low]: Optimizes the screen for smooth and natural images. Best for still images or images with less
movement.
- [Off]: Displays in the most common setting. Disables [SUPER RESOLUTION+].
• [Black Level]: Sets the offset level (for HDMI only).
Offset: as a reference for a video signal, this is the darkest color the monitor can display.
- [High]: Keeps the current contrast ratio of the screen.
- [Low]: Lowers the black levels and raises the white levels from the current contrast ratio of the screen.
• [Variable Backlight]: Provides extended contrast and gradation on a dark screen depending on game or video
content.
- [Faster]: Preferably for PC gaming experiences.
- [Fast]: Preferably for console gaming experiences.
- [Normal]: Preferably for playing video content and internet or word-processing.
- [Off]: Disables the Variable Backlight feature.
• [DFC]
- On: Adjusts the brightness automatically according to the screen.
- Off: Disables the [DFC] feature.
NOTE
•
[Variable Backlight]
- When these feature is enabled, a slight halo effect may be shown on dark backgrounds. This is normal and
not a malfunction.
- When these feature is enabled, the screen flickering may occur intermittently.
- The function can only be used on HDR content.
- It is recommended to turn off when you are not using the gaming function.

21
ENGLISH
[Settings] > [Picture] > [Game Adjust]
• [Response Time]: Sets a response time for displayed pictures based on the movement of the picture on the
screen. For a normal environment, it is recommended that you use [Fast]. When there is a lot of motion, it is
recommended that you use [Faster]. Setting to [Faster] may cause image sticking.
- [Faster]: Sets the response time to faster.
- [Fast]: Sets the response time to fast.
- [Normal]: Sets the response time to normal.
- [Off]: Does not use the response time improvement feature.
• [FreeSync]: Provides seamless and natural images by synchronizing the vertical frequency of the input signal
with that of the output signal.
- [Extended]: 40 ~ 60 Hz range
- [Basic]: 48 ~ 60 Hz range
- [Off]: [FreeSync] function off.
• [Black Stabilizer]: You can control the black contrast to have better visibility in dark scenes. You can easily
distinguish objects on dark game screens.
CAUTION
•
[FreeSync]
- Supported Interface: DisplayPort, HDMI
- Supported Graphic Card: A graphic card that supports AMD’s FreeSync is necessary.
- Supported Version: Make sure to update the graphic card to the latest driver.
- For more information and requirement, AMD website (http://www.amd.com/FreeSync).
[Settings] > [Picture] > [Color Adjust]
• [Gamma]: Adjust the Gamma; [Gamma 1.8], [Gamma 2.0], [Gamma 2.2], [Gamma 2.4], and [Gamma 2.6].
• [Color Temp]: Set your own color temperature.
- [Custom]: The user can customize the red, green and blue color.
- [Warm]: Sets the screen color to a reddish tone.
- [Medium]: Sets the screen color to between a red and blue tone.
- [Cool]: Sets the screen color to a bluish tone.
- [Manual]: The user can fine-tune the color temperature.
• [Red], [Green], [Blue]: You can customize the picture color using [Red], [Green], and [Blue] colors.
• [Six Color]: Meets the user requirements for colors by adjusting the hue and saturation of the six colors (red,
green, blue, cyan, magenta, and yellow) and then saving the settings.
- Hue: Adjusts the tone of the screen colors.
- Saturation: Adjusts the saturation of the screen colors. The lower the value, the less saturated and brighter
the colors become. The higher the value, the more saturated and darker the colors become.
[Settings] > [Picture] > [Picture Reset]
• Returns picture and color to the default settings.

22
ENGLISH
[Sound]
[Settings] > [Sound]
• [Volume]: Adjusts the volume level.
- You can adjust [Mute] / [Unmute] by moving the joystick button to
in the [Volume] menu.
• [Waves MaxxAudio
®
]
- On: MaxxAudio
®
by waves, recipient of a Technical GRAMMY Award
®
is a suite of studio-quality sound tools
for a superior listening experience.
- Off: Disables the [Waves MaxxAudio
®
] feature.
[General]
[Settings] > [General]
• [Language]: Sets the menu screen to the desired language.
• [USB-C Multi-EDID]: Change the EDID according to the [Picture Mode] setting on [USB-C] input.
- It can be set when [Input Compatibility Version] is [1.4].
- If the screen may not work properly depending on the connected device(or operating system), set this
function to off.
• [USB Selection]: Select the USB upstream cable connection port to use USB hub of the monitor.
• [SMART ENERGY SAVING]: Conserve energy by using luminance compensation algorithm.
- [High]: Saves energy using the high-efficiency [SMART ENERGY SAVING] feature.
- [Low]: Saves energy using the low-efficiency [SMART ENERGY SAVING] feature.
- [Off]: Disables the feature.
- The value of energy saving data may differ depending on panel and panel suppliers.
- If you select the option of [SMART ENERGY SAVING] is [High] or [Low], monitor luminance become higher
or lower depend on source.
• [Deep Sleep Mode]: When [Deep Sleep Mode] is on, power consumption is minimized while the monitor is in
standby mode.

23
ENGLISH
• [Power LED]: When the [Power LED] function is turned on, it operates as follows:
- On mode: Light up
- Sleep Mode (Standby Mode): Blinking
- Off mode: Off
• [Automatic Standby]: If there is no operation on the monitor for a certain period of time, the monitor will
automatically switch to standby mode.
• [Input Compatibility Version]: You can set each input to match the supported version of the connected device.
• [Buzzer]: This feature lets you set the sound generated from Buzzer when your monitor powers on.
• [OSD Lock]: This feature disables the configuration and adjustment of menus.
All features are disabled except [Input], [Brightness], [Contrast], [Volume] in [Quick Settings], [OSD Lock] and
[Information] in [General].
• [OSD Size]: User can select OSD Size to large or small.
• [Information]: The following display information will be shown; [Total Power On Time], [Resolution].
• [Reset to Initial Settings]: Returns to the default settings.
PRODUCT SPECIFICATION
Specifications are subject to change without notice.
The symbol
means alternating current, and the symbol means direct current.
Color Depth:
• 8-bit/ 10-bit color is supported.
Resolution
• Max Resolution: 3840x2160@60 Hz
• Recommended Resolution: 3840x2160@60 Hz
Environmental Conditions
• Operating Conditions
- Temperature: 0°C to 40°C (32°F to 104°F)
- Humidity: Less than 80%
• Storing Conditions
- Temperature: -20°C to 60°C (-4°F to 140°F)
- Humidity: Less than 85%

24
ENGLISH
Dimensions: Monitor Size (Width x Depth x Height)
27UQ85R
• With Stand:
- 613.9x239.3x598.6 (mm)
- 24.1x9.4x23.5 (inches)
• Without Stand:
- 613.9x58.3x392.5 (mm)
- 24.1x2.2x15.4 (inches)
32UQ85R
• With Stand:
- 714.5x239.3x626.6 (mm)
- 28.1x9.4x24.6 (inches)
• Without Stand:
- 714.5x58.1x449.3 (mm)
- 28.1x2.2x17.6 (inches)
Weight (Without Packaging)
27UQ85R
• With Stand: 5.7kg (12.5lbs)
• Without Stand: 3.9kg (8.5lbs)
32UQ85R
• With Stand (kg): 7.0kg (15.4lbs)
• Without Stand (kg): 5.15kg (11.3lbs)
AC/DC Adapter
• Model: ACC-LATP2
Manufacturer: SHENZHEN HONOR ELECTRONIC CO., LTD
- Input: 100-240V~ 50/60Hz 2.5A
- Output: 19.5V
10.8A
Power Sources
27UQ85R
• Power Rating: 19.5V 8.0A
• Power Consumption
- Operating Mode: 44W (Typical)*
- Sleep Mode (Standby Mode): ≤ 0.5W**
- Off Mode: ≤ 0.3W
32UQ85R
• Power Rating: 19.5V 9.0A
• Power Consumption
- Operating Mode: 50W (Typical)*
- Sleep Mode (Standby Mode): ≤ 0.5W**
- Off Mode: ≤ 0.3W
* The Operating Mode of Power Consumption is measured with LGE test standard. (Full White pattern,
Maximum resolution, Outgoing condition)
* The Power Consumption level can be different by operating condition and monitor setting.
** When not in use, the monitor goes to the sleep mode in a couple of minutes. (Max. 5minutes)

25
ENGLISH
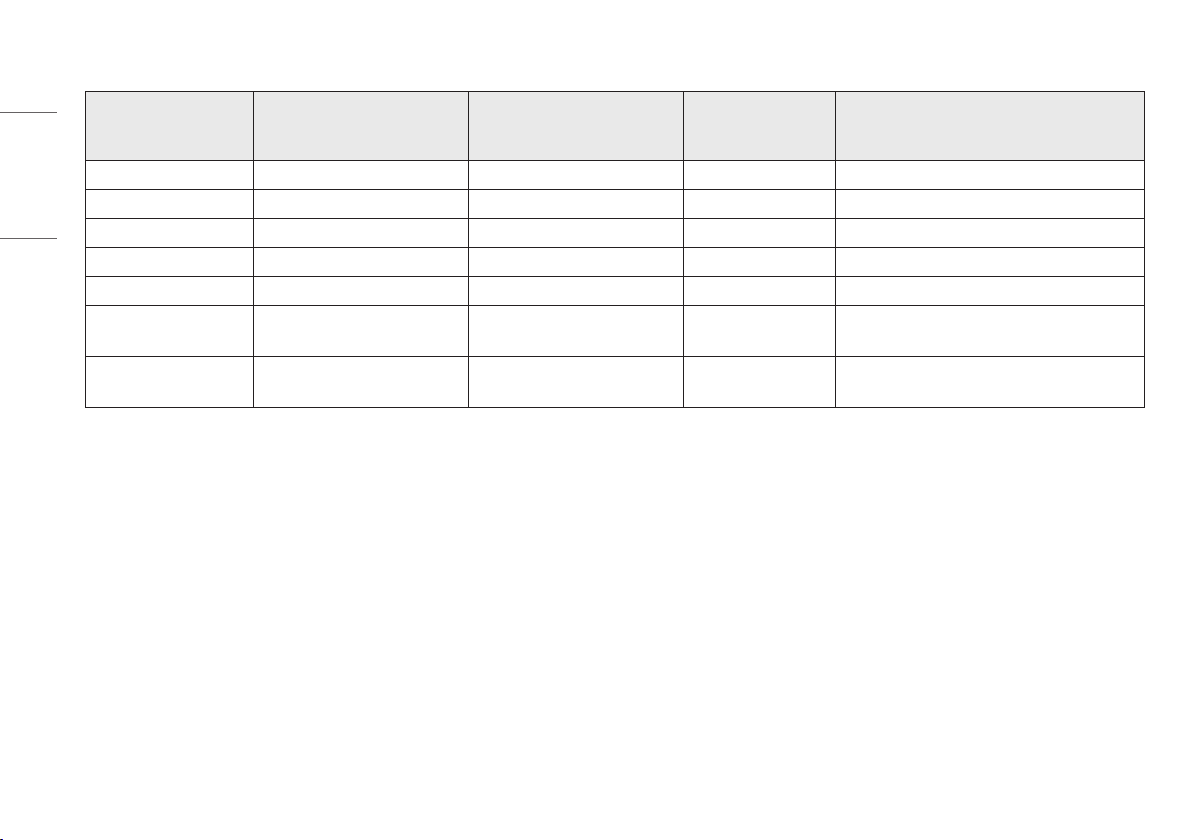
Support Mode
(Preset Mode, DisplayPort / USB-C)
Resolution Horizontal Frequency (kHz) Vertical Frequency (Hz) Polarity (H/V) Remarks
640 x 480 31.469 59.94 -/-
800 x 600 37.879 60.317 +/+
1024 x 768 48.363 60 -/-
1920 x 1080 67.5 60 +/-
2560 x 1440 88.79 59.95 +/-
3840 x 2160 66.90 30 +/-
3840 x 2160 133.8 60 +/- Preferred timing
26
ENGLISH
(Preset Mode, HDMI)
Resolution Horizontal Frequency (kHz) Vertical Frequency (Hz) Polarity (H/V) Remarks
640 x 480 31.469 59.94 -/-
800 x 600 37.879 60.317 +/+
1024 x 768 48.363 60 -/-
1920 x 1080 67.5 60 +/-
2560 x 1440 88.79 59.95 +/-
3840 x 2160 66.90 30 +/-
HDMI1.4 Preferred timing,
[Input Compatibility Version]: [1.4]
3840 x 2160 133.8 60 +/-
HDMI2.0 Preferred timing,
[Input Compatibility Version]: [2.0]
27
ENGLISH
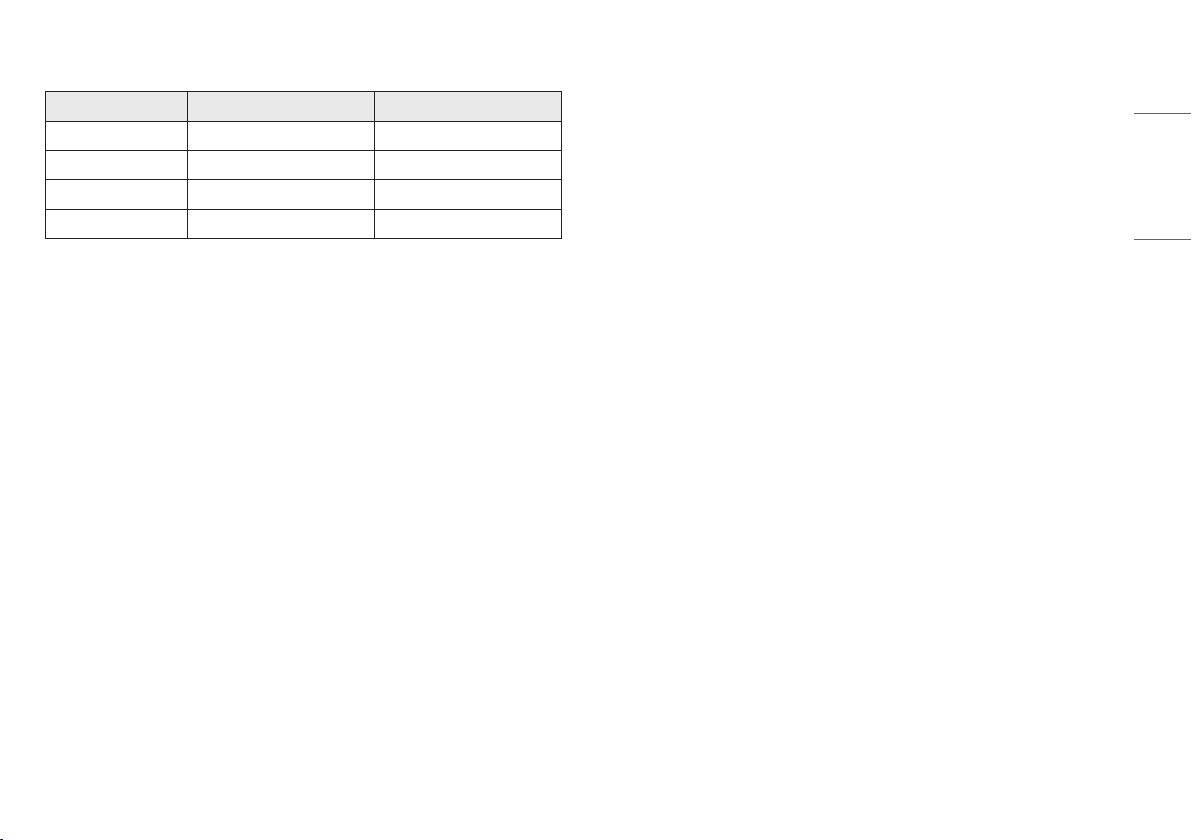
HDMI Timing (Video)
Resolution Horizontal Frequency (kHz) Vertical Frequency (Hz)
480p 31.5 60
720p 45 60
1080p 67.5 60
2160p 135 60

28
ENGLISH
TROUBLESHOOTING
Nothing is displayed on the screen.
• Is the monitor's power cord plugged in?
- Check if the power cord is correctly plugged into the power outlet.
• Is the monitor's adapter plugged in?
- Make sure to use the adapter that is provided in the product package.
- If the monitor is in sleep mode (standby mode), move the mouse, or press any key on the keyboard, to
switch the display on.
- Check if the computer is turned on.
• Is the power LED on?
- Check the power cable connection and press the power button.
• Is the power on and the power LED displaying white?
- Check that the connected input is enabled ([Settings] > [Input]).
• Is the [No Signal] message being displayed?
- This is displayed when the signal cable between the PC and the monitor is missing or disconnected. Check
the cable and reconnect it.
• Is the [Out of Range] message being displayed?
- This occurs when signals transferred from the PC (graphics card) are out of the horizontal or vertical
frequency range of the monitor. Please see the "PRODUCT SPECIFICATION" section of this manual to set the
appropriate frequency.
Screen display is unstable and shaky. / Images displayed on the monitor leave shadow trails.
• Did you select the appropriate resolution?
- If the selected resolution is HDMI 1080i 60/50 Hz (interlaced), the screen may be flickering. Change the
resolution to 1080p or the recommended resolution.
- Not setting the graphics card to the recommended (optimal) resolution may result in blurred text, a
dimmed screen, a truncated display area or misalignment of the display.
- The setting methods may be different depending on the computer or operating system, and some
resolutions may not be available depending on the performance of the graphics card. If this is the case,
contact the manufacturer of the computer or graphics card for assistance.
The screen retains an image.
• Does image sticking occur even when the monitor is turned off?
- Displaying a still image for a prolonged time may cause damage to the screen, resulting in the retention
of the image.
- To extend the lifetime of the monitor, use a screensaver.
• Are there spots on the screen?
- When using the monitor, pixilated spots (red, green, blue, white, or black) may appear on the screen. This
is normal for an LCD screen. It is not an error, nor is it related to the monitor's performance.
29
ENGLISH
Do you see an "Unrecognised monitor, monitor found" message?
• Have you installed the display driver?
- Be sure to install the display driver from our web site: https://www.lg.com.
- Make sure to check if the graphics card supports
function.
Some features are disabled.
• Are some functions not available when you press the Menu button?
- The OSD is locked. Disable [OSD Lock] in [General].
No sound from the headphone port.
• Are images displayed without sound?
- Make sure that the headphone port connections are made properly.
- Try increasing the volume with the joystick.
- Set the audio output of the PC to the monitor you are using. (The settings may differ depending on the
operating system (OS) you use.)
LICENSE
Each model has different licenses. Visit www.lg.com for more information on the license.
The terms HDMI, HDMI High-Definition Multimedia
Interface, and the HDMI Logo are trademarks or registered
trademarks of HDMI Licensing Administrator, Inc.
*

30
ENGLISH
OPEN SOURCE SOFTWARE NOTICE
INFORMATION
To obtain the source code that is contained in this product, under GPL, LGPL, MPL, and other open source
licenses that have the obligation to disclose source code, and to access all referred license terms, copyright
notices and other relevant documents, please visit https://opensource.lge.com.
LG Electronics will also provide open source code to you on CD-ROM for a charge covering the cost of performing
such distribution (such as the cost of media, shipping, and handling) upon email request toopensource@lge.
com.
This offer is valid to anyone in receipt of this information for a period of three yearsafter our last shipment of
this product.
31
ENGLISH
BEEP GUIDE
Menu Location
Quick Settings 1
Quick Settings - Brightness 1 1
Quick Settings - Brightness 1 1 1 Slider
Quick Settings - Contrast 1 2
Quick Settings - Contrast 1 2 1 Slider
Quick Settings - Volume 1 3
Quick Settings - Volume 1 3 1 Slider
Quick Settings - Color Temp 1 4
Quick Settings - Color Temp - Custom 1 4 1
Quick Settings - Color Temp - Warm 1 4 2
Quick Settings - Color Temp - Medium 1 4 3
Quick Settings - Color Temp - Cool 1 4 4
Quick Settings - Color Temp - Manual 1 4 5
Quick Settings - Color Temp - Manual 1 4 5 1 Slider
Quick Settings - Waves MaxxAudio® 1 5 Toggle
Input 2
Input - Input List 2 1
Input - Input List - HDMI1 2 1 1
Input - Input List - HDMI2 2 1 2
Input - Input List - DisplayPort 2 1 3
Input - Input List - USB-C 2 1 4
Input - Auto Input Switch 2 2 Toggle
Input - Aspect Ratio 2 3
Input - Aspect Ratio - Full Wide 2 3 1
Input - Aspect Ratio - Original 2 3 2
Picture 3
Picture - Picture Mode 3 1
Menu Location
Picture - Picture Mode - Custom 3 1 1
Picture - Picture Mode - P3-D65 3 1 2
Picture - Picture Mode - sRGB 3 1 3
Picture - Picture Mode - Calibration 3 1 4
Picture - Picture Mode - BT.2100 PQ 3 1 5
Picture - Picture Adjust 3 2
Picture - Picture Adjust - Brightness 3 2 1
Picture - Picture Adjust - Brightness 3 2 1 1 Slider
Picture - Picture Adjust - Contrast 3 2 2
Picture - Picture Adjust - Contrast 3 2 2 1 Slider
Picture - Picture Adjust - Sharpness 3 2 3
Picture - Picture Adjust - Sharpness 3 2 3 1 Slider
Picture - Picture Adjust - SUPER RESOLUTION+ 3 2 4
Picture - Picture Adjust - SUPER RESOLUTION+ - High 3 2 4 1
Picture - Picture Adjust - SUPER RESOLUTION+ -
Middle
3 2 4 2
Picture - Picture Adjust - SUPER RESOLUTION+ - Low 3 2 4 3
Picture - Picture Adjust - SUPER RESOLUTION+ - Off 3 2 4 4
Picture - Picture Adjust - Black Level 3 2 5
Picture - Picture Adjust - Black Level - High 3 2 5 1
Picture - Picture Adjust - Black Level - Low 3 2 5 2
Picture - Picture Adjust - Variable Backlight 3 2 6
Picture - Picture Adjust - Variable Backlight - Faster 3 2 6 1
Picture - Picture Adjust - Variable Backlight - Fast 3 2 6 2
Picture - Picture Adjust - Variable Backlight - Normal 3 2 6 3
Picture - Picture Adjust - Variable Backlight - Off 3 2 6 4
Picture - Picture Adjust - DFC 3 2 7 Toggle
Picture - Game Adjust 3 3
Picture - Game Adjust - Response Time 3 3 1
Picture - Game Adjust - Response Time - Faster 3 3 1 1
Menu Location
Picture - Game Adjust - Response Time - Fast 3 3 1 2
Picture - Game Adjust - Response Time - Normal 3 3 1 3
Picture - Game Adjust - Response Time - Off 3 3 1 4
Picture - Game Adjust - FreeSync 3 3 2
Picture - Game Adjust - FreeSync - Extended 3 3 2 1
Picture - Game Adjust - FreeSync - Normal 3 3 2 2
Picture - Game Adjust - FreeSync - Off 3 3 2 3
Picture - Game Adjust - Black Stabilizer 3 3 3
Picture - Game Adjust - Black Stabilizer 3 3 3 1 Slider
Picture - Color Adjust 3 4
Picture - Color Adjust - Gamma 3 4 1
Picture - Color Adjust - Gamma - Gamma 1.8 3 4 1 1
Picture - Color Adjust - Gamma - Gamma 2.0 3 4 1 2
Picture - Color Adjust - Gamma - Gamma 2.2 3 4 1 3
Picture - Color Adjust - Gamma - Gamma 2.4 3 4 1 4
Picture - Color Adjust - Gamma - Gamma 2.6 3 4 1 5
Picture - Color Adjust - Color Temp 3 4 2
Picture - Color Adjust - Color Temp - Custom 3 4 2 1
Picture - Color Adjust - Color Temp - Warm 3 4 2 2
Picture - Color Adjust - Color Temp - Medium 3 4 2 3
Picture - Color Adjust - Color Temp - Cool 3 4 2 4
Picture - Color Adjust - Color Temp - Manual 3 4 2 5
Picture - Color Adjust - Color Temp - Manual 3 4 2 5 1 Slider
Picture - Color Adjust - Red 3 4 3
Picture - Color Adjust - Red 3 4 3 1 Slider
Picture - Color Adjust - Green 3 4 4
Picture - Color Adjust - Green 3 4 4 1 Slider
Picture - Color Adjust - Blue 3 4 5
Picture - Color Adjust - Blue 3 4 5 1 Slider
Picture - Color Adjust - Six Color 3 4 6
32
ENGLISH
Menu Location
Picture - Color Adjust - Six Color - Red Hue 3 4 6 1
Picture - Color Adjust - Six Color - Red Hue 3 4 6 1 1 Slider
Picture - Color Adjust - Six Color - Red Saturation 3 4 6 2
Picture - Color Adjust - Six Color - Red Saturation 3 4 6 2 1 Slider
Picture - Color Adjust - Six Color - Green Hue 3 4 6 3
Picture - Color Adjust - Six Color - Green Hue 3 4 6 3 1 Slider
Picture - Color Adjust - Six Color - Green Saturation 3 4 6 4
Picture - Color Adjust - Six Color - Green Saturation 3 4 6 4 1 Slider
Picture - Color Adjust - Six Color - Blue Hue 3 4 6 5
Picture - Color Adjust - Six Color - Blue Hue 3 4 6 5 1 Slider
Picture - Color Adjust - Six Color - Blue Saturation 3 4 6 6
Picture - Color Adjust - Six Color - Blue Saturation 3 4 6 6 1 Slider
Picture - Color Adjust - Six Color - Cyan Hue 3 4 6 7
Picture - Color Adjust - Six Color - Cyan Hue 3 4 6 7 1 Slider
Picture - Color Adjust - Six Color - Cyan Saturation 3 4 6 8
Picture - Color Adjust - Six Color - Cyan Saturation 3 4 6 8 1 Slider
Picture - Color Adjust - Six Color - Magenta Hue 3 4 6 9
Picture - Color Adjust - Six Color - Magenta Hue 3 4 6 9 1 Slider
Picture - Color Adjust - Six Color - Magenta Saturation 3 4 6 10
Picture - Color Adjust - Six Color - Magenta Saturation 3 4 6 10 1 Slider
Picture - Color Adjust - Six Color - Yellow Hue 3 4 6 11
Picture - Color Adjust - Six Color - Yellow Hue 3 4 6 11 1 Slider
Picture - Color Adjust - Six Color - Yellow Saturation 3 4 6 12
Picture - Color Adjust - Six Color - Yellow Saturation 3 4 6 12 1 Slider
Picture - Picture Reset 3 5
Picture - Picture Reset - No 3 5 1
Picture - Picture Reset - Yes 3 5 2
Sound 4
Quick Settings - Volume 4 1
Quick Settings - Volume 4 1 1 Slider
Menu Location
Quick Settings - Waves MaxxAudio® 4 2 Toggle
General 5
General - Language 5 1
General - Language - English 5 1 1
General - Language - German 5 1 2
General - Language - French 5 1 3
General - Language - Spanish 5 1 4
General - Language - Italian 5 1 5
General - Language - Swedish 5 1 6
General - Language - Finnish 5 1 7
General - Language - Portuguese 5 1 8
General - Language - Portuguese (Brazil) 5 1 9
General - Language - Polish 5 1 10
General - Language - Russian 5 1 11
General - Language - Greek 5 1 12
General - Language - Ukrainian 5 1 13
General - Language - Chinese 5 1 14
General - Language - Traditional Chinese 5 1 15
General - Language - Japanese 5 1 16
General - Language - Korean 5 1 17
General - USB-C Multi-EDID 5 2 Toggle
General - USB Selection 5 3
General - HDMI 1 5 3 1
General - HDMI 1 - USB-B 5 3 1 1
General - HDMI 1 - USB-C 5 3 1 2
General - HDMI 2 5 3 2
General - HDMI 2 - USB-B 5 3 2 1
General - HDMI 2 - USB-C 5 3 2 2
General - DisplayPort 5 3 3
General - DisplayPort - USB-B 5 3 3 1
Menu Location
General - DisplayPort - USB-C 5 3 3 2
General - USB-C 5 3 4
General - USB-C - USB-B 5 3 4 1
General - USB-C - USB-C 5 3 4 2
General - SMART ENERGY SAVING 5 4
General - SMART ENERGY SAVING - High 5 4 1
General - SMART ENERGY SAVING - Low 5 4 2
General - SMART ENERGY SAVING - Off 5 4 3
General - Deep Sleep Mode 5 5 Toggle
General - Power LED 5 6 Toggle
General - Automatic Standby 5 7
General - Automatic Standby - 8H 5 7 1
General - Automatic Standby - 6H 5 7 2
General - Automatic Standby - 4H 5 7 3
General - Automatic Standby - Off 5 7 4
General - Input Compatibility Version 5 8
General - Input Compatibility Version - DP: 1.4 /
HDMI: 2.0
5 8 1
General - Input Compatibility Version - DP: 1.2 /
HDMI: 1.4
5 8 2
General - Buzzer 5 9 Toggle
General - OSD Lock 5 10 Toggle
General - OSD Size 5 11
General - OSD Size - Small 5 11 1
General - OSD Size - Large 5 11 2
General - Information 5 12
General - Information 5 12 1
General - Reset to Initial Settings 5 13
General - Reset to Initial Settings - Yes 5 13 1
General - Reset to Initial Settings - No 5 13 2
The model and serial number of the product are located on the back and on one side of the product.
Record them below in case you ever need service.
Model
Serial No.
Supplier's Declaration of Conformity
Trade Name LG
Responsible Party LG Electronics USA, Inc.
Address
111 Sylvan Avenue, North Building,
Englewood Cliffs, NJ 07632
E-mail lg[email protected]om

1
ENG
ENGLISH
IMPORTANT PRECAUTIONS
IMPORTANT PRECAUTIONS
Please read these safety precautions carefully before using the product. All precautions and
safety information applies to LCD and OLED models.
Precautions to the AC Adapter and Electrical Power
WARNING
If water or any foreign substance goes inside the product (TV, monitor, power cord, or AC adapter),
disconnect the power cord immediately and contact the service center.
»
Otherwise, this may cause a fire or electric shock due to damage to the product.
Do not touch the power plug or AC adapter with wet hands. If the pins of the plug are wet or dusty,
wipe and dry them before use.
»
Otherwise, this may cause a fire or electric shock.
Make sure to completely insert the power cord into the AC adapter.
»
If loosely connected, the poor connection may cause a fire or electric shock.
Be sure to use power cords and AC adapters provided or approved by LG Electronics, Inc.
»
The use of non-approved products may cause a fire or electric shock.
When unplugging the power cord, always pull it by the plug. Do not bend the power cord with
excessive force.
»
The power line can be damaged, which may cause electric shock or fire.
Be careful not to step or place heavy objects (electronic appliances, clothing, etc.) on the power cord
or AC adapter. Be careful not to damage the power cord or AC adapter with sharp objects.
»
Damaged power cords may cause a fire or electric shock.
Never disassemble, repair or modify the power cord or AC adapter.
»
This may cause a fire or electric shock.
Use only the power cord supplied with the unit or another manufacturer's authorized cord.
»
Failure to do so may result in fire or electrical shock or damage to the product.
Use only a properly grounded plug and receptacle.
»
If you do not you may be electrocuted or injured. Or the product might be damaged.
Do not use a damaged or loose plug.
»
This may cause electrical shock or fire.
Operate the display only from a power source(i.e. voltage) indicated in the product specification.
»
Otherwise the product can be damaged, fire can occur or you may be electrocuted. If you are not sure what type of
power supply you have, consult a certified electrician.
In the presence of thunder and lightning, never touch the power cord and signal cable because it can
be very dangerous.
»
It can cause electric shock.
Do not connect several extension cords, electrical appliances or electrical heaters to a single outlet.
Use a power bar with a grounding terminal designed for exclusive use with the computer.
»
A fire can break out due to overheating.
Do not touch the power plug with wet hands. Additionally, if the cord pin is wet or covered with dust,
dry the power plug completely or wipe dust off before plugging in the cord.
»
You may be electrocuted due to excess moisture.
If you don’t intend to use the product for a long time, unplug the power cable from the product.
»
Covering dust can cause a fire, or insulation deterioration can cause electric leakage, electric shock or fire.
Insert the power plug firm so it cannot come loose.
»
A loose connection can cause fire.
Failure to follow those warnings may result in death, serious injury or damage to the product or other
property.
WARNING

2
ENG
ENGLISH
IMPORTANT PRECAUTIONS
Precautions in installing the Product
WARNING
Do not insert metal or other conductive materials into the product openings. Additionally, do not
touch the power cable right after plugging into the wall input terminal.
»
You may be electrocuted.
The AC Plug is the disconnecting device. It should be easily accessible in case of emergency.
Please make sure the device is installed near the wall outlet to which it is connected and that the
outlet is easily accessible.
Be sure to keep the outlet, AC adapter, and pins of the power plug clean from dust and etc.
»
This may cause a fire.
Do not unplug the power cord while the product is in use.
»
Electrical shock can damage the product.
As long as this unit is connected to the AC wall outlet, it is not disconnected from the AC power
source even if the unit is turned off.
Keep away from heat sources like heaters or open flames.
»
Electrical shock, fire, malfunction or deformation may occur.
Keep the packing anti-moisture material or vinyl packing out of the reach of children.
»
Anti-moisture material is harmful if swallowed. If swallowed by mistake, force the patient to vomit and visit the
nearest hospital. Additionally, vinyl packing can cause suffocation. Keep it out of the reach of children.
Do not put heavy objects on the product on sit upon it.
»
If the product collapses or is dropped, you may be injured. Children must pay particular attention.
Do not leave the power or signal cable where someone can trip over it.
»
The passerby can falter, which can cause electrical shock, fire, product breakdown or injury.
Install the product in a neat and dry place. Do not use near water.
»
Dust or moisture can cause electrical shock, fire or product damage.
Do not add accessories that have not been designed for this display.
If you smell smoke or other odors or hear a strange sound from the product unplug the power cord
and contact LG Customer Service.
»
If you continue to use without taking proper measures, electrical shock or fire can occur.
If you dropped the product or the case is broken, turn off the product and unplug the power cord.
»
If you continue to use without taking proper measures, electrical shock or fire can occur. Contact LG Customer
Service.
Do not drop an object on or apply impact to the product. Do not throw any toys or objects at the
product.
»
It can cause injury to humans, problems to the product and damage the display.
Keep out of reach of children and do not place toys near the product.
Make sure the product ventilation hole is not blocked. Install the product more than 10cm from the
wall.
»
If you install the product too close to the wall, it may be deformed or fire can break out due to internal heat build-up.
Do not cover the product with cloth or other material (eg. plastic) while plugged in.
»
The product can be deformed or fire can break out due to internal overheating.
Place the product on a flat and stable surface that is large enough to support the product.
»
If the product is dropped, you may be injured or the product may be broken.
Install the product where no Electromagnetic Interference occurs.
Keep the product away from direct sunlight.
»
The product can be damaged.
Do not place the product on the floor.
»
Small Children and others may trip over it.
Do not install this product on a wall if it could be exposed to oil or oil mist.
»
This may damage the product and cause it to fall.
For displays with glossy bezels the user should consider the placement of the display as the bezel
may cause disturbing reflections from surrounding light and bright surfaces.
3
ENG
ENGLISH
IMPORTANT PRECAUTIONS
Precautions in Using/Cleaning the Product
WARNING
Do not attempt to disassemble, repair or modify the product yourself.
»
Fire or electric shock can occur.
»
Contact LG Customer Service for repair.
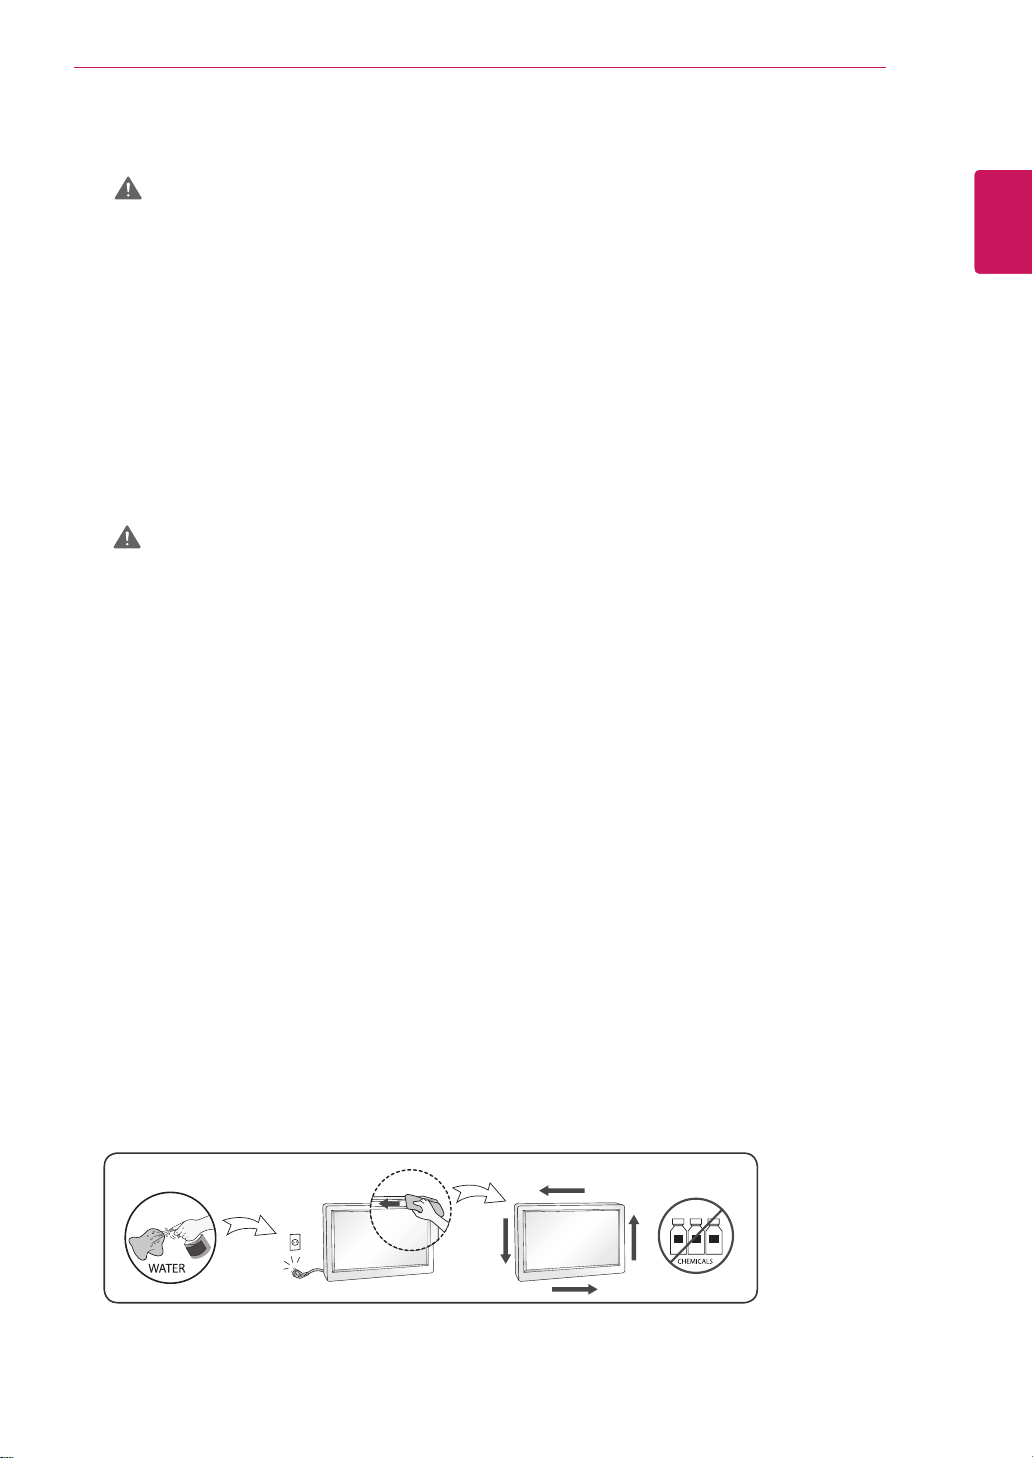
When cleaning the product, unplug the power cord and scrub gently with a soft cloth to prevent
scratching. Do not clean with a wet cloth or spray water or other liquids directly onto the product. An
electric shock may occur. (Do not use chemicals such as benzene, paint thinners or alcohol)
Keep the product away from water.
»
Fire or electric shock accident can occur.
Avoid high temperatures and humidity.
Do not put or store flammable substances near the product.
»
There is a danger of explosion or fire.
Keep the product clean at all times.
Take a comfortable and natural position when working with the product.
Take a regular break when working with the product for a long time.
Do not press on the panel with a hand or sharp object such as nail, pencil or pen, or make a scratch
on it.
Keep proper distance from the product and rest from time-to-time.
»
Your vision may be impaired if you look at the product too closely or for too long.
Set the appropriate resolution by referring to the User’s Guide.
Keep small accessories out of the reach of children.
Displaying a still image for long time on the monitor may leave persistent image or stain on the
monitor screen. To avoid this problem, use a screen saver and power off when this product is not
used. Persistent image or stain caused by long time usage are not covered by the warranty on this
product.
Do not use products using high voltage around the Monitor. (ex. Electrical Swatter)
»
Monitor may have malfunction as its electrical shock.
Spray water onto a soft cloth 2 to 4 times, and use it to clean the front frame;wipe in one direction
only. Too much moisture may cause staining.
Precautions in Moving the Product
WARNING
Make sure to turn off the product.
»
You may be electrocuted or the product can be damaged.
Make sure to remove all cables before moving the product.
»
You may be electrocuted or the product can be damaged.
When lifting or moving the product, do not hold it upside down while holding only the stand.
»
This may cause the product to fall resulting in damage or injury.
Do not shock the product when moving it.
»
You may be electrocuted or the product can be damaged.
Make sure the panel faces forward and hold it with both hands to move.
»
If you drop the product, the damaged product can cause electric shock or fire.
Do not place the product face down.
»
This may damage the TFT-LCD screen.

1
ENG
FRANÇAIS
PRÉCAUTIONS IMPORTANTES
PRÉCAUTIONS IMPORTANTES
Veuillez lire avec attention ces mesures de sécurité avant d’utiliser le produit. Toutes les
précautions et tous les renseignements de sécurité s’appliquent aux modèles ACL et OLED.
Précautions à prendre avec l’adaptateur c.a. et l’alimentation
électrique
AVERTISSEMENTS
Si de l’eau ou toute autre substance étrangère pénètre dans l’appareil (téléviseur, moniteur, cordon
d’alimentation ou adaptateur c.a.), débranchez immédiatement le cordon d’alimentation, puis
communiquez avec le centre de service.
»
Cela pourrait entraîner un incendie ou une décharge électrique en raison des dommages causés à l’appareil.
Ne touchez pas la prise d’alimentation ou l’adaptateur c.a. si vous avez les mains mouillées. Si les
broches de la fiche sont humides ou poussiéreuses, essuyez-les et asséchez-les avant d’utiliser l’appareil.
»
Cela pourrait entraîner un incendie ou une décharge électrique.
Assurez-vous d’enfoncer complètement la fiche du cordon dans l’adaptateur c.a.
»
Un branchement desserré pourrait causer un incendie ou une décharge électrique.
Assurez-vous d’utiliser les cordons d’alimentation et adaptateurs c.a. fournis ou approuvés par LG
Electronics, Inc.
»
L’utilisation de produits non approuvés pourrait entraîner un incendie ou une décharge électrique.
Lorsque vous débranchez le cordon d’alimentation, tirez-le toujours par la fiche. Ne pliez pas le cordon
d’alimentation avec une force excessive.
»
Le cordon d’alimentation peut être endommagé, ce qui pourrait causer une décharge électrique ou un incendie.
Assurez-vous de ne pas marcher sur le cordon d’alimentation ou sur l’adaptateur c.a. ni d’y poser
d’objets lourds (appareils électroniques, vêtements, etc.). Prenez soin de ne pas endommager le cordon
d’alimentation ou l’adaptateur c.a. avec des objets tranchants.
»
Un cordon d’alimentation endommagé pourrait causer un incendie ou une décharge électrique.
Ne désassemblez, ne réparez ou ne modifiez jamais le cordon d’alimentation ou l’adaptateur c.a.
»
Cela pourrait causer un incendie ou une décharge électrique.
Utilisez uniquement le cordon d’alimentation fourni avec le moniteur ou tout autre cordon approuvé par
le fabricant.
»
Le non-respect de cette directive peut entraîner un incendie, une décharge électrique ou endommager l’appareil.
Utilisez uniquement des prises et des fiches correctement mises à la terre.
»
Dans le cas contraire, vous pourriez vous électrocuter ou vous blesser. L’appareil pourrait également être
endommagé.
N’utilisez pas une prise endommagée ou desserrée.
»
Cela pourrait causer une décharge électrique ou un incendie.
Utilisez l’écran uniquement avec une source d’alimentation (tension) conforme aux caractéristiques
indiquées.
»
Dans le cas contraire, l’appareil pourrait être endommagé, un incendie pourrait se produire ou vous pourriez recevoir
une décharge électrique. Si vous n’êtes pas certain du type d’alimentation dont vous disposez, consultez un
électricien qualifié.
En présence de tonnerre et d’éclairs, il est très dangereux de toucher le cordon d’alimentation ou les
câbles de signaux.
»
Cela pourrait causer une décharge électrique.
Ne branchez pas plusieurs cordons d’alimentation, appareils électriques et radiateurs électriques à
une seule prise murale. Utilisez un bloc d’alimentation muni d’une broche de mise à la terre, conçu
exclusivement pour être utilisé avec du matériel informatique.
»
Un incendie pourrait se déclencher par surchauffe.
Ne touchez pas le cordon d’alimentation si vous avez les mains mouillées. En outre, si les broches de la
fiche sont mouillées ou recouvertes de poussière, essuyez complètement la fiche ou essuyez la poussière
avant de la brancher.
»
Vous pourriez recevoir une décharge électrique en raison de l’excès d’humidité.
Si vous ne prévoyez pas utiliser l’appareil pendant une longue période, débranchez le cordon
d’alimentation.
»
L’accumulation de poussière peut causer un incendie, et la dégradation de l’isolation peut entraîner une fuite
électrique, une décharge électrique ou un incendie.
Insérez fermement la fiche afin qu’elle ne soit pas lâche.
Le non-respect de ces avertissements pourrait entraîner la mort, des blessures graves ou endommager le produit
ou d’autres biens.
AVERTISSEMENT

2
ENG
FRANÇAIS
PRÉCAUTIONS IMPORTANTES
Précautions lors de l’installation de l’appareil
AVERTISSEMENTS
Éloignez le moniteur des sources de chaleur comme les radiateurs et les flammes nues.
»
Cela pourrait entraîner une décharge électrique, un incendie, un mauvais fonctionnement ou une déformation de
l’appareil.
Gardez le sachet anti-himidité et l’emballage de vinyle hors de la portée des enfants.
»
Le sachet anti-humidité est dangereux en cas d’ingestion. En cas d’ingestion, forcez la personne à vomir et rendez-
vous à l’hôpital le plus proche. De plus, l’emballage de vinyle peut entraîner la suffocation. Maintenez-le hors de la
portée des enfants.
Ne posez pas d’objets lourds sur l’appareil, et ne vous asseyez pas dessus.
»
Si l’appareil tombe ou s’il est échappé, vous pourriez vous blesser. Les enfants doivent être particulièrement attentifs.
Ne laissez pas le câble d’alimentation ou de signal à un endroit où quelqu’un risquerait de trébucher dessus.
»
Le passant pourrait trébucher, ce qui pourrait entraîner un risque de décharge électrique, d’incendie, de panne de
l’appareil ou de blessure.
Installez l’appareil dans un endroit propre et sec. Ne l’utilisez pas près d’une source d’eau.
»
La poussière et l’humidité peuvent causer une décharge électrique, un incendie ou endommager l’appareil.
N’ajoutez pas d’accessoires qui n’ont pas été conçus pour ce moniteur.
Si une odeur de fumée ou toute autre odeur se dégage du moniteur ou si vous entendez un son étrange en
provenance du moniteur, débranchez le cordon d’alimentation et contactez le service à la clientèle de LG.
»
Si vous continuez à utiliser l’appareil sans prendre de mesures appropriées, il y a un risque de décharge électrique
ou d’incendie.
Si vous avez fait tomber l’appareil ou si le boîtier est cassé, éteignez l’appareil et débranchez le cordon
d’alimentation.
»
Si vous continuez de l’utiliser sans prendre les mesures appropriées, cela risque de provoquer une décharge
électrique ou un incendie. Contactez le service à la clientèle de LG.
Ne faites pas tomber d’objets sur l’appareil et n’exercez pas d’impact sur celui-ci. Ne lancez aucun jouet ni
autre objet vers l’appareil.
»
Cela peut entraîner des blessures corporelles, nuire au fonctionnement de l’appareil et endommager l’écran.
Maintenez-le hors de la portée des enfants et ne placez aucun jouet à proximité.
Assurez-vous que les sorties de ventilation de l’appareil ne sont pas obstruées. Installez l’appareil à plus de
10 cm du mur.
»
Si vous installez l’appareil trop près du mur, cela pourrait le déformer ou un incendie pourrait se déclencher en
raison d’une surchauffe interne.
Ne couvrez pas l’appareil avec des tissus ou d’autres matériaux (plastique par exemple) lorsqu’il est branché.
»
Cela pourrait déformer le moniteur ou un incendie pourrait se déclencher en raison d’une surchauffe interne.
Placez l’appareil sur une surface plane et stable, suffisamment large pour le supporter.
»
Si l’appareil tombe, vous pourriez vous blesser, ou cela pourrait l’endommager.
Installez l’appareil dans un endroit exempt d’interférences électromagnétiques.
Éloignez l’appareil des rayons directs du soleil.
»
L’appareil pourrait être endommagé.
Ne placez pas l’appareil sur le sol.
»
Des jeunes enfants ou d’autres personnes pourraient trébucher.
N’installez pas l’appareil sur un mur où il est susceptible d’être exposé à de l’huile ou à de la vapeur d’huile.
»
Cela pourrait endommager l’appareil et provoquer sa chute.
Pour les écrans munis d’un cadre brillant, lors de l’installation, l’usager doit tenir compte de l’emplacement
de l’écran, car le cadre pourrait créer des reflets gênants en raison de la lumière environnante ou de surfaces
brillantes situées à proximité.
»
Un branchement desserré peut provoquer un incendie.
N’introduisez pas de métal ni tout autre matériau conducteur dans les ouvertures du moniteur. En outre, ne
touchez pas le câble d’alimentation immédiatement après l’avoir branché dans la prise murale.
»
Vous pourriez recevoir une décharge électrique.
La fiche c.a. est utilisée comme dispositif de déconnexion. Elle devrait être facilement accessible en cas
d’urgence.
Assurez-vous que l’appareil est installé à proximité de la prise de courant murale sur laquelle l’appareil
est branché et que la prise de courant est facilement accessible.
Assurez-vous de garder la prise de courant, l’adaptateur c.a. et les broches du cordon d’alimentation
exempts de poussière ou autre substance étrangère.
»
Cela pourrait provoquer un incendie.
Ne débranchez pas le cordon d’alimentation lorsque l’appareil est en cours de fonctionnement.
»
Une décharge électrique pourrait endommager l’appareil.
Tant que cet appareil est relié à la prise d’alimentation murale, il n’est pas déconnecté de la source de
courant alternatif même si l’appareil est éteint.

3
ENG
FRANÇAIS
PRÉCAUTIONS IMPORTANTES
Précautions lors de l’utilisation et du nettoyage de l’appareil
AVERTISSEMENTS
Ne tentez pas de désassembler, de réparer ou de modifier l’appareil vous-même.
»
Il existe un risque d’incendie ou de décharge électrique.
»
Contactez le service à la clientèle de LG pour le faire réparer.
Pour nettoyer l’appareil, débranchez le cordon d’alimentation et frottez doucement avec un chiffon
doux pour prévenir toute éraflure. Ne nettoyez pas avec un chiffon humide et ne pulvérisez ni eau ni
autres liquides directement sur l’appareil. Une décharge électrique peut se produire. (N’employez pas de
produits chimiques tels que le benzène, les diluants pour peinture ou l’alcool.)
Éloignez l’appareil de toute source d’eau.
»
Il existe un risque d’incendie ou de décharge électrique.
Évitez l’humidité et les températures élevées.
Ne placez pas et n’entreposez pas de substances inflammables à proximité de l’appareil.
»
Il existe un danger d’explosion ou d’incendie.
Maintenez l’appareil propre en tout temps.
Adoptez une position confortable et naturelle lorsque vous êtes assis devant le moniteur.
Prenez régulièrement une pause lorsque vous utilisez le moniteur pendant une période prolongée.
N’appuyez pas sur le panneau avec la main ou un objet pointu, comme un ongle, un stylo ou un crayon,
et ne le rayez pas.
Maintenez une distance adéquate avec l’appareil et reposez-vous de temps en temps.
»
Votre vision pourrait être affaiblie si vous regardez le moniteur de trop près ou trop longtemps.
Réglez la résolution appropriée en vous reportant au manuel d’utilisation.
Conservez les petits accessoires hors de la portée des enfants.
L’affichage d’une image fixe pendant une durée prolongée peut provoquer l’apparition d’une image
persistante ou d’une tache. Pour éviter ce problème, définissez un écran de veille et éteignez l’écran
lorsque vous n’utilisez pas l’appareil. La garantie de l’appareil ne couvre pas les images persistantes ni
les taches attribuables à un affichage fixe prolongé.
N’utilisez pas d’appareils à haute tension (comme un tue-mouches électrique) à proximité du moniteur.
»
Une décharge électrique pourrait endommager le moniteur.
Vaporisez de l’eau sur un chiffon doux de 2 à 4 fois, puis utilisez-le pour nettoyer le cadre. Essuyez
toujours dans le même sens. Si le chiffon est trop humide, des taches risquent d’apparaître sur le
moniteur.
Précautions concernant le déplacement de l’appareil
AVERTISSEMENTS
Assurez-vous d’éteindre l’appareil.
»
Vous pourriez recevoir une décharge électrique ou endommager l’appareil.
Assurez-vous de retirer tous les câbles avant de déplacer l’appareil.
»
Vous pourriez recevoir une décharge électrique ou endommager l’appareil.
Lorsque vous soulevez ou déplacez l’appareil, ne le tenez pas à l’envers uniquement par le support.
»
L’appareil pourrait tomber et entraîner des dommages ou des blessures.
Ne cognez pas l’appareil lors de son déplacement.
»
Vous pourriez recevoir une décharge électrique ou endommager l’appareil.
Assurez-vous que le panneau est tourné vers l’avant et que vous le tenez avec les deux mains.
»
Si vous faites tomber l’appareil, l’appareil endommagé peut entraîner une décharge électrique ou un incendie.
Ne placez pas l’appareil face vers le bas.
»
Cela pourrait endommager l’écran à cristaux liquides TFT.
EAU
CHIMIQUES

1
DDC(Display Data Channel)
ENGLISH
DDC is a communication channel over which
the monitor automatically informs the host
system (PC) about its capabilities.
DDC protocol
①
DDC1/DDC2B
An uni-directional communication channel.
②
DDC 2AB/DDC2B+/DDC2Bi
A bi-directional communication channel.
Note
PC must support DDC functions to do this.
DDC (Display Data Channel)
E-DDC (Enhanced DDC)
A protocol based on I²C and used on a bi-
directional data channel between the display
and host. This protocol accesses devices at I²C
address of A0/A1 as well as the address 60.
The 60 address is used as a segment register
to allow larger amounts of data to be retrieved
than is possible using DDC2B protocols. The
protocol is compatible with DDC2B protocols.
DEUTSCH
DDC (Display Data Channel)
DDC ist ein Kommunikationskanal, über
weiche Sie von lhrem Monitor automatisch
über das verbundene System (PC) und seine
Fähigkeiten informiert werden.
DDC Protokoll
①
DDC1/DDC2B
Ein unidirektionaler Kommunikationskanal.
②
DDC 2AB/DDC2B+/DDC2Bi
Ein bidirektionaler Kommunikationskanal.
Anmerkung
Der PC muß für DDC Funktionen eingerichtet
sein.
E-DDC (Erweitertes DDC)
Ein Protokoll, das auf I2C basiert und in einem
bidirektionalen Datenkanal zwischen Anzeige
und Host eingesetzt wird. Dieses Protokoll
greift an der I2C-Adresse von A0/A1 und an
der Adresse 60 auf Gerate zu. Die Adresse 60
dient als Segmentregister und ermoglicht den
Abruf von großeren Datenmengen als mit den
DDC2B-Protokollen. Das Protokoll ist mit den
DDC2B-Protokollen kompatibel.

2
DDC(Display Data Channel)
ITALIANO
DDC (Display Data Channel)
Il DDC è un canale di comunicazione attraverso
il quale il monitor informa automaticamente il
sistema ospite (PC) circa le proprie capacità.
Protocollo DDC
①
DDC1/DDC2B
Un canale di comunicazione uni-direzionale.
②
DDC 2AB/DDC2B+/DDC2Bi
Un canale di comunicazione bi-direzionale.
Nota
Per fare questo il PC deve supportare le
funzioni DDC.
E-DDC (DDC potenziato)
Protocollo basato su I²C e utilizzato su un
canale dati bidirezionale tra monitor e host.
Questo protocollo accede a dispositivi con
indirizzo I²C di A0/A1 nonche all'indirizzo 60.
L'indirizzo 60 viene utilizzato come registro di
segmento per consentire di recuperare quantita
di dati superiori rispetto a quanto e possibile
utilizzando i protocolli DDC2B. Il protocollo e
compatibile con i protocolli DDC2B.
FRANÇAIS
DDC est une chaine de communication par
le biais de laquelle le moniteur prévient
automatiquement le systéme central (PC) de
ces capacités.
Protocole DDC
①
DDC1/DDC2B
Canal de communication unidirectionnel.
②
DDC 2AB/DDC2B+/DDC2Bi
Canal de communication bidirectionnel.
Remarque
Le PC doit posséder les fonctions DDC
pour cela.
DDC (Display Data Channel)
E-DDC (Commande numérique
directe (DDC) optimisée)
Protocole fondé sur l’I²C et appliqué à
un canal bi-directionnel de transmission
de données placé entre l’écran et l’hôte.
Ce protocole accède aux périphériques à
l’adresse I²C de A0/A1 ainsi qu’à l’adresse
60. L’adresse 60 est utilisée comme
registre de segment afin d’obtenir des
quantités de données supérieures à ce
que permettent les protocoles DDC2B.
Ce protocole est compatible avec les
protocoles DDC2B.

3
DDC(Display Data Channel)
ESPAÑOL
DDC es un canal de comunicacion sobre el
cual el monitor automáticamente informa al
sistema anfitrión (PC) sobre sus capacidades.
Protocolo DDC
①
DDC1/DDC2B
Un canal de comunicación unidireccional.
②
DDC 2AB/DDC2B+/DDC2Bi
Un canal de comunicación bidireccional.
Nota
La PC debe soportar las funciones DDC para
poder hacer esto.
DDC (Canal de despliegue de
información)
E-DDC (DDC mejorado)
Un protocolo que se basa en I²C y se usa en
un canal de datos bidireccional entre el monitor
y el sistema host. Este protocolo
accede a los dispositivos en la direccion I²C
de A0/A1, asi como en la direccion 60. La
direccion 60 se usa como un registro de
segmentos para poder recuperar mas cantidad
de datos de lo que es posible mediante los
protocolos DDC2B. El protocolo es compatible
con protocolos DDC2B.
PORTUGUÊS
DDC (Display Data Channel)
DDC é um canal de comunicação através
do qual o monitor informa ao computador
a respeito de suas características.DDC
Protokoll
①
DDC1/DDC2B
Um canal de comunicação unidirecional.
②
DDC 2AB/DDC2B+/DDC2Bi
Um canal de comunicação bidirecional.
Ovservação
O PC deve suportar DDC para fazer isso.
E-DDC (DDC Aperfeicoado)
Um protocolo com base em I²C que e utilizado
em um canal de dados bidirecional entre
o monitor e o host. Este protocolo acessa
dispositivos no endereco I²C do A0/A1 assim
como no endereco 60. O endereco 60 e
utilizado com um registro de segmento que
permite que maiores quantidades de dados
sejam recuperados que quando se utiliza os
protocolos DDC2B. O protocolo e compativel
com os protocolos DDC2B.

4
DDC(Display Data Channel)
DDC.
①
DDC1/DDC2B
②
DDC 2AB/DDC2B+/DDC2Bi
Примечание: Для работы в этом режиме
необходимо загрузить соответствующий
драйвер компьютера.
NEDERLANDS
DDC is een communicatiekanaal waarmee de
monitor het hostsysteem (PC) automatisch
informeert over zijn mogelijkheden.
DDC-protocol
①
DDC1/DDC2B
Een unidirectioneel communicatiekanaal.
②
DDC 2AB/DDC2B+/DDC2Bi
Een bidirectioneel communicatiekanaal.
OPMERKING
Dit kan alleen als de PC DDC ondersteunt.
DDC (Display Data Channel)
E-DDC (Uitgebreide DDC)
Een op I²C gebaseerd protocol dat
wordt gebruikt op een gegevenskanaal
in twee richtingen, tussen het scherm
en de host. Dit protocol geeft toegang
tot apparatuur met A0/A1 en 60 als I²C-
adres. Het adres 60 wordt gebruikt
als een segmentregister waarmee in
vergelijking met DDC2Bprotocollen grotere
hoeveelheden gegevens kunnen worden
gezocht. Het protocol is compatible met
DDC2B-protocollen.

5
DDC(Display Data Channel)
한국어
DDC 는 모니터의 기능에 관한 정보를 자동으로 호스
트 시스템 (PC) 에 제공하는 통신 채널입니다
DDC protocol
① DDC1/DDC2B
단방향 통신 채널 channel.
② DDC 2AB/DDC2B+/DDC2Bi
양방향 통신 채널 .
주
PC 가 DDC 기능을 지원해야 합니다 .
DDC( 디스플레이 데이터 채널 )
E-DDC( 확장 DDC)
I²C 에 기반을 둔 프로토콜로써 디스플레이와 호스트간
의 양방향 데이터 채널 상에서 사용됩니다 . 이 프로토
콜은 A0/A1 의 I²C 주소 및 주소 60 을 통해 장치에
액세스합니다 . 주소 60 은 세그먼트 레지스터로 사용
되어 DDC2B 프로토콜을 사용한 것보다 더 큰 용량의
데이터 검색을 가능하게 합니다 . 이 프로토콜은
DDC2B 와 호환됩니다 .
日本語
DDC は、モニターがその状態をホスト • システム(P
C)へ自動的に通知する通信チャンネルです。
DDC プロトコル
① DDC1/DDC2B
一方向通信チャンネル。
② DDC 2AB/DDC2B+/DDC2Bi
双方向通信チャンネル。
注
• このためにはPCがDDC機能をサポートしなけ
ればなりません。
DDC(ディスプレイ • データ • チャンネル)
E-DDC(Enhanced Display Data
Channel)
I²C べースプロトコルで、ディスプレイとホスト間の
双方向デ-タチャンネルに使用するプロトコル。
このプロトコルを使用して、60 というアドレスと同
様に、A0/A1 という I²C アドレスのデバイスにアク
セスします。
60 というアドレスをセグメントレジスタとして使用す
ると、DDC2B プロトコルを使用するよりも、大容量
のデータを取り出すことができます。このプロトコ
ルは DDC 2B プロトコルと互換性があります。

6
DDC(Display Data Channel)
DDC
DDC
DDC
/ ①
DDC ②
DDC
DDC) E-DDC
/
.
.
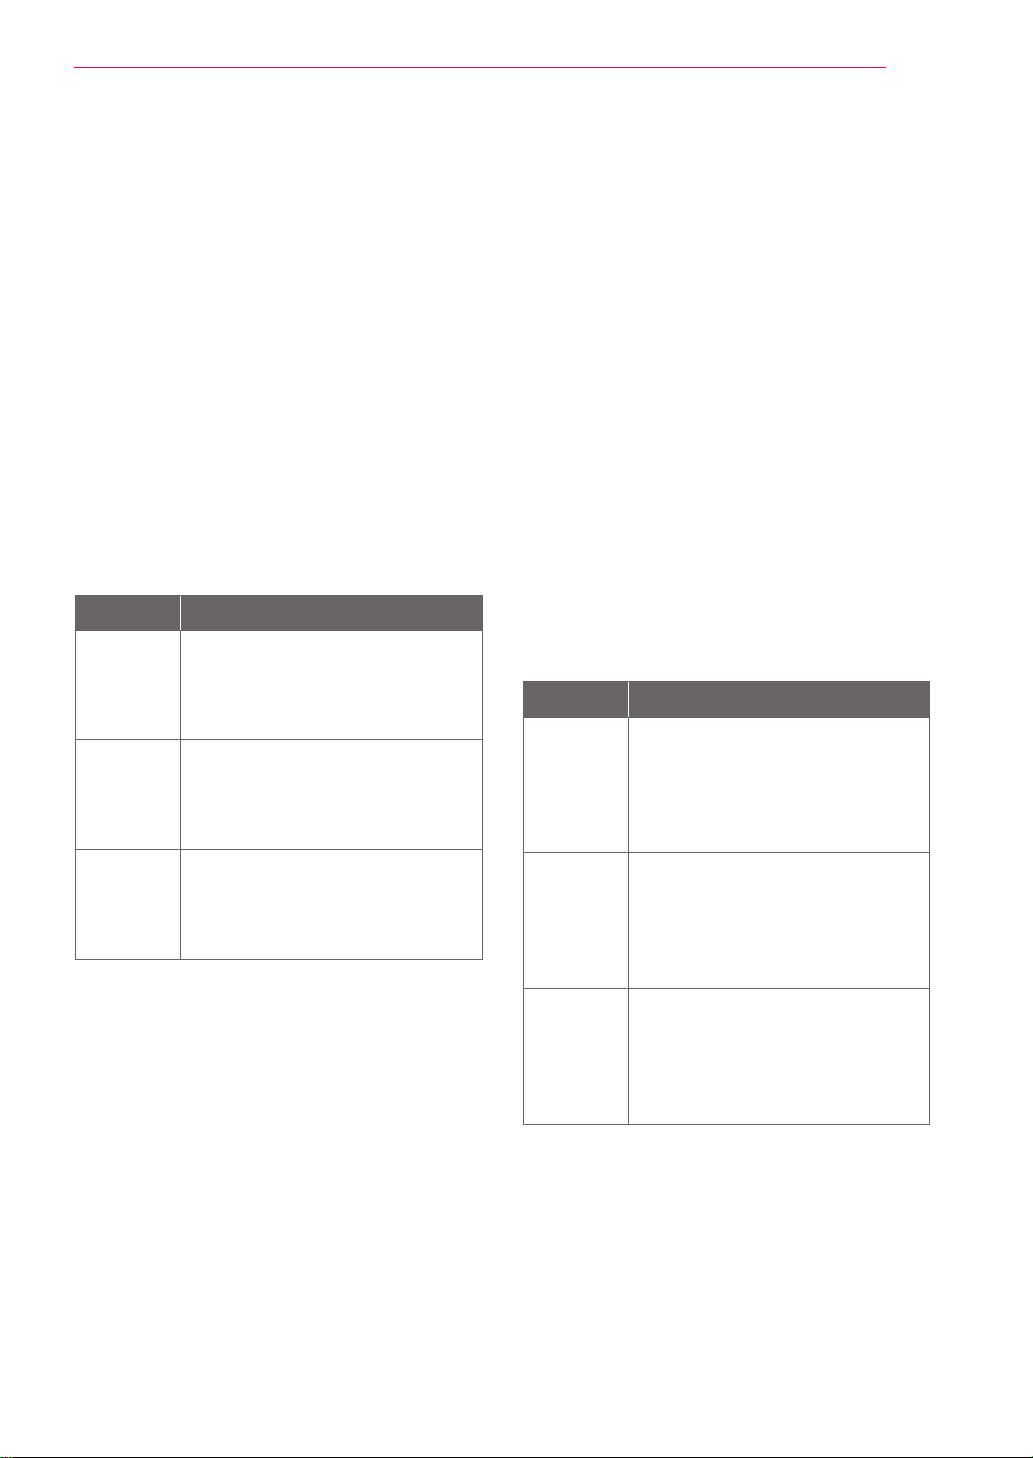
1
Energy saving Design
The energy saving Design monitors only work
while connected to the computers that have
energy saving features.
Os monitores que incorporam o programa
de economia de energia só funcionam
apropriadamente se conectados a
computadores que possuem recursos de
economia de energia.
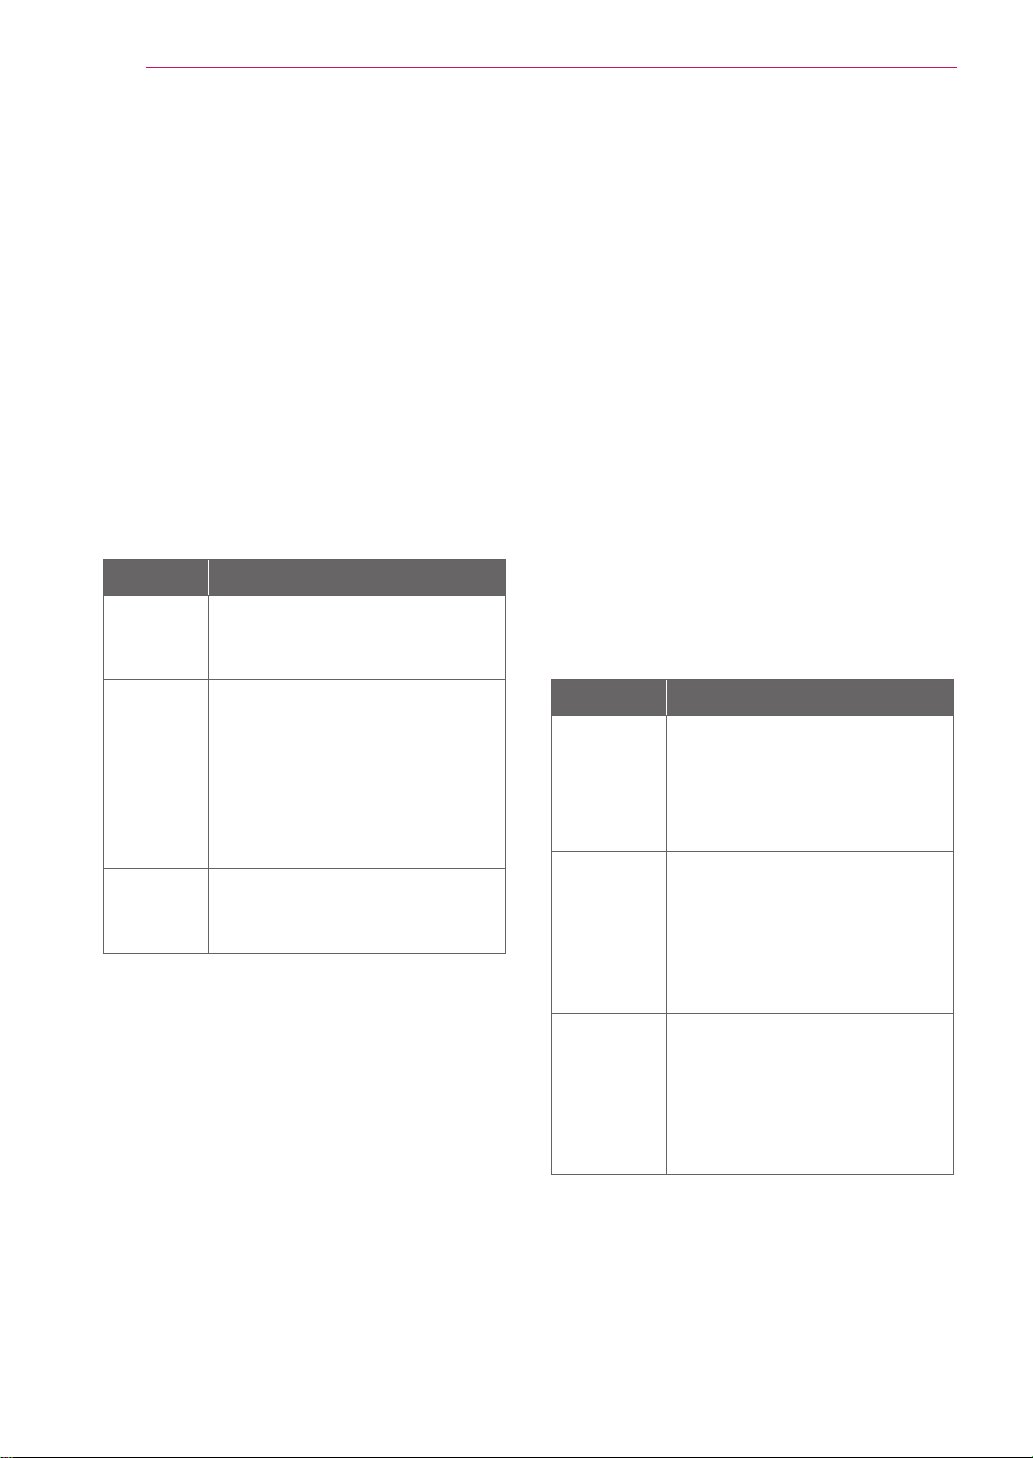
2
Energy saving Design
한국어
절전디자인
이 프로그램은 컴퓨터 장비 제조업체가 해당 제품에
회로를 내장하여 , 사용하지 않는 기간에 전력 소비를
줄일 수 있도록 만들어졌습니다 .
이 모니터를 VESA DPMS(Display Power
Management Signaling) 프로토콜을 준수하는
화면 비움 소프트웨어가 있는 PC 와 함께 사용하면
사용하지 않는 기간에 전력 소비를 줄여서 에너지를
상당히 절약할 수 있습니다 .
두 개의 신호 라인과 세개의 동작모드 [ 온 모드 , 절전
모드 , 오프 모드 ) 가 존재합니다 .
모드 정의
온 모드
정상적인 동작상태 .
전원에 연결되어 있고 스크린에 정상
적인 이미지를 표시하고 있다 .
절전
모드
컴퓨터로 부터 지시를 받은 후 또는
기타 기능에 의해 모니터의 전력이 저
감되는 상태 . 이 모드에서는 스크린
에 아무 것도 표시되지 않으며 , 사용
자 또는 컴퓨터로 부터의 지령 ( 마우
스 동작 , 키보드 입력 ) 에 의해 가동
상태인 온 모드로 전환 된다 .
오프
모드
가장 낮은 전력 소비 상태 .
전원 스위치를 이용해 전원을 오프시
킨 상태이다 .
참 고
모니터 절전 기능은 절전 기능이 있는 컴퓨터
에 연결되어 있는 경우에만 사용할 수 있습니
다 .
Die Bildschirme mit Energiespar-Design
funktionieren nur, wenn sie an Computer mit
Energiesparfunktionen angeschlossen sind.
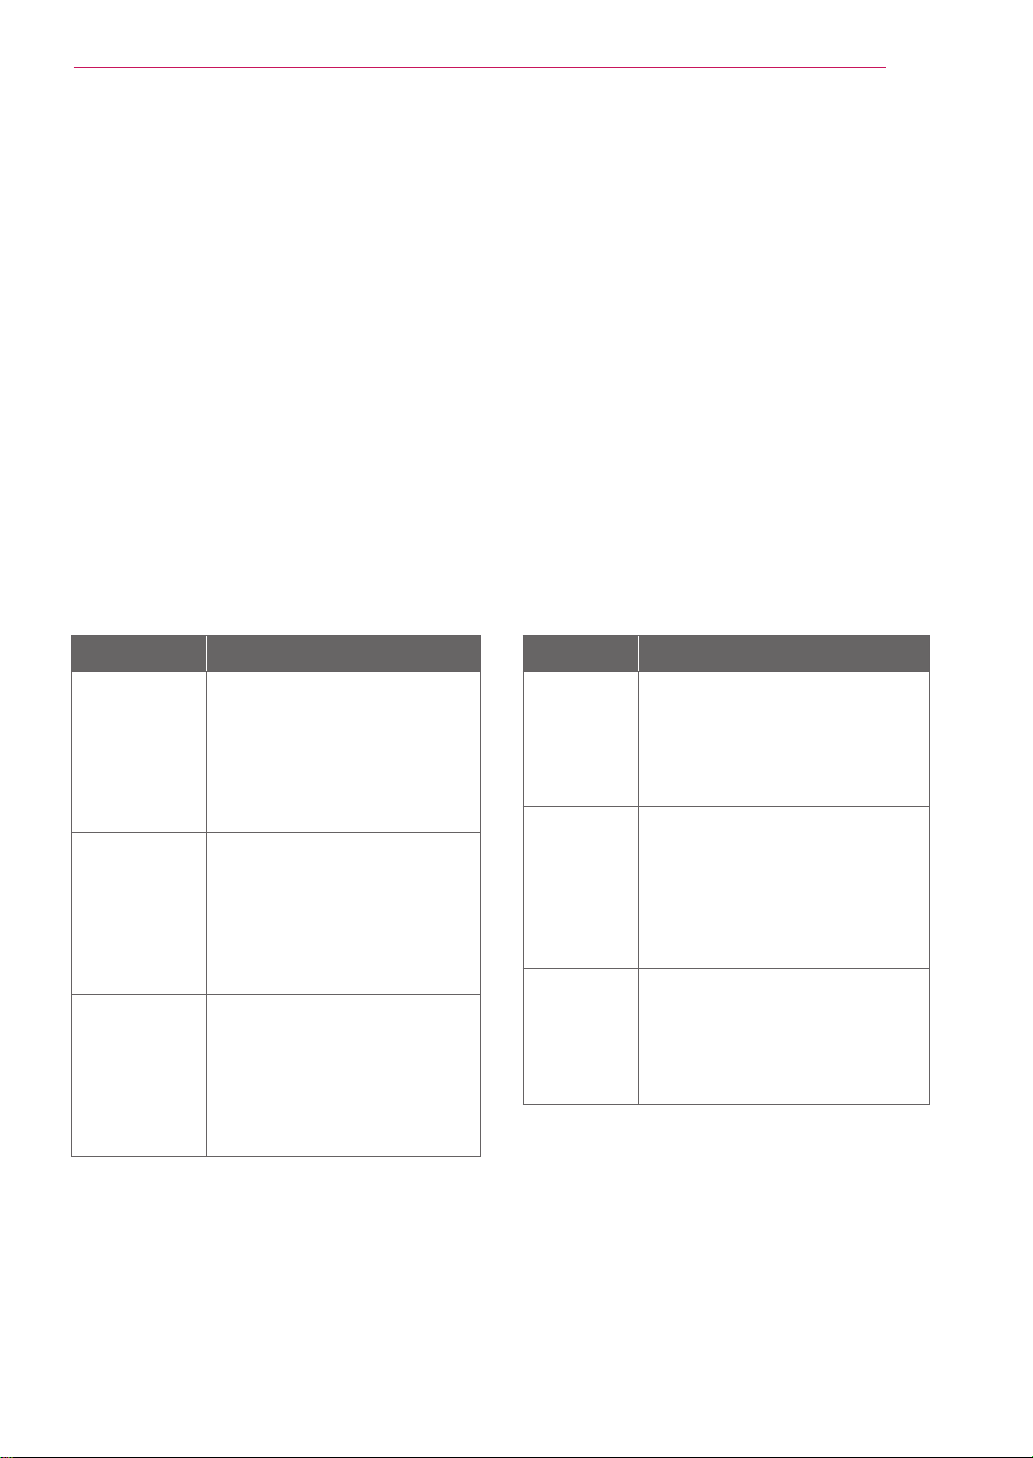
3
Energy saving Design
Az energiatakarékos kialakítással készült
monitorok csak akkor m ködnek, ha olyan
számítógépre csatlakoztatja, amely rendelkezik
energiatakarékossági funkciókkal.
Monitor dengan desain hemat energi hanya
bekerja ketika terhubung dengan komputer
yang memiliki fitur hemat energi.
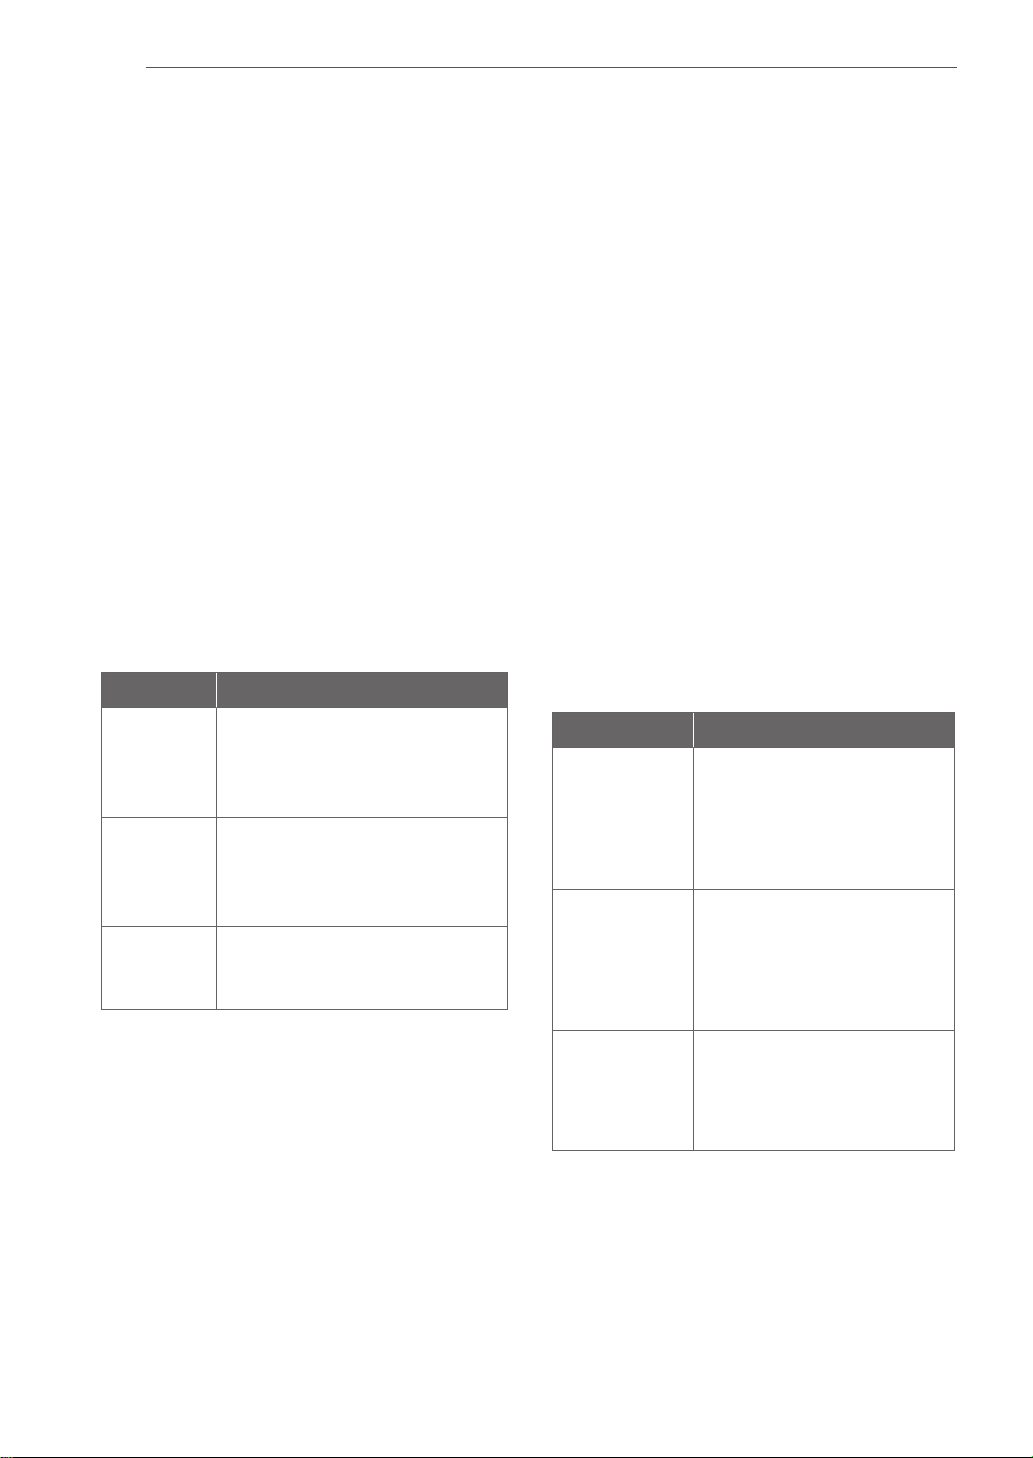
4
Energy saving Design
日本語
省エネ設計
(省エネルギー設計、節電設計)
本プログラムはコンピュータ機器メーカーが製造す
る製品がその非使用時 ( 非動作時 ) は消費電力
を抑える回路構成を持つことを目的に策定されま
した。
本モニターを VESA が策定した DPMS(Display
Power Management Signaling) プロトコルに凖拠し
た スクリーンブランキング(スクリーンセーバー)ソ
フトウェアをインストールした PC と一緒にご使用す
ることで、本モニターの非使用時(非動作時)の消
費電力を大幅に抑えることができます。
2 つの信号ラインと、3 つの操作モードがあります。
操作モードはオンモード、スリープモード、そして
オフモードの3つです。
モード 説明
オン モ
ード
通常の使用時 ( 通常の動作時)
モニターがオンモードで電源は
接続されているとき画像が表示さ
れます。
スリープ モ
ード
省電力の状態です。
マウスを働かすかキーボードー
のどれかのキ-を押すとオンモ
ードに戻ります。
オフ モ
ード
最も消費電力が少ない状態です。
電源スイッチを入れるとオンモー
ドに戻ります。
注 ( ご注意 )
• 省電力設計のモニターは省電力機能を備えたコン
ピュータに接続されたときのみ有效です。
Los monitores con diseño de ahorro de energía
sólo funcionan cuando están conectados a
ordenadores con capacidad de ahorro de
energía.
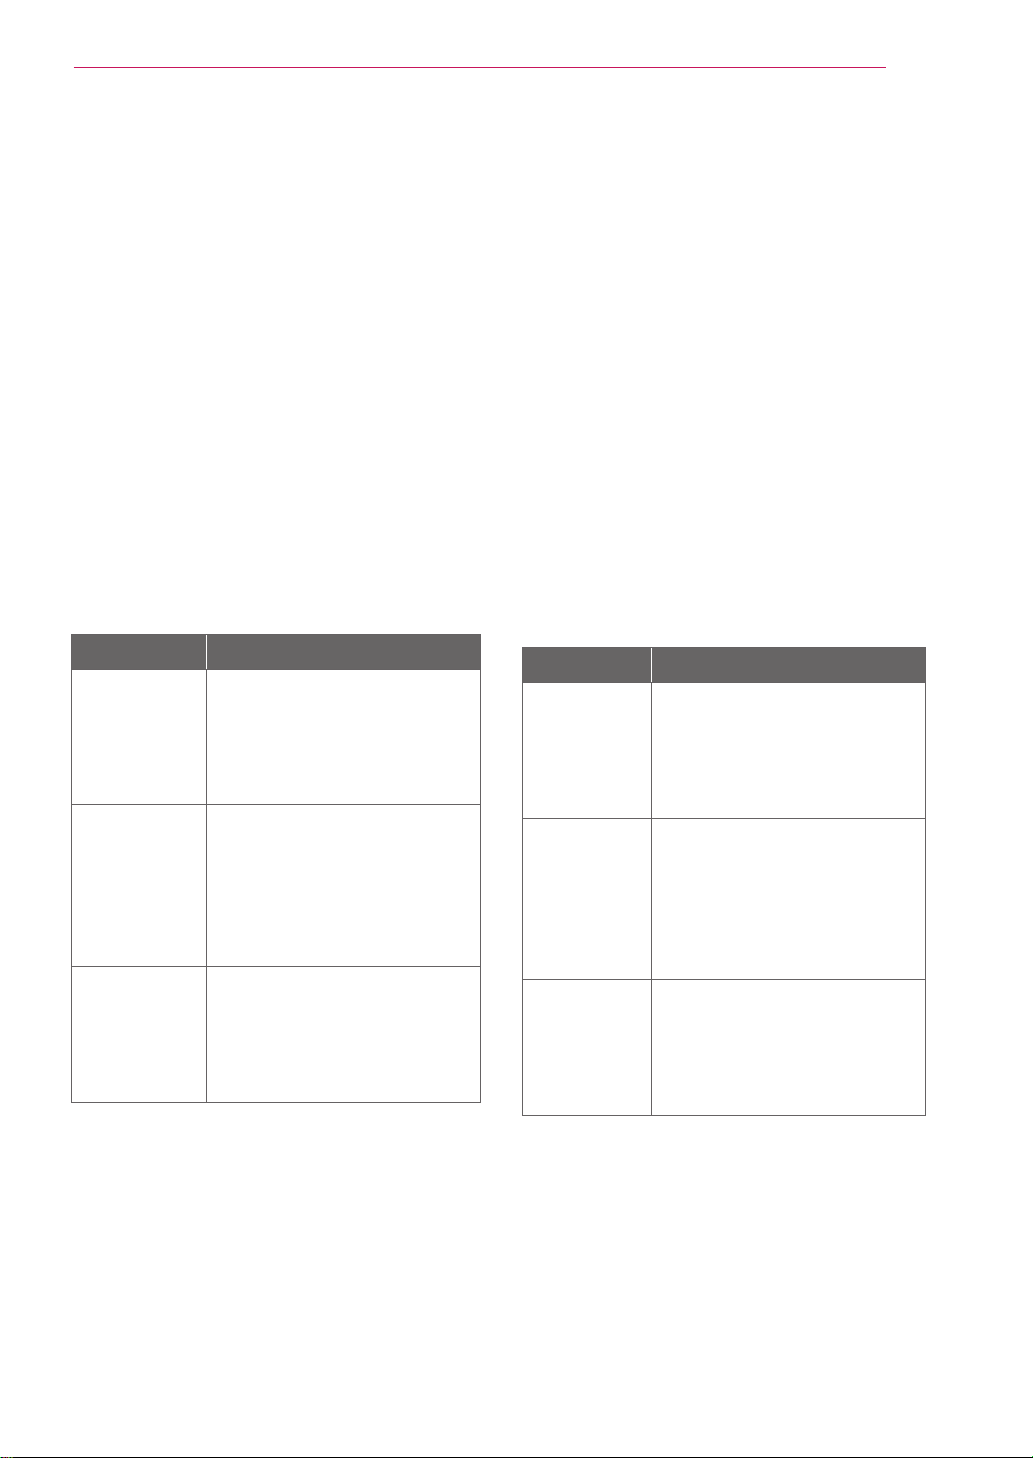
5
Energy saving Design
Энергия үнемдейтін дизайнды мониторлар
энергияны үнемдеу мүмкіндіктері бар
компьютерлерге қосылып тұрғанда ғана
жұмыс істейді.
Monitors met een energiebesparend ontwerp
werken alleen als ze worden aangesloten op
computers met energiebesparende functies.
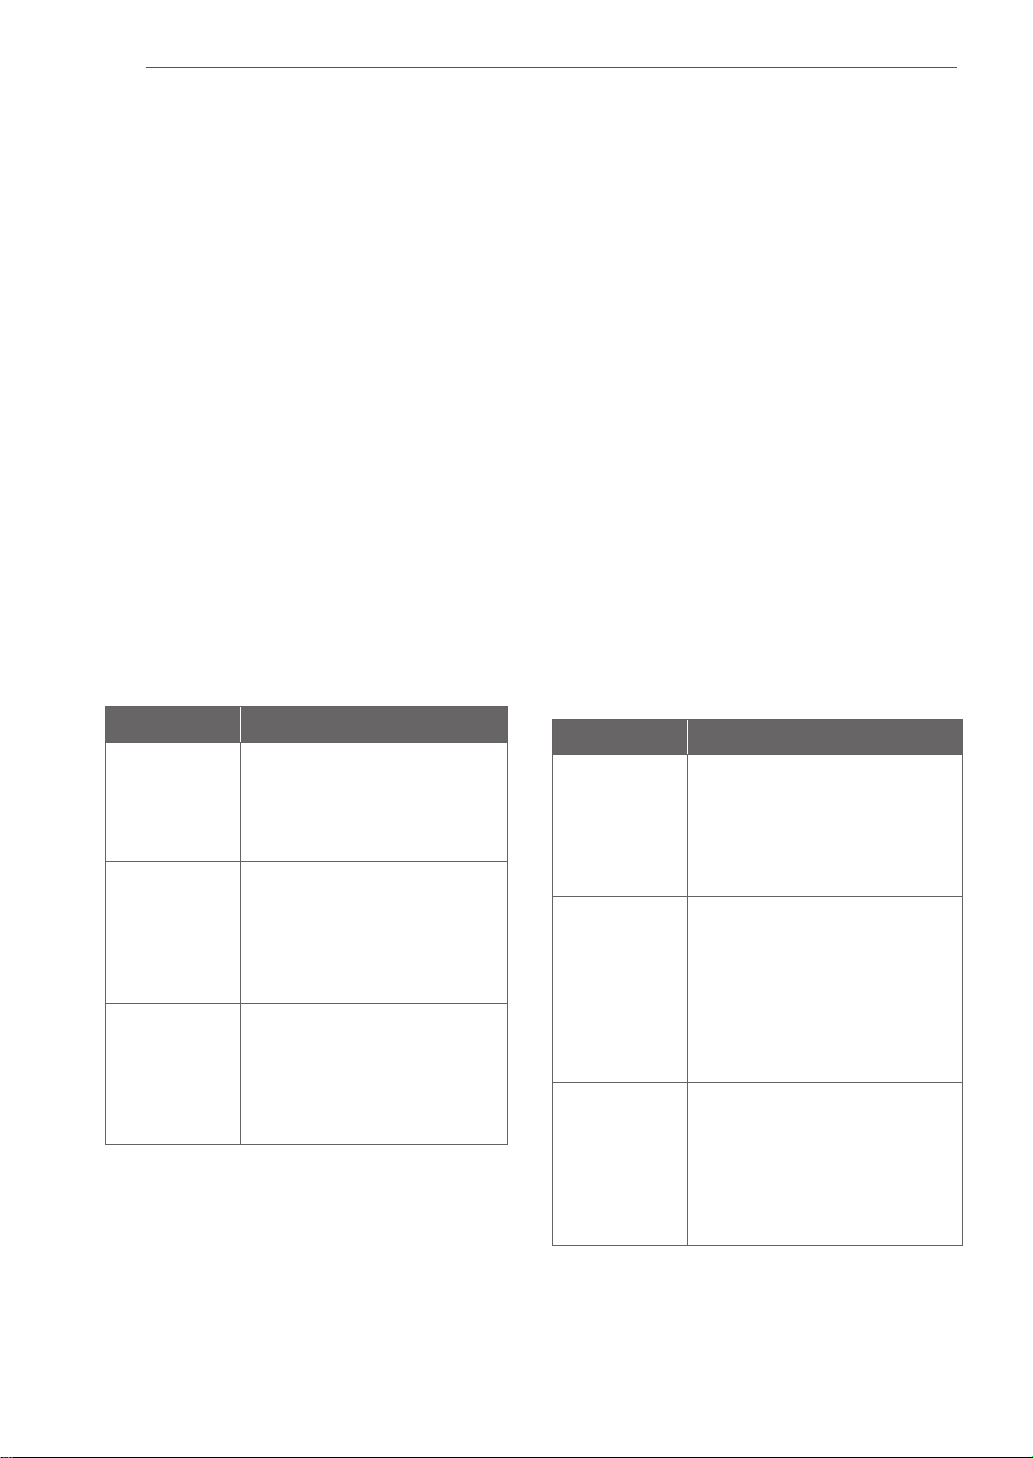
6
Energy saving Design
Οι οθόνες με σχεδίαση εξοικονόμησης ενέργειας
λειτουργούν μόνο όταν είναι συνδεδεμένες
με υπολογιστές που διαθέτουν δυνατότητες
εξοικονόμησης ενέργειας.
Les moniteurs design économiques en énergie
fonctionnent uniquement lorsqu’ils sont
connectés à des ordinateurs disposant de
fonctionnalités d’économie d’énergie.
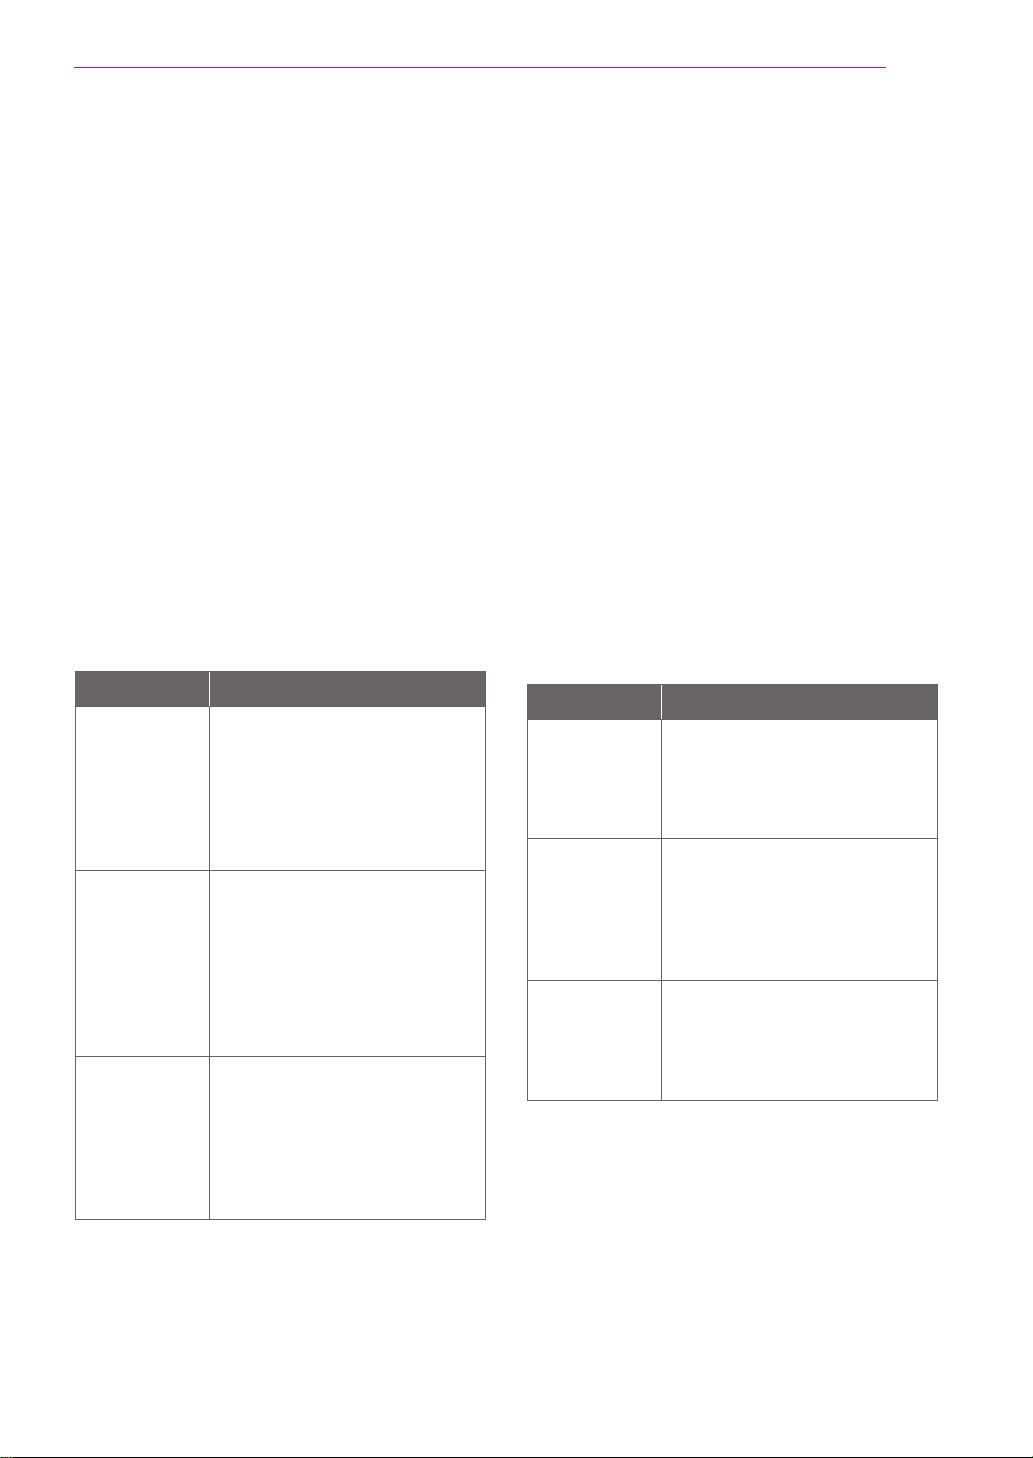
7
Energy saving Design
Функція енергозбереження монітора
працюватиме лише за умови наявності
відповідної функції на під'єднаному
комп'ютері.
I monitor conformi al Programma di risparmio
energetico funzionano solo se connessi a
computer dotati di funzionalità di risparmio
energetico.
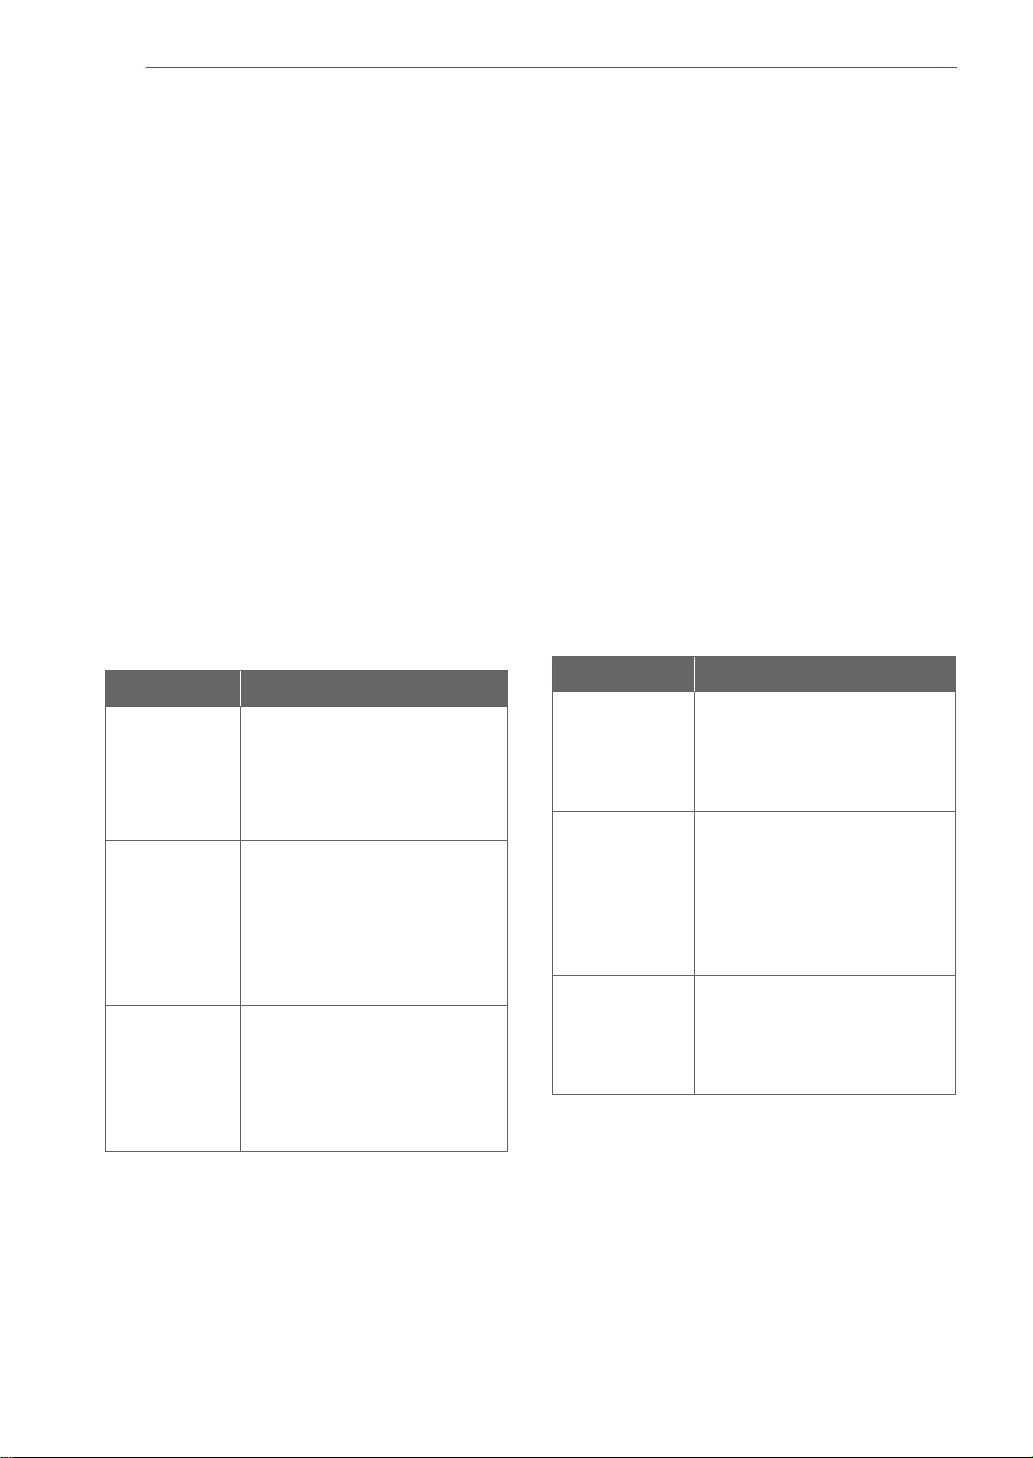
8
Energy saving Design
POLSKI
Oszczędzanie energii
Ten program został stworzony, aby producenci
sprzętu komputerowego mieli możliwość
wbudowania do swoich produktów zespołów
obwodów elektrycznych redukujących pobór
mocy w stanie bezczynności.
W przypadku użycia tego monitora na
komputerze osobistym (PC), na którym
zainstalowano oprogramowanie wygaszające
ekran zgodne z protokołem VESA (DPMS –
Display Power Management Signallising),
umożliwia on zaoszczędzanie znacznych ilości
energii poprzez redukcję poboru mocy w stanie
bezczynności.
Istnieją 2 linie sygnału, 3 tryby pracy:
Włączony, Uśpienie, Wyłączony.
Tryb Definicja
Włączony
Normalny proces działania.
W trybie „włączony”
monitor podłączony jest do
źródła zasilania i wyświetla
obraz.
Uśpienie
Stan zredukowanego
poboru mocy.
Przywraca do stanu
„włączony”, gdy użytkownik
poruszy myszką lub
przyciśnie dowolny klawisz
na klawiaturze.
Wyłączony
Stan najmniejszego
poboru mocy. Przywraca
do stanu „włączony”,
gdy użytkownik naciśnie
włącznik zasilania.
Uwaga
• Monitory z funkcją oszczędzania energii
działają tylko, jeśli są podłączone do
komputerów posiadających właściwości
oszczędzania energii.
РУССКИЙ
Функция сохранения энергии
Эта программа разработана для создания и
внедрения производителями компьютерного
оборудования схем, позволяющих снизить
потребление электроэнергии, когда
компьютер не находится в рабочем режиме.
Если монитор используется с ПК, на котором
установлено программное обеспечение
для затемнения экрана, соответствующее
протоколу VESA Display Power Management
Signalling (DPMS), он может экономить
энергию, сокращая ее потребление, когда
не находится в рабочем режиме.
Существуют 2 сигнальные линии, 3 режима
работы:
Включен, Ожидание, Выключен
Режим Описание
Вкл-
ючен
Обычный режим работы.
Когда монитор подключен
к источнику питания и
находится в режиме
«Включен», он выводит
изображение на экран.
Ожид-
ание
Энергопотребление
снижено. Компьютер
возвращается в режим
«Включен», когда
пользователь перемещает
мышь или нажимает
любую клавишу на
клавиатуре.
Вык-
лючен
Энергопотребление
минимально. Компьютер
переходит в режим
«Включен», когда
пользователь нажимает
кнопку включения
питания.
Примечание
• Мониторы с функцией сохранения энергии
работают только при соединении с
компьютерами, поддерживающими эту
функцию.
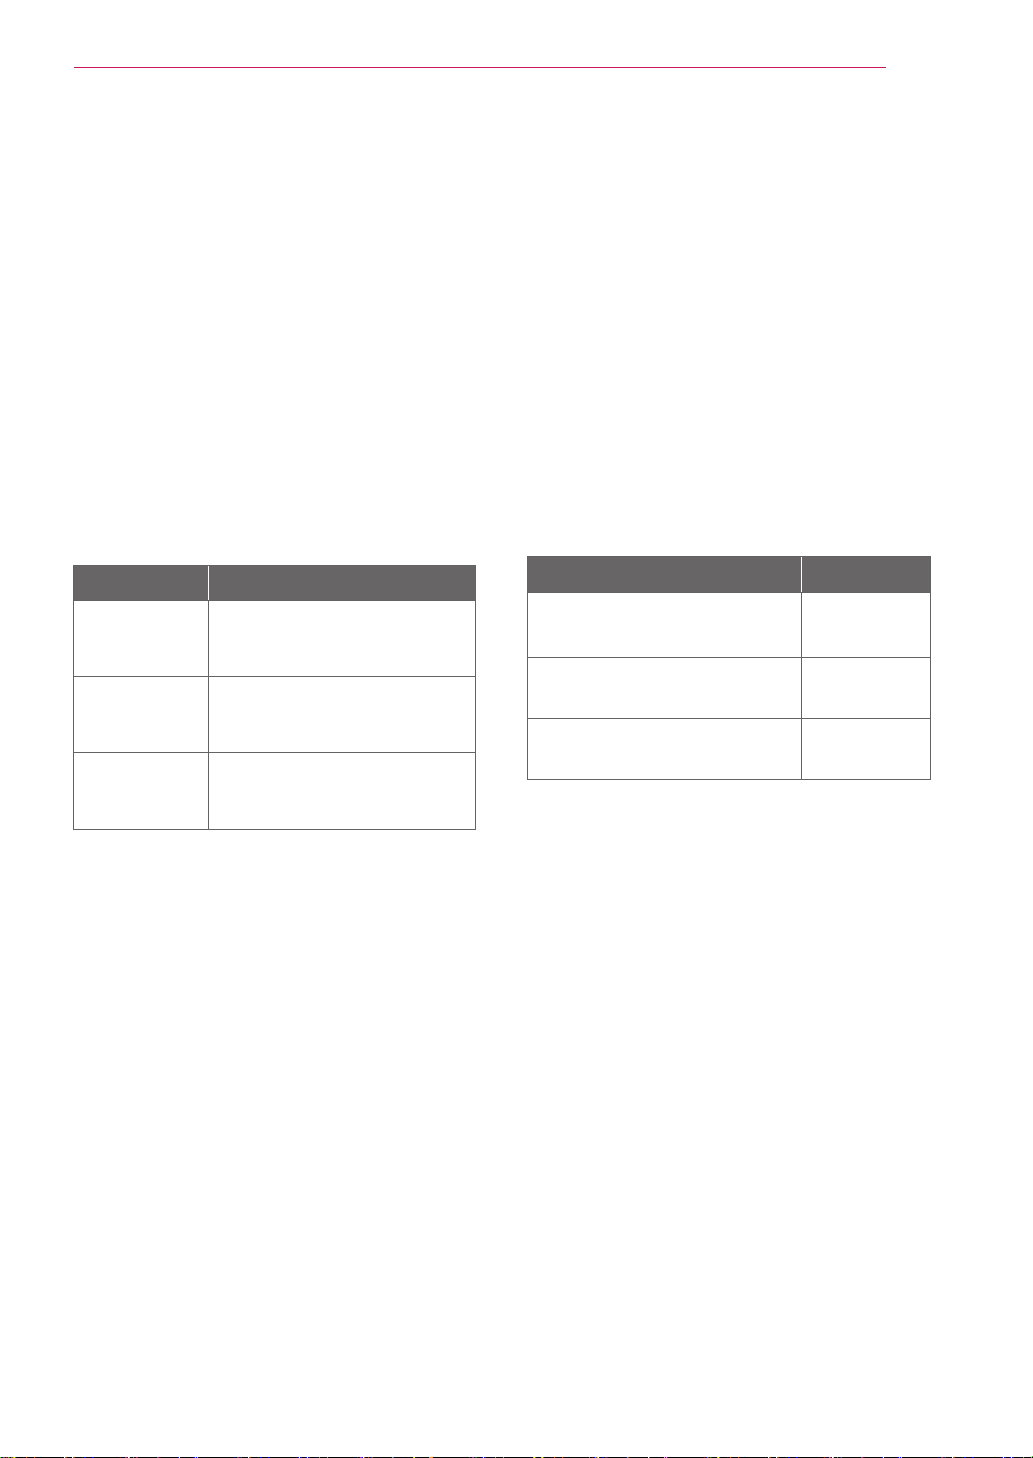
9
Energy saving Design
繁體中文
節能設計
此程式用於幫助電腦設備製造廠商在他們的產
品中建立電路,藉此降低產品處於非作業狀態
時的功率
消耗量。
本顯示器與已安裝符合 VESA 顯示能源管理訊
號 (DPMS) 協定之螢幕抑制顯示軟體的電腦配
合使用時,可降低處於非作業狀態時的功率消
耗量,進而節省大量能源。
共有 2 根訊號線以及 3 種作業模式:
開啟模式、睡眠模式和關閉模式。
模式 定義
開啟模式
正常作業模式。
顯示器與電源連接並處於開
啟模式時,會顯示影像。
睡眠模式
低功率消耗狀態。
若使用者移動滑鼠或按鍵盤
上的鍵,則返回開啟模式。
關閉模式
最低功率消耗狀態。
若使用者按電源開關,則返
回開啟模式。
註
•該節能設計顯示器僅在連接至具有節能功能的電
腦時才能發揮其節能作用。
•
.

1
Service
ENGLISH
Unplug the monitor from the wall outlet and
refer servicing to qualified service personnel
when :
The power cord or plug is damaged or
frayed.
Liquid has been spilled into the monitor.
The monitor has been exposed to rain or
water.
The monitor does not operate normally
following the operating instructions. Adjust
only those controls that are covered in
the operating instructions. An improper
adjustment of other controls may result in
damage and often requires extensive work
by a qualified technician to restore the
monitor to normal operation.
The monitor has been dropped or the cabinet
has been damaged.
The monitor exhibits a distinct change in
performance.
Snapping or popping from the monitor is
continuous or frequent while the monitor is
operating. It is normal for some monitors to
make occasional sounds when being turned
on or off, or when changing video modes.
Service
DEUTSCH
Wartun
Do not attempt to service the monitor yourself,
as opening or removing covers may expose you
to dangerous voltage or other hazards. Refer
all servicing to qualified service personnel.
Fuhren Sie keine Wartungsarbeiten selbst
durch. Durch Offnen oder Entfernen wichtiger
Abdeckungen werden spannungsfuhrende Teile
freigelegt, so dass eine erhohte Gefahrdung
besteht. Fur Wartungsarbeiten in diesen
Bereichen ist der Kundendienst zustandig.
Bei folgenden Fehlerbedingungen ist der
Netzstecker des Monitors zu ziehen und der
Kundendienst zu benachrichtigen:
Wenn der Netzstecker beschadigt oder das
Netzkabel ausgefranst ist.
Wenn Flussigkeit in den Monitor gelaufen ist.
Wenn der Monitor Regen oder Feuchtigkeit
ausgesetzt worden ist.
Wenn der Monitor trotz Befolgung
aller Bedienungsanweisungen nicht
ordnungsgemass arbeitet. Benutzen Sie
ausschliesslich die Bedienelemente, die
in den Hinweisen dieses Handbuchs
beschrieben werden. Werden andere
Bedienelemente geandert oder verstellt,
konnen Schaden entstehen, die nur von
einem qualifizierten Service-Techniker
behoben werden konnen.
Wenn der Monitor fallengelassen und das
Gehause beschadigt wurde.
Wenn beim Betrieb des Monitors haufig oder
lang anhaltend knackende oder knallende
Nebengerausche auftreten. Hiermit sind
nicht die typischen Gerausche gemeint, die
beim Ein- oder Ausschalten des Monitors zu
horen sind.

2
Service
FRANÇAIS
ITALIANO
Maintenance du Moniteur
Manutenzione
Débranchez le moniteur (prise murale)
et contactez un technicien qualifié de
maintenance de ce type d’équipement dans
les cas suivants:
Le cordon d’alimentation ou la prise est
endommagé(e) ou dénudé.
Du liquide a coulé à l’intérieur du moniteur.
Le moniteur a été exposé à la pluie ou à
l’humidité.
Le moniteur ne fonctionne pas normalement
lorsque vous suiv ez les instructions du
mode d’emploi. Ne réglez que les éléments
décrits dans le mode d’emploi. Un Réglage
indadapté d’autres éléments peut entraîner
une déterioration de l’appareil et nécessite
souvent un important travail du technicien
qualifié pour remet tre le moniteur en bon
état de fonctionnement.
Le moniteur est tombé ou son boîtier a été
endommagé.
Le moniteur présente un changement net
dans ses capacités de fonctionnement.
Des bruits secs ou des bruits d’encliquetage
'clic' se font enten dre en continu ou
fréquemment en cours de fonctionnement
du moniteur. Il est normal que certains
moniteurs fassent des bruits occasionnels
lorsqu’ils sont mis sous tension ou hors
tension, ou lors de changements de mode
vidéo.
Staccare il monitor dalla presa elettrica
e consultare il personale addetto alla
manutenzione quando:
Il cavo elettrico o la spina sono danneggiati
o consumati.
Si è rovesciato del liquido sul monitor.
Il monitor è stato esposto alla pioggia o
all'acqua.
Il monitor non funziona correttamente
secondo le istruzioni oper ative. Regolare
unicamente quei controlli contemplati nelle
istruzioni operative. La manomissione di altri
controlli può provo care danni e spesso poi
è necessario un lungo lavoro da parte dei
tecnici specializzati per ripristinare le normali
funzionalità del monitor.
Il monitor è caduto o si è danneggiata la
struttura.
Il monitor funziona in maniera evidentemente
diversa da prima.vIl monitor lampeggia in
maniera continua o frequente mentre è in
funzione. E' normale che alcuni monitor
emettano suoni occa sionali quando
vengono accesi o spenti, oppure quando si
cam bia la modalità video.
Ne tentez pas de réparer vous-même votre
moniteur, car ouvrir le moniteur ou retirer son
boîtier peut vous exposer à des décharges
électriques dangereuses et présente par
ailleurs d’autres risques. Pour toute réparation
du moniteur, contactez un technicien qualifié.
Non cercare di effettuare da soli la
manutenzione poiché l'apertura della struttura
potrebbe esporre l'utente al pericolo di
scariche elettriche o ad altri rischi. Rivolgersi al
personale tecnico qualificato.

3
Service
ESPAÑOL
PORTUGUÊS
Desconecte el monitor del tomacorriente de
la pared y refiera el servicio a personal de
servicio calificado cuando:
El cable o enchufe de energía está dañado o
desgastado.
Se ha derramado líquido en el monitor.
El monitor ha sido expuesto a la lluvia o al
agua.
El monitor no funciona normal aunque
se hayan seguido las instrucciones de
operación. Ajuste sólo los controles que
están cubiertos en las instrucciones de
operación. Un ajuste incorrecto de estos
controles pueden causar daño y a veces
requiere de trabajo extenso por un técnico
calificado para restaurar el monitor al
funcionamiento normal.
El monitor se ha dejado caer o el gabinete
se ha dañado.
El monitor exhibe un cambio distinto en la
ejecución.
Los chasquidos o explosivos que emanan
del monitor son continuos o frecuentes
mientras el monitor está operando.
Los ruidos ocasionales son normales para
algunos monitores cuando se prende o se
apaga, o cambia el modo de video.
Desligue o monitor da tomada e procure por
serviço autorizado, quando:
O cabo de força ou plugue estiver danificado
ou rompido.
Houve queda de líquido no monitor.
O monitor foi exposto à chuva ou água.
O monitor não opera normalmente seguindo
as instruções de operação. Ajuste somente
os controles descritos nas instruções de
operação. Uma tentativa de ajuste de outros
controles invali-dará a garantia, além de
exigir diversas horas de trabalho de pessoal
qualificado para restaurar as condições
originais de fun-cionamento do monitor.
O monitor caiu ou está com o gabinete
quebrado.
O monitor exibe uma distinta mudança de
performance.
O monitor emite estalos ou estouros
continuamente durante sua operação
normal. Para alguns monitores é normal se
ouvirem estalos quando se liga ou desliga o
monitor ou quando há mudança de modo de
vídeo.
Servicio
Manutenção
No trate de arreglar usted mismo el monitor, ya
que abrir y sacar las tapas pueden exponerlo
a niveles de voltaje peligrosos u otros peligros.
Refiera el arreglo a un personal técnico
calificado para ello.
Não tente efetuar a manutenção do monitor
você mesmo. Abrir ou remover as tampas do
gabinete deixarão expostos pontos de alta
tensão em diversas partes do monitor. Procure
sempre pessoal qualificado para execução de
serviços de manutenção.

4
Service
NEDERLANDS
In de volgende gevallen haalt u de stekker van
de monitor uit het stopcontact en roept u de
hulp in van een gekwalificeerde technicus:
Het netsnoer of de stekker is beschadigd of
versleten.
Er is vloeistof in de monitor gemorst.
De monitor heeft blootgestaan aan regen of
water.
De monitor werk niet goed, ondanks het feit
dat u handelt volgens de gebruiksaanwijzing.
Beperk u bij het instellen van de monitor
tot de items die in de gebruiksaanwijzing
worden besproken. Het onjuist instellen van
andere items kan storingen veroorzaken.
Vaak is dan een omvangrijke reparatie door
een gekwalificeerde technicus nodig, om
de monitor weer voor normaal gebruik in
gereedheid te brengen.
De monitor is gevallen of de behuizing is
beschadigd.
De monitor functioneert wezenlijk anders
dan normaal het geval is.
De monitor produceert voortdurend of
regelmatig kraak- en knalgeluiden. Bij
sommige monitoren is het normaal dat ze
af en toe geluiden produceren bij het in- en
uitschakelen, of wanneer ze veranderen van
videomodus.
Onderhoud
Probeer de monitor niet zelf te repareren,
aangezien u bij het openen of verwijderen van
de behuizing blootgesteld kunt worden aan
gevaarlijke elektrische schokken of andere
gevaren. Laat alle reparatiewerkzaamheden
over aan gekwalificeerde technici.
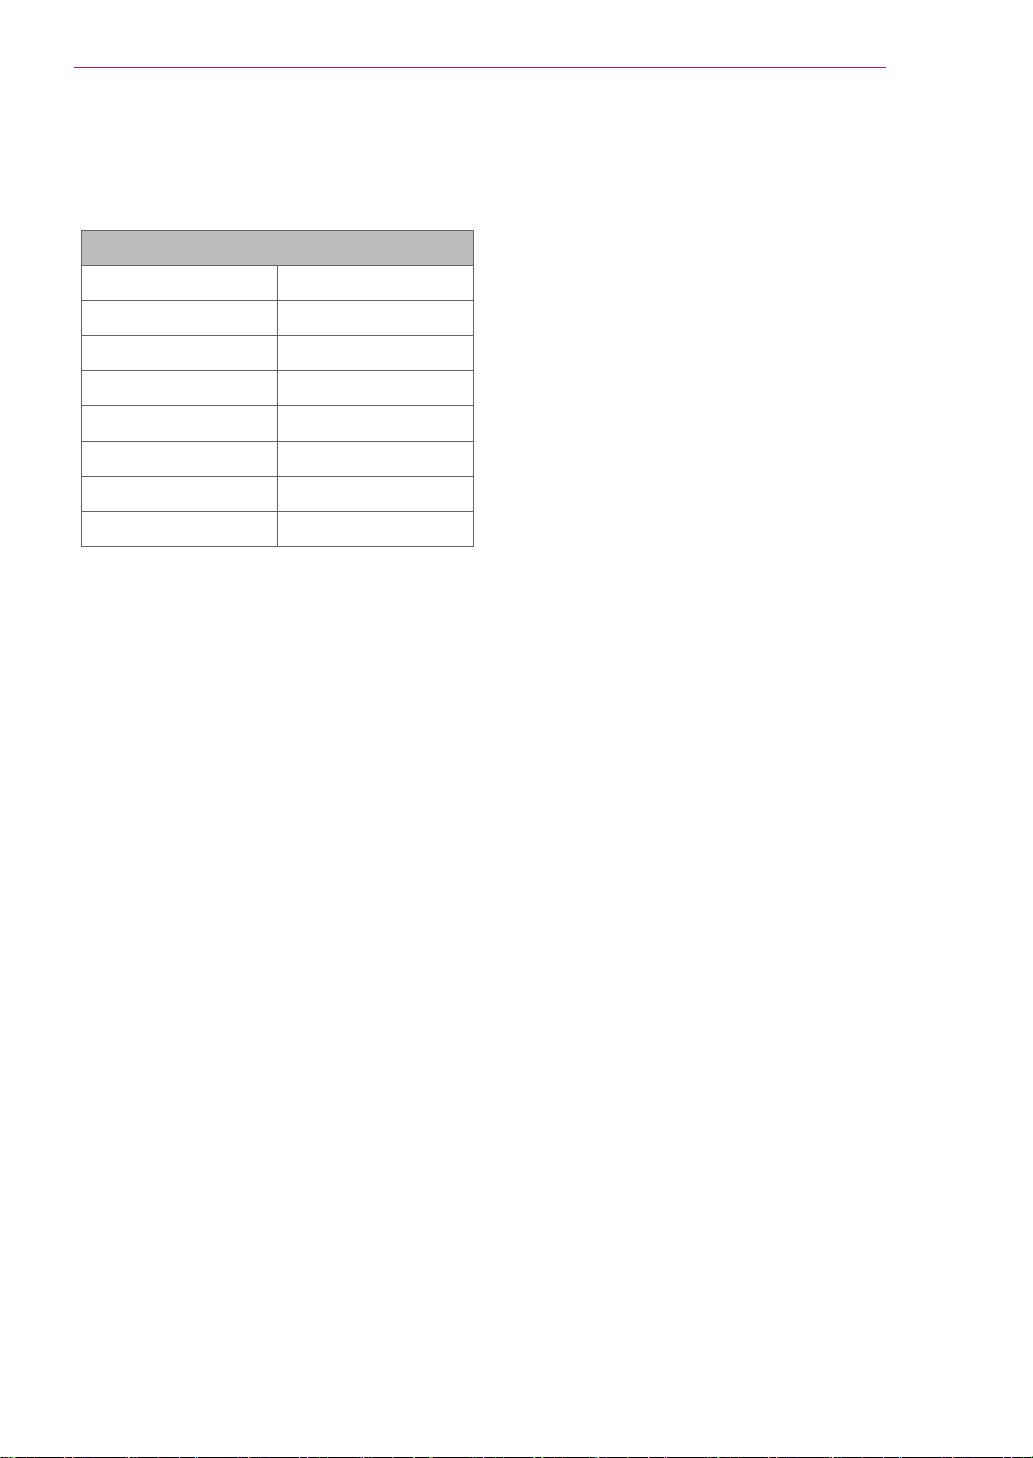
5
Service
Dammam 8339561
Khobar 8942694
Hoffuf 5861262
Jubail 3624444
Riyadh 4652641
Jeddah 6531688
Makkah 5500110
Madina 8274793
Maintenance Tel
6
Service
日本語
한국어
次のような保守になったら、モニタ-の電源プラグ
をコンセントから抜き、修理センターにご相談くださ
い。
電源コードまたはプラグが破損した、または擦り
切れた。
モニターの内部に液体をこぼしてしまった。
モニターが雨または水に濡れてしまった。
取扱説明書どおりに操作してもモニターにうまく
画像が表示されない場合、お客様の方で調整
するのは、取扱 説明書で説明されているボタン
を使った調整だけにしてください。
モニターを床に落としてしまった。または、キャビ
ネットを破損してしまった。
モニターの性能が明らかに落ちてきた。
モニターも使用中、常にまたは断続的にピシピ
シといった音やパンといった音がする。ただし、
正常な モニターでも、電源を入れたりきったりし
たときには音はする場合があります。
다음과 같은 경우에는 벽면 콘센트에서 모니터의 플러그
를 뺀 다음 자격이 있는 수리 담당자에게 의뢰하십시오 .
전원코드 또는 플러그가 손상되거나 낡았습니다 .
액체가 엎질러져서 모니터에 흘러들어갔습니다 .
모니터가 비 또는 물에 노출되었습니다 .
모니터가 일반적인 동작지침에 맞게 동작하지 않으며 ,
동작지침에 설명된 컨트롤만 조정합니다 . 다른컨트롤
을 잘못 조정하여 손상된 것 같습니다 . 모니터가 정상
적으로 동작하도록 복원하려면 자격을 갖춘 기술자가
전반적으로 수리해야 합니다 .
모니터를 떨어뜨렸거나 캐비닛이 손상되었습니다 .
모니터의 성능이 눈에 띄게 달라졌습니다 .
모니터가 작동하는 동안 모니터에서 스냅 또는 팝 현
상이 계속적으로 또는 자주 발생합니다 . 모니터를 켜
거나 끌 때 또는 비디오 모드를 변경할 때 일부 모니
터에서 소리가 나는 경우가 있는데 이는 정상적인 것
입니다 .
保守および修理
수리
モニターのカバーを開いたり取り外したりすると、高
電圧による感電その他の危険性があるので、モニ
ターを自分で修理したりしないでください。修理が
必要なときは、サービスマンに頼んでください。
덮개를 열거나 떼어내는 것은 감전의 우려 및 다른 위험
요소가 있으므로 모니터를 직접 수리하려고 하지 마십시
오.
모든 수리는 자격을 갖춘 수리 담당자에게 의뢰하십시오 .
*お問い合わせ先については提供されている「修理に
関するご案内」カードのサービスセンター案内をご参
照ください。
ディスプレイの裏ぶたを開け
ないでください。内部には高
電圧の部分があり、感電の恐
れがあります。
警告
REGULATORY
INFORMATION
Please read this manual carefully before operating
your set and retain it for future reference.
P/No. : SAC37093516 (2108-REV00)
Copyright ⓒ 2021 LG Electronics Inc. All Rights Reserved.
www.lg.com

2
INFORMATION FOR
ENVIRONMENTAL PRESERVATION
English
Information for Environmental Preservation
LGE. announced the ‘LG Declaration for a Cleaner Environment’ in 1994,
and this ideal has served as a guiding managerial principle ever since. The
Declaration is a foundation that has allowed us to undertake environmentally
friendly activities in careful consideration of economic, environmental, and
social aspects.
We promote activities for environmental preservation, and we specifically
develop our products to embrace the concept of environment-friendly.
We minimize the hazardous materials contained in our products. For example,
there is no cadmium to be found in our product.
Information for recycling
This product may contain parts which could be hazardous to the environment.
It is important that this product be recycled after use.
LGE. handles all waste product through an environmentally acceptable
recycling method. There are several take-back and recycling systems currently
in operation worldwide. Many parts will be reused and recycled, while harmful
substances and heavy metals are treated by an environmentally friendly
method.
If you want to find out more information about our recycling program, please
contact your local LG vendor or a corporate representative of LG.
We set our vision and policies on a cleaner world by selecting the issue of
the global environment as a task for corporate improvement. Please visit our
website for more information about our ‘green’ policies.
http://www.lg.com/global/sustainability/environment/take-back-recycling.jsp
Deutsch
Informationen zur Erhaltung der Umwelt
Im Jahr 1994 verkündete LGE die ‘LG Declaration for a Cleaner Environment’
(LG Erklärung für eine sauberere Umwelt). Seitdem dient dieses Ideal als
führendes Prinzip des Unternehmens. Diese Erklärung war die Basis für die
Durchführung von umweltfreundlichen Aktivitäten, wobei wirtschaftliche,
umweltbezogene und soziale Aspekte in die Überlegungen mit einbezogen
wurden.
Wir fördern Aktivitäten zum Schutz der Umwelt und die Entwicklung
unserer Produkte ist darauf ausgerichtet, unserem Konzept bezüglich
Umweltfreundlichkeit gerecht zu werden.
Wir sind darauf bedacht, den Anteil der in unseren Produkten enthaltenen
schädlichen Materialien zu minimieren. So ist in unseren Produkt beispielsweise
kein Kadmium zu finden.
Informationen zum Thema Recycling
Dieses Produkt enthält Teile die umweltschädlich sein können. Es ist unbedingt
erforderlich, dass das Produkt recycelt wird, nachdem es außer Dinest gestellt
wurde.
Bei LGE werden alle ausrangierten Produkte in einem unter umweltbezogenen
Aspekten geeigneten Verfahren recycelt. Augenblicklich sind weltweit mehrere
Rücknahme- und Recyclingsysteme im Einsatz. Viele Teile werden wieder
verwendet und recycelt. Schädliche Substanzen und Schwermetalle werden
durch umweltverträgliche Verfahren behandelt.
Falls Sie mehr über unser Recyclingprogramm erfahren möchten, wenden Sie
sich bitte an Ihren lokalen LGHändler oder einen Unternehmensvertreter von
LG.
Wir richten unsere Firmenpolitik auf eine sauberere Umwelt hin aus, indem
wir umweltspezifische Aspekte als wichtigen Punkt in die Weiterentwicklung
unseres Unternehmens einfließen lassen. Zusätzliche Informationen über
unsere ‘grüne’ Firmenpolitik erhalten Sie auf unserer Website.
http://www.lg.com/global/sustainability/environment/take-back-recycling.jsp

3
Français
Information sur la protection del’environnement
LGE. a publié sa ‘Déclaration en faveur d’un environnement plus propre’
en 1994 et celle-ci est restée, depuis lors, un principe directeur de notre
entreprise. Cette déclaration a servi de base à notre réflexion et nous a permis
de prendre en compte à la fois les aspects économiques et sociaux de nos
activités, tout en respectant l’environnement.
Nous encourageons les activités en faveur de la préservation de
l’environnement et c’est dans cet esprit que nous développons nos produits :
nous réduisons au minimum les matières dangereuses qui entrent dans leur
composition et l’on ne trouve pas de cadmium, par exemple, dans nos produit.
Information sur le recyclage
Ce produit peut contenir des composants qui présentent un risque pour
l’environnement. Il est donc important que celui-ci soit recyclé après usage.
LGE. traite les produit en fin de cycle conformément à une méthode de
recyclage respectueuse de l’environnement. Nous reprenons nos produits et
les recyclons dans plusieurs sites répartis dans le monde entier. De nombreux
composants sont réutilisés et recyclés, et les matières dangereuses, ainsi que
les métaux lourds, sont traités selon un procédé écologique. Si vous souhaitez
plus de renseignements sur notre programme de recyclage, veuillez contacter
votre revendeur LG ou un l’un de nos représentants.
Nous voulons agir pour un monde plus propre et croyons au rôle de notre
entreprise dans l’amélioration de l’environnement. Pour plus de renseignements
sur notre politique “verte”, rendez visite à notre site :
http://www.lg.com/global/sustainability/environment/take-back-recycling.jsp
Italiano
Informazioni per la tutela dell’ambiente
La LGE. ha annunciato nel 1994 la cosiddetta ‘LG Declaration for a Cleaner
Environment’ (Dichiarazione di LG a favore di un ambiente più pulito), un
ideale che da allora funge da principio ispiratore della gestione aziendale. La
dichiarazione rappresenta il fondamento che consente di intraprendere attività
a favore dell’ambiente tenendo conto degli aspetti economici, ambientali e
sociali.
Noi della LG, promuoviamo attività a favore della tutela dell’ambiente
sviluppando appositamente i nostri prodotti per cogliere il concetto del rispetto
dell’ambiente riducendo i materiali dannosi presenti nei nostri prodotti. Ad
esempio nei nostri prodotto non è presente il cadmio.
Informazioni per il riciclaggio
Il prodotto può presentare componenti che potrebbero risultare eventualmente
dannosi per l’ambiente. È importante che il prodotto sia riciclato al termine del
suo utilizzo.
La LGE. gestisce tutti i prodotto di rifiuto con un metodo di riciclaggio
soddisfacente dal punto di vista ambientale. In tutto il mondo sono
attualmente in funzione numerosi sistemi di riciclaggio e recupero. I diversi
componenti sono riutilizzati e riciclati, mentre le sostanze dannose e i metalli
pesanti vengono trattati con un metodo rispettoso dell’ambiente.
Se si desiderano maggiori informazioni in merito al programma di riciclaggio,
è consigliabile rivolgersi al proprio rivenditore LG o ad un rappresentante
aziendale della LG.
Noi della LG impostiamo la nostra visione e le nostre politiche a favore di un
mondo più pulito ponendo la questione dell’ambiente dal punto di vista globale
come una mansione rivolta al miglioramento della nostra azienda. Vi invitiamo
a visitare il nostro sito internet per ulteriori informazioni sulla nostra politica
“verde”.
http://www.lg.com/global/sustainability/environment/take-back-recycling.jsp

4
Español
Información para la conservación medioambiental
LGE. presentó la ‘Declaración de LG para un entorno más limpio’ en 1994
y este ideal ha servido para guiar nuestros principios empresariales desde
entonces. La Declaración es la base que nos ha permitido llevar a cabo tareas
que respetan el medio ambiente siempre teniendo en cuenta aspectos sociales,
económicos y medioambientales.
Promovemos actividades actividades orientadas a la conservación del medio
ambiente y desarrollamos nuestros productos específicamente para que se
ajusten a la filosofía que protege el entorno. Reducimos al máximo el uso de
materiales de riesgo en nuestros productos. Un ejemplo de ello es la ausencia
total de cadmio en nuestros productos.
Información para el reciclaje
Este producto puede contener piezas que entrañen riesgos medioambientales.
Es importante reciclar este producto después de su utilización.
LGE. trata todos los producto usados siguiendo un método de reciclaje que
no daña al entorno. Contamos con diversos sistemas de recogida y reciclaje
que funcionan a nivel mundial en la actualidad. Es posible reciclar y reutilizar
muchas de las piezas, mientras que las sustancias dañinas y los metales
pesados se tratan siguiendo un método que no perjudique al medio ambiente.
Si desea obtener más información acerca del programa de reciclaje, póngase
en contacto con su proveedor local de LG o con un representante empresarial
de nuestra marca.
Basamos nuestra visión y nuestras políticas en un mundo más limpio y para
ellos optamos por un entorno global como tarea principal de nuestra evolución
como empresa. Visite nuestra página Web para obtener más información sobre
nuestras políticas ecológicas.
http://www.lg.com/global/sustainability/environment/take-back-recycling.jsp
Português
Informações relacionadas à preservação ambiental
A LGE. anunciou a ‘LG Declaration for a Cleaner Environment’ (Declaração da
LG para um ambiente mais limpo) em 1994 e esse ideal tem servido desde
então como um princípio administrativo de orientação. A Declaração é a
base que nos tem permitido realizar atividades favoráveis ao ambiente com
consideração atenta aos aspectos econômicos, ambientais e sociais.
Promovemos atividades de preservação ambiental e desenvolvemos nossos
produtos para englobar especificamente o conceito de favorável ao ambiente.
Reduzimos os materiais perigosos contidos em nossos produtos. Por exemplo,
não há cádmio em nossos produto.
Informações relacionadas à reciclagem
Este produto pode conter peças que podem representar riscos ao ambiente. É
importante que ele seja reciclado após o uso.
A LGE. cuida de todos os produto descartados através de um método
de reciclagem agradável ao ambiente. Há vários sistemas de devolução e
reciclagem atualmente em operação no mundo. Muitas peças serão reutilizadas
e recicladas e as substâncias nocivas e os metais pesados
passarão por tratamento através de um método favorável ao ambiente.
Para obter mais informações sobre nosso programa de reciclagem, entre em
contato com seu fornecedor LG local ou com um representante corporativo
da LG.
Definimos nossa visão e nossas políticas relacionadas a um mundo mais
limpo selecionando a questão do ambiente global como uma tarefa de
aprimoramento corporativo. Visite nosso site para obter mais informações
sobre nossas políticas de meio ambiente.
http://www.lg.com/global/sustainability/environment/take-back-recycling.jsp

5
Nederlands
Informatie met betrekking tot het behoud van het
milieu
LGE. publiceerde in 1994 de ‘LG Declaration for a Cleaner Environment’ (de
LG-verklaring met betrekking tot een schoner milieu). Deze verklaring en
het ideaal van een schoner milieu fungeren sindsdien als een bestuurlijke
leidraad voor onze onderneming. Op basis van deze verklaring ontplooien wij
milieuvriendelijke activiteiten, waarbij er zowel met sociale en economische
aspecten, als met milieuaspecten zorgvuldig rekening wordt gehouden.
Wij ondersteunen activiteiten die zijn gericht op het behoud van het milieu
en wij houden bij het ontwikkelen onze producten specifiek rekening met de
milieuvriendelijkheid van onze producten. Wij minimaliseren het gebruik van
schadelijke stoffen in onze producten. Er wordt bijvoorbeeld geen cadmium
verwerkt in onze product.
Informatie met betrekking tot recycling
Deze product bevat materialen die schadelijk zouden kunnen zijn voor het
milieu. Het is belangrijk dat deze product aan het einde van zijn levensduur
wordt gerecycled.
LGE. verwerkt alle afval product via een milieuvriendelijke recyclingmethode.
Hiervoor worden er momenteel wereldwijd verscheidene inname- en
recyclingsystemen gehanteerd. Een groot aantal onderdelen wordt opnieuw
gebruikt en gerecycled, waarbij schadelijke stoffen en zware metalen volgens
een milieuvriendelijke methode worden verwerkt.
Voor meer informatie over ons recyclingprogramma kunt u contact opnemen
met uw plaatselijke LGvertegenwoordiger of een LG-vestiging.
Onze visie en ons beleid met betrekking tot een schonere wereld vloeien
voort uit het feit dat wij het milieu hebben aangemerkt als een onderwerp dat
speciale aandacht verdient binnen onze onderneming. Bezoek onze website
voor meer informatie over ons ‘groene’ beleid.
http://www.lg.com/global/sustainability/environment/take-back-recycling.jsp
Русский
Информация по охране окружающей среды
В 1994 году корпорация LGE опубликовала «Декларацию LG по охране
окружающей среды», которая с тех пор служит основным принципом
управления. На основе этой декларации мы смогли предпринять
действия, обеспечивающие безопасность окружающей среды, уделяя
при этом должное внимание экономическим, экологическим и
социальным аспектам.
Мы стимулируем деятельность по охране окружающей среды, уделяя
особое внимание разработке нашей продукции в соответствии с
концепцией экологической безопасности.
Мы сводим к минимуму содержание опасных веществ в нашей
продукции. Например, в наших продуктах вы не найдете кадмия.
Информация по утилизации отходов.
Этот продукт может содержать компоненты, которые могут нанести
ущерб окружающей среде. Необходимо утилизировать продукт после
использования.
Корпорация LGE перерабатывает все бракованные продукты с
помощью экологически приемлемого метода утилизации отходов.
По всему миру действуют системы утилизации отходов и возврата
использованной продукции. Многие компоненты будут вторично
использованы и утилизированы, в то время как вредные вещества
и тяжелые металлы будут обработаны с помощью экологически
приемлемого метода.
За более подробной информацией по нашей программе утилизации
отходов обращайтесь к местному поставщику или представителю
корпорации LG.
Мы ориентируемся на обеспечение экологической безопасности, ставя
себе целью глобальную защиту окружающей среды. Дополнительную
информацию о нашей политике по охране окружающей среды вы
можете найти на нашем сайте:
http://www.lg.com/global/sustainability/environment/take-back-recycling.
jsp
6
한국어
환경 보존 정보
LG전자는 1994년 LG환경 선언문을 발표한 후 현재까지 이를 기업경영의
이념으로 삼아왔습니다. 이 선언문을 바탕으로 LG전자는 모든 경영활동에서
경제성뿐만 아니라 환경성 및 사회성을 주요 의사 결정의 기준으로 삼음으로써
지속적으로 환경친화적인 경영을 전개하고 있습니다.
본사는 더욱 활발한 환경 보존 활동과 더불어 환경친화적 제품 개발에 주력해
왔습니다.
또한, 제품에 포함되는 환경 위해 요소를 최소화하는 데에도 노력을 게을리하지
않고 있습니다. LG전자 기기의 경우 카드뮴을 전혀 사용하지 않는 것에서도
이러한 노력을 알 수 있습니다.
재활용 정보
본 기기에는 환경에 위해를 주는 부품이 포함되어 있을 수도 있습니다. 따라서
사용이 끝난 기기는 재활용하는 것이 좋습니다.
폐기기는 모두 환경 친화적 방식으로 처리됩니다. 현재 세계적으로 운영되고
있는 회수 및 재활용 시스템에는 여러 가지가 있습니다. 대부분의 부품의 경우
재사용 또는 재활용되지만 환경 위해 물질과 중금속은 환경 친화적 방법으로
처리됩니다.
본사의 재활용 프로그램에 대한 자세한 정보는 각 지역의 LG공급업체나 LG
기업 대표부에 문의하시기 바랍니다.
LG전자는 기업 개선 정책의 하나로 지구 환경 문제를 채택함으로써 보다 나은
환경을 만들어 나가기 위한 비전과 정책을 수립했습니다. 본사의 친환경 정책에
대한 자세한 정보를 보시려면 아래의 웹 사이트를 방문하십시오.
http://www.lg.com/global/sustainability/environment/take-back-
recycling.jsp
EPEAT
“EPEAT registered where applicable/supported. EPEAT registration varies by
country - see
www.epeat.net
for registration status by country.”
JORDAN ONLY
WEEE
Disposal of your appliance
The symbol indicating separate collection for
electrical and electronic equipment consists of the
crossed-out wheeled bin.
WEEE
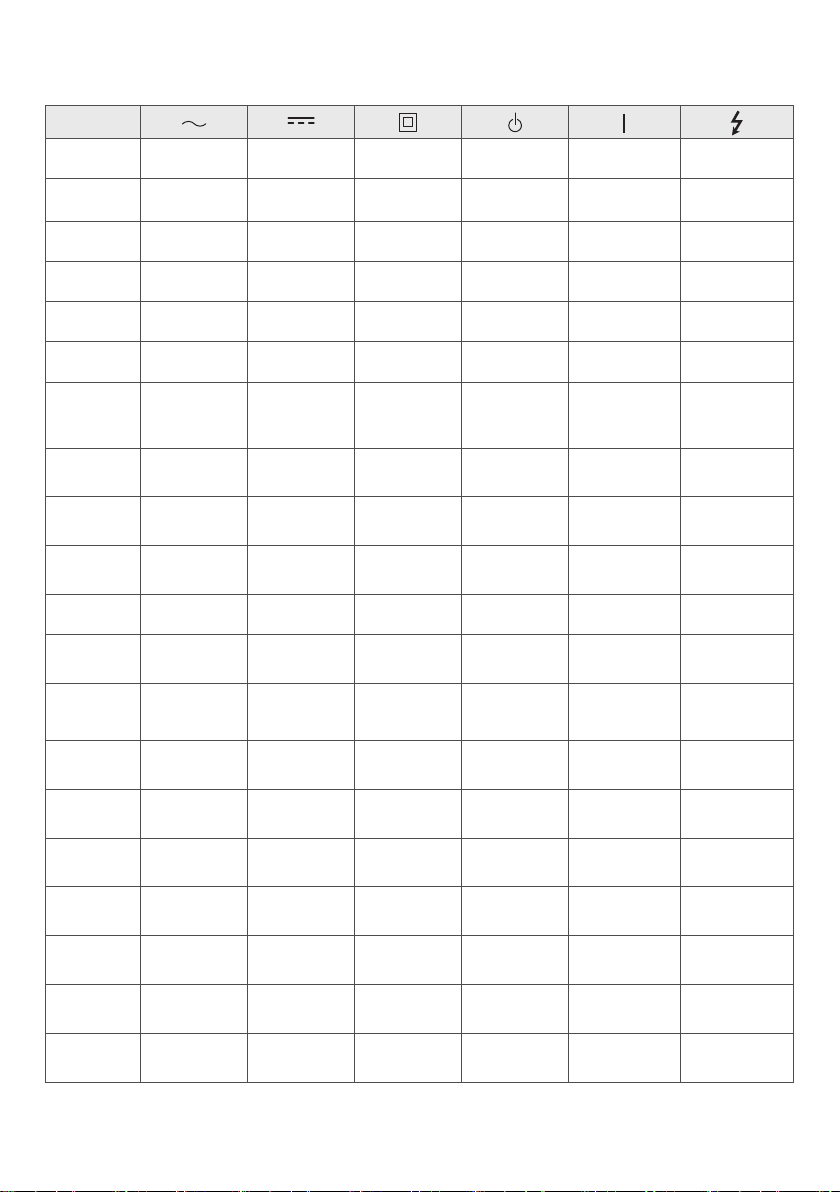
7
SYMBOLS
Language
English
Refers to alternating
current(AC).
Refers to direct
current(DC).
Refers to class II
equipment.
Refers to stand-by.
Refer to “ON”
(power).
Refers to dangerous
voltage.
Svenska
Gäller växelström
(AC).
Gäller likström (DC).
Gäller utrustning i
klass II.
Gäller stand-by. Gäller ”PÅ” (ström). Gäller farlig spänning.
Norsk
Refererer til
vekselstrøm (AC).
Refererer til
likestrøm (DC).
Refererer till klasse
II-utstyr.
Refererer til
ventemodus.
Refererer til “PÅ”
(strøm).
Refererer til farlig
spenning.
Dansk
Refererer til
vekselstrøm (AC).
Refererer til
jævnstrøm (DC).
Refererer til klasse
II-udstyr.
Refererer til standby.
Refererer til “Tændt”,
(Strøm).
Refererer til farlig
elektrisk spænding.
Suomi
Viittaa vaihtovirtaan
(AC).
Viittaa tasavirtaan
(DC).
Viittaa II luokan
laitteeseen.
Viittaa valmiustilaan.
Viittaa (virta) “päällä”
-tilaan.
Viittaa vaaralliseen
jännitteeseen.
Deutsch
Steht für
Wechselstrom (AC).
Steht für
Gleichstrom (DC).
Steht für Geräte der
Klasse II.
Steht für Standby.
Steht für „EIN“
(Einschalten).
Steht für gefährliche
Spannung.
Français
Fait référence au
courant alternatif
(CA).
Fait référence au
courant continu
(CC).
Fait référence à
l’équipement de
classe II.
Fait référence au
mode veille.
Correspond à la
commande
“Marche” (marche-
arrêt).
Fait référence à des
tensions dangereuses.
Italiano
Indica la corrente
alternata (CA).
Indica la corrente
continua (CC).
Si riferisce ad
apparecchiatura di
classe II.
Indica lo stato di
standby.
Indica lo stato
di “acceso”
(alimentazione).
Indica una tensione
pericolosa.
Español
Se refiere a la
corriente alterna
(CA).
Se refiere a la
corriente continua
(CC).
Se refiere a equipos
de clase II.
Se refiere al modo
en espera.
Se refiere al modo
“ON” (encendido).
Se refiere a voltajes
peligrosos.
Português
Refere-se à corrente
alternada (CA).
Refere-se à corrente
contínua (CC).
Refere-se a um
equipamento da
Classe II.
Refere-se ao modo
de suspensão.
Refere-se ao estado
de alimentação
“LIGADA”.
Refere-se a tensão
perigosa.
Nederlands
Verwijst naar
wisselstroom(AC).
Verwijst naar
gelijkstroom(DC).
Verwijst naar Klasse
II-apparatuur.
Verwijst naar
stand-by.
Verwijst naar “AAN”
(stroom).
Verwijst naar
gevaarlijk voltage.
Ελληνικά
Υποδεικνύει το
εναλλασσόμενο
ρεύμα (AC).
Υποδεικνύει το
συνεχές ρεύμα
(DC).
Υποδεικνύει
τον εξοπλισμό
κατηγορίας ΙΙ.
Υποδεικνύει
την κατάσταση
αναμονής.
Υποδεικνύει την
“ΕΝΕΡΓΟΠΟΙΗΣΗ”
(λειτουργία).
Υποδεικνύει
επικίνδυνη τάση.
Magyar
Váltóáramot jelent
(AC).
Egyenáramot jelent
(DC).
Class II berendezést
jelent.
Készenléti állapotot
jelent.
Bekapcsolt állapotot
jelent (tápellátás).
Veszélyes
feszültséget jelent.
Polski
Oznacza prąd
zmienny(AC).
Oznacza prąd
stały(DC).
Oznacza urządzenie
klasy ochronności II.
Oznacza tryb
czuwania.
Oznacza przycisk
„Wł.” (zasilanie).
Oznacza
niebezpieczne
napięcie.
Česky
Označuje střídavý
proud (AC).
Označuje
stejnosměrný proud
(DC).
Označuje zařízení
třídy II.
Označuje
pohotovostní režim.
Označuje režim
„ZAPNUTO“
(napájení).
Označuje nebezpečné
napětí.
Slovenčina
Označuje striedavý
prúd (AC).
Označuje
jednosmerný prúd
(DC).
Označuje zariadenie
triedy II.
Označuje
pohotovostný režim.
Označuje stav „ZAP.“
(napájanie).
Označuje nebezpečné
napätie.
(AC).
(DC).
O’zbekcha
(AC).
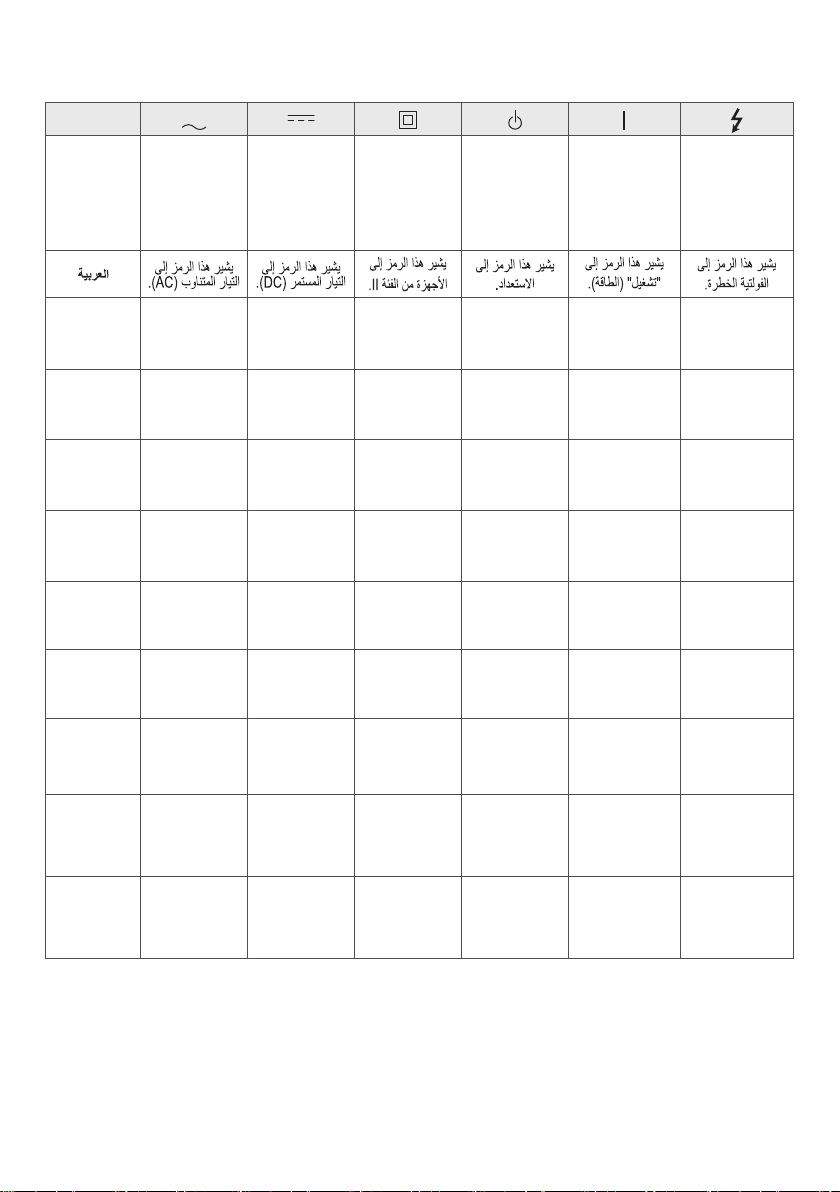
8
Language
Türkçe
Alternatif
akımı (AC)
niteler.
Doğru
akımı (DC)
niteler.
Sınıf II
donanımı
niteler.
Beklemeyi
niteler.
“AÇIK”
(güç)
durumunu
niteler.
Tehlikeli
voltajı
niteler.
Español
(latin)
Se refiere a la
corriente alterna (ca)
Se refiere a la
corriente continua
(cc)
Se refiere a los
equipos clase II
Se refiere al modo
de espera
Se refiere a
"ENCENDIDO"
(alimentación)
Se refiere a voltaje
peligroso
FRANÇAIS
(CANADA)
Se rapporte au
courant alternatif
(c.a.)
Se rapporte au
courant continu (c.c.)
Se rapporte à un
appareil de classe II
Se rapporte à la
mise en veille
Se rapporte à la
mise en marche
(alimentation)
Se rapporte à une
tension dangereuse
BAHASA
INDONESIA
Mengacu pada arus
bolak-balik (AC)
Mengacu pada arus
searah (DC)
Mengacu pada
peralatan kelas II
Mengacu pada siaga
Mengacu pada
“AKTIF” (daya)
Mengacu pada
tegangan berbahaya
日本語
交流(AC)を表
します
直流(DC)を表
します
クラスIIの装置を表
します
スタンバイを表
します
「オン」(電源)を表
します
危険な電圧を表
します
한국어
교류 (AC)를 의미 직류 (DC)를 의미 II급 기기를 의미 대기 상태를 의미
전원 "ON" 상태를
의미
위험 전압을 의미
Português
(brazil)
Refere-se à corrente
alternada (CA)
Refere-se à corrente
contínua (CC)
Refere-se ao
equipamento de
classe II
Refere-se a stand-by
Refere-se à “LIGADO”
(Liga/Desliga)
Refere-se à tensão
perigosa
ประเทศไทย
หมายถึง
ไฟฟ้ากระแสสลับ
(AC)
หมายถึง
ไฟฟ้ากระแสตรง
(DC)
หมายถึงอุปกรณ์
Class II
หมายถึงสแตนด์บาย
หมายถึง “เลือก”
(พลังงาน)
หมายถึงแรงดันไฟฟ้า
อันตราย
中國語
表示交流
电 (AC)
表示直流
电 (DC)
表示 II 类
设备
表示待机
表示“
开”
(电源)
表示危险
电压
繁體中文
代表交流
電 (AC)
代表直流
電 (DC)
代表 II 級
設備
代表待機
代表「開
啟」
(電源)
代表危險
電壓

9

10

11

