Loading ...
ASSEMBLING YOUR
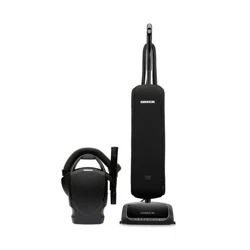
ELEVATE
A
B
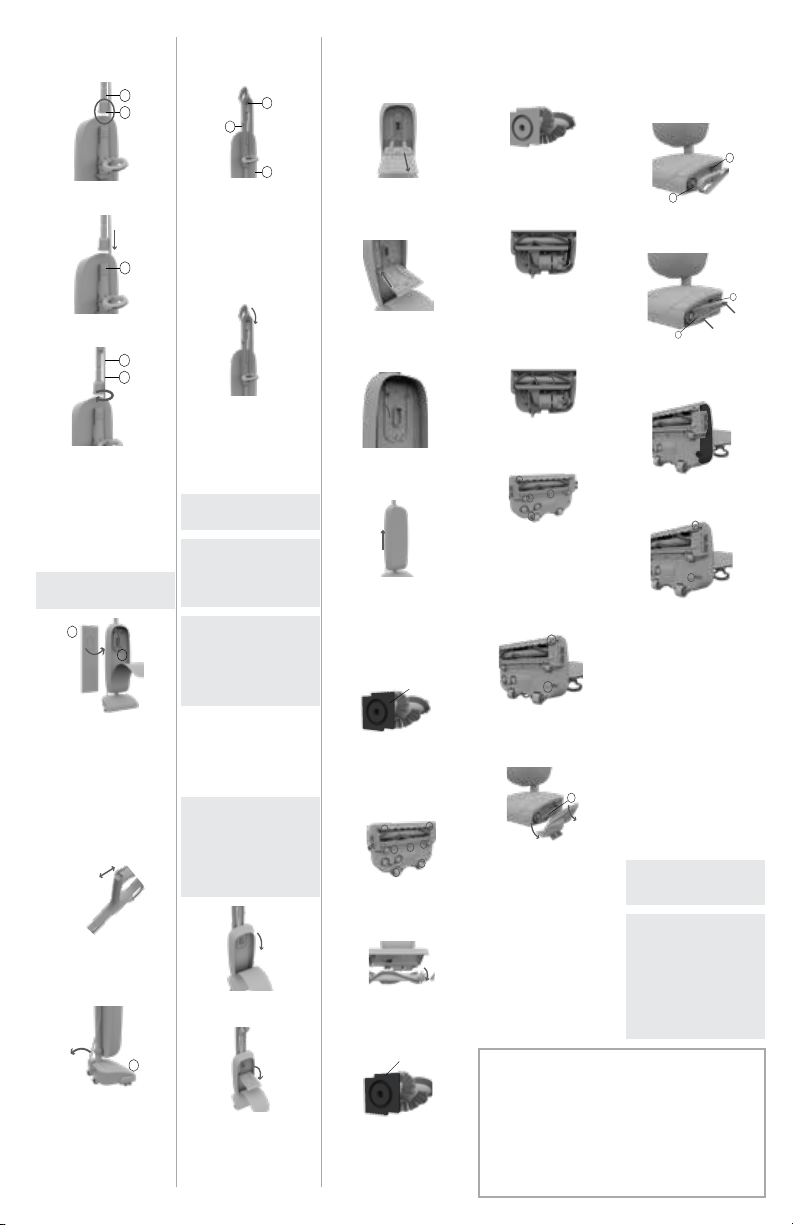
Make sure Upper Tube Connector (A) is
installed on Upper Tube (B).
1
C
Insert Upper Tube into the top of Debris
Transfer Tube (C) until it locks in place.
2
A
B
3
Twist Upper Tube Connector (A)
clockwise until it clicks to secure Upper
Tube (B).
USING YOUR
ELEVATE
3
Place the foot on the electric brush
(A) and pull the handle backwards to
place the unit in the operating
position. Fully raise the handle to the
vertical position to engage the lock.
Do not operate the unit when locked
in the upright position.
A
Please read “Important Safety
Instructions” before use.
2
Push fingertip controls on the handle
forward into the “ON” position to turn
on. Push controls backward into the
“OFF” position to turn off.
CAUTION:
Not to be used for
grooming a pet.
1
Make sure the filtration bag (A) is
attached properly to the filtration
bag dock (B). Attachment
instructions are located on the
filtration bag and in the maintenance
section of this manual. Your vacuum
comes with a bag preinstalled for
your convenience. Do not operate
without a bag.
A
B
3
Gently pull the cardboard collar on
the filtration bag up to engage the
SaniSeal
®
lock and remove from the
bag dock. Discard.
CHANGING THE
FILTRATION BAG
(
CONT’D
)
4
Slide a new filtration bag collar
firmly into the bag dock ensuring all
hooks on dock door are inserted on
the cardboard collar.
5
Rotate bag dock up and press firmly
on the filtration bag at indicated
points until it snaps into place.
6
Zip up the filtration bag case
completely
.
ADJUSTING OR
REPLACING
BRUSHROLL (CONT’D
ADJUSTING OR
REPLACING
BRUSHROLL
NEW
1
Your Oreck
®
unit comes with the
brushroll assembled in the “NEW”
position (multiple notches showing on
top edge). As the brushroll wears it can
be adjusted for longer life.
2
Lay the unit flat to access the power
head nozzle. Remove the 7 screws to
take off the baseplate from the power
head.
3
Remove the brushroll belt and
brushroll from the holding channels
inside of the power head nozzle.
OLD
4
When worn, rotate both plastic black
endcaps at the ends of the brushroll
to show a single notch “OLD”
position. Insert back into the holding
channels of the power head nozzle.
5
When rotating the black endcaps on the
brushroll, make sure both endcap
settings are the same and faceup when
you insert the brushroll.
6
Reassemble the brushroll belt.
Reference the Maintenance Section
on Checking and Replacing the
Brushroll Belt for details.
7
Manually spin the brushroll to see that
it turns freely.
1
Lay the unit flat to access the power
head nozzle. Remove the 2 screws
located on the bottom side of the
service door.
3
Remove the brushroll belt from the
(A) motor shaft and (B) brushroll
pulley.
A
B
2
Slide the service door down away from
the unit to reveal the brush roller belt
(A).
A
CHECKING AND
REPLACING
BRUSHROLL BELT
CHECKING AND
REPLACING
BRUSHROLL BELT
(CONT’D)
4
Loop the new belt over (A) brushroll
pulley. Place the opposite end of the
belt on the (B) motor shaft.
A
B
6
Replace the 2 screws and tighten.
5
Replace the service door by aligning
the screw tabs with the bottom of the
power head nozzle.
USING YOUR
ELEVATE
(
CONT’D
)
A
C
B
4
Wrap Power Cord around Power Cord
Release Hook (A) and the Carry
Handle (B) as shown for convenient
storage. Use the clip on the plug (C)
to attach the plug end to the power
cord. Raise the carry handle for easy
lifting and carrying. Lower the carry
handle during other use to eliminate
obstructions.
5
Twist the power cord release hook
to either side to quickly unwrap the
power cord for use.
CAUTION:
Very fine
materials, such as face powder or
cornstarch may seal the inner
filtration bag and cause it to burst
even though it is only partially full.
Change the bag often when
cleaning this type of material.
CHANGING THE
FILTRATION BAG
SANISEAL
®
OPERATION
Your Elevate
vacuum includes a filtration
bag equipped with the SaniSeal
®
System.
SaniSeal
®
automatically locks in
allergens, dirt and debris each time you
change the bag.
WARNING:
To reduce the
risk of personal injury, unplug before
cleaning or servicing. Do not use
vacuum without inner filtration bag
in place.
FILTRATION BAG PART NUMBERS
AK1CC6 - Standard, AK1CC6A -
Allergen, and AK1CC6H -HEPA
2
Pull the cardboard collar on the
filtration bag downward to release
the bag dock from the dock port
.
1
Unzip the Filtration Bag Case
completely.
IMPORTANT NOTE:
To keep your Elevate
vacuum running
at optimal performance, make sure to
change the filtration bag when the
contents reach the MAXIMUM FILL
LINE. Overloading may result in loss
of air flow suction and decreased
performance.
LUBRICATION: The motor and brushroll
are equipped with bearings which
contain sufficient lubrication for their
lifetime. The addition of lubricant
could cause damage. Do not add
lubricant to motor or brushroll.
MOTOR PROTECTIONS: If the vacuum
becomes overloaded (which could occur
when a large obstruction is sucked up or
when vacuuming extremely thick carpet),
the electronics are designed to shut down
the vacuum. If this happens, the vacuum
will automatically shut off and the
headlights will flash. To reset the vacuum,
turn the unit “off”, then turn on to continue
use. If it shuts down again there may be a
large obstruction in the vacuum. See
Clearing Blockages for the steps on
clearing a blockage.
THE BELT: This vacuum is equipped
with the Endurolife Belt, which is
designed for long life and doesn’t
need changing.
WARNING: TO REDUCE THE RISK OF
PERSONAL INJURY, UNPLUG BEFORE
CLEANING OR SERVICING.
TROUBLESHOOTING
FIND AVAILABLE REPLACEMENT PARTS AND ACCESSORIES AT ORECK.COM.
IF APPLIANCE IS NOT WORKING AS IT SHOULD, HAS BEEN DROPPED, DAMAGED, LEFT
OUTDOORS, OR DROPPED INTO WATER, CALL CUSTOMER SERVICE AT 1-800-989-
3535 PRIOR TO CONTINUING USE.
ACCESSORIES
GENUINE PARTS AND ACCESSORIES: We recommend using only with genuine
ORECK® replacement bags (for Oreck bagged uprights), parts, and accessories.
Damage caused by use with other than genuine ORECK® bags, parts, and
accessories is not covered by and may void your warranty.
8
Replace the 7 screws to secure the
baseplate to the power head nozzle.
Loading ...
Loading ...
Loading ...