Loading ...
Loading ...
Loading ...
4
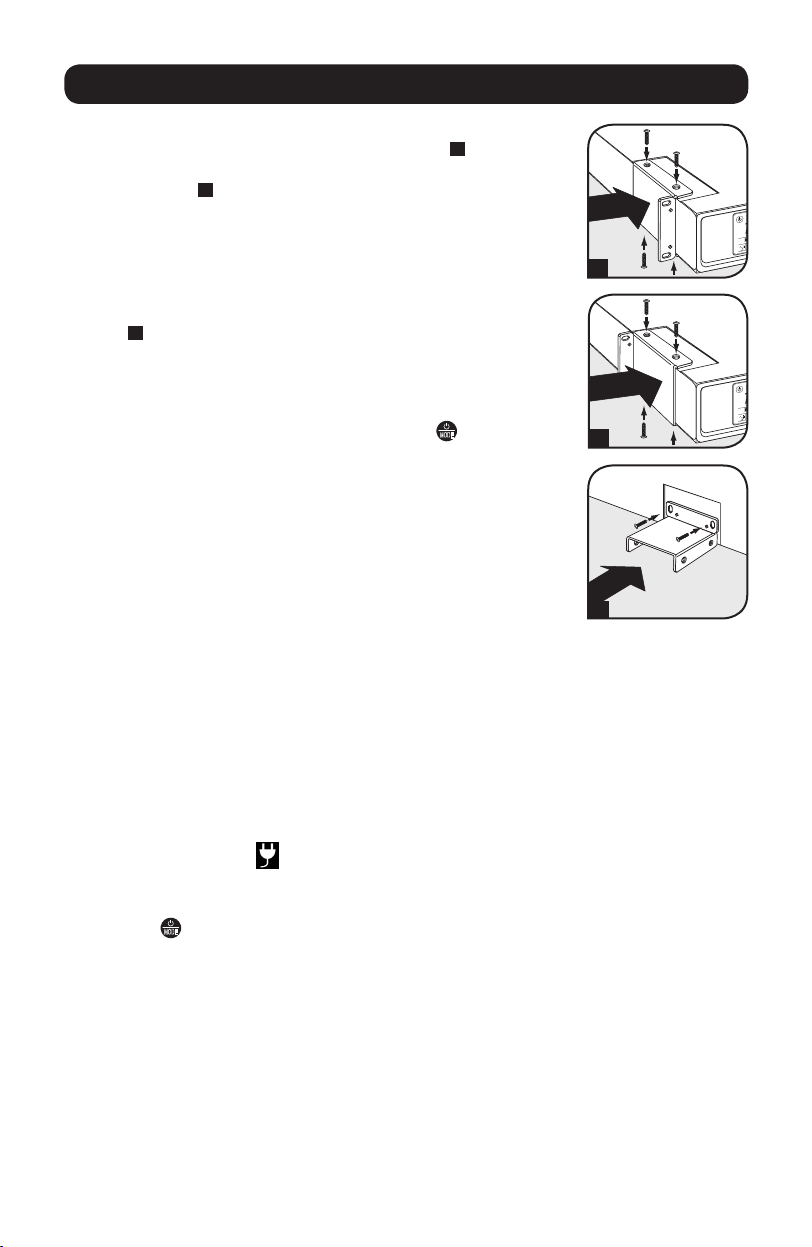
STEP 1: To install the UPS in a 4-post rack, attach the included
mounting hardware to the UPS as shown in diagram
A
. To mount the
UPS in a 2-post rack, attach the included hardware to the UPS as
shown in diagram
B
. Then, using an assistant if necessary, lift the
UPS and attach it to a standard rack or rack enclosure with user-
supplied hardware. Caution: If the UPS is placed flat on a
surface, do NOT stack any other object directly on top of the
unit. The UPS will stand in a tower position without the aid of the
included hardware. However, for added stability Tripp Lite
recommends that the included hardware be attached as shown in
diagram
C
. The UPS and included hardware are designed for
common rack and rack enclosure types and may not be appropriate
for all applications.
STEP 2: Plug the UPS into a properly grounded outlet.
After plugging the UPS into a wall outlet, push the
MODE
button for two
seconds to turn the UPS on (see Basic Operation section). Please
Note! The UPS will not turn on automatically in the presence of
live utility power.
Note: UPS system will function properly upon initial startup; however,
maximum runtime for the unit’s battery will only be accessible after it has
been charged for 24 hours.
STEP 3: Plug your equipment into the UPS.
* Your UPS is designed to support electronic equipment only. You will overload
the UPS if the total VA ratings for all the equipment you connect to the outlets
exceeds the UPS’s Output Capacity. To find your equipment’s VA ratings, look
on their nameplates. If the equipment is listed in amps, multiply the number
of amps by 120 to determine VA. (Example: 1 amp × 120 = 120 VA).If you
are unsure if you have overloaded the outlets, run a self-test (see Self-Test
description in Basic Operation section).
Quick Installation
C
B
A
STEP 4: Optional Installation.
All models include USB and RS-232 communication ports as well as Tel/DSL/network surge
protection jacks. These connections are optional; the UPS will work properly without these
connections. See the connector's description in the Basic Operation section for connection
instructions.
If the LINE POWER icon does not illuminate when the UPS is turned ON, try the
following:
1. Make sure the UPS is plugged into a live AC outlet.
2. Press the
MODE
button for 2 seconds to start the UPS. (A beep should sound when the
UPS starts.)
3. If the UPS still does not start, contact Tripp Lite Tech Support for assistance.
16-02-426-933072.indb 4 3/8/2016 3:27:56 PM
Loading ...
Loading ...
Loading ...