118
PO
(118PO) ULTRA XTR™ POOLS ENGLISH 7.5” X 10.3” PANTONE 295U 05/13/2020
English
OWNER’S MANUAL
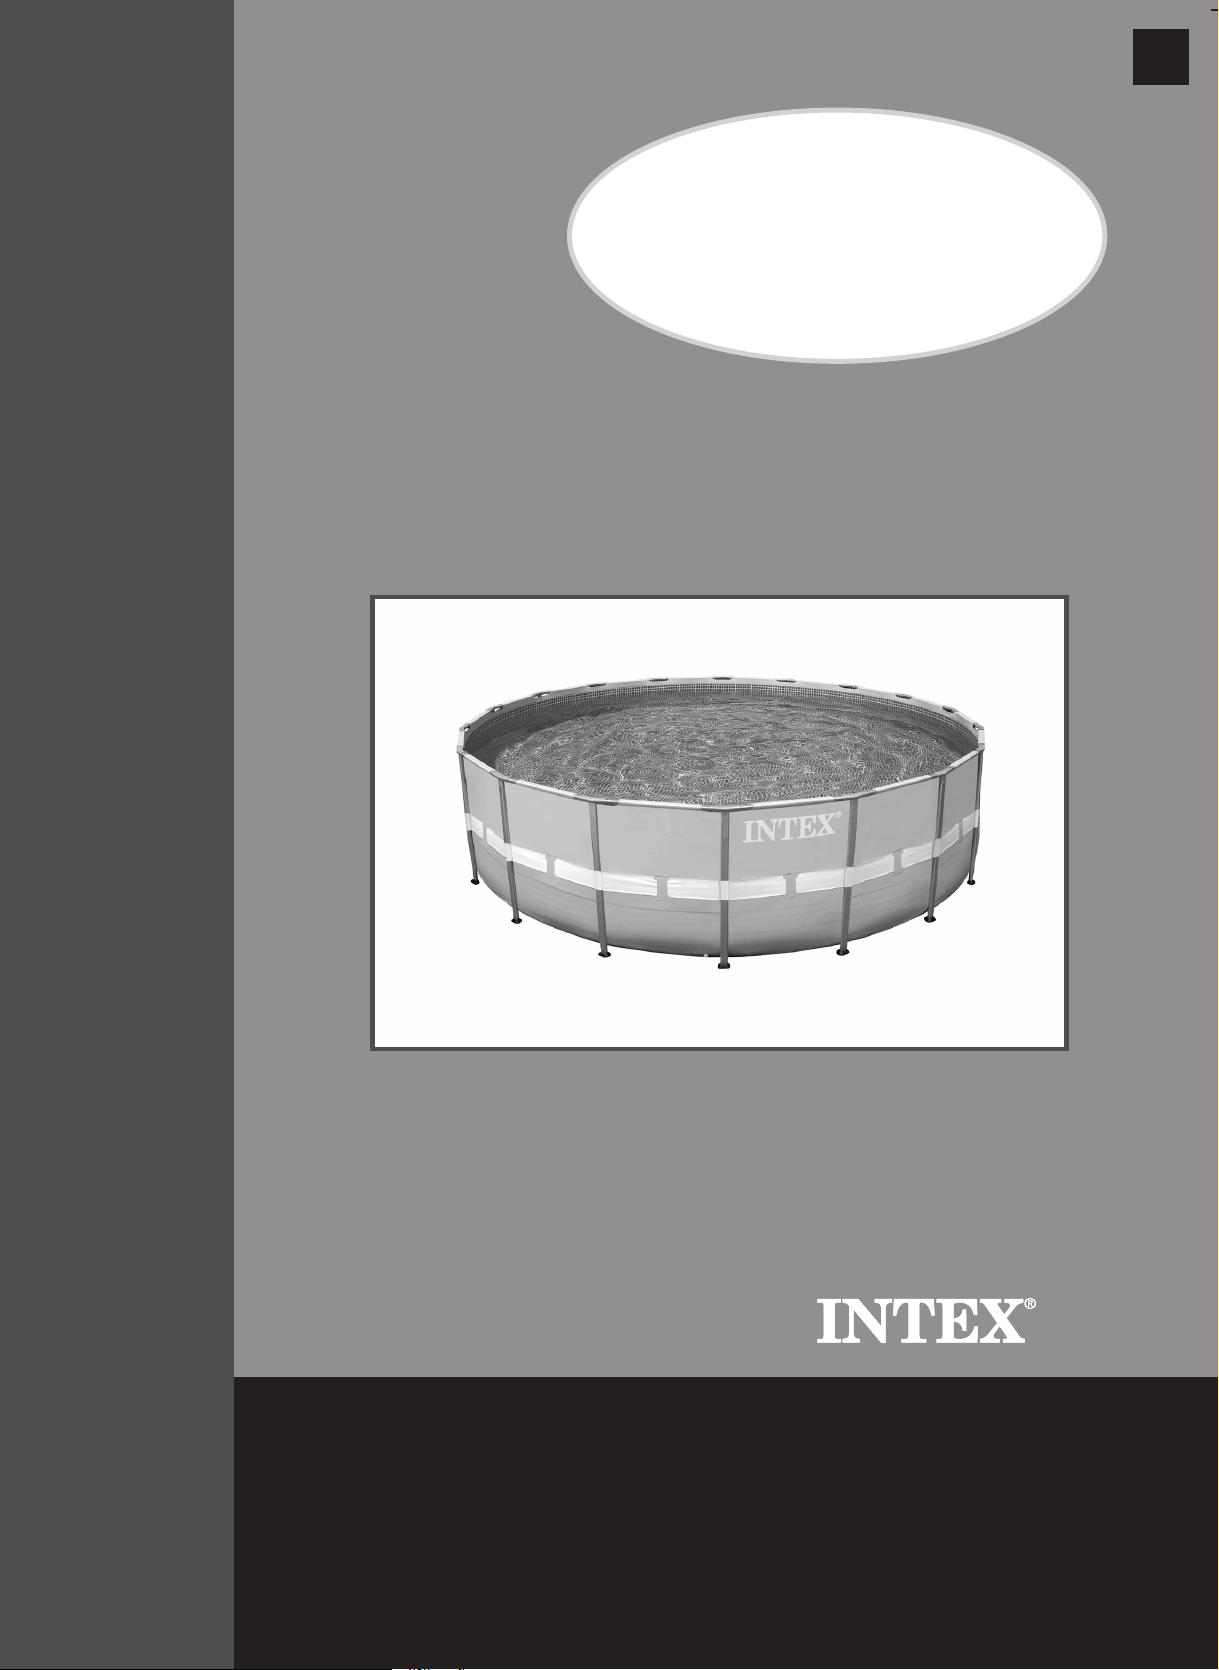
Ultra XTR™ POOL
14' - 26' (427 cm - 792 cm) models
IMPORTANT
SAFETY RULES
Read, understand, and follow
all instructions carefully before
installing and using this product.
Don’t forget to try these other fine Intex products: Pools, Pool
Accessories, Inflatable Pools and In-Home Toys, Airbeds and
Boats available at fine retailers or visit our website listed below.
Due to a policy of continuous product improvement, Intex
reserves the right to change specifications and appearance,
which may result in updates to the instruction manual without
notice.
For illustrative purposes only. Accessories may not be provided with pool.
IMPORTANT!
DO NOT RETURN PRODUCT TO STORE
To purchase parts and accessories or to obtain non-technical assistance, visit
www.intexcorp.com
For technical assistance and missing parts call us toll-free (for U.S. and Canadian Residents):
1-800-234-6839
Monday through Friday, 8:30am to 5:00pm Pacific Time
118-*PO-R0-2105

118
PO
SAVE THESE INSTRUCTIONS
(118PO) ULTRA XTR™ POOLS ENGLISH 7.5” X 10.3” PANTONE 295U 05/13/2020
English
Page 2
Warnings
........................................................................................
3-5
Parts References
...........................................................................
6-9
Setup Instructions
.........................................................................
10-12
General Aquatic Safety
..................................................................
13
Pool Maintenance & Chemicals
....................................................
14
Pool Maintenance & Drainage
......................................................
15
Winter preparations
........................................................................
16
Troubleshooting
..............................................................................
17
Limited Warranty
.............................................................................
18
Special Introductory note:
Thanks for buying an Intex pool. Please read this manual before setting up your pool.
This information will help extend the pool life and make the pool safer for your family's
enjoyment. A team of 2-3 people is recommended for pool set up. Additional people will
speed up the installation.
No tools are required for the assembly.
TABLE OF CONTENTS

118
PO
SAVE THESE INSTRUCTIONS
(118PO) ULTRA XTR™ POOLS ENGLISH 7.5” X 10.3” PANTONE 295U 05/13/2020
English
Page 3
IMPORTANT SAFETY RULES
Read, Understand and Follow All Instructions Carefully Before Installing and Using this Product.
• Continuousandcompetentadultsupervisionofchildrenandthedisabledisrequiredatalltimes.
• Securealldoors,windowsandsafetybarrierstopreventunauthorized,unintentionalorunsupervisedpool
entry.
• Installasafetybarrierthatwilleliminateaccesstothepoolforyoungchildrenandpets.
• Poolandpoolaccessoriesaretobeassembledanddisassembledbyadultsonly.
• Neverdive,jumporslideintoanabove-groundpooloranyshallowbodyofwater.
• Failuretosetuppoolonflat,level,compactgroundoroverfillingcouldresultinthepool’scollapseandthe
possibility that a person lounging in the pool could be swept out/ejected.
• Donotlean,straddle,orexertpressureontheinflatableringortoprimasinjuryorfloodingcouldoccur.Do
not allow anyone to sit on, climb, or straddle the sides of the pool.
• Removealltoysandflotationdevicesfrom,in,andaroundthepoolwhenitisnotinuse.Objectsinthepool
attract young children.
• Keeptoys,chairs,tables,oranyobjectsthatachildcouldclimbonatleastfourfeet(1.22meters)away
from the pool.
• Keeprescueequipmentbythepoolandclearlypostemergencynumbersatthephoneclosesttothepool.
Examplesofrescueequipment:coastguardapprovedringbuoywithattachedrope,strongrigidpolenot
lessthantwelvefeet(12')[3.66m]long.
• Neverswimaloneorallowotherstoswimalone.
• Keepyourpoolcleanandclear.Thepoolfloormustbevisibleatalltimesfromtheoutsidebarrierofthe
pool.
• Ifswimmingatnightuseproperlyinstalledartificiallightingtoilluminateallsafetysigns,ladders,poolfloor
and walkways.
• Stayawayfromthepoolwhenusingalcoholordrugs/medication.
• Keepchildrenawayfrompoolcoverstoavoidentanglement,drowning,orotherseriousinjury.
• Poolcoversmustbecompletelyremoved
before
pool use. Children and adults cannot be seen under a
poolcover.
• Donotcoverthepoolwhileyouoranyoneelseisinthepool.
• Keepthepoolandpoolareacleanandcleartoavoidslipsandfallsandobjectsthatmaycauseinjury.
• Protectallpooloccupantsfromrecreationalwaterillnessesbykeepingthepoolwatersanitized.Don’t
swallow the pool water. Practice good hygiene.
• Allpoolsaresubjecttowearanddeterioration.Certaintypesofexcessiveoraccelerateddeteriorationcan
lead to an operation failure, and can ultimately cause the loss of large quantities of water from your pool.
Therefore,itisveryimportantthatyouproperlymaintainyourpoolonaregularbasis.
• Thispoolisforoutdooruseonly.
• Emptypoolcompletelywhennotinuseforalongerperiodandsafelystoretheemptypoolinsuchaway
thatitdoesnotcollectwaterfromrainoranyothersource.Seestorageinstructions.
• AllelectricalcomponentsshallbeinstalledinaccordancewithArticle680oftheNationalElectrical
Code1999(NEC
®
)“SwimmingPools,FountainsandSimilarInstallations”oritslatestapprovededition.
POOL BARRIERS AND COVERS ARE NOT SUBSTITUTES FOR CONTINUOUS AND COMPETENT
ADULT SUPERVISION. POOL DOES NOT COME WITH A LIFEGUARD. ADULTS ARE THEREFORE
REQUIRED TO ACT AS LIFEGUARDS OR WATER WATCHERS AND PROTECT THE LIVES OF ALL
POOL USERS, ESPECIALLY CHILDREN, IN AND AROUND THE POOL.
FAILURE TO FOLLOW THESE WARNINGS MAY RESULT IN PROPERTY
DAMAGE, SERIOUS INJURY OR DEATH.
Advisory:
Pool owners may need to comply with local or state laws relating to childproof fencing, safety barriers, lighting,
and other safety requirements. Customers should contact their local building code enforcement office for
further details.
WARNING
118
PO
SAVE THESE INSTRUCTIONS
(118PO) ULTRA XTR™ POOLS ENGLISH 7.5” X 10.3” PANTONE 295U 05/13/2020
English
Page 4
Read and follow all safety information and instructions.
Keep for future reference.
Failure to follow these warnings and instructions can result in serious
injury or death to users, especially children.
Prevent Young Children From Drowning:
• Keepunsupervisedchildrenfromaccessingthepoolbyinstallingfencingorapprovedbarrieraroundall
sidesofpool.Stateorlocallawsorcodesmayrequirefencingorotherapprovedbarriers.Checkstate
or local laws and codes before setting up pool. Refer to the list of barrier recommendations and guidelines
asdescribedinCPSCPublicationNo.362.“SafetyBarrierGuidelineforHomePools”foundat
www.poolsafely.gov.
• Drowningoccurssilentlyandquickly.Assignanadulttosupervisepoolandwearprovidedwaterwatcher
tag.
• Keepchildreninyourdirectsightwhentheyareinornearpool.Poolpresentsadrowninghazardeven
duringfillinganddrainingofthepool.Maintainconstantsupervisionofchildrenanddonotremoveany
safety barriers until the pool is completely empty and stowed away.
• Whensearchingforamissingchild,checkthepoolfirst,evenifyouthinkyourchildisinthehouse.
Prevent Young Children From Gaining Access to Pool:
• Toddlerscanclimbladderandgetintopool.Beforeleavingpoolarea,removeladderorothermeansof
access, and safely store away from pool.
• Whenleavingthepool,removefloatsandtoysfromthepoolthatmightattractachild.
• Positionfurniture(forexample,tables,chairs)awayfrompoolsothatchildrencannotclimbonittogain
access to the pool.
• Ifafilterpumpisincludedwiththepool,locatepumpsandfiltersinsuchawaythatchildrencannotclimb
on them and gain access to the pool.
Electrocution Risk:
• Keepallelectricallines,radios,speakersandotherelectricalappliancesawayfromthepool.
• Donotplacepoolnearorunderoverheadelectricallines.
Suction Risk:
• Ifafilterpumpisincludedwiththepool,replacementpumpshallneverexceedthemaximumflowrate
marked on the suction fitting.
Be Prepared to Respond to an Emergency:
•
Keepaworkingphoneandalistofemergencynumbersnearthepool.
•
Becomecertifiedincardiopulmonaryresuscitation(CPR)soyoucanrespondtoanemergency.Intheevent
ofanemergency,immediateuseofCPRcanmakealife-savingdifference.
IMPORTANT SAFETY RULES
WARNING
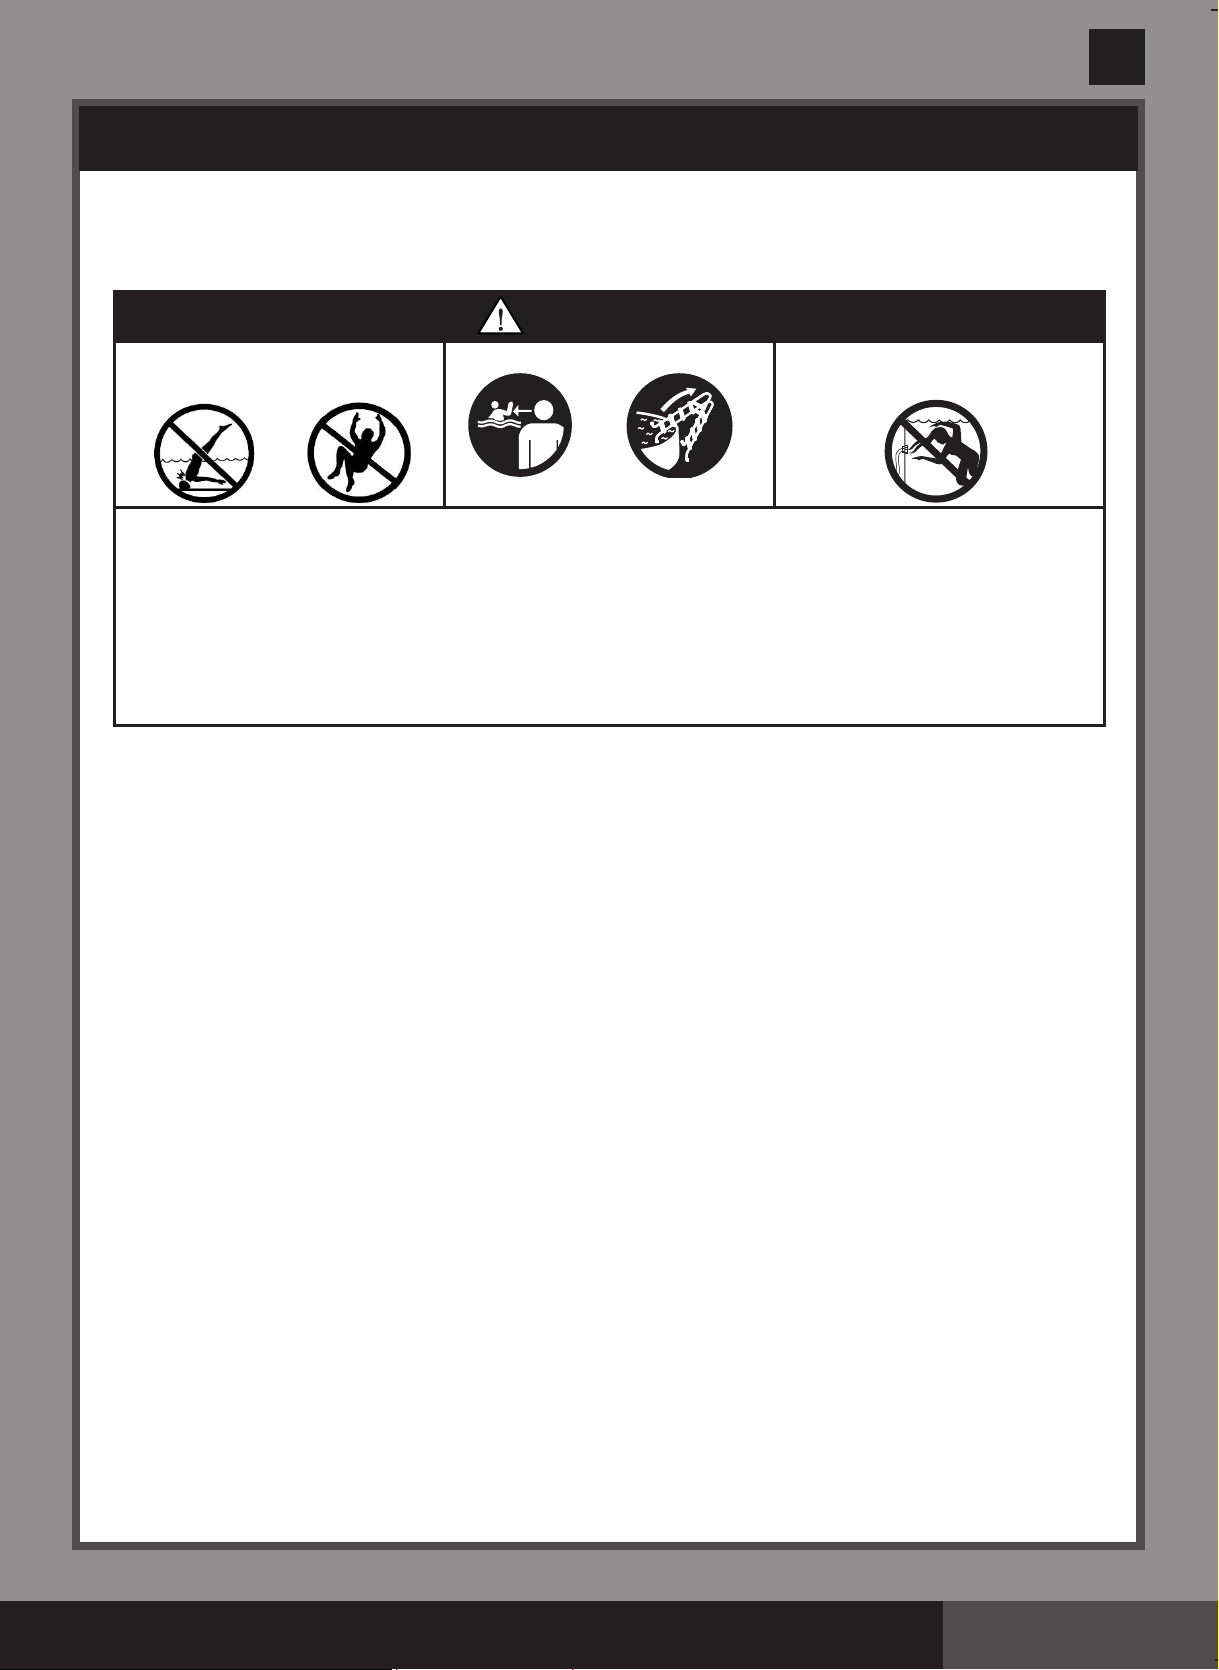
NO DIVING OR JUMPING
SHALLOW WATER
PREVENT DROWNING
Supervise, Supervise, Supervise
STAY AWAY FROM DRAINS
AND SUCTIONS FITTINGS
•
Children, especially children underfiveyears,areathighriskofdrowning.
•
Removeorsecureladderwhennotinuse.
•
Closely watch children who are in or near this pool.
•
Divingorjumpingmayresultinbrokenneck,paralysis,permanentinjuryordeath.
•
Ifdrainorsuctionoutletcoverismissingorbroken,yourhair,bodyandjewelrycangetsuckedinto
drain.Youcouldbeheldunderwateranddrown!Donotusethepoolifdrainorsuctionoutletcoveris
missing or broken.
•
Emptypoolorpreventaccesswhennotinuse.Storetheemptypoolinsuchawaythatitdoesnot
collect water from rain or any other source.

118
PO
SAVE THESE INSTRUCTIONS
(118PO) ULTRA XTR™ POOLS ENGLISH 7.5” X 10.3” PANTONE 295U 05/13/2020
English
Page 5
Barriers for Residential Swimming Pool Guidelines:
Anoutdoorswimmingpool,includinganinground,aboveground,orongroundpool,hottub,orspa,shouldbe
providedwithabarrierwhichcomplieswiththefollowing:
1.
Thetopofthebarriershouldbeatleast48inchesabovegrademeasuredonthesideofthebarrierwhich
facesawayfromtheswimmingpool.Themaximumverticalclearancebetweengradeandthebottomof
the barrier should be 4 inches measured on the side of the barrier which faces away from the swimming
pool.Wherethetopofthepoolstructureisabovegrade,suchasanabovegroundpool,thebarriermay
beatgroundlevel,suchasthepoolstructure,ormountedontopofthepoolstructure.Wherethebarrieris
mountedontopofthepoolstructure,themaximumverticalclearancebetweenthetopofthepoolstructure
and the bottom of the barrier should be 4 inches.
2.
Openings in the barrier should not allow passage of a 4-inch diameter sphere.
3.
Solidbarriers,whichdonothaveopenings,suchasamasonryorstonewall,shouldnotcontain
indentations or protrusions except for normal construction tolerances and tooled masonry joints.
4.
Wherethebarrieriscomposedofhorizontalandverticalmembersandthedistancebetweenthetopsofthe
horizontalmembersislessthan45inches,thehorizontalmembersshouldbelocatedontheswimmingpool
sideofthefence.Spacingbetweenverticalmembersshouldnotexceed1-3/4inchesinwidth.Wherethere
aredecorativecutouts,spacingwithinthecutoutsshouldnotexceed1-3/4inchesinwidth.
5.
Wherethebarrieriscomposedofhorizontalandverticalmembersandthedistancebetweenthetopsof
thehorizontalmembersis45inchesormore,spacingbetweenverticalmembersshouldnotexceed4inches.
Wheretherearedecorativecutouts,spacingwithinthecutoutsshouldnotexceed1-3/4inchesinwidth.
6.
Maximummeshsizeforchainlinkfencesshouldnotexceed
1-1/4
inchsquareunlessthefenceisprovided
with slats fastened at the top or the bottom which reduce the openings to no more than 1-3/4 inches.
7.
Wherethebarrieriscomposedofdiagonalmembers,suchasalatticefence,themaximumopeningformed
by the diagonal members should be no more than 1-3/4 inches.
8.
AccessgatestothepoolshouldcomplywithSectionI,Paragraphs1through7,andshouldbeequipped
toaccommodatealockingdevice.Pedestrianaccessgatesshouldopenoutward,awayfromthepool,and
shouldbeself-closingandhaveaselflatchingdevice.Gatesotherthanpedestrianaccessgatesshould
haveaself-latchingdevice.Wherethereleasemechanismoftheself-latchingdeviceislocatedlessthan
54inchesfromthebottomofthegate,(a)thereleasemechanismshouldbelocatedonthepoolsideofthe
gateatleast3inchesbelowthetopofthegateand(b)thegateandbarriershouldhavenoopeninggreater
than 1/2 inch within 18 inches of the release mechanism.
9.
Whereawallofadwellingservesaspartofthebarrier,oneofthefollowingshouldapply:
(a)
All doors with direct access to the pool through that wall should be equipped with an alarm which
produces an audible warning when the door and its screen, if present, are opened. The alarm should
soundcontinuouslyforaminimumof30secondswithin7secondsafterthedoorisopened.Alarms
shouldmeettherequirementsofUL2017General-PurposeSignalingDevicesandSystems,
Section77.Thealarmshouldhaveaminimumsoundpressureratingof85dBAat10feetandthe
soundofthealarmshouldbedistinctivefromotherhouseholdsounds,suchassmokealarms,
telephones, and door bells. The alarm should automatically reset under all conditions. The alarm should
beequippedwithmanualmeans,suchastouchpadsorswitches,totemporarilydeactivatethealarm
forasingleopeningofthedoorfromeitherdirection.Suchdeactivationshouldlastfornomorethan
15seconds.Thedeactivationtouchpadsorswitchesshouldbelocatedatleast54inchesabovethe
threshold of the door.
(b)
ThepoolshouldbeequippedwithapowersafetycoverwhichcomplieswithASTMF1346-91listed
below.
(c)
Othermeansofprotection,suchasself-closingdoorswithself-latchingdevices,areacceptablesolong
asthedegreeofprotectionaffordedisnotlessthantheprotectionaffordedby(a)or(b)described
above.
10.
Whereanabovegroundpoolstructureisusedasabarrierorwherethebarrierismountedontopofthe
poolstructure,andthemeansofaccessisaladderorsteps,then(a)theladdertothepoolorsteps
shouldbecapableofbeingsecured,lockedorremovedtopreventaccess,or(b)theladderorsteps
shouldbesurroundedbyabarrier.Whentheladderorstepsaresecured,locked,orremoved,any
opening created should not allow the passage of a 4-inch diameter sphere.
Barriers should be located so as to prohibit permanent structures, equipment or similar objects from being
used to climb the barriers.
118
PO
SAVE THESE INSTRUCTIONS
(118PO) ULTRA XTR™ POOLS ENGLISH 7.5” X 10.3” PANTONE 295U 05/13/2020
English
Page 6
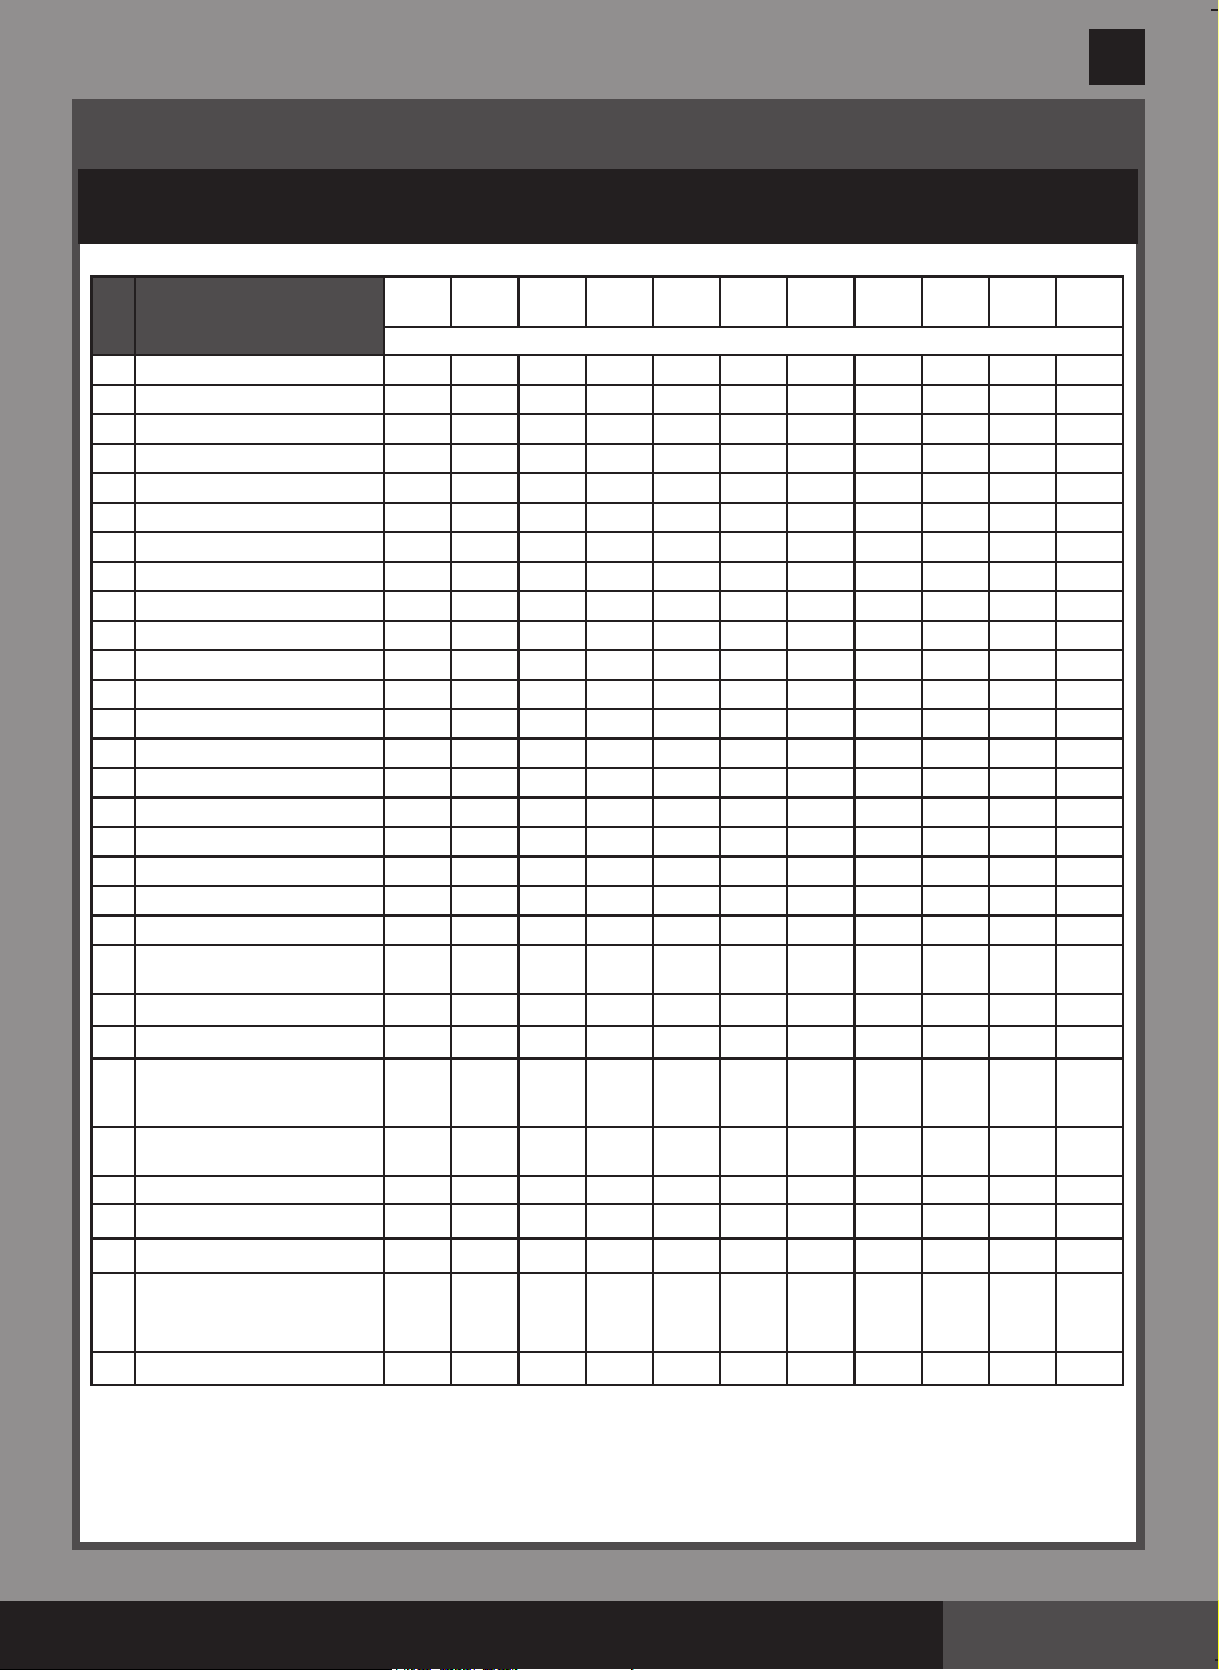
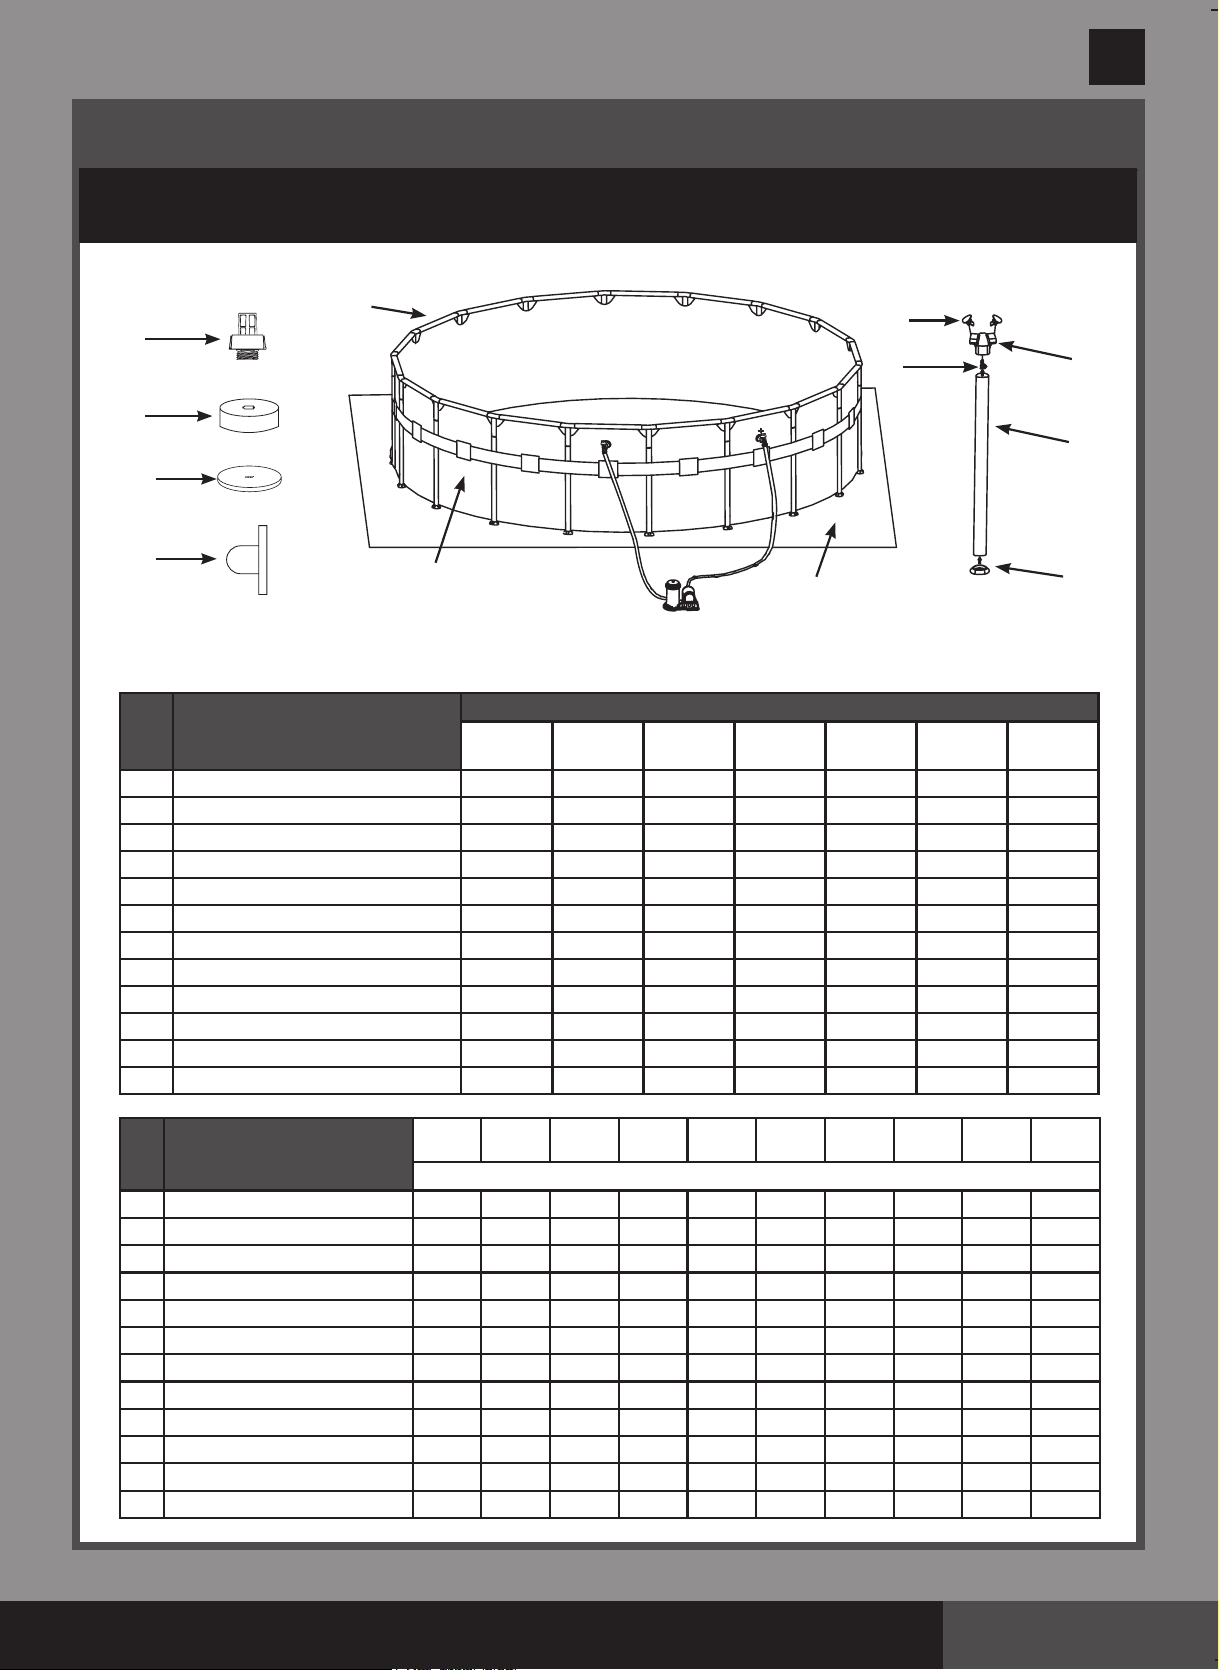
PARTS REFERENCE
Before assembling your product, please take a few minutes to check the contents and become familiar with all the parts.
15’ (457 cm) and below
NOTE:
Drawingsforillustrationpurposeonly.Actualproductmayvary.Nottoscale.
For Pools with Dual Suction Outlets Configuration:
InordertocomplywiththerequirementoftheVirginiaGrahameBakerAct(forUSAandCanada),your
poolisdesignedwithdualsuctionoutletsandoneinletfittings.Overviewofthedualsuctionoutlets
configuration is as follow:
16’ (488 cm) and above
1
2
3
4
5
7
12
6
8
9
10
14 15
16
18 17
19
11
27
28
29
1
2
3
4
5
7
12
6
8
9
10
14 15
16
13 17
20
21 22
23
24 25
26
11
28
118
PO
SAVE THESE INSTRUCTIONS
(118PO) ULTRA XTR™ POOLS ENGLISH 7.5” X 10.3” PANTONE 295U 05/13/2020
English
Page 7
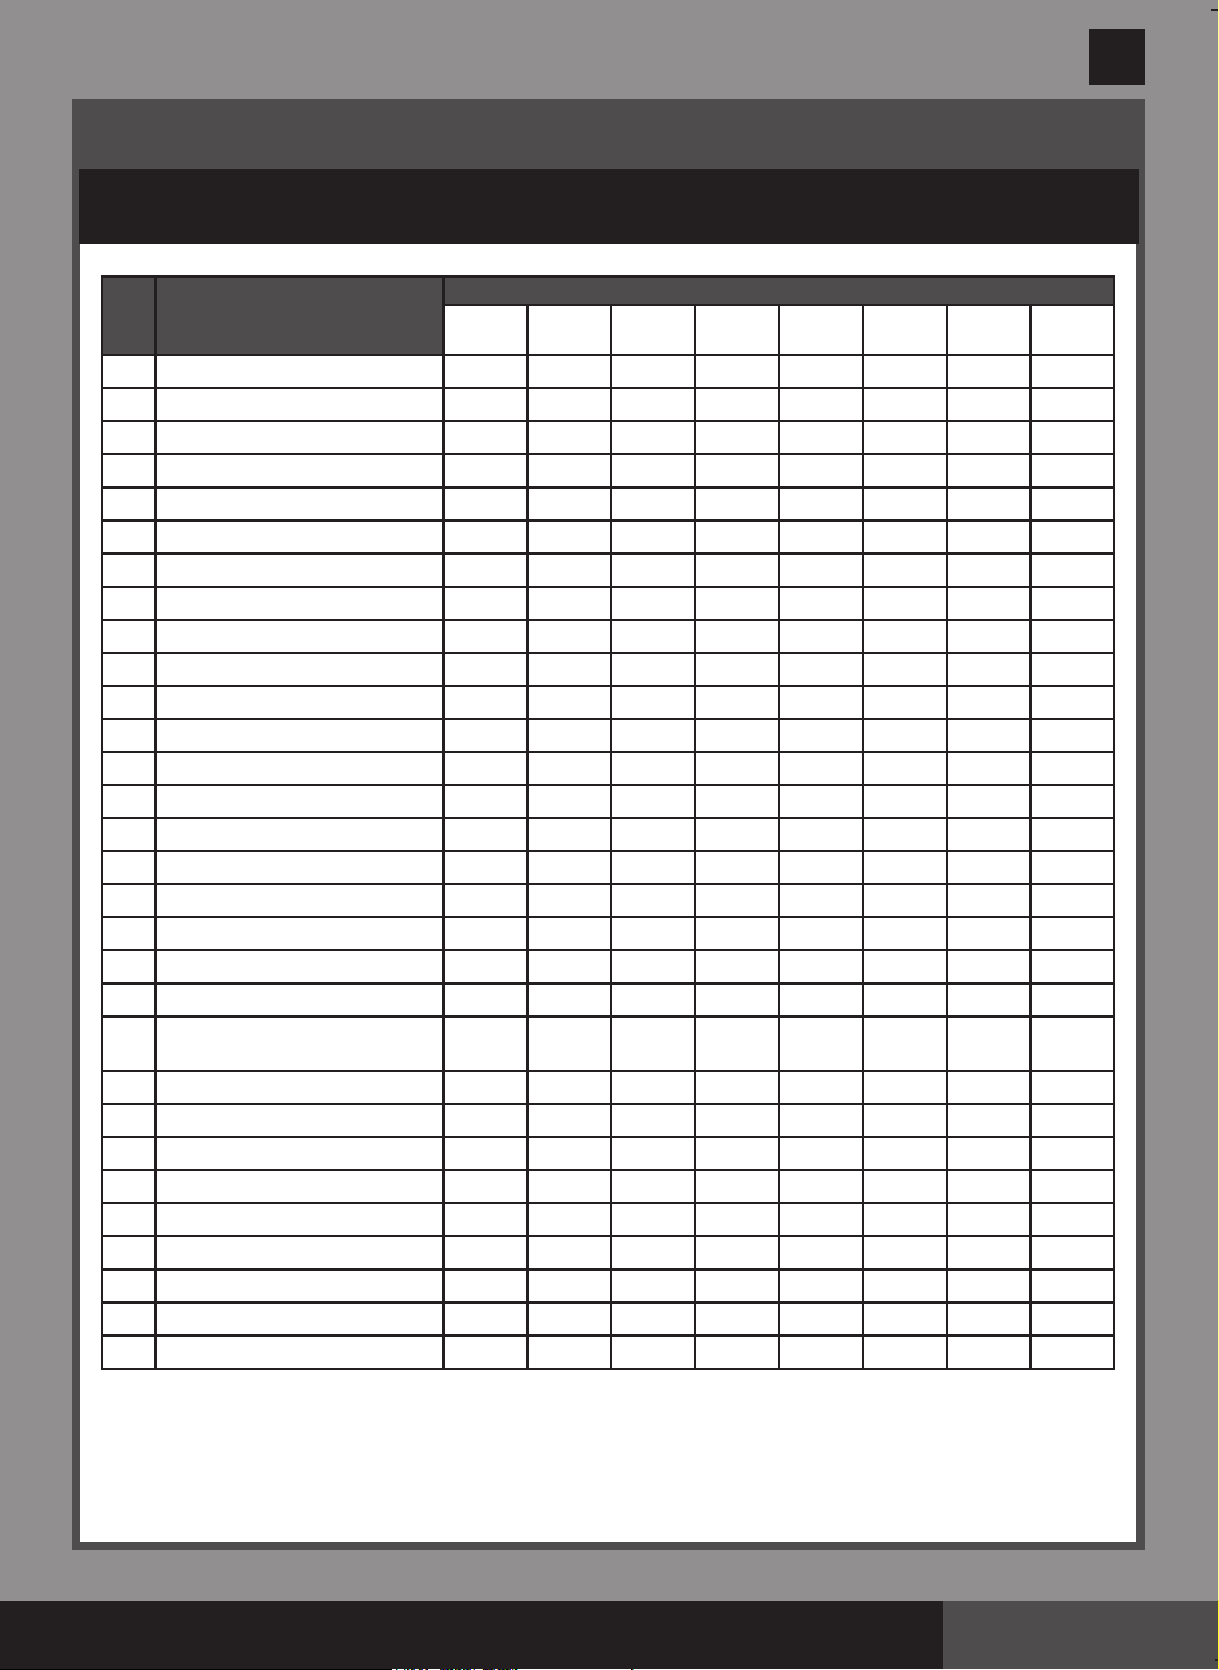
REF
NO.
DESCRIPTION
POOL SIZE & QUANTITIES
14’
(427cm)
15’
(457cm)
16’
(488cm)
18’
(549cm)
20’
(610cm)
22’
(671cm)
24’
(732cm)
26’
(792cm)
1 T - JOINT 14 15 16 18 20 22 24 26
2 VERTICALLEG 14 15 16 18 20 22 24 26
3 LEGCAP 14 15 16 18 20 22 24 26
4 HORIZONTALBEAM 14 15 16 18 20 22 24 26
5
POOLLINER(DRAINVALVECAPINCLUDED)
1 1 1 1 1 1 1 1
6
VERTICALLEGSPRINGPIN
14 15 16 18 20 22 24 26
7 GROUNDCLOTH 1 1 1 1 1 1 1 1
8 DRAINCONNECTOR 1 1 1 1 1 1 1 1
9 DRAINVALVECAP 1 1 1 2 2 2 2 2
10 POOL COVER 1 1 1 1 1 1 1 1
11 STRAINERHOLEPLUG 3 3 2 2 2 2 2 2
12 T-JOINTSPRINGPIN 28 30 32 36 40 44 48 52
13 SPLITHOSEPLUNGERVALVE
- -
1 1 1 1 1 1
14 STRAINERCONNECTOR 2 2 2 2 2 2 2 2
15 STRAINERGRID 2 2 2 2 2 2 2 2
16 HOSE 2 2 2 2 2 2 2 2
17 HOSECLAMP 8 8 4 4 4 4 4 4
18 HOSET-JOINT 1 1
- - - - - -
19 POOLINLETJETNOZZLE 1 1
- - - - - -
20 HOSEO-RING
- -
1 1 1 1 1 1
21
PLUNGERVALVE(HOSEO-RING&
STEPWASHERINCLUDED)
- -
1 1 1 1 1 1
22 STEPWASHER
- -
1 1 1 1 1 1
23 STRAINERNUT
- -
1 1 1 1 1 1
24
FLATSTRAINERRUBBERWASHER
- -
1 1 1 1 1 1
25
INLETTHREADEDAIRCONNECTOR+
- -
1 1 1 1 1 1
26
ADJUSTABLEPOOLINLETJETNOZZLE
- -
1 1 1 1 1 1
27 INLETSTRAINERCONNECTOR 1 1
- - - - - -
28 AIR JET VALVE 1 1 1 1 1 1 1 1
29 POOLINLETAIRADAPTOR+ 1 1
- - - - - -
30
AIR JET VALVE CAP
(NOTSHOWN)
1 1 1 1 1 1 1 1
PARTS REFERENCE (continued)
Before assembling your product, please take a few minutes to check the contents and become familiar with all the parts.
+Ifapplicable,dependingonthesizeofthefilterpumpfittedwithyourpool,youmustquotethemodel
numbershownonthefilterpumphousingtoorderthecorrectsizeof“
Pool Inlet Air Adaptor
”or
“Inlet
Threaded Air Connector”
replacement part.
118
PO
SAVE THESE INSTRUCTIONS
(118PO) ULTRA XTR™ POOLS ENGLISH 7.5” X 10.3” PANTONE 295U 05/13/2020
English
Page 8
REF
NO.
DESCRIPTION
14’ x 42” (427
cm x 107cm)
14’ x 48” (427
cm x 122cm)
15’ x 48” (457
cm x 122cm)
16’ x 48” (488
cm x 122cm)
18’ x 48” (549
cm x 122cm)
18’ x 52” (549
cm x 132cm)
20’ x 48” (610
cm x 122cm)
20’ x 52” (610
cm x 132cm)
22’ x 52” (671
cm x 132cm)
24’ x 52” (732
cm x 132cm)
26’ x 52” (792
cm x 132cm)
SPARE PART NO.
1 T - JOINT 12423A 12423A 12427A 12427A 12427A 12427A 12427A 12427A 12427A 12427A 12427A
2 VERTICALLEG 12425A 12426A 12429A 12429A 12429A 12430A 12429A 12430A 12430A 12430A 12430A
3 LEGCAP 11361 11361 11453 11453 11453 11453 11453 11453 11453 11453 11453
4 HORIZONTALBEAM 12424A 12424A 12428A 12428A 12428A 12428A 12428A 12428A 12428A 12428A 12428A
5
POOLLINER(DRAINVALVECAPINCLUDED)
12440E 12441E 12442E 12434E 12435E 12436E 12443E 12437E 12438E 12439E 12495E
6
VERTICALLEGSPRINGPIN
12432A 12432A 12432A 12432A 12432A 12432A 12432A 12432A 12432A 12432A 12432A
7 GROUNDCLOTH 10080 10080 18932 18927 18933 18933 11290 11290 11510 18935 11543
8 DRAINCONNECTOR 10184 10184 10184 10184 10184 10184 10184 10184 10184 10184 10184
9 DRAINVALVECAP 10649 11044 11044 11044 11044 11044 11044 11044 11044 11044 11044
10 POOL COVER 11054 11054 18901 10754 18937 18937 11289 11289 11509 18929 11542
11 STRAINERHOLEPLUG 10127 10127 10127 10127 10127 10127 10127 10127 10127 10127 10127
12 T-JOINTSPRINGPIN 12433A 12433A 12431A 12431A 12431A 12431A 12431A 12431A 12431A 12431A 12431A
13
SPLITHOSEPLUNGERVALVE
- - -
11872 11872 11872 11872 11872 11872 11872 11872
14 STRAINERCONNECTOR 11070 11070 11070 11070 11070 11070 11070 11070 11070 11070 11070
15 STRAINERGRID 11072 11072 11072 11072 11072 11072 11072 11072 11072 11072 11072
16 HOSE 11873 11873 11873 11873 11873 11873 11873 11873 11873 11873 11873
17 HOSECLAMP 11489 11489 11489 10122 10122 10122 10122 10122 10122 10122 10122
18 HOSET-JOINT 11871 11871 11871
- - - - - - - -
19
POOLINLETJETNOZZLE
12364 12364 12364
- - - - - - - -
20 HOSEO-RING
- - -
10262 10262 10262 10262 10262 10262 10262 10262
21
PLUNGERVALVE(HOSEO-RING&
STEPWASHERINCLUDED)
- - -
10747 10747 10747 10747 10747 10747 10747 10747
22 STEPWASHER
- - -
10745 10745 10745 10745 10745 10745 10745 10745
23 STRAINERNUT
- - -
10256 10256 10256 10256 10256 10256 10256 10256
24
FLATSTRAINERRUBBERWASHER
- - -
10255 10255 10255 10255 10255 10255 10255 10255
25
INLETTHREADEDAIR
CONNECTOR+
- - -
12371
12372
12371
12372
12371
12372
12371
12372
12371
12372
12371
12372
12371
12372
12371
12372
26
ADJUSTABLEPOOLINLETJETNOZZLE
- - -
12369 12369 12369 12369 12369 12369 12369 12369
27
INLETSTRAINERCONNECTOR
12365 12365 12365
- - - - - - - -
28 AIR JET VALVE 12363 12363 12363 12363 12363 12363 12363 12363 12363 12363 12363
29
POOLINLETAIRADAPTOR+
12366
12367
12368
12366
12367
12368
12366
12367
12368
- - - - - - - -
30
AIR JET VALVE CAP (NOTSHOWN)
12373 12373 12373 12373 12373 12373 12373 12373 12373 12373 12373
PARTS REFERENCE (continued)
Before assembling your product, please take a few minutes to check the contents and become familiar with all the parts.
+Ifapplicable,dependingonthesizeofthefilterpumpfittedwithyourpool,youmustquotethemodel
numbershownonthefilterpumphousingtoorderthecorrectsizeof“
Pool Inlet Air Adaptor
”or
“Inlet
Threaded Air Connector”
replacement part.
118
PO
SAVE THESE INSTRUCTIONS
(118PO) ULTRA XTR™ POOLS ENGLISH 7.5” X 10.3” PANTONE 295U 05/13/2020
English
Page 9
PARTS REFERENCE (continued)
Before assembling your product, please take a few minutes to check the contents and become familiar with all the parts.
14' (427 cm), 16' (488 cm), 18' (549 cm), 20' (610 cm), 22' (671 cm), 24' (732 cm) & 26' (792 cm) models
NOTE:
Drawingsforillustrationpurposeonly.Actualproductmayvary.Nottoscale.
REF
NO.
DESCRIPTION
POOL SIZE & QUANTITIES
14’
(427cm)
16’
(488cm)
18’
(549cm)
20’
(610cm)
22’
(671cm)
24’
(732cm)
26’
(792cm)
1 T - JOINT 14 16 18 20 22 24 26
2 VERTICALLEG 14 16 18 20 22 24 26
3 LEGCAP 14 16 18 20 22 24 26
4 HORIZONTALBEAM 14 16 18 20 22 24 26
5
POOLLINER(DRAINVALVECAPINCLUDED)
1 1 1 1 1 1 1
6 VERTICALLEGSPRINGPIN 14 16 18 20 22 24 26
7 GROUNDCLOTH 1 1 1 1 1 1 1
8 DRAINCONNECTOR 1 1 1 1 1 1 1
9 DRAINVALVECAP 1 1 2 2 2 2 2
10 POOL COVER 1 1 1 1 1 1 1
11
STRAINERHOLEPLUG(WITH1EXTRA)
3
- - - - - -
12 T-JOINTSPRINGPIN 28 32 36 40 44 48 52
REF
NO.
DESCRIPTION
14’ x 42” (427
cm x 107cm)
14’ x 48” (427
cm x 122cm)
16’ x 48” (488
cm x 122cm)
18’ x 48” (549
cm x 122cm)
18’ x 52” (549
cm x 132cm)
20’ x 48” (610
cm x 122cm)
20’ x 52” (610
cm x 132cm)
22’ x 52” (671
cm x 132cm)
24’ x 52” (732
cm x 132cm)
26’ x 52” (792
cm x 132cm)
SPARE PART NO.
1 T - JOINT 12423A 12423A 12427A 12427A 12427A 12427A 12427A 12427A 12427A 12427A
2 VERTICALLEG 12425A 12426A 12429A 12429A 12430A 12429A 12430A 12430A 12430A 12430A
3 LEGCAP 11361 11361 11453 11453 11453 11453 11453 11453 11453 11453
4 HORIZONTALBEAM 12424A 12424A 12428A 12428A 12428A 12428A 12428A 12428A 12428A 12428A
5
POOLLINER(DRAINVALVECAPINCLUDED)
12440A 12441A 12434A 12435A 12436A 12443A 12437A 12438A 12439A 12495A
6
VERTICALLEGSPRINGPIN
12432A 12432A 12432A 12432A 12432A 12432A 12432A 12432A 12432A 12432A
7 GROUNDCLOTH 10080 10080 18927 18933 18933 11290 11290 11510 18935 11543
8 DRAINCONNECTOR 10184 10184 10184 10184 10184 10184 10184 10184 10184 10184
9 DRAINVALVECAP 10649 11044 11044 11044 11044 11044 11044 11044 11044 11044
10 POOL COVER 11054 11054 10754 18937 18937 11289 11289 11509 18929 11542
11
STRAINERHOLEPLUG(WITH1EXTRA)
10127 10127
- - - - - - - -
12 T-JOINTSPRINGPIN 12433A 12433A 12431A 12431A 12431A 12431A 12431A 12431A 12431A 12431A
8
9
10
11
1
2
3
4
5
7
12
6
Non-USA & Canada:

118
PO
SAVE THESE INSTRUCTIONS
(118PO) ULTRA XTR™ POOLS ENGLISH 7.5” X 10.3” PANTONE 295U 05/13/2020
English
Page 10
POOL SETUP
WARNING
IMPORTANT SITE SELECTION AND GROUND
PREPARATION INFORMATION
• Thepoollocationmustallowyoutosecurealldoors,windows,andsafetybarrierstoprevent
unauthorized, unintentional or unsupervised pool entry.
• Installasafetybarrierthatwilleliminateaccesstothepoolforyoungchildrenandpets.
• Failuretosetupthepoolonflat,level,compactgroundandtoassembleandfillwithwaterin
accordance with the following instructions could result in the pool’s collapse or the
possibility that a person lounging in the pool could be swept out/ejected, resulting in serious
injury or property damage.
• Riskofelectricshock:connectthefilterpumponlytoagroundingtypereceptacleprotected
by a ground-fault circuit interrupter (GFCI). To reduce the risk of an electrical shock, do not
use extension cords, timers, plug adapters or converter plugs to connect the pump to an
electrical supply. Always provide a properly located outlet. Locate the cord where it cannot
be damaged by lawn mowers, hedge trimmers, and other equipment. See the filter pump
manual for additional warnings and instructions.
• Riskofseriousinjury:donotattempttoassemblepoolinhighwindconditions.
Select an outdoor location for the pool with the following requirements in mind:
1.
The area where the pool is to be set up must be
absolutely flat and level
.
Do not
set up the pool on a
slope or inclined surface.
2.
The ground surface must be compacted and firm enough to withstand the pressure and weight of a fully
set up pool.
Do not
set up the pool on mud, sand, soft or loose soil conditions.
3.
Donotsetupthepoolonadeck,balconyorplatform,whichmaycollapseundertheweightofthefilled
pool.
4.
The pool requires at least 4 feet of space all around pool from objects that a child could climb on to gain
access to the pool.
5.
Grassunderthepoolwillbedamaged.Splashoutchlorinatedpoolwatercoulddamagethesurrounding
vegetation.
6.
Abovegroundstorablepoolsshallbelocatedataminimumdistanceof6ft(1.83meters)fromany
receptacle,andall125-volt15-and20-amperereceptacleslocatedwithin20ft(6.0meters)ofthe
poolshallbeprotectedbyagroundfaultcircuitinterrupter(GFCI),wheredistancesarebymeasuringthe
shortest path the supply cord of an appliance connected to the receptacle would follow without piercing a
floor,wall,ceiling,doorwaywithhingedorslidingdoor,windowopening,orothereffectivepermanent
barrier.
7.
Eliminateallaggressivegrassesfirst.CertaintypesofgrasssuchasSt.AugustineandBermuda,may
growthroughtheliner.Grassgrowingthroughthelineritisnotamanufacturedefectandisnot
coveredunderwarranty.
8.
The area shall facilitate drainage of the pool water after each use and/or for long term pool storage.

118
PO
SAVE THESE INSTRUCTIONS
(118PO) ULTRA XTR™ POOLS ENGLISH 7.5” X 10.3” PANTONE 295U 05/13/2020
English
Page 11
POOL SETUP
(
continued
)
YoumayhavepurchasedthispoolwiththeIntexKrystalClear™filterpump.Thepumphasitsown
separate set of installation instructions. First assemble your pool unit and then set up the filter pump.
Estimatedassemblytime45-60min.(Notetheassemblytimeisonlyapproximateandindividualassembly
experiencemayvary.)
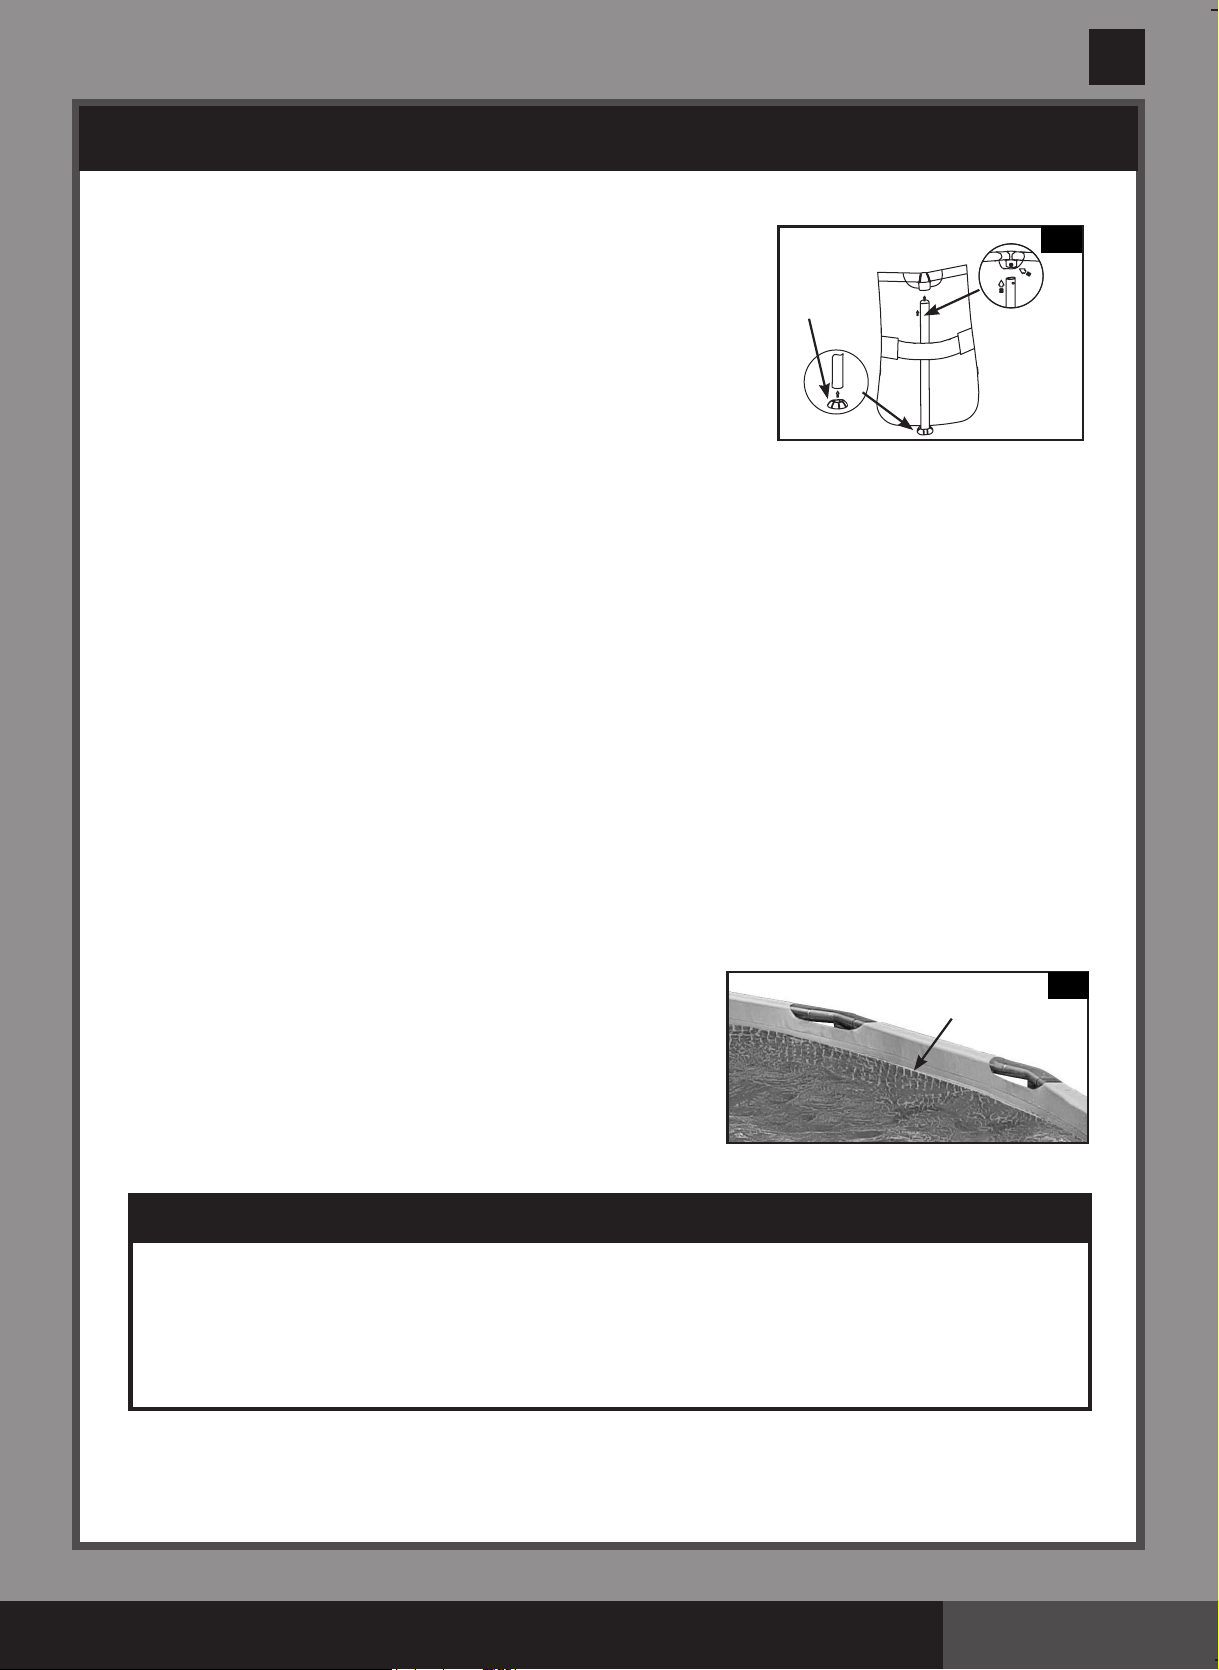
1. Liner preparation
• Findaflat,levellocationthatisfreeandclearofstones,branchesorothersharpobjectsthatmay
puncture the pool liner or cause injury.
• Openthecartoncontainingtheliner,joints,legs,etc.,verycarefullyasthiscartoncanbeusedtostore
the pool during the winter months or when not in use.
• Takeoutthegroundcloth
(7)
(optional)andspreaditover
the cleared area. Then, take out the liner
(5)
and spread
itoutoverthegroundcloth,withthedrainvalvedirected
towardsthedrainingarea.Placethedrainvalveawayfrom
the house. Allow the sun to warm up the liner before
inserting the beams
(4)
intothesleeveopenings.
IMPORTANT: Always set up the pool unit with at least
2 persons. Do not drag the liner across the ground as
this can cause liner damage and pool leakage (see
drawing 1).
• Duringthesetupofthispoolliner,pointthehoseconnectionsoropeningsinthedirectionoftheelectric
powersource.Theouteredgeofthepoolshouldbewithinreachofthepump’selectricalconnection.
2. Frame assembly
• Theframepool’slegs
(2)
and beams
(4)
fall into two groups. The smaller
diametersaretheverticallegs.Boththeselegsandbeamsfitintothe
T-joints
(1)
.
NOTE:
Sprinkle some talcum powder over the horizontal beams
before sliding them into the pool liner sleeve. This will make
removal of the beams from the liner easier during the disassembly
of the pool.
• Startingatanylocation,butalwaysworkinginthesamedirection,push
thehorizontalbeamintothesleeve
(see drawing 2.1)
. Once the beam
is centered take one of the T- joints
(1)
, snap the joint to one end of the
beam by aligning the hole and the spring-loaded pin. Repeat this
procedureinacircularfashionuntilallthebeamsandjointshavebeen
connected
(see drawing 2.2)
.
The last joint connection may be difficult to complete, but can be
easily done by simultaneously raising this last joint and beam
more than 2 inches (5 cm), and connect the beam to the joint while
lowering these pieces to their normal position. The joint will slide
into the beam (see drawing 2.3). Make sure the last joint is fully
assembled before proceeding to assembling the legs.
1
5
2.1
2.3
1
2.2
118
PO
SAVE THESE INSTRUCTIONS
(118PO) ULTRA XTR™ POOLS ENGLISH 7.5” X 10.3” PANTONE 295U 05/13/2020
English
Page 12
POOL SETUP
(
continued
)
IMPORTANT
Before allowing anyone to use the pool, hold a family meeting. Establish a set of rules that
include, at a minimum, the important safety rules and general aquatic safety information in this
manual. Review these rules on a regular basis and with all users of the pool including guests.
The installer of the vinyl liner shall affix on the original or replacement liner, or on the pool
structure, all safety signs in accordance with the manufacturer’s instructions. The safety signs
shall be placed above the water line.
• Nextslidetheverticallegsintothebeltlooplocatedinthemiddleof
the pool liner. Carefully slide the leg into the belt loop and insert the
topofthelegintothebottomofthejoint.Snapthelegintojoint’s
holesbyaligningtheholeandthespring-loadedpin.Attachtheleg’s
end cap
(3)
to the bottom of the leg
(see drawing 3)
.
• Grabtheframepool’stopbeamsin2–3locationsand"shake"the
pooltobesureallthejoints,legsandbeams"fitintoeachother".
• Pullgently,inanoutwarddirection,thebottomofthelegmaking
surethelegisverticalandperpendiculartothelevelground.
•
If pool was purchased with a filter pump, read the Krystal Clear™ Filter Pump Manual first and
then proceed to next installation step.
3. Filling of the pool
• Beforefillingthepoolwithwater,ensurethatthedrainpluginsidethepoolisclosedandthatthedrain
capontheoutsideisscrewedontightly.Fillthepoolwithnomorethan1inch(2.5cm)ofwater.Check
toseewhetherthewaterislevel.
IMPORTANT: If the water in the pool flows to one side, the pool is not completely level. Setting up
the pool on unlevel ground will cause the pool to tilt resulting in the sidewall material bulging and
a potential collapse of the pool. If the pool is not completely level, you must drain the pool, level
the area or move the pool to a different area that is level, and re-fill the pool, following the above
directions.
• Smoothoutthebottomlinerwrinkles(frominsidethepool)bypushingoutwherethepoolfloorandpool
sidesmeet.Or(fromoutsidepool)reachunderthesideofthepool,graspthepoolfloorandpullinan
outwarddirection.Ifthegroundclothiscausingthewrinkles,have2peoplepullfromoppositesidesto
removeallwrinkles.Usetheproperlyassembledpoolladderwhenenteringorexitingthepoolduringthis
process.
• Fillthepoolwithwateruptojustbelowthesleeveline
(see
drawing 4)
.
4
.
Posting
aquatic safety signs
SelectahighlyvisibleareanearthepooltoposttheDanger
NoDivingorJumpingsignincludedlaterinthismanual.
3
3
WATERLEVEL
4

118
PO
SAVE THESE INSTRUCTIONS
(118PO) ULTRA XTR™ POOLS ENGLISH 7.5” X 10.3” PANTONE 295U 05/13/2020
English
Page 13
GENERAL AQUATIC SAFETY
Water recreation is both fun and therapeutic. However, it involves inherent risks of
injury and death. To reduce your risk of injury, read and follow all product, package
and package insert warnings and instructions. Remember, however, that product
warnings, instructions and safety guidelines cover some common risks of water
recreation, but do not cover all risks and dangers.
Assign an adult to be responsible for watching children in the pool. Give this
person a “water watcher” tag and ask that they wear it the entire time they are in
charge of supervising children in the pool. If they need to leave for any reason, ask
this person to pass the “water watcher” tag and the supervision responsibility to
another adult.
For additional safeguards, also familiarize yourself with the following general
guidelines as well as guidelines provided by nationally recognized Safety
Organizations:
• Demandconstantsupervision.Acompetentadultshouldbeappointedasa“lifeguard”
or water watcher, especially when children are in and around the pool.
• Learntoswim.
• TakethetimetolearnCPRandfirstaid.
• Instructanyonewhoissupervisingpoolusersaboutpotentialpoolhazardsandabout
theuseofprotectivedevicessuchaslockeddoors,barriers,etc.
• Instructallpoolusers,includingchildrenwhattodoincaseofanemergency.
• Alwaysusecommonsenseandgoodjudgementwhenenjoyinganywateractivity.
• Supervise,supervise,supervise.
For additional information on safety, please visit
•TheAssociationofPoolandSpaProfessionals:TheSensibleWaytoEnjoyYour
Aboveground/Onground Swimming Pool www.nspi.org
• AmericanAcademyofPediatrics:PoolSafetyforChildrenwww.aap.org
• RedCrosswww.redcross.org
• SafeKidswww.safekids.org
• HomeSafetyCouncil:SafetyGuidewww.homesafetycouncil.org
• ToyIndustryAssociation:ToySafetywww.toy-tia.org
SAFETY IN YOUR POOL
Safe swimming depends on constant attention to the rules. You may also wish to copy and
laminate the sign for protection from the elements. You can also download and print
additional copies of the warning sign and water watcher tags at www.intexcorp.com.
118
PO
SAVE THESE INSTRUCTIONS
(118PO) ULTRA XTR™ POOLS ENGLISH 7.5” X 10.3” PANTONE 295U 05/13/2020
English
Page 14
Water maintenance
The maintenance of a proper water balance through appropriate use of sanitizers is the
single most important factor in maximizing the life and appearance of the liner as well as
ensuring clean, healthy and safe water. Proper technique is important for water testing
and treating the pool water. See your pool professional for chemical, test kits and testing
procedures. Be sure to read and follow the written instructions from the chemical
manufacturer.
1
.Neverletchlorinecomeincontactwiththelinerifitisnotcompletelydissolved.Dissolve
granular or tablet chlorine first in a bucket of water, then add it to the pool water. Likewise
with liquid chlorine; mix it immediately and thoroughly with the pool water.
2
.Nevermixchemicalstogether.Addthechemicalstothepoolwaterseparately.Thoroughly
dissolveeachchemicalbeforeaddinganotheronetothewater.
3
.AnIntexpoolskimmerandanIntexpoolvacuumareavailabletoassistinmaintainingclean
poolwater.Seeyourpooldealerforthesepoolaccessories.
4
.Donotuseapressurewashertocleanthepool.
POOL MAINTENANCE & CHEMICALS
REMEMBER TO
• Protectallpooloccupantsfrompossiblewater-relatedillnessesbykeepingthepool
water clean and sanitized. Do not swallow the pool water. Always practice good
hygiene.
• Keepyourpoolcleanandclear.Thepoolfloormustbevisibleatalltimesfromthe
outside barrier of the pool.
• Keepchildrenawayfrompoolcoverstoavoidentanglement,drowning,orother
serious injury.
WARNING

118
PO
SAVE THESE INSTRUCTIONS
(118PO) ULTRA XTR™ POOLS ENGLISH 7.5” X 10.3” PANTONE 295U 05/13/2020
English
Page 15
EXCESSIVE RAIN: To avoid damage to the pool and over filling, immediately drain rain water that
causes the water level to be higher than the maximum.
How to Drain Your Pool and Long Term Storage
1
. Check local regulations for specific directions regarding disposal of swimming pool water.
2
. Check to make sure that the drain plug inside the pool is plugged in place.
3
. Removethecapfromthedrainvalveontheoutsidepoolwall.
4
. Attach the female end of the garden hose to the drain connector
(8)
.
5
. Place the other end of the hose in an area where the water can be safely drained away from the
house and other nearby structures.
6
. Attachthedrainconnectortothedrainvalve.
NOTE: The drain connector will push the drain
plug open inside the pool and water will start to drain immediately.
7.
Whenthewaterstopsdraining,startliftingthepoolfromthesideoppositethedrain,leadingany
remaining water to the drain and emptying the pool completely.
8
. Disconnecthoseandadapterwhenfinished.
9
. Re-insertdrainplugindrainvalveoninsideofpoolforstorage.
10
. Replace drain cap on outside of pool.
11
.Reverseset-upinstructionstodisassemblethepool,andremoveallconnectingparts.
12
. Be sure that the pool and all parts are completely dry before storage. Air dry the liner in the sun until
completely dry before folding
(see drawing 5)
.Sprinklesometalcumpowdertopreventthevinylfrom
sticking together and to absorb any residual moisture.
13
.Createasquareshape.Startingatoneside,foldone-sixthoflinerinonitselftwice.Dothesameon
the opposite side
(see drawings 6.1 & 6.2)
.
14
.Onceyouhavecreatedtwoopposingfoldedsides,simplyfoldoneovertheotherlikeclosingabook
(see drawings 7.1 & 7.2)
.
15
. Fold the two long ends to the middle
(see drawing 8)
.
16
.Foldoneovertheotherlikeclosingabookandfinallycompacttheliner
(see drawing 9)
.
17
.Storethelinerandaccessoriesinadry,temperaturecontrolled,between32degreesFahrenheit
(0degreesCelsius)and104degreesFahrenheit(40degreesCelsius),storagelocation.
18
. The original packing can be used for storage.
7.1
5
6.1 6.2
7.2 8 9
POOL MAINTENANCE & DRAINAGE
CAUTION
ALWAYSFOLLOWTHECHEMICALMANUFACTURER'S
DIRECTIONS,ANDTHEHEALTHANDHAZARDWARNINGS.
Do not add chemicals if the pool is occupied. This can cause skin or eye irritation.
Concentrated
chlorinesolutionscandamagethepoolliner.InnoeventisIntexRecreationCorp.,IntexDevelopment
Co.Ltd.,theirrelatedcompanies,authorizedagentsandservicecenters,retailersoremployeesliableto
the buyer or any other party for costs associated with the loss of pool water, chemicals or water damage.
Keep spare filter cartridges on hand. Replace cartridges every two weeks.
Werecommendtheuse
ofaKrystalClear™IntexFilterPumpwithallofourabove-ground-pools.
To purchase an Intex Filter
Pump or other accessories see your local retailer, visit our website or call the Intex Consumer
Services Department listed in the separate "Authorized Service Centers" sheet and have your Visa
or Mastercard ready.

118
PO
SAVE THESE INSTRUCTIONS
(118PO) ULTRA XTR™ POOLS ENGLISH 7.5” X 10.3” PANTONE 295U 05/13/2020
English
Page 16
WINTER PREPARATIONS
Winterizing your Above Ground Pool
After usage, you can easily empty and store away your pool in a safe place. You
must drain, disassemble and properly store the pool when the temperature drops
below 41 degrees Fahrenheit (5 degrees Celsius) to prevent ice damage to the pool
and related components. Ice damage can result in sudden liner failure or pool
collapse. Also see the section ‘’How To Drain Your Pool’’.
Should temperatures in your area not drop below 41 degrees Fahrenheit (5 degrees
Celsius), and you choose to leave your pool out, prepare it as follows:
1.
Cleanthepoolwaterthoroughly.IfthetypeisanEasySetPooloranOvalFrame
Pool, make sure that the top ring is properly inflated.
2.
Removetheskimmer(ifapplicable)oranyaccessoriesattachedtothethreaded
strainer connector. Replace strainer grid if necessary. Be sure all accessories parts are
clean and completely dry before storage.
3.
PlugtheInletandOutletfittingfromtheinsideofthepoolwiththeplugprovided
(sizes16'andbelow).ClosetheInletandOutletPlungerValve(sizes17'andabove).
4.
Removetheladder(ifapplicable)andstoreinasafeplace.Besuretheladderis
completely dry before storage.
5.
Removethehosesthatconnectthepumpandfiltertothepool.
6.
Add the appropriate chemicals for the winter period. Consult your local pool dealer as
towhichchemicalsyoushoulduseandhowtousethem.Thiscanvarygreatlyby
region.
7.
CoverpoolwithIntexPoolCover.
IMPORTANT NOTE: INTEX POOL COVER IS NOT
A SAFETY COVER.
8.
Cleananddrainthepump,filterhousingandhoses.Removeanddiscardtheoldfilter
cartridge.Keepasparecartridgeforthenextseason.
9.
Bring pump and filter parts indoors and store in a safe and dry area, preferably
between32degreesFahrenheit(0degreesCelsius)and104degreesFahrenheit
(40degreesCelsius).
118
PO
SAVE THESE INSTRUCTIONS
(118PO) ULTRA XTR™ POOLS ENGLISH 7.5” X 10.3” PANTONE 295U 05/13/2020
English
Page 17
TROUBLESHOOTING
PROBLEM DESCRIPTION CAUSE SOLUTION
ALGAE
•
Greenishwater.
•
Greenorblackspots
on pool liner.
•
Pool liner is slippery
and/or has a bad
odor.
•
ChlorineandpH
levelneed
adjustment.
• Superchlorinatewithshock
treatment.CorrectpHtoyour
poolstore’srecommended
level.
• Vacuumpoolbottom.
• Maintainproperchlorinelevel.
COLORED
WATER
• Waterturnsblue,
brown, or black when
first treated with
chlorine.
•
Copper, iron or
manganese in water
beingoxidizedby
the added chlorine.
• AdjustpHtorecommended
level.
• Runfilteruntilwaterisclear.
• Replacecartridgefrequently.
FLOATING
MATTER IN WATER
• Wateriscloudyor
milky.
• “Hardwater”caused
byatoohighpH
level.
• Chlorinecontentis
low.
• Foreignmatterin
water.
• CorrectthepHlevel.Check
with your pool dealer for
advice.
• Checkforproperchlorine
level.
•
Clean or replace your filter
cartridge.
CHRONIC LOW
WATER LEVEL
• Levelislowerthan
onpreviousday.
• Riporholeinpool
liner or hoses.
• Repairwithpatchkit.
• Fingertightenallcaps.
• Replacethehoses.
SEDIMENT ON POOL
BOTTOM
• Dirtorsandonpool
floor.
• Heavyuse,gettingin
and out of pool.
• UseIntexpoolvacuumto
clean bottom of pool.
SURFACE DEBRIS
• Leaves,insectsetc. • Pooltoocloseto
trees.
• UseIntexpoolskimmer.
PROBLEM CAUSE SOLUTION
POOL INLET AIR
ADAPTOR LEAKING
• Hoseclampsarenotwell-fitted. • Tightenorreinstallhoseclamps.
INLET TREADED
AIR CONNECTOR
LEAKING
• Plungervalvenotwell-fitted. • Tightenorreinstallplungervalve.
AIR JET VALVE
LEAKING
• Airjetvalveisnottightandfacingup.
•Airjetvalveinternalsealblocked.
•Airjetvalveinternalsealdirty.
•Airjetvalvebroken.
• Tightenairjetvalveandmakesure
it’sfacingup.
•TurnONorpluginthepumpand
run for few seconds, then turn OFF
or unplug, repeat 3 times.
•Removeairjetvalve,flushdirtoutwith
waterandreplacevalveback.
•Replaceanewairjetvalve.

118
PO
SAVE THESE INSTRUCTIONS
(118PO) ULTRA XTR™ POOLS ENGLISH 7.5” X 10.3” PANTONE 295U 05/13/2020
English
Page 18
Your Intex Pool has been manufactured using the highest quality materials and
workmanship.AllIntexproductshavebeeninspectedandfoundfreeofdefectspriorto
leavingthefactory.ThisLimitedWarrantyappliestotheIntexPoolonly.
TheprovisionsofthisLimitedWarrantyapplyonlytotheoriginalpurchaserandisnot
transferable.ThisLimitedWarrantyisvalidfortheperiodnotedbelowfromthedateof
theinitialretailpurchase.Keepyouroriginalsalesreceiptwiththismanual,asproofof
purchasewillberequiredandmustaccompanywarrantyclaimsortheLimitedWarranty
isinvalid.
PoolLinerandFrameWarranty-2Years
If a manufacturing defect is found within this 2 years period, please contact the appropriate
IntexServiceCenterlistedintheseparate“AuthorizedServiceCenters”sheet. TheService
Centerwilldeterminethevalidityoftheclaim.IftheServiceCenterdirectsyoutoreturnthe
product, please carefully package the product and send with shipping and insurance
prepaidtotheServiceCenter.Uponreceiptofthereturnedproduct,theIntexService
Centerwillinspecttheitemanddeterminethevalidityoftheclaim.Iftheprovisionsofthis
warrantycovertheitem,theitemwillberepairedorreplacedatnocharge.
AnyandalldisputesregardingtheprovisionsofthisLimitedWarrantyshallbebrought
beforeaninformaldisputesettlementboardandunlessanduntiltheprovisionsofthese
paragraphsarecarriedforth,nocivilactionmaybeinstituted.Themethodsandprocedures
of this settlement board shall be subject to the rules and regulations set forth by the Federal
TradeCommission(F.T.C.).IMPLIEDWARRANTIESARELIMITEDTOTHETERMSOF
THISWARRANTYANDINNOEVENTSHALLINTEX,THEIRAUTHORIZEDAGENTSOR
EMPLOYEESBELIABLETOTHEBUYERORANYOTHERPARTYFORDIRECTOR
CONSEQUENTIALDAMAGESORLIABILITIES.Somestates,orjurisdictionsdonotallow
theexclusionorlimitationofincidentalorconsequentialdamages,sotheabovelimitationor
exclusion may not apply to you.
ThisLimitedWarrantydoesnotapplyiftheIntexproductissubjecttonegligence,abnormal
use or operation, accident, improper operation, improper maintenance or storage, or to
damagebycircumstancesbeyondIntex’scontrol,includingbutnotlimitedto,punctures,
tears, abrasions, ordinary wear and tear and damage caused by exposure to fire, flood,
freezing,rain,orotherexternalenvironmentalforces.ThisLimitedWarrantyappliesonly
tothosepartsandcomponentssoldbyIntex.TheLimitedWarrantydoesnotcover
unauthorizedalterations,repairsordisassemblybyanyoneotherthanIntexServiceCenter
personnel.
DO NOT GO BACK TO THE PLACE OF PURCHASE FOR RETURN
OR REPLACEMENT. IF YOU ARE MISSING PARTS OR NEED
ASSISTANCE, PLEASE CALL US TOLL-FREE (FOR U.S. AND
CANADIAN RESIDENTS): 1-800-234-6839 OR VISIT OUR WEBSITE:
WWW.INTEXCORP.COM.
ProofofPurchasemustaccompanyallreturnsorthewarrantyclaimwillbeinvalid.
LIMITED WARRANTY