m
m
m
m
IR40智能测距仪
IR40 SMART RANGEFINDER

09【 1 】 按键及功能
09【 2 】 参数解析
10【 3 】 显示说明
10【 4 】 操作指引
11【 5 】 高级测量说明
13【 6 】 蓝牙状态指示
13【 7 】 电池电量指示
14【 8 】 错误代码
14【 9 】 安全警告
14【 10 】 生产信息
15【 11 】 连接APP
目录
CATALOG
01【 1 】 Keys and Functions
01【 2 】 Parameters
02【 3 】 Show Description
02【 4 】 Instructions
04【 5 】 Advanced Measurement
06【 6 】 Bluetooth Status Indication
06【 7 】 Battery Level Indication
06【 8 】 Error Code
07【 9 】 Safety Warning
07【 10 】 Production Information
08【 11 】 Connect to APP
01
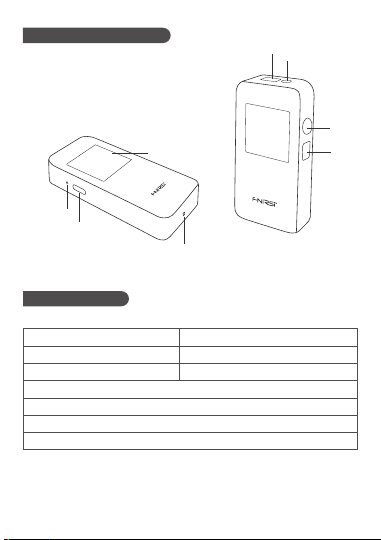
【 1 】 Keys and Functions
LCD display Charging indicator
Type-C port Reset hole
Laser receiver lens Laser emission lens
On/Measure key Off/Clear key
①
③
⑤
⑦
②
④
⑥
⑧
⑧
⑦
⑥
⑤
②
③
①
④
【 2 】 Parameters
Resolution: 1mm
Unit: m/ft/in
Measurement time: 0.1~3s
Measurement accuracy: ±(2mm+5x10
-5
Dmm)
Operating temperature range: 0~40 degrees
Storage temperature range: -20 degrees to 60 degrees
Executive standard: GB7247.1-2012
Laser Class: Class II
Laser type: 620-670nm
Measurement range: 0.05~40m
▲ Parameter Analysis
▲ Test Conditions
1. General Conditions: General conditions:It refers to the strong reflection ability
of the laser irradiation area.(such as painting white walls).The background lighting
is dim and the operating temperature is 15°C-35°C.At this time, an error effect of
plus or minus 0.05 mm/m should be considered
02
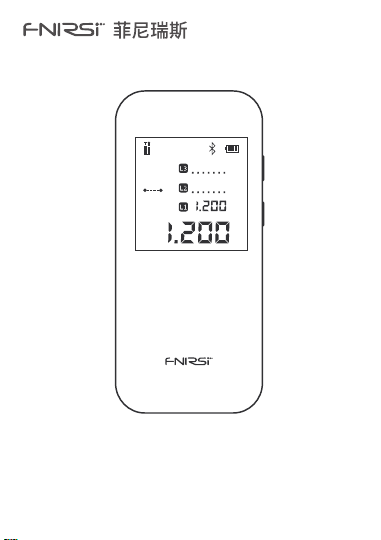
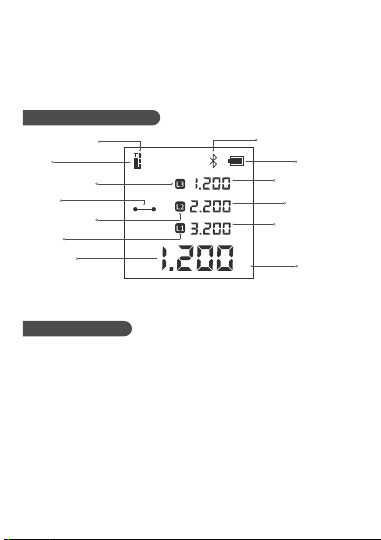
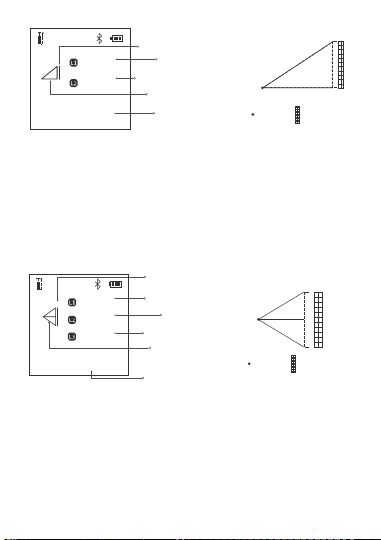
【 3 】 Show Description
m
m
m
m
Laser
working state
Edge L2 icon
Edge L1 icon
Edge L3 icon
Measurement
reference indication
Current
measurement mode
Bluetooth icon
Edge L1
measurement data
Units of
measurement
Edge L3
measurement data
Current
measurement data
Edge L2
measurement data
Power display
【 4 】 Instructions
▲ Power On: Press and hold the "⑦ On/Measure key" for 3 seconds. When the
"FNIRSI" LOGO appears on the LCD display, the device is turned on
▲ Power Off: Press and hold "⑧ Off/Clear key" for 3 seconds.When the LCD
display turns off, the device is turned off.(When there is no operation after power
on: the laser will automatically turn off after 15 seconds, and it will
automatically turn off after 5 minutes)
1. The rangefinder cannot be moved during measurement, it needs to be placed
on a fixed support surface
2. Do not block the laser emission hole and the receiving lens during measurement
3. Based on physical principles, errors will occur when measuring on certain
surfaces, such as transparent, highly reflective, low reflective or porous surfaces.
Aiming targets can be placed on the above objects if necessary to improve
measurement accuracy
▲ Operation Precautions
2. Disadvantages: Refers to the weak reflectivity of the laser-irradiated area.(Like
black cardboard polished tiles.)The background lighting is strong and the working
temperature is <0°C or >45°C.At this time, an error effect of plus or minus 0.15
mm/m should be considered
03
▲ Reset: Poke the "④ Reset hole" with a toothpick and the machine will be
forced to shut down.Used to handle exceptions.
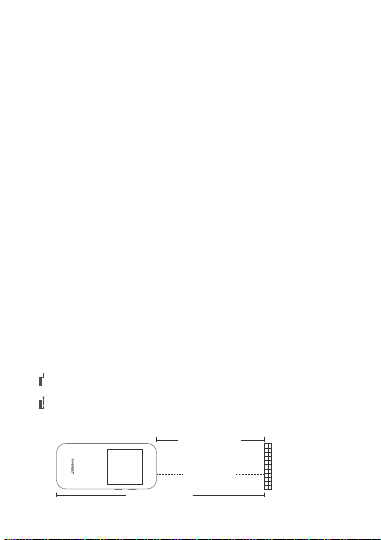
Laser emission
Front benchmark
Measurement
object
Post benchmark
▲ Single Measurement: Single measurement:Single short press "⑦ On/measure
key" to start measurement.Short press the "⑦ On/Measure key" again to get the
measurement data.The page displays up to 4 sets of measurement data. During
measurement, the straight line at the "measurement mode" turns into a dotted
line, indicating that the measurement is being performed
▲ 360° Screen Flip: Built-in gravity sensor chip, the screen can be flipped
automatically.Instructions:Long press the power button in the off state, don't let
go after power on, and enter the display interface after 3 seconds to switch the
adaptive rotation function on/off.
▲
Unit Switching: Quickly double-click with "⑦ On/Measure key" to switch the
unit. The order of unit switching is meter → feet → inch
▲
Automatic Calibration
1. In the off state, press and hold the "⑧ Off/Clear key", then press and hold the
"⑦ On/Measure key" for 3 seconds, when the screen displays "CAL", it means that
the calibration mode is entered
2. Short press "⑦ On/Measure key" to increase the calibration value.Short press
"⑧ Off/Clear key" to decrease the calibration value.The calibration range is
"-10mm to 10mm". Press and hold the "⑦ On/Measure key" for 2 seconds to
indicate that the calibration is complete.Automatically enter the measurement
interface
▲ Clear Function:
Clear function:Short press "⑧ Off/Clear key" to cancel the last
command.A single measurement (area or volume, etc.) within the same
function.You can use "⑧ Off/Clear key" to clear the last measurement operation
and re-measure
▲ Measurement Reference Switching
Measurement reference switching: Quickly double-click the "⑧ Off/Clear key" to
switch the front and rear benchmarks
1. “ ”Front benchmark: Front datum refers to the measurement starting
position from the top of the device
2. “ ”Post benchmark: Rear datum refers to taking the bottom of the device as
the starting position for measurement, and the device defaults to the rear datum
04
▲ Measurement Mode Switching: Long press the "⑦ On/Measure key" to switch
the measurement mode cyclically.The order is "Linear Measurement" → "Area
Measurement" → "Volume Measurement" → "Pythagorean One" → "Secondary
Pythagorean (Data Addition)" → "Secondary Pythagorean (Data Subtraction)"
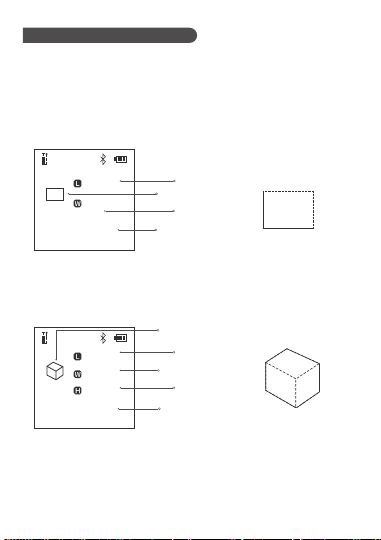
▲ Area Measurement: Click "
⑦ On/Measure key", and measure the length and
width in turn.The dotted line during measurement indicates the edge to be
measured.When all sides are measured, the system automatically calculates the
area
【 5 】 Advanced Measurement
▲ Volume Measurement: Click the “⑦ On/Measure key”, and measure the
length and width in turn.The dotted line during measurement indicates the edge
to be measured.When all sides are measured, the system automatically calculates
the area
m
3
m
m
m
6.000
3.000
2.000
1.000
Edge L
measurement data
Side W
measurement data
Edge H
measurement data
Volume
measurement symbol
Volume
calculation data
L
W
H
m
2
m
m
2.000
2.000
1.000
Edge L
measurement data
Area measurement
symbol
Edge W
measurement data
Area
calculation data
L
W
▲ A Pythagorean: When the selection interface is not measured, the solid yellow
line indicates the edge of the final calculation result.Short press "⑦ On/Measure
key" to start measurement.The dotted line during measurement indicates the edge
to be measured.Short press again to get measurement data.Measure the data of the
right-angled base "L1" and the right-angled hypotenuse "L2" in sequence.At the
end of the measurement, the bottom edge L3 data will be automatically calculated
05
L3
m
m
m
1.089
1.499
1.853
Edge L1 measurement data
Side L3 to be calculated
Edge L2 measurement data
Edge L3
Computational data
One Pythagorean
measurement symbol
L2
L1
Launch
point
Measurement
object
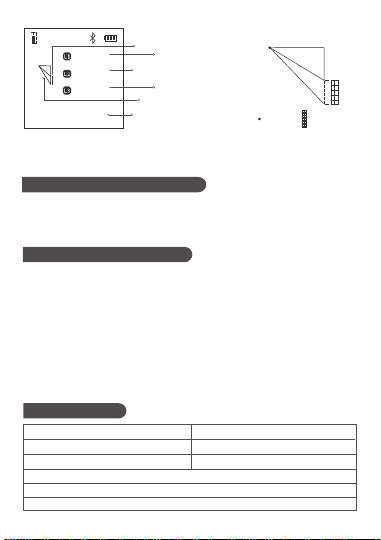
▲ Quadratic Pythagorean (data subtraction): When entering the interface and
not starting the measurement, the yellow solid line indicates the edge of the final
calculation result.Short press "measurement end will" to start the measurement,
the dotted line indicates the edge to be measured during measurement.
Short press again to get measurement data.Measure the right-angle base L1 data,
L2 data and right-angle hypotenuse L3 data in sequence.At the end of the
measurement, the bottom edge L4 data will be automatically calculated
▲ Quadratic Pythagorean(data addition): When entering the interface and not
starting the measurement, the yellow solid line indicates the edge of the final
calculation result.Short press "⑦ On/Measure key" to start measurement
When measuring, the dotted line indicates the edge to be measured. Short press
again to get the measurement data.Measure the triangle hypotenuse L1 data,
height L2 data, and hypotenuse L3 data in sequence.At the end of the
measurement, the bottom edge L4 data will be automatically calculated
1.938
Edge L1
measurement data
Edge L4 to be calculated
m
m
m
m
1.838
1.715
1.954
Edge L2
measurement data
Edge L2
measurement data
Edge L4
measurement data
Quadratic Pythagorean
measurement symbol
L1
L2
L4
L3
Launch
point
Measurement
object
06
ERR02: Unstable signal
ERR04: Target out of range
ERR06: Background light is too strong
【 8 】 Error Code
ERR01: Hardware malfunction
ERR03: Abnormal temperature
ERR05: Invalid measurement result
ERR07: The signal is too strong or too weak
ERR30: Does not satisfy the Pythagorean theorem
ERR60: No light return or hardware failure
【 7 】 Battery Level Indication
▲ Battery Level Indicator: When all segments of the battery icon on the LCD
display are displayed, it means the battery is fully charged.The number of
displayed segments decreases, indicating that the power is relatively reduced.
When only the battery box is displayed, it should be ready to charge in
time.When charging, the segment code will flow and the red charging indicator
on the left side of the device will light up.When the red light goes out, the battery
is fully charged
▲ Automatic Shutdown When Low Battery: When the battery is too low, the
LCD display will prompt the low battery.And countdown to shutdown
【 6 】 Bluetooth Status Indication
▲ After power on, the Bluetooth icon at the top of the screen flashes.After the
bluetooth connection is successful, the bluetooth icon will no longer flash
1.722
Side L1 measurement data
Edge L4 to be calculated
m
m
m
m
0.538
1.768
1.961
Edge L3 measurement data
Edge L2 measurement data
Edge L4 Computational data
Quadratic Pythagorean
measurement symbol
L1
L2
L4
L3
Launch
point
Measurement
object

07
【 9 】 Safety Warning
Warning! Before using the product for the first time.Please read the safety
regulations and operating instructions carefully first
▲ Please read all operating instructions and safety regulations in this manual
carefully before using the product.Using the product not in accordance with the
operating methods in this manual may cause damage to the product, affect the
measurement accuracy, and cause personal injury to the user or others
▲ Do not open or repair the product by yourself in any way.It is strictly prohibited
to illegally modify or change the performance of the product's laser
transmitter.Please keep the product properly, do not place it where children can
reach
▲ It is strictly forbidden to use the product laser to irradiate your own or others'
eyes and other parts of the body.It is strictly forbidden to irradiate the laser on the
surface of highly reflective objects
▲ The electromagnetic radiation of the product may cause interference to other
equipment and devices.Please do not use this product near aircraft or medical
equipment.Do not use the product in a flammable and explosive environment.
▲ Used batteries and scrapped products replaced by products cannot be
disposed of with household waste.Please dispose of used batteries and scrapped
products in accordance with relevant national or local laws
Product name: FNIRSI 40m Smart Rangefinder
Brand / Model: FNIRSI / FNIRSI-IR40
Manufacturer: Shenzhen FNIRSI Technology Co., Ltd.
Website: www.fnirsi.cn
Address: Building C, Weihuada Industrial Park, Dalang Street, Longhua District,
Shenzhen, Guangdong, China
【 10 】 Production Information

08
【 11 】 Connect APP
▲
Please search for "RangeFinder" in Google Play (Android) or App
Store (IOS) to download the rangefinder APP and install it for
authorized use.
▲
On the APP device page "+" to enter the searching page, it will
automatically search for nearby devices.
▲
When the rangefinder icon appears, select the corresponding
device to add and connect successfully, and the Bluetooth icon on
the terminal device page is always on.