
PDS-5000F
PDS-6000F
Version A
ENG
User’s Guide PDS-5000F/PDS-6000F

i
Using the guide
Thank you for buying a Brother machine! Reading the documentation will help you make the most of your
machine.
Symbols and conventions used in this guide
The following symbols and conventions are used throughout this guide:
CAUTION CAUTION indicates a potentially hazardous situation which, if not avoided,
may result in minor or moderate injuries.
IMPORTANT IMPORTANT indicates a potentially hazardous situation which, if not avoided,
may result in damage to property or loss of product functionality.
NOTE Notes tell you how you should respond to a situation that may arise or give tips
about other scanning features.
Bold Bold style identifies keys on the machine or computer screen.
Italics Italicised style emphasises an important point or refers you to a related topic.
Courier New Text in Courier New font identifies messages on the LCD screen of the machine.
NOTE
• For PDS-5000F users: This guide uses PDS-6000F screen images, unless otherwise indicated.
• If you use a tablet running Windows
®
, you can make your selections either by tapping the screen or by
clicking with your mouse.

ii
Table of Contents
1 Scanning Software 1
Choose your scanning software ...............................................................................................................1
2 General Information 2
Scanner overview .....................................................................................................................................2
Control panel ............................................................................................................................................3
Control panel overview .......................................................................................................................3
LED indications ...................................................................................................................................4
Machine status messages ..................................................................................................................4
3 Document Information 5
Acceptable documents .............................................................................................................................5
Unacceptable documents .........................................................................................................................6
Documents recommended for use with the Carrier Sheet (for ADF Scan) ...............................................7
4 Scan Preparation 8
Set up your machine for Automatic Document Feeder (ADF) use ...........................................................8
Set up your machine for Flatbed use ........................................................................................................9
Load documents .....................................................................................................................................10
Loading documents in the ADF ........................................................................................................10
Loading documents on the Flatbed’s scanner glass ........................................................................13
Loading multiple different-size documents in the ADF .....................................................................14
Loading documents using the Carrier Sheet in the ADF ..................................................................16
Loading documents wider than Letter/A4 size ..................................................................................18
5 Scan (Windows
®
) 20
Scan using the control panel ..................................................................................................................20
Assign a scanning application to the Scan button ............................................................................20
Scan a document ..............................................................................................................................24
Scan using your computer ......................................................................................................................25
Scan with DS Capture ......................................................................................................................25
Change scan settings using the TWAIN driver .......................................................................................27
Functional overview ..........................................................................................................................27
DS Capture home screen .................................................................................................................28
Scanner Properties dialog box .........................................................................................................30
Image tab ..........................................................................................................................................31
Compression tab ..............................................................................................................................37
Color Dropout tab .............................................................................................................................38
Paper tab ..........................................................................................................................................40
Multi-Feed Detection tab ..................................................................................................................45
Preview tab .......................................................................................................................................47
Rotation tab ......................................................................................................................................50
Enhancement tab .............................................................................................................................52

iii
More Settings tab .............................................................................................................................56
Digital Imprinter tab ..........................................................................................................................58
Information tab ..................................................................................................................................62
Scan using the ISIS driver ......................................................................................................................63
6 Scan (Macintosh) 64
Scan using the control panel ..................................................................................................................64
Assign a profile to the Scan button ...................................................................................................64
Scan a document ..............................................................................................................................64
Scan using your computer ......................................................................................................................65
Scan with DS Capture ......................................................................................................................65
Change scan settings using the TWAIN driver .......................................................................................66
Functional overview ..........................................................................................................................66
DS Capture screen overview ............................................................................................................67
Profile tab .........................................................................................................................................68
Image tab ..........................................................................................................................................69
File tab ..............................................................................................................................................75
Color Dropout tab .............................................................................................................................77
Paper tab ..........................................................................................................................................79
Rotation tab ......................................................................................................................................84
Enhancement tab .............................................................................................................................86
Setting tab ........................................................................................................................................90
Imprinter tab .....................................................................................................................................91
Information tab ..................................................................................................................................95
7 Maintenance 96
Clean the outside of your machine .........................................................................................................96
Clean the Scanner Glass ..................................................................................................................97
Clean the inside of your machine ...........................................................................................................98
Replace parts ........................................................................................................................................104
Supply information ..........................................................................................................................104
Check replacement cycle ...............................................................................................................106
Replace the Rollers ........................................................................................................................106
Reset the usage counters ...............................................................................................................111
Packing and shipping the machine .......................................................................................................112
8 Troubleshooting 115
Error and maintenance messages ........................................................................................................115
Document jam ................................................................................................................................118
Multi-feed ........................................................................................................................................120
Troubleshooting ....................................................................................................................................122
A Appendix A 126
Specifications ........................................................................................................................................126
General ...........................................................................................................................................126
Scanner ..........................................................................................................................................129
Interfaces ........................................................................................................................................130
Supported languages .....................................................................................................................130
Computer requirements ..................................................................................................................131

iv
B Appendix B 132
Contact Brother .....................................................................................................................................132
Register your product online at .......................................................................................................132
Frequently Asked Questions (FAQs) ..............................................................................................132
For customer service ......................................................................................................................133
For Brother accessories & supplies ................................................................................................133
Technical support (for PageManager) ..................................................................................................134
1
1
1
Choose your scanning software
After installing Brother’s scanner drivers, select a scanning application to save scanned images to your
computer. Brother has supplied several options for you on Brother’s installation DVD; use this table to
determine which of the included scanning applications will work best for you:
1
Visit support.brother.com
NOTE
In addition to the above, you can also use your TWAIN (Windows
®
/Mac), WIA (Windows
®
),
ISIS (Windows
®
) and ICA (Mac) compatible applications for scanning.
Scanning Software 1
Software Description Where is it? For more information
DS Capture
(Windows
®
/Mac)
Brother’s scanning application: it allows
you to scan, browse and file your
scanned documents. DS Capture is
installed automatically when you install
the scanner driver.
Windows
®
:
DVD/Brother
Solutions Center
1
Mac: Brother
Solutions Center
1
For Windows
®
: See Scan using
your computer on page 25.
For Macintosh: See Scan using
your computer on page 65 and
Scan using the control panel on
page 64).
Button Manager V2
(Windows
®
)
Use this application to extend the
DS Capture scanning functionality, and to
create multiple types of scan buttons to
perform one-touch scanning. If scanning
with your computer, click the button to
which the required scan settings have
been assigned with the application.
If scanning with your machine, select the
menu to which the required scan settings
have been assigned on the LCD screen,
and then press the machine’s Scan
button.
The following scan functions are
supported:
Scan to File/Scan to File (OCR)/
Scan to App/E-mail/Printer/
Shared Folder/FTP/SharePoint
See the Button Manager Help menu
for more information about using
Button Manager V2.
DVD/Brother
Solutions Center
1
See the Button Manager V2
User’s Guide.
To scan using the Scan button
on your machine’s control panel,
customize the Scan button in
advance (see Scan using the
control panel on page 20).
OmniPage SE 18
(Windows
®
)
OmniPage SE 18 is an OCR scanning
application from Nuance.
DVD See the software’s user
instructions.
PageManager 9
(Mac)
PageManager 9 is a scanning application
from NewSoft.
Brother Solutions
Center
1
See the software’s user
instructions.
2
2
2
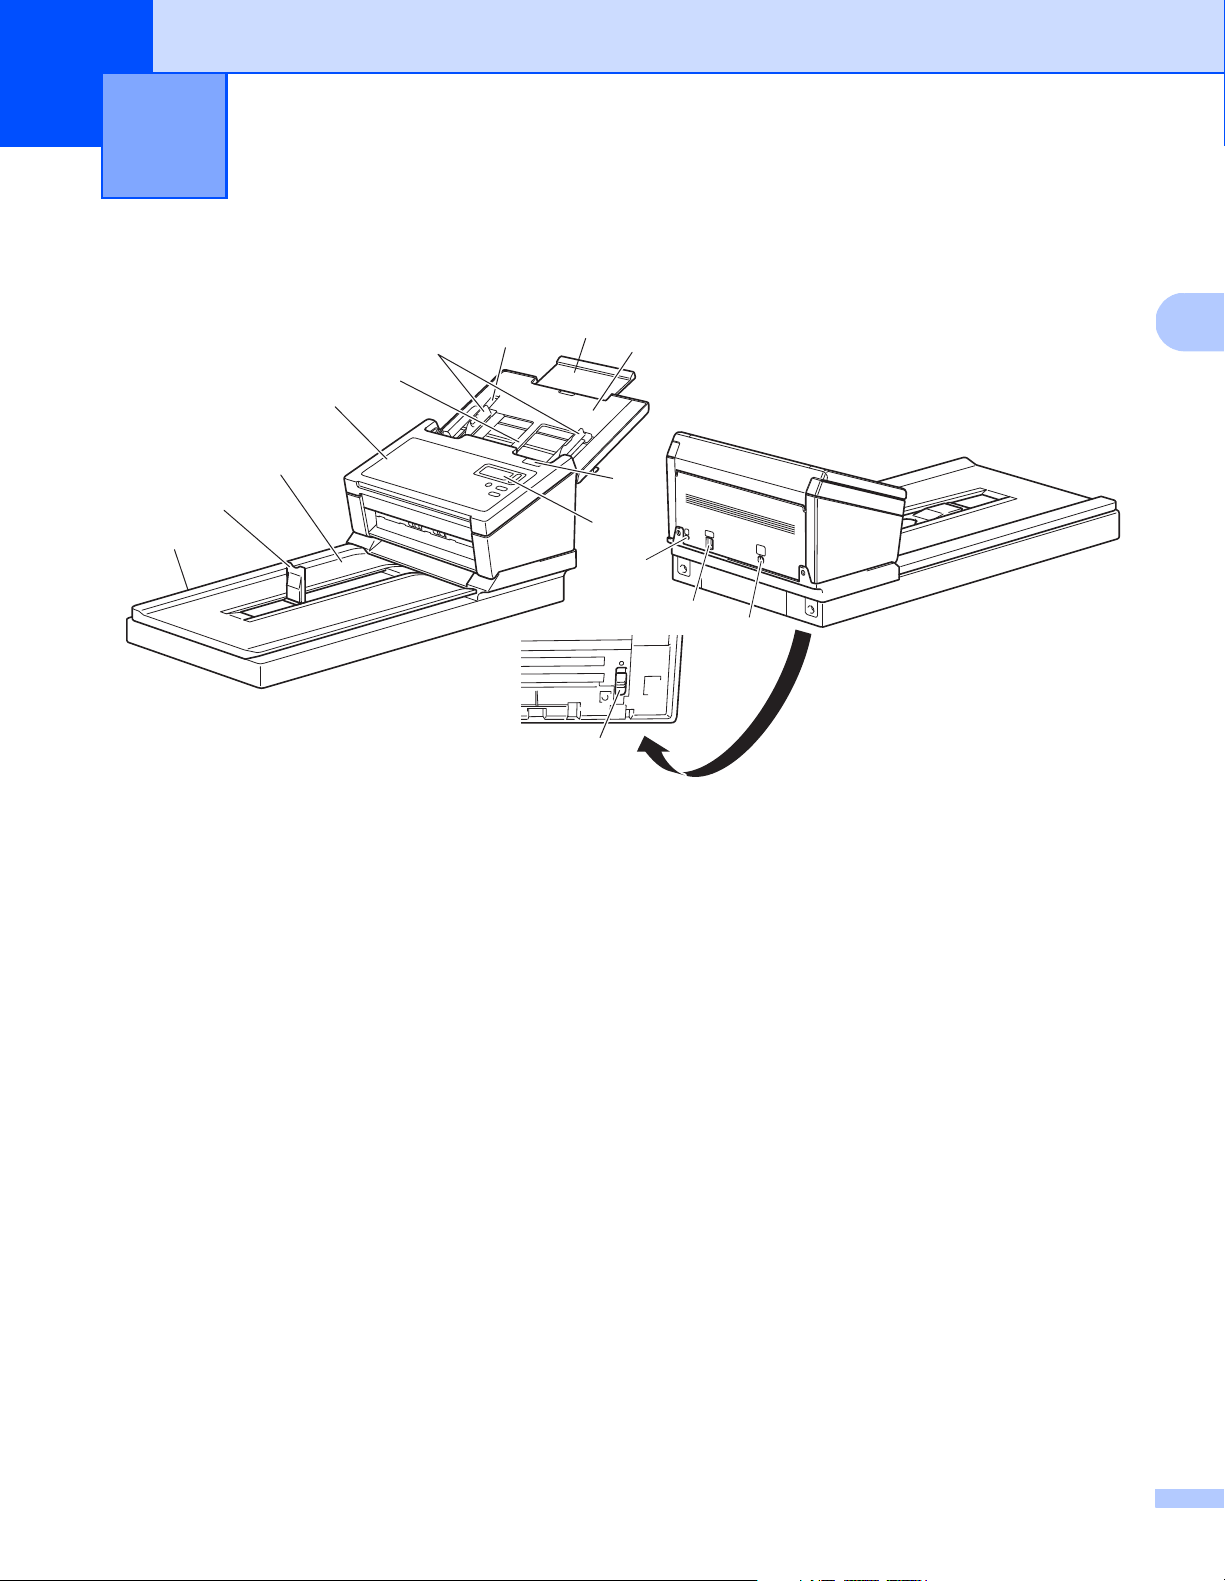
Scanner overview
1 Top Cover
2 Cover Extension
3 Document Guide Stopper
4 Document Guides
5 Automatic Document Feeder (ADF)
6 ADF Cover
7 Document Cover
8 Document Stopper
9 Flatbed
10 Control Panel
11 Cover Release Lever
12 Security Slot
13 USB 3.0 SuperSpeed Port
14 AC Power Port
15 Transport Lock
General Information
2
1
2
4
3
6
7
8
10
9
12
14
13
15
11
5
General Information
3
2
Control panel
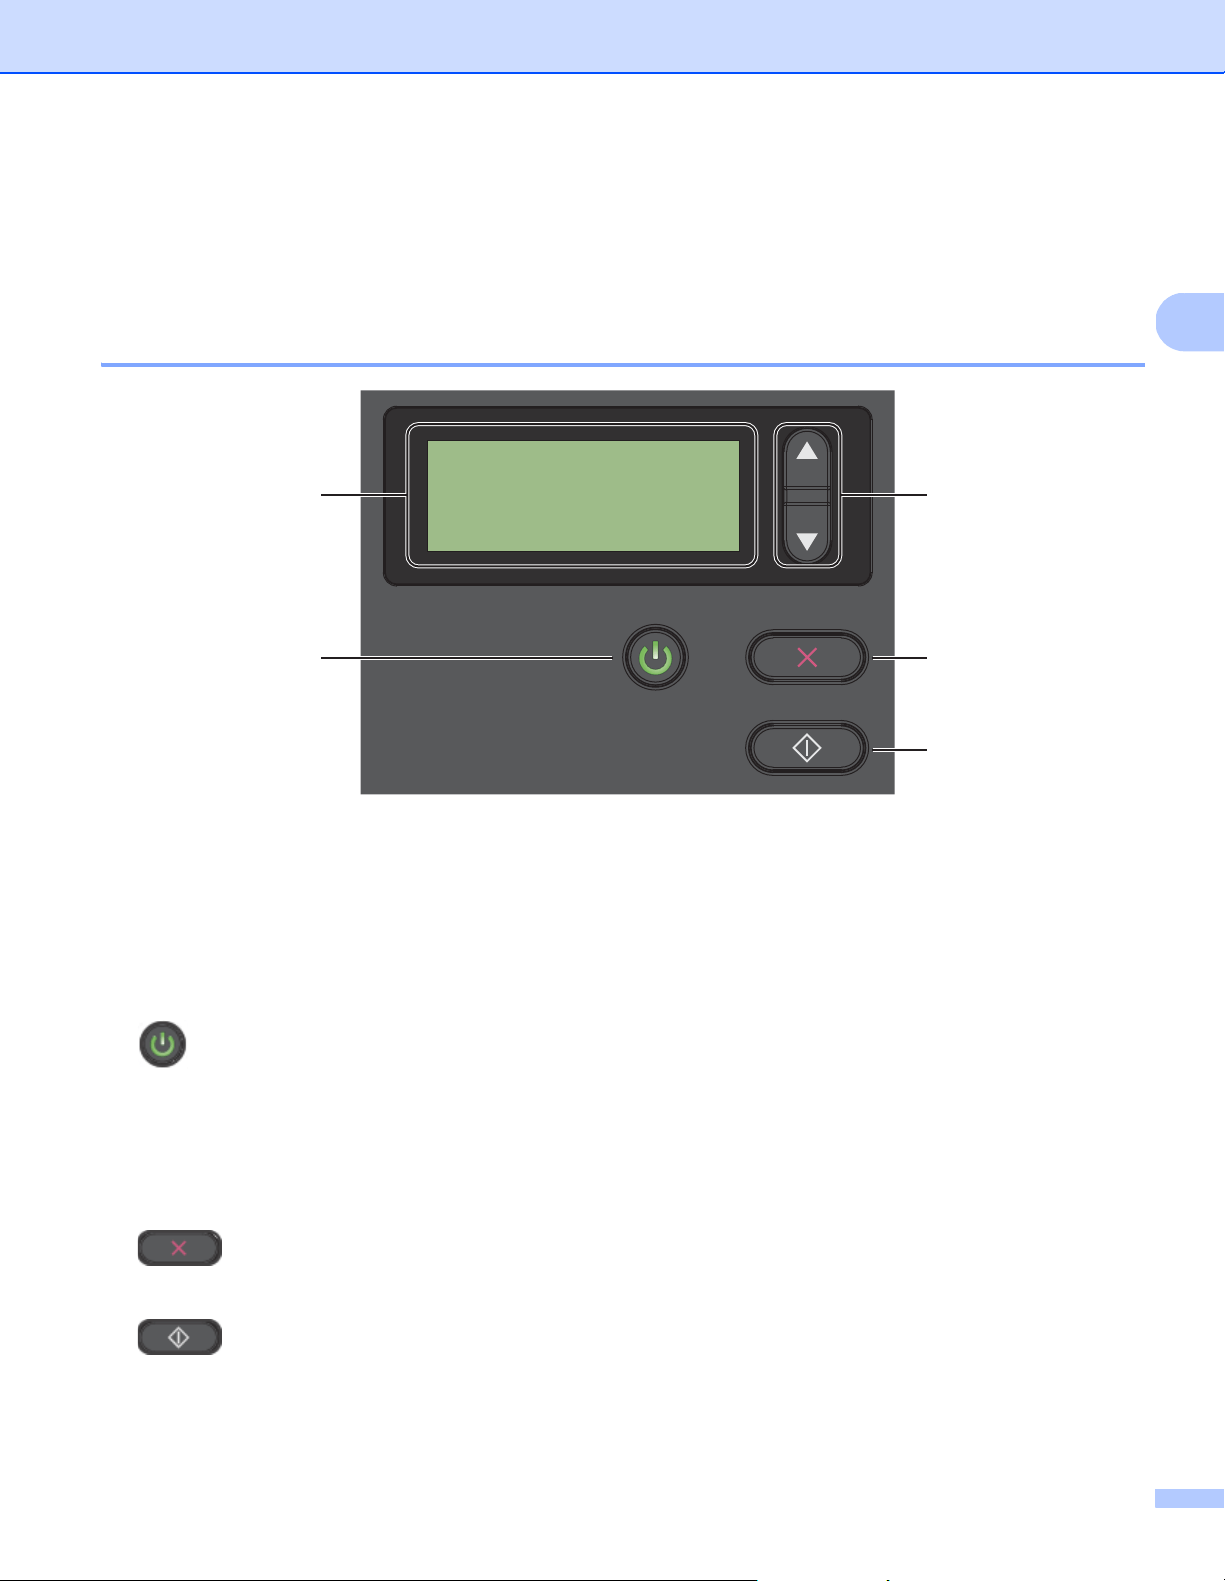
Your Brother machine has one Liquid Crystal Display (LCD), five buttons and one Light Emitting Diode (LED)
on the control panel. The LCD is a 16 character, two-line display.
Control panel overview
1 Liquid Crystal Display (LCD)
Displays messages to help you set up and use your machine.
2 Function Selector (a or b)
Press to scroll through the function numbers.
For more information about the function numbers, see Scan using the control panel on page 20,
step 4 and 5.
3 Power button (LED)
• Press to turn the machine ON when the machine is off or in Power Saving Mode.
• Press to enter Power Saving Mode when the machine is ON.
• Press and hold down to turn the machine OFF.
For more information about Power Saving Mode, see Energy Saving Control on page 57.
4 Cancel button
Press to stop scanning.
5 Scan button
Press to start scanning or to launch a scanning application.
1
2
3
4
5
General Information
4
2
LED indications
The LED indicates your Brother machine’s status.
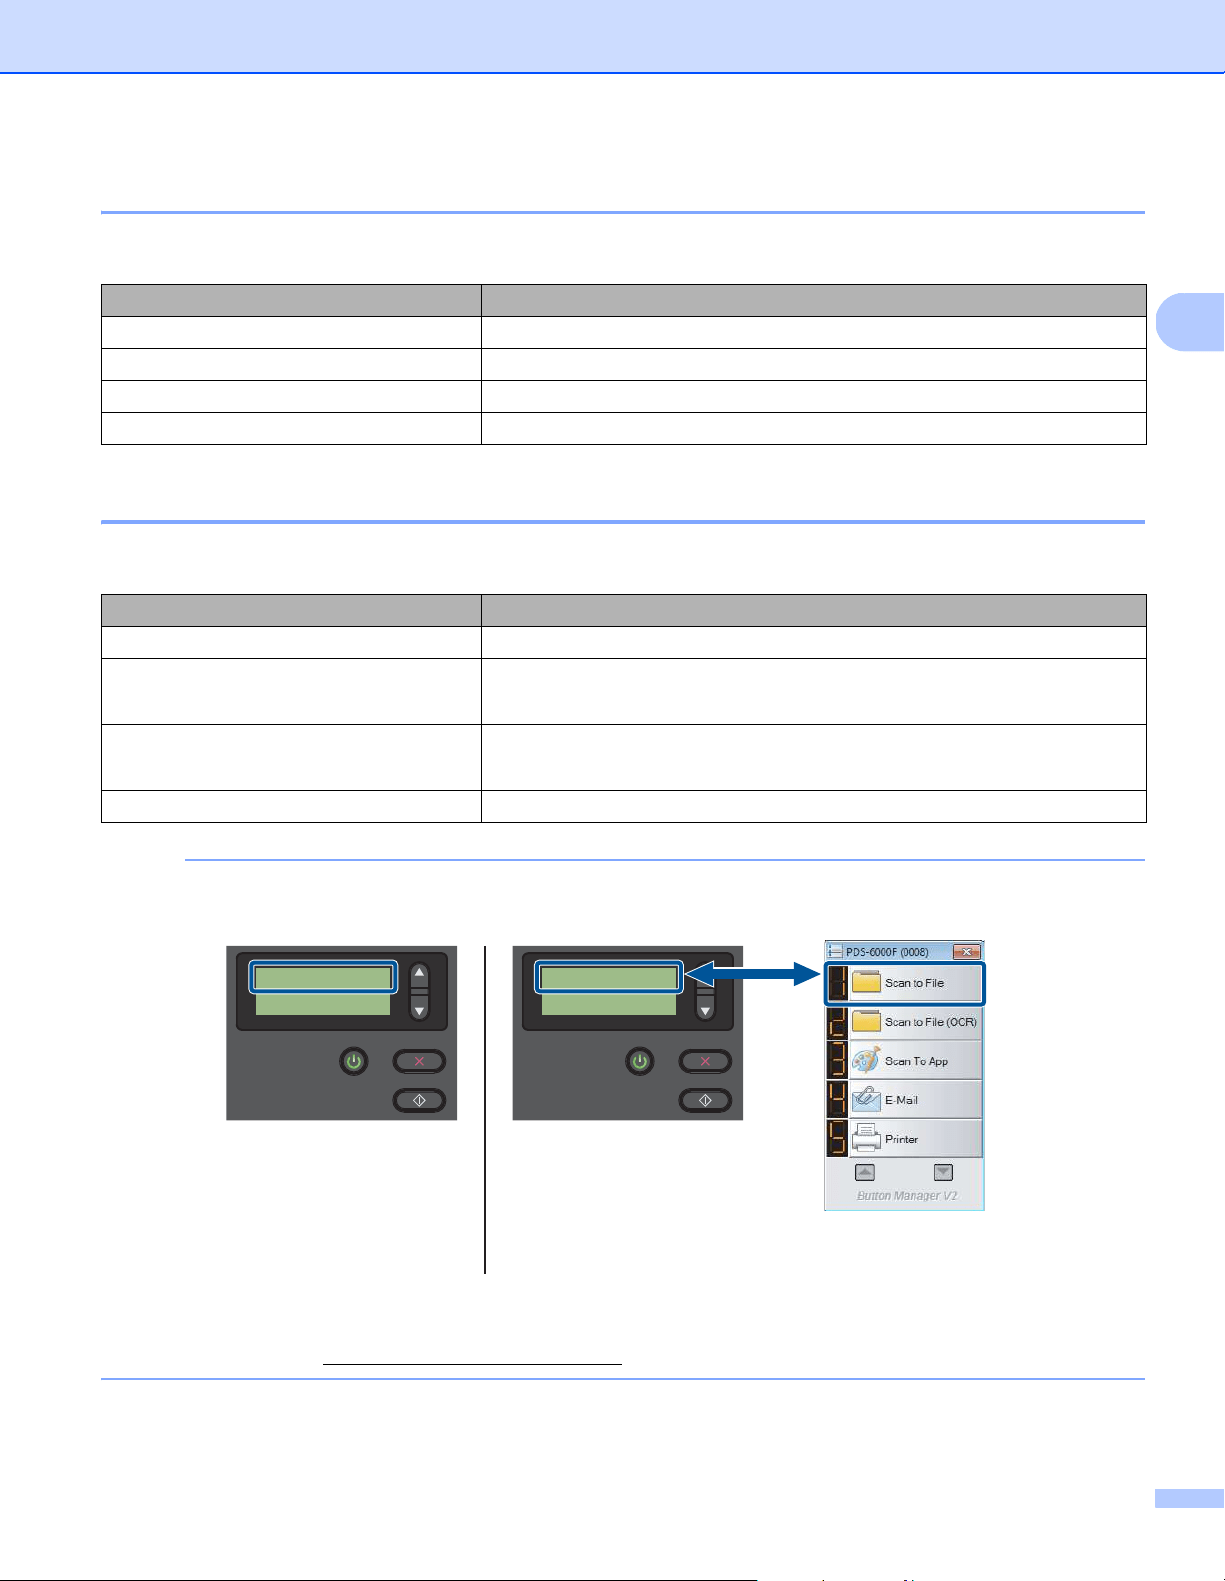
Machine status messages
The following table explains the machine’s status messages during normal operation:
NOTE
When Button Manager is running on your computer, Function X changes to a Button Manager function
number and name.
For more information, see the Button Manager V2 User’s Guide. Go to your model’s page on the Brother
Solutions Center at solutions.brother.com/manuals
to download the Button Manager V2 User’s Guide.
LED Indication Meaning
No light The machine is OFF.
Green The machine is ON.
Blinking green The machine is initializing or in Power Saving Mode.
Blinking red There is a problem with the machine.
Machine Status Message Meaning
Function X This shows the currently selected function number.
PageCount XXXXX The machine is ready to scan.
Where XXXXX is the document scan count.
Scanning XXXXX The machine is scanning.
Where XXXXX is the current document scan count.
Canceling The machine is cancelling the current scan job.
LCD
(When Button Manager V2
is running)
Button Manager V2
Button Panel
1.Scan to File
PageCount 0
LCD
(When Button Manager V2
is not running)
Function 1
PageCount 0

5
3
3
´
Acceptable documents
1
If scanning at 200 dpi
Document Information
3
Standard Paper Length ADF 2.13 in. to 14.0 in. (54 mm to 356 mm)
Scanner Glass 14.0 in. Maximum: (356 mm)
Width ADF 2.0 in. to 8.58 in. (51 mm to 218 mm)
Scanner Glass 8.5 in. Maximum: (216 mm)
Weight ADF 7.5 lb to 106 lb (28 g/m
2
to 400 g/m
2
)
To scan thinner documents, use the Carrier
Sheet (see Loading documents using the
Carrier Sheet in the ADF on page 16).
Maximum Number of Pages
ADF (Automatic Document
Feeder)
100 sheets (with 28 to 80 g/m
2
paper)
70 sheets (with 105 g/m
2
paper)
60 sheets (with 127 g/m
2
paper)
50 sheets (with 200 g/m
2
paper)
15 sheets (with 400 g/m
2
paper)
15 sheets (Business Card)
Standard Paper Size A4 8.3 in. × 11.7 in. (210 mm × 297 mm)
A5 5.8 in. × 8.3 in. (148 mm × 210 mm)
A6 4.1 in. × 5.8 in. (105 mm × 148 mm)
A7 2.9 in. × 4.1 in. (74 mm × 105 mm)
B5 7.2 in. × 10.1 in. (182 mm × 257 mm)
B6 5.0 in. × 7.2 in. (128 mm × 182 mm)
B7 3.6 in. × 5.0 in. (91 mm × 128 mm)
Legal 8.5 in. × 14 in. (215.9 mm × 355.6 mm)
Letter 8.5 in. × 11 in. (215.9 mm × 279.4 mm)
Long Paper
ADF (Automatic
Document Feeder)
Maximum Length 236.0 in. (5,994 mm)
1
Width 2.0 in. to 8.58 in. (51 mm to 218 mm)
Weight 7.5 lb to 106 lb (28 g/m
2
to 400 g/m
2
)
To scan thinner documents, use the Carrier Sheet
(see Loading documents using the Carrier Sheet in the ADF on
page 16).
Maximum Number of Pages 1 page (1 sheet)

Document Information
6
3
Unacceptable documents
Documents with paper clips or staples
Documents with wet ink
Fabrics, metallic sheets, overhead projector sheets
Glossy or mirrored media
Embossed plastic cards
Documents that exceed recommended thicknesses
IMPORTANT
The damage caused by using any unacceptable document with your Brother machine may not be covered
under warranty.
Plastic Cards Length ADF 2.76 in. to 3.74 in. (70 mm to 95 mm)
Scanner Glass 14.0 in. Maximum: (356 mm)
Width ADF 2.0 in. to 2.17 in. (51 mm to 55 mm)
Scanner Glass 8.50 in. Maximum: (216 mm)
Standard Size (ISO) 3.37 × 2.13 × 0.03 in. (85.6 × 54.0 × 0.76 mm)
Material Plastic (PET)
Type Plastic card, such as a driver’s license or
an insurance card
Thickness (ISO) Less than 30 mil (0.76 mm)
Up to 49 mil (1.25 mm) (with Embossed)
Maximum Number of Pages 1 page (1 sheet)

Document Information
7
3
Documents recommended for use with the Carrier Sheet
(for ADF Scan)
NOTE
• You cannot place a Carrier Sheet onto the Flatbed’s scanner glass.
•
To purchase a Carrier Sheet, find contact information for your local Brother office at
www.brother.com
U.S. users: find contact information for your local Authorized Service Center at
www.brother-usa.com/service/
Use the optional Carrier Sheet when you scan the following:
Plastic cards
Documents with a carbon sheet attached
Documents written in pencil
Documents narrower than 2.0 in. (50 mm) wide
Documents shorter than 2.13 in. (54 mm) long
Documents of uneven thickness, such as envelopes
Documents with large wrinkles or curls
Bent or damaged documents
Documents that use tracing paper
Documents that use coated paper
Photographs (photographic paper)
Documents printed on perforated paper
Documents printed on unusually-shaped paper (not square or rectangular)
Documents with photos, notes, or stickers affixed to them
Documents that use carbonless paper
Documents that use loose-leaf paper or any paper with holes in it
Photographic negatives
Receipts
For more information about using the Carrier Sheet, see Loading documents using the Carrier Sheet in the
ADF on page 16.
CAUTION
To avoid cutting yourself, do not slide or scrape your hand or fingers along the edges of the Carrier Sheet.

8
4
4
Set up your machine for Automatic Document Feeder (ADF) use
a Open the Top Cover (1), pull the Cover Extension (2) out, and then unfold the Document Guides (3).
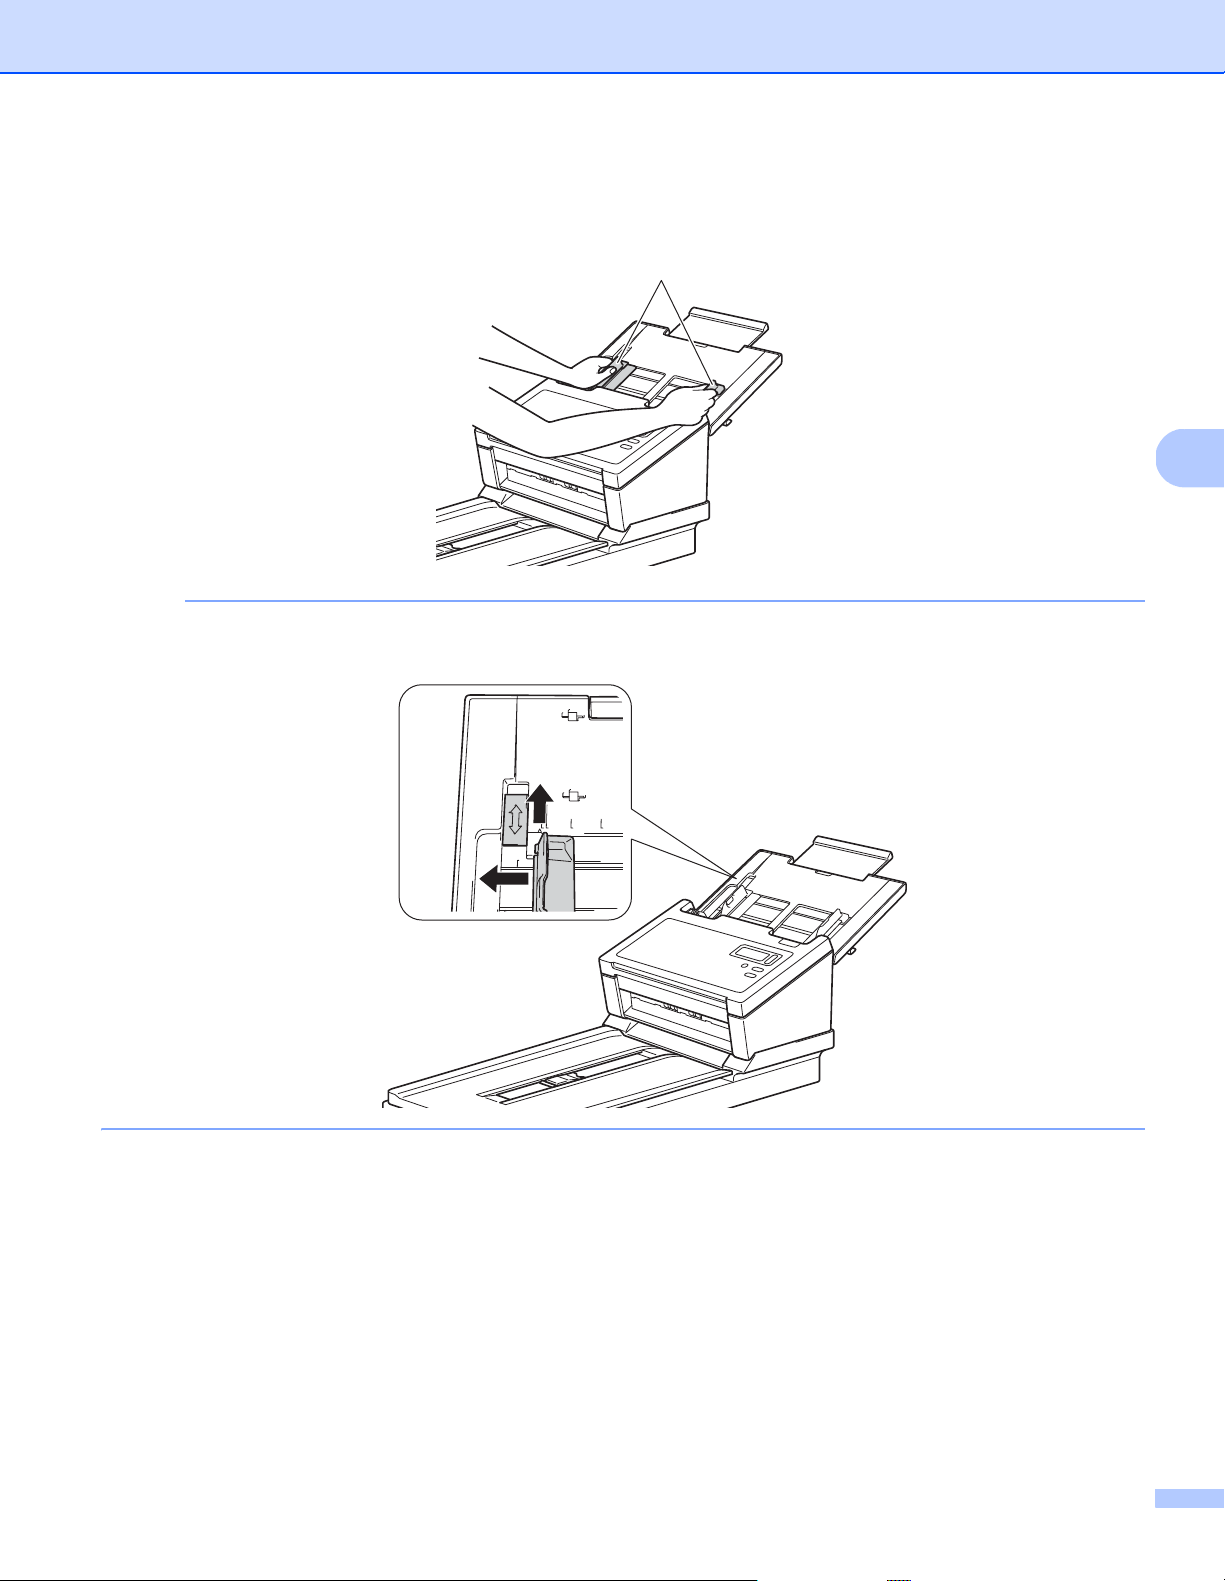
b Lift the Document Stopper (1) and slide it to fit the size of your paper.
Scan Preparation 4
3
2
1
1
Scan Preparation
9
4
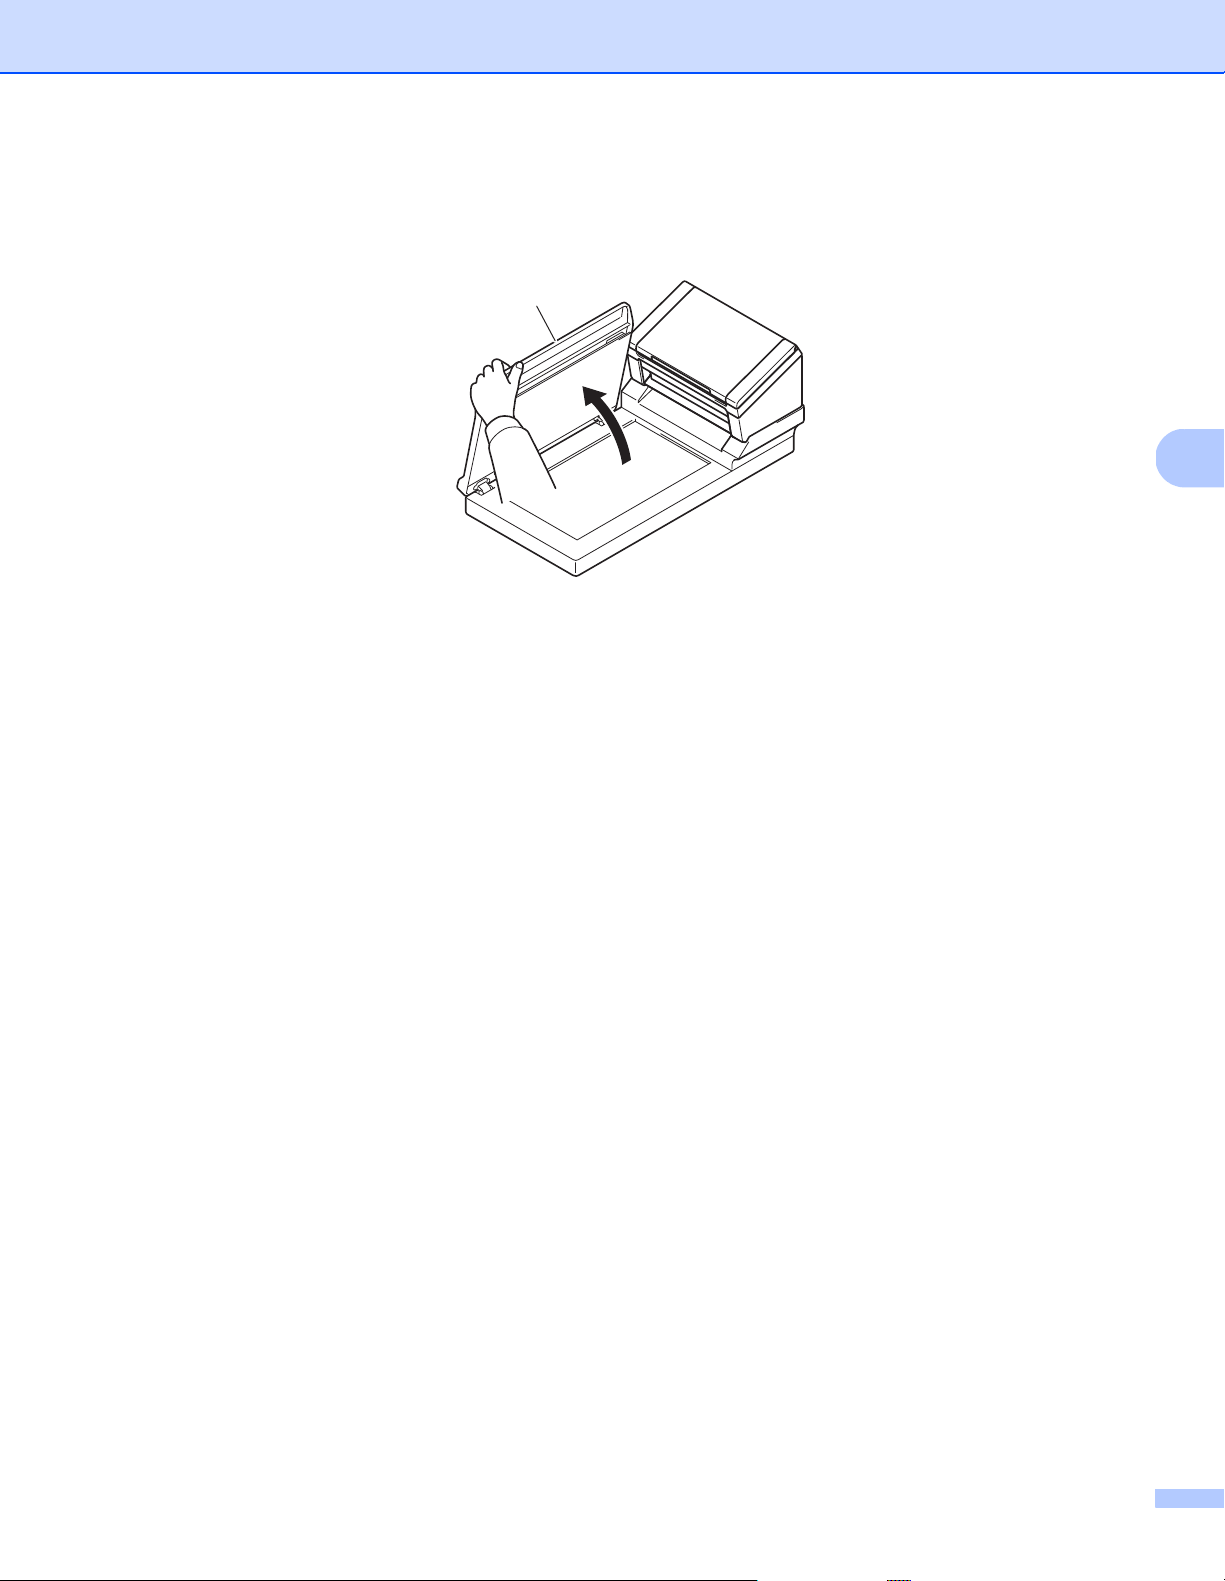
Set up your machine for Flatbed use
a Lift the document cover (1).
b Make sure the scanner glass is empty.
1
Scan Preparation
10
4
Load documents
IMPORTANT
• The ADF can hold up to 100 pages and feeds each sheet individually. Use 20 lb (80 g/m
2
) paper and
always fan the pages before placing them in the ADF.
• DO NOT pull on the document while it is feeding.
• DO NOT use paper that is curled, wrinkled, folded, ripped, stapled, paper-clipped, pasted, or taped.
• DO NOT try to scan cardboard or fabric.
NOTE
• Make sure the documents that have ink or correction fluid on them are completely dry.
• Certain types of plastic cards may be scratched when scanned. To prevent damage to the card,
we recommend using the Carrier Sheet or scanner glass.
• If misfeeds frequently occur when you scan thin sheets, reduce the number of documents held in the ADF,
and then start scanning again.
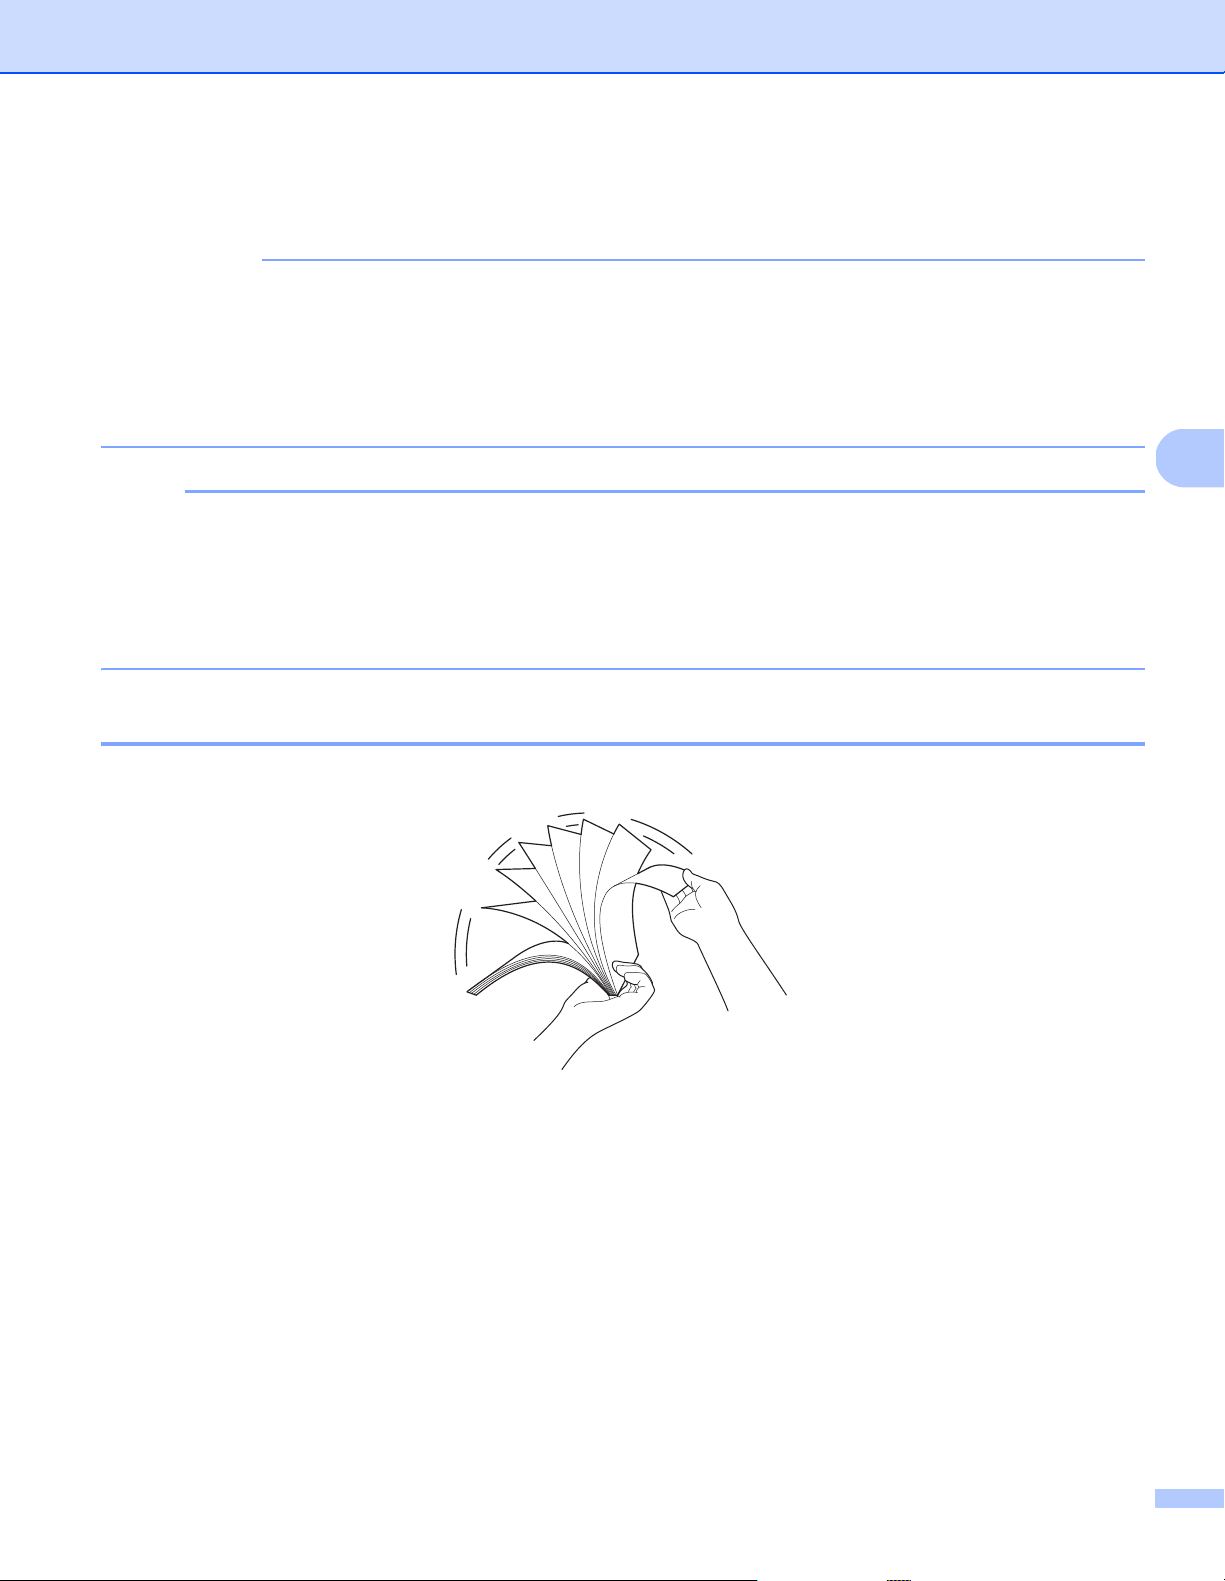
Loading documents in the ADF
a Fan the pages several times along both the long edge and the short edge.
Scan Preparation
11
4
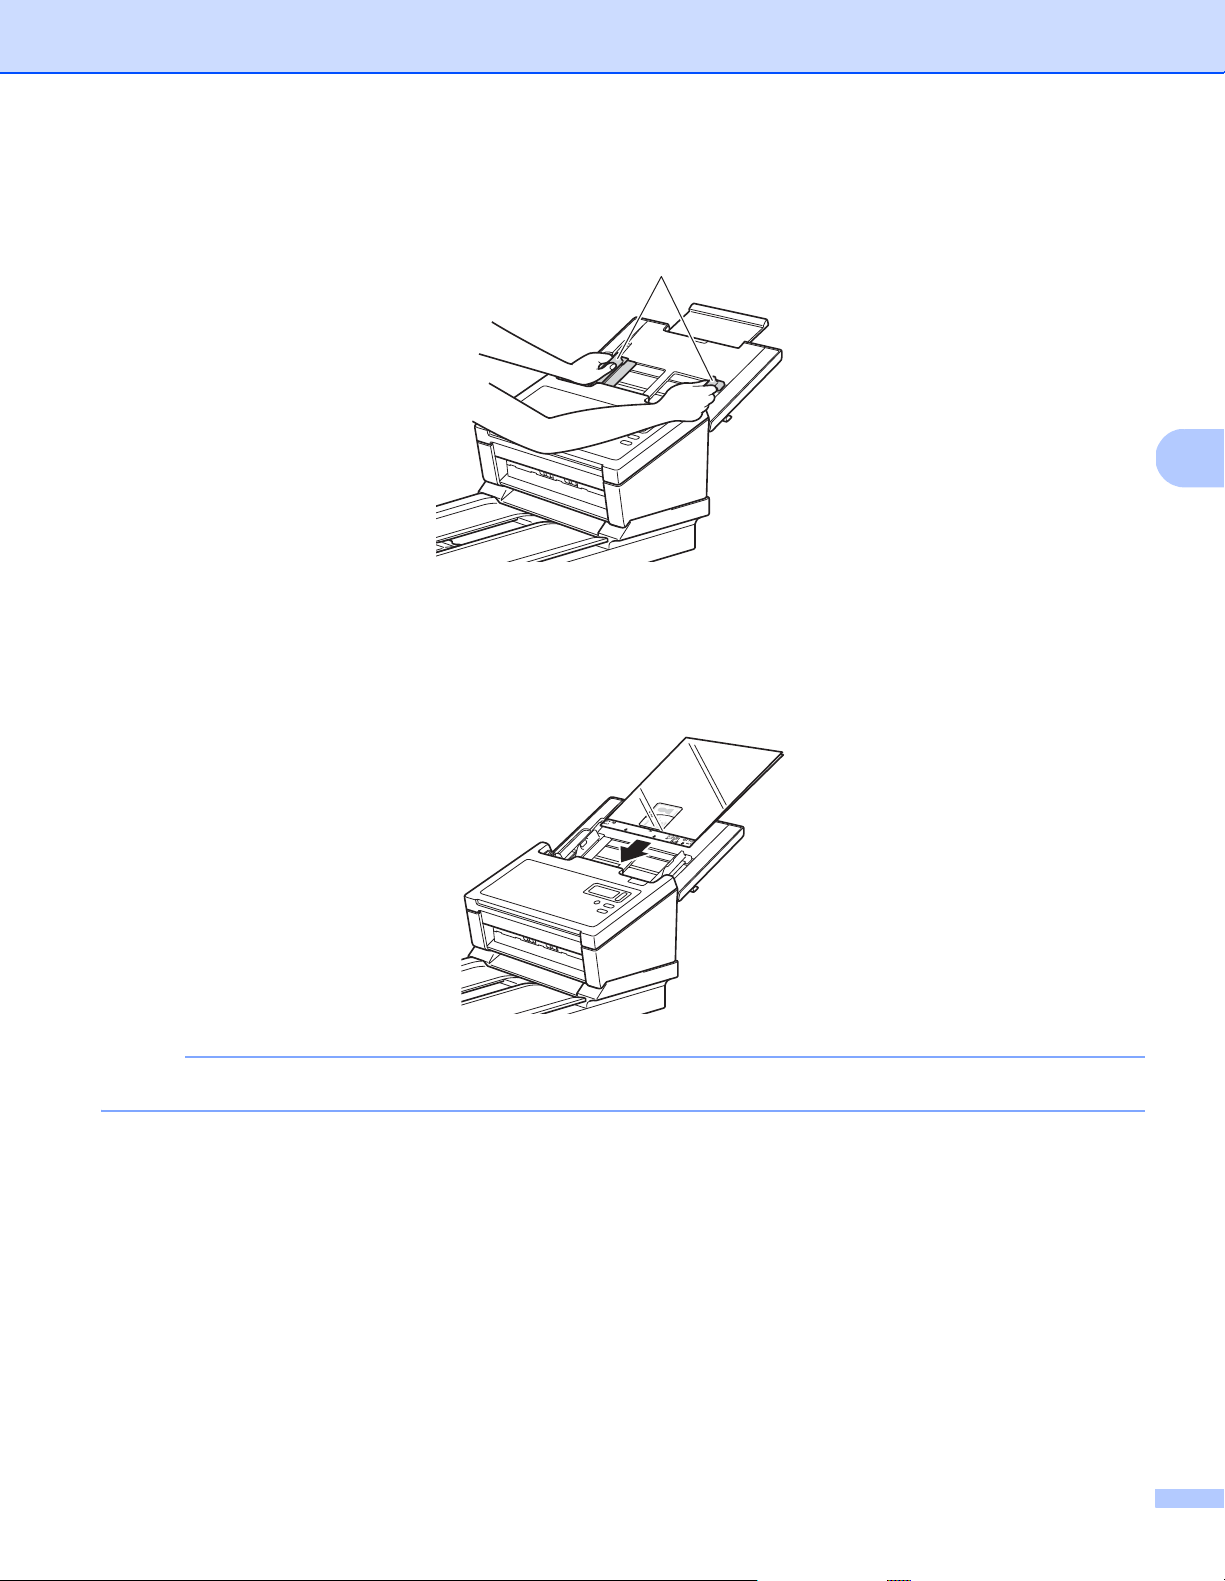
b Adjust the Document Guides (1) to fit the width of your document.
NOTE
When scanning documents with punch holes, such as continuous form paper, slide the Document Guide
Stopper (1) up, and then extend the Document Guide (2).
1
1
2
Scan Preparation
12
4
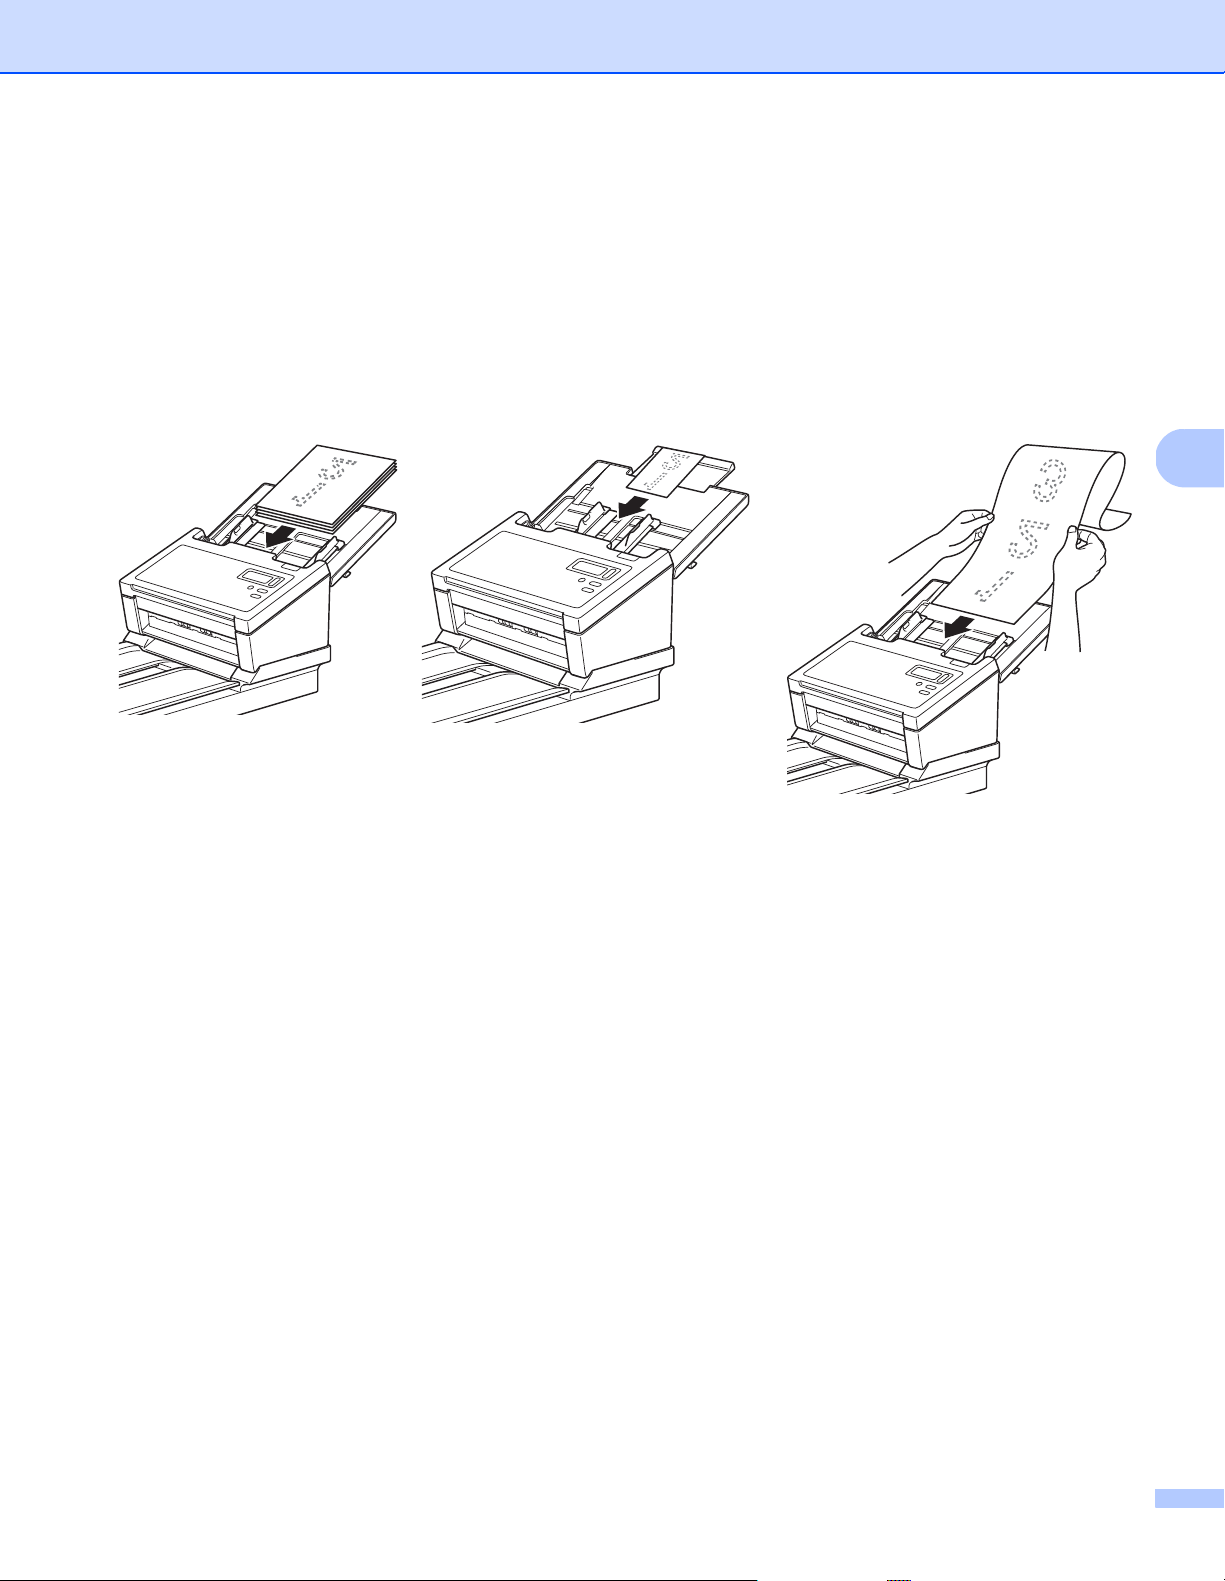
c Place the pages, face down, top edge first in the ADF between the Guides until you feel them touch
the inside of the machine.
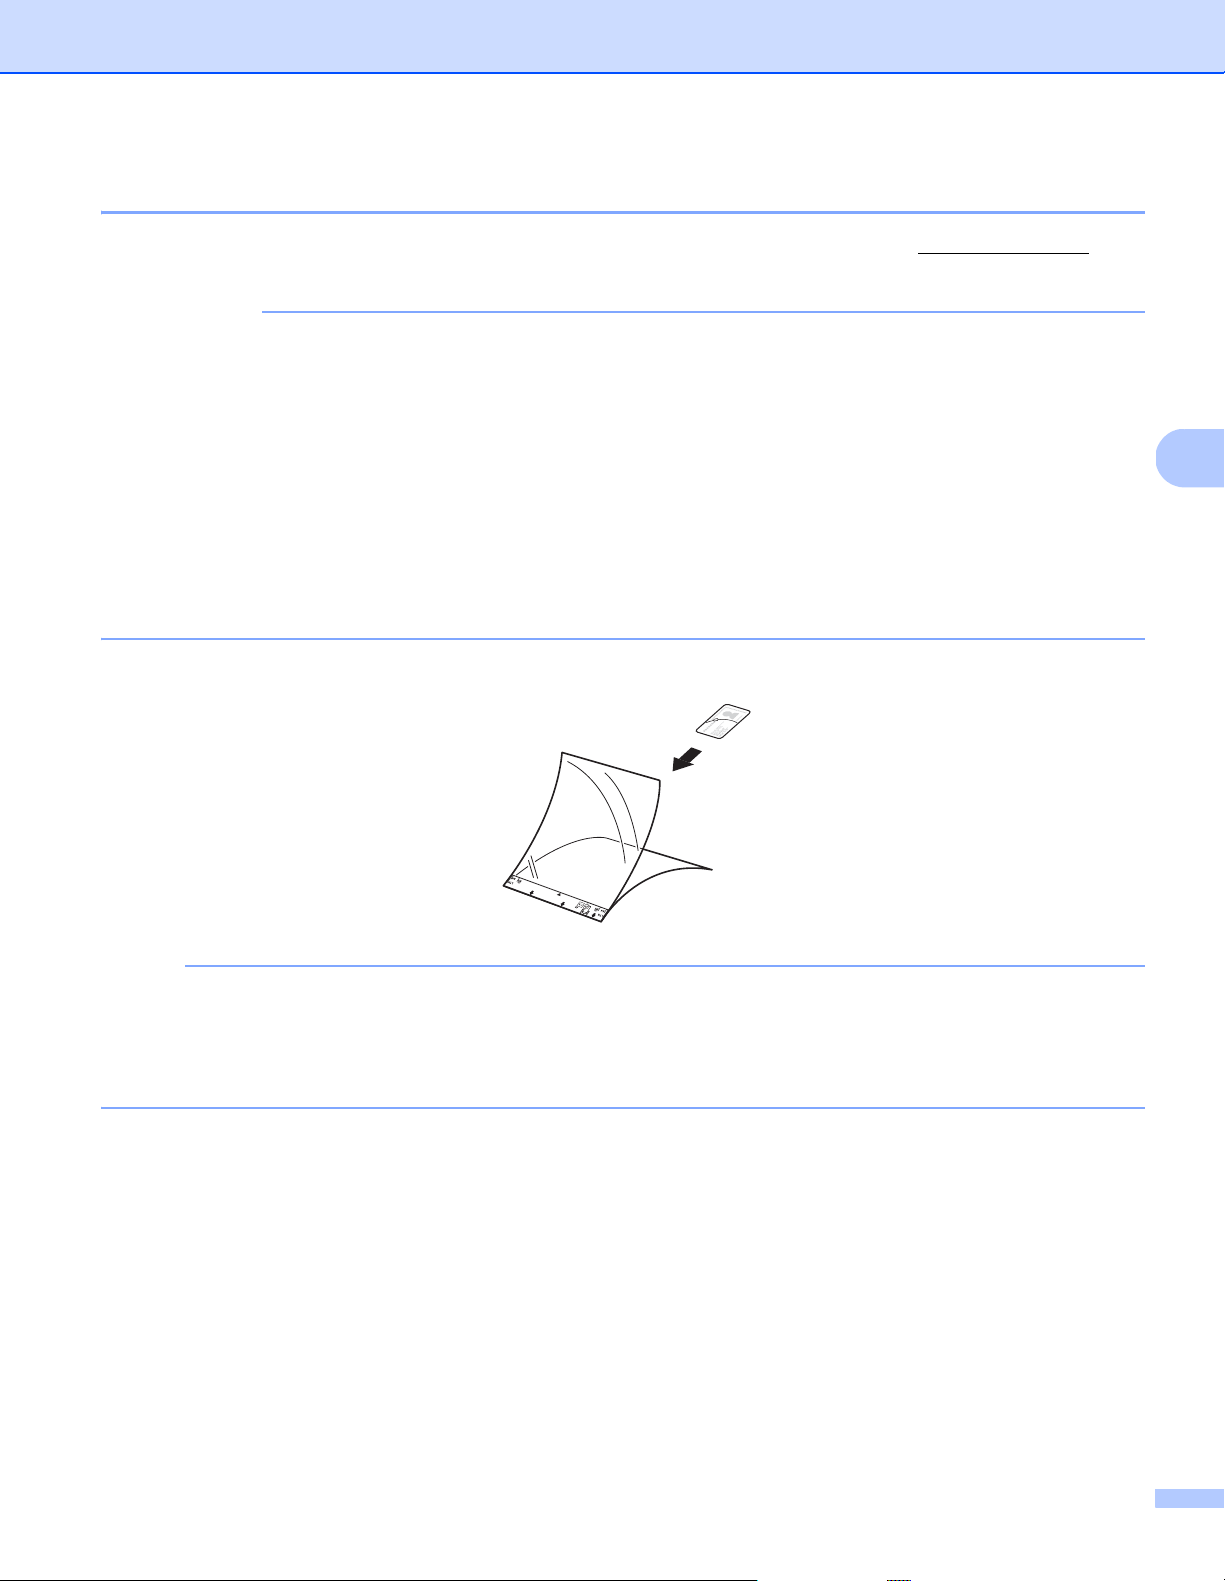
For plastic cards: Place your card, face down and short side first in the ADF between the Guides until
you feel it touch the inside of the machine. Load only one plastic card at a time.
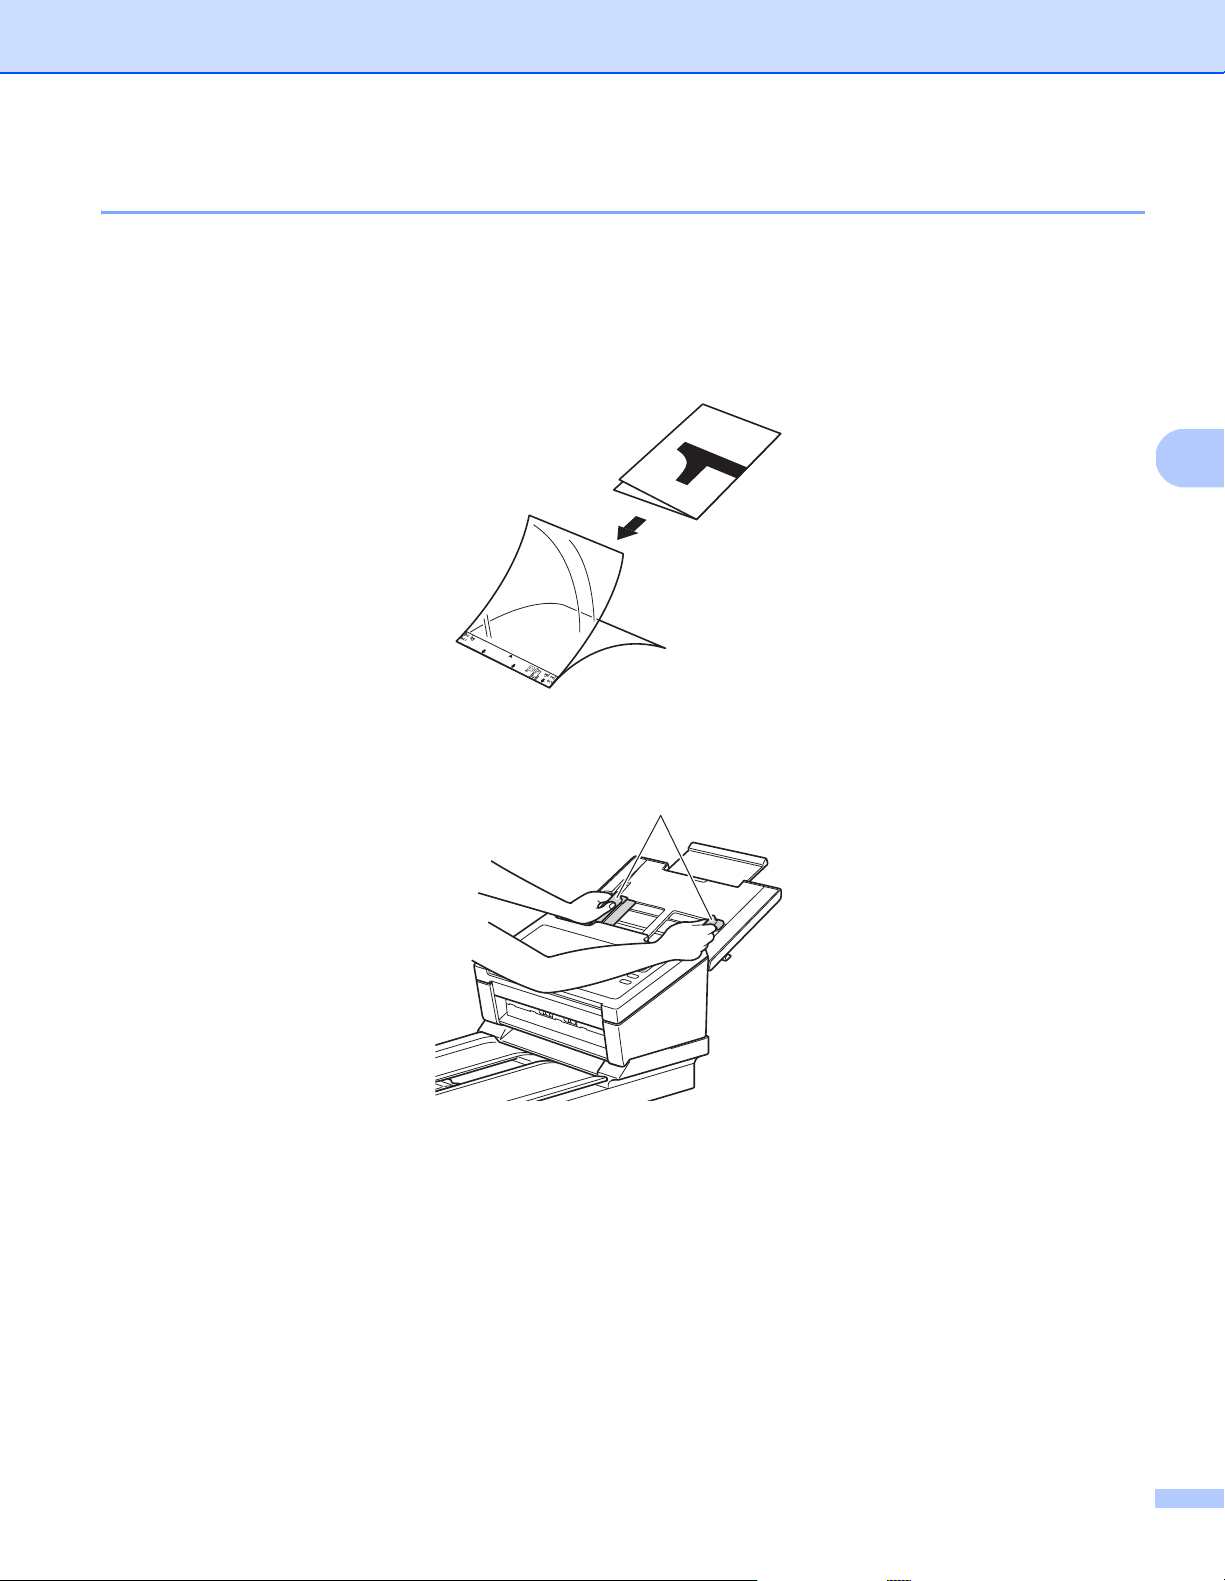
For documents longer than Letter/A4 size: If the document is longer than the Top Cover, support the
document with your hand. Load only one document at a time.
See Acceptable documents on page 5.
Scan Preparation
13
4
Loading documents on the Flatbed’s scanner glass
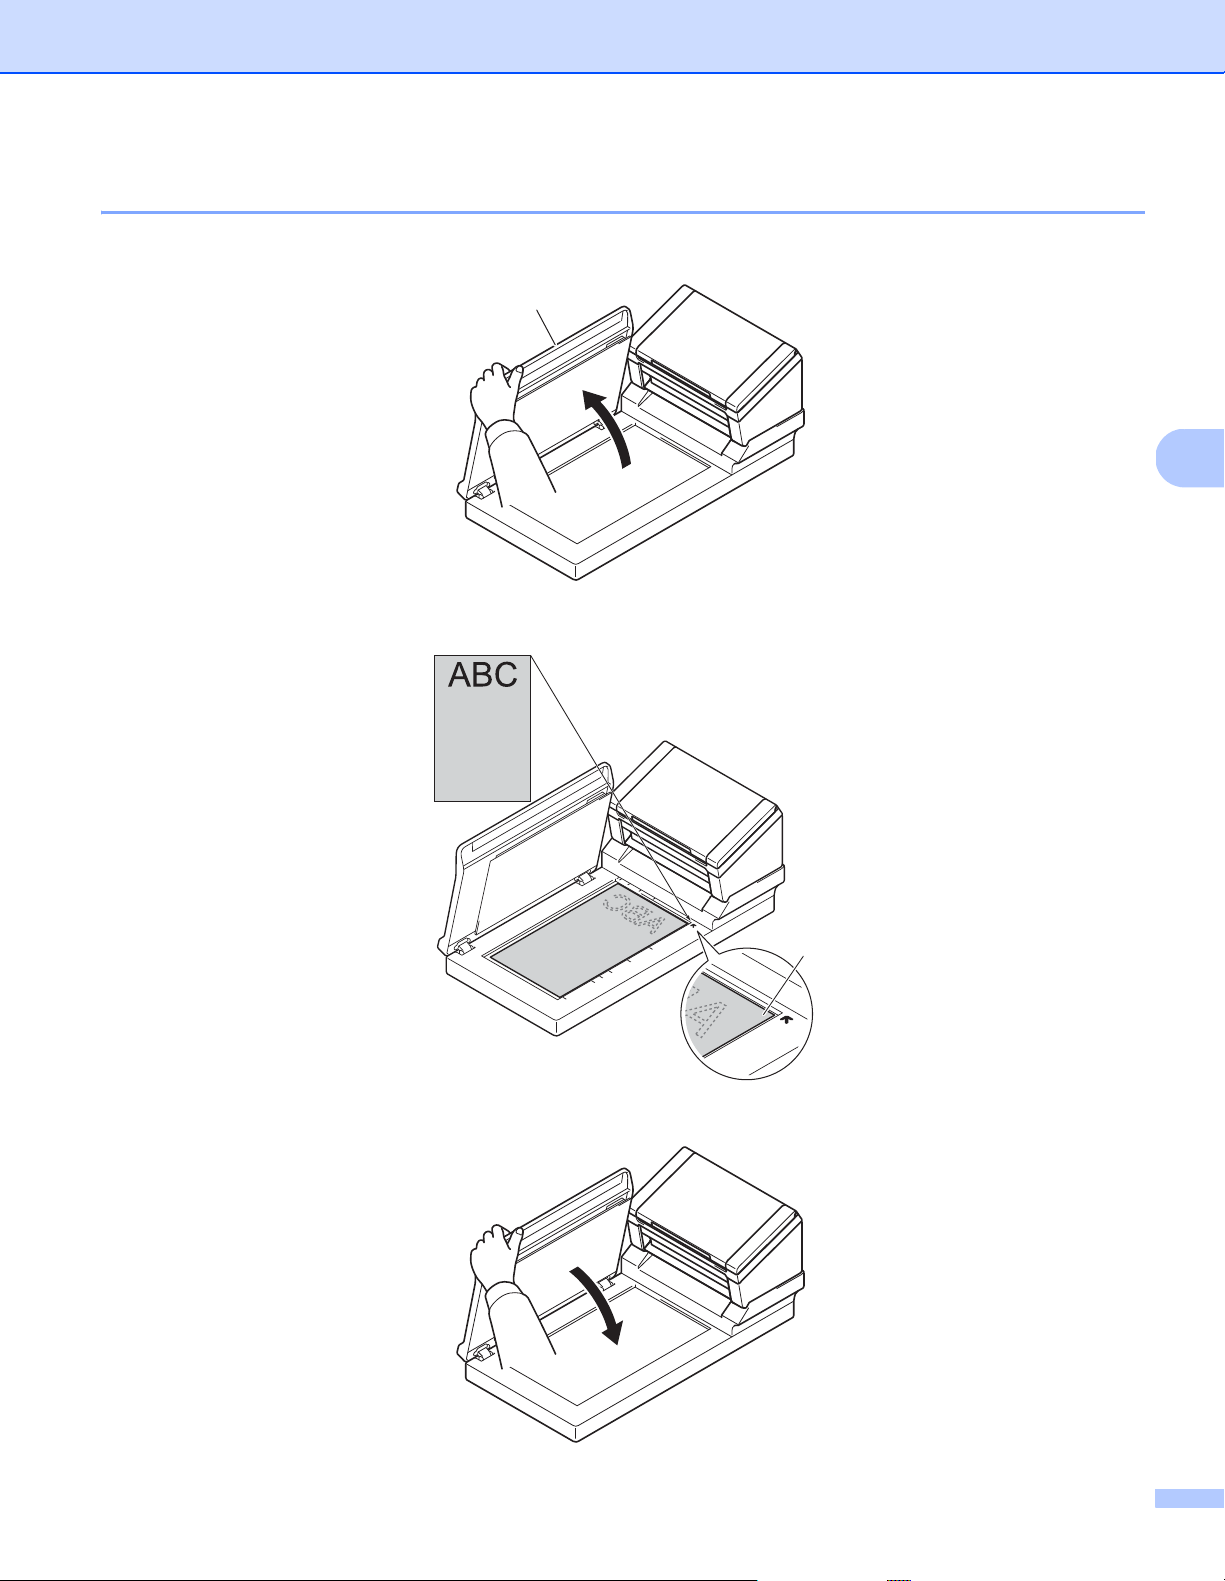
a Lift the document cover (1).
b Place the document face down in the right corner of the scanner glass (1), as shown.
c Close the document cover.
1
1

Scan Preparation
14
4
Loading multiple different-size documents in the ADF
NOTE
Make sure that the narrowest document is wide enough to touch the ADF’s feed rollers, or it may cause
a document jam.
a Stack the documents on top of each other, making sure that the top edge and the left side of each
document are aligned.
b Adjust the Document Guides (1) to fit the width of the largest document.
c Place the documents, face down, top edge first in the ADF between the Guides until you feel them
touch the inside of the machine.
1
Scan Preparation
15
4
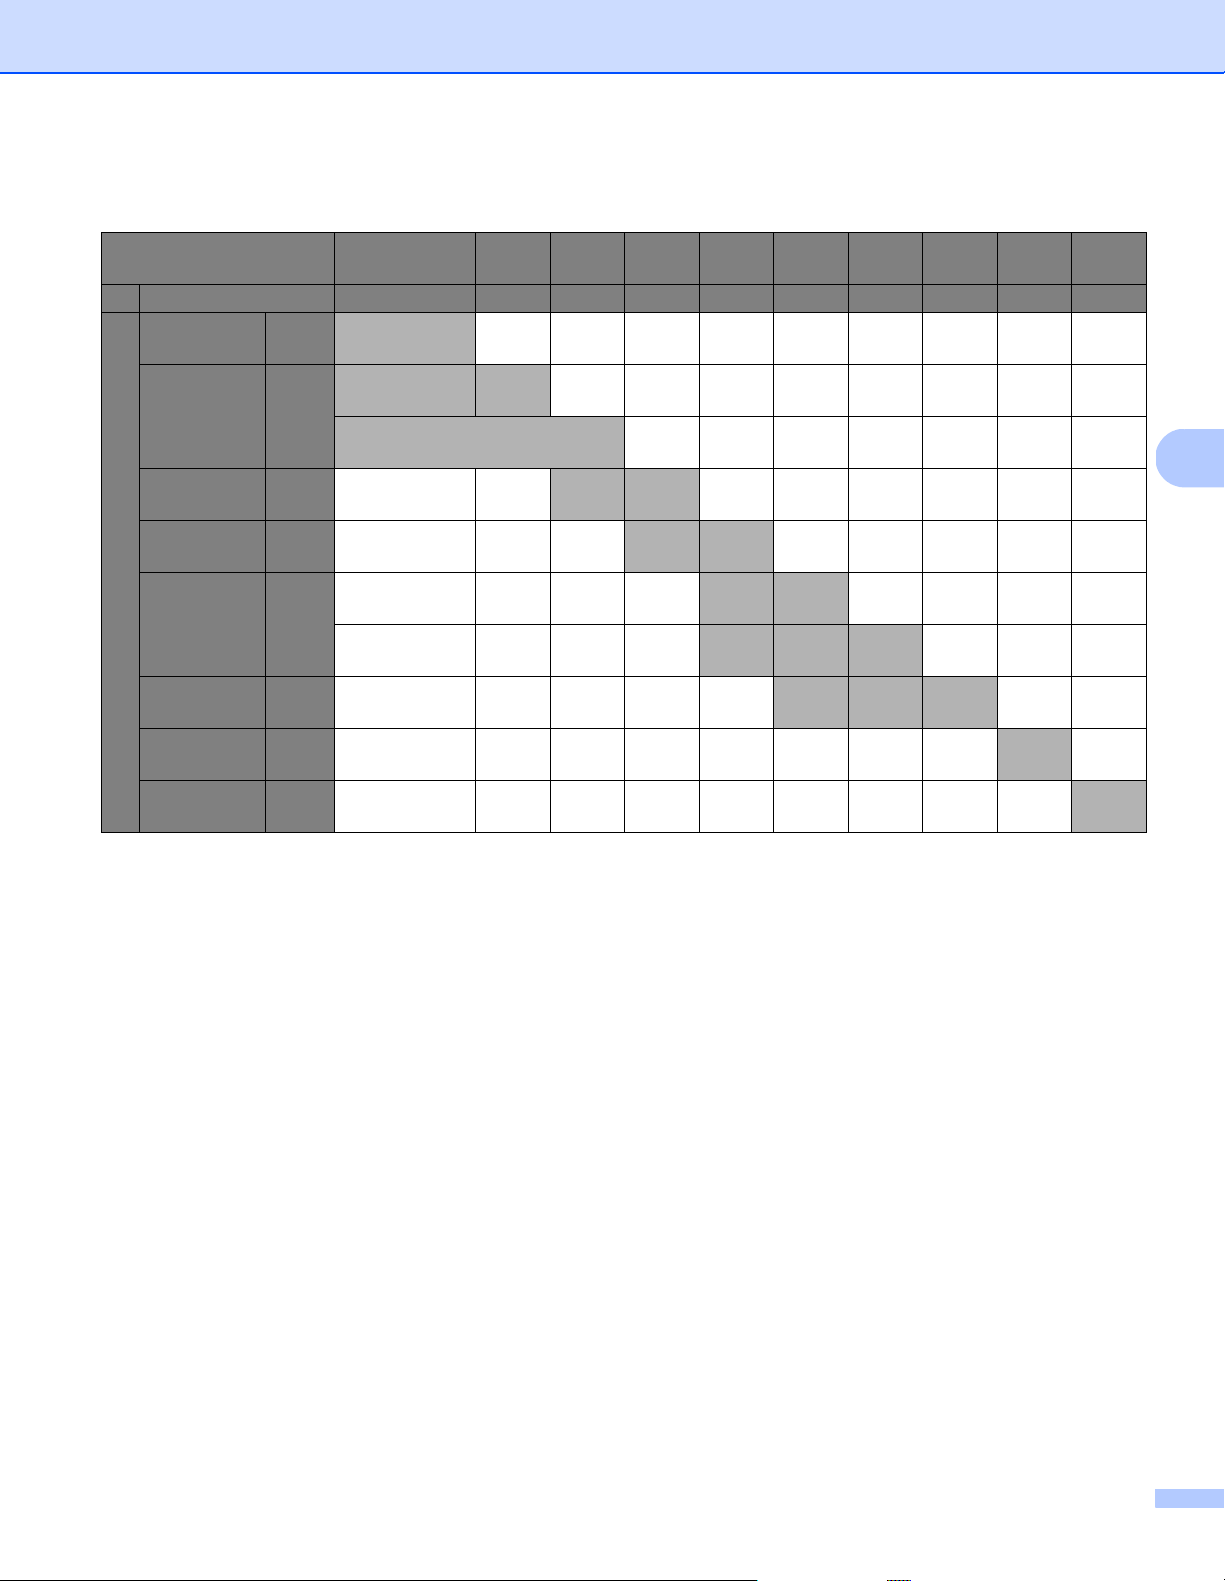
Combinations of multiple different-sized documents
LTR: Letter size
(P): Portrait
(L): Landscape
Maximum size
LTR (P)
Carrier Sheet
A4 (P)
A5 (L)
B5 (P)
B6 (L)
A5 (P)
A6 (L)
B6 (P)
B7 (L)
A6 (P)
A7 (L)
B7 (P)
B8 (L)
A7 (P)
A8 (L)
B8 (P) A8 (P)
Width (mm) (*1) 216 210 182 149 129 105 91 74.3 64.3 52.5
Minimum size
LTR (P)
Carrier Sheet
216
A4 (P)
A5 (L)
210
B5 (P)
B6 (L)
182 Available range
A5 (P)
A6 (L)
149
B6 (P)
B7 (L)
129
A6 (P)
A7 (L)
105
B7 (P)
B8 (L)
91
A7 (P)
A8 (L)
74.3
B8 (P) 64.3
A8 (P) 52.5
Scan Preparation
16
4
Loading documents using the Carrier Sheet in the ADF
To purchase a Carrier Sheet, find contact information for your local Brother office at www.brother.com
IMPORTANT
• Do not write on the Carrier Sheet, as the writing may be seen in scanned documents. If the Carrier Sheet
becomes dirty, wipe it with a dry cloth.
• Do not leave documents in the Carrier Sheet for extended periods of time, as the printing on the documents
may bleed through onto the Carrier Sheet.
• Do not place the Carrier Sheet in direct sunlight or in an area subject to high temperatures and high humidity,
as the Carrier Sheet may warp.
• Do not place large or heavy objects on the Carrier Sheet when it is lying flat.
• Do not bend or pull the Carrier Sheet. If it becomes damaged, it may not be acceptable for scanning - do not
use it.
• Do not scan multiple Carrier Sheets in a row.
a Insert the document into the Carrier Sheet.
NOTE
• Place the document in the center of the Carrier Sheet and align the top of the document with the top of the
Carrier Sheet.
• To avoid document jams, do not put several small documents into the Carrier Sheet at the same time.
Insert only one document into the Carrier Sheet at a time.
Scan Preparation
17
4
b Adjust the Document Guides (1) to fit the width of the Carrier Sheet.
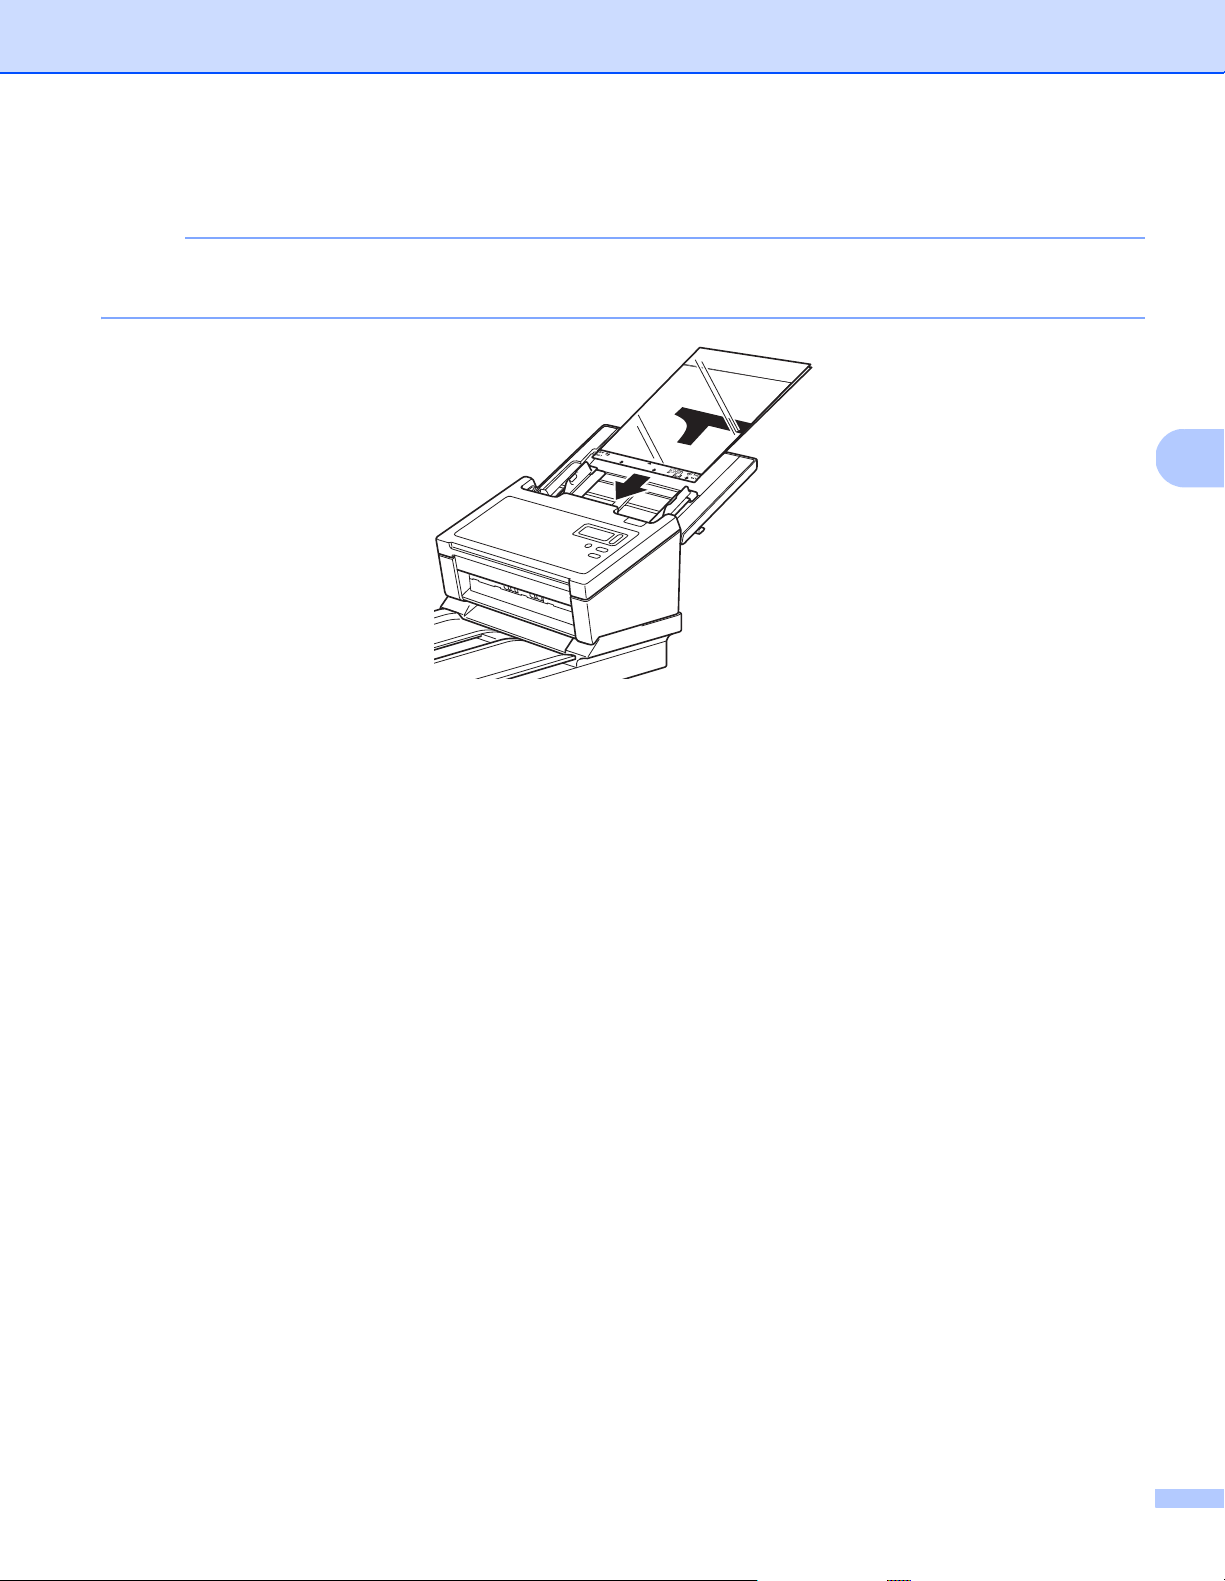
c Place the Carrier Sheet in the ADF between the Guides until you feel it touch the inside of the machine.
NOTE
To avoid document jams, do not load the Carrier Sheet upside down.
1
Scan Preparation
18
4
Loading documents wider than Letter/A4 size
You can scan documents that are wider than Letter/A4 size using the Carrier Sheet.
Before scanning, see Loading documents using the Carrier Sheet in the ADF on page 16 for basic usage
instructions and notes about the Carrier Sheet.
a For best results, carefully fold your document in half, making sure all the corners are even, and then
insert the document into the Carrier Sheet.
b Adjust the Document Guides (1) to fit the width of the Carrier Sheet.
1
Scan Preparation
19
4
c Place the Carrier Sheet in the ADF between the Guides until you feel it touch the inside of the machine.
NOTE
To reduce the white space in the center of a scanned page, be sure to position the folded edge of the
original document closer to the right edge of the Carrier Sheet.

20
5
5
Scan using the control panel
Customize the Scan button on your Brother machine’s control panel to scan using your preferred
scanning software.
Assign a scanning application to the Scan button
a Confirm that the machine is connected to your computer via a USB cable.
b Access the machine from your computer using one of the following:
- For Windows
®
10
Click (Start) > Settings > Devices > Printers&Scanners > Devices&Printers.
- For Windows
®
8/8.1
Move your mouse to the lower right corner of your desktop. When the menu bar appears,
click > Control Panel. In the Hardware and Sound group, click View devices and
printers.
- For Windows
®
7
Click (Start)> Devices and Printers.
- For Windows Vista
®
Click (Start)> Control Panel > Scanners and Cameras > Printers.
c Right-click the scanner icon, and select Scan properties from the menu.
For Windows Vista
®
, select the machine and click Properties.
Scan (Windows
®
)
5
Scan (Windows
®
)
21
5
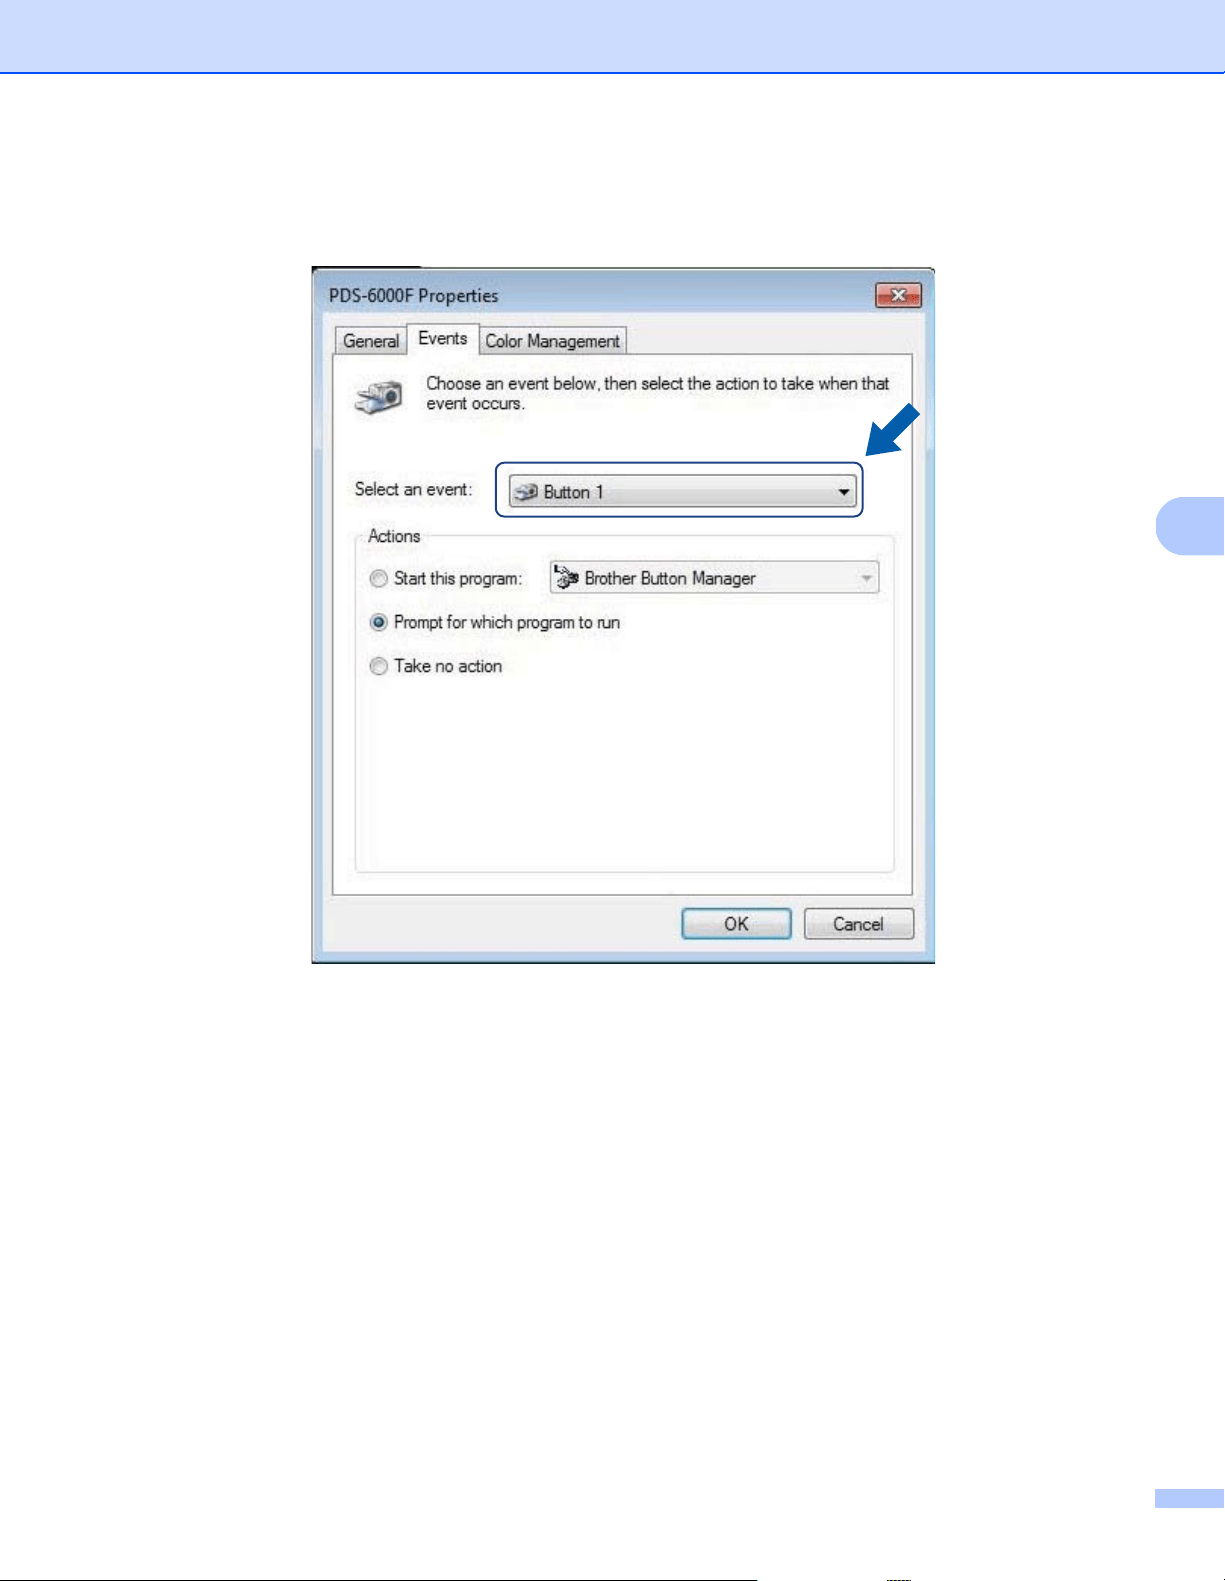
d Click the Events tab, and then select an event number from the Select an event drop-down list.
The Button # you select from this list directly corresponds with the function numbers (Function X)
displayed on the machine’s LCD.
Scan (Windows
®
)
22
5
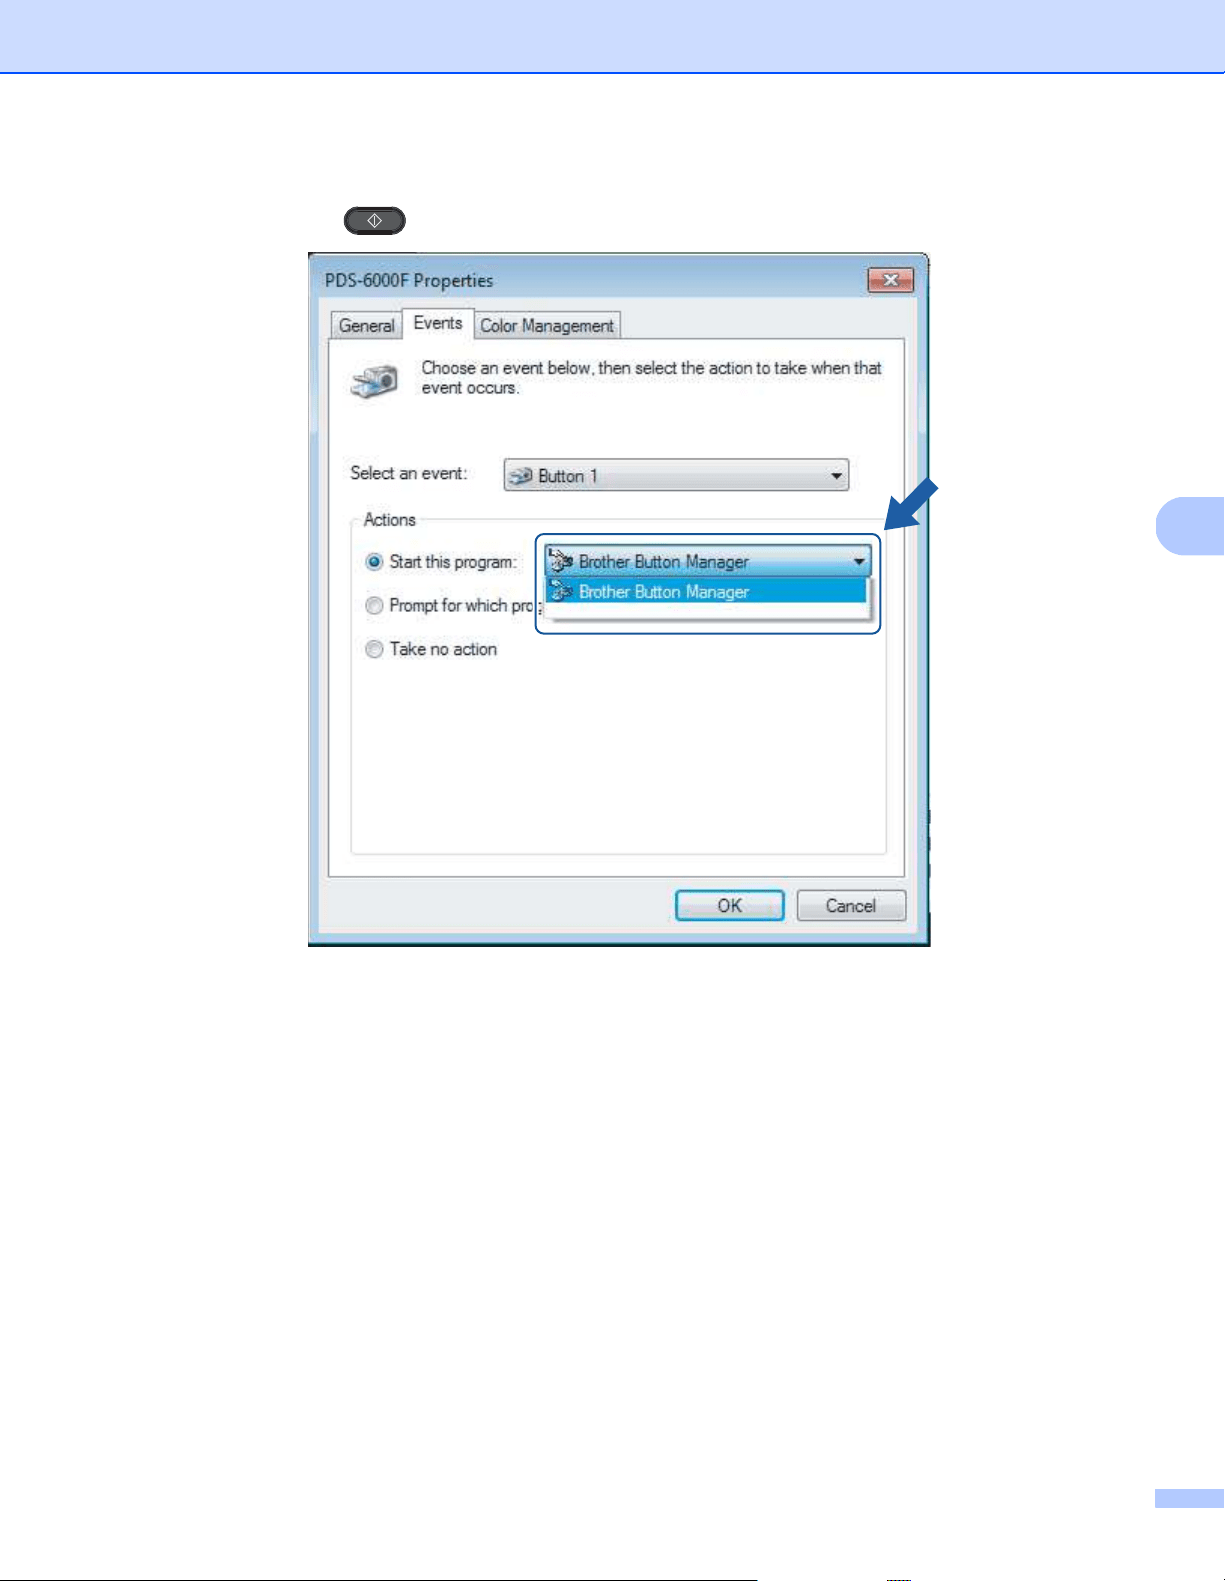
e Select Start this program from Actions, and then select the scanning application you want to launch
when you press the (Scan) button on your machine’s control panel.
f Click OK.
Scan (Windows
®
)
23
5
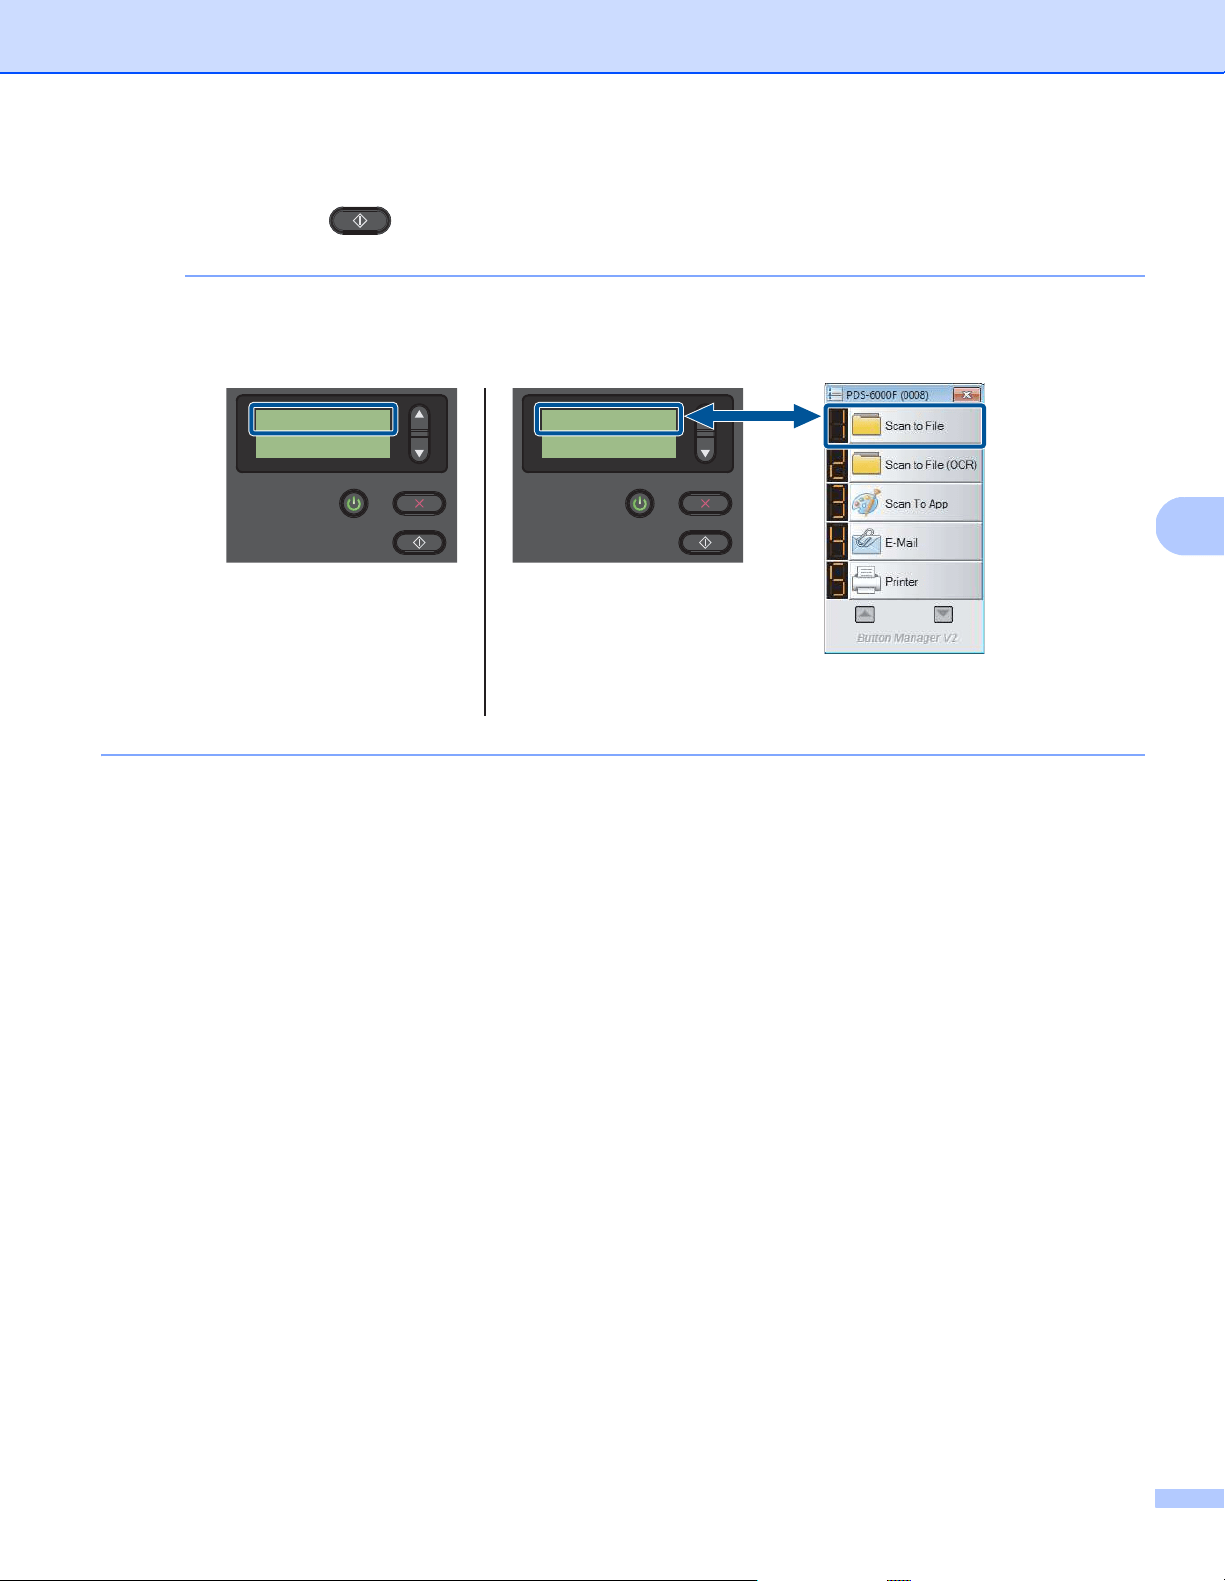
g Select the function number that you assigned to the scanning application on the machine’s LCD,
and then push the (Scan) button on your machine to launch the assigned application.
NOTE
When you use Button Manager V2 application, you can synchronize the machine’s LCD and application’s
function names by assigning Brother Button Manager to all the Button # in the Select an event
drop-down list. For more information, see the Button Manager V2 User’s Guide.
LCD
(When Button Manager V2
is running)
Button Manager V2
Button Panel
1.Scan to File
PageCount 0
LCD
(When Button Manager V2
is not running)
Function 1
PageCount 0
Scan (Windows
®
)
24
5
Scan a document
a Confirm that the machine is connected to your computer via a USB cable.
b Place your document either in the ADF, or on the scanner glass.
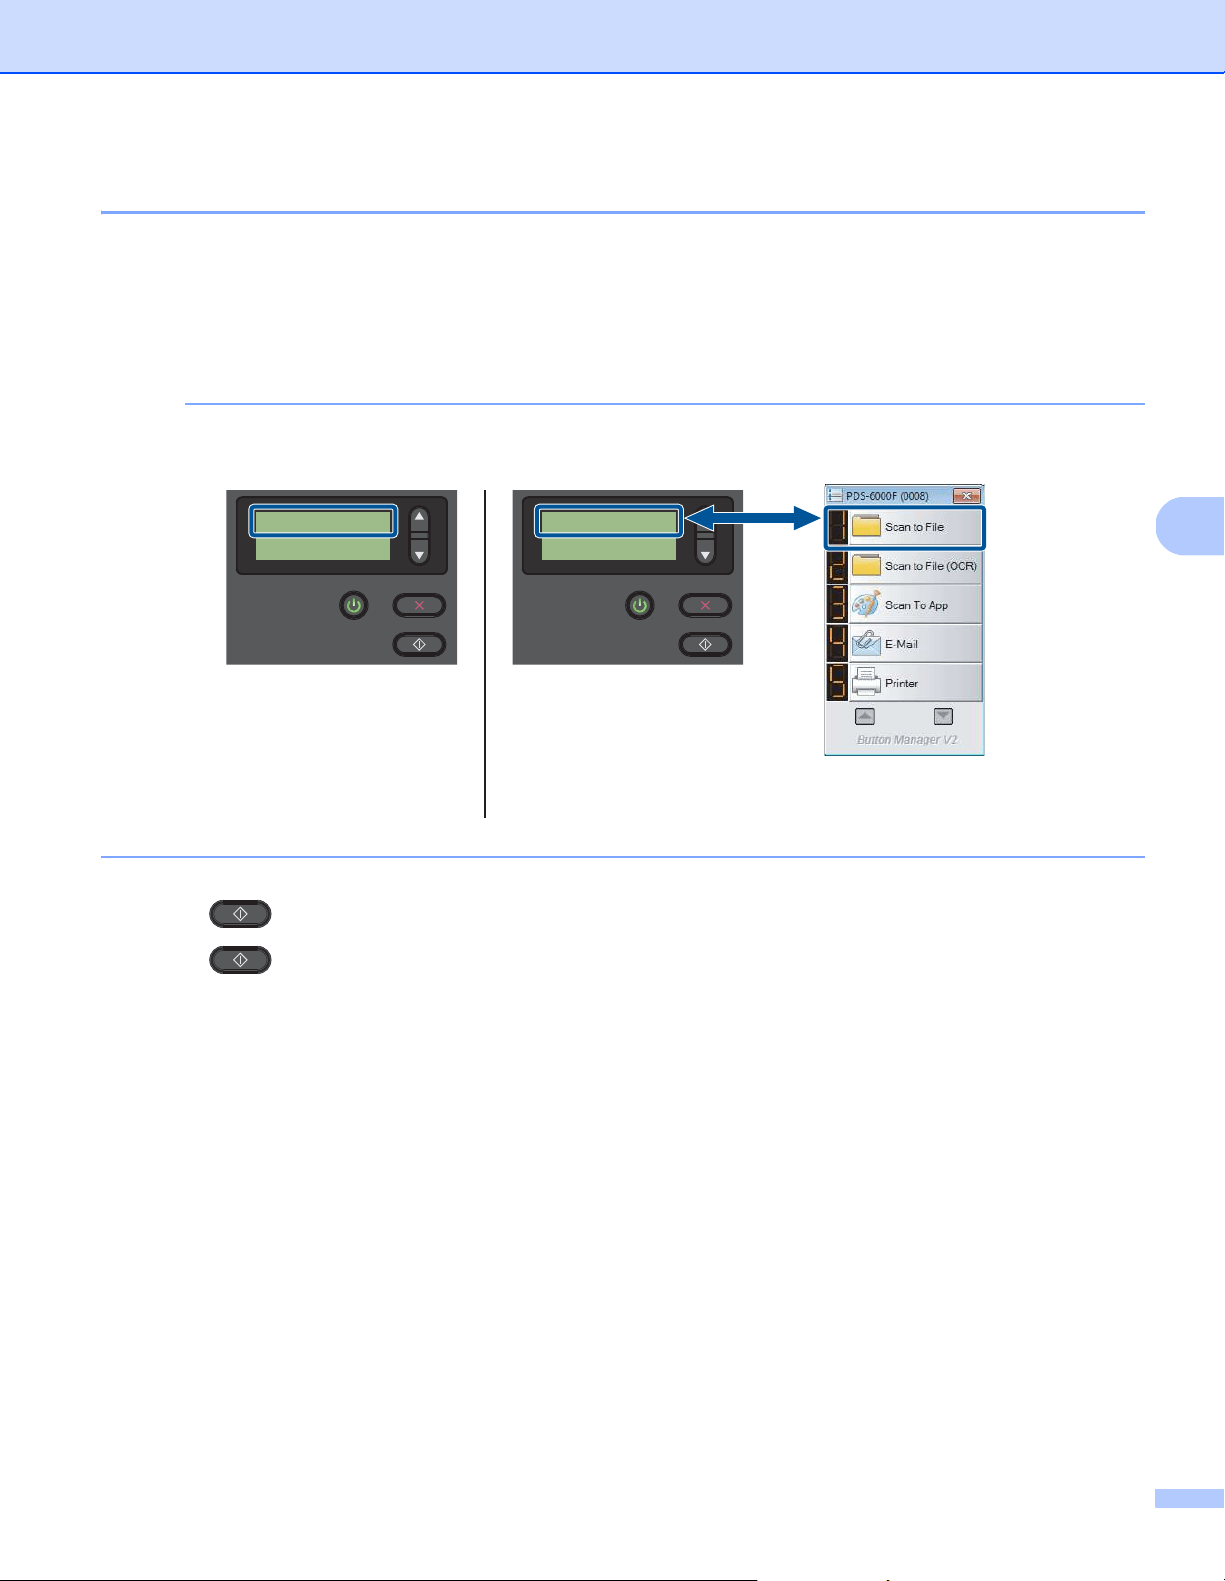
c Press a or b to select a Function.
NOTE
When Brother’s Button Manager is running on your computer, the machine’s LCD displays a Button Manager
function number and name. For more information, see the Button Manager V2 User’s Guide.
d Press to launch the scanning application.
e Press again to begin scanning.
LCD
(When Button Manager V2
is running)
Button Manager V2
Button Panel
1.Scan to File
PageCount 0
LCD
(When Button Manager V2
is not running)
Function 1
PageCount 0
Scan (Windows
®
)
25
5
Scan using your computer
To scan using your computer, launch a TWAIN-compatible application on your computer, such as DS Capture
or Adobe
®
PhotoShop
®
. This guide uses DS Capture as an example.
Scan with DS Capture
a Confirm that the machine is connected to your computer via a USB cable.
b Double-click the DS Capture icon on your desktop.
NOTE
If the DS Capture icon is not visible on your desktop, click Start > All Programs >
Brother PDS-XXXX Scanner (where XXXX is your model name) > DS Capture.
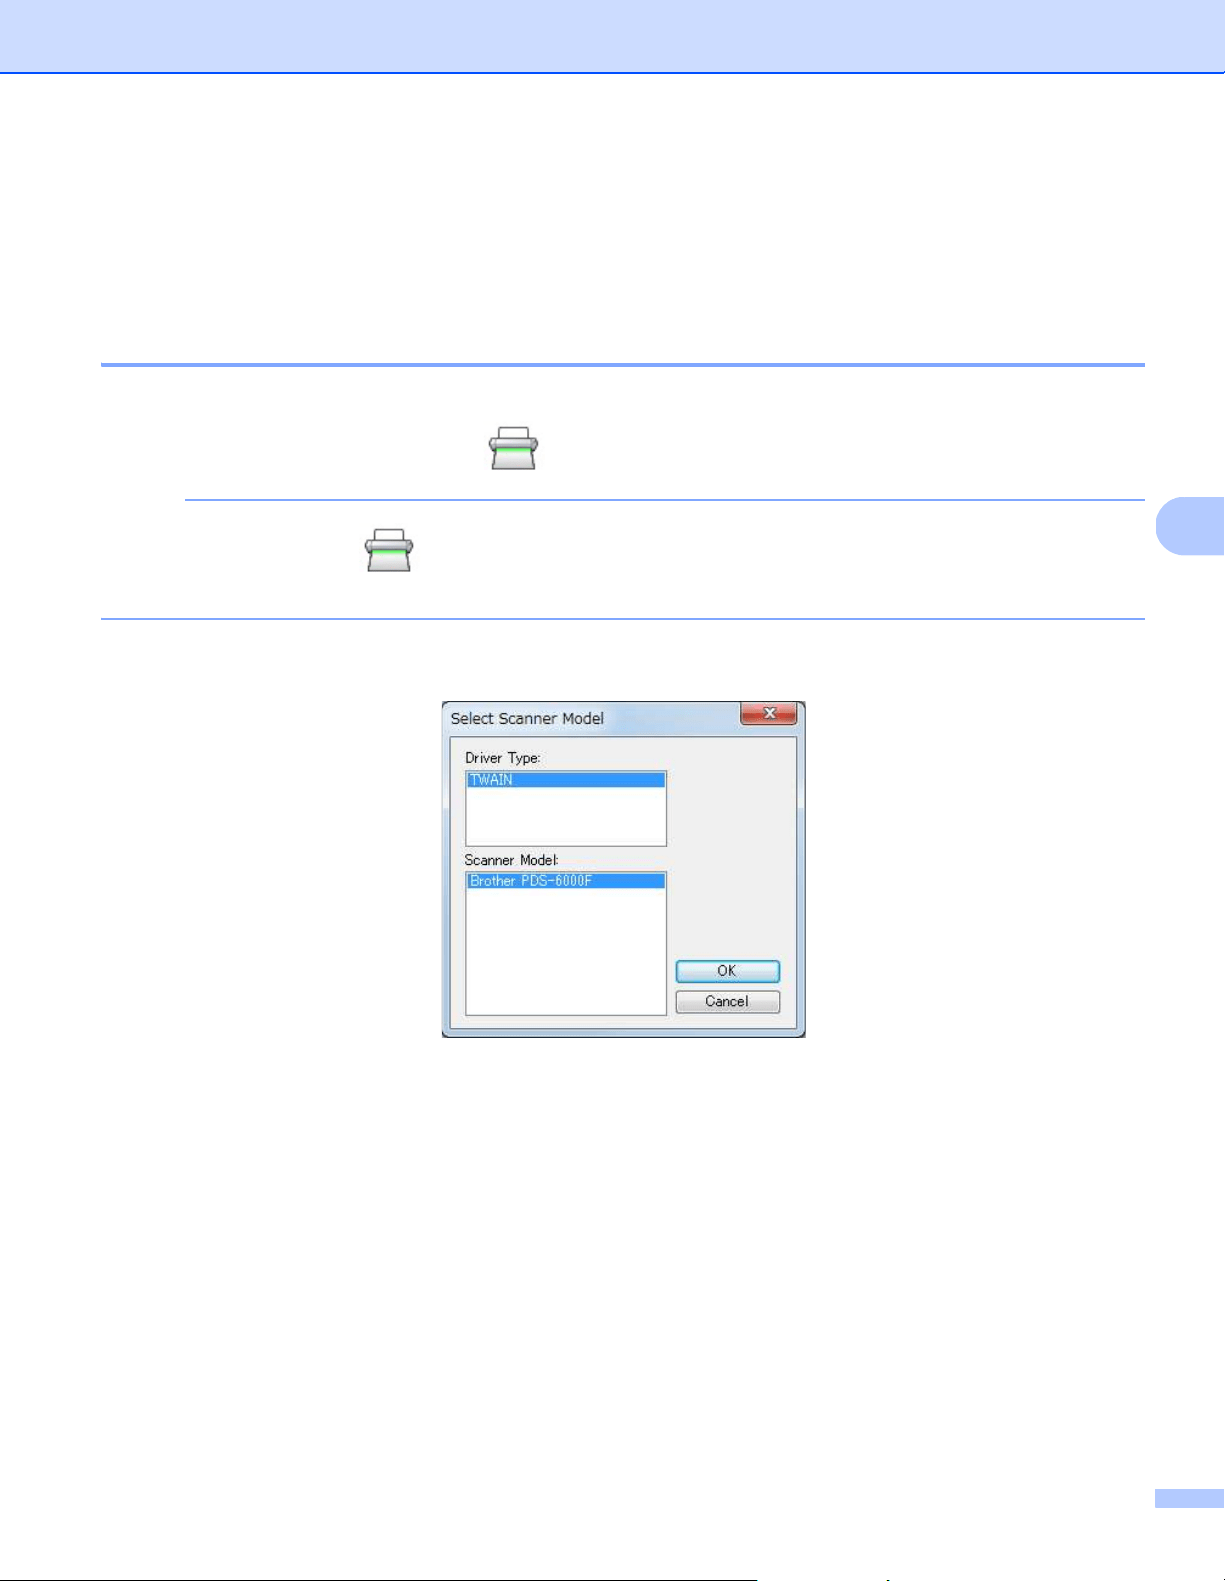
c The Select Scanner Model dialog box appears.
Select your Brother machine’s model from the Scanner Model list, and then click OK.
Scan (Windows
®
)
26
5
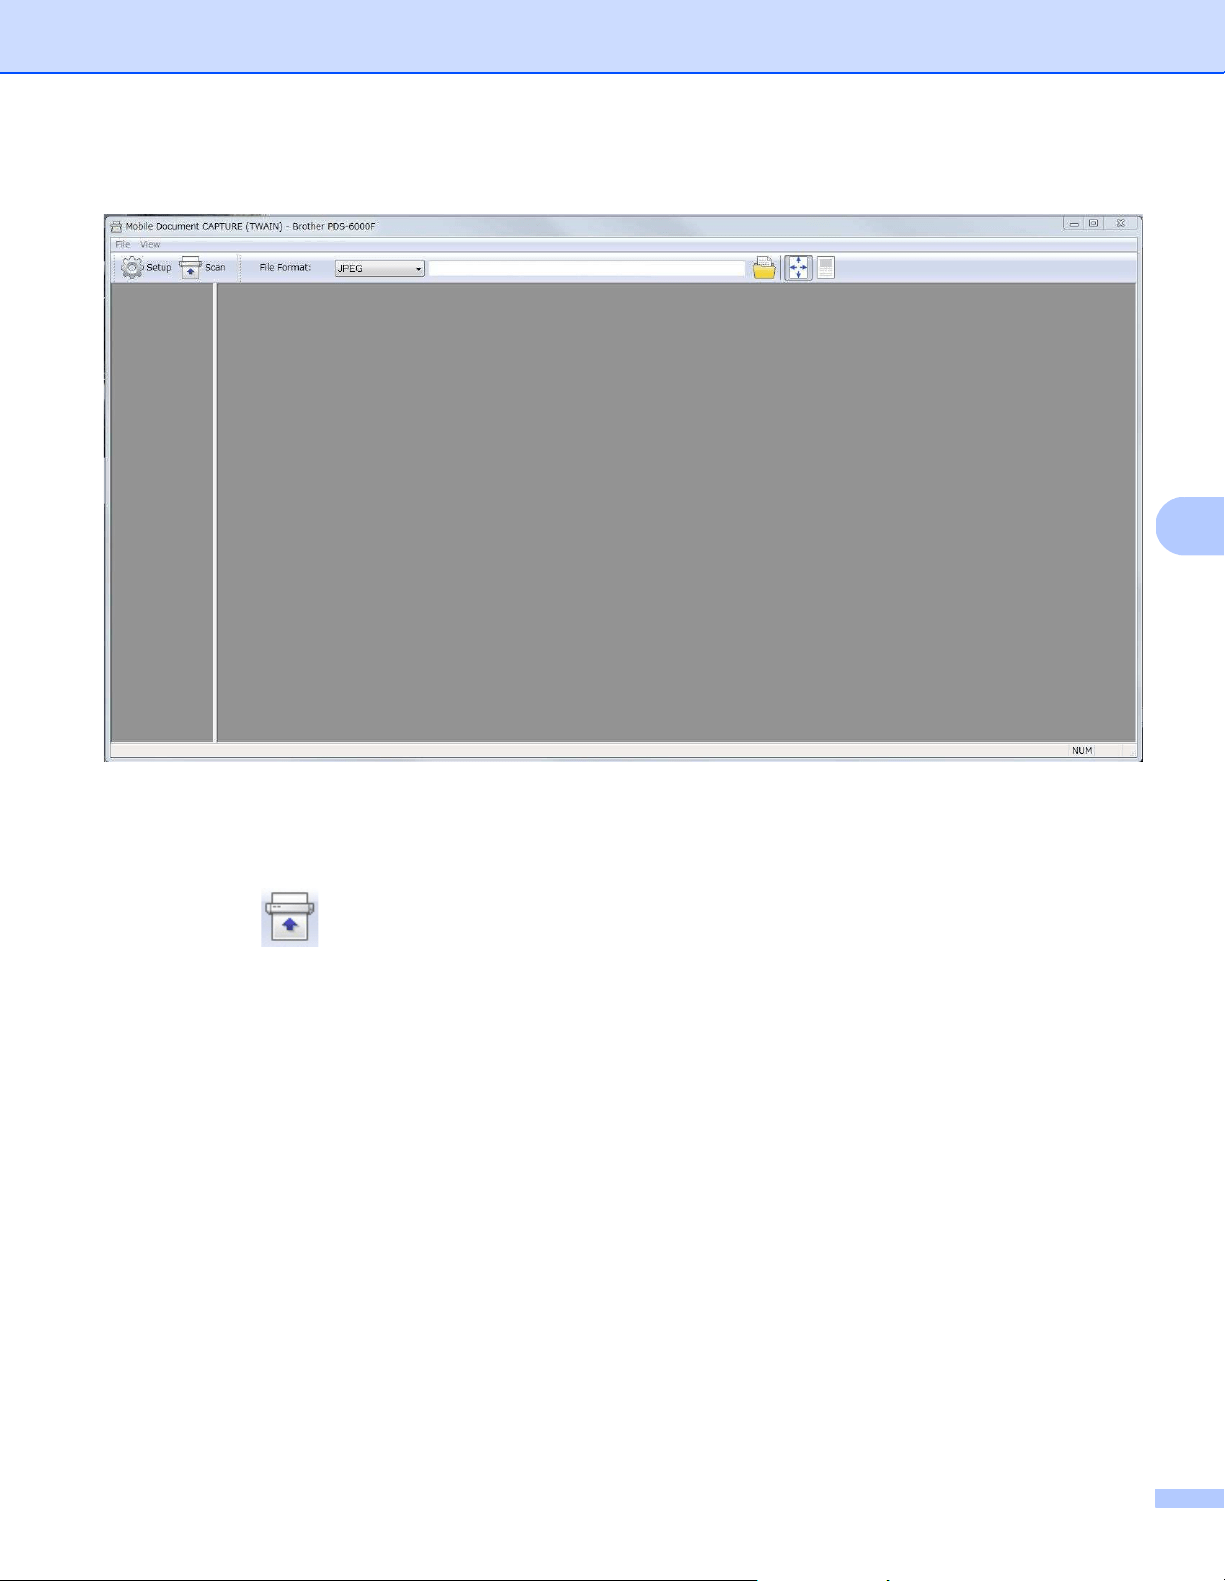
d DS Capture launches.
e Click Setup to change the scan settings, if needed.
For more information on changing settings, see Change scan settings using the TWAIN driver on page 27.
f Place your document either in the ADF, or on the scanner glass.
g Click Scan . Your machine starts scanning.
A thumbnail of the scanned image appears in the DS Capture window and the scanned image is saved
in the directory you specified in the Path field. For more information, see DS Capture home screen on
page 28.
Check the scan result to confirm that all settings are correct.
Scan (Windows
®
)
27
5
Change scan settings using the TWAIN driver
The TWAIN driver provides various settings and useful functions, which you can use when scanning, as listed
in the overview table below.
In this guide, we use the DS Capture application in our examples. Instructions for other scanning software
should be similar.
Functional overview
Category Function Reference
Basic settings Specify the image type (color) and scan Image tab on page 31
Automatically identify the document color and scan Image tab on page 31
Specify the document size and scan Paper tab on page 40
Automatically identify the document size and scan Paper tab on page 40
Specify the resolution and scan Image tab on page 31
Image processing Remove the specified color and scan Color Dropout tab on page 38
Rotate the document Rotation tab on page 50
Detect and remove blank pages Enhancement tab on page 52
Remove punch holes of scanned documents Enhancement tab on page 52
Automatically compensate the document tilt Paper tab on page 40
Remove the document base color Enhancement tab on page 52
Add a white or black edge around the border Enhancement tab on page 52
Remove small dots or specks from the background Enhancement tab on page 52
Efficient scanning See preview and check scan settings Preview tab on page 47
Save your scanner properties Image tab on page 31
Acquire multiple color type scan results with a single scan Image tab on page 31
Specify the computer memory used when scanning More Settings tab on page 56
Perform consecutive document scanning Paper tab on page 40
Advanced functions Scan a barcode to read information Enhancement tab on page 52
Add a character string to the scan result Digital Imprinter tab on page 58
Divide a 1 page document into 2 pages Rotation tab on page 50
Scan a document larger than Letter/A4 size Image tab on page 31
Machine settings Specify multifeed detection settings Multi-Feed Detection tab on
page 45
Check and reset the scan count Information tab on page 62
Change the Power Saving Mode and Power Off time
settings
More Settings tab on page 56
System information Check the scanner and computer system information Information tab on page 62
Scan (Windows
®
)
28
5
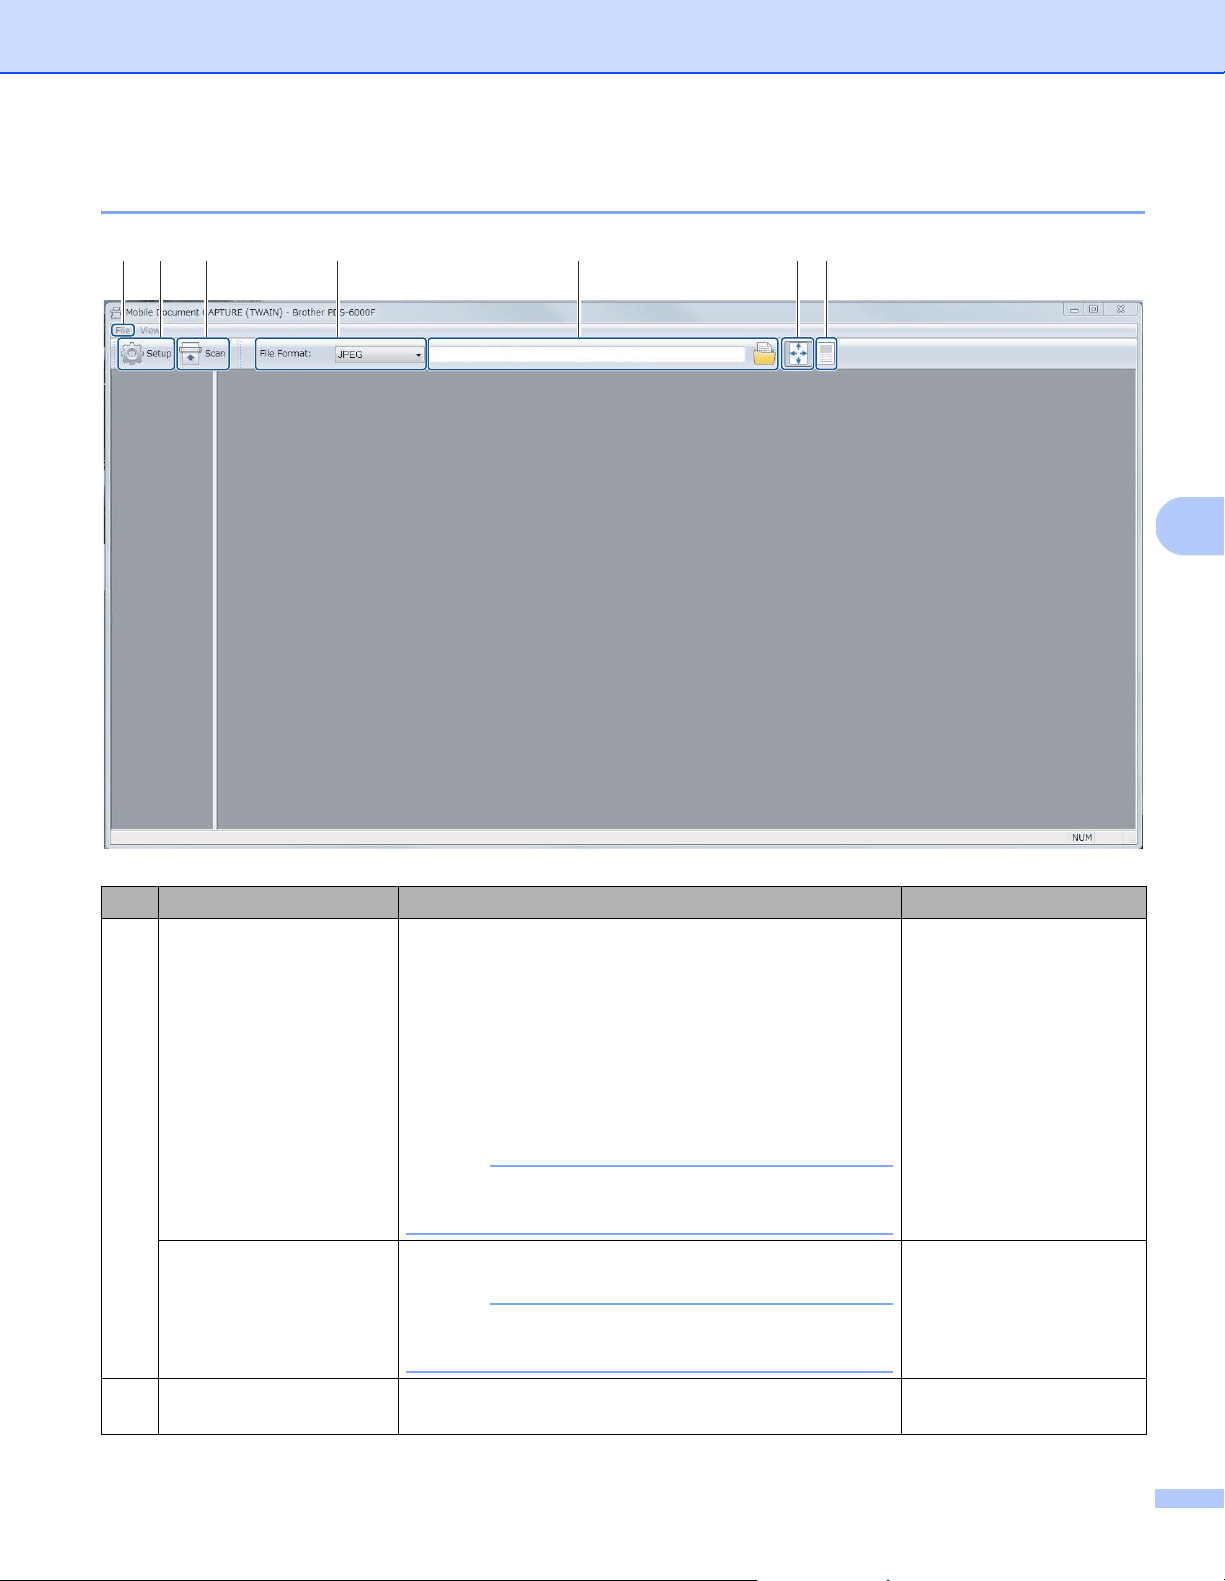
DS Capture home screen
No. Name Description Default
(1) Fast scan mode /
Fast display mode
(select from the File
menu)
Switch the scan mode if needed.
Fast scan mode
Fast scan mode gives priority to scanning speed.
Thumbnails are displayed after scanning is complete.
Fast display mode
In Fast display mode, thumbnails are displayed in
real-time.
NOTE
When you select Fast display mode, scanning
speed may be slower, depending on your computer.
Fast scan mode
Debug
(select from the File
menu)
Set the debug value between 0 and 9.
NOTE
Debug is a developer’s function. Users should not
need to change this setting.
0
(2) Setup Change scanner properties. For more information,
see Scanner Properties dialog box on page 30.
-
(2)(1) (3) (4) (5) (6) (7)

Scan (Windows
®
)
29
5
(3) Scan Click this button to scan. -
(4) File Format Change the file format.
Select the format you want from the drop-down list.
NOTE
To save multiple documents as one file, select
Multi-page PDF (MPDF) or Multi-page TIFF (MTIFF)
from the drop-down list.
JPEG
(5) Path Specify the directory where you want to save scanned
images.
\My Documents\My Scan\
(6) Fit Page View and resize the scanned image.
You cannot use Fit Page when PDF or Multi-page PDF
is selected in File Format.
(selected)
(7) Actual Size (100%) View the scanned image in Actual Size (100%).
You cannot use Actual Size (100%) when PDF or
Multi-page PDF is selected in File Format.
(not selected)
No. Name Description Default
Scan (Windows
®
)
30
5
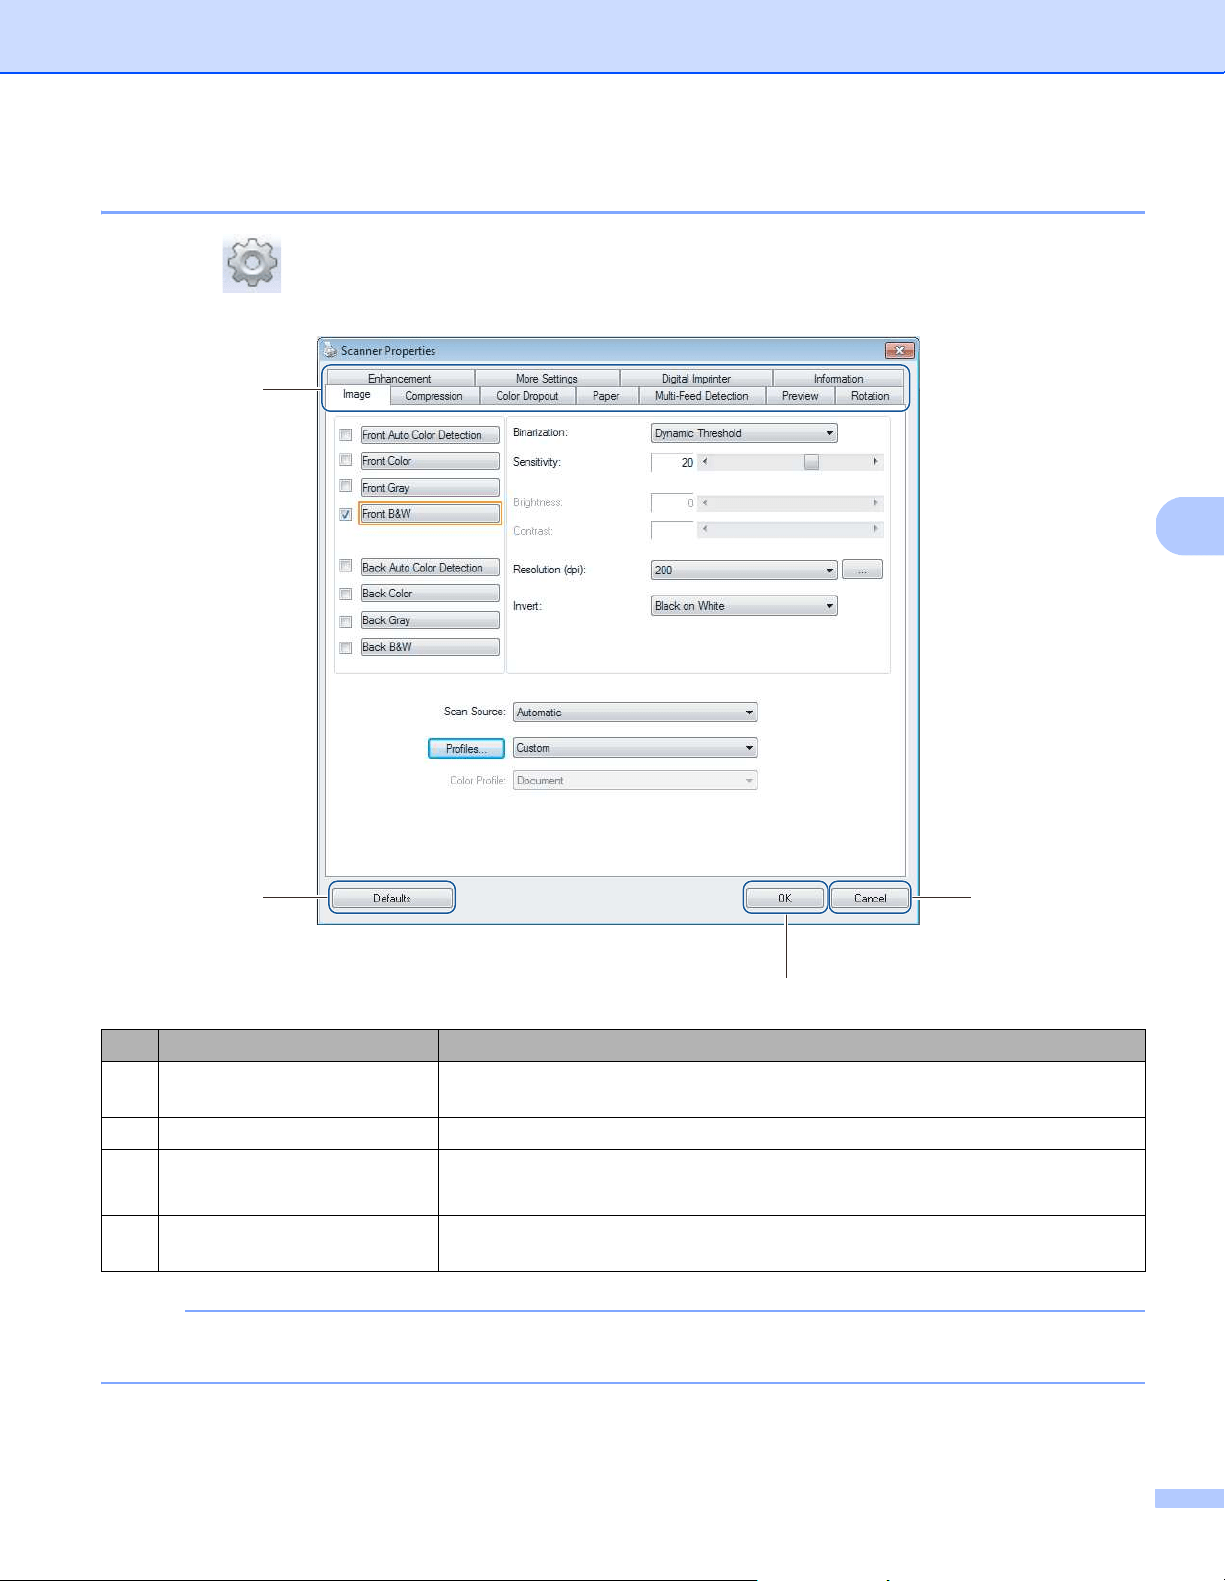
Scanner Properties dialog box
Click Setup on the DS Capture home screen to display the Scanner Properties dialog box.
Use the Scanner Properties tabs to configure your Brother machine’s settings.
NOTE
All settings in the Image tab (except for the Resolution), the Compression tab, the Color Dropout tab,
and the Preview tabs can be set individually for the front and back of any double-sided document you scan.
No. Name Description
(1) Tabs Image, Compression, Color Dropout, Paper, Multi-Feed Detection, Preview,
Rotation, Enhancement, More Settings, Digital Imprinter, Information
(2) Defaults Click Defaults to reset all settings in all tabs to factory settings.
(3) Scan/OK Click the Scan button to start a scan.
Click OK to save the settings and close the Scanner Properties dialog box.
(4) Cancel Click Cancel to close the Scanner Properties dialog box without saving
changes.
(1)
(4)
(3)
(2)
Scan (Windows
®
)
31
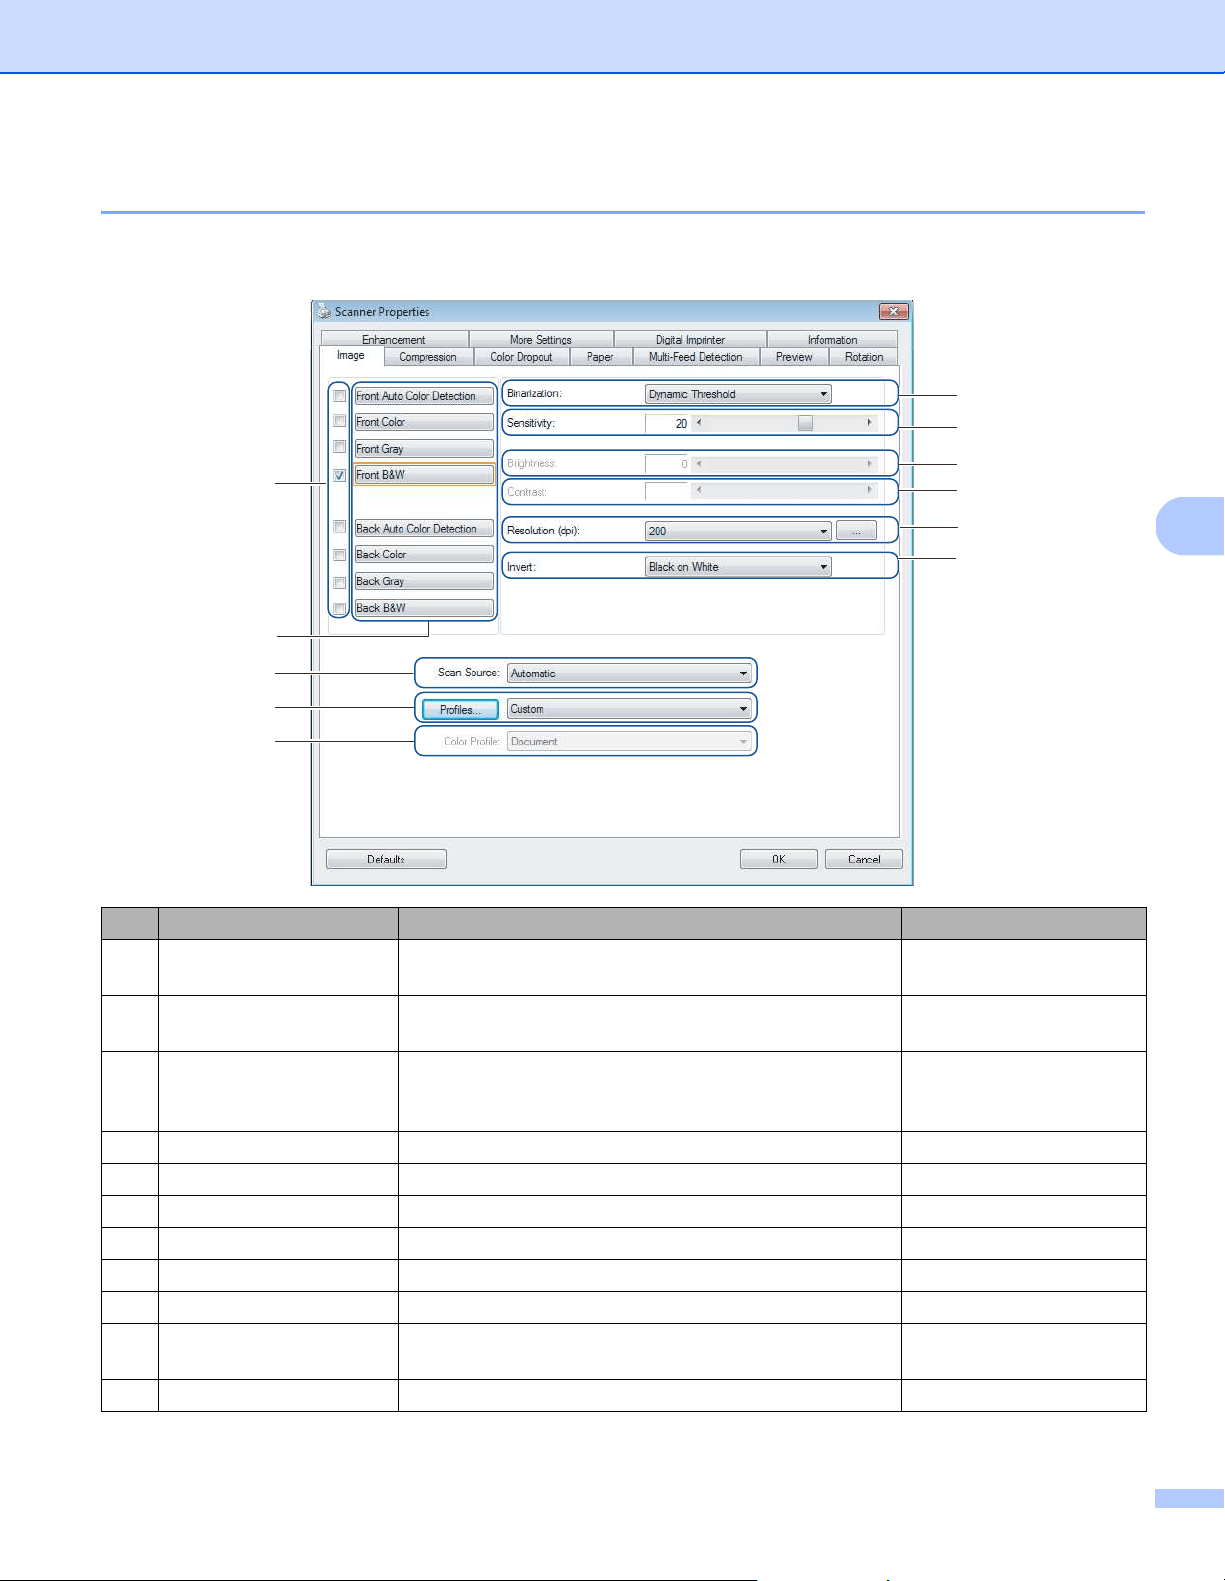
5
Image tab
Click the Image tab to set basic scan settings, to assign values for the front or back of your document and
to specify the image type.
No. Name Description Default
(1) Image Selection check
boxes
Select the check boxes to specify the type of scan
for the front (and back) of your document.
Front B&W
(2) Image Selection group Customize the settings for the front and back of your
document.
Front B&W
(3) Binarization /
Document Type /
Non-Color Selection
Select an appropriate image processing mode. This
field name changes based on your choice in the Image
Selection group.
Dynamic Threshold /
Document /
Black and White
(4) Sensitivity / Threshold Change sensitivity/threshold value. -
(5) Brightness Change brightness. 0
(6) Contrast Change contrast. 0
(7) Resolution (dpi) Select resolution. 200
(8) Invert Reverse the brightness and the colors in the image. Black on White
(9) Scan Source options Select a scan source. Automatic
(10) Profiles Create or change scan profiles for frequently used scan
settings.
Custom
(11) Color Profile Ensure accurate colors when scanning. Document
(1)
(9)
(2)
(10)
(3)
(4)
(5)
(6)
(7)
(8)
(11)
Scan (Windows
®
)
32
5
Image Selection check boxes
Select the check boxes to set the color mode for both the front and the back of your document. For example,
to scan both the front and back of a color document page in color, select the Front Color and Back Color
check boxes. For a black and white scan of the front and a color scan of the back, select Front B&W and
Back Color.
NOTE
• Select more than one image type check box to generate multiple scan results from a single scan.
For example, if you select Front Color and Front Gray, and then scan your document, scan data in
both color and gray is saved.
• If you select Front Auto Color Detection, you must select Back Auto Color Detection as a back image
type (and the other way round). These two options work only with each other.
• Back Auto Color Detection, Back Color, Back Gray and Back B&W is not available when using the
scanner glass.
Image Selection group
The Image Selection group lets you configure detailed settings used when scanning in each color mode.
Select an image type and customize detailed settings. You can apply different settings to each image type.
Binarization / Document Type / Non-Color Selection
This field name changes based on your choice in the Image Selection group.
Binarization (B&W mode only)
Binarization is the process of converting a grayscale or color image into a black and white image. There
are several methods of performing this conversion.
Image Type Description
Color Select Color if your original is in color and you want an exact copy.
Gray Select Gray if your original contains shades of gray.
B&W Select B&W if your original is typed, written in pencil, or written in pen.
Auto Color Detection Select Auto Color Detection to automatically detect and scan the front or back of your color
document. If your document is in color, the machine automatically scans the document as a
color image. If your document is not in color, select either Black and White or Gray from the
Non-Color Selection drop-down list. Use this option if your document is multi-page and
includes both color and black and white.
Conversion Methods Description
Dynamic Threshold Select Dynamic Threshold to allow the machine to dynamically evaluate each document
to produce the highest quality image. Select this option to scan documents containing faint
text, shaded background, or color background. If you select Dynamic Threshold:
Threshold, Brightness, and Contrast are not available.
Fixed Processing Select Fixed Processing for black and white and other high-contrast documents. A single
level is set to determine the black and white transition. The threshold is programmable
over the entire density range. If you select Fixed Processing, Contrast is not available.
Halftone 1-5 Select Halftone to view a gray image composed of different-sized dots. In other machines,
this is sometimes called “Grayscale”.
Scan (Windows
®
)
33
5
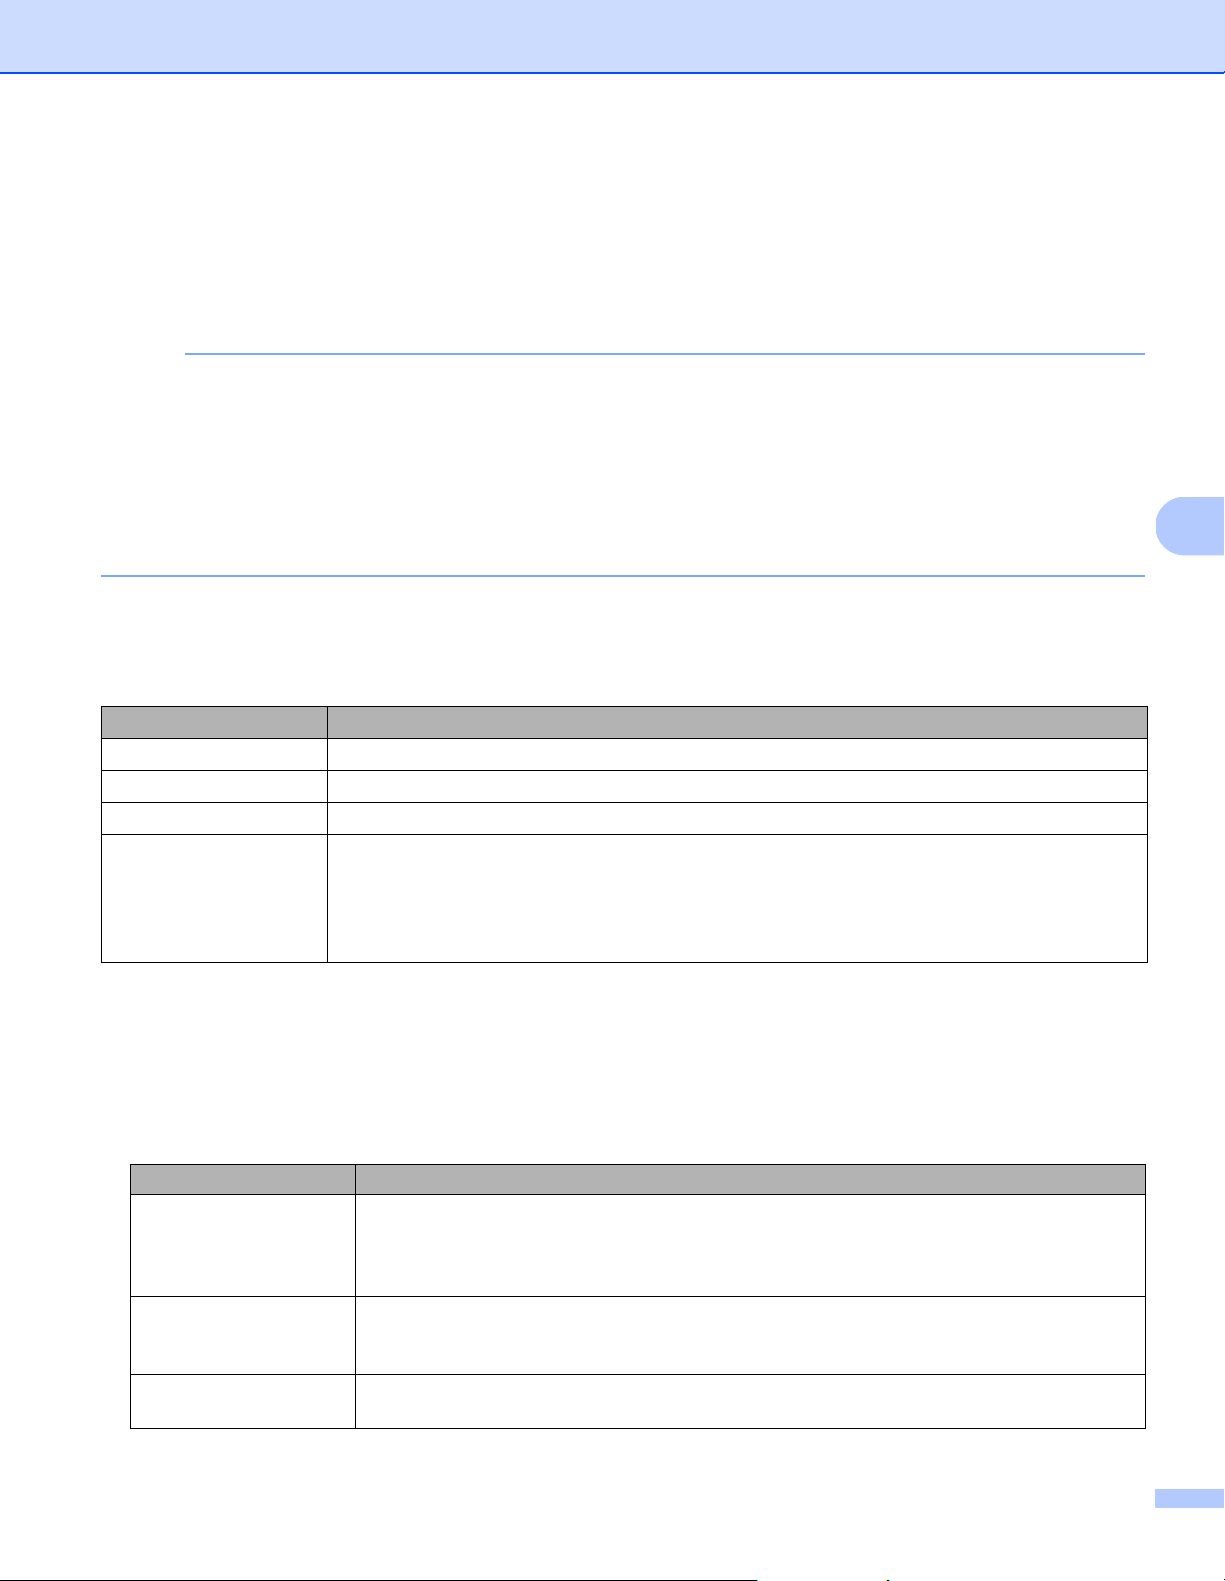
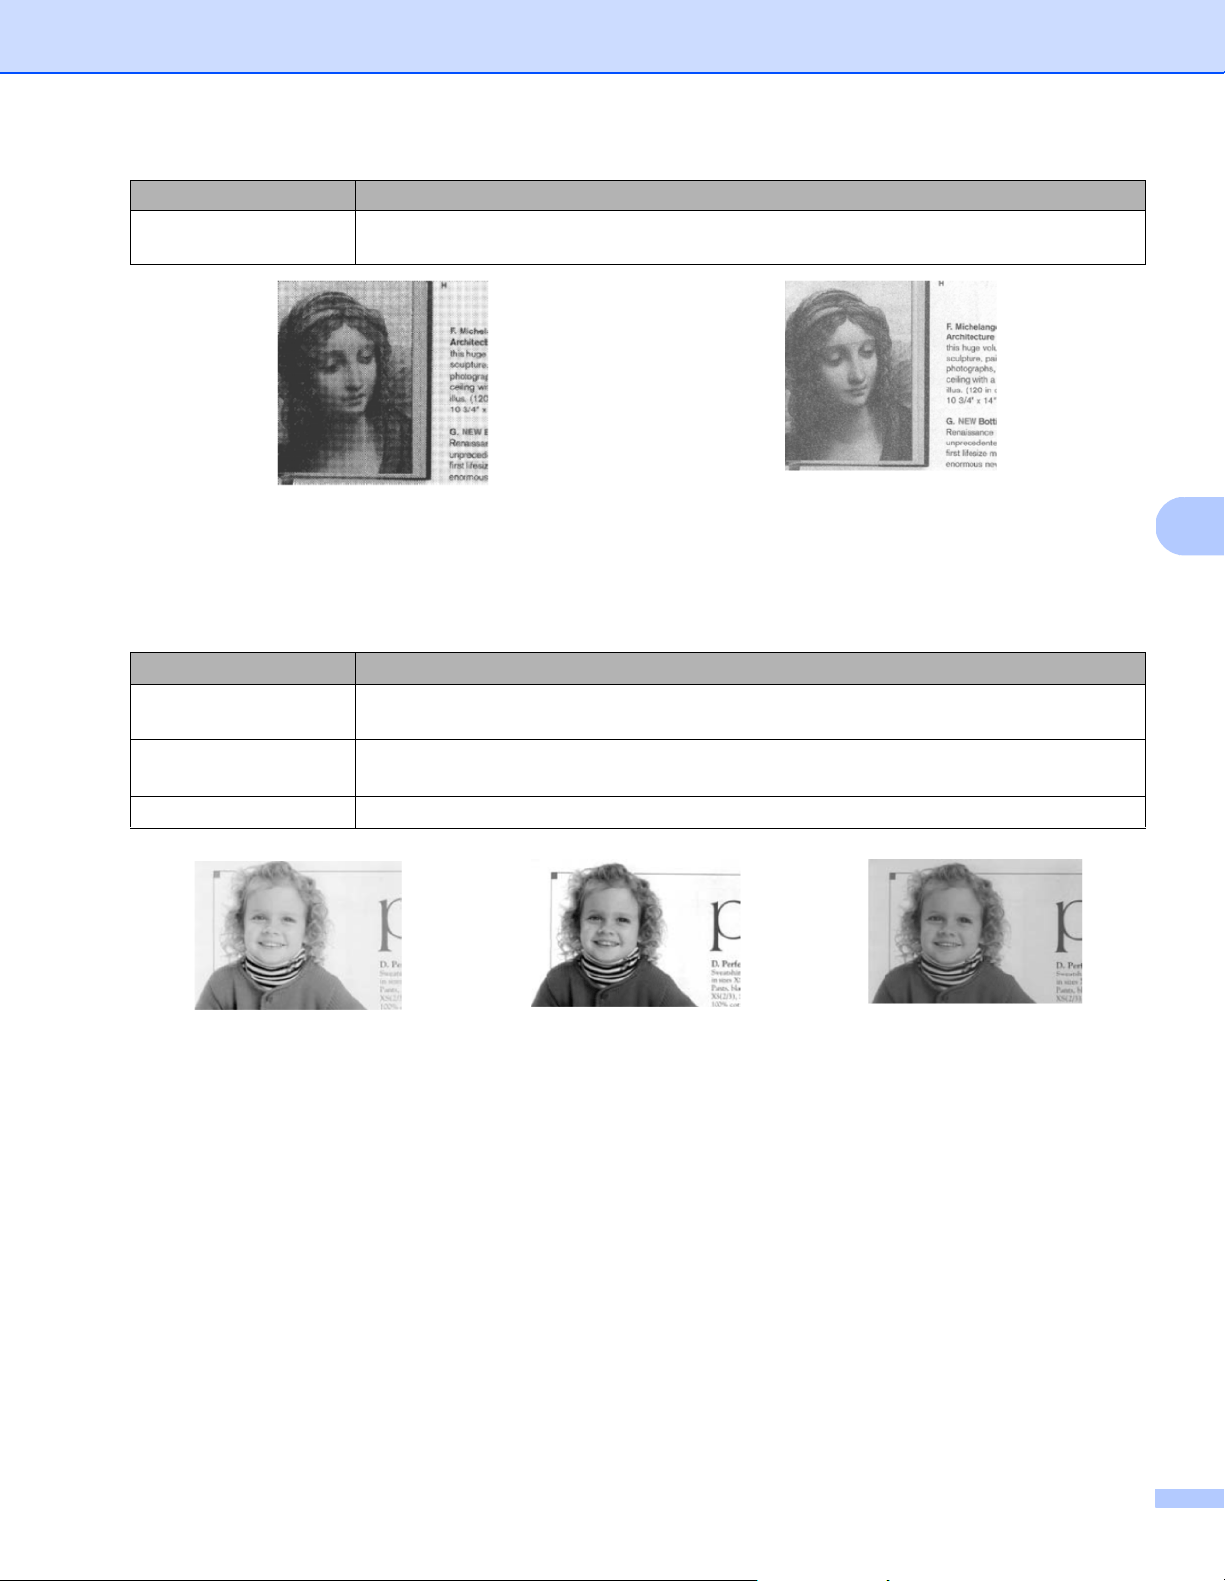
Document Type (Gray mode only)
When you select Gray as the image type for your scanned document, you can choose from three
document types:
Non-Color Selection (Auto Color Detection mode only)
If your document is non-color, you can choose the output to be either Black and White or Gray.
This option is useful when you scan a combination of color and non-color documents.
Error Diffusion Select Error Diffusion for a type of Halftone. Error Diffusion results in good image
texture and makes text in images more legible than Halftone 1-5 above.
Halftone Diffusion
Document Type Description
Document Select Document if your original contains only text or a mixture of text and graphics. This
is the optimal setting for regular business documents.
Photo Select Photo if your original contains a photograph, to reproduce it in a vivid grayscale
image.
Normal Select Normal to adjust Brightness and Contrast manually.
Document
(Threshold: 230)
Photo Normal
Conversion Methods Description
Scan (Windows
®
)
34
5
Sensitivity / Threshold
Sensitivity (available when you select Dynamic Threshold or Auto Color Detection)
Sensitivity of Dynamic Threshold:
If your document contains small dots or speckles and you want to remove them, increase the sensitivity
value by moving the bar to the right.
Sensitivity of Auto Color Detection:
If your document contains primarily black and white text with a small amount of light or pale color that you
do not want to be recognized as color, reduce the sensitivity value by moving the bar to the left.
Threshold (available when you select Fixed Processing or Document)
A low threshold value produces a lighter image, and can be used to subdue backgrounds and unneeded
information. A high threshold value produces darker images, and can be used to help faint images
stand out.
Brightness
Use the Brightness bar to lighten or darken an image. The greater the value, the clearer the image.
Contrast
Use the Contrast bar to adjust the range between the darkest and the lightest shades in the image.
The greater the value, the greater the difference between light and dark.
Resolution (dpi)
Select a resolution value from the drop-down list. The greater the value, the higher the resolution, and larger
the file size.
You can set a custom resolution value by clicking the button to the right of the drop-down list.
Invert
Use Invert to reverse the brightness and the colors in the image. The default setting is Black on White
background. To reverse this, select White on Black.
Scan Source
Automatic
The machine uses the paper from the ADF first. If there is no paper in the ADF, the machine switches to
Flatbed scanning.
Black on White White on Black

Scan (Windows
®
)
35
5
Automatic Document Feeder (ADF)
Use the ADF to scan multiple pages.
Flatbed
Use the scanner glass to scan.
2 in 1 for Automatic Document Feeder
Use 2 in 1 to scan documents wider than Letter/A4 size. The machine scans both sides of the folded
document, and merges the images onto a single page.
• Merge Vertically check box
Select this check box to align both sides vertically.
Clear this check box to align both sides horizontally.
Profiles
Click Profiles to save your frequently-used scan settings.
To create a scan profile:
a Select your scan settings in the Scanner Properties dialog box, using any of the tabs.
b When finished, click the Image tab, and then click Profiles.
The Edit Your Profile dialog box appears.
Select Merge Vertically Clear Merge Vertically

Scan (Windows
®
)
36
5
c Click Add..., and then type the name of the profile you want to save.
d Click Save.
The new profile is added to the Profiles drop-down list.
NOTE
You can Delete, Rename, or Reset profile names in the Edit Your Profile dialog box.
Color Profile
Use the Color Profile settings to achieve accurate color reproduction for scans. This option uses the default
ICC profile parameters to adjust the image colors. ICC profiles are used with color mapping, mainly in digital
photography and printing.
Document
Select Document if your original contains only text or a mixture of text and graphics. This is an optimal
setting for regular business documents.
None
Select None to disable the Color Profile option.
Photo
Select Photo if your document contains photos, and you want to reproduce your photos in vivid color.
Mix
Select Mix if your document contains a combination of text and graphics. The Mix option offers mid-range
scan quality between Document and Photo.
Scan (Windows
®
)
37
5
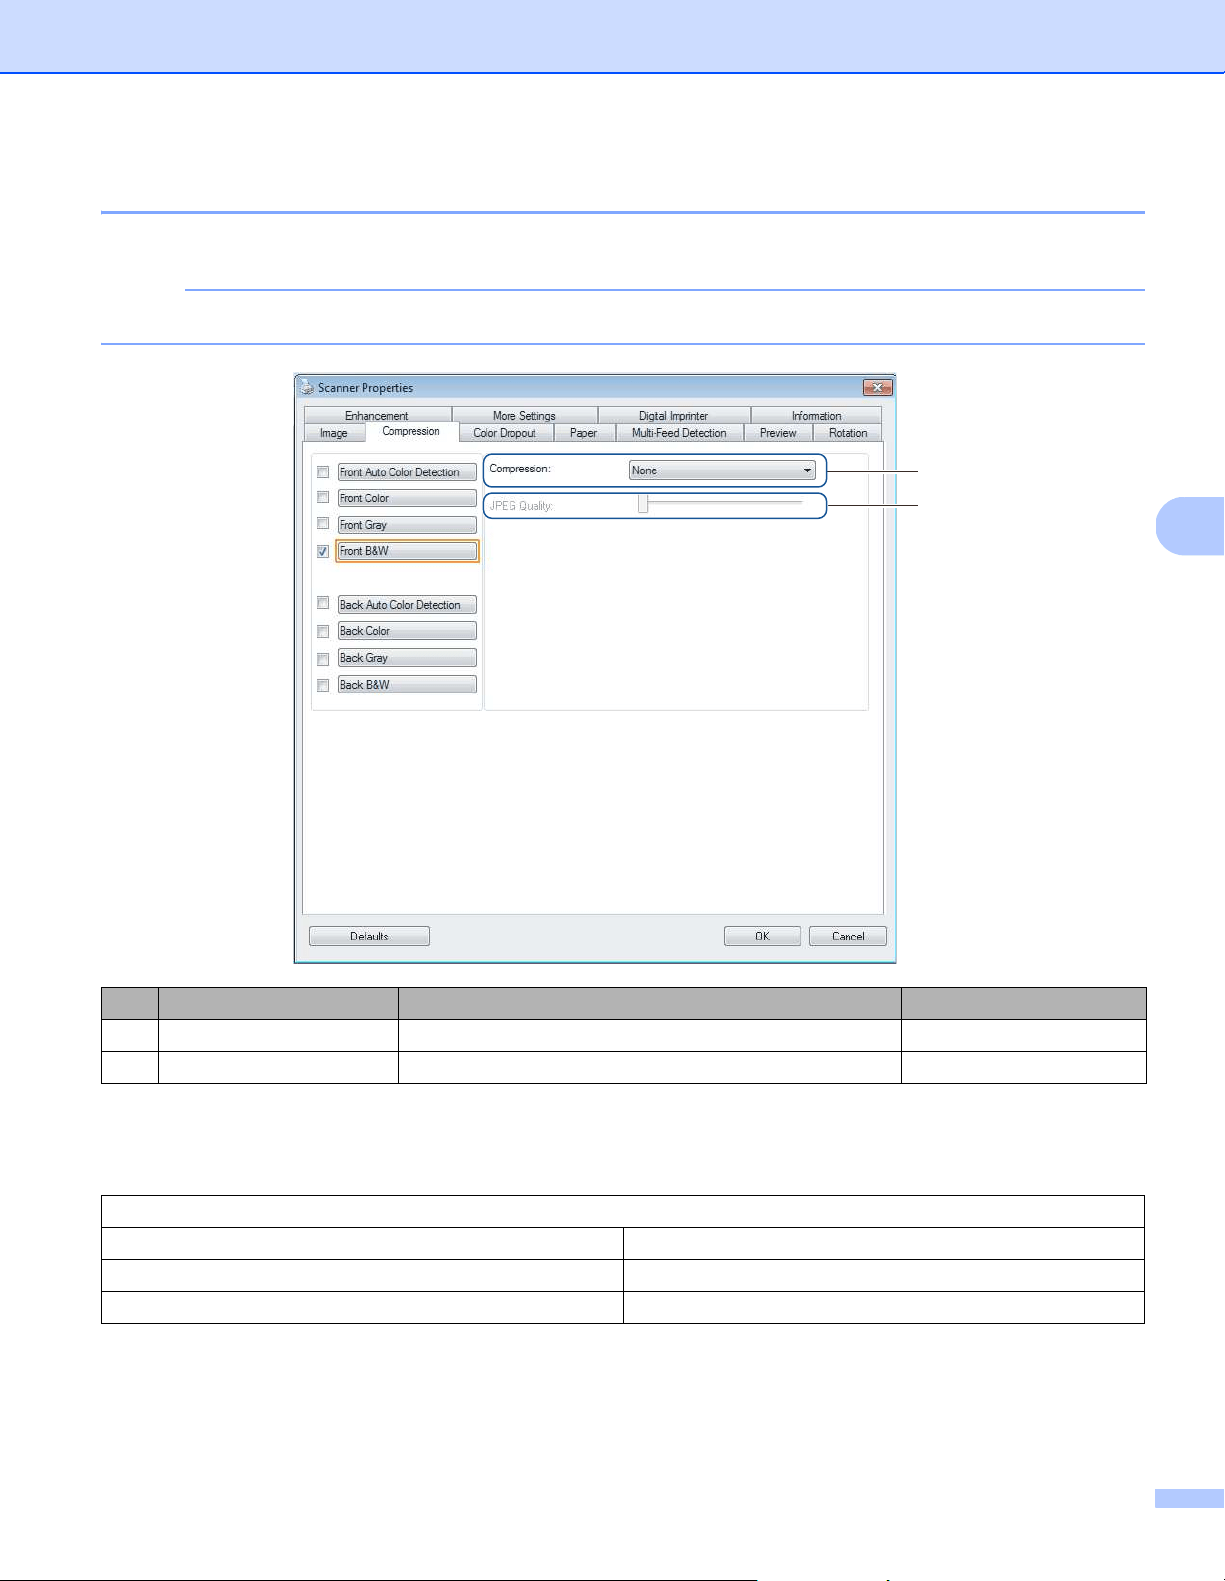
Compression tab
Click the Compression tab to reduce the scanned image size but maintain image quality.
NOTE
The Compression options available may differ depending on the scanning application you use.
Compression
To following compression types are available:
JPEG Quality
Move the JPEG Quality slider to the right or left to increase or decrease the level of compression.
The greater the JPEG Quality percentage value, the larger the file size.
No. Name Description Default
(1) Compression Select a Compression mode. None
(2) JPEG Quality Change the JPEG quality. 50
Available Compression Types
Color or Gray Images Black and White Images
None None
JPEG G4
(1)
(2)
Scan (Windows
®
)
38
5
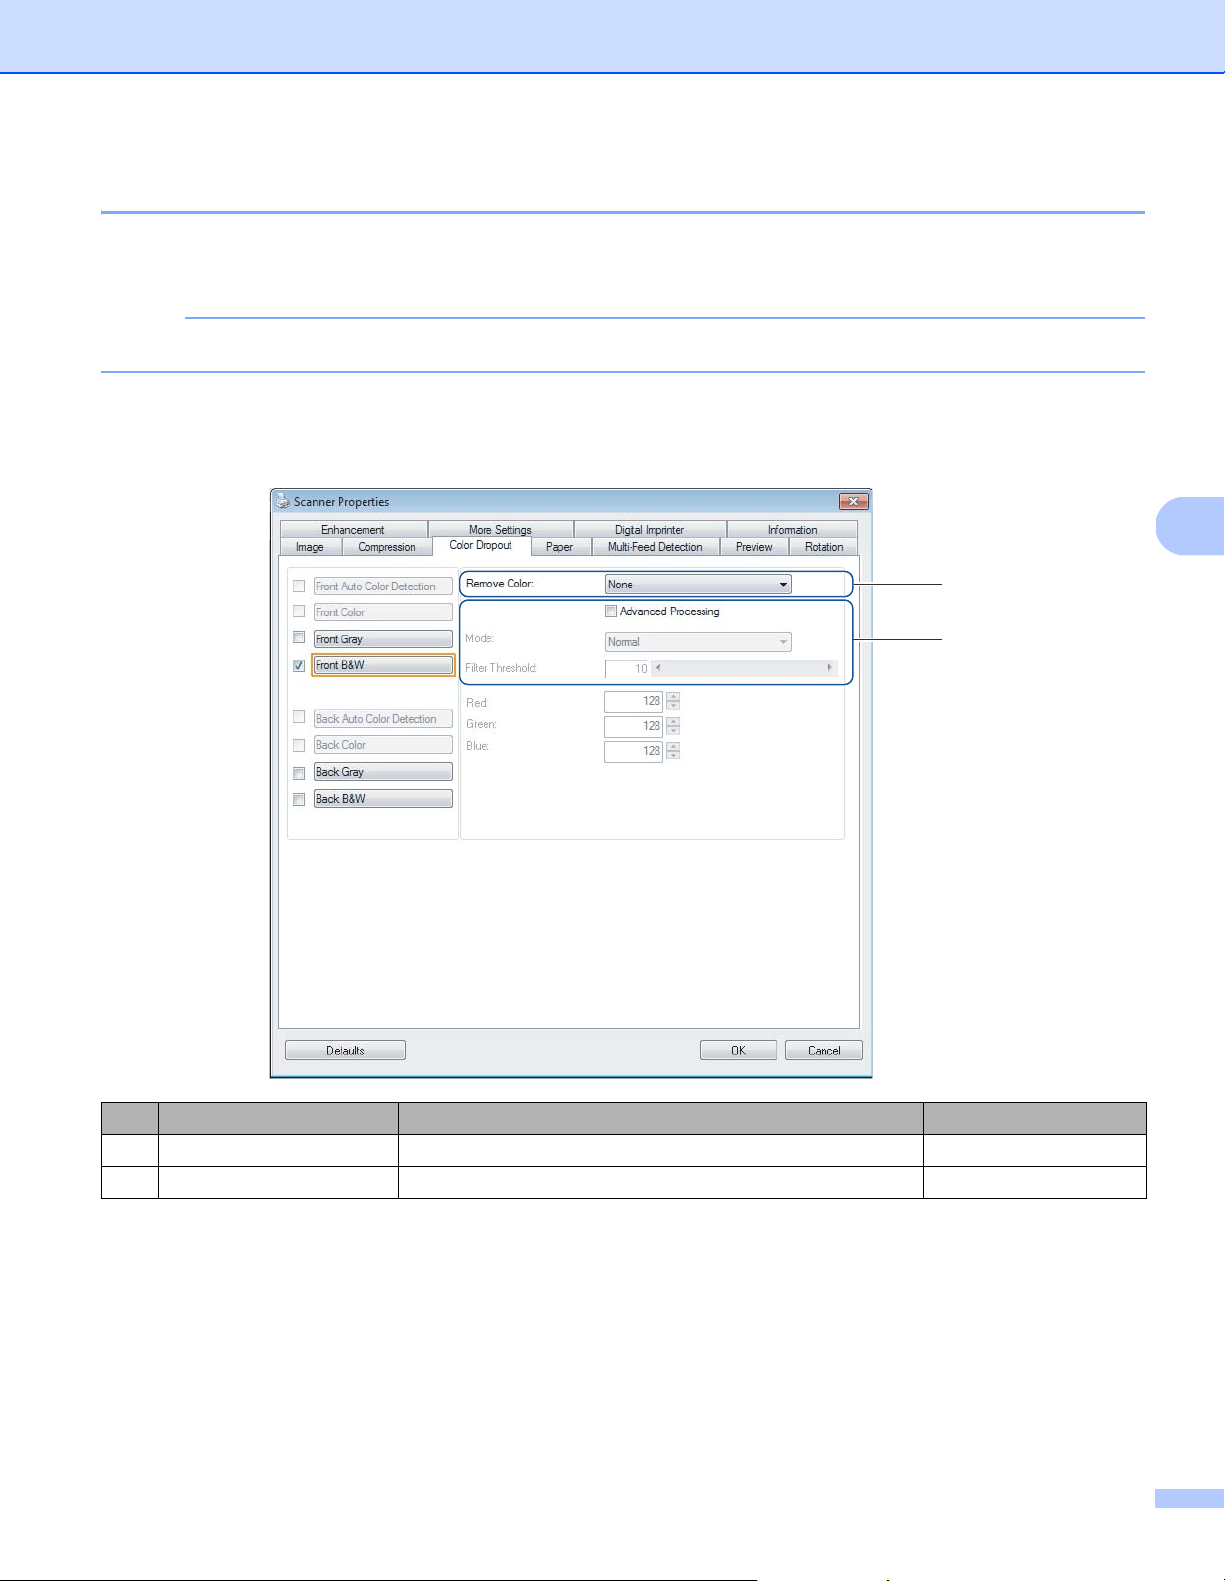
Color Dropout tab
Click the Color Dropout tab to remove the red, blue, or green color from your scanned image resulting in
a gray or black and white document.
NOTE
Color Dropout is available only when you select Gray or B&W from the Image Selection group.
If your image contains a red watermark or background, select the Red channel to remove any red watermark
or background color. This feature is useful for sharpening text when using Optical Character Recognition (OCR)
software.
No. Name Description Default
(1) Remove Color Select the color you want to remove from your scan. None
(2) Advanced Processing Configure the advanced settings when removing a color. (not selected)
(1)
(2)
Scan (Windows
®
)
39
5
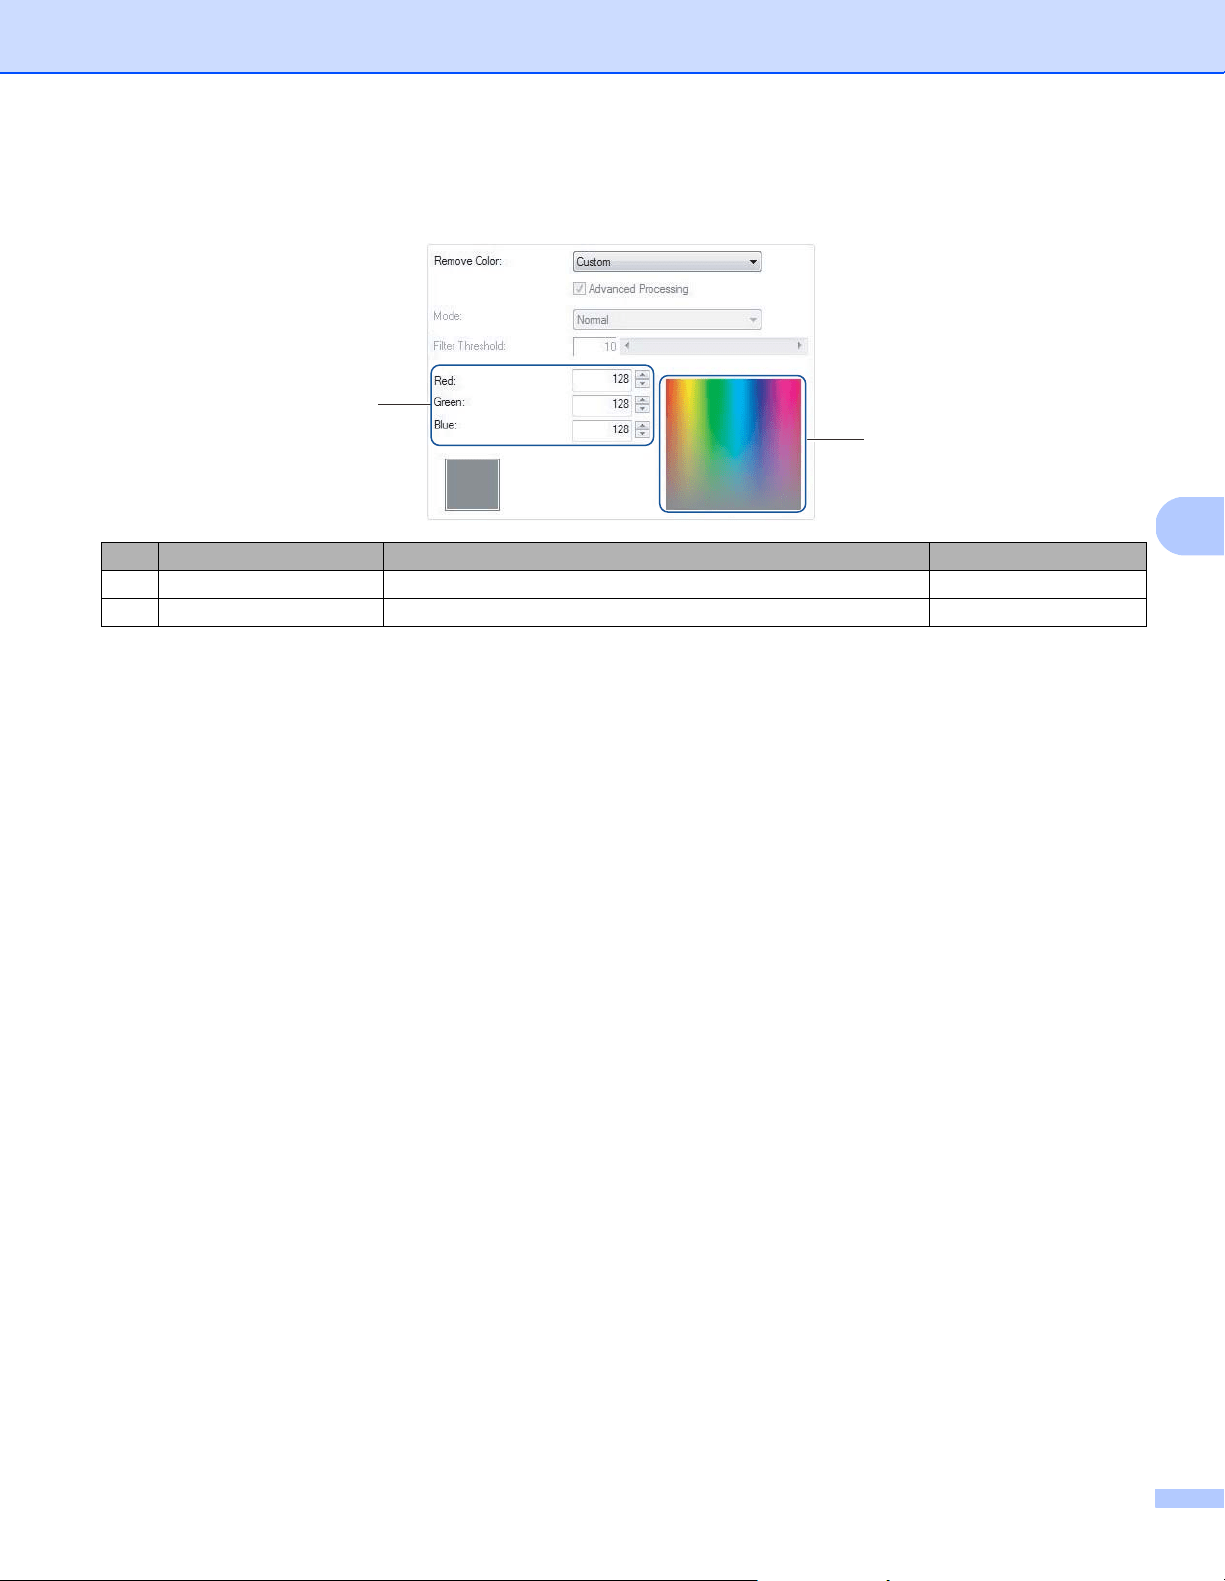
When you select Custom from the Remove Color drop-down menu, the Color Dropout tab changes as
follows:
Remove Color
Select one of the following from the Remove Color drop-down list:
None
No color is removed.
Remove Red / Remove Green / Remove Blue
Removes red, green, or blue from the scan.
Custom
See Custom settings on page 39.
Advanced Processing
Select the Advanced Processing check box to adjust the details that can optimize your scan result.
Mode
Select Quality to configure detailed settings for the Filter Threshold value. Mode is available only when
Remove Red, Remove Green, Remove Blue, or Automatic is selected in the Remove Color drop-down
list.
Filter Threshold
This value determines how much color to remove. A lower value removes more of the selected color, while
a higher value keeps more of the selected color. Filter Threshold is available only when Quality is
selected in the Mode drop-down list.
Custom settings
Select Custom in the Remove Color drop-down list to specify the exact color you want to remove by entering
its RGB (Red, Green, and Blue) value or by selecting it in the Color palette.
RGB values
Displays the RGB value for the color selected in the Color palette. Adjust RGB values manually, if needed.
Color palette
To manually specify the color you want to remove, click that color in the palette. The RGB value of the
selected color appears in RGB values.
No. Name Description Default
(3) RGB values Display the RGB value for the color selected. -
(4) Color palette Select the color you want to remove from the color picker. -
(4)
(3)
Scan (Windows
®
)
40
5
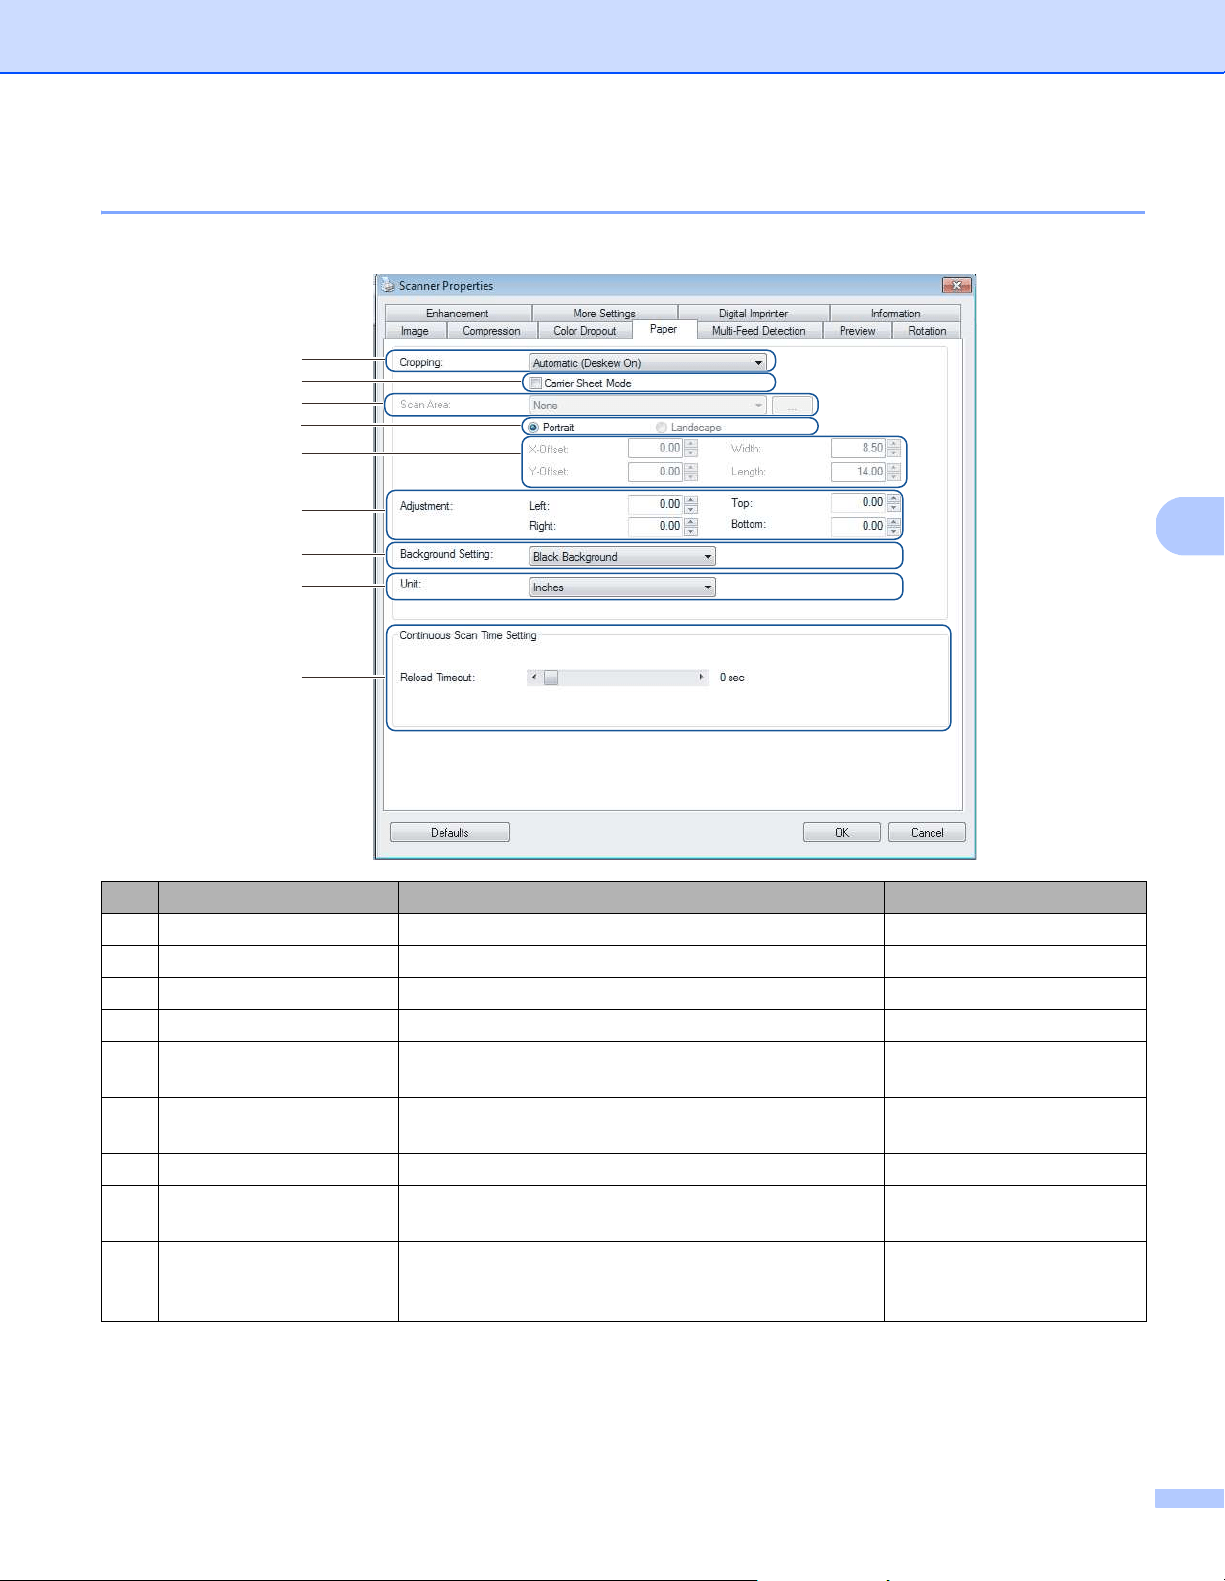
Paper tab
Click the Paper tab to define values relating to image output and auto scan.
No. Name Description Default
(1) Cropping Capture a portion of the document being scanned. Automatic (Deskew ON)
(2) Carrier Sheet Mode Select this check box if using the Carrier Sheet. (not selected)
(3) Scan Area / Page Size Select the paper size. ISO A4 - 210 mm x 297 mm
(4) Portrait / Landscape Select your scanned document’s layout. Portrait
(5) X-Offset / Y-Offset /
Width / Length / Center
Adjust the scanning area manually. -
(6) OverScan / Adjustment Add a specific margin at the top and bottom of the
edge of the image.
0.00
(7) Background Settings Select a background color. White Background
(8) Unit Select the unit of measurement displayed in the
Scanner Properties window.
(based on language)
(9) Reload Timeout Set the amount of time the machine has to wait before
starting an auto scan after the first scan job is
completed.
0
(1)
(3)
(4)
(5)
(6)
(7)
(8)
(9)
(2)
Scan (Windows
®
)
41
5
Cropping
Cropping allows you to capture a portion of the document being scanned. Options include:
Automatic (Deskew ON)
This option automatically adjusts the cropping window according to document size. Use this option for
batches of mixed-sized documents.
NOTE
• When you select Automatic (Deskew ON), scanned images are automatically deskewed if the images
are crooked.
• Punch Hole Removal is not available when Automatic Cropping is disabled.
Fixed Area (Deskew OFF)
This option allows you to define the area or zone to be captured. Use it when scanning batches of same-sized
documents. If you select this option, type numerical values, or use the up or down arrow keys to define
the x and y offset values, width and length of your scan area.
EOP (End of Page) Detection (Deskew OFF)
This option allows you to define the area or zone to be captured. Use it when scanning batches of same-width
but different-length documents. If you select this option, type numerical values, or use the up or down arrow
keys ( ) to define the x and y offset values, width, and length of your scan area.
Relative to Document (Deskew OFF)
This option allows you to crop different areas of your documents and deliver these images in black and
white, gray, or color separately. Use it if you are working with an application that requires you to store the
entire document in black and white and a part of the document in color to save storage space. This is
useful for documents where a photograph or signature appears in the same area on each document.
Scan (Windows
®
)
42
5
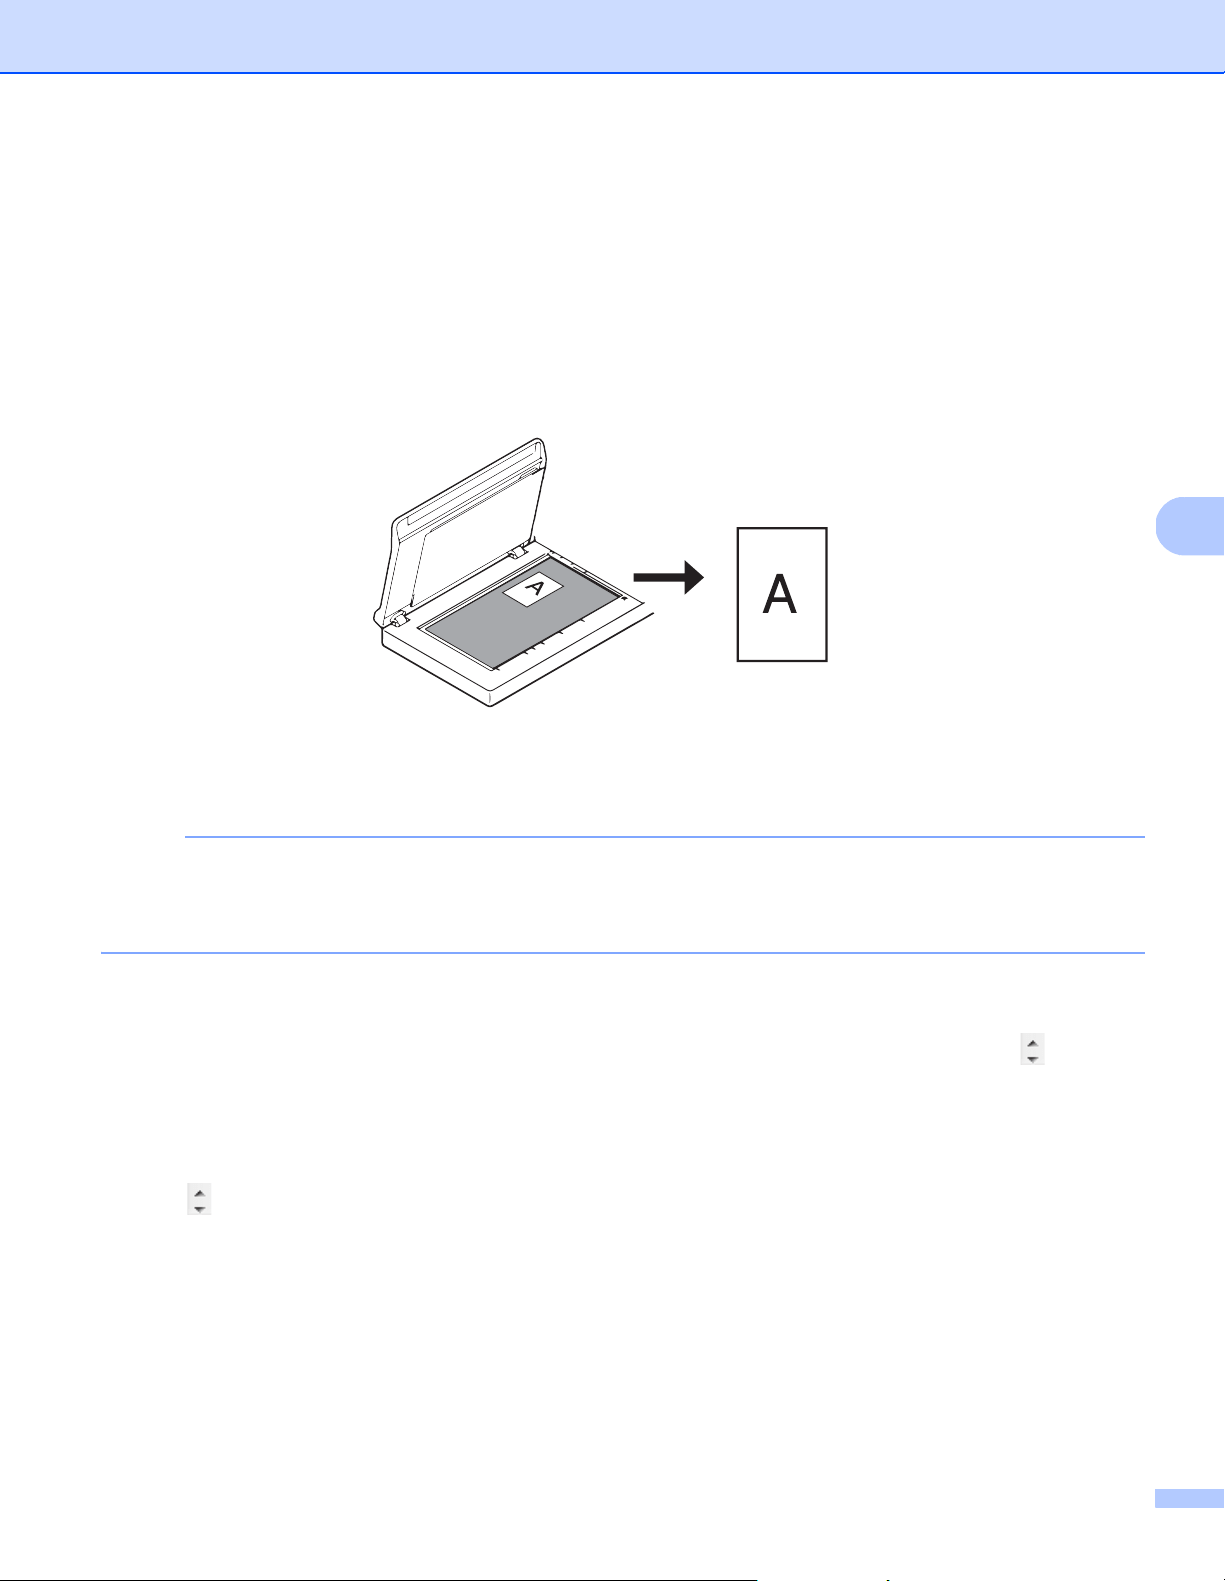
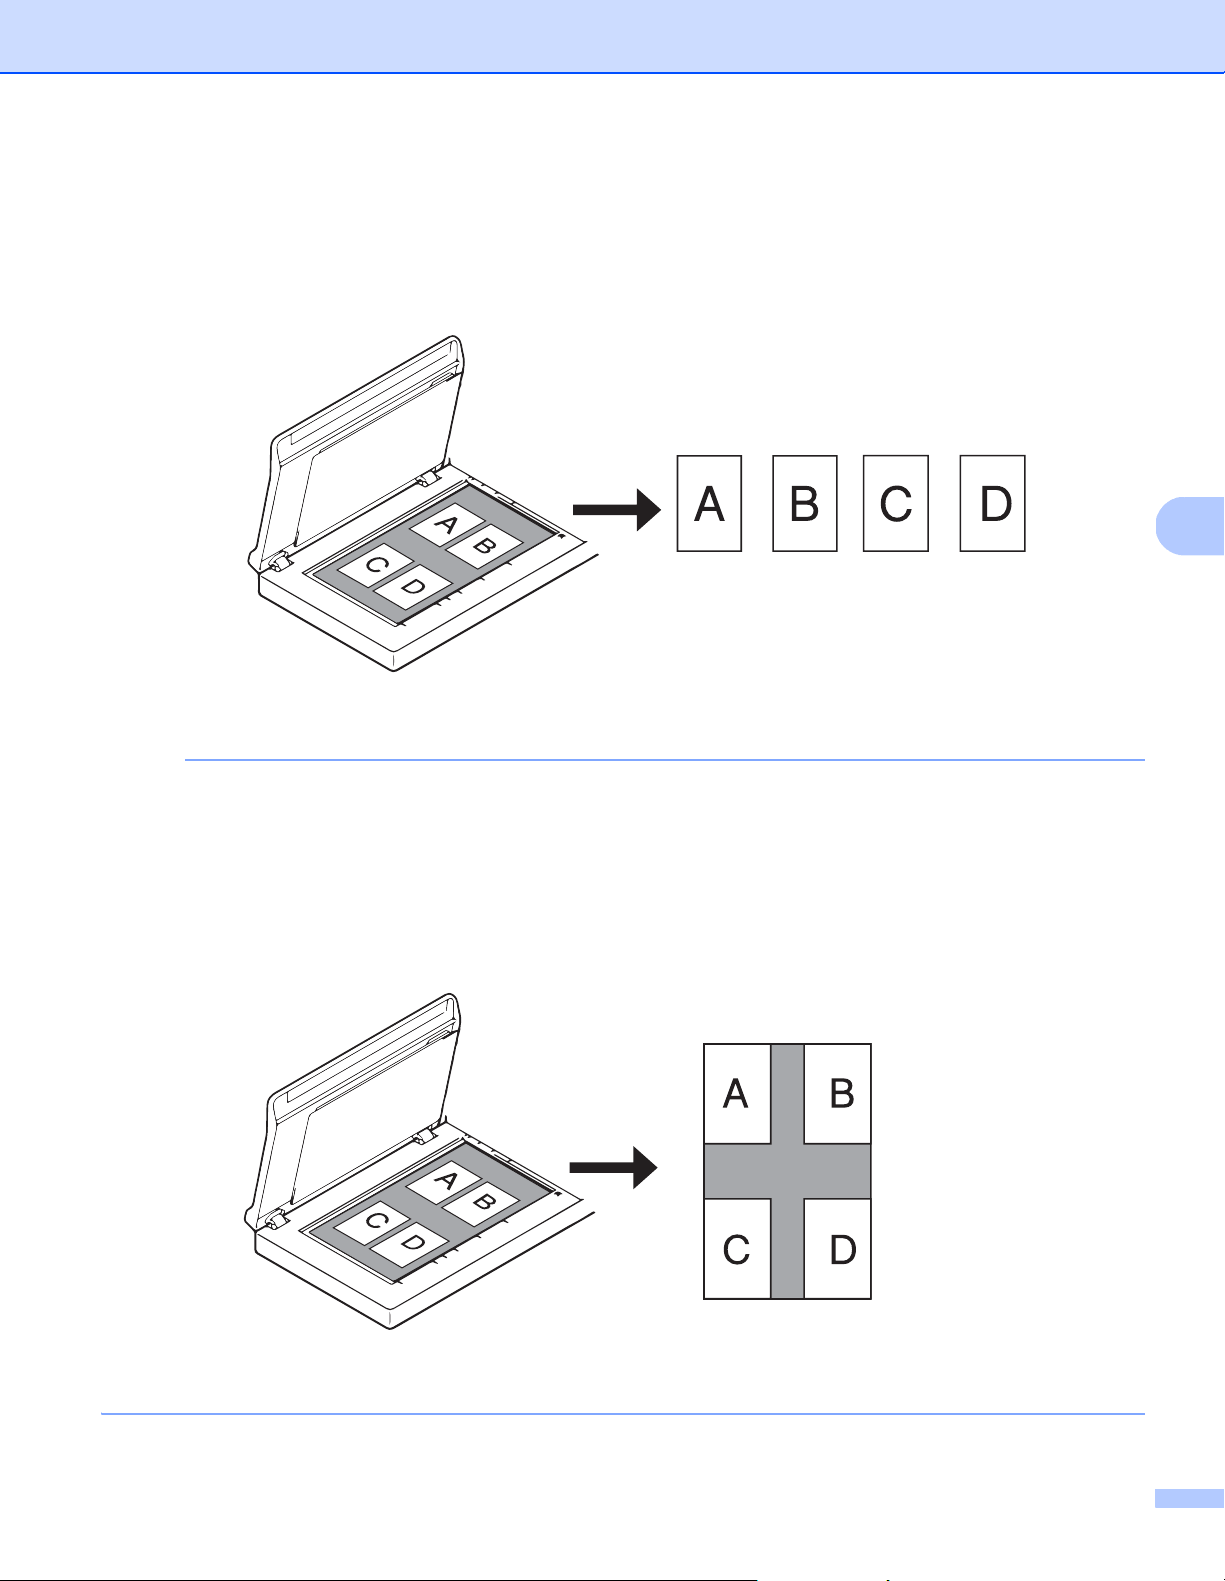
Auto Crop (Flatbed Only): multi image output
This option allows you to automatically scan to the multiple files when you place multiple documents on
the scanner glass at the same time.
NOTE
Only available when Scan Source is set to Flatbed.
Limitation of Auto Crop (Flatbed Only): multi image output
• A minimum distance between objects is 0.5 in.
• Objects must be at least 1 inch in size.
• If you set Automatic (Deskew ON), it will be scanned as shown in the illustration.

Scan (Windows
®
)
43
5
Carrier Sheet Mode
Select this check box if using the Carrier Sheet.
NOTE
• Carrier Sheet Mode is available only when Automatic (Deskew ON) is selected from the Cropping
drop-down list.
• Carrier Sheet Mode is not available when using the scanner glass.
Scan Area / Page Size
This field name changes based on your selection in the Cropping drop-down list.
Select the paper size you want from the drop-down list:
None
US Legal - 8.5 in. × 14 in.
US Letter - 8.5 in. × 11 in.
Photo - 6 in. × 4 in.
Photo - 5 in. × 3 in.
ISO A4 - 210 mm × 297 mm
ISO A5 - 148 mm × 210 mm
ISO A6 - 105 mm × 148 mm
ISO A7 - 74 mm × 105 mm
ISO B5 - 176 mm × 250 mm
ISO B6 - 125 mm × 176 mm
ISO B7 - 88 mm × 125 mm
JIS B5 - 182 mm × 257 mm
JIS B6 - 128 mm × 182 mm
JIS B7 - 91 mm × 128 mm
Maximum Scan Length
Long Page (< 236 in. [5,994 mm]
2
)
Custom
1
1
Available after adding a Custom setting (see below).
2
If scanning at 200 dpi, the document length that can be scanned may vary with the resolution.
Custom
Click the button to add or change a custom paper size. To apply the custom settings, select Custom
from the Scan Area / Page Size drop-down list.
NOTE
Long Page in the Scan Area drop-down list is not available when using the scanner glass.

Scan (Windows
®
)
44
5
Portrait / Landscape
NOTE
Landscape cannot be selected when US Legal, US Letter, A4, B5, Maximum Scan Length,
or Long Page is selected.
X-Offset / Y-Offset / Width / Length / Center
When you select Fixed Area (Deskew OFF) from the Cropping drop-down list, you can adjust the scan area
manually using the following values:
X-Offset
Adjusts the distance from the left edge of the scanner to the left edge of the area in your document.
Y-Offset
Adjusts the distance from the top edge of the document to the top edge of the area in your document.
Width
Adjusts the width of the area in your document.
Length
Adjusts the length of the area in your document.
Center
Allows the software to automatically center the scanned image based on the selected paper size.
OverScan / Adjustment
Allows you to add a specific margin at the top and bottom of the edge of the image. This is used to reduce
possible corner clipping on skewed images and is often applied to a batch of skewed documents.
Select a value between 0 in. and 0.18 in. (4.5 mm).
Background Setting
Select White Background or Black Background from the drop-down list to set the background color for your
scanned images.
NOTE
This option is available only when you select Automatic (Deskew ON) in the Cropping drop-down list.
Unit
Select Millimeters, Inches, or Pixels from the drop-down list. The default setting is based on your OS language.
Reload Timeout
Set the amount of time the machine has to wait before auto-scanning the next document after a scan job is
completed. Use this feature if you load many separate documents, which must be scanned using the same
scan settings, in the ADF.
Scan (Windows
®
)
45
5
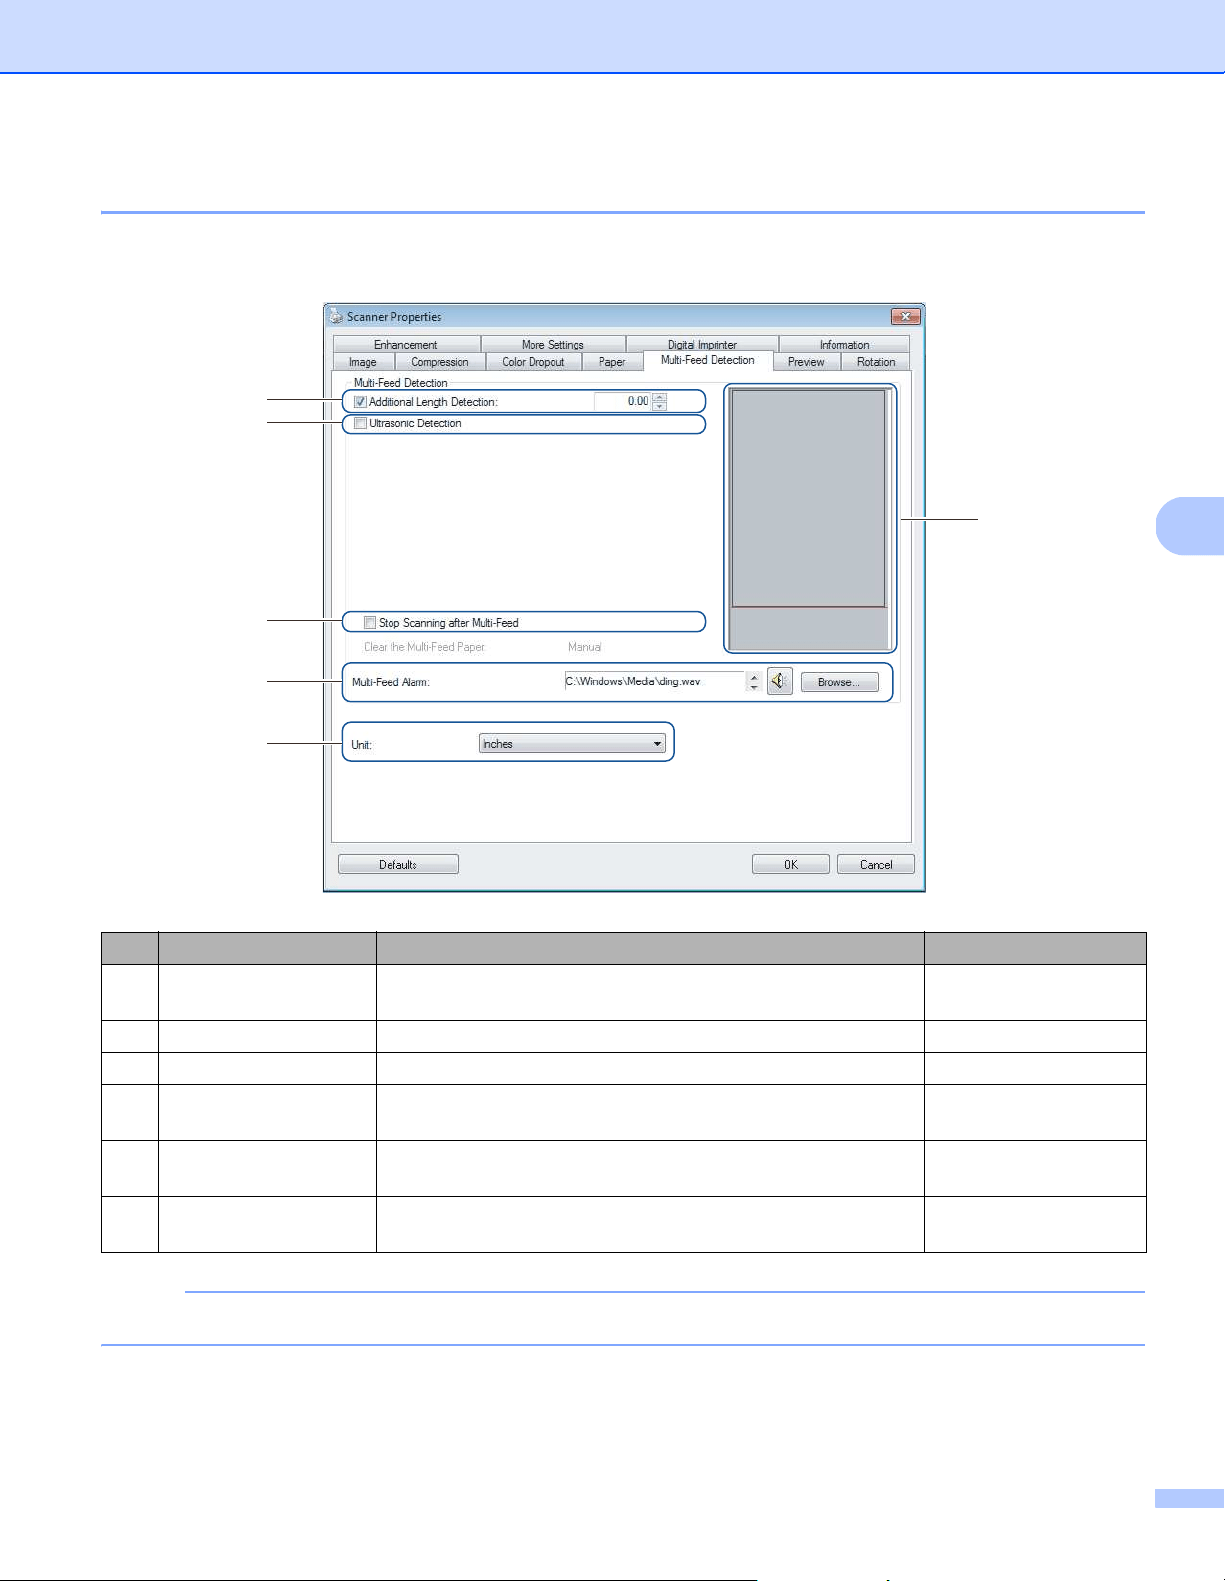
Multi-Feed Detection tab
Click the Multi-Feed Detection tab to detect pages that overlap when fed through the ADF. A multifeed
usually occurs due to stapled documents, adhesives on documents, or electrostatically charged documents.
NOTE
Multi-Feed Detection tab is not available when using the scanner glass.
No. Name Description Default
(1) Additional Length
Detection
Define the page length if it exceeds the scan area. (not selected)
(2) Ultrasonic Detection Detect overlapped pages by measuring paper thickness. (not selected)
(3) Display window Display a preview of Additional Length Detection.-
(4) Stop Scanning after
Multi-Feed
Stop the ADF and display a warning when a multifeed is
detected.
(not selected)
(5) Multi-Feed Alarm Customize an alarm sound if a multifeed occurs. C:\Windows\Media\
ding.wav
(6) Unit Select the unit of measurement displayed in the Scanner
Properties window.
(based on language)
(3)
(1)
(2)
(4)
(5)
(6)

Scan (Windows
®
)
46
5
Additional Length Detection
Allows you to define the length of document being scanned by specifying the additional length exceeding
scan area. The Display window displays the size of the page as you change the value. A value of “0”
indicates no additional length detection. Use the Additional Length Detection feature when scanning
multiple same-sized documents from the ADF.
If you select this detection method, scanning does not stop even if a multifeed is detected.
Ultrasonic Detection
Detects overlapping pages by measuring paper thickness.
When this feature is selected, and your machine detects a multifeed, scanning stops immediately and
a warning message appears on your computer monitor.
Display window
Displays a preview of the Additional Length Detection value.
When this feature is selected, and your machine detects a multifeed, scanning stops immediately and
a warning message appears on your computer monitor.
Stop Scanning after Multi-Feed
Select this check box to stop the feeder and display the warning dialog box when a multifeed is detected.
NOTE
This option is available only when you select Additional Length Detection.
Multi-Feed Alarm
Use this feature to set an audible alarm emitted when a multifeed occurs.
To change the alarm sound, click Browse... and select a wave file from your computer.
NOTE
• This feature is available when either Additional Length Detection or Ultrasonic Detection is selected.
• The alarm field supports the .wav file format only.
Unit
Select Millimeters, Inches, or Pixels from the drop-down list. The default setting is based on your
OS language.
Scan (Windows
®
)
47
5
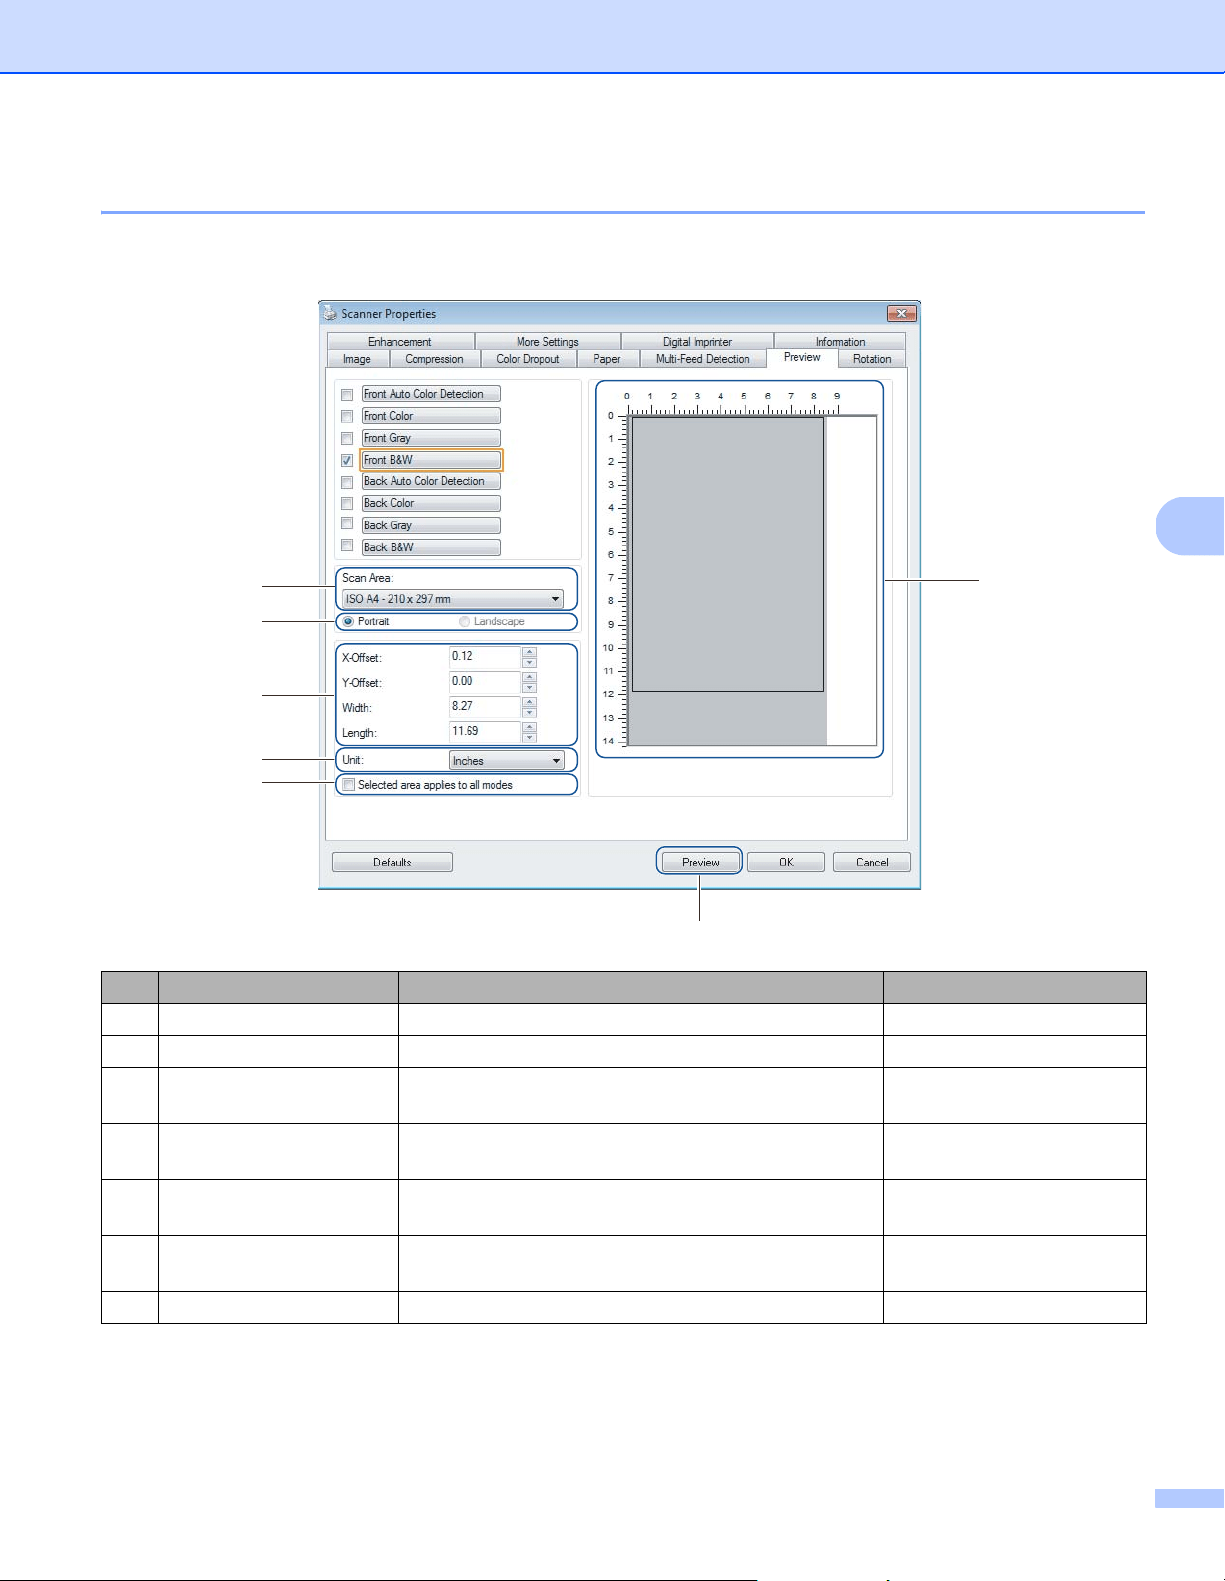
Preview tab
Click the Preview tab to display a low-resolution preview of your image before the final scan. The preview
image helps to determine your scan area and check your color processing results.
No. Name Description Default
(1) Scan Area Select the paper size. ISO A4 - 210 mm x 297 mm
(2) Portrait / Landscape Select the scanned document’s layout. Portrait
(3) Display window Display a preview of your scanned image or set your
scan area manually.
-
(4) X-Offset / Y-Offset /
Width / Length
Adjust your scan area manually. -
(5) Unit Select the unit of measurement displayed in the
Scanner Properties window.
(based on language)
(6) Selected area applies to
all modes
Apply the same scan area settings to all documents. (not selected)
(7) Preview Preview your scan. -
(3)
(7)
(1)
(2)
(4)
(5)
(6)

Scan (Windows
®
)
48
5
NOTE
Scan Area, Portrait / Landscape, Display window, X-Offset / Y-Offset / Width / Length and Unit are
disabled under the following settings:
• When Cropping is set to Automatic (Deskew ON) in the Paper tab (see Paper tab on page 40).
• When Cropping is set to Fixed Area (Deskew OFF) and Scan Area is set to Long Page in the Paper tab
(see Paper tab on page 40).
Scan Area
Select the paper size you want from the drop-down list:
None
US Legal - 8.5 in. × 14 in.
US Letter - 8.5 in. × 11 in.
Photo - 6 in. × 4 in.
Photo - 5 in. × 3 in.
ISO A4 - 210 mm × 297 mm
ISO A5 - 148 mm × 210 mm
ISO A6 - 105 mm × 148 mm
ISO A7 - 74 mm × 105 mm
ISO B5 - 176 mm × 250 mm
ISO B6 - 125 mm × 176 mm
ISO B7 - 88 mm × 125 mm
JIS B5 - 182 mm × 257 mm
JIS B6 - 128 mm × 182 mm
JIS B7 - 91 mm × 128 mm
Maximum Scan Length
Portrait / Landscape
NOTE
Landscape cannot be selected when US Legal, US Letter, A4, B5, Maximum Scan Length,
or Long Page is selected.
Display window
Displays a preview of your scanned image.
You can set your scan area by placing your cursor in the Display window and dragging it diagonally to resize
the outline.

Scan (Windows
®
)
49
5
X-Offset / Y-Offset / Width / Length
You can adjust the scan area manually using the following values:
X-Offset
Adjust the distance from the left edge of the scanner to the left edge of the area in the document that you
want to scan.
Y-Offset
Adjust the distance from the top edge of the document to the top edge of the area in the document that
you want to scan.
Width
Adjust the width of the area in the document that you want to scan.
Length
Adjust the length of the area in the document that you want to scan.
Unit
Select Millimeters, Inches, or Pixels from the drop-down list. The default setting is based on your
OS language.
Selected area applies to all modes
Select the Selected area applies to all modes check box to use the same scan area settings for all documents.
Preview
Click Preview to display a low-resolution preview in the Display window.
Scan (Windows
®
)
50
5
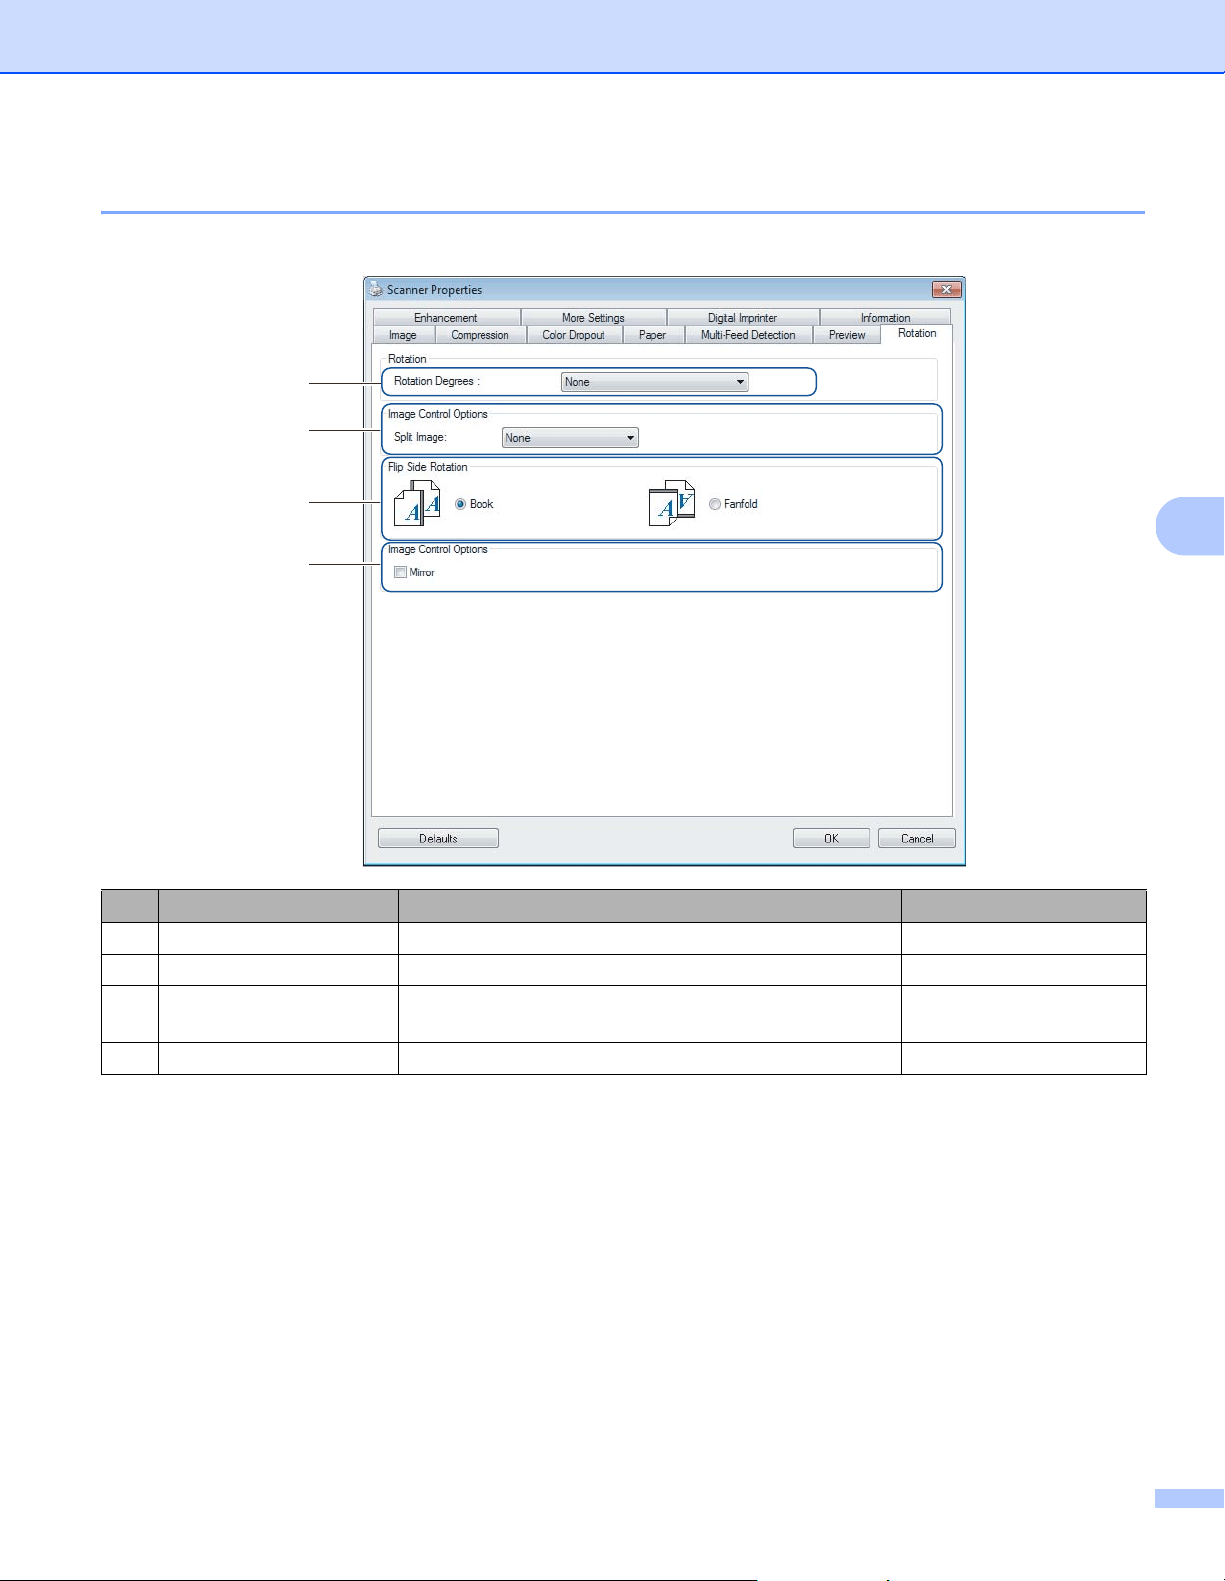
Rotation tab
Click the Rotation tab to change values related to image rotation.
Rotation Degrees
To rotate the scanned image, select the rotation angle from the drop-down list:
None
90 degrees CW (Clockwise)
90 degrees CCW (Counter-clockwise)
180 degrees
Auto Orientation
If you select Auto Orientation, the machine automatically rotates your document based on its contents.
No. Name Description Default
(1) Rotation Degrees Rotate the scanned image. None
(2) Split Image Split the scanned image horizontally or vertically. None
(3) Flip Side Rotation Change the orientation of the reverse side of the output
page.
Book
(4) Mirror Reverse the right and left sides of your image. (not selected)
(1)
(2)
(3)
(4)

Scan (Windows
®
)
51
5
Split Image
When you split an image, the machine creates two separate images aligned either horizontally or vertically.
This is useful for documents containing an image that spans two pages, because you can save both images
as a single image on a single page.
None
Horizontal
Divide a single image in half horizontally.
Vertical
Divide a single image in half vertically.
Flip Side Rotation
Book
Maintain the same image orientation on the reverse side of the output page.
Fanfold
Rotate the image orientation 180 degrees on the reverse side of the output page.
NOTE
• Flip Side Rotation is available only when you set Image Selection options to scan both front and back
of your document in the Image tab.
• Flip Slide Rotation is not available when using the scanner glass.
Mirror
Select the Mirror check box to reverse the right and left sides of your image.
Scan (Windows
®
)
52
5
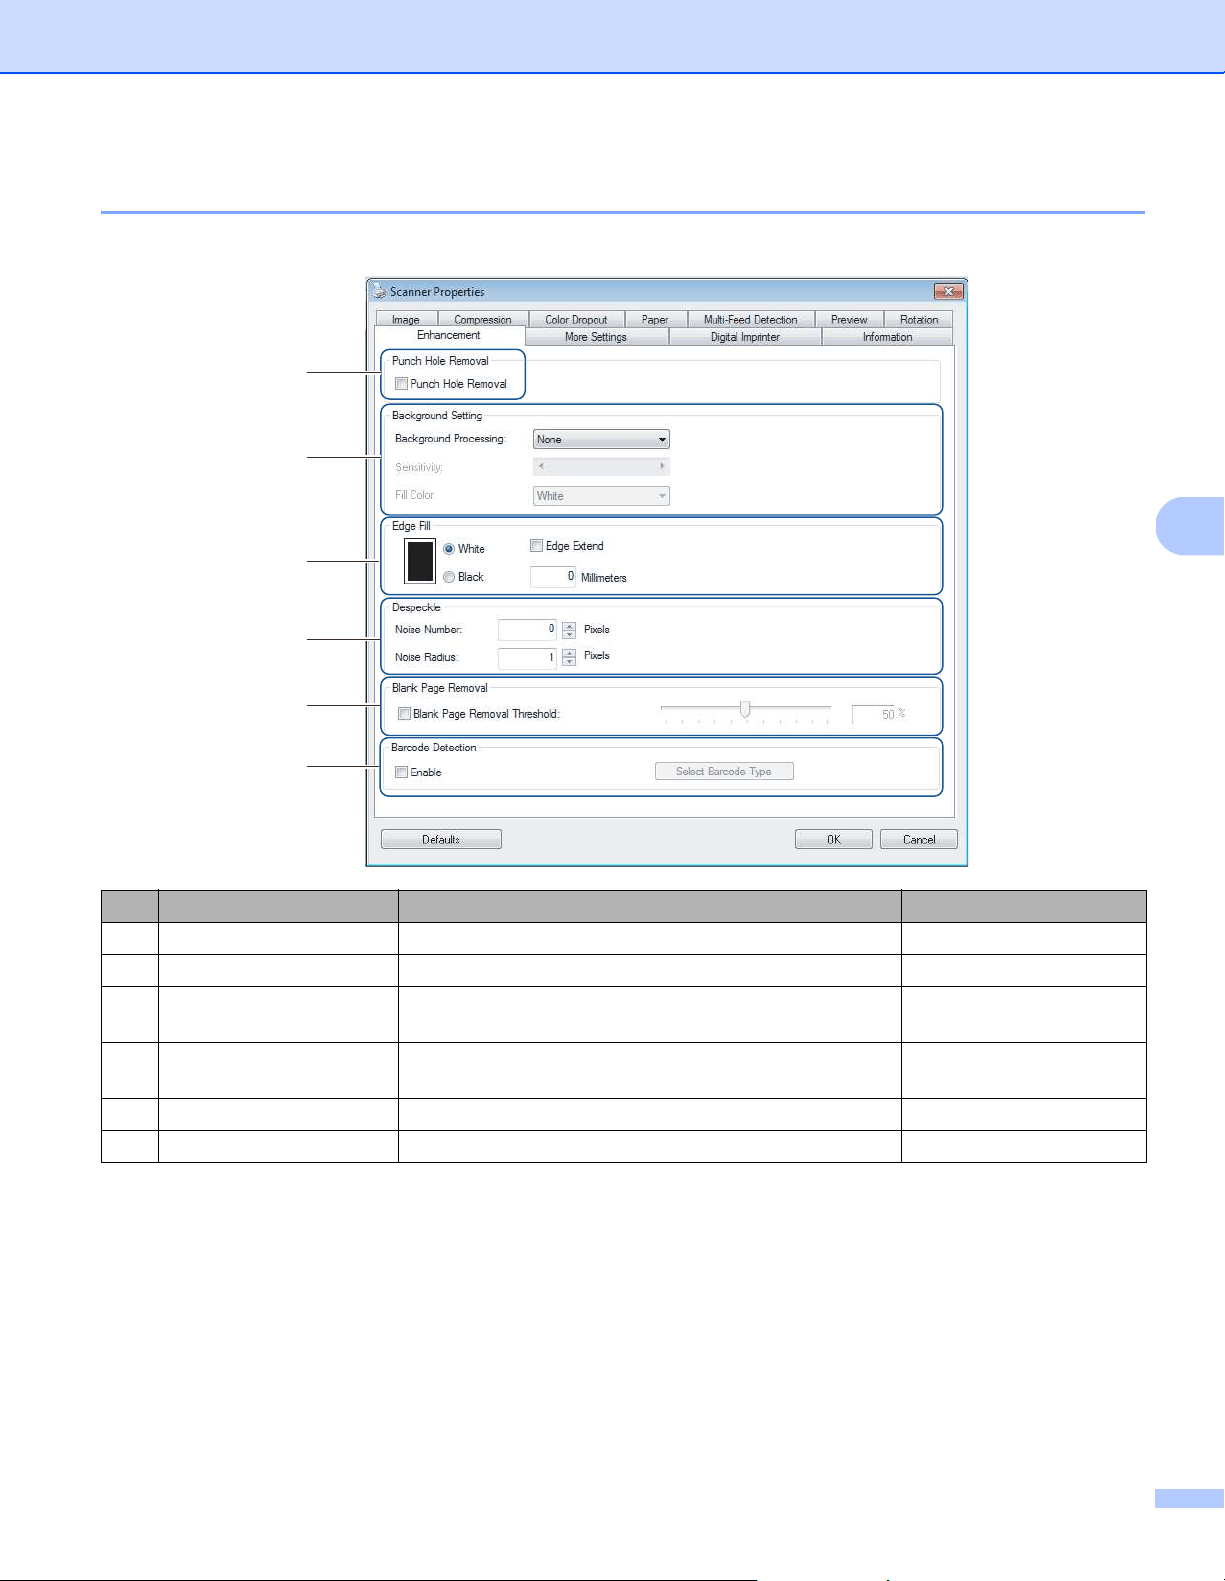
Enhancement tab
Click the Enhancement tab to improve the appearance of your scanned image.
No. Name Description Default
(1) Punch Hole Removal Remove punch hole markings. (not selected)
(2) Background Setting Remove or smoothen the background color. None
(3) Edge Fill Add a white or black edge around the border. White
Millimeters: 0
(4) Despeckle Remove small dots or specks from the background. Noise Number: 0
Noise Radius: 1
(5) Blank Page Removal Remove any blank pages from the original document. (not selected)
(6) Barcode Detection Detect and recognize barcodes. (not selected)
(1)
(2)
(3)
(4)
(5)
(6)
Scan (Windows
®
)
53
5
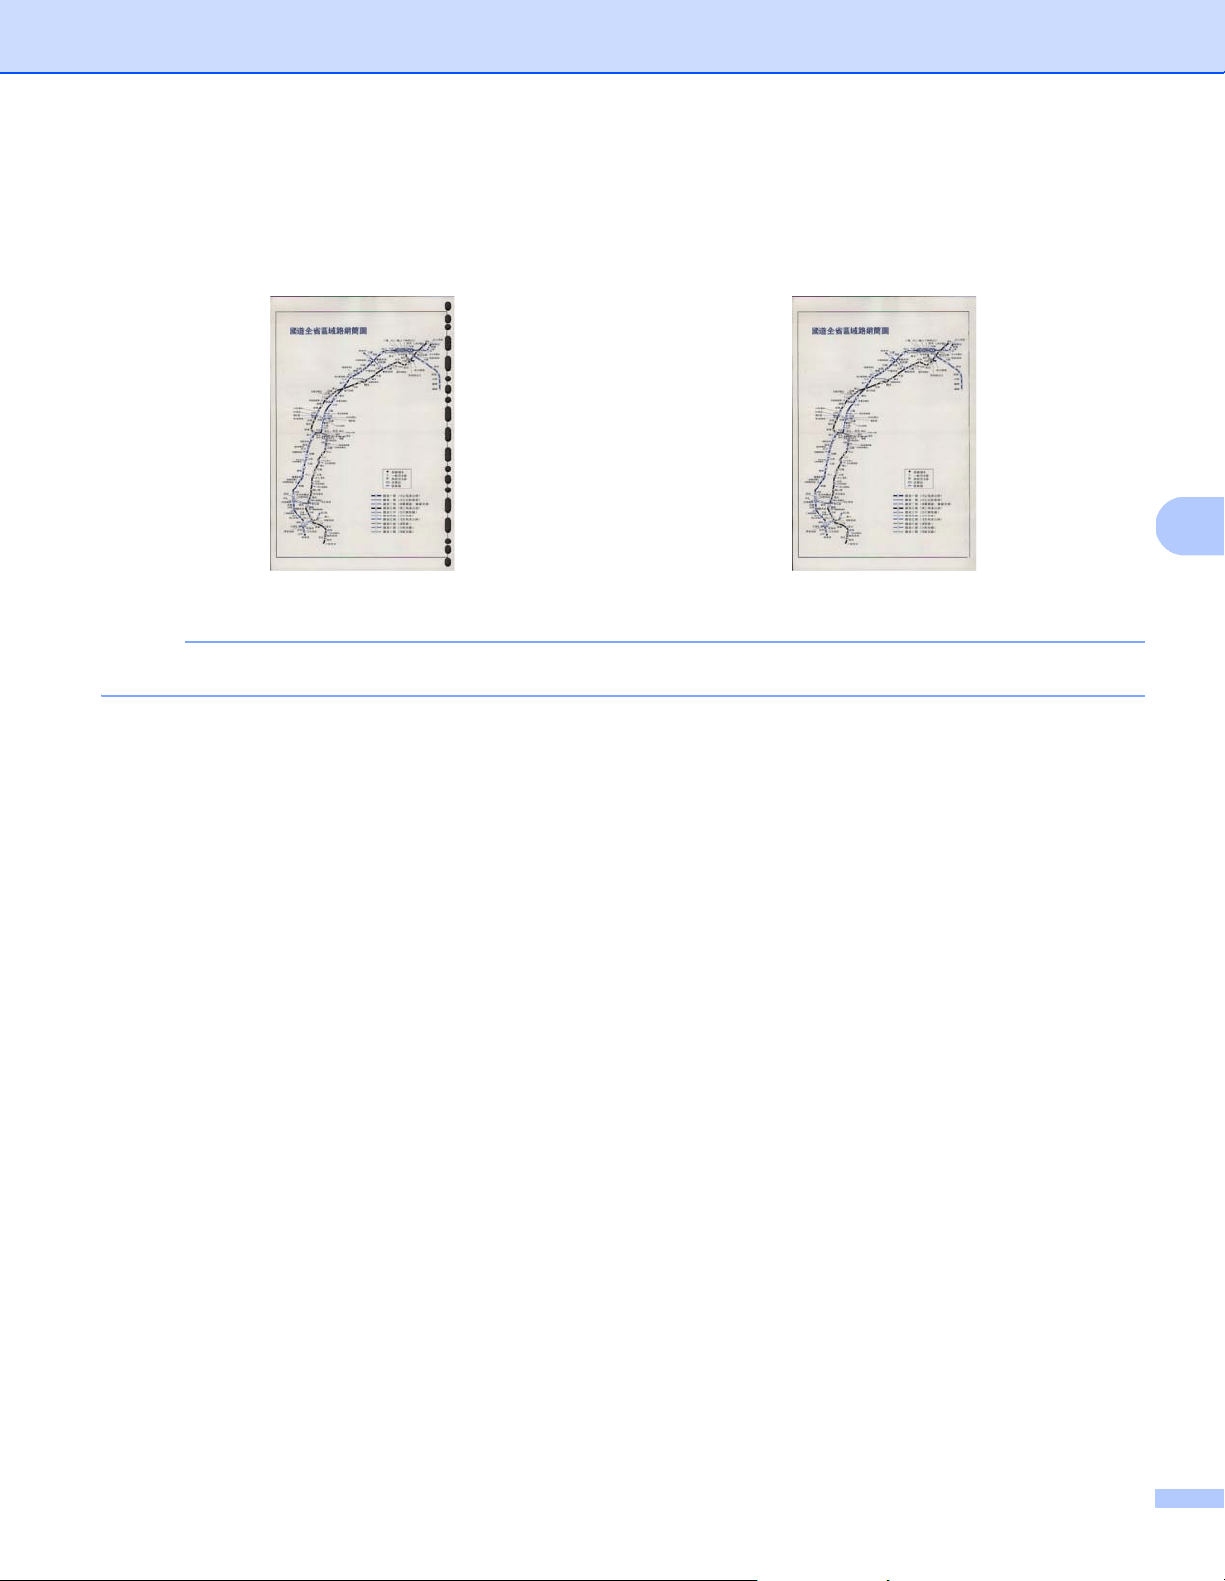
Punch Hole Removal
Select the Punch Hole Removal check box to remove punch hole markings on scanned images. This feature
removes the punch hole markings by filling hole marks with the surrounding color.
NOTE
Punch Hole Removal is not available when Automatic Cropping is disabled.
Background Setting
Specifying the Background Setting allows you to remove or smoothen the base color of scanned documents.
Background Processing
Select None, Smooth or Removal from the drop-down list. Smooth makes the background smooth,
and Removal removes the background color.
Sensitivity
Move the Sensitivity slider to the left or right to adjust the sensitivity to base color or background.
The greater the sensitivity value, the better the scan results, the slower the scanning speed.
Mode
This option is available only if you select Smooth under Background Processing above. Select Auto
to allow the software to process the image automatically. Select Moire to reduce moire.
Fill Color
This option is available only if you select Removal under Background Processing above. Select White
to make the background white. Select Auto to allow the software to detect the background color
automatically and fill it in with the color.
Original Punch Hole Removal
Scan (Windows
®
)
54
5
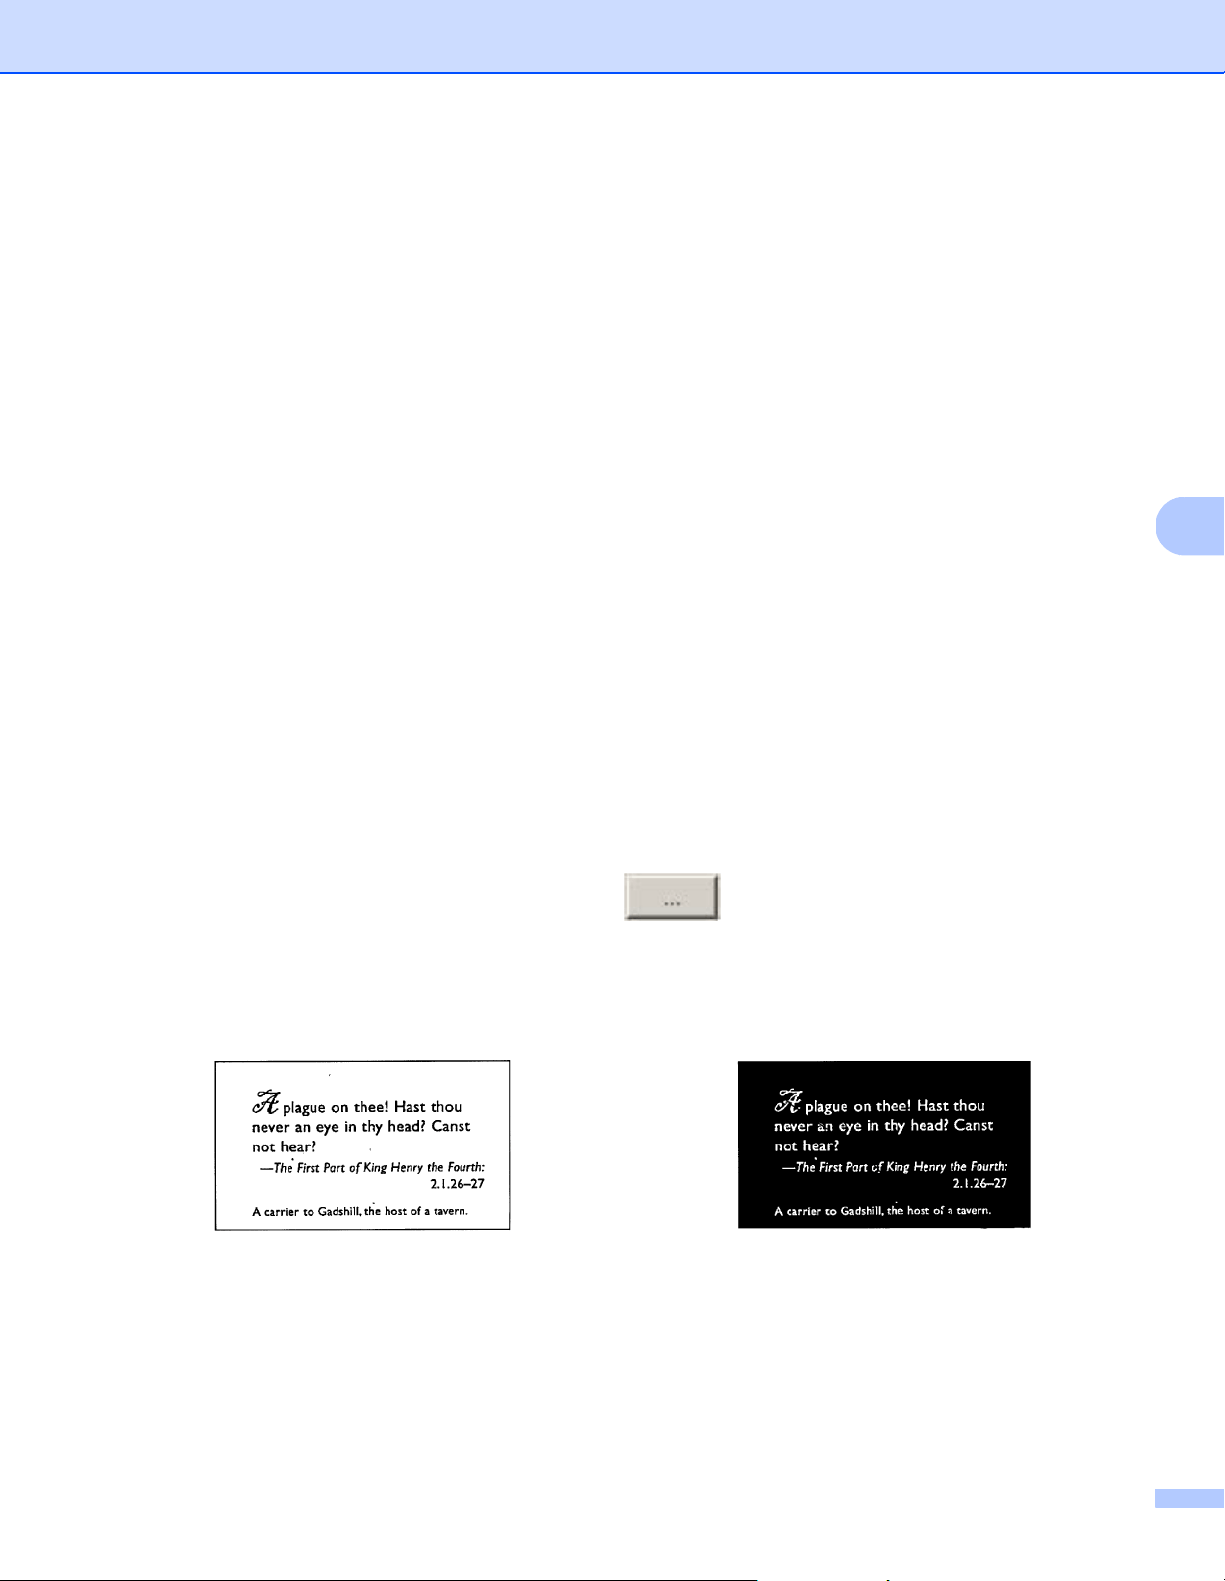
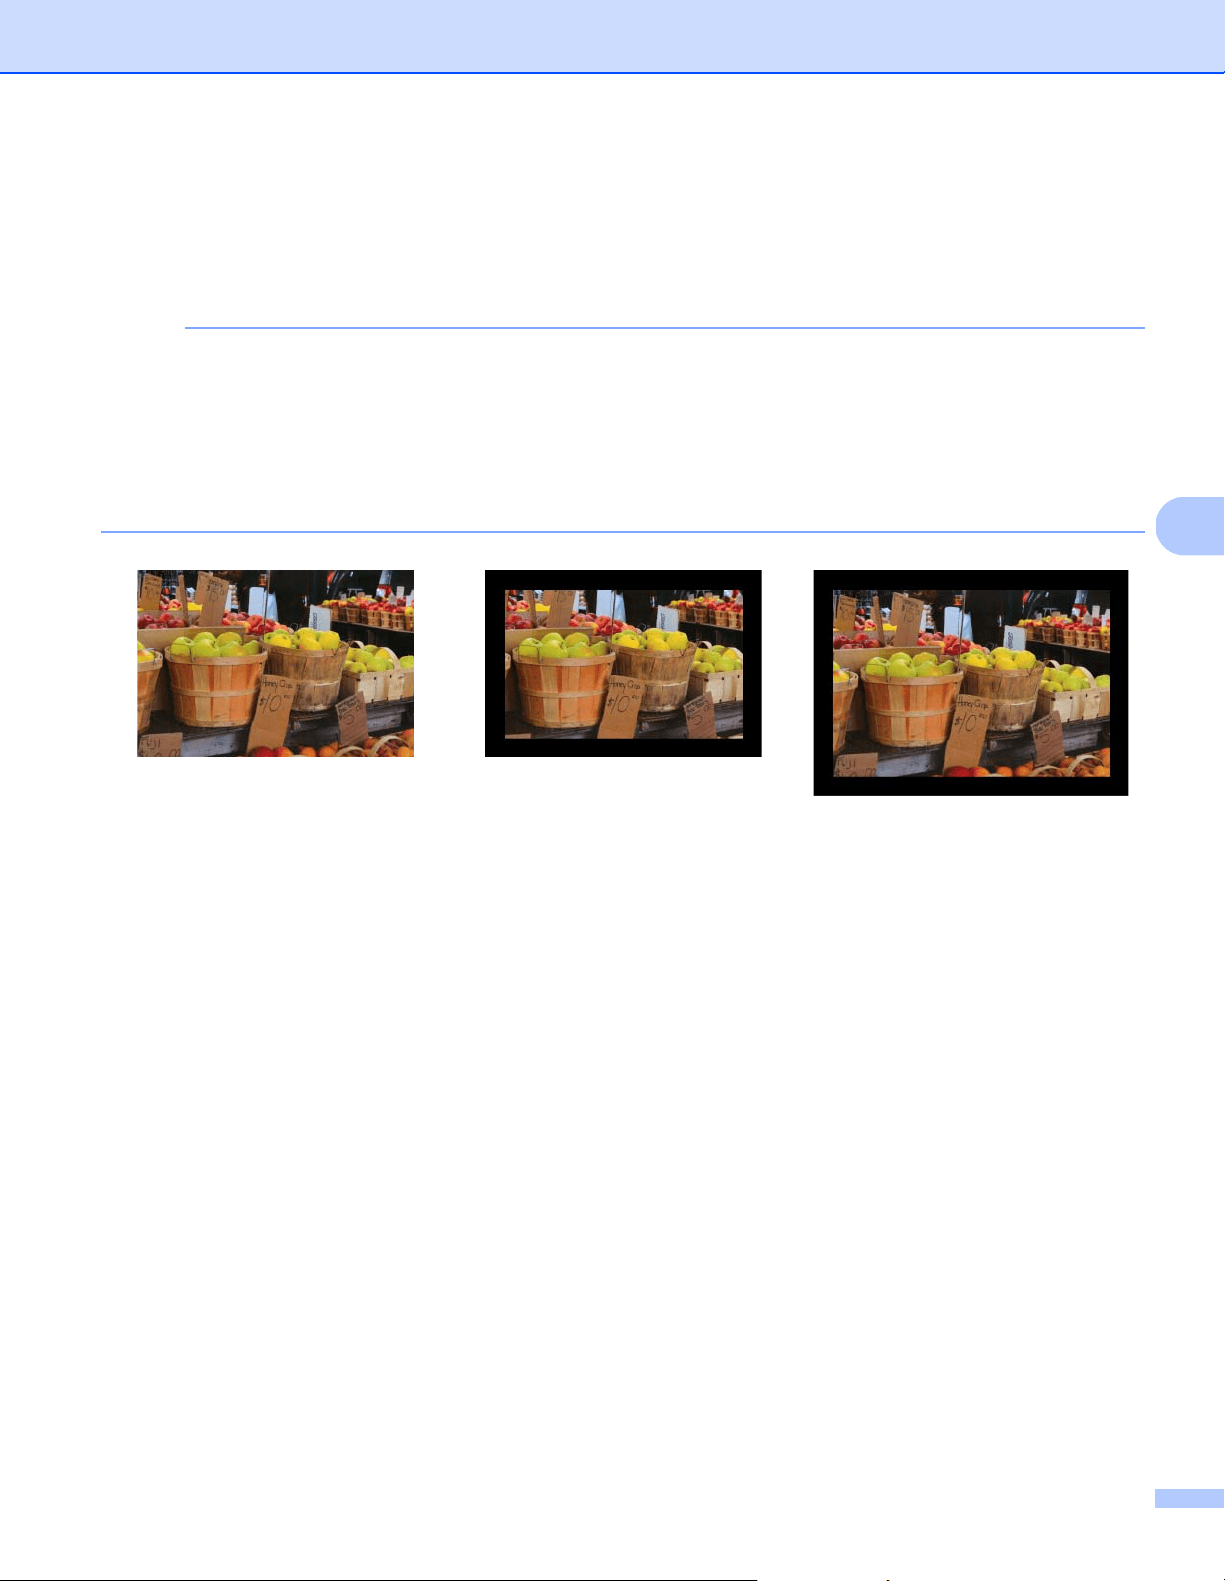
Edge Fill
Select White or Black and set a value (in Millimeters) to add a white or black edge around the border of your
scanned image.
Select the Edge Extend check box to add a white or black edge outside the border of your scanned image.
NOTE
• The maximum edge fill value equals half the length of the shorter side of a selected scan area.
For example, if you select Letter size, which is 8.5 × 11 in., the maximum value for the white edge or black
edge is 4.25 in. (or half of 8.5 in.). If you select an A4 size, which is 210 × 297 mm, the maximum value for
the white edge or black edge is 105 mm (half of 210 mm).
• If you set a value greater than the maximum allowed, the value automatically defaults to the maximum.
• To disable this feature, set the value to “0”.
Original Edge Fill: 20 mm (Black) Edge Fill: 20 mm (Black)
Edge Extend: Selected
Scan (Windows
®
)
55
5
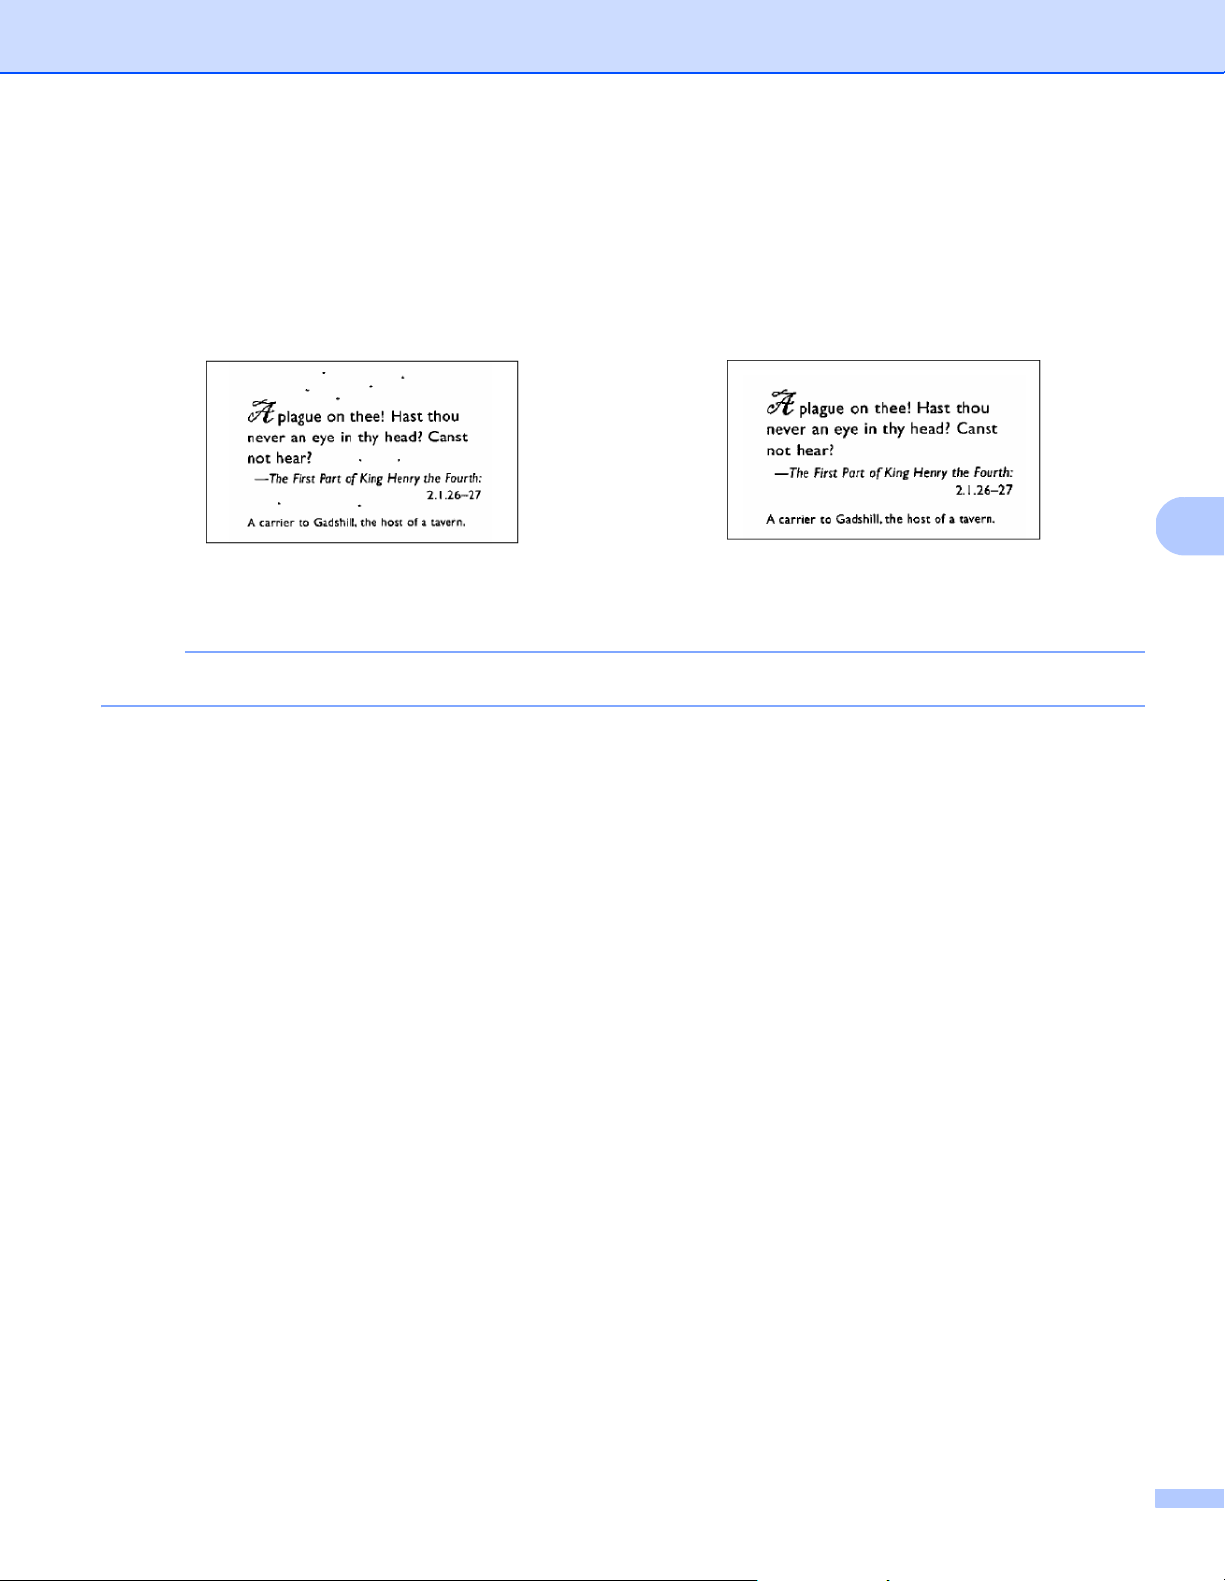
Despeckle
This function allows you to remove small dots or speckles called “noise,” from the background of scanned
images. Removing unwanted speckles provides a clear image for OCR processing, and helps to reduce
compressed file sizes.
Define the noise you want to remove by specifying Noise Number (size) and Noise Radius (range).
NOTE
Despeckle is available for black and white images only.
Blank Page Removal
Select the Blank Page Removal check box to remove blank pages from your scanned image.
Move the slider to change the threshold, or level of pixels, that determines a blank page.
Barcode Detection
Select the Barcode Detection check box to split multi-page scanned files whenever a barcode is detected.
An avbarcode.ini file containing the barcodes types is created and stored on your system drive, for example,
C:\ProgramData\PDS-XXXX\avbarcode.ini (where XXXX is your model name).
Select Barcode Type
Click Select Barcode Type and select the barcode types to specify the barcode you want the scanning
software to recognize.
Before Despeckle
(Noise Number: 0, Noise Radius: 1)
After Despeckle
(Noise Number: 22, Noise Radius: 10)
Scan (Windows
®
)
56
5
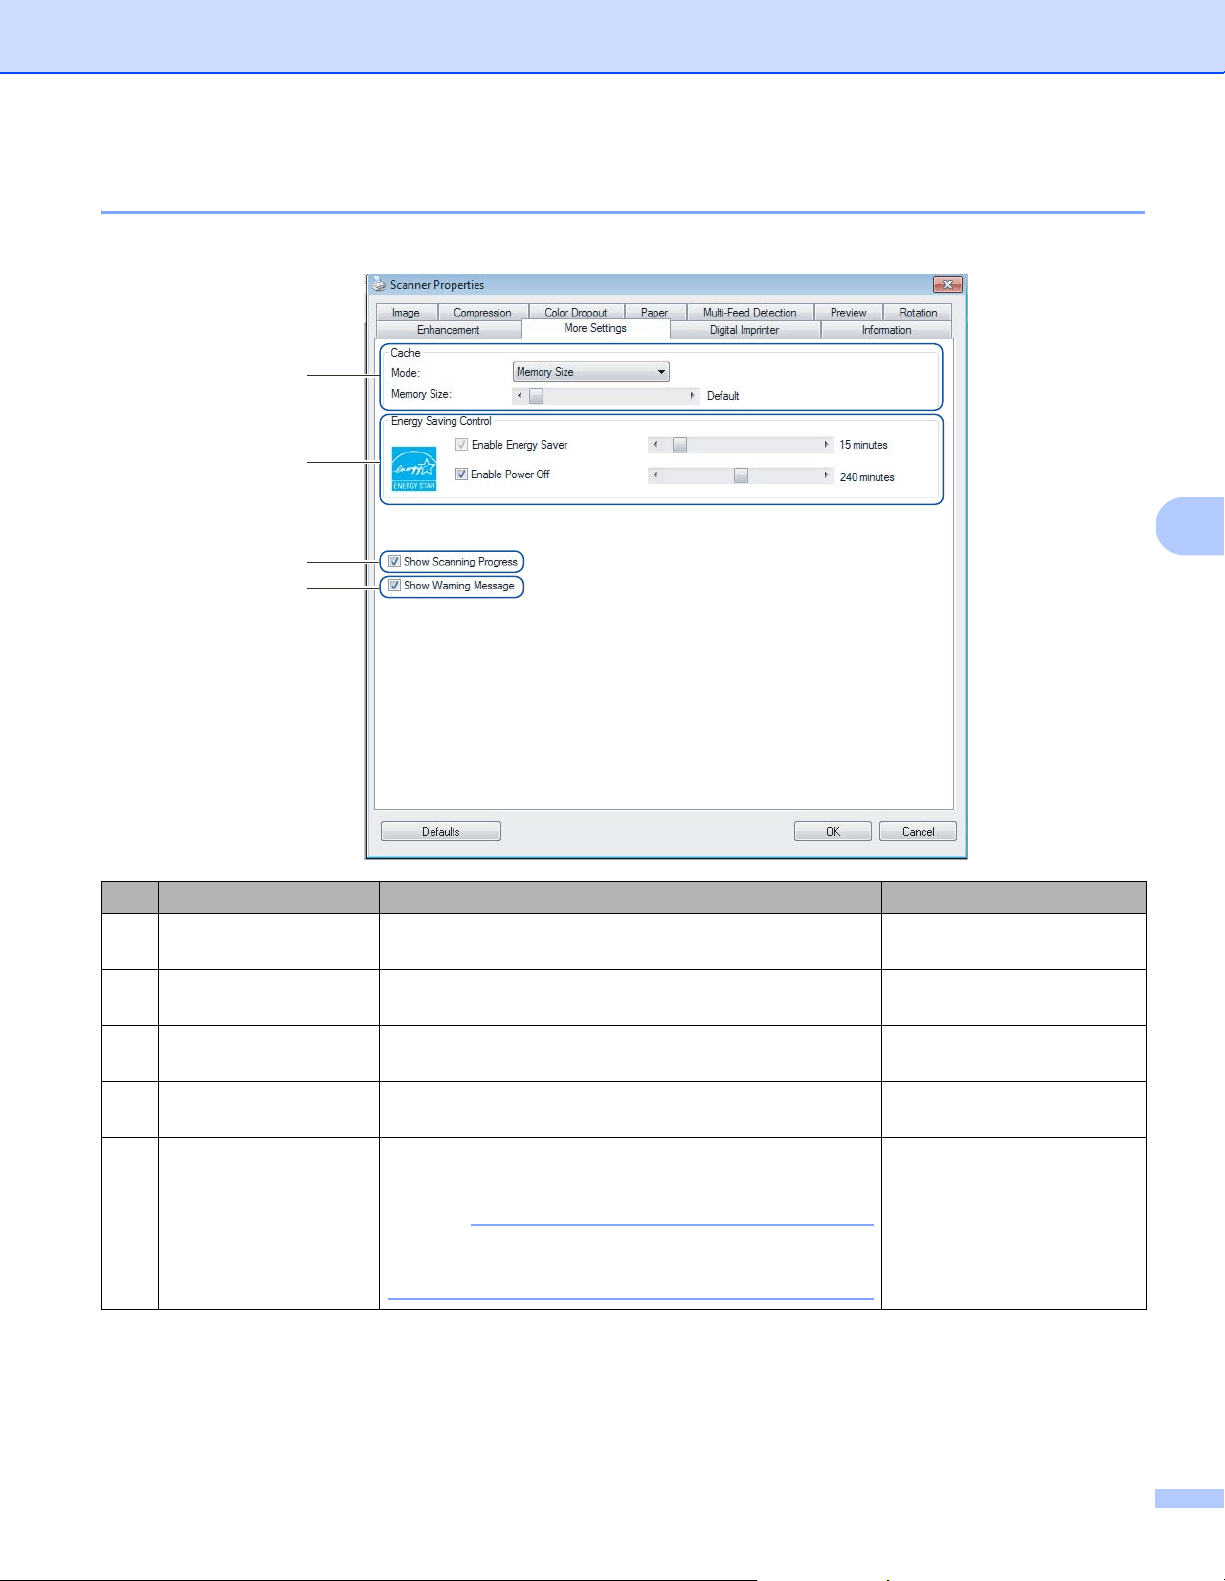
More Settings tab
Click the More Settings tab to configure additional scanning options.
No. Name Description Default
(1) Cache Assign a specified amount of memory from the available
RAM to process the image data.
Memory Size
(2) Energy Saving
Control
Change settings related to energy saving. Energy Saver: 15 minutes
Power Off: 240 minutes
(3) Show Scanning
Progress
Select to display the scanning progress bar during
scanning.
(selected)
(4) Show Warning
Message
Select to display warning messages. (selected)
(5) Save Settings after
Closing
Select to save all settings when you close the Scanner
Properties dialog box.
NOTE
This item is displayed only when using a
TWAIN-compliant application, such as OmniPage.
(selected)
(1)
(2)
(3)
(4)

Scan (Windows
®
)
57
5
Cache
This option allows you to assign a specified amount of memory from the available RAM to process the image
data. By specifying a smaller memory size, you free more memory for other applications you are running.
By specifying a larger memory size, you have more memory to process the image data, which is useful
especially when you have a large number of documents to scan.
None
Select None from the Mode drop-down list to specify the number of pages to scan. For example, to scan
only the first two pages of a document, move the page slider to 2.
Page Number
Select Page Number to limit your cache size by the number of scanned pages it contains. For reference,
a Letter/A4 color document scanning at 300 dpi consumes approximately 24 MB.
Memory Size
Select Memory Size to limit your cache size by memory size. The amount of available memory depends
on your computer.
NOTE
Cache is not available when using the scanner glass.
Energy Saving Control
Enable Energy Saver (Power Saving Mode)
Move the slider to set the amount of idle time before the machine enters Power Saving Mode.
Enable Power Off
Select the Enable Power Off check box and move the slider to set the amount of idle time before the
machine automatically powers off.
NOTE
• You cannot disable Enable Energy Saver.
• If you clear the Enable Power Off check box, your machine will not power off automatically.
• Power Off time must be greater than or equal to Energy Saver time.
Show Scanning Progress
Select the Show Scanning Progress check box to display the scanning progress bar during scanning.
Show Warning Message
Select the Show Warning Message check box to display warning messages. If the rollers are near their
end-of-life period, a warning message appears once per day until you reset the Reverse Roller Count and
Pick-up and Separation Roller Count.
Save Settings after Closing
Select the Save Settings after Closing check box to save your settings when you close the Scanner
Properties dialog box. The next time you open the Scanner Properties dialog box, the previous settings
will appear.
NOTE
This item is displayed only when using a TWAIN-compliant application, such as OmniPage.
Scan (Windows
®
)
58
5
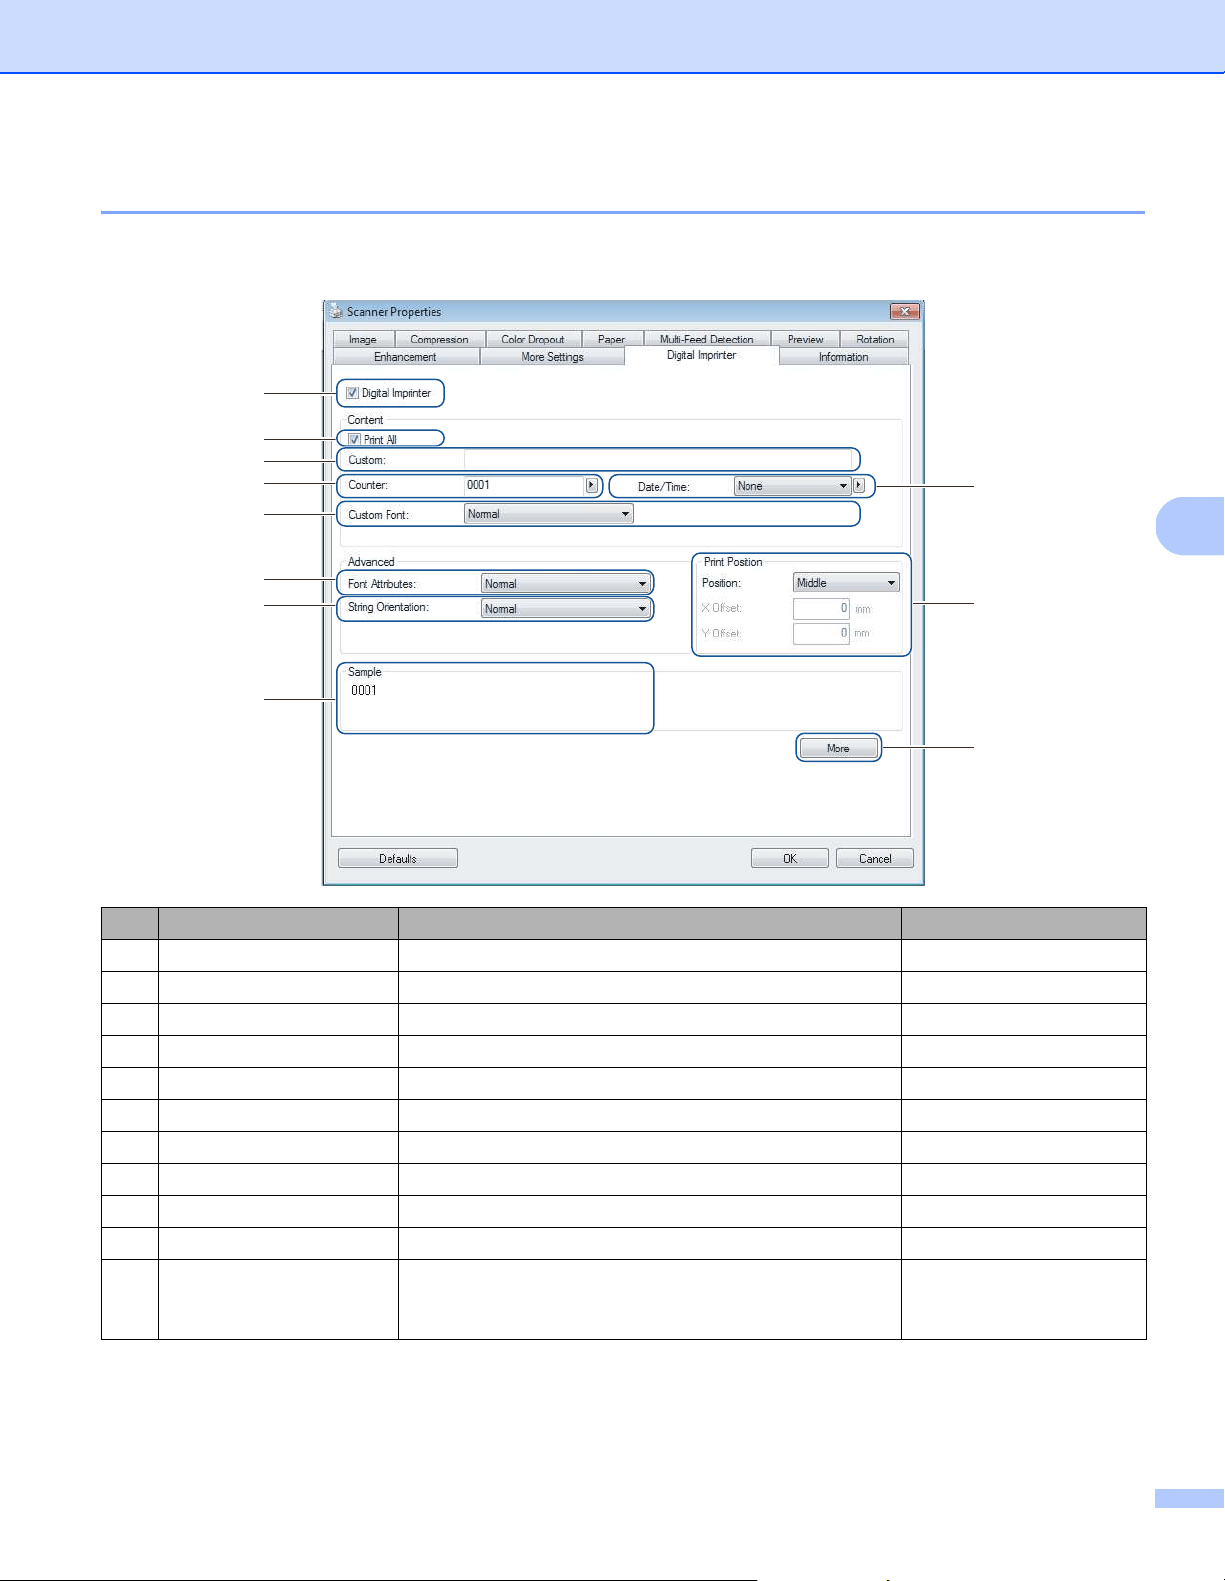
Digital Imprinter tab
Click the Digital Imprinter tab to print the date, time, document count, or custom messages on your scanned
image.
No. Name Description Default
(1) Digital Imprinter Select to activate this feature. (not selected)
(2) Print All Print on every page of the scanned image. (selected)
(3) Custom Type the custom text to print on your scanned image. (none)
(4) Counter Change the scan counter. Number (such as 1234)
(5) Date/Time Change the date/time. None
(6) Custom Font Select a font. Normal
(7) Font Attributes Select a font attribute. Normal
(8) String Orientation Select the print direction. Normal
(9) Print Position Select a print position. Middle
(10) Sample Preview your custom text. (none)
(11) More Set advanced font settings. Size: 5
Density: 0
Transparency: 0
(1)
(2)
(7)
(8)
(10)
(6)
(4)
(3)
(9)
(5)
(11)

Scan (Windows
®
)
59
5
Digital Imprinter
Select the Digital Imprinter check box to use the digital imprinter to print custom text on your scanned image.
Print All
Select the Print All check box to print the text on every page of the scanned image.
Clear the check box to print the text only on the first page of the scanned image.
Custom
Type the text you want in your print string (up to 31 characters).
Counter
Click to increase the scan counter.
The number of digits specified here is displayed on the scanned image. For example, selecting Number (123456)
causes “000001” to be shown on the first page of the scanned image, “000002” on the second, “000003” on the
third, and so forth.
Date/Time
Select Date, Time, or Date+Time to include the date or time in your print string.
Click to select a date or time separator from the drop-down list.
Custom Font
Select Normal or Fixed Width from the Custom Font drop-down list.
Fixed Width (monospace) fonts use fixed character spacing, so each character occupies the same width.
Font Attributes
Select Normal, Underline, Double, or Bold from the Font Attributes drop-down list.
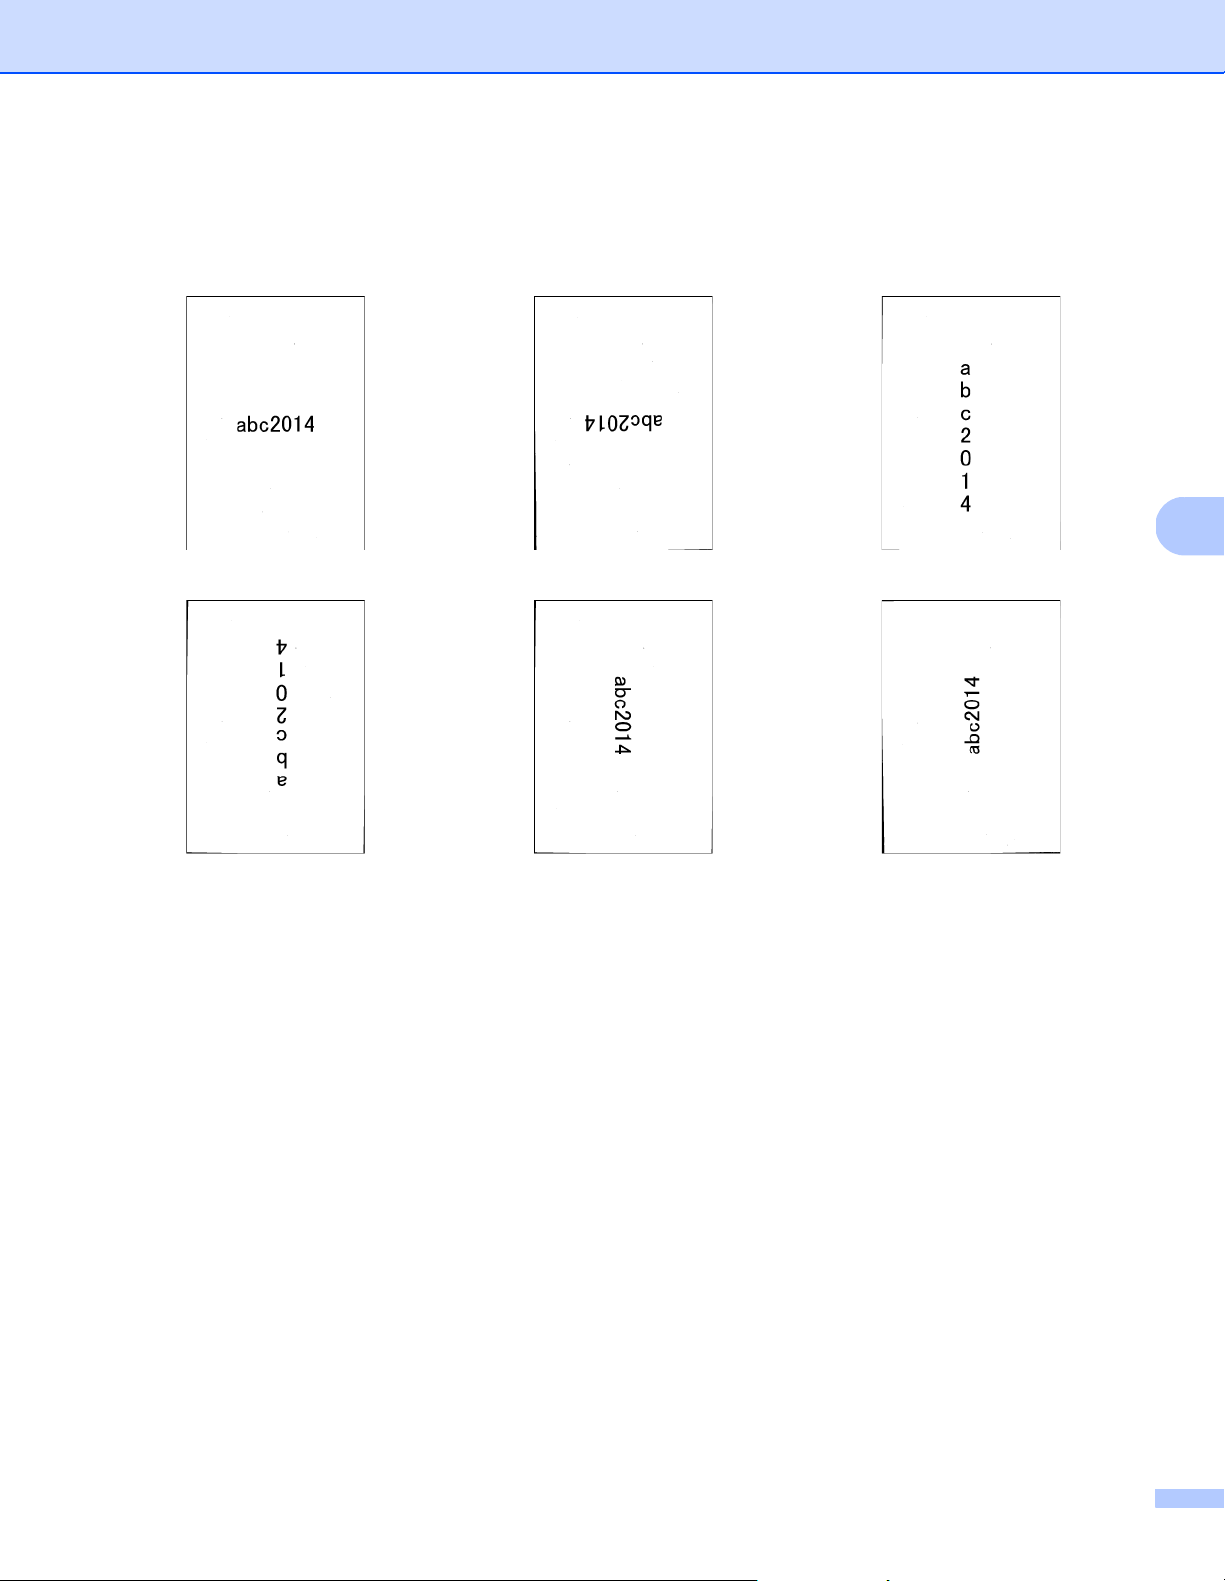
Scan (Windows
®
)
60
5
String Orientation
Select Normal, Rotated, Vertical, Vertical Inversion, 90 Degrees CW (clockwise), or 90 Degrees CCW
(counter-clockwise) from the String Orientation drop-down list to specify the text’s print direction.
Print Position
Select Top, Middle, Bottom, or Custom from the Position drop-down list.
If you select Custom, enter the X Offset and Y Offset value to specify the text’s start position.
Sample
Preview your text here.
Normal Rotated Vertical
Vertical Inversion 90 Degrees CW 90 Degrees CCW
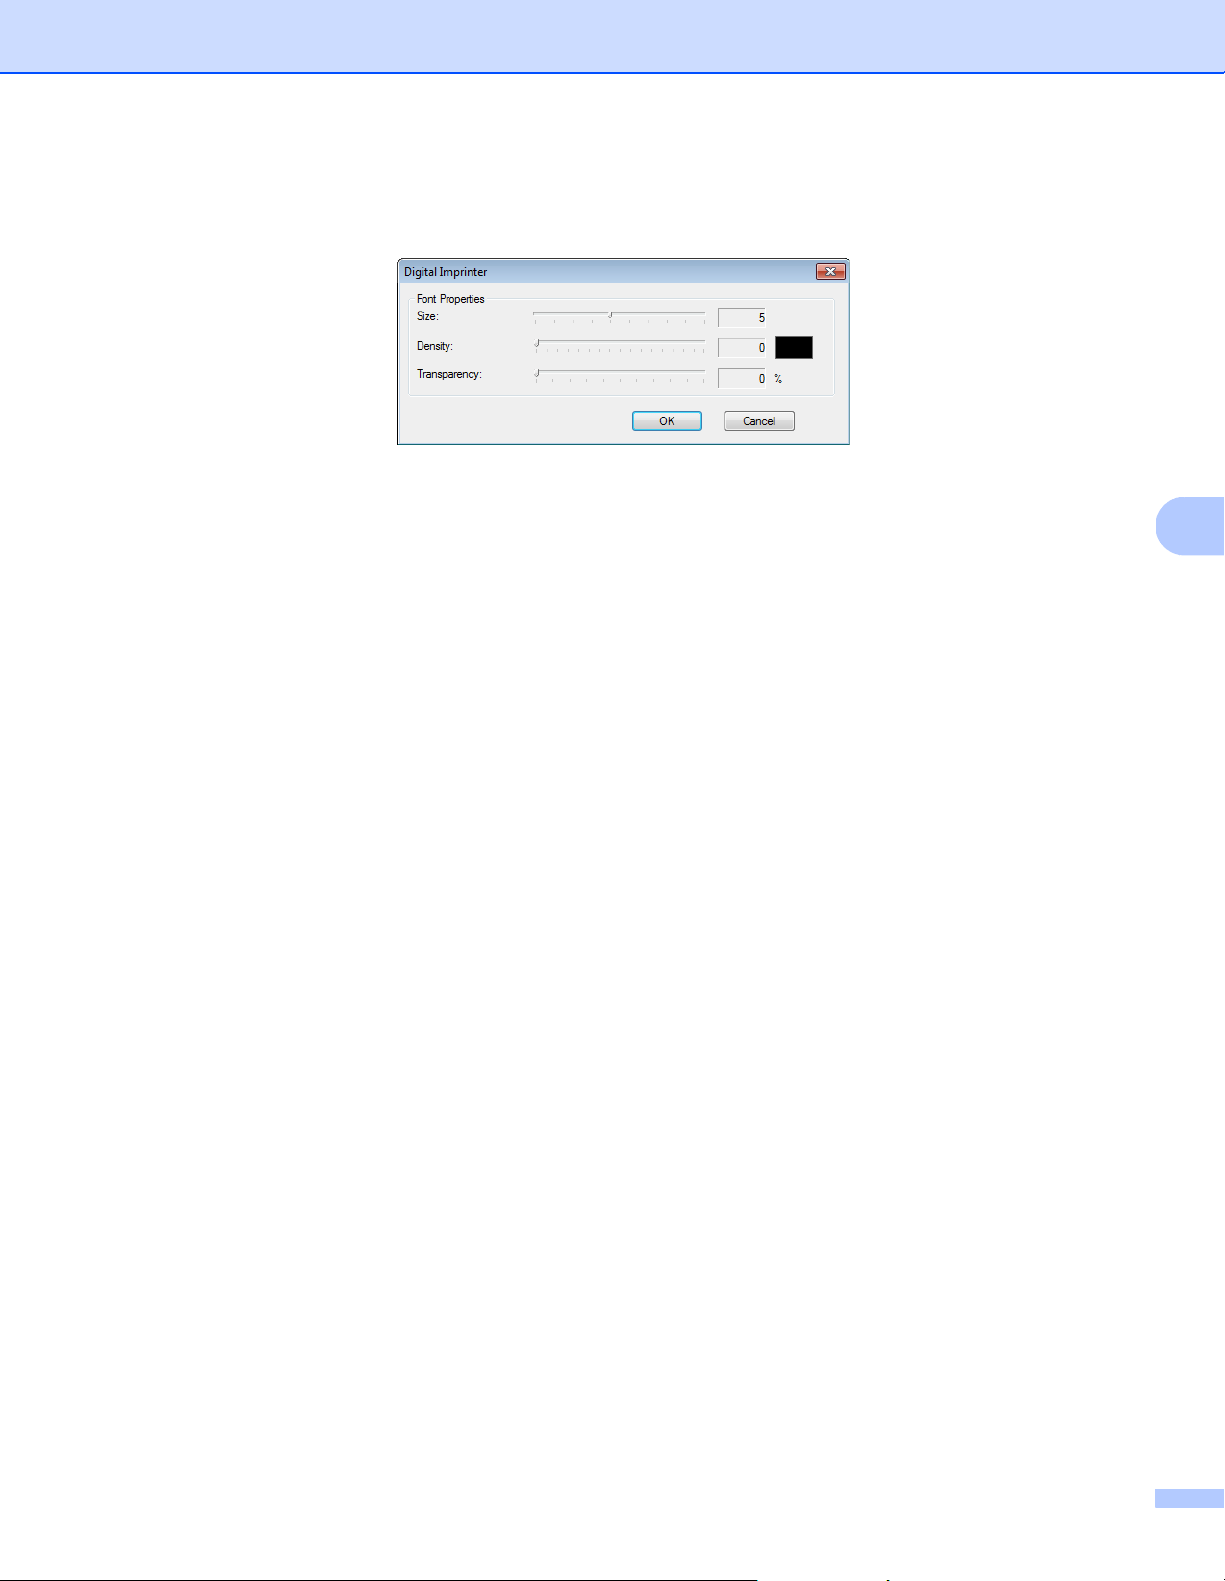
Scan (Windows
®
)
61
5
More
Click the More button to select additional font properties.
Size
Move the slider to select font size (Default: 5).
Density
Move the slider to select font density (Default: 0).
Transparency
Move the slider to select a transparency value from 0% (not transparent) to 100% (completely transparent).
This is useful when creating a partially transparent watermark.
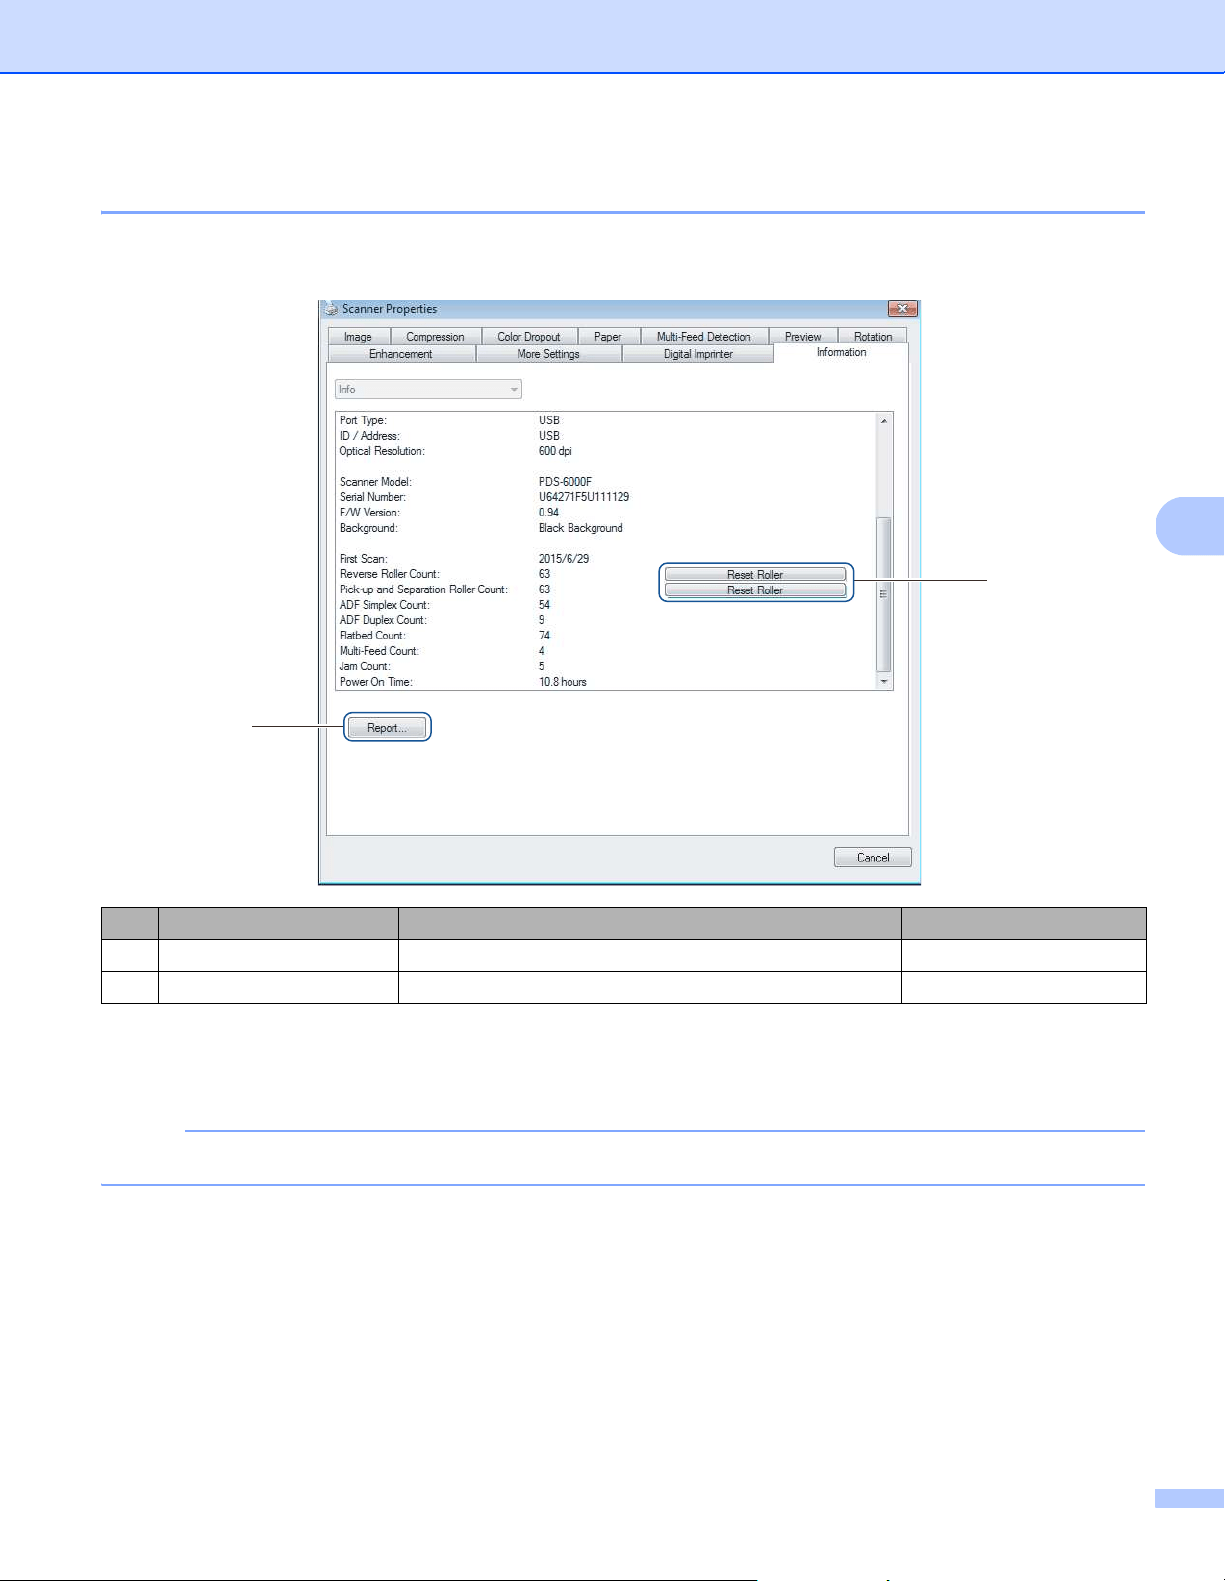
Scan (Windows
®
)
62
5
Information tab
Click the Information tab to display system and machine information, such as scanner driver version and
firmware version. You can also view the roller count and reset the count in this window.
Reset Roller
After replacing the scanner rollers, click the Reset Roller button to reset the roller count.
NOTE
Do not reset the counter unless you have replaced the rollers.
Report
Click the Report button to generate a report.txt file that is stored on the system drive (for example, C:\XXXX
<where XXXX is your scanner model>). Use this text file for troubleshooting when you encounter an error
message (see Troubleshooting on page 115), or share this file with service personnel if you contact them via
phone or email for troubleshooting support.
No. Name Description Default
(1) Reset Roller Reset the roller count. -
(2) Report Generate a report.txt file. -
(1)
(2)
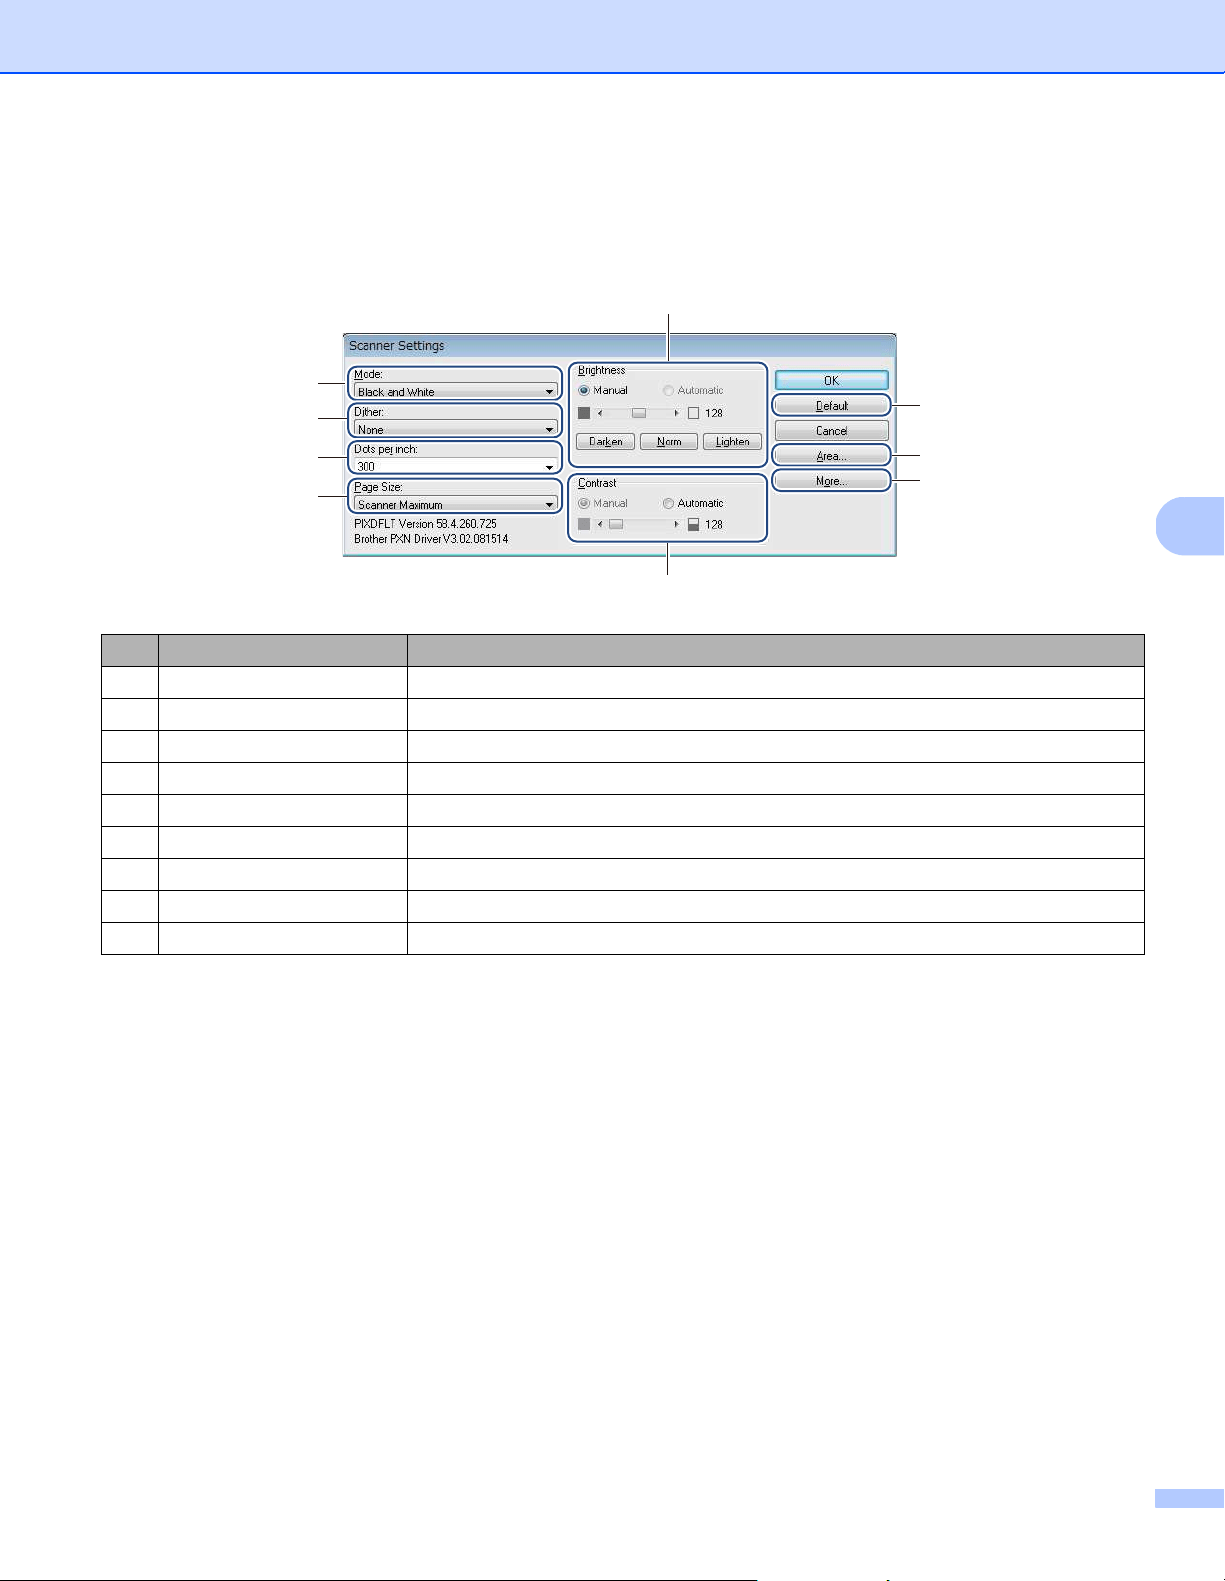
Scan (Windows
®
)
63
5
Scan using the ISIS driver
Applications compatible with the ISIS driver allow you to set the scan settings.
No. Name Description
(1) Mode Select a scan type, such as black and white, gray, or color.
(2) Dither Select one of five halftone levels.
(3) Dots per inch Select the resolution you want.
(4) Page Size Select the page size you want.
(5) Brightness Adjust the brightness of your scanned image.
(6) Contrast Adjust the range between the darkest and the lightest shades in the image.
(7) Default Click to reset all settings to the factory settings.
(8) Area Select the scan area or position you want.
(9) More Click to reverse image, set multifeed detection and specify color drop-out.
(1)
(2)
(3)
(4)
(5)
(6)
(7)
(8)
(9)
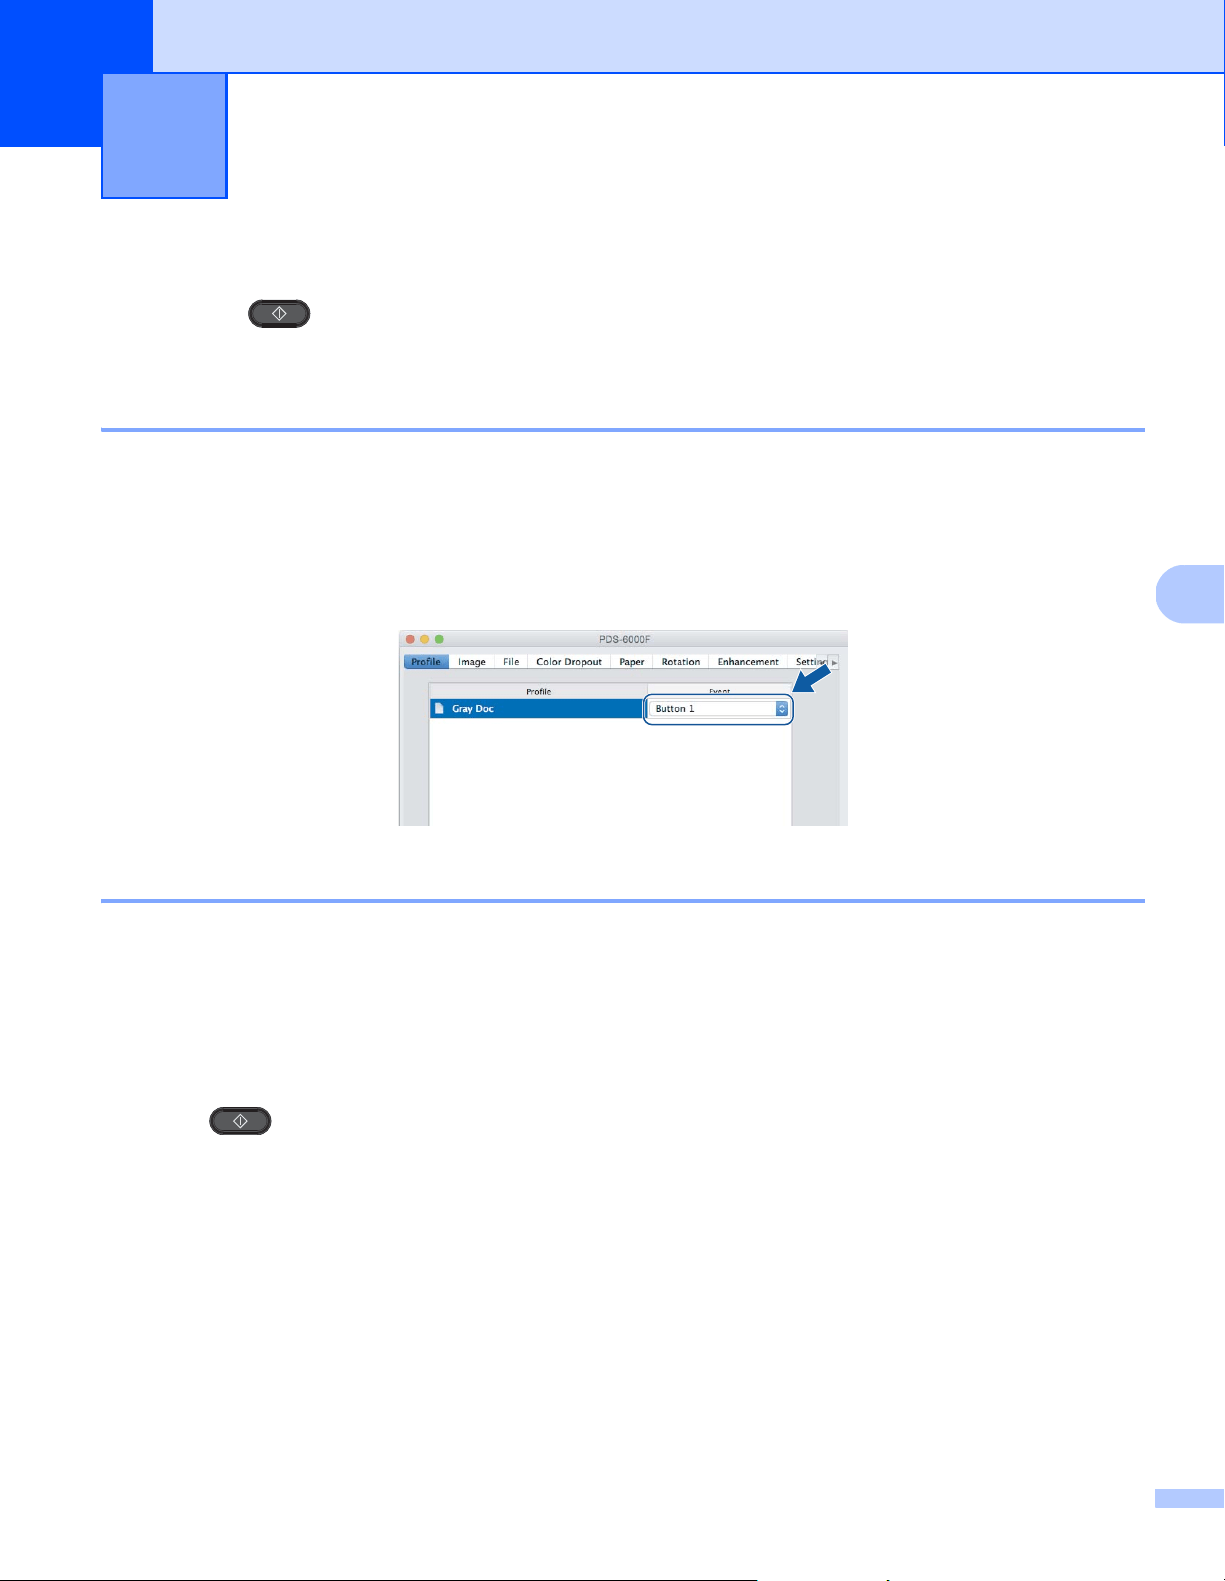
64
6
6
Scan using the control panel
Customize the (Scan) button on your Brother machine’s control panel to scan using your preferred
scanning software.
Assign a profile to the Scan button
a Confirm that the machine is connected to your computer via a USB cable.
b Launch DS Capture, and click the Profile tab.
c Click the Event pop-up list, and select an event number.
The Button # you select from this list directly corresponds with the function numbers (Function X)
displayed on the machine’s LCD.
Scan a document
a Confirm that the machine is connected to your computer via a USB cable.
b Place your document either in the ADF, or on the scanner glass.
c Launch DS Capture.
d Press a or b to select a Function.
e Press to start scanning.
Scan (Macintosh) 6
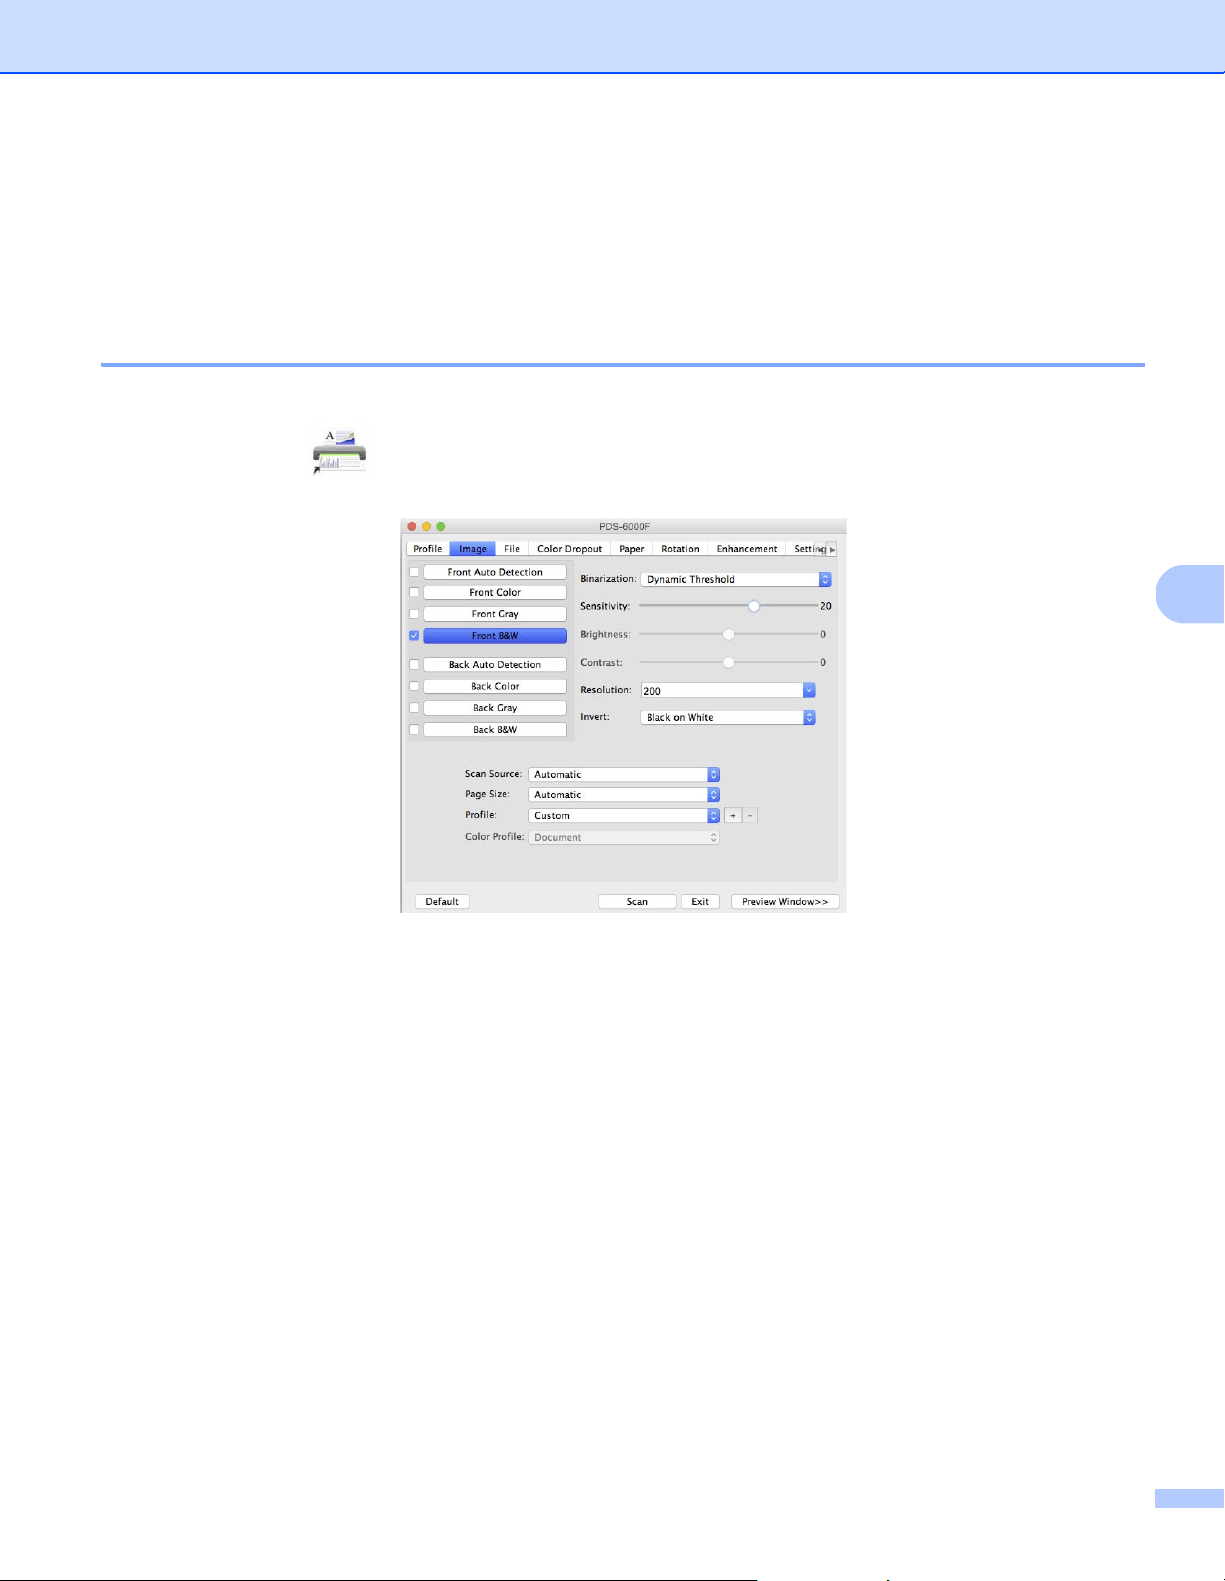
Scan (Macintosh)
65
6
Scan using your computer
To scan using your computer, launch a TWAIN-compatible application on your computer, such as DS Capture
or Adobe
®
PhotoShop
®
. This guide uses DS Capture as an example.
Scan with DS Capture
a Confirm that the machine is connected to your computer via a USB cable.
b Double-click the (DS Capture) icon on your desktop.
c DS Capture launches.
d Change the scanning settings, if needed.
For more information on changing settings, see Change scan settings using the TWAIN driver on page 66.
e Place your document either in the ADF, or on the scanner glass.
f Click Scan in the DS Capture screen.
Your machine starts scanning. The scanned image is saved in the directory you specified in the File tab.
For more information, see File tab on page 75. Check the scan result to confirm that all settings are correct.
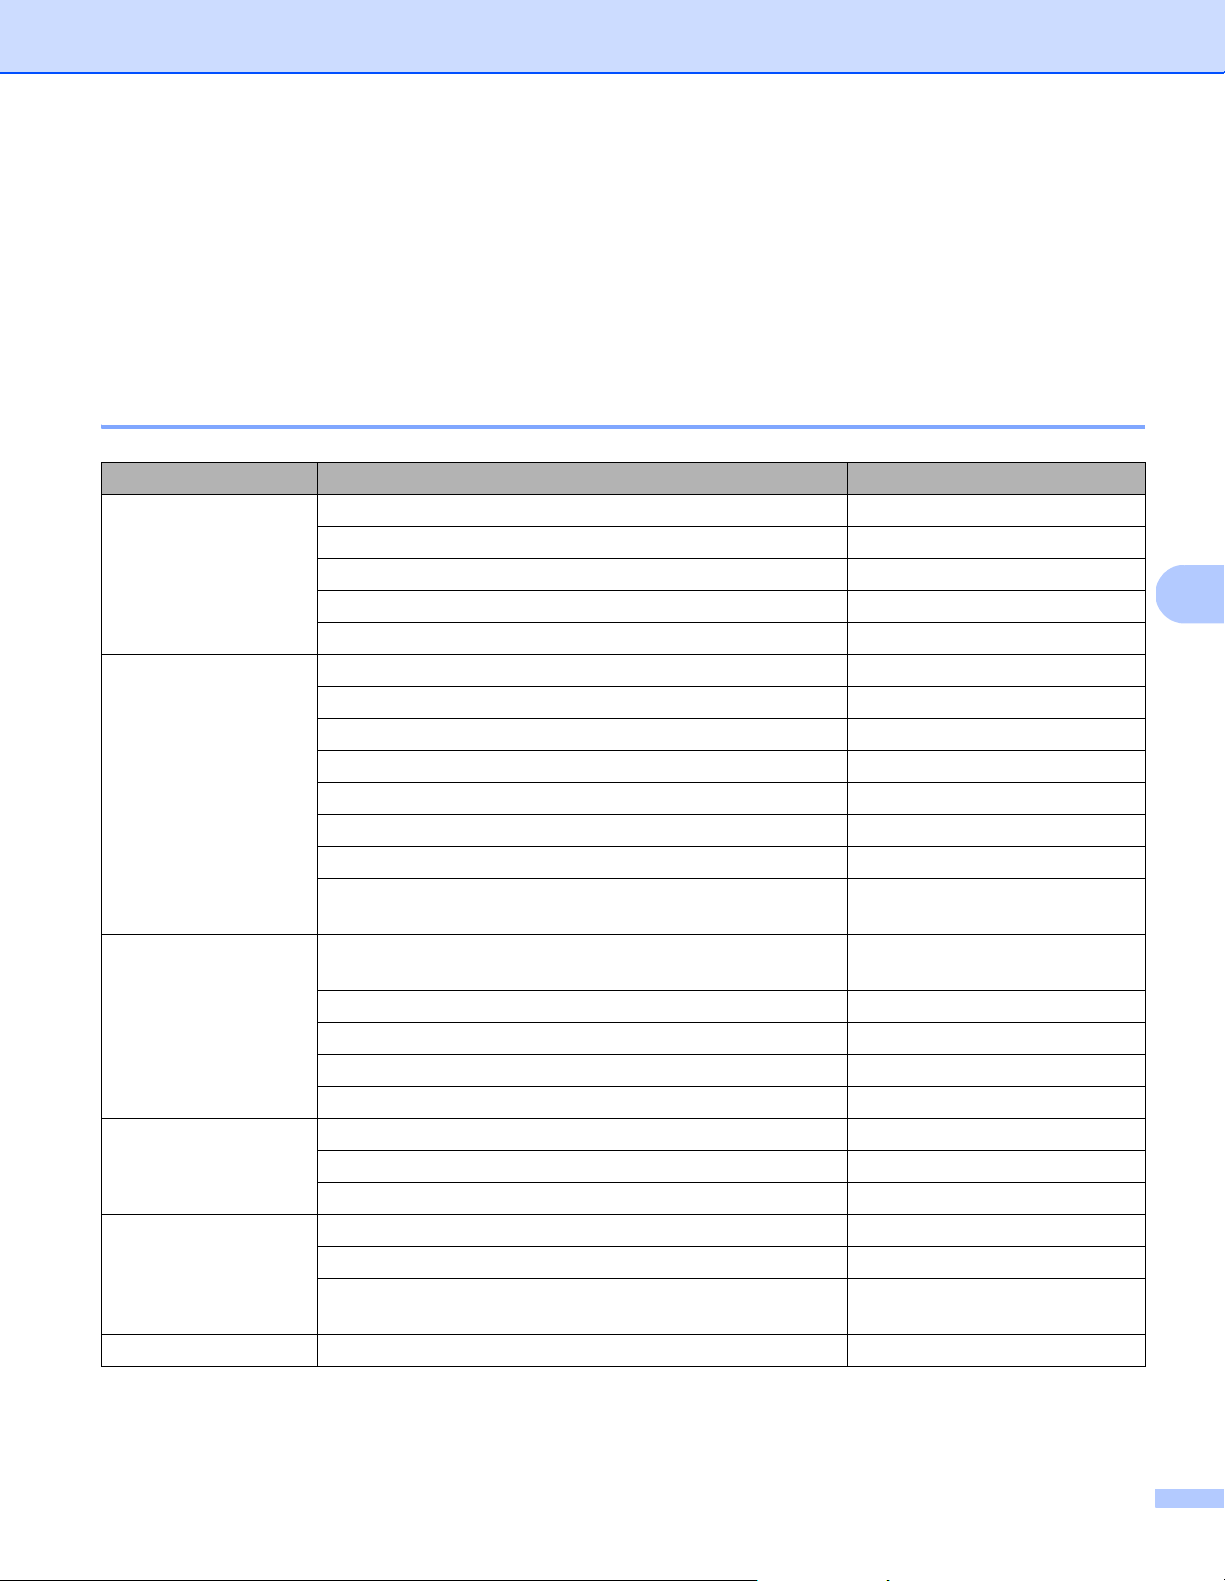
Scan (Macintosh)
66
6
Change scan settings using the TWAIN driver
The TWAIN driver provides various settings and useful functions, which you can use when scanning, as listed
in the overview table below.
In this guide, we use the DS Capture application in our examples. Instructions for other scanning software
should be similar.
Functional overview
Category Function Reference
Basic settings
Specify the image type (color) and scan Image tab on page 69
Automatically identify the document color and scan Image tab on page 69
Specify the document size and scan Paper tab on page 79
Automatically identify the document size and scan Paper tab on page 79
Specify the resolution and scan Image tab on page 69
Image processing
Remove the specified color and scan Color Dropout tab on page 77
Rotate the document Rotation tab on page 84
Detect and remove blank pages Enhancement tab on page 86
Remove punch holes of scanned documents Enhancement tab on page 86
Automatically compensate the document tilt Paper tab on page 79
Remove the document base color Enhancement tab on page 86
Add a white or black edge around the border Enhancement tab on page 86
Remove small defects, due to dust or scratches, from
a scanned image
Enhancement tab on page 86
Efficient scanning
See preview and check scan settings DS Capture screen overview on
page 67
Save your scanner properties Image tab on page 69
Acquire multiple color type scan results with a single scan Image tab on page 69
Specify the computer memory used when scanning Setting tab on page 90
Perform consecutive document scanning Paper tab on page 79
Advanced functions
Add a character string to the scan result Imprinter tab on page 91
Divide a 1 page document into 2 pages Rotation tab on page 84
Scan a document larger than Letter/A4 size Image tab on page 69
Machine settings
Specify multifeed detection settings Paper tab on page 79
Check and reset the scan count Information tab on page 95
Change the Power Saving Mode and Power Off time
settings
Setting tab on page 90
System information
Check the scanner and computer system information Information tab on page 95

Scan (Macintosh)
67
6
DS Capture screen overview
Launch the TWAIN user interface using your scanning software. This guide uses the DS Capture user
interface to explain the TWAIN user interface.
Click the tab menus to configure your Brother machine’s settings.
NOTE
All settings in the Image tab (except for the Resolution), and the Color Dropout tab can be set
individually for the front and back of any double-sided document you scan.
No. Name Description
(1) Tabs Profile, Image, File, Color Dropout, Paper, Rotation, Enhancement,
Setting, Imprinter, Information
(2) Default Click Default to reset all settings in all tabs to factory settings.
(3) Scan Click Scan to start scanning.
(4) Exit Click Exit to close the window.
(5) Preview Window Click to show or hide the image preview window, containing a low-resolution
preview of your image, before your final scan.
(1)
(2)
(3) (4) (5)
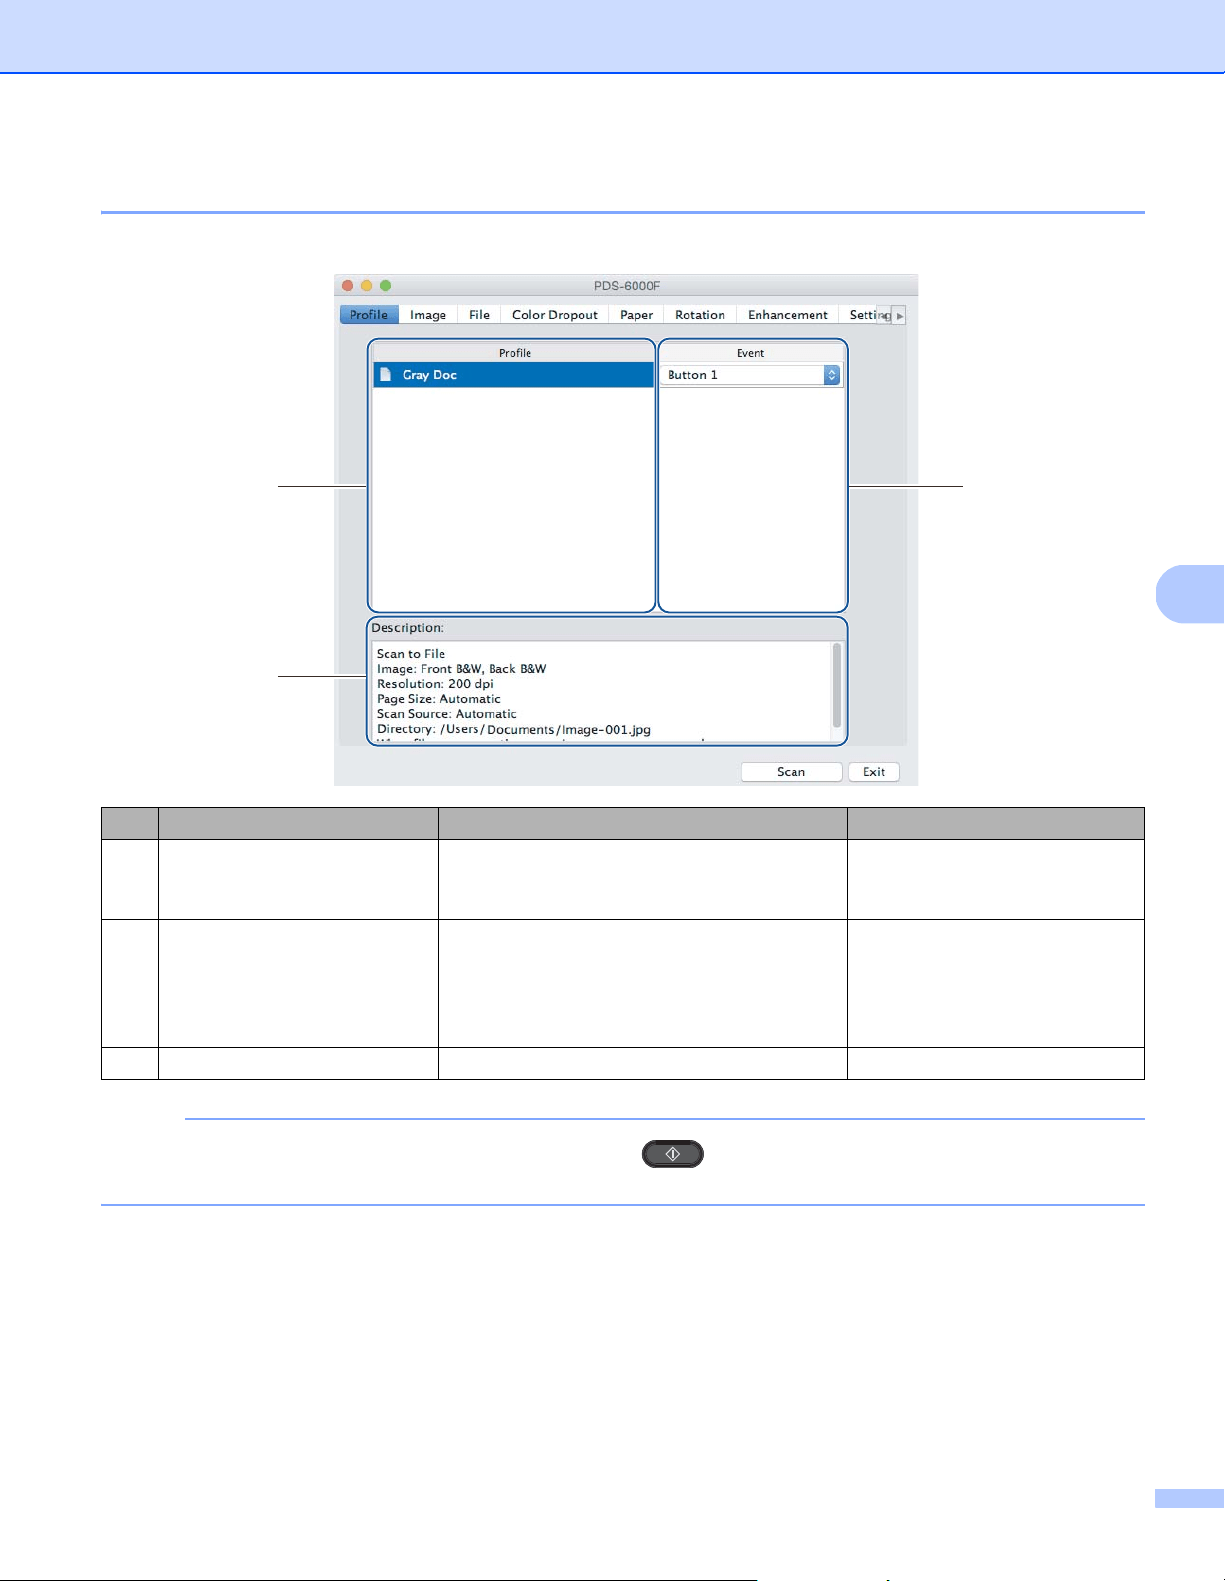
Scan (Macintosh)
68
6
Profile tab
Click the Profile tab to assign specific scan profiles to specific buttons on your Brother machine’s control panel.
NOTE
You must assign an event number to scan using the Scan button on the machine. For more
information, see Scan using the control panel on page 64.
No. Name Description Default
(1) Profile View all scan profiles saved in DS Capture.
Click a Profile to view its settings in the
Description field.
-
(2) Event Select a button number from the pop-up list.
The Button # you select from this list directly
corresponds with the function numbers
(Function X) displayed on the machine’s
LCD.
-
(3) Description View the selected scan profile’s settings. -
(1)
(2)
(3)
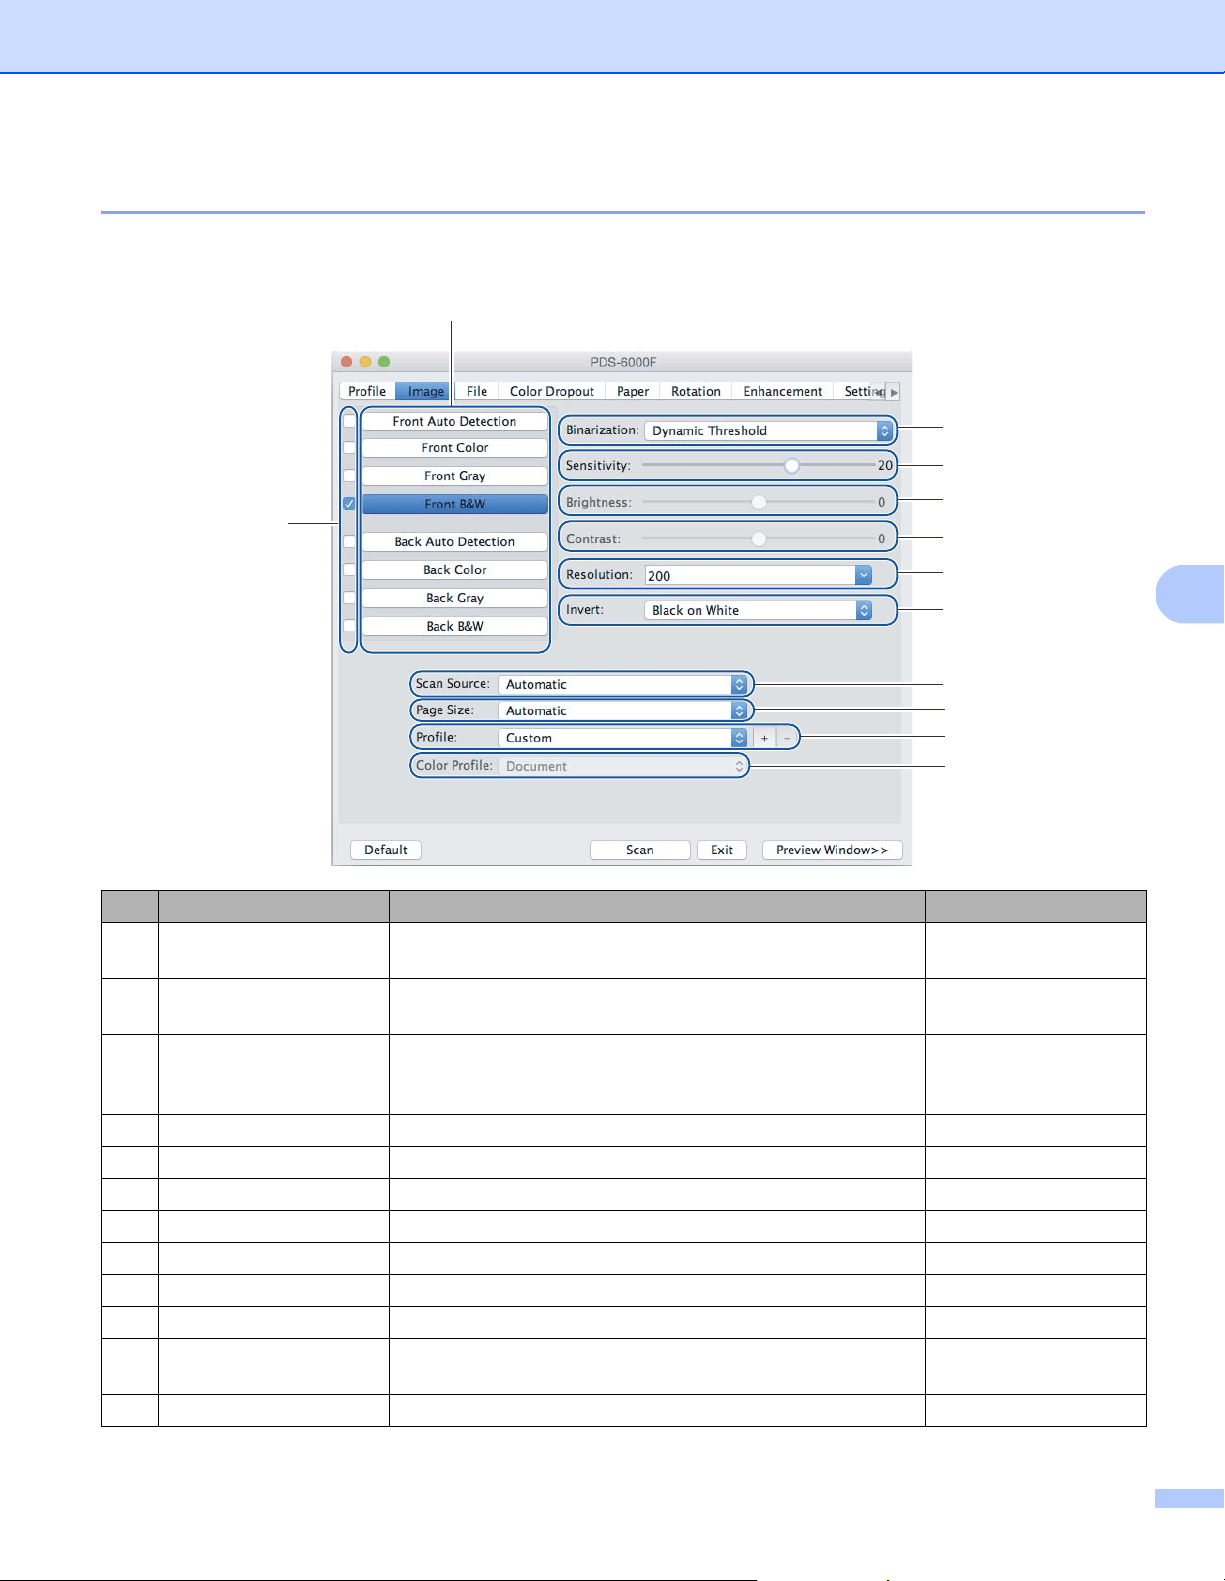
Scan (Macintosh)
69
6
Image tab
Click the Image tab to set basic scan settings, to assign values for the front or back of your document and to
specify the image type.
No. Name Description Default
(1) Image Selection check
boxes
Select the check boxes to specify the type of scan for the
front (and back) of your document.
Front B&W
(2) Image Selection group Customize the settings for the front and back of your
document.
Front B&W
(3) Binarization /
Document Type
Select an appropriate image processing mode. This field
name changes based on your choice in the Image Selection
group.
Dynamic Threshold /
Document
(4) Sensitivity / Threshold Change sensitivity/threshold value. (none)
(5) Brightness Change brightness. 0
(6) Contrast Change contrast. 0
(7) Resolution Select resolution. 200
(8) Invert Reverse the brightness and the colors in the image. Black on White
(9) Scan Source Select a scan source. Automatic
(10) Page Size Capture a portion of the document being scanned. Automatic
(11) Profile Create or change scan profiles for frequently used scan
settings.
Custom
(12) Color Profile Ensure accurate colors when scanning. Document
(1)
(2)
(3)
(4)
(5)
(6)
(7)
(8)
(10)
(9)
(11)
(12)
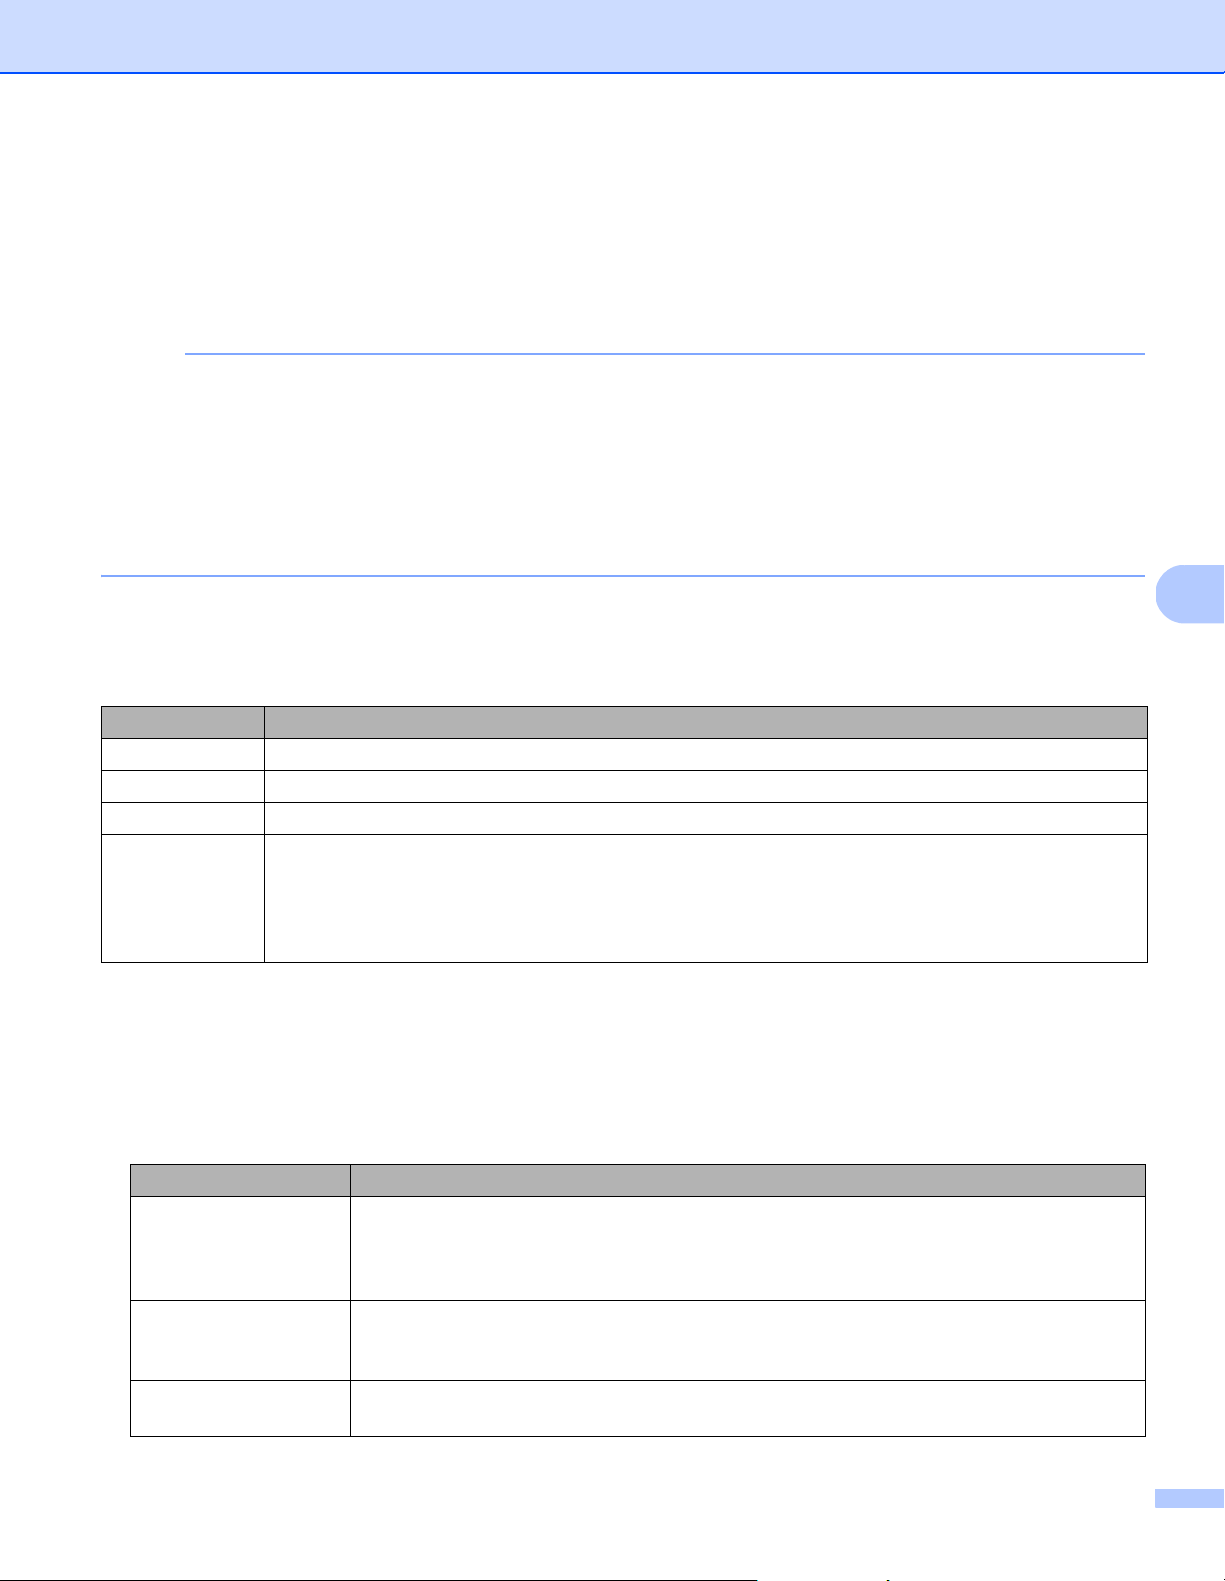
Scan (Macintosh)
70
6
Image Selection check boxes
Select the check boxes to set the color mode for both the front and the back of your document. For example,
to scan both the front and back of a color document page in color, select the Front Color and Back Color
check boxes. For a black and white scan of the front and a color scan of the back, select Front B&W and
Back Color.
NOTE
• Select more than one image type check box to generate multiple scan results from a single scan. For example,
if you select Front Color and Front Gray, and then scan your document, scan data in both color and gray is
saved.
• If you select Front Auto Detection, you must select Back Auto Detection as a back image type (and the
other way round). These two options work only with each other.
• Back Auto Detection, Back Color, Back Gray and Back B&W is not available when using the scanner
glass.
Image Selection group
The Image Selection group lets you configure detailed settings used when scanning in each color mode.
Select an image type and customize detailed settings. You can apply different settings to each image type.
Binarization / Document Type
This field name changes based on your choice in the Image Selection group.
Binarization (B&W mode only)
Binarization is the process of converting a grayscale or color image to a black and white image. There are
several methods of performing this conversion.
Image Type Description
Color Select Color if your original is in color and you want an exact copy.
Gray Select Gray if your original contains shades of gray.
B&W Select B&W if your original is typed, written in pencil, or written in pen.
Auto Detection Select Auto Detection to automatically detect and scan the front or back of your color document.
If your document is in color, the machine automatically scans the document as a color image. If your
document is not in color, select either Black and White or Gray from the Non-Color Selection
pop-up list. Use this option if your document is multi-page and includes both color and black and
white.
Conversion Methods Description
Dynamic Threshold Select Dynamic Threshold to allow the machine to dynamically evaluate each document
to produce the highest quality image. Select this option to scan documents containing
faint text, shaded background, or color background. If you select Dynamic Threshold:
Threshold, Brightness, and Contrast are not available.
Fixed Processing Select Fixed Processing for black and white and other high-contrast documents. A single
level is set to determine the black and white transition. The threshold is programmable
over the entire density range. If you select Fixed Processing, Contrast is not available.
Halftone 1-5 Select Halftone to view a gray image composed of different-sized dots. In other machines,
this is sometimes called “Grayscale”.
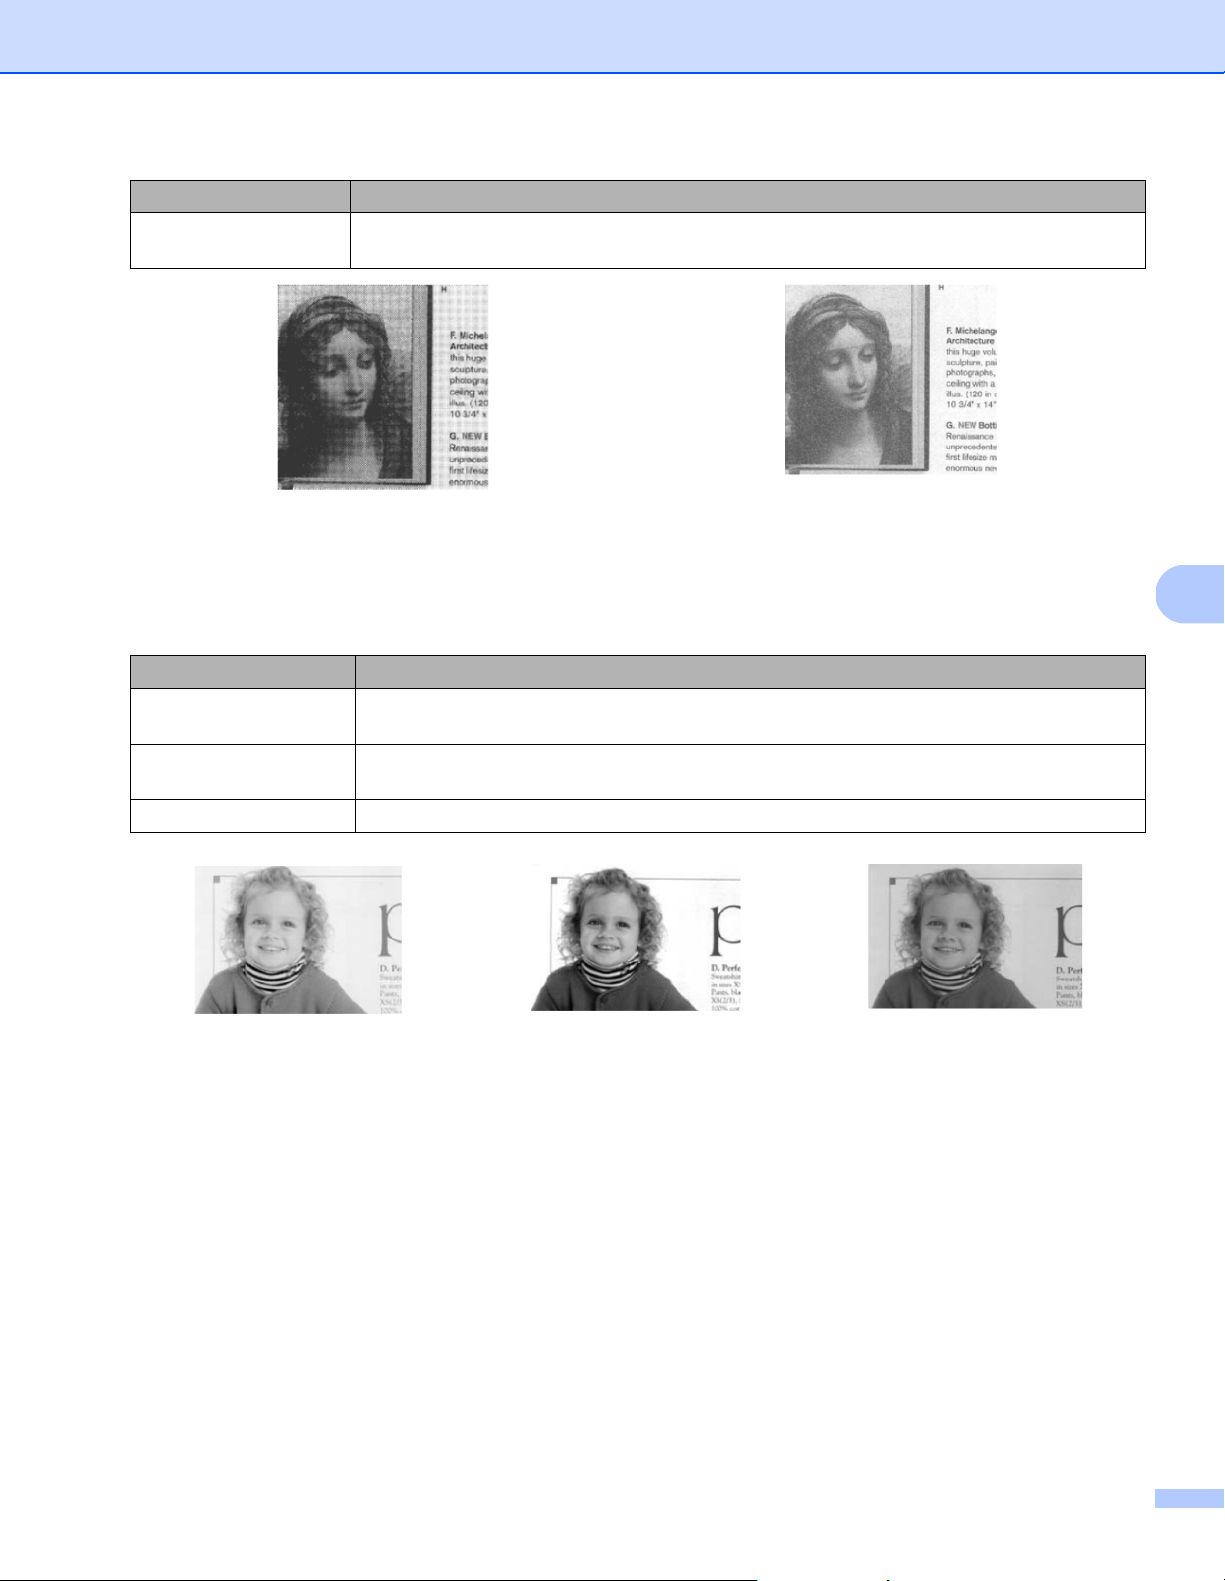
Scan (Macintosh)
71
6
Document Type (Gray mode only)
When you select Gray as the image type for your scanned document, you can choose from three
document types:
Error Diffusion Select Error Diffusion for a type of Halftone. Error Diffusion results in good image
texture and makes text in images more legible than Halftone 1-5 above.
Halftone Diffusion
Document Type Description
Document Select Document if your original contains only text or a mixture of text and graphics.
This is the optimal setting for regular business documents.
Photo Select Photo if your original contains a photograph, to reproduce it in a vivid grayscale
image.
Normal Select Normal to adjust Brightness and Contrast manually.
Document
(Threshold: 230)
Photo Normal
Conversion Methods Description
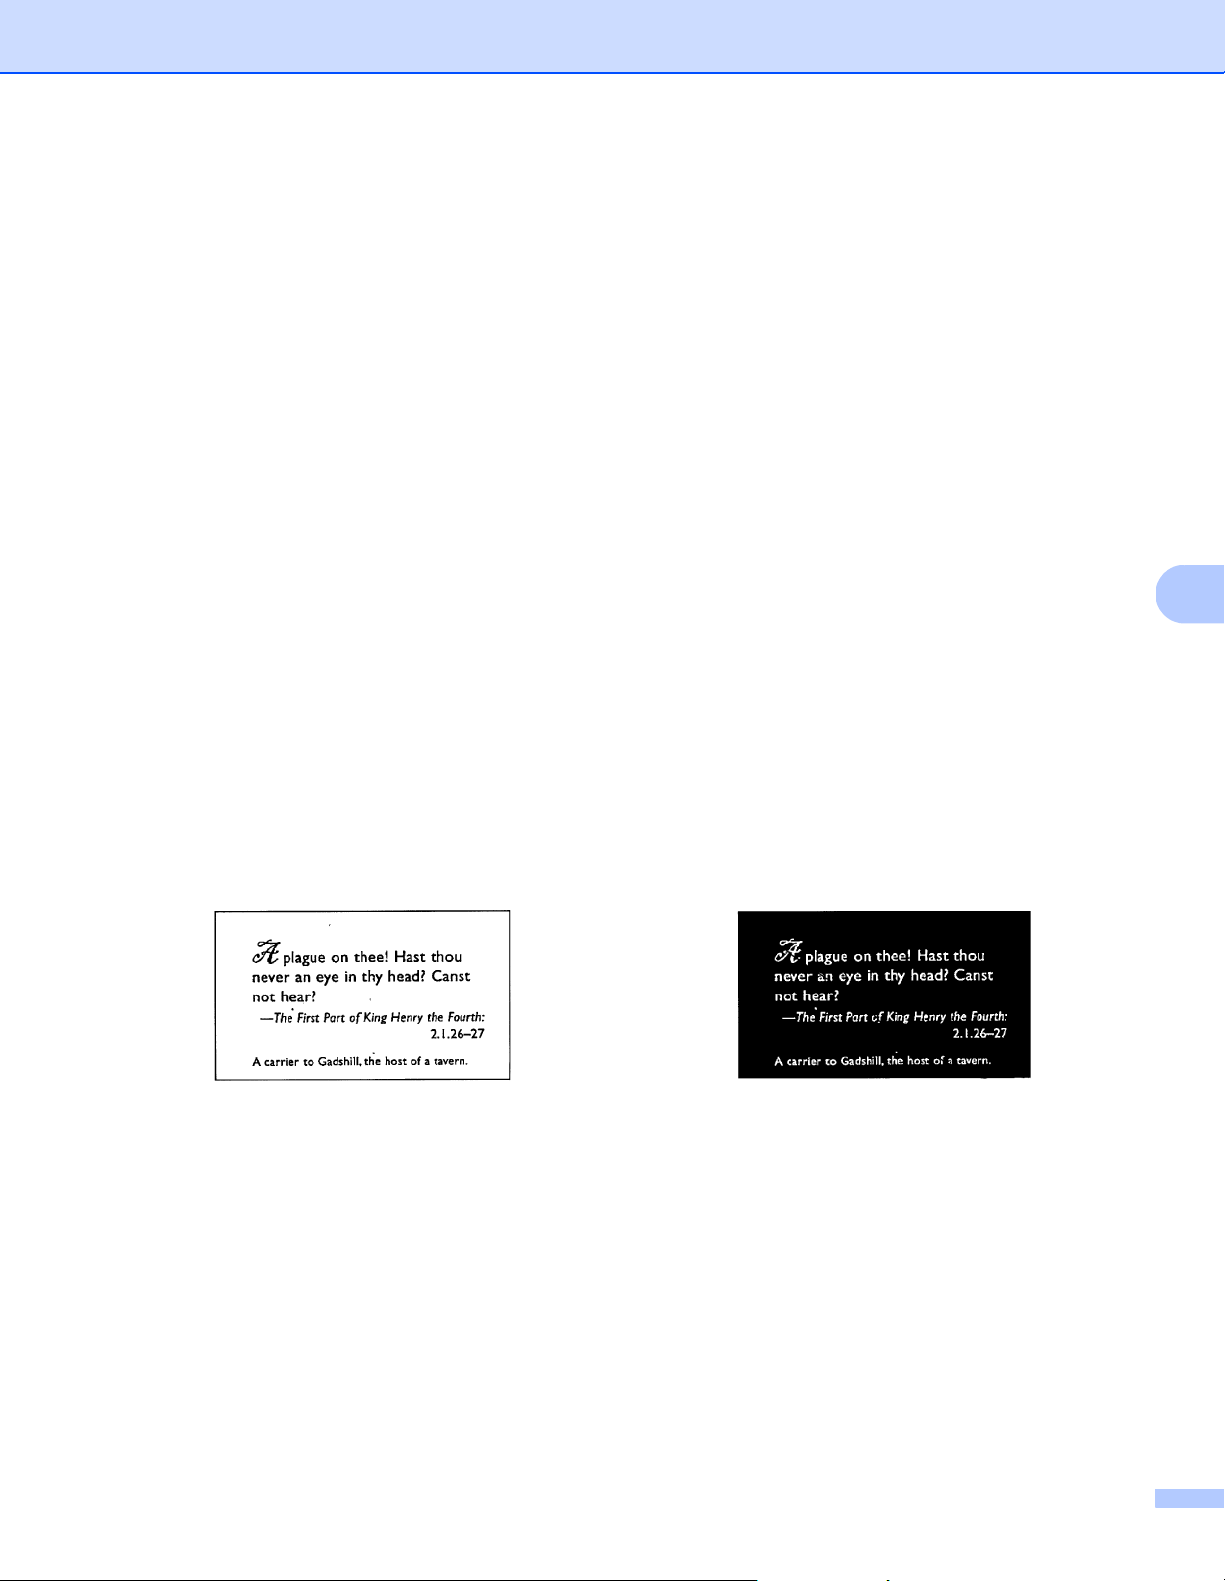
Scan (Macintosh)
72
6
Sensitivity / Threshold
Sensitivity (available when you select Dynamic Threshold)
If your document contains small dots or speckles and you want to remove them, increase the sensitivity
value by moving the bar to the right.
Threshold (available when you select Fixed Processing or Document)
A low threshold value produces a lighter image, and can be used to subdue backgrounds and unneeded
information. A high threshold value produces darker images, and can be used to help faint images stand out.
Brightness
Use the Brightness bar to lighten or darken an image. The greater the value, the clearer the image.
Contrast
Use the Contrast bar to adjust the range between the darkest and the lightest shades in the image.
The greater the value, the greater the difference between light and dark.
Resolution
Select a resolution value from the pop-up list. The greater the value, the higher the resolution, and larger the
file size.
You can type a custom resolution value in the Resolution field.
Invert
Use Invert to reverse the brightness and the colors in the image. The default setting is Black on White
background. To reverse this, select White on Black.
Scan Source
Automatic
The machine uses the paper from the ADF first. If there is no paper in the ADF, the machine switches
to Flatbed scanning.
Automatic Document Feeder (ADF)
Use the ADF to scan multiple pages.
Flatbed
Use the scanner glass to scan.
Black on White White on Black
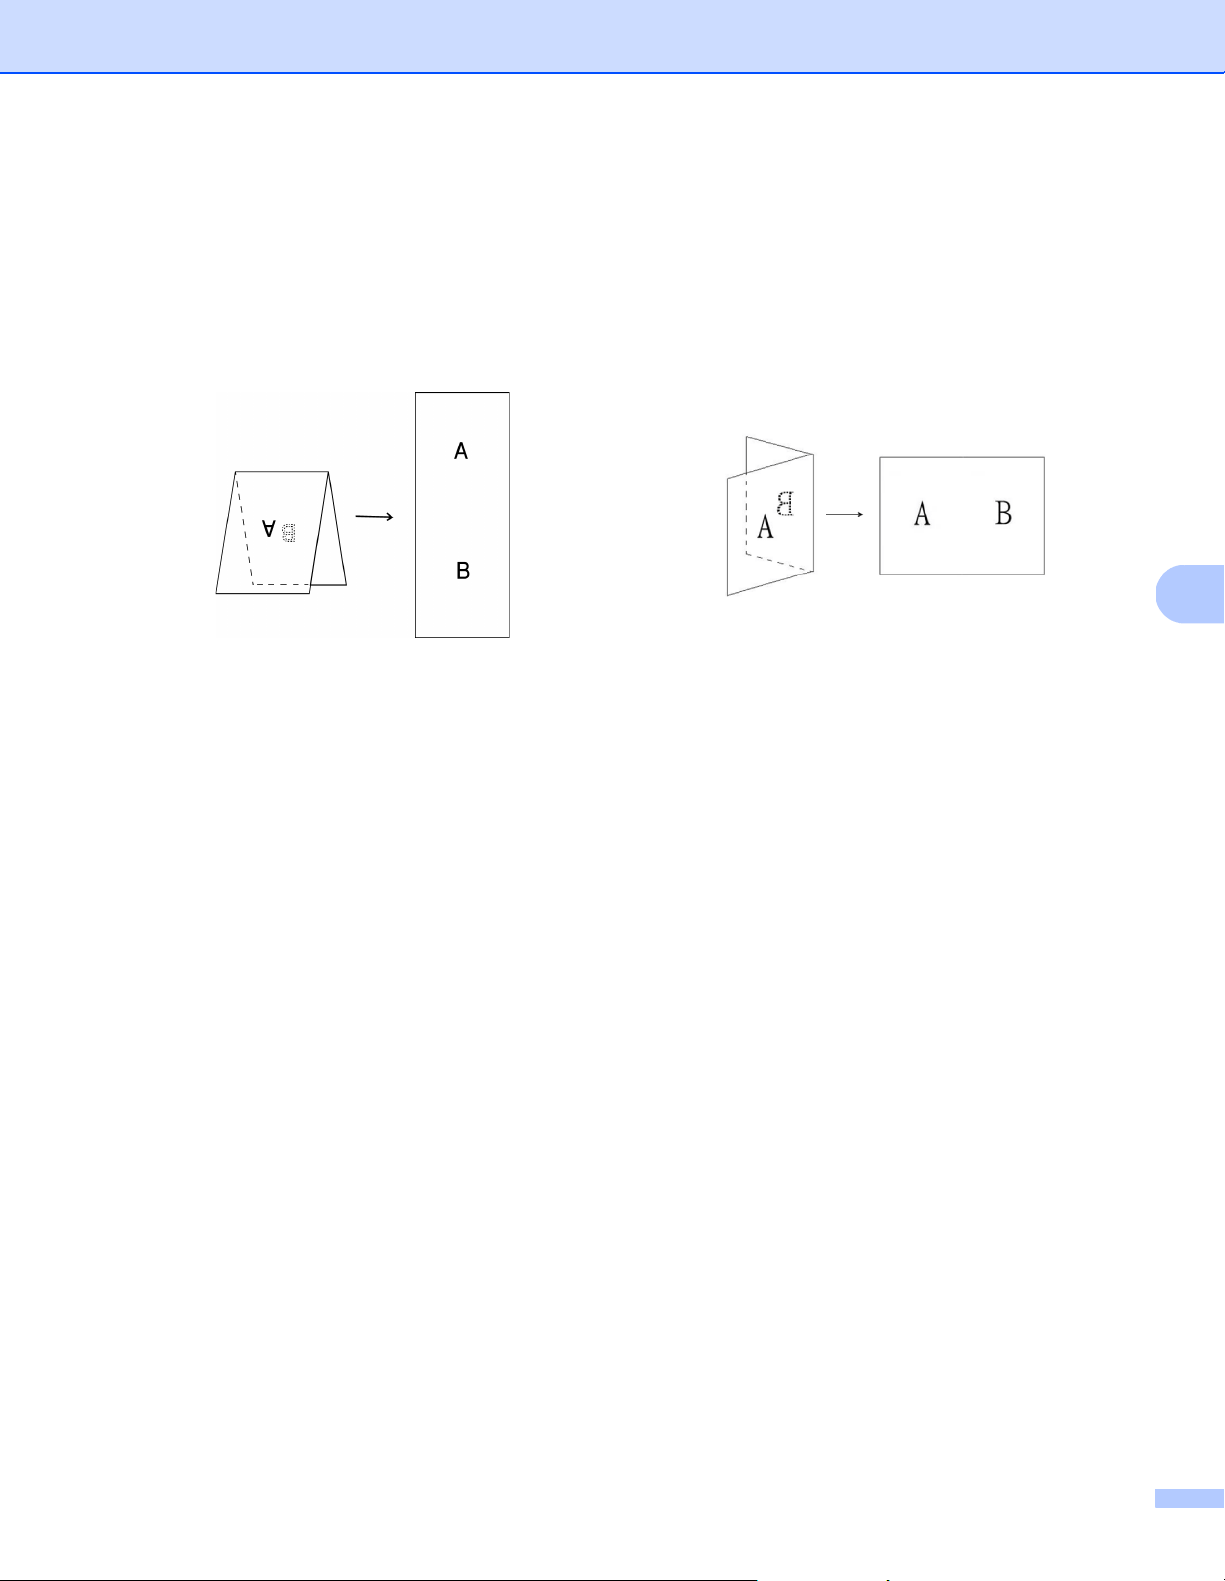
Scan (Macintosh)
73
6
2 in 1 for Automatic Document Feeder
Use 2 in 1 to scan documents wider than Letter/A4 size. The machine scans both sides of the folded
document, and merges the images onto a single page.
• Merge Vertically check box
Select this check box to align both sides vertically.
Clear this check box to align both sides horizontally.
Page Size
Select the paper size you want from the pop-up list:
Automatic
Auto Crop(Flatbed Only): multi image output
US Legal - 8.5 in. × 14 in.
US Letter - 8.5 in. × 11 in.
Photo - 6 in. × 4 in.
Photo - 5 in. × 3 in.
ISO A4 - 210 mm × 297 mm
ISO A5 - 148 mm × 210 mm
ISO A6 - 105 mm × 148 mm
ISO A7 - 74 mm × 105 mm
ISO B5 - 176 mm × 250 mm
ISO B6 - 125 mm × 176 mm
ISO B7 - 88 mm × 125 mm
JIS B5 - 182 mm × 257 mm
JIS B6 - 128 mm × 182 mm
JIS B7 - 91 mm × 128 mm
Maximum Scan Length
Long Page (< 236 in. [5,994 mm]
1
)
Custom
1
If scanning at 200 dpi, the document length that can be scanned may vary with the resolution.
Select Merge Vertically Clear Merge Vertically
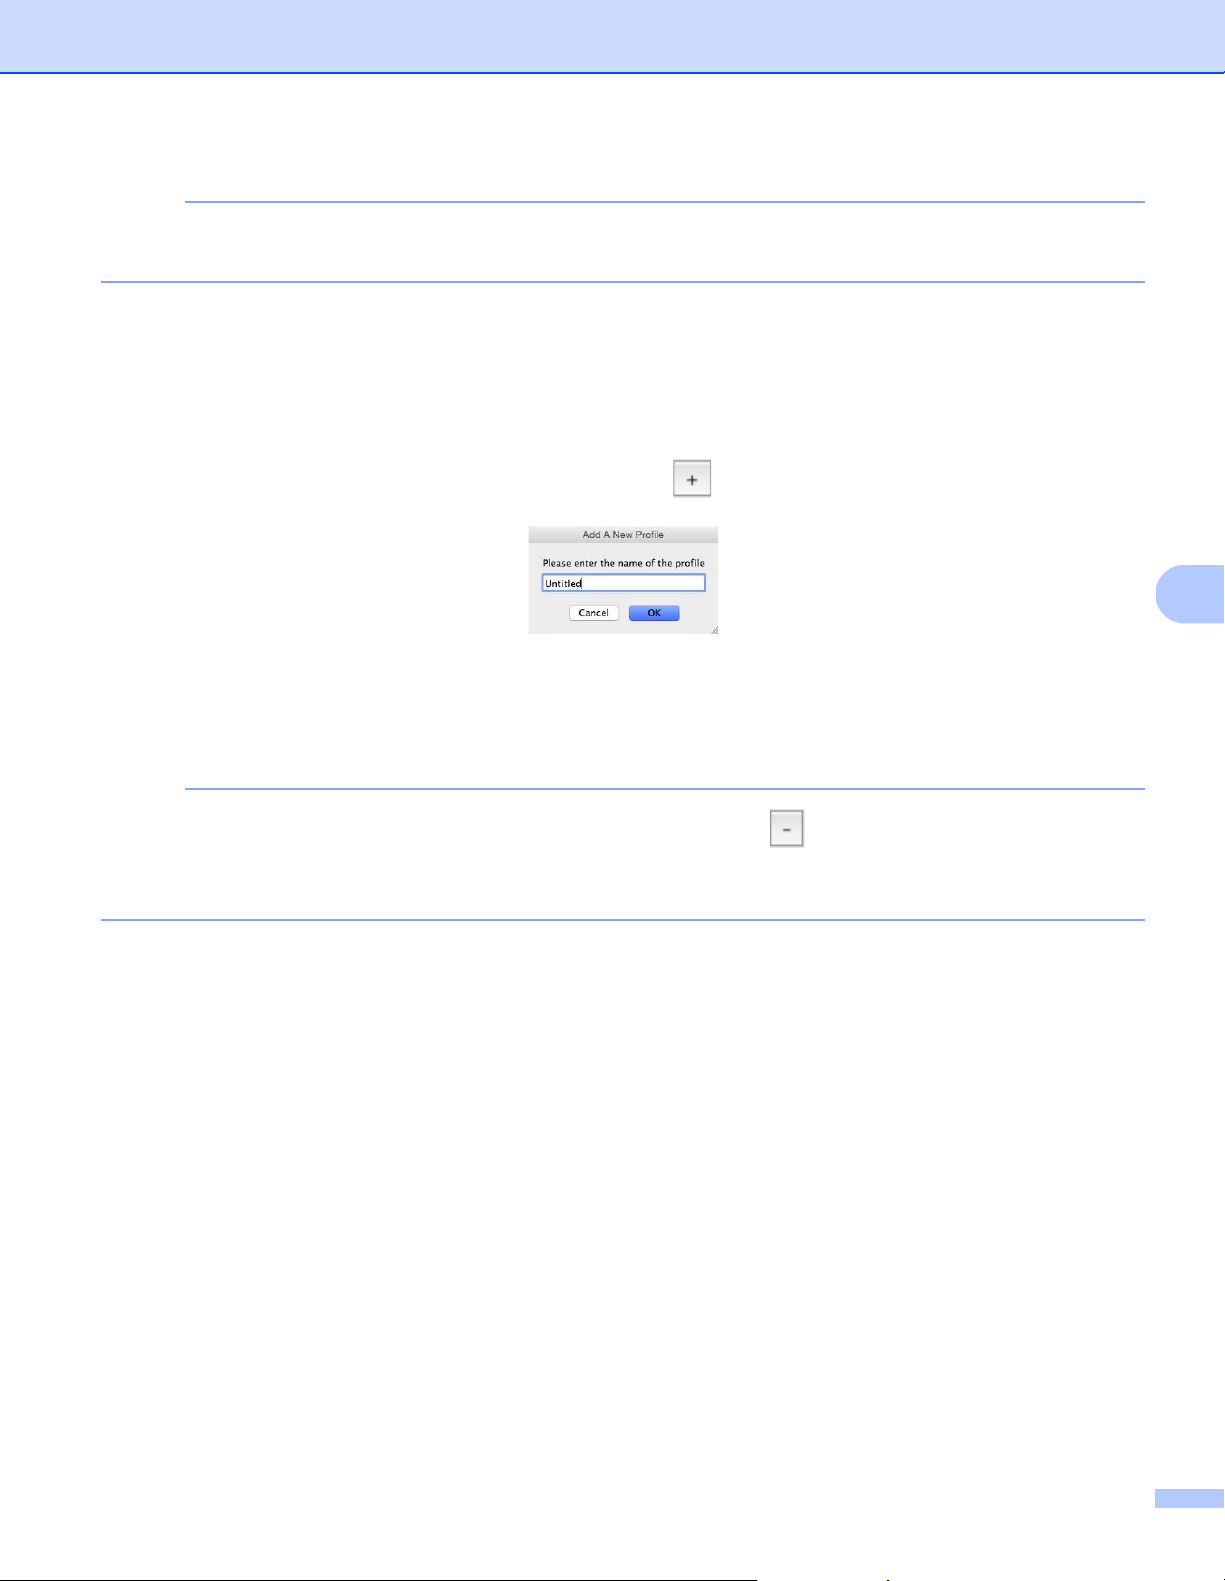
Scan (Macintosh)
74
6
NOTE
Auto Crop(Flatbed Only): multi image output is only available when Scan Source is set to Automatic
or Flatbed.
Profile
Click Profile to save your frequently used scan settings.
To create a scan profile:
a Select your scan settings using any of the tabs.
b When finished, click the Image tab, and then click the button on the right of the Profile field.
The Add A New Profile dialog box appears.
c Type the name of the profile you want to save.
d Click OK.
The new profile appears in the Profile field and in the Profile pop-up list.
NOTE
• To delete a profile, select the profile from the pop-up list, click the button, and click OK.
• To edit a profile, enter the name of the profile you want to edit in the Add a New Profile dialog box and
click OK.
Color Profile
Use the Color Profile settings to achieve accurate color reproduction for scans. This option uses the default
ICC profile parameters to adjust the image colors. ICC profiles are used with color mapping, mainly in digital
photography and printing.
Document
Select Document if your original contains only text or a mixture of text and graphics. This is an optimal
setting for regular business documents.
None
Select None to disable the Color Profile option.
Photo
Select Photo if your document contains photos, and you want to reproduce your photos in vivid color.
Mix
Select Mix if your document contains a combination of text and graphics. The Mix option offers mid-range
scan quality between Document and Photo.
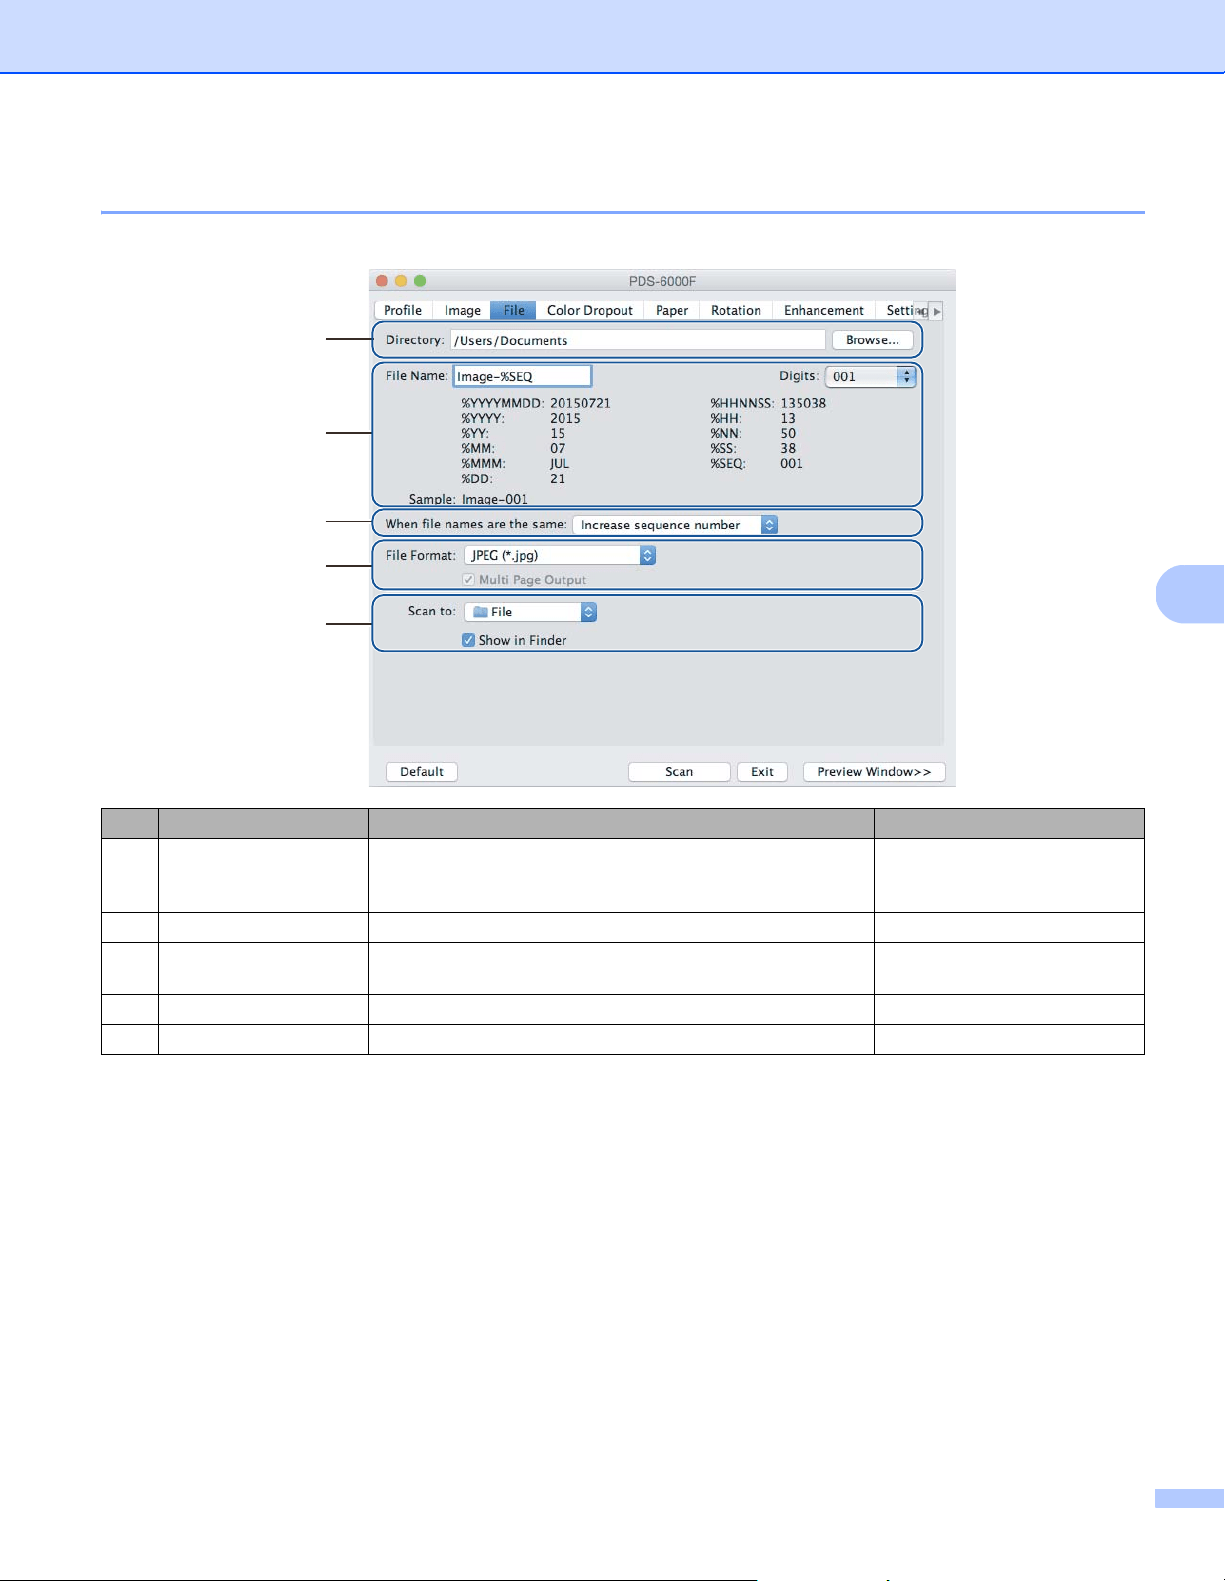
Scan (Macintosh)
75
6
File tab
Click the File tab to set the directory path, file name and file format of your scanned images.
Directory
Click the Browse button to navigate to the directory where you want to save scanned images, or type a file
location in the Directory field.
File Name options
You can customize the default file name using text and special symbols.
File Name
Type a file name using any text and any of the codes shown. For example, to name all scans “User1” with
the month and year (that is, “User1-December, 2014”), type User1-%MM%YYYY in the File Name field.
Digits
Select the number of digits. This setting is available when %SEQ is set.
Sample
Displays an example of your file name.
No. Name Description Default
(1) Directory Specify where you want to save scanned images. /Users/xxx/Documents
(where xxx is your user
name)
(2) File Name options Specify the default file name of scanned images. Image-%SEQ
(3) When file names are
the same
Select an operation to execute if the same file name
exists in the directory.
Increase sequence
number
(4) File Format Select the file format you want. JPEG (*.jpg)
(5) Scan to Select where to automatically send the scanned image. File
(1)
(3)
(4)
(2)
(5)

Scan (Macintosh)
76
6
When file names are identical
Choose an automatic action for the scanning software to execute if file names are duplicated in your default
directory:
Increase sequence number
Increase the sequence number of the new scanned image file, and save both new and old files.
Overwrite always
Save only the new scanned image and overwrite the old one.
Ask User
Display a dialog box that prompts you to either increase the sequence number of the new file or overwrite
the old file.
File Format
Select the file format you want from the pop-up list.
To save multiple documents as one file, select the Multi Page Output check box.
Scan to
Select File, Application, E-mail, or Printer from the pop-up list to specify where to send the scanned image file.
Select the Show in Finder check box to open the Finder and display the directory where the image is saved.
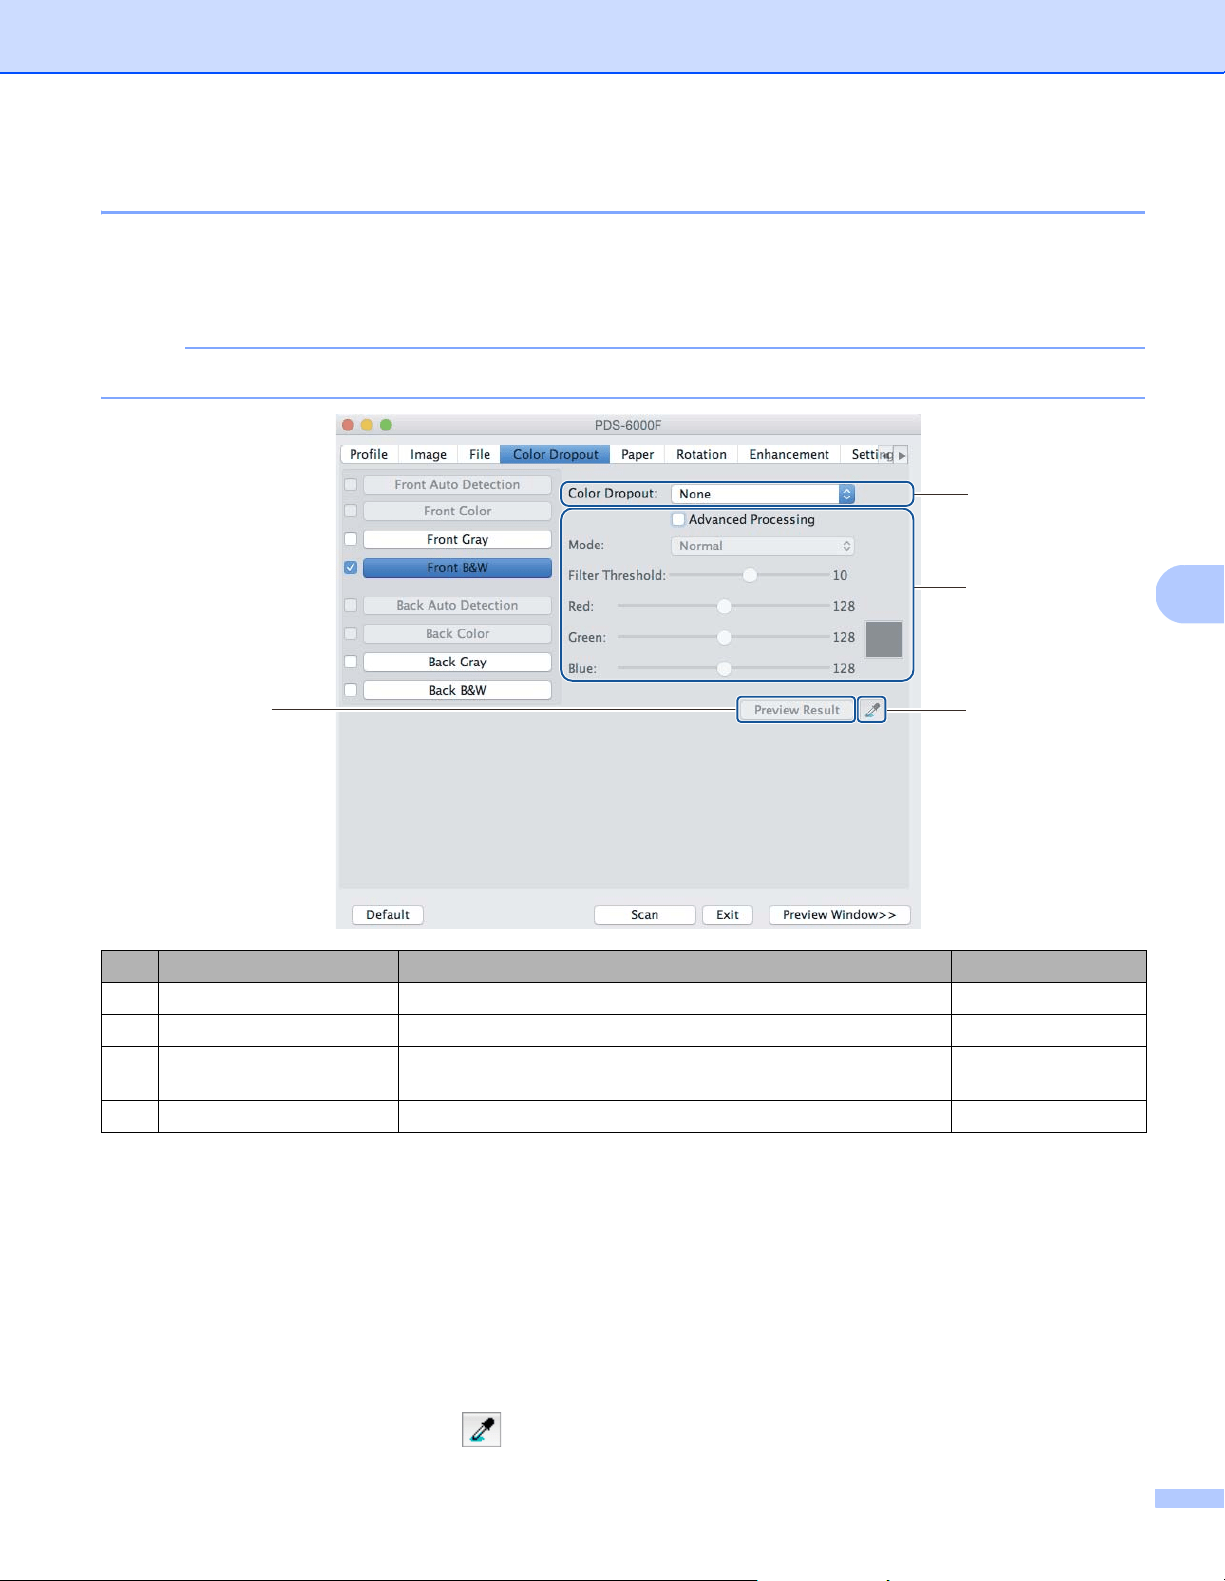
Scan (Macintosh)
77
6
Color Dropout tab
Click the Color Dropout tab to remove the red, blue, or green color from your scanned image resulting in a
gray or black and white document. If your image contains a red watermark or background, select the Red
channel to remove any red watermark or background color. This feature is useful for sharpening text when
using Optical Character Recognition (OCR) software.
NOTE
This function supports only black and white or gray documents.
Color Dropout
Select one of the following from the Color Dropout pop-up list:
None
No color is removed.
Remove Red / Remove Green / Remove Blue
Removes red, green, or blue from the scan.
Custom
Manually adjust the RGB value of the color you want to remove, or select the dropout color from the
preview image using Color Picker .
No. Name Description Default
(1) Color Dropout Select the color you want to remove from your scan. None
(2) Advanced Processing Configure the advanced settings when removing a color. (not selected)
(3) Preview Result Preview the result of current color dropout settings in the
image preview window.
-
(4) Color Picker Select the dropout color from the preview image. -
(3)
(1)
(2)
(4)

Scan (Macintosh)
78
6
Advanced Processing
Select the Advanced Processing check box to adjust the details that can optimize your scan result.
Mode
Select Quality to configure detailed settings for the filter threshold value. Mode is available only when
Remove Red, Remove Green, Remove Blue, or Automatic is selected in the Remove Color pop-up list.
Filter Threshold (available when you select None, Remove Red, Remove Green, or Remove Blue)
This value determines how much color to remove. A lower value removes more of the selected color,
while a higher value keeps more of the selected color. Filter Threshold is available only when Quality
is selected in the Mode pop-up list.
RGB values (available when you select Custom)
Displays the RGB value for the color selected in the image preview window. Adjust RGB values manually,
if needed.
Preview Result
Click this button to preview your color dropout settings. Before using this feature you must preview your image
by clicking the Preview Window button.
Color Picker
The Color Picker option is available only if you select Custom under Color Dropout, and only after you
preview your image by clicking the Preview Window button. Select the dropout color from the preview image.
Click the button, move the mouse over the preview image, and click the color you want to remove.
The RGB values for the selected color automatically populate the Red, Green and Blue fields.
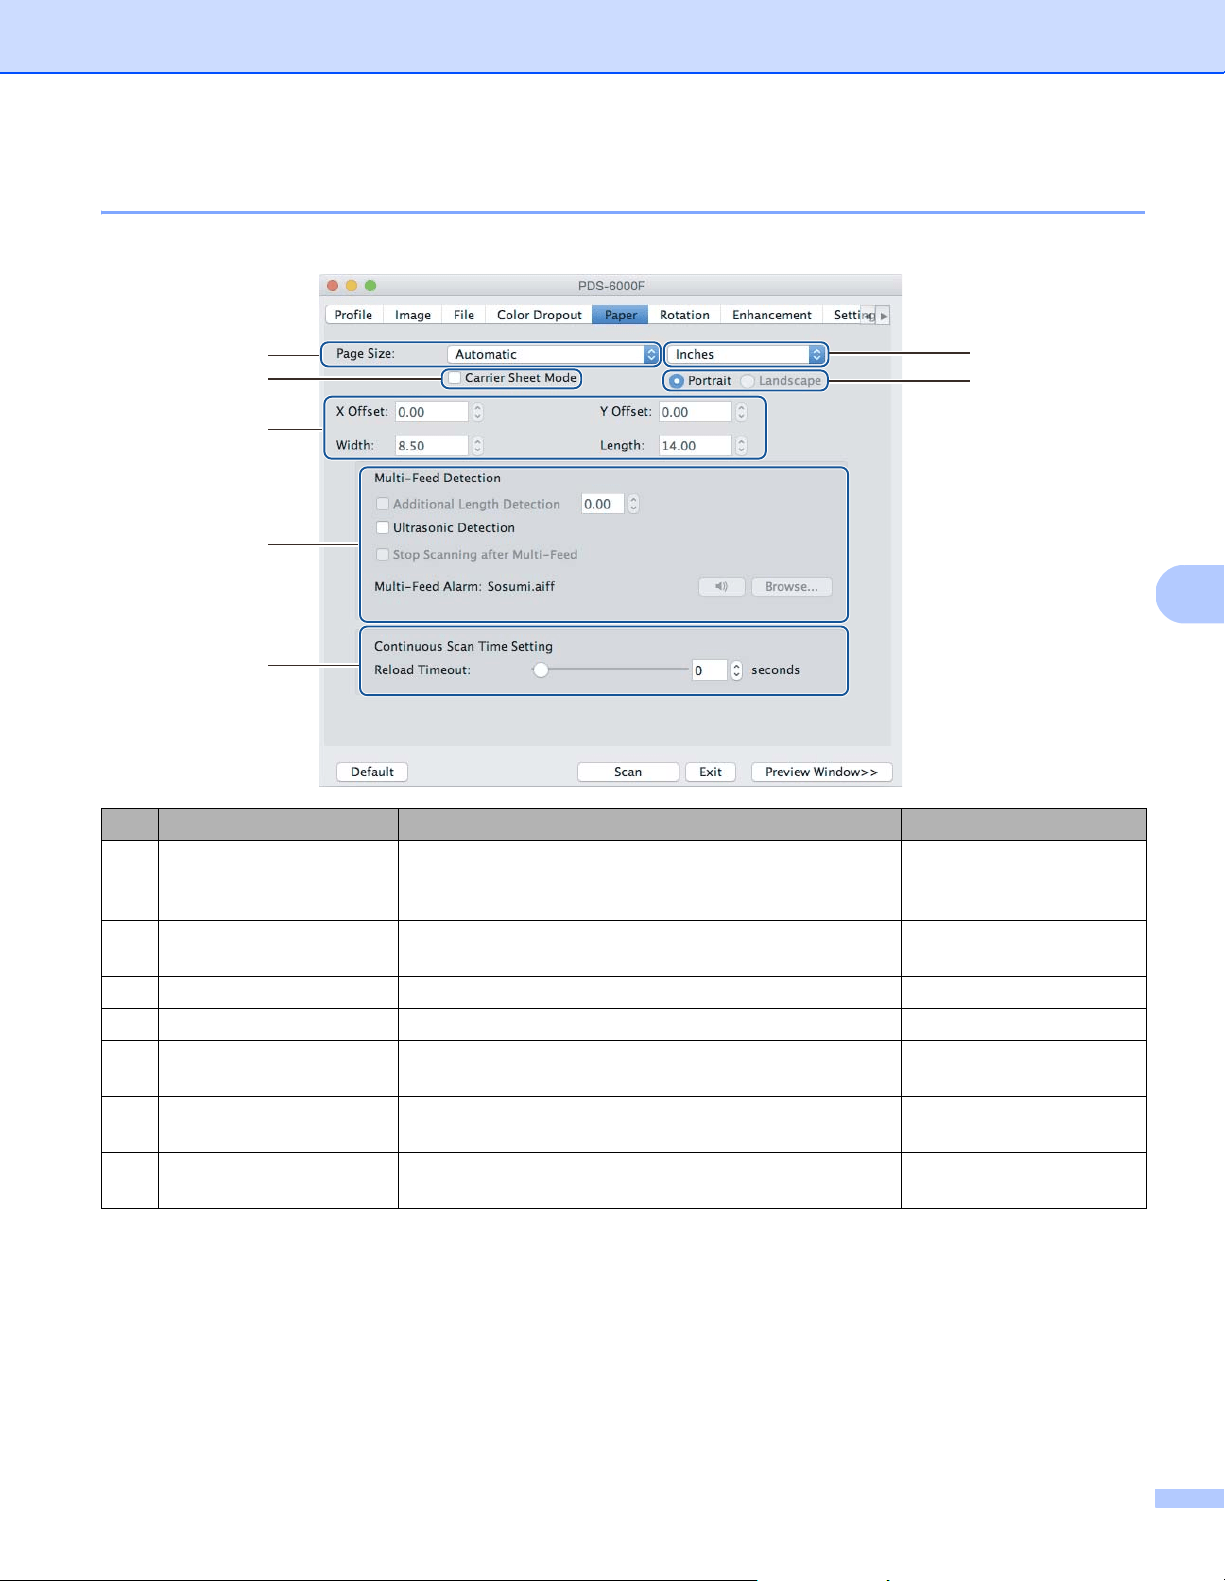
Scan (Macintosh)
79
6
Paper tab
Click the Paper tab to define values relating to image output, overlapping pages, and auto scan.
No. Name Description Default
(1) Page Size Capture a portion of the document being scanned.
If you select Automatic, scanned images are
automatically deskewed if they are crooked.
Automatic
(2) Unit Select the unit of measurement displayed from the
available options.
(based on language)
(3) Carrier Sheet Mode Select this check box if using the Carrier Sheet. (not selected)
(4) Portrait / Landscape Select your scanned document’s layout. Portrait
(5) X-Offset / Y-Offset /
Width / Length
Adjust the scanning area manually. -
(6) Multi-Feed Detection
options
Configure the options to detect documents that overlap
when fed through the ADF.
OFF
(7) Reload Timeout Set the amount of time the machine has to wait before
starting an auto scan after the first scan job is completed.
0
(7)
(6)
(5)
(3)
(1)
(2)
(4)

Scan (Macintosh)
80
6
Page Size
Select the paper size you want from the pop-up list:
Automatic
Auto Crop(Flatbed Only): multi image output
US Legal - 8.5 in. × 14 in.
US Letter - 8.5 in. × 11 in.
Photo - 6 in. × 4 in.
Photo - 5 in. × 3 in.
ISO A4 - 210 mm × 297 mm
ISO A5 - 148 mm × 210 mm
ISO A6 - 105 mm × 148 mm
ISO A7 - 74 mm × 105 mm
ISO B5 - 176 mm × 250 mm
ISO B6 - 125 mm × 176 mm
ISO B7 - 88 mm × 125 mm
JIS B5 - 182 mm × 257 mm
JIS B6 - 128 mm × 182 mm
JIS B7 - 91 mm × 128 mm
Maximum Scan Length
Long Page (< 236 in. [5,994 mm]
1
)
Custom
1
If scanning at 200 dpi, the document length that can be scanned may vary with the resolution.
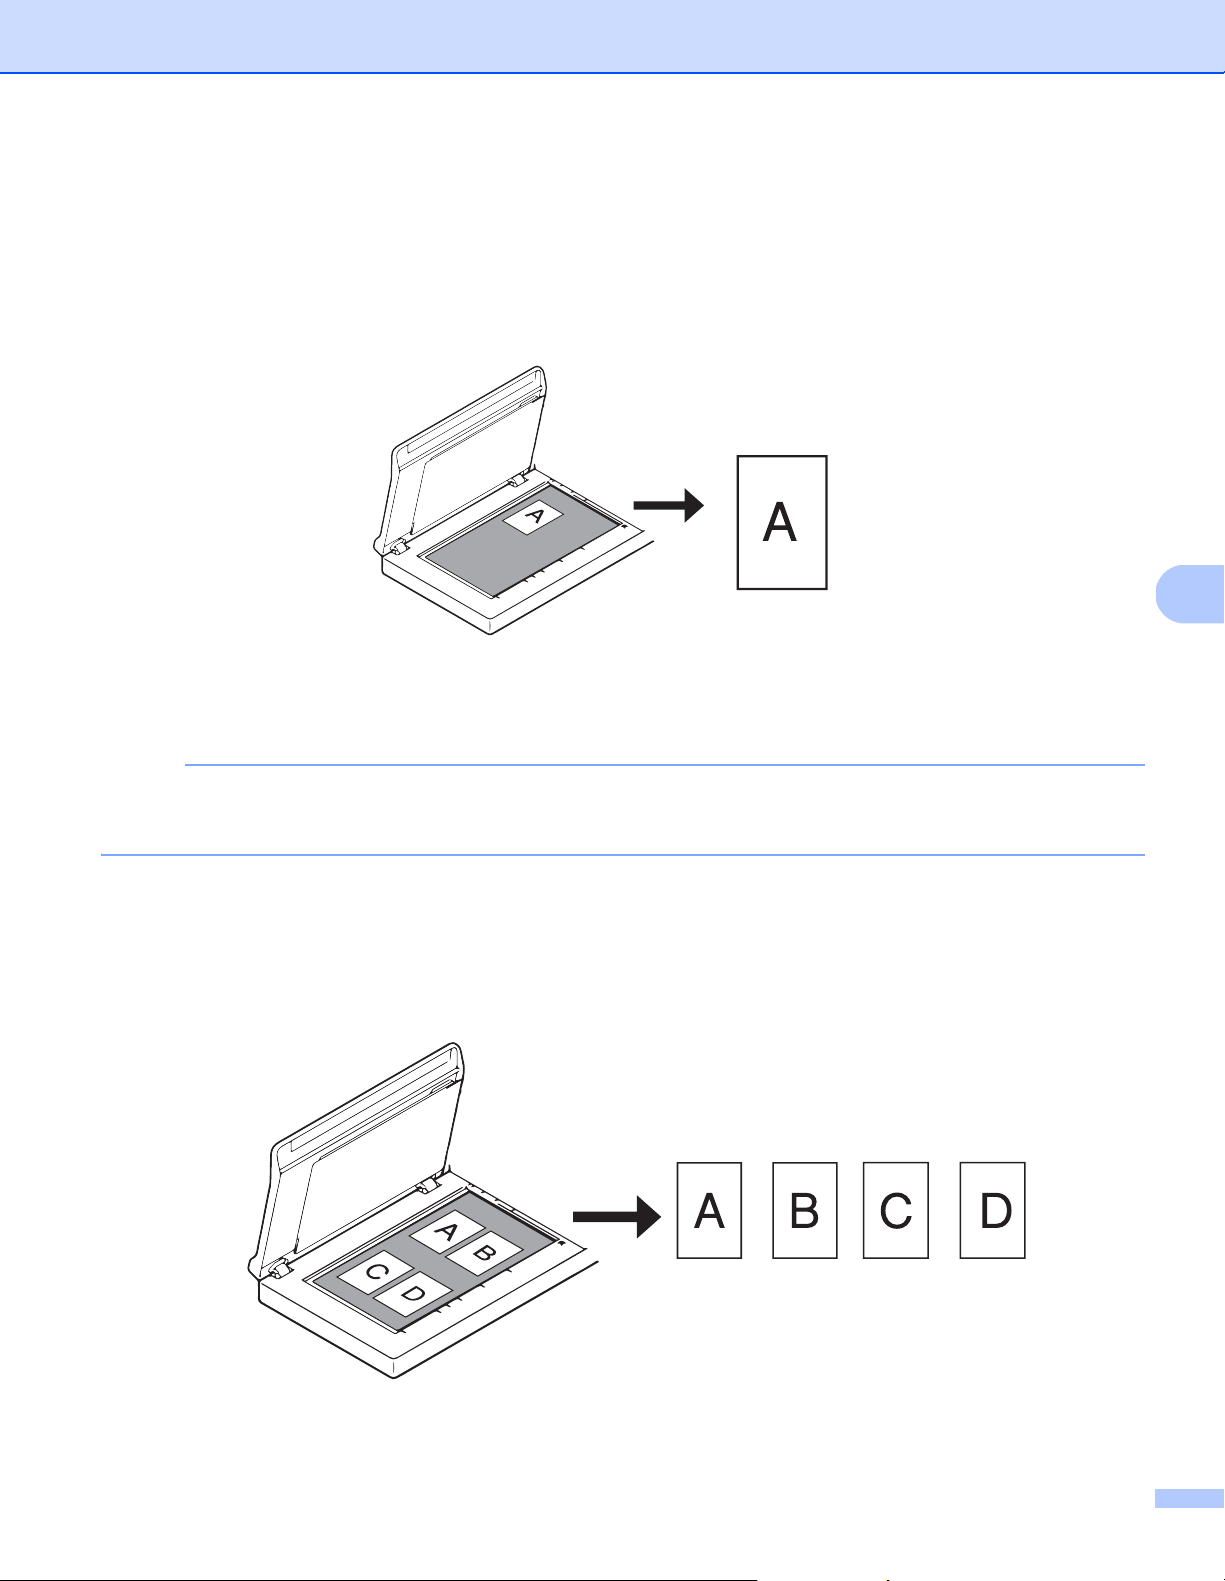
Scan (Macintosh)
81
6
Automatic
This option automatically adjusts the cropping window according to document size. Use this option for
batches of mixed-sized documents.
NOTE
• When you select Automatic, scanned images are automatically deskewed if the images are crooked.
• Punch Hole Removal is not available when Automatic Cropping is disabled.
Auto Crop (Flatbed Only): multi image output
This option allows you to automatically scan to the multiple files when you place multiple documents on the
scanner glass at the same time.
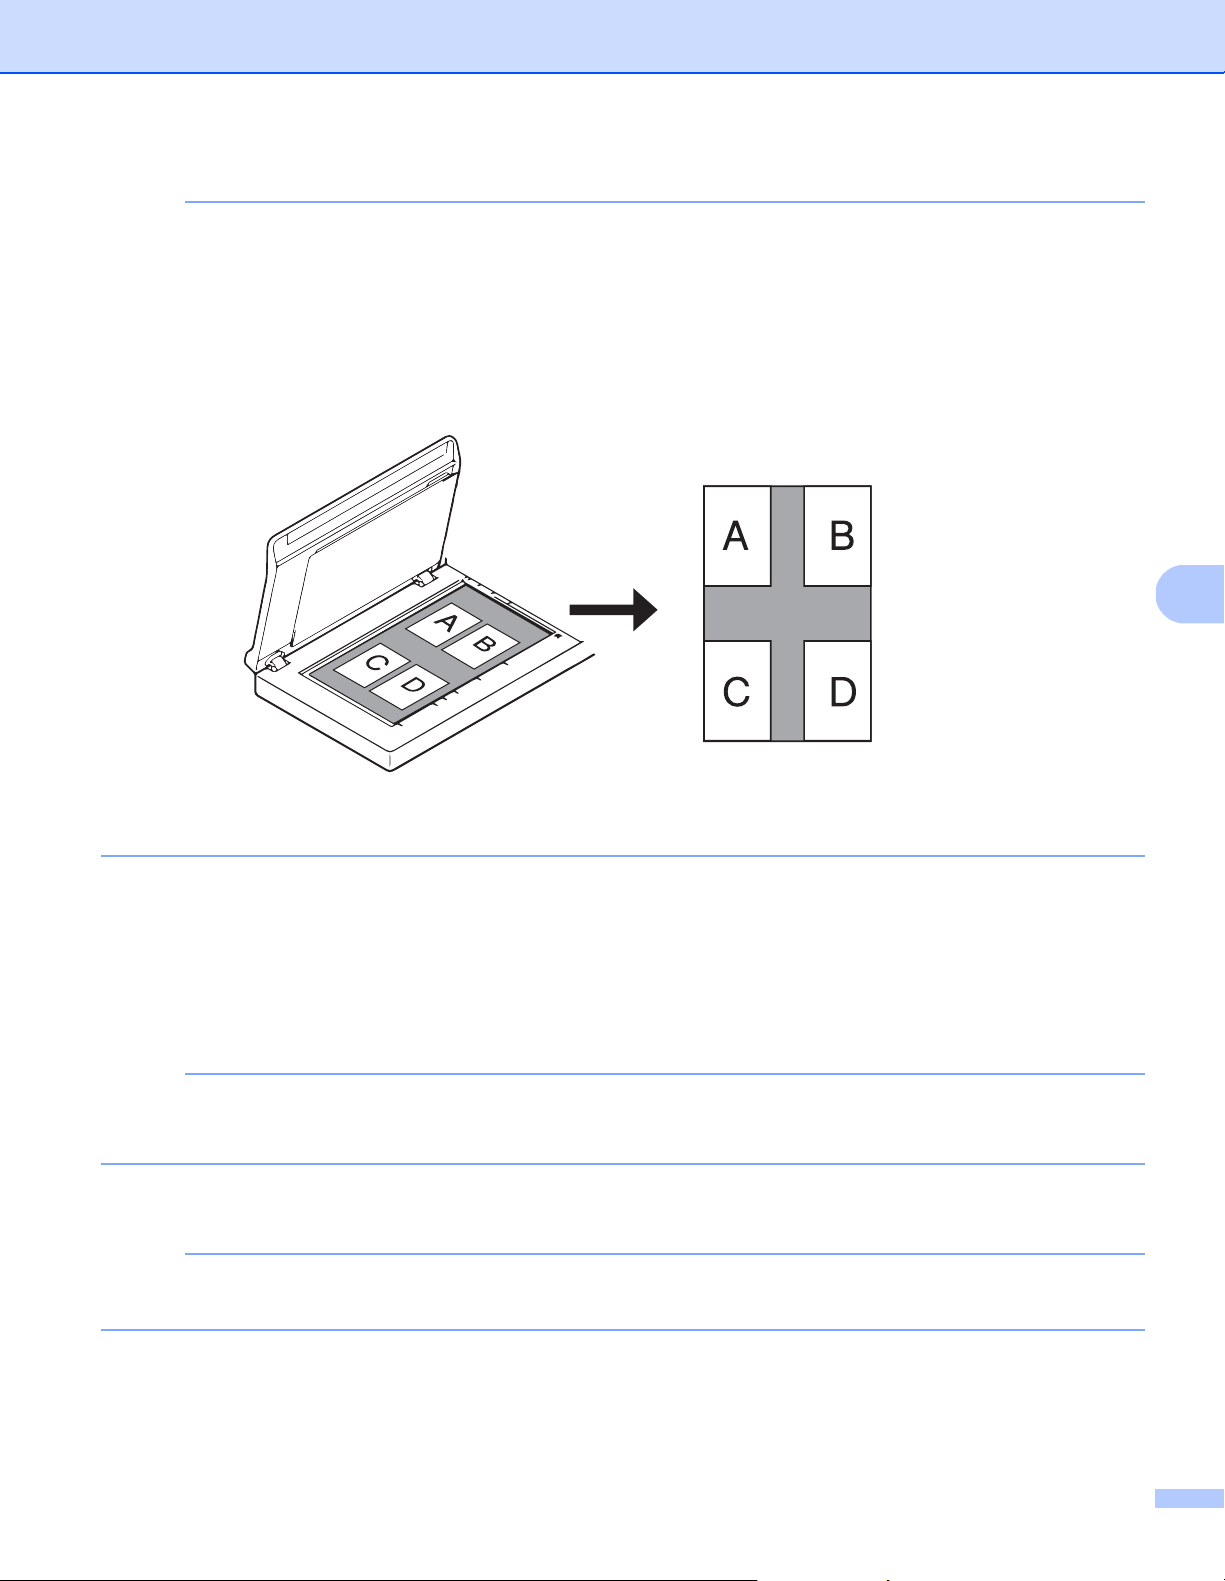
Scan (Macintosh)
82
6
NOTE
Only available when Scan Source is set to Flatbed.
Limitation of Auto Crop (Flatbed Only): multi image output
• A minimum distance between objects is 0.5 in.
• Objects must be at least 1 inch in size.
• If you set Automatic, it will be scanned as shown in the illustration.
Unit
Select Millimeters, Inches, or Pixels from the pop-up list. The default setting is based on your OS language.
Carrier Sheet Mode
Select this check box if using the Carrier Sheet.
NOTE
• This option is available only when Automatic is selected in the Page Size pop-up list.
• Carrier Sheet Mode is not available when using the scanner glass.
Portrait / Landscape
NOTE
Landscape cannot be selected when US Legal, US Letter, A4, B5, Maximum Scan Length,
or Long Page is selected.

Scan (Macintosh)
83
6
X-Offset / Y-Offset / Width / Length
You can adjust the scan area manually using the following values:
X-Offset
Adjusts the distance from the left edge of the scanner to the left edge of the area in the document that you
want to scan.
Y-Offset
Adjusts the distance from the top edge of the document to the top edge of the area in the document that
you want to scan.
Width
Adjusts the width of the area in the document that you want to scan.
Length
Adjusts the length of the area in the document that you want to scan.
Multi-Feed Detection options
Configure the Multi-Feed Detection options to detect documents that overlap when fed through the ADF.
A multifeed usually occurs due to stapled documents, adhesives on documents, or electrostatically charged
documents.
Additional Length Detection
Allows you to define the length of document being scanned by specifying the additional length exceeding
scan area. A value of “0” indicates no additional length detection. Use the Additional Length Detection
feature when scanning multiple same-sized documents from the ADF.
If you select this detection method, scanning does not stop even if a multifeed is detected.
Ultrasonic Detection
Detects overlapping pages by measuring paper thickness.
When this feature is selected, and your machine detects a multifeed, scanning stops immediately and
a warning message appears on your computer monitor.
Stop Scanning after Multi-Feed
Select this check box to stop the feeder and display the warning dialog box when a multifeed is detected.
NOTE
• This option is available when you select Additional Length Detection.
• To stop scanning immediately when a multifeed is detected, select the Stop Scanning after Multi-Feed
check box.
Multi-Feed Alarm
Use this feature to set an audible alarm emitted when a multifeed is detected.
To change the alarm sound, click Browse... and select a wave file from your computer.
NOTE
This feature is available when either Additional Length Detection or Ultrasonic Detection is selected.
Reload Timeout
Set the amount of time the machine has to wait before auto-scanning the next document after the scan job is
completed. Use this feature if you load many separate documents, which must be scanned using the same
scan settings, in the ADF.
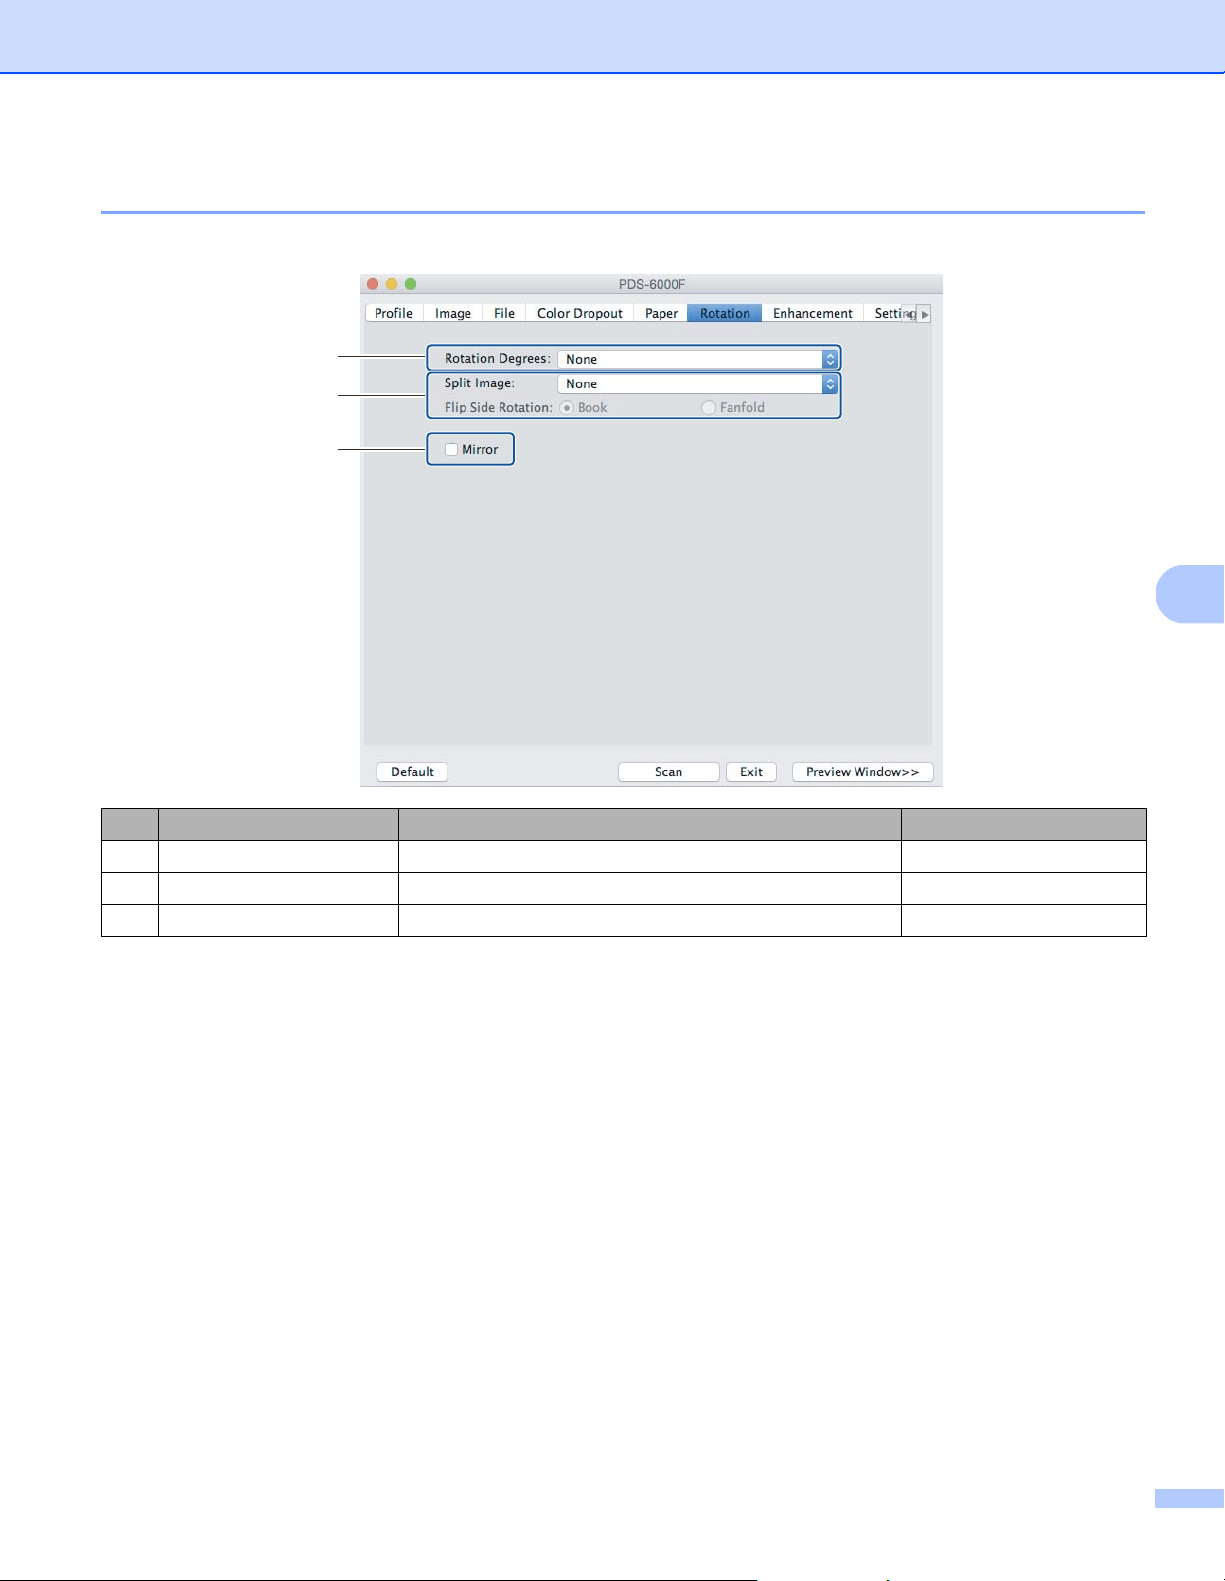
Scan (Macintosh)
84
6
Rotation tab
Click the Rotation tab to set specifications related to image rotation.
Rotation Degrees
To rotate the scanned image, select the rotation angle from the pop-up list:
None
90 degrees CW (Clockwise)
180 degrees
90 degrees CCW (Counter-clockwise)
Auto based on contents
If you select Auto based on contents, the machine automatically rotates your document based on its contents.
No. Name Description Default
(1) Rotation Degrees Rotate the scanned image. None
(2) Split Image Split the scanned image horizontally or vertically. None
(3) Mirror Reverse the right and left sides of your image. (not selected)
(1)
(2)
(3)

Scan (Macintosh)
85
6
Split Image
When you split an image, the machine creates two separate images aligned either horizontally or vertically.
This is useful for documents containing an image that spans two pages, because you can save both images
as a single image on a single page.
None
Horizontal
Divide a single image in half horizontally.
Vertical
Divide a single image in half vertically.
Mirror
Select the Mirror check box to reverse the right and left sides of your image.
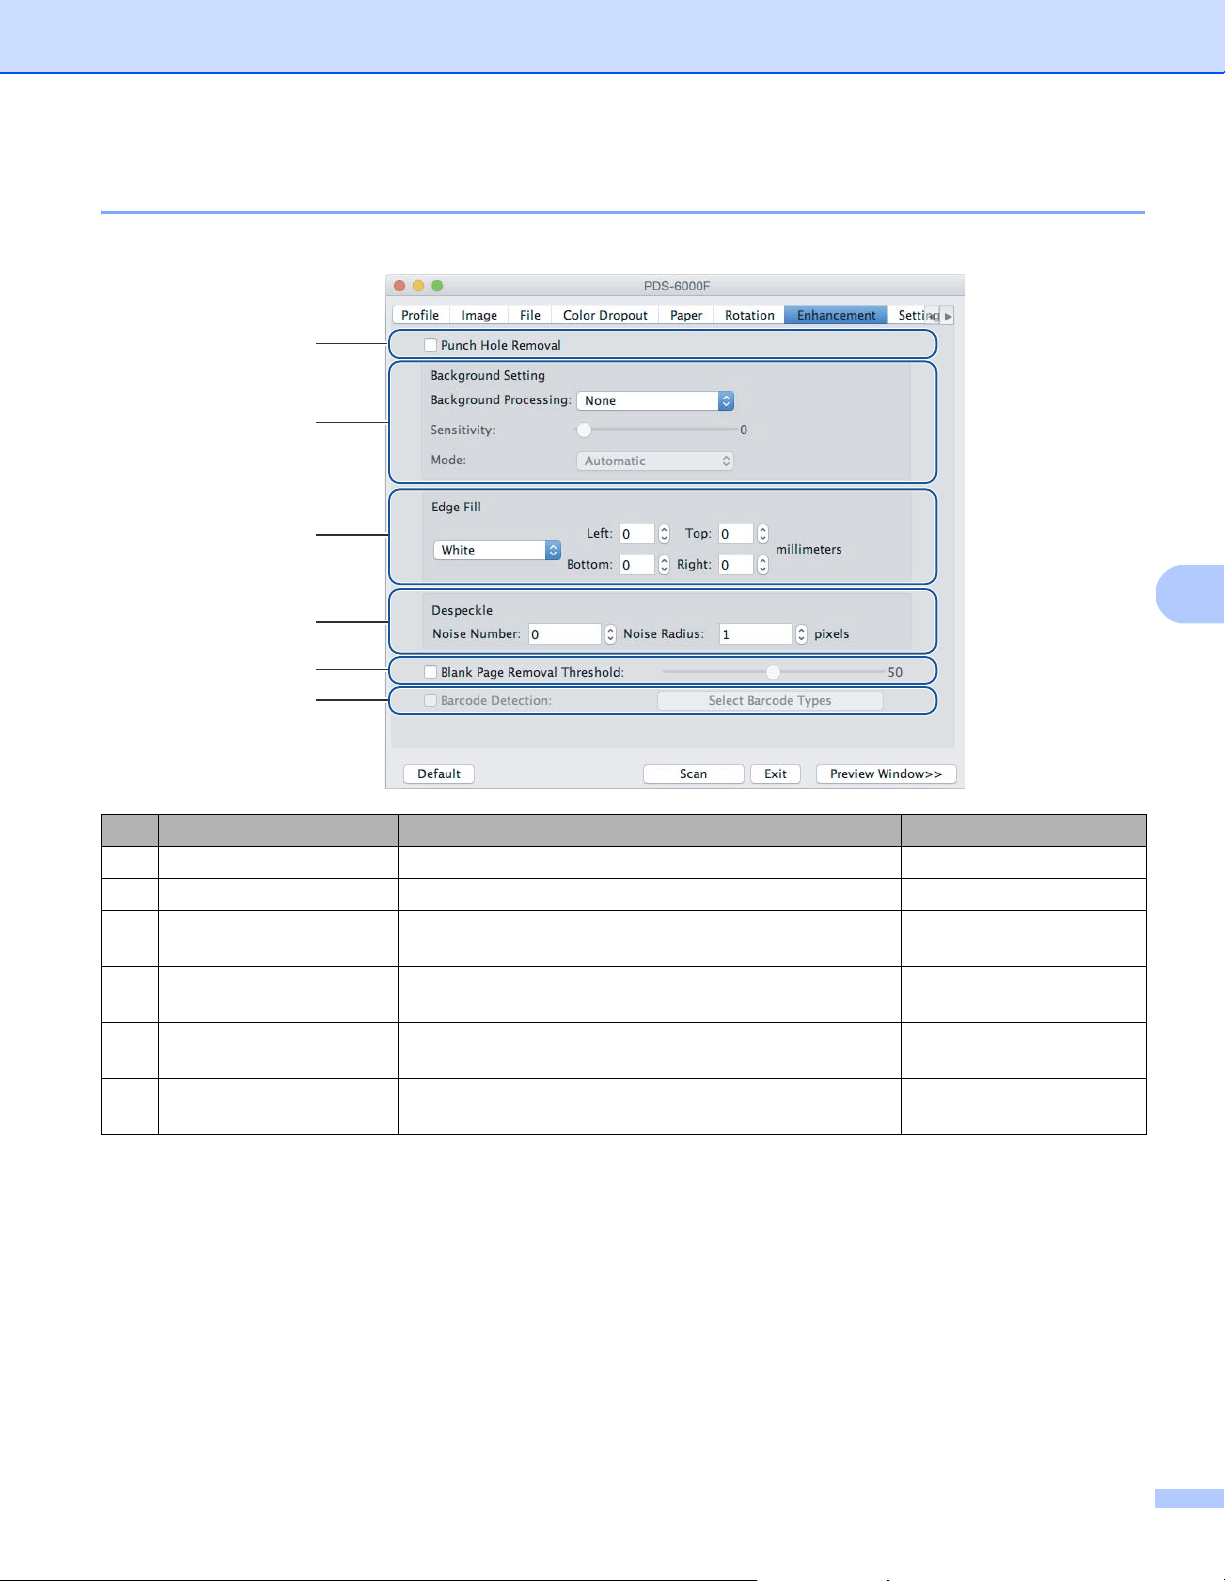
Scan (Macintosh)
86
6
Enhancement tab
Click the Enhancement tab to improve the appearance of your scanned image.
No. Name Description Default
(1) Punch Hole Removal Remove punch hole markings. (not selected)
(2) Background Setting Remove or smoothen the background color. None
(3) Edge Fill Add a white or black edge around the border. White
Millimeters: 0
(4) Despeckle Remove small dots or speckles from the background. Noise Number: 0
Noise Radius: 1
(5) Blank Page Removal
Threshold
Remove any blank pages from the original document. (not selected)
(6) Barcode Detection Detect and recognize barcodes; separates your
multi-page document whenever a barcode is detected.
(not selected)
(1)
(2)
(3)
(4)
(5)
(6)
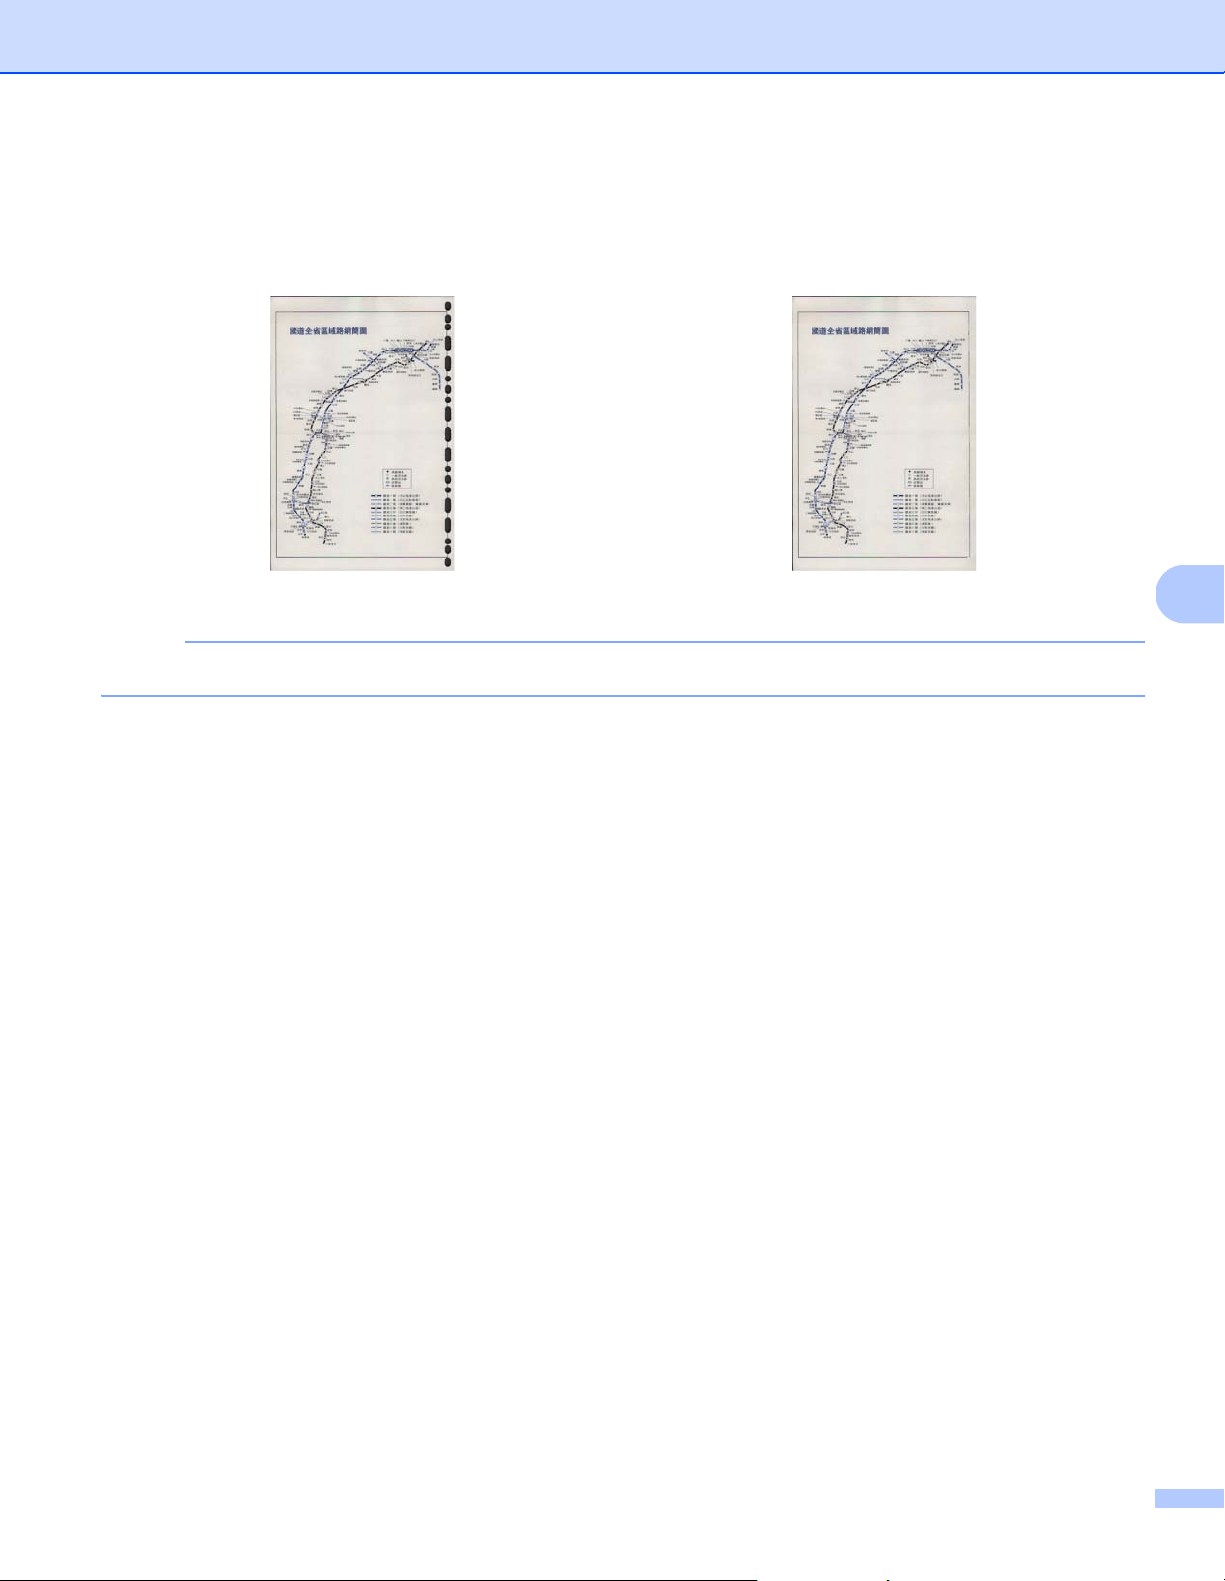
Scan (Macintosh)
87
6
Punch Hole Removal
Select the Punch Hole Removal check box to remove punch hole markings on scanned images. This feature
removes the punch hole markings by filling hole marks with the surrounding color.
NOTE
Punch Hole Removal is available when the paper size is set to Automatic.
Background Setting
Specifying the Background Setting allows you to remove or smoothen the base color of scanned documents.
Background Processing
Select None, Smooth or Removal from the pop-up list. Smooth makes the background smooth,
and Removal removes the background color.
Sensitivity
Move the Sensitivity slider to the left or right to adjust the sensitivity to base color or background.
The greater the sensitivity value, the better the scan results, the slower the scanning speed.
Mode
This option is available only if you select Smooth under Background Processing above. Select Automatic
to allow the software to process the image automatically. Select Moire to reduce moire.
Fill Color
This option is available only if you select Removal under Background Processing above. Select White
to make the background white. Select Automatic to allow the software to detect the background color
automatically and fill it in with the color.
Original Punch Hole Removal
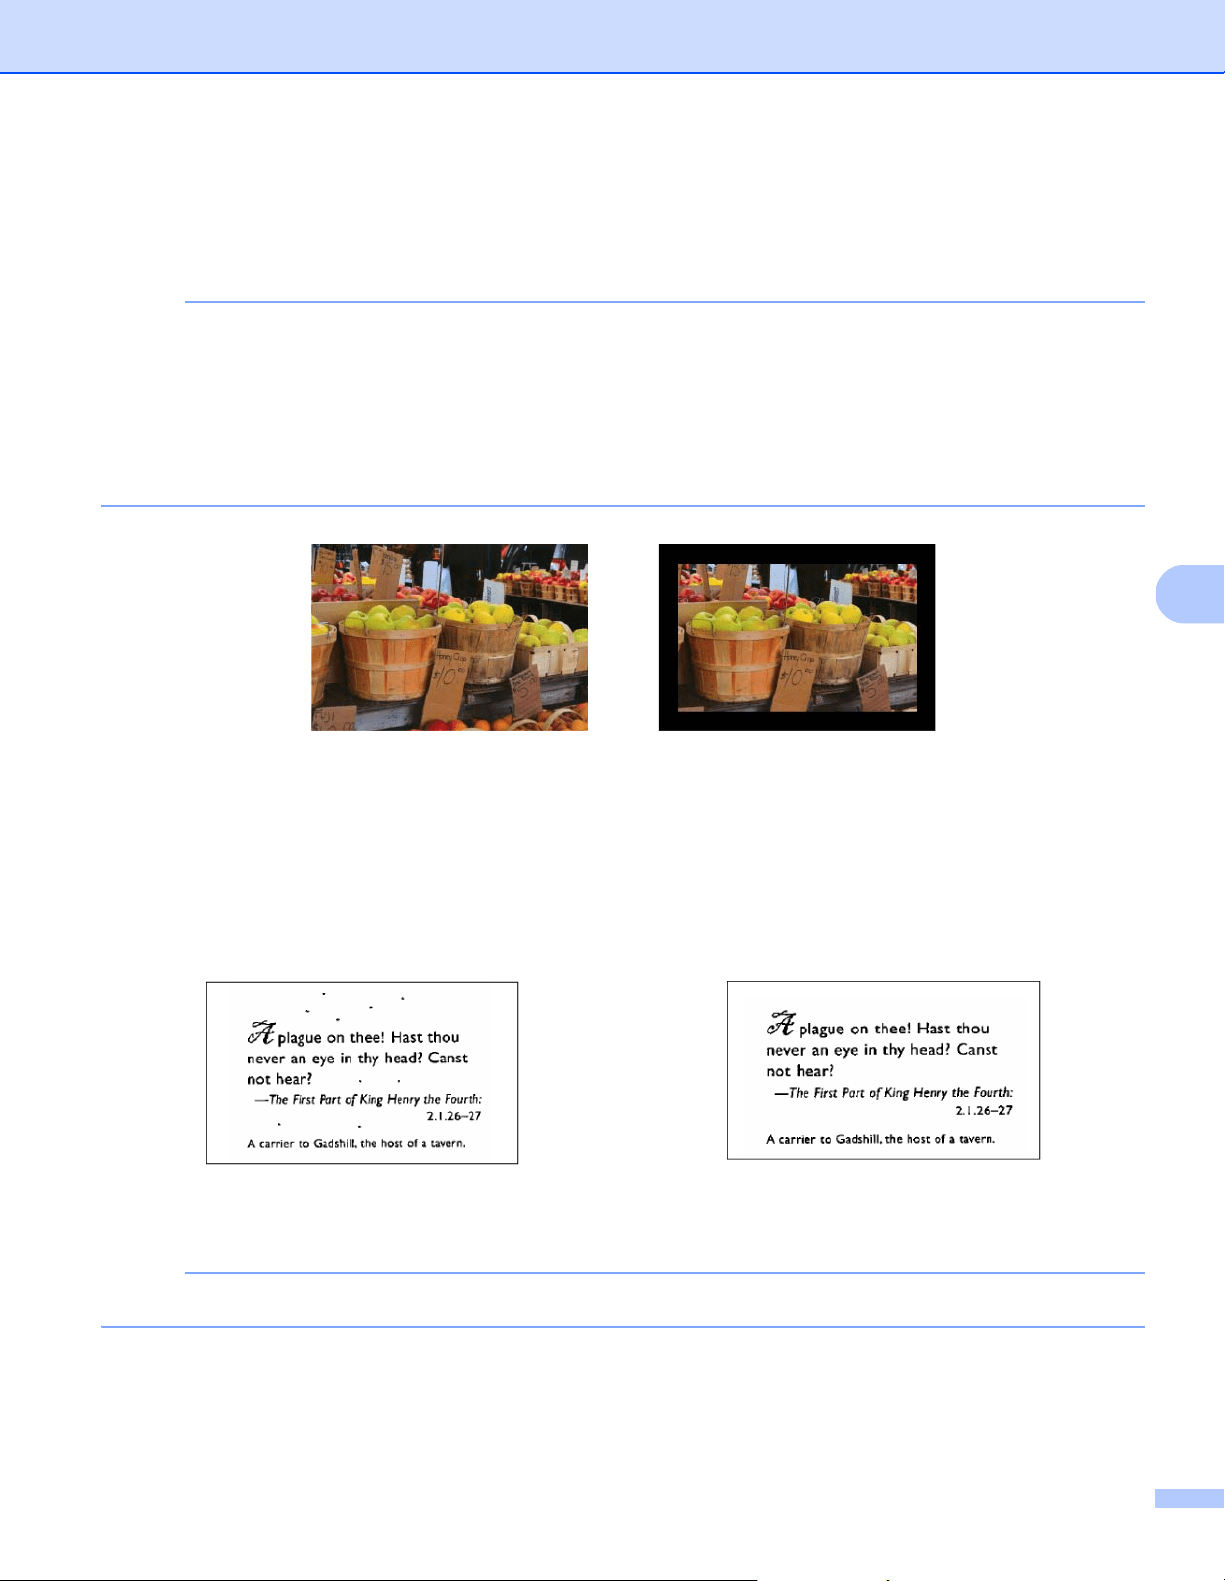
Scan (Macintosh)
88
6
Edge Fill
Select White or Black and set a value (in millimeters) to add a white or black edge around the border of your
scanned image.
NOTE
• The maximum edge fill value equals half the length of the shorter side of a selected paper size. For example,
if you select a Letter size, which is 8.5 × 11 in., the maximum value for the white edge or black edge is
4.25 in. (or half of 8.5 in.). If you select an A4 size, which is 210 × 297 mm, the maximum value for the white
edge or black edge is 105 mm (half of 210 mm).
• If you set a value greater than the maximum allowed, the value automatically defaults to the maximum.
• To disable this feature, set the each value to “0”.
Despeckle
This function allows you to remove small dots or speckles called “noise,” from the background of scanned
images. Removing unwanted speckles provides a clear image for OCR processing, and helps to reduce
compressed file size.
Define the noise you want to remove by specifying Noise Number (size) and Noise Radius (range).
NOTE
Despeckle is available for black and white images only.
Original Edge Fill: 20 mm (Black)
Before Despeckle
(Noise Number: 0, Noise Radius: 1)
After Despeckle
(Noise Number: 22, Noise Radius: 10)

Scan (Macintosh)
89
6
Blank Page Removal Threshold
Select the Blank Page Removal check box to remove blank pages from your scanned image.
Move the slider to change the threshold, or level of pixels, that determines a blank page.
Barcode Detection
Select the Barcode Detection check box to split multi-page scanned files whenever a barcode is detected.
Select Barcode Types
Click Select Barcode Type and select the barcode types to specify the barcode you want the scanning
software to recognize.
NOTE
• This function is available only when the File Format setting on the File tab is set to PDF or TIFF,
and Multi Page Output is selected.
• When you use Barcode Detection to split documents, pages that contain barcodes do not appear in your
scan results.
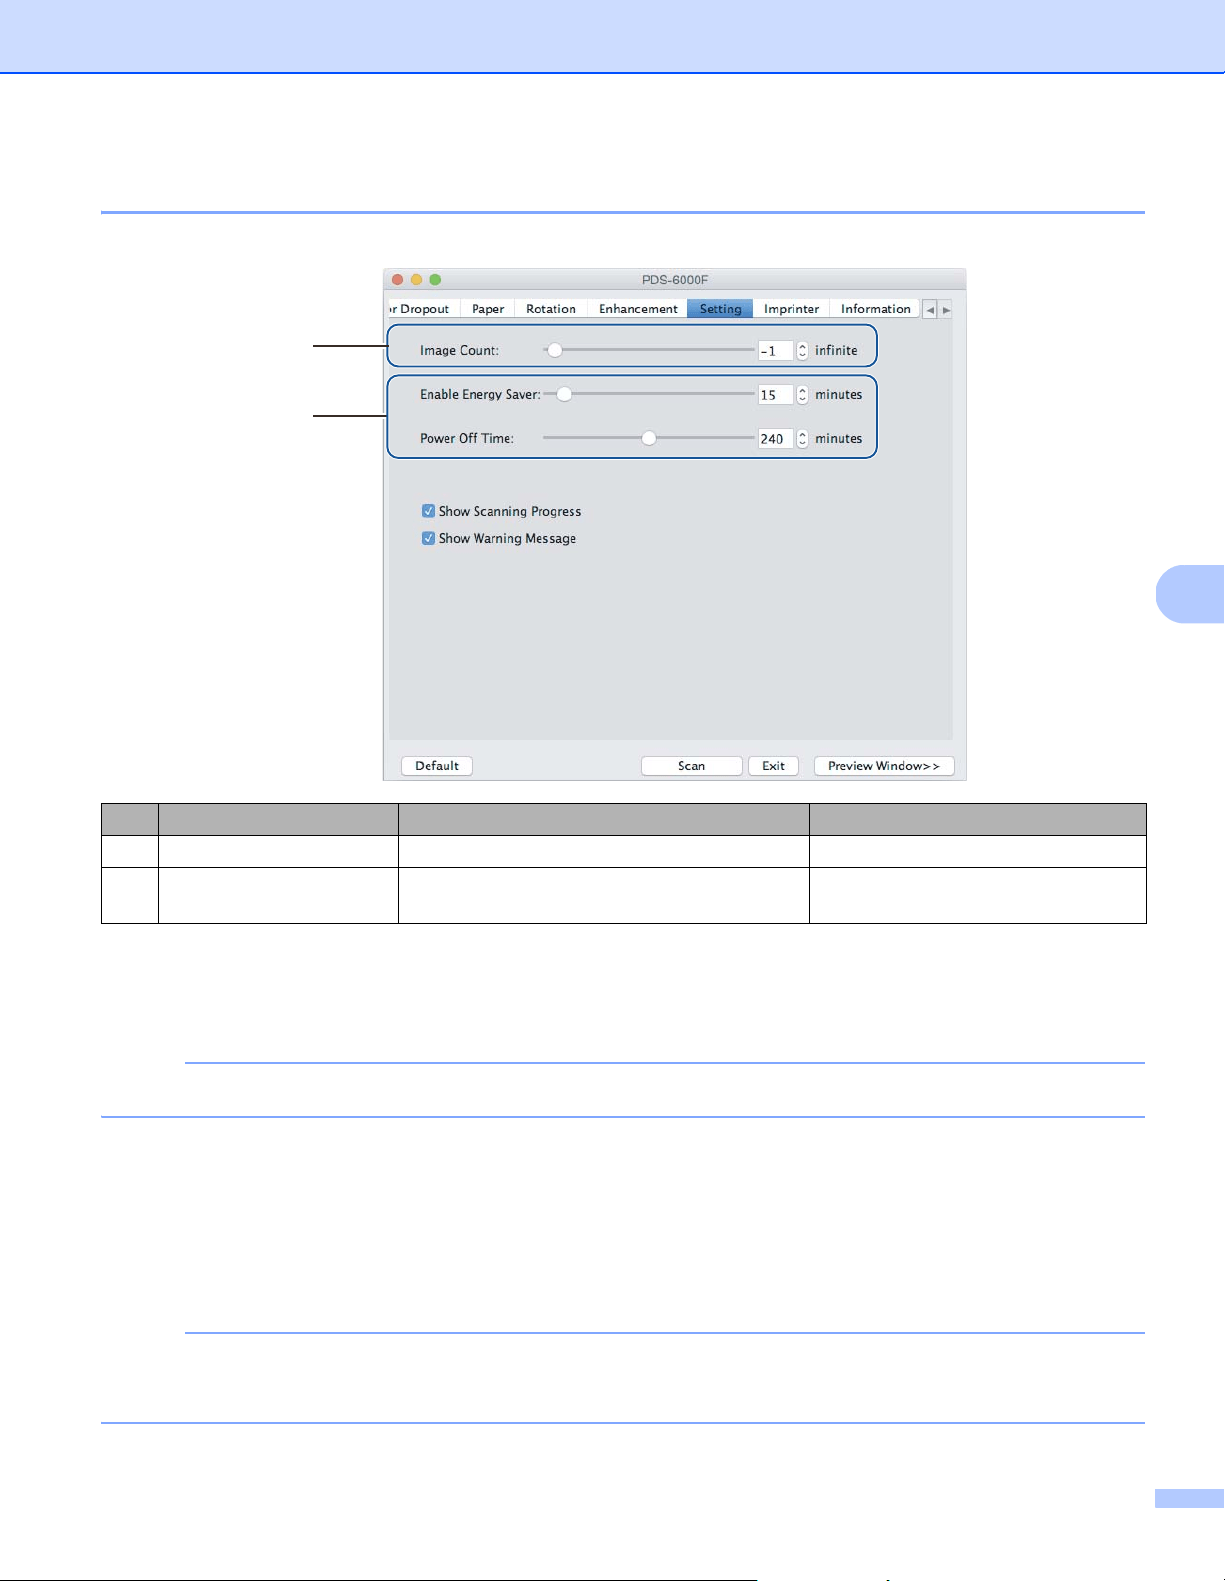
Scan (Macintosh)
90
6
Setting tab
Click the Setting tab to configure additional scanning options.
Image Count
This option allows you to specify the number of pages to scan. For example, to scan only the first two pages
of a document, move the page slider to “2”.
NOTE
Image Count is not available when using the scanner glass.
Energy Saver controls
Enable Energy Saver (Power Saving Mode)
Move the slider to set the amount of idle time before the machine enters Power Saving Mode.
Power Off Time
Move the slider to set the amount of idle time before the machine automatically powers off.
NOTE
• You cannot disable Enable Energy Saver.
• Power Off Time must be greater than or equal to Energy Saver time.
No. Name Description Default
(1) Image Count Specify the number of pages to scan. Infinite
(2) Energy Saver controls Change settings related to saving energy. Enable Energy Saver: 15 minutes
Power Off Time: 240 minutes
(1)
(2)
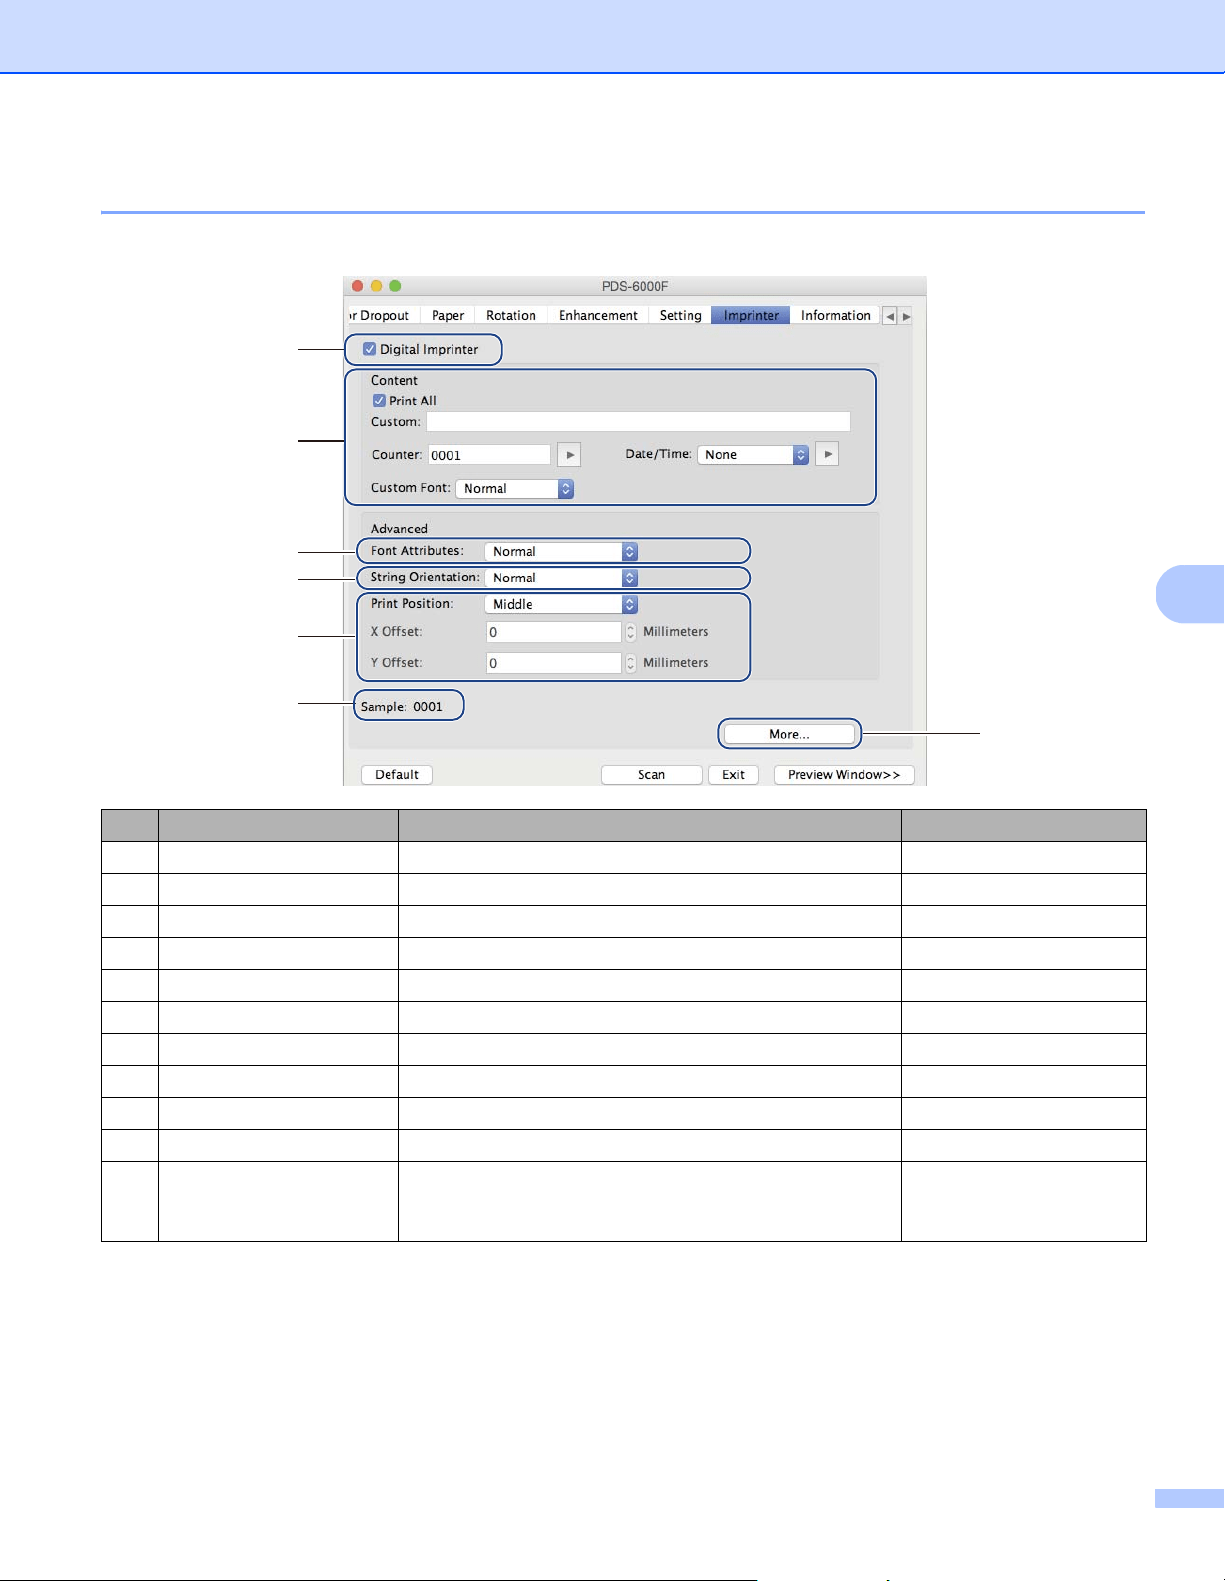
Scan (Macintosh)
91
6
Imprinter tab
Click the Imprinter tab to print the date, time, document count, or custom messages on your scanned image.
No. Name Description Default
(1) Digital Imprinter Select to activate this feature. (not selected)
(2) Print All Print on every page of the scanned image. (selected)
(3) Custom Type the custom text to print on your scanned image. (none)
(4) Counter Change the scan counter. Number (such as 1234)
(5) Date/Time Change the date/time. None
(6) Custom Font Select a font. Normal
(7) Font Attributes Select a font attribute. Normal
(8) String Orientation Select the print direction. Normal
(9) Print Position Select a print position. Middle
(10) Sample Preview your custom text. (none)
(11) More Set advanced font settings. Size: 5
Density: 0
Transparency: 0
(2) ~ (6)
(1)
(7)
(10)
(8)
(9)
(11)

Scan (Macintosh)
92
6
Digital Imprinter
Select the Digital Imprinter check box to use the digital imprinter to print custom text on your scanned image.
Print All
Select the Print All check box to print the text on every page of the scanned image.
Clear the check box to print the text only on the first page of the scanned image.
Custom
Type the text you want in your print string (up to 31 characters).
Counter
Click to increase the scan counter.
The number of digits specified here is displayed on the scanned image. For example, selecting Number (123456)
causes “000001” to be shown on the first page of the scanned image, “000002” on the second, “000003” on the
third, and so forth.
Date/Time
Select Date, Time, or Date+Time to include the date or time in your print string.
Click to select a date or time separator from the pop-up list.
Custom Font
Select Normal or Fixed Width from the Custom Font pop-up list.
Fixed Width (monospace) fonts use a fixed character spacing, so each character occupies the same width.
Font Attributes
Select Normal, Underline, Double, or Bold from the Font Attributes pop-up list.
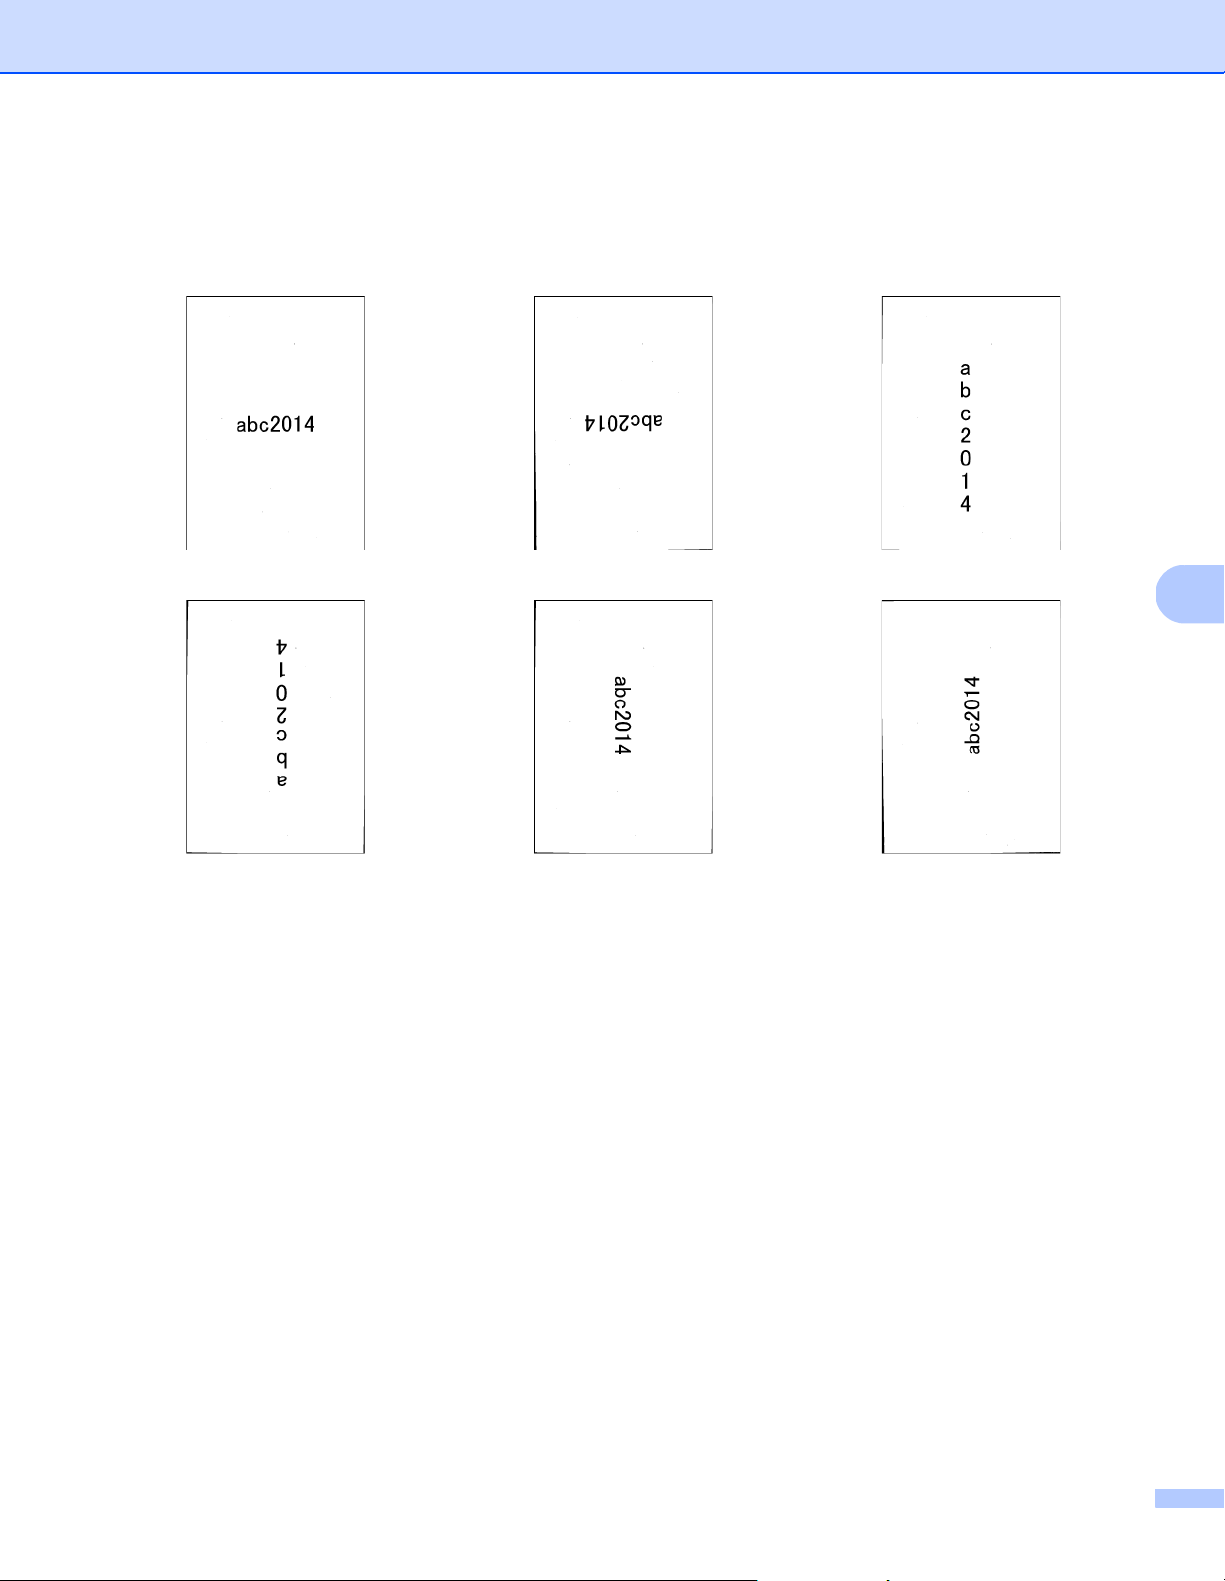
Scan (Macintosh)
93
6
String Orientation
Select Normal, Rotated, Vertical, Vertical Inversion, 90 Degrees CW (clockwise), or 90 Degrees CCW
(counter-clockwise), from the String Orientation pop-up list to specify the text’s print direction.
Print Position
Select Top, Middle, Bottom, or Custom from the Print Position pop-up list.
If you select Custom, enter the X Offset and Y Offset value to specify the text’s start position.
Sample
Preview your text here.
Normal Rotated Vertical
Vertical Inversion 90 Degrees CW 90 Degrees CCW
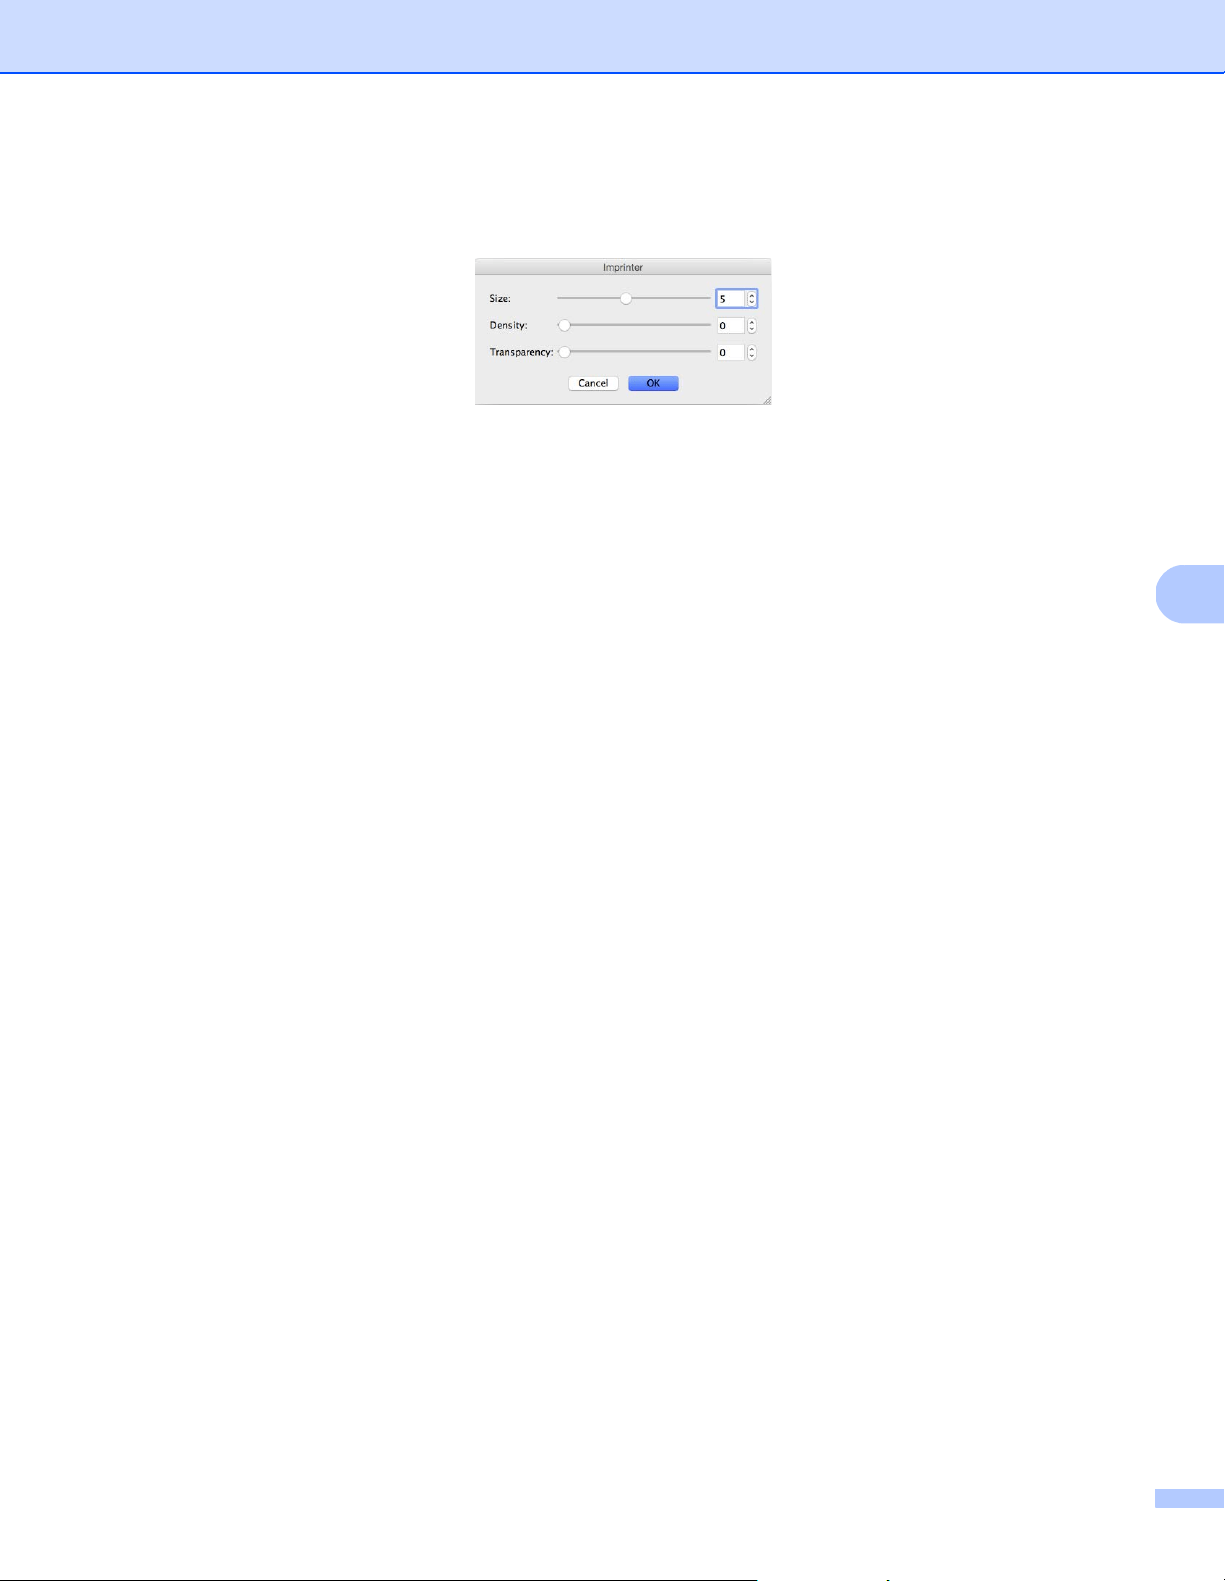
Scan (Macintosh)
94
6
More
Click the More button to select additional font properties.
Size
Move the slider to select font size (Default: 5).
Density
Move the slider to select font density (Default: 0).
Transparency
Move the slider to select a transparency value from 0% (not transparent) to 100% (completely transparent).
This is useful when creating a partially transparent watermark.
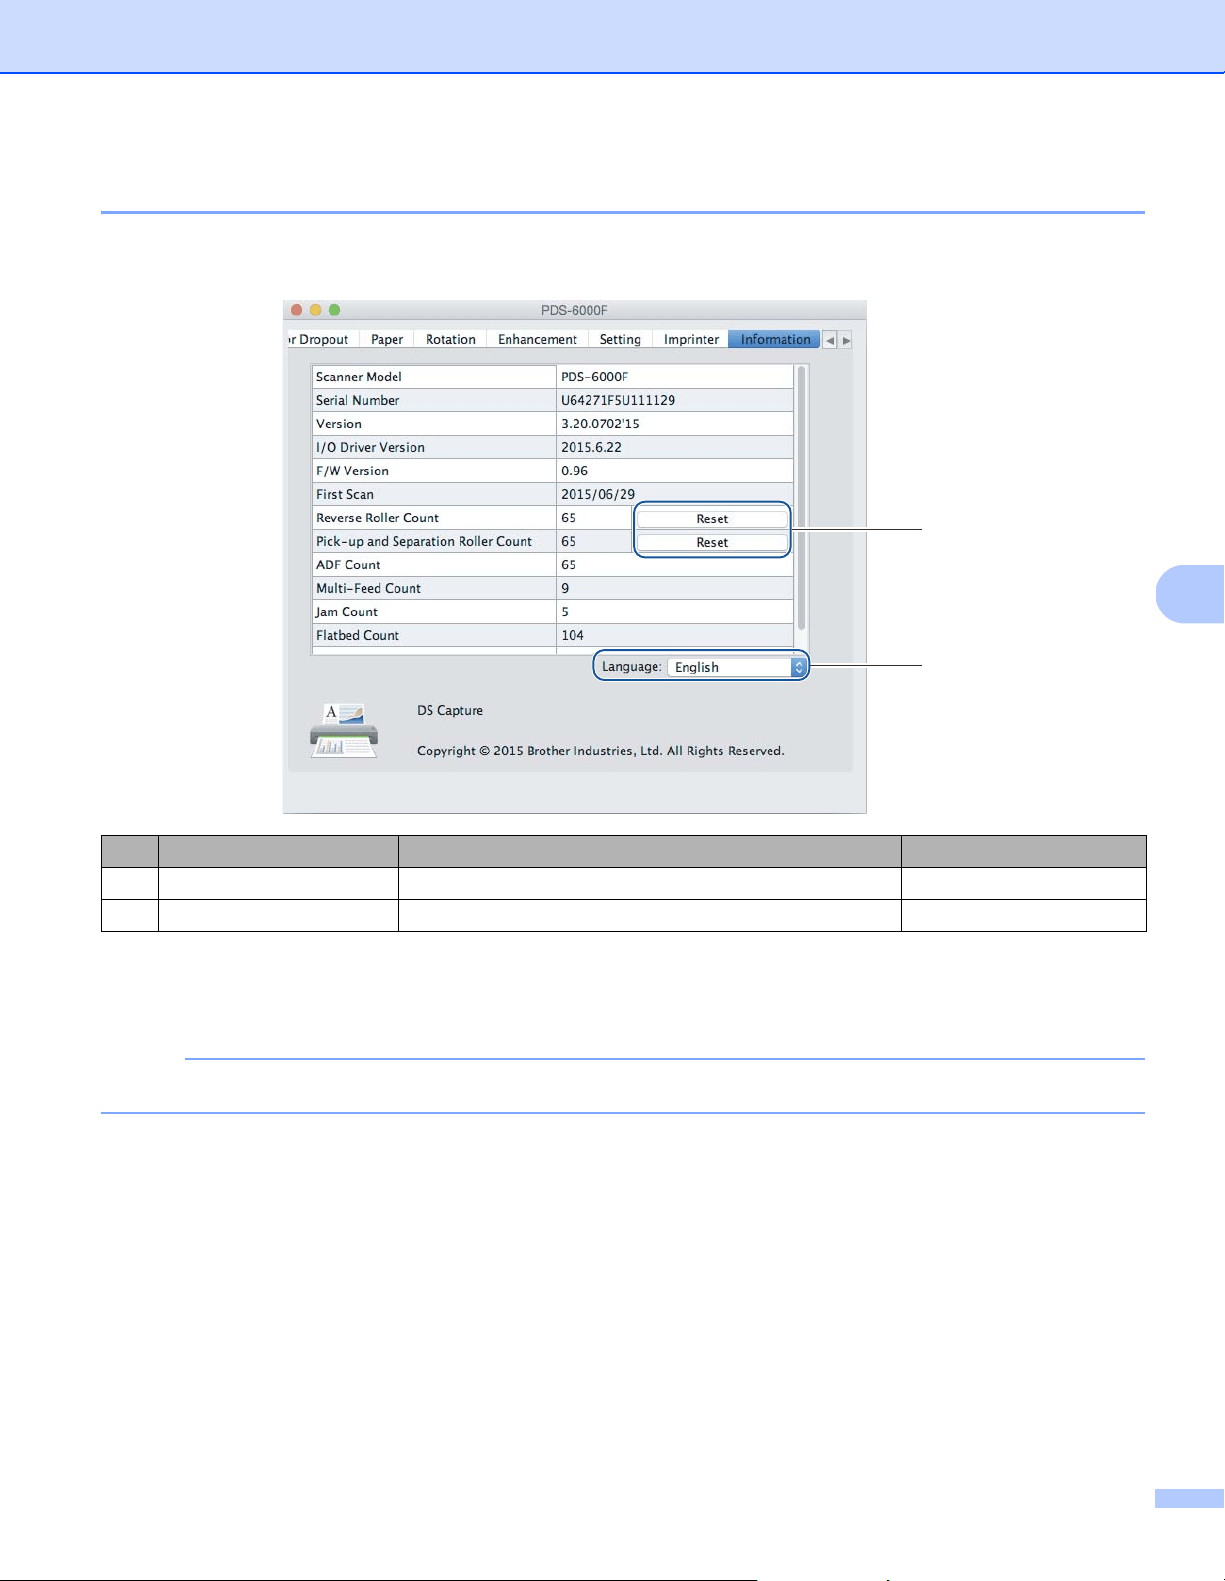
Scan (Macintosh)
95
6
Information tab
Click the Information tab to display system and machine information, such as scanner driver version and
firmware version. You can also view the roller count and reset the count in this window.
Reset Roller Count
After replacing the scanner rollers, click the Reset button to reset the roller count.
NOTE
Do not reset the counter unless you have replaced the rollers.
Language
Change the language of the DS Capture user interface, if needed.
No. Name Description Default
(1) Reset Roller Count Reset the roller count. -
(2) Language Change the language of the DS Capture user interface. (based on OS language)
(1)
(2)
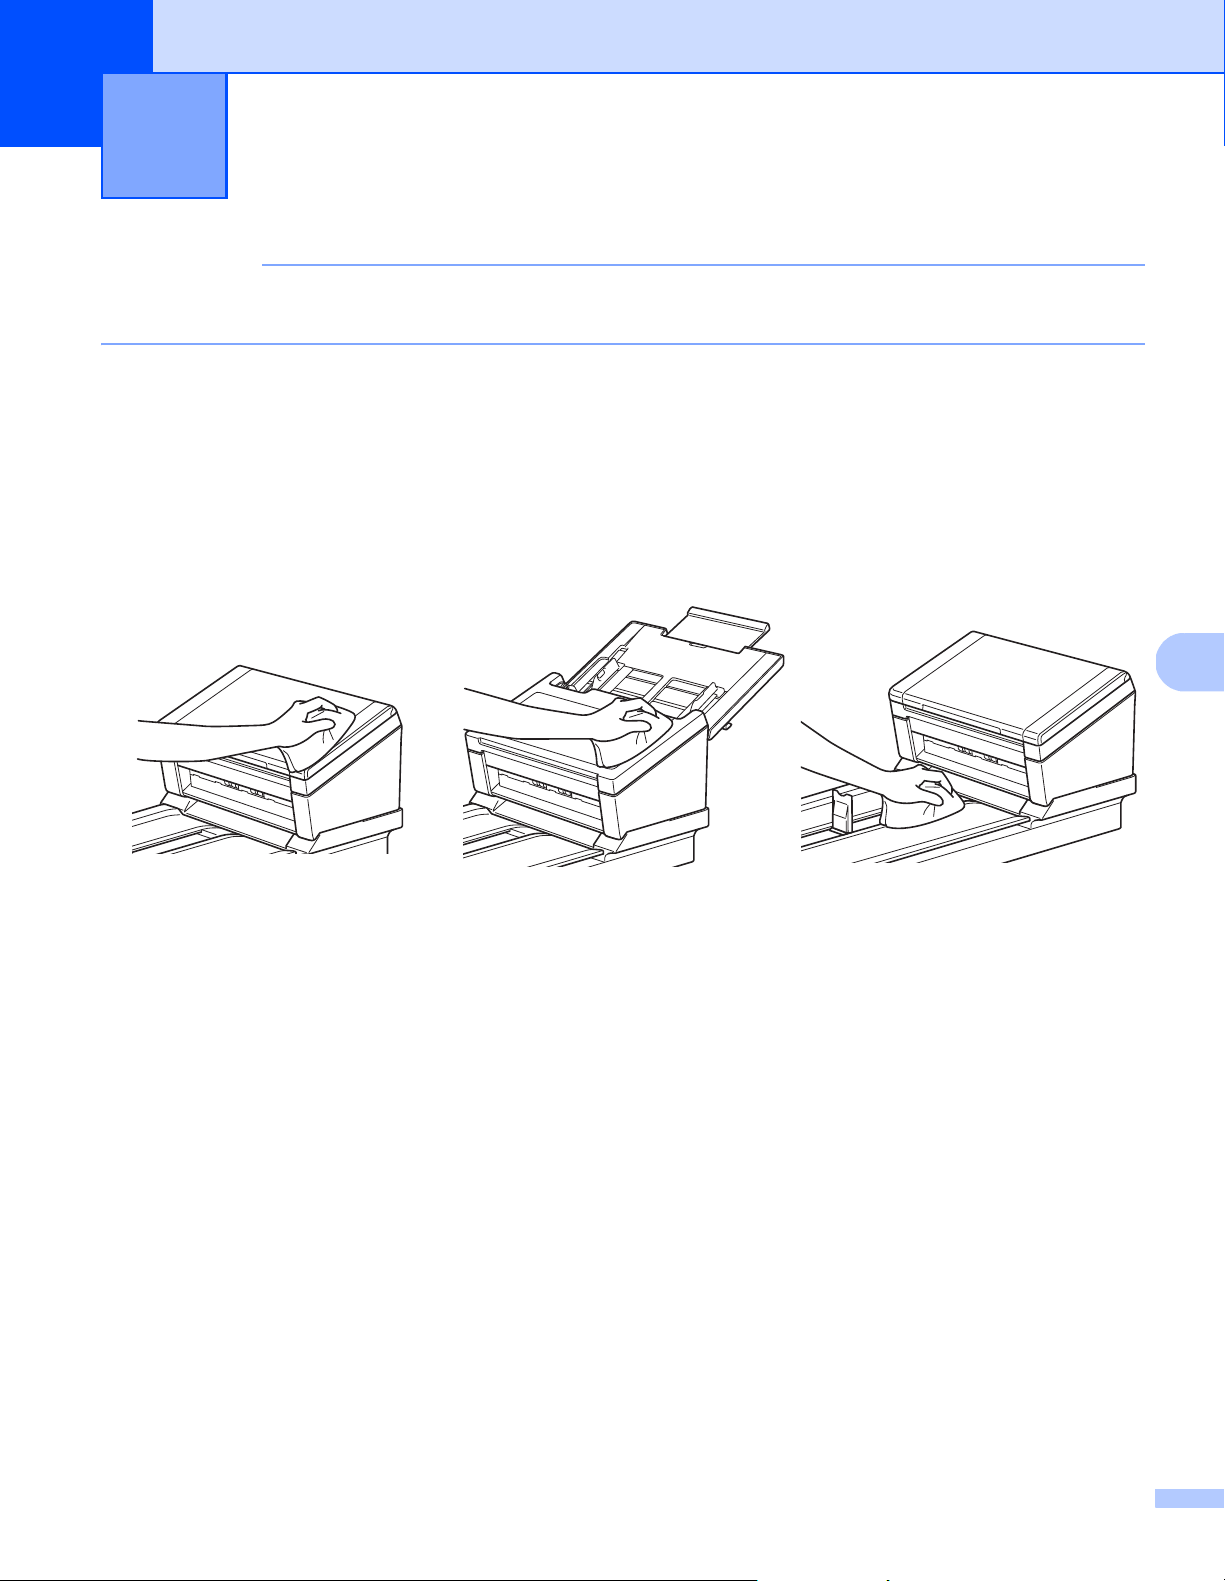
96
7
7
IMPORTANT
Do not use any solvents or corrosive liquids, such as alcohol or kerosene, to clean any part of your Brother
machine, or the plastic may be permanently damaged.
Clean the outside of your machine
To prevent dust accumulation, we recommend cleaning the exterior of your Brother machine periodically.
Wipe the outside of the machine with a dry, soft, lint-free cloth.
Maintenance
7
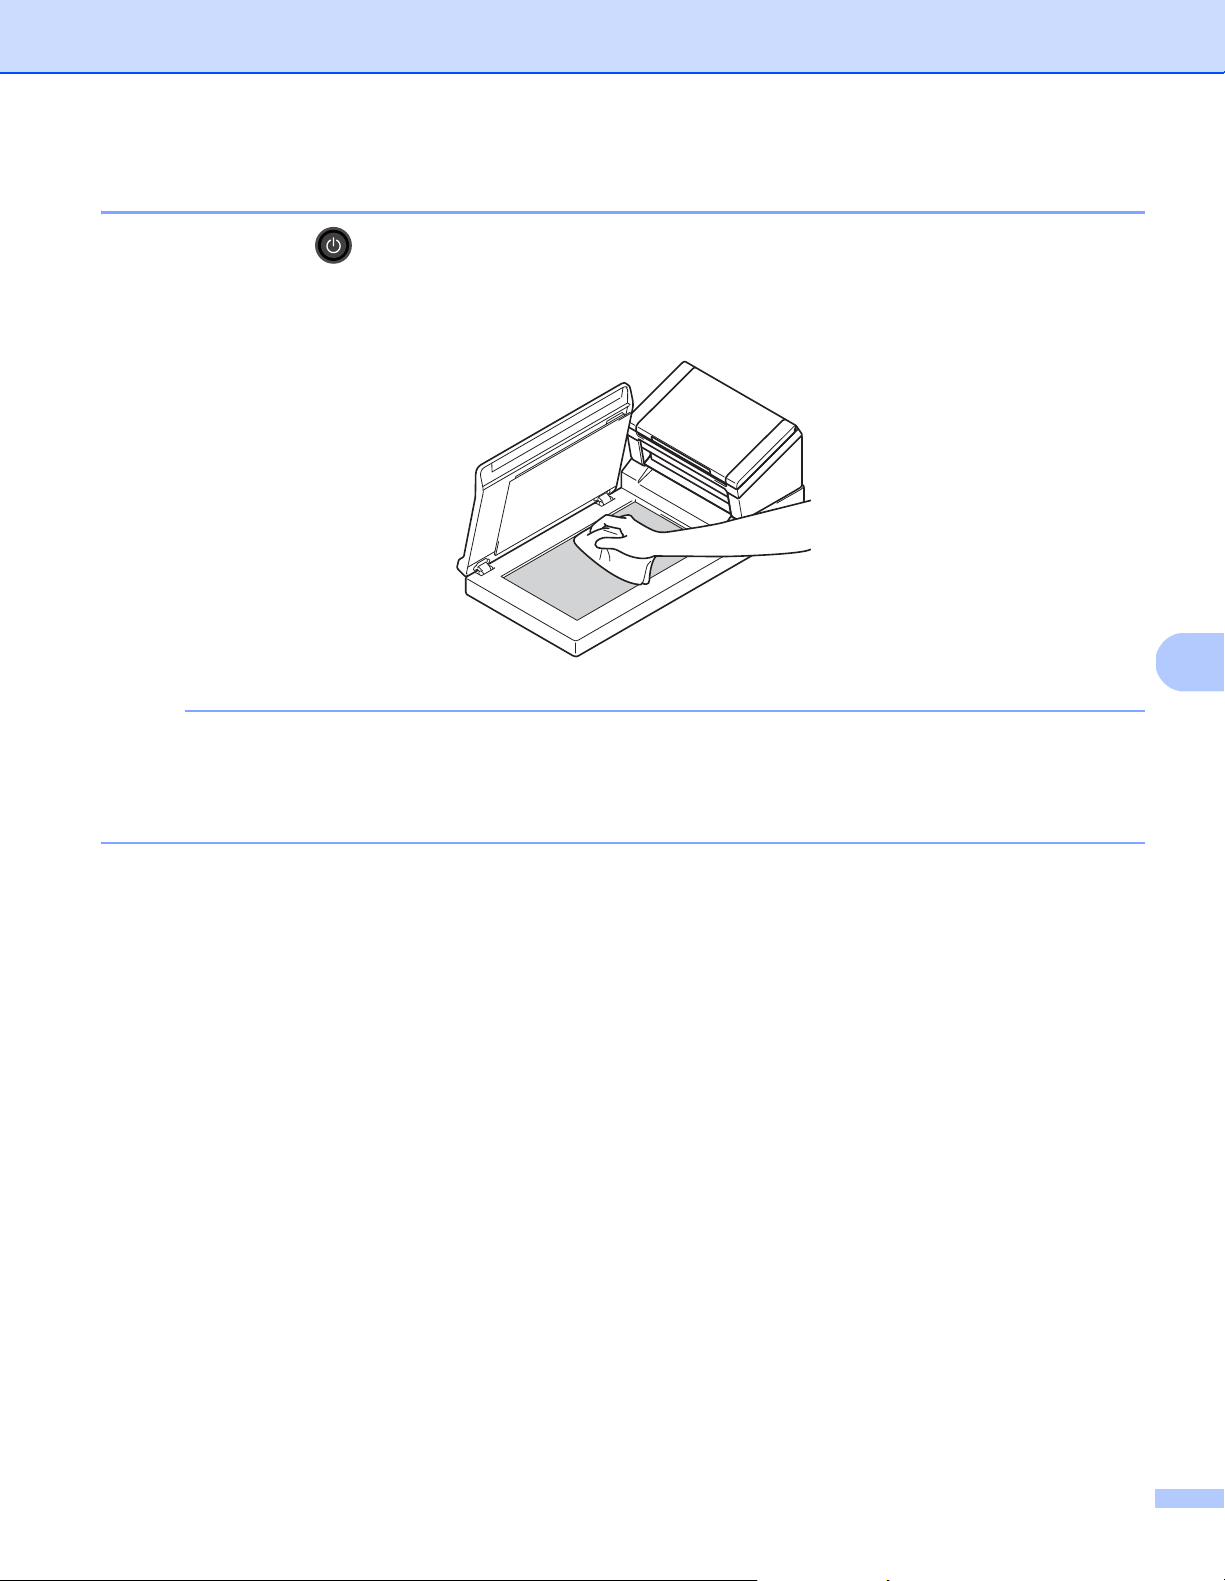
Maintenance
97
7
Clean the Scanner Glass
Press and hold down to turn the machine off.
Lift the document cover.
Clean the scanner glass under the document cover with a soft, lint-free cloth moistened with water.
NOTE
In addition to cleaning the scanner glass and glass strip with a soft, lint-free cloth moistened with water,
run your finger tip over the glass to see if you can feel anything on it. If you feel dirt or debris, clean the
glass again, concentrating on that area. You may have to repeat the cleaning process three or four times.
To test, scan after each cleaning.
Close the document cover.
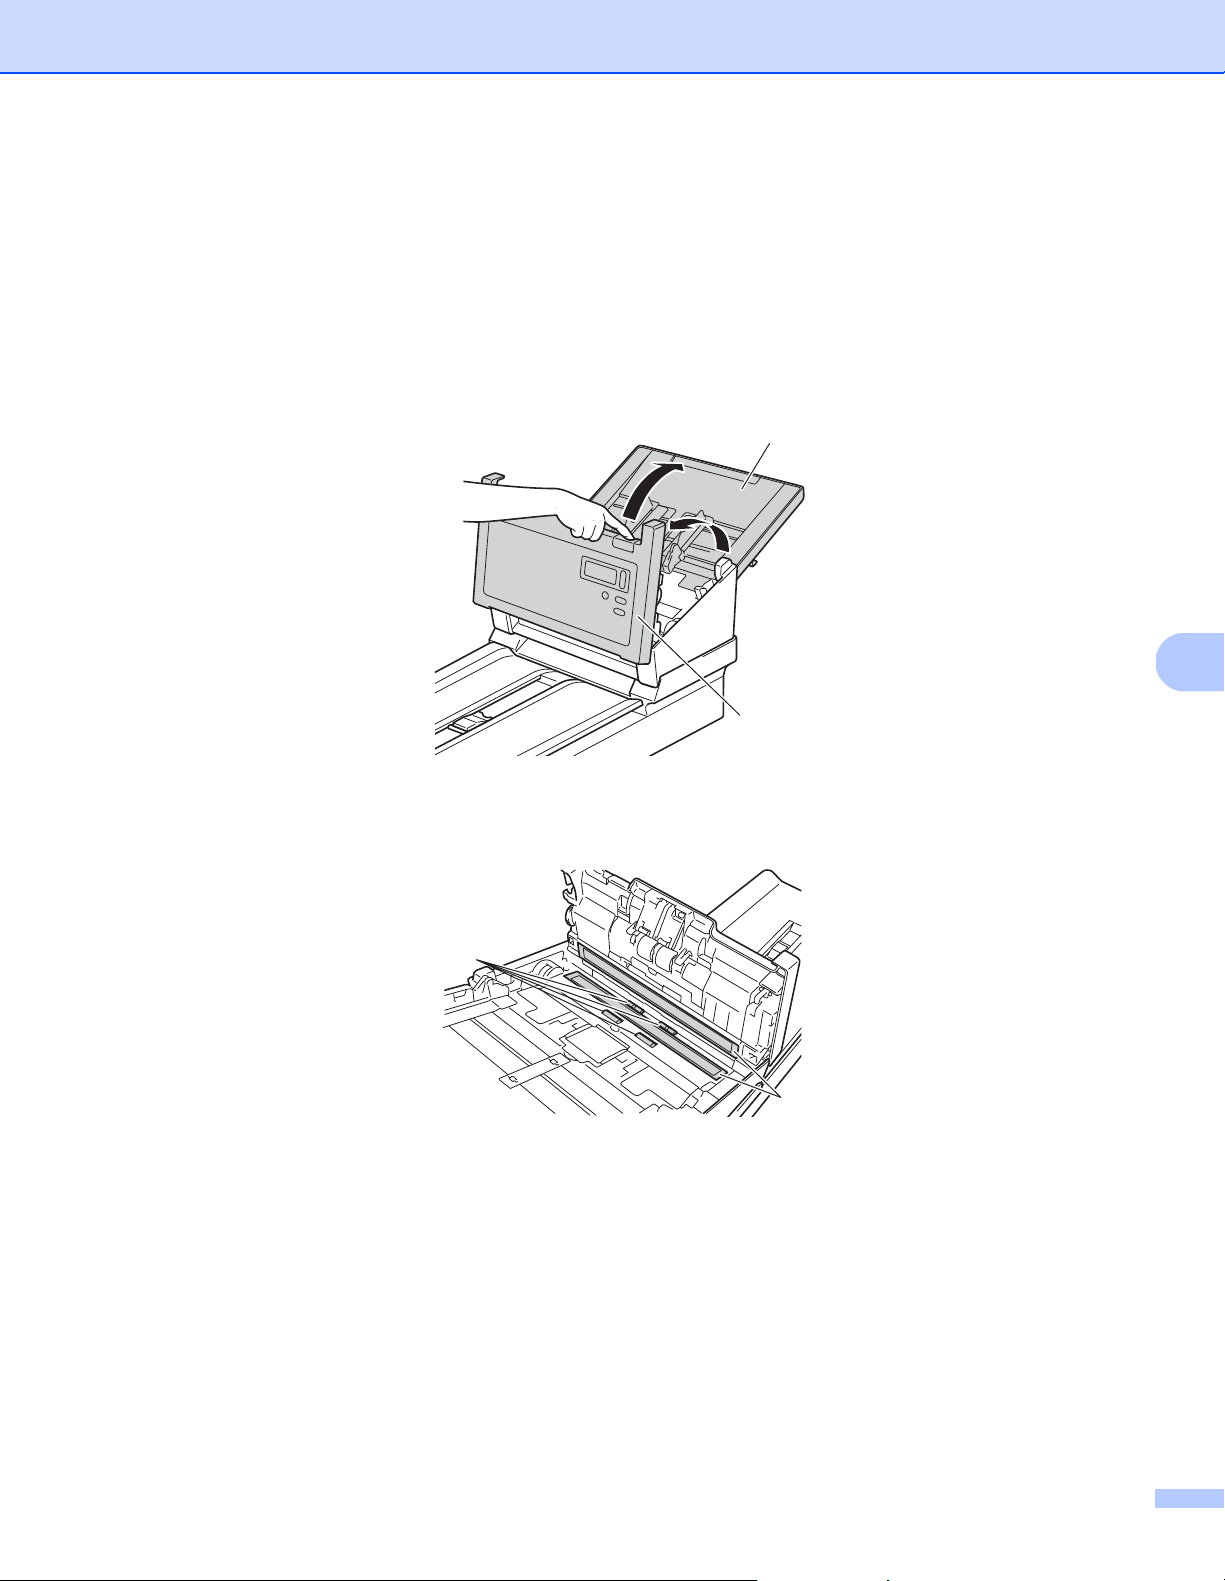
Maintenance
98
7
Clean the inside of your machine
A spot of dirt or correction fluid on the glass strip may cause poor-quality scans. If a vertical line appears in
the scanned data or if parts of the document are missing, you must clean the inside of the machine.
a Unplug the machine from the AC power outlet.
b Open the Top Cover (1) and the ADF Cover (2).
c In the ADF unit, clean the glass strips (1) and feed rollers (2) with a soft, lint-free cloth moistened with
water.
1
2
2
1
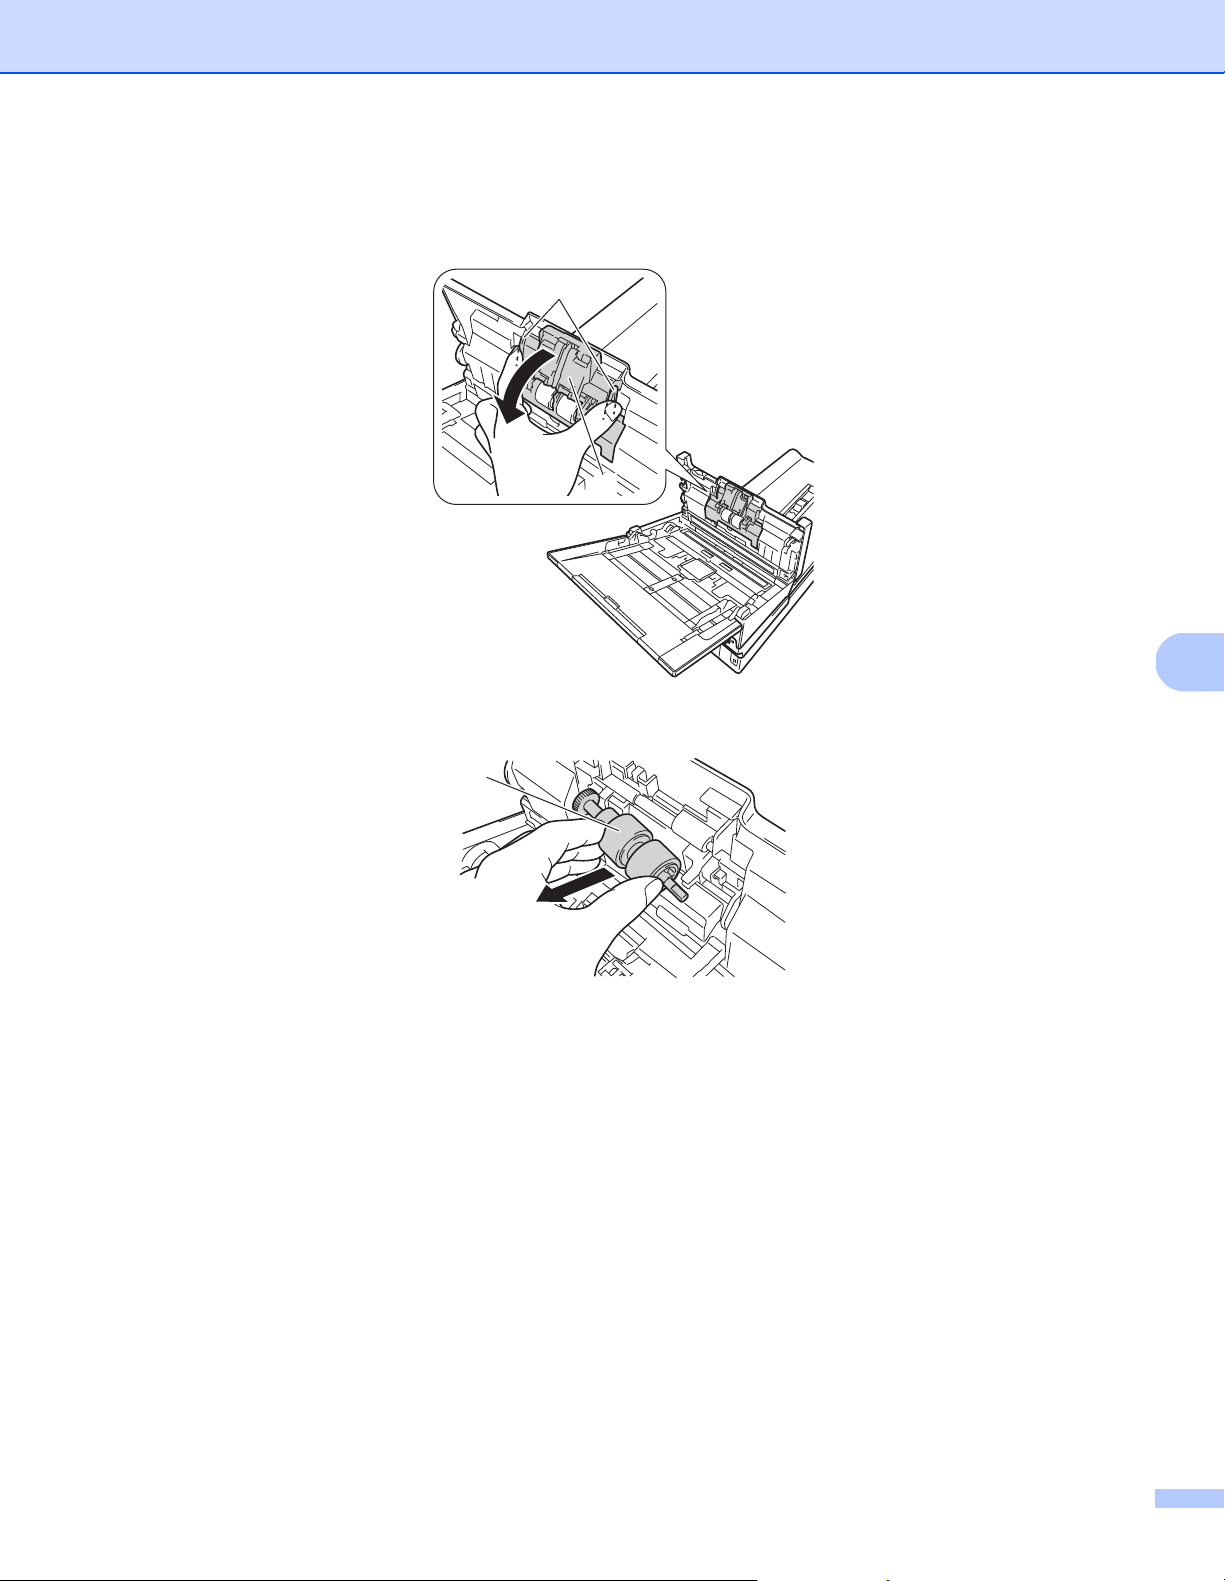
Maintenance
99
7
d Press and hold the buttons (1) on the inside of the ADF Cover, and then pull the Reverse Roller Cover (2)
down.
e Pinch the Reverse Roller (1) and pull it out of the machine.
f Clean the Reverse Roller with a soft, lint-free cloth moistened with water.
g Pinch the Reverse Roller and reinstall it in the machine.
1
2
1
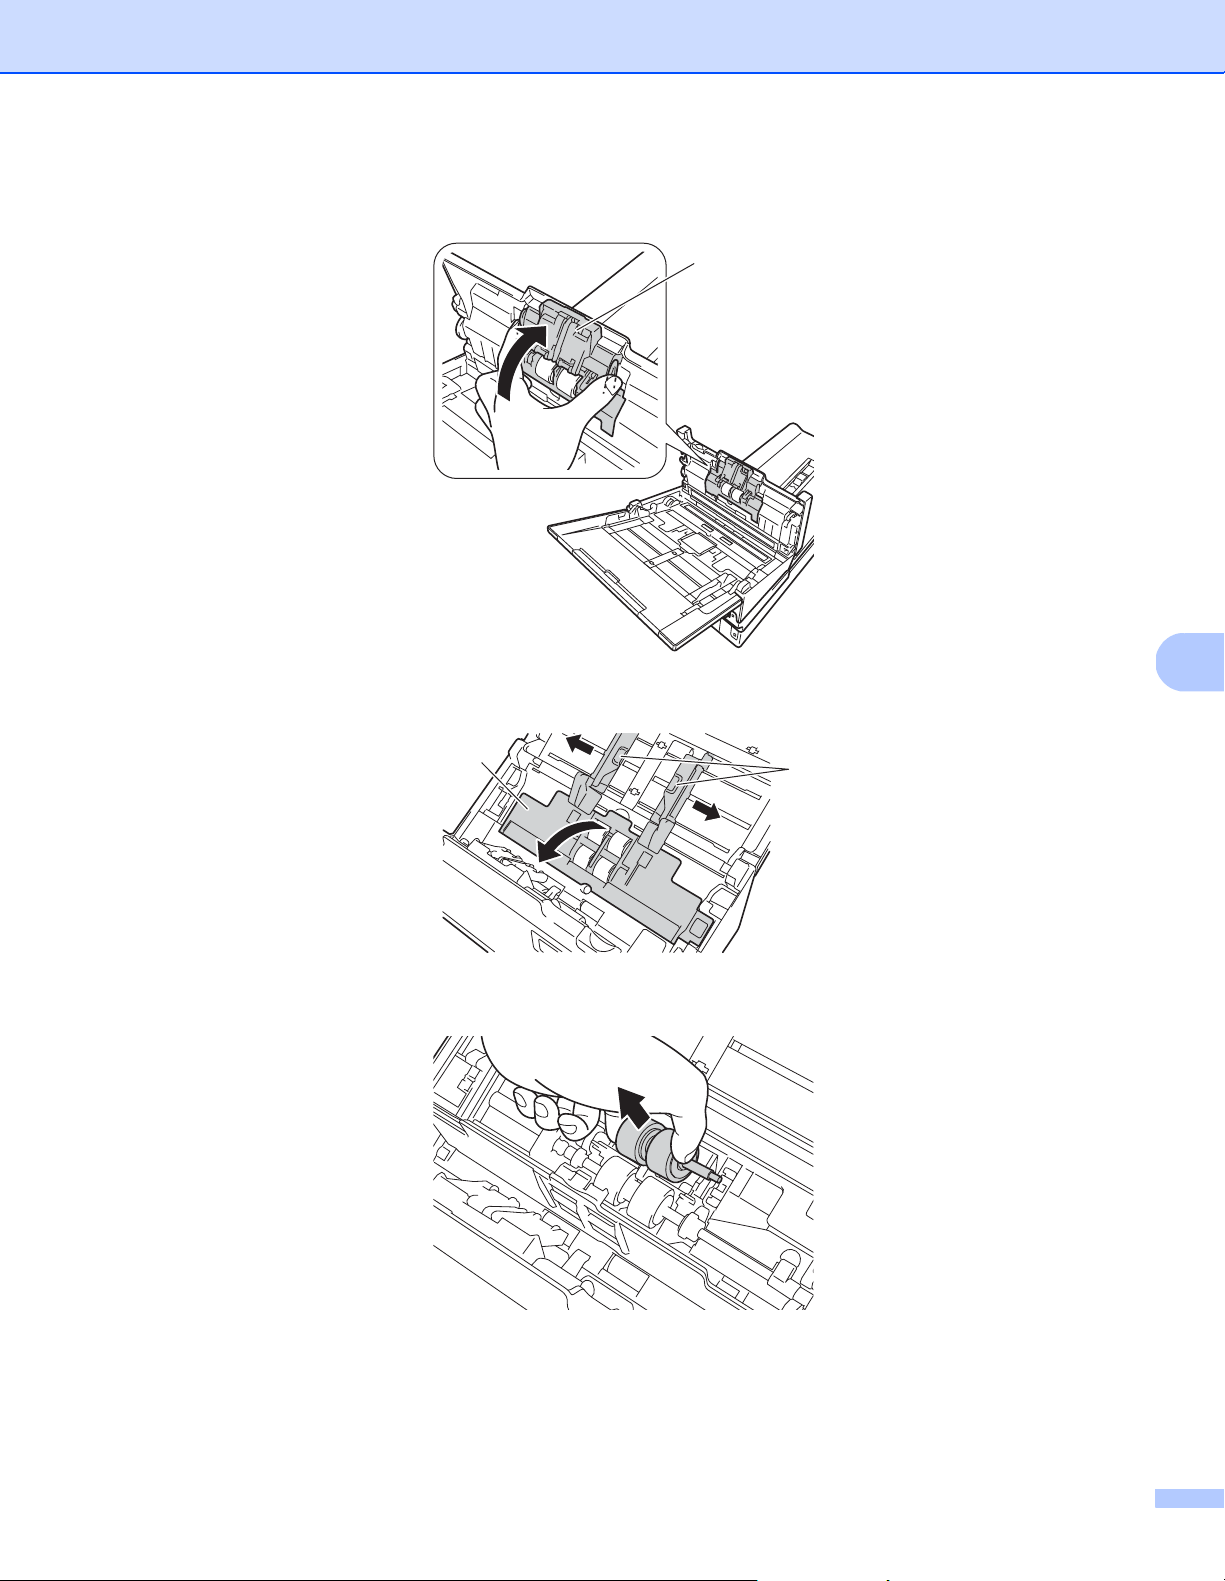
Maintenance
100
7
h Securely close the Reverse Roller Cover (1) until the hooks snap into the ADF Cover.
i Slide the document guides (1) as far apart as possible and pull the Roller Cover (2) down.
j Pinch the Pick-up Roller and pull it out of the machine.
1
2
1

Maintenance
101
7
k Pull the blue hook on the Separation Roller down.
l Pinch the Separation Roller and pull it out of the machine.
m Clean the Pick-up Roller and the Separation Roller with a soft, lint-free cloth moistened with water.
n Pinch the Separation Roller and reinstall it in the machine.

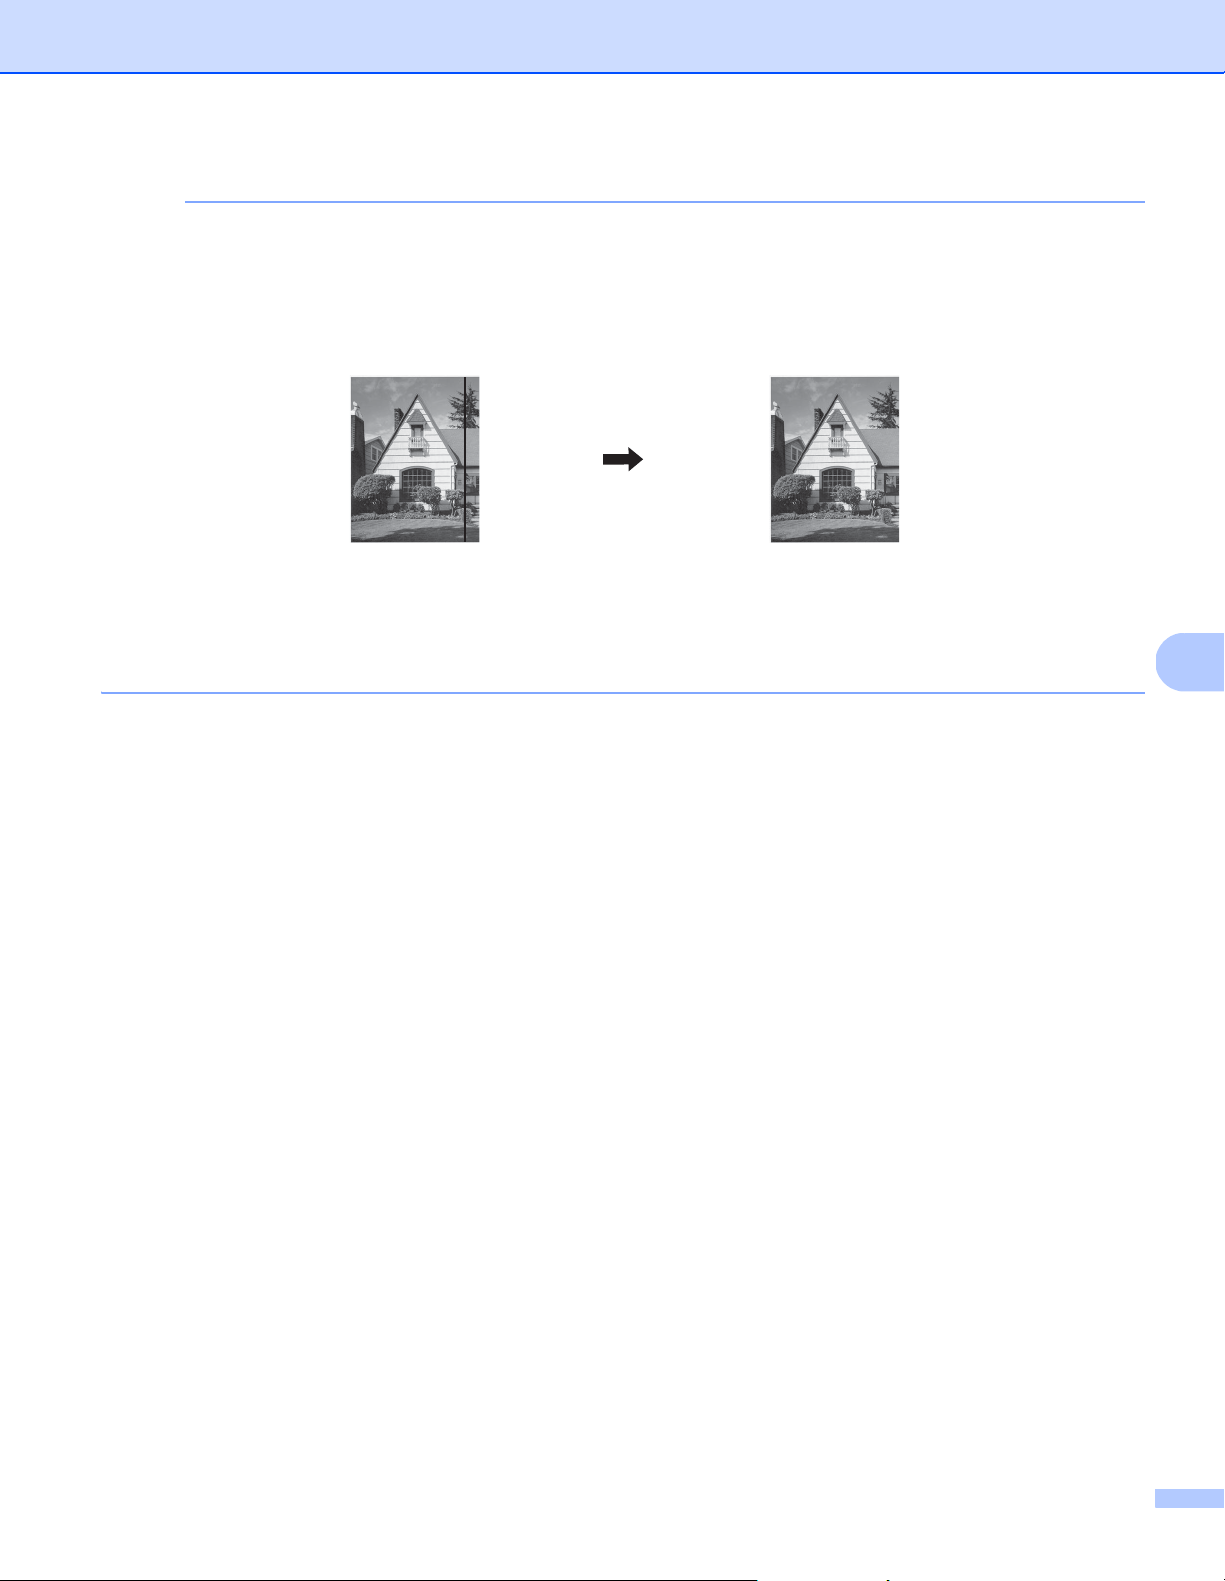
Maintenance
103
7
NOTE
In addition to cleaning the glass strips with a non-flammable glass cleaner, run your fingertip over the glass
to see if you can feel anything on it. If you feel dirt or debris, clean the glass again concentrating on that
area. You may need to repeat the cleaning process three or four times. To test, scan a document after
each cleaning attempt.
When there is a spot of dirt or
correction fluid on the glass
strip, the scanned sample
shows a vertical line.
After the glass strip is cleaned
the vertical line is gone.
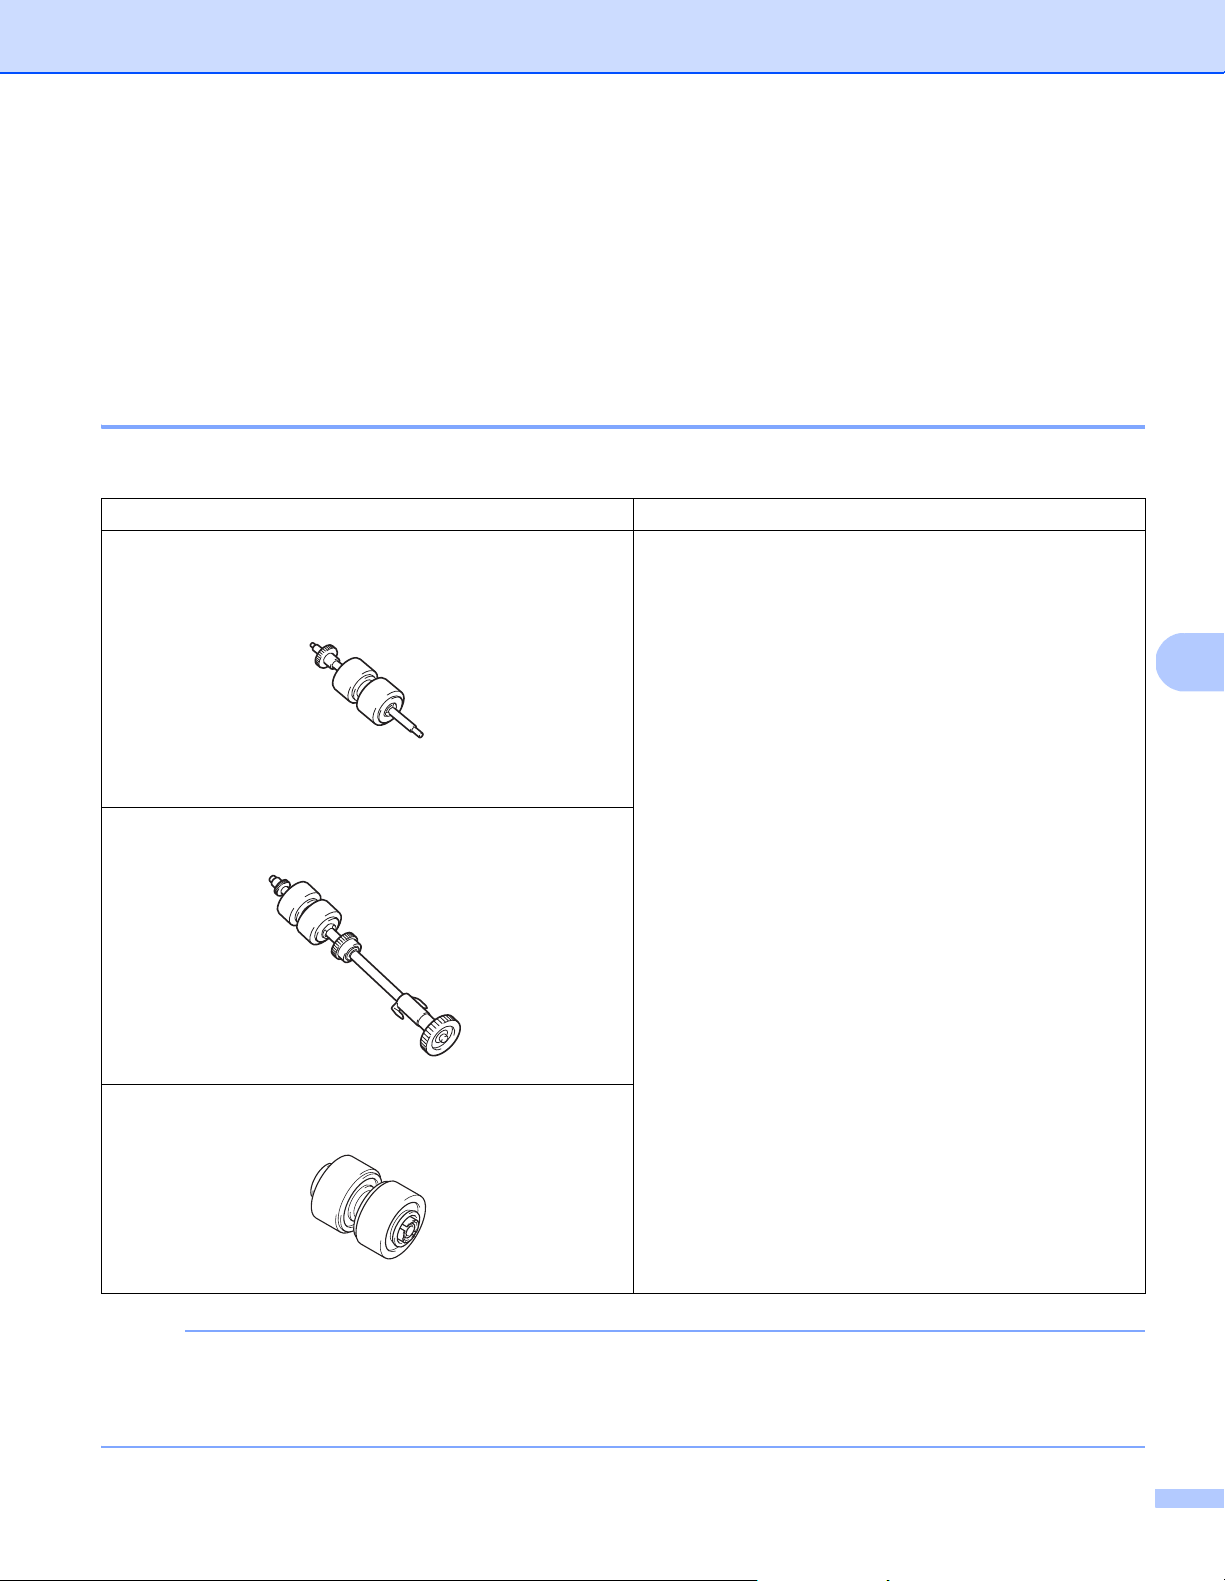
Maintenance
104
7
Replace parts
When your Brother machine detects that scanner parts are nearing their end-of-life period, a warning
message appears on your computer monitor.
If the warning message warns you to replace the Pick-up Roller, the Separation Roller, or the Reverse Roller,
order new parts, and then replace the used parts with the new ones.
Supply information
The following table lists part names and contains recommendations about usage and replacement:
NOTE
• Your replacement cycles may vary depending on the usage environment, types of documents, and
scanning frequency.
• We recommend replacing all three rollers at the same time, or the roller count value will be incorrect.
Part Name Standard Replacement Cycle
Pick-up Roller
200,000 sheets or 5 years
Separation Roller
Reverse Roller

Maintenance
105
7
These parts are available at most Brother retailers. If you cannot find the part you need, you can order parts
directly from Brother. Visit us online for a complete selection of the Brother parts and supplies.
In USA: 1-877-552-MALL (1-877-552-6255)
1-800-947-1445 (fax)
www.brothermall.com/
In Canada:
www.brother.ca/
Other Countries:
www.brother.com/
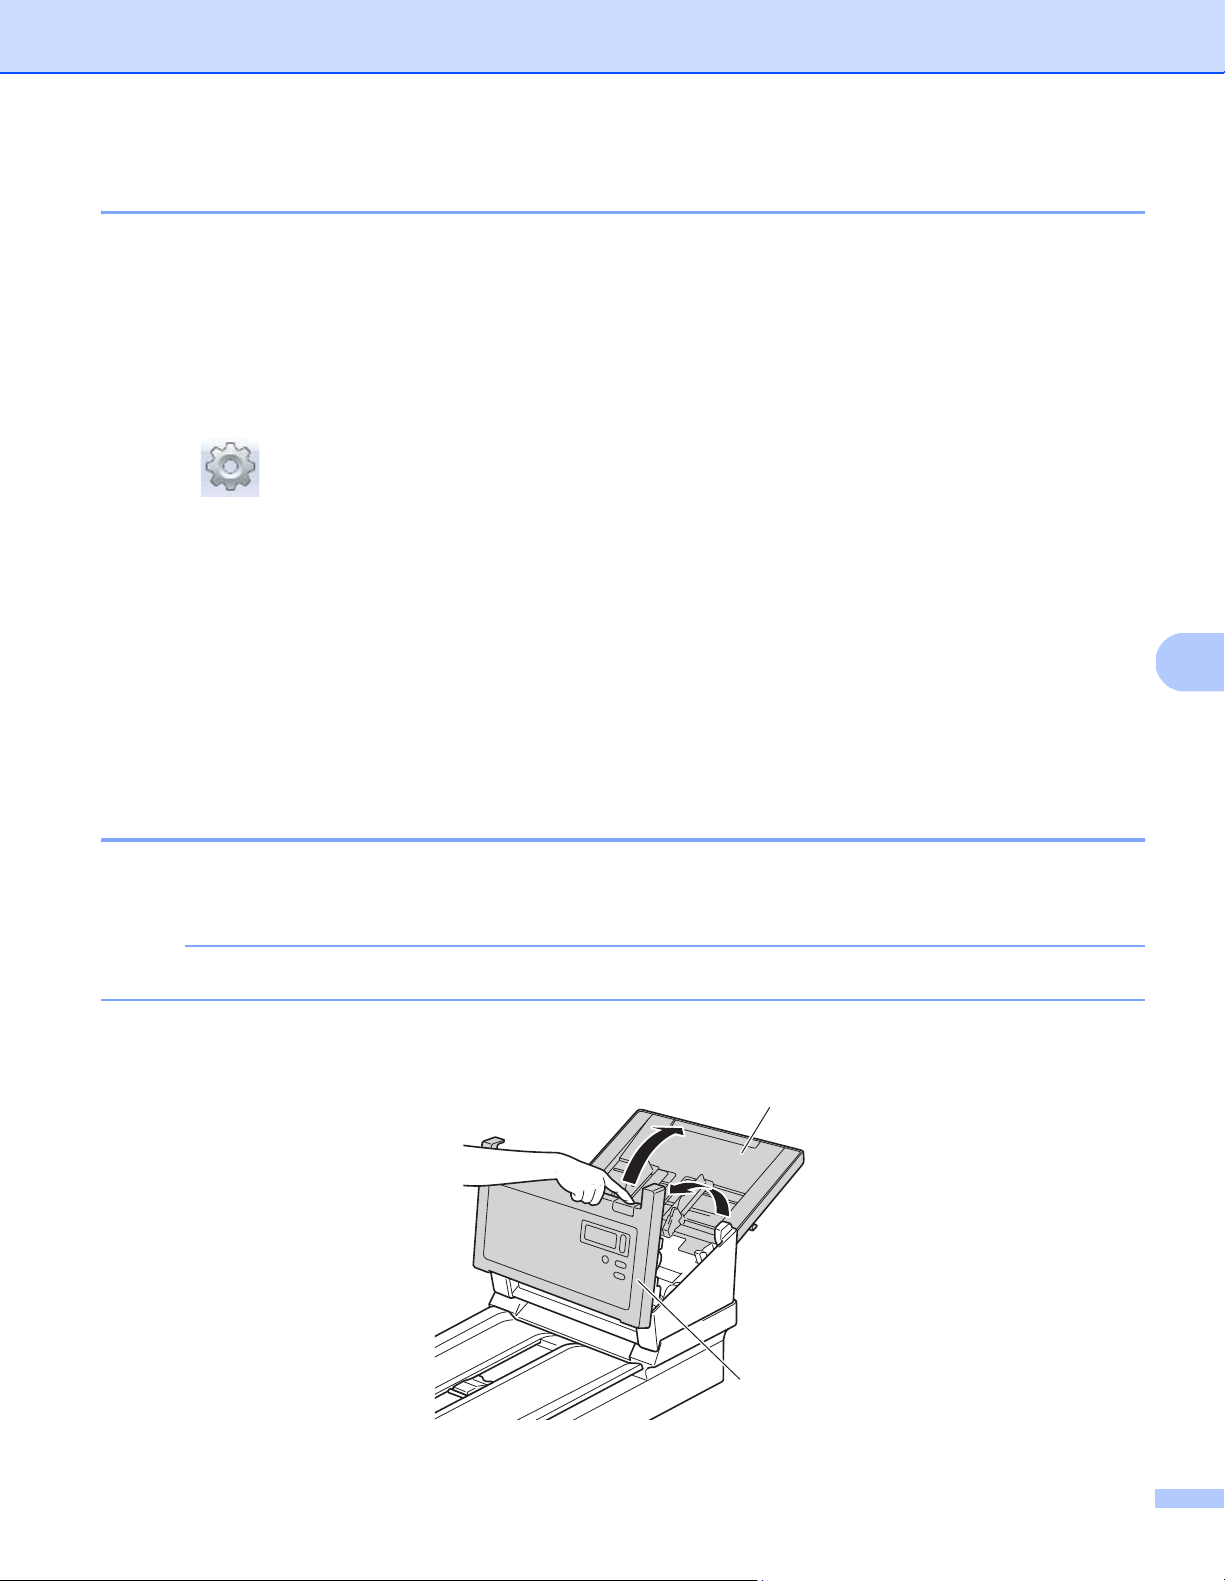
Maintenance
106
7
Check replacement cycle 7
Your Brother machine is equipped with a scan counter, which automatically counts how many pages the
machine scans.
To check the scan count, follow these steps:
For Windows
®
:
a Launch DS Capture.
b Click (Setup), and then click the Information tab.
c Scroll down in the information window until you see ADF Roller Count, ADF Simplex Count or
ADF Duplex Count.
For Macintosh:
a Launch DS Capture.
b Click the Information tab.
c Check ADF Roller Count, ADF Simplex Count or ADF Duplex Count.
Replace the Rollers 7
When the machine has scanned 200,000 sheets, the machine displays a message “Please replace the
roller and reset the roller count.” on your computer to remind you to replace the Rollers.
NOTE
We recommend replacing all three rollers at the same time, or the roller count value will be incorrect.
a Open the Top Cover (1) and the ADF Cover (2).
1
2
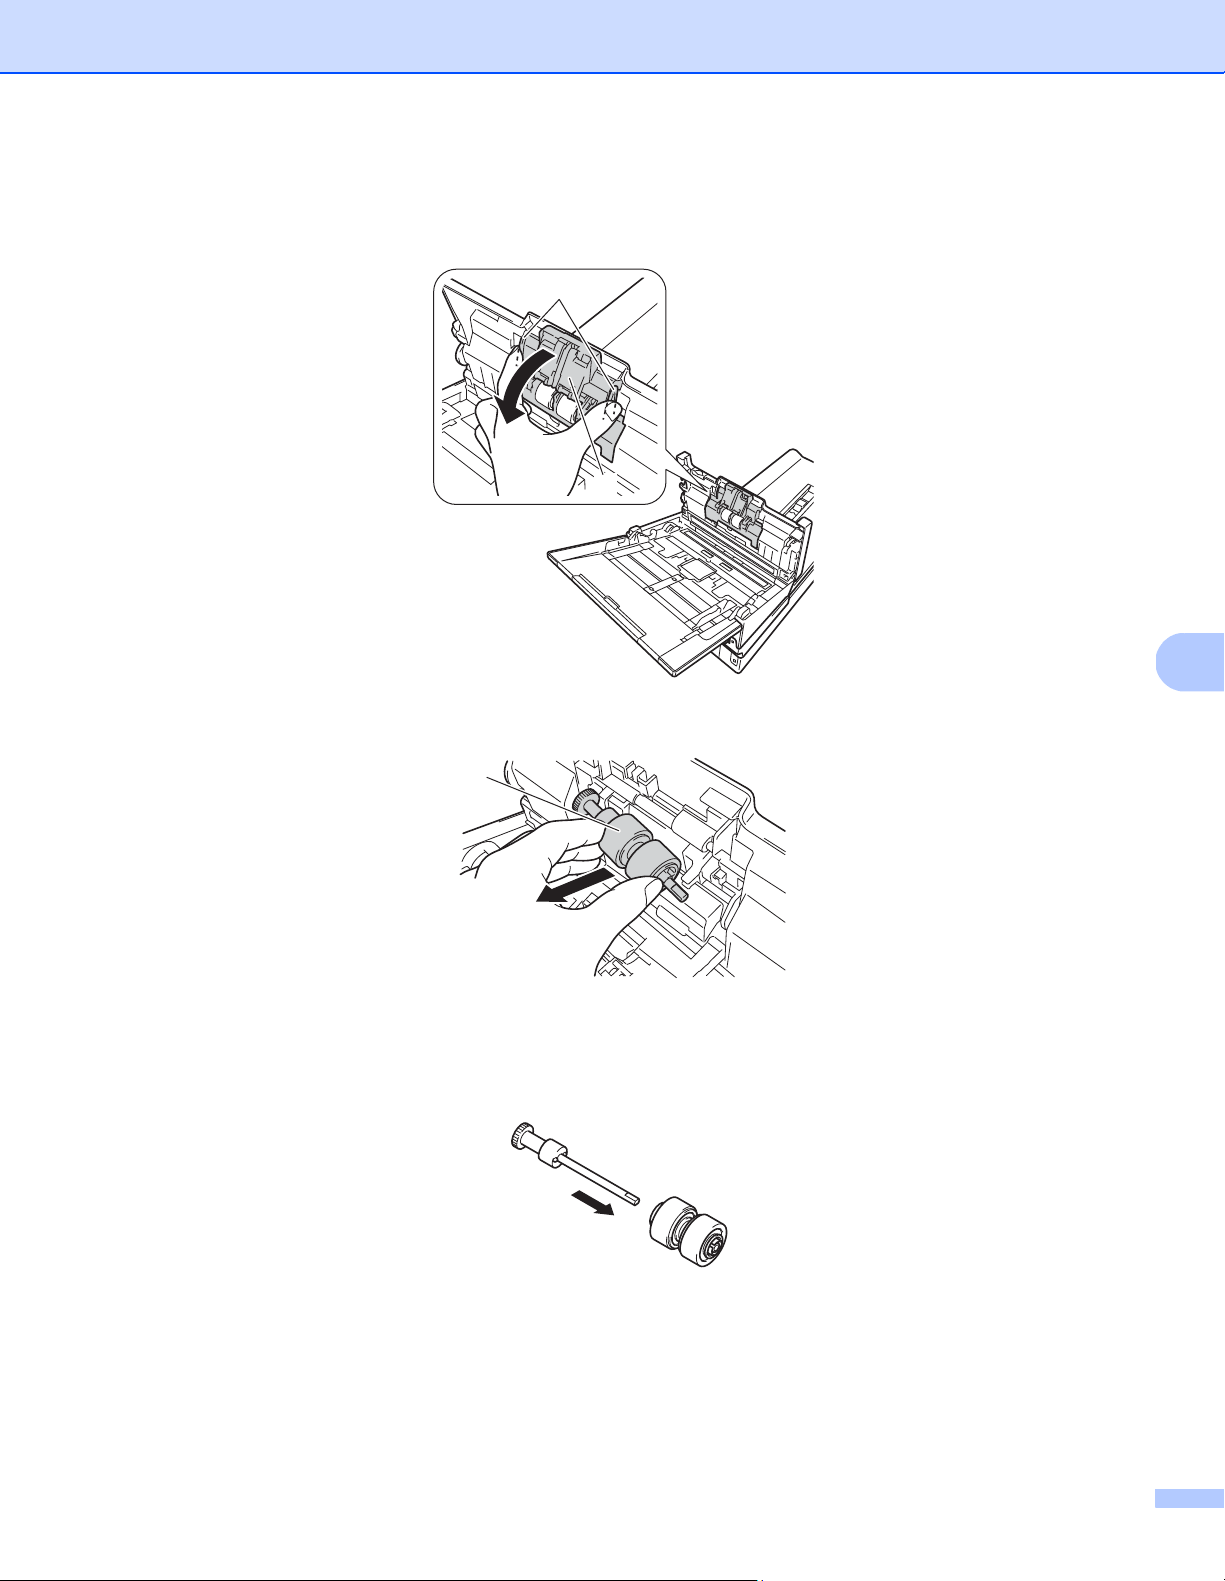
Maintenance
107
7
b Press and hold the buttons (1) on the inside of the ADF Cover, and then pull the Reverse Roller Cover (2)
down.
c Pinch the Reverse Roller (1) and pull it out of the machine.
d Remove the old Reverse Roller from the shaft and insert the new Reverse Roller completely onto the
shaft.
1
2
1
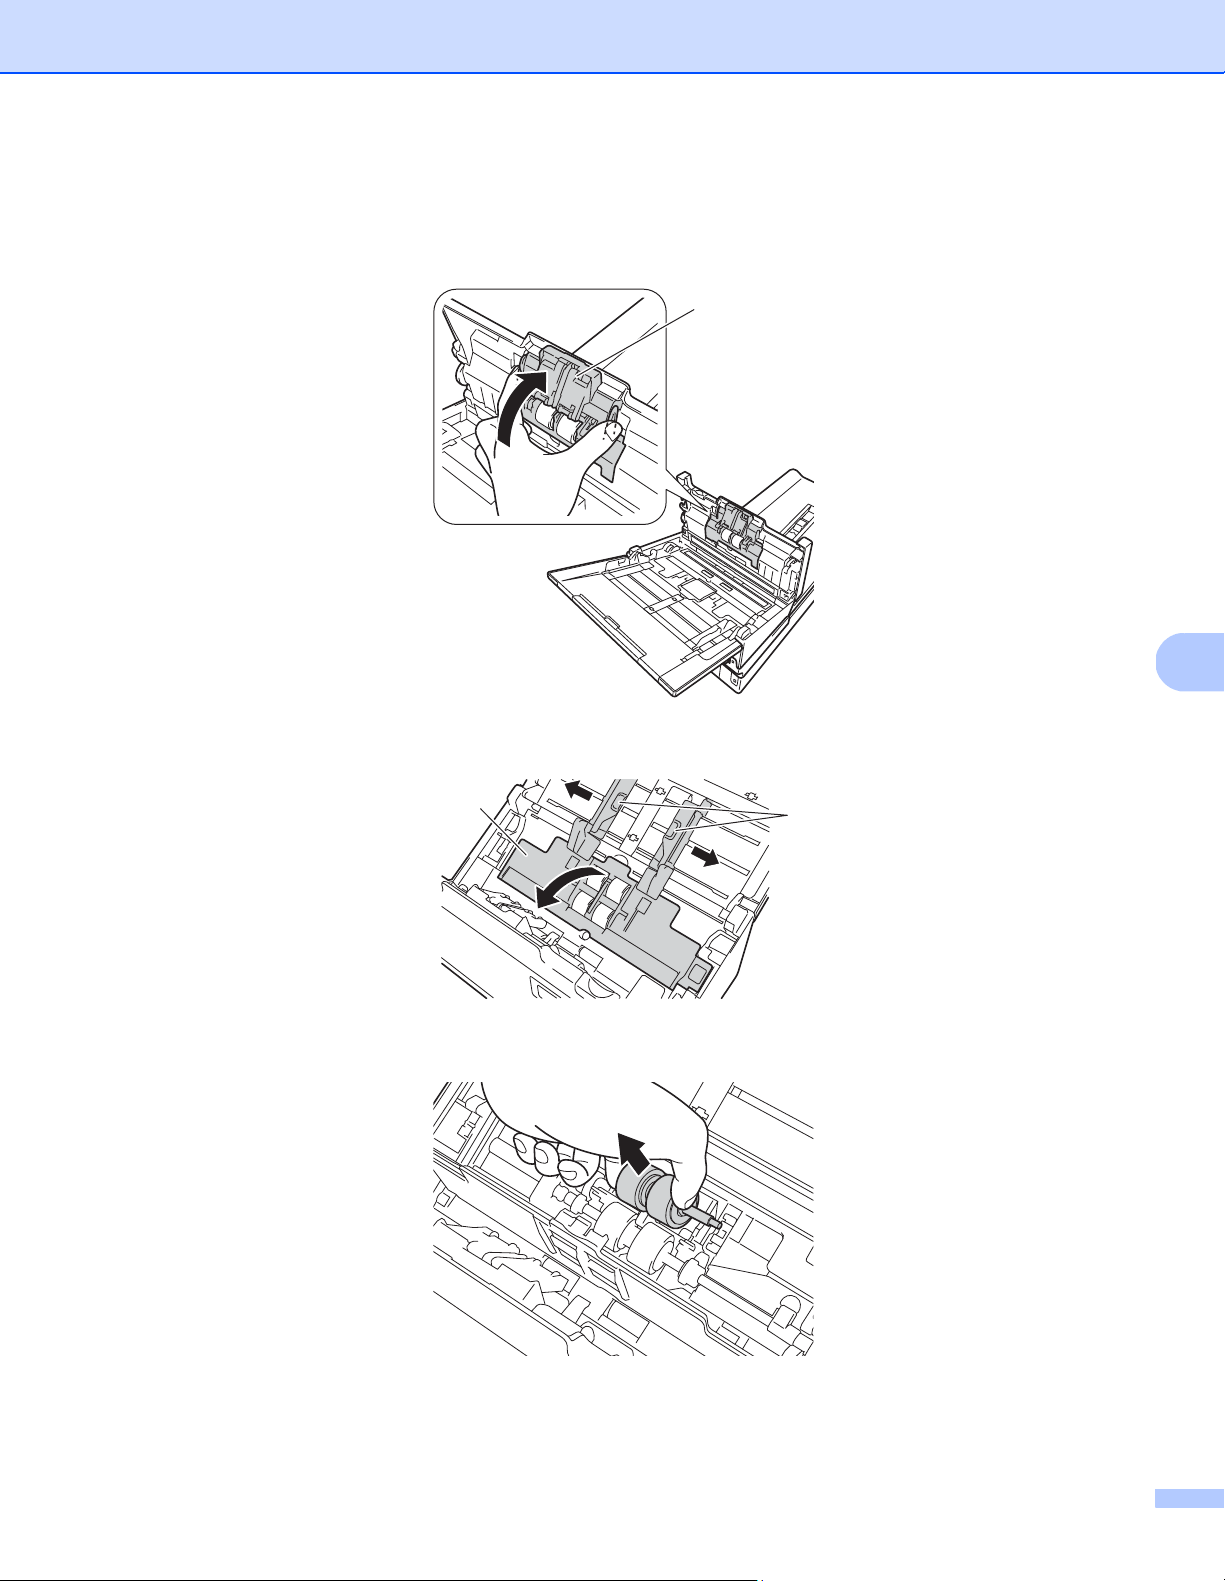
Maintenance
108
7
e Pinch the new Reverse Roller and reinstall it in the machine.
f Securely close the Reverse Roller Cover (1) until the hooks snap into the ADF Cover.
g Slide the document guides (1) as far as possible and pull the Roller Cover (2) down.
h Pinch the Pick-up Roller and pull it out of the machine.
1
2
1
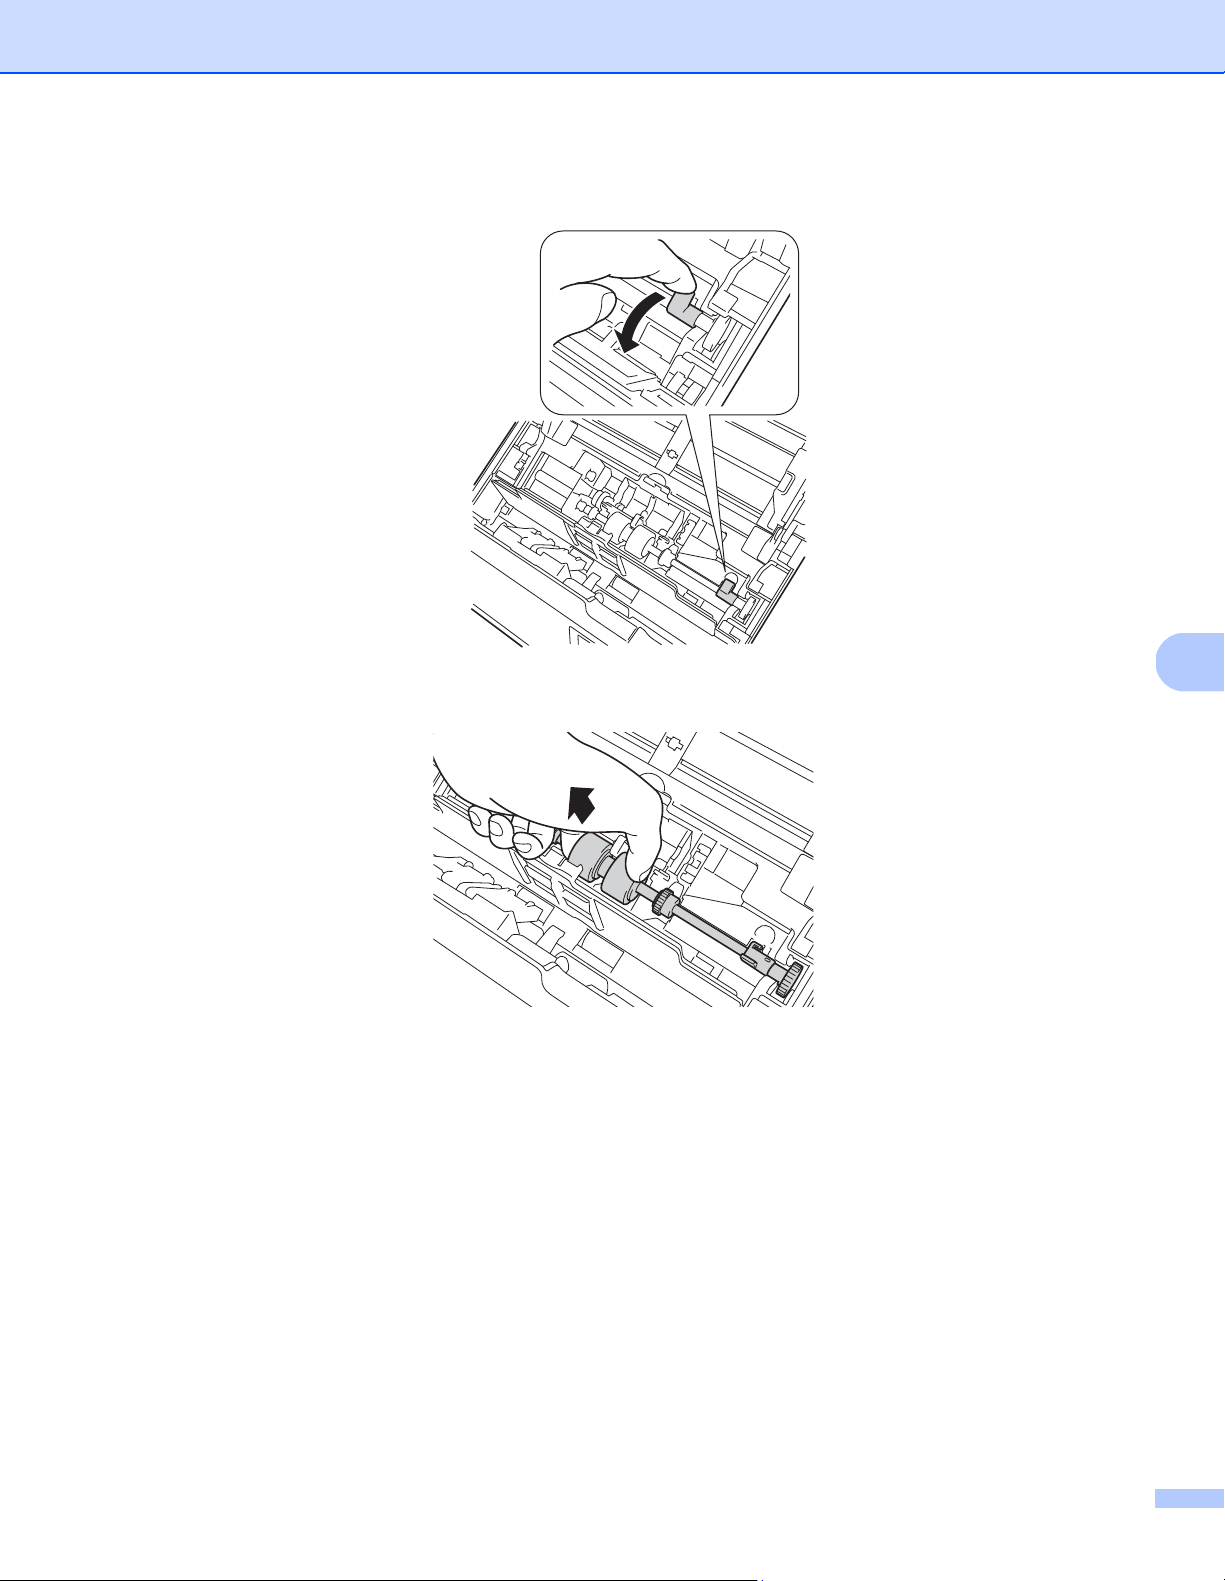
Maintenance
109
7
i Pull the blue hook on the Separation Roller down.
j Pinch the Separation Roller and pull it out of the machine.

Maintenance
110
7
k Pinch a new Separation Roller and reinstall it in the machine.
l Lift the blue hook that you pulled down in the step i.
m Pinch a new Pick-up Roller and reinstall it in the machine.
n Close the Roller Cover (1).
o Close the ADF Cover and the Top Cover.
p Reset the counter (see Reset the usage counters on page 111).
1

Maintenance
111
7
Reset the usage counters
After you have replaced scanner parts, reset the usage counter.
For Windows
®
:
a Launch DS Capture.
b Click (Setup), and then click the Information tab.
c Scroll down in the information window until you see Reset Roller button.
d Click Reset Roller Count to reset the usage counter.
For Macintosh:
a Launch DS Capture.
b Click the Information tab.
c Click Reset to reset the usage counter.

Maintenance
112
7
Packing and shipping the machine
When you transport the machine, use the packing materials that came with your machine. If you do not pack
the machine correctly, any damage that may occur in transit may not be covered by your warranty. The machine
should be adequately insured with the carrier.
a Close the Top Cover gently.
b Carefully turn the machine over. Slide the transport lock switch on the reverse side to the Locked position,
as shown in the illustration.
Locked Unlocked
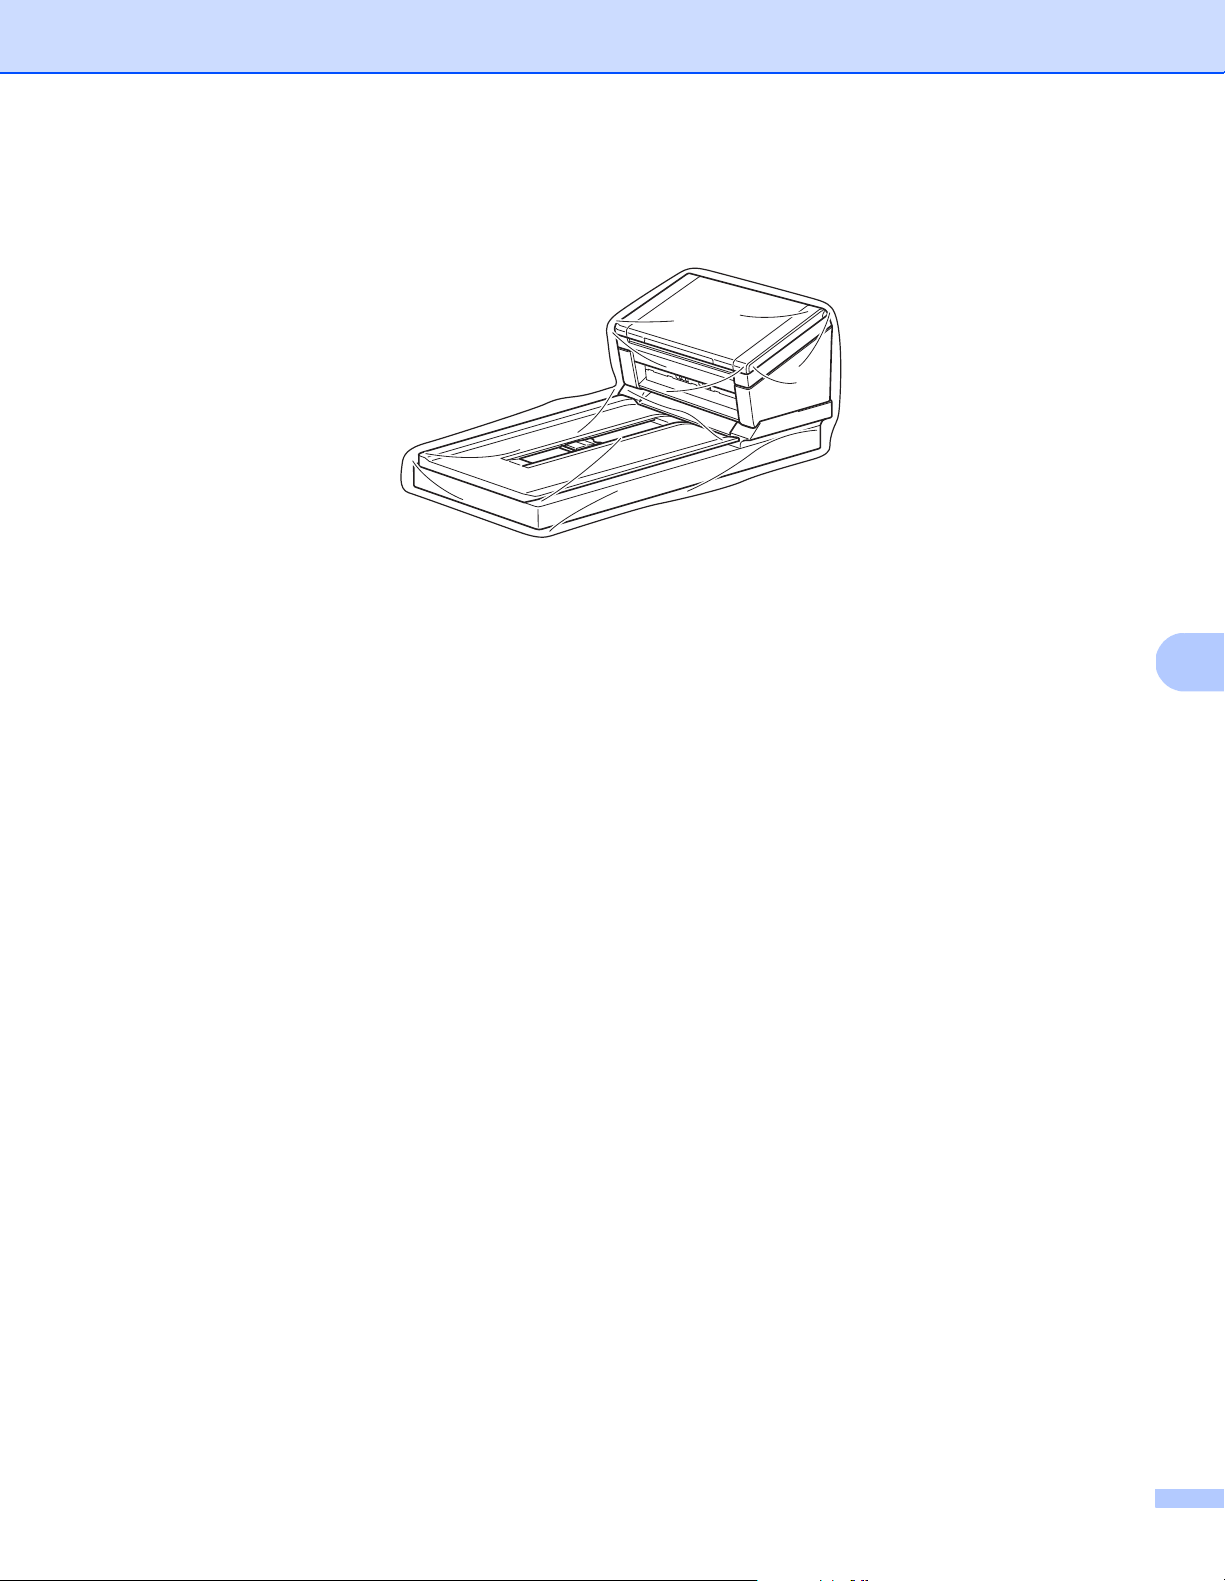
Maintenance
113
7
c Wrap the machine in the bag it originally came in.

Maintenance
114
7
d Pack the machine and the printed materials in the original carton with the original packing material as
shown below.
NOTE
USA and Canada only. If you are returning your machine to Brother as part of the Exchange Service, pack
only the machine. Keep all separate parts (power cord and USB cable) and printed materials to use with
your “Exchange” machine.
e Close the carton and tape it shut.
Ṟ
ṟ
Ṡ
Ṡ
ṡ
ṡ
ṡ
ṡ
Ṣ
ṣ

115
8
8
If you think there is a problem with your Brother machine, check the chart below and follow the suggestions.
You can correct most problems yourself. If you need additional help, visit the Brother Solutions Center at
support.brother.co
m and click FAQs & Troubleshooting.
Using non-Brother supplies may affect scan quality, hardware performance and product reliability.
Error and maintenance messages
Messages displayed on your machine’s LCD
Troubleshooting
8
Error message Cause Action
ADF Cover open ADF Cover is open. Close the ADF Cover.
Document misfeed Multiple sheets were fed at the same
time.
Align the edges of the pages and
place your document correctly,
and then try again.
Document Jam/too Long
The Document Guides are not set
to the correct document size.
The settings are not suitable for
your document.
Paper dust has accumulated on
the surface of the Pick-up Roller
or Feed Roller.
Clear the document jam (see
Document jam on page 118),
and then do the following:
Adjust the Document Guides to fit
the width of the document. When
Scan Size is set to Auto and you
are scanning a document that
contains multiple page sizes, insert
narrow pages straight and as close
to the center of the machine as
possible. If the document is cannot
be fed straight, use Continuous
Scanning.
Confirm the settings. See the
IMPORTANT section on
page 119.
Clean the rollers. See Clean the
inside of your machine on
page 98.
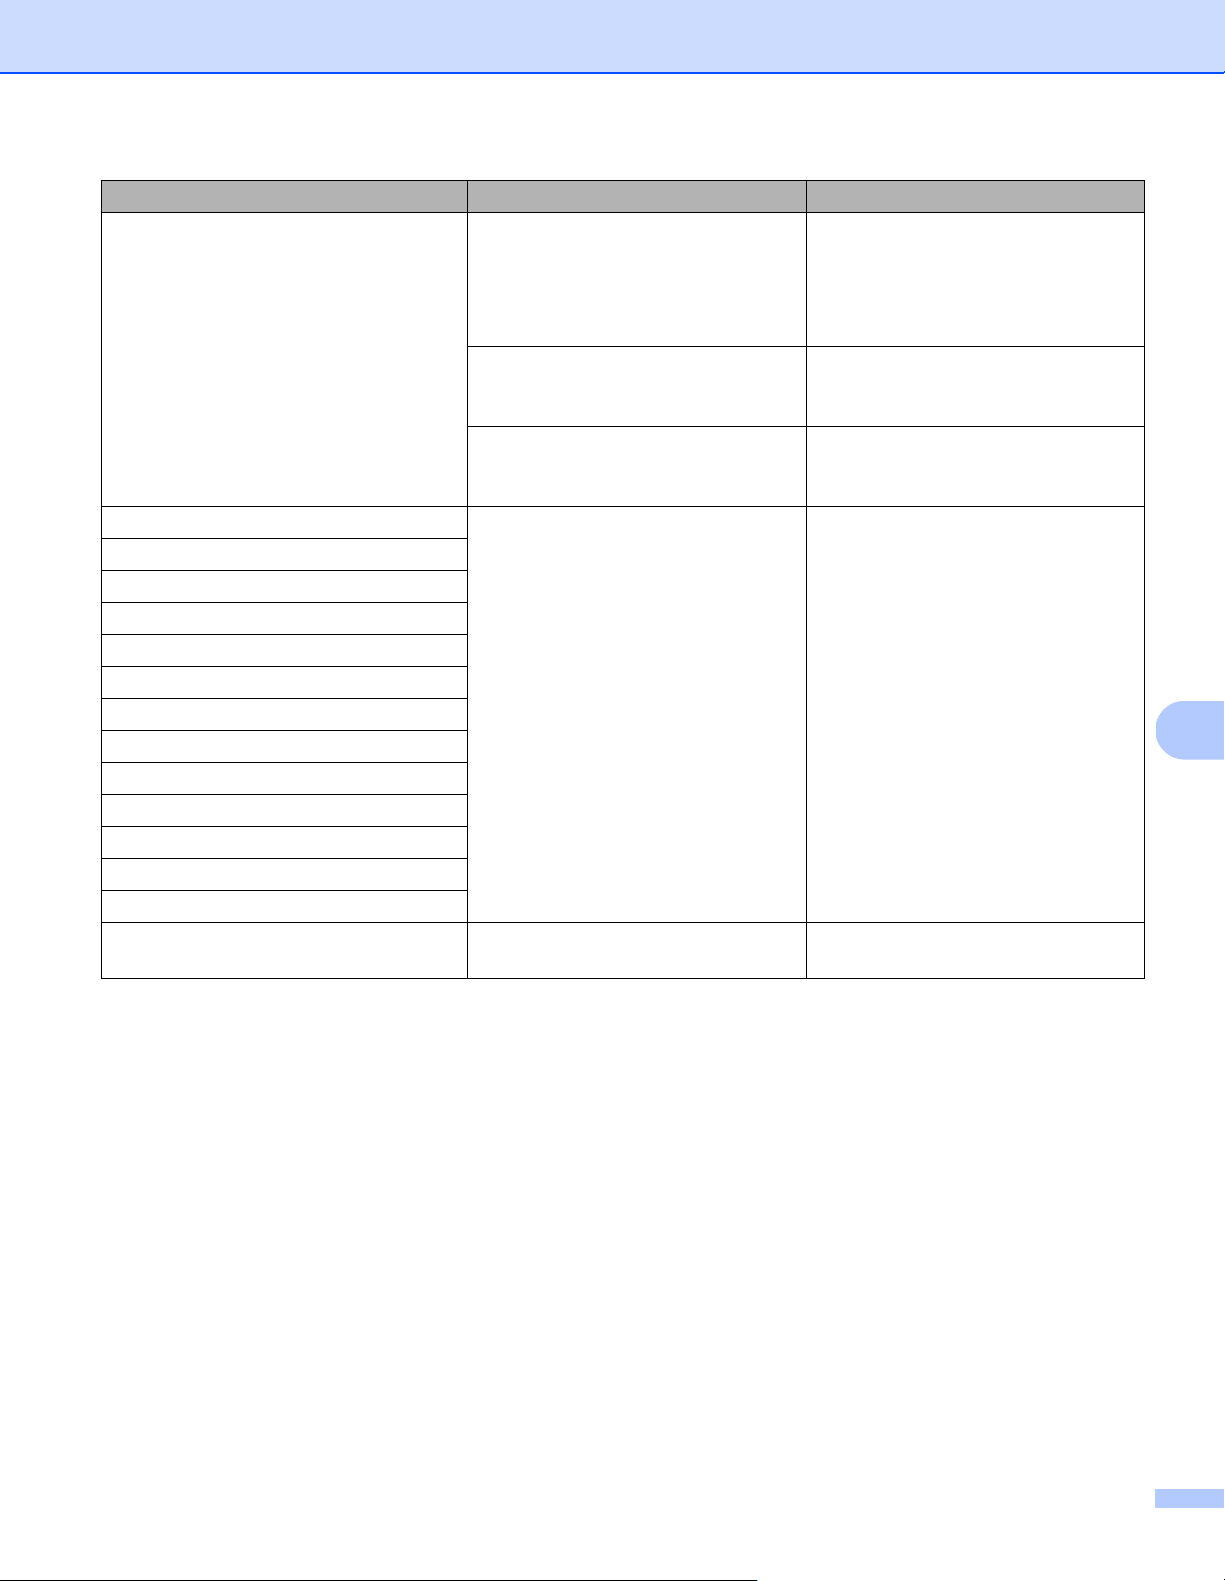
Troubleshooting
116
8
Multifeed error Multiple pages were fed at the same
time.
Remove the pages.
See Multi-feed on page 120.
Reload your documents in the ADF.
See Load documents on page 10
Using a Carrier Sheet. Enable Carrier Sheet Mode, and
then try again. See Carrier Sheet
Mode on page 43.
Your document is not acceptable for
the machine.
Make sure your document is suitable
for the machine (see Document
Information on page 5).
DRAM R/W test error A hardware error has occurred. Contact Brother customer service.
For more information, see For
customer service on page 133.
AFE R/W test error
NVRAM R/W test error
ADF front lamp error
Ultrasonic error
ADF AFE R/W test error
USB R/W test error
FlashROM R/W test error
AFE LVDS test error
ADF AFE LVDS test error
ADF rear lamp error
Flatbed home position error
Flatbed lamp error
Lock error The transport lock is locked. Unlock the transport lock and turn off
and on the scanner.
Error message Cause Action

Troubleshooting
117
8
Messages displayed on your computer
Error message Cause Action
A document is jammed in the ADF. A jammed document stops the
scanning process.
Open the top cover and remove the
document by pulling it backwards,
and then close the top cover.
Do not open the ADF Cover when
scanning.
Your machine’s top cover is open
when scanning starts.
Close the top cover and start
scanning again.
No document in ADF. No document is placed in the ADF. Place your document in the ADF and
start scanning again.
Cannot find the scanner. Your machine is not connected to
your computer.
Confirm that the USB cable
connecting the machine to the
computer is connected correctly.
The machine may power off
automatically if its automatic power
off function is on. Press the Power
button to turn the machine ON.
Document misfeeds. The document is not feeding
correctly.
Remove the document, align the
pages, place it carefully in the ADF,
and then start scanning again.
Multifeed is detected. Documents are multifed. Remove the remaining document
from the ADF, place it carefully in the
ADF, and then start scanning again.
Unknown error. - Contact Brother customer service or
your local Brother dealer. See For
customer service on page 133.
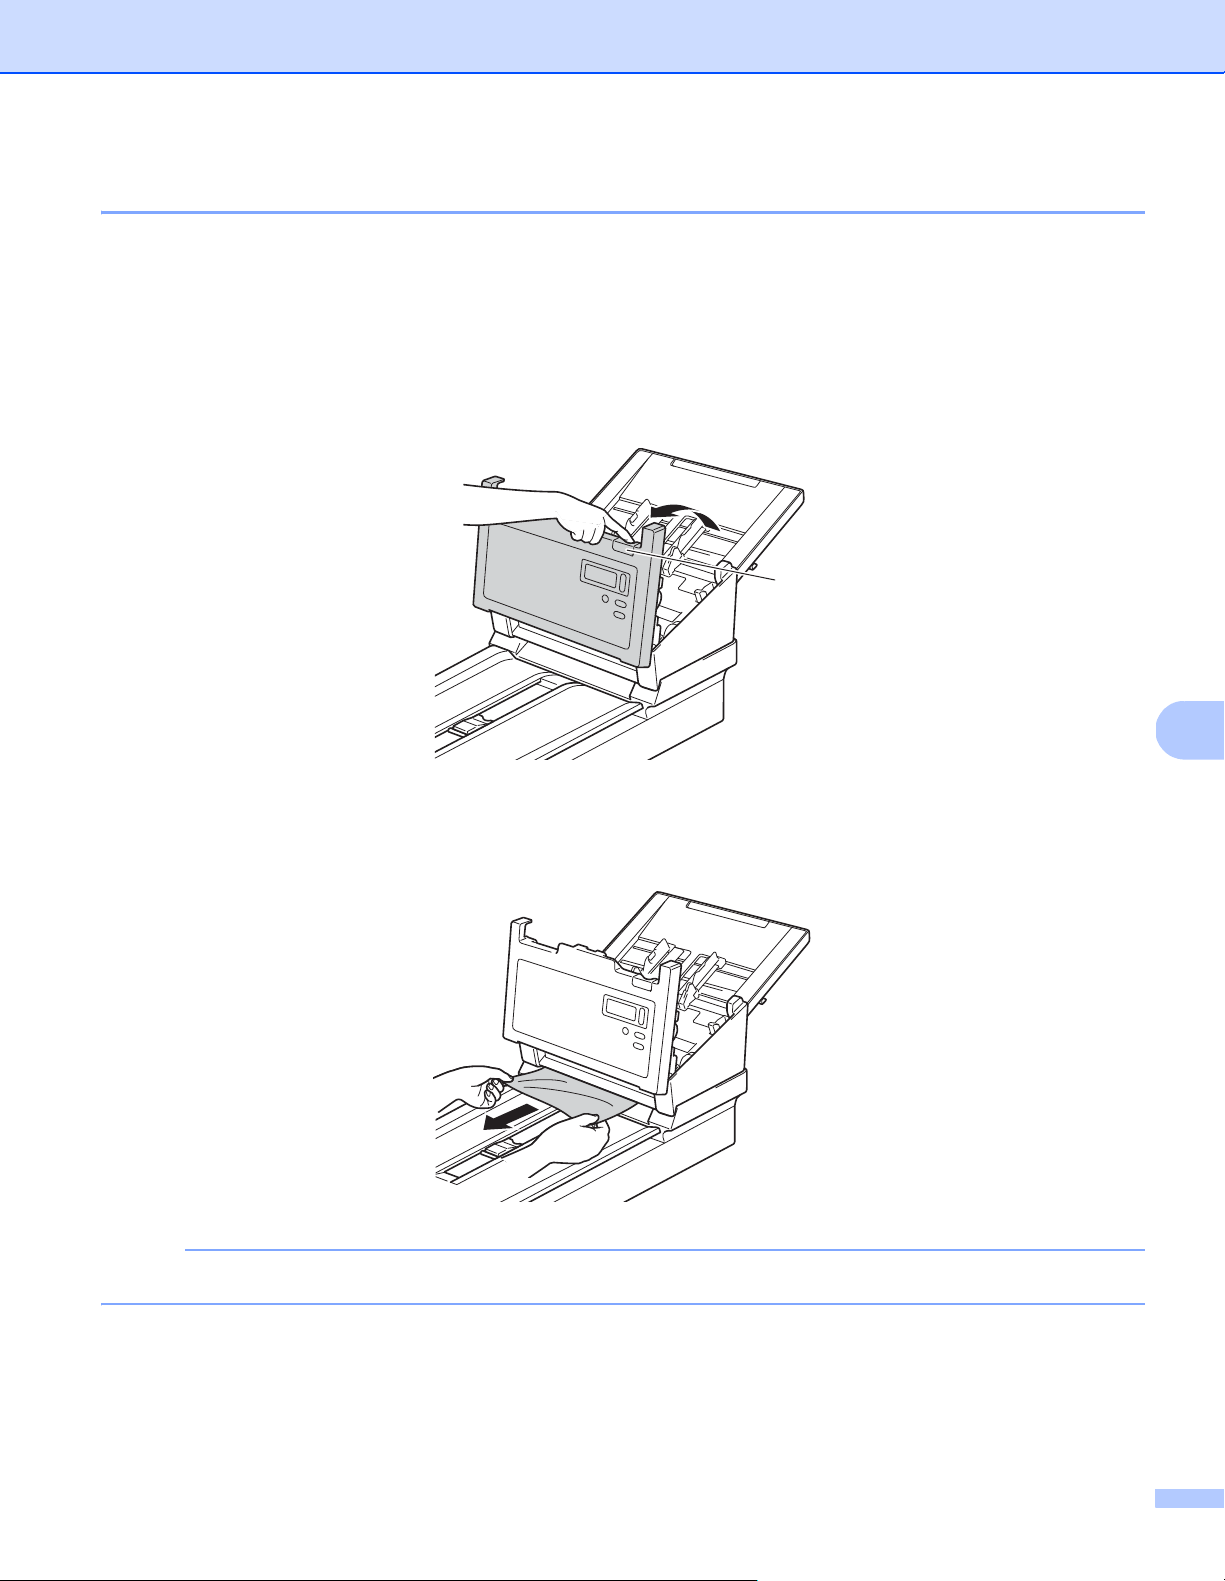
Troubleshooting
118
8
Document jam
Pages can jam in the ADF if they are not inserted or fed correctly, or if they are too long. Follow the steps
below to clear a document jam.
a Remove any paper that is not jammed from the ADF.
b Open the ADF Cover pulling the Cover Release Lever (1) towards you.
c Pull the jammed document out of the machine.
NOTE
Check for ripped paper inside the machine. Remove any ripped paper you find.
d Close the ADF Cover.
e Confirm that the pages scanned before the jam occurred are saved in the designated folder, and then
start scanning again at the next page (or at the beginning of the document, if necessary).
1

Troubleshooting
119
8
IMPORTANT
• To avoid damage to the jammed document, DO NOT pull the document out before opening the ADF Cover.
• Remove any paper from the ADF before closing the ADF Cover.
• To avoid future document jams, do the following:
• Close the ADF Cover completely by pushing it gently in the middle.
• Configure the settings for your document correctly.
• Clean the Rollers. See Clean the inside of your machine on page 98
• Stagger the pages, and then load your document.
• Make sure your document is acceptable for the machine. See Acceptable documents on page 5.
• Load the card vertically when scanning cards.
• Select Long Page from the Scan Area / Page Size or Page Size drop-down list, under the Paper tab
when scanning a long document.
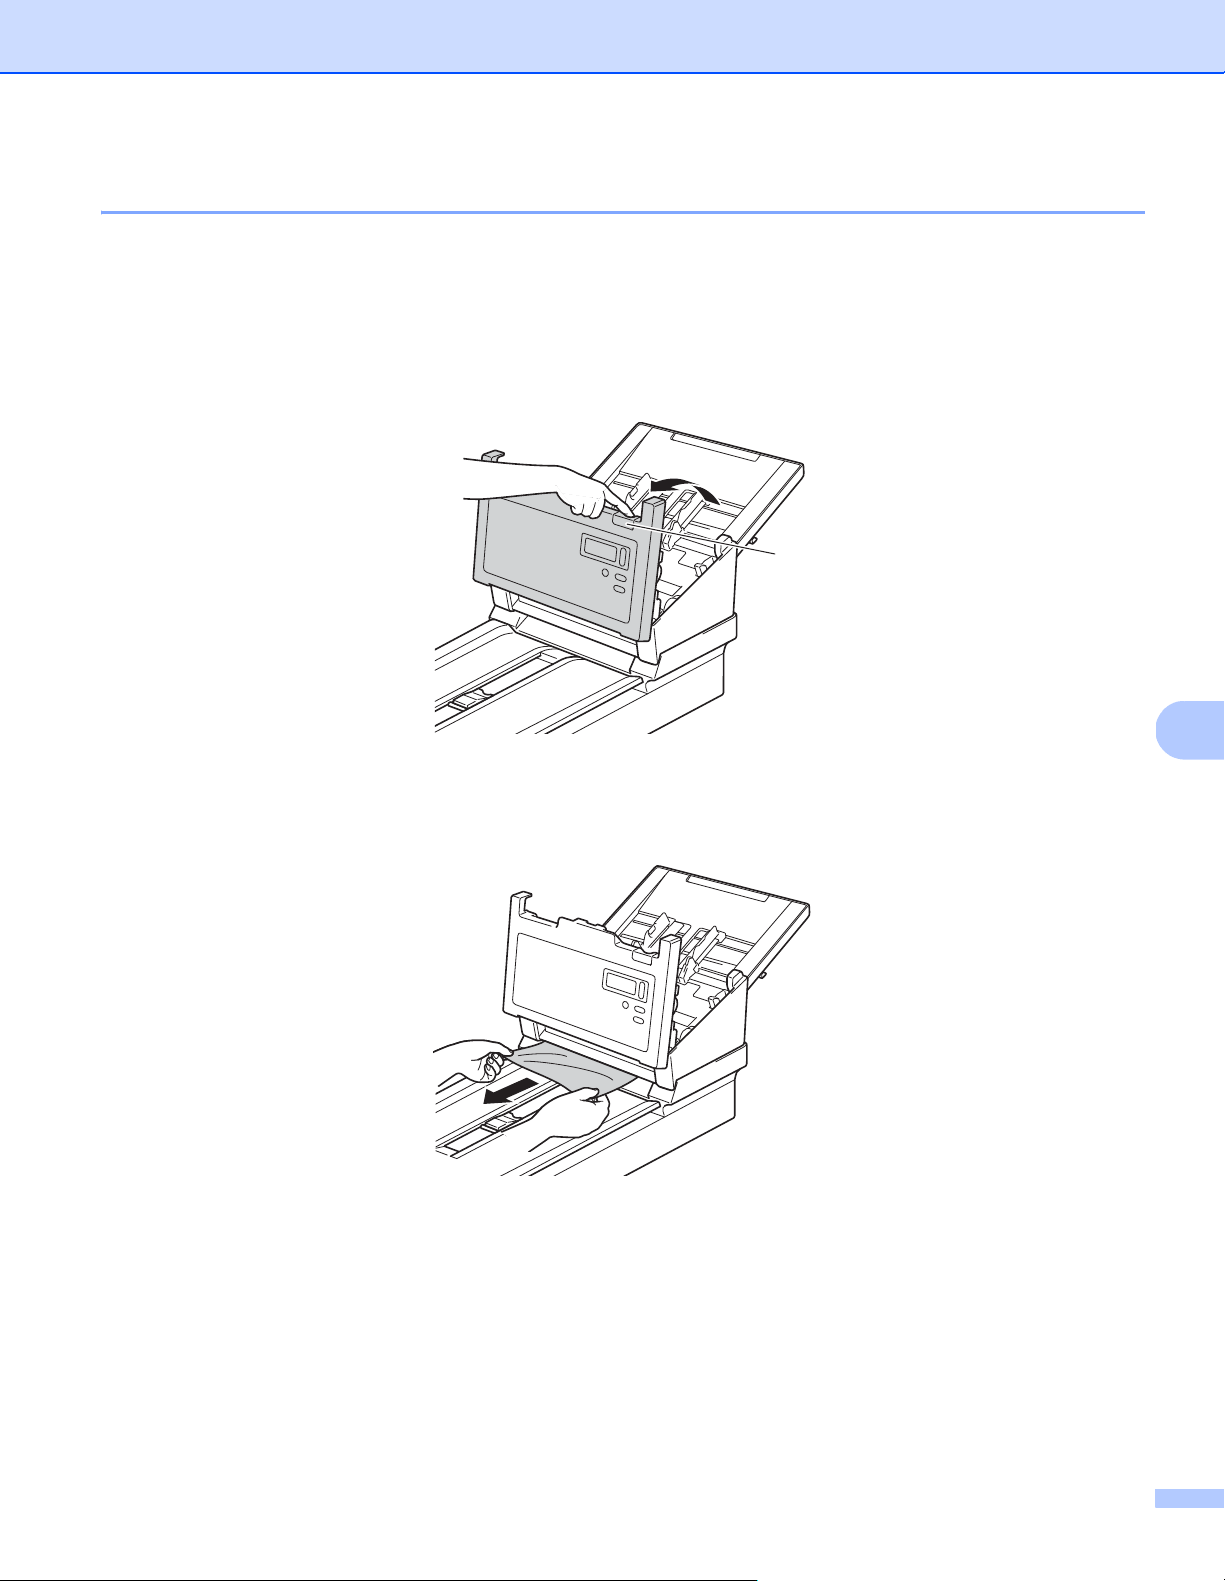
Troubleshooting
120
8
Multi-feed
A multifeed error means that multiple pages were fed at the same time. To clear the multifeed:
a Remove any paper from the ADF.
b Open the ADF Cover pulling the Cover Release Lever (1) towards you.
c Pull the multifed pages out of the machine.
d Close the ADF Cover.
e Confirm that the pages scanned before the multifeed error occurred are saved in the designated folder,
and then start scanning again at the next page (or at the beginning of the document, if necessary).
1

Troubleshooting
121
8
IMPORTANT
• Remove any paper from the ADF before closing the ADF Cover.
• To avoid future multi-feeds, do the following:
• Disable the multifeed detection when scanning business cards.
• Select the Carrier Sheet Mode check box in the Paper tab when scanning using the Carrier Sheet.

Troubleshooting
122
8
Troubleshooting
Scanning difficulties
Difficulty Cause Suggestions
TWAIN or WIA errors
appear when starting
to scan. (Windows
®
)
The TWAIN or WIA driver has not been
selected as the primary source in your
scanning application.
Make sure the Brother TWAIN or WIA driver is
selected as the primary source in your scanning
application. For example, in OmniPage SE 18, click
Scan Settings, and then click Select to select the
Brother TWAIN/WIA driver.
TWAIN errors appear
when starting to scan.
(Macintosh)
TWAIN driver has not been selected as
the primary source in your scanning
application.
Make sure the Brother TWAIN driver is selected
as the primary source.
In PageManager 9, click File, Select Source,
and then select the Brother TWAIN driver.
OS X v10.8.x, 10.9.x, 10.10.x or later users can
also scan documents using the ICA Scanner Driver.
My scanned images
have black lines
running through them,
blank spaces, or are of
overall bad quality.
This problem occurs if a foreign object,
such as a paper clip or ripped paper,
is stuck in the machine.
Check the ADF slot and make sure that the slot is
clear. If you find foreign objects, remove them from
your machine.
My scanned image is
missing.
The Document Guides are not adjusted
to fit the width of the document.
Adjust the Document Guide to fit the width of the
document. When Cropping is set to Automatic
(Deskew ON) and you are scanning a document
that contains multiple page sizes, insert narrow
pages straight and as close to the center of the
machine as possible. If the document does not stay
straight while feeding, use Continuous Scanning.
The settings are not suitable for your
document. For example, an A4
document is fed when “Letter” was
selected as the document size.
Make sure the document size settings are suitable
for your document.
For Windows
®
: see Paper tab on page 40.
For Macintosh: see Paper tab on page 79.
The scan speed is too
slow.
The resolution is not suitable for your
document.
Decrease the machine resolution.
For Windows
®
: see Image tab on page 31.
For Macintosh: see Image tab on page 69.
Unusual noise occurs
when the power is ON.
Check the transport lock is unlocked.
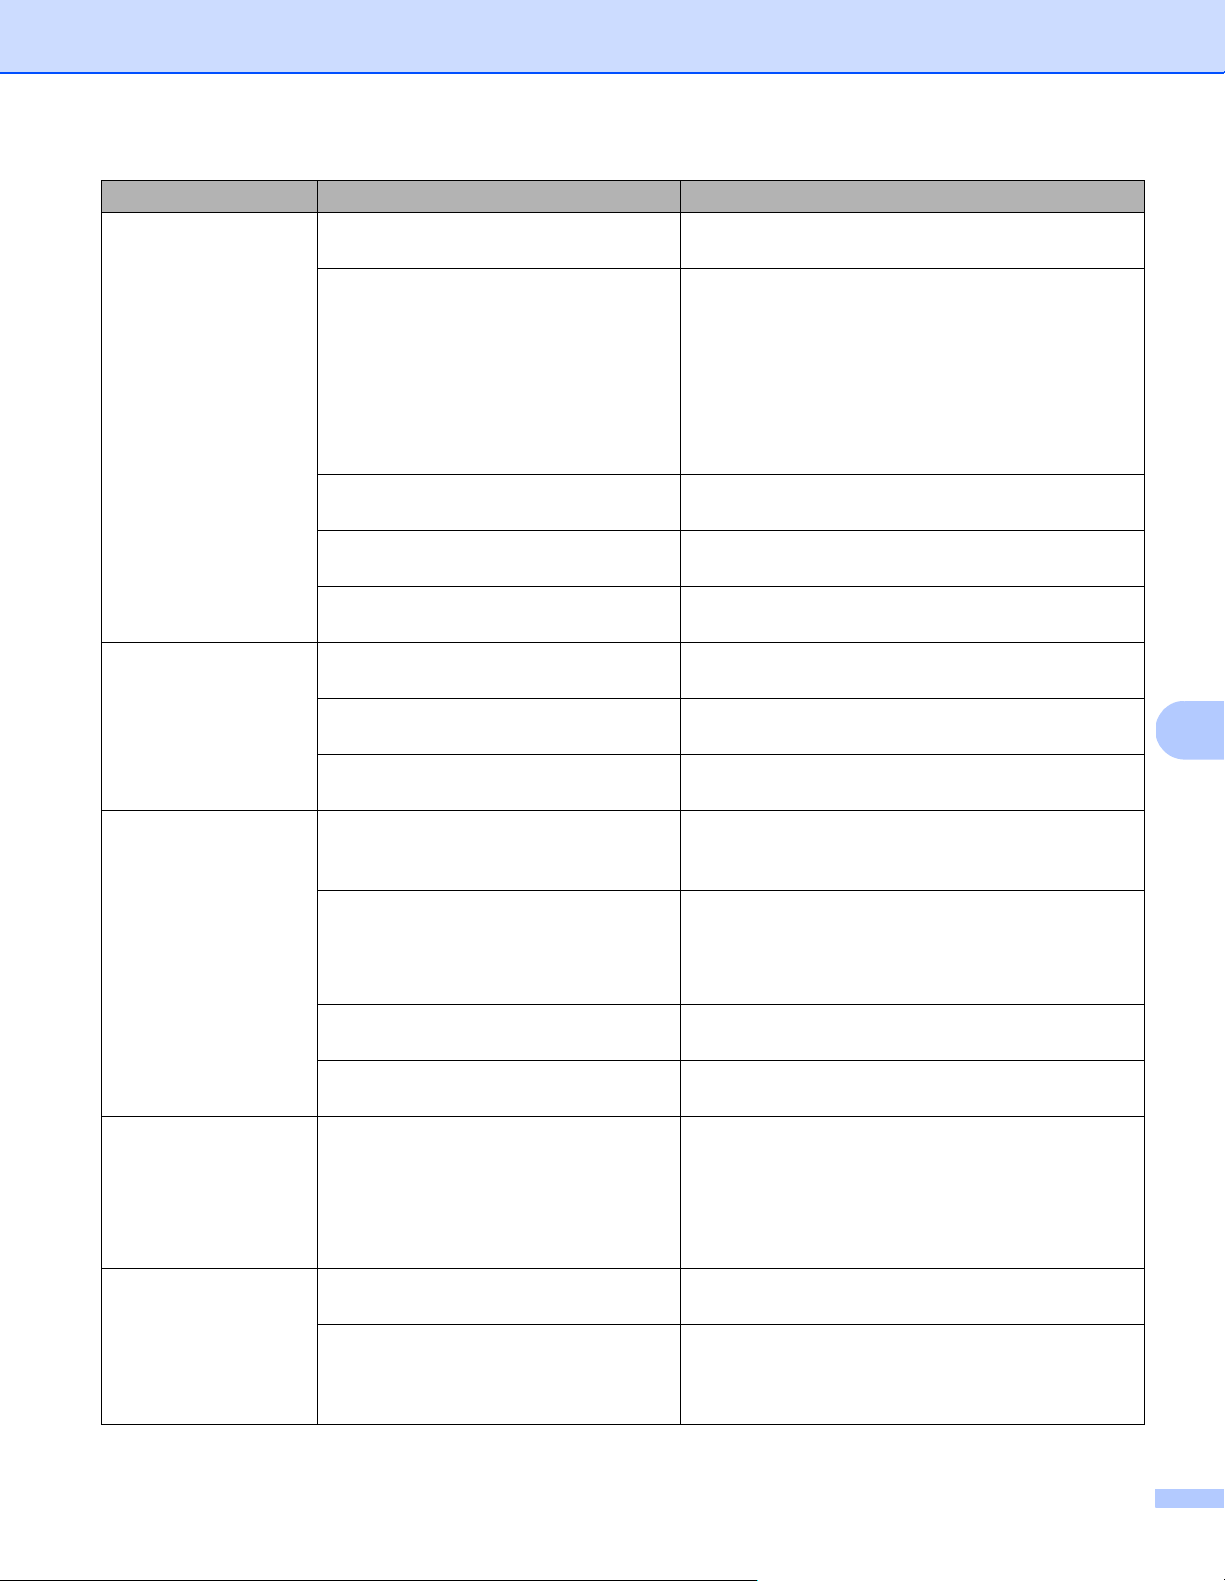
Troubleshooting
123
8
My machine is
connected but it does
not feed my document
or do anything else.
Your document is placed incorrectly. Insert your document until you feel the top edge of
the document touch the inside of your machine.
Your document is too thin or too thick. Check that your document is acceptable
(see Document Information on page 5).
If your document is acceptable:
1. Confirm that the USB cable connecting your
machine to your computer is connected correctly.
2. Reinstall the scanner driver from the Brother
installation DVD.
Paper dust has accumulated on the
surface of the rollers.
Clean the rollers.
See Clean the inside of your machine on page 98.
Too many documents are loaded in the
ADF at a time.
Make sure your document is acceptable for the
machine. See Document Information on page 5.
There are foreign objects in the ADF. Remove any foreign objects or ripped paper from
the ADF.
A multifeed occurs. Paper dust has accumulated on the
surface of the rollers.
Clean the rollers.
See Clean the inside of your machine on page 98.
Too many documents are loaded in the
ADF at a time.
Load no more than 100 pages at a time.
See Document Information on page 5.
The document is sticky or has a sticky
note on it, which caused a multi-feed.
Use the Carrier Sheet to scan the multifed
document.
The document is
jammed.
Causes may vary. Open the machine’s top cover and gently pull out
the document. Make sure no paper remains in the
machine.
Your document is not acceptable for the
machine (for example, if the paper is
too long).
Make sure your document is suitable for the
machine (see Document Information on page 5).
Use the Carrier Sheet (see Loading documents
using the Carrier Sheet in the ADF on page 16).
Paper dust has accumulated on the
surface of the rollers.
Clean the rollers. See Clean the inside of your
machine on page 98.
There are foreign objects in the ADF. Remove any foreign objects or ripped paper from
the ADF.
My machine gets
warm.
It is normal for your machine to emit a
small amount of heat after prolonged
use.
If there is a strange smell coming from the machine
or the machine feels hot to the touch, immediately
remove the power cord and USB cable from your
machine. Contact Brother customer service or your
local Brother dealer. See For customer service on
page 133.
The scan quality is
poor.
Paper dust has accumulated inside
your machine.
Clean your machine (see Maintenance on page 96).
The machine resolution is too low. Increase the machine resolution.
For Windows
®
: see Image tab on page 31.
For Macintosh: see Image tab on page 69.
Difficulty Cause Suggestions
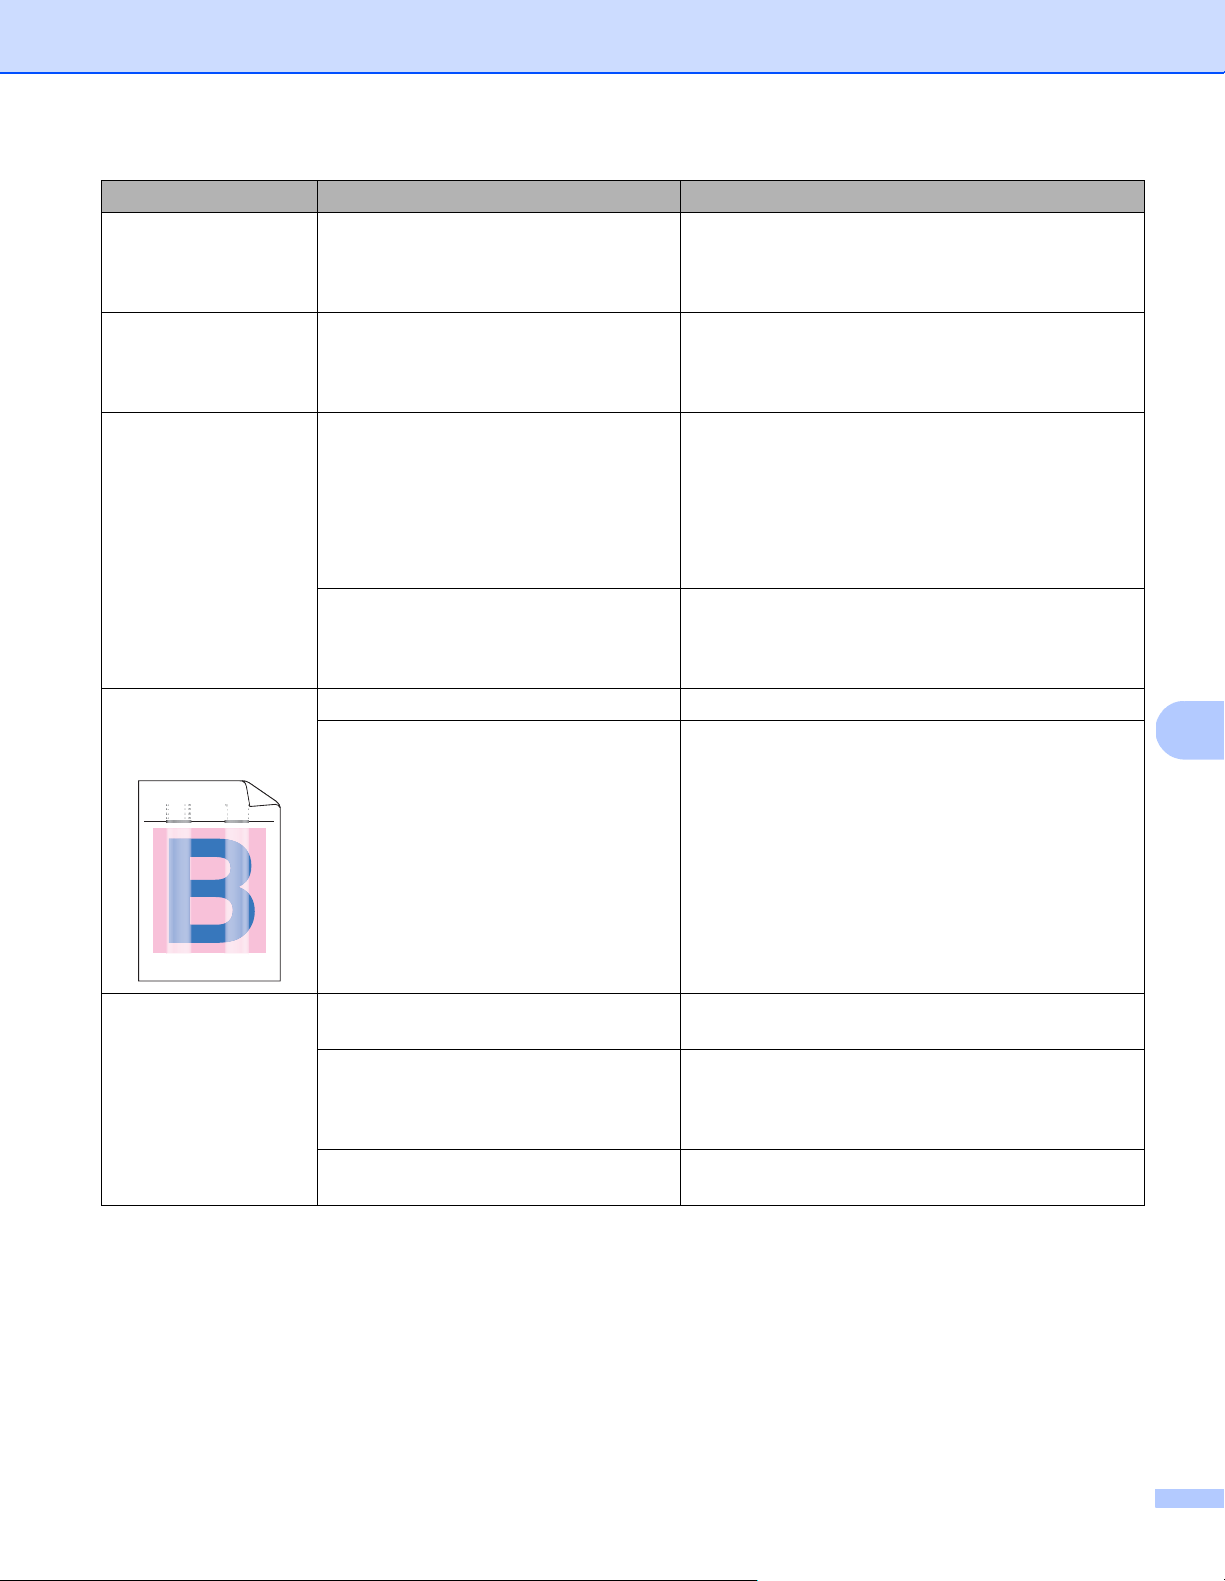
Troubleshooting
124
8
Colors in the scanned
image are dark.
The settings are not appropriate for the
type of document being scanned.
Adjust the scan settings.
For Windows
®
: see Image tab on page 31.
For Macintosh: see Image tab on page 69.
A page that is not
a blank page was
skipped.
The document’s contents are too light,
or Blank Page Removal is set to On.
Set Blank Page Removal to Off.
For Windows
®
: see Paper tab on page 40.
For Macintosh: see Paper tab on page 79.
The scanned image is
skewed (crooked).
The machine’s Document Guides are
not adjusted to fit the width of the
document.
Adjust the Document Guides to fit the width of the
document. When Cropping is set to Automatic
(Deskew ON) and you are scanning a document
that contains multiple page sizes, insert narrow
pages straight and as close to the center of the
machine as possible. If the document does not stay
straight while feeding, use Continuous Scanning.
The Auto Deskew feature was set to Off
when the document was scanned.
Set Cropping to Automatic (Deskew ON).
For Windows
®
: see Enhancement tab on page 52.
For Macintosh: see Enhancement tab on page 86.
White vertical lines or
white stripes appear
on the scanned image.
The machine is under direct sunlight. Move the machine out of direct sunlight.
A light source is near the machine. Move the machine far away from the light source.
Bleed-through is seen
in the scanned image.
Your document is too thin. Check that your document is acceptable
(see Document Information on page 5).
The contrast setting is incorrect. Increase the contrast level.
For Windows
®
: see Image tab on page 31.
For Macintosh: see Image tab on page 69.
The Background Processing feature is
set to Off.
Set Background Processing to On (see Background
setting on Enhancement tab on page 52).
Difficulty Cause Suggestions
ABCDEFGHIJKLMNOPQRSTUVWXYZ. 0123456789. abcdefghij klmno pqrstu vwxyz.
ABCDEFGHIJKLMNOPQRSTUVWXYZ. 0123456789. abcdefghij klmno pqrstu vwxyz.
ABCDEFGHIJKLMNOPQRSTUVWXYZ. 0123456789. abcdefghij klmno pqrstu vwxyz.
ABCDEFGHIJKLMNOPQRSTUVWXYZ. 0123456789. abcdefghij klmno pqrstu vwxyz.
KL
KL
L
LM
MN
MN
MN
OPQRSTUVW
OP
QRSTUV
TU
W
W
W
W
WX
KL
KL
L
LM
MN
MN
MN
OPQRSTUVW
OP
QRSTUV
TU
W
W
W
W
WX
KL
KL
L
LM
MN
MN
MN
OPQRSTUVW
OP
QRSTUV
TU
W
W
W
W
WX
KL
KL
L
LM
MN
MN
MN
OPQRSTUVW
OP
QRSTUV
TU
W
W
W
W
WX
ef
f
fg
g
ghijklmnop
ghijklmno
hijklmn
ijk
qrst
qrs
r
t
u
u
u
ef
f
fg
g
ghijklmnop
ghijklmno
hijklmn
ijk
qrst
qrs
r
t
u
u
u
ef
f
fg
g
ghijklmnop
ghijklmno
hijklmn
ijk
qrst
qrs
r
t
u
u
u
ef
f
fg
g
ghijklmnop
ghijklmno
hijklmn
ijk
qrst
qrs
r
t
u
u
u

Troubleshooting
125
8
Software difficulties
Other difficulties
Difficulty Cause Suggestions
When I click Scan in
my scanning software,
an error message
appears: Cannot find
the scanner or
Operation system
error.
This error message appears if your
machine is not recognized by your
computer.
1. Make sure your machine is connected correctly.
2. Confirm that the USB cable is working and that it
is not frayed or damaged in any way.
If the error still appears after verifying that the
USB cable is connected correctly, reinstall the
scanner driver from Brother installation DVD.
I cannot install the
scanner drivers.
(Windows
®
)
You may not have been given
administrator privileges.
Log into Windows
®
with administrator rights.
I cannot install the
scanner drivers.
(Macintosh)
You may not have been given
administrator privileges.
From the Apple menu, select System
Preferences > System > Users & Groups.
The left pane of the window lists the current
accounts, one of which should be your name with
the word “Admin” below. If this is not the case,
contact your system administrator.
The file size is too
large.
The physical size of the document and
the amount of text / graphics on each
page affect the resulting file size and
cannot be changed.
To produce the smallest scan file for a given
document, use the lowest resolution and Black
and White mode, and scan the smallest area
possible. Using the opposite settings (scanned
in the highest resolution, in the Color mode, and
scanning the largest area possible) produces
the largest-sized file.
For Windows
®
: see Change scan settings using the
TWAIN driver on page 27.
For Macintosh: see Change scan settings using the
TWAIN driver on page 66.
Difficulty Cause Suggestions
I want to use a
USB hub.
- Use your machine without connecting to a USB hub.

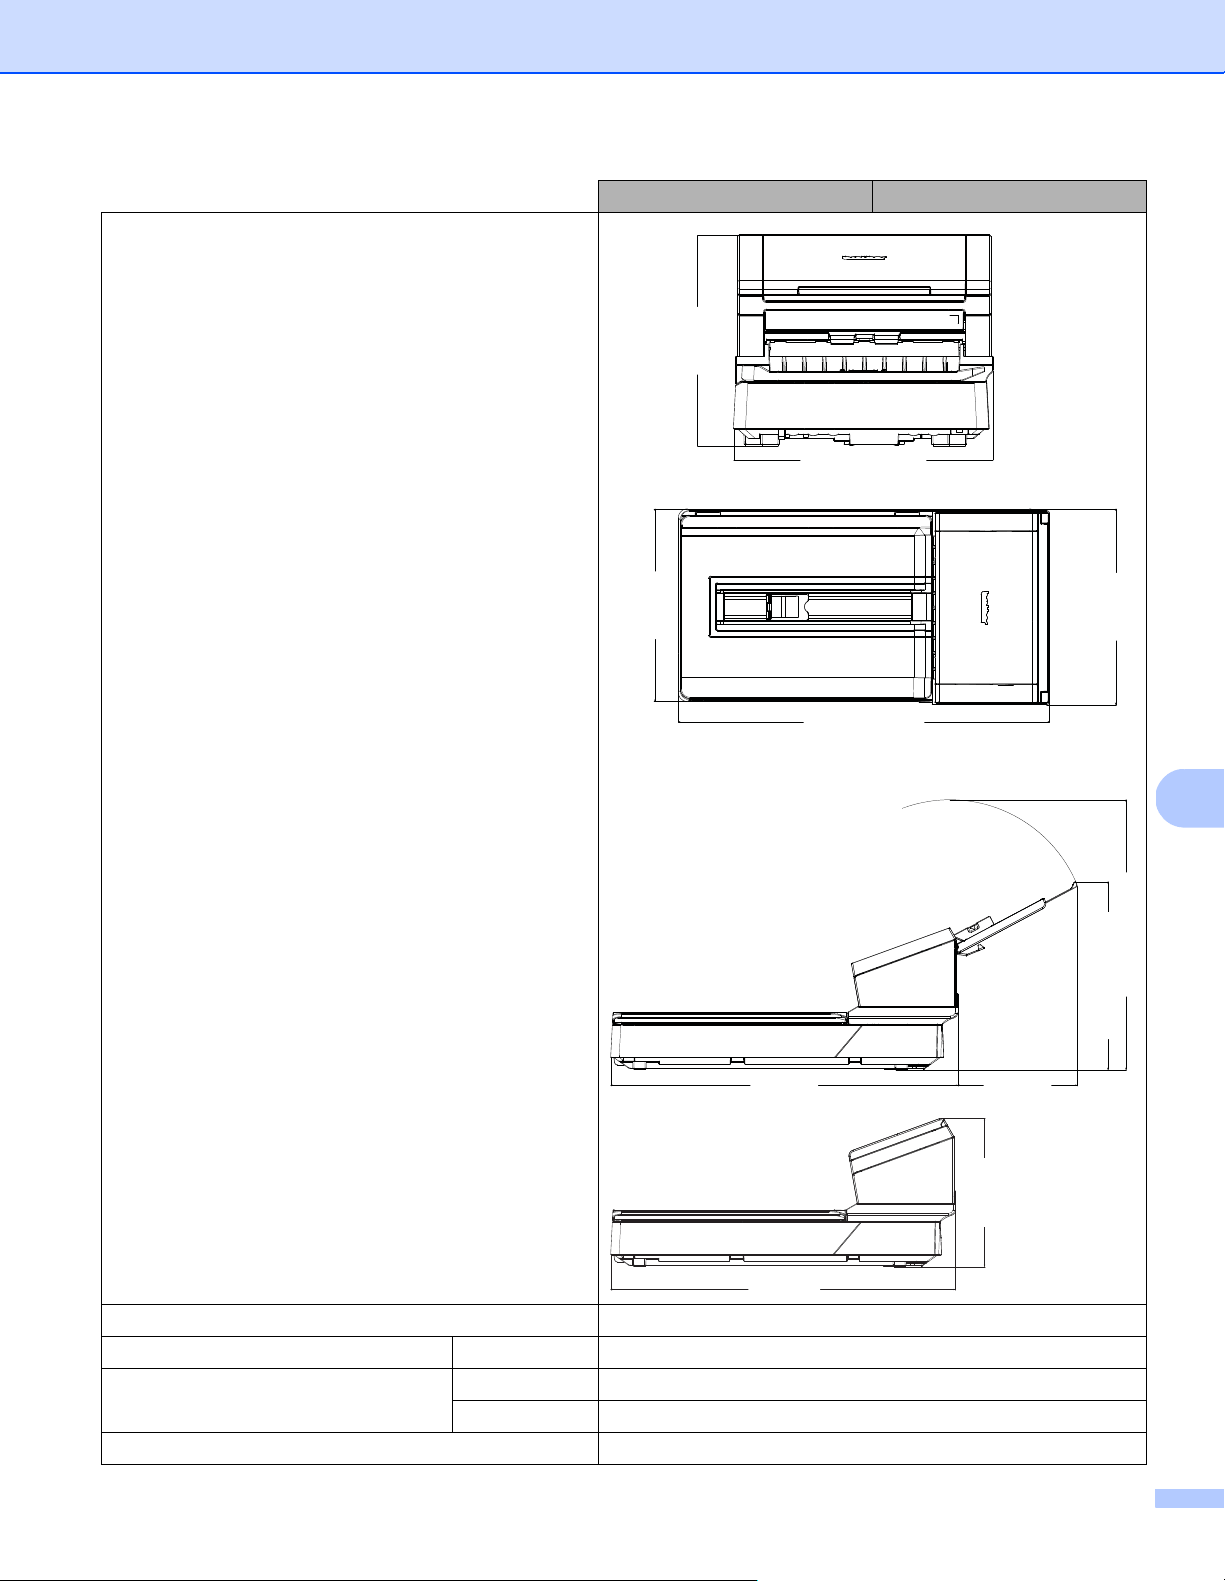
Appendix A
127
A
Dimensions
Weight Approx. 20.3 lbs (9.20 kg)
Temperature Operating 41 to 95 °F (5 to 35 °С)
Humidity Operating 20 to 80%
Storage 10 to 90%
ADF (Automatic Document Feeder) Up to 100 pages (Paper: 20 lb (80 g/m
2
))
PDS-5000F PDS-6000F
318 mm
(12.52 in.)
263 mm
(10.35 in.)
332 mm (13.07 in.)
476 mm (18.74 in.)
323 mm
(12.72 in.)
323 mm (12.72 in.)
613 mm (24.13 in.)
613 mm
(24.13 in.)
211 mm
(8.31 in.)
263 mm
( 10.35 in.)
613 mm
(24.13 in.)
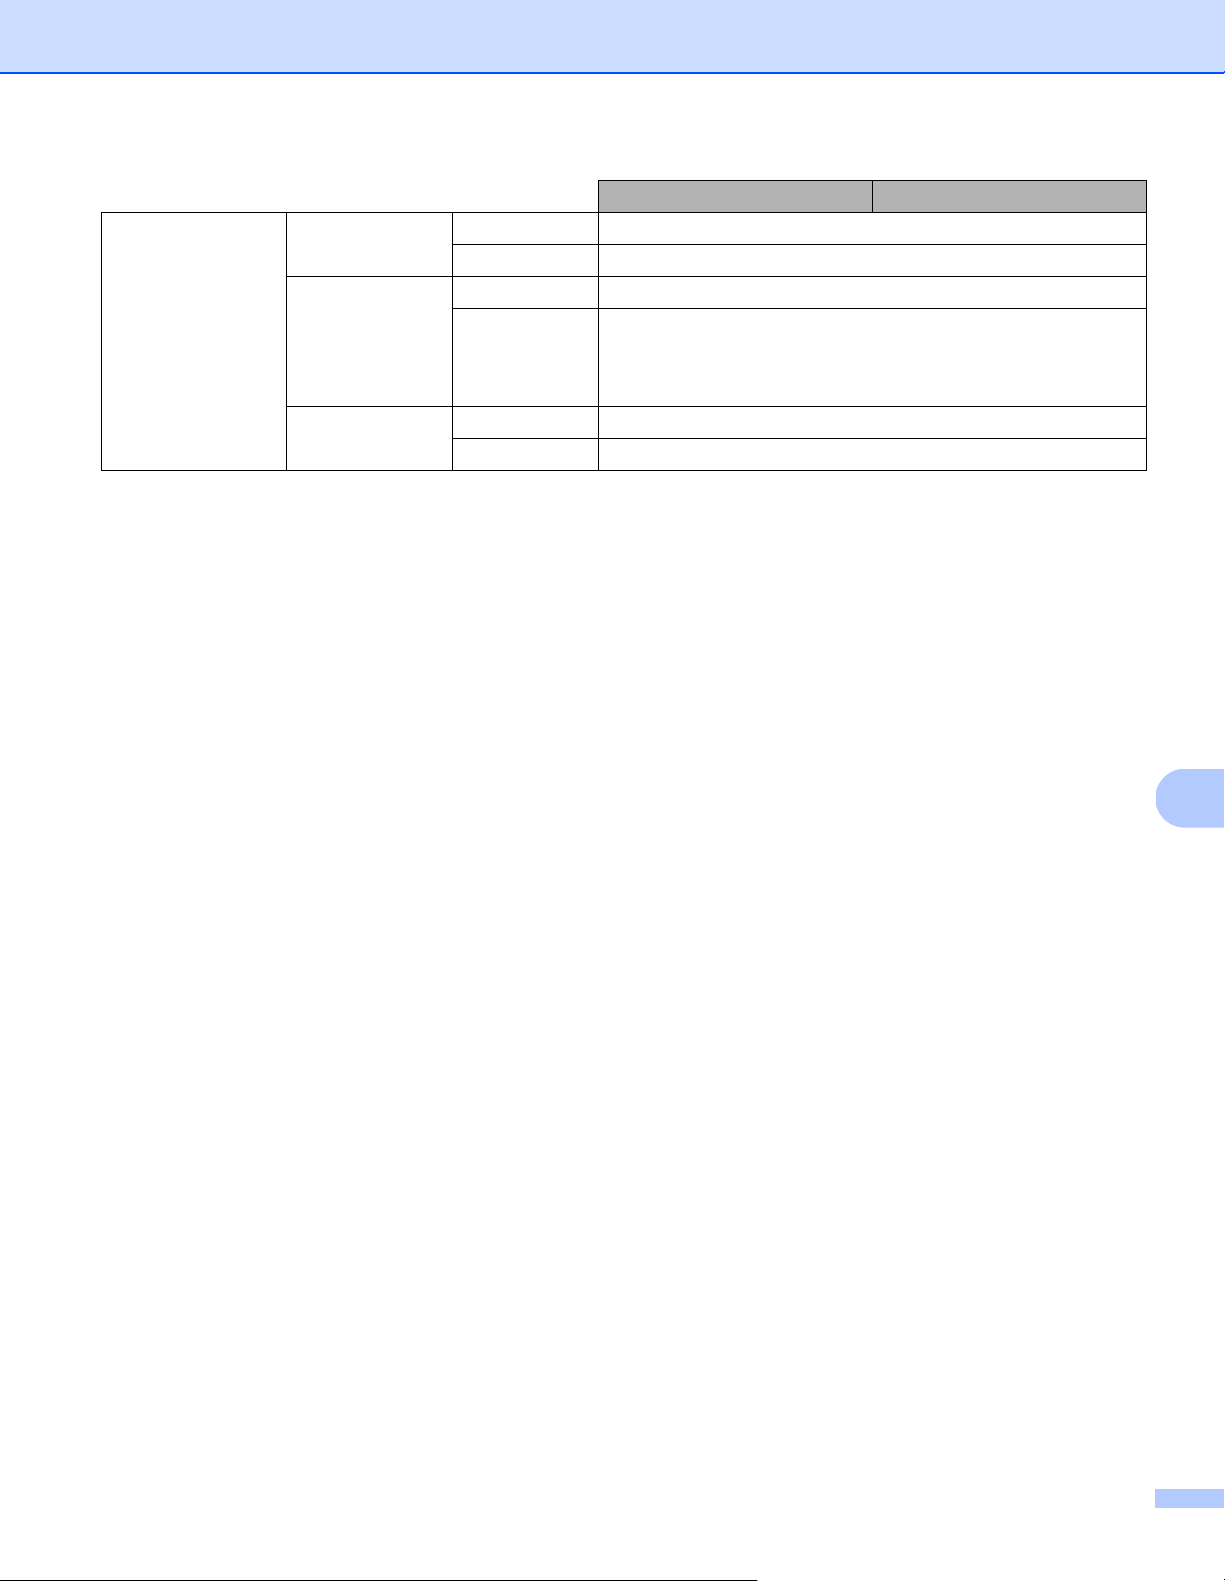
Appendix A
128
A
1
Measured when the machine is connected to your computer.
2
For a 200 dpi scan.
Document Size Multiple Paper Width 2.0 in. to 8.58 in. (51 mm to 218 mm)
Length 2.13 in. to 14.0 in. (54 mm to 356 mm)
Single Paper Width 2.0 in. to 8.58 in. (51 mm to 218 mm)
Length 1-sided scan
2.13 in. to 236.0 in. (54 mm to 5,994 mm)
2
2-sided scan
2.13 in. to 14.0 in. (54 mm to 356 mm)
Flatbed Width Maximum: 8.5 in. (216 mm)
Length Maximum: 14.0 in. (356 mm)
PDS-5000F PDS-6000F
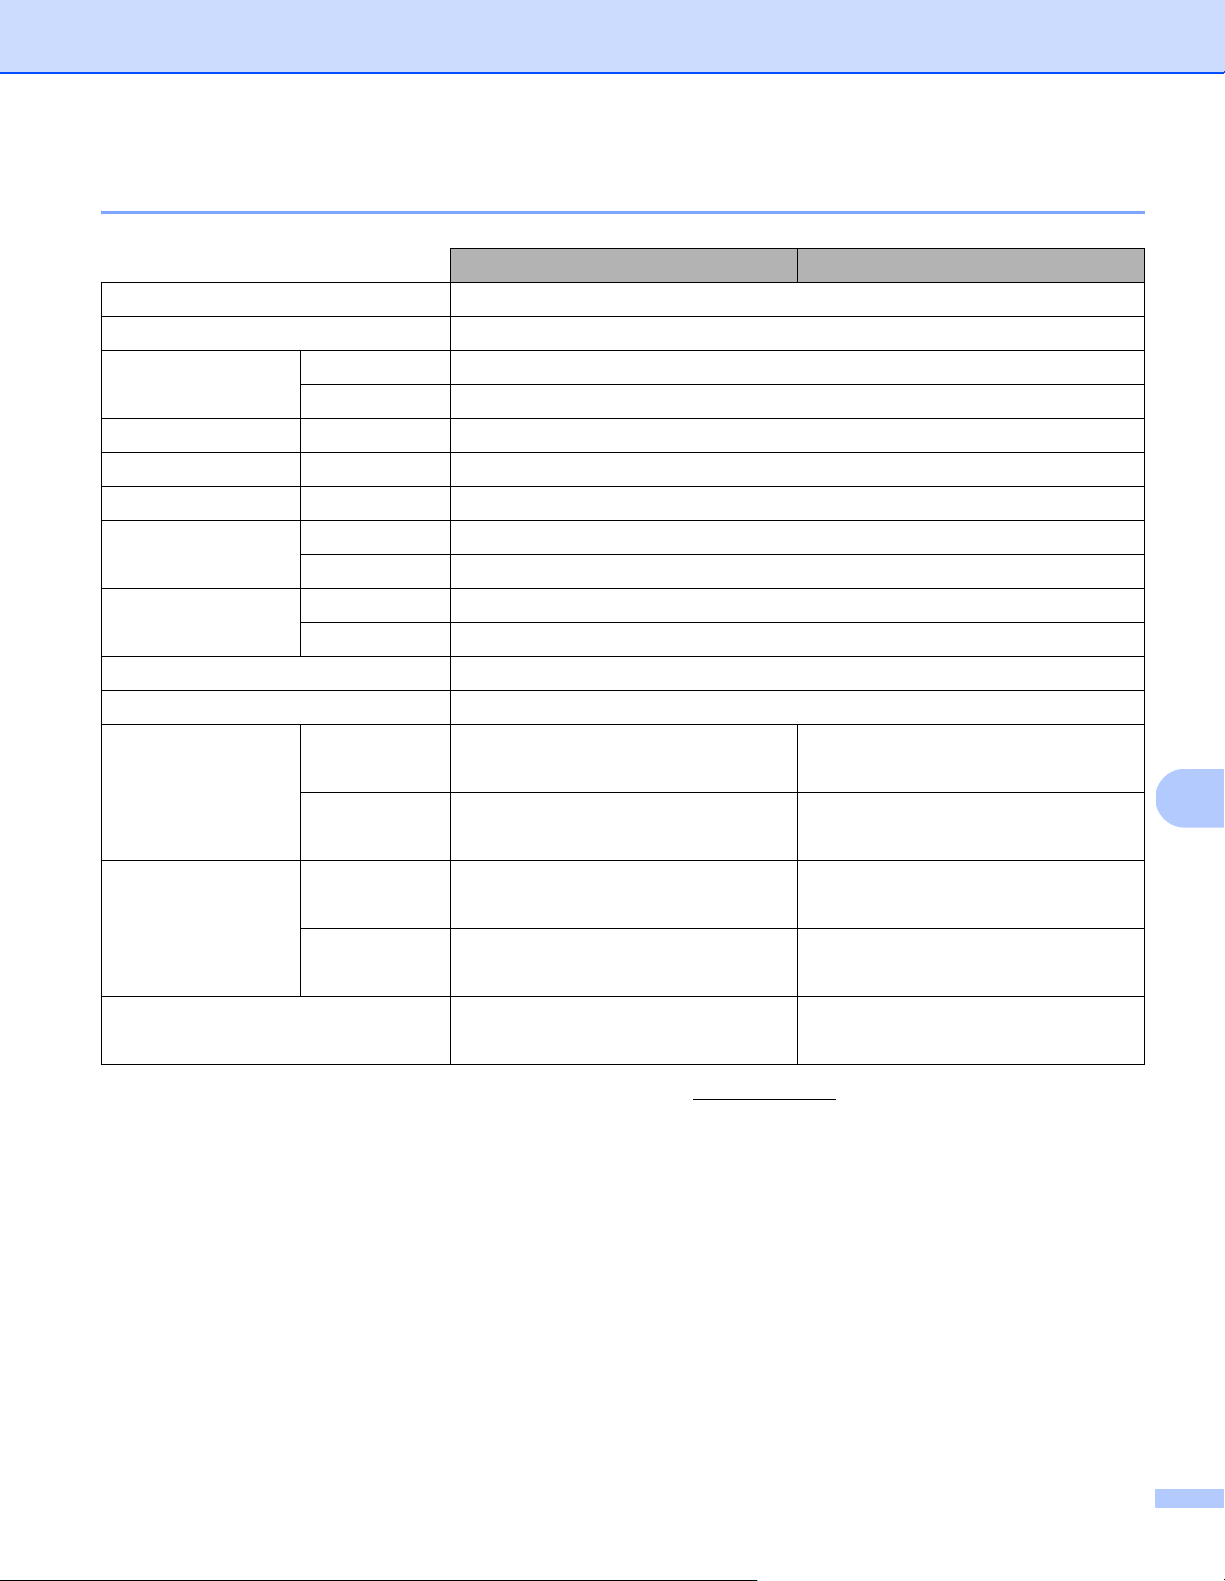
Appendix A
129
A
Scanner
1
For the latest driver updates for the Mac OS X version you are using, visit us at support.brother.com
2
The actual speed may be slower, depending on your computer specifications and scan settings.
PDS-5000F PDS-6000F
Color / Black Yes / Yes
Duplex Scan Yes
TWAIN Compliant Windows
®
Windows Vista
®
/ Windows
®
7, 8, 8.1, 10
Macintosh OS X v10.8.x, 10.9.x, 10.10.x or later
1
WIA Compliant Windows
®
Windows Vista
®
/ Windows
®
7, 8, 8.1, 10
ICA Compliant Macintosh OS X v10.8.x, 10.9.x, 10.10.x or later
1
ISIS™ Compliant Windows
®
Windows Vista
®
/ Windows
®
7, 8, 8.1, 10
Color Depth Input 48 bit color processing
Output 24 bit color processing
Resolution Optical Up to 600 × 600 dpi
Interpolated Up to 600 × 600 dpi
Scanning Width Up to 216 mm
Gray Scale 8 bit
Scanning Max.
Speed
2
Mono 60 ppm (200 / 300 dpi)
15 ppm (600 dpi)
80 ppm (200 / 300 dpi)
20 ppm (600 dpi)
Color 60 ppm (200 / 300 dpi)
15 ppm (600 dpi)
80 ppm (200 / 300 dpi)
20 ppm (600 dpi)
Duplex Scanning
Max. Speed
2
Mono 60 ppm / 120 ipm (200 / 300 dpi)
15 ppm / 30 ipm (600 dpi)
80 ppm / 160 ipm (200 / 300 dpi)
20 ppm / 40 ipm (600 dpi)
Color 60 ppm / 120 ipm (200 / 300 dpi)
15 ppm / 30 ipm (600 dpi)
80 ppm / 160 ipm (200 / 300 dpi)
20 ppm / 40 ipm (600 dpi)
Flatbed Scanning Speed 1.8 s (200/300 dpi, Color/Gray, A4)
7.6 s (600 dpi, Color/Gray, A4)
1.8 s (200/300 dpi, Color/Gray, A4)
7.6 s (600 dpi, Color/Gray, A4)

Appendix A
130
A
Interfaces
1
Your Brother machine has a Hi-Speed USB 3.0/USB 2.0/USB 1.1/USB 1.0 interface. The machine can also be connected to a computer that has
a USB 2.0/USB 1.1/USB 1.0 interface.
2
Third party USB ports are not supported.
Supported languages
The default setting displayed on your Brother machine’s LCD is based on the connected computer’s OS language.
If the OS language is not one of the supported languages as listed in the table above, the LCD displays English.
USB SuperSpeed USB 3.0
1, 2
Use a USB 3.0 cable (Type B) that is no more than 1.8 meters long.
Display Languages English, French, German, Italian, Spanish, Portuguese, Dutch, Norwegian, Swedish, Danish,
Russian, Czech, Hungarian, Polish, Bulgarian, Romanian, Slovakian, Finnish
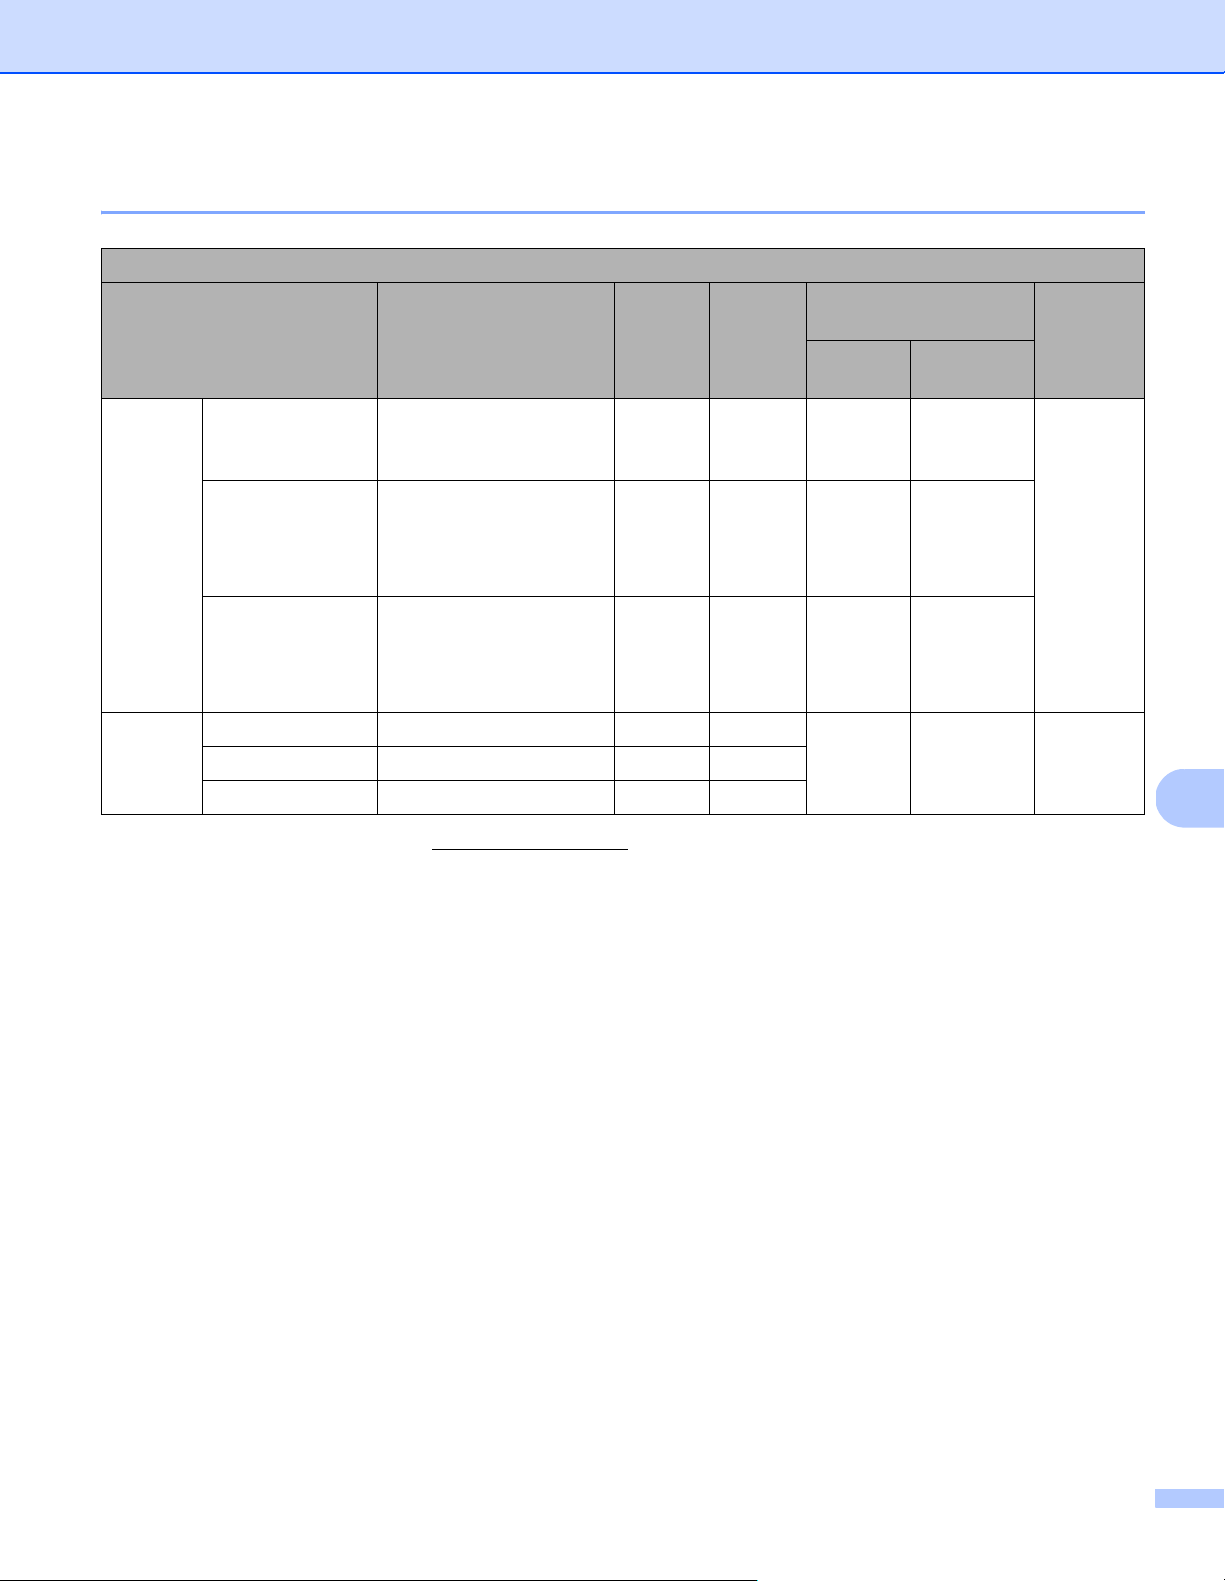
Appendix A
131
A
Computer requirements
For the latest driver updates, visit support.brother.com
All trademarks, brand and product names are property of their respective companies.
SUPPORTED OPERATING SYSTEMS AND SOFTWARE FUNCTIONS
Computer Platform and
Operating System Version
Minimum Processor
Speed
Minimum
RAM
Recom-
mended
RAM
Hard Disk Space
to Install
Supported
Computer
Interface
For
Drivers
For
Applications
Windows
®
Operating
System
Windows Vista
®
Intel
®
Core™ 2 Duo or
equivalent 64-bit (Intel
®
64
or AMD64) supported CPU
1 GB 2 GB 50 MB 1.5 GB USB
Windows
®
7Intel
®
Core™ 2 Duo or
equivalent 64-bit (Intel
®
64
or AMD64) supported CPU
1 GB
(32-bit)
2 GB
(64-bit)
2 GB
(32-bit)
4 GB
(64-bit)
50 MB 1.5 GB
Windows
®
8/8.1/10 Intel
®
Core™ i3 or
equivalent 64-bit (Intel
®
64
or AMD64) supported CPU
1 GB
(32-bit)
2 GB
(64-bit)
2 GB
(32-bit)
4 GB
(64-bit)
50 MB 1.5 GB
Macintosh
Operating
System
OS X 10.8.x Intel
®
Processor 2 GB 4 GB 50 MB 400 MB USB
OS X 10.9.x Intel
®
Processor 2 GB 4 GB
OS X 10.10.x Intel
®
Processor 2 GB 4 GB

132
B
B
Contact Brother
Register your product online at
www.brother.com/registration
By registering your product with Brother, you will be recorded as the original owner of the product. Your
registration with Brother:
• may serve as confirmation of the purchase date of your product should you lose your receipt;
• may support an insurance claim by you in the event of product loss covered by insurance; and,
• will help us notify you of enhancements to your product and special offers.
The most convenient and efficient way to register your new product is online at: www.brother.com/registration
Frequently Asked Questions (FAQs)
The Brother Solutions Center is our one-stop resource for all your Brother machine needs. You can download
the latest software documents and utilities, read FAQs and troubleshooting tips, and learn how to get the most
from your Brother product.
support.brother.com
• Check here for Brother driver updates.
• To keep your machine’s performance up to date, check here for the latest firmware upgrade.
Appendix B
B

Appendix B
133
B
For customer service
Visit support.brother.com
for technical support and contact information of your local Brother office.
Service Center Locator (USA only)
For the location of a Brother authorized service center, call 1-877-BROTHER
(1-877-276-8437) or visit www.brother-usa.com/service
Service Center Locations (Canada only)
For the location of a Brother authorized service center, visit www.brother.ca/support
For Brother accessories & supplies
In USA: www.brother-usa.com
1-877-BROTHER (1-877-276-8437)
1-901-379-1215 (fax)
In Canada: www.brother.ca/support
(Self-Service, Videos, Email, Chat, Facebook and Twitter Help)
If you have comments or suggestions, please write us at:
In USA: Printer Customer Support
Brother International Corporation
7905 North Brother Boulevard
Bartlett, TN 38133
In Canada: Brother International Corporation (Canada), Ltd.
- Marketing Dept.
1, Rue Hotel de Ville Dollard-des-Ormeaux, PQ, Canada H9B 3H6
Other
Countries: Visit www.brother.com/
for contact information for your local Brother office.
In USA: www.brothermall.com/
1-877-552-MALL (1-877-552-6255)
1-800-947-1445 (assistance via fax)
In Canada: www.brother.ca/
In UK: www.brother.co.uk/
Other
Countries: Visit www.brother.com/
for contact information for your local Brother office.

Appendix B
134
B
Technical support (for PageManager)
For USA
For Canada
Other countries
NOTE
For all other issues, see For customer service on page 133.
Company name: NewSoft America Inc.
Postal Address: 47102 Mission Falls Court, Suite 202 Fremont CA 94539
Telephone: 510-770-8900
Fax: 510-770-8980
E-mail Address: [email protected]
URL: www.newsoftinc.com
E-mail Address: [email protected]
E-mail Address: [email protected]