Loading ...
Loading ...
Loading ...

instructions
nuwavenow.com
12 13
ENGLISH
nuwavenow.com
INSTRUCTIONS
12 13
10-degree increments.
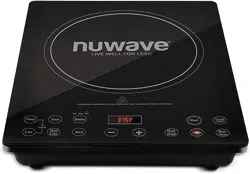
See the Panel Display
Chart for more details.
• The PIC Flex will
automatically stop cooking
once time has expired and
the PIC Flex will beep.
• The display will always
show the current
temperature during the
cooking cycle.
3. To display the remaining
cook time, press Time and
a countdown will appear,
marking the duration before
the cycle or stage is complete.
Note: “0” should appear on the
control panel when the program
is clear or when the power is on.
See Pause/Clear Function for
more.
Setting Temperature
This appliance is preset to cook
on Med/High (375F/191C).
1. To reset, press the desired
temperature on the control
panel then press Start. The
temperature range will be
displayed.
2. To raise or lower the
temperature in 10-degree
increments press + or -.
Refer to Panel Display Chart for
preset temperatures.
Note: The displayed
temperature represents the
center temperature of 1.5Q
(1.5L) of oil in the NuWave
3.5-quart Stainless Steel Pot.
Thermometer location was
tested at the origin (middle) of
the NuWave 3.5-quart Stainless
Steel Pot at an equidistant length
between the pot base and the top
of the oil.
ºF to ºC
The PIC Flex is set to default to
Fahrenheit (F).
1. To switch the display to
Celsius (C), press Prog,
followed by -. Press - again to
convert to Celsius.
2. To return to Fahrenheit press
- once more.
3. To exit from the F/C
conversion option press
Pause/Clear until “0” is
displayed.
Setting Cooking Time
1. Press Time. A “0” will flash in
the far right corner.
2. Press + to reach your desired
time.
Example 1: To program 5
minutes, press Time once, then
press + until “00:05” is displayed.
Press Start.
Example 2: For 20 minutes,
press Time twice, then press +
until “00:20” is displayed. Press
Start.
Example 3: For 2 hours and 30
minutes, press Time twice, then
press + until you reach “00:30”,
then press Time again. Press
+ until 02:30 is displayed, then
press Start.
Pro
Prog
0
Time
• The blinking “0” indicates
the digit you can adjust. The
maximum time is 99 hours and
60 minutes.
• The display shows hours and
minutes, but not seconds.
Pause/Clear Function
1. Press Pause/Clear once to
pause the cooking process.
This will pause the PIC
regardless of cooking stage.
• The temperature will
remain displayed, but the
“F” will be blinking.
2. Press Start to resume
cooking.
Note: Press Pause/Clear twice
to clear the cooking mode or
display while the PIC Flex is in
operation. The screen will be
cleared and “0” will appear.
Programming Function (Stage
Cooking)
1. Press Prog.
2. Choose your desired set
temperature, ranging
from Low to Max/Sear. To
increase or decrease the
temperature press - or +.
3. Press Time. “00:00” will be
displayed then press - or
+ until the desired time
is reached. See Setting
Cooking Time for entering
minutes and hours.
375F
Pause/Clear
Pro
Prog
• To add additional stages,
repeat steps 2 and 3 then
press Start to begin the
program.
• You may program up
to 10 stages (delay is
considered a stage).
• Press Pause/Clear twice
to change any part of your
program or start over.
Example: Boil for 5 minutes
before reducing to a simmer for
20 minutes:
Press Prog. Press Max/Sear.
Press Time once, and then press
+ until “00:05” is reached. Press
Med/Low. Press Time twice,
and then press + until “00:20” is
reached. Finally, press Start.
Note: Maximum programmable
cook time is 99 hours and 60
minutes.
Delay Function:
Delay lets you set programs to
start at a later time.
1. To delay a program, press
Prog.
2. Press Time. A “0” will flash in
the display panel.
3. Press + until the desired
amount of time to delay the
program start is reached.
See Setting Cooking Time
for more.
4. Press Prog again to set
the cooking program. The
amount of time selected
for delay is included in the
programmed stages.
0
Time
Loading ...
Loading ...
Loading ...