

<RXUQHZZDVKLQJPDFKLQH
<RXKDYHFKRVHQD%RVFK ZDVKLQJ
PDFKLQH
3OHDVHWDNHDIHZPLQXWHVWRUHDGDQG
EHFRPHIDPLOLDUZLWKWKHDGYDQWDJHVRI
\RXUZDVKLQJPDFKLQH
7RPHHWWKHKLJKTXDOLW\GHPDQGV
UHTXLUHGE\%RVFKHYHU\ZDVKLQJ
PDFKLQHWKDWOHDYHVRXUIDFWRU\LV
FDUHIXOO\FKHFNHGWRHQVXUHWKDWLW
IXQFWLRQVFRUUHFWO\DQGLVLQSHUIHFW
FRQGLWLRQ
)RUPRUHLQIRUPDWLRQRQRXUSURGXFWV
DFFHVVRULHVUHSODFHPHQWSDUWVDQG
VHUYLFHVVHHRXUZHEVLWHZZZERVFK
KRPHFRP RUFRQWDFWRXUDIWHUVDOHV
VHUYLFHFHQWUHV
,IWKHRSHUDWLQJDQGLQVWDOODWLRQ
LQVWUXFWLRQVGHVFULEHGLIIHUHQWPRGHOV
DQ\GLIIHUHQFHVZLOOEHSRLQWHGRXWDWWKH
UHOHYDQWSRLQWVLQWKHWH[W
5HDGWKHVHRSHUDWLQJDQGLQVWDOODWLRQ
LQVWUXFWLRQVEHIRUHVZLWFKLQJRQWKH
ZDVKLQJPDFKLQH
*%VWDQGDUG
*%
*%
*%
*%
*%
*%7
*%
'LVSOD\UXOHV
::DUQLQJ
7KLVFRPELQDWLRQRIV\PERODQGVLJQDO
ZRUGLQGLFDWHVDSRVVLEO\GDQJHURXV
VLWXDWLRQ1RWKHHGLQJWKHZDUQLQJFDQ
FDXVHGHDWKRULQMXULHV
&DXWLRQ
7KLVVLJQDOZRUGLQGLFDWHVDSRVVLEO\
GDQJHURXVVLWXDWLRQ1RWKHHGLQJWKH
FDXWLRQFDQFDXVHSURSHUW\DQGRU
HQYLURQPHQWDOGDPDJH
1RWHWLS
,QIRUPDWLRQ DERXW WKH RSWLPXP XVH RI WKH
DSSOLDQFHDQ\RWKHUXVHIXOLQIRUPDWLRQ
DEF
7KH VWHSV DUH UHSUHVHQWHG E\ QXPEHUV RU
OHWWHUV
■
/LVWVDUHUHSUHVHQWHGE\DVPDOOER[RUD
GDVK

HQ
&RQWHQWV
HQ,QVWUXFWLRQ0DQXDODQG,QVWDOODWLRQ,QVWUXFWLRQV
8 ,QWHQGHGXVH
( 6DIHW\LQVWUXFWLRQV
&KLOGUHQSHRSOHSHWV
,QVWDOODWLRQ
2SHUDWLRQ
&OHDQLQJ0DLQWHQDQFH
7 (QYLURQPHQWDOSURWHFWLRQ
3DFNDJLQJXVHGDSSOLDQFH
7LSVRQHFRQRPLFDOXVH
5 3RVLWLRQLQJDQGFRQQHFWLQJ
,QFOXGHGZLWKWKHDSSOLDQFH
,QVWDOODWLRQ
6DIHW\LQVWUXFWLRQV
5HPRYLQJWKHIRDPEORFN
,QVWDOODWLRQVXUIDFH
,QVWDOODWLRQRQDEDVHRUDZRRGHQMRLVW
IORRU
,QVWDOOLQJWKHDSSOLDQFHLQDNLWFKHQHWWH
5HPRYLQJWKHWUDQVSRUWORFNV
+RVHDQGFDEOHOHQJWKV
:DWHULQOHW
:DWHURXWOHW
$OLJQPHQW
(OHFWULFDOFRQQHFWLRQ
%HIRUHZDVKLQJIRUWKHILUVWWLPH
7UDQVSRUWDWLRQ
/7KHPDLQSRLQWVLQEULHI
* *HWWLQJWRNQRZWKHDSSOLDQFH
$SSOLDQFH
&RQWUROSDQHO
'LVSOD\V\PEROV
Z /DXQGU\
3URWHFWLQJ\RXUODXQGU\DQGDSSOLDQFH
6RUWLQJODXQGU\
0 3URJUDPPHGHIDXOWVHWWLQJV
偁䂾 7HPSHUDWXUH&
熄爷 6SLQVSHHG 0
窜悾 )LQLVKLQ 0
\ $GGLWLRQDOSURJUDPPHVHWWLQJV
䗨爷 撚坍 VSHHG3HUIHFWHFR3HUIHFW
熓䦖叀 (DV\,URQ
㒸儚伯5LQVHSOXV
㒸侐仹 6RDNLQJ
1 2SHUDWLQJWKHDSSOLDQFH
3UHSDULQJWKHDSSOLDQFH
6HOHFWSURJUDPPHVZLWFKRQWKH
DSSOLDQFH
3ODFLQJODXQGU\LQWRWKHGUXP
0HDVXUHDQGDGGGHWHUJHQWDQG FDUH
SURGXFWV
6WDUWWKHSURJUDPPH
&KLOGSURRIORFN
$GGLQJUHPRYLQJODXQGU\
&KDQJLQJWKHSURJUDPPH
&DQFHOWKHSURJUDPPH
3URJUDPPHHQGGXULQJULQVHKROG
3URJUDPPHHQG
$IWHUZDVKLQJ
Q$SSOLDQFHVHWWLQJV
2 &OHDQLQJDQGPDLQWHQDQFH
$SSOLDQFHKRXVLQJFRQWUROSDQHO
'UXP
'HVFDOLQJ
'HWHUJHQWGUDZHUDQGKRXVLQJ
&OHDQLQJWKHPHDVXULQJDLG$IRUOLTXLG
GHWHUJHQW
'UDLQSXPSLVEORFNHG
7KHGUDLQKRVHDWWKHVLSKRQLVEORFNHG
)LOWHULQWKHZDWHUVXSSO\LVEORFNHG
3 )DXOWV DQG ZKDW WR GR DERXW WKHP
(PHUJHQF\UHOHDVH
,QIRUPDWLRQRQWKHGLVSOD\SDQHO
)DXOWVDQGZKDWWRGRDERXWWKHP

HQ ,QWHQGHGXVH
4 $IWHUVDOHVVHUYLFH
J 7HFKQLFDOGDWD
8 ,QWHQGHGXVH
,QWHQGHGXVH
■ 7KLVDSSOLDQFHLVLQWHQGHGIRUSULYDWH
GRPHVWLFXVHRQO\
■ 'R QRW LQVWDOO RU RSHUDWH WKLV DSSOLDQFH
DQ\ZKHUHWKDWLVOLDEOHWRH[SHULHQFH
IURVW DQGRU RXWGRRU FRQGLWLRQV 7KHUH
LVDULVNWKDWWKHDSSOLDQFHZLOOEH
GDPDJHGLIUHVLGXDOZDWHULQLW
IUHH]HV,IKRVHVIUHH]HXSWKH\PD\
FUDFNEXUVW
■ 7KLVDSSOLDQFHPXVWRQO\EHXVHGIRU
ZDVKLQJGRPHVWLFODXQGU\FRQVLVWLQJ
RI PDFKLQHZDVKDEOH LWHPV DQG KDQG
ZDVKDEOHZRROOHQVVHHODEHORQ
LWHP8VLQJWKHDSSOLDQFHIRUDQ\
RWKHUSXUSRVHLVRXWVLGHRIWKHVFRSH
RILWVLQWHQGHGDSSOLFDWLRQDQGLV
IRUELGGHQ
■ 7KLVDSSOLDQFHLVVXLWDEOHIRU
RSHUDWLRQZLWKPDLQVZDWHUDQG
FRPPHUFLDOO\DYDLODEOHGHWHUJHQWV
DQGFDUHSURGXFWVPXVWEHVXLWDEOH
IRUXVHLQZDVKLQJPDFKLQHV
■ 7KLVDSSOLDQFHLVLQWHQGHGIRUXVHXS
WRDPD[LPXPKHLJKWRI PHWUHV
DERYHVHDOHYHO
%HIRUH\RXVZLWFKRQWKHDSSOLDQFH
&KHFNWKDWWKHUHLVQRYLVLEOHGDPDJHWR
WKHDSSOLDQFH'RQRWRSHUDWHWKH
DSSOLDQFHLILWLVGDPDJHG6KRXOG\RX
KDYHDQ\SUREOHPVSOHDVHFRQWDFW\RXU
VSHFLDOLVWGHDOHURURXUFXVWRPHUVHUYLFH
5HDGDQGIROORZWKHRSHUDWLQJDQG
LQVWDOODWLRQLQVWUXFWLRQVDQGDOORWKHU
LQIRUPDWLRQSURYLGHGZLWKWKLVDSSOLDQFH
5HWDLQWKHGRFXPHQWVIRUVXEVHTXHQW
XVHRUIRUVXEVHTXHQWRZQHUV

6DIHW\LQVWUXFWLRQV HQ
( 6DIHW\LQVWUXFWLRQV
6DIHW\LQVWUXFWLRQV
7KHIROORZLQJVDIHW\LQIRUPDWLRQ
DQGZDUQLQJVDUHSURYLGHGWR
SURWHFW\RXIURPLQMXU\DQGWR
SUHYHQW PDWHULDO GDPDJH WR \RXU
VXUURXQGLQJV
,WLVQHYHUWKHOHVVLPSRUWDQWWR
WDNHWKHQHFHVVDU\SUHFDXWLRQV
DQGWRSURFHHGZLWKFDUHZKHQ
LQVWDOOLQJPDLQWDLQLQJFOHDQLQJ
DQGRSHUDWLQJWKHDSSOLDQFH
&KLOGUHQSHRSOHSHWV
::DUQLQJ
5LVNRIGHDWK
&KLOGUHQDQGRWKHUSHRSOHZKR
DUHXQDEOHWRDVVHVVWKHULVNV
LQYROYHGZKHQXVLQJWKH
DSSOLDQFH PD\ LQMXUH WKHPVHOYHV
RUPD\ILQGWKHPVHOYHVLQOLIH
WKUHDWHQLQJ VLWXDWLRQV 7KHUHIRUH
SOHDVHQRWH
■ 7KHDSSOLDQFHPD\EHXVHG
E\FKLOGUHQRYHUWKHDJHRI
\HDUVDQGE\SHUVRQVZLWK
UHGXFHGSK\VLFDOVHQVRU\RU
PHQWDO FDSDFLW\ RU E\ SHUVRQV
ZLWKDODFNRIH[SHULHQFHRU
NQRZOHGJHDVORQJDVWKH\
DUHVXSHUYLVHGRUKDYH
UHFHLYHG LQVWUXFWLRQ RQ KRZ WR
XVHWKHDSSOLDQFHVDIHO\DQG
WKH\KDYHXQGHUVWRRGWKH
SRWHQWLDOULVNVRIXVLQJWKH
DSSOLDQFH
■ &KLOGUHQPXVWQRWSOD\ZLWK
WKLVDSSOLDQFH
■ 'RQRWDOORZFKLOGUHQWRFOHDQ
RUPDLQWDLQWKLVDSSOLDQFH
XQVXSHUYLVHG
■ .HHSFKLOGUHQXQGHU\HDUV
DQGSHWVDZD\IURPWKLV
DSSOLDQFH
■ 'RQRWOHDYHWKHDSSOLDQFH
XQDWWHQGHGZKHQFKLOGUHQRU
RWKHUSHRSOHZKRDUHXQDEOH
WRDVVHVVWKHULVNVDUHLQWKH
YLFLQLW\
::DUQLQJ
5LVNRIGHDWK
&KLOGUHQPD\ORFNWKHPVHOYHV
LQVLGHDSSOLDQFHVDQGILQG
WKHPVHOYHVLQDOLIHWKUHDWHQLQJ
VLWXDWLRQ
■ 'RQRWSRVLWLRQWKHDSSOLDQFH
EHKLQGDGRRUDVWKLVPD\
REVWUXFW WKH DSSOLDQFH GRRU RU
SUHYHQWLWIURPRSHQLQJ
FRPSOHWHO\
■ 2QFHDQDSSOLDQFHKDV
UHDFKHG WKH HQG RI LWV OLIH SXOO
WKHPDLQVSOXJIURPWKH
VRFNHW EHIRUHVHYHULQJWKH
PDLQV FDEOH DQG WKHQ GHVWUR\
WKHORFNRQWKHDSSOLDQFH
GRRU
::DUQLQJ
5LVNRIVXIIRFDWLRQ
,IDOORZHGWRSOD\ZLWKWKH
SDFNDJLQJSODVWLF ILOP RU SDFNLQJ
FRPSRQHQWVFKLOGUHQPD\
EHFRPHFDXJKWLQWKHVHRUSXOO
WKHPRYHUWKHLUKHDGVDQG
VXIIRFDWH
.HHS SDFNDJLQJ SODVWLF ILOP DQG
SDFNLQJFRPSRQHQWVDZD\IURP
FKLOGUHQ

HQ 6DIHW\LQVWUXFWLRQV
::DUQLQJ
5LVNRISRLVRQLQJ
'HWHUJHQWVDQGFDUHSURGXFWV
PD\UHVXOWLQSRLVRQLQJLI
FRQVXPHG
,IDFFLGHQWDOO\VZDOORZHGVHHN
PHGLFDO DGYLFH .HHS GHWHUJHQWV
DQGFDUHSURGXFWVRXWRIWKH
UHDFKRIFKLOGUHQ
::DUQLQJ
5LVNRIEXUQV
:KHQZDVKLQJDWKLJK
WHPSHUDWXUHVWKHJODVVLQWKH
DSSOLDQFHGRRUEHFRPHVKRW
6WRSFKLOGUHQIURPWRXFKLQJWKH
DSSOLDQFHGRRUZKHQLWLVKRW
::DUQLQJ
(\HVNLQLUULWDWLRQ
&RQWDFWZLWKGHWHUJHQWVRUFDUH
SURGXFWVPD\FDXVHH\HVNLQ
LUULWDWLRQ
5LQVHH\HVVNLQWKRURXJKO\LI
WKH\LWFRPHVLQWRFRQWDFWZLWK
GHWHUJHQWVRUFDUHSURGXFWV
.HHSGHWHUJHQWVDQGFDUH
SURGXFWVRXWRIWKHUHDFKRI
FKLOGUHQ
,QVWDOODWLRQ
::DUQLQJ
5LVNRIHOHFWULFVKRFNILUH
PDWHULDOGDPDJHGDPDJHWR
WKHDSSOLDQFH
,IWKHDSSOLDQFHLVQRWLQVWDOOHG
SURSHUO\WKLVPD\OHDGWRD
GDQJHURXVVLWXDWLRQ(QVXUH
WKH IROORZLQJ
■ 7KHPDLQVYROWDJHRQ\RXU
SRZHUVRFNHWPXVWPDWFKWKH
UDWHGYROWDJHVSHFLILHGRQWKH
DSSOLDQFHLGHQWLILFDWLRQ
SODWH7KHFRQQHFWHGORDGV
DQGWKHUHTXLUHGIXVH
SURWHFWLRQ DUH VSHFLILHG RQ WKH
LGHQWLILFDWLRQSODWH
■ 7KHPDLQVSOXJDQGWKH
SURWHFWLYHFRQWDFWVRFNHW
PXVWPDWFKDQGWKHHDUWKLQJ
V\VWHPPXVWEHFRUUHFWO\
LQVWDOOHG
■ 7KHLQVWDOODWLRQPXVWKDYHDQ
DGHTXDWHFURVVVHFWLRQ
■ 7KH PDLQV SOXJ PXVW EH IUHHO\
DFFHVVLEOHDWDOOWLPHV,IWKLV
LVQRWSRVVLEOHLQRUGHUWR
FRPSO\ZLWKWKHUHOHYDQW
VDIHW\UHJXODWLRQVDVZLWFK
DOOSROHGLVFRQQHFWLRQPXVW
EHEXLOWLQWRWKHSHUPDQHQW
LQVWDOODWLRQ LQ DFFRUGDQFH ZLWK
HOHFWULFDOLQVWDOODWLRQ
UHJXODWLRQV
■ ,IXVLQJDUHVLGXDOFXUUHQW
FLUFXLWEUHDNHURQO\XVHRQH
WKDWEHDUVWKHIROORZLQJPDUN
z7KHSUHVHQFHRIWKLV
PDUNLVWKHRQO\ZD\WREH
VXUHWKDWLWIXOILOVDOOWKH
DSSOLFDEOHUHJXODWLRQV
::DUQLQJ
5LVNRIHOHFWULFVKRFNILUH
PDWHULDOGDPDJHGDPDJHWR
WKHDSSOLDQFH
,IWKHDSSOLDQFHVPDLQVFDEOHLV
DOWHUHGRUGDPDJHGWKLVPD\
UHVXOWLQHOHFWULFVKRFNVKRUW
FLUFXLWLQJRUILUHGXHWR
RYHUKHDWLQJ

6DIHW\LQVWUXFWLRQV HQ
7KHPDLQVFDEOHPXVWQRWEH
NLQNHGFUXVKHGRUDOWHUHGDQG
PXVWQRWFRPHLQWRFRQWDFWZLWK
DQ\KHDWVRXUFHV
::DUQLQJ
5LVNRIILUHPDWHULDOGDPDJH
GDPDJHWRWKHDSSOLDQFH
7KHXVHRIH[WHQVLRQFRUGVRU
SRZHUVWULSVPD\UHVXOWLQILUH
GXHWRRYHUKHDWLQJRUVKRUW
FLUFXLWLQJ
&RQQHFW WKH DSSOLDQFH GLUHFWO\ WR
DQ HDUWKHG VRFNHW WKDW KDV EHHQ
FRUUHFWO\LQVWDOOHG'RQRWXVH
H[WHQVLRQFRUGVSRZHUVWULSVRU
PXOWLZD\FRXSOHUV
::DUQLQJ
5LVNRILQMXU\PDWHULDO
GDPDJHGDPDJHWRWKH
DSSOLDQFH
■ 7KHDSSOLDQFHPD\YLEUDWHRU
PRYHZKHQLQRSHUDWLRQ
SRWHQWLDOO\ UHVXOWLQJ LQ LQMXU\ RU
PDWHULDOGDPDJH
3ODFHWKHDSSOLDQFHRQD
FOHDQHYHQVROLGVXUIDFH
DQGXVLQJDVSLULWOHYHOWR
JXLGH\RXOHYHOLWZLWKWKH
VFUHZLQIHHW
Risk of injury/material damage/damage to the appliance!
■ ,I\RXWDNHKROGRIDQ\RIWKH
DSSOLDQFHVSURWUXGLQJSDUWV
HJWKHDSSOLDQFHGRRULQ
RUGHUWROLIWRUPRYHLWWKHVH
SDUWV PD\ EUHDN RII DQG FDXVH
LQMXU\
'RQRWWDNHKROGRIDQ\RIWKH
DSSOLDQFHV SURWUXGLQJ SDUWV LQ
RUGHUWRPRYHWKHDSSOLDQFH
::DUQLQJ
5LVNRILQMXU\
■ 7KHDSSOLDQFHLVYHU\KHDY\
/LIWLQJLWPD\UHVXOWLQLQMXU\
'RQRWOLIWWKHDSSOLDQFHRQ
\RXURZQ
Risk of injury!
■ 7KHDSSOLDQFHKDVVKDUS
HGJHV RQ ZKLFK \RX FRXOG FXW
\RXUKDQGV
'RQRWWDNHKROGRIWKH
DSSOLDQFHE\LWVVKDUSHGJHV
:HDUSURWHFWLYHJORYHVWROLIW
LW
Risk of injury!
■ ,I WKH KRVHV DQG PDLQV FDEOHV
DUHQRWFRUUHFWO\URXWHGWKH\
PD\FRQVWLWXWHDWULSSLQJ
KD]DUGZKLFKPD\UHVXOWLQ
LQMXU\
5RXWH KRVHV DQG FDEOHV VXFK
WKDWWKH\GRQRWFRQVWLWXWHD
WULSSLQJKD]DUG
&DXWLRQ
0DWHULDOGDPDJHGDPDJHWR
WKHDSSOLDQFH
■ ,IWKHZDWHUSUHVVXUHLVWRR
KLJKRUWRRORZWKHDSSOLDQFH
PD\QRWEHDEOHWRRSHUDWH
SURSHUO\DQGLWPD\DOVR
UHVXOWLQPDWHULDOGDPDJHRU
GDPDJHWRWKHDSSOLDQFH
0DNHVXUHWKDWWKHZDWHU
SUHVVXUHLQWKHZDWHUVXSSO\
IDFLOLW\LVDWOHDVW
N3D EDU DQG GRHV QRW
H[FHHG N3D EDU
Material damage/damage to the appliance

HQ 6DIHW\LQVWUXFWLRQV
■ ,IWKHZDWHUKRVHVDUHDOWHUHG
RU GDPDJHG WKLV PD\ UHVXOW LQ
PDWHULDOGDPDJHRUGDPDJH
WRWKHDSSOLDQFH
7KHZDWHUKRVHVPXVWQRWEH
NLQNHGFUXVKHGDOWHUHGRU
VHYHUHG
Material damage/damage to the appliance
■ 7KHXVHRIKRVHVVXSSOLHGE\
RWKHU EUDQGV WR FRQQHFW WR WKH
ZDWHUVXSSO\PD\UHVXOWLQ
PDWHULDOGDPDJHRUGDPDJH
WRWKHDSSOLDQFH
8VHWKHKRVHVVXSSOLHGZLWK
WKHDSSOLDQFHRUJHQXLQH
VSDUHSDUWKRVHVRQO\
Material damage/damage to the appliance
■ 7KHDSSOLDQFHLVVHFXUHGIRU
WUDQVSRUWDWLRQE\WUDQVSRUW
ORFNLQJGHYLFHV,IWKH
WUDQVSRUWORFNLQJGHYLFHVDUH
QRWUHPRYHGEHIRUHWKH
DSSOLDQFHLVRSHUDWHGWKLV
PD\UHVXOWLQGDPDJHWRWKH
DSSOLDQFH
,WLVLPSRUWDQWWRFRPSOHWHO\
UHPRYHDOOWUDQVSRUWORFNLQJ
GHYLFHVEHIRUHXVLQJWKH
DSSOLDQFHIRUWKHILUVWWLPH
0DNHVXUHWKDW\RXUHWDLQ
WKHVHWUDQVSRUWORFNLQJ
GHYLFHVVHSDUDWHO\,WLV
LPSRUWDQW WR UHILW WKH WUDQVSRUW
ORFNLQJGHYLFHVLIWKH
DSSOLDQFH LV WR EH WUDQVSRUWHG
LQRUGHUWRSUHYHQWWKH
DSSOLDQFHIURPEHLQJ
GDPDJHGLQWUDQVLW
2SHUDWLRQ
::DUQLQJ
5LVNRIH[SORVLRQVILUH
/DXQGU\WKDWKDVEHHQ
SUHWUHDWHGZLWKFOHDQLQJDJHQWV
WKDWFRQWDLQVROYHQWVHJVWDLQ
UHPRYHUFOHDQLQJVROYHQWPD\
FDXVHDQH[SORVLRQLQWKHGUXP
5LQVHWKHODXQGU\WKRURXJKO\
ZLWKZDWHUEHIRUHZDVKLQJLWLQ
WKHPDFKLQH
::DUQLQJ
5LVNRISRLVRQLQJ
3RLVRQRXVIXPHVPD\EHJLYHQ
RIIE\FOHDQLQJDJHQWVWKDW
FRQWDLQVROYHQWVHJFOHDQLQJ
VROYHQW
'RQRWXVHFOHDQLQJDJHQWVWKDW
FRQWDLQVROYHQWV
::DUQLQJ
5LVNRILQMXU\
■ ,I\RXVXSSRUW\RXUZHLJKWVLW
RQWKHDSSOLDQFHGRRUZKHQLW
LV RSHQ WKH DSSOLDQFH PD\ WLS
RYHUZKLFKPD\UHVXOWLQ
LQMXU\
'R QRW VXSSRUW \RXU ZHLJKW RQ
WKHDSSOLDQFHGRRUZKHQLWLV
RSHQ
Risk of injury!
■ ,I\RXFOLPERQWRWKH
DSSOLDQFHWKHZRUNWRSPD\
EUHDNZKLFKPD\UHVXOWLQ
LQMXU\
'RQRWFOLPERQWRWKH
DSSOLDQFH
Risk of injury!

6DIHW\LQVWUXFWLRQV HQ
■ ,I\RXUHDFKLQWRWKHGUXP
ZKLOH LW LV VWLOO URWDWLQJ \RX ULVN
LQMXULQJ\RXUKDQGV
:DLWXQWLOWKHGUXPKDV
VWRSSHGURWDWLQJ
::DUQLQJ
5LVNRIVFDOGLQJ
:KHQZDVKLQJDWKLJK
WHPSHUDWXUHVWKHUHLVDULVNRI
VFDOGLQJ LI \RX FRPH LQWR FRQWDFW
ZLWKKRWGHWHUJHQWVROXWLRQHJ
ZKHQGUDLQLQJKRWGHWHUJHQW
VROXWLRQLQWRDZDVKEDVLQ
'RQRWUHDFKLQWRWKHKRW
GHWHUJHQWVROXWLRQ
::DUQLQJ
(\HVNLQLUULWDWLRQ
'HWHUJHQWDQGFDUHSURGXFWV
PD\VSUD\RXWLIWKHGHWHUJHQW
GUDZHULVRSHQHGZKLOHWKH
DSSOLDQFHLVLQRSHUDWLRQ
5LQVHH\HVVNLQWKRURXJKO\LI
WKH\LWFRPHVLQWRFRQWDFWZLWK
GHWHUJHQWVRUFDUHSURGXFWV,I
DFFLGHQWDOO\VZDOORZHGVHHN
PHGLFDODGYLFH
&DXWLRQ
0DWHULDOGDPDJHGDPDJHWR
WKHDSSOLDQFH
■ ,I WKH DPRXQW RI ODXQGU\ LQ WKH
DSSOLDQFHH[FHHGVLWV
PD[LPXPORDGFDSDFLW\LW
PD\QRWEHDEOHWRRSHUDWH
SURSHUO\RUWKLVPD\UHVXOWLQ
PDWHULDOGDPDJHRUGDPDJH
WRWKHDSSOLDQFH
'RQRWH[FHHGWKHPD[LPXP
ORDGFDSDFLW\RIGU\ODXQGU\
0DNHVXUH\RXFRPSO\ZLWK
WKHPD[LPXPORDGFDSDFLWLHV
VSHFLILHGIRUHDFKRIWKH
SURJUDPV
Material damage/damage to the appliance
■ ,I \RX SRXU WKH ZURQJ TXDQWLW\
RI GHWHUJHQW RU FOHDQLQJ DJHQW
LQWRWKHDSSOLDQFHWKLVPD\
UHVXOWLQPDWHULDOGDPDJHRU
GDPDJHWRWKHDSSOLDQFH
8VH GHWHUJHQWVFDUH SURGXFWV
FOHDQLQJ DJHQWV DQG VRIWHQHUV
LQDFFRUGDQFHZLWKWKH
PDQXIDFWXUHUVLQVWUXFWLRQV
&OHDQLQJ0DLQWHQDQFH
::DUQLQJ
5LVNRIGHDWK
7KHDSSOLDQFHLVSRZHUHGE\
HOHFWULFLW\7KHUHLVDULVNRI
HOHFWULFVKRFNLI\RXFRPHLQWR
FRQWDFWZLWKOLYHFRPSRQHQWV
7KHUHIRUHSOHDVHQRWH
■ 6ZLWFKRIIWKHDSSOLDQFH
'LVFRQQHFWWKHDSSOLDQFH
IURPWKHSRZHUVXSSO\SXOO
RXWWKHSOXJ
■ 1HYHUWDNHKROGRIWKHPDLQV
SOXJZLWKZHWKDQGV

HQ (QYLURQPHQWDOSURWHFWLRQ
■ :KHQUHPRYLQJWKHPDLQV
SOXJIURPWKHVRFNHWDOZD\V
WDNH KROG RI WKH SOXJ LWVHOI DQG
QHYHUWKHPDLQVFDEOH
RWKHUZLVHWKLVPD\GDPDJH
WKHPDLQVFDEOH
■ 'RQRWPDNHDQ\WHFKQLFDO
PRGLILFDWLRQV WR WKH DSSOLDQFH
RULWVIHDWXUHV
■ 5HSDLUVDQGDQ\RWKHUZRUN
RQ WKH DSSOLDQFH PXVW RQO\ EH
FRQGXFWHGE\RXUFXVWRPHU
VHUYLFHRUE\DQHOHFWULFLDQ
7KHVDPHDSSOLHVIRU
UHSODFLQJWKHPDLQVFDEOH
ZKHQQHFHVVDU\
■ 6SDUHPDLQVFDEOHVFDQEH
RUGHUHGIURPRXUFXVWRPHU
VHUYLFH
::DUQLQJ
5LVNRISRLVRQLQJ
3RLVRQRXVIXPHVPD\EHJLYHQ
RIIE\FOHDQLQJDJHQWVWKDW
FRQWDLQVROYHQWVHJFOHDQLQJ
VROYHQW
'RQRWXVHFOHDQLQJDJHQWVWKDW
FRQWDLQVROYHQWV
::DUQLQJ
5LVN RI HOHFWULF VKRFNPDWHULDO
GDPDJHGDPDJHWRWKH
DSSOLDQFH
,IPRLVWXUHSHQHWUDWHVWKH
DSSOLDQFHWKLVPD\FDXVHLWWR
VKRUWFLUFXLW
'RQRWXVHDSUHVVXUHZDVKHU
VWHDPFOHDQHUKRVHRUVSUD\
JXQWRFOHDQ\RXUDSSOLDQFH
::DUQLQJ
5LVNRILQMXU\PDWHULDO
GDPDJHGDPDJHWRWKH
DSSOLDQFH
7KHXVHRIVSDUHSDUWVDQG
DFFHVVRULHVVXSSOLHGE\RWKHU
EUDQGVLVGDQJHURXVDQGPD\
UHVXOWLQLQMXU\PDWHULDOGDPDJH
RUGDPDJHWRWKHDSSOLDQFH
)RU VDIHW\ UHDVRQV XVH JHQXLQH
VSDUHSDUWVDQGDFFHVVRULHV
RQO\
&DXWLRQ
0DWHULDOGDPDJHGDPDJHWR
WKHDSSOLDQFH
&OHDQLQJDJHQWVDQGDJHQWVIRU
SUHWUHDWLQJODXQGU\HJVWDLQ
UHPRYHUVSUHZDVKVSUD\VHWF
PD\ FDXVH GDPDJH LI WKH\ FRPH
LQWRFRQWDFWZLWKWKHVXUIDFHVRI
WKHDSSOLDQFH7KHUHIRUHSOHDVH
QRWH
■ 'RQRWDOORZWKHVHDJHQWVWR
FRPHLQWRFRQWDFWZLWKWKH
VXUIDFHVRIWKHDSSOLDQFH
■ &OHDQWKHDSSOLDQFHZLWK
QRWKLQJEXWZDWHUDQGDVRIW
GDPSFORWK
■ 5HPRYH DQ\ GHWHUJHQW VSUD\
RU RWKHU UHVLGXHV LPPHGLDWHO\
7 (QYLURQPHQWDO
SURWHFWLRQ
(QYLURQPHQWDOSURWHFWLRQ
3DFNDJLQJXVHGDSSOLDQFH
'LVSRVHRISDFNDJLQJLQDQHQYLURQPHQWDOO\UHVSRQVLEOHPDQQHU
.HHS FKLOGUHQ DZD\ IURP WKH SDFNDJLQJ PDWHULDOV DQG SDFNDJLQJ PDWHULDOV DUH QRW WR\V

(QYLURQPHQWDOSURWHFWLRQ HQ
5HSURFHVVLQJDQGUHXVHRISDFNDJLQJPDWHULDOVDYHVUDZPDWHULDOVUHGXFLQJZDVWH
$OO SDFNDJLQJ PDWHULDOV XVHG DUH LQ OLQH ZLWK HQYLURQPHQWDO SURWHFWLRQ UHTXLUHPHQWV DQG
UHXVDEOH
1DPHDQGFRQWHQWRIKD]DUGRXVVXEVWDQFHVLQSURGXFWV
1RWH $OORIFRPSRQHQWSDUWVLQWKH%6+SURGXFWVWKDWIDOOLQWRWKHVDPHFDWHJRU\DUH
FRYHUHGLQWKHWDEOHDERYHWKHFRPSRQHQWSDUWVRIWKLVSURGXFWGHSHQGRQWKHDFWXDO
VLWXDWLRQ,I\RXKDYHDQ\TXHVWLRQVSOHDVHFRQWDFWXVE\GLDOOLQJWKHFXVWRPHUVHUYLFH
QXPEHULQWKHSURGXFW
&RPSR
QHQWQDPH
+D]DUGRXVVXEVWDQFH
/HDG
3E
0HU
FXU\
+J
&DG
PLXP
&G
+H[DYD
OHQWFKUR
PLXP
&U9,
3RO\EURPL
QDWHGELSKH
Q\OV3%%
3RO\EUR
PLQDWHG
GLSKHQ\O
HWKHUV
3%'(
3&% [ Û Û Û Û Û
'LVSOD\ [ Û Û Û Û Û
&RQWUROOHU [ Û Û Û Û Û
3RZHUFRUG
DQG FRQQHFW
ZLULQJKDU
QHVV
[ Û Û Û Û Û
3XPSVDQG
GULYHV
[ Û Û Û Û Û
+RXVLQJ Û Û Û Û Û Û
'RRUDQGLWV
FRQVWLWXHQW
SDUWV
[ Û Û Û Û Û
'UXPV\V
WHPDQGLWV
FRQVWLWXHQW
SDUWV
[ Û Û Û Û Û
:DWHUVXS
SO\FRPSR
QHQWV
H[HPSWHG
GU\HU
[ Û Û Û Û Û
7KLVWDEOHZDVGHYHORSHGDFFRUGLQJWRWKHSURYLVLRQVRI6-7
Û 7KHFRQWHQWRIVXFKKD]DUGRXVVXEVWDQFHLQDOOKRPRJHQHRXVPDWHULDOVRIVXFK
FRPSRQHQWLVEHORZWKHOLPLWUHTXLUHGE\*%7
[ 7KHFRQWHQWRIVXFKKD]DUGRXVVXEVWDQFHLQDFHUWDLQKRPRJHQHRXVPDWHULDOVRI
VXFKFRPSRQHQWLVEH\RQGWKHOLPLWUHTXLUHGE\*%7

HQ 3RVLWLRQLQJDQGFRQQHFWLQJ
7LSVRQHFRQRPLFDOXVH
■ 8WLOLVHWKH PD[LPXPDPRXQW
RI ZDVKLQJIRU WKH SDUWLFXODU
SURJUDPPH
■ :DVK QRUPDOO\ VRLOHG ZDVKLQJ ZLWKRXW
3UHWUHDW
■ )RU OLJKW DQG QRUPDO VRLOLQJ LQ ODXQGU\
\RXFDQVDYHHQHUJ\DQGGHWHUJHQW
■ 7KHVHOHFWDEOHWHPSHUDWXUHVDSSO\WR
WKHFDUHODEHOVRQWKHWH[WLOHV7KH
WHPSHUDWXUHVLQWKHPDFKLQHPD\
GHYLDWHIURPWKLVVRWKDW\RXJHWWKH
RSWLPXPPL[RIHQHUJ\VDYLQJDQG
ZDVKLQJUHVXOWV
■ (QHUJ\VDYLQJPRGH7KHGLVSOD\
SDQHOOLJKWJRHVRXWDIWHUVHYHUDO
PLQXWHVWKHLQGLFDWRUODPSRI 䄒㯝
倍橵 6WDUW5HORDGEXWWRQIODVKHV
7RDFWLYDWHWKHOLJKWVHOHFWDQ\
EXWWRQ(QHUJ\VDYLQJPRGHLVQRW
DFWLYDWHGLIDSURJUDPPHLVUXQQLQJ
■ ,IWKHODXQGU\LVWKHQGULHGLQWKH
WXPEOHGU\HUVHOHFWVSLQVSHHG
DFFRUGLQJWRWKHLQVWUXFWLRQRIWKH
GU\HUPDQXIDFWXUHU
5 3RVLWLRQLQJDQG
FRQQHFWLQJ
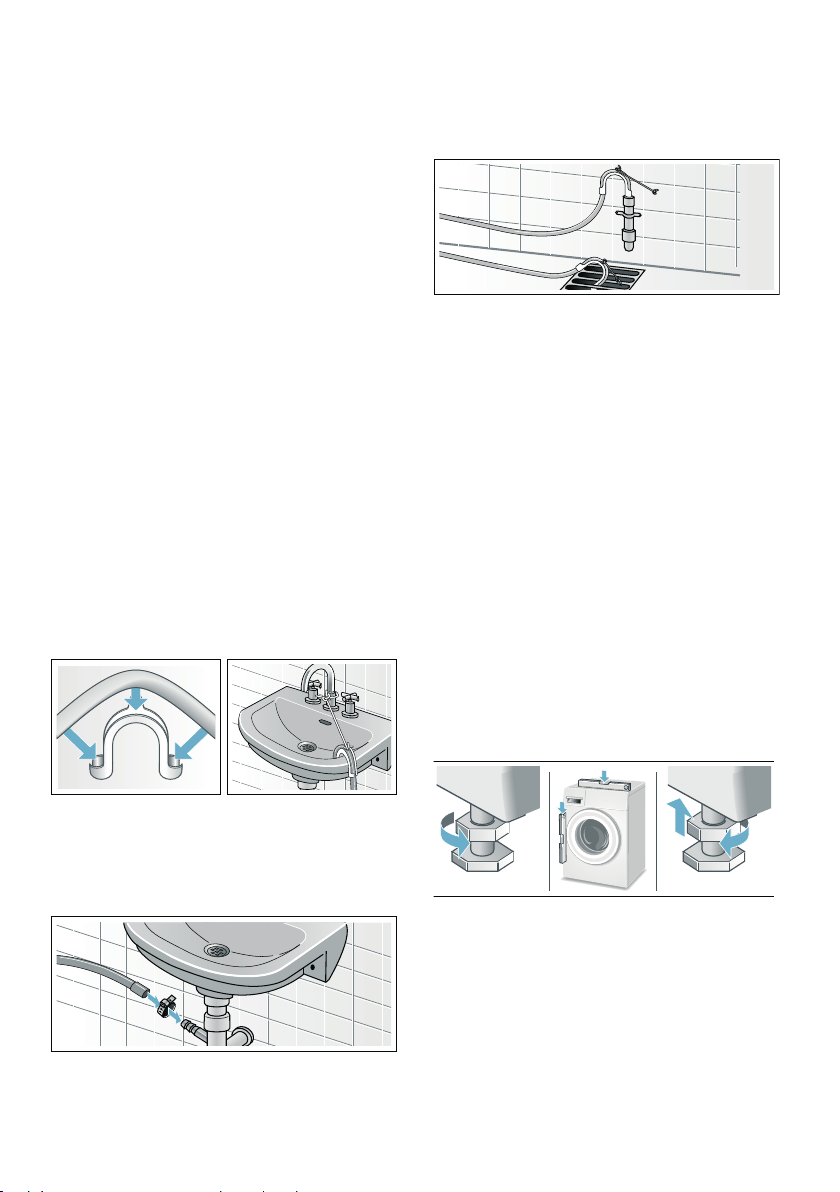
3RVLWLRQLQJDQGFRQQHFWLQJ
,QFOXGHGZLWKWKHDSSOLDQFH
1RWH &KHFNWKHDSSOLDQFHIRUWUDQVSRUW
GDPDJH1HYHUXVHDGDPDJHG
DSSOLDQFH,I\RXKDYHDQ\FRPSODLQWV
FRQWDFWWKHGHDOHUIURPZKRP\RX
SXUFKDVHG WKH DSSOLDQFH RU RXU FXVWRPHU
VHUYLFHV
,QGLFDWLYH6WDWHPHQWRI(QYLURQPHQW3URWHFWLRQRI3URGXFW
3OHDVHXVHDQGPDLQWDLQWKHSURGXFWDFFRUGLQJWRWKHLQVWUXFWLRQRIWKHPDQXDOWKH
SURGXFW PD\ KDUP WR HQYLURQPHQW DQG KXPDQ KHDOWK GXH WR LPSURSHU XWLOL]DWLRQ RU GLV
SRVDO
$FFRUGLQJWRWKHODZRI¶6WDWXWHRI5HFRYHU\DQG'LVSRVDORI:DVWH(OHFWULFDODQG
(OHFWURQLF3URGXFWV·3OHDVHKDQGLQWKHSURGXFWVWRWKHGLVSRVDOHQWHUSULVHVZKLFK
DUH TXDOLILHG ZKHQ \RX SODQ WR WKURZ LW 3OHDVH UHIHU WR WKH WDEOH DERYH IRU WKH LQIRUPD
WLRQDERXWWKHFRQWHQWRIUHOHYDQWWR[LFDQGKD]DUGRXVVXEVWDQFHV
$ 0DLQVFDEOH

3RVLWLRQLQJDQGFRQQHFWLQJ HQ
'HSHQGLQJRQWKHPRGHO
,QDGGLWLRQ
DKRVHFODPSPPGLDPHWHU
DYDLODEOHIURPVSHFLDOLVWGHDOHUVLV
UHTXLUHGWRFRQQHFWWKHZDWHUGUDLQKRVH
WRDVLSKRQ
8VHIXOWRROV
■ 6SLULWOHYHOIRUDOLJQLQJ
■ :UHQFKZLWK
² :$) IRU ORRVHQLQJ WKH WUDQVSRUW
EUDFHVDQG
² :$)IRUDOLJQLQJWKHDSSOLDQFH
IHHW
,QVWDOODWLRQ
1RWH +XPLGLW\ LQ WKH GUXP LV FDXVHG E\
WKHILQDOLQVSHFWLRQ
6DIHW\LQVWUXFWLRQV
::DUQLQJ
5LVNRILQMXU\
■ 7KHDSSOLDQFHLVYHU\KHDY\
%HFDUHIXOZKHQOLIWLQJWUDQVSRUWLQJ
WKHDSSOLDQFH
■ :KHQWKHDSSOLDQFHLVOLIWHGE\LWV
SURWUXGLQJSDUWVHJWKHDSSOLDQFH
GRRUWKHFRPSRQHQWVPD\EUHDNRII
DQGFDXVHLQMXULHV
'RQRWOLIWWKHDSSOLDQFHE\SURWUXGLQJ
SDUWV
■ ,IWKHKRVHDQGPDLQVFDEOHVDUHQRW
URXWHGSURSHUO\WKHUHLVDULVNRI
WULSSLQJDQGLQMXU\
/D\KRVHVDQGFDEOHVLQVXFKDZD\
WKDWWKHUHLVQRULVNRIWULSSLQJ
&DXWLRQ
'DPDJHWRWKHDSSOLDQFH
)UR]HQKRVHVPD\ULSEXUVW
'RQRWLQVWDOOWKHDSSOLDQFHLQDUHDV
H[SRVHGWRIURVWRURXWGRRUV
&DXWLRQ
:DWHUGDPDJH
7KHFRQQHFWLRQSRLQWVIRUWKHZDWHU
VXSSO\KRVHDQGZDWHUGUDLQKRVHDUH
XQGHUKLJKZDWHUSUHVVXUH7RSUHYHQW
OHDNV DQG ZDWHU GDPDJH \RX PXVW IROORZ
WKHLQVWUXFWLRQVLQWKLVVHFWLRQ
1RWHV
■ ,QDGGLWLRQWRWKHVDIHW\LQIRUPDWLRQ
OLVWHGKHUHWKHORFDOZDWHUDQG
HOHFWULFLW\VXSSOLHUPD\KDYHVSHFLDO
UHTXLUHPHQWV
■ ,ILQGRXEWKDYHWKHDSSOLDQFH
FRQQHFWHGE\DVSHFLDOLVW
5HPRYLQJWKHIRDPEORFN
7KLVDSSOLDQFHLVVHFXUHGZLWKDIRDP
EORFNZKLFKKDVWREHUHPRYHGEHIRUH
XVLQJWKHDSSOLDQFHIRUWKHILUVWWLPH,ILQ
GRXEWSOHDVHFRQWDFWVSHFLDOLVW
&DXWLRQ
'DPDJHWRWKHDSSOLDQFH
,IWKHIRDPEORFNLVQRWUHPRYHGWKH
DSSOLDQFHPD\EHGDPDJHGZKHQLWLV
RSHUDWHG
%HIRUHXVLQJWKHDSSOLDQFHIRUWKHILUVW
WLPHPDNHVXUHWKDW\RXFRPSOHWHO\
UHPRYHWKHIRDPEORFN
% %DJ
■ 2SHUDWLQJDQGLQVWDOODWLRQ
LQVWUXFWLRQV
■ :DUUDQW\
■ 6XSSOHPHQWDU\VKHHWIRUWKH
RSHUDWLQJDQGLQVWDOODWLRQ
LQVWUXFWLRQV
■ %RWWRPFRYHULQVWUXFWLRQ
■ +RPH&RQQHFW,QVWDOODWLRQ
*XLGHV
■ &RYHUFDSVIRURSHQLQJVDIWHU
WKH WUDQVSRUW EUDFHV KDYH EHHQ
UHPRYHG
& :DWHUGUDLQKRVH
' :DWHUVXSSO\KRVHRQVWDQGDUG
$TXD6HFXUHPRGHOV
( 6FUHZ
) %RWWRPFRYHU
GHSHQGLQJRQWKHPRGHO

HQ 3RVLWLRQLQJDQGFRQQHFWLQJ
::DUQLQJ
5LVNRILQMXU\GDPDJHWRWKH
DSSOLDQFH
7LOWLQJWKHDSSOLDQFHWRWKHUHDUPD\
UHVXOWLQLQMXU\DQGGDPDJHWRWKH
DSSOLDQFHLI\RXDFFLGHQWDOO\GURSWKH
DSSOLDQFH'RQRWWLOWWKHDSSOLDQFHRQ
\RXURZQDQGEHFDUHIXO
1RWH 5HPRYHWKHIRDPEORFNILUVW
EHIRUH\RXUHPRYHWKHWUDQVSRUWORFNV
1. 5HPRYHWKHIRDPEORFN
D 7LOWWKHDSSOLDQFHWRWKHUHDU
E 5HPRYHWKHIRDPEORFNDQG
ERWWRPSDG
2. )LWWKHERWWRPFRYHU<RXFDQILQGLW
LQWKHGUXP
/RFNWKHERWWRPFRYHUILUPO\LQSODFH
E\DSSO\LQJSUHVVXUHWRWKHVQDSLQ
KRRNV
1RWH ,IQHFHVVDU\VHFXUHERWWRP
FRYHUZLWKVFUHZV
,QVWDOODWLRQVXUIDFH
1RWH 7KHDSSOLDQFHPXVWEHVWDEOH
DOLJQHGVRWKDWLWGRHVQRWPRYHDURXQG
■ 7KHLQVWDOODWLRQVXUIDFHPXVWEHILUP
DQGOHYHO
■ 6RIWIORRUVIORRUFRYHULQJVDUHQRW
VXLWDEOH
,QVWDOODWLRQRQDEDVHRUD
ZRRGHQMRLVWIORRU
&DXWLRQ
'DPDJHWRWKHDSSOLDQFH
7KHDSSOLDQFHPD\ZDQGHUDQGWLS
WRSSOHIURPWKHEDVHZKHQVSLQQLQJ
7KHIHHWRIWKHDSSOLDQFHPXVWEH
VHFXUHGZLWKKROGLQJEUDFNHWV
2UGHUQR:0= :;
&= = ;
1RWH 2QZRRGHQMRLVWIORRUVLQVWDOOWKH
DSSOLDQFH
■ ,QDFRUQHULISRVVLEOH
■ 2QDZDWHUUHVLVWDQWZRRGHQERDUG
PLQPPWKLFNZKLFKLVVFUHZHG
WLJKWO\WRWKHIORRU
,QVWDOOLQJWKHDSSOLDQFHLQD
NLWFKHQHWWH
::DUQLQJ
5LVNRIGHDWK
7KHUHLVDULVNRIHOHFWULFVKRFNLI\RX
WRXFKOLYHFRPSRQHQWV

3RVLWLRQLQJDQGFRQQHFWLQJ HQ
1RWHV
■ 5HFHVVZLGWKRIFPUHTXLUHG
■ 2QO\LQVWDOOWKHDSSOLDQFHXQGHUQHDWK
DFRQWLQXRXVZRUNWRSWKDWLVVHFXUHO\
FRQQHFWHGWRDGMDFHQWFDELQHWV
,I\RXZDQWWRLQVWDOOWKHDSSOLDQFH
XQGHUQHDWKDFRQWLQXRXVZRUNWRS\RX
PXVWUHPRYHWKHDSSOLDQFHFRYHULQJ
SODWHDQGXVLQJDGHGLFDWHGPHWDOFRYHU
VXEVWLWXWHIRULW
1RWH 'HGLFDWHGPHWDOFRYHULV
DYDLODEOHIURPFXVWRPHUVHUYLFHRUGHU
1R
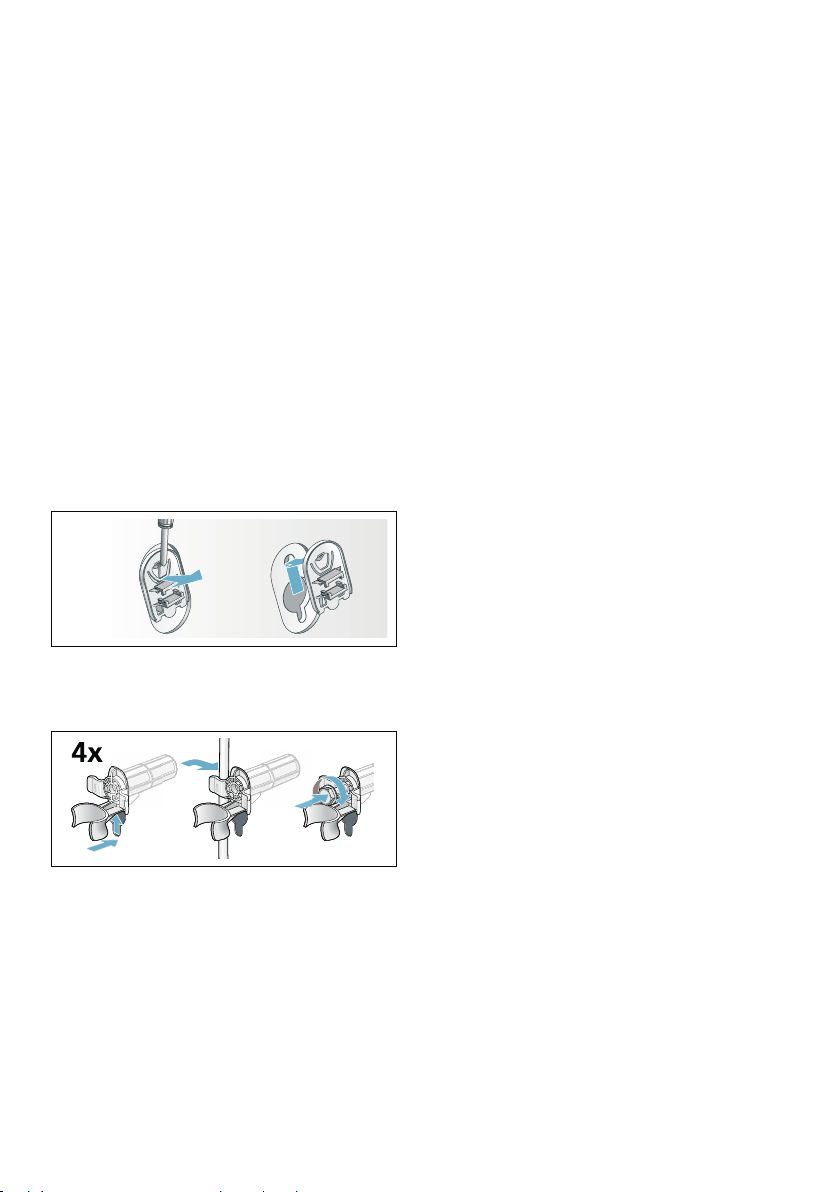
5HPRYLQJWKHWUDQVSRUWORFNV
&DXWLRQ
'DPDJHWRWKHDSSOLDQFH
■ 7KHDSSOLDQFHLVVHFXUHGIRU
WUDQVSRUWDWLRQ XVLQJ WUDQVSRUW ORFNV ,I
WKHWUDQVSRUWORFNVDUHQRWUHPRYHG
WKHDSSOLDQFHPD\EHFRPHGDPDJHG
ZKHQLWLVRSHUDWHG
%HIRUH XVLQJ WKH DSSOLDQFH IRU WKH ILUVW
WLPHPDNHVXUHWKDW\RXFRPSOHWHO\
UHPRYHDOOIRXUWUDQVSRUWORFNV.HHS
WKHORFNVLQDVDIHSODFH
■ 7RSUHYHQWWUDQVSRUWGDPDJHIURP
RFFXUULQJLIWKHDSSOLDQFHLVPRYHGDW
DODWHUGDWH\RXPXVWUHILWWKH
WUDQVSRUW ORFNV EHIRUH WUDQVSRUWLQJ WKH
DSSOLDQFH
1RWH .HHSWKHVFUHZVDQGVOHHYHVLQD
VDIHSODFH
1. 7DNHWKHKRVHVRXWRIWKHKROGHUV
2. 8QVFUHZ DQG UHPRYH DOO IRXU WUDQVSRUW
EUDFHVFUHZV
5HPRYHWKHVOHHYHV7RGRWKLV
UHPRYHWKHPDLQVFDEOHIURPWKH
KROGHUV
3. )LWWKHFRYHUV/RFNWKHFRYHUVILUPO\
LQSODFHE\DSSO\LQJSUHVVXUHWRWKH
VQDSLQKRRNV
+RVHDQGFDEOHOHQJWKV
&RQQHFWLRQRQOHIWVLGH
aFP
aFP
aFP
PD[FP

HQ 3RVLWLRQLQJDQGFRQQHFWLQJ
RU
&RQQHFWLRQRQULJKWVLGH
1RWH ,IWKHKRVHKROGHUVDUHXVHGWKH
SRVVLEOHKRVHOHQJWKVDUHUHGXFHG
$YDLODEOHIURPGHDOHUFXVWRPHU
VHUYLFH
■ /RQJHUVXSSO\KRVHDSSUR[ P
■ $SSOLDQFH·VWDS
:DWHULQOHW
::DUQLQJ
5LVNRIGHDWK
7KHUHLVDULVNRIHOHFWULFVKRFNLI\RX
WRXFKOLYHFRPSRQHQWV
1RWHV
■ 2QO\ RSHUDWH WKH DSSOLDQFH XVLQJ FROG
PDLQVZDWHU
■ 'RQRWFRQQHFWWKHDSSOLDQFHWRWKH
PL[HUWDSRIDQXQSUHVVXULVHGKRW
ZDWHUERLOHU
■ 'RQRWXVHDXVHGVXSSO\KRVH2QO\
XVHWKHVXSSO\KRVHVXSSOLHGRURQH
WKDWZDVSXUFKDVHGIURPDQ
DXWKRULVHGVSHFLDOLVWUHWDLOHU
■ 'RQRWNLQNRUVTXDVKWKHZDWHU
VXSSO\KRVH
■ 'R QRW DOWHU VKRUWHQ FXW WKURXJK WKH
ZDWHUVXSSO\KRVHRWKHUZLVHLWV
VWUHQJWKLVQRORQJHUJXDUDQWHHG
■ 2QO\ WLJKWHQ WKH VFUHZ FRQQHFWLRQV E\
KDQG,IWKHVFUHZFRQQHFWLRQVDUH
WLJKWHQHG WRR PXFK ZLWK D WRRO SOLHUV
WKHWKUHDGPD\EHFRPHGDPDJHG
2SWLPXP ZDWHU SUHVVXUH LQ WKH VXSSO\
QHWZRUN
$WOHDVW03DEDU
0D[LPXP03DEDU
1RWHV
■ :KHQWKHWDSLVRSHQWKHZDWHUIORZ
UDWHLVDWOHDVWOPLQ
■ ,IWKHZDWHUSUHVVXUHLVKLJKHUWKDQ
WKLVDSUHVVXUHUHGXFLQJYDOYHPXVW
EHLQVWDOOHG
&RQQHFWLRQ
&RQQHFW WKH ZDWHU VXSSO\ KRVH WR WKH WDS
PP ö
1RWH 7XUQ RQ WKH WDS FDUHIXOO\ FKHFNLQJ
WKHOHDNWLJKWQHVVRIWKHFRQQHFWLRQ
SRLQWV7KHVFUHZFRQQHFWLRQLVXQGHU
PDLQVZDWHUSUHVVXUH
:DWHURXWOHW
::DUQLQJ
5LVNRIVFDOGLQJ
:KHQ\RXDUHZDVKLQJDWKLJK
WHPSHUDWXUHV WKHUH LV D ULVN RI VFDOGLQJ LI
\RX FRPH LQWR FRQWDFW ZLWK KRW ZDWHU HJ
ZKHQGUDLQLQJKRWZDWHULQWRD
ZDVKEDVLQ
'RQRWUHDFKLQWRWKHKRWZDWHU
&DXWLRQ
:DWHUGDPDJH
:KHQZDWHULVEHLQJSXPSHGDZD\WKH
RXWOHWKRVHLVXQGHUZDWHUSUHVVXUHDQG
PD\VOLSRXWRIWKHZDVKEDVLQRU
FRQQHFWLRQSRLQW
6HFXUHWKHGUDLQKRVHVRWKDWLWFDQQRW
VOLSRXW
aFP
aFP
aFP
PD[FP
3RVLWLRQLQJDQGFRQQHFWLQJ HQ
&DXWLRQ
'DPDJHWRWKHDSSOLDQFHIDEULFV
,IWKHHQGRIWKHGUDLQKRVHLVLPPHUVHG
LQWKHGUDLQHGZDWHUZDWHUPD\EH
VXFNHGEDFNLQWRWKHDSSOLDQFHDQGPD\
GDPDJHWKHDSSOLDQFHIDEULFV
0DNHVXUHWKDW
■ 7KHSOXJGRHVQRWEORFNGUDLQDJH
IURPWKHZDVKEDVLQ
■ 7KHHQGRIWKHGUDLQKRVHLVQRW
LPPHUVHGLQWKHGUDLQHGZDWHU
■ 7KHZDWHUGUDLQVDZD\TXLFNO\
HQRXJK
1RWHV
■ 'RQRWNLQNWKHZDWHUGUDLQKRVHRU
SXWVWUDLQRQLWOHQJWKZD\V
■ 7KHKHLJKWRIZDWHURXWOHWSODFHPHQW
0LQLPXPFPa 0D[LPXPFP
&RQQHFWLRQ
■ 'UDLQDJHLQWRDZDVKEDVLQ
6HFXUHWKHRXWOHWKRVHVRWKDWLW
FDQQRWVOLSRXW
(OERZDYDLODEOHIURPDIWHUVDOHV
VHUYLFH
,QGLYLGXDOSDUWQXPEHU
■ 'UDLQDJHLQWRDVLSKRQ
7KH FRQQHFWLRQ SRLQW PXVW EH VHFXUHG
XVLQJ D KRVH FODPS ZLWK D GLDPHWHU RI
PPDYDLODEOHIURPVSHFLDOLVW
GHDOHUV
■ 'UDLQDJHLQWRDSODVWLFSLSHZLWK
UXEEHUEXVKLQJRULQWRDGUDLQDJH
SLW
$OLJQPHQW
/HYHOWKHDSSOLDQFHXVLQJDVSLULWOHYHO
,QFRUUHFWOHYHOOLQJPD\UHVXOWLQLQWHQVH
QRLVHYLEUDWLRQVDQGZDQGHULQJ
1. /RRVHQWKHORFNQXWVXVLQJDZUHQFK
E\WXUQLQJLWLQDFORFNZLVHGLUHFWLRQ
2. &KHFNWKHDOLJQPHQWRIWKHDSSOLDQFH
ZLWKDVSLULWOHYHODQGDGMXVWLWLI
QHFHVVDU\&KDQJHWKHKHLJKWE\
WXUQLQJWKHDSSOLDQFHIHHW
$OOIRXUDSSOLDQFHIHHWPXVWVWDQG
ILUPO\RQWKHJURXQG
3. 7LJKWHQWKHORFNQXWDJDLQVWWKH
KRXVLQJ
,QGRLQJVRKROGWKHIRRWWLJKWDQGGR
QRWDGMXVWLWVKHLJKW
7KHORFNQXWVRQDOOIRXUDSSOLDQFH
IHHWPXVWEHVFUHZHGWLJKWO\DJDLQVW
WKHKRXVLQJ

HQ 3RVLWLRQLQJDQGFRQQHFWLQJ
(OHFWULFDOFRQQHFWLRQ
(OHFWULFDOVDIHW\
::DUQLQJ
5LVNRIHOHFWULFVKRFN
5LVNRIGHDWKLIOLYHSDUWVDUHWRXFKHG
■ :KHQGLVFRQQHFWLQJWKHPDLQSOXJ
DOZD\VSXOOWKHSOXJLWVHOIDQGQRWWKH
FDEOHRWKHUZLVHWKHFDEOHFRXOGEH
GDPDJHG
■ 1HYHUWRXFKRUKROGWKHPDLQVSOXJ
ZLWKZHWKDQGV
■ 1HYHUSXOORXWWKHPDLQVSOXJGXULQJ
RSHUDWLRQ
■ 2QO\FRQQHFWWKHZDVKHUGU\HUWRDQ
DOWHUQDWLQJFXUUHQWXVLQJD FRUUHFWO\
LQVWDOOHGHDUWKHGVRFNHW
■ 7KHPDLQVYROWDJHPXVWEHWKHVDPH
DVWKHYROWDJHVSHFLILFDWLRQVRQWKH
ZDVKHUGU\HUDSSOLDQFHUDWLQJSODWH
■ 7KHFRQQHFWHGORDGDQGWKHUHTXLUHG
IXVHDUHDOVRLQGLFDWHGRQWKH
DSSOLDQFHUDWLQJSODWH
(QVXUHWKDW
■ 7KHPDLQVSOXJDQGVRFNHWPDWFK
■ 7KHFDEOHFURVVVHFWLRQLVDGHTXDWH
■ 7KHHDUWKLQJV\VWHPKDVEHHQ
LQVWDOOHGFRUUHFWO\
■ $ GDPDJHGSRZHUFRUGLVRQO\
UHSODFHGE\DQ HOHFWULFLDQ
$ UHSODFHPHQWPDLQVFDEOHFDQEH
REWDLQHGIURPFXVWRPHUVHUYLFH
■ <RXGRQRWXVHPXOWLSOHSOXJV
FRXSOLQJVRUH[WHQVLRQFDEOHV
■ ,I D UHVLGXDOFXUUHQWRSHUDWHGFLUFXLW
EUHDNHULVXVHG\RXXVHRQO\D W\SH
ZKLFKIHDWXUHVWKLVV\PERO z
2QO\WKLVV\PEROJXDUDQWHHV
FRPSOLDQFHZLWKWKHFXUUHQWO\YDOLG
UHJXODWLRQV
■ 7KHPDLQVSOXJLVDOZD\VDFFHVVLEOH
■ 7KHSRZHUFRUGLVQRWNLQNHG
FUXVKHGDOWHUHGRUVHYHUHGDQGKDV
QRWFRPHLQWRFRQWDFWZLWKDQ\KHDW
VRXUFHV
%HIRUHZDVKLQJIRUWKHILUVW
WLPH
7KH DSSOLDQFHZDVLQVSHFWHGWKRURXJKO\
EHIRUH OHDYLQJ WKH IDFWRU\ 7R UHPRYH DQ\
UHVLGXDOWHVWZDWHUUXQWKH 'UXPFOHDQ
SURJUDPPH WKH ILUVW WLPH ZLWKRXW ODXQGU\
1RWH
■ 7KH DSSOLDQFHPXVWKDYHEHHQ
LQVWDOOHGDQGFRQQHFWHGSURSHUO\
~ 3RVLWLRQLQJDQGFRQQHFWLQJ
RQ SDJH
■ 1HYHUVZLWFKRQDGDPDJHG
DSSOLDQFH
1. ,QVHUWPDLQVSOXJ
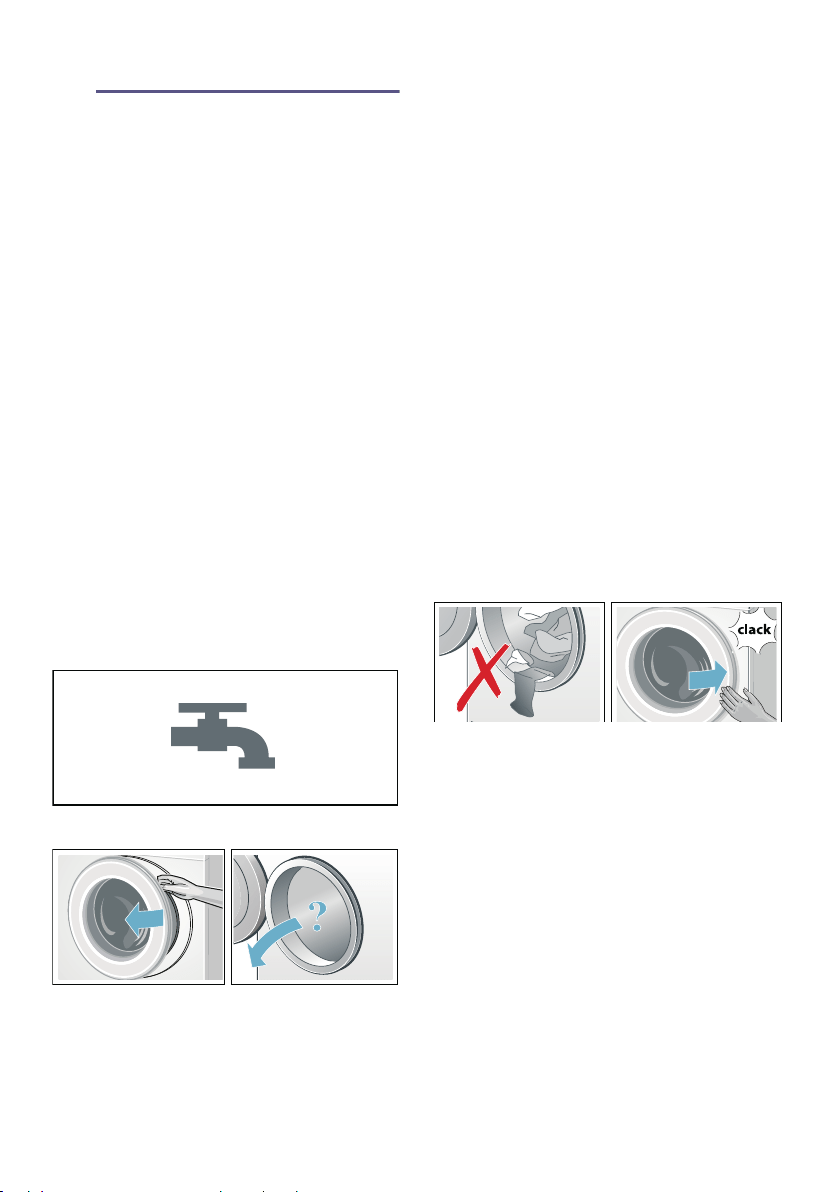
2. 7XUQWKHZDWHUWDSRQ
3. &ORVHWKHGRRU'R QRWORDGDQ\
ODXQGU\
4. 6HOHFWWKH 'UXPFOHDQ &
SURJUDPPH
5. 2SHQWKHGHWHUJHQWGUDZHU
6. 3RXUDSSUR[ OLWUHRIZDWHULQWR
GLVSHQVHU ,,
7. $GGVWDQGDUGGHWHUJHQWWR
GLVSHQVHU ,,DFFRUGLQJ
WR PDQXIDFWXUHU·V LQVWUXFWLRQV IRU OLJKW
VRLOLQJ
1RWH 7R SUHYHQWIURWKLQJXVHRQO\
KDOIWKHUHFRPPHQGHGDPRXQW
RI GHWHUJHQW 'R QRW XVH DQ\ ZRROOHQV
RUPLOGGHWHUJHQWV
8. &ORVHWKHGHWHUJHQWGUDZHU
9. 6HOHFW䄘㯣 倓橻 6WDUW5HORDG
10. :KHQWKHSURJUDPPHHQGVWXUQWKH
SURJUDPPHVHOHFWRUWR 2II7KH
DSSOLDQFHLVVZLWFKHGRII
<RXUDSSOLDQFHLVQRZUHDG\IRUXVH
3RVLWLRQLQJDQGFRQQHFWLQJ HQ
7UDQVSRUWDWLRQ
HJZKHQPRYLQJKRPH
3UHSDUDWRU\ZRUN
1. 7XUQRIIWKHZDWHUWDS
2. 5HGXFHWKHZDWHUSUHVVXUHLQWKH
VXSSO\KRVH ~ 3DJH
3. 'UDLQDQ\UHVLGXDOZDWHU ~ 3DJH
4. 'LVFRQQHFWWKHDSSOLDQFHIURPWKH
PDLQV
5. 5HPRYHWKHKRVHV
6. (PSW\WKHGLVSHQVHUV
DQG ~ &OHDQLQJWKHPHDVXULQJDLG
$IRUOLTXLGGHWHUJHQWRQ SDJH
,QVWDOOLQJWKHWUDQVSRUWORFNV
1. 5HPRYHWKHFRYHUVDQGNHHSWKHPLQ
DVDIHSODFH
8VHDVFUHZGULYHULIQHFHVVDU\
2. ,QVHUWDOOIRXUVOHHYHV
&OLSWKHPDLQVFDEOHVHFXUHO\LQWKH
KROGHUV ,QVHUW DQG WLJKWHQ WKH VFUHZV
%HIRUHVZLWFKLQJRQWKHDSSOLDQFH
DJDLQ
1RWHV
■ 7KHVXSSRUWVWUXWV PXVWEHUHPRYHG
■ 7KHWUDQVSRUWEUDFHV PXVWEH
UHPRYHG
~ 5HPRYLQJWKHWUDQVSRUWORFNV
RQ SDJH
■ 3RXUDSSUR[OLWUHRIZDWHULQWR
FRPSDUWPHQW,,VHOHFWWKH 6LQJOH
ULQVHSURJUDPPHRU 6LQJOHVSLQDQG
VWDUW
7KLVZLOOSUHYHQWGHWHUJHQWIURP
IORZLQJVWUDLJKWLQWRWKHGUDLQGXULQJ
WKHQH[WZDVK

HQ 7KHPDLQSRLQWVLQEULHI
/7KHPDLQSRLQWVLQEULHI
7KHPDLQSRLQWVLQEULHI
--------
--------
--------
@@@
,QVHUWPDLQV
SOXJ
7XUQWKHWDSRQ
2SHQWKH
DSSOLDQFHGRRU
6HOHFWWKH
SURJUDPPH HJ
&RWWRQ
7KHORDGLQ
GLVSOD\SDQHO
@@
,IUHTXLUHGFKDQJHSURJUDPPH
VHWWLQJVRIWKHVHOHFWHGSURJUDPPH
DQGVHOHFWDGGLWLRQDOSURJUDPPH
VHWWLQJV
6RUWWKHODXQGU\ ,QVHUWWKH
ODXQGU\
@@@
FODFN
2SHQWKH
GHWHUJHQW
GUDZHU
'RVHGHWHUJHQW
DFFRUGLQJWR
GRVLQJ
UHFRPPHQGDWLRQ
&ORVHWKH
DSSOLDQFHGRRU
6HOHFW 䄒㯝 倍
橵 6WDUW
5HORDG
@@@
(QGRIWKH
SURJUDPPH
6HWSURJUDPPH
VHOHFWRUWR 2II
2SHQWKHGRRU
DQGUHPRYHWKH
ODXQGU\
7XUQRIIWKHWDS

*HWWLQJWRNQRZWKHDSSOLDQFH HQ
--------
* *HWWLQJWRNQRZWKHDSSOLDQFH
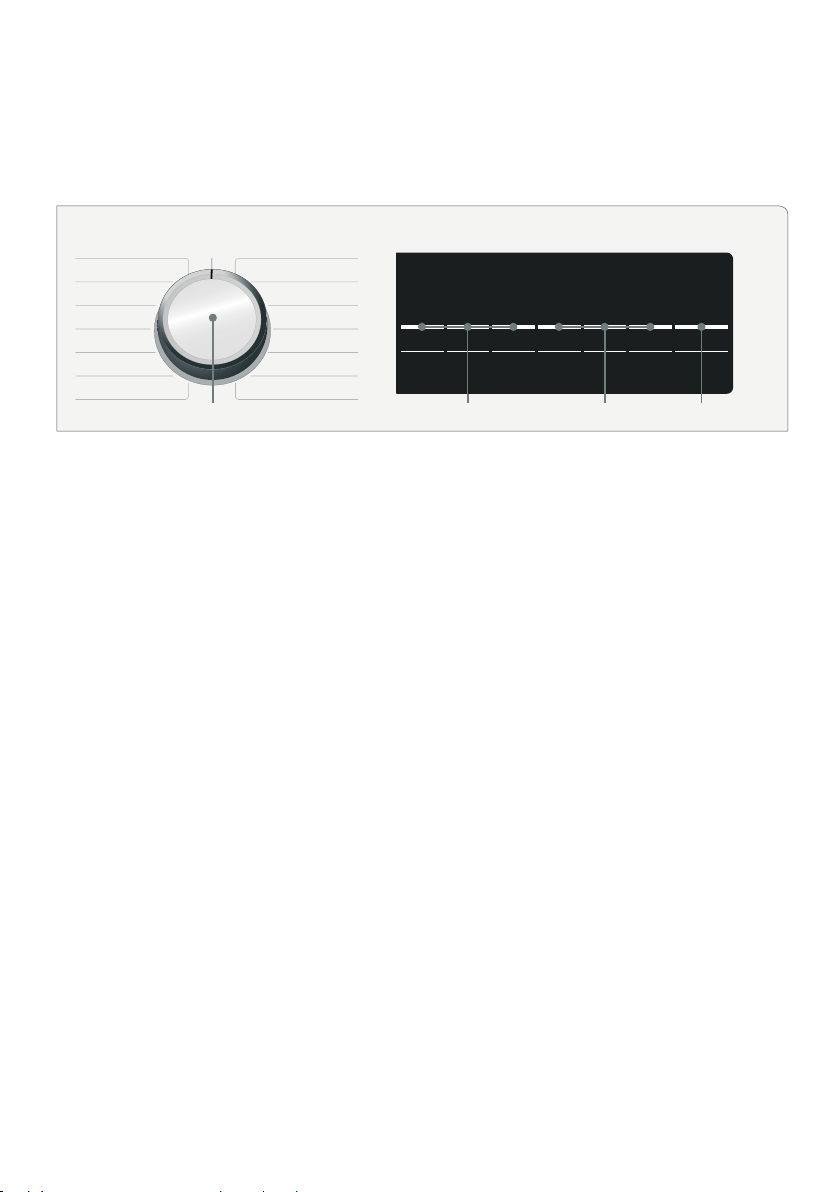
*HWWLQJWRNQRZWKHDSSOLDQFH
$SSOLDQFH
6 7
#
( 'HWHUJHQWGLVSHQVHU
0 &RQWUROSDQHO
8 'RRU
9S 2SHQWKHGRRU
9T &ORVHWKHGRRU
@ 6HUYLFHIODS
HQ *HWWLQJWRNQRZWKHDSSOLDQFH
&RQWUROSDQHO
<RX FDQ ILQG SRVVLEOH SURJUDPPH GHIDXOW VHWWLQJV DQG DGGLWLRQDO SURJUDPPH VHWWLQJV LQ
WKHRYHUYLHZWKHVHGLIIHUGHSHQGLQJRQWKHPRGHO
'LVSOD\V\PEROV
#
( 3URJUDPPHGHIDXOWVHWWLQJV FDQ
EHFKDQJHG
2YHUYLHZRIDOOSURJUDPPHGHIDXOW
VHWWLQJV ~ 3DJH
0 DGGLWLRQDOSURJUDPPHVHWWLQJV
FDQEHVHOHFWHG
2YHUYLHZRIDOODGGLWLRQDO
SURJUDPPHVHWWLQJV
8 䄒㯝 倍橵 6WDUW5HORDGEXWWRQ
IRUVWDUWLQJLQWHUUXSWLQJHJ
DGGLQJODXQGU\DQGFDQFHOOLQJD
SURJUDPPH
@ 3URJUDPPHVHOHFWRUIRUVHOHFWLQJ
WKHSURJUDPPHDQGIRUVZLWFKLQJ
WKHDSSOLDQFHRQDQGRII

*HWWLQJWRNQRZWKHDSSOLDQFH HQ
1RWH 'HSHQGLQJRQWKHVHOHFWHG
PRGHODQGSURJUDPPH
7KHPD[ORDGRI:$3:LVNJ
3URJUDPPHSURJUHVVV\PEROV
N:DVKLQJ2QLIWKHZDVKLQJF\FOHLVUXQ
QLQJ
à 5LQVH2QLIWKHULQVHF\FOHLVUXQQLQJ
0 6SLQ'UDLQ 2Q LI WKH VSLQ RU GUDLQ F\FOH LV
DFWLYH
3URJUDPPHLQIRUPDWLRQV\PEROV
& 0NJ7HPSHUDWXUHVSLQ
VSHHGPD[ORDGIRUVHOHFWHGSURJUDPPH
3URJUDPPHUHPDLQLQJWLPH
E &KLOGSURRIORFN2QLIFKLOGSURRIORFNLV
DFWLYDWHG$FWLYDWHGHDFWLYDWHWKHFKLOGSURRI
ORFN
Õ 'RRUXQORFNHG2QLIGRRUFDQQRWEH
RSHQHG
r 7DS )ODVKLQJ LI WDS ZDV QRW RSHQHG RU QR
ZDWHUVXSSO\2QLIWKHZDWHUSUHVVXUHZDV
ORZ
Å 2YHUGRVDJH2QLIWRRPXFKGHWHUJHQW
XVHG

HQ /DXQGU\
Z /DXQGU\
/DXQGU\
3URWHFWLQJ\RXUODXQGU\DQG
DSSOLDQFH
&DXWLRQ
'DPDJHWRWKHDSSOLDQFHWH[WLOHV
)RUHLJQREMHFWVHJFRLQVSDSHUFOLSV
QHHGOHV QDLOV PD\ GDPDJH WKH ZDVKLQJ
RUFRPSRQHQWVRIWKHDSSOLDQFH
7KHIROORZLQJLQVWUXFWLRQVPXVWEH
REVHUYHGZKHQSUHSDULQJ\RXUODXQGU\
■ $OZD\VIROORZWKH PDQXIDFWXUHUV
LQVWUXFWLRQVZKHQGRVLQJ
DOO GHWHUJHQWVFOHDQLQJDLGVFDUH
SURGXFWVDQG FOHDQLQJDJHQWV
■ 'RQRWH[FHHGPD[LPXPORDG
2YHUILOOLQJZLOOLPSDLUWKHZDVKLQJ
UHVXOW
■ .HHSGHWHUJHQWVDQGDJHQWVIRUWKH
SUHWUHDWPHQWRIODXQGU\HJ VWDLQ
UHPRYHUSUHZDVKVSUD\V HWFDZD\
IURPWKHVXUIDFHVRIWKHDSSOLDQFH
8VLQJD GDPSFORWKLPPHGLDWHO\
UHPRYHDQ\ILQHVSUD\UHVLGXHDQG
RWKHUUHVLGXHRUGURSOHWV
■ (PSW\DQ\SRFNHWV5HPRYHDQ\
IRUHLJQREMHFWV
■ 5HPRYHPHWDOSDUWVSDSHUFOLSV
HWF
■ 7URXVHUVNQLWZHDUDQGNQLWWHG
WH[WLOHV HJ MHUVH\ JDUPHQWV 7VKLUWV
RUVZHDWVKLUWVVKRXOGEHWXUQHG
LQVLGHRXW
■ (QVXUHWKDWXQGHUZLUHGEUDVDUH
DSSOLDQFHZDVKDEOH
■ :DVK GHOLFDWHV LQ D QHW RU EDJ WLJKWV
XQGHUZLUHGEUDVHWF
■ &ORVH]LSVEXWWRQXSFRYHUV
■ %UXVK VDQG RXW RI SRFNHWV DQG FROODUV
■ 5HPRYHFXUWDLQILWWLQJVRULQFOXGHLQ
WKHQHWEDJ
6RUWLQJODXQGU\
6RUW\RXUODXQGU\DFFRUGLQJWRWKHFDUH
LQVWUXFWLRQVDQGPDQXIDFWXUHUV
LQIRUPDWLRQ RQ WKH FDUH ODEHOV GHSHQGLQJ
RQ
■ 7\SHRIIDEULFILEUH
■ &RORXU
1RWH /DXQGU\PD\GLVFRORXU:DVK
ZKLWHDQGFRORXUHGLWHPVVHSDUDWHO\
:DVKQHZFRORXUHGLWHPVVHSDUDWHO\
WKHILUVWWLPH\RXZDVKWKHP
■ 6RLOLQJ
:DVKODXQGU\ZLWKWKHVDPHOHYHORI
VRLOLQJWRJHWKHU
6RPHH[DPSOHVRIVRLOLQJOHYHOVFDQ
EHIRXQGLQWKHFKDSWHU
² /LJKW'RQRWQHHGWRSUHWUHDW
VHOHFWWKH 䗢爱 VSHHG3HUIHFW
VHWWLQJLIQHFHVVDU\
² 1RUPDO
² +HDY\ /RDG OHVV ODXQGU\ QHHG WR
SUHWUHDWRUVRDNODXQGU\ILUVWO\
² 6WDLQV5HPRYHSUHWUHDWVWDLQV
ZKLOH WKH\ DUH IUHVK )LUVW GDE ZLWK
VRDS\ZDWHUGRQRWUXE7KHQ
ZDVKWKHLWHPVRIODXQGU\ZLWKWKH
DSSURSULDWHSURJUDPPH6WXEERUQ
RUGULHGLQVWDLQVFDQVRPHWLPHV
RQO\EHUHPRYHGE\ZDVKLQJ
VHYHUDOWLPHV
■ 6\PEROVRQWKHFDUHODEHOV
M 6XLWDEOHIRUQRUPDOZDVKLQJ
SURFHVV
HJ&RWWRQSURJUDPPH
N $JHQWOHZDVKLQJSURFHVVLV
UHTXLUHG
HJ6\QWKHWLFVSURJUDPPH
O $QHVSHFLDOO\JHQWOHZDVKLQJ
SURFHVVLVUHTXLUHG
HJ'HOLFDWH SURJUDPPH
W 6XLWDEOHIRUZDVKLQJE\KDQG
HJ:RROSURJUDPPH
Ž 'RQRWPDFKLQHZDVK

3URJUDPPHGHIDXOWVHWWLQJV HQ
0 3URJUDPPHGHIDXOW
VHWWLQJV
3URJUDPPHGHIDXOWVHWWLQJV
倻䂸 7HPSHUDWXUH&
&
'HSHQGLQJ RQ ZKDW VWDJH WKH SURJUDPPH
LVLQ\RXFDQFKDQJHWKHWHPSHUDWXUH
EHIRUHDQGGXULQJWKHSURJUDPPH
7KHPD[LPXPWHPSHUDWXUHWKDWFDQEH
VHWGHSHQGLQJRQWKHPRGHODQGWKH
SURJUDPPHWKDWKDVEHHQVHOHFWHG
煾爱 6SLQVSHHG 0
0
'HSHQGLQJRQZKDWVWDJHWKHSURJUDPLV
LQ\RXFDQFKDQJHWKHVSLQVSHHGLQ
USPUHYROXWLRQVSHUPLQXWHEHIRUHDQG
GXULQJWKHSURJUDP
6HWWLQJ ´1R VSLQµ 7KH ULQVLQJ ZDWHU
LVGUDLQHGEXWWKHUHLVQRILQDOVSLQ7KH
ODXQGU\ VWD\V ZHW LQVLGH WKH GUXP HJ IRU
LWHPVWKDWVKRXOGQRWEHVSXQ
6HWWLQJ´5LQVHKROGµ 5LQVH KROG
QRILQDOGUDLQ7KHODXQGU\VWD\VLQWKH
ZDWHUDIWHUWKHILQDOULQVH
<RXFDQVHOHFW5LQVHKROGWRSUHYHQW
FUHDVLQJLIWKHODXQGU\ZLOOQRWEHWDNHQ
RXW RI WKH DSSOLDQFH LPPHGLDWHO\ DIWHU WKH
SURJUDPKDVHQGHG
7RFRQWLQXHHQGWKHSURJUDP
~ 3DJH
7KHPD[LPXPVSHHGWKDWFDQEHVHW
GHSHQGVRQWKHPRGHODQGSURJUDPWKDW
KDVEHHQVHOHFWHG
窖悸 )LQLVKLQ 0
0
%HIRUHVWDUWLQJWKHSURJUDPPH\RX
FDQSUHVHOHFWWKHSURJUDPPHHQG
)LQLVK LQ WLPH LQ KRXUO\ LQFUHPHQWV K
KRXUXSWRDPD[LPXPRIKRXUV
7RGRWKLV
1. 6HOHFWDSURJUDPPH
7KHSURJUDPPHGXUDWLRQLVGLVSOD\HG
IRU WKH VHOHFWHG SURJUDPPH HJ
KRXUVPLQXWHV
2. 7RXFKWKH 窖悸 )LQLVKLQ 0EXWWRQ
UHSHDWHGO\XQWLOWKHUHTXLUHGQXPEHU
RIKRXUVLVGLVSOD\HG
3. 6HOHFWWKH 䄒㯝 倍橵 6WDUW5HORDG
EXWWRQ
7KHSURJUDPPHVWDUWV
7KHVHOHFWHGQXPEHURIKRXUVHJ
KLVVKRZQLQWKHGLVSOD\SDQHODQG
FRXQWVGRZQXQWLOWKHSURJUDPPH
VWDUWV 7KH GXUDWLRQ RI WKH SURJUDPPH
LVWKHQGLVSOD\HG
1RWH 7KHOHQJWKRIWKHSURJUDPPHLV
DXWRPDWLFDOO\DGMXVWHGZKHQWKH
SURJUDPPHLVUXQQLQJ&KDQJHVWRWKH
SURJUDPPHGHIDXOWVHWWLQJVRU
SURJUDPPHDGGLWLRQDOVHWWLQJVPD\DOVR
FKDQJHWKHSURJUDPPHGXUDWLRQ
$IWHUVWDUWLQJWKHSURJUDPPHLID 窖悸
)LQLVK LQ 0 WLPH KDV EHHQ VHOHFWHG DQG
WKHSURJUDPPHKDVQRW\HWVWDUWHG\RX
FDQFKDQJHWKHSUHVHOHFWHGQXPEHURI
KRXUVDVIROORZV
1. 6HOHFWWKH 䄒㯝 倍橵 6WDUW5HORDG
EXWWRQ
2. 7RXFK WKH 窖悸)LQLVK LQ 0 EXWWRQ WR
FKDQJHWKHQXPEHURIKRXUV
3. 6HOHFWWKH 䄒㯝 倍橵 6WDUW5HORDG
EXWWRQ

HQ $GGLWLRQDOSURJUDPPHVHWWLQJV
\ $GGLWLRQDO SURJUDPPH
VHWWLQJV
$GGLWLRQDOSURJUDPPHVHWWLQJV
1RWH <RXFDQILQGSRVVLEOHDGGLWLRQDO
SURJUDPPHVHWWLQJVLQWKHRYHUYLHZ
WKHVHGLIIHUGHSHQGLQJRQWKHPRGHO
䗢爱 撔均 VSHHG3HUIHFW
HFR3HUIHFW
GF
%XWWRQZLWKWZRSRVVLEOHVHWWLQJVIRU
DGDSWLQJWKHVHOHFWHGSURJUDPPH
■ 䗢爱 VSHHG3HUIHFW
:DVKLQJLQDVKRUWHUWLPHZKLOH
DFKLHYLQJDZDVKLQJUHVXOWWKDWLV
FRQVLVWHQW ZLWK EXW XVHV PRUH HQHUJ\
WKDQWKHVHOHFWHGSURJUDPPH
ZLWKRXWWKH䗨爷 撚坍 VSHHG3HUIHFW
HFR3HUIHFWVHWWLQJ
1RWH 'RQRWH[FHHGWKHPD[LPXP
ORDG
■ 撔均HFR3HUIHFW
(QHUJ\RSWLPLVHGZDVKLQJE\
UHGXFLQJWKHWHPSHUDWXUHZKLOH
DFKLHYLQJDZDVKLQJUHVXOWWKDWLV
FRQVLVWHQWZLWKWKHVHOHFWHG
SURJUDPPHZLWKRXWWKH䗨爷 撚坍
VSHHG3HUIHFWHFR3HUIHFWVHWWLQJ
6HOHFWWKHEXWWRQWRGRWKLV)LUVWRIDOO
\RXFDQVHOHFWWKH 䗢爱 VSHHG3HUIHFW
VHWWLQJ ,I \RX VHOHFW WKH EXWWRQ DJDLQ WKH
撔均HFR3HUIHFWVHWWLQJLVDFWLYH7KH
UHVSHFWLYH V\PERO LV VKRZQ LQ WKH GLVSOD\
ZKHQWKHVHWWLQJLVDFWLYDWHG
,I\RXVHOHFWWKHEXWWRQDJDLQQRVHWWLQJ
LVDFWLYH
熍䦐厺 (DV\,URQ
æ
5HGXFHVFUHDVLQJWKDQNVWRDVSHFLDO
VSLQVHTXHQFHIROORZHGE\IOXIILQJDQG
UHGXFHGVSLQVSHHG
1RWH 7KH ZDVKLQJV UHVLGXDO PRLVWXUH LV
LQFUHDVHG
㒲儔伩5LQVHSOXV
l
$GGLWLRQDOULQVHF\FOHGHSHQGLQJRQWKH
SURJUDPPH ORQJHU SURJUDPPH OHQJWK IRU
SDUWLFXODUO\ VHQVLWLYH VNLQ DQGRU IRU DUHDV
ZLWKYHU\VRIWZDWHU
㒲侊仳 6RDNLQJ
õ
%HIRUHWKHPDLQZDVKF\FOHVWDUWVWKH
ZDVKLQJUHPDLQVIRUORQJHULQWKHZDWHU
WRSDUWLDOO\GLVVROYHLQWHQVLYHVRLOLQJ
1RWHV
■ 3XWGHWHUJHQWLQGLVSHQVHU ,EHIRUH
VWDUWLQJWKHDSSOLDQFH
■ /RDGODXQGU\RIWKHVDPHFRORXU
■ ,I\RXUDSSOLDQFHGRHVQRWKDYHWKLV
DGGLWLRQDO SURJUDPPH VHWWLQJ \RX FDQ
VRDNDVIROORZV
1. 3XWGHWHUJHQWLQGLVSHQVHU ,,EHIRUH
VWDUWLQJWKHDSSOLDQFH
2. 6HOHFWWKH &RWWRQ &SURJUDPPH
DQGWKH 䄒㯝 倍橵 6WDUW5HORDG
EXWWRQ
3. 6HOHFWWKH 䄒㯝 倍橵 6WDUW5HORDG
EXWWRQDIWHUDSSUR[PLQXWHV7KH
ODXQGU\UHPDLQVLQWKHVRDNLQJ
VROXWLRQ
4. /HDYHWKHODXQGU\WRVRDNIRUDVORQJ
DVUHTXLUHGWKHQHLWKHUVHOHFWWKH 䄒
㯝 倍橵 6WDUW5HORDGEXWWRQDJDLQ
WR FRQWLQXH WKH SURJUDPPH RU FKDQJH
WKHSURJUDPPH
2SHUDWLQJWKHDSSOLDQFH HQ
1 2SHUDWLQJWKH
DSSOLDQFH
2SHUDWLQJWKHDSSOLDQFH
3UHSDULQJWKHDSSOLDQFH
7KH DSSOLDQFH ZDV WHVWHG EHIRUH GHOLYHU\
7RUHPRYHUHVLGXDOZDWHUIURPWKHWHVW
SURFHGXUH WKH ILUVW ZDVK F\FOH VKRXOG EH
UXQ ZLWKRXW ODXQGU\ XVLQJ WKH 'UXP FOHDQ
SURJUDPPH
~ %HIRUHZDVKLQJIRUWKHILUVWWLPH
RQ SDJH
1RWHV
■ 1HYHUVZLWFKRQD GDPDJHG
DSSOLDQFH
■ ,QIRUPFXVWRPHUVHUYLFH
1. ,QVHUWPDLQVSOXJ
::DUQLQJ
5LVNRIGHDWKIURPHOHFWULFVKRFN
5LVNRIGHDWKLIOLYHSDUWVDUHWRXFKHG
² 1HYHUSXOORXWWKHPDLQVSOXJE\
WXJJLQJWKHSRZHUFRUG
² ,QVHUWSXOORXWWKHPDLQVSOXJZLWK
GU\KDQGVRQO\
2. 7XUQWKH WDS RQ
3. 2SHQWKH DSSOLDQFHGRRU
6HOHFWSURJUDPPHVZLWFKRQ
WKHDSSOLDQFH
1RWH ,I\RXKDYHDFWLYDWHGWKH
FKLOGSURRI ORFN \RX PXVW ILUVW GHDFWLYDWH LW
EHIRUH\RXFDQVHWDSURJUDPPH
8VH WKH SURJUDPPH VHOHFWRU WR VHOHFW WKH
UHTXLUHGSURJUDPPH7KHSURJUDPPH
VHOHFWRUFDQEHURWDWHGLQHLWKHUGLUHFWLRQ
7KHDSSOLDQFHLVVZLWFKHGRQ
7KH SURJUDPPH GHIDXOW VHWWLQJV IRU WKH
VHOHFWHG SURJUDPPH DOWHUQDWHO\ DSSHDU LQ
WKHGLVSOD\SDQHO
■ 7KHPD[LPXPORDGDQG
■ WKHGXUDWLRQRIWKHSURJUDPPHDQG
■
3ODFLQJODXQGU\LQWRWKHGUXP
,QVHUWWKHZDVKLQJ
&ORVHWKHGRRU
1RWHV
■ 8QIROGDQGORDGSUHVRUWHGLWHPV
RI ZDVKLQJ 0L[ ODUJH DQG VPDOO LWHPV
:DVKLQJLWHPVRI GLIIHUHQWVL]H
GLVWULEXWHWKHPVHOYHVEHWWHUGXULQJ
WKH VSLQF\FOH,QGLYLGXDOLWHPV
RI ZDVKLQJ PD\ FDXVH DQ XQEDODQFHG
ORDG
■ 2EVHUYH WKH PD[LPXP VSHFLILHG ORDG
2YHUILOOLQJDGYHUVHO\DIIHFWVWKH
ZDVKLQJUHVXOWDQGSURPRWHV
FUHDVLQJ0DNHVXUHWKDWQRLWHPVRI
ODXQGU\ DUH WUDSSHG EHWZHHQ WKH GRRU
DQGWKHUXEEHUVHDODQGFORVHWKH
GRRU
HQ 2SHUDWLQJWKHDSSOLDQFH
0HDVXUHDQGDGGGHWHUJHQW
DQG FDUHSURGXFWV
&DXWLRQ
'DPDJHWRWKHDSSOLDQFH
'HWHUJHQWVDQGDJHQWVIRUWKH
SUHWUHDWPHQWRIODXQGU\HJVWDLQ
UHPRYHUSUHZDVKVSUD\VHWFPD\
GDPDJHWKHVXUIDFHVRIWKHDSSOLDQFH
.HHSWKHVHDJHQWVDZD\IURPWKH
VXUIDFHVRIWKHDSSOLDQFH8VLQJDGDPS
FORWK LPPHGLDWHO\ UHPRYH DQ\ ILQH VSUD\
UHVLGXHDQGRWKHUUHVLGXHRUGURSOHWV
'RVLQJ
'RVHWKHGHWHUJHQWVDQGFDUHSURGXFWV
DFFRUGLQJWR
■ ZDWHUKDUGQHVVDVN\RXUZDWHU
VXSSO\FRPSDQ\
■ WKHPDQXIDFWXUHU·VVSHFLILFDWLRQVRQ
WKHSDFNDJLQJ
■ WKHDPRXQWRIODXQGU\
■ VRLOLQJ
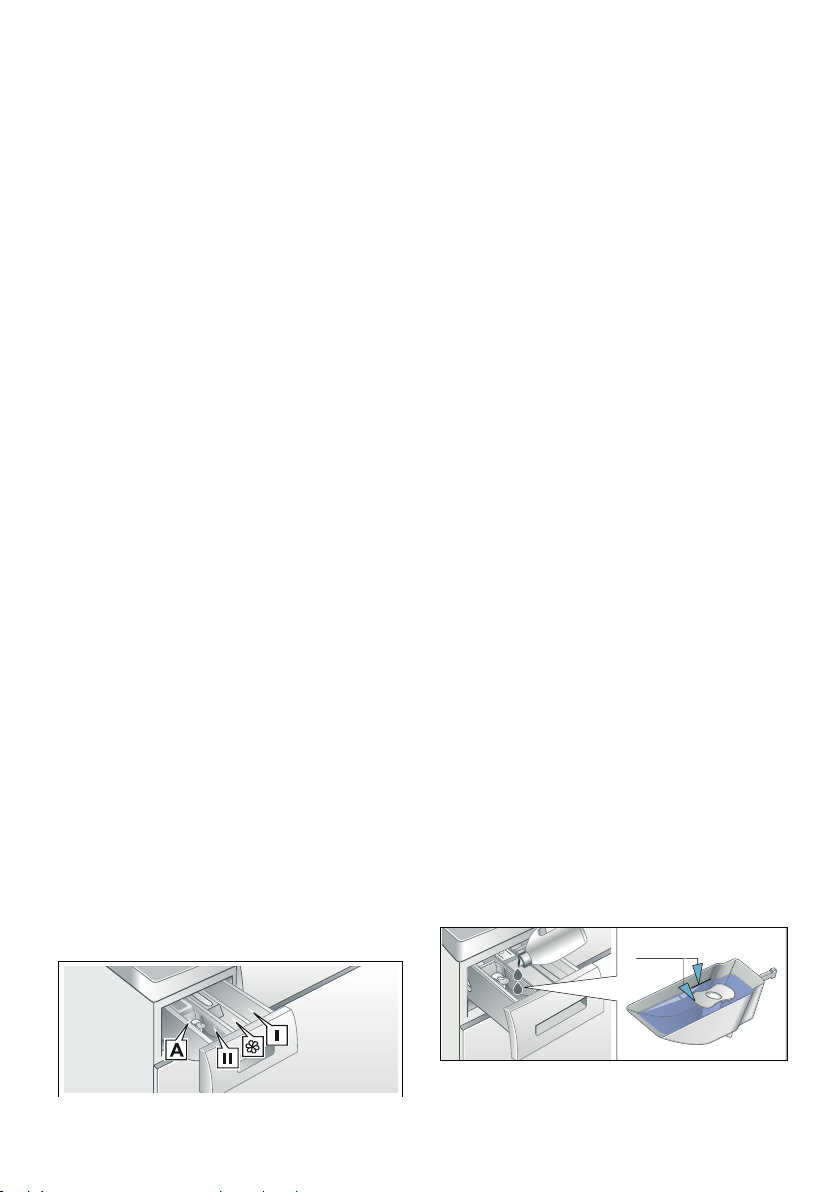
)LOOLQJWKHGLVSHQVHUV
1. 3XOORXWWKH GHWHUJHQWGUDZHU
::DUQLQJ
(\HVNLQLUULWDWLRQ
,IWKHGHWHUJHQWGUDZHULVRSHQHG
ZKLOHWKHDSSOLDQFHLVUXQQLQJ
GHWHUJHQWRUFDUHSURGXFWPD\UXQ
RXW
2SHQWKHGUDZHUFDUHIXOO\
,IGHWHUJHQWRUFDUHSURGXFWFRPHV
LQWRFRQWDFWZLWKH\HVRUVNLQULQVH
WKRURXJKO\
,IDFFLGHQWDOO\VZDOORZHGVHHN
PHGLFDODGYLFH
2. 3RXULQGHWHUJHQWDQGRUFOHDQLQJ
SURGXFW
'HSHQGLQJRQWKHPRGHO
1RWHV
■ 'LOXWHYLVFRXVIDEULFVRIWHQHU
DQG IDEULF FRQGLWLRQHU ZLWK ZDWHU 7KLV
ZLOOSUHYHQWEORFNDJHV
■ %HFDUHIXOZKHQRSHQLQJWKH
GHWHUJHQWGUDZHUZKLOHWKHDSSOLDQFH
LVUXQQLQJ
0HDVXULQJDLG$IRUOLTXLGGHWHUJHQW
'HSHQGLQJRQWKHPRGHO
3RVLWLRQ WKH PHDVXULQJ DLG IRU PHDVXULQJ
WKHFRUUHFWDPRXQWRIOLTXLGGHWHUJHQW
1. 3XOORXWWKHGHWHUJHQWGUDZHU,QVHUW
WKHOLTXLGGHWHUJHQWFRQWDLQHULQWR
GLVSHQVHU ,,IRUPDLQZDVK
2. 3RXUOLTXLGGHWHUJHQWLQWROLTXLG
GHWHUJHQWFRQWDLQHUDQGGRQRW
H[FHHGWKH0D[LPXQPDUN
3. 5HLQVHUWWKHGUDZHU
'LVSHQVHU , &ORWKLQJ
GLVLQIHFWDQW
'LVLQIHFWDQW
DGGLWLRQDO
SURJUDPPHVHWWLQJ
RU 'LVLQIHFWDQW
SURJUDPPHLV
VHOHFWHGRQO\
'LVSHQVHU i 6RIWHQHU'R QRW
H[FHHG
WKH PD[LPXPORDG
'LVSHQVHU ,, 'HWHUJHQWIRU PDLQ
ZDVKOLTXLG
GHWHUJHQW
0HDVXULQJ DLG $ )RUGRVLQJOLTXLG
GHWHUJHQW
0$;
2SHUDWLQJWKHDSSOLDQFH HQ
1RWH 'RQRWXVHWKHYLVFRXVOLTXLG
GHWHUJHQW
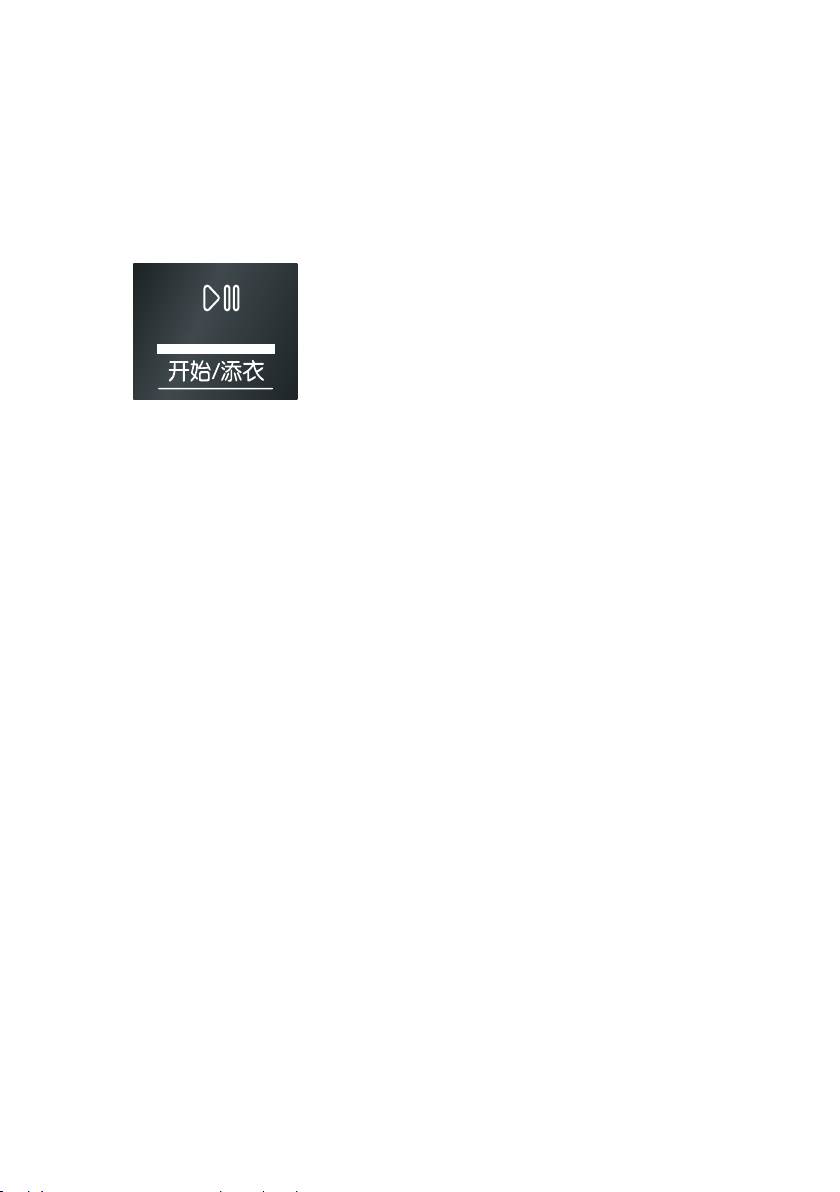
6WDUWWKHSURJUDPPH
7RXFKWKH 䄒㯝 倍橵 6WDUW5HORDG
EXWWRQ7KHV\PERO AOLJKWVXSDQGWKH
SURJUDPPHVWDUWV
&KLOGSURRIORFN
E
<RX FDQ ORFN WKH DSSOLDQFH WR SUHYHQW WKH
VHWWLQJV \RX KDYH VHW IURP EHLQJ FKDQJHG
LQDGYHUWHQWO\7RGRWKLVDFWLYDWHWKH
FKLOGSURRIORFN
7RXFK DQG KROG WKH 煾爱 6SLQ VSHHG 0
DQG 窖悸 )LQLVKLQ 0EXWWRQVDWWKH
VDPHWLPHWR DFWLYDWHGHDFWLYDWHWKH
FKLOGSURRIORFN
7RDFWLYDWHWKHFKLOGSURRIORFN
$IWHUWKHSURJUDPPHVWDUWV7RXFKDQG
KROGWKH 煾爱 6SLQVSHHG 0DQG 窖悸
)LQLVKLQ 0EXWWRQVIRUVHFRQGV
■ EOLJKWVXS7KHFKLOGSURRIORFNLV
DFWLYDWHG
■ EIODVKHV7KHFKLOGSURRIORFNLV
DFWLYHDQGWKHSURJUDPPHVHOHFWRU
KDVEHHQDGMXVWHG
1RWH :KHQWKHSURJUDPPHHQGV (QG
LVGLVSOD\HG7KHGRRULVFORVHG EDQG
ÕV\PEROVUHPDLQRQWRUHPLQG\RXWR
GHDFWLYDWHWKHFKLOGSURRIORFN
7RGHDFWLYDWHWKHFKLOGSURRIORFN
7RXFKDQGKROGWKH 煾爱 6SLQVSHHG
0 DQG 窖悸 )LQLVKLQ 0EXWWRQVXQWLO
WKHV\PERO EGLVDSSHDUV
$GGLQJUHPRYLQJODXQGU\
$IWHUVWDUWLQJWKHSURJUDPPH\RXFDQ
DGGRUUHPRYHODXQGU\LIQHFHVVDU\
7RXFKWKH 䄒㯝 倍橵 6WDUW5HORDG A
EXWWRQ7KHDSSOLDQFHFKHFNVZKHWKHU
UHORDGLQJLVSRVVLEOH
,IWKHIROORZLQJDSSHDUVRQWKHGLVSOD\
SDQHO
■ 7KHV\PERO ÕGLVDSSHDUVUHORDGLQJ
LVSRVVLEOH
■ 7KHV\PERO ÕOLJKWVXSUHORDGLQJLV
QRWSRVVLEOH
7R FRQWLQXH WKH SURJUDPPH WRXFK WKH
䄒㯝 倍橵 6WDUW5HORDG AEXWWRQ
7KHSURJUDPPHFRQWLQXHVDXWRPDWLFDOO\
1RWHV
■ 'RQRWOHDYHWKHGRRURSHQIRUWRR
ORQJZKHQDGGLQJODXQGU\DVZDWHU
IURPWKHODXQGU\PD\OHDNRXW
■ )RUVDIHW\UHDVRQVWKHGRRUUHPDLQV
ORFNHGZKHQWKHZDWHUOHYHORU
WHPSHUDWXUH LV KLJK RU ZKLOH WKH GUXP
LV WXUQLQJ DQG LW LV QRW SRVVLEOH WR DGG
ODXQGU\GXULQJWKLVWLPH
&KDQJLQJWKHSURJUDPPH
,I \RX KDYH VWDUWHG WKH ZURQJ SURJUDPPH
E\PLVWDNH\RXFDQFKDQJHWKH
SURJUDPPHDVIROORZV
1. 7RXFKWKH AEXWWRQ
2. 6HOHFWDQRWKHUSURJUDPPH
3. $QGWRXFKWKH AEXWWRQDJDLQ7KH
QHZSURJUDPPHVWDUWVIURPWKH
EHJLQQLQJ
&DQFHOWKHSURJUDPPH
)RUSURJUDPPHVDWKLJKWHPSHUDWXUHV
1. 7RXFKWKH 䄒㯝 倍橵 6WDUW5HORDG
EXWWRQ
2. 7RFRROGRZQODXQGU\6HOHFW 6LQJOH
ULQVH

HQ $SSOLDQFHVHWWLQJV
3. 7RXFKWKH 䄒㯝 倍橵 6WDUW5HORDG
EXWWRQ
)RUSURJUDPPHVDWORZWHPSHUDWXUHV
1. 7RXFKWKH 䄒㯝 倍橵 6WDUW5HORDG
EXWWRQ
2. 6HOHFW 6LQJOHVSLQ
3. 7RXFKWKH 䄒㯝 倍橵 6WDUW5HORDG
EXWWRQ
3URJUDPPHHQGGXULQJULQVH
KROG
,I\RXVHWVSLQVSHHGWR QR
GUDLQWKHV\PERO 0DQG ÕDSSHDU
LQWKHGLVSOD\SDQHODQGWKH AV\PERO
IODVKHV
&RQWLQXHWKHSURJUDPE\
■ 7RXFKLQJ WKH 䄒㯝倍橵6WDUW5HORDG
EXWWRQWKHODXQGU\ZLOOEHGUDLQHG
ZLWKWKHGHIDXOWVSLQVSHHGVHWWLQJRU
■ 6HOHFWLQJDVSLQVSHHGRUVHWWKH
SURJUDPVHOHFWRUWR 6LQJOHVSLQDQG
WKHQWRXFKLQJWKH 䄒㯝 倍橵 6WDUW
5HORDGEXWWRQ
3URJUDPPHHQG
(QG DSSHDUV LQ WKH GLVSOD\ SDQHO DQG WKH
V\PERO ÕDQG AGLVDSSHDU
,I\RXVHWVSLQVSHHGWR ´1RVSLQµ
7KHZDWHULVRQO\GUDLQHG
$IWHUZDVKLQJ
1. 6HWSURJUDPPHVHOHFWRUWR 2II
2. 2SHQDSSOLDQFHGRRUDQGUHPRYH
ODXQGU\
1RWH 1RWUHTXLUHGIRU$TXD6WRS
PRGHOV
3. 7XUQRIIWKH WDS
1RWHV
■ 'RQRWOHDYHDQ\LWHPVRIODXQGU\LQ
WKH GUXP 7KH\ PD\ VKULQN LQ WKH QH[W
ZDVKRUGLVFRORXUDQRWKHULWHP
■ 5HPRYHDQ\IRUHLJQREMHFWVIURPWKH
GUXPDQGWKHUXEEHUVHDO²ULVNRI
UXVWLQJ
■ :LSHWKHUXEEHUVHDOGU\
■ /HDYHWKHGRRUDQGGHWHUJHQWGUDZHU
RSHQVRWKDWDQ\UHVLGXDOZDWHUFDQ
HYDSRUDWH
■ $OZD\VZDLWXQWLOWKHSURJUDPPH
HQGVDVWKHDSSOLDQFHFRXOGVWLOOEH
ORFNHG7KHQVZLWFKWKHDSSOLDQFHRQ
DQGZDLWIRULWWRXQORFN
Q$SSOLDQFHVHWWLQJV
$SSOLDQFHVHWWLQJV
<RXFDQFKDQJHWKHIROORZLQJVHWWLQJV
■ 7KHYROXPHRIWKHHQGVLJQDO
■ 7KHYROXPHRIWKHEXWWRQVLJQDO
■ 6ZLWFKLQJWKHGUXPFDUHLQIRUPDWLRQ
VLJQDORQRII
<RX ZLOO QHHG WR DFWLYDWH WKH VHWWLQJ PRGH
LQRUGHUWRFKDQJHWKHVHVHWWLQJV
SRVLWLRQVRQWKH
SURJUDPPHVHOHFWRU

&OHDQLQJDQGPDLQWHQDQFH HQ
$FWLYDWHVHWWLQJPRGH
1. 6HWWKHSURJUDPPHVHOHFWRUWR
SRVLWLRQ 7KHDSSOLDQFHLVVZLWFKHG
RQ
2. 7RXFKDQGKROGWKH 䄒㯝 倍橵 6WDUW
5HORDG EXWWRQ DQG DW WKH VDPH WLPH
WXUQWKHSURJUDPPHVHOHFWRU
FORFNZLVHWRSRVLWLRQ5HOHDVH
WKH 䄒㯝 倍橵 6WDUW5HORDGEXWWRQ
7KHVHWWLQJPRGHLVDFWLYDWHGDQGWKH
SUHVHWVHWWLQJDSSHDUVLQWKHGLVSOD\
SDQHO
&KDQJLQJWKHYROXPHDQGGUXPFDUH
LQIRUPDWLRQ
8VHWKH 窖悸 )LQLVKLQ 0EXWWRQWR
FKDQJHWKHIROORZLQJVHWWLQJVDWWKH
FRUUHVSRQGLQJSURJUDPPHVHOHFWRU
SRVLWLRQV
■ 7KHYROXPHRIWKHHQGVLJQDO
■ 7KHYROXPHRIWKHEXWWRQVLJQDOV
■ 6ZLWFKLQJWKHGUXPFDUH
LQIRUPDWLRQVLJQDORQRII
([LWLQJVHWWLQJPRGH
<RX FDQ QRZ HQG WKH SURFHVV DQG VHW WKH
SURJUDPPHVHOHFWRUWRWKH 2IISRVLWLRQ
7KHVHWWLQJVDUHVDYHG
2 &OHDQLQJDQG
PDLQWHQDQFH
&OHDQLQJDQGPDLQWHQDQFH
::DUQLQJ
5LVNRIGHDWK
7KHUHLVDULVNRIHOHFWULFVKRFNLIWRXFK
OLYHFRPSRQHQWV
6ZLWFKRIIWKHDSSOLDQFHDQGSXOORXWWKH
PDLQVSOXJ
&DXWLRQ
)LUHDQGH[SORVLRQKD]DUG
7R[LFYDSRXUVFDQEHSURGXFHGE\
FOHDQLQJDJHQWVWKDWFRQWDLQVROYHQWV
HJFOHDQLQJVROYHQW
'RQRWXVHFOHDQLQJDJHQWVWKDWFRQWDLQ
VROYHQWV
&DXWLRQ
7KHDSSOLDQFHPD\EHGDPDJHG
&OHDQLQJDJHQWVWKDWFRQWDLQVROYHQWV
HJFOHDQLQJVROYHQWFDQGDPDJH
VXUIDFHVDQGFRPSRQHQWVLQWKH
DSSOLDQFH
'RQRWXVHFOHDQLQJDJHQWVWKDWFRQWDLQ
VROYHQWV
$SSOLDQFHKRXVLQJFRQWURO
SDQHO
■ 5HPRYHWKHGHWHUJHQWUHVLGXH
LPPHGLDWHO\
■ :LSHWKHKRXVLQJDQGWKHFRQWURO
SDQHOZLWKDVRIWGDPSFORWK
■ 'RQRWXVHDEUDVLYHFORWKVVSRQJHV
RU GHWHUJHQWV VWDLQOHVV VWHHO FOHDQHU
■ 'RQRWFOHDQWKHDSSOLDQFHZLWKD
ZDWHUMHW
RII TXLHW
PHGLXP ORXG
YHU\ORXG
Ž RQ
ΠRII
HQ &OHDQLQJDQGPDLQWHQDQFH
'UXP
::DUQLQJ
5LVNRILQMXU\PDWHULDOGDPDJH
GDPDJHWRWKHDSSOLDQFH
3HUPDQHQWO\ZDVKLQJDWORZ
WHPSHUDWXUHVDQGDODFNRIYHQWLODWLRQIRU
WKH DSSOLDQFH PD\ GDPDJH WKH GUXP DQG
FDXVHLQMXU\
5HJXODUO\UXQDSURJUDPPHIRUFOHDQLQJ
WKHGUXPRUZDVKDWWHPSHUDWXUHVRIDW
OHDVW&
/HDYHWKHDSSOLDQFHWRGU\DIWHUHYHU\
RSHUDWLRQZLWKWKHGRRURSHQDQGOHDYH
WKHGHWHUJHQWGUDZHUWRGU\
8VH FKORULQHIUHH FOHDQLQJ DJHQWV GR QRW
XVHVWHHOZRRO
,IWKHUHDUHRGRXUVLQWKHDSSOLDQFHRUWR
FOHDQWKHGUXPUXQWKH 'UXPFOHDQ
&SURJUDPPHZLWKRXWODXQGU\
'HVFDOLQJ
'HVFDOLQJVKRXOGQRWEHQHFHVVDU\LIWKH
GHWHUJHQWLVPHDVXUHGRXWFRUUHFWO\
+RZHYHULILWLVUHTXLUHGIROORZWKH
PDQXIDFWXUHUVLQVWUXFWLRQVIRUWKH
GHVFDOLQJDJHQW6XLWDEOHGHVFDOHUVFDQ
EHREWDLQHGYLDRXUZHEVLWHRUIURP
FXVWRPHUVHUYLFHV
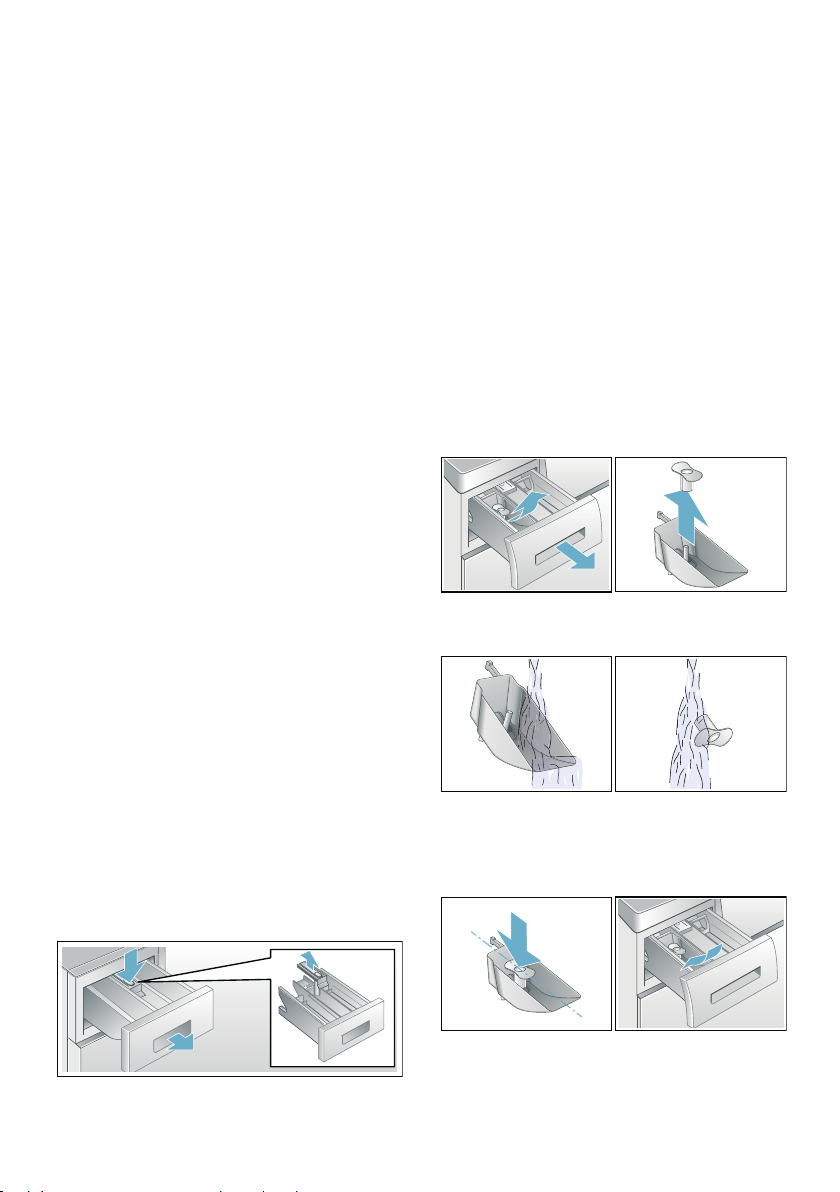
'HWHUJHQWGUDZHUDQGKRXVLQJ
,IWKHDSSOLDQFHFRQWDLQVGHWHUJHQWRU
IDEULFVRIWHQHUUHVLGXHV
1. 3XOORXWWKHGHWHUJHQWGUDZHU3UHVV
GRZQWKHLQVHUWDQGIXOO\UHPRYHWKH
GUDZHU
2. 7RUHPRYHWKHLQVHUW3XVKWKHLQVHUW
XSZDUGVIURPEHORZZLWK\RXUILQJHU
3. &OHDQWKHGHWHUJHQWGLVSHQVHUWUD\
DQG LQVHUW ZLWK ZDWHU DQG D EUXVK DQG
GU\LW&OHDQWKHLQVLGHRIWKHKRXVLQJ
DVZHOO
4. )LW WKH LQVHUW DQG ORFN LW LQ SODFH SXVK
WKHF\OLQGHURQWRWKHJXLGHSLQ
5. 3XVKLQWKHGHWHUJHQWGUDZHU
1RWH /HDYHWKHGHWHUJHQWGUDZHURSHQ
VRWKDWDQ\UHVLGXDOZDWHUFDQHYDSRUDWH
&OHDQLQJ WKH PHDVXULQJ DLG $
IRUOLTXLGGHWHUJHQW
,ILWFRQWDLQVOLTXLGGHWHUJHQWUHVLGXH
1. +ROGWKHPHDUVXULQJDLGSXOOWKH
FRYHUXSZDUGDQGGLVFRQQHFWWKHP
2. &OHDQWKHPHDVXULQJDLGDQGFRYHU
ZLWKZDWHUDQGEUXVK
3. ,QVWDOOWKHFRYHUEDFNWRWKH
PHDVXULQJDLG3D\DWWHQWLRQWRWKH
DVVHPEOHPDUNDQGSUHVVWKHFRYHU
XQWLOFOLFNVRXQGV
GHSHQGLQJRQWKHPRGHO

&OHDQLQJDQGPDLQWHQDQFH HQ
'UDLQSXPSLVEORFNHG
1RWH 7XUQWKHWDSRIIWRSUHYHQWPRUH
ZDWHU IURP IORZLQJ LQ DQG WR HQVXUH WKDW LW
LVGUDLQHGYLDWKHSXPS
::DUQLQJ
5LVNRIVFDOGLQJ
:KHQ \RX ZDVK DW KLJK WHPSHUDWXUHV WKH
ZDWHUJHWVYHU\KRW,I\RXFRPHLQWR
FRQWDFWZLWKWKHKRWZDWHU\RXPD\EH
VFDOGHG
$OORZWKHZDWHUWRFRROGRZQ
1. 6ZLWFKRIIWKHDSSOLDQFH3XOORXWWKH
PDLQVSOXJ
2. 2SHQWKHVHUYLFHIODS
3. 7DNHWKHGUDLQKRVHRXWRIWKH
UHWDLQHU
5HPRYH WKH VHDOLQJ FDS DQG SRXU WKH
ZDWHURXWLQWRDVXLWDEOHFRQWDLQHU
5HSODFH WKH VHDOLQJ FDS DQG SODFH WKH
GUDLQKRVHEDFNLQWKHUHWDLQHU
4. &DUHIXOO\XQVFUHZWKHSXPSFRYHU
UHVLGXDOZDWHUPD\OHDNRXW
&OHDQWKHLQWHULRUSXPSFRYHUWKUHDG
DQG SXPS KRXVLQJ 7KH LPSHOOHU LQ WKH
GUDLQSXPSPXVWEHDEOHWRURWDWH
5HILWDQGVFUHZRQWKHSXPSFRYHU
7KHKDQGOHPXVWEHLQDYHUWLFDO
SRVLWLRQ
5. 3XWWKHVHUYLFHIODSEDFNRQORFNLW
LQWRSODFHDQGFORVHLW
1RWH 7R SUHYHQW XQXVHG GHWHUJHQW IURP
IORZLQJVWUDLJKWLQWRWKHGUDLQGXULQJWKH
QH[WZDVK3RXUOLWUHRIZDWHULQWR
GLVSHQVHU ,,DQGVWDUWWKH 6LQJOHVSLQ
SURJUDPPH
7KHGUDLQKRVHDWWKHVLSKRQ
LVEORFNHG
1. 7XUQWKHSURJUDPPHVHOHFWRUWR 2II
3XOORXWWKHPDLQVSOXJ
2. /RRVHQWKHKRVHFODPS&DUHIXOO\
UHPRYH WKH GUDLQ KRVH UHVLGXDO ZDWHU
PD\OHDNRXW
3. &OHDQWKHGUDLQKRVHDQGVLSKRQ
FRQQHFWLQJSLHFH
HQ )DXOWVDQGZKDWWRGRDERXWWKHP
4. 5HDWWDFKWKHGUDLQKRVHDQGVHFXUH
WKHFRQQHFWLRQSRLQWXVLQJWKHKRVH
FODPS
)LOWHULQWKHZDWHUVXSSO\LV
EORFNHG
1. 5HOHDVHZDWHUSUHVVXUHLQWKHVXSSO\
KRVH
D 7XUQRIIWKHWDS
E 6HOHFWDQ\SURJUDPPHH[FHSW
6LQJOHULQVHDQG 6LQJOHVSLQ
F 6HOHFWWKH 䄒㯝 倍橵 6WDUW
5HORDGEXWWRQ$OORZWKH
SURJUDPPHWRUXQIRUDSSUR[
VHFRQGV
G 7XUQWKHSURJUDPPHVHOHFWRUWR
2II7KHDSSOLDQFHLVVZLWFKHGRII
H 3XOORXWWKHPDLQVSOXJ
2. &OHDQWKHILOWHUV
D 'LVFRQQHFWWKHKRVHIURPWKHWDS
&OHDQWKHILOWHUZLWKDVPDOOEUXVK
E )RUVWDQGDUGDQG$TXD6HFXUH
PRGHOV FOHDQ WKH ILOWHU RQ WKH UHDU
RIWKHDSSOLDQFH
'LVFRQQHFWWKHKRVHIURPWKHUHDU
RIWKHDSSOLDQFH
8VHSOLHUVWRUHPRYHWKHILOWHUDQG
WKHQFOHDQLW
3. &RQQHFW WKH KRVH DQG FKHFN IRU OHDNV
3)DXOWVDQGZKDWWRGR
DERXWWKHP
)DXOWVDQGZKDWWRGRDERXWWKHP
(PHUJHQF\UHOHDVH
(JSRZHURXWDJHRULQWKHHYHQWRID
ORVVRISRZHU
7KHSURJUDPPHFRQWLQXHVZKHQWKH
SRZHUVXSSO\LVUHVWRUHG
+RZHYHULIWKHODXQGU\KDVWREH
UHPRYHGWKHDSSOLDQFHGRRUFDQEH
RSHQHGDVIROORZV
::DUQLQJ
5LVNRIVFDOGLQJ
:KHQ\RXDUHZDVKLQJDWKLJK
WHPSHUDWXUHV WKHUH LV D ULVN RI VFDOGLQJ LI
\RX FRPH LQWR FRQWDFW ZLWK KRW ZDWHU DQG
ODXQGU\
,ISRVVLEOHOHDYHLWWRFRROGRZQILUVW
&DXWLRQ
5LVNZKHQUHDFKLQJLQWRJULSSLQJWKH
URWDWLQJGUXP
<RXPD\LQMXUH\RXUKDQGVLI\RXUHDFK
LQWRWKHGUXPZKLOHLWLVWXUQLQJ
'RQRWUHDFKLQWRWKHGUXPZKHQLWLV
WXUQLQJ
&DXWLRQ
:DWHUGDPDJH
$Q\HVFDSLQJZDWHUPD\FDXVHZDWHU
GDPDJH
'RQRWRSHQWKHGRRULIZDWHUFDQEH
VHHQWKURXJKWKHJODVV
1. 6ZLWFKRIIWKHDSSOLDQFH3XOORXWWKH
PDLQVSOXJ
2. 'UDLQWKHZDWHU
.
3. 3XOOWKHHPHUJHQF\UHOHDVH
GRZQZDUGVZLWKDWRRODQGUHOHDVH
7KHGRRUFDQWKHQEHRSHQHG

)DXOWVDQGZKDWWRGRDERXWWKHP HQ
,QIRUPDWLRQRQWKHGLVSOD\SDQHO
'LVSOD\ &DXVH5HPHG\
Õ ■ )ODVKHVIDVWZDUQLQJVLJQDO7KHGRRUZDVRSHQHGDQGWKH
ZDWHU OHYHO LV WRR KLJK &ORVH WKH GRRU FRQWLQXH WKH SURJUDPPH
ZLWK 䄒㯝 倍橵 6WDUW5HORDG EXWWRQ RU VHOHFW 6LQJOH VSLQ SUR
JUDPPH
■ )ODVKHVVORZO\7KHGRRUORFNWHPSHUDWXUHLVWRRKLJKWRRSHQ
WKHGRRU:DLWDSSUR[VHFRQGVXQWLOWKHGRRUORFNWHPSHUD
WXUHFRROVGRZQ
r ■ )ODVKHVQRZDWHUVXSSO\7DSWXUQHGRQ")LOWHULQWKHZDWHU
VXSSO\LVEORFNHG"
~ )LOWHULQWKHZDWHUVXSSO\LVEORFNHGRQ SDJH
,VWKHVXSSO\KRVHNLQNHGRUWUDSSHG"
■ /LJKWVXS ORZZDWHUSUHVVXUH)RULQIRUPDWLRQRQO\7KLVZLOO
QRWDIIHFWWKHSURJUDPPHSURJUHVV7KHSURJUDPPHGXUDWLRQLV
H[WHQGHG
( ,VWKHGUDLQSXPSEORFNHG"
~ 'UDLQSXPSLVEORFNHGRQ SDJH
,VWKHGUDLQKRVHDWWKHVLSKRQEORFNHG"
~ 7KHGUDLQKRVHDWWKHVLSKRQLVEORFNHGRQ SDJH
( $OWHUQDWLQJGLVSOD\ZLWK (QGZKHQSURJUDPPHLVILQLVKHGXQEDO
DQFHSUREOHPVSLQQLQJSKDVHLVDERUWHG
EOLJKWVXS 7KHFKLOGSURRIORFNLVDFWLYDWHG²GHDFWLYDWHLW
ÅOLJKWVXS 7RRPXFKIRDPKDVEHHQGHWHFWHGDQGDQDGGLWLRQDOZDVKF\FOH
KDVEHHQDFWLYDWHG$GGOHVVGHWHUJHQWWRWKHQH[WZDVKLQJF\FOH
ZLWKWKHVDPHORDG
¢IODVKHV 5XQWKH 'UXPFOHDQ SURJUDPPHWRFOHDQDQGFDUHIRUWKHGUXP
DQGWKHRXWHUWXE
1RWHV
■ 5XQWKHSURJUDPPHZLWKRXWODXQGU\
■ 8VHZDVKLQJSRZGHURUDGHWHUJHQWFRQWDLQLQJEOHDFK7RSUH
YHQWIRDPLQJRQO\XVHKDOIWKHDPRXQWRIGHWHUJHQWUHFRP
PHQGHGE\WKHGHWHUJHQWPDQXIDFWXUHU'RQRWXVHGHWHUJHQW
GHVLJQHGIRUZRROOHQVRUGHOLFDWHV
■ 6ZLWFKLQJWKHLQIRUPDWLRQVLJQDORQRII
2WKHUGLVSOD\V 6ZLWFK RII WKH DSSOLDQFH ZDLW IRU ILYH VHFRQGV DQG WKHQ VZLWFK LW RQ
DJDLQ,IWKHGLVSOD\DSSHDUVDJDLQFDOOFXVWRPHUVHUYLFHV

HQ )DXOWVDQGZKDWWRGRDERXWWKHP
)DXOWVDQGZKDWWRGRDERXWWKHP
)DXOWV &DXVH5HPHG\
:DWHU LV OHDNLQJ IURP
WKHDSSOLDQFH
■ $WWDFKWKHGUDLQKRVHFRUUHFWO\RUUHSODFHLW
■ 7LJKWHQWKHVFUHZILWWLQJRQWKHVXSSO\KRVH
7KHDSSOLDQFHLVQRW
ILOOLQJZLWKZDWHU
'HWHUJHQWLVQRW
EHLQJGLVSHQVHG
■ 3URJUDPPHGRHVQRWVWDUW"
■ ,VWKHWDSWXUQHGRQ"
■ &RXOGWKHILOWHULQWKHZDWHUVXSSO\EHEORFNHG"
~ )LOWHULQWKHZDWHUVXSSO\LVEORFNHGRQ SDJH
■ ,VWKHVXSSO\KRVHNLQNHGRUWUDSSHG"
7KHZURQJGHWHU
JHQWIDEULFVRIWHQHU
KDV EHHQ SRXUHG LQWR
WKHGLVSHQVHUV
'LVSHQVHUV
1. (PSW\DQGFOHDQ
2. 5HILOO
'HWHUJHQWIDEULFVRI
WHQHU KDV FRQJHDOHG
LQWKHGLVSHQVHUV
&OHDQDQGUHILOOWKHGLVSHQVHUV
7KHGRRUFDQQRWEH
RSHQHG
■ 7KHVDIHW\IXQFWLRQLVDFWLYDWHG6WRSWKHSURJUDPPH"
■ &DQWKHGRRURQO\EHRSHQHGE\WKHHPHUJHQF\UHOHDVH"
~ (PHUJHQF\UHOHDVHRQ SDJH
■ &KLOGSURRIORFNDFWLYDWHG"'HDFWLYDWHFKLOGSURRIORFN
■ 7KHWHPSHUDWXUHLQGUXPLVWRRKLJKWRRSHQWKHGRRU:DLW
DSSUR[VHFRQGVXQWLOWKHWHPSHUDWXUHLQGUXPFRROV
GRZQ
■ 7KHZDWHUOHYHOLQGUXPLVWRRKLJK
7KHSURJUDPPHZLOO
QRWVWDUW
■ +DYH\RXWRXFKHGWKH 䄒㯝 倍橵 6WDUW5HORDGEXWWRQRU
VHOHFWHG 窖悸 )LQLVKLQ 0WLPH"
■ ,VWKHGRRUFORVHG"
■ &KLOGSURRIORFNDFWLYDWHG"'HDFWLYDWHFKLOGSURRIORFN
7KHZDWHULVQRW
GUDLQLQJ
■ &RXOGWKHGUDLQSXPSEHEORFNHG"
~ 'UDLQSXPSLVEORFNHGRQ SDJH
■ &RXOGWKHGUDLQKRVHDWWKHVLSKRQEHEORFNHG"
~ 7KHGUDLQKRVHDWWKHVLSKRQLVEORFNHGRQ SDJH
:DWHU LV QRW YLVLEOH LQ
WKHGUXP
1RWDIDXOW²WKHZDWHULVEHORZWKHYLVLEOHDUHD
7KH VSLQ UHVXOW LV QRW
VDWLVIDFWRU\
/DXQGU\ZHWWRR
GDPS
■ 1RW D IDXOW ² WKH XQEDODQFHG ORDG GHWHFWLRQ V\VWHP KDV LQWHU
UXSWHGWKHVSLQF\FOHEHFDXVHWKHODXQGU\LVXQHYHQO\GLV
WULEXWHG 'LVWULEXWH VPDOO DQG ODUJH LWHPV RI ODXQGU\ HYHQO\ LQ
WKHGUXP
■ ,V 熍䦐厺 (DV\ ,URQ DGGLWLRQDO SURJUDPPH VHWWLQJ VHOHFWHG
GHSHQGLQJRQWKHPRGHO"
■ ,V 1LJKW ZDVK DGGLWLRQDO SURJUDPPH VHWWLQJ RU 1LJKW ZDVK
SURJUDPPHVHOHFWHGGHSHQGLQJRQWKHPRGHO"
■ ,VWKHVHOHFWHGVSHHGWRRORZ"

)DXOWVDQGZKDWWRGRDERXWWKHP HQ
7KHVSLQF\FOHUXQV
VHYHUDOWLPHV
1RWDIDXOW²WKHXQEDODQFHGORDGGHWHFWLRQV\VWHPLVDGMXVWLQJ
DQLPEDODQFH
7KHSURJUDPPHLV
WDNLQJORQJHUWKDQ
XVXDO
■ 1RW D IDXOW ² WKH XQEDODQFHG ORDG GHWHFWLRQ V\VWHP LV DGMXVW
LQJDQLPEDODQFHE\UHSHDWHGO\GLVWULEXWLQJWKHODXQGU\
■ 1RW D IDXOW ² WKH IRDP GHWHFWLRQ V\VWHP LV DFWLYDWHG ² D ULQVH
F\FOHKDVEHHQVZLWFKHGRQ
7KHOHQJWKRIWKH
SURJUDPPH FKDQJHV
GXULQJWKHZDVK
F\FOH
1RWDIDXOW²WKHSURJUDPPHVHTXHQFHLVRSWLPLVHGIRUWKHVSH
FLILFZDVKLQJSURFHVV7KLVPD\FKDQJHWKHOHQJWKRIWKHSUR
JUDPPHVKRZQRQWKH7RXFK'LVSOD\
)RDP PD\ FRPH RXW
RIWKHGHWHUJHQW
GUDZHU
7RRPXFKGHWHUJHQWXVHG"
0L[ WDEOHVSRRQRIIDEULFVRIWHQHUZLWKô OLWUHRIZDWHUDQG
SRXULQWRGLVSHQVHU ,,1RWVXLWDEOHIRURXWGRRUFORWKLQJVSRUWV
ZHDURULWHPVVWXIIHGZLWKGRZQ
5HGXFHGHWHUJHQWGRVDJHIRUWKHQH[WZDVKF\FOH
8VHFRPPHUFLDOO\DYDLODEOHORZIRDPGHWHUJHQWDQGFDUHSURG
XFWZKLFKDUHVXLWDEOHIRUPDFKLQH
2GRXUVVWDLQIRUPD
WLRQLQWKHDSSOLDQFH
5XQWKH 'UXPFOHDQ&SURJUDPPHZLWKRXWODXQGU\
$GGZDVKLQJSRZGHURUDGHWHUJHQWFRQWDLQLQJEOHDFK
1RWH 7RSUHYHQWIRDPLQJRQO\XVHKDOIWKHDPRXQWRIGHWHU
JHQWUHFRPPHQGHGE\WKHGHWHUJHQWPDQXIDFWXUHU'RQRWXVH
GHWHUJHQWVGHVLJQHGIRUZRROOHQVRUGHOLFDWHV
'HWHUJHQWIDEULFVRI
WHQHUGULSVRIIWKH
VHDODQGFROOHFWVRQ
WKHGRRURULQWKH
VHDOIROG
7KHUHLVWRRPXFKGHWHUJHQWIDEULFVRIWHQHULQWKHGLVSHQVHUV
'RQRWILOODERYHWKH PD[PDUNLQWKHGLVSHQVHUV
/RXGQRLVHVYLEUD
WLRQVDQGDSSOLDQFH
PRYHPHQWGXULQJ
WKHVSLQF\FOH
■ ,VWKHDSSOLDQFHDOLJQHG" ~ $OLJQPHQWRQ SDJH
■ $UHWKHDSSOLDQFHVIHHWIL[HG"6HFXUHWKHDSSOLDQFHVIHHW
■ +DYH WKH WUDQVSRUW ORFNV EHHQ UHPRYHG" ~ 5HPRYLQJ WKH
WUDQVSRUWORFNVRQ SDJH
7KH7RXFK'LVSOD\
LQGLFDWRUOLJKWVGR
QRWZRUNZKLOHWKH
DSSOLDQFHLVUXQQLQJ
■ +DVWKHUHEHHQDSRZHUIDLOXUH"
■ +DYHWKHIXVHVEORZQ"5HVHWUHSODFHWKHIXVHV
■ ,IWKHIDXOWRFFXUVUHSHDWHGO\FDOOFXVWRPHUVHUYLFHV
7KHUHLVGHWHUJHQW
UHVLGXHRQWKHODXQ
GU\
■ 6RPHSKRVSKDWHIUHHGHWHUJHQWVFRQWDLQZDWHULQVROXEOH
UHVLGXH
■ 6HOHFW 6LQJOHULQVHRUEUXVKWKHODXQGU\DIWHUZDVKLQJ
,I \RX FDQQRW UHFWLI\ D IDXOW \RXUVHOI DIWHU VZLWFKLQJ WKH DSSOLDQFH RII DQG RQ DJDLQ RU D
UHSDLULVUHTXLUHG
■ 6ZLWFKRIIWKHDSSOLDQFHDQGSXOORXWWKHPDLQVSOXJ
■ 7XUQRIIWKHWDSDQGFDOOFXVWRPHUVHUYLFHV
)DXOWV &DXVH5HPHG\

HQ $IWHUVDOHVVHUYLFH
4 $IWHUVDOHVVHUYLFH
$IWHUVDOHVVHUYLFH
,I\RXFDQQRWUHFWLI\DIDXOW\RXUVHOI
~ )DXOWVDQGZKDWWRGRDERXWWKHP
RQ SDJH SOHDVHFRQWDFWRXUDIWHU
VDOHVVHUYLFH
:HZLOODOZD\VILQGDQDSSURSULDWH
VROXWLRQWRDYRLGXQQHFHVVDU\YLVLWVE\
HQJLQHHUV
3OHDVHSURYLGHWKHDIWHUVDOHVVHUYLFH
ZLWKWKHSURGXFWQXPEHU(1UDQGWKH
SURGXFWLRQQXPEHU)'RIWKHDSSOLDQFH
<RXFDQILQGWKLVLQIRUPDWLRQGHSHQGLQJ
RQWKHPRGHO
■ 2QWKHLQVLGHRIWKHORDGLQJGRRU
■ 2QWKHEDFNRIWKHDSSOLDQFH
7UXVWWKHH[SHUWLVHRIWKH
PDQXIDFWXUHU&RQWDFWXV%\GRLQJVR
\RXFDQEHVXUHWKDWWKHUHSDLUVDUH
FDUULHGRXWE\WUDLQHGVHUYLFHSHUVRQQHO
XVLQJJHQXLQHVSDUHSDUWV
(1U 3URGXFWQXPEHU
)' 3URGXFWLRQQXPEHU
(1U )'
7HFKQLFDOGDWD HQ
J 7HFKQLFDOGDWD
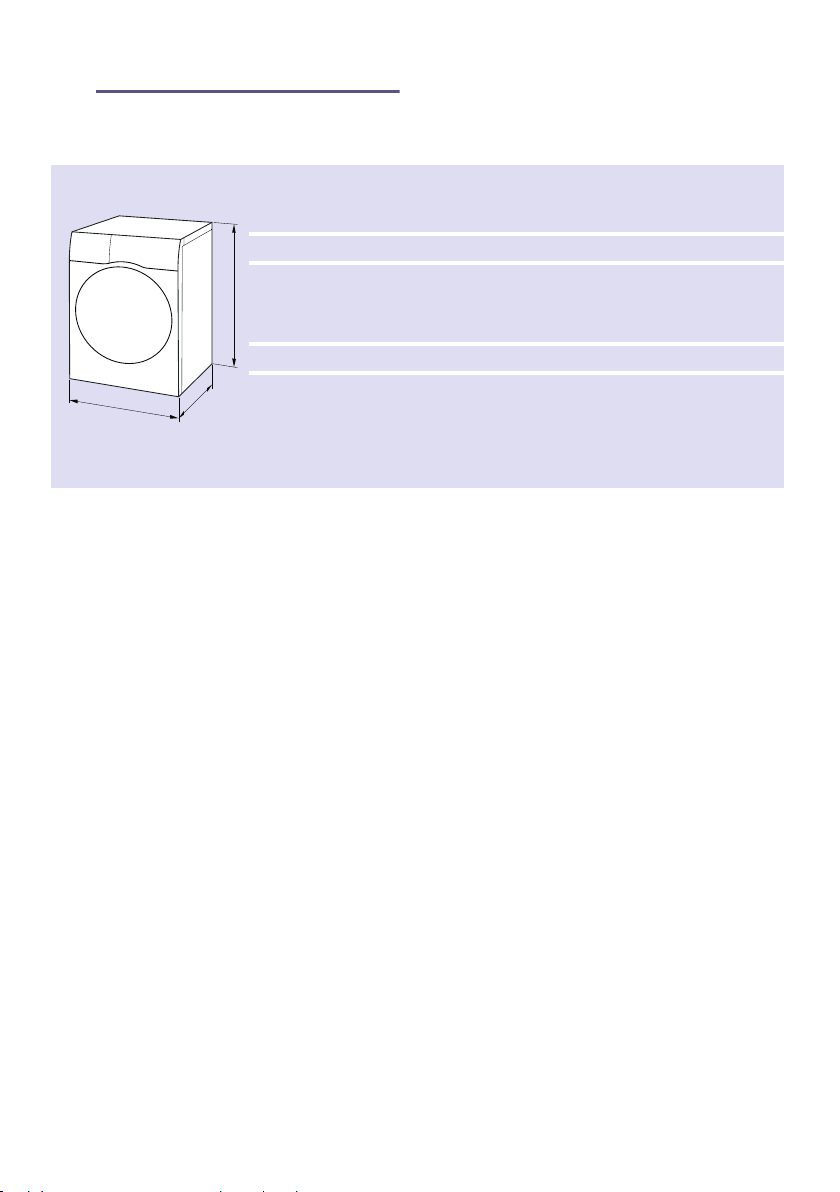
7HFKQLFDOGDWD
'LPHQVLRQV D PP
E PP
F PP
:HLJKW NJ
0DLQVFRQQHFWLRQ 1RPLQDOYROWDJH9 +]
1RPLQDOFXUUHQW $
1RPLQDOSRZHU :
:DWHUSUHVVXUH ² 03D² EDU
(QYLURQPHQWDOFRQGL
WLRQVIRUXVH
DFFRUGLQJWR*%7
$PELHQW7HPSHUDWXUH
ઊ ઊ QRQIUHH]LQJ
5HODWLYH+XPLGLW\
OHVVWKDQDWઊ QRQFRQ
GHQVLQJ
D
E
F

5REHUW%RVFK+DXVJHUlWH*PE+
&DUO:HU\6WUDH
0QFKHQ*(50$1<
ZZZERVFKKRPHFRP
*9001297629*
HQ
7KDQN \RX IRU EX\LQJ D %RVFK +RPH
$SSOLDQFH
5HJLVWHU\RXUQHZGHYLFHRQ0\%RVFKQRZDQGSURILWGLUHFWO\IURP
([SHUWWLSVWULFNVIRU\RXUDSSOLDQFH
:DUUDQW\H[WHQVLRQRSWLRQV
'LVFRXQWVIRUDFFHVVRULHVVSDUHSDUWV
'LJLWDOPDQXDODQGDOODSSOLDQFHGDWDDWKDQG
(DV\DFFHVVWR%RVFK+RPH$SSOLDQFHV6HUYLFH
)UHHDQGHDV\UHJLVWUDWLRQ²DOVRRQPRELOHSKRQHV
ZZZERVFKKRPHFRPZHOFRPH
/RRNLQJIRUKHOS"
<RXOOILQGLWKHUH
([SHUWDGYLFHIRU\RXU%RVFKKRPHDSSOLDQFHVQHHGKHOSZLWKSUREOHPVRUDUHSDLUIURP
%RVFKH[SHUWV
)LQGRXWHYHU\WKLQJDERXWWKHPDQ\ZD\V%RVFKFDQVXSSRUW\RX
ZZZERVFKKRPHFRPVHUYLFH
&RQWDFWGDWDRIDOOFRXQWULHVDUHOLVWHGLQWKHDWWDFKHGVHUYLFHGLUHFWRU\