1
Safety instructions
– The washing machine is heavy - caution when lifting it.
– Warning: Frozen hoses may tear/burst. Do not install washing machine in areas where
there is a risk of frost and/or outdoors.
– Washing machine may be damaged. Do not lift by projecting components (e.g. washing
machine door).
– In addition to the instructions mentioned here, special regulations of the relevant water and
power supply companies may apply.
– If in doubt, have the appliance connected by a technician.
– Lay hoses and cables in such way that there is no risk of stumbling..
Environmental disposal
– Dispose of packaging in an environmentally friendly manner.
– Keep packaging and associated parts out of the reach of children.
– Environment-conscious recycling can reclaim valuable raw materials.
– All packaging materials used are environment friendly and re-usable.
Installation area
– Stability is important to prevent the machine from wandering!
– The installation area must be firm and level.
– Soft floor coverings/wooden floor/steps are not suitable.
– Keep the enviroment dry and vented.
– Never put small appliance, such as microwave oven, jar cooker on the machine.
– Keep the machine away from the flaming equipment,such as candle,cooking stove,
liquefied gas container etc.
– Never put the pressure containers on the machine.
– Never put the machine over the opening of an uncovered drainage.
If installing the appliance on a pedestal
– It is essential to secure the washing machine feet with holding brackets.
If installing the appliance on a wooden joist floor
– if possible, install the washing machine in a corner.
– Screw a water-resistant wodden panel (min. 30 mm thick) to the floor.
It is essential to secure the washing machine feet with holding brackets.
Built-under/Built-in appliance
Build-under/build-in before connection to the power supply.
Installed in between kitchen units (built-under or built-in)
– 60 cm cavity width required.
– Install washing machine only under a continuous worktop connected firmly to the adjacent
cupboards.
2
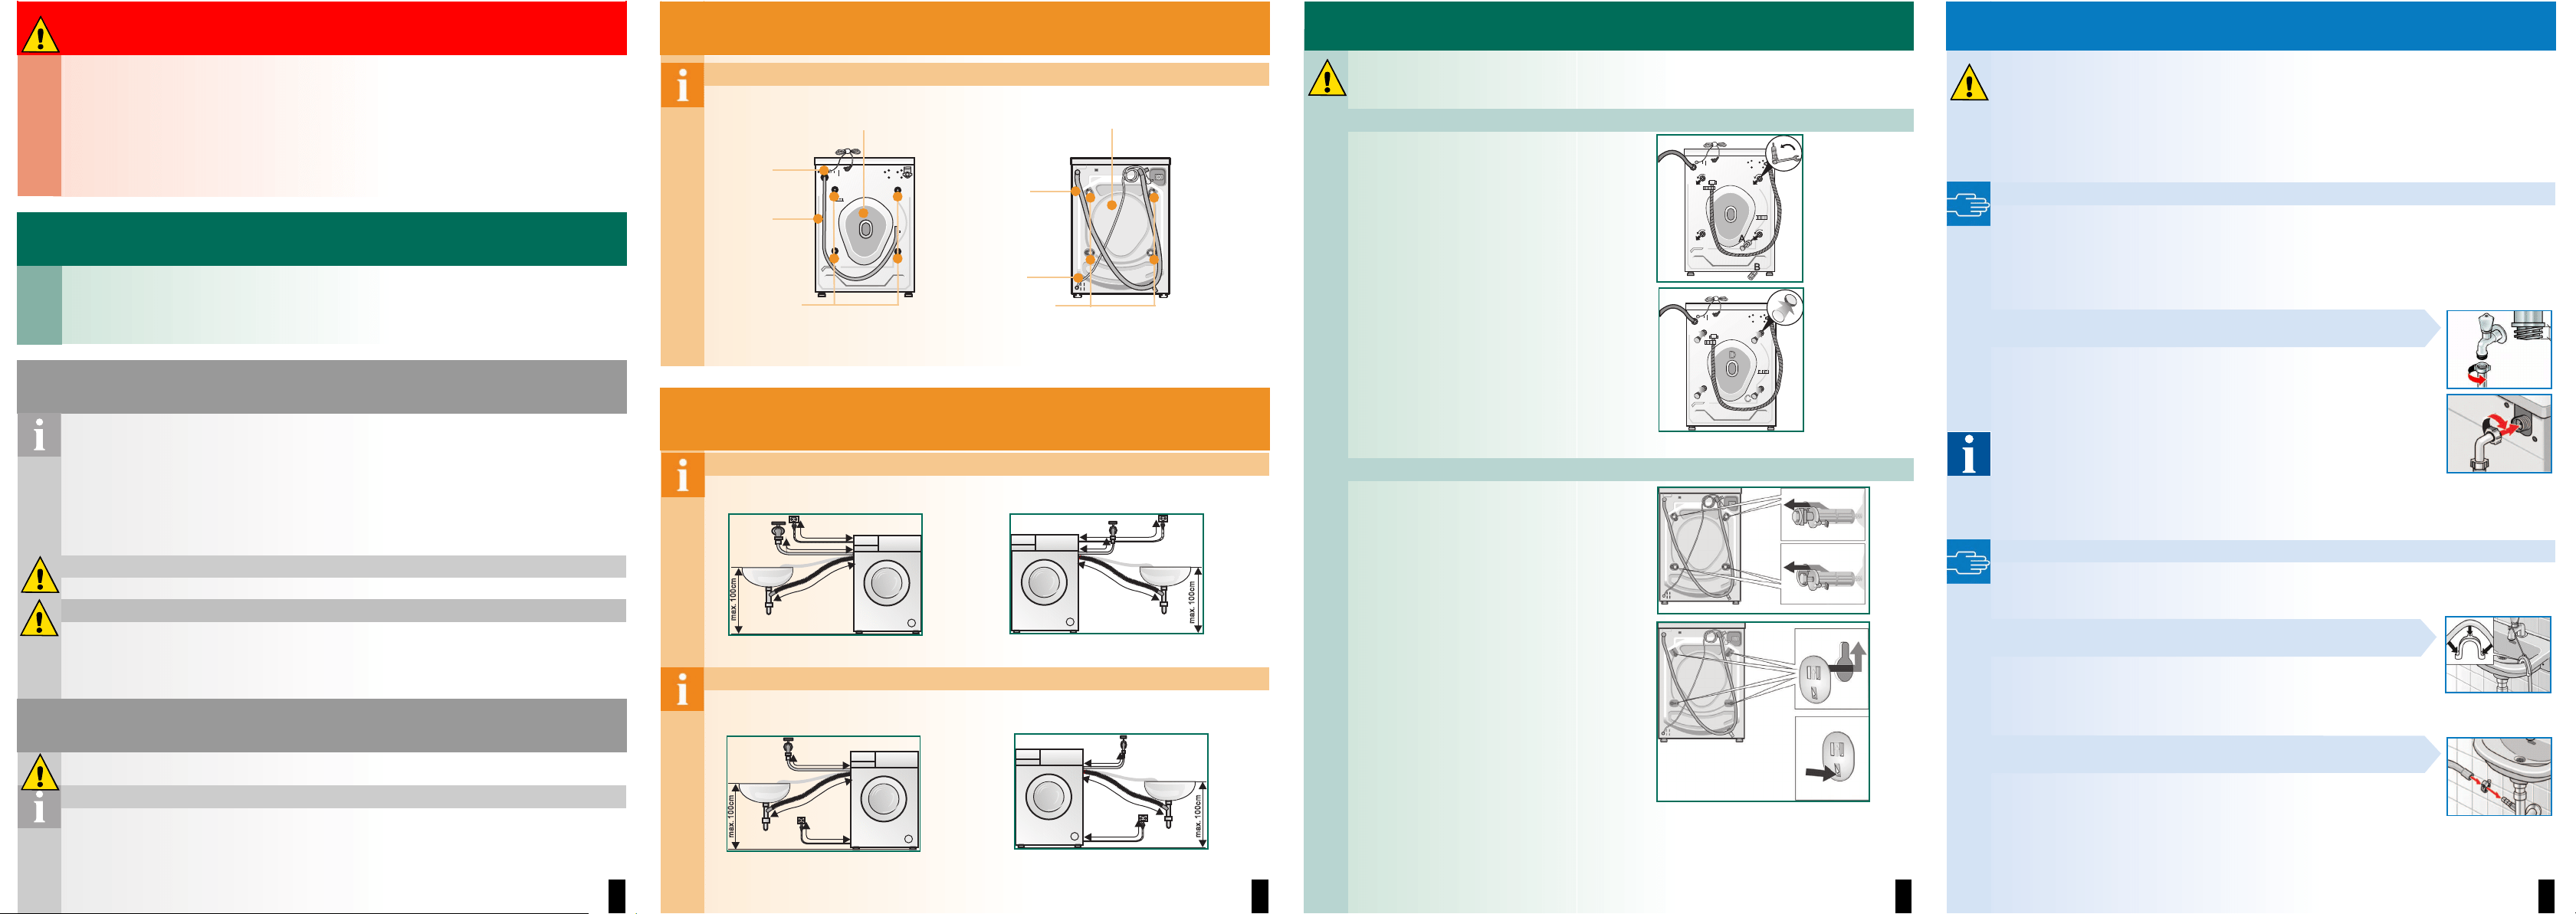
Standard accessories at the back of machine
For WM,WAX,WAE For WS,WLX
For WM,WAX,WAE
For WS,WLX
power
cord
drainage
hose
transportation
bolt
rear cover rear cover
drainage
hose
power
cord
transportation
bolt
150cm
~
~
50cm
~
~
110cm
~
~
max 100
.
cm
max 100
.
cm
110cm
~
~
100cm
~
~
50cm
~
~
connection on left side connection on right side
145cm
~
~
105cm
~
~
max 100
.
cm
100cm
~
~
90cm
~
~
150cm
~
~
max 100
.
cm
150cm
~
~
connection on left side connection on right side
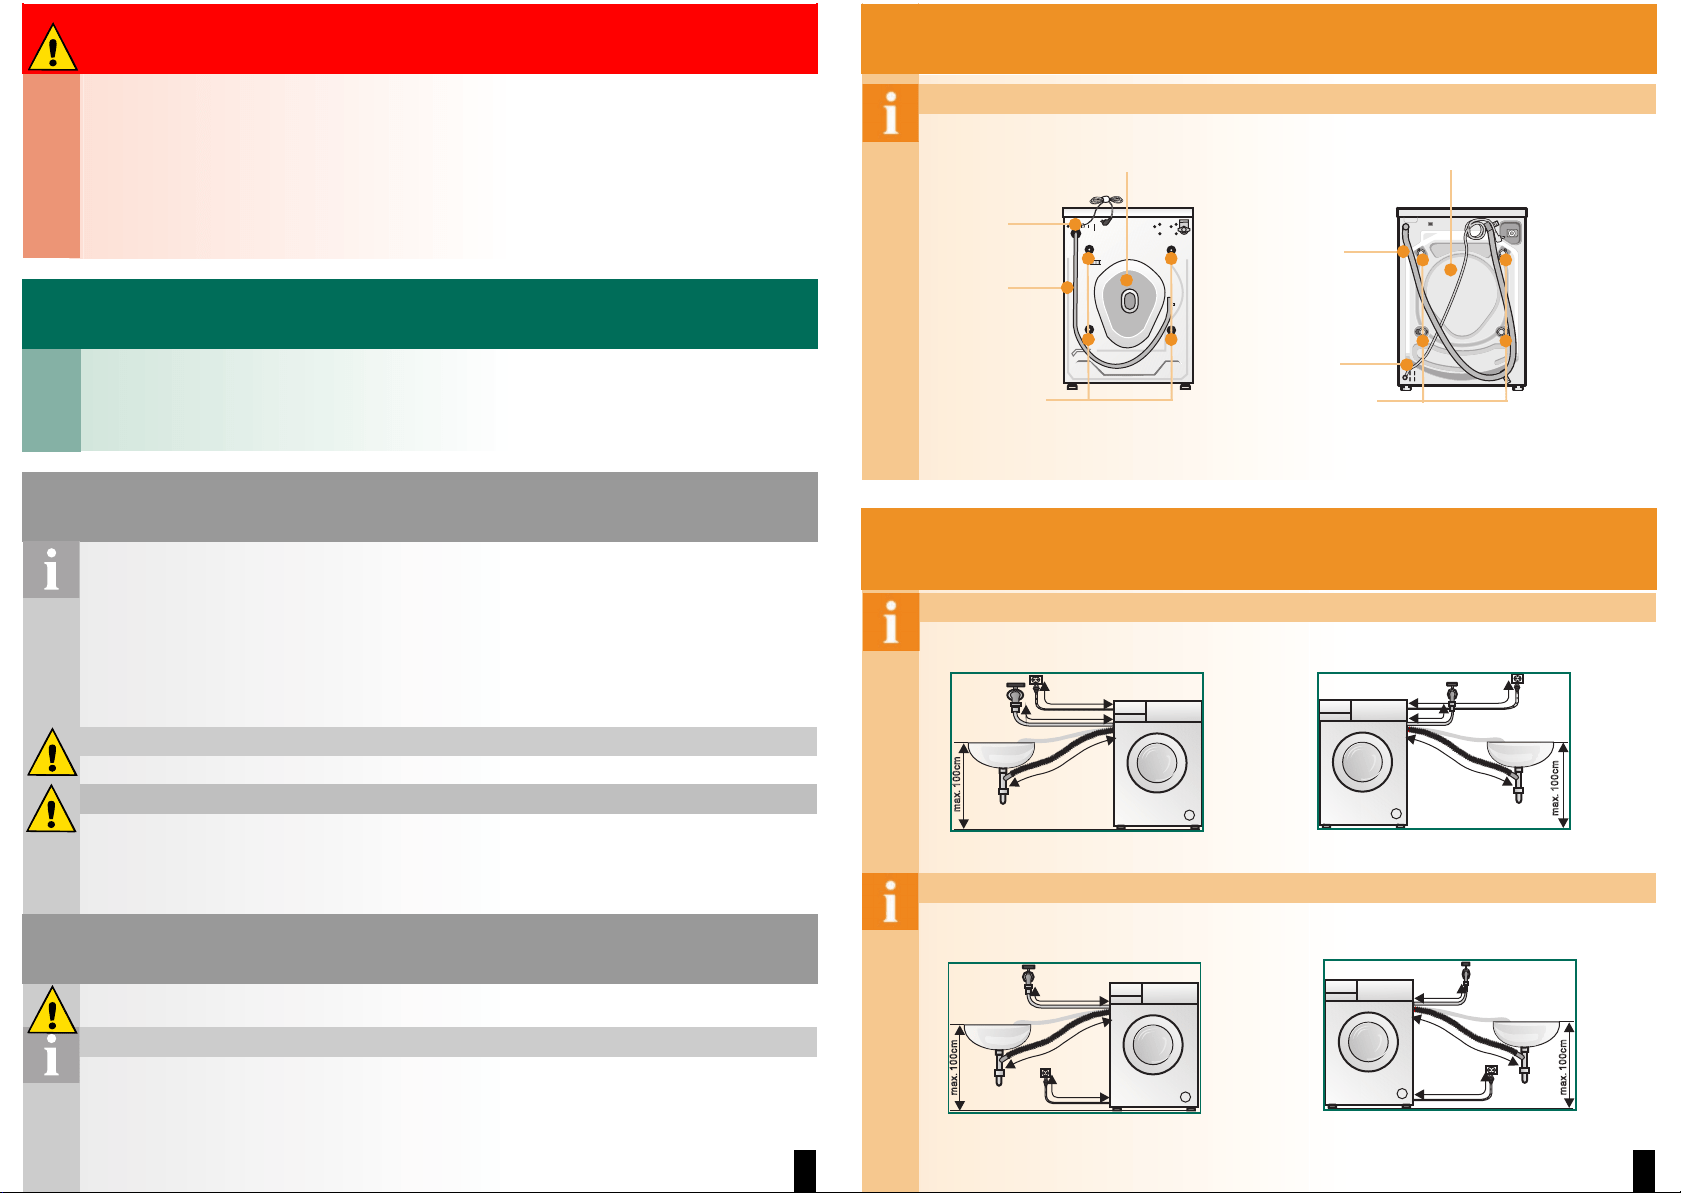
Hose and cable lengths
3
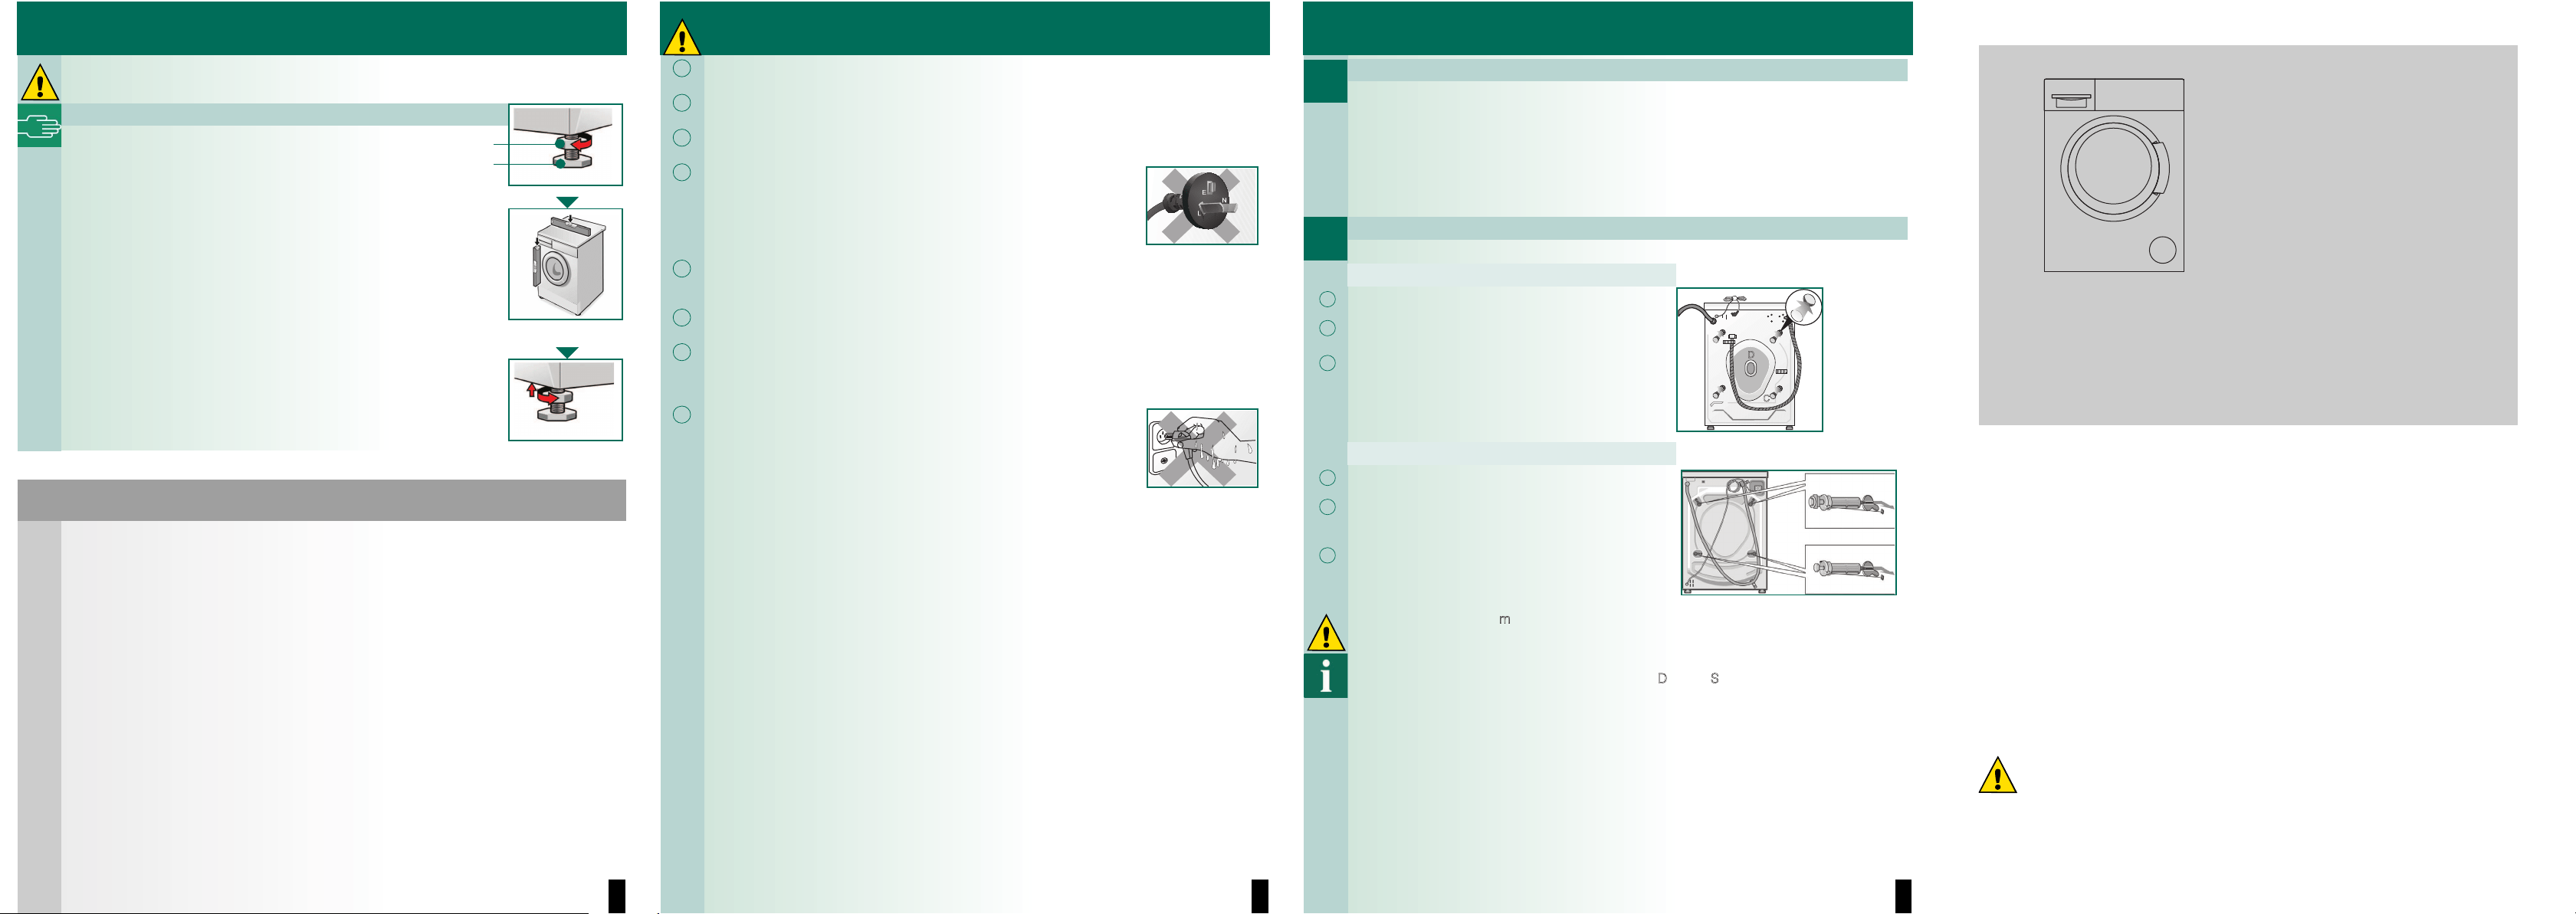
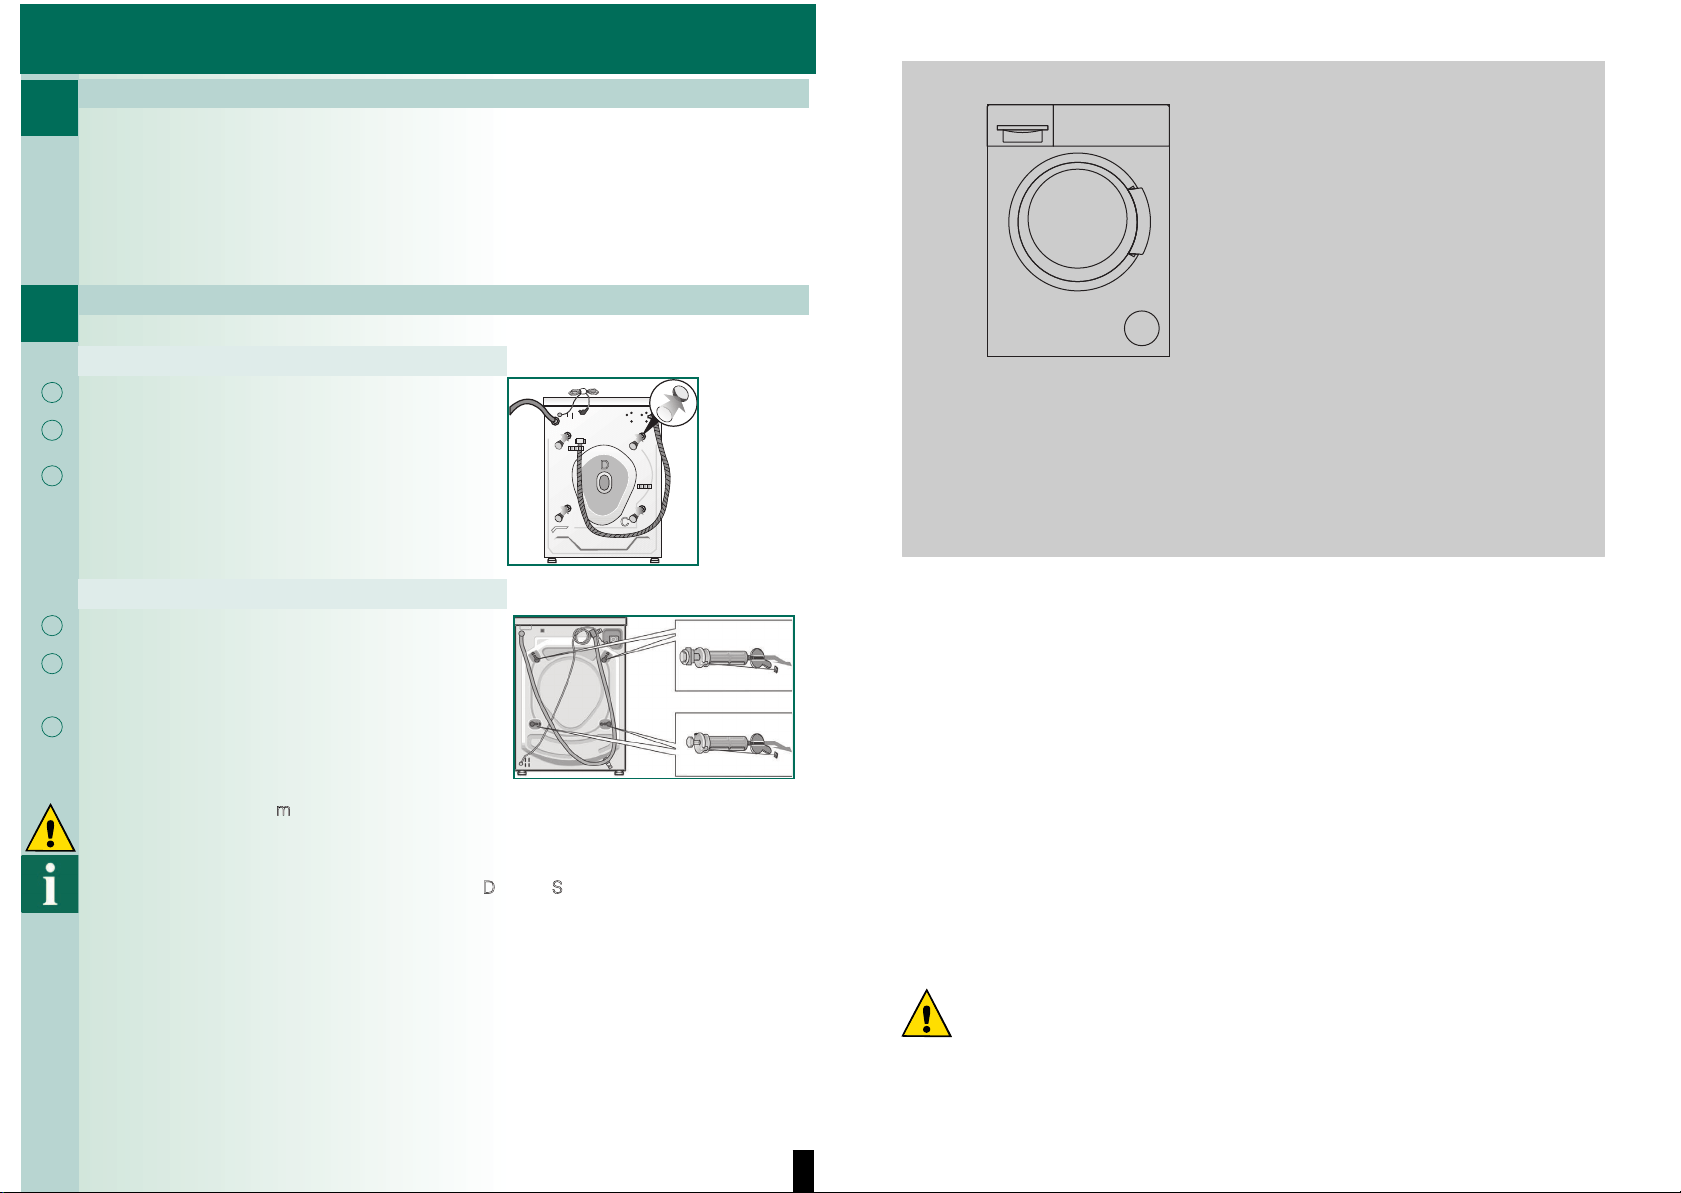
Removing transportation bolt
– Before using the appliance for the first time, always remove and retain
all 4 transportation bolt at the back of appliance.
– Be careful when you handle it and avoid injuring.
For WM,WAX,WAE
1. Release all fixing bolts A by spanner.
2. Remove the four parts B. They will fall to the floor
when you tip the machine.
3. Insert the cover caps C which you will find in the
bag containing the documentation.
For WS,WLX
1. Loosen the four bolts by spanner until they are
freely movable, remove them.
2. Insert the cover caps which you will find in the bag
containing the documentation.
D
C
4
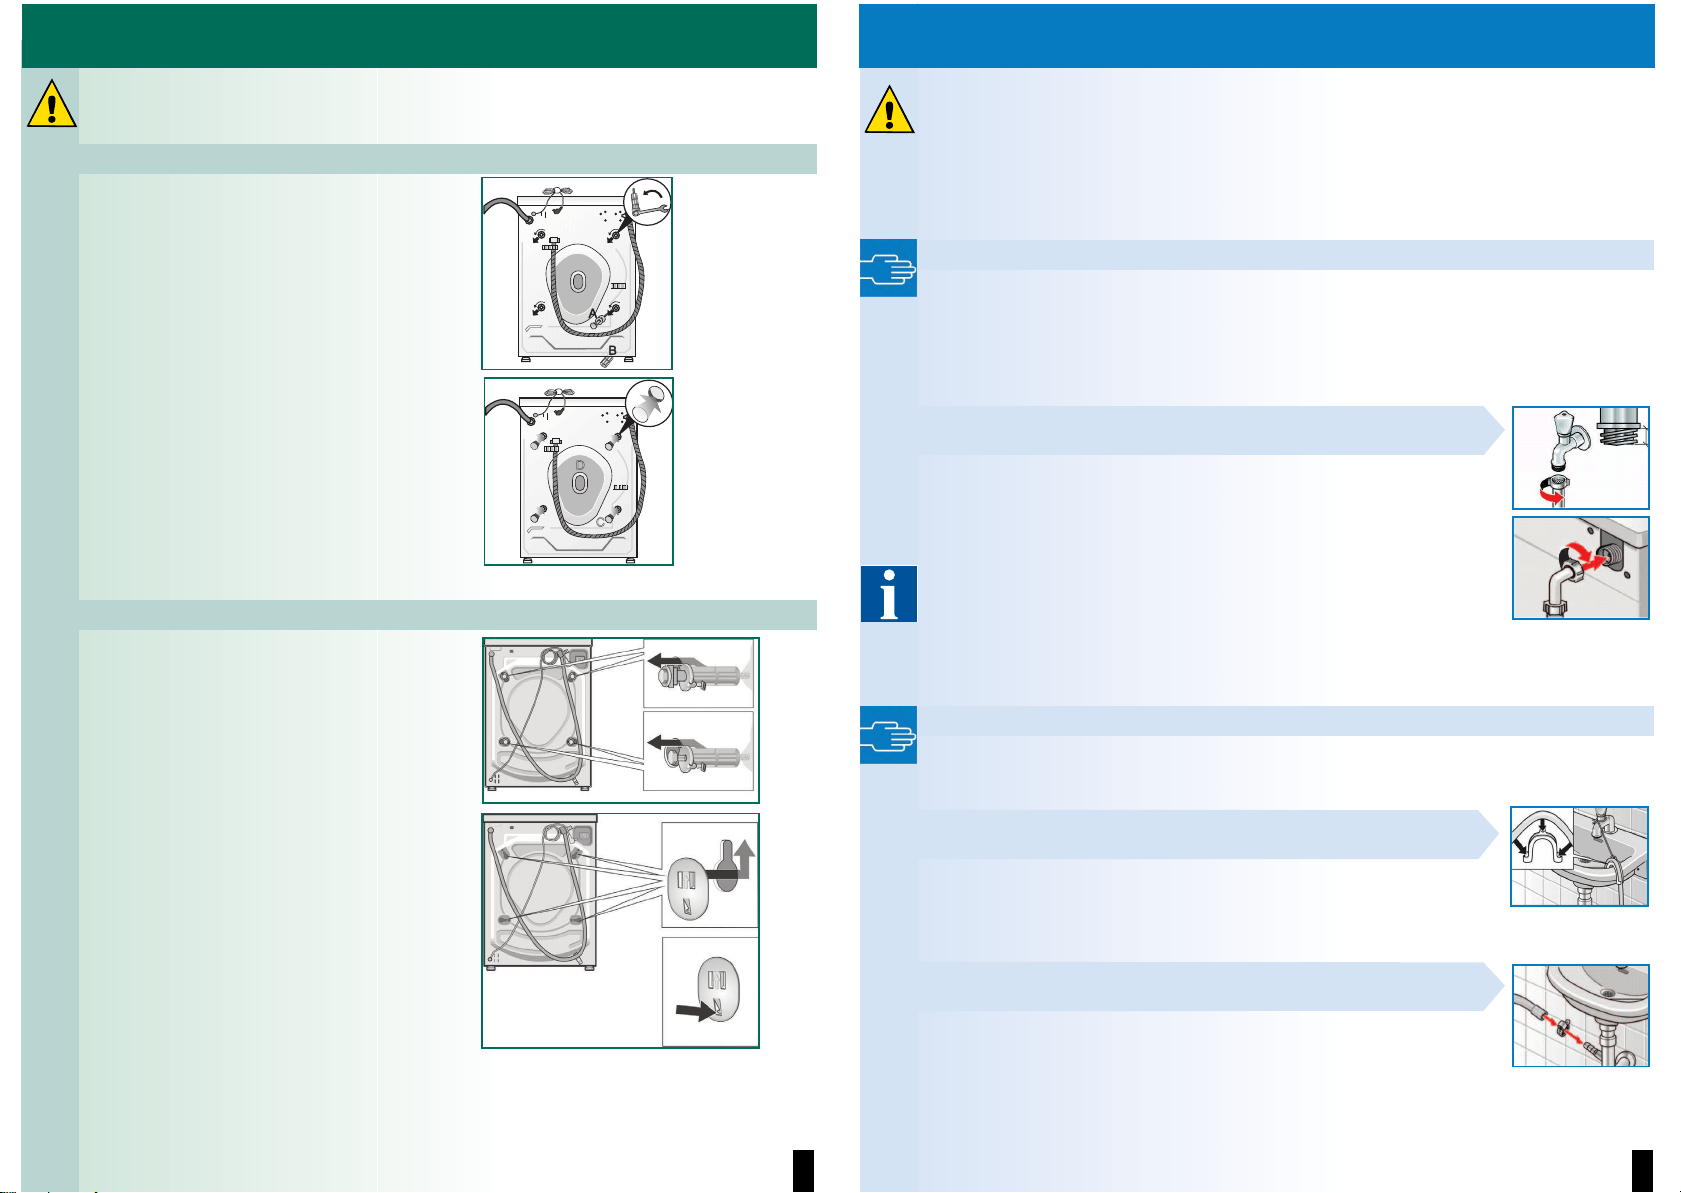
Water connection
– To prevent leakage or water damage, follow the instructions in this chapter!
– Attention: Operate the washing machine with cold water only.
Do not connect to a mixer tap of a pressureless hot-water heater.
– Do not disassemble the warter inlet hose frequently, the untight connection will lead to
leakage. We suggest that you use a water inlet hose specially for the machine.
– Do not use a used inlet hose. Only use the inlet hose supplied or one whih was purchased
from an authorised specialist dealer.
– If in doubt, have the appliance connected by a technician.
Water supply
Water inlet hose:
Attention:
do not kink, crush, modify or cut through(strength is no longer guaranteed).
Optimum water pressure in the mains: 100-1000 kPa (1-10 bar)
– When the tap is turned on, the water flow should be more than 8l/min.
– If the water pressure is too high, install a pressure reducing valve.
1. Connect water inlet hose to the tap.
Tighten plastic screw-fittings by hand only.
2. Carefully turn on the tap and check that the connection
points are not leaking.
Attention: screw connection is under water mains
pressure.
Call customer service to get the plastic connector freely. It may connect
tightly the water inlet hose and your water tap.
Available from dealer/customer service:
– Special water tap fof machine.
– Extended water inlet hose.
Water drainage
Water drainage hose:
Attention: do not kink stretch.
Height difference between installation area and outlet: max. 100 cm
Drainage into a sink/bath tub:
Attention: Secure the drainage hose to prevent it from slipping out of
the sink.
Attention: The plug must not be in the plug hole. When the water is being
pumped out of the washing machine, check that the water drains away
quickly enough. Do not insert the end of the drainage hose into the pumped
off water! There is a risk that water will be drawn back into the washing
machine!
Drainage into a siphon:
Attention: Secure connection point with hose clip, Ø 24-40 mm.
min10mm
5
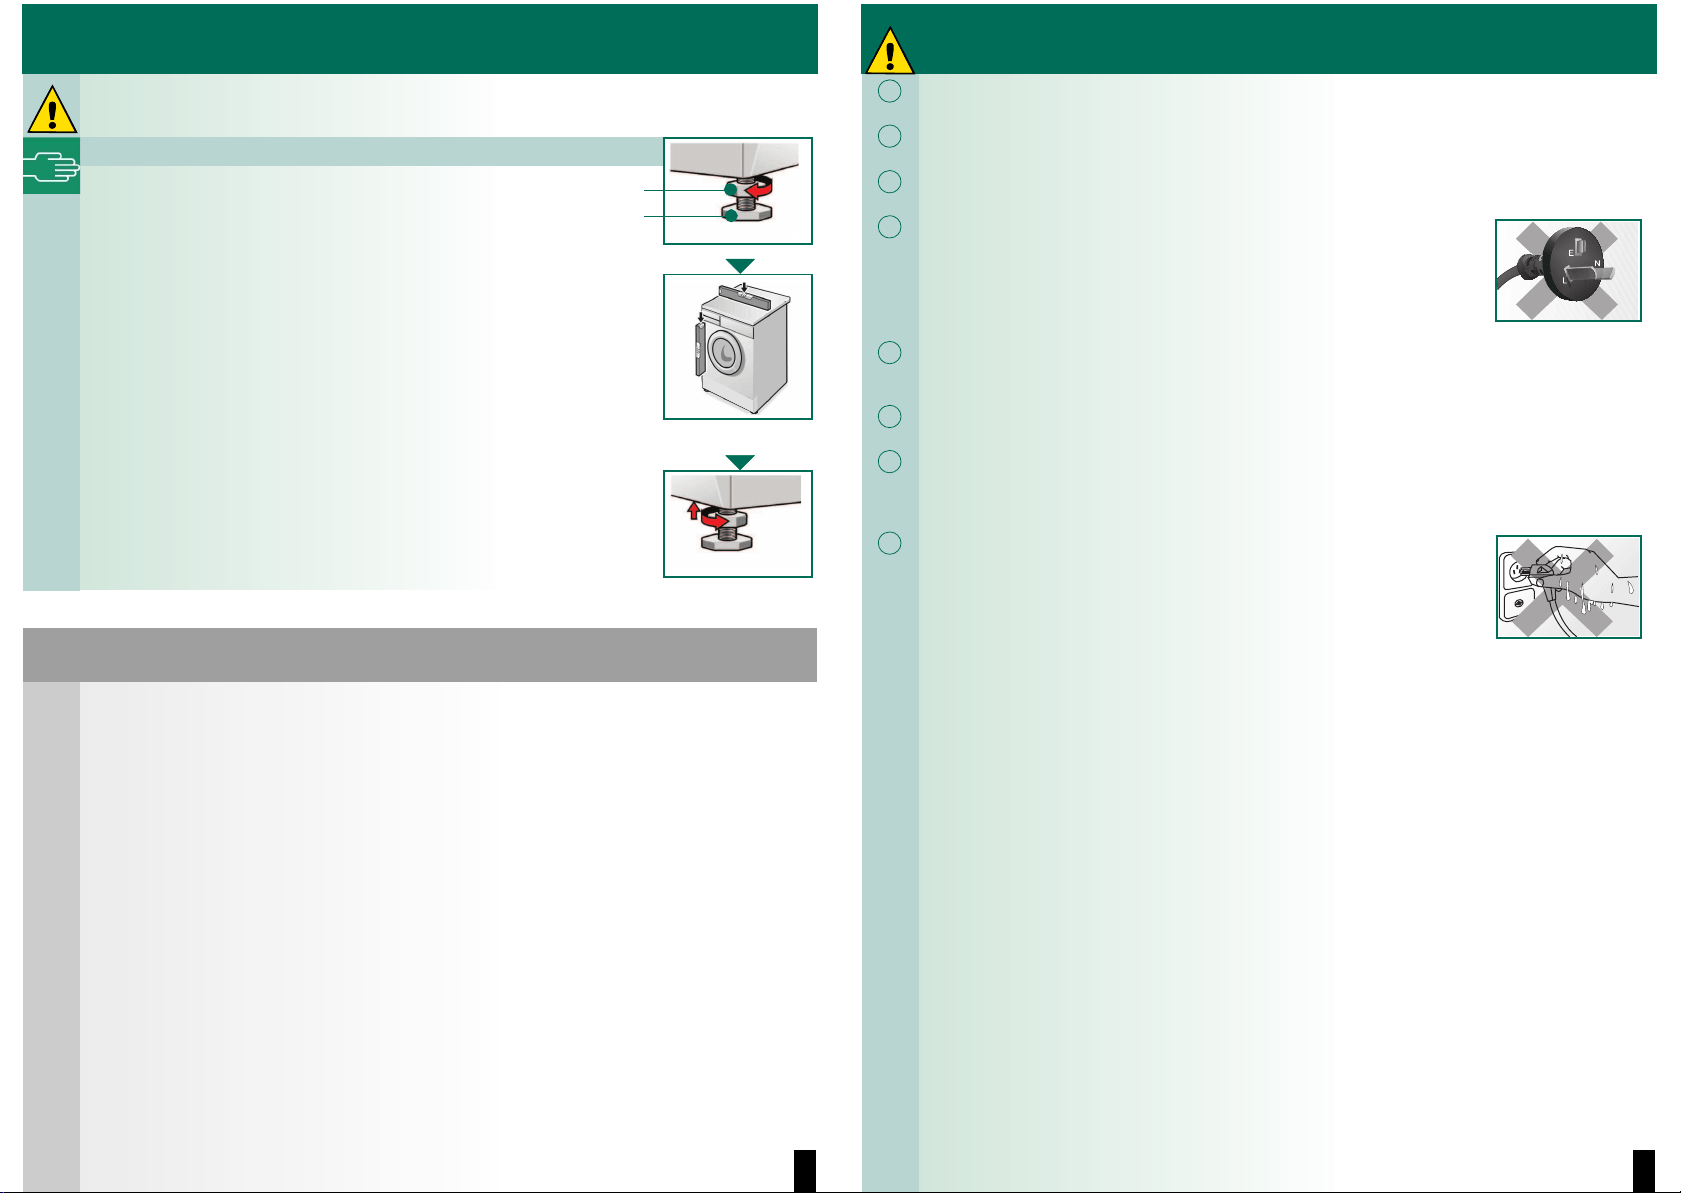
Alignment
Loud noise formation, intense vibrations and ”wandering” may be due to incorrect
alignment!
Align washing machine with spirit level.
1. Loosen lock nut in a clockwise direction with a wrench.
2. Change height by rotating the appliance feet.
All four appliance feet must be firmly on the floor.
The washing machine must not wobble!
Check alignment of the washing machine (if available with a spirit level)
and,if required, correct.
3. Tighten the lock nut against the housing.
Hold the foot in place and make sure that the height is not adjusted.
The lock nuts on all four appliance feet must be screwed tightly against
the housing.
Product standard
The washing machine carry out the national standard as following:
GB 4706.1
GB 4706.24
GB 19606
GB 4343.1
GB 17625.1
GB/T 4288
GB 12021.4
lock nut
appliance
foot
0613/9000372388Manufacturer (see Operating instructions)
6
Electrical connection
ʑ
Connect the washing machine to an alternating current via a correctly
installed earthed socket only.
ʑ
The main voltage and specifications on the washing machine must
match the nameplate at the back of machine at the installation location.
ʑ
Connected load and required fuse or line protecting cut-out are
indicated on the nameplate.
ʑ
Ensure that:
– the mains plug and socket are compatible,
– the main plug is easy to reach,
– the cable cross-section is adequate,
– the earthing system has been installed correctly.
ʑ
A damaged power cord may be only replaced by special power cord or
power cord from the manufacture or customer service center. Replace
by an electrician only.
ʑ
Do not use multiple plugs/couplings or extension cables.
ʑ
If an earth-leakage circuit-breaker is used, use only a type which
features this symbol: 7 .
Only this symbol guarantees compliance with the current valid
regulations.
ʑ
Mains plug:
– do not insert/pull out of the socket with damp hands.
– do not pull the plug out of the socket by tugging the power cord.
– never pull out of the plug while the appliance is operating.
7
Transportation, e.g. if moving house
Before transporting the washing machine:
1. Turn off the tap.
2. Release the water pressure in the water inlet hose.
a Operating instructions ; Filter in the water inlet hosey .
3. Drain any residual detergent solution.
a Operating instructions ; Detergent solution pump.
4. Isolate the washing machine from the power supply.
5. Remove the hoses.
Installing transportation bolts
For WM,WAX,WAE
ʑ
Remove the four cover caps C.
ʑ
Remove the rear cover D and prepare the
transportation bolts.
ʑ
Insert and tighten the transportaion bolts.
For WS,WLX
ʑ
Remove the four cover caps.
ʑ
Prepare the four transportation bolts.
Pull the bolt out of the sleeve until the end of the bolt
is flush with the end of the sleeve.
ʑ
Insert and tighten the bolts. The lug on the washer
must be located in the groove in the rear cover.
The transportation bolts m
ust be removed after transportation.a Page 3.
To prevent unused detergent from flowing into the outlet during the next wash:
Pour 1 litre of water into dispenser II and start the D
rain or Spin programme.
1.
2.
D
C
Installation instructions
Contents Page
ʋSafety instructions . . . . . . . . . . . . . . . . . . . . . . . . . . . . . 1
ʋEnvironmental disposal . . . . . . . . . . . . . . . . . . . . . . . . . 1
ʋInstallation area . . . . . . . . . . . . . . . . . . . . . . . . . . . . . . . 1
ʋBuilt-under/Built-in appliance . . . . . . . . . . . . . . . . . . . . 1
ʋStandard accessories at the back of machine . . . . . . . 2
ʋHose and cable lengths . . . . . . . . . . . . . . . . . . . . . . . . 2
ʋRemoving transportation bolt . . . . . . . . . . . . . . . . . . . . 3
ʋWater connection . . . . . . . . . . . . . . . . . . . . . . . . . . . . . 4
ʋAlignment . . . . . . . . . . . . . . . . . . . . . . . . . . . . . . . . . . . 5
ʋProduct standard . . . . . . . . . . . . . . . . . . . . . . . . . . . . . . 5
ʋElectrical connection . . . . . . . . . . . . . . . . . . . . . . . . . . . 6
ʋTransportation, e.g. if moving hous . . . . . . . . . . . . . . . . 7
Washing
machine
Read installation instructions before switching on the washing machine!
Also follow the separate Operating instructions.
Any fault or loss caused by not following installation instructions or operating
instructions is not in the arrange of the warranty, and in this case manufacture
has no responsibility.
Retain all documents for subsequent use or for the next owner.
If in doubt, please contact the local customer service center.
en
1
Safety instructions
– The washing machine is heavy - caution when lifting it.
– Warning: Frozen hoses may tear/burst. Do not install washing machine in areas where
there is a risk of frost and/or outdoors.
– Washing machine may be damaged. Do not lift by projecting components (e.g. washing
machine door).
– In addition to the instructions mentioned here, special regulations of the relevant water and
power supply companies may apply.
– If in doubt, have the appliance connected by a technician.
– Lay hoses and cables in such way that there is no risk of stumbling..
Environmental disposal
– Dispose of packaging in an environmentally friendly manner.
– Keep packaging and associated parts out of the reach of children.
– Environment-conscious recycling can reclaim valuable raw materials.
– All packaging materials used are environment friendly and re-usable.
Installation area
– Stability is important to prevent the machine from wandering!
– The installation area must be firm and level.
– Soft floor coverings/wooden floor/steps are not suitable.
– Keep the enviroment dry and vented.
– Never put small appliance, such as microwave oven, jar cooker on the machine.
– Keep the machine away from the flaming equipment,such as candle,cooking stove,
liquefied gas container etc.
– Never put the pressure containers on the machine.
– Never put the machine over the opening of an uncovered drainage.
If installing the appliance on a pedestal
– It is essential to secure the washing machine feet with holding brackets.
If installing the appliance on a wooden joist floor
– if possible, install the washing machine in a corner.
– Screw a water-resistant wodden panel (min. 30 mm thick) to the floor.
It is essential to secure the washing machine feet with holding brackets.
Built-under/Built-in appliance
Build-under/build-in before connection to the power supply.
Installed in between kitchen units (built-under or built-in)
– 60 cm cavity width required.
– Install washing machine only under a continuous worktop connected firmly to the adjacent
cupboards.
2
Standard accessories at the back of machine
For WM,WAX,WAE For WS,WLX
For WM,WAX,WAE
For WS,WLX
power
cord
drainage
hose
transportation
bolt
rear cover rear cover
drainage
hose
power
cord
transportation
bolt
150cm
~
~
50cm
~
~
110cm
~
~
max 100
.
cm
max 100
.
cm
110cm
~
~
100cm
~
~
50cm
~
~
connection on left side connection on right side
145cm
~
~
105cm
~
~
max 100
.
cm
100cm
~
~
90cm
~
~
150cm
~
~
max 100
.
cm
150cm
~
~
connection on left side connection on right side
Hose and cable lengths
3
Removing transportation bolt
– Before using the appliance for the first time, always remove and retain
all 4 transportation bolt at the back of appliance.
– Be careful when you handle it and avoid injuring.
For WM,WAX,WAE
1. Release all fixing bolts A by spanner.
2. Remove the four parts B. They will fall to the floor
when you tip the machine.
3. Insert the cover caps C which you will find in the
bag containing the documentation.
For WS,WLX
1. Loosen the four bolts by spanner until they are
freely movable, remove them.
2. Insert the cover caps which you will find in the bag
containing the documentation.
D
C
4
Water connection
– To prevent leakage or water damage, follow the instructions in this chapter!
– Attention: Operate the washing machine with cold water only.
Do not connect to a mixer tap of a pressureless hot-water heater.
– Do not disassemble the warter inlet hose frequently, the untight connection will lead to
leakage. We suggest that you use a water inlet hose specially for the machine.
– Do not use a used inlet hose. Only use the inlet hose supplied or one whih was purchased
from an authorised specialist dealer.
– If in doubt, have the appliance connected by a technician.
Water supply
Water inlet hose:
Attention: do not kink, crush, modify or cut through(strength is no longer guaranteed).
Optimum water pressure in the mains: 100-1000 kPa (1-10 bar)
– When the tap is turned on, the water flow should be more than 8l/min.
– If the water pressure is too high, install a pressure reducing valve.
1. Connect water inlet hose to the tap.
Tighten plastic screw-fittings by hand only.
2. Carefully turn on the tap and check that the connection
points are not leaking.
Attention: screw connection is under water mains
pressure.
Call customer service to get the plastic connector freely. It may connect
tightly the water inlet hose and your water tap.
Available from dealer/customer service:
– Special water tap fof machine.
– Extended water inlet hose.
Water drainage
Water drainage hose:
Attention: do not kink stretch.
Height difference between installation area and outlet: max. 100 cm
Drainage into a sink/bath tub:
Attention: Secure the drainage hose to prevent it from slipping out of
the sink.
Attention: The plug must not be in the plug hole. When the water is being
pumped out of the washing machine, check that the water drains away
quickly enough. Do not insert the end of the drainage hose into the pumped
off water! There is a risk that water will be drawn back into the washing
machine!
Drainage into a siphon:
Attention: Secure connection point with hose clip, Ø 24-40 mm.
min10mm
5
Alignment
Loud noise formation, intense vibrations and ”wandering” may be due to incorrect
alignment!
Align washing machine with spirit level.
1. Loosen lock nut in a clockwise direction with a wrench.
2. Change height by rotating the appliance feet.
All four appliance feet must be firmly on the floor.
The washing machine must not wobble!
Check alignment of the washing machine (if available with a spirit level)
and,if required, correct.
3. Tighten the lock nut against the housing.
Hold the foot in place and make sure that the height is not adjusted.
The lock nuts on all four appliance feet must be screwed tightly against
the housing.
Product standard
The washing machine carry out the national standard as following:
GB 4706.1
GB 4706.24
GB 19606
GB 4343.1
GB 17625.1
GB/T 4288
GB 12021.4
lock nut
appliance
foot
0613/9000372388Manufacturer (see Operating instructions)
6
Electrical connection
ʑ
Connect the washing machine to an alternating current via a correctly
installed earthed socket only.
ʑ
The main voltage and specifications on the washing machine must
match the nameplate at the back of machine at the installation location.
ʑ
Connected load and required fuse or line protecting cut-out are
indicated on the nameplate.
ʑ
Ensure that:
– the mains plug and socket are compatible,
– the main plug is easy to reach,
– the cable cross-section is adequate,
– the earthing system has been installed correctly.
ʑ
A damaged power cord may be only replaced by special power cord or
power cord from the manufacture or customer service center. Replace
by an electrician only.
ʑ
Do not use multiple plugs/couplings or extension cables.
ʑ
If an earth-leakage circuit-breaker is used, use only a type which
features this symbol: 7 .
Only this symbol guarantees compliance with the current valid
regulations.
ʑ
Mains plug:
– do not insert/pull out of the socket with damp hands.
– do not pull the plug out of the socket by tugging the power cord.
– never pull out of the plug while the appliance is operating.
a
a
ʑ
ʑ
ʑ
ʑ
ʑ
ʑ
a
ʋ
ʋ
ʋ
ʋ
ʋ
ʋ
ʋ
ʋ
ʋ
ʋ
ʋ
ʋ
ʑ
ʑ
ʑ
ʑ
ʑ
ʑ
ʑ
ʑ
7
Transportation, e.g. if moving house
Before transporting the washing machine:
1. Turn off the tap.
2. Release the water pressure in the water inlet hose.
a Operating instructions ; Filter in the water inlet hosey .
3. Drain any residual detergent solution.
a Operating instructions ; Detergent solution pump.
4. Isolate the washing machine from the power supply.
5. Remove the hoses.
Installing transportation bolts
For WM,WAX,WAE
ʑ
Remove the four cover caps C.
ʑ
Remove the rear cover D and prepare the
transportation bolts.
ʑ
Insert and tighten the transportaion bolts.
For WS,WLX
ʑ
Remove the four cover caps.
ʑ
Prepare the four transportation bolts.
Pull the bolt out of the sleeve until the end of the bolt
is flush with the end of the sleeve.
ʑ
Insert and tighten the bolts. The lug on the washer
must be located in the groove in the rear cover.
The transportation bolts must be removed after transportation.a Page 3.
To prevent unused detergent from flowing into the outlet during the next wash:
Pour 1 litre of water into dispenser II and start the D
rain or Spin programme.
1.
2.
D
C
Installation instructions
Contents Page
ʋSafety instructions . . . . . . . . . . . . . . . . . . . . . . . . . . . . . 1
ʋEnvironmental disposal . . . . . . . . . . . . . . . . . . . . . . . . . 1
ʋInstallation area . . . . . . . . . . . . . . . . . . . . . . . . . . . . . . . 1
ʋBuilt-under/Built-in appliance . . . . . . . . . . . . . . . . . . . . 1
ʋStandard accessories at the back of machine . . . . . . . 2
ʋHose and cable lengths . . . . . . . . . . . . . . . . . . . . . . . . 2
ʋRemoving transportation bolt . . . . . . . . . . . . . . . . . . . . 3
ʋWater connection . . . . . . . . . . . . . . . . . . . . . . . . . . . . . 4
ʋAlignment . . . . . . . . . . . . . . . . . . . . . . . . . . . . . . . . . . . 5
ʋProduct standard. . . . . . . . . . . . . . . . . . . . . . . . . . . . . . 5
ʋElectrical connection . . . . . . . . . . . . . . . . . . . . . . . . . . . 6
ʋTransportation, e.g. if moving hous . . . . . . . . . . . . . . . . 7
Washing
machine
Read installation instructions before switching on the washing machine!
Also follow the separate Operating instructions.
Any fault or loss caused by not following installation instructions or operating
instructions is not in the arrange of the warranty, and in this case manufacture
has no responsibility.
Retain all documents for subsequent use or for the next owner.
If in doubt, please contact the local customer service center.
en