ge.com
0
©
Safety Information ......... 2-6
Operating Instruc_tions
Browning Features ........ 16, 17
Convenience Features ..... 14, 15
Grilling Features ......... 18, 19
Microwave Terms ............ 22
Other Features ........... 20, 21
Oven Features ............. 7, 8
Power Levels ................ 9
Timed Features .......... 10-13
Care and Cleaning ......... 2,°,
Troubleshooting Tips ....... 24
Things That Are Normal ...... 24
Consumer Support
Consumer Support .... Back Co_er
Product Registration ...... 25, 26
Warranty .................. 27
Write the model and serial
numbers here:
Model #
Serial #
You can find them on a label
inside the oven.
j :sz2ss
3513913700 49-40497 01-06JR
IMPORTANTSAFETYINSTRUCTIONS.
READALLINSTRUCTIONSBEFOREUSING.
^.. WARNING- Foryoursafety,theinformationinthismanualmustbefollowedtominimizetherisk
of fire or explosion, electric shock, or to prevent property damage, personal injury, or loss of life.
PRECAUTIONSTOAVOIDPOSSIBLEEXPOSURE
TOEXCESSIVEMICROWAVEENERGY
(a) Do NotAttempt to operate this oven with the door
open since alien<leer operation can result in ham/fill
eN)osui'e m nlicrowave energy', It is iinl)ortant not to
deteat or tamper with the satiety interlocks.
(h) DoNotPlace any object between the oven fl'ont ti_ce
and the door or allow soil or cleaner residue to
accunlulate on sealing suiqfilces.
(c) Do Not Operate the oven if it is dan/aged. It is
i)articularly in/i)ortant that the oven door close
i)roi)erly and that there is no dan/age to the:
(l) door (bent),
(2) hinges and latches (broken or h)osened),
(3) door seals and sealing sui_fi_ces.
(d) The Oven Should Not be a(!iusted or rei)aired by
anyone except l)rol)erly qualified service l)ei_onnel.
IMPORTANTSAFETYINSTRUCTIONS.
When using electrical appfiances basic safety precautions should be followed, including the following.
Use this appfiance only for its intended purpose as described in this Owner's Manual.
• Read and h)lh)w the specific l)re(atltions in the • Do not store this apl)liance ot/tdoois. Do not t/se this
Precautions toAvoid Possible Exposure to Excessive
Microwave Energy section above.
• This al)pliance inust be grotlnded. (:onnect only
to a i)roi)erly grounded outlet. See the Grounding
Instructions section on page 4.
• hlstall or h)cate this api)liance only in accordance
with the provided installation instructions.
• This ()veil n/ust be h)cated at least 3 ft. above floor level.
• Be cert;fin to place the fl'ont surtilce of the door
3" or nlore back fl'onl the counterto l) edge to avoid
accidental ill)ping of the al)pliance in nornlal usage.
• Do not n/aunt this ai)pliance over a sink.
• Do not I//Otlnt the i//ici'ol_;ive ()veil over or near }lliV
poilion of a heating or cooking al)pliance.
• Do not store anything directly oil top of the nlicrowave
oven surti_ce when the n/icrowave oven is in oi)eration.
• Do not operate this ai)pliance if it has a damaged
power cord or phIg, if it is not working l)rol)erly or
if it has been danlaged or drol)ped. If the power caM
is damaged, it n/list be replaced by General Electric
SeIMce or an authorized seiMce agent using a power
cord a\_filable fl'onl General Electric.
• Do not cover or block any oi)enings on the apl)liance.
• Lrse this al)pliance only fin" its intended use as described
in this Ill_lIltl_ll. Do not rise coFi'osive cheI/licals or wlpoi's
in this ai)pliance. This nlicrowave oven is specifically
designed to heat, dry or cook flied, and is not inmnded
fi)r lal)oratorv or industrial rise.
• This n/icrowave oven is not apl)roved or tested tor
I/l}lIJne rise.
i)roduct near watei_t0r exainl)le, in a wet basenlent,
near a swinnning pool, near a sink or in sinlilar locations.
• Kee I) power cord away fl'oin heated suFlilces.
• Do not iininei_e power coId or plug in wateI:
• Do not let power cord hang over edge at table or
Co/In[elL
• To reduce the risk of fire in the oven cavity:
-- Do not overcook fi)od. (:areflillv attend ai)pliance when
papei; plastic or other combustible n/aterials are placed
inside the oven while cooking.
-- Ren/ove wire twist-ties and metal handles fl'oin paper or
plastic containei_ bet)re placing then/in the oven.
-- Do not rise the oven fl)r storage pui])oses. Do not leave
paper products, cooking utensils or ti)od in the ()veil
when not in use.
-- If n/aterials inside the oven ignite, kee I) the oven door
ch)sed, turn the oven off and disconnect the power
cord, or shut off power at the flIse or circuit breaker
panel. If the door is opened, the fire nlay spread.
• See door surfi_ce cleaning instructions in the
Careand cleaning of the microwave oven section
of this nlanual.
• This al)pliance illtlst only be seiMced by qualified service
i)eisonnel. Contact nearest authorized seiMce ti_cilitv fin,
examination, repair or a(!iusnnent.
• _&swith any ai)pliance, ch)se supeiMsion is necessary
when used bv children.
SAVETHESEINSTRUCTIONS
2
WARNING!
g_com
ARCING
If you see arcing, press CLEAR/OFFand correct the problem.
Arcing is tile inicrowa;'e tetin fl)r sparks in tile ()veil.
Arcing is caused by:
• Metal or fifil touching the side of the oven.
• Foil not molded to fi)od (upturned edges act
like antennas).
• Metal, such as twist-ties, poultty pins or gold-
rimmed dishes, in the microwave.
• Recycled paper towels containing small metal
pieces being used in the microwave.
FOODS
• \._]/en microwaving, place all foods and
containet_ on the glass microwave turntable.
• SUPERHEATEDWATER
Liquids,such aswater,coffee or teaare able to
be overheatedbeyondtheboilingpoint without
appearingto beboiling. Visiblebubblingor boiling
whenthecontainer isremovedfrom themicrowave
ovenis notalwayspresent.THISCOULDRESULT
IN VERYHOTLIQUIDSSUDDENLYBOILING0 VER
WHENTHECONTAINERISDISTURBEDORA
SPOONOROTHERUTENSILIS INSERTEDINTO
THELIQUID.
To reduce the risk ot iqi mT to persons:
-- Do not overheat the liquid.
-- Stir tile liquid both beflwe and halfway through
heating it.
-- Do not use straight-sided ('ontainet_ with
tl_l ITOW tlec]<s.
--J-_dter heating, allow tile container to stand in
tile microwave oven for a short time heft)re
removing tile container:
--Use extreme care when inserting a spoon or
other utensil into the container:
Do not pop popcorn in your microwave oven
unless in a special microwave I)opcorn accessory
or unless w)u use popcorn labeled fin" use in
microwave ()veils.
• Some products such as whole eggs and sealed
containet_fi)r example, closedjat_--are able
to eN)lode and should not be heated in this
tllict'owave ovetl. Sttch ttse of tile tllict'owave
oveIl could t'esttlt iIl iIljttt')'.
• Do not boil eggs in a microwave oven. Pressure
will build up inside egg yolk and will cause it
to butut, possibly resulting in iqjmT:
Operating tile microwave with no fi)od inside fin,
tl/ot'e than a tllitlHte oF tWO tllay cause damage to
the oven and could start a fire. It increases the
heat around tile magnetron and can shorten tile
life of the oven.
• Foods with unbroken outer "skin" such as
potatoes, hot dogs, sausages, tomatoes, apples,
chicken livet_ and other giblets, and egg p)lks
should be pierced to allow steam to escape
dtuing cooking.
• Avoid heating baby f0od in glass jms, even
with the lid off. Make sure all infimt t0od is
thoroughly cooked. Stir food to distfibum tile
heat evenly: Be carefltl to prevent scalding when
winching flnmula. Tile container may libel cooler
than tile titan ula really is. _wavs test tile titan ula
beflwe feeding tile baby:
• Don't defl'ost fl'ozen beverages in narrot_necked
bottles (espedally carbonated beverages). Even if
the container is opened, i)ressure can build up.
This can cause the container to btust, possibly
resulting in iqjmy:
• Hot foods and steam can cause burns. Be ('arefltl
when opening any containet_ of hot food,
including popcorn bags, cooking i)ouches and
boxes. To prevent possible iqjury, direct steam
away fi'om hands and face.
• Do not overcook potatoes. Thev could dehydrate
and catch fire, causing damage to your oven,
• Cook ineat and poultty thoroughl)_meat to at
least an INTERNAl, temperature of 160°F and
poultt T to at least an INTERNAl, temperature
of 180°E Cooking to these temperatures usually
protects against fi)odborne illness.
IMPORTANTSAFETYINSTRUCTIONS.
READALLINSTRUCTIONSBEFOREUSING.
WARNING!
MICROWAVE-SAFECOOKWARE
Make sure to use suitable cookware during
iilicro_zlve cooking. Most glass casseroles, cooking
dishes, measuring cups, custard cups, potmry or
china dinnerware which does not have metallic trim
or glaze with a metallic sheen can be used. Some
cookware is labeled "suitable tot microwaving."
• Place food or microwavable container directly
on tile glass turntable to cook w)m" food.
• Use of tile black metal tray during microwave
cooking will result in inferior cooking
perlimnance.
• If you are not sure it a dish is microwave-sate,
use this test: Place in the oven both the dish you
are testing and a glass measuring cup filled with
1 cup of water--set tile measuring cup either in
or next to the dish. Microwave 30-45 seconds
at high. If the dish heats, it should not be used
for microwaving.
If the dish remains cool and only the water in
the cup heats, then the dish is microwave-sate.
• Ifw)u use a meat them_omemr while cooking,
IIlake S/lI'e it is sate tor rise in ii/ici'owave ovens.
• Paper towels, waxed paper and plastic wrap
can be used to cover dishes in order to retain
moisture and prevent spattering. Be sure to
vent plastic wrap so steam can escape.
• Cookware may become hot because of heat
transferred fl'om tile heamd food. Pot holde_
may be needed m handle tile cookware.
"Boilable" cooking pouches and tightly closed
plastic bags should be slit, pierced or vented as
directed by package. If they are not, plastic could
bm_t dm_ing or immediately after cooking,
possibly resulting in injui T. A]so, plastic storage
containet_ should be at least partially uncovered
because they fblm a fight seal. _4]/en cooking
with containe_ tightly covered with plastic wrap,
remove covering careflflly and direct steam away
fi'om hands and e_ce.
Use toil only as directed in this guide. TV dinnet_
may be microwaved in tbil trays less than 3/4"
high; remove tile top foil cover and return tile
troy to tile box. \4lien using foil in tile microwave
oven, kee I) tile foil at least 1" away from tile sides
of tile oven.
• Do not use recycled paper products. Recycled
paper towels, napkins and waxed paper can
contain metal flecEs which may cause ardng
or ignim. Paper products containing nylon
or IMon filaments should be avoided, as they
may also ignim.
• Some st),rof0am trays (like those that meat
is packaged on) have a thin strip of metal
embedded in tile bottom. \._]/en microwaved,
tile metal can burn tile floor of tile oven or
ignite a paper towel.
• Do not use tile microwave to (hT newspape_.
• Not all plastic wrap is suitable tot use in
micrm_z_ve ovens. Check the package tot
proper use.
• Plastic cookware>--Plasfic cookware designed tot
microwave cooking is ve_y uselifl, but should be
used carefully Even microwave-safe plastic may
not be as tolerant of overcooking conditions as
are glass or ceramic inateiJals, and may st)lien oi"
char if subjected to short periods of overcooking.
In longer exposures to overcooking, the t0od
and cookware could ignim.
Follow those guidelines."
_/Jse microwave-sate plastics only and use
them in strict compliance with the cookware
IIla n tilil Ct t ii'ei"s I'e COIIlII/e n da finns.
] Do not Illicl'owa_,e ell/l)g ,' containei3.
_'] Do not peru/it children to use plastic
cookware without complete superxision.
4
ge.com
BROWNINGANDGRILLINGSAFETY
• Use the black metal tray when browning or • Use of the browner rack:
grilling. Use the tray in the same way you would
use a shallow baking pan or baking tray, Place
]'O0(l_ oven-sate cookware or the bi'owner rack
directk on the black metal tray when cooking.
Use of the glass tm'ntable when browning
or grilling will result in inferior cooking
peis{Oi_/ll ance.
Do not cover the black metal tray with metal toil.
This will cause arcing in the oven.
Any non-metal, oven-sate dish can be used when
browning or grilling in the o'_en. •
The oven and door will get hot when browning
or grilling,
Cookware will become hot when browning or
grilling. Pot holders or oven Initts will be needed
to handle the cookware.
• D,,not use paper towels or coveiJngs_ containei_
or cooking/roasting bags inade (>f foil or other
reflective material, plastic, wax or paper when
browning or grilling.
• D,, not place food directly against the top or
bottom heating elements.
-- Place the dish directly on the rack.
-- Remove the rack fl'om the oven when not in use.
-- Use pot holdet_ or oven mitts when handling
the rack. It may be hot.
-- Be sm'e that the rack is positioned i)roperly
inside the oven to prevent product damage.
-- Do not cover the rack or any part of the oven
with metal tbil. This will cause overheating of
the oven.
During and after use, do not much, or let
clothing, pot holde_ or other flammable
materials contact the top heating element or
guard. These sure_ces may be hot enough
to burn even though they are dark in colo_:
/_dlow suflident tiine fi>r cooling fi_t,
Remove cookware completely fl'om the oven
befi we turning tb(>d.
Make sm'e tbod is cooked all the way through
before browning.
GROUNDINGINSTRUCTIONS
WARNING:I ro eruseof the grounding plug can result in a risk of electric shock.
This appliance inust be grotmded. In the event of
an electrical short circuit, grotmding reduces the
risk of electric shock by providing an escape wire
forthe electric current.
This appliance is equipped with a power cord
having a grotmding wire with a grotmding plug.
The plug must be plugged into an outlet that is
i)roperly installed and grotmded.
Consult a qualified electrician or se_Mce technician
if the grotmding instructions are not completely
tmdetstood, or if doubt exists as to whether the
appliance is properly grotmded.
If the outlet is a standard 2-prong wall outlet,
it is yore" personal responsibili_, and obligation
to have it replaced with a propedy grotmded
3-prong wall outlet.
Do not under _liiV cii'c/li//st_lnces cut oi" i'elllOVe
the third (grotmd) prong fl'om the power cord.
We do not recommend using an extension cord
with this appliance. If the power cord is too short,
have a qualified electrician or service technidan
install an outlet near the appliance.
(See EXTENSION CORDS section.)
For best operation, plug this appliance into its
own electrical outlet to prevent flickering (ff lights,
blowing of fllse or tripping of circuit breaker.
IMPORTANTSAFETYINSTRUCTIONS.
READALLINSTRUCTIONSBEFOREUSING.
,i__ADAPTERPLUGS
Usage situations where appliance's power cord will be disconnected infrequently.
Because of potential sali_t}' ha/m'ds under certain conditions,
we stronglyrecommend against the use ofan adapter plug. Howevex;
if you still elect to use an adapter, where local codes permit, a
TEMPORARY CONNECTIONmay be inade to a propedy grounded
2-prong wall receptacle by the tlse of a UI, listed adapter which
is a\;filable at most local hardware stores.
The larger slot in the adapter must be aligned with the larger slot
in the wall receptacle to pro_ide proper polari b in the connection
of the power cord.
{Adapter plugs not
permittedinCanada)
Alignlarge I I i' I
__pron_,ots] I
/fT" Ensureproperground
TEMPORARY andfirmconnection
METHOD beforeuse.
^_CAUTION:A_achingtheadaptergroundterminaltothewallreceptaclecoverscrewdoesnotground
the appliance unless the cover screw is metal, and not insulated, and the wall receptacle is grounded through the
house wiring.
You should have the drcuit checked by a qualified electrician to make sure the receptacle is properly
grounded.
When disconnecting the power cord ti'om the adaptor; alwa):s hold the adapter with one hand. If this
is not done, the adapter ground terminal is ve_, ' likely to break with repeated use. Should this hal_pen,
DO NOT USEthe appliance until a proper ground has again been established.
Usage situations where appliance's power cord will be disconnected frequently.
Do not usean adapter plug in these situations because ti'equent disconnection of the power cord places
m_due strain on the adapter and leads to eventual fifilm'e of the adapter ground temfinal. You should have
the 2-prong wall receptacle replaced with a 3-prong (grounding) receptacle by a qualified electrician
befin'e using the appliance.
EXTENSIONCORDS
A short power SUl)ply cord is provided to reduce the _isks resulting ti'om becoming ent;mgled in or t_ipping
over a longer cord.
Extension cords may be used if you are carelifl in using them.
If an extension cord is used--
Ir_The marked electrical rating of the e×tension cord shotfld be at least asgreat asthe electrical radng
of the appliance;
_'_ The extension cord must be a grotmding-t)]_e 3-wire cord and it must be _luo-o-ed into a 3-slot outlet;
_The extension cord should be arranged so that it will not drape o_er the countertop or tabletop where
it can be pulled on by children or tripped o_er tmintentionallv.
]f you use an extension cord, the interior light may flicker and the bh_wer sound nlav wli_,' when the
microwave oven is on. Cooking times may be longe_; too.
READANDFOLLOWTHISSAFETYINFORMATIONCAREFULLY.
SAVETHESEINSTRUCTIONS
Aboutthe featuresofyouroven. gecom
Throughout this manual, features and appearance may vary from your model.
1000Watts
Featuresof theOven
Door Latches 0
Window with Metal Shield
Screen allows cooking to be "dewed while
kee )in,* microwa'_es confined in the oxen.
ControlPanel and Selector Dial @
Fix_t turn, then press the dial to make
selections,
@
_l_en entering cooking time using the dial,
tim e will add or subtract in 15-second
increments up to 6 nlinutes. For cooking times
of C_I 5 minutes, time will add or subtract in
30-second increments. When entering cooking
times of 15-30 minutes, time will add or
subtract in 1-minutes increments. For times
over 30 nlinutes, time will add or subtract in
5-minutes increments.
Glass Turntable
Center the tray on the tm'ntable support when
using the microwaxe teatm'es. Place food or
microwaxe-safe cookware directly on the glass
tm'ntable.
Black Metal Tray
Put food or appropriate cookware direcdy on
the black metal tray and place on the tm'ntable
support when usino,t-.,browning, or ,grilling,
features.
RemovableTurntableSupport
The turntable support must be in place when
using the oven.
NOTE:RatkTgplateIslocatedonthefrontofthe
microwave,behl)_dthedoor Ovenvent(s)andovenh)ht
are/ocatedontheinsidewaftsofthemicrowaveoven.
Heating Elements
A]lows VOtl to cook fi'ozen con'_enien('e _()ods,
brown alread_ cooked foods quickly on top,
or grill too(ls on the top and bottom.
Browner Rack
Center the rack on the black metal trax when
usin,* the browning or grilling features only:
7
Aboutthe featuresofyouroven.
You can microwave by time, or with the convenience features, or cook using the browning and grilling features.
GRILL
0
BROWN
0
MICRO
0
DEFROST REHEAT
CDCD
POWER POPCORN
CDCD
EXPRESS BEVERAGE
OCD
-- Selector DiaI--Tum to make
selectimTs andpress to ente_
CookingControls
Press Enter Option
MICRO Amountofcookingtime more/lesstime
DEFROST
Turndialto AUTO Foodweight
Turndialto TIME Amountofdefrostingtime
POWER Powerlevel1-10
EXPRESS Startsimmediately!
BROWN Foodtype,servingsize more/lesstime
REHEAT Foodtype,servingsize
GRILL Foodtype,servingsize more/lesstime
POPCORN 3.5oz.or3 oz.
BEVERAGE 4,8,or12oz.
8
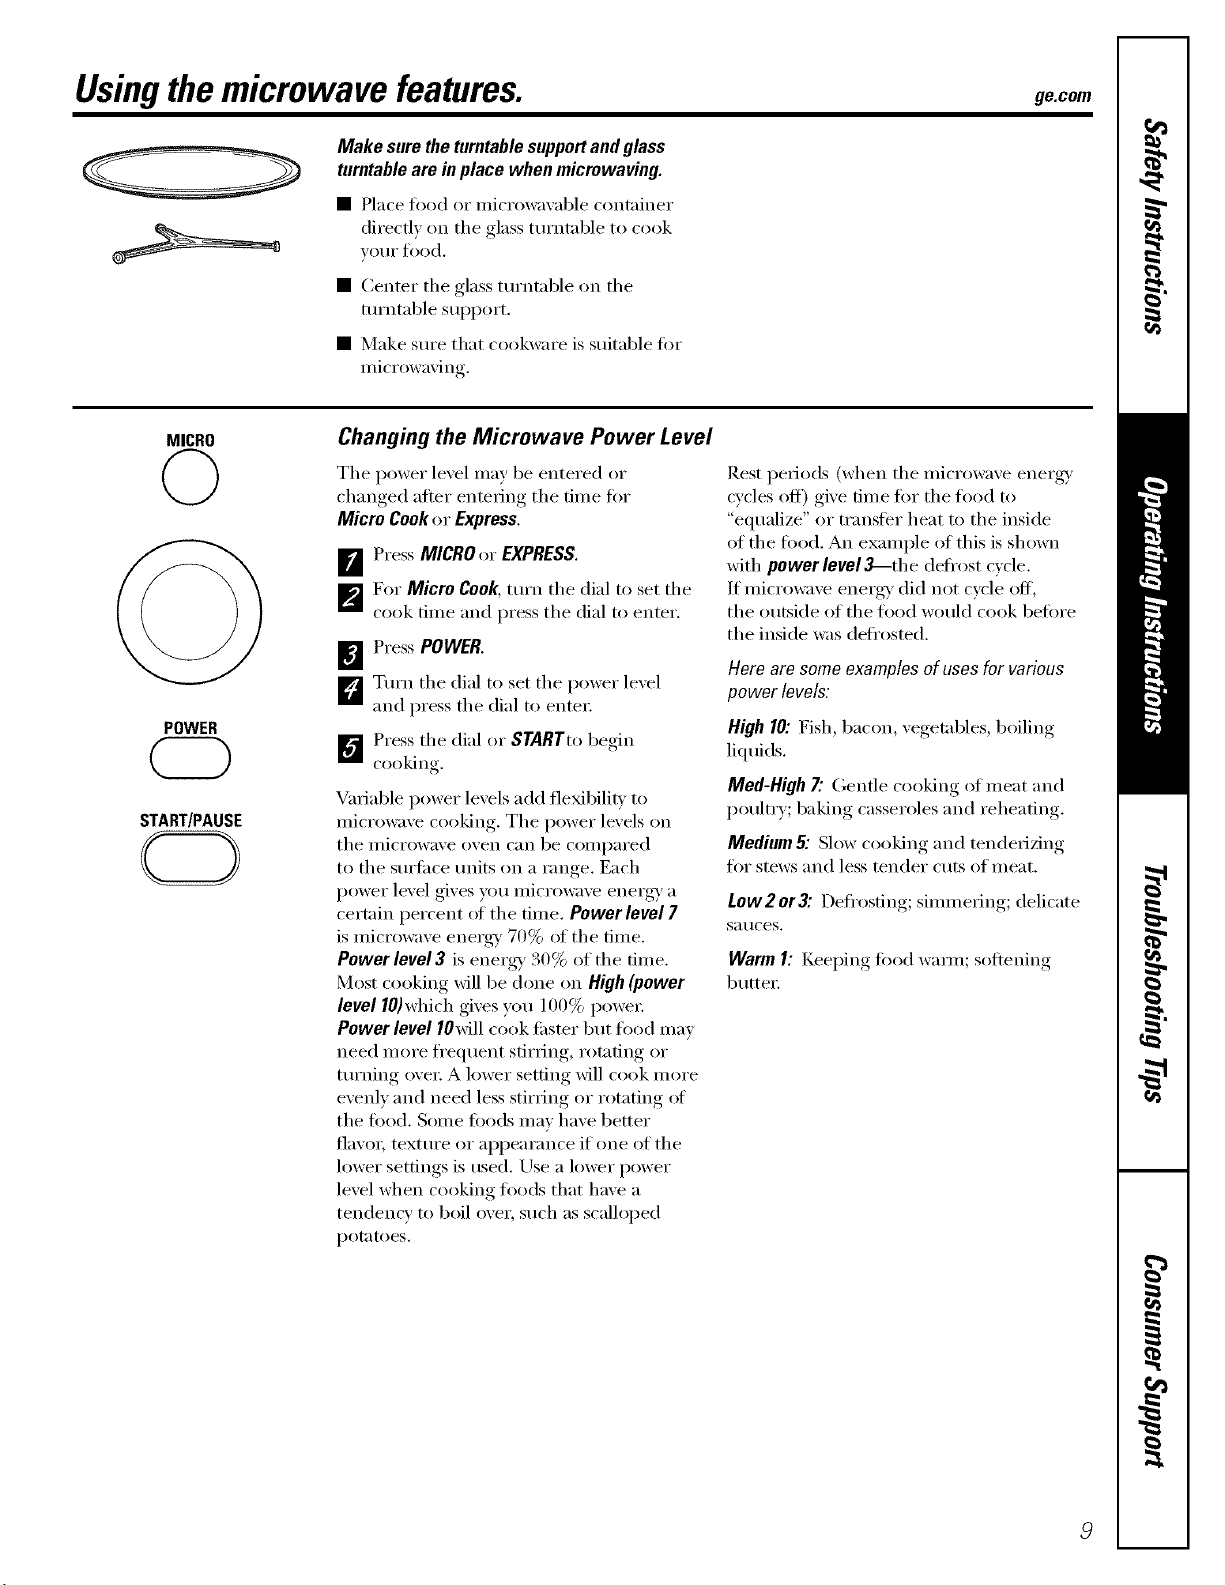
Usingthemicrowave features, ge.com
Make sure the turntable support and glass
turntable are in place when micrewaving.
• Place food or microwavable container
directly on the glass turntable to cook
VO/II" fl)od,
• Center the glass turntable on the
turntable support.
• Make sure that cookware is suitable fin.
microwaving.
MICRO
©
POWER
START/PAUSE
CD
Changing the Microwave Power Level
The power level may be entered or
changed after entering the time fi)r
Micro Cookor Express,
[]Press MICROor EXPRESS,
p_For Micro Cook, mrn the dial to set the
cook time and press the dial to enter.
[] Press POWER.
L_Turn the dial to set the power level
and press the dial to entex;
_"_ Press the dial or STARTto begin
cooking
Variable power levels add flexibility to
microwave cooking. The power levels on
tile ii/icrowave oven can be COlili)ai'ed
to the sm'ti_ce milts on a range. Each
power level gives you microwave energy' a
certain percent ot the time. Power level 7
is microwave energy 70% of the time,
Power level 3 is energy' 30% of the time,
Most cooking will be done on High(power
level 10)which gives you 100% powex:
Power level IOMll cook tipster but food may
need more fl'equent stirring, _xm_fing or
turning ove_; A lower setting will cook more
evenly and need less stirring or rotating ot
the food. Some foods may have better
fla\'o_; textm'e or appearance if one of tile
lower settings is used, Use a lower power
level when cooking toods that have a
tendency to boil over, such as scalloped
potatoes.
[lest periods (when tile microwave energy'
cycles off) give time fin" the toed to
"equalize" or transter heat to the inside
of the food. An example of this is shown
with power level_-the deti'ost cycle.
If microwave energy' did not cycle off,
the outside of the toed would cook befin'e
the inside was deti'osted.
Hero am some examples of uses for various
power levels:
High 10: Fish, bacon, vegetables, boiling
liquids.
Med-High7"Gentle cooking of meat and
poultry; baking casseroles and reheating.
Medium & Slow cooking and tenderizing
fin" stews and less tender cuts of ineat.
Low 2 or3".Defl'osfing; simm ering; delicate
Satlces.
Warm I: Keel)ing, fi)od waxm; softening
butte_:
Aboutthe timedmicrowave features.
MICRO
©
POWER
START/PAUSE
Micro Cook
_d]ows you to illiCi'Owave tOi" aIIV [iI/le
up to 99 minutes.
Highpower level (10) is autolnatically set, but
you may change it tor inore flexibility:
Make sure the turntable supportand glass
turntable are in place when microwaving.
[]Press MICRO.
_'_ Turn tile dial to set tile cook time
and press tile dial to enteI;
[]Change tile power lexel ifxou don't
want fl/ll powei: (Press POWER;turn tile
dial to set the power lexel and press the
dial to entex:)
D Press the dial or STARTt,,begin
cooking.
Ym may open tile door during Micro Cook
to check tile food. Close tile door and press
STARTto resume cooking.
Turn tile dial to add or sul)tract 5 seconds
ot cooking time during cotmtdown.
EXPRESS
Express
Thisis a quick way toset cooking timefor
30secondsat PowerLevel 10.
Make sure the turntable supportand glass
turntable are in place when microwaving.
Tile oven will start ilmnediatelv: It will add
30 seconds to tile time cotmting down each
time tile button is pressed.
Tile pox_er level can be changed as time is
counting down. Press POWER and turn tile
dial to select 1-10. Press the dial to enteI:
DEFROST
MICRO
©
POWER
Sequence Programming
The oven allows you to automatically begin
microwave cooking after defrosting.
Make sure the turntable supportand glass
turntable are in place when microwaving.
_r_ Pi-ess DEFROST
_Turn tile dial to select either Auto
Defl'ost or Tilne Defl'ost and press
tile dial to enter;
[]Tm'n tile dial to enter tile fi)od weight
or defl'osfing tilne and press tile dial
to entei;
D Press MICRO.
_'_ Ttu'n tile dial to select tile cook dine
and press tile dial to entei:
_ Change tile power lexel if you don't
want flfll I)owe_: (Press POWERLEVEL;
turn the dial to set the power lexel and
press the dial to enteI:)
I Press the dial or STARTto begin
defrosting. _Mter defl'osting, Micro
Cook will autolnaticallx COllnt down.
START/PAUSE
10
ge.com
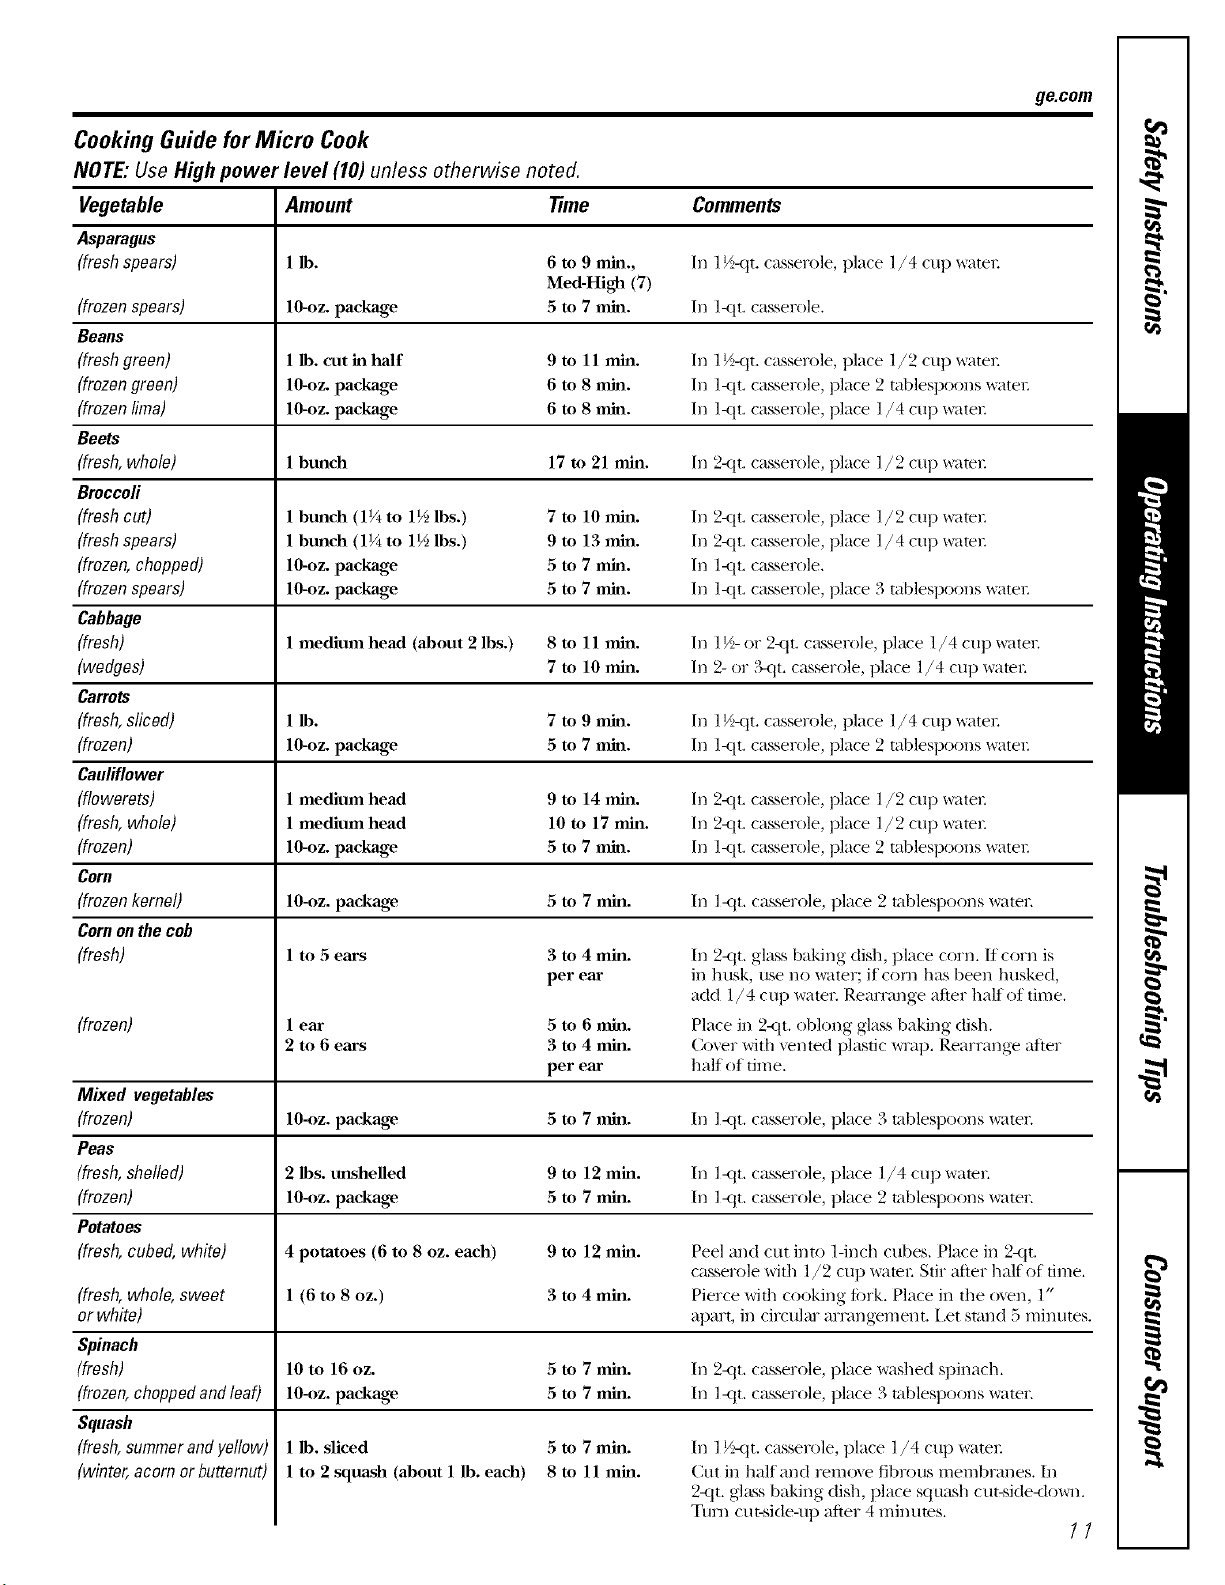
Cooking Guide for Micro Cook
NOTE: Use High power level (10) unless otherwise noted.
Vegetable Amount time Comments
Asparagus
(fresh spears) 1 lb. 6 to 9 rain., In 1½-<tt. casserole, place l/4 cup _ltel:
Med-High (7)
(frozen spears) lO-oz, package 5 to 7 nfin. In l<tt. casserole.
Beans
(freshgreen) 1 lb. cut in half 9 to 11 rain. In 1½-<tt. casserole, place l /2 cup _tel:
(frozengreen) 10-oz. package 6 to 8 rain. In l<tt. casserole, place 2 tablespoons _ater.
(frozen lima) 10-oz. package 6 to 8 rain. In l<tt. casserole, place l/4 cup _ater.
Beets
(fresh, whole) 1 bunch 17 to 21 rain. In 2-<it. casserole, place 1/2 cup _ltel:
Broccoli
(fresh cut) 1 bmlch (1¼ to 1½ lbs.) 7 to 10 nfin. In 2-<it. casserole, place 1/2 cup _ltel:
(freshspears) 1 bmlch (1¼ to 1½ lbs.) 9 to 13 rain. In 2-<it. casserole, place 1/4 cup _ltel:
(frozen, chopped) lO-oz, package 5 to 7 nml. In I-<tL casserole.
(frozenspears) 10-oz. package 5 to 7 rain. In l<tt. casserole, place 3 tablespoons _ater.
Cabbage
(fresh) 1 medium head (about 2 lbs.) 8 to 11 rain. In 1½- or 2<it. casserole, place l/4 cup _ltel:
(wedges) 7 to 10 rain. In 2- or ?_t t. casserole, place l/4 cup _ltel:
Carrots
(fresh,sliced) 1 lb. 7 to 9 rain. In 1½-<tt. casserole, place l/4 cup _ltel:
(frozen) 10-oz. package 5 to 7 nfin. In l<tt. casserole, place 2 tablespoons _atel:
Cauliflower
(flowerets) 1 medium head 9 to 14 rain. In 2-<it. casserole, place l/2 cup _tel:
(fresh,whole) 1 medium head 10 to 17 rain. In 2-<tLcasserole, place l/2 cup x_ltel:
(frozen) 10-oz. package 5 to 7 rain. In l<tt. casserole, place 2 tablespoons _atel:
Corn
(frozen kernel) 10-oz. package 5 to 7 rain. In 1-<tt. casserole, place 2 tablespoons ware1:
Cornon the cob
(fresh) 1 to .5ears
(frozen)
3 to 4 rain.
per ear
(fresh,whole,sweet
or white)
Spinach
(fresh)
(frozen,choppedandleaO
Squash
(fresh,summerandyellow)
(winter,acornor butternut)
lear 5 to 6 rain.
2 to 6 ears 3 to 4 rain.
per ear
In 2-<it. glass baking dish, place corn. II corn is
in husk, use no water; if corn has been husked,
add ]/4 cup ware1: Rearrmlge after half of time.
Place in 2<tt. oblong glass baking dish.
Cover with vented plastic _Tap. Rearrange after
half of time.
Mixed vegetables
(frozen) 10-_)z.package 5 to 7 rain. In l<tt. casserole, place 3 tablespoons water:
Peas
(fresh, shelled) 2 lbs. unshelled 9 to 12 rain. In l-<tt, casserole, place 1/4 cup water:
(frozen) 10-_)z.package 5 to 7 rain. In ]<tt. casserole, place 2 tablespoons water.
Potatoes
(fresh, cubed, white) 4 potatoes (6 to 8 oz. each) 9 to 12 rain. Peel and cut into l-inch cubes. Place in 2-<it.
casserole with l/2 cup _te_: Stir after half of time.
1 (6 to 8 oz.) 3 to 4 rain. Pierce with cooking fi)_k. Place in the oven, l"
apart, in circular arrangement, i,et stand 5 minutes.
10 to 16 oz. 5 to 7 rain. In 2<tt. casserole, place washed spinach.
104)z. package 5 to 7 rain. In l<tt. casserole, place 3 tablespoons water:
1 lb. sliced
1 to 2 squash (about 1 lb. each)
5 to 7 rain.
8to 11 rain.
In l V_tt. casserole, place 1/4 cup water:
Cut ill half and relnoxe fibrous inelnbrtmes. In
2-<it.glass baking dish, place squash cut-side<lo_l.
Ttml cut-side-up after 4 minutes.
11
Aboutthe timedmicrowave features.
DEFROST fimeDefrost
START/PAUSE
Mlows you to defl'ost fi)r a selected length
ot tinle. See tile Defrosting Guide fi)r
suggested tiInes. (Auto Defrost eN)lained
in tile Aboutthe conveniencemicrowave
features section.)
Make sure the turntable support and glass
turntable are in place whenmicmwaving.
D'_ PI'ess DEFROST
_Turn tile dM to TIMEand press tile dial
to entei;
[]Turn tile dial to enter defl'ostin,* tiine
and press the dial to entei;
D Press tile dial or START
D Turn tile flied ()xeI" when tile oxen
signals.
1_ PI'ess the dial or START
_._]/en tile oven signals, ttlI'n I_()od ovei" and
break al)ait or rearrange pieces fi)r nlore
even defl'osting. Shield anv waI]n areas with
snlall pieces of fi)il. The oven will continue
to deli'ost if you don't open tile door and
ttlI'n tile fi)od.
A dull thunlI)ing noise max be heard
during defl'ostin , This is noimal when
(i_ell is not (ii_ei'ating, at High powei:
Defrosting tips
• Foods fi'ozen in [)aper or plastic can be
defl'osted in the Ilackage. Ch)sed packages
shotfld be slit, pierced or vented A_q-ER
fi)od has paItially defl'osted. Hastic stoiage
containers should be ilartially uncovered.
• Fanlil)'-size, i)repackaged frozen dinnei_
can be defl'osted and nlicrowaved. If tile
fi)od is in a fi)il containei; tI'anster it to
a niicrowave-safe dish.
• Foods that spoil easily should not be
alh)wed to sit ()tit tor I/lore than one hotlr
after (leti'()stiilg. ]_ooln tenll)erature
i)rolnotes tile gi'()\_h ot hai]nfli1 bactelia.
• For i/lore even defl'osting of larger fi)ods,
such as roasts, use AutoDefrost.Be sure
laIge nleats are coinpletely defrosted
befi)re cooking.
• When defl'osted, food should be cool
but softened ill all areas. If still slightly
it)', I'ettlI'n t() tile i/iicrowa\'e ()veil vei'v
briefl> or let it stand a ti_w niinutes.
12
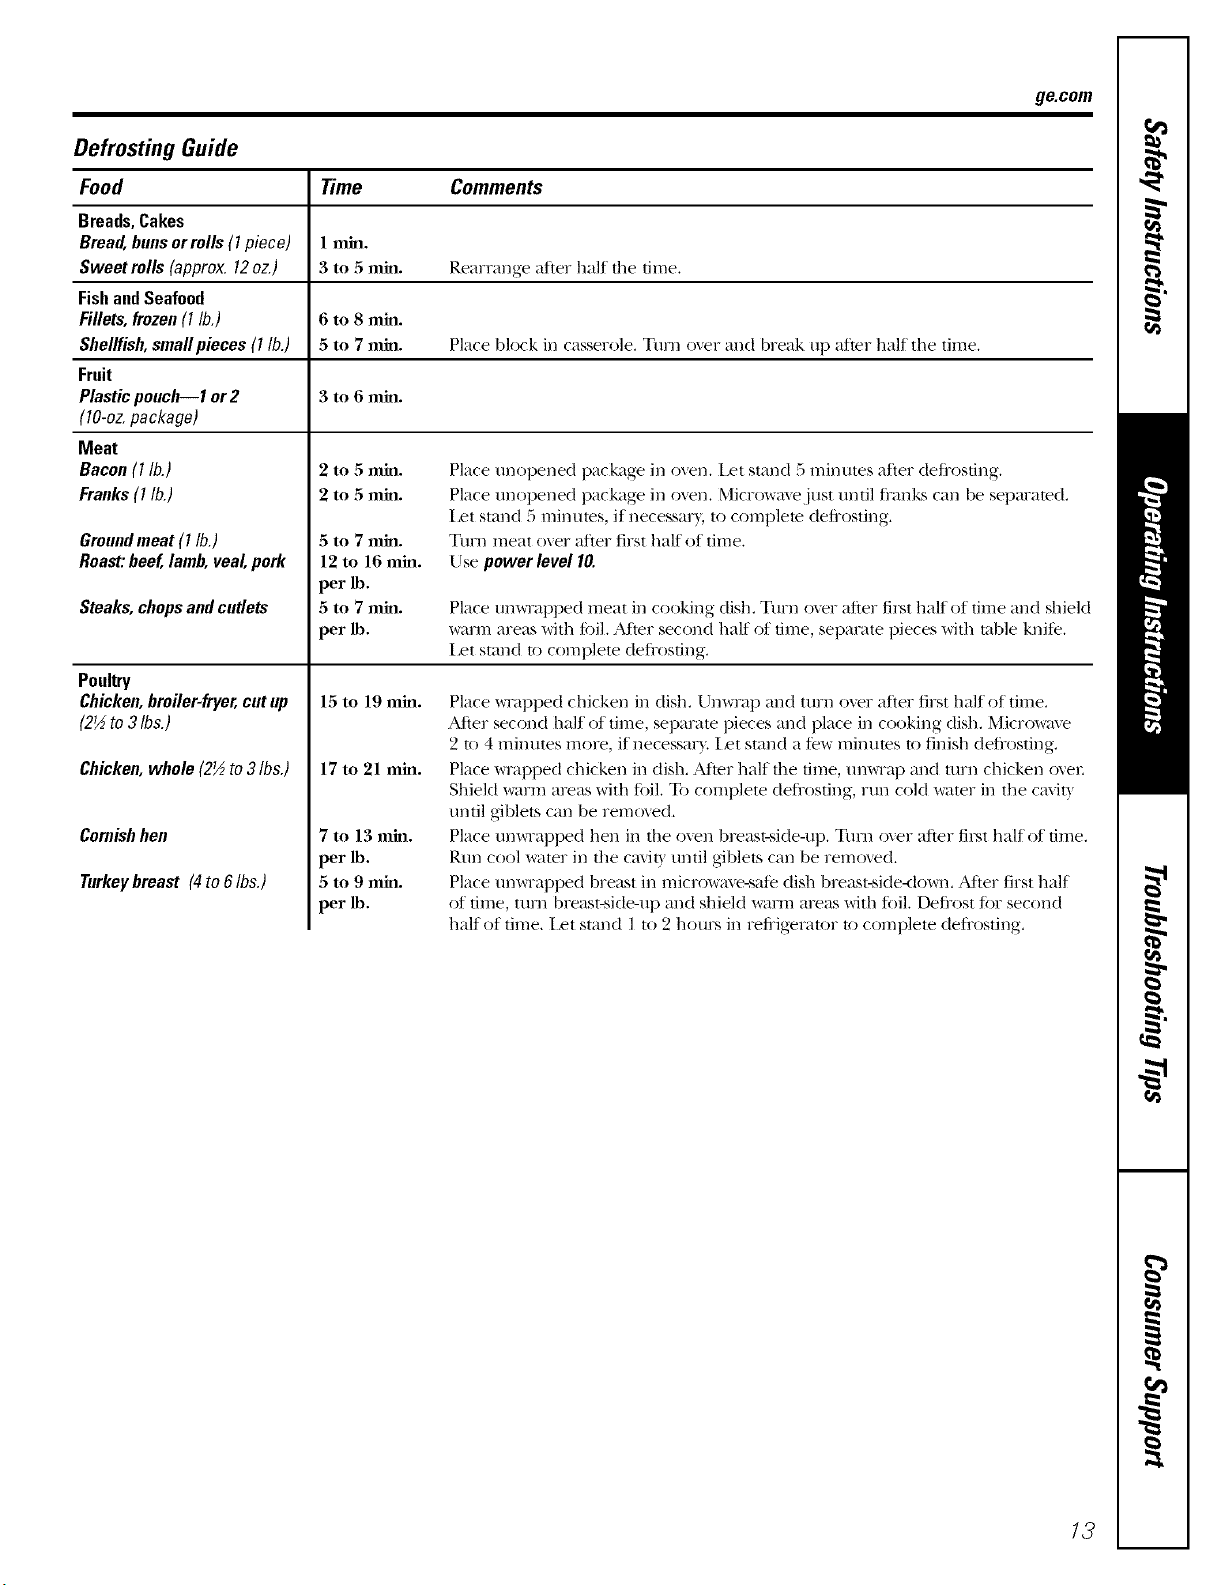
ge.com
Defrosting Guide
Food Time Comments
Breads, Cakes
Bread, bans orrolls (I piece) ! rain.
Sweet rolls (approx. 12oz.) 3 to 5 rain. Rearrange after half the time.
Fish and Seafood
Fillets, frozen (I lb.) 6 to 8 rain.
Shellfish, smallpieces (I lb.) 5 to 7 rain. Place Mock in casserole. Turn o'_er and break up m'ter half the time.
Fruit
Plastic poach--1 or2 3 to 6 rain.
(10-oz. package)
Meat
Bacon(I lb.)
Franks(I lb.)
Groundmeat (I lb.)
Roast:beef, lamb,veal, pork
Steaks, chopsandcutlets
Poultry
Chicken,broiler-fryer,cat up
(2½ to3 Ibs.)
Chicken,whole(2½to3Ibs.)
Cornishhen
Turkeybreast (4to 6Ibs.)
5to7mm.
12tol6mm.
per_.
5to7mm.
per_.
15 to 19 rain.
17 to 21 rain.
7tol3mm.
per_.
5to9mm.
per_.
Place tmopened package ira oven, l_t stand 5 minutes m'ter defi'osdng.
Place tmopened package ira o_en. Microwm%just tmtil fi'anks can be separated.
I set stand 5 rain tires, if necessm3, to complete defi'osting.
Tuna meat over after first half of time.
Use power level I0.
Place Um_Tapped meat ira cooking dish, Turn over after first half of time and shield
warm areas with fi)il. _Mter second half of time, separate pieces with ruble knife,
Iset stand to complete deli'osfing.
Place _Tapped chicken ira dish. Unwrap mad turn over after first half of time.
After second half of time, separate pieces and place ira cooking dish. Microwave
2 to 4 minutes more, if necessar\, iset stand a few minutes to finish deli'osting.
Place _Tapped chicken ira dish. _Mter half the time, unvvTa l) and turn chicken o_el:
Shield warm areas with lifil. 33) complete deli'osting, run cold water ira the ca\it_
tmtil giblets can be removed.
Place um_Tapped hen ira the ()\era breast-side-up. Tm'n o_er after first half of time.
Rtm cool water ira the ca\it) tmtil giblets can be removed.
Place um_Tapped breast ira microwm'e-sale dish breast-side<lo_m. Alter first half
of time, mrn breast-side-up and shield warm areas with li)il. Deli'ost Ii)r second
half of time. ilet stand I to 2 hours ira refi'igerator to complete deJi'osting.
13
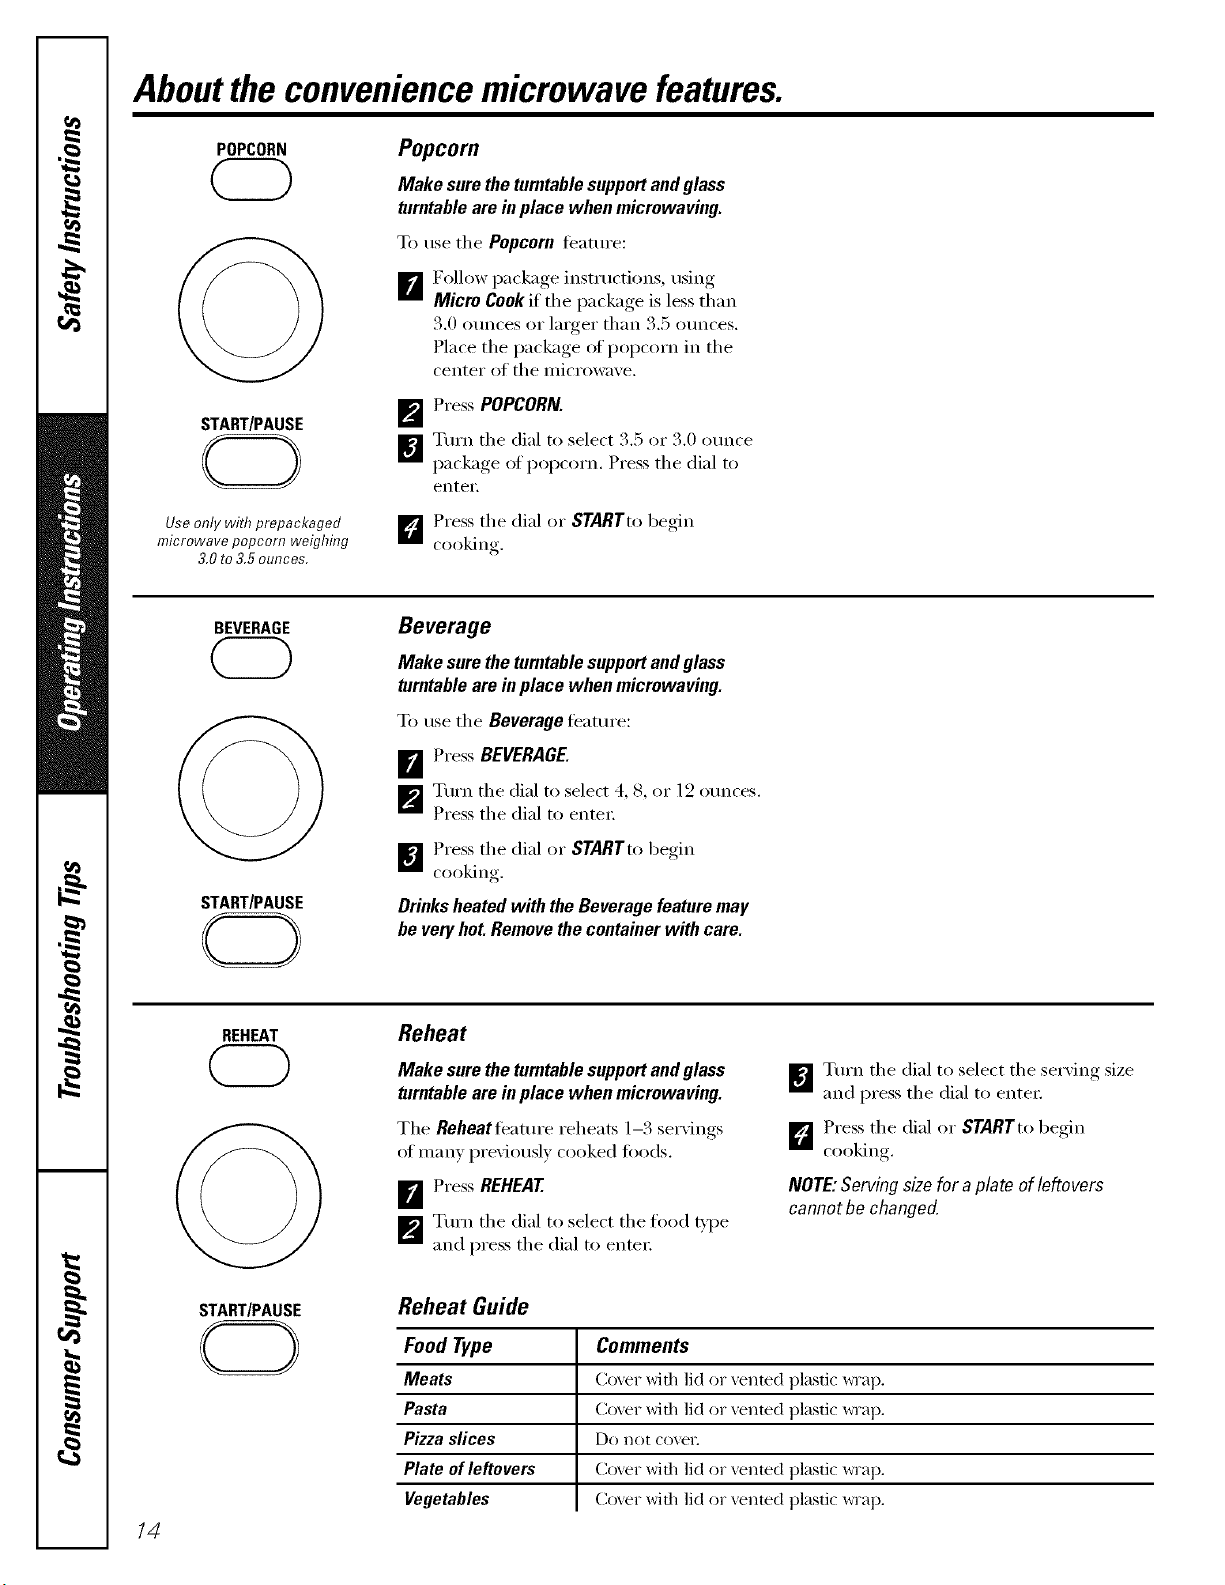
Aboutthe conveniencemicrowave features.
POPCORN
START/PAUSE
CD
Use only with prepackaged
microwave popcorn weighing
3,0to 3,5ounces,
Popcorn
Make sure the turntable supportand glass
turntable are in place when microwaving.
To use the Popcorn teature:
[]Follow i)ackage instructions, using
Micro Cook if the package is less than
3.0 ounces or linger than 3.5 ounces.
Place the package of popcorn in the
center of the microwave.
_p_ Press POPCORN.
[]Turn the dial to select 3.5 ox 3.0 ounce
package of popcorn. Press the dial to
eilter.
D Press the dial or STARTtobegin
cooking
BEVERAGE
@
START/PAUSE
CD
Beverage
Make sure the turntable supportand glass
turntable are in place when microwaving.
To use the Beverage teatm'e:
D'_ Press BEVERAGE.
_'J Turn the dial to select 4, 8, or 12 ounces.
Press the dial to enter:
B Press the dial or STARTto begin
cooking
Drinks heated with the Beverage feature may
be very hot. Remove the container with care.
14
REHEAT
@
START/PAUSE
CD
Reheat
Make sure the turntable supportand glass
turntable are in place when microwaving.
The Reheatleature reheats 1-3 servings
ot many previously cooked t0ods.
_r_ Press REHEAT.
_p_ Turn the dial to select the food _'pe
and press the dial to entei:
_',',J Tt:m_ the dial to select the serxing size
and press the dial to entex:
D Press the dial or STARTto begin
CookiIlg.
NOTE:Serving size for a plate of leftovers
cannot he changed.
Reheat Guide
Food Type
Meats
Pasta
Pizza slices
Plate of leftovers
Vegetables
Comments
Co_er with lid or _ented plastic _Tap.
Co_er with lid or vented plastic _Tap.
Do not cove1:
Co_er with lid or vented plastic _Tap.
Coxer with lid or vented plastic _viap.
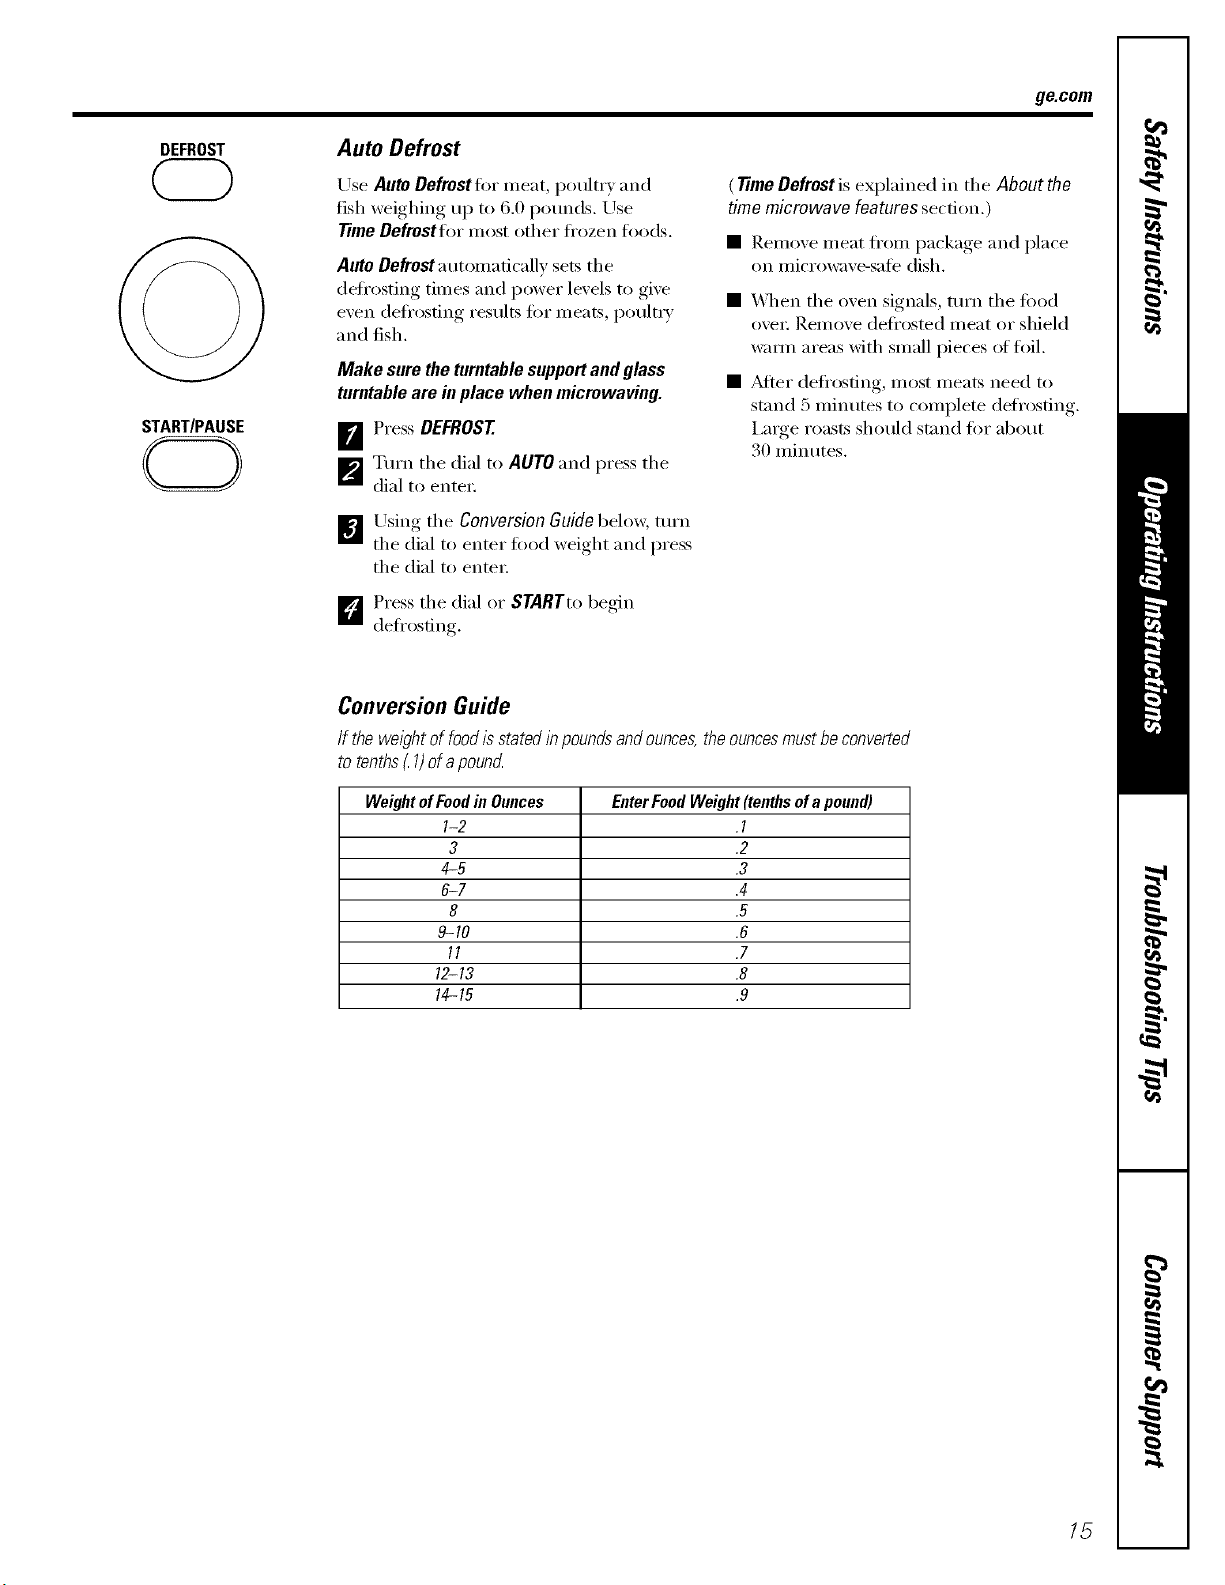
DEFROST
START/PAUSE
CD
ge.com
Auto Defrost
Use AUtO Defrestflw meat, poultr)and
fish weighing up to 6.0 pomMs. Use
Time Defrostfor most other fl'ozen foods.
Auto Defrosta utonmficallv sets the
defl'osting times and power levels to give
even defl'osting results tot meats, poult_ 3'
and fish.
Make sure the turntable support and glass
turntable are in place when micrewaving.
ir_ Press DEFROST
_'_ Turn the dial to AUTO and press the
dial to enter:
_"Jl Using the Conversion Guide below, tm'n
the dial to enter food weight and press
the dial to enter:
(TimeDefrostis explained in the About the
timemicrowave featuressection.)
• Remove meat from I)ackage, and place
on microwaxe-sate dish.
• _]_en the oven signals, mrn the food
ove_: Remove defrosted meat or shield
warn/areas with small pieces of foil.
• _Mter defl'osting, most meats need to
stand 5 minutes to complete defl'osting.
I,a_ge roasts should stand for about
30 minutes.
D Press the dial or STARTto begin
defl'osfing.
Conversion Guide
If the wel)ht of foodisstated I)_poundsandounces,the ouncesmustbe converted
to tenths_1)of apound
WeightofFoodin Ounces EnterFoodWeight(tenthsofapound)
I-2 .I
3 .2
4-5 .3
6-7 .4
8 .5
9-10 .6
11 .7
12-13 .8
14-15 .9
15
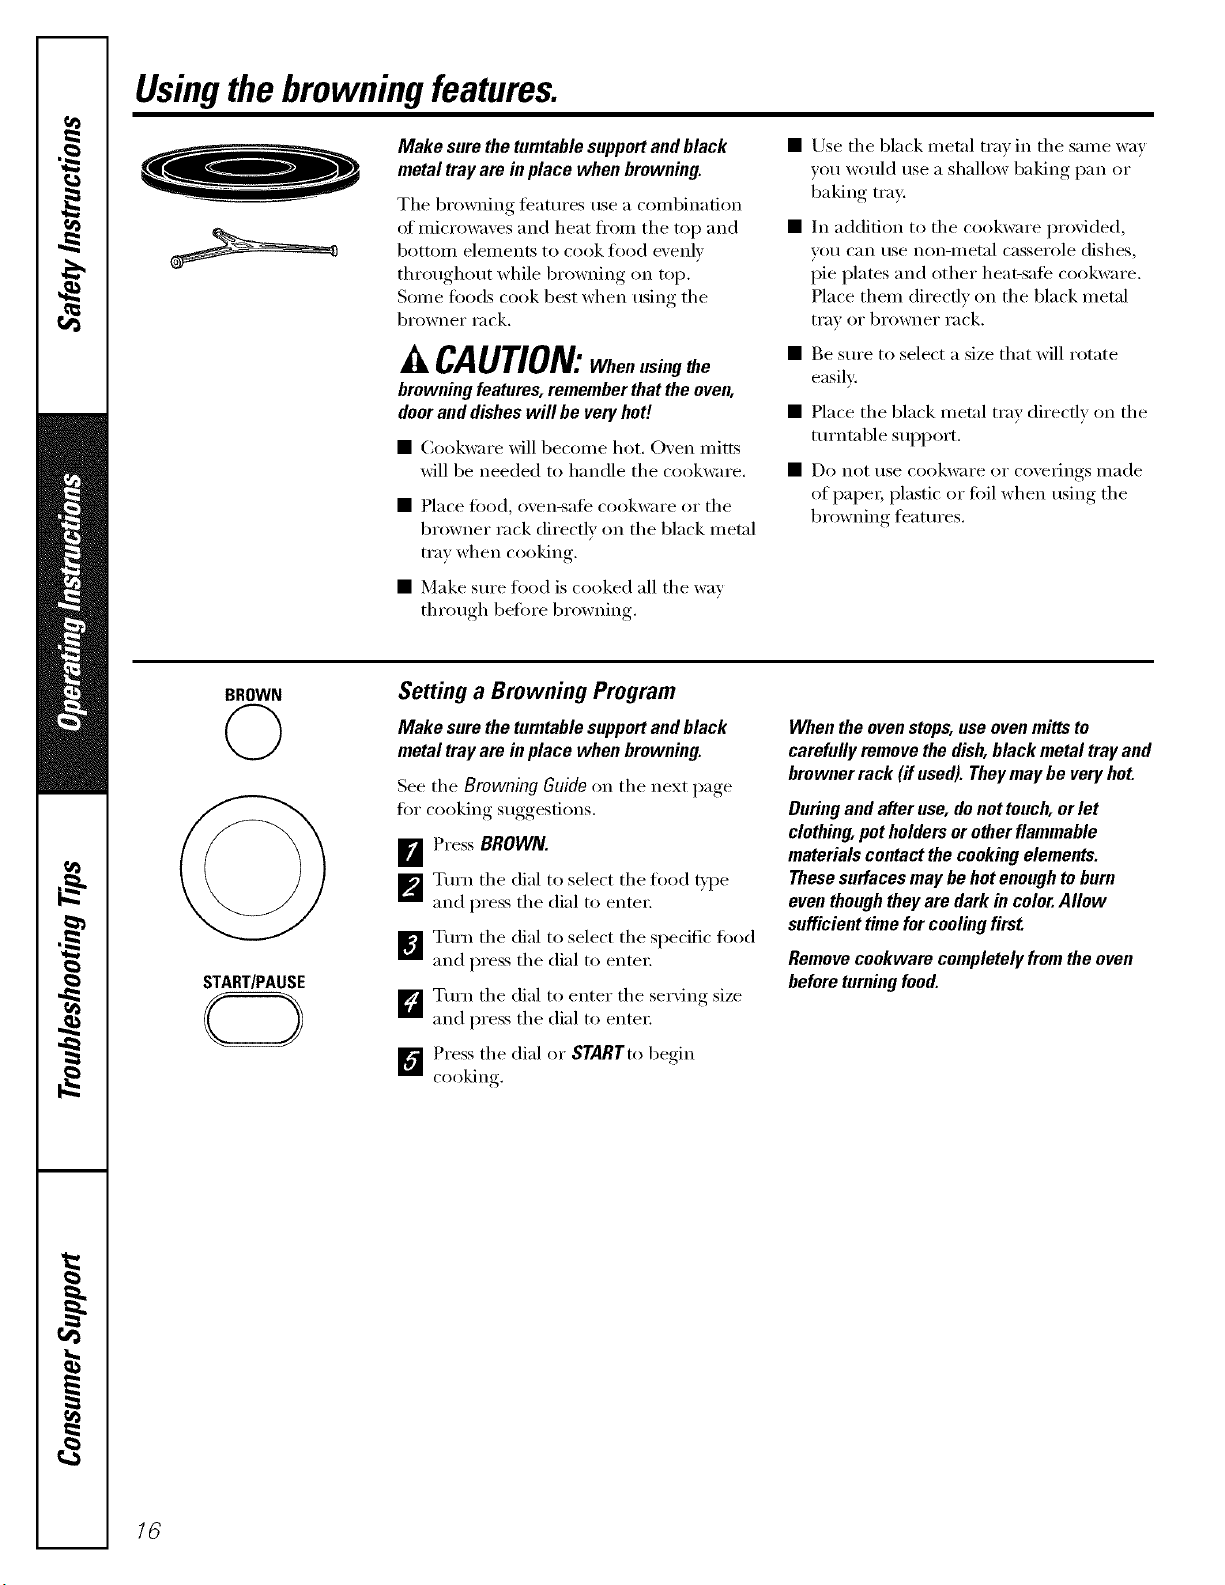
Usingthebrowningfeatures.
Make sure the turntable supportand black
metal tray are in place when browning.
The browning teatures use a combination
of microwaves and heat from the top and
bottoi/l elelllents to cook t0od e\'enlv
throughout while browning on top.
Some toods cook best when using the
browner rack.
CAUTION: Whenusingthe
browningfeatures,rememberthattheoven,
dooranddisheswill be veryhot!
• Cookware will become hot. Oxen mitts
will be needed to handle the cookware.
• Place tood, oven-sate cookware or tile
browner rack directly on the black metal
tray when cooking.
• Make sm'e toed is cooked all the way
through before browning.
• Use tile black metal tray in tile same way
you would use a shallow baking pan or
baking tray:
• In addition to the cookware provided,
Veil can use non-iilet_ll casserole dishes,
pie plates and other heat-sate cookware.
Place them directly on the black metal
tray or browner rack.
• Be sm'e to select a size that will rotate
easily:
• Place tile black metal tray directly on tile
tm+ntable support.
• Do not use cookware or coverings made
of paper; plastic or toil when using the
br_)wning teatm'es.
BROWN
©
START/PAUSE
Setting a Browning Program
Make sure the turntable supportand black
metal tray are in place when browning.
See tile Browning Guide on tile next page
fin" cooking suggestions.
B Press BROWN.
_'J Turn tile dial to select tile food g'pe
and press tile dial to enter:
!i
Turn tile dial to select tile specific fi>od
and press the dial to enter;
_Tm'n the dial to enter the serving size
and press the dial to enter;
D Press tile dial or STARTto begin
cooking,
Whentheovenstops,useovenmittsto
carefullyremovethedish,blackmetaltrayand
brownerrack(ifused).Theymaybeveryhot.
Duringandafteruse,denottouch,orlet
clothing,potholdersorotherflammable
materialscontactthecookingelements.
Thesesurfacesmaybehotenoughtoburn
eventhoughtheyaredarkin color.Allow
sufficienttimeforcoolingfirst
Removecookwarecompletelyfromtheoven
beforeturningfood.
16
ge.com
Manual Browning
Make sure the turntable supportand black
metal tray are in place when browning.
The Manual browning teatm'es allow you to
a(!jtlst the all/otlnt OI microwave and heater
power used fin" browning.
B Press BROWN.
[]Turn the dial to MANUAL and press the
dial to enter:
]Turn the dial to select one of the
manual browning modes and press
the dial to enter:
D Turn the dial to enter cook time and
press the dial to enter:
D Change the microwaxe power lexel if
xou don't want dill powex: (Press
POWER; turn the dial to set the power
level and press the dial to entex:)
1_ Press the dial or STARTto be_6n
cooking
COMBI I and COMBI 2 utilize m ore top
element powex; browning food tipster
on top.
COMBI 3uses equal parts top elenlent and
ii/icrowave power ik)i" less browning on [el).
COMBI 4 utilizes top element, bottom
elei//ent and illicro%;ive l)ower ti)r even
browning on all sides.
Browning Guide
Serving
Size Comments
1 or4
1 or4
1 or4
1 or4
1 or4
1 or4
Food Type
FrozenChicken
Nuggets, breaded
Patties, breaded
Tenders,breaded
FrozenFish
Fillets, breaded
Fish sticks, breaded
Shrimp, breaded
FrozenFries
Coatedfries
Crinkle fries
Potato nuggets
Regular fries
Steak fries
Waffle fries
Pizza
Deep dish single
Filled pizzashell
Regular crust
Rising crust
Snacks
Choosesticks
Chicken wings
Jalapefio poppers
Egg rolls, mini
Nachos, mini
Onionrings
Pizzarolls
Snacks or bagels
Manual Cook
COMBI I
COMBI 2
COMBI 3
COMBI 4
1 or4
1 or4
1 or4
1 or4
1 or4
1 or4
1 or 2 pizzas
12"
6 or 12"
6 or 12"
2or4
1 or4
1 or4
1 or4
1 or4
1 or4
1 or4
1 or4
Check the fi)od when tile oxen sig_]als.
Check the fi)od when tile o_en sig33als.
Place fi)od on the browner rack.
Place fi)od on tile browner rack.
Utilizes more top element powel; bro_v_fing Ii)od li_ster
on top.
Utilizes less top element powel:
Utilizes equal parts top element and microwme power Ii)r
less browning on top.
Utilizes top element, bottom element and micro_m_e
powel: Use fi)r packaged loo(ls such as au gTatin potatoes
or stuffing. Place dish on the bro_ler rack and fi)llow
package directions. ] 7
Using the grilling features.
Make sure the turntable supportand black
metal tray are in place when grilling.
The grilling featm'es use direct heat fi'on_
the top and botton_ elements to cook ti'esh
and frozen foods.
CAUtiON: When using the
grilling features, remember thatthe even,
doorand disheswill be very heft
• Cookware will becoille hot. (-)ven n/itts
will be needed to handle the cookware.
• Place fi)od, oven-sate cookware or the
browner rack directly on the black metal
tray when cooking.
• Use the black metal tray in the same way
vou would use a shallow baking pan or
baking tray.
In addition to the cookware p_xwided,
V()/I C_III tlSe non-ii/etal casserole dishes,
pie plates and other heat-sate cookware.
Place them directly on the black metal
tI'_IV OI" bI'owneI" rack.
• Be sure to select a size that will rotate
easily:
• Place the black metal tray directly on the
turntable support.
• Do not rise cookware or coveiJngs II/ade
of paper; plastic or foil when using the
grilling teatures.
GRILL
START/PAUSE
CD
Setting a Grilling Program
Make sure the turntable supportand black
metal tray are in place when grilling.
See the Grilling Guide on the next page
fi)r cooking suggestions.
F_ Press GRILL.
_'_ Turn the dial to select the food type
and press the dial to entex:
_€_ Turn the dial to select the specific food
and press the dial to entex:
t_ Depending on your selection, turn the
dial to enter the serxing size or cook
time and press the dial to enter:
D Press the dial or $TARTto begin
c(>(>king
When the ovenstops, use ovenmitts to
carefully remove the dish,black metal tray and
browner rack (if used). Theymay be very hot.
During and after use, de net touch, or let
clothing, pet holders or other flammable
materials contact the cooking elements.
These surfaces may be hot enough to burn
even though theyare dark in color.Allow
sufficient time forcooling first
Remove ceokware cempletely frem the oven
before turning food.
18

ge.com
Manual Grilling
Make suretheturntablesupportandblack
metal tray are in place when grilling.
The Manual grilling features allow you to
choose which heating elements are used
when grilling and set the cooking time.
[]Press GRILL.
_'_ Turn the dM to MANUAL and press
the dial to enter:
_1 Tm'n tile dM to select GRILLI or
GRILL2.
D Turn the dial to enter cook time and
press the dial to enter:
_"_ Press the dial or STARTtobeoin
cooking
GRILLI uses the top heating elelnent only
fin" browning on top.
GRILL 2 utilizes both the top and bottom
elements fin" even browning on all sides.
Grilling Guide
Serving
Size Comments
Food Type
Entree
Burritos, frozen
Grilled cheese
Egg rolls, large
Corndogs,
mini frozen
Pocket sandwich,
frozen
Corndogs,
regular frozen
Meats
Chicken breast
Filet mignon
Pork chop
Seafood
Salmon fillets
Shrimp
Manual Cook
Grill I
Grill2
1 or4
1 or4
1 or4
1 or4
Arrange 4 ser\ings in a star pattern.
Turn fi)od over when tile oven signals.
Arrange 4 se_a_ings in a star pattern.
1 or 4 Arrange 4 ser\ings in a star pattern.
1 or4
1 or4
lor2
1
Tuna fi)od oxer when tile oxen signals.
Ttml fitod over when tile oven signals.
Ttml Iood over when the oven sig_mls.
1 or 2 Check li)od when tile oxen sigmals.
1 lb, Shrimp should be thawed and peeled.
Uses tile top heating element onl)
Uses both the top and bottom heating elements. Use fi)r
fl-ozen breakii_st items such as French toast or wallles.
19
Aboutthe otherfeatures.
Cooking Complete Reminder
To remind you that you have t0od in the
oven, tile oven will display FOODIS READY
and beep once a minute until you either
open tile oxen door or press CLEAR/OFF.
OPTIONS
Clock
Press to enter the time ot d_ly.
_r_ Press OPTIONS.
_'_ Turn the di_ll t(> CtOCKand press the
died to enter.
_] Tm'n the dial to enter the horn" and
press the dial to enter_
_Tm'n the di_l to enter the mimltes and
press the died to enter_
START/PAUSE
CD
Start/Pause
In addition to cancelling selections,
START/PAUSEallowsyou to stop cooking
without opening tile door or clearing
tile display. Press START/PAUSEto restart
tile oven.
CLEAR/OFF
Child Lock-Out
Y_)u may lock tile control panel to prexent
tile microwaxe oxen from being accidentally
started or used b_ children.
To lock or tmlock tile controls, press and
hold CLEAR/OFFIor about 3 seconds. _q/en
the control panel is locked, Lwill be in
the display.
TIMER Timer
7Trueroperates as a minute timer when tile
oxen is not operating.
_ Press TIMER.
_'_ Tm'n tile dial to enter tile minutes and
press tile dial to enter:
I_€_ Tm'n tile dial to enter tile seconds and
press tile dial to enter:
D PressTIMER.
_4]/en time is up, tile oven will signal.
Press TIMERt(>cancel tile time_:
NOTE:7he 77merindicator willbe litwhile the
timer is operating.
2O
OPTIONS
Beeper On/Off
The button beep can be turned on or off.
FJ Press OPTIONS.
_Turn the dial to BEEPER and press
the dial to enter;
[]Turn the dial to select ON or OFFand
press the dial to enter:
NOTE:TheMUTEindicator will be litwhenthe
button heepisturned OFF.
ge.com
OPTIONS
Display On/Off
To tm'n the clock displa) on or off:
FJ Press OPTIONS.
[]Tm'n the dial to DISPLAY ON/OFFand
press the dial to enter;
B Tm'n the dial to select ON or Of Fand
press the dial to enter:
OPTIONS
Scroll Speed
The scroll speed of the displa_ can be
chan red
B Press OPTIONS.
[]Turn the dial to SCROLLSPEEDand
press the dial to enter;
]_l Tm'n the dial to select 1-5 fin" slow
to fi_st scroll speed and press the dial
to entei',
21

Microwave terms.
Term
Arcing
Covering
Shielding
Standingtime
Venting
Definition
Arcing is the inicrowave telin fl)r sparLs in the oven. Arcing is caused by:
• metal or foil touching the side of the oven.
• fifil that is not molded to fl_od (upturned edges act like antennas).
• metal such as twist-ties, poultry pins, gold-rimmed dishes.
• recycled paper towels containing small metal pieces.
Covei_ hold in moisture, allow fin" more even heating and reduce cooking time. Venting plastic wrap or
covering with wax paper allo_vs excess steam to escape.
In a regular oven, you shield chicken breasts or baked toods to prevent ove_q)rowning. _._]_en microwaving,
w)u use small strips of foil to shield thin parts, such as the tips of wings and legs on poultry, which would
cook befln'e larger parts.
When you cook with regular ovens, fi)ods such as roasts or cakes are allowed to stand to finish cooking or
to set. Standing time is especially important in microwave cooking. Note that a microwaved cake is not
placed on a cooling rack.
_MteI"covering a dish with plastic wrap, you vent the plastic wrap by turning back one corner so excess
stealI/ C_III escape.
22
Careand cleaningofthemicrowave oven.
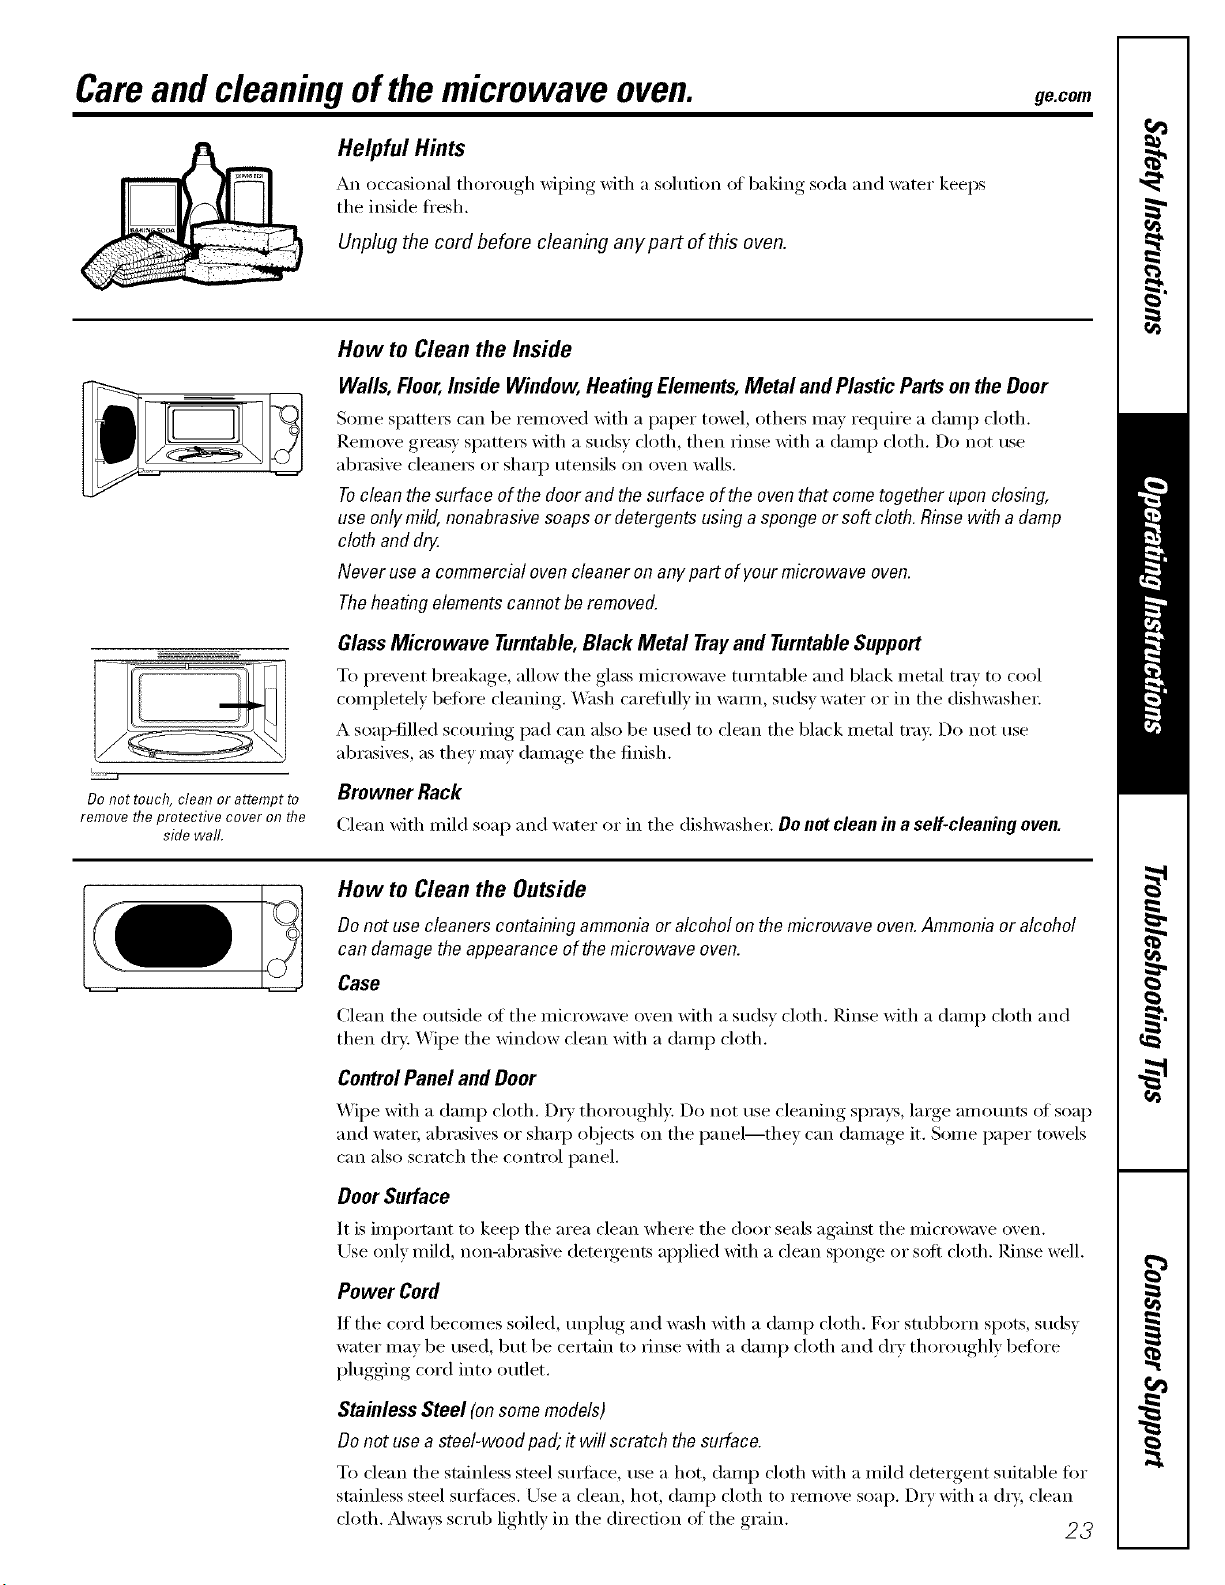
Helpful Hints
An occasional thorough wiping with a solution ot baking soda and water keeps
the inside fl'esh.
Unplug the cord before cleaning anypart of this oven.
ge.com
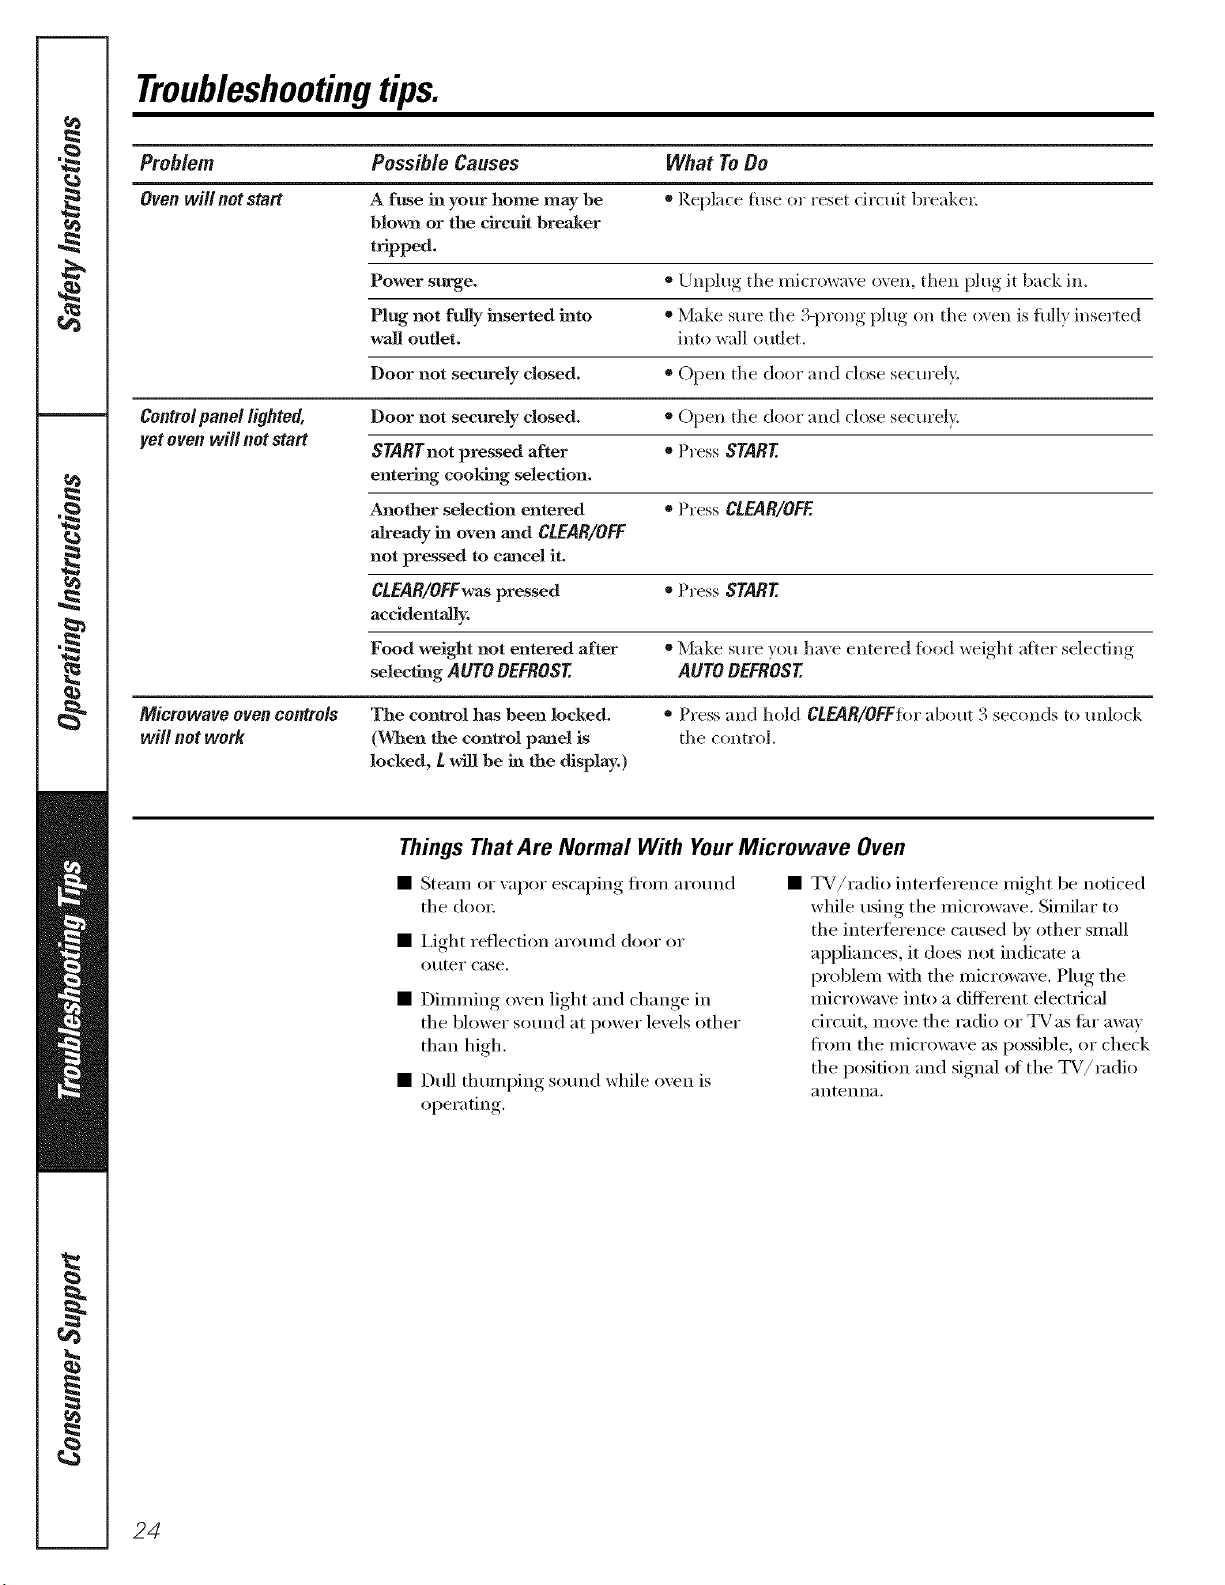
Do not touch, cleat? or attempt to
remove the protective cover on the
side wall.
How to Clean the Inside
Walls, Floor,Inside Window, Heating Elements,Metal and Plastic Parts on theDoor
Some spatte_ can be removed with a paper towel, othe_ may require a damp cloth.
]_.einove greasy Sl)attei_ with a sudsy cloth, then rinse with a damp cloth. Do not use
abrasive cleaners or sharp utensils on oven walls.
Tocleanthesurfaceof thedoor and thesurfaceofthe oventhat cometogether uponclosing,
useonlymild,nonabrasivesoapsor detergentsusinga spongeor soft cloth.Rinsewith a damp
cloth anddrg.
Never usea commercialovencleaneron anypart ofyourmicrowave oven.
Theheatingelementscannotbe removed.
GlassMicrowave Turntable,Black Metal Trayand TurntableSupport
To prevent breakage, allow the glass microwave mrntnble and black metal tray to cool
completely befin'e cleaning. Wash careflflly in w:mn, sudsy water or in the dishwasher:
A soap-filled scorning pad can also be used to clean the black metal tray. Do not use
abrasives, as they may damage the finish.
Browner Rack
Clean with mild soap and water or in the dishwashex: Do not clean in a serf-cleaning oven.
How to Clean the Outside
Donot usecleanerscontainingammoniaor alcoholon themicrowave oven.Ammoniaor alcohol
candamagetheappearanceofthemicrowave oven.
Case
Clean the outside of the microwave oven with a sudsy cloth. Rinse with a damp cloth and
then dry: Wipe the window clean with a damp cloth.
ControlPanel and Door
_._]l)e with a damp cloth. Dry thoroughly. Do not use cleaning sprays, large amounts of soap
and water; abrasives or shaq) objects on the panel--they can damage it. Some paper towels
can also scratch the control panel.
Door Surface
It is importnnt to kee I) the area clean where the door seals against the microwave oven.
Use only mild, non-abrasive deteigents applied with a dean sponge or soft cloth. Rinse well.
Power Cord
If the cord becomes soiled, tml)lug and wash with a damp cloth. For sml)born spots, sudsy
water may be used, but be cert;fin to rinse with a damp cloth and dry thoroughly heft)re
plugging cord into outlet.
Stainless Steel (onsomemodels)
Donot usea steel-woodpad;it will scratch the surface.
To clean the stainless steel sm_fiwe, use a hot, damp cloth with a mild detergent suitable fin.
stainless steel surfilces. Use a clean, hot, damp cloth to i'ei//ove soap. Dry with a (h T, clean
s "" '" " "_ _ 23
cloth. _Mwavs .;crul) h_htlx m the (hrecn m of the ,rain
Troubleshootingtips.
Problem Possible Causes What ToDo
Oven will not start A fuse in your home may be * Replace h=se or reset circtdt breakeL
blown or the drcmt breaJmr
t_pped.
Power surge. ®Unplug the microwax e o_en, then }_lug,it back in.
Plug not fully inserted into * Make sure the .13- _rong,}_lug, on the oxen is hdl} inselq_ed
wail outlet, into wall outlet.
Door not securely closed. * Open the door and close seem'ely.
Controlpanel lighted, Door not securely closed. * Open the door and close secm'ely.
yet oven will not start STARTnot pressed after * Press START
entering cooldng selection.
Another selection entered * Press CLEAR/OFF.
aJready in oven a_ad CLEAR/OFF
not pressed to cancel it.
CLEAR/OFFwaspressed * Press START
accidentally.
Food weight not entered after * Make sure ",ou haxe entered fi)od weioht_ ;Oer selecting
selecting AUTO DEFROST AUTO DEFROST
Microwave oven controls The control has been locked. = Press and hold CLEAR/OFFFIwabout 3 seconds to unlock
will not work (When the control panel is the control.
locked, L will be in the display.)
Things That Are Normal With YourMicrowave Oven
• Steam or vapor escaping fl'om arotmd
the (h)o_:
• i,ight reflection ar(umd door or
o/iter case.
• Dimming ()veil light and change in
the bh)wer sotmd at power levels other
than high,
• Dull thumping sotmd while oren is
operating.
TV/radio interference might be noticed
while using the microwave. Similar to
the interference caused b)' other small
appliances, it does not indicate a
problem with the microwave. Plug the
microwave into a different electrical
ciretfit, move the radio or TVas fin" away
fl'om the microwave as possible, or check
the position and signal ot the TV/radio
antenna,
24

GE Service Protection Plus 'M
GE, a name recognized worldwide fbr quality and dependability, offers you
Service Protection Plus'_'--comprehensive protection on all yore appliances--
No Matter What Brand!
Benefits Include:
* Backed by GE
* All brands covered
* Unlimited service calls
* All parts and labor costs included
o No out-of-pocket expenses
o No bidden deductibles
o One 800 number to call
We TICover Any Appliance.
Anywhere. Anytime.
You _dll be completel) satisfied with our service protection or )ou ma) request )our mone) back
on the remaining value of your contract. No questions asked. It's that simple.
Protect yore" refrigerator, dishwasher, washer and dryer, range, TV_ VCR and much more--a_y brand!
Plus there's no extra charge flw emergency service and low monthly financing is available. Even icemaker
coverage and toed spoilage protection is offered. You can rest easy, knowing that all your valuable
household products are protected against expensive repairs.
Place ,our confidence in GE and call us in the U.S. toll-free at _UU._Z_.ZZZ_
for l//Ol'e infol'I//atiOll.
:_,_*]1 hi}in(Is (o_.{!l_{!(L tip t(t _0 ){!iris Ill(I, ]11 the (on[lllenl tl [.S.
.n_ ( Jill here
Please place in envelope and mail to:
GeneralElectricCompany
Warranty Registration Department
P.O. Box 32150
Louisville, KY 40232-2150
25
Consumer Product Ownership Registration
Dear Customer:
Thank you for purchasing our product and thank you for placing your confidence in us.
_'e are proud to ha_e you as a customer!
Follow these three steps to protect your new appliance investment:
Complete and mail
your Consumer
Product Ownership
Registration today.
tt_lw' tht _p_'ac_' of
mind of knowing wc
Call colltact VOl/ ill
tile unlikely ev('nt of a
sati_'V, modification.
Alter mailing the
registration below,
store this docllment
ill a sati., place. It
contains inl_rmation
you will need should
you require service.
OHr selvice number is
800.GE.CAlZES
(800.432.2737).
Read your Owner's
Manual carefilllv.
It will help you
oporat( yol/r llew
appliance properly.
Model Number Serial Number
I I I I I I
Important: If you did not get a registration card with your
product, detach and return the form below to
ensure that your product is registered, or register
online at ge.com.
Consumer Product Ownership Registration
Model Number Serial Number
M_ Ms. Mls. Mi_s
Fir'q ] I L_st]
Name I I I I I I I I I Nain(! I I I I I I I I I I I I
_11-( (!1 I
Addr(ss I I I I I I I I I I I I I I I I I I I I I I I I
, I
I
I
Apt.#l, , , , , , , I g-nmilAddress*
1);u(, Pla(ed
Monlh
GE Consumer & Industrial
Appliances
General Electric Compan U
Louisville, KV40225
ge.com
* Please pr(wi(le your e-mail address to ruceive, via e-mail, discounts, special ofl_.q-_,and other important
communications from (;E Appliances ((;1_\).
Check her_, if )(hi do not want to receixe (ommunications ti-om G1LVs car('flllly selected partner',.
FAILI HZETO (:OMPLETE AND RETI 7RN TIIIS C,\RI) DOES NfYF DIMINISII g()[ 7R
_%\I_\N'IY RIGIITS.
For mor(, inti)rmation al)out G1LVs privet(3 and (Ilia usage policN go to ge.com and cli(k on "Privacy
Policy" or call 800.6'26.'2994.
26
GEMicrowave OvenWarranty.
All warranty service provided by our Factory Service Centers,
or an authorized Customer Care® technician. Toschedule service,
on-line, 24hours a day, visit us at ge.com, or call 800.GE.CARES
(800.432.2737).Please have serial and model numbers available
when calling for service.
Staple your receipt here.
Proofof the original purchase
date is needed to obtain service
under the warrant}4
For The Period Of."
OneYear
Fromthedate ofthe
originalpurchase
GEWill Replace:
Anypartof the microwave oven which fifils due to a (lefect in materials or workmanship.
During this limitedone-yearwarranty,GE will alsoprovide, freeofcharge,all labor and related
service to replace the defecti\'e part,
Fortheabovelimitedwarranty: Toavoidanytripcharges,youmusttakethemicrowaveoventoa GeneralElectricCustomerCare®servicerand
pickit upfo//ow/bgservice,in-homesemceisalsoavailable,butyoumustpayfortheservicetechnic/an#travelcoststoyourhome.
What GEWill Not Cover:
• Service trips to your home to teach you how to
use the product.
• Improper installation, delivery or maintenance.
• Product not accessible to provide required service.
• Failure of the product or dmnage to the product if it is
abused, misused (for exaanple, cavity arcing from wire
rack or metaJ/foil), or used for other thaa_ the intended
purpose or used commerciaJly.
• Replacement of house fuses or resetth_g of circuit
breakers.
• Damage to the product caused by accident, fire, floods
or acts of God.
• h_cidentaJ or consequentiaJ damage caused by possible
defects with this applimlce.
• Damage caused after delivery.
EXCLUSION OFIMPLIED WARRANTIES--Your sole and exclusive remedy is product repa# as provided in this
Limited Warranty. Any implied warranties, including the implied warranties of merchantability or fitness for a
particular purpose, are limited to one year or the shortest period allowed bylaw.
Thiswarrantyis extendedto theoriginalpurchaserand anysucceedingownerforproductspurchasedforhomeusewithin theUSA.
If theproductis locatedin an area whereservicebya GEAuthorizedServicerisnot available,youmaybe responsiblefora tripcharge
or youmaybe requiredtobring theproductto anAuthorizedGEServiceLocationforservice.InAlaska,thewarrantyexcludesthe
servicecalls to yourhome.
Somestatesdonot allow theexclusionor limitation of incidentalor consequentialdamages.Thiswarrantygivesyouspecificlegal
rights,andyoumayalso haveotherrights which varyfromstate tostate. Toknow what yourlegalrightsare,consultyourlocalor
state consumeraffairsoffice oryourstate'sAttomey General.
Warrantor: General Electric Company. Louisville, KY 40225
27
ConsumerSupport.
gEAppliancesWebsite ge.com
Haxe a question or need assistance with your al_pliance? Try tile (;E Appliances _.Vebsite 24 hours a day
any day of the xear'. For greater comenience and taster service, you can now download Owner's Manuals,
O " S i.
order parts, catalogs, or exert schedule set\ice on-line. You can also "_sk Our Team f Expert.
yO/lI" q/lestions, and so Illtlcl/ iiloi'e...
ScheduleService
Expert (;E repair setsice is onl) one step away fl'om xom" door Get on-line and schedule your set\ice at
xom', conxenience 24 hours any (lax of tile year! Or call 800.GE.CARES (800.432.2737) dining n{mnal
business hem's.
ge.com
RealLifeDesignStudio ge.com
GE SUl)ports tile Universal Design concept--l)roducts, services and environments that can be used by
people of all ages, sizes and capabilities. We recognize tile need to design fin" a wide range of physical and
mental abilities and impaim/ents. For details of GE's Universal Design applications, including kitchen
design ideas tot people with disabilities, check out our Websim today. For the headng impaired, please call
800.TDD.GEAC (800.833.4322).
ExtendedWarranties ge.com
Pro'chase a (;E extended warrant_ and learn about special discounts that are axailable while your, warranla,
is still in effect. You C[llli)m'chase it on-line an)time, or call 800.626.2224 dining nomml business hours.
(;E (_onsuiner Home Ser\ices will still be there after your warrant} expires.
[ "I
J
PartsandAccessories
ge.com
Individuals qualified to se_'ice their own api)liances can have parts or accessoiies sent direcflv to their
homes (VISA, MasterCard, and Discover cards are accepted). Order on-line today, 24 hem's every day or
by phone at 800.626.2002 dining nomml business hours.
Instructions contained in this manual cover procedures to be performed by any user. Otherservicing generally
should be referred to qualified service personnel Cautionmust be exercised, since improper servicing may cause
unsafe operation.
ContactUs
ge.com
If you are not satisfied with the service w)u receive fl'om GE, contact us on our _&'ebsite with all the details
including yore" phone ntlI/lbeI'_ oi" write to: General Manage_; Customer Relations
GE Appliances, Appliance Park
I,ouisville, KY 40225
l RegisterYourApplbnce
Register your new applimlce on-line--at your convenience! Timel) product registration will allow for
b enhanced commtmication and prompt service trader tile terms of _om" warranty shotfld tile need a_ise.
You may also mail in tile pre-p_inted registration card included in tile packing material.
ge.com
Printed in Korea

