Loading ...
Loading ...
Loading ...
English
9
Speed Selector (Fig. A)
NOTICE: Risk of tool damage. Do not rotate the speed
selector lever while the drill is running or coasting,
damage may occur to the tool.
Rotate the speed selector dial
6
to the desired speed:
1 (·) = low speed (high torque)
2 (··) = high speed (low torque)
nOTE: The first time the tool is run after changing speeds,
you may hear a click on start up. This is normal and does not
indicate a problem.
Variable Speed Trigger (Fig. A)
Depressing the variable speed trigger
7
turns the tool on,
releasing the variable speed trigger turns the tool off. The
variable speed trigger permits speed control—the farther
the trigger is depressed, the higher the speed of the drill.
Forward/Reverse Button (Fig. A)
A forward/reverse button
9
determines the direction of the
tool. It is located in front of the trigger.
To select forward rotation, release the trigger
7
and depress
the forward/reverse button on the right side of thetool.
To select reverse, depress the forward/reverse button on
the left side of the tool. When changing the position of the
button, be sure the trigger is released.
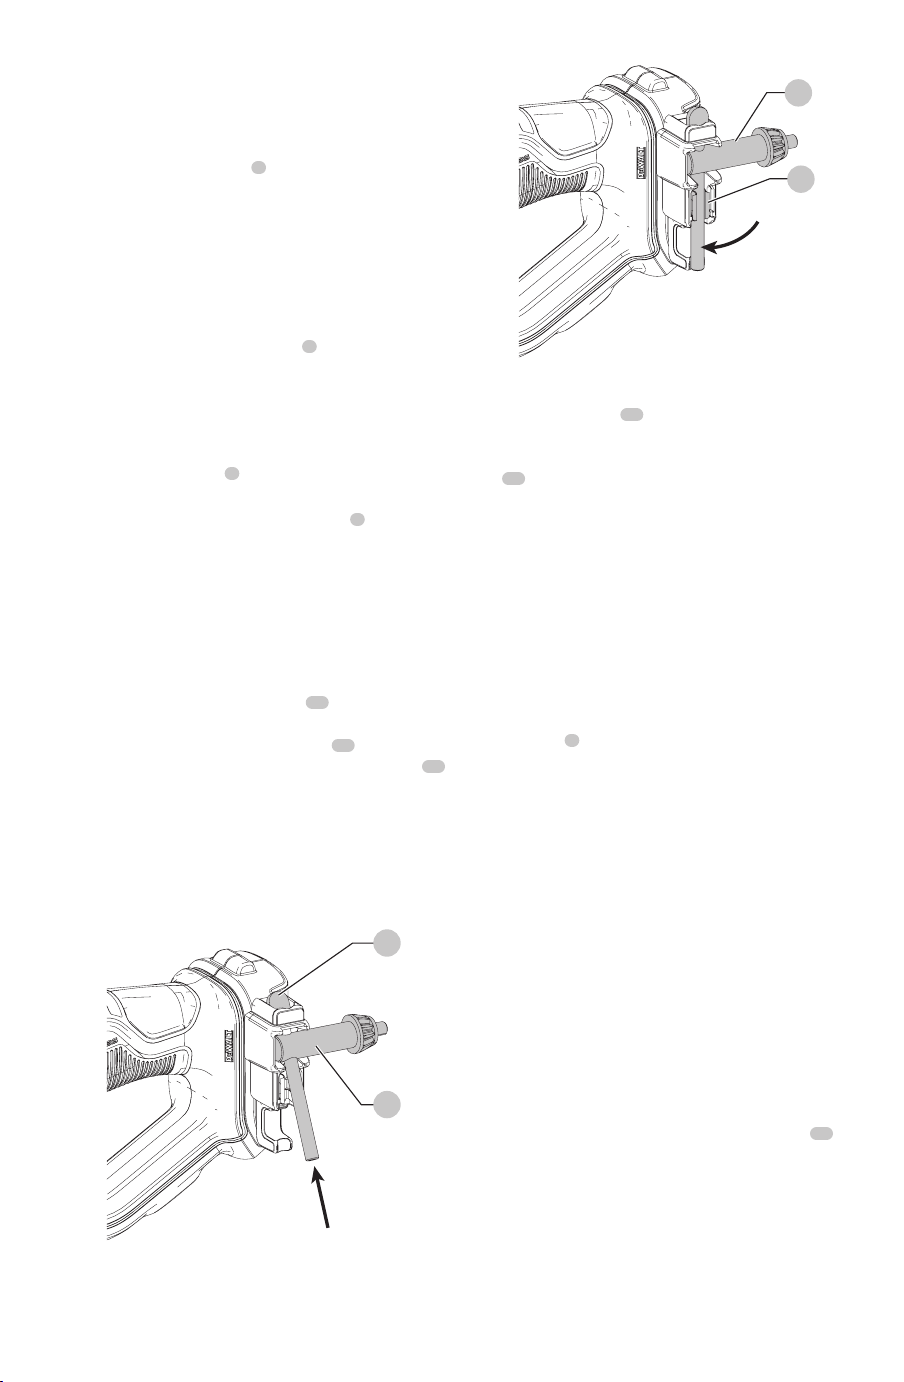
Installing and Removing the Chuck Key
(Fig. G)
Your tool is provided with a chuck key
11
that can be
stored on the foot of the tool. To install the chuck key into
its holder, slide the flat head of the handle
15
into the hole
as shown. Snap the handle's shaft into the retention clip
16
on the holder.
To remove the chuck key from its holder, pull the chuck
key handle out of the holder and slip the flat head out of
thehole.
nOTE: To avoid losing the chuck key, do not store it in any
other orientation.
Fig. G
15
11
16
11
Installing and Releasing a Bit (Fig. A)
Open the keyed chuck
10
jaws by turning the collar by
hand then insert the shank of the bit about 3/4" (19 mm)
into chuck. Tighten the chuck collar by hand. Place chuck
key (
11
, Fig.A) in each of the three holes, and tighten
in clockwise direction. It’s important to tighten chuck
with all three holes. To release the bit, turn the chuck
counterclockwise in just one hole, then loosen the chuck
by hand.
nOTE: When using hex shank or three-sided shank bits, be
sure to align the flat sides of the bit with the chuck jaws to
ensure the bit is properly engaged by the jaws.
Worklight (Fig. A)
CAUTION: Do not stare into worklight. Serious eye
injury could result.
The worklight
8
is activated when the trigger is depressed,
and will remain on for a short time after the trigger is
released. If the trigger remains depressed, the worklight will
remain on.
nOTE: The worklight is for lighting the immediate work
surface and is not intended to be used as a flashlight.
DEWALT
Bluetooth® Tool Tag Ready
(Fig. A, J)
Optional Accessory
WARNING: Read instruction manual for the
DEWALT
Bluetooth® ToolTag.
WARNING: Remove battery from tool before installing
the
DEWALT
Bluetooth® ToolTag.
WARNING: When installing or replacing the
DEWALT
Bluetooth® Tool Tag, use only the screws provided. Be
sure to securely tighten thescrews.
Your tool comes with mounting holes and fasteners
13
for installing a
DEWALT
Bluetooth® Tool Tag (DCE041). You
will need a cross head bit tip to install the tag. Screw torque
should be between 0.8 and 1.2 Nm (7.1 to 10.6 in-lbs). The
DEWALT
Tool Tag is designed for tracking and locating
professional power tools, equipment, and machines using
the
DEWALT
Tool Connect™ app. For proper installation of
the
DEWALT
Tool Tag, refer to the
DEWALT
Tool Tagmanual.
To learn more,visit:
www.
DEWALT
.com/en-us/jobsite-solutions/tool-connect
Loading ...
Loading ...
Loading ...