

<RXUQHZZDVKLQJPDFKLQH
<RXKDYHFKRVHQD%RVFK ZDVKLQJ
PDFKLQH
3OHDVHWDNHDIHZPLQXWHVWRUHDGDQG
EHFRPHIDPLOLDUZLWKWKHDGYDQWDJHVRI
\RXUZDVKLQJPDFKLQH
7RPHHWWKHKLJKTXDOLW\GHPDQGV
UHTXLUHGE\%RVFKHYHU\ZDVKLQJ
PDFKLQHWKDWOHDYHVRXUIDFWRU\LV
FDUHIXOO\FKHFNHGWRHQVXUHWKDWLW
IXQFWLRQVFRUUHFWO\DQGLVLQSHUIHFW
FRQGLWLRQ
)RUPRUHLQIRUPDWLRQRQRXUSURGXFWV
DFFHVVRULHVUHSODFHPHQWSDUWVDQG
VHUYLFHVVHHRXUZHEVLWHZZZERVFK
KRPHFRP RUFRQWDFWRXUDIWHUVDOHV
VHUYLFHFHQWUHV
,IWKHRSHUDWLQJDQGLQVWDOODWLRQ
LQVWUXFWLRQVGHVFULEHGLIIHUHQWPRGHOV
DQ\GLIIHUHQFHVZLOOEHSRLQWHGRXWDWWKH
UHOHYDQWSRLQWVLQWKHWH[W
5HDGWKHVHRSHUDWLQJDQGLQVWDOODWLRQ
LQVWUXFWLRQVEHIRUHVZLWFKLQJRQWKH
ZDVKLQJPDFKLQH
*%VWDQGDUG
*%
*%
*%
*%
*%
*%7
*%
'LVSOD\UXOHV
::DUQLQJ
7KLVFRPELQDWLRQRIV\PERODQGVLJQDO
ZRUGLQGLFDWHVDSRVVLEO\GDQJHURXV
VLWXDWLRQ1RWKHHGLQJWKHZDUQLQJFDQ
FDXVHGHDWKRULQMXULHV
&DXWLRQ
7KLVVLJQDOZRUGLQGLFDWHVDSRVVLEO\
GDQJHURXVVLWXDWLRQ1RWKHHGLQJWKH
FDXWLRQFDQFDXVHSURSHUW\DQGRU
HQYLURQPHQWDOGDPDJH
1RWHWLS
,QIRUPDWLRQ DERXW WKH RSWLPXP XVH RI WKH
DSSOLDQFHDQ\RWKHUXVHIXOLQIRUPDWLRQ
DEF
7KH VWHSV DUH UHSUHVHQWHG E\ QXPEHUV RU
OHWWHUV
■
/LVWVDUHUHSUHVHQWHGE\DVPDOOER[RUD
GDVK

HQ
&RQWHQWV
HQ,QVWUXFWLRQ0DQXDODQG,QVWDOODWLRQ,QVWUXFWLRQV
8 ,QWHQGHGXVH
( 6DIHW\LQVWUXFWLRQV
&KLOGUHQSHRSOHSHWV
,QVWDOODWLRQ
2SHUDWLRQ
&OHDQLQJ0DLQWHQDQFH
7 (QYLURQPHQWDOSURWHFWLRQ
3DFNDJLQJXVHGDSSOLDQFH
7LSVRQHFRQRPLFDOXVH
5 3RVLWLRQLQJDQGFRQQHFWLQJ
,QFOXGHGZLWKWKHDSSOLDQFH
,QVWDOODWLRQ
6DIHW\LQVWUXFWLRQV
5HPRYLQJWKHIRDPEORFN
,QVWDOODWLRQVXUIDFH
,QVWDOODWLRQRQDEDVHRUDZRRGHQMRLVW
IORRU
,QVWDOODWLRQRQDSODWIRUPZLWKGUDZHU
,QVWDOOLQJWKHDSSOLDQFHLQD
NLWFKHQHWWH
5HPRYLQJWKHWUDQVSRUWORFNV
+RVHDQGFDEOHOHQJWKV
:DWHULQOHW
:DWHURXWOHW
$OLJQPHQW
(OHFWULFDOFRQQHFWLRQ
%HIRUHZDVKLQJIRUWKHILUVWWLPH
7UDQVSRUWDWLRQ
* *HWWLQJWRNQRZWKHDSSOLDQFH
$SSOLDQFH
&RQWUROSDQHO
7RXFK'LVSOD\
Z /DXQGU\
3URWHFWLQJ\RXUODXQGU\DQG
DSSOLDQFH
6RUWLQJODXQGU\
P2YHUYLHZRISURJUDPPHV
6HOHFWDEOHSURJUDPPH
6RDNLQJ
0 3URJUDPPHGHIDXOWVHWWLQJV
7HPSHUDWXUH
6SLQVSHHG
)LQLVKLQ
\ $GGLWLRQDOSURJUDPPH
VHWWLQJV
䗨爷VSHHG3HUIHFW
撚坍 HFR3HUIHFW
硼旤俊'LVLQIHFWDQW
㒸儚伯 5LQVHSOXV
熓䦖叀(DV\LURQ
淈䇞 0HPRU\
㬴砌1LJKWZDVK
1 2SHUDWLQJWKHDSSOLDQFH
3UHSDULQJWKHDSSOLDQFH
6ZLWFKLQJRQWKHDSSOLDQFHVHOHFWLQJD
SURJUDPPH
3ODFLQJODXQGU\LQWRWKHGUXP
0HDVXUHDQGDGGGHWHUJHQWDQG FDUH
SURGXFWV
6WDUWLQJWKHSURJUDPPH
&KLOGSURRIORFN
$GGLQJUHPRYLQJODXQGU\
&KDQJLQJWKHSURJUDPPH
&DQFHOWKHSURJUDPPH
3URJUDPPHHQG
5HPRYLQJODXQGU\VZLWFKLQJRIIWKH
DSSOLDQFH
Q$SSOLDQFHVHWWLQJV
$XWRPDWLFVZLWFKRII
%DVLFVHWWLQJV
H 6HQVRUV
8QEDODQFHGORDGGHWHFWLRQV\VWHP

HQ ,QWHQGHGXVH
2 &OHDQLQJDQGPDLQWHQDQFH
$SSOLDQFHKRXVLQJFRQWUROSDQHO
'UXP
'HVFDOLQJ
'HWHUJHQWGUDZHUDQGKRXVLQJ
&OHDQLQJWKHPHDVXULQJDLG$IRUOLTXLG
GHWHUJHQW
'UDLQSXPSLVEORFNHG
7KHGUDLQKRVHDWWKHVLSKRQLV
EORFNHG
)LOWHULQWKHZDWHUVXSSO\LVEORFNHG
3)DXOWVDQGZKDWWRGRDERXW
WKHP
(PHUJHQF\UHOHDVH
,QIRUPDWLRQRQWKHGLVSOD\SDQHO
)DXOWVDQGZKDWWRGRDERXWWKHP
4 $IWHUVDOHVVHUYLFH
[ &RQVXPSWLRQYDOXHV
J 7HFKQLFDOGDWD
8 ,QWHQGHGXVH
,QWHQGHGXVH
■ 7KLVDSSOLDQFHLVLQWHQGHGIRUSULYDWH
GRPHVWLFXVHRQO\
■ 'R QRW LQVWDOO RU RSHUDWH WKLV DSSOLDQFH
DQ\ZKHUHWKDWLVOLDEOHWRH[SHULHQFH
IURVW DQGRU RXWGRRU FRQGLWLRQV 7KHUH
LVDULVNWKDWWKHDSSOLDQFHZLOOEH
GDPDJHGLIUHVLGXDOZDWHULQLW
IUHH]HV,IKRVHVIUHH]HXSWKH\PD\
FUDFNEXUVW
■ 7KLVDSSOLDQFHPXVWRQO\EHXVHGIRU
ZDVKLQJGRPHVWLFODXQGU\FRQVLVWLQJ
RI PDFKLQHZDVKDEOH LWHPV DQG KDQG
ZDVKDEOHZRROOHQVVHHODEHORQ
LWHP8VLQJWKHDSSOLDQFHIRUDQ\
RWKHUSXUSRVHLVRXWVLGHRIWKHVFRSH
RILWVLQWHQGHGDSSOLFDWLRQDQGLV
IRUELGGHQ
■ 7KLVDSSOLDQFHLVVXLWDEOHIRU
RSHUDWLRQZLWKPDLQVZDWHUDQG
FRPPHUFLDOO\DYDLODEOHGHWHUJHQWV
DQGFDUHSURGXFWVPXVWEHVXLWDEOH
IRUXVHLQZDVKLQJPDFKLQHV
■ 7KLVDSSOLDQFHLVLQWHQGHGIRUXVHXS
WRDPD[LPXPKHLJKWRI PHWUHV
DERYHVHDOHYHO
%HIRUH\RXVZLWFKRQWKHDSSOLDQFH
&KHFNWKDWWKHUHLVQRYLVLEOHGDPDJHWR
WKHDSSOLDQFH'RQRWRSHUDWHWKH
DSSOLDQFHLILWLVGDPDJHG6KRXOG\RX
KDYHDQ\SUREOHPVSOHDVHFRQWDFW\RXU
VSHFLDOLVWGHDOHURURXUFXVWRPHUVHUYLFH
5HDGDQGIROORZWKHRSHUDWLQJDQG
LQVWDOODWLRQLQVWUXFWLRQVDQGDOORWKHU
LQIRUPDWLRQSURYLGHGZLWKWKLVDSSOLDQFH
5HWDLQWKHGRFXPHQWVIRUVXEVHTXHQW
XVHRUIRUVXEVHTXHQWRZQHUV

6DIHW\LQVWUXFWLRQV HQ
( 6DIHW\LQVWUXFWLRQV
6DIHW\LQVWUXFWLRQV
7KHIROORZLQJVDIHW\LQIRUPDWLRQ
DQGZDUQLQJVDUHSURYLGHGWR
SURWHFW\RXIURPLQMXU\DQGWR
SUHYHQW PDWHULDO GDPDJH WR \RXU
VXUURXQGLQJV
,WLVQHYHUWKHOHVVLPSRUWDQWWR
WDNHWKHQHFHVVDU\SUHFDXWLRQV
DQGWRSURFHHGZLWKFDUHZKHQ
LQVWDOOLQJPDLQWDLQLQJFOHDQLQJ
DQGRSHUDWLQJWKHDSSOLDQFH
&KLOGUHQSHRSOHSHWV
::DUQLQJ
5LVNRIGHDWK
&KLOGUHQDQGRWKHUSHRSOHZKR
DUHXQDEOHWRDVVHVVWKHULVNV
LQYROYHGZKHQXVLQJWKH
DSSOLDQFH PD\ LQMXUH WKHPVHOYHV
RUPD\ILQGWKHPVHOYHVLQOLIH
WKUHDWHQLQJ VLWXDWLRQV 7KHUHIRUH
SOHDVHQRWH
■ 7KHDSSOLDQFHPD\EHXVHG
E\FKLOGUHQRYHUWKHDJHRI
\HDUVDQGE\SHUVRQVZLWK
UHGXFHGSK\VLFDOVHQVRU\RU
PHQWDO FDSDFLW\ RU E\ SHUVRQV
ZLWKDODFNRIH[SHULHQFHRU
NQRZOHGJHDVORQJDVWKH\
DUHVXSHUYLVHGRUKDYH
UHFHLYHG LQVWUXFWLRQ RQ KRZ WR
XVHWKHDSSOLDQFHVDIHO\DQG
WKH\KDYHXQGHUVWRRGWKH
SRWHQWLDOULVNVRIXVLQJWKH
DSSOLDQFH
■ &KLOGUHQPXVWQRWSOD\ZLWK
WKLVDSSOLDQFH
■ 'RQRWDOORZFKLOGUHQWRFOHDQ
RUPDLQWDLQWKLVDSSOLDQFH
XQVXSHUYLVHG
■ .HHSFKLOGUHQXQGHU\HDUV
DQGSHWVDZD\IURPWKLV
DSSOLDQFH
■ 'RQRWOHDYHWKHDSSOLDQFH
XQDWWHQGHGZKHQFKLOGUHQRU
RWKHUSHRSOHZKRDUHXQDEOH
WRDVVHVVWKHULVNVDUHLQWKH
YLFLQLW\
::DUQLQJ
5LVNRIGHDWK
&KLOGUHQPD\ORFNWKHPVHOYHV
LQVLGHDSSOLDQFHVDQGILQG
WKHPVHOYHVLQDOLIHWKUHDWHQLQJ
VLWXDWLRQ
■ 'RQRWSRVLWLRQWKHDSSOLDQFH
EHKLQGDGRRUDVWKLVPD\
REVWUXFW WKH DSSOLDQFH GRRU RU
SUHYHQWLWIURPRSHQLQJ
FRPSOHWHO\
■ 2QFHDQDSSOLDQFHKDV
UHDFKHG WKH HQG RI LWV OLIH SXOO
WKHPDLQVSOXJIURPWKH
VRFNHW EHIRUHVHYHULQJWKH
PDLQV FDEOH DQG WKHQ GHVWUR\
WKHORFNRQWKHDSSOLDQFH
GRRU

HQ 6DIHW\LQVWUXFWLRQV
::DUQLQJ
5LVNRIVXIIRFDWLRQ
,IDOORZHGWRSOD\ZLWKWKH
SDFNDJLQJSODVWLF ILOP RU SDFNLQJ
FRPSRQHQWVFKLOGUHQPD\
EHFRPHFDXJKWLQWKHVHRUSXOO
WKHPRYHUWKHLUKHDGVDQG
VXIIRFDWH
.HHS SDFNDJLQJ SODVWLF ILOP DQG
SDFNLQJFRPSRQHQWVDZD\IURP
FKLOGUHQ
::DUQLQJ
5LVNRISRLVRQLQJ
'HWHUJHQWVDQGFDUHSURGXFWV
PD\UHVXOWLQSRLVRQLQJLI
FRQVXPHG
,IDFFLGHQWDOO\VZDOORZHGVHHN
PHGLFDO DGYLFH .HHS GHWHUJHQWV
DQGFDUHSURGXFWVRXWRIWKH
UHDFKRIFKLOGUHQ
::DUQLQJ
5LVNRIEXUQV
:KHQZDVKLQJDWKLJK
WHPSHUDWXUHVWKHJODVVLQWKH
DSSOLDQFHGRRUEHFRPHVKRW
6WRSFKLOGUHQIURPWRXFKLQJWKH
DSSOLDQFHGRRUZKHQLWLVKRW
::DUQLQJ
(\HVNLQLUULWDWLRQ
&RQWDFWZLWKGHWHUJHQWVRUFDUH
SURGXFWVPD\FDXVHH\HVNLQ
LUULWDWLRQ
5LQVHH\HVVNLQWKRURXJKO\LI
WKH\LWFRPHVLQWRFRQWDFWZLWK
GHWHUJHQWVRUFDUHSURGXFWV
.HHSGHWHUJHQWVDQGFDUH
SURGXFWVRXWRIWKHUHDFKRI
FKLOGUHQ
,QVWDOODWLRQ
::DUQLQJ
5LVNRIHOHFWULFVKRFNILUH
PDWHULDOGDPDJHGDPDJHWR
WKHDSSOLDQFH
,IWKHDSSOLDQFHLVQRWLQVWDOOHG
SURSHUO\WKLVPD\OHDGWRD
GDQJHURXVVLWXDWLRQ(QVXUH
WKH IROORZLQJ
■ 7KHPDLQVYROWDJHRQ\RXU
SRZHUVRFNHWPXVWPDWFKWKH
UDWHGYROWDJHVSHFLILHGRQWKH
DSSOLDQFHLGHQWLILFDWLRQ
SODWH7KHFRQQHFWHGORDGV
DQGWKHUHTXLUHGIXVH
SURWHFWLRQ DUH VSHFLILHG RQ WKH
LGHQWLILFDWLRQSODWH
■ 7KHPDLQVSOXJDQGWKH
SURWHFWLYHFRQWDFWVRFNHW
PXVWPDWFKDQGWKHHDUWKLQJ
V\VWHPPXVWEHFRUUHFWO\
LQVWDOOHG
■ 7KHLQVWDOODWLRQPXVWKDYHDQ
DGHTXDWHFURVVVHFWLRQ
■ 7KH PDLQV SOXJ PXVW EH IUHHO\
DFFHVVLEOHDWDOOWLPHV,IWKLV
LVQRWSRVVLEOHLQRUGHUWR
FRPSO\ZLWKWKHUHOHYDQW
VDIHW\UHJXODWLRQVDVZLWFK
DOOSROHGLVFRQQHFWLRQPXVW
EHEXLOWLQWRWKHSHUPDQHQW
LQVWDOODWLRQ LQ DFFRUGDQFH ZLWK
HOHFWULFDOLQVWDOODWLRQ
UHJXODWLRQV

6DIHW\LQVWUXFWLRQV HQ
■ ,IXVLQJDUHVLGXDOFXUUHQW
FLUFXLWEUHDNHURQO\XVHRQH
WKDWEHDUVWKHIROORZLQJPDUN
z7KHSUHVHQFHRIWKLV
PDUNLVWKHRQO\ZD\WREH
VXUHWKDWLWIXOILOVDOOWKH
DSSOLFDEOHUHJXODWLRQV
::DUQLQJ
5LVNRIHOHFWULFVKRFNILUH
PDWHULDOGDPDJHGDPDJHWR
WKHDSSOLDQFH
,IWKHDSSOLDQFHVPDLQVFDEOHLV
DOWHUHGRUGDPDJHGWKLVPD\
UHVXOWLQHOHFWULFVKRFNVKRUW
FLUFXLWLQJRUILUHGXHWR
RYHUKHDWLQJ
7KHPDLQVFDEOHPXVWQRWEH
NLQNHGFUXVKHGRUDOWHUHGDQG
PXVWQRWFRPHLQWRFRQWDFWZLWK
DQ\KHDWVRXUFHV
::DUQLQJ
5LVNRIILUHPDWHULDOGDPDJH
GDPDJHWRWKHDSSOLDQFH
7KHXVHRIH[WHQVLRQFRUGVRU
SRZHUVWULSVPD\UHVXOWLQILUH
GXHWRRYHUKHDWLQJRUVKRUW
FLUFXLWLQJ
&RQQHFW WKH DSSOLDQFH GLUHFWO\ WR
DQ HDUWKHG VRFNHW WKDW KDV EHHQ
FRUUHFWO\LQVWDOOHG'RQRWXVH
H[WHQVLRQFRUGVSRZHUVWULSVRU
PXOWLZD\FRXSOHUV
::DUQLQJ
5LVNRILQMXU\PDWHULDO
GDPDJHGDPDJHWRWKH
DSSOLDQFH
■ 7KHDSSOLDQFHPD\YLEUDWHRU
PRYHZKHQLQRSHUDWLRQ
SRWHQWLDOO\ UHVXOWLQJ LQ LQMXU\ RU
PDWHULDOGDPDJH
3ODFHWKHDSSOLDQFHRQD
FOHDQHYHQVROLGVXUIDFH
DQGXVLQJDVSLULWOHYHOWR
JXLGH\RXOHYHOLWZLWKWKH
VFUHZLQIHHW
Risk of injury/material damage/damage to the appliance!
■ ,I\RXWDNHKROGRIDQ\RIWKH
DSSOLDQFHVSURWUXGLQJSDUWV
HJWKHDSSOLDQFHGRRULQ
RUGHUWROLIWRUPRYHLWWKHVH
SDUWV PD\ EUHDN RII DQG FDXVH
LQMXU\
'RQRWWDNHKROGRIDQ\RIWKH
DSSOLDQFHV SURWUXGLQJ SDUWV LQ
RUGHUWRPRYHWKHDSSOLDQFH
::DUQLQJ
5LVNRILQMXU\
■ 7KHDSSOLDQFHLVYHU\KHDY\
/LIWLQJLWPD\UHVXOWLQLQMXU\
'RQRWOLIWWKHDSSOLDQFHRQ
\RXURZQ
Risk of injury!
■ 7KHDSSOLDQFHKDVVKDUS
HGJHV RQ ZKLFK \RX FRXOG FXW
\RXUKDQGV
'RQRWWDNHKROGRIWKH
DSSOLDQFHE\LWVVKDUSHGJHV
:HDUSURWHFWLYHJORYHVWROLIW
LW
Risk of injury!

HQ 6DIHW\LQVWUXFWLRQV
■ ,I WKH KRVHV DQG PDLQV FDEOHV
DUHQRWFRUUHFWO\URXWHGWKH\
PD\FRQVWLWXWHDWULSSLQJ
KD]DUGZKLFKPD\UHVXOWLQ
LQMXU\
5RXWH KRVHV DQG FDEOHV VXFK
WKDWWKH\GRQRWFRQVWLWXWHD
WULSSLQJKD]DUG
&DXWLRQ
0DWHULDOGDPDJHGDPDJHWR
WKHDSSOLDQFH
■ ,IWKHZDWHUSUHVVXUHLVWRR
KLJKRUWRRORZWKHDSSOLDQFH
PD\QRWEHDEOHWRRSHUDWH
SURSHUO\DQGLWPD\DOVR
UHVXOWLQPDWHULDOGDPDJHRU
GDPDJHWRWKHDSSOLDQFH
0DNHVXUHWKDWWKHZDWHU
SUHVVXUHLQWKHZDWHUVXSSO\
IDFLOLW\LVDWOHDVW
N3D EDU DQG GRHV QRW
H[FHHG N3D EDU
Material damage/damage to the appliance
■ ,IWKHZDWHUKRVHVDUHDOWHUHG
RU GDPDJHG WKLV PD\ UHVXOW LQ
PDWHULDOGDPDJHRUGDPDJH
WRWKHDSSOLDQFH
7KHZDWHUKRVHVPXVWQRWEH
NLQNHGFUXVKHGDOWHUHGRU
VHYHUHG
Material damage/damage to the appliance
■ 7KHXVHRIKRVHVVXSSOLHGE\
RWKHU EUDQGV WR FRQQHFW WR WKH
ZDWHUVXSSO\PD\UHVXOWLQ
PDWHULDOGDPDJHRUGDPDJH
WRWKHDSSOLDQFH
8VHWKHKRVHVVXSSOLHGZLWK
WKHDSSOLDQFHRUJHQXLQH
VSDUHSDUWKRVHVRQO\
Material damage/damage to the appliance
■ 7KHDSSOLDQFHLVVHFXUHGIRU
WUDQVSRUWDWLRQE\WUDQVSRUW
ORFNLQJGHYLFHV,IWKH
WUDQVSRUWORFNLQJGHYLFHVDUH
QRWUHPRYHGEHIRUHWKH
DSSOLDQFHLVRSHUDWHGWKLV
PD\UHVXOWLQGDPDJHWRWKH
DSSOLDQFH
,WLVLPSRUWDQWWRFRPSOHWHO\
UHPRYHDOOWUDQVSRUWORFNLQJ
GHYLFHVEHIRUHXVLQJWKH
DSSOLDQFHIRUWKHILUVWWLPH
0DNHVXUHWKDW\RXUHWDLQ
WKHVHWUDQVSRUWORFNLQJ
GHYLFHVVHSDUDWHO\,WLV
LPSRUWDQW WR UHILW WKH WUDQVSRUW
ORFNLQJGHYLFHVLIWKH
DSSOLDQFH LV WR EH WUDQVSRUWHG
LQRUGHUWRSUHYHQWWKH
DSSOLDQFHIURPEHLQJ
GDPDJHGLQWUDQVLW
2SHUDWLRQ
::DUQLQJ
5LVNRIH[SORVLRQVILUH
/DXQGU\WKDWKDVEHHQ
SUHWUHDWHGZLWKFOHDQLQJDJHQWV
WKDWFRQWDLQVROYHQWVHJVWDLQ
UHPRYHUFOHDQLQJVROYHQWPD\
FDXVHDQH[SORVLRQLQWKHGUXP
5LQVHWKHODXQGU\WKRURXJKO\
ZLWKZDWHUEHIRUHZDVKLQJLWLQ
WKHPDFKLQH

6DIHW\LQVWUXFWLRQV HQ
::DUQLQJ
5LVNRISRLVRQLQJ
3RLVRQRXVIXPHVPD\EHJLYHQ
RIIE\FOHDQLQJDJHQWVWKDW
FRQWDLQVROYHQWVHJFOHDQLQJ
VROYHQW
'RQRWXVHFOHDQLQJDJHQWVWKDW
FRQWDLQVROYHQWV
::DUQLQJ
5LVNRILQMXU\
■ ,I\RXVXSSRUW\RXUZHLJKWVLW
RQWKHDSSOLDQFHGRRUZKHQLW
LV RSHQ WKH DSSOLDQFH PD\ WLS
RYHUZKLFKPD\UHVXOWLQ
LQMXU\
'R QRW VXSSRUW \RXU ZHLJKW RQ
WKHDSSOLDQFHGRRUZKHQLWLV
RSHQ
Risk of injury!
■ ,I\RXFOLPERQWRWKH
DSSOLDQFHWKHZRUNWRSPD\
EUHDNZKLFKPD\UHVXOWLQ
LQMXU\
'RQRWFOLPERQWRWKH
DSSOLDQFH
Risk of injury!
■ ,I\RXUHDFKLQWRWKHGUXP
ZKLOH LW LV VWLOO URWDWLQJ \RX ULVN
LQMXULQJ\RXUKDQGV
:DLWXQWLOWKHGUXPKDV
VWRSSHGURWDWLQJ
::DUQLQJ
5LVNRIVFDOGLQJ
:KHQZDVKLQJDWKLJK
WHPSHUDWXUHVWKHUHLVDULVNRI
VFDOGLQJ LI \RX FRPH LQWR FRQWDFW
ZLWKKRWGHWHUJHQWVROXWLRQHJ
ZKHQGUDLQLQJKRWGHWHUJHQW
VROXWLRQLQWRDZDVKEDVLQ
'RQRWUHDFKLQWRWKHKRW
GHWHUJHQWVROXWLRQ
::DUQLQJ
(\HVNLQLUULWDWLRQ
'HWHUJHQWDQGFDUHSURGXFWV
PD\VSUD\RXWLIWKHGHWHUJHQW
GUDZHULVRSHQHGZKLOHWKH
DSSOLDQFHLVLQRSHUDWLRQ
5LQVHH\HVVNLQWKRURXJKO\LI
WKH\LWFRPHVLQWRFRQWDFWZLWK
GHWHUJHQWVRUFDUHSURGXFWV,I
DFFLGHQWDOO\VZDOORZHGVHHN
PHGLFDODGYLFH
&DXWLRQ
0DWHULDOGDPDJHGDPDJHWR
WKHDSSOLDQFH
■ ,I WKH DPRXQW RI ODXQGU\ LQ WKH
DSSOLDQFHH[FHHGVLWV
PD[LPXPORDGFDSDFLW\LW
PD\QRWEHDEOHWRRSHUDWH
SURSHUO\RUWKLVPD\UHVXOWLQ
PDWHULDOGDPDJHRUGDPDJH
WRWKHDSSOLDQFH
'RQRWH[FHHGWKHPD[LPXP
ORDGFDSDFLW\RIGU\ODXQGU\
0DNHVXUH\RXFRPSO\ZLWK
WKHPD[LPXPORDGFDSDFLWLHV
VSHFLILHGIRUHDFKRIWKH
SURJUDPV
Material damage/damage to the appliance
■ ,I \RX SRXU WKH ZURQJ TXDQWLW\
RI GHWHUJHQW RU FOHDQLQJ DJHQW
LQWRWKHDSSOLDQFHWKLVPD\
UHVXOWLQPDWHULDOGDPDJHRU
GDPDJHWRWKHDSSOLDQFH
8VH GHWHUJHQWVFDUH SURGXFWV
FOHDQLQJ DJHQWV DQG VRIWHQHUV
LQDFFRUGDQFHZLWKWKH
PDQXIDFWXUHUVLQVWUXFWLRQV

HQ 6DIHW\LQVWUXFWLRQV
&OHDQLQJ0DLQWHQDQFH
::DUQLQJ
5LVNRIGHDWK
7KHDSSOLDQFHLVSRZHUHGE\
HOHFWULFLW\7KHUHLVDULVNRI
HOHFWULFVKRFNLI\RXFRPHLQWR
FRQWDFWZLWKOLYHFRPSRQHQWV
7KHUHIRUHSOHDVHQRWH
■ 6ZLWFKRIIWKHDSSOLDQFH
'LVFRQQHFWWKHDSSOLDQFH
IURPWKHSRZHUVXSSO\SXOO
RXWWKHSOXJ
■ 1HYHUWDNHKROGRIWKHPDLQV
SOXJZLWKZHWKDQGV
■ :KHQUHPRYLQJWKHPDLQV
SOXJIURPWKHVRFNHWDOZD\V
WDNH KROG RI WKH SOXJ LWVHOI DQG
QHYHUWKHPDLQVFDEOH
RWKHUZLVHWKLVPD\GDPDJH
WKHPDLQVFDEOH
■ 'RQRWPDNHDQ\WHFKQLFDO
PRGLILFDWLRQV WR WKH DSSOLDQFH
RULWVIHDWXUHV
■ 5HSDLUVDQGDQ\RWKHUZRUN
RQ WKH DSSOLDQFH PXVW RQO\ EH
FRQGXFWHGE\RXUFXVWRPHU
VHUYLFHRUE\DQHOHFWULFLDQ
7KHVDPHDSSOLHVIRU
UHSODFLQJWKHPDLQVFDEOH
ZKHQQHFHVVDU\
■ 6SDUHPDLQVFDEOHVFDQEH
RUGHUHGIURPRXUFXVWRPHU
VHUYLFH
::DUQLQJ
5LVNRISRLVRQLQJ
3RLVRQRXVIXPHVPD\EHJLYHQ
RIIE\FOHDQLQJDJHQWVWKDW
FRQWDLQVROYHQWVHJFOHDQLQJ
VROYHQW
'RQRWXVHFOHDQLQJDJHQWVWKDW
FRQWDLQVROYHQWV
::DUQLQJ
5LVN RI HOHFWULF VKRFNPDWHULDO
GDPDJHGDPDJHWRWKH
DSSOLDQFH
,IPRLVWXUHSHQHWUDWHVWKH
DSSOLDQFHWKLVPD\FDXVHLWWR
VKRUWFLUFXLW
'RQRWXVHDSUHVVXUHZDVKHU
VWHDPFOHDQHUKRVHRUVSUD\
JXQWRFOHDQ\RXUDSSOLDQFH
::DUQLQJ
5LVNRILQMXU\PDWHULDO
GDPDJHGDPDJHWRWKH
DSSOLDQFH
7KHXVHRIVSDUHSDUWVDQG
DFFHVVRULHVVXSSOLHGE\RWKHU
EUDQGVLVGDQJHURXVDQGPD\
UHVXOWLQLQMXU\PDWHULDOGDPDJH
RUGDPDJHWRWKHDSSOLDQFH
)RU VDIHW\ UHDVRQV XVH JHQXLQH
VSDUHSDUWVDQGDFFHVVRULHV
RQO\

6DIHW\LQVWUXFWLRQV HQ
&DXWLRQ
0DWHULDOGDPDJHGDPDJHWR
WKHDSSOLDQFH
&OHDQLQJDJHQWVDQGDJHQWVIRU
SUHWUHDWLQJODXQGU\HJVWDLQ
UHPRYHUVSUHZDVKVSUD\VHWF
PD\ FDXVH GDPDJH LI WKH\ FRPH
LQWRFRQWDFWZLWKWKHVXUIDFHVRI
WKHDSSOLDQFH7KHUHIRUHSOHDVH
QRWH
■ 'RQRWDOORZWKHVHDJHQWVWR
FRPHLQWRFRQWDFWZLWKWKH
VXUIDFHVRIWKHDSSOLDQFH
■ &OHDQWKHDSSOLDQFHZLWK
QRWKLQJEXWZDWHUDQGDVRIW
GDPSFORWK
■ 5HPRYH DQ\ GHWHUJHQW VSUD\
RU RWKHU UHVLGXHV LPPHGLDWHO\

HQ (QYLURQPHQWDOSURWHFWLRQ
7 (QYLURQPHQWDO
SURWHFWLRQ
(QYLURQPHQWDOSURWHFWLRQ
3DFNDJLQJXVHGDSSOLDQFH
'LVSRVHRISDFNDJLQJLQDQHQYLURQPHQWDOO\UHVSRQVLEOHPDQQHU
.HHS FKLOGUHQ DZD\ IURP WKH SDFNDJLQJ PDWHULDOV DQG SDFNDJLQJ PDWHULDOV DUH QRW WR\V
5HSURFHVVLQJDQGUHXVHRISDFNDJLQJPDWHULDOVDYHVUDZPDWHULDOVUHGXFLQJZDVWH
$OO SDFNDJLQJ PDWHULDOV XVHG DUH LQ OLQH ZLWK HQYLURQPHQWDO SURWHFWLRQ UHTXLUHPHQWV DQG
UHXVDEOH
1DPHDQGFRQWHQWRIKD]DUGRXVVXEVWDQFHVLQSURGXFWV
1RWH $OORIFRPSRQHQWSDUWVLQWKH%6+SURGXFWVWKDWIDOOLQWRWKHVDPHFDWHJRU\DUH
FRYHUHGLQWKHWDEOHDERYHWKHFRPSRQHQWSDUWVRIWKLVSURGXFWGHSHQGRQWKHDFWXDO
VLWXDWLRQ,I\RXKDYHDQ\TXHVWLRQVSOHDVHFRQWDFWXVE\GLDOOLQJWKHFXVWRPHUVHUYLFH
QXPEHULQWKHSURGXFW
&RPSRQHQWQDPH
+D]DUGRXVVXEVWDQFH
/HDG
3E
0HU
FXU\
+J
&DG
PLXP
&G
+H[DYD
OHQWFKUR
PLXP
&U9,
3RO\EURPL
QDWHGELSKH
Q\OV3%%
3RO\EUR
PLQDWHG
GLSKHQ\O
HWKHUV
3%'(
3&% [ Û Û Û Û Û
'LVSOD\ [ Û Û Û Û Û
&RQWUROOHU [ Û Û Û Û Û
3RZHUFRUGDQG
FRQQHFWZLULQJKDU
QHVV
[ Û Û Û Û Û
3XPSVDQGGULYHV [ Û Û Û Û Û
+RXVLQJ Û Û Û Û Û Û
'RRUDQGLWVFRQVWLW
XHQWSDUWV
[ Û Û Û Û Û
'UXPV\VWHP DQG LWV
FRQVWLWXHQWSDUWV
[ Û Û Û Û Û
:DWHUVXSSO\FRP
SRQHQWVH[HPSWHG
GU\HU
[ Û Û Û Û Û
7KLVWDEOHZDVGHYHORSHGDFFRUGLQJWRWKHSURYLVLRQVRI6-7
Û 7KHFRQWHQWRIVXFKKD]DUGRXVVXEVWDQFHLQDOOKRPRJHQHRXVPDWHULDOVRIVXFK
FRPSRQHQWLVEHORZWKHOLPLWUHTXLUHGE\*%7
[ 7KHFRQWHQWRIVXFKKD]DUGRXVVXEVWDQFHLQDFHUWDLQKRPRJHQHRXVPDWHULDOVRI
VXFKFRPSRQHQWLVEH\RQGWKHOLPLWUHTXLUHGE\*%7

(QYLURQPHQWDOSURWHFWLRQ HQ
7LSVRQHFRQRPLFDOXVH
■ $OZD\VILOOWKHDSSOLDQFHZLWKWKH
PD[LPXPDPRXQWRIODXQGU\IRUHDFK
SURJUDPPH ~ 3DJH
■ :DVKQRUPDOO\VRLOHGODXQGU\ZLWKRXW
SUHWUHDWLQJ
■ )RU OLJKW DQG QRUPDO VRLOLQJ LQ ODXQGU\
\RXFDQVDYHHQHUJ\DQGGHWHUJHQW
■ 7KHVHOHFWDEOHWHPSHUDWXUHVDSSO\WR
WKHFDUHODEHOVRQWKHWH[WLOHV7KH
WHPSHUDWXUHVLQWKHDSSOLDQFHPD\
GHYLDWHIURPWKLVVRWKDW\RXJHWWKH
RSWLPXPPL[RIHQHUJ\VDYLQJDQG
ZDVKLQJUHVXOWV
■ $XWRPDWLFVZLWFKRII,IWKH
DSSOLDQFHLVQRWRSHUDWHGIRUDSSUR[
PLQXWHVGHSHQGLQJRQWKHZDWHU
OHYHOLQVLGHRIDSSOLDQFHLWZLOO
DXWRPDWLFDOO\VZLWFKRIIEHIRUHWKH
SURJUDPPHVWDUWVRUDIWHUWKH
SURJUDPPHKDVHQGHG3UHVVWKH
SRZHU EXWWRQ # DJDLQ WR VZLWFK RQ WKH
DSSOLDQFH
■ ,IWKHODXQGU\ZLOOEHGULHGLQDGU\HU
VHOHFW WKH VSLQ VSHHG DFFRUGLQJ WR WKH
GU\HUPDQXIDFWXUHUVLQVWUXFWLRQV
,QGLFDWLYH6WDWHPHQWRI(QYLURQPHQW3URWHFWLRQRI3URGXFW
3OHDVHXVHDQGPDLQWDLQWKHSURGXFWDFFRUGLQJWRWKHLQVWUXFWLRQRIWKHPDQXDOWKH
SURGXFW PD\ KDUP WR HQYLURQPHQW DQG KXPDQ KHDOWK GXH WR LPSURSHU XWLOL]DWLRQ RU GLV
SRVDO
$FFRUGLQJWRWKHODZRI¶6WDWXWHRI5HFRYHU\DQG'LVSRVDORI:DVWH(OHFWULFDODQG
(OHFWURQLF3URGXFWV·3OHDVHKDQGLQWKHSURGXFWVWRWKHGLVSRVDOHQWHUSULVHVZKLFK
DUH TXDOLILHG ZKHQ \RX SODQ WR WKURZ LW 3OHDVH UHIHU WR WKH WDEOH DERYH IRU WKH LQIRUPD
WLRQDERXWWKHFRQWHQWRIUHOHYDQWWR[LFDQGKD]DUGRXVVXEVWDQFHV
HQ 3RVLWLRQLQJDQGFRQQHFWLQJ
5 3RVLWLRQLQJDQG
FRQQHFWLQJ
3RVLWLRQLQJDQGFRQQHFWLQJ
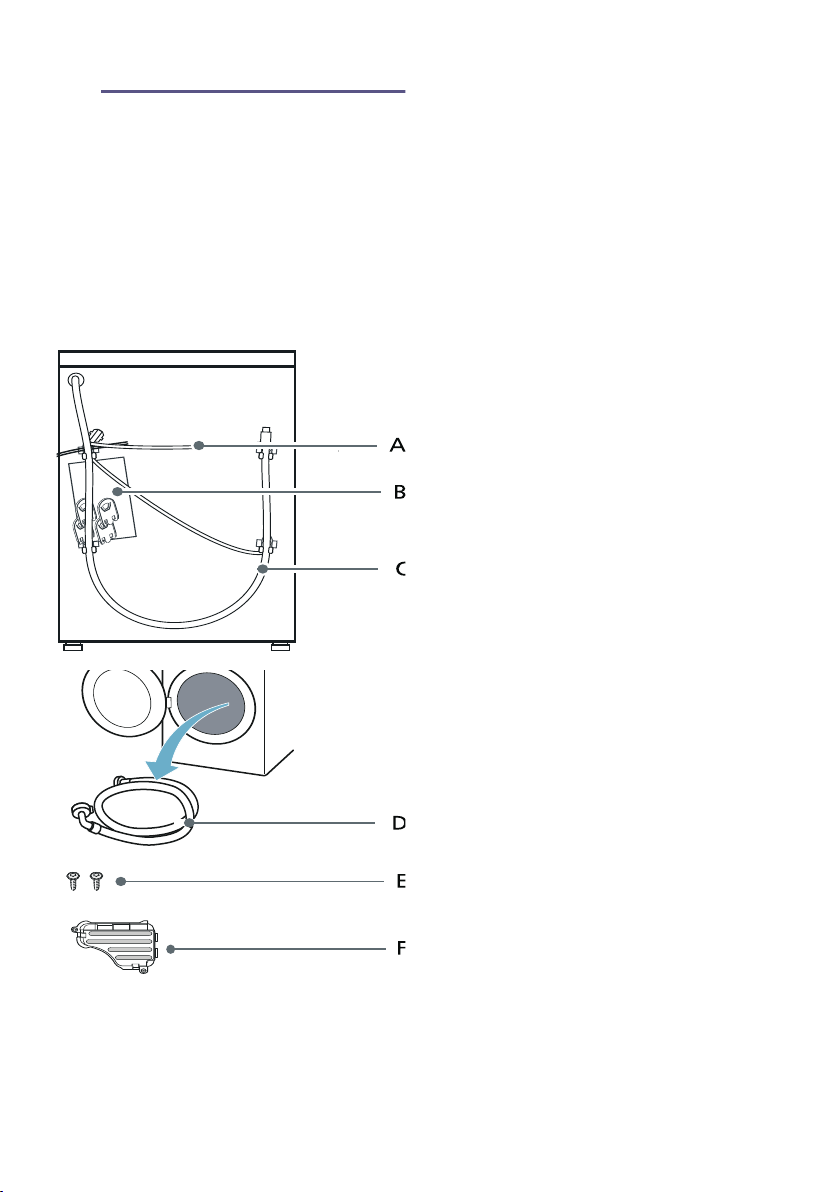
,QFOXGHGZLWKWKHDSSOLDQFH
1RWH &KHFNWKHDSSOLDQFHIRUWUDQVSRUW
GDPDJH1HYHUXVHDGDPDJHG
DSSOLDQFH,I\RXKDYHDQ\FRPSODLQWV
FRQWDFWWKHGHDOHUIURPZKRP\RX
SXUFKDVHG WKH DSSOLDQFH RU RXU FXVWRPHU
VHUYLFHV
'HSHQGLQJRQWKHPRGHO
,QDGGLWLRQ
DKRVHFODPSPPGLDPHWHU
DYDLODEOHIURPVSHFLDOLVWGHDOHUVLV
UHTXLUHGWRFRQQHFWWKHZDWHUGUDLQKRVH
WRDVLSKRQ
8VHIXOWRROV
■ 6SLULWOHYHOIRUDOLJQLQJ
■ :UHQFKZLWK
² :$) IRU ORRVHQLQJ WKH WUDQVSRUW
EUDFHVDQG
² :$)IRUDOLJQLQJWKHDSSOLDQFH
IHHW
,QVWDOODWLRQ
1RWH +XPLGLW\ LQ WKH GUXP LV FDXVHG E\
WKHILQDOLQVSHFWLRQ
6DIHW\LQVWUXFWLRQV
::DUQLQJ
5LVNRILQMXU\
■ 7KHDSSOLDQFHLVYHU\KHDY\
%HFDUHIXOZKHQOLIWLQJWUDQVSRUWLQJ
WKHDSSOLDQFH
$ 0DLQVFDEOH
% %DJ
■ 2SHUDWLQJDQGLQVWDOODWLRQ
LQVWUXFWLRQV
■ :DUUDQW\
■ 6XSSOHPHQWDU\VKHHWIRUWKH
RSHUDWLQJDQGLQVWDOODWLRQ
LQVWUXFWLRQV
■ %RWWRPFRYHULQVWUXFWLRQ
■ +RPH&RQQHFW,QVWDOODWLRQ
*XLGHV
■ &RYHUFDSVIRURSHQLQJVDIWHU
WKH WUDQVSRUW EUDFHV KDYH EHHQ
UHPRYHG
& :DWHUGUDLQKRVH
' :DWHUVXSSO\KRVHRQVWDQGDUG
$TXD6HFXUHPRGHOV
( 6FUHZ
) %RWWRPFRYHU
3RVLWLRQLQJDQGFRQQHFWLQJ HQ
■ :KHQWKHDSSOLDQFHLVOLIWHGE\LWV
SURWUXGLQJSDUWVHJWKHDSSOLDQFH
GRRUWKHFRPSRQHQWVPD\EUHDNRII
DQGFDXVHLQMXULHV
'RQRWOLIWWKHDSSOLDQFHE\SURWUXGLQJ
SDUWV
■ ,IWKHKRVHDQGPDLQVFDEOHVDUHQRW
URXWHGSURSHUO\WKHUHLVDULVNRI
WULSSLQJDQGLQMXU\
/D\KRVHVDQGFDEOHVLQVXFKDZD\
WKDWWKHUHLVQRULVNRIWULSSLQJ
&DXWLRQ
'DPDJHWRWKHDSSOLDQFH
)UR]HQKRVHVPD\ULSEXUVW
'RQRWLQVWDOOWKHDSSOLDQFHLQDUHDV
H[SRVHGWRIURVWRURXWGRRUV
&DXWLRQ
:DWHUGDPDJH
7KHFRQQHFWLRQSRLQWVIRUWKHZDWHU
VXSSO\KRVHDQGZDWHUGUDLQKRVHDUH
XQGHUKLJKZDWHUSUHVVXUH7RSUHYHQW
OHDNV DQG ZDWHU GDPDJH \RX PXVW IROORZ
WKHLQVWUXFWLRQVLQWKLVVHFWLRQ
1RWHV
■ ,QDGGLWLRQWRWKHVDIHW\LQIRUPDWLRQ
OLVWHGKHUHWKHORFDOZDWHUDQG
HOHFWULFLW\VXSSOLHUPD\KDYHVSHFLDO
UHTXLUHPHQWV
■ ,ILQGRXEWKDYHWKHDSSOLDQFH
FRQQHFWHGE\DVSHFLDOLVW
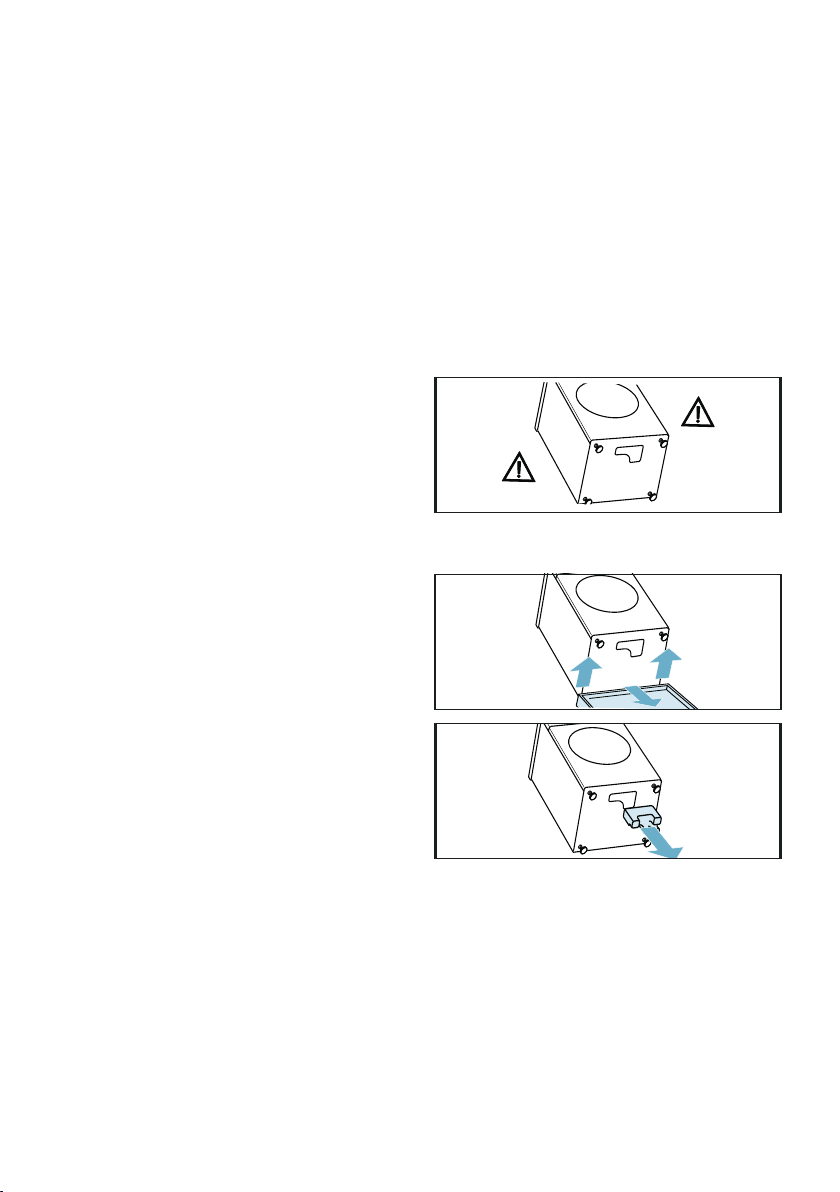
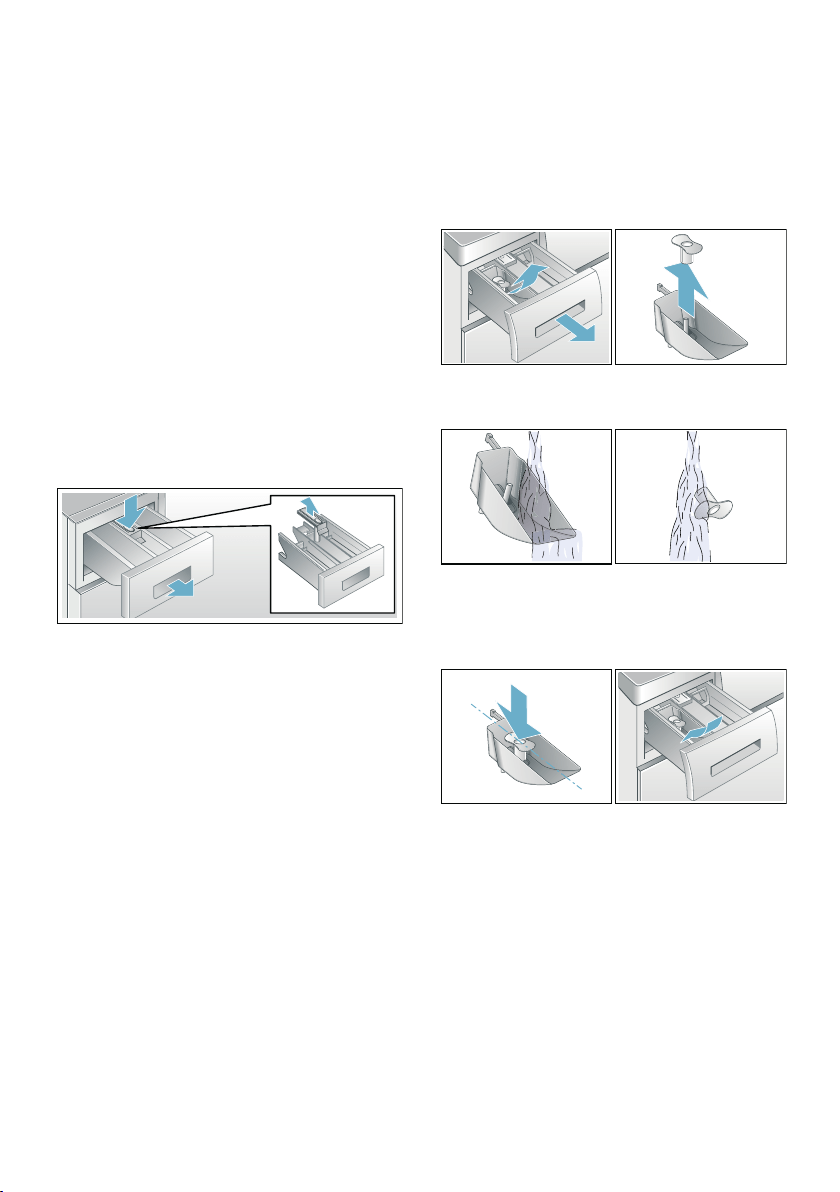
5HPRYLQJWKHIRDPEORFN
7KLVDSSOLDQFHLVVHFXUHGZLWKDIRDP
EORFNZKLFKKDVWREHUHPRYHGEHIRUH
XVLQJWKHDSSOLDQFHIRUWKHILUVWWLPH,ILQ
GRXEWSOHDVHFRQWDFWVSHFLDOLVW
&DXWLRQ
'DPDJHWRWKHDSSOLDQFH
,IWKHIRDPEORFNLVQRWUHPRYHGWKH
DSSOLDQFHPD\EHGDPDJHGZKHQLWLV
RSHUDWHG
%HIRUHXVLQJWKHDSSOLDQFHIRUWKHILUVW
WLPHPDNHVXUHWKDW\RXFRPSOHWHO\
UHPRYHWKHIRDPEORFN
::DUQLQJ
5LVNRILQMXU\GDPDJHWRWKH
DSSOLDQFH
7LOWLQJWKHDSSOLDQFHWRWKHUHDUPD\
UHVXOWLQLQMXU\DQGGDPDJHWRWKH
DSSOLDQFHLI\RXDFFLGHQWDOO\GURSWKH
DSSOLDQFH'RQRWWLOWWKHDSSOLDQFHRQ
\RXURZQDQGEHFDUHIXO
1RWH 5HPRYHWKHIRDPEORFNILUVW
EHIRUH\RXUHPRYHWKHWUDQVSRUWORFNV
1. 5HPRYHWKHIRDPEORFN
D 7LOWWKHDSSOLDQFHWRWKHUHDU
E 5HPRYHWKHIRDPEORFNDQG
ERWWRPSDG
GHSHQGLQJRQWKHPRGHO
HQ 3RVLWLRQLQJDQGFRQQHFWLQJ
2. )LWWKHERWWRPFRYHU<RXFDQILQGLW
LQWKHGUXP
/RFNWKHERWWRPFRYHUILUPO\LQSODFH
E\DSSO\LQJSUHVVXUHWRWKHVQDSLQ
KRRNV
1RWH ,IQHFHVVDU\VHFXUHERWWRP
FRYHUZLWKVFUHZV
,QVWDOODWLRQVXUIDFH
1RWH 7KHDSSOLDQFHPXVWEHVWDEOH
DOLJQHGVRWKDWLWGRHVQRWPRYHDURXQG
■ 7KHLQVWDOODWLRQVXUIDFHPXVWEHILUP
DQGOHYHO
■ 6RIWIORRUVIORRUFRYHULQJVDUHQRW
VXLWDEOH
,QVWDOODWLRQRQDEDVHRUD
ZRRGHQMRLVWIORRU
&DXWLRQ
'DPDJHWRWKHDSSOLDQFH
7KHDSSOLDQFHPD\ZDQGHUDQGWLS
WRSSOHIURPWKHEDVHZKHQVSLQQLQJ
7KHIHHWRIWKHDSSOLDQFHPXVWEH
VHFXUHGZLWKKROGLQJEUDFNHWV
2UGHUQR:0= :;
&= = ;
1RWH 2QZRRGHQMRLVWIORRUVLQVWDOOWKH
DSSOLDQFH
■ ,QDFRUQHULISRVVLEOH
■ 2QDZDWHUUHVLVWDQWZRRGHQERDUG
PLQPPWKLFNZKLFKLVVFUHZHG
WLJKWO\WRWKHIORRU
,QVWDOODWLRQRQDSODWIRUPZLWK
GUDZHU
3ODWIRUPRUGHUQR:0=:
:0=6:0=*
,QVWDOOLQJWKHDSSOLDQFHLQD
NLWFKHQHWWH
::DUQLQJ
5LVNRIGHDWK
7KHUHLVDULVNRIHOHFWULFVKRFNLI\RX
WRXFKOLYHFRPSRQHQWV
'RQRWUHPRYHWKHDSSOLDQFHFRYHULQJ
SODWH
1RWHV
■ 5HFHVVZLGWKRIFPUHTXLUHG
■ 2QO\LQVWDOOWKHDSSOLDQFHXQGHUQHDWK
DFRQWLQXRXVZRUNWRSWKDWLVVHFXUHO\
FRQQHFWHGWRDGMDFHQWFDELQHWV
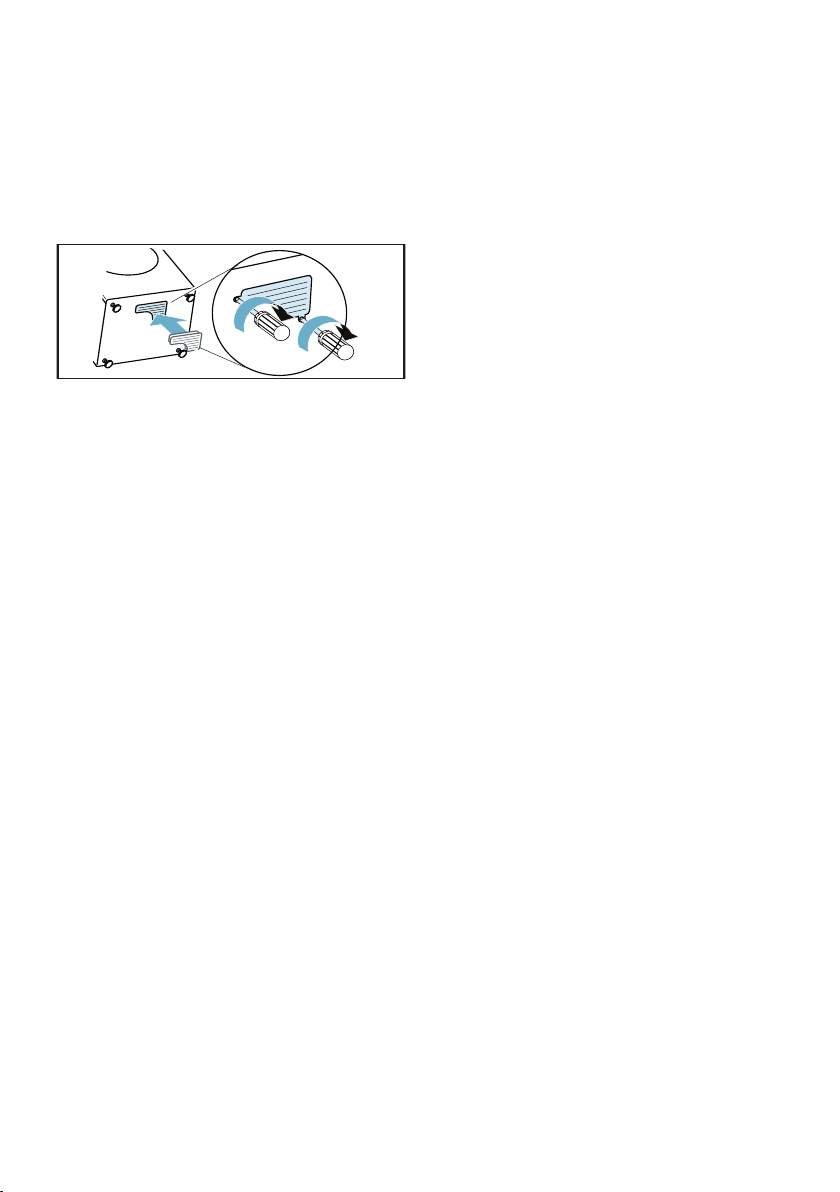
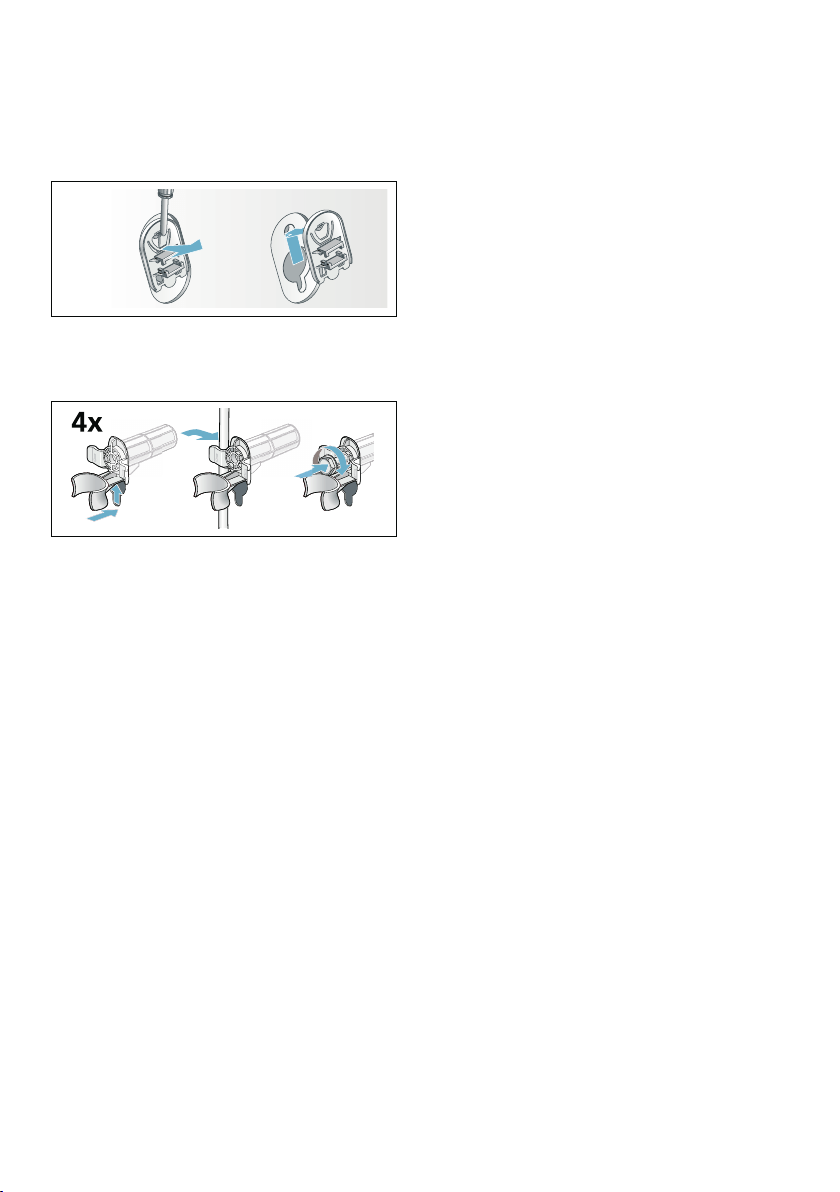
5HPRYLQJWKHWUDQVSRUWORFNV
&DXWLRQ
'DPDJHWRWKHDSSOLDQFH
■ 7KHDSSOLDQFHLVVHFXUHGIRU
WUDQVSRUWDWLRQ XVLQJ WUDQVSRUW ORFNV ,I
WKHWUDQVSRUWORFNVDUHQRWUHPRYHG
WKHDSSOLDQFHPD\EHFRPHGDPDJHG
ZKHQLWLVRSHUDWHG
%HIRUH XVLQJ WKH DSSOLDQFH IRU WKH ILUVW
WLPHPDNHVXUHWKDW\RXFRPSOHWHO\
UHPRYHDOOIRXUWUDQVSRUWORFNV.HHS
WKHORFNVLQDVDIHSODFH
■ 7RSUHYHQWWUDQVSRUWGDPDJHIURP
RFFXUULQJLIWKHDSSOLDQFHLVPRYHGDW
DODWHUGDWH\RXPXVWUHILWWKH
WUDQVSRUW ORFNV EHIRUH WUDQVSRUWLQJ WKH
DSSOLDQFH
1RWH .HHSWKHVFUHZVDQGVOHHYHVLQD
VDIHSODFH
'HSHQGLQJRQWKHPRGHO
3RVLWLRQLQJDQGFRQQHFWLQJ HQ
1. 7DNHWKHKRVHVRXWRIWKHKROGHUV
2. 8QVFUHZ DQG UHPRYH DOO IRXU WUDQVSRUW
EUDFHVFUHZV
5HPRYHWKHVOHHYHV7RGRWKLV
UHPRYHWKHPDLQVFDEOHIURPWKH
KROGHUV
3. )LWWKHFRYHUV/RFNWKHFRYHUVILUPO\
LQSODFHE\DSSO\LQJSUHVVXUHWRWKH
VQDSLQKRRNV
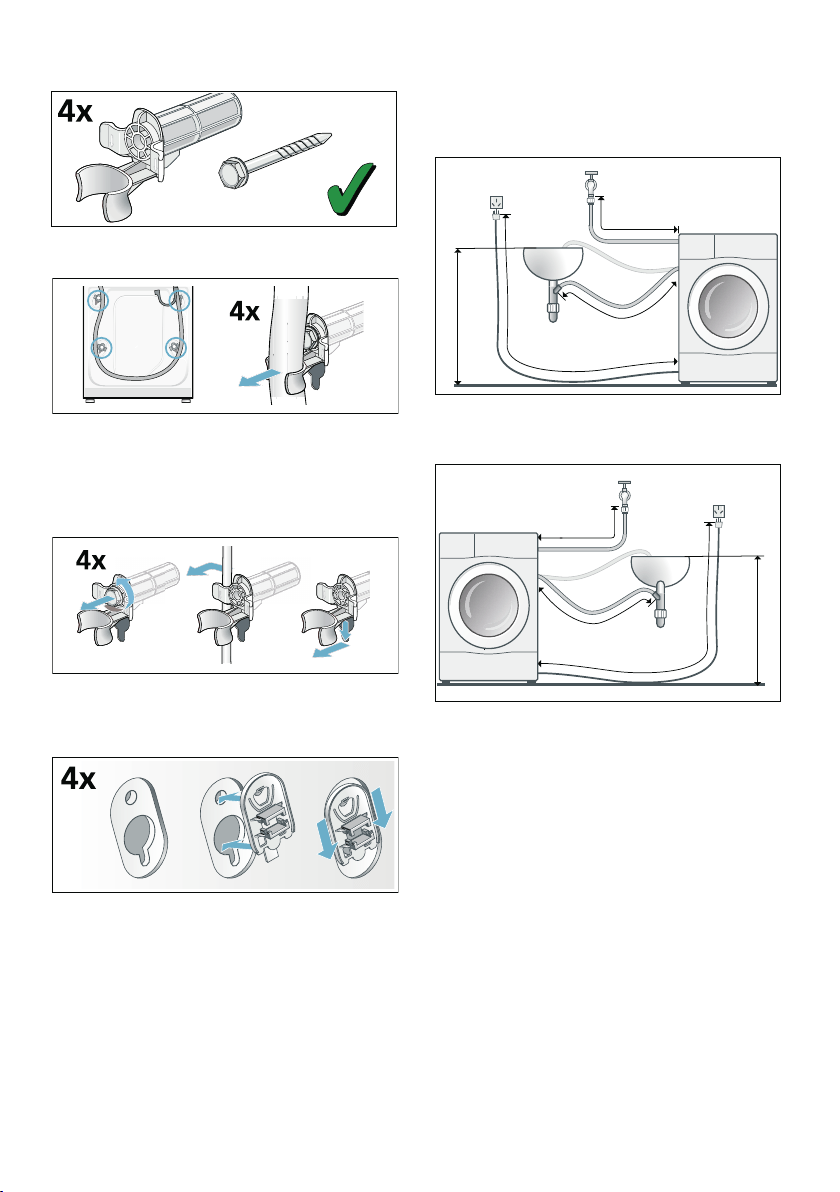
+RVHDQGFDEOHOHQJWKV
&RQQHFWLRQRQOHIWVLGH
RU
&RQQHFWLRQRQULJKWVLGH
1RWH ,IWKHKRVHKROGHUVDUHXVHGWKH
SRVVLEOHKRVHOHQJWKVDUHUHGXFHG
$YDLODEOHIURPGHDOHUFXVWRPHU
VHUYLFH
■ /RQJHUVXSSO\KRVHDSSUR[ P
■ $SSOLDQFH·VWDS
aFP
aFP
aFP
PD[FP
aFP
aFP
aFP
PD[FP
HQ 3RVLWLRQLQJDQGFRQQHFWLQJ
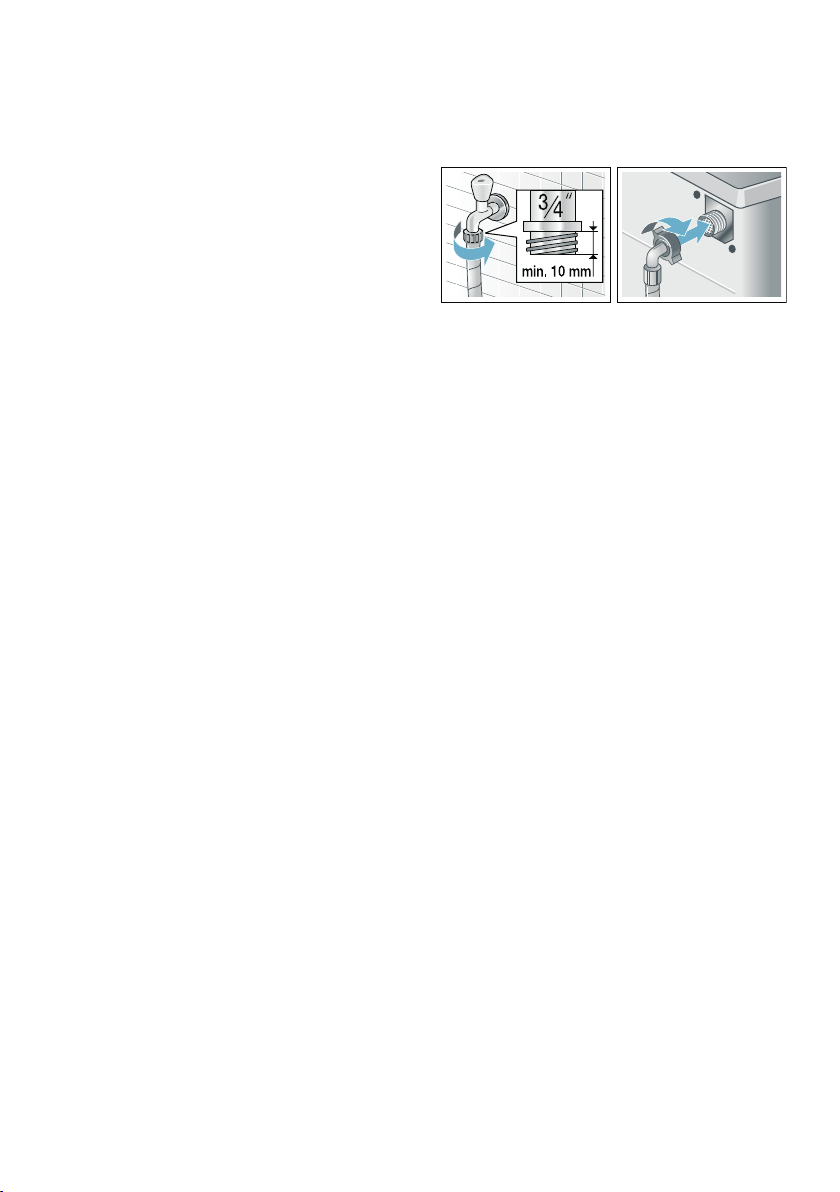
:DWHULQOHW
::DUQLQJ
5LVNRIGHDWK
7KHUHLVDULVNRIHOHFWULFVKRFNLI\RX
WRXFKOLYHFRPSRQHQWV
1RWHV
■ 2QO\ RSHUDWH WKH DSSOLDQFH XVLQJ FROG
PDLQVZDWHU
■ 'RQRWFRQQHFWWKHDSSOLDQFHWRWKH
PL[HUWDSRIDQXQSUHVVXULVHGKRW
ZDWHUERLOHU
■ 'RQRWXVHDXVHGVXSSO\KRVH2QO\
XVHWKHVXSSO\KRVHVXSSOLHGRURQH
WKDWZDVSXUFKDVHGIURPDQ
DXWKRULVHGVSHFLDOLVWUHWDLOHU
■ 'RQRWNLQNRUVTXDVKWKHZDWHU
VXSSO\KRVH
■ 'R QRW DOWHU VKRUWHQ FXW WKURXJK WKH
ZDWHUVXSSO\KRVHRWKHUZLVHLWV
VWUHQJWKLVQRORQJHUJXDUDQWHHG
■ 2QO\ WLJKWHQ WKH VFUHZ FRQQHFWLRQV E\
KDQG,IWKHVFUHZFRQQHFWLRQVDUH
WLJKWHQHG WRR PXFK ZLWK D WRRO SOLHUV
WKHWKUHDGPD\EHFRPHGDPDJHG
2SWLPXP ZDWHU SUHVVXUH LQ WKH VXSSO\
QHWZRUN
$WOHDVW03DEDU
0D[LPXP03DEDU
1RWHV
■ :KHQWKHWDSLVRSHQWKHZDWHUIORZ
UDWHLVDWOHDVWOPLQ
■ ,IWKHZDWHUSUHVVXUHLVKLJKHUWKDQ
WKLVDSUHVVXUHUHGXFLQJYDOYHPXVW
EHLQVWDOOHG
&RQQHFWLRQ
&RQQHFW WKH ZDWHU VXSSO\ KRVH WR WKH WDS
PP ö
1RWH 7XUQ RQ WKH WDS FDUHIXOO\ FKHFNLQJ
WKHOHDNWLJKWQHVVRIWKHFRQQHFWLRQ
SRLQWV7KHVFUHZFRQQHFWLRQLVXQGHU
PDLQVZDWHUSUHVVXUH
:DWHURXWOHW
::DUQLQJ
5LVNRIVFDOGLQJ
:KHQ\RXDUHZDVKLQJDWKLJK
WHPSHUDWXUHV WKHUH LV D ULVN RI VFDOGLQJ LI
\RX FRPH LQWR FRQWDFW ZLWK KRW ZDWHU HJ
ZKHQGUDLQLQJKRWZDWHULQWRD
ZDVKEDVLQ
'RQRWUHDFKLQWRWKHKRWZDWHU
&DXWLRQ
:DWHUGDPDJH
:KHQZDWHULVEHLQJSXPSHGDZD\WKH
RXWOHWKRVHLVXQGHUZDWHUSUHVVXUHDQG
PD\VOLSRXWRIWKHZDVKEDVLQRU
FRQQHFWLRQSRLQW
6HFXUHWKHGUDLQKRVHVRWKDWLWFDQQRW
VOLSRXW
&DXWLRQ
'DPDJHWRWKHDSSOLDQFHIDEULFV
,IWKHHQGRIWKHGUDLQKRVHLVLPPHUVHG
LQWKHGUDLQHGZDWHUZDWHUPD\EH
VXFNHGEDFNLQWRWKHDSSOLDQFHDQGPD\
GDPDJHWKHDSSOLDQFHIDEULFV
0DNHVXUHWKDW
■ 7KHSOXJGRHVQRWEORFNGUDLQDJH
IURPWKHZDVKEDVLQ
■ 7KHHQGRIWKHGUDLQKRVHLVQRW
LPPHUVHGLQWKHGUDLQHGZDWHU
■ 7KHZDWHUGUDLQVDZD\TXLFNO\
HQRXJK

3RVLWLRQLQJDQGFRQQHFWLQJ HQ
1RWHV
■ 'RQRWNLQNWKHZDWHUGUDLQKRVHRU
SXWVWUDLQRQLWOHQJWKZD\V
■ 7KHKHLJKWRIZDWHURXWOHWSODFHPHQW
0LQLPXPFPa 0D[LPXPFP
&RQQHFWLRQ
■ 'UDLQDJHLQWRDZDVKEDVLQ
6HFXUHWKHRXWOHWKRVHVRWKDWLW
FDQQRWVOLSRXW
(OERZDYDLODEOHIURPDIWHUVDOHV
VHUYLFH
,QGLYLGXDOSDUWQXPEHU
■ 'UDLQDJHLQWRDVLSKRQ
7KH FRQQHFWLRQ SRLQW PXVW EH VHFXUHG
XVLQJ D KRVH FODPS ZLWK D GLDPHWHU RI
PPDYDLODEOHIURPVSHFLDOLVW
GHDOHUV
■ 'UDLQDJHLQWRDSODVWLFSLSHZLWK
UXEEHUEXVKLQJRULQWRDGUDLQDJH
SLW
$OLJQPHQW
/HYHOWKHDSSOLDQFHXVLQJDVSLULWOHYHO
,QFRUUHFWOHYHOOLQJPD\UHVXOWLQLQWHQVH
QRLVHYLEUDWLRQVDQGZDQGHULQJ
1. /RRVHQWKHORFNQXWVXVLQJDZUHQFK
E\WXUQLQJLWLQDFORFNZLVHGLUHFWLRQ
2. &KHFNWKHDOLJQPHQWRIWKHDSSOLDQFH
ZLWKDVSLULWOHYHODQGDGMXVWLWLI
QHFHVVDU\&KDQJHWKHKHLJKWE\
WXUQLQJWKHDSSOLDQFHIHHW
$OOIRXUDSSOLDQFHIHHWPXVWVWDQG
ILUPO\RQWKHJURXQG
3. 7LJKWHQWKHORFNQXWDJDLQVWWKH
KRXVLQJ
,QGRLQJVRKROGWKHIRRWWLJKWDQGGR
QRWDGMXVWLWVKHLJKW
7KHORFNQXWVRQDOOIRXUDSSOLDQFH
IHHWPXVWEHVFUHZHGWLJKWO\DJDLQVW
WKHKRXVLQJ
(OHFWULFDOFRQQHFWLRQ
(OHFWULFDOVDIHW\
::DUQLQJ
5LVNRIHOHFWULFVKRFN
5LVNRIGHDWKLIOLYHSDUWVDUHWRXFKHG
■ :KHQGLVFRQQHFWLQJWKHPDLQSOXJ
DOZD\VSXOOWKHSOXJLWVHOIDQGQRWWKH
FDEOHRWKHUZLVHWKHFDEOHFRXOGEH
GDPDJHG
■ 1HYHUWRXFKRUKROGWKHPDLQVSOXJ
ZLWKZHWKDQGV
■ 1HYHUSXOORXWWKHPDLQVSOXJGXULQJ
RSHUDWLRQ
■ 2QO\FRQQHFWWKHZDVKHUGU\HUWRDQ
DOWHUQDWLQJFXUUHQWXVLQJD FRUUHFWO\
LQVWDOOHGHDUWKHGVRFNHW

HQ 3RVLWLRQLQJDQGFRQQHFWLQJ
■ 7KHPDLQVYROWDJHPXVWEHWKHVDPH
DVWKHYROWDJHVSHFLILFDWLRQVRQWKH
ZDVKHUGU\HUDSSOLDQFHUDWLQJSODWH
■ 7KHFRQQHFWHGORDGDQGWKHUHTXLUHG
IXVHDUHDOVRLQGLFDWHGRQWKH
DSSOLDQFHUDWLQJSODWH
(QVXUHWKDW
■ 7KHPDLQVSOXJDQGVRFNHWPDWFK
■ 7KHFDEOHFURVVVHFWLRQLVDGHTXDWH
■ 7KHHDUWKLQJV\VWHPKDVEHHQ
LQVWDOOHGFRUUHFWO\
■ $ GDPDJHGSRZHUFRUGLVRQO\
UHSODFHGE\DQ HOHFWULFLDQ
$ UHSODFHPHQWPDLQVFDEOHFDQEH
REWDLQHGIURPFXVWRPHUVHUYLFH
■ <RXGRQRWXVHPXOWLSOHSOXJV
FRXSOLQJVRUH[WHQVLRQFDEOHV
■ ,I D UHVLGXDOFXUUHQWRSHUDWHGFLUFXLW
EUHDNHULVXVHG\RXXVHRQO\D W\SH
ZKLFKIHDWXUHVWKLVV\PERO z
2QO\WKLVV\PEROJXDUDQWHHV
FRPSOLDQFHZLWKWKHFXUUHQWO\YDOLG
UHJXODWLRQV
■ 7KHPDLQVSOXJLVDOZD\VDFFHVVLEOH
■ 7KHSRZHUFRUGLVQRWNLQNHG
FUXVKHGDOWHUHGRUVHYHUHGDQGKDV
QRWFRPHLQWRFRQWDFWZLWKDQ\KHDW
VRXUFHV
%HIRUHZDVKLQJIRUWKHILUVW
WLPH
7KH DSSOLDQFHZDVLQVSHFWHGWKRURXJKO\
EHIRUH OHDYLQJ WKH IDFWRU\ 7R UHPRYH DQ\
UHVLGXDOWHVWZDWHUUXQWKH 'UXPFOHDQ
SURJUDPPH WKH ILUVW WLPH ZLWKRXW ODXQGU\
1RWH
■ 7KH DSSOLDQFHPXVWKDYHEHHQ
LQVWDOOHGDQGFRQQHFWHGSURSHUO\
~ 3RVLWLRQLQJDQGFRQQHFWLQJ
RQ SDJH
■ 1HYHUVZLWFKRQDGDPDJHG
DSSOLDQFH
1. ,QVHUWPDLQVSOXJ
2. 7XUQWKHZDWHUWDSRQ
3. 3UHVVWKH #EXWWRQWLOOWKHLQGLFDWRU
ODPS OLJKWV XS UHOHDVH WKH EXWWRQ 7KH
DSSOLDQFHLVVZLWFKHGRQ
4. &ORVHWKHGRRU'R QRWORDGDQ\
ODXQGU\
5. 6HOHFWWKH 'UXPFOHDQ&
SURJUDPPH
6. 2SHQWKHGHWHUJHQWGUDZHU
7. 3RXUDSSUR[ OLWUHRIZDWHULQWR
GLVSHQVHU ,,
8. $GGVWDQGDUGGHWHUJHQWWR
GLVSHQVHU ,,DFFRUGLQJ
WR PDQXIDFWXUHU·V LQVWUXFWLRQV IRU OLJKW
VRLOLQJ
1RWH 7R SUHYHQWRYHUVXGVLQJXVH
RQO\KDOIWKHUHFRPPHQGHGDPRXQW
RI GHWHUJHQW 'R QRW XVH DQ\ ZRROOHQV
RUPLOGGHWHUJHQWV
9. &ORVHWKHGHWHUJHQWGUDZHU
10. 6HOHFW A
11. :KHQ WKH SURJUDPPH HQGV SUHVV WKH
#EXWWRQWLOOWKHLQGLFDWRUODPSWXUQV
RIIUHOHDVHWKHEXWWRQ
<RXUDSSOLDQFHLVQRZUHDG\IRUXVH
7UDQVSRUWDWLRQ
HJZKHQPRYLQJKRPH
3UHSDUDWRU\ZRUN
1. 7XUQRIIWKHZDWHUWDS
2. 5HGXFHWKHZDWHUSUHVVXUHLQWKH
VXSSO\KRVH ~ 3DJH
3. 'UDLQDQ\UHVLGXDOZDWHU ~ 3DJH
4. 'LVFRQQHFWWKHDSSOLDQFHIURPWKH
PDLQV
5. 5HPRYHWKHKRVHV
6. (PSW\WKHGLVSHQVHUV
DQG ~ &OHDQLQJWKHPHDVXULQJDLG
$IRUOLTXLGGHWHUJHQWRQ SDJH
3RVLWLRQLQJDQGFRQQHFWLQJ HQ
,QVWDOOLQJWKHWUDQVSRUWORFNV
1. 5HPRYHWKHFRYHUVDQGNHHSWKHPLQ
DVDIHSODFH
8VHDVFUHZGULYHULIQHFHVVDU\
2. ,QVHUWDOOIRXUVOHHYHV
&OLSWKHPDLQVFDEOHVHFXUHO\LQWKH
KROGHUV ,QVHUW DQG WLJKWHQ WKH VFUHZV
%HIRUHVZLWFKLQJRQWKHDSSOLDQFH
DJDLQ
1RWHV
■ 7KHVXSSRUWVWUXWV PXVWEHUHPRYHG
■ 7KHWUDQVSRUWEUDFHV PXVWEH
UHPRYHG
~ 5HPRYLQJWKHWUDQVSRUWORFNV
RQ SDJH
■ 3RXUDSSUR[OLWUHRIZDWHULQWR
FRPSDUWPHQW,,VHOHFWWKH 5LQVH
SURJUDPPHRU 6SLQDQGVWDUW
7KLVZLOOSUHYHQWGHWHUJHQWIURP
IORZLQJVWUDLJKWLQWRWKHGUDLQGXULQJ
WKHQH[WZDVK
HQ *HWWLQJWRNQRZWKHDSSOLDQFH
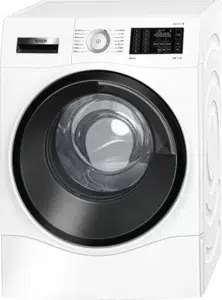
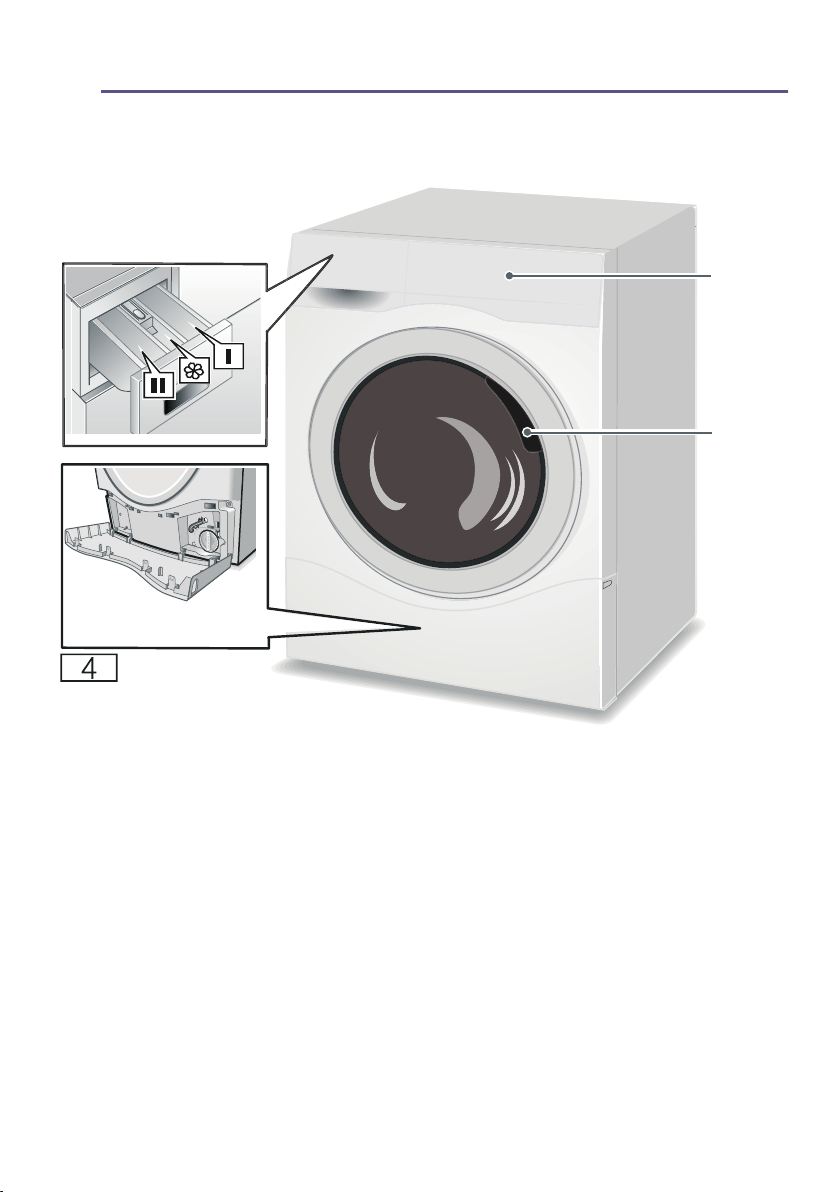
* *HWWLQJWRNQRZWKHDSSOLDQFH
*HWWLQJWRNQRZWKHDSSOLDQFH
$SSOLDQFH
#
( 'HWHUJHQWGUDZHU
0 2SHUDWLQJGLVSOD\SDQHO
8 /RDGLQJGRRU
@ 6HUYLFHIODS
*HWWLQJWRNQRZWKHDSSOLDQFH HQ
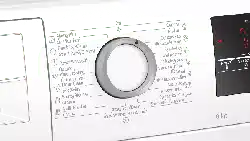
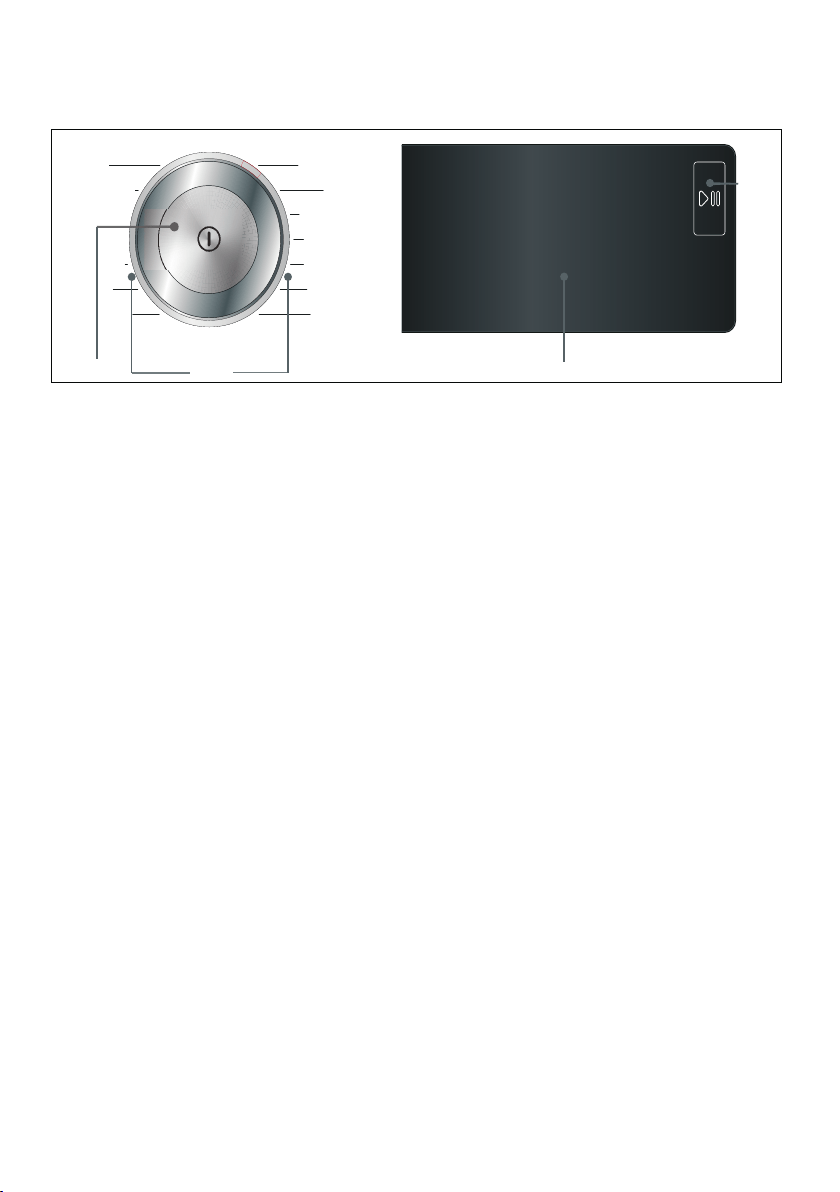
&RQWUROSDQHO
1RWH 7KHPD[6SLQVSHHGRQ7RXFK
'LVSOD\ IRU :/8::/8:
LV
#
( 3URJUDPPHVWKDWFDQEHVHOHFWHG
0 7RXFK'LVSOD\
8 6WDUW3DXVHEXWWRQ
6HOHFW A EXWWRQWRVWDUWLQWHUUXSW
HJ UHORDG ODXQGU\ DQG FDQFHO WKH
SURJUDPPH
@ 0DLQVZLWFK
3UHVVWKH # EXWWRQWRVZLWFKWKH
DSSOLDQFHRQRII
HQ *HWWLQJWRNQRZWKHDSSOLDQFH
7RXFK'LVSOD\
3URJUDPPHGHIDXOWVHWWLQJV
$GGLWLRQDOSURJUDPPHVHWWLQJV
6WDWXVLQGLFDWRUVIRUWKHSURJUDPPH
SURJUHVVSURJUDPPHVHTXHQFH
'LVSOD\ 6HWWLQJ 'HVFULSWLRQ
—
&
7HPSHUDWXUH 7HPSHUDWXUH
WKDW FDQ EH VHW
LQ&
— FROG
2
6SLQVSHHG 6SLQVSHHGLQ
USPUHYROX
WLRQVSHUPLQ
XWH
2 1RVSLQ
3URJUDPPH
UHPDLQLQJ
WLPH
3URJUDPPH
UHPDLQLQJ WLPH
GHSHQGVRQ
WKHSUR
JUDPPH VHOHF
WLRQLQKPLQ
KRXUVPLQ
XWHV
K
)LQLVKLQ
WLPH
3URJUDPPH
HQGV DIWHU K
K KRXUV
NJ 0D[LPXP
ORDG
5HFRP
PHQGHGORDG
LQNJ
'HSHQGLQJRQWKHVHOHFWHGPRGHODQG
SURJUDPPH
7KHPD[VSLQVSHHGRQ7RXFK'LV
SOD\IRU:/8:
:/8:LV
7KHPD[ORDGRI:/8:
:/8:LVNJ
'LVSOD\ 6HWWLQJ
䗨爷 䗨爷VSHHG3HUIHFW
撚坍 撚坍 HFR3HUIHFW
硼旤俊 硼旤俊'LVLQIHFWDQW
㒸儚伯 㒸儚伯 5LQVHSOXV
熓䦖叀 熓䦖叀(DV\LURQ
淈䇞 淈䇞 0HPRU\
㬴砌 㬴砌 %DVLFVHWWLQJV
'LVSOD\ 6HWWLQJ
A 6WDUW3DXVHEXWWRQ
ã 3UHWUHDWPHQW
N :DVK
à 5LQVH
0 6SLQ'UDLQ
(QG 3URJUDPPHHQG
/DXQGU\ HQ
Z /DXQGU\
/DXQGU\
3URWHFWLQJ\RXUODXQGU\DQG
DSSOLDQFH
&DXWLRQ
'DPDJHWRWKHDSSOLDQFHWH[WLOHV
)RUHLJQREMHFWVHJFRLQVSDSHUFOLSV
QHHGOHV QDLOV PD\ GDPDJH WKH ZDVKLQJ
RUFRPSRQHQWVRIWKHDSSOLDQFH
7KHIROORZLQJLQVWUXFWLRQVPXVWEH
REVHUYHGZKHQSUHSDULQJ\RXUODXQGU\
■ $OZD\VIROORZWKH PDQXIDFWXUHUV
LQVWUXFWLRQVZKHQGRVLQJ
DOO GHWHUJHQWVFOHDQLQJDLGVFDUH
SURGXFWVDQG FOHDQLQJDJHQWV
■ 'RQRWH[FHHGPD[LPXPORDG
2YHUILOOLQJZLOOLPSDLUWKHZDVKLQJ
UHVXOW
■ .HHSGHWHUJHQWVDQGDJHQWVIRUWKH
SUHWUHDWPHQWRIODXQGU\HJ VWDLQ
UHPRYHUSUHZDVKVSUD\V HWFDZD\
IURPWKHVXUIDFHVRIWKHDSSOLDQFH
8VLQJD GDPSFORWKLPPHGLDWHO\
UHPRYHDQ\ILQHVSUD\UHVLGXHDQG
RWKHUUHVLGXHRUGURSOHWV
■ (PSW\DQ\SRFNHWV5HPRYHDQ\
IRUHLJQREMHFWV
■ 5HPRYHPHWDOSDUWVSDSHUFOLSV
HWF
■ 7URXVHUVNQLWZHDUDQGNQLWWHG
WH[WLOHV HJ MHUVH\ JDUPHQWV 7VKLUWV
RUVZHDWVKLUWVVKRXOGEHWXUQHG
LQVLGHRXW
■ (QVXUHWKDWXQGHUZLUHGEUDVDUH
DSSOLDQFHZDVKDEOH
■ :DVK GHOLFDWHV LQ D QHW RU EDJ WLJKWV
XQGHUZLUHGEUDVHWF
■ &ORVH]LSVEXWWRQXSFRYHUV
■ %UXVK VDQG RXW RI SRFNHWV DQG FROODUV
■ 5HPRYHFXUWDLQILWWLQJVRULQFOXGHLQ
WKHQHWEDJ
6RUWLQJODXQGU\
6RUW\RXUODXQGU\DFFRUGLQJWRWKHFDUH
LQVWUXFWLRQVDQGPDQXIDFWXUHUV
LQIRUPDWLRQ RQ WKH FDUH ODEHOV GHSHQGLQJ
RQ
■ 7\SHRIIDEULFILEUH
■ &RORXU
1RWH /DXQGU\PD\GLVFRORXU:DVK
ZKLWHDQGFRORXUHGLWHPVVHSDUDWHO\
:DVKQHZFRORXUHGLWHPVVHSDUDWHO\
WKHILUVWWLPH\RXZDVKWKHP
■ 6RLOLQJ
:DVKODXQGU\ZLWKWKHVDPHOHYHORI
VRLOLQJWRJHWKHU
6RPHH[DPSOHVRIVRLOLQJOHYHOVFDQ
EHIRXQGLQWKHFKDSWHU
² /LJKW'RQRWQHHGWRSUHWUHDW
VHOHFWWKH 䗢爱 VSHHG3HUIHFW
VHWWLQJLIQHFHVVDU\
² 1RUPDO
² +HDY\ /RDG OHVV ODXQGU\ QHHG WR
SUHWUHDWRUVRDNODXQGU\ILUVWO\
² 6WDLQV5HPRYHSUHWUHDWVWDLQV
ZKLOH WKH\ DUH IUHVK )LUVW GDE ZLWK
VRDS\ZDWHUGRQRWUXE7KHQ
ZDVKWKHLWHPVRIODXQGU\ZLWKWKH
DSSURSULDWHSURJUDPPH6WXEERUQ
RUGULHGLQVWDLQVFDQVRPHWLPHV
RQO\EHUHPRYHGE\ZDVKLQJ
VHYHUDOWLPHV
■ 6\PEROVRQWKHFDUHODEHOV
M 6XLWDEOHIRUQRUPDOZDVKLQJ
SURFHVV
HJ&RWWRQVSURJUDPPH
N $JHQWOHZDVKLQJSURFHVVLV
UHTXLUHG
HJ6\QWKHWLFVSURJUDPPH
O $QHVSHFLDOO\JHQWOHZDVKLQJ
SURFHVVLVUHTXLUHG
HJ'HOLFDWHV SURJUDPPH
W 6XLWDEOHIRUZDVKLQJE\KDQG
HJ:RRO WSURJUDPPH
Ž 'RQRWPDFKLQHZDVK

HQ 2YHUYLHZRISURJUDPPHV
P2YHUYLHZRI
SURJUDPPHV
2YHUYLHZRISURJUDPPHV
6HOHFWDEOHSURJUDPPH
3URJUDPPH7\SHRIZDVKLQJ 2SWLRQV,QIRUPDWLRQ
1DPHRIWKHSURJUDPPH
%ULHIH[SODQDWLRQRIWKHSURJUDPPHDQGIRUZKLFK
IDEULFVLWLVVXLWDEOH
0D[ORDGDVNJ
GHSHQGLQJRQWKHPRGHODQGWKH
SURJUDPPH
0D[ORDGDFFRUGLQJWR
*%
VHOHFWDEOHWHPSHUDWXUHDV&
GHSHQGLQJRQWKHPRGHODQGWKH
SURJUDPPH
VHOHFWDEOHVSLQVSHHGLQUSP
GHSHQGLQJRQWKHPRGHODQGWKH
SURJUDPPH
SRVVLEOHSURJUDPPHDGGLWLRQDO
VHWWLQJV GHSHQGLQJ RQ WKH PRGHO
DQGWKHSURJUDPPH
VRIWHQHU
&RWWRQV
+DUGZHDULQJIDEULFVKHDWUHVLVWDQWIDEULFVPDGH
RIFRWWRQRUOLQHQ
1RWH 5HGXFHG ORDG ZLWK 䗢爱 VSHHG3HUIHFW
SURJUDPPHDGGLWLRQDOVHWWLQJ
0D[NJNJ
0D[NJNJ
—&
USP
USP
撚坍 䗨爷硼旤俊 㒸儚伯 熓
䦖叀 㬴砌넬淈䇞
SRVVLEOH
0L[
0L[HGORDGRIFRWWRQVDQGV\QWKHWLFIDEULFV
0D[NJ
—&
USP
2USP
撚坍 䗨爷硼旤俊 㒸儚伯 熓
䦖叀 㬴砌넬淈䇞
SRVVLEOH

2YHUYLHZRISURJUDPPHV HQ
6\QWKHWLFV
7H[WLOHVPDGHRIV\QWKHWLFPDWHULDOVRUEOHQGHG
IDEULFV
0D[NJ
0D[NJ
—&
USP
2USP
撚坍 䗨爷硼旤俊 㒸儚伯 熓
䦖叀 㬴砌넬淈䇞
SRVVLEOH
'HOLFDWHV
)RUGHOLFDWHZDVKDEOHIDEULFVHJPDGHRIVLON
VDWLQV\QWKHWLFILEUHVRUEOHQGVHJVLONEORXVHV
VLONVFDUYHV
0D[NJ
—&
2USP
撚坍 䗨爷㒸儚伯 熓䦖叀 㬴
砌넬淈䇞
SRVVLEOH
:RRO W
+DQGRUDSSOLDQFHZDVKDEOHIDEULFVWKDWDUH
PDGHRIZRRORUFRQWDLQZRRO
SDUWLFXODUO\JHQWOHZDVKSURJUDPPHWRSUHYHQW
ODXQGU\IURPVKULQNLQJZLWKORQJHUSDXVHVLQWKH
SURJUDPPHGXULQJZKLFKWKHLWHPVUHVWLQWKH
ZDWHU
0D[NJ
—&
2USP
㬴砌넬淈䇞
SRVVLEOH
5LQVH
)RUULQVLQJZLWKDVXEVHTXHQWVSLQF\FOH
2USP
2USP
㒸儚伯 熓䦖叀 淈䇞
SRVVLEOH
6SLQ
)RU VSLQQLQJ ZLWK D VHOHFWDEOH VSLQ VSHHG DQG VXE
VHTXHQWGUDLQLQJ
2USP
2USP
熓䦖叀 淈䇞
QRWSRVVLEOH
3URJUDPPH7\SHRIZDVKLQJ 2SWLRQV,QIRUPDWLRQ

HQ 2YHUYLHZRISURJUDPPHV
'UXPFOHDQ
6SHFLDO SURJUDP IRU GUXP K\JLHQH RU IOXII UHPRYDO
'R QRWORDGDQ\ODXQGU\
& DQWLEDFWHULDOSURJUDP
& DQWLEDFWHULDOSURJUDPVSHFLDOGUXPFOHDQ
LQJGHWHUJHQWFDQEHXVHG
— QR DQWLEDFWHULDO SURJUDPPH WR UHPRYH KDLU RU
IOXIIIURPWKHWXE
7KHV\PERO ÛPHPRU\IXQFWLRQGUXPFDUH
IODVKHVLI\RXKDYHQRWXVHGDQ\SURJUDPPHDWD
WHPSHUDWXUHRI&RUKLJKHUIRUDQH[WHQGHG
SHULRG
1RWHV
■ 6ZLWFKLQJ WKH GUXPFOHDQ LQIRUPDWLRQ VLJQDO RQ
RII
■ $OZD\VIROORZWKH PDQXIDFWXUHUVLQVWUXFWLRQV
ZKHQGRVLQJWKH GHWHUJHQW
■ 7KLVSURJUDPPHFDQQRWEHLQWHUUXSWHG
0D[NJ
—&&
USP
㬴砌넬淈䇞
QRWSRVVLEOH
'RZQ
$SSOLDQFHZDVKDEOHIDEULFVVWXIIHGZLWKGRZQ
VXFK DV SLOORZV DQG GXYHWV DOVR VXLWDEOH IRU LWHPV
VWXIIHGZLWKV\QWKHWLFILEUHV
0D[NJ
0D[NJ
—&
USP
2USP
撚坍넬䗨爷㒸儚伯넬淈䇞
QRWSRVVLEOH
2XWGRRU
:HDWKHUSURRI DQG RXWGRRU FORWKLQJ ZLWK PHPEUDQH
FRDWLQJDQGZDWHUUHVLVWDQWWH[WLOHV
0D[NJ
—&
2USP
撚坍 䗨爷㒸儚伯 㬴砌넬淈䇞
QRWSRVVLEOH
'HQLP
3URJUDPVXLWDEOHIRUZDVKLQJ-HDQVDQGRWKHU
GDUNFRORUWH[WLOHVPDGHRIFRWWRQRUV\QWKHWLFWH[
WLOHV
0D[NJ
0D[NJ
—&
USP
2USP
撚坍 䗨爷㒸儚伯 熓䦖叀 㬴
砌넬淈䇞
SRVVLEOH
3URJUDPPH7\SHRIZDVKLQJ 2SWLRQV,QIRUPDWLRQ

2YHUYLHZRISURJUDPPHV HQ
1RWHV
■ 6XLWDEOHIRU:$8:
■ 6XLWDEOHIRU:/8::/8:
6RDNLQJ
$GGWKHDSSURSULDWHGRVHGHWHUJHQWLQWR
GLVSHQVHU ,,DFFRUGLQJ
WR WKH PDQXIDFWXUHU·VLQVWUXFWLRQVVHW
WKH &RWWRQV &SURJUDPPHDQG
VHOHFW A $IWHU PLQXWHV VHOHFW A IRU
VRDNLQJWKHODXQGU\:KHQWLPHLVXS
VHOHFW AWREHFRQWLQXHWKHSURJUDPPH
RUVHOHFWRWKHUZDVKLQJSURJUDPPHV
DFFRUGLQJWRWH[WLOHV
%DE\FDUH
6XLWDEOHIRUZDVKLQJVRLOHGEDELHVNLGVFORWKHV
PDGHRIFRWWRQHIIHFWLYHO\UHPRYLQJEDFWHULD
0D[NJ
0D[NJ
—&
USP
USP
撚坍 䗨爷硼旤俊 㒸儚伯 熓
䦖叀 㬴砌넬淈䇞
SRVVLEOH
6XSHU·
([WUDVKRUWSURJUDPPHRIDSSUR[PLQXWHV
VXLWDEOHIRUVPDOOLWHPVRIOLJKWO\VRLOHGODXQGU\
0D[NJ
—&
USP
2USP
㒸儚伯넬㬴砌넬淈䇞
SRVVLEOH
0\7LPH
0L[HGIDEULFVIRUOLJKWO\VRLOHGODXQGU\PDGHRI
FRWWRQDQGV\QWKHWLFV
7KHOHQJWKRIWKHZDVKSURJUDPPHFDQEHVHW
HDFKWLPH7KHPD[LPXPSURJUDPPHOHQJWKLV
PLQXWHVDQGLWFDQEHUHGXFHGLQPLQXWHLQFUH
PHQWV
1RWHV
■ ,QFUHDVHWKHOHQJWKRIWKHZDVKSURJUDPPH
ORDGZLWK 㒲儔伩 5LQVHSOXVSURJUDPPH
DGGLWLRQDOVHWWLQJ
■ 7KH )LQLVKLQSURJUDPPHGHIDXOWVHWWLQJFDQ
QRWEHVHOHFWHGIRUWKLVSURJUDPPH
0D[NJ
—&
USP
2USP
㒸儚伯 熓䦖叀 㬴砌넬淈䇞
SRVVLEOH
3URJUDPPH7\SHRIZDVKLQJ 2SWLRQV,QIRUPDWLRQ
HQ 3URJUDPPHGHIDXOWVHWWLQJV
0 3URJUDPPHGHIDXOW
VHWWLQJV
3URJUDPPHGHIDXOWVHWWLQJV
<RXFDQFKDQJHWKHGHIDXOWVHWWLQJVIRU
VHOHFWHGSURJUDPPHV7KHVHWWLQJVFDQ
EHFKDQJHGHYHQZKLOHWKHVHOHFWHG
SURJUDPPHLVUXQQLQJ7KHHIIHFWV
GHSHQGLQJRQWKHSURJUHVVRIWKH
SURJUDPPH
7HPSHUDWXUH
&
'HSHQGLQJ RQ ZKDW VWDJH WKH SURJUDPPH
LVLQ\RXFDQFKDQJHWKHWHPSHUDWXUH
EHIRUHDQGGXULQJWKHSURJUDPPH
7KHPD[LPXPWHPSHUDWXUHWKDWFDQEH
VHWGHSHQGLQJRQWKHPRGHODQGWKH
SURJUDPPHWKDWKDVEHHQVHOHFWHG
6SLQVSHHG
0
'HSHQGLQJ RQ ZKDW VWDJH WKH SURJUDPPH
LVLQ\RXFDQFKDQJHWKHVSLQVSHHGLQ
USPUHYROXWLRQVSHUPLQXWHEHIRUHDQG
GXULQJWKHSURJUDPPHE\DGMXVWLQJWKH
GHVLUHGVSHHGRQWKHGLVSOD\
VHWWLQJ 2 2 µ1R VSLQµ 7KH ZDWHU LV RQO\
GUDLQHG
<RXFDQVHOHFW´1RVSLQµWRSUHYHQW
FUHDVLQJLIWKHODXQGU\ZLOOQRWEHWDNHQ
RXW RI WKH DSSOLDQFH LPPHGLDWHO\ DIWHU WKH
SURJUDPPHKDVHQGHG
7KHPD[LPXPVSHHGWKDWFDQEHVHW
GHSHQGLQJRQWKHPRGHODQGWKH
SURJUDPPHWKDWKDVEHHQVHOHFWHG
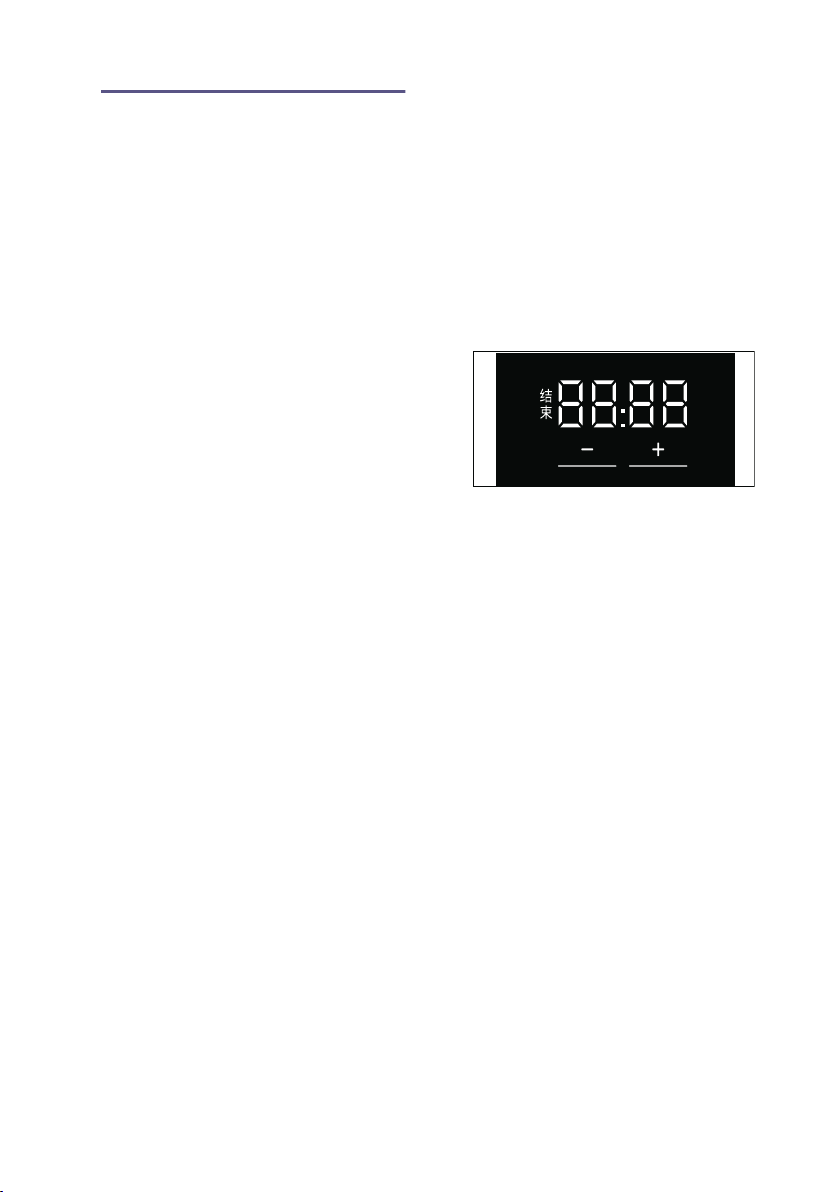
)LQLVKLQ
惫䥷
%HIRUHVWDUWLQJWKHSURJUDPPH\RX
FDQSUHVHOHFWWKHSURJUDPPHHQG
)LQLVKLQWLPHLQKLQFUHPHQWVK
KRXUXSWRDPD[LPXPRIKRXUV
7RGRWKLV
1. 6HOHFW D SURJUDPPH H[FHSW 0\7LPH
SURJUDPPH
7KHSURJUDPPHGXUDWLRQLVGLVSOD\HG
IRU WKH VHOHFWHG SURJUDPPH HJ
KRXUVPLQXWHV
2. 6HOHFWWKH ˜EXWWRQUHSHDWHGO\XQWLO
WKHUHTXLUHGQXPEHURIKRXUVLV
GLVSOD\HG
1RWH 7KHVHWWLQJYDOXHVDUH
LQFUHDVHGXVLQJWKH ˜EXWWRQDQG
GHFUHDVHGXVLQJWKH ªEXWWRQ
3. 6HOHFWWKH AEXWWRQ
7KHSURJUDPPHVWDUWV
7KHVHOHFWHGQXPEHURIKRXUVHJ
KLVVKRZQLQWKHGLVSOD\SDQHODQG
FRXQWVGRZQXQWLOWKHSURJUDPPH
VWDUWV 7KH GXUDWLRQ RI WKH SURJUDPPH
LVWKHQGLVSOD\HG
1RWH 7KHOHQJWKRIWKHSURJUDPPHLV
DXWRPDWLFDOO\DGMXVWHGZKHQWKH
SURJUDPPHLVUXQQLQJ&KDQJHVWRWKH
SURJUDPPHGHIDXOWVHWWLQJVRU
SURJUDPPHDGGLWLRQDOVHWWLQJVPD\DOVR
FKDQJHWKHSURJUDPPHGXUDWLRQ
$IWHUVWDUWLQJWKHSURJUDPPHLID
)LQLVKLQWLPHKDVEHHQVHOHFWHGDQGWKH
SURJUDPPHKDVQRW\HWVWDUWHG\RXFDQ
FKDQJHWKHSUHVHOHFWHGQXPEHURIKRXUV
DVIROORZV
1. 6HOHFWWKH AEXWWRQ
2. 7RXFKWKH ˜RU ªEXWWRQWRFKDQJH
WKHQXPEHURIKRXUV
3. 6HOHFWWKH AEXWWRQ

$GGLWLRQDOSURJUDPPHVHWWLQJV HQ
\ $GGLWLRQDO SURJUDPPH
VHWWLQJV
$GGLWLRQDOSURJUDPPHVHWWLQJV
1RWH <RXFDQILQGSRVVLEOHDGGLWLRQDO
SURJUDPPHVHWWLQJVLQWKHRYHUYLHZ
WKHVHGLIIHUGHSHQGLQJRQWKHPRGHO
%\VHOHFWLQJDGGLWLRQDOSURJUDPPH
VHWWLQJV\RXFDQEHWWHUDGDSWWKH
ZDVKLQJ SURFHVV WR \RXU LWHPV RI ODXQGU\
7KHVHWWLQJVFDQEHVHOHFWHGRU
GHVHOHFWHG GHSHQGLQJ RQ WKH SURJUHVV RI
WKHSURJUDPPH
7KHEXWWRQLQGLFDWRUODPSVOLJKWXSLID
VHWWLQJLVDFWLYDWHG
7KHVHWWLQJVDUHQRWUHWDLQHGDIWHUWKH
DSSOLDQFHLVVZLWFKHGRII
䗢爱 VSHHG3HUIHFW
䗨爷
:DVKLQJLQDVKRUWHUWLPHZKLOHDFKLHYLQJ
DZDVKLQJUHVXOWWKDWLVFRQVLVWHQWZLWK
EXWXVHVPRUHHQHUJ\WKDQWKHVHOHFWHG
SURJUDPPHZLWKRXWWKH 䗢爱
VSHHG3HUIHFW VHWWLQJ
1RWH 'RQRWH[FHHGWKHPD[LPXPORDG
撔均 HFR3HUIHFW
撚坍
(QHUJ\RSWLPLVHGZDVKLQJE\UHGXFLQJ
WKHWHPSHUDWXUHZKLOHDFKLHYLQJD
ZDVKLQJUHVXOWWKDWLVFRQVLVWHQWZLWKWKH
VHOHFWHGSURJUDPPHZLWKRXWWKH 撔
均 HFR3HUIHFW VHWWLQJ
硶旞俄'LVLQIHFWDQW
硼旤俊
)RUZDVKLQJZLWKVSHFLDOGLVLQIHFWDQWVLQ
RUGHUWRNLOOEDFWHULDDQGWKHUHE\PHHW
KLJKVWDQGDUGVRIK\JLHQH
1RWH $GGGLVLQIHFWDQWWRGLVSHQVHU ,,
㒲儔伩 5LQVHSOXV
㒸儚伯
$GGLWLRQDOULQVHF\FOHGHSHQGLQJRQWKH
SURJUDPPH ORQJHU SURJUDPPH OHQJWK IRU
SDUWLFXODUO\ VHQVLWLYH VNLQ DQGRU IRU DUHDV
ZLWKYHU\VRIWZDWHU
熍䦐厺(DV\LURQ
熓䦖叀
5HGXFHVFUHDVLQJWKDQNVWRDVSHFLDO
VSLQVHTXHQFHIROORZHGE\IOXIILQJDQG
UHGXFHGVSLQVSHHG
1RWH 7KH ZDVKLQJV UHVLGXDO PRLVWXUH LV
LQFUHDVHG
淂䇘 0HPRU\
淈䇞
<RXFDQVDYHDVHOHFWHGSURJUDPPHZLWK
\RXUIDYRXULWHVHWWLQJVKHUH
7RVWRUH
1. 6ZLWFKRQWKHDSSOLDQFH
2. 6HOHFWDSURJUDPPH
3. ,IUHTXLUHGFKDQJHWKHSURJUDPPH
GHIDXOWVHWWLQJVDQGRUVHOHFW
SURJUDPPHDGGLWLRQDOVHWWLQJV
4. 7RXFKDQGKROG 淂䇘EXWWRQIRU
DSSUR[WKUHHVHFRQGV
7KHSURJUDPPHLVVDYHGLIDOORIWKH
VHWWLQJVIODVKEULHIO\
7R XVH WKH VDYHG SURJUDPPH WRXFK 淂䇘
EXWWRQEULHIO\DIWHU\RXVZLWFKRQWKH
DSSOLDQFH
7RFKDQJHWKHVDYHGSURJUDPPHWRXFK
DQGKROG 淂䇘EXWWRQDJDLQIRUDSSUR[
WKUHHVHFRQGVDIWHUVHOHFWLQJWKHQHZ
VHWWLQJV
HQ 2SHUDWLQJWKHDSSOLDQFH
㬮砆1LJKWZDVK
㬴砌
5HGXFHGQRLVHYDOXHVWKDQNVWRVSHFLDO
ZDVK DQG VSLQ F\FOH DQG GHDFWLYDWHG HQG
VLJQDO(VSHFLDOO\VXLWDEOHIRUZDVKLQJDW
QLJKW
1RWH 5HVLGXDOPRLVWXUHRIWKHZDVKLQJ
LVVOLJKWO\LQFUHDVHG7KHVSLQUHVXOWLV
PD\ QRW VDWLVIDFWRU\ <RX FDQ VHOHFW 6SLQ
SURJUDPPHEHIRUHKDQJLQJ
1 2SHUDWLQJWKH
DSSOLDQFH
2SHUDWLQJWKHDSSOLDQFH
3UHSDULQJWKHDSSOLDQFH
7KH DSSOLDQFH ZDV WHVWHG EHIRUH GHOLYHU\
7RUHPRYHUHVLGXDOZDWHUIURPWKHWHVW
SURFHGXUH WKH ILUVW ZDVK F\FOH VKRXOG EH
UXQ ZLWKRXW ODXQGU\ XVLQJ WKH 'UXP FOHDQ
SURJUDPPH
~ %HIRUHZDVKLQJIRUWKHILUVWWLPH
RQ SDJH
1RWHV
■ 1HYHUVZLWFKRQD GDPDJHG
DSSOLDQFH
■ ,QIRUPFXVWRPHUVHUYLFH
1. ,QVHUWPDLQVSOXJ
::DUQLQJ
5LVNRIGHDWKIURPHOHFWULFVKRFN
5LVNRIGHDWKLIOLYHSDUWVDUHWRXFKHG
² 1HYHUSXOORXWWKHPDLQVSOXJE\
WXJJLQJWKHSRZHUFRUG
² ,QVHUWSXOORXWWKHPDLQVSOXJZLWK
GU\KDQGVRQO\
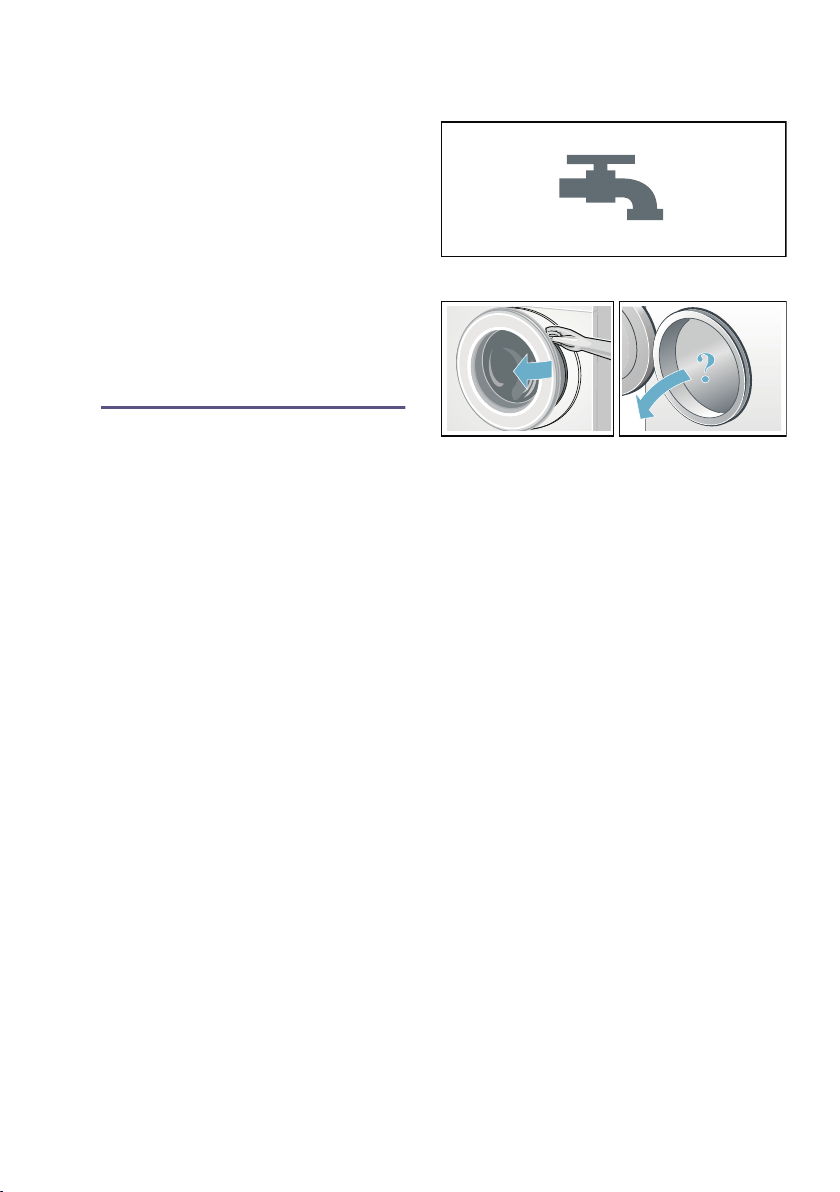
2. 7XUQWKH WDS RQ
3. 2SHQWKH DSSOLDQFHGRRU
6ZLWFKLQJRQWKHDSSOLDQFH
VHOHFWLQJDSURJUDPPH
3UHVVWKH #EXWWRQWLOOWKHLQGLFDWRUODPS
OLJKWVXSUHOHDVHWKHEXWWRQ7KH
DSSOLDQFHLVVZLWFKHGRQ
7KH &RWWRQV SURJUDPPH ZKLFK LV SUHVHW
DWWKHIDFWRU\LVWKHQDOZD\VGLVSOD\HG
<RXFDQXVHWKLVSURJUDPPHRUVHOHFWD
GLIIHUHQWSURJUDPPH
1RWH ,I\RXKDYHDFWLYDWHGWKH
FKLOGSURRIORFN\RXPXVWGHDFWLYDWHLW
EHIRUH\RXFDQVHWDSURJUDPPH
3UHVHWWLQJVDQGPD[LPXPORDGDUH
LQGLFDWHGRQWKH7RXFK'LVSOD\IRUWKH
VHOHFWHGSURJUDPPH
<RXFDQXVHWKHGLVSOD\HGSUHVHWWLQJVRU
DGMXVWWKHVHOHFWHGSURJUDPPHRSWLPDOO\
WRWKHLWHPVRIZDVKLQJE\FKDQJLQJWKH
~ 3URJUDPPHGHIDXOWVHWWLQJV
RQ SDJH DQGRUVHOHFWLQJ
~ $GGLWLRQDOSURJUDPPHVHWWLQJV
RQ SDJH
2SHUDWLQJWKHDSSOLDQFH HQ
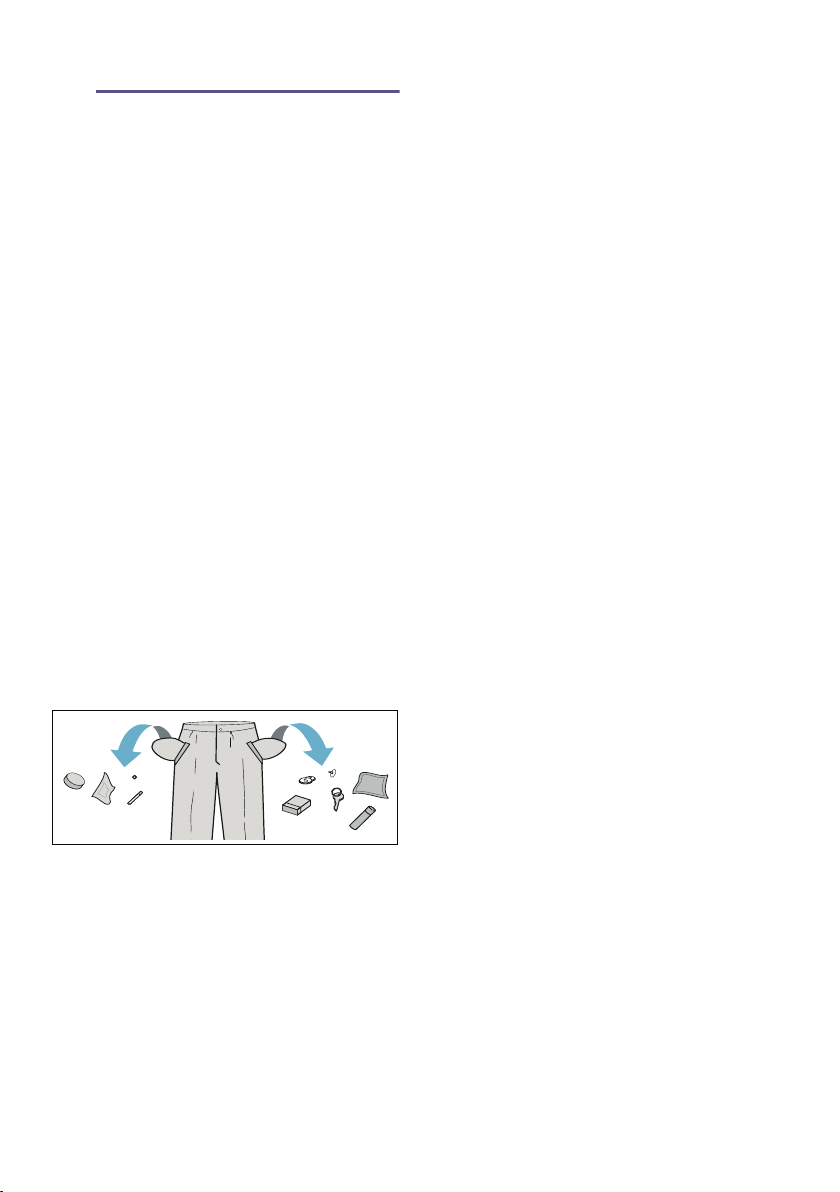
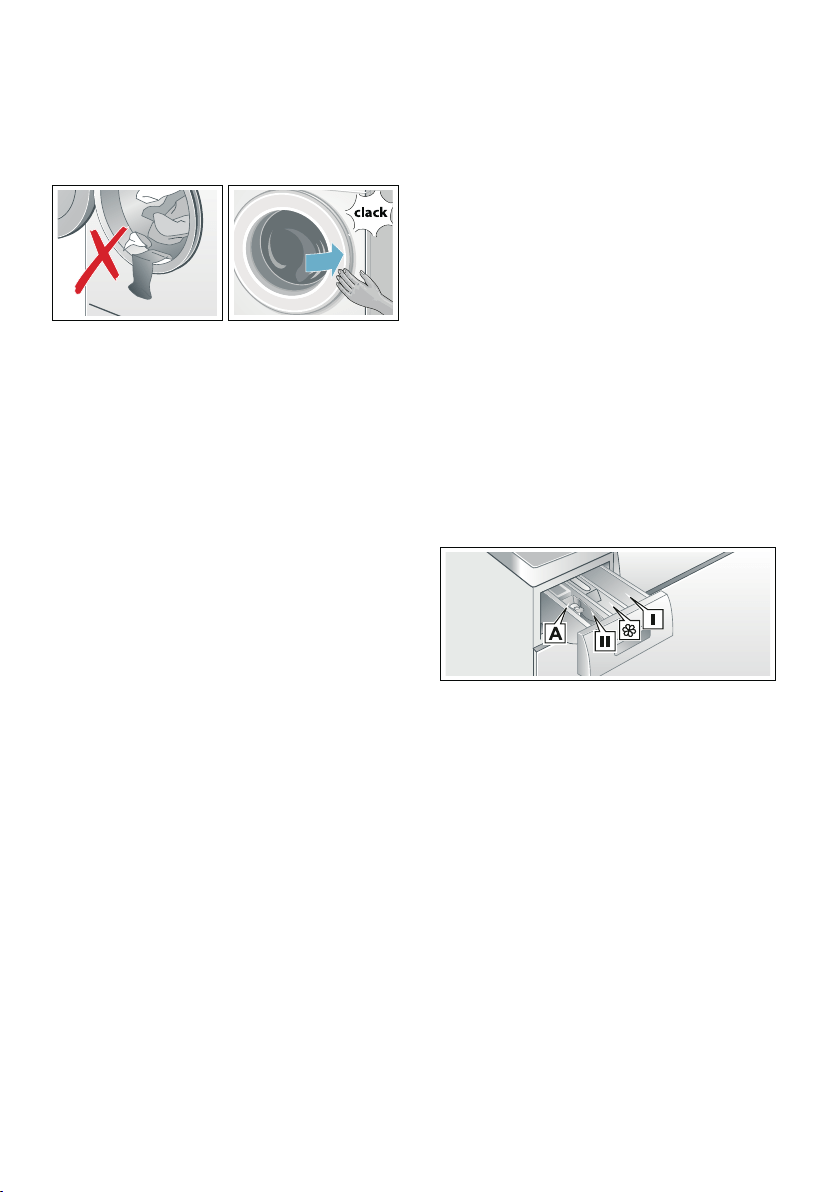
3ODFLQJODXQGU\LQWRWKHGUXP
,QVHUWWKHZDVKLQJ
&ORVHWKHGRRU
1RWHV
■ 8QIROGDQGORDGSUHVRUWHGLWHPV
RI ZDVKLQJ 0L[ ODUJH DQG VPDOO LWHPV
:DVKLQJLWHPVRI GLIIHUHQWVL]H
GLVWULEXWHWKHPVHOYHVEHWWHUGXULQJ
WKH VSLQF\FOH,QGLYLGXDOLWHPV
RI ZDVKLQJ PD\ FDXVH DQ XQEDODQFHG
ORDG
■ 2EVHUYH WKH PD[LPXP VSHFLILHG ORDG
2YHUILOOLQJDGYHUVHO\DIIHFWVWKH
ZDVKLQJUHVXOWDQGSURPRWHV
FUHDVLQJ0DNHVXUHWKDWQRLWHPVRI
ODXQGU\ DUH WUDSSHG EHWZHHQ WKH GRRU
DQGWKHUXEEHUVHDODQGFORVHWKH
GRRU
0HDVXUHDQGDGGGHWHUJHQW
DQG FDUHSURGXFWV
&DXWLRQ
'DPDJHWRWKHDSSOLDQFH
'HWHUJHQWVDQGDJHQWVIRUWKH
SUHWUHDWPHQWRIODXQGU\HJVWDLQ
UHPRYHUSUHZDVKVSUD\VHWFPD\
GDPDJHWKHVXUIDFHVRIWKHDSSOLDQFH
.HHSWKHVHDJHQWVDZD\IURPWKH
VXUIDFHVRIWKHDSSOLDQFH8VLQJDGDPS
FORWK LPPHGLDWHO\ UHPRYH DQ\ ILQH VSUD\
UHVLGXHDQGRWKHUUHVLGXHRUGURSOHWV
'RVLQJ
'RVHWKHGHWHUJHQWVDQGFDUHSURGXFWV
DFFRUGLQJWR
■ ZDWHUKDUGQHVVDVN\RXUZDWHU
VXSSO\FRPSDQ\
■ WKHPDQXIDFWXUHU·VVSHFLILFDWLRQVRQ
WKHSDFNDJLQJ
■ WKHDPRXQWRIODXQGU\
■ VRLOLQJ
)LOOLQJWKHGLVSHQVHUV
1. 3XOORXWWKH GHWHUJHQWGUDZHU
::DUQLQJ
(\HVNLQLUULWDWLRQ
,IWKHGHWHUJHQWGUDZHULVRSHQHG
ZKLOHWKHDSSOLDQFHLVUXQQLQJ
GHWHUJHQWRUFDUHSURGXFWPD\UXQ
RXW
2SHQWKHGUDZHUFDUHIXOO\
,IGHWHUJHQWRUFDUHSURGXFWFRPHV
LQWRFRQWDFWZLWKH\HVRUVNLQULQVH
WKRURXJKO\
,IDFFLGHQWDOO\VZDOORZHGVHHN
PHGLFDODGYLFH
2. 3RXULQGHWHUJHQWDQGRUFOHDQLQJ
SURGXFW
'HSHQGLQJRQWKHPRGHO
'LVSHQVHU , &ORWKLQJ
GLVLQIHFWDQW
'LVLQIHFWDQW
DGGLWLRQDO
SURJUDPPHVHWWLQJ
RU 'LVLQIHFWDQW
SURJUDPPHLV
VHOHFWHGRQO\
'LVSHQVHU i 6RIWHQHU'R QRW
H[FHHG
WKH PD[LPXPORDG
'LVSHQVHU ,, 'HWHUJHQWIRU PDLQ
ZDVKOLTXLG
GHWHUJHQW
0HDVXULQJ DLG $ )RUGRVLQJOLTXLG
GHWHUJHQW
HQ 2SHUDWLQJWKHDSSOLDQFH
1RWHV
■ 'LOXWHYLVFRXVIDEULFVRIWHQHU
DQG IDEULF FRQGLWLRQHU ZLWK ZDWHU 7KLV
ZLOOSUHYHQWEORFNDJHV
■ %HFDUHIXOZKHQRSHQLQJWKH
GHWHUJHQWGUDZHUZKLOHWKHDSSOLDQFH
LVUXQQLQJ
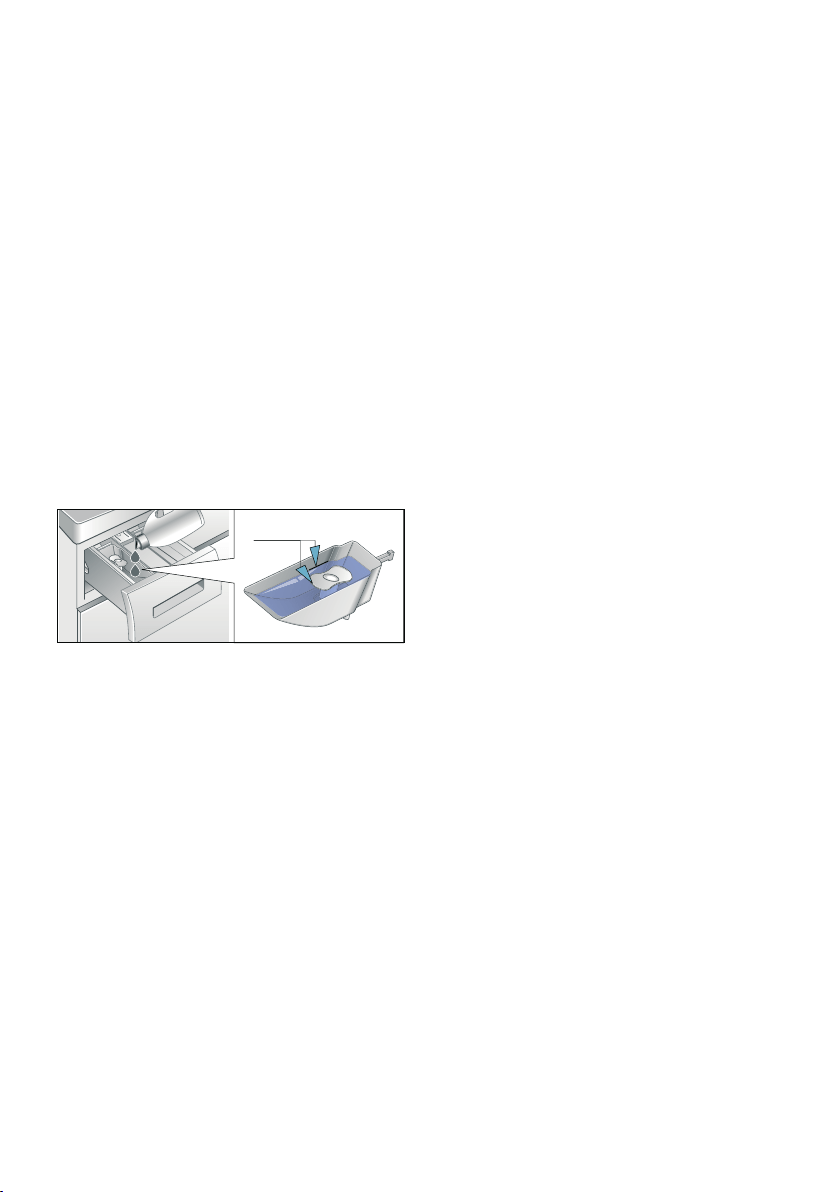
0HDVXULQJDLG$IRUOLTXLGGHWHUJHQW
'HSHQGLQJRQWKHPRGHO
3RVLWLRQ WKH PHDVXULQJ DLG IRU PHDVXULQJ
WKHFRUUHFWDPRXQWRIOLTXLGGHWHUJHQW
1. 3XOORXWWKHGHWHUJHQWGUDZHU,QVHUW
WKHOLTXLGGHWHUJHQWFRQWDLQHULQWR
GLVSHQVHU ,,IRUPDLQZDVK
2. 3RXUOLTXLGGHWHUJHQWLQWROLTXLG
GHWHUJHQWFRQWDLQHUDQGGRQRW
H[FHHGWKH0D[LPXQPDUN
3. 5HLQVHUWWKHGUDZHU
1RWH 'RQRWXVHWKHYLVFRXVOLTXLG
GHWHUJHQW
6WDUWLQJWKHSURJUDPPH
7RXFKDQGKROG AEXWWRQIRUa
VHFRQGVWKHQUHOHDVHWKHEXWWRQ7KH
SURJUDPPH VWDUWV DQG WKH DSSOLDQFH GRRU
LVORFNHG
7KH )LQLVK LQ WLPH LV VKRZQ LQ WKH 7RXFK
'LVSOD\DQGFRXQWVGRZQXQWLOWKH
SURJUDPPHVWDUWV$IWHUWKHSURJUDPPH
KDVVWDUWHGWKHSURJUDPPHGXUDWLRQLV
GLVSOD\HG$QGWKHGLVSOD\VIRUWKH
SURJUDPPHVSURJUHVVOLJKWXS
~ 7RXFK'LVSOD\RQ SDJH
1RWH )RDPGHWHFWLRQ
,IWKHV\PERO ÅDOVROLJKWVXSLQWKH
7RXFK'LVSOD\WKHDSSOLDQFHKDV
GHWHFWHGWRRPXFKIRDPGXULQJWKHZDVK
F\FOHDQGDXWRPDWLFDOO\DFWLYDWHG
DGGLWLRQDOULQVHF\FOHVWRUHPRYHWKH
IRDP
,I\RXZDQWWRORFNWKHSURJUDPPHWR
SUHYHQWLWIURPEHLQJDGMXVWHG
LQDGYHUWHQWO\\RXFDQVHOHFWWKH
FKLOGSURRIORFN
&KLOGSURRIORFN
峽眙寪
<RX FDQ ORFN WKH DSSOLDQFH WR SUHYHQW WKH
IXQFWLRQV\RXKDYHVHWIURPEHLQJ
FKDQJHGLQDGYHUWHQWO\7RGRWKLV
DFWLYDWHWKHFKLOGSURRIORFN
7RXFKDQGKROGWKH 峷眓 寤 EXWWRQWR
DFWLYDWHGHDFWLYDWHWKHFKLOGSURRIORFN
7RDFWLYDWHWKHFKLOGSURRIORFN
$IWHUWKHSURJUDPPHVWDUWV7RXFKDQG
KROG WKH 峷眓 寤 EXWWRQ IRU VHFRQGV
■ 峷眓 寤 OLJKWVXS7KHFKLOGSURRI
ORFNLVDFWLYDWHG
■ 峷眓 寤 IODVKHV,IDEXWWRQLV
WRXFKHGZKLOHFKLOGSURRIORFNLV
DFWLYDWHGWKH 峷眓 寤 EXWWRQZLOO
IODVK
1RWH :KHQWKHSURJUDPPHHQGV (QG
LVGLVSOD\HG7KHGRRULVORFNHG 峷眓
寤DQG ÕUHPDLQRQWRUHPLQG\RXWR
GHDFWLYDWHWKHFKLOGSURRIORFN
7RGHDFWLYDWHWKHFKLOGSURRIORFN
7RXFKDQGKROGWKH 峷眓 寤 EXWWRQ
XQWLOWKH 峷眓 寤 LQGLFDWRUODPSLVRII
0$;
2SHUDWLQJWKHDSSOLDQFH HQ
$GGLQJUHPRYLQJODXQGU\
$IWHUVWDUWLQJWKHSURJUDPPH\RXFDQ
DGGRUUHPRYHODXQGU\LIQHFHVVDU\
7RXFKWKH AEXWWRQ7KHDSSOLDQFH
FKHFNVZKHWKHUUHORDGLQJLVSRVVLEOH
,IWKHIROORZLQJDSSHDUVRQWKH7RXFK
'LVSOD\
■ 7KHV\PERO ÕGLVDSSHDUVUHORDGLQJ
LVSRVVLEOH
■ 7KHV\PERO ÕOLJKWVXSUHORDGLQJLV
QRWSRVVLEOH
7R FRQWLQXH WKH SURJUDPPH WRXFK WKH
AEXWWRQ7KHSURJUDPPHFRQWLQXHV
DXWRPDWLFDOO\
1RWHV
■ 'RQRWOHDYHWKHGRRURSHQIRUWRR
ORQJZKHQDGGLQJODXQGU\DVZDWHU
IURPWKHODXQGU\PD\OHDNRXW
■ )RUVDIHW\UHDVRQVWKHGRRUUHPDLQV
ORFNHGZKHQWKHZDWHUOHYHORU
WHPSHUDWXUH LV KLJK RU ZKLOH WKH GUXP
LV WXUQLQJ DQG LW LV QRW SRVVLEOH WR DGG
ODXQGU\GXULQJWKLVWLPH
&KDQJLQJWKHSURJUDPPH
,I \RX KDYH VWDUWHG WKH ZURQJ SURJUDPPH
E\PLVWDNH\RXFDQFKDQJHWKH
SURJUDPPHDVIROORZV
1. 7RXFKWKH AEXWWRQ
2. 6HOHFWDQRWKHUSURJUDPPH
3. $QGWRXFKWKH AEXWWRQDJDLQ7KH
QHZSURJUDPPHVWDUWVIURPWKH
EHJLQQLQJ
&DQFHOWKHSURJUDPPH
)RUSURJUDPPHVDWKLJKWHPSHUDWXUHV
1. 7RXFKWKH AEXWWRQ
2. 7RFRROGRZQODXQGU\6HOHFW 5LQVH
3. 7RXFKWKH AEXWWRQ
)RUSURJUDPPHVDWORZWHPSHUDWXUHV
1. 7RXFKWKH AEXWWRQ
2. 6HOHFW 6SLQ
3. 7RXFKWKH AEXWWRQ
3URJUDPPHHQG
(QGOLJKWVXSRQWKH7RXFK'LVSOD\DQG
ADQG ÕGLVSOD\VDUHRII
5HPRYLQJODXQGU\VZLWFKLQJ
RIIWKHDSSOLDQFH
1. 3UHVVWKH #EXWWRQWLOOWKHLQGLFDWRU
ODPS WXUQV RII UHOHDVH WKH EXWWRQ 7KH
DSSOLDQFHLVVZLWFKHGRII
2. 2SHQWKHGRRUDQGUHPRYHWKH
ODXQGU\
3. 7XUQRIIWKHZDWHUWDS
1RWH 1RWUHTXLUHGIRU$TXD6WRS
PRGHOV
1RWHV
■ 'RQRWOHDYHDQ\LWHPVRIODXQGU\LQ
WKH GUXP 7KH\ PD\ VKULQN LQ WKH QH[W
ZDVKRUGLVFRORXUDQRWKHULWHP
■ 5HPRYHDQ\IRUHLJQREMHFWVIURPWKH
GUXPDQGWKHUXEEHUVHDO²ULVNRI
UXVWLQJ
■ :LSHWKHUXEEHUVHDOGU\
■ /HDYHWKHGRRUDQGGHWHUJHQWGUDZHU
RSHQVRWKDWDQ\UHVLGXDOZDWHUFDQ
HYDSRUDWH
■ $OZD\VZDLWXQWLOWKHSURJUDPPH
HQGVDVWKHDSSOLDQFHFRXOGVWLOOEH
ORFNHG7KHQVZLWFKWKHDSSOLDQFHRQ
DQGZDLWIRULWWRXQORFN
HQ $SSOLDQFHVHWWLQJV
Q$SSOLDQFHVHWWLQJV
$SSOLDQFHVHWWLQJV
$XWRPDWLFVZLWFKRII
,IWKHDSSOLDQFHLVQRWRSHUDWHGIRU
DSSUR[PLQXWHVGHSHQGLQJRQWKH
ZDWHUOHYHOLQVLGHRIDSSOLDQFHLWZLOO
DXWRPDWLFDOO\VZLWFKRIIEHIRUHWKH
SURJUDPPH VWDUWV RU DIWHU WKH SURJUDPPH
KDVHQGHG3UHVVWKHSRZHUEXWWRQ #
DJDLQWRVZLWFKRQWKHDSSOLDQFH
%DVLFVHWWLQJV
7RDFFHVVWKHEDVLFVHWWLQJVWRXFKDQG
KROGWKH 㬮砆EXWWRQIRUDSSUR[
VHFRQGV7KHFRQWUROSDQHOVKRZ
<RXFDQFKDQJHWKHIROORZLQJEDVLF
VHWWLQJV
■ (7KHYROXPHRIWKHHQGVLJQDO
■ 07KHYROXPHRIWKHEXWWRQV
■ 87KHEULJKWQHVVRIWKH7RXFK
'LVSOD\
■ @6ZLWFKLQJWKHGUXPFDUH
LQIRUPDWLRQVLJQDORQRII
(QGVLJQDO
7RXFKDQGKROGWKH㬴砌EXWWRQIRU
DSSUR[VHFRQGV7KHLQGLFDWRUODPSLQ
SRVLWLRQ LVRQ<RXFDQXVHWKH ˜
EXWWRQWRDGMXVWWKHYROXPHRIWKHHQG
VLJQDOHJ ‘ „
3RVVLEOHVHWWLQJYDOXHV
%XWWRQVLJQDO
<RXFDQVHOHFWSRVLWLRQ DQGXVHWKH ˜
EXWWRQWRDGMXVWWKHYROXPHRIWKHEXWWRQ
VLJQDOHJ › „
3RVVLEOHVHWWLQJYDOXHV
%ULJKWQHVV
3RVVLEOHVHWWLQJYDOXHV
<RXFDQVHOHFWSRVLWLRQ DQGXVHWKH ˜
EXWWRQWRDGMXVWWKHEULJKWQHVVRIWKH
7RXFK'LVSOD\HJ ’ „
3RVVLEOHVHWWLQJYDOXHV
#
#
RII
TXLHW
PHGLXP
ORXG
YHU\ORXG
RII
TXLHW
PHGLXP
ORXG
YHU\ORXG
QRWYHU\EULJKW
QRUPDOOHYHORI
EULJKWQHVV
EULJKW
YHU\EULJKW
#
#
6HQVRUV HQ
6ZLWFKLQJWKHGUXPFDUHLQIRUPDWLRQ
VLJQDORQRII
<RXFDQVHOHFWSRVLWLRQ DQGXVHWKH ˜
EXWWRQWRVZLWFKWKH 'UXPFOHDQ
LQIRUPDWLRQVLJQDORQRURIIHJ š ‚
3RVVLEOHVHWWLQJYDOXHV
H 6HQVRUV
6HQVRUV
8QEDODQFHGORDGGHWHFWLRQ
V\VWHP
7KH DXWRPDWLF XQEDODQFHG ORDG GHWHFWLRQ
V\VWHPGHWHFWVLPEDODQFHVDQGHQVXUHV
HYHQGLVWULEXWLRQRIWKHODXQGU\E\
UHSHDWHGO\VWDUWLQJDQGVWRSSLQJGUXP
VSLQQLQJ
,IWKHODXQGU\LVH[WUHPHO\XQHYHQO\
GLVWULEXWHGWKHVSLQVSHHGLVUHGXFHGRU
WKHVSLQF\FOHLVQRWSHUIRUPHGIRUVDIHW\
UHDVRQV
1RWH 3ODFHODUJHDQGVPDOOLWHPVRI
ODXQGU\HYHQO\LQWKHGUXP
2 &OHDQLQJDQG
PDLQWHQDQFH
&OHDQLQJDQGPDLQWHQDQFH
::DUQLQJ
5LVNRIGHDWK
7KHUHLVDULVNRIHOHFWULFVKRFNLIWRXFK
OLYHFRPSRQHQWV
3UHVVWKHEXWWRQ #DQGSXOORXWWKH
PDLQVSOXJ
&DXWLRQ
)LUHDQGH[SORVLRQKD]DUG
7R[LFYDSRXUVFDQEHSURGXFHGE\
FOHDQLQJDJHQWVWKDWFRQWDLQVROYHQWV
HJFOHDQLQJVROYHQW
'RQRWXVHFOHDQLQJDJHQWVWKDWFRQWDLQ
VROYHQWV
&DXWLRQ
7KHDSSOLDQFHPD\EHGDPDJHG
&OHDQLQJDJHQWVWKDWFRQWDLQVROYHQWV
HJFOHDQLQJVROYHQWFDQGDPDJH
VXUIDFHVDQGFRPSRQHQWVLQWKH
DSSOLDQFH
'RQRWXVHFOHDQLQJDJHQWVWKDWFRQWDLQ
VROYHQWV
$SSOLDQFHKRXVLQJFRQWURO
SDQHO
■ 5HPRYHWKHGHWHUJHQWUHVLGXH
LPPHGLDWHO\
■ :LSHWKHKRXVLQJDQGWKHFRQWURO
SDQHOZLWKDVRIWGDPSFORWK
■ 'RQRWXVHDEUDVLYHFORWKVVSRQJHV
RU GHWHUJHQWV VWDLQOHVV VWHHO FOHDQHU
■ 'RQRWFOHDQWKHDSSOLDQFHZLWKD
ZDWHUMHW
'UXP
8VH FKORULQHIUHH FOHDQLQJ DJHQWV GR QRW
XVHVWHHOZRRO
,IWKHUHDUHRGRXUVLQWKHDSSOLDQFHRUWR
FOHDQWKHGUXPUXQWKH 'UXPFOHDQ
&SURJUDPPHZLWKRXWODXQGU\
RII
RQ
#
HQ &OHDQLQJDQGPDLQWHQDQFH
'HVFDOLQJ
'HVFDOLQJVKRXOGQRWEHQHFHVVDU\LIWKH
GHWHUJHQWLVPHDVXUHGRXWFRUUHFWO\
+RZHYHULILWLVUHTXLUHGIROORZWKH
PDQXIDFWXUHUVLQVWUXFWLRQVIRUWKH
GHVFDOLQJDJHQW6XLWDEOHGHVFDOHUVFDQ
EHREWDLQHGYLDRXUZHEVLWHRUIURP
FXVWRPHUVHUYLFHV
'HWHUJHQWGUDZHUDQGKRXVLQJ
,IWKHDSSOLDQFHFRQWDLQVGHWHUJHQWRU
IDEULFVRIWHQHUUHVLGXHV
1. 3XOORXWWKHGHWHUJHQWGUDZHU3UHVV
GRZQWKHLQVHUWDQGIXOO\UHPRYHWKH
GUDZHU
2. 7RUHPRYHWKHLQVHUW3XVKWKHLQVHUW
XSZDUGVIURPEHORZZLWK\RXUILQJHU
3. &OHDQWKHGHWHUJHQWGLVSHQVHUWUD\
DQG LQVHUW ZLWK ZDWHU DQG D EUXVK DQG
GU\LW&OHDQWKHLQVLGHRIWKHKRXVLQJ
DVZHOO
4. )LW WKH LQVHUW DQG ORFN LW LQ SODFH SXVK
WKHF\OLQGHURQWRWKHJXLGHSLQ
5. 3XVKLQWKHGHWHUJHQWGUDZHU
1RWH /HDYHWKHGHWHUJHQWGUDZHURSHQ
VRWKDWDQ\UHVLGXDOZDWHUFDQHYDSRUDWH
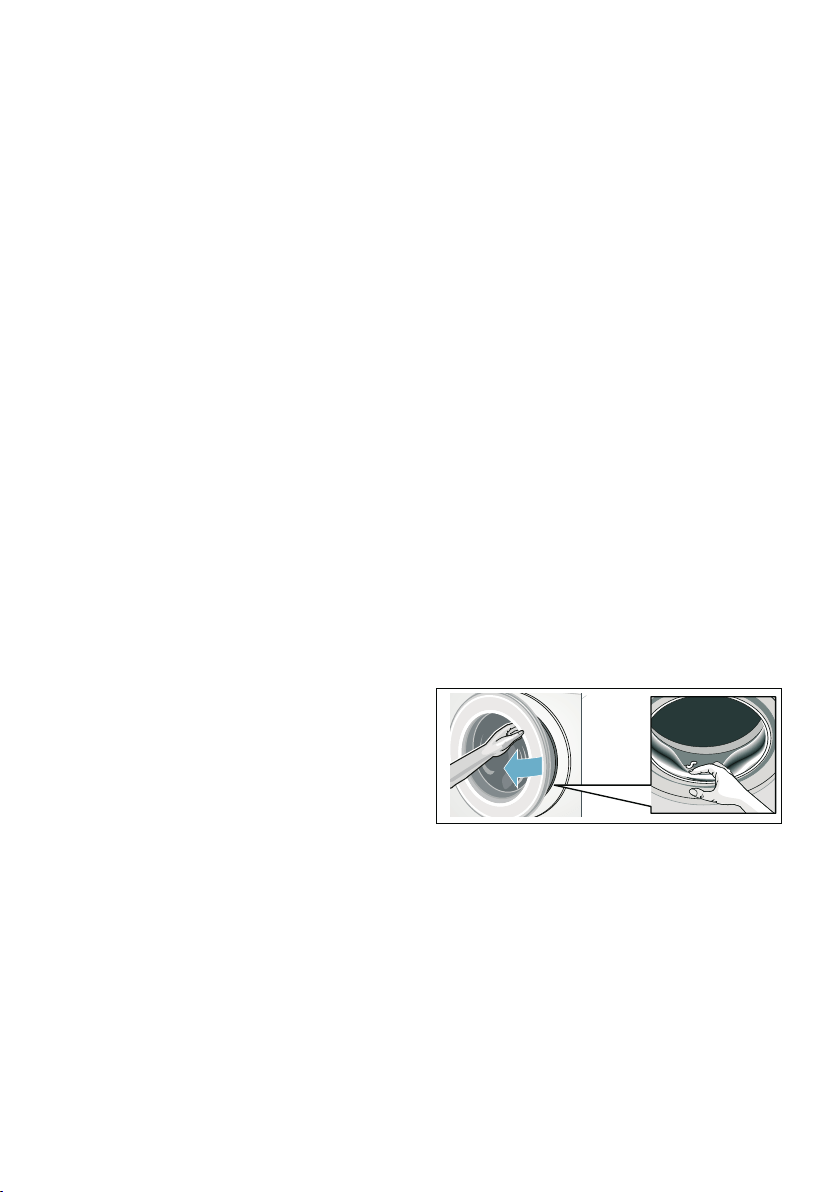
&OHDQLQJ WKH PHDVXULQJ DLG $
IRUOLTXLGGHWHUJHQW
,ILWFRQWDLQVOLTXLGGHWHUJHQWUHVLGXH
1. +ROGWKHPHDUVXULQJDLGSXOOWKH
FRYHUXSZDUGDQGGLVFRQQHFWWKHP
2. &OHDQWKHPHDVXULQJDLGDQGFRYHU
ZLWKZDWHUDQGEUXVK
3. ,QVWDOOWKHFRYHUEDFNWRWKH
PHDVXULQJDLG3D\DWWHQWLRQWRWKH
DVVHPEOHPDUNDQGSUHVVWKHFRYHU
XQWLOFOLFNVRXQGV
'UDLQSXPSLVEORFNHG
1RWH 7XUQWKHZDWHUWDSRIIWRSUHYHQW
PRUH ZDWHU IURP IORZLQJ LQ DQG WR HQVXUH
WKDWLWLVGUDLQHGYLDWKHSXPS
::DUQLQJ
5LVNRIVFDOGLQJ
:KHQ \RX ZDVK DW KLJK WHPSHUDWXUHV WKH
ZDWHUJHWVYHU\KRW,I\RXFRPHLQWR
FRQWDFWZLWKWKHKRWZDWHU\RXPD\EH
VFDOGHG
GHSHQGLQJRQWKHPRGHO
&OHDQLQJDQGPDLQWHQDQFH HQ
$OORZWKHZDWHUWRFRROGRZQILUVW
1. 6ZLWFKRIIWKHDSSOLDQFH3XOORXWWKH
PDLQVSOXJ
2. 2SHQWKHVHUYLFHIODS
3. 7DNHWKHGUDLQKRVHRXWRIWKH
UHWDLQHU
5HPRYH WKH VHDOLQJ FDS DQG SRXU WKH
ZDWHURXWLQWRDVXLWDEOHFRQWDLQHU
5HSODFH WKH VHDOLQJ FDS DQG SODFH WKH
GUDLQKRVHEDFNLQWKHUHWDLQHU
4. &DUHIXOO\XQVFUHZWKHSXPSFRYHU
UHVLGXDOZDWHUPD\OHDNRXW
&OHDQWKHLQWHULRUSXPSFRYHUWKUHDG
DQG SXPS KRXVLQJ 7KH LPSHOOHU LQ WKH
GUDLQSXPSPXVWEHDEOHWRURWDWH
5HILWDQGVFUHZRQWKHSXPSFRYHU
7KHKDQGOHPXVWEHLQDYHUWLFDO
SRVLWLRQ
5. &ORVHWKHVHUYLFHIODS
1RWH 7R SUHYHQW XQXVHG GHWHUJHQW IURP
IORZLQJVWUDLJKWLQWRWKHGUDLQGXULQJWKH
QH[WZDVK3RXUOLWUHRIZDWHULQWR
GLVSHQVHU ,,DQGVWDUWWKH 6SLQ
SURJUDPPH
7KHGUDLQKRVHDWWKHVLSKRQ
LVEORFNHG
1. 6ZLWFKRIIWKHDSSOLDQFH3XOORXWWKH
PDLQVSOXJ
2. /RRVHQWKHKRVHFODPS&DUHIXOO\
UHPRYH WKH GUDLQ KRVH UHVLGXDO ZDWHU
PD\OHDNRXW
3. &OHDQWKHGUDLQKRVHDQGVLSKRQ
FRQQHFWLQJSLHFH
4. 5HDWWDFKWKHGUDLQKRVHDQGVHFXUH
WKHFRQQHFWLRQSRLQWXVLQJWKHKRVH
FODPS
)LOWHULQWKHZDWHUVXSSO\LV
EORFNHG
1. 5HOHDVHZDWHUSUHVVXUHLQWKHVXSSO\
KRVH
D 7XUQRIIWKHZDWHUWDS
E 6HOHFWDQ\SURJUDPPHH[FHSW
5LQVHDQG6SLQ
F 6HOHFWWKH AEXWWRQ$OORZWKH
SURJUDPPHWRUXQIRUDSSUR[
VHFRQGV
HQ )DXOWVDQGZKDWWRGRDERXWWKHP
G 3UHVV WKH # EXWWRQ 7KH DSSOLDQFH
LVVZLWFKHGRII
H 3XOORXWWKHPDLQVSOXJ
2. &OHDQWKHILOWHUV
D 'LVFRQQHFWWKHKRVHIURPWKHWDS
&OHDQWKHILOWHUZLWKDVPDOOEUXVK
E )RUVWDQGDUGDQG$TXD6HFXUH
PRGHOV FOHDQ WKH ILOWHU RQ WKH UHDU
RIWKHDSSOLDQFH
'LVFRQQHFWWKHKRVHIURPWKHUHDU
RIWKHDSSOLDQFH
8VHSOLHUVWRUHPRYHWKHILOWHUDQG
WKHQFOHDQLW
3. &RQQHFW WKH KRVH DQG FKHFN IRU OHDNV
3)DXOWVDQGZKDWWRGR
DERXWWKHP
)DXOWVDQGZKDWWRGRDERXWWKHP
(PHUJHQF\UHOHDVH
(JSRZHURXWDJHRULQWKHHYHQWRID
ORVVRISRZHU
7KHSURJUDPPHFRQWLQXHVZKHQWKH
SRZHUVXSSO\LVUHVWRUHG
+RZHYHULIWKHODXQGU\KDVWREH
UHPRYHGWKHDSSOLDQFHGRRUFDQEH
RSHQHGDVIROORZV
::DUQLQJ
5LVNRIVFDOGLQJ
:KHQ\RXDUHZDVKLQJDWKLJK
WHPSHUDWXUHV WKHUH LV D ULVN RI VFDOGLQJ LI
\RX FRPH LQWR FRQWDFW ZLWK KRW ZDWHU DQG
ODXQGU\
,ISRVVLEOHOHDYHLWWRFRROGRZQILUVW
&DXWLRQ
5LVNZKHQUHDFKLQJLQWRJULSSLQJWKH
URWDWLQJGUXP
<RXPD\LQMXUH\RXUKDQGVLI\RXUHDFK
LQWRWKHGUXPZKLOHLWLVWXUQLQJ
'RQRWUHDFKLQWRWKHGUXPZKHQLWLV
WXUQLQJ
&DXWLRQ
:DWHUGDPDJH
$Q\HVFDSLQJZDWHUPD\FDXVHZDWHU
GDPDJH
'RQRWRSHQWKHGRRULIZDWHUFDQEH
VHHQWKURXJKWKHJODVV
1. 6ZLWFKRIIWKHDSSOLDQFH3XOORXWWKH
PDLQVSOXJ
2. 'UDLQWKHZDWHU ~ 3DJH
3. 3XOOWKHHPHUJHQF\UHOHDVH
GRZQZDUGVZLWKDWRRODQGUHOHDVH
7KHGRRUFDQWKHQEHRSHQHG

)DXOWVDQGZKDWWRGRDERXWWKHP HQ
,QIRUPDWLRQRQWKHGLVSOD\SDQHO
'LVSOD\ &DXVH5HPHG\
Õ ■ )ODVKHVIDVWVLJQDO7KHGRRUZDVRSHQHGDQGWKHZDWHU
OHYHOLVWRRKLJK&ORVHWKHGRRUFRQWLQXHWKHSURJUDPPHZLWK
AEXWWRQRUVHOHFW 6SLQ
■ )ODVKHV VORZO\ 7KH GRRU ORFN WHPSHUDWXUH LV WRR KLJK WR RSHQ
WKHGRRU:DLWDSSUR[VHFRQGVXQWLOWKHGRRUORFNWHPSHUD
WXUHFRROVGRZQ
r ■ )ODVKHVQRZDWHUVXSSO\7DSWXUQHGRQ")LOWHULQWKHZDWHU
VXSSO\LVEORFNHG" ~ )LOWHULQWKHZDWHUVXSSO\LVEORFNHG
RQ SDJH
,VWKHVXSSO\KRVHNLQNHGRUWUDSSHG"
■ /LJKWVXS ORZZDWHUSUHVVXUH)RULQIRUPDWLRQRQO\7KLVZLOO
QRW DIIHFW WKH SURJUDPPH SURJUHVV 7KH SURJUDPPH GXUDWLRQ LV
H[WHQGHG
( (DOWHUQDWLQJGLVSOD\ZLWK
■ 7KHGUDLQSXPSLVEORFNHG ~ 'UDLQSXPSLVEORFNHG
RQ SDJH
■ 7KH GUDLQ KRVH DW WKH VLSKRQ LV EORFNHG ~ 7KH GUDLQ KRVH DW
WKHVLSKRQLVEORFNHGRQ SDJH
(6XLWDEOH
IRUVSHFLDOPRG
HOV
(DOWHUQDWLQJGLVSOD\ZLWK WKHUHLVZDWHULQWKHEDVH
WURXJK WKH DSSOLDQFH LV OHDNLQJ 7XUQ RII WKH WDS &DOO FXVWRPHU VHU
YLFHV
峷眓 寤 OLJKWV
XS
7KHFKLOGSURRIORFNLVDFWLYDWHG²GHDFWLYDWHLW
ÅOLJKWVXS 7RRPXFKIRDPKDVEHHQGHWHFWHGDQGDQDGGLWLRQDOZDVKF\FOH
KDVEHHQDFWLYDWHG$GGOHVVGHWHUJHQWWRWKHQH[WZDVKLQJF\FOH
ZLWKWKHVDPHORDG
7KHLQGLFDWRU
ODPS RI WKH 'UXP
FOHDQSUR
JUDPPHIODVKHV
5XQWKH 'UXPFOHDQ SURJUDPPHWRFOHDQDQGFDUHIRUWKHGUXP
DQGWKHRXWHUWXE
1RWHV
■ 5XQWKHSURJUDPPHZLWKRXWODXQGU\
■ 8VHZDVKLQJSRZGHURUDGHWHUJHQWFRQWDLQLQJEOHDFK7RSUH
YHQWIRDPLQJRQO\XVHKDOIWKHDPRXQWRIGHWHUJHQWUHFRP
PHQGHGE\WKHGHWHUJHQWPDQXIDFWXUHU'RQRWXVHGHWHUJHQW
GHVLJQHGIRUZRROOHQVRUGHOLFDWHV
■ 6ZLWFKLQJWKHLQIRUPDWLRQVLJQDORQRII ~ 6ZLWFKLQJWKH
GUXPFDUHLQIRUPDWLRQVLJQDORQRIIRQ SDJH
2WKHUGLVSOD\V 6ZLWFK RII WKH DSSOLDQFH ZDLW IRU ILYH VHFRQGV DQG WKHQ VZLWFK LW RQ
DJDLQ,IWKHGLVSOD\DSSHDUVDJDLQFDOOFXVWRPHUVHUYLFHV

HQ )DXOWVDQGZKDWWRGRDERXWWKHP
)DXOWVDQGZKDWWRGRDERXWWKHP
)DXOWV &DXVH5HPHG\
:DWHU LV OHDNLQJ IURP
WKHDSSOLDQFH
■ $WWDFKWKHGUDLQKRVHFRUUHFWO\RUUHSODFHLW
■ 7LJKWHQWKHVFUHZILWWLQJRQWKHVXSSO\KRVH
7KHDSSOLDQFHLVQRW
ILOOLQJZLWKZDWHU
'HWHUJHQWLVQRW
EHLQJGLVSHQVHG
■ 3URJUDPPHGRHVQRWVWDUW"
■ ,VWKHWDSWXUQHGRQ"
■ &RXOGWKHILOWHULQWKHZDWHUVXSSO\EHEORFNHG"
~ )LOWHULQWKHZDWHUVXSSO\LVEORFNHGRQ SDJH
■ ,VWKHVXSSO\KRVHNLQNHGRUWUDSSHG"
7KHZURQJGHWHU
JHQWIDEULFVRIWHQHU
KDV EHHQ SRXUHG LQWR
WKHGLVSHQVHUV
'LVSHQVHUV
1. (PSW\DQGFOHDQ
2. 5HILOO
'HWHUJHQWIDEULFVRI
WHQHU KDV FRQJHDOHG
LQWKHGLVSHQVHUV
&OHDQDQGUHILOOWKHGLVSHQVHUV
7KHGRRUFDQQRWEH
RSHQHG
■ 7KHVDIHW\IXQFWLRQLVDFWLYDWHG6WRSWKHSURJUDPPH"
■ &DQWKHGRRURQO\EHRSHQHGE\WKHHPHUJHQF\UHOHDVH"
~ (PHUJHQF\UHOHDVHRQ SDJH
■ &KLOGSURRIORFNDFWLYDWHG"'HDFWLYDWHFKLOGSURRIORFN
■ 7KHWHPSHUDWXUHLQGUXPLVWRRKLJKWRRSHQWKHGRRU:DLW
DSSUR[VHFRQGVXQWLOWKHWHPSHUDWXUHLQGUXPFRROV
GRZQ
■ 7KHZDWHUOHYHOLQGUXPLVWRRKLJK
7KHSURJUDPPHZLOO
QRWVWDUW
■ +DYH \RX WRXFKHG WKH A EXWWRQ RU VHOHFWHG )LQLVK LQ WLPH"
■ ,VWKHGRRUFORVHG"
■ &KLOGSURRIORFNDFWLYDWHG"'HDFWLYDWHFKLOGSURRIORFN
7KHZDWHULVQRW
GUDLQLQJ
■ &RXOGWKHGUDLQSXPSEHEORFNHG"
~ 'UDLQSXPSLVEORFNHGRQ SDJH
■ &RXOGWKHGUDLQKRVHDWWKHVLSKRQEHEORFNHG"
~ 7KHGUDLQKRVHDWWKHVLSKRQLVEORFNHGRQ SDJH
:DWHU LV QRW YLVLEOH LQ
WKHGUXP
1RWDIDXOW²WKHZDWHULVEHORZWKHYLVLEOHDUHD
7KH VSLQ UHVXOW LV QRW
VDWLVIDFWRU\
/DXQGU\ZHWWRR
GDPS
■ 1RW D IDXOW ² WKH XQEDODQFHG ORDG GHWHFWLRQ V\VWHP KDV LQWHU
UXSWHGWKHVSLQF\FOHEHFDXVHWKHODXQGU\LVXQHYHQO\GLV
WULEXWHG 'LVWULEXWH VPDOO DQG ODUJH LWHPV RI ODXQGU\ HYHQO\ LQ
WKHGUXP
■ ,V 熍䦐厺 (DV\ LURQ DGGLWLRQDO SURJUDPPH VHWWLQJ VHOHFWHG
GHSHQGLQJRQWKHPRGHO"
■ ,V 㬮砆 1LJKW ZDVK DGGLWLRQDO SURJUDPPH VHWWLQJ RU 6LOHQW
ZDVKSURJUDPPHVHOHFWHGGHSHQGLQJRQWKHPRGHO"
■ ,VWKHVHOHFWHGVSHHGWRRORZ"

)DXOWVDQGZKDWWRGRDERXWWKHP HQ
7KHVSLQF\FOHUXQV
VHYHUDOWLPHV
1RWDIDXOW²WKHXQEDODQFHGORDGGHWHFWLRQV\VWHPLVDGMXVWLQJ
DQLPEDODQFH
7KHSURJUDPPHLV
WDNLQJORQJHUWKDQ
XVXDO
■ 1RW D IDXOW ² WKH XQEDODQFHG ORDG GHWHFWLRQ V\VWHP LV DGMXVW
LQJDQLPEDODQFHE\UHSHDWHGO\GLVWULEXWLQJWKHODXQGU\
■ 1RW D IDXOW ² WKH IRDP GHWHFWLRQ V\VWHP LV DFWLYDWHG ² D ULQVH
F\FOHKDVEHHQVZLWFKHGRQ
7KHOHQJWKRIWKH
SURJUDPPH FKDQJHV
GXULQJWKHZDVK
F\FOH
1RWDIDXOW²WKHSURJUDPPHVHTXHQFHLVRSWLPLVHGIRUWKHVSH
FLILFZDVKLQJSURFHVV7KLVPD\FKDQJHWKHOHQJWKRIWKHSUR
JUDPPHVKRZQRQWKH7RXFK'LVSOD\
)RDP PD\ FRPH RXW
RIWKHGHWHUJHQW
GUDZHU
7RRPXFKGHWHUJHQWXVHG"
0L[ WDEOHVSRRQRIIDEULFVRIWHQHUZLWKô OLWUHRIZDWHUDQG
SRXULQWRGLVSHQVHU ,,1RWVXLWDEOHIRURXWGRRUFORWKLQJVSRUWV
ZHDURULWHPVVWXIIHGZLWKGRZQ
5HGXFHGHWHUJHQWGRVDJHIRUWKHQH[WZDVKF\FOH
8VHFRPPHUFLDOO\DYDLODEOHORZIRDPGHWHUJHQWDQGFDUHSURG
XFWZKLFKDUHVXLWDEOHIRUPDFKLQH
2GRXUVVWDLQIRUPD
WLRQLQWKHDSSOLDQFH
5XQWKH 'UXPFOHDQ&SURJUDPPHZLWKRXWODXQGU\
$GGZDVKLQJSRZGHURUDGHWHUJHQWFRQWDLQLQJEOHDFK
1RWH 7RSUHYHQWIRDPLQJRQO\XVHKDOIWKHDPRXQWRIGHWHU
JHQWUHFRPPHQGHGE\WKHGHWHUJHQWPDQXIDFWXUHU'RQRWXVH
GHWHUJHQWVGHVLJQHGIRUZRROOHQVRUGHOLFDWHV
'HWHUJHQWIDEULFVRI
WHQHUGULSVRIIWKH
VHDODQGFROOHFWVRQ
WKHGRRURULQWKH
VHDOIROG
7KHUHLVWRRPXFKGHWHUJHQWIDEULFVRIWHQHULQWKHGLVSHQVHUV
'RQRWILOODERYHWKH PD[PDUNLQWKHGLVSHQVHUV
/RXGQRLVHVYLEUD
WLRQVDQGDSSOLDQFH
PRYHPHQWGXULQJ
WKHVSLQF\FOH
■ ,VWKHDSSOLDQFHDOLJQHG" ~ $OLJQPHQWRQ SDJH
■ $UHWKHDSSOLDQFHVIHHWIL[HG"6HFXUHWKHDSSOLDQFHVIHHW
■ +DYH WKH WUDQVSRUW ORFNV EHHQ UHPRYHG" ~ 5HPRYLQJ WKH
WUDQVSRUWORFNVRQ SDJH
7KH7RXFK'LVSOD\
LQGLFDWRUOLJKWVGR
QRWZRUNZKLOHWKH
DSSOLDQFHLVUXQQLQJ
■ +DVWKHUHEHHQDSRZHUIDLOXUH"
■ +DYHWKHIXVHVEORZQ"5HVHWUHSODFHWKHIXVHV
■ ,IWKHIDXOWRFFXUVUHSHDWHGO\FDOOFXVWRPHUVHUYLFHV
7KHUHLVGHWHUJHQW
UHVLGXHRQWKHODXQ
GU\
■ 6RPHSKRVSKDWHIUHHGHWHUJHQWVFRQWDLQZDWHULQVROXEOH
UHVLGXH
■ 6HOHFW 5LQVHRUEUXVKWKHODXQGU\DIWHUZDVKLQJ
,I \RX FDQQRW UHFWLI\ D IDXOW \RXUVHOI DIWHU VZLWFKLQJ WKH DSSOLDQFH RII DQG RQ DJDLQ RU D
UHSDLULVUHTXLUHG
■ 6ZLWFKRIIWKHDSSOLDQFHDQGSXOORXWWKHPDLQVSOXJ
■ 7XUQRIIWKHWDSDQGFDOOFXVWRPHUVHUYLFHV
)DXOWV &DXVH5HPHG\

HQ $IWHUVDOHVVHUYLFH
4 $IWHUVDOHVVHUYLFH
$IWHUVDOHVVHUYLFH
,I\RXFDQQRWUHFWLI\DIDXOW\RXUVHOI
~ )DXOWVDQGZKDWWRGRDERXWWKHP
RQ SDJH SOHDVHFRQWDFWRXUDIWHU
VDOHVVHUYLFH
:HZLOODOZD\VILQGDQDSSURSULDWH
VROXWLRQWRDYRLGXQQHFHVVDU\YLVLWVE\
HQJLQHHUV
3OHDVHSURYLGHWKHDIWHUVDOHVVHUYLFH
ZLWKWKHSURGXFWQXPEHU(1UDQGWKH
SURGXFWLRQQXPEHU)'RIWKHDSSOLDQFH
<RXFDQILQGWKLVLQIRUPDWLRQGHSHQGLQJ
RQWKHPRGHO
■ 2QWKHLQVLGHRIWKHORDGLQJGRRU
■ 2QWKHEDFNRIWKHDSSOLDQFH
7UXVWWKHH[SHUWLVHRIWKH
PDQXIDFWXUHU&RQWDFWXV%\GRLQJVR
\RXFDQEHVXUHWKDWWKHUHSDLUVDUH
FDUULHGRXWE\WUDLQHGVHUYLFHSHUVRQQHO
XVLQJJHQXLQHVSDUHSDUWV
$GYLFH DQG UHSDLU RUGHU LQ WKH HYHQW RI
IDXOWV
(1U 3URGXFWQXPEHU
)' 3URGXFWLRQQXPEHU
&1
(1U )'

&RQVXPSWLRQYDOXHV HQ
[ &RQVXPSWLRQYDOXHV
&RQVXPSWLRQYDOXHV
0RGHO :$8:
/HYHO
(QHUJ\FRQVXPSWLRQ
N:KSHUF\FOH
:DWHUFRQVXPSWLRQ
OLWUHVSHUF\FOH
(QHUJ\HIILFLHQF\RI
ZDVKLQJ
1RLVHOHYHOYDOXHV
0D[YDOXHIRUVSLQQLQJ
G%$
0D[YDOXHIRUZDVKLQJ
G%$
(QHUJ\FRQVXPSWLRQWHVWHGZLWK &RWWRQV &SURJUDPPHDQGSURJUDPPHDGGL
WLRQDOVHWWLQJV 撔均 HFR3HUIHFW LQDFFRUGDQFHZLWK*%
1RLVHOHYHOVWHVWHGLQDFFRUGDQFHZLWK*%
0RGHO :/8::/8:
/HYHO
(QHUJ\FRQVXPSWLRQ
N:KSHUF\FOH
:DWHUFRQVXPSWLRQ
OLWUHVSHUF\FOH
(QHUJ\HIILFLHQF\RI
ZDVKLQJ
1RLVHOHYHOYDOXHV
0D[YDOXHIRUVSLQQLQJ
G%$
0D[YDOXHIRUZDVKLQJ
G%$
(QHUJ\FRQVXPSWLRQWHVWHGZLWK &RWWRQV &SURJUDPPHDQGSURJUDPPHDGGL
WLRQDO VHWWLQJV 撔均 HFR3HUIHFW DQG 㒲儔伩 5LQVH SOXV LQ DFFRUGDQFH ZLWK
*%
1RLVHOHYHOVWHVWHGLQDFFRUGDQFHZLWK*%
HQ 7HFKQLFDOGDWD
J 7HFKQLFDOGDWD
7HFKQLFDOGDWD
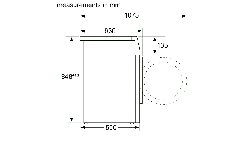
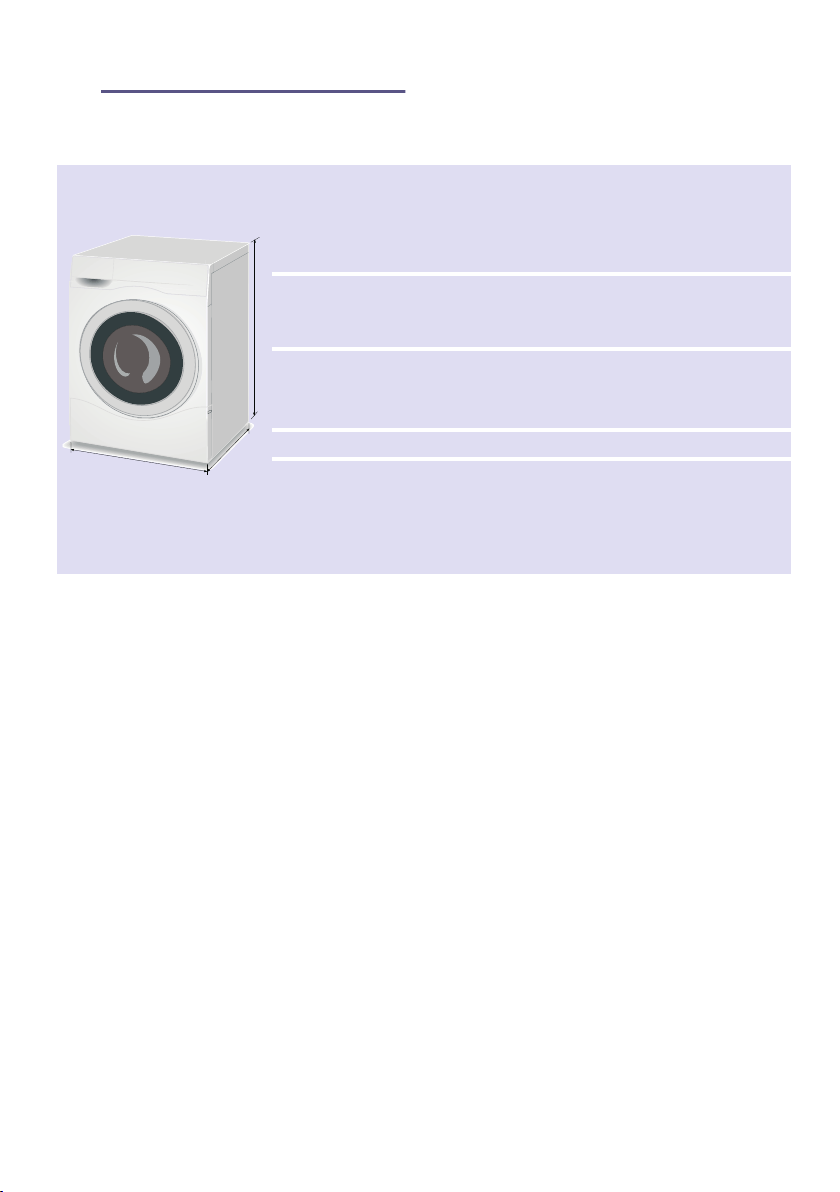
'LPHQVLRQV D PP
E PP:$8:
E PP:/8:
:/8:
F PP
:HLJKW NJ:$8:
NJ:/8:
:/8:
0DLQVFRQQHFWLRQ 1RPLQDOYROWDJH9a +]
1RPLQDOFXUUHQW $
1RPLQDOSRZHU :
:DWHUSUHVVXUH ² 03D² EDU
(QYLURQPHQWDOFRQGL
WLRQVIRUXVH
DFFRUGLQJWR*%7
$PELHQW7HPSHUDWXUH
ઊ ઊ QRQIUHH]LQJ
5HODWLYH+XPLGLW\
OHVVWKDQDWઊ QRQFRQ
GHQVLQJ
D
E
F

6

5REHUW%RVFK+DXVJHUlWH*PE+
&DUO:HU\6WUDH
0QFKHQ*(50$1<
ZZZERVFKKRPHFRP
*9001145220*
HQ
7KDQN \RX IRU EX\LQJ D %RVFK +RPH
$SSOLDQFH
5HJLVWHU\RXUQHZGHYLFHRQ0\%RVFKQRZDQGSURILWGLUHFWO\IURP
([SHUWWLSVWULFNVIRU\RXUDSSOLDQFH
:DUUDQW\H[WHQVLRQRSWLRQV
'LVFRXQWVIRUDFFHVVRULHVVSDUHSDUWV
'LJLWDOPDQXDODQGDOODSSOLDQFHGDWDDWKDQG
(DV\DFFHVVWR%RVFK+RPH$SSOLDQFHV6HUYLFH
)UHHDQGHDV\UHJLVWUDWLRQ²DOVRRQPRELOHSKRQHV
ZZZERVFKKRPHFRPZHOFRPH
/RRNLQJIRUKHOS"
<RXOOILQGLWKHUH
([SHUWDGYLFHIRU\RXU%RVFKKRPHDSSOLDQFHVQHHGKHOSZLWKSUREOHPVRUDUHSDLUIURP
%RVFKH[SHUWV
)LQGRXWHYHU\WKLQJDERXWWKHPDQ\ZD\V%RVFKFDQVXSSRUW\RX
ZZZERVFKKRPHFRPVHUYLFH
&RQWDFWGDWDRIDOOFRXQWULHVDUHOLVWHGLQWKHDWWDFKHGVHUYLFHGLUHFWRU\