*Select Models Only
SAFETY INFORMATION .....3
OPERATING INSTRUCTIONS
Features ..........................6
Controls ..........................9
Dispenser* ....................... 13
Autofill* ......................... 14
Single Serve Brewer* .............. 15
About Appliance Communication . . . 16
Water Filter ...................... 17
Fresh Food Storage Options ....... 18
Climate Zone & Temperature
Controlled Drawer ................20
Freezer ..........................22
Automatic Ice maker ..............23
CARE AND CLEANING ..... 24
Replacing the Lights ..............25
INSTALLATION INSTRUCTIONS
Preparing to Install the
Refrigerator ......................26
Installing the Refrigerator ..........28
Installing the Water Line ........... 41
TROUBLESHOOTING TIPS . . 46
Normal Operating Conditions ......45
Truth or Myth ....................49
LIMITED WARRANTY ....... 51
CONSUMER SUPPORT
RPWFE Water Filter Cartridge
Limited Warranty ................52
Performance Data Sheet ...........53
Consumer Support ................54
ENGLISH/FRANÇAIS/
ESPAÑOL
Write the model and serial
numbers here:
Model # _________________
Serial # _________________
Find these numbers on a label
on the left side, near the middle
of the refrigerator compartment.
49-60792 Rev. 3 01-19 GEA
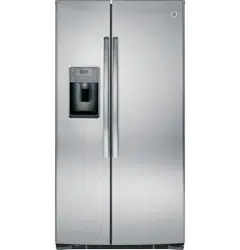
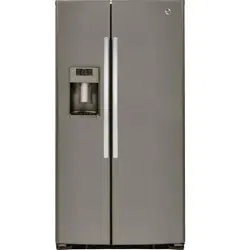
GE Profile™ Models
Models that start with DFE, GFE,
GFS, GNE, PFH, PFE, PFD and
GFD are Standard Depth
Models (SD)
Models that start with GYE, GYS,
PYE, DYE, PWE, ZWE and PYD
are Counter Depth Models (CD)
OWNER’S MANUAL &
INSTALLATION
INSTRUCTIONS
REFRIGERATORS
Bottom Freezer
GE is a trademark of the General Electric Company. Manufactured under trademark license.

2 49-60792 Rev. 3
THANK YOU FOR MAKING GE APPLIANCES A PART OF YOUR HOME.
Whether you grew up with GE Appliances, or this is your first, we’re happy to have you in the family.
We take pride in the craftsmanship, innovation and design that goes into every GE Appliances
product, and we think you will too. Among other things, registration of your appliance ensures that we
can deliver important product information and warranty details when you need them.
Register your GE appliance now online. Helpful websites and phone numbers are available in the
Consumer Support section of this Owner’s Manual. You may also mail in the pre-printed registration
card included in the packing material.
49-60792 Rev. 3 3
CAUTION
To reduce the risk of injury when using your refrigerator, follow these basic safety
precautions.
Ŷ 'RQRWFOHDQJODVVVKHOYHVRUFRYHUVZLWKZDUP
water when they are cold. Glass shelves and
covers may break if exposed to sudden temperature
changes or impact, such as bumping or dropping.
Tempered glass is designed to shatter into many
small pieces if it breaks.
Ŷ .HHSILQJHUVRXWRIWKH³SLQFKSRLQW´DUHDV
clearances between the doors and between the
doors and cabinet are necessarily small. Be careful
closing doors when children are in the area.
Ŷ 'RQRWWRXFKWKHFROGVXUIDFHVLQWKHIUHH]HU
compartment when hands are damp or wet, skin
may stick to these extremely cold surfaces.
Ŷ 'RQRWUHIUHH]HIUR]HQIRRGVZKLFKKDYHWKDZHG
completely.
Ŷ ,QUHIULJHUDWRUVZLWKDXWRPDWLFLFHPDNHUVDYRLG
contact with the moving parts of the ejector
mechanism, or with the heating element that
UHOHDVHVWKHFXEHV'RQRWSODFHILQJHUVRUKDQGV
on the automatic ice making mechanism while the
refrigerator is plugged in.
SAFETY INFORMATION
READ AND SAVE THESE INSTRUCTIONS
IMPORTANT SAFETY INFORMATION
READ ALL INSTRUCTIONS BEFORE USING THE APPLIANCE
INSTALLATION
WARNING
EXPLOSION HAZARD
.HHSIODPPDEOHPDWHULDOVDQGYDSRUVVXFKDVJDVROLQHDZD\IURPUHIULJHUDWRU)DLOXUHWRGRVRFDQUHVXOWLQILUH
explosion, or death.
WARNING
TIP OVER HAZARD.
%XLOWLQVW\OHPRGHOVPRGHO3<(*<(*<63:(3<'DQG=:(DUHWRSKHDY\HVSHFLDOO\ZLWKDQ\GRRUV
open. These models must be secured with the anti-tip floor bracket to prevent tipping forward, which could result
in death or serious injury. Read and follow the entire installation instructions for installing the anti-tip floor bracket
packed with your refrigerator.
WARNING
To reduce the risk of fire, explosion, electric shock, or injury when using your
refrigerator, follow these basic safety precautions:
Ŷ 7KLVUHIULJHUDWRUPXVWEHSURSHUO\LQVWDOOHG
DQGORFDWHGLQDFFRUGDQFHZLWKWKH,QVWDOODWLRQ
,QVWUXFWLRQVEHIRUHLWLVXVHG
Ŷ 8QSOXJWKHUHIULJHUDWRUEHIRUHPDNLQJUHSDLUV
replacing a light bulb, or cleaning.
NOTE: Power to the refrigerator cannot be
disconnected by any setting on the cont rol panel.
NOTE: Repairs must be performed by a qualified
Service Professional.
Ŷ 5HSODFHDOOSDUWVDQGSDQHOVEHIRUHRSHUDWLQJ
Ŷ 'RQRWXVHDQH[WHQVLRQFRUG
Ŷ 'RQRWVWRUHRUXVHJDVROLQHRURWKHUIODPPDEOH
vapors and liquids in the vicinity of this or any other
appliance.
Ŷ 'RQRWVWRUHH[SORVLYHVXEVWDQFHVVXFKDVDHURVRO
cans with a flammable propellant in this appliance.
Ŷ 7RSUHYHQWVXIIRFDWLRQDQGHQWUDSPHQWKD]DUGV
WRFKLOGUHQUHPRYHWKHIUHVKIRRGDQGIUHH]HU
doors from any refrigerator before disposing of it or
discontinuing its use.
Ŷ 7RDYRLGVHULRXVLQMXU\RUGHDWKFKLOGUHQVKRXOGQRW
stand on, or play in or with the appliance.
Ŷ &KLOGUHQDQGSHUVRQVZLWKUHGXFHGSK\VLFDOVHQVRU\
or mental capabilities or lack of experience and
knowledge can use this appliance only if they are
supervised or have been given instructions on safe
XVHDQGXQGHUVWDQGWKHKD]DUGVLQYROYHG
Ŷ 7KLVDSSOLDQFHLVLQWHQGHGWREHXVHGLQKRXVHKROG
and similar applications such as: staff kitchen areas
LQVKRSVRIILFHVDQGRWKHUZRUNLQJHQYLURQPHQWV
IDUPKRXVHVE\FOLHQWVLQKRWHOVPRWHOVEHG
EUHDNIDVWDQGRWKHUUHVLGHQWLDOHQYLURQPHQWV
catering and similar non-retail applications.
Ŷ 'RQRWDSSO\KDUVKFOHDQHUVWRWKHUHIULJHUDWRU
Certain cleaners will damage plastic which may
cause parts such as the door or door handles to
detach unexpectedly. See the Care and Cleaning
section for detailed instructions.
Ŷ &RQQHFWWRSRWDEOHZDWHUVXSSO\RQO\ZLWKZDWHU
SUHVVXUHPD[LPXPRISVLNLORSDVFDOV
4 49-60792 Rev. 3
SAFETY INFORMATION
IMPORTANT SAFETY INFORMATION
READ ALL INSTRUCTIONS BEFORE USING THE APPLIANCE
READ AND SAVE THESE INSTRUCTIONS
PROPER DISPOSAL OF YOUR OLD REFRIGERATOR
Do not, under any circumstances, cut or remove the third (ground) prong from the power cord. For
personal safety, this appliance must be properly grounded.
The power cord of this appliance is equipped with a
SURQJJURXQGLQJSOXJZKLFKPDWHVZLWKDVWDQGDUG
SURQJJURXQGLQJZDOORXWOHWWRPLQLPL]HWKH
SRVVLELOLW\RIHOHFWULFVKRFNKD]DUGIURPWKLVDSSOLDQFH
Have the wall outlet and circuit checked by a qualified
electrician to make sure the outlet is properly
grounded.
Where a standard 2-prong wall outlet is encountered, it
is your personal responsibility and obligation to have it
replaced with a properly grounded 3-prong wall outlet.
'RQRWXVHDQDGDSWHU
The refrigerator should always be plugged into its own
individual electrical outlet which has a voltage rating
that matches the rating plate.
$9ROW$&+]RUDPSIXVHGJURXQGHG
electrical supply is required. This provides the best
performance and also prevents overloading house
ZLULQJFLUFXLWVZKLFKFRXOGFDXVHDILUHKD]DUGIURP
overheated wires.
Never unplug your refrigerator by pulling on the power
cord. Always grip plug firmly and pull straight out from
the outlet.
,PPHGLDWHO\GLVFRQWLQXHXVHRIDGDPDJHGVXSSO\
FRUG,IWKHVXSSO\FRUGLVGDPDJHGLWPXVWEH
replaced by a qualified service professional with an
DXWKRUL]HGVHUYLFHSDUWIURPWKHPDQXIDFWXUHU
When moving the refrigerator away from the wall, be
careful not to roll over or damage the power cord.
CONNECTING ELECTRICITY
WARNING
ELECTRICAL SHOCK HAZARD
Plug into a grounded 3-prong outlet
'RQRWUHPRYHWKHJURXQGSURQJ
'RQRWXVHDQDGDSWHU
'RQRWXVHDQH[WHQVLRQFRUG
)DLOXUHWRIROORZWKHVHLQVWUXFWLRQVFDQUHVXOWLQGHDWKILUHRUHOHFWULFDOVKRFN
WARNING
SUFFOCATION AND ENTRAPMENT HAZARD
)DLOXUHWRIROORZWKHVHGLVSRVDOLQVWUXFWLRQVFDQUHVXOWLQGHDWKRUVHULRXVLQMXU\
IMPORTANT: Child entrapment and suffocation
are not problems of the past. Junked or abandoned
refrigerators are still dangerous even if they will sit
IRU³MXVWDIHZGD\V´,I\RXDUHJHWWLQJULGRI\RXUROG
refrigerator, please follow the instructions below to help
prevent accidents.
Before You Throw Away Your Old Appliance
Ŷ7DNHRIIWKHIUHVKIRRGDQGIUHH]HUGRRUV
Ŷ Leave the shelves in place so that children may not
easily climb inside.
Refrigerant and Foam Disposal:
'LVSRVHRIDSSOLDQFHLQDFFRUGDQFHZLWK)HGHUDODQG/RFDO5HJXODWLRQV)ODPPDEOHLQVXODWLRQPDWHULDOXVHG
requires special disposal procedures. Contact your local authorities for the environmentally safe disposal of your
appliance.

49-60792 Rev. 3 5
IMPORTANT SAFETY INFORMATION
READ ALL INSTRUCTIONS BEFORE USING THE APPLIANCE
SAFETY INFORMATION
READ AND SAVE THESE INSTRUCTIONS
WARNING
Scalding Hazard.
The hot water dispenser is capable of heating water to a temperature of approximately 185°)°&:DWHU
temperatures above 125°)°&FDQFDXVHVHYHUHEXUQVRUGHDWKIURPVFDOGLQJ&KLOGUHQWKHGLVDEOHGDQGWKH
elderly are at highest risk of being scalded.
HOT WATER DISPENSER
Use this appliance only for its intended purpose as described in this Owner’s Manual. To reduce the risk of
severe burns, scald injuries, or death when using your hot water dispenser, the instructions below must be
followed:
Ŷ 'RQRWOHDYHFRQWDLQHUXQDWWHQGHGDURXQGFKLOGUHQ
during or after hot water dispense.
Ŷ'RQRWSHUPLWFKLOGUHQWRXVHWKHKRWZDWHUGLVSHQVHU
Ŷ The hot water dispensing knob requires both twist and
push motions in order to reduce the risk of hot water
being dispensed unintentionally or by small children.
'RQRWWDPSHUZLWKRUPRGLI\WKHKRWZDWHUGLVSHQVLQJ
knob.
Ŷ The water coming from the dispenser is very hot.
8VHH[WUHPHFDXWLRQZKHQGLVSHQVLQJDQGGULQNLQJ
water. Allow water to cool to a drinkable temperature
before drinking. Your container should be close to
WKHGLVSHQVLQJSRLQWWRPLQLPL]HWKHVSODVKLQJRIKRW
water.
Ŷ When dispensing hot water, the container can become
YHU\KRW8VHDWHPSHUDWXUHLQVXODWLQJFRQWDLQHUVXFK
DVFHUDPLFRUIRDP8VLQJFRQWDLQHUPDWHULDOVVXFKDV
paper or plastic may result in a burn while holding the
FXS'RQRWXVHJODVVFRQWDLQHUVDVWKHUPDOVKRFN
can cause the container to break and may result in
scalding or lacerations.
Ŷ Always follow the formula manufacturer’s instructions
for preparation of baby formula. When dispensing
ZDWHUEHORZÛ)FPDOZD\VWHVWWKH
temperature of the water before drinking.
Ŷ The first time the hot water feature is used, confirm if
\RXOLYHDERYHIHHWPHWHUVKLJKDOWLWXGH
This limits the temperature of the hot water system to
avoid boiling. To access the high altitude selection, go
to the settings menu if available or for other models
press Fridge and Door Alarm together to cycle from
Hi AL to Lo ALKLJKDOWLWXGHWRORZDOWLWXGH
Ŷ A newly installed water filter cartridge will cause water
WRVSXUWIURPWKHGLVSHQVHU5XQJDOORQVOLWHUV
of water through the cold water dispenser (about 5
PLQXWHVWRUHPRYHDLUIURPWKHV\VWHP8QWLOWKLVDLU
is removed from the system through the cold water
GLVSHQVHU'2127XVHWKHKRWZDWHUGLVSHQVHUDV
it may result in spurting of hot water and lead to hot
water scalding.
Ŷ'RQRWXVHZLWKZDWHUWKDWLVPLFURELRORJLFDOO\XQVDIH
or of unknown quality.
Ŷ The hot water dispenser is designed to only dispense
ZDWHU'RQRWDWWHPSWWRKHDWRUGLVSHQVHDQ\WKLQJ
RWKHUWKDQZDWHU'RQRWDWWHPSWWRGLVDVVHPEOHRU
clean the tank.
Ŷ'RQRWPRGLI\WKHKRWZDWHUV\VWHP6HUYLFHZLWK
factory replacement part only.

6 49-60792 Rev. 3
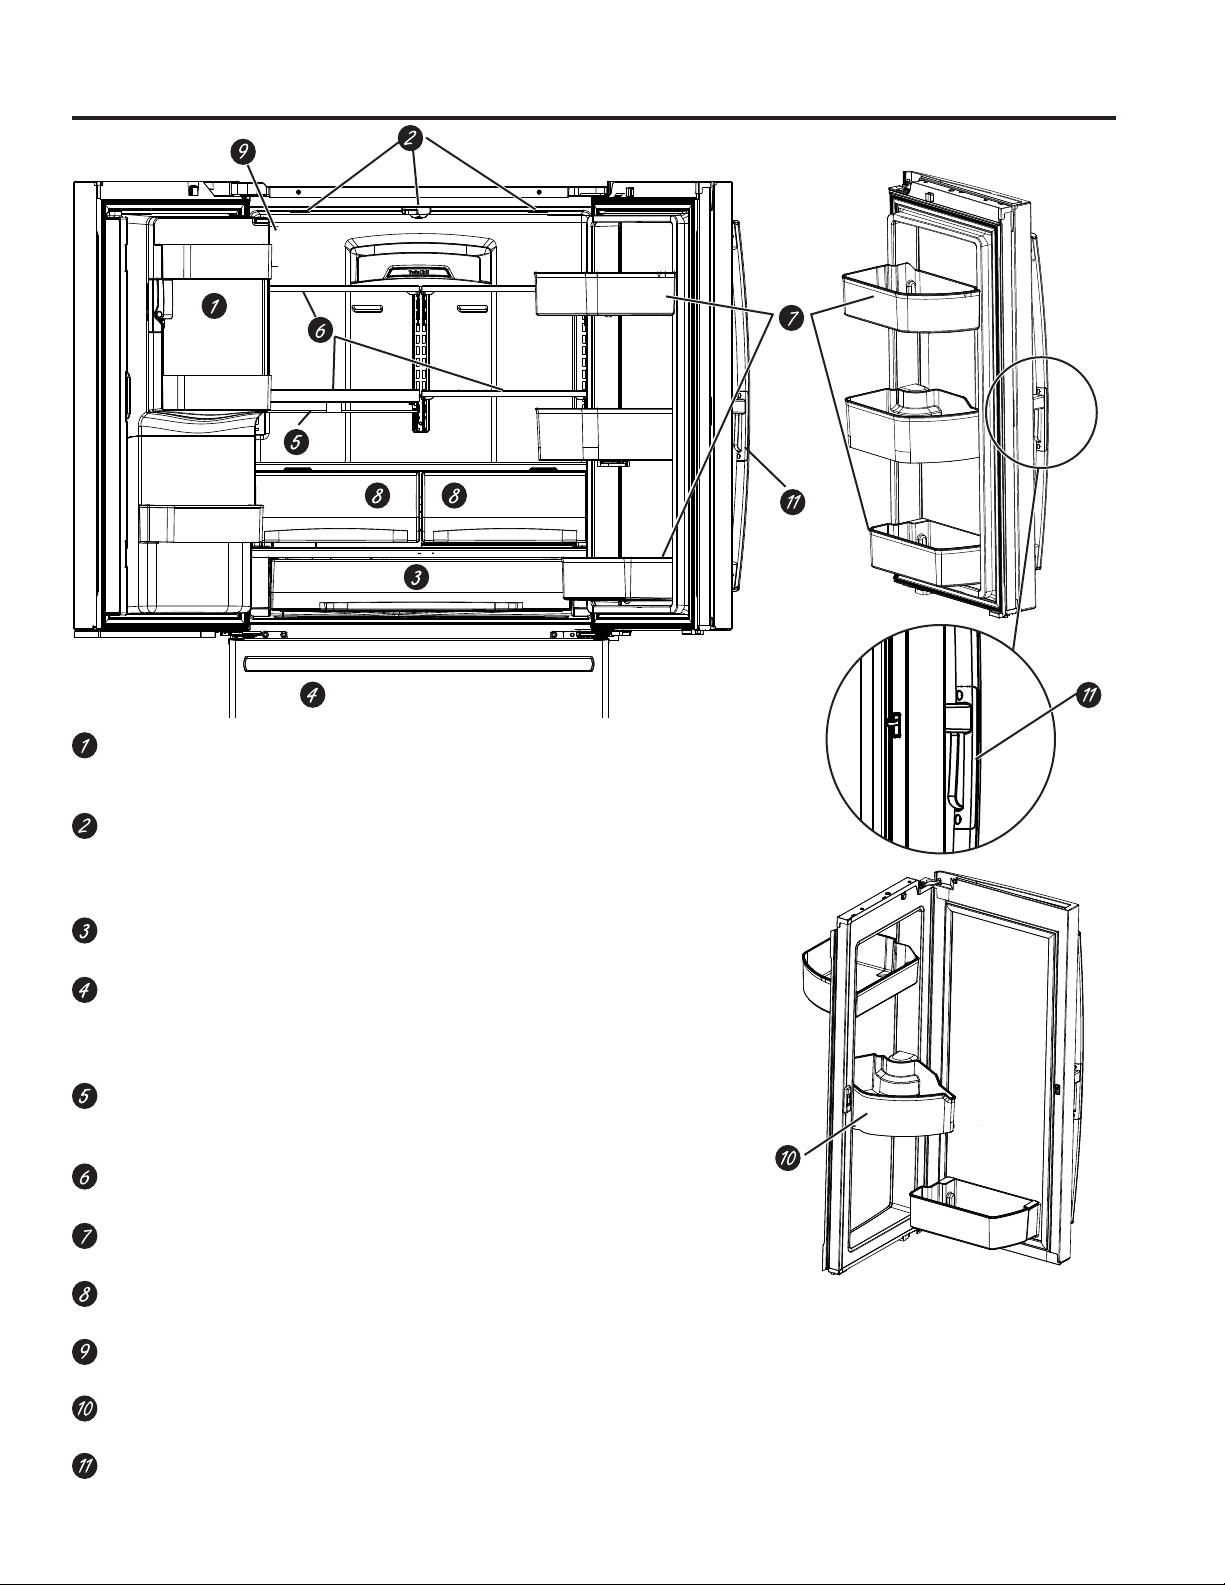
Space-saving ice maker*
,FHPDNHUDQGELQDUHORFDWHGRQWKHGRRUFUHDWLQJ
more usable storage space.
Showcase LED lighting
/('OLJKWLQJLVSRVLWLRQHGWKURXJKRXWWKHLQWHULRUWR
VSRWOLJKWDUHDVLQWKHUHIULJHUDWRU/('VDUHORFDWHG
XQGHUWKHIUHVKIRRGGRRUWROLJKWWKHIUHH]HUZKHQ
opened.
Drop-down tray*
Allows for extra door storage when you need it and
tucks away when you don’t.
Full-width temperature controlled drawer
Adjustable temperature control bin that can
accommodate larger items.
Dairy bin
Separate compartment for your items.
Ice bin/Ice maker*
,FHPDNHUZLWKLFHVWRUDJHELQV
QuickSpace™ shelf*
)XQFWLRQVDVDQRUPDOIXOOVL]HGVKHOIZKHQQHHGHG
and easily slides back to store tall items below.
Spillproof shelves
'HVLJQHGWRFDSWXUH\RXUVSLOOVIRUHDVLHUFOHDQXS
Anti-slip Mat
Liner that captures spills, keeps containers from
shifting when the door is opened and is easily
removable for cleaning.
Removable door bin
Can be removed for those with a wall limiting the door
opening.
Climate zone bin
Separate bins for produce storage.
Water filter
)LOWHUVZDWHUDQGLFH
* Select models only.
Features
USING THE REFRIGERATOR:)HDWXUHV
49-60792 Rev. 3 7
Space-saving ice maker*
,FHPDNHUDQGELQDUHORFDWHGRQWKHGRRUFUHDWLQJPRUHXVDEOHVWRUDJH
space.
Showcase LED lighting
/('OLJKWLQJLVSRVLWLRQHGWKURXJKRXWWKHLQWHULRUWRVSRWOLJKWDUHDVLQWKH
UHIULJHUDWRU/('VDUHORFDWHGXQGHUWKHIUHVKIRRGGRRUWROLJKWWKHIUHH]HU
when opened.
Full-width temperature controlled drawer
Adjustable temperature control bin that can accommodate larger items.
Freezer Ice maker/Ice Bin*
An ice maker in both compartments give you more ice whenever you need
LW$YDLODEOHRQ1RQ'LVSHQVHPRGHOVDOVRDYDLODEOHDVDNLWIRUVRPH
models.
QuickSpace™ shelf*
)XQFWLRQVDVDQRUPDOIXOOVL]HGVKHOIZKHQQHHGHGDQGHDVLO\VOLGHVEDFN
to store tall items below.
Spillproof shelves
'HVLJQHGWRFDSWXUH\RXUVSLOOVIRUHDVLHUFOHDQXS
Removable door bin
Can be removed for those with a wall limiting the door opening.
Climate zone bin
Separate bins for produce storage.
Water filter
)LOWHUVZDWHUDQGLFH
Rotating Bin*
Can be rotated out for easy access.
Door in Door Latch*
6TXHH]HWKHODWFKRQWKHXQGHUVLGHRIWKHKDQGOHWRRSHQWKHRXWHUGRRU
* Select models only.
Features
USING THE REFRIGERATOR:)HDWXUHV
8 49-60792 Rev. 3
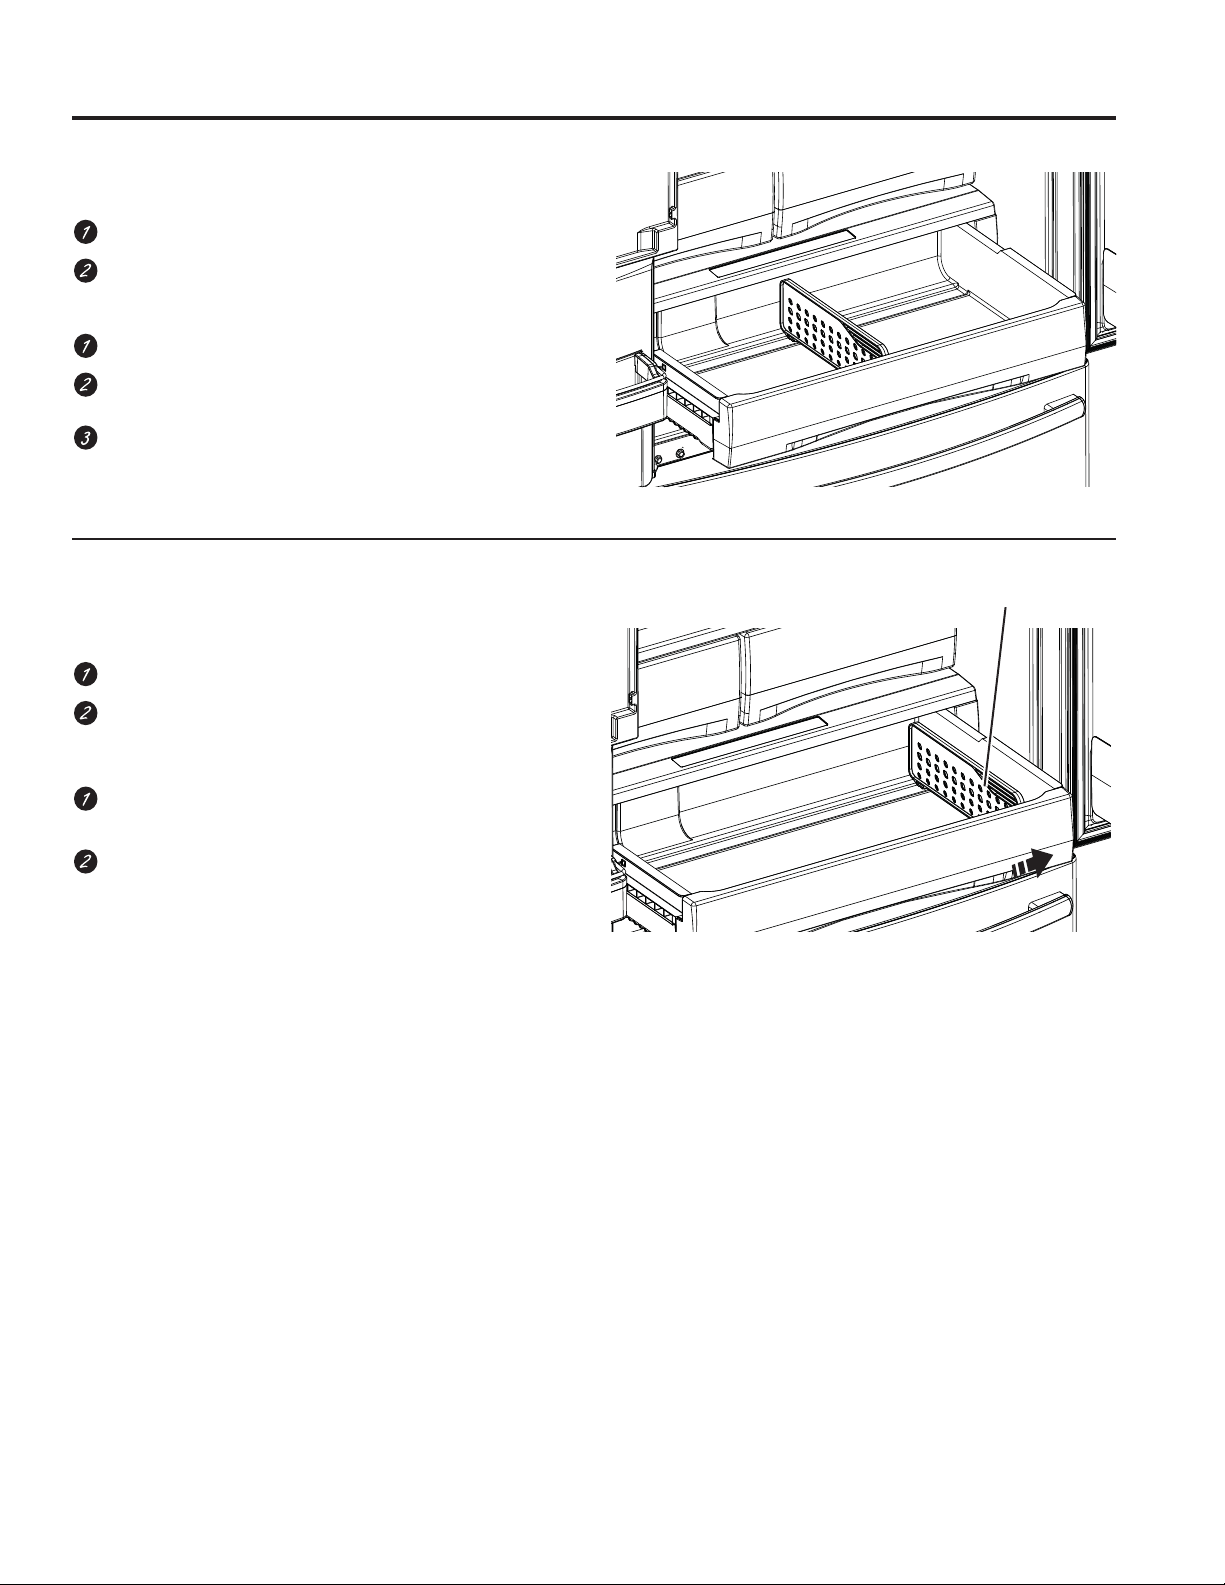
Door ice bin*
1. Open left fresh food door.
2. Pull down latch to release bin door.
8VLQJKDQGKROGOLIWLFHEXFNHWXSDQGRXWWRFOHDU
locators in bottom of bin.
4. To replace the ice bucket, set it on the guide
brackets and push until the ice bucket seats
properly.
,IEXFNHWFDQQRWEHUHSODFHGURWDWHWKH,FH%XFNHW
)RUNWXUQFORFNZLVH
Ice/water filter
Certified to reduce chlorine-resistant cysts, lead,
VHOHFWSKDUPDFHXWLFDOVDQGPRUH)RUHDV\ILOWHU
replacement instructions see page 17.
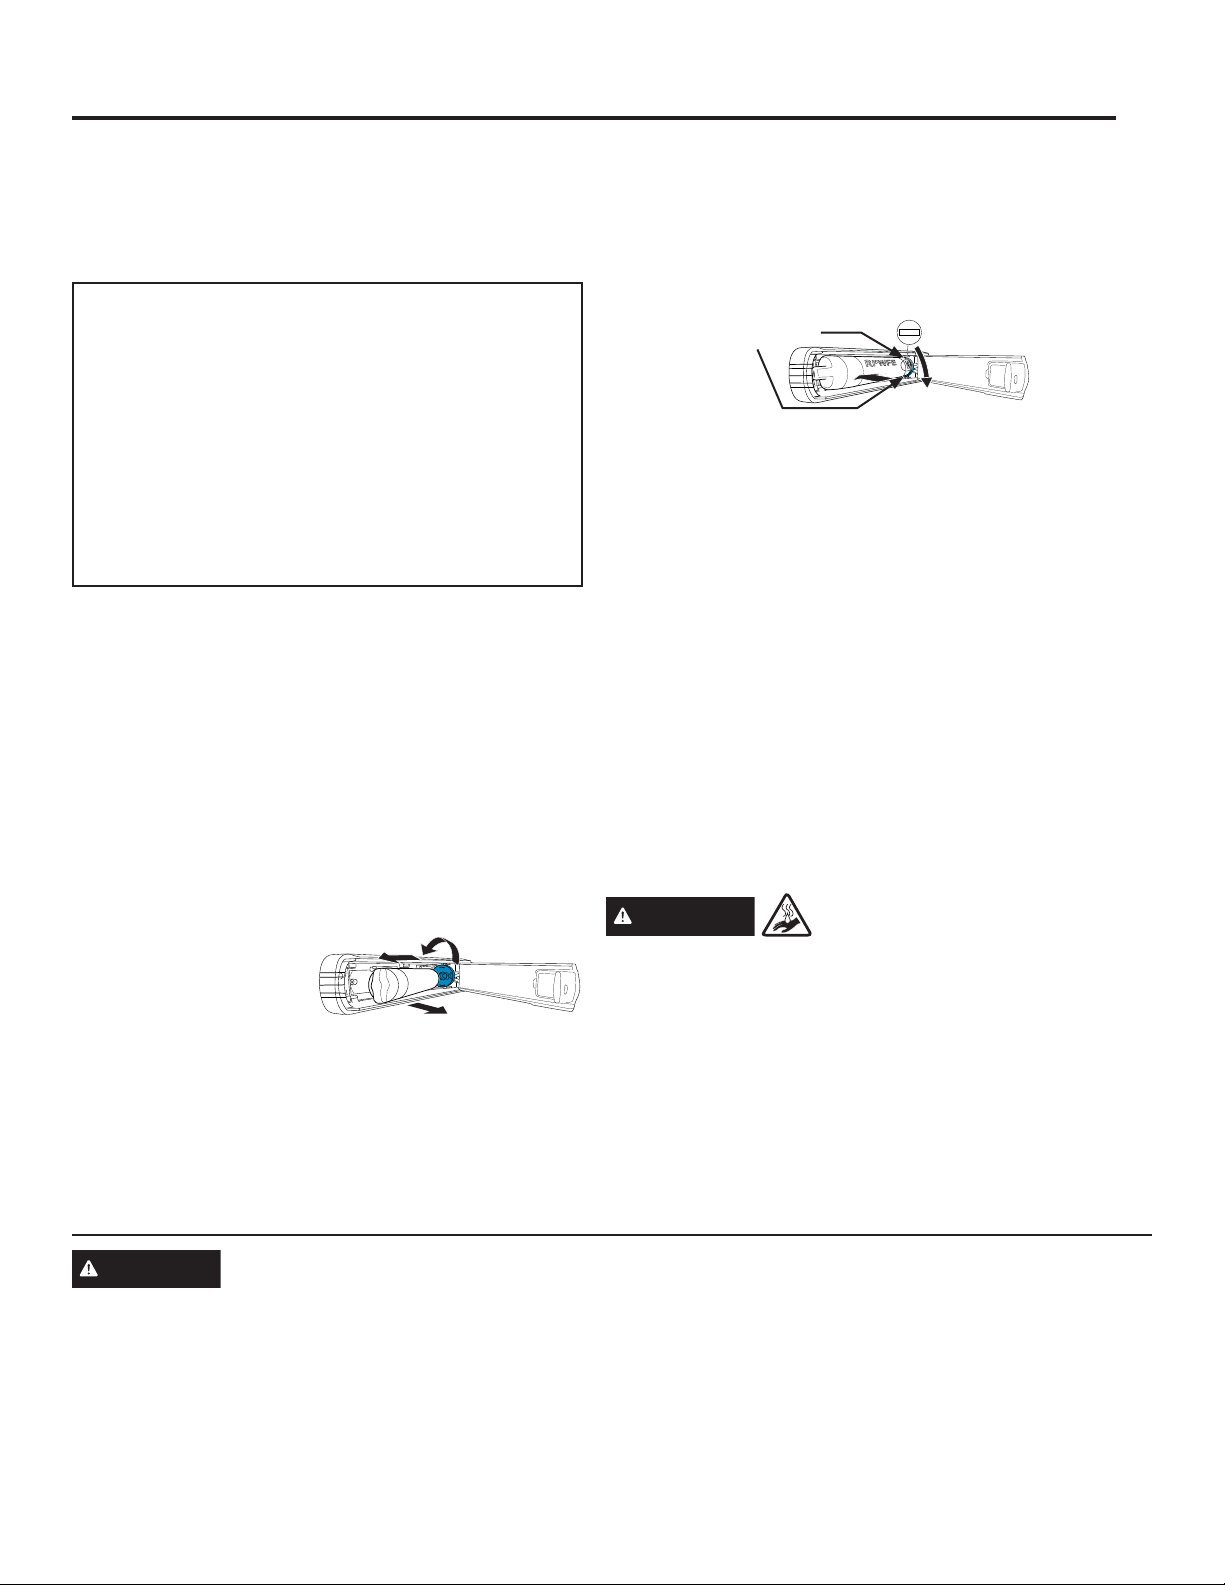
WARNING
Scalding Hazard.*
8VHRIWKHKRWZDWHUGLVSHQVHUSULRUWRSXUJLQJDLUIURP
the system may result in spurting of hot water and lead
WRKRWZDWHUVFDOGLQJ)ROORZWKHLQVWUXFWLRQVIRU³:DWHU
)LOWHU6WHS´RQSDJHWRSXUJHDOODLUIURPWKH
system through the cold water dispenser prior to using
the hot water dispenser.
The first time the hot water feature is used, confirm if
you live above 5000 feet (1524 meters) (high altitude).
This limits the temperature of the hot water system to
avoid boiling. To access the high altitude selection,
see Controls.
*Select Models Only
Features
USING THE REFRIGERATOR:)HDWXUHV
,FHEXFNHW
Latch
49-60792 Rev. 3 9
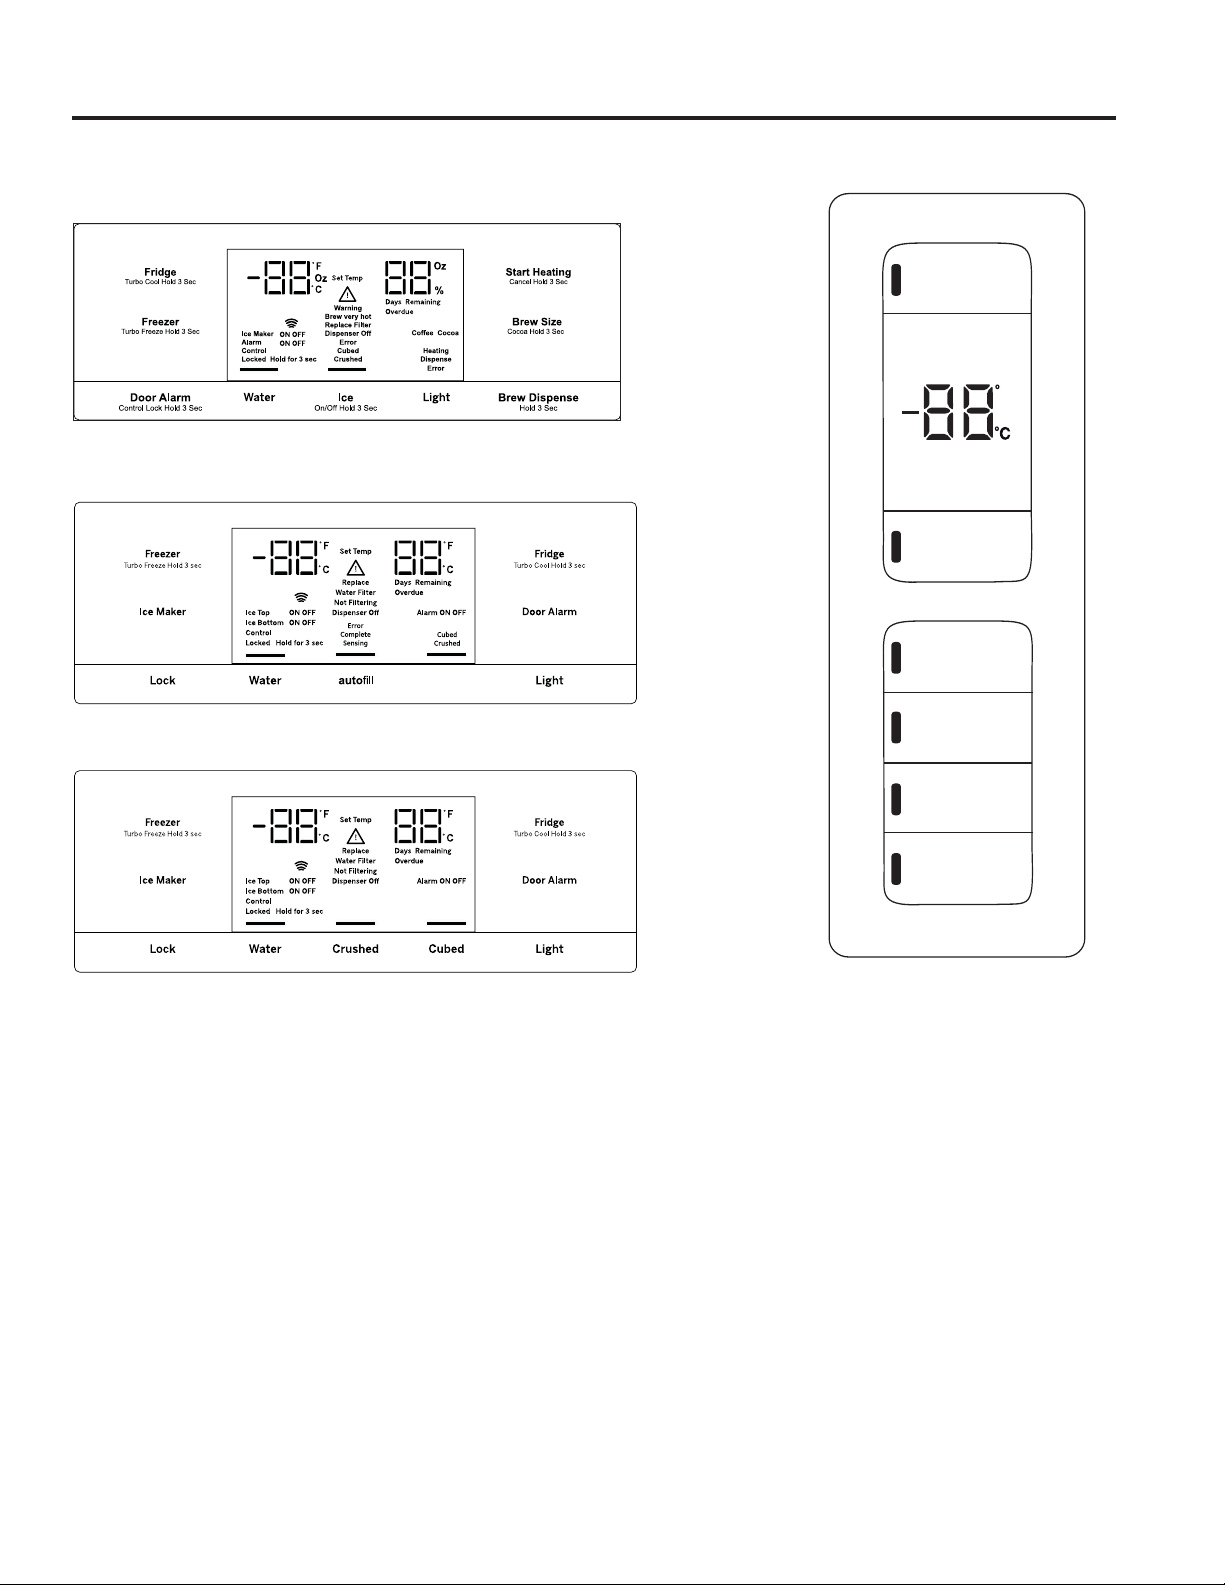
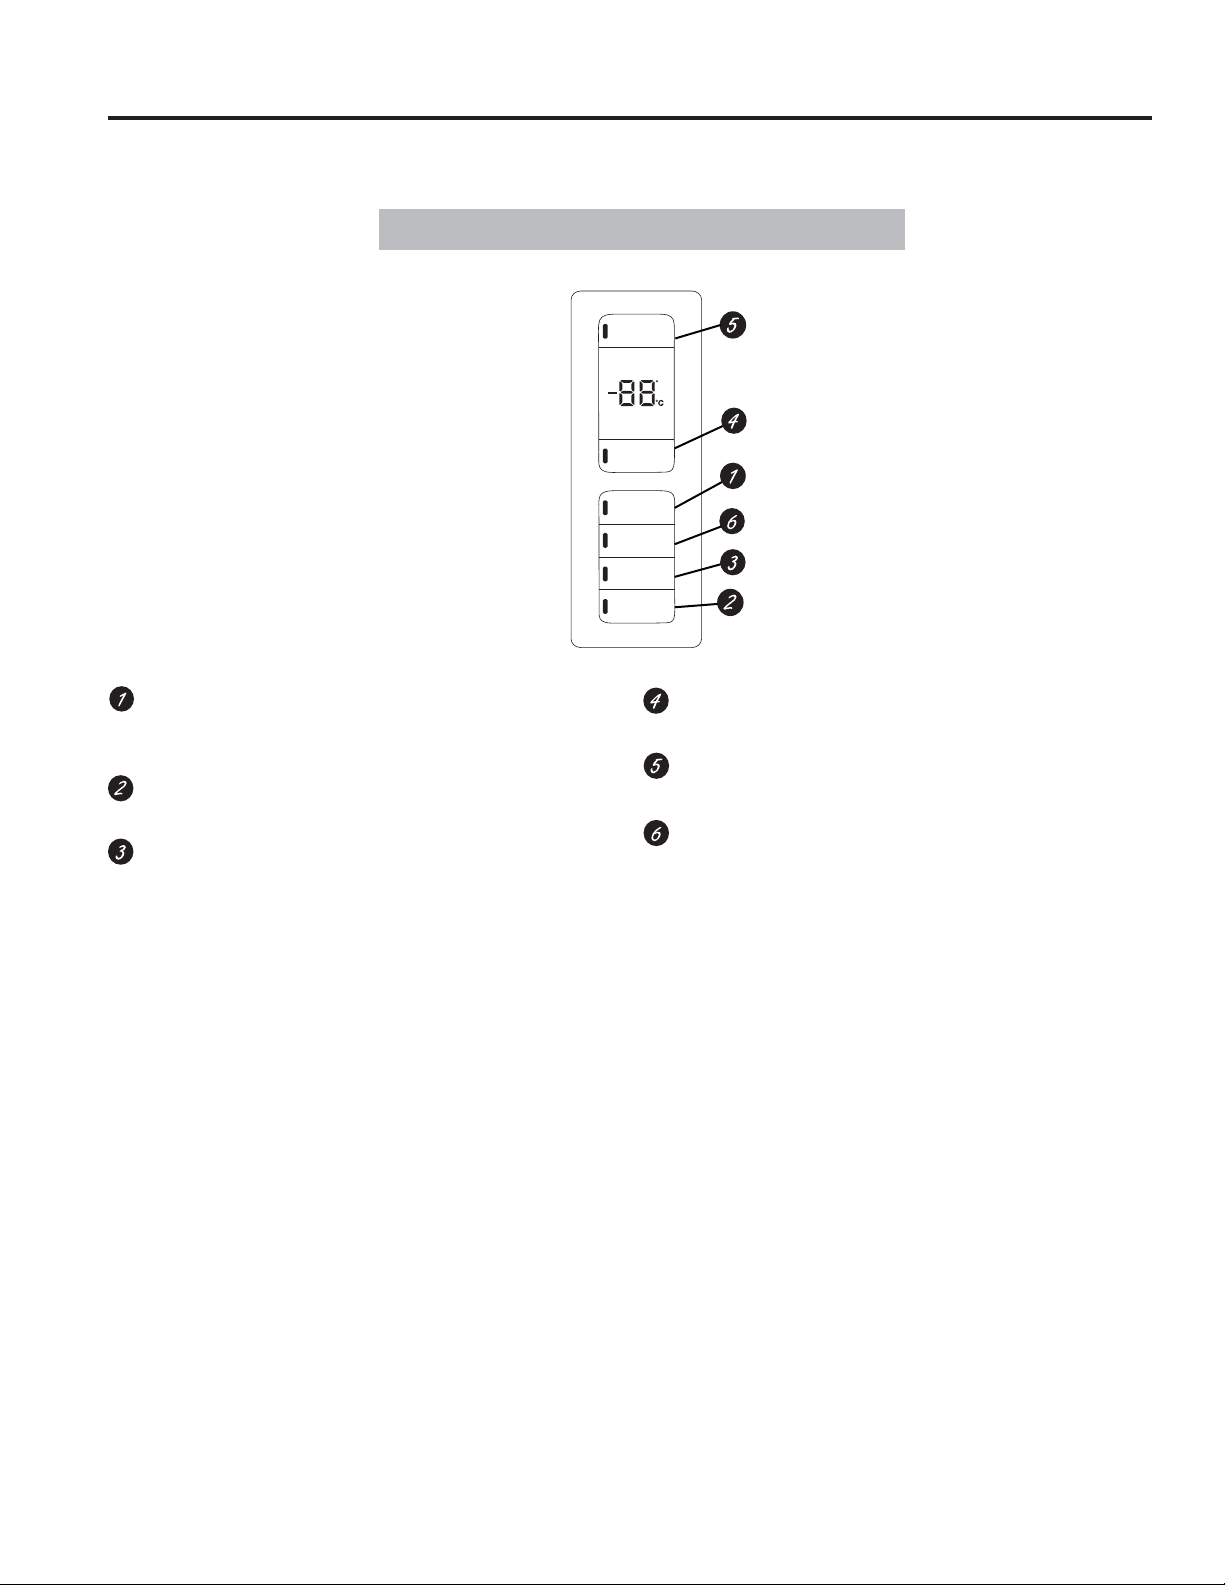
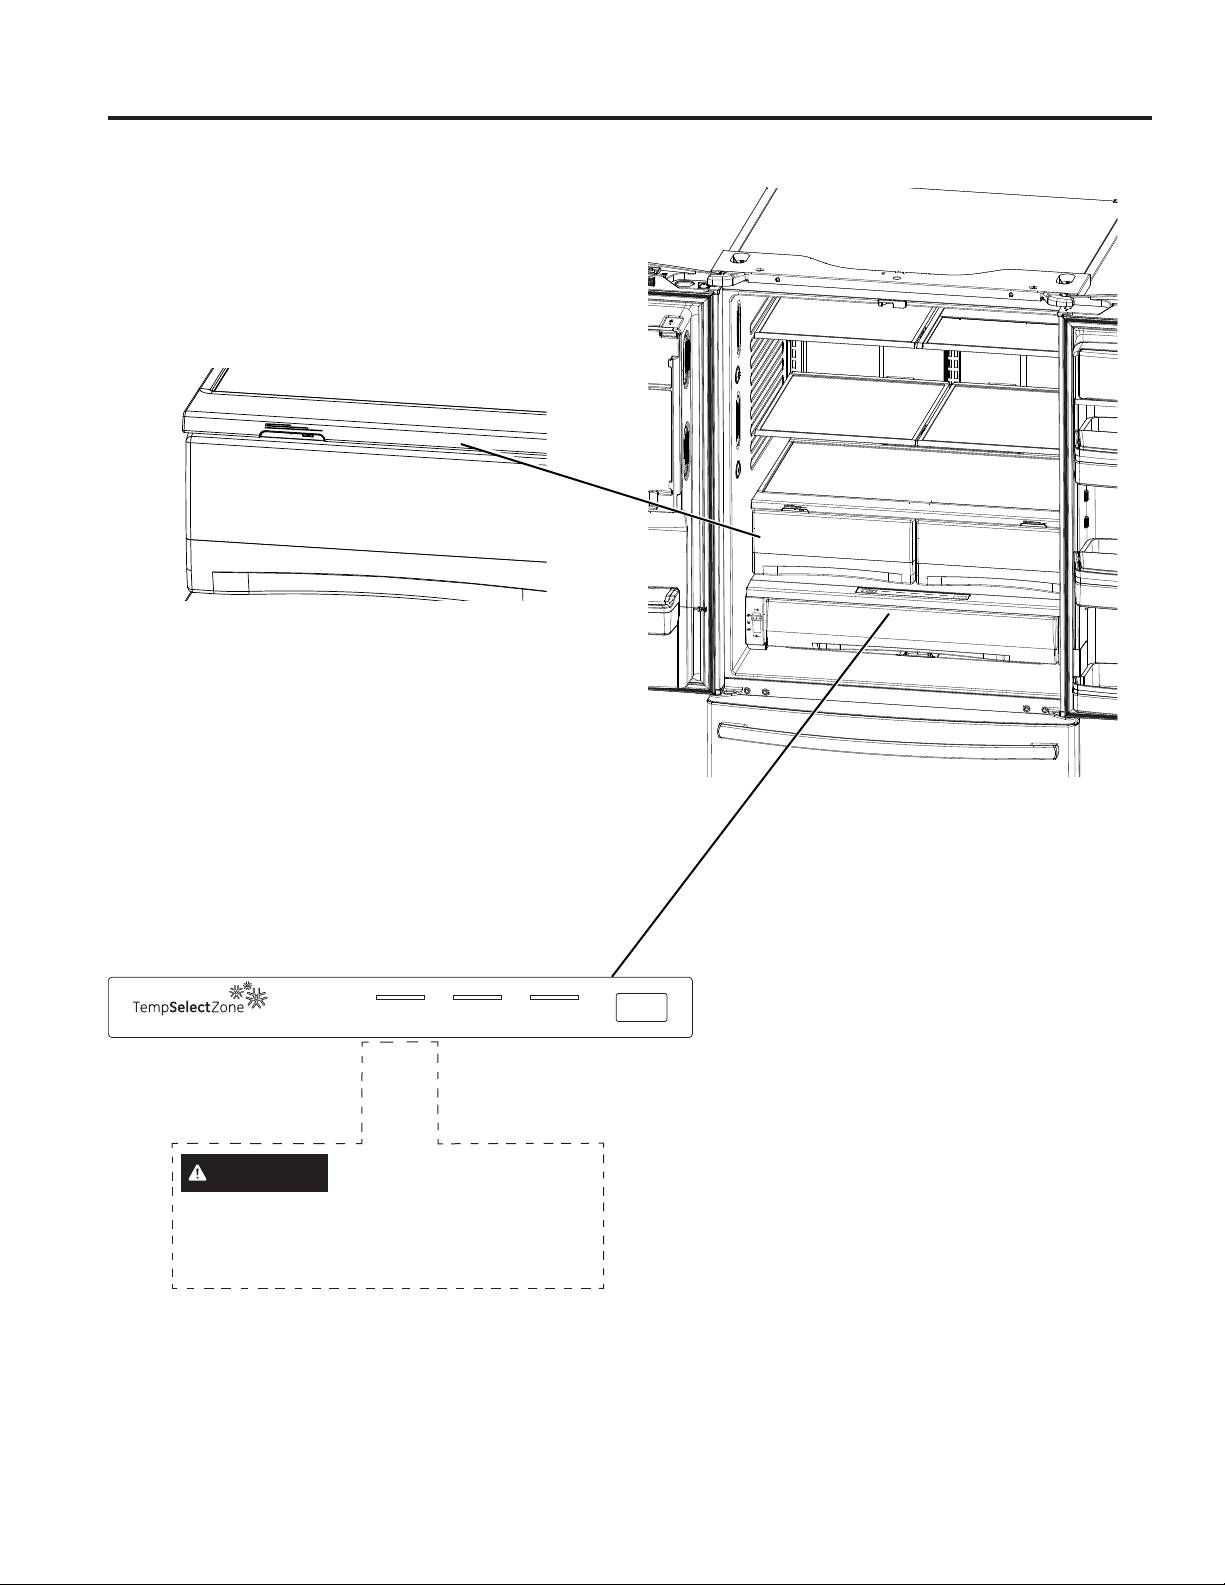
USING THE REFRIGERATOR: Controls
7KHWHPSHUDWXUHFRQWUROVDUHSUHVHWLQWKHIDFWRU\DW)IRUWKHUHIULJHUDWRUFRPSDUWPHQWDQG)IRUWKHIUHH]HU
FRPSDUWPHQW$OORZKRXUVIRUWKHWHPSHUDWXUHWRVWDELOL]HWRWKHSUHVHWUHFRPPHQGHGVHWWLQJV
Control Style D: The temperature controls can display both the SET temperature as well as the actual temperature
LQWKHUHIULJHUDWRUDQGIUHH]HU7KHDFWXDOWHPSHUDWXUHPD\YDU\VOLJKWO\IURPWKH6(7WHPSHUDWXUHEDVHGRQXVDJH
DQGRSHUDWLQJHQYLURQPHQW3:(DQG*1(RQO\
NOTE: The refrigerator is shipped with protective film covering the temperature controls.
,IWKLVILOPZDVQRWUHPRYHGGXULQJLQVWDOODWLRQUHPRYHLWQRZ
PFE28P, PYE22P Control Style A, Single Serve Models
PFH28, PFE28K, DFE28, PFD28, PYE22K, PYD22, DYE22
&RQWURO6W\OH%$XWR)LOO0RGHOV
GFD28, GFE28, GFE26, GFS26, GYS22, GYE22 Control Style C, GE Models
GNE29, PWE23&RQWURO6W\OH'1RQ'LVSHQVH&RQWURO
Refrigerator
Hold 3 Sec for °F/°C
Hold 3 Seconds
Hold 3 Seconds
Recommended: 37 °F
Actual Set
Freezer
Door Alarm
Ice Maker
Lock Controls
Reset Filter
Recommended: 0°F
F
Ice
Error
Complete
Sensing
Cubed
Crushed
Controls

10 49-60792 Rev. 3
NOTE: )RURSWLPDOWHPSHUDWXUHSHUIRUPDQFHZHUHFRPPHQGWRDYRLGSODFLQJIRRGLWHPVGLUHFWO\DWWKHDLUIORZYHQWV
of the fresh food air tower and thus blocking the air flow.
Changing the Temperature for Control Style A
To Change the Refrigerator Temperature:
Press the Fridge button and current set temperature
will display. Pressing and releasing the button will cycle
through the available temperature settings. Press and
hold button for Turbo Cool feature. The display will show
tC.
To Change the Freezer Temperature:
Press the Freezer button and current set temperature
will display. Pressing and releasing the button will cycle
through the available temperature settings. Press and
hold button for Turbo Freeze feature. The display will
show tF.
Cooling system can be turned off by pressing and holding
Freezer and Start Heating. OFF will be displayed. To
turn on, press Fridge or Freezer. ON will be displayed.
Turning the cooling system off stops the cooling to the
refrigerator, but it does not shut off the electrical power.
Changing the Temperature for Control Styles B and C
To change the temperature, press and release the
Freezer or Fridge pad. The display will show the set
temperature. To change the temperature, press either the
Freezer or Fridge pad until the desired temperature is
displayed. Press and hold button for Turbo Cool feature.
The display will show tC. Press and hold button for Turbo
Freeze feature. The display will show tF.
To turn off the cooling system press and hold the Fridge
and Ice Maker buttons. To turn on, press Fridge or
Freezer.
Turning the cooling system off stops the cooling to the
refrigerator, but it does not shut off the electrical power.
Changing Temp. for Control Style D
7HPSHUDWXUH'LVSOD\LVORFDWHGRQLQVLGHRIOHIWKDQG
refrigerator door. To change the temperature, press
and release the REFRIGERATOR or FREEZER
pad. The ACTUAL TEMP light will come on and the
display will show the actual temperature. To change
the temperature, tap either the REFRIGERATOR or
FREEZER pad until the desired temperature is displayed.
To turn OFF cooling system, press and hold the
REFRIGERATOR and FREEZER pads simultaneously
for 3 seconds. When cooling system is OFF the display
should read OF. To turn ON cooling system, press either
REFRIGERATOR or FREEZER pad. The display will
show the preset temperature settings of 37°F (3Û& for
refrigerator and 0°F (-18Û& IRUIUHH]HU
Turning the cooling system off stops the cooling to
refrigerator, but it does not shut off the electrical power.
Controls
USING THE REFRIGERATOR: Controls
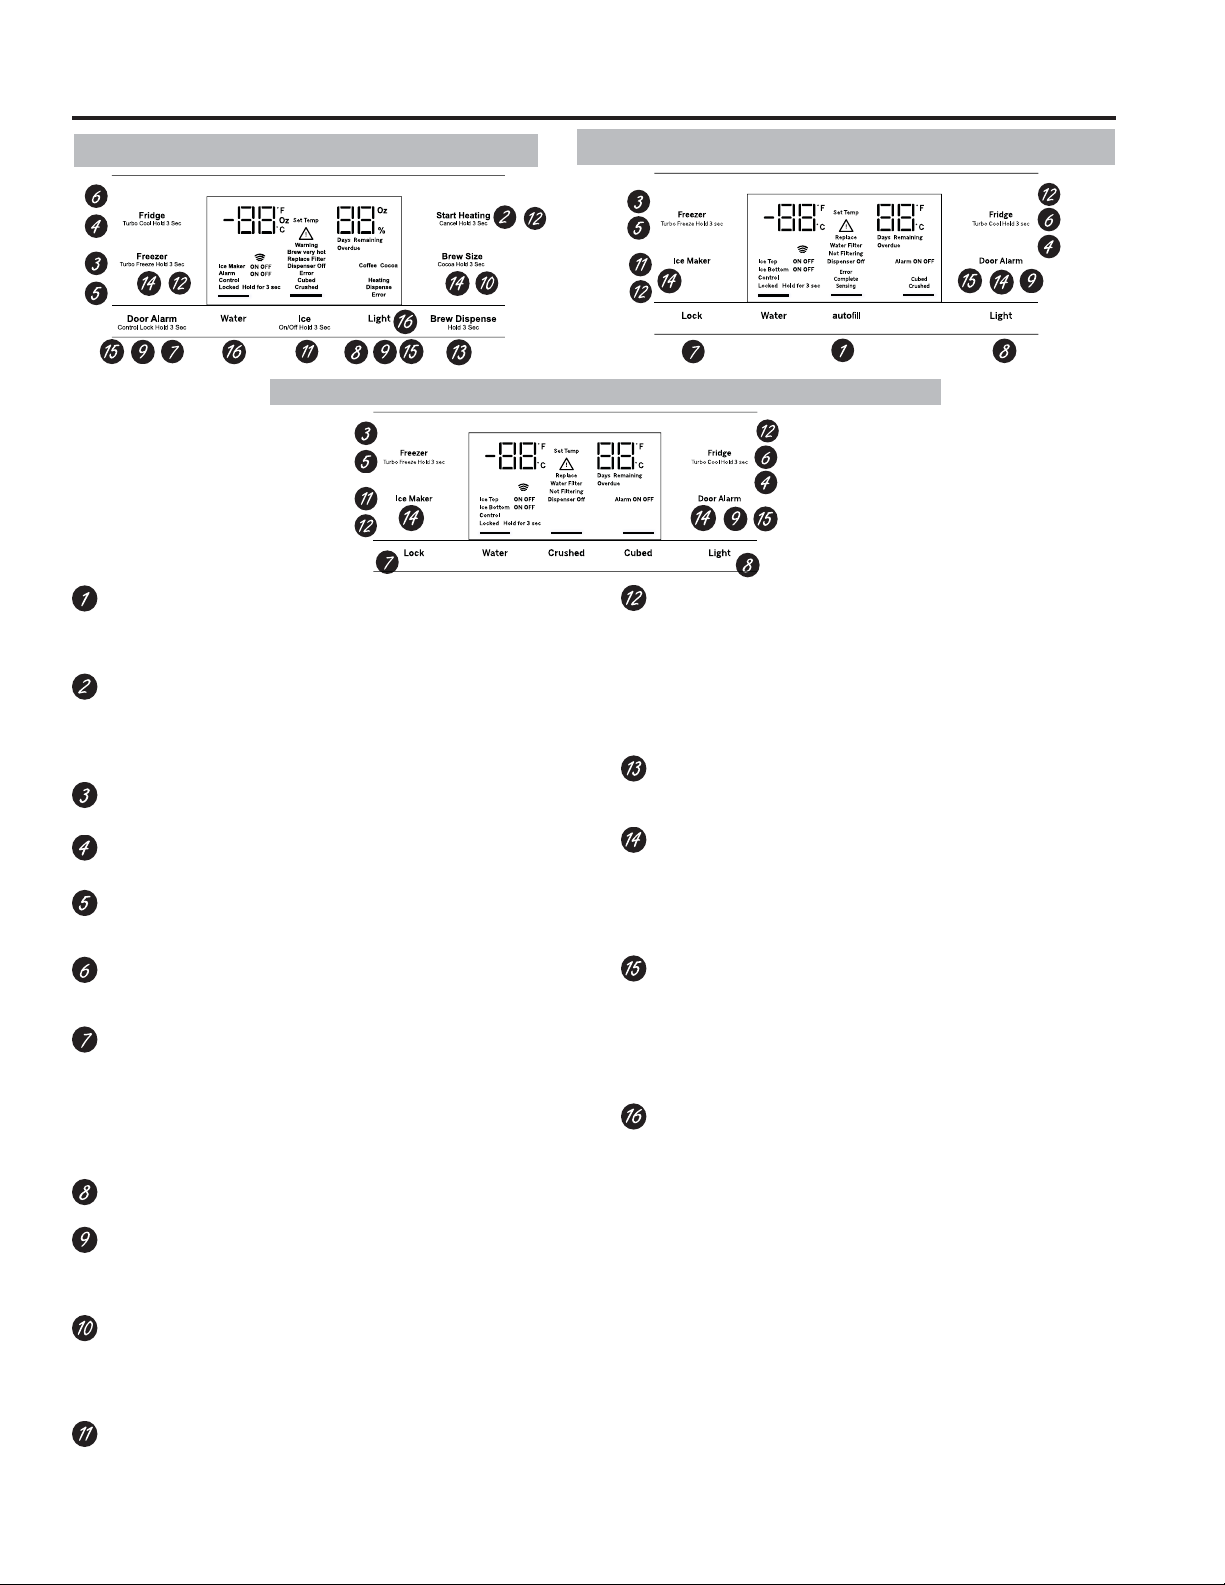
49-60792 Rev. 3 11
USING THE REFRIGERATOR: Controls
Controls
Ice
Hands-free Autofill*
Hands-free Autofill uses sensors to monitor container
height to automatically dispense filtered water without
having to activate the paddle.
Start Heating*
The Start Heating button is used to initiate the water
heating for the Single Serve feature. To abort the Start
Heating feature, press and hold the Start Heat button for
3 seconds.
Freezer temp control
$GMXVWIUHH]HUFRPSDUWPHQWWHPSHUDWXUH
Fresh food temp control
Adjust fresh food compartment temperature.
TurboFreeze™ setting
Activate TurboFreezeWRTXLFNO\UHVWRUHIUHH]HU
temperatures after frequent door openings.
TurboCool™ setting
Activate TurboCool to quickly restore fresh food
temperature after frequent door openings.
Lock Controls
Control Style A - Press and hold the Door Alarm pad
for 3 seconds to lock out ice and water dispenser and all
feature and temperature buttons.
Control Styles B & C - Press Lock pad and hold 3
seconds to lock out ice and water dispenser and all
feature and temperature buttons.
Dispenser light
/LJKWLQJWKDWFDQEHWXUQHGRQRIIWROLJKW\RXUGLVSHQVHU
Door Alarm
6RXQGVWRDOHUWZKHQWKHIUHH]HURUIUHVKIRRGGRRUVKDYH
been left open. Press and hold Door
Alarm pad and it will
toggle the sound between low, high, and off.
Brew Size*
7KH%UHZ6L]HEXWWRQLVXVHGWRVHOHFWWKHGHVLUHGFXS
VL]HIRUVLQJOHVHUYH3UHVVDQGKROGWKHEXWWRQIRU
seconds to toggle the brew type between Coffee and
Cocoa.
Ice maker setting
7XUQ\RXULFHPDNHUVRQRII
Cooling system On/Off
Control Style A - Press and hold Freezer and Start
Heating simultaneously to turn cooling system off. To turn
cooling system on press either the Fridge or Freezer.
Control Style B & C - Press and hold Fridge and Ice
Maker simultaneously for 3 seconds to turn the cooling
system off. To turn cooling system on press either the
Fridge or Freezer.
Brew Dispense
Press and hold Brew Dispense button for 3 seconds, but
no longer than 6 seconds, to dispense coffee or cocoa.
F°/C°
Control Style A - Press and hold Freezer and Brew Size
WRVZLWFKEHWZHHQ)&
Control Style B & C - Press and hold Ice Maker and
Door Alarm simultaneously for 3 seconds to switch
EHWZHHQ)&
Sound Control for pad chimes
Control Style A - Press and hold the Light pad: Once for
High to Off, twice for Off to Low and three times for Low
to High.
Control Styles B & C - Press and hold the Door Alarm
pad: Once for High to Off, twice for Off to Low and three
times for Low to High.
High Altitude
Control Style A (PYE and PFE only) - Press and hold
Fridge and Door Alarm for to toggle between Hi Al and
Lo AL for high altitude and low altitude.
Additional settings:
• &RQQHFWHG+RPHUHDG\3)(33<(33)+RQO\
• :DWHU)LOWHU - An indicator will illuminate when the filter
needs to be replaced. When a new filter is installed the
indicator will go off.
Additional Mode:
• Sabbath Mode
Control Style A - Press and hold Alarm and Light
VLPXOWDQHRXVO\IRUVHFRQGVWRHQWHUH[LW6DEEDWKPRGH
Control Style B & C - Press and hold Lock and Light
VLPXOWDQHRXVO\IRUVHFRQGVWRHQWHUH[LW6DEEDWKPRGH
Sabbath Mode will turn off or dim interior lights, temperature
control and advanced features. Compressor will run on a
timed defrost when in Sabbath mode.
Control Style A, External Controls 3)(33<(3
Control Style B, External Controls
3)+3)(.')(3)'
3<(.3<''<(
Control Style C, External Controls *)'*)(*)(*)6GYE22, GYS22
*Select Models Only
Error
Complete
Sensing
Cubed
Crushed
12 49-60792 Rev. 3
Refrigerator
Hold 3 Sec for °F/°C
Hold 3 Seconds
Hold 3 Seconds
Recommended: 37 °F
Actual Set
Freezer
Door Alarm
Ice Maker
Lock Controls
Reset Filter
Recommended: 0°F
F
Controls Style D, Internal Controls GNE29, PWE23
Door Alarm
6RXQGVWRDOHUWZKHQWKHIUHH]HURUIUHVKIRRGGRRUV
have been left open.
Reset Filter
Hold for 3 seconds after replacing filter.
Lock Controls
Press and hold 3 seconds to lock out ice and water
dispenser and all feature and temperature buttons.
Freezer temp control
$GMXVWIUHH]HUFRPSDUWPHQWWHPSHUDWXUH
Refrigerator temp control
Adjust fresh food compartment temperature
Ice maker setting
7XUQ\RXULFHPDNHURQRII
Additional Mode:
• Sabbath Mode
Press and hold Door Alarm and Ice Maker
VLPXOWDQHRXVO\IRUVHFRQGVWRHQWHUH[LW6DEEDWKPRGH
Controls
USING THE REFRIGERATOR: Controls
49-60792 Rev. 3 13
USING THE REFRIGERATOR: 'LVSHQVHU
'LVSHQVHU7UD\
Important Facts About Your Dispenser
Ŷ'RQRWDGGLFHIURPWUD\VRUEDJVWRWKHGRRULFH
PDNHUEXFNHW,WPD\QRWFUXVKRUGLVSHQVH
Ŷ Avoid overfilling glass with ice and use of narrow
glasses. Backed-up ice can jam the chute or cause the
GRRULQWKHFKXWHWRIUHH]HVKXW,ILFHLVEORFNLQJWKH
chute remove the ice bucket, poke it through with a
wooden spoon.
Ŷ Beverages and foods should not be quick-chilled in the
door ice maker bin. Cans, bottles or food packages in
the storage drawer may cause the ice maker or auger
to jam.
Ŷ To keep dispensed ice from missing the glass, put the
glass close to, but not touching, the dispenser opening.
Ŷ Some crushed ice may be dispensed even though you
selected CUBED ICE. This happens occasionally when
a few cubes accidentally get directed to the crusher.
Ŷ After crushed ice is dispensed, some water may drip
from the chute.
Ŷ Sometimes a small mound of snow will form on the
door in the ice chute. This condition is normal and
usually occurs when you have dispensed crushed ice
repeatedly. The snow will eventually evaporate.
,IQRZDWHULVGLVSHQVHGZKHQWKHUHIULJHUDWRULVILUVW
installed, there may be air in the water line system. Press
the dispenser paddle for at least five minutes to remove
trapped air from the water line and to fill the water
system. To flush out impurities in the water line, throw
away the first six full glasses of water.
To remove Dispenser Tray (Type A and B Only)
Ŷ3XOO'LVSHQVHU7UD\RXWXQWLOLWVWRSV
Ŷ Locate tab in the center on the bottom and push up.
Ŷ3XOO'LVSHQVHU7UD\DVVHPEO\RXW
Ŷ/LIW'LVSHQVHU7UD\RXWDWFHQWHUQRWFKWRFOHDQ
To remove Dispenser Tray (Type C Only)
*UDVS'LVSHQVHU7UD\DQGSXOOILUPO\XQWLOLWFRPHVRXW
To reinstall Dispenser Tray (Type A and B Only)
Ŷ
3ODFHWKH'LVSHQVHU7UD\FRYHURQWRSRIFDWFKWUD\
and position under the two plastic retainers on either
side.
Ŷ&HQWHU'LVSHQVHUWUD\DQGDOLJQZLWKFHQWHUJXLGHV
Ŷ Push in until it locks firmly in place.
To reinstall Dispenser Tray (Type C Only)
Line up the guide on tray bottom with track on dispenser
and slide it in until it stops against the back of the
dispenser.
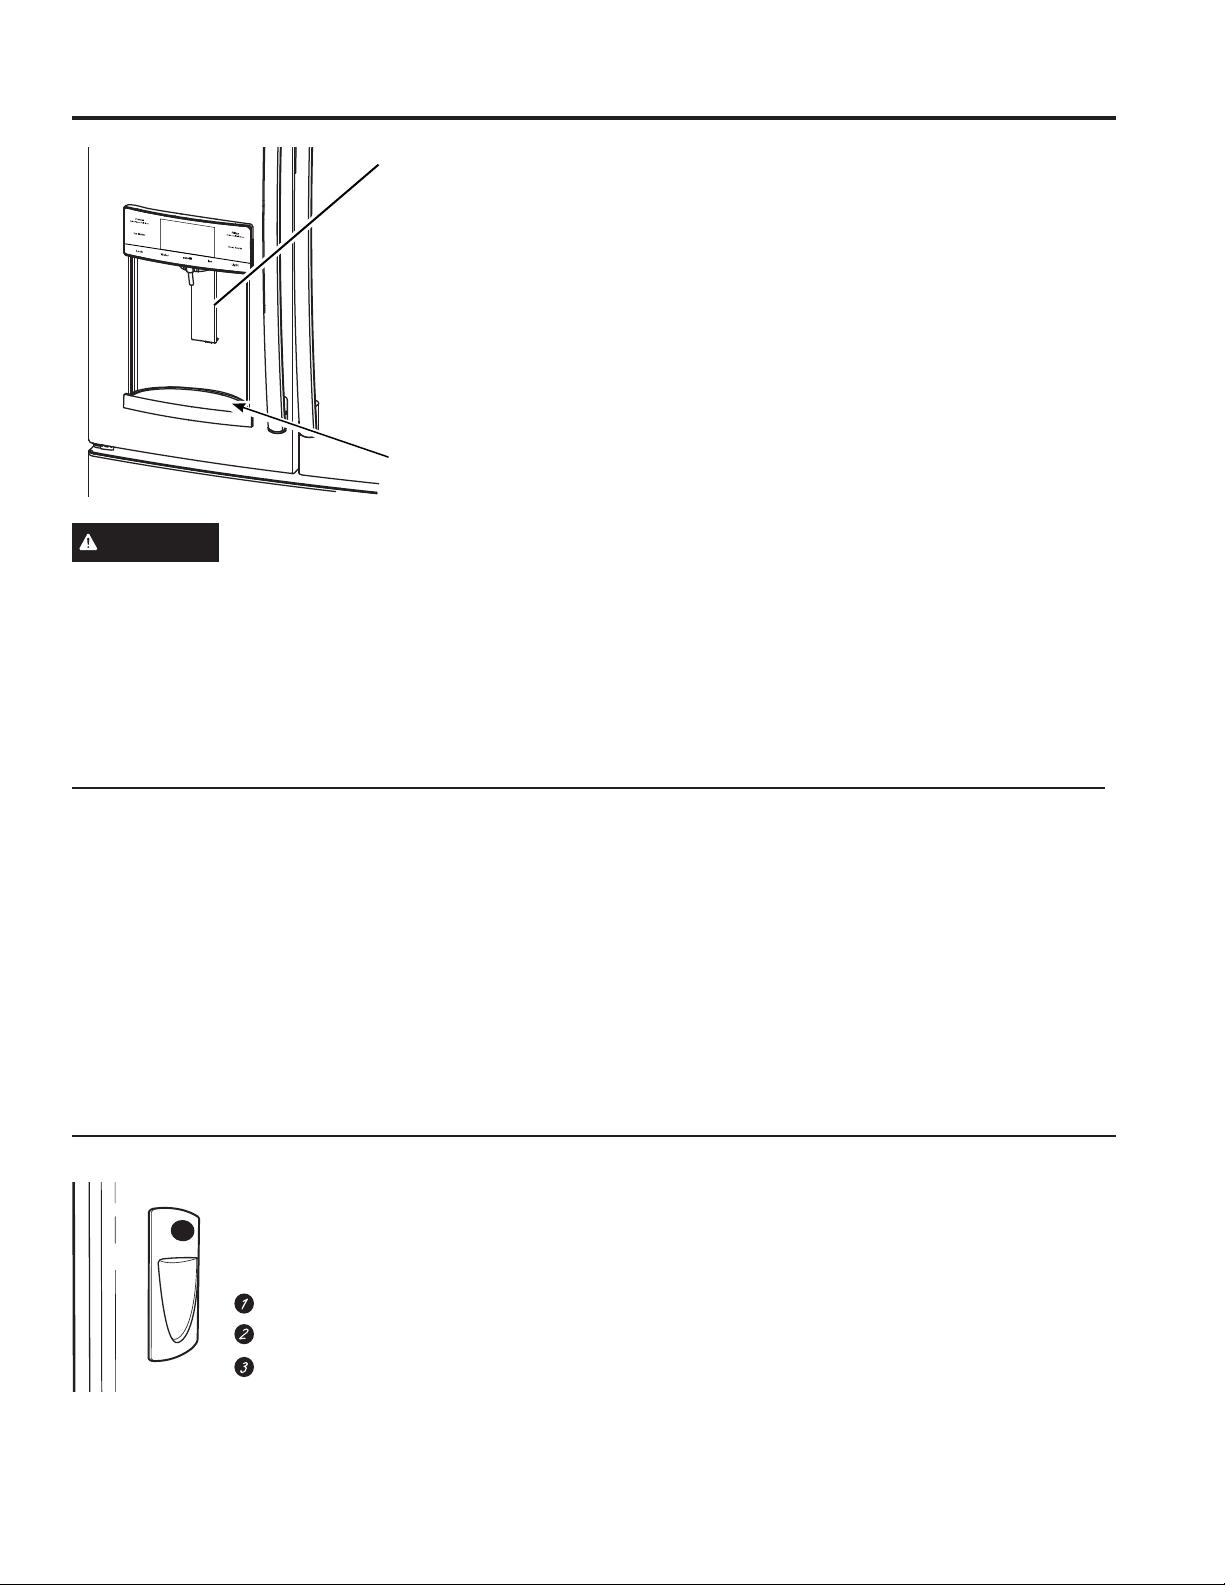
Water & Ice Dispenser
(See About the controls
with temperature settings
& About the control
IHDWXUHV
To Use the Internal Water Dispenser*
The water dispenser is located on
the left wall inside the refrigerator
compartment.
To dispense water:
Hold the glass against the recess.
Push the water dispenser button.
Hold the glass underneath the
dispenser for 2–3 seconds after
releasing the dispenser button.
Water may continue to dispense
after the button is released.
,IQRZDWHULVGLVSHQVHGZKHQWKHUHIULJHUDWRULVILUVW
installed, there may be air in the water line system. Press
the dispenser button for at least 5 minutes to remove
trapped air from the water line and to fill the water
V\VWHP'XULQJWKLVSURFHVVWKHGLVSHQVHUQRLVHPD\EH
loud as the air is purged from the water line system. To
flush out impurities in the water line, throw away the first
6 glassfuls of water.
NOTE: To avoid water deposits, the dispenser should
be cleaned periodically by wiping with a clean cloth or
sponge.
WARNING
Laceration Hazard
Ŷ Never put fingers or any other object into ice crusher
GLVFKDUJHRSHQLQJ'RLQJVRFDQUHVXOWLQFRQWDFWLQJ
the ice crushing blades and lead to serious injury or
amputation
Ŷ8VHDVWXUG\JODVVZKHQGLVSHQVLQJLFH$GHOLFDWH
glass may break and result in personal injury.
*Select Models Only
Dispenser*
14 49-60792 Rev. 3
To Use HANDS FREE AUTOFILL:
Ŷ &HQWHUFRQWDLQHURQ5HFHVV'LVSHQVHU7UD\DVIDU
back as possible without activating paddle and remove
hand from container
Ŷ Press AUTOFILL
To Stop AUTOFILL
Ŷ Press AUTOFILL to stop.
Important Facts about AUTOFILL
Ŷ)RURSWLPXPUHVXOWVXVHDXQLIRUPFRQWDLQHUEHWZHHQ
´FPWDOODQG´FPZLGH
Ŷ)LOOOHYHODQGIXQFWLRQDOLW\PD\YDU\RQFRQWDLQHUVWDOOHU
WKDQ´FPRUZLGHUWKDQ´FP
Ŷ&RQWDLQHUYROXPHVPD\YDU\LIHUURUPHVVDJH³1RW
)RXQG´LVJLYHQWU\DGLIIHUHQWFRQWDLQHU
Ŷ$872),//ZLOOWLPHRXW
Ŷ Handles, straws, and garnishes on the rim of the
container my cause overfilling or variation in fill
volumes.
Ŷ Splashing may occur depending on the location of the
container, water flow rate, container shape, and ice
cubes.
Ŷ.HHSVHQVRUVFOHDQZLWKDFOHDQGDPSFORWKDQGGR
not spray liquid or cleaners directly on sensors
Ŷ$872),//ZRUNVEHVWZLWKKRXVHKROGZDWHUSUHVVXUH
RIWRSVLWRN3D
Ŷ,FHLQFRQWDLQHUPD\DIIHFWILOOYROXPH,ILVVXHVDUH
experienced, use less ice.
Sensors
*Select Models Only
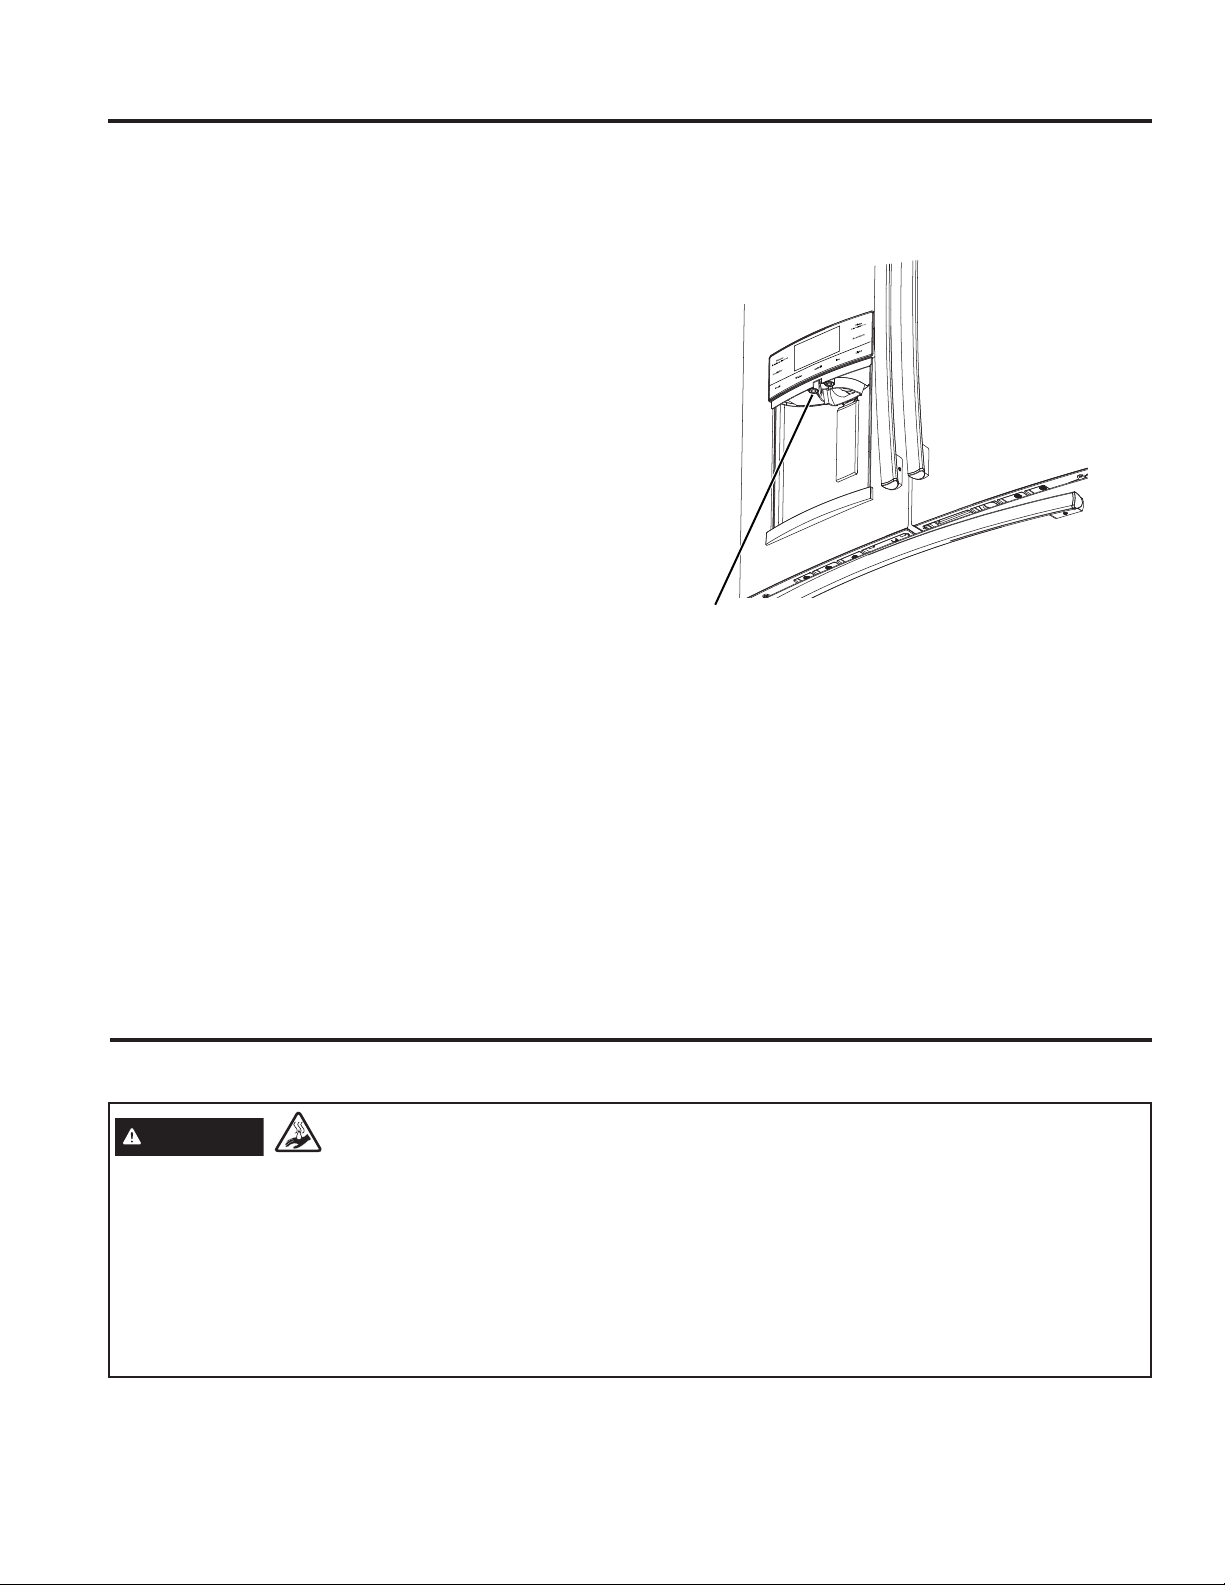
Single Serve Keurig K-Cup Brewer*
WARNING
Scalding Hazard.
Ŷ The water coming from the dispenser is very hot and
can cause scalds or burns. Read all warnings on
page 5 prior to use.
Ŷ'RQRWSHUPLWFKLOGUHQWRXVHWKHEUHZHU
Ŷ Always use a container that is suitable for hot liquids
FHUDPLFIRDPHWF
Ŷ'RQRWEUHZLQWRDPXJPDGHRIJODVV'RLQJVRPD\
cause the glass to crack or break.
Ŷ,I\RXOLYHDERYHIHHWPHWHUVSUHVV
Fridge and Door Alarm and control will cycle from
/RZ$OWLWXGH/R$/WR+LJK$OWLWXGH+L$/
Ŷ DO NOT use the hot water dispenser immediately after
installing a new water filter as it may result in spurting
RIKRWZDWHU'LVSHQVHFROGZDWHUIRUDERXWPLQXWHV
to purge air from the system prior to dispensing hot
water.
Important Facts about HOT WATER
AUTOFILL*
USING THE REFRIGERATOR:$872),//.HXULJ.&XS%UHZHU
49-60792 Rev. 3 15
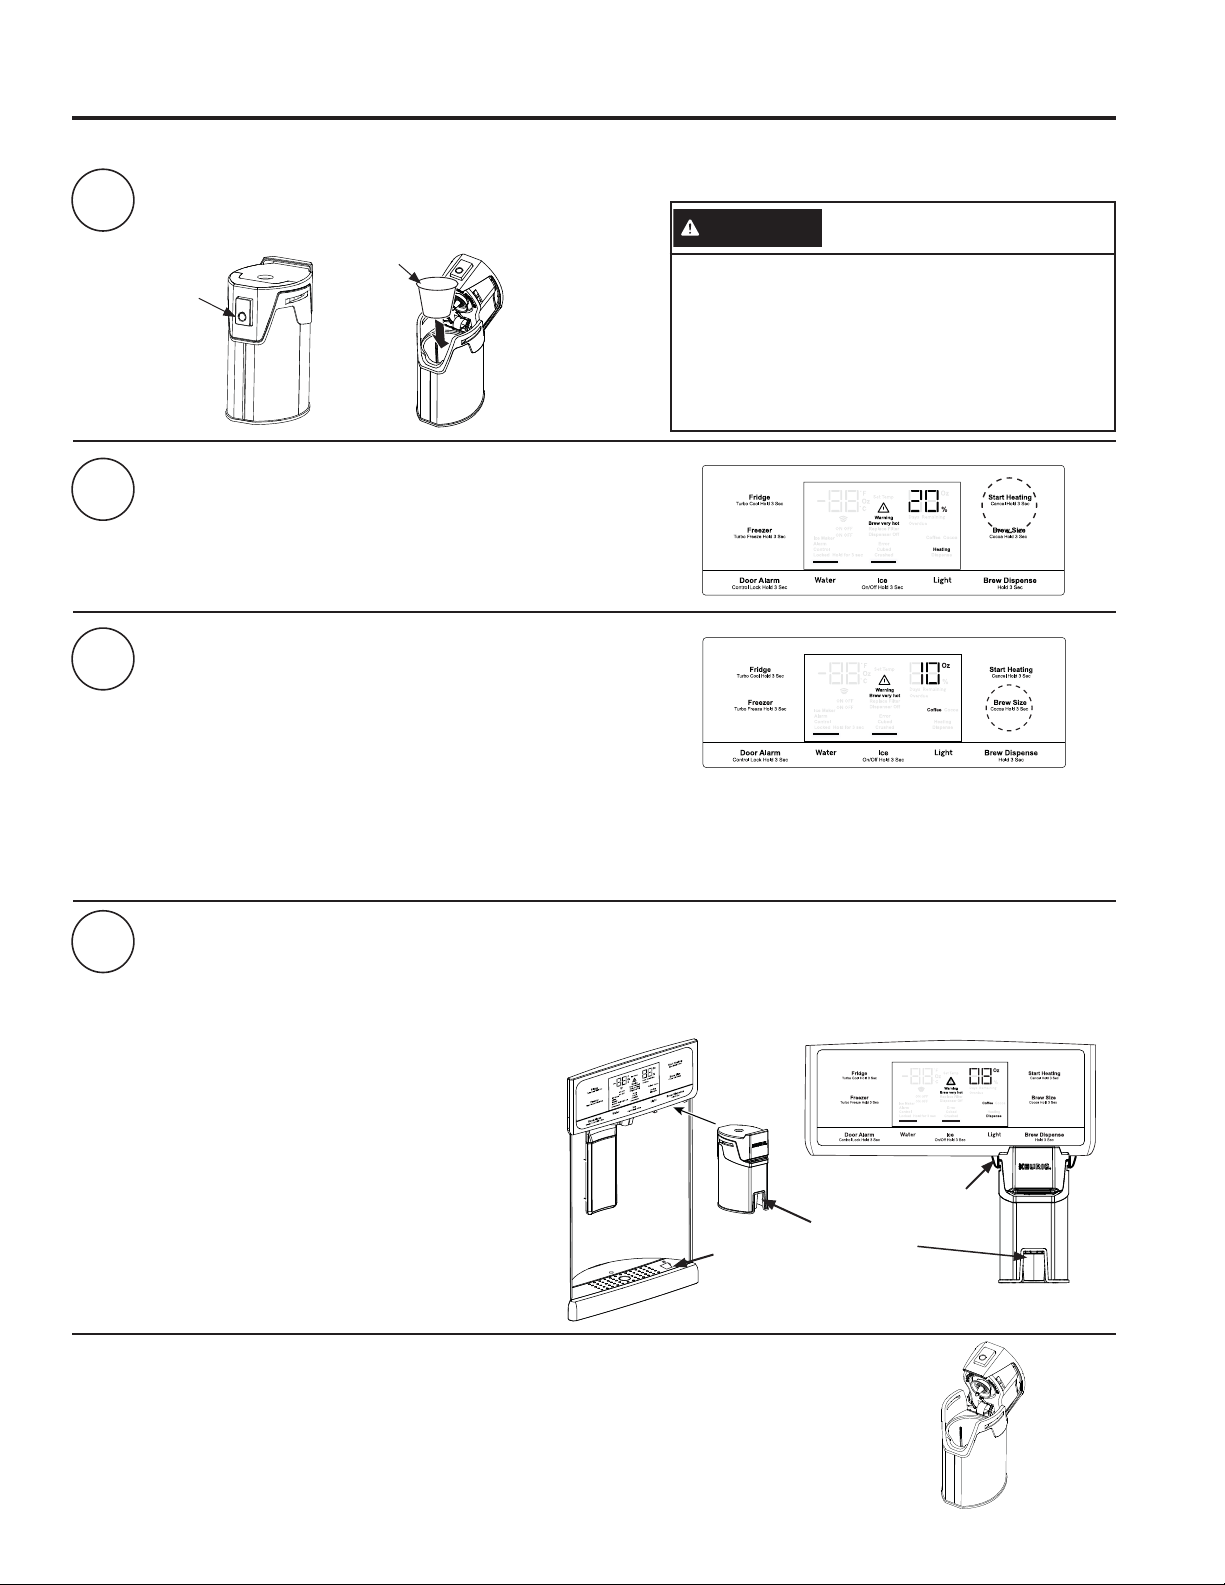
USING THE REFRIGERATOR: .HXULJ.&XS%UHZHU
*Select Models Only
Push to
open
1
2
3
Load the K-Cup Brewer
,QVHUWD.HXULJ.&XSSRGLQWRWKHEUHZHUDQGSUHVVGRZQ
ILUPO\\RXZLOOKHDUDSRSSLQJVRXQG
Two Ways To Brew
1. Press the Start Heating button.
OR
,QLWLDWHKHDWLQJZLWKWKH*(.LWFKHQ$SS'RZQORDGWKH
$SS³*(.LWFKHQ´9LVLWGEAppliances.com/connect for
more information.**
CAUTION
Cut/Puncture Hazard.
• There are two sharp needles located inside the
.&XSEUHZHU7RDYRLGULVNRILQMXU\GRQRW
SXW\RXUILQJHUVLQVLGHWKHEUHZHU8VHFDXWLRQ
when cleaning.
• .HHSWKH.&XSEUHZHURXWRIWKHUHDFKRI
children, as they may be injured in using the
.&XSEUHZHULQFRUUHFWO\
4
Dispense
2QFHWKHKHDWLQJSURFHVVLVFRPSOHWHWKH'LVSHQVHOLJKWRQWKHGLVSOD\ZLOOIODVK
To dispense, slide the brewer into the rails. Make sure the brewer is pushed all the way into the bracket.
Place your mug on the drip tray mug icon, under the red brew spout. Press and hold Brew Dispense for 3
seconds until you hear the dispenser engage.
Cleaning the brewer
Ŷ
7KH.&XSEUHZHULVWRSUDFNGLVKZDVKHUVDIH
Ŷ
,WLVUHFRPPHQGHGWRULQVHLWWKRURXJKO\DIWHUZDVKLQJWRUHPRYHDOOVRDSUHVLGXH
Ŷ
Periodic cleaning of dispenser recess area is recommended as staining may occur with usage
RIWKH.&XSEUHZHU
.&XS
Close the
brewer.
Lid will
click when
secure.
Change Brew Size
Press the Brew Size button any time during the heating cycle to
FKRRVHRUR]7KHGHIDXOWVL]HLVR](QVXUHWKHPXJ
EHLQJXVHGLVODUJHHQRXJKIRUWKHVL]HVHOHFWHG
NOTE: Press and hold the Brew Size button for 3 seconds to
toggle between Coffee and Cocoa. The default is Coffee.
NOTE: To abort the heating cycle, press and hold the Start Heating button for 3
seconds. To abort the brew dispense cycle, press and hold the Start Heating button
for 3 seconds, press the paddle, press any button on the display besides Brew Size or
Brew Dispense, or open the right fresh food door.
Red brew
spout for mug
alignment
Mug icon for
placement
Rails for
the brewer
)RU86DQG867HUULWRULHV2QO\
How to use the single serve dispenser
Single Serve Keurig K-Cup Brewer* (Cont.)
16 49-60792 Rev. 3
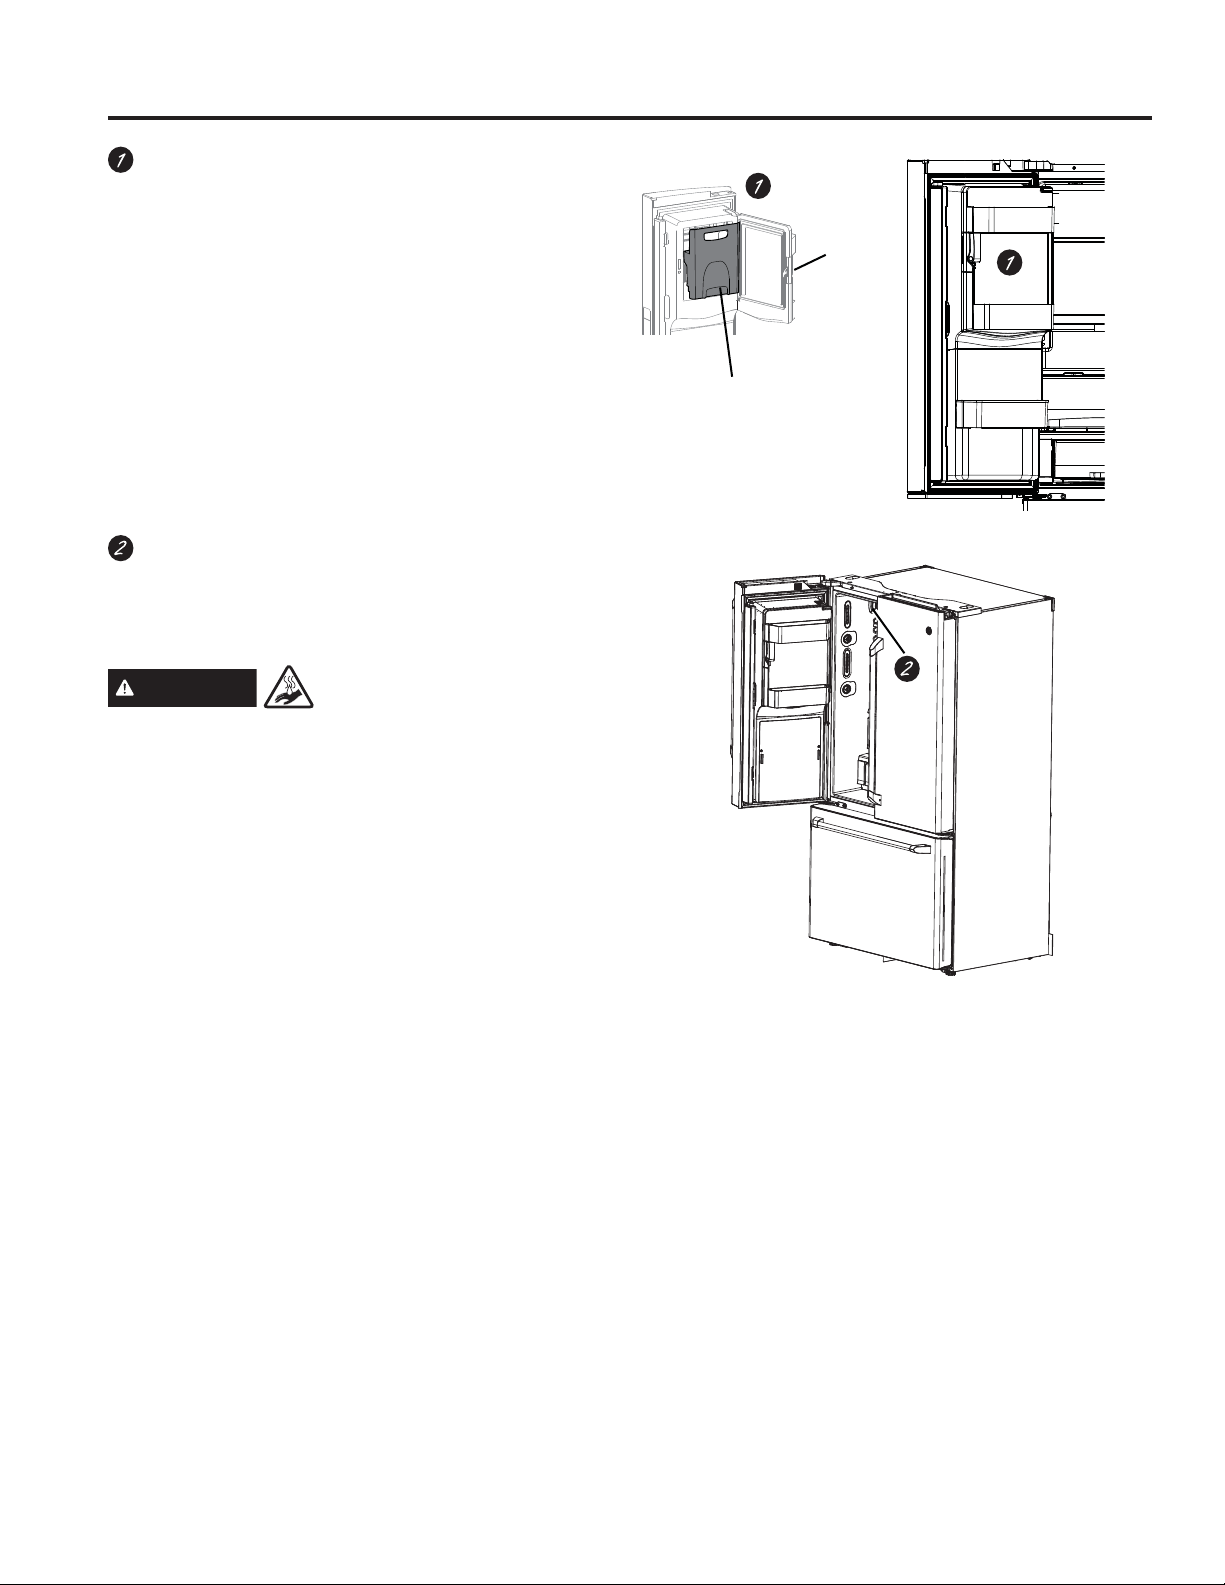
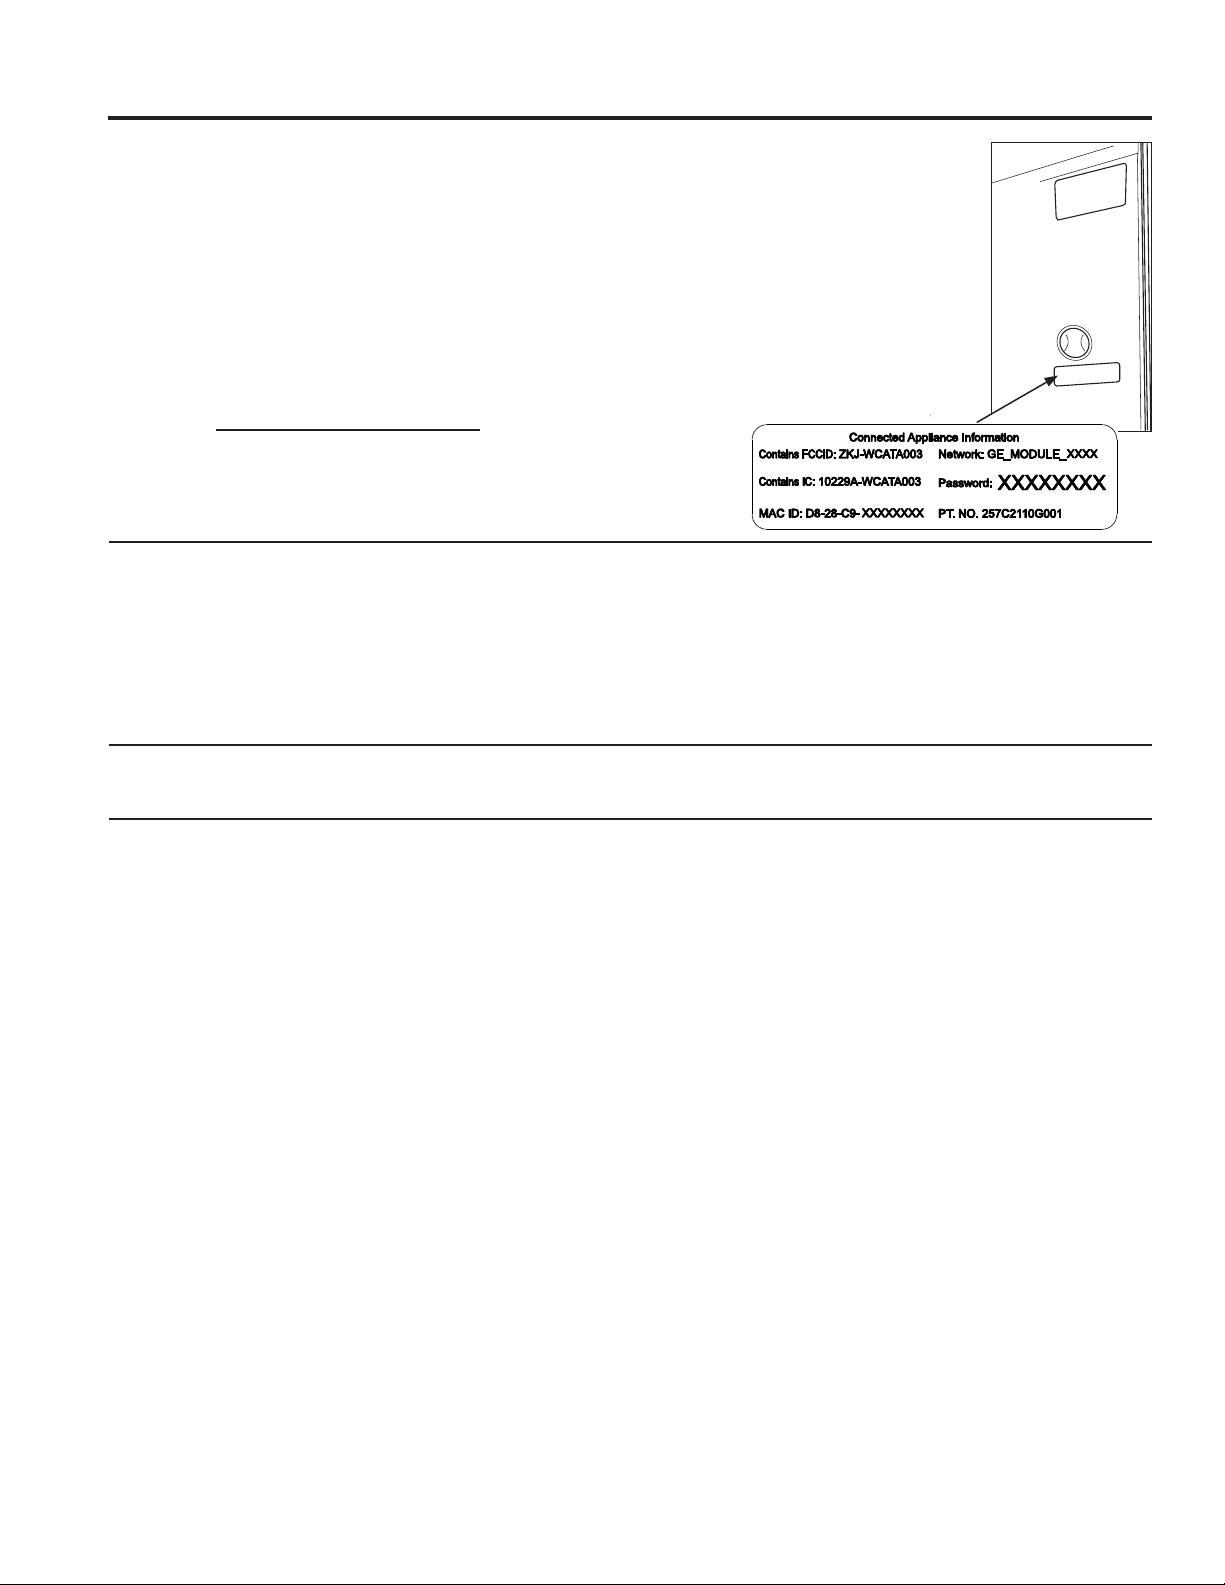
GE WiFi Connect**
(for customers in the United States, its territories, and Canada)
GE WiFi Connect Enabled* (PFE28P, PFD28, PYD22,
PYE22P, PFH models only)
,I\RXUUHIULJHUDWRUKDVD&RQQHFWHG$SSOLDQFHLQIRUPDWLRQODEHOORFDWHGRQWKHLQVLGHDVVKRZQ
\RXUUHIULJHUDWRUFDQEHFRQQHFWHGWR\RXU:L)LQHWZRUNDOORZLQJLWWRFRPPXQLFDWHZLWK\RXU
VPDUWSKRQHIRUUHPRWHPRQLWRULQJFRQWURODQGQRWLILFDWLRQV'HSHQGLQJRQWKHUHIULJHUDWRU
PRGHO\RXKDYH\RXHLWKHUKDYHD:L)LFRPPXQLFDWLRQFDUGEXLOWLQWRWKHSURGXFWRUDSRUWIRU
DQH[WHUQDO:L)L&RQQHFW3OXV0RGXOHVROGVHSDUDWHO\
Please visit GEAppliances.com/connect to learn more about
connected appliance features, and to learn what connected appliance
apps will work with your Smart Phone.**
7RXVH\RXU:L)LSUHVVWater and Light on the control panel.
REGULATORY INFORMATION
FCC/IC Compliance Statement:
7KLVGHYLFHFRPSOLHVZLWK3DUWRIWKH)&&5XOHV2SHUDWLRQLVVXEMHFWWRWKHIROORZLQJWZRFRQGLWLRQV
1. This device may not cause harmful interference.
2. This device must accept any interference received, including interference that may cause undesired operation.
This equipment has been tested and found to comply with the limits for a Class B digital device, pursuant to Part
RIWKH)&&5XOHV7KHVHOLPLWVDUHGHVLJQHGWRSURYLGHUHDVRQDEOHSURWHFWLRQDJDLQVWKDUPIXOLQWHUIHUHQFHLQD
residential installation. This equipment generates uses and can radiate radio frequency energy and, if not installed
and used in accordance with the instructions, may cause harmful interference to radio communications. However,
WKHUHLVQRJXDUDQWHHWKDWLQWHUIHUHQFHZLOOQRWRFFXULQDSDUWLFXODULQVWDOODWLRQ,IWKLVHTXLSPHQWGRHVFDXVHKDUPIXO
interference to radio or television reception, which can be determined by turning the equipment off and on, the user
is encouraged to try to correct the interference by one or more of the following measures:
• Reorient or relocate the receiving antenna.
,QFUHDVHWKHVHSDUDWLRQEHWZHHQWKHHTXLSPHQWDQGUHFHLYHU
• Connect the equipment into an outlet on a circuit different from that to which the receiver is connected.
&RQVXOWWKHGHDOHURUDQH[SHULHQFHGUDGLRWHOHYLVLRQWHFKQLFLDQIRUKHOS
Labelling: Changes or modifications to this unit not expressly approved by the manufacturer could void the user’s
authority to operate the equipment.
ConnectPlus module only (or similar communication module)
RF Exposure -7KLVGHYLFHLVRQO\DXWKRUL]HGIRUXVHLQDPRELOHDSSOLFDWLRQ$WOHDVWFPRIVHSDUDWLRQGLVWDQFH
between the ConnectPlus device and the user’s body must be maintained at all times.
GE WiFi Connect Optional *
You refrigerator is GE WiFi Connect compatible using the GE ConnectPlus module that is provided with your
refrigerator. To connect this appliance to the internet you will need to attach the module to your appliance through
the communication port in the appliance. The GE ConnectPlus will allow your appliance to communicate with your
smart phone for remote appliance monitoring, control and notifications. Please visit GEAppliances.com/connect to
learn more about connected appliance features, to learn what connected appliance App’s will work with your Smart
Phone and to learn where you can purchase a GE ConnectPlus.**
:L)L&RQQHFWLYLW\)RUDVVLVWDQFHZLWKWKHDSSOLDQFHRUWKHConnectPlus network connectivity (for models that are
:L)LHQDEOHGRU:L)LRSWLRQDOSOHDVHFDOO1-800-220-6899.
)RU86867HUULWRULHVDQG&DQDGD2QO\
Appliance Communication
*Select Models Only
USING THE REFRIGERATOR: Appliance Communication
49-60792 Rev. 3 17
USING THE REFRIGERATOR::DWHU)LOWHU&DUWULGJH53:)(
WARNING
To reduce the risk associated with choking, do not allow children under 3 years of age to have
access to small parts during the installation of this product. The disposable filter cartridge should be replaced every
6 months at the rated capacity, or sooner if a noticeable reduction in flow rate occurs.
)RUWKHPD[LPXPEHQHILWRI\RXUILOWUDWLRQV\VWHP*($SSOLDQFHVD+DLHUFRPSDQ\UHFRPPHQGVWKHXVHRI*(
$SSOLDQFHVEUDQGHGILOWHUVRQO\8VLQJ*($SSOLDQFHVEUDQGHGILOWHUVLQ*($SSOLDQFHVUHIULJHUDWRUVSURYLGHVRSWLPDO
SHUIRUPDQFHDQGUHOLDELOLW\2XUILOWHUVPHHWULJRURXVLQGXVWU\16)VWDQGDUGVIRUVDIHW\DQGTXDOLW\WKDWDUHLPSRUWDQW
for products that are filtering your water. There is no assurance that brands other than GE Appliances filters meet our
standards for quality, performance and reliability.
If you have questions, or to order additional filter cartridges, visit gewaterfilters.com. ,Q&DQDGDYLVLW
cafeappliances.ca/service or consult the yellow pages for the nearest Camco Service Center.
Water Filter Cartridge - RPWFE
Water Filter Cartridge
The water filter cartridge is located in the fresh food
interior on the left side wall, near the top.
6HOHFWPRGHOVXVHUDGLRIUHTXHQF\LGHQWLILFDWLRQ5),'
WRGHWHFWOHDNVDQGPRQLWRUILOWHUVWDWXV7KH5),'
WHFKQRORJ\LVFHUWLILHGE\WKH)&&
When to Replace the Filter Cartridge
The filter cartridge should be replaced every six months
RUHDUOLHULIJDOORQVOLWHUVRIZDWHUKDV
been dispensed or the flow of water to the dispenser or
icemaker decreases.
Touch Screen Models: A filter status message will
appear on the screen when the water filter needs to be
replaced. The filter status will automatically update when
the filter is replaced.
Non-touch Screen Models: A filter indicator light will
illuminate on the screen when the water filter needs to
be replaced.
Removing the Filter Cartridge/Bypass Plug
1. Remove the old
cartridge or bypass plug
by opening the filter
door and pulling on the
ERWWRPRIWKHFDUWULGJH
bypass plug to disengage it from the filter clips. Swing
WKHFDUWULGJHE\SDVVSOXJRXWZDUGXQWLO\RXKHDU
the 'click' of the cartridge holder engaging with the
bracket.
7ZLVWWKHFDUWULGJHE\SDVVSOXJRQHTXDUWHUWXUQ
FRXQWHUFORFNZLVH$IWHUWZLVWLQJUHPRYHWKHFDUWULGJH
bypass plug by pulling it away from the cartridge
holder. A small amount of water may drip out.
Installing the Filter Cartridge/Bypass Plug
$OLJQWKHILOWHUFDUWULGJHE\SDVVSOXJZLWKWKHFDUWULGJH
KROGHUZLWKWKHZRUG)5217IDFLQJWKHWRSRIWKH
XQLW3XVKWKHFDUWULGJHE\SDVVSOXJWRZDUGWKHUHDURI
WKHXQLWXQWLOLWLVIXOO\VHDWHG7ZLVWWKHILOWHUFDUWULGJH
bypass plug clockwise one-quarter turn, until the word
)5217LVIDFLQJRXWZDUG
:KLOHFRQWLQXLQJWRHQVXUHFDUWULGJHE\SDVVSOXJLV
fully seated in the holder, gently swing the filter inward
XQWLOLWLVLQSRVLWLRQ,IILOWHUZLOOQRWVZLQJHDVLO\FKHFN
to ensure filter is properly aligned and fully seated
ZLWKLQWKHFDUWULGJHKROGHU7KH5('LQGLFDWRUVVKRXOG
not be visible.
NOTE: ,WLVQRUPDOIRUZDWHUWRDSSHDUGLVFRORUHGGXULQJ
the initial system flush. Water color will return to normal
after first few minutes of dispensing.
Filter Bypass Plug
To reduce the risk of property damage due to water
leakage, you MUST use the filter bypass plug when
a replacement filter cartridge is not available. Some
models do not come equipped with the filter bypass
plug. To obtain a free bypass plug, visit us on-line at
JHDSSOLDQFHVFRPVHUYLFH,Q&DQDGDYLVLW
JHDSSOLDQFHVFDVHUYLFH7KHGLVSHQVHUDQGLFHPDNHU
will not operate without either the filter or the bypass plug
installed. The bypass plug is installed in the same way
DVDILOWHUFDUWULGJH´
WARNING
SCALDING HAZARD.*
8VHRIWKHKRWZDWHUGLVSHQVHUSULRUWRSXUJLQJDLUIURP
the system may result in spurting of hot water and lead
WRKRWZDWHUVFDOGLQJ)ROORZWKHLQVWUXFWLRQVDERYHWR
purge all air from the system through the cold water
dispenser prior to using the hot water dispenser.
FCCID: ZKJ-EBX1532P001 ICID:
10229A-EBX1532P001
“This device complies with part 15 of the FCC Rules.
Operation is subject to the following two conditions:
(1) This device may not cause harmful interference, and
(2) this device must accept any interference received,
including interference that may cause undesired
operation.”
“This device complies with Industry Canada licence-
exempt RSS standard(s). Operation is subject to the
following two conditions: (1) this device may not cause
interference, and (2) this device must accept any
interference, including interference that may cause
undesired operation of the device.”
FRONT
3
4
Red indicators
should not be
visible
1
2
*Select Models Only
18 49-60792 Rev. 3
*Select Models Only
Fresh Food Storage Options
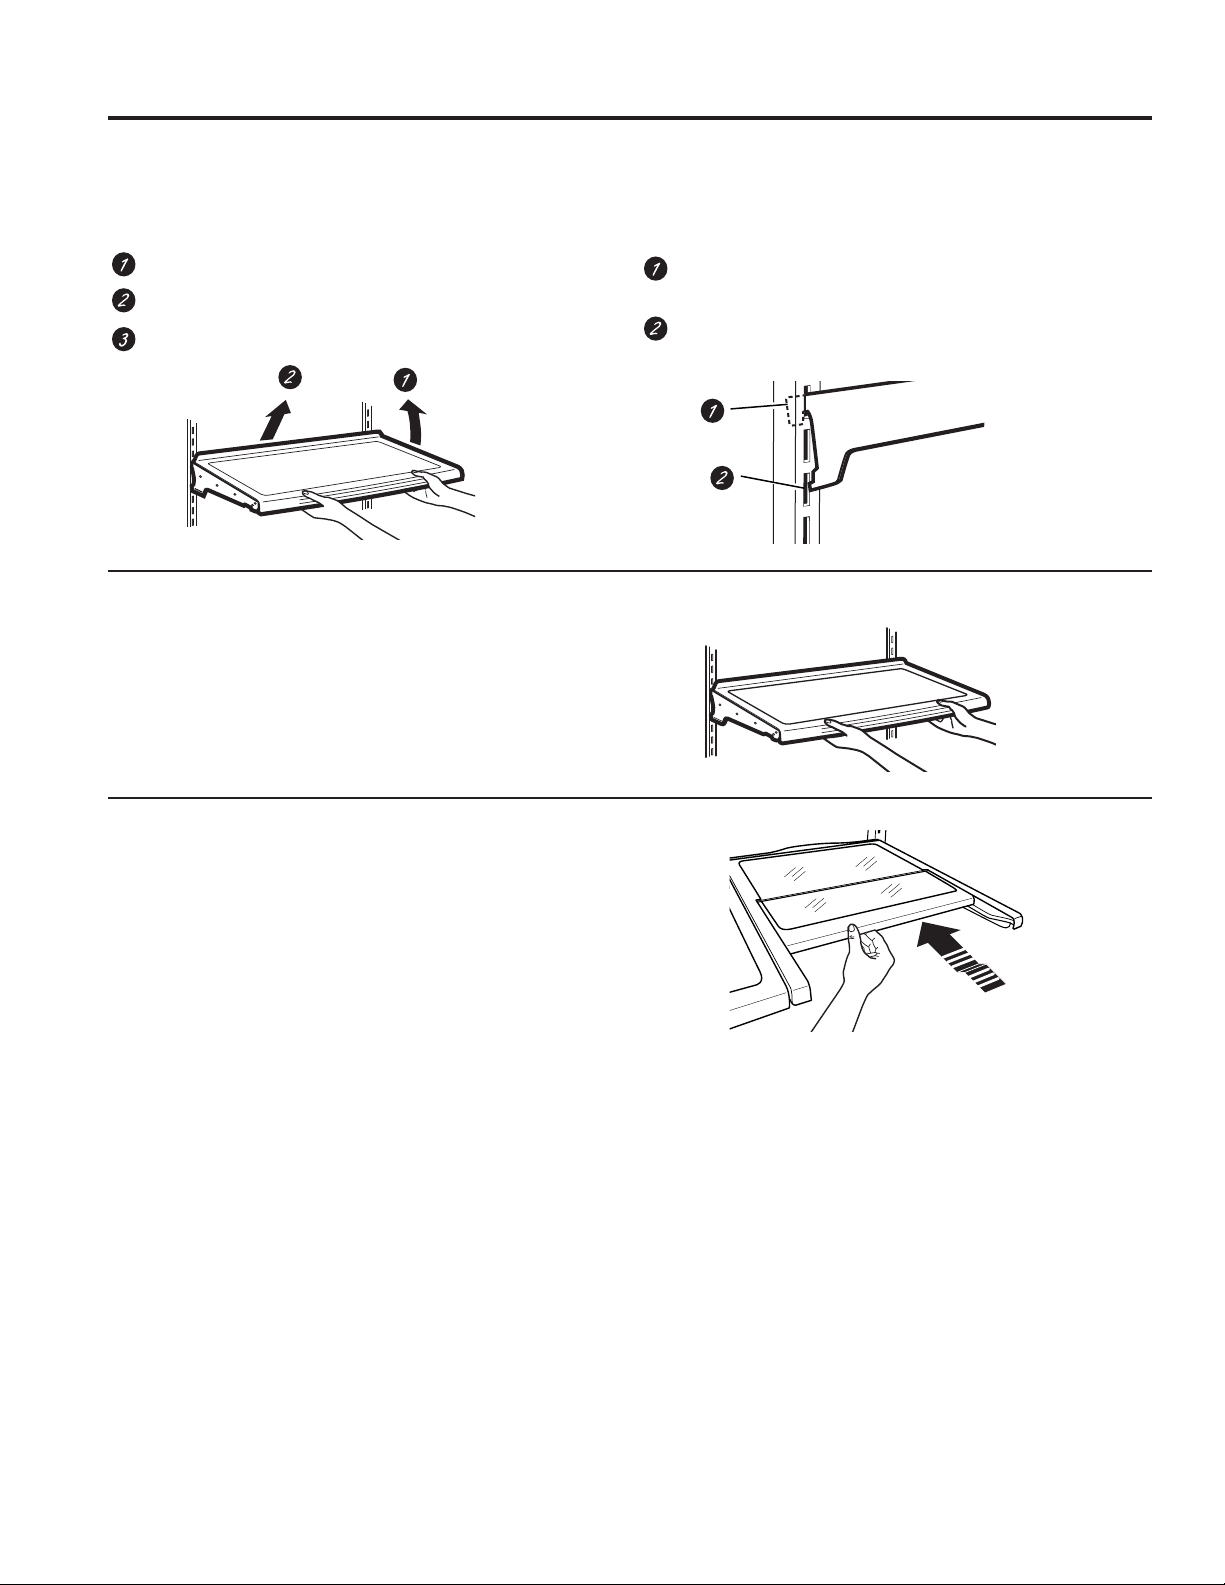
Rearranging the Shelves
Shelves in the refrigerator compartment are adjustable.
To remove:
Remove all items from the shelf.
Tilt the shelf up at the front.
Lift the shelf up at the back and bring the shelf out.
To replace:
While tilting the shelf up, insert the top hook at the
back of the shelf in a slot on the track.
Lower the front of the shelf until the bottom of the
shelf locks into place.
Spillproof Shelves
Spillproof shelves have special edges to help prevent
spills from dripping to lower shelves.
Quick Space Shelf *
This shelf splits in half and slides under itself for storage of
tall items on the shelf below.
This shelf can be removed and replaced or relocated (just
OLNHVSLOOSURRIVKHOYHV
NOTE: The back half of the Quick Space Shelf is not
adjustable.
USING THE REFRIGERATOR: )UHVK)RRG6WRUDJH2SWLRQV
49-60792 Rev. 3 19
USING THE REFRIGERATOR: &OLPDWH=RQH7HPSHUDWXUH&RQWUROOHG'UDZHU
*Select Models Only
Fresh Food Storage Options
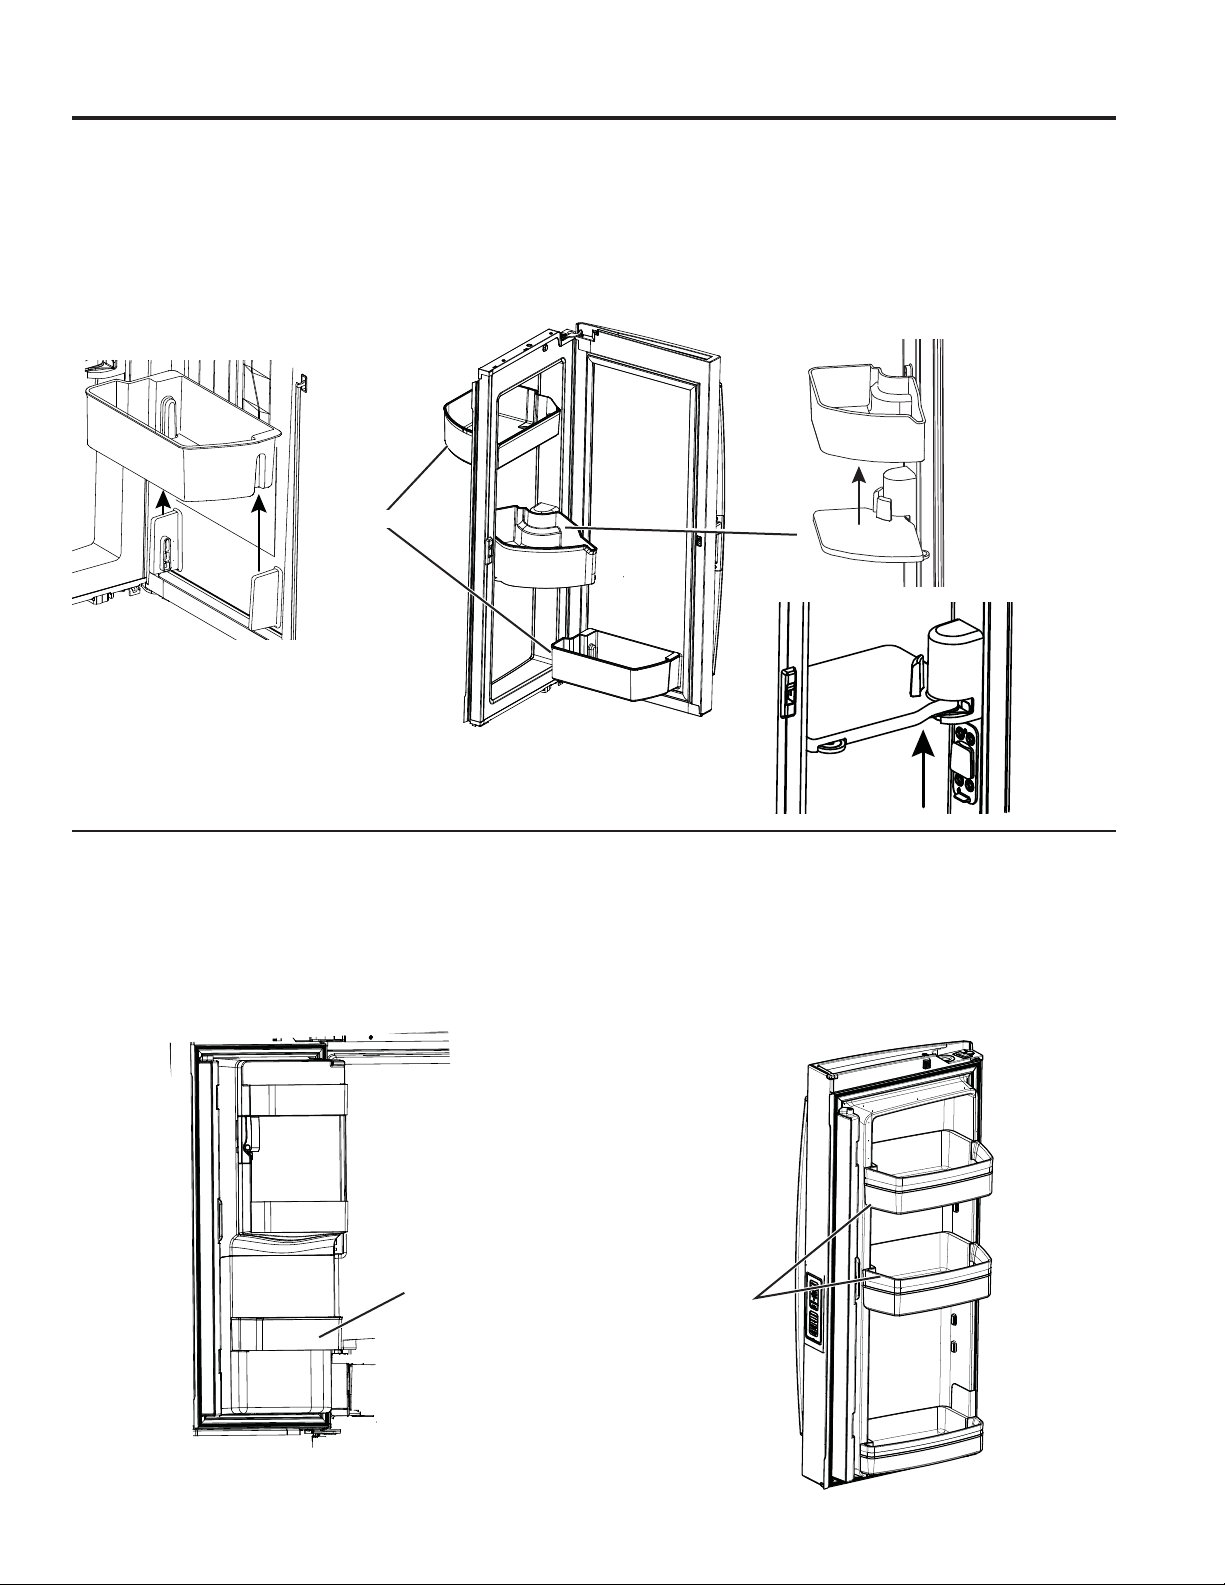
Left Door Bins
DISPENSER MODELS - FIXED BIN*
To remove: Lift the bin straight up, then pull out.
The ice maker door bins are not interchangeable, note the
location upon removal and replace the bin in its proper
location.
NON-DISPENSER MODELS - ADJUSTABLE BINS*
Adjustable bins can easily moved up or down the inside
of the door to give better flexibility for storage.
To remove: Lift bin straight up, then pull out.
Right Door Bins
FIXED BINS can easily be carried from refrigerator to
work area.
To remove: Lift bin straight up, then pull out.
ROTATING BIN:
To remove: Rotate bin outward then lift straight up. To
remove Place hand under metal base and lift up.
To remove Metal Base: Place hand under metal base
and lift up.
)L[HG%LQV
)L[HG%LQ
Adjustable Bins
Remove
Rotating Bin
5HPRYH)L[HG%LQV
Remove
Metal Base
20 49-60792 Rev. 3
C
Fruits Vegetables
F
C
M
EAT
DELI
P
R
ODU
C
E
C
H
E
ESE
CI
TRU
S
SELEC
T
ClimateZone
Fruits Vegetables
Fruits Vege
D
*Select Models Only
Climate Zone & Temperature Controlled Drawer
32° 34° 38°
Note: Temperatures indicate the appropriate
temperatures for the food and actual
temperatures may vary based on normal
operation and other factors such as door
openings and fresh food set point.
CAUTION
Laceration Hazard.
'RQRWVWRUHJODVVERWWOHVDWWKLVVHWWLQJ,I
WKH\DUHIUR]HQWKH\FDQEUHDNDQGUHVXOWLQ
personal injury.
Meat Beverage Deli
Select
ClimateZone
.HHSIUXLWVDQGYHJHWDEOHVRUJDQL]HGLQVHSDUDWH
compartments for easy access.
Excess water that may accumulate in the bottom of the
drawers or under the drawers should be wiped dry.
Temperature Controlled Drawer*
7KH7HPSHUDWXUH&RQWUROOHG'UDZHULVDIXOOZLGWK
drawer with adjustable temperature control. This drawer
can be used for large miscellaneous items.
To change setting, press select button.
USING THE REFRIGERATOR: &OLPDWH=RQH7HPSHUDWXUH&RQWUROOHG'UDZHU
49-60792 Rev. 3 21
USING THE REFRIGERATOR:&OLPDWH=RQH7HPSHUDWXUH&RQWUROOHG'UDZHU
'LYLGHU
*Select Models Only
Climate Zone & Temperature Controlled Drawer
How to Remove and Replace Drawer
To remove:
Pull the drawer out to the stop position.
Lift the front of the drawer up and out.
To replace:
Pull left and right slides until fully extended.
Place drawer back in first and rotate drawer front down
to seat on slide.
Push the drawer in to closed position.
How to Remove and Replace Drawer
Divider*
To remove:
Pull the drawer out to the stop position.
Raise the front side of the divider to unhook it from
the rear wall of the drawer.
To replace:
Hook the back of the divider over the rear wall of the
drawer.
Push the divider down.
22 49-60792 Rev. 3
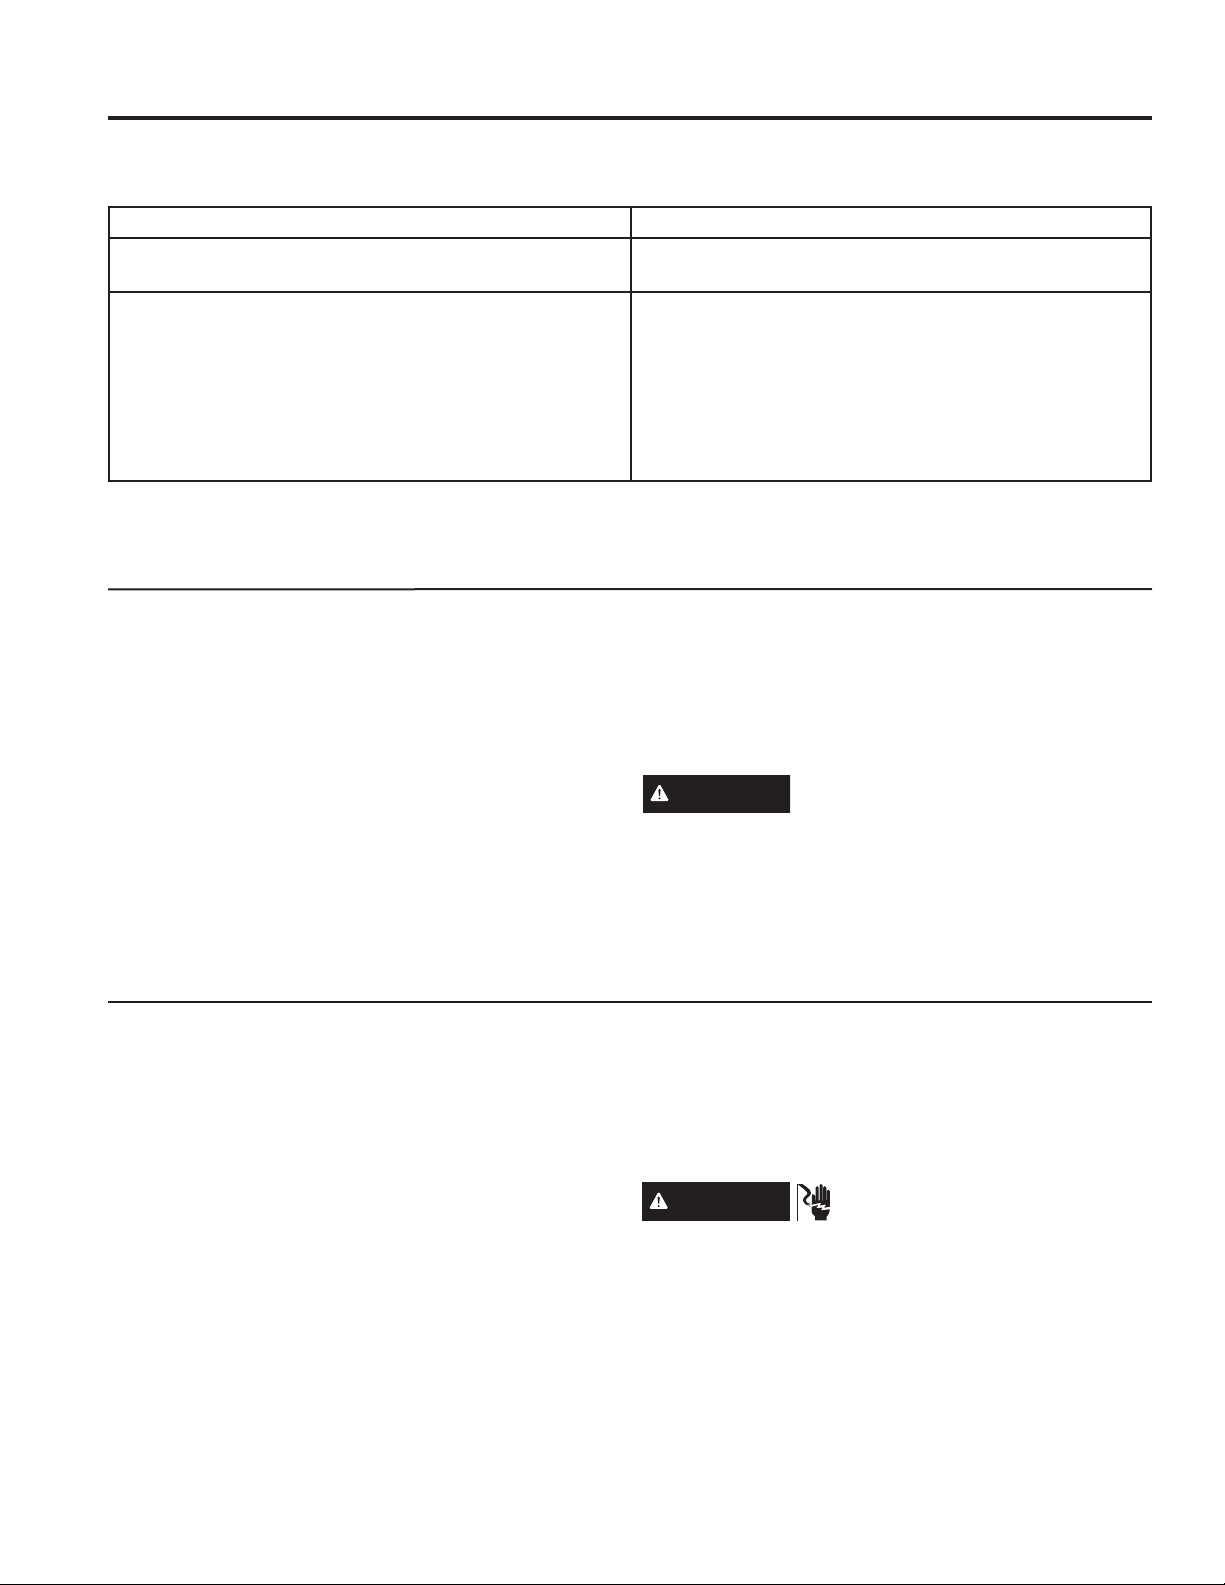
Freezer Basket and Drawer
Basket.
'UDZHU
,FH%XFNHW$YDLODEOHRQ1RQ'LVSHQVHPRGHOV
RQO\$YDLODEOHDVD,0.LWRQVRPHPRGHOV
Non-Adjustable Bin in the Freezer*
To remove:
Push in plastic tab on either left or right side
To replace:
Slide bin into location until it locks into place.
Basket Removal
To remove, standard depth models only:
2SHQIUHH]HUGRRUWRWKHVWRSSRVLWLRQ
5HPRYHIUHH]HUGRRUELQE\SXVKLQJSODVWLFWDERQ
either left or right side to release bin hinge pin.
5HPRYHIUHH]HUEDVNHWE\OLIWLQJXSWKHUHDURIWKH
basket and moving basket rearward until the front of
the basket can be rotated upward and out.
4. Lift it out to remove.
To remove, counter depth models only:
1. Open fresh food doors.
2SHQIUHH]HUGRRUWRWKHVWRSSRVLWLRQ
5HPRYHIUHH]HUEDVNHWE\OLIWLQJXSWKHUHDURIWKH
basket and rotate it upward.
4. Lift it out to remove.
To replace:
Reverse step 1 through 4 to replace.
*Select Models Only
Baskets, Drawers, and Bins
Plastic Tabs
USING THE REFRIGERATOR:%DVNHWV'UDZHUVDQG%LQV

49-60792 Rev. 3 23
USING THE FREEZER:$XWRPDWLF,FH0DNHU
'LVSOD\7\SH
6HH3DJH
Model # +RZWRWXUQWKHLFHPDNHURQRII
Control Style A 3)(33<(3 8VHWKH³,&(´EXWWRQRQWKHFRQWURO6HHControls,
pages 10 & 11.
Control Style B, C 3)+3)(.3)'')(
*)(*)'*)(*)63<'
3<(.'<(.*<(*<6
8VHWKH³,&(0$.(5´EXWWRQRQWKHFRQWURO6HH
Controls, pages 10 & 11.
&RQWURO6W\OH' GNE29, PWE23 8VHWKH³,&(0$.(5´EXWWRQRQWKHFRQWURO6HH
Controls, pages 10 & 11.
How to Turn the Ice Maker On/Off
Lift and pull
,FH%R[
'RRU
Ice Bucket and Dispenser*
• Open the ice box door on inside of the left door.
• Pull up and out on the ice bucket in the left hand door
to remove it from the compartment .
• To replace the ice bucket, set it on
the guide brackets and push until
the ice bucket seats properly.
,IEXFNHWFDQQRWEHUHSODFHG
URWDWHWKHLFHEXFNHWIRUNWXUQ
clockwise.
Ice Maker (Available on Non Dispense models,
also available as IM Kit for some models)
7KHUHLVDGGLWLRQDOLFHVWRUDJHLQWKHIUHH]HUFRPSDUWPHQW
drawer.
2SHQWKHIUHH]HUGUDZHU
• The ice bucket
is located on
the left side
of the upper
basket.
• Pull the upper
basket forward
to remove the
ice bucket.
)UHH]HU
,FH
Bucket
Automatic Ice Maker
A newly installed refrigerator may take 12 to 24 hours to begin making ice.
Automatic Ice maker*
The ice maker will produce seven cubes per cycle
approximately 100–130 cubes in a 24-hour period,
GHSHQGLQJRQIUHH]HUFRPSDUWPHQWWHPSHUDWXUHURRP
temperature, number of door openings and other use
conditions.
7KHLFHPDNHUZLOOILOOZLWKZDWHUZKHQLWFRROVWR)
&$QHZO\LQVWDOOHGUHIULJHUDWRUPD\WDNHWR
hours to begin making ice cubes.
,IWKHUHIULJHUDWRULVRSHUDWHGEHIRUHWKHZDWHUOLQH
connection is made to the unit or if the water supply to
an operating refrigerator is turned off, make sure that
the ice maker is turned off. Once the water has been
connected to the refrigerator, the ice maker may be
turned on. See the table below for details.
<RXPD\KHDUDEX]]LQJVRXQGHDFKWLPHWKHLFHPDNHU
fills with water.
Throw away the first
few batches of ice to
allow the water line to
clear.
Be sure nothing
interferes with the
sweep of the feeler arm.
When the bin fills to the
level of the feeler arm,
WKHLFHPDNHUZLOOVWRSSURGXFLQJLFH,WLVQRUPDOIRU
several cubes to be joined together.
,ILFHLVQRWXVHGIUHTXHQWO\ROGLFHFXEHVZLOOEHFRPH
cloudy, taste stale and shrink.
NOTE: ,QKRPHVZLWKORZHUWKDQDYHUDJHZDWHU
pressure, you may hear the ice maker cycle multiple
times when making one batch of ice.
CAUTION
7RPLQLPL]HWKHULVNRISHUVRQDOLQMXU\
avoid contact with the moving parts of the ejector
mechanism, or with the heating element that releases
WKHFXEHV'RQRWSODFHILQJHUVRUKDQGVRQWKH
automatic ice making mechanism while the refrigerator is
plugged in.
)HHOHU$UP
,FH
maker
*Select Models Only
WARNING
Connect to potable water supply
only.
A cold water supply is required for automatic icemaker
operation. The water pressure must be between 40
DQGSVLNLORSDVFDOV
24 49-60792 Rev. 3
Care and Cleaning
Cleaning the Outside
Cleaning the Inside
To help prevent odors, leave an open box of baking
VRGDLQWKHUHIULJHUDWRUDQGIUHH]HUFRPSDUWPHQWV
Unplug the refrigerator before cleaning.
,IWKLVLVQRWSUDFWLFDOZULQJH[FHVVPRLVWXUHRXWRI
sponge or cloth when cleaning around switches, lights or
controls.
8VHDQDSSOLDQFHZD[SROLVKRQWKHLQVLGHVXUIDFH
between the doors.
8VHZDUPZDWHUDQGEDNLQJVRGDVROXWLRQ²DERXWD
WDEOHVSRRQPORIEDNLQJVRGDWRDTXDUWOLWHURI
ZDWHU7KLVERWKFOHDQVDQGQHXWUDOL]HVRGRUV5LQVHDQG
wipe dry.
To clean the inside metal panel*, open the outer door
XVLQJWKH'RRULQ'RRU/DWFK&OHDQWKHSDQHOZLWKD
PLOGGHWHUJHQWDQGWKHQZLSHGU\ZLWKDVRIWFORWK'RQRW
use any stainless steel cleaner on the panel as it may
damage the surrounding plastic.
CAUTION
'RQRWFOHDQJODVVVKHOYHVRU
coverswith warm water when they are cold. Glass
shelves and covers may break if exposed to sudden
temperature changes or impact such as bumping or
dropping. Tempered glass is designed to shatter into
many small pieces if it breaks.
'RQRWZDVKDQ\SODVWLFUHIULJHUDWRUSDUWVLQWKH
dishwasher.
Behind the Refrigerator
Be careful when moving the refrigerator away from
the wall. All types of floor coverings can be damaged,
particularly cushioned coverings and those with
embossed surfaces.
Raise the leveling legs located at the bottom front of the
refrigerator.
Pull the refrigerator straight out and return it to position
by pushing it straight in. Moving the refrigerator in a side
direction may result in damage to the floor covering or
refrigerator.
Lower the leveling legs until they touch the floor.
WARNING
ELECTRICAL SHOCK HAZARD
When pushing the refrigerator back, make sure you
don’t roll over the power cord or water supply line.
*Select Models Only
CARE AND CLEANING
Directions for Cleaning Outside Surfaces, Door Handles, and Trim
DO USE DO NOT USE
Soft, clean cloth or sponge Abrasive cloths, scrubbing sponges, scouring or steel
wool pads
Mild detergent mixed with warm water
$SSURYHGVWDLQOHVVVWHHOFOHDQHUV9LVLWWKH*(
Appliances parts store for approved stainless steel
cleaners: GEAppliancesparts.com or call 877.959.8688
&OHDQHUVZLWKR[DOLFDFLGVXFKDV%DU.HHSHUV)ULHQG6RIW
Cleanser™ can be used to remove surface rust, tarnish
and small blemisheson stainless steel surfaces only.
Abrasive powders or sprays
Window Sprays or Ammonia
Citrus or plant oil-based cleaners
Acidic or vinegar-based cleaners
Oven cleaners
&OHDQHUVFRQWDLQLQJDFHWRQHSURSDQRQH
$Q\FOHDQHUZLWK:$51,1*DERXWSODVWLFFRQWDFW
NOTE: DO NOT allow stainless steel cleaner to come in contact with any plastic parts such as trim pieces, handle
KDUGZDUHDQGOLQHUV,IXQLQWHQWLRQDOFRQWDFWRIFOHDQHUVZLWKSODVWLFSDUWVGRHVRFFXUFOHDQSODVWLFSDUWZLWKD
sponge and mild detergent mixed with warm water.
49-60792 Rev. 3 25
CARE AND CLEANING
Preparing for Vacation
)RUORQJYDFDWLRQVRUDEVHQFHVUHPRYHIRRGDQG
unplug the refrigerator. Clean the interior with a baking
VRGDVROXWLRQRIRQHWDEOHVSRRQPORIEDNLQJVRGD
WRRQHTXDUWOLWHURIZDWHU/HDYHWKHGRRUVRSHQ
,IWKHWHPSHUDWXUHFDQGURSEHORZIUHH]LQJKDYHD
qualified service technician drain the water supply
system to prevent serious property damage due to
flooding.
1. Turn refrigerator off or unplug the refrigerator.
2. Empty ice bucket
3. Turn water supply off
If you cut the water supply off, turn off the ice
maker.
8SRQUHWXUQLQJIURPYDFDWLRQ
1. Replace the water filter.
5XQJDOORQVOLWHUVRIZDWHUWKURXJKWKHFROG
ZDWHUGLVSHQVHUDERXWPLQXWHVWRIOXVKWKHV\VWHP
Preparing to Move
Secure all loose items such as shelves and drawers by
taping them securely in place to prevent damage.
When using a hand truck to move the refrigerator, do not
rest the front or back of the refrigerator against the hand
truck. This could damage the refrigerator.
Handle only from the sides of the refrigerator.
Be sure the refrigerator stays in an upright position
during moving.
Care and Cleaning
Replacing the Lights
Refrigerator Lights (LEDs)
Appearance may vary by model.
7KHUHLV/('OLJKWLQJLQIUHVKIRRGFRPSDUWPHQWDQGRQ
WKHERWWRPRIWKHIUHVKIRRGGRRUVWROLJKWWKHIUHH]HU
compartment.*
$QDXWKRUL]HGWHFKQLFLDQZLOOQHHGWRUHSODFHWKH/('
light.
,IWKLVDVVHPEO\QHHGVWREHUHSODFHGFDOO*(
$SSOLDQFHV6HUYLFHDWLQWKH8QLWHG
States or 1.800.561.3344 in Canada.
/('/LJKWV
*Select Models Only
26 49-60792 Rev. 3
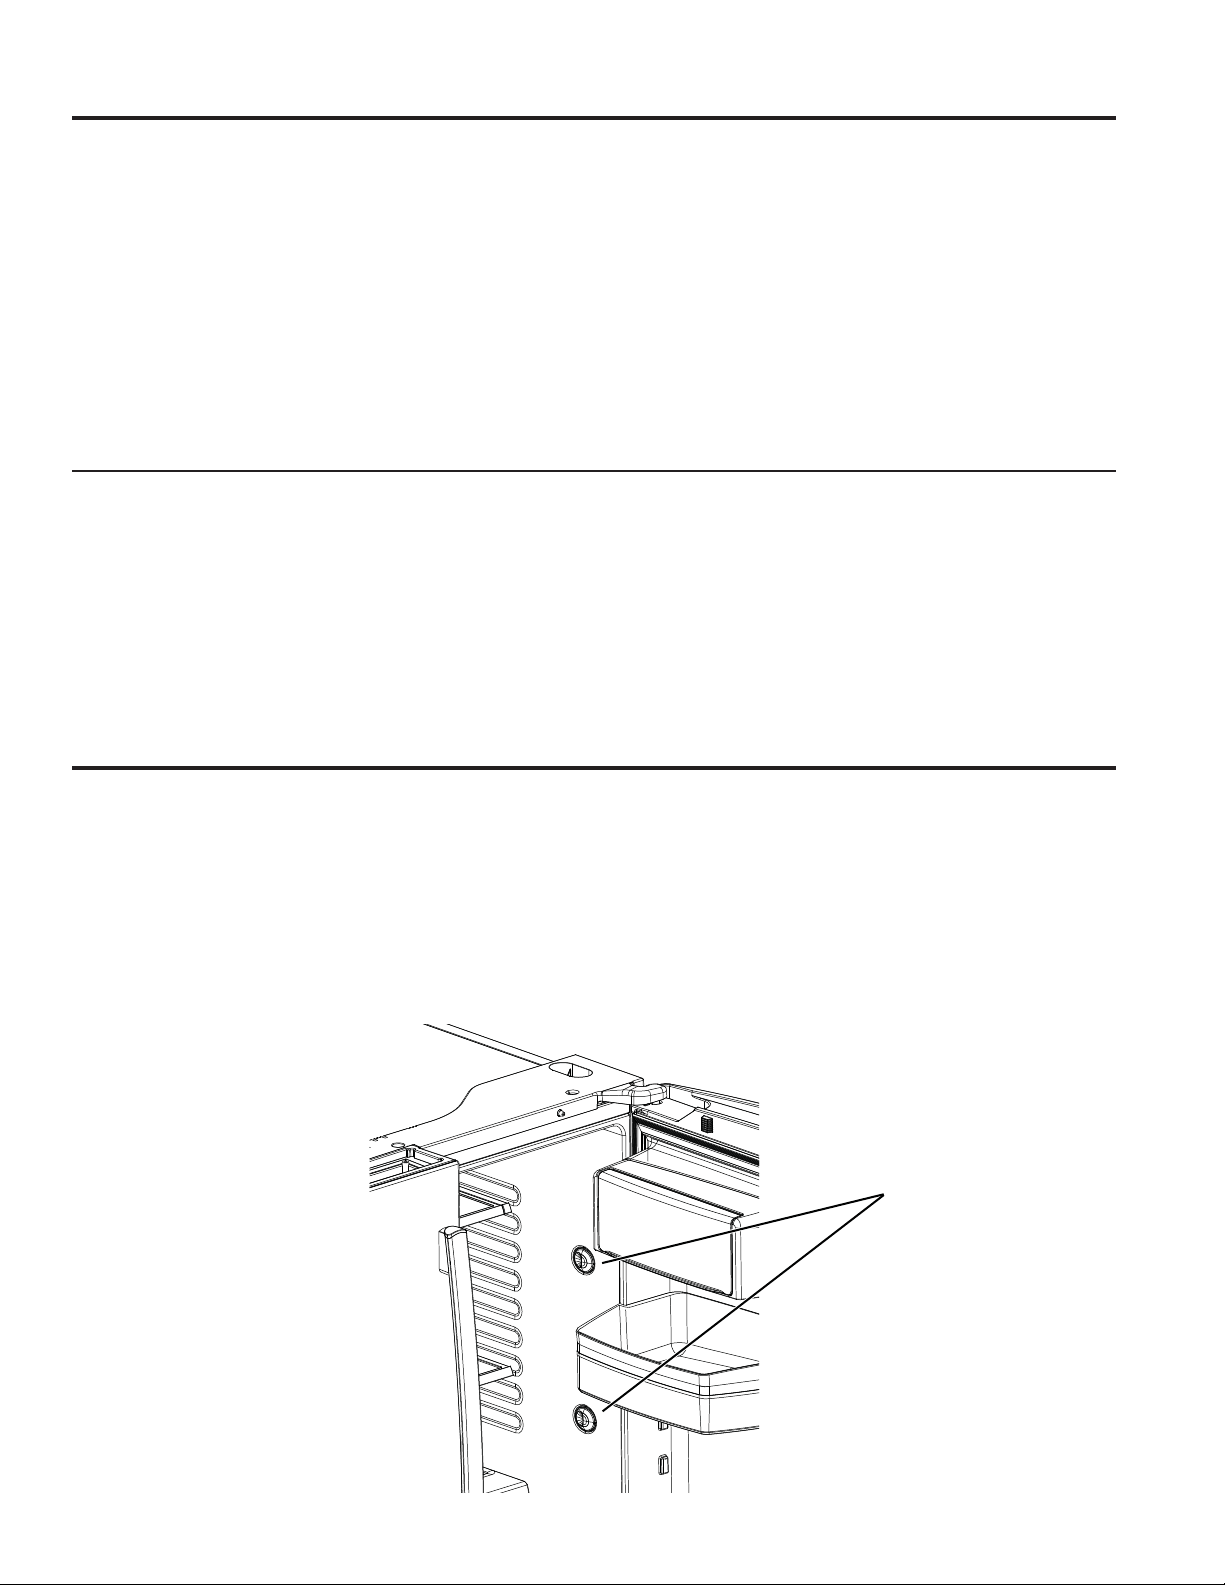
TOOLS YOU MAY NEED
BEFORE YOU BEGIN
Read these instructions completely and carefully.
WARNING
Tip Over Hazard.
Built-in style models (model PYE, GYE, GYS, PWE,
DQG=:(DUHWRSKHDY\HVSHFLDOO\ZLWKDQ\GRRUV
open. These models must be secured with the anti-tip
floor bracket to prevent tipping forward, which could
result in death or serious injury. Read and follow the
entire installation instructions for installing the anti-tip
floor bracket packed with your refrigerator.
•
IMPORTANT — Observe all governing codes
and ordinances. Save these instructions for local
inspector’s use.
• Note to Installer – Be sure to leave these
instructions with the Consumer.
• Note to Consumer –.HHSWKHVHLQVWUXFWLRQVIRU
future reference.
• Skill level – ,QVWDOODWLRQRIWKLVDSSOLDQFHUHTXLUHV
basic mechanical skills.
• Completion time –5HIULJHUDWRU,QVWDOODWLRQ
can vary
:DWHU/LQH,QVWDOODWLRQ
30 minutes
• Proper installation is the responsibility of the
installer.
• Product failure due to improper installation is not
covered under the Warranty.
PREPARATION
MOVING THE REFRIGERATOR INDOORS
,IWKHUHIULJHUDWRUZLOOQRWILWWKURXJKDGRRUZD\WKH
UHIULJHUDWRUGRRUDQGIUHH]HUGUDZHUFDQEHUHPRYHG
7RUHPRYHWKHUHIULJHUDWRUGRRUVHHWKH,QVWDOOLQJ
the Refrigerator section.
7RUHPRYHWKHIUHH]HUGUDZHUVHHWKH5HPRYLQJ
WKH)UHH]HU'UDZHUVHFWLRQ
WATER SUPPLY TO THE ICE MAKER AND
DISPENSER
,IWKHUHIULJHUDWRUKDVDQLFHPDNHULWZLOOKDYH
to be connected to a cold water line. A GE
Appliances water supply kit (containing tubing, shutoff
YDOYHILWWLQJVDQGLQVWUXFWLRQVLVDYDLODEOHDWH[WUD
cost from your dealer, by visiting our website at
GEAppliances.com (in Canada at
GEAppliances.caRUIURP3DUWVDQG$FFHVVRULHV
LQ&DQDGD
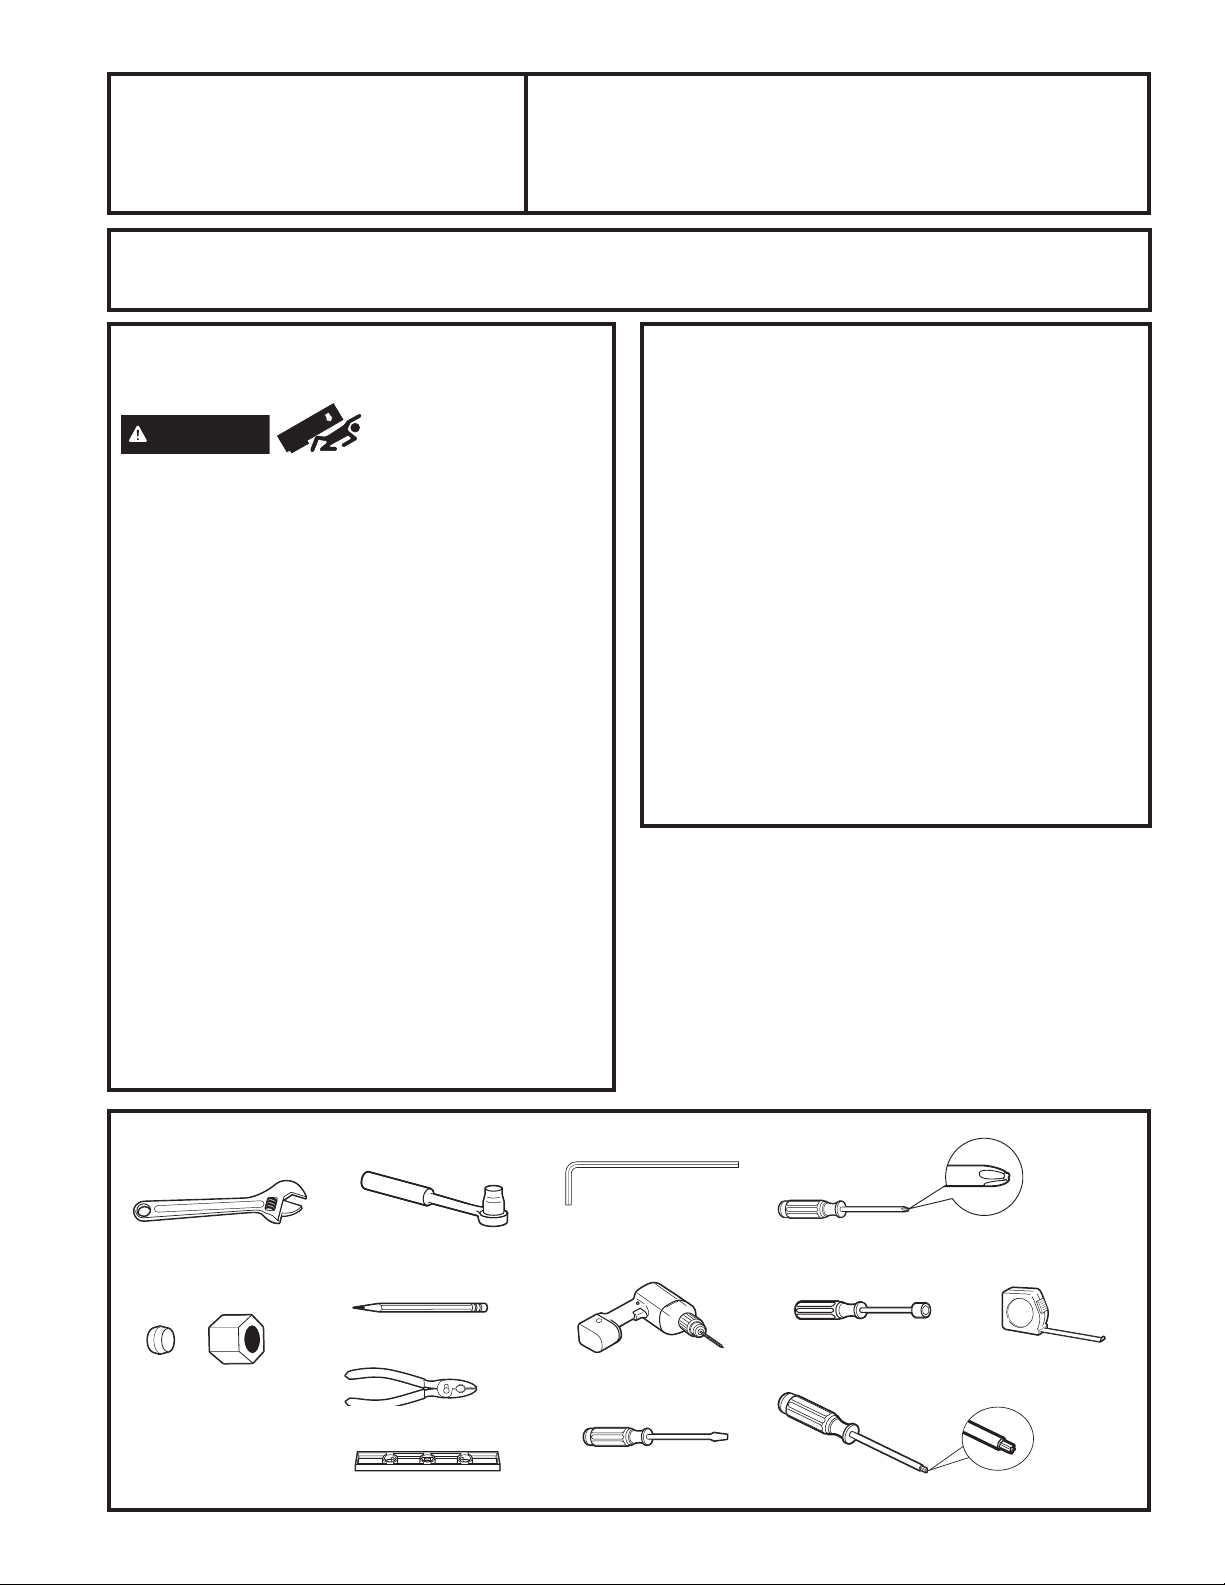
Adjustable Wrench
´2XWHU'LDPHWHU
Compression Nut
DQG)HUUXOHVOHHYH
Phillips-Head Screwdriver
Ǫ´6RFNHW5DWFKHW'ULYHU
´´´& ´
Allen Wrenches
Pencil
´'ULOO%LWDQG
(OHFWULFRU+DQG'ULOO
Tape Measure
´1XW'ULYHU
Pliers
Level
)ODW+HDG6FUHZGULYHU
Torx T20, T25
Installation
Instructions
Refrigerator
GE and GE Profile™ models
Questions? Call 800.GE.CARES (800.432.2737) or visit our Website at: GEAppliances.com
In Canada, call 1.800.561.3344 or visit our Website at: GEAppliances.ca
INSTALLATION INSTRUCTIONS
49-60792 Rev. 3 27
INSTALLATION INSTRUCTIONS
MOVING THE REFRIGERATOR
8VLQJWKHFKDUWEHORZGHWHUPLQHLIWKHZLGWKRI\RXUSDVVDJHZD\FDQDFFRPPRGDWHWKHGHSWKRIWKH
refrigerator. Ensure you have clearance to prevent damage to the refrigerator before safely moving it to the final
location.
,ISDVVDJHZD\VDUHODUJHHQRXJKWRDFFRPPRGDWHWKHUHIULJHUDWRUZLWKRXWUHPRYLQJWKHKDQGOHVVNLSWR6WHS
Leave tape, film and all packaging on doors until the refrigerator is in the final location.
• NOTE: Use a padded hand truck or moving straps to move this refrigerator. Place the refrigerator on the
hand truck with a side against the truck. We strongly recommend that two people move and complete
this installation.
DIMENSIONS
All measurements are given with leveling leg fully retracted.
SD CD
Overall Height to Top of Hinge Cover
69´ 69´
Height to Top of Cabinet
69´ 69´
Case Depth without Doors
29
´ 24
´
Overall Exterior Case Width
´ ´
Overall Exterior Depth Doors/Drawers with Handles
36
´ 31
´
6WDQGDUG'HSWK6'0RGHOV2QO\&RXQWHU'HSWK&'0RGHOV2QO\
&DVH'HSWKZR
'RRUV´6'
´&'
Height from floor
to hinge cover top
´
$GGLWLRQDO'LPHQVLRQV
´6'
´&'
´
´
´
´
´
´
´
´
Fully
Assembled
36.375” 34.375” 34” 30.5” 29.625”
Remove door parts in order until dimension is less than opening
Removing
Handles
Removing
LH Door
Case w/
Fz Slides
Case only
(no hinges)
If your model number starts with PFE, PFH, PFD, GFD,
GFE, GFS, DFE (SD)
Fully
Assembled
36.275” 33.75” 30.5” 29.625”
Remove door parts in order until dimension is less than opening
Removing
Handles
Case w/
Fz Slides
Case only
(no hinges)
If your model number starts with GNE (SD)
Fully
Assembled
31.375” 29.375” 25.875” 24.625”
Remove door parts in order until dimension is less than opening
Removing
Handles
Removing
LH Door
Case w/
Fz Slides
Case only
(no hinges)
28.875”
If your model number starts with DYE, GYE, GYS, PYE,
PYD, PWE (CD)
Installation Instructions
28 49-60792 Rev. 3
Installation Instructions
INSTALLING THE REFRIGERATOR
REFRIGERATOR LOCATION
Ŷ'RQRWLQVWDOOWKHUHIULJHUDWRUZKHUHWKH
WHPSHUDWXUHZLOOJREHORZ)&EHFDXVH
it will not run often enough to maintain proper
temperatures.
Ŷ'RQRWLQVWDOOWKHUHIULJHUDWRUZKHUHWKH
WHPSHUDWXUHZLOOJRDERYH)&EHFDXVH
it will not perform properly.
Ŷ 'RQRWLQVWDOOWKHUHIULJHUDWRULQDORFDWLRQH[SRVHG
WRZDWHUUDLQHWFRUGLUHFWVXQOLJKW
Ŷ,QVWDOOLWRQDIORRUVWURQJHQRXJKWRVXSSRUWLWIXOO\
loaded.
CLEARANCES
Allow the following clearances for ease of
installation, proper air circulation and plumbing and
electrical connections.
6LGHV ´PP
7RS ´PP&DELQHW+LQJH&RYHU
%DFN ´PP
REMOVING THE REFRIGERATOR
DOORS
Ŷ IMPORTANT NOTE: This refrigerator is 36
1
4´GHHS
(31
1
4´IRU&'PRGHOV'RRUVDQGSDVVDJHZD\V
leading to the installation location must be at least
36
1
4´ZLGHLQRUGHUWROHDYHWKHGRRUVDQGKDQGOHV
attached to the refrigerator while transporting it into
WKHLQVWDOODWLRQORFDWLRQ,ISDVVDJHZD\VDUHOHVV
than 36
1
4´WKHUHIULJHUDWRUGRRUVDQGKDQGOHVFDQ
easily be scratched and damaged. The top cap and
doors can be removed to allow the refrigerator to be
VDIHO\PRYHGLQGRRUV,ISDVVDJHZD\VDUHOHVVWKDQ
31
1
4´VWDUWZLWK6WHS
Ŷ,ILWLVQRWQHFHVVDU\WRUHPRYHGRRUVVNLSWR6WHS
11. Leave tape and all packaging on doors until the
refrigerator is in the final location.
Ŷ NOTE:8VHDSDGGHGKDQGWUXFNWRPRYHWKLV
refrigerator. Place the refrigerator on the hand
truck with a side against the truck. We strongly
recommend that TWO PEOPLE move and complete
this installation.
REMOVE THE FRESH FOOD
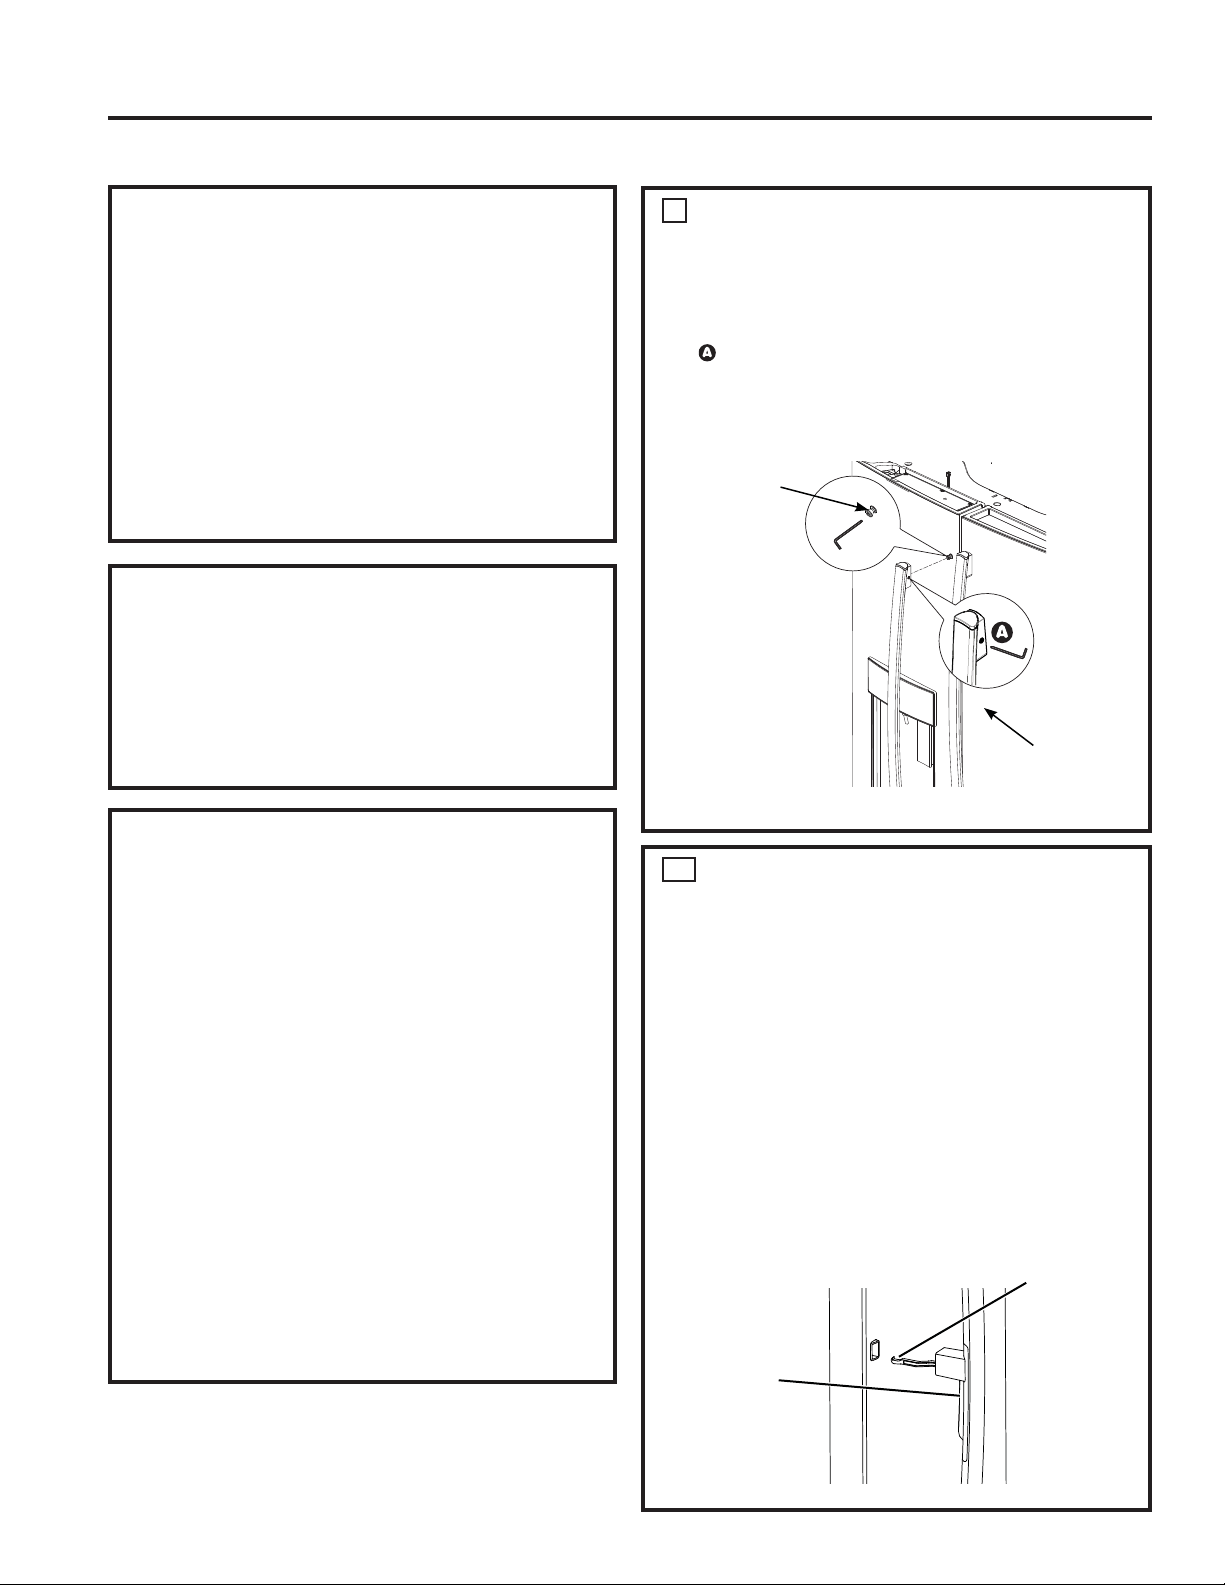
DOOR HANDLE
+DQGOH'HVLJQYDULHVEDVHGRQPRGHOVKRZHYHU
,QVWDOODWLRQLVVDPH
Stainless steel and plastic handles:
/RRVHQWKHVHWVFUHZVZLWKWKH´$OOHQ
wrench and remove the handle.
NOTE: ,IWKHKDQGOHPRXQWLQJIDVWHQHUVQHHG
WREHWLJKWHQHGRUUHPRYHGXVHD´ Allen
wrench.
FOR DOOR IN DOOR MODELS
ONLY
To Remove the Handle:
Ŷ2SHQWKHRXWHUGRRUE\SUHVVLQJWKH'RRULQ
'RRUODWFK
Ŷ Loosen the set screws as shown in Step 1.
To Install the Handle:
Ŷ Align the lever with the opening on the outer
door. Make sure the hook is pointed up.
Ŷ,QVHUWWKHODWFKOHYHULQWRWKHRSHQLQJDQG
align the handle with the mounting fasteners.
Ŷ Once the handle is flush with the outer door,
tighten the set screws.
'RQRWUHPRYHWDSHIURPGRRUXQWLOKDQGOHLV
installed
1
1a
Mounting
)DVWHQHUV
Leave film
on until after
installation
INSTALLATION INSTRUCTIONS
'RRULQGRRU
Latch
Latch Lever
with Hook
facing up.
49-60792 Rev. 3 29
INSTALLATION INSTRUCTIONS
3
REMOVE THE REFRIGERATOR
DOORS (cont)
C
'LVFRQQHFWHOHFWULFDOFRQQHFWRUVFRPLQJIURPHDFK
door located under the hinge covers.
5HPRYHWKH´KH[KHDGVFUHZWRGLVFRQQHFWWKH
ground wire from the hinge.
5HPRYHWKH´KH[KHDGVFUHZWRUHPRYHWKH
strain relief from the water line.
'
'LVFRQQHFWWKHZDWHUOLQHIURPWKHEDFNRIWKHXQLW
by pressing down on the dark grey collar while
pulling up on the water line.Pull water line through
case conduit from the top to free the line for door
removal. The water line is more than 4’ long and
PD\QHHGWREHWDSHGWR'RRUIRUDFFHVVLELOLW\
when reinstalling.
E
8VLQJD´VRFNHWUDWFKHWGULYHU
remove the screws securing the
top hinge to the cabinet, then lift
the hinge straight up to free the
hinge pin from the location in the
top of the door.
CAUTION
Lifting Hazard
Single person lift could cause injury. Use
assistance when handling, moving or lifting the
doors.
NOTE: when removing door, to prevent damage to
door and electronics, carefully place the door in a
proper location.
NOTE: The lower door hinge pin and hinge are keyed
and must be matched correctly for the door to self
close properly. Please follow the directions carefully.
2
REMOVE THE FREEZER DOOR
HANDLE
+DQGOH'HVLJQYDULHVEDVHGRQPRGHOVKRZHYHU
,QVWDOODWLRQLVVDPH
Stainless steel and plastic handles:
/RRVHQWKHVHWVFUHZVZLWKWKH´$OOHQ
wrench and remove the handle.
NOTE: ,IWKHKDQGOHPRXQWLQJIDVWHQHUVQHHGWR
EHWLJKWHQHGRUUHPRYHGXVHD´ Allen wrench.
Reinstall the handles using the same procedure as
removing.
Mounting
)DVWHQHUV
Leave film
on until after
installation
Installation Instructions
INSTALLING THE REFRIGERATOR (Cont.)
3
REMOVE REFRIGERATOR DOORS
WARNING
)ROORZDOOVWHSVIRUUHPRYLQJ
DQGUHLQVWDOOLQJWKHGRRU)DLOXUHWRIROORZWKHVH
instructions, leaving off parts, or overtightening screws,
can lead to the door falling off and result in injury and
property damage.
A
Securely tape the
door shut with
masking tape or
have a second
person support
the door.
B
Start with
left-hand door
first: Remove the hinge
cover on top of the left
refrigerator door by
removing all hex screws
DQGSXOOLQJLWXS'RWKH
same for the right-hand
door and the middle cover.
Hinge
Cover
Ground
screw
Strain
Relief
Y or Straight
Connector
30 49-60792 Rev. 3
REINSTALLING THE
REFRIGERATOR DOORS
Reverse steps 1 through 4 to reinstall refrigerator
doors, follow details below for critical alignments.
A
Reinstall center hinge first
and torque the screws to 65
in-lbs (7.34 N-m). With the LH
door at 90º to the front of the
case, lower the refrigerator
door onto the center hinge.
Ensure that the door and hinge align correctly.
B
Rotate doors closed and make sure moveable
center sealing portion of the door aligns with the
VWULNHU,IWKHGRRUZLOOQRWVHOIFORVHDIWHU
reinstalling, remove door, turn door upside down,
FKHFNDOLJQPHQWPDUNDQGDUURZWKHUHLVDQ
DOLJQPHQWPDUNRQWKHGRRUFORVXUHPHFKDQLVP,W
corresponds to an alignment arrow on the plastic
ring. Rotate door closure mechanism to align mark
DQGDUURZUHLQVWDOOGRRU'RRULQ'RRUPRGHOVGR
not have the same closure mechanism on the right
hand door. You may notice a difference in closure.
Securely tape the door shut with masking tape or
have a second person support the door. Reinstall
the top hinge and torque the screws to 65 in-lbs
(7.34 N-m).
C
Be sure to reinstall the ground wire and strain
relief to the top hinge.
'
Reinstall hinge cover. NOTE: Ensure wires are not
pinched or under screw bosses before tightening
screws.
3
REMOVE THE REFRIGERATOR
DOORS (cont)
Note: For proper installation later, please follow
the next step carefully.
)
Remove the tape and keeping the door as
straight as possible, open the door to 90º then lift
straight up to remove it.
REMOVE OPPOSITE DOOR
)ROORZWKHVDPHSURFHGXUHRQWKHRSSRVLWHGRRU
There are no water lines on the opposite side.
For Door in Door Models: Securely tape the
inner and outer doors before installing or removing.
90º door alignment not required during installation
or removal for these models.
4
REMOVE CENTER HINGE (if necessary)
5HPRYHWKHƎVFUHZVVHFXULQJWKHFHQWHUKLQJH
to the cabinet.
8VH7GULYHUWRUHPRYHRXWERDUGVFUHZ
5
Remove
center screw
Lift up & off
center hinge
2SHQ'RRUWR
Align flats with tab.
8QGHUVLGHRI
)UHVK)RRG'RRU
If door cannot be installed at 90° follow steps below:
,QVWDOOGRRUDWWRFDVHIURQW
,IVSDFHOLPLWVRSHQLQJGRRUWROHVVWKDQWKHQ
D5HPRYHGRRUFDUHIXOO\WXUQGRRUXSVLGHGRZQ
E&KHFNDOLJQPHQWRIGRRUFORVXUHPHFKDQLVPVKDIW
on underside of door. The flats on the shaft should
correspond to alignment tab on plastic ring or
mark on bottom end cap.
F,IVKDIWLVQRWDOLJQHGWRWDEPDUNXVLQJ´
Allen wrench, rotate door closure mechanism
shaft counterclockwise for right door and clock-
ZLVHIRUOHIWGRRU7KHQDOLJQIODWZLWKWDEPDUN
G,QVWDOOWKHGRRUDW
Loosen outer
screws
Installation Instructions
INSTALLING THE REFRIGERATOR (Cont.)
INSTALLATION INSTRUCTIONS
49-60792 Rev. 3 31
INSTALLATION INSTRUCTIONS
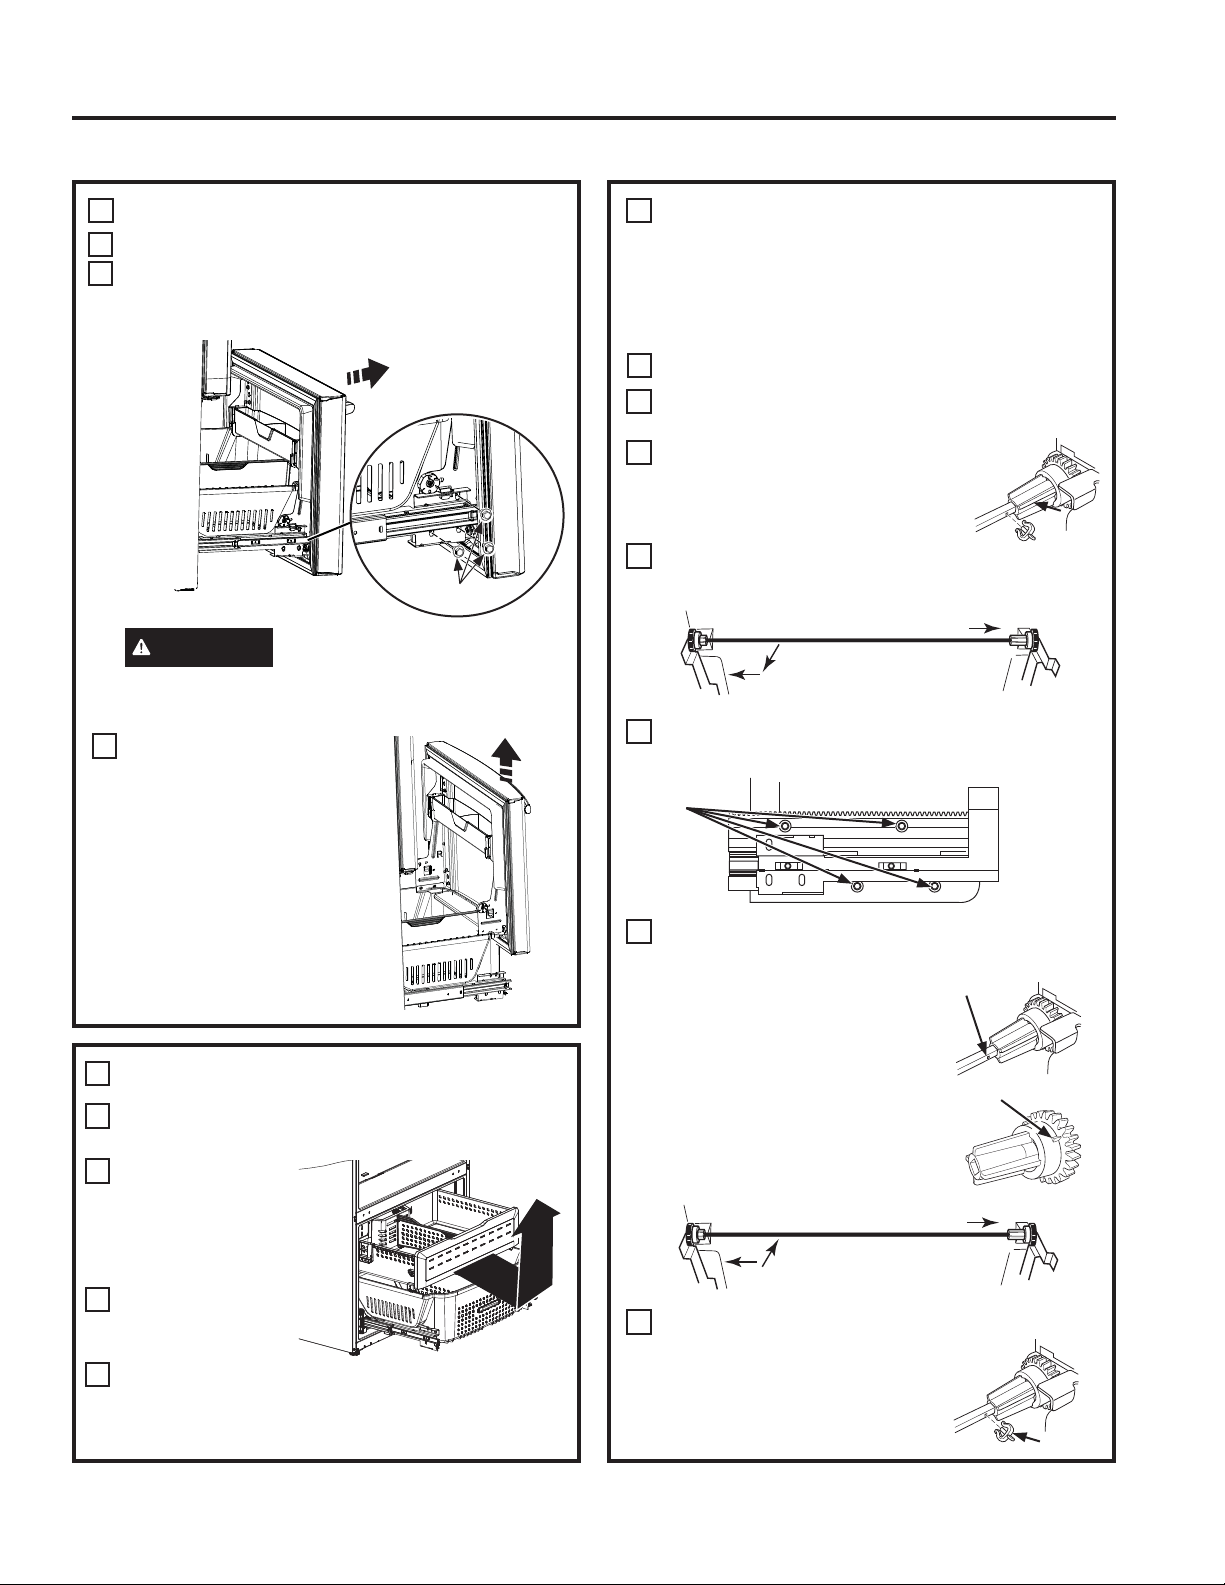
REMOVE THE FREEZER DOOR
3XOOWKHIUHH]HUGRRURSHQWRIXOOH[WHQVLRQ
Remove 3 attachment screws, located at the
ERWWRPRQHDFKVLGHRIWKHIUHH]HUGRRUXVLQJ
´KH[VRFNHWGULYHU
CAUTION
Lifting Hazard
Freezer door is heavy Use both hands to
secure the door before lifting.
/LIWWKHIUHH]HUGRRU
to disengage it from
the slide mechanism
The door can safely
rest on the bottom.
'RQRWUHVWWKH
door on any other
surfaces to avoid
scratches.
REMOVE THE FREEZER
BASKET SLIDES
7KHIUHH]HUEDVNHWVOLGHVFDQEHUHPRYHGWR
JDLQDQRWKHU´FPFOHDUDQFHWKURXJK
a doorway.
5HPRYHIUHH]HUGRRUDVVKRZQLQ6WHS
Remove the upper and lower baskets as shown
in Step 7.
Remove the clip on the crossbar
located along the right hand
side of the rack and pinion gear
assembly by sliding forward.
Remove crossbar by sliding to the
right, then pull out and to the left.
5HPRYHWKHIRXU´KH[KHDGEROWVSHUVLGH
and remove side supports.
Reverse the steps to assemble. When installing
the crossbar, always put the hole on the right
hand side. Align the left and
right gears with the timing
marks on the gears when
inserting the crossbar. Always
insert the crossbar in the right
hang gear first and then the
left hand gear.
,QVHWWKHFOLSLQWRWKHFURVVEDUKROHORFDWHGRQ
the right hand side.
A
A
B
B
C
C
6
8
3 Screws
REMOVE FREEZER BASKET
Pull the lower basket and slide mechanism to
full extension using both hands.
Remove the top
IUHH]HUGUDZHUE\
fully extending the
drawer then lifting
up and out.
Remove the basket
resting on the
slides.
Push the bottom
basket slides back
until the slide mechanism self retracts.
7
A
B
C
'
'
E
)
G
Installation Instructions
INSTALLING THE REFRIGERATOR (Cont.)
1
2
1
2
Hex head
bolts
Clip
Hole for clip
Timing
mark
Clip
32 49-60792 Rev. 3
RE-INSTALL FREEZER DRAWER
5HLQVWDOOIUHH]HUGUDZHUE\SODFLQJWKHGUDZHU
wheels onto the top of the track mounted to the
VLGHRIWKHIUHH]HUZDOOV7KHZKHHOVRQWKH
IUHH]HUGUDZHUVKRXOGEHRQWRSRIWKHERWWRP
basket sides.
ON MODELS EQUIPPED WITH ICE MAKER
IN THE FREEZER: Place the ice bucket in the
GUDZHUDQGSXVKWKHGUDZHULQWRWKHIUHH]HUZLWK
the front of the bucket to the front of the basket,.
Make sure:
- The ice bucket does not hit the icemaker arm
DQGWKHIUHH]HUGUDZHUUHWUDFWVFRPSOHWHO\LQWR
WKHIUHH]HUFRPSDUWPHQW
- The fill tube extends into the fill cup opening at
the back of the icemaker.
9
A
Installation Instructions
INSTALLING THE REFRIGERATOR (Cont.)
INSTALLATION INSTRUCTIONS
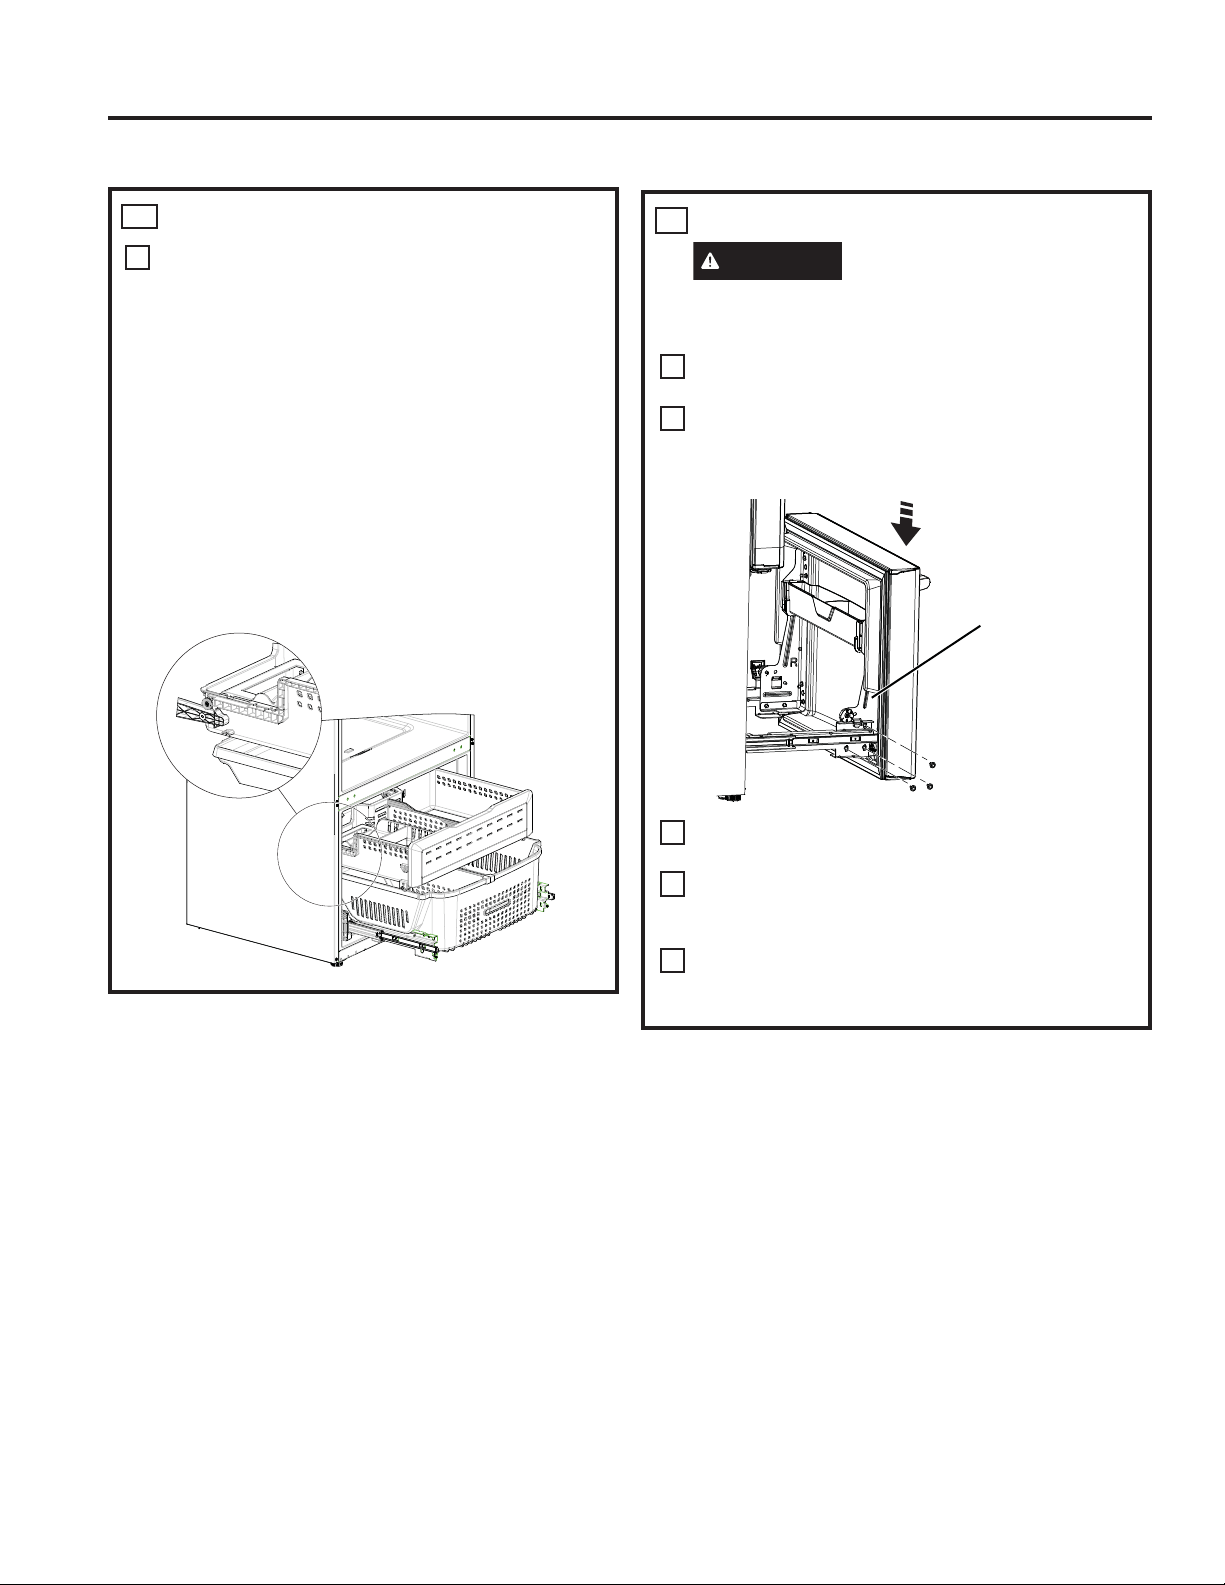
REPLACE FREEZER DOOR
CAUTION
Lifting Hazard
Freezer door is heavy Use both hands to
secure the door before lifting.
Pull the lower basket slide mechanism to full
extension with both hands.
/LIWWKHIUHH]HUGRRUDQGDOLJQWKHWDEVRQWKH
door bracket sides with the square holes in slide
mechanisms.
Replace the attachment screws and torque the
VFUHZVWRLQOE1P
)RUDGMXVWLQJIUHH]HUGRRUJDSVIROORZWKH
instructions on page 30 or in the Owner’s
Manual.
5HSODFHIUHH]HUEDVNHWRQWRWKHVOLGHEUDFNHWV
DQGPDNHVXUHWKHIUHH]HUGRRURSHUDWHVDQG
closes freely.
10
Align and insert
WDERQ)UHH]HU
'RRU%UDFNHWZLWK
VORWRQ)UHH]HU
Slide Bracket.
NOTE: Place one
side in first and
then align the
other side.
A
B
C
'
E
49-60792 Rev. 3 33
INSTALLATION INSTRUCTIONS
IMPORTANT!
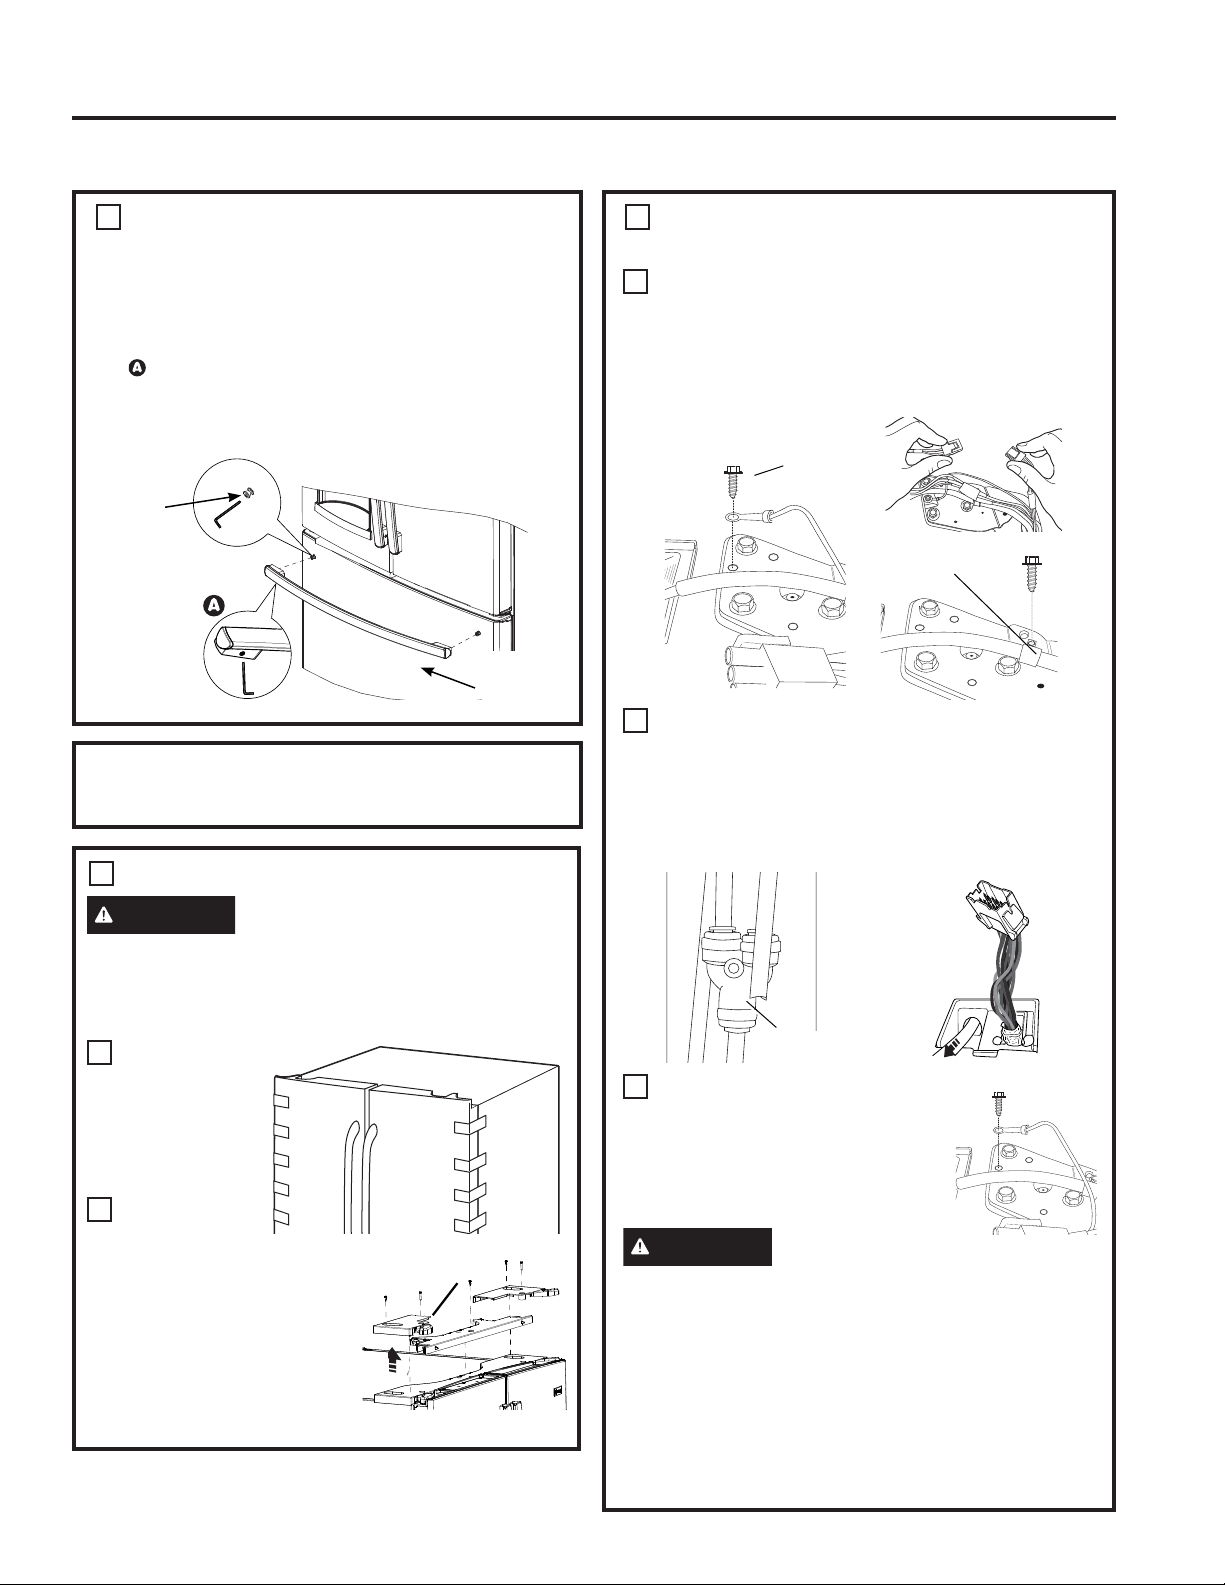
The 6 mounting screws (3 on each side) are NOT interchangeable with the center or top hinge screws.
Drawer screws have flat washer heads, and other screws have lines/ribs on washer heads.
$IWHULQVWDOODWLRQRIWKHIUHH]HUGRRUFKHFNIRUXQLIRUPJDSVWRSDQGERWWRPRIULJKWDQGOHIWKDQGVLGHZLWKWKH
template provided.
,QWKHHYHQWRIH[FHVVLYHJDSVXVHWKHIROORZLQJVWHSVWRDGMXVWWKHIUHH]HUGRRU
Step 1 /RRVHQWKHVFUHZVRQHDFKVLGHULJKWDQGOHIWRIWKHIUHH]HUGRRU
Step 2 -$GMXVWVHWVFUHZFORFNZLVHLIJDSDWWKHWRSLVWRRELJVHHWHPSODWH7XUQWKHVHWVFUHZXVLQJ´KH[
key clockwise by quarter to half a rotation
Step 3 -$GMXVWVHWVFUHZFRXQWHUFORFNZLVHLIJDSDWWKHERWWRPLVWRRELJVHHWHPSODWHTurn the set screw using
´KH[NH\FRXQWHUFORFNZLVHE\TXDUWHUWRKDOIDURWDWLRQ
Step 4 -7LJKWHQWKHVFUHZVRQHDFKVLGHULJKWDQGOHIW
Step 5 - Re-check the gaps using the template and repeat steps 1 to 4 if required and complete with step 5.
Instructions for adjusting freezer door gaps:
Fold here for using template
FP
´
Template for checking gaps.
*DSVKRXOGEH´RUEHORZ
Gabarit pour vérifier les écarts.
L’écart doit être de 0,6 po (1,5
FPRXPRLQV
Plantilla para el control de
espacios. El espacio debería
VHUGH´RLQIHULRU
Step 1
Étape 1
Paso 1
Step 4
Étape 4
Paso 4
Set Screw
Vis d’ajustement
Tornillo del Set
Step 3
Étape 3
Paso 3
Step 2
Étape 2
Paso 2
Plier ici pour utiliser le gabarit Dóblelo aquí para usar la plantilla
Installation Instructions
INSTALLING THE REFRIGERATOR (Cont.)
34 49-60792 Rev. 3
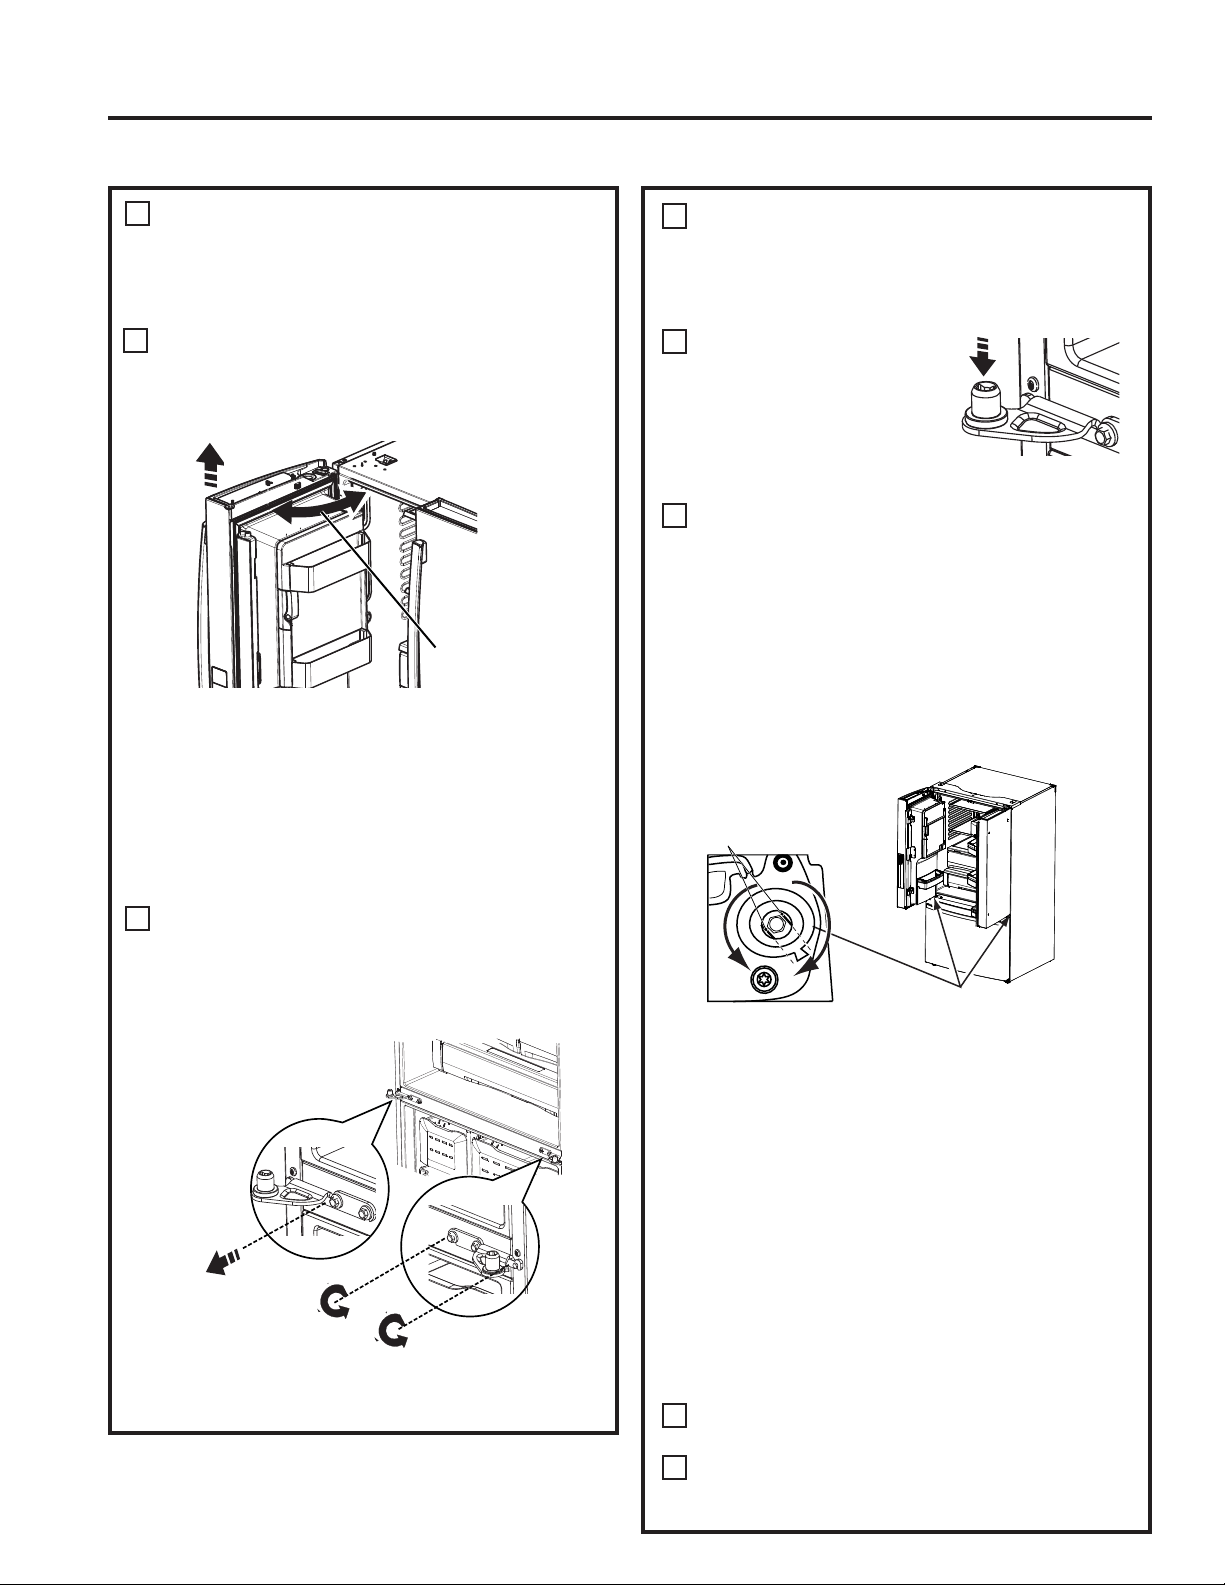
LEVEL THE FREEZER DOOR
Locate the height adjuster cam in the
IUHH]HUGRRU6OLJKWO\ORRVHQWKHWKUHHGRRU
attachment screws on both sides using a
´KH[VRFNHWGULYHU
Locate and loosen the cam screw using the
T-27 screw driver.
10
A
B
REMOVE PACKAGING
Remove all tape, foam and protective
packing from shelves and drawers.
11
LEVEL THE FREEZER DOOR
(cont.)
Lift the door on the side requiring
adjustment, rotate the cam to required
position.
After adjustment tighten the 3 attachment
VFUHZVXVLQJWRLQOE1P
10
,QLWLDOSRVLWLRQ
/LIWE\´FP
/RZHUE\´FP
/RZHUE\´FP
/RZHUE\´FP
A
B
Installation Instructions
INSTALLING THE REFRIGERATOR (Cont.)
INSTALLATION INSTRUCTIONS
49-60792 Rev. 3 35
INSTALLATION INSTRUCTIONS
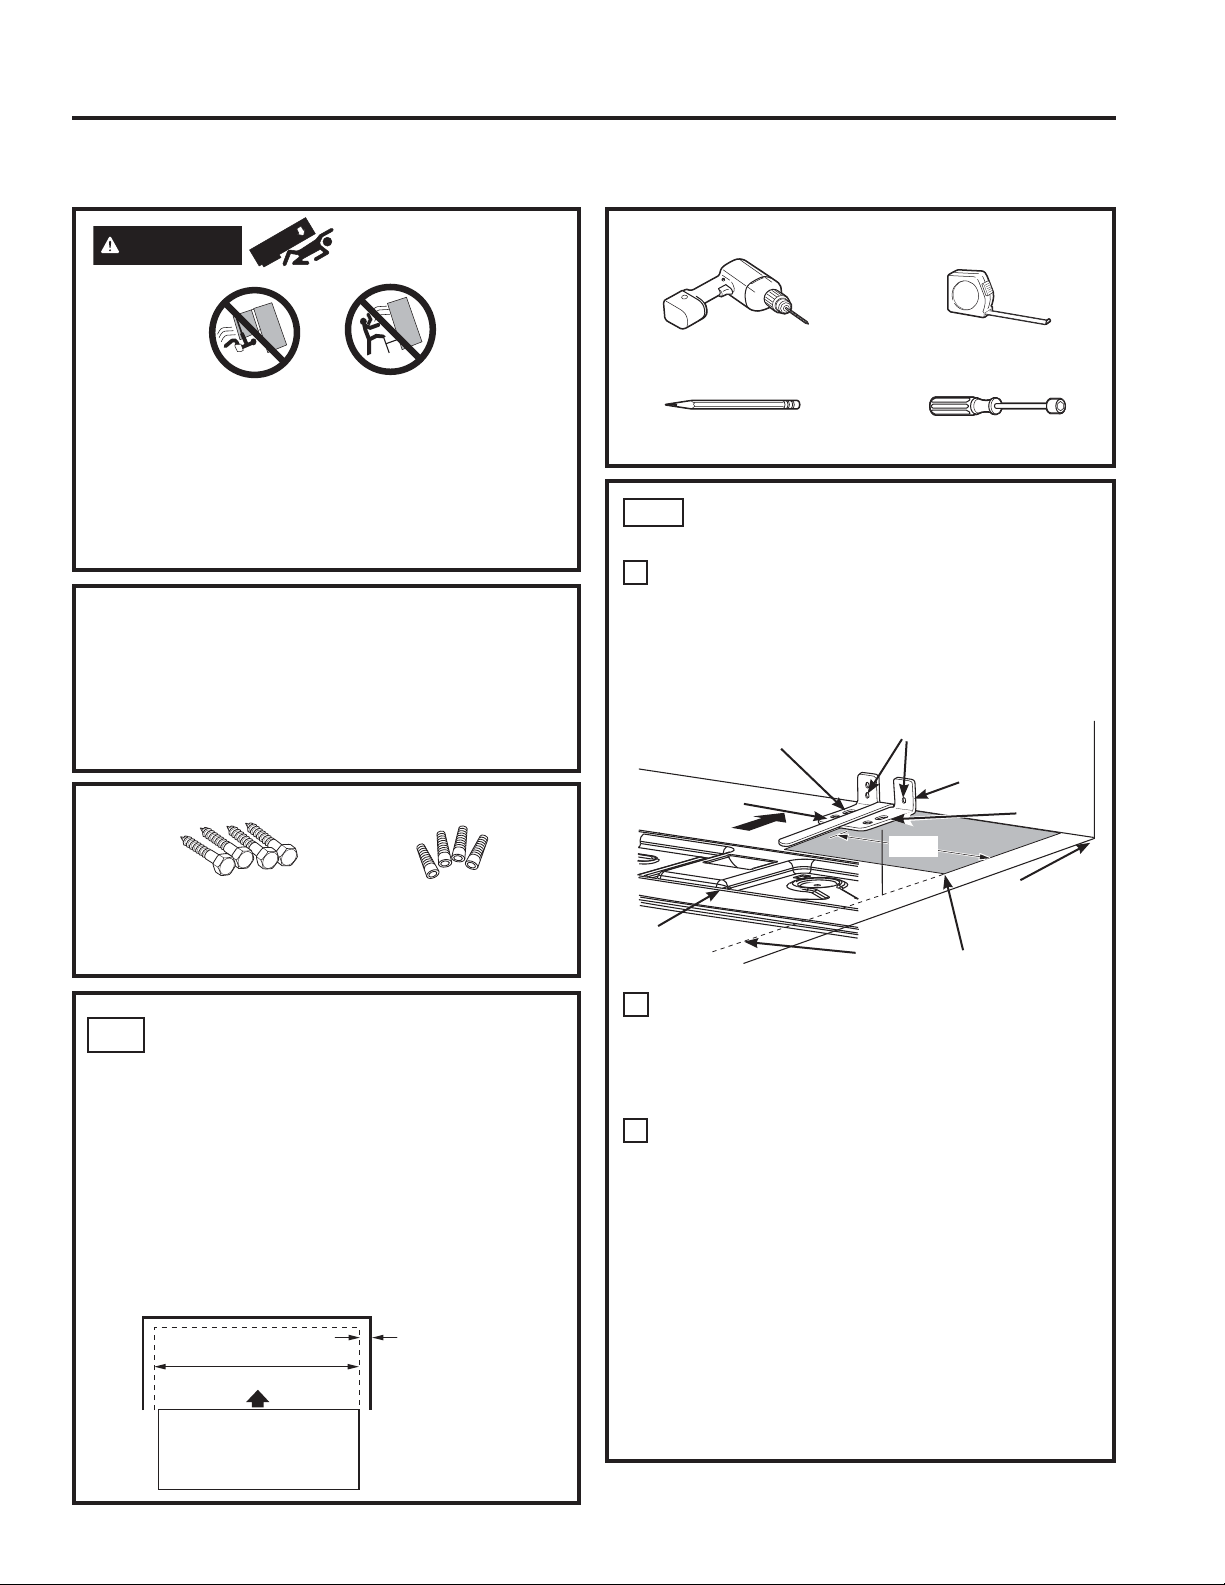
MEASURE CABINET
OPENING AVAILABLE VS.
REFRIGERATOR WIDTH
Measure width of cabinet opening where
refrigerator will be placed, W.
Be sure to account for any countertop overhang,
baseboard thickness and any clearance desired.
:LGWK:VKRXOGQRWEHOHVVWKDQ´7KH
refrigerator will be placed approximately in the
middle of this opening.
MATERIALS YOU MAY NEED QRWLQFOXGHG
TOOLS YOU WILL NEED
Pencil
´PP'ULOO%LWDQG
(OHFWULFRU+DQG'ULOO
Tape measure
´PP1XW'ULYHU
Lag Bolts
´PP[´PP
Anchor Sleeves
´PP2'
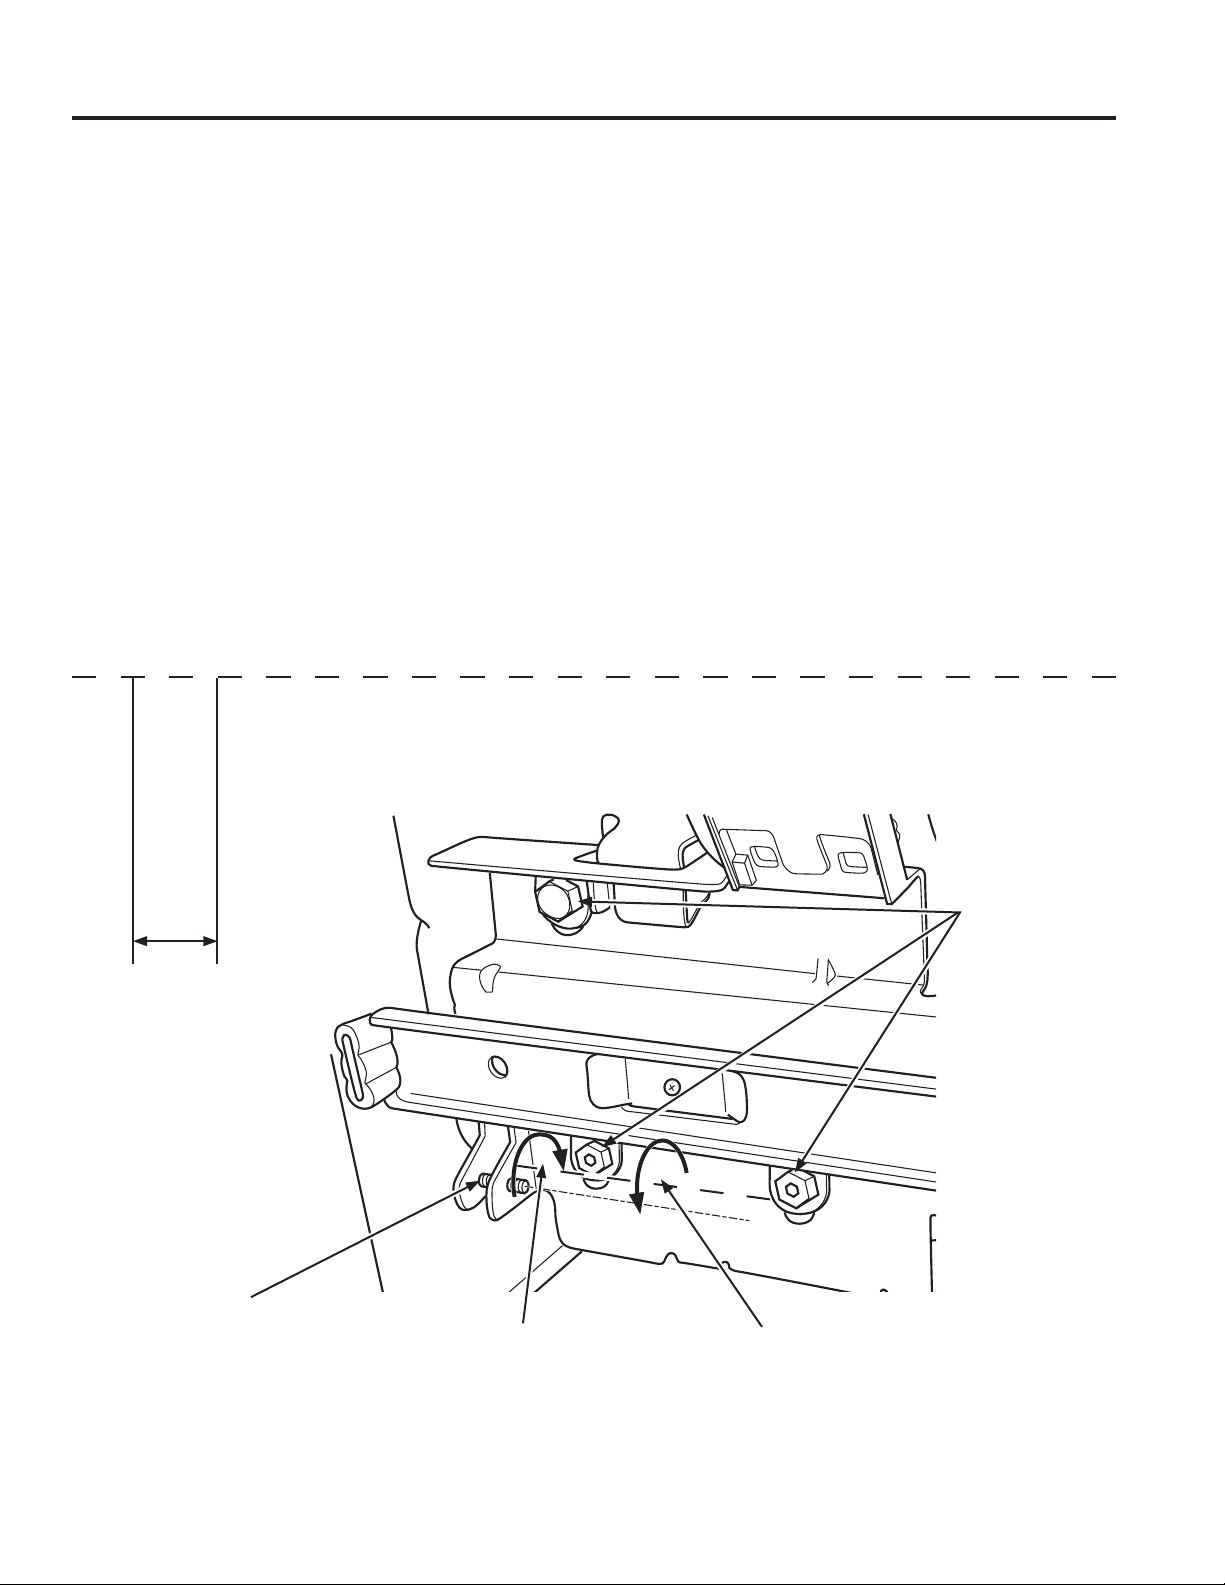
)RU$QWL7LS%UDFNHW0RXQWHGRQ&21&5(7()ORRUV2QO\
'ULOO%LW$SSURSULDWHIRU$QFKRUV
AT-1
LOCATING THE ANTI-TIP
FLOOR BRACKET
Place the anti-tip floor bracket locator template
LQFOXGHGLQVLGHWKHDQWLWLSNLWRQWRWKHIORRU
up against the rear wall, within W, and in line
with the desired location of the RH side of the
UHIULJHUDWRUVHH)LJXUH
Place the anti-tip floor bracket onto the locator
template with its RH floor holes lined up with
the floor holes indicated on the template sheet,
DSSUR[LPDWHO\ó´FPIURPWKHHGJH
of the sheet or the RH side of the refrigerator.
Hold down in position and use the anti-tip floor
bracket as a template for marking the holes
based upon your configuration and type of
construction as shown in Step 3. Mark the hole
locations with a pencil, nail or awl.
NOTE:
,WLV5(48,5('WRXVHDWOHDVWVFUHZVWR
mount the floor bracket (one on each side of
WKHDQWLWLSIORRUEUDFNHW%RWKPXVWEHLQWR
HLWKHUWKHZDOORUWKHIORRU)LJXUHLQGLFDWHV
all the acceptable mounting configurations for
VFUHZV,GHQWLI\WKHVFUHZKROHVRQWKHDQWLWLS
floor bracket for your configuration.
AT-2
A
B
C
Baseboard
Thickness or
Countertop
Overhang
:KLFKHYHU,V
/DUJHU3OXV
$Q\'HVLUHG
Clearance
Rear Wall
)URQW
RH Side
W
5()5,*(5$725
)LJXUH± ,QVWDOODWLRQ2YHUYLHZ
Base Bracket
on the
Refrigerator
2 Wall Holes
RH Side of
Refrigerator
)ORRU±&RQFUHWH
+ROHV
)ORRU±:RRG
+ROHV
ó´
Locator
Template Sheet
)ORRU%UDFNHW
WR,QVWDOO
RH Holes
Rear RH
Corner of
Cabinet Wall
WARNING
Tip Over Hazard.
Built-in style models (model PYE, GYE, GYS, PWE,
DQG=:(DUHWRSKHDY\HVSHFLDOO\ZLWKDQ\GRRUV
open. These models must be secured with the anti-tip
floor bracket to prevent tipping forward, which could
result in death or serious injury. Read and follow the
entire installation instructions for installing the anti-tip
floor bracket packed with your refrigerator.
NOTE:
,I\RXGLGQRWUHFHLYHDQDQWLWLSEUDFNHWZLWK\RXU
purchase, call 1.800.626.8774 to receive one at no
FRVW,Q&DQDGDFDOO
)RULQVWDOODWLRQLQVWUXFWLRQVRIWKHEUDFNHWYLVLW
GEAppliances.com.
,Q&DQDGDGEAppliances.ca.
Installation Instructions
INSTALLING THE REFRIGERATOR (Cont.)
Anti-Tip Floor Bracket Installation
(Models PYE, GYE, GYS, DYE, PWE, and ZWE only)
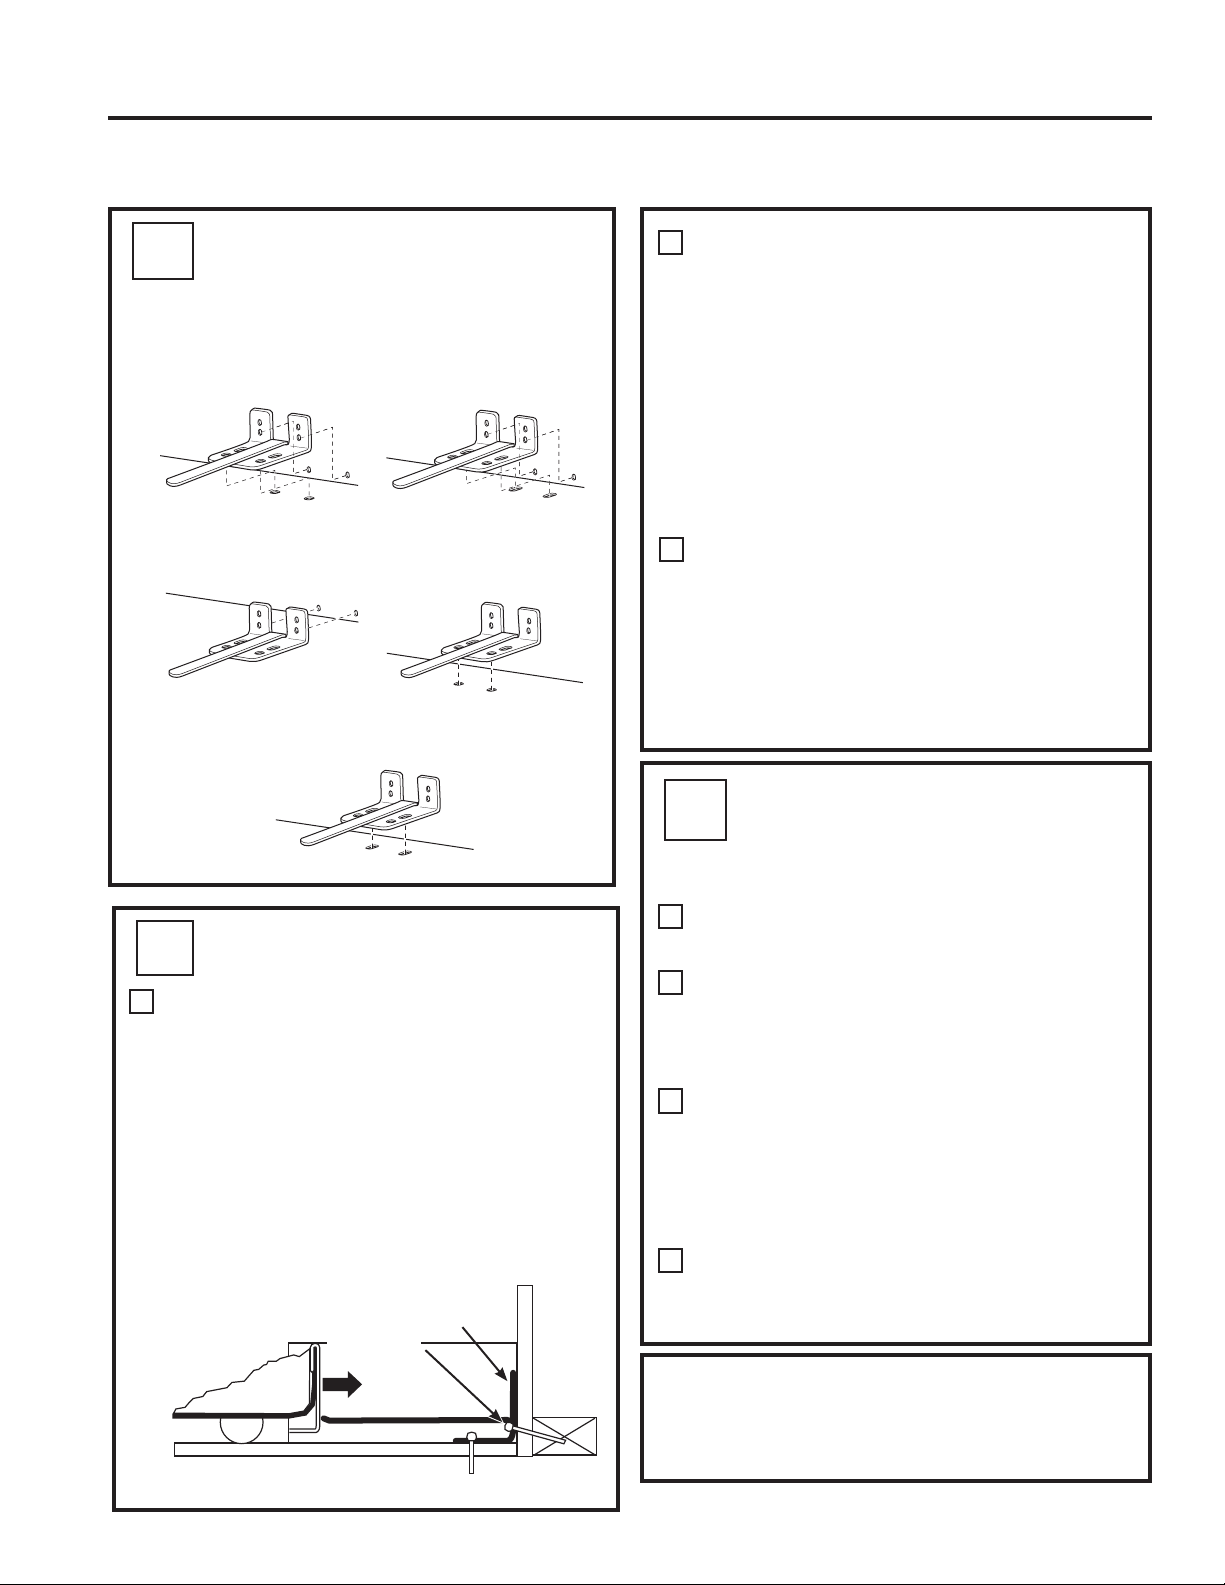
36 49-60792 Rev. 3
AT-2
LOCATING THE ANTI-TIP
FLOOR BRACKET (cont.)
5HFRPPHQGHG,QVWDOODWLRQ
– Wood
5HFRPPHQGHG,QVWDOODWLRQ
– Concrete
Minimum Acceptable #1 –
Wall Plate Stud
Minimum Acceptable #2
±:RRG)ORRU
Minimum Acceptable #3
±&RQFUHWH)ORRU
)LJXUH± $FFHSWDEOH6FUHZ3ODFHPHQW
Locations
&21&5(7(:DOODQG)ORRU&RQVWUXFWLRQ
$QFKRUVUHTXLUHGQRWSURYLGHG
HDFK´PP[´PPODJEROWV
HDFK´PP2'VOHHYHDQFKRUV
'ULOOWKHUHFRPPHQGHGVL]HKROHVIRUWKH
anchors into the concrete at the center of the
holes marked in Step 2.
•
,QVWDOOWKHVOHHYHDQFKRUVLQWRWKHGULOOHGKROHV
Place the anti-tip floor bracket as indicated in Step
2. Remove the locator template from the floor.
,QVWDOOWKHODJEROWVWKURXJKWKHDQWLWLSIORRU
bracket and tighten appropriately.
:22':DOODQG7,/()ORRU&RQVWUXFWLRQ
)RUWKLVVSHFLDOFDVHORFDWHWKHZDOOKROHV
LGHQWLILHGLQ)LJ'ULOODQDQJOHG´PP
SLORWKROHDSSUR[DVVKRZQLQ)LJLQWKH
center of each hole.
• Mount the anti-tip floor bracket using the
0LQLPXP$FFHSWDEOH,QVWDOODWLRQDV
LOOXVWUDWHGLQ)LJ
C
B
AT-3
ANTI-TIP BRACKET
INSTALLATION
:22':DOODQG)ORRU&RQVWUXFWLRQ
'ULOOWKHDSSURSULDWHQXPEHURI´PP
pilot holes in the center of each floor bracket
hole being used (a nail or awl may be used if
DGULOOLVQRWDYDLODEOH$1'UHPRYHWKHORFDWRU
template from the floor.
• Mount the anti-tip floor bracket by fastening the
2, or recommended 4, #10-16 hex-head screws
WLJKWO\LQWRSODFHDVLOOXVWUDWHGLQ)LJXUH
A
AT-4
POSITIONING THE
REFRIGERATOR TO ENGAGE
THE ANTI-TIP FLOOR AND
BASE BRACKETS
Before pushing the refrigerator into the opening,
plug the power cord into the receptacle and
FRQQHFWZDWHUOLQHLIHTXLSSHG&KHFNIRUOHDNV
Locate the refrigerator’s RH side and move back
approximately in line with the RH side of the
cabinet opening, W. This should position the
anti-tip floor bracket to engage the anti-tip base
bracket on the refrigerator.
Gently roll the refrigerator back into the cabinet
opening until it comes to a complete stop.
Check to see if the refrigerator front lines up
ZLWKWKHFDELQHWIURQWIDFH,IQRWFDUHIXOO\URFN
the refrigerator forward and backward until
engagement occurs and you notice that the
refrigerator is fully pushed up against the rear wall.
If Applicable:$GMXVWWKHUHDUDQGIURQWZKHHO
height settings to fully engage the rear anti-tip
brackets, while also aligning the refrigerator
front with the cabinet front face.
A
C
B
'
)LJXUH± $WWDFKPHQWWR:DOODQG)ORRU
NOTE:,I\RXSXOOWKHUHIULJHUDWRURXWDQG
away from the wall for any reason, make sure
the anti-tip floor bracket is engaged when the
refrigerator is pushed back against the rear wall.
Rear RH Corner
of the Refrigerator
)ORRU
Wall
Plate
Stud
)ORRU
Bracket
2 Screws
Must Enter
Wood or
Metal Stud
Wall
Installation Instructions
INSTALLING THE REFRIGERATOR (Cont.)
Anti-Tip Floor Bracket Installation
(Models PYE, GYE, GYS, DYE, PWE, and ZWE only)
INSTALLATION INSTRUCTIONS
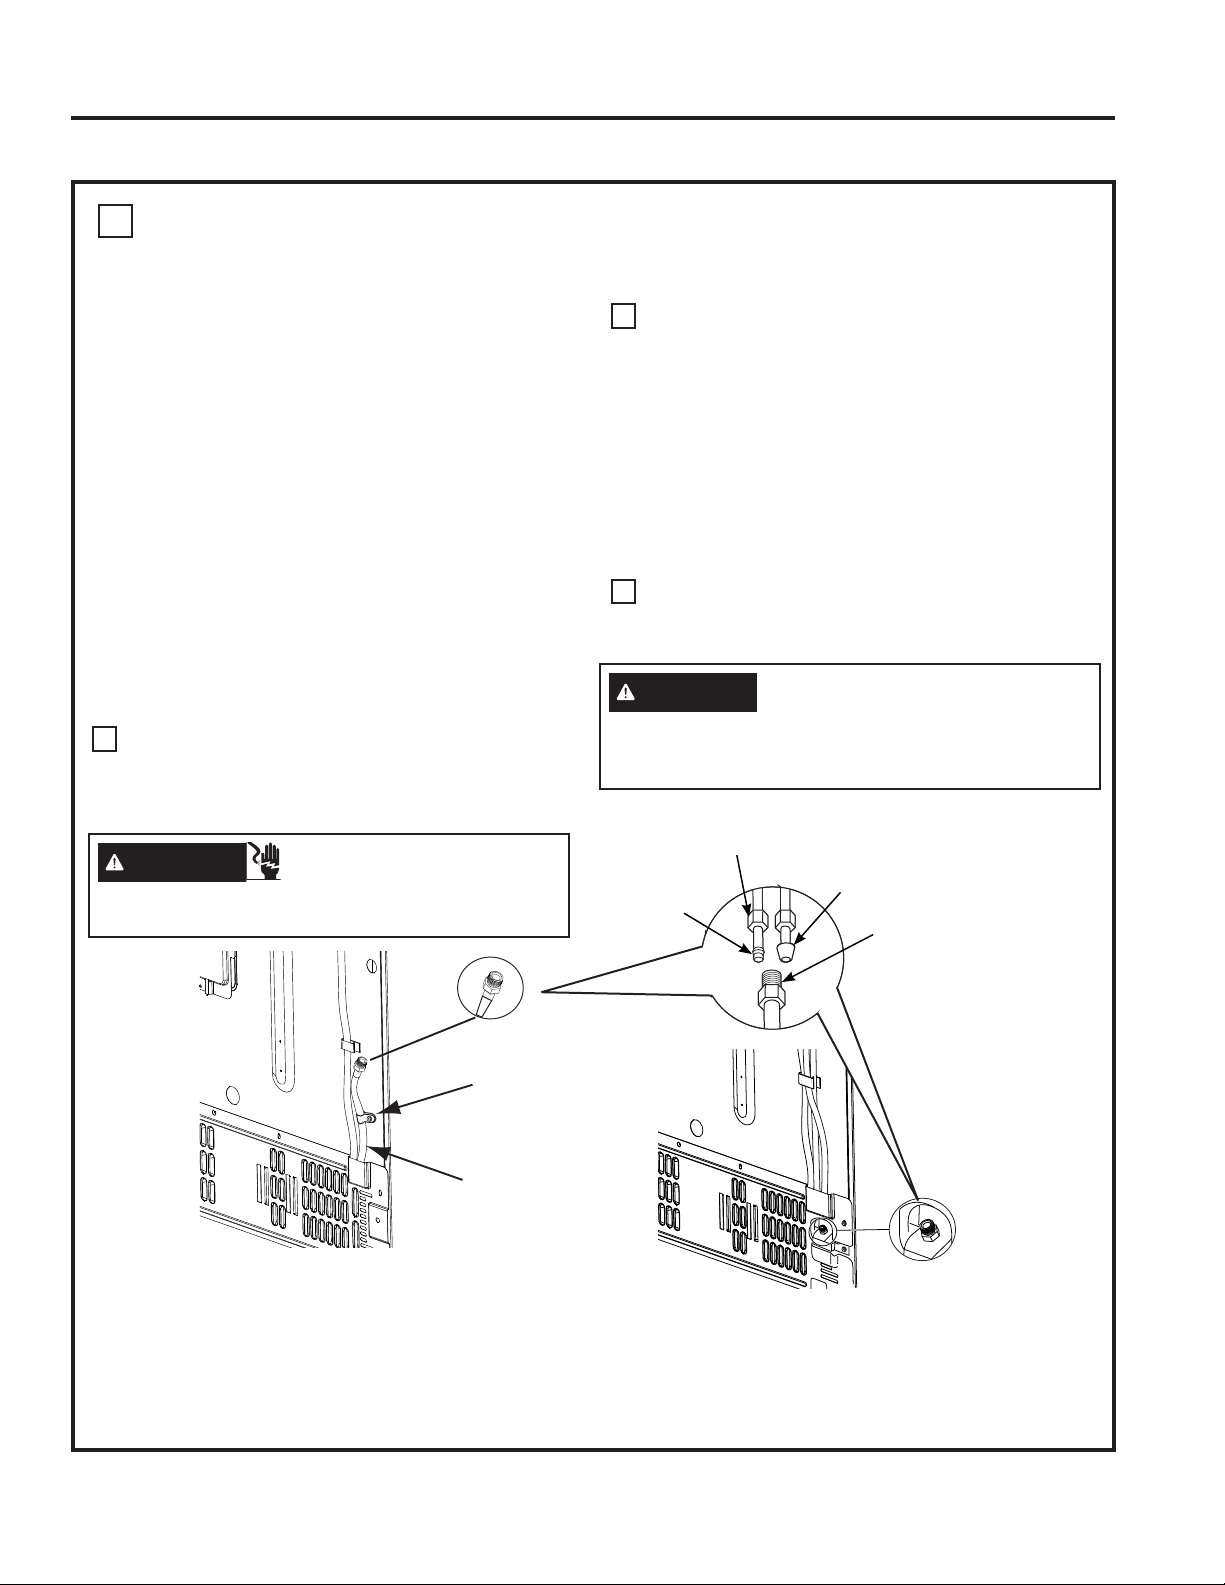
49-60792 Rev. 3 37
INSTALLATION INSTRUCTIONS
11
CONNECTING THE REFRIGERATOR TO THE HOUSE WATER LINE
A cold water supply is required for automatic
LFHPDNHURSHUDWLRQ,IWKHUHLVQRWDFROGZDWHU
supply, you will need to provide one. See
,QVWDOOLQJWKH:DWHU/LQHVHFWLRQ
NOTES:
• Before making the connection to the
refrigerator, be sure the refrigerator power
cord is not plugged into the wall outlet.
,I\RXUUHIULJHUDWRUGRHVQRWKDYHDZDWHU
filter, we recommend installing one if your
water supply has sand or particles that
could clog the screen of the refrigerator’s
ZDWHUYDOYH,QVWDOOLWLQWKHZDWHUOLQHQHDU
WKHUHIULJHUDWRU,IXVLQJ6PDUW&RQQHFW
™
5HIULJHUDWRU7XELQJ.LW\RXZLOOQHHGDQ
DGGLWLRQDOWXEH:;;WRFRQQHFWWKH
ILOWHU'RQRWFXWSODVWLFWXEHWRLQVWDOOILOWHU
• Before connecting the water line to the house,
purge the house line for at least 2 minutes.
,I\RXDUHXVLQJFRSSHUWXELQJSODFHD
FRPSUHVVLRQQXWDQGIHUUXOHVOHHYHRQWRWKH
end of the tubing coming from the house cold
water supply.
,I\RXDUHXVLQJWKH6PDUW&RQQHFW
™
tubing, the
nuts are already assembled to the tubing.
,I\RXDUHXVLQJFRSSHUWXELQJLQVHUWWKHHQG
of the tubing into the refrigerator connection, at
the back of the refrigerator, as far as possible.
While holding the tubing, tighten the fitting.
,I\RXDUHXVLQJ6PDUW&RQQHFW
™
tubing,
insert the molded end of the tubing into the
refrigerator connection, at the back of the
refrigerator, and tighten the compression nut
until it is hand tight. Then tighten one additional
turn with a wrench. Over tightening may cause
leaks.
)DVWHQWKHWXELQJLQWRWKHFODPSSURYLGHGWR
hold it in position. You may need to pry open
the clamp.
A
B
C
Installation Instructions
INSTALLING THE REFRIGERATOR (Cont.)
” Compression
Nut
)HUUXOH
VOHHYH
SmartConnect
™
Tubing
Refrigerator
Connection
1/4” Tubing
Tuyau de 1/4 po
Tubería de 1/4“
Tubing Clamp
Bride
Abrazadera del tubo
OR
Tubing Clamp
´7XELQJ
WARNING
Electrical Shock Hazard.
$WWDFKWXELQJFODPSXVLQJH[LVWLQJKROHRQO\'2
NOT drill into the refrigerator.
WARNING
Connect to potable water supply
only. A cold water supply is required for automatic
icemaker operation. The water pressure must be
EHWZHHQDQGSVLNLORSDVFDOV
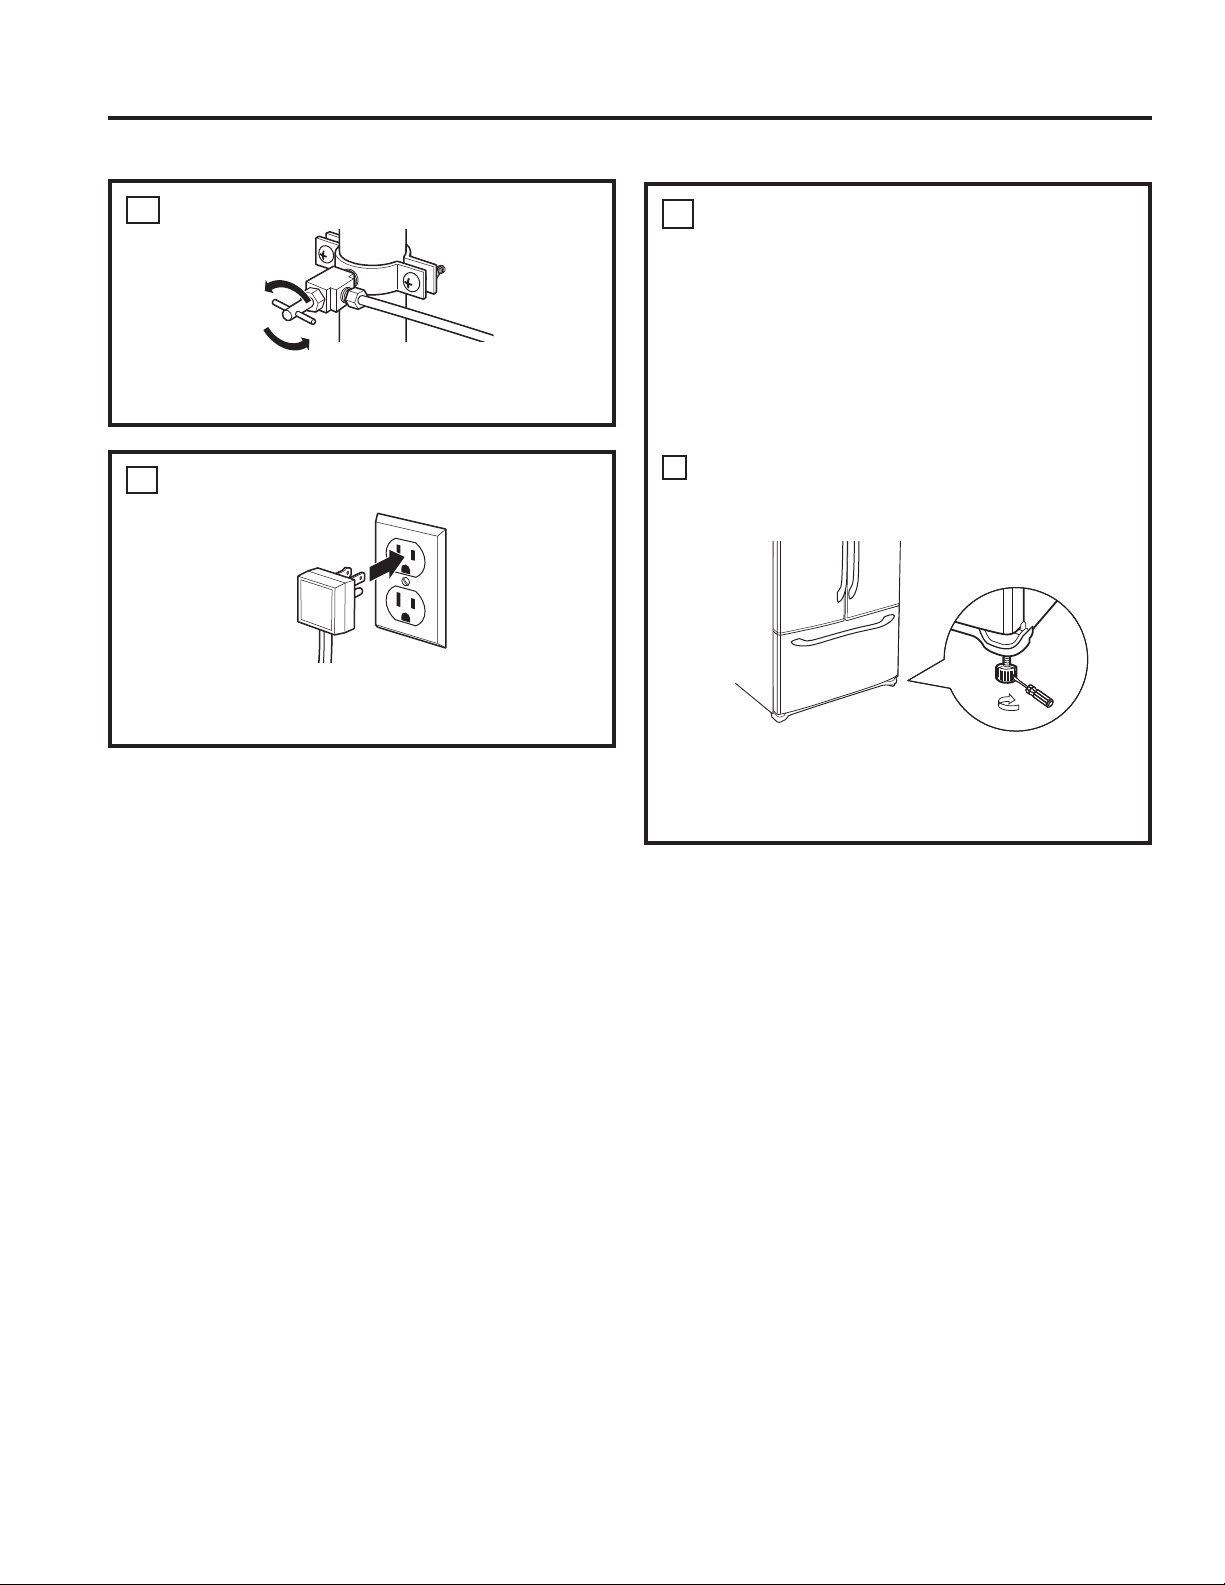
38 49-60792 Rev. 3
TURN ON THE WATER SUPPLY
Turn the water on at the shutoff valve (house
ZDWHUVXSSO\DQGFKHFNIRUDQ\OHDNV
12
PLUG IN THE REFRIGERATOR
See the grounding information attached to the
power cord.
13
LEVEL THE REFRIGERATOR
The leveling legs have 2 purposes:
1. Leveling legs adjust so the refrigerator is
firmly positioned on the floor and does not
wobble.
/HYHOLQJOHJVVHUYHDVDVWDELOL]LQJEUDNH
to hold the refrigerator securely in position
during operation and cleaning. The leveling
legs also prevent the refrigerator from tipping.
Turn the leveling legs clockwise to raise the
refrigerator, counterclockwise to lower it.
NOTICE: To avoid possible property damage,
the leveling legs must be firmly touching the
floor.
14
A
)ODW+HDG6FUHZGULYHU
Raise
Installation Instructions
INSTALLING THE REFRIGERATOR (Cont.)
INSTALLATION INSTRUCTIONS

49-60792 Rev. 3 39
INSTALLATION INSTRUCTIONS
LEVEL THE REFRIGERATOR
DOORS
Remember a level refrigerator is necessary for
JHWWLQJWKHGRRUVSHUIHFWO\HYHQ,I\RXQHHG
help, review the previous section on leveling the
refrigerator.
,I\RXRSHQWKHIUHH]HUGRRU\RXFDQVHH
the center hinge.
,QVHUW´$OOHQZUHQFKLQWRWKHVKDIWRIWKH
center hinge.
Adjust the height by turning clockwise
or counterclockwise. When you turn
counterclockwise, the door will move up.
15
A
B
When
the left
door is
lower than
the right
door.
When
the left
door is
higher
than
the right
door.
Adjustment
point
C
RAISE
Installation Instructions
INSTALLING THE REFRIGERATOR (Cont.)
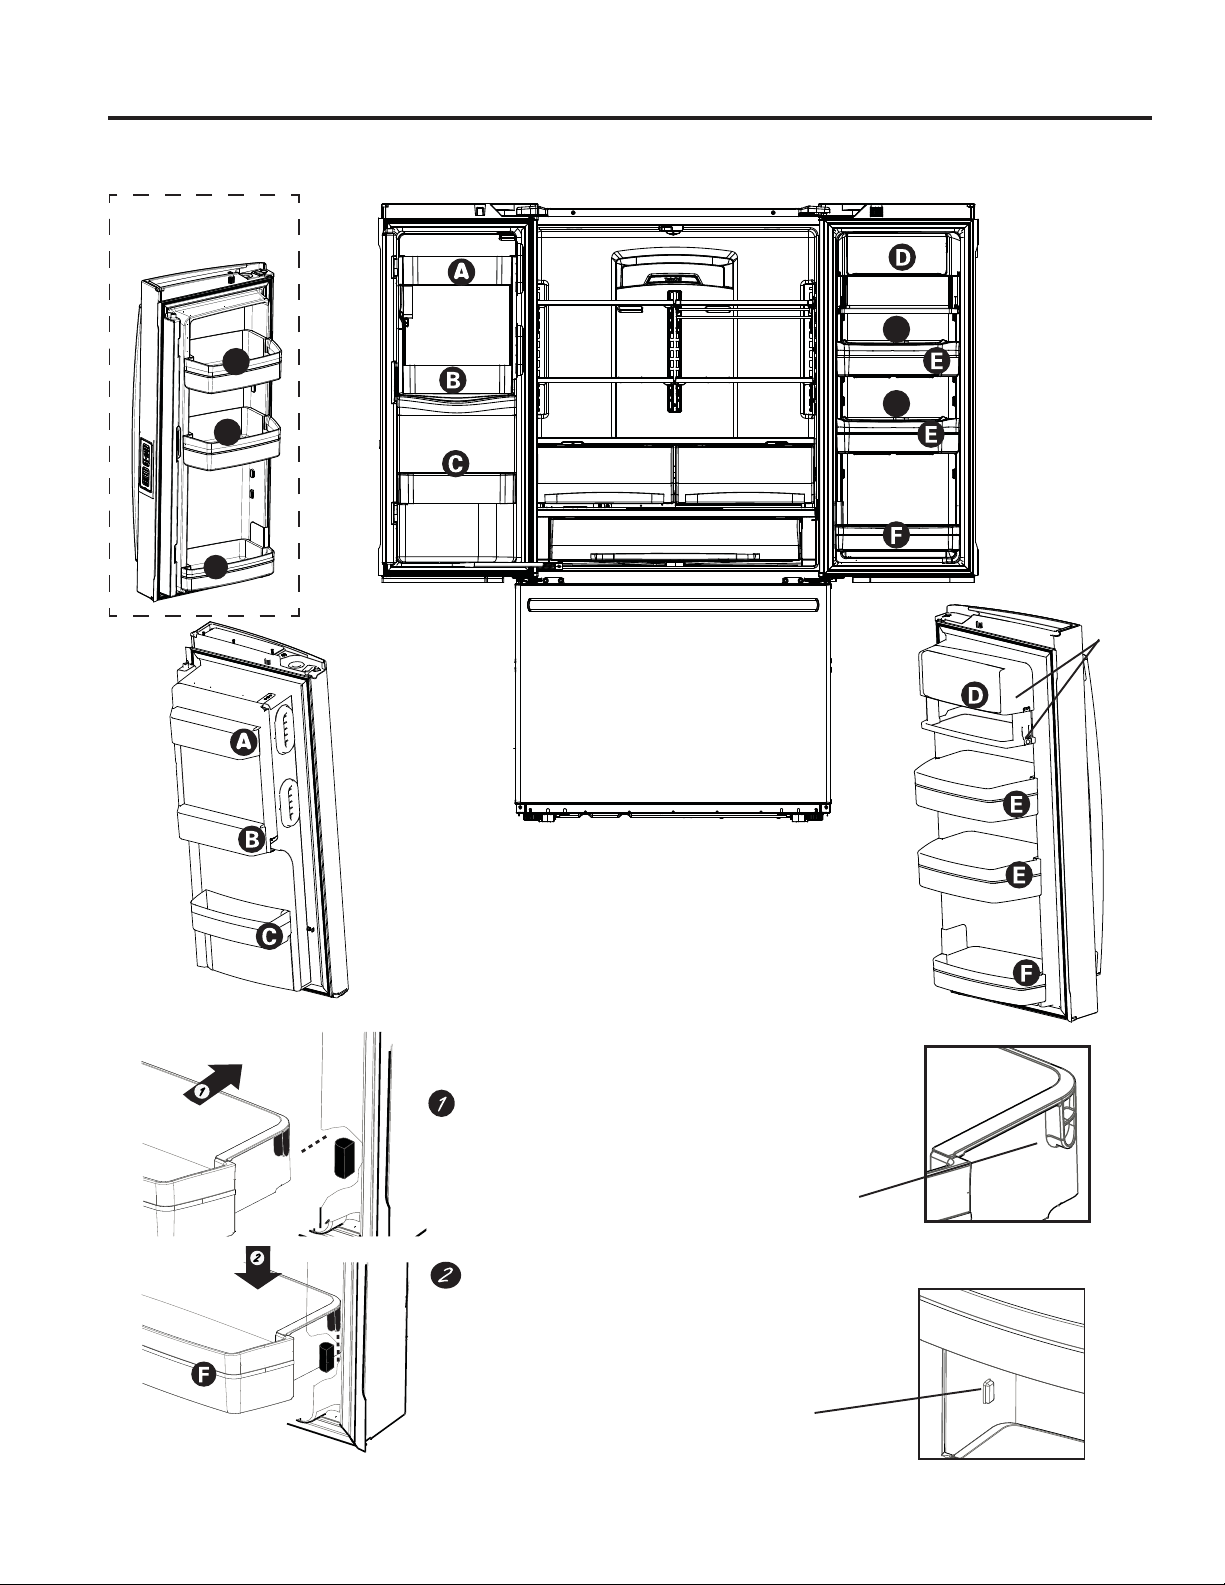
40 49-60792 Rev. 3
To place bins into doors:
Match your bin with the letter shown.Position
the bin hooks over the bin locator and push
forward until inserted fully.
Bin locator
each side
Bin hook
rear each side
Push bin down until locked into position.
J
H
H
(Select
models
RQO\
1RQ'LVSHQVH
Models
INSTALLING THE REFRIGERATOR (Cont.)
Installation Instructions
G
G
,FHPDNHULQIUHH]HU
available on Non-
'LVSHQVHPRGHOVDQG
DYDLODEOHDV,0.LWIRU
some models.
INSTALLATION INSTRUCTIONS
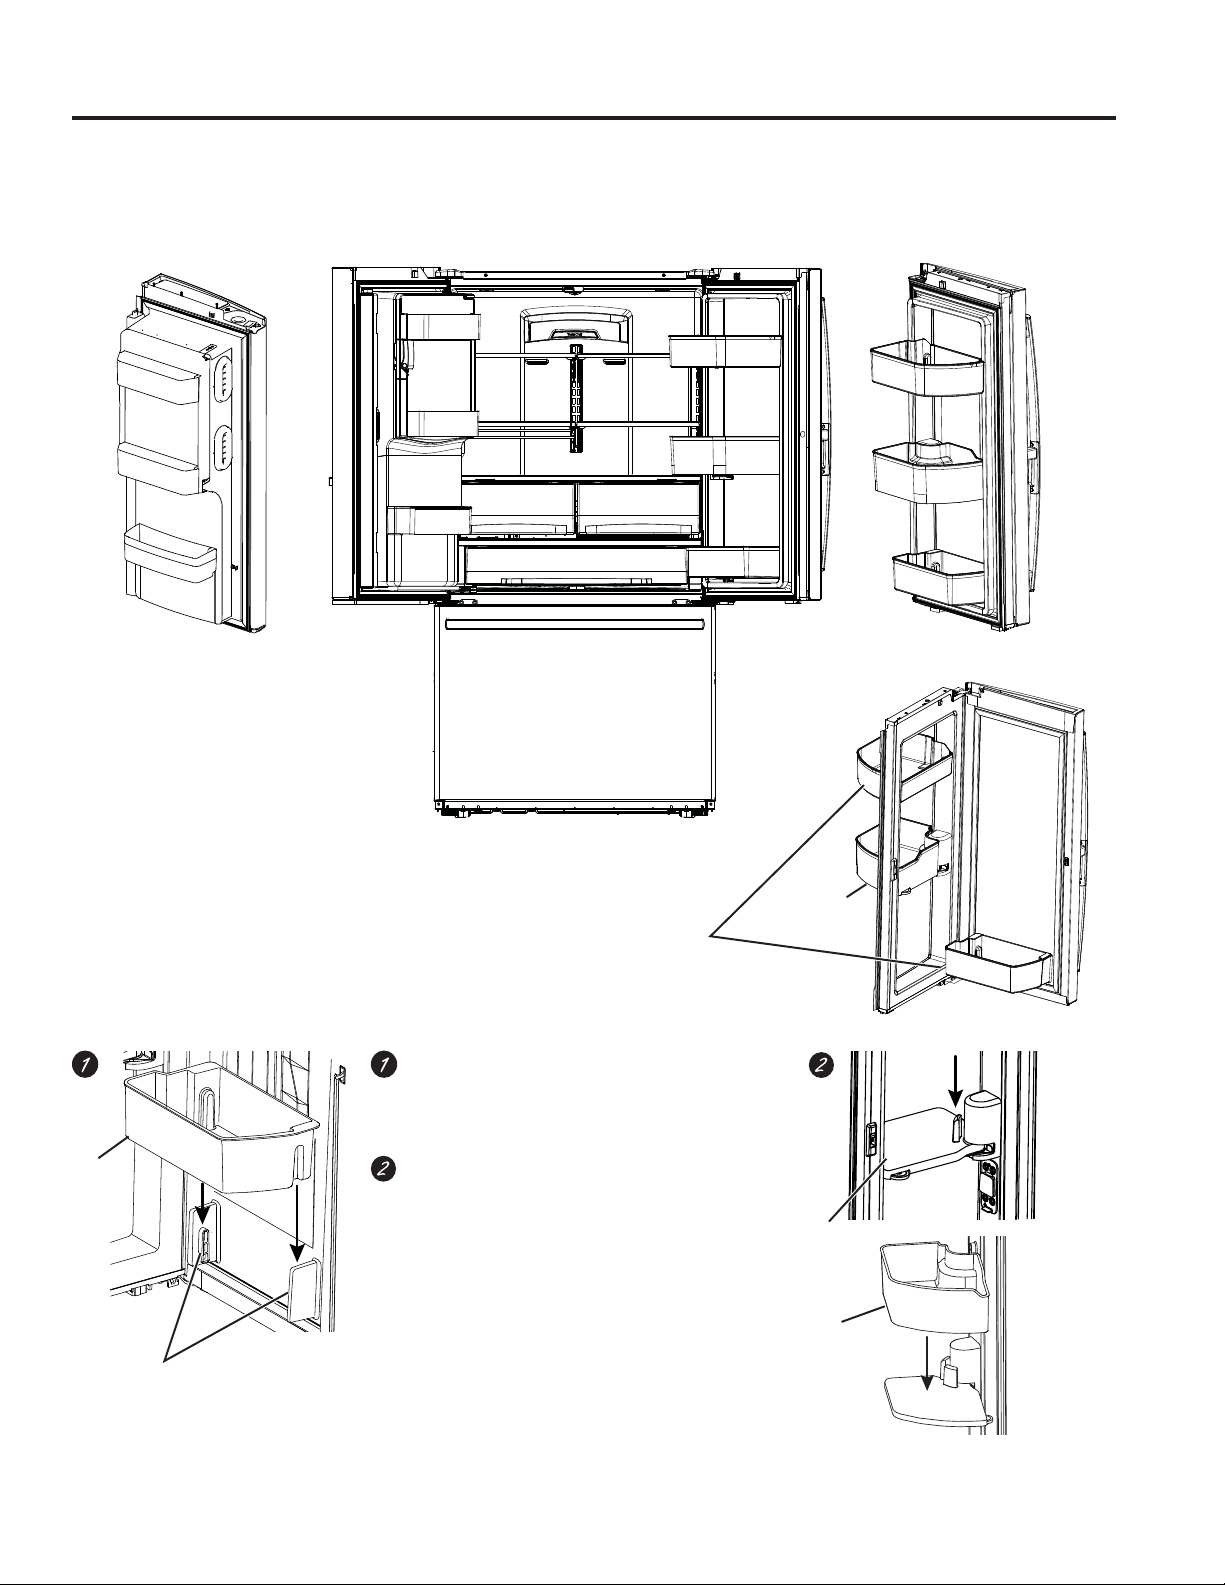
49-60792 Rev. 3 41
INSTALLATION INSTRUCTIONS
To place rotating bin into door:
1. Slide bin base assembly onto the bracket on
the door.
2. Slide the bin onto the bin base
To place adjustable bins into door:
Position the bins over the bin locators and
push down until locked in position.
Installation Instructions
INSTALLING THE REFRIGERATOR (Cont.)
Bin
Bin
base
,QVWDOO
metal
base
Bin
Bin locators
Adjustable
bins
Rotating
bin
Models PFD, PYD, GFD

42 49-60792 Rev. 3
Recommended copper water supply kits are WX8X2,
WX8X3 or WX8X4, depending on the amount of
tubing you need. Approved plastic water supply
lines are SmartConnect
™
Refrigerator Tubing
:;;:;;DQG:;;
When connecting your refrigerator to a GE
Appliances Reverse Osmosis Water System, the only
DSSURYHGLQVWDOODWLRQLVZLWKD*($SSOLDQFHV59.LW
)RURWKHUUHYHUVHRVPRVLVZDWHUV\VWHPVIROORZWKH
manufacturer’s recommendations.
,IWKHZDWHUVXSSO\WRWKHUHIULJHUDWRULVIURPD
5HYHUVH2VPRVLV52:DWHU)LOWUDWLRQ6\VWHP
$1'WKHUHIULJHUDWRUDOVRKDVDZDWHUILOWHUXVH
WKHUHIULJHUDWRU¶VILOWHUE\SDVVSOXJ8VLQJWKH
refrigerator’s water filtration cartridge in conjunction
with the RO water filter can result in hollow ice cubes.
Some models do not come equipped with the filter
bypass plug. To obtain a free bypass plug, call 800.
*(&$5(6,Q&DQDGDFDOO
This water line installation is not warranted by the
UHIULJHUDWRURULFHPDNHUPDQXIDFWXUHU)ROORZWKHVH
LQVWUXFWLRQVFDUHIXOO\WRPLQLPL]HWKHULVNRIH[SHQVLYH
water damage.
:DWHUKDPPHUZDWHUEDQJLQJLQWKHSLSHVLQKRXVH
plumbing can cause damage to refrigerator parts and
lead to water leakage or flooding. Call a qualified
plumber to correct water hammer before installing the
water supply line to the refrigerator.
To prevent burns and product damage, do not hook
up the water line to the hot water line.
,IWKHUHIULJHUDWRULVRSHUDWHGEHIRUHWKHZDWHU
connection is made to the ice maker, see Controls
section on page 9 to turn ice maker off.
'RQRWLQVWDOOWKHLFHPDNHUWXELQJLQDUHDVZKHUH
WHPSHUDWXUHVIDOOEHORZIUHH]LQJ
When using any electrical device (such as a power
GULOOGXULQJLQVWDOODWLRQEHVXUHWKHGHYLFHLVGRXEOH
insulated or grounded in a manner to prevent the
KD]DUGRIHOHFWULFVKRFNRULVEDWWHU\SRZHUHG
All installations must be in accordance with local
plumbing code requirements.
BEFORE YOU BEGIN
WHAT YOU WILL NEED
• Copper or SmartConnect
™
Refrigerator Tubing kit,
´RXWHUGLDPHWHUWRFRQQHFWWKHUHIULJHUDWRUWRWKH
ZDWHUVXSSO\,IXVLQJFRSSHUEHVXUHERWKHQGVRI
the tubing are cut square.
To determine how much tubing you need: measure
the distance from the water valve on the back of the
refrigerator to the water supply pipe. Be sure there
is sufficient extra tubing to allow the refrigerator to
move out from the wall after installation.
SmartConnect
™
5HIULJHUDWRU7XELQJ.LWVDUHDYDLODEOH
in the following lengths:
¶P ±:;;
¶P ±:;;
¶P ±:;;
Installation Instructions
INSTALLING THE WATER LINE
WARNING
Connect to potable water supply only.
A cold water supply is required for automatic icemaker
operation. The water pressure must be between 40
DQGSVLNLORSDVFDOV
INSTALLATION INSTRUCTIONS
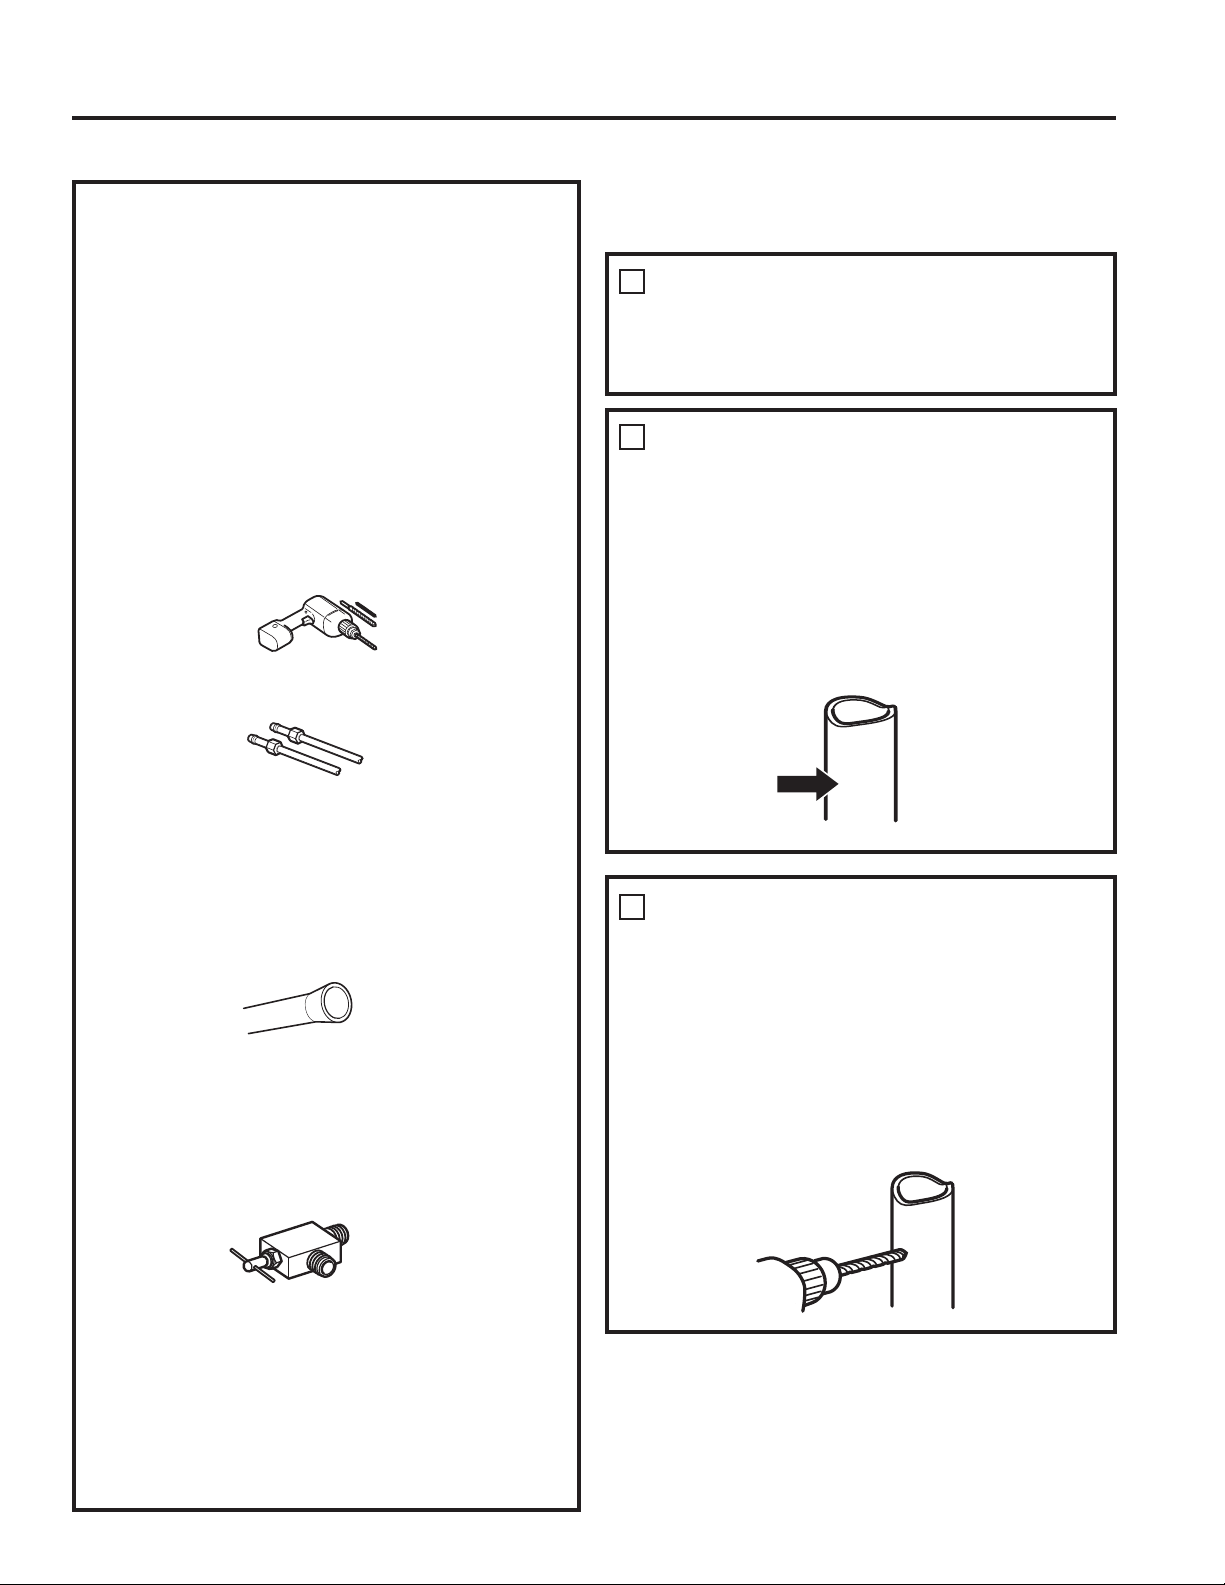
49-60792 Rev. 3 43
INSTALLATION INSTRUCTIONS
NOTE: The only GE Appliances approved
plastic tubing is that supplied in SmartConnect
™
5HIULJHUDWRU7XELQJNLWV'RQRWXVHDQ\RWKHU
plastic water supply line because the line is under
pressure at all times. Certain types of plastic will
crack or rupture with age and cause water damage
to your home.
• A GE Appliances water supply kit (containing
WXELQJVKXWRIIYDOYHDQGILWWLQJVOLVWHGEHORZLV
available at extra cost from your dealer or from
Parts and Accessories, 877-959-8688 (in Canada
• A cold water supply. The water pressure must be
EHWZHHQDQGSVL±EDU
• Power drill.
´RUDGMXVWDEOHZUHQFK
• Straight and Phillips blade screwdriver.
7ZR´RXWHUGLDPHWHUFRPSUHVVLRQQXWV
DQGIHUUXOHVVOHHYHV²WRFRQQHFWWKHFRSSHU
tubing to the shutoff valve and the refrigerator
water valve.
OR
,I\RXDUHXVLQJD6PDUW&RQQHFW
™
Refrigerator
Tubing kit, the necessary fittings are preassembled
to the tubing.
,I\RXUH[LVWLQJFRSSHUZDWHUOLQHKDVDIODUHGILWWLQJ
at the end, you will need an adapter (available
DWSOXPELQJVXSSO\VWRUHVWRFRQQHFWWKHZDWHU
line to the refrigerator OR you can cut off the
flared fitting with a tube cutter and then use a
FRPSUHVVLRQILWWLQJ'RQRWFXWIRUPHGHQGIURP
SmartConnect
™
Refrigerator tubing.
• Shutoff valve to connect to the cold water line.
The shutoff valve should have a water inlet
ZLWKDPLQLPXPLQVLGHGLDPHWHURI´DWWKH
SRLQWRIFRQQHFWLRQWRWKH&2/':$7(5/,1(
Saddle-type shutoff valves are included in many
water supply kits. Before purchasing, make sure
a saddle-type valve complies with your local
plumbing codes.
SHUT OFF THE MAIN WATER
SUPPLY
Turn on the nearest faucet long enough to clear
the line of water.
,QVWDOOWKHVKXWRIIYDOYHRQWKHQHDUHVWIUHTXHQWO\
used drinking water line.
1
Choose a location for the valve that is easily
DFFHVVLEOH,WLVEHVWWRFRQQHFWLQWRWKHVLGHRI
a vertical water pipe. When it is necessary to
FRQQHFWLQWRDKRUL]RQWDOZDWHUSLSHPDNHWKH
connection to the top or side, rather than at the
bottom, to avoid drawing off any sediment from
the water pipe.
CHOOSE THE VALVE LOCATION
2
DRILL THE HOLE FOR THE
VALVE
3
'ULOOD´KROHLQWKHZDWHUSLSHHYHQLIXVLQJ
DVHOISLHUFLQJYDOYHXVLQJDVKDUSELW5HPRYH
any burrs resulting from drilling the hole in the
pipe.
Take care not to allow water to drain into the drill.
)DLOXUHWRGULOOD´KROHPD\UHVXOWLQUHGXFHG
ice production or smaller cubes.
Installation Instructions
INSTALLING THE WATER LINE (Cont.)
WHAT YOU WILL NEED (Cont.)
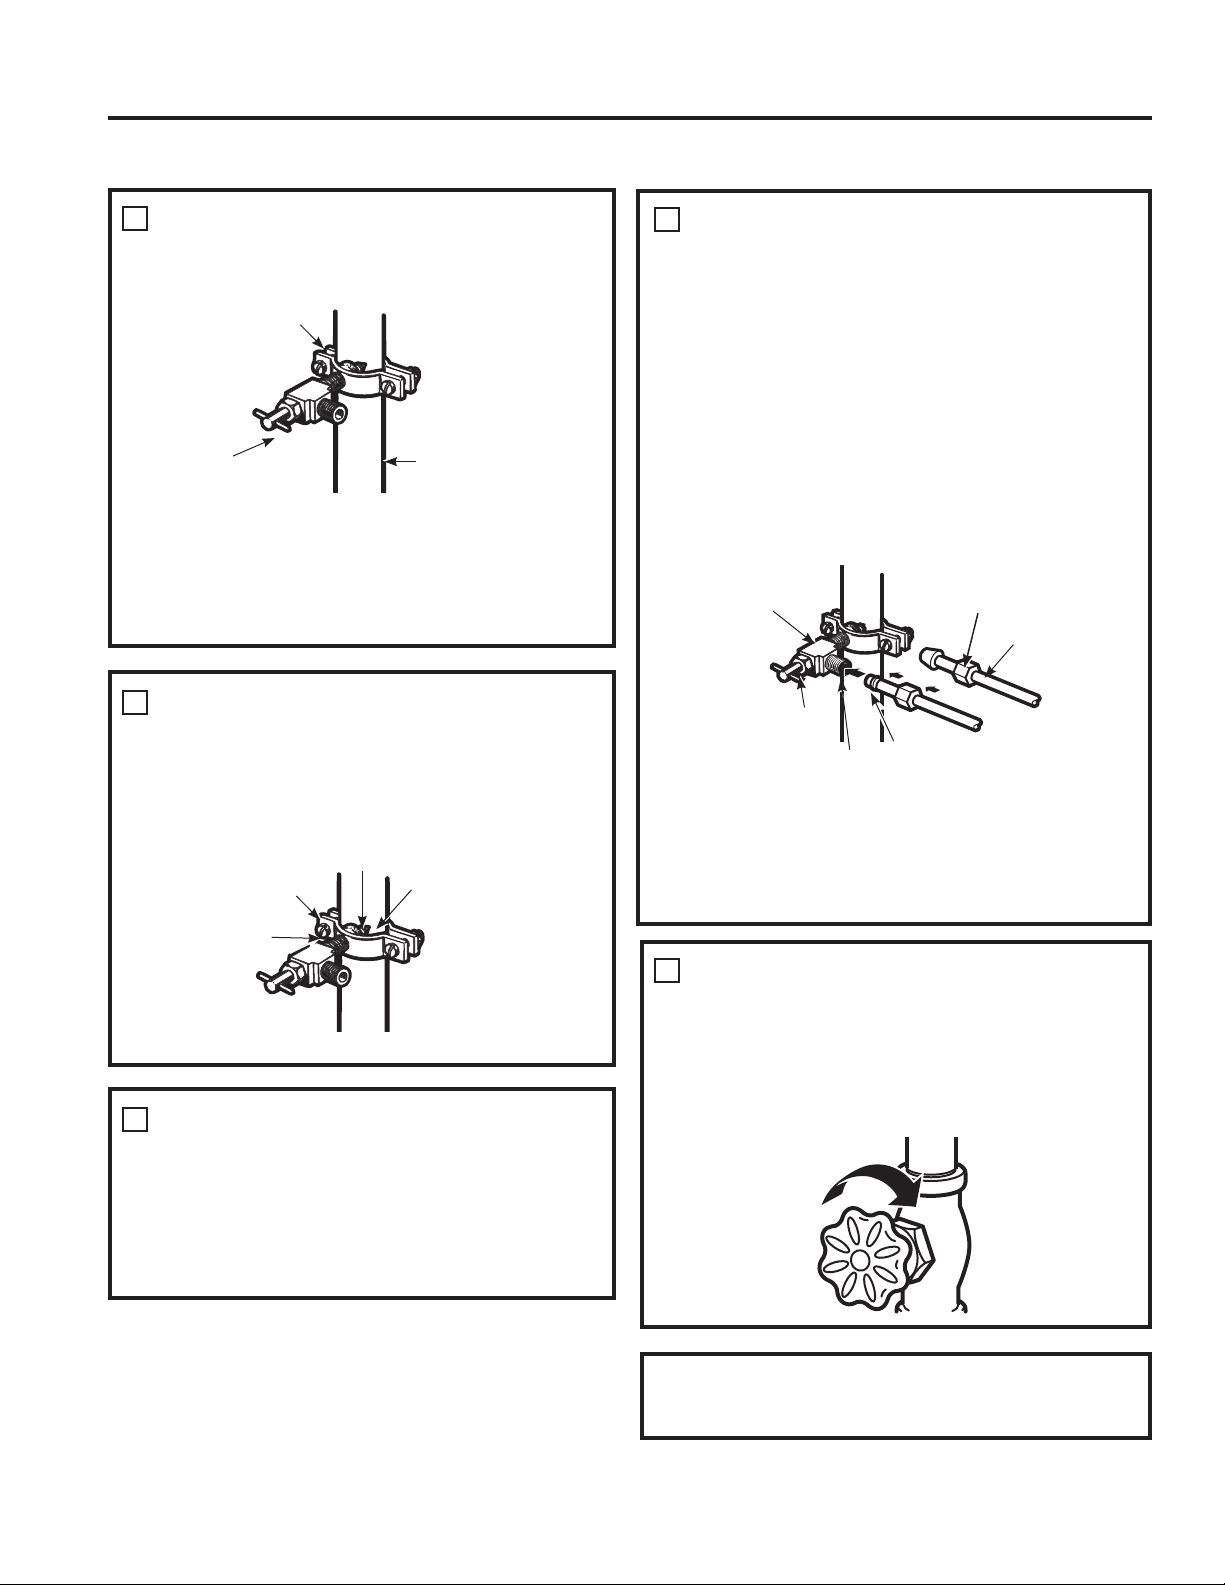
44 49-60792 Rev. 3
3ODFHWKHFRPSUHVVLRQQXWDQGIHUUXOHVOHHYH
for copper tubing onto the end of the tubing and
connect it to the shutoff valve.
Make sure the tubing is fully inserted into the valve.
Tighten the compression nut securely.
)RUSODVWLFWXELQJIURPD6PDUW&RQQHFW
™
Refrigerator Tubing kit, insert the molded end
of the tubing into the shutoff valve and tighten
compression nut until it is hand tight, then tighten
one additional turn with a wrench. Over tightening
may cause leaks.
NOTE: Commonwealth of Massachusetts
Plumbing Codes 248CMR shall be adhered to.
Saddle valves are illegal and use is not permitted
in Massachusetts. Consult with your licensed
plumber.
CONNECT THE TUBING TO THE
VALVE
7
Turn the main water supply on and flush out the
tubing until the water is clear.
Shut the water off at the water valve after about
RQHTXDUWOLWHURUPLQXWHVRIZDWHUKDVEHHQ
flushed through the tubing.
FLUSH OUT THE TUBING
8
Saddle-Type
Shutoff Valve
Compression Nut
Packing Nut
Outlet Valve
)HUUXOHVOHHYH
SmartConnect
™
Tubing
)DVWHQWKHVKXWRIIYDOYHWRWKHFROGZDWHUSLSH
with the pipe clamp.
NOTE: Commonwealth of Massachusetts
Plumbing Codes 248CMR shall be adhered to.
Saddle valves are illegal and use is not permitted
in Massachusetts. Consult with your licensed
plumber.
FASTEN THE SHUTOFF VALVE
4
Tighten the clamp screws until the sealing washer
begins to swell.
NOTE:'RQRWRYHUWLJKWHQRU\RXPD\FUXVK
the tubing.
TIGHTEN THE PIPE CLAMP
5
Pipe Clamp
Vertical Cold
Water Pipe
Saddle-Type
Shutoff Valve
Washer
,QOHW(QG
Pipe Clamp
Clamp
Screw
Route the tubing between the cold water line and
the refrigerator.
Route the tubing through a hole drilled in the wall
or floor (behind the refrigerator or adjacent base
FDELQHWDVFORVHWRWKHZDOODVSRVVLEOH
ROUTE THE TUBING
6
To complete the installation of the refrigerator, go
EDFNWR6WHSLQ,QVWDOOLQJWKH5HIULJHUDWRU
Installation Instructions
INSTALLING THE WATER LINE (Cont.)
INSTALLATION INSTRUCTIONS
49-60792 Rev. 3 45
Newer refrigerators sound different from older refrigerators.
Modern refrigerators have more features and use newer technology.
HUMMM...
WHOOSH...
Ŷ The new high efficiency compressor may run faster
and longer than your old refrigerator and you may
hear a high-pitched hum or pulsating sound while it
is operating.
Ŷ <RXPD\KHDUDZKRRVKLQJVRXQGZKHQWKHGRRUV
FORVH7KLVLVGXHWRSUHVVXUHHTXDOL]LQJZLWKLQWKH
refrigerator.
Ŷ $IWHUGLVSHQVLQJLFHDPRWRUZLOOFORVHWKHLFHFKXWH
to keep warn room air from entering the ice bucket,
PDLQWDLQLQJLFHDWDIUHH]LQJWHPSHUDWXUH
The hum of the motor closing the ice chute is
normal, shortly after dispensing ice.
Ŷ
You may hear the fans spinning at high speeds.
This happens when the refrigerator is first plugged
in, when the doors are opened frequently or when
a large amount of food is added to the refrigerator
RUIUHH]HUFRPSDUWPHQWV7KHIDQVDUHKHOSLQJWR
maintain the correct temperatures.
Ŷ
The fans change speeds in order to provide optimal
cooling and energy savings.
CLICKS, POPS,
CRACKS and SNAPS
Ŷ You may hear cracking or popping sounds when
the refrigerator is first plugged in. This happens as
the refrigerator cools to the correct temperature.
Ŷ The compressor may cause a clicking or chirping
sound when attempting to restart (this could take
XSWRPLQXWHV
Ŷ Expansion and contraction of cooling coils during
and after defrost can cause a cracking or popping
sound.
Ŷ On models with an ice maker, after an ice making
cycle, you may hear the ice cubes dropping into the
ice bucket.
Ŷ After dispensing ice, a motor will close the ice chute
to keep warm room air from entering the ice bucket,
PDLQWDLQLQJLFHDWDIUHH]LQJWHPSHUDWXUH
WATER SOUNDS
Ŷ The flow of refrigerant through the cooling coils may
make a gurgling noise like boiling water.
Ŷ Water dropping on the defrost heater can cause
DVL]]OLQJSRSSLQJRUEX]]LQJVRXQGGXULQJWKH
defrost cycle.
Ŷ A water dripping noise may occur during the defrost
cycle as ice melts from the evaporator and flows
into the drain pan.
Ŷ Closing the door may cause a gurgling sound due to
SUHVVXUHHTXDOL]DWLRQ
Do you hear what I hear? These conditions are normal.
START UP COOLING
,WFDQWDNHXSWRKRXUVIRUWKHUHIULJHUDWRUDQG
IUHH]HUWHPSHUDWXUHVWRPDWFKWKHGLVSOD\'XULQJWKDW
WLPHUHIULJHUDWRUDQGIUHH]HUGRRURSHQLQJVVKRXOGEH
PLQLPL]HG
TIPS
Ŷ )UHH]HUFRROVILUVW
Ŷ 5HIULJHUDWRUFRPSDUWPHQWFRROVODVWLWPD\WDNH
VHYHUDOKRXUVDIWHUWKHIUHH]HU
Ŷ 7XUQLQJRIILFHPDNHUPDNHVERWKIUHVKIRRGDQG
IUHH]HUIRRGFRROIDVWHU
Normal Operating Conditions.
TROUBLESHOOTING TIPS: Normal Operating Conditions
46 49-60792 Rev. 3
Problem Possible Causes What to Do
Water filter indicated as installed
incorrectly or a leak is present on
cap control panel.
Water filter installed backward or is
leaking.
&KHFNIRUOHDN,IQROHDNLVSUHVHQW
UHPRYHILOWHUE\SDVVSOXJURWDWH
180° and reinstall.
³:DUQLQJ7ULDQJOH´LVOLW
5HSODFH)LOWHU5HSODFH:DWHU)LOWHU
is lit
2YHU'XHOLJKWLVOLW
Water filter leaking or needs
replacing
Water filter backwards
Replace water filter, check for leak
Remove filter, rotate 180° and reinstall
'LVSHQVHU2IILVOLW Control A, B & C
Wrong filter installed
Replace filter with proper filter
Remove filter, rotate 180° and reinstall
Not filtering )LOWHUE\SDVVLQVWDOOHG&RQWUROV%
C
,QVWDOOFRUUHFWZDWHUILOWHU
5HVHW)LOWHULVOLW Water filter leaking or needs
replacing
Replace water filter, or install filter
bypass **
3UHVVDQGKROG5HVHW)LOWHUIRU
VHFRQGVWRUHVHW&RQWURO'RQO\
Water filter indicator light is not lit This is normal. This indicator will
turn on to tell you that you need to
replace the filter soon.
See About the Water Filter for more
information.
+DQGOHLVORRVHKDQGOHKDVDJDS Handle needs adjusting See Attach Fresh Food Handle and
$WWDFKWKH)UHH]HU+DQGOHVHFWLRQVIRU
detailed instructions.
Refrigerator beeping This is door alarm -Turn off or disable with door closed
,IGRRURSHQDQGDODUPLVVRXQGLQJ
\RXFDQRQO\VQRR]HWKHDODUP
Not cooling The cooling system is off See About Controls.
:DWHUKDVSRRUWDVWHRGRU Water dispenser has not been used
for a long time
'LVSHQVHZDWHUXQWLODOOZDWHULQ
system is replenished.
Water in glass is warm* Normal when refrigerator is first
installed
Wait 24 hours for the refrigerator to
completely cool down.
Water dispenser has not been used
for a long time
'LVSHQVHZDWHUXQWLODOOZDWHULQ
system is replenished
Water system has drained Allow several hours for replenished
supply to chill
Water dispenser does not work* Water supply line turned off or not
connected
See Installing the Water Line
:DWHUILOWHUFORJJHGRUILOWHUE\SDVV
plug not installed
Replace filter cartridge or remove filter
and install bypass plug**
Air may be trapped in the water
system
Press the dispenser arm for at least 5
minutes.
:DWHULQUHVHUYRLULVIUR]HQEHFDXVH
the controls are set too cold
Set the refrigerator control to a warmer
VHWWLQJDQGZDLWKRXUV,IWKHZDWHU
does not dispense after 24 hours, call
for service
*Select Models Only
6RPHPRGHOVGRQRWFRPHHTXLSSHGZLWKWKHILOWHUE\SDVVSOXJ7RREWDLQDIUHHE\SDVVSOXJFDOO*(&$5(6,Q&DQDGDFDOO
Troubleshooting Tips... Before you call for service
Save time and money! Review the charts on the following pages first and you may not need to call for service.
TROUBLESHOOTING TIPS
49-60792 Rev. 3 47
TROUBLESHOOTING TIPS
*Select Models Only
6RPHPRGHOVGRQRWFRPHHTXLSSHGZLWKWKHILOWHUE\SDVVSOXJ7RREWDLQDIUHHE\SDVVSOXJFDOO*(&$5(6,Q&DQDGDFDOO
Problem Possible Causes What to Do
Water spurting from dispenser* Newly installed filter cartridge Run water from the dispenser for 5
PLQXWHVDERXWJDOORQV
No water or ice cube production* Supply line or shutoff valve is
clogged
Call a plumber
Water filter is clogged Replace filter cartridge or remove filter
and install bypass plug**
)LOWHUFDUWULGJHQRWSURSHUO\LQVWDOOHG Remove and reinstall filter cartridge,
being certain that it locks in place.
,FHPDNHULVWXUQHGRII Check that the ice maker is turned on.
See About the Automatic Ice Maker.
Water is leaking from dispenser* Air may be present in the water line
system, causing water to drip after
being dispensed
'LVSHQVHZDWHUIRUDWOHDVWPLQXWHVWR
remove air from system
AUTO FILLXQGHUILOOQRILOO Not all containers work with
AUTOFILL
Try different container
Error message See page 14
Clean sensor. See page 14.
AUTO FILL overfills* Not all containers work with
AUTO FILL
Try different container
)UHH]HUFRROLQJIUHVKIRRGQRW
cooling
Normal, when refrigerator first
plugged in or after extended power
outage
Wait 24 hours for temperature in both
compartments to reach selected
temperatures.
,FHGLVSHQVHURSHQVDIWHUFORVLQJ
IUHH]HUGUDZHU
Normal The ice dispenser door may open after
FORVLQJIUHH]HUGRRUWRDOORZDFFHVV
Low brewing flow rate There may have been a dent at the
ERWWRPRI.&XSFDXVLQJWKHSLQ
to pierce the filter allowing coffee
grounds clogging the bottom pin
$YRLGXVLQJGDPDJHGGHQWHG.FXSV
and clean the lower needle before next
brew
/RZEUHZLQJIORZUDWHZDWHUGULSV
from inner door
Top needle of the brewer clogged 8QFORJWKHWRSQHHGOHKROHVXVLQJD
paper clip and rinse brewer. Rinse
brewer after every use.
Brewer is not detected or hot water
leaking from top of the brewer
,QFRUUHFWDVVHPEO\RIEUHZHULQWKH
bracket
0DNHVXUHWKH.HXULJ/RJRLVLQWKH
front. Push brewer all the way in the
brackets
Coffee dispensed with splash or
bubble bursting
Blocked vent hole in the brewer Make sure the vent hole at the bottom
of the brewer is clear from food or any
other contamination
Troubleshooting Tips... Before you call for service

48 49-60792 Rev. 3
*Select Models Only
6RPHPRGHOVGRQRWFRPHHTXLSSHGZLWKWKHILOWHUE\SDVVSOXJ7RREWDLQDIUHHE\SDVVSOXJFDOO*(&$5(6,Q&DQDGDFDOO
Problem Possible Causes What to Do
Beverage quality not as expected You may be using non-standard or
RXWGDWHG.&XSV
5HFRPPHQGXVLQJRIILFLDO.HXULJ
.FXSVWKDWDUHQRWSDVWH[SLUDWLRQDQG
have not been damaged
Liquid drips from the brewer after
brewer cycle is completed and the
brewer is removed from the bracket
,WLVSRVVLEOHIRUOLTXLGVWREH
retained by the brewer and drip
when it is removed
8VHDFORWKRUFRQWDLQHUWRFDSWXUHWKH
drips when brewer is removed
'HOD\ZKHQXVLQJ.HXULJ.FXS3RG
dispenser
To ensure a quality beverage is
delivered, a short delay is required
to ensure the refrigerator is
operating correctly
Ensuring consistent, quality operation
requires the refrigerator to delay
dispense for a short period of time
After brewing, my powdered
beverage is not fully cleared from
the used pod
'HSHQGLQJRQVL]HVHOHFWHGWKH
powder may not dissolve fully.
Some powdered beverages develop
into ‘clumps’ when left sitting for
some time
Shake the powdered pods before
brewing to break up these clumps and
DOORZEHWWHUFOHDULQJ)RUSRZGHUHG
beverage with no filter, use the Cocoa
cycle selection
Brewer lid is difficult to close .FXSLVQRWIXOO\VHDWHG 3UHVV.FXSDOOWKHZD\GRZQLQWRWKH
brewer prior to closing the lid. Lower
QHHGOHPXVWSXQFWXUH.FXSEIRUH
closing the brewer lid
Brewer leaks during the brew cycle Trouble in closing brewer lid or
GDPDJHG.FXS
3UHVV.FXSDOOWKHZD\GRZQLQWRWKH
brewer prior to closing the lid. Lower
QHHGOHPXVWSXQFWXUH.FXSEIRUH
closing the brewer lid. Recommend
XVLQJRIILFLDO.HXULJ.FXSVWKDWKDYH
not been damaged and have a good
seal between the top cover and plastic
bottom
Troubleshooting Tips... Before you call for service
TROUBLESHOOTING TIPS

49-60792 Rev. 3 49
TROUBLESHOOTING TIPS/TRUTH OR MYTH
Truth or Myth? Answer Explanation
The refrigerator water filter may require
replacement prior to six months
758( The water filter indicator will indicate the need to replace the water
filter every six months or 170 gallons of water dispensed (select
PRGHOVRQO\:DWHUTXDOLW\YDULHVIURPFLW\WRFLW\,IZDWHUIORZIURP
the dispenser slows, or ice production decreases, the water filter
should be replaced, even though the filter indicator may not indicate
the need for replacement.
The automatic ice maker in my refrigerator will
produce ice when the refrigerator is plugged
into a power receptacle.
MYTH The refrigerator must be connected to water, and the ice maker
must be turned on. Make sure the ice maker is turned on, only after
the water line is connected and water is turned on. The ice maker
can be turned onoff from the controls and ensure the ice maker
is on, as indicated on the refrigerator control panel. See About the
Automatic Ice Maker.
After the refrigerator has been plugged in and
FRQQHFWHGWRZDWHU,ZLOOLPPHGLDWHO\KDYH
unlimited chilled water available from the
water dispenser.
MYTH The water dispenser tank located inside the refrigerator stores water
for dispensing. The water in this tank requires 24 hours to chill after
installation. High usage conditions will not allow time for the water
to chill.
After water dispenses, a few drops of water
are normal.
758( A few drops of water may fall from the dispenser, after the dispenser
SDGGOHKDVEHHQUHOHDVHG7RPLQLPL]HWKHGURSVUHPRYHWKHJODVV
slowly from the dispenser.
,ZLOOQHYHUVHHIURVWLQVLGHWKHIUHH]HU
compartment.
MYTH )URVWLQVLGHWKHIUHH]HUW\SLFDOO\LQGLFDWHVWKDWWKHGRRULVQRW
SURSHUO\VHDOHGRUKDVEHHQOHIWRSHQ,IIURVWLVIRXQGFOHDUWKH
frost using a plastic spatula and towel, then check to ensure that no
IRRGSDFNDJHVRUFRQWDLQHUVDUHSUHYHQWLQJWKHIUHH]HUGRRUIURP
closing. Check the refrigerator control panel to ensure the door
alarm is on.
When the refrigerator is installed, or after
UHSODFLQJWKHZDWHUILOWHU,PXVWGLVSHQVH
water for five minutes.
758(
A newly installed refrigerator or water filter contains air in the water
lines. Press the dispenser paddle and dispense cold water for at
least 5 minutes to remove air from the water line, and flush the filter.
To fill the ice bucket to the maximum capacity,
,VKRXOGGLVSHQVHDQGKRXUVDIWHU
installation.
758( 'LVSHQVLQJFXEHVKRXUVDQGKRXUVDIWHULQVWDOODWLRQ
allows ice to disperse within the ice bucket, which in turns calls on
the ice maker to produce additional ice. Normal ice production =
100 cubes in 24 hours.
,FDQXVHWKHZDWHUILOWHUE\SDVVSOXJWR
determine if the filter requires replacement.
758( 'HFUHDVHLQIORZIURPWKHZDWHUGLVSHQVHURUGHFUHDVHGLFH
SURGXFWLRQPD\LQGLFDWHWKHQHHGWRUHSODFHWKHZDWHUILOWHU,QVWDOO
the water filter bypass plug (provided with the refrigerator on some
PRGHOVDQGFKHFNIORZIURPWKHGLVSHQVHU,IZDWHUIORZUHWXUQVWR
normal with the bypass plug in place, replace the water filter.
The top of the refrigerator doors will always be
aligned.
MYTH Several things can affect the fresh food door alignment, including
WKHIORRUWKHUHIULJHUDWRULVLQVWDOOHGRQDQGORDGLQJRIGRRUV,IWKH
WRSRIWKHIUHVKIRRGGRRUVDUHQRWDOLJQHGXVHD´DOOHQZUHQFK
WRDGMXVWWKHULJKWOHIWKDQGGRRU7KHDGMXVWPHQWVFUHZLVORFDWHG
RQWKHERWWRPULJKWRUOHIWKDQGVLGHRIWKHGRRURSHQWKHIUHH]HU
door to access the screw.
Refrigerator door handles can be easily
tightened.
758( ,IGRRUKDQGOHVDUHORRVHRUKDYHDJDSWKHKDQGOHFDQEHDGMXVWHG
XVLQJD´DOOHQZUHQFKRQVHWVFUHZVORFDWHGRQWKHHQGVRIWKH
handles.
There may be odor and taste problems with
your ice.
758( After starting the ice maker, throw away 24 hours of ice production
to avoid odor and taste problems.
,FDQPDNHILQHDGMXVWPHQWVWRWKHIUHVKIRRG
doors to align them.
758( ,IWKHIUHVKIRRGGRRUVDUHQRWDOLJQHGXVHD´$OOHQZUHQFKWR
adjust the right hand door. The adjustment screw is located on the
ERWWRPRIWKHULJKWOHIWKDQGGRRU2SHQWKHIUHH]HUGRRUWRDFFHVV
Truth or Myth
Truth or Myth
SERVICE
Before you call for service, review the detailed troubleshooting tips in the Owner’s manual.
,IQHHGHGVHUYLFHFDQEHVFKHGXOHGE\YLVLWLQJXVRQOLQHGEAppliances.com or calling
800.GE.CARES 800.432.2737. ,Q&DQDGDYLVLWGEAppliances.ca or call 800.561.3344.

50 49-60792 Rev. 3
Truth or Myth? Answer Explanation
'RRUKDQGOHVVKRXOGDOZD\VEHUHPRYHGIRU
installation.
MYTH ,IWKHGRRUVPXVWEHUHPRYHGGRQRWUHPRYHWKHKDQGOHVRULIWKH
refrigerator will fit easily through the passage way opening. Adjust
KDQGOHVWKDWDUHORRVHRUKDYHDJDSE\DGMXVWLQJ´VHWVFUHZV
on either end of handles.
'RRUUHPRYDOLVDOZD\VUHTXLUHGIRU
installation.
MYTH &KHFNFKDUWRQUHYHUVHVLGHRIWKLVLQVWUXFWLRQ'RRUVVKRXOGRQO\EH
removed when necessary to prevent damage from passage way or
access to final location.
Refrigerator doors that won’t close after
installation, can be adjusted to close properly.
758( 'RRUPHFKDQLVPZRUNVEHVWLILQVWDOOHGDW,ILQVWDOOHGDW
remove the door from the mid hinge, and swing the door 180° before
reinstalling. See Reinstalling the Refrigerator Doors.
There is an adjustment to rear wheels. MYTH )URQWOHYHOLQJOHJVDUHDGMXVWDEOHDQGVKRXOGEHXVHGWREDODQFHWKH
refrigerator. Leveling legs are used to make initial fresh food door
adjustment.
Check for leaks after all water connections
are made.
758( While purging the air from the water system, check all water line
connections for leaks. Check the connection to the household water
supply at back of refrigerator, and door water line connect.
Any packaging residue can be cleaned off the
refrigerator using any cleaner.
MYTH 'RQRWXVHZD[SROLVKEOHDFKRURWKHUSURGXFWVFRQWDLQLQJFKORULQH
on Stainless Steel panels, door handles and trim. Check this
LQVWUXFWLRQXQGHU³&OHDQLQJWKH2XWVLGH´IRUIXOOGHWDLOV
6RPHPRGHOVGRQRWFRPHHTXLSSHGZLWKWKHILOWHUE\SDVVSOXJ7RREWDLQDIUHHE\SDVVSOXJFDOO*(&$5(6,Q&DQDGDFDOO
Truth or Myth
Truth or Myth
SERVICE
Before you call for service, review the detailed troubleshooting tips in the Owner’s manual.
,IQHHGHGVHUYLFHFDQEHVFKHGXOHGE\YLVLWLQJXVRQOLQHGEAppliances.com or calling
800.GE.CARES 800.432.2737. ,Q&DQDGDYLVLWGEAppliances.ca or call 800.561.3344.
TROUBLESHOOTING TIPS/TRUTH OR MYTH
49-60792 Rev. 3 51
Ŷ Service trips to your home to teach you how to use
the product.
Ŷ,PSURSHULQVWDOODWLRQGHOLYHU\RUPDLQWHQDQFH
Ŷ)DLOXUHRIWKHSURGXFWLILWLVDEXVHGPLVXVHGRU
used for other than the intended purpose or used
commercially.
Ŷ/RVVRIIRRGGXHWRVSRLODJH
Ŷ5HSODFHPHQWRIKRXVHIXVHVRUUHVHWWLQJRIFLUFXLW
breakers.
Ŷ'DPDJHWRILQLVKVXFKDVVXUIDFHUXVWWDUQLVKRU
small blemishes not reported within 48 hours of
delivery.
Ŷ5HSODFHPHQWRIWKHZDWHUILOWHUFDUWULGJHLI
included, due to water pressure that is outside
the specified operating range or due to excessive
sediment in the water supply.
Ŷ5HSODFHPHQWRIWKHOLJKWEXOEVLILQFOXGHGRU
water filter cartridge, if included, other than as
noted above.
Ŷ'DPDJHWRWKHSURGXFWFDXVHGE\DFFLGHQWILUH
floods or acts of God.
Ŷ,QFLGHQWDORUFRQVHTXHQWLDOGDPDJHFDXVHGE\
possible defects with this appliance.
Ŷ3URGXFWQRWDFFHVVLEOHWRSURYLGHUHTXLUHGVHUYLFH
Ŷ'DPDJHFDXVHGE\DQRQ*($SSOLDQFHV%UDQG
water filter.
What GE Appliances Will Not Cover:
For the Period of: GE Appliances Will Replace
One Year
)URPWKHGDWHRIWKH
original purchase
Any part of the refrigerator which fails due to a defect in materials or workmanship.
'XULQJWKHlimited one-year warranty, GE Appliances will also provide, free of
charge, all labor and related service to replace the defective part.
Thirty Days
:DWHUILOWHULILQFOXGHG
)URPWKHRULJLQDOSXUFKDVH
date of the refrigerator
Any part of the water filter cartridge which fails due to a defect in materials or
ZRUNPDQVKLS'XULQJWKLV limited thirty-day warranty, GE Appliances will also
provide, free of charge, a replacement water filter cartridge.
GE PROFILE™ MODELS ONLY
Five Years
)URPWKHGDWHRIWKH
purchase
Any part of the sealed refrigerating system (the compressor, condenser, evaporator
DQDOOFRQQHFWLQJWXELQJZKLFKIDLOVGXHWRDGHIHFWLQPDWHULDOVRUZRUNPDQVKLS
'XULQJWKLVOimited five-year sealed refrigerating system warranty, GE Appliances
will also provide, free of charge, all labor and related service to replace the defective
part in the sealed refrigerating system.
GEAppliances.com
For US Customers, DOOZDUUDQW\VHUYLFHLVSURYLGHGE\RXU)DFWRU\6HUYLFH&HQWHUVRUDQDXWKRUL]HG&XVWRPHU
Care
®
technician. To schedule service online, visit us at geappliances.com, or call GE Appliances at 800.GE.CARES
3OHDVHKDYH\RXUVHULDOQXPEHUDQG\RXUPRGHOQXPEHUDYDLODEOHZKHQFDOOLQJIRUVHUYLFH
In Canada, call 800.661.1616.
GE Appliances Refrigerator Limited Warranty
EXCLUSION OF IMPLIED WARRANTIES
Your sole and exclusive remedy is product repair as provided in this Limited Warranty. Any implied warranties,
including the implied warranties of merchantability or fitness for a particular purpose, are limited to one year or the
shortest period allowed by law.
For US Customers: This limited warranty is extended to the original purchaser and any succeeding owner for products
SXUFKDVHGIRUKRPHXVHZLWKLQWKH86$,IWKHSURGXFWLVORFDWHGLQDQDUHDZKHUHVHUYLFHE\D*($SSOLDQFHV$XWKRUL]HG
Servicer is not available, you may be responsible for a trip charge or you may be required to bring the product to an
$XWKRUL]HG*($SSOLDQFHV6HUYLFHORFDWLRQIRUVHUYLFH,Q$ODVNDWKHOLPLWHGZDUUDQW\H[FOXGHVWKHFRVWRIVKLSSLQJRU
service calls to your home.
Some states do not allow the exclusion or limitation of incidental or consequential damages. This warranty gives you
specific legal rights, and you may also have other rights which vary from state to state. To know what your legal rights
are, consult your local or state consumer affairs office or your state’s Attorney General.
Warrantor: GE Appliances, a Haier company
Louisville, KY 40225
For Customers in Canada: This
limited warranty is extended to the original purchaser and any succeeding owner
IRUSURGXFWVSXUFKDVHGLQ&DQDGDIRUKRPHXVHZLWKLQ&DQDGD,QKRPHZDUUDQWVHUYLFHZLOOEHSURYLGHGLQDUHDV
where it is available and deemed reasonable by Mabe to provide.
Warrantor Canada: MC Commercial, Inc., Burlington, Ontario, L7R 5B6
Servicing your refrigerator may require the use of the onboard data port for diagnostics. This gives a GE
Appliances Factory Service technician the ability to quickly diagnose any issues with your appliance and
helps GE Appliances improve its products by providing GE Appliances with information on your appliance.
If you do not want your appliance data to be sent to GE Appliances, please advise your technician NOT to
submit the data to GE Appliances at the time of service.
Staple your receipt here. Proof of the original purchase
date is needed to obtain service under the warranty.
LIMITED WARRANTY
52 49-60792 Rev. 3
,I\RXU*($SSOLDQFHVSDUWIDLOVEHFDXVHRIDPDQXIDFWXULQJGHIHFWZLWKLQWKLUW\GD\VIURPWKHGDWHRIRULJLQDOSXUFKDVHIRUXVHZHZLOOJLYH\RX
a new or, at our option, a rebuilt part without charge. Return the defective part to the parts supplier from whom it was purchased together with a
FRS\RIWKH³SURRIRISXUFKDVH´IRUWKHSDUW,IWKHSDUWLVGHIHFWLYHDQGVKRZVQRVLJQVRIDEXVHLWZLOOEHH[FKDQJHG7KHZDUUDQW\GRHVQRW
FRYHUWKHIDLOXUHRISDUWVZKLFKDUHGDPDJHGZKLOHLQ\RXUSRVVHVVLRQDUHDEXVHGRUKDYHEHHQLQVWDOOHGLPSURSHUO\,WGRHVQRWFRYHUWKHFRVW
RIUHWXUQLQJWKHSDUWWRWKHVXSSOLHUIURPZKRPLWZDVSXUFKDVHGQRUGRHVLWFRYHUWKHFRVWRIODERUWRUHPRYHRULQVWDOOLWWRGLDJQRVHWKHIDXOW,W
GRHVQRWFRYHUSDUWVXVHGLQSURGXFWVLQFRPPHUFLDOXVHH[FHSWLQWKHFDVHRIDLUFRQGLWLRQLQJHTXLSPHQW,QQRHYHQWVKDOO*($SSOLDQFHVEH
liable for consequential damages.
Warrantor: GE Appliances, a Haier company
/RXLVYLOOH.<
Seller:
Name
Address
City State =LS
Signature 'DWH
Buyer:
Name
Address
City State =LS
Signature 'DWH
Staple your receipt here. Proof of the original purchase
date is needed to obtain service under the warranty.
What GE Appliances will not cover:
Ŷ Service trips to your home to teach you how to use
the product.
Ŷ ,PSURSHULQVWDOODWLRQ
Ŷ )DLOXUHRIWKHSURGXFWLILWLVDEXVHGPLVXVHGXVHGIRU
other than the intended purpose or used commercially.
Ŷ Replacement of house fuses or resetting of circuit
breakers.
Ŷ Replacement of the water filter cartridge due to water
pressure that is outside the specified operating range
or due to excessive sediment in the water supply.
Ŷ 'DPDJHWRWKHSURGXFWFDXVHGE\DFFLGHQWILUH
floods, or acts of God.
Ŷ ,QFLGHQWDORUFRQVHTXHQWLDOGDPDJHFDXVHGE\
possible defects with this appliance.
RPWFE Water Filter Cartridge Limited Warranty
This warranty is extended to the original purchaser and any succeeding owner for products purchased for home use
ZLWKLQWKH86$,Q$ODVNDWKHZDUUDQW\H[FOXGHVWKHFRVWRIVKLSSLQJRUVHUYLFHFDOOVWR\RXUKRPH
Some states do not allow the exclusion or limitation of incidental or consequential damages. This warranty gives you
specific legal rights, and you may also have other rights which vary from state to state. To know what your legal rights
are, consult your local or state consumer affairs office or your state’s Attorney General.
For Purchases Made In Iowa: This form must be signed and dated by the buyer and seller prior to the
consummation of this sale.
This form should be retained on file by the seller for a minimum of two years.
For the period of GE Appliances will replace
Thirty Days
)URPWKHGDWH
of the original
purchase
Any part of the water filter cartridge which fails due to a defect in materials
or workmanship during this limited thirty-day warranty.*
Contact us at geapplianceparts.com, or call 800.GE.CARES.
EXCLUSION OF IMPLIED WARRANTIES
Your sole and exclusive remedy is part exchange as provided in this Limited Warranty. Any implied warranties,
including the implied warranties of merchantability or fitness for a particular purpose, are limited to six months or
the shortest period allowed by law.

49-60792 Rev. 3 53
Performance Data Sheet
Model: GE Appliances RPWFE
Ŷ6\VWHPFHUWLILHGE\,$30257DJDLQVW16)$16,6WDQGDUGVDQG3IRUWKHUHGXFWLRQRIFODLPVVSHFLILHGRQWKHSHUIRUPDQFH
data sheet and at iapmort.org.
Ŷ$FWXDOSHUIRUPDQFHPD\YDU\ZLWKORFDOZDWHUFRQGLWLRQV
,WLVHVVHQWLDOWKDWWKHPDQXIDFWXUHU¶VUHFRPPHQGHGLQVWDOODWLRQ
maintenance and filter replacement requirements be carried out for the
SURGXFWWRSHUIRUPDVDGYHUWLVHG6HH,QVWDOODWLRQ0DQXDOIRU:DUUDQW\
information.
Application Guidelines/Water Supply Parameters
6HUYLFH)ORZ JSPOSP
Water Supply Potable Water
Water Pressure SVLN3D
Water Temperature ))&&
Capacity JDOORQVOLWHUV
Substance Tested for Reduction
,QIOXHQWFKDOOHQJH
concentration
PJ/
Maximum permissible
product water
FRQFHQWUDWLRQPJ/
Avg %
Reduction
Chlorine Taste and Odor PJ/ 1$ > 99
Chloramine Taste and Odor PJ/ 0.5 > 99
3DUWLFXODWH&ODVV, $WOHDVWP/ 1$ 91.4
Cysts / 1$ > 99.99
Lead 0.15 0.01 98.85
Mercury 0.006 0.002 96.95
Asbestos WRILEHUV/ 1$ > 99
Toxaphene 0.003 86.95
92&&KORURIRUPVXUURJDWHFKHPLFDO 0.300 0.015 > 99
Alachlor 0.050 0.001 > 98
$WUD]LQH 0.100 0.003 > 97
%HQ]HQH 0.081 0.001 > 99
Carbofuran 0.190 0.001 > 99
carbon tetrachloride 0.078 0.0018 98
FKORUREHQ]HQH 0.077 0.001 > 99
chloropicrin 0.015 0.0002 99
' 0.110 0.0017 98
GLEURPRFKORURSURSDQH'%&3 0.052 0.00002 > 99
R'LFKORUREHQ]HQH 0.08 0.001 > 99
S'LFKORUREHQ]HQH 0.040 0.001 > 98
1,2-dichloroethane 0.088 0.0048 95
1,1-dichloroethylene 0.083 0.001 > 99
cis-1,2-dichloroethylene 0.170 0.0005 > 99
trans-1,2-dichloroethylene 0.086 0.001 > 99
1,2-dichloropropane 0.080 0.001 > 99
cis-1,3-dichloropropylene 0.079 0.001 > 99
dinoseb 0.170 0.0002 99
Endrin 0.053 0.00059 99
(WK\OEHQ]HQH 0.088 0.001 > 99
HWK\OHQHGLEURPLGH('% 0.044 0.00002 > 99
bromochloroacetonitrile 0.022 0.0005 98
dibromoacetonitrile 0.024 0.0006 98
dichloroacetonitrile 0.0096 0.0002 98
trichloroacetonitrile 0.015 0.0003 98
1,1-dichloro-2-propanone 0.0072 0.0001 99
1,1,1-trichloro-2-propanone 0.0082 0.0003 96
KHSWDFKORU++HSWR[ 0.025 0.00001 > 99
heptachlor epoxide 0.0107 0.0002 98
hexachlorobutadiene 0.044 0.001 > 98
hexachlorocyclopentadiene 0.060 0.000002 > 99
Lindane 0.055 0.00001 > 99
methoxychlor 0.050 0.0001 > 99
pentachlorophenol 0.096 0.001 > 99
VLPD]LQH 0.120 0.004 > 97
Styrene 0.150 0.0005 > 99
1,1,2,2-tetrachloroethane 0.081 0.001 > 99
Tetrachloroethylene 0.081 0.001 > 99
Toluene 0.078 0.001 > 99
73VLOYH[ 0.270 0.0016 99
tribromoacetic acid 0.042 0.001 > 98
7ULFKORUREHQ]HQH 0.160 0.0005 > 99
1,1,1-trichloroethane 0.084 0.0046 95
1,1,2-trichloroethane 0.150 0.0005 > 99
trichloroethylene 0.180 0.0010 > 99
bromoform 0.300 0.015 95
bromodichloromethane 0.300 0.015 95
chlorodibromomethane 0.300 0.015 95
xylenes 0.070 0.001 > 99
Meprobamate 60 > 99
Atenolol 30 > 99
&DUEDPD]HSLQH 200 > 99
'((7 200 > 99
Metolachlor 200 > 99
Trimethoprim 20 > 99
Linuron 20 > 99
TCEP 700 > 99
TCPP 700 > 99
Phenytoin 30 > 99
,EXSURIHQ 60 > 99
Naproxen 20 > 99
Estrone 20 > 99
Bisphenol A 300 > 99
Nonyl phenol 200 > 99
3)2$3)26 PJ/ 0.07 99.25
NOTE: While the testing was performed under standard
laboratory conditions, actual performance may vary.
5HSODFHPHQW&DUWULGJH53:)()RUHVWLPDWHGFRVWVRI
replacement elements please call 1.877.959.8688 or visit our
website at gewaterfilters.com.
WARNING
To reduce the risk associated with
ingestion of contaminants:
• Do not use with water that is microbiologically unsafe or of
unknown quality without adequate disinfection before and
after the system. Systems certified for cyst reduction may be
used on disinfected water that may contain filterable cysts.
NOTICE
To reduce the risk of water leakage or flooding, and to
ensure optimal filter performance:
• Read and follow use instructions before installation and use of
this system.
,QVWDOODWLRQDQGXVHMUST comply with all state and local
plumbing codes.
• Do notLQVWDOOLIZDWHUSUHVVXUHH[FHHGVSVLN3D
,I\RXUZDWHUSUHVVXUHH[FHHGVSVL\RXmust install a
pressure-limiting valve. Contact a plumbing professional if you
are uncertain how to check your water pressure.
• Do notLQVWDOOZKHUHZDWHUKDPPHUFRQGLWLRQVPD\RFFXU,I
water hammer conditions exist you must install a water hammer
arrester. Contact a plumbing professional if you are uncertain
how to check for this condition.
• Do not install on hot water supply lines. The maximum
RSHUDWLQJZDWHUWHPSHUDWXUHRIWKLVILOWHUV\VWHPLV)
&
• Protect filter from freezing. 'UDLQILOWHUZKHQWHPSHUDWXUHV
GURSEHORZ)&
• Change the disposable filter cartridge every six months or
sooner if you observe a noticeable reduction in water flow rate.
)DLOXUHWRUHSODFHWKHGLVSRVDEOHILOWHUFDUWULGJHDW
recommended intervals may lead to reduced filter performance
and cracks inthe filter housing, causing water leakage or
flooding.
7KLV6\VWHPKDVEHHQWHVWHGDFFRUGLQJWR16)$16,
401 and P473 for the reduction of the substances listed below.
The concentration of the indicated substances in water entering
the system was reduced to a concentration less than or equal to
the permissible limit for water leaving the system, as specified in
16)$16,DQG3
53:)(6\VWHPLVFHUWLILHGE\,$302
57DJDLQVW16)$16,6WDQGDUGV
53, 401, and P473 for the reduction of
claims specified on the performance
data sheet and at iapmort.org.
PLATINUM SEAL
WATER QUALITY
I
A
P
M
O
R
E
S
E
A
R
C
H
A
N
D
T
E
S
T
I
N
G
™

54 49-60792 Rev. 3
3ULQWHGLQ8QLWHG6WDWHV
Consumer Support
CONSUMER SUPPORT
GE Appliances Website
Have a question or need assistance with your appliance? Try the GE Appliances Website 24 hours a day, any day of the year!
You can also shop for more great GE Appliances products and take advantage of all our on-line support services designed for
\RXUFRQYHQLHQFH,QWKH86GEAppliances.com ,Q&DQDGDGEAppliances.ca
Register Your Appliance
Register your new appliance on-line at your convenience! Timely product registration will allow for enhanced communication and
prompt service under the terms of your warranty, should the need arise. You may also mail in the pre-printed registration card
included in the packing material.
,QWKH86GEAppliances.com/register
,Q&DQDGDProdsupport.mabe.ca/crm/Products/ProductRegistration.aspx
Schedule Service
Expert GE Appliances repair service is only one step away from your door. Get on-line and schedule your service at your
FRQYHQLHQFHDQ\GD\RIWKH\HDU,QWKH86GEAppliances.com/service or call 800.432.2737 during normal business hours.
,Q&DQDGDGEAppliances.ca/en/support/service-request or call 800.561.3344
Extended Warranties
Purchase a GE Appliances extended warranty and learn about special discounts that are available while your warranty is still
LQHIIHFW<RXFDQSXUFKDVHLWRQOLQHDQ\WLPH*($SSOLDQFHV6HUYLFHVZLOOVWLOOEHWKHUHDIWHU\RXUZDUUDQW\H[SLUHV,QWKH86
GEAppliances.com/extended-warranty or call 800.626.2224 during normal business hours.
,Q&DQDGDGEAppliances.ca/en/support/purchase-extended-warranty or call 866.277.9842.
Parts and Accessories
,QGLYLGXDOVTXDOLILHGWRVHUYLFHWKHLURZQDSSOLDQFHVFDQKDYHSDUWVRUDFFHVVRULHVVHQWGLUHFWO\WRWKHLUKRPHV
9,6$0DVWHU&DUGDQG'LVFRYHUFDUGVDUHDFFHSWHG2UGHURQOLQHWRGD\KRXUVHYHU\GD\
,QWKH86GEApplianceparts.com or by phone at 877.959.8688 during normal business hours.
Instructions contained in this manual cover procedures to be performed by any user. Other servicing generally should
be referred to qualified service personnel. Caution must be exercised, since improper servicing may cause unsafe
operation.
Customers in Canada should consult the yellow pages for the nearest Mabe service center, visit our website at
GEAppliances.ca/en/products/parts-filters-accessories or call 800.661.1616.
Contact Us
,I\RXDUHQRWVDWLVILHGZLWKWKHVHUYLFH\RXUHFHLYHIURP*($SSOLDQFHVFRQWDFWXVRQRXU:HEVLWHZLWKDOOWKHGHWDLOVLQFOXGLQJ
your phone number, or write to:
,QWKH86*HQHUDO0DQDJHU&XVWRPHU5HODWLRQV_*($SSOLDQFHV$SSOLDQFH3DUN_/RXLVYLOOH.<
GEAppliances.com/contact
,Q&DQDGD'LUHFWRU&RQVXPHU5HODWLRQV0DEH&DQDGD,QF_6XLWH)DFWRU\/DQH_0RQFWRQ1%(&0
GEAppliances.ca/en/contact-us