LW1516ER
LW1816ER
LW2516ER
LW1521ERSM
LW1821ERSM
LW2521ERSM
EN ENGLISH
TYPE : WINDOW
www.lg.com
Copyright © 2017 - 2021 LG Electronics Inc. All Rights Reserved.
OWNER’S MANUAL
AIR CONDITIONER
Read this owner’s manual thoroughly before operating the
appliance and keep it handy for reference at all times.
*MFL70960606*
MFL70960606
Rev.06_081921

2
TABLE OF CONTENTS
TABLE OF CONTENTS
3 SAFETY INSTRUCTIONS
3 IMPORTANT SAFETY INSTRUCTIONS
8 PRODUCT OVERVIEW
8 Exterior Parts
8 Interior Parts
19 SMART FUNCTIONS
19 LG ThinQ Application
22 MAINTENANCE
22 Air Filter
23 TROUBLESHOOTING
23 Before Calling for Service
23 Normal Sounds You May Hear
27 WARRANTY
11 How to Install the Unit
11 Window Requirements
11 Storm Window Requirements
12 Preparation of Cabinet
13 Cabinet Installation
14 Unit Installation
16 OPERATION
16 Control Panel and Remote Control
17 Wireless Remote Control
18 Ventilation
18 Air Direction
18 Additional Features
9 INSTALLATION
9 Electrical Data
10 Parts Included

3 EN
SAFETY INSTRUCTIONS
SAFETY INSTRUCTIONS
READ ALL INSTRUCTIONS BEFORE USE
Your safety and the safety of others are very important.
We have provided many important safety messages in this manual and on your appliance. Always
read and follow all safety messages.
This is the safety alert symbol.
This symbol alerts you to potential hazards that can kill or injure you and others.
All safety messages will follow the safety alert symbol and either the word WARNING or
CAUTION.
These words mean:
WARNING
You may be killed or seriously injured if you do not follow instructions.
CAUTION
You may be injured or cause damage to the product if you do not follow instructions.
All safety messages will tell you what the potential hazard is, tell you how to reduce
the chance of injury, and tell you what may happen if the instructions are not followed.
IMPORTANT SAFETY INSTRUCTIONS
WARNING
injury to persons when using this product, follow basic precautions,
including the following:
INSTALLATION
● Before use, the appliance must be properly installed as described in this manual.
● Contact the authorized service technician for repair or maintenance of this unit.
● Contact the installer for installation of this unit.
● The air conditioner is not intended for use by young children or invalids without supervision.
● Young children should be supervised to ensure that they do not play with the air conditioner.
The following symbols are displayed on units.
This symbol indicates that this appliance uses a flammable refrigerant. If the refrigerant is
is leaked and exposure to an external ignition source, there is a risk of fire.
This symbol indicates that the Operation Manual should be read carefully.
This symbol indicates that a service personnel should be handling this equipment with
reference to the Installation Manual.
This symbol indicates that information is available such as the Operating Manual or
Installation Manual.
4
SAFETY INSTRUCTIONS
● When the power cord is to be replaced, replacement work shall be performed by authorized
personnel only using only genuine replacement parts.
and authorized personnel only.
● Connect to a properly rated, protected, and sized power circuit to avoid electrical overload.
● Always plug into a grounded outlet.
● Do not under any circumstances, cut or remove the third (ground) prong from the power cord.
● When installing or moving the appliance, be careful not to pinch, crush, or damage the power
cord.
● Plug in the power plug properly.
● Do not modify or extend the power cord.
● Do not start/stop operation by plugging/unplugging the power cord.
● If the cord/plug is damaged, have it replaced by an authorized service person using authorized
replacement parts.
● Use a dedicated circuit.
● Do not disassemble or modify the product.
● Adhere to all industry recommended safety procedures including the use of long-sleeved gloves
and safety glasses.
● Disconnect the power cord or circuit breaker before installing or servicing the appliance.
● Keep packaging materials out of the reach of children. These materials can pose a suffocation
risk to children.
● Store and install the product where it will not be exposed to temperatures below freezing or
exposed to outdoor weather conditions.
other appliance.
OPERATION
● Use this appliance only for its intended purpose.
● Never attempt to operate this appliance if it is damaged, malfunctioning, partially disassembled,
or has missing or broken parts, including a damaged cord or plug.
● Repair or immediately replace all power cords that have become frayed or otherwise damaged.
Do not use a cord that shows cracks or abrasion damage along its length or at either end.
● Do not run cord under carpets or mats where it could be stepped on and damaged.
● Keep the cord out from under heavy objects like tables or chairs.
● Do not place the power cord near a heat source.
● Do not use an adaptor or plug the product into a shared outlet.
● Do not tamper with controls.
● If you detect a strange sound, a chemical or burning smell, or smoke coming from the appliance,
unplug it immediately, and contact an LG Electronics Customer Information Center.
straight out from the outlet.
● Do not grasp the power cord or touch the appliance controls with wet hands.
5 EN
SAFETY INSTRUCTIONS
● If water enters the product, turn off the power at the main circuit, then unplug the product and call
for service.
● If the product has been submerged, contact an LG Electronics Customer Information Center for
instructions before resuming use.
● Unplug the product when unused for long periods.
● Unplug the product before cleaning.
● In the event of a gas leak (propane gas, etc.) do not operate this or any other appliance. Open a
window or door to ventilate the area immediately.
● This appliance is not intended for use by persons (including children) with reduced physical,
sensory or mental capabilities, or lack of experience and knowledge, unless they have been
given supervision or instruction concerning the use of the appliance by a person responsible for
their safety.
● The interior of the product must only be cleaned by an authorized service center or a dealer.
● Do not use solvent-based detergent on the product. Doing so can cause corrosion or damage,
GROUNDING INSTRUCTIONS
● The power cord of this appliance is equipped with a three-prong (grounding) plug. Use this with
a standard three-slot (grounding) wall power outlet to minimize the hazard of electric shock. The
sure the receptacle is properly grounded. DO NOT CUT OR REMOVE THE THIRD (GROUND)
PRONG FROM THE POWER PLUG.
- Situations when the appliance will be disconnected occasionally; Because of potential safety
hazards, we strongly discourage the use of an adapter plug. However, if you wish to use an
adapter, a TEMPORARY CONNECTION may be made. Use UL-listed adapter, available from
most local hardware stores.
The large slot in the adapter must be aligned with the large slot in the receptacle to assure a
proper polarity connection.
● Attaching the adapter ground terminal to the wall receptacle cover screw does not ground the
appliance unless the cover screw is metal, and not insulated, and the wall receptacle is grounded
to make sure the receptacle is properly grounded.
● Disconnect the power cord from the adapter, using one hand on each. Otherwise, the adapter
ground terminal might break. Do not use the appliance with a broken adapter plug.
- Situations when the appliance will be disconnected often; Do not use an adapter plug in these
situations. Unplugging the power cord frequently can lead to an eventual breakage of the
ground terminal. The wall power outlet should be replaced by a three-slot (grounding) outlet
instead.
6
SAFETY INSTRUCTIONS
CAUTION
To reduce the risk of minor or moderate injury to persons, malfunction, or
damage to the product or property when using this product, follow basic
precautions, including the following:
INSTALLATION
● Take care when installing the product that exhaust or condensation does not damage nearby
property.
● Follow installation instructions exactly to avoid excessive vibration or water leakage.
● Wear gloves and use caution when unpacking and installing the appliance. Screws or sharp
edges can cause injuries.
OPERATION
● This appliance is not intended for use as a precision refrigeration system. Do not use it for special
purposes such as maintaining pets, food, precision machinery, or art objects.
● When installing or moving the appliance, be careful not to pinch, crush, or damage the power
cord.
● Make sure the air inlet and outlet are free from obstructions.
● Use a soft cloth to clean the appliance. Do not use waxes, thinners, or harsh detergents.
● Do not step on or place heavy objects on top of the appliance.
● Do not drink water drained from the appliance.
are used simultaneously.
● Remove the batteries if the remote control is not to be used for an extended period of time.
● Never mix different types of batteries, or old and new batteries for the remote control.
f with clean water.
consult a doctor.
● Do not recharge or disassemble the batteries.
MAINTENANCE
● Never use strong cleaning agents or solvents when cleaning the air conditioner or spray water.
Use a smooth cloth.
Do not expose people, animals, or plants to the cold or hot wind from the air conditioner for
extended periods of time.
7 EN
SAFETY INSTRUCTIONS
REFRIGERANT (FOR R32 ONLY)
WARNING
● Do not use means to accelerate the defrosting process or to clean, other than those
recommended by the manufacturer.
● The appliance shall be stored in a room without continuously operating ignition sources (for
CAUTION
associated with older units. Please follow all precautions and advisories.
- Use caution while handling and prevent damage to unit. Do not put any holes into product for
any reason. This can cause damage to product and prevent unit from cooling.
- Maintenance and cleaning of unit should be performed by trained personnel. Failure to properly
clean unit can result in damage to the refrigeration system and or the electrical system.
- Make certain that all the air circulation/ventilation openings are free from obstruction.
-
warranties.
-
water heaters or furnaces. Also keep away from electric heaters. Damaged units should be
repaired before storage.
SAVE THESE INSTRUCTIONS
8
PRODUCT OVERVIEW
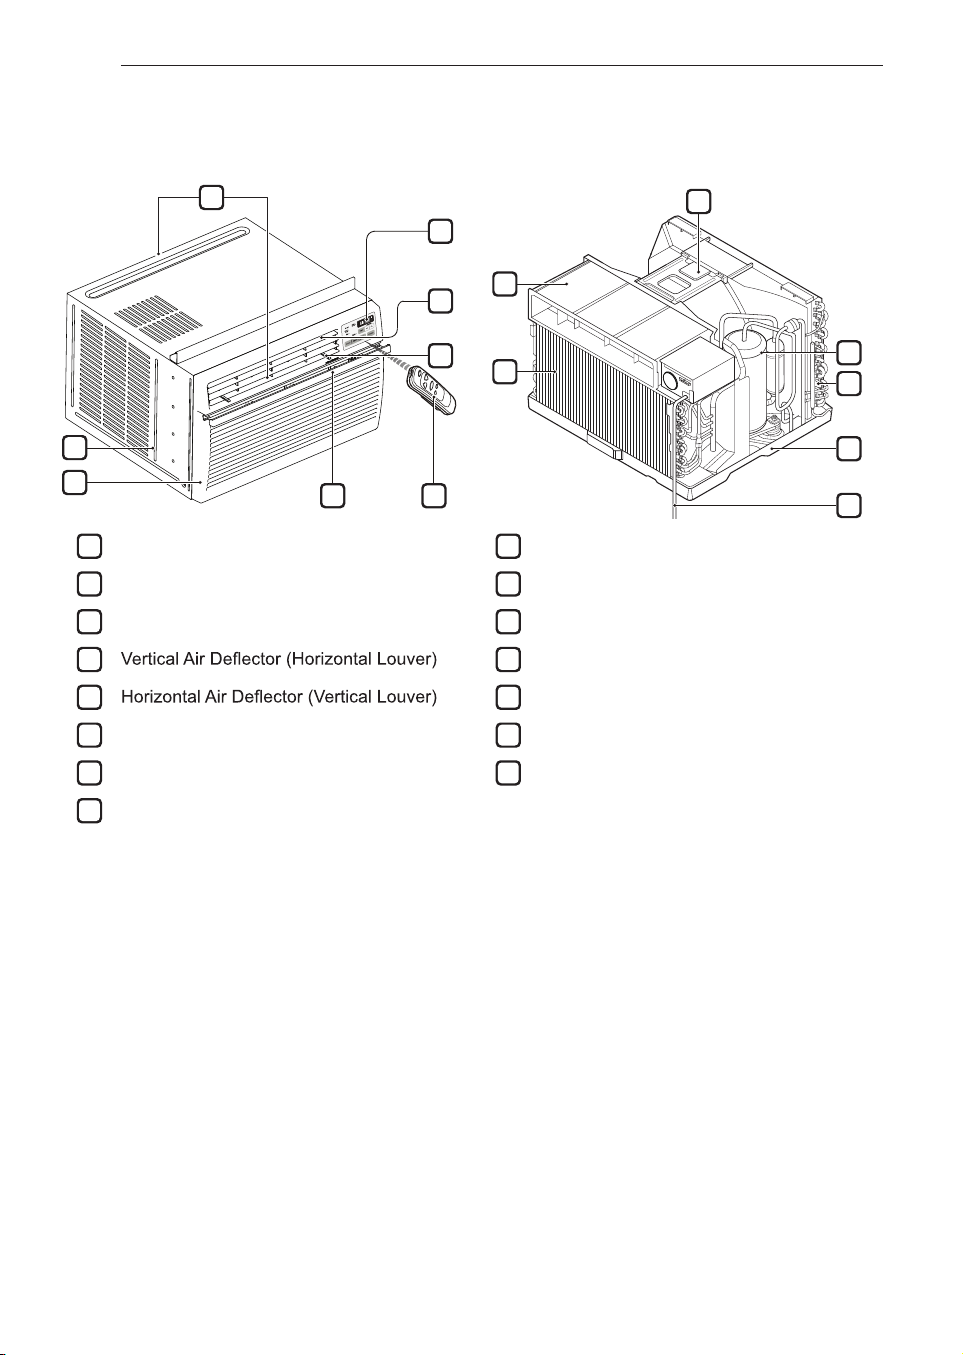
PRODUCT OVERVIEW
Exterior Parts Interior Parts
1
Evaporator
2
Air Guide
3
4
Brace
5
Compressor
6
Condenser
7
Base Pan
Power Cord
1
Control Panel
2
Remote Control
3
Air Filter
4
5
6
Front Grille
7
8
Cabinet
Air Outlet
8
6
2
3
1
4
5
7
3
2
1
4
5
6
7
9
INSTALLATION
EN
INSTALLATION
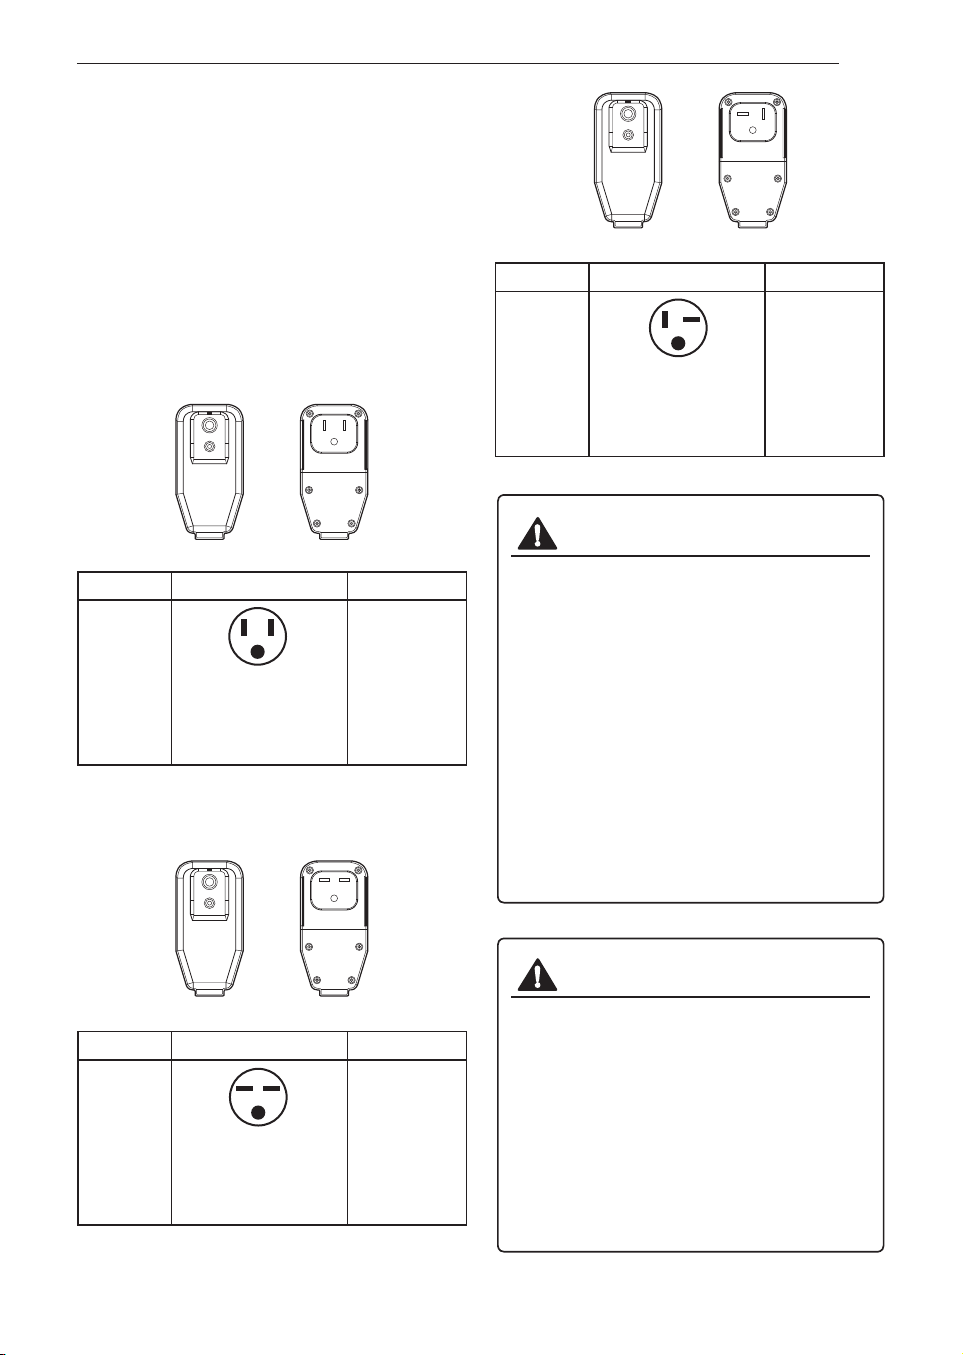
Electrical Data
Power cord may include a current interrupter
device. TEST and RESET buttons are provided
on the plug case. The device should be tested on
a periodic basis by first pressing the
TEST button
and then the RESET button. If the TEST button
does not trip or if the RESET button will not stay
engaged, discontinue use of the air conditioner
and contact a qualified service technician.
for 240 V
RESET
TEST
Use Wall ReceptacleModel
LW1816ER
LW1821ERSM
Power Supply
WARNING
● This appliance should be installed in
accordance with the National Electrical
Code.
● Use of extension cords could cause serious
injury or death.
- Do not use an extension cord with this
window air conditioner.
- Do not use surge protectors or multi-outlet
adapters with this window air conditioner.
● Never push the TEST button during
operation. Doing so can damage the plug.
- Do not remove, modify, or immerse this
plug. If this device trips, the cause should
be corrected before further use.
CAUTION
● The conductors inside this cord are
surrounded by shields, which monitor
leakage current. These shields are not
grounded. Periodically examine the cord
for any damage. Do not use this product
in the event the shields become exposed.
Avoid shock hazard. This unit cannot be
user-serviced. Do not open the tamper-
resistant sealed portion. All warranties and
performance will be voided. This unit is not
intended to be used as an ON/OFF switch.
Standard 240 V, 3-wire
grounding receptacle
rated 15 A / 240 VAC /
60 Hz
Use 15 A, time
delay fuse or
15 A, circuit
breaker.
Use Wall ReceptacleModel
LW1516ER
LW1521ERSM
Power Supply
Standard 120 V, 3-wire
grounding receptacle
rated 15 A / 120 VAC /
60 Hz
Use 15 A, time
delay fuse or
15 A, circuit
breaker.
for 120 V
RESET
TEST
RESET
TEST
Use Wall ReceptacleModel
LW2516ER
LW2521ERSM
Power Supply
Standard 240 V, 3-wire
grounding receptacle
rated 20 A / 240 VAC /
60 Hz
Use 20 A, time
delay fuse or
20 A, circuit
breaker.
10
INSTALLATION
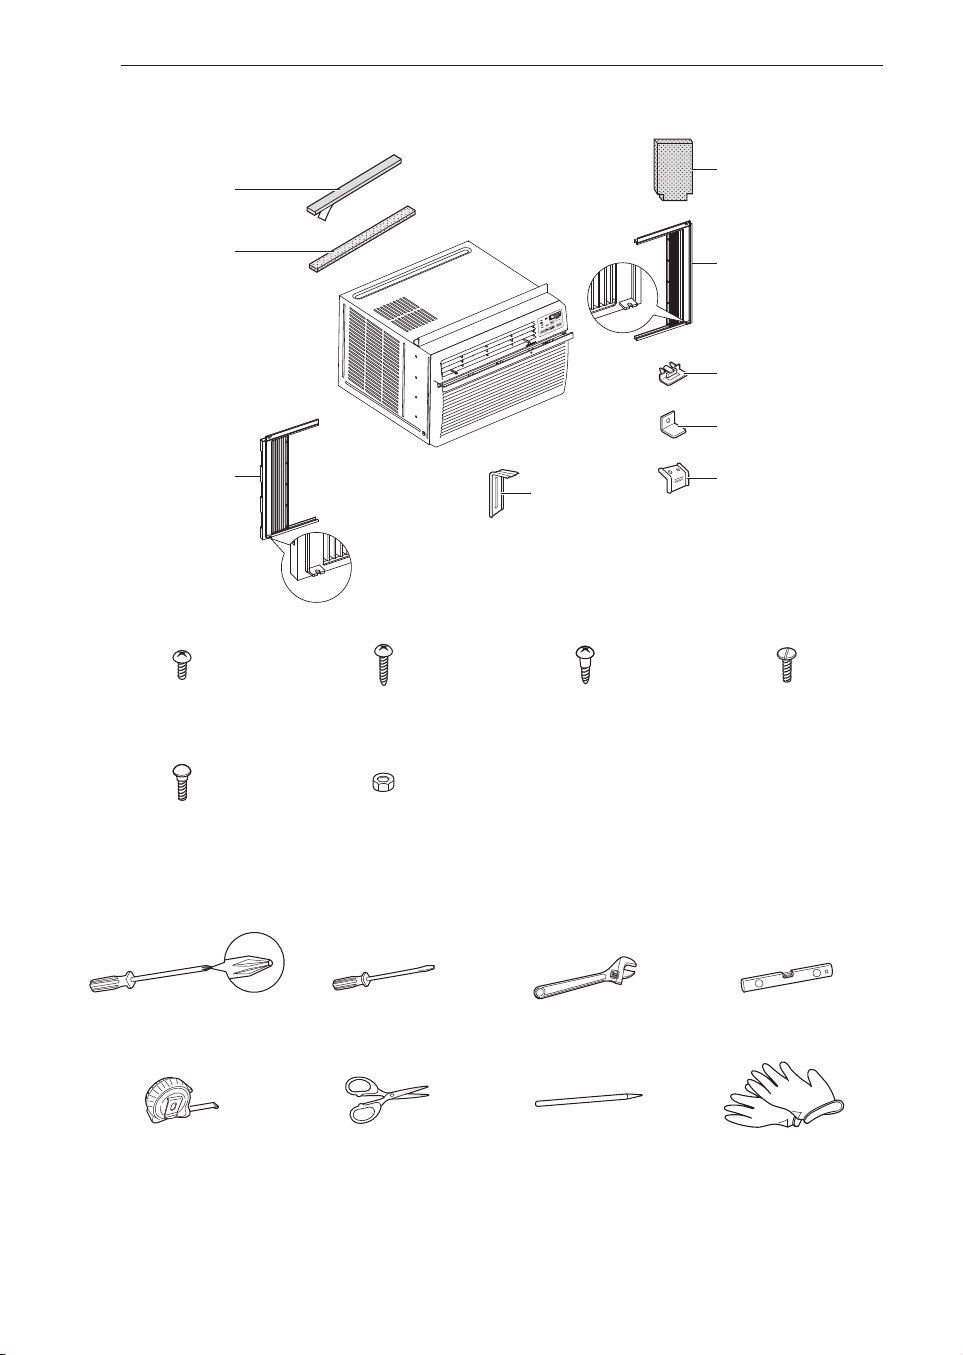
Parts Included (Appearance May Vary)
Type 'A' Screws
(12)
Type 'B' Screws
(7)
Type 'C' Screws
(5)
Type 'D' Screws
(2)
Carriage Bolts
(2)
Lock Nuts
(4)
Tools Needed
Phillips-head
screwdriver
Flat-blade screwdriver Adjustable wrench Level
Tape measure Scissors or
Cutting Knife
Pencil
Heatproof foam (2)
(Adhesive backed)
Right curtain
panel
Left curtain
panel
Foam strip
(Non-adhesive)
Foam-PE (2)
(Adhesive backed)
Lower panel
guide (2)
Window locking
bracket
Sill bracket (2)
Support
bracket (2)
Gloves
INSTALLATION
11 EN
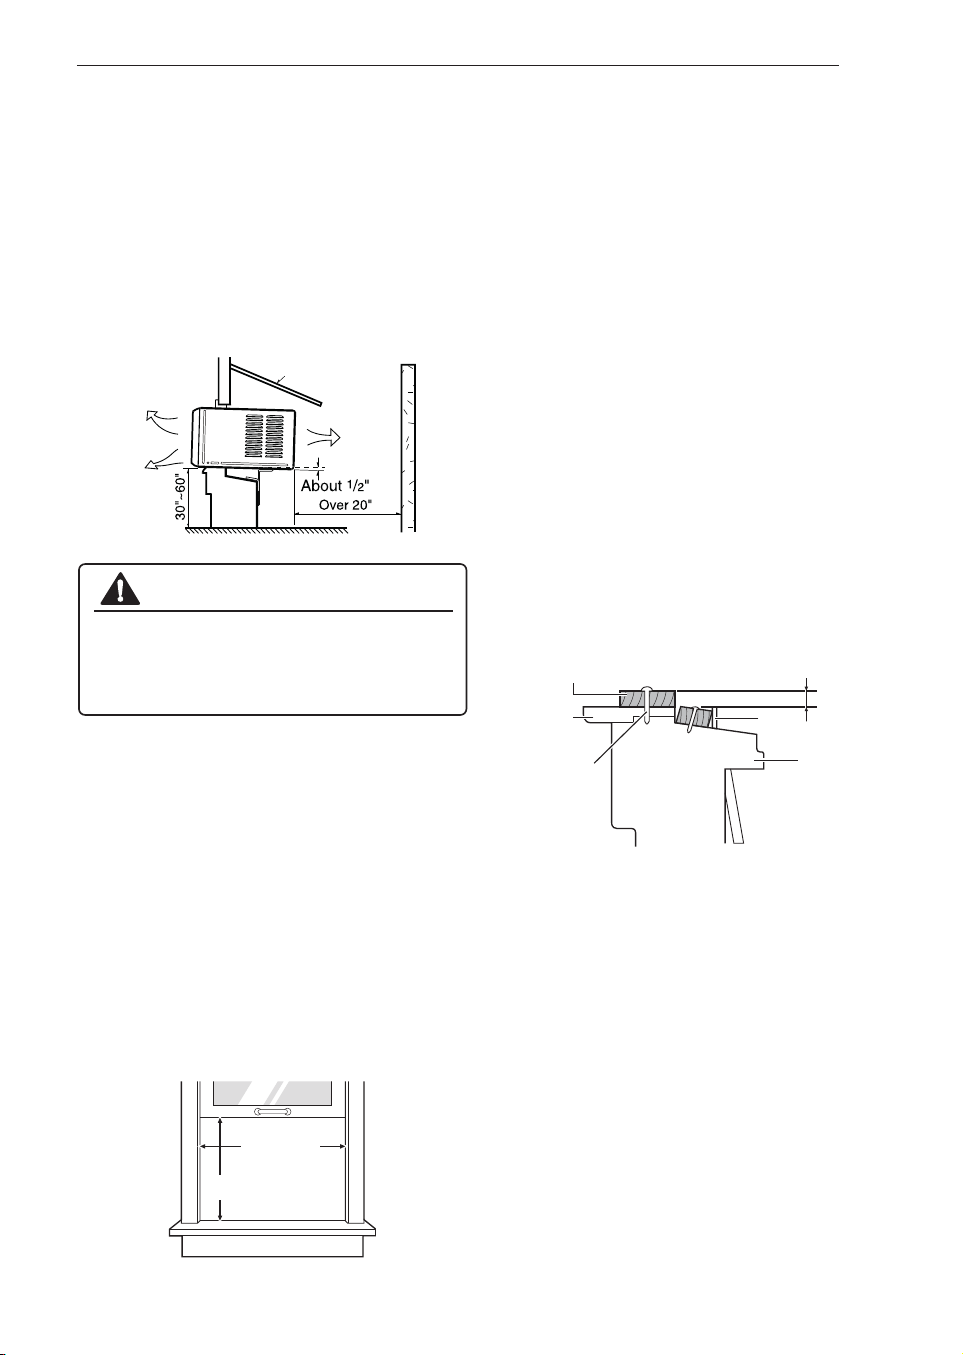
Window Requirements
● This unit is designed for installation in standard
double hung windows with actual opening
widths from 29" to 41".
The top and bottom window sashes must open
sufficiently to allow a clear vertical opening of
19" from the bottom of the upper sash to the
inside sill.
29" to 41"
19" min
How to Install the Unit
1
To prevent vibration and noise, make sure
the unit is installed securely and firmly.
2
Install the unit out of direct sunlight.
3
Fence
Awning
Heat
radiation
Cooled air
CAUTION
●
There should be no obstacles, such as a
fence or wall, within 20" from the back of the
cabinet because it will prevent heat radiation
of the condenser.
Restriction of outside air will greatly reduce
the cooling efficiency of the air conditioner.
DO NOT cover or block any of the side and
top louvers. All side louvers of the cabinet
must remain exposed to the outside of the
structure and unobstructed.
●
This product is a window air conditioner.
As such, a standard single-hung or double-hung
window is required for proper installation.
Non-window installations, including using sleeves
or wall openings, and other installation methods
are not recommended.
4
Install the unit slightly tilted so the back is
slightly lower than the front (about 1/2").
This will force condensed water to flow to
the outside.
5
Install the unit with the bottom between
30" ~60" above the floor level.
1
2
If necessary, attach another 2" x 2" wood
strip flush against the back of the inner sill.
Storm Window Requirements
Windows that include a storm window frame
may prevent the air conditioner from tilting
down toward the outside to drain properly.
For proper drainage, attach a 2" x 2" piece
of wood to the inner sill, trimmed to a length
which fits inside the window frame. The top
of the wood shim must be at least 1 1/4"
higher than the top of the storm window
frame. Attach the wood securely to the sill
with nails or screws.
Indoors
Inner Sill
Nail or screw
Outer Sill
Storm
Window Frame
Wood Strip Mounted
on Top of Inner Sill
1 1/4” higher than
storm window frame
Outdoors
NOTE
●
All supporting parts should be secured to firm
wood, masonry, vinyl, fiberglass, or metal.

12
INSTALLATION
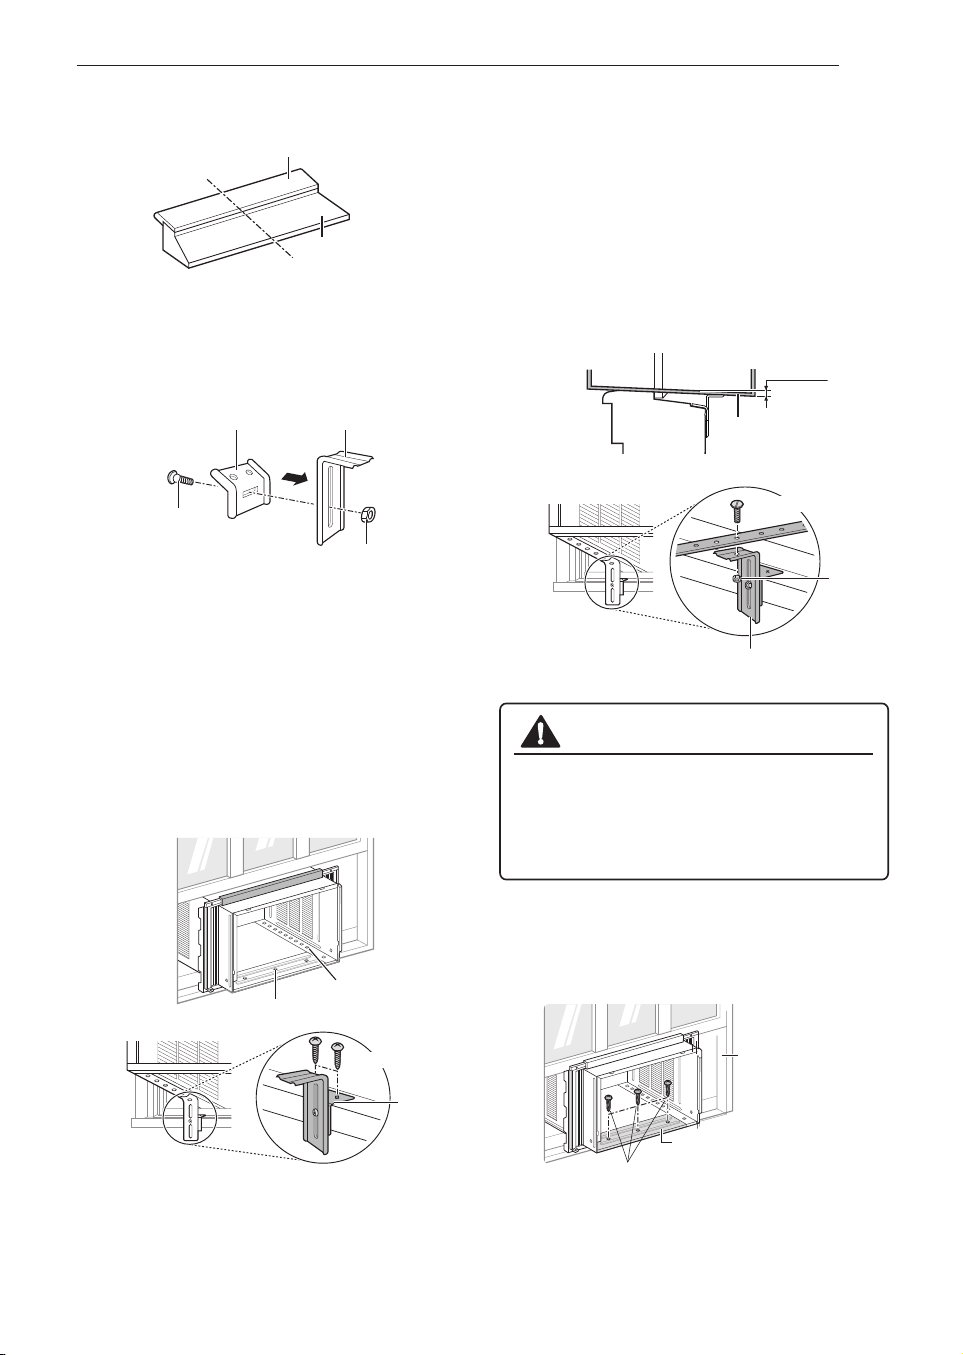
Preparation of Cabinet
1
Remove 4 screws which fasten the cabinet
at both sides and at the back. (Keep the
screws for later use.)
2
Slide the unit from the cabinet by gripping
the base pan handle and pulling forward
while bracing the cabinet.
3
Cut the window sash seals (Foam-PE)
to the proper length. Peel off the backing
and attach the adhesive-backed foam to
the underside of the window sash and the
bottom of the window frame.
Shipping
Screws
CAUTION
● The unit is heavy. To prevent injury, use
proper lifting techniques when pulling unit
forward from cabinet. Obtain assistance
from another person if possible.
Foam-PE
(Adhesive backed)
4
5
Insert the top and bottom rails of the curtain
panels into the upper and lower panel
guides.
CAUTION
●
The lower panel guides are easily broken. Be
careful with them when installing the cabinet.
6
Upper Panel Guide
Right Curtain Panel
Left Curtain Panel
Lower Panel
Guide
Insert the hooks on the lower panel guides
into the slots on the bottom of the cabinet.
Make sure that the flanges on the lower panel
guides will face toward the inside of the room.
Hook
Indoor
Fasten the curtain panels to the unit with 10
type A screws.
Fasten the screws behind the curtain panel.
Screws
(Type A)
Screws
(Type A)
NOTE
●
Use a long screwdriver to make installing the
screws easier.
INSTALLATION
13 EN
Cabinet Installation
1
Open the window. Mark a line on the center
of the inside sill and extending across the
center of the outside sill.
Loosely attach each sill bracket to a support
bracket using a carriage bolt and a lock nut.
Sill Bracket
Carriage
Bolt
Lock Nut
Support Bracket
2
Sill
Bracket
3
Carefully place the cabinet back in the
window and align the cabinet track holes
with the support brackets. Attach each
support bracket to the cabinet through a
cabinet track hole, using a type D screw
and a lock nut. Use the first track hole past
the sill bracket on the outer edge of the
window sill. Tighten the lock nuts on the
support brackets to secure them to the sill
brackets.
Install the cabinet with a slight tilt (about 1/2 ")
downward to the outside sill
Support Bracket
Lock
Nut
Center Line
Outside Sill
Inside Sill
Carefully place the cabinet in the window
and align the center hole on the cabinet
bottom front with the center line marked on
the window sills. Pull the bottom window
sash down behind the upper guide until
they meet. Align the support brackets with
the cabinet track holes and mark the sill
along the sides of each sill bracket.
Remove the cabinet from the window and
attach each sill bracket on the outside sill
between the marks using 2 type B screws.
Screws (Type B)
Cabinet Track Holes
Center Hole
CAUTION
● Do not drill a hole in the bottom pan.
The product is designed to operate with
approximately 1/2” of water in the bottom
pan. There is no need to add water if the
pan is dry.
about 1/2”
Cabinet
Screws (Type D)
4
Sash Track
Front Angle
Screws (Type B)
Mount the cabinet to the window sill using
3 type B screws in the holes on the front
angle.

14
INSTALLATION
5
Pull each curtain panel out until it meets the
window sash track. Pull the bottom window
sash down behind the upper panel guide
until they meet.
Front Angle
Sash Track
Upper Panel
Guide
Inside Window Sill
NOTE
● Do not pull the window sash down so
tightly that the movement of the curtain
panels is restricted.
6
Use a screwdriver or power drill to attach
the curtain panels to the window sashes
by inserting 4 type C screws into the
sashes through the panel holes shown in
the figure below.
1
CAUTION
● The unit is heavy. Use an assistant to help
lift the unit and set it in place. Lifting and
maneuvering the unit by yourself could
result in injury.
Hold the unit firmly in place until the window
frame is lowered to meet the top surface of
the unit directly behind the upper guide. If
the unit falls from the window, it could cause
personal injury or property damage.
Screws
(Type C)
Unit Installation
With the aid of an assistant, slide the unit
into the cabinet. Do not push on the
controls or the finned colis. Reinstall the
screws removed from the cabinet sides in
step 1 of preparation of cabinet.
2
Cut the non-adhesive foam strip to the
proper length and insert it between the
upper window sash and the lower window
sash.
Foam Strip
(Non-adhesive)
3
Window Locking Bracket
Screw
(Type C)
Screw
(Type C)
To prevent broken glass or damage to
windows, on vinyl or other similarly
constructed windows, attach the window
locking bracket with a type C screw.
Vinyl
Wood

4
5
Connect the wire harness before
assembling the front grille.
6
NOTE
● Guide the lever carefully through the grille
as you push it in.
Before installing the front grille, fold out the
vent control lever located to the left
of the control panel, as shown below
Attach the front grille to the cabinet by
inserting the tabs on the grille into the
slots on the front top of the cabinet.
Push the grille in until it snaps into place.
7
Remove air filter from the front grille by
pulling the filter forward and then up
slightly.
Secure it with 2 type A screws through the
front grille.
NOTE
●
Heatproof Foam
H
Heatproof foam improves the cooling
capability of the air conditioner.
W1
(Adhesive Backed)
W2
8
After the air conditioner is installed,
measure the curtain panel on each side
and cut the adhesive-backed heatproof
foam to fit each panel. The size of the
panels may differ. Remove the backing
from the heatproof foam and attach the
foam to the curtain panels.
W1
W2
W
H
W
H
H
● See the Electrical Data section for
information on attaching the power cord
to an electrical outlet.
INSTALLATION
15 EN
16
OPERATION
OPERATION
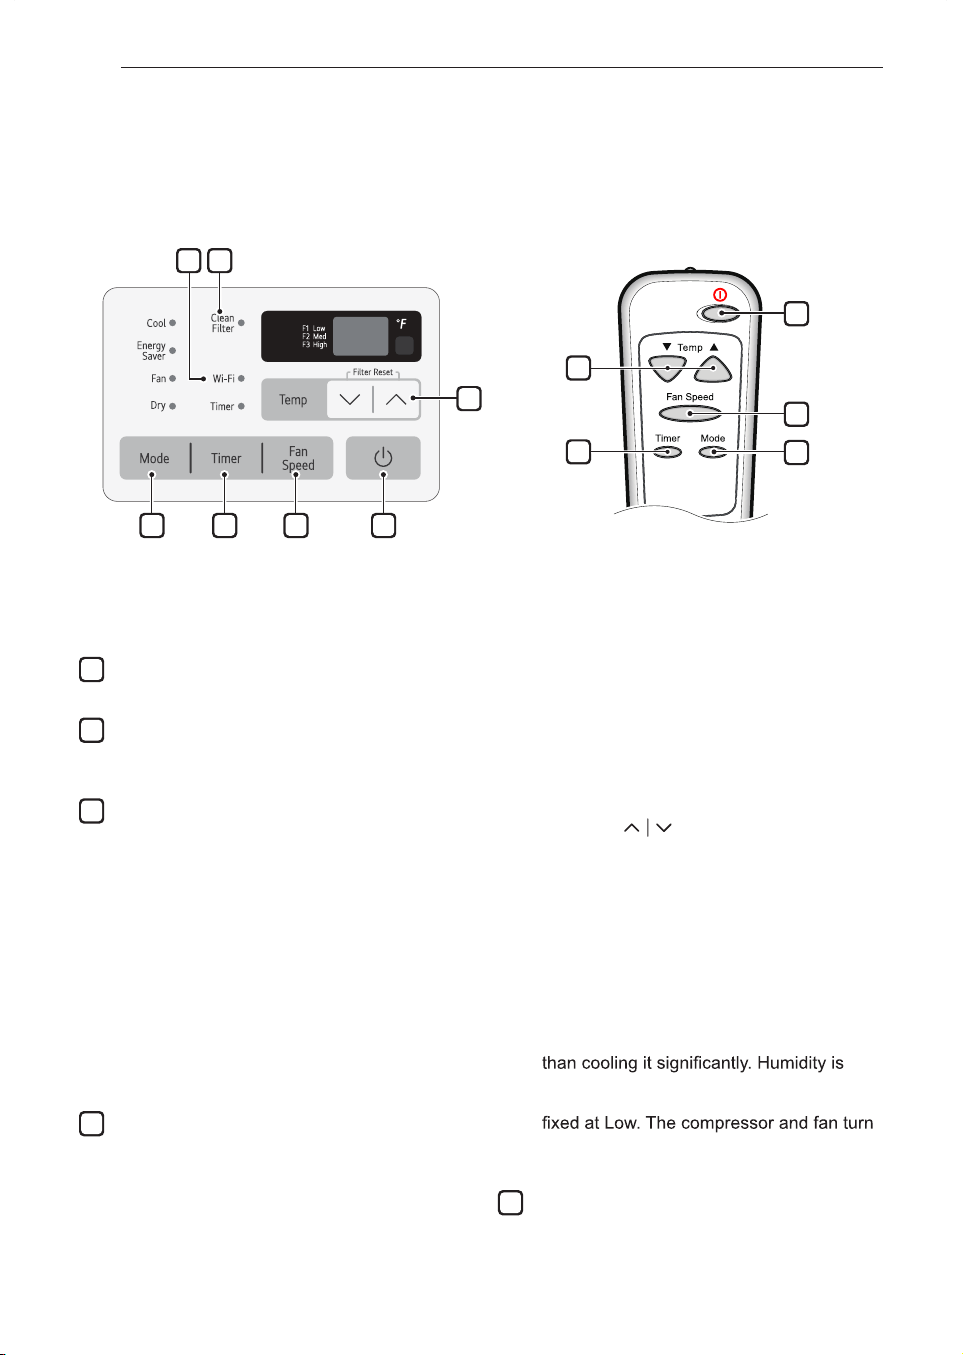
Control Panel and Remote Control
Remote Control
5
Wi-Fi (Wi-Fi Model Only)
Enables connection of the air conditioner to
the home Wi-Fi.
1
Power
Press to turn the air conditioner ON or OFF.
2
Fan Speed
Press to set the fan speed to Low (F1),
Medium (F2), or High (F3).
3
Delay ON/OFF Timer
Delay ON - When the air conditioner is off,
set it to automatically turn on from 1 to 24
hours later, at its previous mode and fan
settings.
Delay OFF - When the air conditioner is on,
set it to automatically turn off from 1 to 24
hours later.
NOTE
NOTE
● Each press of the Timer button advances
the timer by 1 hour. After the last press
the display returns to the temperature
setting.
4
Operation Mode
Press the Mode button to cycle between
4 types of air conditioner operation:
Energy Saver / Cool / Fan / Dry.
Cool
Fan - In this mode the fan circulates air
but the compressor does not run. Use
the Fan Speed button to set fan speed to
High, Medium or Low. In this mode, you
cannot adjust the set temperature.
Dry - This mode is ideal for rainy and
damp days to dehumidify the room rather
removed from the room by the combination
of compressor operation and the fan speed
off once the set temperature is reached.
Fan speed cannot be adjusted in Dry mode.
1
4
2
7
3
- This mode is ideal on hot days to
cool and dehumidify the room quickly. Use
the Temp
buttons to set the desired
room temperature and use the Fan Speed
button to set the desired fan circulation
speed.
Energy Saver - In this mode the
compressor and fan turn off when the set
temperature is achieved. Approximately
every 3 minutes the fan turns on to allow
the unit sensor to accurately determine if
more cooling is needed.
1234
5 6
7
● The feature may be changed according to the type of model.
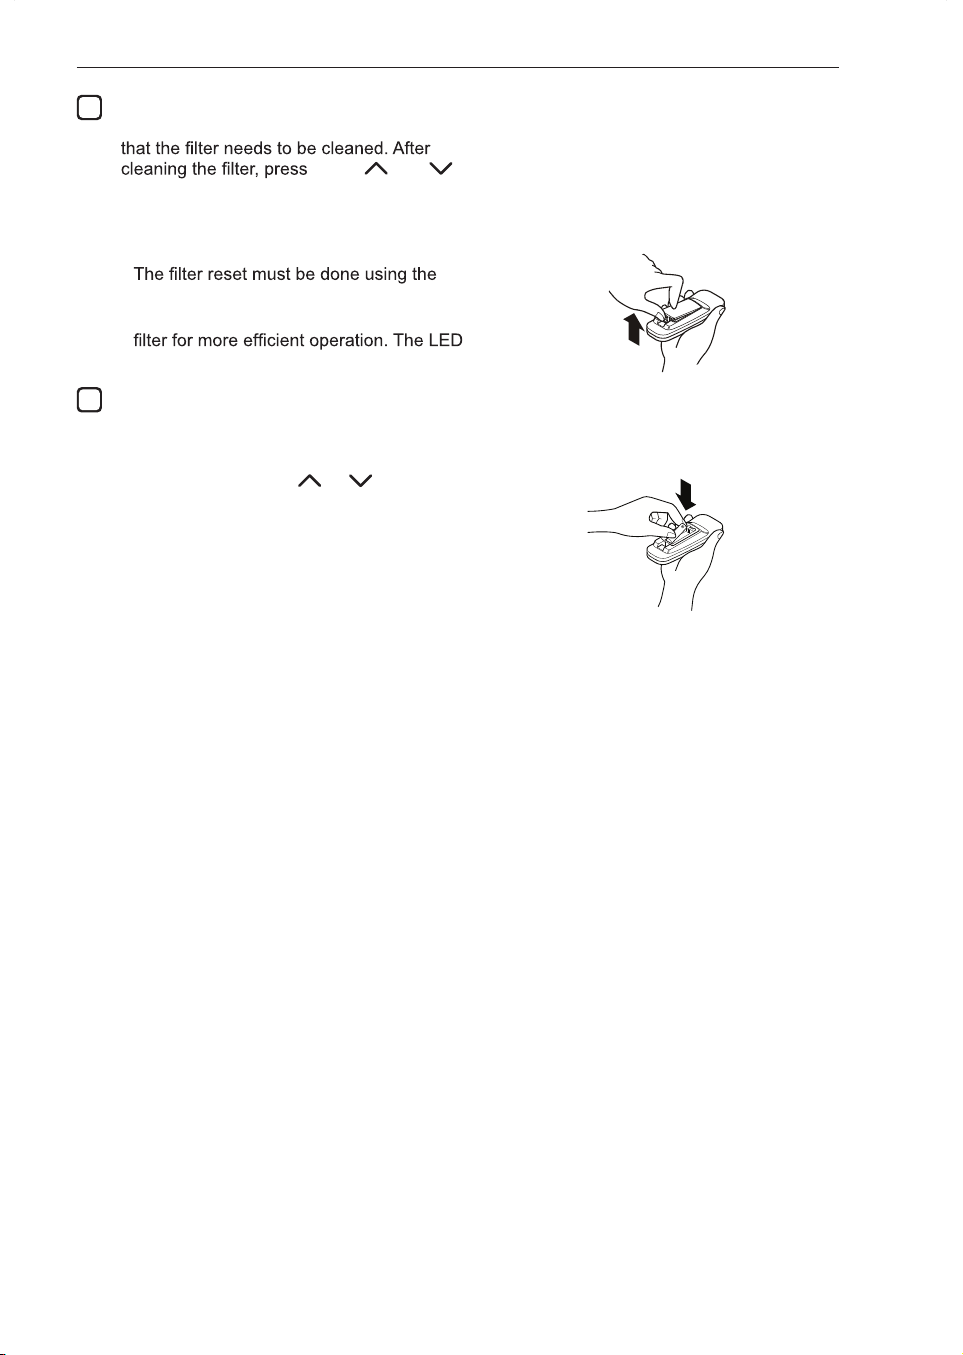
6
Clean Filter
The Clean Filter LED lights up to notify you
Temp
and
together on the control panel to turn off the
Clean Filter light.
NOTE
●
control panel, not the remote control.
● This feature is a reminder to clean the air
light turns on after 250 hours of operation.
7
Temperature Control
The thermostat monitors room temperature
to maintain the desired temperature. The
thermostat can be set between 60 °F–86 °F
(16 °C–30 °C). Press
or arrows to
increase or decrease temperature setting.
NOTE
● Auto Restart: If the air conditioner turns off due
to a power outage, it will restart automatically
once the power is restored, with the same
settings as were set before the unit turned off.
● Energy Saver: The unit defaults to the Energy
Saver mode each time the unit is switched on
except in Fan mode or when power is restored
after an electrical power outage.
● The remote control will not function properly if
the AC infrared sensor is exposed to direct light
or if there are obstacles between the remote
control and the air conditioner.
Wireless Remote Control
Inserting Battery
1
Push out the cover on the back of the
remote control with your thumb.
2
With the plus and minus poles facing as
marked, insert one new AAA 1.5 V
battery.
3
Reattach the cover.
NOTE
● One new battery is supplied with the air
conditioner for use in the remote control.
● Do not use a rechargeable battery. Make sure
that the battery is new.
● In order to prevent discharge, remove the
battery from the remote control if the air
conditioner is not going to be used for an
extended period of time.
● Keep the remote control away from extremely
hot or humid places.
● To maintain optimal operation of the remote
control, the remote sensor should not be
exposed to direct sunlight.
OPERATION
17 EN
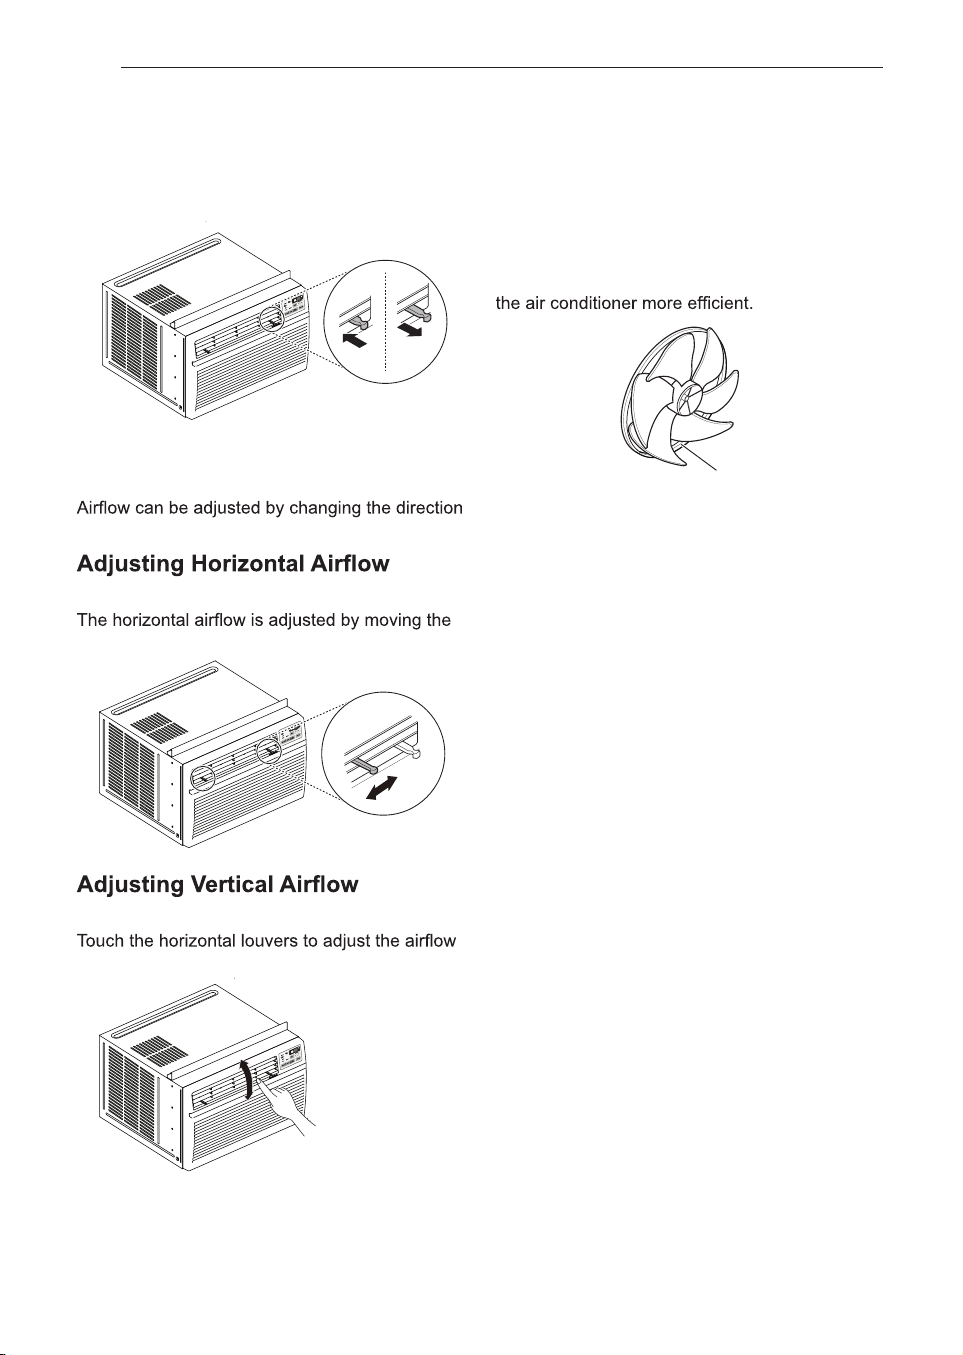
Ventilation
Push the ventilation lever in to the closed position
to maintain the best cooling performance. Pull
the ventilation lever out to open the vent and
draw fresh air into the room.
Air Direction
of the air conditioner’s louvers.
Direction
levers of the vertical louvers to the left or right.
Direction
up or down.
NOTE
● When the weather is extremely hot, the unit
may turn off automatically to protect the
compressor.
Additional Features
Slinger Fan
This air conditioner is equipped with a slinger
fan. (See drawing.)
The fan’s outer ring picks up the condensed
water from the base pan if the water level gets
high enough. The water is then picked up by the
fan and expelled through the condenser, making
Ring
Close Open
18
OPERATION
SMART FUNCTIONS
The LG ThinQ application allows you to
communicate with the appliance using a
smartphone.
Communicate with the appliance from a
smartphone using the convenient smart features.
the or ThinQ logo
1
Check the distance between the appliance
and the wireless router (Wi-Fi network).
• If the distance between the appliance and
the wireless router is too far, the signal
strength becomes weak. It may take a
long time to register or installation may
fail.
2
Turn off the Mobile data or Cellular Data
on your smartphone.
3
Connect your smartphone to the wireless
router.
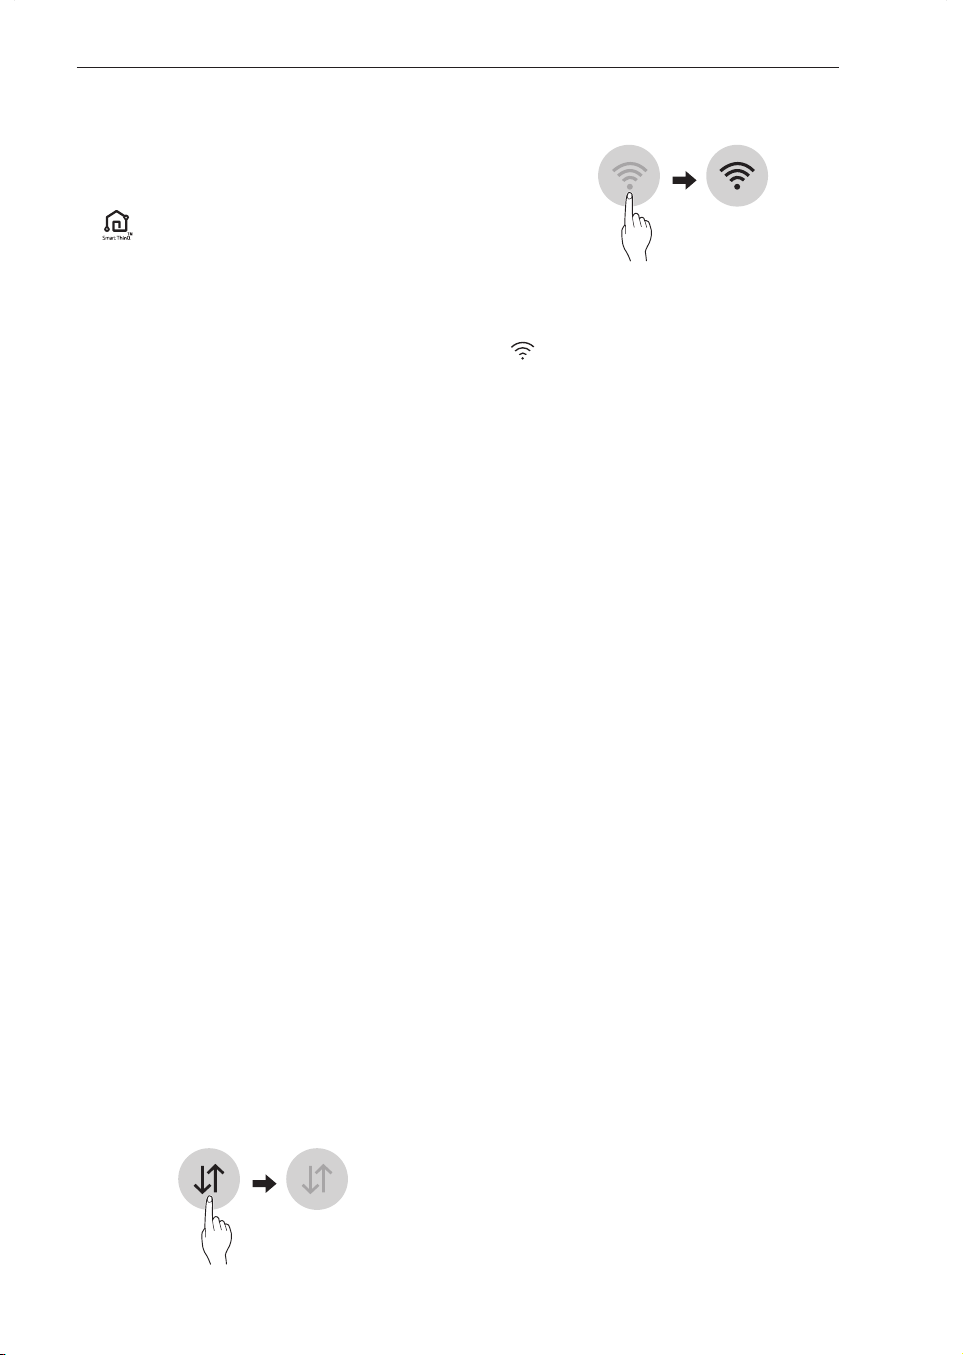
NOTE
• To verify the Wi-Fi connection, check that
icon on the control panel is lit.
• The appliance supports 2.4 GHz Wi-Fi
networks only. To check your network
frequency, contact your Internet service
provider or refer to your wireless router
manual.
• LG ThinQ is not responsible for any network
connection problems or any faults,
malfunctions, or errors caused by network
connection.
• If the appliance is having trouble connecting to
the Wi-Fi network, it may be too far from the
router. Purchase a Wi-Fi repeater (range
extender) to improve the Wi-Fi signal strength.
• The Wi-Fi connection may not connect or may
be interrupted because of the home network
environment.
• The network connection may not work
properly depending on the Internet service
provider.
• The surrounding wireless environment can
make the wireless network service run slowly.
• The appliance cannot be registered due to
problems with the wireless signal
transmission. Unplug the appliance and wait
about a minute before trying again.
• If the firewall on your wireless router is
enabled, disable the firewall or add an
exception to it.
• The wireless network name (SSID) should be
a combination of English letters and numbers.
(Do not use special characters.)
• Smartphone user interface (UI) may vary
depending on the mobile operating system
(OS) and the manufacturer.
• If the security protocol of the router is set to
WEP, you may fail to set up the network.
Please change it to other security protocols
(WPA2 is recommended) and register the
product again.
LG ThinQ Application
This feature is only available on models with
LG ThinQ Application Features
If you experience a problem while using the
appliance,this smart diagnosis feature will help
you diagnose the problem.
Smart Diagnosis
Allows you to set various options on the
appliance and in the application.
Settings
Before Using LG ThinQ Application
TM
NOTE
• If you change your wireless router, internet
service provider, or password, delete the
registered appliance from the LG ThinQ
application and register it again.
• The application is subject to change for
appliance improvement purposes without
notice to users.
• Functions may vary by model.
SMART FUNCTIONS
19 EN

Installing the LG ThinQ
Application
Search for the LG ThinQ application from
the Google Play Store or Apple App Store on a
smartphone. Follow instructions to download
and install the application.
Open Source Software Notice
Information
To obtain the source code under GPL, LGPL, MPL,
and other open source licenses, that is contained
in this product, please visit https://opensource.lge.
com.
In addition to the source code, all referred license
terms, warranty disclaimers and copyright notices
are available for download.
LG Electronics will also provide open source code
to you on CD-ROM for a charge covering the cost
of performing such distribution (such as the cost of
media, shipping, and handling) upon email request
to [email protected]. This offer is valid for a
period of three years after our last shipment of this
product. This offer is valid to anyone in receipt of
this information.
Smart Diagnosis
This feature is only available on models with the
or logo.
Use this feature to help you diagnose and solve
problems with your appliance.
NOTE
TM
●
For reasons not attributable to LGE’s
negligence, the service may not operate due to
external factors such as, but not limited to, Wi-Fi
unavailability, Wi-Fi disconnection, local app
store policy, or app unavailability.
●
The feature may be subject to change without
prior notice and may have a different form
depending on where you are located.
Using LG ThinQ to Diagnose
Issues
If you experience a problem with your Wi-Fi
equipped appliance, it can transmit troubleshooting
data to a smartphone using the LG ThinQ
application.
●
Launch the LG ThinQ application and select
the Smart Diagnosis feature in the menu.
Follow the instructions provided in the LG
ThinQ application.
TM
20
SMART FUNCTIONS
FCC Notice
This equipment has been tested and found
This following notice cover the transmitter
module contained in this product.
to comply with the limits for a Class B digital
device, pursuant to Part 15 of the FCC Rules.
These limits are designed to provide reasonable
protection against harmful interference in a
residential installation. This equipment generates,
uses, and can radiate radio frequency energy
and, if not installed and used in accordance with
the instructions, may cause harmful interference
to radio communications. However, there is no
guarantee that interference will not occur in a
particular installation. If this equipment does
cause harmful interference to radio or television
reception, which can be determined by turning
the equipment off and on, the user is encouraged
to try to correct the interference by one or more
of the following measures:
● Reorient or relocate the receiving antenna.
● Increase the separation between the equipment
and the receiver.
● Connect the equipment into an outlet on a circuit
different from that to which the receiver is
connected.
● Consult the dealer or an experienced radio/TV
technician for help.
This device complies with part 15 of the FCC
Rules. Operation is subject to the following two
conditions:
1) This device may not cause harmful
interference and
2) This device must accept any interference
received, including interference that may
cause undesired operation.
this device which are not expressly approved by
Any changes or modifications in construction of
the party responsible for compliance could void
the user’s authority to operate the equipment.
FCC RF Radiation Exposure
Statement
This equipment complies with FCC radiation
exposure limits set forth for an uncontrolled
environment. This transmitter must not be co-
located or operating in conjunction with any other
antenna or transmitter.
This equipment should be installed and operated
with a minimum distance of 20 cm (7.8 inches)
between the antenna and your body. Users must
follow the specific operating instructions for
satisfying RF exposure compliance.
Wireless LAN Module Specifications
SMART FUNCTIONS
21 EN
Frequency
Range
2412 MHz - 2462 MHz
Output
Power
(Max)
< 30 dBm
2
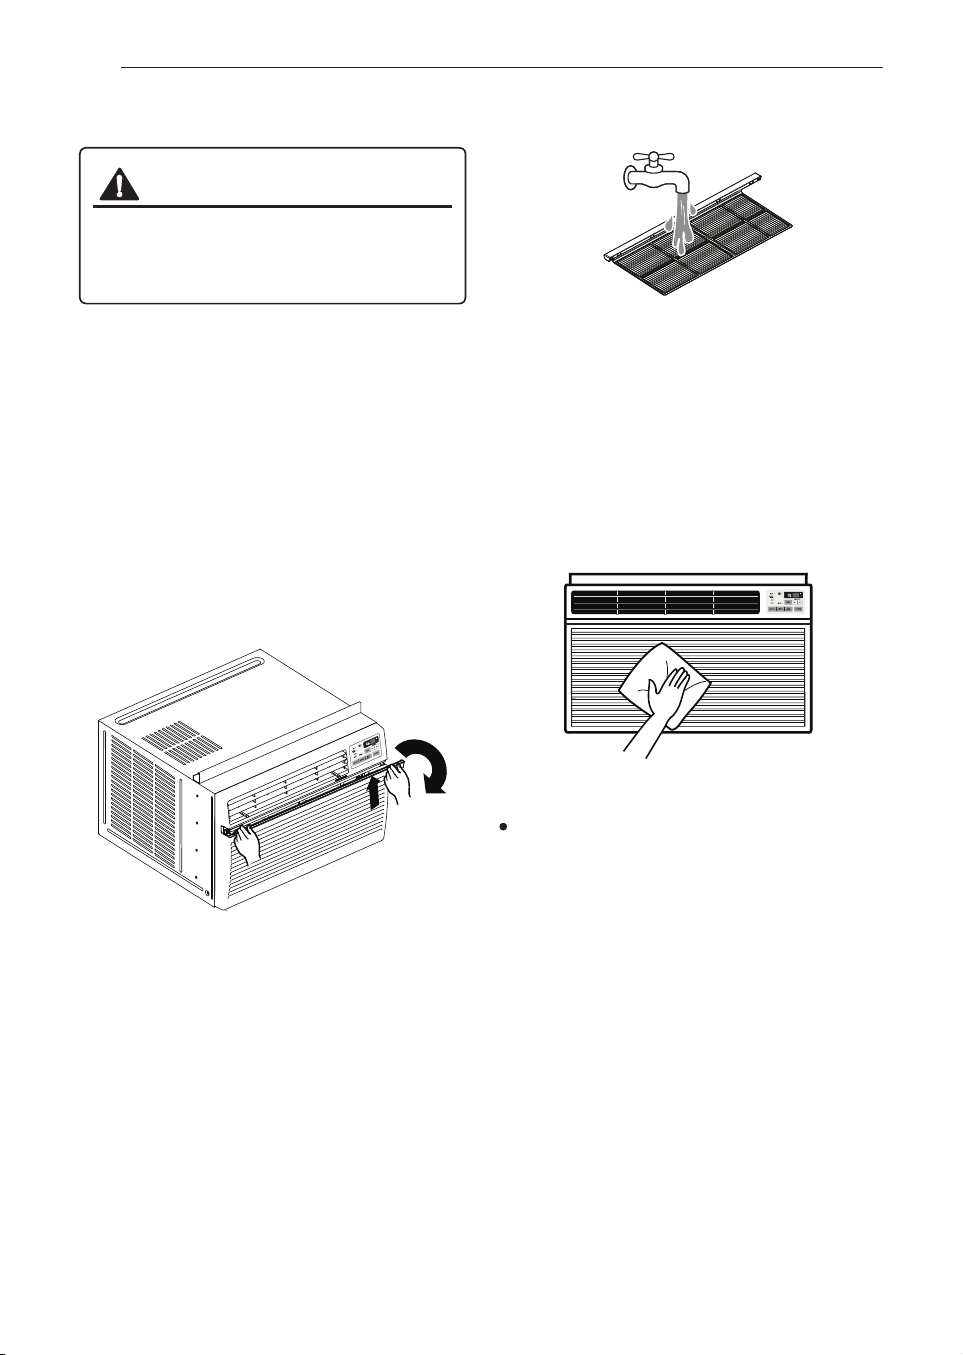
Wash the filter using lukewarm water below
40 °C (104 °F).
WARNING
Before cleaning or performing maintenance,
disconnect the power supply and wait until
the fan stops.
Air Filter
Cleaning the Air Filter
1
MAINTENANCE
3
Gently shake the excess water from the
Cleaning the Air Conditioner
● Wipe the front grille and inlet grille with a cloth
dampened in a mild detergent solution.
● Wash the cabinet with mild soap or detergent
and lukewarm water, then polish using liquid
appliance wax.
NOTE
condenser coils (outside of unit) should be
checked periodically and cleaned if clogged
with soot or dirt from outside air.
● For repair and maintenance, contact an
Authorized Service Center. See the warranty
page for details or call 1-800-243-0000.
Have your model number and serial number
available. They can be found on the side of
the cabinet. Record them on page 28 for future
reference.
To ensure continued peak efficiency, the
filter and replace.
Check the air filter at least twice a month to see
if cleaning is necessary. Trapped particles in the
filter can build up and block the airflow, reducing
cooling capacity and causing an accumulation of
frost on the evaporator.
Remove the air filter from the front grille by
pulling the filter forward and then up slightly.
22
MAINTENANCE
TROUBLESHOOTING
Before Calling for Service
The appliance is equipped with an automatic error-monitoring system to detect and diagnose problems
at an early stage. If the appliance does not function properly or does not function at all, check the
following before you call for service.
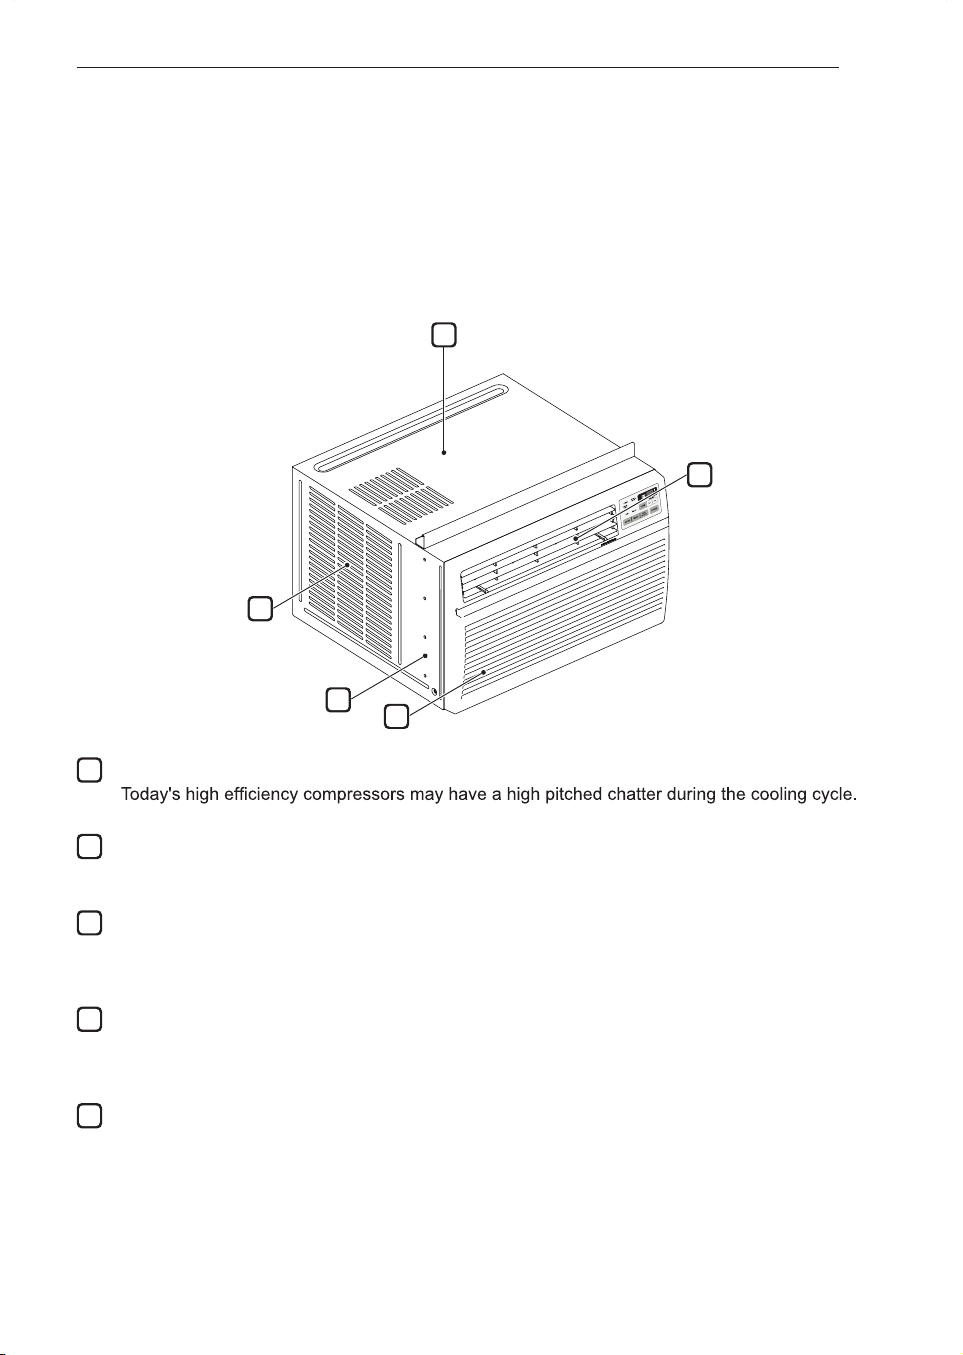
Normal Sounds You May Hear
1
High Pitched Chatter
2
Sound of Rushing Air
At the front of the unit, you may hear the sound of rushing air being moved by the fan.
3
Gurgle/Hiss
Gurgling or hissing noise may be heard due to refrigerant passing through evaporator during
normal operation.
4
Vibration
Unit may vibrate and make noise because of poor wall or window construction or incorrect
installation.
5
Pinging or Swishing
Droplets of water hitting condenser during normal operation may cause pinging or swishing
sounds.
1
2
5
4
3
TROUBLESHOOTING
23 EN
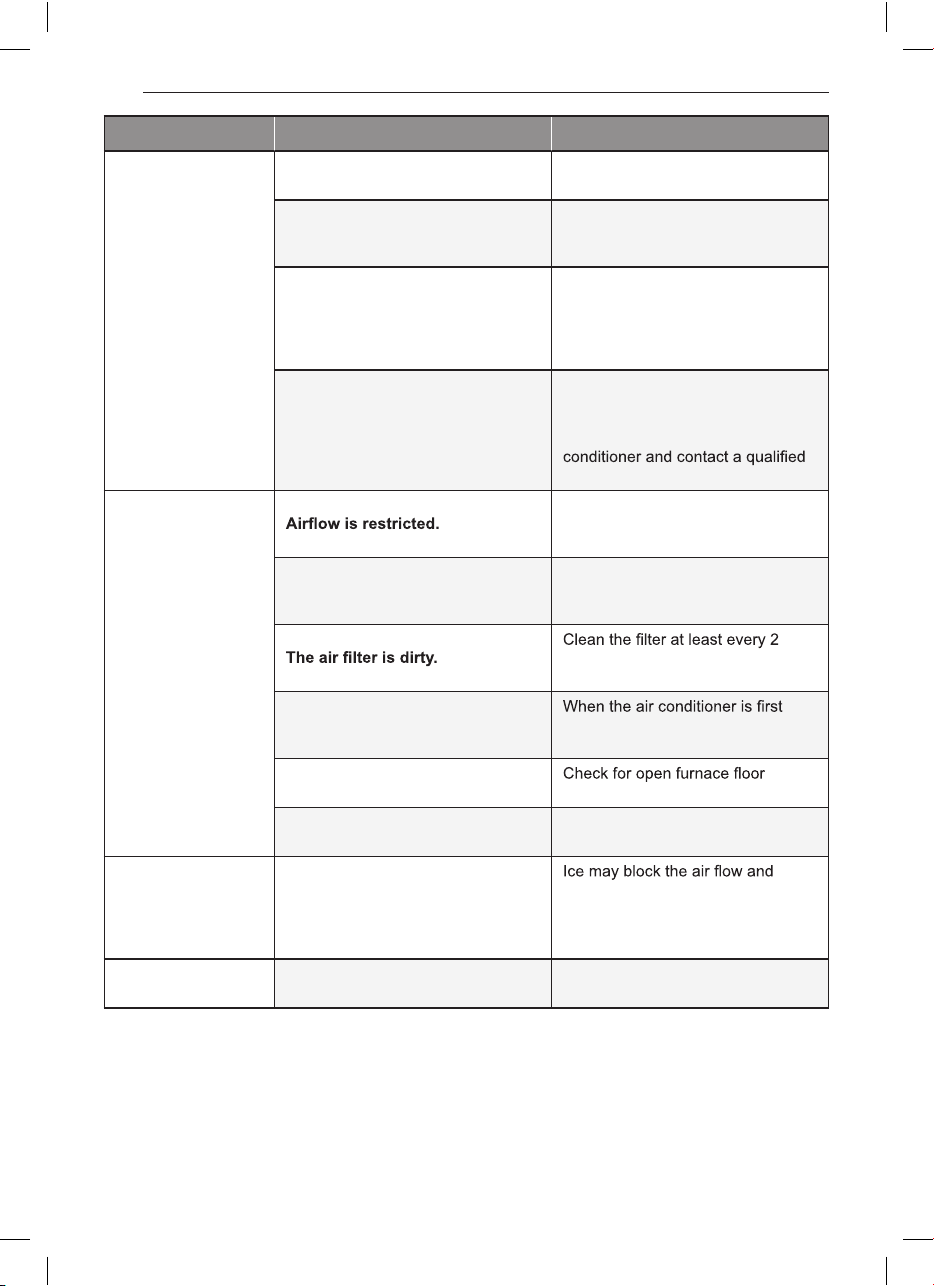
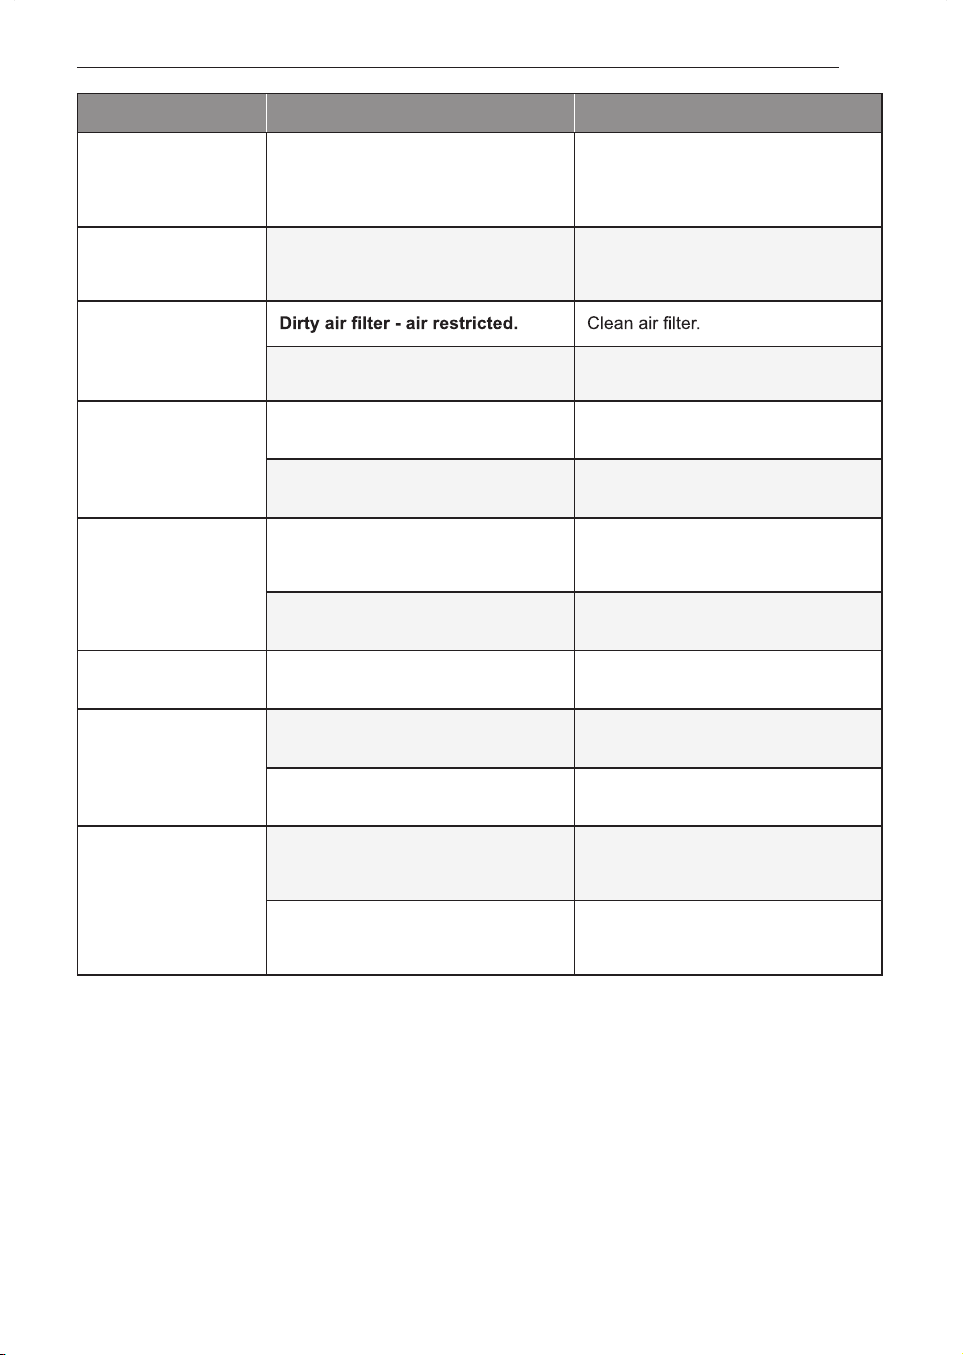
Problem Possible Cause Solutions
Air conditioner
does not start.
The air conditioner is unplugged.
Make sure the air conditioner plug
is pushed completely into the outlet.
The fuse is blown/circuit breaker
is tripped.
Check the house fuse/circuit
breaker box and replace the fuse or
reset the breaker.
Power failure.
If power failure occurs, turn the
mode control to off. When power is
restored, wait 3 minutes to restart
the air conditioner to prevent
tripping of the compressor overload.
The current interrupter device is
tripped.
Press the RESET button located
on the power cord plug. If the
RESET button will not stay
engaged, discontinue use of the air
service technician.
Air conditioner
does not cool as it
should.
Make sure there are no curtains,
blinds, or furniture blocking the front
of the air conditioner.
The temp control may not be set
correctly.
Set the desired temperature to
a level lower than the current
temperature.
weeks. See the 'MAINTENANCE'
section.
The room may have been hot.
turned on, you need to allow time
for the room to cool down.
Cold air is escaping.
registers and cold air returns.
Cooling coils have iced up.
See 'Air conditioner freezing up'
below.
Air conditioner
freezing up.
The cooling coils are iced over.
obstruct the air conditioner from
properly cooling the room. Set the
mode control at High Fan or High
Cool.
Water drips
outside.
Hot, humid weather. This is normal.
24
TROUBLESHOOTING
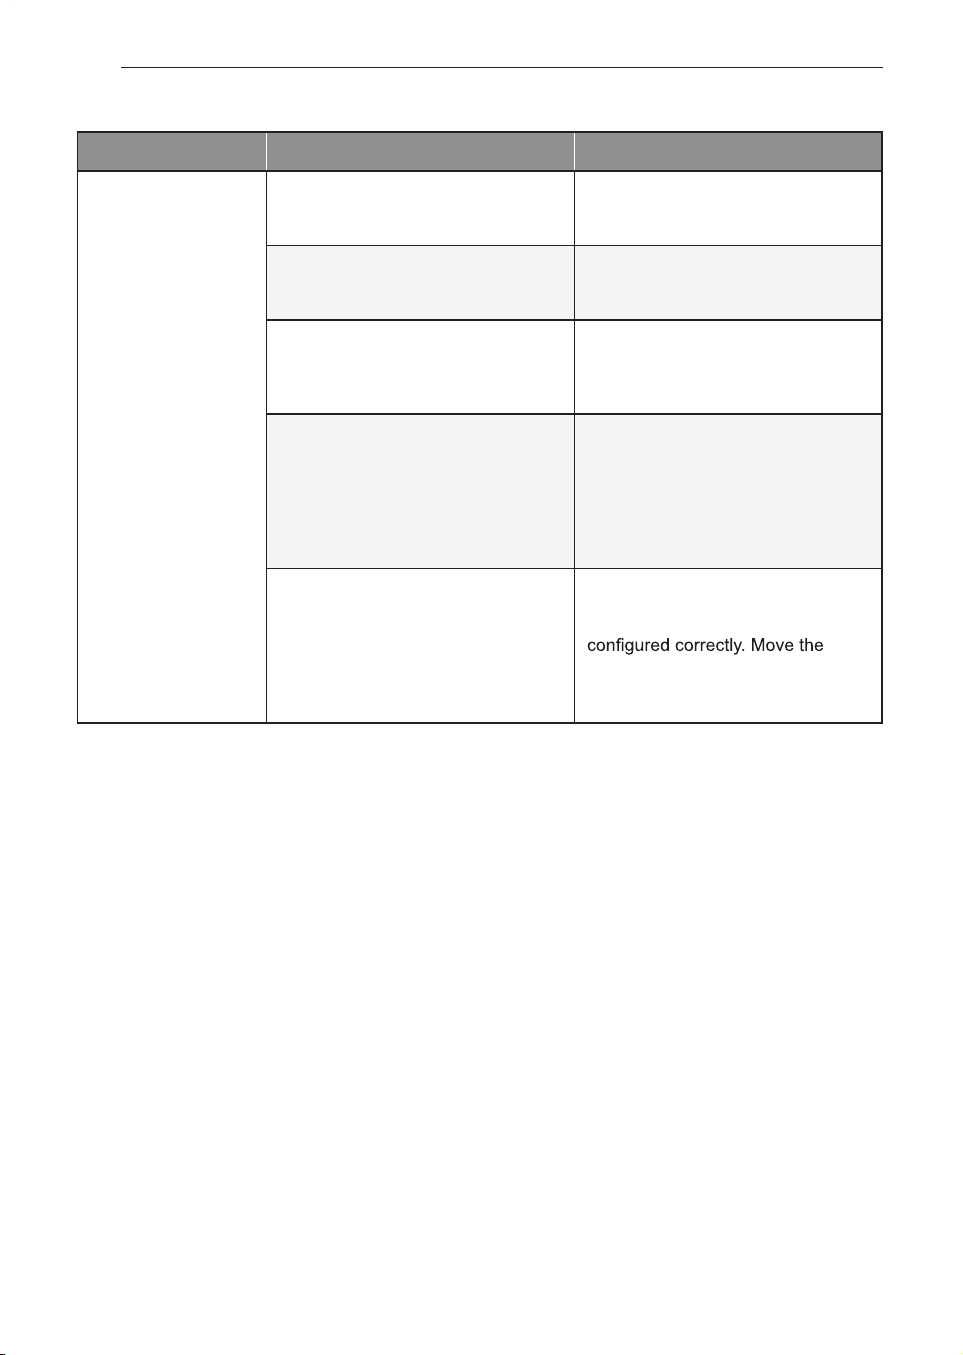
Problem Possible Cause Solutions
Water drips
indoors.
The air conditioner is not tilted to
the outside.
For proper water disposal, make
sure the air conditioner slants
slightly from the cabinet front to the
rear.
Water collects in
base pan.
Moisture removed from air and
drains into base pan.
This is normal for a short period in
areas with little humidity; normal for
a longer period in very humid areas.
Air conditioner
turns on and off
rapidly.
Outside temperature extremely
hot.
Refer to installation instructions or
check with installer.
Noise when unit is
cooling.
Air movement sound.
This is normal. If too loud, set to
lower FAN setting.
Window vibration - poor
installation.
Refer to installation instructions or
check with installer.
Remote sensing
deactivating
prematurely.
Remote control not located
within range.
Place remote control within 20 feet
& 120° radius of the front of the
unit.
Remote control signal
obstructed.
Remove obstruction.
Room too cold. Set temperature too low. Increase set temperature.
Can't connect the
LG ThinQ App. to
the air conditioner.
Air conditioner is turned off. Turn the air conditioner on.
Wireless router is turned off. Turn the router on.
The air conditioner
is not connecting
to the Wi-Fi.
The Wi-Fi router is too far from
the air conditioner.
Move the router closer to the air
conditioner or purchase and install
a Wi-Fi repeater (signal booster).
You do not have permission
to use the router or it is
incompatible.
Make sure you are selecting the
correct wireless router from the list.
The router must be set to 2.4 GHz.
NOTE
● You can refer to the Energy Star program in detail at www.energystar.gov.
● If you see "CH" in the display, please call 1-800-243-0000.
TROUBLESHOOTING
25 EN
Wi-Fi
Problem Possible Cause Solutions
Trouble connecting
appliance and
smartphone to
Wi-Fi network.
The password for the Wi-Fi
network was entered incorrectly.
Delete your home Wi-Fi network
and begin the registration process
again.
Mobile data for your smartphone
is turned on.
Turn off the Mobile data on your
smartphone before registering the
appliance.
The wireless network name
(SSID) is set incorrectly.
The wireless network name (SSID)
should be a combination of English
letters and numbers. (Do not use
special characters.)
The router frequency is not 2.4
GHz.
Only a 2.4 GHz router frequency
is supported. Set the wireless
router to 2.4 GHz and connect the
appliance to the wireless router. To
check the router frequency, check
with your Internet service provider
or the router manufacturer.
The appliance is too far from
the router.
If the appliance is too far from the
router, the signal may be weak
and the connection may not be
router closer to the appliance
or purchase and install a Wi-Fi
repeater.
26
TROUBLESHOOTING
WARRANTY
WHAT THIS WARRANTY COVERS:
LG Electronics U.S.A., Inc. (“LG”) warrants your LG Room Air Conditioner ("product") against defect in
THIS LIMITED WARRANTY CONTAINS AN ARBITRATION PROVISION THAT
REQUIRES YOU AND LG TO RESOLVE DISPUTES BY BINDING ARBITRATION INSTEAD OF IN
COURT, UNLESS YOU CHOOSE TO OPT OUT. IN ARBITRATION, CLASS ACTIONS AND JURY
TRIALS ARE NOT PERMITTED. PLEASE SEE THE SECTION TITLED “PROCEDURE FOR RESOLVING
DISPUTES” BELOW.
materials or workmanship under normal household use, during the warranty period set forth below, LG
will, at its option, repair or replace the product. This limited warranty is valid only to the original retail
purchaser of the product, is not assignable or transferrable to any subsequent purchaser or user, and
applies only when the product is purchased through an LG authorized dealer or distributor and used
within the United States (“U.S.”) including U.S. Territories.
NOTE
● Replacement products and repair parts may be new or factory-remanufactured and are warranted
for the remaining portion of the original unit’s warranty period or ninety (90) days, whichever is
longer. Please retain dated receipt or delivery ticket as evidence of the Date of Purchase for proof of
warranty (you may be required to submit a copy to LG or authorized representative).
WARRANTY PERIOD:
ARBITRATION NOTICE:
1 year from the Date of Purchase: Any internal/ functional Parts and Labor
HOW SERVICE IS HANDLED: In-Home Service
In-home service will be provided during the warranty period subject to availability within the United
States. In-home service may not be available in all areas. To receive in-home service, the product
must be unobstructed and accessible to service personnel. If during in-home service repair cannot
be completed, it may be necessary to remove, repair and return the product. If in-home service is
unavailable, LG may elect, at our option, to provide for transportation of our choice to and from a LG
authorized service center.
THIS LIMITED WARRANTY DOES NOT COVER:
● Service trips to deliver, pick up, or install the product or for instruction on product use.
● Replacing house fuses or resetting of circuit breakers, correction of house wiring or plumbing, or
correction of product installation.
● Damage or failure caused by leaky / broken / frozen water pipes, restricted drain lines, inadequate or
interrupted water supply or inadequate supply of air.
●
● Damage or failure resulting from misuse, abuse, improper installation, repair or maintenance.
●
● Damage or failure caused by incorrect electrical current, voltage, or plumbing codes.
●
unless such damage results from defects in materials or workmanship and is reported to LG within
seven (7) calendar days from the date of delivery.
● Damage or missing items to any display, open box, discounted, or refurbished product.
WARRANTY
27 EN
● Product where the original factory serial numbers have been removed, defaced or changed in any
way.
● Repairs when product is used in other than normal and usual household use (e.g. rental, commercial
’s manual.
● The removal and reinstallation of the Product if it is installed in an inaccessible location.
THIS WARRANTY
IS IN LIEU OF ANY OTHER WARRANTY, EXPRESS OR IMPLIED, INCLUDING
AND WITHOUT LIMITATION TO, ANY WARRANTY OF MERCHANTABILITY OR FITNESS FOR A
PARTICULAR PURPOSE. TO THE EXTENT ANY IMPLIED WARRANTY IS REQUIRED BY LAW,
THIS WARRANTY IS LIMITED IN DURATION TO THE TERM PERIOD EXPRESSED ABOVE.
REPAIR OR REPLACEMENT AS PROVIDED UNDER THIS WARRANTY IS THE EXCLUSIVE
REMEDY FOR THE CUSTOMER. NEITHER THE MANUFACTURER NOR ITS U.S. DISTRIBUTOR
SHALL BE LIABLE FOR ANY INCIDENTAL, CONSEQUENTIAL, INDIRECT, SPECIAL, OR
PUNITIVE DAMAGES OF ANY NATURE, INCLUDING AND WITHOUT LIMITATION TO, LOST
REVENUES OR PROFITS, OR ANY OTHER DAMAGE, WHETHER BASED IN CONTRACT, TORT,
OR OTHERWISE.
Some states do not allow the exclusion or limitation of incidental or consequential damages or
limitations on how long an implied warranty lasts, so the above exclusion or limitation may not apply
state to state.
HOW TO OBTAIN WARRANTY SERVICE & ADDITIONAL INFORMATION:
Call 1-800-243-0000 or visit our website at www.lg.com.
Mail to: LG Customer Information Center (ATTN: CIC)
201 James Record Road, Huntsville, AL 35824
FOR YOUR RECORDS
Write the model and serial numbers here:
Model No.
Serial No.
Dealer's Name
Date Purchased
● Staple your receipt to this page in the event you need it to prove date of purchase or for warranty
issues.
● This information is located on a label on the side of the unit.
28
WARRANTY

PROCEDURE FOR RESOLVING DISPUTES:
ALL DISPUTES BETWEEN YOU AND LG ARISING OUT OF OR RELATING IN ANY WAY TO THIS
Definitions. For the purposes of this section, references to “LG” mean LG Electronics U.S.A., Inc., its
parents, subsidiaries and affiliates, and each of their officers, directors, employees, agents, beneficiaries,
predecessors in interest, successors, assigns and suppliers; references to “dispute” or “claim” shall
include any dispute, claim or controversy of any kind whatsoever (whether based in contract, tort, statute,
regulation, ordinance, fraud, misrepresentation or any other legal or equitable theory) arising out of or
relating in any way to the sale, condition or performance of the product or this Limited Warranty.
LIMITED WARRANTY OR THE PRODUCT SHALL BE RESOLVED EXCLUSIVELY THROUGH
BINDING ARBITRATION, AND NOT IN A COURT OF GENERAL JURISDICTION. BINDING
ARBITRATION MEANS THAT YOU AND LG ARE EACH WAIVING THE RIGHT TO A JURY TRIAL
AND TO BRING OR PARTICIPATE IN A CLASS ACTION.
Notice of Dispute. In the event you intend to commence an arbitration proceeding, you must first notify
LG in writing at least 30 days in advance of initiating the arbitration by sending a letter to LG at LG
Electronics, USA, Inc. Attn: Legal Department- Arbitration 111 Sylvan Avenue, Englewood Cliffs, NJ 07632.
You and LG agree to engage in good faith discussions in an attempt to amicably resolve your claim.
The notice must provide your name, address, and telephone number; identify the product that is the
subject of the claim; and describe the nature of the claim and the relief being sought. If you and LG are
unable to resolve the dispute within 30 days, either party may proceed to file a claim for arbitration.
Agreement to Binding Arbitration and Class Action Waiver. Upon failure to resolve the dispute
To begin arbitration of a claim, either you or LG must make a written
during the 30 day period after sending written notice to LG, you and LG agree to resolve any claims
between us only by binding arbitration on an individual basis, unless you opt out as provided below.
Any dispute between you and LG shall not be combined or consolidated with a dispute involving any
other person’s or entity’s product or claim. More specifically, without limitation of the foregoing, any
dispute between you and LG shall not under any circumstances proceed as part of a class or
representative action. Instead of arbitration, either party may bring an individual action in small claims
court, but that small claims court action may not be brought on a class or representative basis.
Arbitration Rules and Procedures.
demand for arbitration. The arbitration will be administered by the American Arbitration Association
(“AAA”) and will be conducted before a single arbitrator under the AAA’s Consumer Arbitration Rules
that are in effect at the time the arbitration is initiated (referred to as the “AAA Rules”) and under the
procedures set forth in this section. The AAA Rules are available online at www.adr.org/consumer.
Send a copy of your written demand for arbitration, as well as a copy of this provision, to the AAA in
the manner described in the AAA Rules. You must also send a copy of your written demand to LG at
LG Electronics, USA, Inc. Attn: Legal Department- Arbitration 111 Sylvan Avenue, Englewood Cliffs,
NJ 07632. If there is a conflict between the AAA Rules and the rules set forth in this section, the rules
set forth in this section will govern. This arbitration provision is governed by the Federal Arbitration Act.
Judgment may be entered on the arbitrator’s award in any court of competent jurisdiction. All issues are
for the arbitrator to decide, except that issues relating to the scope and enforceability of the arbitration
provision and to the arbitrability of the dispute are for the court to decide. The arbitrator is bound by the
terms of this provision.
The law of the state of your residence shall govern this Limited Warranty and any Governing Law.
disputes between us except to the extent that such law is preempted by or inconsistent with applicable
federal law.
You do not need to pay any fee to begin an arbitration. Upon receipt of your written Fees/Costs.
demand for arbitration, LG will promptly pay all arbitration filing fees to the AAA unless you seek more
than $25,000 in damages, in which case the payment of these fees will be governed by the AAA Rules.
Except as otherwise provided for herein, LG will pay all AAA filing, administration and arbitrator fees for
any arbitration initiated in accordance with the AAA Rules and this arbitration provision. If you prevail in
WARRANTY
29 EN

the arbitration, LG will pay your attorneys’ fees and expenses as long as they are reasonable, by
If your claim is for $25,000 or less, you may choose to have the arbitration Hearings and Location.
conducted solely on the basis of (1) documents submitted to the arbitrator, (2) through a telephonic
hearing, or (3) by an in-person hearing as established by the AAA Rules. If your claim exceeds $25,000,
the right to a hearing will be determined by the AAA Rules. Any in-person arbitration hearings will be
held at a location within the federal judicial district in which you reside unless we both agree to another
location or we agree to a telephonic arbitration.
considering factors including, but not limited to, the purchase amount and claim amount. Notwithstanding
the foregoing, if applicable law allows for an award of reasonable attorneys’ fees and expenses, an
arbitrator can award them to the same extent that a court would. If the arbitrator finds either the
substance of your claim or the relief sought in the demand is frivolous or brought for an improper
purpose (as measured by the standards set forth in Federal Rule of Civil Procedure 11(b)), then the
payment of all arbitration fees will be governed by the AAA Rules. In such a situation, you agree to
reimburse LG for all monies previously disbursed by it that are otherwise your obligation to pay under
the AAA Rules. Except as otherwise provided for, LG waives any rights it may have to seek attorneys’
fees and expenses from you if LG prevails in the arbitration.
You may opt out of this dispute resolution procedure. If you opt out, neither you nor LG can Opt Out.
require the other to participate in an arbitration proceeding. To opt out, you must send notice to LG no
later than 30 calendar days from the date of the first consumer purchaser’s purchase of the product by
either: (i) sending an e-mail to [email protected], with the subject line: “Arbitration Opt Out” or (ii) calling
1-800-980-2973. You must include in the opt out e-mail or provide by telephone: (a) your name and
address; (b) the date on which the product was purchased; (c) the product model name or model
number; and (d) the serial number (the serial number can be found (i) on the product; or (ii) online by
accessing https://www.lg.com/us/support/repair-service/schedule-repair-continued and clicking on
“Find My Model & Serial Number”).
You may only opt out of the dispute resolution procedure in the manner described above (that is, by
e-mail or telephone); no other form of notice will be effective to opt out of this dispute resolution
procedure. Opting out of this dispute resolution procedure will not affect the coverage of the Limited
Warranty in any way, and you will continue to enjoy the full benefits of the Limited Warranty. If you keep
this product and do not opt out, then you accept all terms and conditions of the arbitration provision
described above.
30
WARRANTY
LG Customer Information Center
1-800-243-0000
Register your product Online!
www.lg.com
LG Electronics Inc.
111 Sylvan Avenue, Englewood Cliffs, NJ 07632.