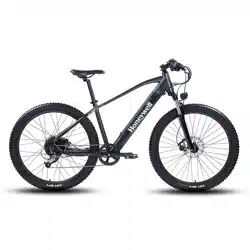

Electric Mountain Bicycle
1

WELCOME
Thank you for purchasing a Honeywell electric bike! We wish you many happy rides with your new ebike!
Please read and understand all sections of this entire manual before operating the bike for the first time. This
manual contains important safety, performance and service information. Failure to follow the instructions and
warnings may lead to serious injury or death.
If you have any questions or need service, please access our Help Center to submit a request, and/or contact
us by email or a phone call for a solution.
Help Center: https://honeywellbikes.zendesk.com
Email: support@honeywellbikes.com
Phone: (800)-768-0792
2

TABLE OF CONTENTS
General info ……………………………………………………………………………………………………………………………………………… 4
Battery ……………………………………………………………………………………………………………………………………………………….. 6
Assembly instructions …………………………………………………………………………………………………………………………… 9
Operation ………………………………………………………………………………………………………………………………………………….. 17
Maintenance and care ………………………………………………………………………………………………………………………….. 22
Warnings and safety ………………………………………………………………………………………………………………………......... 24
Warranty ……………………………………………………………………………………………………………………………………………………. 26
3

GENERAL INFO
Speed Limit
Your Honeywell electric bike can assist you up to 20MPH (32 km/h), which is the legal limit in most areas in
U.S. Honeywell bikes are considered Class 2 electric bikes.
Riding Range
Your electric bike can travel up to 40 miles with pedal assist on a single full charge of the battery. However, the
range may vary depending on elevation, speed, assistance level, rider weight, headwind and ambient
temperature, tire type and pressure, road condition etc.
Maximum Riding and Cargo Weight Limit
•
Maximum Rider Weight: 300lb (158kg)
•
Maximum Cargo* Weight: 50lb (23kg)
*Cargo
racks are optional and need to be purchased and installed separately
4

GENERAL INFO (CONTINUED)
Transportation and Storage
•
When transporting the bike, make sure the power is off.
•
If transporting on a vehicle, be aware of the maximum load capacity of the vehicle’s roof, towing hook and/or
the bicycle carrier and make sure the battery is removed and stored elsewhere in the vehicle.
•
Always know and obey the local laws regarding transportation of an electric bicycle. Check with your airline
or local carrier before transporting your bike. Also make sure to check your local regulations regarding
traveling with a Li-Ion battery.
•
It is recommended to park your bikes indoor, and always lock up your bike and battery if parked in public
places.
5

BATTERY
General Info
•
Your electric bikes uses Lithium-Ion battery which can be charged on or off the bike.
•
Make sure to fully charge the battery for about 8 hours before the first use.
•
A full charge normally takes about 4-5 hours when the battery is not completely empty.
•
When battery is completely empty (0% charge), a normal charge of 4-5 hours might not be sufficient. It is
necessary to proceed with an 8 hours charge.
Charging Procedure
•
Make sure that the bike is turned off while charging.
•
Remove the rubber cover on the charging port and plug the charger into the bike charging port. Then, plug
the other end of the charger into a power outlet. Charging should initiate and will be indicated by the charge
status lights on the charger turning red.
•
You will know the bike is fully charged when the light on the battery box turns green, you can then unplug
the charger from the wall outlet and proceed to remove the charger output plug from the battery charging
port.
6

BATTERY (CONTINUED)
Battery Removal/ Installation
•
Ensure the bike is turned off while removing or installing the battery.
•
Insert the key in the lock and turn it to unlock the battery box. Carefully remove/insert the battery from/into
the bike.
•
Ensure the battery has been properly secured to the bike. Do not ride the bike if the battery rattles or moves.
•
Do not touch the “+” and “-” terminal contacts on the bottom of the battery when the battery is removed from
the bike.
7

BATTERY (CONTINUED)
Battery Safety and Care
•
Make sure to turn off the bike while charging.
•
Check the charger, charger cables, plug and battery for damage before each charge, and ensure these components are dry
to avoid any short circuit.
•
Only use the originally included battery and charge, please contact us if you need any replacement.
•
Do not cover up the charger when plugged in or charging.
•
Do not open the battery housing as it will void warranty.
•
Store and charge the battery in a safe, dry indoor location between 32
°F
and 104
°F
, and away from children. To ensure a
long battery life it is best to store the battery at room temperature.
•
For long term storage make sure that the battery is fully charged, then remove from the bike and store in a safe place.
Check the battery regularly, and fully charge the battery every two months.
•
Battery leakage may occur under extreme usage or temperature conditions. Avoid contact with skin and eyes.
•
Do not charge a battery for more than 12 hours at a time.
•
Never leave a charging battery unattended.
•
Battery and the other bike components should be disposed and recycle according to local recycling and environmental
regulation. Do not dispose those with household waste.
8

ASSEMBLY INSTRUCTIONS
Step 1: Unbox your bike
Open the bike box, first remove the small box inside, ask someone to help slowly lift the bike out of the box.
Once the bike is removed from the box , set the bike on the ground with its rear wheel and front fork touching
the floor. Open the small box and carefully set out all contents. We suggest you take a picture of the whole bike
and all the accessories before installation.
Make sure all the following pieces are included: Front wheel, Quick release, Handlebar, Keys (2x, attached to
the handlebar), Assembly toolkit, Pedals (left and right), Charger and Manual.
•
Included tools for assembly:
If there are any missing parts, please contact us immediately.
9
Hardware Usage Torque Required (Nm)
1. 13mm, 15mm flat wrenches Install pedals and front wheel nuts 12-15
2. Phillips screwdriver Reserved for spare
3. 4mm allen key Tighten the screws on the handlebar 4-5
4. 5mm allen key Tighten the screws on the stem 6
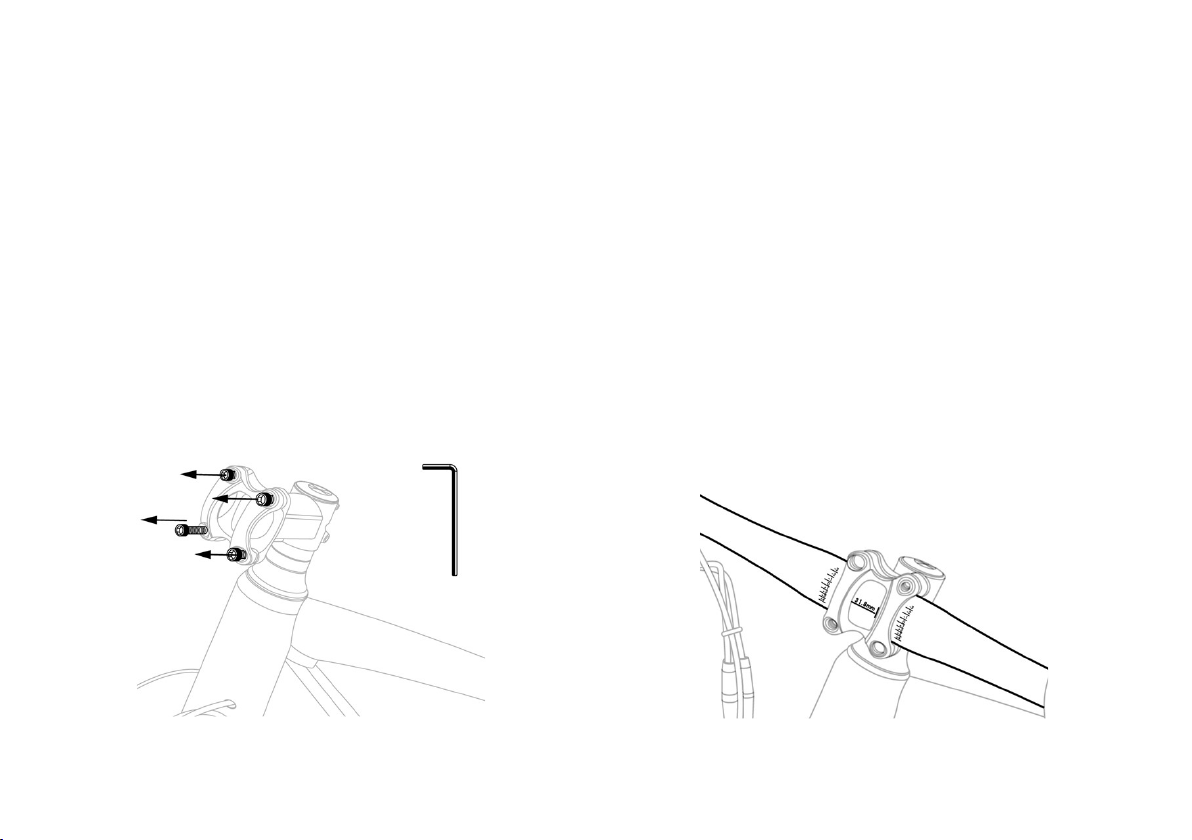
a. Use the 4mm allen key to take off the 4 front
bolts of the stem.
b. Once the 4 front bolts are removed, place the
handlebar into the handlebar holder. Adjust the
handlebars to the desired angle and make sure that
the handlebar is centered on the stem.
10
ASSEMBLY INSTRUCTIONS (CONTINUED)
Step 2: Install the handlebar
First adjust the fork and make sure that it is facing forward in the correct direction. You will know the fork is in the
correct position when the brake caliper is situated on the drivers left hand side of the bike.
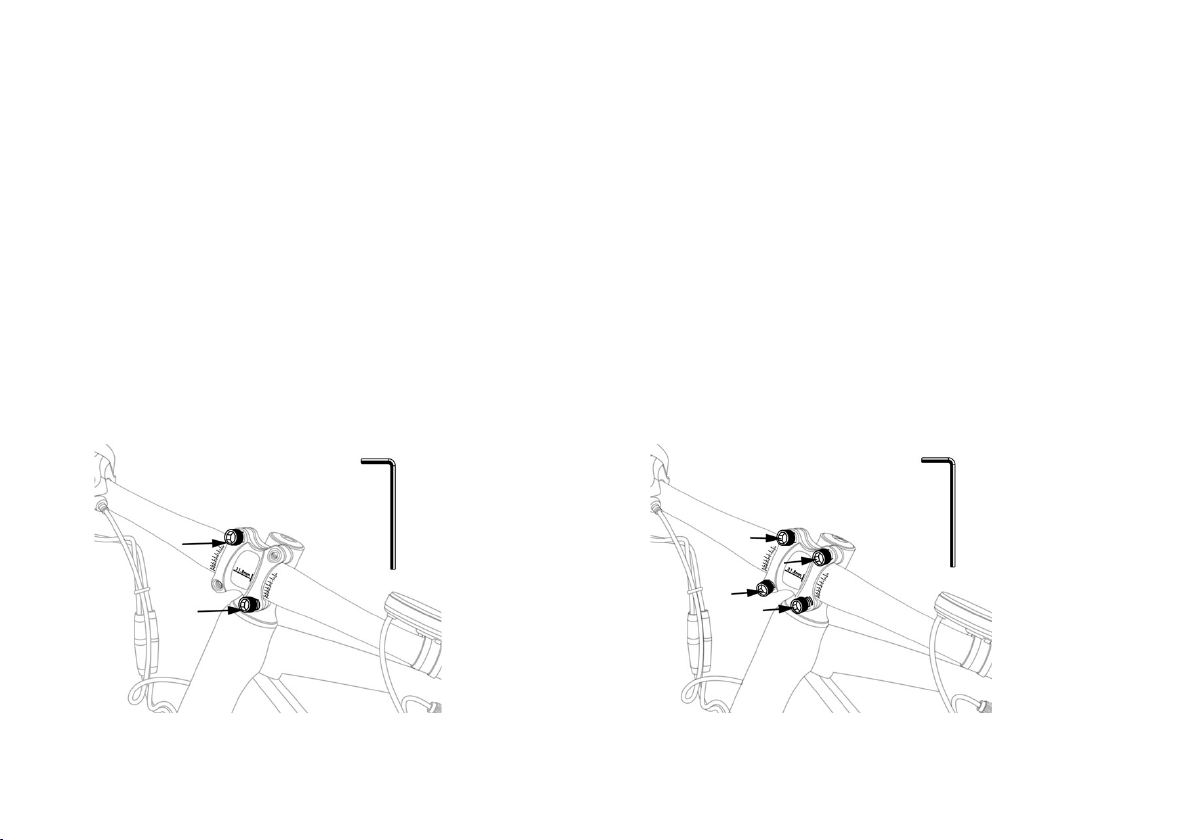
c. Attach the 4 front bolts one at a time. d. Fully tighten all bolts.
11
ASSEMBLY INSTRUCTIONS (CONTINUED)
Step 2: Install the handlebar
Once you find a suitable position you are able to start fastening down the handlebar faceplate. We recommend
using the 4mm allen key to attach the bolts one at a time (diagonally), then fully tighten until all bolts are installed.
e. Tighten the top bolt. f. Tighten the bottom bolt.
12
ASSEMBLY INSTRUCTIONS (CONTINUED)
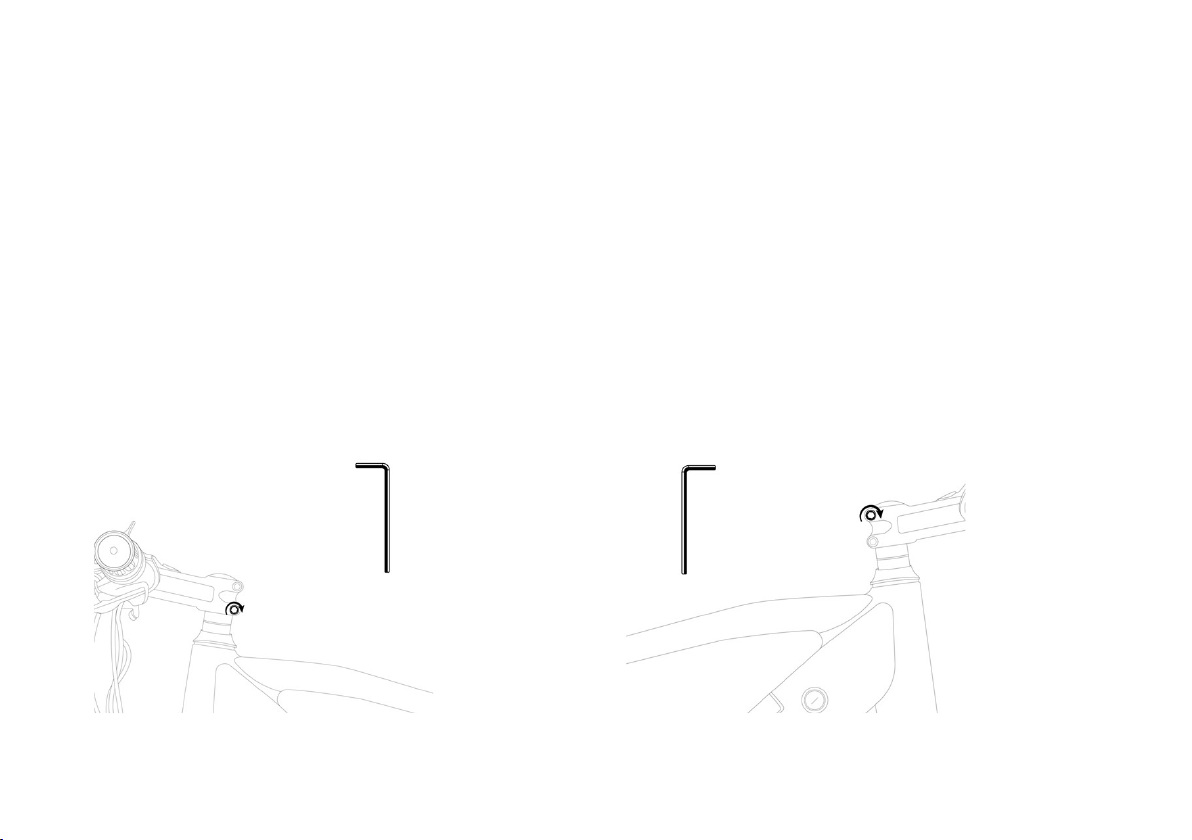
Step 2: Install the handlebar
Make sure to tighten the top and bottom bolts on the stem with your 5mm allen key. The bolts will already be in
place, just make sure they are tightly fastened.
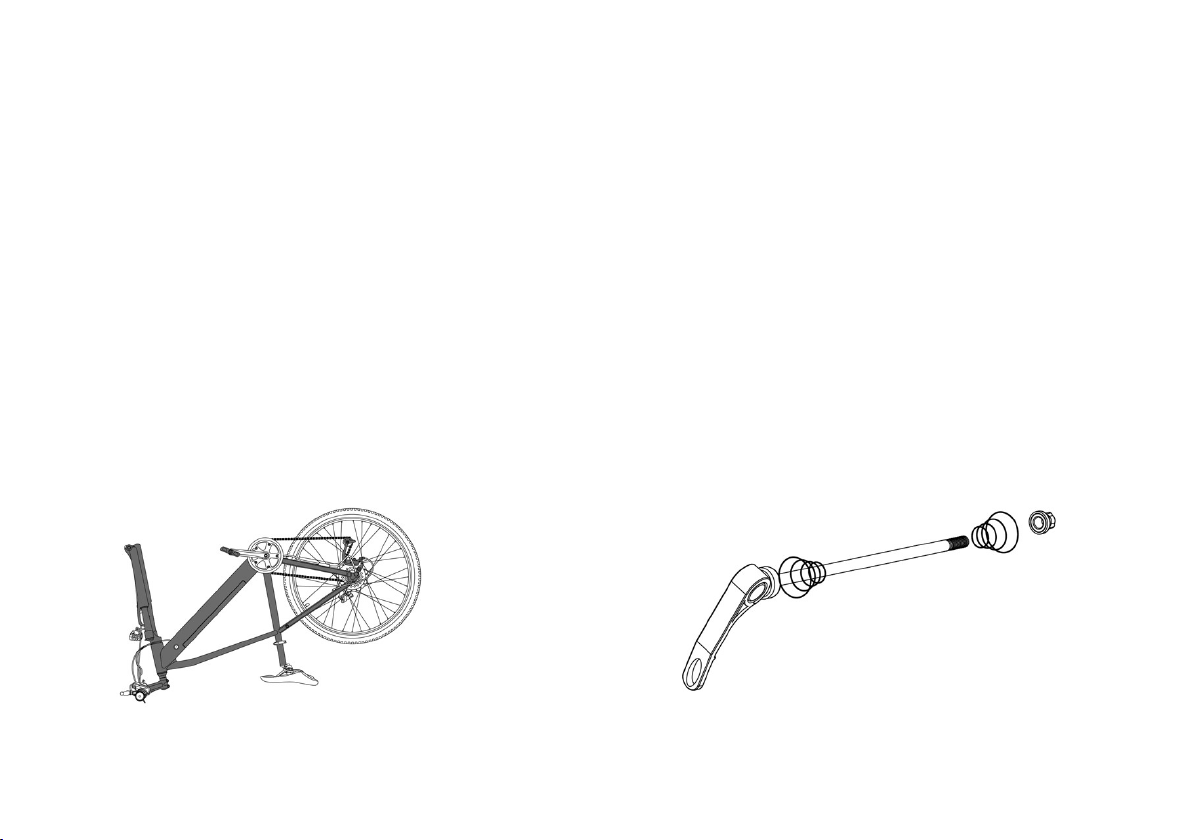
a. Flip your bike upside down as below. b. Locate the quick release lever, the thumb nut and
cone spring (opposite the lever) attached to the
front wheel. Make sure you keep the thumb nut and
spring together.
13
ASSEMBLY INSTRUCTIONS (CONTINUED)
Step 3: Install front wheel*
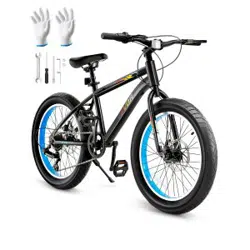
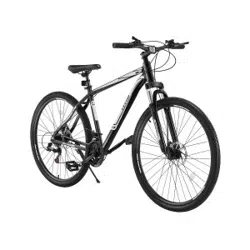
*Note that even though the tire in the below photos might not be the same size for your bike, the installation process is the same.
Once your handlebar is in place you are able to start the wheel installation process. Flip your bike upside down,
make sure it is resting on the seat and the handlebar. You also need to make sure that your display is out of the way,
if you rest your bike on top of the display it is likely to become damaged.
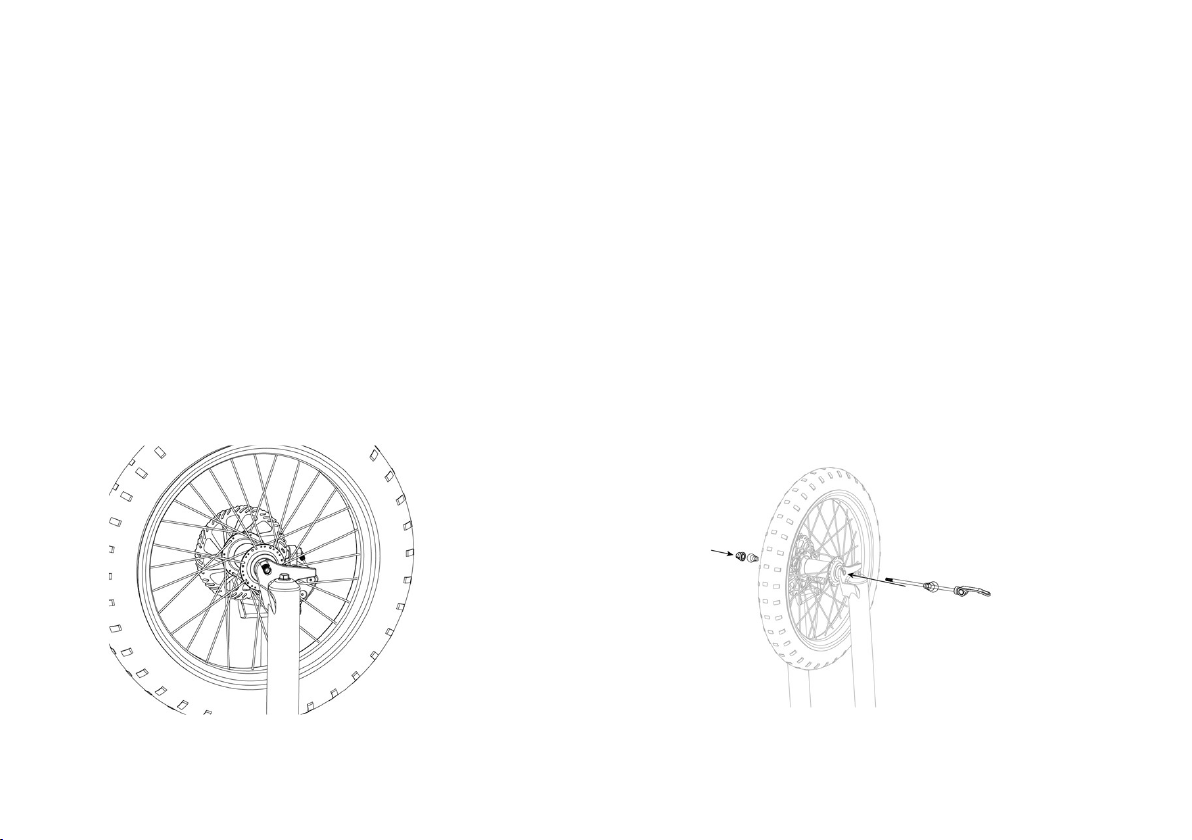
c. Position the front wheel and make sure that the
direction of the disc and the disc brake are the
same.
d. The front fork should be straight. Push the quick
release lever through the front wheel hub, make
sure that the spring is positioned correctly on each
side of the wheel. Finally, tighten the nut to fix the
front wheel and then turn your bike over to the
proper position.
14
ASSEMBLY INSTRUCTIONS (CONTINUED)
Step 3: Install front wheel*
*Note that even though the tire in the below photos might not be the same size for your bike, the installation process is the same.
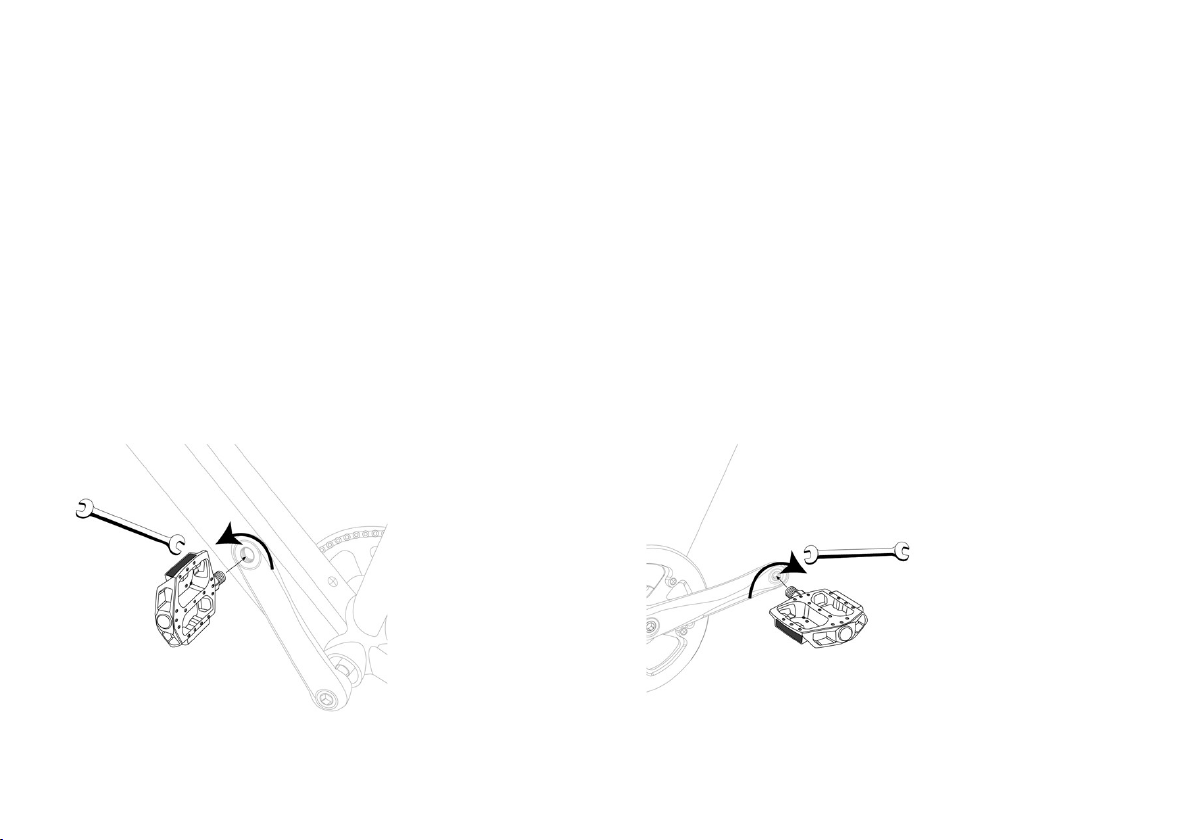
a. Install the left pedal. b. Install the right pedal.
15
ASSEMBLY INSTRUCTIONS (CONTINUED)
Step 4: Install the pedals
L/WL is marked as left pedal, R/WR is marked as right pedal. Carefully insert the right pedal (R/WR) into the right
crank, and the left pedal (L/WL) into the left crank. Make sure that when installing, the pedal is rotated in the
forward-facing direction, then use the 15mm flat wrench to tighten them into place.
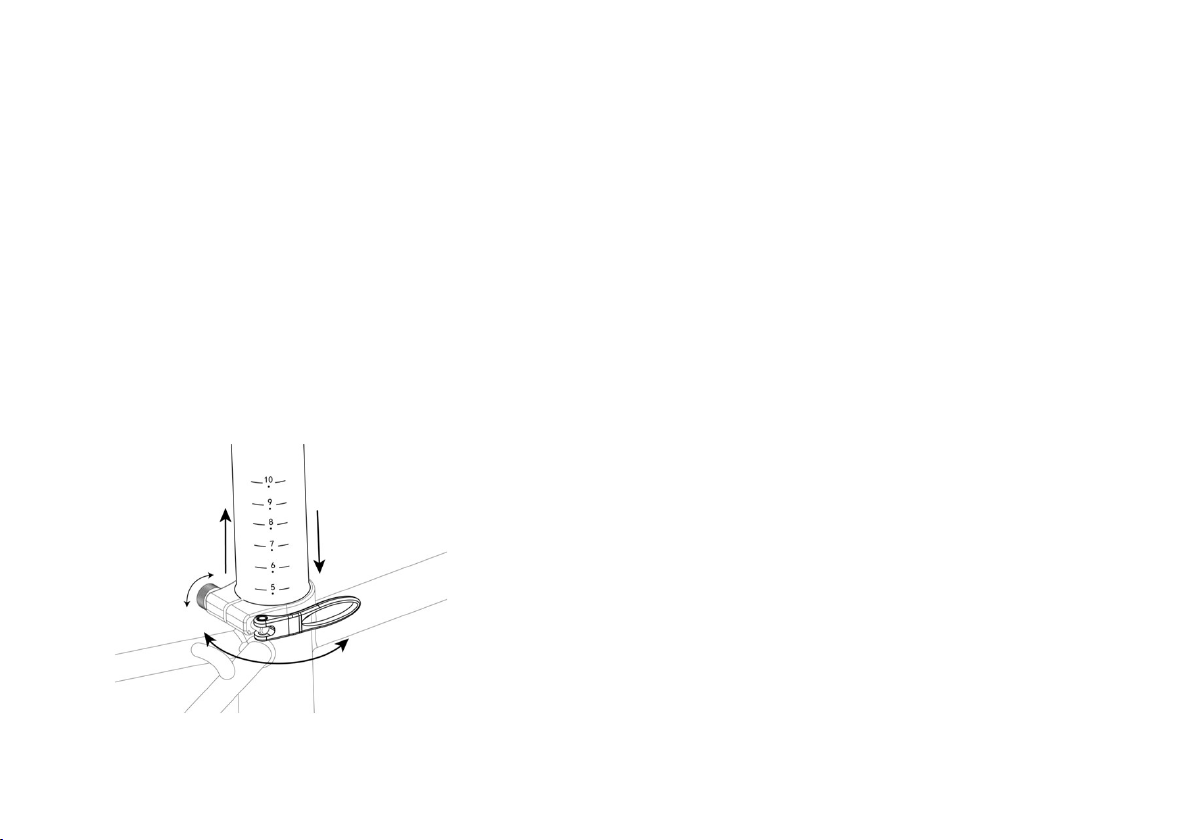
ASSEMBLY INSTRUCTIONS (CONTINUED)
Step 5: Adjusting your seat height
Your seat height should be adjusted properly to ensure you get the most comfortable ride possible. The seat height
can be adjusted by loosening the lever on the seat tube clamp. Make sure to retighten after adjustment. If you are
unable to adjust your seat, open the lever, and then turn it counterclockwise to loosen it. On the contrary, if it is too
loose, turn the lever clockwise to tighten it.
16
OPERATION
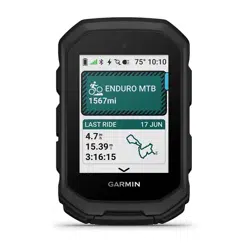
LCD Display Operation
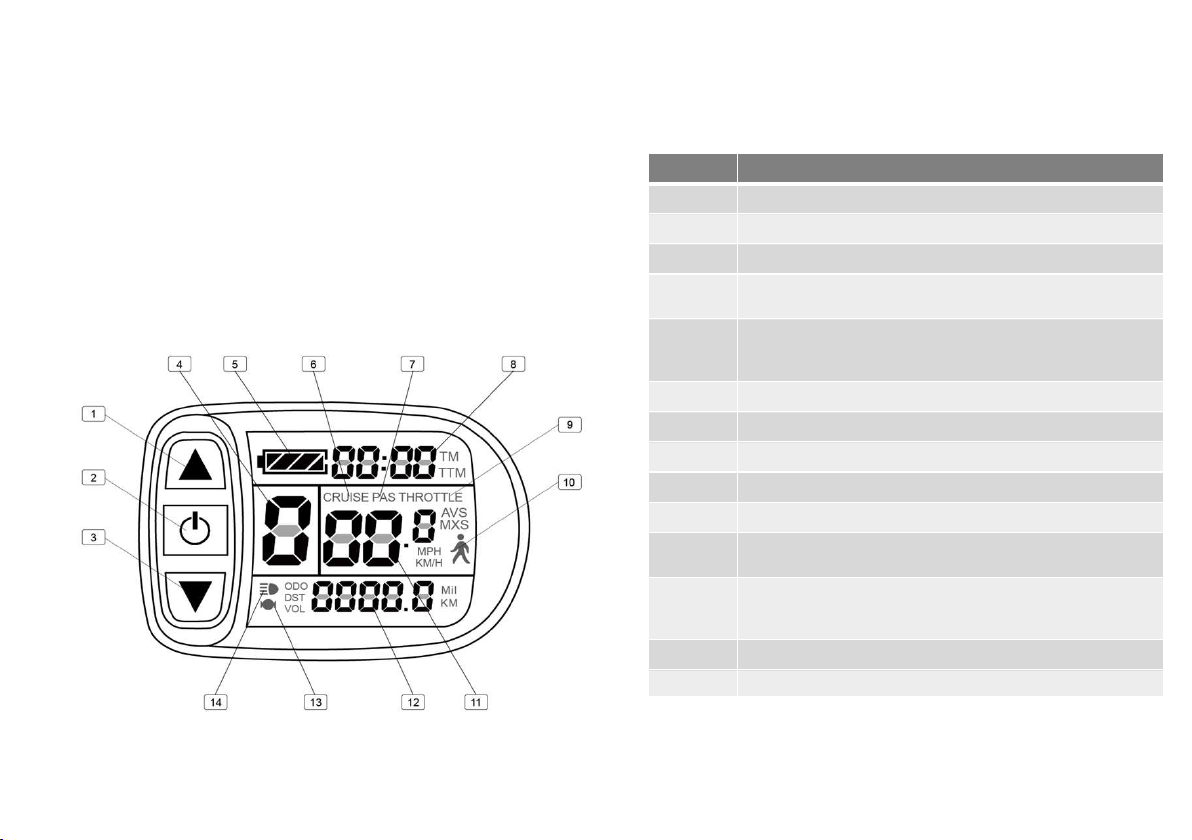
The table and image below show the various features and
information displayed on the LCD display.
17
Location Information
1. UP button
2. POWER/SWTICH button
3. DOWN button
4. Pedal Assist Level (PAS):
(0 – 5) Mode; 0 = No assistance
5. Battery Level Indicator:
4 Bars: over 70% battery capacity
0 Bar: less than 15% battery capacity
6. Cruise Mode Indicator: (On /Off)
7. Pedal Assist Indicator: (On /Off)
8. Timer: (Current trip time TM / Total trip time TTM)
9. Throttle Mode Indicator: (On /Off)
10. Walk Assist Mode Indicator: (On /Off)
11. Speed (MPH or KM/H):
(Real-time speed/ Max speed MXS / Average speed AVS)
12. Distance (MPH or KM):
(Current distance traveled DST/ Total distance traveled
ODO /Real-time battery voltage VOL)
13. Brake Indicator: (On /Off)
14. Head Light Indicator: (On /Off)

OPERATION (CONTINUED)
Please read and understand all sections of this entire manual before operating the bike for the first time.
Ensure the bike has been properly assembled and the pre-ride safety check has been performed.
Turning on/off the e-bike
•
Your electric bike is operated using the display on the handlebar. Press and hold the ‘POWER’ button to
turn-on or turn-off the display and the motor power supply of the bike.
•
The display and the motor power supply will automatically turn off when the bike is not used for consecutive
5 minutes.
Pedal Assistance
•
Your electric bike offers pedal assist by providing power only when you pedal.
•
To use the pedal assist, simply press the ‘UP’ or ‘DOWN’ button on the display to increase or decrease the
amount of pedal assist from levels 0-5. Level 0 means conventional nonelectric riding.
•
Pedal assist will propel you at speeds up to 20mph (32km/h). This means that as you reach this speed
electrical assistance stops.
18

OPERATION (CONTINUED)
Throttle
•
Your electric bike is equipped with a thumb throttle, which is mounted near the rider’s right thumb. No pedal is needed once
the bike is moving on the throttle power.
•
Simply push the throttle using your thumb and the throttle can propel you at speeds up to 20 mph (32km/h).
•
The throttle can only be engaged within pedal assist levels 1 though 5. Regardless of the power assist level you select, your
bike will accelerate to the top speed when the throttle is engaged. You can use the throttle along with the pedal assist or on
its own.
Headlight Operation
•
Once the display is powered on, press and hold the ‘UP’ button on the display to turn on the headlight.
•
Press and hold the ‘UP’ button again to turn off the headlight.
Walk Assistance
•
Walk Assist can make it easier for you to push your bike. This mode should only be used while dismounted from the bike
and with both hands on the handlebar.
•
Press and hold the ‘DOWN’ button to initiate walk assist mode. The bike will move at a steady pace of 3.5MPH (6km/h) until
the ‘DOWN’ button is released.
19
OPERATION (CONTINUED)
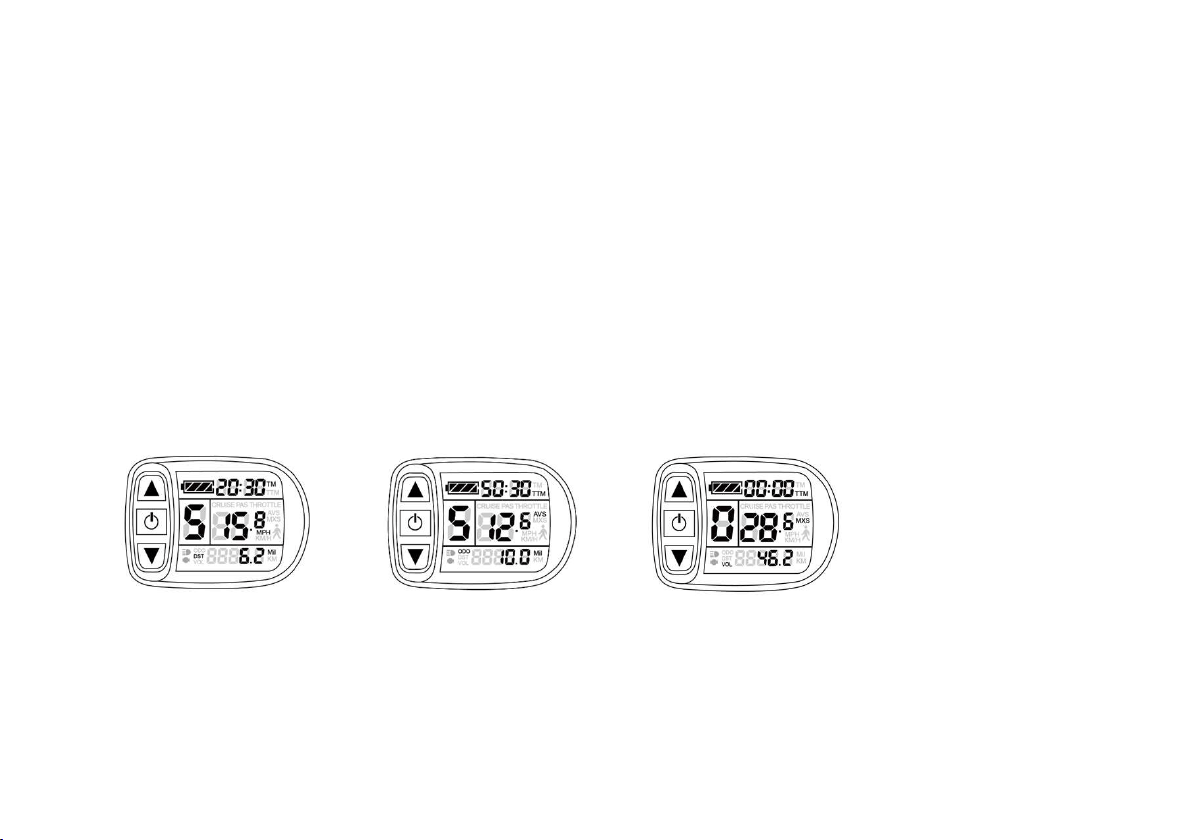
Display Mode
Press the ‘POWER’ button to cycle through the different modes of the display. The display will automatically
return to display 1 after 5 seconds while riding.
•
Display 1: Battery level indicator/ Current trip time/ PAS level/ Real-time speed/ Current distance traveled
•
Display 2: Battery level indicator/ Total trip time/ PAS level/ Average speed/ Total distance traveled
•
Display 3: Battery level indicator/ Total trip time/ PAS level/ Maximum speed/ Real-time voltage
20
Display 1 Display 2 Display 3

OPERATION (CONTINUED)
Error Codes
Your Honeywell electric bike is equipped with an error detection system integrated into the display. In the rare
event of an electrical issue with the bike, an error code may appear on your display.
Please note the error code and contact Honeywell Bikes Support at (800)-768-0792 immediately.
The following error codes can aid in troubleshooting:
21
Error Code Definition
01_info Throttle abnormality
03_info Motor hall signal abnormality
04_info Torque sensor signal abnormality
05_info
Axis speed sensor abnormality
(only applied to torque sensor )
06_info Motor or controller short circuit abnormality

MAINTENANCE AND CARE
General Bike Care
•
Just like standard bikes, regularly clean and check your electric bikes components. Always remove the
battery and turn off the bike before performing any inspection or service.
•
We recommend lubricating the bike chain every two months.
•
It is recommended to have your bike inspected and adjusted every 3 months by a professional bicycle
technician.
•
Honeywell electric bikes and their components are water resistant. Riding in rain or snow should not cause
any damage. However, please do not submerge your bikes electrical components in water, or use a pressure
washer to clean the bike. This could cause water damage to components inside the bike. Clean all
components carefully with a soft, damp cloth using mild soap and water. Then use a dry cloth to wipe clean.
•
Protect electric system and battery against extreme temperatures. It is recommended to store your bike and
battery in a cool, dry indoor place and if the bike is exposed to water, make sure to dry your bike as soon as
possible.
22

MAINTENANCE AND CARE (CONTINUED)
Pre-ride Safety Check
It is recommended to perform a safety check of your electric bike before each ride.
•
Make sure tires are properly inflated. Use a reliable tire gauge to check the tire pressure, if the pressure is too low, inflate
your tires until you reached the recommended pressure as shown on the tire sidewall. Inspect the outer surface of the tires.
Make sure there no excessive wear in the tread, cuts or cracks on the tread or sidewall, exposed threads or wires, or bulges.
•
Make sure all wheel spokes are tight and are free from any damage.
•
Check to make sure that the quick-release levers are fully closed and secured with the proper tension.
•
Ensure the brakes work properly. Spin the wheels to check for rubbing and then apply the brakes to ensure they stop the
bike smoothly and evenly. Check the brake pads for excessive wear.
•
Inspect your bike chain to make sure it runs smoothly. If there’s any rust or if it squeaks when you turn the crank, be sure to
lubricate it.
•
Adjust handlebars and seat so they are tight and at a comfortable height.
•
Make sure the battery is locked and secured in the frame and charged before use.
•
Check the cables and housing to make sure there is no fraying or splitting. Ensure headlight, throttle and display screen are
properly working.
•
Check for any loose parts or other mechanical problems.
23

WARNINGS AND SAFETY
This manual contains important safety, performance and service information. Failure to
follow the instructions and warnings may lead to serious injury or death.
•
All users must read and understand this manual carefully before riding on the new electric bicycle. Always
keep this manual for future reference.
•
Check your bicycle for proper fit and installation, normal operation, loose parts and defects before riding. If
you find any problem, please contact us before riding.
•
Electric bikes are heavier and faster than normal bikes, that also increases the risk of accidents. Please take
extra caution and care while riding. We recommend using the lowest assist level until you are comfortable
with the bike operation.
•
It is the rider’s responsibility to know and obey the local regulations and rules such as where you can ride,
minimum rider age, transportation, and registration that apply to an electric bicycle.
•
Always wear an approved bicycle helmet whenever riding a bike. We recommend using head and tail lights at
night to increase visibility and using proper cycling hand signals while riding.
•
Do not ride aggressively as it can damage the bike and/or cause or lead to dangerous riding situations.
•
Never operate a bike while under the influence of alcohol, drugs, or any substance or condition that could
impair the ability to safely operate a bike.
24

WARNINGS AND SAFETY (CONTINUED)
This manual contains important safety, performance and service information. Failure to
follow the instructions and warnings may lead to serious injury or death.
•
Take extra care while riding in wet condition such as snow and rain.
•
Some bike accessories may present a choking hazard to small children. Always keep these accessories away
from children.
•
Check the user manual for maximum riding weight and loading capacity of your electric bicycle.
•
While riding, do not become distracted by or operate the display screen and always remain alert to all riding
conditions.
•
Make sure to turn off the power when walking next to, mounting, or dismounting the bike.
•
This electric bike is designed for use by persons aged from 16 years old and older. If you may have physical
or mental condition that could impact your ability to safely operate a bike, consult your physician before
riding.
•
We strongly recommends having a certified professional bike mechanic to perform maintenance and
adjustment of your bike If you do not have the experience, skill, or tools.
•
The replacement of original components or installation of aftermarket accessories is at your own risk and
may void your warranty.
25

WARRANTY
All Honeywell electric bikes and their components carry 1-year manufacturer warranty with the original
registered owner. Please carefully read our warranty terms below. If you believe your electric bike has a warranty
issue, please contact us directly.
Warranty Policy
•
All Honeywell electric bikes and their components carry the following 1-year manufacturer warranty with the
original registered owner including frame, battery, electronics and most parts (excluding tires, tubes, brake
pads, cables & housing, pedals)
•
Our Support team will work with you to determine whether a covered component must be replaced. We will
need photos and video of the defective part before process the claim.
•
The replacement parts will be shipped free of charge and a pre-paid shipping label will be provided for any
defected covered component.
•
The owner will be responsible for labor.
•
The warranty coverage only applies to the original registered owner and is not transferable.
26

WARRANTY (CONTINUED)
Warranty Exclusions
•
Normal wear and tear
•
Damage or failure resulting from failure to follow instructions in the owner’s manual
•
Damage or failure from abuse, neglect, misuse, improper repairs or accident
•
Damage or failure from modification of any of the bike systems
•
Damage or failure of any part of the electrical system resulting from improper storage or charging of the
battery
•
Damage or failure from the replacement of any of original components or installation of aftermarket
accessories
•
Lost or damaged keys
•
Shipping damage (such claims must be presented directly to the shipper)
27

WE ARE HERE TO HELP
If you have any questions or need service, please access our Help Center to submit a request, and/or contact
us by email or a phone call for a solution.
Help Center: : https://honeywellbikes.zendesk.com
Email: support@honeywellbikes.com
Phone: (800)-768-0792
28

Raze Outdoors LLC.
Sturtevant, WI 53177
Phone: 800-768-0792
Email: support@honeywellbikes.com
Web: www.honeywelbikes.com
Made in China
© 2021 Raze Outdoors LLC. All rights reserved.
The Honeywell Trademark is used under license from Honeywell International Inc.
Honeywell International Inc. makes no representations or warranties with respect to this product.
This product is manufactured by Raze Outdoors LLC.