
Loading ...
Loading ...
Loading ...
ENGLISH
7
E-Clutch™
This unit is equipped with an E-Clutch™ (Electronic Clutch),
which in the event of a high-load or wheel pinch, the
unit will be shut off to reduce the reaction torque to the
user. The switch needs to be cycled (turned on and off) to
restarttool.
Power-OFF™ Overload Protection
The power supply to the motor will be reduced in case
of motor overload. With continued motor overload, the
tool will shut off. The switch needs to be cycled (turned
on and off) to restart tool. The tool will power off each
time the current load reaches the overload current value
(motor burn-up point). If continued overload shutdowns
occur, apply less force/weight on the tool until the tool will
function without the overloadengaging.
Electronic Soft Start
This feature limits the initial start up momentum, allowing
the speed to build up gradually over a 1 secondperiod.
ASSEMBLY AND ADJUSTMENTS
WARNING: To reduce the risk of serious personal
injury, turn unit off and disconnect it from
power source before making any adjustments or
removing/installing attachments or accessories.
An accidental start-up can causeinjury.
Attaching Side Handle (Fig.A)
WARNING: Before using the tool, check that the
handle is tightenedsecurely.
Screw the side handle
5
tightly into one of the holes on
either side of the gear case. The side handle should always
be used to maintain control of the tool at alltimes.
Guards
CAUTION: Guards must be used with all grinding
wheels, cutting wheels, sanding flap discs,
wire brushes, and wire wheels. The tool may
be used without a guard only when sanding with
conventional sanding discs. Refer to Figure A to see
guards provided with the unit. Some applications may
require purchasing the correct guard from your local
dealer or authorized servicecenter.
NOTE: Edge grinding and cutting can be performed with
Type 27 wheels designed and specified for this purpose;
1/4" (6.35mm) thick wheels are designed for surface
grinding while thinner Type 27 wheels need to be examined
for the manufacturer's label to see if they can be used for
surface grinding or only edge grinding/cutting. A Type 1/41
guard must be used for any wheel where surface grinding
is forbidden. Cutting can also be performed by using a Type
1/41 wheel and a Type 1/41 guard.
NOTE: See the Accessories Chart to select the proper guard
/ accessorycombination.
Adjusting and Mounting Guard(Fig.C,D)
CAUTION: Turn unit off and unplug the tool before
making any adjustments or removing or installing
attachments oraccessories.
CAUTION: BEFORE operating the tool, identify which
guard adjustment option your tool is set to.
Adjustment Options
For guard adjustment, the guard release lever
7
engages
one of the alignment holes
11
on the guard collar using
a ratcheting feature. Your grinder offers two options for
thisadjustment.
• One-touch
TM
: In this position the engaging face
is slanted and will ride over to the next alignment
hole when guard is rotated in a clockwise direction
(spindle facing user) but self-locks in the counter-
clockwisedirection.
• Two-touch
TM
: In this position the engaging face is
straight and squared off. It will NOT ride over to the next
alignment hole unless guard release lever is pressed and
held while simultaneously rotating the guard in either
a clockwise or counter-clockwise direction (spindle
facinguser).
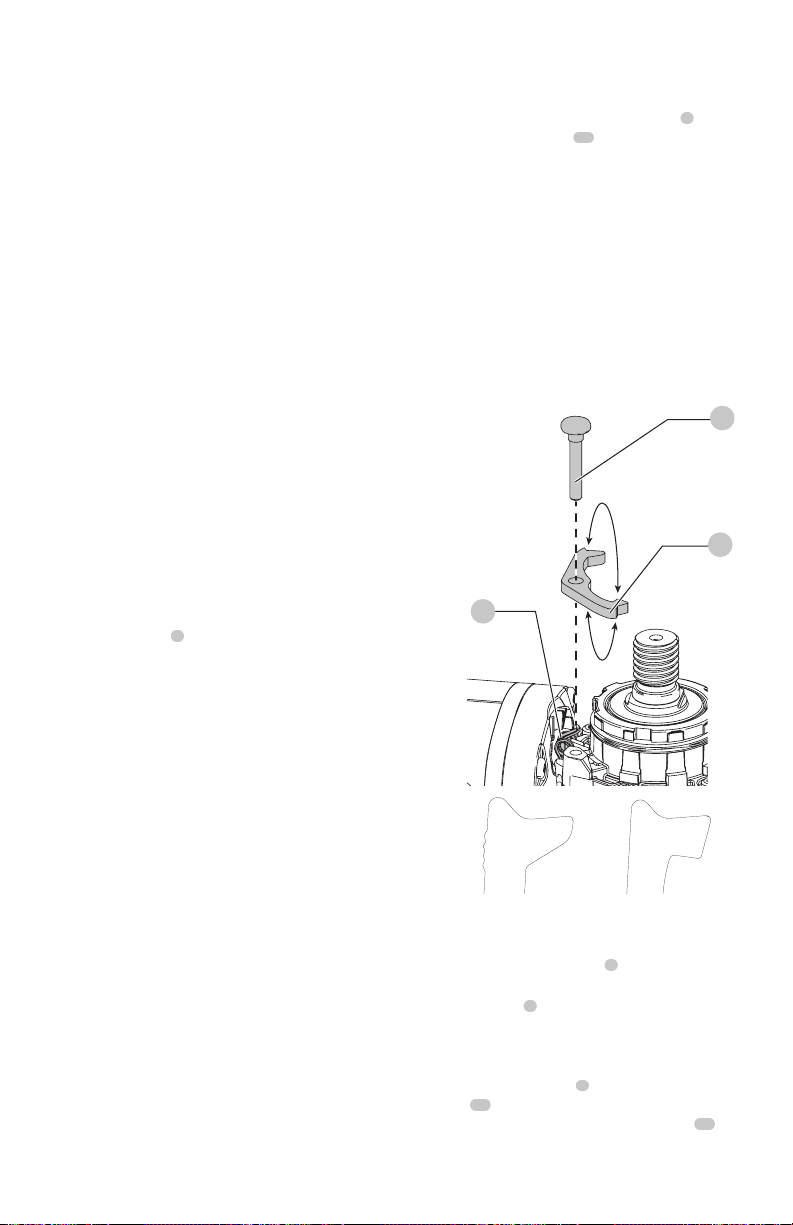
Fig. C
7
9
10
One-Touch
TM
Two-Touch
TM
Setting Guard Adjustment Options
To adjust the guard release lever
7
for desired
adjustmentoption:
1. Remove screw
9
using a T20bit.
2. Remove the guard release lever taking note of the
spring position. Choose the end of the lever for the
desired adjustment option. One-touch will use the
slanted end of the lever
7
to engage the alignment
holes
11
on the guard collar. Two-touch will use the
squaredend to engage the alignment holes
11
on the
guardcollar.
Loading ...
Loading ...
Loading ...