COHTENT$
SAFSTY
US_ AND CARE
CLEAHIN6
Cleaning Tips ................................................................. 17
Removable Paris ................. ......................................18-20
BEFOR_ CALLING FOR SERVICE
What to Do Before Calling for Service .............. 21, 22
"Do II Yourself" Temperature Adjustments ........... 23
Customer Service Numbers ............................................24
WARRA[_TY
MODELS 46540
46541
46545
46556
46559
46555
K_n_ore
RecycledPaper
o oSAFETY
_AL
229C40_0P02(:)=2 SR10223
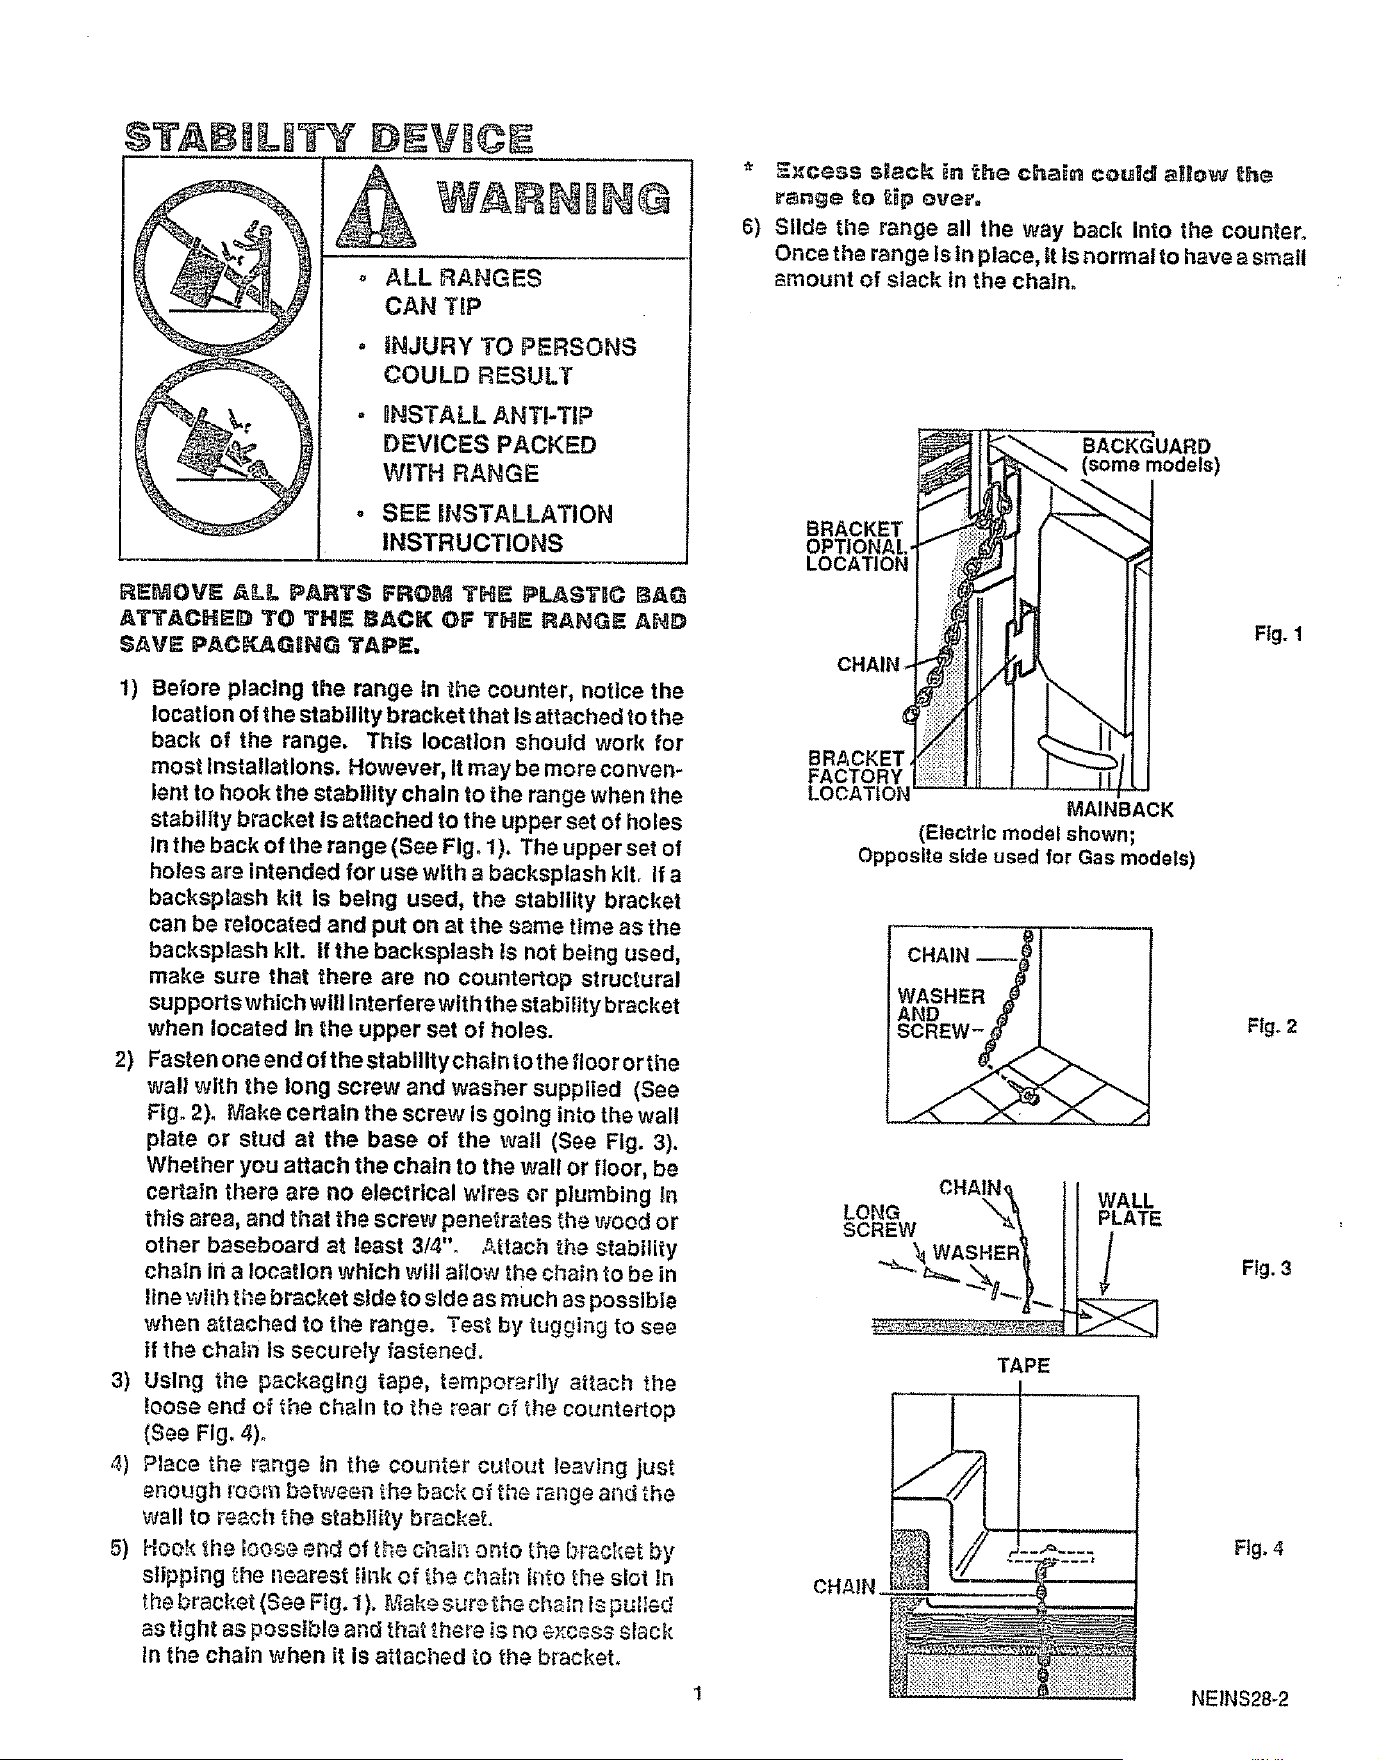
TIi IIII.ITY I;)IVI©!
a
ALL RANGES
CAN TIP
iNJURY TO PERSONS
COULD RESULT
INSTALL ANT!-TIP
DEVICES PACKED
WITH RANGE
SEE INSTALLATION
INSTRUCTIONS
F_EMOVE AILL PARTS FROM THE PLASTIC BAG
ATTACHED TO THE BACK OF THE RANGE APJD
gAVE PAC_GIHG TAPE,
1) Beiore placing the range in _he counter, notice the
location of the stability bracket that is attached to the
back of the range, This location should work for
most Insta!latlons. However, it may be more conven-
ient to hook the stability chain to the range when the
stability bracket is at{ached to the upper set of holes
in the back of the range (See Fig. 1). The upper set of
holes are intended for use with a backspiash kit, If a
backsplash kit Is being used, the stability bracket
can be relocated and put on at the same time as the
backsplash kit. if the backsplash ts not being used,
make sure that there are no countertop structural
supportswhich will Interferewiththestabilty bracket
when located In the upper set of holes.
2) Fasten one end of the stabillty chaln to the floor or the
wall with the long screw and washer supplied (See
Fig. 2), Make certaln the screw Is going into thewall
plate or stud at the base of the wall (See Fig. 3).
Whether you attach the chain to the wall or floor, be
certain there are no electrical wires or plumbing tn
this area, and that the screw penetrates the wood or
other baseboard at Jeast 3/4", ._ttach the stability
chain in a location which will alow the chain to be in
line wlh tha bracket side to side as much as possible
when attached to the range. Test by tugging to see
if the chain ts securely fastened.
3) Using the packaging tape, temporarily attach the
loose end of the chain to the rear of the countertop
(See Fig. 4)°
4) Place the range in the counter culout leaving just
enough rool n between _.heback of the r_nge ar,d the
wall to r_ch the stabllty bract, eL
5) Hook _he ;oos# end of the ch_i_, onto _he brac_÷t by
slipping the nearest link of ',he Chall t_'_tOthe slot in
the bracket (See Fig, t), ltak÷ s_r_.the chain is puled
as tight as possible and that there is no _+×c_ssslack
In the chain when it is attacl_ed to the bracket,
* _}{CeSS slack in _he chair, could alH_)_,_'_he
r_nge to lip over.
6) Slide the range all the way back into the countero
Once the range Is in place, it is normal to have a small
_mount of slack in the chaln.
BRACKET
OPTIONAl..
LOCATION
CHAIN +-
_'_ BACKGUARD
I I _" (some models)
¢
MAINBACK
(Elsctrfc model shown;
Opposite side used for Gas models)
BRACKET
FACTORY
LOCATtO_
Fig. 1
CHAIN
AND
Fig_ 2
CHAIN_ I I WALL
LONG \x,_ PLAT=
SCREW _, II , "=
WASHER I I /
TAPE
Fig. 3
Fig, 4
NEINS28-2
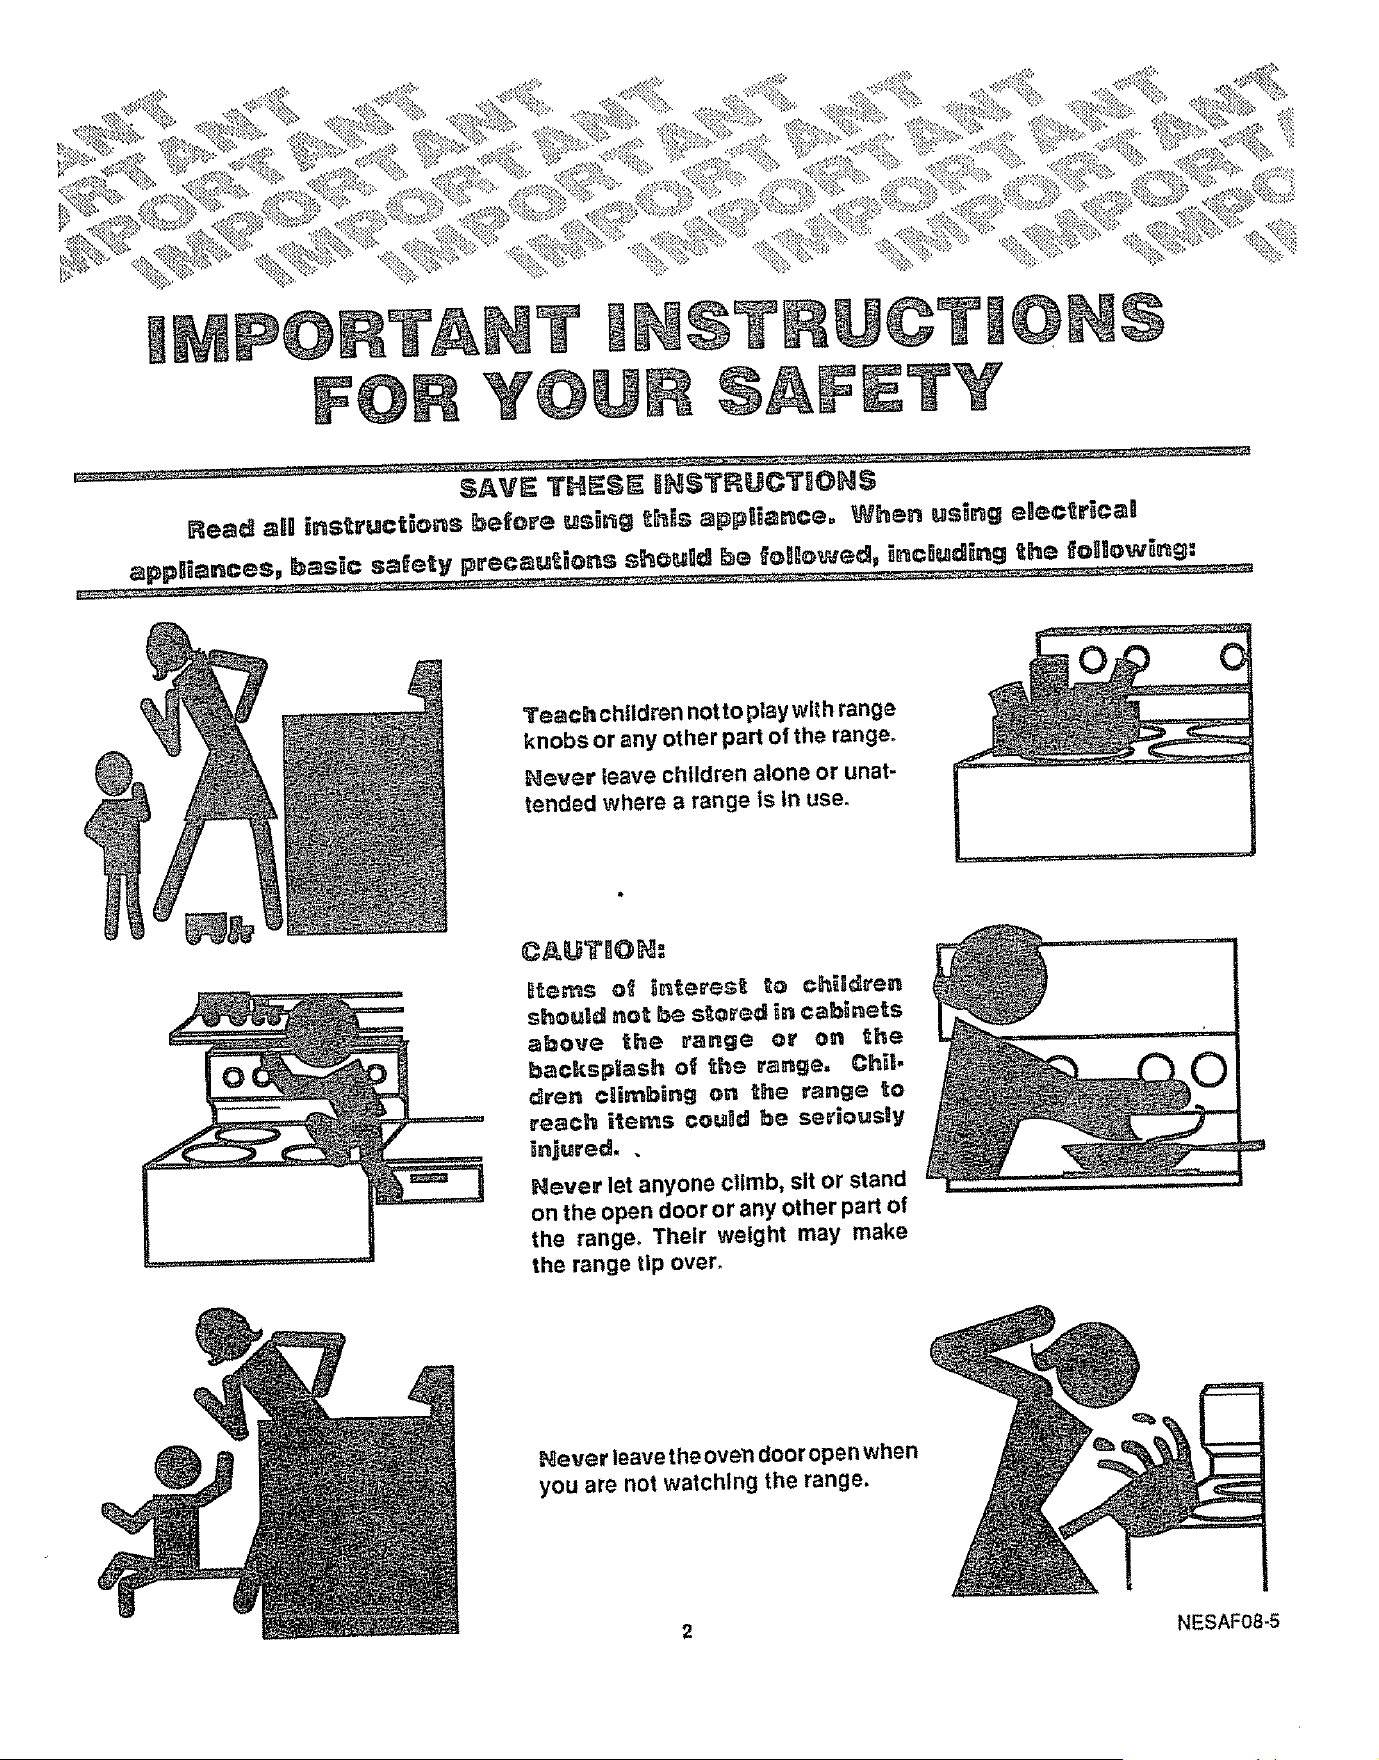
_i_ _ _ _!_ _:_ _ _!
i_ _" ,,,_:_
....._ '_:_i_'_'_::_!:_: _
!_::' . _ i!_'__:'_:
PO T NT
Y@U SAFETY
Teach ch{ldren notto play with range
knobs or any other part of the range,
Never leave children alone or unat-
tended where a range ls in use.
should no_ _e a_red _n ca_nets
a_ove _he range er on f_he
_acksplash o_ _he range. Ch_l.
_ren c_i_bing on _he range _o
reach items cougd _e seriousgy
_njured, .
Hayer let anyone climb, sit or stand
on the open door or any other part of
the range. Their weight may make
the range tip over.
Never leave the oven dooropen when
you are not watching the range.
2 NESAF08-5
r ; •
carefU,y.K.eep_thanayfotquit,easyr_f_nce..Payc=oseattent,optot,e
safe!ysections Of your manual. You can recogmze the safety sect|ons by
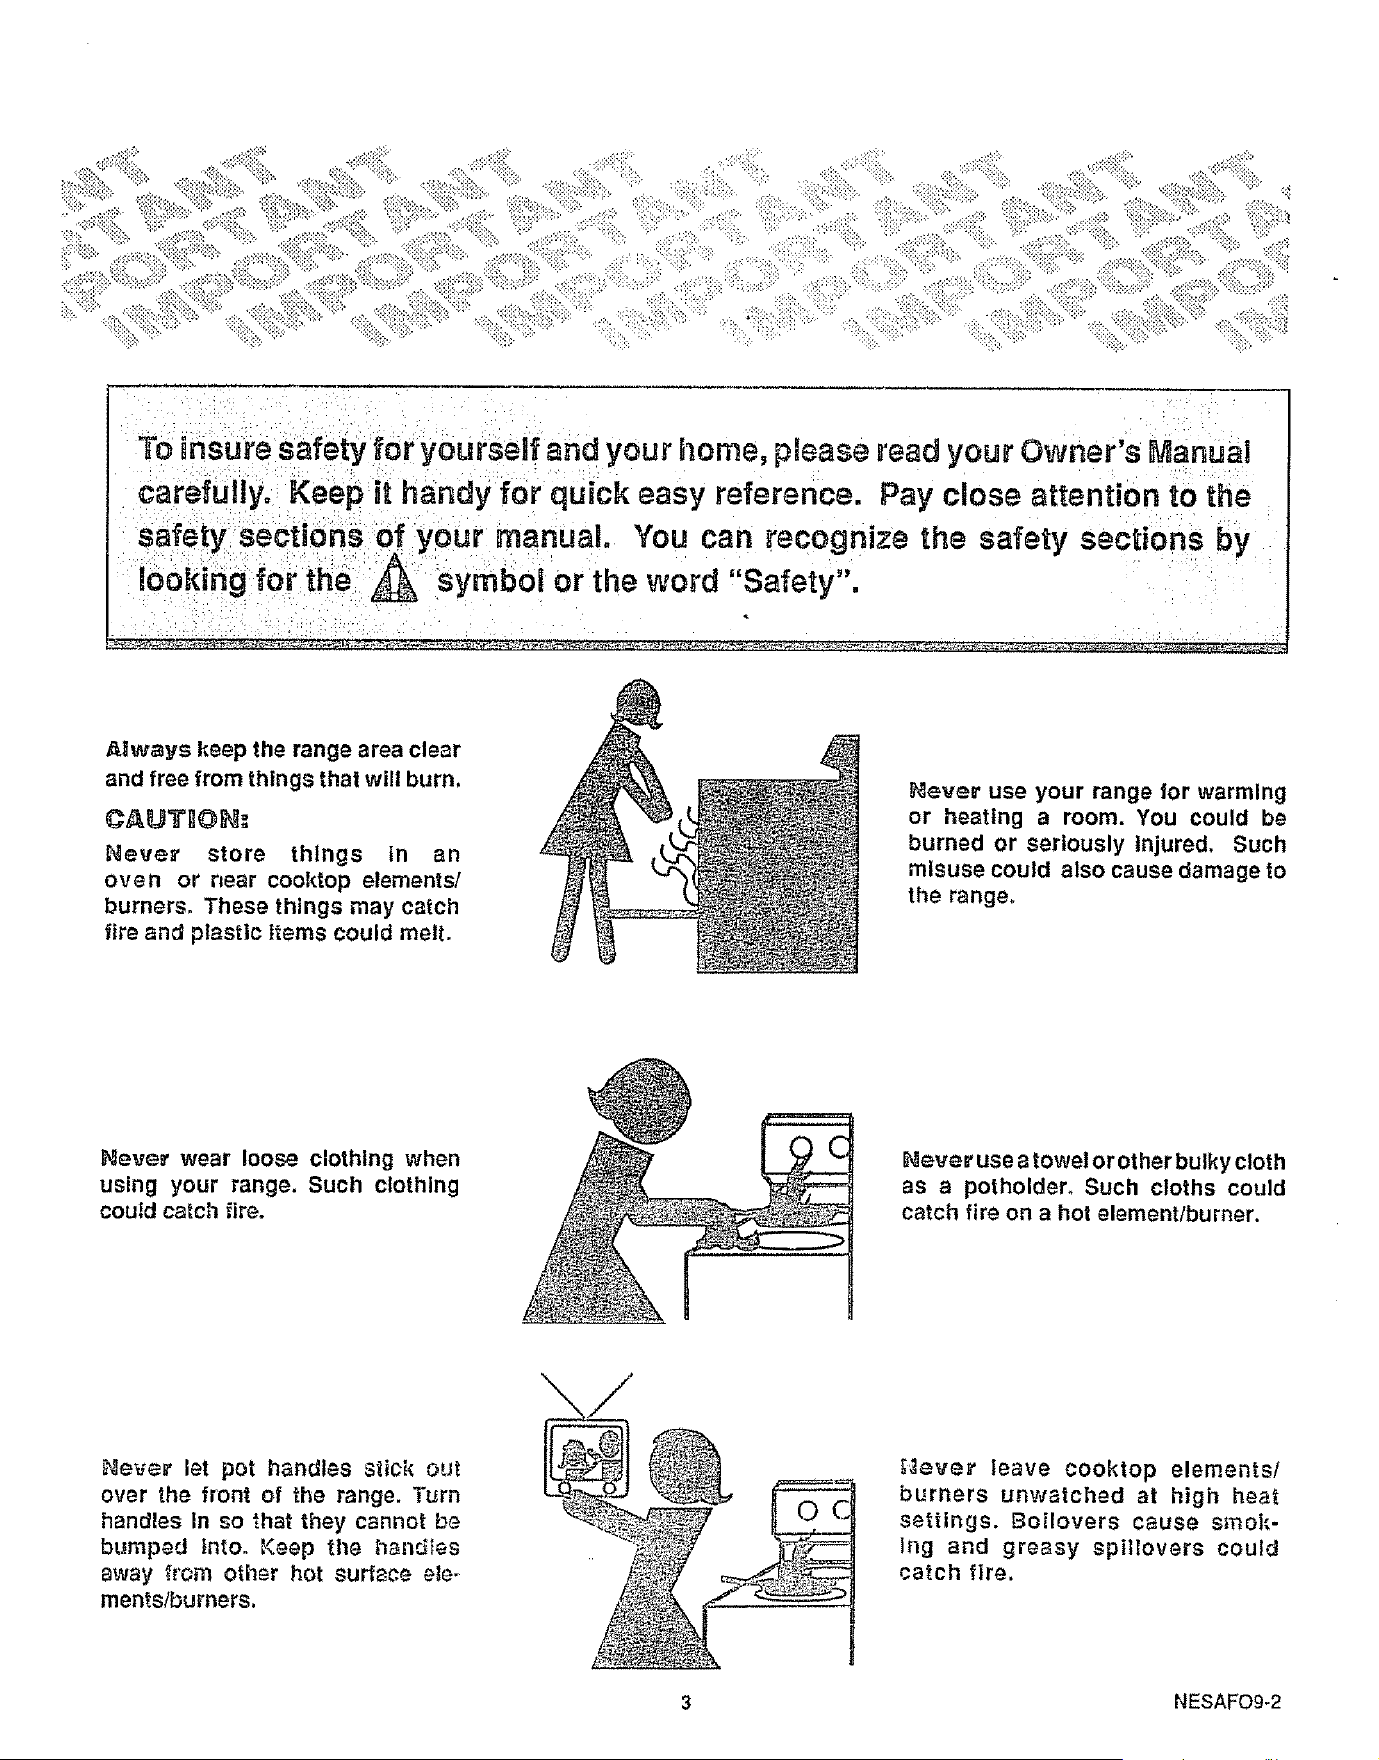
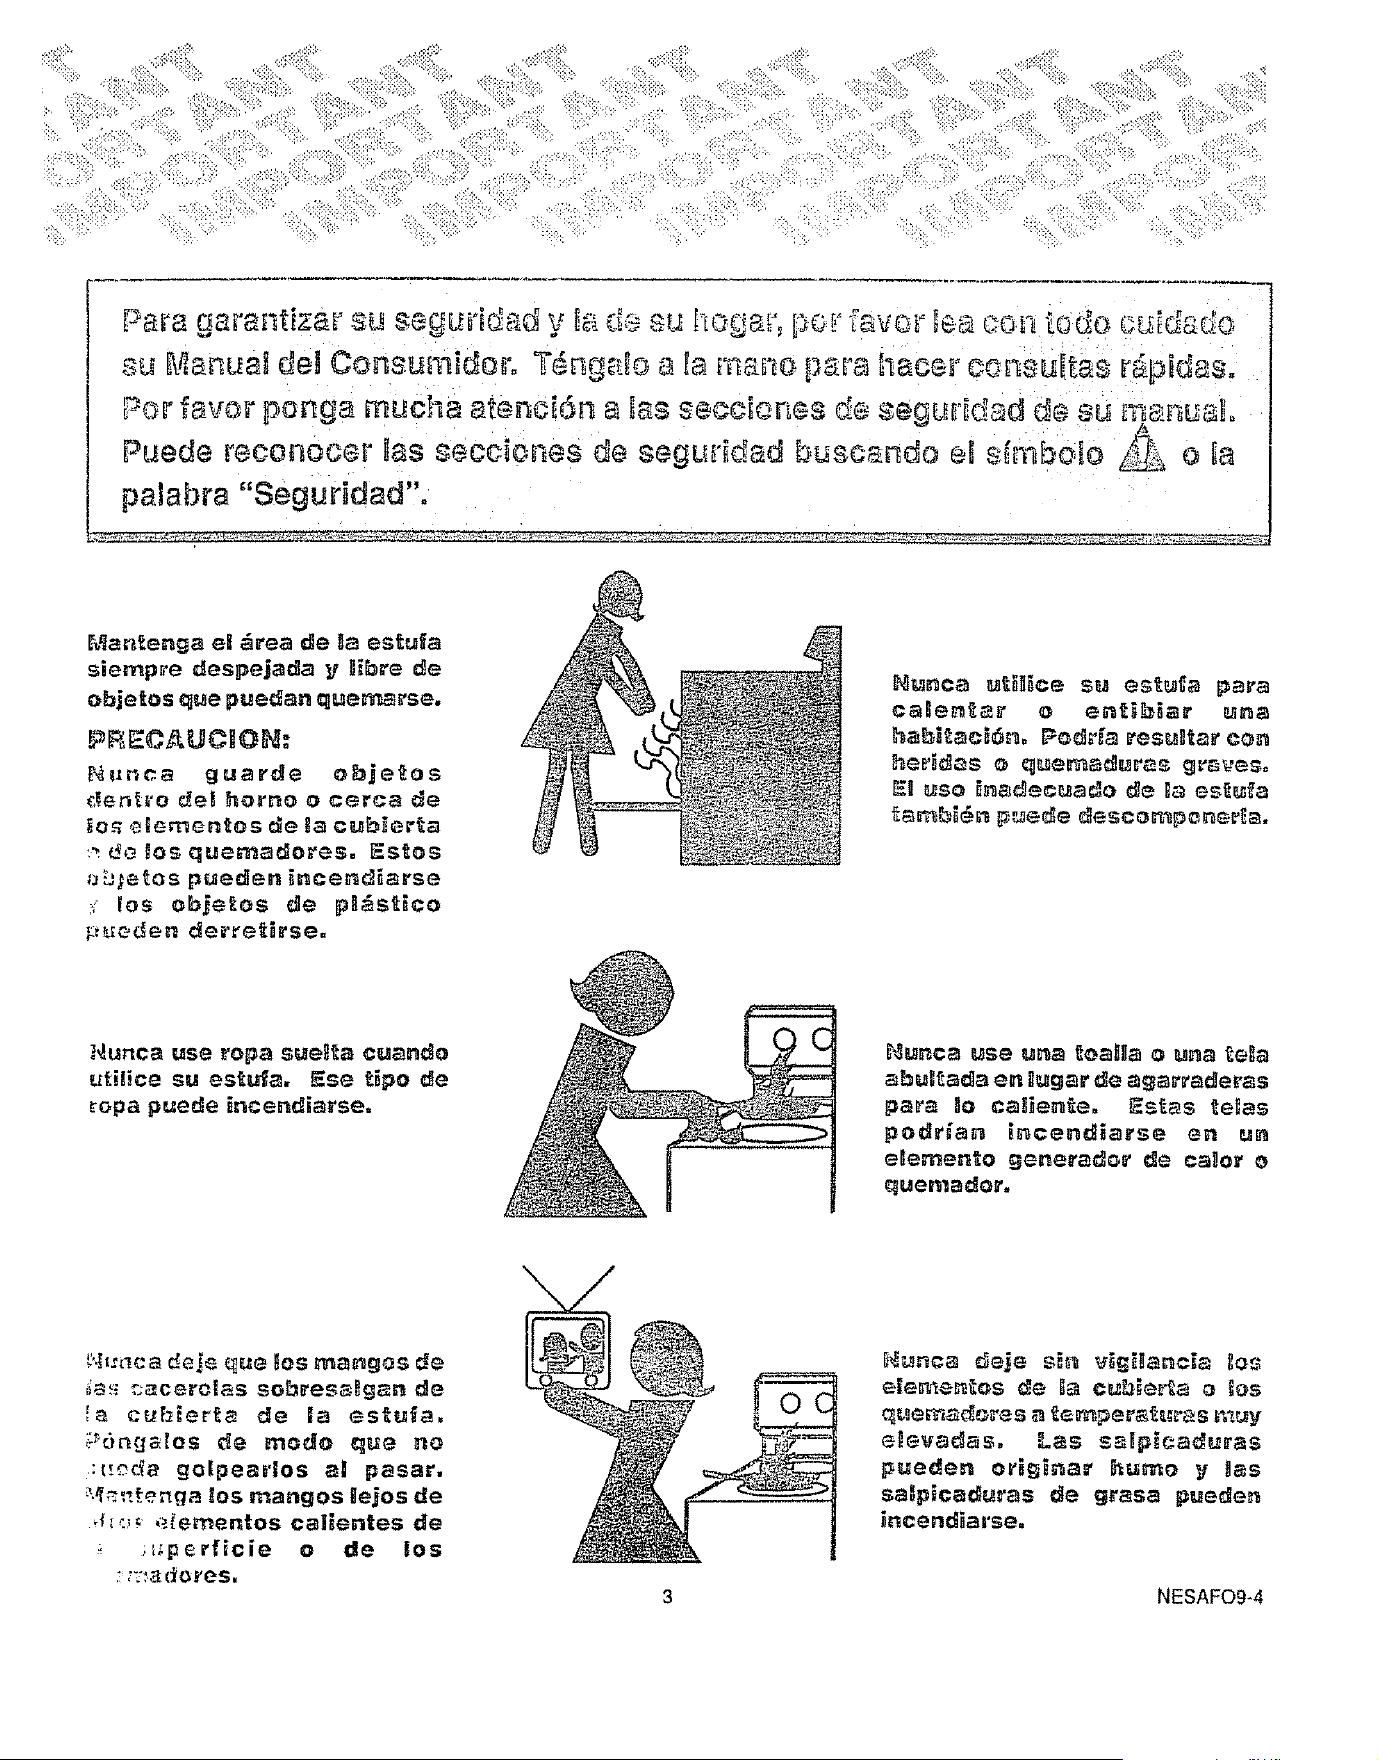
Always keep the range area clear
and free from things that will burn,
CAUTI_:
Never store things tn an
oven or near cooktop elements/
burners. These things may catch
fire and plastic [terns could melt.
Never use your range for warming
or heating a room. You could be
burned or seriously injured, Such
misuse could also cause damage to
the range.
Never wear loose clothing when
using your range. Such clothing
could catch fire.
Never use atowel or other bulky cloth
as a potholder. Such cloths could
catch fire on a hot element/burner.
;_e_,*er let pot h_ndles stick out
over the front of the range. T_rn
handles In so that they cannot b_
bumped into. Keep the h_ndtes
away from other hot surface _le-
ments/burners,
_;_ever leave cooktop elements/
burners unwatched at high heat
settings. Botlovers cause smok-
Ing and greasy spillovers could
catch fire.
3 NESAFO9-2
P@ T HT I $T U T!OH$
A$1C SAFETY PRECAUT O $
Keep this book for later use.
Be sure your range is installed and grounded properly
by a qualified technician.
Always use dry pothotders when removing pans from
_he oven or cooktop° Moist or damp potholders can
cause steam burns.
_,l]ways follow cleaning Instructions In this book.
Always keep the range and oven clean. Food and
grease are easy to ignite. Clean the range, oven and
vents regularly.
Clean Only Parts Listed in Manual.
CAUTIOH: Do not store items o_ interest _o
children in cabinets above a range or on the
baCkguard of a range, Children climbing on a
range to reach items could be seriously injured.
Aliways keep combustible wall coverings, curtains, or
drapes a safe distance away from your range and oven°
Always keep dish towels, dish cloths, potholders and
other linens a safe distance away from your range°
Never store such items on your ranges
Always keep the appliance area clear and free from
things that will burn (gasoline and other flammable
vapors and liquids).
=
Never try to repair or replace any part of the range
unless Instructions are given In this book. All other
work should be done by a skilled technician.
Never heat unopened food containers. Pressure
buildup may make container burst and cause injury°
Never leave jars or cans of fat or drippings on or near
the range. Never let grease build up on your range. You
can keep grease fires from starting if you clean up
grease and spills after each range use.
Never try to move a pan of hot fat, especially a deep iat
fryer. Wait until the fat has cooled.
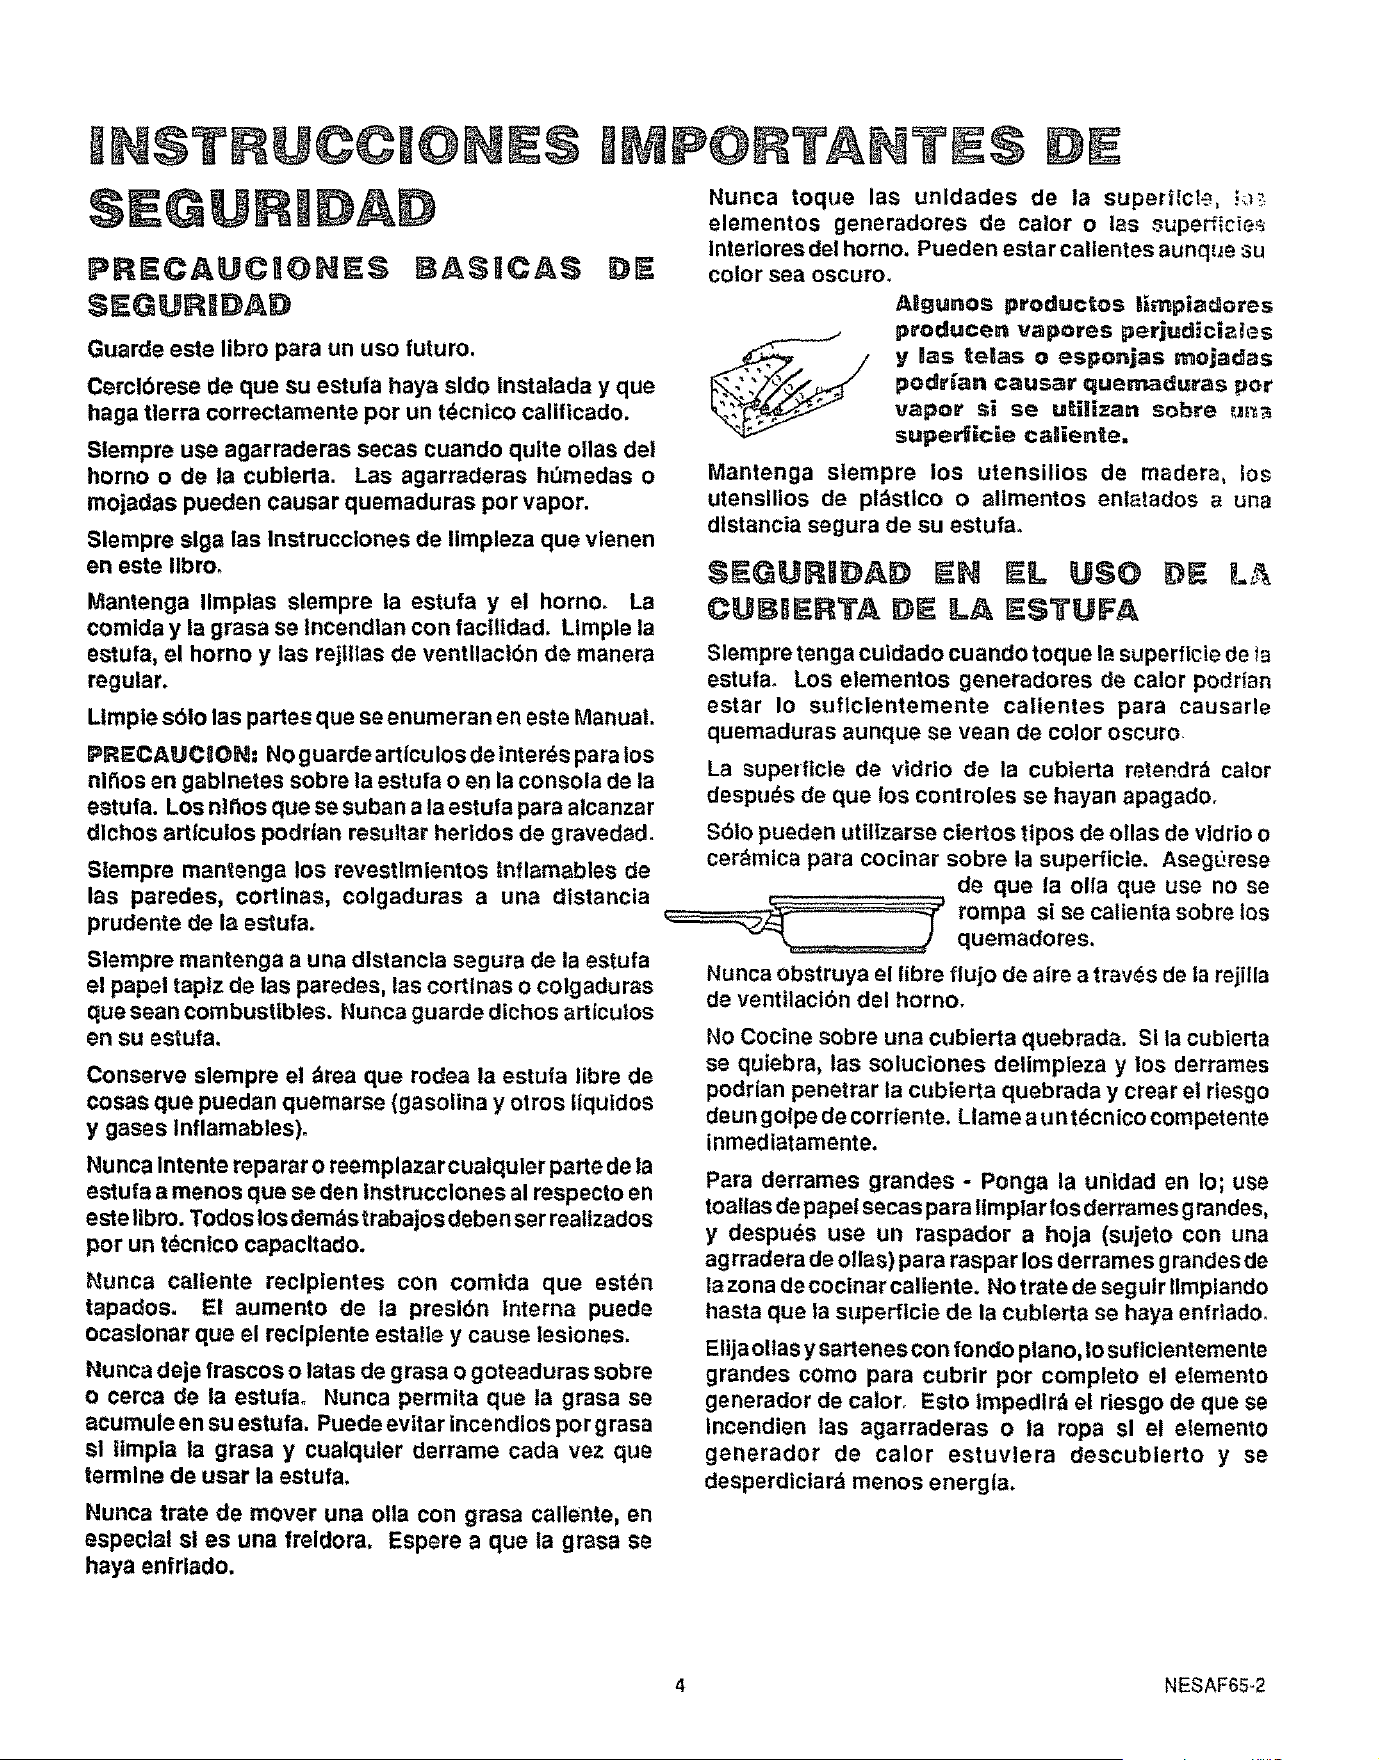
Never touch surface units, heating elementS, or interior
surfaces of the oven. They may be hot even though they
appear dark In color.
Always keep wooden utensils, plastic utensils orcanned
food a safe distance away from your range.
Some cleaners produce nox-
ious fumes and wet cloths or
sponges could cause steam
burns if used on a hot surface.
COO TOP SAFETY
Aaways use care when touching the cooktop. Heating
elements could be hot enough to burn you even if they
are dark in color.
Only some kinds of glass or ceramic pans can be used
for cooktop cooking. Be sure that the pan you use wig
not break when heated on the cooktop elements.
Hever block free airflow through the oven venL
,.............. Choose pots and pans
with flat bottoms, large
enough to cover the en=
tire cooktop element. This will cut down the risk of
setting potholders or clothlng on flrewith an uncovered
element and waste less energy.
OVEN SAFETY
Place oven racks in desired position while oven is cool
if rack must be moved while oven Is hot, do not let
potholder contact hot heating element in oven.
After broiling, always take the broiler pan out of the
range and clean it. Leftover grease in the broiler p_n
can catch on fire the next time you use the pan.
Always use care when opening oven door. Let hot atr
and steam escape before moving food.
Never use aluminum foil to line drip bowls or oven
bottoms. Improper use of foil could start a fire.
SELF°CLEAN SAFETY
gf the self-c_eaning mode ma_functio_s, turn off
and disconnect the power supply. Have serviced by a
qualified technician.
Always remove broiler pan and other utensils from the
oven before a self-clean cycle.
Never rub, move, or damage the door gasket on self-
cleaning ranges. The gasket Is essential fora good seal
Never try to clean utensils, cookware or removable
parts of your range during a self-clean cycle.
Do Not Use Oven Cleaners -- No commercial oven
cleaner or oven liner protective coating of any kind
shbuld be used in or around any part of the oven°
4 NESAF65
$1!II ITY IIST£11@YIOII$ Ic 4 ==e l
T£I$ III!!Q£11iiTI@B! B!QW!
I P©IT . NT SIi!IFITY
H©TI©I
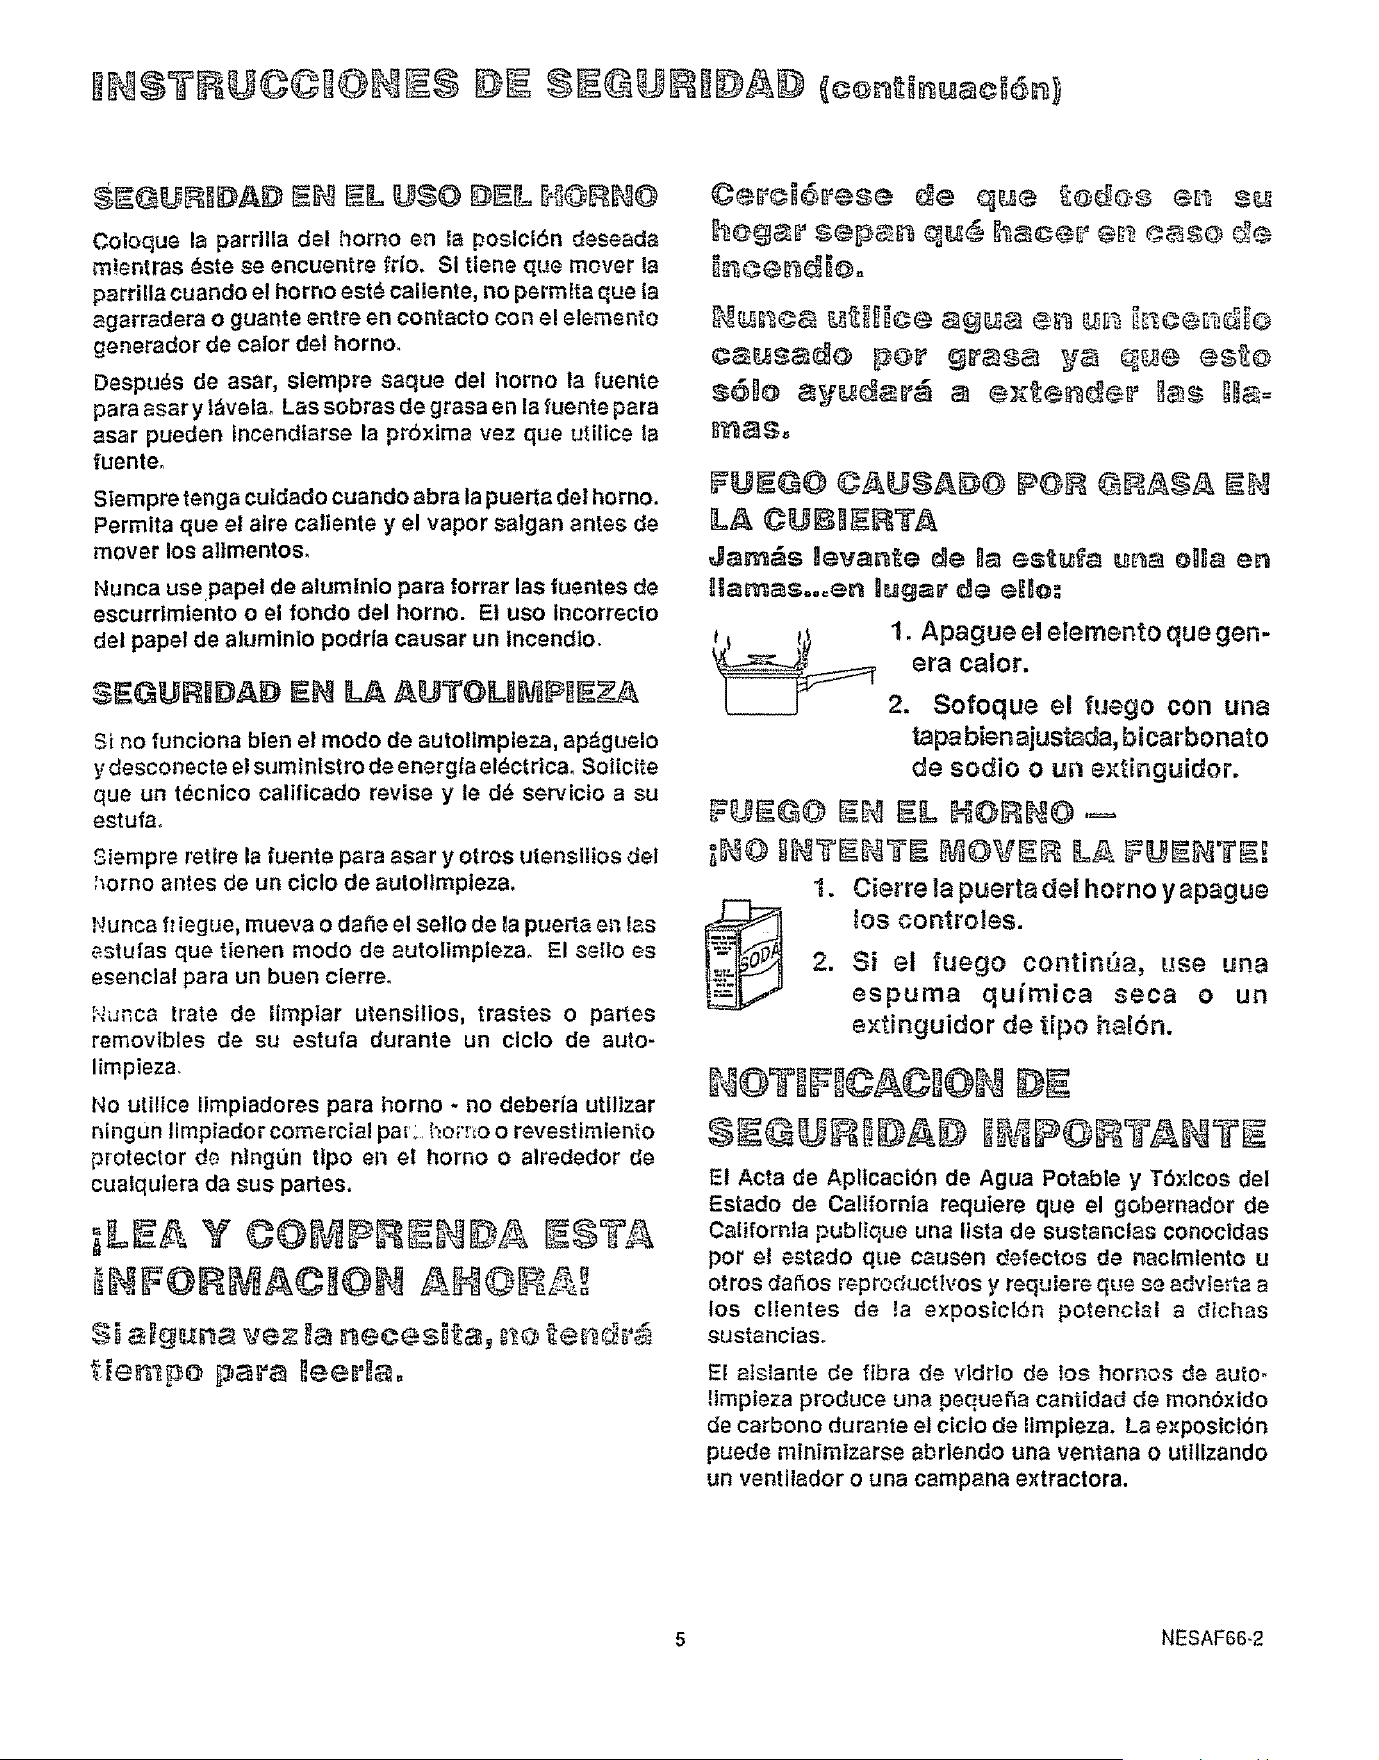
©@©I,'I.IF@P @IilIA$tl FII_I!
'it. Turn off the element.
2. Smotherthe firewith atightty
fitting pan lid, baking soda
o_ an e_._tinguisher.
1. Close even door r=nd turn controls
off.
2. If fire continues, throw baking soda
on the fie'e, or use a dry chemical,
foam, or halon type e×tinguisher.
ii_ Cati;orn!a Safe Drir_klng Water and To),'tc Enforce,
m_nt ,_,ct .Tequtres the governor of Cal_ornta to publish
a ilst o,_ substances known to the state to cause birth
def_cts or other reproductive harm and requires busi-
nesses to warn c ustomers of potental e_,'posure to such
substances.
The fiberglass Insulation in sole.clean ovens gives off a
vsry sinai amount of carbon monoxide during the cl_an-
trig cycle. Exposure can be m!nimized by venting with
an open window or using a ventilation fan or hood.
WHE_ O_Bl Y@_ !=001_ FOIIt
PACkaGING T_P$?
Elements
Drip pans
Control panel: top, sides, and bottom
Under maintop
Door trim: top, sides, and bottom
Bake element
Door handles
5 NESAF6_I
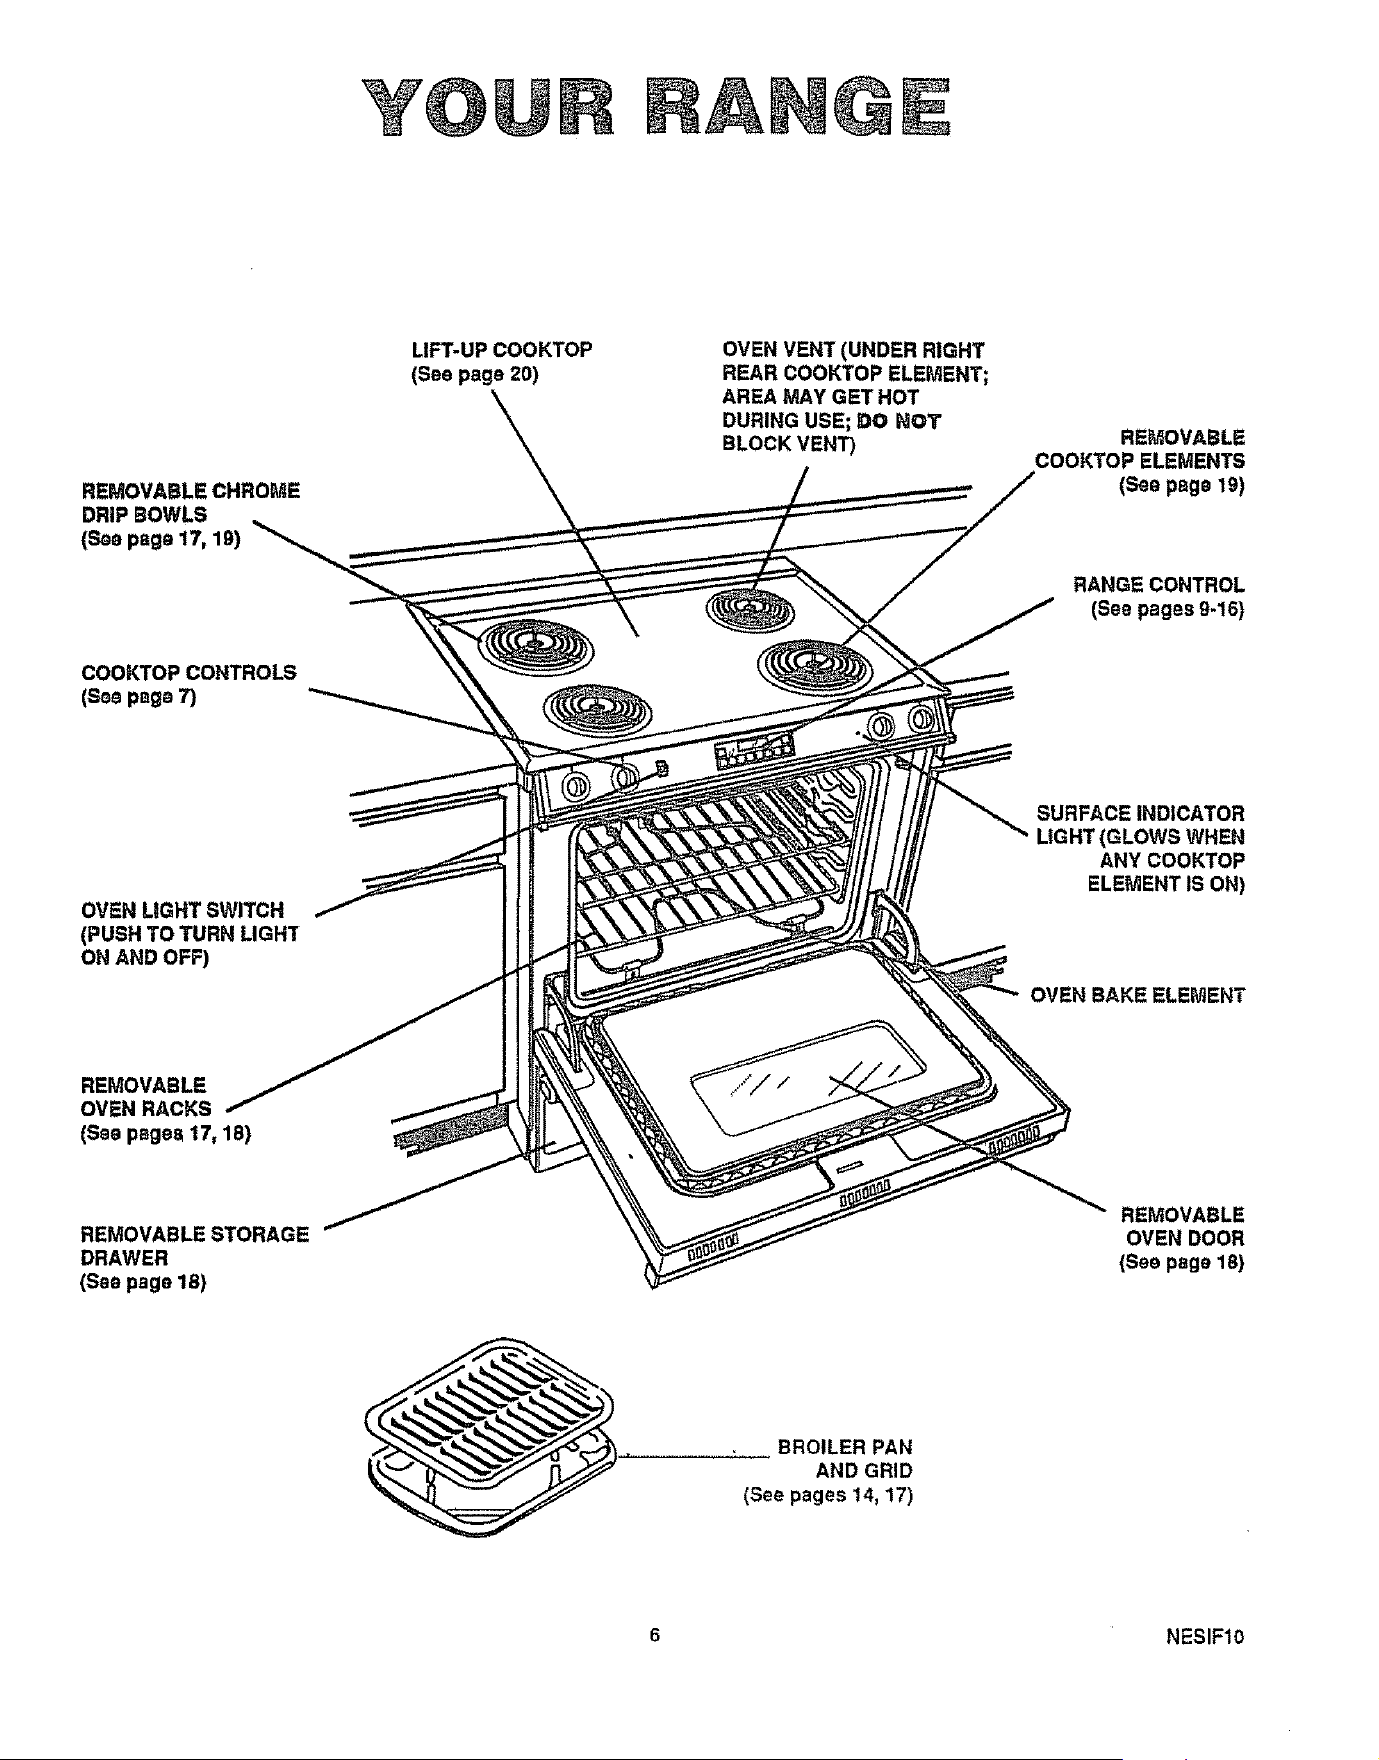
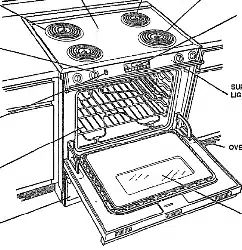
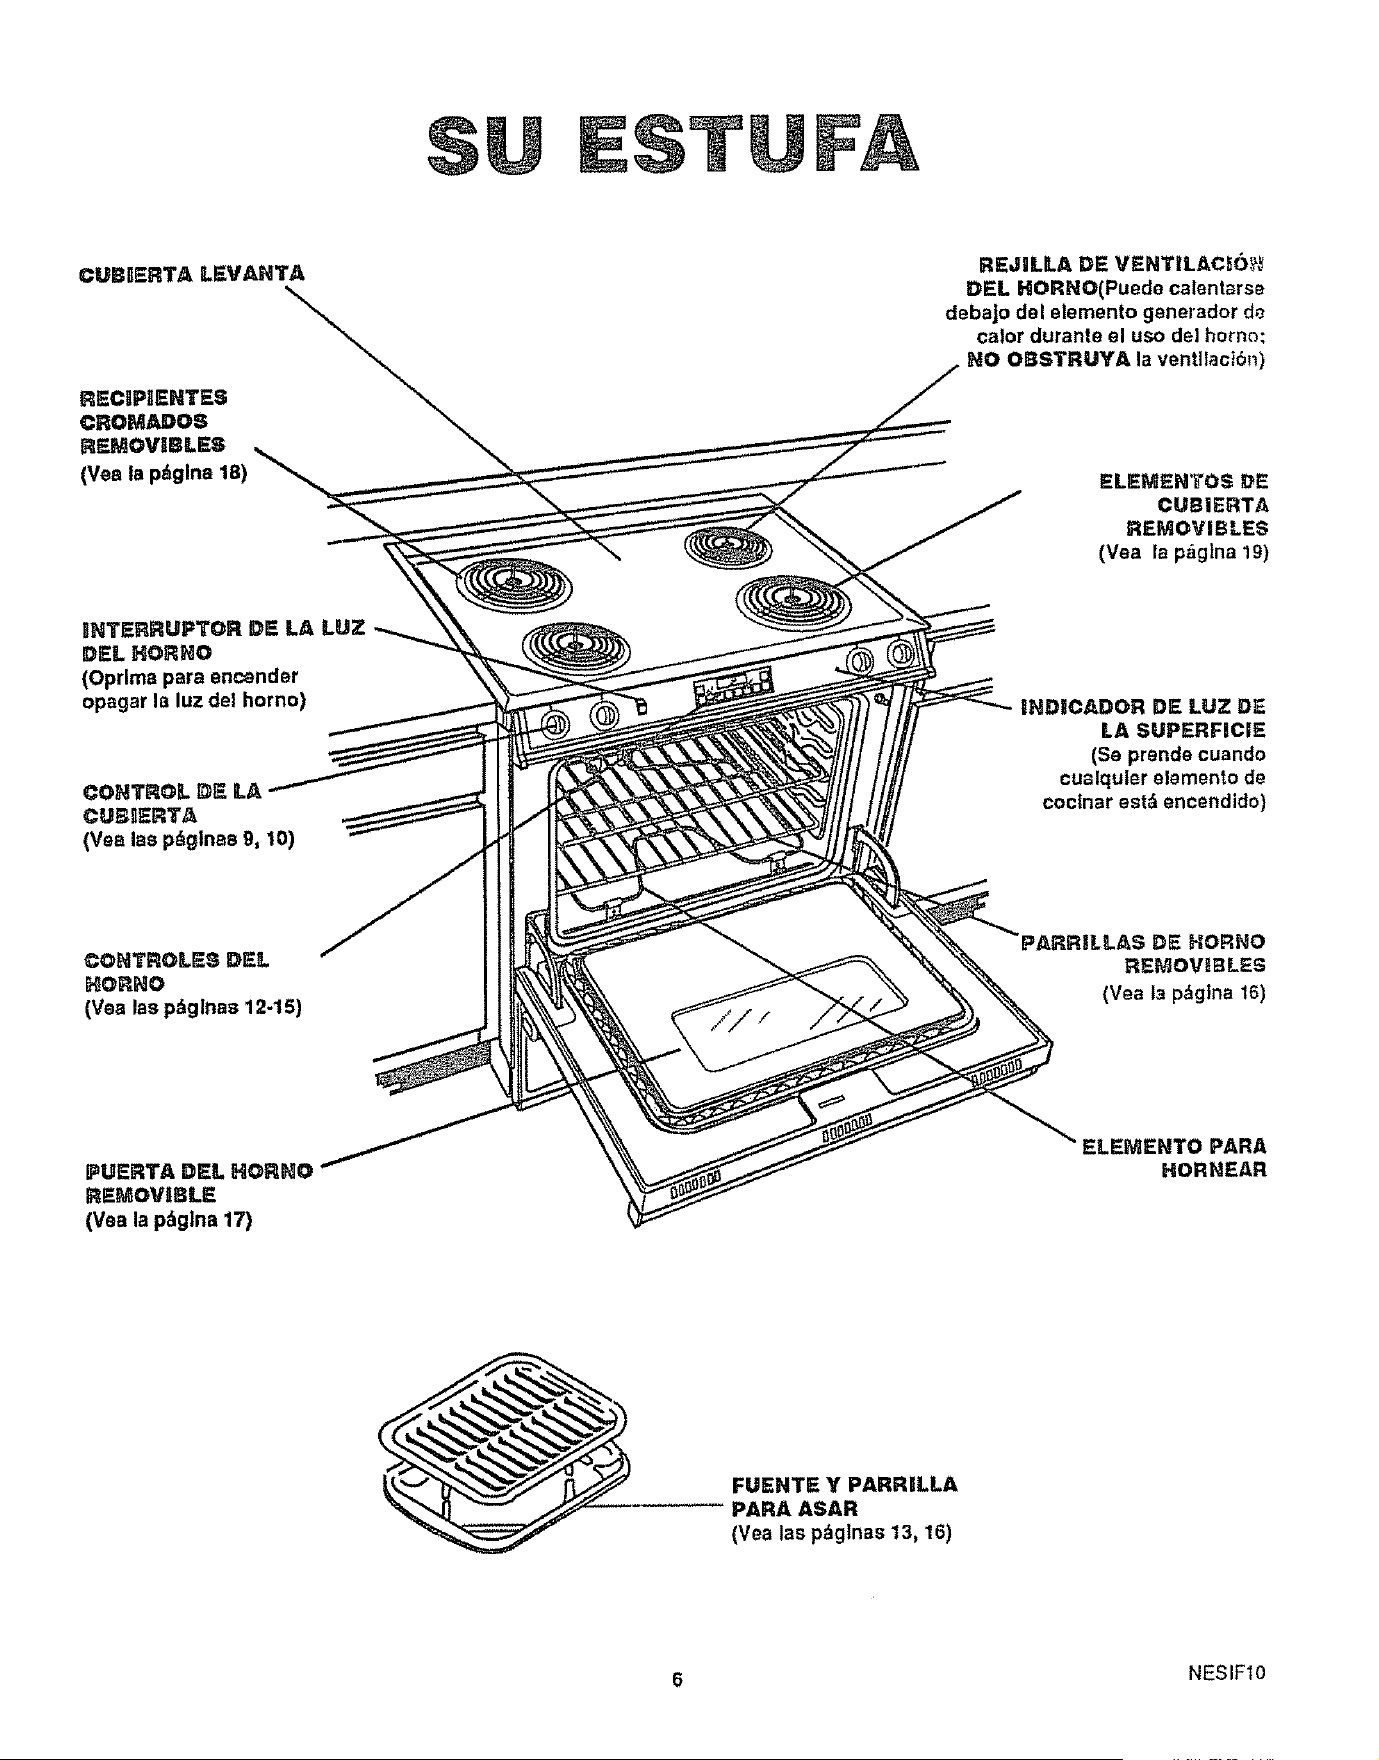
Y@
COOKTOP CONTROLS
(S_e page 7)
LIFT-UP COOKTOP
(See page 20)
OVEN VENT (UNDER RIGHT
REAR COOKTOP ELEMENT;
AREA MAY GET HOT
DURING USE; DO NOT
BLOCK VENT)
REMOVABLE
COOKTOP ELEMENTS
(See page 19)
RANGE CONTROL
(See pages9-16)
OVEN LIGHT SWITCH
(PUSHTO TURN LIGHT
ON AND OFF)
REMOVABLE
OVEN RACKS
(Seepages17,18)
/////
SURFACE iNDICATOR
LIGHT (GLOWS WHEN
ANY COOKTOP
ELEMENT IS ON)
OVEN BAKE ELEMENT
REMOVABLESTORAGE
DRAWER
(Seepage18)
REMOVABLE
OVEN DOOR
(See page 18)
BROILER PAN
AND GRID
(See pages 14, 17)
6 NESIF10
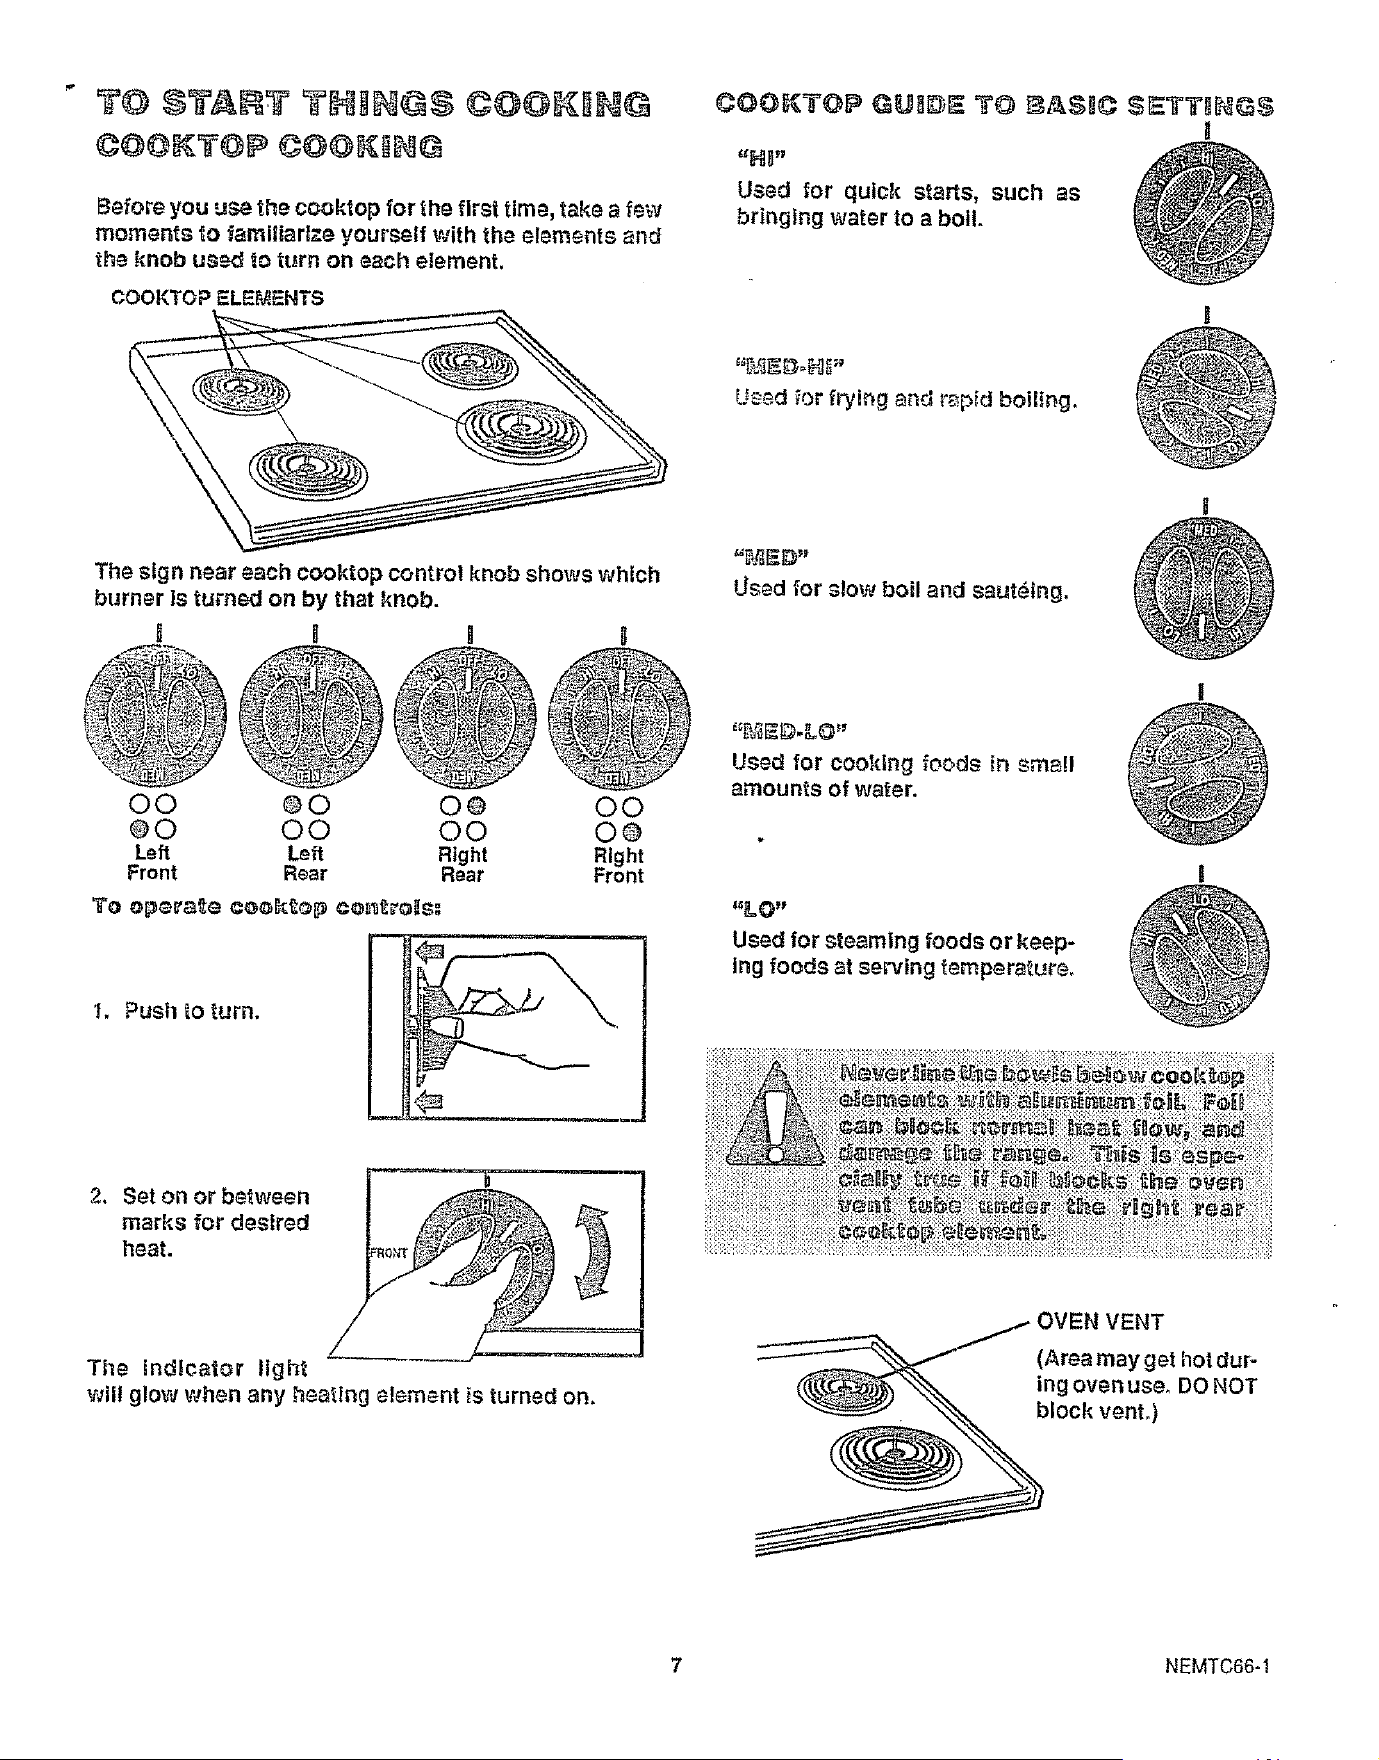
@Q@I III@
Before you use the co4)ktop for the first time, take a few
moments to familartze yourself with the elements and
the knob ua_ io turn on each element.
COOKTOP ELEMENTS
The slgn near each cooktop contro! knob shows which
burner is turned on by that knob.
I I I I
-0 @
)j_ N
O0 ®0 0o
®0 O0 O0
Lel _ff Right
Front Rear Rear
t. Push _o turn.
O0
O@
Right
Front
@OOKTOP Gl=llllil TO III$10 SETTtt8$
!
==HI"
Used for quick starts, such as
bringing water to a boll.
Used _orfrylngand rapidboiling.
Used for slow boiland sauteing.
Used for cooking foods in small
amounts of water.
%.0"
Used for steaming foods or keep-
Ing foods at serving temperature.
2, Set on or between
marks for desired
heat.
The indicator light
will glow when any heating element is turned on.
OVEN VENT
(Area may get hot dur-
ing oven use. DO NOT
block vent,)
7 NEMTC66-1
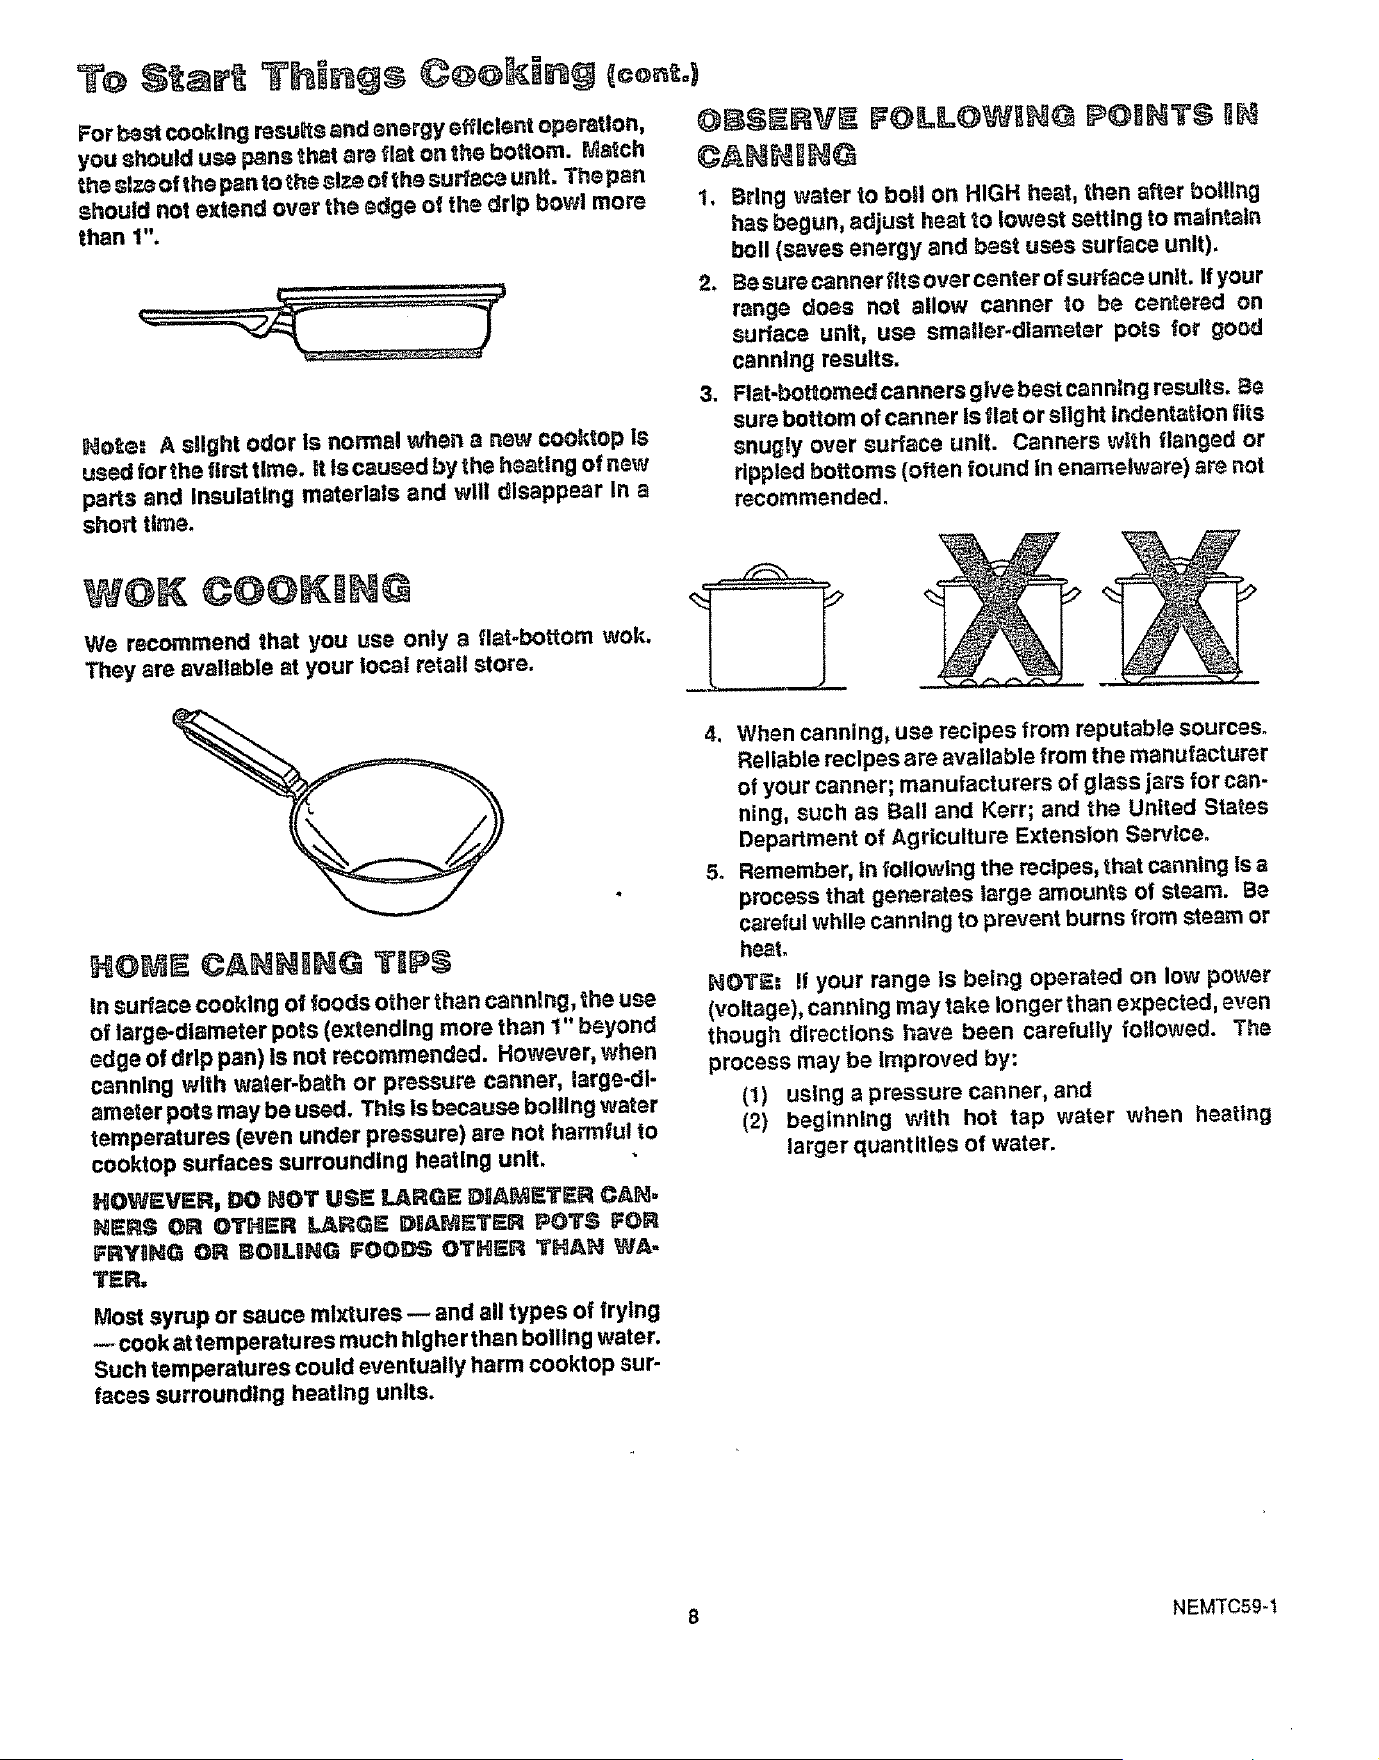
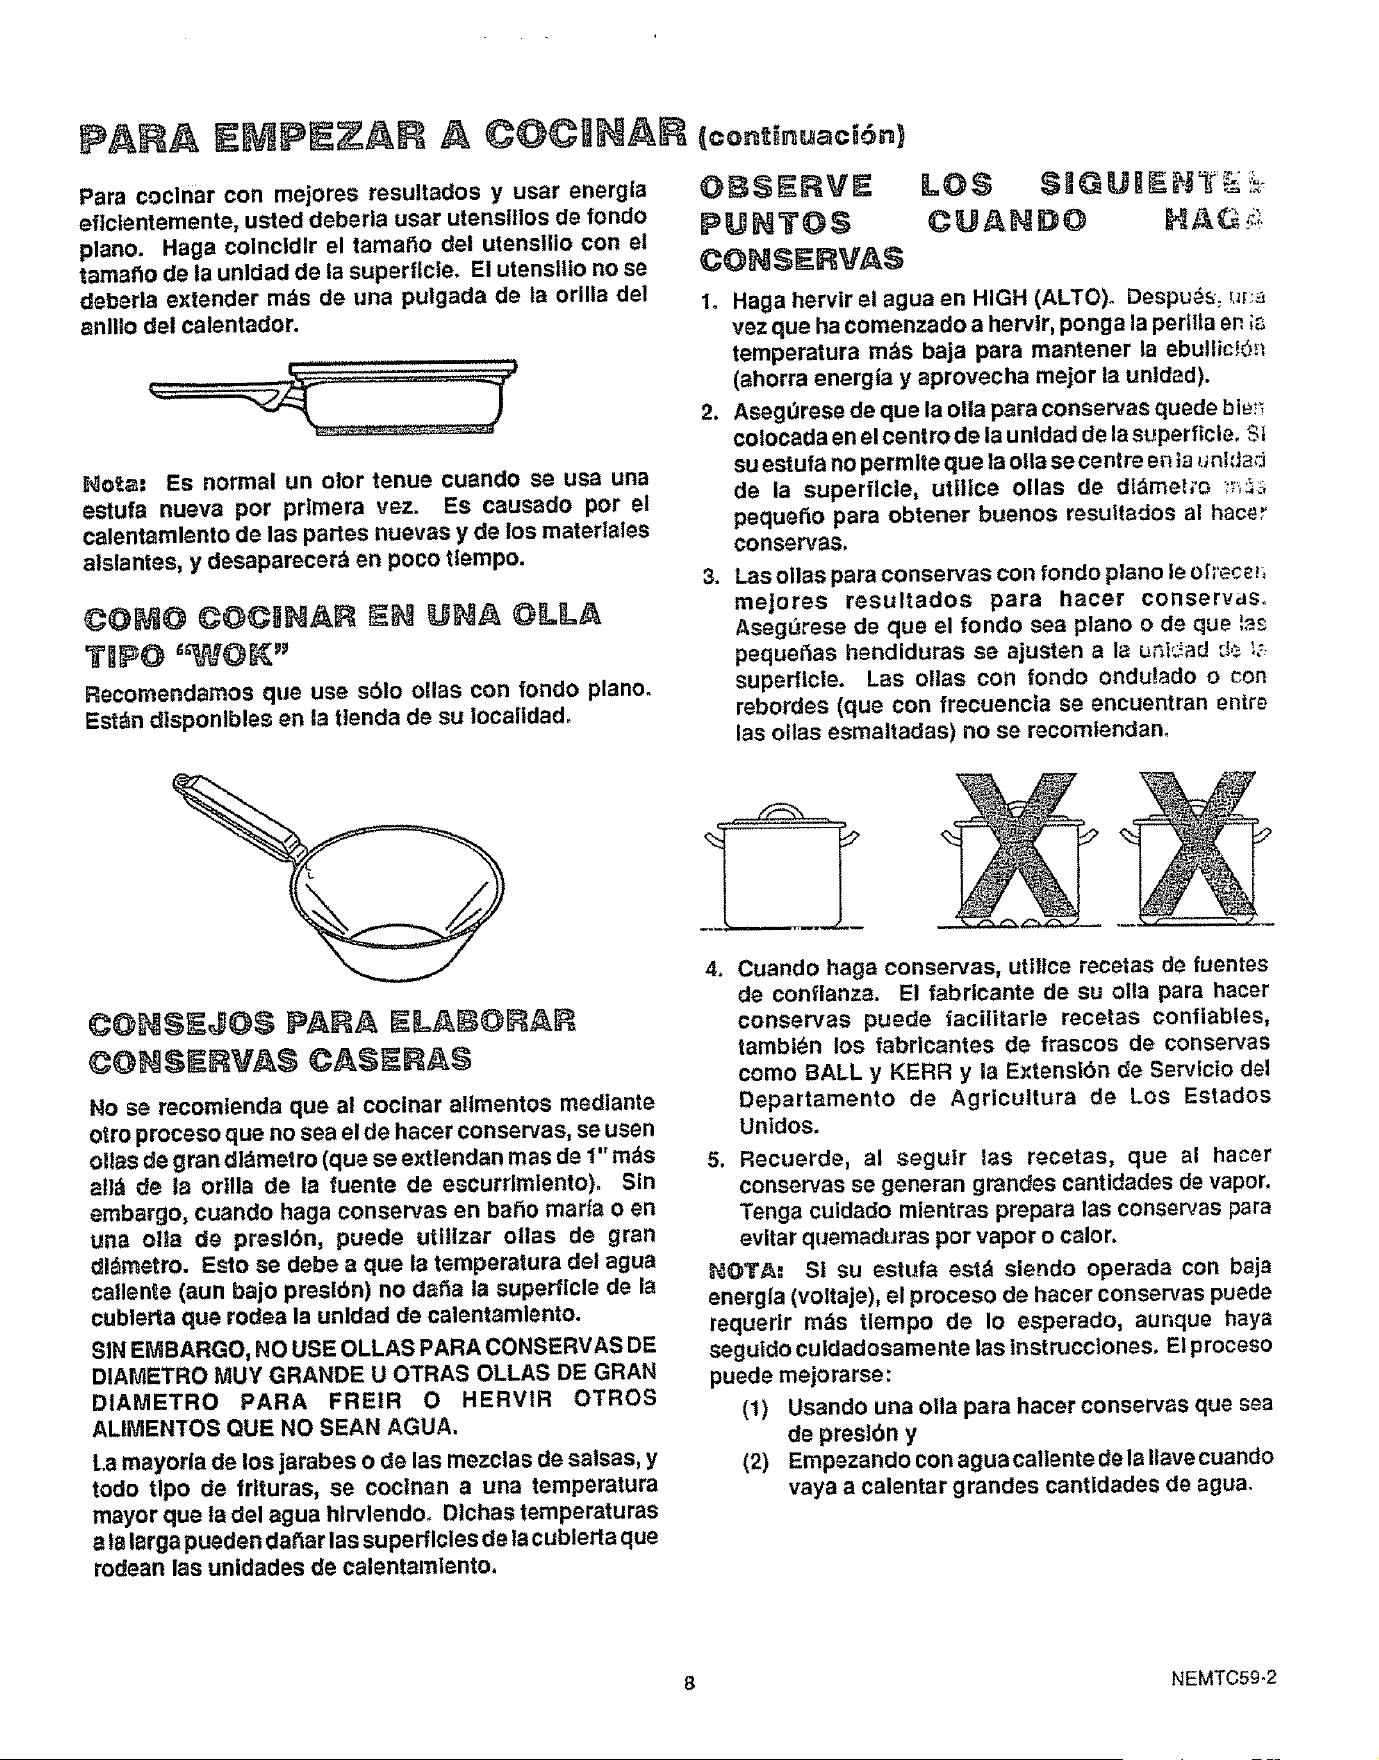
To Star ©@o J g {©grit°)
For _st cooking resuBtsand energy efficient operation,
you should use pans that are flat on the !_o_om. Match
the s_zeof the pan to the size of the sur_ac_ unit. The pan
should not extend over the edge of the drip bowl more
than 1".
i_o_s: A slight odor Is normal when a new cooktop is
used forths first time. _tis caused by the heating of new
parts and insulating materials and will disappear in a
short time.
1. Bring water to boil on HIGH heat, then after boiling
has begun, adjust heat to lowest setting to maintain
boll (saves energy and best uses surface unit).
2. Be sure canner fits over center of surface unit. If your
range does not allow canner to be centered on
surface unit, use smaller-diameter pots for go_'J
canning results.
3. Flat-bottomed canners give best canning results. Be
sure bottom of canner is flat or slight indentation fits
snugly over surface unit. Canners with flanged or
rippled bottoms (often found in enamelware) are not
recommended.
©@@IKHH{
We recommend that you use only a flat.bottom wok.
They are available at your local retail store.
@A Ng[ G TiPS
in surface cooking of foods other than canning, the use
of large-diameter pots (extending more than 1" beyond
edge of drip pan) is not recommended. However, when
canning with waler-bath or pressure canner, large-all.
ameter pots may be used. This is because bolting water
temperatures (even under pressure) are not harmful to
cooktop surfaces surrounding heating unlt.
HOWEVER, DO _OT U_ _- LARGE _A_E'_R CA_-
_I_R$ OR OT_I_R L_R_I_ DI_Ai_E_TSR l_@'f$ FOR
FRYtI_G OR B@_L_G FOODS OTHER THA_t _A-
_I_R=
Most syrup or sauce mixtures-- and all types of frying
cook at temperatures much higher than boiling water.
Such temperatures could eventually harm cooktop sur-
faces surrounding heating units.
4. When canning, use recipes from reputable sources.
Reliable recipes are available from the manufacturer
of your canner; manufacturers of glass jars for can-
ning, such as Ball and Kerr; and the United States
Department of Agriculture Extension Service.
5. Remember, in following the recipes, that canning Is a
process that generates targe amounts of steam. Be
careful while canning to prevent bums from steam or
he, to
N_T_; if your range is being operated on low power
(voltage), canning may take longer than e_pected, even
though directions have been carefully followed. The
process may be Improved by:
(1) using a pressure canner, and
(2) beginning with hot tap water when heating
larger quantities of water.
8 NEMTC59-1
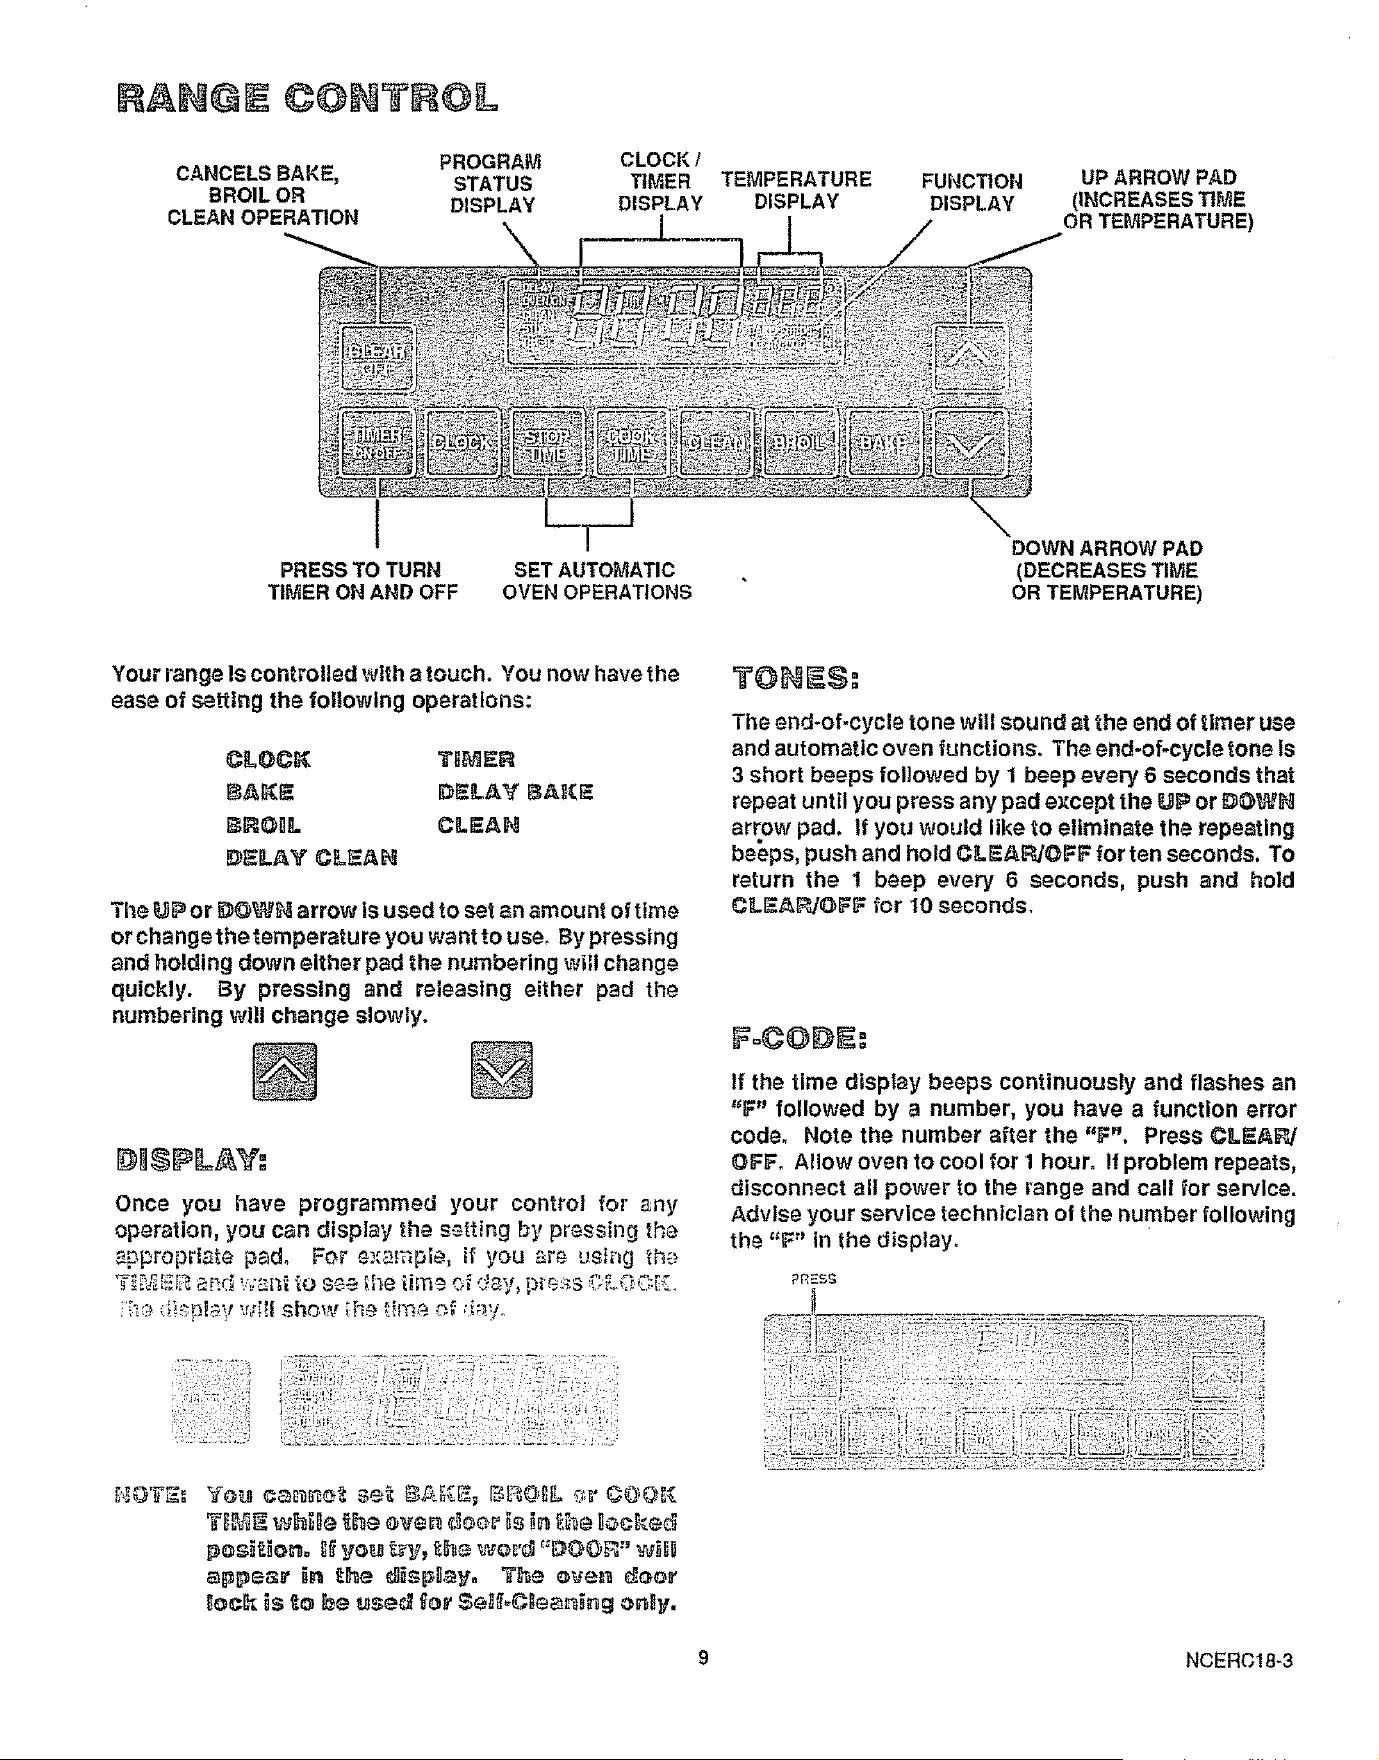
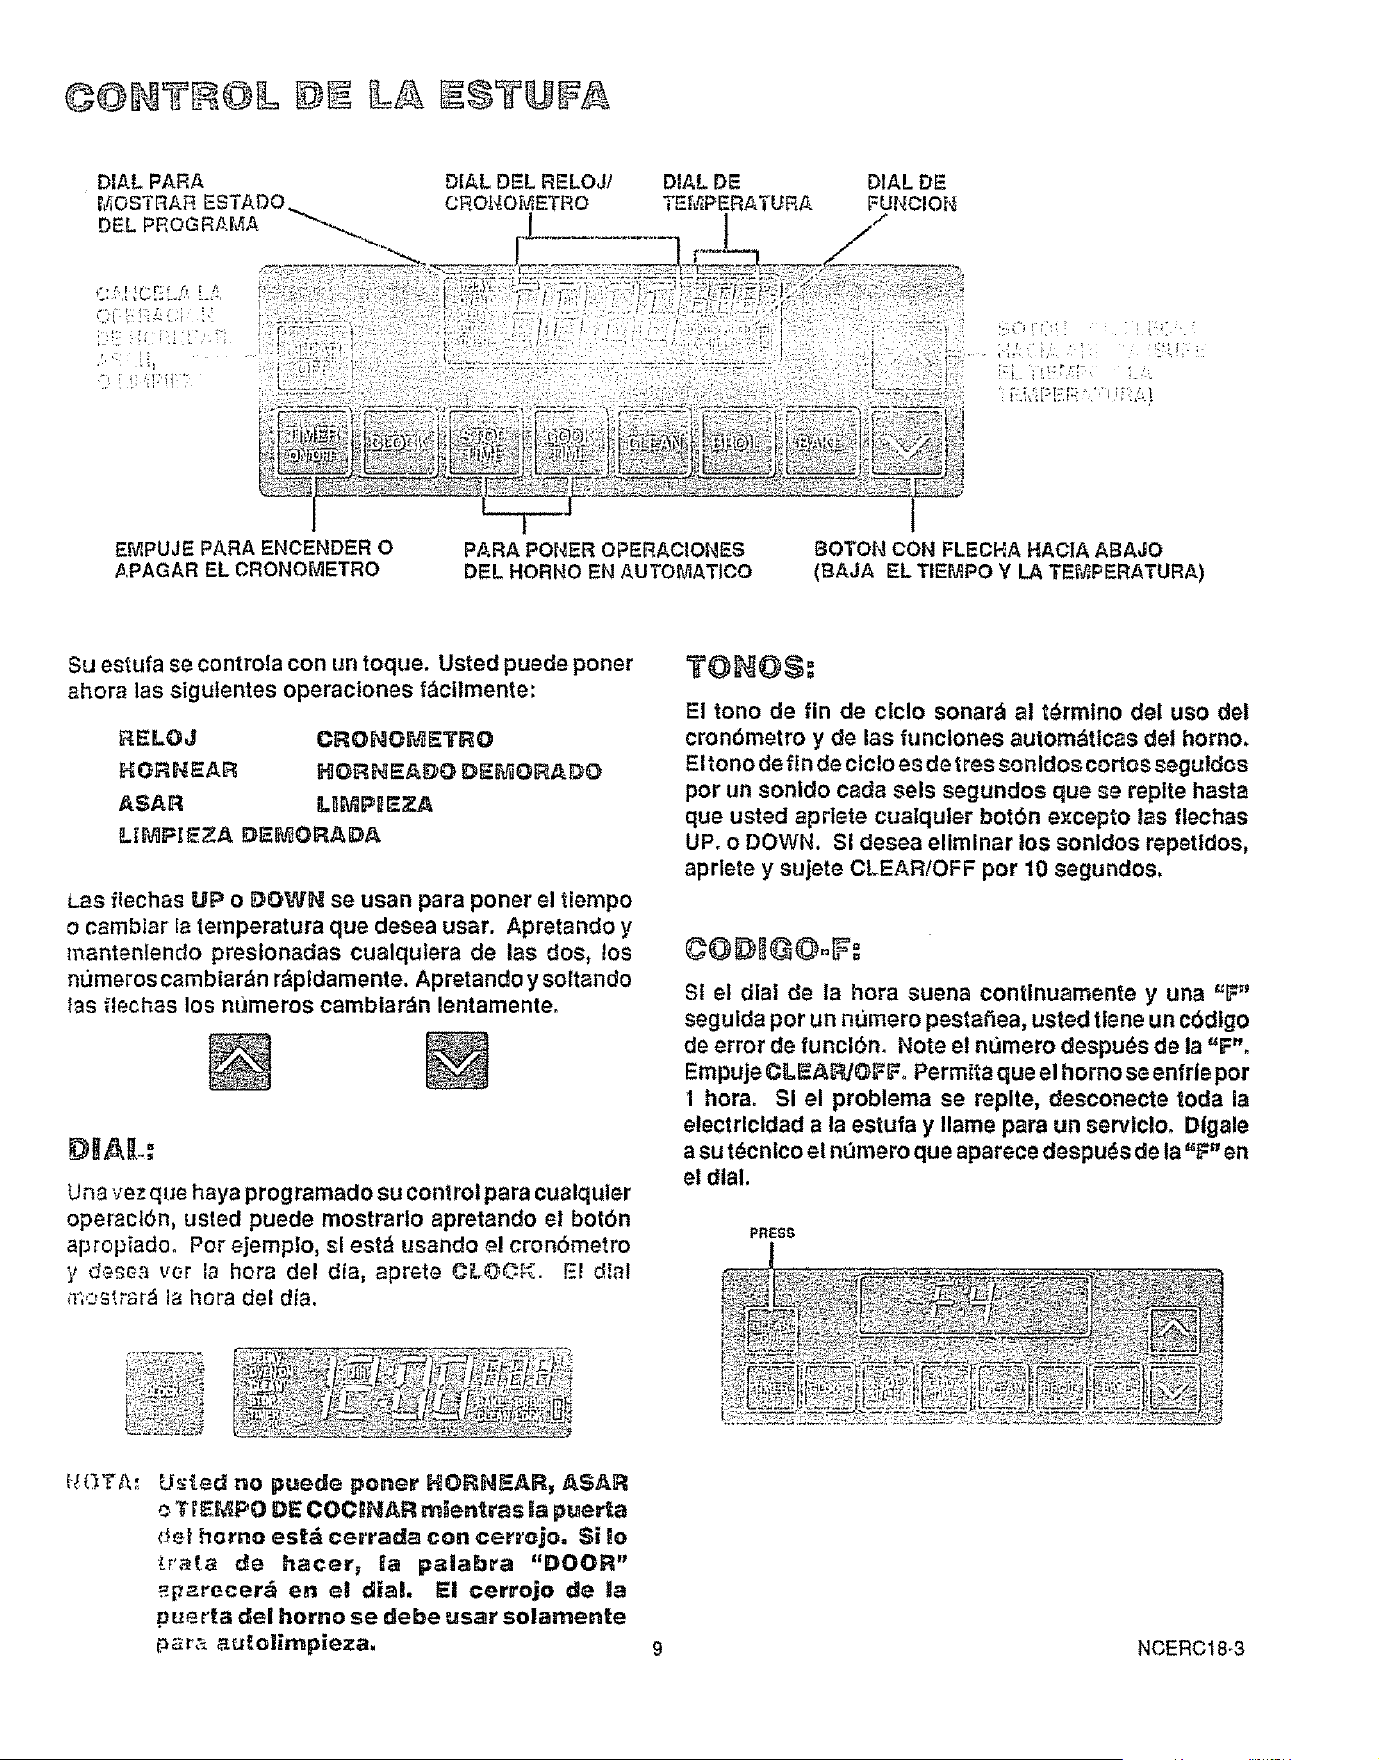
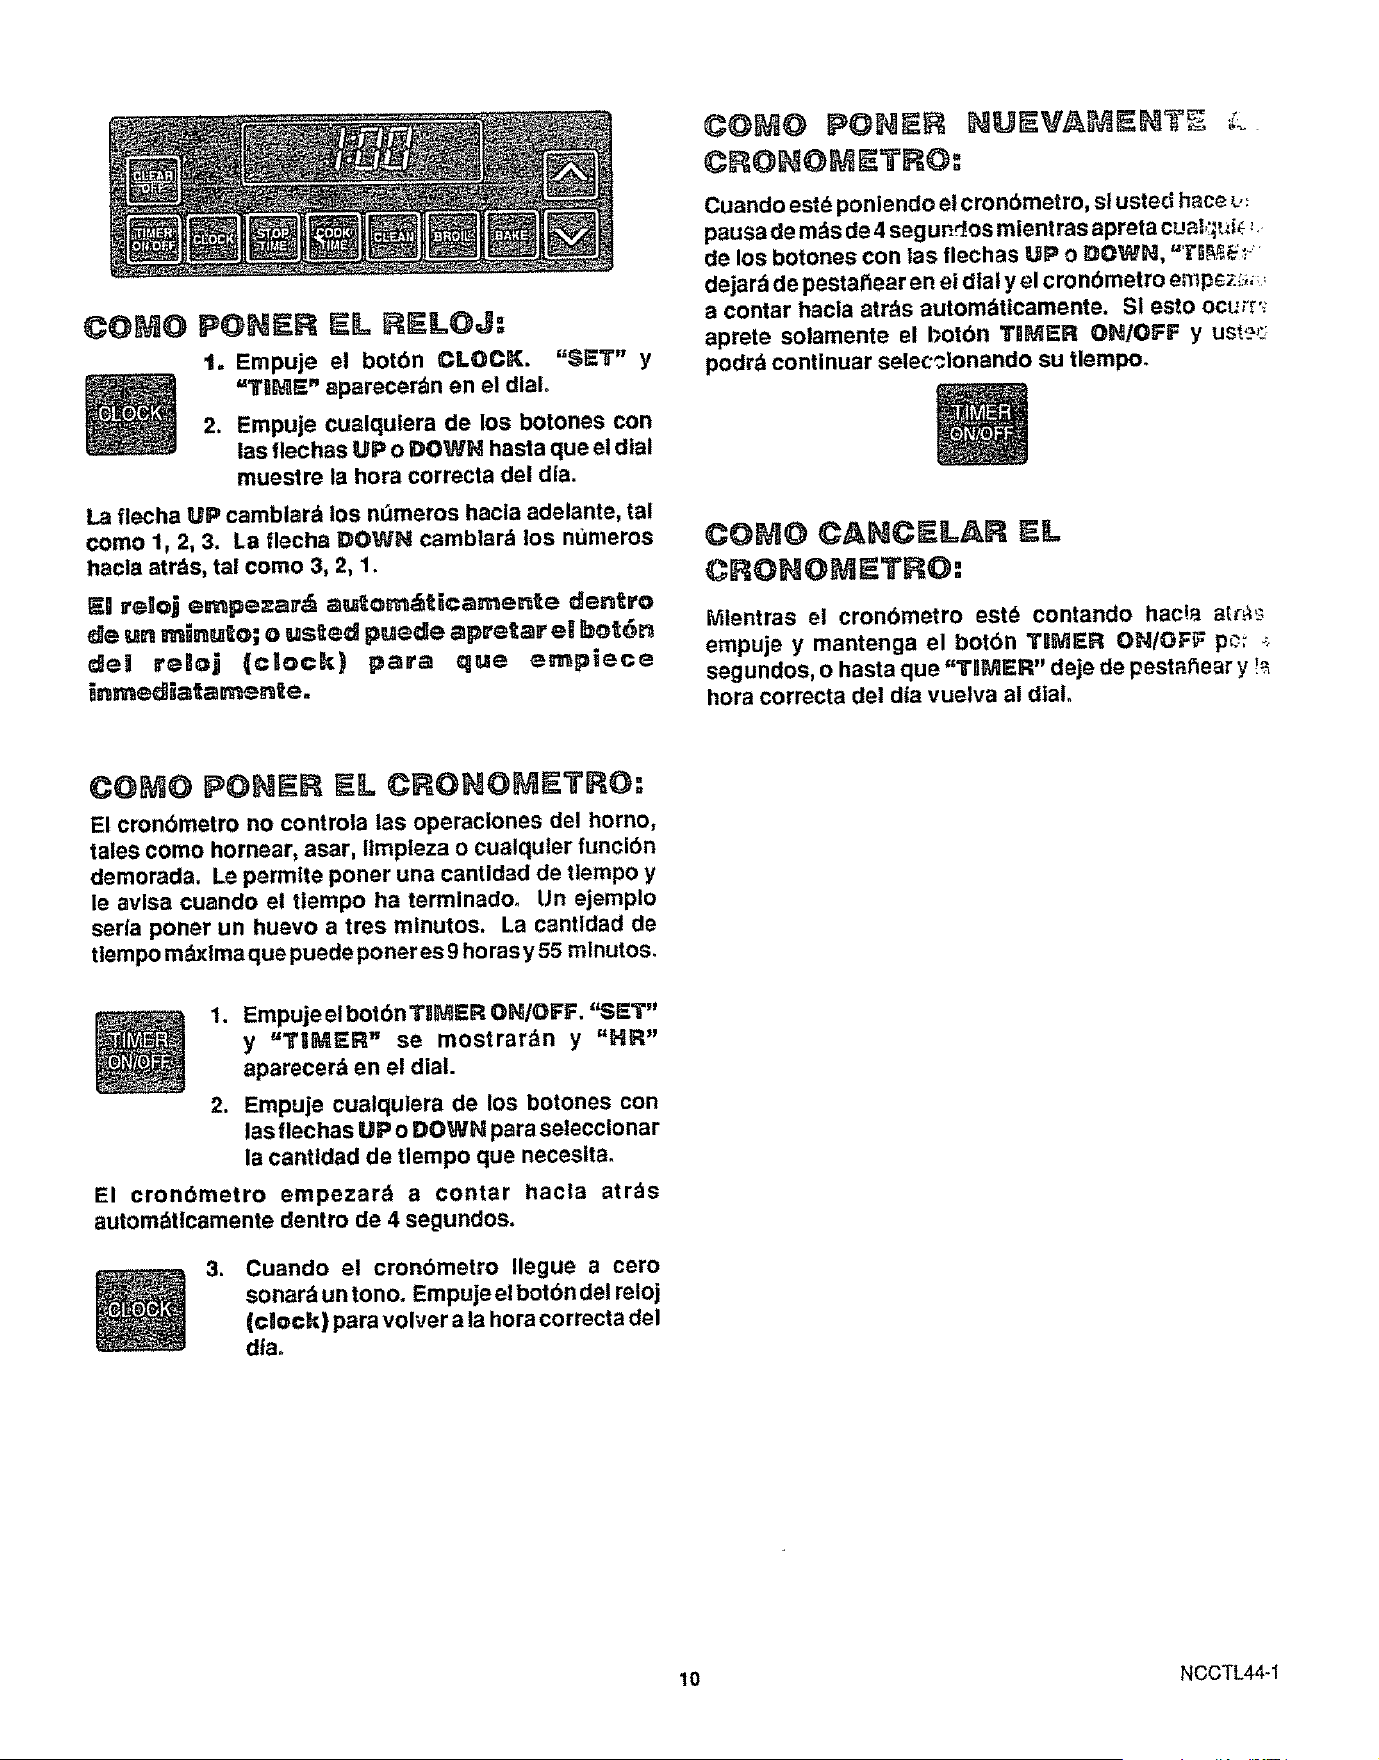
@©HT OL
PROGRAM
CANCELS BAKE, STATUS
BROIL OR DISPLAY
CLEAN OPERATION
X
CLOCK /
"RMER
DtSPL.AY
TEMPERATURE
DISPLAY
FUNCTION
DISPLAY
UP ARROW PAD
(INCREASES TIME
OR TEMPERATURE)
I
PRESS TO TURN
TIMER ON AND OFF
SET AUTOMATIC
OVEN OPERATIONS
DOWN ARROW PAD
(DECREASES TIME
OR TEMPERATURE)
Your range Is controlled with a touch. You now have the
ease of settlng the following operations:
CLOC_ TB_ER
_A_5 DELAY BAtCE
_ROg!. CLEAN
DELAY CL_AH
The Ui_ or DOWN arrow is used to set an amount of time
or change the "_emperatureyou want to use. By pressing
and holding down either pad the numbering will change
quickly. By pressing and releasing either pad the
numbering will change slowly.
Once you have programmed your control for -3ny
operation, you can display the setting by pressing the
appropriate pad. Fo_ e._:a:np;e, if you -_re ush'_g the
T_[F,_ _nd '.:;_ to s_e i.he tima of day, press O_O0_Z
i_;, db'_p_y wf!l sho_r _h÷ time of r_ay.
TOH $:
The end-of-cycle tone will sound at the end of timer use
and automatic oven functions. The end-of-cycle tone is
3 short beeps followed by I beep every 6 seconds that
repeat until you press any pad except the UP or DOWN
arrow pad. If you would like to eliminate the repeating
beeps, push and hold CLEAR/OFF for ten seconds. TO
return the 1 beep every 6 seconds, push and hold
C_.E_,F_JOFF for 10 seconds.
FoCOD :
If the time display beeps continuously and flashes an
"F" followed by a number, you have a function error
code. Note the number after the "F". Press CLEAR/
OFF. Allow oven to cool for 1 hour° it problem repeats,
disconnect all power to the range and call for service.
Advise your service technician of the number following
the "F" in the display.
PRESS
a_e_r _n _he €_s_ay. The e_._en _eo_'
_ec_ _8 _o r_e use_ _or Set_.C_ean_ng _n_y.
9 NCERC18-3
TO SET THE CLOCK:
1. Press the CLOCK pad. "$_3"" and
"THME" will show In the display.
2. Press either the UP or DOWN arrow pad,
untll the display shows the correct time of
day.
The UP arrow wilt change numbering forward, such as
1, 2, 3. The DOWN arrow will change numbering
backwards, such as 3, 2, 1.
The cBock will au_ernaticaBJy star_ within ene
_inute after releaslng the arrow pzd; or you
may press the clrock pad for _mrnediate Sta_.
When you are setting the timer, if you pause more than
4 seconds while pressing either the UP or DO_#N arrow
pad, =TD_ER" wltl stop flashing In the display and the
timer will automatically start _o count down. If thls
should happen just press the TJ_ER O_/OF'F pad and
you will be able to continue setting your time.
Y@ CANCE!= THE T IMEP=:
While the timer is counting down, press and hold down
the TIMER ON/OFF pad for 4seconds, or untli"TRt'_ ER"
quits flashing and the current time of day returns to the
display.
TO SET THE T|MER:
The timer does not control oven operations, such as
bake, broil, clean or any delay function, it allows you to
set an amount of time and alerts you when that time is up.
An example would be timing a three minute egg. The
maximum amount of time you may set Is 9 hours and 55
minutes.
1. Press the TIIMER OH/OFF pad. "SET"
and "TBMER" will flash and "HR" will
show in the display°
2. Press either the UP or DOWN arrow pad
to set the amount of time you want.
The timer will automatically start to count down 4 seconds
after the time Is set°
3. When the timer counts down to zero'a
tone will sound. Pressthe CLOCK pad to
return to the current time of day.
10 NCCTL44-1
OVEN COOKING
GENERAL RULES
. When cooking a food for the first time In your new
oven, us_ time given on recipes as a guide°
After you have used your oven for awhile, if you feel
your oven should b_ hotter or cooler, you can adjust
tt yourselfo S_-_T_P_ATUR_ _I_U@T_NT@
In this manual.
o NO PEEKING-- Opening the door too often to ch_ck
food during baking _v_ll allo?s heat loss and may
cause poor bakSng results.
• Theremaybssomeodorwhentheovan IsfTrstused.
This is caused by the heating of new parts and
Insulation.
• Do not cover an entire oven rack with foil The foil
can block normal heat flow and cause poor baking
results. Do not place any iotl directly above the bake
element. Foil used on the oven bottom under the
_Eement may damage the oven surface, therefore, it
should not be used.
FREHEA_NG
When recipes require preheating, have food nearby
before you open the oven door. If the oven door ts
allowed to remain open for more than a brief time,
the preheat temperature wig be lost.
Let the oven preheat thoroughly before cooking
baked products. Watch for the P_ehe_t @n_c_[tor
L_h_: _o go off or tisten for a preheat notification
tone. if your oven is not equipped with either of
these, preheat for 10 mlnu_es before you put food in
the oven.
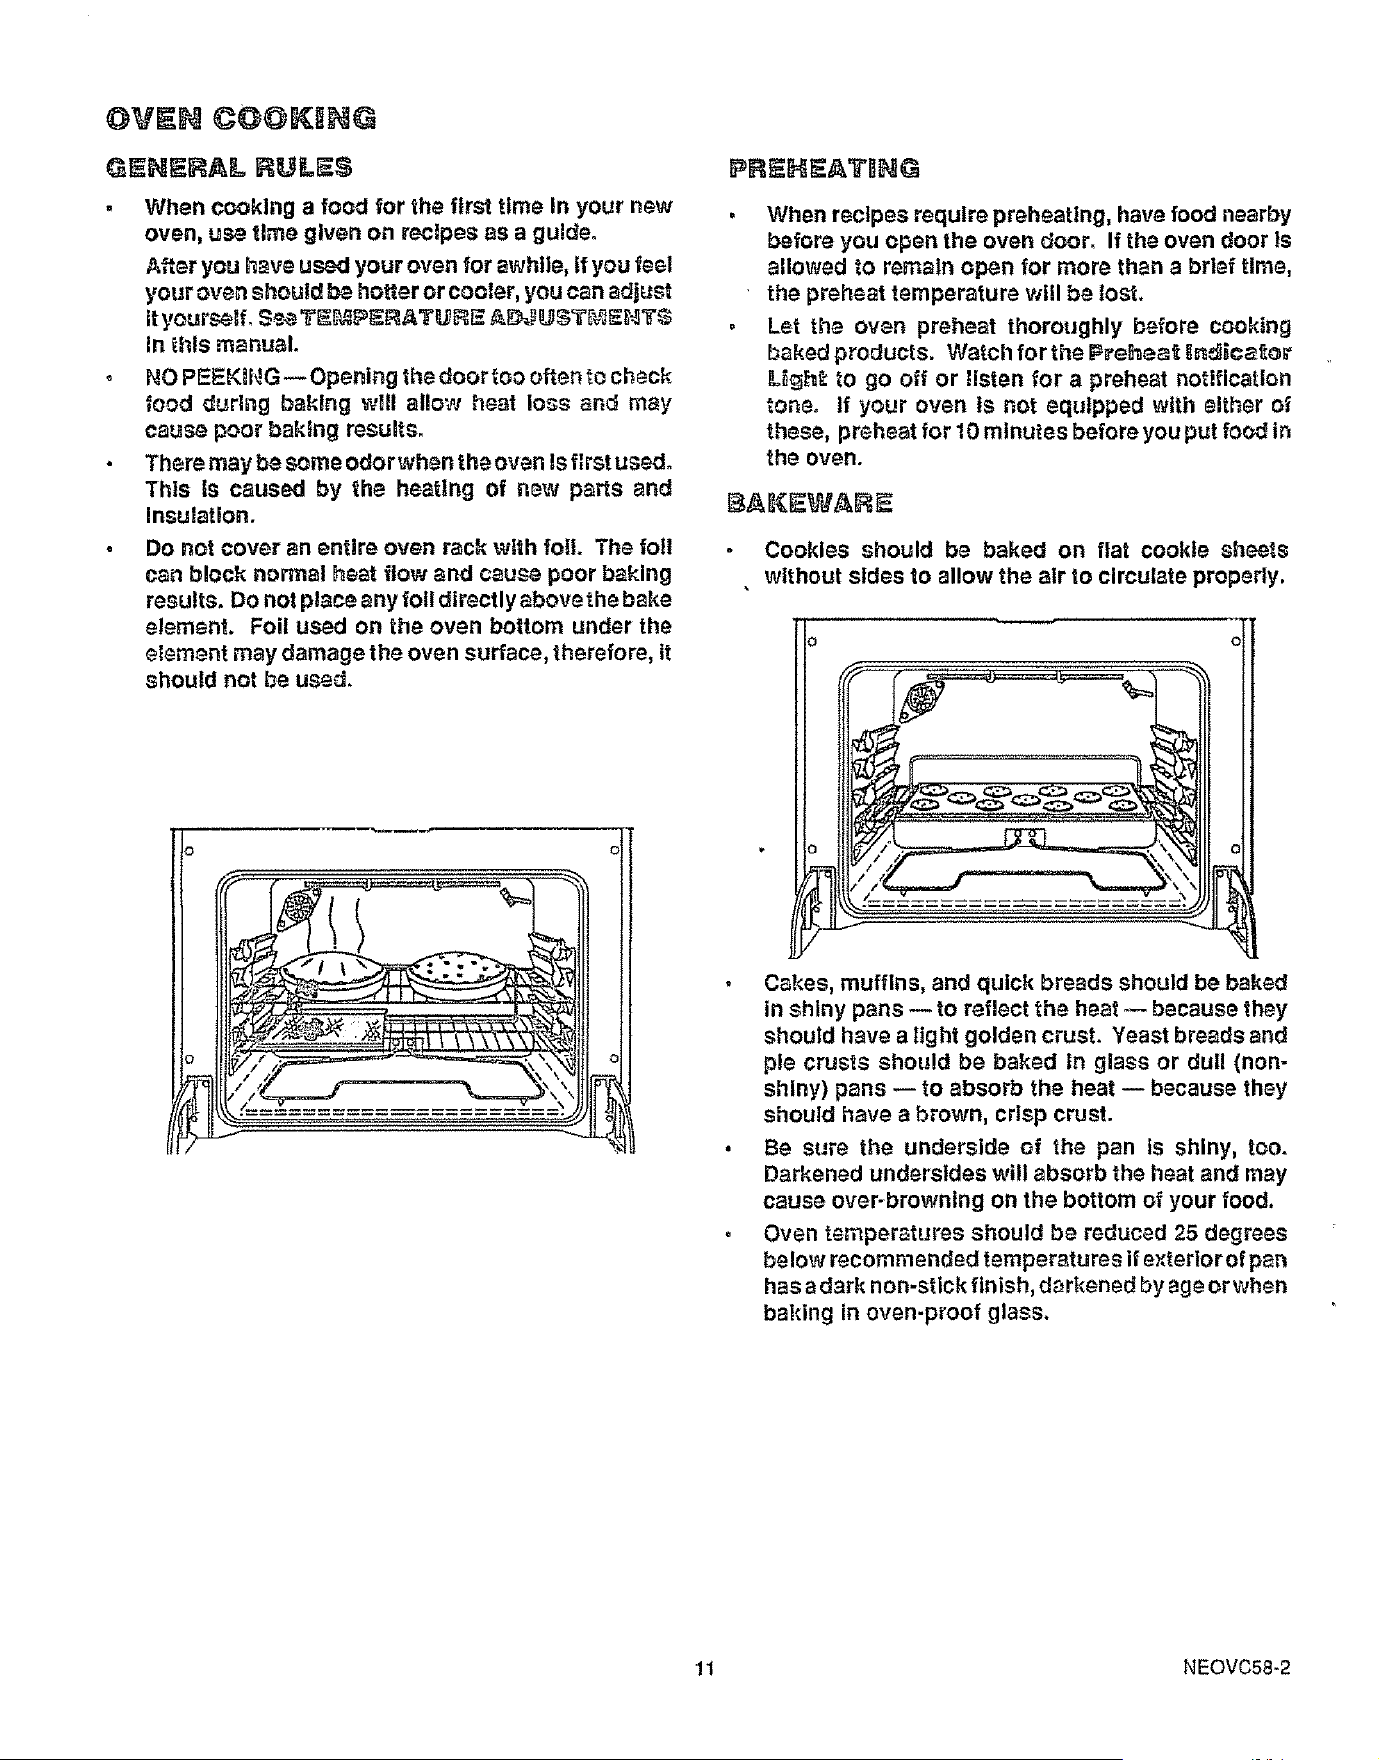
BA_WA_E
Cookies should be baked on flat cookie sheets
without sides to allow the air to circulate properly.
• Cakes, muffins, and quick breads should be baked
in shiny pans -- to reflect the heat --- because they
should have a tight golden crust. Yeast breads and
pie crusts should be baked in glass or dull (non-
shiny) pans -- to absorb the heat -- because they
should have a brown, crisp crust.
• Be sure the underside of the pan is shiny, too.
Darkened undersides will absorb the heat and may
cause over-browning on the bottom of your food.
• Oven temperatures should be reduced 25 degrees
below recommended temperatures if exterior of p_n
has a d_rk non-stick finish, darkened by age or when
baldng in oven-proof glass.
1t NEOVC58-2
BA_NG'_
o Always follow recipe carefully°
• Measure Ingredients properly.
, Use proper pen and rack placement to obtain the
best cooking results.
NOTE:
The _op posi_ion _s enl_y a guJd_, _t c_nnot be used
_s a rack posi_io_t,
RACK POSITIONS
NOTE: YOUR OVEN HAS FOUR (4)
RACK POSITIONS.
Place pans on the oven racks with 1" to I 1/2" of air
space on all sides of each pan° Avoid overcrowding
the oven.
The oven will start to heat automatically, You wlll see
100 degrees showing In the upper right corner ot the
display. As the oven helzts this temperature will change
until It reaches your selected temperature, then a tone
will sound.
3, When baking Is comptete, press the
CLEAR/OFF pad.
Til_ED BAKING:
TO SET Y@UR OVEl_ T@ BAE_ F@R
A SET AI_@UNT @F TIME AND TU L_I_,_
OFF AUTOCrATiCALLY.
2,
3_
4.
Press the BAEE pad.
Press either the UP or DOWN arrow pad,
to set the temperature you want to use,
Press the COOK TB_,_Epad.
Press either the UPor DOWN arrow pad,
to set the amount of time you want foods
tocook. Be sure you Include yourpreheat
time when setting this amount of time.
If you pause between steps when you are setting this ]
function, the control will bgep_ This Is normal. The
control is letting you know you need to contlnue_
You should consider that food will continue to cook
after control turns OFF unless you remove the food
immediately°
m
!
When baking several Items, stagger pans so that no
pan ts directly above another,
Pans too close to each other, to oven walls or to the
oven bottom block the frsemovement ofairo Improper
air movement causes uneven browning and cooking.
Fan:
You will hear a fan. This is normal. The fan may
continue to work even after the oven has been
turned off.
TO SET BAKE:
1. Press the BAKE pad,
2. Press either the UP or DOWN arrow pad.
The last temperature used will show In the
Use the UP arrow pad to increase this
temperature or the DOWN arrow pad to decrease this
temperature until you reach the temperature you prefer
to use.
display,
12
NEOVC59-2
TO SET YOUR OVEN FOR _ I_EL_YED
START AND AUTOmATiC STGP
While setting this operation you will not need to
calculate when the oven will turn on; the control will
do this for you. You will need to set [he following:
1. Temperature 2. Cooking Time 3. Stop Time
1. Pres_ the I_KE pad.
2. Pi_ss the _J_ or DOWE',__rrow p_d to
s_lect the '_mperature you want.
3. Press the OOO;( T_ pad.
4. Press the UP arrow to seiecl how iong
you want food to cook. I_e sure _o
JncBude yo_r B_ehea_ _me.
5. Press the STOP TI]_£ ped.
6. Press the UP arrow pad to enter the time
of day you want the oven to turn off. The
oven will shut off automatica!ly when the
preset STOP TIME is reached.
7. Press the CL.OCI;_ pad to return the dis..
play to the current time of day.
ROASTS_@
Roasting is cooking tender cuts of meats with dry air. it
is not necessary to preheat your oven before roasting.
G_HERAL ROASY_}_G aH_TRUCT_ON_
1o Place meat (fatty side up) on a roasting rack or In a
shallow pan about the same size of the meat.
2, Place pan tn No,1 or No, 2 rack position.
3. Press the Bake pad.
If you pause between steps when you are setting
this function, the control will beep. This is normal.
The control is letHng you know that you need to
continue.
4. P}ess the UP or DOWN arrow pad to select the
temperature you need.
If you want to cancel the setting of this function, press
ti_e CLE,_,R/OFF pad.
5. When roasting is finished, press the CLEAR/OFF
pad.
i'_ost meats continue to cook internally after being taken
out of the oven.
13 NEOVC38-1
I ROlUNG
BROULI]NG TIPS:
Flease r_te:
Your oven ¢Boor should
be open to the b_oJ[ s_op
position while broiling.
• Use only the broiler pan and grid that came with your
range for broiling. They are designed for proper
drainage of fat and liquids and help prevent spatter,
smoke or fire.
• _ no_ preheat when brooming, For even broiling
on both sides, start the food on a cold pan.
• Trim the outer layer of fat from steaks and chops. Slit
the fatty edges to keep the meat from curling.
• For maximum juiciness, salt the first side just before
turning the meat. Salt the second side just before
serving.
• Brush chicken and fish with butter several times as
they broil. When broiling fish, grease the grid to
prevent sticking. Broil chicken skin side down. It is
not necessary to turn fish.
, Never leave a soiled broiBer pan in the oven.
Grease In the pan may smoke or burn the next time
the oven Is used°
• Be sure you know the correct procedure for putting
out a grease fire. See the section on safety.
The closer the food is to the broil element, the _aster the
meat browns on the outside, yet stays red to pink in the
center. _i_vlng the meat farther away from the element
lets the meat cook to the center while browning outside.
Side one should be cooked 1 - 2 minutes longer than
side two.
Food
R_ck
Poseidon
4 = Highest
t = Lowest
Steak - 1" Thick
Rare
Medium
Well Done
Ground Beef Patties
iVledium-1" Thick
IVtedlum-1/2" Thick
Lamb Chops - 1" Thick
Pork Chops - 1" Thick
Pork Chops - 1/2" Thick
Ham Slice - 1/2" Thick
Fish (Fillets)
Chicken (Pieces)
Bacon
'" i ' i '_ ......... . , ...... _.......
4
3
3
3
4
.........
3
3
3
3
2
9-11
13-t5
21-23
, , ,,,,,,,
16-18
7-9
18-21
27-29
' 16-t8
11-12
11-13
_, , ,,,
45-55
3
3
8-11
9=11
This chart is a general guide. The size, weight, thick-
ness, and starting temperature of the food, as well as
your own personal preference, will affect the cooking
time. Times in the chart are based on the food being at
refrigerator temperature_ The U.S. Department ef
Agriculture no_es: Rare n_ats _re popular, but
cooking m_ats to only 140°F means so_e po_.
sonlng organisms may survive.
TO BROIL:
POSiTiONiNG BROILER PAN
Broiling is cooktng by direct heat from the broil element.
Tender cuts of meat or marinated meat should be se*
lected for broiling. For best results, steaks and chops
should be at least 3/4" thick.
After placing food on the broiler pan and grid, put the
pan on an oven rack In the proper position. The recom-
mended rack position and cooking time can be found in
the following chart° If your oven Is connected to 208
volts, you may want to preheat and position the oven
rack one position hlghen
14
1. Pressthe BROIL pad,
2. Press the UP arrow pad once to select LO
BROIL.
3. Press the UP arrow pad twice to select HB BRORL.
"BROIIU' and either "Hi" or "LO" will show inthe upper right
corner of the display depending on your cholce_
NOTE: Use LO broil to cook foods such as poultry or thick
cuts of meat thoroughly without over-browning them°
If you do not press the up ordown arrow pad, the display
will go blank and you must repeat Steps I and 2.
4. When broiling is finished, press the
CLEAR/OFF pad_
NEBRL31-4
I EF@RA A OLAAN ©YCL
1. Remove the broiler pan and grid, oven racks, all
utensils and any foil that may be tn the oven, Do not
try to clean utensils or any other objects in the oven
during a self-clean cycle, If oven r_ct_s a_'e le_l i_'_
,=_! =_..e l-Icl_l ii_ilIi ._eet
!_ lie _aol eiges aiier il_esellocleaa clcle.
This vaill _al_e ll_e _a¢l_s easier, Io s!ile.
2. Soil on the oven front frame, under the front edge of
the cooktop, the door liner outside the door gasket
and the _ront edge of the oven cavity (about I" Into the
oven) will not be cleaned during a clean cycle (see
tlustralon below). Clean these areas by hand before
starting a clean cycle.
Use hot water with a soap4illed steel woof pad. We
recommend a cleanser such as 'Soft Scrub@' brand
or a similar cleaning product to keep white surfaces
looking clean and new. After cleaning, rinse we!l to
help prevent a brown _°esldue from forming when the
oven Is heated. Buff th_se areas dry wHh a dry c!oth.
Y.O SAT A @ -LF-CLAAN CYCLA
1. Push the CLEAF,_pad. The display will show'_LEAl_1",
"TI_{E", and {-,..).
OVEN LIGHT
To pro_on_ the life of the bulb, be sure
the oven hght is OFF during Self-Clean° FRONT
FRAME
2. Press the UP or DOWN arrow pad to select the
amount of time you want the oven to clean. The
normal cycle is 3 hours, but you can choose between
2 and 4 hours.
DOOR GASKEq
DOOR LINER
3. Wipe up heavy spilovers on the oven botlom. Too
much soil may cause smoking during the clean cycle.
4. Do not _ub the door gasket. The ibergtass materiai of
_hegasket hasan e_tremely low resistance to _brasion_
An !n[act and well fNdng oven door gasket is essentla!
for energy efficient oven operation and good baking
results. !f you notice the gasket becoming worn,
frayed or damaged h_ any way or if ff l_as become
displaced on the door, you shoutd replace the gasket.
You can press the STOP TI[_E pad to see the time of
day the clean cycle will be finished. Push the ClEA_'_
pad to return to the countdown.
t5
(Self-Clean continued on next page )
NESCL64-1
(Self-Cleancontinued..,)
WHEN A C:L AN CYCLE
FI NBSHED:
1. Wait until the LOC_ display goes out. The oven
temperature must drop below locking temperature
before the door can be unlocked.
WAiT GO_S OUT
When the lock display goes out the display will return to
the time of day.
TO INTERRUPT A CLEAN CYCLE:
1. Push CLEAR/OFF.
Follow Instructions under %VHEN A CLEAN
CYCLE BSFBNISHED,"
TO SET A DELAYED
SELF=CLEAN CYCLE:
You will not need to determine when the oven _I11
turn on, when setting this function. The control will
do this for you. You will need to set the amount of
time you want your oven to clean (between 2 and 4
hours), and the time of day when you want the oven
to turn off.
1. Press the CLEAN pad. The display will
Show "CLEAN", =TildE" and (---).
.
Press either the UP or DOWN arrow'pad
to select the amount of time you want the
oven to clean. The normal cycle Is 3
hours but you may choose between 2
and 4 hours.
3o Press the STOP TnME pad,
4. Press either the UP or DOWN arrow pad
to select the time of day you want the
cycle to end and the oven to turn off.
Make sure your oven ttg ht is off during a self-clean cycle
to prolong the life of the bulb.
AFTEL A CLEAN CYCIL
After a clean cycle, you may
notice some white ash In the
oven. Just wipe It up with a _..i'_ J"
dampclothorsponge.
tfwhite spots remain, remove
them with a soap-fllEed steel
wool pad. Be sure to rinse thoroughly witl_ a vinegar
and water mixture. These deposits are usually a ealt
residue _h_t cannc,t be removed by the clean cycle,
_fthe oven is not clean after one clean cycle, _hs cycle
may be repeated.
Q. if my range control is not working, can I still self-
clean my oven?
A. No. Your RANGE CONTROL is used to program the
oven to start and stop the self-cleaning cycle.
Q. Can I use commercial oven cleaners on any part of
my self-cleaning oven?
A. No cteaners or coatings should be used on or around
any part of this oven.
Q. Can lci_anthewoven gasket around theoven door?
Ao You cannot clean the woven gaskeL
Q. is It normal to hear "crackling sound" during clean-
Ing?
A. Yes. This is the metal heating and cooling,
Qo Why do I have ash left in my oven after cleaning?
A, Some types of soil will leave a deposit. It can be
removed with a damp sponge or cloth.
a.
Ao
What should I do it excessive smoking occurs during
cleaning?
This is caused by excessive soil and you should
press CLEARIOFF. Open windows to rid room of
smoke. Allow the oven to cool for at least one hour
before opening the door. Wipe up excess soil and
reset the clean cycle.
a.
Ao
Should there be any odor during the cleaning?
Yes, there may be an odor during the first few
cleanlngs. Failure to wipe out excessive soil might
also cause an odor when cleaning.
16 NESCL61-2
CLEAN! NG TSP$
PART
CO_TROL P&N, EL_
F.HOB$
COOETOP
{A_ U[_DER COOKTOP)
_RODLER P_N &HD
GR_D
CH_E DR_F BOWIS
BROW_I FOOE) STA_aS
BLUE-GOLD HEAT
STAaNS
_RUSHED CHROME
CO0_TOP
{SO_E _ODELS)
OVeN DOOR QASK T
CLE,&Hi_NG _&TER_ALS
Detergent, warm water, soft cloth
Detergent, _arm water, piSSHC Orn"_ Z
ion scouring pad
De_erge_, v_,_lTnvcaler, _uting p_d or
_?._fll_ ste._,_woo_p_orovencle_ner
Detergent and water
Detergent, w_rrn water, soap-filled
scouring pad, commercial oven
cleaner
Detergent, water, plastic scouring
pads, mild abrasive cleaners, soap-
filled scouring pads, ammonia
Metal potish
RE_'_ARKS
Do not use abrasive cleaners. Knobs pull
off for easier cleaning°
Clean after each spillover. Soak stubborn
soil.
Remove from oven to cieano Rinse _hor-
Clean a_er each spiltover with detergent
and water. Dry well.
RemovesolL_d pan fro_'noven to cool. Drain fat
orddppings. Fillpanwlthwarmwatero Sprinkle
gdd with detergent and coverwith damp cloth or
paper towels_ Let pan and gild soak for a few
minutes. Rinse or scour as needed. Grid and
pan may be washed In a dishwasher.
Bowls can permanently discolor If exposed
to excesslve heat or If soil is allowed to bake
on. After each use, wash, rinse and dry to
prevent difficult soils, tf heavily soiled,
place an ammonia-soaked paper towel on
stains to loosen soil, then gently scrub with
plastic scouring pad.
These stains are caused by overheating, normally occur over a period of time, and
usually are permanent. To minimize:
1. Avoid excessive use of the high heat setting. Use it to start cooking, then lower
the heat setting to finish cooking.
2. Use flat bottom pans that do not extend more than two Inches from the surface
element. If large pans or canners are used, alternate the elements that are used.
Detergent, warm water, soft cloth ora
chrome cleaner or Sears Cooktop
Cleanh_g Creme
Glass Cleaner and paper towels
Detergent, wari_awater and scouring
pad or soap-filled steel wool pad
Do not use oven cleaner in o_around
any part of your se!l-cl._an oven
Do not clean
Do not scour chrome tops. Stubborn stains
may be removed by using Espree Magwheel
Cleaner@ or Turtle Wax Polishing Com-
pound®. To remove finger prints on brushed
chrome, apply a little baby oil with a paper
towel. Rub In the direction of the brush
marks. Armor All Protectant® can also be
used (after cleaning). Be sureto clean spills
of acidic foods qulcklyo Vinegar spills can
permanently stain chrome.
Remove stubborn soil with paste of baking
soda and water. Do not use abrasive clean-
ers. Rinse thoroughly.
Rinse well _ter cleaning. Cleaning Inside
the oven need only be done as an optional
touch.-up between self-clean cycles. See
the self-clea ning oven section of this manual
for more information.
17 NECCH77-1
REMOVABLI OVEN RA@KS
BUMPED-IN
RACK GUIDES
Be careful not to scratch the oven finlsh when
§nstalling er removlng oven racks,
To Install:
1. Set the raised back edge of the rack on a pair of rack
guides.
2. Push the rack In until you reach the bump in the rack
guide, then lift the front of the rack and push the rack
all the way In.
To remove=
1. Pull the oven rack out, then up.
NOTE=
The racks are designed with stop locks. When
the racks are placed correctly on the rac_ sup,
pen and extended _rom the oven, _he stop lock
prevents the racks from tilting when you are
removing food #_'om the racks or placing food on
them.
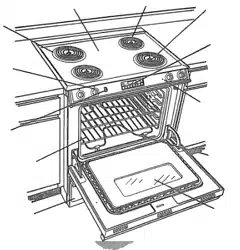
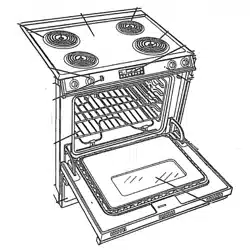
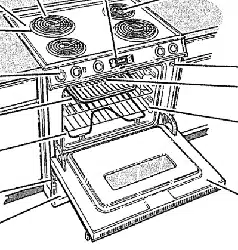
TO roB'novel
1. Open the door to the stop position (see tllustratlon).
2. Grasp thedoor at each side and ilft up and off the
hinges, DO NOT lift the door by the handle.
NOTE, = When the doer is ren'_vad and hinge arms
_re at stop position, c_onot bump or t_ to move
tha hinge arms, The hinges could snap back
causing an injury _o the hands or damage to the
percellain on _he front o# _he range. Cover the
h_nges with recycling or empty towel rolls while
working in the oven area,
To replace:
1. Hold the door over the hinges with the slots at the
bottom edge of the door lined up wlth the hinges.
The hinge arms must still he _n the stop
position,
2. Slide the door down onto the hinges as far as It will
go and close the door.
HINGE
/
This drawer gives you space for keeping
cookware and bakeware, PlaaHcs and _larnn'mble
material should not be kept in this drawer,
Do not overload the storage drawer. It the drawer is too
heavy, It may slip off the track when opened. To openthe
drawer, grasp the center of the handle and pull straight
out.
To remove: Pull drawer straight out and lift over the
guide stops.
To replace: Lift over the guide stops and slide drawer
into place.
18 NEMNT94
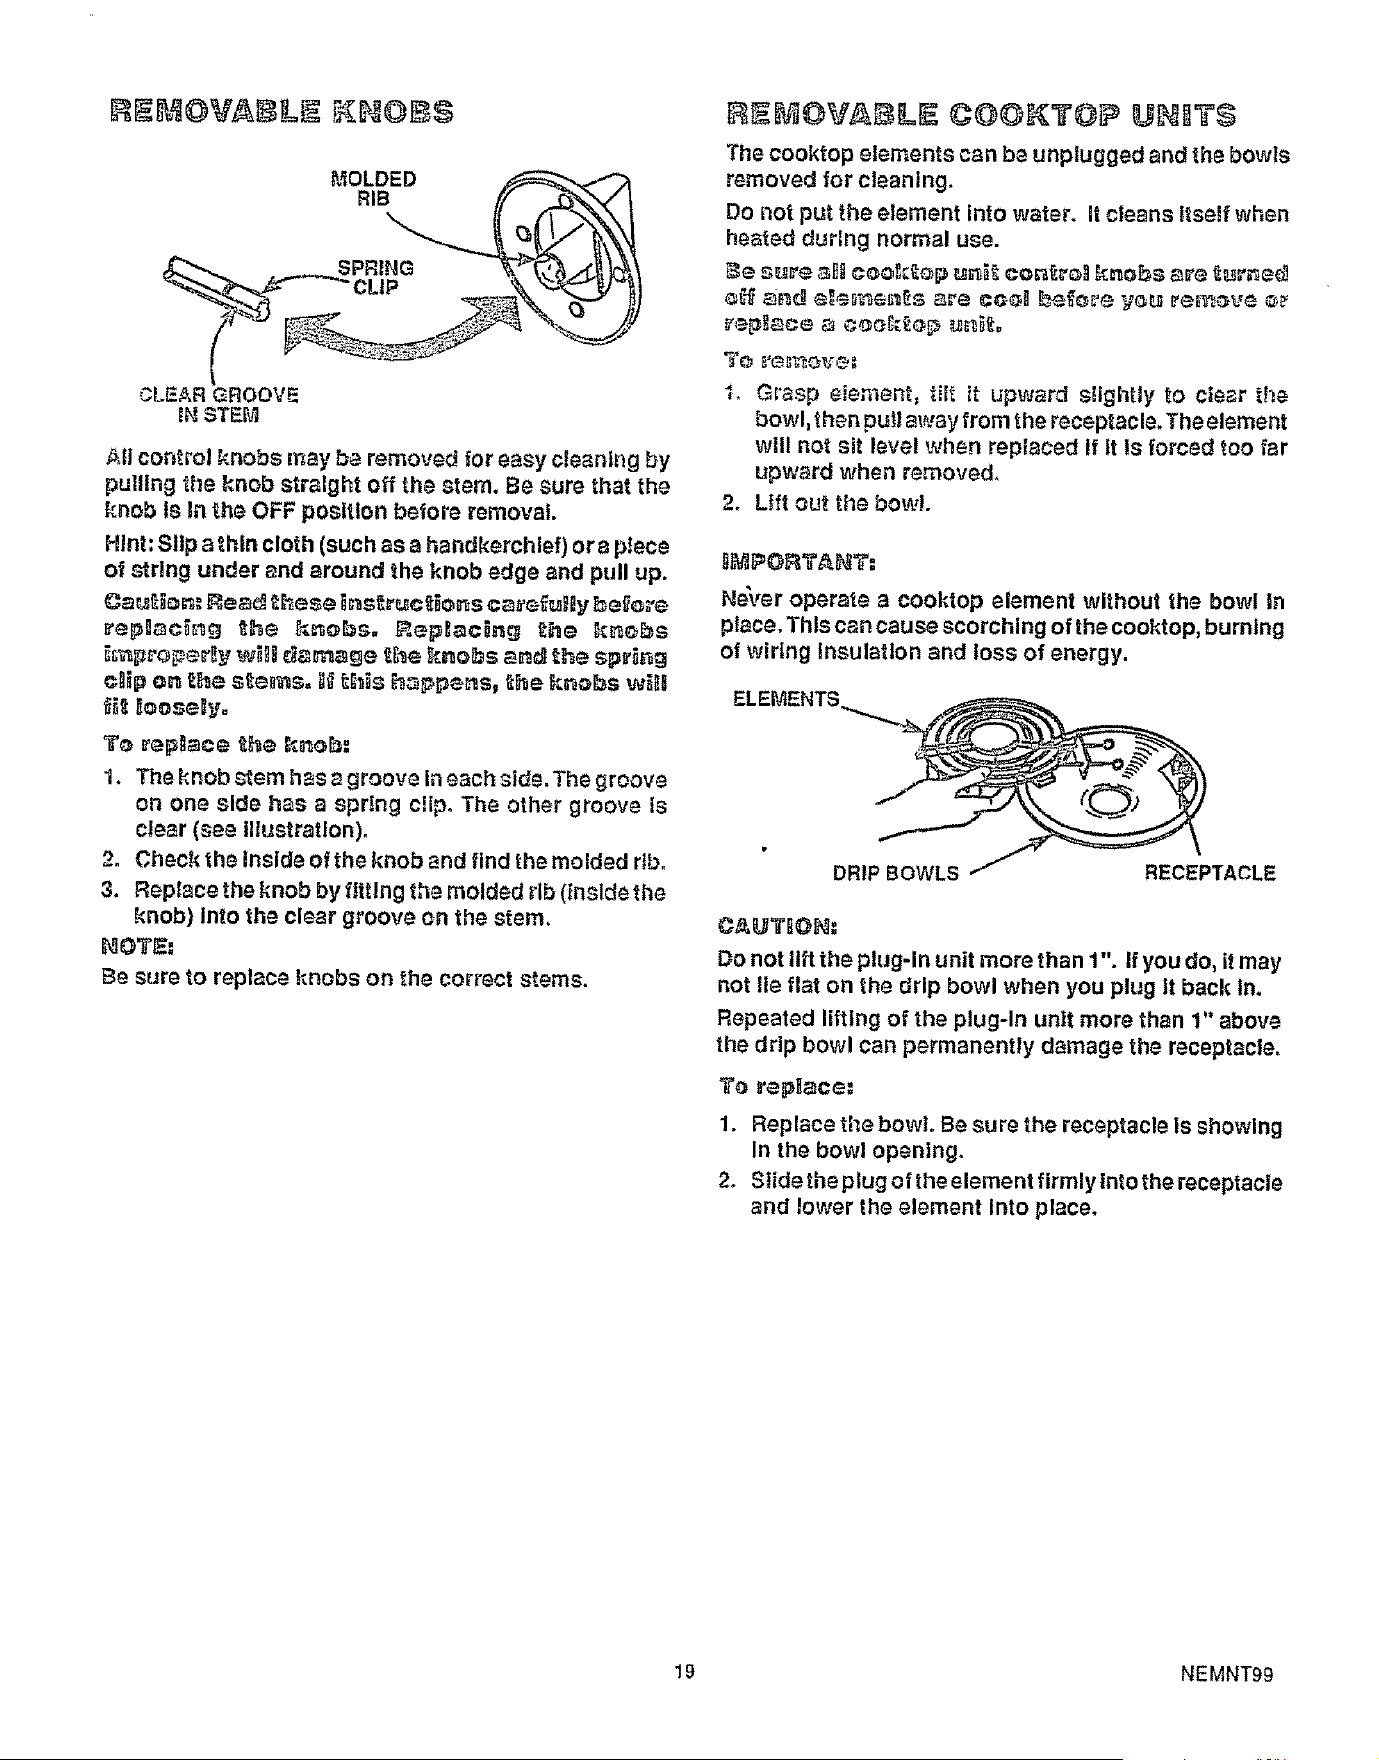
CLE_,RGROOVE
_NSTEFVt
Ali control knobs may b_ removed for easy cteantng by
pulling the knob straight off the stem. Be sure that the
knob is In _he OFF posltlon before removal
Hint: Slip a thin cloth (such as a handkerchief) ora piece
of _rlng under and around the knob edge and pull up,
_epg_c_g _he h_o_s. _ep_cing _he _,_bs
clii_ e= _he s_e_s, _ _lh_s h_l_pe_s, _he k_e_s w_
_ I_ooseByo
To _ep_ce _he _ne_:
1. The knob _em has _ groove In each _ide. The groove
on one side has a sprtng clipo The other groove Is
clear (see illustration)°
2= Check the Inside of the knob and find the molded rib.
3, Replace the knob by ftttlng the molded rib (inslde the
knob) into the clear groove cn the stem.
NOT_:
Be sure to replace knobs on the correct stems.
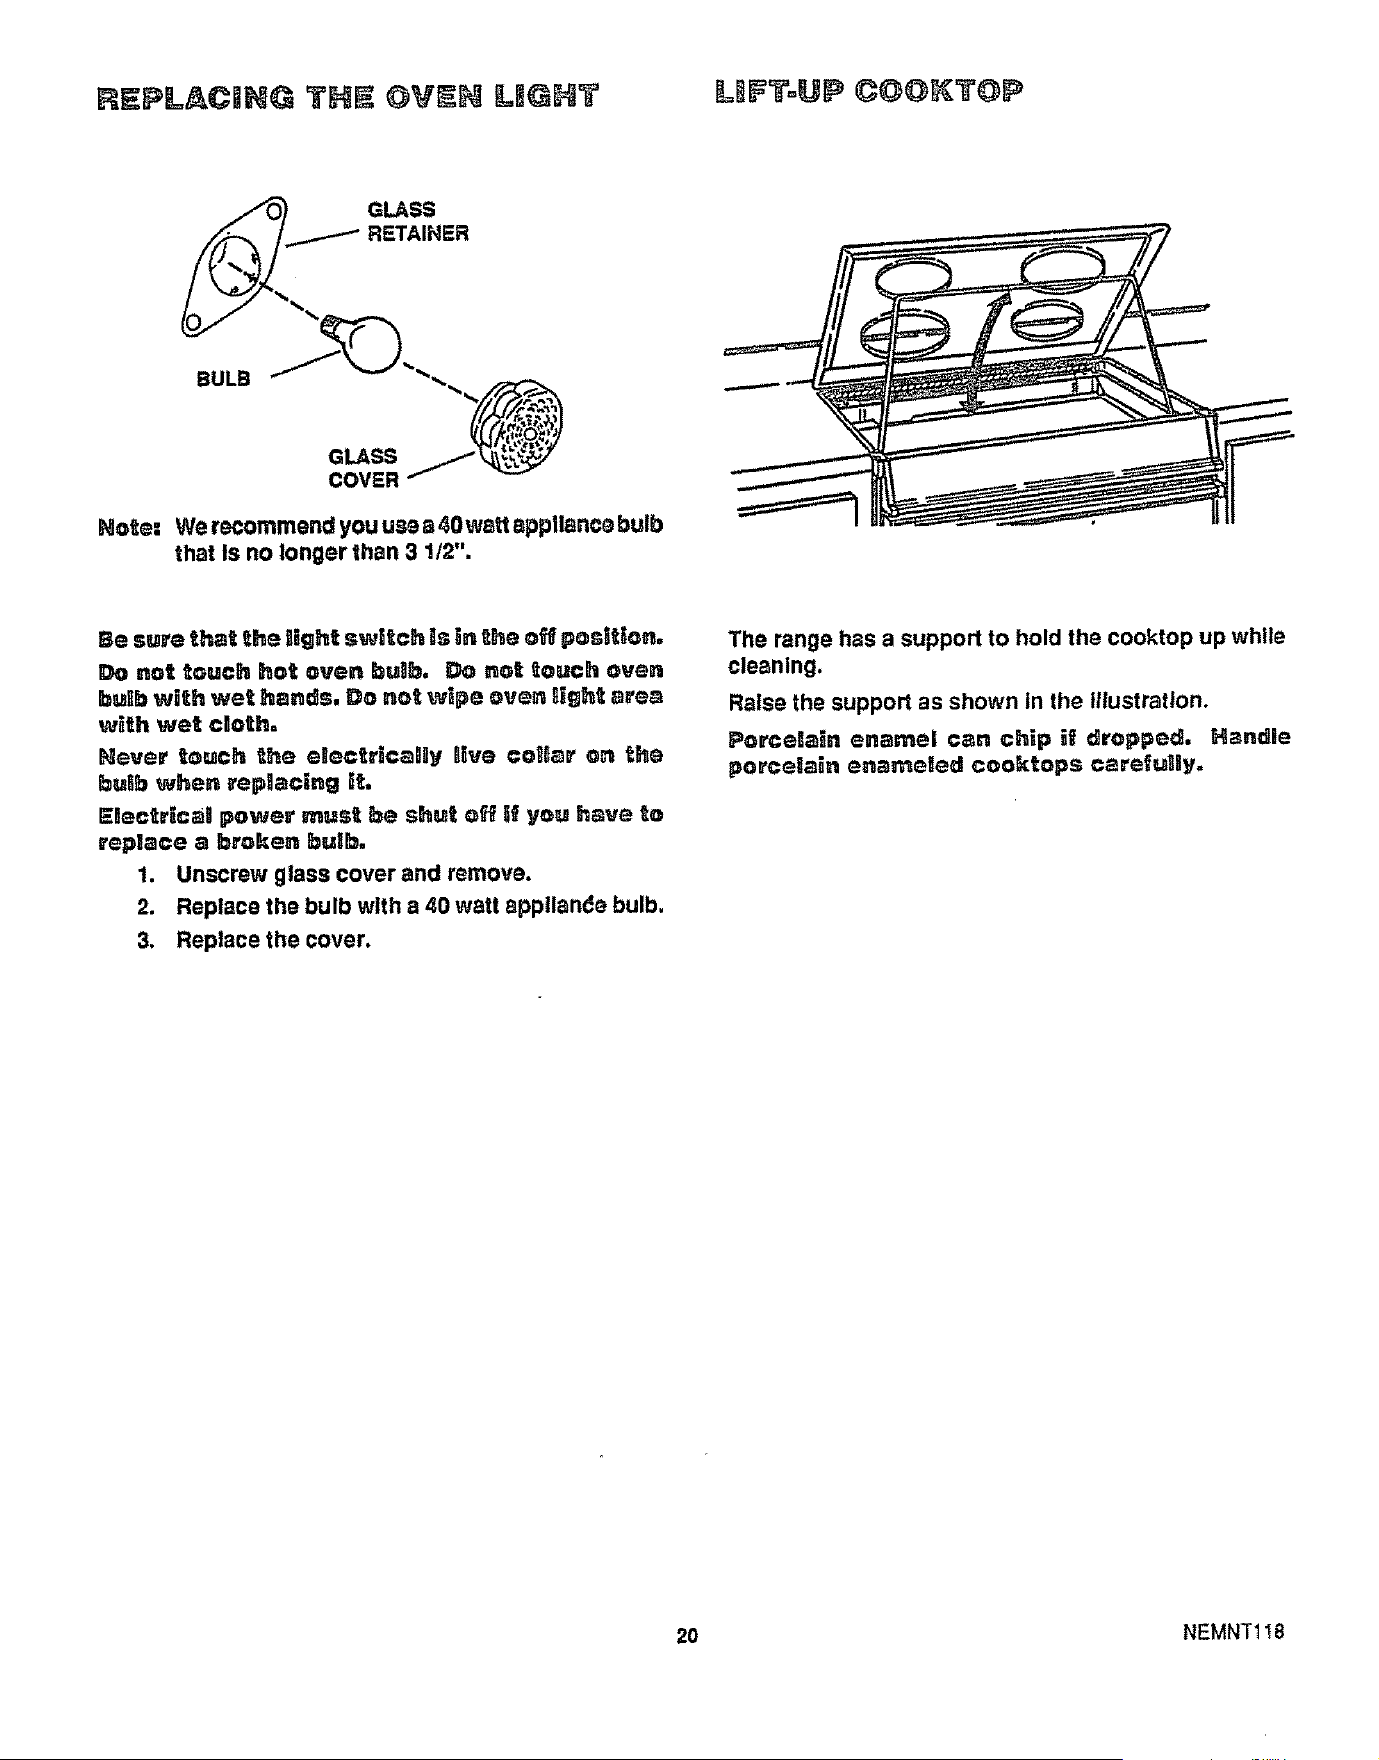
The cooktop elements can b_ unplugged and the bowls
removed for cleaning.
Do not put the element into water, it cleans _tsetf when
heated during normal use.
I, G='asp element, tilt it upward stightly to ciecr the
bowl, then pu_laway from the receptacle. The element
will not sit level when replaced If ft is forced too far
upw,_rd when removed,
2. Lift out the bowl
_i_PORT_.NT:
Ne\_er operate a cooktop element without the bowl in
place, Thle can cause scorching of the cooktop, burning
of wiring insulation _nd loss of energy.
RECEPTACLE
C_T_OH!:
Do not lift the plug-in unit more than 1". If you do, it may
not lie flat on the drip bowl when you plug It back In.
Repeated lifting of the plug-In unit more than 1" above
the drip bowl can permanently damage the receptacle.
1. Replace the bowto Be sure the receptacle Is showing
In the bowl opening.
2. Stide the plug of the element firmly lnto the receptacle
and lower the element Into place.
19 NEMNT99
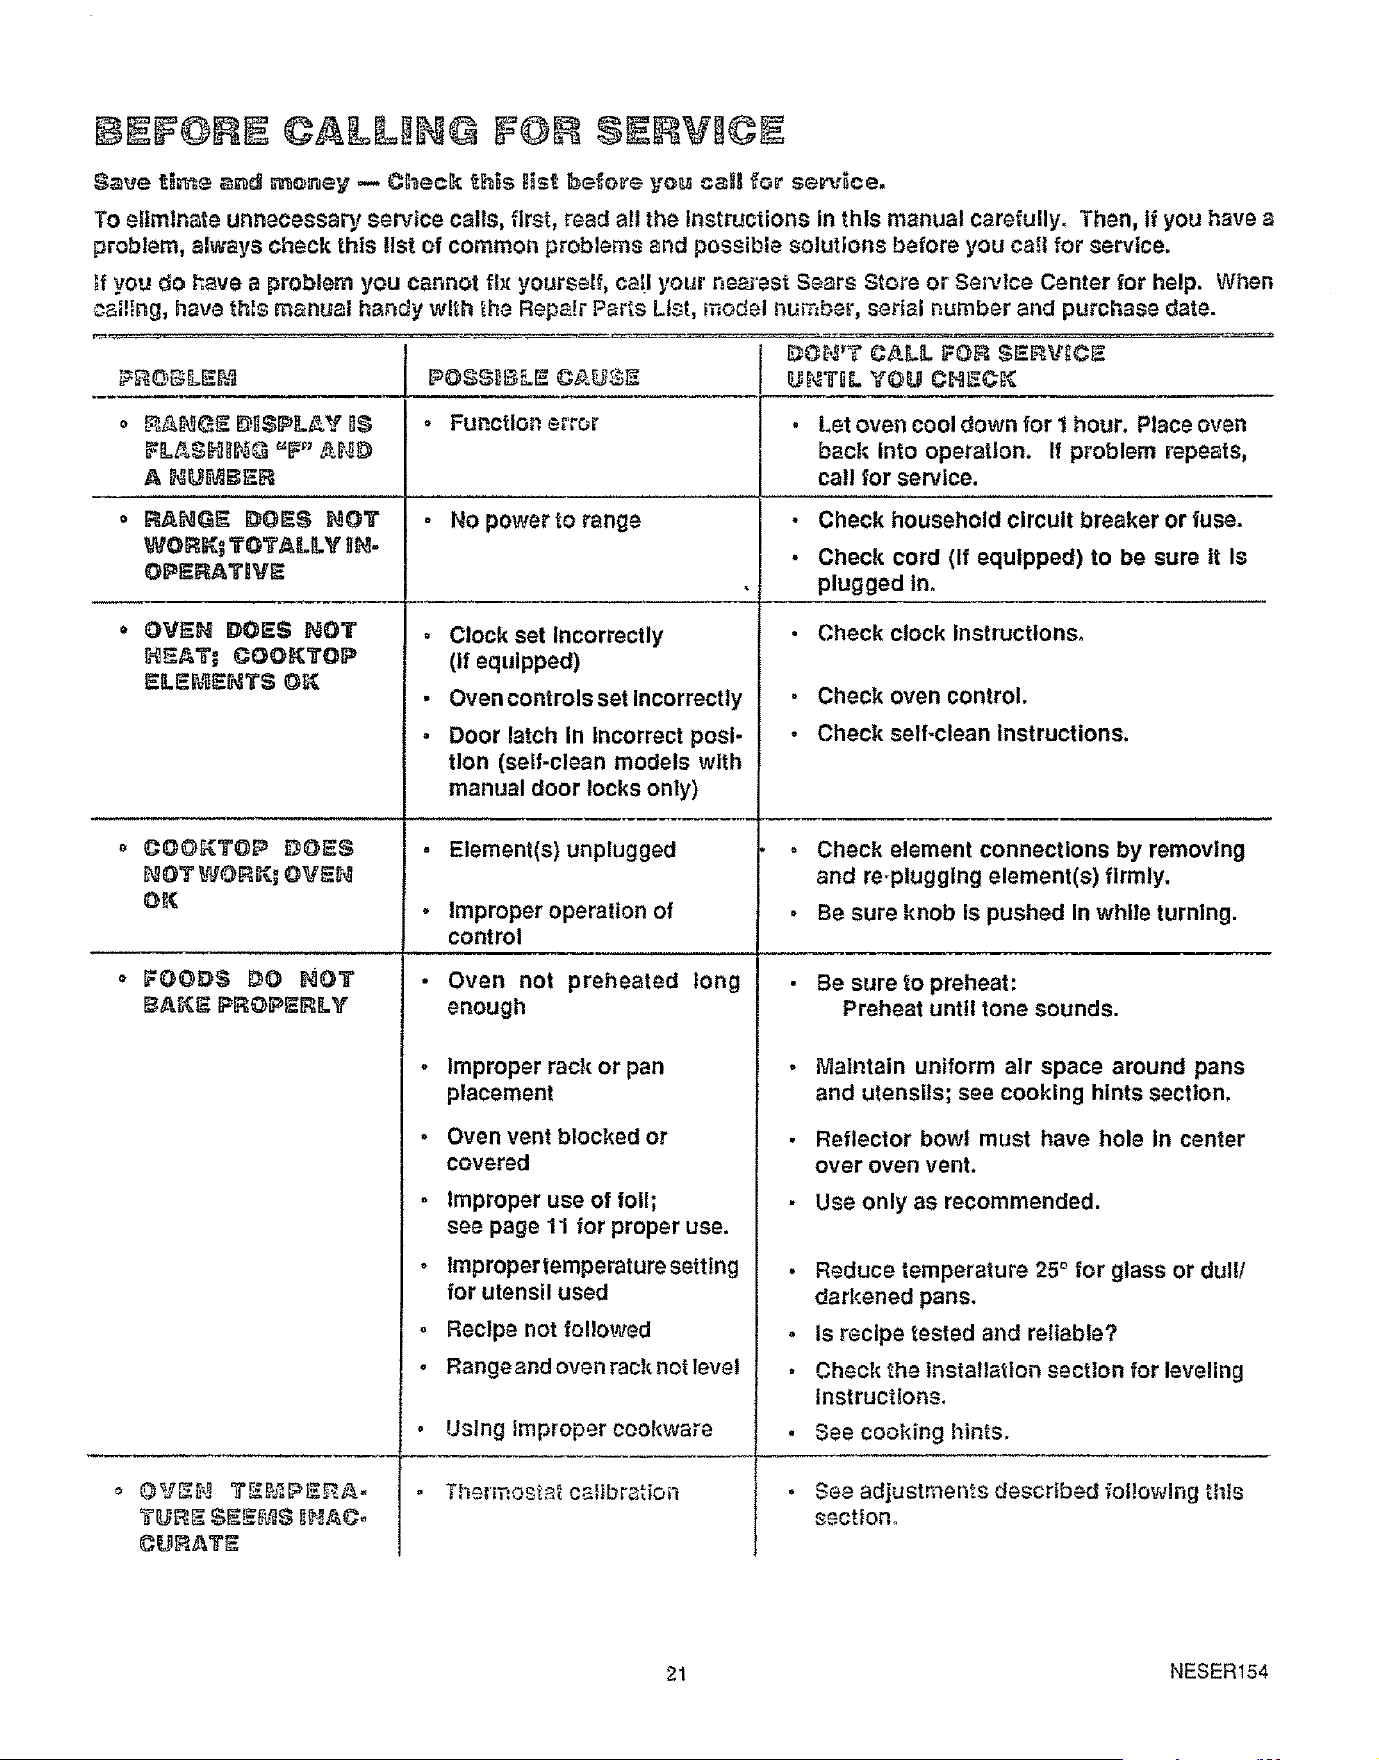
Note:
BULB __"_,,..,.,_
We recommend you us_ a 40watlappilanco bulb
that Is no longer than 3 1/2".
Be sure that the light switch Is in the off position,
Do not touch hot oven buab, Do not touch even
bulb with wet h_nds, Do net w[pe oven tight a_ea
with wet cloth°
_eve_ teuch the etectricaBly live cotaar on the
buEb when replacing ft.
EBectrica! power must be shut off N you have to
replace a broken bulb,
1. Unscrew glass cover and remove.
2. Replace the bulb with a 40 watt appliance bulb,
3. Replace the cover.
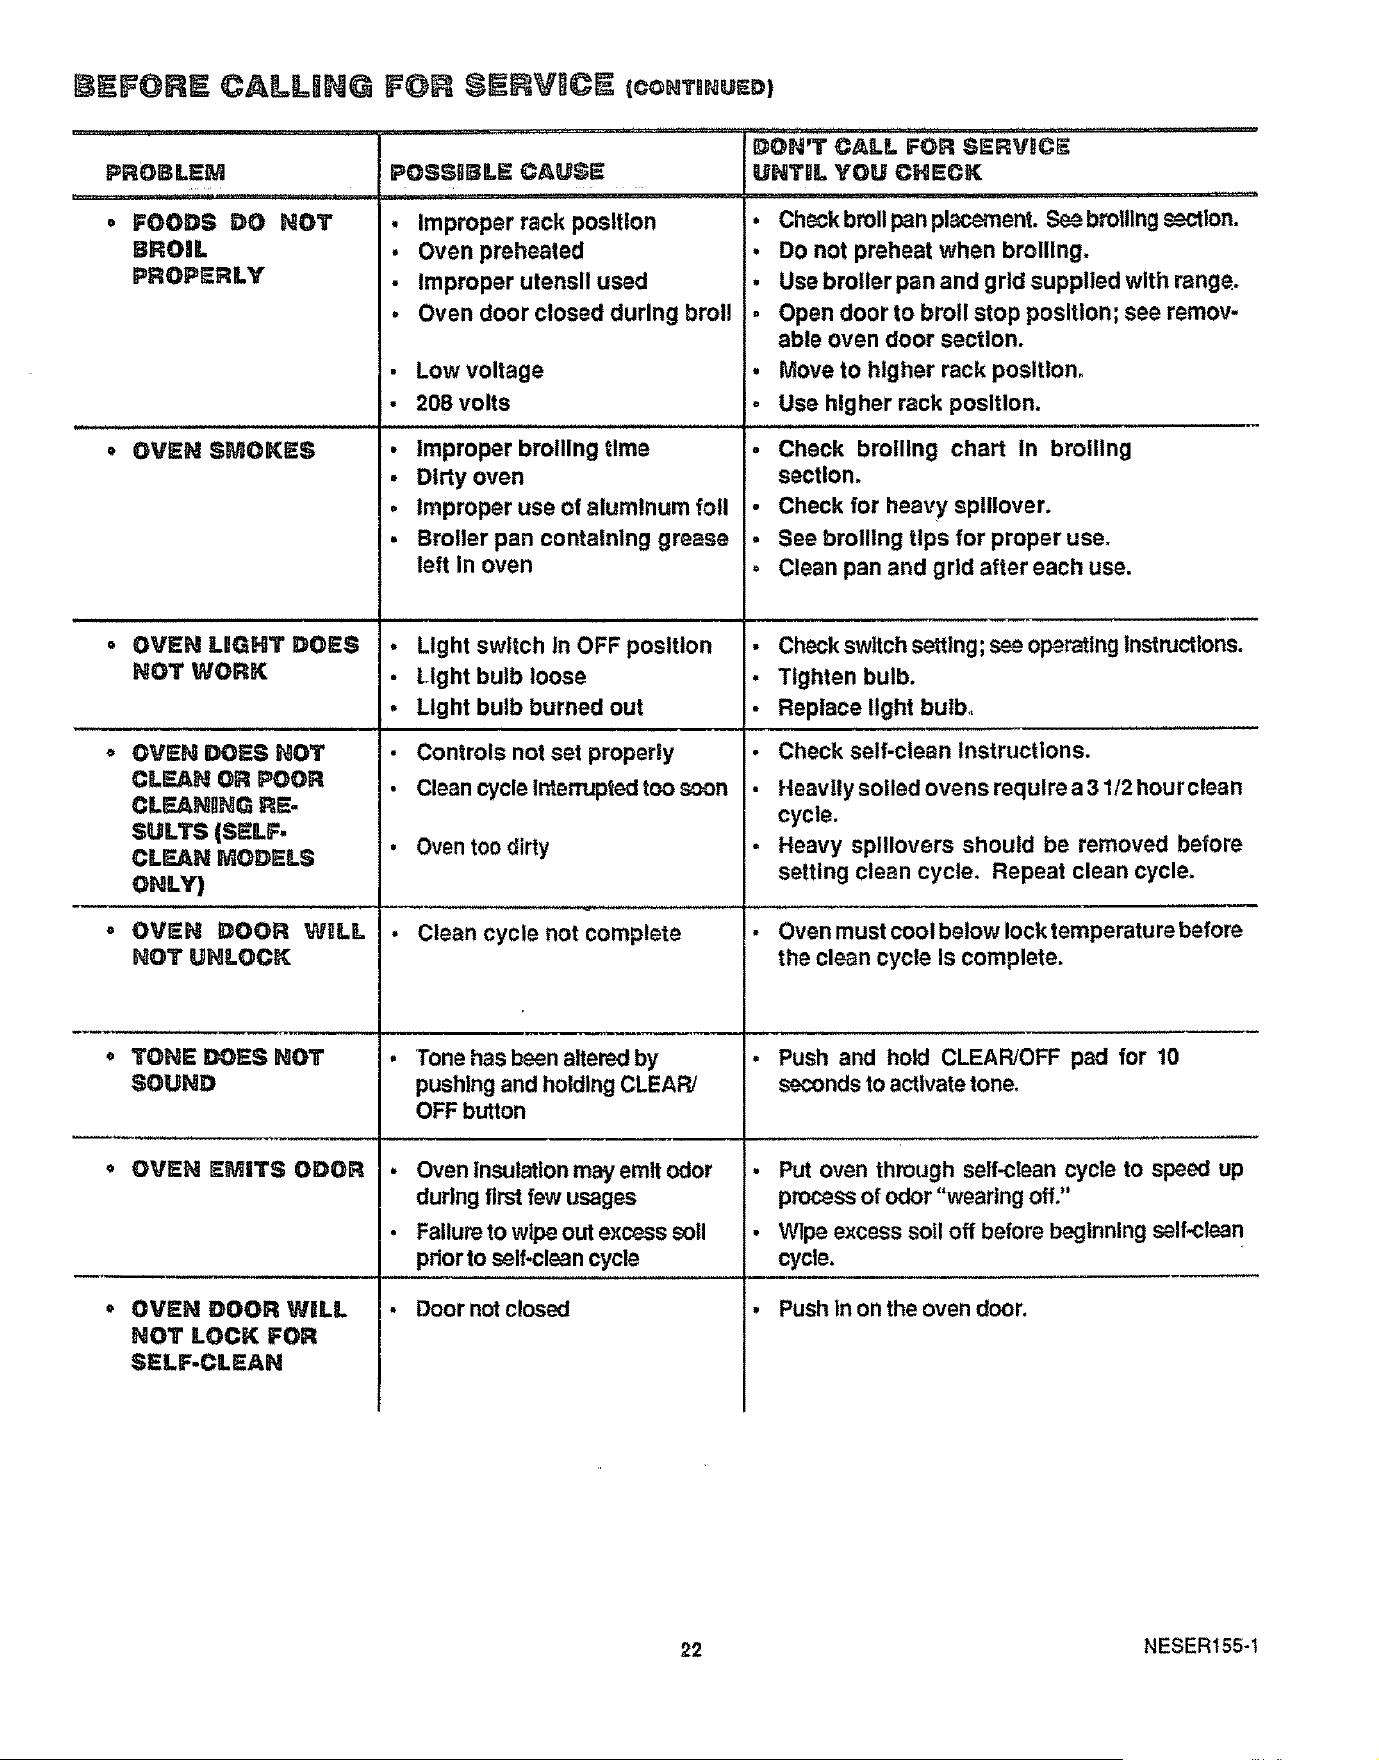
The range has a support to hold the cooktop up while
cleaning,
Raise the support as shown in the illustration.
Porcen_in enamel can chip if droppe_, Handle
porcelain enameled cooktops carefutly=
20 NEMNT118
@IF©IIII F©I IIIIIVIII)E
$;_ve Ii_s _I _o_el -- ¢i_ecl_ %lis list Ielo_e you call Io_ service,
To elmlnate unnecessary service calls, first, read all the Instructions in this manual carefully. Then, If you have a
problem, always check this list of common problems and possible solulons before you ca!l for service.
If you do P,ave a problem you cannot t× yourself, ca!l your ne_est Sears Store or Servtce Center for help. When
¢_llng, have thIs manual handy with the Repair Parts List, _odel nur_ber, serial number and purchase date.
_ON_Y CALL FO_ $1!;FIVICI_
A I£.L!IIIBER
RANGE_ DOES HOT
l_l'Ol:ll4i_TOT_I.I.Y II,I-
OPER_ATllV_t
OYE_ DOES _OT
_E_Y; COO_TOP
ELE_ENT_ O_
o CO@_T@P DOE_
O_
• FOODS _0 HOT
_A_E F_OFERLY
TglISE£%£1HA¢o
C_R_YE
° Function _ror
o No power to range
• Clock set Incorrectly
(If equipped)
• Oven controls set Incorrectly
, Door latch In Incorrect posi-
tion (self-clean models wlth
manual door locks only)
. Element(s) unplugged
. Improper operation of
control
• Oven not preheated long
enough
o Improper rack or pan
placement
- Ovenvent blocked or
covered
o Improper use of foil;
see page 11 for proper use.
o Improper temperature settng
for utensil used
o Recipe not followed
. Rangeand oven rack net level
• Using improper ceokware
. Thermostat cafbration
t.et oven cool down for 1 hour. Place oven
back Into operation. If problem repeats,
call for service.
Check household circuit breaker or _use.
Check cord (if equipped) to be sure it Is
plugged In.
• Check clock instructions°
• Check oven control.
• Check self.clean instructions.
• Check element connections by removlng
and re-plugging element(s) flrmly.
• Be sure knob is pushed In while turning.
Be sure to preheat:
Preheat until tone sounds.
iVlaintain uniform air space around pans
and utensils; see cooking hints section,
Reflector bowl must have hole in center
over oven vent.
Use only as recommended.
• Reduce temperature 25 ° for glass or dulf/
darkened pans.
. is recipe tested and reliable?
• Check the installation section for leveing
Instructions.
. See cooking hints.
• See adjustments described following this
section°
21 NESER154
BEFORE CALUN@ FOR SERVnCE (¢ONT,.USD)
PROBLEM
o FOODS DO NOT
BROIL
PROPERLY
o OVEN SMOKES
POSSgELE CAUSE
. Improper rack position
• Oven preheated
• Improper utensil used
DON'T CALL FOR SERVICE
UNTBL YOU CHECK
. ChE_ckbroil pen pl_,ement. See broiling_-tlon.
• Do not preheat when brolllng.
Use broiler pan and grid supplied with range,
° OVEN LIGHT DOES
NOT WORK
OVEN DOES NOT
CLEAN OR POOR
CLEANING RE-
SULTS (SELF-
CLEAN MODELS
ONLY)
OVEN DOOR WILL
NOT UNLOCK
TONE DOES NOT
SOUND
OVEN EMITS ODOR
OVEN DOOR WILL
NOT LOCK FOR
SELF-CLEAN
i
o
g
Oven door closed during broil
Low voltage
208 volts
Improper broiling time
Dirty oven
Improper use of aluminum loll
Broiler pan containing grease
left In oven
Light switch In OFF position
Light bulb loose
Light bulb burned out
Controls not set property
Clean cycle Interrupted too soon
Oven too dirty
Clean cycle not complete
Tone has been altered by
pushing and holding CLEAR/
OFF button
• Oven Insulation may emit odor
during first few usages
• Failure to wipe out excess soil
prior to self-clean cycle
Door notclosed
Open door to broil stop position; see remov-
able oven door section.
Move to higher rack position,
Use higher rack position.
Check brolllng chart In brolllng
section,
Check for heavy splllover.
See broiling tips for proper use.
Clean pan and grid after each use.
• Check switch settlng; see operaUng Instructions.
• Tighten bulb,
• Replace light bulbo
Check self-clean Instructions.
Heavily soiled ovens require a 31/2 hour clean
cycle.
Heavy splllovers should be removed before
setting clean cycle. Repeat clean cycle.
• Oven must cool below lock temperature before
the clean cycle Is complete.
• Push and hold CLEAR/OFF pad for 10
seconds to activate tone.
• Put oven through self-clean cycle to speed up
process of odor "wearing off."
•Wlpe excess soil off before b_glnnlng self-clean
cycle.
• Push In on the oven door.
22 NESER155-t
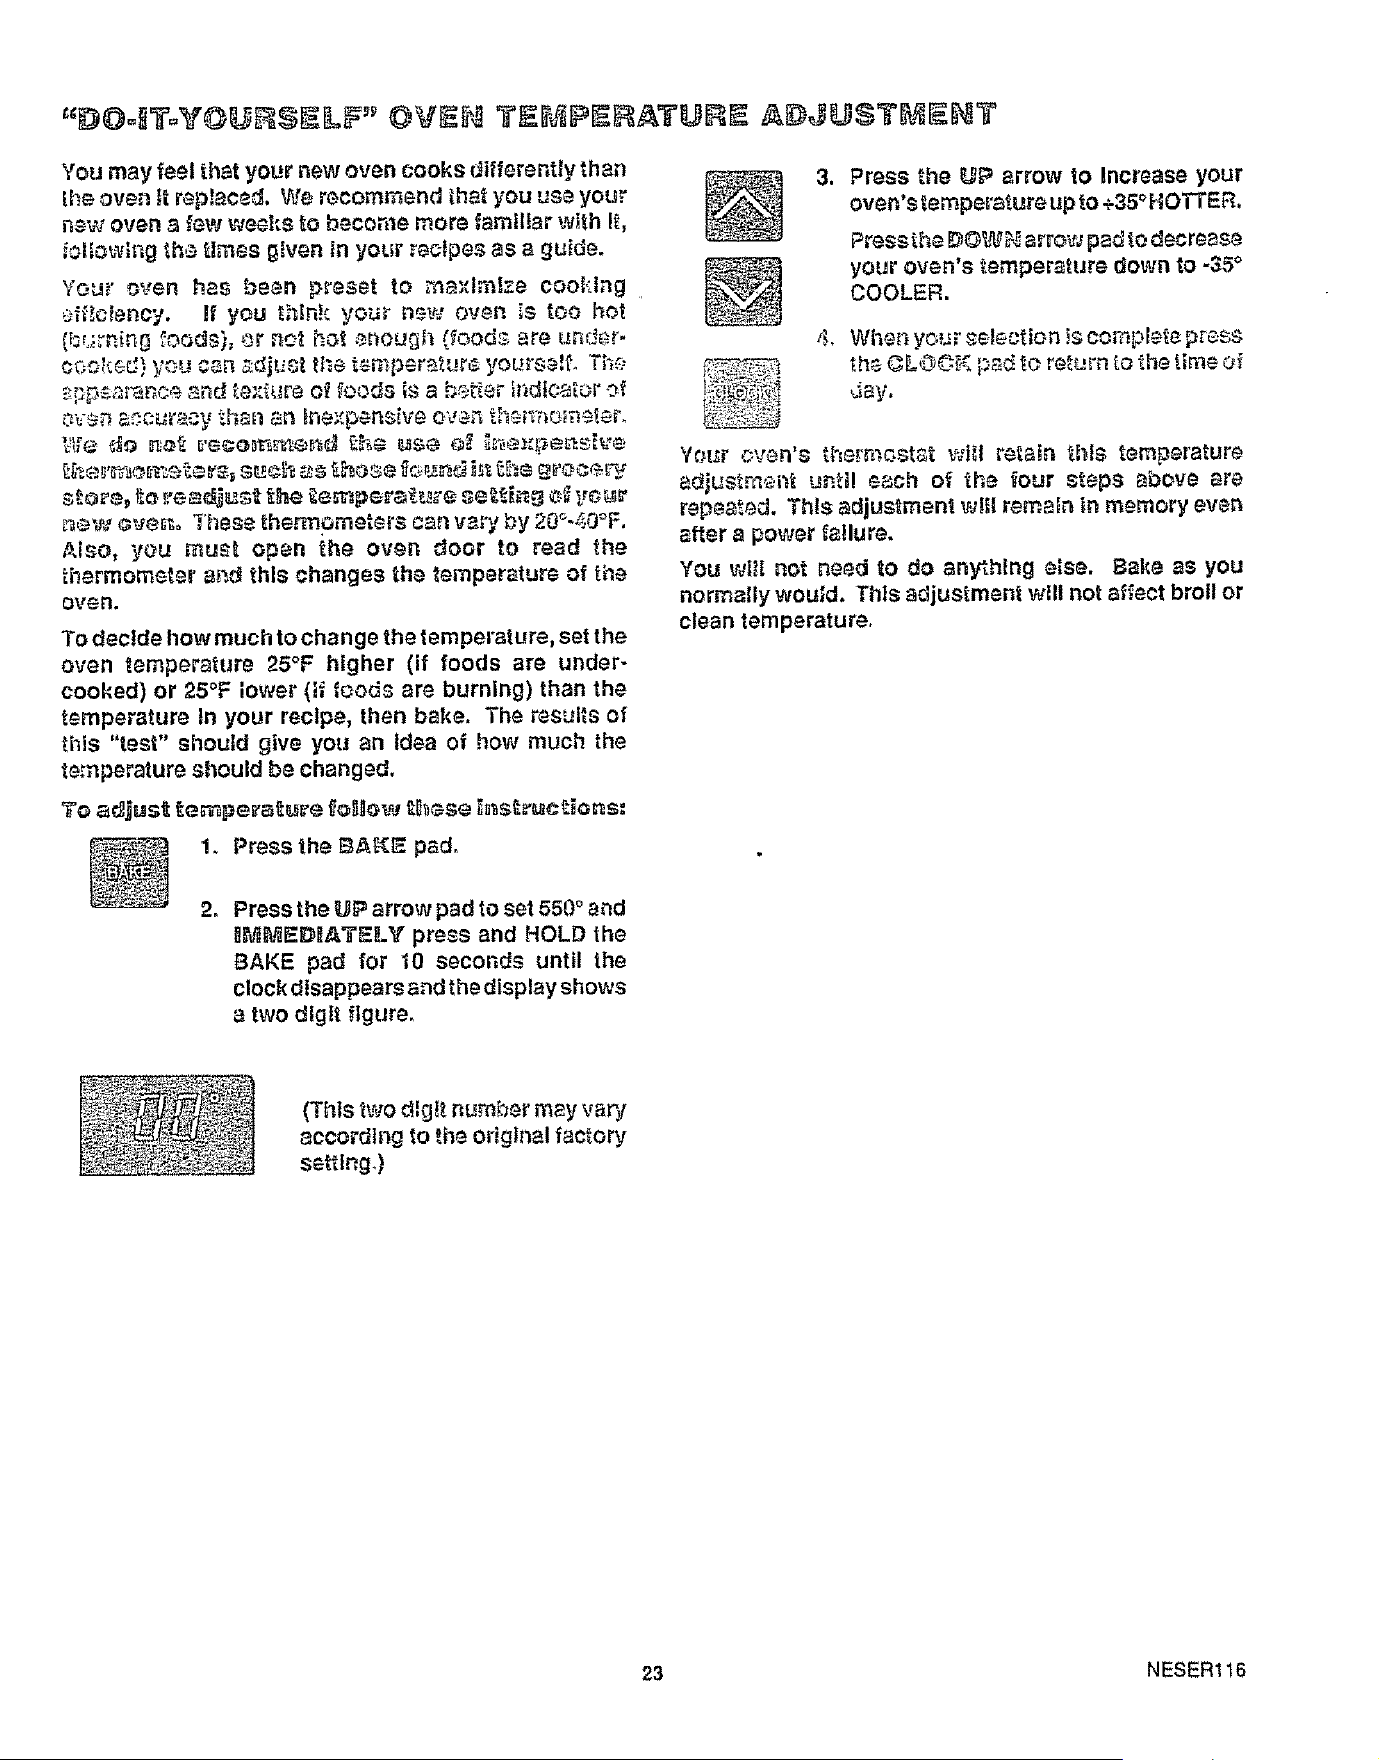
You may feel that your new oven cooks differently than
_h_ oven tt rep!aced. We rocormnend that you use your
ne_v oven _ few weehs to beconle more _amtliar with It,
_olfowlng ";he times given in your reclpes as a gu!de,
Your oven has been preset to n'_a,"lmtze cooking
eff_clency. If you _hink you_ new oven is too hot
(_urn_r_g _oods), or _o_ hst _r_ough {food_ are under-
cocked) yr_ can adjust the t_mperatur_ yourse_t The
_[:p_.arance aad tex_.'re of foods ;s a bet,.or _ndtcator of
oven 8_curaoy than an _ne'xpensive ove_ the_'_7_o_,,eter.
ste_8_ _e _'ea_._t the _.e_peratu_e se_.h'_g e_ yo_r
_ev_, eVe_o These thermometers can vary by 20°-40°F,
Also, you mu_t open the oven door to read the
thermometer and this changes the _emperature of the
oven.
To decide haw much to change the temperature, set the
oven temperature 25°F higher (if foods are under-
cooked) or 25°F lower (_f _oods are burning) than the
temperature in your recipe, then bake. The results of
this "test" should give you an idea of how much the
temperature should be changed.
To a_jus_ _e_r_pe_at_'e f_ow tlhcse h_s_ruc_:_ons:
3. Press the _JP arrow to increase your
oven's temperature up to +35° HOTTER,
Pressthe DOWN arrow pad to decrease
your oven's temperature down to -35°
COOLER.
4, When your _electton _ co_plete press
theC ,L-O0_4pad t_oreturn to 1hetime o_
day.
Yot;r oven's ther_c, stat will retain _hls temperature
adjustment untO! each of the four steps above are
repea_ed. This adjustment wi_l remain _nmemory even
after a power fa!lure,
YOU wt_i not need to do anything else. Bake as you
normally would. This adjustment will not affect broil or
clean temperature,
!, Press the E_AKE pad°
2. Press the _lP arrow pad to set 550 ° and
_M_D_AT_LY press and HOLD the
BAKE pad for I0 seconds until the
clock disappears and the display shows
a two digit figure.
(This two dlgtt number may vary
according _otf_e ol!gtnal factory
setting.)
23 NESER116

Fsr the repai_ er reilHaceme_tl_arts yea _88d
Call 7 am - 7 pro, 7 days a week
I =800=I!I_}6°II_ART
(1-810-366-7278)
For in-home major brant repair service
Call 24 hours a day, 7 days a week
1-800-4°IIF611ii
{1-I11-473-7247)
For the location of a
Sears lepair Service letter ia your area
Call 24 hours a day, 7 days £ week
! -800-488= t 222
For information on purchasinga Sears
Maintenance Agreementor to' inquire
about an existing Agreement
call 9 am - 5 pm, Monday-Saturday
t °800-EIIW-tI¢IiI_
America's Repair Speciafists
24
D_r C_mer:
Our constant e_-iorls are
directed toward making
sure your new Kenmora
Range will arrive at your
home In perfect condition
and will give you proper
p_rformance. As part of
these efforts, we feel It is
our responsibtl_y to pro-
vide you wlh this warranty
for your range.
f
PARTS _;KC_T GLAS_ PARTS
!f, within on@year from the da|_, of Installation, any part, other than a glass
part, f_lls to functt_n properly _ue _o a defect In material or workmanship,
Se_r_ wilt repair or replace if, frc_ oi charge.
If, within 30 days from _.hadate _ h_t_latlon, any glass part orthe finish
on any p_rc_lain enamel, painted or bright metal part Is defective in
m_ter|al or workmanship, Sears wll replace the part, free of charge.
For 90 ciays from _hed_te of tnstalaton, S_ars will provide, free of charge,
any mechanic_l adjustments nece._sary for proper operation of the range,
except for normal maintenance.
if th_ range is subjected to other than private family use, the above
warranty coverage Is effective for only 90 days.
WARRANTY _RVIC_ t_ _VAIU_._L_ _Y CONTACTING TH_
This warranty applies only while this product Is In use In the United States.
This warranty gives you specific legal rig hts, and you may also have other
rights which vary from state to state. _EARS, ROEBUCK and CO.
Dept. 720PSO
3333 B_verly Road
Hoffman Es_ss, IL 60179
"We Service Wha_ We Sell" Is our assurance to you that you can d_pend on Sears for service because Sears
service is nationwide.
Your Kenmore Range has added value when you consider that Sears has a service unit near you staffed by
Sears trained technicians.., professional technicians sp$clflca!ly trained on Sears appliances, having the
parts, tools and equipment to ensure that we meet our pledge to you _ "We Service What We Sell!"
TO FURTHER AD_ TO TH_ V_L_ OF YOUR RA_;_GE_,I_UY _ _R_ _i_TE_A_CE _,_REE;_E_T,
KenmoreRangesare designed,manufacturedand
tested for years of dependable operation. Yet,any
modern appliance mayrequire service from ttm_
to ttmeoThe Seers Warrantyplus the Sears Main-
tenance Agreement provides protection from un-
expected repair bills and assures you of _joying
maximum range efficiency.
Here's a comparative warranty end _lntenancs
Agreement chart showing you the benefits of a
Sears Range _'_alntenanceAgreement°
Yoars of Ownership Coverage
Repfscom f D_focflve
1 Po. o,ho, . po.oo, ,. W NA NA
or Glass
90 DAYS
2 W NA NA
30 DAYS
. , ,,,,H.., ............ , .,u
Annual Proventlvo Malnt on-
4 ante Ch_ck a, €our r°qu_st NA MA NA
INDICE
SEGURnDAD
U$O Y CUBDADO
C6mo sacar le clnta de empaque ................................ 5
Su e_tufa y sue carecteristlcas .......................................6
C6mo coc_nBr en Is superflcle de co¢ln-,r ........... 7, 8
Conlroles de la estufa .................................................... 9
C6mo poner el reloj ......................................... ....... 9, I0
C6mo coclnar en elhomo ............................................11-13
Conlrolea del homo ...................................................12=16
C6mo asar ....................................................................14
Ciclo de autolimpleza .............................................15, 16
L_PI_ZA
Ideas para la Ilmpleza ...........................................................17
Partea removibtea ..............................................................!8, 19
A_T_$ D_ GOLI_CtITAR
Uh_ $_RVI]G_O
Qu_ hacer antes de solleitar un servlc|o ............20, 21
Usl_d mlsmo pued_ aJuatar las temperaturas ..........22
N_meros de servlclo pars et clients ............................23
@A_A_THA
46540
46541
46545
46559
46555
MODELOS
PBpel Recl_ado
229C4020P020=2 SR10223
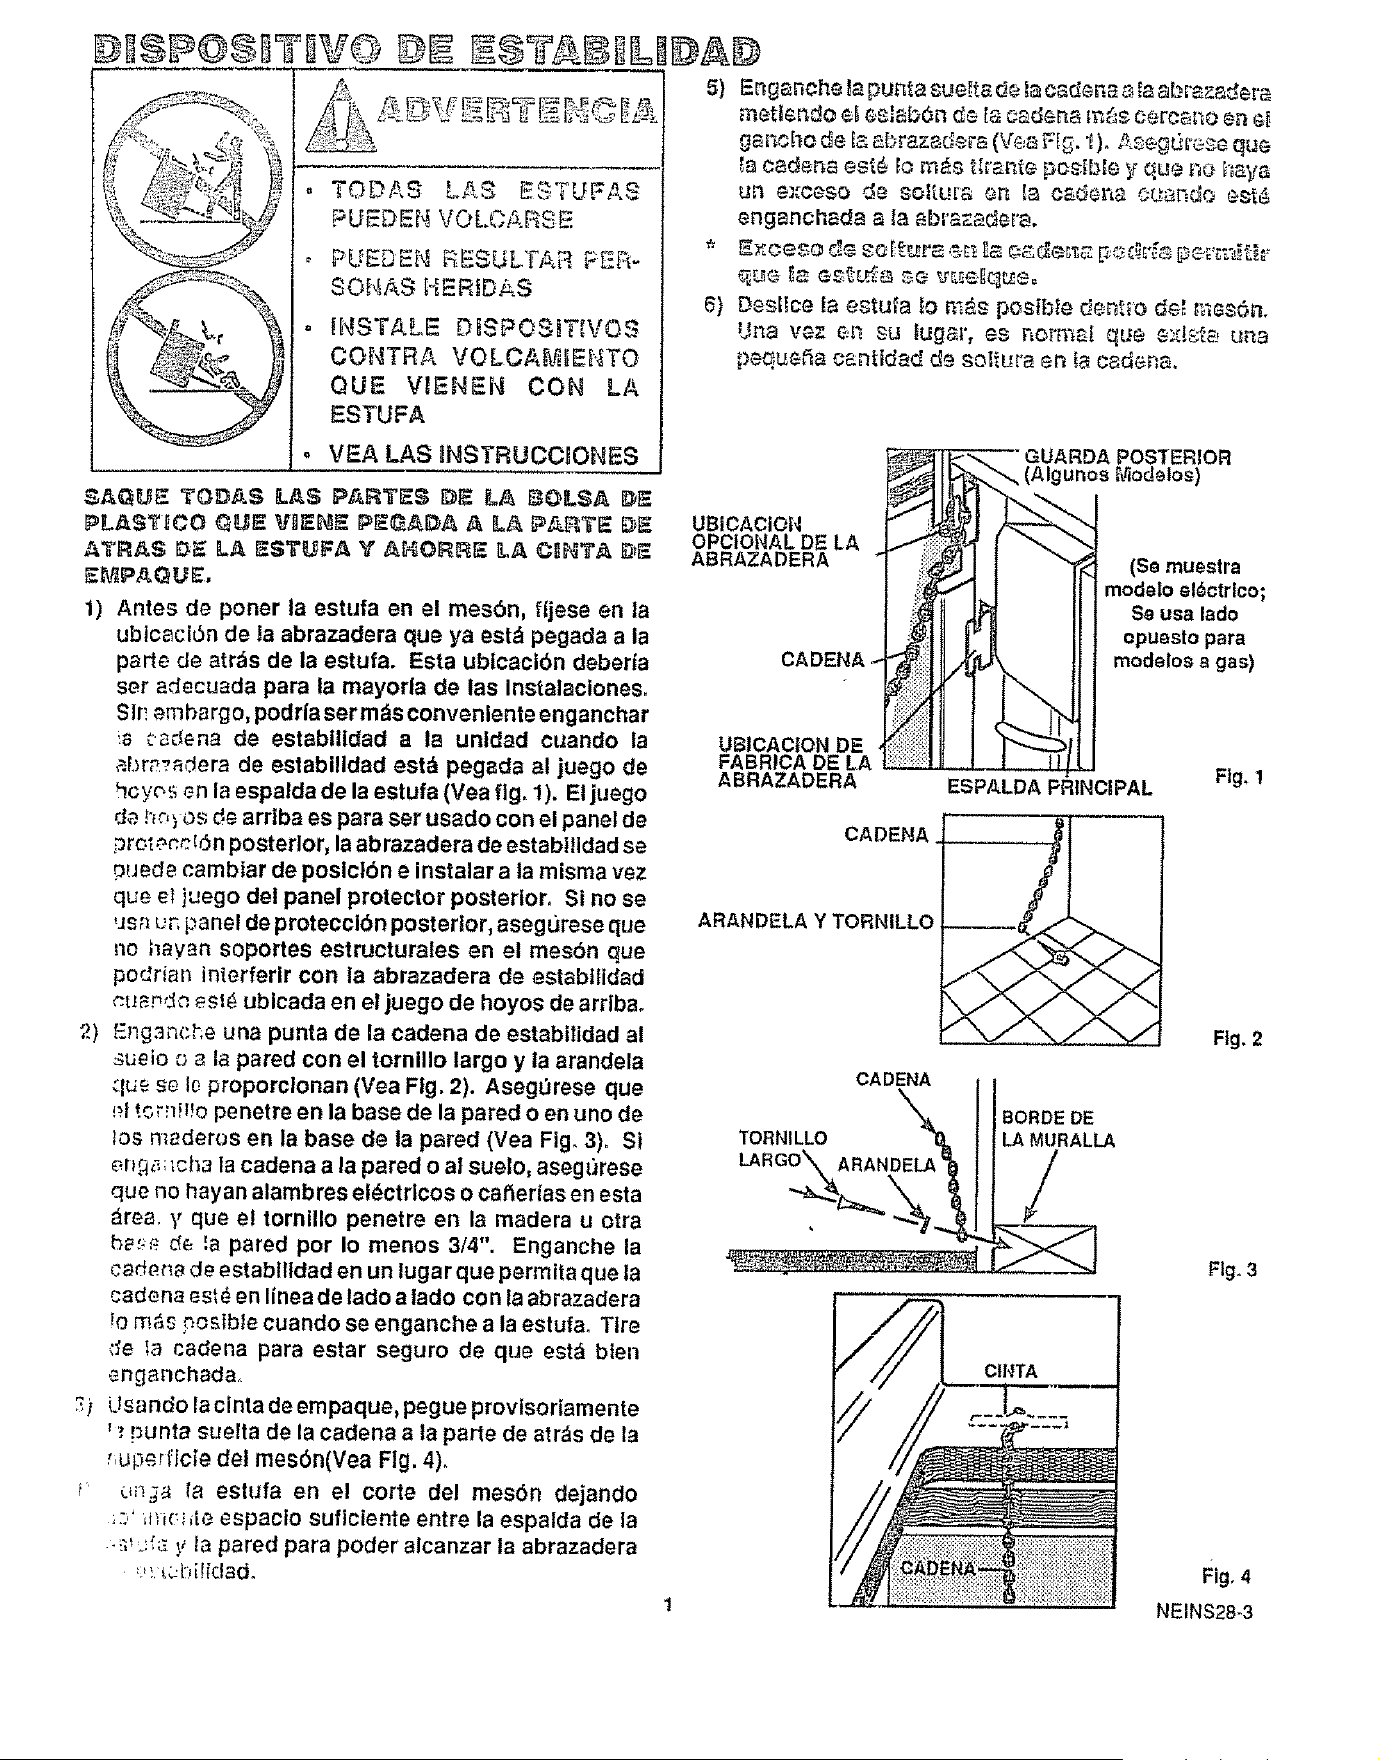
IIIPOII?IVO II II?IIILI!)III
I
PUEDEN VOLC.&RS E
PUEDEN RESUL'FAF_ FER-
$ONAS HERfDAS
[NSTALB DISPOSITIVOS
CONTRA VOLCA_C4ENTO
QUE VlENEN CON LA
ESTUFA
VEA LAS INSTRUCCIONES
SAGUE TODAS LA$ PARTE8 D_ L,A _OLSA #_-
PLA$TICO QUE VlEIl5 PEI_BA A LA PARTE B_E
ATRAS B_ LA EST_JFA Y AHOR_ &,A CIR_TA _E
_MPAQUE.
1) Antes de poner la estufa en el mesen, tjese en la
ubicaciSn de la abrazadera que ya est_ pegada a la
parte de arras de la estufa. Esta ub|cacibn deberfa
set adecuada para la mayorla de las instalaclones_
Sin _.mbargo, podr|a ser m,'isconvenlente enganchar
'.s esdena de establlldad ala unldad cuando la
_br£_adera de estabi!ldad est_ pegada al juego de
hcyos _.nla espalda de la estufa (Yea fig. 1). El juego
d_ h_,) os de arrtba es pare set usado con el panel de
prm_cc [Sn posterior, la abrazadera de establlldad se
puede cambiar de poslclbn e nsta ar ala misma vez
queef }uego del panel protector posterior° SI no se
,Js_ ur, panel de protecciOn posterior, aseg_Jrese que
no hayan soportes estructurales en el mesbn que
podrian interferlr con la abrazadera de estabtlidad
_._n,_ es_ ublcada en el juego de hoyos de arrlba.
2) E!_g3n,_;he una punta de la cadena de establtdad al
sueio o _ la pared con el tornillo largo y la arandela
que se le proporclonan (Yea Fig. 2). Aseg_3rese que
_1t.,.,m!to penetre en la base de la pared o en uno de
los maderos en la base de la pared (Vea Fig. 3). Si
en!a,;',cha la cadena a la pared o al suelo, asegt_rese
que no hayan alambres el_ctrlcos o caSerlas en esta
_rea, y que el tornillo penetre en la madera u otra
h_:;._ de _apared por Io menos 3/4". Enganche la
cadene de estabtlldad en un lugar que permita que la
cadena est _en linea de lado a tado co n la abrazadera
!o rn_s pc£ible cuando se enganche ala estufa, Tire
de ;a cadena para estar seguro de que estd bien
enganchad&
) L sanoo la cinta de empaque, pegue provlsonarnente
_'t!_unta suella de la cadena ala parte de arras de la
,,uperficle dei mesSn(Vea Fig. 4).
u_-_.._ta eslufa en el corte del mesen dejando
,::,' ,m_:_4e espacio suflciente entre la espalda de la
•_*_'._Gy ta pared para poder alcanzar ta abrazadera
,:,:._uL[!i¢lado
!_) Enga_che la pu_ta sue!_ de Ia cadena s._aabr_za_era
metler_do el esl_b_n d_ 18c£den__ _s ceroar_o en 8i,
gsncho de _sabr_z_ders (\r_,aFI_. I)o Ase#_rese que
_acadena es£_ _om_s t[r_nte pcstble y qu# so h_ya
un e][ceso de soltu[s _n la csdeRa OQa_dr_ est_
enganchada ala abrazadera.
6) Desltce Ia estufa _ot_is poslbte dent_o del _ifsin.
Una vez en su Iugar, es r:orms[ que e:_lsta una
peque_a c_nLidad de soltura en _acsdena,
UBICACiON
OPCIONAL DE LA
ABRAZADERA
CADENA,
UBICACtON DE
FABRICA DE LA
ABRAZADERA
L<_ k_'-_ "GUARDA POSTERIOR
t 1 III modeloel_ctrlco;
I ilt 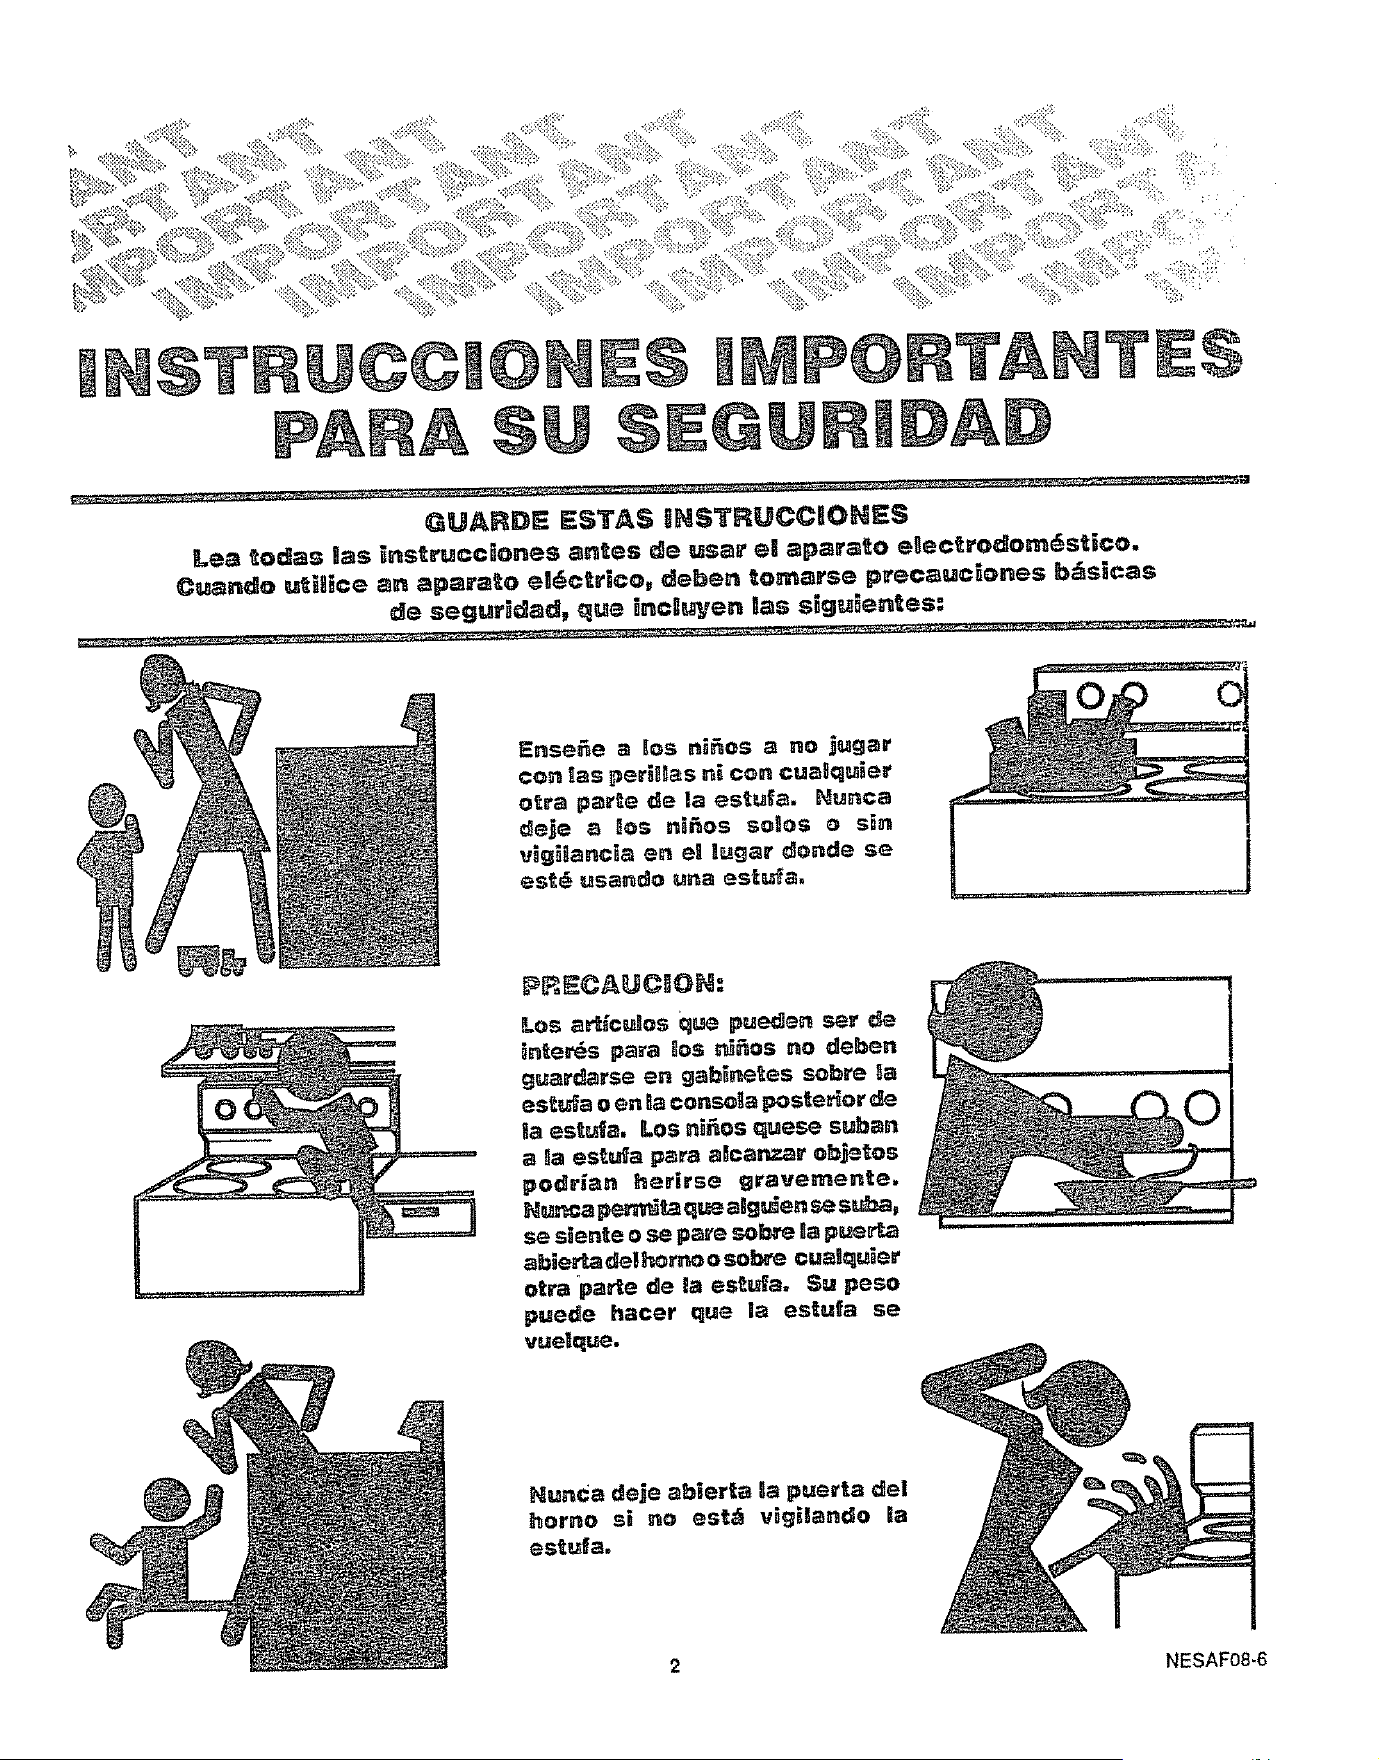
STR@©©I
T
GUARDE _$TA$ gNSTRUCCROHES
Lea toclas las _nstrucc_ones _n_es de usar e! apara_o eUectrodo_stico.
Cu_ndo utHice _n apa_'ato el_c_rico, deben to_arse p_ec_uc_ones b_slcas
E:nse_e _ _os n_os a no jug_r
con _as per_s ni con cua_u_er
_eje _ _os ni_os solos o s_n
v_g_nc_ _n e! _ugar _onde se
PR_CA_C_ON:
Los ar_gcu_os que pu_e_ s_r
i_er_s papa 8os _os no deben
guar_rse en gab_ne_es sobre 8a
es_u_a o en ta cons_a pos_e_or
_a es_a. Los n_os quese suban
a _a es_ufa p_ra a_canzar o_os
pod_i_n herirse gravemen_e.
Hu_ p_ qu_ aig_den se SU_,
se s_en_e o se pa_e so_e _apue_.a
ab_eH_adefame o so.re cua_!c_u_e_
otra par_e de la es_ufa. 5u peso
puede hacer que ia es_u_a se
vuetque,
Nunca deje abier_a I_apuer_a _el
homo si r_o est_ v_g_ando ia
es_u_a,
2 NESAFO8-6
su _anua_ deAConsun'fidoa T_n_Io _ ta mano para hace__coneultas r_pidas.
Per favor ponga mucha 8tenci6n a Eas secciones de segu_idad de s_ _nu_L__'_ _'_'
Puede reconooer las s_cc_ones de segL;_dad busc£ndo e_ _mbo_o _ o _a
Segu_ _dad °
palabra" " "" "
_{_r_e_#a el _rea de _a es&u_a
siempre despeja_a y Hbre _e
obje_os q_e pue_an quer_se.
PREC#_UC_ON:
N.r_ca guarde obje_os
_,!ent_'o del _erno o cerca _e
_o._ ,a;ementes de 8a ceb_er&a
:_ de _os que_a_o_'es. Es_os
_b_etos puede_ _ncer_rse
; los objetes de p_stico
p_._eden de_ve_se.
_unca e_ce s. este_a para
ha_,_ac_6n. Fo_r_a resu_tar c_n
he_'_as o q_e_adl_ra$ eraves.
E! _so _na_ecua_o _e _a es_u_a
_an_b_6n #'_e_e _esco_pene_4,a,
Nunca use _opa sue_ta cuan_o
utilice su es_u_a, Ese t_po de
_opa pue_e incendiarse.
F3unca #se u_ toa_a o una _e_a
abu_&a_a en _ugar de a$_a_*raderas
para _o ca_en_e. Estas _e_as
psdr_an _ncen_ia_se en ua
e_emen_o _enera_ de ca_or o
quema_o_,
'_'.fL,nC a de_ _e _os _angos _e
_.3:_c_.cerolas sobres_gen de
[a cu&ier_ de la estu_a.
i:_6ng_[os _te rnodo _e no
:t,_oda golpearlos al pasar.
_,_,_;tte_g8 _os mangos iejos de
_ _u = ,_Jementos ca|_entes de
;_;perficie o de los
Nunca _e_e sh_ _anc_8 _os
eien_e_.es _e _a eub_ed_a e _es
e_eva_a$. Las sa_p_ea_ras
pue_en orie_ar h_mo y _as
sa_picade_'as de erasa pueden
_ncendiarse,
NESAF09-4
P@ T HTR$
PIRIECAUCIONE$ BASICAS DE
SEGURIDAD
Guarde este libro para un uso futuro.
Cerclbrese de que su estufa haya sldo instalada y que
haga tlerra correctamente por un t_cnlco calificado.
Stempre use agarraderas secas cuando quite ollas del
horno o de la cubterla. Las agarraderas h_medas o
mo|adas pueden causar quemaduras por vapor.
Slempre slga las Instrucciones de limpleza que vlenen
en este Ilbro_
Mantenga Ilmplas slempre la estufa y el homo° La
comlda y la grasa se Incendlan con fac|ltdad. Limple la
estufa, el horno y las rejillas de ventllaclbn de manera
regular.
Umple solo las partes que se enumeran en este Manual.
PRECAUCnON: No guarde artlculos de interns para los
nitios en gablnetes sobre la estufa o en la consola de la
estufa. Los nitros que se suban a la estufa para alcanzar
dlchos artlculos podrtan resultar herldos de g ravedad.
Slempre mantenga los revestlmientos ;nflamables de
las paredes, cortlnas, colgaduras a una dtstancla
prudente de ia estufa.
Slempre mantenga a una dlstancla segura de la estufa
el papel taplz de las paredes, las cortlnas o colgaduras
queseancombustlbtes. Nunca guarde dichos articulos
en su estufa.
Conserve slempre el _rea que roctea la estufa libre de
cosas que puedan quemarse (gasolina y otros liqutdos
y gases lnflamables).
Nunca Intente reparar o reemplazar cualquler parte de la
estufa a menos que se den tnstrucclones al respecto en
este iibro. Todos los demos trabajos deben ser realizados
por un t@cnlco capacltado.
Nunca caliente reclplentes con comlda que est_n
tapados. El aumento de la preslbn Interna puede
ocaslonar que el reclplente estalie y cause lesiones.
Nunca deje frascos o latas de grasa o goteaduras sobre
o cerca de la estuta. Nunca permita que la grasa se
acumule en su estufa. Puede evitar incendlos por grasa
si limpia la grasa y cualquler derrame cada vez que
termine de usar la estufa.
Nunca trate de mover una otla con grasa callente, en
especial sl es una freldora, Espere a que la grasa se
haya enfrlado.
Nunca toque las unldades de la superi_cte, _<_;,
elementos generadores de calor o las super_cie_
Interlores del homo. Pueden estar ¢allentes aunq_e su
color sea oscuro.
Aigunos prOdUCtOS l_pJa_ores
produce,t vapores perjud_ci_tes
y las telas o esponjas mojadas
podr_an causar quemaduras por
vapor si se u_iiiza, sobre u_,_
supe_icie c_lien_e.
Mantenga slempre los utensilios de madera, los
utensllios de pl_stlco o allmentos enlatados a una
dlstancia segura de su estufm
SEGURIIDAD EN USO DE
CUBIIERTA DE LA ESTUFA
Slempre tonga culdado cuando toque la superflcte de t_
estufa. Los elementos generadores de calor podri_n
estar Io suflclentemente calientes para causarle
quemaduras aunque se vean de color oscuro
La supeHlcie de vidrio de la cubierta retendr_ calor
despu_s de que los controles se hayan apagadoo
S01o pueden utillzarse ciertos ttpos de ollas de vldrio o
cer_mlca para cocinar sobre la superficle. Asegurese
de que la olla que use no se
rompa si se calienta sobre los
quemadores.
Nunca obstruya el libre flujo de aire a trav_s de la rejilla
de ventilaciSn del homo.
No Cocine sobre una cubierta quebrada. SI la cubierta
se quiebra, las soluclones delimpleza y los derrames
podrlan penetrar la cubterta quebrada y crear el rtesgo
deun golpe de corriente. Llame a un tdcnico competente
inmediatamente.
Para derrames grandee - Ponga la unldad en io; use
toatlas de papel secas para timp|ar los derrames grandes,
y despu_s use un raspador a hoja (sujeto con una
agrradera de ollas) para raspar los derrames grandes de
la zona de coclnar caliente. No trate de segulr llmpiando
hasta que la superficle de la cublerta se haya enfrlado.
Elija ollas y sartenes con rondo piano, lo suflclentemente
grandes como para cubrlr por completo el elemento
generador de calor. Esto tmpedlr_ el riesgo de que ee
Incendien las agarraderas o ia ropa sl el elemento
generador de calor estuvlera descublerto y se
desperdiciar& menos energia.
4 NESAF65-2
Coloque la parrllla del homo en la poslcl_n deseada
mientras _ste se encuentre frio. SI ttene que mover ta
parrilla cuando el homo est_ calente, no permta que La
agarradera o guante entre en contacto con e! etemento
generador de calor de! homo.
Despu_s de asar, siempre saque del homo la fuente
para asar y |&vela. Las sobras de grasa en la fuente para
asar pueden Incendiarse la prb×lma vez que ullice la
fuente.
Stempre tenga culdado cuando abra la puerta del homo.
Permita que el alre caliente y el vapor salgan antes de
mover los almentos.
Nunca use papel de alumlnlo para forrar las fuentes de
escurdmiento o el rondo del homo. El uso Incorrecto
del pape! de aluminio podria causar un incendto.
$111IIUI_IIi)AII) ilg I.A _IJIFOI-IIVIIII__!_
5i no funciona bien el modo de autottmpleza, ap_guelo
y desconecte el sumintstro de energia el_ctrica, Solcite
que un t_cnico calificado revise y le d_ aervicio a su
estufao
Siempre retire la fuente para asar y otros uf,en_iios del
homo antes de un clclo de autoltmpleza.
l!unca fl iegue, mueva o dafie el sello de _apuerta el_ tas
estufas que tienen modo de autolimpteza. El sello es
esenclal para un buen clerre.
Hut, ca Irate de lmpiar utenafiios, trastes o partes
removibles de su estufa durante un clclo de auto-
limpieza.
No utltce lmpladores para homo - no deberl'a utlizar
ningun limpiador corn_rcial parL ho_'r_oo reve_timiento
protector de nlngun tlpo en el horno o alrededor de
cualqulera da sus partes.
II.EF- tI@I "!IIBBHDA EIY.£
i l',IFOlll= a£@l@tl
i_0÷_Ii¢)°
$81_) al_la_£ a ÷xte_le_ lab lla--
FI=III@@ @_!tI_$_i1)© _©i_ Q1£$£ !i1---,1
L_ @UIIIIIFA
tamis le_a_te te la est_ia _[_a ella en
l_amaSo.oe_ l_ga_ ¢le elle:
_ _,_, 1. Apague e! elemento que gen-
era calor.
2. Sofoque el fuego con una
tapa bien ajustada, bicarbonato
de sodio o un extinguidor.
I. Cierre la puerta del homo yapague
los controles.
2. Si el fuego continua, use una
espurna quimica seca o un
extinguidor de tipo ha!6n.
l'I@lll!lI£@l@lg I)i
51@@£11 .i) li .I£©BWlllST
El Acta de Apltcact0n de Agua Potable y Tbxlcos del
Estado de California requiere que el gobernador de
California publique una Iista de sustanclas conocidas
pot el e_tado que causen defectos de naclrntento u
otros _aCios reproducttvos y requlere que se advlerta a
los ctentes de !a exposicl6n potenct_! a dlchas
sustanciaa°
E_ aislante de flbra de vldrlo de !os hornos de auto-
limpieza produce una pequefia cantidad de mon_xtdo
de carbono durante et ciclo de Itmpleza. La exposicl6n
puede mlnimtzarse abrlendo una ventana o utlllzando
un ventilador o una campana extractora.
5 NESAF66-2
CUBUERTA LEVANTA
REC_PIENTES
CROMADOS
RSMOVIBLES
(V®aIs p_glna 18)
REJILLA DE VENT_LAC_6_
DEL HORNO(Puede calentarss
debajo del elemento genel'ador d_
calor durante el uso de] homo:
NO OBSTRUYA la ventilacib_)
ELEMENTOS DE;
CUBIERTA
REMOVIBLES
(Yea la pagtna 19)
BNTERRUPTOR DE LA LUZ
DEL HORNO
(Oprlma para encender
opagar la luz del homo)
IHDICADOR DE LUZ DE
LA SUPERFlClE
(Se pranda cuando
cualquler elemento de
cocinar est_ encendido)
E HORHO
REMOVIBLES
(Yea 13p&glna 16)
ELEMENTO PARA
HORNEAR
FUENTE Y PARRllLLA
PARA ASAR
(Yea las p_glnas 13, 16)
6 NESIF10
Antes de que utilce la cubierta per primera vez, tome
uP,os mementos para famliarizarse con los etementos y
ta peHla que se usa para encender cede uno de los
elementos.
DE LA CUBIERTA
\
I
"Ht" {"AE_?A"]
Seutilt_ pars inlcios r6pidos,tales
corno hervir ague.
'%t_El_.[_f- (.L'_r_EB_.AL?A,;)
$e utilize par_ freer o herv_r con
rapidez
El signo que se encuentra cerca de carla pertla de
control de la cubierta muestra qu6 eiemento enciende
esa perilla_
J i 1 t
O0 @0 O@ O0
@0 O0 O0 O@
tzquierdo Izquierdo Derecho Derecho
D_F-_n_ero Posterior Posterior Delantero
_era operaw el c_n_rol _e la cu_ier_a
Opiima pera hacerlo
girar.
Ss usa para coclnar alimentes con
pequefias cantldades de agua.
Se usa para cocinar alirnentes con
pequefias cantIdades de agua.
"LG" ("SA_A')
Se usa par_ coclnar allmentos al
vapor o pare mantener calientes !os
alimentos a una temperatura
adecuada para serv_rlos.
2 Col6quelo eno
entre las marcas
!;2[a obtener et
taler deseado.
[ a _uz I_}dicadora se encender_ cuando se active
•'ds!%t_ietade los elementos generadores de calor,
VENTft.ACtON DEL HORNO
(El _rea puede calentarse
durante el use del homo,
NO obstruya la venttlacl6n).
7 NEMTC66-1
Para coclnar con mejoras resultados y usar energla
eflclentemente, usted deberla usar utensttlos de fondo
piano. Haga coincidlr el tamaSo del utensllio con el
tamafto de la unldad de ta superflcfe. El utensllto no se
deberla extender m_s de una pulgada de la orllla del
anll|o de! calentador.
Hot_: Es normal un otor tenue cuando se usa una
estufa nueva por prlmera vez. Es causado pot el
calentamlento de las partes nuevas y de los materlales
alslantes, y desaparecer_ en poco ttempo.
CO . O COCiNAR UNA OLLA
Recomendamos qua use sblo oElas con rondo piano°
Estbn dlsponlbles en la ttenda de su local!dad.
OBSERVE LOS SIGU JT
CONSERVA$
,
Haga hervir el agua en HIGH (ALTO). Oespu_.s=_r;_
vez qua ha comenzado a hervlr, ponga la perflla en ;a
temperatura m&s baja pare mantener la ebullic_5.,_
(ahorra energla y aprovecha major la unldad).
Asegdrese de qua la olla para conservas quede bier;
colocada en el centro de la unldad de la superflcle. $i
su estufa no permlte qua la olla se cent re en ;a _nldarJ
de la superflcle, utilfce ollas de df_me_;'o :,;'_,_,_,
pequefio para obtener buenos resultados al hacer
conserves.
,
Las ollas para conserves con fondo piano le o[r_c_;;
mejores resultados para hacer conserves.
Asegurese de que el rondo sea piano o de qua _
peque_ias hendlduras se ajusten ala _r_I3ad _,_ !_,
superflc|e. Las o!las con rondo onduRado o con
rebordes (que con frecuencla se encuentran entre
las ollas esmaltadas) no se recomtendan.
PARA I LAI @I AP
No se recomienda que al cocinar a!lmentos mediante
otro proceso que no sea el de hacer conservas, se usen
o|las de gran dldmetro (qua se extlendan mas de 1" m_s
all_ de la orilla de la fuente de escurrlmlento). Sin
embargo, cuando haga conservas en baSo maria o en
una olta de preslbn, puede utilizer ollas de gran
all&metro. Esto se debe a que la temperatura del ague
¢atlen_e (aun bajo preslbn) no dafia ia superflcle de la
cublerta qua rodea la unldad de calentamlento.
SIN EMBARGO, NO USE OLLAB PARA CONSERVAS DE
DIAMETRO MUY GRANDE U OTRAS OLLAS DE GRAN
DIAMETRO PARA FREIR O HERVIR OTROS
ALIMENTOS QUE NO BEAN AGUA.
La mayorla de los jarabes o de las mezclas de salsas, y
todo tlpo de frlturas, se coclnan a una temperatura
mayor qua Ix del agua hlrvlendo. Dichas temperaturas
ala larga pueden darter las superficies de lacublerta qua
rodean las unidades de calentamlento.
4_
Cuando haga conserves, utiltce recatas de fuentes
de conflanza. E! fabricante de su olla pare hacer
conservas puede faeilitarle recetas confiables,
tambl_n los fabrlcantes de frescos de conservas
como BALL y KERR y la Extensibn de Servicio del
Departamento de Agricultura de Les Estados
Untdos.
5. Recuerde, al segutr tas recetas, qua al hater
conservas se generan grandes cantidades de vapor.
Tenga culdado mientras prepare las conservas pare
evitar quemaduras por vapor ocalor.
N_TA: S! su estufa est_ slendo operada con baja
energla (voltaje), el proceso de hacer conservas puede
requerlr rods tlempo de Io esperado, aunque haya
seguldo culdadosamente las Instrucctones. El proceso
puede mejorarse:
(1) Usando una olla para hacer conservas qua sea
de presl0n y
(2) Empezando con agua callente de la llave cuando
vaya a ealentar grandes cantldades de agua.
8 NEMTC59-2
©©MY eL DE LA $Y FA
DEAL FARA
MOSTRAR ESTADO
DEL PROGRAMA
.! ': k{=
:_[t:;F_:':
DIAL DEL RELOJ/ DIALDE
C_ONOMETRO TE[_PERATURA
t
DIAL DE
FUNCION
)::O!O ! ; _ ;r .
E[v_PUJE PARA ENCENDER O
APAGAR EL CRONOMETRO
PARA PONER OPERACIONES
DEL HORNO EN AUTOItlATICO
f
BOTON CON FLECHA HACIA ABAJO
(BAJA EL TIEIIPO Y LA TEf_PERATURA)
Su estufa se controla con un toque. Usted puede porter
ahora las sigutentes operaclones f&ctlmente:
RELOJ CROI_O_'_ETRO
HORHEAR HORNEADO DE_ORADO
ASAR I.It/IPI EZA
L_MF[EZA DEE_ORADA
Las flechas UP o DOWN se usan para poner el iempo
o carnbiar Ia temperatura que desea usar. Apretando y
mantenlendo preslonadas cualqulera de las dos, los
nt)meros carnbiar_n r_pldarnente. Apretando y sottando
las flechas los nt)meros camblar_n lentamente.
#IAt..:
Una vez que haya programado su control para cualquler
operact6n, usted puede mostrarlo apretando el bot6n
apropiadoo Pot ejemplo, sl estd usando el cron6metro
y dese_ ver la hora del dia, aprete CLO©._'[. El d[a!
,'}ios_,rsr_ la hora del dia.
TONO$:
El tono de fin de clclo sonar_ al t_rmlno del uso del
cron6metro y de las funclones automdtlcas del homo,
Eltono de fin de ctclo es de tree sonldos cor!os seguldos
pot un sonido cada sels segundos que se replte hasta
que usted aprlete cuatquler botbn excepto las flechas
UP. o DOWN. SI desea eliminar los sonldos repetldos,
aprlete y sujete OLEARIOFF por 10 segundos,
©O!)tQ©.F:
St el dial de la hora suena contlnuamente y una "F"
segulda pot un numero pestafiea, usled tlene un c6dlgo
de error de funcl_m Note el numero despu_s de la "F".
Empuje CLEAR/OFF° Perm_ta que el homo se enfrle por
I hora. SI el problema se replte, desconecte toda ia
electrlcldad a la estufa y lame para un servlclo° D|gale
asu t_cnlco el nt_mero que aparece despu_s de la"lF" en
el dial.
PRESS
Us_ed rio puede po_et [_ORH_AR, ASAR
c 3_Ef_pO DE"COCINIAR mien_ras ia puer_a
_el homo estd cerrada con cerrojo. $i !o
t;'ata de hacer_ ta pelabra "DOOR"
_parecer_ en el dial. El cerrojo de la
p_erta del homo se debe usar solamente
NCERC18-3
COP @ PO ER N JEVA E T
CROtRO ETRO:
Cuando est_ ponlendo et cronbmetro, sl usted hace (,:
pausa de robs de 4 seg urines relent ras aprata cualq_i_ _.
de los botones con |as flechas UP o DOWN, "i'_;-
dejard de pestatiear en ei dlal y el cronbmetro emp_z;:_,
a contar hacia atr_s autombUcamente. S! esto oct:r_';
aprete solamente el botbn TI]MER O_!OFF y ust_,:
podrd continuar selec_ionando su tlempo.
C_O CA_CEL._R EL
CROHO_ETRO:
_lentras el cronbmetro estd contando hac!a atr:_;
empuje y mantenga el botbn T_ER ONIOFF p_-..:
segundos, o hasta que "TI_MER" dsje de pesta_ear y !_
hora corrects del dis vuelva al dial
EL RO O ETRO:
El cronbmetm no controla las operaclones del homo,
tales como hornear, asar, limpleza o cualquler funclbn
demorada. Le permits poner una cantidad de tlempo y
le avisa cuando el tlempo ha terminadoo Un ejemplo
ser|a poner un huevo a tres mlnutos, La cantldad de
tlempo m_lmaquepuedeponeres 9 horasy 55 minutos.
1, Empujeelbotbn Tl_ER O_lOFF. "SET"
y '=_[_ER" se mostrar_n y "HR"
aparecer_ en el dial.
2. Empuje cualqulera de los botones con
las flechas UP o DOW_ para selecclonar
la cantldad de tlempo que neceslta_
El cronbmetro empezar_ a contar hacla atr_s
autom_tlcamente dentro de 4 segundos,
,
Cuando el cronbmetro Ilegue a cero
sonard un tono. Empuje el botbn del reloj
(clock) para volver a la hora correcta del
dla°
10 NCCTL44-1

©OIi@ ,@@iBIA, P= IB! AL I I@I@410
IIIBA@ @!II!IALI@
•. Cuando coclne per pdmera vez un allmento en 8u
nuevo homo, use como guia los tfempos que se dan
en las recelas.
Una vez que haya usado su homo durance un tlempo,
s! consldera q_e debe operar m&s callente o m_s
frto, puede ajustar|o usted mlsmo. Consule la
secclSn A4USTE@ D,_ "rEB_._RAT#RA de es_e
manual.
. NO k'_IRE DEMASIADO _ SI abre el homo con
demaetada frecuencla durante el horneado de _os
alirnentos, permilr_ que haya p_rdtd._ de ¢alor y que
los resutados del horneado no seen saUsfactorlos.
. Puede salr algun o!or cuando el homo se usa pot
primera vez. Esto es causado porelcalentamlento
de Ins parles nuevas y el alslante.
o No cubra pot eompleto con papel de alumtnio una
parrilla del homo. E! papel de alumlnlo puede
obstruir el flujo normal de calor y orlginar malos
resultados al hornear. No Coloque papel de alum Jn|o
directamente enclma del elemento que genera el
calor del homo. El papel de aluminto que se utltce
en el {ondo del homo, debajo del elemento puede
darer la supedicle. Pot Io tanto, no debe utllzarseo
Ouando Bas recetes requleran precslentam|ento,
tense cerca los almentos antes de abrir ta puer_a del
homo. SI deja ablerta _a puer_a de{ homo durante
mucho tiempo, se perder'_ _a temperatura de
precalentamiento.
, Permffa qL_ e_ herno se preealente pot compbto
antes de cocinar productos horneados, Espere que
_a _uz Ind|oadora de precalentado ee enc_enda y
ponga la comlda en el homo, Sl su homo no vlene
equlpado con esto, precalente per 10 minutos an-
tes de poner la comlda en el homo.
_AN#E_A@ PAPUA I_@_t_AR
° Las galletas deben hornearse en bandejas p_anas
pare hornear galletas, que no tengan odllas que
Impidan la libre y adecuada circulaclSn del a|re.
J
° Las queques, panecil!os y panes r_ptdos deben
hornearse en moldes brtllantes-que reflejen el calor-
ya que deben tenet una corteza de tono dorado
claro.
• Aseg_rese de que la parte de abajo del molde tambl_n
sea brillante. Los rondos opacos absorber_n el
caloty podrtan produclr que la parle de abajo de su
comida se dore demaeiado.
. La temperatures del homo se deben reduclr 25
grados F de ins temperatures recomendadas sl el
exterior de la fuente tlene un acabado contra
pegaduras oscuro, se ha oscurecldo pot el llempo o
cuando se hornea envtdrlo para hornoso
11 NEOVC58-2
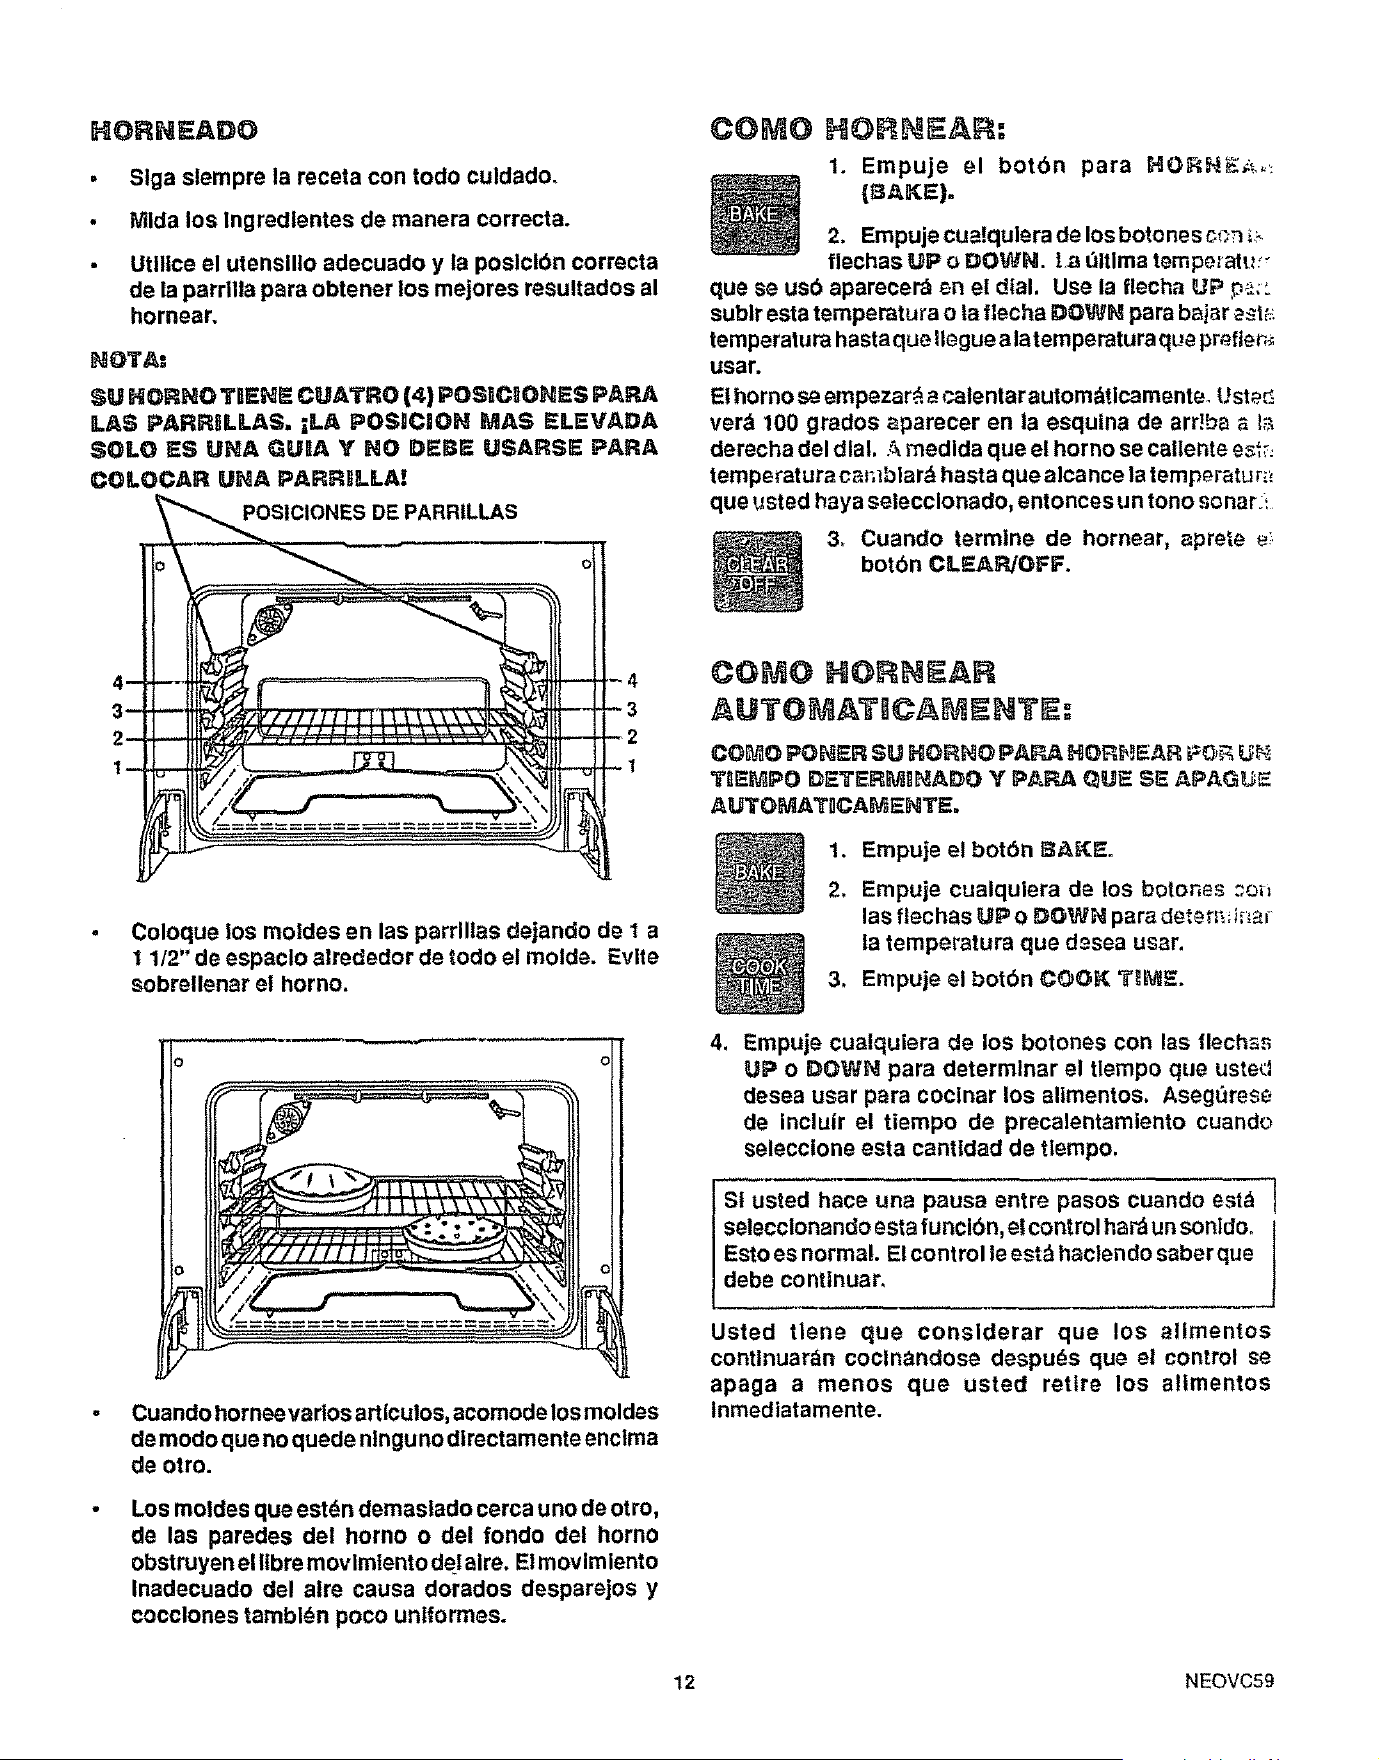
HORNEADO
• Slga slempre la receta con todo culdado.
• lVtlda los Ingredlentes de manera correcta.
• Utlltce el utenslllo adecuado y la poslclbn correcta
de la parrllla para obtener los mejores resultados al
hornear.
NIOTA:
• Coloque los moides en las parrlllas dejando de I a
1 1/2" de espaclo alrededor de todo el molde. Evlte
sobrellenar el horno.
COMO HORNEAR:
1. Empuje el botbn para HOFcN_,.:
{BAKE).
2. Empuje cua!qulera de los botone s ccn ;:.
flechas UP o DOWN. t.a dltlma tempezatt_:'-
que se us6 aparecer'& en el dial, Use la flecha UP p_;:
sublr esta temperatura o ta tlecha DOWN para bajar _st;_:
temperatura hasta que Ilegue a latemperatura que pr_fter,_
usar.
Et homo se empezar& a calentar autom_tlcamente. UstP_
verd 100 grados aparecer en la esquina de art!ha a U._
derecha del dial, ..'_medida que el horno se callente e_;_._
temp_ratura cm_blar& hasta que alcance la temperatu rz.,
que usted haya se|ecclonado, entonces u n tono so nat;"
3_ Cuando termlne de hornear, aprete e:
bot6n CLEAR!OFF.
CGMO HORNEAR
AUTO AT CAMENT :
COCO PONER SU HORNO PAIRA HORB_F_ARP_ L;_._
"rll{_PO DIF.TERB_tINADO Y PARA GUI_ $5 APAG_
AUTO_ATOCA_HT_,
1, Ernpuje el bot6n I_A_.
2, Empuje cualqulerade los boton_ ._o_
las flechas _P o DOWN para det_r=__ir-_
ta temperatura que d_sea usar.
3. Empuje el botbn COOK T_ME,
Cuando horneevados articulos, acomode los moldes
de modo que no quede nlnguno dlrectamente enclma
de otro.
Los moldes que est_n demastado cerca uno de otro,
de las paredes dei homo odel fonclo del homo
obstruyen el Ilbre movlm|ento del aire. Elrnovimiento
Inadecuado del aire causa dorados desparejos y
cocclones tambi_n poco untformes.
4_
Empuje cualquiera de los botones con las flechss
UP o DOWN para determlnar el tlempo que usted
desea usar para coclnar los allmentos. Aseg_trese
de incluir el tiempo de precalentamlento cuando
selecclone esta canttdad de ttempo.
St usted hace una pausa entre pasos cuando est&
selecclonando esta funclbn, et control ha_ un sonldoo
EstoesnormaL E!control le est& haclendo saber que
debe contlnuar,
Usted tlene que considerar que los allmentos
contlnuar_n coclnandose despuds que el control se
apaga a menos que usted rettre los a!Imentos
Inmediatamente,
12 NEOVC59
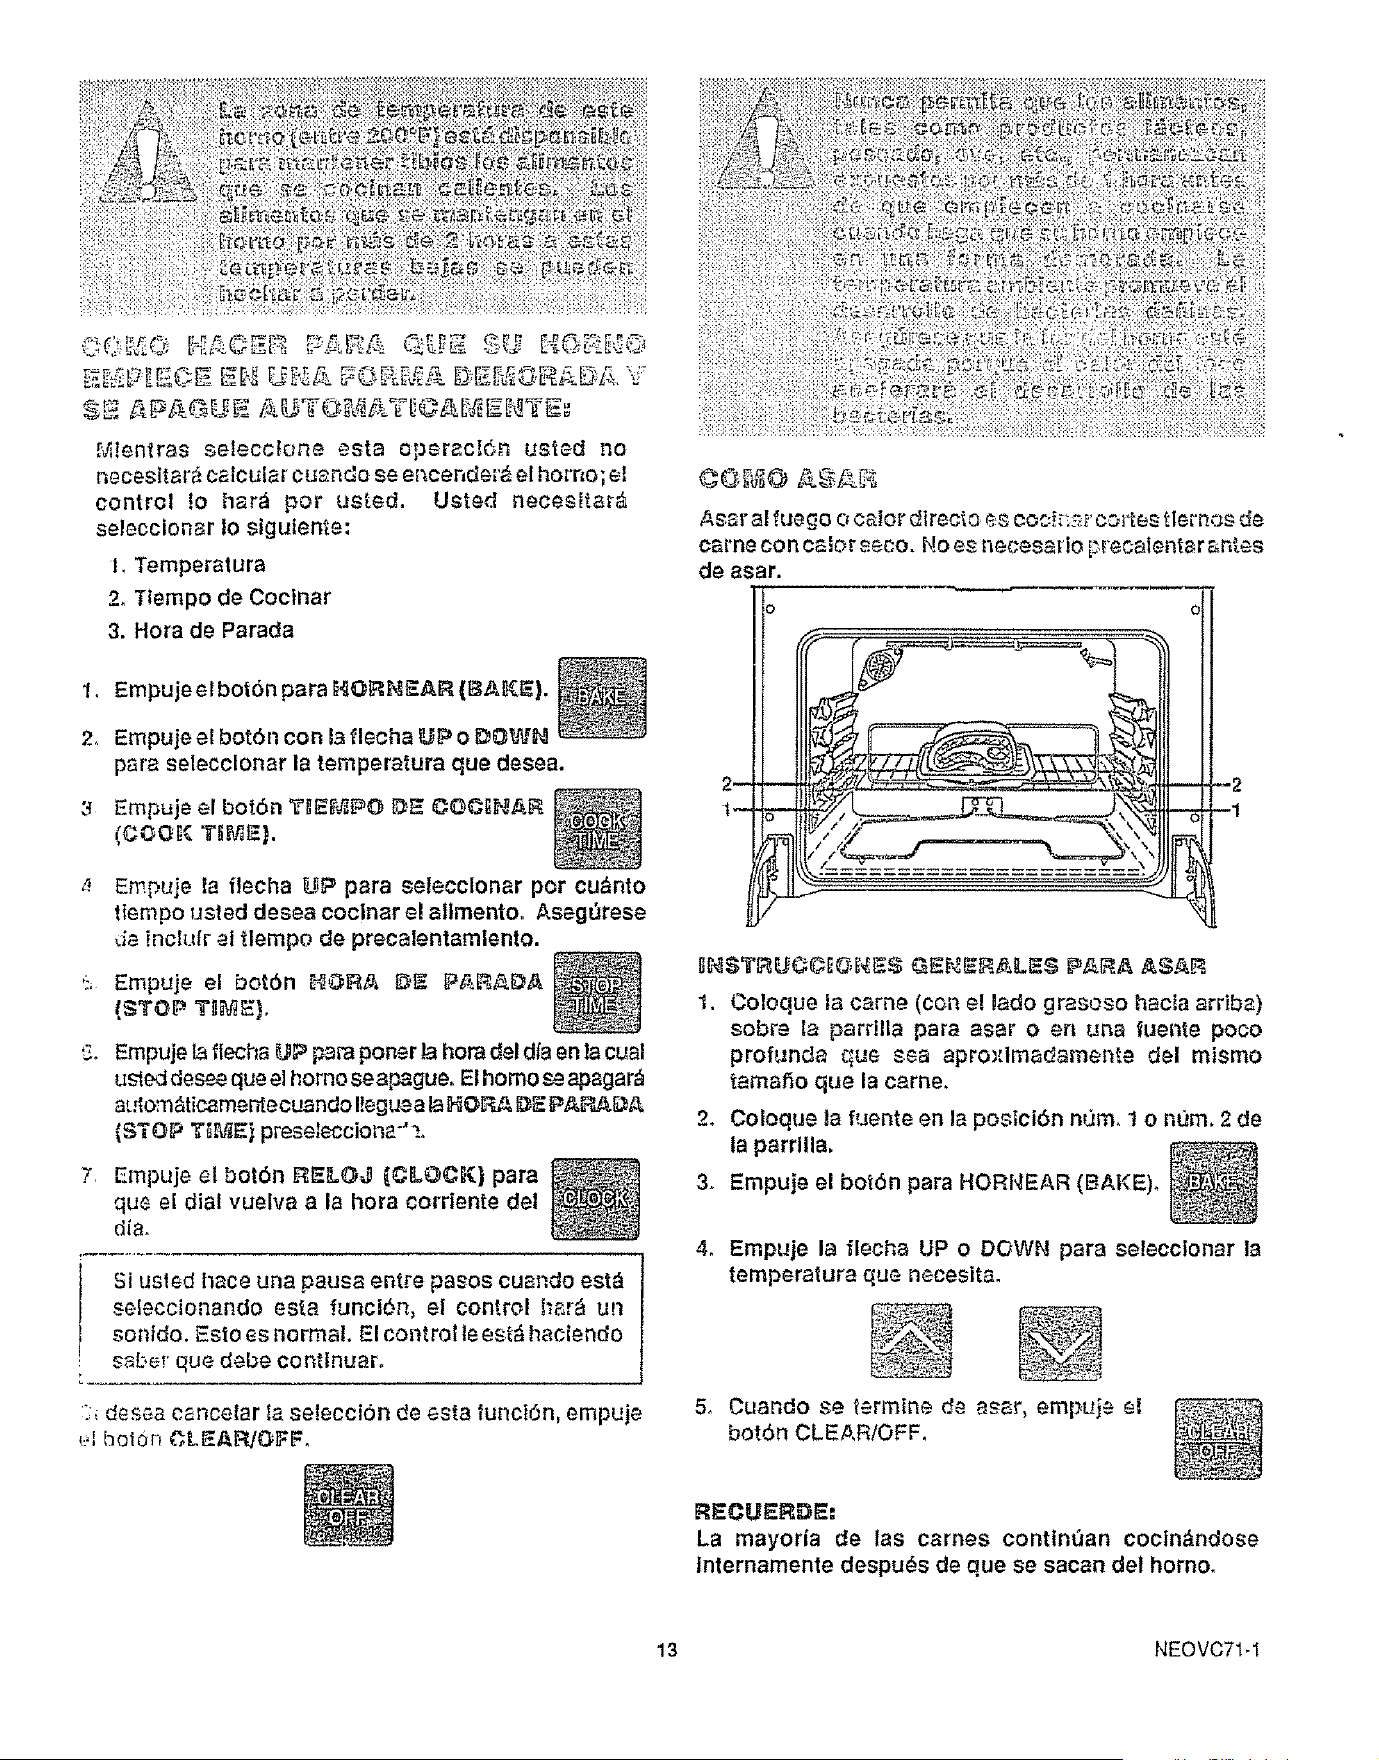
M!entras seleccFone esta operacI6n usted no
necesitara ealoulaF ¢u_ndo se e_cender_, el homo; el
control !o har_ pot usted. Usted neeesltar_
seleccionar 1oslguieme:
1, Temperatura
2, Ttempo de Coctnar
3. Hora de Parada
Asar al fuego o ealor direcio es coc_ss_' aeries tle_'nos de
came con calor seco. No es necesado preoalentar _ntee
de asar.
1,
2o
Empuje et bot6n para F_OF_NEAR {I_A_E}.
Empuje el bot6n con la flecha _ o DG_,_N
para selecclonar la temperatura que desea.
Ernpuje el botSn _E_,_O [_E @OC_NAR
r
Empuje la flecha ._P para eelecclonar pot cu_nto
tIernpo usted desea coclnar el attmentoo Aseg_rese
de incluir el 'tlempo de precalentamlento.
Empuje el bot6n MO_t% DE P_R_DA
(STOP T_ME),
Empuje la fiecha U; _ para poner la horn del dta en la cual
u_ed desee que el homo seapague, El homo _ apagar_
a,_om_,ticamenteeuando Iteguea la MO_ _E P_F'_DA
(S_'OP T_E) preselecciona-'_.°
Empuje el bot6n _E_.OJ {OkOC_) para
qu¢ el dial vuelva a la hora corriente del
din.
Si usted llace uria pausa entre pasos cuat:do est&
seIeccionando esta funci6n, el control har_ U!l
sonido. Esto es normal. El control le est_ haciendo
saber que debe contlnuaro
:_ desaa cancelar Ia selecci_n de esta luncidn, empuje
_:,Ibol0n ¢.LEA['4JO_:F.
t. Coloque la came (con el lado grasoso hacta arriba)
sobre la pardlla Darn near o en una fuente poco
profunda que sea aproxlrnadamente del mismo
tama_io que la came,
2. Coloque la fuente en la posici6n n0m. t o num. 2 de
la parrllla.
3. Ernpuje el bot6n para HORNEAR (BAKE).
4. Empuje la flecha UP o DOWN para selecclonar la
temperalura que neceslta.
5. Cuando se termlne de ash-r, ernpuje el
bot6n CLEARIOFF,
RECUERDE;
La mayorla de las carries contlnean coc|n&ndose
lnternamente despu_s de qua se sacan del homo.
13 NEOVC71-1

• Use solamente la fuente y la parrllla pare asar que
viene con su estufa. Est_n dlsetiadas pare drenar
grasa y liquldos adecuadamente y prevenir
salplcaduras, humo o fuego.
- Ho precailente cuando ase a la parrilla. Para
asar en forma unlforme en ambos lados, emplece en
una fuente frla.
• Corteelexcesodegrasadelacarneylaschuletas. Haga
cones en la carn_ para prevenlr que se enrosque°
• Pare que la came quede blen jugosa, pbngale sal _
primer lado al momento de darla vuelta. P6ngale ._a;
al segundo lado al momento de servtrla.
• Aplique mantequilla al polio y al pescado varias
veces con una brocha mlentras se asa. Cuando ase
pescado, engrase la parrllla pare prevenlr que se
pegue y dselo con la plel hacta abajo_ No es
necesar!o dar vuelta el pescado.
. Hunca deje una fuente pare asar sucia en Ba
estufa, La grasa en la fuente podda causer humo o
quemarse la prbxlma vez que el horno se use.
• Cerc!_re.._ de que _ el procedlmlento correcto pare
apagar un Incendlo de gmsa. Yea na secc_6n de
segurida_
POSitiON FUENTE PAJ: ASAFI
Asar a la parrllla es asar a calor dlrecto det elemento
pare asar. Los cortes tlernos de came o came marlnada
deben ser selecctonadas para ser asadas. Paramejores
resultados, los blstecs y tas chuletes deben tener
menos de 3/4" de grosor.
Despu_s de porter la comlda sobre la fuente y ta parrilla,
coloque la fuente en la parrilla det horno en la posiclbn
recomendada. La poslctbn recomendada para las
parrillas y el tlempo de cocinar se encuentran en tatabla
de m_s abajo. Per sl su homo est_ conectado a 208
voitios, podria desear usar una posicibn m_s altao
14
Mientras m_s cerca estd |a comida del quemad_ ,_;m.,
asar, mds r_pldo se dorarb ta came por ah=_-,_
permanectendo roja o rosada en el centro. Afe_an=:t;:,_
came del elemento permtte que la came se cocine e_,_
centro mlentras se dora pot afuera° El prJme_"ta_, _
debe cocinar de 1 a 2 mlnutos mds que el segundo ;a_'_
Amimento
BJstec. 1"
de grueso
Casi crudo
A medic asar
Bten _sad_
Totters de came mol]da
de grosor
T_rmino medic - 1/2"
de grosor
Chuletas de cordero. 1"
de grosor
Chuletas de cerdo. 1"
de grosor
Chuletas de cerdo - 1/2"
de grosor
Rebanada de jambn _1/2"
de grosor
Pescado (filetes)
Polio (presas)
Salchtchas
Tocino
Posici6n de
ia parrilla
4 = M_s a|ta
I = M&s baja
4
3
3
2.1-I
13-t5
21.,23
3
4
3
3
3
3
3
2
3
3
16-t8
7_9
27-29
16-18
11,,12
I%I3
45_5S
8-I !
9-11
Esta tabla es una guia general El tamaSo, peso, gresm'
y la temperatura inlcial de comida, asl como su su
preferencla personal, afectar_n el tiempo de cccci6=_
Los tiempos en la tabla est_n basados en la temper_.,._:_r_
de la comida en el refrlgerador. El Dep_,rtrnento de
Agrlcultura de E.E.UoUo dice que aunque las c_rnes
crudas son populares, coclnar la came hasta solo 140°F
slgnlfica que organlsmos venenosos pueden sobrevivtr_
C_O _;I_L_CC_O_R PARA ASAR A LA
PA_R_LLA:
1. Empuje el botbn BROIL (ASAR),
2. Empuje la flecha UP una vez par_
setecclonar LO broil (temperatura baja),
3. Empuje la flecha UP dos veces para selecclonar HI
BROIL (temperatura alta),
L.ap_labra"BROIL" y "H_GH" o "LOW" aparecerd en _
parle demcha de ardba en el dial de acuerdo a su selecclSn.
NOTA: Use LO (BAJA) pare cocirmr _l_imeneos _es
cmvm avey cor_s die ca_s g_.msoscon_te_n_n_e
sin que se doren dernas_ado,
Sf noapreta nlnguna de las flechas, el dial se mostrar_ en
blanco y deber_ repetlr los Pasos 1 y 2.
4o Cuando termine de asar, empuje el botOn
CLEARiOFFo
NEBRL31-4
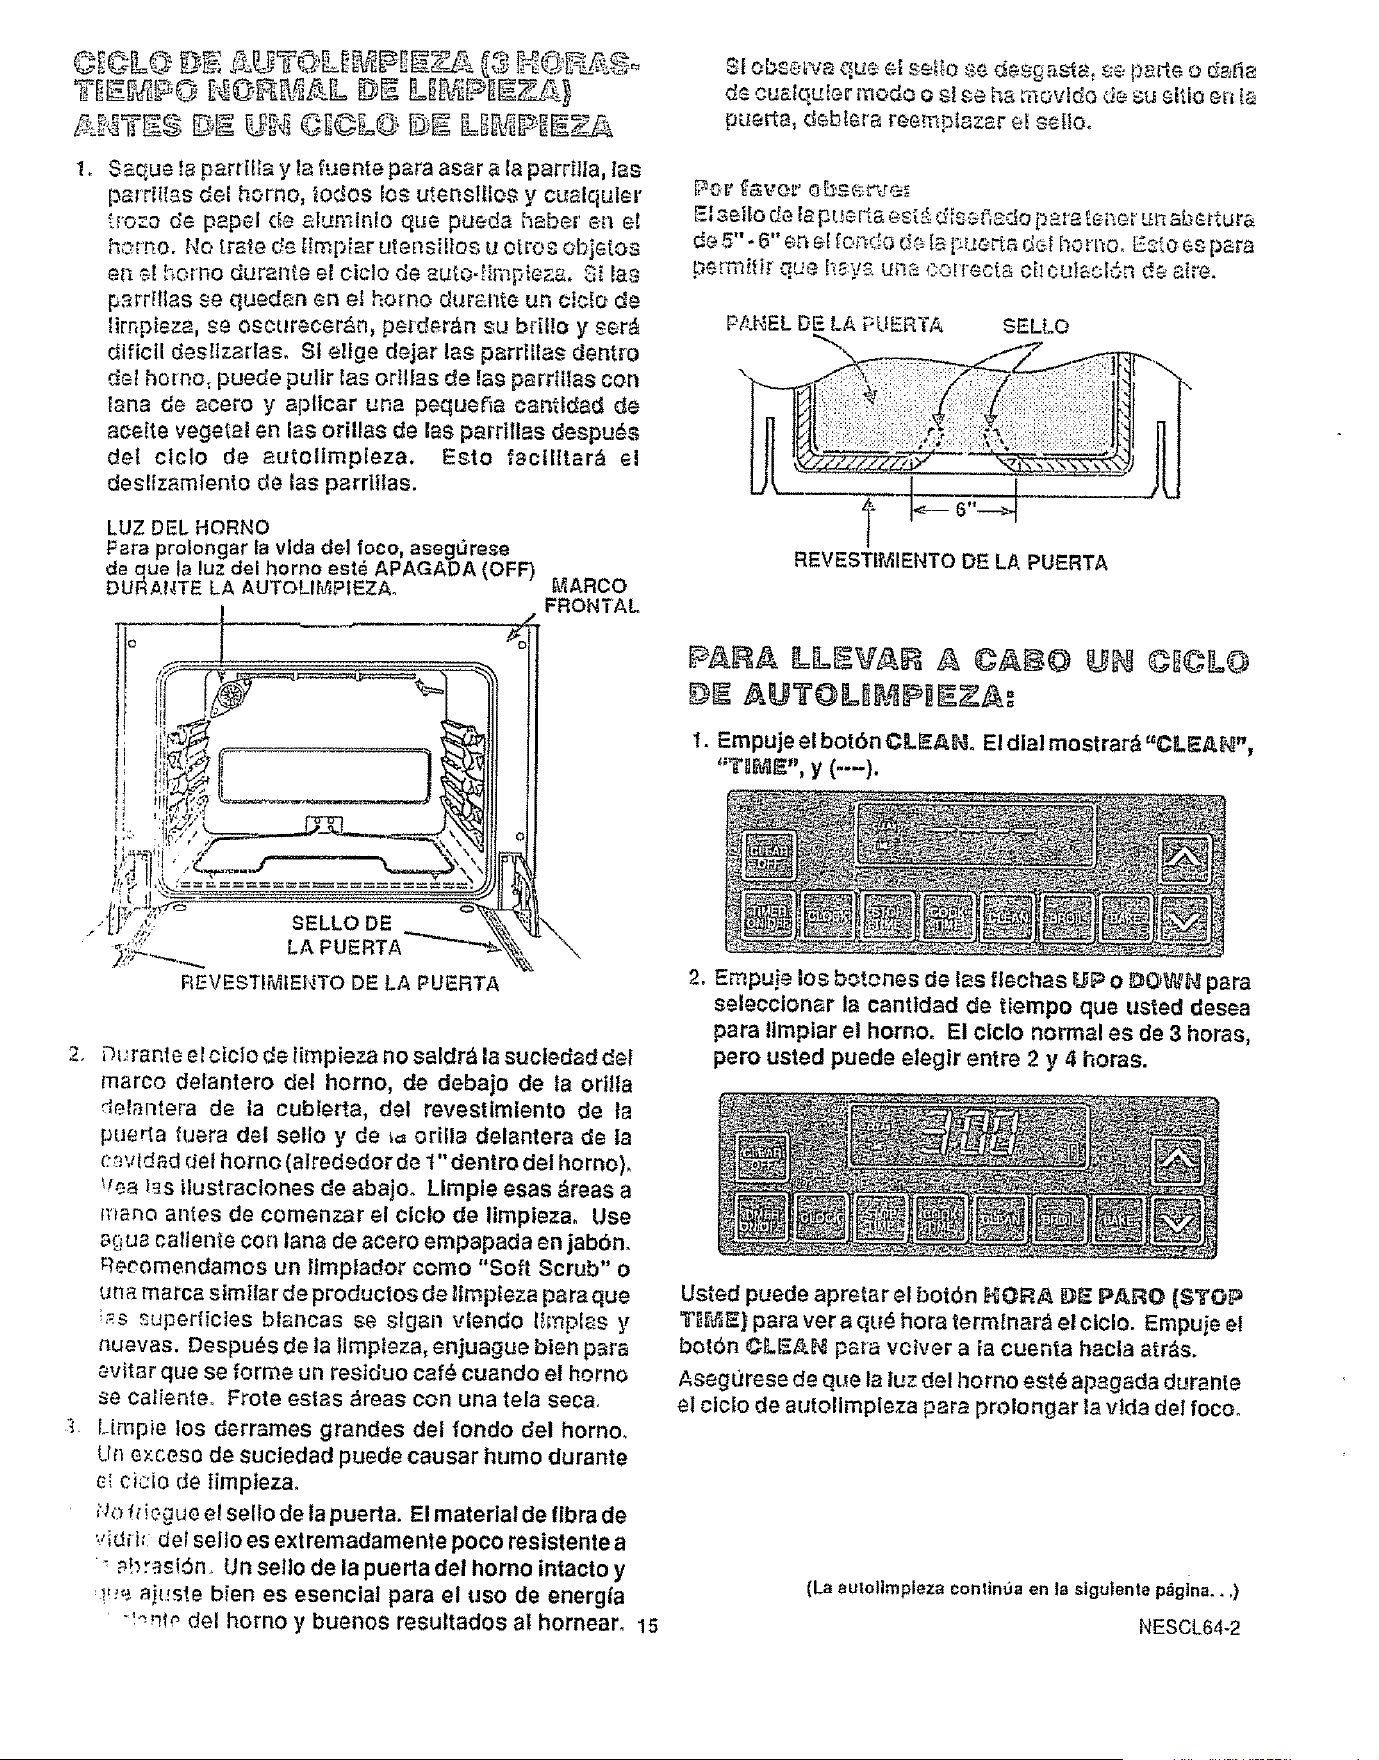
Saque t_ partllla y la f,._entepara asar a la parrilla, las
pm°rlttas del homo, _odos fos u_enstlfos y cualqulsr
t;ozo de papal de aIumlnlo qua pueda haber en el
homo. No tra_e de _impiar u_.ensiltos u otroa objetos
en ¢[ homo durante e{ ciclo de au_odimpieza. Si Ias
parrfltas se quedan en e! homo durante un clclo de
tirnpieza, se oscurecer_n, perder_n su brii!o y set4
dificll desIIzarlas. SI ellge dejar las parrlIlas dentro
d_l homo, puede pulir las ortlfas de las parrtltas con
lana de acero y apllcar una pequefia cantfdad de
ace[to vegetal en fas orillas de las parrillas despu_s
de! clclo de autolimpleza, Esto fscllttar& et
deslizamlento de los pardltas.
LUZ DEL HORNO
Para proiongar la vlda del foco, aseg_3rese
de qua la luz del homo est_ APAGADA (OFF)
DURANTE LA AUTOLIMPIEZA.
['4ARCO
FRONTAL
SI obse_.-_aqu® _1seato 8e desgasta: se porte o da_ia
de cualquter modo o st se ha,r_ovfdo de su eitio eu ta
puerto, deb{ara reemplazar e_setlo.
El seilo de ta pue_la est#_dls.e_ado i_ara tenet ,_ abc-4ura
de 5"- 6" en ÷[ rondo de [a Fuels 0:4 horno. Esto es para
permiflr que h_:ys, una oorrecta ci_culaotSn de aire.
t Lo,,-J
REVESTIMIENTO DE LA PUERTA
PA!AA LLIVAIII A @AIO ©I@LO
DI A TOLI PIA A,.
1. Empuje el boten CLEAN, El dial mostrar,_ _'CLEAF_",
"T_&_", y (---).
SELLO DE
._:i;g-.-...,...... LA FUERTA
REVESTIMIENTO DE LA PUERTA
2. Durante el ciclo de limpieza no saldra la sucledad dal
marco delantero del homo, de debajo de la ortlta
delantera de la cublerta, del revestimlento de la
puerto fl_era del sello y de _,_orilla delantera de la
cr:vldad del homo (alrededor de t" dentro del homo).
_ea _as ilustraclones de abajo. Llmple esas _reas a
mano antes de comenzar el ci¢lo de limpieza. Use
a£]ua callente con lana de acero empapada en jaben.
qecomendamos un ltmpIador como "Soft Scrub" o
una marca similar de produclos de Itmpleza para que
i_s superficies blancas se stgan vlendo limplas y
nuevas. Despu_s de la llmpieza, enjuague blen para
evitar que se forme un restduo caf6 cuando el homo
se calienteo Frote eslas _reas con una tela seca,
] Limpie los derrames grandes del rondo del homo,
Un exceso de sucledad puede causar humo durante
e[cicio de timpieza.
;lo _i 0gu e e! sello de la puerta. El material de libra de
vidlb det sello es extremadamente poco resistente a
,=bra_iSn, Un setlo de la puerta dei homo intacto y
q_;e aiuste bien es esenclaI para el uso de energia
-_-:.nledel homo y buenos resultados al hornear, 15
2. Empu}e los botches de los flechas _JI_o I_OWN para
seleccionar la canttdad de ttempo qua usted desea
para ttmplar el homo° El ctclo normal es de 3 horas,
pero usted puede eleglr entre 2 y 4 horas.
Usted puede apretar el boien HORA D_ P_oRO (STOP
T_,&_E}para vet a qu_ hora termlnar& el ctclo. Empuje el
bot6n @L_AN para vciver a ia cuenta hacla atr_s.
Aseg0rese de que la luz del homo est_ apagada duranle
el clclo de autollmpleza para prolongar la vtda deI focoo
(La autolimpieza conltnua en Ia siguiente p_gina.. ,)
NESCL64-2
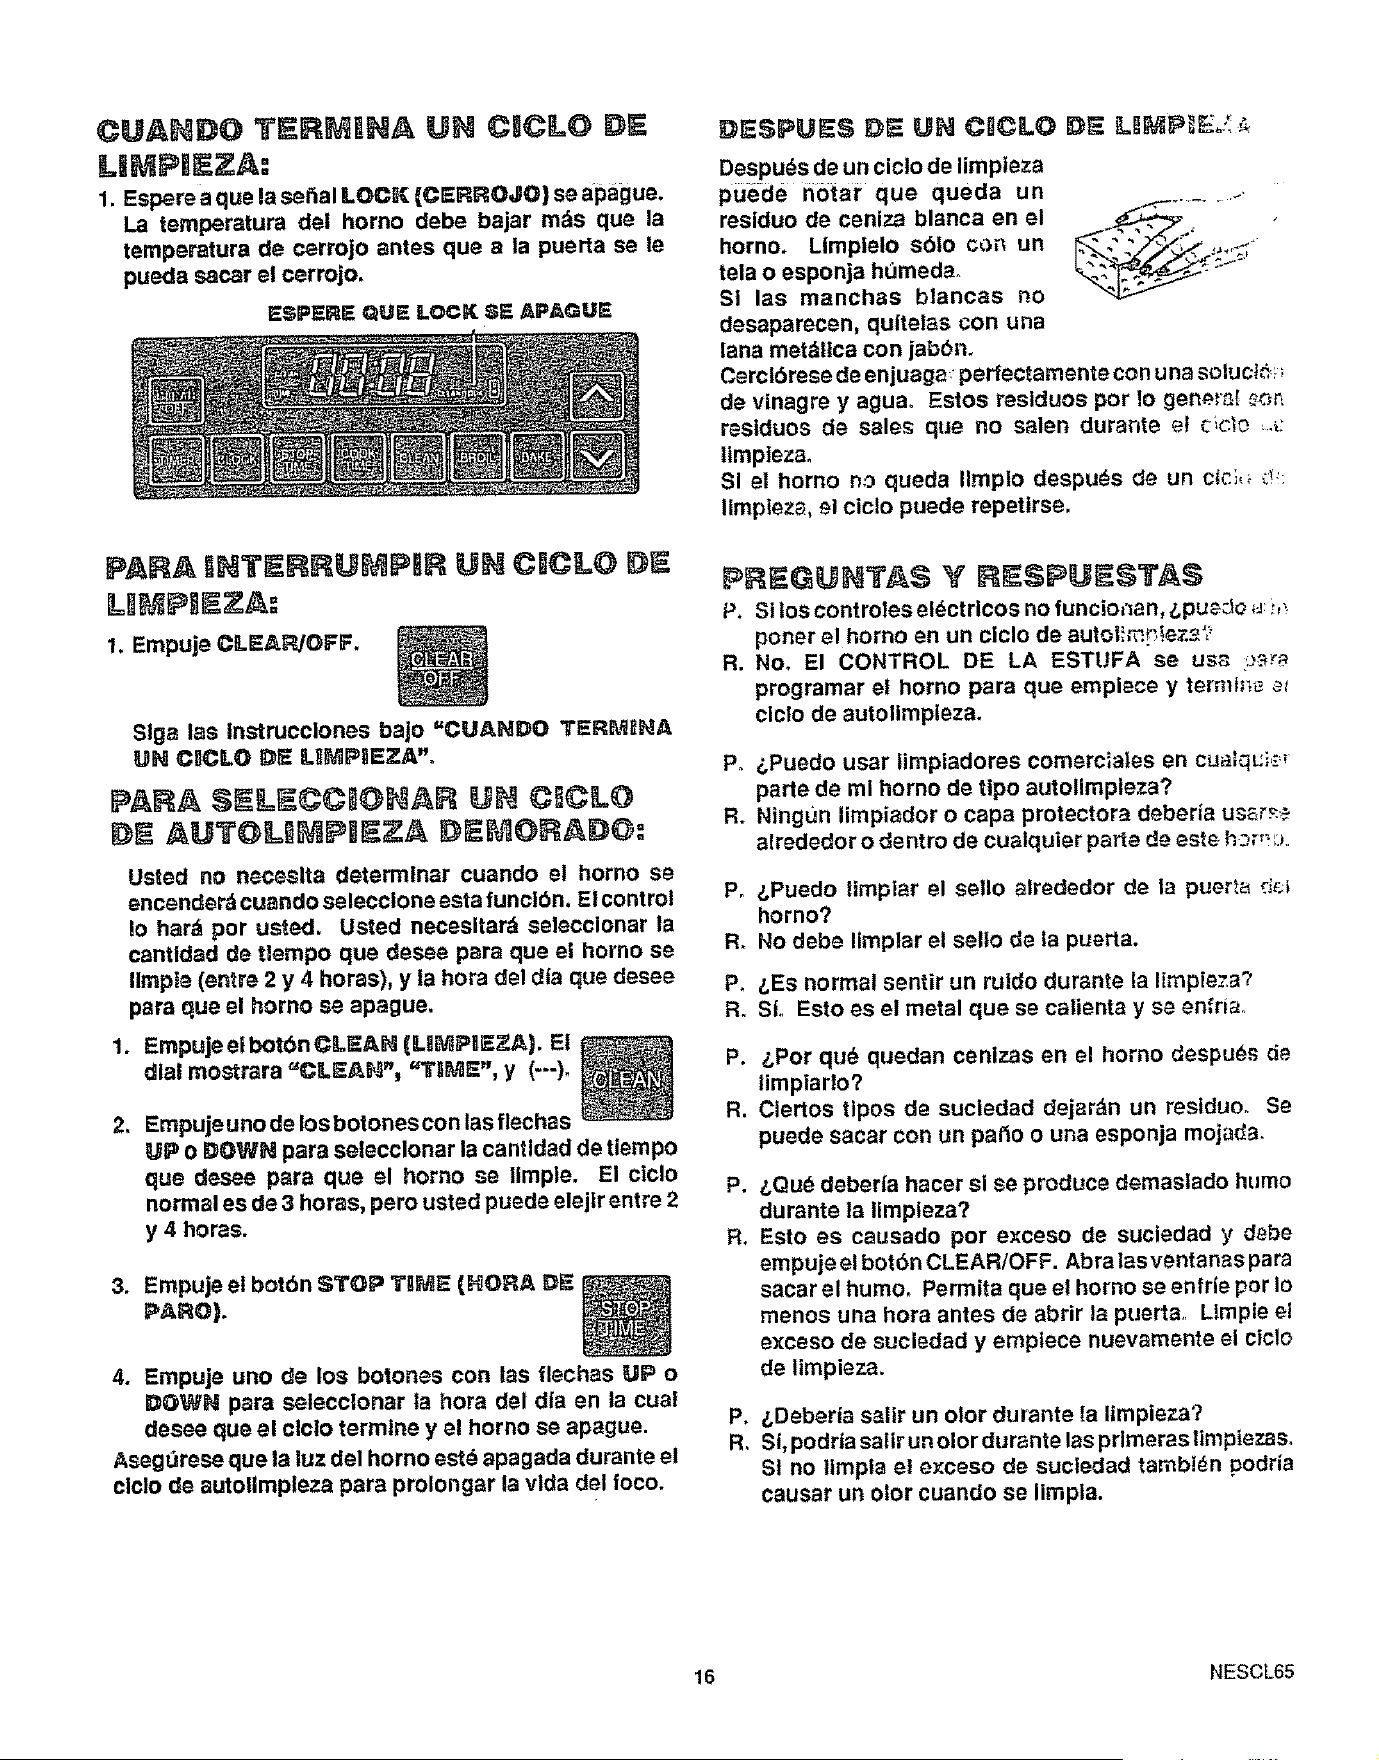
CUANDO TERM NA UN CICLO DE
UMPIEZA:
1. Espere a que la sepal LOCK {CERROJO) se apague.
La temperatura dei horno debe bajar rods que la
temperatura de cerrojo antes que a la puerta se le
pueda sacar el cerrojo,
ESPERE QUE LOCK SE APAGUE
PAR,S. NTERRUMPRR UN CICLO DE
L MPIEZA:
1. Empuje CLEAR/OFF.
Slga las instrucclones bajo =CUANDO TERMIINA
UN CUCLO DE UMP_EZA"o
PARA SEIL CC O AR UH C CLO
DE AUTOL[tMPBEZA D ;MORADO:
Usted no neceslta deterrninar cuando el horno se
encenderd cuando selecclone esta funclbn. El control
Io barb por usted, Usted necesltard seleccionar la
cantidad de tlempo que desee para que el horno se
Ilmpt_ (entre 2 y 4 horas), y la hora del dia que desee
para qua el homo ae apague.
1. EmpujeeibotbnCLEAN (UMPIEZA). El
dla! mostrara _CLEA_"_ "Ti_,_E", y (---)_
2_
Empuje uno de los botones con las flechas
UP o DOWN para selecclonar la cantldad de tiampo
que de,see para que el homo se |impie. El cIclo
normal es de 3 horas, pero usted puede elejlr entre 2
y 4 horas.
3. Empuje el botbn STOP TaME (HORA DE
PARO).
4. Empuje uno de los botones con !as flechas UP o
DOWN para selecclonar ta hora del dla en la cual
desee que el clclo termlne y el horno se apague.
Asegdrese que la !uz del homo est_ apagada durante el
clclo de autollmpleza para prolongar la vlda del foco.
E)ESP_EES _E U_ C_CLO D_ L_P_EJ;,_
DesPu_s de un ciclo de limpteza
puede notar que queda un
residuo de ceniza blanca en el
homo, LImpielo sb!o c_n un
tela o esponja humeda_
S! las manchas blancas no
desaparecen, qultel_s con una
lana metdllca con jabbn_
Cerclbrese de enjuaga perfectamente con u na s_luct_._
de vinagre y aguao Estos reslduos por 1o gen_.r_! _,
residuos de sales que no salen durar_te _t c_c,;o ,v
limp_eza.
SI el homo no queda Ilmplo despu_s de un cici_ ,',!:
llmp_ez_, el ciclo puede repetlrse.
P. Si |os controles eldctricos no funcioi_an, _.pu_J_ _-_:i,_
poner el homo en un ciclo de autoi:,_.!_.ez_?
R. No. El CONTROL DE LA ESTUFA se us_ _,3._
programar el homo para que empiece y termI;_ _
cic|o de autolimpleza.
Po _,Puedo usar !imp!adores comerc_a|es en cuaiqL:i,;_
parte de mi homo de tipo autolimpleza?
R. Ningun limpiador o capa protectora deberia u;_,_
alrededor o dentro de cualquier parte de este h-::r,_J.
Po &Puedo |tmplar el sello alrededor de la puer._a d_;t
homo?
R. No debe limplar el sel|o de la puarta.
P. _,Es normal sentir un ru|do durante la limpieza?
R, Sto Esto es el metal que se calienta y se enfria,,
P. &Pot qu_ quedan cenizas en el homo despues de
limpiar!o?
R. Clertos tlpos de suciedad dejardn un residuoo Se
puede sacar con un patio o una esponja mojada,
Po
R.
_,QuOdeber|a hacer si se produce demaslado humo
durante !a llmpleza?
Esto es causado por e×ceso de suciedad y d_be
empuje el bot6n CLEAR/OFF. Abra lasventanas para
sacar el humo, Permita que el homo se enfrie pot Io
menos una hora antes de abrir la puerta,, Limpie el
exceso de suciedad y empiece nuevamente el ciclo
de limpieza.
P,
R_
&Deberia salir un o!or durante [a limpieza?
St, podria salir u nolor durante las prlmeras limpiezaso
St no tlmpia el e_ceso de sucledad tarabldn podria
causar un o|or cuando se limpla.
16 NESCL65
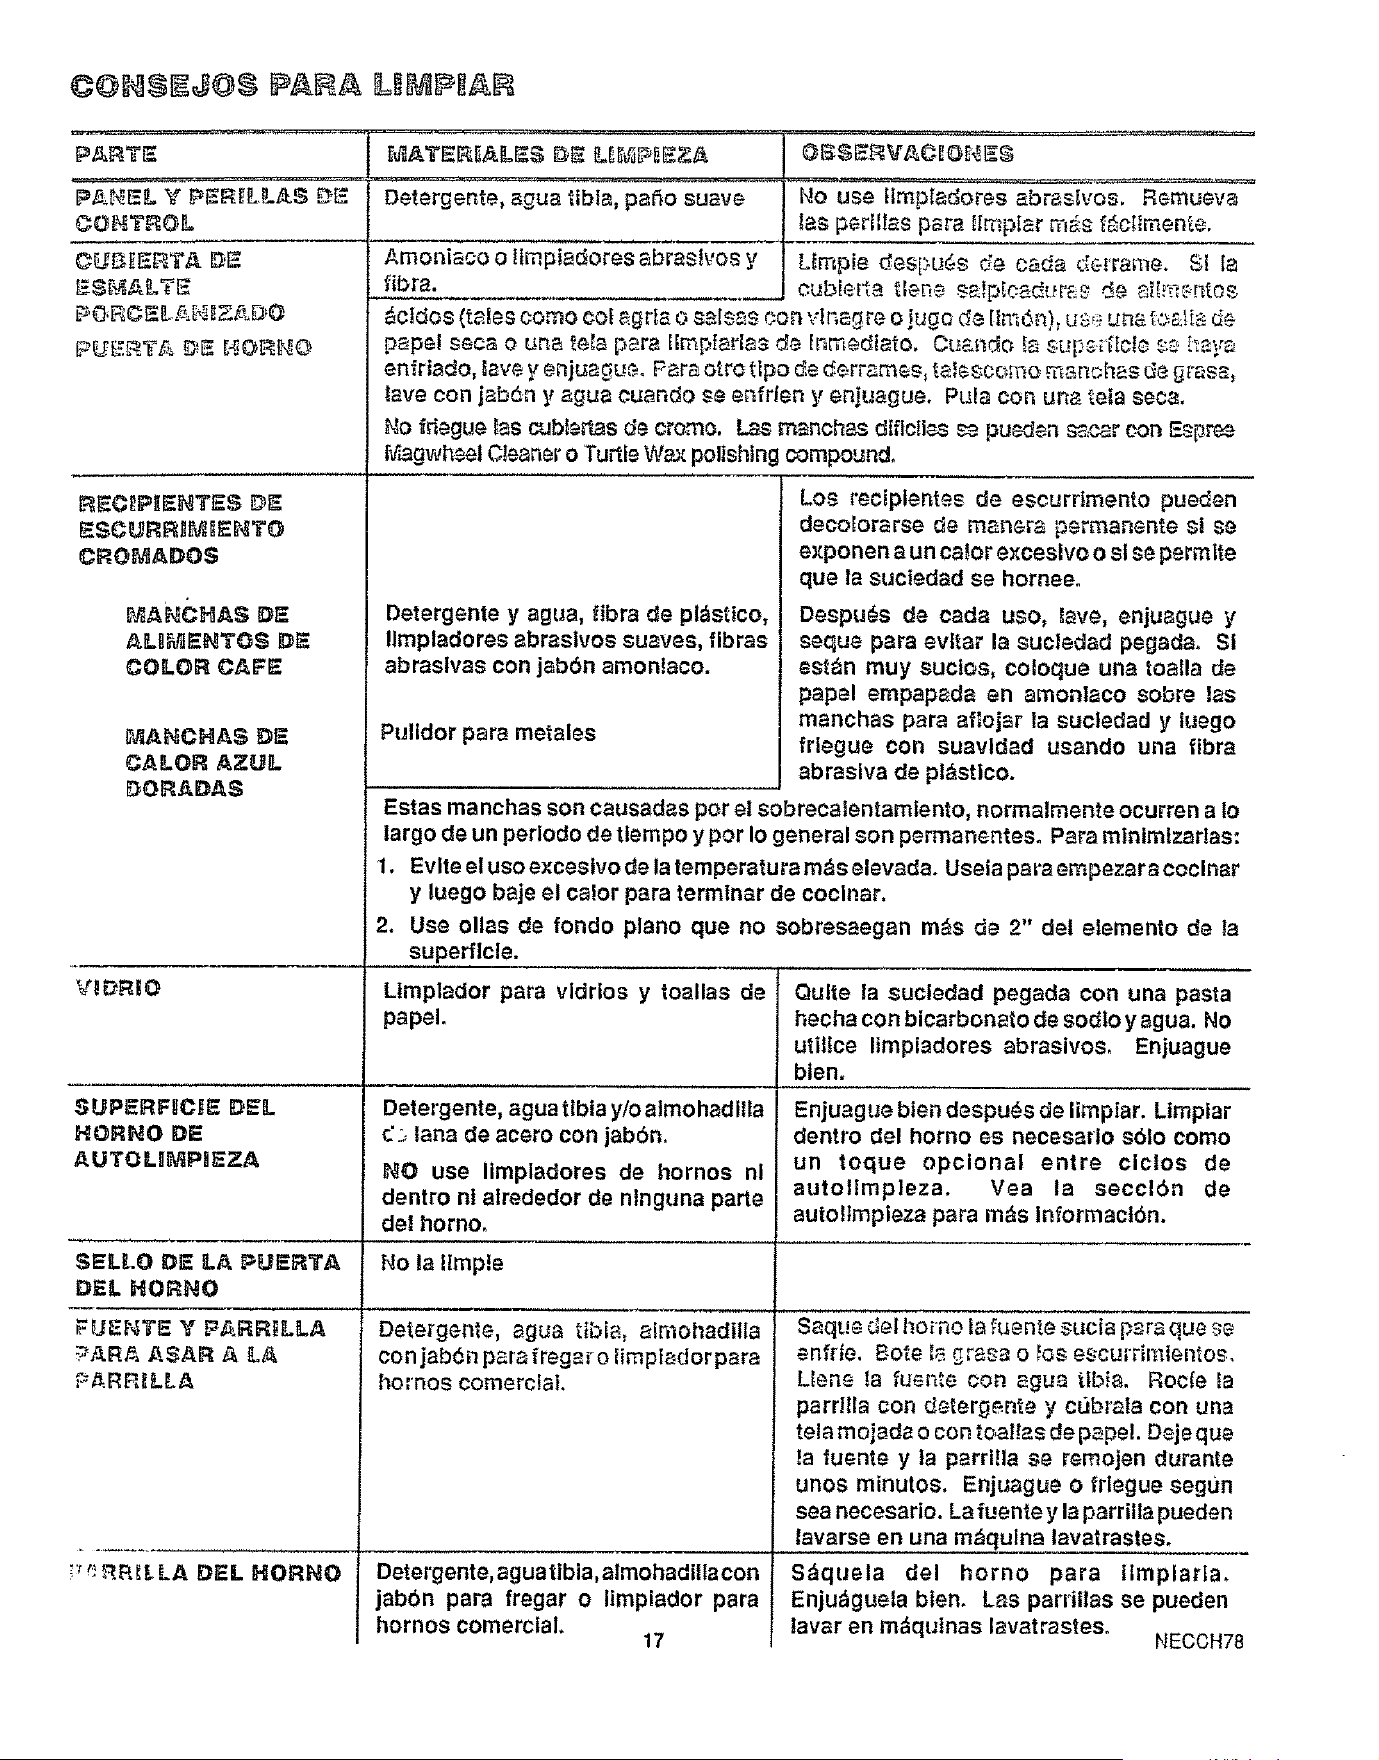
¢llIi&Ii)ll PII!A LIIPII£
P_RT_
COIqT_OL
©UBIIIIIFA I)i
PQ, RC!L!_I-I I£11oI_O
PII!T#_ Ii 1401110
CRO_ADO$
A CHAS DE
_LIMENTO$ DE
COLOR CAFE
MAHCHASD_
CALOR AZUL
DOR_DAS
V_DRIO
Detergente, agua libla, paio suave
SUPERFICtE DE_.
HORHO DE
AUTOLIMPIEZA
Arnonisco o Irapiadores abrasivos y
libra.
O1_I EFIVF4CIOI_I!:_
!O use Hmp[adoras abitsivo/. !GtIIVt
ias perillas p_ra lrnp[ar n-,_ _clmen_e.
Lirapiedes[>L._Sde cada d_rrame. $I Ia
¢ub_r=rt_ lena sa!pioadur_ d(_ '_ _'.... _-
_cidos (telescomo col_£rl_o s._ls_L_scon vlnagreo jugo ds [Im6n),us,:_un_ t:>£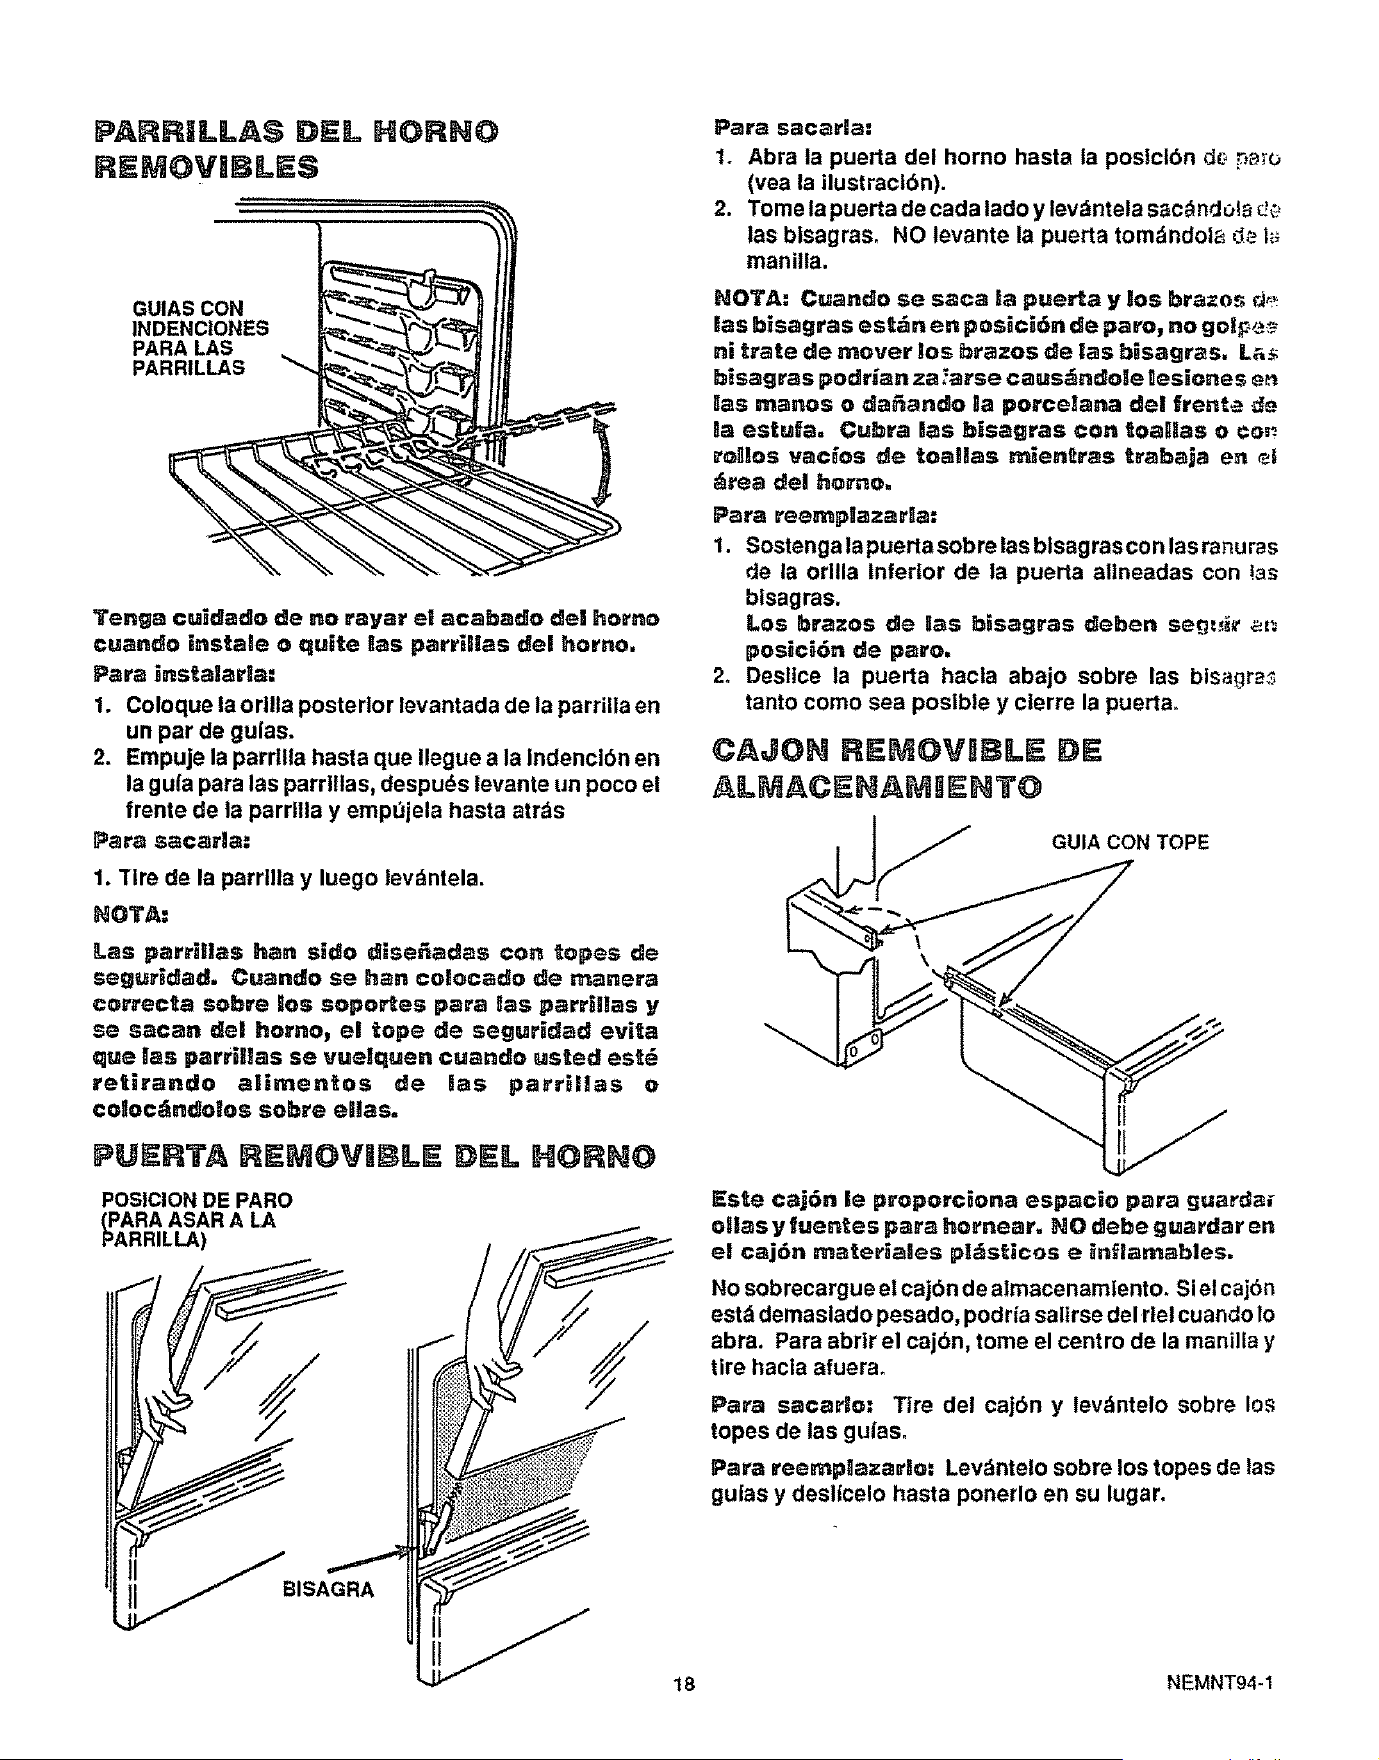
PARF ILLA$ DEL HORNO
REMOVIBLE$
GUIAS CON
INDENCtONES
PARA LAS
PARRILLAS
Tenga ouidado de no rayar e! acabado de! homo
ouando instale o quite !as parriHas del homo,
Pare ins_alarla:
1. Coloque la orllla posterlor levantada de la parrilla en
un par de gulas.
2. Empuje la parrltla basra que Ilegue a la indenclbn en
la gu(a para las parrlllas, despu_s levante un poco el
frente de la parrllla y empt_jela hasta atr_s
Pare sacarla:
1. Tire de la parrllla y luego lev_ntela.
No'rA:
,-as parriilas hen side dise=_adas con topes de
segurldad. Cuandlo se hen colecado de r_nera
co_ecta sobre los soportes pare las parriilas y
se sacan dlel homo, el tope de seguridad evi_a
clue !as parrilias se vuelquen cuando usted est_
retirando alimentos de las parrillas o
ce_ocdndoles sebre elias.
PUERTA REMOVl LE DEL HORNO
POSICION DE PARe
_PARAASAR A LA
RRILLA)
J
SAGRA
Pare sacarla:
1. Abra la puerta del borne haste la postci6n de ;_o
(vea la ilustracibn).
2. Tome ta puerta de cada lade y levdntela sac_ndol_ _#
las blsagras0 NO levante la puerta tom_ndola de t_:_
man!lie.
NOTA: Cuando se saca la puerta y los brazes _
las bisagras estdn en posJci6n de pare, no golp_
nitrate de mover !os i_razos de las bisagras. L&_
bisagras podr_an za _arse caus_ndo!e !esiones e_
!as manes o da_ando ia porcelana del frente ,ff_
!a estufa, Cubra las bisagras con toal_llas o ¢o_
re_es vac_os €_e _oeiles mlen_ras _rabaja en _t
drea _ei homo,
Pare ='eemp!azar_a:
1. Sostenga la puerta sobre tas blsagras con las ranu ras
de la orllla interior de la puerta allneadas con !as
blsagras.
Los brazes de las bisagras deben seg=,h' _
pos_ci_n de pare,
2o Desitce la puerta hacla abajo sobre las blsagr_._
tanto come sea poslble y cierre la puerta_
AL AC NA I HTO
(_ GUIA CON TOPE
Es_e cajun !e proporciona espacio para guard_
elias y fuentes pare hornear. He debe guarder en
el caj6n materia!es pidsfdcos e _rt_iamables.
No sobrecargue el cajbn de almacenamIento. Si el cajbn
estd demaslado pesado, podria salirse del rtet cuando Io
abra. Pare abrtr el cajbn, tome el centre de la manilla y
tire hacla afuera_
Pare sacar_o: Tire del cajbn y levdntelo sobre los
topes de las gules°
Pai'a reemp_azar_o: Levdntelo sobre los topes de las
guias y deslfcelo hasta ponerlo en su lugar.
t8 NEMNT94-1
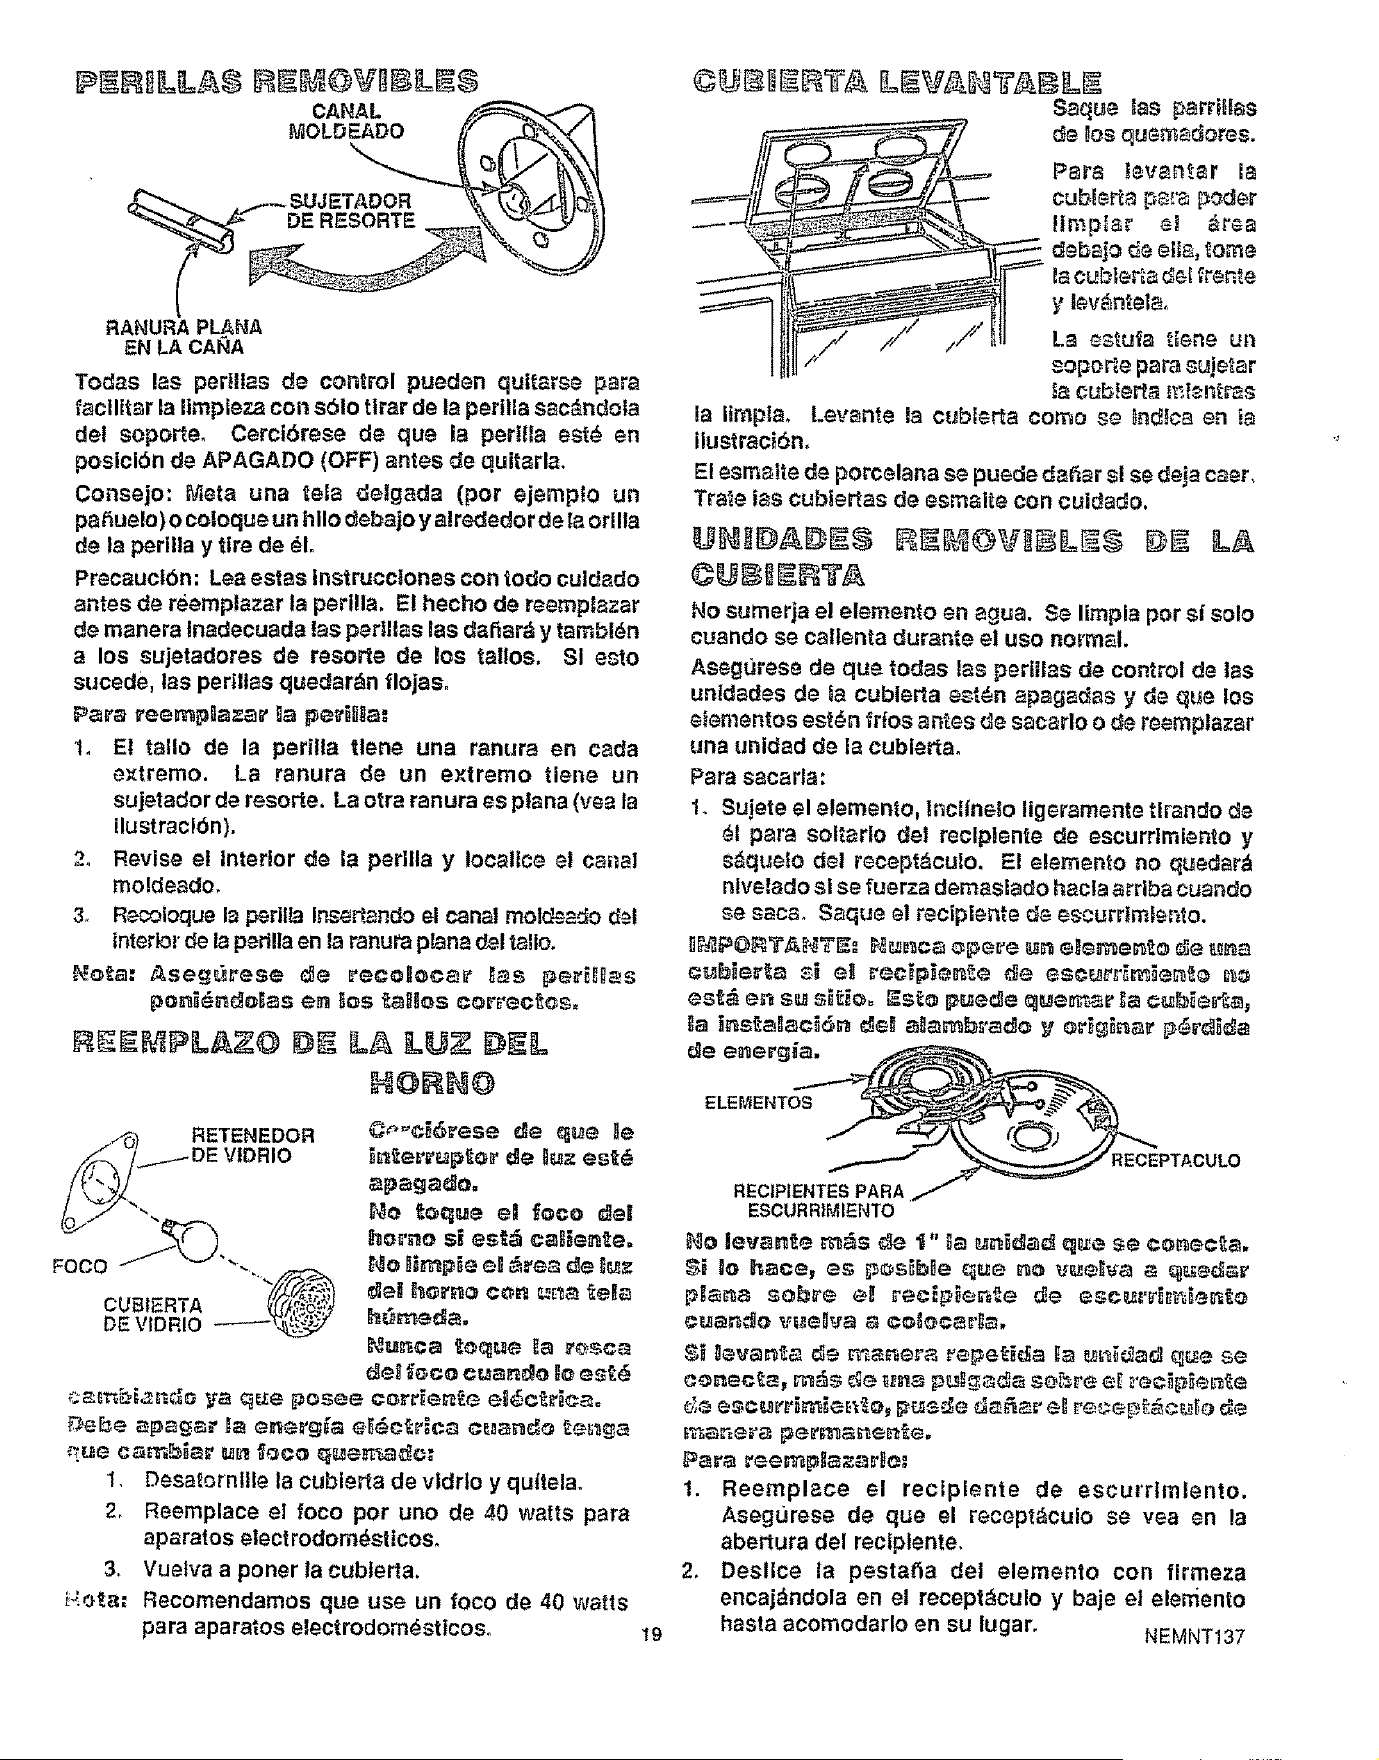
RANURA PLANA
EN LA CAI'_A
Todas las perllas de control pueden qultarse pare
_acllttar la ltmpleza con sblo tlrar de la pertlla sac_ndola
del soporte, CerciSrese de qua ia perils est_ en
posicibn de APAGADO (OFF) antes de quitarla.
Consejo: Meta una tela detgada (per ejernplo un
pafiue!o) o coioque un hllo debajo y alrededor de Ia orilla
de la perilla y tire de dl.
Precauctbn: Lea estas Instrucciones con ted© culdado
antes de reernplazar la perilla. El hecho de reernptazar
de rnanera Inadecuada las perllas las dafiar_ y tambl_n
a los sujetadores de rosette de los tallos. SI esto
sucede, las pedllas quedar&n flojaso
Pars _'ee_plazar la pe_illa:
1. E1 tall© de la perllla tlene una ranura en carla
extreme. La ranura de un extrerno tiene un
sujetador de resorts. La otra ranura es plans (yea la
ilustraclbn).
2, Revise el interior de la perllla y Iocaltce el carrel
rnoldeado,
3, Recoioque la papilla Irks,errand© el canal rnoldeado d._l
interior de la perilla en la ranura ptana del tale.
,_.oIa: Ase%i_'ese Ie _econoca_ las l_erili_s
ponii_Iolas !_ los IIllls Ilia'tills=
CUBIERTA
DE VIDRIO
apaga_o,
_o _eque e! _oco de!
homo si est_ catie_Ie,
tie ilmi_ie e! £_ea Ie l_z
tel hem© can _ma fela
h_meda,
e_el_¢o cuan_o t_ e_r_
c_bi_n_e ya _e _osee cor_ienf_e el£cltioao
IF_ebe a!___r la ene_'Ii_ elieIrlca e_,_and_ f_e_Ila
_e cam!_ia_ _ face _e_ade:
1, Desa_ornllle la cublerta de vldrto y quitela,
2, Reernplace el foco per uno de 40 watts para
aparatos elect rodorn_sticos,
& Vuelva a poner la cubterta.
14eta: Recornendarnos qua use un foco de 40 watts
para aparatos electrodornastlcos,
La estu_a tlene un
soporte pars suje_ar
_ac_bIer_a ,*_,I_ntr_s
la trnpla° Levante la cublerta corn© se lndtca en _a
ilustraci_n,
El esm_le de porcelana se puede dafar sl se deja caer,
Tra_e ins cublertas de esrnaite con cuidado.
lll!llgAl -$ RIt'4@V!IfL!$ #i fLA
©IIIlt,IRTA
No surnerja el elemento en ague. Se lirnpla per s| solo
cuando se caltenta durante el us© normal.
Asegurese de qua todas Ins parties de control de las
untdades de Is cublerta est_n apagadas y de qua los
elernentos est_n Ides antes de sacarlo o de re_rnplazar
una unidad de la cublerta,
Pars sacarla:
1. Sujete el element©, Inctnelo ilgerarnente tlrando de
_1 para soltarlo del reciplente de escurrlmiento y
s,'_quelo del recept_culo, El element© no quedar_
nlvelado slse fuerza dernaslado hacla arrlba cuando
se sacs, Saque el recip_ente de escurdmfento.
cubie_a _i el _ecip_en_e de esee_i_i®n_ _
la inslalaciSn _lel ala_b_'ac_e y _ri£inar l)£rd]icla
_le emergia.
ELEMENTOS
!9
RECEPTACULO
RECIPIENTES PARA
ESCURRiMIENTO
No levan_e _s de t" la uai_la_ qua se ¢_necla,
$ile hace, es t_sible qua a© uuelva a _t_lar
_lana sobre _! reei!'ier_",e de escu_'ri_=4en_e
eaandIe _',=_elva a cel_carla,
$i leva_ta de _anera rape!its ta _idad tte se
¢enec_a_ r_s ¢le _ta p_l__ada se_=re e! _'ecipie_'_&e
.e_eescuvrirr_ie_o_ f_e_e deaar el _ece_iPocul_ de
Pa_'a ree_r_ptaza_'te:
1. Reemplace el reciplente de escurrlrnlento.
Aseg_Jrese de que el recept_culo se yea en la
abertura del reclplente,
2, Desllce la pestatia del element© con firmeza
encaj&ndola en el recept_culo y baje el elemento
hasta acornodarlo en su lugar. NEMNT137
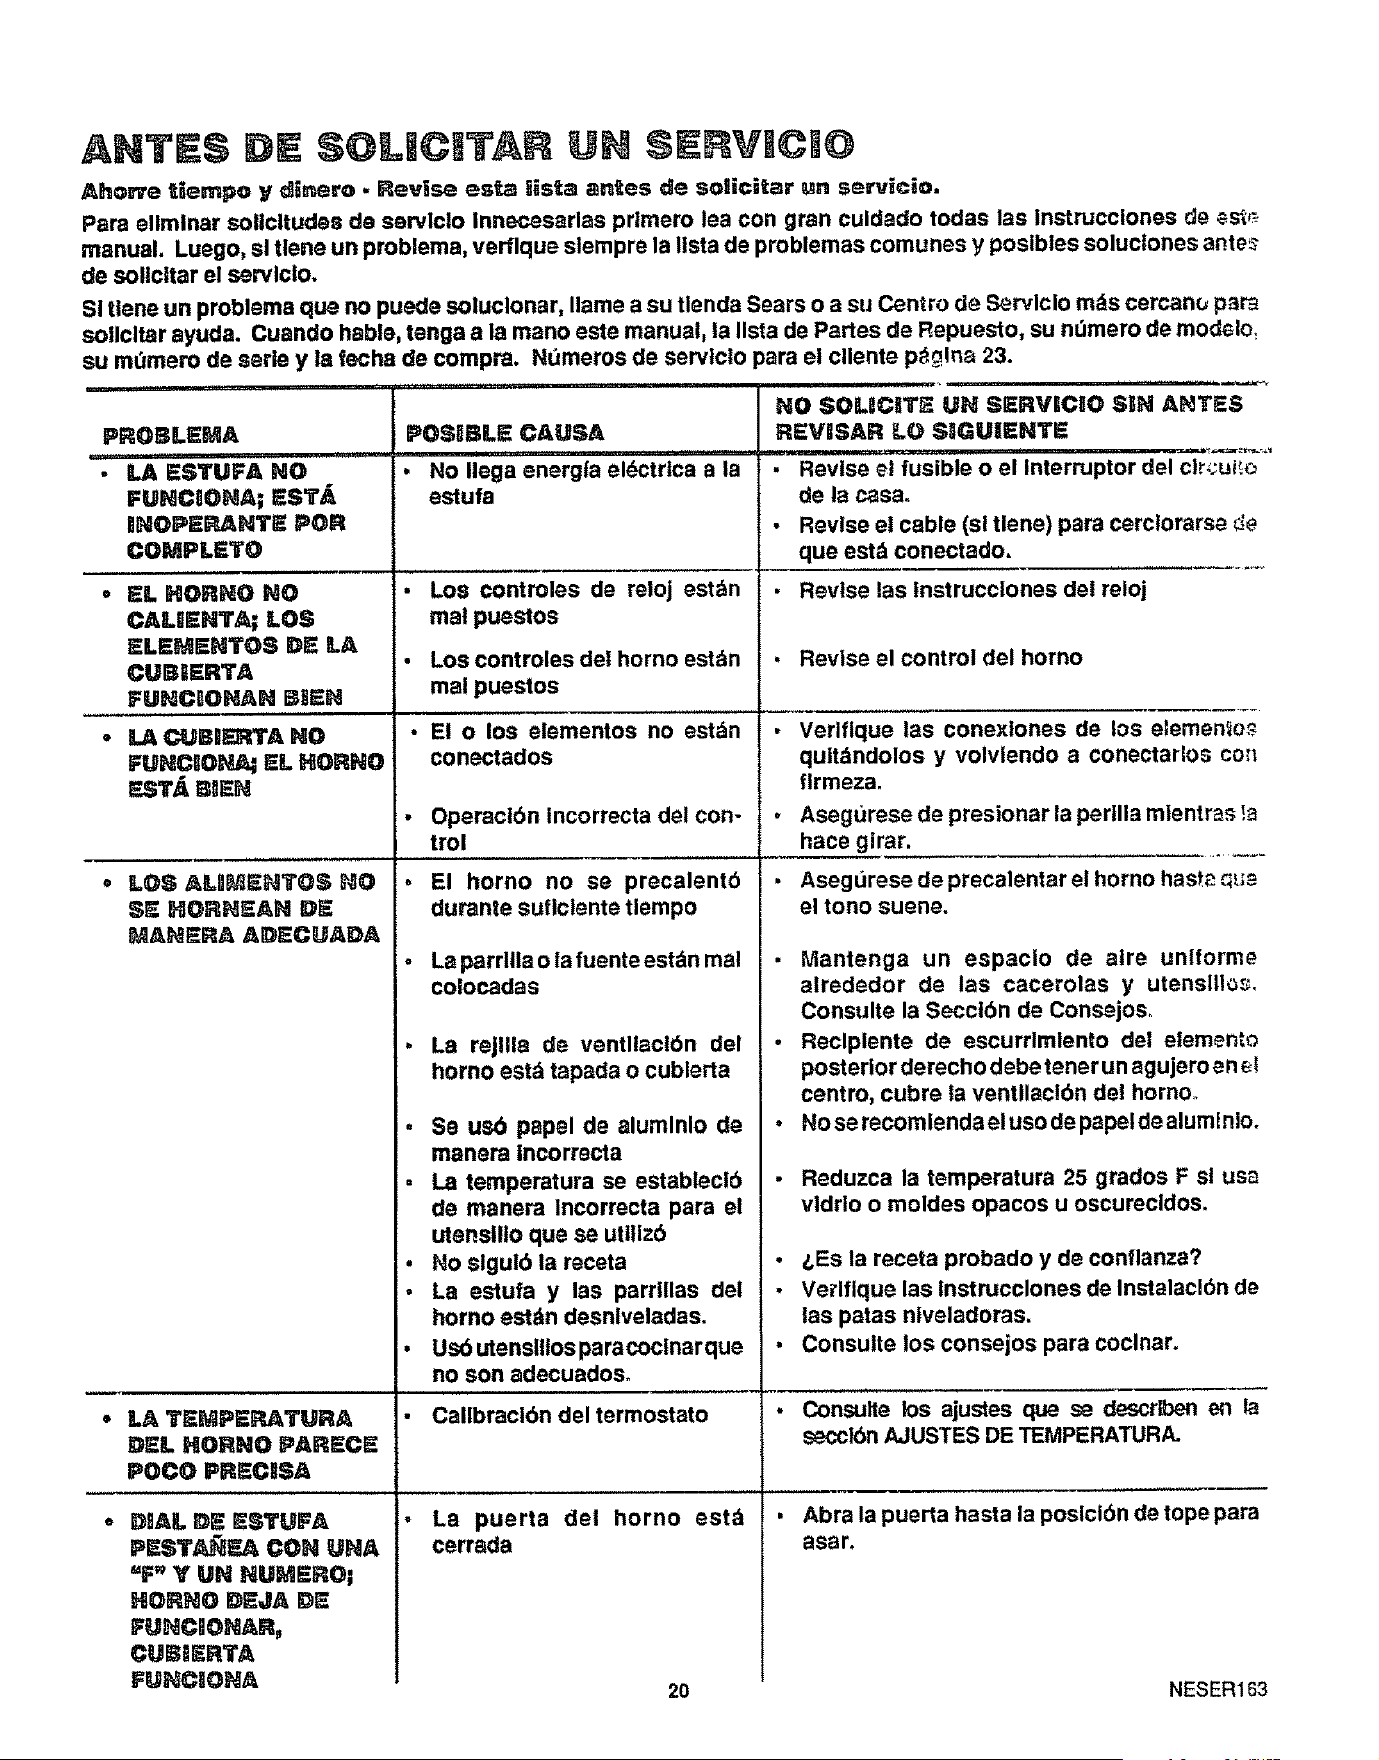
ANTES DE $OLiCETAR @N SERVICIO
Aho_e tJempo y ditto - Revise e$_ tista antes de solicitar _n servicio.
Para ellmlnar solicitudes de servlcio Innecesarlas pr|mero lea con gran culdado todas las Instrucciones de _s_
manual. Luego, sl tlene un problema, verflque slernpre la Itsta de problemas comunes y posibles soluclones ante_
de sollcitar el servlclo.
SI Uene un problema que no puede soluclonar, Ilame a su tlenda Sears o a su Centro de S_rvIclo rods cercan_ par_
soilcltar ayuda. Cuando hable, tonga a la mano este manual, la Ilsta de Partes de Repuesto, su ndmero de modelo,
su mdmero de serie y ia fecha de compra. N_meros de servlclo para el cllente p_lna 23.
PROBLEMA
.....; SSTU ANo
FUNCaONA;SST ,
mOPS .TS POR
COMPLETO
• EL HORNO NO
C/t,LIENTA; LOS
ELEMENTOS DE LA
CUBSER_'A
FUNCSOHAN BBEN
• LA CUBI_rlrA NO
FUNCgO_ EL HORNO
sST_i B_EN
° LOS #,UM_NTO$ _'_0
S_- HORNEAN DE
MANTRA ADEC_ADA
• L_ T_PERATUR_
DSl. HORNO PAREC_
POCO PIRECI_SA
PESI'/_F._ CON UN#,
"F" Y UN NU_SRO;
HOR_O D_JA DZ
FUHCDGHAR,
C_B_ERTA
FU_C_O_A
POSI_BL_ CAUSA
i .............................
• NO Ilega energ_a el_ctrica a la
estufa
• Los controles de reloj est_n
ma! puestos
• Los controles det horno estbn
mal puestos
• El o los elementos no estdn
con_ctados
Operacibn incorrecta del con-
trol
El horno no se precalentb
durante suflclente tlempo
La parrllla o la fuente est_n mal
colocadas
La reJllla de venUlaclbn del
homo estd tapada o cublerta
, Se us_ p_pel de alumlnlo de
manera incorrecta
• La temperatura se estableclb
de manera Incorrecta para el
utensllto que se utlllzb
• No slgulb la receta
• La estufa y las parrillas del
homo est_n desnlveladas.
• Us_ utensltlos paracoclnarque
no son adecuados°
Callbraci6n del termostato
- La puerta del horno est_
cerrada
NO SOUCBT5 UN SERVICIO SIgN AHTES
REVISAR LO S_GUIENTE
• Revise _'i'_;bie o el Inte__:'_._ "_'
de la casa.
- Revise el cable (sl tlene) para cerclorarse _e
que est& conectado=
• Revise las tnstrucclones dei reloj
, Revise el control del horno
• Veriflque las conexlones de los etemenio_
quitdndolos y volviendo a conectaHos co_
flrmeza
. Asegurese de presionar la perllla mientra,s !a
hace girar.
Asegurese de precalentar el homo hastP-Gue
el tono suene.
tVtantenga un espaclo de aire unlforme
alrededor de las cacerolas y utenslllo;
Consulte la Secclbn de Consejos.
Reclplente de escurrlmlento del elemen_o
posterior derecho debe tenor un agujero en _!
centro, cubre ta ventllaclbn del homo
No se recomlenda el uso de papel de alum[nlo.
• Reduzca la temperatura 25 grados F sl usa
vldrlo o moldes opacos u oscurecldos.
• _,Es la receta probado y de conflanza?
. Ve_lflque las Instrucclones de Instalacl0n de
las paras niveladoras.
• Consulte los consejos para coclnar.
- Consulte los ajus_es clue se descrlben en la
secclbn AJUSTES DE TEMPERATURA.
• Abra la puerta hasta la poslclbn de tope para
asar.
2O
NESER163
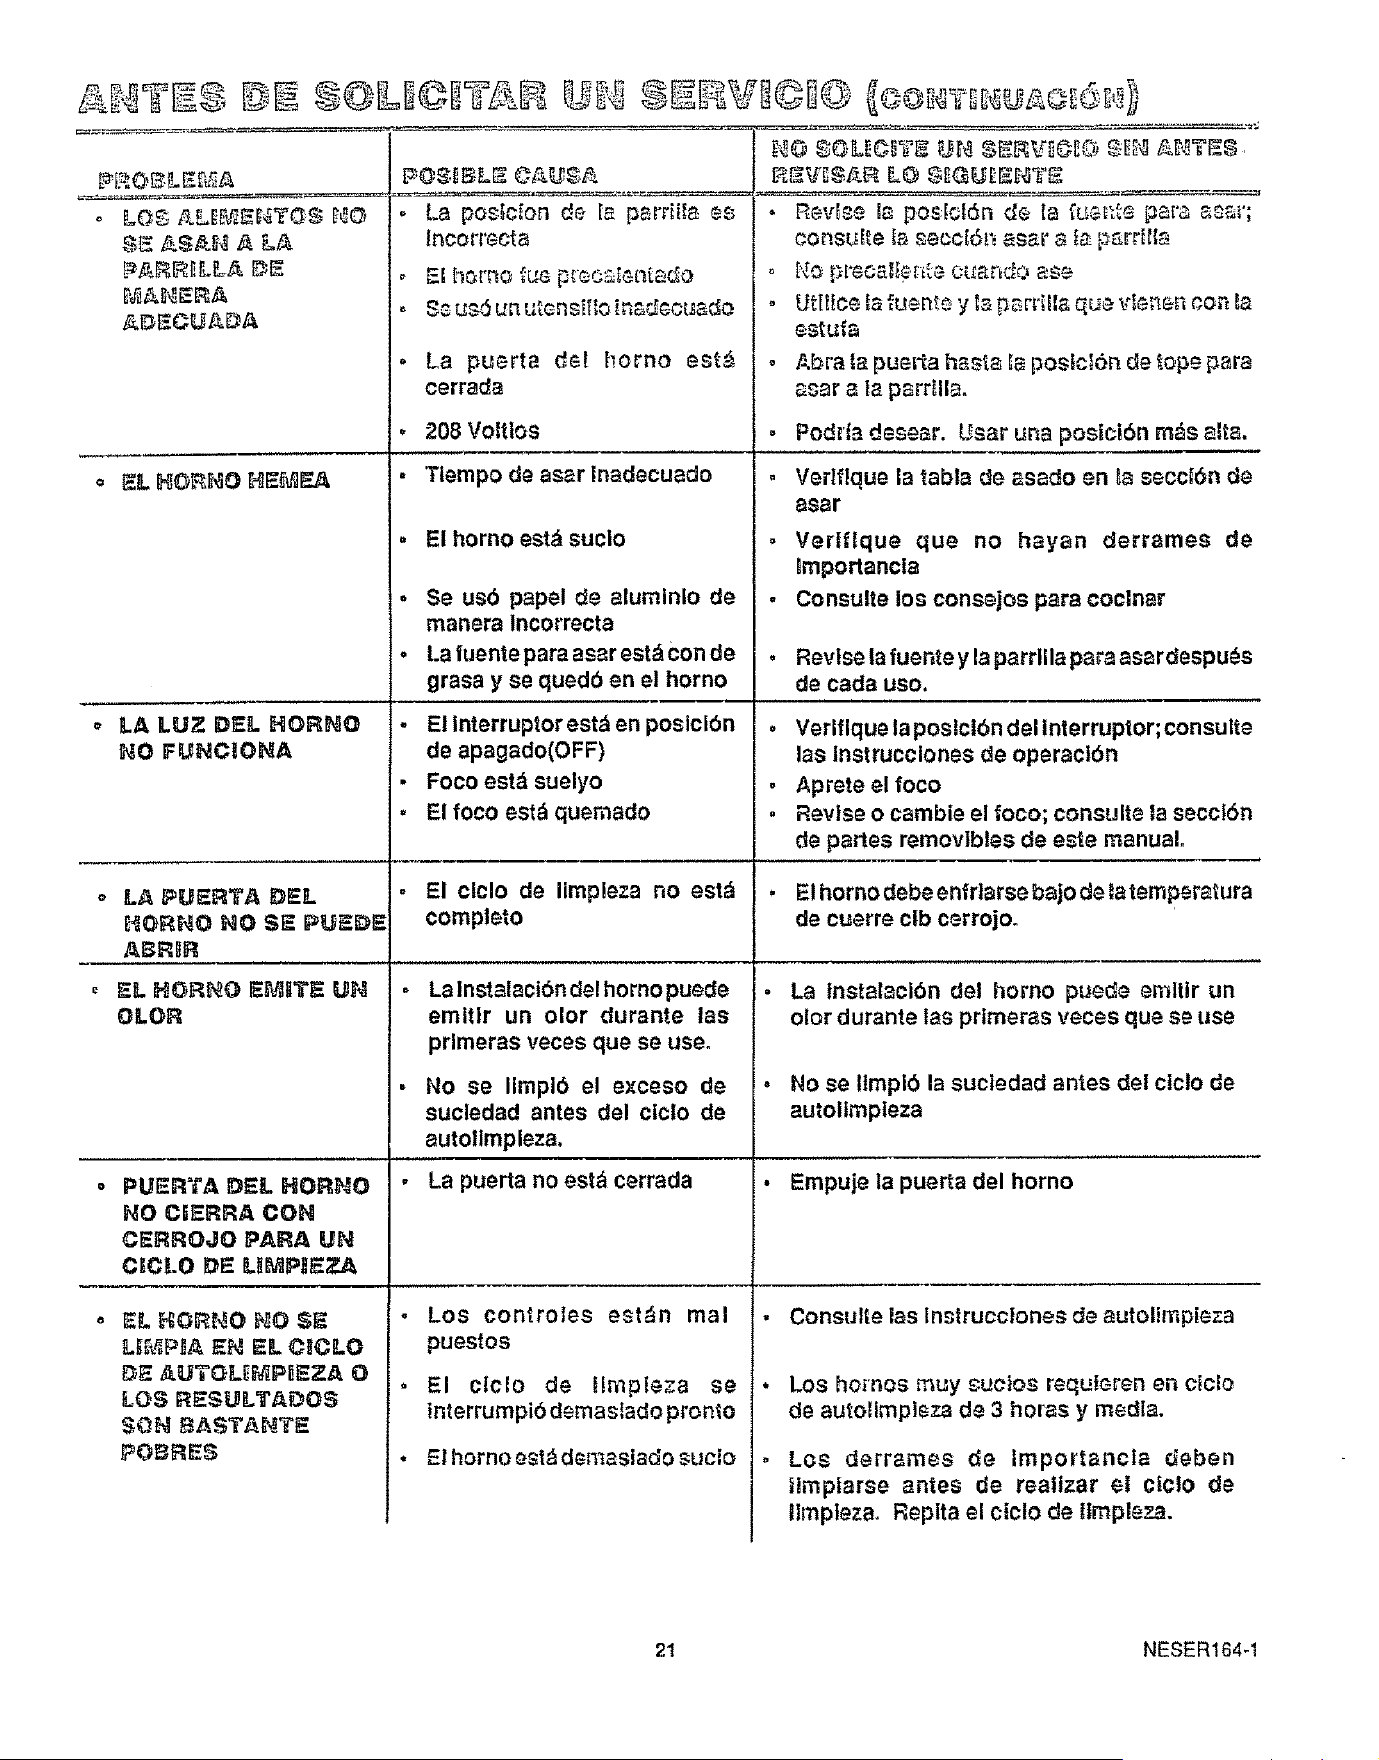
. La position de I_ parri[[a ®s
[ncorrecta
o .F_[h_rno fu_ precs[¢nta_o
o La puerta d_! homo est_
cerrada
° _L HO_O F_E_F.A
LA LUZ DEL HORNO
NO FUNCIONA
EA PU_'RTA DEE
HOR_NO NO S_- IPUSDI_
ASR_R
• L HGRHO I_T_ UN
OLOR
° PUERTA DEE HORF_O
NO CIERRA CON
CERROJO PARA U_'_
C_CLO DE U_P_EZ:A
Lt_P_A EN _E C_CLO
D_ AUTOLi_PI_ZA 0
SON _ASTANT_
• 208 Vo[ttos
t
e
o
e
Ttempo de asar [nadecuado
El homo estd suclo
Se us6 papel de alumlnlo de
manera lncorrecta
La iuente para asar est_ Con de
grasa y se quedb en el homo
E! Interruptor est', en poslclbn
de apagado(OFF)
Foco est_ suelyo
El foco est_ quernado
, El clclo de Iimpleza no estd
completo
. Lalnstalactbndelhomopuede
emitlr un olor durante las
prlmeras veces que se use.
No se Ilrnplb el exceso de
sucledad antes del clclo de
autollmpleza.
La puerta no est_ cerrada
, Los controles est_n mal
puestos
• El ciclo de Hmpieza se
tnterrumpib demasIado pronto
• El horno est_ demaslado sueto
Rev[_e _a pos_e[d_n _e [a _ _....
consufte _aseccl6n asar a _a parril{a
o Ut[_fee _afuente y ta parriUa que vbn_n con _a
estufa
o Abra ta pue_la haste Ia poslcI6nde tope para
asar a _aparr_lla.
o Podda desear. User una posicibn m_,s atta.
= Vedflque la table de asado en _aseeci6n de
asar
o Veriflque que no hayan derrames de
_mportancla
• Consulte los consejos pare coclnar
. Revlse la fuente y la parrllla pare asardespu_s
de cada uso.
• Verlflque la poslctbn del lnterruptor; consulte
las Instrucclones de operacl6n
, Aprete el foco
, Revise o camble el foeo; consulte ta secclSn
de partes removlbles de es_e manual.
. El homo debe en[rtarse bajo de la temperatura
de cuerre clb cerrojo_
La lnstalacl6n del homo puede emltlr un
olor durante las prtmeras veces que se use
No se limplO la sucledad antes del clclo de
autoltmpteza
• Empuje la puerta del homo
• Consulte las Instrucclones de autolimpieza
Los homos muy sucios requleren en ctclo
de autolimpleza de 3 horas y media.
Los derrames de Importancia deben
itmpiarse antes de realtzar el ciclo de
llmpleza. Replta el ctclo de ltmpleza.
21 NESER164-1
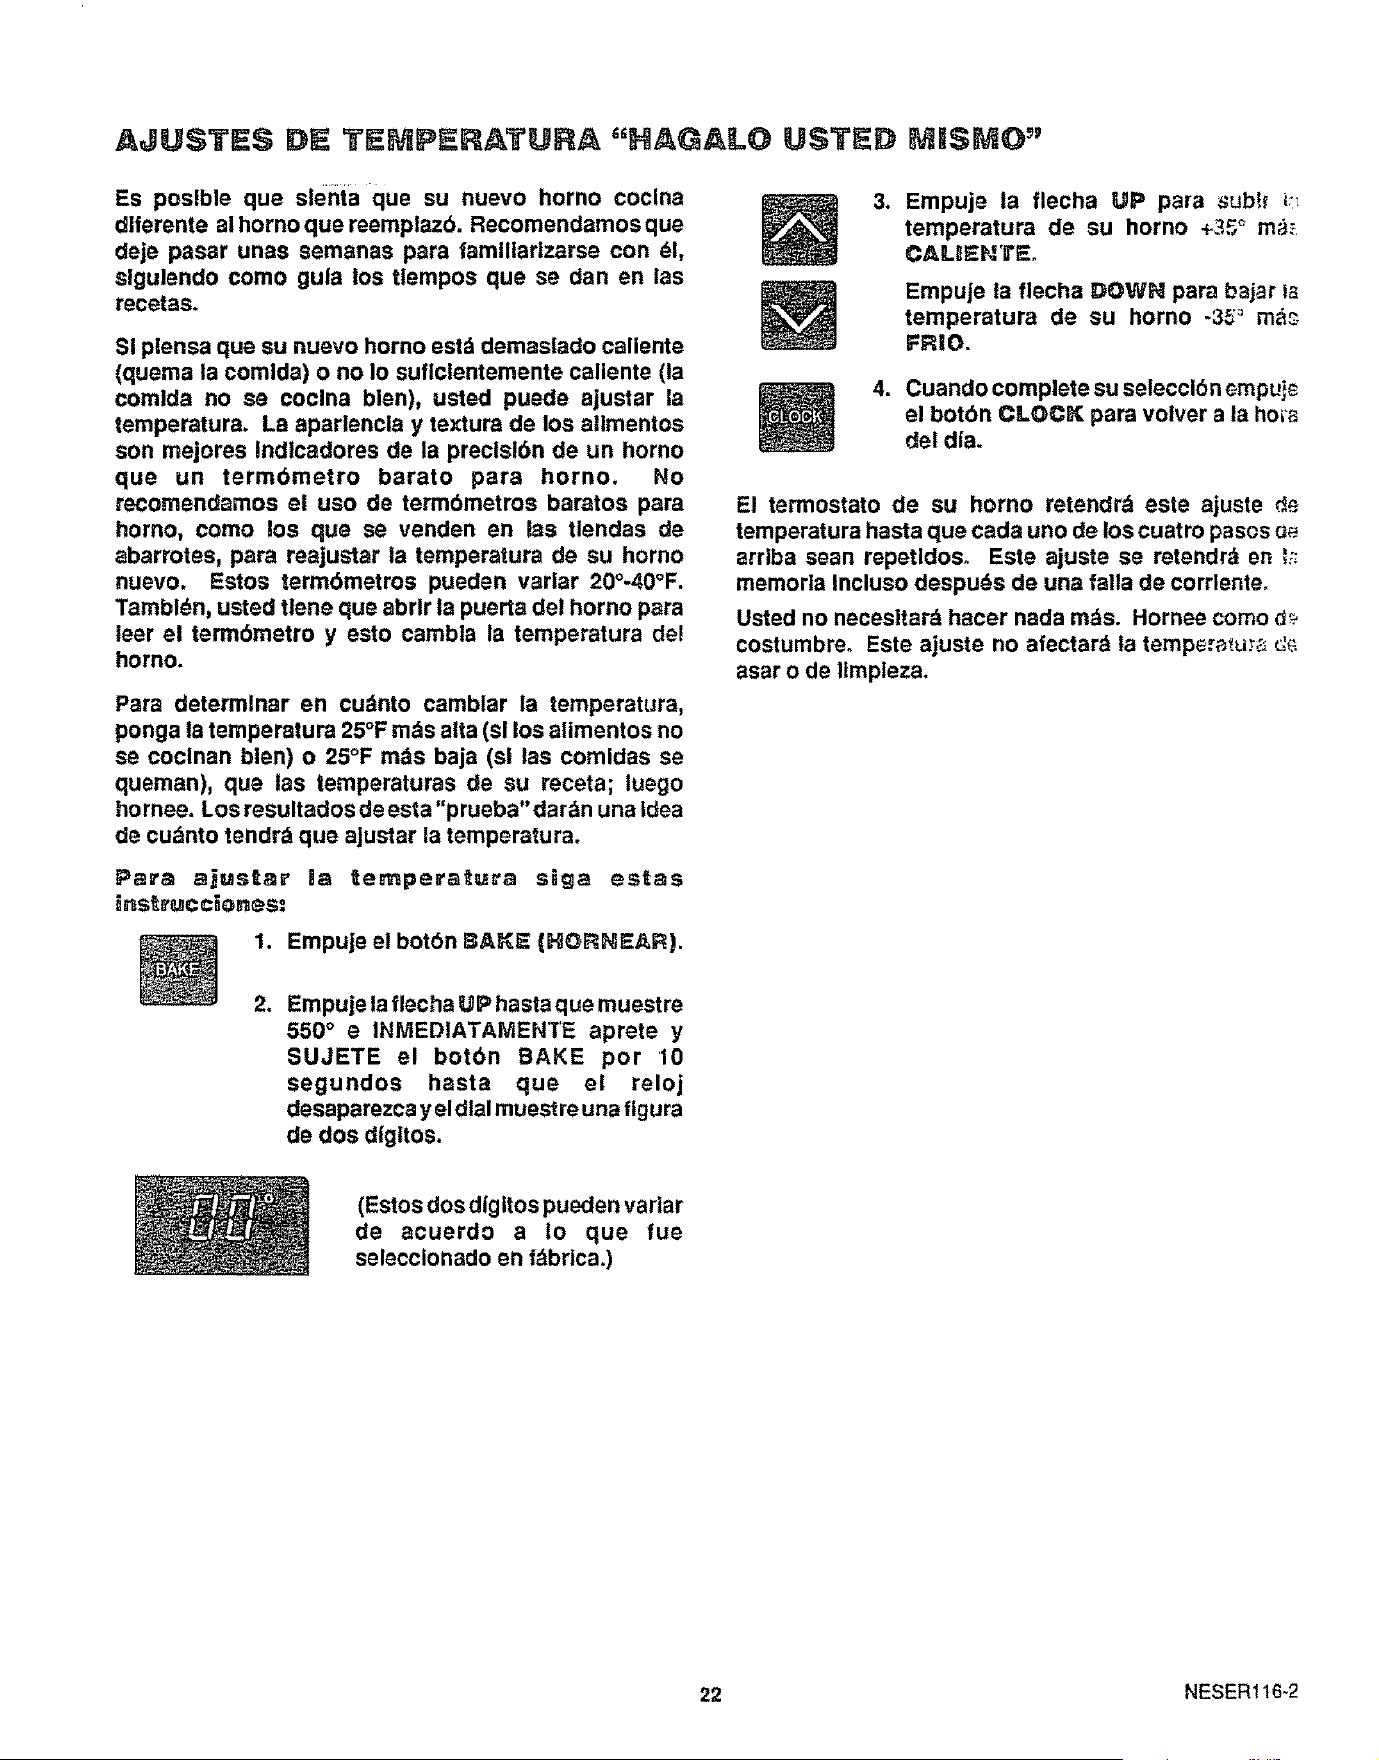
Es poslble que slenta que su nuevo horno coclna
dlferente al homo que reemplazO. Recomendamos que
deje pasar unas semanas para famlllarlzarse con _1,
sigulendo como gula los tlempos que se dan en ias
recetas.
SI plensa que su nuevo homo estd demasiado callente
(quema la comlda) o no Io suflclentemente callente (la
comida no se coclna blen), usted puede ajustar la
ternperatura. La aparlencla y textura de los allmentos
son mejores Indlcadores de ia preclslbn de un homo
que un termbmetro barato para homo. No
recomendamos el uso de termbmetros baratos para
homo, como los que se venden en las tlendas de
abarrotes, para reajustar ia temperatura de su homo
nuevo. Estos termbmetros pueden varlar 20°-40°F.
Tambl_n, usted tlene que abrlr la puerta del homo para
leer el termbmetro y esto cambla ia temperatura del
homo.
Para determlnar en cubnto camblar ia temperatura,
ponga la temperatura 25°F m_s alta (sl los alimentos no
se coclnan blen) o 25°F m_s baja (si las comldas se
queman), que las temperaturas de su receta; luego
hornee. Los resultados de esta "prueba"darbn una idea
de cudnto tendr_ que ajustar la temperatura.
Para ajustar la ternpera_ura siga estas
i_strucciones:
3. Empuje la flecha UP para sub!_ i_:_
temperatura de su horno +35 ° ma_
CAUENTEo
Empuje ta flecha DOWN para bajar i_
temperatura de su homo -35 _=ma_
FRIO.
4. Cuando complete su seleccl6n _mpuie
el botbn CLOCK para votver a la hma
del dla.
El termostato de su homo retendrd este ajuste _e
temperatura hasta que cada uno de los cuatro pasos _
arriba sean repetldOSo Este ajuste se retendrb en _?
memorta Incluso despuds de una faila de corrlente.
Usted no necesltard hacer nada rods. Hornee como ci_
costumbreo Este ajuste no afectard la temp_._u._ d_
asar o de limpteza.
1. Empuje el botbn BA_;E (HORNEAR).
21
Empuje la flecha UP hasta que muestre
550 ° e INMEDIATAMENTE aprete y
SUJETE el botbn BAKE por 10
segundos hasta que el reloj
desaparezca y el dial muest re una figura
de dos dlgttos.
(Estos dos dig itos pueden variar
de acuerdo a Io que rue
seleccionado en fdbrica.)
22 NESER116-2
Parapartesde repara¢io_e8o ole_eemp_a_o
q_e ne_esita
Llame de 7 am ..7 pro, 7 dias a la semana
I
(1°800°366=7278)
£arareparaeionesy servi¢iode marcas
mayoresen _u casa
Llarne 24 horas al dia, 7 dias a la semana
1
(!°800°473°7247)
Paraubicar un Oentro de Servicio de
Reparacionesen su _.t_ea
Llame 24 horas al dia, 7 dias a la semana
1 °8©@°488°! 222
[][]
Parairfformacio__esacerca de Contratos
de Mantenci6n Sears o para preguntas
acereade ur_Co_trato e×_stenoe
Llame de 9 am - 5 pro, Lunes - Sb_bado
!
Los especialidas de reparacbnes de America
23
ARANTIA DE
f
Estlmado cllente:
Nuestros esfuerzos
constantes estbn
dlrtgidos a asegurar qua
su nueva Estufa Kenmore
Iiegue a su begat en
perfectas cond|ciones y
le d_ el servic|o
adecuado. Come parte
de estos esfuerzos,
sentimos qua es
responsabllldad nuestra
proporclonarie esta
garantla pare su estufa.
Pa_oolte_¢k_do
LN DANES
TODO UN ANO DE GARANTIA COMPLETA PARA LA$ FUHCIG_: ._ _,
TODAS t.AS PART_S L_CF:.PT_ LAS D- ¥_P_')
_1,dentro del laps<}de un a_o a partir de _afach_ de L,'_._.:_;_ct6n. c;;n_q_L_ _,; ;,_ _.,
no sea de vldrto, |unclona mal debldo a un defecto e_ _;,,:_,._r_l o _;,__ nt_._;_.__
obra, Sears la reparard o la reemplazard, sin c_:,:_ a_gu_._o
ACABADO D_- _St_ALT_ P_RCF.L_lZ#,'_f_, PART_S D_ _._S.Tt,}.
P_HTADO 0 _Rf_!.J_'%TE
SI, dentro de los trelnta dies posterlores a |a im_i._cl_n, cualquler parle d,,_."..,!_-;
o el acebade de cualquler esmalta p¢_cela;_z_.3_o parte de metal pint _G,_..:_b=;_!:;;>
tlene defectos en el material o ma._ods _br; _3_s reemplazar_ ta p_rte, _ir, c •_;;_
alguno.
GARANTIA TOTAL D_ _(_ _i:_._ F_h_AJU$T_$ _,'_ECA._,_I_._"
Durante 90 dies a partir de la fech_.;._einsb_,_cI_n, Sears pr_porclon_._k,s;n, _:.: , ;
alguno, cualquler ajuste mer:P_nlco necesario pare la corre_a c.F,_._,'_6r,..: _;:
eStufa, e_ceptuando el ma_t=rlmt._n_o normat.
St la estufa estd suJet_a o_;'eus<)qua no sea el prlvado familiar, la e_.,_,_.u_; '_,_]_- •
garanfia menclon_d;_e;_!ba serd _iecttva s_l_ durante 90 dies.
E_ CO_TACT_ CO_ EL CENTRO O DEPARTAMENTO D_ S_Vt_I_
SF.ARS _A$ CERCA_O EH LOS ESTADOS U_IIDO,%
Esta garantfa se aplca s_lo cuande este producto se use en los Es_a,J.:_ Ur_<;_
Esta garantia le bdnda detaches |egales esp_.fficos, y tambi_n pu.:_.t}_t_;P.e=oi _,;
detaches qua wrian de un estado a otto.
SEARS, ROEBUC_ _ _.-);_c_.
Dept. 72OPSO
3333 B_Ve_iy R_
Hoffman Estatte_, _L _79
"Le d_mos servlclo a Io qua vendemos" es la manera de asegurarle qua puede d_pender de Sears pare _; _rvloIr,_
porque el servlclo Sears se ofrece en t_do el pa_s.
Su Estufa Kenmore tlene un valor agregado cuando usted considera qua Setrs posse un_. untied i_ _c_,_ ,
cerca _e usted, qua cuenta con un equ|po Sears de t_cn]cos capacitadoso. _t_cnicos profeaionales _speciic_;mem_
entrenades pare manejar los aparatos Sears, y qua tlenen acceso alas partes, herramientas y equipo _ar_
asegurar qua cumplamos nuestro compromise con usted: "iLe dames servicio a Io qua vendemos!"
PARA A_PILIAR EL VALOR D_ SU _STUFA, CO_PRE U_'_COHTRATO DE M_NTENIM_I_NTO SEA_S.
Las estufas Kenmore sstdn dlse_adas, fa brlcadas
y probadas pare brlndarle aSos de operacl6n
conflabla° Sin embargo, cualquler aparato
moderno puede requerlr de afgdn ssrvtclo de vaz
en cuando. La garant|a S_ara, adam,s d el contrato
de Mantenlmtento Sears le brindan protecctbn
contra cuentas de reparaclones lnesparadas y |e
asaguran qua dlsfrute de ta mdxtma aflclencla en
estufas.
He aqul una garantla cemparativa y una tabia del
¢ontrato de Mantenlmiento qua le muestra los
banaficlos de un contrato blantenlrnlento Sears
pare Estufas.
2 Ajust_ mocdnlco
3 Partas da porcelana y v_drto
RovisT_n anual d_ manl_nirn_en|o
prov_nt|vo a solctlud de Ustod
At_osdecoberturadelapropiedad _ 2_a5o J 3er_F_o
qu0 no s_an do porc_an_ o viddo
°°° .......
G
G - Gar_ntt_ AN - Con_'ato de M_ntoNm_nto