Loading ...
Loading ...
Loading ...
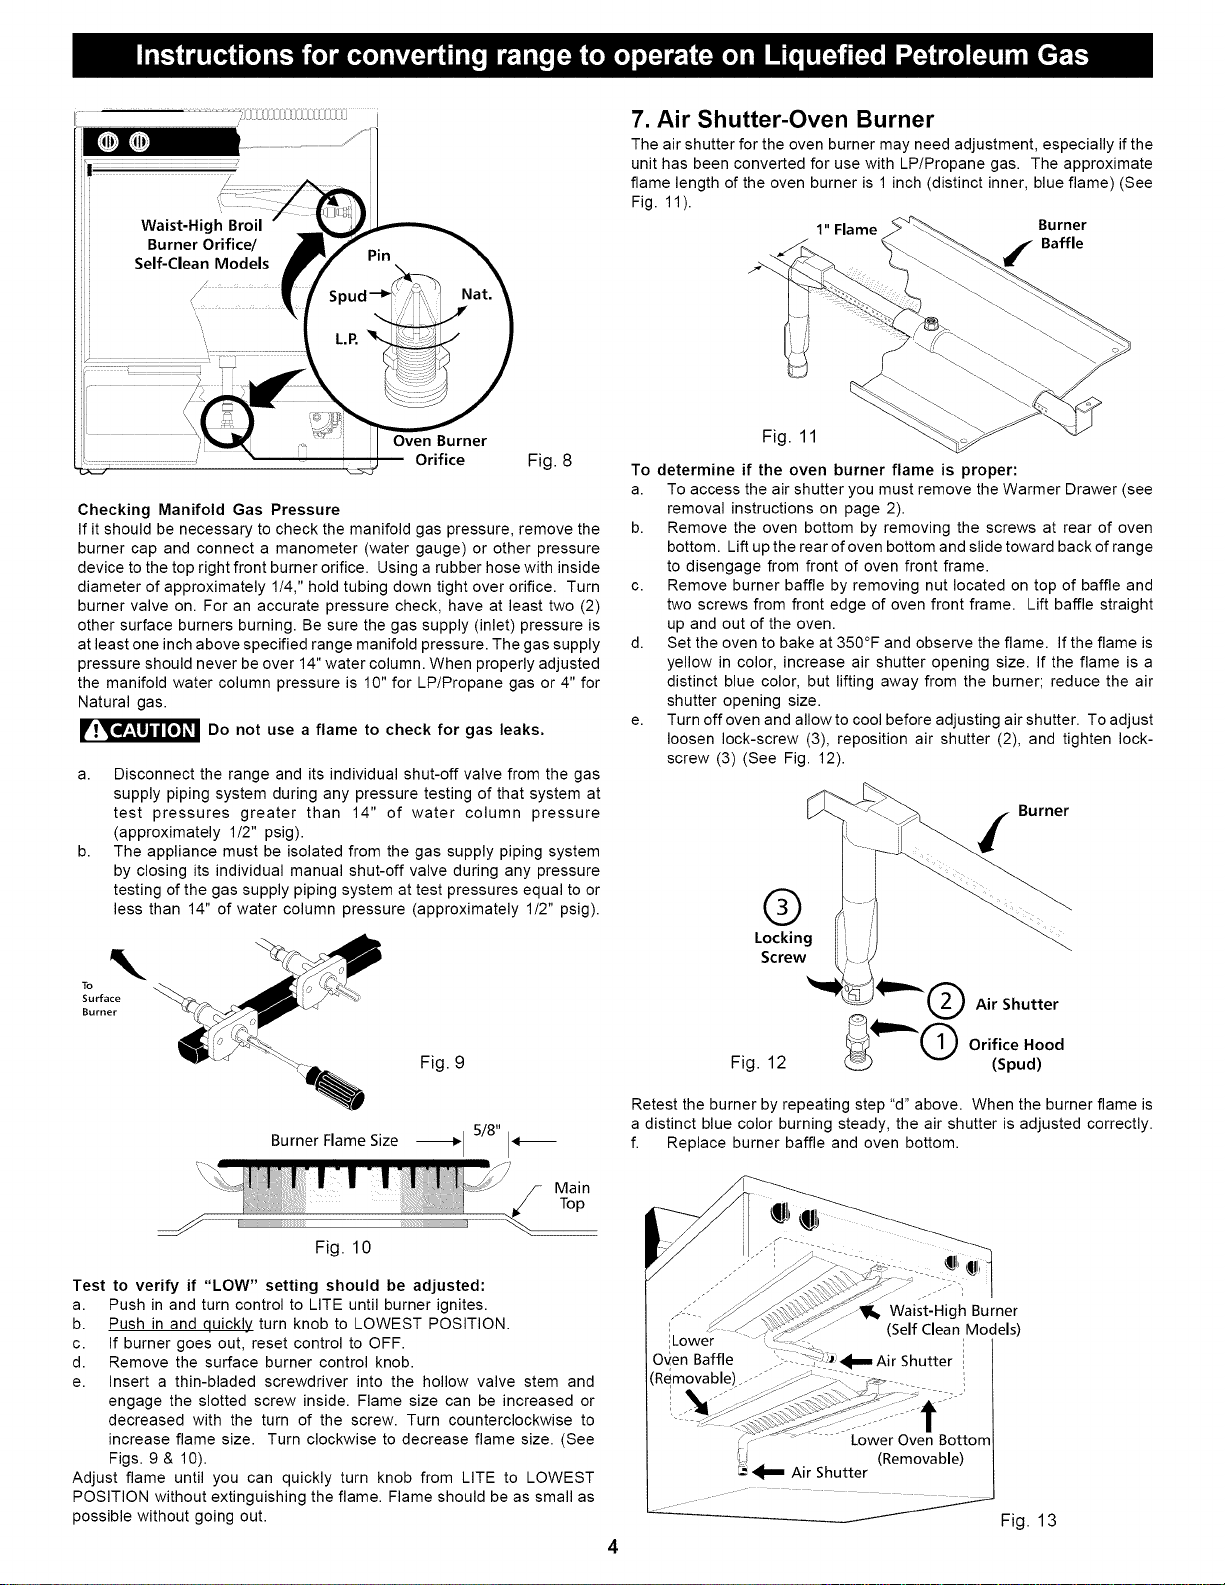
Waist-High Broil
Burner Orifice/
Self-Clean Models Pin
Oven Burner
Orifice
Fig. 8
Checking Manifold Gas Pressure
If it should be necessary to check the manifold gas pressure, remove the
burner cap and connect a manometer (water gauge) or other pressure
device to the top right front burner orifice. Using a rubber hose with inside
diameter of approximately 1!4," hold tubing down tight over orifice. Turn
burner valve on. For an accurate pressure check, have at least two (2)
other surface burners burning. Be sure the gas supply (inlet) pressure is
at least one inch above specified range manifold pressure. The gas supply
pressure should never be over 14" water column. When properly adjusted
the manifold water column pressure is 10" for LP/Propane gas or 4" for
Natural gas.
_ Do not flame to check for leaks.
use a
gas
a. Disconnect the range and its individual shut-off valve from the gas
supply piping system during any pressure testing of that system at
test pressures greater than 14" of water column pressure
(approximately 1!2" psig).
b. The appliance must be isolated from the gas supply piping system
by closing its individual manual shut-off valve during any pressure
testing of the gas supply piping system at test pressures equal to or
less than 14" of water column pressure (approximately 1!2" psig).
To
Surface
Burner
Burner Flame Size
Fig. 10
Fig. 9
---_l 5/8"i.-
MainTop
Test to verify if "LOW" setting should be adjusted:
a. Push in and turn control to LITE until burner ignites.
b. Push in and quickly turn knob to LOWEST POSITION.
c. If burner goes out, reset control to OFF.
d. Remove the surface burner control knob.
e. Insert a thin-bladed screwdriver into the hollow valve stem and
engage the slotted screw inside. Flame size can be increased or
decreased with the turn of the screw. Turn counterclockwise to
increase flame size. Turn clockwise to decrease flame size. (See
Figs. 9 & 10).
Adjust flame until you can quickly turn knob from LITE to LOWEST
POSITION without extinguishing the flame. Flame should be as small as
possible without going out.
7. Air Shutter-Oven Burner
The air shutter for the oven burner may need adjustment, especially ifthe
unit has been converted for use with LP/Propane gas. The approximate
flame length of the oven burner is 1 inch (distinct inner, blue flame) (See
Fig. 11).
1" Flame Burner
Baffle
Fig. 11
To determine if the oven burner flame is proper:
a. To access the air shutter you must remove the Warmer Drawer (see
removal instructions on page 2).
b. Remove the oven bottom by removing the screws at rear of oven
bottom. Lift up the rear of oven bottom and slide toward back of range
to disengage from front of oven front frame.
c. Remove burner baffle by removing nut located on top of baffle and
two screws from front edge of oven front frame. Lift baffle straight
up and out of the oven.
d. Set the oven to bake at 350°F and observe the flame. If the flame is
yellow in color, increase air shutter opening size. If the flame is a
distinct blue color, but lifting away from the burner; reduce the air
shutter opening size.
e. Turn off oven and allow to cool before adjusting air shutter. To adjust
loosen lock-screw (3), reposition air shutter (2), and tighten lock-
screw (3) (See Fig. 12).
Burner
®
Locking
Screw
Air Shutter
Orifice Hood
Fig. 12 (Spud)
Retest the burner by repeating step "d" above. When the burner flame is
a distinct blue color burning steady, the air shutter is adjusted correctly.
f. Replace burner baffle and oven bottom.
Waist-High Burner
(Self Clean Models)
iLower
Oven Baffle . __ _mAir Shutter
(Removable) s' ....
JJ
-Lower Oven Bottorr
(Removable)
_ Air Shutter
Fig. 13
Loading ...