Loading ...
Loading ...
Loading ...
1
INDOOR UNIT DISPLAY
Note:
●
The provided Remote Controller is a wireless type, which also can be
used as a wire. Please see “How to Connect The Remote Controller
for Wired Operation”, located in installation instruction, in case of wired
control is required.
●
In wire operation, remote controller will return to initial condition
(PRESET, TIMER and CLOCK will return to initial condition) when user
shutdown power supply of Air conditioner.
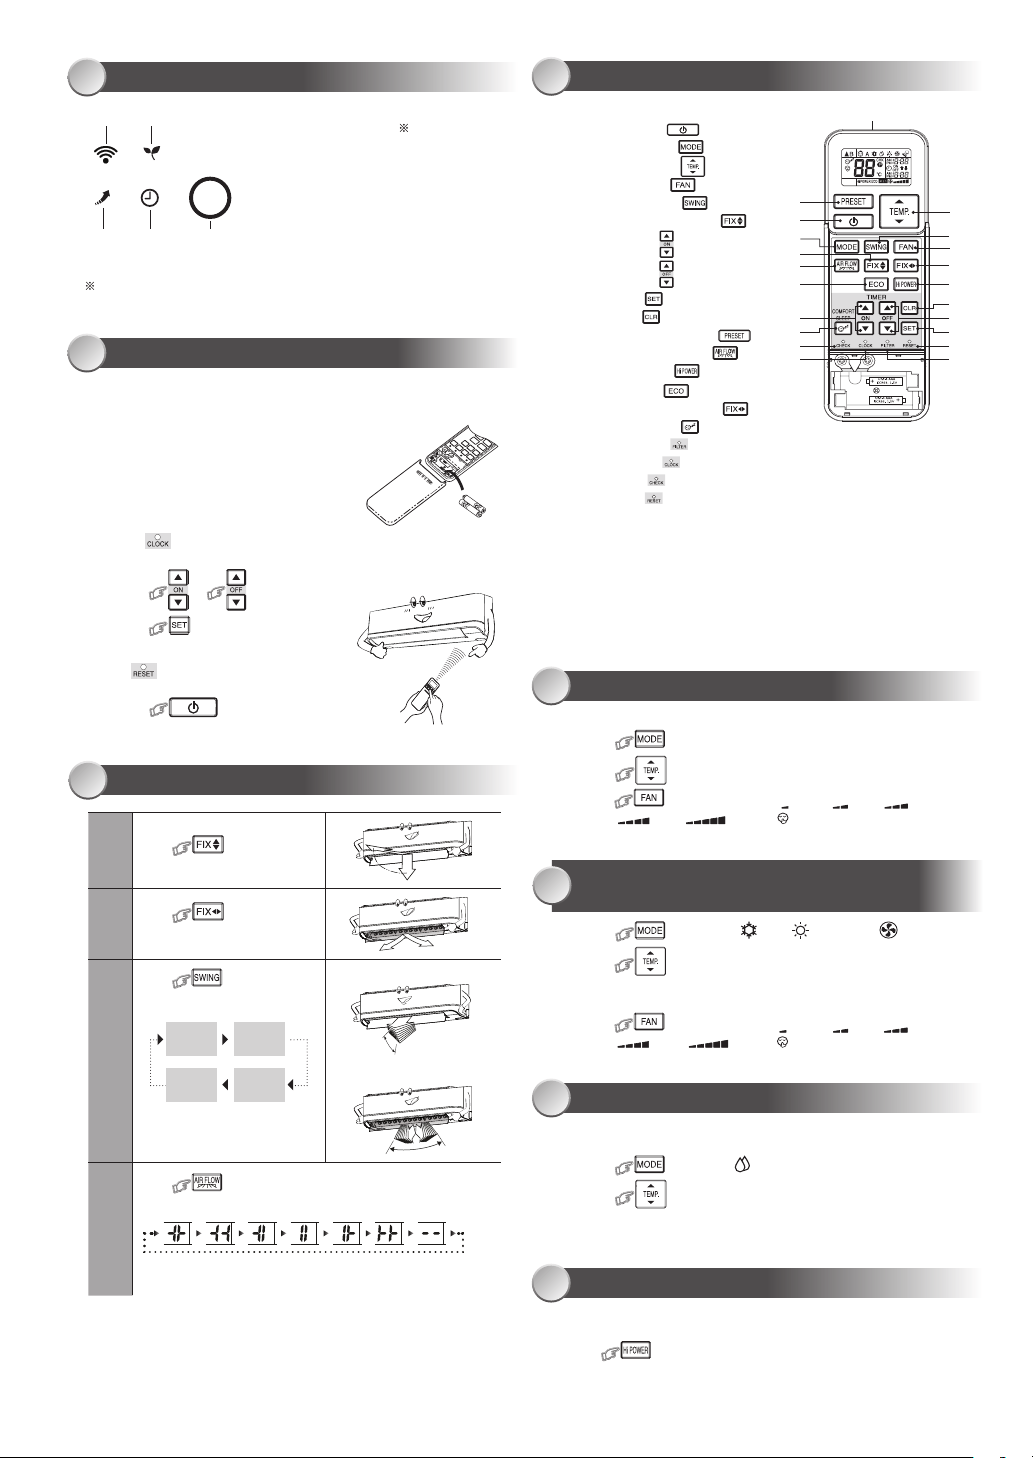
1
Infrared signal emitter
2
Start/Stop button ( )
3
Mode select button ( )
4
Temperature button ( )
5
Fan speed button ( )
6
Swing louver button ( )
7
Set louver Up-Down button ( )
8
On timer button ( )
9
O timer button ( )
0
Setup button ( )
!
Clear button ( )
@
Memory and Preset button ( )
#
AIR FLOW selection button ( )
$
High power button ( )
%
Economy button ( )
^
Set louver Left-Right button ( )
&
Comfort sleep button ( )
*
Filter reset button ( )
(
Set clock button ( )
)
Check button ( )
-
Reset button ( )
2
PREPARATION BEFORE USE
4
REMOTE CONTROL
● Display brightness can be adjusted, follow procedure on !.
Require Wireless LAN connecting adapter which available as
accessory.
1
3 4
5
2
1 ECO (White)
2 Wi-Fi access (White)
3 Hi Power (White)
4 Timer (White)
5 Operation mode
- Cool (Blue)
- Heat (Orange)
Preparing Filters
1. Open the air inlet grille and remove the air lters.
2. Attach the lters. (
see detail in the Installation Manual
).
Loading Batteries (when use wireless operation.)
1. Remove the slide cover.
2. Insert 2 new batteries (AAA type)
following the (+) and (–) positions.
1
4
@
2
3
7
#
%
8
&
)
(
6
5
^
$
!
9
0
-
*
Clock Setup
1. Push by tip of the pencil.
If timer indication is ashing, go to the next step 2.
2. Press
or
: adjust the time.
3. Press
: Set the time.
Remote Control Reset
Push by tip of the pencil or
1. Remove the batteries.
2. Press
.
3. Insert the batteries.
5
AUTOMATIC OPERATION
To automatically select cooling, heating, or fan only operation
1. Press
: Select Auto A.
2. Press : Set the desired temperature. Min. 17°C, Max. 30°C,
3. Press : Select AUTO, LOW , LOW+ , MED ,
MED+ , HIGH or Quiet
.
6
COOLING / HEATING / FAN ONLY
OPERATION
1. Press : Select Cool , Heat , or Fan only .
2. Press
: Set the desired temperature.
Min. 17°C, Max. 30°C,
Fan Only: No temperature indication
3. Press : Select AUTO, LOW , LOW+ , MED ,
MED+ , HIGH or Quiet
.
8
Hi POWER OPERATION
To automatically control room temperature and airow for faster cooling or
heating operation (except in DRY and FAN ONLY mode)
Press : Start and stop the operation.
7
DRY OPERATION
For dehumidication, a moderate cooling performance is controlled
automatically.
1. Press
: Select Dry .
2. Press : Set the desired temperature. Min. 17°C, Max. 30°C.
Note: Dry mode fan speed is set to Auto only.
Press
: Move the louver
in the desired vertical direction.
Press
: Move the
louver in the desired horizontal
direction.
Press
: For select
louver swing operation.
Press
: To select provided air ow direction
Wide
center
Wide
right
Wide
left
Spot
left
Spot
right
Return to
manually setting
Spot
center
Note:
●
Do not move the louver manually by hands or others.
●
The louver may automation positioning by some operation mode.
3
1
2
3
4
AIR FLOW DIRECTION
Vertical
(Up-Down)
Swing
Swing o
Pi
Pi
Pi Pi
Horizontal
(Left-Right)
Swing
Up-Down
Left-Right
Swing
●
Vertical (Up-Down) swing
●
Horizontal (Left-Right) swing
“Pi” sound when air ow direction is set and “Pi Pi” sound when
air ow direction is canceled and return to manually setting.
1120650281_00_S01_182x257_8p_S_p70_210329.indd 4 21/04/01 1:23:00 PM
Loading ...
Loading ...
Loading ...