Loading ...
Loading ...
Loading ...
9EN
5. If you find your refrigerator rocks from corner
to corner, it means your floor is uneven. Find a
piece of plastic or hardboard etc. and pack it
firmly under the roller.
6. You may now need to fine-tune the installation
by repeating steps 3, 4 and 5.
7. When you have the appliance in its final position,
it needs to be stabilised. Wind the stability foot
under the door hinge down to the floor until
it just makes contact with the floor. Lift the
front of the appliance to take the weight o
the stability foot, then turn it half a turn further
to ensure firm contact with the floor. Wind the
large height adjusting nut back up to ensure
all the weight is now on the front stability foot.
Wind the large height adjusting nut back up to
ensure all the weight is now on the front stability
foot.
8. Repeat step 7 for the stability foot on the handle
side. Whenever you need to move the appliance,
be sure to wind the feet back up so that the
appliance can roll freely and be sure to reset it
when reinstalling.
9. Plug your refrigerator straight into its own power
point and never use a double adapter. If you
need to roll the refrigerator to get to the plug,
remember to raise the stability foot first.
10. Before you put any food in your refrigerator,
it’s recommended you leave it on for 2 or 3
hours to check it is running properly.
Fridge door flush with the cabinetry
Side clearance must be 90mm either side of the
fridge body, to have the fridge doors siting flush
with the kitchen cabinetry.
Minimum cabinetry opening (WxDxH) :
1070mm x 741mm x 1800m
Note : Top gap all 5 mm.
1. Roll the refrigerator into place.
The rollers are designed for forward or backward
movement only. They are not castors. Moving
the refrigerator sideways may damage your floor
and the rollers. Before moving your refrigerator
ensure height adjusting nut and the stability foot
are fully wound up o the floor.
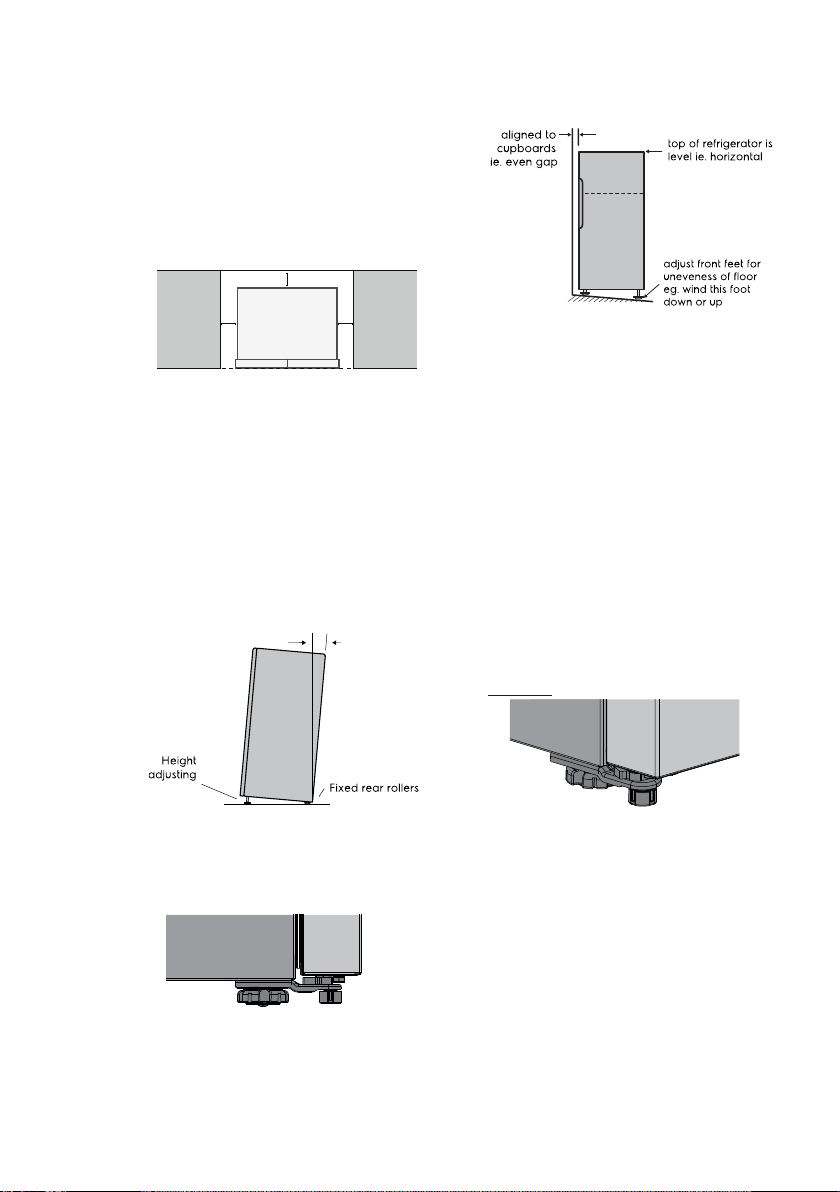
2. Wind the large height adjusting nut under door
hinge down until the refrigerator is tilted back
by 10mm (see diagram).
3. Wind the large height adjusting nut on the
handle side down until the refrigerator is level
and stable. If you have difficulty winding the nut
or height adjusting foot down, have someone tilt
the refrigerator back so you have better access.
4. Check the alignment of the refrigerator to the
surrounding cupboards to see if it is level. You
can adjust the level as detailed in step 2 and 3.
stability foot
wound up
stability foot
wound down
Front view
nut
For adjustment
where floor is not level
10-33mm
30 mm
90 mm 90 mm
Loading ...
Loading ...
Loading ...