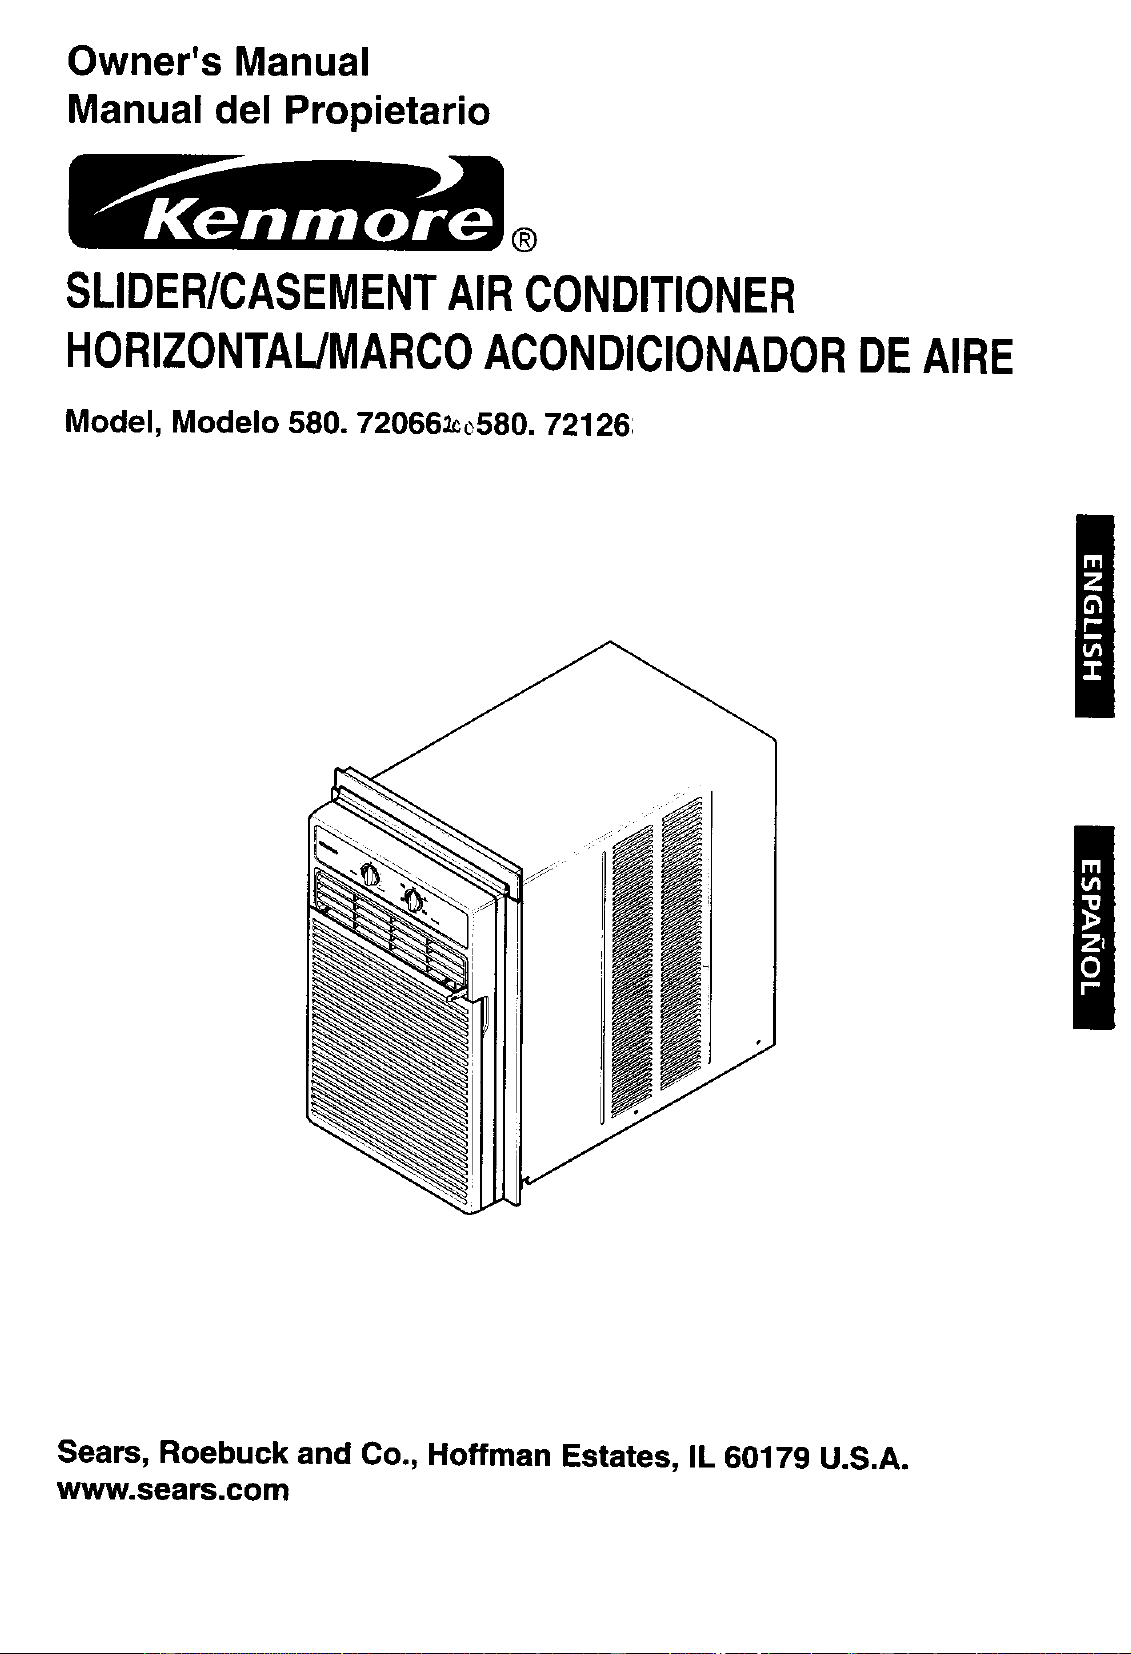
Owner's Manual
Manual del Propietario
®
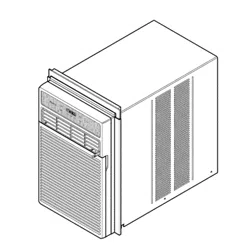
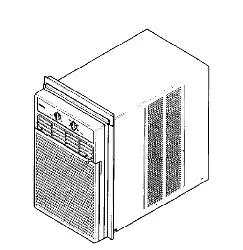
SLIDER/CASEMENTAIRCONDITIONER
HORIZONTAUMARCOACONDICIONADORDEAIRE
Model, Modelo 580. 72066_580. 72126:
Sears, Roebuck and Co., Hoffman Estates, IL 60179 U.S.A.
www.sears.com
TABLE OF CONTENTS ........................2
WARRANTY ..............................................2
SAFETY .....................................................3
ImportantSafety Instructions...................... 3
ELECTRICAL REQUIREMENTS .......4
INSTALLING THE POWER CORD-.-.4
INSTALLATION ........................................5
Installation Requirements ......................... 5
Installation ................................................ 6
Horizontal Sliding Window Installation-..-.6
Casement Window Installation...................... 8
Removal From Window ............................... 8
OPERATION ............................................. 9
How and Why ........................................... 9
Normal Sounds ........................................ 9
Capacity and Running Time ..................... 9
Features ................................................. 10
Using the Air Conditioner ....................... 10
Air Conditioner Features ........................ 11
MAINTENANCE ..................................... 12
Air Filter Cleaning ................................... 12
Air Conditioner Cleaning ........................ 12
How to Remove the Front Grille.................. 12
How to Replacethe Front Grille.................. 12
TROUBLESHOOTING .........................13
Before Calling for Service ...................... 13
ESPAI_iOL ................................................14
SERVICE NUMBERS ............Back Cover
FULL ONE YEAR WARRANTY ON
ROOM AIR CONDITIONER
For one year from the date of purchase, when this
air conditioner is operated and maintained for
normal room cooling according to instructions in this
owner's manual, Sears will repair this air
conditioner, free of charge, if defective in material or
workmanship.
FULL FIVE-YEAR WARRANTY ON
SEALED REFRIGERATION SYSTEM
For five years from the date of purchase, when this
air conditioner is operated and maintained for
normal room cooling according to instructions in this
owner's manual, Sears will repair the sealed
refrigeration system (consisting of refrigerant,
connecting tubing, and compressor), free of charge,
if detective in material or workmanship.
WARRANTY SERVICE IS AVAILABLE BY
CONTACTING SEARS SERVICE AT
1-800-4-MY-HOME ®,
Warranty coverage applies only to air conditioners
used for non-commercial, private household
purposes.
This warranty applies only while this product is in
use in the United States.
This warranty gives you specific legal rights, and
you may also have other right which vary from state
to state.
Sears, Roebuck and Co., D/817WA,
Hoffman Estates, IL 60179 U.S.A.
-2-
IMPORTANT SAFETY INSTRUCTIONS
The safety instructions below willtell you how to use your room air conditioner to avoid harm to yourself or
damage to your ROOM AIR CONDITIONER.
FOR YOUR SAFETY
Do not store or use gasoline or other flammable
vapors and liquids in the vicinity of this or any other
appliance. Read product labels for flammability and
other warnings.
PREVENT ACCIDENTS
To reduce the risk of fire, electrical shock, or injury
to persons when using your air conditioner, follow
basic precautions, including the following:
• Be sure the electrical service is adequate for the
model you have chosen.
• If the air conditioner is to be installed in a window,
you will probably want to clean both sides of the
glass first. If the window is a triple-track type with a
screen panel included, you may want to remove
the screen completely before installation.
• Be sure the air conditioner has been securely and
correctly installed according to the separate
installation instructions provided with this manual.
Save this manual and installation instructions for
possible future use in removing or reinstalling this
unit.
• Use gloves when handling the air conditioner.
Be careful to avoid cuts from sharp metal fins on
front and rear coils.
ELECTRICAL INFORMATION
The complete electrical rating of your new room air
conditioner is stated on the serial plate. Refer to the
rating when checking the electrical requirements.
• Be sure the air conditioner is properly grounded.
To minimize shock and fire hazards, proper
grounding is important. The power cord is
equipped with a three-prong grounding plug for
protection against shock hazards.
• Your air conditioner must be plugged into in a
properly grounded wall receptacle. If the wall
receptacle you intend to use is not adequately
grounded or protected by a time delay fuse or
circuit breaker, have a qualified electrician install
the proper receptacle.
• Do not run air conditioner with a protective
covering. This could result in mechanical damage
within the air conditioner.
• Do not use an extension cord or an adapter
plug.
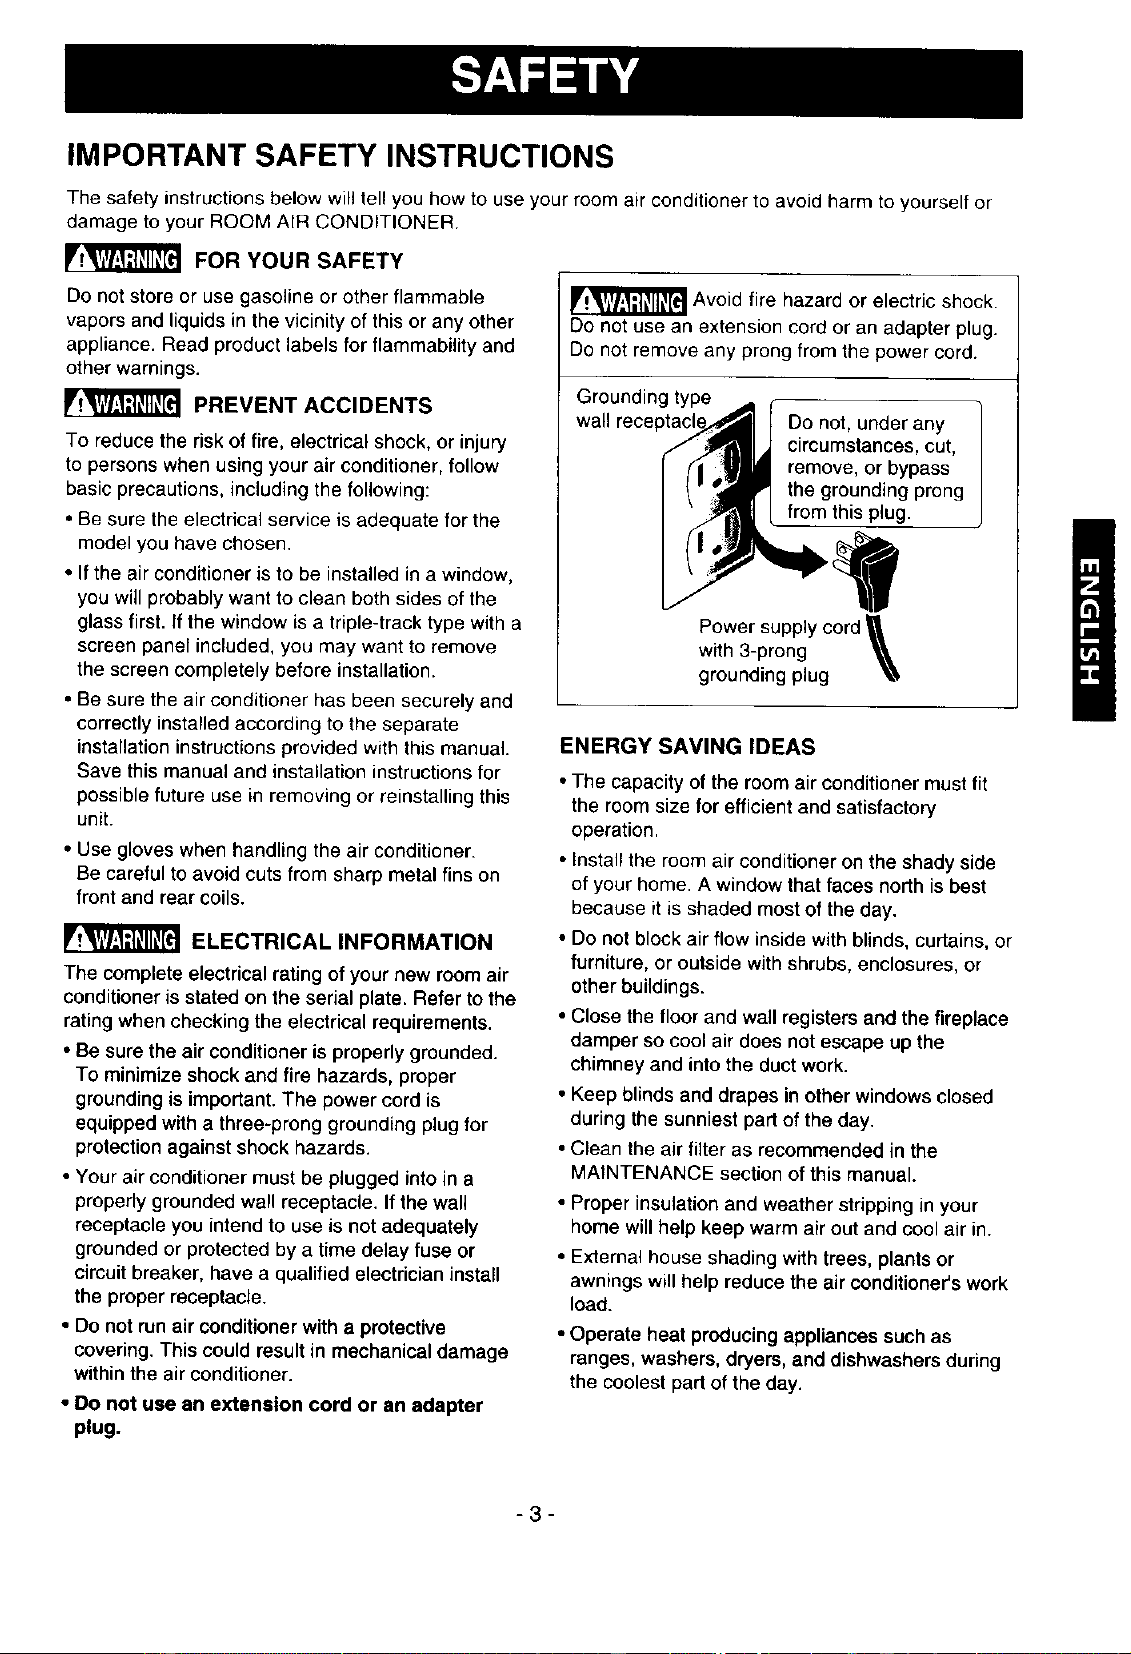
_]_ Avoid or electric shock.
fire
hazard
Do not use an extension cord or an adapter plug.
Do not remove any prong from the power cord.
Grounding type
wall
Do not, under any
circumstances, cut,
remove, or bypass
the grounding prong
from this plug.
Power supply cord
with 3-prong _,_,
grounding plug _,'_
ENERGY SAVING IDEAS
• The capacity of the room air conditioner must fit
the room size for efficient and satisfactory
operation.
• Install the room air conditioner on the shady side
of your home. A window that faces north is best
because itis shaded most of the day.
• Do not block air flow inside with blinds, curtains, or
furniture, or outside with shrubs, enclosures, or
other buildings.
• Close the floor and wall registers and the fireplace
damper so cool air does not escape up the
chimney and into the duct work.
• Keep blinds and drapes in other windows closed
during the sunniest part of the day.
• Clean the air filter as recommended in the
MAINTENANCE section of this manual.
• Proper insulation and weather stripping in your
home will help keep warm air out and cool air in.
• External house shading with trees, plants or
awnings will help reduce the air conditioner's work
load.
• Operate heat producing appliances such as
ranges, washers, dryers, and dishwashers during
the coolest part of the day.
-3-
OBSERVE ALL LOCAL CODES AND
ORDINANCES.
DO NOT, UNDER ANY CIRCUMSTANCES,
REMOVETREPOWERSUPPLYCORD
GROUND PRONG.
ELECTRICAL GROUND IS REQUIRED ON
THIS APPLIANCE.
A 115-volt 60 Hz, AC only, 15A fused and
properly grounded electrical supply is required•
A time delay fuse or time delay circuit breaker
is recommended. Use a dedicated circuit,
serving only this appliance.
DO NOT USE AN EXTENSION CORD.
RECOMMENDED GROUNDING METHOD
For your personal safety, this appliance must
be grounded. This appliance has a power
supply cord with a 3-prong grounding plug. To
minimize possible shock hazard, the cord must
be plugged into a mating grounding type wall
receptacle and grounded in accordance with
the National Electrical Code (ANSI/NFPA 70)
latest edition and all local codes and
ordinances. If a mating wall receptacle is not
available, it is the personal responsibility and
obligation of the customer to have a properly
grounded 3-prong wall receptacle installed by a
qualified electrician.
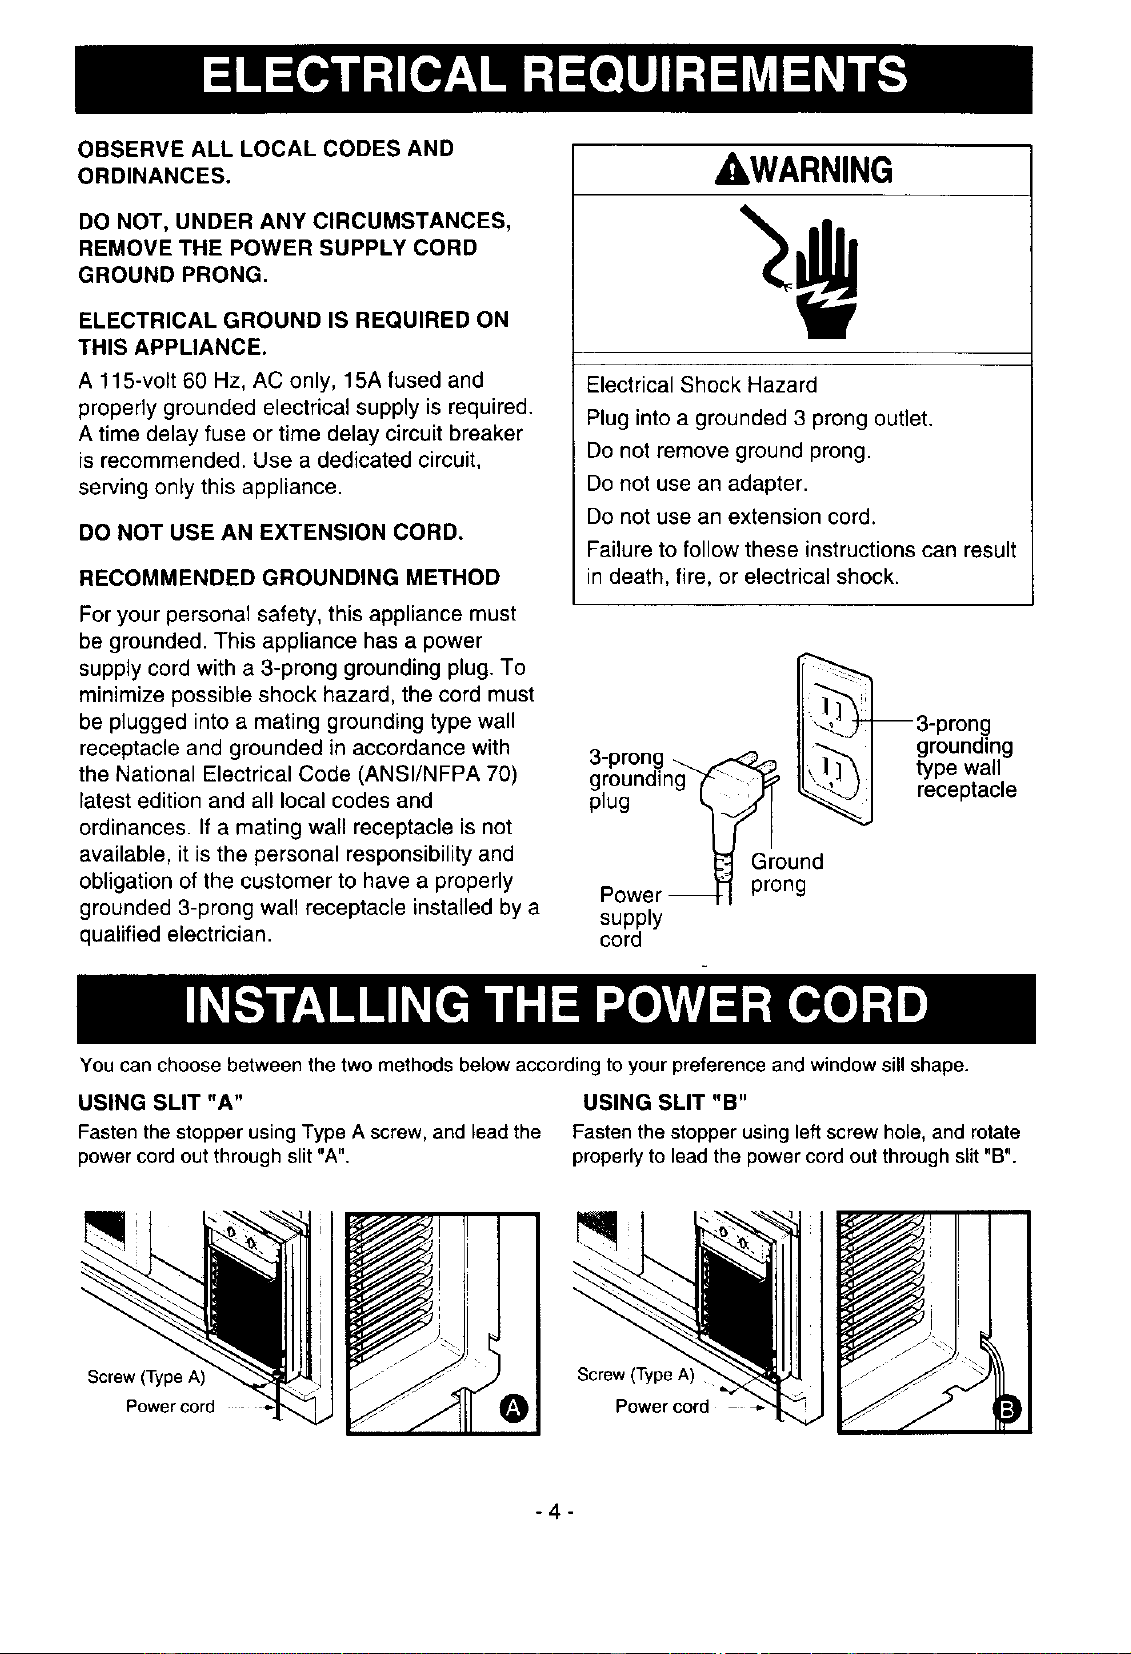
_WARNING
Electrical Shock Hazard
Plug into a grounded 3 prong outlet.
Do not remove ground prong.
Do not use an adapter.
Do not use an extension cord.
Faiture to follow these instructions can result
in death, fire, or electrical shock.
_3-prong
^ , _- _ grounding
,J-prong -_<.._--_ - 13I,,---- ,
• type wall
groundln_ _w re " I
plug _ (_._ _ ceplace
Ground
Power _ prong
supply
cord
You can choose between the two methods below according to your preference and window sill shape.
USING SLIT "A" USING SLIT "B"
Fasten the stopper using Type A screw, and lead the Fasten the stopper using left screw hole, and rotate
power cord out through slit "A". properly to lead the power cord out through slit "B".
Screw (Type A)
Powercerd
Screw (Type A
Power cord
D
-4-
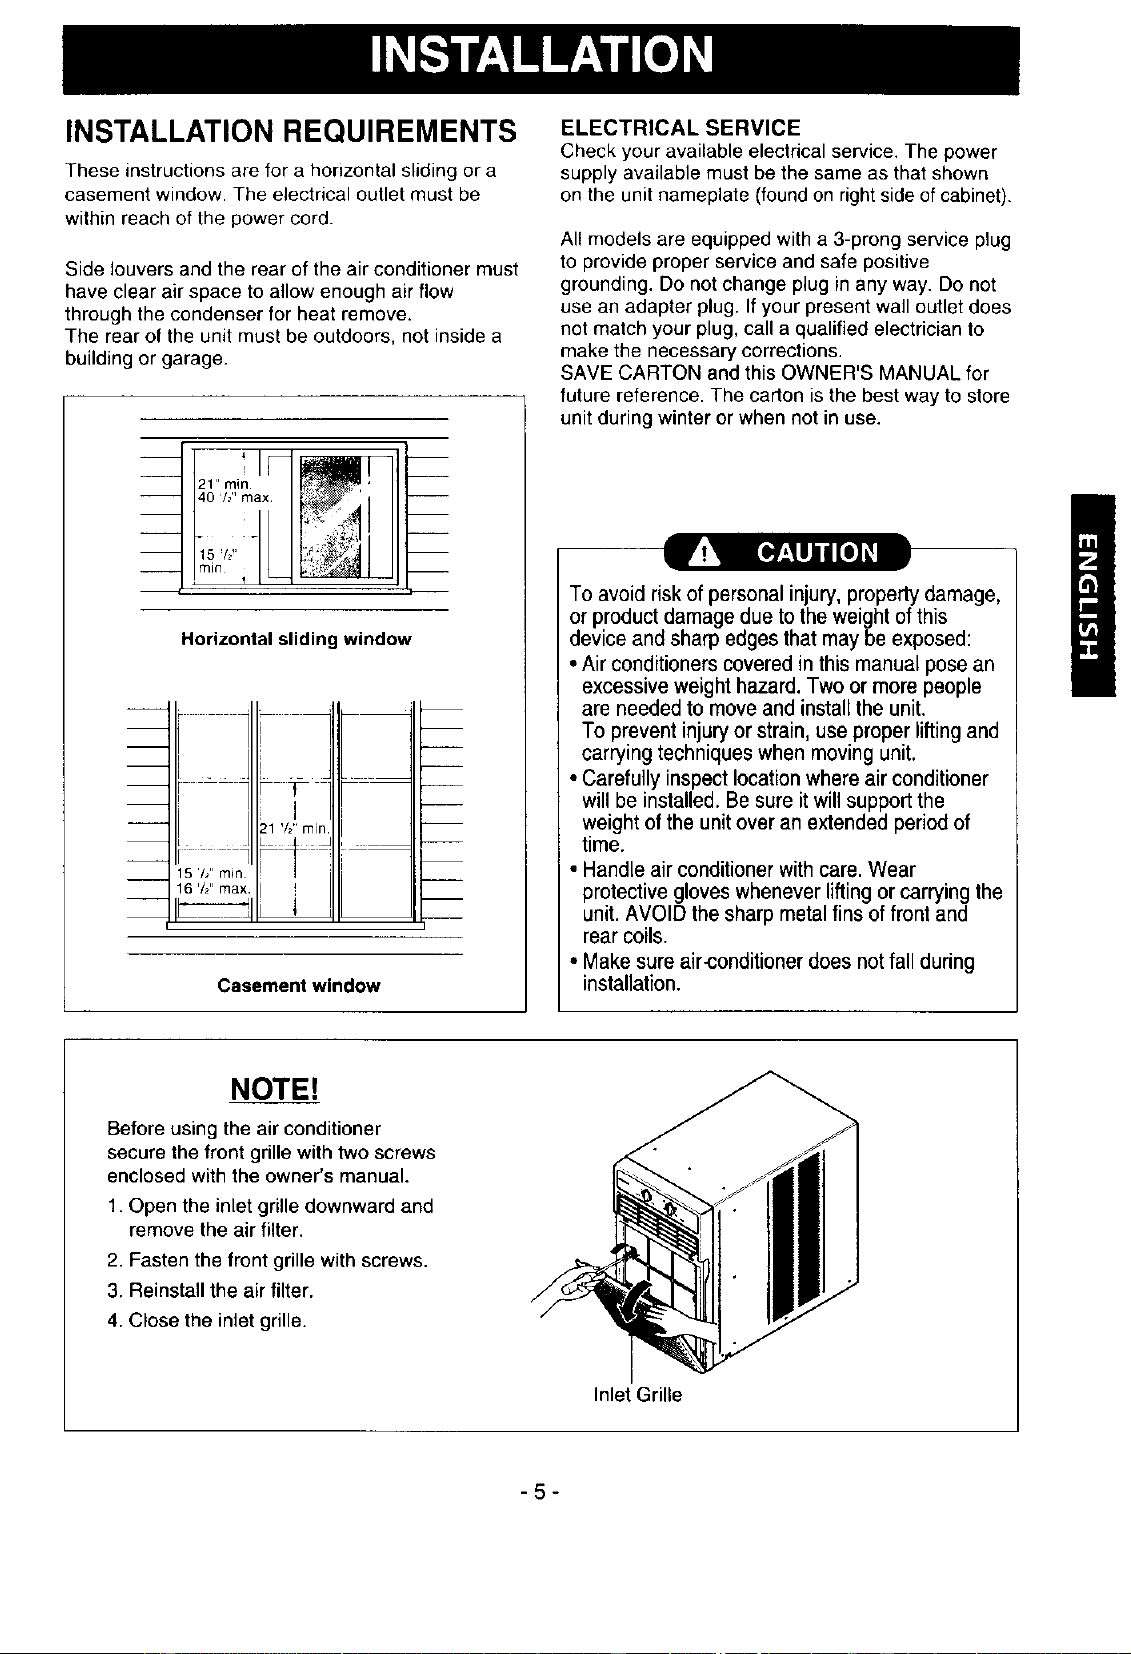
INSTALLATION REQUIREMENTS
These instructions are for a horizontal sliding or a
casement window. The electrical outlet must be
within reach of the power cord.
Side louvers and the rear of the air conditioner must
have clear air space to allow enough air flow
through the condenser for heat remove.
The rear of the unit must be outdoors, not inside a
building or garage.
Horizontal sliding window
i
!
i
i
F
i
21 '/2" rnin.
LA
5 /_" rain ||_
6 '/2"max i
h
m
m
Casement window
ELECTRICAL SERVICE
Check your available electrical service. The power
supply available must be the same as that shown
on the unit nameplate (found on right side of cabinet).
All models are equipped with a 3-prong service plug
to provide proper service and safe positive
grounding. Do not change plug in any way. Do not
use an adapter plug. If your present wall outlet does
not match your plug, call a qualified electrician to
make the necessary corrections.
SAVE CARTON and this OWNER'S MANUAL for
future reference. The carton is the best way to store
unit during winter or when not in use.
To avoid risk of personal injury, property damage,
or product damage due to the weight of this
device and sharp edges that may be exposed:
• Air conditioners coveredin this manual pose an
excessive weight hazard.Two or more people
are neededto move and install the unit.
To prevent injury or strain, use proper lifting and
carrying techniques when moving unit.
• Carefully inspect location whereair conditioner
will be installed. Be sure it will support the
weight of the unit over an extended periodof
time.
• Handle air conditioner with care. Wear
protective gloves whenever lifting or carrying the
unit. AVOID the sharp metal fins of front and
rear coils.
• Makesure air_onditioner does not fall during
installation.
NOTE!
Before using the air conditioner
secure the front grille with two screws
enclosed with the owner's manual.
1. Open the inlet grille downward and
remove the air filter.
2. Fasten the front grille with screws.
3. Reinstall the air filter.
4. CFose the inlet grille.
Inlet Grille
-5-
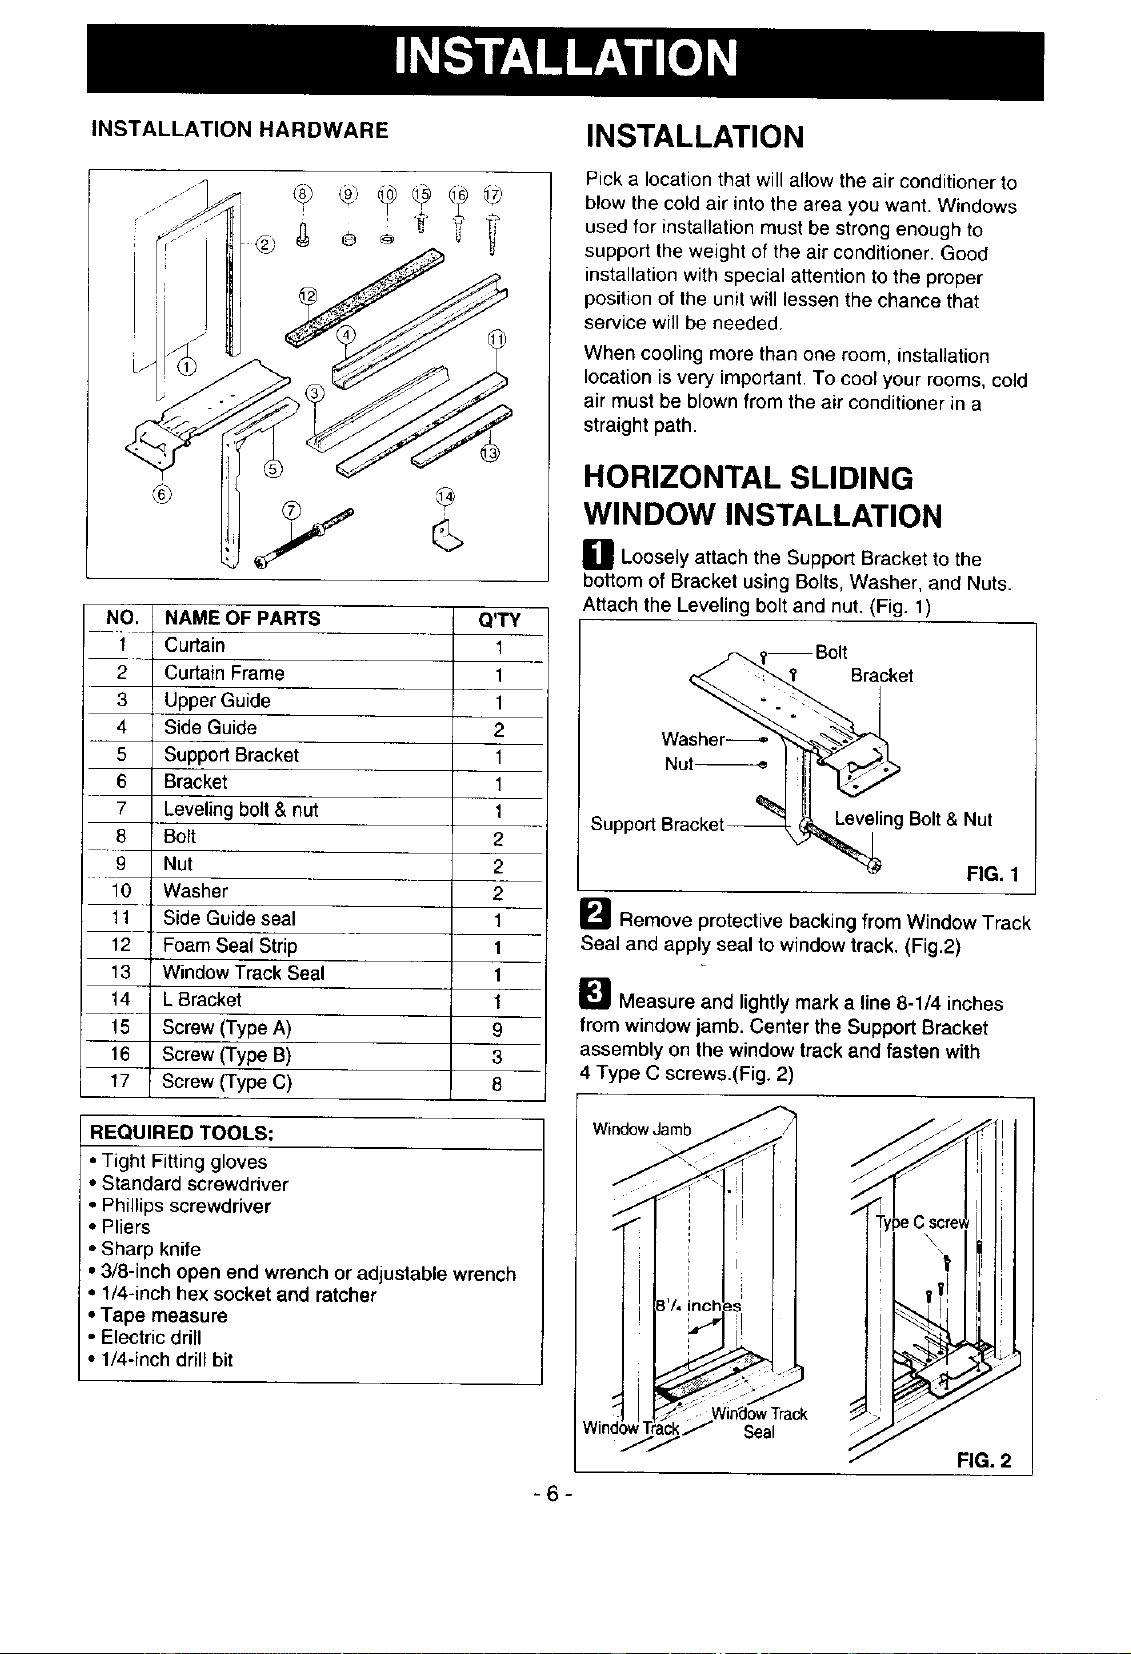
INSTALLATION HARDWARE
NO. NAME OF PARTS
t Curtain
2 Curtain Frame
3 Upper Guide
4 Side Guide
5 Support Bracket
6 Bracket
7 Leveling bolt & nut
8 Bolt
9 Nut
10 Washer
11 Side Guideseal
12 Foam Seal Strip
13 Window Track Seal
14 LBracket
t 5 Screw (Type A)
16 Screw (Type B)
17 Screw (Type C)
REQUIRED TOOLS;
Q'TY
1
1
1
2
1
t
t
2
2
2
1
1
1
1
9
3
8
• Tight Fitting gloves
• Standard screwdriver
• Phillips screwdriver
• Pliers
• Sharp knife
• 3/8-inch open end wrench or adjustab e wrench
• 1/4-inch hex socket and ratchet
• Tape measure
• Electric drill
• 1/4-inch ddll bit
1
-6-
INSTALLATION
Pick a location that will allow the air conditioner to
blow the cold air into the area you want. Windows
usecl for installation must be strong enough to
support the weight of the air conditioner. Good
installation with special attention to the proper
position of the unit will lessen the chance that
service will be needed.
When cooling more than one room, installation
location is very important. To cool your rooms, cold
air must be blown from the air conditioner in a
straight path.
HORIZONTAL SLIDING
WINDOW INSTALLATION
E_ Loosely attach the Support Bracket to the
bottom of Bracket using Bolts, Washer, and Nuts.
Attach the Leveling bolt and nut. (Fig. 1)
Bracket
Support Leveling Bolt & Nut
FIG. 1
_ Remove protective backing from Window Track
Seal and apply seal to window track. (Fig.2)
_ Measure and lightly mark a line 8-1/4 inches
from window jamb. Center the Support Bracket
assembly on the window track and fasten with
4 Type C screws.(Fig. 2)
WindowJamb __ii"_.. I
\\ I
FIG. 2
_lput the Support Bracket against the outside
wall and tighten the Bolts on top of the Bracket.
Adjust the Leveling Bolt so thai the air conditioner
will be installed with a very slight tilt (about 1/4")
downward toward the outside for proper drainage.
Tighten the nut. (Fig. 3)
NOTE: DO NOT drill a hole in the bottom of the
base pan. The air conditioner is designed to
operate with the bottom of the base pan
approximately half-fuU of water.
About I/4"-_
_Ii FIG. 3
_-"_ Fasten Side Guides to the sides of the Air
Conditioner using 3 Type A screws per Guide.
Start with first screw at middle of Guide. (Fig. 4)
r_ Fasten upper Guide on the top of the Air
Conditioner using 3 Type A screws. (Fig. 4)
Fastening Side Guides
Upper Guide
Side Guide
FIG. 4
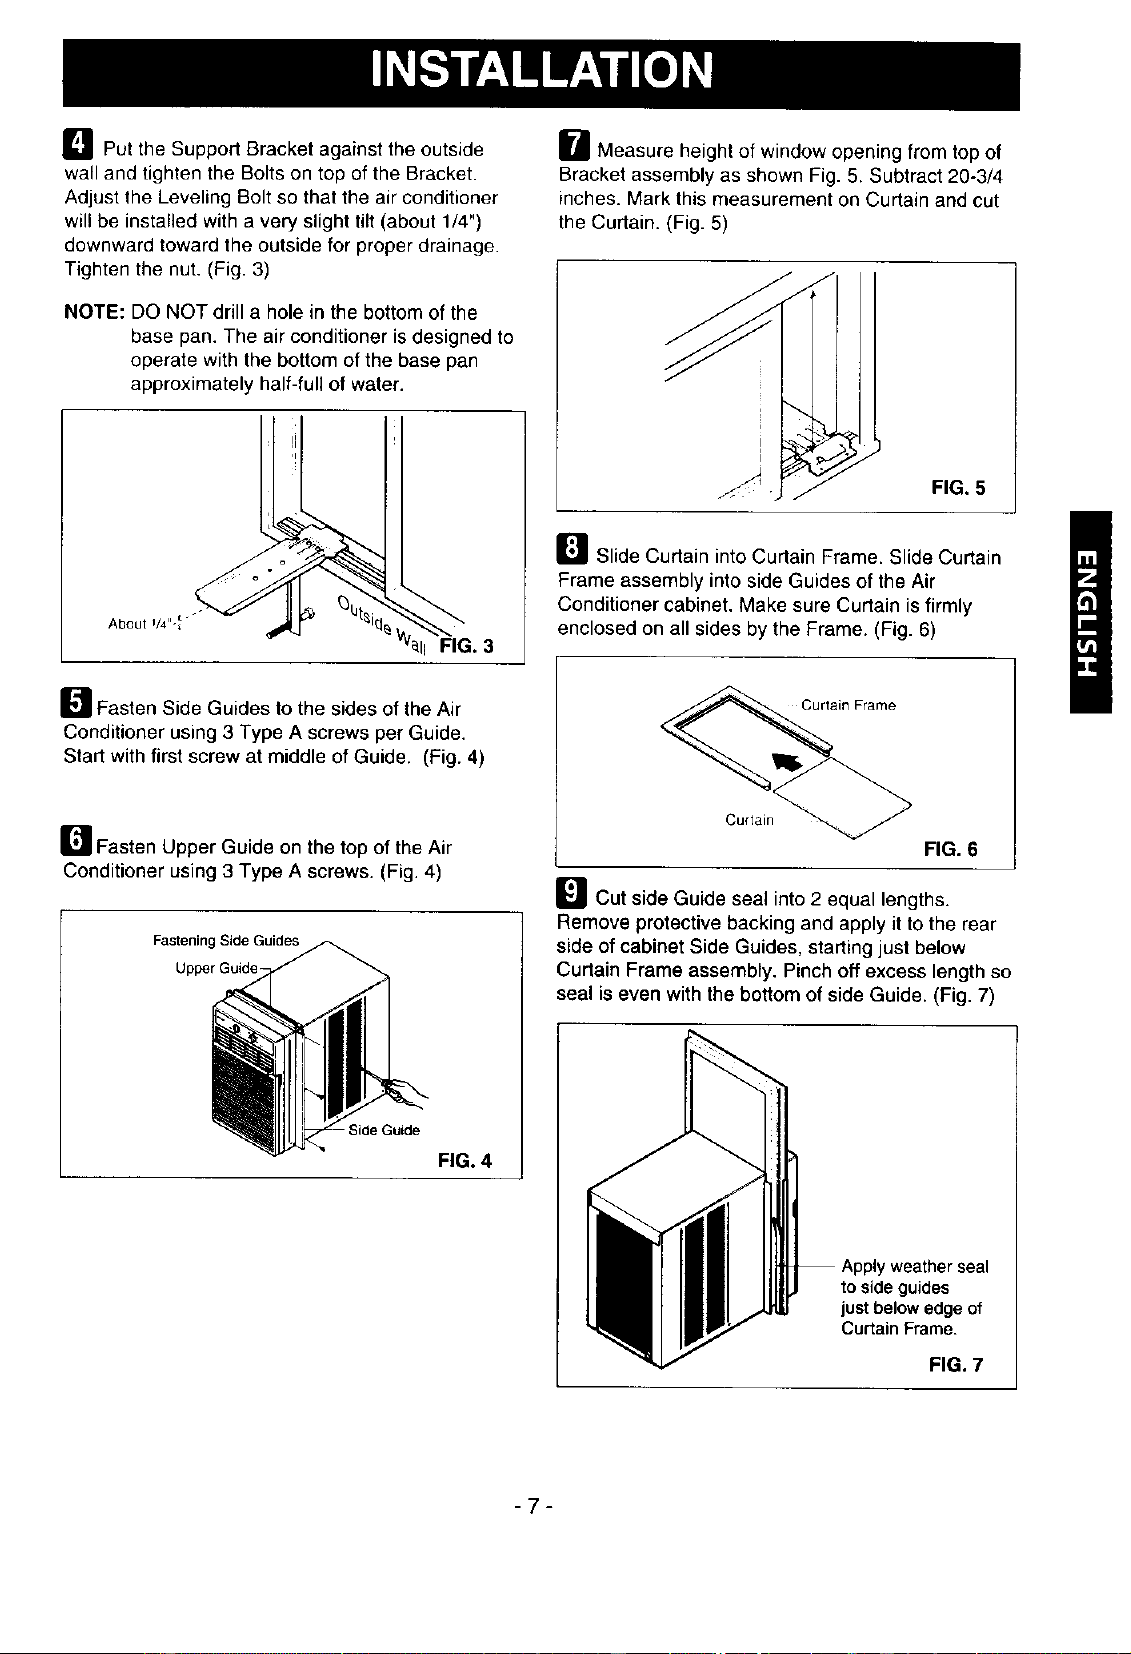
i_ Measure height of window opening from top of
Bracket assembly as shown Fig. 5. Subtract 20-3/4
inches. Mark this measurement on Curtain and cut
the Curtain. (Fig. 5)
_r_ Slide Curtain into Curtain Frame. Slide Curtain
Frame assembly into side Guides of the Air
Conditioner cabinet, Make sure Curtain is firmly
enclosed on all sides by the Frame. (Fig. 6)
in Frame
Cudain_
FIG. 6
_Cut side Guide seal into 2 equal lengths.
Remove protective backing and apply it to the rear
side of cabinet Side Guides, starting just below
Curtain Frame assembly, Pinch off excess length so
seal is even with the bottom of side Guide. (Fig. 7)
Apply weather seal
to side guides
just below edge of
Curtain Frame.
FIG. 7
-7-
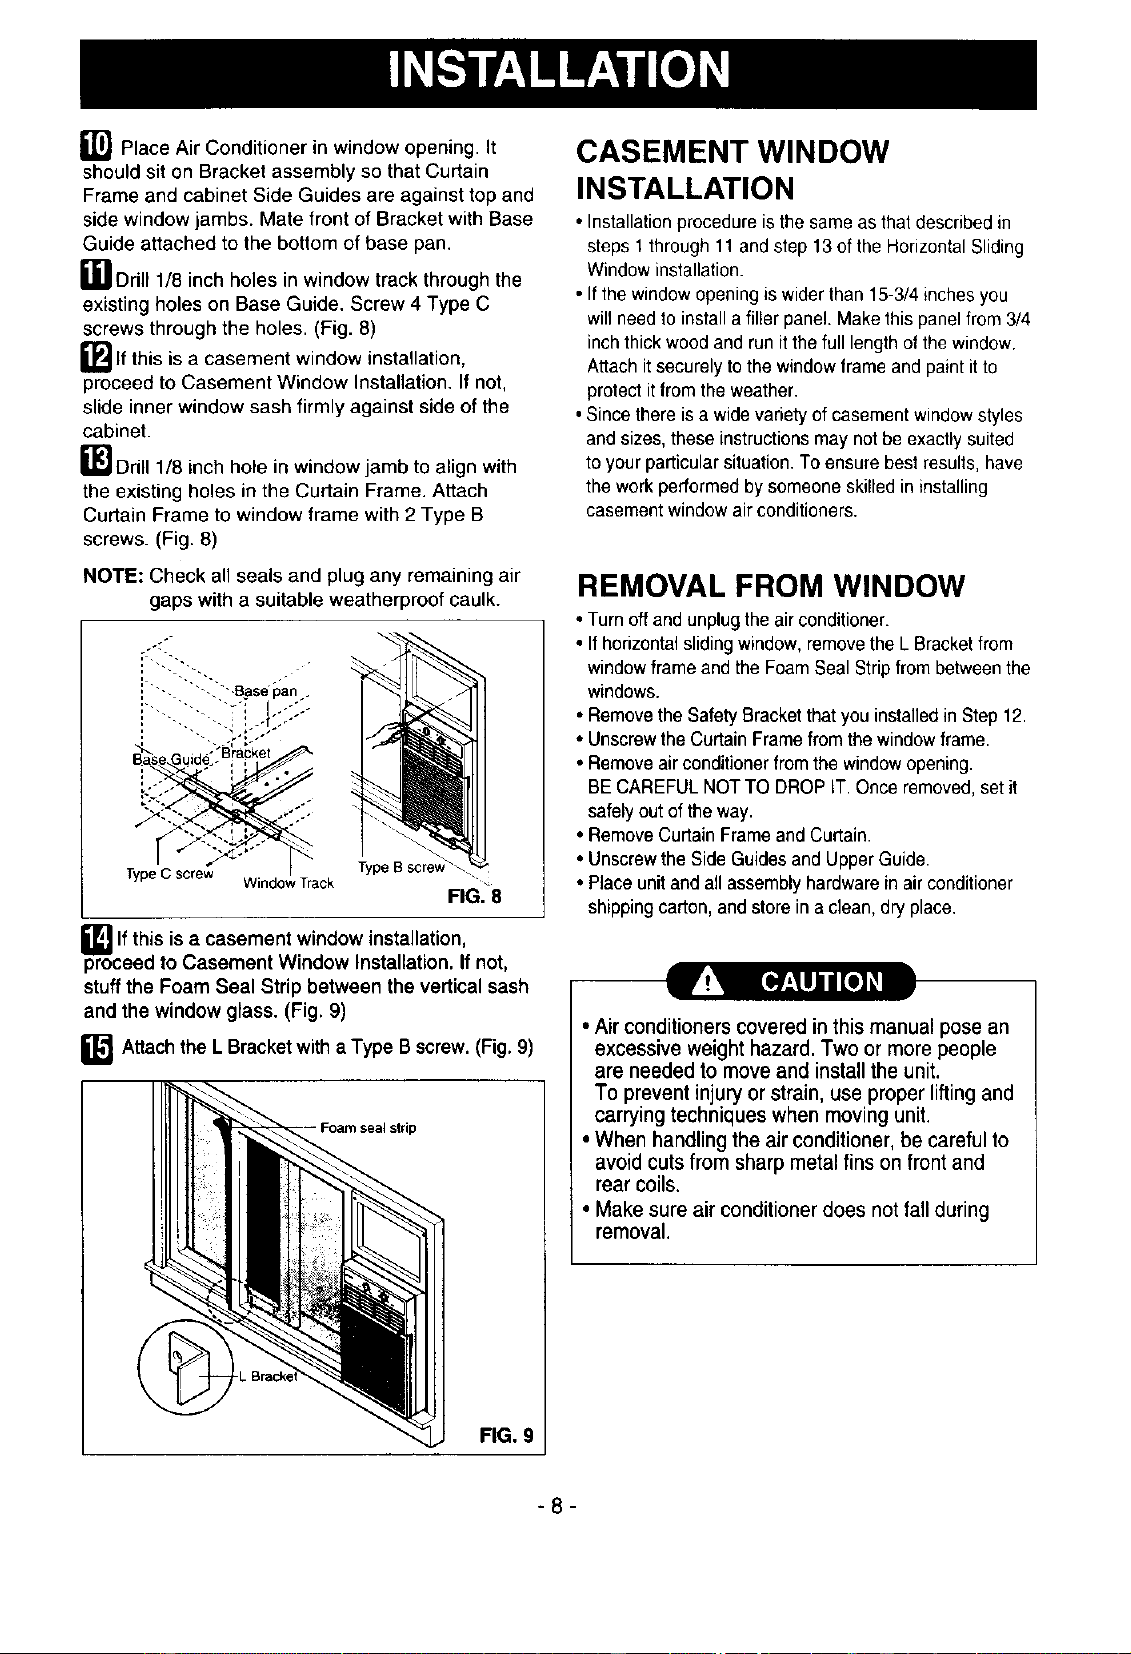
_1"_ Place Air Conditioner in window opening. It
should sit on Bracket assembly so that Curtain
Frame and cabinet Side Guides are against top and
side window jambs. Mate front of Bracket with Base
Guide attached to the bottom of base pan.
_1 Drill 1/8 inch holes in window track through the
existing holes on Base Guide. Screw 4 Type C
screws through the holes. (Fig. 8)
_llf this is a casement window installation,
proceed to Casement Window Installation, If not,
slide inner window sash firmly against side of the
cabinet.
_"] Drill 1/8 inch hole in window jamb to align with
the existing holes in the Curtain Frame. Attach
Curtain Frame to window frame with 2 Type B
screws. (Fig. 8)
NOTE; Check all seals and plug any remaining air
gaps with a suitable weatherproof caulk.
o
Type B scre_
TypeC screw Window Track FIG8-
IL_lf this is a casement window installation,
proceed to Casement Window Installation. If not,
stuff the Foam Seal Strip between the vertical sash
and the window glass. (Fig. 9)
_1_-tAttachthe L Bracketwith a Type B screw. (Fig. 9)
FIG. 9
CASEMENT WINDOW
INSTALLATION
• Installation procedure is the same as that described in
steps 1 through 11 and step 13 of the Horizontal Sliding
Window installation.
• If the window opening is wider than 15-3/4 inches you
win needto install a filler panel. Make this panel from 3/4
inch thick wood and run it the full length of the window.
Attach itsecurely to the window frame and paint it to
protectit from the weather.
• Since there isa wide variety of casement window styles
and sizes, these instructions may not be exactly suited
to your particular situation. To ensurebest results, have
the work performed by someone skilled in installing
casement window air conditioners.
REMOVAL FROM WINDOW
• Turnoffandunplugthe airconditioner.
• I1horizontalslidingwindow,removethe L Bracketfrom
windowframe and the FoamSeal Strip from between the
windows.
• Removethe Safety Bracket that you installed in Step 12.
• Unscrewthe Curtain Framefrom the window frame.
• Removeair conditioner from the window opening.
BE CAREFUL NOT TO DROP IT. Once removed,set it
safelyout of the way.
• RemoveCurtain Frame and Curtain.
• Unscrewthe Side Guides and Upper Guide.
• Place unit and all assembly hardware in air conditioner
shippingcarton, and store in a clean, dry place,
• Airconditioners covered inthismanual pose an
excessive weight hazard.Two or more people
are needed to moveand install the unit.
To prevent injury or strain, use proper lifting and
carrying techniques when moving unit.
• When handling the air conditioner, be careful to
avoid cuts from sharp metal fins on front and
rear coils.
• Make sure air conditioner does not fall during
removal.
-8-
HOW AND WHY
Your room air conditioner provides the following
functions to make hot weather living more
comfortable:
• Cools and circulates room air.
• Lowers humidity by removing excess moisture.
• Filters out summertime dust, dirt, and some
airborne impurities.
The air conditioner performs these functions by
drawing room air through a filter which traps dust
and dirt particles. The air then passes over a
cooling coil which refrigerates the air and removes
excess moisture. The same air is then returned to
the room- cooler, drier, and cleaner. Moisture
removed from the room air is carried to the outside
and evaporated.
Your air conditioner is designed to be easy to
operate and to provide plenty of cooling power.
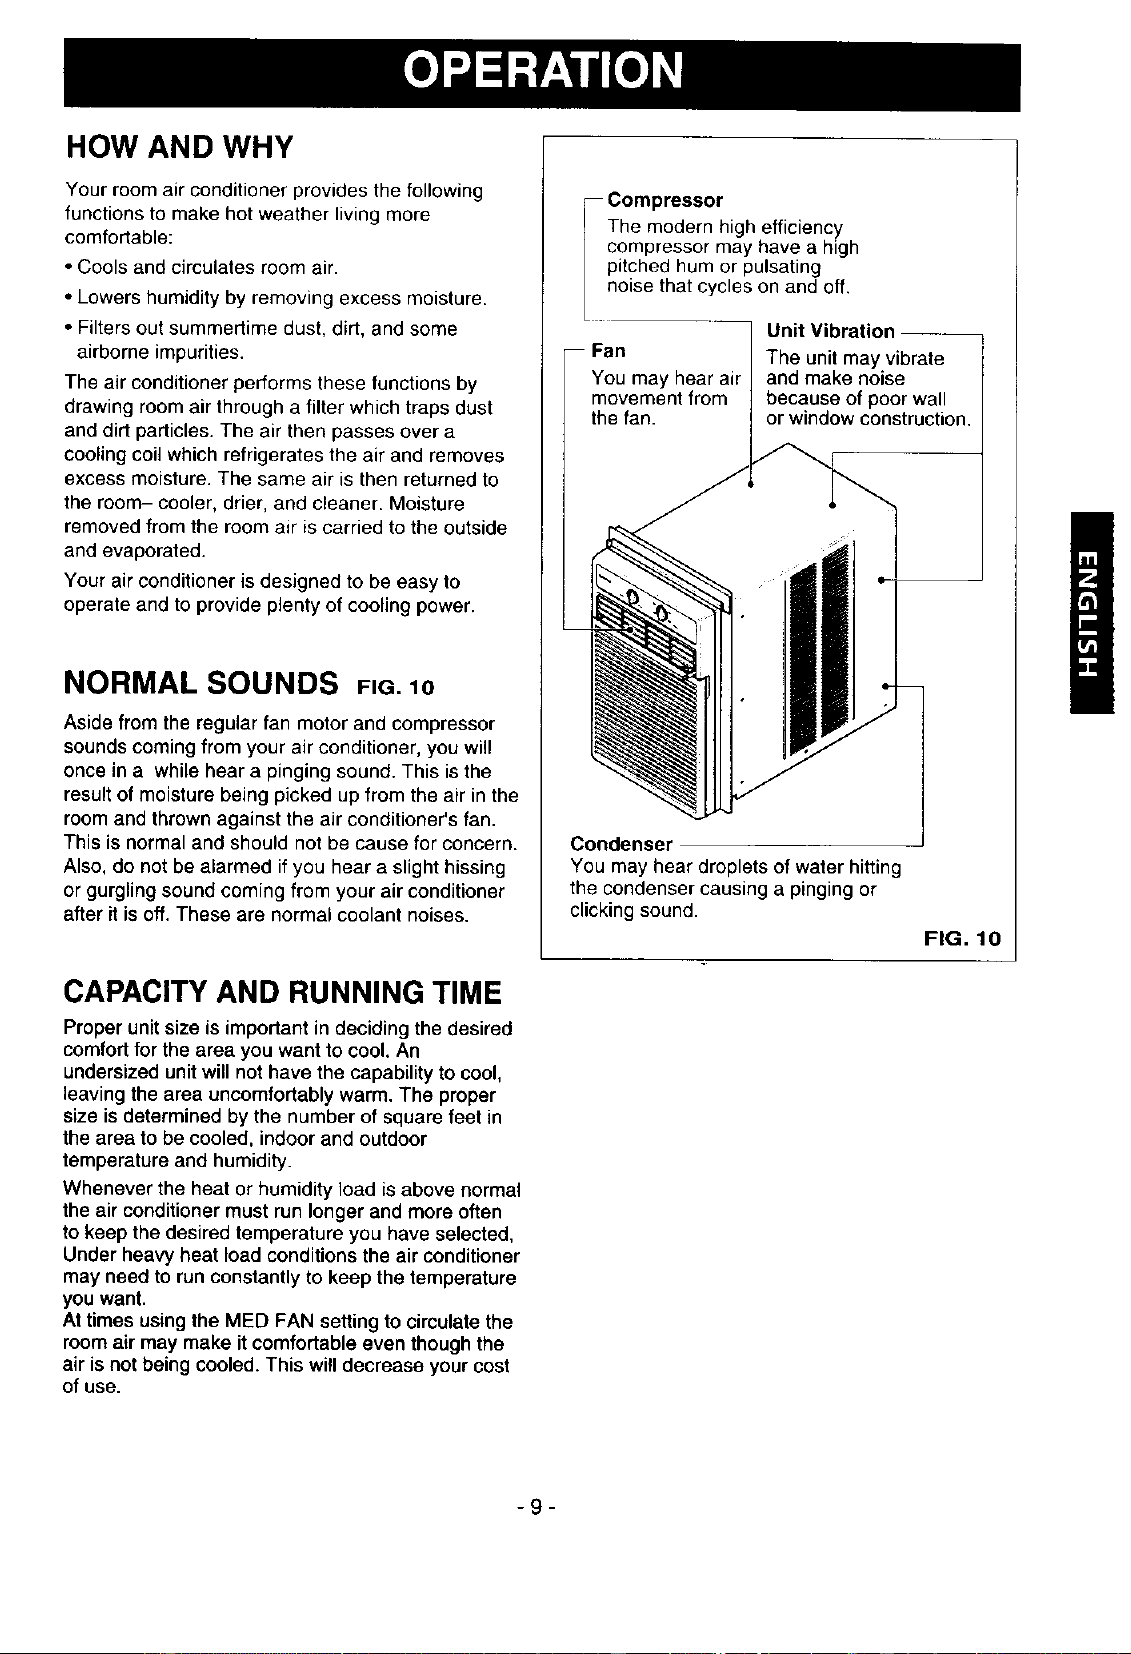
NORMAL SOUNDS FIG.10
Aside from the regular fan motor and compressor
sounds coming from your air conditioner, you will
once in a while hear a pinging sound. This is the
result of moisture being picked up from the air in the
room and thrown against the air conditioner's fan.
This is normal and should not be cause for concern.
Also, do not be alarmed if you hear a slight hissing
or gurgling sound coming from your air conditioner
after it is off. These are normal coolant noises.
CAPACITY AND RUNNING TIME
Proper unit size is important in deciding the desired
comfortfor the area you want to cool. An
undersized unit will not have the capability to cool,
leaving the area uncomfortably warm. The proper
size is determined by the number of square feet in
the area to be cooled, indoor and outdoor
temperature and humidity.
Whenever the heat or humidity load is above normal
the air conditioner must run longer and more often
to keep the desired temperature you have selected,
Under heavy heat load conditions the air conditioner
may need to run constantly to keep the temperature
you want.
At times using the MED FAN setting to circulate the
room air may make it comfortable even though the
air is not being cooled. This will decrease your cost
of use.
F Compressor
The modern high efficiency
compressor may have a high
pitched hum or pulsating
noise that cyc es on and off.
Unit Vibration ----
i Fan The unit may vibrate
You may hear air and make noise
movement from because of poor wall
the fan. or window construction.
Condenser
You may hear droplets of water hitting
the condenser causing a pinging or
clicking sound.
FIG. 10
-9-
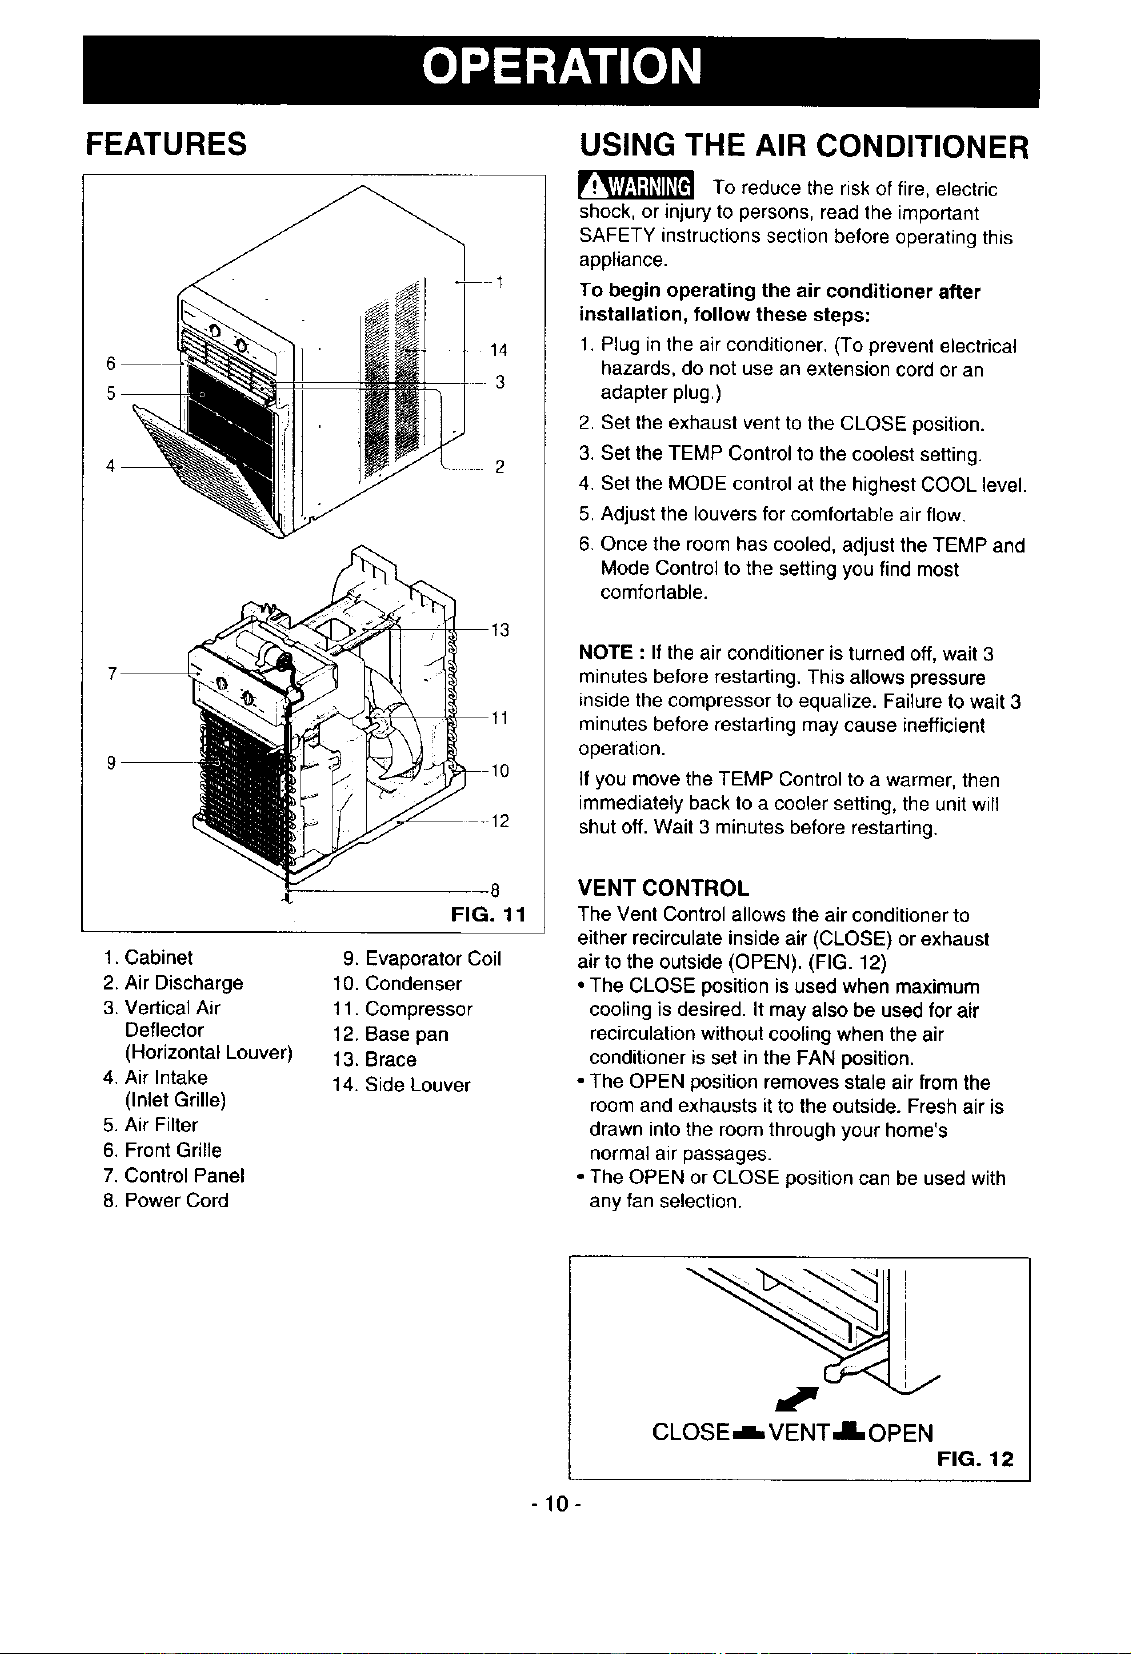
FEATURES
1
14
3
4
7 " 13
11
9 _ 10
FIG. 11
1. Cabinet
2. Air Discharge
3. Vertical Air
Deflector
(Horizontal Louver)
4. Air Intake
(Inlet Grille)
5. Air Filter
6. Front Grille
7. Control Panel
8. Power Cord
9. Evaporator Coil
10. Condenser
11. Compressor
12. Base pan
13. Brace
14. Side Louver
USING THE AIR CONDITIONER
To reduce the risk of fire, electric
shock, or injury to persons, read the important
SAFETY instructions section before operating this
appliance.
To begin operating the air conditioner after
installation, follow these steps:
1. Plug in the air conditioner. (To prevent electrical
hazards, do not use an extension cord or an
adapter plug.)
2. Set the exhaust vent to the CLOSE position.
3. Set the TEMP Control to the coolest setting.
4. Set the MODE control at the highest COOL level.
5. Adjust the louvers for comfortable air flow.
6. Once the room has cooled, adjust the TEMP and
Mode Control to the setting you find most
comfortable.
NOTE : If the air conditioner is turned off, wait 3
minutes before restarting. This allows pressure
inside the compressor to equalize. Failure to wait 3
minutes before restarting may cause inefficient
operation.
If you move the TEMP Control to a warmer, then
immediately back to a cooler setting, the unit will
shut off. Wait 3 minutes before restarting.
VENT CONTROL
The Vent Control allows the air conditioner to
either recirculate inside air (CLOSE) or exhaust
air to the outside (OPEN). (FIG. 12)
• The CLOSE position is used when maximum
cooling is desired. It may also be used for air
recirculationwithout cooling when the air
conditioner is set in the FAN position.
• The OPEN position removes stale air from the
room and exhausts itto the outside. Fresh air is
drawn into the room through your home's
normal air passages.
• The OPEN or CLOSE positioncan be used with
any fan selection.
I
CLOSE .-=..VENT _ OPEN
FIG. 12
-10-
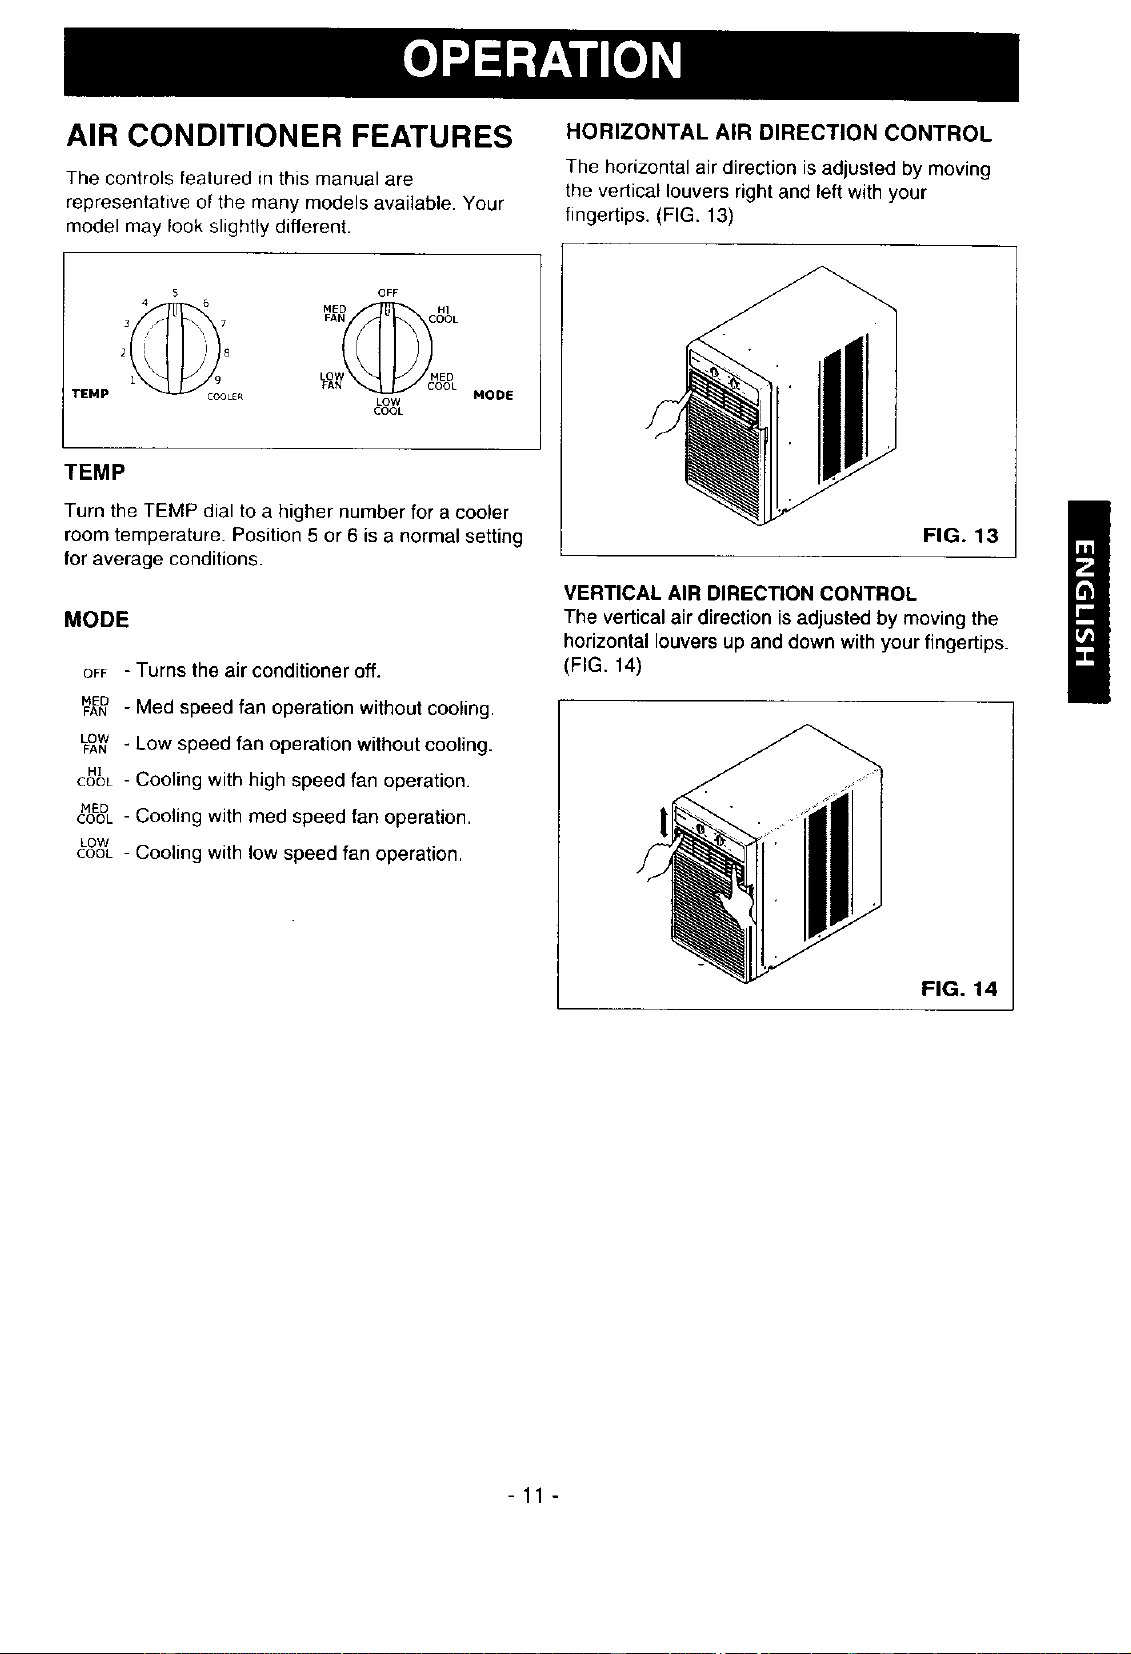
AIR CONDITIONER FEATURES
The controls featured in this manual are
representative of the many models available. Your
model may look slightly different.
HORIZONTAL AIR DIRECTION CONTROL
The horizontal air direction is adjusted by moving
the vertical louvers right and left with your
fingertips. (FIG. 13)
5 OFF
3 7 FAN COOL
2 8
LOW MED
1 9 FAN OOL
TEMP OLE_ MODE
LOW
COOL
TEMP
Turn the TEMP dial to a higher number for a cooler
room temperature. Position 5 or 6 is a normal setting
for average conditions.
MODE
OFF - Turns the air conditioner off.
MEDFAN- Med speed fan operation without cooling.
LOWFAN" LOWspeed fan operation without cooling.
H[
cool - Cooling with high speed fan operation.
MED
COOL- Cooling with med speed fan operation.
Low
COOL- Cooling with low speed fan operation.
FIG. 13
VERTICAL AIR DIRECTION CONTROL
The vertical air direction is adjusted by moving the
horizontal louvers up and down with your fingertips.
(FIG. 14)
-11 -
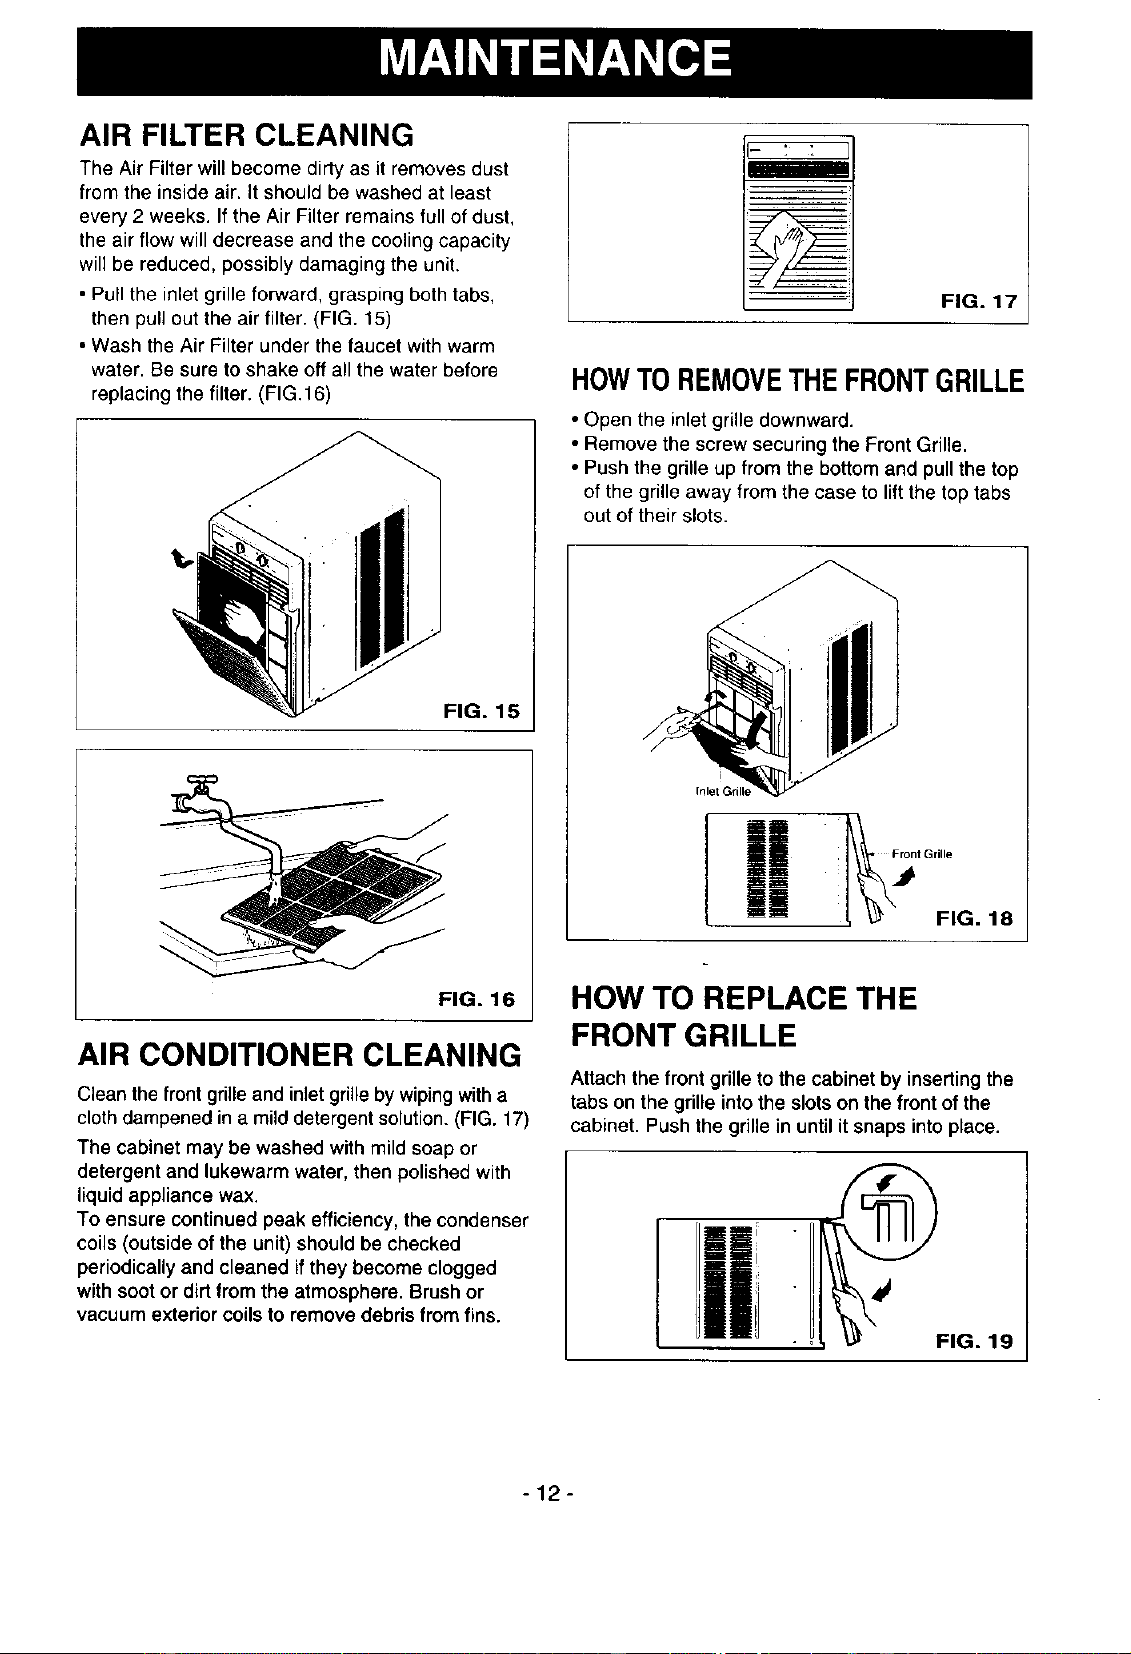
AIR FILTER CLEANING
The Air Filter will become dirty as it removes dust
from the inside air. It should be washed at least
every 2 weeks. If the Air Filter remains full of dust,
the air flow will decrease and the cooling capacity
will be reduced, possibly damaging the unit.
• Pull the inlet grille forward, grasping both tabs,
then pull out the air filter. (FIG. 15)
• Wash the Air Filter under the faucet with warm
water. Be sure to shake off all the water before
replacing the filter. (FIG. 16)
t,.
FIG. 15
FIG. 16
AIR CONDITIONER CLEANING
Clean the front grille and inlet grille by wipingwith a
cloth dampened in a mild detergent solution. (FIG. 17)
The cabinet may be washed with mild soap or
detergent and lukewarm water, then polished with
liquid appliance wax.
To ensure continued peak efficiency, the condenser
coils (outside of the unit) should be checked
periodically and cleaned if they become clogged
with soot or dirt from the atmosphere. Brush or
vacuum exterior coils to remove debris from fins.
imaBiil=
FIG. 17
HOWTOREMOVETHE FRONTGRILLE
• Open the inlet grille downward.
• Remove the screw securing the Front Grille.
• Push the grille up from the bottom and pullthe top
of the grille away from the case to liftthe top tabs
out of their slots.
Irllet G_II
I
i_t Grille
_ FIG. 18
HOW TO REPLACE THE
FRONT GRILLE
Attach the front grille to the cabinet by inserling the
tabs on the grille into the slots on the front of the
cabinet. Push the grille in until it snaps into place.
-12-
BEFORE CALLING FOR SERVICE
Check the following list to be sure a service call is really necessary. A quick reference to this manual may
help you avoid an unneeded service call.
THE AIR CONDITIONER WILL NOT OPERATE
Check if... Then...
Wall plug disconnected.
House fuse blown or circuit breaker tripped.
MODE selector is OFF position.
Unit was tumed off and then on too quickly.
TEMP Control cot warmer than room temperature
Push plugfirmly into walloutlet.
Replace fuse withtime delay type or reset circuit breaker.
Tum MODE selector to the desired COOL setting.
Tum unit off and wait 3 minutes before restarting
Tum TEMP Control clockwise to a cooler setting (highernumber).
AIR FROM UNIT DOES NOT FEEL COLD ENOUGH.
Check if... Then...
MODE selector in LOW COOL Position.
TEMP Control set too warm (lower number).
Room temperature below 70°F (21°C).
Temperature sensing tube touching evaporator coit,
located behind front grille.
Turn selector to HIGH COOL position
Tum TEMP Control clockwise to a cooler setting (higher number).
Cooling may not occur until room temperature rises above 70°F (21°C).
Straighten tube away from evaporator coil
Air filter may be dirty.
TEMP Control set toocold for night-time cooling.
THE AIR CONDITIONER COOLING, BUT ROOM IS TOO WARM - ICE FORMING ON COOLING COIL BEHIND FRONT GRILLE.
Check if... Then...
Outdoor temperature below 70°F (21°C). To defrost the coil, set selectorto FAN position. Then, turn TEMP control
counterclockwico toa wanner setting (lower number),
Clean filter. Referto Maintenance section of owner's manual. To defrost,
set selector to FAN position
Todefrostthecoil,setseleclertoa FANposition.Then,settheMODEcontrolat FAN
positionor "HighCool"withtheTEMPcontroltoawarmersetting(lowernumber).
11"tEAIRCONDnlONERCOOUNG,BUTROOMISTOOWARM.
Check if...
Dirty air filter- air restricted.
TEMP Control cot too warm.
Front of unit is blocked by drapes, blinds, furniture,
etc. Air distribution is restncted.
Doors, windows, registers, etc. open. Cold air escapes.
Unit recently tumed on in hot room,
Clean air filter. Referto Maintenancesectionof owners manual.
Tum TEMP controlclockwiseto a cooler cotting (higher number).
Clear blockage in frontof unit.
Close doors, windows,registers, etc.
Allowaddi_onaltimeto removestoredheatfromwalls,ceiling,floor,andfurniture,
THE AIR CONDITIONER TURNS ON AND OFF RAPIDLY.
Check If.,. Then...
I Outside temperature isextremelyhot. I Set MODE on HIGH speedto bitng air past coolingcoils faster. I
NOISE WHEN UNIT IS COOLING.
Check if... Then...
I Soundof fanhitltngwater- fromthemoistureremovalsystem. This is normalwhen humidityis high.Close doors,windows, and registers.Widdow vibration - poor installatlen. I Referto installationinstructlensor check with installer. !
WATER DRIPPING INSIDE ROOM WHEN UNIT IS COOLING.
Check if... Then,,,
I The air conditioner isimproperlyinstalled. I Tilt air conditioner slightlyto the outsideto allow waterdrainage. Refer to
I
installationinstructions or check withinstaller. I
I
I
WATER DRIPPING OUTSIDE WHEN UNIT IS COOLING.
Check If... Then...
i i id inglarge quantities of moisture I "lIlls is Dermalduringexcoscively huroid day_3. !
-13-
INDICE DE MATERIAS ............................. 14
GARANT|A ................................................ 14
SEGURIDAD .............................................. 15
Importantesinstrucciones de seguridad .....15
REQUERIMIENTOS ELECTRICOS ......... 16
INSTALACI(_N DEL CABLE ELI:tCTRICA...16
INSTALACI(_N ........................................... 17
Requistios de ventana .......................... 17
Installaci6n ............................................ 18
Montaje en una ventana de corredera
horizontal............................................... 18
Instalacion de ventana con marco......... 20
La eliminacion de la ventana ................. 20
GARANT|A DE UN ANO POR EL
OPERACION .............................................. 21
C6mo y per que ..................................... 21
Sonidos normales.................................. 21
Capacidad y tiempo de funcionamiento ...2t
Caractefisticas ..................................... 22
Use del equipo de aire acondieionado ..22
Caracterfsticas del equipo de aire
acondieionado....................................... 23
MANTENIMIENTO .................................... 24
Limpieza del filtro del aire...................... 24
Limpiezadelequipodeaireacondicionado....24
C6mo saear la rejilla frontal ................... 24
C6mo a reemplaza el grille anterior ......24
CORRECCI(_N DE FALLAS ...................... 25
Antesde Uamarparaservicio...................... 25
PARA PEDIR SERVICIO ....... Cubierta Trasera
EQUIPO DE A[RE ACONDICIONADO
DE HABITAClON
Durante un afio complete a partir de la fecha de
compra, si este equipo de aire acondicionado recibe
mantenimiento y se utiliza para el enfriamiento
normal de habitaci6n segen las instrucciones
indicadas en este manual del propietario, Sears
reparar_l gratuitamente este equipo de aire
acondicionado, si tiene algl_n defecto en materiales
o fabricaci6n.
GARANT{A TOTAL DE ClNCO ANOS
POR EL SISTEMA DE REFRIGERAClON
HERMI=TICAMENTE SELLADO
Durante cinco aries a partir de la fecha de compra,
si este equipo de aire acondicionado recibe
mantenimiento y se utiliza para el enfriamiento
normal de habitaci6n segOn las instrucciones
indicadas en este manual del propietario, Sears
reparard gratuitamente el sistema de refrigeraci6n
hermdticamente sellado (que consiste en el agente
refrigerante, los tubes de conexi6n y el compresor),
si tiene alg_n defecto en materiales o fabricacibn.
EL SERVICIO DE GARANT[A EST'. A SU
DISPOSICION CON S()LO PONERSE EN
CONTACTOEL CENTRO DE SEARS AL
1"800-4-MY-HOME ®
La proteccion de garantia cubre unicamente a los
equipos de aire acondicionado usades para use
domestico y no para use comercial.
Esta garantia sblo tiene validez mientras el producto
se est_ usando en los Estados Unidos.
Esta garantfa le da derechos legales especfficos y
usted puede tener otros derechos que varian de
estado en estado.
Sears, Roebuck and Co., D/817WA,
Hoffman Estates, IL 60179 U.S.A.
-14-
IMPORTANTES INSTRUCCIONES DE SEGURIDAD
Las siguientes instrucciones de seguridad le indicaran c6mo usar su equipo de aire acondicionado de
habitacion para evitar dafios para usted mismo y para su EQUIPO DE AIRE ACONDICIQNADO.
POR SU SEGURIDAD
No almacene ni use gasolina u otros vapores y
liquidos inflamables cerca de este o cualquier olro
electrodomestico. Lea las etiquetas de los
productos para vet si contienen advertencias sobre
el caracter inflamable de los mismos y otras
advertencias.
i
PARA PREVENIR ACCIDENTES
Para reducir el riesgo de incendios, descargas
electricas o lesiones personales al usar su equipo
de aire acondicionado, tome las precauciones
b&sicas, entre las que estan las siguientes:
• Aseg0rese de que la alimentacion electrica sea la
apropiada para el modelo que usted ha elegido.
• Si el equipo de aire acondicionado debe instalarse
en una ventana, a usted probablemente le
eonviene limpiar primero ambos lados del vidrio.
Si la ventana ee del tipo de tres paneles con un
panel incluido de pantalla, le conviene sacar la
ventana completamente antes de la instalacion.
• Asegurese de que el equipo de aire
acondicionado ha sido instalado correctamente y
con seguridad segL'm se sefiala en las
instrucciones separadas de inslalaciOn que vienen
en este manual. Conserve este manual y las
instrucciones de instalaciOn para usarlos
posiblemente en el futuro al sacar o volver a
instalar esta unidad.
• Use guantes al manejar el equipo de aire
acondicionado, tenga cuidado para evitar cortadas
con las afiladas aletas metalicas que se hallan en
nes frontales y posteriores.
INFORMAClON ELECTRICA
En la placa de serie del fabricante se indica cual es
la capacidad el_ctrica nominal completa de su nuevo
equipo de aire acondicionado para habitaciOn.Consulte
esta placacuando vaya a verificar los requenmientos
el_,ctricos.
• Asegurese de que el equipa deaire acondicionado
tenga una conexiOncorrecta a tierra. Para reducir al
mlnimo los riesgos de descargas el0etficas e incendio,
es importanteconectar el equipo correctamente a tierra.
El cordon de alimentaciOnel_,ctdca esta equipade con
un enchufe de tres espigas con conexiOna tierra para
protegerlecontra riesgos de descargas electricas.
• Su equipo de aire acondicionado debe enchufarse en
una toma de corriente de pared que tenga una conexion
correctaa tierra. Si latoma de corriente de pared que
usted piensa usar no esta.conectada correctamente a
tierra o no est_ protegida con un fusible de acoiOn
retardada o con un interruptor de circuito, haga que un
electricistacalificado le instale la toma decorriente de
pared en forma correcta.
• No ponga a funcionar el equipo de aire acondicionado
con una cubierla protectora extedor encima. Esto pedria
ocasionar dafios mec_nicos dentro del aire
acondicionado.
• No use un cable de extensibn ni un enchufe
adaptador.
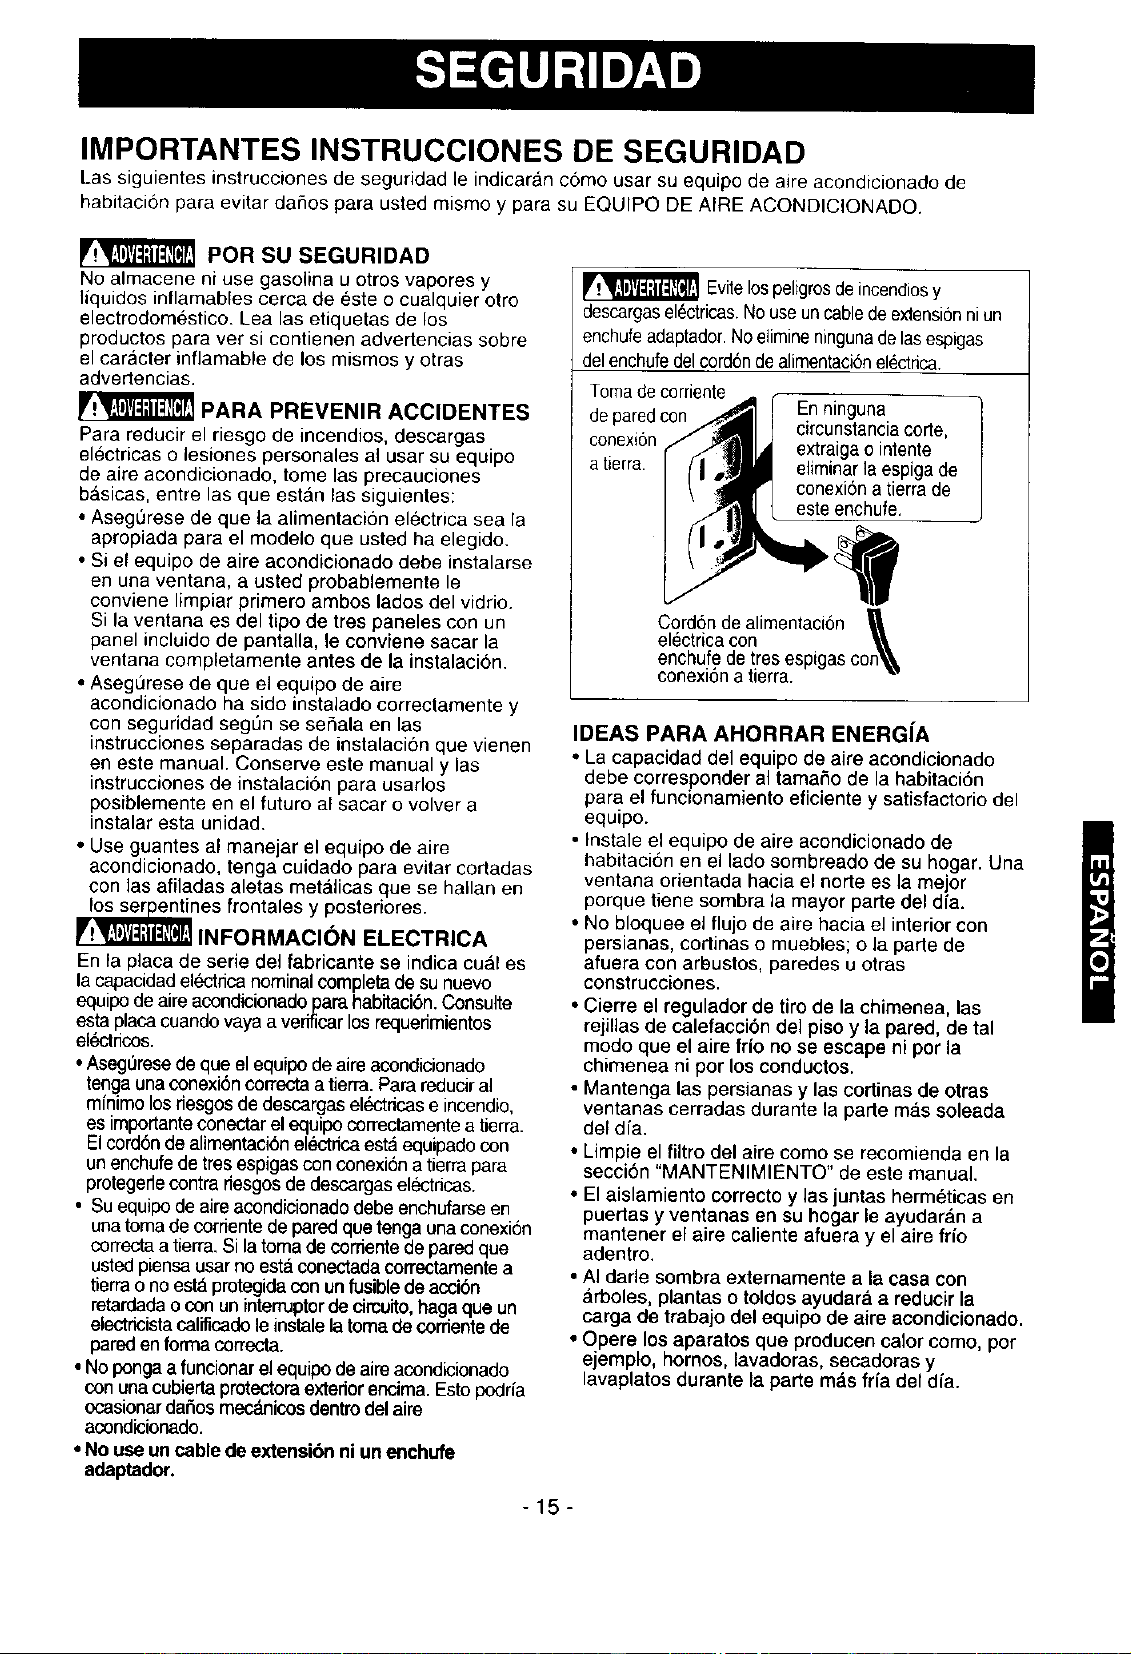
_r_ Evite lospeligrosdeincendiosy
descargasel0ctricas.Nouse uncabledeextensionni un
enchufeadaptader.No elimineningunade las espigas
del enchufedel cordondealimentacionel0ctrica.
Toma decorriente
de paredcon En ninguna ]
circunstancia corte,
conexi6n extraiga o intente
/
a tierra, eliminar la espiga de
conexiOna tierra de
este enchufe.
CordOnde alimentacion
el0ctrica con _1,
enchufe de tres espigas eon_,_
conexiOna tierra. ""
IDEAS PARA AHORRAR ENERG[A
• La capacidad del equipo de aire acondicionado
debe corresponder al tamafio de la habitaciOn
para el funeionamiento eficiente y satiefactorio del
equipo.
• Instale el equipo de aire acondieionado de
habitacion en el lado sombreado de su hogar. Una
ventana orientada hacia el norte es la mejor
porque tiene sombra la mayor parte del dfa.
• No bloquee el flujo de aire haeia el interiorcon
persianas, cortinas o muebles; o la parle de
afuera con arbustos, paredes u otras
construeciones.
• Cierre el regulador de tiro de la chimenea, las
rejillas de calefacci6n del piso y la pared, de tal
modo que el aire frio no se escape ni por la
chimenea ni por los conductos.
• Mantenga las persianas y las eortinas de otras
ventanas cerradas durante la parte m&s soleada
del dfa.
• Limpie el filtro del aire como se recomienda en la
secei6n "MANTENIMIENTO" de este manual.
• El aislamiento correcto y las juntas hermOtieas en
puertas y ventanas en su hogar le ayudaran a
mantener el aire caliente afuera y el aire frfo
adentro.
• AI darle sombra externamente a la casa con
arboles, plantas o toldos ayudara a reducir la
carga de trabajo del equipo de aire acondicionado.
• Opere los aparatos que producen calor como, por
ejemplo, hornos, lavadoras, secadoras y
lavaplatos durante la parte mas frfa del dia.
-15-
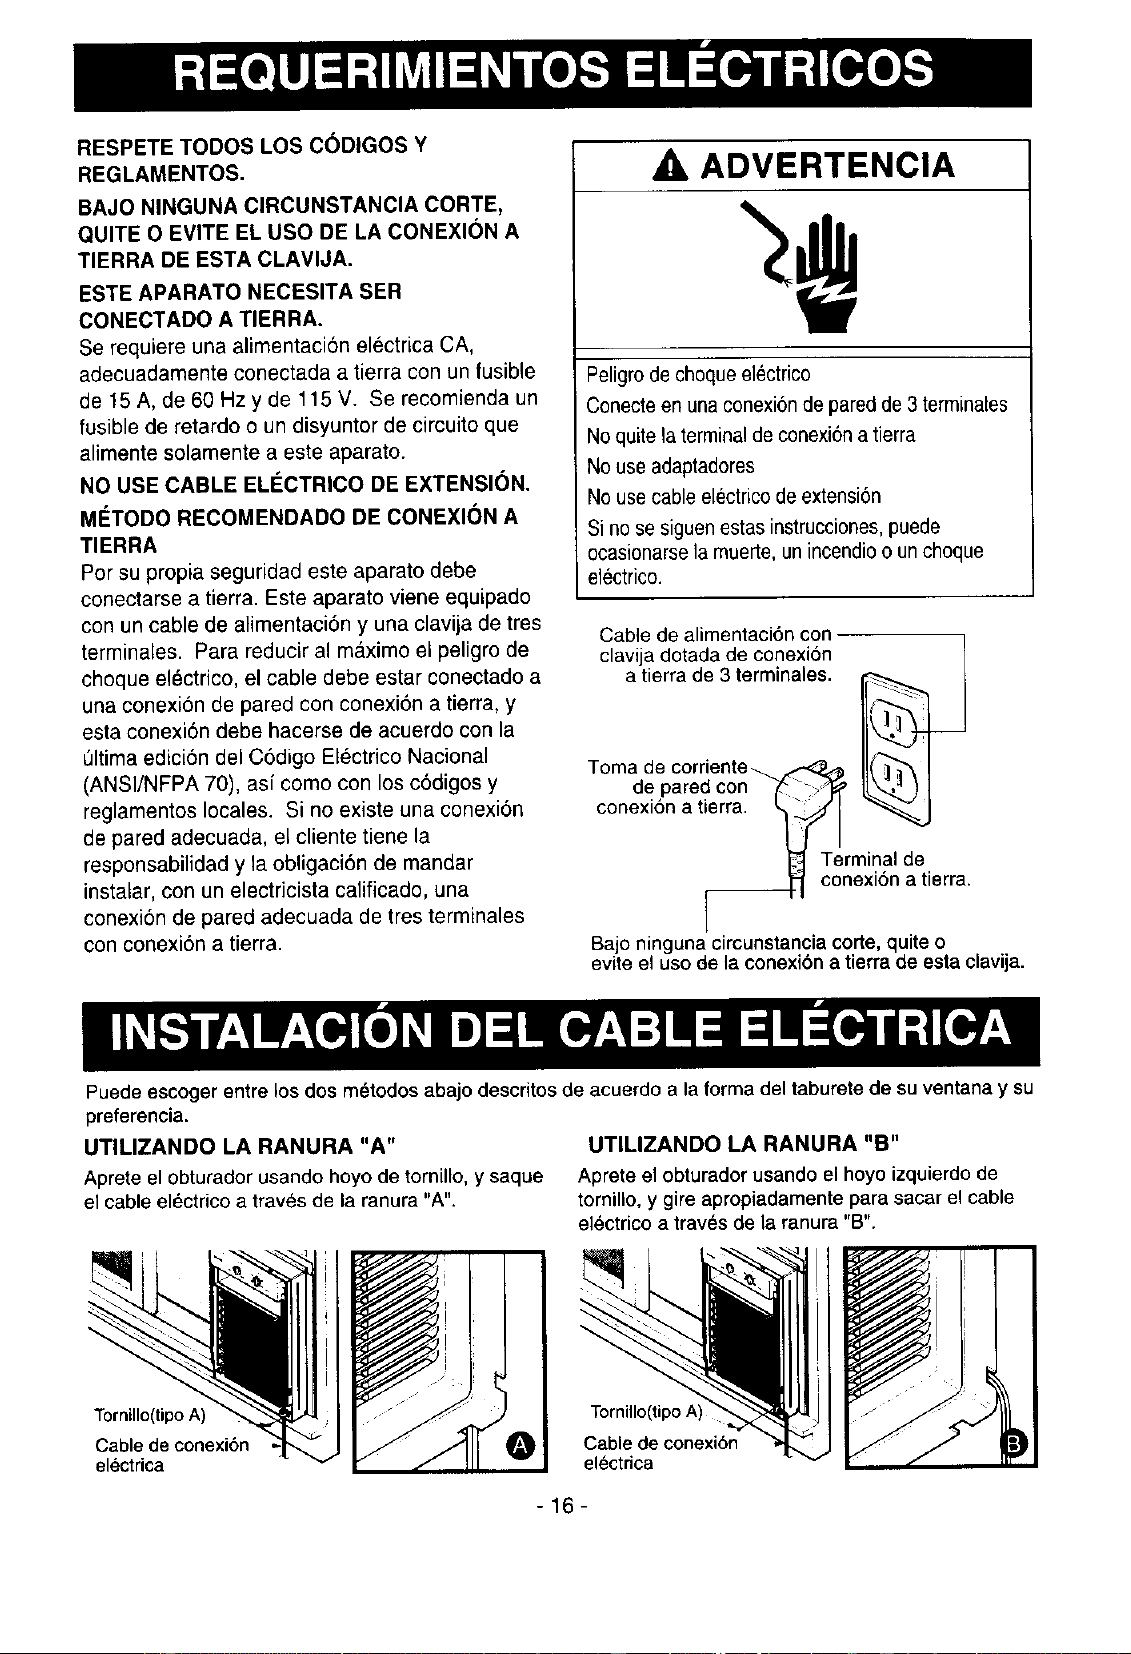
RESPETE TODOS LOS CODIGOS Y
REGLAMENTOS.
BAJO NINGUNA CIRCUNSTANCIA CORTE,
QUITE O EVITE EL USO DE LA CONEXION A
TIERRA DE ESTA CLAVIJA.
ESTE APARATO NECESITA SER
CONECTADO A TIERRA.
Se requiere una alimentaci6n electrica CA,
adecuadamente conectada a tierra con un fusible
de 15 A, de 60 Hz y de 115 V. Se recomienda un
fusible de retardo o un disyuntor de circuito que
alimente solamente a este aparato.
NO USE CABLE ELISCTRICO DE EXTENSI(_N.
MI_TODO RECOMENDADO DE CONEXI(_N A
TIERRA
Porsu propiaseguridad este aparato debe
conectarsea tierra. Este aparatoviene equipado
conun cable de alimentaci6ny una clavijade tres
terminales. Para reducir al m_.ximoel peligro de
choqueelectrieo,el cable debe estar conectadoa
una eonexi6nde pared con conexi6na tierra, y
esta conexibndebe bacerse de acuerdo con la
_ltima edici6ndel Codigo ElectrieoNacional
(ANSI/NFPA 70), asf como con losc6digosy
reglamentos locales. Si no existe una conexi6n
de pared adecuada, el cliente tiene la
responsabilidad y la obligaci6n de mandar
instalar, con un electricista calificado, una
conexi6n de pared adecuada de tres terminales
con conexi6n a tierra.
A ADVERTENCIA
Peligrode chequeelectrico
Conecteen una conexionde paredde3 terminales
No quite laterminaldeconexibna tierra
No use adaptadores
No usecable electricode extension
Sino sesiguenestas instrucciones,puede
ocasionarsela muerte,unincendioo unchoque
el_ctrico.
Cable de alimentaci6n con I
clavi a dotada de conexion /
a tierra de 3 terminales. _ I
Toma de corriente_ _ I1(]_ I
de pared con _ JI
conexi6n a tierra. _'_l _
_1 Terminal de
conexibn a tierra.
Bajo ninguna circunstancia corte,quite o
evite el uso de la conexibn a tierra de esta clavija.
Puede escoger entre los dos m6todos abajo descritos de acuerdo a la forma del taburete de su ventana y su
preferencia.
UTILIZANDO LA RANURA "A" UTILIZANDO LA RANURA "B"
Aprete el obturador usando hoyo de tornillo, y saque Aprete el obturador usando el hoyo izquierdo de
el cable el_ctrico a trav6s de la ranura "A". tomillo, y gire apropiadamente para sacar el cable
electrico a traves de la ranura "B".
Tornillo(tipo A)
Cable de conexibn
electrica
Tornillo(tipo A)
Cable de conexi6n
electrica
=3
-16-
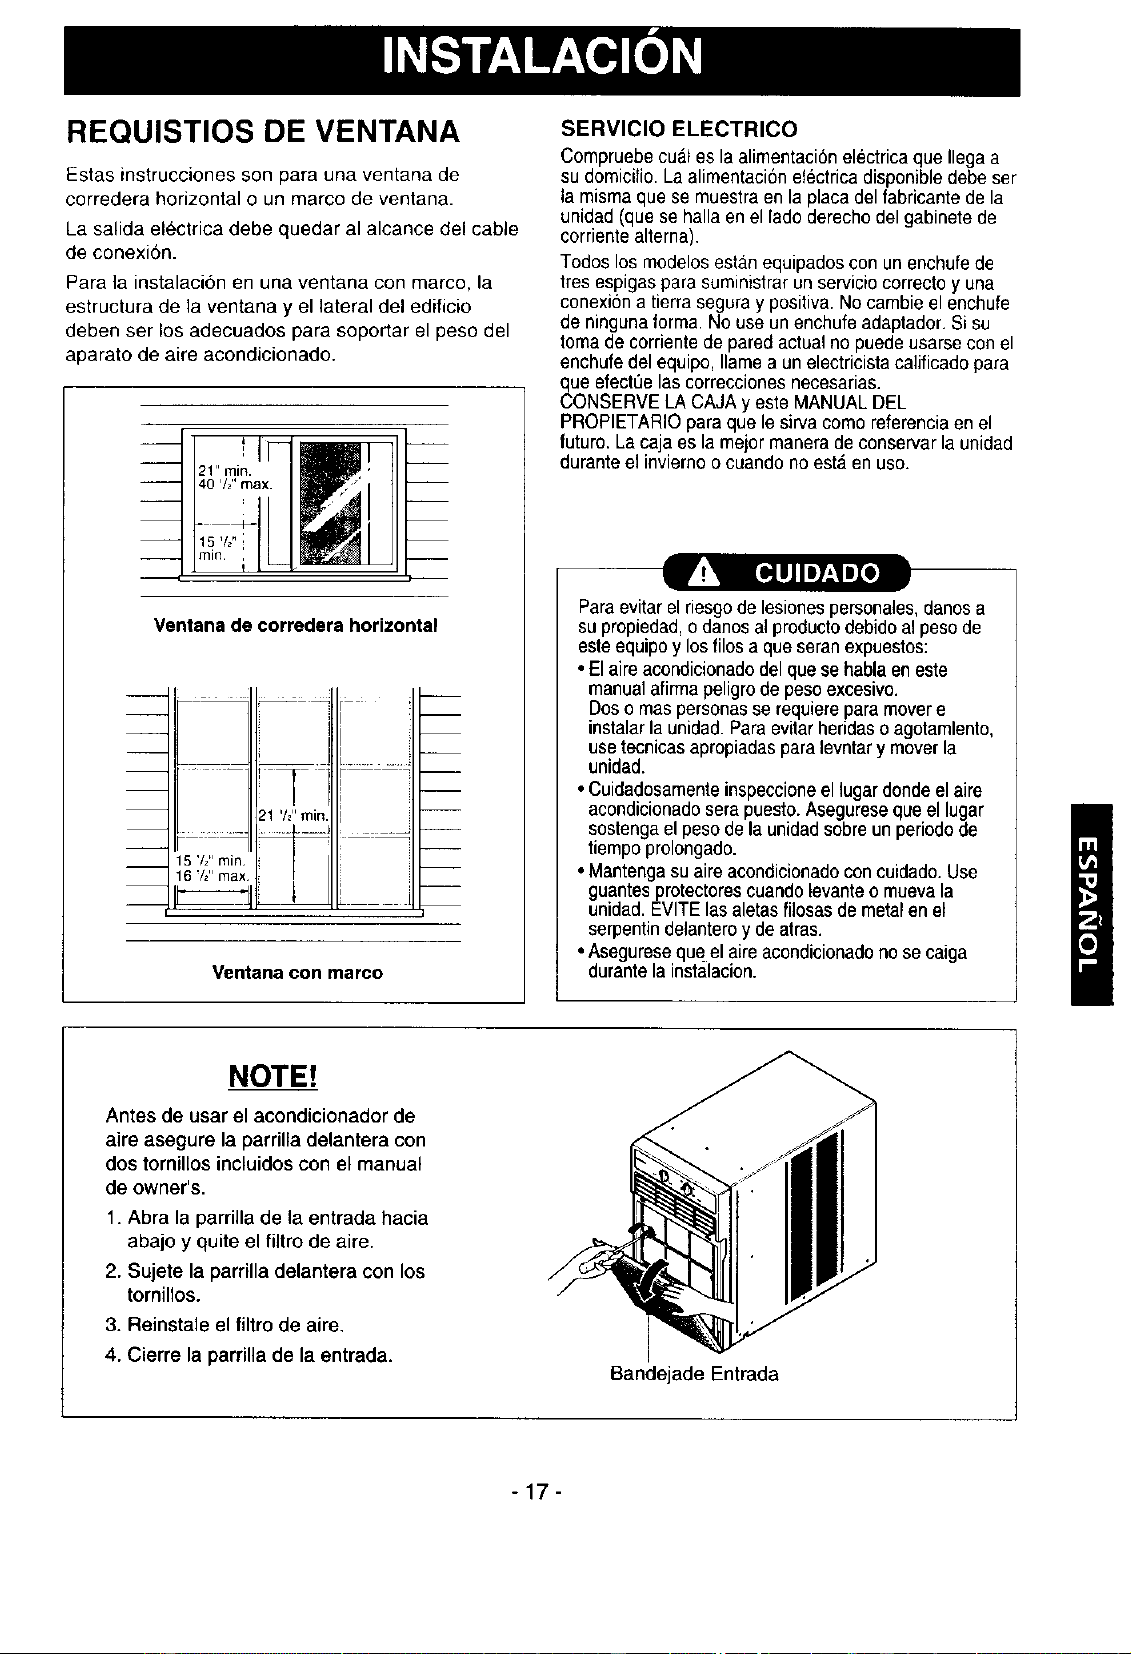
REQUISTIOS DE VENTANA
Estas instrucciones son para una ventana de
corredera horizontal o un marco de ventana.
La salida electrica debe quedar al alcance del cable
de conexi6n.
Para la instalaci6n en una ventana con marco, la
estructura de la ventana y el lateral del edificio
deben ser los adecuados para soportar el peso del
aparato de aire acondicionado.
Ventana de corredera horizontal
m
m
i i
! I
• J ........
21 '/="rain.
5 '/2' rain
6 W' max
m
m
m
Ventana con marco
SERVIClO ELECTRICO
Compruebe cual es la alimentacion electrica que Ilega a
su domicilio. La alimentaci6n el6ctrica disponibledebe ser
la misma que se muestra en la placa del fabricante de la
unidad (que se halla enel lado derecho del gabinete de
corriente alterna).
Todos los modelos estanequipados con unenchufe de
tres espigas para suministrar un servicio correcto y una
conexi6n a tierra segura y positiva. No cambie el enchufe
de ninguna forma. No use un enchufe adaptador. Si su
tomade corriente de pared actual no puede usarse con el
enchufe del equipo, Ilame a un electricista calificado para
que efectL)elas correcciones necesarias.
CONSERVE LA CAJA y este MANUAL DEL
PROPIETARIO para que le sirra como referencia en el
futuro. La caja es la mejor manera de conservar la unidad
durante el invierno o cuando no est_ en uso.
Paraevitar el riesgode lesionespersonales, danos a
su propiedad,o danos al productodebido al peso de
este equipo y los filos a que seranexpuestos:
• El aire acondicionado del que se habla en este
manual afirrna peligrode peso excesivo.
Dos o mas personasse requiere para movere
instalar la unidad. Paraevitar heridas o agotamlento,
usetecnicas apropiadas para levntary mover la
unidad.
• Cuidadosamenteinspeccioneel lugar donde el aire
acondicionado sera puesto. Asegureseque el lugar
sostenga el peso de la unidad sobre unperiodo de
tiempo prolongado.
• Mantenga su aire acondicionado concuidado. Use
guantes protectorescuando levante o muevala
unidad. EVITE las aletas filosas de metal en el
serpentindelantero y de atras.
• Aseguresequeel aire acondicionadono se caiga
durante la instalacion.
NOTE!
Antes de usar el acondicionador de
aire asegure la parrilla delantera con
dos tornillos incluidos con el manual
de owner's.
1. Abra la parrilla de la entrada hacia
abajo y quite el filtro de aire.
2. Sujete la parrilla delantera con los
tornillos.
3. Reinstale el filtro de aire.
4. Cierre la parrilla de la entrada.
Bandejade Entrada
-17-
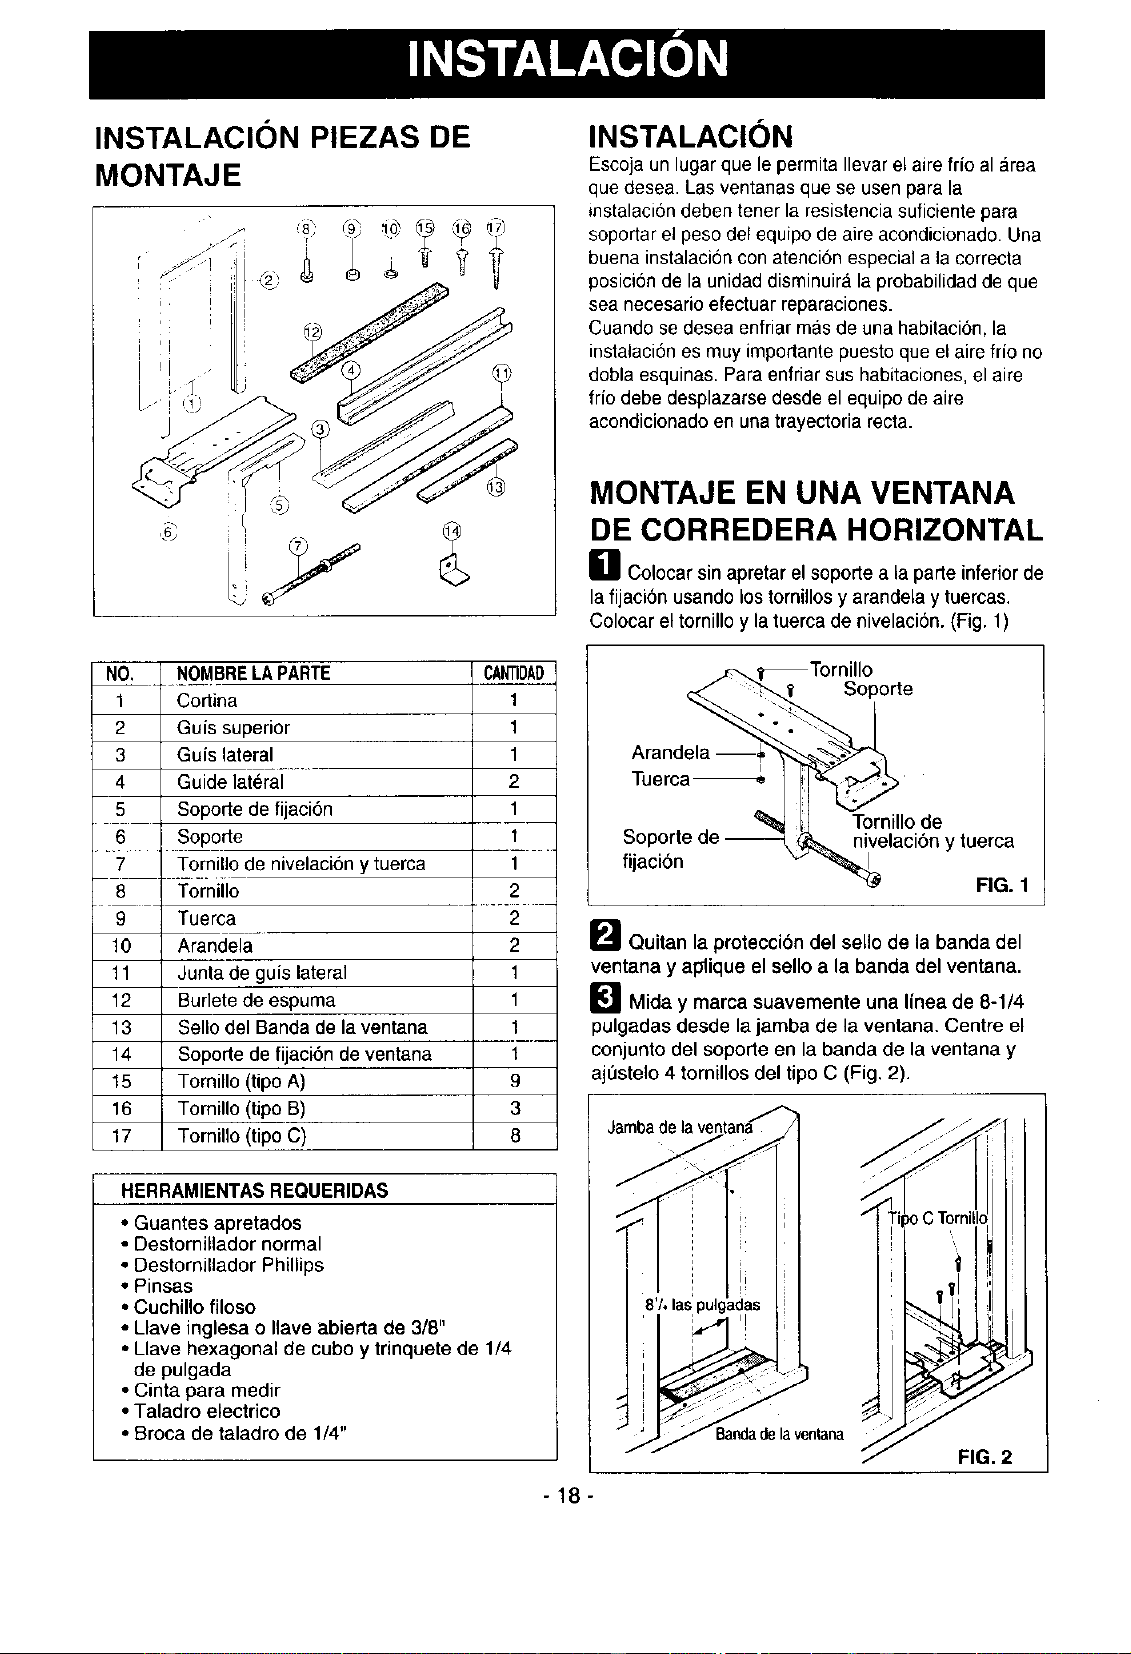
INSTALACI( N PIEZAS DE
MONTAJE
NO. NOMBRELA PARTE
1 Cortina
2 Guis superior
3 Guis lateral
4 Guide lateral
5 Soporte de fijaci6n
6 . Soporte
CANTIDAD
1
t
1
2
1
t
7 Tornillo de nivelacion y tuerca 1
8 Tomillo 2
9 Tuerca 2
10 Arandela 2
11 Junta de guis lateral 1
12 Burlete de espuma 1
13 Sello del Banda de la ventana 1
14 Soporte de fijaci6n de ventana 1
15 Tomillo (tipo A) 9
16 Tomillo (tipo B) 3
17 Tomillo (tipo C) 8
HERRAMIENTAS REQUERIDAS
• Guantes apretados
• Destornillador normal
• Destornillador Phillips
• Pinsas
• Cuchiflo filoso
• Llave inglesa o Ilave abierta de 3/8"
• Llave hexagonal de cubo y trinquete de 1/4
de pulgada
• Cinta para medir
• Taladro electrico
• Broca de taladro de 1/4"
INSTALACION
Escoja un lugar que le permita Ilevar el aire frio al area
que desea. Las ventanas que se usen para la
instalaci6n deben tener la resistencia suficiente para
seportar el peso del equipo de aire acondicionado. Una
buena instalacion con atencion especial a la correcta
posici6nde la unidad disminuira la probabilidad de que
sea necesario efectuar reparaciones.
Cuando se desea enfriar mas de una habitaci6n, la
instalaci6n es muy importante puesto que el aire frio no
dobla esquinas. Para enfriar sus habitaciones, el aire
frio debe desplazarse desde el equipo de aire
acondicionado en uea trayectoria recta.
-18-
MONTAJE EN UNA VENTANA
DE CORREDERA HORIZONTAL
_1 Colocar sin apretar el soporte a la parte inferiorde
lafijaci6n usando los tornillosy arandela y tuercas.
Colocar eltornilloy latuerca de nivelaci6n. (Fig. 1)
j_.j_Tornillo
_" _,,';'_$ Soporte
Arande__
muerca_ I _
LI Tornillo de
Soporte de _ _ nivelaci6n y tuerca
fijacibn v
_'_ FIG. 1
I_11 Quitan la proteccibn del se[Io de la banda del
ventana y aplique el sello a la banda del ventana.
IL_ll Mida y marca suavemente una I{nea de 8-1/4
pulgadas desde la jamba de la ventana. Centre el
conjunto del soporte en la banda de la ventana y
aji_stelo 4 tornillos del tipo C (Fig. 2).
ILE! Coloque la sujecion del soporte contra la pared
exterior y apriete los tornillos en la parte superior
del soporte. Ajuste los tornillos de nivelaci6n de
forrna que el aire acondicionado quede instalada
con una inclinacion muy suave (unos 1/4") hacia
abajo hacia la salida para que drene correctamente.
Apriete la tuerca. (Fig. 3)
NOTA: NO taladrar un agujero en la parte inferior
de la bandeja de la base. El aire
acondicionado ha sido diseSado para
funcionar con la bandeja de la base Ilena
con agua aproximadamente hasta la mitad
de su capacidad.
unos 114" _l
I_ Sujete las gufas laterales a los laterales del aire
acondicionado con tres tornillos del tipo A para las
gu/as. Comience con el primer tornillo en la parte
media de las guias. (Fig. 4)
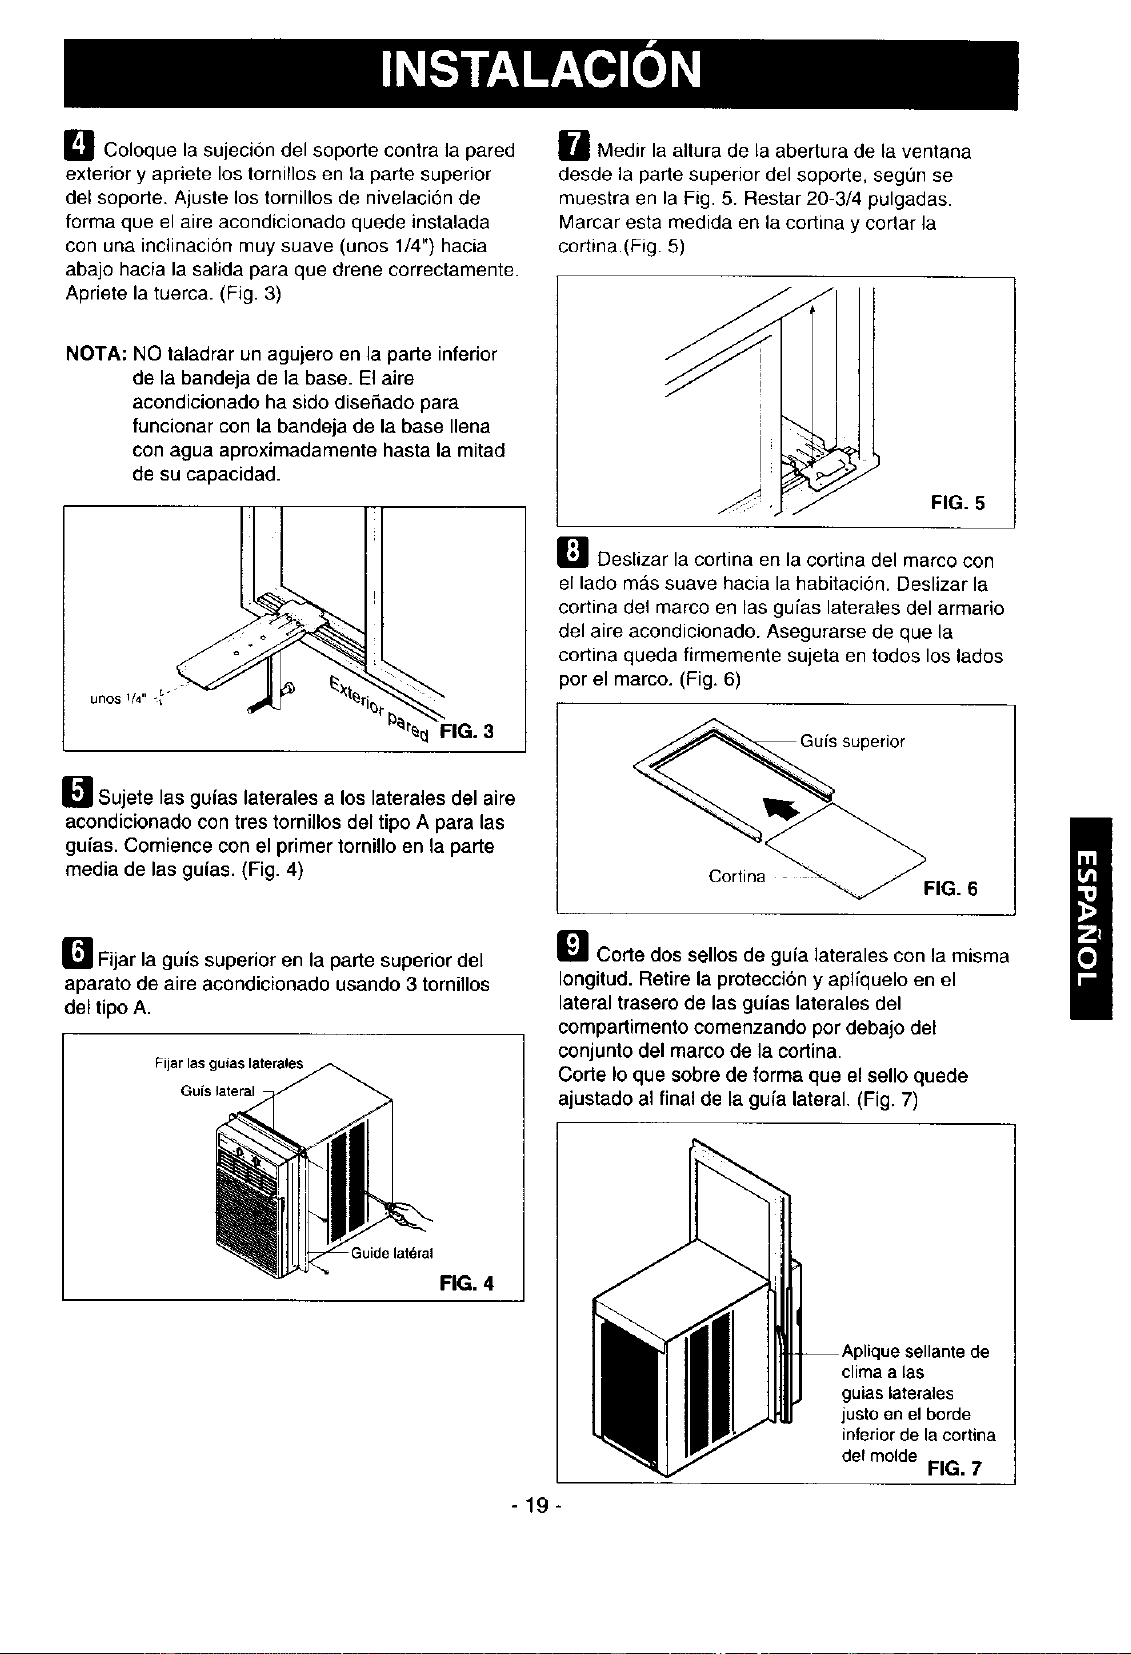
I_1 Medir la altura de la abertura de la ventana
desde la parle superior del soperte, segun se
muestra en la Fig. 5. Restar 20-3/4 pulgadas.
Marcar esta medida en la cortina y cortar la
cortina.(Fig. 5)
FIG. 5
I1_1 Deslizar la cortina en la cortina del marco con
el lado m_,ssuave hacia la habitaci6n. Deslizar la
cortina del marco en las gufas laterales del armario
del aire acondicionado. Asegurarse de que la
cortina queda firmemente sujeta en todos los lados
_orel marco. (Fig. 6)
Ir_ Fijar la gu/s superior en la parte superior del
aparato de aire acondicionado usando 3 tornillos
del tipo A.
Fijar las guias laterales
Guis lateral
Guide lat6ral
FIG. 4
ll_ Corte dos s_,llos de gufa laterales con la misma
Iongitud. Retire la protecci6n y aplfquelo en el
lateral trasero de las guias laterales del
compartimento comenzando por debajo del
conjunto del marco de la cortina.
Code Io que sobre de forma que el sello quede
ajustado al final de la gu/a lateral. (Fig. 7)
-19-
clima alas
guias laterales
justo en el borde
interior de la cortina
del molde
FIG. 7
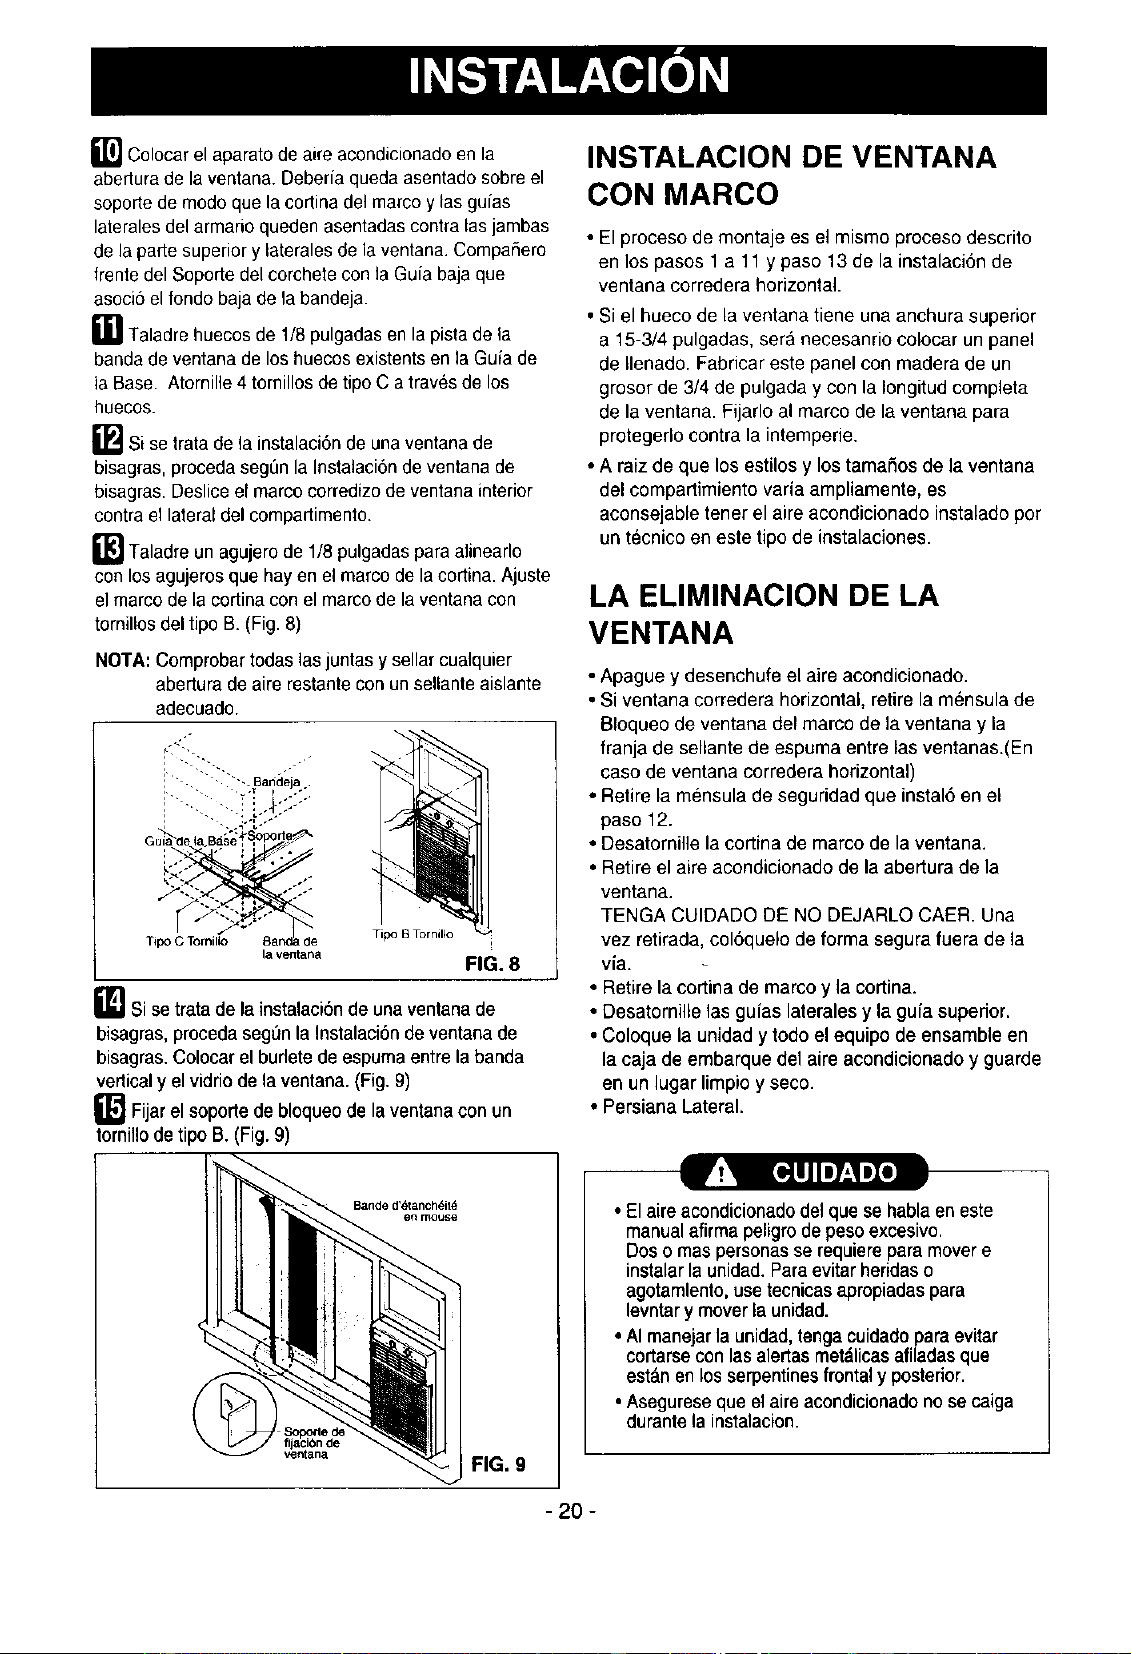
illl Colocar el aparato de aire aeondicionado en la
abertura de la ventana. Deberia queda asentado sobre el
soporte de modo que la cortina del marco y tas guias
laterales del armario queden asentadas contra las jambas
de la parte superior y laterales de la ventana. Compafiero
frente del Soporte del corchete con la Guia baja que
asoci6 el fondo baja de la bandeja.
ill Taladre huecos de 1/8 pulgadas en la pista de la
banda de ventana de los huecos existents en la Guia de
la Base. Atornille 4 tomillos de tipo C a trav_s de los
huecos.
i_JSi se trata de la instalaci6n de una ventana de
bisagras, proceda segLin la Instalaci6n de ventana de
bisagras. Deslice el marco corredizo de ventana interior
contra el lateral del compaltimento.
i'[R1Taladre un agujero de 1/8 pulgadas para alinearlo
con los agujeros que hay en el marco de la cortina. Ajuste
el marco de la cortina con el marco de la ventana con
tornillos del tipo B. (Fig. 8)
NOTA: Comprobar todas 1asjuntas y sellar cualquier
abertura de aire restante con un seUanteaislante
adecuado.
""-. Bad_Jeja .
L'.":'Y ."
Tipo C T_nil_ _& "BandaT_d'e Tipo B Tornil4o
la ventana
FIG. 8
IL_l] si se trata de la instalaci6n de una ventanade
bisagras, proceda segOnla Instalaci6n de ventana de
bisagras. Colocar el burlete de espuma entre la banda
vertical y el vidrio de la ventana. (Fig. 9)
i_ Fijar el soporte de bloqueo de laventana con un
tornillo de tipo B. (Fig. 9)
INSTALAClON DE VENTANA
CON MARCO
• El proceso de montaje es el mismo proceso descrito
en los pasos 1 a 11 y paso 13 de la instalaci6n de
ventana corredera horizontal.
• Si el hueco de la ventana tiene una anchura superior
a 15-3/4 pulgadas, ser_ necesanrio colocar un panel
de Ilenado. Fabricar este panel con madera de un
grosor de 3/4 de pulgada y con la Iongitud completa
de la ventana. Fijarlo al marco de la ventana para
protegedo contra la intempede.
• A raiz de que los estilos y los tamai_os de la ventana
del oompartimiento varia ampliamente, es
aconsejable tener el aire acondicionado instalado por
un t_=cnicoen este tipo de instalaciones.
LA ELIMINACION DE LA
VENTANA
• Apague y desenchufe el aire acondicionado.
• Si ventana corredera horizontal, retire la m_nsula de
BIoqueo de ventana clelmarco de la ventana y la
franja de sellante de espuma entre las ventanas.(En
caso de ventana corredera horizontal)
• Retire la mensula de seguridad que instal6 en el
paso 12.
• Desatornille la cortina de marco de la ventana.
• Retire el aire acondicionado de la abertura de la
ventana.
TENGA CUIDADO DE NO DEJARLO CAER. Una
vez retirada, col6quelo de forma segura fuera de la
via.
• Retire la cortina de marco y la cortina.
• Desatornille 1asguias laterales y la guia superior.
• Coloque la unidad y todo el equipo de ensamble en
la caja de embarque de1aire acondicionado y guarde
en un lugar limpio y seco.
• Persiana Lateral.
I_ [eiUlIe7_,IeZo]
Bande d'_tanch_il_
FIG. 9
• El aireacondicionado de1que se habla en este
manual afirma peligro de pesoexcesivo.
Dos o mas personas se requiere para mover e
instalar la unidad. Para evitar heridas o
agotamlento, use tecnicas apropiadas para
levntar y mover la unidad.
• AI manejar la unidad, tenga cuidado para evitar
cortarse con las alertas met&licas afiladas que
estan en los serpentines frontal y posterior.
• Asegurese que el aire acondicionado no se caiga
durante la instalacion.
- 20 -
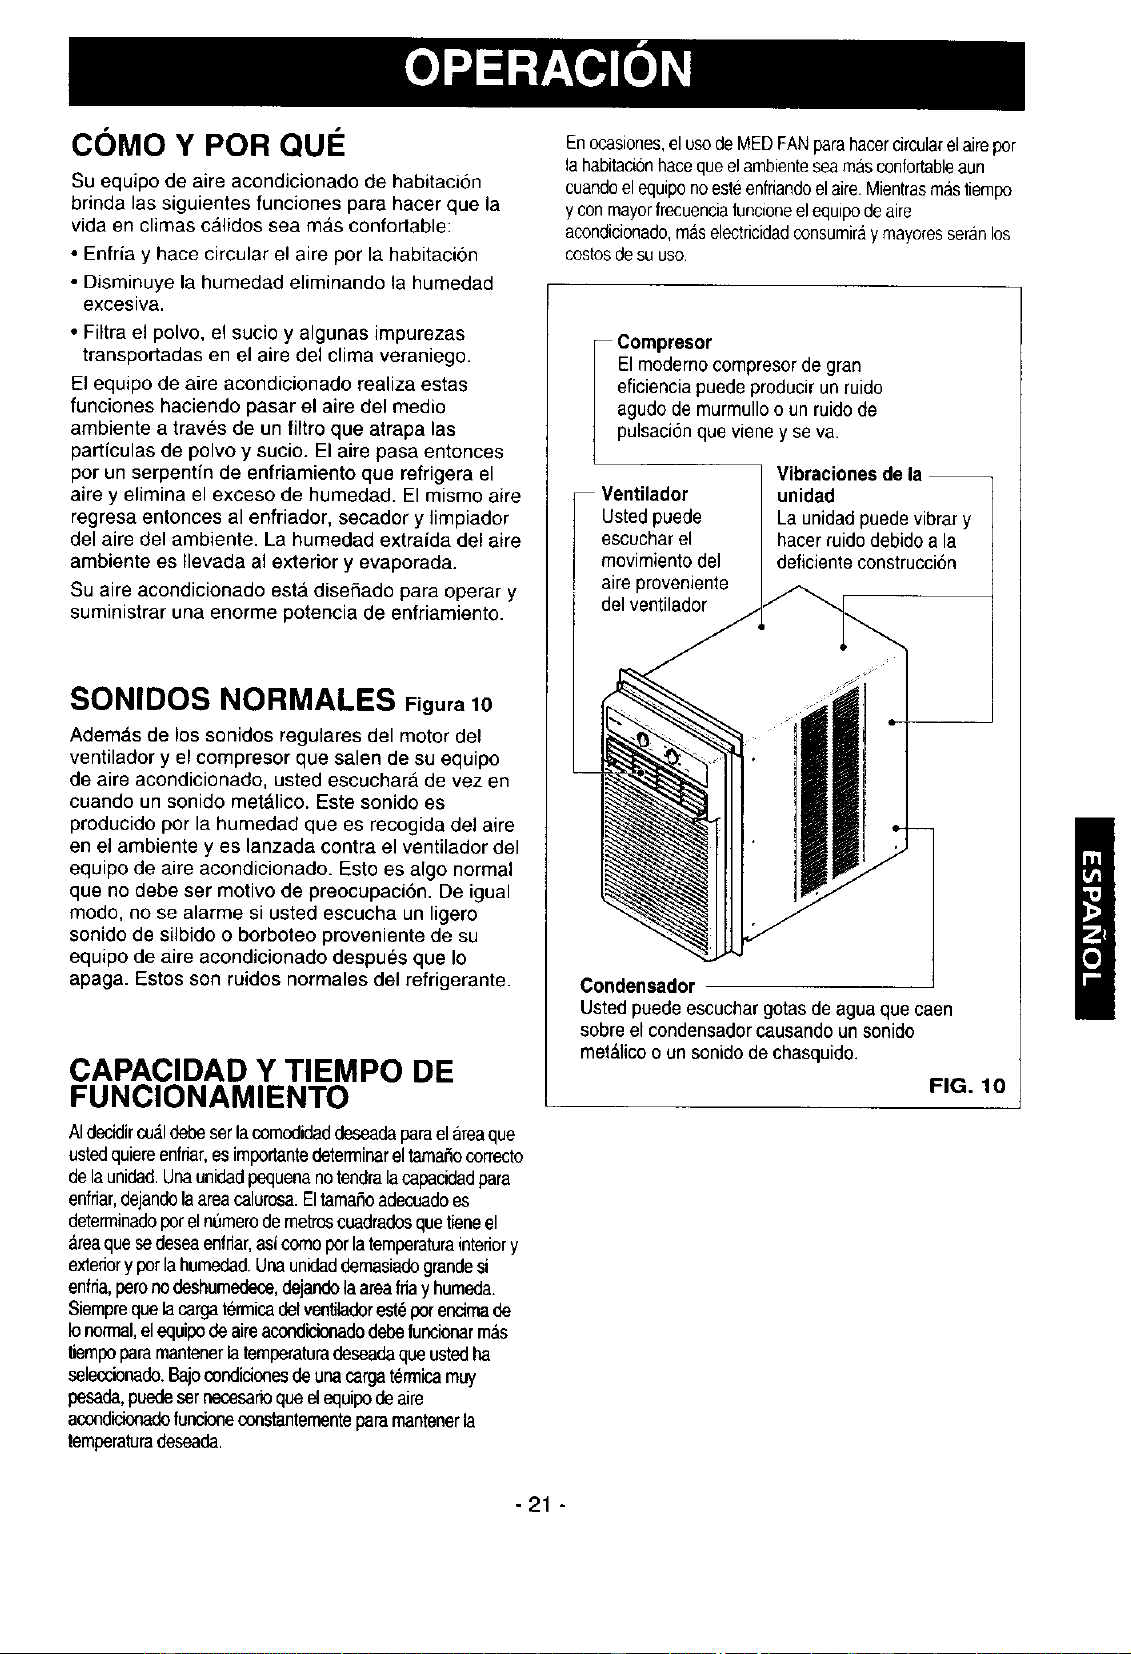
COMOYPOR QUE
Su equipo de aire acondicionado de habitaci6n
brinda las siguientes funciones para hacer que la
vida en climas calidos sea mas confortable:
• Enfria y hace circular el aire por la habitacion
• Disminuye la hurnedad eliminando la humedad
excesiva.
• Filtra el polvo, el sucio y algunas impurezas
transportadas en el aire del clima veraniego.
El equipo de aire acondicionado realiza estas
funciones haciendo pasar el aire del medio
ambiente a trav_s de un filtro que atrapa las
part[culas de polvo y sucio. El aire pasa entonces
por un serpentfn de enfriamiento que refrigera el
aire y elimina el exceso de humedad. El mismo aire
regresa entonces al enfriador, secador y limpiador
del aire del ambiente. La humedad extraida del aire
ambiente es Ilevada al exterior y evaporada.
Su aire acondicionado esta disefiado para operar y
suministrar una enorme potencia de enfriamiento.
SONIDOS NORMALES Figu a10
Ademas de los sonidos regulares del motor del
ventilador y el compresor que salen de su equipo
de aire acondicionado, usted escuchara de vez en
cuando un sonido met&lico. Este sonido es
producido por la humedad que es recogida del aire
en el ambiente yes lanzada contra el ventilador del
equipo de aire acondicionado. Esto es algo normal
que no debe ser motivo de preocupaci6n. De igual
modo, no se alarme si usted escucha un ligero
sonido de silbido o borboteo proveniente de su
equipo de aire acondicionado despues que Io
apaga. Estos son ruidos normales del refrigerante.
CAPAClDAD Y TIEMPO DE
FUNClONAMIENTO
AIdecidirc_aldebeearla cornodidaddeseadaparael areaque
ustedquiereenfriar,esimportantedeterrninareltamafiocorrecto
delaunidad.Unaunidadpequenanotendralacapacidadpara
enfriar,dejandolaareacalurosa.Eltamafioadecuadoes
determinadepotel nt_merode metroscuadradosquetieneel
areaquesedeseaenfriar,eaicomo porlatemperaturainteriory
extenory potlahumedad.Ueaunidaddemasiadograndesi
enfda,perono deahumedece,dejandolaareafnay humeda.
Siemprequelacargatermieadel ventiladorest_porencimade
Ionormal,el equipodeaireaeandicionadedebeluncioearmas
tiempoparamantenerla temperaturadeseadaqueustedha
seleccionado.Bajocondicionesdeunacargatermicamuy
peeada,puedesernecesarioqueel equipodeaire
aceadidonadofunelnoeconstantementepararnantenerla
temperaturadeseada.
Enocasiones,el usodeMEDFANparahacercircularelairepor
lahabitaci6nhacequeel ambienteseamasconfortableaun
cuandoelequ_ponoesteenfriandoelaire Mientrasmastieml_
ycon mayorfrecuencialuncioneel equipode aire
aceaclicionado,maselectricidadconsumiraymayore$seranlos
COStOSde SUUSO
i ompresor
El moderno compresor de gran
eficiencia puede producir un ruido
agudo de murmulloo un ruido de
pulsaci6n que viene y se va.
Vibraciones de la
Ventilador unidad
Ustedpuede La unidadpuedevibrary
eseucharel hacer ruidodebidoa la
movimiento del deficienteeonstrueaion
aire provaniente
delventilador
Condensador
Usted puede escuchar gotas de agua que caen
sobre el condensador causando un sonido
met&lico o un sonido de chasquido.
FIG. 10
-21 -

CARACTERiSTICAS
4
3
2
8
FIG. 11
1. Cabinete
2. Salida Deaire
3. Defleotor De Aire
Horizontal
(Vent Anillas
Horizontales)
4. Recoleotoor
De Aire
(Bandejade Entrada)
5. Fitro De Aire
6. Grillage Frontal
7. Panel De Control
8. Cable De Conexi6n
Electrica
9. Evaporador
10. Condensador
11. Compresor
12. Bandeja
13. Suspensores
14. Persiana Lateral
USO DEL EQUIPO DE AIRE
ACONDICIONADO
_Para reducir el riesgo de incendio,
descargas electrica o lesiones personales, lea las
IMPORTANTES INSTRUCClONES DE
SEGURIDAD antes de operar este aparalo.
Para comenzar a utilizar el equipo de aire
acondicionado, siga estos pasos:
1. Enchufe el equipo de aire aeondicionado, (Para
prevenir riesgos de descargas el_ctricas, no use
un cable de extension ni un enchufe adaptador.)
2. Ajuste el extractor de aire en la posici6n CLOSE.
3. Aluste el control de MODE al mas alto nivel
fresco.
4, Ajuste el control del ventilador al mas alto nivel.
5. Ajuste las rejillas desviadoras para Iograr un flujo
confortable de aire.
6. Una vez que la habitaci6n se haya enfriado,
aluste el control de temperatura TEMP a la
graduacion que usted considere m&s confortable.
NOTA: Si se apaga el aire acondicionado, espere 3
minutos antes de volver a encenderlo. Esto permite
que se estabilice la presion dentro del compresor.
Si no sigue estas instrucciones, el equipo podria
funcionar con poca eficiencia.
Si usted mueve el TEMP el control a un warmer,
entonces inmediatamente espalda a una colocacion
m_.s fresca, la unidad apagar& Espere 3 minutos.
CONTROL DE VENTILACI(_N
El control de ventilaci6n permite que el equipo de
aire acondicionado haga recircular el aire an el
interior de la habitacion (CLOSE) o saque el aire
hacia el exterior (OPEN). (Figura 12)
• La posici6n CLOSE sirve cuando se desea un
enfriamiento m_ximo. Tambi_n puede usarse para
hacer recircular el aire sin enfriar la habitaci6n
cuando el equipo de aire acondicionado se ajusta
en la posici6n FAN.
• La posicion OPEN extrae el aire estancado de la
habitaci6n y Io expulsa haoia fuera. El aire fresco
es Ilevado hacia el intedor de la habitaci6n a traves
de los pasajes normales de aire que se hallan en
los hogares.
• La posici6n OPEN o CLOSE puede usarse con
cualquier selecci6n de ventilador.
!
CLOSEdb VENT JLOPEN
(TIRARPARAABRIR/ EMPUJARPARACERRAR)
FIG. 12
- 22 -
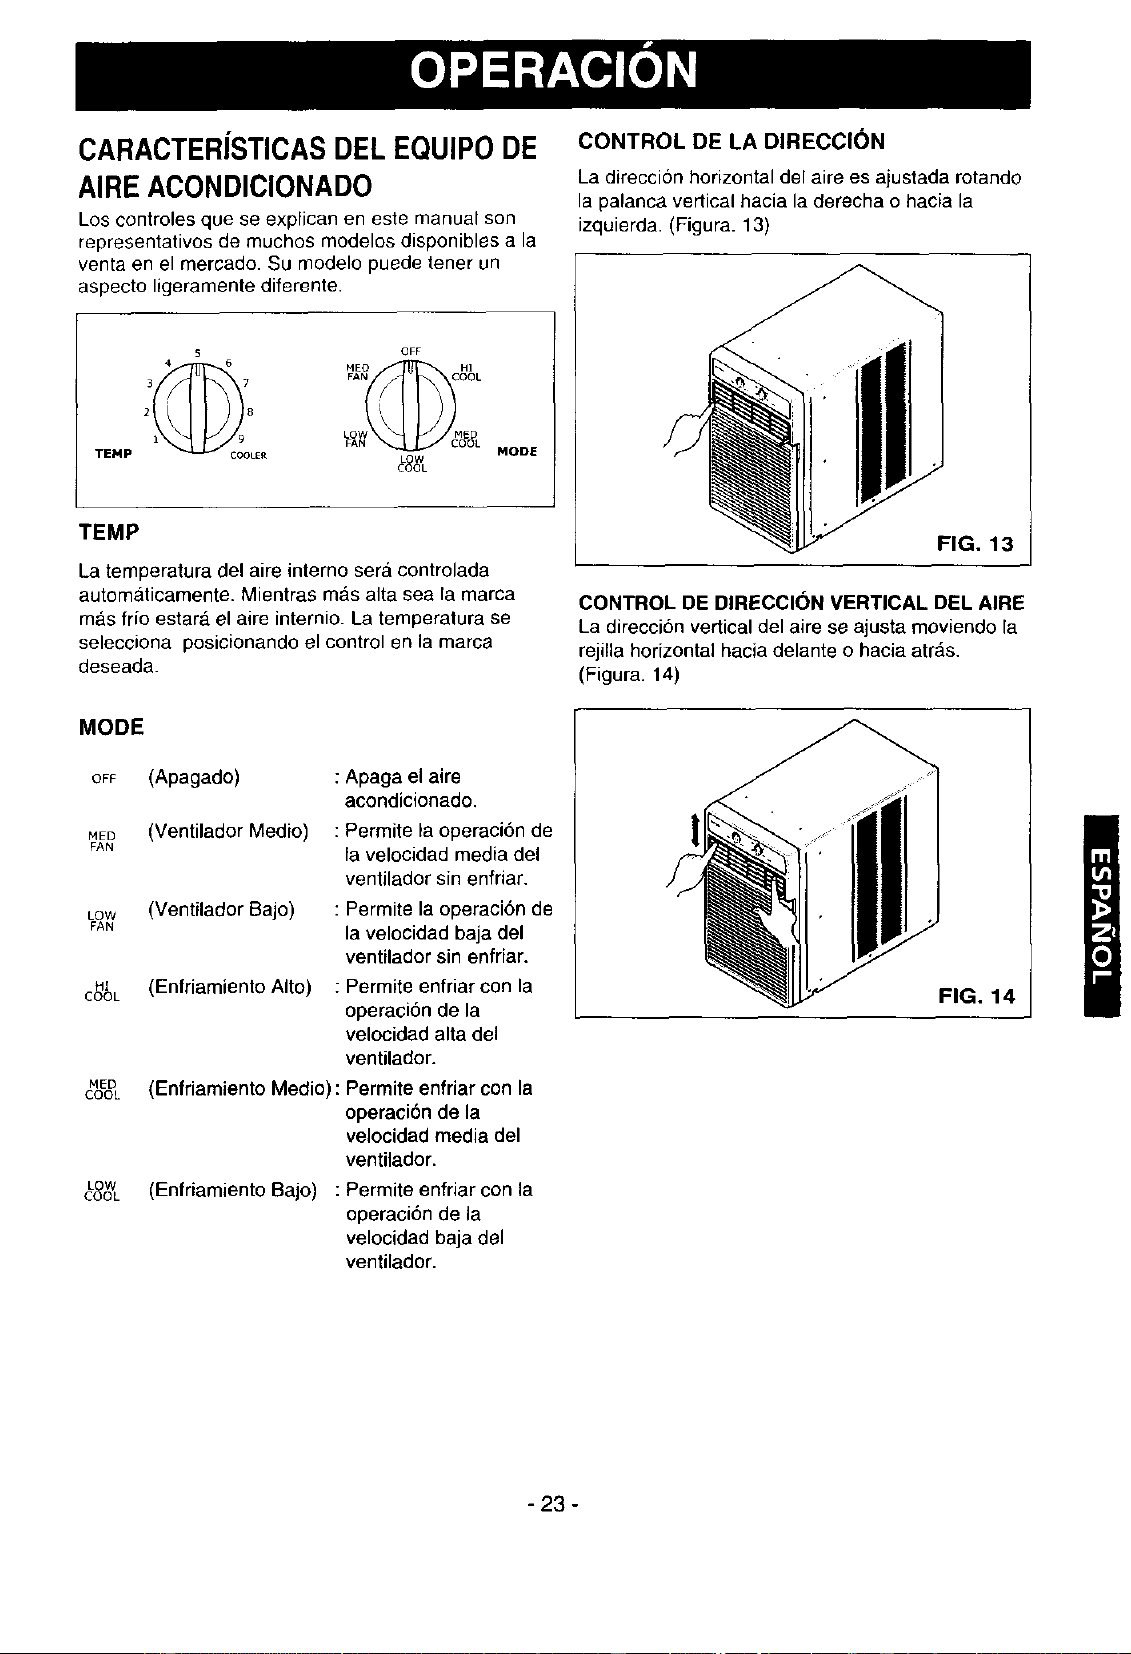
CARACTERISTICASDEL EQUIPO DE
AIRE ACONDICIONADO
Los controles que se explican en este manual son
representativos de muchos modelos disponibles a la
venta en el mercado. Su modelo puede tener un
aspecto ligeramente diferente.
5 OFF
3 7 FAN COOl.
2 8
LOW H_D
1 9 FAN OOI.
TEMP JEt. MODE
L W
C_OL
TEMP
La temperatura del aire interno sera controlada
automaticamente. Mientras mas alta sea la marca
mas frio estara el aire internio. La temperatura se
selecciona posicionando el control en la marca
deseada.
MODE
OFF (Apagado) : Apaga el aire
acondicionado.
HED
FAN
LOW
FAN
HI
COOL
HED
COOL
LOW
COOL
Ventilador Medio) : Permite la operaci6n de
la velocidad media del
ventilador sin enfriar,
Ventilador Bajo) : Permite la operaci6n de
la velocidad baja del
ventilador sin enfriar.
Enfriamiento Alto)
: Permite enfriar con la
operaci6n de la
velocidad alta del
ventilador.
Enfriamiento Medio) : Permite enfriar con la
operacibn de la
velocidad media del
ventilador.
Enfriamiento Bajo) : Permite enfriar con la
operaci6n de la
velocidad baja del
ventilador.
CONTROL DE LA DIRECCI(3N
La direccion horizontal del aire es ajustada rotando
la palanca vertical hacia la derecha o hacia la
izquierda. (Figura. 13)
FIG. 13
CONTROL DE DIRECCION VERTICAL DEL AIRE
La direccion vertical del aire se ajusta moviendo la
rejilla horizontal hacia delante o hacia arras.
(Figura. 14)
FIG. 14
- 23 -
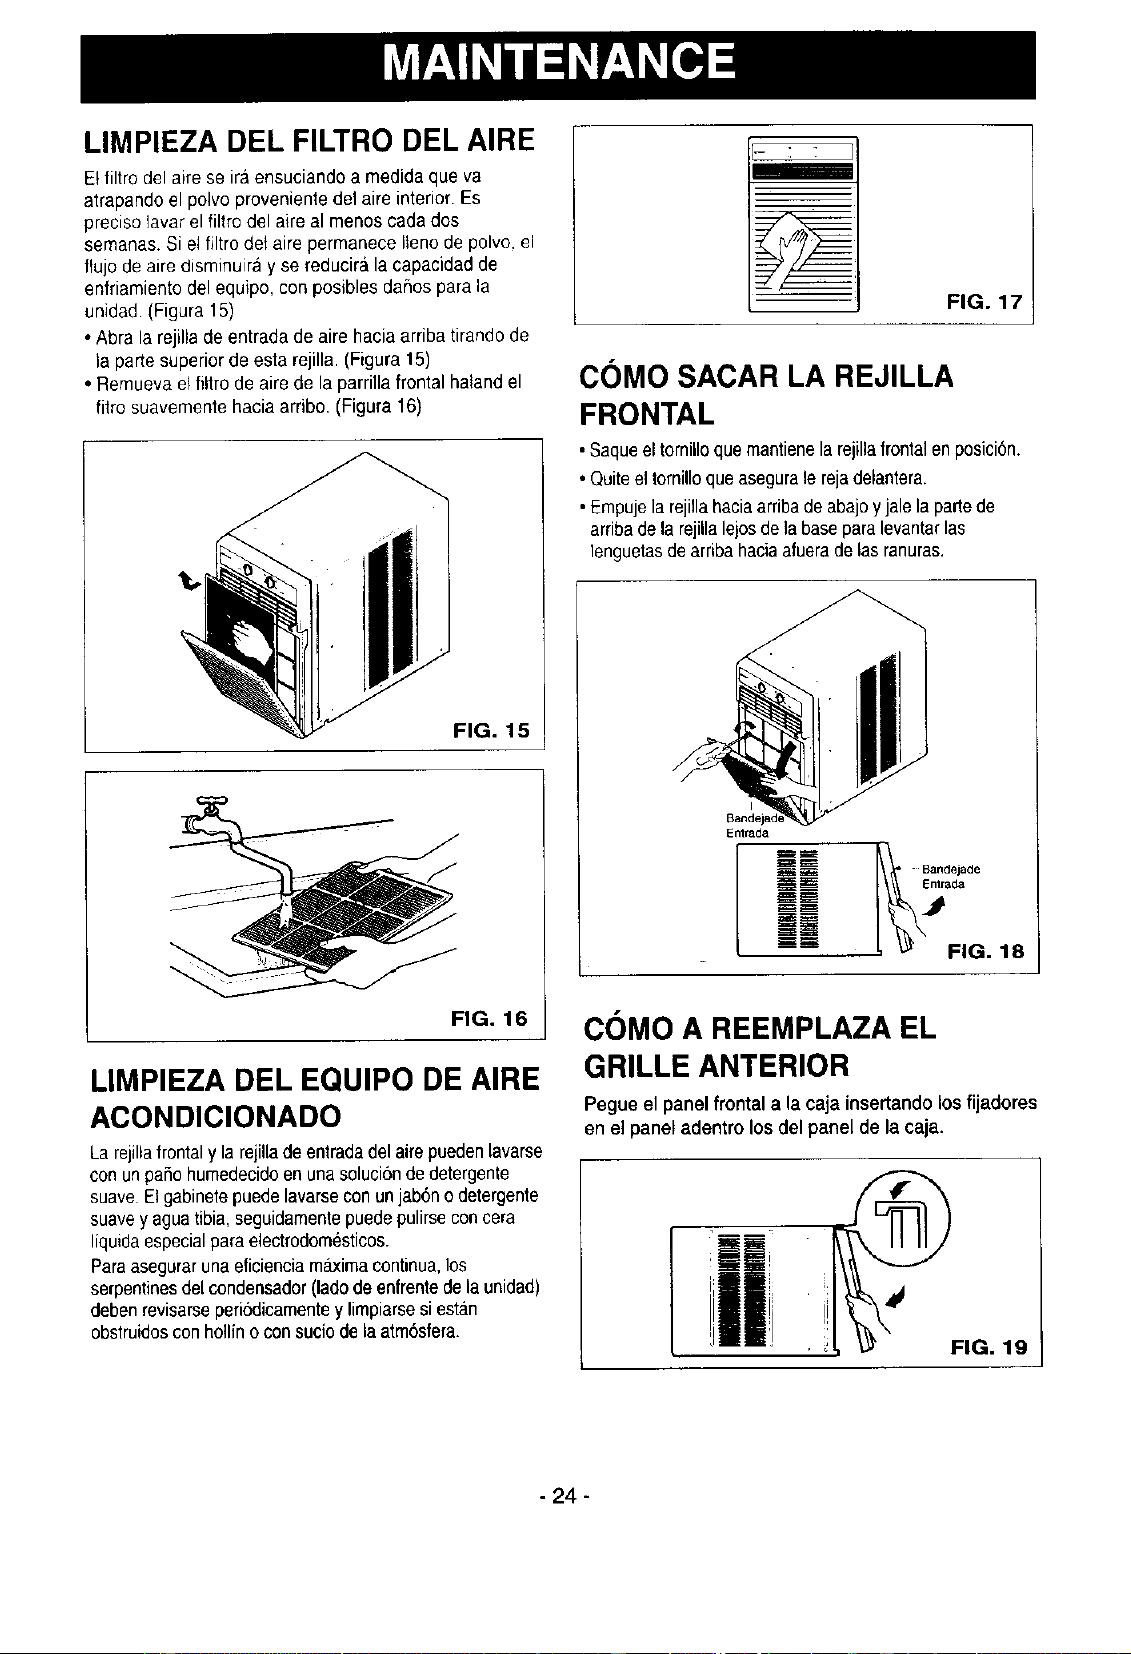
LIMPIEZA DEL FILTRO DEL AIRE
E! filtrodel aire se ira,ensuciando a medida que va
atrapando el polvo proveniente del aire interior. Es
preciso lavar el filtro del aire al menos cada dos
semanas. Si el filtro det aire permanece Itenode polvo, el
ftujo de aire disminuira y se reducir& la capacidad de
enfriamiento del equipo, con posibles daflos para la
unidad. (Figura 15)
• Abra la rejilla de entrada de aire hacia arriba tirando de
la parte superior de esta rejilla. (Figura 15)
• Remueva el filfro de aire de la parrilla frontal hatand el
fitro suavemente hacia arribo, (Figura 16)
FIG. 15
FIG. 16
LIMPIEZA DEL EQUIPO DE AIRE
ACONDICIONADO
La rejillafrontal y la rejillade entradadelaire puedenlavarse
con unpatio hurnedecidoen una solucionde detergente
suave El gabinetepuedelavarse con unjab6n odetergente
suavey aguatibia,seguidamentepuedepulirsecon cera
liquidaespecialparaelectrodomesticos.
Paraaseguraruna eficienciam_ima continua,los
serpentinesdel condensador(lado de enfrentede la unidad)
debenrevisarseperi_:Jicamentey limpiarsesi estan
obstruidosconhollin o consucio de laatmosfera.
m
-- FIG. 17
C()MO SACAR LA REJILLA
FRONTAL
•Saqueel tornilloque mantienela rejillafrontal en posici6n.
• Quiteel tornilloqueasegurale rejadelantera.
• Empujela rejiflabaciaarribade abajo yjale la parlede
arribadela rejiUalejosde labaseparalevantarlas
lenguetasde arribahaciaafuera de las ranuras.
Entrada
_ Bandejade
IE
_ _ _ FIG. 18
COMO A REEMPLAZA EL
GRILLE ANTERIOR
Pegue el panelfrontala la caja insertandolos fijadores
en e] paneladentro los del panel de la caja.
- 24-

ANTES DE LLAMAR PARA SERVICIO
Cheque la siguiente lista para asegurarse si en realidad es necesario Ilamar para servicio. Una referencia rapida a
este manual puede evitar una Ilamada para servicio innecesaria.
EL EQUlPO DE AIRE ACONDICIONADO NO FUNCIONA.
Elenchufeno estaconectadeenlatomadecornentede pared.
Elfusibleeslaquemedoo elinterruptordecircuitoseha disparado
ElselectordelventiladerMODEestaen la pos_idedeOFF.
Launidadseapagoy sevolvioa encenderdemasiadorapido.
ElcontroldetemperaturaTEMPsealUStOmascelidequela
temperaturaambiente
Conecteelenchufeltrrnemenleenlatomadecorrientedepared
Reemplaceelfusibleda_do conunfusiblede accideretardadao realusleel
inlerruptordecircuito
Pongaelselectorenlaposicbnde COOL.
Apaguelaunidedy espere3 minutosantesdevoiveraencendeda
Gireelcontroldetemperaturaen elsentidedelasagujasdelrelojhastauna
graduacidnmasfde(numeromasalto).
EL AIRE DE LA UNIDAD NO SALE BASTANTE FR[O.
Elselectora unaposicidemasLOW COOL.
Elccolreldetemperature_MP sea_usi6dema_ c_lde(numeromasbaio)
Latemperaturaambienteest_pot debajode los70oF(21°C)
Eltubosensorde tempereturaest;_tocandoel serpentinevaForador
queestasituadodetr&sdelfiltrodelaire
Gireelselectora una Fos_cionHIGHCOOL.
Gireetcontrc4detemperaturaenelsenltdodelasa_ilasdelrelqpara(numerorn_afro)
Nopuedeproducirseelenfnamientohastaquelatempereturaambientesuba
Forencimade los 70° F (21°C).
Endereceel tuboalejandolodelserpentinevaporador.
ELAIREACONDICIONADOENFRI'A,PEROLAHABiTACI(_NSESIENTEDEMASIADOCALIDA;SEFORMAHIELOENELSERPENT1NDEENFRIAMIENTO
DE'I_,J_DELPANELDECORATIVOFRONTAL
Latenlperaturaarrbienteenolex'teno_estapo:debajodelos70°F(21°C)
Elfiltrodelairepuedeestarsucio
Elcontroldetemperaturaseajustodemasiadofde parael
enfltamieetoPoetumo.
Paradescongetarel serpendeIleveelselectora laposc_SnFAN
Seguidemente,gireelcontroldetemderaturaTEMPenelsentidedelasagujas
delreloIparaIlevadohastaunagraduacidem_scalide(numerornasbajo)
Umpieetfiltro.Consultelasecoion"Mantenimiento"Paradeccongelar,Ileveel
selectora laFosici0nFAN
Paradescongelarelserpentin,Ileveelselectora laposicionFAN.Seguidamente
ajusteelcontroldetemderaturaa unaposicionmascalida(numeromasbajo)
ELAIREACONDICIONA,DOENFR[A,PEROLAHABITACI(_NSESIENTEDEMASIADOC_,LIOA;NOSEFORMAHIELOENELSERPENTiNDE
ENFRIAMIENTODE'[RASDELPANELDECORA'nVOFRONTAL.
ElfiltrodelaireestasucioconIoqueserestnngeelflujodelaire. Umpieelfiltrodelaire Consultela sec_6n"Mantenimiento"
Elcont_ detemperaturaTEMPsegrade6enpecicidedemasiadecelida. Gireelcontroldetemperaturaen elseolidede lasagujasdelrelojparaIlevadoa
usegraduacimmasfria.(N(Irr_rom&sa_io)
La pedeIroetalde launidadestabloqueadaFO_coronas,per_anas, ElirnineelI_oqueoenfrentedelaunidad.
mueblesetc.querestrindenlad_ribucibndelaire.
Laspuertas,ventanas,rejillasde calefaccidn,etc_tera,estanabie_s con Cierrelaspuertas,ventanas,relillasdecalefaccion,etcetera
IoqueseFormiteeles,capedelairefrio.
La unidedacobadeencenderseenunahabltaddncaJiecte. Permitaquetranscorraunpecornasdetiempoparaeliminarel"caloralmaconade"
enlasparedes,elte_ho,elpisoylosmuebles
EL EQUIPODE AIRE ACONDIClONADOSE APAGA Y SE ENClENDER.,_PIDAMENTE.
I Latemdereturaexterioresextremadamentecaliecte. AjusteelMODOenlavelcoidedALTAparahacerqueelairepaseForlabobina ]
derengerac_nm_sr_pido I
SE ESCUCHAN RUIDOSCUANDO LA UNIDAD ESTA ENFRIANDO.
EIsonidodelventiladeralchecarconl_aelaguadd sistemade Estoesnormalcoandela humedadesalia Cierrelaspuedas,ventanasyrejillas
decalefacc_n.
elimi.nac_ndet_medad,
Vbraoldedelaventana;inslalecidndeddente. Lealasinsttuccionesdeinstaladdeo consultealinstelador
EL AGUA GOTEA DENTRO DE LA HABITACI(_N CUANDO LA UNIDAD EST'. ENFRIANDO.
I Instaladdeinadecoada Incise_ge_a_-nenleele_po deaireeconoldecadehadalapedeexle_ parapermilirel
d_najedelagco,I.,e_lasinsltt_cdonesde_staladbnocmsul_alinstalador.
ELAGUAGOTEA AFUERACUANDO LA UNIDAD ESTA ENFRIANDO.
LaunidedeetaextrayendegrandescoetJdedecdehurnededdeunah_rnedaIEstoesalgonorrnaJdurantelosdiasexr_=sivamentehumedos. I
-25 -
m26 o
Master Protection Agreements
Congratulations on making a smart purchase.
Your new Kenmore ®product is designed and
manufactured for years of dependable operation.
But like all products, it may require preventive
maintenance or repair from time to time.
That's when having a Master Protection Agreement
can save you money and aggravation.
Purchase a Maser Protection Agreement now and
protect yourself from unexpected hassle and
expense.
The Master Protection Agreement also helps extend
the life of your new product. Here's what's included
in the Agreement:
[] Expert service by our 12,000 professional
repair specialists
[] Unlimited service and no charge for parts and
labor on all covered repairs
[] "No-lemon" guarantee - replacement of your
covered product if four or more product failures
occur within twelve months
[] Product replacement if your covered product
can't be fixed
[] Annual Preventive Maintenance Check at your
request - no extra charge
[] Fast help by phone - phone support from a
Sears technician on products requiring in-home
repair, plus convenient repair scheduling
[] Power surge protection against electrical
damage due to power fluctuations
[] Rental reimbursement if repair of your covered
product takes longer than promised
Once you purchase the Agreement, a simple phone
call is all that ittakes for you to schedule service.
You can call anytime day or night, or schedule a
service appointment online.
Sears has over 12,000 professional repair
specialists, who have access to over 4.5 million
quality parts and accessories. That's the kind of
professionalism you can count on to help prolong
the life of your new purchase for years to come.
Purchase your Master Protection Agreement today!
Some limitations and exclusions apply.
For prices and additional information call
1-800-827-6655,
Sears Installation Service
For Sears professional installation of home
appliances, garage door openers, water
heaters, and other major home items, in the
U.S.A. call 1-800-4-MY-HOME ®
Acuerdos de Proteccion Especializada
iEnhorabuena] Ha realizado una compra inteligente.
Su nuevo aparato Kenmore_ esta diseSado y fabricado
para ofrecerle aSos de buen funcionamiento.
Sin embargo, al igual que todos los productos, puede
precisar un mantenimiento preventivo o inctuso alguna
reparacion de vez en cuando. En esas ocasiones, un
Master Protection Agreement puede ayudarle a ahorrar
dinero e inconvenientes,
Adquiera un Maser Protection Agreement ahora, y
protejase a s/mismo de molestias y gastos inesperados
El Master Protection Agreement le ayudara tambien a
prolongar la vida de su nuevo aparato. Los siguientes
servicios estan incluidos:
[] Servicio experto por parte de cualquiera de
nuestros 12.000 tdcnicos profesionales especialistas
de Sears.
[] Prestacidn de servicios sin limitaciones y sin
cargarle las piezas o la mane de obra en todas las
reparaciones cubiertas por el acuerdo.
[] Garantia seria de sustitucion de las piezas del
producto cubierto por el acuerdo, si cuatro o mas
piezas se mostrasen defectuosas en un periodo de
doce meses.
[] Sustitucion del producto pot otto nuevo, si el
defectuoso no pudiese repararse.
[] Control de mantenimiento anual preventivo,
siempre que Io desee y sin gasto adicional alguno.
[] Asistencia teletbnica inmediata de un tecnico
especialista en productos que han de ser reparados a
domicilio, adema.s de una programaei6n adecuada de
la reparaci6n.
[] Protecci6n contra subidas de tensibn que
provoquen da_os electricos debidos alas
fluctuaciones en el suministro.
[] Reintegro del alquiler si la reparaci6n del producto
Ileva ma.s tiempo del promtetido
Una vez que haya adquirido el Agreement, no necesitara
masque una simple Ilamada para solicitar el servicio de
su aparato. Adem_,s, podr_ hacerlo en cualquier momento
del dia o de la noche, o solicitar una eita para prestaci6n
de servicios online.
Sears cuenta con mas de 12.000 tecnicos profesionales
especialistas en reparaciones, con acceso a mas de 4,5
millones de piezas de sustituei6n y accesorios de calidad.
€:steser_.el tipo de profesionalidad y servicio con el que
podra contar para prolongar la vida de su nuevo producto
por muchos aSos. iAdquiera boy mismo su Master
Protection Agreement!
Se aplicardn algunas limitaciones y
reetricciones.
Si desea hacer alguna consulta sobre los
precios u otra informaci6n adicional, le rogamos
Ilame al tel_fono 1-800-827-6655.
Servicios de Instalaci6n Sears
Para solicitar servicios de instalaci6n profesionales
de Sears de electrodomesticos, mandos de apertura
de puertas de garajes, calentadoros de agua y otros
aparatos en los Estados Unidos, puede Ilamar a
1-800-4-MY-HOME ®

Get it fixed, at your home or ours!
Your Home
For repair - in your home-of all major brand appliances,
lawn and garden equipment, or heating and cooling systems,
no matter who made it, no matter who sold it!
For the replacement parts, accessories and
owner's manuals that you need to do-it-yourself.
For Sears professional installation of home appliances
and items like garage door openers and water heaters.
1-800-4-MY-HOME ® (1-800-469-4663)
Call anytime, day or night (U.S.A. and Canada)
www.sears.com www.sears.ca
Our Home
For repair of carry-in items like vacuums, lawn equipment,
and electronics, call or go on-line for the location of your nearest
Sears Parts & Repair Center.
1-800-488-1222
Call anytime, day or night (U.S.A. only)
www.sears.com
To purchase a protection agreement (U.S.A.)
or maintenance agreement (Canada) on a product serviced by Sears:
1-800-827-6655 (U.S.A.) 1-800-361-6665 (Canada)
Para pedir servicio de reparacion
a dornicilio, y para ordenar piezas:
1-888-SU-HOGAR _
(1-888-784-6427)
Au Canada pour service en franc;ais:
1-800-LE-FOYER Mc
(1-800-533-6937)
www.sears.ca
® Registered Trademark / TU Trademark / s_ Service Mark of Sears, Roebuck and Co.
® Marca Registrada / T_ Marca de F&brica / s_ Marca de Servicio de Sears, Roebuck and Co.
MCMarque de commerce / MOMarque depos6e de Sears, Roebuck and Co
© Sears, Roebuck and Co.
Pa_ NO.:3828A20291F