Owner’s manual
FRX2
Hand Turbine AM/FM/NOAA Weather Radio
with LED Flashlight
FRX2 OWNER’S MANUAL
2
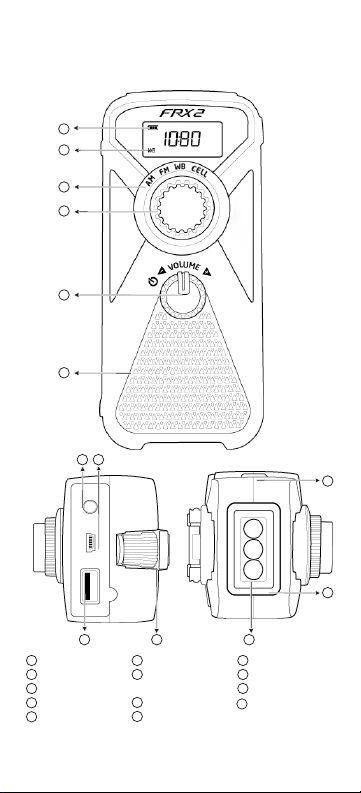
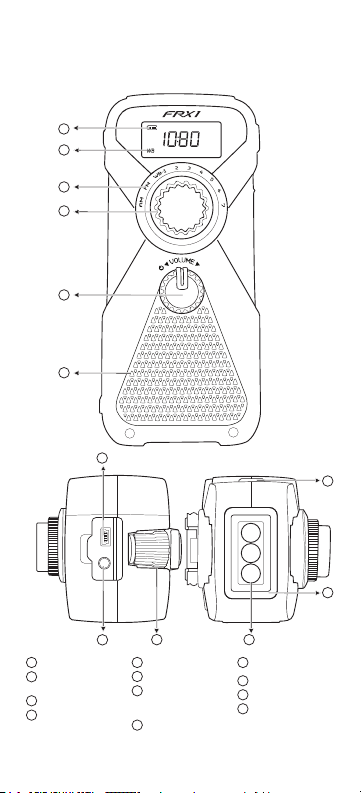
FUNCTION KEYS
1
Tuning Dial
2
Power/Volume Dial
3
Speaker
4
Radio Band Dial
5
WB Indicator
6
Charging Indicator
7
Mini USB Jack
(DC-in 5v)
8
Headphone Jack
9
Hand Turbine
10
Flashlight button
11
LED Flashlight
12
Glow in Dark Locator
USB Charging Port
13
4
1
3
2
5
9
10
11
12
6
7
8
13
FRX2 OWNER’S MANUAL
3
POWER SOURCES
1. Rechargeable battery pack (included)
2. Mini USB DC Input
3. Built-in dynamo
4. Solar Panel
CHARGING THE BATTERY PACK
Hand Turbine Charging
1. Pull out the hand turbine in the back of the unit, then
turn. The built-in dynamo will generate electricity and
the unit will store the electric energy into the battery
pack automatically.
2. When charging, the charging indicator “ “ will be on.
NOTE: 5 minutes of cranking will result in about 10 minutes
of low volume play and 2 hours of ashlight use.
Adaptor Charging
1. Open the rubber cover on the side of the unit. Plug one
end of the matching adaptor cable (included) into the AC
electronic socket, plug the other end of the adaptor cable
into the < mini USB jack >, the electric energy will store
into the battery pack automatically.
2. When charging, the charging indicator “ “ will be on.
The battery will be full in about 3 hours.
USING THE LIGHT
Press the <Light> button (on the top of the unit) and the
light will be on. Press the button again to turn off the light.
TURNING THE RADIO ON AND OFF
Turn the Power/Volume dial clockwise to turn the radio on
and increase the volume.
Turn the Power/Volume dial counter-clockwise to turn the
volume down and turn off the radio.
ADJUSTING THE VOLUME
Set VOLUME control to the desired level.

FRX2 OWNER’S MANUAL
4
TUNING IN RADIO STATIONS:
1. Rotate band selector to select your desired band; AM, FM,
then rotate the <frequency dial> to select your desired
station(frequency);
2. The LCD display will read your desired band and
station(frequency).
WEATHERBAND TUNING:
1. Rotate band selector to select WB, then rotate the
<frequency dial> select each WB station until you hear the
strongest WB station for your area.
2. The LCD display will display 1ch,2ch,3ch…7ch.
SETTING THE CLOCK (with radio off)
Long press <tunig dial> to enter clock/alarm setting
function, rotate dial to select ALARM or setting clock (hour
and minute will ash). When hour and minute ashing, quick
press this <tuning dial>, HOUR indicator will ash, rotate the
dial to select hour, then quick press the dial again to enter
select the minutes, minute will ash, rotate dial to select
minutes. Quick press the dial again to exit clock setting.
Note: this radio’s time format is 12 hour
SETTING THE ALARM (with radio off)
Long press <tuning dial> to enter clock/alarm setting
function, rotate dial clockwise to select ALARM, so alarm
icon will ash. Use the same setting procedure as clock to
set up hour and minute. Then quick press <tuning dial> once
more, OFF will appear on screen, turn the <tuning dial> to
select OFF/on for alarm function. If selected ‘on’, <ALARM>
will show on screen. Quick press this <tuning dial> again to
exit ALARM setting.
When alarm goes off, quick press the <tuning dial> to turn it off.
SEEK FUNCTION (with radio on)
This operation only works with AM and FM band.

FRX2 OWNER’S MANUAL
5
If you last rotated the <tuning dial> clockwise, then a press
and hold the tuning dial and the radio will seek the next
higher frequency (or station);
If you last rotated the <tuning dial> counter-clockwise, then
a press and hold the tuning dial and the radio will seek next
lower frequency (or station).
GLOW IN DARK LOCATOR
After absorbing light energy, the glow in the dark locator
glows up to 8 hours allowing an easy locator.
EARPHONE JACK
Plug in earphones (not included). Sound is heard from both
sides in mono audio format.
CHARGING WITH THE SOLAR PANEL
Place the radio with solar panel facing up in direct sunlight.
It is best to angle the Solar panel so that it is pointed
directly at the sun. Charging with the radio off will provide
the fastest charging.
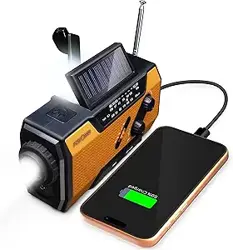
PHONE CHARGING JACK
Rotate band selector to CELL, the LCD display will show
“USB”. Plug in your phone’s USB charging cable (not
included) to USB charging port, connect the other end to
your mobile phone. Your phone will start charging as soon
as you plug it into the radio. You also can wind the dynamo
to charge phone.
WARNING
• Do not expose this appliance to rain or moisture.
• Protect from high humidity and rain.
• Only operate within specied temperature range (0 °C to 40 °C).
• Clean only with a dry cloth. Do not use detergents or
chemical solvents as this might damage the nish.
• Do not remove cover [or back].
• Refer servicing to qualied service personnel.
FRX2 OWNER’S MANUAL
6
ENVIRONMENT
Disposal
According to the European Directive 2002/96/EC all
electrical and electronic products must be collected
separately by a local collection system.
Please act according to your local rules and do not dispose
of your old products with your normal household waste.
Please dispose of all types of batteries per your
Government, State or Local rules and/or regulations. If you
are unsure, please call the appropriate local authority to
nd out how to dispose of them safely and help protect the
environment.
WARRANTY REGISTRATION
To ensure full warranty coverage or product updates,
registration of your product should be completed as soon
as possible after purchase or receipt.
Visit our website at http://www.etoncorp.com. for product
registration.
LIMITED WARRANTY
Retain your proof of purchase. Full Limited Warranty
information can be viewed at www.etoncorp.com.
SERVICE FOR YOUR PRODUCT
To obtain service for your product, we recommend rst
contacting an Etón service representative via email at
customer_support@etoncorp.com or calling 1-800-872-
2228 in the USA or (650) 903-3866 worldwide for problem
determination and trouble-shooting. If further service is
required, the technical staff will instruct how to proceed

FRX2 OWNER’S MANUAL
7
based on whether the radio is still under warranty or needs
non-warranty service.
WARRANTY
If your product is still in warranty and the Etón service
representative determines that warranty service is needed,
a return authorization will be issued and instructions for
shipment to an authorized warranty repair facility. Do
not ship your radio back without obtaining the return
authorization number.
NON-WARRANTY
If your product is no longer under warranty and requires
service our technical staff will refer you to the nearest
repair facility that will be able to best handle the repair.
For service outside of North America, please refer to the
distributor information included at time of purchase/receipt.
NEED HELP? CONTACT US.
Customer_support@etoncorp.com or via send mail to:
Etón Corporation, 1015 Corporation Way, Palo Alto, CA
94303, USA. 1-800-872-2228 (U.S.);
650-903-3866 (worldwide); M-F, 8:00-4:30,
Pacic Standard Time; www.etoncorp.com.

FRX1 MANUAL D’OPÉRATION
8
FONCTIONS DES TOUCHES
1
Cadran de Réglage
2
Cadran de Mise en
Marche/Volume
3
Haut-parleur
4
Cadran de la Gamme
d’Ondes
5
Voyant Chaîne Météo
6
Voyant de Recharge
7
Port Mini USB (Entrée
CC 5V)
8
Prise Écouteurs
9
Manivelle de dynamo
10
Bouton de Lampe
Torche
11
Lampe Torche à LED
12
Positionneur
Fluorescent
Port de Charge USB
9
10
11
12
7
8
4
1
3
2
5
6
13
13

FRX1 MANUAL D’OPÉRATION
9
ALIMENTATION
1. Batterie rechargeable (fournie)
2. Alimentation externe CA
3. Dynamo intégrée
RECHARGER LA BATTERIE
Manivelle de dynamo
1. Sortez la manivelle du dos de l’appareil, puis tournez-la.
La dynamo intégrée génère de l’électricité et recharge
automatiquement la batterie interne.
2. Pendant la recharge, le voyant de recharge « »
est allumé.
REMARQUE: Tourner la manivelle pendant 5 minutes offre
une autonomie d’écoute de 10 minutes à
faible volume ou 2 heures d’utilisation de la
lampe torche.
Recharge avec adaptateur
1. Soulevez le capuchon en caoutchouc présent sur le
côté de l’appareil. Branchez l’une des extrémités d’un
câble adapté (fourni) dans une prise électrique CA, puis
branchez son autre extrémité dans le <port mini USB>. La
batterie se recharge automatiquement.
2. Pendant la recharge, le voyant de recharge « » est
allumé. La batterie se recharge en 3 heures environ.
Appuyez sur le bouton <Lampe> (situé au-dessus de
l’appareil) pour allumer la lampe. Appuyez à nouveau sur
ce bouton pour l’éteindre.
UTILISER LA LAMPE TORCHE
Appuyez sur le bouton <Lampe> (situé au-dessus de
l’appareil) pour allumer la lampe. Appuyez à nouveau sur
le bouton pour éteindre la lampe.

FRX1 MANUAL D’OPÉRATION
10
ALLUMER ET ÉTEINDRE LA RADIO
Tournez le cadran de mise en marche/volume dans le
sens des aiguilles d’une montre pour allumer la radio et
augmenter le volume.
Tournez le cadran de mise en marche/volume dans le sens
contraire des aiguilles d’une montre pour baisser le volume
et éteindre la radio.
RÉGLER LE VOLUME
Réglez le volume avec le bouton de réglage du VOLUME.
RÉGLER LES STATIONS DE RADIO :
1. Tournez le sélecteur de bande pour sélectionner la bande
désirée : AM, FMST, FM, puis tournez le <Cadran de la
Gamme d’Ondes> pour sélectionner la station désirée
(fréquence) ;
2. L’écran LCD lira la bande et la station (fréquence) désirées.
RÉGLAGE DE LA BANDE MÉTÉO :
Tournez le cadran de la gamme d’ondes sur chaque station
de bande météo jusqu’à entendre la station météo la plus
puissante disponible à votre emplacement.
POSITIONNEUR FLUORESCENT
Après avoir absorbé de l’énergie lumineuse, le positionneur
uorescent s’illumine jusqu’à 8 heures, ce qui permet de
retrouver la radio plus facilement dans le noir.
RÉGLAGE DE L’HORLOGE (avec la radio
éteinte)
Faites un appui long sur <Cadran de Réglage> pour entrer
dans la fonction de réglage de l’horloge/de l’alarme,
tournez le cadran pour sélectionner ALARME ou le réglage
de l’horloge (l’heure et les minutes clignoteront). Lorsque
l’heure et les minutes clignotent, faites un appui rapide

FRX1 MANUAL D’OPÉRATION
11
sur ce <Cadran de Réglage>, l’indicateur HEURE clignotera,
tournez le cadran pour sélectionner l’heure, puis faites de
nouveau un appui rapide sur le cadran pour entrer dans la
sélection des minutes, les minutes clignoteront, tournez le
cadran pour sélectionner les minutes. Faites de nouveau
un appui rapide sur le cadran pour quitter le réglage de
l’horloge.
RÉGLAGE DE L’ALARME (avec la radio
éteinte)
Faites un appui long sur <Cadran de Réglage> pour entrer
dans la fonction de réglage de l’horloge/de l’alarme, tournez
le cadran pour sélectionner ALARME, l’icône de l’alarme
clignotera. Utilisez la même procédure de réglage que pour
l’horloge an de régler l’heure et les minutes. Puis faites
de nouveau un appui rapide sur <Cadran de Réglage>, OFF
apparaîtra à l’écran, tournez le <Cadran de Réglage> an
de sélectionner OFF/on pour la fonction alarme. Si « on »
est sélectionné, <ALARM> s’afchera sur l’écran. Faites de
nouveau un appui rapide sur ce <Cadran de Réglage> pour
quitter le réglage de l’ALARME.
Lorsque l’alarme se déclenche, faites un appui rapide sur
<Cadran de Réglage> pour l’éteindre.
FONCTION RECHERCHE (avec la radio
allumée)
Cette opération ne fonctionne que sur les bandes AM et FM.
Si vous avez tourné le <Cadran de Réglage> dans le sens
des aiguilles d’une montre la dernière fois, alors maintenez
appuyé le cadran de réglage et la radio cherchera la
prochaine fréquence (ou la station) la plus puissante ;
Si vous avez tourné le <Cadran de Réglage> dans les sens
contraire des aiguilles d’une montre, alors maintenez
FRX1 MANUAL D’OPÉRATION
12
appuyé le cadran de réglage et la radio cherchera la
prochaine fréquence (ou la station) la moins puissante.
PRISE ÉCOUTEURS
Branchez des écouteurs (non fournis). Le signal sonore
transmis aux écouteurs droit et gauche est monophonique.
BESOIN D’AIDE? CONTACTEZ-NOUS.
Etón Corporation, 1015 Corporation Way, Palo Alto, CA
94303, USA. 1-800-872-2228 (U.S.); 650-903-3866
(worldwide); M-F, 8:00-4:30, Pacic Standard Time;
www.etoncorp.com.
AVERTISSEMENT
• Ne pas exposer cet appareil à la pluie ou à l’humidité.
• Ne pas immerger ou exposer à l’eau pendant une longue période.
• Protéger d’une grande humidité et de la pluie.
• Débrancher immédiatement si un liquide a été renversé sur
l’appareil ou si un objet quelconque est tombé à l’intérieur.
• Nettoyer seulement avec un chiffon sec. Ne pas utiliser
de détergents ni de solvants chimiques qui pourraient
endommager le ni.
• Débrancher et déconnecter l’antenne extérieure en cas d’orages.
• Ne pas enlever le couvercle [ou l’arrière].
• S’adresser à du personnel qualié pour la maintenance.
ENVIRONNEMENT
Mise au rebut
Conformément à la Directive Européenne 2002/96/EC
tous les produits électriques et électroniques doivent
être récupérés séparément par un système local de
collecte. Veuillez agir suivant les règles locales et ne pas
mettre au rebut vos vieux appareils avec vos déchets
ménagers ordinaires.

FRX1 MANUAL D’OPÉRATION
13
Veuillez mettre au rebut tout type de piles selon vos lois/
règlements locaux, d’état, ou de gouvernement. Si vous
n’êtes pas sûr de vous, veuillez appeler l’autorité locale
appropriée pour savoir comment les mettre au rebut en
sécurité et aider à protéger l’environnement.
ENREGISTREMENT DE LA GARANTIE
An d’assurer une couverture complète de la garantie et les
mises à jour du produit, l’enregistrement de votre produit
doit être effectué le plus tôt possible après l’achat ou la
réception. Vous pouvez utiliser une des options suivantes
pour enregistrer votre produit:
En consultant notre site web http://www.etoncorp.com.
GARANTIE LIMITÉE
Conservez l’information de garantie de votre carte de
garantie avec votre preuve d’achat ou bien l’information de
garantielimitée peut être consultée sur www.etoncorp.com.
MAINTENANCE DE VOTRE PRODUIT
Pour obtenir la maintenance de votre produit, nous
recommandons de contacter d’abord le service clientèle
Etón au 800-872-2228 US or (650) 903- 3866 pour
déterminer le problème et le dépannage. Si une intervention
complémentaire est nécessaire, l’équipe technique vous
indiquera la façon de procéder suivant que la radio est
toujours sous garantie ou si elle nécessite une intervention
hors garantie.
GARANTIE
Si votre produit est toujours sous garantie et si le
représentant du service clientele de Etón juge nécessaire
une réparation garantie, une autorisation de retour sera
délivrée ainsi que les instructions pour l’expédition à
un atelier agréé pour la réparation sous garantie. NE

FRX1 MANUAL D’OPÉRATION
14
RENVOYEZ PAS votre radio sans avoir obtenu le numéro
d’autorisation de retour.
HORS GARANTIE
Si votre produit n’est plus sous garantie et nécessite
une reparation, notre équipe technique vous adressera à
l’atelier de réparation le plus proche qui sera apte à réaliser
au mieux la réparation.
Pour une réparation hors de l’Amérique du Nord, veuillez
vous reporter à l’information sur les distributeurs qui vous
a été fournie lors de l’achat/réception.
GUÍA DE FUNCIONADMIENTO DE FRX1
15
1
Dial de Sintonía
2
Dial de Encendido/
Volumen
3
Altavoz
4
Dial de Banda de
Radio
5
Indicador WB
6
Indicador de carga
7
Puerto USB-mini
(Toma de alimen-
tación CC de 5V)
8
Salida para auriculares
9
Turbina de manivella
10
Botón de linterna
11
Linterna LED
12
Localizador que brilla
en la oscuridad
TECLAS DE FUNCIÓN
9
10
11
12
7
8
4
1
3
2
5
6

16
GUÍA DE FUNCIONADMIENTO DE FRX1
FUENTES DE ALIMENTACIÓN
1. Batería recargable (incluida)
2. Alimentación CA directa
3. Dínamo integrado
RECARGA DE LA BATERÍA
Turbina de manivella
1. Saque la turbina de manivella de la parte posterior de
la unidad y dele vueltas. El dínamo convertirá la fuerza
motriz en electricidad y la electricidad se almacenará en la
batería recargable de la unidad automáticamente.
2. Durante la recarga, el indicador de carga “ “
permanecerá encendido.
NOTA: 5 minutos dando vueltas a la manivela equivale a unos
10 minutos de reproducción a un volumen bajo y 2 horas
de luz al usar la linterna.
Recarga con el adaptador
1. Abra la cubierta de goma a un lado de la unidad.
Enchufe un extremo del adaptador del cable (incluido)
a la toma de corriente CA y conecte el otro extremo del
cable al < puerto USB-mini >. La energía eléctrica se
almacenará automáticamente en la batería.
2. Durante la recarga, el indicador de carga “
“ permanecerá encendido. La batería se cargará por
completo en unas 3 horas. Uso de la linterna Pulse el
botón <Luz> (en la parte superior de la unidad) para
encender la linterna. Pulse de nuevo el botón para
apagarla.
UTILIZACIÓN DEL INTERNA
Pulse el botón <Luz> (en la parte superior de la unidad) para
encender la linterna. Pulse de nuevo el botón para apagarla.
ENCENDIDO Y APAGADO DE LA RADIO
Gire el dial de encendido/volumen en sentido horario para
encender la radio y aumentar el volumen.

GUÍA DE FUNCIONADMIENTO DE FRX1
17
Gire el dial de encendido/volumen en sentido antihorario
para bajar el volumen y apagar la radio.
AJUSTE DEL NIVEL DE VOLUMEN
Ajuste el VOLUMEN con el control al nivel deseado.
SINTONIZAR EMISORAS DE RADIO:
1. Gire el selector de banda para seleccionar la banda
deseada; AM, FMST, FM, luego gire el <Dial de Banda de
Radio> para seleccionar la emisora (frecuencia) que desea;
2. La pantalla LCD leerá la banda y la emisora (frecuencia)
que desea.
SINTONIZACIÓN DE LA BANDA
METEOROLÓGICA:
Gire el dial de banda de radio para cada emisora de banda
meteorológica hasta que escuche la más fuerte para su
región.
CONFIGURAR EL RELOJ (con la radio
apagada)
Mantenga pulsado <Dial de Sintonía> para entrar a
la función de ajuste del reloj/alarma, gire el dial para
seleccionar ALARMA o congurar el reloj (la hora y los
minutos parpadearán). Cuando la hora y los minutos
parpadeen, pulse rápidamente este <Dial de Sintonía>,
el indicador de las HORAS parpadeará, gire el dial para
seleccionar la hora, a continuación, pulse rápidamente el dial
de nuevo para entrar a seleccionar los minutos, los minutos
parpadearán, gire el dial para seleccionar los minutos. Pulse
rápidamente el dial de nuevo para salir del ajuste de reloj.
CONFIGURAR LA ALARMA (con la radio
apagada)
Mantenga pulsado <Dial de Sintonía> para entrar a
la función de ajuste del reloj/alarma, gire el dial para
seleccionar ALARMA, de tal manera que el icono de alarma

18
GUÍA DE FUNCIONADMIENTO DE FRX1
parpadeará. Utilice el mismo procedimiento de ajuste
que con el reloj para congurar hora y los minutos. A
continuación, pulse rápidamente <Dial de Sintonía>, una vez
más, aparecerá en la pantalla OFF, gire el <Dial de Sintonía>
para seleccionar OFF/ON para la función de alarma. Si está
seleccionado “ON”, <ALARM> se mostrará en pantalla. Pulse
rápidamente esta <Dial de Sintonía> de nuevo para salir del
ajuste de ALARMA.
Cuando la alarma se apague, pulse rápidamente el <Dial de
Sintonía> para apagarla.
FUNCIÓN DE BÚSQUEDA (con la radio encendida)
Esta operación solo funciona con las bandas AM y FM.
Si giró el <Dial de Sintonía> en sentido horario la última
vez, entonces mantenga pulsado el dial de ajuste y la radio
buscará la siguiente frecuencia (o emisora) más alta;
Si giró el <Dial de Sintonía> en sentido antihorario la última
vez, entonces mantenga pulsado el dial de ajuste y la radio
buscará la frecuencia (o emisora) inmediatamente inferior.
LOCALIZADOR QUE BRILLA EN LA
OSCURIDAD
Al absorber la luz del sol, el localizadorpuede brillar
en la oscuridad hasta 8 horas para poder encontrarlo
con facilidad.
SALIDA PARA AURICULARES
Conecte unos auriculares (no incluidos) al aparato. El
sonido emitido por los altavoces de los auriculares será
monoaural (mono).
¿NECESITA AYUDA? PÓNGASE EN
CONTACTO CON NOSOTROS.
Etón Corporation, 1015 Corporation Way, Palo Alto, CA
94303, USA. 1-800-872-2228 (U.S.); 1-650-903-3866
GUÍA DE FUNCIONADMIENTO DE FRX1
19
(worldwide); M-F, 8:00-4:30, Pacic Standard Time;
www.etoncorp.com.
ATENCIÓN
• No exponer este aparato a la lluvia ni a la humedad.
• No sumergir ni exponer al agua durante un período prolongado.
• Proteger contra la humedad alta y la lluvia.
• Desenchufar inmediatamente en caso de derrame de líquidos
o de caída de cualquier objeto sobre el aparato.
• Limpiar únicamente con un trapo seco. No usar detergentes
ni solventes químicos, ya que estos podrían dañar el
acabado del producto.
• Desenchufar y desconectar antenas externas durante
tormentas eléctricas.
• No retirar la tapa [ni la parte de atrás].
• Referir cualquier revisión del aparato a personal de
servicio cualicado.
MEDIO AMBIENTE
Desecho
Según la Directiva Europea 2002/96/EC, todos los productos
eléctricos y electrónicos deben ser recogidos de forma
separada por parte un sistema local de recogida. Por favor,
actúe de acuerdo a sus leyes locales y no deseche sus productos
viejos en la basura normal de su casa.
Para desechar cualquier tipo de baterías siga las normas
o leyes de su gobierno, estado o ciudad. Si no está seguro,
póngase en contacto con las autoridades locales apropiadas
para saber cómo desecharlas de manera segura y así
proteger el medio ambiente.

20
GUÍA DE FUNCIONADMIENTO DE FRX1
REGISTRO DE LA GARANTÍA
Para asegurar una plena cobertura por parte de la garantía
o de actualizaciones del producto, usted deberá completar
el registro de su producto lo antes posible después de su
compra o recibo. Sírvase de cualquiera de las opciones
siguientes para registrar su producto:
Visita a nuestro sitio web http://www.etoncorp.com.
GARANTÍA LIMITADA
Conserve la información de la garantía presente en su
tarjeta de garantía junto a su prueba de compra; o bien
puede obtener información acerca de la Garantía Limitada
en www.etoncorp.com.
SERVICIO DE REPARACIÓN DE
SU PRODUCTO
Para obtener un servicio de reparación de su producto,
recomendamos, lo primero, que usted se ponga en contacto
con un representante del servicio de reparación de Eton,
llamando al 800-872-2228 EE.UU., 800-637-1648 Canadá
ó (650) 903-3866 para determinar el problema y su
solución. Si se requiriera un servicio adicional, el personal
técnico le instruirá acerca de cómo proceder, dependiendo
de si la radio está todavía bajo garantía o de si necesita un
servicio de no garantía.
GARANTÍA
Si su producto aún se encuentra en garantía y el
representante de servicio de reparación de Eton determina
que es necesario un servicio de garantía, se emitirá
una autorización de envío de vuelta acompañada de
instrucciones de envío a una tienda autorizada de servicio
de reparación de garantía. No envíe su radio de vuelta
sin previa obtención de un número de autorización de
devolución.

GUÍA DE FUNCIONADMIENTO DE FRX1
21
NO GARANTÍA
Si su producto ya no se encuentra en garantía y requiere de
servicio de reparación, nuestro personal técnico le referirá
a la instalación de reparación más cercana y que mejor sea
capaz de hacerse cargo de la reparación.
Para el servicio de reparación fuera de Norteamérica, por
favor reérase a la información del distribuidor incluida en
el momento de compra/recibo del producto.

Etón Corporation
www.etoncorp.com
Designed by Etón Corporation and assembled in China.
© Copyright 2016 Etón Corporation. All rights reserved. v042619