Table of Contents
3
EN
1Description 9
1.1 General Description 9
1.2 Control panel 10
1.3 Other parts 10
1.4 Available accessories 11
2Use 12
2.1 First use 12
2.2 Use of accessories 13
2.3 Using the oven 13
2.4 Using the temperature probe 20
2.5 Cooking tips 27
2.6 Special features 28
2.7 Settings 33
3 Cleaning and maintenance 37
3.1 Surface cleaning 37
3.2 Cleaning the door 37
3.3 Cleaning inside the oven 38
3.4 Extraordinary maintenance 43
IMPORTANT SAFETY INSTRUCTIONS
WARNING: If the instructions contained in this manual are
not followed precisely, fire or explosion may result causing property
damage, personal injury or loss of life.
READ AND SAVE THESE INSTRUCTIONS - Your safety and the safety of
others are very important.
We have provided many important safety messages throughout this manual and
on the appliance.
Read all the instructions before using the appliance and always obey all safety
messages.
Important Safety Instructions
4
The safety messages will inform you of potential hazards, how to avoid the risk of injury and
what can occur if the instructions are not followed.
IMPORTANT: Observe all codes and ordinances in force.
Do not store or use gasoline or other flammable vapors, liquids or materials near this or any
other appliance.
RECOGNIZE SAFETY INFORMATION
This is a safety alert symbol. This symbol alerts you to potential hazards that can
result in severe personal injury or loss of life.
UNDERSTAND SIGNAL WORDS
A signal word - DANGER, WARNING or CAUTION - is used with the safety alert
symbol. DANGER denotes the most serious hazards. It means you could lose your
life or be seriously injured if you do not immediately
follow the instructions.
WARNING means you could lose your life or be seriously injured if the instructions
are not followed. CAUTION indicates a potentially hazardous situation which, if
not avoided, could result in minor to moderate injury.
WARNING
• This appliance is intended for use in the home only.
• Use this appliance only for its intended purpose. The manufacturer
cannot be held liable for damage caused by improper use of this
appliance.
• This appliance complies with current safety regulations. Improper
use of this appliance can result in personal injury and material
damage.
• Read all the instructions before installing or using the appliance for
the first time.
• Keep these operating instructions in a safe place and pass them on
to any future user.
WARNING: For your safety, the instructions contained in this
manual must be followed to minimize the risk of fire or explosion and to
prevent property damage, personal injury or loss of life.
NOTE: This appliance is NOT designed for installation in manufactured (mobile)
homes or in recreational vehicles (RVs).
DO NOT install this appliance outdoors.
Important Safety Instructions
5
EN
• Read all instructions.
• Proper installation is your responsibility.
Have a qualified technician install and
ground this appliance in accordance
with these installation instructions.
• It is the responsibility of the installer to
comply with installation information
specified on the model/serial ID plate.
The ID plates are visibly located on the
back of the appliance and on the oven
door frame. These ID plates must never
be removed.
• Proper installation is your responsibility.
Make sure your appliance is properly
installed and grounded by a qualified
installer.
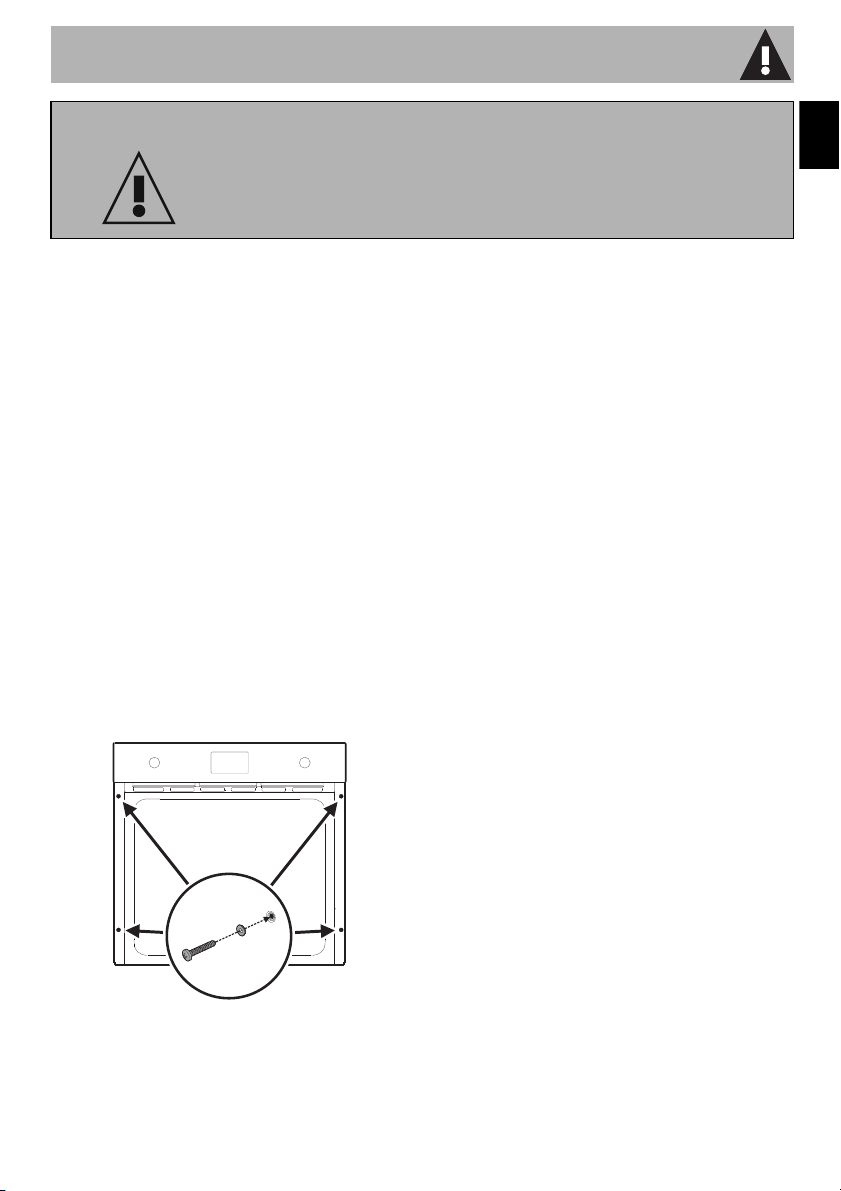
• Fix the appliance to the unit by screwing
the 4 screws with their washers into the
holes in the frame.
•
WARNING:
A) A child or adult can tip the range and be
killed.
B) Verify the anti-tip device has been
properly installed and engaged.
C) Ensure the anti-tip device is re-engaged
when the range is moved.
D) Do not operate the range without the
anti-tip device in place and engaged.
E) Failure to do so can result in death or
serious burns to children or adults."
•
WARNING: NEVER use this
appliance as a space heater to heat or
warm the room. Doing so may result in
overheating of the oven.
• DO NOT LEAVE CHILDREN
UNATTENDED: Children should not be
left alone or unattended in the area
where the appliance is being used.
Never allow children to sit or stand on
any part of the appliance.
•
CAUTION: Do not store items
of interest to children in cabinets above
a range or on the backguard of a range
- children climbing on the range to reach
items could be seriously injured.
WARNING
To reduce the risk of fire, electrical shock, personal
injury, or damage when using the appliance, follow
basic safety precautions, including the following:

Important Safety Instructions
6
• WEAR PROPER APPAREL: Loose-fitting or
hanging garments should never be worn
while using the appliance.
• For safety reasons and to avoid damage
to your appliance, never sit, stand or
lean on the oven door.
• FLAMMABLE MATERIALS SHOULD
NEVER BE STORED IN THE OVEN.
• DO NOT TOUCH THE INSIDE OF THE
APPLIANCE: Heating elements may be
hot even though they are dark in color.
The oven cavity can be hot enough to
cause burns. During and after use, do
not touch areas inside of the oven until
they have had sufficient time to cool. Do
not allow garments or any flammable
material to come into contact with hot
surfaces. If personal clothing or hair
catches on fire, drop and roll
immediately to extinguish the flames.
• PLACEMENT OF OVEN RACKS -
Always place oven racks in desired
location while oven is cool. If rack must
be moved while oven is hot, do not let
potholder contact hot heating element in
oven.
• USE CAUTION WHEN OPENING
THE OVEN DOOR: Allow hot air or
steam to escape before removing or
placing foods in the oven.
• Do not leave the packing materials
around the home. Sort the various items
of waste and take them to the nearest
specialized waste collection facility.
• Do not obstruct oven vents or openings
for air intake.
• ELECTRICAL GROUNDING IS
REQUIRED. It is the customer’s
responsibility:
1. To contact a qualified electrician.
2. To ensure that the electrical system is
adequate and in compliance with the
National Electrical Code ANSI / NFPA
70 Electrical Code – latest edition – or
the CANADIAN ELECTRICAL CODE,
C22.11 – 1982 and C22.2 No.
01982 – or latest edition – and all local
codes and ordinances.
• Always check that the controls are in the
"zero" (off) position when the oven is not
in use.
• Do not attempt to repair or replace any
part of this appliance unless specifically
recommended in this manual. All other
servicing should be done by a qualified
technician.
• Never use any part of the oven for
storage. Flammable materials can ignite
and plastic items may melt or burst into
flame.
• Do not hang articles on any part of the
appliance or place anything against the
oven. Some fabrics are extremely
flammable and could ignite.
• DO NOT USE ALUMINUM FOIL TO
LINE ANY PART OF THE OVEN. Use of
a foil liner can result in an electrical
shock or fire hazard or obstruct the flow
of heat and air. Foil is an excellent heat
insulator, allowing heat to be trapped
under it. This can interfere with cooking
and can damage the enamel of the
oven.

Important Safety Instructions
7
EN
• Prevent aluminum foil from contacting the
heating elements.
• Do not place pans or trays directly on
the bottom of the oven cavity.
• DO NOT HEAT UNOPENED FOOD
CONTAINERS: A buildup of pressure
can cause the containers to burst.
• DO NOT USE FLAMMABLE
PRODUCTS TO CLEAN THE OVEN.
• Do not clean, rub, damage or remove
the oven door gasket. It is essential for a
good, tight seal during baking and when
the self-clean cycle is engaged. Replace
the oven door gasket if it becomes
damaged or encrusted with food
residue.
• ONLY QUALIFIED SERVICE
PERSONNEL SHOULD PERFORM
REPAIRS. Service personnel must
disconnect the power supply before
servicing this unit.
• For SELF-CLEANING ovens:
A) Do not use a protective coating to line
the oven and do not use commercial oven
cleaner unless Certified for use in a self-
cleaning oven..
B) Clean Only Parts Listed in Manual.
C) Before Self-Cleaning the Oven –
Remove broiler pan and other utensils.
•
CAUTION: DO NOT LEAVE
FOOD OR COOKING UTENSILS,
ETC., IN OVEN DURING THE
PYROLYTIC SELF-CLEANING MODE
OF OPERATION.
• Do Not Use Water on Grease Fires -
Smother fire or flame or use dry
chemical or foam-type extinguisher.
• Use Only Dry Potholders - Moist or
damp potholders on hot surfaces may
result in burns from steam. Do not let
potholder touch hot heating elements.
Do not use a towel or other bulky cloth.
• Do not stand or sit on the oven door.
• Remove all packing materials and
temporary labels from the oven.
• Record the Model and Serial number on
Page 2 of this booklet. The Model and
Serial number are on the appliance ID
plate. The ID plates are visibly located
on the oven door frame. THE ID PLATE
MUST NOT BE REMOVED.
• BEFORE BAKING FOR THE FIRST TIME,
turn on the oven to burn off any dirt, oil
or grease remaining from the
manufacturing process. Turn the oven on
and set to 450°F(230 °C) for 20 to 30
minutes.
State of California Proposition 65 Warning
WARNING
This product can expose you to chemicals including vinyl chloride, which is
known to the State of California to cause cancer and birth defects or other
reproductive harm. For more information go to www.P65Warnings.ca.gov.
Important Safety Instructions
8
To save energy
• Unless otherwise indicated on the
package, defrost frozen foods before
placing them in the oven.
• When cooking several types of food, it is
recommended that you cook the foods
one after the other to make the best use
of the already hot oven.
• It is preferable to use dark metal pans,
which help to absorb the heat better.
• Remove all trays and racks that will not
be used during cooking or baking.
• Turn off the oven a few minutes before
the time required. Cooking will continue
for the remaining minutes with the heat
already accumulated inside the oven.
• Do not open the oven door very often to
avoid heat loss.
• Keep the inside of the oven clean at all
times.
Light sources
• This appliance contains user-
replaceable light sources.
• The light sources contained in the
product are suitable for use in ambient
temperatures of ≥572°F (300°C) and
intended for use in high temperature
applications such as in ovens.
• This appliance contains efficiency class
“G” light sources.
How to read the user manual
This user manual uses the following reading
conventions:
1. Use instruction sequence.
• Single use instruction.
SAVE THESE INSTRUCTIONS
Instructions
General information on this user
manual, on safety and final
disposal.
Description
Description of the appliance and its
accessories.
Use
Information on the use of the
appliance and its accessories,
cooking advice.
Cleaning and maintenance
Information for proper cleaning and
maintenance of the appliance.
Safety instructions
Information/Advice
Description
9
EN
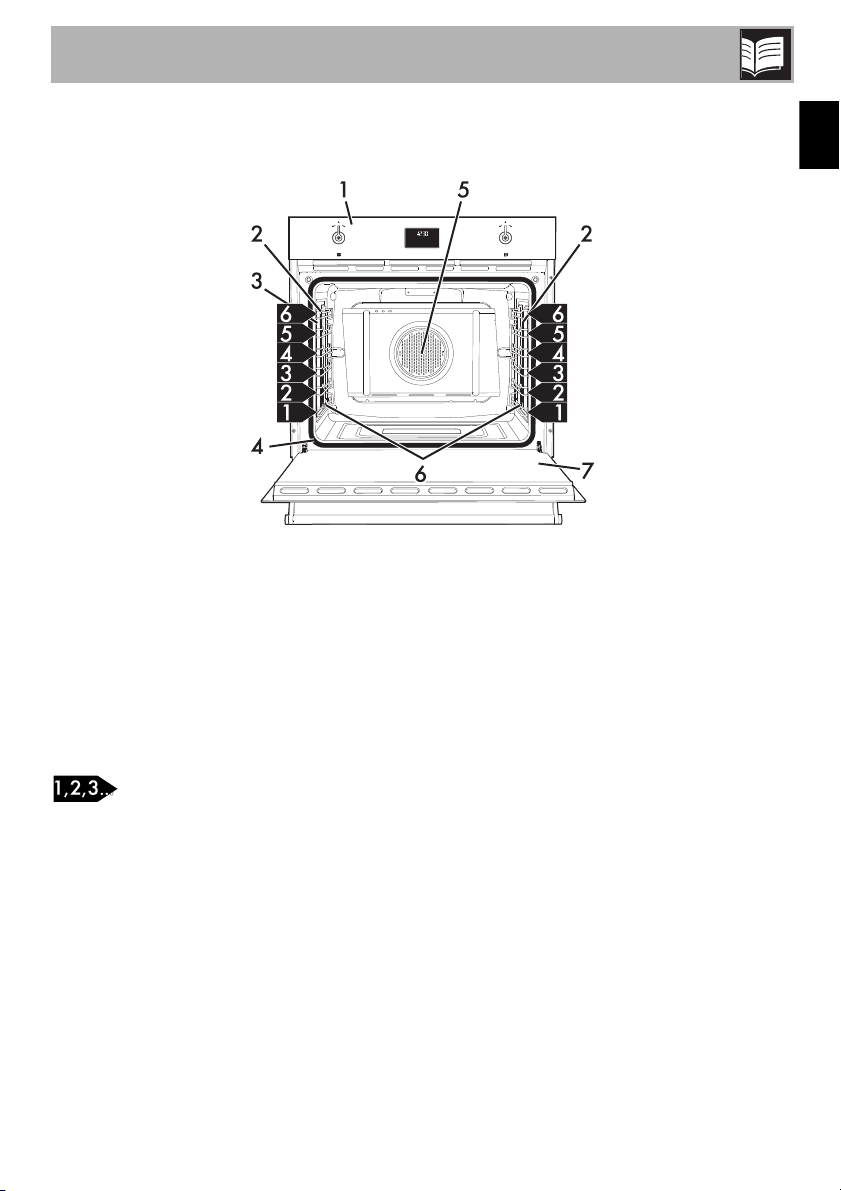
1 Description
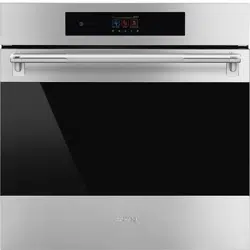
1.1 General Description
1 Control panel
2 Oven light
3 Temperature probe socket
4 Door gasket
5 Fan
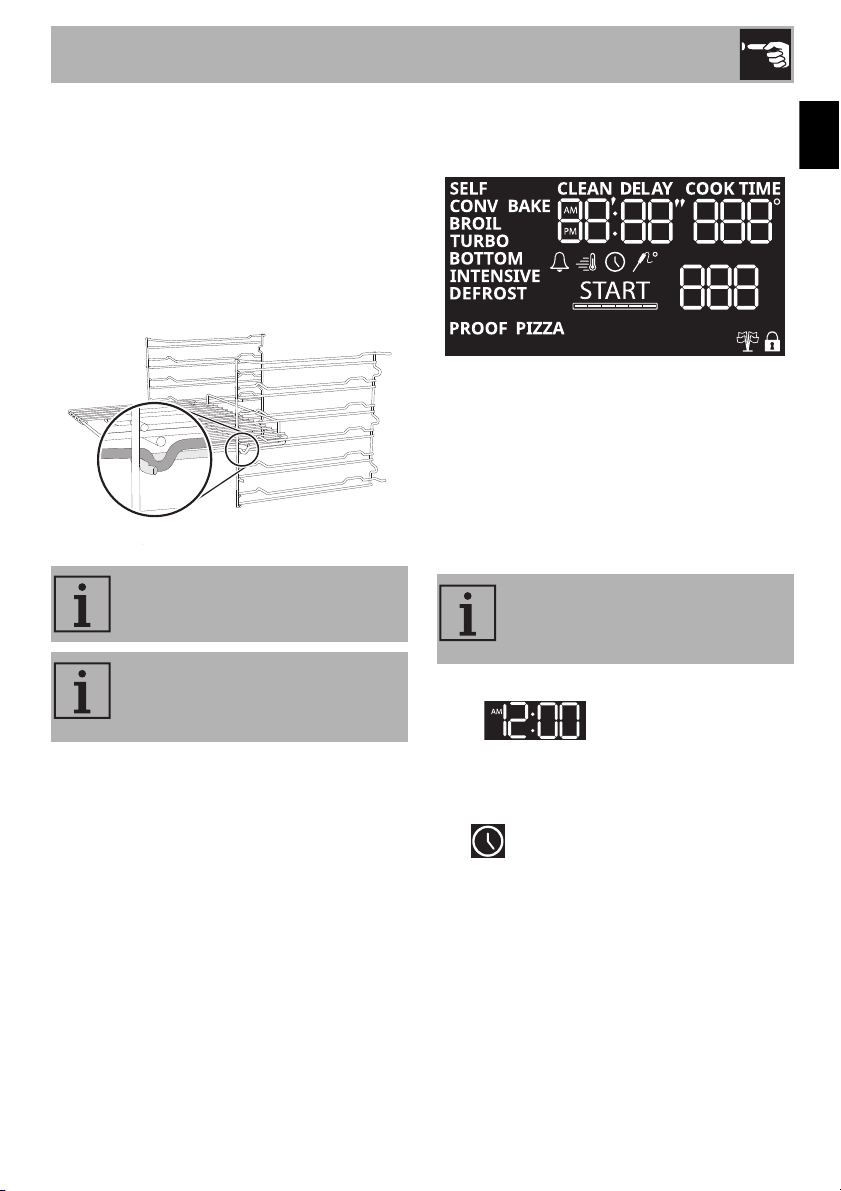
6 Rack/tray support frames
7 Door
Frame shelf
Description
10
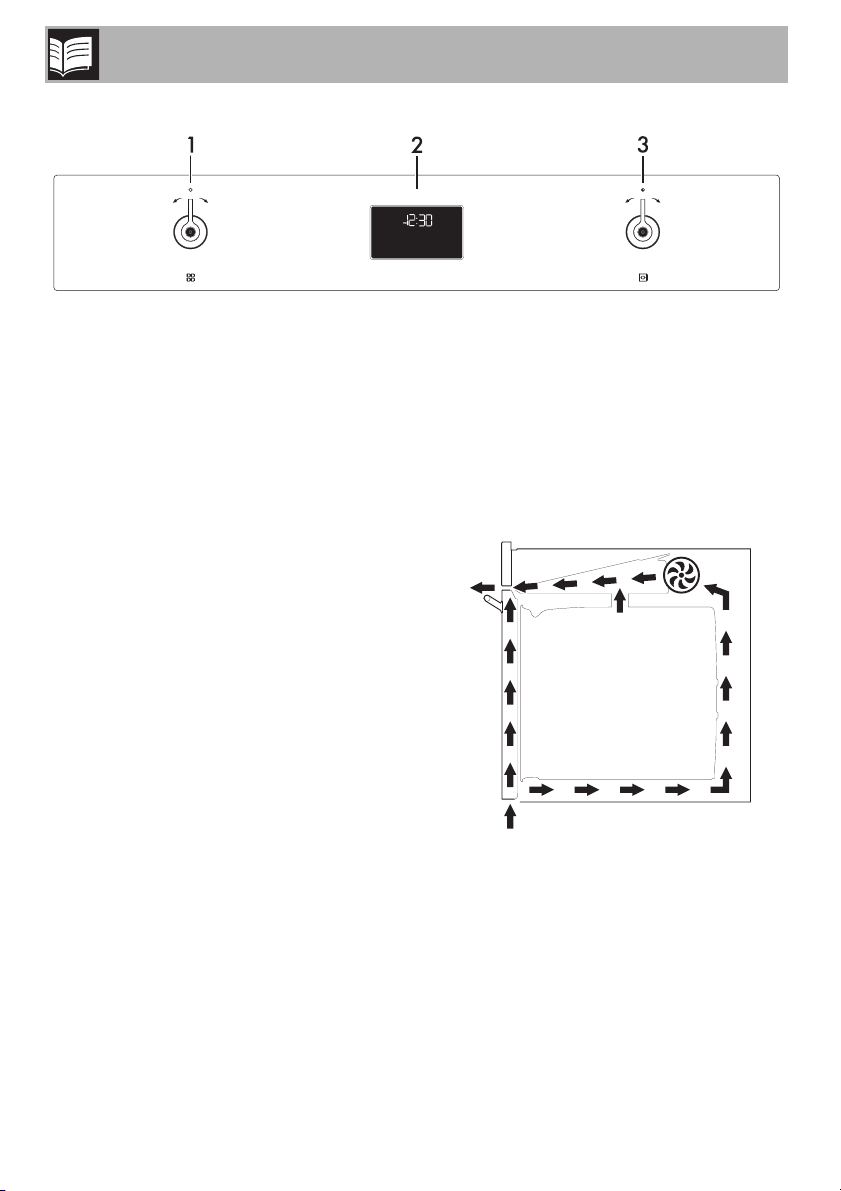
1.2 Control panel
1 Function knob
This knob can be used to:
• select a function
• start or stop a function
2 Digital programmer
Displays the current time, the function, the
selected cooking temperature, power and
any time that has been set.
3 Temperature knob
This knob can be used to set:
• the cooking temperature
• the duration of a function
• programmed cooking
1.3 Other parts
Positioning shelves
The appliance has shelves for positioning
trays and racks at various heights. The
position heights go from the bottom
upwards (see 1.1 General Description).
Cooling fan
The fan cools the appliance and turns on
during cooking or baking.
The fan provides a steady outflow of air
from above the door, which may continue
for a short time after the appliance has
been turned off.
Description
11
EN
Oven lighting
The internal lighting for the appliance turns
on:
• when the door is opened
• when the temperature knob is turned to
the right
• when any function is selected, except for
the and
functions.
1.4 Available accessories
Rack
Used to hold containers containing food to
be cooked.
Temperature probe
With the temperature probe, you can cook
according to the temperature measured at
the center of the food.
Protective cover
Used to cover and protect the temperature
probe socket when the temperature probe
is not in use.
When the door is open, you
cannot turn off the internal lighting.
Not all accessories are provided
on all models.
Accessories that may come into
contact with food are made of
materials that comply with all legal
provisions in force.
Original accessories supplied or
optional can be purchased at
authorized service centers. Only
use original manufacturer’s
accessories.
Use
12
2 Use
Warnings
2.1 First use
1. Remove all protective film from the
outside and inside of the appliance
and accessories.
2. Remove all labels (except the nameplate
with technical data) from the inside of
the oven and accessories.
3. Remove and wash all accessories of
the appliance (see “Cleaning inside the
oven”).
4. To remove any production residues, turn
the oven on to the maximum cooking
temperature for at least 20 minutes
(see “Using the oven”).
High temperature inside the oven
while in use
Burn hazard
• Keep the door closed while cooking or
baking.
• Use potholders or wear thermal gloves
to protect your hands when handling
pans that have been inside the oven.
• Do not touch the heating elements inside
the oven.
• Do not pour water directly on very hot
trays.
• Do not allow children near the
appliance during operation.
High temperature inside the oven
while in use
Danger of fire or explosion
• Do not use spray products near the
appliance.
• Do not use or store flammable materials
near the appliance.
• Do not use plastic dishes or containers
for cooking or baking food.
• Do not put sealed tin cans or containers
in the oven.
• Do not leave the appliance unattended
during cooking operations that could
release fats or oils.
• Remove all trays and racks that will not
be used during cooking or baking.
Improper use
Risk of damage to enameled
surfaces
• Do not cover the bottom of the oven with
sheets of aluminum or tin foil.
• If you wish to use parchment paper,
place it so that it will not interfere with
the hot air circulation inside the oven.
• Do not place pots or pans directly on
the bottom of the oven.
• Do not pour water directly on very hot
trays.
Use
13
EN
2.2 Use of accessories
Racks
Racks and trays must be inserted into the
side guides until they stop.
• The mechanical safety locks that prevent
accidental removal of the racks must
face downward and towards the rear of
the oven.
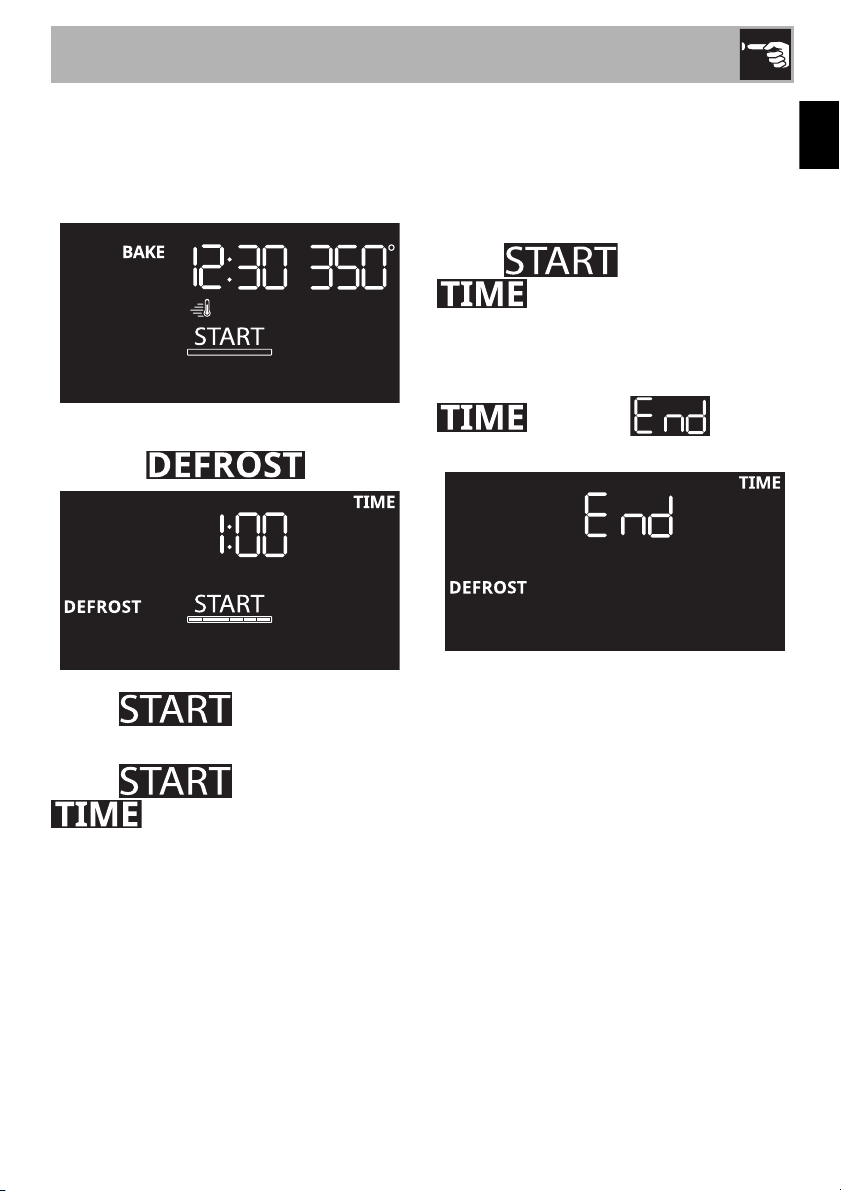
2.3 Using the oven
Display
The parameters and values for the currently
selected function will be indicated on the
display. To use it, simply turn the functions
and temperature knobs according to the
functions to be carried out by the
appliance.
How to set the current time
On the first use, or after a power failure, the
digits will be flashing on the
appliance’s display.
1. Turn the temperature knob repeatedly to
the right or left to adjust the time.
The symbol on the display turns on, the
segments that refer to the hours flash while
those of the minutes remain lit steadily.
Insert the racks gently into the oven
and push back until they stop.
Clean the racks before using them
for the first time to remove any
manufacturing residues.
It is not possible to use the
appliance if the current time has
not been set.
Use
14
2. Press the temperature knob to confirm the
hour.
The segments that refer to the hour remain lit
steadily while those of the minutes flash.
3. Turn the temperature knob to the right or
left to adjust the minutes.
4. Press the temperature knob to confirm the
minutes and finish setting the time.
The symbol on the display turns off.
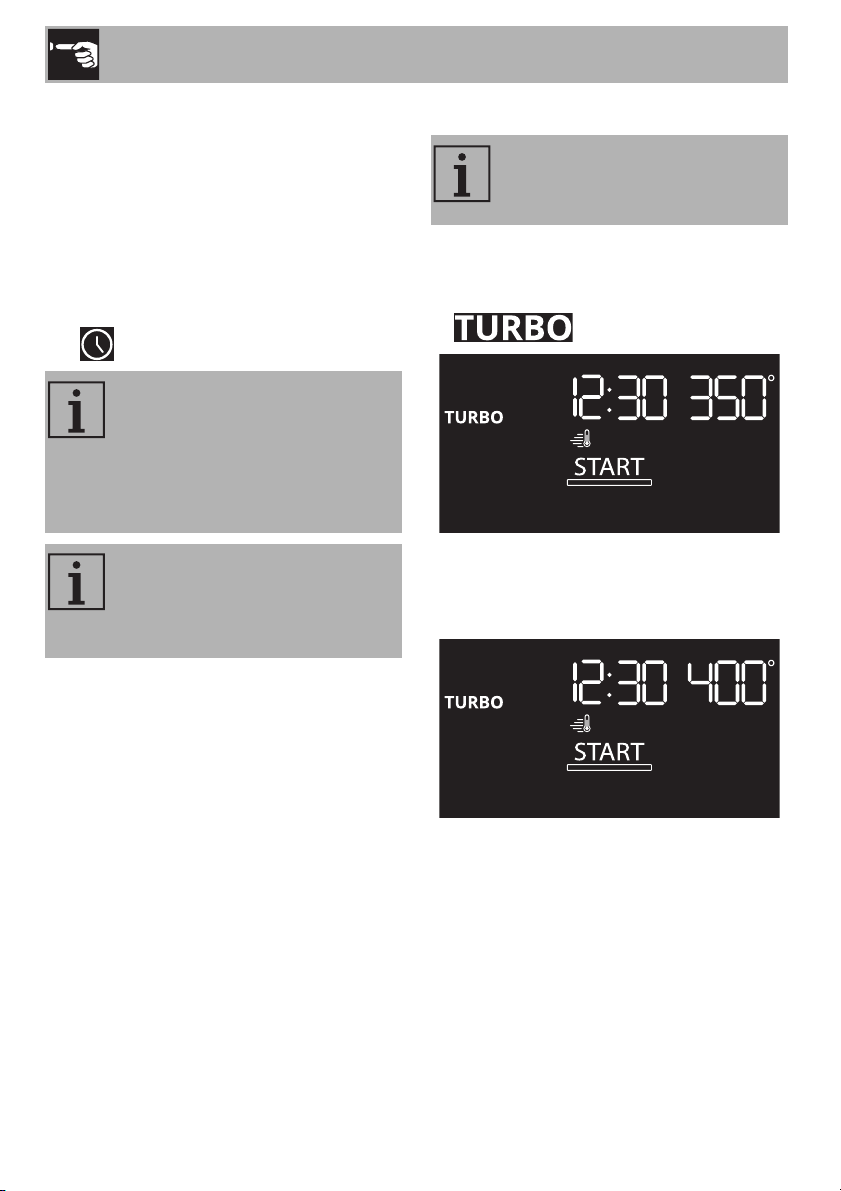
Switching on the oven
To switch the oven on:
1. Turn the functions knob to the right or left
to select the required function (e.g.
).
2. Turn the temperature knob to the right or
left to select the required temperature
(e.g. 400°F).
To modify the time, keep the
temperature knob turned to the
right or left until the segments that
refer to the hour flash and then
carry out the procedure described
above.
When the current time is shown,
the display will be dimmed 2
minutes after the knobs were last
used.
To exit immediately from a function
that is in progress, turn the functions
knob to the left.
Use
15
EN
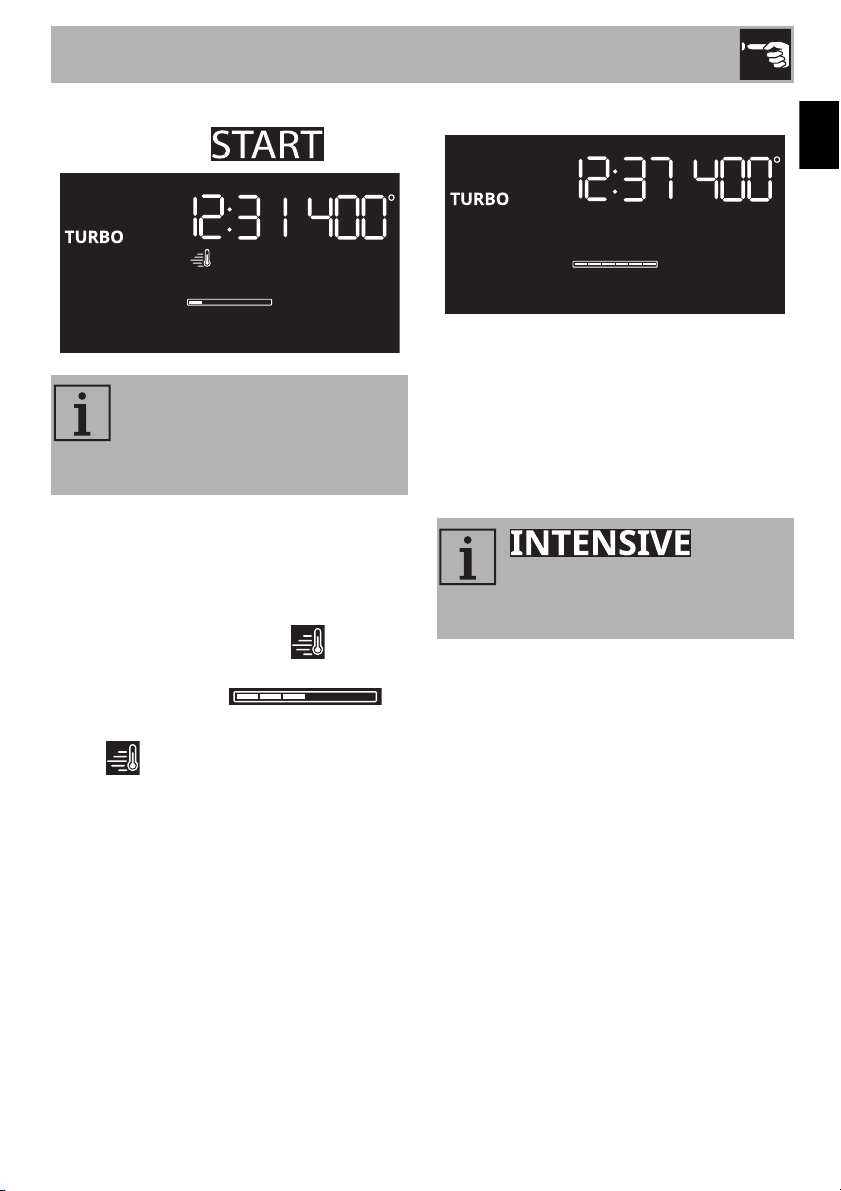
3. Press the functions knob to start the
function (the text turns off).
Preheating stage
Cooking is preceded by a preheating
stage, which allows the appliance to heat
up to the cooking temperature more quickly.
This stage is indicated by the indicator
and a progressive increase in the
temperature reached .
At the end of the preheating stage:
• the indicator turns off
• the cooking stage starts automatically
• a sound is emitted to indicate that the
food can be put in the oven.
Cooking stage
1. Open the door.
2. Place the food to be cooked in the oven.
3. Close the door.
4. Turn the temperature knob to the right
from time to time to turn the oven light on
and check how the food is cooking.
End of cooking
1. To finish cooking, turn the functions knob
to the left.
2. Open the door.
3. Take the food out of the oven.
4. Close the door.
When the door is opened, the
function in progress is stopped.
The function restarts automatically
when the door is closed.
: when
using this function, the food can be
placed in the oven even when the
oven is cold.
Use
16
Modifying the temperature during
cooking
To change the temperature during cooking:
1. Press the temperature knob.
The degrees symbol flashes.
2. Turn the temperature knob to the right or
left to select the required temperature.
3. Press the temperature knob or wait for a
few moments to confirm the new
temperature required.
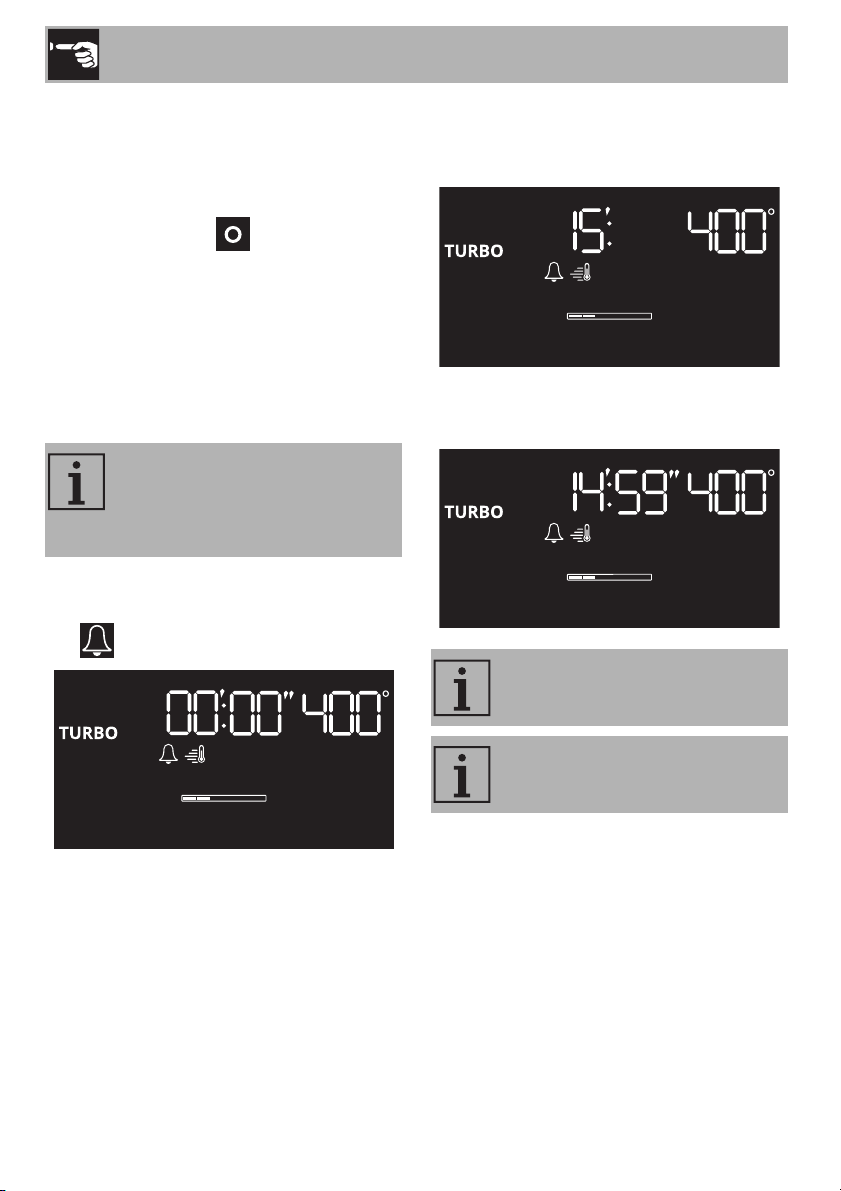
Minute minder during cooking
1. After starting cooking, press the
temperature knob twice in succession.
The symbol flashes.
2. Turn the temperature knob to the right or
left to select the required duration of the
minute minder (e.g. 15 minutes).
3. Press the temperature knob or wait for a
few moments to start the minute minder.
The minute minder does not stop
the cooking cycle, it warns the user
when the set number of minutes
has passed.
It is not possible to set minute
minders for more than 12 hours.
To cancel a minute minder, set the
values to 0.
Use
17
EN
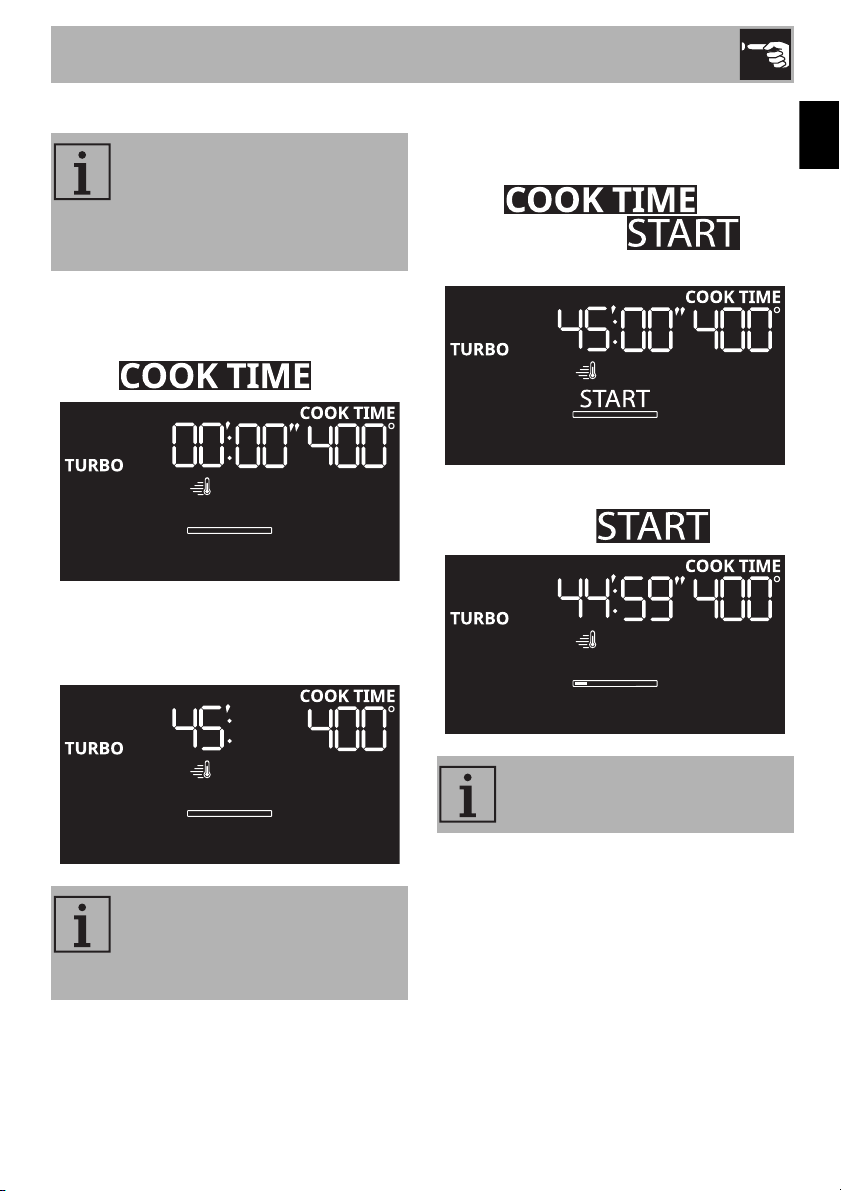
Timed cooking
1. After selecting a cooking function and a
temperature, press the temperature knob
twice in succession.
The text flashes.
2. Turn the temperature knob to the right or
left to select the required cooking time
(e.g. 45 minutes).
3. Press the temperature knob or wait for a
few moments to confirm the required
cooking time.
The text remains lit
with a steady light and
flashes.
4. Press the functions knob to start the
function (the text turns off).
Timed cooking is the function
which allows a cooking operation
to be started and then ended after
a specific length of time set by the
user.
It is not possible to set a timed
cooking for less than 10 minutes or
for more than 11 hours and 59
minutes.
Turn the functions knob to the left to
exit from the function.
Use
18
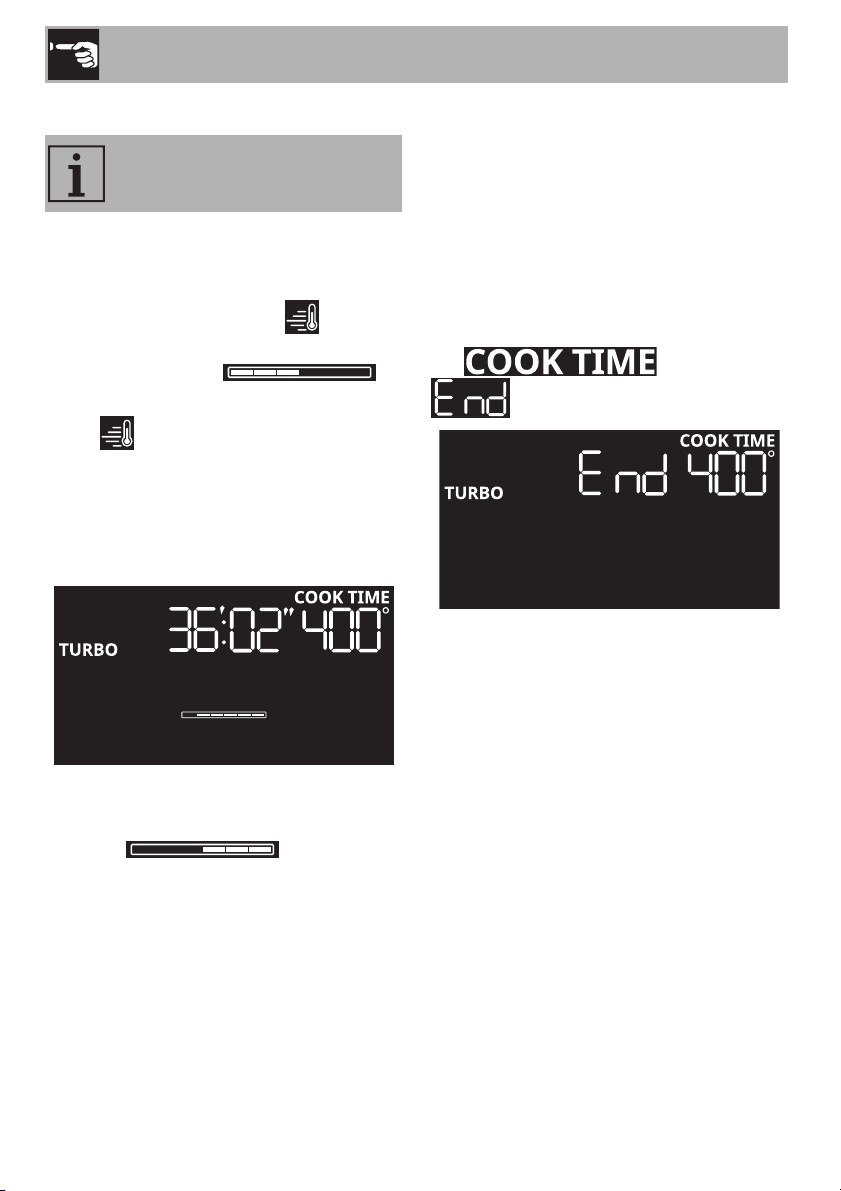
Preheating stage
Timed cooking is preceded by a preheating
stage, which allows the appliance to heat
up to the cooking temperature more quickly.
This stage is indicated by the indicator
and a progressive increase in the
temperature reached .
At the end of the preheating stage:
• the indicator turns off
• the cooking stage starts automatically
• a sound is emitted to indicate that the
food can be put in the oven.
Cooking stage
Timed cooking is indicated by the
progressive decrease in the cooking time
and level .
1. Open the door.
2. Place the food to be cooked in the oven.
3. Close the door.
4. Turn the temperature knob to the right
from time to time to turn the oven light on
and check how the food is cooking.
End of timed cooking
A sound is emitted when cooking ends. The
text flashes and
appears on the display.
1. Turn the functions knob to the left to exit
from the function.
2. Open the door.
3. Take the food out of the oven.
4. Close the door.
The time required for preheating is
included in the set cooking time.
Use
19
EN
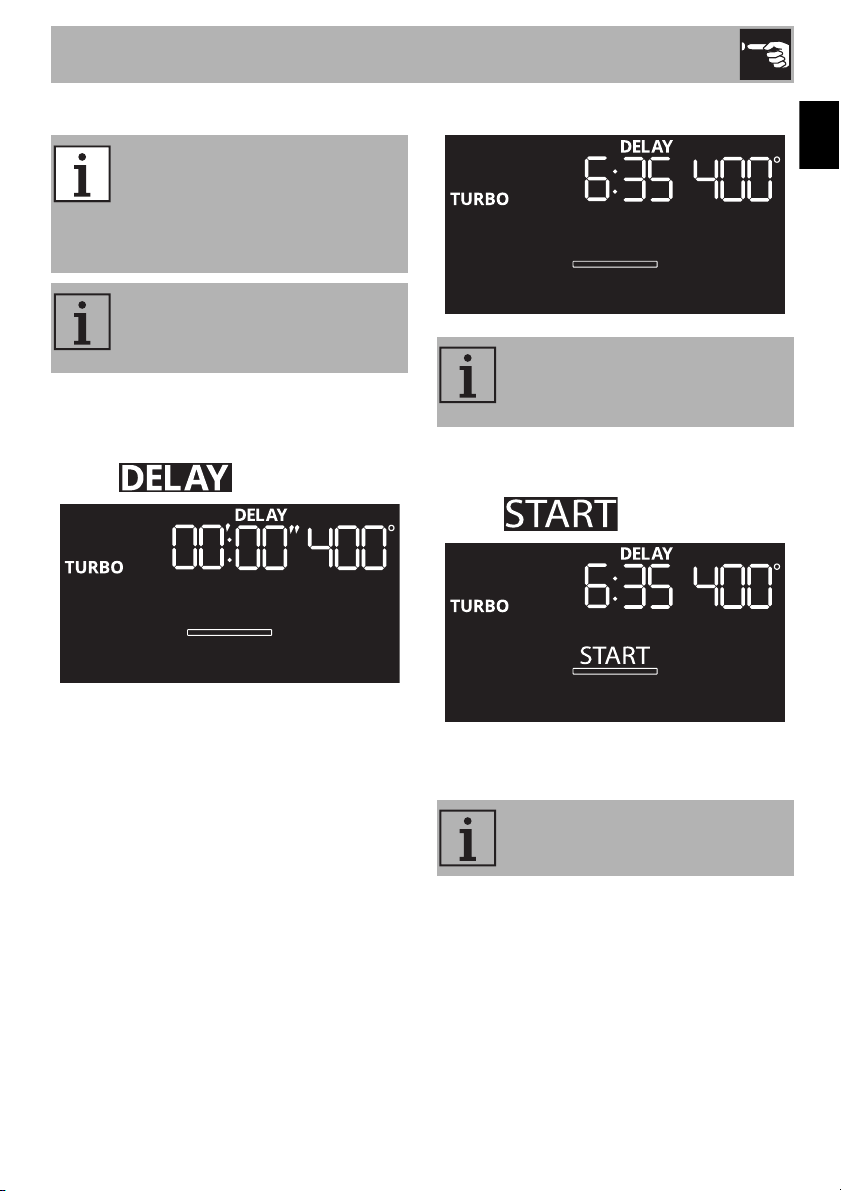
Cooking delayed
1. After having selected timed cooking (see
previous section), press the temperature
knob.
The text flashes.
2. Turn the temperature knob to the right or
left to select the required delay time
before cooking starts (e.g. 6 hours and
35 minutes).
3. Press the temperature knob to confirm the
required delay time.
The text flashes.
4. Press the functions knob to start the
function.
Delayed cooking is the function
that allows the user to start timed
cooking later that the current time,
after which the appliance will
switch off automatically.
The appliance does not preheat
when the delayed cooking
function is used.
It is not possible to set delayed
cooking times for more than 12
hours.
Turn the functions knob to the left to
exit from the function.
Use
20
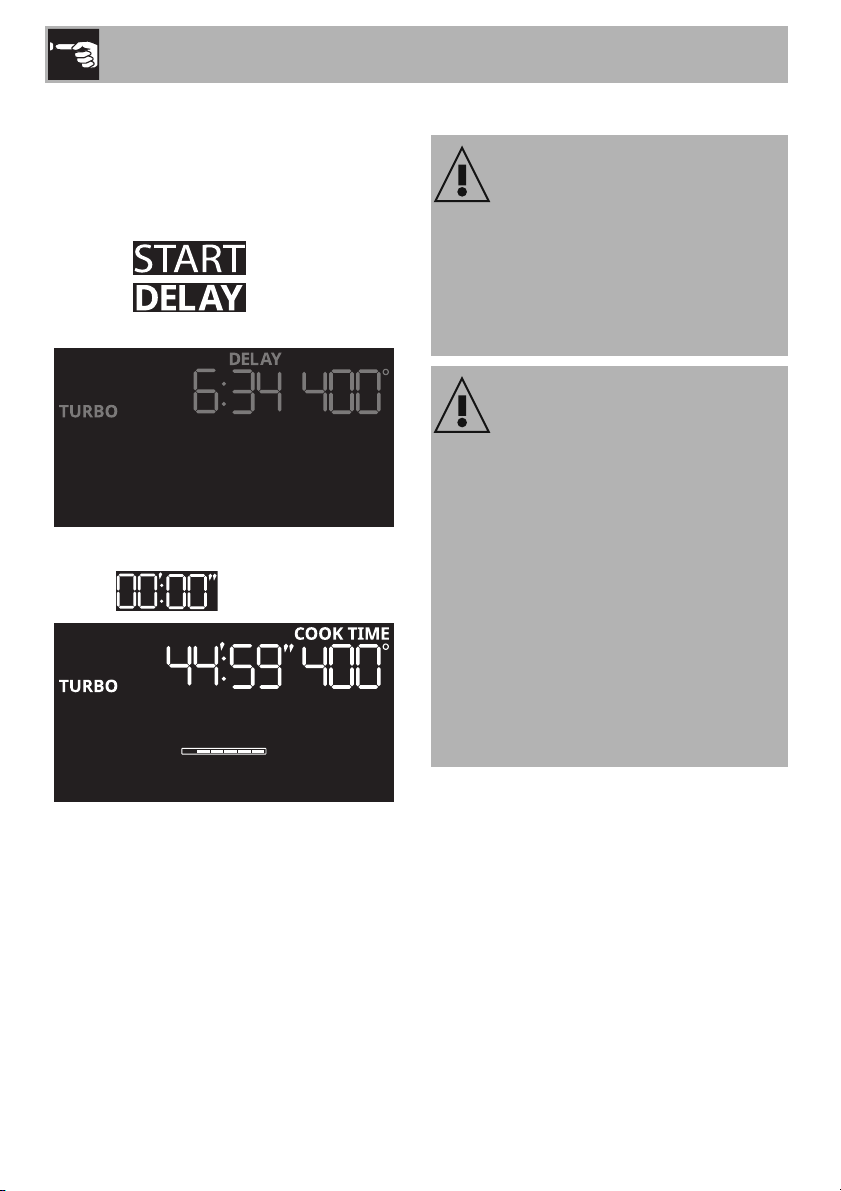
Countdown phase
During the delay time countdown:
• the display goes into dimmed mode and
indicates the time remaining before
timed cooking starts
• the text turns off
• the text remains lit with a
steady light.
Timed cooking starts when the countdown
reaches .
2.4 Using the temperature probe
The temperature probe is very hot
Burn hazard
• Do not touch the rod or the tip of the
temperature probe after it has been
used.
• Wear oven gloves when handling the
temperature probe.
Improper use
Risk of damage to the appliance
• Only use the temperature probe
provided or one recommended by the
manufacturer.
• Take care not to scratch or damage
enameled or chrome-plated surfaces
with the tip or the plug of the
temperature probe.
• Do not insert the temperature probe into
openings and slots on the appliance.
• When the temperature probe is not in
use, make sure that the protective metal
cap is properly closed.
Use
21
EN
Temperature probe
Using the temperature probe allows roasts,
pork loin and various cuts and sizes of meat
to be cooked to perfection, even if
contained in plastic oven bags (suitable for
cooking) or wrapped in aluminum foil.
The temperature probe allows foods to be
cooked to perfection because it accurately
monitors the core temperature of the food,
which is measured by a sensor in the tip of
the probe.
Positioning the temperature probe
1. Place the food on a tray.
2. Insert the tip of the probe into the food
before placing it in the oven.
Improper use
Risk of damage to temperature
probe
• Do not pull the cord to remove the
temperature probe from the socket or
from the food.
• Make sure that the temperature probe
or its cord do not get caught in the door.
• Make sure that the temperature probe
or its cord do not come into contact with
heating elements inside the oven.
• No part of the temperature probe
should be allowed to come into contact
with the inside walls of the oven, the
heating elements, the racks or the trays
while they are still hot.
• The probe should not be stored inside
the appliance.
In order to measure the core
temperature of the food
accurately, the tip of the probe
should not be in contact with
bones or fat.
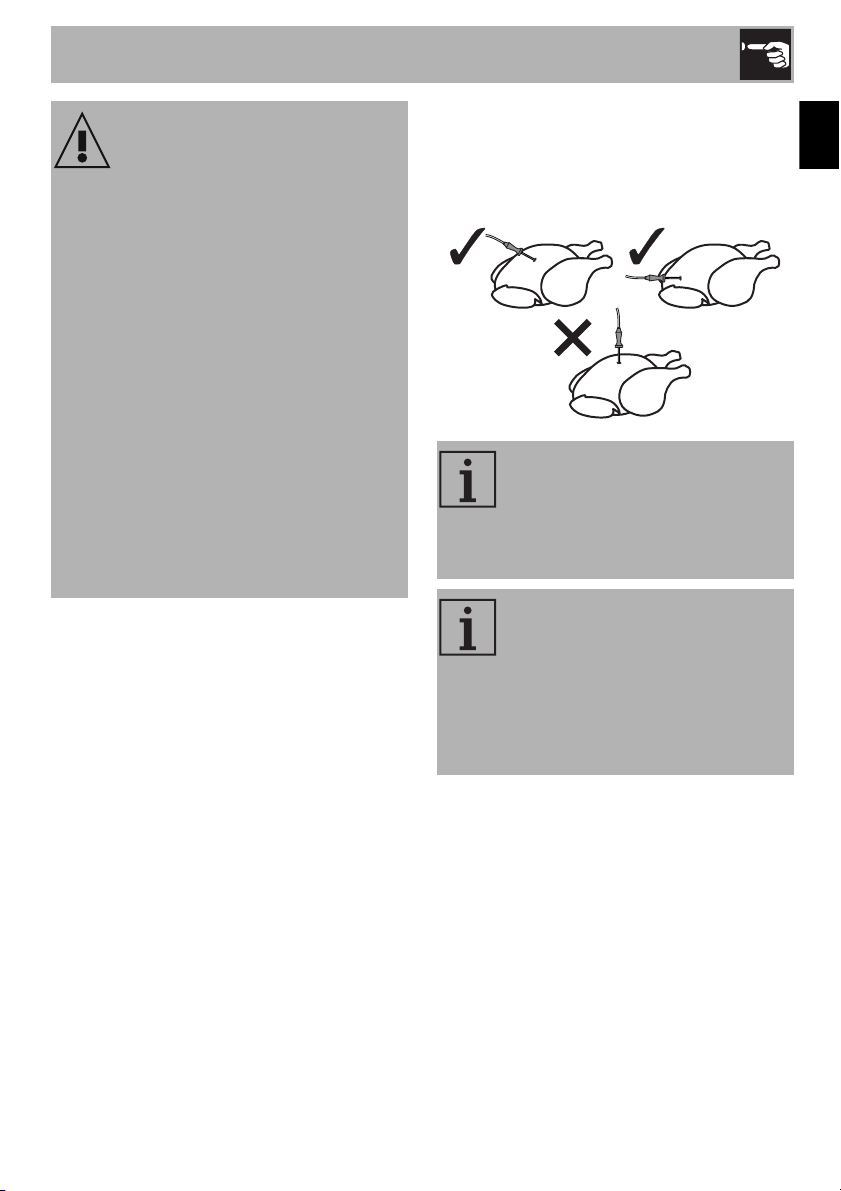
For best results, make sure that the
temperature probe is inserted
transversely in the thickest part of
the food and by at least 3/4 of its
length. Make sure that it does not
touch the tray underneath and that
it does not protrude from the food.
Use
22
Cooking settings when using the
temperature probe
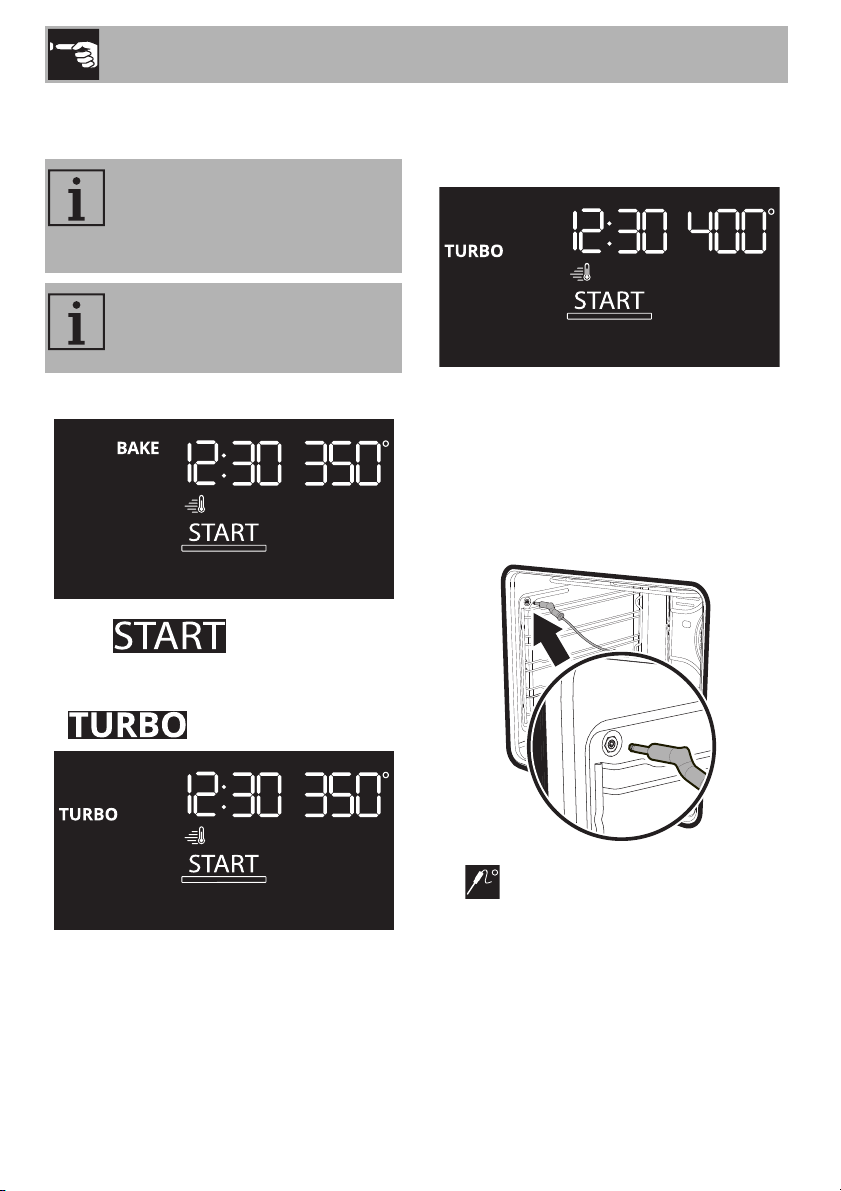
1. Press the functions knob.
The text flashes.
2. Turn the functions knob to the right or left
to select the required function (e.g.
).
3. Turn the temperature knob to the right or
left to select the required temperature
(e.g. 400°F).
4. Open the door.
5. Insert the rack with the food to be
cooked on the required shelf.
6. Insert the connector of the temperature
probe into the special housing on the
side of the oven cavity.
The symbol flashes on the display.
Settings can only be made if the
temperature probe connector is
inserted correctly into the socket
inside the oven.
The temperature probe can also
be connected after the end of the
preheating stage.
Use
23
EN
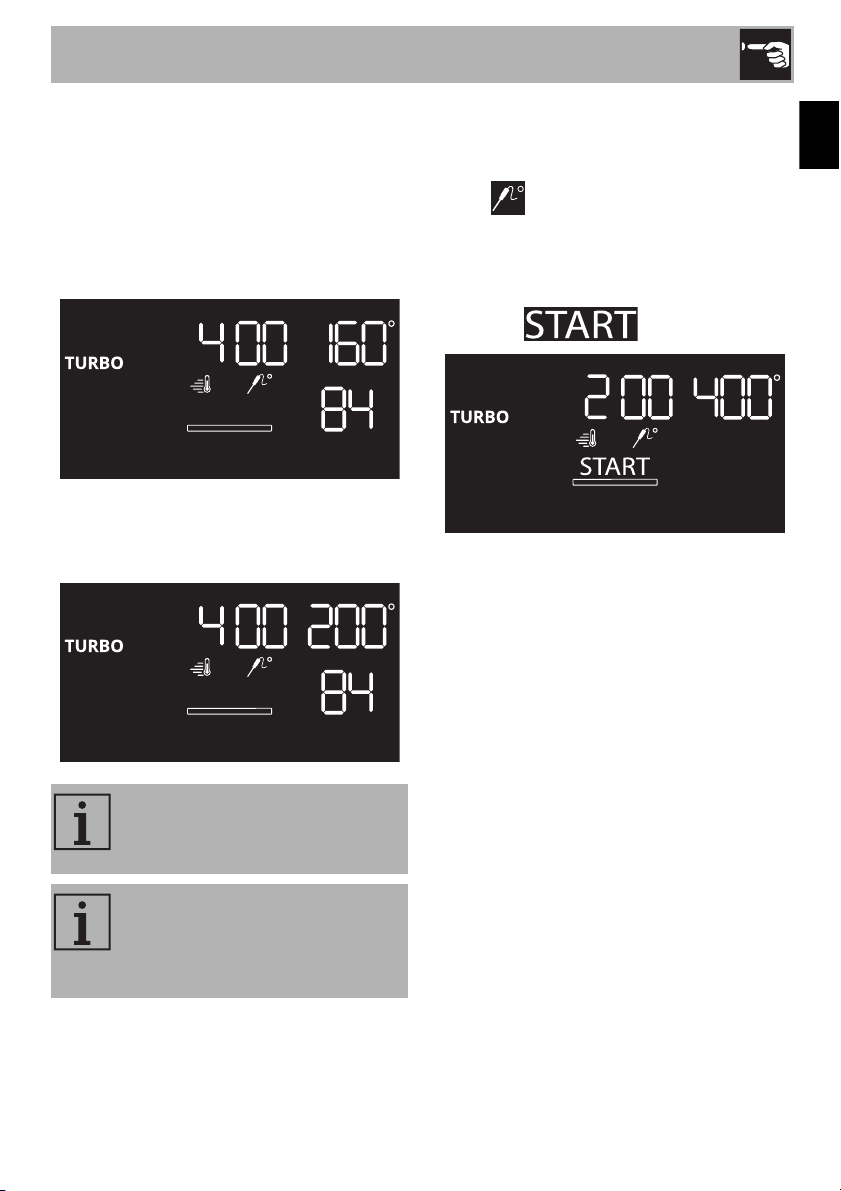
7. Press the temperature knob.
The display shows:
• the set cooking temperature, in the
center
• the target temperature, at the top right
• the actual temperature inside the food, at
the bottom right.
8. Turn the temperature knob to the right or
left to select the required target
temperature (e.g. 200°F).
9. Press the temperature knob to confirm the
target temperature.
The display shows:
• the symbol on steadily
• the target temperature, in the center
• the set cooking temperature, at the top
right
• the text flashes.
The temperature that can be
selected ranges from a minimum of
100°F to a maximum of 200°F.
For best results, we recommend
that you set the cooking
temperature higher than the target
temperature.
Use
24
Cooking using the temperature probe
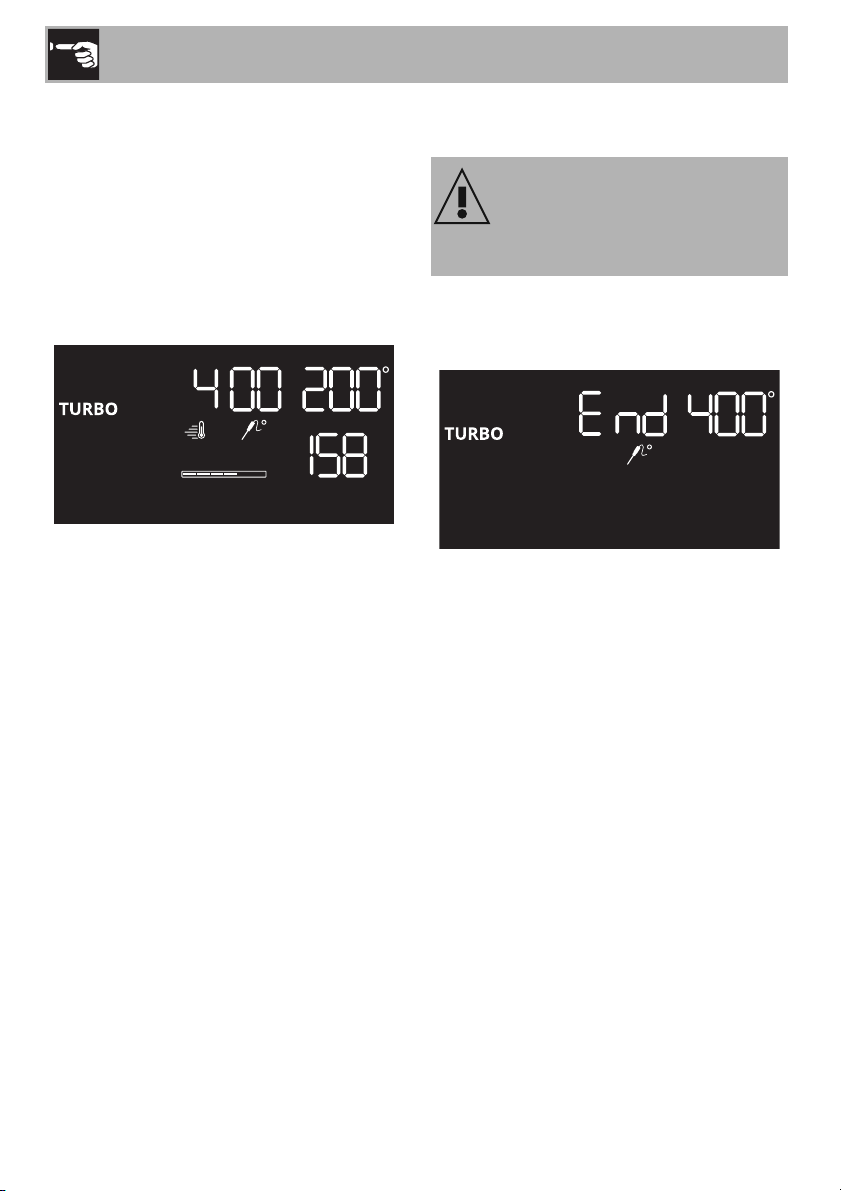
10. Press the functions knob to start
cooking.
11. During cooking, press the temperature
knob to display the actual temperature
inside the food.
The current temperature inside the food
appears at the bottom right of the display
(158 in the example).
Cooking ends when the temperature inside
the food reaches the target temperature set
by the user.
End of cooking with the temperature
probe
When cooking ends, the heating elements
are deactivated and the appliance emits a
series of beeps.
1. Turn the functions knob to the left to exit
from the function.
2. Open the door.
3. Remove the probe from the food and
unplug it from the socket.
4. Make sure that the protective cap is
properly closed.
5. Take the food out of the oven.
6. Close the door.
Improper use
Risk of injury
• Wear oven gloves.
Use
25
EN
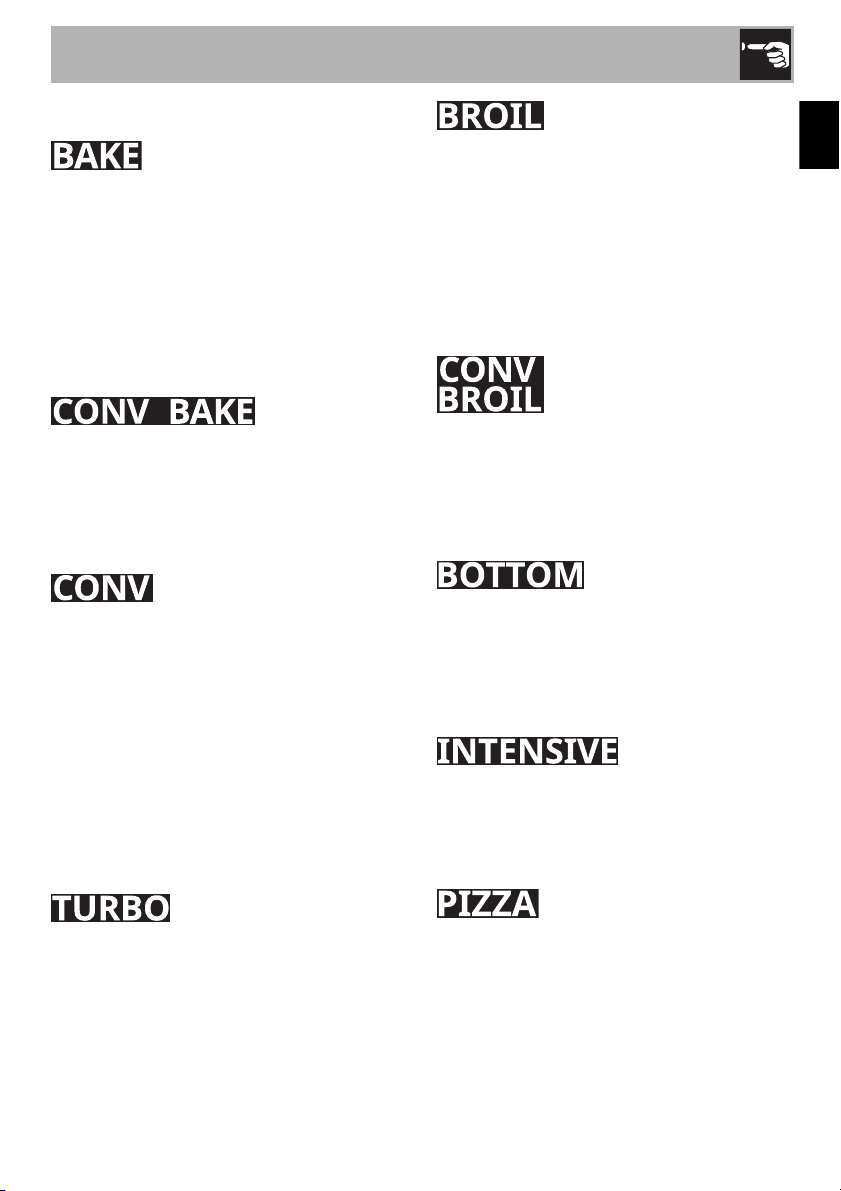
Functions list
As the heat comes from above and below
at the same time, this system is particularly
suitable for certain types of food. Traditional
cooking, also known as static cooking, is
suitable for cooking just one dish at a time.
Perfect for all types of roasts, bread and
cakes and particularly suitable for fatty
meats such as goose and duck.
The operation of the fan, combined with
traditional cooking, ensures uniform
cooking even with complex recipes. Perfect
for cookies and cakes, even when
simultaneously cooked on several levels.
The combination of the fan and the
convection heating element (incorporated
in the rear of the oven) allows you to cook
different foods on several levels, as long as
they need the same temperatures and same
type of cooking. Hot air circulation ensures
instant and uniform distribution of heat. It will
be possible, for instance, to cook fish,
vegetables and cookies simultaneously (on
different levels) without mixing odors and
flavors.
The combination of convection cooking
and traditional cooking allows different
foods to be cooked on several levels
extremely quickly and efficiently, without
odors and flavors mingling. Perfect for large
volumes that call for intense cooking.
The heat coming from the broiler element
gives perfect broiling results above all for
thin and medium thickness meat and, in
combination with the rotisserie (where
fitted), gives the food an even browning at
the end of cooking. Perfect for sausages,
ribs and bacon. This function enables large
quantities of food, particularly meat, to be
grilled evenly.
The air produced by the fan softens the
strong heatwave generated by the broiler,
roasting even very thick foods perfectly.
Perfect for large cuts of meat (e.g. pork
shank).
The heat coming just from the bottom allows
you to complete the cooking of foods that
require a higher bottom temperature,
without affecting their browning. Perfect for
cakes, pies, tarts and pizzas.
Allows you to quickly finish cooking food
that is already cooked on the surface but
not internally. Ideal for quiches, suitable for
all kinds of dishes.
Function designed for cooking pizza.
Perfect not just for pizzas, but also for
biscuits and cakes.
Use
26
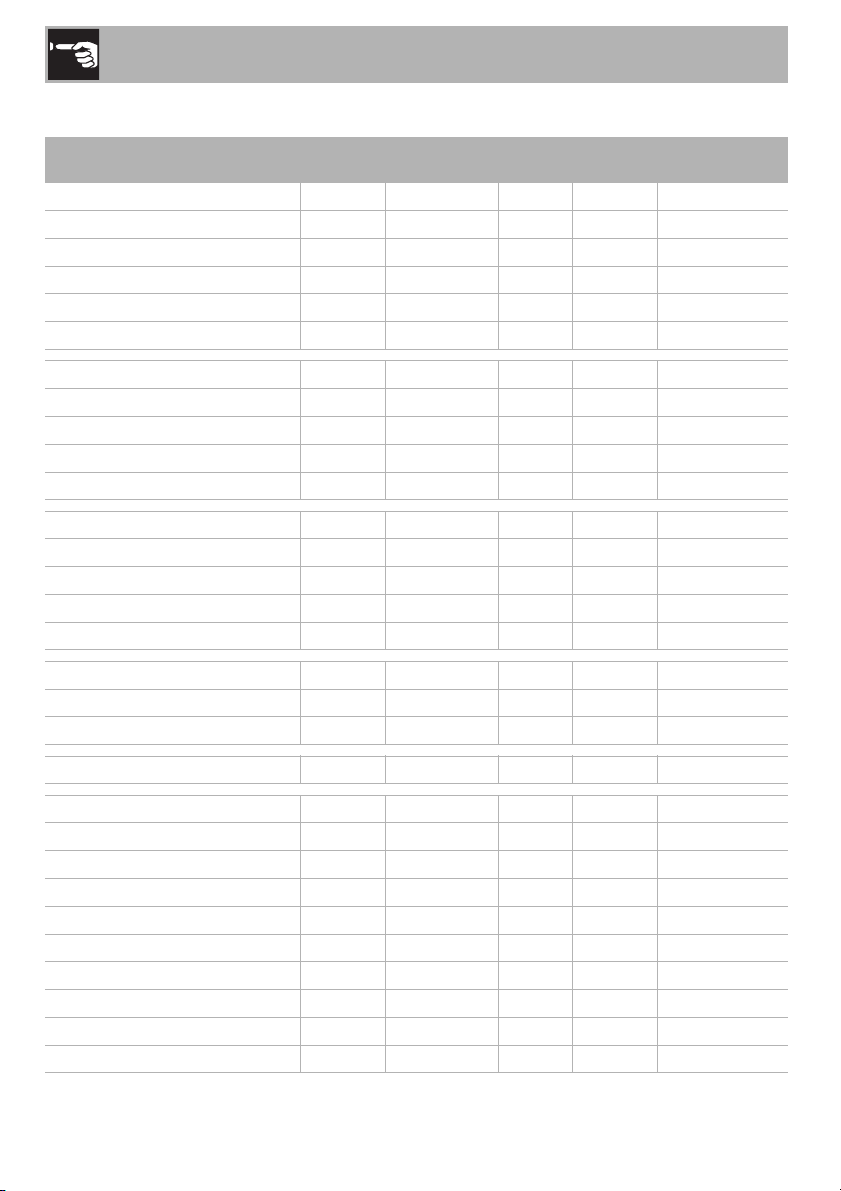
Cooking information chart
Food
Weight
(lbs.)
Function Shelf
Temp.
(°F)
Time (min.)
Focaccia bread
3.3 Turbo 2 375 25/30
Bread
6 x 0.3 Bake 2 400 38/42
Pizza
1.5/2.5 Conv. Bake 3 500 10/15
Pizza (frozen)
1.1 Conv. Bake 1 500 3/5
Quiche
3.3 Bake 2 375 40/45
Grilled vegetables
-Broil5500
8 1
st
+ 5 2
nd
Tenderloin (med-rare)
3.6 Turbo 3 425 52/55
Steak (rare)
1.1 Broil 6 500
3 1
st
+ 4 2
nd
Steak (med-rare)
1.1 Broil 6 500
5 1
st
+ 5 2
nd
Standing rib roast (med-rare)
6.6 Turbo 2 350 140/145
Standing rib roast (well done)
6.6 Turbo 2 350 175/185
Whole turkey
10/15 Conv. Bake 3 380 18/20 per lb.
Whole turkey
15/20 Conv. Bake 3 380 18/20 per lb.
Whole chicken
4.4 Conv. Bake 3 380 18/20 per lb.
Chicken breast
6 x 0.5 Broil 5 450
231
st
+ 12 2
nd
Chicken bone-in
12 x 0.2 Broil 5 450
131
st
+ 12 2
nd
Pork loin
5.5 Turbo 3 380 110/115
Sausages
12 x 0.4 Broil 6 500
101
st
+ 6 2
nd
Pork shoulder
5.5 Turbo 3 380 165/175
Fish
1.1 Broil 5 500
9 1
st
+ 8 2
nd
Sugar cookies
12 x 0.03 Bake 3 375 8/12
Sugar cookies (multi-shelf)
12 x 0.03 Conv. Bake 1 and 4 350 8/12
Biscuits
- Bake 3 see pkg. 10/13
Biscuits (multi-shelf)
- Bake 2 and 4 see pkg. 12/14
Muffins
12 x 0.06 Bake 3 340 18/22
Muffins (multi-shelf)
24 x 0.06 Bake 2 and 5 320 18/22
Brioches (multi-shelf)
- Bake 2 and 5 350 30/35
White cake (multi-shelf)
4 x 1.1 Bake 2 and 5 see pkg. 35/40
Apple pie
3.75 Bake 2 375 55/58
Bundt cake
3.3 Bake 3 340 56/59
The times indicated in the table do not include preheating times and are provided as a guide only.
“1st” and “2nd” means the first and the second side of the food to be cooked.

Use
27
EN
2.5 Cooking tips
General tips
• Use a convection function to achieve
uniform cooking at several levels.
• Increasing the temperature does not
shorten cooking or baking times (the
food could be well cooked on the
outside and undercooked on the inside).
• Depending on the food, use the most
suitable container on the rack.
Tips for cooking meats
• Cooking times vary depending on the
thickness and quality of the meat, and on
consumer tastes.
• Use a meat thermometer when cooking
roasts, or simply press on the roast with a
spoon. If it feels hard, it is ready;
otherwise, it needs to roast a bit longer.
Tips for cooking with the broiler and
convection broiler
• The meat can be grilled starting with a
cold oven or with the oven preheated if
you want to change the effect of the
cooking.
• With the convection broiler function, it is
recommended that the oven be
preheated before broiling.
• We recommend placing the food
directly at the center of the rack with a
pan placed below it to collect dripping
fats.
Tips for baking cakes and cookies
• It is preferable to use dark metal pans,
which help to absorb the heat better.
• The temperature and baking duration
depend on the quality and consistency
of the dough.
• To check whether the cake is baked
through, stick a toothpick into its highest
point at the end of the baking time. If the
dough does not stick to the toothpick, the
dessert is cooked.
• If the dessert goes flat when it comes out
of the oven, on the next occasion reduce
the set temperature by about 50°F,
selecting a longer cooking time if
necessary.
Tips for defrosting and proving
• With the wrapping removed, place
frozen foods into a lidless container and
place it on the first rack in the oven.
• Do not overlap foods.
• To defrost meat, use a rack placed on
the second level and a tray placed on
the first level. This way, the meat does
not remain in contact with the liquid from
thawing.
• The most delicate parts can be covered
with aluminum foil.
• For good proofing, place a container of
water at the bottom of the oven.
To save energy
• Turn off the oven a few minutes before
the time required. Cooking will continue
for the remaining minutes with the heat
already accumulated inside the oven.
• Do not open the oven door very often to
avoid heat loss.
• Always keep the inside of the appliance
clean.
Use
28
2.6 Special features
Minute minder
1. Press the temperature knob.
The symbol flashes.
2. Turn the temperature knob to the right or
left to select the required duration in
minutes (e.g. 15 minutes).
3. Press the temperature knob or wait for a
few moments to start the minute minder.
(timed)
Rapid defrosting is helped by switching on
the fan provided and the top heating
element that ensure uniform distribution of
low temperature air inside the oven.
The minute minder only warns the
user that the set number of minutes
has passed.
It is not possible to set minute
minders for more than 12 hours.
To cancel a minute minder, set the
values to 0.
If the oven has been used a short
time ago for cooking, we
recommend that you let the
appliance cool down before
activating the function.
The timed Defrost function can
range from a minimum of 1 minute
to a maximum of 11 hours and 59
minutes.
It is not possible to modify the
default temperature of the Defrost
function.
Use
29
EN
1. Open the door.
2. Place the food in the oven and close the
door.
3. Press the functions knob.
4. Turn the functions knob to the right or left
to select .
The text flashes.
5. Press the temperature knob.
The text turns off while
flashes.
6. Turn the temperature knob to the right or
left to select the required defrost
duration.
7. Press the temperature knob to confirm the
required defrost duration.
The text flashes while
remains lit with a steady light.
8. Press the functions knob to start the
function.
When finished, a sound is emitted. The text
flashes and appears
on the display.
1. Turn the functions knob to the left to exit
from the function.
2. Open the door.
3. Take the food out of the oven.
4. Close the door.
Use
30
This function is particularly suitable for
proving dough.
1. Open the door.
2. Place the dough to be proofed on the
second shelf and close the door.
3. Press the functions knob.
4. Turn the functions knob to the right or left
to select
.
The text flashes.
5. Press the temperature knob.
The text turns off while
flashes.
6. Turn the temperature knob to the right or
left to select the required proofing
duration.
7. Press the temperature knob to confirm the
required proofing duration.
The text flashes while
remains lit with a steady light.
8. Press the functions knob to start the
function.
If the oven has been used a short
time ago for cooking, we
recommend that you let the
appliance cool down before
activating the function.
The proofing duration can range
from a minimum of 1 minute to a
maximum of 11 hours and 59
minutes.
It is not possible to modify the
default temperature of the Proofing
function.
For good proofing, place a
container of water at the bottom of
the oven.
Use
31
EN
When finished, a sound is emitted. The text
flashes and appears
on the display.
1. Turn the functions knob to the left to exit
from the function.
2. Open the door.
3. Take the food out of the oven.
4. Close the door.
(Sabbath)
This function allows you to cook food while
respecting the provisions of the Jewish day
of rest.
When in this mode, the appliance will
operate as follows:
• cooking can continue indefinitely, but it is
also possible to set a cooking time
• preheating is not carried out
• the cooking temperature that can be
selected is between 170°F and 550°F
• the oven light is off, it cannot be turned
on by opening the door or trying to
activate it manually
• the fan is deactivated
• the buzzers are deactivated
To use the Sabbath function:
1. Open the door.
2. Place the food in the oven.
3. Close the door.
4 Press the functions knob.
5. Turn the functions knob to the right or left
to select .
6. Turn the temperature knob to the right or
left to select the required temperature.
After having activated the Sabbath
mode, parameters cannot be
modified.
Use
32
7. Wait a few moments until
flashes.
8. Press the functions knob to start the
function.
• Turn the functions knob to the left to exit
from the function.
Timed Sabbath
1. After having selected the required
temperature, press the temperature knob.
The text flashes.
2. Turn the temperature knob to the right or
left to select the required cooking time
(from 10 minutes to 73 hours).
3. Press the temperature knob to confirm the
required cooking time.
4. Press the functions knob to start the
function.
End of the Sabbath function
The following screen is displayed when the
function ends.
1. Turn the functions knob to the left to exit
from the function.
2. Open the door.
3. Take the food out of the oven.
4. Close the door.
Turn the functions knob to the left at
any time to exit from the function.
No sound is emitted when the
function ends.
The scroll bar
indicates the cooling of the
cooking compartment.
Use
33
EN
2.7 Settings
To access the settings menu:
1. From the clock screen, turn the
temperature knob to the right.
The oven light switches on.
2. Keep the temperature knob pressed for a
few seconds.
Controls lock (child safety)
1. After accessing the settings menu, the first
setting that can be changed is the panel
Controls lock.
2. Turn the temperature knob to the right or
left to enable or disable this setting.
When enabled, to unlock the controls lock:
1. turn the temperature knob to the right.
The indicator flashes.
2. Keep the temperature knob pressed for a
few seconds.
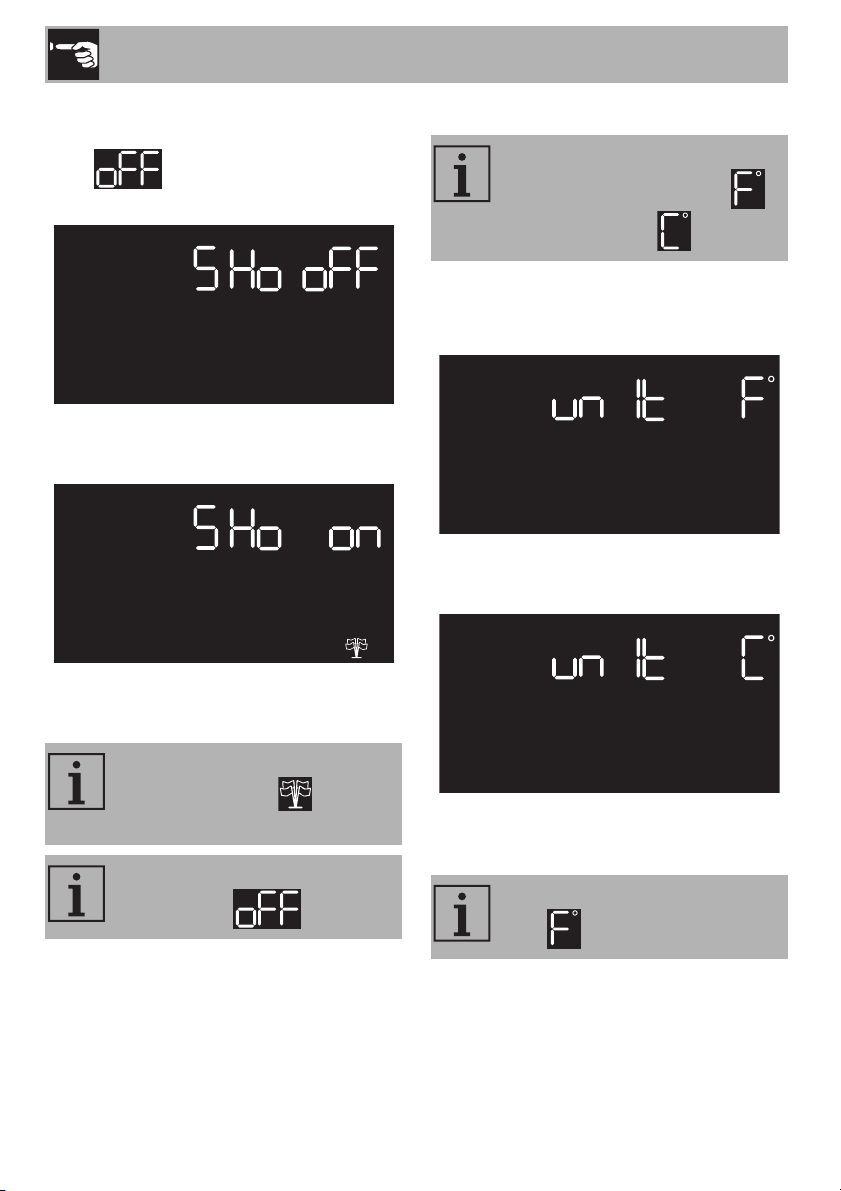
Showroom (for exhibitors only)
This mode allows the appliance to
lock the controls automatically.
During normal operation, the
controls lock is indicated by the
symbol lighting up.
If there is a power outage, the
controls lock remains active when
it comes back on.
If the controls lock is enabled, it will
not be possible to enter any
additional settings.
This setting deactivates all the
appliance’s heating elements
while keeping the control panel
active.
This setting is only visible for 5
minutes after connecting the
appliance to the mains power
supply.
Use
34
1. After having accessed the settings menu
(and having left the controls lock setting
on ), press the temperature knob
to select the Showroom setting.
2. Turn the temperature knob to the right or
left to enable or disable this setting.
3. Press the temperature knob to confirm
and move to the next setting.
Temperature format
1. After accessing the settings menu, press
the temperature knob to select the
Temperature format.
2. Turn the temperature knob to the right or
left to enable or disable this setting.
3. Press the temperature knob to confirm
and move to the next setting.
When the showroom function is
active, the indicator is lit on
the display.
To use the appliance normally, set
this function to .
Allows you to set the temperature
scale to degrees Fahrenheit
or degrees Celsius .
The Temperature format is factory
set to .
Use
35
EN
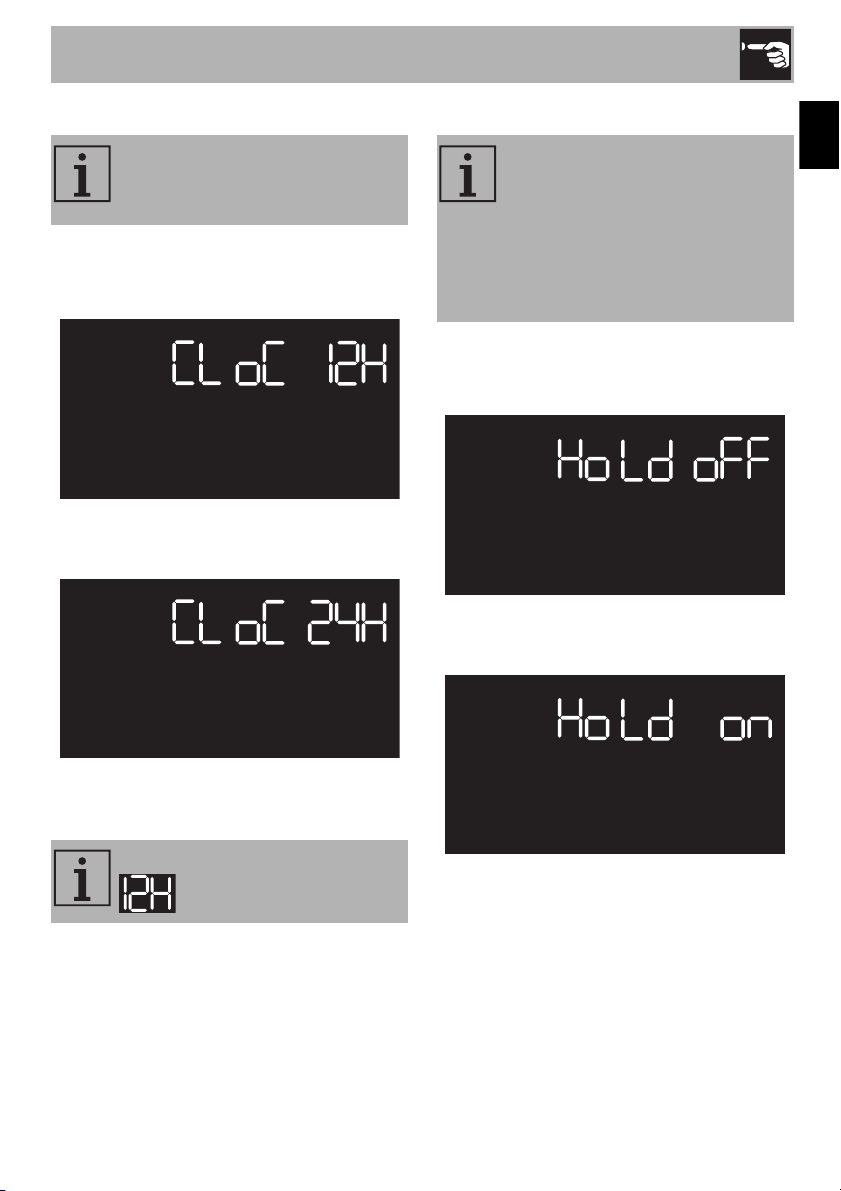
Time format
1. After accessing the settings menu, press
the temperature knob to select Time
format.
2. Turn the temperature knob to the right or
left to enable or disable this setting.
3. Press the temperature knob to confirm
and move to the next setting.
Keep warm
1. After accessing the settings menu, press
the temperature knob to select Keep
warm.
2. Turn the temperature knob to the right or
left to enable or disable this setting.
This setting allows you to enable or
disable the clock display in a 12
or 24 hour format.
The Time format is factory set to
.
This setting allows the appliance to
keep cooked food warm (at low
temperatures) after timed cooking
finishes (if it is has not been
interrupted manually), without
altering the taste and aroma
obtained during cooking.
Use
36
3. Press the temperature knob to confirm
and move to the next setting.
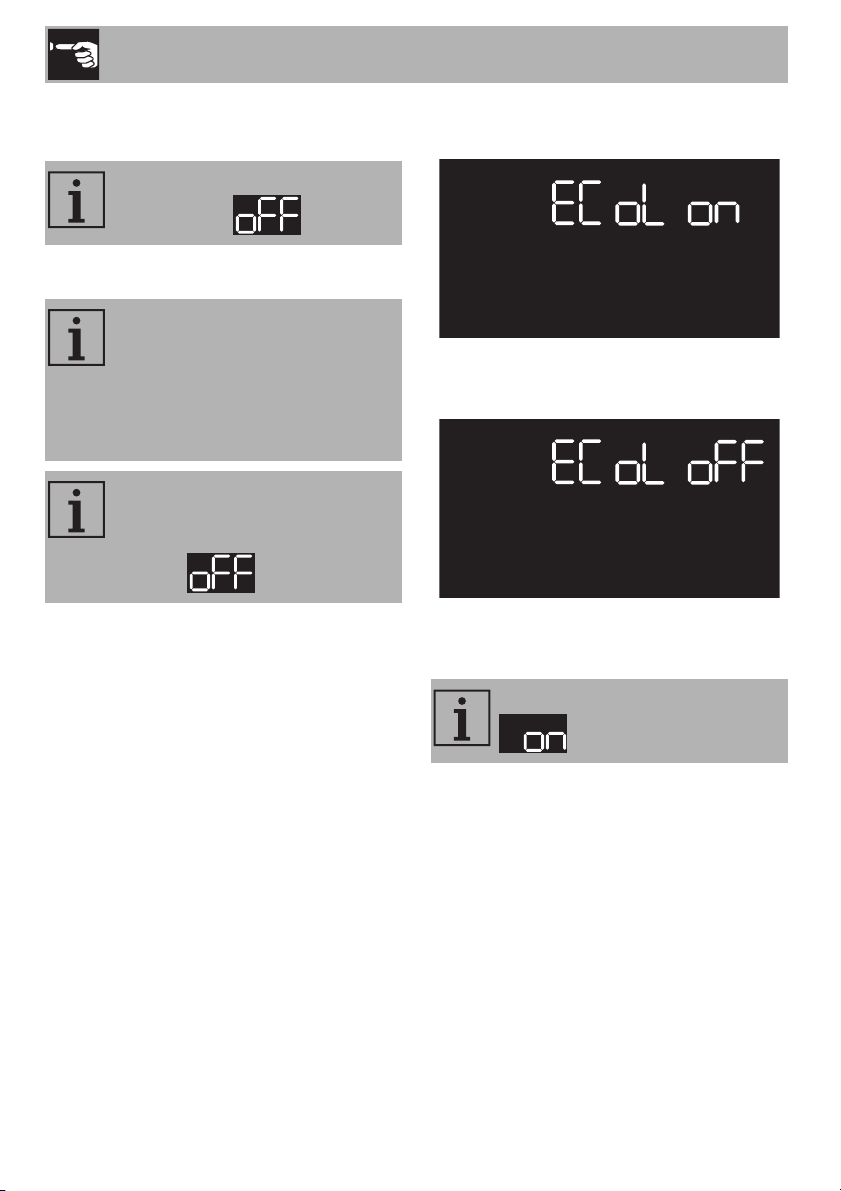
Eco light
1. After accessing the settings menu, press
the temperature knob to select Eco logic.
2. Turn the temperature knob to the right or
left to enable or disable this setting.
3. Press the temperature knob to confirm
and exit the settings menu.
To use the appliance normally, set
this function to .
For greater energy savings, the
lights inside the oven are
automatically switched off
approximately one minute after the
start of cooking or after the door is
opened.
To disable the function that turns
the oven light off automatically
after about one minute, set this
mode to .
The Eco light is factory set to
.
Cleaning and Maintenance
37
EN
3 Cleaning and maintenance
Warnings
3.1 Surface cleaning
To maintain the surfaces, you must clean
them regularly after each use once they
have cooled down.
Ordinary daily cleaning
Always use only specific products that do
not contain abrasives or chlorine-based
acids. Pour the product on a damp cloth
and wipe the surface, rinse thoroughly and
dry with a soft fabric or microfiber cloth.
Food stains or residues
Do not use steel wool or sharp scrapers:
they will damage the surface.
Use ordinary, non-abrasive products, with
the aid of wooden or plastic tools if
necessary. Rinse thoroughly and dry with a
soft fabric or microfiber cloth.
Do not let sugar-based food residues (e.g.
jam/jelly) dry within the appliance as they
can ruin the coating on the inside of the
appliance.
3.2 Cleaning the door
Removing the door
To facilitate cleaning, we recommend that
you remove the door and place it on a
towel.
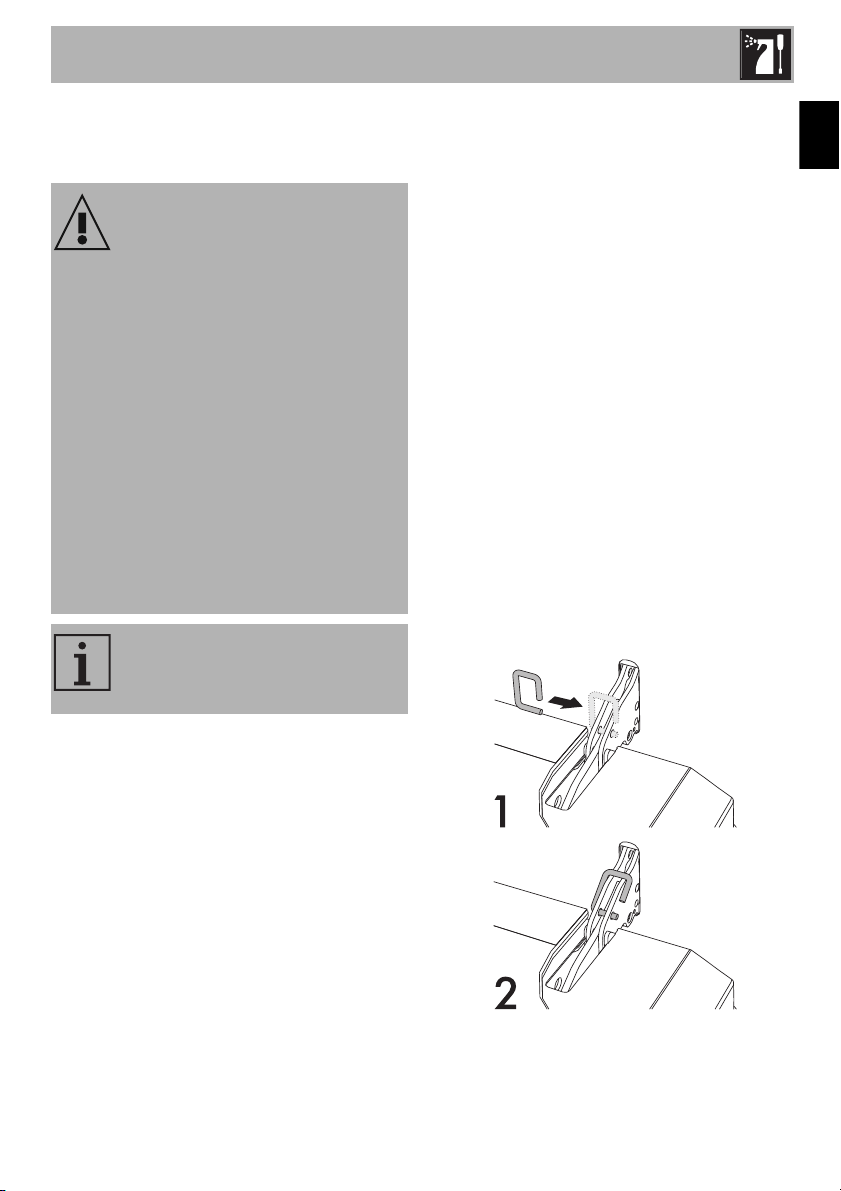
To remove the door, proceed as follows:
1. Open the door completely and insert two
pins into the holes in the hinges, as
shown in the image.
Improper use
Risk of damage to surfaces
• Do not use steam jets to clean the
appliance.
• Do not use cleaning products containing
chlorine, ammonia or bleach on the
steel parts or those with metallic surface
finishes (e.g. anodizing, nickel or
chrome plating).
• Do not use abrasive or corrosive
detergents on the glass parts (e.g.
powder products, stain removers or
metal scouring pads).
• Do not use rough or abrasive materials
or sharp metal scrapers.
We recommend using cleaning
products distributed by the
manufacturer.
Cleaning and Maintenance
38
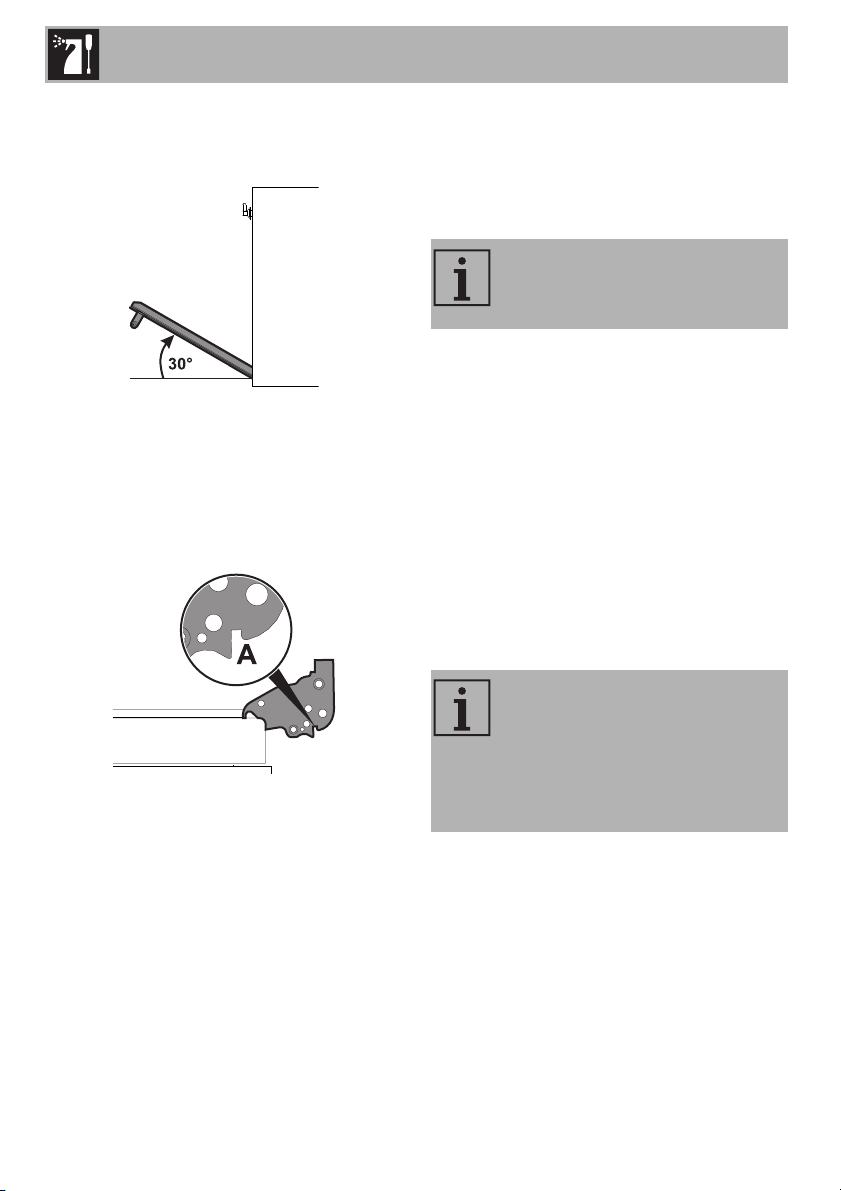
2. Grasp the door on both sides with both
hands. Lift it, forming an angle of about
30°, and remove it.
3. To remount the door, insert the hinges
into the slots on the oven, making sure
that the grooves A fit tightly in the slots.
Lower the oven door and once it is in
position, remove the pins from the holes
in the hinges.
Cleaning the door glazing
We recommend always keeping the glass
doors thoroughly clean. Use paper towels.
If there are tough to clean spots, use a
damp sponge and regular detergent.
3.3 Cleaning inside the oven
Proper maintenance of the oven's interior
requires that it be cleaned regularly, after
allowing it to cool. Avoid leaving dried up
food inside the oven because it could
damage the enamel surface. Before
cleaning, take out all removable parts.
To make cleaning easier, we recommend
the removal of:
• the door;
• the frame supports for racks/trays;
• the gasket.
We recommend using cleaning
products distributed by the
manufacturer.
If you are using specific cleaning
products, we recommend
operating the appliance at the
maximum temperature for about
15-20 minutes to remove any
residues.
Cleaning and Maintenance
39
EN
Manual door lock lever deactivation
The door lock lever is located in the first slot
on the left under the control panel, in the
upper part of the front of the oven.
During normal cleaning operations, the
door lock lever may be activated
accidentally.
door lock lever activated
(view from above)
1. Move the door lock lever to the right as
far as it will go.
(view from above)
2. Gently release the door lock lever.
The mechanism’s spring will move the door
lock lever back into the deactivated
position.
To avoid damaging the mechanism, never
attempt to deactivate the door lock lever by
forcing it to the left.
(view from above)
Improper use
Burn hazard
• The following should always be carried
out with the appliance cold and
switched off.
• Do not attempt to deactivate the door
lock lever manually during a Self-Clean
cycle.
Cleaning and Maintenance
40
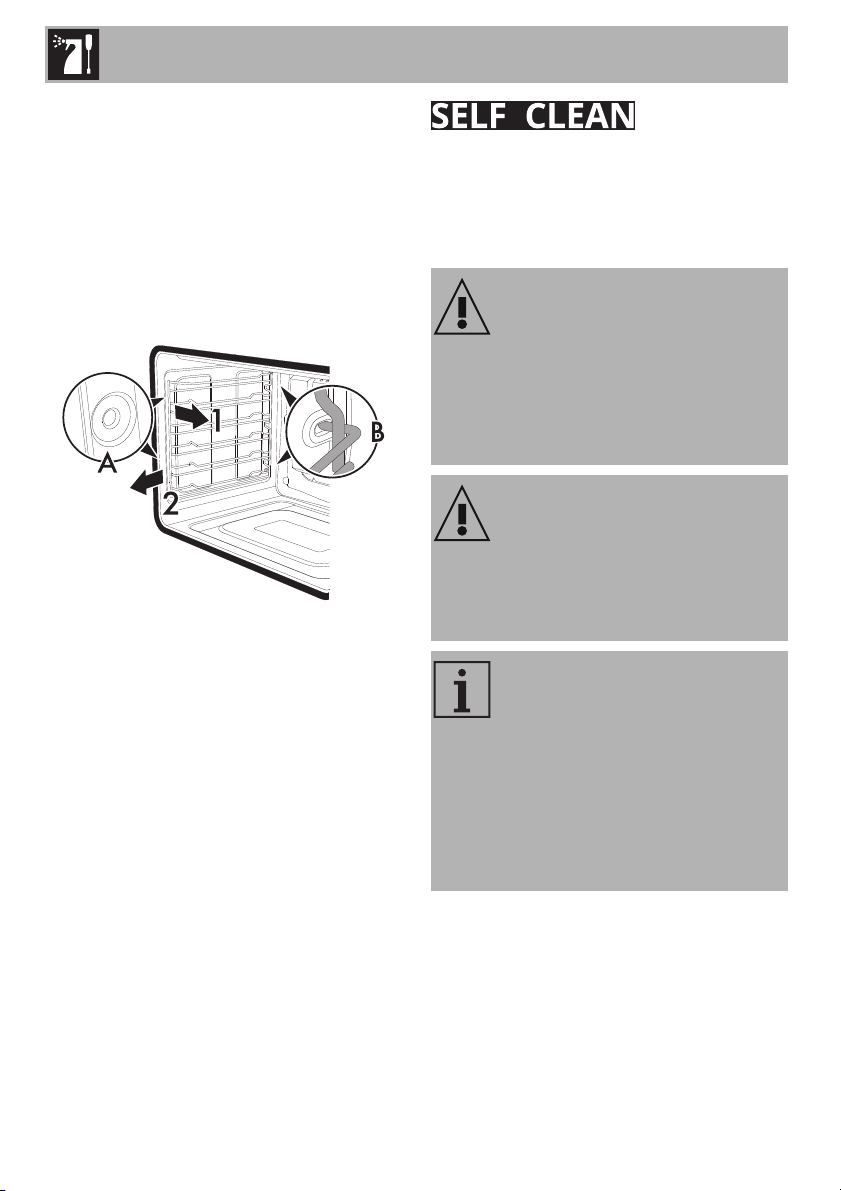
Removal of the frame supports for racks/
trays
Removing the guide frames makes it easier
to clean the sides of the oven.
To remove the guide frames:
• Pull the frame towards the inside of the
oven to unhook it from its housing A, and
then slide it out of the grooves at the
back B.
• When you have finished cleaning the
oven, repeat the procedures indicated
above to reposition the guide frames.
Self-Clean is an automatic high-
temperature cleaning procedure that
dissolves grime. Thanks to this process, it is
possible to clean the inside of the oven very
easily.
Improper use
Risk of injury
• When this function is in use, the surfaces
could reach temperatures that are
higher than usual.
• Keep children at a safe distance.
Improper use
Risk of damage to surfaces
• Switch off any burners or electric hot
plates if a cooking top is installed above
the oven.
During the Self-Clean cycle, the
fans are noisier because they are
running at a higher speed. This is
normal and is intended to provide
more effective heat dissipation. At
the end of the Self-Clean cycle, the
fans will continue to operate long
enough to prevent the overheating
of the sides of the adjacent units
and the front of the oven.
Cleaning and Maintenance
41
EN
Preliminary operations
Before starting the Self-Clean function:
• Clean the internal glass panel following
the usual cleaning instructions.
• Remove any food or spill residues from
the inside of the oven.
• Remove all accessories inside the oven.
• For very stubborn grime, spray an oven
cleaning product onto the glass (read
the warnings on the product); leave for
60 minutes, then rinse and dry the glass
using paper towels or a microfiber cloth.
• Remove the temperature probe (if
present).
• Remove the frame supports for racks/
trays.
• Close the door.
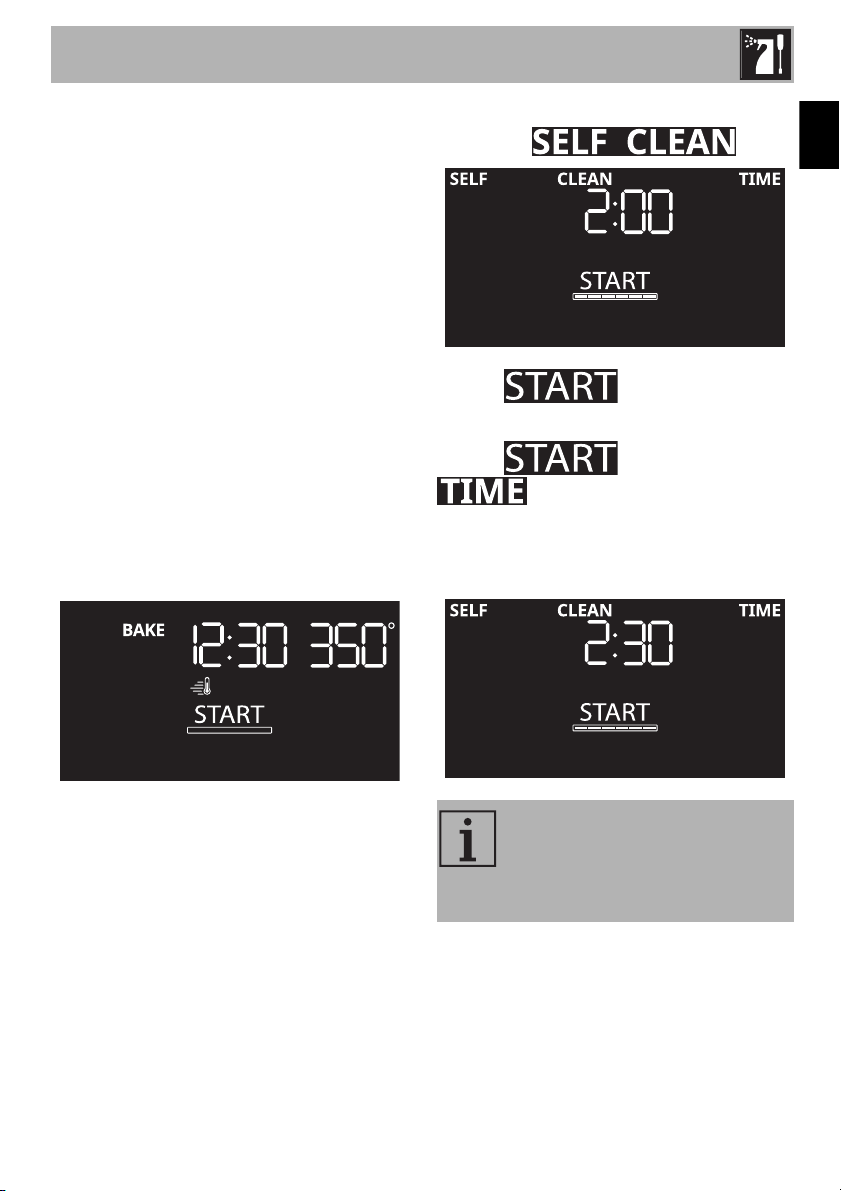
Using the Self-Clean function
1. Press the functions knob.
2. Turn the functions knob to the right or left
to select
.
The text flashes.
3. Press the temperature knob.
The text turns off while
flashes.
4. Turn the temperature knob to the right or
left to select the required Self-cleaning
duration (e.g. 2:30).
5. Press the temperature knob to confirm the
required Self-cleaning duration.
Recommended cycle time:
• Light dirt = 02:00.
• Medium dirt = 02:30.
• Heavy dirt = 03:00.
Cleaning and Maintenance
42
The text flashes while
remains lit with a steady light.
Self-Clean cycle
6. Press the functions knob to start the
function.
Two minutes after the Self-Clean cycle has
started, the door is locked by a device that
prevents the door from being opened (the
symbol appears on the display).
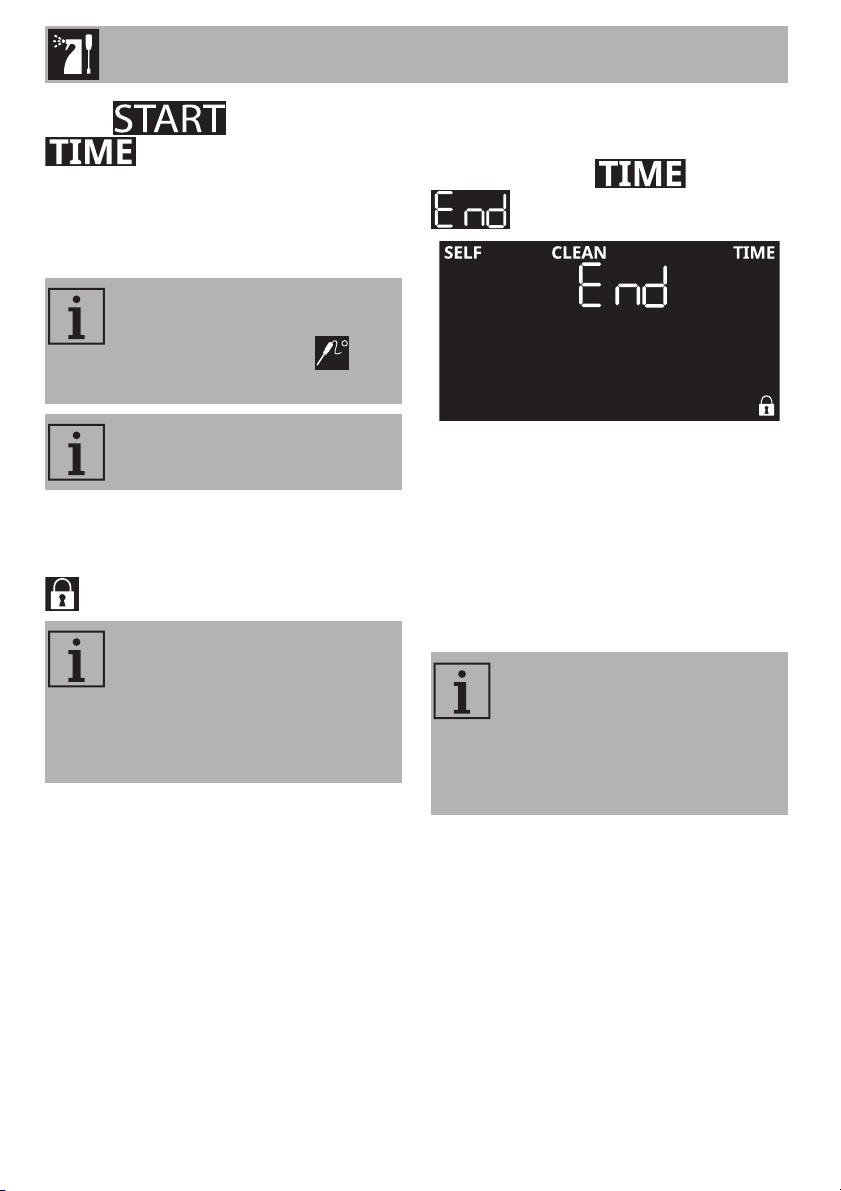
End of the Self-Clean cycle
A sound is emitted when the Self-Clean
cycle ends. The text flashes and
appears on the display.
1. Turn the functions knob to the left to exit
from the function.
The door remains locked until the
temperature inside the oven returns to a
safe level.
2. Wait for the oven to cool down and
remove the residue deposited inside the
oven using a damp microfiber cloth.
It is not possible to start the Self-
Clean cycle if the temperature
probe is plugged in (the
symbol appears on the display).
Press or turn the one of the knobs
at any time to exit from the function.
During the first Self-Clean cycle,
unpleasant odors may be given off
due to the normal evaporation of
oily manufacturing substances. This
is normal and the odor disappears
after the first cleaning cycle.
If the Self-Clean cycle gives
unsatisfactory results at the
minimum duration, it is
recommended that you set a
longer time for subsequent
cleaning cycles.

Cleaning and Maintenance
43
EN
3.4 Extraordinary maintenance
Replacing the oven light
1. Remove all accessories inside the oven.
2. Remove the frame supports for racks/
trays.
3. Remove the light cover using a tool (e.g.
a spoon).
4. Loosen and remove the light bulb.
5. Replace the bulb with a similar one
(40 W).
6. Reattach the cover. Leave the inside of
the glass molding (A) facing the door.
7. Press the cover firmly so that it adheres
tightly to the light bulb holder.
Tips for maintenance of the oven gasket
The oven gasket must be soft and elastic.
To keep the gasket clean, use a soft sponge
and rinse with warm water.
Live parts
Danger of shock
• Switch off the electrical supply to the
appliance.
Be careful not to scratch the
enamel of the oven walls.
Do not touch the halogen bulb with
your fingers; cover them with an
insulating cloth.

PAGE INTENTIONALLY LEFT BLANK