
IMPORTANT SAFETY INSTRUCTIONS READ CAREFULLY AND91477B367/A
e
I M P O RT A N T SA F E T Y I N S TR U C T IO N S
READ CAREFULLY AND KEEP FOR
FUTURE REFERENCE 3
Recognize safety information 3
General safety instruction 4
Appliance purpose 7
Proposition 65 Warning 8
Manufacturer's liability 8
Identification plate 8
Disposal 8
To save energy 9
DESCRIPTION 9
General description 9
Control panel 10
Other parts 10
Accessories 10
USE 11
Preliminary operations 11
Use of accessories 11
Using the oven 11
Cooking tips 14
Mini guide to accessories 15
Discover the recipes 16
CLEANING AND MAINTENANCE 16
Cleaning the appliance 16
Cleaning the oven cavity 16
Cleaning the door 17
Extraordinary maintenance 18
We recommend that you read this manual carefully. It includes all the instructions on
maintaining the esthetic qualities and functionality of the appliance you have purchased. For
more information about the product: https://www.smeg.com
IMPORTANT SAFETY INSTRUCTIONS
READ CAREFULLY AND KEEP FOR FUTURE REFERENCE
Recognize safety information
The safety messages will inform you of
potential hazards, how to avoid the risk of
injury and what can occur if the instructions
are not followed.
WARNING: If the instructions contained in this manual are not followed
precisely, fire or explosion may result causing property damage,
personal injury or death.
OWNER: Please retain these instructions for future reference and pass
them on to any future user.
IMPORTANT: Save these instructions for the local electrical inspector’s
use.
NOTICE: This appliance must be installed solely and exclusively by a
qualified technician. Any technical procedures must be carried out by
an authorized technician.
READ AND SAVE THESE INSTRUCTIONS
WARNING
• This indicates that death or serious
injuries may occur as a result of non-
observance of this warning.
4 - IMPORTANT SAFETY INSTRUCTIONS READ CAREFULLY 91477B367/A
General safety instruction
Injury to persons
• During and after use, do not touch the
inner areas of the oven cavity until they
have had sufficient time to cool.
• Do not allow clothing or any flammable
material to come in contact with hot
surfaces. If personal clothing or hair
catch fire, roll on the ground to
extinguish the flames.
• Tie up hair to prevent it from catching
fire.
• WEAR APPROPRIATE CLOTHING:
Never wear loose or dangling clothing
when using the appliance.
• During and immediately after use, do
not hang or place objects on any part of
the appliance.
• Protect your hands by wearing oven
gloves when moving food inside the
oven.
• Use only dry potholders: wet potholders
on hot surfaces can cause steam burns.
Do not let the potholder touch hot
heating elements. Do not use towels or
other bulky cloths.
• Never attempt to extinguish flames/fire
with water. Turn off the appliance and
cover the flame with a lid or a fire
CAUTION
• This indicates that minor or moderate
injuries may occur as a result of non-
observance of this warning.
NOTES
• This indicates important information
and/or suggestion.
CAUTION
• This appliance is NOT designed for
installation in manufactured (mobile)
homes, on a boat or in recreational
vehicles (RVs).
• DO NOT install this appliance
outdoors.
• This unit is designed as a cooking
appliance. For safety purposes, never
use it for warming the room or as a
space heater.
WARNING
• Never allow children to play with
packaging material.
• DO NOT modify or alter the
construction of the appliance.
• Do not store or use gasoline or other
flammable vapors, liquids or materials
near this or any other appliance.
• Do not step, lean or sit on the door
appliance, it can result in serious injuries
and cause damage to the appliance.
• Make sure your appliance is properly
installed and grounded by a qualified
technician. Installation, electrical
connections and grounding must
comply with all applicable codes.
WARNING
• This appliance complies with current
safety regulations. Improper use of this
appliance can lead to personal injury
and property damage
• During use, the appliance and its
accessible parts become very hot. Small
children must be kept away from the
appliance.
• Do not touch the inside of the device.
During use the appliance and its
accessible parts become very hot even
if they remain dark in color. The oven
cavity can be hot enough to cause
burns.
• To reduce the risk of fire, electric shock,
personal injury or damage when using
the device, follow these safety
precautions:

IMPORTANT SAFETY INSTRUCTIONS READ CAREFULLY AND91477B367/A
e
blanket, or use dry chemicals or foam
fire-extinguishers. Alternatively, use
sodium bicarbonate.
• Make sure to have foam fire-
extinguishers close to the appliance.
• Use a fire extinguisher ONLY if it is Class
ABC, you know how to use it, the fire is
small and contained near the
appliance, the fire department has
already been alerted and you can fight
the fire keeping your back to the exit.
• It is important for your safety to install a
smoke detector near the kitchen.
• This appliance may be used by children
and by persons with reduced physical,
sensory or mental capacity, or without
sufficient experience or knowledge,
provided that they are supervised or
instructed by adults who are responsible
for their safety.
• Activate the system lock so that children
cannot inadvertently turn on the
appliance.
• Children's skin is much more sensitive to
high temperatures than that of adults. Do
not allow children to touch the door
glass, control panel and ventilation slots.
• Children should not play with the
appliance.
• Keep children away unless they are
constantly supervised.
• Do not allow children to approach the
appliance when it is in operation.
• Pets should not be near the appliance
while it is in operation.
• Cleaning and maintenance should not
be performed by children without
supervision.
• Before manually cleaning any part of
the appliance, make sure all controls
are off and the appliance is cool.
Cleaning the hot appliance can cause
burns.
• Cooking process should always be kept
under control. A short cooking process
must be continuously surveyed.
• Never leave the appliance unattended
during cooking operations where fats or
oils could overheat and take fire. Be
very careful.
• Do not leave food in the appliance for a
long period of time, this may cause food
poisoning or illness.
• Do not introduce sealed cans for
canning or reheating food. Risk of injury
caused by increased pressure.
• Risk of injury caused by food.
• Do not touch a red-hot pan, risk of
burns.
• Do not pour water directly on very hot
trays.
• Keep the door closed while cooking or
baking.
• If you need to move food or at the end
of cooking, open the door 1" 15/16
(50 mm) for a few seconds, let the
steam come out, then open it fully.
• Do not insert sharp metal objects (knives
and utensils) into the slots.
• Turn off the appliance after use.
• Risk of injury from electric shock.
• DO NOT USE OR STORE
FLAMMABLE MATERIALS INSIDE OR
NEAR THE APPLIANCE.
• DO NOT USE AEROSOLS IN THE
VICINITY OF THIS APPLIANCE
WHILST IT IS IN USE.
• DO NOT MODIFY THIS APPLIANCE.
• Do not pull the cable to remove the
plug.
• Damage to the device may compromise
your safety; do not use it if damaged.
• DO NOT USE THE APPLIANCE if the
door is warped, if door hinges are
loose, if abnormal holes or cracks are
visible, and if the power cord is
damaged.
Damage to the appliance
• Do not use abrasive or corrosive
detergents (e.g. scouring powders, stain
removers and metallic sponges), rough
or abrasive materials or sharp metal
scrapers on glass parts as this could
WARNING
6 - IMPORTANT SAFETY INSTRUCTIONS READ CAREFULLY 91477B367/A
scratch the surface and break the glass.
If possible, use wooden or plastic
utensils.
• Do not sit on the appliance.
• Do not use cleaning products containing
chlorine, ammonia or bleach on the
steel parts or those with metallic surface
finishes (e.g. anodizing, nickel or
chrome plating).
• Racks and trays should be inserted as
far as they will go into the side guides.
The mechanical safety locks that prevent
them from being removed must face
downwards and towards the back of
the oven cavity.
• Always place racks and trays in the
desired position while the oven cavity is
cold. If it is necessary to move racks and
trays while the oven cavity is hot, take
care that the potholder does not come
in contact with the heating element.
• Do not use steam jets to clean the
appliance.
• Do not use any spray products near the
appliance.
• DO NOT USE FLAMMABLE
PRODUCTS FOR CLEANING THE
APPLIANCE.
• Do not clean, scrub, damage or remove
the seal, which is essential for a good,
airtight seal during cooking. Replace the
seal if it is damaged or encrusted with
food residue.
• Do not block openings, ventilation slots
and heat dissipation vents. Covering the
ventilation vents may cause the
appliance to overheat.
• Fire hazard: never leave objects in the
oven cavity.
• DO NOT USE THE APPLIANCE TO
HEAT ROOMS FOR ANY REASON.
• Do not use this appliance as storage
space.
• Do not use plastic dishes or containers
for cooking or baking food.
• Do not place sealed tins or containers in
the oven cavity.
• Remove all trays and racks which are
not required during cooking.
• DO NOT COVER ANY PART OF THE
APPLIANCE WITH ALUMINUM OR
TIN FOIL SHEETS. The use of aluminum
covering may cause electric shock or
fire hazard or obstruct the flow of heat
and air. The foil is an excellent thermal
insulator because it allows heat to be
trapped underneath it. This can interfere
with cooking and damage the enamel
of the oven cavity.
• Prevent the aluminum foil from coming
into contact with the heating elements.
• Do not place pots or pans directly on
the bottom of the oven.
• If necessary, you can use the tray rack
(supplied or sold separately, depending
on the model) by placing it on the
bottom as a support for cooking.
• If you wish to use greaseproof paper,
place it so that it will not interfere with
the hot air circulation inside the oven
cavity.
• Be careful of spilling food with high
sugar and acid content (fruit juices,
cakes, tomatoes, milk, etc.), this may
cause discoloration of enamel.
Discoloration does not change the
properties of the enamel; do not attempt
to remove these stains.
• Be careful when cooking foods with
high alcohol content (rum, brandy,
bourbon, etc...). The alcohol content in
food is highly flammable and can
damage the oven cavity.
• Do not use the open door to place pans
or trays on the internal glazing pane.
• Do not use the open door as a lever to
move the appliance into place.
• Do not apply excessive pressure to the
door when it is open.
• Do not use the handle to lift or move this
IMPORTANT SAFETY INSTRUCTIONS READ CAREFULLY AND91477B367/A
e
appliance.
WHEN FIRST USING THIS APPLIANCE,
FOLLOW THESE INSTRUCTIONS
CAREFULLY:
• Set a cooking time of at least one hour.
• Heat the empty oven compartment at
the maximum temperature to burn off
any residues left by the manufacturing
process.
• Cold temperatures can damage
electronics. When using the appliance
for the first time or when it has not been
used for a long period of time, make
sure that the appliance has been left in
an environment with a temperature
above 32°F/0°C for at least three
hours before turning it on.
WHEN HEATING THE APPLIANCE:
• air the room;
•don't stay.
• If the appliance is built-in behind a
cabinet door, do not close the door
while it is in use. Closing the cabinet
door may cause damage to the
appliance, leave the cabinet door open
until the appliance has cooled down
completely.
• Do not attempt to use the appliance
during a power failure.
• In hot and humid environments, there is a
greater likelihood of infestation given by
pests, and this could damage the
appliance. Make sure to keep the
appliance clean at all times. Damage
caused by pests is not covered by the
warranty.
• Make sure that the appliance has been
switched off and disconnected from the
mains power supply or that the mains
power has been switched off before
replacing the interior lighting bulbs.
Appliance purpose
This appliance is intended to be used in
household and similar applications such
as:
• In kitchen areas provided for employees
in shops, offices and other work
environments.
• In farms/farmhouses.
• By guests in hotels, motels and other
types of residential environments.
• In bed and breakfasts.
For this appliance
• Do not lean or sit on the door when it is
open.
• Make sure that no objects are stuck in
the doors.
• Do not install/use the appliance
outdoors.
• (on some models only) Only use the
temperature probe provided or
recommended by the manufacturer.
• This appliance can be used up to a
maximum altitude of 4000 meters
above sea level.
• The bulbs used in this appliance are
specific for household appliances; do
not use them for home lighting.
Installation and maintenance
• Ask the installer to show the circuit
breaker and fuse to prevent damage to
people or the appliance during future
maintenance.
• This appliance must be correctly
installed and grounded by a qualified
technician.
• Refer to the installation manual for further
details.
• Do not repair or replace any part of the
appliance unless specified in this
NOTES
CAUTION
CAUTION
CAUTION
WARNING

8 - IMPORTANT SAFETY INSTRUCTIONS READ CAREFULLY 91477B367/A
manual.
• Before replacing the bulbs inside the
oven cavity, it is necessary to turn off the
general power supply.
• The bulb guards are made of glass;
handle them carefully to prevent them
from breaking. Risk of injury.
• Make sure the appliance is not hot
while the bulbs are being replaced.
• The appliance door is heavy, use both
hands to remove it.
• The appliance door is made of glass
elements, handle with care to avoid
breakage. Risk of injury.
• Do not grip the appliance door by the
handle but only by the side, failure to
grip the door properly may result in
injury.
• Do not force the appliance door open
or closed. The hinges could be
damaged and cause damage and
injury.
• Do not rest the appliance door on
pointed objects, this may cause the
glass to break.
• Do not use this device if it is not working
properly or if it has been damaged. In
such a case, contact customer service.
Proposition 65 Warning
This product may contain a chemical known
to the State of California, which can cause
cancer or reproductive harm. Therefore, the
packaging of your product may bear the
following label as required by California:
Manufacturer's liability
The manufacturer accepts no liability for
damage to persons or property caused by:
• use of the appliance in any way other
than stipulated herein;
• failure to comply with the instructions in
the User Manual;
• tampering with any part of the
appliance;
• use of after-market replacement parts.
Identification plate
• The identification plate contains model,
technical data, serial number and brand
name of the appliance.
• It is the responsibility of the installer to
comply with the installation information
specified on the identification plate.
• Identification plates are visibly placed
on the back of the appliance or on the
frame of the oven cavity.
• THE IDENTIFICATION PLATE SHOULD
NEVER BE REMOVED.
Disposal
Entrapment risk for children. Before you
throw away an old appliance:
• Remove the doors.
• Leave the racks and the trays positioned
so that children cannot easily climb
inside.
• Do not leave the packaging or any
parts of it unattended.
• Destroy or recycle cardboard, plastic
bags, and any outer packaging
material immediately after unpacking
the appliance. Children should NEVER
use these items for play. They can cause
suffocation and death.
• Take the appliance to a suitable
recycling center for electric and
electronic waste, or return it to the
dealer when purchasing an equivalent
product, as a one-on-one exchange.
Before you throw away an old appliance:
• Unplug the power cord plug.
• Cut the power cord.
• Do not allow children to climb, stand on,
WARNING
State of California propositions 65
Warning
• Cancer or Reproductive Harm
More informations:
www.P65Warnings.ca.gov
WARNING
CAUTION
DESCRIPTION - 991477B367/A
e
or attach themselves to the appliance's
racks and trays.
• Do not allow children to play with the
appliance.
To save energy
It is highly recommended to follow the
recommendations below to reduce energy
consumption.
• Only preheat the appliance if the recipe
requires you to do so.
• In all functions, avoid opening the door
during cooking.
• Unless otherwise indicated on the
packaging, defrost the frozen food
before placing it in the oven cavity.
• In case of multiple cooking, it is
advisable to cook the products one after
the other to make the most of the
already hot oven cavity.
• It is preferable to use dark metal pans,
which help to absorb the heat better.
• Remove all trays and racks which are
not required during cooking.
• Turn off the oven a few minutes before
the time required. Cooking will continue
for the remaining minutes with the heat
already accumulated inside the oven.
• Do not open the oven door very often to
avoid heat loss.
• Keep the inside of the oven clean at all
times.
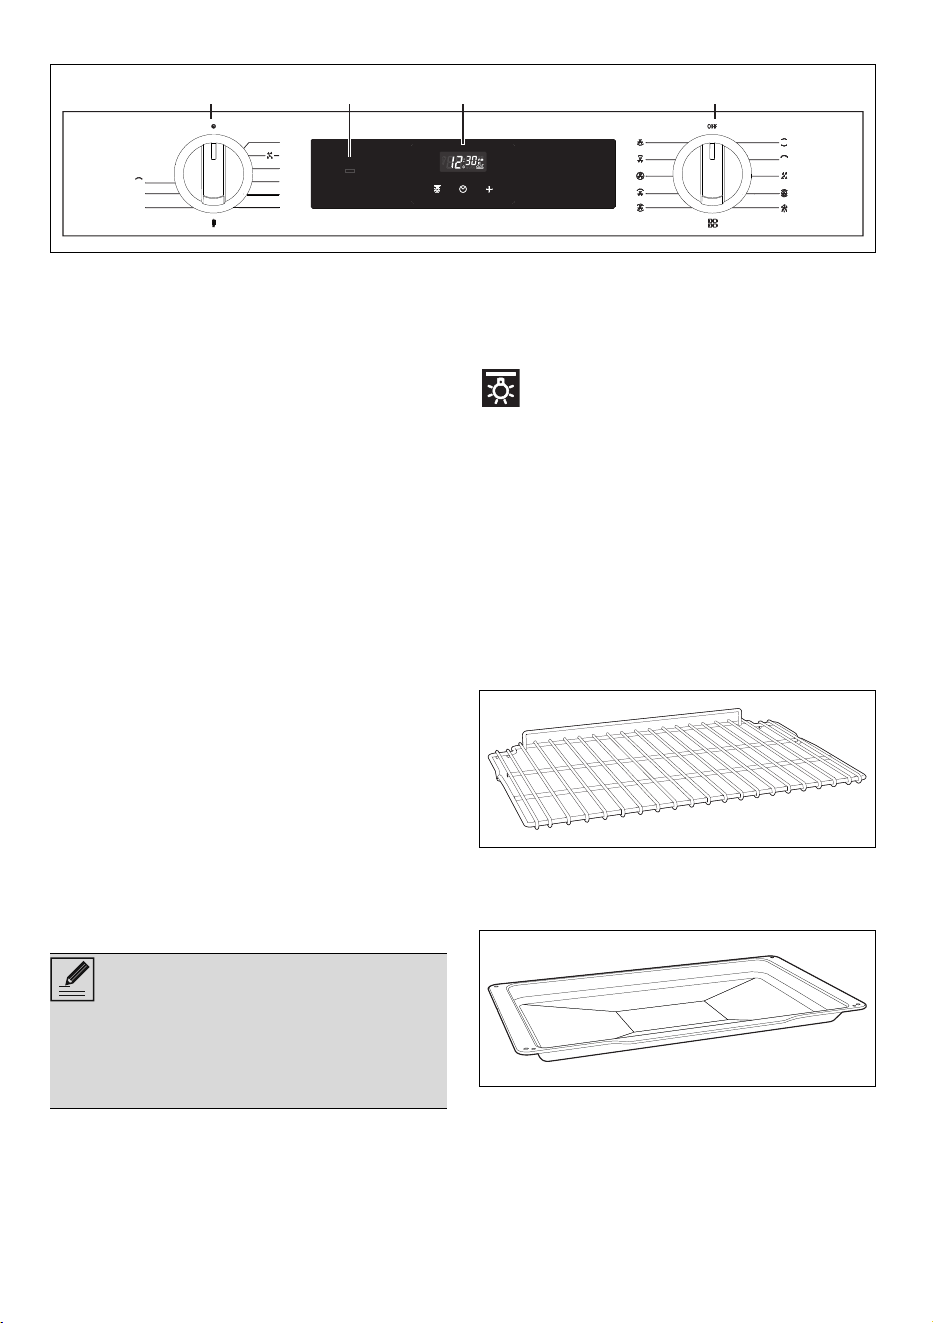
DESCRIPTION
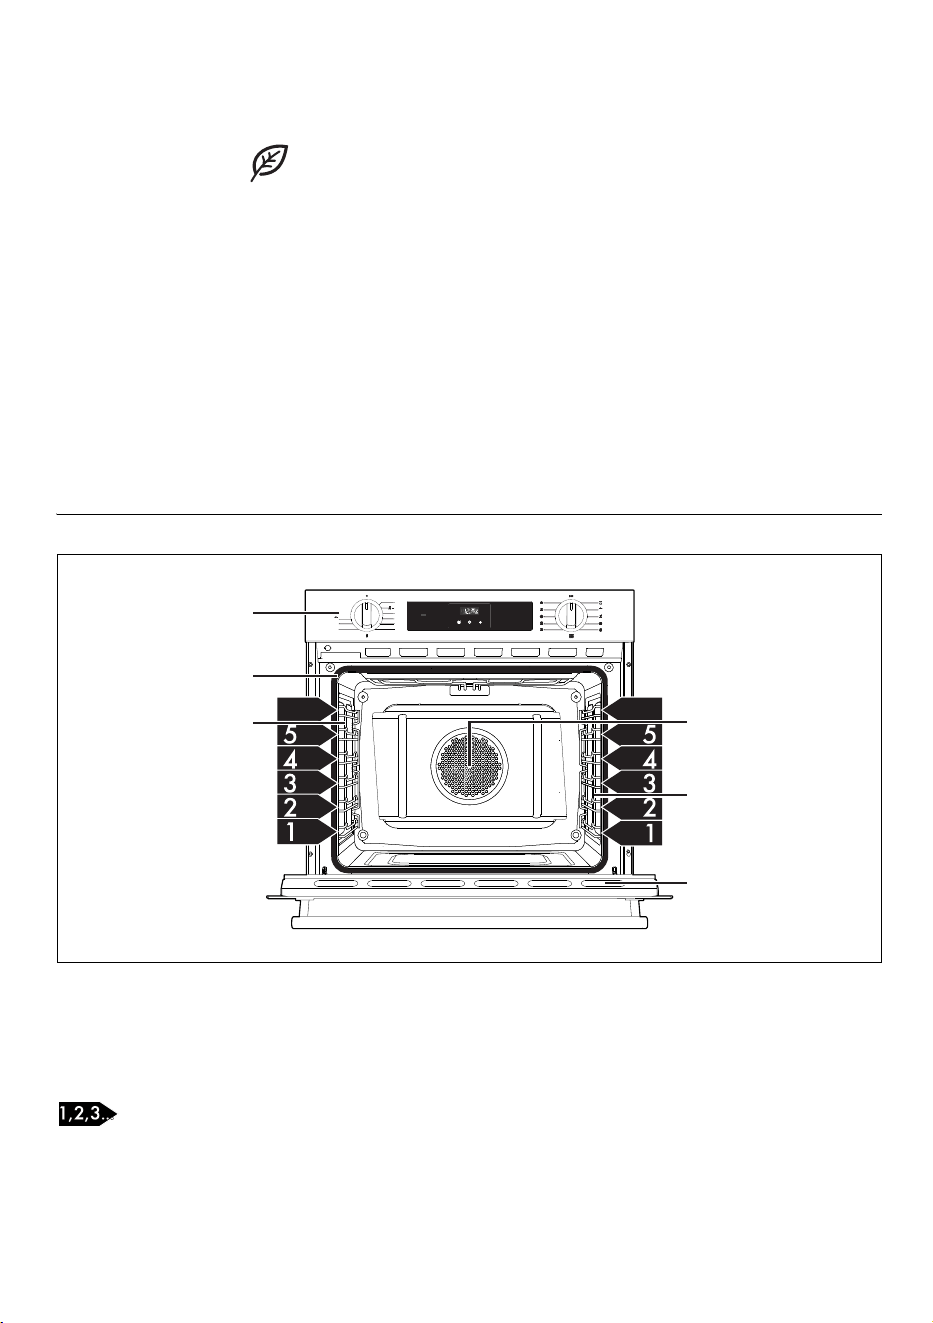
General description
1 Control panel
2 Gasket
3 Light
4 Fan
5 Door
Frame rack
66
6
2
3
1
3
4
5
True convection
Convection
Maxi convection broil
100
Convection bake
Convection broil
Bake
Broil
Vapor Clean
Convection roast
Defrost
150
200
250
300
350400
450
500
10 - DESCRIPTION 91477B367/A
Control panel
1 Temperature knob
This knob allows you to select the cooking
temperature and the Vapor Clean temperature
(selected models only).
Turn the knob clockwise to the required value,
between the minimum and maximum settings.
2 Thermostat indicator light
When the indicator light is flashing, it indicates
that the oven is heating up to reach the set
temperature. Once the temperature has been
reached, the light remains lit until the oven is
turned off.
3 Programmer clock
Useful for displaying the current time, set the
minute minder time, set the cooking time, set the
timer, and turn the light inside the appliance on/
off.
4 Function knob
The oven's various functions are suitable for
different cooking modes. After selecting the
required function, set the cooking temperature
using the temperature knob.
Other parts
Positioning shelves
The appliance has shelves for positioning trays
and racks at various heights. The insertion
heights are indicated from the bottom upwards.
Cooling fan
The fan cools the appliance and comes into
operation during cooking.
The fan causes a steady outflow of air from
above the door which may continue for a short
period of time even after the appliance has
been turned off.
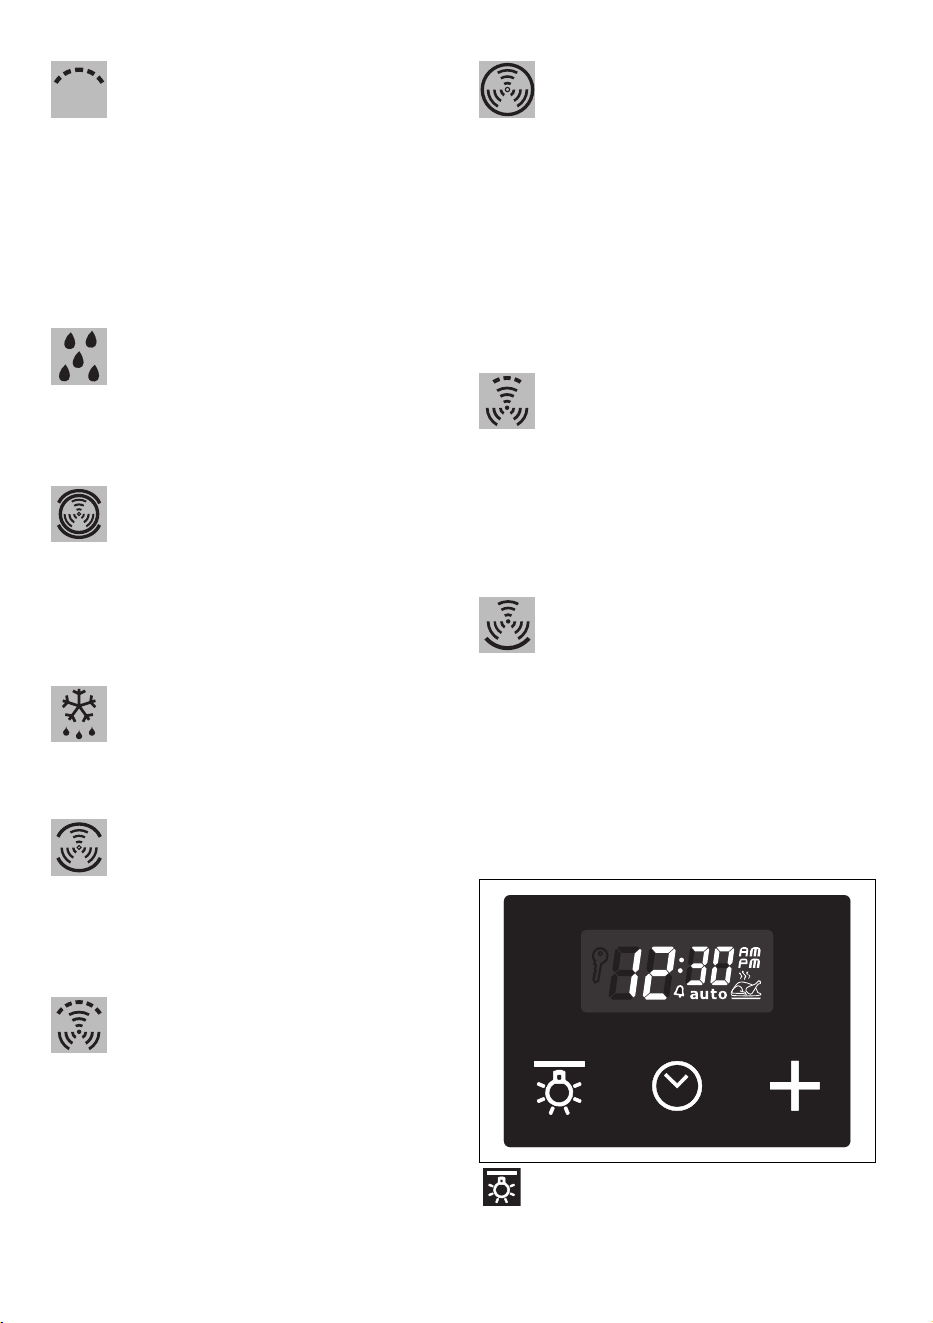
Oven cavity lighting
The internal lighting of the device is turned on/
off only by pressing the decrease value button
.
Accessories
• Not all accessories are provided on all
models.
• Accessories that may come into contact with
food are made of materials that comply with
all legal provisions in force.
• Original accessories supplied or optional
can be purchased at authorized service
centers. Only use original manufacturer’s
accessories.
Rack
Used for supporting containers with food during
cooking.
Deep tray
Useful for collecting fat from foods placed on
the rack above and for cooking pies, pizzas,
baked desserts, biscuits, etc.
2
3 41
True convection
Convection
Maxi convection broil
100
Convection bake
Convection broil
Bake
Broil
Vapor Clean
Convection roast
Defrost
150
200
250
300
350400
450
500
NOTES
• Any telescopic rails can be hooked up
to the fifth shelf from below. The sixth
shelf does not allow the rails to be
hooked.
USE - 1191477B367/A
e
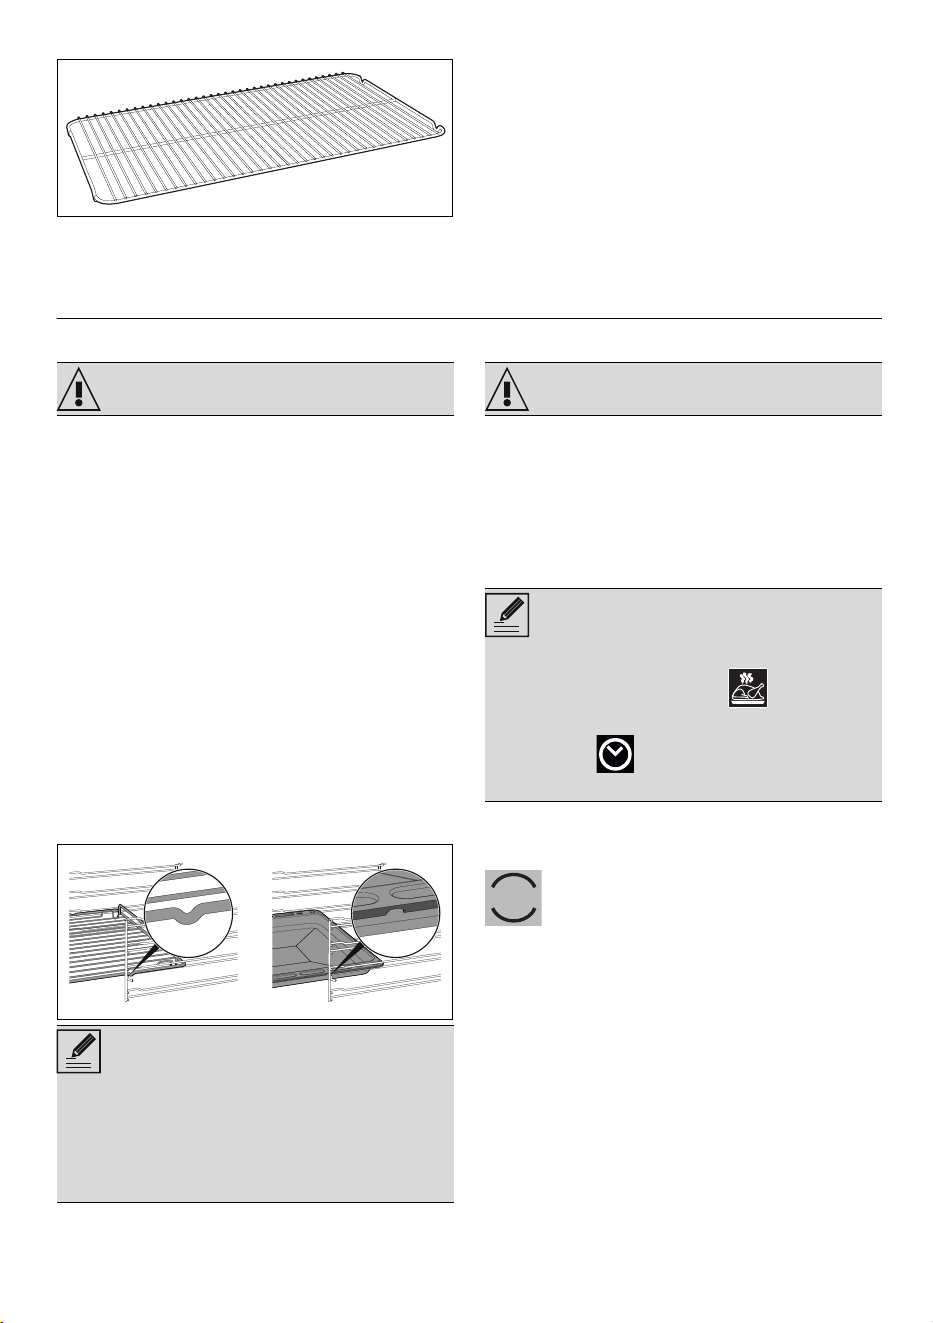
Tray rack
To be placed over the top of the tray; for
cooking foods which may drip.
USE
Preliminary operations
• Remove all protective film from the outside
and inside of the appliance and
accessories.
• Remove any labels (apart from the technical
data plate) from the accessories and
shelves.
• Remove and wash all the appliance
accessories (see chapter "CLEANING
AND MAINTENANCE").
Use of accessories
Racks and trays
Racks and trays must be inserted into the side
guides until they stop.
• The mechanical safety locks that prevent the
rack from being removed accidentally must
face downwards and towards the back of
the oven cavity.
Using the oven
Switching on the appliance
To switch the appliance on:
1. Select the cooking function using the
function knob.
2. Select the temperature using the
temperature knob
.
List of traditional cooking functions
Bake
WARNING
NOTES
• Gently insert racks and trays into the oven
until they come to a stop.
• Clean the trays before using them for the
first time to remove any manufacturing
residues.
WARNING
NOTES
• Ensure that the programmer clock shows the
cooking duration symbol otherwise it
will not be possible to turn on the oven.
Press the button to reset the
programmer clock.
As the heat comes from above and
below at the same time, this system is
particularly suitable for certain types of
food. Traditional cooking, also known
as static cooking, is suitable for cooking
just one dish at a time. Perfect for all
types of roasts, bread and cakes and
particularly suitable for fatty meats such
as goose and duck.
12 - USE 91477B367/A
Broil
Vapor Clean
Convection roast
Defrost
Convection bake
Maxi convection broil
True convection
Convection broil
Convection
Programming clock
Value decrease key and switching the
internal light on/off
The heat coming from the broiler
element gives perfect broiling results
above all for thin and medium thickness
meat and, in combination with the
rotisserie (where fitted), gives the food
an even browning at the end of
cooking. Perfect for sausages, ribs and
bacon. This function enables large
quantities of food, particularly meat, to
be grilled evenly.
This function makes cleaning easier
using the steam produced by a little
quantity of water poured onto the
appropriate drawing placed on the
bottom.
The combination of convection cooking
and traditional cooking allows different
foods to be cooked on several levels
extremely quickly and efficiently, without
odors and flavors mingling. Perfect for
large volumes that call for intense
cooking.
Rapid defrosting is helped by switching
on the fan provided and the top heating
element that ensures uniform distribution
of low temperature air inside the oven.
The operation of the fan, combined with
traditional cooking, ensures uniform
cooking even with complex recipes.
Perfect for cookies and cakes, even
when simultaneously cooked on several
levels.
The air produced by the fan softens the
strong heatwave generated by the
broiler, roasting even very thick foods
perfectly. Perfect for large cuts of meat
(e.g. pork shank).
The combination of the fan and the
convection heating element
(incorporated in the rear of the oven)
allows you to cook different foods on
several levels, as long as they need the
same temperatures and same type of
cooking. Hot air circulation ensures
instant and uniform distribution of heat. It
will be possible, for instance, to cook
fish, vegetables and cookies
simultaneously (on different levels)
without mixing odors and flavors.
Through the combined action of the fan
and the heat of the central element only,
this function is perfect for rapid cooking
and au gratin cooking of small
quantities of food (particularly meats),
by bringing together the dietary
advantages of the broiler and the even
cooking of the fan
.
The combination of the fan with just the
bottom heating element allows cooking
to be completed more rapidly. This
system is recommended for sterilizing or
for finishing off the cooking of foods
which are already well-cooked on the
surface, but not inside, and therefore
need a little more heat. Perfect for any
type of food.
USE - 1391477B367/A
e
Clock key
Value increase key
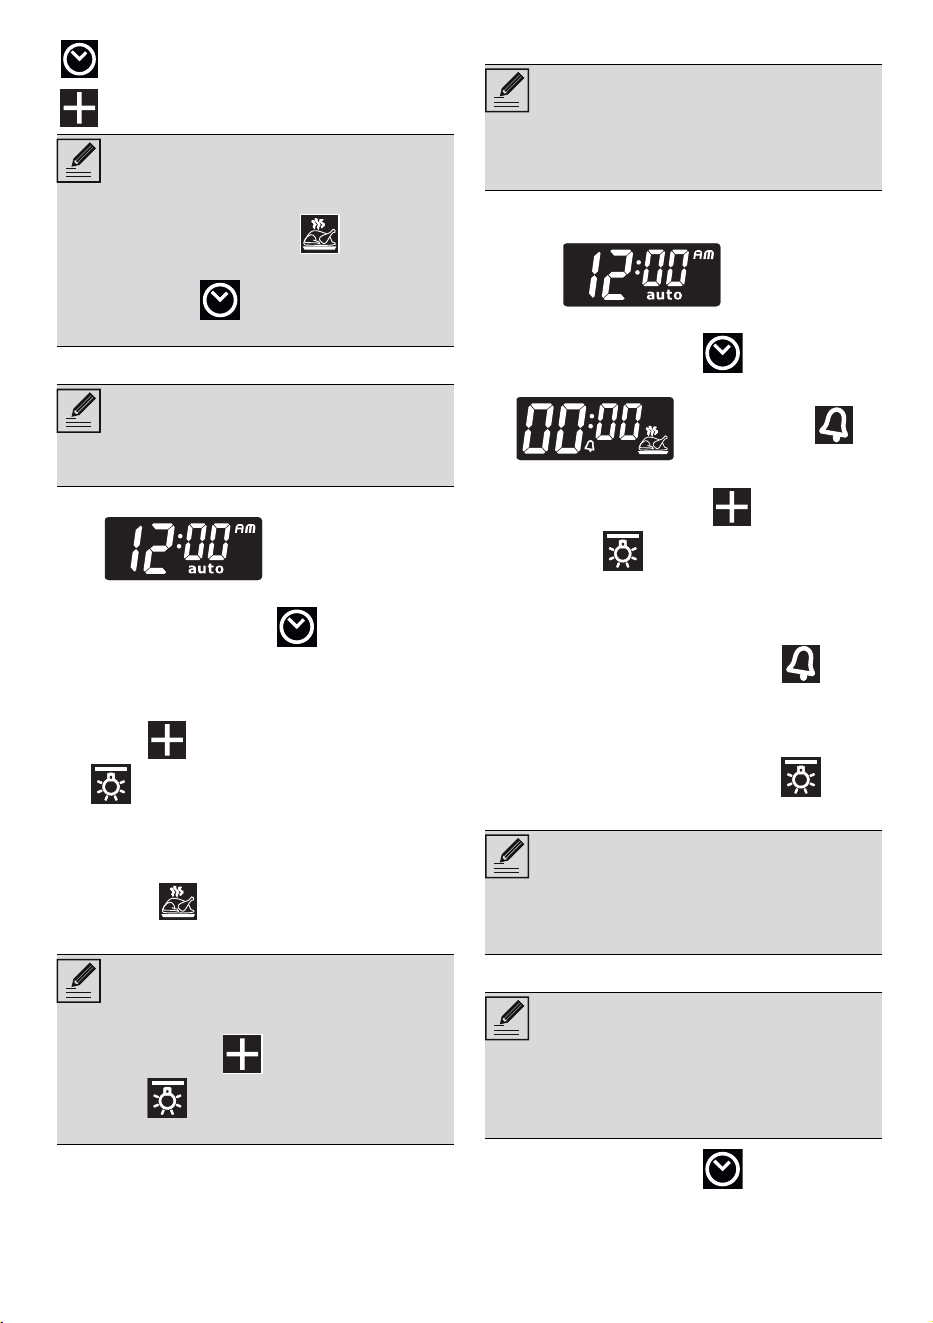
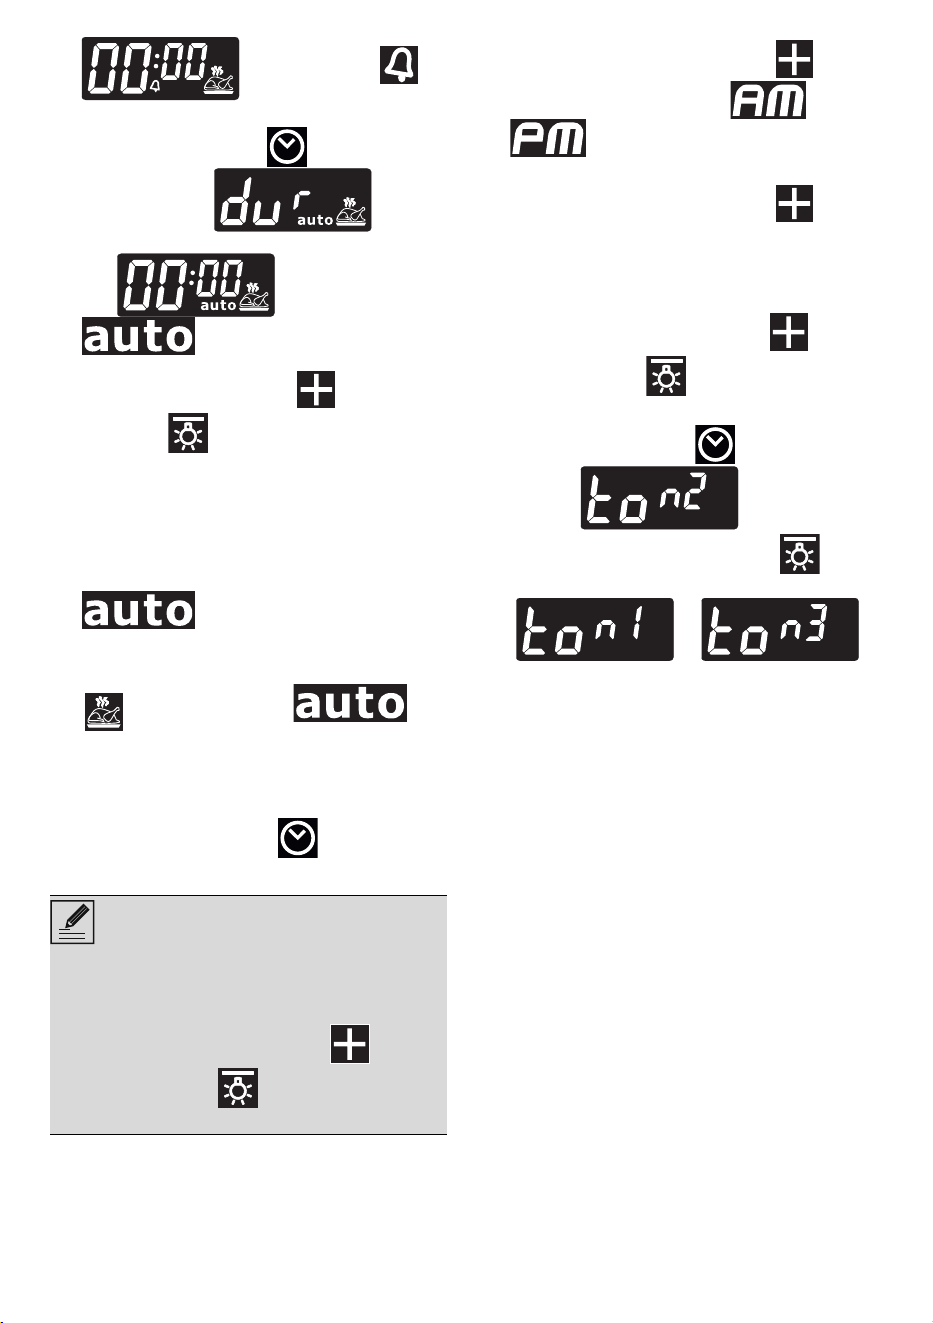
Setting the time
On the first use, or after a power failure, the
digits will be flashing on the
appliance’s display.
1. Keep the clock button for two
seconds. The dot between the hours and the
minutes flashes.
2. The time can be set via the value increase
button and value decrease button
. Keep the button pressed in to
increase or decrease rapidly.
3. Wait 7 seconds. The dot between the hours
and the minutes stops flashing.
The symbol on the display indicates that
the appliance is ready to start cooking.
Minute minder time
The minute minder time can be activated at any
time. On the first use, or after a power failure,
the digits will be flashing on
the appliance’s display.
1. Keep the clock button pressed for two
seconds. The display shows figures
and the symbol
flashing between the hours and minutes.
2. Use the value increase and value
decrease buttons to set the number of
minutes required
3. Wait approx. 5 seconds without pressing
any button to finish setting the minute minder.
The current time and the symbol
appear on display.
4. A buzzer will sound when the set time is
reached.
5. Press the value decrease button to turn
the buzzer off.
Timed cooking
1. Keep the clock button pressed for two
seconds. The display shows figures
NOTE
• Ensure that the programmer clock shows the
cooking duration symbol otherwise it
will not be possible to turn on the oven.
Press the key to reset the programmer
clock.
NOTES
• If the time is not set, the oven will not switch
on.
NOTES
• To change the time, hold down the value
increase button and value decrease
button at the same time for two
seconds, then set the time.
NOTES
• The minute minder timer does not stop the
cooking operation but rather informs the
user when the set time has run out
.
NOTES
• The minute minder timer can be set from 1
minute to a maximum of 23 hours and 59
minutes.
NOTES
• Timed cooking is the function which allows
a cooking operation to be started and then
ended after a specific length of time set by
the user.
14 - USE 91477B367/A
and the symbol
flashing between the hours and minutes.
2. Press the clock button again. On the
display the digit displays
alternating with the
digit
and the symbol
flashings under the minutes.
3.
Use the value increase and value
decrease buttons to set the required
minutes of cooking.
4. Select a function and a cooking
temperature.
5. Wait approx. 5 seconds without pressing
any button in order for the function to
activate. The current time and the symbol
will appear on the display. At
the end of cooking the heating elements will
be deactivated. On the display, the symbol
turns off, the symbol
flashes and the buzzer sounds.
6. To turn the buzzer off, simply press one of the
programmer clock buttons.
7. Press the clock button to reset the
programmer clock.
12h or 24h format
The default mode is 12h format.
1. Keep the value increase button for a
few seconds. The symbols or
disappear on the display and 24
h format is set.
2. Keep the value increase button for a
few seconds to return to the 12 h format.
Selecting the buzzer
The buzzer can have 3 tones.
1. Hold down the value increase
and
value decrease buttons at the same
time.
2. Press the clock button . On the display
the digit appear.
3. Press the value decrease button to
select a different buzzer tone
( or ).
Cooking tips
General tips
• Use a fan function to achieve uniform
cooking at several levels.
• Increasing the temperature does not shorten
cooking or baking times (the food could be
well cooked on the outside and
undercooked on the inside).
• To prevent condensation from forming on
the glass, hot food should not be left inside
the oven for too long after cooking.
Tips for cooking meats
• Cooking times vary depending on the
thickness and quality of the meat, and on
consumer tastes.
• For meat and potatoes, it is
recommended from time to time to turn
and/or mix the food to obtain a uniform
browning on all sides.
• Use a meat thermometer when cooking
roasts, or simply press on the roast with a
spoon. If it feels hard, it is ready; otherwise, it
needs to roast a bit longer.
• For low temperature cooking, brown the
NOTES
• It is not possible to set a cooking time of
more than 10 hours.
• To cancel the set programming press and
hold down the value increase and the
value decrease buttons at the same
time and then turn the oven off manually.
USE - 1591477B367/A
e
meat in a pan for a few minutes on all
sides before baking in the oven.
Advice for cooking with the Grill
• The meat can be grilled starting with a cold
oven or with the oven preheated if you want
to change the effect of the cooking.
• When using the convection broil function (if
any), it is recommended to preheat the oven
cavity before grilling.
• We recommend placing the food at the
center of the rack.
• With the broil function, we recommend that
you set the temperature to the maximum
value to optimize cooking.
Tips for baking cakes and cookies
• It is preferable to use dark metal pans,
which help to absorb the heat better.
• The temperature and baking duration
depend on the quality and consistency of
the dough.
• To check whether the cake is baked
through, stick a toothpick into its highest
point at the end of the baking time. If the
dough does not stick to the toothpick, the
dessert is cooked.
• If the dessert goes flat when it comes out of
the oven, on the next occasion reduce the
set temperature by about 50°F/10°C,
selecting a longer baking time if necessary.
Tips for cooking on two shelves:
• It is recommended to have 2 racks (can be
requested to Authorized Assistance
Centers).
• To facilitate the flow of air, place the molds/
pans in the center of the racks and make
sure that their width/diameter does not
exceed 11" 13/16 (300 mm).
• Position the racks keeping an empty level
between them.
• Depending on the food and the increased
load inside the cavity, cooking on two levels
may take a few minutes longer than on a
single shelf.
• The functions indicated for cooking on two
shelves are TRUE CONVECTION and
EUROPEAN BAKE +.
Tips for defrosting and leavening
• Place frozen foods without their packaging
in a lidless container on the first shelf of the
oven.
• Do not overlap foods.
• To defrost meat, use a rack placed on the
second level and a tray placed on the first
level. This way, the meat does not remain in
contact with the liquid from thawing.
• The most delicate parts can be covered with
aluminum foil.
• For successful proving, a container of water
should be placed in the bottom of the oven.
To save energy
• Turn off the oven a few minutes before the
time required. Cooking will continue for the
remaining minutes with the heat already
accumulated inside the oven.
• Do not open the oven door very often to
avoid heat loss.
• Always keep the inside of the appliance
clean.
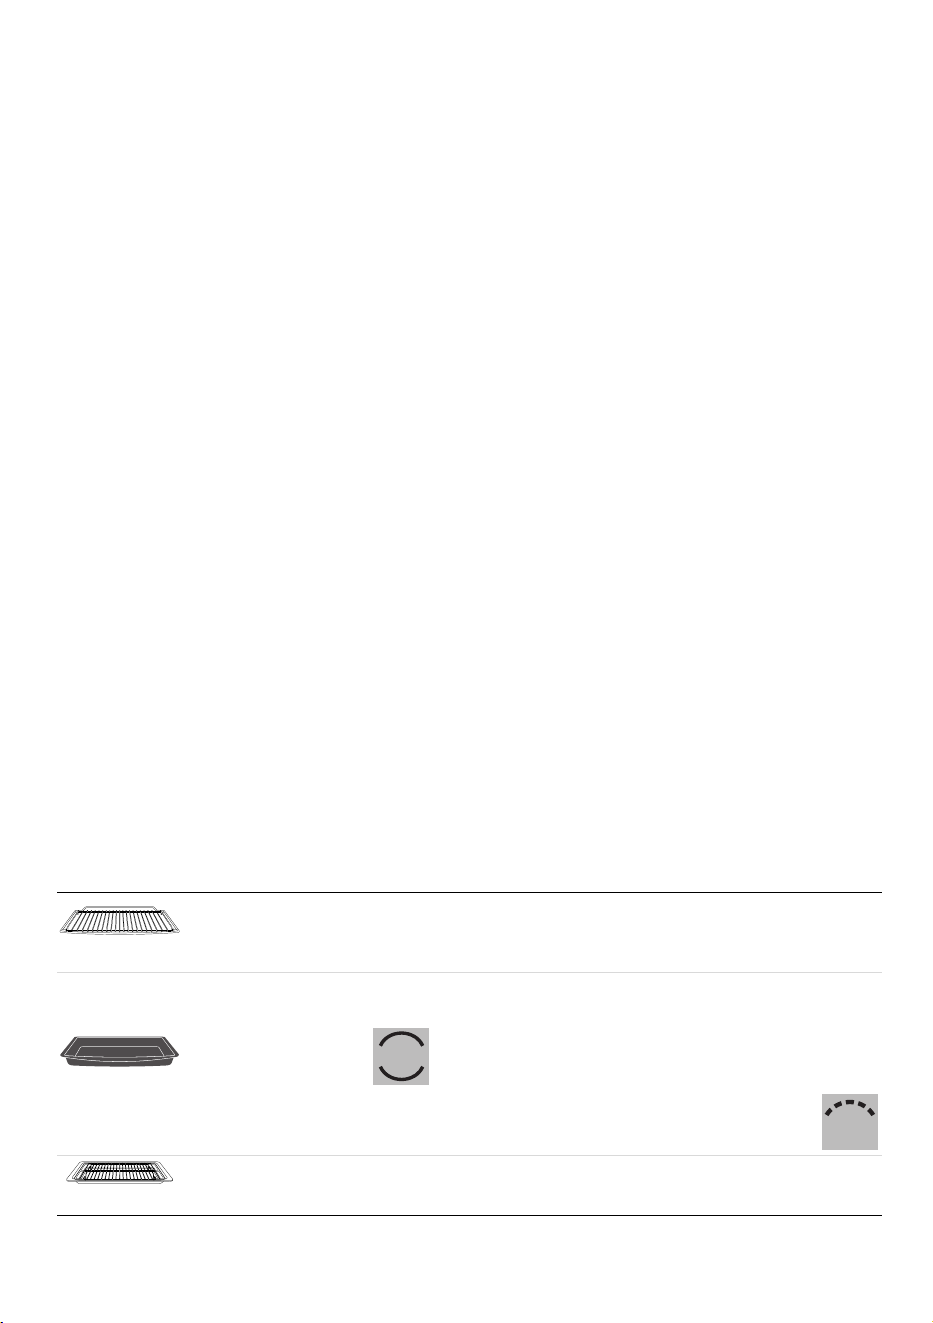
Mini guide to accessories
Rack
We recommend the use of the grill as a support surface for baking molds/casseroles.
In the absence of the baking tray grill, the grill can be used as a base for grilling with the deep
baking tray placed on a shelf below to collect the juices.
Deep tray
We recommend the use of the deep baking tray for cooking on one level only.
Place the deep baking tray on the center shelf when using the fan-assisted functions. When
using the BAKE function,
place the deep baking tray on the required shelf.
Place the baking tray on the last shelf with the baking tray grill to cook in BROIL mode .
Tray rack
We recommend using the baking tray grill as a base for food to grill. The pan below collects
the juices from the grills.
16 - CLEANING AND MAINTENANCE 91477B367/A
Discover the recipes
To consult the recipes developed for various
categories of food and for more information on
cooking suggestions, we recommend visiting the
dedicated page on the www.smeg.com
website, which can be reached using the QR
code on the leaflet supplied with the product.
CLEANING AND MAINTENANCE
Cleaning the appliance
Surface cleaning
To maintain the surfaces, you must clean them
regularly after each use once they have cooled
down.
Ordinary daily cleaning
Always use specific products only that do not
contain abrasives or chlorine-based acids.
Pour the product onto a damp cloth and wipe
the surface, rinse thoroughly and dry with a soft
cloth or a microfiber cloth.
Food stains or residues
Do not use steel sponges and sharp scrapers,
as they will damage the surfaces.
Use normal, non-abrasive products and a
wooden or plastic tool, if necessary. Rinse
thoroughly and dry with a soft cloth or a
microfiber cloth.
Do not allow residues of sugary foods (such as
jam) to set inside the oven. If left to set for too
long, they might damage the enamel lining of
the oven.
Cleaning the oven cavity
Proper maintenance of the oven's interior
requires that it be cleaned regularly, after
allowing it to cool.
Avoid leaving dried up food inside the oven
because it could damage the enamel surface.
Before cleaning, take out all removable parts.
To make cleaning easier, we recommend the
removal of:
• The door:
• the frame supports for racks/trays;.
Drying
Cooking food generates moisture inside the
appliance. This is a normal phenomenon and
does not affect the appliance's operation in any
way.
Each time you finish cooking:
1. let the appliance cool down;
2. Remove any dirt from inside the appliance.
3. Dry the interior of the appliance with a soft
cloth.
4. Leave the door open until the inside of the
appliance has dried completely.
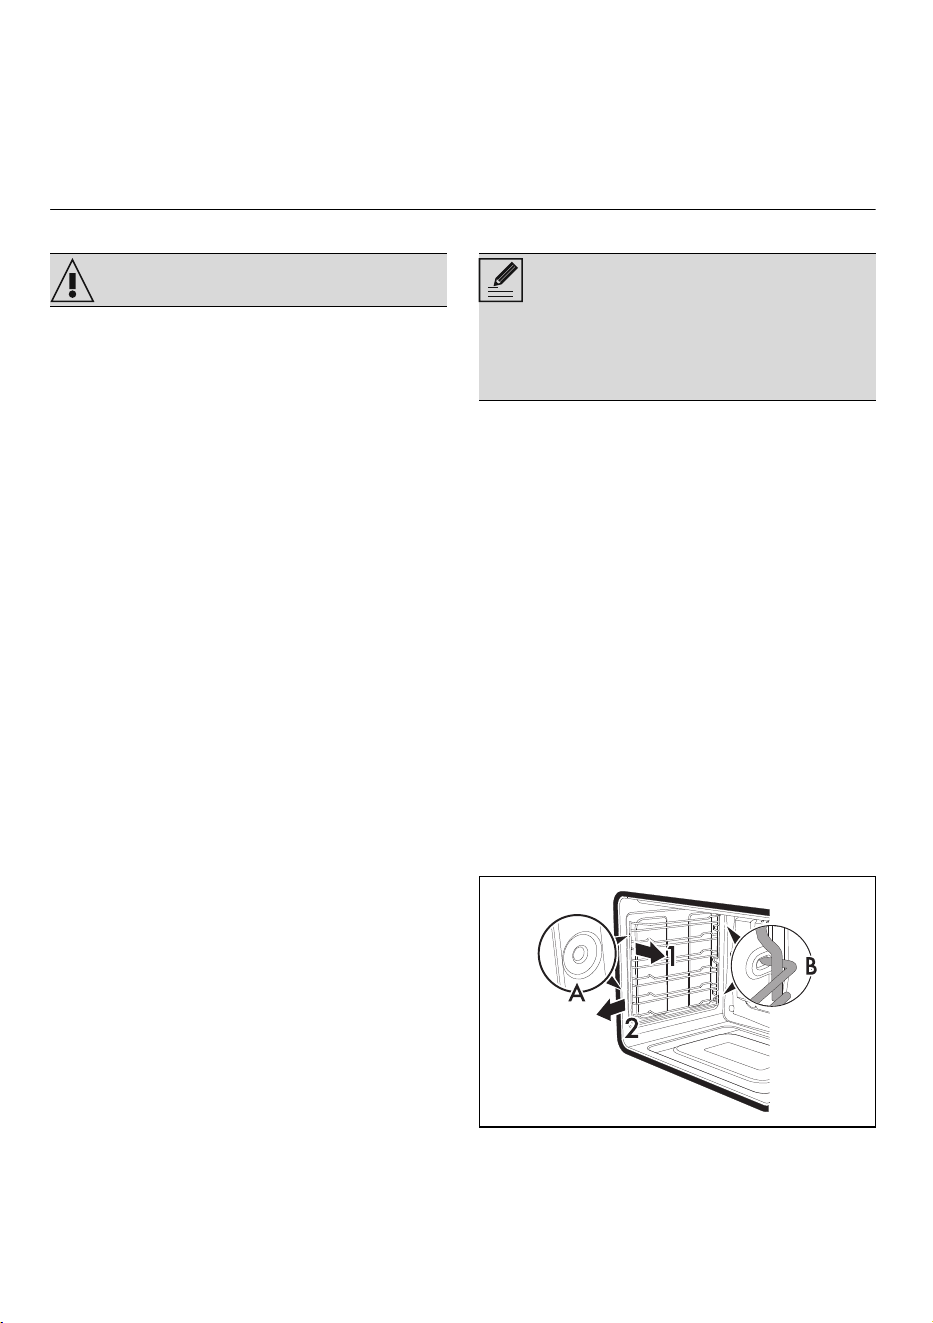
Removing racks/trays support frames
Removing the rack/tray support frames makes it
easier to clean the sides of the oven.
To remove the rack/tray support frames:
1. Pull the frame towards the inside of the oven
cavity to release it from groove A.
2. Slide the frame out of the slots at the back B.
When cleaning is complete, repeat the above
procedures to put the rack/tray support frames
back in.
WARNING NOTES
• If you are using specific cleaning products,
we recommend operating the appliance at
the maximum temperature for about 15-20
minutes to remove any residues.
CLEANING AND MAINTENANCE - 1791477B367/A
e
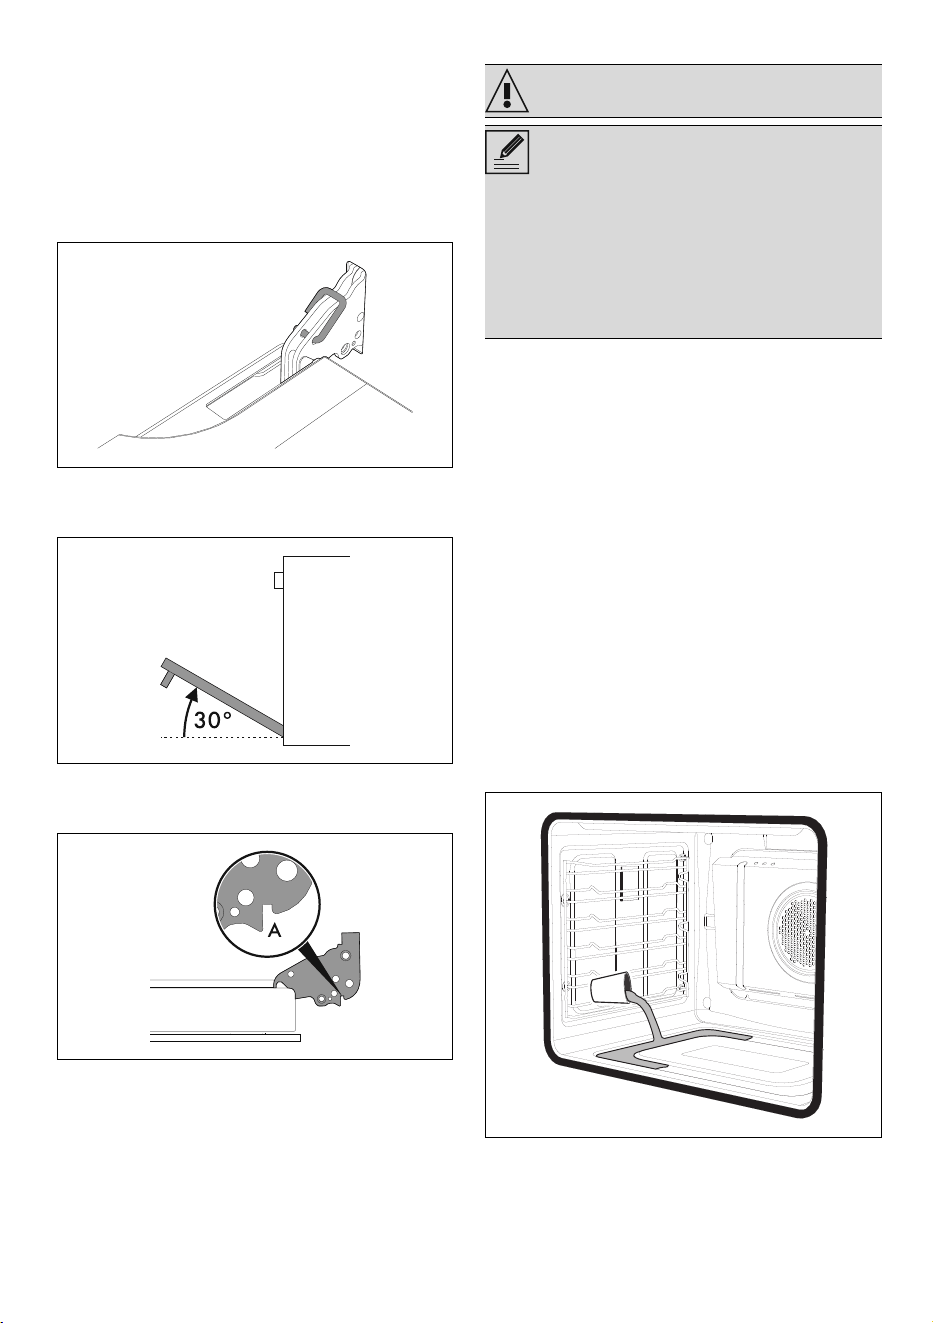
Cleaning the door
Removing the door
For easier cleaning it is recommended to
remove the door and place it on a towel.
To remove the door proceed as follows:
1. Open the door completely and insert two
pins into the holes on the hinges indicated in
the figure.
2. Grasp the door on both sides with both
hands, lift it forming an angle of around 30°
and remove it.
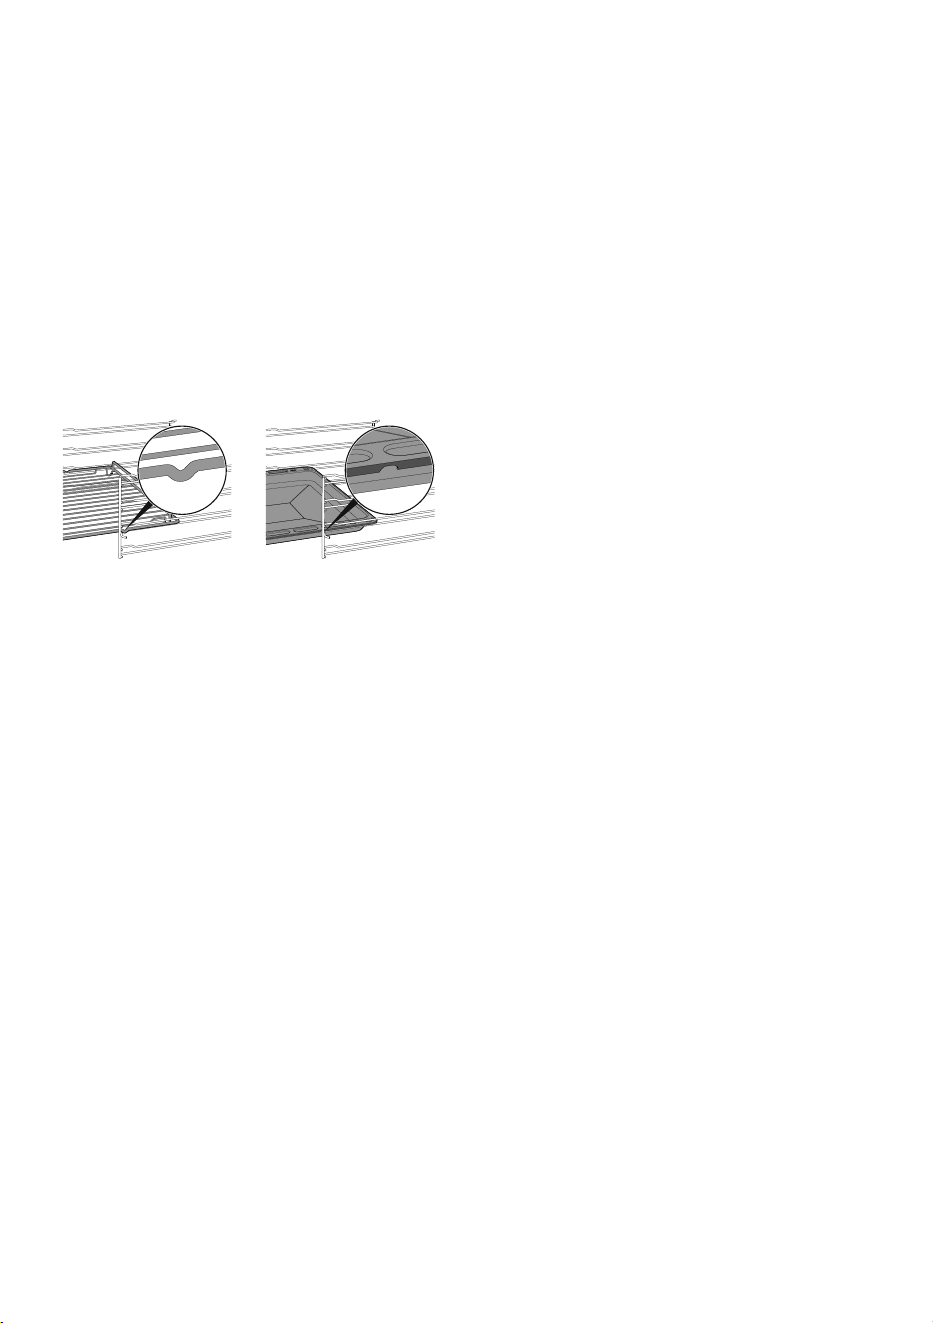
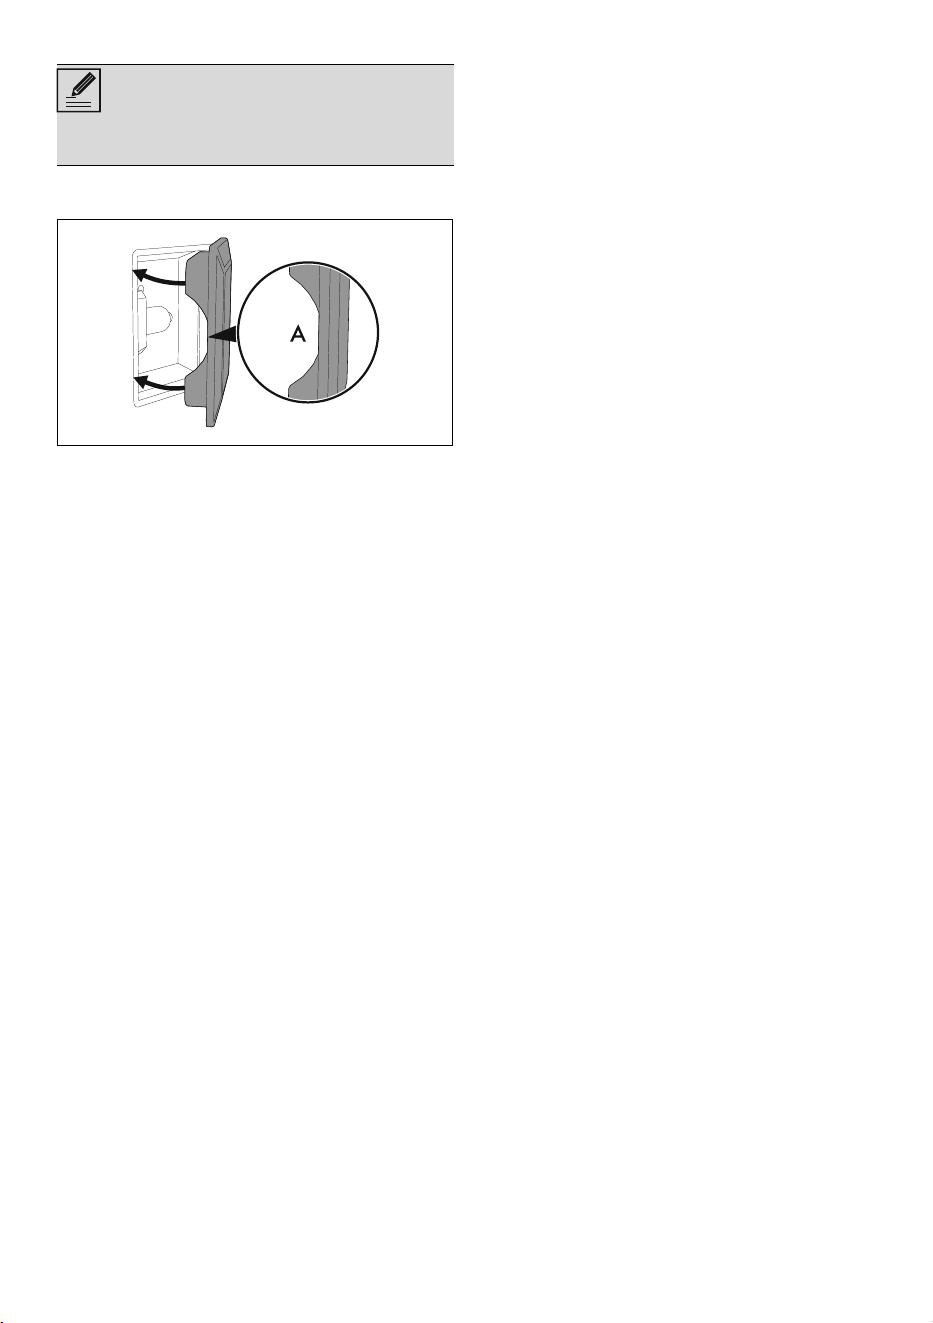
3. To reattach the door, insert the hinges into
the slots on the oven, making sure that
grooved sections A fit tightly in the slots.
4. Lower the door and once it is in place
remove the pins from the holes in the hinges.
Cleaning the door glazing
The glass in the door should always be kept
thoroughly clean. Use absorbent paper towels.
If there are tough to clean spots, use a damp
sponge and regular detergent.
Vapor Clean
Preliminary operations
Before starting the Vapor Clean function:
• Remove all accessories inside the oven.
• Remove any food residue inside the
appliance.
• Perform the Vapor Clean function only when
the appliance is cold.
• Remove the temperature probe (where
fitted).
• Remove the self-cleaning panels (where
fitted).
• During the assisted cleaning cycle, wash the
self-cleaning panels (where fitted), which
were previously removed, separately in
warm water and a small amount of
detergent.
• Pour approx. 4 fl. oz. (120 cc) of water onto
the floor of the oven. Make sure it does not
overflow out of the cavity.
• Spray a water and mild liquid detergent
inside the oven using a spray nozzle. Direct
the spray against the side walls, upwards,
WARNING
NOTES
• The Vapor Clean function is an assisted
cleaning procedure which facilitates the
removal of dirt. Thanks to this process, it is
possible to clean the inside of the oven very
easily. The dirt residues are softened by the
heat and water vapor for easier removal
afterwards.

18 - CLEANING AND MAINTENANCE 91477B367/A
downwards and towards the deflector.
• Close the door.
Vapor Clean cycle setting
5.
Turn the function knob to the symbol
and the temperature knob to
the
symbol.
6. Set a cooking time of 18 minutes using the
cooking time procedure described in more
detail in “Programmed cooking”.
7. The Vapor Clean cycle starts approximately
6 seconds after the last press on the
programmer buttons.
8. At the end of the Vapor Clean cycle, the
timer will deactivate the oven heating
elements, the buzzer will start to sound and
the numbers on the dial will flash.
End of the Vapor Clean cycle
9. Open the door and wipe away the less
stubborn dirt with a microfiber cloth.
10.Use an anti-scratch sponge with brass
filaments on tougher encrustations.
11.In case of grease residues, use specific oven
cleaning products.
12.Remove the water left inside the oven.
13.For improved hygiene and to avoid food
being affected by any unpleasant odors, we
recommend drying the oven using a
convection function at 320°F for
approximately 10 minutes.
Extraordinary maintenance
Replacing the oven light
1. Remove all accessories inside the oven.
2. Remove the frame supports for racks/trays.
3. Use a tool (e.g. a spoon) to remove the bulb
cover.
4. Loosen and remove the light bulb.
NOTES
• We recommend spraying approx. 20 times
at the most.
NOTES
• We recommend to use rubber gloves for
these operations.
• For easier manual cleaning of the parts that
are difficult to reach, it is recommended to
remove the door.
WARNING
• Unplug the appliance.
• Wear protective gloves.
NOTES
• Be careful not to scratch the enamel of the
oven walls.
CLEANING AND MAINTENANCE - 1991477B367/A
e
5. Replace the bulb with a similar one (40 W).
6. Reattach the cover. Ensure the molded part
of the glass (A) is facing the door.
7. Press the cover firmly so that it adheres
tightly to the light bulb holder.
Seal maintenance tips
The seal should be soft and elastic.
• To keep the seal clean, use a non-abrasive
sponge and wash with lukewarm water.
What to do if...
The display is completely off:
• Check the mains power supply.
• Check if any circuit breakers upstream of the
appliance supply line are in the "ON"
position.
The appliance does not heat up:
• Check whether "Show Room (for
showrooms only)" or "Demo Mode (for
showrooms only)" has been set (for further
details see "settings" section).
The controls do not respond:
• Check whether the "Controls lock" mode has
been set (for further details see "settings"
section).
NOTES
• Do not touch the halogen bulb with your
fingers; cover them with an insulating cloth.