
Operator's Manual
5-1/2 in. 18 VOLT
CORDLESS TRIM SAW
Model No.
315.114231
Save this manual for
future reference
WARNING: Read and follow
all Safety Rules and Operaling
Inslructions before using this
product.
Customer Help Line: 1-800-932-3188
Sears Roebuck and Co., 3333 Beverly Rd. Hoffman Estates, IL 60179 USA
Visit the Craftsman web page: www.sears.com
983000-281
3-03
•Safety
• Features
•Assembly
•Operation
• Maintenance
•Parts List

•TableOf Contentsand Warranty...................................................................................................................................... 2
•Introductionand GeneralSafety Rules........................................................................................................................ 3-4
•SpecificSafety Rulesand Symbols............................................................................................................................. 4-7
•ProductSpecifications,Unpacking,andAccessodes ...................................................................................................... 8
•Features..................................................................................................................................................................... 8-10
•Assembly................................................................................................................................................................... 11-13
•Operation ................................................................................................................................................................. 13-19
•Maintenance................................................................................................................................................................... 20
•ExplodedV'mwAndRepair PartsList....................................................................................................................... 22-23
•PartsOrdedng/Servico................................................................................................................................................. 24
FULL ONE YEAR WARRANTY ON CRAFTSMAN CORDLESS TRIM SAW
Ifthis CRAFTSMANCordlessTrimSaw failsto give completesatisfactionwithinone year from thedate of purchase,
RETURN IT TO THE NEAREST SEARS STORE OR SEARS SERVICE CENTER IN THE UNITED STATES, and Sears
willrepair it, free of charge.
If thisCRAFTSMANCordlessTrimSaw is usedfor commercial or rentalpurposes,thiswarrantyappliesfor onlyg0 days
from the date of purchase,
Thiswarrantygivesyou specificlegalrights,and you may also haveother fightswhichvaryfrom stateto state,
Sears, Roebuck and Co., DopL 817 WA, Hoffman Estates, IL 60179
_l, Look for this symbol to point out important safety precautions. It means attentionlll
Your safety is involved.
AWARNING:
OThe operationofany powertoolcan resultinforeignobjectsbeingthrown intoyoureyes, whichcan result
in severeeye damage, Before beginningpowertooloperation,alwayswear safety gogglesor safety
glasseswith side shieldsand a full face shieldwhen needed, We recommendWide VisionSafety Mask
for useover eyeglassesor standardsafetyglasseswith side shields,availableat Sears RetailStores,
Always wear eye protectionwhichis markedto comply withANSI Z87.1.
2
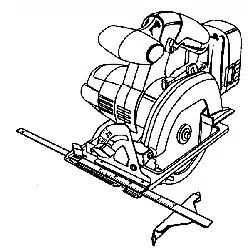
Yourtrim sew has manyfeaturesfor makingyourcutting
operationsmore pleasantand enjoyable.Safety,
performance and dependabilityhavebeen giventop
priorityinthe designofthistdm sew makingiteasy to
maintainand operate.
_k WARNING: Do not attemptto usathe tooluntil
you have read thoroughlyand understandcompletely
theoperator'smanual, Pay closeattentionto the
safety rules,includingDangers,Warnings,and
Cautions.If you usathis toolproperlyand onlyfor
what itis intended,you willenjoyyearsof safe,
reliableservice,
A WARNING: Read and follow all instructions.
Failuretofollowall instructionslistedbelow,may
resultin electricshock,fireand/or sadous personal
injury.
SAVE THESE INSTRUCTIONS
Work Area
•Keep yourwork area clean and well lit. Cluttered
benches and darkareas inviteaccident.
• Do not operate power tools in eaplosive strno-
spheres, such as in the presence of flammable
liquids, gases, or dust. Powertools create sparks
whichmay Ignitethe dustor fumes.
•Keep bystandam, children, and visitors away while
operating apower tool, Distractionscancauseyou
to lose control.
Electrical Safety
•Abette|y operated tool with Integral bettados or a
separate be#ely pack must be recharged only with
the specified charger for the betteiy. A chargerthat
may be suitableforone type of batterymay createa
riskoffire when usedwithanotherbattery.
• Use bsttary operated tool only with specifically
designated battery pock. Use ofanyotherbatteries
may createa dskoftire. Useonlywith batterypack
listed.
•Do not abuse the cord. Never use the cord to carry
the charger. Keap cord away from heat, oil, chaq)
edges, or moving parts. Replace damaged cords
immediately. Damaged cords may createa fire.
•Use bettely only with charger listed.
MODEL BA'rrERY PACK CHARGER
315.114231 item No. _t1045 RamNo. _!11041
(1323905) (1425301)
Personal Safety
•Stay alert, watch what you are doing and use
common eanea when operating a power tool. Do
not use tool while tired or under the influence of
drags, alcohol, or medication. Amoment ofinatten-
tionwhileoperatingpowertoolsmay resultin serious
personal injury.
•Dress properly. Do not wear loose clothing or
jewelry. Contain long hair. Keep your hair, clothing,
and gloves away from moving parts, Looseclothes,
jewelry,or longheir can be caught in moving parts,
•Avoid accidental starting. Be sure switch is in the
locked or off position before inserting bsttery
pack. Carryingtools withyourfingeron the switchor
insertingthe batterypeck intoa toolwiththe switch on
invitesaccidents.
•Remove adjusting keys orwrenchea before turn-
ing the tool on. A wrenchera keythat is leftattached
to a rotatingpert ofthe toolmay resultin personal
injury,
•Do not overreach. Keep proper footing and bal-
ance at all times. Properfootingand balanceenable
petter controlof thetoolin unexpectedsituations.
•Use safety equipment. Always wear aye protection.
Dust mask,nonskidsafetyshoes,hard hat,or hearing
protectionmustbe usedfor appropriateconditions.
Tool Use and Care
•Usa clamps or other practical way to secure and
support the workplace to a stable plstfonn. Holding
thework byhandor againstyourbodyis unstableand
may lead toloss ofcontrol.
•Do not force tool. Use the con'act tool for your
application. The correcttool willdo thejobbe_rarand
saferat the rateforwhichitisdesigned.
3
Do not use tool if switch does not turn iton or off.
A toolthatcannotbe controlledwiththe switchis
dangerousand must be repaired.
Disconnect batter/pack from tool or place the
switch in the looked or off position before making
any adjustments, changing accoseodes, or stodng
tool. Such preventivesafetymeasures reduce the dsk
of starting the toolaccidentally.
Store idle tools out of the mech of children and
other untrained persons. Toolsare dangerousin the
handsof untrainedusam.
When batter/pack is not in use, keep it away from
other metal objects like: paper clips, coins, keys,
nails, screws, or other small metal objects that can
make a connection from one terminal to another.
Shortingthe batteryterminals togethermay cause
sparks,bums,or a fire.
Maintain tools with care. Keep cutting tools sharp
and clean. Properlymaintainedtoolswith sharp
cuttingedges are lesslikelyto bindand are easier to
ccntrol.
•Check for miaslignmeot or binding of moving
pe4s, breakage of paris, and any other condition
that may affect the tool's operation, if damaged,
have the tool serviced before using. Many accidents
are caused bypoorlymaintainedtools.
•Use only ecneasodas that are recommended by
the manufaotumr for your model. Accessoriesthat
may be suitablefor one tool,may createa riskof injury
when used on another tool.
Service
Tool se_ice must be performed by qualified repair
personnel. Serviceor maintenanceperformedby
unqualifiedpersonnelmay result in a riskofinjury.
When servicing a tool, use only identical replace.
merit pads. Follow instructions in the Maintenance
section of this manual. Usa of unauthorizedpartsor
failuretofollow MaintenanceInstructionsmay createa
_sk of shockor injury.
•Hold tool by insulated gripping surfaces when performing an operation where the cutting tool may contact
hidden wiring. Contactwitha "live" wire will make exposedmetalparts of the tool "live" and shockthe operator.
Additional Rules For Safe Operation
•Know your power tool. Reed operator's manual
carefully. Learn its applications and limitations, as
well as the specific potential hmrds misted to
this tool. Followingthis rulewillreducethe risk of
electricshock,fire, or seriousinjury.
•Make sure your extension cord is in good condi-
tion. When using an extension cord, be sure to use
one heavy enough to carry the current your prod-
uct will drew. Awire gage size (A.W.G.) of at least
16 is recommended for an extension cord 100 f_st
or less in length. A cord exceeding 100 feet is not
recommended. If in doubt, use the next heavier
gage. The smaller the gage number, the heavier
the cord. An undersizedcordwillcause a dropin line
voltage resultingin lossof powerand overheating.
Important Rules For Battery Tools
•Batter/tools do not have to be plugged into an
electrical outlet; therefore, they are always in
operating condition. Be aware of possible hazards
when not using your better/tool or when chang-
ing accessories.
•Do not place batter/tools or their baHefies near
fire or heat. This willreducethe riskofexplosionand
possibleinjury.
•Batteriesvent hydrogengasand canexplode inthe
presenceof a sourceof ignition,suchas a pilotlight.
To reducethe riskof sedous personal injury,never
useany cordlessproductin the presenceofopen
flame. An explodedbattery can propeldebdsand
chemicals. Ifexposed,flushwithwater immediately.
•Do not charge baiter/tool in a damp orwet loca-
tion. Followingthisrulewillreducethe risk of electric
shock,tim, or seriouspersonal injury.
•Your belier/tool should be charged in a location
where the temperature is more than 50°F hut less
then 100°F. Followingthisrule will reducethe risk of
electricshock,fire,or serious personalinjury.
•Under extreme usage or temperature conditions,
batter/leakage may occur. If liquid comas in
contact with your skin, wash immediately with
soap and water, then neutralize with leman juice or
vinegar. If liquid gets into your eyes, flush them
with clean water for at Isesl 10 minutes, then seek
immediate medical attention. Following this rule will
reducetheriskof seriouspersonalinjury.
4
Additional Specific Safety Rules
• DANGERI Keep hands away from cutting am and
blade. Keep your second hand on auxilianj handle
or motor housing. If bothhandsam holdingthe saw,
they cannotbe cutbythe blade,
•Kasp your body positioned to either side of the
saw blade, but not in line with the sew blade.
KICKBACK couldcause the saw tojump backwards.
•Do not reach underneath the work. The guard
cannot pmtactyou fromthe blade belowthework.
•Chack the lower guard for proper closing before
each use. Do not operate saw if lower guard does
not move freely and close instantly, Never clamp
or tie the lower guard into the open position. If
saw is accidentallydropped,lowerguardmay bebent.
Raise the lower guardwiththe retractinghandleand
make sure itmovesfreely and does not touchthe
bladeor any otherpart,in all anglesand depthsofcut.
•Check the operation and condition of the lower
guard spdng, If the guard and the spdng are not
operating properly, they must be serviced before
use. Lowerguard may operatesluggishlydue to
damaged parts,gummydeposits,or a buildupof
debds.
•Lower guard should be retracted manually only for
special cute such as =Pocket Cuts" and "Com-
pound Cuts". Raise lower guard by Retracting
Handle. As soon as blade enters the mstadal,
lower guard must be released. Forall othersawing,
the lowerguardshouldoperateautomatically.
•Always obeerve that the lower guard is covedng
the blade before placing saw down on bench or
floor. An unprotected,coastingbladewillcause the
saw to walk backwards,cuttingwhatever isin its path,
Beaware ofthe timeittakes forthe bladeto stop after
switchisreleased.
NEVER hold piece being cut in your hands or
across your leg. It is important to supportthe work
properlyto minimizebodyexposure,blade binding,or
lossof control.
•Hold tool by insulating gripping sudecse when
performing an operation where the cutting tool
may contact hidden widng. Contactwitha "live"wire
willalso make exposedmetal parts of the tool"live"
and shockthe operator.
•When dpping always use a rip fence for a straight
edge guide. Thisimprovesthe accuracyof cutand
reducesthe chanceof blade binding.
• Always use blades with cowect size end shape
(diamond vs. round) arbor holes. Bladesthatdo not
matchthe mountinghardwareofthe saw willrun
eccentdcally,causinglossofcontrol.
•Never use damaged or incorrect blade washers or
bolts. The blade washersand boltwere specially
designedfor your saw,foroptimumperformanceand
safety of operation.
• Causes and Operator Prevention of Kickback:
Kickback is a suddenreactiontoa pinched,bound,or
misalignedsaw blade, causing an unccntmlledsaw to
liftup and outofthe workpiecetowardthe operator.
When the bladeispinchedor hound tightlyby the kerr
closingdown,the bladestallsand the motorreaction
drivesthe unitrapidlybeck towardthe operator.
If theblade becomestwistedor misalignedinthe cut,
theteeth at the backedge ofthe blade can digintothe
top surfaceofthe woodcausing the blade toclimbout
ofthe ken'and jumpback towardthe operator.
Kickback isa resultof toolmisuseand/orincorract
operatingproceduresor conditionsand can be
avoidedby takingproperprecautionsas givenbelow:
•Maintain a finmgrip on the sew and position your
body and arm in a way that allows you to resist
KICKBACK forces. KICKBACKforcescan be con-
trolled by the operator,ifproperprecautionsare taken.
• When blade is binding, orwhen intemupting a cut
for any reason, release the trigger and hold the
saw motionless in the mutadal until the blade
comas to a complete stop. Never attempt to
remove the saw from the work or pull the sew
backward while the blade is in motion or KICK-
BACK may occur. Investigateand take corrective
actions to eliminatethe cause ofblade binding.
• When restarting a sew in the workplace, canter the
saw blade in the kerr and check that teeth are not
engaged into the mstedal. If saw blade isbinding,it
maywalk upor KICKBACKfrom the workpiecaas the
saw is restarted.
•Support large panels to minimize the dsk of blade
pinching and KICKBACK. Large panels tend tosag
undertheirown weight.Supportsmustbe placed
underthe penal on bothsides,nearthe lineof cutand
nearthe edge ofthe panel.
•Do not use dull or damaged blade. Unsharpenedor
impmpedyset bladesproducenarrowken'causing
excessivefriction, blade binding,and KICKBACK.
•Blade depth and bevel adjusting locking levera
must be tight and secure before making cut. If
blade adjustmentsh_ftswhilecutting,it willcause
bindingand KICKBACK.
• Use extra caution when making a "Pocket Cut"
into existing walls or other blind areas. The protrud-
ingblademay cutobjectsthatcan cause KICKBACK.
5
• Neveruseabatterythat has been dropbedor re-
ceived a sharpblow,A damaged bakery is subjectto
explosion,Pmpedy dispose ofa droppedbattery
immediately.Failureto head this warningcan result in
seriouspersonalinjury.
• Before using battery charger, read ell instructions
and cautionary markings in this manual, on battery
charger, and product using battery charger. Follow-
ingthisrulewillreducethe dskof electricshock,fire,
or sedouspersonalinjury.
•To reduce dsk of injury, charge only nickel-
cadmium type rechargeeble bottedss. Other types
of batteries may burst causing personal injury end
damage. Followingthis rulewillreducethe dsk of
electricshook, tim, or sedouspersonal injury.
•Do not expose charger to rein or snow. Following
this rulewillreducethe dsk ofelectdc shock,fire,or
serious personalinjury.
•Usa of an attachment not recommended oraold by
the battery charger manufacturer may result in •
risk of fire, electric shock, or injury to penmns.
Followingthisrule willreduce the riskofelectricshock'
fire, or sedouspersonalinjury,
•To reduce the dek of damage to charger body and
cord, pull by charger plug rathor than cord when
disconnecting charger. Following thisrulewillreduce
the risk ofsedous personal injury.
•Make sure cord is located so that it will not be
stepped on, tdpped over, or othanvise subjected to
damage or stress. Followingthis rulewillreducethe
dsk of seriouspersonalinjury.
•An extension cord should not be used unless
absolutely necsssmy. Use ofimproperextension
cordcouldresultin a dsk offireend electricshock.If
extensioncord must be used,make sure:
a. That pinson plugof extensioncordam the same
number,size and shape as thoseof plugon
charger.
b. That extensioncordis pmpedywiredand ingood
electricalcondition; and
c. Thatwire size islargeenough forAC ampere rating
of chargeras specifiedbelow:
Cord Length(Feet) 25" 50" 100"
Cord Size (AWG) 16 16 16
Note: AWG =AmadcanWire Gage
•Donot operatechargerwith adarnaged cord or
plug. Ifdamaged, have replaced immediately by a
qualified sstvicaman, Followingthisrulewillrsduce the
dskof electricshock,fire,or serious personalinjury.
•Do not operate charger if It has received a sharp
blow, been dropped, or othanNise damaged in any
way; take It to a qualified serviceman. Following this
rule willreducethe riskof electdcshock,fire,or
seriouspersonal injury.
•Do not dissessmbls charger, take it to a qualified
serviceman when ssrvica or repair is required.
Incorrect ressssmbly may result in arisk of elec-
tric shock or fire. Followingthis rulewillreducethe
dskof electricshock,firs,or seriouspersonal injury,
•To reduce the risk of electric shock, unplug
charger from outlet before attempting any mainte-
.anco or cleaning. Turning off controls will not
reduce this risk, Followingthis rulewillreducethe
dskof electricshock'firs,or sedous personalinjury.
•Do not use charger outdoors. Followingthisrulewill
reducethe riskofelectricshock,fire, or sadous
personal injury.
• Dieconnect charger from power supply when not
in use. Followingthis rule willreducethe riskof
electricshock,tim, or serious personal injury,
•RISK OF ELECTRIC SHOCK. DO NOT TOUCH
UNIHSULATED PORTION OF OUTPUT CONNEC-
TOR OR UNINSULATED BA'I-rERY TERMINAL.
• Save thsse instructions. Refer to tbem frequently
and use them to instnJntothers who may usethis
tool. if you loan someone this tool, loanthem
these instructions also. Followingthisrulewill
reduce the riskofelectricshock'fire, or serious
personalinjury,
AWARNING" . Some dust created bypower sanding,
sawing, grinding,drilling,and other construction
activities contains chemicals knownto cause
cancer, birthdefects or other reproductive harm,
Some examples of these chemicals are:
• lead from lead-besed paints,
• crystallinesilicafrom bdcks and cement
and other masonry products,and
•arsenic and chromiumfrom chemically-
treated lumber.
Your riskfrom these exposures varies, depending
on how often you do this type ofwork. To reduce
your exposure to these chemicals:work in a wall
ventilated area, and work with approved safety
equipment, suchas those dust masks that are
speciallydesigned to filter out microscopicparticles.
SAVE THESE INSTRUCTIONS
6
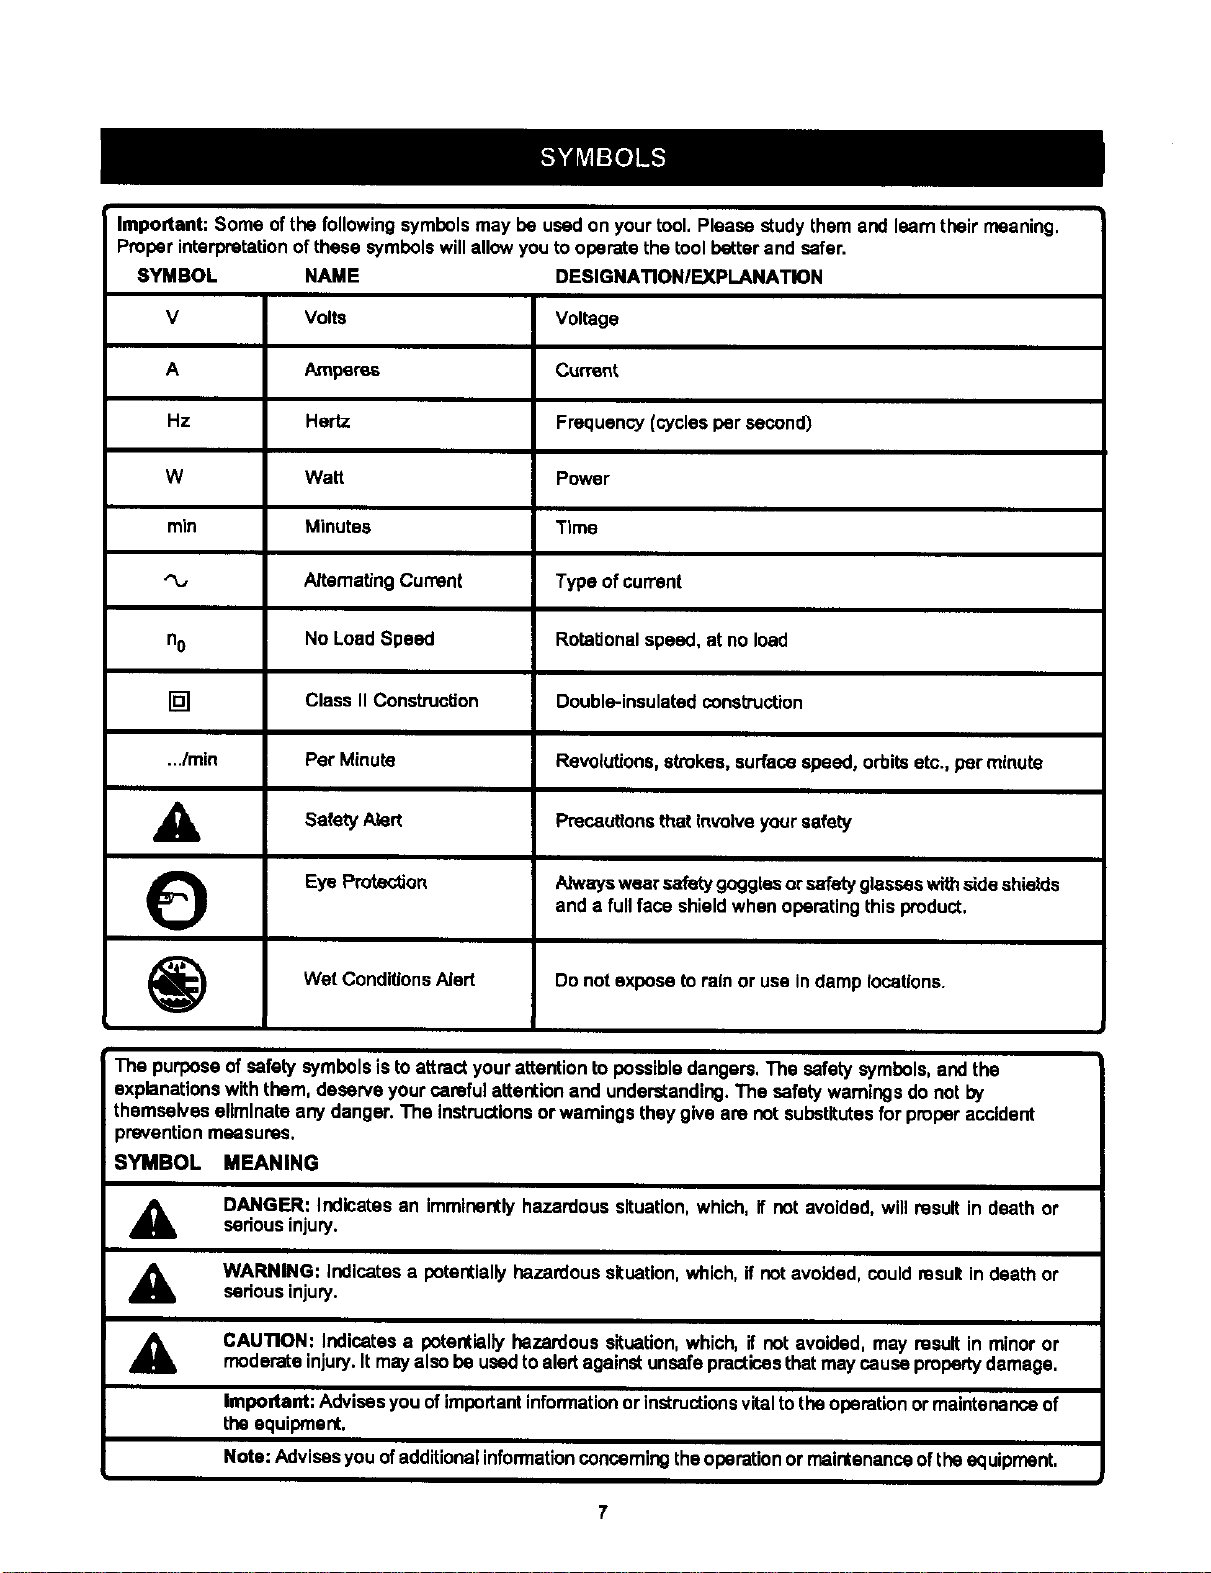
Important: Some ofthe followingsymbolsmay be usedon yourtool, Please studythem and leamtheir moaning.
Proper interpretationofthese symbolswillallowyouto operatethe tool betterand safer.
SYMBOL NAME DEBIGNATIONIEXPLANATION
V Volts Voltage
AAmperes Current
Hz Hertz Frequency(cyclesper second)
W Watt Power
min Minutes Time
ARematingCurrent Type of current
no No LoadSpeed Rotationalspeed, at no load
[] Class II Construction Double-insulatedconstruction
.../min Per Minute Revolutions,strokes,surfacespeed, orbitsetc., per minute
,_ Safety Alert Preoauttonsthat involveyoursafety
OEye Protection Alwayswear ,safetygogglesorsafetyglasseswith,sideshields
and a fullface shieldwhen operatingthis product.
_) Wet ConditionsAlert Do not expose torainor usein damp locations.
The purposeof safety symbols is toattractyourattentionto possibledangers,The safety symbols, and the
explanationswiththem, deserveyourcarefulattentionand understanding.The safetywarningsdo not by
themselves eliminateany danger. The instructionsor warningstheygive am not substitutesfor properaccident
preventionmeasures.
SYMBOL MEANING
ADANGER: Indicates an immlnontlyhazardoussituation,which, if not avoided,will rasult in death or
sedcos injury.
AWARNING: Indicatesa potentiallyhazardoussituation,which, if notavoided,could resultin death or
serious injury.
A, CAUTION: Indicates a potentiallyhazardous situation,which, if not avoided, may resultin minor or
moderateinjury.Itmay alsobe usedto alertagainst unsafepracticesthatmaycausepropertydamage.
Impodant: Advisesyou of importantinformationorinstructionsvitaltotheoperationor maintenanceof
the equipment.
Note: Advisesyou ofadditionalinformationconcerningthe operationor maintenanceof the equipment.
7
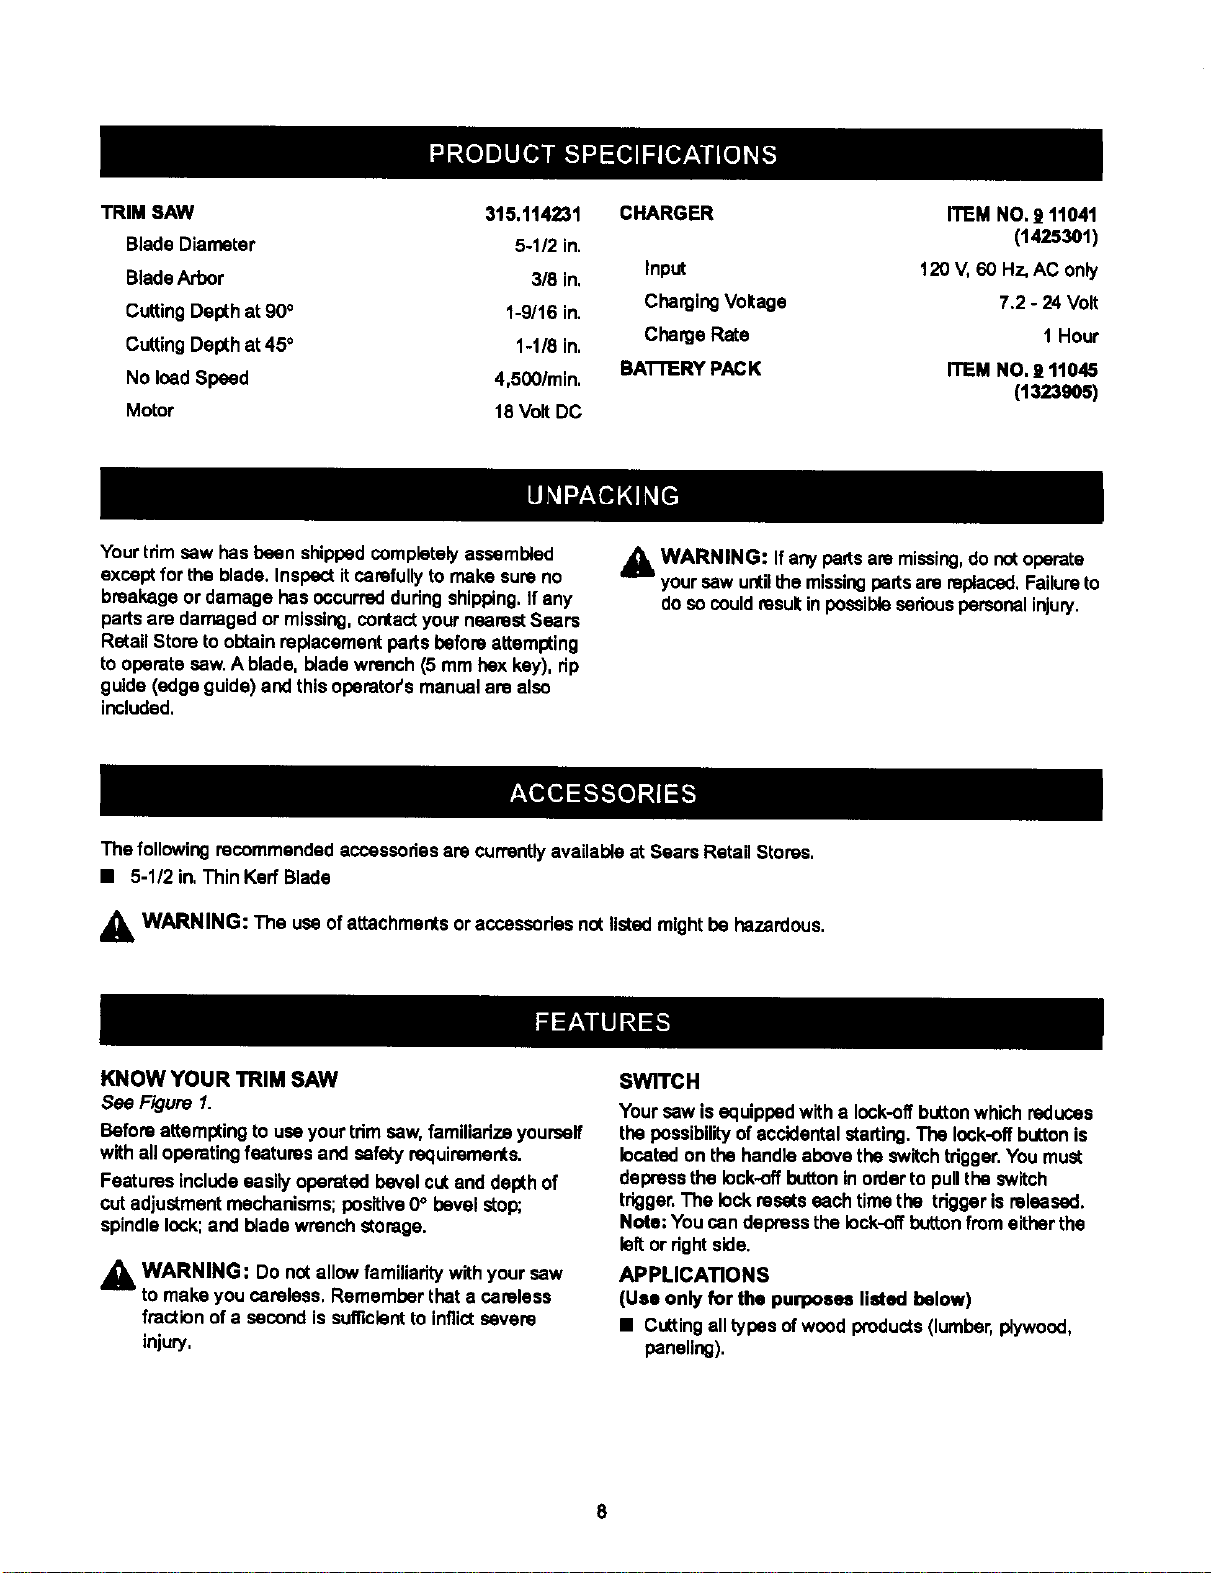
TRIMSAW 315.114231
BladeDiameter 5-1/2in.
BladeArbor 318in,
CuttingDepthat 900 1-9/16 in.
CuttingDepthat 450 1-118in,
No lead Speed 4,500/min,
Motor 18 VoltDC
CHARGER ITEM NO. 111041
(1425301)
Input 120 V,60 Hz,AC only
ChargingVoltage 7.2 - 24 Volt
Charge Rate 1 Hour
BA'I-FIERYPACK ITEM NO. 9 11045
(1323905)
Your trim saw has been shippedcompletelyassembled
exceptfor the blade. Inspectitcarefullyto make sureno
breakageor damage has occurredduringshipping,If any
partsare damaged or missing,contact your nearestSears
RetailStore toobtain replacementparts beforeattempting
to operate saw.Ablade, bladewrench (5 mm hex key), dp
guide(edge guide) and thisoperators manualare also
included,
WARNING: If anypartsaremissing,do notoperate
yoursaw until_e missingpatts are replaced,Failureto
do socouldresultinpassible seriouspersonalinjury.
The following recommendedaccessoriesare currentlyavailableat BearsRetail Stores,
•5-1/2 in,Thin KerrBlade
WARNING: The useofattachmentsor aceassodesnotlistedmightbe hazardous.
KNOW YOUR TRIM SAW
See Figure 1.
Beforeattemptingtouseyourtdm saw,familiarizeyourself
withall operatingfeaturesand safetyrequirements.
Featuresincludeeasilyoperated bevel cutand depthof
cutadjustmentmechanisms;positive0° bevel stop;
spindlelock;and blade wrenchstorage.
,l_k WARNING: Do not allowfamiliarity with saw
your
to make you careless. Remember that a careless
fractionof a second issufficientto inflictsevere
injury.
SWITC H
Yoursawis equippedwithalock-offbuttonwhichreduces
the possibilityof accidentalstarting. The lock-offbuttonis
locatedonthe handleabove the switchtdgger.You must
depressthe lock-offbuttoninorderto pulltheswitch
trigger.The lockresetseach timethe triggerisreleased.
Note: Youcan depressthe iock-off buttonfrom eitherthe
left or dghtside.
APPLICATIONS
(Use only for the purposes lieted below)
•Cuttingall typesofwoodproducts(lumber,plywood,
paneling).
8
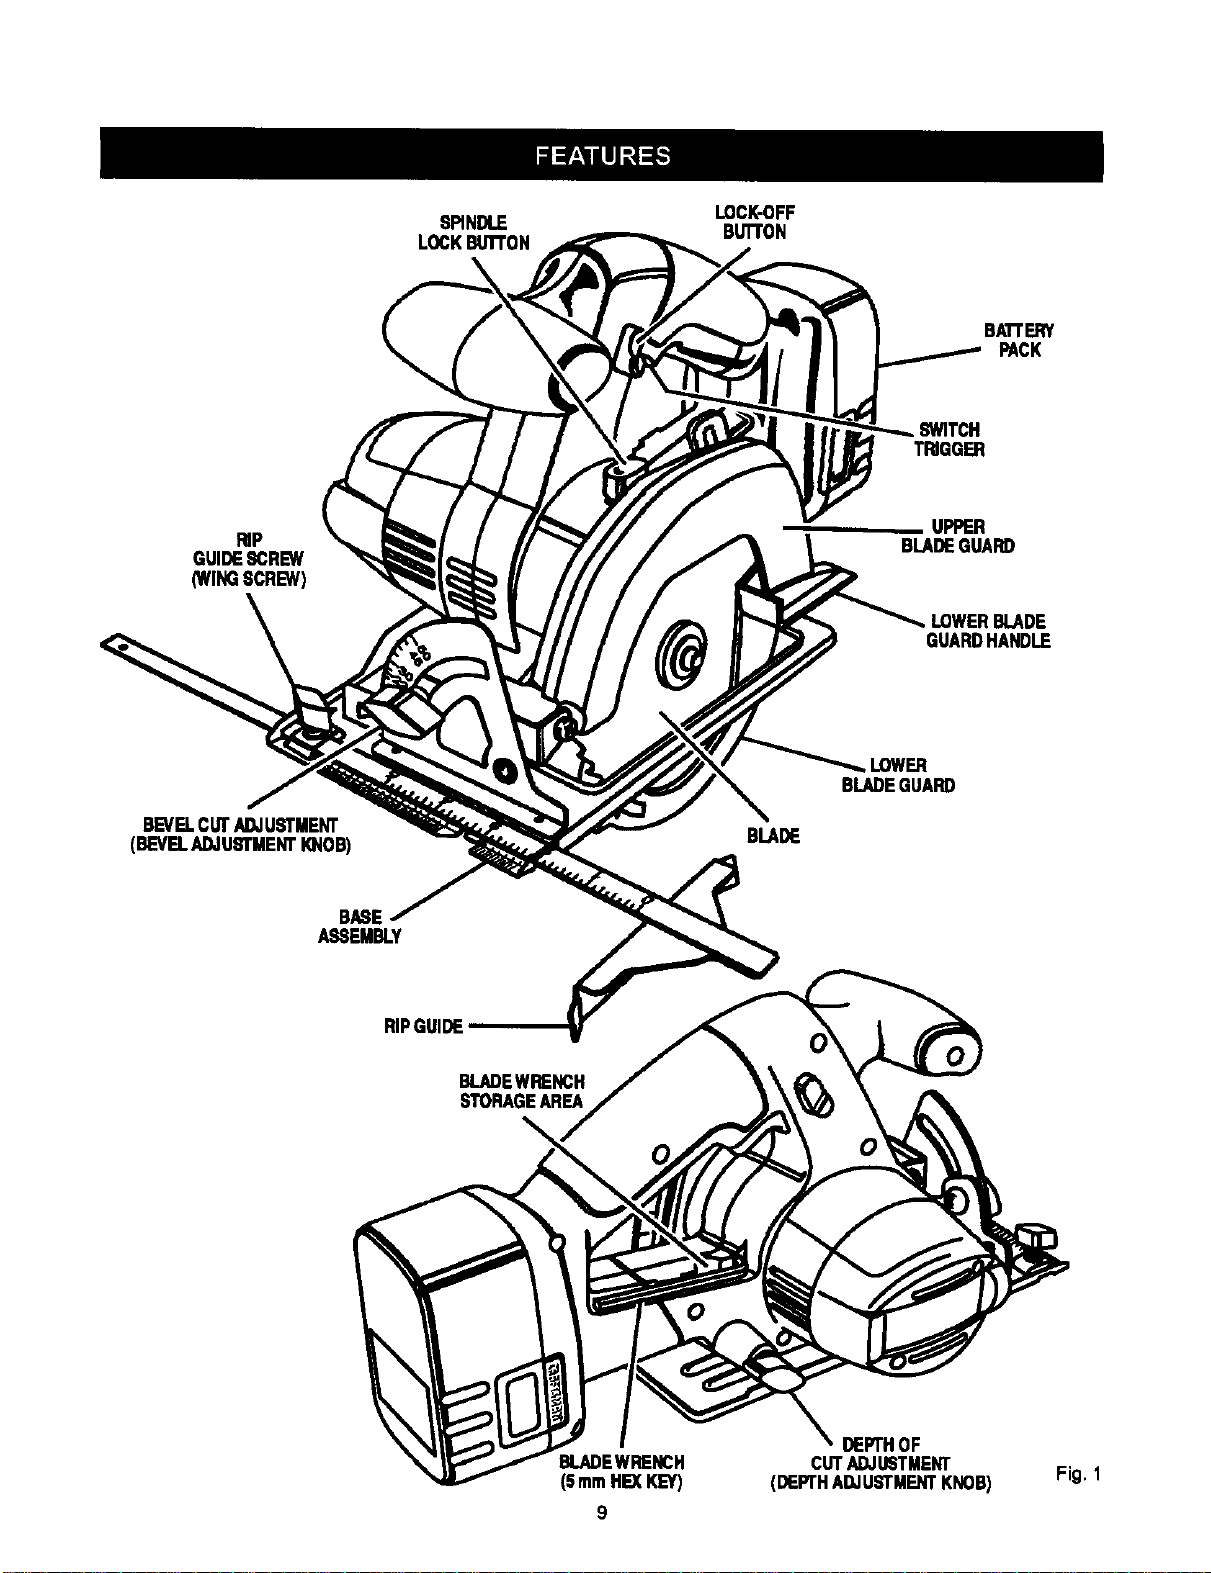
SPINDLE
LOCKBUTFON
LOCK-OFF
BUTrON
BA'n'ERY
PACK
TRIGGER
RIP
GUIDE8CREW
(WINGSCREW)
BLADEGUARD
, LOWERBLADE
GUARDHANDLE
BEVELCUTADJUSTMENT
(BEVELADJUSTMENTKNOB) BLADE
LOWER
BLADEGUARD
BASE
ASSEMBLY
FlIPGUIDE
BLADEWRENCH
STORAGEAREA
Fig. 1
DEPTHOF
BLADEWRENCH CUTADJUSTMENT
(5mmHE)(KEY) (DEPTHADJUSTMENTKNOB)
9
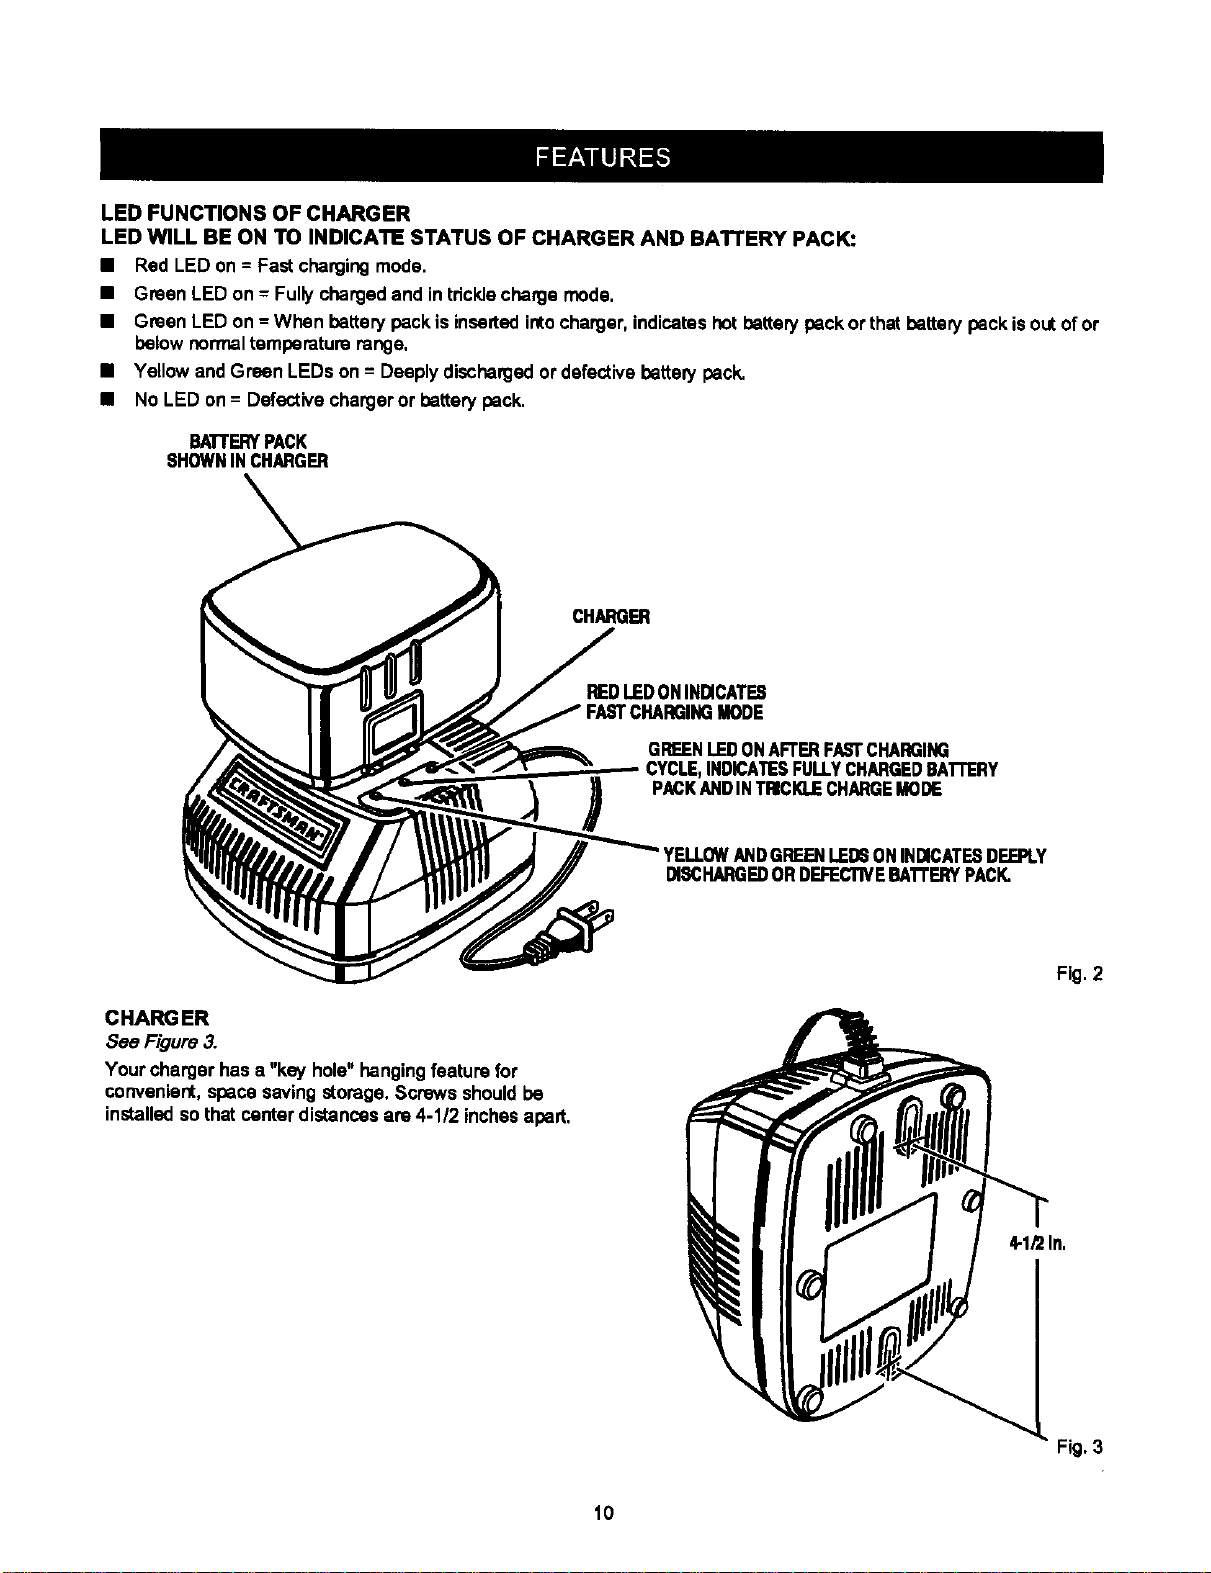
LEDFUNCTIONSOFCHARGER
LEDWILLBEONTOINDICATESTATUSOFCHARGERANDBATTERYPACK:
•Red LED on = Fast chargingmode,
•Green LED on = Fullychargedand intricklechargemode,
•Green LED on = When batterypackis insertedintocharger,indicateshothatter/pack or that batterypackisout ofor
belownormaltemparatum range,
•Yellow and Green LEDs on = Deeplydischargedor defectivebatter/pack.
•No LED on = Defectivechargeror batterypack.
BATrERYPACK
SHOWNINCHARGER
CHARGER
REDLEDONINDICATES
GREENLEDONAFTERFASTCHARGING
CYCLE, INDICATESFUlly CHARGEDBATrERY
PACKANDIN TRICKLECHARGEMODE
YEllOW ANDGREENLED6ONINDICATESDEEPLY
DISCHARGERORDEFECTIVEBA'I'rERYPACK,
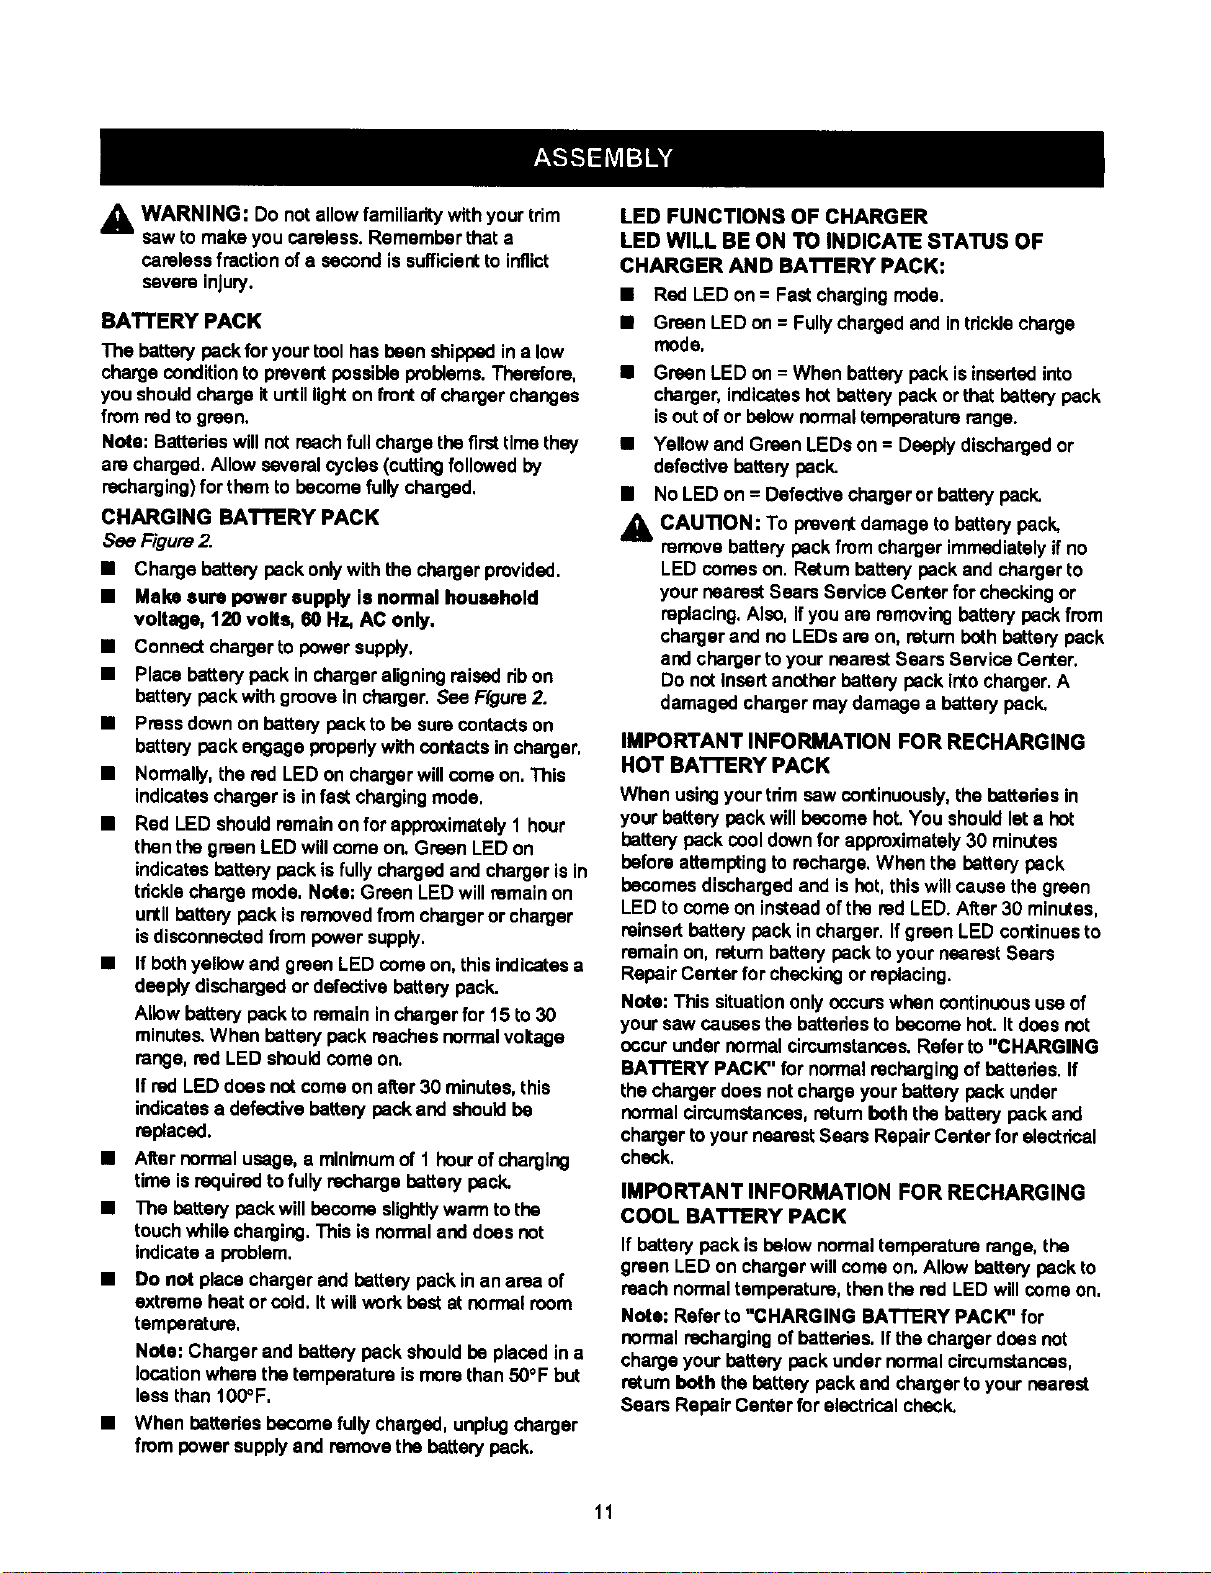
CHARG ER
See Figure3.
Yourcharger has a "key hole"hanging feature for
convenient,space savingstorage, Screws shouldbe
installedsothatcanter distancesare 4-1/2 inchesapart,
Fig. 2
4-1/2In,
Fig, 3
10
WARNING: Do notallowfamiliaritywith yourtrim
sew tomake you careless.Rememberthat a
careless fraction ofa secondis sufficientto inflict
severe injury.
BATTERY PACK
The batterypeck for yourtoolhas bean shippedin a low
chargecondition to preventpossibleproblems.Therefore,
you shouldchargeituntillightonfront ofchargerchanges
from redto green,
Note: Batterieswillnutreach fullchargethe firsttimethey
are charged,Allowseveral cycles(cuttingfollowed by
recharging)for them to becomefully charged,
CHARGING BATTERY PACK
See Figure2.
• Charge battery peckonlywiththe chargerprovided.
• Make sure power supply is normal household
voltage, 120 vo#s, 60 Hz, AC only.
•Connectchargerto powersupply.
•Place batterypack inchargeraligningraisedribon
battery peck with groovein charger.See Ffgure2.
•Pressdownon battery packto be surecontacts on
battery peck engage probedywithcontacts incharger,
•Normally,the red LED on chargerwillcome on,This
indicatescharger isinfast chargingmode,
•Red LED shouldremainon for approximately1 hour
thanthe green LED willcome on, Green LED on
indicatesbatterypeck isfully chargedand chargerisin
tdckiechargemode, Note: Green LEDwill remainon
untilbatterypeck is removedfrom chargeror charger
isdisconnectedfrom powersupply,
•If bothyellowand green LED comaon, thisindicatesa
deeplydischargedor defectivebatterypack.
Allowbatterypack to remaininchargerfor 15 to30
minutes.When batterypack rsaches normalvoltage
range, red LED shouldcoma on.
If red LED does nutcomeon after30 minutes,this
indicatesa defectivebattery peck and shouldbe
replaced.
•After normal usage,a minimumof 1 hour ofcharging
time isrequiredtofully recharge batterypeck.
• The batterypeck willbecome slightlywarmto the
touchwhilecharging.This isnormaland does not
indicatea problem.
•Do not place chargerand batterypackinan area of
extreme heator cold, Itwillwork best at normal room
temperature,
Note: Charger and batterypack shouldbe placedin a
locationwhere the temperature ismore than 50°F but
lessthan 100=F,
When battedesbecomefully charged,unplugcharger
from power supplyand removethe batterypack.
LED FUNCTIONS OF CHARGER
LED WILL BE ON TO INDICATE STATUS OF
CHARGER AND BATTERY PACK:
•Red LED on = Fastchargingmode.
•Green LED on = Fullychargedand intricklecharge
mode,
•Green LED on = When batterypackisinsertedinto
charger,indicateshutbatterypack or that batterypack
isout ofor belownormaltemperaturerange.
•Yellowand Green LEDs on= Deeplydischargedor
defectivebatterypeck.
•No LED on =Defectivechargeror batterypeck.
_, CAUTION: To preventdamage to batterypack,
removebattery peck from charger immediatelyif no
LED comes on. Ratum battery peck and charger to
your nearestSeers Service Canterfor checkingor
replacing,Also, ifyou are removingbatterypeck from
chargerand no LEDs am on, return bothbatterypack
and chargertoyour nearestSears Service Center,
Do nut Insert another batterypeck Into charger.A
damagedcharger maydamage a better/peck.
IMPORTANT INFORMATION FOR RECHARGING
HOT BATTERY PACK
When usingyourtdm sew continuously, the batteriesin
your batterypeck willbecome hot.You shouldlet• hot
batterypack cool downfor approximately30 minutes
before attemptingto recharge,When the batterypeck
becomes dischargedand is hot,thiswillcause thegreen
LED to comaon insteadofthe red LED.After 30 minutes,
reinsert batterypeck incharger.If green LED continuesto
remainon, ratum batterypeck toyour nearestSears
Repair Centerfor checkingor replacing.
Note: This situationonlyoccurswhen continuous useof
your saw causes the bettedas to become hot.It does not
occurundernormal circumstances.Refer to"CHARGING
BAI'TERY PACK" for normalrecharging of bettafias. If
the charger does notchargeyourbattery peck under
normal circumstances,return both thebattery peck and
chargertoyour nearestSears RepairCenter for electrical
check.
IMPORTANT INFORMATION FOR RECHARGING
COOL BATTERY PACK
If batterypack is belownormaltemperaturerange, the
green LED on chargerwillcome on.Allow batterypeck to
reach normaltemperature,than the red LED willcome on,
Note: Refer to "CHARGING BATTERY PACK" for
normal rechargingofbatteries. Ifthe chargerdoes not
chargeyourbattery peck undernormalcircumstances,
returnboth the batterypack and chargerto yournearest
Sears Repair Center for electricalcheck.
11
WARNING:Alwaysremovebatterypackfrom your
sewwhen you are assemblingparts, making
adjustments,assemblingor removingblades,
cleaning,or when not in use. Removing batterypack
willpreventaccidentalstartingthat couldcause
seriouspersonalinjury.
Note: Your sew isassembledwith the batterypack
attached,
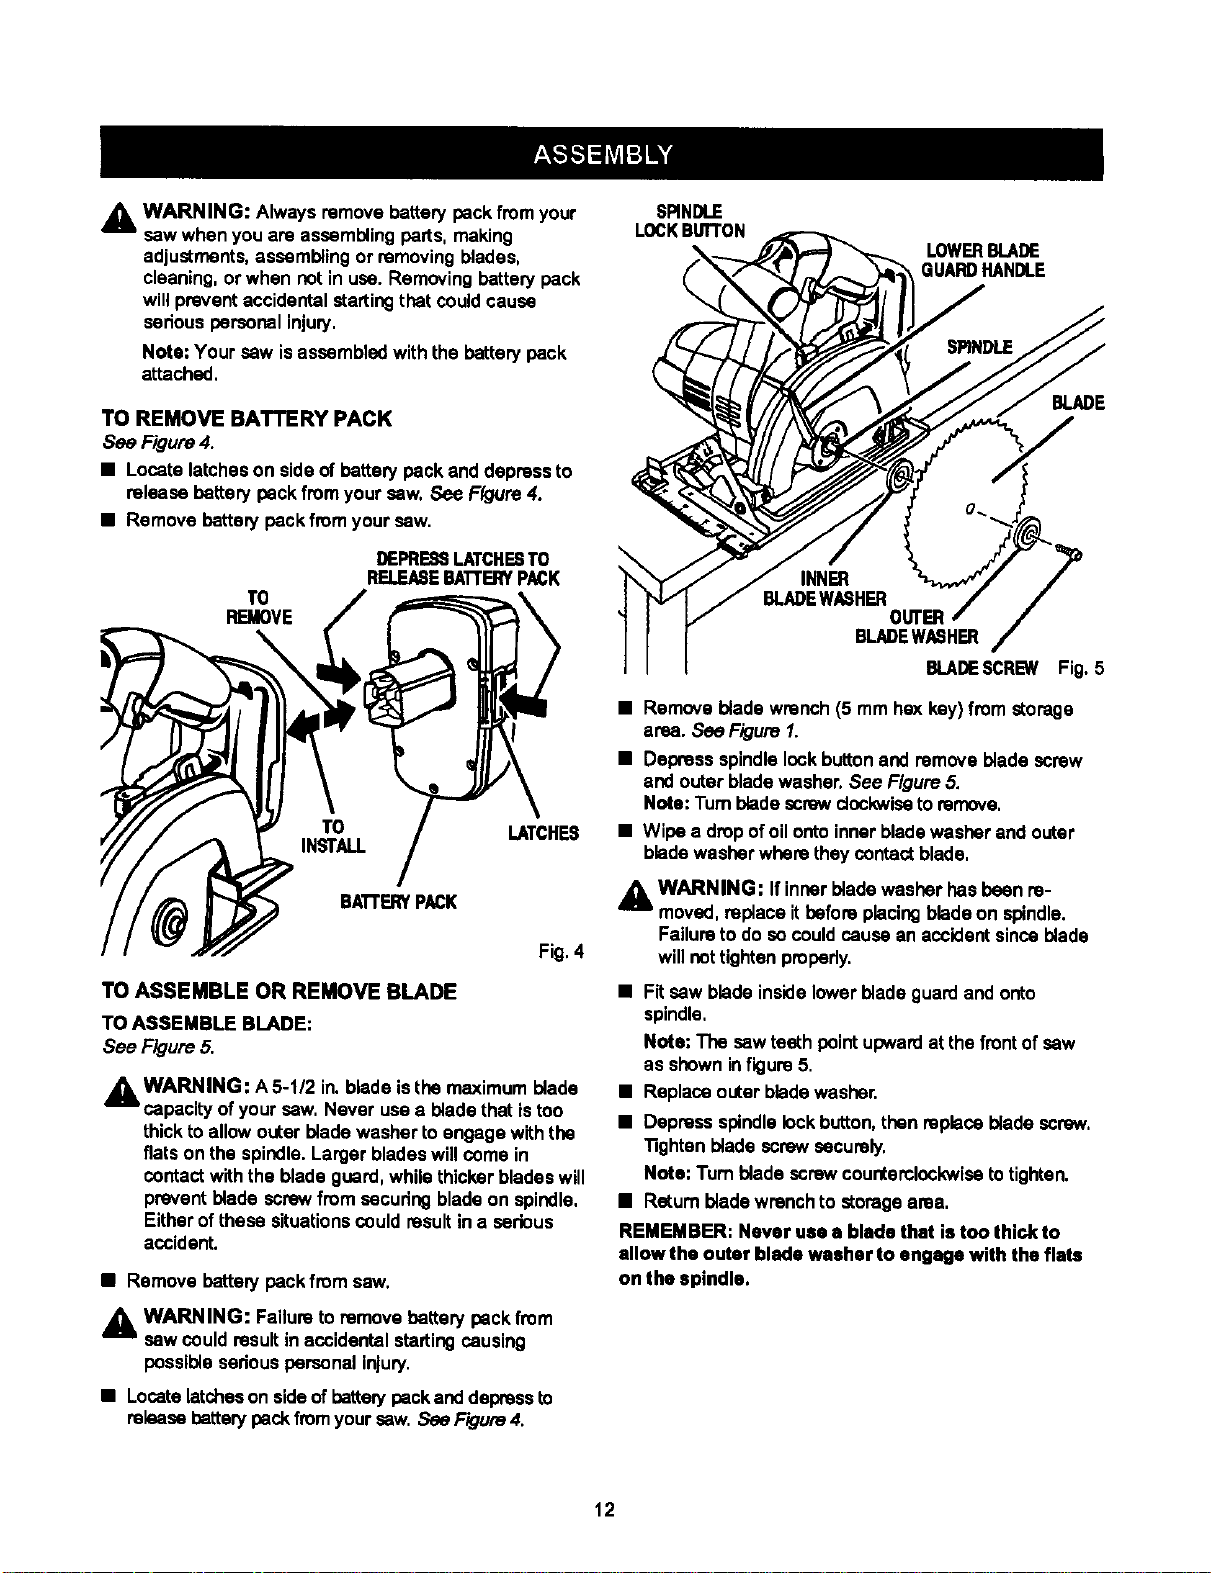
TO REMOVE BATTERY PACK
See Figure4.
• Locate latcheson sideof battery packand depressto
release battery pack fromyour sew. See Ffgure4.
•Remove battery packfromyour sew.
DEPRE88LATCHr-._TO
RELEASEBATI'ERYPACK
TO
REMOVE
TO LATCHES
INSTALL
BATrF._RYPACK
Fig,4
TO ASSEMBLE OR REMOVE BLADE
TO ASSEMBLE BLADE:
See Figure5.
WARNING: A5-1/2 in.blade isthe maximumblade
capacityof yoursew. Never usea bladethat istoo
thickto allowouter blade washer to engagewith the
fiats on the spindle.Larger bladeswillcome in
contact withthe bladeguard,whilethickerbladeswill
preventblade screwfrom securingbladeon spindle,
Eitherofthese situationscould resultin a serious
accident.
•Remove batterypackfrom saw,
A WARNING: Failuretoremove battery pack from
sew could resultinaccidental startingcausing
passible seriouspersonalinjury.
•Locatelatcheson sideof batterypack and depressto
releasebattery pack fromyoursew. See F/gum4.
SRNDLE
LOCKBUTTON LOWERBLADE
GUARDHANDLE
BLADE
INNER
BLADEWASHER
OUTER
BLADEWASHER
BLADESCREW Fig.5
•Remove bladewrench(5 mm hex key)from storage
area. See Figure 1.
•Depress spindlelockbuttonand remove blade screw
and outerbladewasher, See Figure5.
Note: Turnbladescrewdcckwisetoremove,
•Wipe adropofoilontoinnerbladewasher and outer
bladewasher wheretheycontact blade.
WARNING: If innerblade washer has been re-
moved,replaceitbeforeplacingbladeon spindle.
Failureto do socould cause an accidentsince blade
willnottightenpmpedy,
•Fit sew blade insidelowerblade guardand onto
spindle,
Note: The sew teethpaint upwardat thefrontof sew
as showninfigure 5.
•Replace outerbladewasher.
•Depress spindlelockbutton,than replaceblade screw,
"nghtanblade screw securely,
Note: Turn blade screw countemlockwiseto tighten.
•Ratum blade wrenchto storage area.
REMEMBER: Never use a blade that istoo thick to
allow the outer blade washer to engage with the fiats
on the spindle.
12
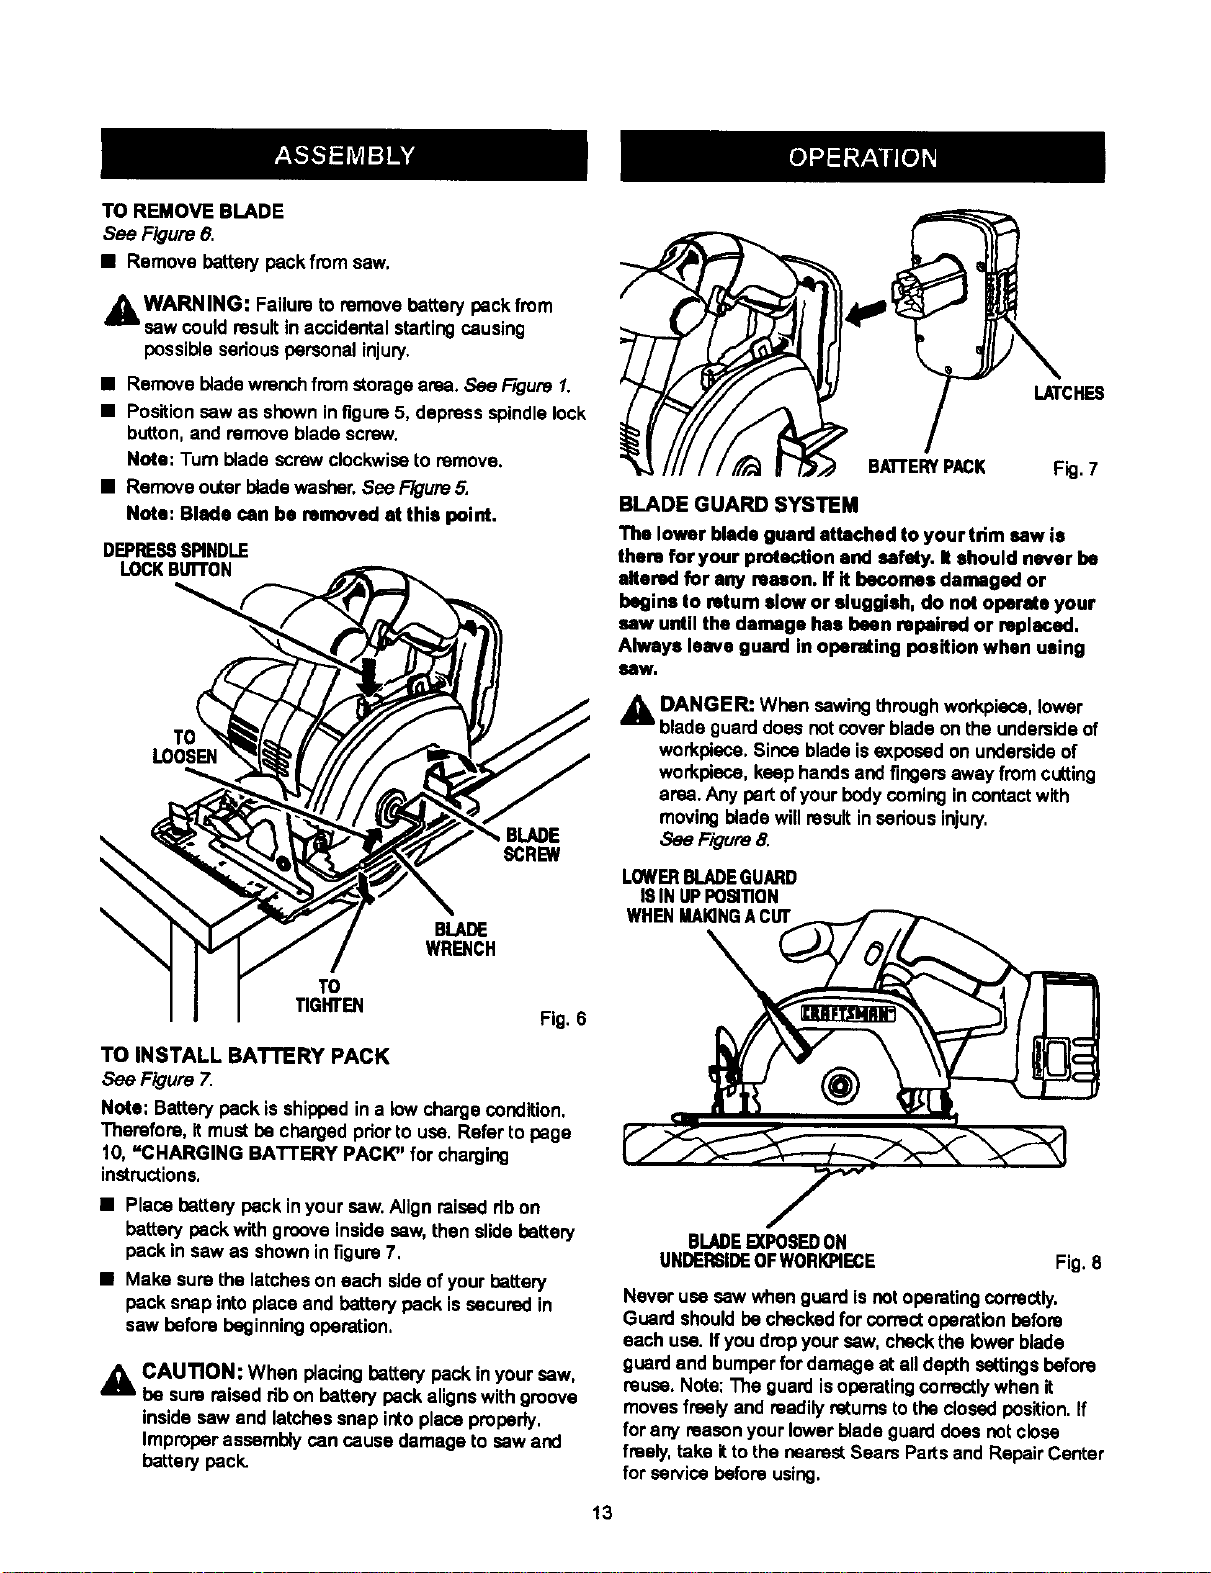
TOREMOVEBLADE
See Figure 6.
• Remove batter/pack from saw,
WARN ING: Failuretoremove battery backfrom
sew couldresultinaccidental startingcausing
possiblesedouspersonalinjury.
mRemove bladewrenchfrom storagearea. See/:?gum 1.
•Positionsew as shownin figure5, depress spindlelock
button,and remove bladescrew.
Note; Turnblade screwclockwiseto remove.
M Removeouterbladewasher.See F/gum5.
Note: Bledo can be removed at this point.
DEPRESSSPINDLE
LOCKBUTFON
LOOSEN
SCREW
BLADE
WRENCH
TO
TIGHTEN Fig. 6
TO INSTALL BATTERY PACK
See Figure 7.
Note: Batterypack isshippedin a lowchargecondition,
Therefore, it mustbecharged pdorto use. Refer to page
10, =CHARGING BATTERY PACK" for charging
instructions,
•Place battery back inyour sew.Alignraiseddb on
batteryback with grooveinside sew, then slidebattery
packin saw as showninfigure7,
•Make sure the latcheson each sideofyour battery
back snap intoplace and batterypack issecured in
saw beforebeginningoperation,
CAUTION: When placingbatteryback in yoursew,
be sure raisedfib on battery back alignswithgroove
insidesaw end latchessnap intoplace properly,
Improperassemblycan cause damage to sew and
battery peck.
LATCHES
BATrERYPACK Fig.7
BLADE GUARD SYSTEM
The lower blade guard attached to your tdm sew is
there for your protection and safety. It should never be
altered for any mason. If it becomes damaged or
begins to mtum slow or sluggish, do not operate your
sew until the damage has been repaired or replaced.
Always leave guard in operating position whon using
SaW.
_k DANGER: When sewing through workpiese,lower
bladeguard does notcover bladeon the underside of
workpiece,Since bladeise_pesed on undersideof
workpiece,keep handsand fingersawayfrom cutting
area. Any partofyourbodycoming in contact with
moving bladewillresultinserious injury,
See Figure8.
LOWERBLADEGUARD
ISIN UP POSITION
WHENMAKINGA CUT
BLADEEXPOSEDON
UNDERSIDEOFWORKPIECE Fig. 8
Never usesew whenguard isnot obamtingcorrectly.
Guard shouldbecheckedfor correct operationbefore
each use. Ifyou dropyoursew, checkthe lowerblade
guardand bumperfor damage at all depthsettingsbefore
reuse. Note:The guardisoperatingcorrectly when it
movesfreely and readilyratums to theclosedposition. If
for any reasonyour lowerblade guard does notclose
freely, take itto the nearestSears Partsand RepairCenter
for servicebeforeusing,
13
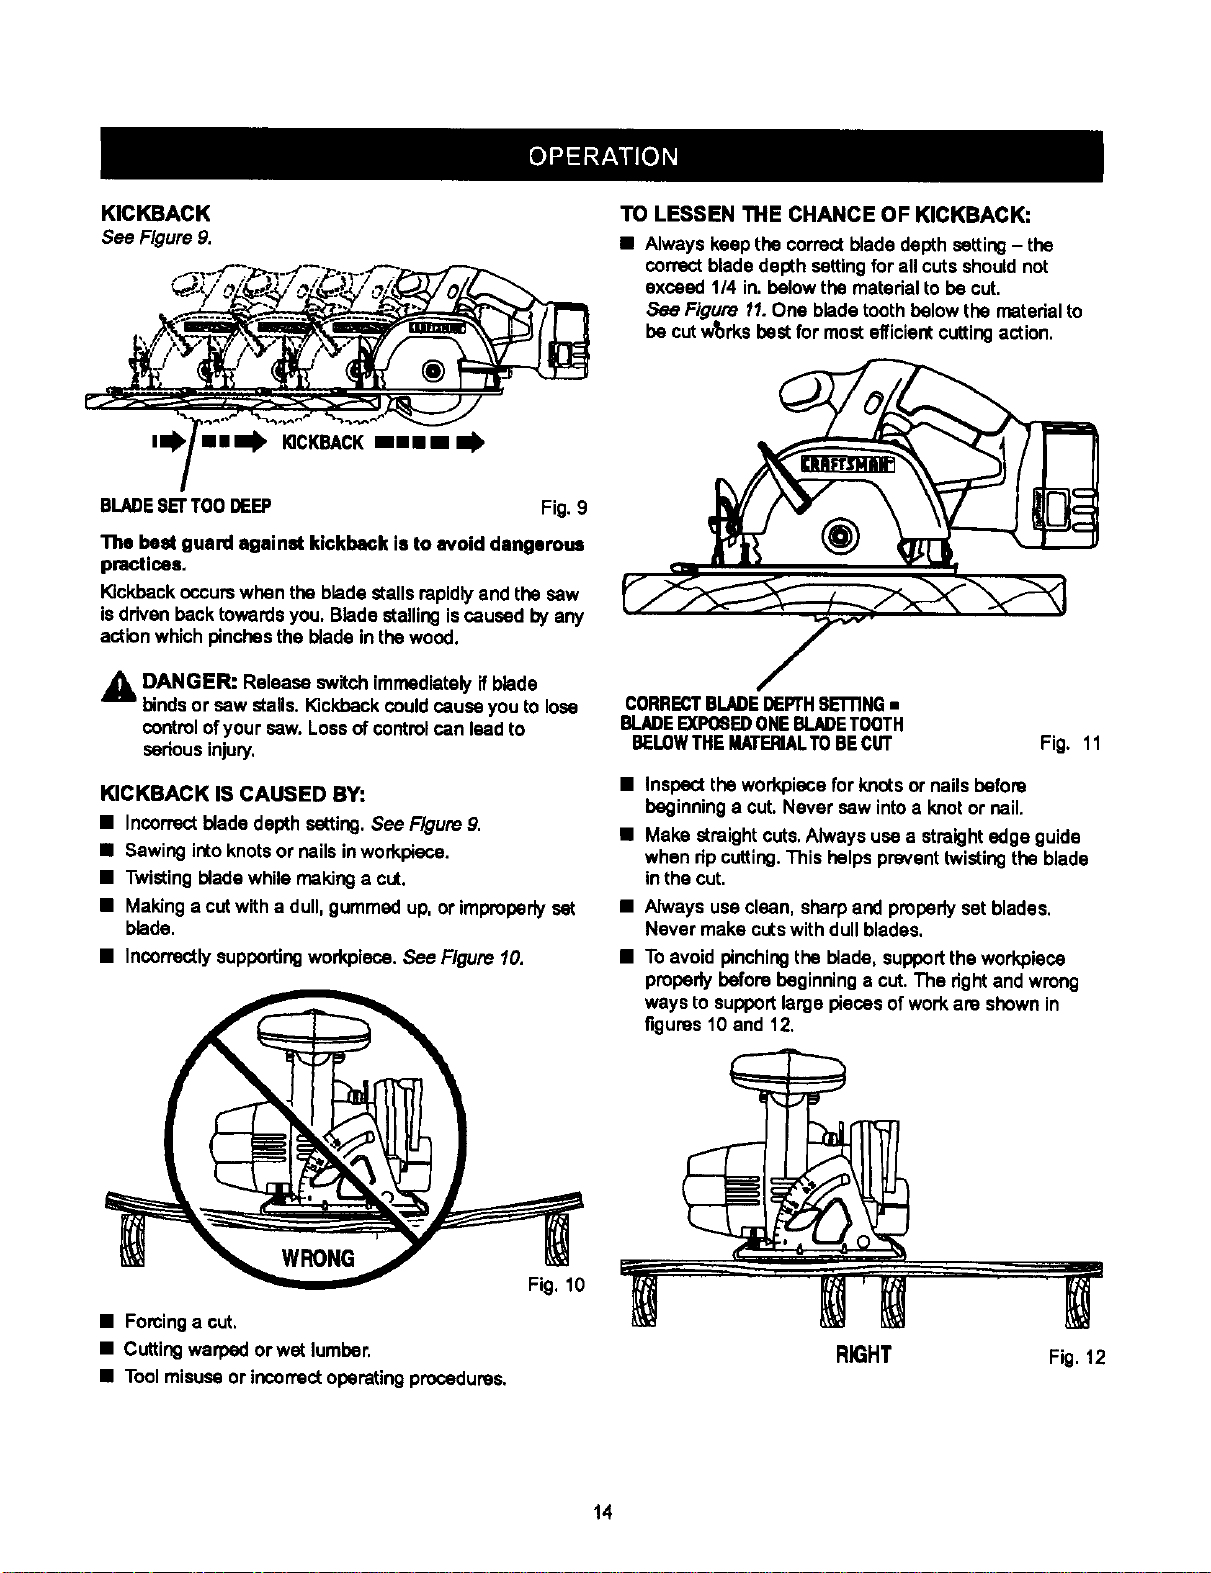
KICKBACK
See Figure9.
nm mum), K]CKBACKlmalnk
BLADESETTOODEEP Fig, 9
Tho best guard against kickback is to avoid dangomus
practices.
Kickbackoccurswhen the bladestallsrapidlyand the saw
isddvenbacktowardsyou. Bladestallingiscaused by any
actionwhichpinchesthe bladein thewood.
_k DANGER: Release switchimmediately ifblade
bindsor sew stalls. Kickback couldcause you to lose
control ofyour saw. Lossofcontrolcan lead to
sadous injury,
KICKBACK IS CAUSED BY:
• Incorrect blade depth setting,See Figure9.
•Sawingintoknotsor nailsinworkpiece.
•Twistingbladewhile makinga cut.
•Makinga cutwitha dull,gummedup.or improperlyset
blade.
•Incorrectlysupportingworkplace.See Figure 10.
TO LESSEN THE CHANCE OF KICKBACK:
• Alwayskeep the correctblade depthsetting- the
correct blade depthsettingforall cutsshouldnot
exceed 1/4 in.belowthe materialto be cut.
See Figure 11.One bladetoothbelowthe matedal to
be cutw_rks bestfor most efficientcuttingaction.
CORRECT'BLADEDEPTHSETrlNG•
BLADEEXPOSEDONEBLADETOOTH
BELOWTHEMATERIALTOBECUT Fig. 11
• Inspectthe workpiecefor knotsor nailsbefore
beginninga cut. Never sew intoa knot or nail.
•Make straight cuts,Always usea straightedge guide
when dp cutting.This helps preventtwistingthe blade
inthe cut.
•Alwaysuse clean, sharpand properlyset blades.
Never make cutswith dullblades,
• Toavoid pinchingthe blade, supportthe workpieco
properlybeforebeginningacut. The rightand wrong
waysto supportlarge pieces ofwork am shownin
figures10 and 12.
•Forcinga cut,
• Cuttingwarped orwet lumber,
•Toolmisuseor incon'ectoperatingprocedures.
Fig, 10
RIGHT Fig. 12
14

• When makinga cut usesteady, even pressure,
Never force cuts.
•Do notcut waq_edor wet lumber,
•Always holdyoursaw firmlywith bothhandsand keep
yourbody ina balanced positionsoas to resistthe
forces ofkickbackshoulditoccur,
When using your saw, always stay alelt and oxeroiso
control. Do not remove your saw from workplace
white the blade is moving,
DEPTH OF CUTADJUSTMENT
Always keep correctbladedepth setting. The correct
bladedepthsettingforall cutsshouldnotexceed 1/4 inch
belowthe materialto be cut. More bladedepthwill
increasethe chance ofkickbackand causethe cutto be
rough,One bladetooth below the matedalto be cutworks
bestfor mostefficient cuttingaction.
TO ADJUST BLADE DEPTH
•Remove battery packfrom saw.
WARNING: Failureto remove batterypackfrom
saw couldresultin accidentalstarting causing
possibleseriouspersonalinjury.
•Loosendepthadjustment knob.See Figure 13,
TORAISE
SAW
TO BASE
ASSEMBLY
TIGHTEN
DEPTH
JTO ADJUSTMENT
LOOSEN KNOB Fig, 13
•Hold base flat againstthe workpieceand raiseor lower
saw untilthe requireddepthis reached.
•"13ghtendepthadjustmentknobsecurely.
STARTING A CUT
Know the right way to useyour saw.
See Figure 14.
Never use your saw as shown in figure 15.
Fig, 14
WRONG Fig. 15
Never place your hand on the workplace behind your
sewwhile making a cut.
_k WARNING: To make sawing easierand safer,
alwaysmaintainpropercontrol ofyoursaw,Lossof
controlofyour saw could causean accidentresulting
in possibleseriousinjury.
15
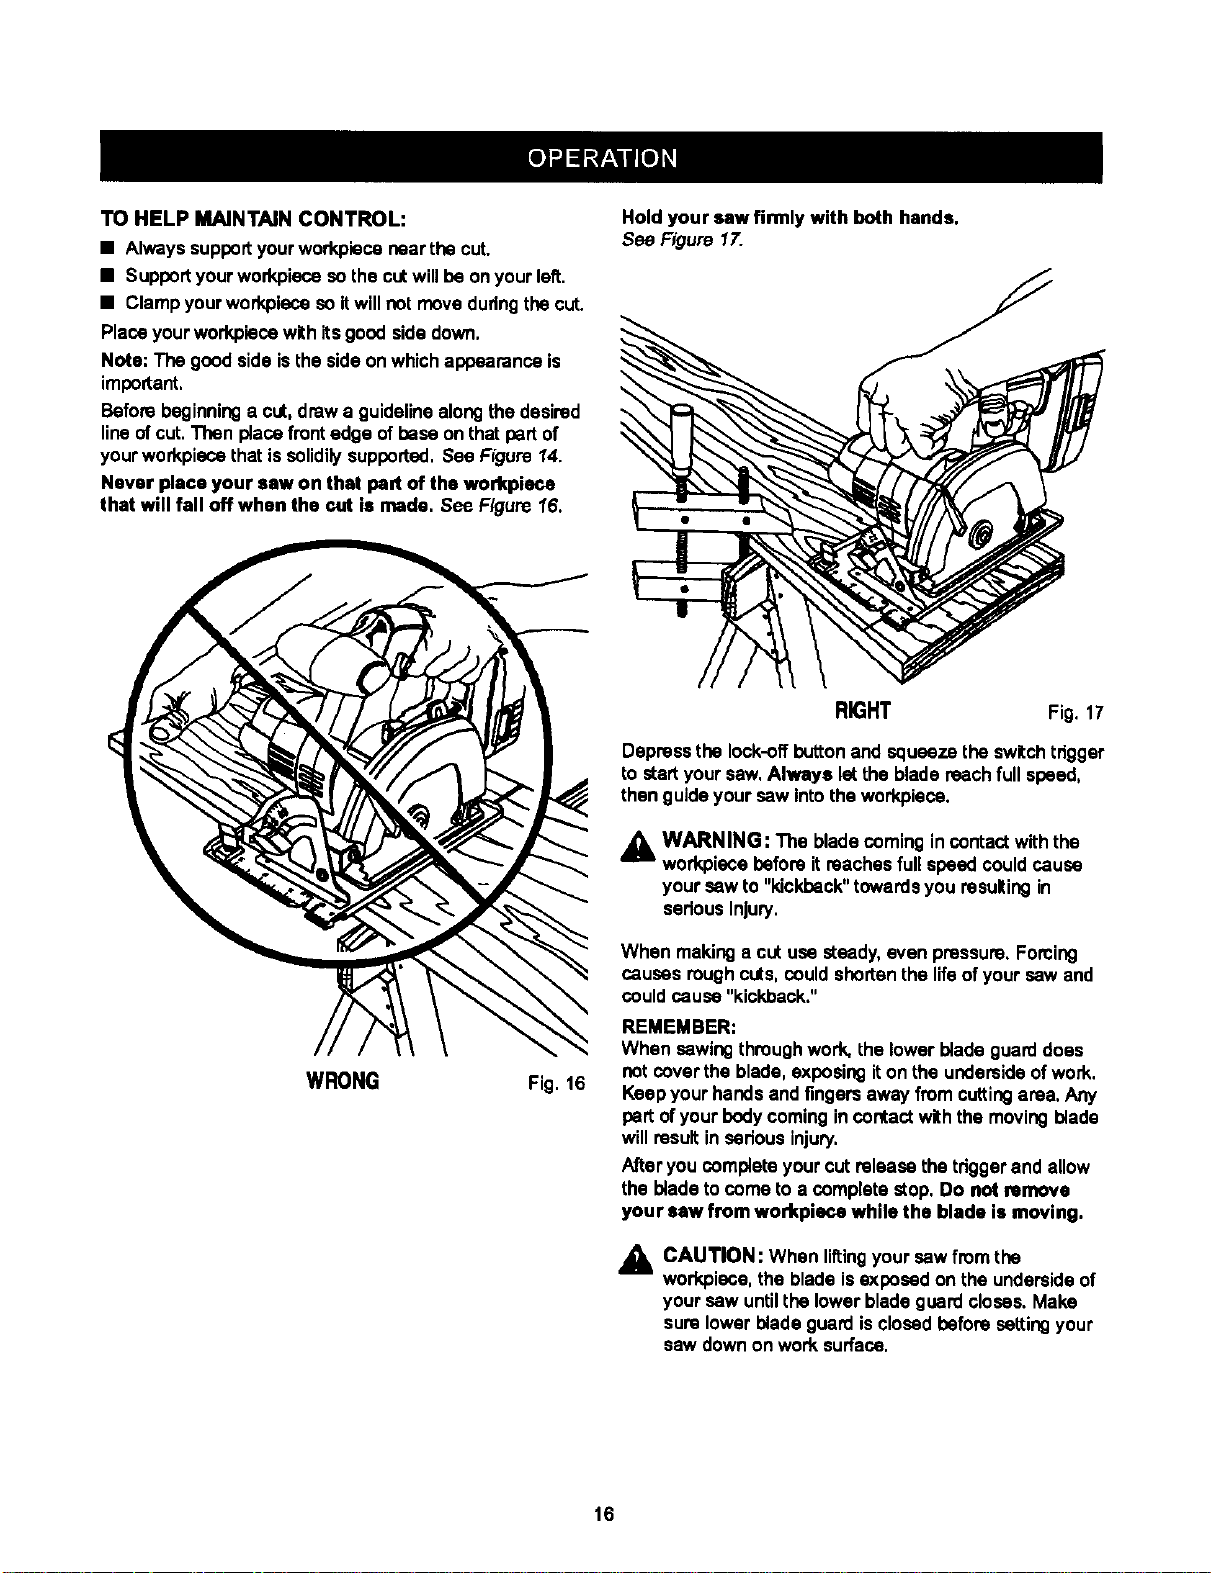
TOHELPMAINTAINCONTROL:
•Always supportyourworkpiecenearthe cut.
•Supportyourworkpiecesothe cutwillbe onyour left.
•Clampyourworkplece soitwillnot movedudngthe cut.
Placeyourworkpiecewithitsgood sidedown,
Note: The goodside is the sideon whichappearance is
important,
Beforebeginninga cut,draw a guidelinealongthedesired
lineofcut. Then placefront edge of baseon thatport of
yourworkpiecethatis solidily supported,See F{gure14.
Never place your saw on that part of the workpiece
that will fall off when the cut is made. See Ffgure 16.
Hold your sew firmly with both hands.
See Figure 17.
WRONG Fig, 16
RIGHT Fig, 17
Depressthe lock-offbuttonand squeezethe switchtdgger
to startyoursaw,Always letthe bladereachfull speed,
then guideyour saw intothe workpiece.
_i, WARNING: The bladecoming incontactwith the
workpiece before itreaches fullspeed couldcause
your saw to"kickback" towardsyou resultingin
cedous Injury.
When makinga cutuse steady, even pressure,Forcing
causes roughcuts, couldshortenthe llfeof yoursew and
couldcause "kickback."
REMEMBER:
When sewing throughwork,the lowerblade guarddoes
notcoverthe blade, exposingiton the undersideofwork,
Keepyour handsand fingersaway fromcuttingarea. Any
pert ofyour bodycomingin contactwiththe movingblade
willresultin serious injury,
After you completeyour cutrelease thetriggerand allow
the blade to cometo a complete stop. Do not remove
your saw from workpieee while the blade is moving.
_k CAUTION: When lifting sew from the
your
workpiece,the blade isexposedon the undersideof
yoursew untilthe lowerbladeguard closes,Make
sure lower blade guardisclosedbefore setting your
saw downon work surface,
16
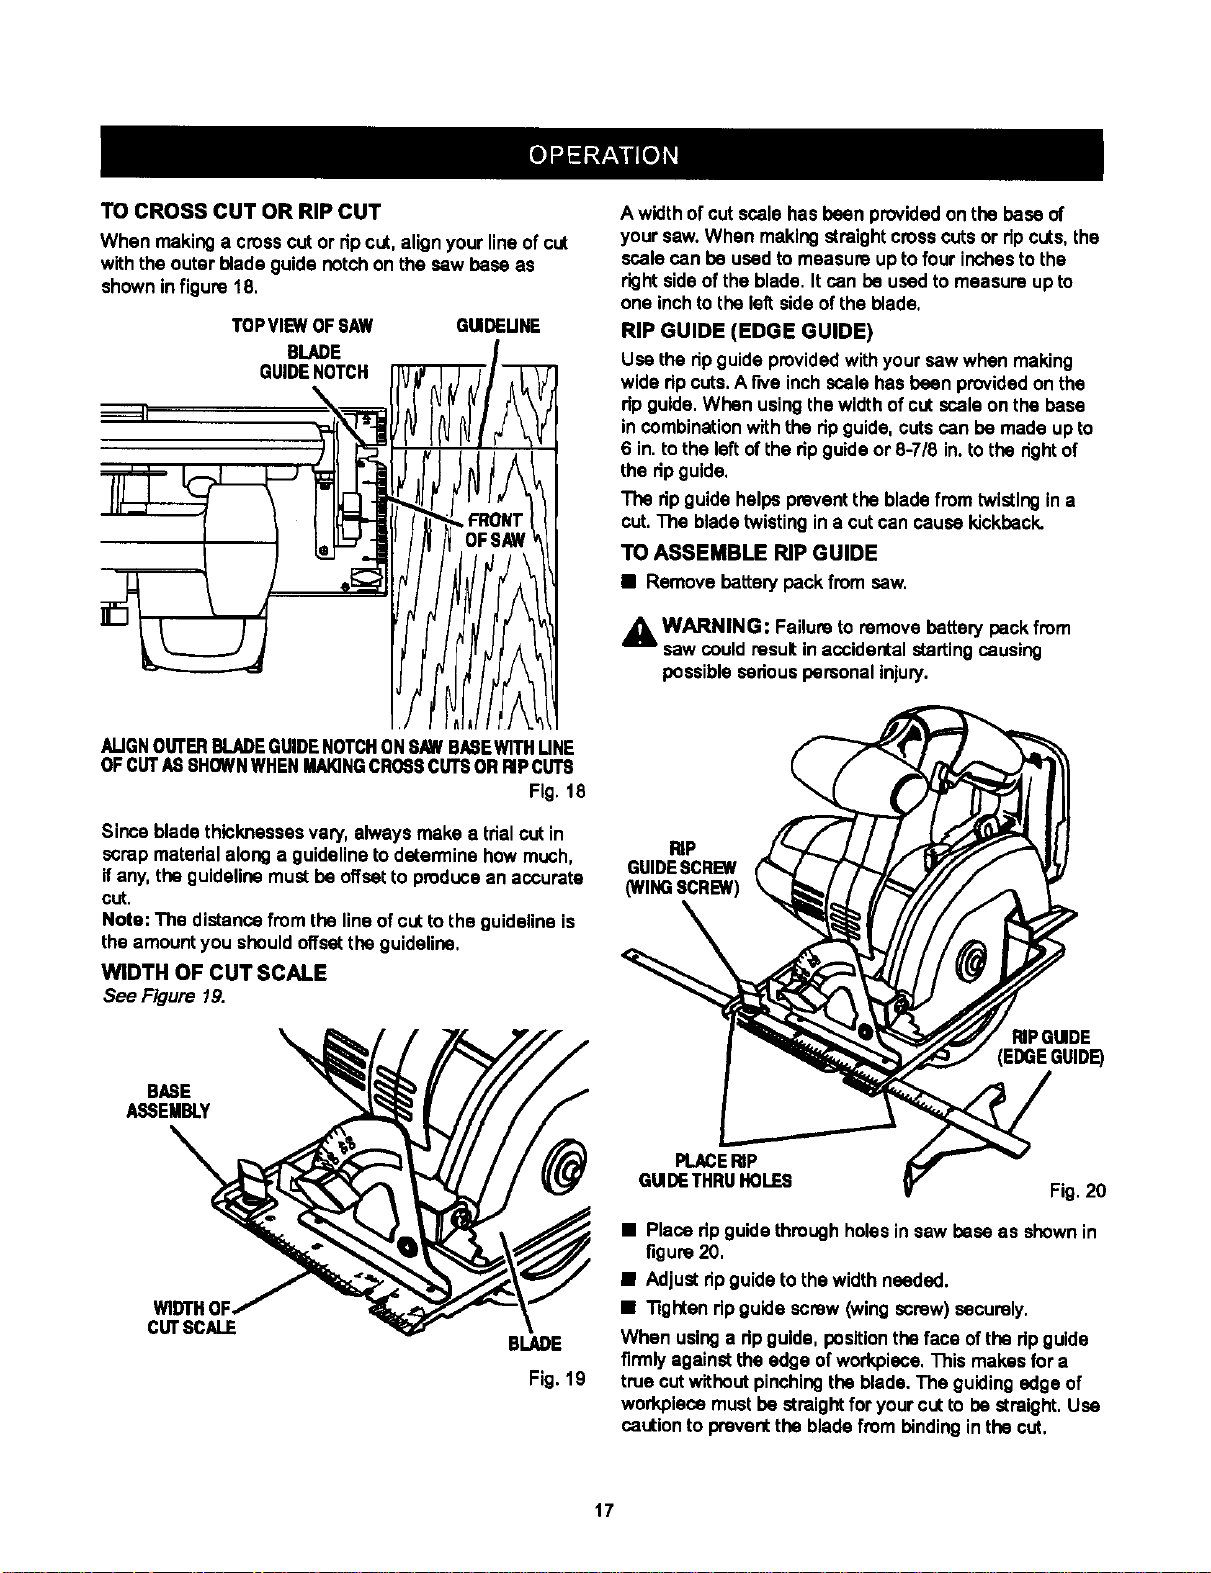
TO CROSS CUT OR RIP CUT
When makinga crosscutor ripcut, alignyour line ofcut
withthe outerblade guide notchon the saw base as
showninfigure 18.
TOPVIEWOFSAW
BLADE
GUIDENOTCH
GUIDEUNE
A widthofcut scalehas been providedon the base of
your saw.When makingstraightcrosscutsor ripcuts,the
scalecan be used tomeasure up tofour inchestothe
rightsideof the blade. Itcan he used to measureup to
one inchtothe leftside ofthe blade.
RIP GUIDE (EDGE GUIDE)
Use the ripguide providedwith yoursaw when making
wide ripcuts.A five inchscale hasbeen providedon the
ripguide.When usingthewidthofcut scaleon the base
in combinationwith the ripguide,cutscan be madeup to
6 in.tothe leftof the ripguideor 8-7/8 in.to the right of
the dp guide.
The ripguidehelps preventthe bladefrom twistingin a
cut.The bladetwistingin a cutcan cause kickback.
TO ASSEMBLE RIP GUIDE
•Remove battery packfrom saw.
WARNING: Failureto removebattery packfrom
saw could resultinaccidental startingcausing
possiblesedous personalinjury.
AUGNOUTERBLADEGUIDENOTCHONSAWBASEWITHUNE
OFCUTASSHOWNWHENMAKINGCRO6SCUTSORRIPCUTS
Fig. 18
Since bladethicknessesvary, alwaysmake a trialcutin
scrap materialalong a guidelineto determine how much,
ifany,the guidelinemustbe offsetto producean accurate
cut.
Note: The distancefrom the lineofcutto the guidelineis
the amountyou shouldoffsetthe guideline.
WIDTH OF CUT SCALE
See Figure 19.
BASE
ASSEMBLY
RiP
GUIDESCREW
(WINGSCREW)
I_IPGUIDE
(EDGEGUIDE)
CUTSCALE BLADE
Fig. 19
PLACERiP
GUIDETHRUHOLES Fig. 20
•Place ripguidethroughholesin saw base as shownin
figure 20.
•Adjust ripguideto the width needed.
•"nghtenripguide screw(wingscrew) securely,
When usinga ripguide,position theface ofthe dp guide
firmlyagainstthe edge ofworkpiece,Thismakes for a
true cutwithoutpinchingtheblade. The guidingedge of
workplecemustbe straightforyourcutto he straight. Use
caution to preventthe bladefrom bindinginthe cut.
17
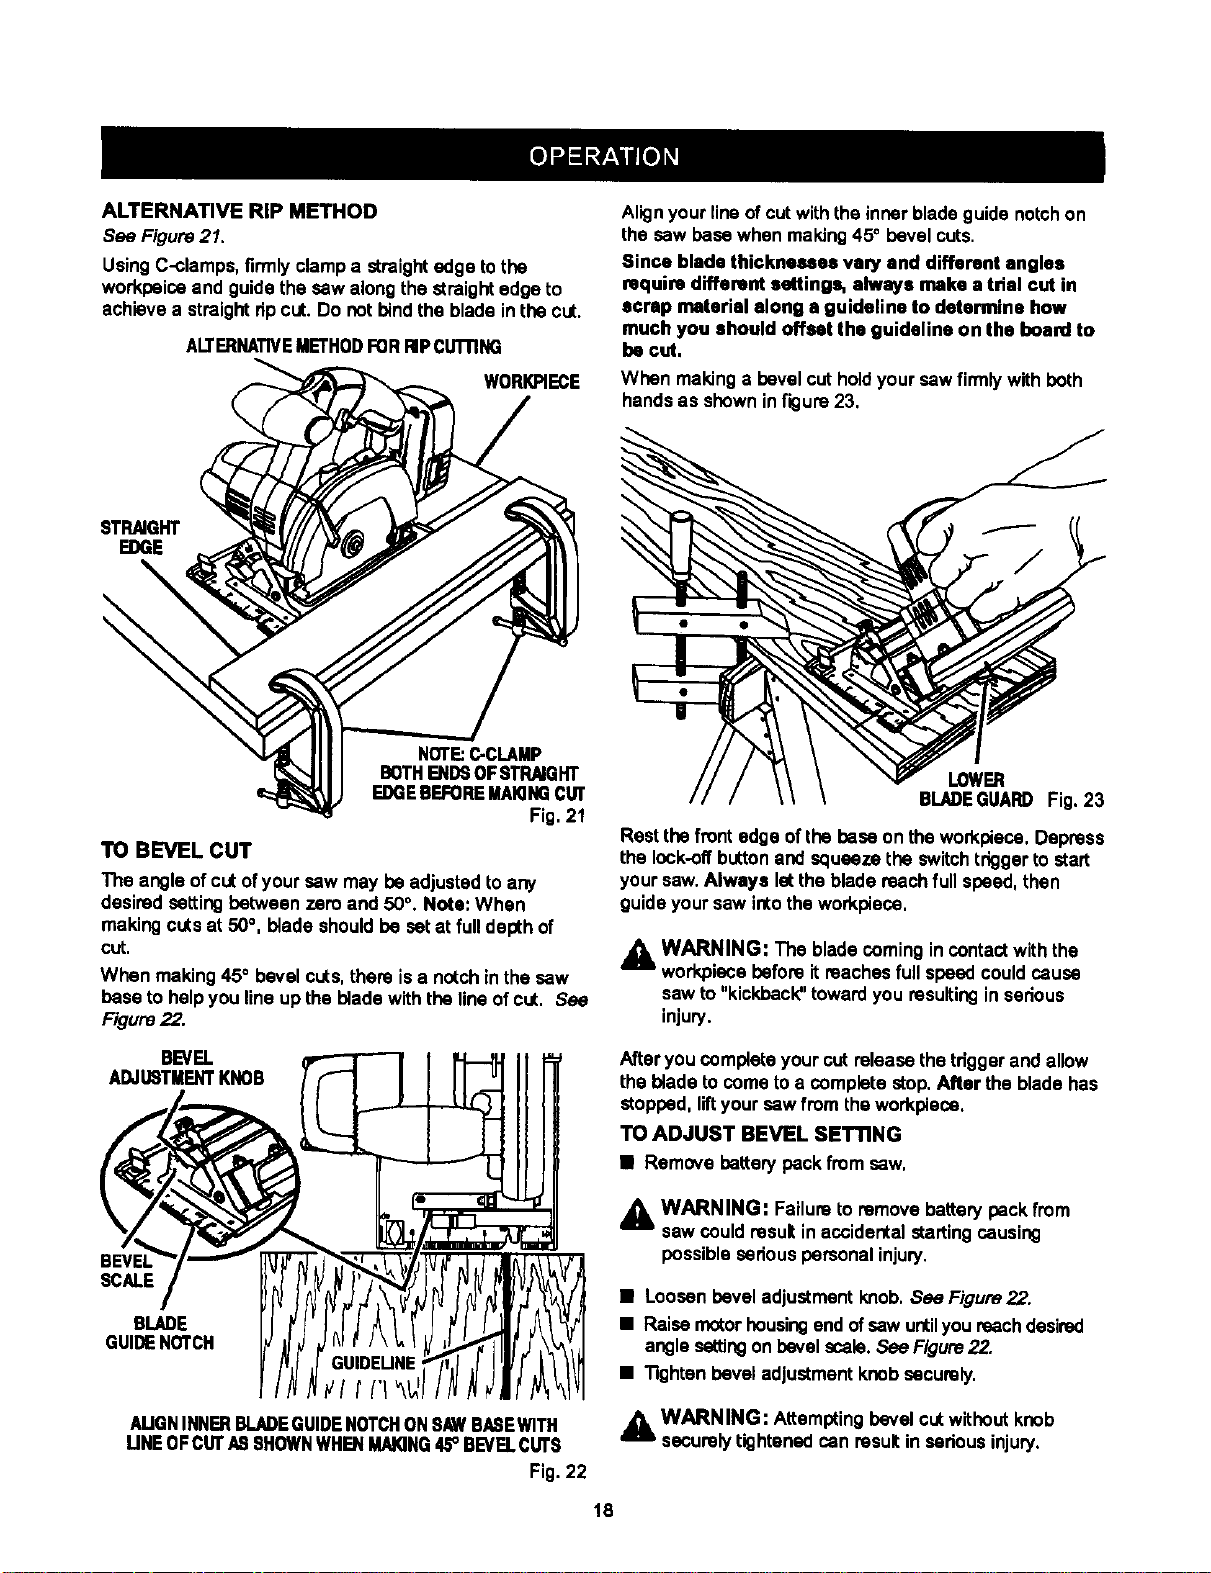
ALTERNATIVE RIP METHOD
See Figure21.
UsingC-clamps, firmlyclamp a straightedge tothe
workbaicaand guidethe sew along the straightedge to
achievea straightdp cut. Do not bindthe bladeinthe cut.
ALTERNATIVEMETHODFORRIPCUTrlNG
WORI_ECE
Alignyour lineofcutwiththe inner bladeguide notchon
the sew base when making45° bevel cuts.
Since blade thicknesses vanj and different angles
require different sottings, always make atdal cut in
scrap materiel along aguideline to determine how
much you should offset the guideline on the board to
be cut,
When makingabevel cutholdyoursew firmly with both
handsas showninfigure23,
STRAIGHT
EDGE
NOTE:C-CLAMP
BOTHENDSOFSTRAIGHT
EDGEBEFOREMAIONGCUT
Fig. 21
TO BEVEL CUT
The angle ofcutofyour sew may beadjusted to any
desired settingbetween zero and 50°. Note: When
makingcutsat 50°, blade shouldbe setat full depthof
cut.
When making45° bevel cuts,there isa notchinthe sew
base to helpyou lineup the bladewith theline ofcut. See
F/gum 22.
BEVEL
ADJUSTMENTKNOB
BeVel W
SCALE
BLADE
GUIDE NOTCH
AUGNINNERBLADEGUIDENOTCHONSAWBASEWITH
UNEOFCUTASSHOWNWHENMAIQNG45° BEVELCUTS
Fig. 22
LOWER
BLADEGUARDFig. 23
Restthe frontedge ofthe base onthe workpieca,Depress
the lock-off buttonand squeezethe switchtrigger to start
yoursaw,Always letthe bladereachfull speed, then
guide yoursaw intotheworkpieco.
AWARNING: The bladecomingin contact withthe
workplacebefore it reachesfull speed couldcause
saw to "kickback" toward you resultinginserious
injury.
Afteryou complete your cut release the triggerand allow
the blade tocome to a complete stop, After the bladehas
stopped, liftyoursew from the workpiece.
TO ADJUST BEVEL SETTING
•Remove batterypackfrom saw,
WARNING: Failureto removebatterypackfrom
saw could resultin accidentalstarting causing
possibleserious personalinjury.
•Loosen bevel adjustmentknob,See Figure22.
•Raise motorhousingend ofsew untilyou reachdesired
anglesettingon bevelscale.See FIgure22.
•Tightenbevel adjustmentknobsecurely.
WARNING: Attemptingbevel cutwithoutknob
securelytightenedcan resultin seriousinjury.
18
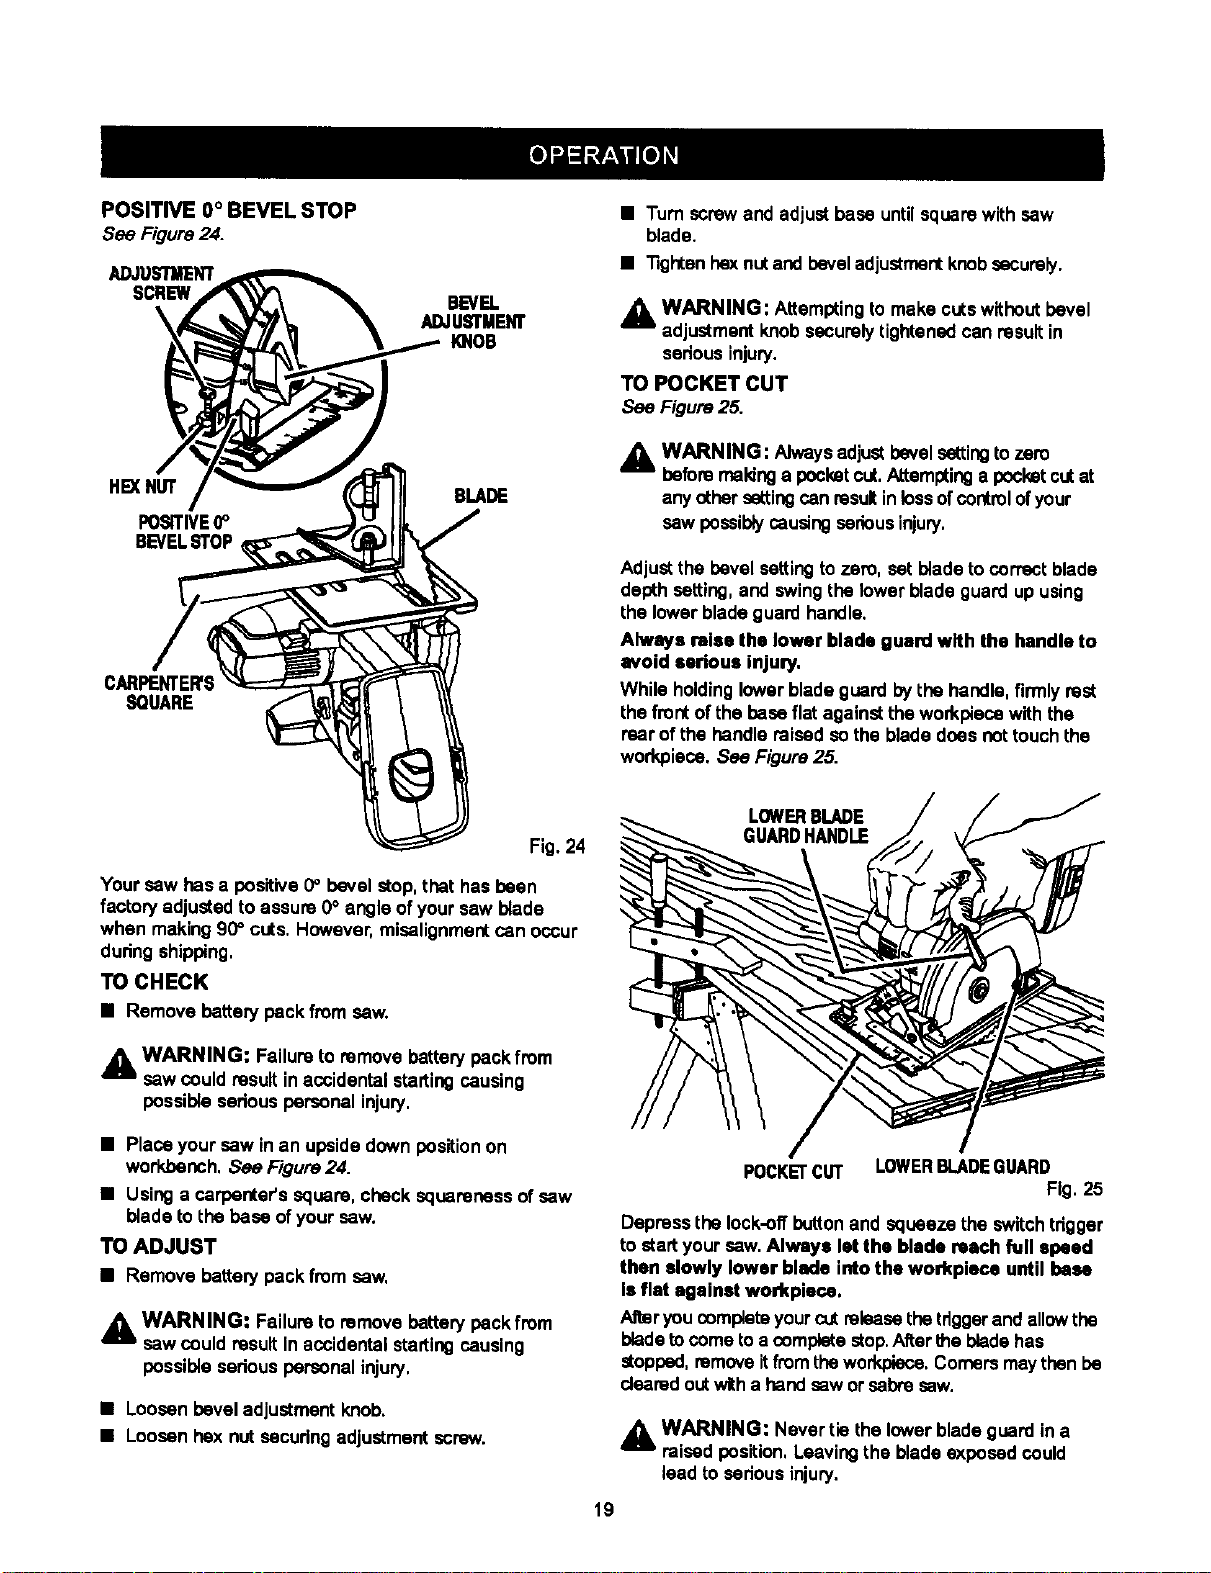
POSITIVEO°BEVELSTOP
See Figure24.
HE)(NUT
PosrI'IVE0°
BEVELSTOP
CARPENTER'S
80UARE
BEVEL
ADJUSTMENT
KNOB
BLADE
• Turn screwand adjustbase untilsquarewith sew
blade.
•"13ghtanhexnutandbeveladjustmentknobsecurely.
_h WARN ING: Attemptingto make cutswithoutbevel
adjustmentknobsecurelytightenedcan result in
seriousinjury.
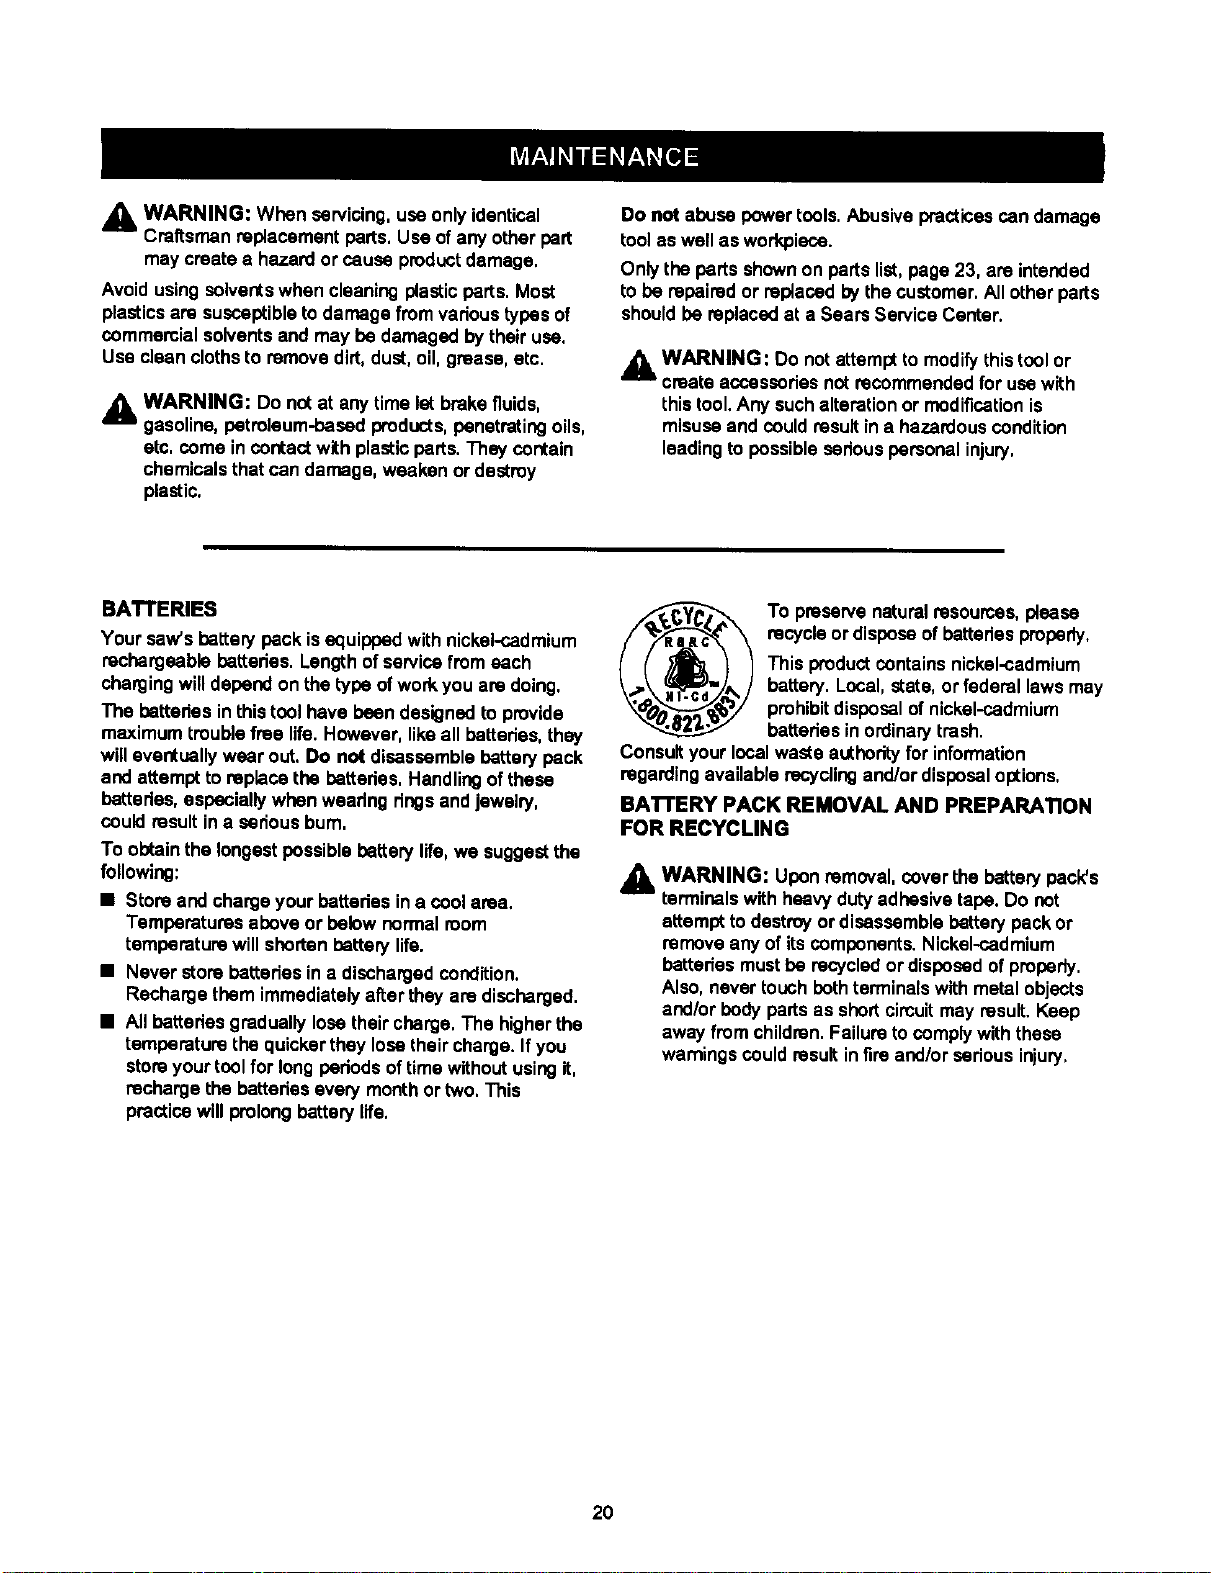
TO POCKET CUT
See Figure25.
A WARNING: ,aJwaysadjustbevelsettingtozero
before maldnga pocketcut.Attemptinga pocketcutat
anyothersettingcanresultinlossofcontrolofyour
cawpossiblycausingseriousinjury.
Adjustthe bevel settingto zero, cat bladeto correct blade
depthsetting,and swingthe lower blade guard up using
the lowerbladeguard handle.
Always lisa the lower blade guard with the handle to
avoid serious injurj,
While holding lowerbladeguard bythe handle, firmly rest
thefront ofthe baseflat againstthe workplacewiththe
rear ofthe handleraisedsothe blade does nottouchthe
workpieca. See Figure25.
Fig. 24
Your caw has a positive0° bevel stop,that hasbeen
factoryadjustedto assure O° angle ofyour saw blade
when making90° cuts, However,micalignmantcan occur
dudngshipping.
TO CHECK
•Remove battery backfrom caw.
_. WARNING: Failureto ramove batteryback from
caw could resultin accidentalstartingcausing
possible seriouspersonalinjury,
•Placeyour caw in an upsidedown positionon
workbench, See Figure24.
•Usinga carpenter's square, check squareness of caw
blade to thebase ofyour sew.
TO ADJUST
•Remove battery packfrom caw,
,_k WARNING: Failureto remove batterypackfrom
caw could resultIn accidentalstartingcausing
possible sadouspersonalinjury.
•Loosenbevel adjustmentknob.
•Loosenhax nut secudng adjustmentscrew.
LOWERBLADE
GUARDHANDLE
POCKETCUT LOWERBLADEGUARD
FIg. 25
Depressthe lock-offbuttonand squeeze the switchtdgger
to start your caw.Always let the blade reach full speed
then slowly lower blade into the wod_piace until base
is flat against workpieoe.
Alteryoucompleteyourcutraieasethetdggerand allowthe
bladetocome toa completestop,Afterthe bladehas
stopped, remove itfrom theworkpieoe,Comersmaythenbe
clearedoutwitha hand sawor sabresaw.
WARNIN G: Never tie the lowerblade guardin a
raisedposition, Leavingthe blade exposedcould
lead tosedous injury.
19
A WARNING:Whenservicing,useonlyidentical
Craftsmanreplacementparts,Useofanyotherpart
maycreateahazardorcauseproductdamage,
Avoidusingsolventswhencleaningplasticparts.Most
plasticsaresusceptibletodamagefromvadoustypesof
commercialsolventsandmay be damaged bytheiruse.
Use clean clothsto remove dirt,dust,oil, grease,etc.
_WARNING: Do notat any time let brakefluids,
gasoline, patrcleum.-pased products,penetratingoils,
etc. come in contact withplasticparts. They contain
chemicalsthat can damage, weaken or destroy
plastic.
Do not abuse powertools. Abusivepracticescan damage
toolas well as workpiece.
Onlythe parts shownon parts list,page 23, are intended
to be repairedor replaced bythecustomer,Allotherparts
shouldbe replacedat a Sears ServiceCenter.
_WARNING: Do notattemptto modifythistoolor
craata accessoriesnot recommendedfor usewith
this tool.Any suchalterationor modificationis
misuseand couldresultina hazardouscondition
leadingto possiblesedous personalinjury,
BATTERIES
Your saw's bakery pack isequippedwith nickel-cadmium
recbargeablebatteries. Lengthof servicefrom each
chargingwilldependon the type ofworkyou are doing.
The battedes in thistoolhave been designedto provide
maximum trouble free life. However, likeall batteries,they
willeventuallywear out. Do not disassemblebattery pack
and attemptto replacethe batteries.Handlingofthese
battedes,especiallywhen weadng dngsand jewelry,
could resultin a serious bum.
To obtainthe longestpossiblebattery life,we suggestthe
following:
•Store and chargeyour batteriesina cool area.
Temperaturesabove or below normalroom
temperaturewill shortenbattery life.
•Never store battedes in a dischargedcondition.
Recharge them immediatelyafter theyare discharged.
• All batteriesgradually losetheircharge. The higherthe
temperature the quickerthey lose theircharge. Ifyou
storeyourtoolfor longpadods of timewithoutusingit,
recharge the battedes every month or two. This
practicewillprolongbattery life.
To preservenaturalresources,please
recycleor disposeof batteriesproperly.
This productcontains nickel-cadmium
batten/. Local, state, or federal lawsmay
prohibitdisposalof nickel-cadmium
batteriesin ordinarytrash.
Consultyourlocalwaste authorityfor information
regardingavailable recyclingand/ordisposaloptions.
BATFERY PACK REMOVAL AND PREPARATION
FOR RECYCLING
_i WARNING: Upon removal,cover the batterypack's
terminalswithheavy dutyadhesivetape. Do not
attemptto destroyor disassemblebatterypackor
removeany of itscomponents. Nickel-cadmium
battades mustbe recycledor disposedof properly.
Also, never touch bothterminalswith metal objects
and/or bodyparts as shortcircuitmay result. Keep
away from children.Failureto comply withthese
warningscould resultin fire and/orsedous injury.
20

21
5
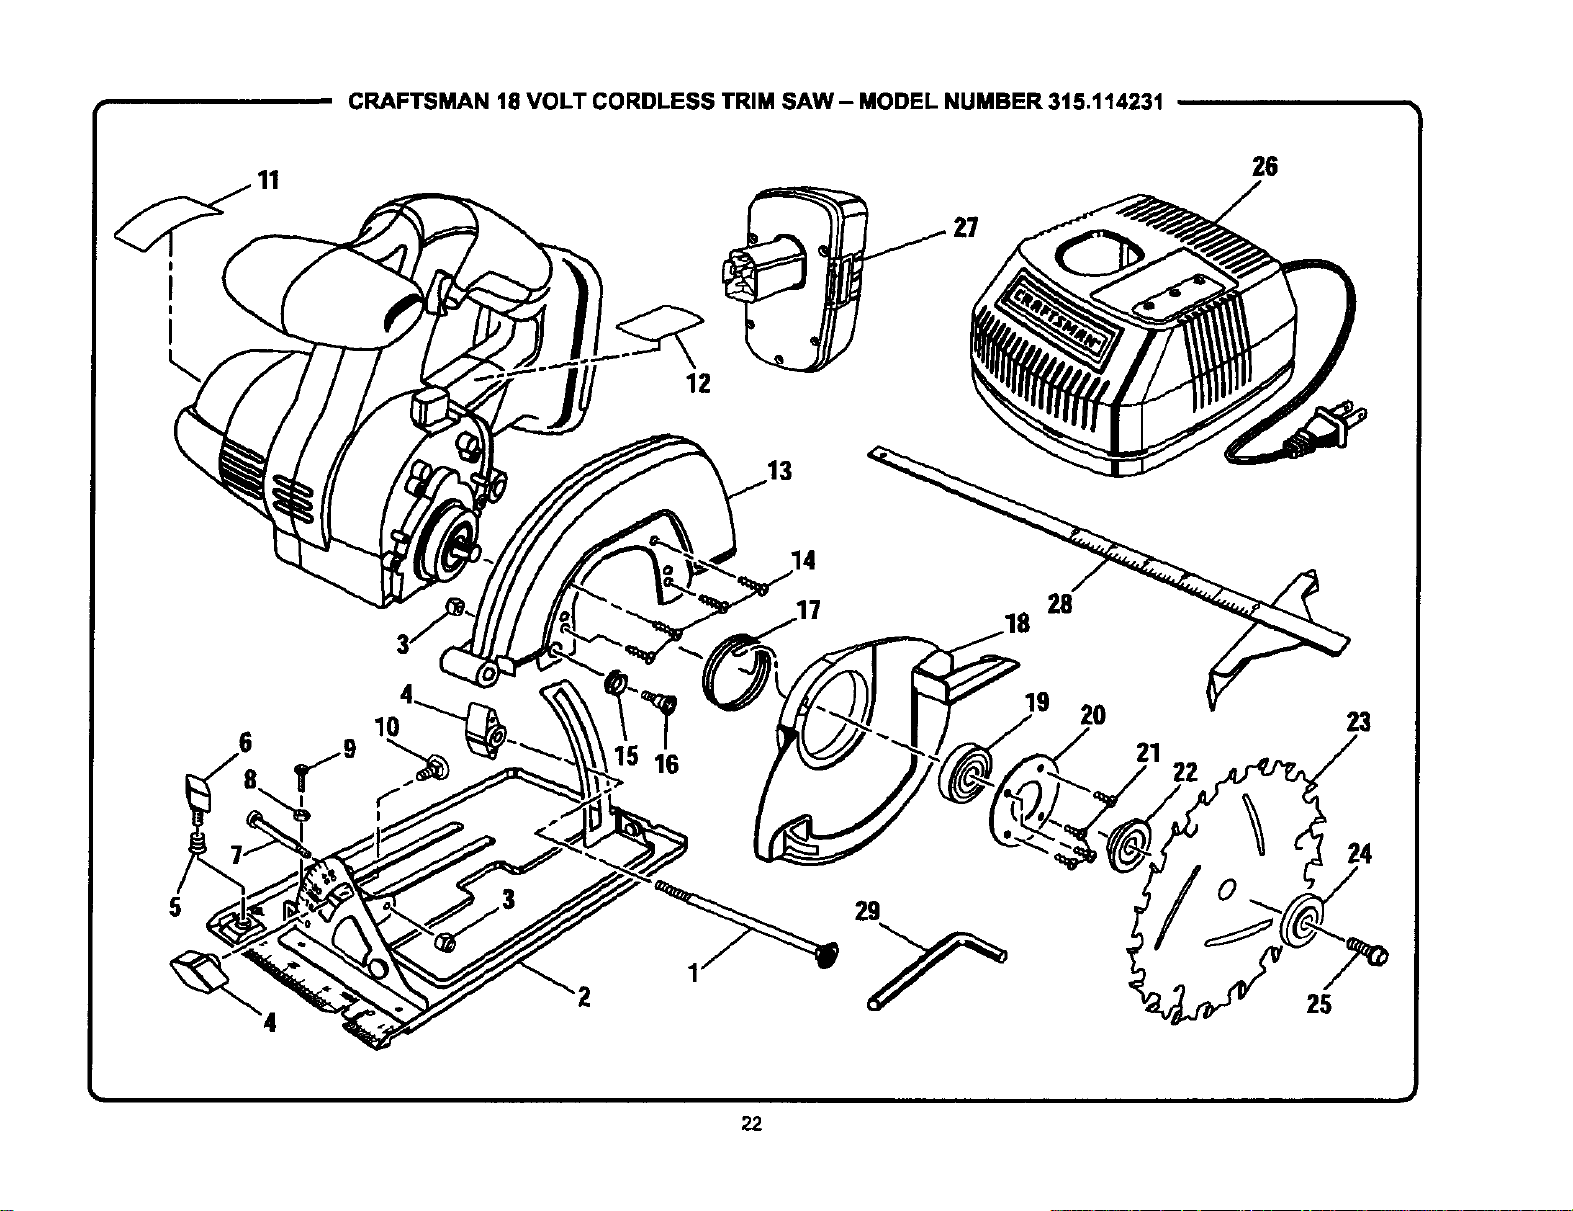
CRAFTSMAN 18 VOLT CORDLESS TRIM SAW- MODEL NUMBER 315.114231
12
26
14
28
19 20
104_ 23
6T-j9 _16 21 22
,I
24
225
i
22
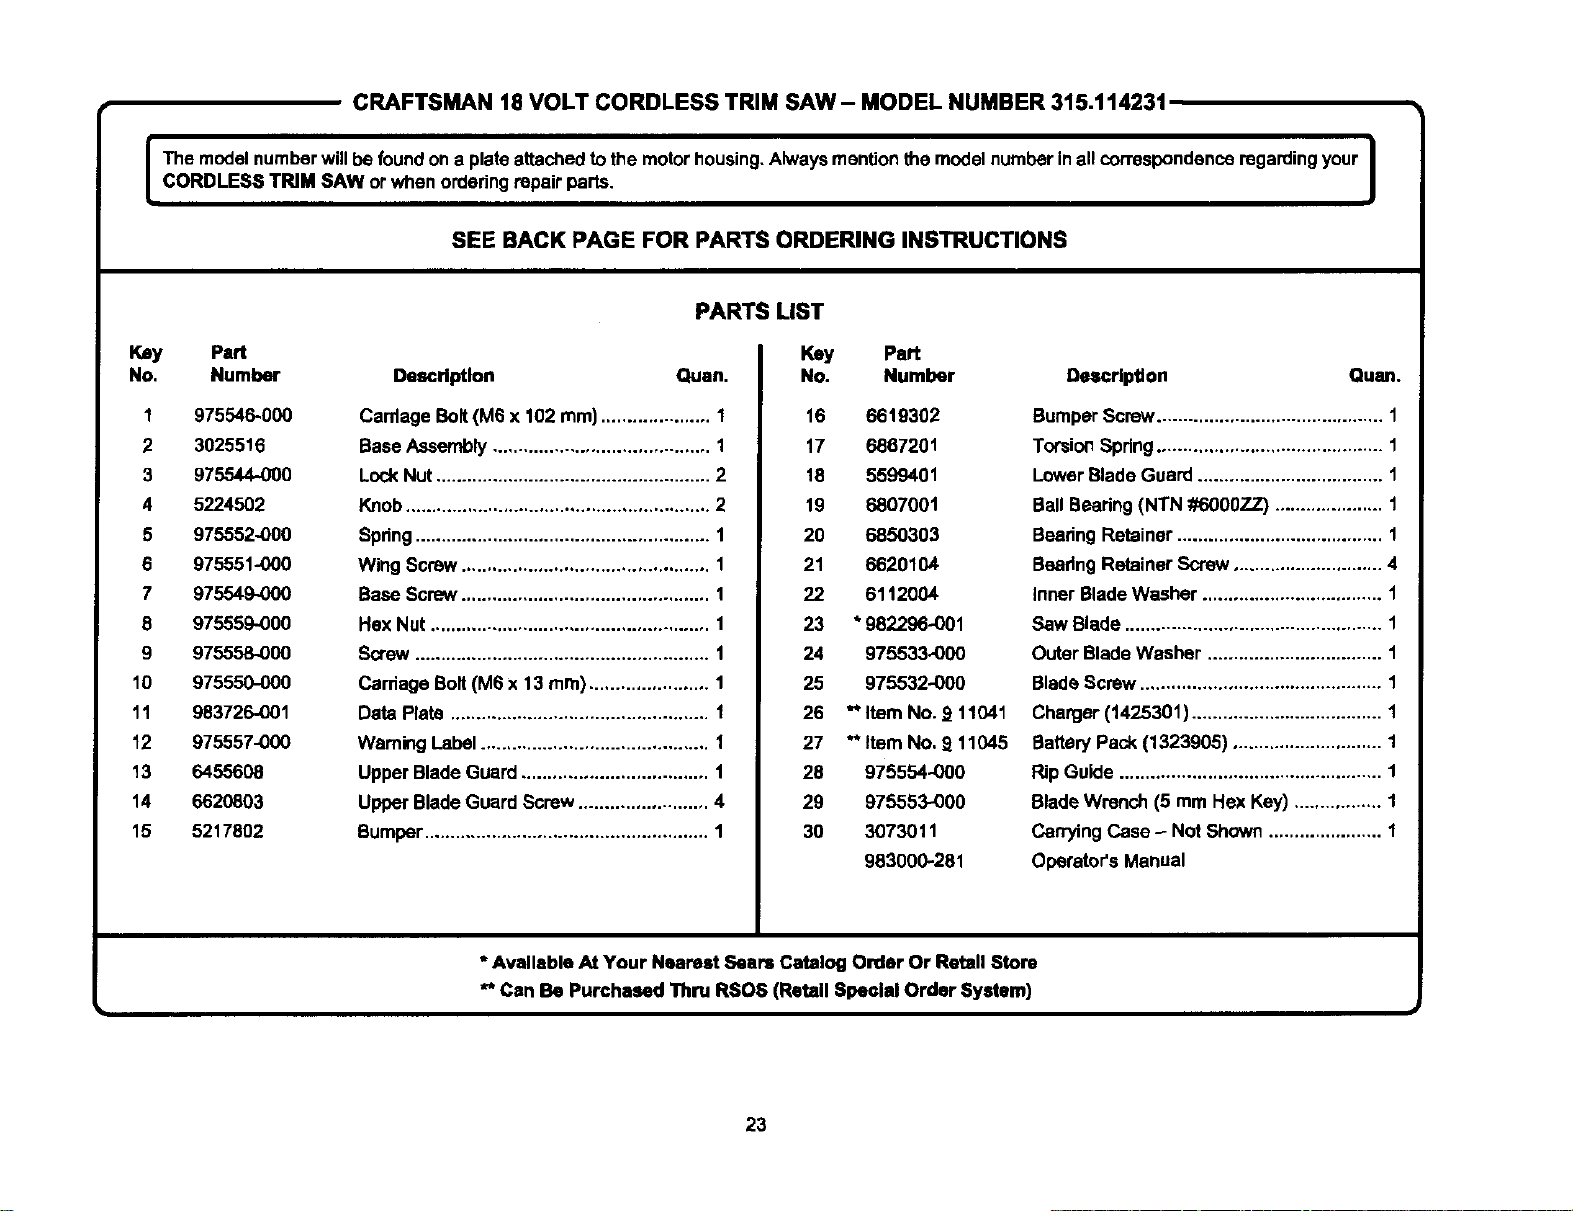
1CRAFTSMAN 18 VOLT CORDLESS TRIM SAW- MODEL NUMBER 315.11423t
The modelnumberwillbe found on a platoattachedto the motorhousing,Alwaysmention themodel numberinall correspondenceregardingyour
CORDLESS TRIM SAW or when orderingrepairparts.
SEE BACK PAGE FOR PARTS ORDERING INSTRUCTIONS I
Key
NO.
1
2
3
4
5
6
7
8
9
10
11
12
13
14
15
Part
Number
975546-000
3025516
975544-00O
5224502
975552-000
975551-000
975549-,000
975559000
9755,58-000
975550-000
983726-001
975557-000
64556O8
6620803
5217802
PARTS LIST
Dsecrlptlon Quan.
Cardage Bolt(MSx 102 ram)..................... 1
BaseAssembly.......................................... 1
LockNut ..................................................... 2
Knob........................................................... 2
Spdng......................................................... 1
Wing Screw................................................ 1
Base Screw................................................ 1
Hex Nut ...................................................... 1
Screw......................................................... 1
CarriageBort(M6 x 13 ram)....................... 1
Data Plate .................................................. 1
Warning Label............................................ 1
Upper BladeGuard .................................... 1
Upper BladeGuard Screw......................... 4
Bumper ....................................................... 1
Key Part
No. Number
16 6619302
17 6867201
18 5599401
19 6807001
20 6850303
21 6620104
22 6112004
23 * 982296-001
24 975533-00O
25 975532-000
26 ** Item No. _11041
27 "_'Item No. 9 11045
28 975554-000
29 975553-000
30 3073011
983000-281
nelmrlptlon Quse.
BumperScrew............................................ 1
Torsio_Spdng............................................ 1
LowerBladeGuard .................................... 1
BallBearing(NTN #6000ZZ) ..................... 1
BearingRetainer........................................ 1
BearingRetainer Screw ............................. 4
Inner BladeWasher ................................... 1
Saw Blade .................................................. 1
Outer BladeWasher .................................. 1
BladeScrew ............................................... 1
Charger(1425301) ..................................... 1
Battery Pack (1323905) ............................. 1
Rip Guido................................................... 1
BladeWrench (5 mm Hex Key) ................. 1
CarryingCase - NOtShown...................... 1
Operator's Manual
* Available At Your Nearest Sears Catalog Order Or Retail Store
** Can Be Purchased Thru RSO6 (Retail Special Order System)
23

Your Home
For repair-in your home-of all major brand appliances,
lawn and garden equipment, or heating and coolingsystems,
no matter who made it, no matter who sold itl
For the replacement parts, accessoriesand
owner's manuals that you need to do-it-yourself.
For Sears professionalinstallationof home appliances
and items like garage door openers and water heaters.
1-800.4-MY-HOME ®(1_oo..4_9-4_s3)
Call any0me, day or night (U.S.A. and Canada)
www,sears,com www, sears,ca
Our Home
For repair of carry-in items likevacuums, lawn equipment,
and electronics, call or go on-line for the locationof your nearest
Sears Parts & Repair Center.
1-800-488-1222
Call anytime, day or night (U.S.A. only)
www, sears,com
To purchase a protecUonagreement (U.S.A.)
or maintenance agreement (Canada) on a product serviced by Sears:
1-800-827-6655 (U.S.A.) 1-800-361-6665 (Canada)
Para pedir sarvicio de reparacibn
a domicilio, y para ordenar piazas:
1-888-SU-HOGAR sM
(1-888-784-6427)
Au Canada pour service en fran_;ais:
1-800-LE-FOYER _c
(1-800-533-6937)
www.sears.ca
8E U 8
®RegisteredTradem_'kITMTrademark/auSendeeMKk ofSears. RoebuckandCo.
®Marea Reglotrade/"rMMarcade F_bdcaIaMMaro=de Sen.'ldode Sears,RodauGkandCo.
MCMarquede cornrneme/M®Marqued6pos6edeSear_ RoebuckandCo. ®Sea's, Roebuckand Co.