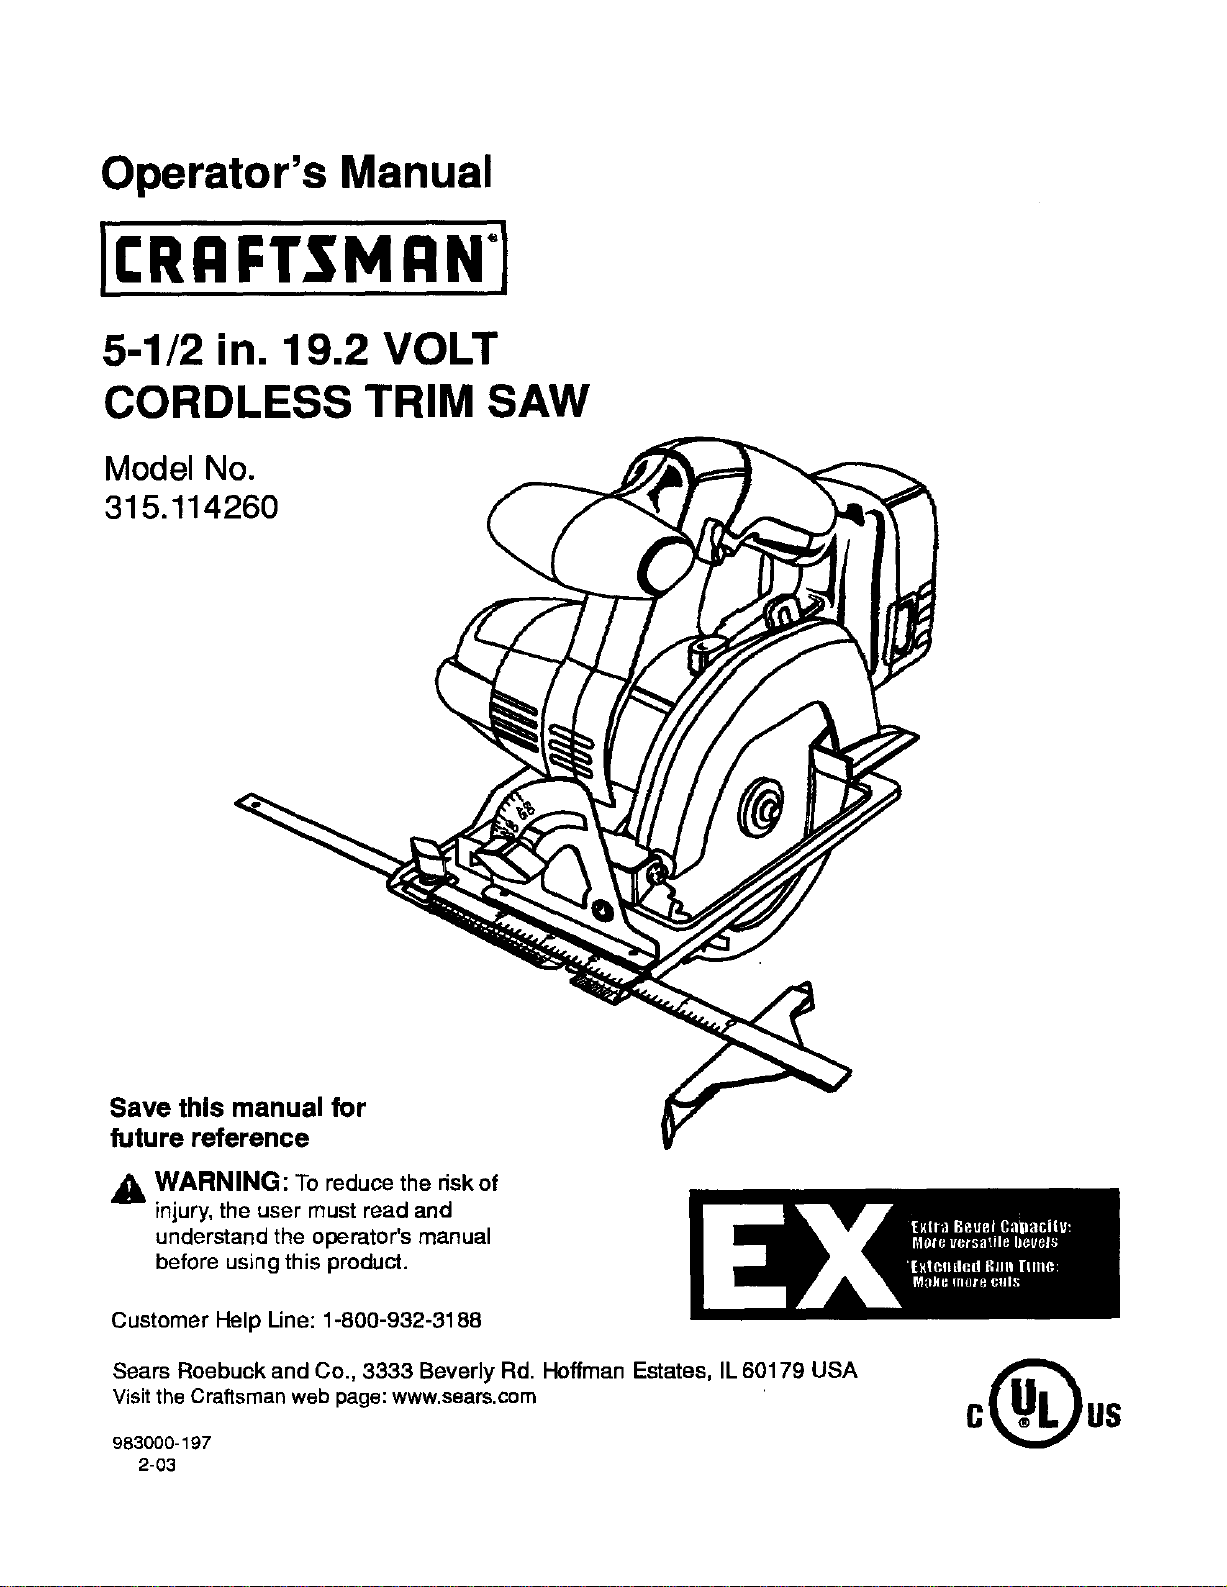
Operator's Manual
5-1/2 in. 19.2 VOLT
CORDLESS TRIM SAW
Model No.
315.114260
Save this manual for
future reference
A
WARNING: To reduce the dskof
injury, the user must read and
understand the operator's manual
before using this product.
Customer Help Line: 1-800-932-3188
Sears Roebuck and Co., 3333 Beverly Rd. Hoffman Estates, IL 60179 USA
Visit the Craftsman web page: www.sears.com
983000-197
2-03
• TableofContentsand Warranty ....................................................................................................................................... 2
• Introductionand General Safety Rules ........................................................................................................................ 3-4
• SpecificSafety Rulesand Symbols ............................................................................................................................. 4-7
• ProductSpecificatLons,Unpacking,andAccessodes ...................................................................................................... 8
• Features..................................................................................................................................................................... 8-10
• Assembly................................................................................................................................................................... 1!-12
• Operation ................................................................................................................................................................. 12-18
• Maintenance................................................................................................................................................................... 19
• ExplodedViewand Repair Parts List....................................................................................................................... 20-21
• PartsOrdering / Service................................................................................................................................................. 22
FULL ONE YEAR WARRANTY ON CRAFTSMAN CORDLESS TRIM SAW
ff thisCRRFTSMRNCordlessTrim Saw fails to give completesatisfactionwithinone year from the date ofpurchase,
RETURN IT TO THE NEAREST SEARS STORE OR SEARS SERVICE CENTER INTRE UNITED STATES, and Sears
willrepairit, free of charge.
Ifthis£RRFTSMRNCordlessTrim Saw isused forcommercialor rentalpurposes,thiswarrantyapplies for only90 days
fromthe date of purchase.
Thiswarrantygives you specificlegalrights,and you may also haveotherdghtswhichvary fromstate to state,
Sears, Roebuck and Co., Dept. 817 WA, Hoffman Estates, IL 60179
_k Look for this symbol to point out Important safety precautions. It means
attention!!! Your safety is Involved.
WARNING:
O
The operationof any powertool can resultinforeignobjectsbeing thrownintoyoureyes, whichcan
resultin severe eye damage. Before beginningpowertooloperation,alwayswear safety gogglesor
safety glasses withside shieldsand a full face shieldwhen needed. We recommendWide Vision
Safety Maskfor use overeyeglasses or standardsafety glasseswith side shields,available at Sears
Retail Stores,Always wear eye protectionwhichismarked tocomplywith ANSI Z87.1,

Your trim saw has manyfeatures for making your cutting
operations more pleasant and enjoyable. Safety,
performanceand dependability have been giventop
pnodty in the design ofthis trim saw making it easy to
maintain and operate.
j_. WARNING: Do notattemptto usethis productuntil
you read thoroughly and understandcompletelythe
operator'smanual. Pay closeattentiontothe safety
rulesincludingDangers,Warningsand Cautions. If
you usethis productproperlyand onlyas intended,
you willenjoyyears ofsafe, reliableservice.
WARNING: Read and follow all Instructions.
Failureto follow all instructionslistedbelow,may
resultin electricshock, fire and/or seriouspersonal
_njury.
SAVE THESE INSTRUCTIONS
Work Area
• Keep your work area clean and well lit. Cluttered
benches and dark areas invite accident,
• Do not operate power tools in e_plaelve atmo-
spheres, such as in the presence of flammable
liquids, gases, or dust. Power tools create sparks
which may ignite the dust or fumes.
• Keep bystanders, children, and visitors away while
operating a power tool. Distractions can cause you to
lose control.
Electrical Safety
• Do not abuse the cord. Never use the cord to carry
the charger. Keep cord away from host, oil, sharp
edges, or moving pads. Replace damaged cords
immedistely. Damaged cords may create a fire.
• A battery operated tool with Integral batteries or a
separate battery pack must he recharged only with
the specified charger for the battery. A chargerthat
may be suitablefor one type of battery may create a
riskoffire when usedwithanother battery.Use battery
onlywithcharger listed.
MODEL BA'FFERYPACK CHARGER
315.114260 Item No. S,11375 Item No. _ 11041
(1323517 and 1323903) (1425301)
• Use battery operated tool only wIth specifically
deeignstnd battery pack. Use of any otherbatteries
may createa riskoffire. Use onlywith batterypack
listed.
Personal Safety
• Stay alert, watch what you are doing and use
common sense when operating a power tool. Do
not use tool while tired or under the Influence of
drugs, alcohol, or medlcaUon. A momentofinatten-
tionwhileoperatingpowertoolsmay resultin serious
personalinjury.
• Dress properly. Do not wear loose clothing or
jewelry. Conteln long hair. Keep your heir, clothing,
and gloves away from moving pads. Looseclothes,
jewelry,orlong hairsan be caughtin moving parts.
• Avoid ancldentel starling. Be sure swnch Is In the
locked or off paeltlon before Inserting battery pack.
Carryingtoolswithyourfingeronthe switchor insetting
thebatterypack intoa toolwiththe switchon invites
accidents.
• Remove adjusting keys or wrenches before turning
the tool on. A wrenchor a key that isleftattachedto a
rotetingpart ofthe toolmay resultinpersonalinjury.
• Do not overreach. Keep proper footing and balance
st all Umee. Properfooting and balanceenable better
control ofthe toolin unexpectedsituations.
• Use safety equipment. Always wear eye protection.
Dust mask, nonskidsafetyshoes, hardhat, or hearing
protectionmustbe usedfor appropriateconditions
Tool Use and Care
• Use clamps or other practical way to secure and
suppatt the workplace to a stable platform. Holding
the work by hand or againstyourbodyisunstableand
may lead to loss ofcontrol.
• Do not force tool. Use the correct tool for your
application. The correct toolwilldo thejobbetterand
saferat the rate for whichitisdesigned.
• Do not ueatool If switch does not tum it on or off. A
toolthat cannotbe controlled withthe switchisdanger-
ousand must be repaired.
• Disconnect battery pack fromtool or placathe
switch In the locked or off pasltlon before making
any adjustments, changing acceeeedee, or storing
tool. Such preventivesafety measures reducethe risk
of startingthetoolaccidentally,
• Store Idle tools out ofthe reach of children and
other untrained persons. Toolsare dangerousinthe
handsof untrainedusers.
• When battery pack Is not In use, keep It sway from
other metal objects like: paper clips, coins, keys,
nails, screws, or other small metal objects that can
make a connection from one terminal to another.
3
Shorting the battery terminals together may cause
sparks, burns,or a fire.
• Maintain tools with care. Keep cutting tools sharp
and clean. Properlymaintained tools with sharpcutting
edges are less likelyto bind and are easier to control.
• Check for misalignment or binding of moving pads,
breakage of parts, and any other condition that may
attest the toors operation, ff damaged, have the tool
serviced before using. Many accidents am caused by
poorlymaintained tools.
• Use only accsssorlea that are recommended by the
manufacturer for your model. Accessories that may
be su_able for one tool, may create a risk of injurywhen
used on another tool.
SewIce
• Tool service must be performed by qualified repair
personnel. Serviceor maintenance performedby
unqualifiedpersonnelmay resultin a riskofinjury.
• When sarvicing s tool, use only Identical replace-
ment pads. Follow instructions In the Maintenance
eactlon of this manual. Use of unauthorizedpartsor
failuretofollowMaintenance Instructionsmay createa
riskofshockor injury.
Hold tool by Insulated gripping surfaces when performing an operation where the catting tool may contact hidden
wiring. Contact with a "live" wire will make exposed metal parts ofthe tool "live" and shock the operator.
Additional Rules For Safe Operation
• Knowyour power tool. Read operator's manual
carefully. Learn its applications and limitations, as
well as the specific potential hazards related to this
tool. Followingthis rule willreducethe riskofelectrio
shock,fire, or seriousinjury.
• Make sure your extension cord Is In good condi-
tion. When using an extension cord, be sure to use
one heavy enough to oarw the current your product
will draw. Awire gage size (A.W.G.) of st least 16 Is
recommended for an extension cord 100 feat or
leas In length. A cord exceeding 100 feat Is not
recommended. If In doubt, use the next heevlar
gage. The smaller the gage number, the heevler the
cord. An undersizedcordwillcause a drop in line
voltageresultingin lossof powerand overheating.
Important Rules For Battery Tools
• Battery tools do not have to be plugged Into an
electrical outlat; therefore, they are always In
operating condition. Be aware of possible hazards
when not using your battery tool or when changing
accessories.
• DO not place battery tools or their batteries near fire
or heat. This will reduce the risk of explosion and
possible injury.
• Batteriss vent hydrogen gas and can explode in the
presence of a source of ignition, such as a pilot light.
To reduce the risk of serious personal injury, never use
any cordless product in the presence of open flame. An
exploded battery can propel debris and chemicals. If
exposed, flush with water immediately.
• Do not charge battery tool In a damp or wat loca-
tion. Following this rule will reduce the risk of electric
shock, fire, or serious personal injury.
• Your battery tool should be charged In a location
where the temperature Is more then 5O_Fbut less
than 100°1=.Followingthis rulewillreducethe riskof
electric shock,fire,or seriouspersonalinjury.
• Under extreme ueage or temperst urs oonditlons,
battery leakage may occur. If liquid comes in
contacl with your skJn,wash Immediately with soap
and water, then neutrslize with lemon juice or
vinegar. Ifliquid gets Into your eyes, flush them
with clean water for at least 10 minutes, then seek
Immediate medical attention. Following this rulewill
reducethe riskof seriouspersonalinjury.
Additional Specific Safety Rules
• DANGER! Keep hands away from cutting area and
blade. Keep your second hand on atadllary handle
or motor housing, ifbothhandsare holdingthe saw,
they cannot becut bythe blade.
• Keep your body posltlonnd to either side of the saw
blade, but not In line with the saw blade. KICKBACK
could causethe saw tojump backwards.See Pages 13
and 14.
• Do not reach underneath the work. The guardcannot
protectyoufromthe blade belowthe work.
• Check the lower guard for proper closing before
each use. Do not operate saw If lower guard does
not move freely and close Instantly. Never clamp or
tie the lower guard Into the open position. Ffsaw is
accidentallydropped,lowerguard may be bent.Raise
the lowerguardwith the retractinghandle and make
sureit move_;freely and does nottouchthe bladeor
any otherpart,in all anglesand depthsofcut.
• Cheek the operetlon and condiUon of the lower
guard spring. If the guard and the spring are not
operating properly, they must be serviced before
use. Lower guard may operate sluggishlydue to
damagedparts,gummy deposits,or a buildupof debris.
• Lower guard should be retracted manually only for
special cuts such as "Pocket Cuts" and =Com-
pound Cuts". Raise lower guard by Retracting
Handle. As soon as blade enters the meterlal, lower
guard muet be released. For all othersawing,the
lowerguard shouldoperate automatically,
• Always observe that the lower guard Is covering the
blade before placing saw down on bench or floor.
An unprotected,coastingblade willcause the saw to
walkbackwards,cuttingwhatever is in itspath. Be
aware ofthe time ittakes forthe bladetostop after
switchis released.
• NEVER hold piece being cut in your hands or
across your leg. Itis importantto supportthe work
properlyto minimizebodyexposure,blade binding,or
lossofcontrol.
• Holdtool by Insulating gdpplng sndaces when
performing an operation where the cutting tool may
contact hidden wiring. Contactwith a "live" wirewill
also make exposedmetal parts ofthe tool"live"and
shockthe operator.
• When ripping always use a dp fence for a etralght
edge guide. This improvesthe accuracyofcutand
reducesthe chance of bladebinding.
• Always use blades with correct size and shape
(diamond vs. round) arbor holes. Bladesthat do not
match the mounting hardware ofthe saw willrun
eccentrically,causing loss ofcentral.
• Never use damaged or Incorrect blade washers or
bolts. The bladewashers and boltwere specially
designedfor yoursaw,for optimumperformanceand
safetyof operation.
• Causes and Operator Prevention of Kickback:
Kickbackisa suddenreactionto a pinched,bound,or
misaligned saw blade,causing an uncontrolledsaw to
liftup and out ofthe workpiecetowardthe operator.
When the blade ispinchedor boundtightlybythe ked
closingdown,the blade stallsand the motorreaction
drivesthe unitrapidlyback towardthe operator.
Ifthe blade becomestwistedor misalignedinthe cut,
the teeth at the back edge ofthe bladecan dig into the
top surfaceofthe wood causing the bladeto climbout
ofthe kerfand jumpbacktoward the operator.
Kickbackisa resultoftoolmisuseand/or incorrect
operating proceduresor conditionsand can be avoided
by taking properprecautionsas givenbelow:
• Maintain a firm grip on the saw and position your
body and arm In a way that allows you to resist
KICKBACK forces. KICKBACKforcescan be con-
trolledbyth_ operator, ifproperprecautions are taken.
• When blade Is binding, or when Interrupting a cut
for any reason, release the trigger and hold the saw
motionless In the metedal until the blade comes to
a complete stop. Never attempt to remove the saw
from the work or pull the saw backward while the
blade Is In motion or KICKBACK may occur. Investi-
gateand take correctiveactions toeliminate the cause
ofblade binding.
• When restarting a saw in theworkplace, center the
saw blade In the kerf end check that teeth are not
engaged Into the material. Ifsaw blade isbinding,it
maywalk upor KICKBACKfromthe workpieceasthe
saw is restarted.
• Support large panels to minimize the risk of blade
pinching and KICKBACK. Large panelstend to sag
undertheirownweight.Supportsmust be placed under
the panelon bothsides, nearthe lineof cut and near
theedge ofthepanel.
• Do not use dull or damaged blade. Unsharpened or
improperlyset bladesproducenarrowkerfcausing
excessivefriction,bladebinding,and KICKBACK.
• Blade depth and bevel adJuetlnglocking levers
must be tight and secure before making cut, If blade
adjustment shiftswhilecutting, itwillcause binding and
KICKBACK.
• Use utra caution when making e =PocketCUt'*into
e_lstlng walls or ether blind areas. The protruding
blade may cut objectsthat cancause KICKBACK.
• Neverusea battery that has been dropped or received
a sharp blow. A damaged battery is subject to explo-
sion, Properly dispose of a dropped battery immedi-
ately. Failure to heed this warning can result in sendus
personal injury.
• Before using battery charger, read all Instructions
and cautionary markings In this manual, on battery
charger, and product using battery charger. Follow-
ing this rulewJJlreduce the risk ofelectric shock,fire, or
serious personal injury.
• To reduce risk of Injury, charge only nickal-ced-
mlum and nickel metal hydride type rechargeable
batteries. Other types of batteries may burst
causing personal Injury and damage. Following this
rule will reduce the riskof alectdc shock, fire, or
sehouspersonal injury.
• Do not e0(posocharger to rain or snow. Following
this rule will reduce the risk of electric shock, fire, or
seriouspersonal injury.
• Use of an attachment not recommended or sold by
the baltery charger manufacturer may result In a
risk of fire, electric shock, or Injury to persons.
Followingthis rule wilt reducethe riskof electdc shock,
fire, or seriouspersonalinjury,
• To reduce the risk of damage to charger body and
cord, pull by charger plug rsther than cord when
disconnecting charger. Followingthis rule willreduce
the riskof seriouspersonalinjury.
• Make sure cord is located to that Itwill not be
stepped on, tripped over, or otherwise subjected to
damage or stress. Followingthis rulewillreduce the
riskof seriouspersonalinjury.
• An e0(tensloncord should not be used unless
absolutely necessary. Use of improperextensioncard
couldresultina riskof fire and electdcshock.If exten-
sioncordmustbe used, make sure:
a. That pinson plug ofextensioncordare the same
number,size and shape as those ofplugon
charger.
b. Thatextensioncord is propedywiredand in good
electricalcondition;and
c. That wire size is largeenoughforAC ampere rating
ofcharger as specifiedbelow:
Cord Length (Feet) 25" 50" 100"
Cord Size (AWG) 16 16 16
Note: AWG =American Wire Gage
• Do not operate charger with a damaged cord or ping.
Ifdamaged, have replaced Immediately by a qualified
serviceman. Followingthis rule willreducetheriskof
electricshock, firs,orseriouspersonal injury
• Do not operate cherger If it has received a sharp
blow, been dropped, or othel_ise damaged in any
way; take Itto a qualified serviceman. Followingthis
rulewillreducethe riskof electric shock,fire, or serious
personalinjury.
• Donot dlsussemblo oharger; take It to a qualified
servlseman when service or repair is requiL_l.
Incorrect reessembly may result In a risk of electric
shock or firs. Followingthis rulewillreducethe riskof
electricshock,fire,or seriouspersonal injury.
• To reduce the diskof electric shock, unplug charger
from outlet before attempting any maintenance or
cleaning. Tumlng off controls will not reduce this
dsk. Followingthisrulewillreducethe riskofelectric
shock,fire,or serious personalinjury.
• Do not use charger outdoors. Followingthis rule will
reducethe riskofelectricshock,fire, or seriousper-
sonalinjury.
• Disconnect charger from power supply when not in
use. Followingthis rulewillreducethe riskof electric
shock,fire,or seriouspersonalinjury.
• RISK OF ELECTRIC SHOCK. DO NOT TOUCH
UNINSULATED PORTION OF OUTPUT CONNECTOR
OR UNINSULATED BA'n'ERY TERMINAL.
• Save these Instructions. Refer to them frequently
and use them to Instruct others who may use this
tool. If you loan someone this tool, loan them these
instructions also. Following this rule will reduce the
risk of electdc shock, fire, or serious personal injury
WARNING: some dust created by power
sanding, sawing, grinding, ddlling, and other
construction activities contains chemicals known
to cause cancer,birth defects or other reproduc-
tive harm. Some examples of these chemicals are:
• lead from lead-based paints,
• crystallinesilica from bricksand cement
and other masonry products, and
• arsenic and chromium from chemically-
treated lumber.
Your riskfrom these exposures varies, depending
on how often you do this type ofwork. To reduce
your exposure to these chemicals:work ina well
ventilated area, and work with approved safety
equipment, such as those dust masks that are
specially designed to filter out microscopic
particles.
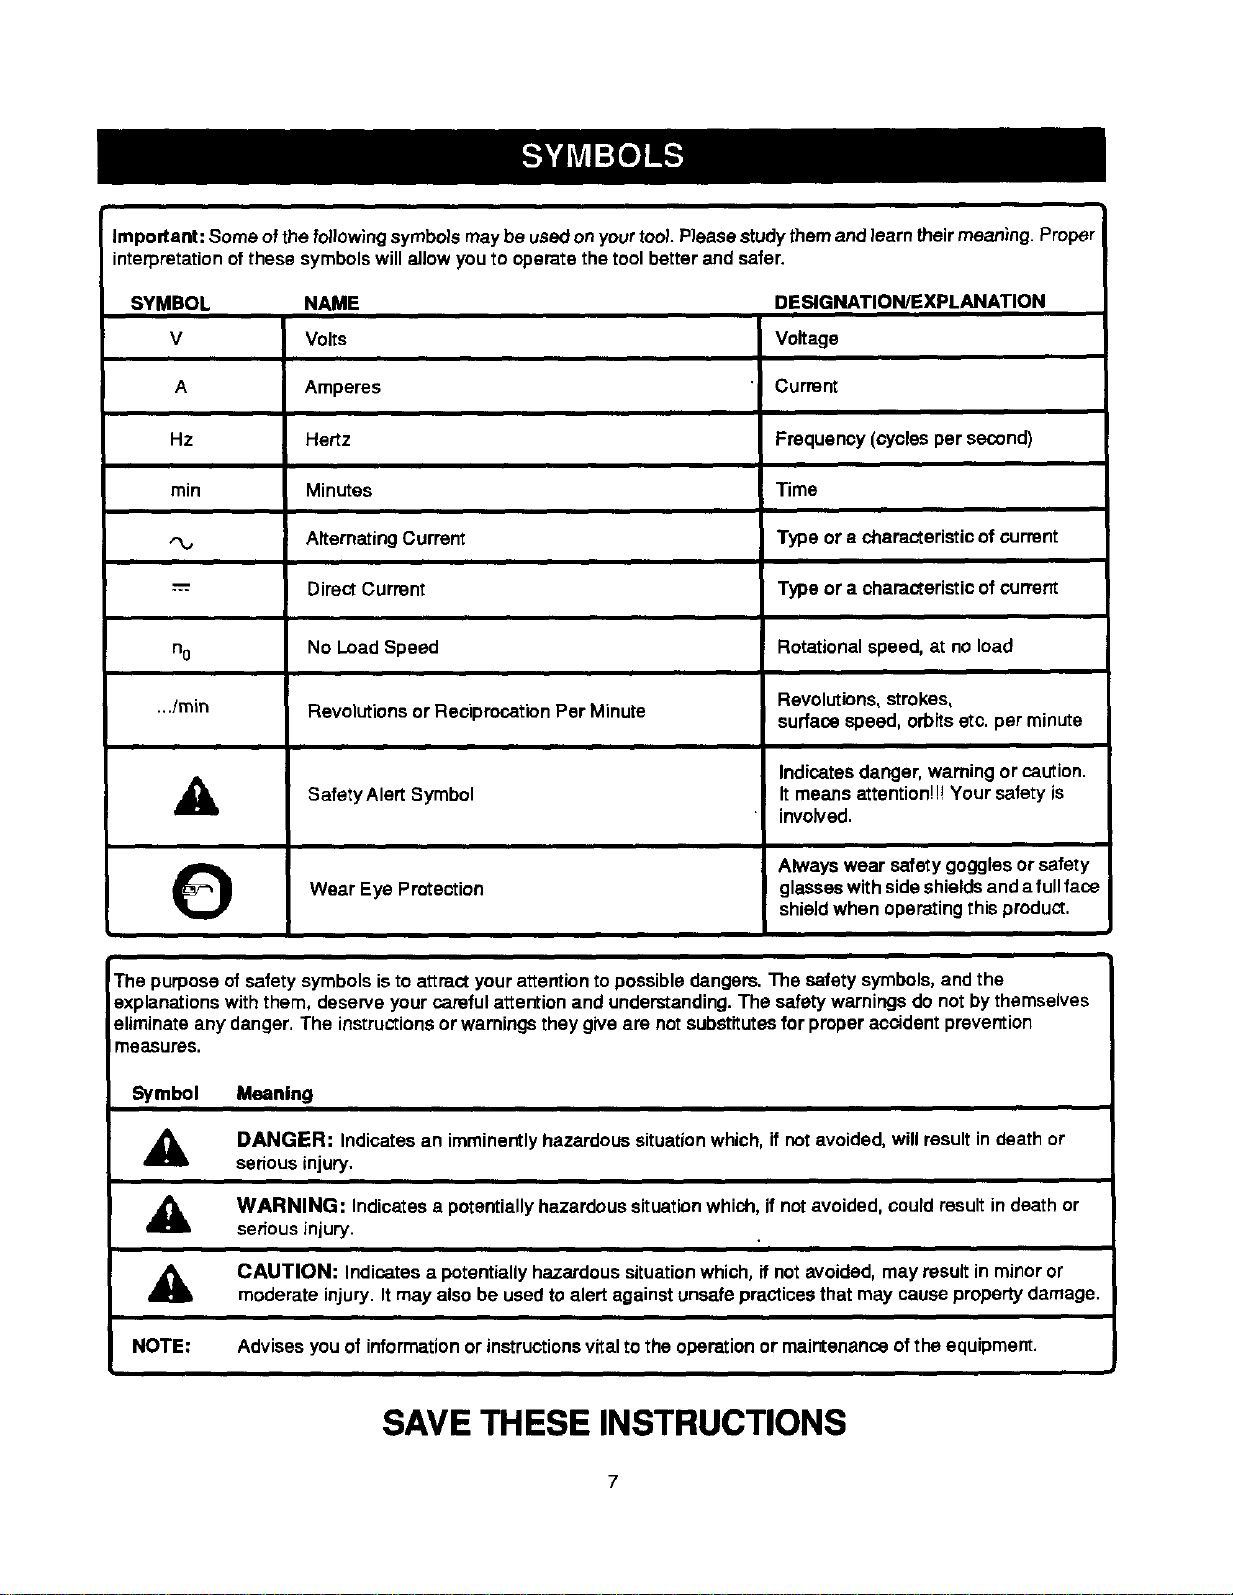
Important:Someof thefollowing symbolsmay beusedon yourtool.Please studythemand learn theirmeaning. Proper
interpretationofthese symbolswillaJlowyou to operatethe toolbetter and safer.
SYMBOL NAME DESIGNATION/EXPLANATION
V Volts Voltage
A Amperes Current
Hz Hertz Frequency(cycles per second)
rain Minutes Time
AlternatingCurrent Type or a characteristicof current
--"=- DirectCurrent Type or a characteristicof current
no No Load Speed Rotationalspeed, at no load
Revolutions,strokes,
.../rain Revolutionsor ReciprocationPer Minute surfacespeed, orbitsetc. per minute
Indicatesdanger, warningor caution.
,_ Alert Itmeans attention!!!Yoursafety is
Safety Symbol
involved.
O Alwayswear safety gogglesor safety
Wear Eye Protection glasseswithsideshieldsand a full face
shieldwhen operatingthis product.
i
The purposeofsafety symbolsisto attractyourattentionto possibledangers.The safety symbols,and the
explanations withthem, deserve yourcareful attentionand understanding.The safety warningsdo not by themselves
eliminate any danger. The instructionsor warningsthey give are not substitutesfor properaccident prevention
Imeasures,
Symbol Meaning
DANGER: Indicates an imminently hazardous situation which, if not avoided, will result in death or
serious injury,
WARNING: Indicatesa potentiallyhazardoussituationwhich, ifnotavoided, could resultin death or
seriousinjury.
CAUTION: Indicates a potentiallyhazardoussituationwhich, if notavoided, may resultin minor or
moderate injury.It may also be usedto alert against unsafepracticesthat may causepropertydamage.
NOTE: Advisesyou of information or instructionsvital tothe operationor maintenance ofthe equipment.
SAVETHESEINSTRUCTIONS
7
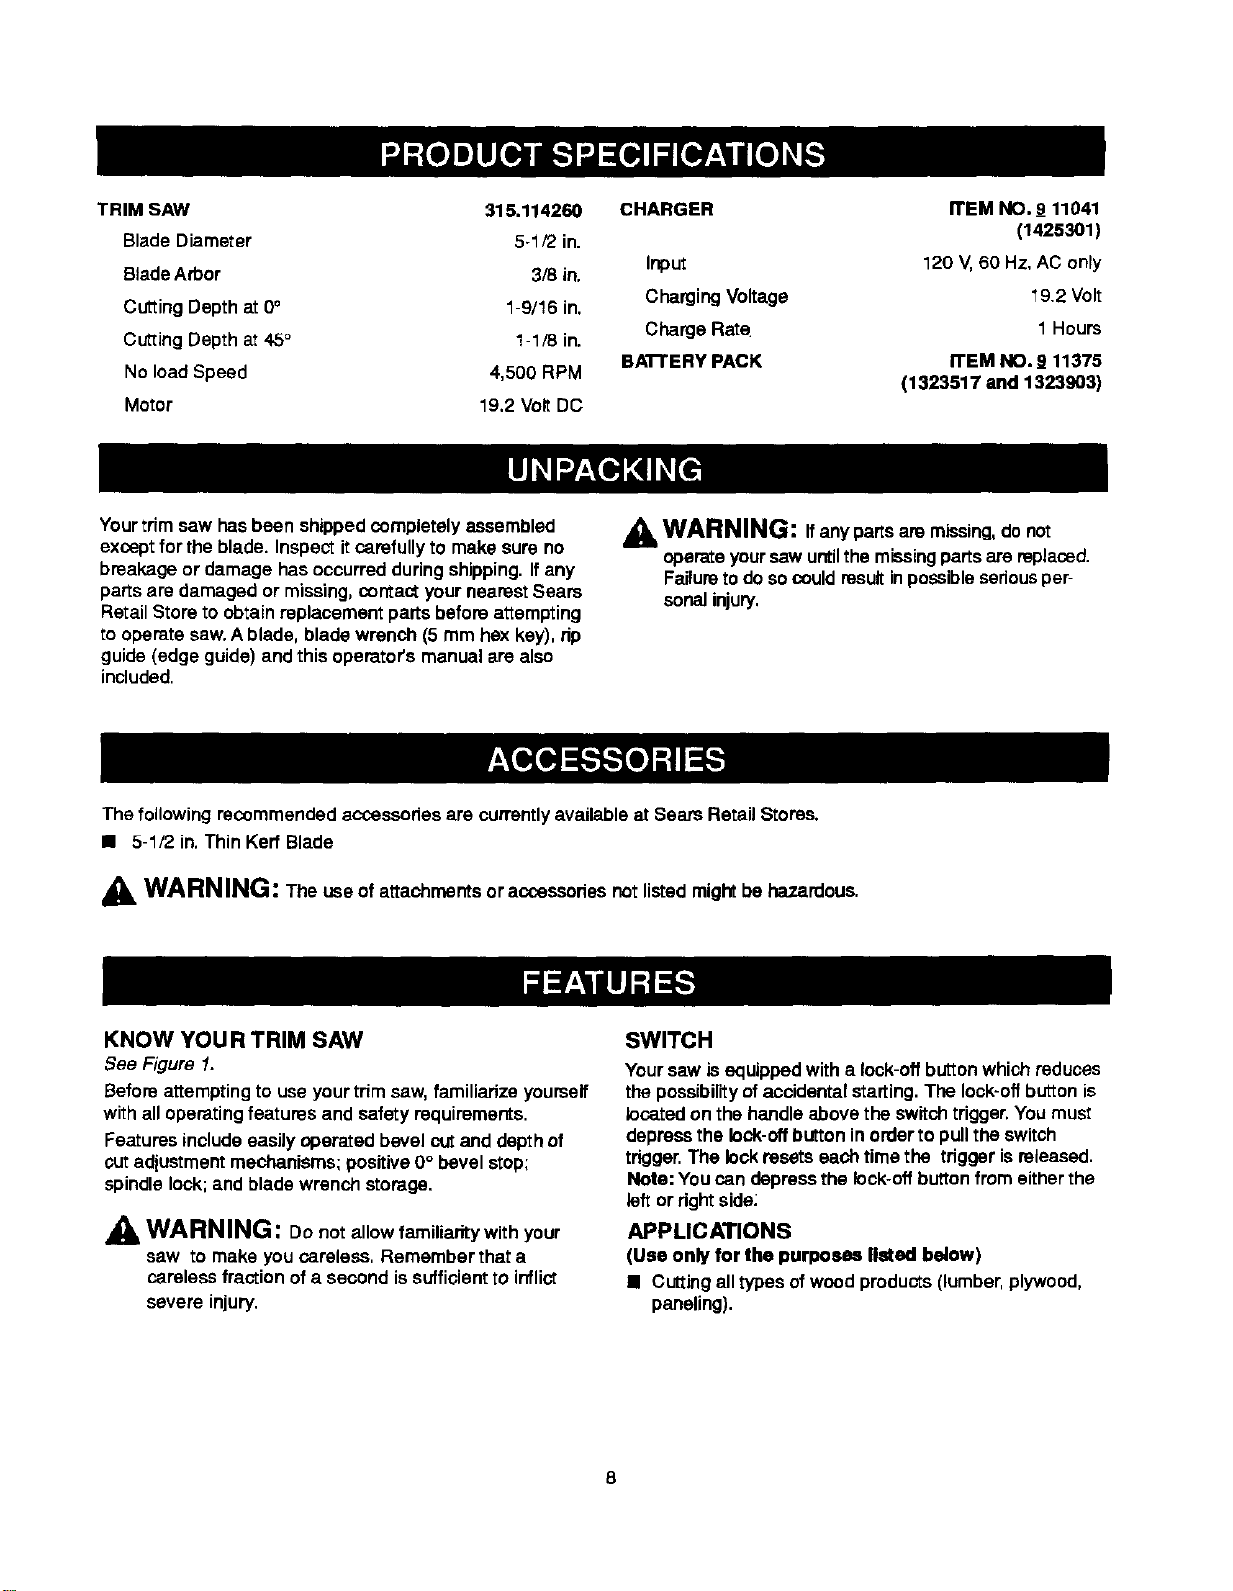
TRIM SAW 315.114260
Blade Diameter 5-1/2 in.
Blade Arbor 3/8 in.
Cutting Depth at 0° 1-9/16 in,
Cutting Depth at 45° 1-1/8 in.
No load Speed 4,500 RPM
Motor 19.2 Volt DC
CHARGER
Input
ChargingVoltage
Charge Rate
BATrERY PACK
ITEM NO._9 11041
(1425301)
120 V, 60 Hz, AC only
19.2 Volt
1 Hours
ITEM NO. _ 11375
(1323517 and 1323903)
Yourtrim saw hasbeen shippedcompletelyassembled
exceptfor the blade. Inspectitcarefullyto makesure no
breakageor damage hasoccurredduringshipping.Ifany
partsare damaged or missing, contactyournearestSears
RetailStore toobtain replacementpartsbeforeattempting
to operate saw.Ablade, bladewrench (5 mm hexkey), rip
guide(edge guide)and this operator'smanual arealso
included.
WARNING: Ifanypartsare missing,do not
operateyoursaw untilthe missing partsare replaced.
Failuretodo socould resultinpossiblessrious per-
sonaJinjury.
The following recommendedaccassones are currentlyavailableat Sears RetailStores.
• 5-1/2 in.Thin KerrBlade
WARNING: The useof attachmentsor accessoriesnotlistedmightbe hazardous.
KNOW YOU R TRIM SAW
See Figure 1.
Beforeattemptingto use yourtrim saw,familiarizeyoursoff
withall operatingfeatures and safety requirements.
Featuresincludeeasily operated bevel cutand depthof
cut adiustmentmechanisms;positive0° bevel stop;
spindlelock;and bladewrenchstorage.
" JkWARNING: Donotallow familiarity with your
saw to make you careless. Remember thata
carelessfraction ofa second issufficientto inflict
severe injury.
SWITC H
Yoursaw isequippedwith a look-offbuttonwhichreduces
the possibilityofaccidentalstarting.The lock-offbut'_onis
located on the handleabove the switchtrigger. Youmust
depressthe lock-offbuttoninorder topullthe switch
trigger.The lock resets eaoh timethe triggerisreleased.
Nots: Youcan depress the lock-off buttonfrom eitherthe
leftor rightside:
APPLICATIONS
(Use only for the purposes listed below)
• Cuttingalltypesof woodproducts(lumber,plywood,
paneling).
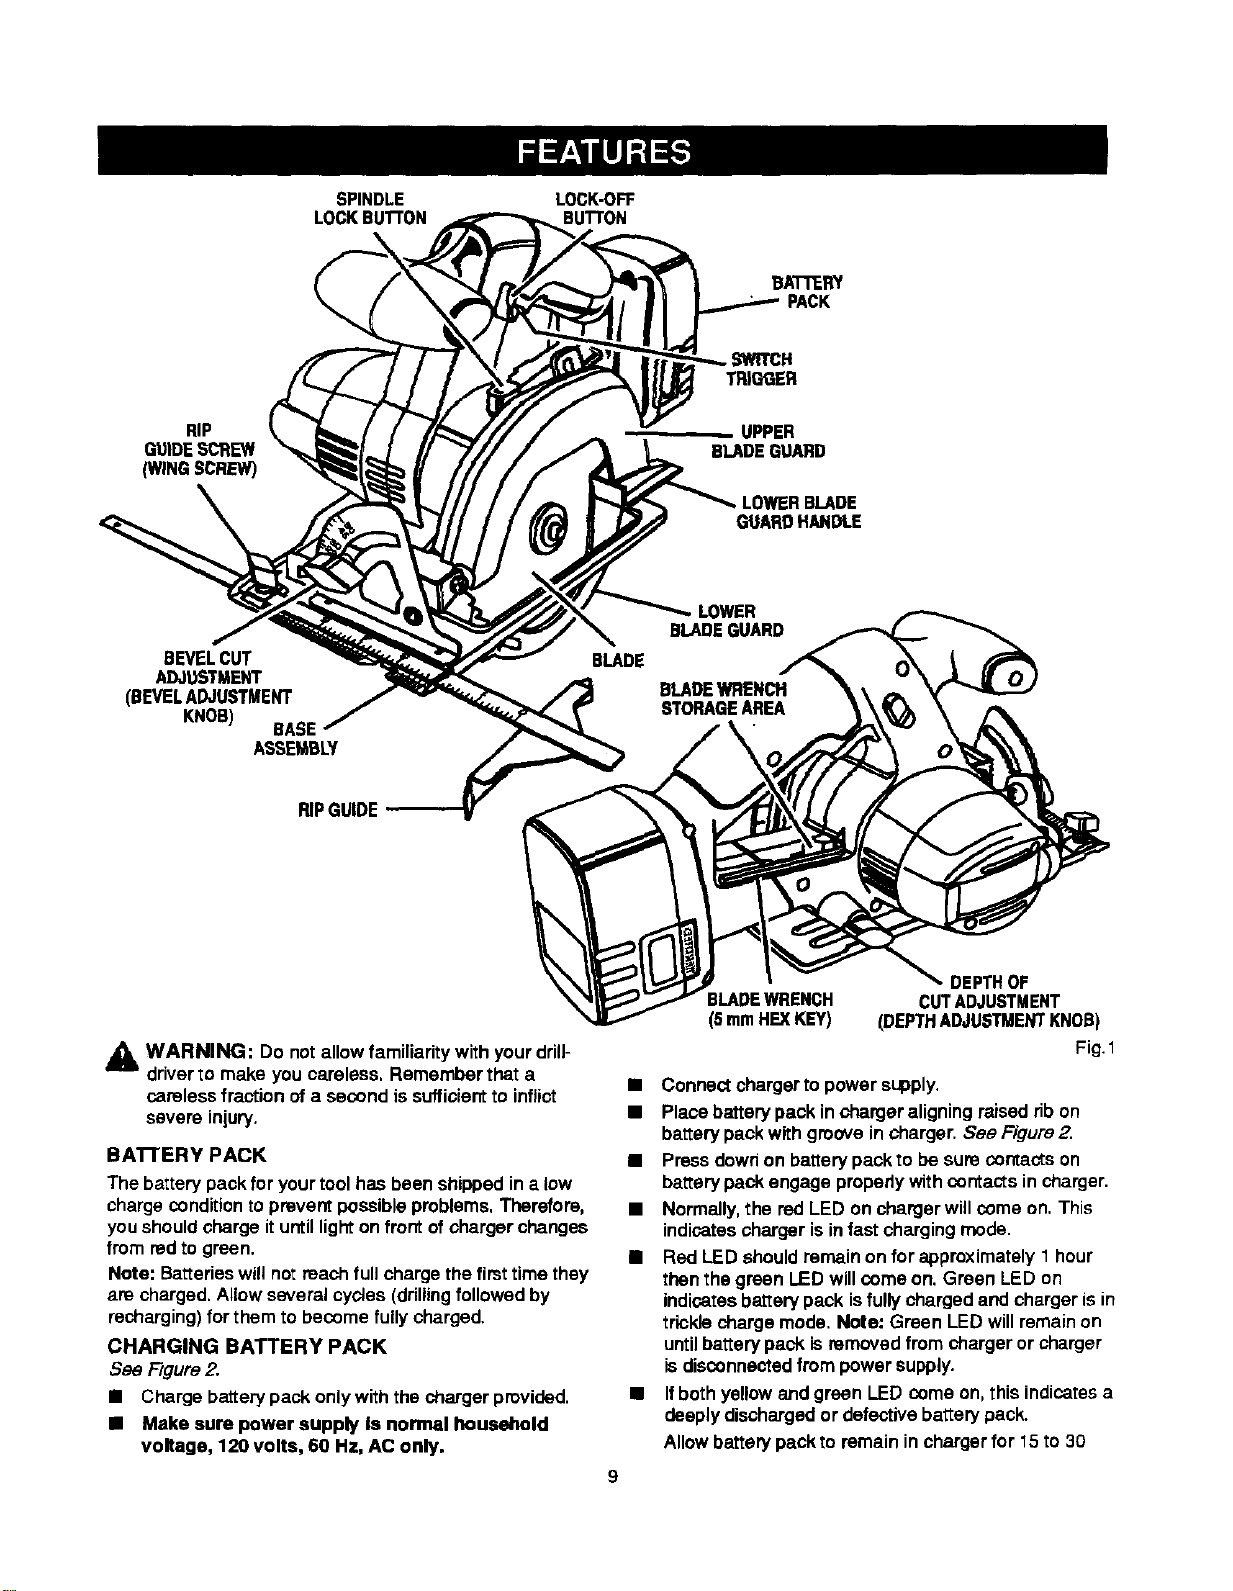
SPINDLE
LOCKBUTrON
LOCK-OFF
BUTrON
TRIGGER
RIP
GUIDESCREW
(WINGSCREW)
UPPER
BLADEGUARD
GUARD HANDLE
BEVELCUT
ADZu_TMENT
(BEVELADJU_FMENT
KNOB) BASE
ASSEMBLY
RiP GUIDE
A WARNING: Do not allowfamiliaritywith yourdrill-
driverto make youcareless, Rememberthat a
carelessfraction ofa secondis sufficientto inflict
severe injury.
BA'rrERY PACK
The batterypackforyourtoolhas been shippedin a low
chargecondition topreventpossibleproblems,Therefore,
youshouldchargeit untillighton frontofcharger changas
from redto green.
Note: Batterieswillno: roach fullchargethe firsttime they
are charged.Allowseveral cycles(drillingfollowedby
recharging)forthem to become fully charged.
CHARGING BATTERY PACK
See Figure2.
• Charge batterypackonlywiththe charger provided.
• Make sure power supply Is normal household
voltage, 120 volts, 60 Hz, AC only,
9
BLADEWRENCH'J_
BLADEWRENGH
mmHEXKEY)
DEPTHOF
CUTADJUSTMENT
(DEPTHADJUSTMENTKNOB)
Fig.1
• Connectchargerto power supply.
• Placebatterypack inchargeraligningraisedribon
batterypackwithgroovein charger. See Figure2.
• Pressdown1on battery pack to besure contacts on
batterypackengage properlywithcontacts in charger.
• Normally,the red LED on chargerwillcome on. This
indicatescharger isinfast chargingmode.
• Red LED shouldremainon for approximately1 hour
then thegreen LED willcomeon. Green LED on
indicatesbatterypack isfullycharged and chargerisin
tricklecharge mode. Note: Green LEDwill remainon
untilbatterypack isremovedfrom charger or charger
is disconnectedfrom powersupply.
• Ifbothyellowandgreen LED comeon, thisindicatesa
deeply dischargedor defectivebatterypack.
Allowbattery packtoremain inchargerfor 15 to 30
minutes.Whenbattery pack reaches normalvoltage
range, red LED shouldcome on.
Ifred LED does not come on after 30 minutes,this
indicatesa defective battery packand shouldbe
replaced.
After normalusage, a minimumof 1 hourofcharging
time isrequiredto fully recharge batterypack.
The batterypack will become slightlywarmtothe
touch whilecharging.This is normal and does not
indicatea problem.
Do not place charger and batterypack inan area of
extreme heator cold. Itwillwork bestat normalroom
temperature.
Note: Charger and battery pack shouldbe placed ina
locationwhere the temperature is more than 50°F but
lessthan 100°F.
• When batteriesbecome fullycharged,unplugcharger
from powersupplyand remove the batterypack.
LED FUNCTIONS OF CHARGER
LED WILL BE ON TO INDICATE STATUS OF
CHARGER AND BATTERY PACK:
• Red LED on = Fastchargingmode,
• Green LED on = Fully chargedand intricklecharge
mode.
• Green LED on =When batterypack is insettedinto
charger,indicateshotbattery packor thatbattery pack
isout of or belownormaltemperature range,
• Yellow and Green LEGs on = Deeplydischargedor
defectivebattery pack.
• No LED on = Defectivechargeror batterypack,
,_k CAUTION: To prevent damage to battery pack,
removebattery packfrom charger immediatelyifno
LED comes on Return batterypack and chargerto
yournearest Sears Service Centerfor checkingor
BATTERYPACK
SHOWNINCHARGER
replacing.Also, ifyouare removingbattery packfrom
charger and no LEDs are on, returnbothbatterypack
and chargerto yournearest Sears ServicoCenter.
Do not insertanother battery pack intocharger.A
damagedcharger may damage a batterypack.
IMPORTANT INFORMATION FOR RECHARGING
HOT BATTERY PACK
When usingyourtrim saw continuously,the batteriesin
yourbatterypack willbecome hot.You shouldlet a hot
batterypackcooldownfor approximately30 minutes
beforeattemptingto recharge.When the battery pack
becomesdischargedand ishot,this willcause the green
LED to some on insteadofthe red LED. After 30 minutes,
reinsertbatterypack in charger. Ifgreen LEO continuesto
remainon,returnbattery packto yournearest Sears
Repair Centerfor checkingor replacing.
Note: Thissituationonlyoccurswhen continuous useof
your drillcausesthe batteriesto become hot.It does not
occurundernormal circumstances.Refer to "CHARGING
BATTERY PACK" for normalrechargingof batteries. If
thecharger does not chargeyourbattery pack under
normalcircumstances,return both the battery packand
charger to yournearest Sears Repair Centerfor electrical
check.
IMPORTANT INFORMATION FOR RECHARGING
COOL BATTERY PACK
Ifbattery packis belownormaltemperature range, the
green LED on charger willsome on. Allow batterypackto
reach normaltemperature,then the red LED willcome on.
Note: Refer to "CHARGING BA'I-FERY PACK" for
normal rechargingofbatteries, ifthe chargerdoes not
charge yourbatterypack under normalcircumstances,
returnboth the battery packand chargerto yournearest
Sears Repair Centerfor electrical check.
CHARGER
)N INDICATES
FASTCHARGINGMODE
GREENLEDONAFTERFASTCHARGING
CYCLE, INDICATESFULLYCHARGED
"rERYPACKAND INTRICKLE
CHARGEMODE.
4-1/2 in.
Fig, 2
_.YELLOWANDGREENLEDSON INDICATESDEEPLY
DISCHARGEDOR DEFEC'nVEBATTERYPACK.
10
WARNING: Always remove batterypack
from
yoursaw when you are assemblingparts, making
adjustments,assemblingor removingblades,
cleaning,or when not in use. Removingbattery pack
willprevem accidental startingthat couldcause
seriouspersonalinjury.
Note: Your saw isassembledwith the batterypack
attached.
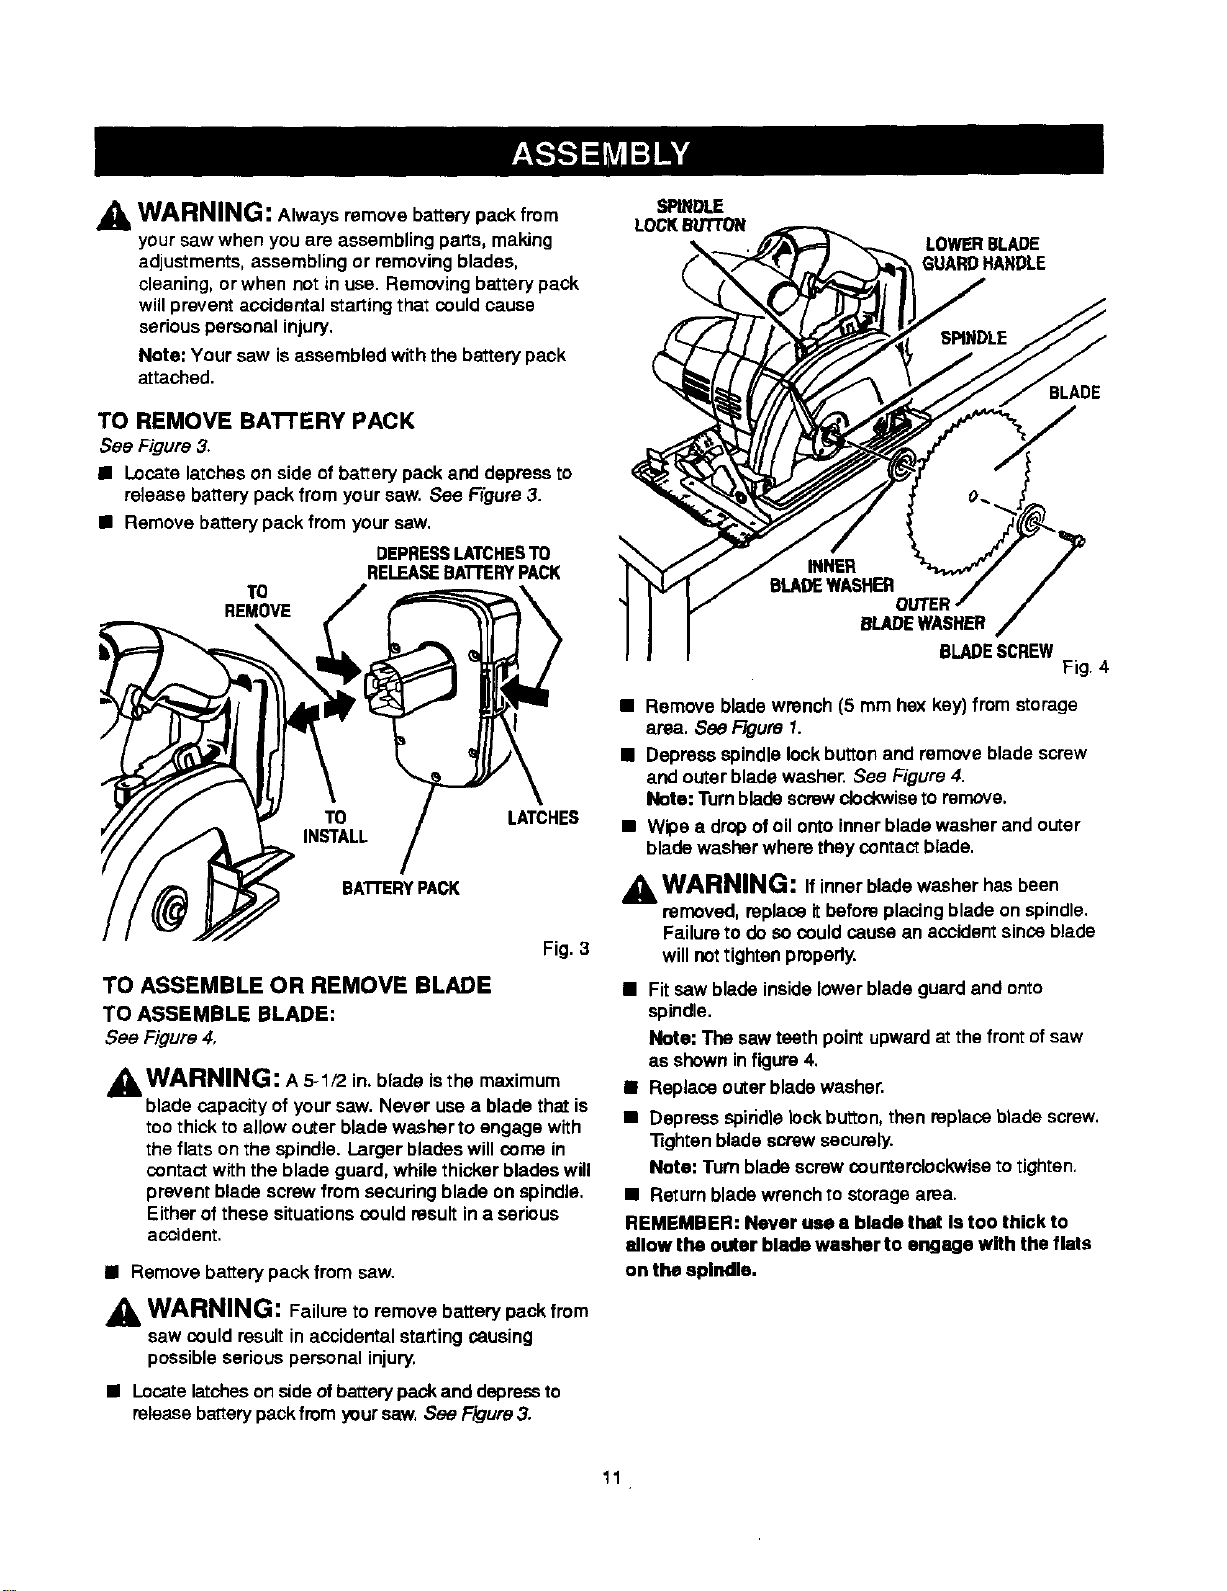
TO REMOVE BATrERY PACK
See Figure3.
• Locatelatcheson side of be_ery packand depressto
release battery packfrom yoursaw. See Ffgure3.
• Remove batterypack from yoursaw.
DEPRESSLATCHESTO
RELEASESATrERYPACK
TO
REMOVE
TO LATCHES
BATFERYPACK
Fig. 3
TO ASSEMBLE OR REMOVE BLADE
TO ASSEMBLE BLADE:
See Figure4,
WARNING: A 5-1/2 in.blade isthe maximum
bladecapacity ofyour saw. Never usea bladethat is
toothick to allow outer blade wssherto engagewith
theflats on the spindle. Larger bladeswill come in
contact withthe blade guard,while thickerbladeswill
preventblade screwfrom securingbladeon spindle.
Eitherofthese situationscouldresultin a serious
accident.
• Remove battery pack from sew.
WARNING: Failureto remove battery packfrom
saw could resultinaccidental startingcausing
possibleseriouspersonal injury.
• Locate latcheson sideofbattery packand depressto
releasebattery pack from yoursaw. See Figure3.
SPINDLE
LOCKBg'TTON
LOWIERBLADE
GUARDHANDLE
BLADE
F
MNER
BLADEWASHER
BLADESCREW
Fig. 4
• Removebladewrench (5 mm hex key) from storage
area. See Figure1.
• Depressspindle lockbuttonand removeblade screw
and outerblade washer.See Figure4.
Note: Turnbladescrewclockwiseto remove.
• Wipea dropofoilontoinnerblade washer and outer
bladewasher wherethey contact blade.
WARNING: If innerbladewasher has been
removed, replaceitbeforeplacingblade on spindle.
Failureto do socould cause an accidentsinceblade
willnat tightenpropedy.
• Fit saw bladeinsidelowerblade guardand onto
spindle.
Note: The saw teethpointupward at thefrontof saw
as showninfigure 4.
• Replaceouterbladewasher.
• Depressspiridlelockbutton,then replaceblade screw.
"lightenbladescrewsecurely.
Note: Turnbladescrewcounterclockwise to tighten.
• Returnbladewrenchto storage area.
REMEMBER: Never use a blade that Is too thick to
allow the outer blade washer to engage with the flats
on the spindle.
11
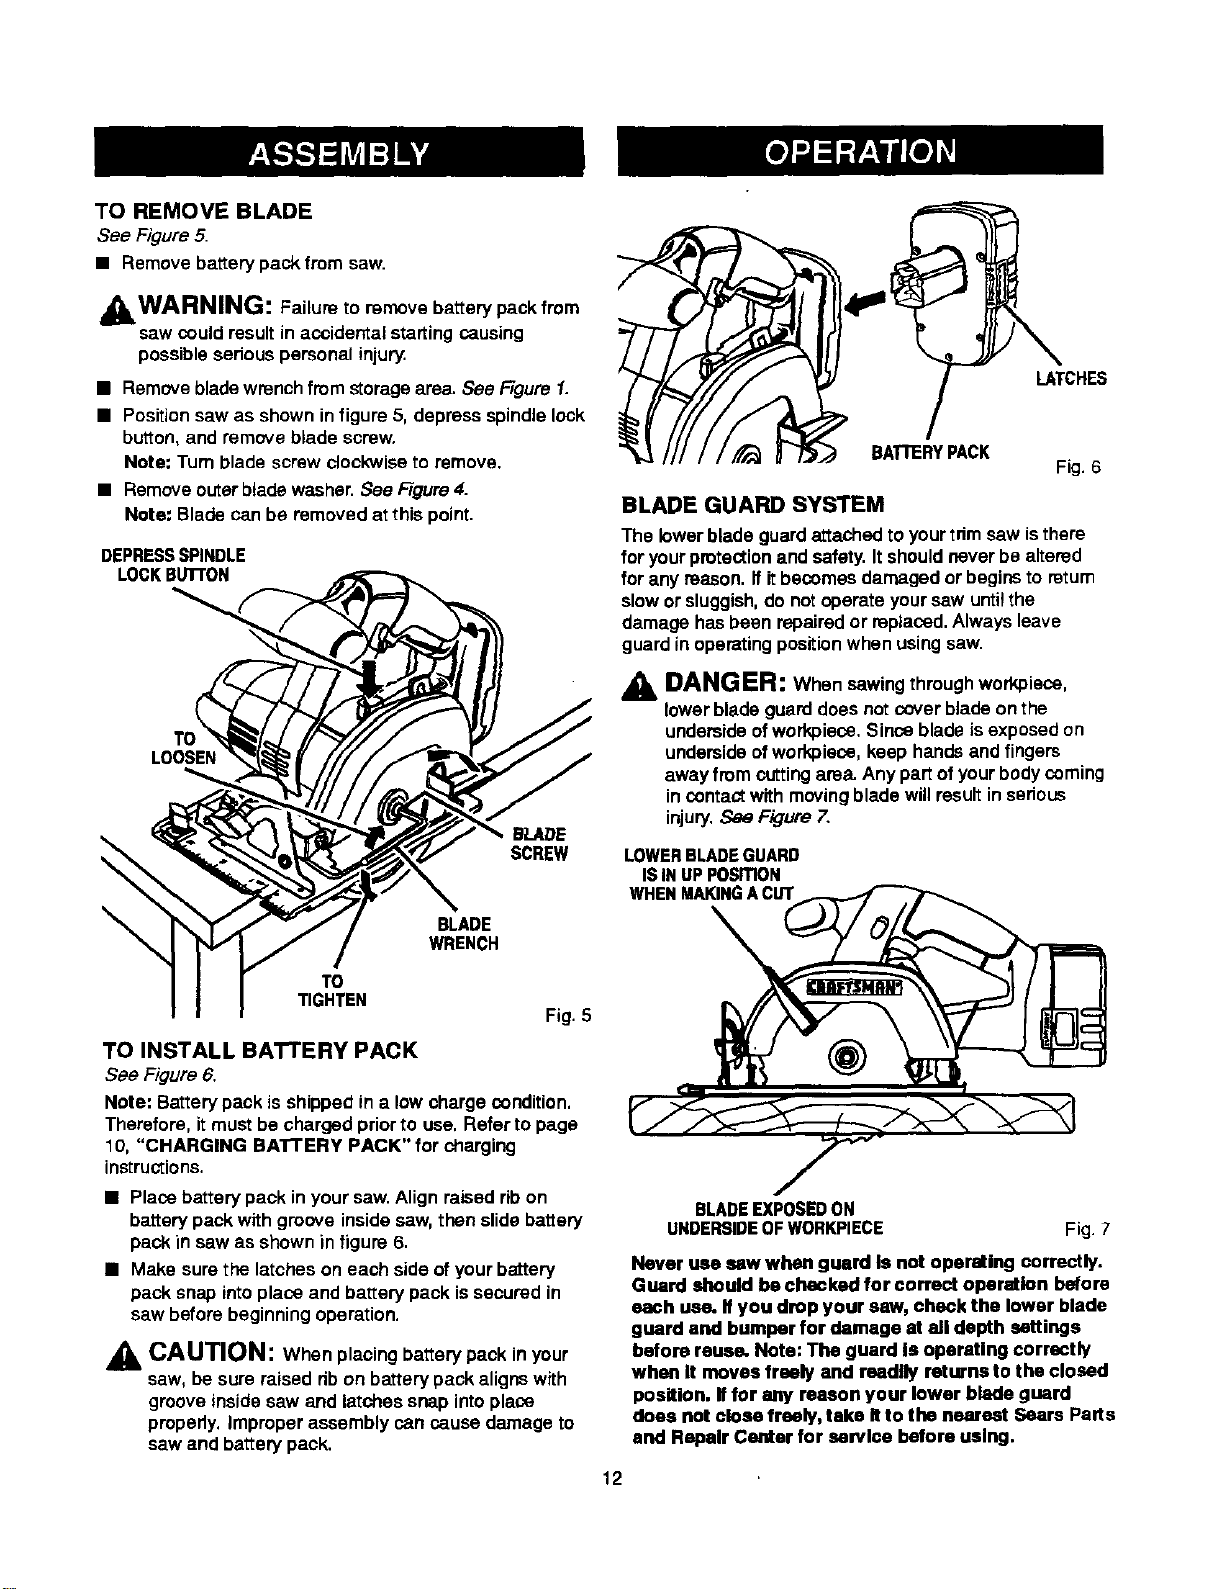
TO REMOVE BLADE
See Figure5.
• Remove battery pack from saw.
WARNING: Failure to remove battery pack from
saw could result in accidental starting causing
possible serious pemonal injury.
• Removebladewrenchfrom storagearea. See Figure1.
• Positionsaw as shown infigure 5, depressspindlelock
button, and remove blade screw.
Note; Turn blade screwclockwiseto remove.
• Removeouterbladewasher.See Figure4.
Note: Blade can be removed at this point.
DEPRESSSPINDLE
LOCKBLrrroN
LOOSEN
BLADE
SCREW
BLADE
WRENCH
LATCHES
BATTERYPACK
Fig. 6
BLADE GUARD SYSTEM
The lower blade guardattachedto yourtrimsaw isthere
for yourprotectionand safety.Itshouldnever be altered
for any mason. Ifitbecomesdamaged or beginsto mtum
slow or sluggish,do notoperate yoursaw untilthe
damage has been repairedor replaced.Always leave
guardin operatingpositionwhen usingsaw.
DANGER: When sawing throughworkpieco,
lower bladeguarddoes notcover blade onthe
undersideofworkpiece.Since blade isexposedon
undersideofworkpiece,keep handsand fingers
away from cuttingarea. Any partof yourbodycoming
in contact withmoving blade willresultin serious
injury.Sae Figure7.
LOWERBLADEGUARD
ISIN UP POSITION
WHENMAKINGA CUT
TO
TIGHTEN
Fig. 5
TO INSTALL BA'I'rERY PACK
See Figure6.
Note: Batterypack is shippedin a low chargecondition.
Therefore, itmust be charged priorto use, Refer to page
10, "CHARGING BA'rFERY PACK" for charging
instructions.
• Place battery pack in your saw.Align raked ribon
batterypackwith groove insidesaw,then slidebattery
packin saw as shown in figure 6.
• Make surethe latches on each side ofyourb_ttery
pack snap intoplace and battery pack issecured in
saw before beginningoperation.
CAUTION: When placing battery pack in your
saw, be sure raised nb on battery pack aligns with
groove inside saw and latches snap into place
properly, Improper assembly can cause damage to
saw and battery pack,
BLADEEXPOSEDON
UNDERSIDEOFWORKPIECE
Fig. 7
Never use sew when guard Is not operating correctly.
Guard should be checked for correct operation before
each use. If you drop your saw, check the lower blade
guard and bumper for damage at all depth settings
before reuse. Note: The guard Is operallng correctly
when It moves freely and readily returns to the closed
position. If for any reason your lower blade guard
does not close freely, take Rto the nearest Sears Parts
and Repair Center for sarvloe before using.
12
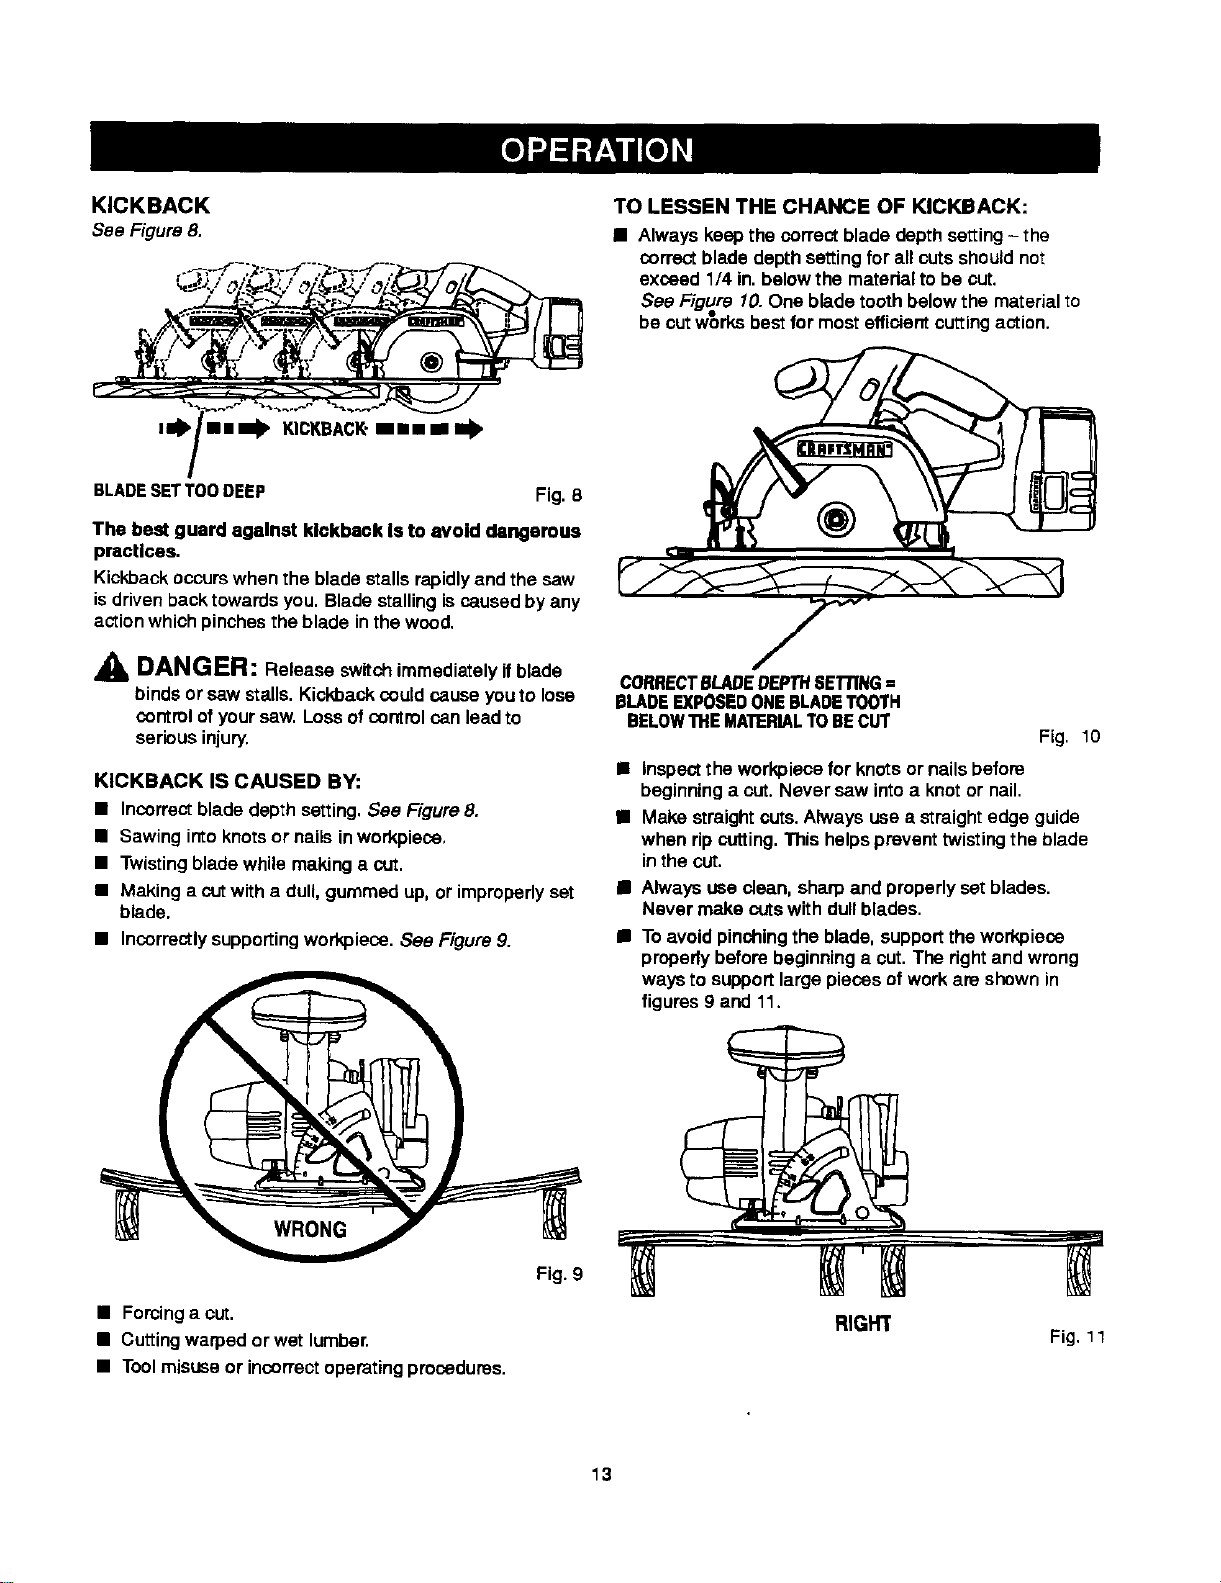
KICKBACK
See Figure8.
KICKBACI_mmmm i
BLARE SET TOODEEP
Fig.B
The best guard against kickback Is to avoid dangerous
practices.
Kickback occurswhen the blade stallsrepidlyend the saw
is driven back towards you. Blade stalling iscausedby any
action which pinches theblade in the wood.
DANGER: Release switch immediatelyif
blade
bindsor sew stalls.Kickbackcouldcause youto lose
control ofyoursaw. Lossofcontrol can lead to
serbus iniur/.
KICKBACK IS CAUSED BY:
• Incorrectbladedepthsetting,See Figure 8.
• Sawingintoknotsor nailsinworkpiece,
• Twistingbladewhile making a cut.
• Making a cutwith a dull,gummedup, or improperlyset
blade.
• Incorrectlysupportingworkpiece.See Figure9.
TO LESSEN THE CHANCE OF KICKBACK:
• Always keepthe correctblade depth setting- the
correct blade depth settingfor artouts shouldnot
exceed 1/4 in. belowthe materialto be cut.
Sea Figure 10.One blade toothbelowthe materialto
be cutw_)rksbestfor mostefficient cuttingaction.
CORRECTBLADEDEPTHSETtiNG=
BLADEEXPOSEDONEBLADETOOTH
BELOW'n.IEMATERIALTOBECUT
Fig, 10
• Inspect the workplacefor knotsor nailsbefore
beginninga cut. Never saw intoa knotor nail.
m Make straightcuts.Ahvaysusea straightedge guide
when ripcutting.This helpspreventtwistingthe blade
in the cut.
• Ah_aysuseclean, sharpand properlyset blades.
Never make cutswith du_lblades.
• To avoidpinching the blade, supportthe workpieco
properly beforebeginning a out.The right and wrong
ways to supportlarge pieces of work are shownin
figures 9 and 11.
• Forcing a cut.
• Cutting warped orwet lumber.
• Tool misuse or incorrect operating procedures.
Fig. 9
RIGR1
Fig. 11
13
• When making a cut use steady, even pressure,
Never force cuts.
• Do not cut warped or wet lumber.
• Always hold your saw firmly with both hands and keep
your body in a balanced position so as to resist the
forces of Idckback should it occur.
When using your saw, always stay alert and exercise
control. Do not remove your sew from workplece
while the blade Is moving.
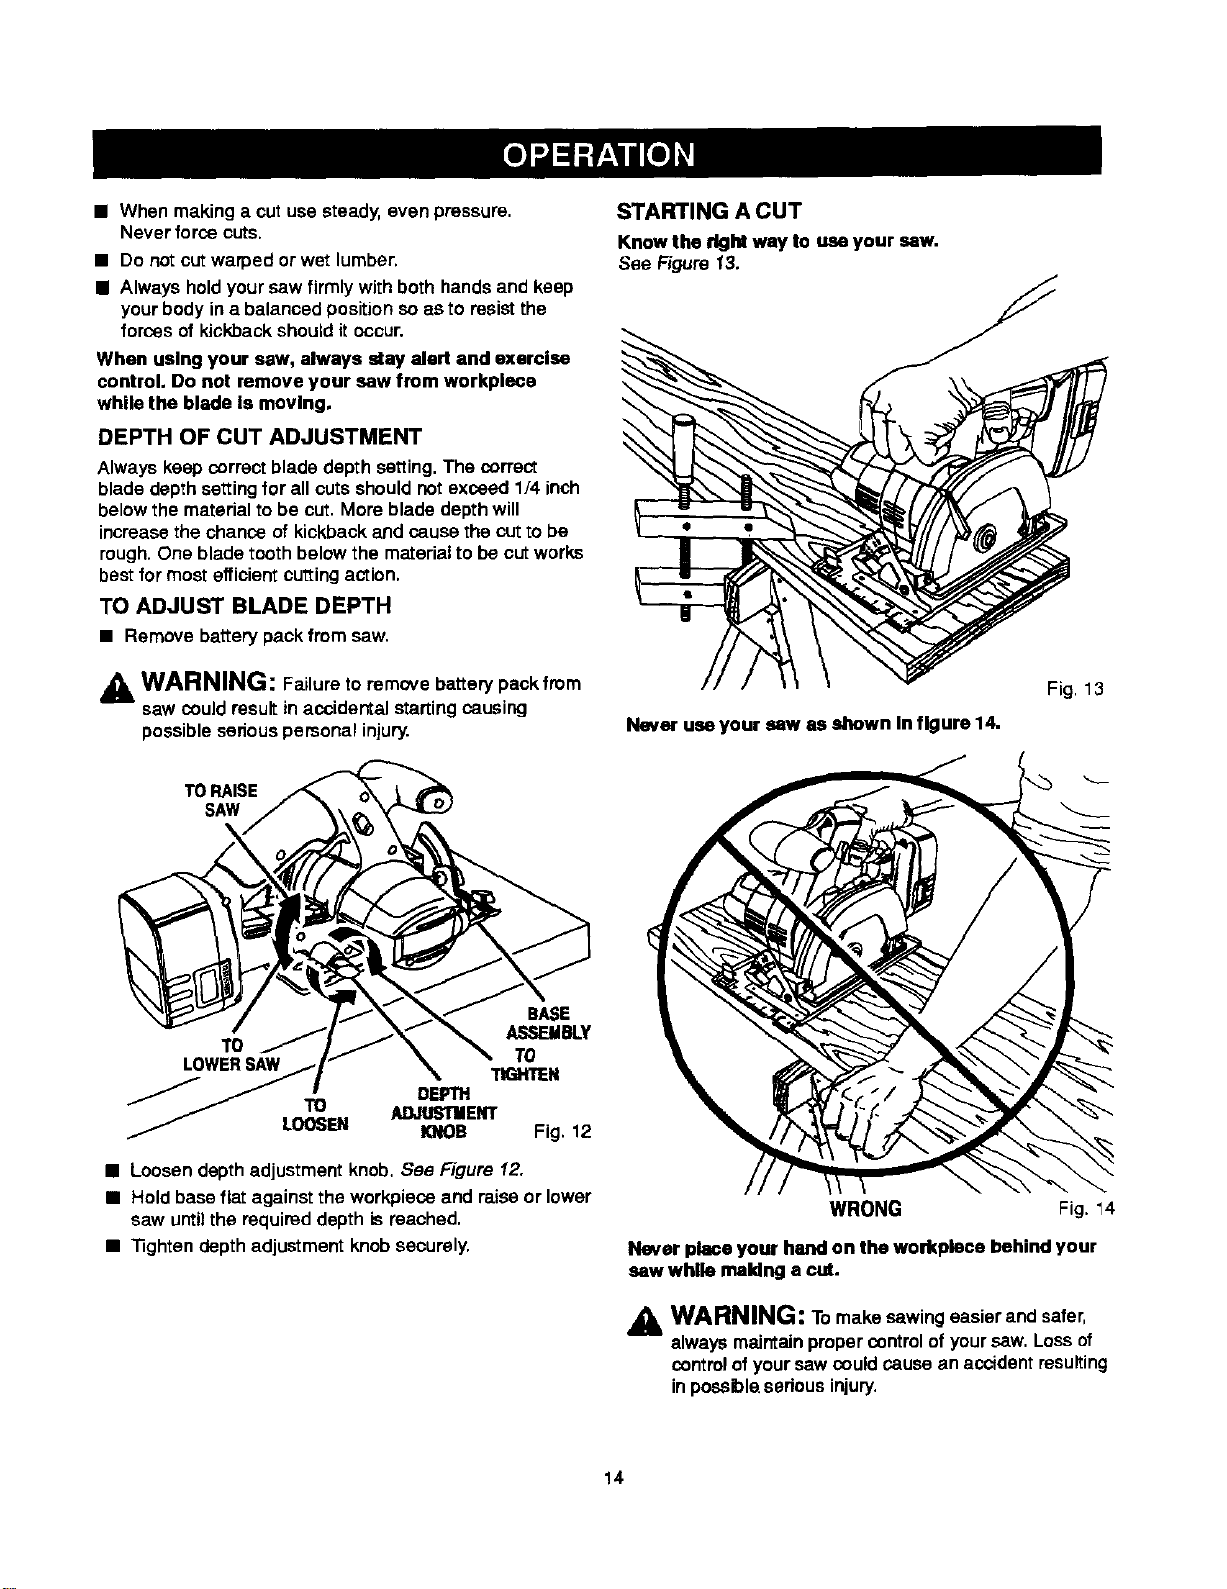
DEPTH OF CUT ADJUSTMENT
Always keep correctblade depth setting.The correct
blade depthsettingfor all cutsshouldnot exceed 1/4 inch
belowthe materialtobe cut. More blade depthwill
increasethe chance of kickbackand cause the cuttobe
rough.One bladetoothbelow the materialto be cutworks
bestfor mostefficientcuttingaction.
TO ADJUS'rBLADE DEPTH
• Remove battery packfrom saw.
WARNING: Failureto remove battery packfrom
saw couldresultin accidental startingcausing
possibleseriouspersonal injury.
STARTING A CUT
Know the dght way to use your saw,
See Rgure 13.
Never use your sew as shown In figure 14.
Fig, 13
TORAISE
SAW
BASE
ASSEMBLY
TO TO
LOWERSAW TIGHTEN
DEPTH
TO AI_USTIIIENT
LOOSEN KNOB Fig. 12
• Loosen depth adjustment knob. See Figure 12.
• Hold base flat againstthe workpiece and raise or lower
saw until the required depth is reached.
• "13ghtendepth adjustment knob securely.
WRONG Fig. 14
Never place your hand on the workpleoe behind your
sew while making a cuL
_. WARNING: To make sawing easierand safer,
alwaysmaintain propercontrolof yoursaw. Lossof
controlofyoursaw couldcause an accidentresulting
inposs_le,sedous injury.
14
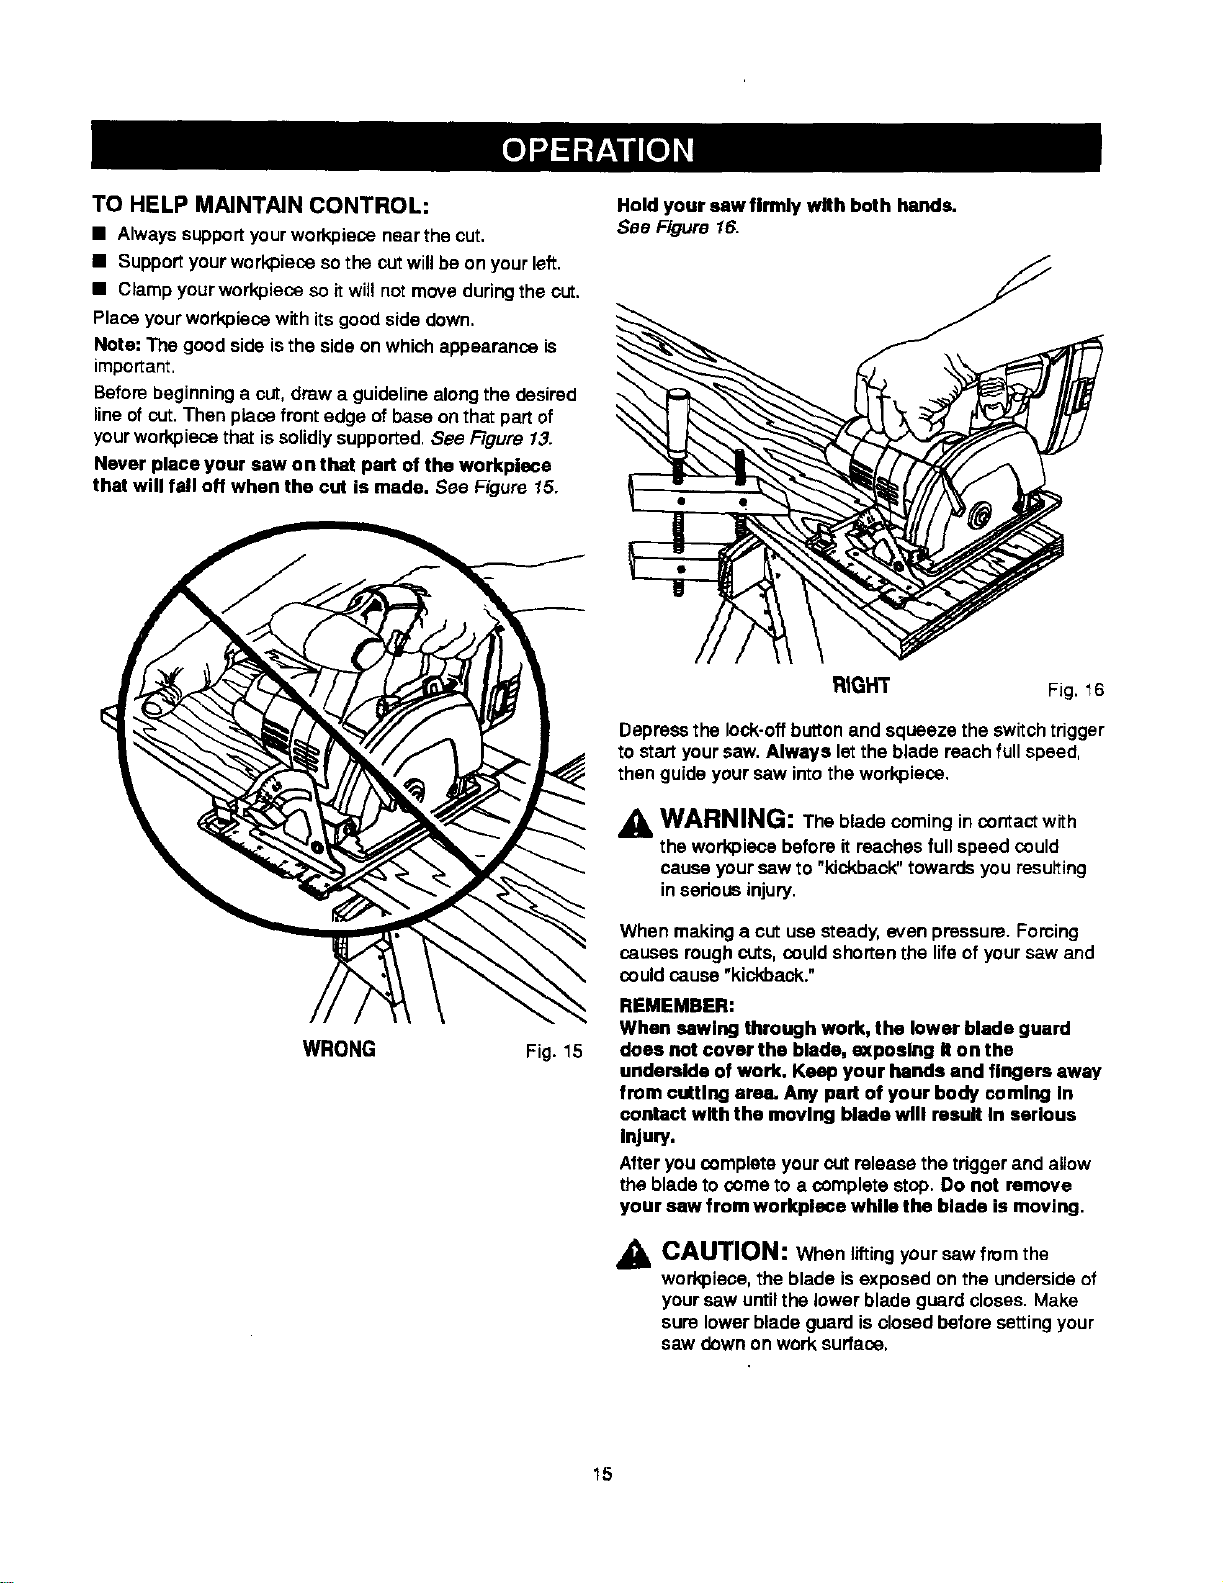
TO HELP MAINTAIN CONTROL:
• Always supportyour workpiece near the cut,
• Support your workpieceso the cut will be on your left.
• Clamp your workpiece so itwill not move during the cut.
Place your workpiece with its good side down.
Note: The good side is the side onwhich appearance is
important,
Before beginning a cut, draw a guidelinealong the desired
line of cut. Then place front edge of base on that part of
your workpiece that is solidly supported, See Figure 13.
Never place your saw on that part of the workplece
that will fall off when the out is made. See FkJure15.
Hold your saw firmly with both hands.
See Figure 16.
WRONG Fig. 15
RIGHT Fig. 16
Depressthe lock-offbuttonand squeeze the switchtrigger
to startyoursaw.Always letthe blade reachfull speed,
then guide yoursaw intothe workplace.
WARNING: The blade coming incontactwith
the workplacebefore it reachesfullspeed could
causeyourcaw to "kickback" towards you resuhing
insedous injury,
When makinga cut usesteady, evenpressure. Forcing
causes roughcuts, couldshortenthe life of yourcaw and
couldcause "kickback."
REMEMBER:
When sawing through work, the lower blade guard
does not cover the blade, ea(poslng it on the
underside of work. Keep your hands and fingers away
from cuttlug area. Any part of your body comlug In
contact with the moving blade win result In serious
Injury.
After you completeyourcut release the trigger and allow
the blade tocome to a complete stop. Do not remove
your saw from workplace while the blade is moving.
CAUTION: When lifting your saw from the
workpiece,the blade isexposed onthe underside of
yoursaw untilthe lower bladeguard closes.Make
sure lowerblade guard isclosedbefore settingyour
saw downon worksurface,
15
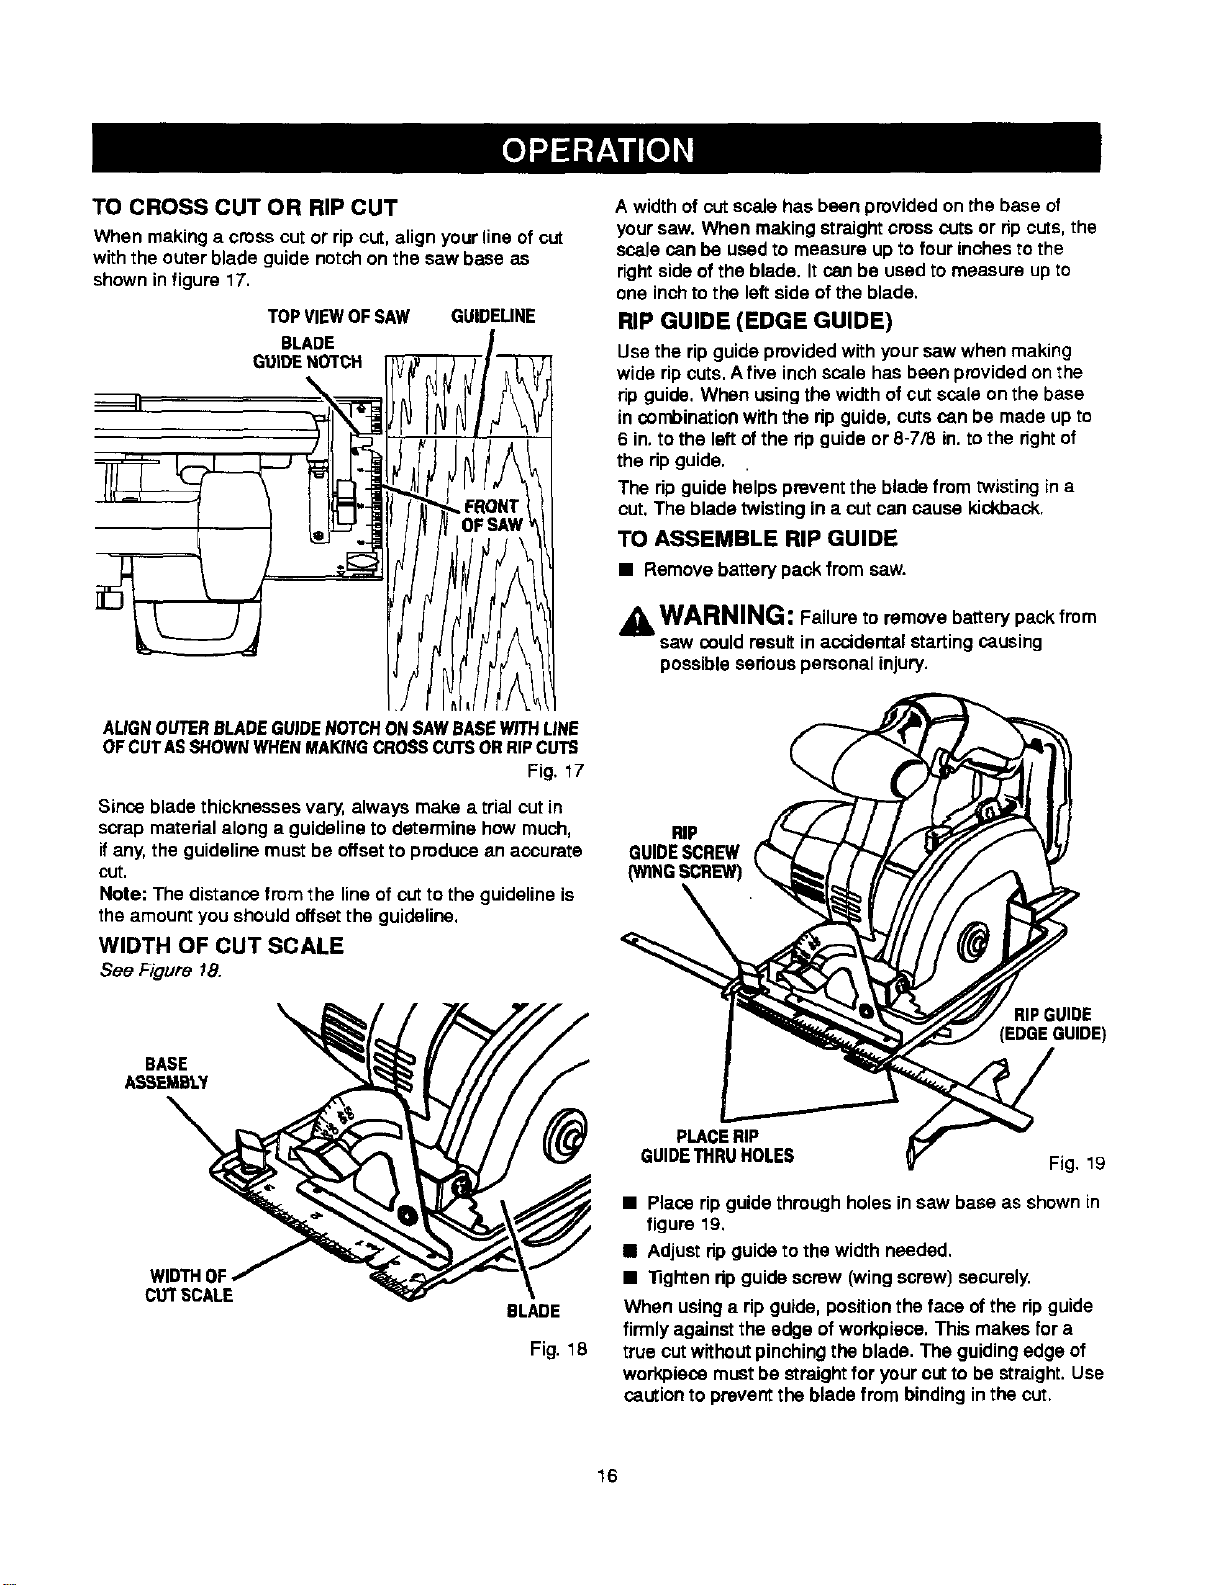
TO CROSS CUT OR RIP CUT
When making a cross cut or rip cut, align your line of cut
with the outer blade guide notch on the saw base as
shown in figure 17.
TOP VIEWOF SAW GUIDELINE
BLADE
GUIDE NOTCH
A widthof cutscale has been provided on the base of
yoursaw. When making straightcrosscutsor ripcuts,the
scale canbe used to measure up to fourinchesto the
rightsideof the blade. Itcan be used to measure up to
one inchto the leftside ofthe blade.
RIP GUIDE (EDGE GUIDE)
Usethe ripguide providedwith yoursaw when making
wide ripcuts.Afive inchscale hasbeen providedonthe
ripguide.When usingthewidth ofcutscale on the base
incombinationwith the dp guide,cutscan be madeup to
6 in.tothe leftofthe ripguideor 8-7/8 in.to the right of
the ripguide.
The ripguide helpspreventthe bladefrom twistingin a
out.The bladetwisting in a cutcan cause kickback.
TO ASSEMBLE RIP GUIDE
• Remove batterypack from saw.
WARNING: Failureto remove batterypackfrom
saw could resultin accidentalstartingcausing
possiblesenouspersonalinjury.
ALIGNOUTERBLADE GUIDENOTCH ON SAWBASEWITH LINE
OF CUTASSHOWNWHEN MAKINGCROSS CUTSOR RIPCUTS
Fig, 17
Since blade thicknesses vary, always make a trial cut in
scrap matedal along a guideline to determine how much,
if any, the guideline must be offset to produce an accurate
cut.
Note: The distance from the line of cut to the guideline is
the amount you should offset the guideline.
WIDTH OF CUT SCALE
See Figure 18.
BASE
ASSEMBLY
RIP
GUIDESCREW
(WINGSCREW)
RIP GUIDE
(EDGEGUIDE)
WIDTHi
C'tTrSCALE
BLADE
Fig. 18
PLACERIP
GUIDETHRUHOLES
Fig. 19
• Place ripguidethrough holesin saw base as shown in
figure 19.
• Adjustripguide tothe width needed.
• "Rghtenripguide screw (wingscrew) securely.
When usinga ripguide,positionthe face ofthe ripguide
firmly againstthe edge ofworkpieca.This makes for a
true cutwithoutpinchingthe blade. The guidingedge of
workpiecomust be straightfor yourcutto be straight. Use
cautionto preventthe bladefrom bindinginthe cut.
16
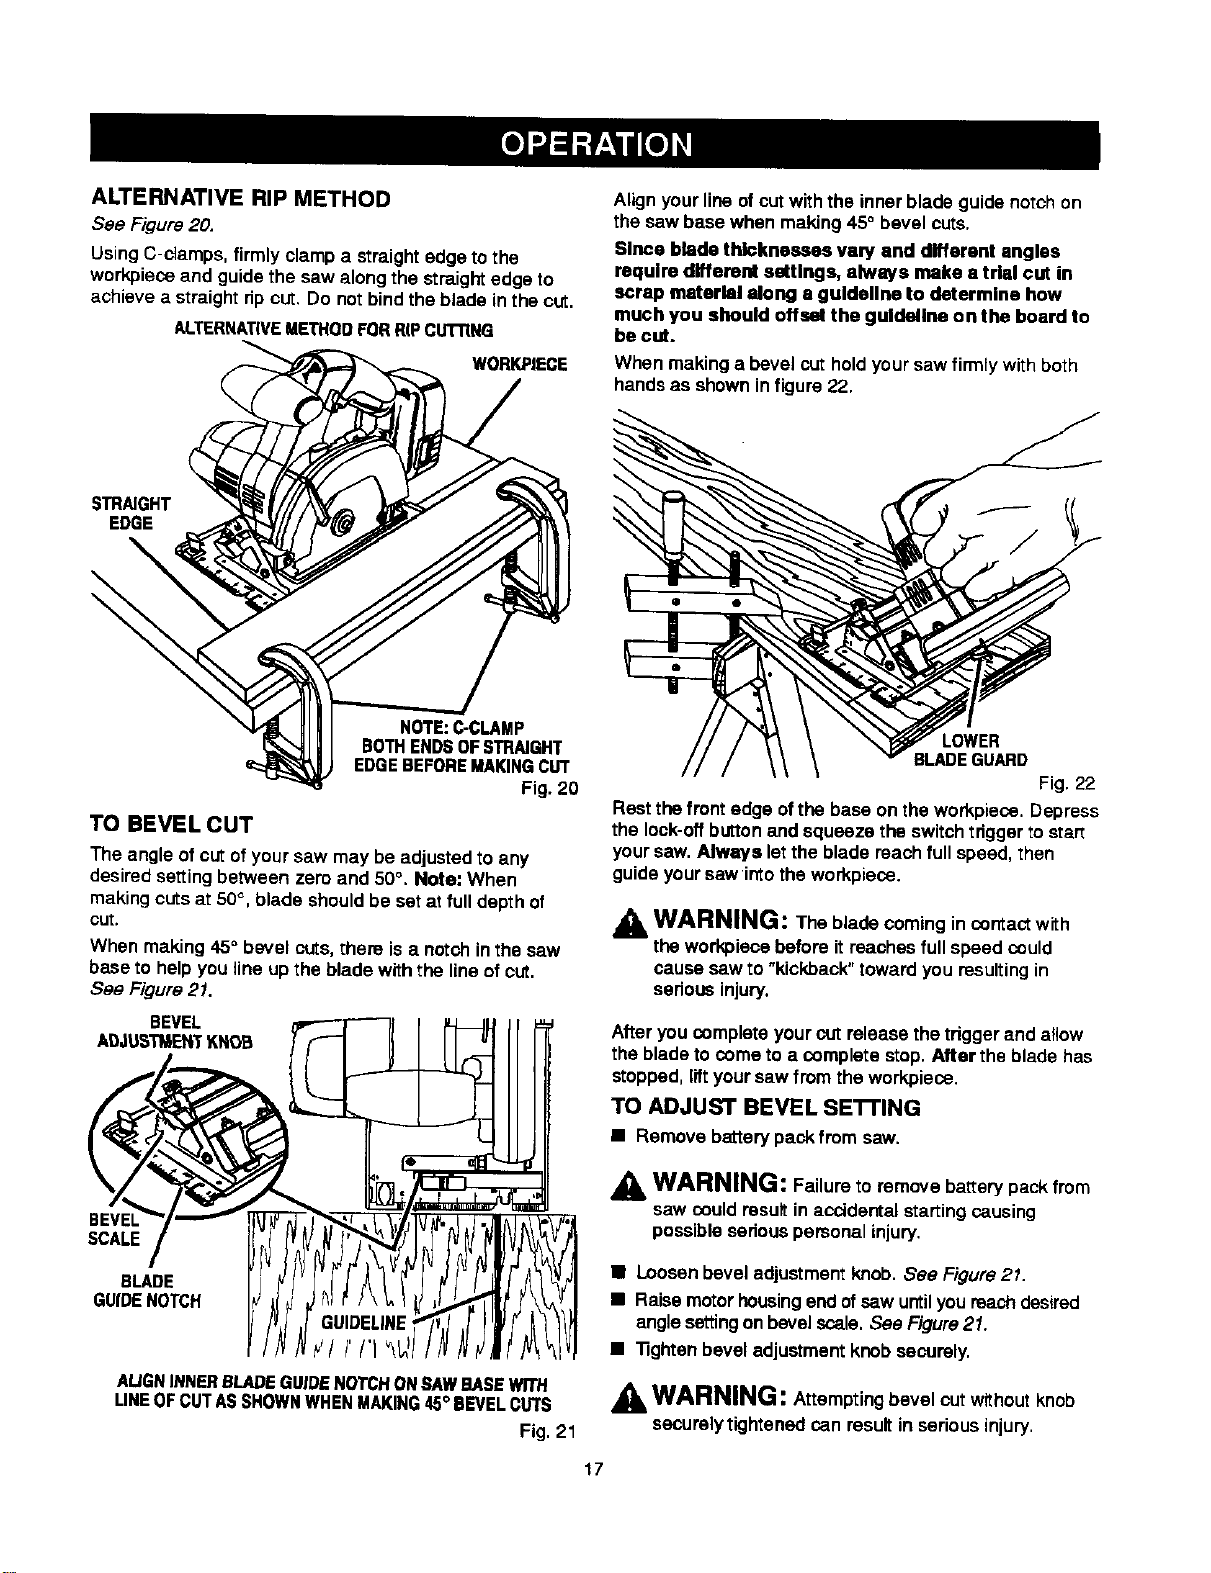
ALTERNATIVE RIP METHOD
See Figure20.
Using C-damps, firmlyclamp a straightedge tothe
workpieceand guide the saw along the straightedge to
achieve a straight ripcut. Do notbind theblade inthe out.
ALTERNATIVEMETHQOFOR RIP CUTTING
WORKPIECE
Align yourline of cutwiththe inner bladeguide notchon
the saw base when making45° bevel cuts.
Since blade thicknesses van/and different angles
require different settings, always make a trial cut in
scrap material along a guideline to determine how
much you should offsel the guldallne on the board to
be cut.
When makinga bevel cut holdyour saw firmlywithboth
hands as shownin figure 22.
STRNGHT
EDGE
\
NOTE:C-CLAMP
BOTHENDSOFSTRAIGHT
EDGEBEFOREMAKINGCUT
Fig. 20
TO BEVEL CUT
The angle ofcut ofyour saw may be adjustedto any
desiredsettingbetween zero and 50°. Note: When
makingcutsat 50°, blade shouldbe setat fulldepthof
CUt.
When making 45° bevel cuts, there is a notch in the saw
base to help you line up the blade with the line of cut.
See Figure 21.
BEVEL
ADJUSTI_EttTKNOB
BEVEl
SCALE
BLADE
GUIDENOTCH
GUIDELINE
l I'I'1
AUGNINNERBLADEGUIDENOTCHONSAWBASEWITH
LINEOFCUTASSHOWNWHENMAKING45°BEVELCUTS
Fig. 21
LOWER
BLADEGUARD
Fig. 22
Rest the front edge of the base on the workpieca. Depress
the lock-off button and squeeze the switch trigger to statt
your saw. Always let the blade reach full speed, then
guide your sawinto the workpieco.
WARNING: The bladecoming in contactwith
the workpiecebefore itreaches fullspeed could
cause saw to "kickback"towardyou resultingin
serious injury.
After youcomplete yourcut release the triggerand allow
the bladeto come to a complete stop.After the blade has
stopped,liftyoursaw from the workpieco.
TO ADJUST BEVEL SE'n'ING
• Remove bmtery packfrom saw.
"4& WARNING: Failureto remove battery pack from
saw could resultin accidentalstartingcausing
possiblesedouspersonalinjury.
• Loosenbevel adjustmentknob. See Figure21.
• Raise motorhousingend ofsaw untilyoureachdesired
angle settingonbevel scale,See Figure21.
• "13ghtenbevel adjustmentknobsecurely.
"Jl WARNING: Attempting bevel cutwithout knob
securelytightened can resultin seriousinjury,
17
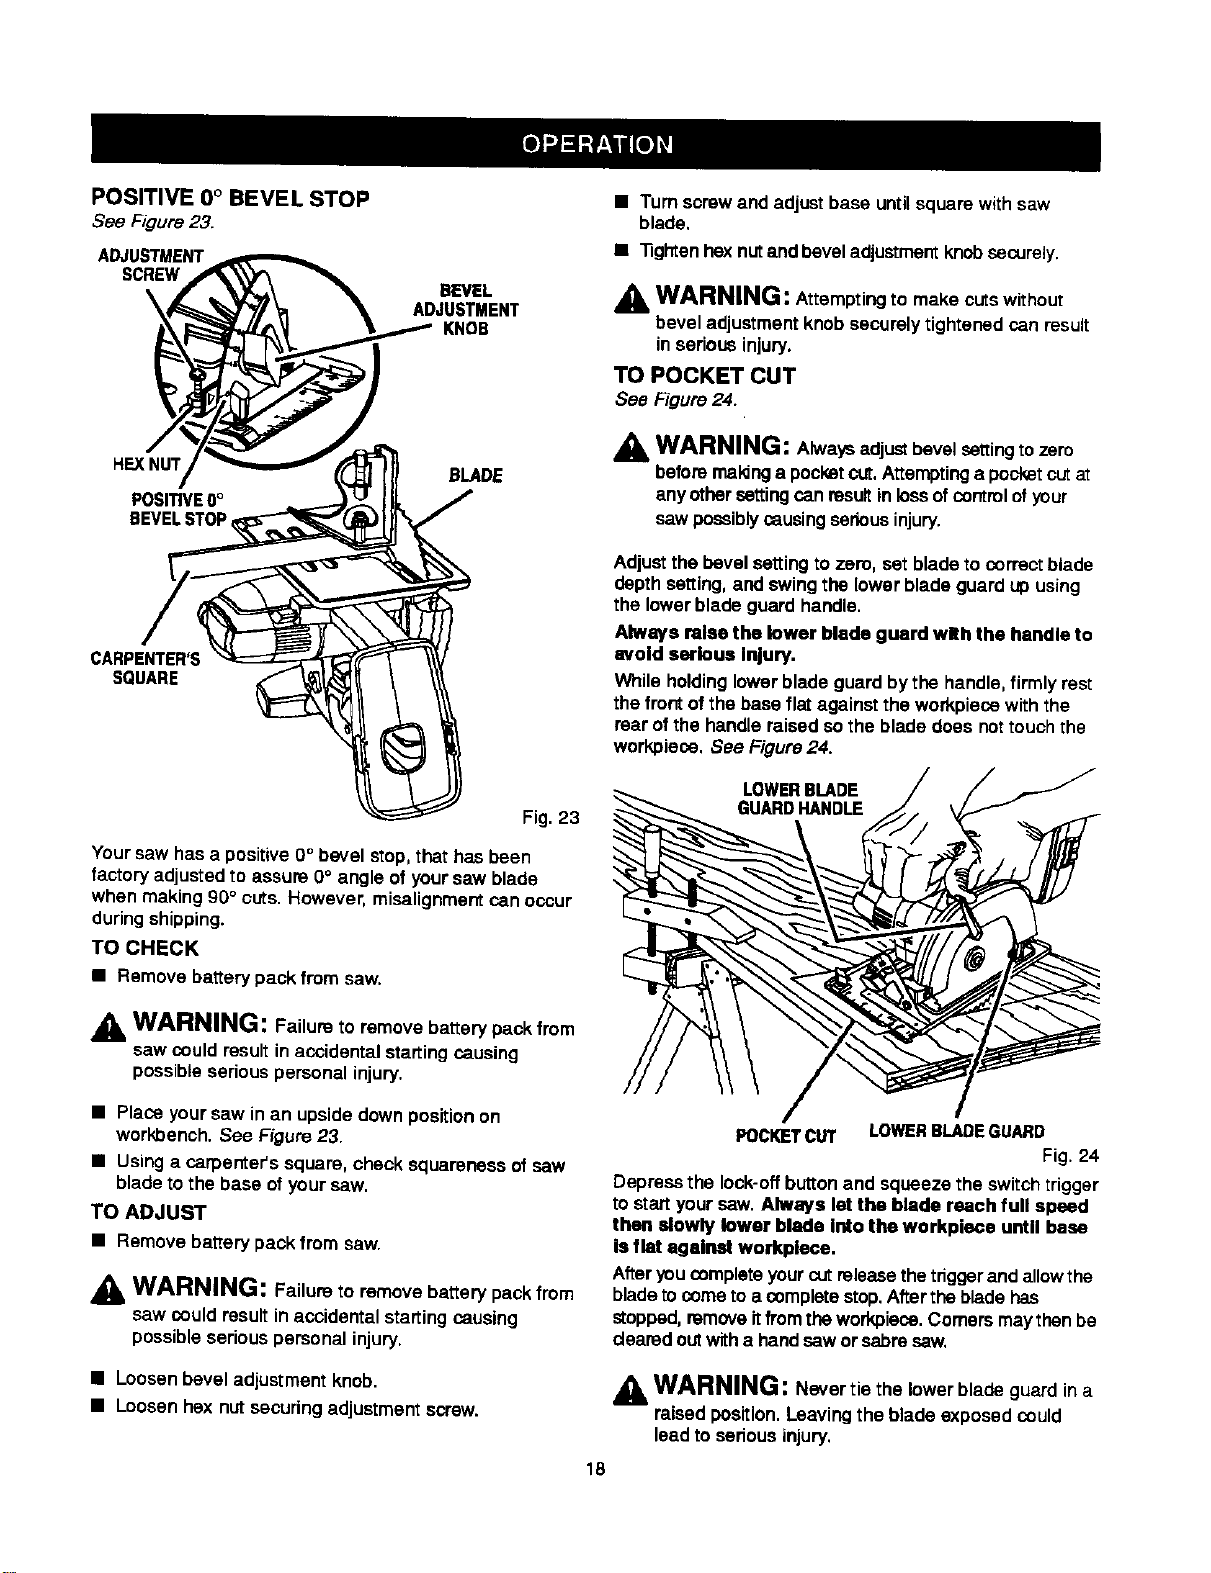
POSITIVE 0° BEVEL STOP
See Figure23.
ADJUSTMENT
SCREW
REVEL
ADJUSTMENT
KNOB
• Turn screwand adjustbase untilsquarewith saw
blade.
• "nghtenhax nutandbeveladjustmentknobsecurely.
"_ WARNING: Attemptingto make cutswithout
bevel adjustmentknobsecurelytightenedcon result
in sadous injury.
TO POCKET CUT
See Figure24.
HEXNUT
POSITIVE0°
BEVELSTOP
BLADE
WARNING: Always adjust bevel setting to zero
beforemeldnga pocket cut.Attemptinga pocketcutat
anyotharsettingcon resultin lossofcontmlofyour
saw possiblycausingseriousinjury.
CARPENTER'S
SQUARE
Adjustthe bevel settingto zero, set bladeto correctblade
depthsetting,and swingthe lower bladeguard up using
the lowerbladeguard handle.
Always raise the lower blade guard wRh the handle to
avoid serious Injury.
While holdinglowerblade guard bythe handle,firmlyrest
the frontof the baseflat againstthe workpiecowiththe
rear ofthe handle raisedsothe blade does nottouchthe
workpiese.See Figure24.
Fig. 23
Yoursaw has a positiveO° bevel stop,that has been
factory adjusted to assure0° angle of your saw blade
when making90° cuts. However, misalignmentcon occur
duringshipping.
TO CHECK
• Remove battery pack from saw,
WARNING: Failure to remove battery pack from
saw couldresultin accidentalstartingcausing
possibleserious personalinjury.
• Place yoursaw in an upsidedown positionon
workbench. See Figure23.
• Usinga carpenter'ssquare, check squarenessof saw
bladeto the base of yoursaw.
TO ADJUST
• Remove battery pack from saw.
WARNING: Failure to remove battery pack from
saw could resultin accidental startingcausing
possible serious personal injury.
• Loosenbevel adjustment knob.
• Loosenhex nut securingadjustmentscrew.
18
LOWERBLADE
GUARD HANDLE
POCKETCUT LOWERBLADEGUARD
Fig. 24
Depressthe lock-offbuttonand squeeze the switchtrigger
tostartyoursaw. Always let the blade reach full speed
then slowly lower blade Intothe workplace until base
is flat against workpisce.
Afteryou complete yourcutreleasethetriggerand allowthe
bladeto come to a complete stop.Aftertheblade has
stopped,removeitfromthaworkpieco.Comersmaythen be
clearedoutwitha hand saw orsabresaw,
WARNING: Never tie the lowerblade guard in a
raisedposition. Leavingthe blade exposedcould
lead toseriousinjury,
A_IL WARNING: When servicing, use onlyidentical
Craftsman replacement parts.Use ofany otherpart
may create a hazard or cause produstdamage.
Avoid using solvents when cleaningplastic parts. Most
plasticsare susceptibleto damage from vadoustypesof
commercialsolventsand may be damaged by theiruse.
Use clean clothsto remove dirt,dust,oil, grease, etc.
-- WARNING: Do not at any time let brake fluids,
gasoline, petroleum-based products, penetrating oils,
etc. come in contact wi_hplastic parts. They contain
chemicals that can damage, weaken or destroy
plastic.
Do not abuse powertools.Abusive practices can damage
toolas well as workpieca.
Onlythe parts shownon parts list, page 21, are intended
to be repaired or replaced by the customer.All other parts
shouldbe replacedat a Sears Service Center.
WARNING: Do not attempt to modifythis toolor
create accessoriesnot recommendedfor use with
this tool.Any such alterationor modification is
misuse and could result ina hazardouscondition
leadingto possiblesshous personalinjury.
BA'I'rERIES
Your saw's battery pack is equippedwith nickel-cadmium
rechargeablebatteries. Lengthof servicefrom each
chargingwilldepend on the type ofwork you are doing.
The batteriesin thistool have been designedto provide
maximum troublefree life.However, likeall batteries, they
willeventually wear out. Do not disassemblebatterypack
and attemptto replacethe batteries. Handlingofthese
batteries, especiallywhen wearing rings and jewelry,
could result ina ssnous bum.
To obtain the longest possible battery life, we suggest the
following:
• Store and charge your batteries in a cool area.
Temperatures above or below normal room
temperature will shorten battery life.
• Never store batteries in a discharged condition.
Recharge them immediately after they are discharged.
• All batteries gradually lose their charge. The higher the
temperature the quicker they lose their charge. If you
store your tool for long pedods of time without using it,
recharge the batteries every month or two. This
practice will prolong battery life.
To preservenaturalresources,please
recycleor disposeofbatteriesproperly.
This productcontains nickel-cadmium
battery. Local,state, or federal lawsmay
prohibitdisposalof nickel-cadmium
batteries inordinarytrash.
Consultyour localwaste authorityfor information
regarding available recycling and/ordisposaloptions.
BA'I'rERY PACK REMOVAL AND
PREPARATION FOR RECYCLING
WARNING: Upon removal,cover the battery
pack'sterminalswith heavy duty adhesivetape. Do
notattempt to destroyor disassemblebatterypackor
remove anyof itscomponents.Nickel-cadmium
batteriesmust be recycledor disposedofproperly.
Also, nevertouchbothterminalswith metalobjects
and/orbodypartsas shortcircuitmay result.Keep
away from children.Failureto complywith these
warningscould resultin fire and/orseriousinjury.
19
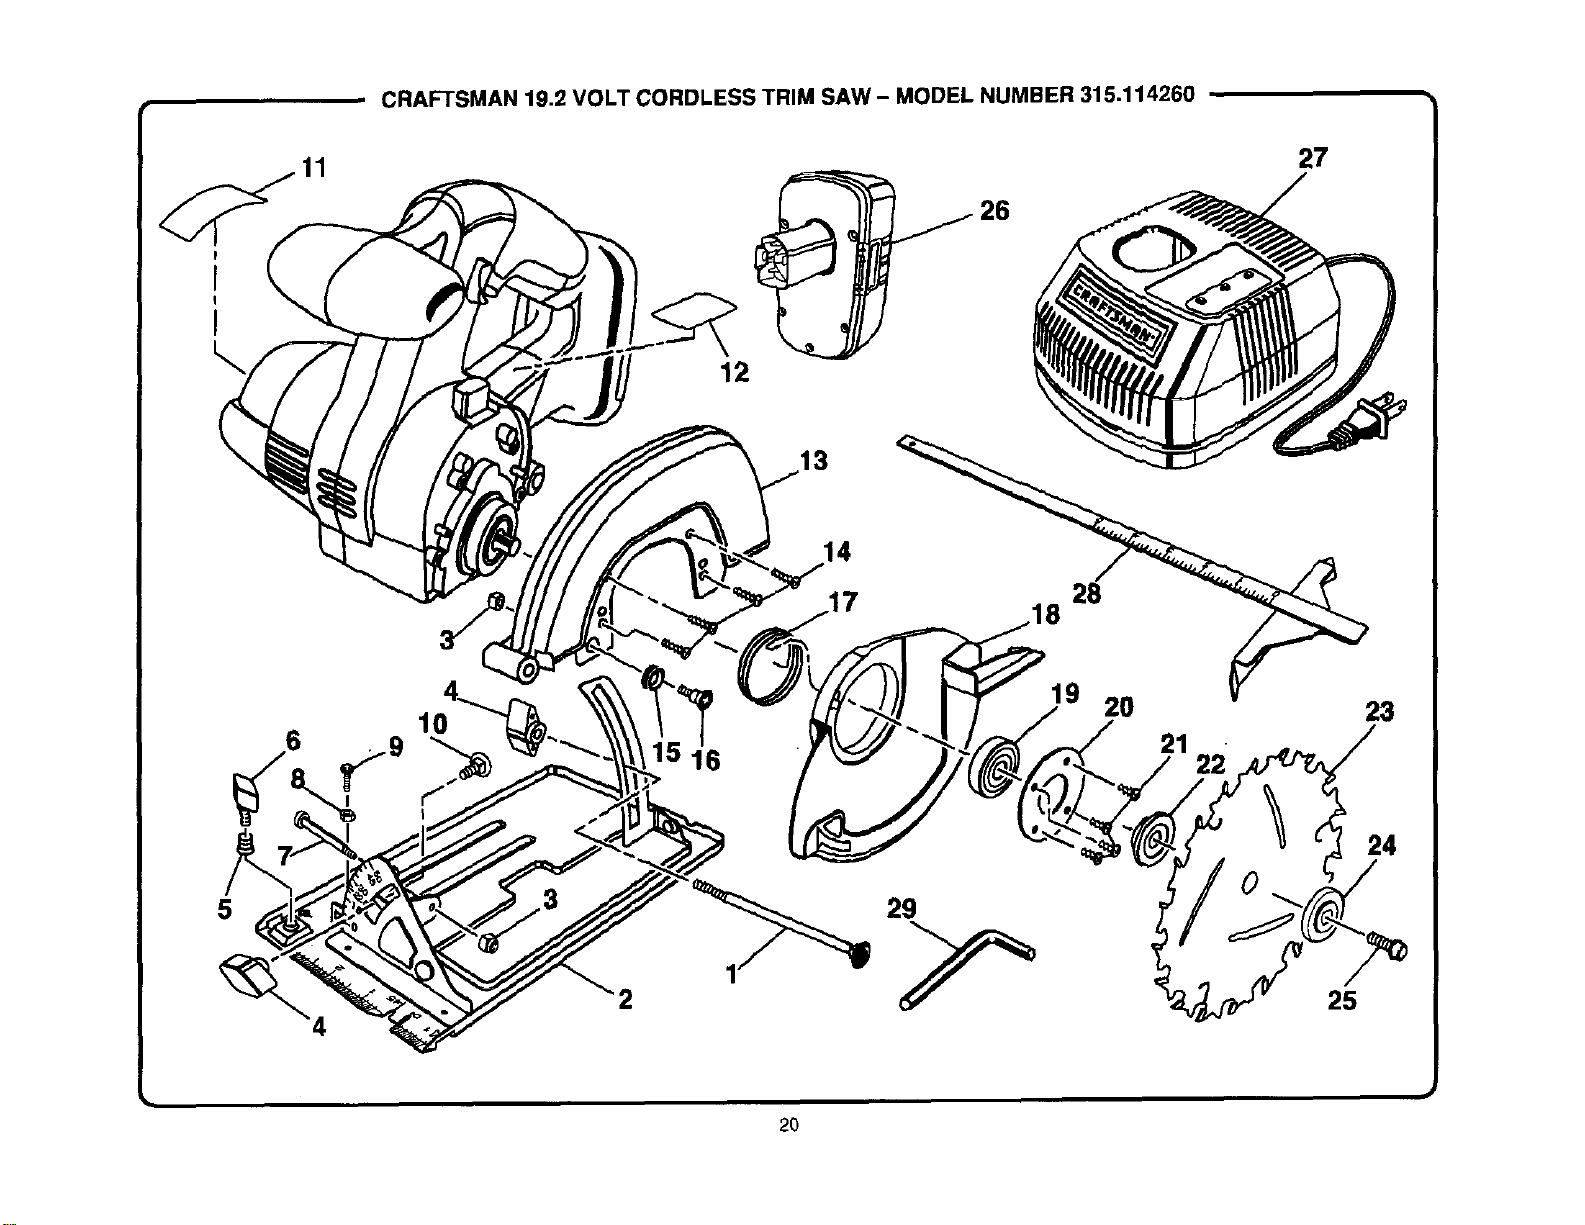
CRAFTSMAN 19.2 VOLT CORDLESS TRIM SAW - MODEL NUMBER 315.114260
11
12
13
27
14
28
5
16
19
20
21
23
24
25
2O
1
CRAFTSMAN 19.2 VOLT CORDLESS TRIM SAW - MODEL NUMBER 315.114260 ,
The model numberwillbe foundona plateattachedtothe motorhousing,Alwaysmentionthe modelnumberinallcorrespondenceregardingyour
CORDLESS TRIM SAW orwhenorderingrepairparts.
SEE BACK PAGE FOR PARTS ORDERING INSTRUCTIONS
J
Kay
No.
1
2
3
4
5
6
7
8
9
10
11
12
13
14
15
Part
Number
975546-000
3025516
975544-000
5224502
975552-000
975551-000
975549-000
975559-000
975558-000
975550-000
984380-001
975557-000
6455607
6620803
5217802
PARTS LIST
Description Qty.
CarriageBolt(M6 x 102 ram)..................... 1
BaseAssembly.......................................... 1
LockNut..................................................... 2
Knob........................................................... 2
Spdng......................................................... 1
Wing Screw................................................ 1
Base Screw................................................ 1
Hex Nut ...................................................... 1
Screw ......................................................... 1
CarriageBolt(M6 x 13 ram)....................... 1
DataPlate .................................................. 1
WarningLabel............................................ 1
UpperBladeGuard.................................... 1
UpperBladeGuardScrew......................... 4
Bumper....................................................... 1
Key Part
No. Number
16 6619302
17 6867201
18 5599401
19 6807001
20 6850303
21 6620104
2_2 6112004
23 *+*
24 975533-000
25 975532-000
26 ** ItemNo,911041
27 ** ItemNo.911375
28 975554-000
29 975553-000
30 3063677
3073062
983000-197
Description Qty.
BumperScrew............................................ 1
TorsionSpring............................................ 1
LowerBladeGuard.................................... 1
BallBearing(NTN #60OOZZ)..................... 1
BearingRetainer........................................ 1
BearingRetainerScrew............................. 4
InnerBladeWasher................................... 1
Saw Blade.................................................. 1
Outer BladeWasher .................................. 1
BladeScrew............................................... 1
Charger(1425301)..................................... 1
BatteryPack (1323517 and 1323903) ....... 1
RipGuide................................................... 1
BladeWrench(5 mm Hex Key)................. 1
CarryingCase- Not Shown...................... 1
ComboCarrying Case - NotShown.......... 1
Operator'sManual
* Available At YoUrNemrestSears Catalog Order Or Retail Store
** Can Be Purchased Thru RSOS (Retail SpecialOrder System)
21