
Loading ...
Terms & Policy
Arovast Corporation (“Arovast”) warrants this
product to the original purchaser to be free from
defects in material and workmanship, under
normal use and conditions, for a period of 2 years
from the date of original purchase.
Arovast agrees, at our option during the
warranty period, to repair any defect in material
or workmanship or furnish an equal product in
exchange without charge, subject to verification
of the defect or malfunction and proof of the date
of purchase.
There is no other express warranty. This warranty
does not apply:
• If the product has been modified from its
original condition;
• If the product has not been used in
accordance with directions and instructions
in the user manual;
• To damages or defects caused by accident,
abuse, misuse or improper or inadequate
maintenance;
• To damages or defects caused by service
or repair of the product performed by an
unauthorized service provider or by anyone
other than Arovast;
• To damages or defects occurring during
commercial use, rental use, or any use for
which the product is not intended;
• To damages or defects exceeding the cost
of the product.
Arovast will not be liable for indirect, incidental, or
consequential damages in connection with the use
of the product covered by this warranty.
This warranty extends only to the original consumer
purchaser of the product and is not transferable to
any subsequent owner of the product regardless
of whether the product is transferred during the
specified term of the warranty.
This warranty does not extend to products
purchased from unauthorized sellers. Arovast’s
warranty extends only to products purchased from
authorized sellers that are subject to Arovast’s
quality controls and have agreed to follow its
quality controls.
All implied warranties are limited to the period of
this limited warranty.
This warranty gives you specific legal rights
and you may also have other rights which
vary from state to state. Some states do not
allow the exclusion or limitation of incidental or
consequential damages, so the above limitation or
exclusion may not apply to you.
If you discover that your product is defective within
the specified warranty period, please contact
Customer Support via [email protected].
DO NOT dispose of your product before
contacting us. Once our Customer Support Team
has approved your request, please return the
product with a copy of the invoice and order ID.
Every Levoit product automatically includes a
2-year warranty. To make the customer support
process quick and easy, register your product
online at www.levoit.com/warranty.
This warranty is made by:
Arovast Corporation
1202 N. Miller St., Suite A
Anaheim, CA 92806
Product
Dual 150 Ultrasonic
Cool Mist Humidifier
Model LUH-D302-WUS
For your own reference, we strongly recommend that
you record your order ID and date of purchase.
Date of Purchase
Order ID
WARRANTY INFORMATION
CUSTOMER SUPPORT
If you have any questions or concerns about
your new product, please contact our helpful
Customer Support Team.
Arovast Corporation
1202 N. Miller St., Suite A
Anaheim, CA 92806
Email: [email protected]
Toll-Free: 888 7268520
MonFri, 9:00 am5:00 pm PST/PDT
Support Hours
*Please have your order invoice and order ID
ready before contacting Customer Support.
DL011422RF-M1_LUH-D302-WUS
76 8 9 10
Figure 1.11
Note:
For best results,
we recommend using
pure essential oil.
5. Optionally, add 10-15
drops of essential oil
into the water tank for
aromatherapy. Figure 1.11
Filling & Refilling (cont.)
USING YOUR HUMIDIFIER
1. Plug in the humidifier. Rotate the Control Knob
clockwise to turn the humidifier on. Adjust the
knob to your desired mist level. Figure 2.1
2. Rotate the nozzle to adjust the direction of the
mist. [Figure 2.2]
3. When your room has reached your preferred
humidity level, turn the humidifier to a lower
setting, or turn it o.
4. Rotate the Control Knob counterclockwise to
turn the humidifier o.
1. Remove the water filter from the tank by
rotating it counterclockwise and lifting it out.
Figure 3.5
2. Fill the tank with 3 US cups / 710 mL of distilled
white vinegar. Figure 3.6
Figure 2.1 Figure 2.2
Note: If there is no water in the tank or the
tank is removed, the humidifier will stop
misting and the Refill Indicator light will turn
on. Refill the tank and properly place it on the
base to use your humidifier.
Figure 2.3
Figure 2.4
Figure 2.5
Important Tips
Your humidifier must have the correct level of
water in the base chamber to work properly. If
there is too much water in the base chamber,
the humidifier cannot create mist.
• Never pour water directly into the base
chamber. Figure 2.3
• Only add water to the water tank. The
humidifier will automatically release the correct
amount of water into the base chamber.
Note: The max water line is only for this purpose.
Do not pour water into the base chamber.
• Avoid moving or shaking the humidifier.
Figure 2.4 This may cause the water tank to
release too much water into the base chamber.
• Before moving the humidifier, turn it o,
unplug it, and remove the water tank.
• If your humidifier doesn’t produce mist
correctly, check the max water line to see if
there is too much water in the base chamber.
Pour out extra water if water is over the max
line. Figure 2.5
Figure 3.2
Figure 3.9 Figure 3.10
Figure 3.1
Figure 3.7 Figure 3.8
Figure 3.3
Figure 3.5 Figure 3.6
Figure 3.4
Figure 3.14
Figure 3.15
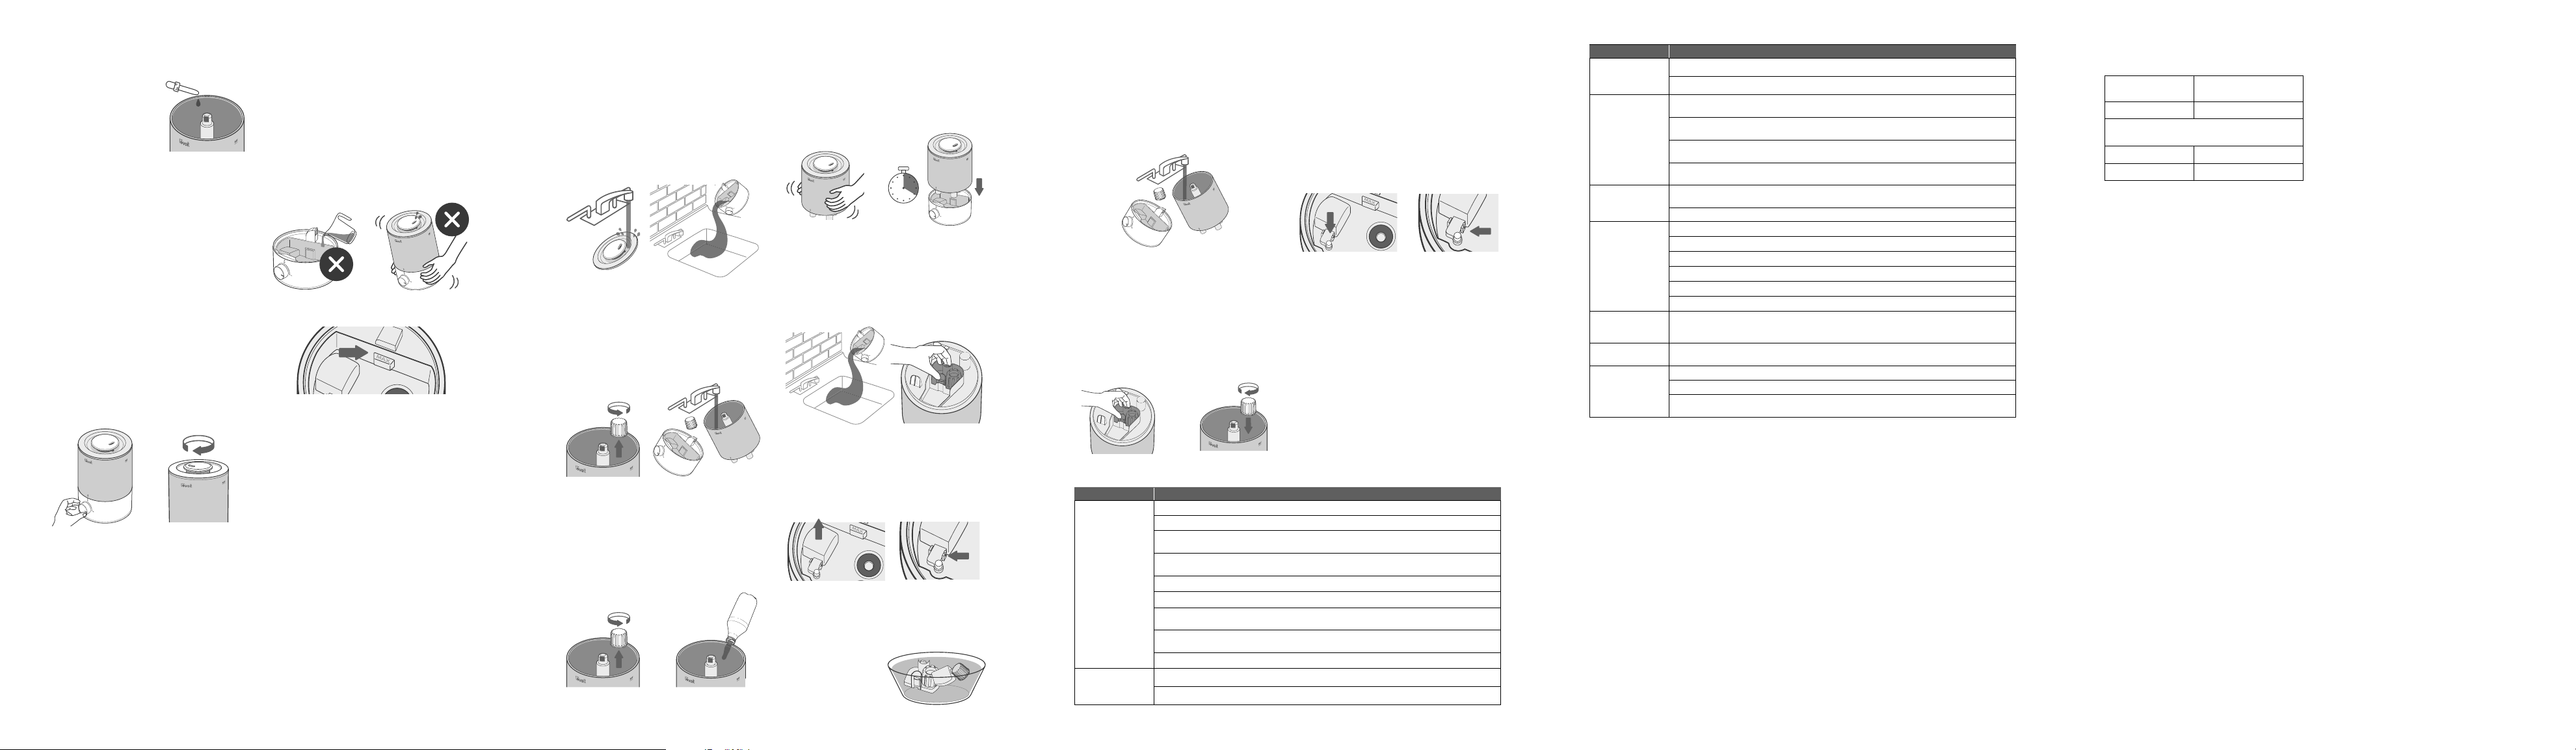
CARE & MAINTENANCE
Note:
• All maintenance should be done on a water-
resistant surface, such as a kitchen counter.
• Change the water daily to avoid bacteria growth.
• Use a tissue or cloth to clean the nozzle regularly.
• If not using the humidifier for 3 days or longer,
do not leave water inside. Clean and dry the
humidifier instead.
Note: When pouring out water, hold
down the float to ensure that it does
not fall out of the base chamber.
Note:
• Never immerse the base in water or liquid.
Do not place any part of the humidifier in
a dishwasher.
• Do not use detergents to clean the humidifier.
Cleaning
Descaling Your Humidifier
You should clean your humidifier every 3 days,
and when you’re ready to store it.
4. Remove the water filter assembly from the
tank by rotating it counterclockwise and lifting
it out. Figure 3.3
5. Rinse the tank, water filter assembly, and
base chamber with room temperature water.
Figure 3.4
1. Unplug the humidifier.
2. Remove and rinse the water tank cover. Figure 3.1
3. Remove the water tank from the base and pour
out any water from the tank and base chamber.
Figure 3.2
Cleaning (cont.) Descaling Your Humidifier (cont.)
3. Replace the tank cover and swish the vinegar
around the tank. Figure 3.7
4. Place the tank on the base and soak for
15–20 minutes. Vinegar will drain into the base
chamber and loosen scale (mineral buildup) in
the tank and in the base chamber (including the
transducer and float). Figure 3.8
5. Remove the tank, remove the tank cover, and
pour out any vinegar. Figure 3.9
6. Flip the tank over and remove the noise
silencer. To remove the noise silencer, press
the release tabs and gently pull away from the
humidifier. Figure 3.10
7. Remove the float from the base chamber by
pulling up one end of the float Figure 3.11 and
pulling the shaft out from the float brackets. One
side of the float brackets is open (U-shaped) to
allow the shaft to be removed. Figure 3.12
8. Place the float, water filter assembly, and noise
silencer in a small container. Fill with enough
vinegar to cover them. Soak for 15–20 minutes.
Figure 3.13
Figure 3.11
Figure 3.17
Figure 3.12
Figure 3.18
Figure 3.13
9. Use the cleaning brush and a soft cloth to
remove scale from all parts.
10. Rinse all parts until any vinegar smell is
completely gone. Figure 3.14
11. Dry all parts with a cloth. Make sure all parts are
completely dry before reassembling or storing.
Reassembling
1. Flip the water tank over and place the noise
silencer back into the tank. Figure 3.15
2. Place the water filter assembly back into the
tank and rotate it clockwise to secure it in
place. Figure 3.16
3. Place the float back into the base chamber:
a. Make sure the correct side of the float is
facing up. Figure 3.17
b. Insert the smaller prong into the closed
side of the float brackets. Figure 3.18
c. Place the larger prong into the open
Ushaped side of the float brackets.
4. Place the tank back on the base. Refill the
tank, if necessary.
5. Place the tank properly on the base and place
the tank cover on the water tank.
Storing
Replacing the Filter Assembly
Follow the cleaning instructions (see page 6) and
allow all parts to dry completely before storing.
Store in a cool, dry location.
If the filter assembly is damaged or water
cannot flow into the base chamber, the filter
or filter assembly needs to be replaced. For
more information, contact Customer Support
(see page 10).
Figure 3.16
Problem Possible Solution
Little or no mist
comes out.
Turn the mist level to a higher setting.
Fill the water tank.
There may be too much water in the base chamber. Empty the base chamber. Refill the water tank
(not the base chamber) and place the water tank properly onto the base.
Make sure the air inlet on the bottom of the base is not blocked. The humidifier should not be set on
carpet or other surfaces that may block the air inlet.
Make sure the nozzle is not blocked or clogged.
Make sure the humidifier is on a level surface.
The water temperature may be too low. Turn the mist level to the highest setting and let the
humidifier run for a while, then adjust to the desired setting.
If the water tank or base was washed with detergent, rinse thoroughly with clean water to remove
any detergent.
Clean the water filter assembly (see page 6) or replace it with a new one (see page 10).
Humidifier doesn’t
turn on, or turns o
unexpectedly.
Plug in the humidifier and turn it on.
Add purified or distilled water to the water tank.
Problem Possible Solution
Humidifier produces
an unusual smell.
If the humidifier is new, unplug and rinse all parts, then place in a cool, dry place for 12 hours.
Clean the water tank and base chamber (see Care & Maintenance, page 6).
Humidifier makes
a loud or unusual
noise.
Make sure the water tank is properly in place (see Getting Started, page 5).
Set mist level to a lower setting.
Empty the base chamber. Refill the water tank (not the base chamber) and place the water tank
properly onto the base.
The humidifier may be malfunctioning. Stop using the humidifier and contact Customer Support (see
page 10).
White scale (mineral
buildup) appears
around the humidifier.
We recommend using purified or distilled water to fill the humidifier. Avoid using water with high
mineral content.
Clean the humidifier (see Care & Maintenance, page 6).
Water leaks from the
humidifier.
Make sure the silicone sealing ring around the water outlet valve is secure.
Avoid running the humidifier in a room with high relative humidity.
Wipe any excess water o the top and bottom of the base.
Do not shake the humidifier.
Make sure to place the humidifier on a flat, level surface.
Check the water tank for leaks. If there are leaks, contact Customer Support (see page 10).
Condensation forms
around humidifier or
windows.
Humidity may be too high. Turn down the mist level, turn o the humidifier, or open a door or window
in the room.
Mold grows inside
the humidifier.
Clean the water tank and base chamber regularly (see Care & Maintenance, page 6).
Refill Indicator Light
turns on.
Fill the water tank.
Place the water tank properly on the base.
Clean the water filter (see page 6) or replace it with a new one. To request a new water filter, contact
Customer Support (see page 10).
FEDERAL COMMUNICATION COMMISSION INTERFERENCE STATEMENT PART 18
FCC SDOC SUPPLIER’S DECLARATION OF CONFORMITY
This device complies with part 18 of the FCC Rules.
This equipment generates and uses ISM frequency energy and if not installed and used properly, that is in strict accordance with
the manufacturer’s instructions, may cause interference to radio and television reception. It has been type tested and found to
comply with limits for an ISM Equipment pursuant to part 18 of FCC Rules, which are designed to provide reasonable protection
against such interference in a residential installation. However, there is no guarantee that interference will not occur in a particular
installation. If this equipment does cause interference to radio or television reception, which can be determined by tuning the
equipment o and on, the user is encouraged to try to correct the interference by one or more of the following:
• Reorient the receiving antenna of radio or television.
• Relocate the equipment with respect to the receiver.
• Move the equipment away from the receiver.
• Plug the equipment into a dierent outlet so that the equipment and receiver are on dierent branch circuits.
Conduct only the user maintenance found in this manual. Other maintenance and servicing can cause harmful interference
and can void the required FCC compliance. The manufacturer is not responsible for any radio or TV interference cause by
unauthorized modification to the equipment. It is the responsibility of the user to correct such interference.
Arovast Corporation hereby declares that this equipment is in compliance with the FCC Part 18 Subpart B. The declaration of
conformity may be consulted in the support section of our Web site, accessible from www.levoit.com