Quiet Air rangehoods take the noise out of the kitchen.
Call Glem Service on 1 300 307 917 if in doubt.
Quiet Air Rangehoods are a product of Glem Gas Australasia Pty. Ltd.
INSTALLATION AND OPERATION GUIDE
Rangehood models GQA90SC - GQA120TBLED - GQA9OTBLED - GQA85UC
OFF BOARD RANGEHOOD SOLUTIONS
EDITION 2
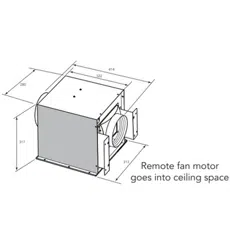
The fan motor and housing are located separate from the hood. If there isn’t a space available in
which to locate the fan motor (such as in an apartment) then this rangehood should be considered
unsuitable for installation.
2
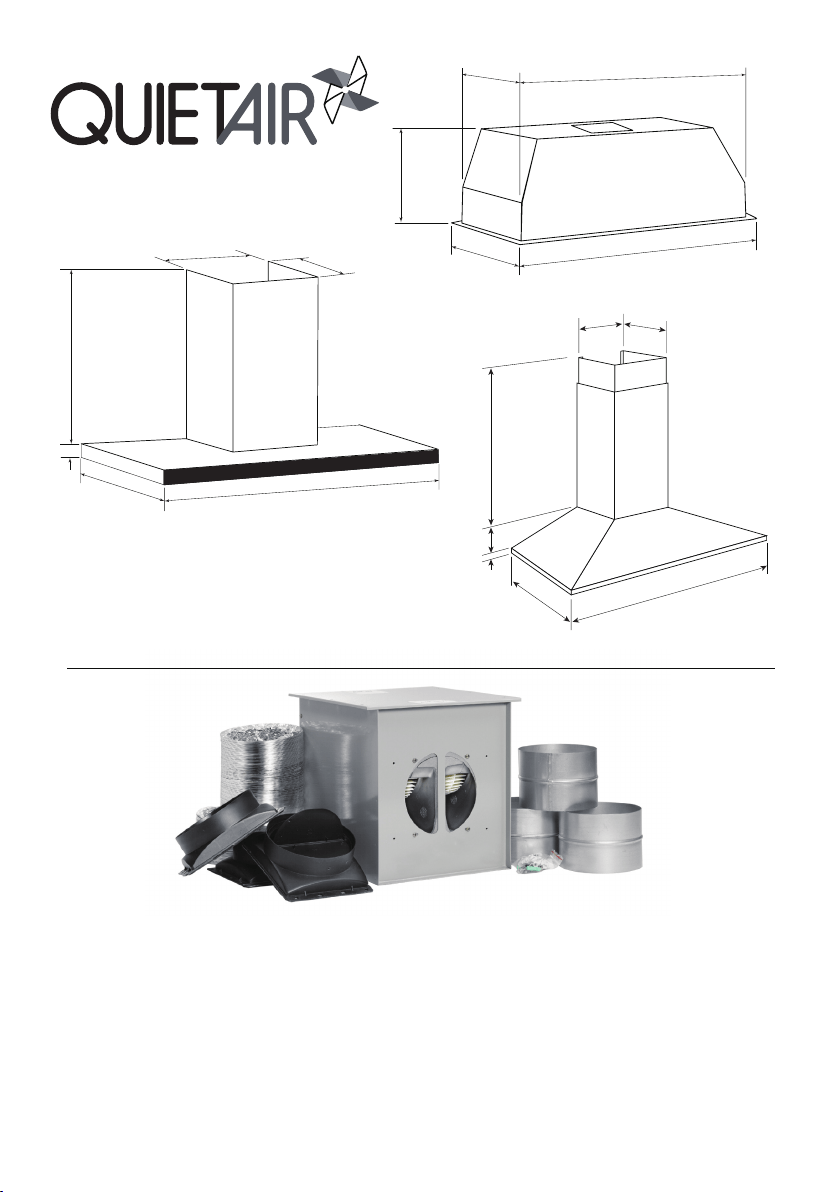
INCLUDED
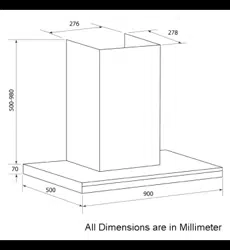
300
282
850
276
278
500-980
70
500
900/1200
30
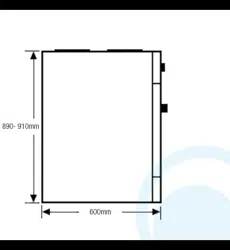
80
980 max
500
276 278
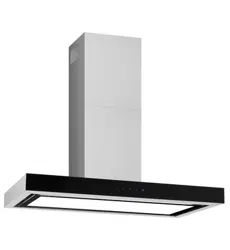
MODELS GQA90TBLED and GQA120TBLED
MODEL GQA85UC
MODEL GQA90SC
FLEXIBLE DUCTING X 2
CONNECTOR SLEEVE X 3
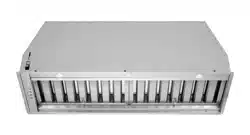
REMOTE FAN MOTOR UNIT
BLACK ATTACHMENT MODULE X 3
FASTENERS AND FITTINGS
MOTOR MOUNTING BRACKET X 2
FOR VERTICAL MOUNTING
NOTE: We do not include the
external vent.
OFF BOARD RANGEHOOD SOLUTIONS
CHIMNEY (FLUE) TOP MOUNTING
BRACKET - (CANOPY HOODS)
INSTRUCTION BOOK
2 X CHIMNEY (FLUE) LENGTHS ON
CANOPY MODELS ONLY
3 MESH FILTERS - GQA90SC ONLY
PATTERN FOR WALL MOUNTED
HOODS
900
263 827
500 min
3
MODEL
Date of Purchase
Retailer or supplier
Invoice number
properly trained in the use of the rangehood.
OFF BOARD RANGEHOOD SOLUTIONS
CONGRATULATIONS
Thank you for purchasing the new Quiet Air rangehood.
This manual has been written to assist you and instruct you in the operation of your new Quiet Air
rangehood. It will help you get the best performance and make full use of the rangehood’s features.
The safety precautions and warnings are listed for your safety, and the safety of others when
operating this rangehood.
Please keep this manual in a safe place for future reference.
This rangehood has been designed for use in a domestic cooking environment. Any other application
other than for domestic (household) use is considered inappropriate. The manufacturer accepts no
responsibility in the event of problems caused by improper use, incorrect use or faulty installation. A
signed installation certificate including details of the installer should be retained for warranty service.
IMPORTANT!
This appliance is designed and intended for use in a domestic household application.
It is not suitable for any non domestic application.
IT SHOULD NOT BE USED IN A COMMERCIAL ENVIRONMENT.
The appliance guarantee will be void if the appliance is used within a
non domestic environment. This includes semi commercial, commercial
or communal applications such as clubs and schools.
MODEL NUMBER DETAILS ARE ON THE INSIDE OF THE RANGEHOOD.
Quiet Air Rangehoods have been designed and constructed to meet the following standards:
AS/NZ 1530.3 Early Fire Hazard properties - flexible ducting

FIRST TIME USE
IMPORTANT !
Remove all packing material and literature from the rangehood before connecting the electrical
supply.
A protective plastic maybe used to protect the stainless steel and plastic control panel. This must be
removed we strongly recommend removing the film prior to installing the rangehood.
IMPORTANT !
• DO NOT spray aerosols in the vicinity of your cooking area while it is in operation.
• DO NOT allow young children to use the rangehood
• DO NOT touch surfaces when they are hot
This appliance is not recommended for use in marine craft, caravans or mobile homes.
If the rangehood fails to operate correctly, call Glem Gas Australasia Pty Ltd on 1300 307 917
or their appointed agent for service. DO NOT ATTEMPT REPAIRS YOURSELF.
Glem Gas Australasia Pty. Ltd. does not accept any responsibility for any damage coming from
inappropriate, incorrect and irrational use. For more detailed information, refer to the Warranty Card.
Contact Glem Gas Australasia Pty. Ltd. on 1300 307 917 for all service enquiries.
DO NOT MODIFY THIS APPLIANCE
DO NOT INSTALL IF THE RANGEHOOD IS DAMAGED
NOTE:
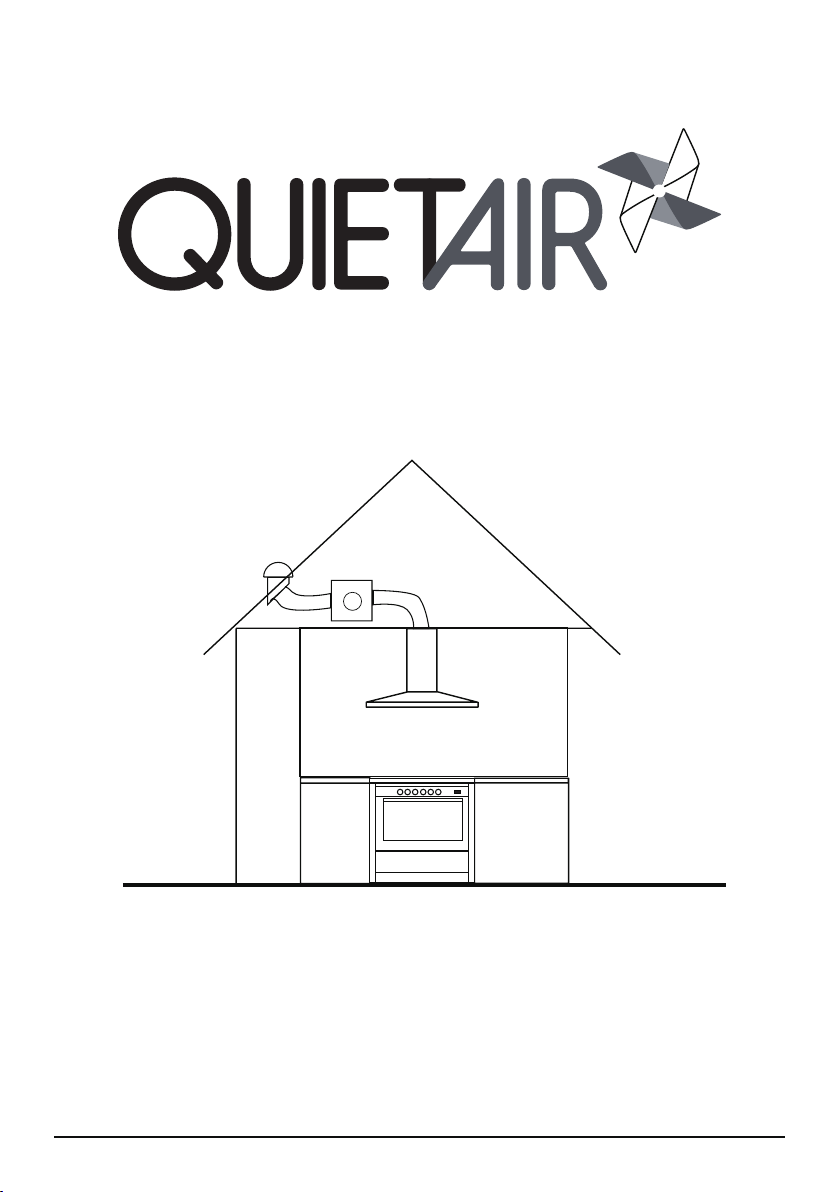
FAN MOTOR LOCATION
Quiet Air Rangehoods achieve low noise levels due to the remote location of the main fan motor
assembly. Typically this asssembly is installed remotely inside the roof space above the rangehood.
In some cases the fan assembly can be installed in another location however the intention of the
range-hood is for installation inside a ceiling cavity. If you are in doubt call Glem Gas service team on
1300 307 917 or email on [email protected].
The remote motor assembly is NOT weather proof in any way and is only for internal installation.
Quiet Air Rangehoods are not considered to be suitable for installation in an apartment or dwelling
4
Roof Space fan motor location
317
280
414
322
313

SAFETY WARNINGS
Please read all points below before attempting to operate the rangehood.
BEFORE INSTALLATION
• The manufacturer will not be held liable for any damages resulting from incorrect or
improper installation.
•
servicing.
•
•
inside the hood. Ensure that the rangehood is correctly earthed.
• If the hood is used in conjunction with non-electrical appliances (gas burning appliance), a
sufficient degree of ventilation must be guaranteed in the room in order to prevent the
backflow of exhaust gas. The kitchen must have an opening directly to the open air in
order to guarantee the entry of clean air
•
• NOTE: Two or more people are required to install or move this appliance.
Failure to do so can cause physical injuries.
2. CORRECT USAGE
• The range hood has been designed only for domestic use to eliminate kitchen fumes.
• Never use the hood for purposes other than what it has not been designed for.
does not engulf the pan sides.
• Deep fat fryers must be continuously monitored during use: overheated oil can burst into
• The hood should not be used by children or persons not instructed in its correct use.
warranty.
• Turn the rangehood on prior to commencement of cooking and leave it to run for
• Never ignite gas burners and leave them running without a vessel.
3. MAINTENANCE
• Proper maintenance of the range hood will assure proper performance of the unit.
• Disconnect the hood from the main supply before carrying out any maintenance work.
• Before performing any cleaning or maintenance task disconnect the rangehood from the
mains by unplugging it.
IMPORTANT:
if in doubt call Glem Gas service on 1 300 307 917
5
OPERATION
Quiet Air rangehoods have almost silent operation when installed correctly. The only sound is the
movement of air through the filters. We recommend using the supplied ducting or rigid ducting such
as PVC pipe for the most efficient result. We may not provide warranty service if an alternative
flexible ducting is used in installation.
Please call Glem Gas Service on 1300 307 917 if you require further information.
CONTROLS
The rangehood is operated using push button or touch controls.
TOUCH CONTROL - TB models
The on/off switch turns the rangehood on and off.
The light switch turns the lights on and off.
The fan buttons turn the fan on to 3 speed settings.
ELECTRONIC BUTTONS
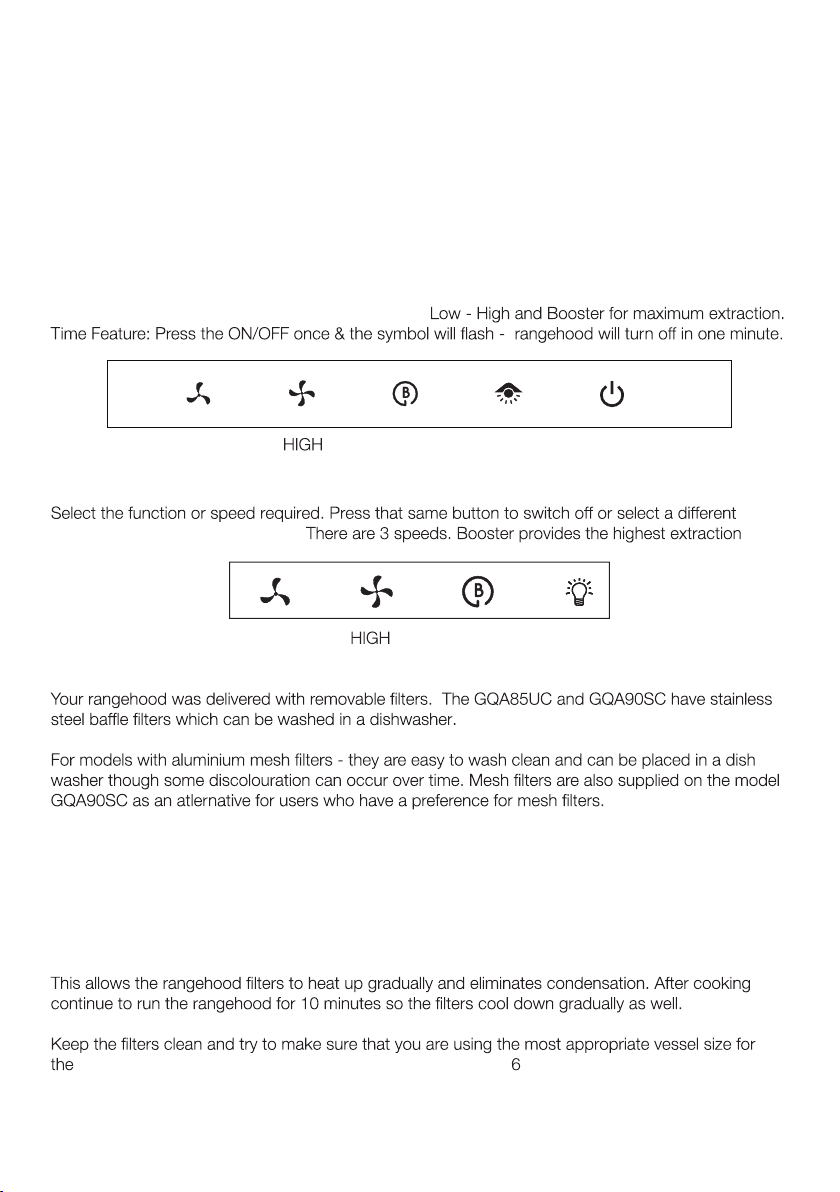
LOW
BOOSTER
LIGHT ON/OFF
LOW
BOOSTER
LIGHT
fan
speed by pressing another button.
GREASE FILTERS
-
AVOIDING CONDENSATION
In some circumstances condensation can build up in your rangehood. While this is not essentially a
major problem it is a good idea to minimise condensation where possible so it doesn’t drip into the
food being prepared. There are many variables that can create increases in condensation - climate,
installation location and type of cooktop with induction being the biggest producer of steam.
One way to minimise condensation is to operate the rangehood for a few minutes prior to cooking.
burner or hotplate being used. Install the rangehood so it is 50mm above the cooking surface.
6
INSTALLATION
This rangehood is designed for internal domestic household installation only. It is not intended for
use in a commercial environment. If installed in a commercial environment the warranty will be con-
sidered to be void.
Gas on 1300 307 917 for advice.
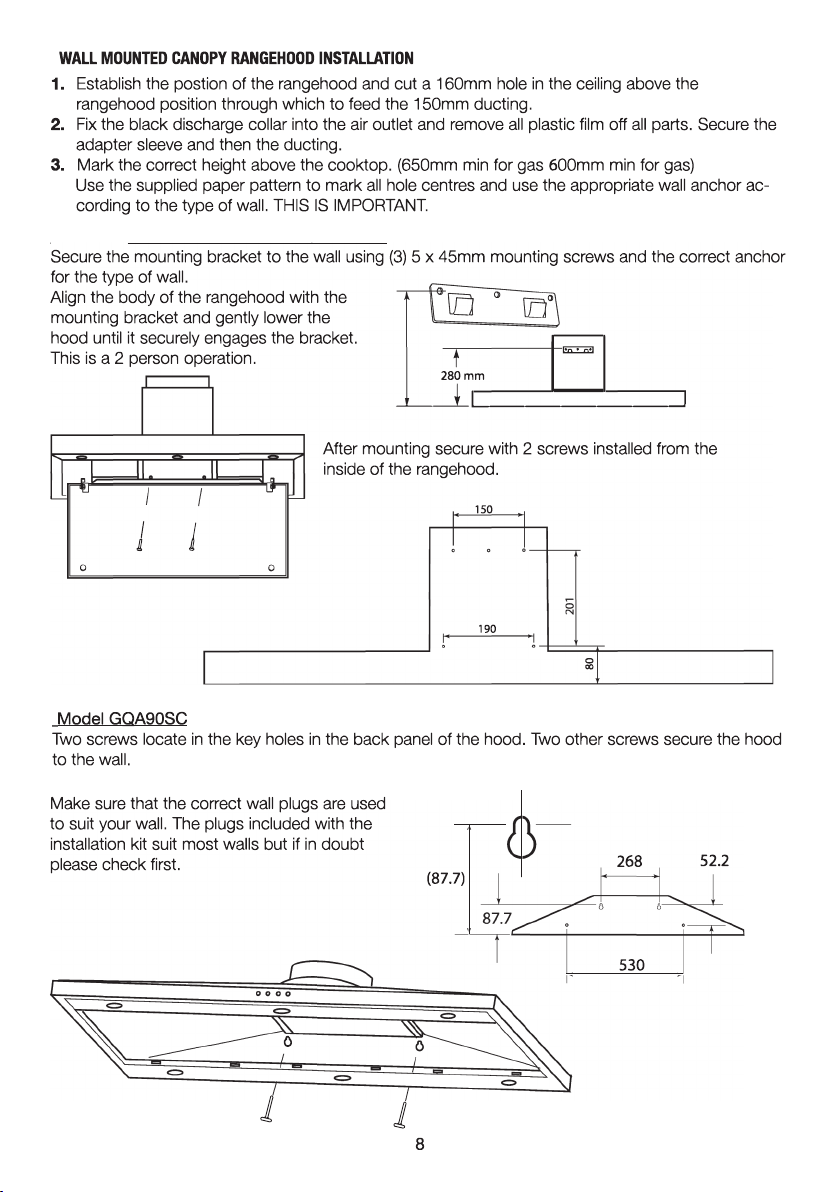
RANGEHOOD MOUNTING POSITIONS
Installl the rangehood centrally over the cooktop.
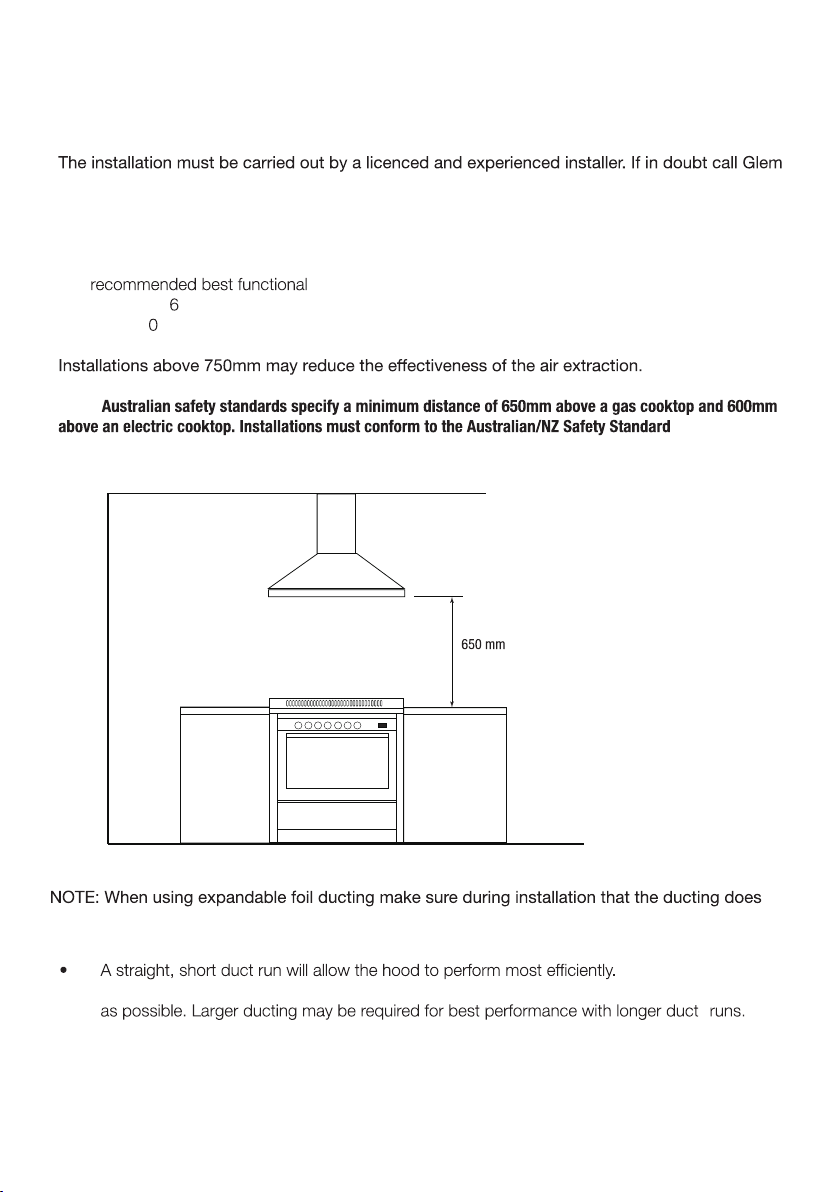
The
minimum distance above the benchtop and the lowest point of
the rangehood
50mm above a gas cooktop. The recommended minimum height above an electric
cooktop is 6
0mm.
NOTE:
• Decide where the ductwork will run between the hood and the ceiling.
• Long duct runs, elbows, and transitions will reduce the performance of the hood. Use as few
• Regulations concerning the discharge of air have to be met.
• Install a wall cap. Connect round metal ductwork to cap and work back towards the hood
location. Use duct tape to seal the joints between ductwork sections.
INSTALLA
TION OF THE DUCTING
not come in contact with the stainless steel chimney as it can create vibration noise.
7
TIP: USE PVC PIPE TO THE CEILING
THEN FLEXI DUCTING
FOR THE QUIETEST OPERATION
Models GQA90TBLED and GQA120TBLED
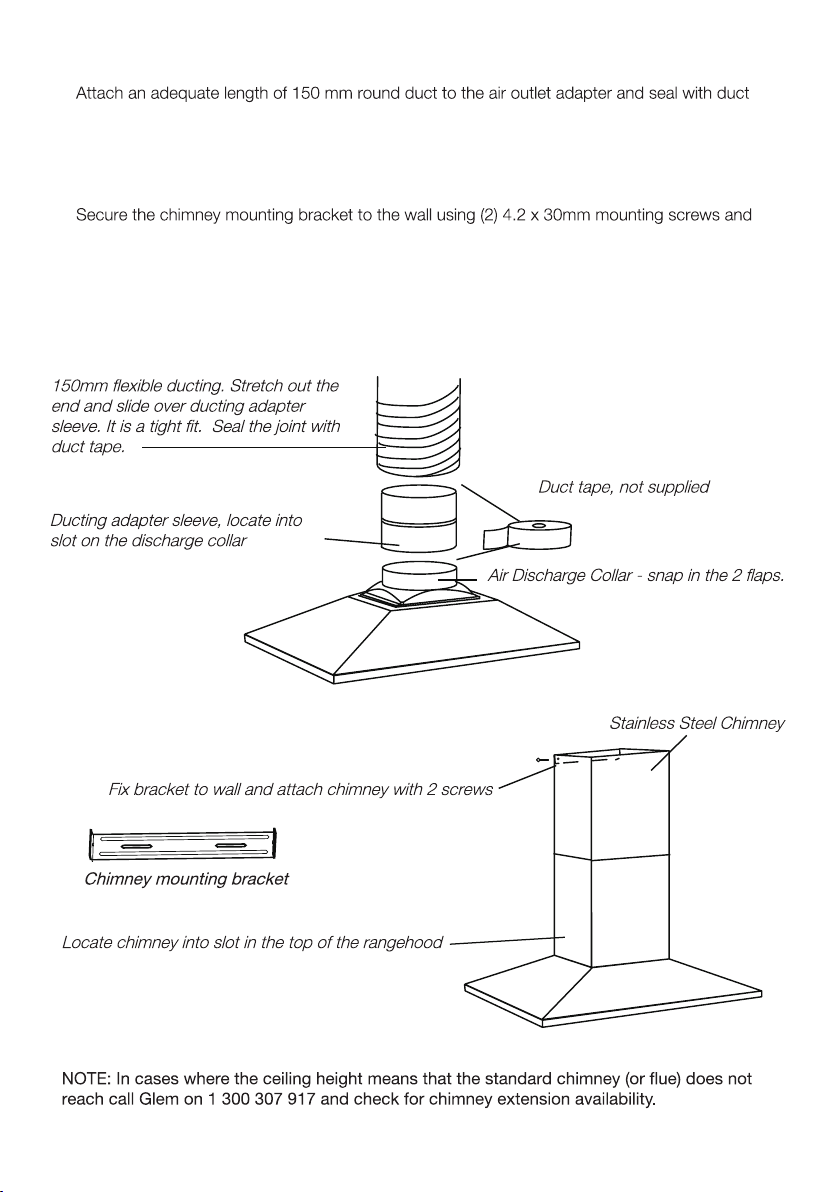
tape. Feed it through the previously cut hole in the ceiling. .
Carefully slide the stainless steel chimney down into the chimney bottom and then place the
chimney bottom into the recessed area on top of the hood.
anchors.
Raise the chimney top until its holes align with the holes in the chimney mounting bracket
located on the wall.
Level the hood and secure the chimney with 2 chimney bracket screws.
1.
2.
3.
4.
5.
9
CHIMNEY INSTALLATION
10
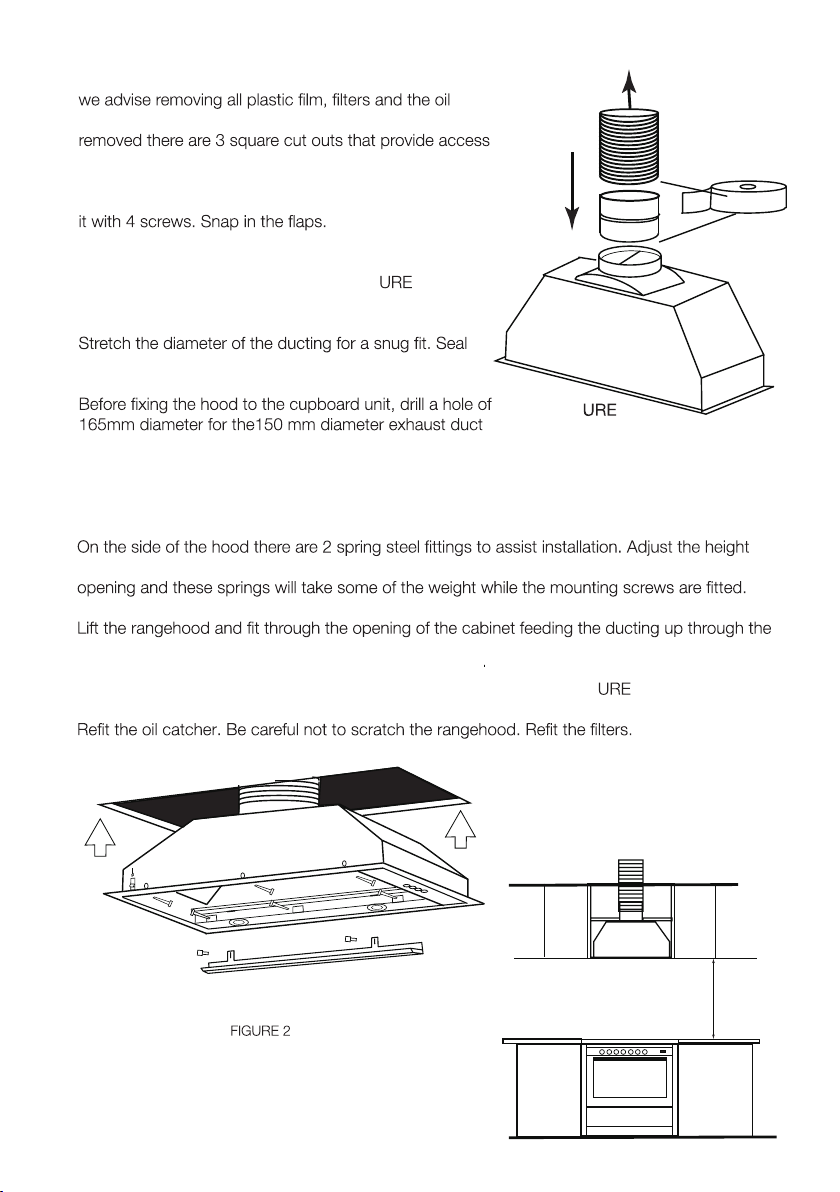
UNDER CUPBOARD RANGEHOOD INSTALLATION
Before beginning installation, to better handle the hood,
catcher. The oil catcher is held by 2 thumb screws. When
to the screw mounting holes.
Attach the black air outlet adapter over the hood. Tighten
The ducting must be attached to the rangehood before
installing the hood into the cupboard. FIG
1.
Slide the 150 mm diameter ducting over the sleeve.
with duct tape.
-
ing in the top of the cupboard and ceiling.
1.
2.
3.
4.
5.
6.
7.
8.
9.
10.
To motor unit connection
FIG 1
Check the position of the power outlet and consider where the power cable will run. A hole might
have to be made in the wall unit to accommodate the plug and cable
of the spring steel to match the thickness of the mounting panel. The hood can be slid into the
pre drilled holes.
Secure the unit by using 6 long mounting screws, 3 into each side - FIG
2.
Oil Catcher
650 mm
11
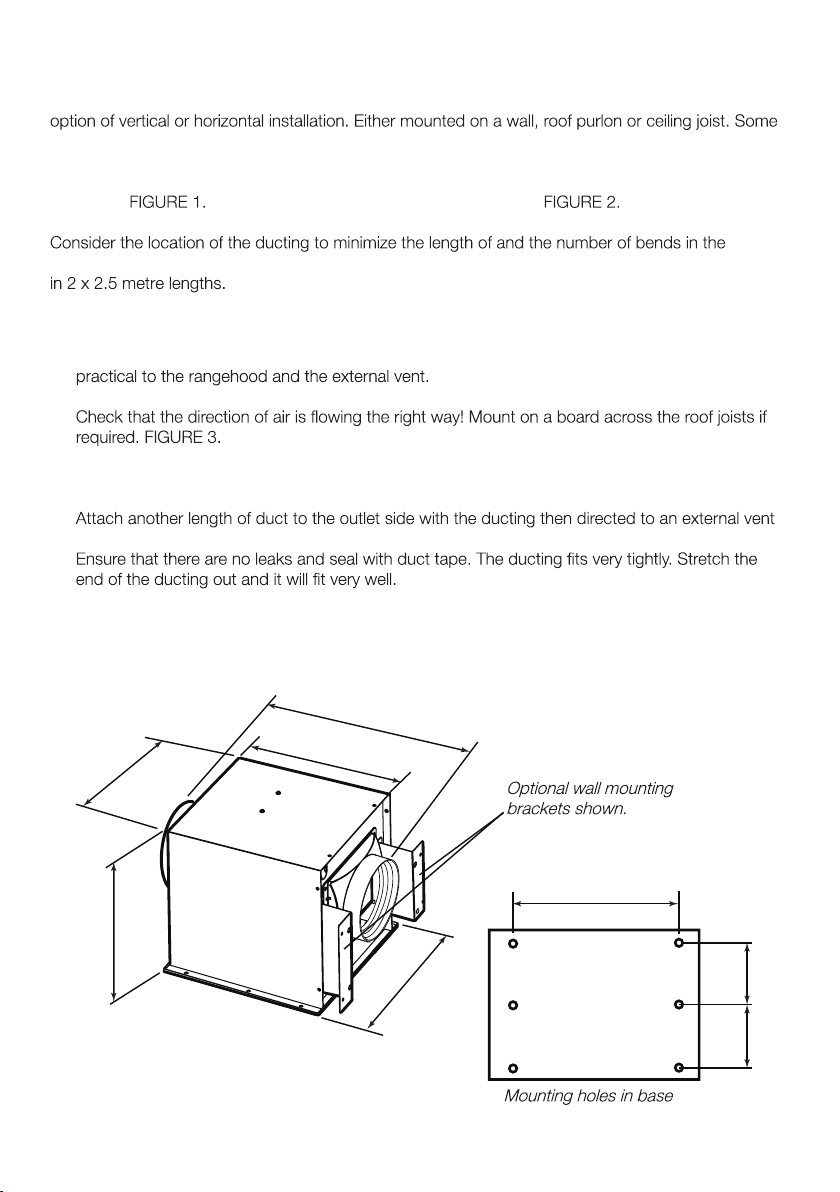
REMOTE MOTOR UNIT INSTALLATION
It is recommended that the roof space motor unit be mounted in an environment that is free of
other gases and air pressure that could create blow back. The motor unit has been designed with the
other simple support framework may need to be added to provide the best installation.
Take motor unit out of the packaging. Attached the black attachment modules using 4 screws on
each side.
Attach the two rigid metal connector sleeves.
ducting. THE DUCTING MUST BE TAUT TO PREVENT NOISE. CUT TO SUIT. The supplied ducting is
Establish a suitable position in the roof space for the motor unit. Install it as close as
Using the screws provided mount the motor unit onto a suitable structure in the roof space.
Feed the duct through from the rangehood and attach to the inlet side of the motor unit. Get the
duct as taut as possible to stop noise from vibration. It is important that the duct does not rest
against the stainless steel chimney.
in the roof or wall. FIGURE 2.
Feed the power cable from the motor unit down the chimney and plug it into the
rangehood. FIGURE 4.
1.
2.
3.
4.
5.
6.
317
280
414
322
313
120
120
296
A really good tip is to use PVC or steel rigid pipe from the rangehood to the ceiling and then attach the
flexible ducting. This provide optimum performance with lowest noise levels.
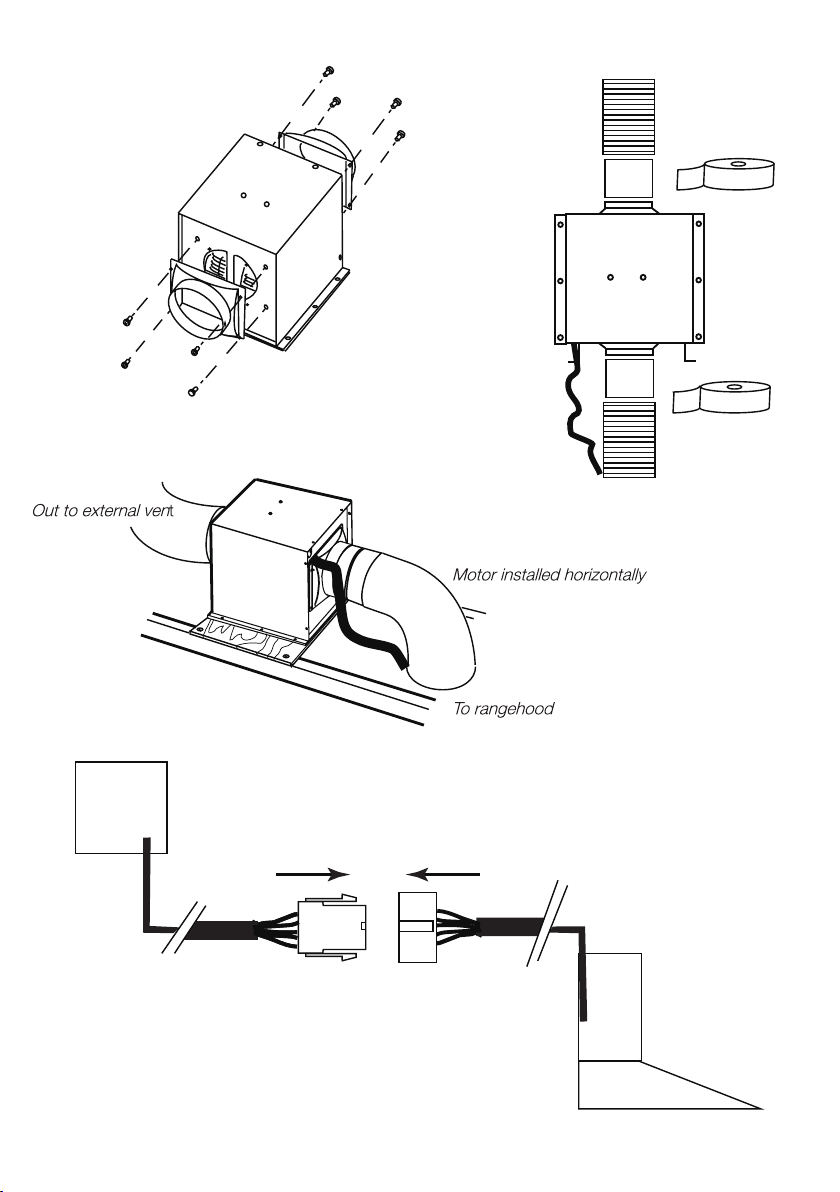
AIR IN
AIR OUT
FIGURE 1
FIGURE 2
FIGURE 3
12
A
IR
IN
AIR OUT
FIGURE 4
13
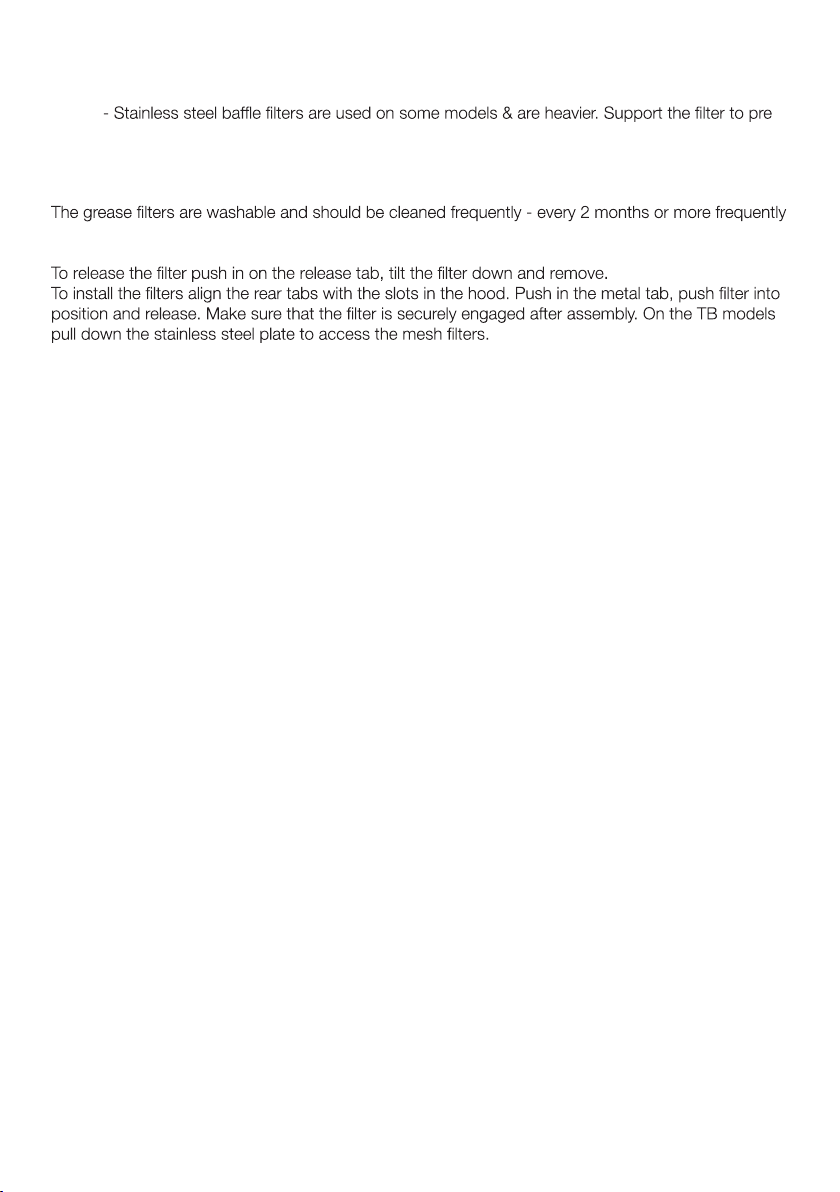
-
CARE AND MAINTENANCE
NOTE
vent it suddenly falling when removing for cleaning.
GREASE FILTERS - aluminium mesh and stainless steel
for heavy use. Use a warm detergent solution.
REMOVING LED LAMPS
MODEL GQA90SC - 6 LED spot lights
First switch off the rangehood and unplug from the socket. Wait until the lights have cooled before
attempting to remove them from the rangehood. Remove the filters and using a cloth, push down
on the lights from behind and lights will pop out.
MODEL GQA8UC - LED light bar
First switch off the rangehood and unplug from the socket. Wait until the light bar is cool before
attempting to remove it from the rangehood. Remove the filters. There is a cable with plug that runs
to the light bar, unplug the cable and then remove the 2 screws securing the light bar allowing it to
drop free from the rangehood.
MODELS GQA90TBLED and GQA120TBLED - Full LED panel
First switch off the rangehood and unplug from the socket. Hinge the LED panel down. Remove
the filters. There is a black cable with an inline plug and socket, disconnect the cable at this point.
The cable can be fed back through a hole in the bottom of the rangehood, there is a rubber seal
that is easily removed. Undo the 4 screws and remove the LED panel and hinges.
CONTACT GLEM GAS ON 1300 307 917 for replacement LED lights
SERVICING & CLEANING
It is important that the installation of the rangehood takes into account accessibility for servicing.
IF SERVICING THE RANGEHOOD REQUIRES DAMAGE TO TILES, WALLS, CEILINGS OR
FINISHES THIS WILL NOT BE COVERED UNDER WARRANTY.
We strongly recommend keeping filters clean. They are easy to wash and with regular care will
provide years of service.
Stainless steel should only be clean with a quality non abrasive cleaner. We recommend just using
a soft cloth with hot water. Detergents can cause streaking and aggressive detergents can attack
the surface finish of the stainless steel. IN COASTAL AREAS WITH HIGH LEVELS OF SALINITY IN
THE AIR ADDITIONAL CARE MUST BE GIVEN TO PROTECT ALL STAINLESS STEEL PRODUCTS
TO PREVENT DISCOLOURATION AND CORROSION.
ROOF SPACE FAN MOTOR - The roof space fan motor should be checked from time to time to
make sure it is free of debris that could obstruct airflow, and check that the ducting is remaining in
good condition.
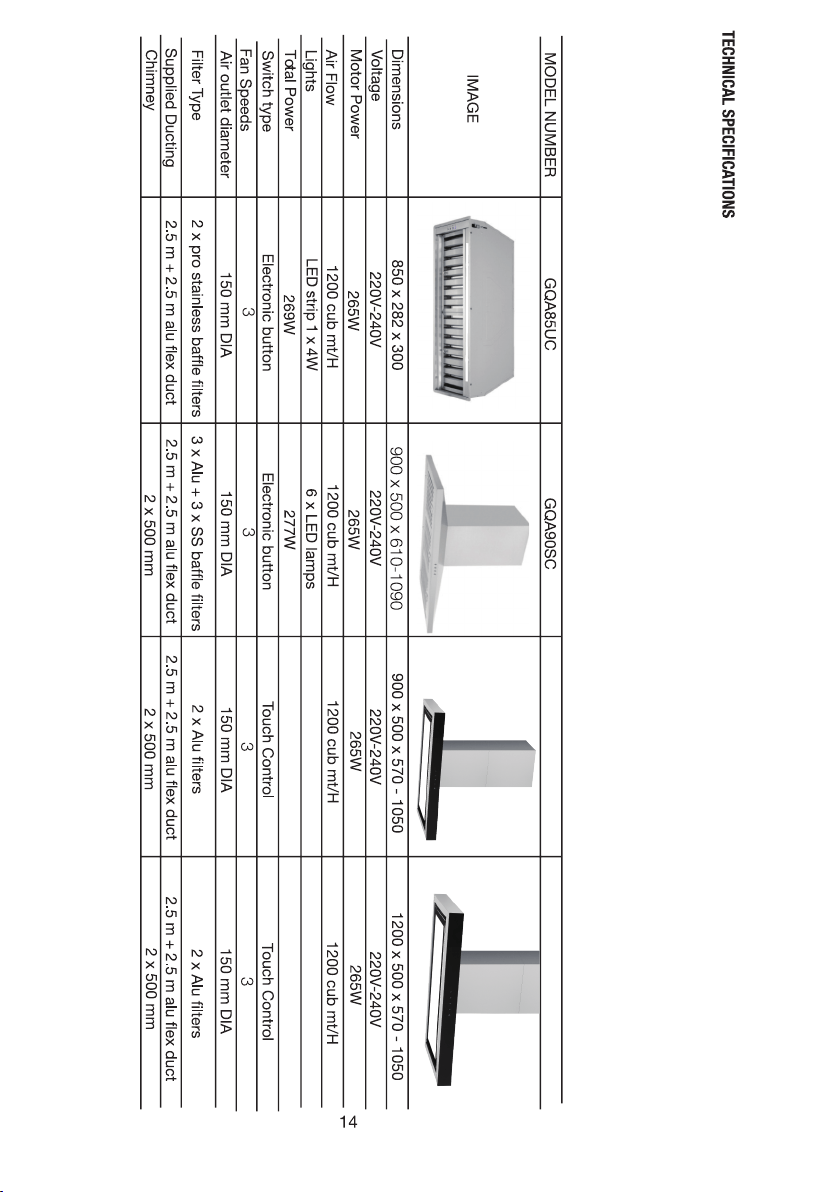
GQA90TBLED GQA120TBLED
LED light panel 20W
285W 285W
LED light panel 20W

15
PRODUCT WARRANTY
immediately.
which the consumer may have under the Trade Practices Act 1974 of the Commonwealth of Australia and/or similar
State or Territory Laws.
replacement or refund for a major failure if the goods fail to be of acceptable quality. You are also entitled to have the
goods repaired or replaced if the goods fail to be of acceptable quality and failure does not amount to a major failure.
period of:
1. a) Where the appliance is intended to be used and is used for DOMESTIC USE - 24 MONTHS FROM DATE OF
INVOICE TO THE ORIGINAL PURCHASER
.
b) Where the appliance is intended to be used and is used for
COMMERCIAL USE - 90 DAYS FROM DATE OF INVOICE TO THE ORIGINAL PURCHASER.
-
Glem Gas. is found to be defective.
This Warranty shall not apply:
2. a) If the rating plate has been removed or the serial number or other details on it have been removed or rendered
illegible.
b) If the appliance is connected to amy electrcial voltage other than shown on rating plate.
Australasia Pty Ltd.
e) If any defect or failure is due to connection to an inadequate or faulty power supply.
f) If damage is caused by foreign objects in or on the appliance or by reason of its use for purposes other than that
for which it was delivered.
g) If a repair has been made or attempted by the purchaser
h) If you live outside the service area of the Glem Gas Australasia service agents this warranty does not cover the
cost of transport of the appliance for service or the service agent’s travelling time.
3. This warranty does not cover any glass damage or replacement of light bulbs.
4. Glem Gas Australasia Pty Ltd accepts no liability pursuant to this Warranty for any cost or consequential damage
-
the product.
5. Parts covered under warranty that need replacing can be posted to the customer to put on at their discretion.
This Warranty is given by Glem Gas Australasia Pty Ltd and no other person or organisation is authorised to vary its
provisions and conditions.
Complete this section and keep for your own record.
Appliance Model No _______________ Serial No ______________________________
Purchased From ___________________________ Date of purchase_______________
Please complete the section below and return to:
Appliance Model No ___________________ Serial No __________________________
Purchased From _________________________________ Date of purchase____________________
Customer Name _________________________________________________
Customer Address______________________________________________________________________________________
Postcode __________
Installers signature__________________________________Installer License _____________________________________
SERVICING 1300 307 917