Loading ...
Loading ...
Loading ...

8 — English
ASSEMBLY
WARNING:
Do not attempt to modify this product or create acces-
sories not recommended for use with this product. Any
such alteration or modification is misuse and could result
in a hazardous condition leading to possible serious
personal injury.
WARNING:
To prevent accidental starting that could cause serious
personal injury, always remove the battery pack from the
product when assembling parts
INSTALLING/REMOVING THE AUXILIARY
HANDLE ASSEMBLY
See Figure 2.
The auxiliary handle assembly can be installed on either
side of the tool.
Toinstalltheauxiliaryhandleassembly:
Remove the battery pack.
Turn the handle grip counterclockwise to loosen it and
open the collar wide enough to fit over the front of the
power cleaner.
Place the collar as shown.
Turn the handle grip clockwise to tighten. Make sure the
handle assembly is secure before beginning operation.
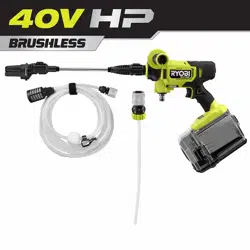
CONNECTING THE SPRAY WAND TO THE
POWER CLEANER
See Figure 3.
Align the arrows and insert the end of the spray wand into
the power cleaner and push it until it clicks into place.
Pull on the spray wand to be certain it is properly secured.
To remove, press the button on the power cleaner and
pull to remove the spray wand.
CONNECTING THE 3-IN-1 NOZZLE TO THE
SPRAY WAND
See Figure 4.
Align the arrows and insert the end of the 3-in-1 nozzle
into the spray wand and push it until it clicks into place.
Pull on the 3-in-1 nozzle to be certain it is properly secured.
To remove, press the button on the wand and pull to
remove the 3-in-1 nozzle.
CONNECTING THE SIPHON HOSE TO THE
POWER CLEANER
See Figure 5.
The siphon hose can be submerged directly into any fresh
water source like a lake, pool, or a 5 gal. bucket for maxi-
mum portability
Completely uncoil and straighten the siphon hose to
prevent kinks.
Align the quick connect collar on the siphon hose to the
water inlet on the power cleaner.
Push the collar onto the water inlet until it clicks securely
into place.
Pull on the hose to be certain it is properly secured.
CONNECTING A GARDEN HOSE TO THE
POWER CLEANER
See Figure 6.
The power cleaner can be attached to a garden hose by
using one of the following methods.
NOTICE:
Always observe all local regulations when connecting
hoses to the water main. Some areas have restrictions
against connecting directly to public drinking water sup-
ply to prevent the feedback of chemicals into the drinking
water supply. Direct connection through a receiver tank
or backflow preventer is usually permitted.
NEVER use hot water. Before connecting a garden hose to
the power cleaner:
Run water through the hose for 30 seconds to clean any
debris from the hose.
To connect a garden hose to the siphon hose:
Completely uncoil the garden hose or remove completely
from reel to prevent kinks.
NOTE: There must be a minimum of 10 feet of unrestricted
hose between the power cleaner intake and the hose
faucet or shut off valve (such as a “Y” shut off connector).
Unscrew and remove the filter from the end of the siphon
hose. Store filter for later use.
With the hose faucet turned completely off, attach the
end of the garden hose to the siphon hose water intake.
Tighten by hand.
To connect a garden hose to the power cleaner:
Completely uncoil the garden hose or remove completely
from reel to prevent kinks.
Loading ...
Loading ...
Loading ...