Loading ...
Loading ...
Loading ...

ENGLISH
10
8
9
10
19
6
Fig. K
Fig. J
5
1
Fig. I
Trigger and Clockwise/Counterclockwise
Selector (Fig. I, J)
The tool is turned on and off by pulling and releasing the
trigger
1
. The tool will stop as soon as the trigger switch is
fullyreleased.
The clockwise/counterclockwise selector
5
determines the
rotational direction of the tool and also serves as a lock-off.
• To select clockwise rotation, release the trigger and
depress the clockwise/counterclockwise selector on the
right side of the tool.
• To select counterclockwise, depress the clockwise/
counterclockwise selector on the left side of the tool.
NOTE: The center position of the clockwise/
counterclockwise selector locks the tool in the off position.
When changing the position of the selector, be sure the
trigger is released.
Fig.H
2
6
8
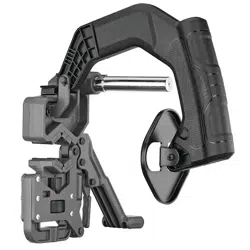
Threading Pipe (Fig. A, K, L)
WARNING: When threading 1" (25mm) or larger
pipe, ALWAYS use a support device to resist threading
forces. Use an appropriate support device per
these instructions. Support devices improve control
and reduce the risk of striking,crushing, and/or
otherinjuries.
WARNING: Properly support pipe. This will reduce the
risk of falling pipe, tipping and seriousinjury.
1. Inspect the cutterheads
24
of the die for wear,
deformation, chips or otherissues.
2. After inspection, insert the die into the pipe threader as
described in Attaching the Die and oil the die
6
.
3. Make sure that the end of the support arm is squarely
aligned with the end of the pipe and securely tighten
theclamp.
NOTE: Pipe smaller than 1" (25mm) dimension can
be threaded without the use of the clamp, but MUST
be properly secured to prevent rotation, with the user
resisting the threading forces. ALWAYS firmly hold the
tool when threading or backing die head off pipe to
resist the threading forces and to reduce the risk injuries.
4. With the clamp attached to the pipe, insert the support
arm
10
through the loop
19
on the pipethreader and
the pipe into the die.
5. Lower the die arm
8
into position over thedie so that
the die plate
9
contacts the die.
6. Ensure the clockwise/counterclockwise selector
5
is set
to the correct direction for the threads beingformed.
7. While applying mild pressure to the die arm onto the
pipe, pull the trigger
1
switch on the mainhandle
2
to
begin threading.
NOTE: Once the threading has started, the die arm can
be raised into the position seen in Fig. K and wil be held
in place by the clip.
8. Continuously apply cutting oil to the pipe and the
threader while the tool is cuttingthreads.
Loading ...
Loading ...
Loading ...