Loading ...
Loading ...
Loading ...
ENGLISH
8
Removing Die (Fig. B)
NOTE: If the die becomes stuck use a piece of wood or
a dead blow hammer to remove the die from the die
interface. Do not use metal tool to remove the die. Metal
tools could damage the dieinterface.
1. Place the pipe threader on a flat surface. The die
6
should be facing down.
2. Using both hands with equal pressure, push the die out
of the die interface
7
and free from the frictionhold.
Fig.B
6
7
Attaching the Die (Fig. B)
WARNING: Inspect the cutterheads of the die for
wear, deformation, chips or other issues. Dull or
damaged cutterheads increase the amount of force
required, produce poor quality threads and increase
the risk of injury. Only use
DEWALT
recommended dies.
Other dies may not fit correctly, increasing the risk of
damage or personal injury.
1. Insert the die on the side of the tool as shown in Fig.B.
2. Using both hands with equal pressure, push the
die
6
inside the die head interface
7
until the ridge
of the die head sits flush against the ridge of the die
headinterface.
3. Rotate the die slightly so the latch engages.
ASSEMBLY AND ADJUSTMENTS
WARNING: To reduce the risk of serious personal
injury, turn unit off and remove the battery pack
before making any adjustments or removing/
installing attachments or accessories. An
accidental start-up can causeinjury.
Mounting Clamp to Pipe (Fig. E, K)
WARNING: Properly support the pipe in a stand or
securely brace in place to reduce the risk of the pipe
falling ortipping.
WARNING: Always attach the clamp before using the
pipethreader.
WARNING: Always use the die arm when starting
the thread as shown in Proper Hand Position.
Do not substitute your hand for the die arm to start
thethread.
1. Set the adjustment
11
on the clamp
12
for the
appropriate pipe diameter following the size
indicator
28
.
2. Place the clamp over the pipe
20
so that the end of
the pipe aligns with the end of the support arm
10
as
in Fig K.
3. Put pressure on the clamp
12
to properly secure it to
the pipe. If not secure, make any needed adjustments
Intended Use
The pipe threader is designed for threading pipe and
conduit using appropriate cutting dies.
DO NOT use for drilling or driving fasteners.
DO NOT use under wet conditions or in presence of
flammable liquids orgases.
This pipe threader is a professional power tool.
DO NOT let children come into contact with the tool.
Supervision is required when inexperienced operators use
thistool.
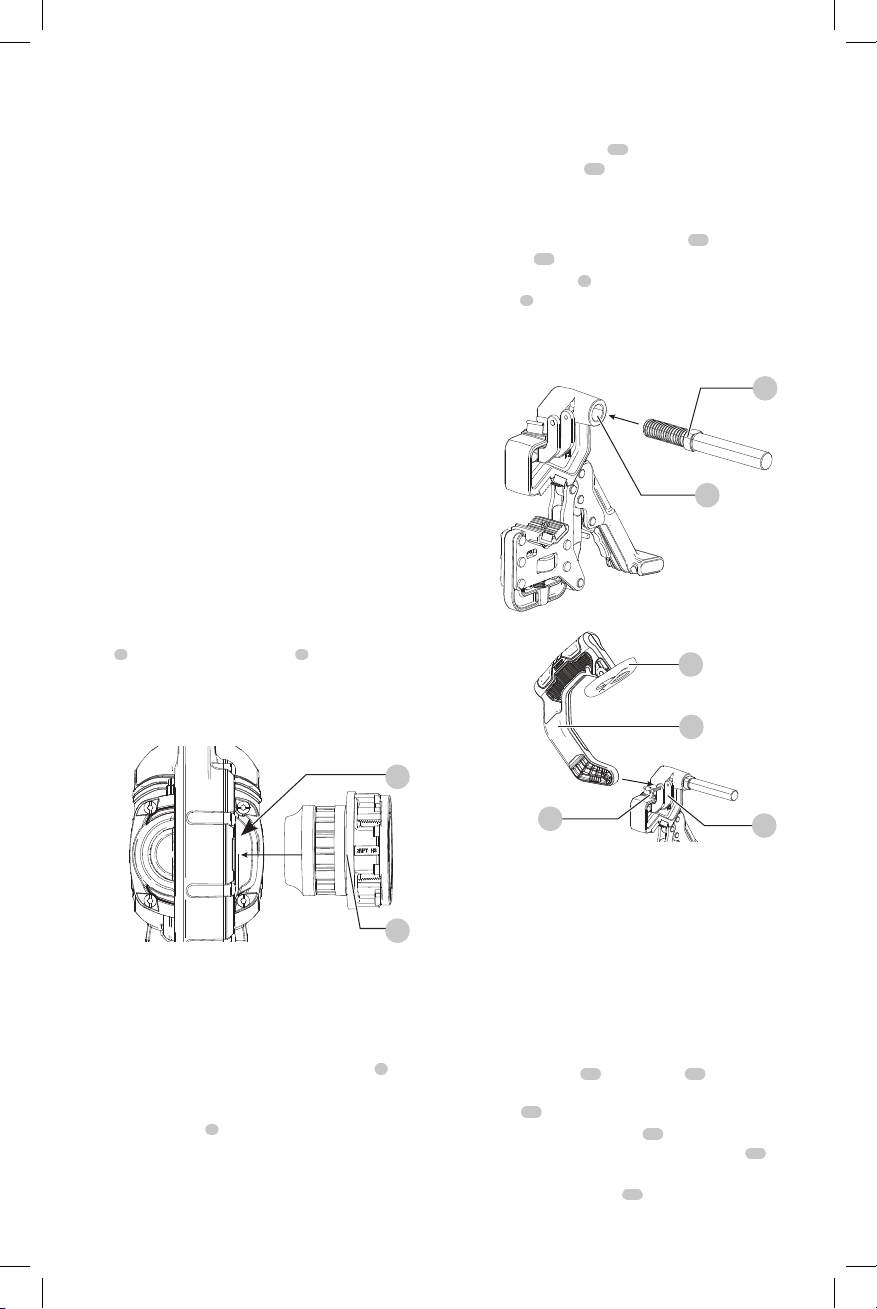
Fig.C
10
27
Assemble Clamp (Fig. C, D)
Assemble Support Arm
1. Thread the support arm
10
completely through the
support arm mount
27
.
2. Tighten the support arm with an open end wrench.
Assemble Die Arm
1. Unthread the preassembled wing nut
18
from the die
arm saddle
17
.
2. Attach the die arm
8
to the die arm saddle with the the
die plate
9
facing toward the end of the pipe. Thread
and tighten the preassembled wing nut to secure the
die arm intoplace.
Fig.D
9
8
17
18
Loading ...
Loading ...
Loading ...