Loading ...
Loading ...
Loading ...

4
Installation
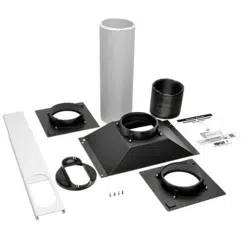
Self-Tapping Screw
Vertical
Window
Opening
Horizontal Window
Opening
5
6
7
8
5
Attach the Long Flexible Tube to the Tube Adapter by turning the
adapter onto the tube’s threaded side.
6
Align the second Tube Adapter with the inner Tube Adapter and
attach to the outside of the perforated rack enclosure door
A
.
Make sure the pin on each tube adapter is aligned with the
corresponding hole on the adjacent tube adapter before attaching
to the rack enclosure door.
Note: The Tube Adapter uses internal magnets to attach to the rack
enclosure.
7
Connect the Ceiling Adapter to the Long Flexible Tube by turning
the adapter onto the tube’s threaded side.
A
Warning: Some ceilings may require modified installation procedures. The user must determine the fitness of hardware
and procedures before installing. The procedures described in this step may not be appropriate for all applications.
8
Choose a removable drop ceiling panel near the unit to provide
the straightest, shortest path available for the Long Flexible Tube.
Measure the width of the ceiling panel, including the portion that
rests on the ceiling grid. Combine the two sections of the Ceiling
Tile Insert, then adjust to match the width of the ceiling panel.
After the Ceiling Tile Insert is set to the correct width, use the
included self-tapping screw to lock it in place.
Note: The exhaust panel can adjust from 26.6 to 49.2 inches
(67.5 to 125 cm).
Loading ...
Loading ...
Loading ...