Loading ...
Loading ...
Loading ...

6
Plug charger cord into your standard power
outlet.
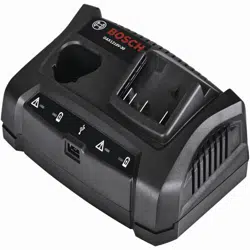
With no battery pack inserted, the
charger’s green indicator lights 4 and 7 will
go ON. This indicates the charger is
receiving power and the charger is ready
for operation.
When you insert a battery pack
1 into either slot 2 or 3, the
corresponding green indicator
light 4 or 7 will begin to
“BLINK”. This indicates that a battery is
receiving a fast charge.
▼ NOTES:
• Only one battery can be charged at a
time. The first battery inserted is the
first to get charged. The second
inserted battery will start charging
only after the first battery is fully
charged.
• If both batteries are installed before
connecting the charger to power
outlet, the 18V battery charges first.
Once approximately 80% battery capacity
has been reached, the blinking of green
light will slow down, indicating that fast
charging is now complete. If battery
remains in charger, the charging process is
completed in Long Life charging mode.
The purpose of the rapidly “BLINKING”
green light is to indicate that the battery
pack is fast-charging. It does not indicate
the exact point of full charge. The light will
stop blinking when battery is fully charged.
Continuous green battery
charger light indicates that the
battery is fully charged.
However, the battery pack may
be used at any time, even if the green light
is still blinking.
A steady red indicator light
means that the battery pack is
outside the proper temperature
ranges (too hot or too cold) so
the charger will not begin the charging
process. Charging (Fast or long Life
Charging Mode) is only possible when the
temperature range of the battery pack is
between 32°F (0°C) and 113°F (45°C).
As soon as the battery pack reaches the
correct temperature range, the battery
charger will automatically switch to fast
charging.
If the red indicator light is
“BLINKING”, the battery pack
cannot accept a charge. This
may be due to the contacts on
the charger or battery pack is
contaminated, the battery pack itself may
be defective, or battery may be wrong type
for this charger.
• Check to see if the battery is
compatible with charger.
• If applicable, insert another
compatible battery pack into charger
to verify charger is working properly.
• Clean the contacts of the charger or
battery pack (e. g. by using a cotton
swab and alcohol on battery and
charger terminals or inserting and
removing the battery several times) or
replace the battery pack, as required.
When the battery pack is fully charged,
unplug the charger (unless you're charging
another battery pack) and slip the battery
pack back into the tool.
You can use the USB port 6 to charge
various battery-operated USB devices like
mobile phones, tablets or MP3 players.
Ensure that your external USB device can
be charged using the USB port on the
charger.
Do not connect any
device that is not
compatible with 5VDC, 2.1A power source
to the USB port. Charging of non-
compatible devices may create a risk of
charger malfunction.
Connect USB cable 9 of your device to USB
port 6 to charge.
▼ NOTES:
- The USB port provides power even if a
battery pack is currently being
charged in the slot 2 or 3.
- The USB port remains active even
when nothing is connected to it.
Charging Battery Pack
Charging USB Devices
2610052923.qxp_GAX1218V-30 2/20/19 2:43 PM Page 6
Loading ...
Loading ...
Loading ...
