GEAppliances.com
0
am
0
U
m
0
Safety Instructions 2-7
Operating Instructions
Aluminum Foil ......... t4
Clock end Timer ..... 18
Lower Oven Drawer ..... 30
Oven ............... Ii-32
Baking and Roasting ..... 14
Broiling, Broiling Guide ..... 15
Control Lockout ..... 25
Convection ........ 19-23
Gas/Control Lockout 25
Oven Control .... 1L 12
Power Outage . ,l& 16
Preheating ......... 14
Probe . ,18
Racks ..... t4
Sabbath Feature .26
Self-Cleaning ..... 31, 32
Special Features .... 24, 25
Thermostat Adjustment ..... 27
Timed Baking
and Roasting ....... 17
Timed Convection Baking 23
Surface Cooking ..... 8-10
Griddle .......... i0
Warming Drawer ...... 28, 29
Care and Cleaning
Burner Assemblg ..... 33.34
Burner Grates ..... 35
Control Panel and Knobs . 36
Cooktop ........ 35
Door Removal ........ 37
Drawer 38.39
Griddie ............. 35
Oven Bottom ......... 36
Oven Light Replacement ,, 38
Oven Vents ............. 36
Racks .............. 38
Self-Cleaning ........ 31.32
Stainless Steel Surfaces .37
Installation
Instructions 4o-51
Air Adjustment _ 50
Anti-Tip Device ..... 43, 51
Assemble Surface Burners 48
Checking Burner
Ignition ............. 49
Connecting the Range
to Gas ............. 44-46
Dimensions and Clearances , 42
Electrical Connections 47, 48
Leveling the Range ...... 50
LP .......... 51
Troubleshooting
Tips .... s2-ss
Accessories ..... S7
Consumer Support
Consumer Support , Back Cover
Warranty for Customers
in Canada ......... 59
Warrantg for Customers
in the US A ........ 58
::::::::::::::::::::::::::::::
JGB800
JGBB05
JGB810
JGB820
JGB900
In Canada contact us at
www.GEApptiances ca
Write the model and serial
numbers here:
Model#
Serial #
Youcan find them on a label
an thefront of the range behind the
warming drawer or lower
ovendrawer
183D5580P252 49-85170-1 06-09JR
• z ••
-: s:
:_i:i:_i:il,_
i:_:7::i,:;i'i_
:•:!i__:ii:;i!•:,i_•ii:
:!!:•!L::_iz•;:;!!:i
01
o
01
o_
oj
6
"_ :n
01'1
o
.4::
ol i
IMPORTANT SAFETYINFORMATION.
READALL INSTRUCTIONS BEFORE USING.
WARNING!
For your safetg, theinformation in this manual must be fallowed to minimize the risk of fireor
explosion, electricshock, or toprevent property damage, personal injury, or toss of tire
®
.4_WARNING: iftheinformation
in this manual is not followed exactlg,
a fire or explosion mag result, causing
propertg damage, personal injurg
or death.
Do not store or use gasoline or' other
flammable vapors and liquids in the
vicinitg of this or ang other appliance.
WHAT TO DO IF YOU
SMELL GAS
:'i_::::Do not trg to light ang appliance.
Do not touch any electrical switch;
do not use ang phone in gour building.
::_ Immediatelg call gour gas supplier
from a neighbor's phone. Follow tile
gas supplier's instructions.
:::::iIf gou cannot reach your gas supplier,
call the fire department.
Installation and service must be
performed by a qualified installer,
service agencg or' the gas supplier.
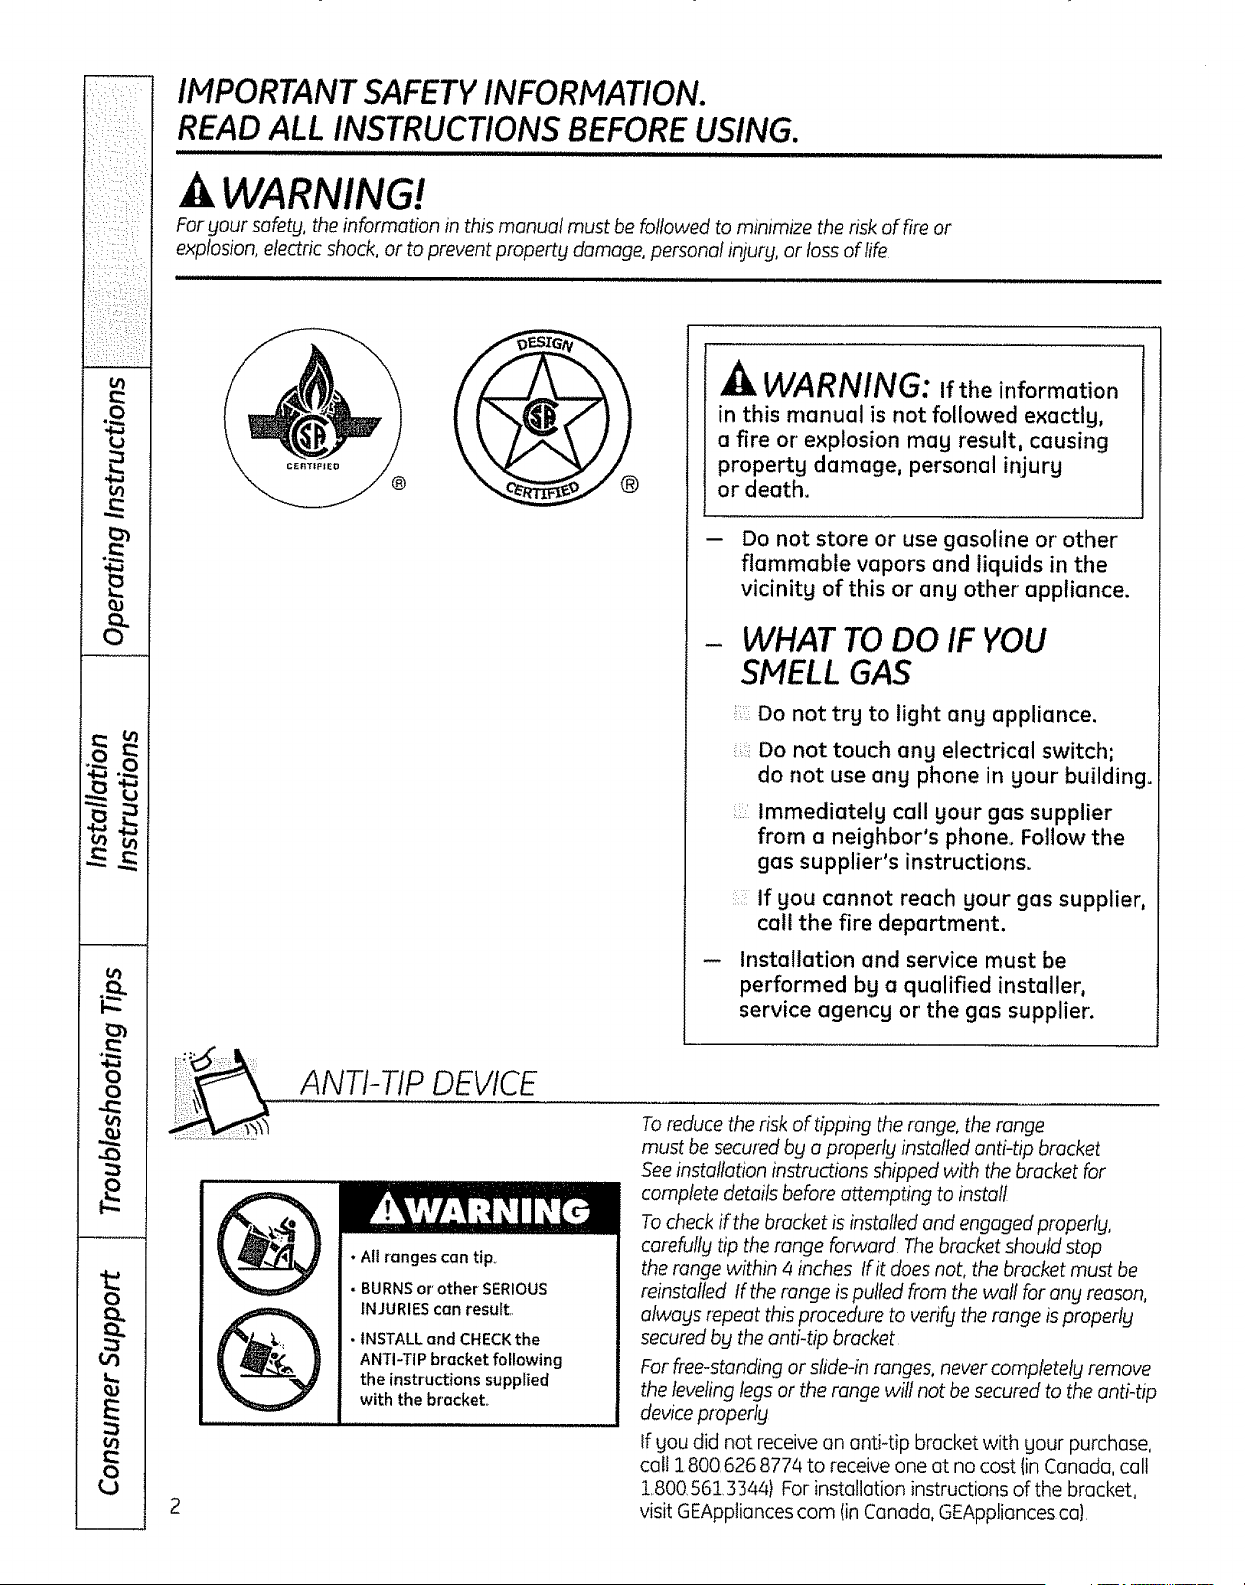
ANTI-TIP DEVICE
@
Q
•All ranges contip.
- BURNS or' other SERIOUS
INJURIES can result,,
•INSTALLand CHECKthe
ANTI-TIP bracket following
the instructions supplied
with the bracket,,
Toreduce the risk of tipping the range, the range
must be secured by a properlg installed anti-tip bracket
See installation instructians shipped with the bracket for
complete details before attempting to install
Tocheck ifthe bracket is installed and engaged properly,
carefully tip the range forward The bracket should stop
the range within 4 inches tfit does not, the bracket must be
reinstalled tfthe range is pulled from the wall forany reason,
always repeat this procedure to verifg therange is properly
secured by the anti-tip bracket
For free-standing or slide-in ranges, never completetg remove
the leveling legs or the range wilt not be secured to the anti-tip
device praperly
Ifgou did not receive an anti-tip bracket with gour purchase,
call 1800,626 877z4 to receive one at no cost (in Canada, call
1,800,561,3344) For installation instructions of the bracket,
visit GEApptiancescam (inCanada, GEAppliances ca!,
iii, ,11,11,1iii,iii1,1111,1,1,ii ......................................
WARNING!
GEAppliancesocom
IMPORTANTSAFETYNOTICE
The Cafifomia Safe Drinking Water and Toxic Enforcement Act requiresthe Governor ofCalifornia to
publish a fistofsubstances known to the state tocause birth defects or other reproductive harm, and
requiresbusinesses to warn customers ofpotentia! exposure tosuch substances
Gas appliances can cause minor exposure to four ofthese substances, namely benzene, carbon
monoxide, formaldehyde and soot, caused primarily by the incomplete combustion ofnatural gas or
LP fuels.Properly adjusted burners, indicated by a bluish rather than a yellow flame, will minimize
incomplete combustion Exposure to these substancescan be minimized by venting with an open
window or using a ventilation fan or hood
SAFETYPRECAUTIONS
Have theinstaller show you the location oftherange gas
Have gour range installed and propertg
grounded bg a qualified installer in
accordance with the Installation Instructions.
Ang adjustment and sen,iceshould be
performed ontgbg qualified gas range
installers or service technicians
Donot attempt to repair or replace ang
part of gour range unless itisspecificaIlg
recommended in this manual All other service
should be referred to a qualified technician
shutooffvalve and how toshut itoff ifnecessarg
Plug gour range into a 120-volt grounded
outlet onlg Donot remove the round
grounding prong from the plug If in doubt
about the grounding ofthe home electrical
sgstem0itisgour personal responsibilitg and
obligation to havean ungrounded outlet
replaced with a properlg grounded,
three-prong outlet in accordance with
the National ElectricalCode Donot use
an extension cord with this appliance
:, ::::b:, _
:4< :: ,:: :J
:L:iI,II::II:::i:I
:::;:: i _:::
2
g
0
n _,,a,
v A
0
0
m
t'b
v
0
o
El
IMPORTANT SAFETYINFORMATION.
READALL INSTRUCTIONSBEFOREUSING.
SAFETYPRECAUTIONS
Locate the range out of kitchen traffic path
and outof draftg locations to prevent poor
air circulation
_:!iii:
Be sureall packaging materials are removed
from the range before operating it to prevent
fire or smoke damage should the packaging
material ignite
Besure gour range is correcttg adjusted bg
o qualified ser_Jicetechnician or' installer for
the tgpe ofgas (natural or LP}that is to be
used Your range can be converted for use
with either tgpe ofgas Seethe Installation
of therange section
WARNING: Theseadjustments
must be made bg a qualified service
technician in accordance with the
manufacturer's instructions and all codes
and requirements of the authoritg having
jurisdiction, Failureto follow these instructions
could result in serious injury or propertg
damage, Thequalified agency performing
this work assumes responsibility for the
conversion,
After prolonged use ofa range, high floor
temperatures mag result and many floor
coverings will not withstand this kindof use
Never install the range over vinyl tile or
linoleum that cannot withstand such tgpe
of use Never install itdirectly over interior
kitchen carpeting
Donot leavechildren alone or unattended
where a range ishot or in operation
Theg could be seriouslg burned
Donot allow anyone to climb, stand or hang
on the oven door,lower' oven drawer, warming
drawer or cooktop Theg could damage the
range and even tip it over, causing severe
personal injurg
CAUTION: Items of interest to
children should not be stored in cabinets
above a range or on the backspIash of a
range-children climbing on the range to
reach items could be serioustg injured,
AWARNING: NEVERusethis
appliance as a space heater to heat or
warm the room Doing somay result
in carbon monoxide poisoning and
overheating ofthe oven,
Never wear loose-fitting or hanging garments
while usingthe appliance Be careful when
reaching for items stored in cabinets overthe
range.Flammable material could be ignited
ifbrought in contact with flame or hotoven
surfaces and mag cause severe burns
Do not store flammable materials in an oven,
a range drawer or near a cool<top
Do not store or usecombustible materials,
gasoline or other flammable vapors and
liquids in the vicinitg of this or any other
appliance
Donot letcooking greaseor other flammable
materials accumulate in or near the range
Donot usewater on grease fires Never pick
up a flaming pan Turnthe controls off
Smother a flaming pan on a surface burner
bg covering the pan completely with
a well-fitting lid, cookie sheet or flat tray,
Use a multi-purpose drg chemical or
foam-tgpe fire extinguisher
Flaming grease outside a pan can be put
out by covering itwith baking soda or;
ifavailable, by using a multi-purpose drg
chemical or foam-tgpe fireextinguisher
Flame in the upper oven or lower oven drawer
can be smothered completely bg closing the
oven door or drawer and turning the control
to off or by using a multi-purpose dry
chemical or foam-tgpe fire extinguisher
,:_:Letthe burner grates and other surfaces cool
before touching them or leaving them where
children can reach them
Never block the vents (air openingsl ofthe
range Theg provide the air inletand outlet
that are necessarg for the range to operate
properlg with correct combustion, Air openings
are located at the rear ofthe cooktop, at the
top and bottom of the oven door,and at the
bottom of the range under the warming
drawer_ lower oven drawer or kickpanel
Large scratches or impacts to glass doors
can lead to broken or shattered glass
GEAppliances_com
,&WARNING!
SURFACEBURNERS
Useproper pan size-avoid pans that are unstable or easily tipped Select cookware having fiat
bottoms large enough tocover burner grates To avoidspillovers, make surecookware islarge enough
tocontain thefood properlg This will both save cleaning time and prevent hazardous accumulations
of food, since heavy spattering or spit!oversleft on range canignite, Use pans with handles that can
be easily grasped and remain cool
Alwags usethe LITE position when igniting
the top burners and make sure the burners
have ignited,
Never leavethe surface burners unattended
athigh flame settings Boilovers cause smoking
and greasg spilloversthat mug catch on fire
Adjust the top burner flame size so itdoes
notextend begond the edge of the cookware
Excessiveflame ishazardous.,
Use ontg drg pot holders- moist or damp pot
holders on hot surfaces mag result in burns
from steam Donot letpot holders come near
open flames when lifting cookware Do not use
a towel or other bulky cloth in place ofa pot
holder.
When using gloss cookware, make sure it
is designed for top-of-range cooking,,
Tominimize the possibilitg of burns, ignition
offlammable materials and spillage, turn
cookware handles toward the sideor back
ofthe range without extending over adjacent
burners
:;_Carefullg watch foods being fried at a high
flame setting
::: Always heat fat slowly, and watch as itheats,
' Do not leaveang items on the cooktop The
hot air from the vent mug ignite flammable
items and will increase pressure in closed
containers, which mug cause them to burst
If a combination of oilsor fats wil! be used
in frying, stir together before heating or
asfats melt s!owIg,
Use a deep fat thermometer whenever
possible to prevent overheating fat beyond
the smoking point,
Use the least possible amount of fat for
effective shallow or deep-fat frying Filling the
pan too fullof fat can cause spitlovers when
food isadded
:::::Donotflame foods on the cooktop If gou
do flame foods under the hood, turn the
fan on
Donot usea wok on the cooking surface
ifthe wok hasa round metal ring that is
placed overthe burner grate to support the
wok This ring acts as u heat trap, which may
damage the burner grate and burner head
Also, itmay cause the burner towork
improperlg This mug cause o carbon
monoxide Ievel above that allowed bg current
standards, resulting in o health hazard
':i Foods for ffging should be asdrg aspossible,
Froston frozen foods or moisture on fresh
foods can cause hotfat to bubble up and
overthe sides ofthe pan
• Never trg to move a pan of hot fat, especiallg
a deep fat ffger.Wait until the fat is cool
Do not leaveplastic items on the cooktop-
they mag melt ifleft too close to the vent,
: Keep all plastics owag from the surface
burners
::: Toavoid the passibititg of a burn, alwags be
certain that the controls for all burners are
at the OFF position and all grates are cool
before attempting to remove them,
If range islocated near a window, do not hang
long curtains that could blow overthe surface
burners and create a firehazard
If gou smell gas, turn off the gas tothe range
and calla qualified service technician,, Never
usean open flame to locate a leek
Alwags turn the surface burner controls off
before removing cookware
:::Donot lift the cooktop Lifting the cooktop can
lead todamage and improper operation ofthe
range,
: When disabling Gas!Control Lockout, make
surethe surface controls are set to the OFF
position This will preclude gas flow when
the range is turned on
:/ ::L:::
!:_:C:,!:_i
:_:::d( _>::_:
::i,,:_i::: ,,:_,_
2
g
g.
vi i1_
.
u
o
o
w
w

/!::: :ii:! ::i_
_ ,: .LL _,: •
_::_:ii!:_i::i:,:!::_:
i•::•i_i-,:::i!!::i
o
v
_ u
. i
2i
e#
o
E
8
IMPORTANT SAFETY INFORMATION.
READALL INSTRUCTIONSBEFORE USING.
ELECTRICWARMING DRAWER
AND LOWER OVEN DRAWER (onsome models)
!Z
i::iiiii
L!i:i
The purpose ofthe warming drawer and the
WARHZONE setting of the lower oven drawer
is to hold hot cooked foods at serving
temperature Alwags star[ with hotfood;
cold food cannot be heated or cooked in the
worming drawer or the WARHZONEsetting
ofthe lower oven drawer:
Donot usethe drawer to drg newspapers,
If overheated, theg can catch on fire
Do not leave paper products, plastics, canned
food, or combustible materials in the drawer
Never leave jars or cans offat drippings
in or near gear drawer:
Do not warm food in the drawer for more
than two hours
Never place, useor self-clean the lower oven
drawer pen in the upper oven.
:i:: Donot touch the heating element
or the interior surface ofthe drawer.
These surfaces meg be hot enough to burn
REMEMBER:Theinside surface ofthe drawer
mag be hotwhen the drawer is opened
Use curewhen opening the drawer Open
the drawer a crack and lethot air or steam
escape before removing or replacing food
Hot air or steam which escapes can cause
burns to hands, face and/or egos,
Donot usealuminum foil to line the lower
oven drawer Foilis an excellent heat insulator
and will trap heat beneath it. This will upset
the performance ofthe drawer and it could
damage the interior finish
COOK MEATAND POULTRYTHOROUGHLY...
Cook meat and paultrg thoroughlg-meat to at least an INTERNAL temperature of l 60°F and poultrg
to at least an INTERNAL temperature of 180°F Cooking to these temperatures usuallg protects against
foodbome illness,
SELF-CLEANINGTHE UPPEROVEN
Besure to wipe off excess spillage before
self-cleaning operation
:::.::Before self-cleaning the oven, remove ang
broiler pan, broiler grid, atl cookware, probe
and ang aluminum foil
Never place, useor self-clean the lower oven
drawer pan in the upper oven
:_:::::Nickel oven racks (on some models} should
be removed from the oven before beginning
the self-clean cgcle
_:::::Grog porcelain-coated oven racks (on some
models} mag be cleaned in the oven during
the self-clean cgcle
:::::Clean onlg parts listed in this Owner's Hanual.
Donot clean the door gasket Thedoor gasket
is essential for a good seal. Careshould be
taken not to rub,damage or move the gasket,
If the self-cleaning mode malfunctions,
turn the oven off and disconnect the power
supplg. Have itserviced bg a qualified
technician
!:,::Donot use oven cleaners No commercial
oven cleaner or oven liner of ang kind should
be used in or around ung part of the oven,
Residue from oven cleaners willdamage
the insideof the oven when the self-clean
cgcle isused.
GEAppliances.,com
.i,.i, ,ll i imlll i
UPPEROVEN
Standaway from therange when opening thedoor of a hot oven The hot air and steam that escape
cancause burns to hands, face and egos
::::Donot usethe oven for a storage area
items stored in the oven can ignite
Keep the oven flee from grease buildup.,
:::::Place the oven racks in the desired position
while the oven is coo!
Pulling out the rack to the stop-lock isa
convenience in lifting heavy foods It,isalso
a precaution against burnsfrom touching hot
surfaces of the door or oven wails Thelowest
position isnot designed to slide
Donot heat unopened food containers
Pressure could build up and the container
cou{d burst, causing an injury
A WARNING: NEVERcoverang
slots, holesor passages in the oven bottom
or cover an entire rack with materials such
asaluminum foil Doingso blocks air flow
through the oven and mag cause carbon
monoxide poisoning Aluminum foil linings
mag alsotrap heat, causing a firehazard
Donot usealuminum foil anywhere in the
oven except asdescribed in this manual.
Misuse could result in a fire hazard or damage
to the range
When using cooking or roasting bags in the
oven, follow the manufacturer's directions
Donot use your oven to dry newspapers
tf overheated, they cancatch fire
Use ontg glass cookware that isrecommended
for use in gas ovens
::::Always remove any broiler pan from range
assoon asyou finish broiling Grease left in
the pen can catch fire ifoven is used without
removing the greasefrom the broiler pan
When broiling, ifmeat is too close to the flame,
the fat may ignite. Trim excess fat to prevent
excessiveflare-ups
::_Hake sure any broiler pan isin place correctly
to reduce the possibility of grease fires
: If you should have a greasefire in a broiler
pan, press the Clear/Off pad,and keep
the oven door closed to contain fire until
itburns out,
For safety and proper cooking performance,
alwags bake and broil with the oven door
closed
:::::Never place, useor self-clean the lower oven
drawer pan in the upper oven
READAND FOLLOWTHISSAFETYINFORMATIONCAREFULLY.
SAVE THESEINSTRUCTIONS
01
£
ol
iq:_ :_2 ¸ :
•L_,/:::: :_ _ :
¸•i•i¸¸i¸•¸
:_: ,i;i_:,i:::_
n
v A
- I,,_ u
v e ,."_
84
4
01 i
it.
0
#,
t_
E
01
0
Using the gas surface burners.
,,,,,, ,,,,,,,,, ,,, ,,
Throughout this manual, features and appearance may vary from your model
Before Lighting a Gas Burner
Hake sure all burnersare in place,
Hake sure all grateson therange are
properlyplaced before usingang burner,
ifgour range has theGas!ControlLockout
feature, makesure itis disabledbefore
attempting tolight thesurface burners
After Lighting a Gas Burner
Do not operatethe burner for-an extended
periodoftime withoutcookware on the
grate Thefinishon thegratemagchip
without cookwareto absorbtheheat
Besure theburners and gratesare cool
before gou placegout hand.a pot holder,
cleaning cloths or'othermaterials on them
Pushthecontrolknobin andturnit
totheLITEposition
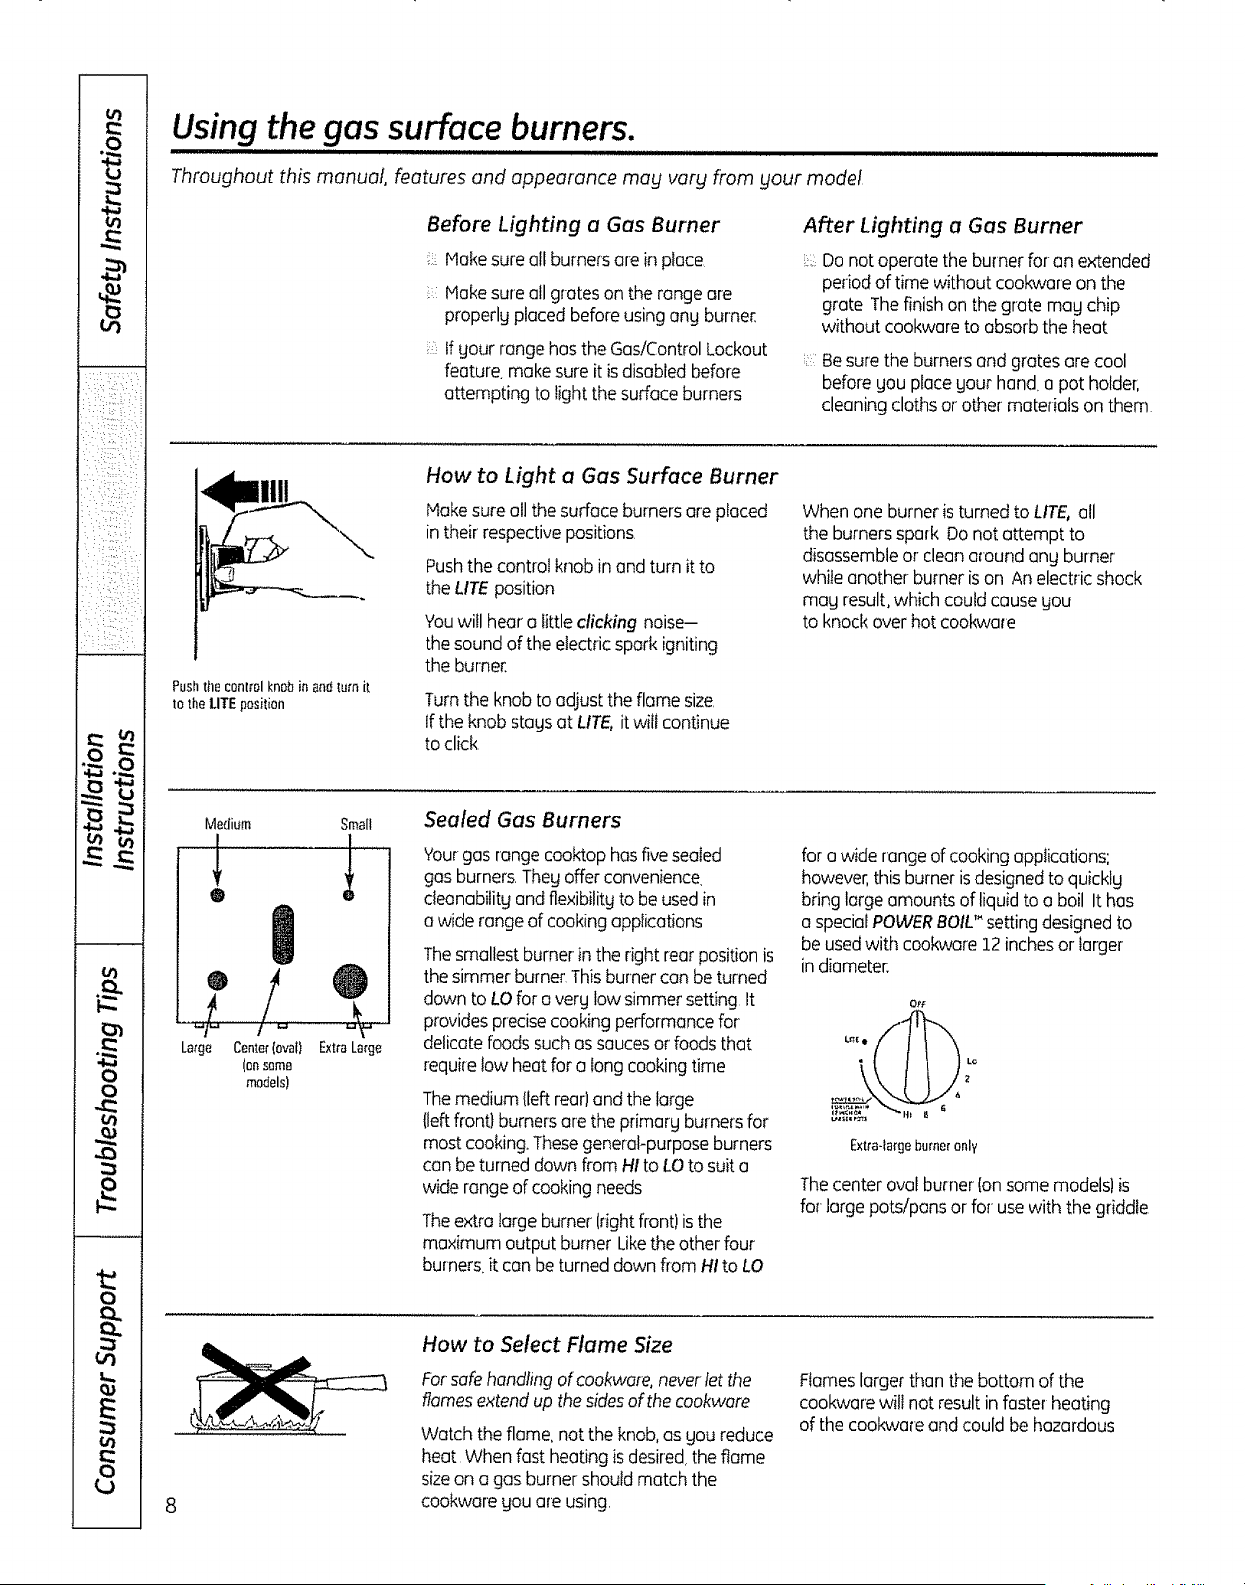
How to Light a Gas Surface Burner
Hakesure all thesurface burnersare placed
intheir'respectivepositions.
Push the control knob in and turn it to
the LITE position
Youwillhear a little clicking noise-
thesound ofthe electric spark igniting
theburner.
Turntheknobto adjust theflame size.
If theknob stags atLITE,it wilt continue
toclick
When one burner is turned toLITE,all
theburnersspark Do not attempt to
disassembleor clean around ang burner
while anotherburner ison Anelectric shock
magresult,which couldcausegou
toknock over hot cookware
Medium Small
I
@
Sealed Gas Burners
'four gas range coaktop hasfivesealed
gasburners.Theg offerconvenience.
deanabilitgand flexibilitgtobeused in
a widerangeofcookingapplications
Thesmallest burnerin theright rear positionis
thesimmer burner Thisburner can be turned
downtoLOfor a verg lowsimmersetting It
providesprecisecookingperformancefor
delicatefoods suchas saucesor foods that
requirefow heat fora longcookingtime
Themedium {leftrear)and the large
(leftfront} burnersare the primargburnersfor
most cooking.ThesegeneraFpurposeburners
can be turneddown from HItoLOtosuit a
wide range of cooking needs
The extra largeburner (rightfront)is the
maximum output burner Liketheother four
burners,itcan be turned downfloraHIto LO
fora wide range ofcookingapplications:
however,this burnerisdesignedtoquicklg
bring largeamounts ofliquidtoa boil Ithas
a specialPOWERBOIL" settingdesigned to
be usedwith cookware 12inchesor larger
in diameter.
O£F
Extra-largeburneronly
The center oval burner[on some models)is
forlarge pots/pans or foruse with thegriddle
How to Select Name Size
For safe handling ofcookware, never letthe
flames extend up the sidesofthe cookware
Watchthe flame,notthe knob,as gou reduce
heat Whenfastheating is desired,theflame
sizeon a gasburnershould matchthe
cookware gou are using,
Flameslarger thanthe bottom of the
cookware wilt not result in faster heating
ofthecookwareand couldbe hazardous
Use aflatobmlemedwok
GEAppliances.com
,, illll,, i
Top-of-Range Cookware
Aluminum: Medium-weightcookware is
recommendedbecauseitheatsquickly
and evenly Most foodsbrawnevenlgin an
aluminum skillet Usesaucepanswith tight-
fittinglids when cookingwith minimum
amountsof water.
Cast-Iron: If heated slowly,mostskillets
will give satisfactoryresults.
Enamelware: Under some conditions,
the enamel of some cookware mag melt.
Followcookwore manufacturer's
recommendations forcooking methods
Glass: Thereore two typesof glass
cookwore-those for oven use onlyand
those for top-of-range cooking(saucepans.
coffee and teapots)Glass conducts heat
verg s!owtg
HeatproofGlass-Ceramic: Can be used for
either surface or oven cooking ttconducts
heat very slowlg and cools very slowlg Check
cookware manufacturers directions to be
sure itcan be used on gas ranges
Stainless Steel:Thismetal alone has poor
heating propertiesand is usuallycombined
with copper,aluminum or othermetals for
improved heat distributionCombination
metal skilletsusuallgwork satisfactorily if
themare usedwith medium heat as the
manufacturer recommends
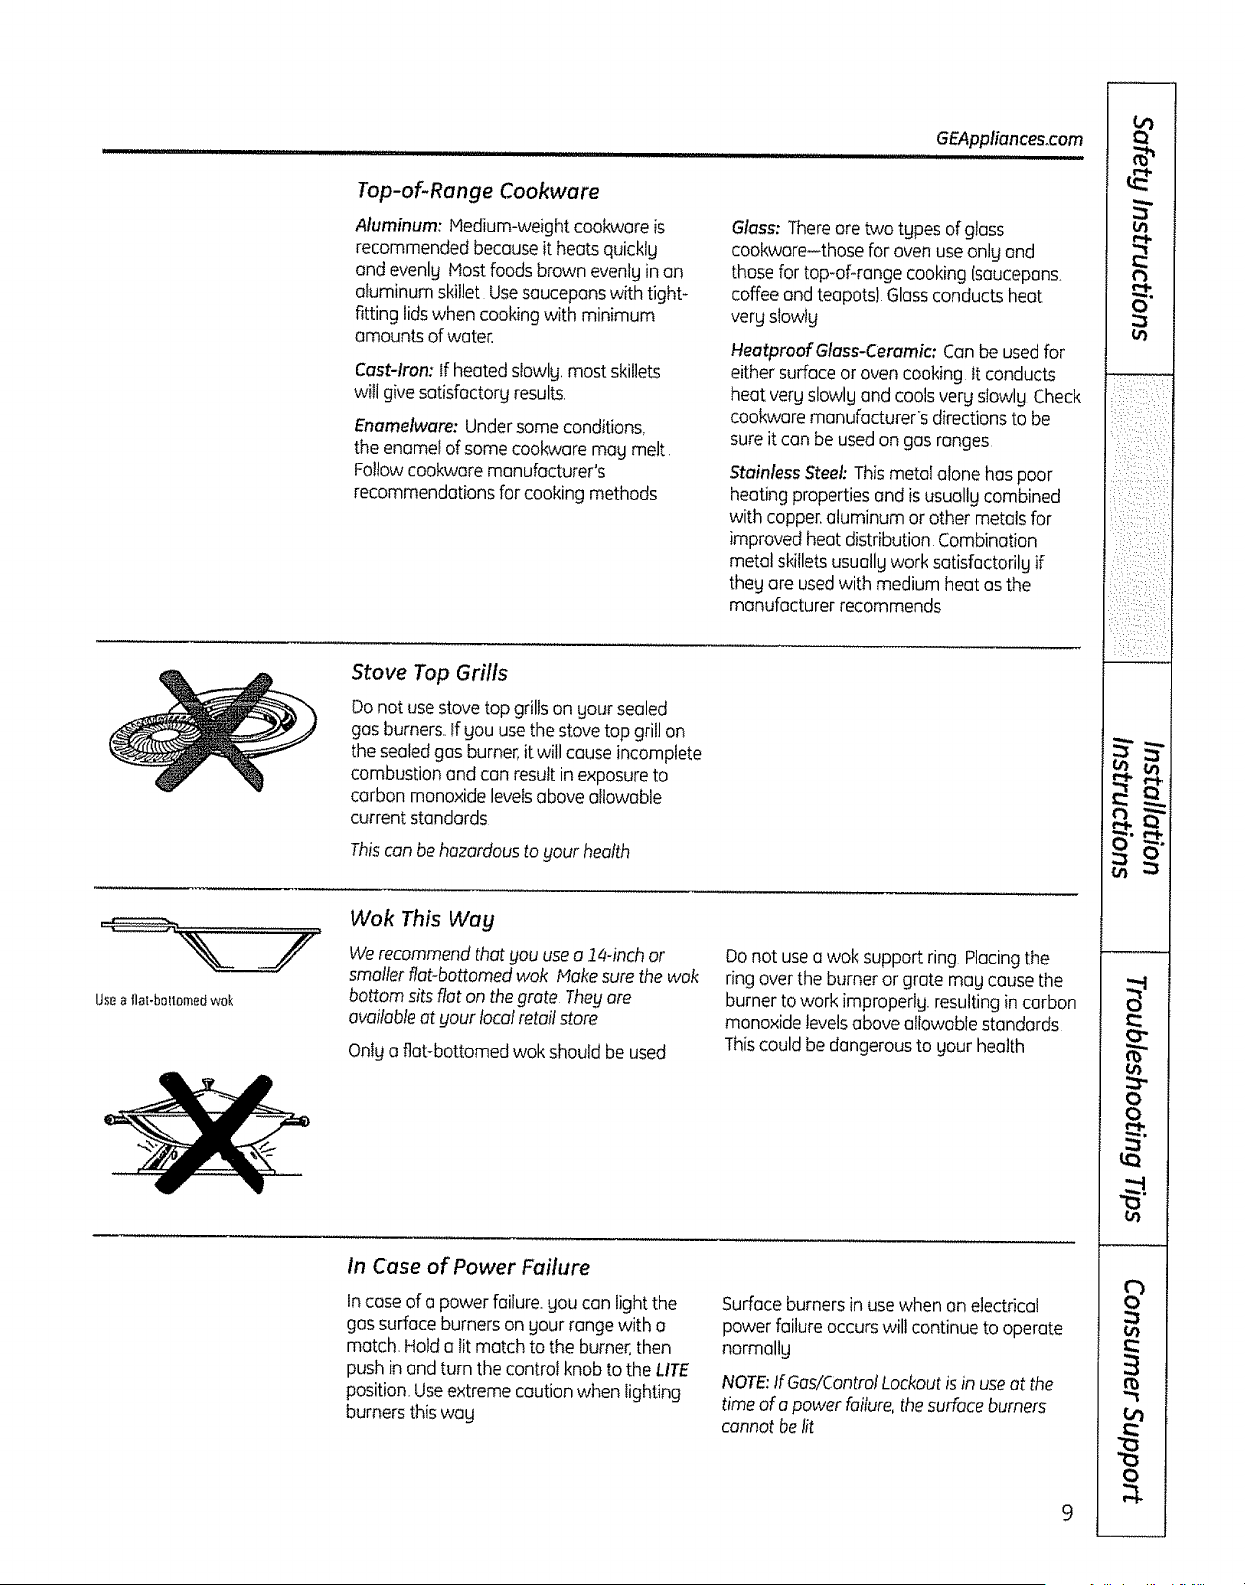
Stove Top Grills
Do notuse stove topgrillson yoursealed
gas burners.,If youusethestovetop grillon
thesealedgasburner,it will cause incomplete
combustionand canresultinexposureto
carbonmonoxidelevelsabove allowable
current standards
Thiscan behazardousta yourhealth
Wok This Way
We recommend that you use a14-inch or
smaller fiat-bottomed wok Makesure the wok
bottom sitsflat on thegrate They are
available at your localretailstare
Only a flabbottomed wok should be used
Do notuse a wok support ring Placingthe
ring over theburneror grote may cause the
burner to work improperly, resultingincarbon
monoxidelevelsabove allowable standards
Thiscould be dangerousto yourhealth
In Case of Power Failure
Incase of o power failure, you can light the
gas surface burners on your range with a
match, Hold a litmatch to the burner, then
push in and turn the control knob tothe LITE
position, Useextreme caution when lighting
burners this wag
Surface burnersin use whenan electrical
power failure occurswillcontinue tooperate
normally
NOTE: IfGas/Control Lockout isin useat the
time of a power failure, thesurface burners
cannot be fit
0
o_
•_z __,_._ : :;
L: :_-::x_-i ,b
i i 'iilliilI!
:_:: --,:,<7: 2_:
_,:T:_/;-_ __ _j
tn ,
v,.,#
i.i i
•-_ 1
0 I
J
m J
_ r
Q I
u_
a
:::::':%!:_'i:
{!!:_i,_,ii:ii:i
i_, _,i__ __!
Li ._.:.ii_:_,.",:
w A
vJ let
L
0
0
4::
ul
0
U3
E
u_
8
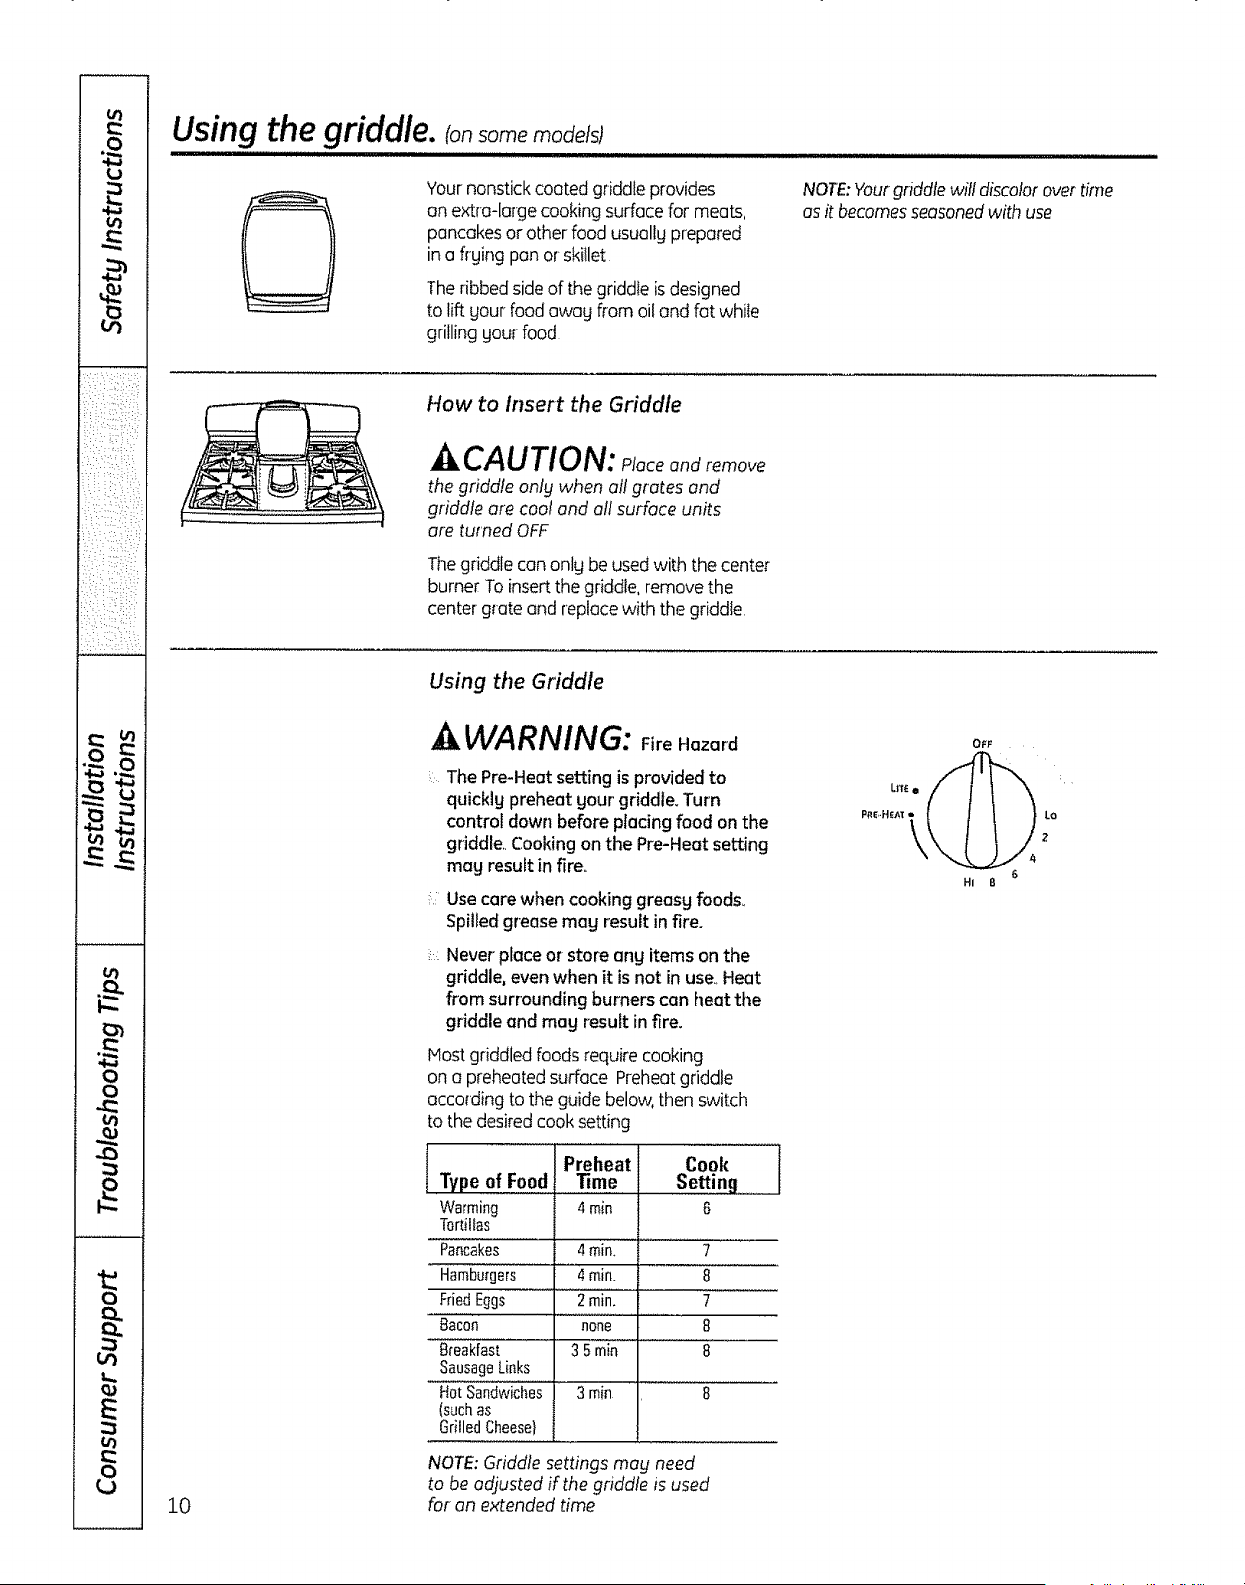
Using the griddle.
(on some models)
Yournonstickcoated griddleprovides
an extra-large cookingsurface for meats,
pancakesor other foodusually prepared
in a flying pan or skillet
Theribbed sideofthegriddle isdesigned
tolift yourfoodaway from oil and fat while
grilling your food
NOTE:Yourgriddlewilldiscolorover time
as itbecomesseasonedwith use
How to Insert the Griddle
CAUTION: Ploceandremove
the griddle only when oit grates and
griddle are cool end ofl surface units
ore turned OFF
Thegriddle can only be used with the center
burner To insert the griddle, remove the
center grate and replace with the griddle.
10
Using the Griddle
-AWARNING: FireH=ord
The Pre-Heat setting isprovided to
quickly preheat your' griddle. Turn
control down before placing food on the
griddle. Cooking on the Pre-Heat setting
may result in fire.,
:.::Use corewhen cooking greasy foods_
Spilled grease may result in fire.
.:_Never place or-store any items on the
griddle, even when it is not in use.. Heat
from surrounding burners can heat the
griddle and may result in fire.
Host griddled foodsrequire cooking
on a preheated sudace Preheatgriddle
according tothe guide below,thenswitch
tothedesiredcooksetting
Type ofFood
Warming
Tor[illas
Pancakes
Hamburgers
FriedEggs
Bacon
Breakfast
SausageLinks
Hot Sandwiches
(suchas
GrilledCheese}
Preheat
Time
4rain
4 rain.
4 rain. i
2rain. i
none i
35min I
3 min I
Cook
Setting
6
7
8
7
8
8
NOTE:Griddle settings may need
tobe adjusted if thegriddle isused
foran extended time
\
6
HI B
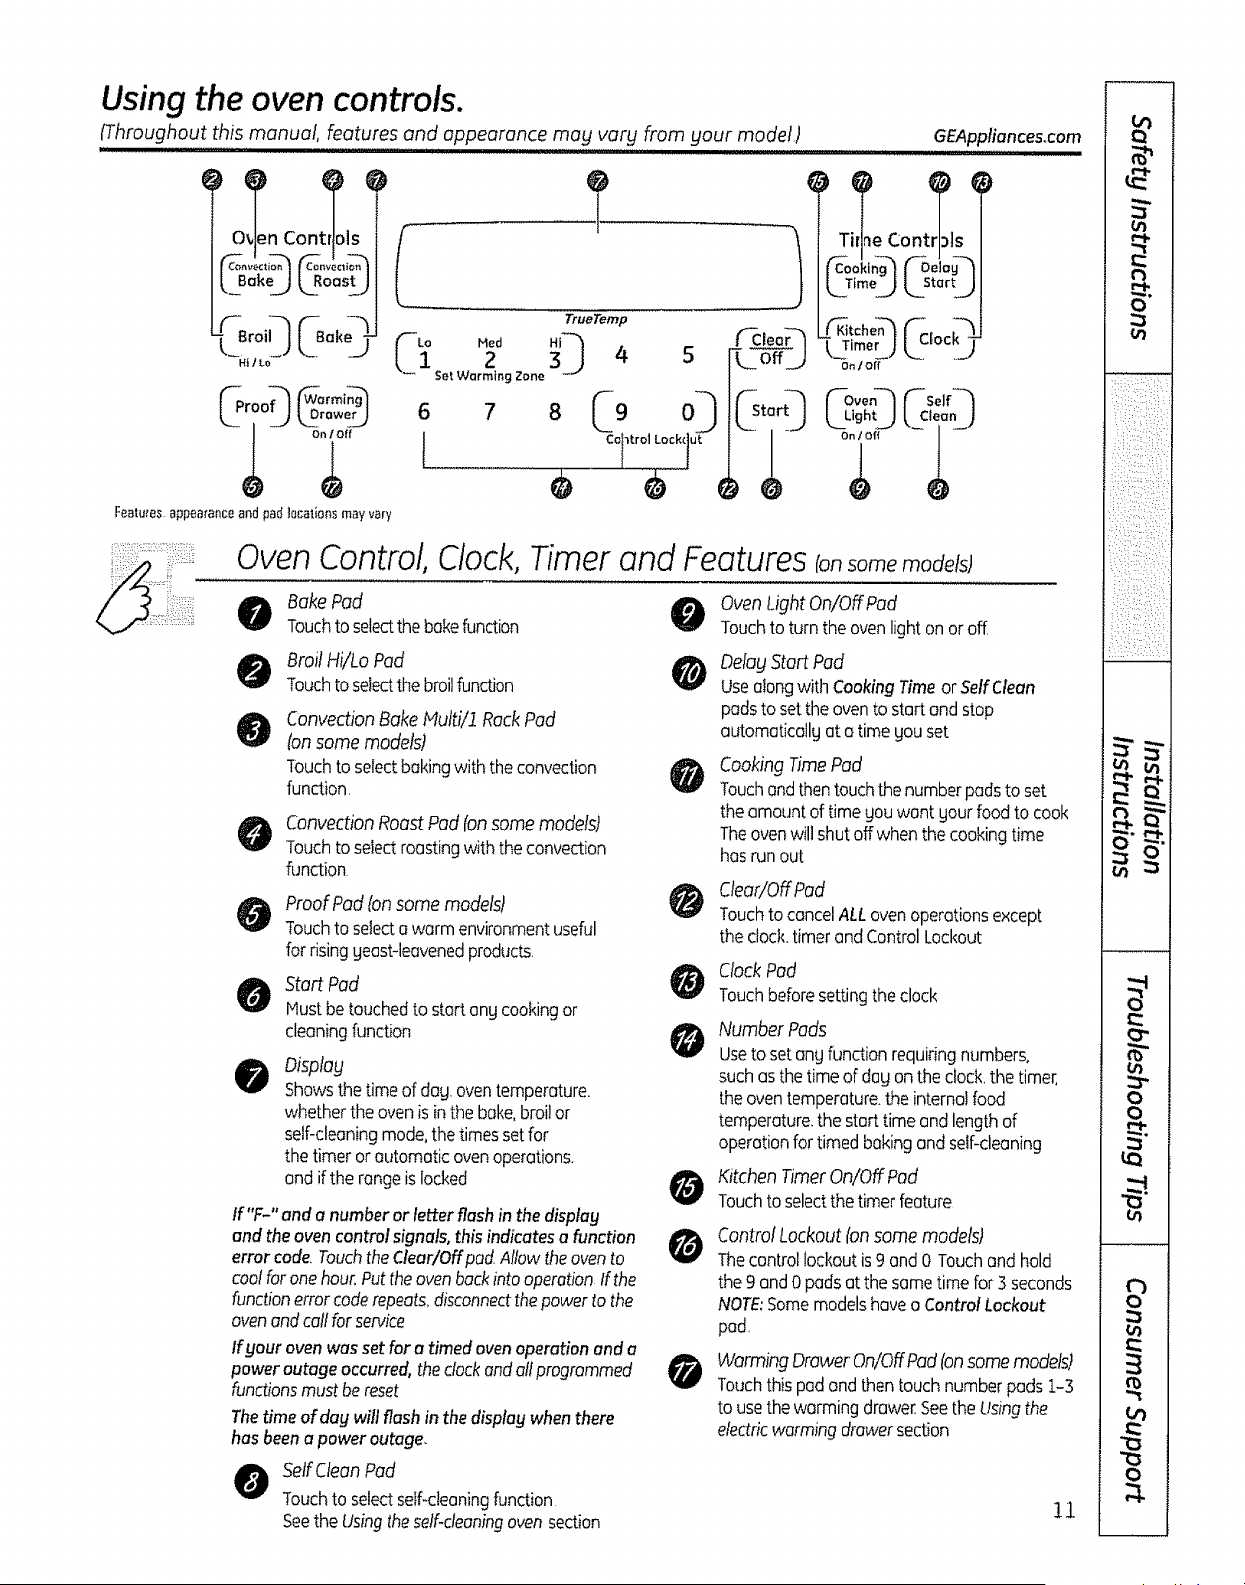
Using the oven controls.
(Throughout this manual, features and appearance may vary from your mode!)
GEAppliances.com
'
@i@ f °'i';3
Featuresappearanceandpad]ocalionsmayv_ry
6
1
TrueTemp
2 4
get Warming Zone
°& 0
0 Coltrol0 1 iLock( ut
_ eoQ
k offJ
T e Con s
LTimoj L_St.rtj
Ot_IOff
_oveo-'1f-solf_'1
ghLJL.2,o,oL)
On1Off 1
Oven Control, Clock,Timer and FeaturesIon models)
@
@
BakePad
Touchto selectthebakefunction
Broil Hi/Lo Pad
Touchto selectthebroilfunction
ConvectionBake Nulti/i RackPad
ton some models)
TOuchto selectbakingwiththe convection
function,
ConvectionRoast Pad(onsome models)
Touchtoselectroostingwith the convection
function
ProofPadtonsome models)
Touchto selectawarm environmentuseful
forrisingyeast-leavenedproducts
Start Pad
Hustbe touchedtostartany cookingor
cleaningfunction
Display
Showsthe timeofdog.oventemperature.
whetherthe oven isinthebake,broilor
self-cleaningmode,the timessetfor
the timeror automaticovenoperations.
and iftherangeis locked
If"F-" and a number or letter flash in the display
and the ovencontrol signals,this indicatesa function
errorcode.TouchtheClear/Offpad Allow theovento
cool foronehour.Putthe ovenbackinto operationIfthe
functionerrorcoderepeats_disconnectthepowertothe
ovenendcallfor service
If youroven wasset for a timedovenoperation end a
power outage occurred,the clockandallprogrammed
functionsmust bereset
Thetime of day will flash in the displaywhen there
has beena poweroutage.
O elf Clean Pad
Touchtoselectself-cleaningfunction
Seethe Usingtheself-cleaningoven section
Oven LightOn/OffPad
Touchtoturn the ovenlighton oroff.
@
Delay Start Pad
Usealongwith CookingTimeorSelf Clean
padsto setthe ovento start andstop
automaticallyat a time gouset
Cooking Time Pad
Touchand then touch the number pads toset
the amount of time you want gout food to cook
Theoven will shut off when the cooking time
hasrunout
Clear/OffPad
Touchto cancelALLovenoperationsexcept
the clod<,timerandControlLockout
ClockPad
Touchbeforesettingthe clock
Number Pads
Useto setany functionrequiringnumbers,
suchas the timeof dogon the clock thetimer,
the oventemperature,the internalfood
temperature,the start timeand lengthof
operationfor timedbakingandself-cleaning
Kitchen TimerOn/OffPod
Touchto selectthe timerfeature
Control Lockout (onsome models)
Tiqecontrollockoutis9 and0 Touchand hold
the 9 and0 padsatthe sometimefor 3 seconds
NOTE:Somemodelshavea ControlLockout
pad.
Warming DrawerOn/OffPad(onsomemodels)
Touchthispadandthen touchnumberpads 1-3
tousethewormingdrawer Seethe Usingthe
electricwarmingdrawersection
!1
q-
tb
O
o')
0
O"
o_
0
0
t_
0
0_
fo
0
e,i
u
): 2 :::[i:"
(_ :_i L:,) ih
i_i)i::ii!(i:i(_):::
:U)::::Ii::i:
(ii)!(_i::)ii_:i!';:ili
iii:
v
vx lt,,_
0
0
4b
o
A
E
8
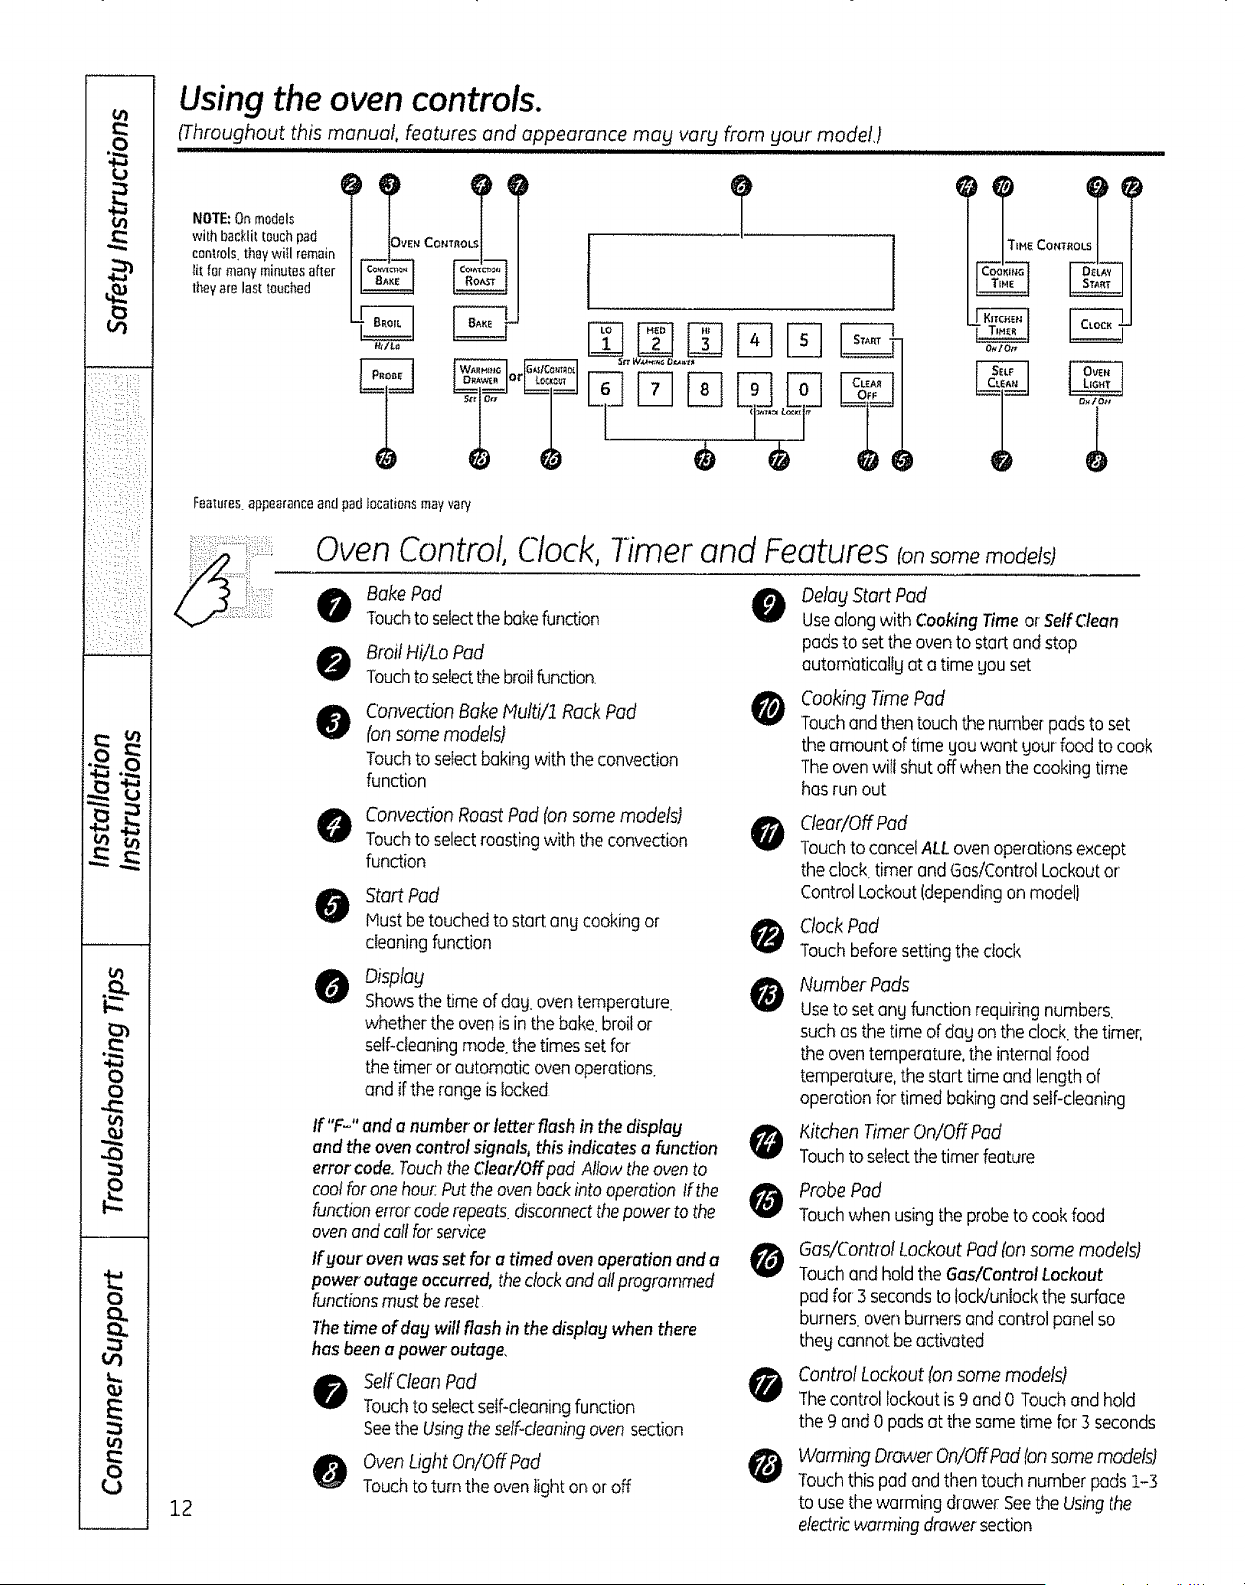
Using the oven controls.
(Throughout this manual, features and appearance mag vary from gout mode(,)
NOTE:Onmodels
with bacNittouchpad
controls,theywitl remain
Eitfe_manyminutesafter
theyatelasttouched
VEN CONTRO
HML_
?
F
t
.........e
=MECOHTRO
O_l Ot_
??
Featuresappearanceandpad locationsmayvary
Touchtoselectthe bakefunction
12
Oven Control, Clock,Timer and Features models)
Broil Hi/Lo Pad
Touchtoselectthe broilfunction
@
ConvectionBake Multi/1 RackPad
(on somemodels)
Touchto selectbakingwiththe convection
function
O onvectionRoastPad (on somemodels)
Touchto selectroastingwith the convection
function
Start Pad
Hust betouchedto startangcookingor
cleaningfunction
Disptag
Showsthe timeof dog.oventemperature.
whetherthe ovenis inthe bake.broilor
self<leaningmode thetimesset for
the timeror automaticovenoperations
andif therangeis locked
If "F-" and anumber'or letter flash in thedisplag
and the ovencontrol signals,this indicates a function
errorcode.TouchtheCleat/Offpad Allow theovento
coolfor onehou_:Putthe ovenbackintooperation tf the
functionerrorcoderepeatsdisconnectthepowertothe
ovenandcall for service
If gour oven was setfor a timed oven operation and a
power outage occurred, theclock and attprogrammed
functionsmust bereset
1hetime ofdogwill flashin thedisp!agwhenthere
hasbeenapower'outage,
SetfCfeanPad
TouchtoselectselFcleaningfunction
Seethe Usingthestir-cleaningoven section
Oven LightOn/Off Pad
Touchto turn the ovenlight onor off
0
0
DetagStart Pad
Usealongwith CookingTimeorSeffClean
padstosetthe oventostart andstop
autombticallgata timegouset
Cooking TimePad
Touchandthentouchthe numberpads to set
the amountoftime gouwant gout food tocook
Theovenwiti shutoffwhen the cookingtime
has runout
Clear/Off Pad
TouchtocancelALLovenoperationsexcept
the clocktimerandGas!cOntrolLockoutor
ControlLockout(dependingonmodel)
Clock Pad
Touchbeforesettingthe dock
0
Number Pads
Useto setang functionrequiringnumbers.
suchas the timeofdogontheclock,the timer,
the oventemperature,the internalfood
temperature,thestarttimeandlengthof
operationfortimedbakingand self-cleaning
llitchen TimerOn!OffPod
Touchto selectthe timerfeature
Probe Pad
Touchwhenusingtheprobeto cookfood
Gas/Control LockoutPad(onsome models)
Touchandholdthe Gas/ControlLockout
pad for-3 secondsto loclduniockthe surface
burnersovenburnersandcontrolpanelso
theg cannotbeactivated
Control Lockout (on same models)
Thecontrol lockoutis 9 and0 Touchand hold
the 9 and0 padsatthe sametime for] seconds
Warm_ngDrawer On/OffPod(onsomemodels)
Touchthis padandthen touchnumber pods1-3
touse thewarming drawer Seethe Usingthe
electricwarmingdrawersection
Using the upper oven.
n,quu! ,, ,,,,,,,,,,,u iml
To ovoid possible burns, place the rocksin thedesiredposition beforeyou turn the ovenon,
/
GEAppfiances°com
Before you begin°_
Theracks have stop-locks,so that when
placedcorrectlg on theracksupports
(AthroughE).theg willstop before coming
completelg out. and willnot tilt
When placing and removingcookware,
pulltherackouttothebumpon therack
support
Toremove a rack, pullittoward gou tilt the
front end up and pull it out
Toreplace, place theend ofthe rack
tstop4ocks}on thesupport, tilt up the front
and push the rack in
NOTE:Therackis not designedtoslideout
atthe speciallowrock (RIposition
Theovenhas5_ec£posilians
Italsohasaspe_iaIIow rackposition
(R)let extralargeitems suchasalarge
turkey
Plastic ilerns on lhecooklop may mall
it left too close to thevent
Ventappearance and Iocalion vary
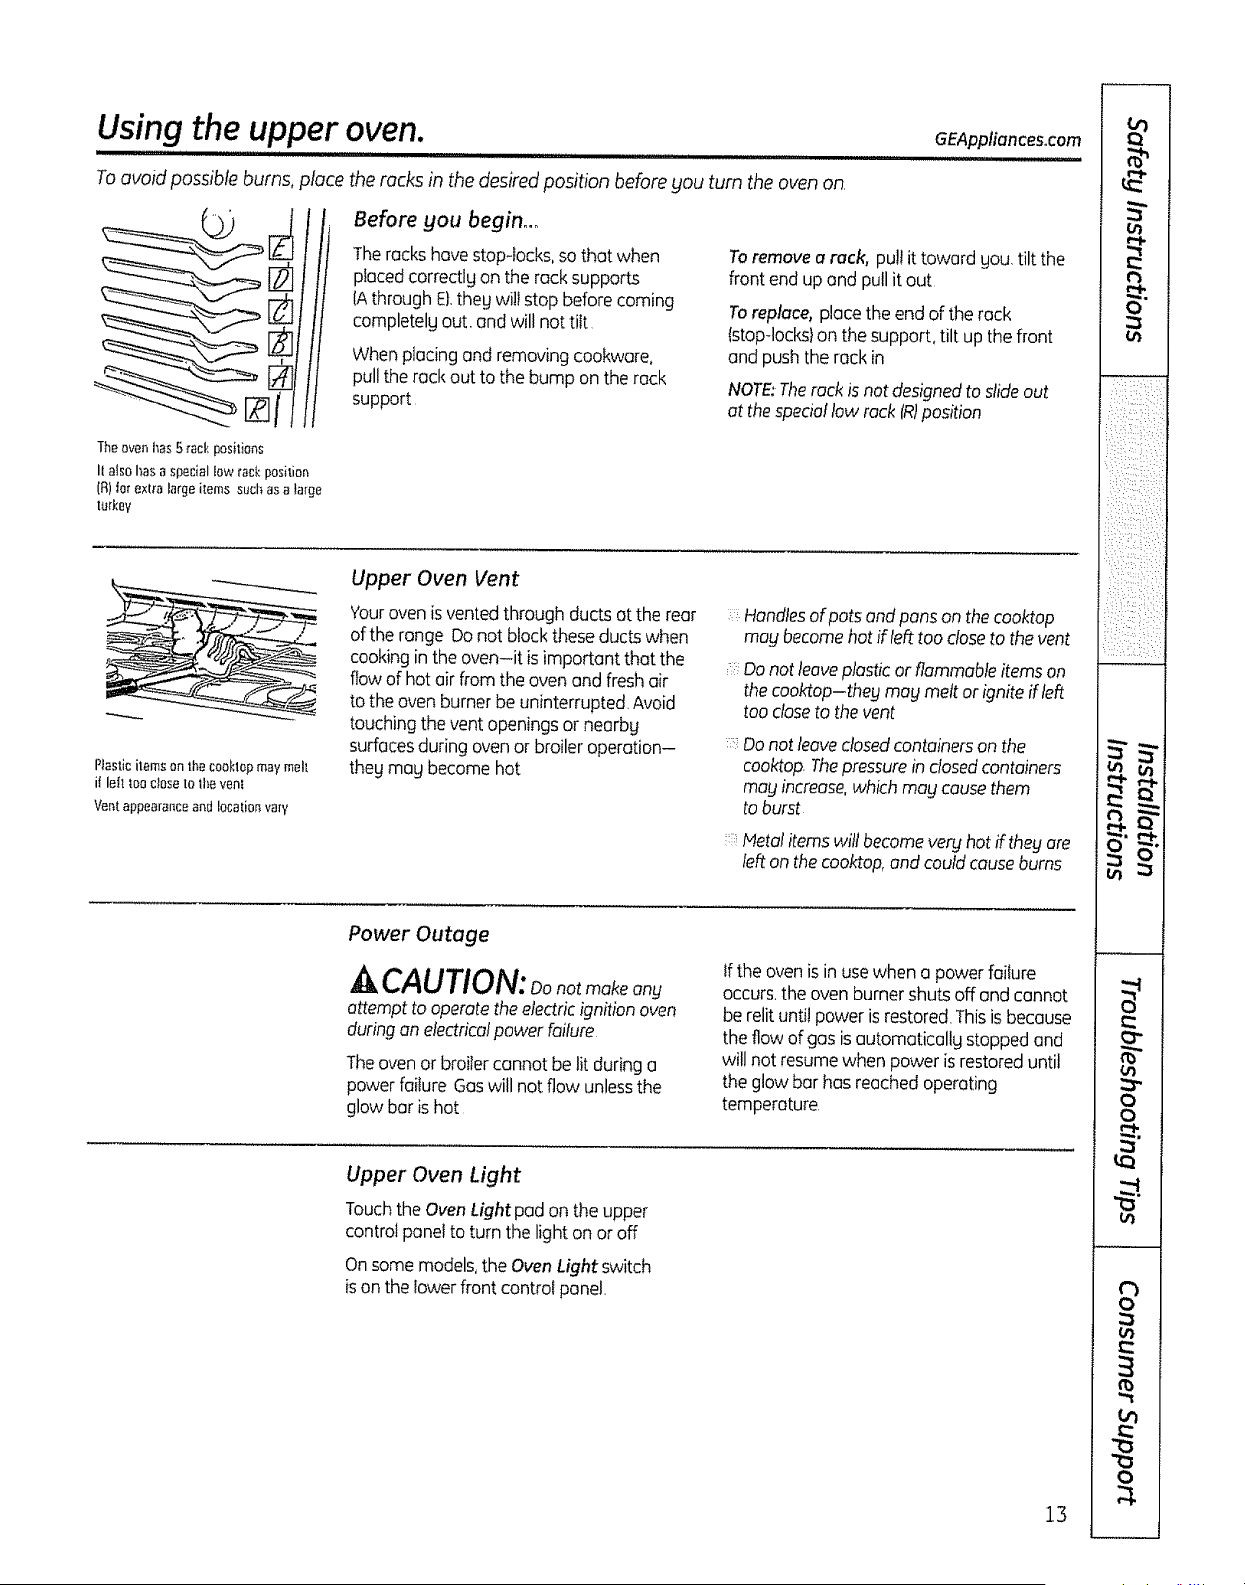
Upper Oven Vent
'four oven isvented through ducts atthe rear
ofthe range Do not block these ducts when
cooking in the oven-it isimportant that the
flow of hot air from the oven and fresh air
to the oven burner be uninterrupted. Avoid
touching the vent openings or nearby
surfaces during oven or broiler operation-
theg meg become hot
Handlesof pots and pans on the cooktop
mag become hot ifleft too close to the vent
Do not leaveplastic or flammable itemson
the cooktop-theg ma_lmelt or ignite if left
tooclosetothe vent
Donotleave closed containers on the
coaktop The pressure inclosed containers
mag increase, which ma_! cause them
to burst
kletalitems will become very hot iftheft are
left on the coaktop, and could cause bums
Power Outage
CAUTION: notmakeanuuy
attempt tooperatethe electricignition oven
duringan electricalpowerfailure
Theoven or broilercannot be lit during a
power failure Gaswill notflow unlessthe
glow bar ishot
If the oven is in use whena power failure
occurs,theoven burnershutsoff and cannot
be relit until poweris restored.Thisis because
the flow ofgasisautomaticallg stoppedand
willnotresumewhenpoweris restoreduntil
theglowbar has reached operating
temperature,
Upper Oven Light
Touchthe Oven Lightpad on theupper
control paneltoturnthelighton or off
Onsome models,theOven Lightswitch
is on the lower front control panel,
13
e"t
£.1
".:X X. ":L::_':__
:_:_i;i_i:.::i:::_i,!/!_
!:,:i__,_)_!I_:!!I::I;:)I_:,::_I_:
w A
__ w .
.- L
vJ el,_
o
0
0
L,.
E
8
Using the upper oven.
tf gour model hasa door latch, do not tacktheoven door with thelatch during baking or roasting
The latch isusedfor self-cleaning ontg,
Theovenhasaspecialtowrack(R)
position just above theoven bottom
Use it when extra cooking space is
needed, for example, when cooking
alarge turkey Tile rack isnot designed
to slide out at this position
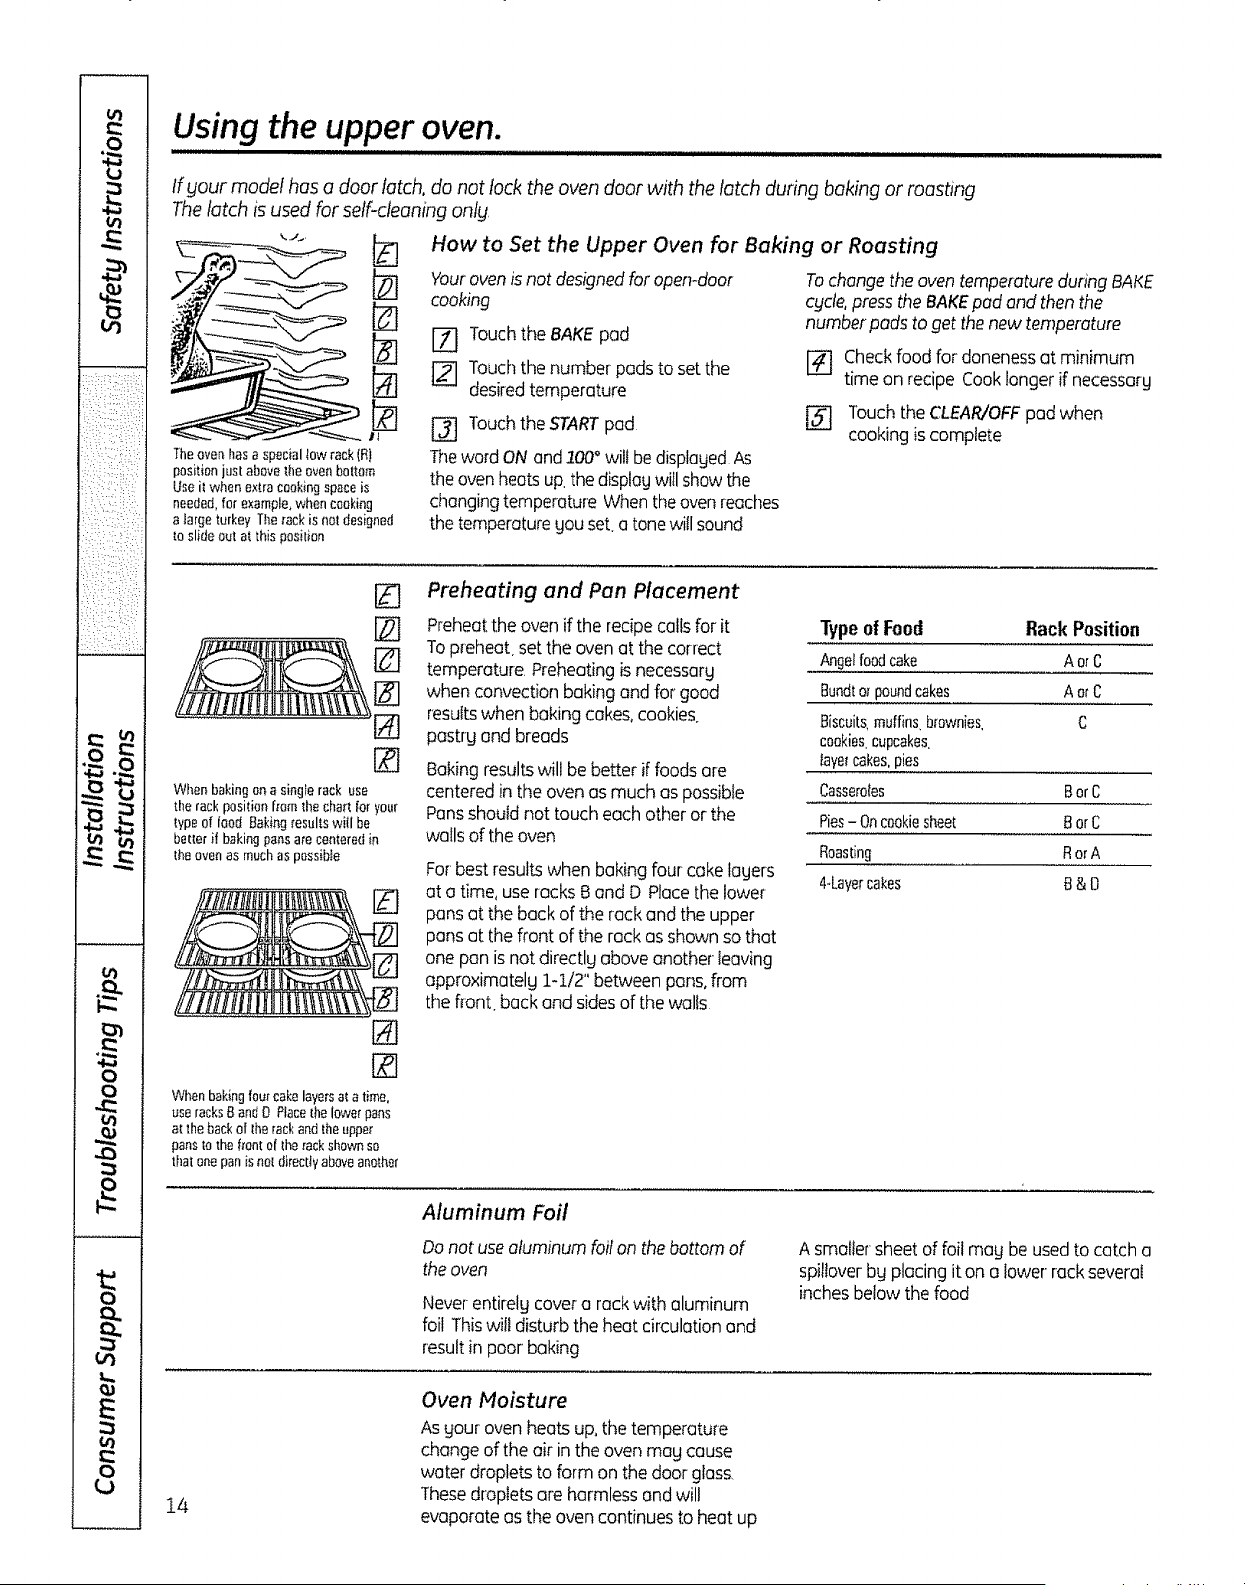
How to Set the Upper Oven for Baking or Roasting
'Fouroven isnot designed for open-door
cooking
I_] TouchtheBAKEpad
[] Touchthenumber pads toset the
desiredtemperature
[_ TouchtheSTARTpad
Theword ON and1OO°will bedisplagedAs
the oven heatsup,the displogwill showthe
ctlangingtemperature When theoven readies
the temperaturegouset a tonewill sound
To change the oven temperature during BAKE
cycle, press the BAKE pad and then the
number pads to get the new temperature
[_ Checkfoodfordonenessatminimum
time on recipeCooklonger if necessarg
Touchthe CLEAR/OFFpad when
cookingis complete
@
@
#q
Whenbakingonasinglerack usa
therackpositionfromthe chartforyour
typeoffood Bakingresultswill be
betterif bakingpansarecenteredin
theovenasmuchaspassiNe
%
Preheating and Pan Placement
Preheattheoven iftherecipecallsforit
Topreheat, setthe ovenatthecorrect
temperature.Preheatingis necessarg
whenconvectionbaking and forgood
resultswhenbaking cokes,cookies.
postrg and breads
Bakingresultswillbe better iffoodsore
centeredin theoven as much as possible
Pansshould nottouch each otheror the
wells ofthe oven
Forbest resultswhenbaking fourcakelagers
ata time,use racks 8 and D Placethe lower
pans atthe back oftherackand the upper
pans atthe front of therack as shown so that
one pan is notdirectlg above another leaving
approximatelg1-1/2" between pans,from
theflont backand sidesofthewalls
Typeof Food RackPosition
Angelfoodcake AorC
Bundto_poundcakes AorC
Biscuits,muffins,brownies C
cookies,cupcakes.
layercakes,pies
Casserotes BorC
Pies- Oncookiesheet BorC
Roasting RorA
4*Layercakes B&D
When baking fourcake layersat atime,
use tacks B and D Race thelower pans
at theback of the rackandtheupper
pans to _hofront el d_erackshown so
that one pan isnotdirectly aboveanother
Aluminum Foil
Do not usealuminum foil on the bottom of
the oven
Never-entirelu covera reckwith aluminum
foil Thiswilldisturb theheatcirculationend
resultin poor baking
A smallersheet of foilmagbe usedtocatcha
spilloverbg placing iton a lowerrockseveraI
inchesbelowthe food
14
Oven Moisture
As goutoven heats up,thetemperature
change oftheair in the ovenmag cause
water droplets toform on the door glass,
Thesedropletsare harmless andwill
evaporate as the ovencontinuestoheatup
GEAppliances,,com
lf gour model has a door btch, do not !ock the oven door with the latch during broiling,
The latch isused for self-cleaning onlg
CloseLhedoor Alwaysbroilwith
the doorclosed
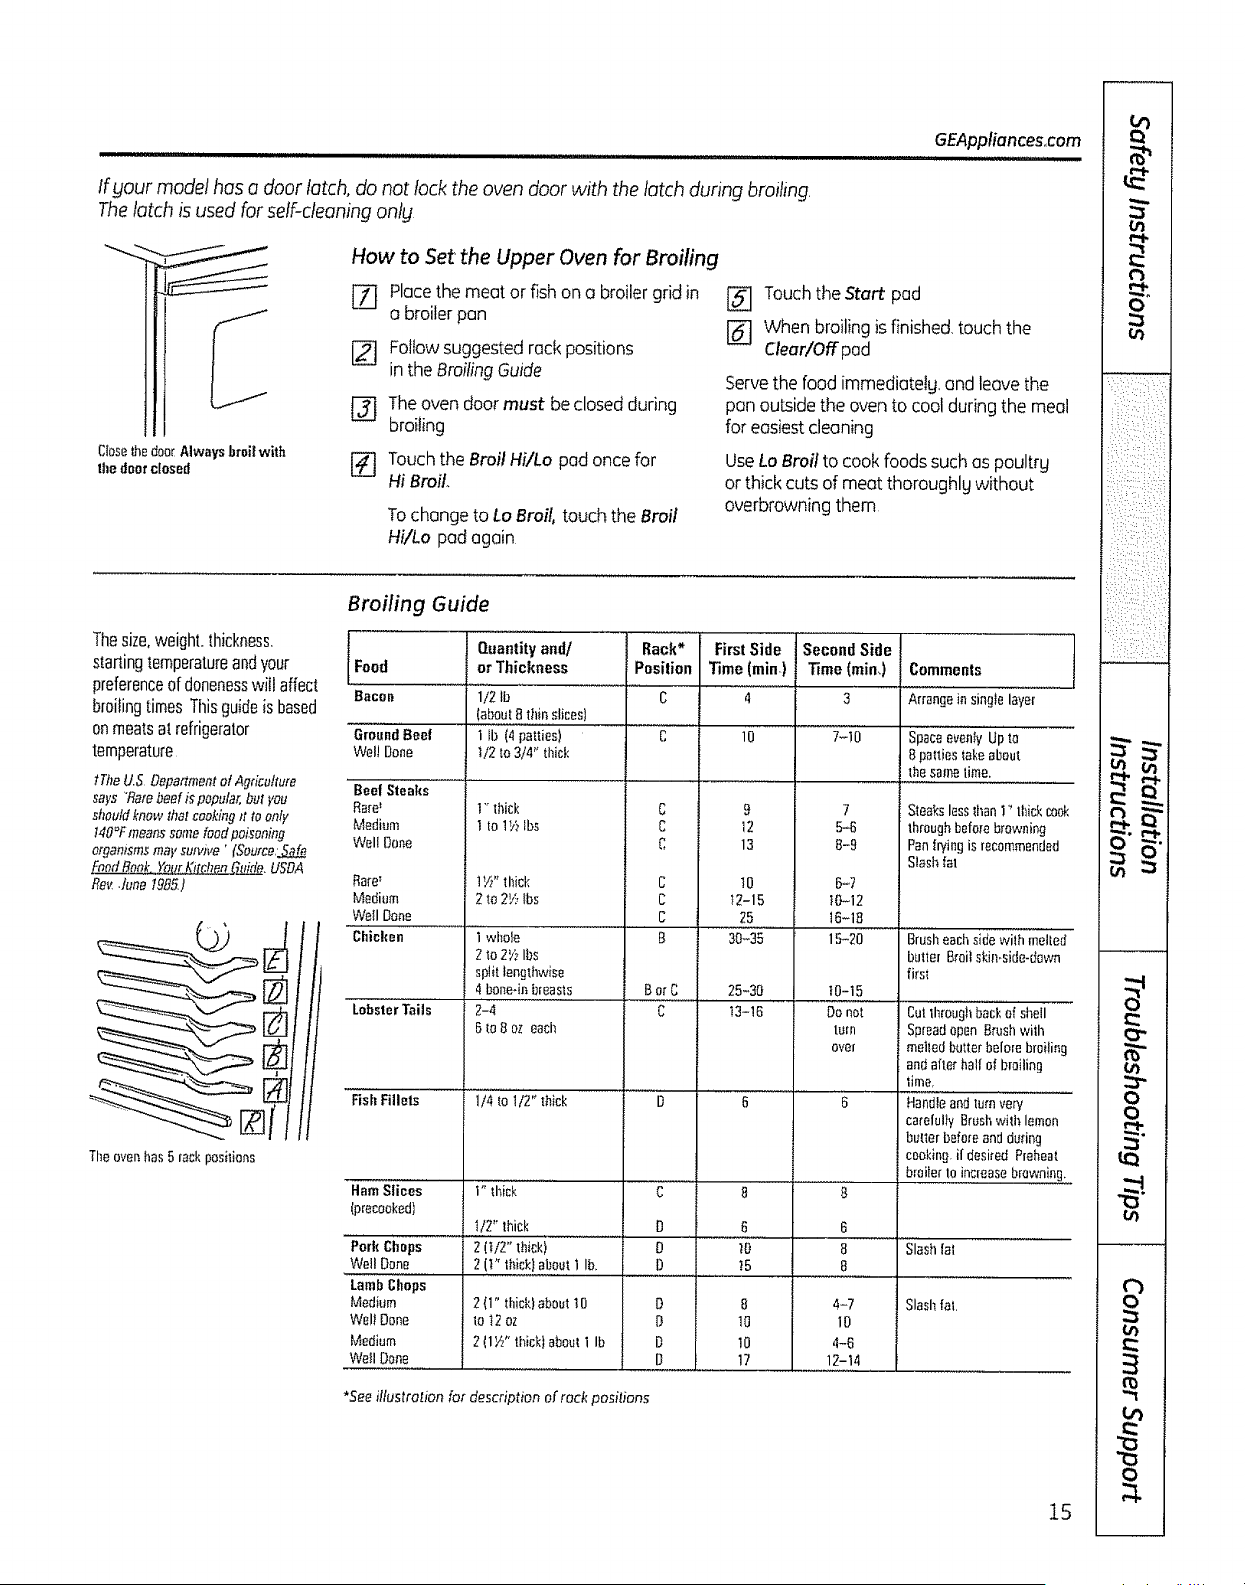
How to Set the Upper Oven for Broifing
[Z] Place the meat or fish on o broiler grid in
o broiler pan
[_ Followsuggested reckpositions
inthe BroilingGuide
_] The oven door must be closed during
broiling
[_ Touch the Broil Hi/Lo pod once for
Hi Broil,
To change toLo Broil,touch theBroil
Hi/Lo pod again
[_] Touch the Start pod
[_ When broiling isfinished, touch the
Cleor/Off pod
Servethefood immediotelg,endleavethe
pan outsidetheoven tocool during themeal
foreasiestcleaning
UseLoBroil tocookfoods suchas poultrg
or thick cutsofmeat thoroughlg without
overbrowningthem
Thesize,weight, thickness.
starlingtemperatureandyour
preferenceof donenesswill affect
broilingtimes Thisguide isbased
onmeats at refrigerator
temperature
tThe U.5 Department of Agriculture
says "Rare beef ispopular, butyou
should knew that cooking _tto only
140°Fmeans some food po_soning
orgamsms may sufwve ' (Source,_
Fnett Bt_nk._/r Kitchen C_, USDA
Re_ June 1985)
Tileovenhas5rackpositions
Broiling Guide
Quantity and/
Food or Thickness
Bacon 1/2 lb
G;o,,ndBeef
Well Done
Beef Steaffs
RaW I"thick
Medium I to 1_/_Ibs
Well Done
Rare_ IV/'thick
Medium 2 tO2_'lbs
Wail Done
Rack*
Posilion
C
(about8 thinslices)
1ib (4patties)
t/2to3/4"thick
Chicken Iwhole
2to 2_,_Ibs
split lengthwise
4bone-inbreasts
LObste'r"Tails" 2-4
5to 8ez each
FishFillels
HamSlicEs
(precooked)
'Pork C'hops
Well Done
LambChaps
Medium
We!_Done
Medium
Weft Done
C
c
c
c
C
C
C
First Side
Time(min)
10
9
12
13
10
12-15
25
Second Side
Time (rain,)
3
7-111"
7
5-6
8-9
G-7
10-12
16-18
Spaceevenly"LiptO
8pattiestakeabout
the sametime.
Steaks less Ihan !" thickcook
through before b,rowning
Pan |Piingis recommended
Slash ial
"1";4'io"1'/2,'t,ick
1"thick
tl2" thick
2(U2" thicki
2(1" tt_ick)aboutI lb.
2(1" Ihick)about 10
to t2 oz
2(1W' thick) about I Ib
B 30-35
Barc 25-30
C t3-!6
D
D
D
D
D
D
D
15-20
10-15
Donot
turn
over
G G
8 8
G 6
IO 8 Slashfat
15 8
8 4-7 Slashfat,
10 1O
10 4-B
17 12-14
Brusheachsidewilhmelted
butler B_oilskin-side-down
first
Cutthroughbackefshell
Spreadopen Brushwith
meltedbutterbolerobroiling
andafterhallof broiling
time,
Handle"andturn'very ......
carefullyBrushwith lemon
butterbeforeandduring
ceokin_,if desiredPreheat
broilertoincreasebrowning,:,
*Seeillustration for description of rockpositions
15
0
ul
£
01
r_
w
w - -
vm ,_
01
O_
0
0
4=
ol
4_
A
0
ul
oj
E
01
8
Using the clock and timer.
Not aft features are on all models
CLocK
Makesuretheclockissettothecorrect
time of day
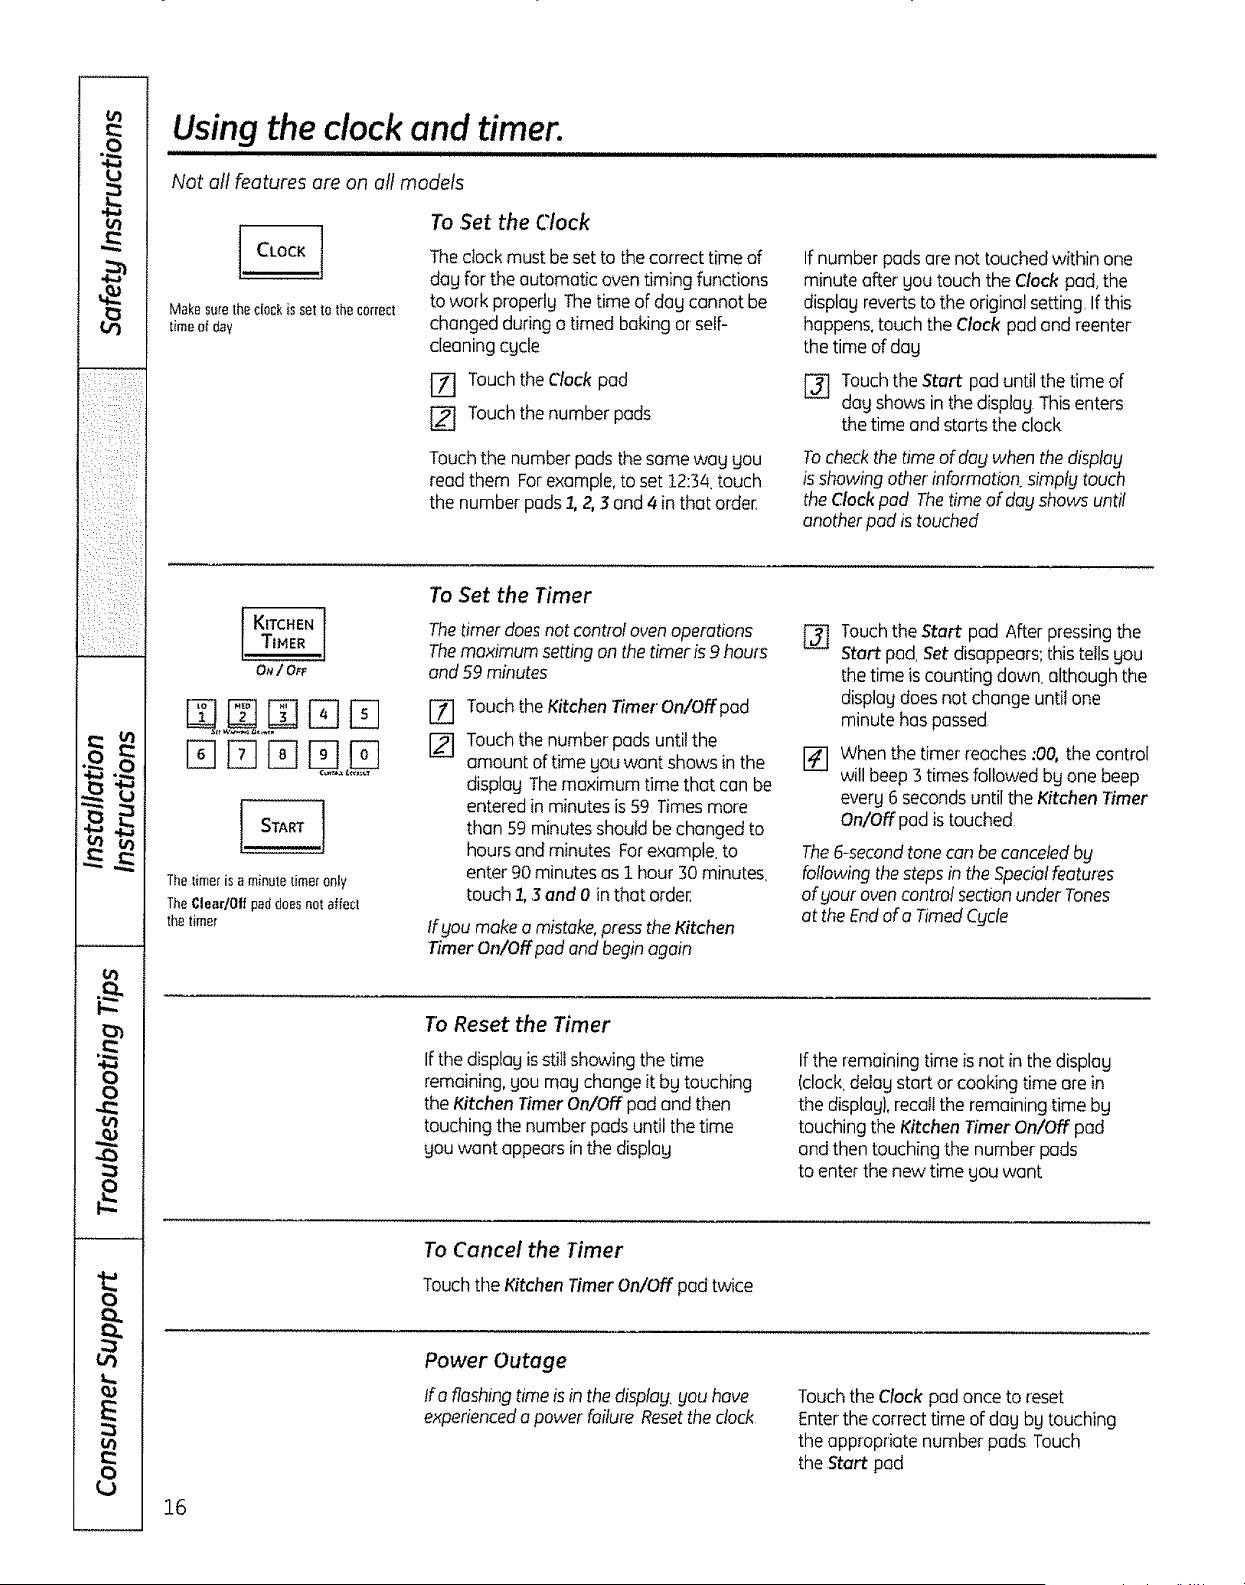
To Set the Clock
The dock mustbeset tothe correcttime of
dog forthe automatic oven timing functions
towork properlg The time of dag cannot be
changedduringa timed baking or self-
cleaning cgc[e
[Z] TouchtheClockpad
[] Touchthenumber pads
Touchthenumber pads the same wag gou
read them Forexample,toset 12:34.touch
thenumberpads2, 2,3 end 4 in that order,
Ifnumberpads are nottouchedwithin one
minute after gou touch theClockpad, the
display reverts to theoriginal setting.Ifthis
happens,touch theClockpad end reenter
thetime of dag
[_ TouchtheStart pad until thetime of
dag shows in thedisplagThisenters
thetime and starts theclock
Tocheckthe time of dag when the display
is showingother information simptgtouch
the Clock pad Thetime ofdag shows until
anotherpod is touched
KITCHEN
[, TIMER J
0_/ OfF
START
Thetimer isa minute timer only
TheCleadOlf pad does not affect
tl_e time[
To Set the Timer
Thetimer does not cant{of oven operations
Themaximum setting on thetimer is9 hours
and 59 minutes
Touchthe Kitchen TimerOn/Offpad
Touchthe numberpads until the
amount of time gouwont shows in the
displagThemaximum time that conbe
entered in minutes is 59 Timesmore
than59 minutes should bechangedto
hours and minutes Forexample,to
enter 90 minutes asi hour 30minutes,
touch 1,3 and 0 inthat order`
ff youmakeo mistake,pressthe Kitchen
Timer On/Offpad and beginagain
@
TouchtheStar pad After pressingthe
Start pad, Set disappears;this tellsgou
the time is counting down. although the
displagdoes notchangeuntil one
minute has passed
When thetimer reaches:00, thecontrol
will beep 3timesfollowed bg one beep
ever# 6seconds until theKitchen Timer
On/Offpad is touched
The 6-second tone can be canceled by
following the steps in the Special features
of your oven contro! section under Tones
at the End ofa Timed Cycle
To Reset the Timer
Ifthedisplag isstill showingthetime
remaining,gou moo change itbgtouching
theKitchenTimerOn/Off pad and then
touching the number pods until thetime
gou want appears in thedisplaLJ
If the remainingtime is notin the displag
(clock,deIag startor cooking time are in
the display),recall theremaining time bg
touching theKitchen Timer On/Offpad
and then touching thenumberpads
toenterthe newtime gou want
To Cancel the Timer
TouchtheKitchen TimerOn/Off pad twice
Power Outage
!f a flashingtimeis in the display,youhave
experienceda powerfailureResetthe clock
TouchtheClockpad once toreset
Enterthe correcttime ofdag bg touching
theappropriatenumber pads Touch
the Start pad
16

Using the timed baking androasting features, tupperovenonlyt G App,once com
,111,111111 ,1111 , i iiiii II ...................... .......
If your model has a door latch, do not lock the oven door with the latch during timed cooking The btch is used for
self-cleaning onfg
NOTE: Foods that spoil easily-such as milk, eggs, fish,stuffings, poultry end pork-should not be allowed to sit for
more than i hour before or after cooking Room temperature promotes the growth ofharmful bacteria Be sure that
the oven light is off because heat from the bulb willspeed harmful bacteria growth
D FqD
DDD ,D
How to Set an immediate Start and
Theupper oven willturn on immediately and cook
for a selected length of time Atthe end of the
cooking time. the oven _41tturn offautomatico!tg
[Z] TouchtheBake pad
[] Touch the number pads toset the desired
oven temperature
[_] Touchthe Cooking Timepad
NOTE:Ifgout reciperequirespreheating, you mug
need to add additional time to the length of the
cooking time
[_ Touchthenumberpadsto setthedesired
lengthof cookingtime Theminimum
cookingtimeyoucansetis 1minute
Theoven temperature that you set and the
cookingtimethat you entered witibe inthe
display
Automatic Stop
[] TouchtheStart pad
TheovenwillturnON,andthe displaywillshow
thecookingtimecountdownandthechanging
temperaturestartingatt00°F[Thetemperature
displaywil!startto changeoncetheoven
temperaturereachesIO0°F)Whenthe oven
reachesthetemperatureyou set.3 beepswi!l
sound
Theovenwillcontinueto cookforthe setamount
of time.thenturnoffautomatically
Aftertheoventurnsoff.theen&of_cgdetonewill
sound
[_ TouchtheClear/Offpadto clearthe display
ifnecessaryRemovethe foodfromthe
oven Remember.eventhoughthe oven
turnsoffautomatically,foodleftinthe oven
willcontinuecookingafterthe oventurnsoff
N,,NND
DSD ,,D
DDD ,D
How to Set a Delayed Start and Automatic Stop
Theupper ovenwilt turn onatthe timeofda!jyou
set,cookfor a specificlength of timeand then turn
offoutomaticollg
Hake sure theclock shows the correct time of day
[Z] Touch the Bake pad
[_ Touch the number pads to set the desired
oven temperature
[_ Touch the Cooking Time pad
NOTE:If your reape requirespreheating,youmay
needto add additional timetothe length ofthe
cooking time
[]
Touchthe numberpodsto setthe desired
lengthof cookingtime Theminimum
cookingtimeyoucansetis .1.minute
Theoventemperaturethatyousetandthe
cookingtimethat youenteredwillbeinthe
dispIag
[_ TouchtheDelayStart pad
[_] Touchthe number pads to set the timeof
dayyou wanttile oven to turn onand start
cooking
NOTE:Anattentiontonewiltsoundif youareusing
timedbakinganddonot touchtheStartpad
NOTE:Ifyou wouldliketocheckthetimesyou
hoveset.touchtheDelayStartpodto checkthe
starttimeyouhavesetortouchtheCookingTime
pad tocheckthelengthofcookingtimeyou hove
set
Whenthe oven turnsONatthetime ofday
youset.the displaywillshowthe cooking time
countdown and the changing temperature
starting at ].O0°F(Thetemperaturedisplay
wilt start to changeonce theoven temperature
reaches _.O0_F}Whenthe oven reachesthe
temperature youset.beepswilt sound
Theovenwillcontinueto cookforthe setamount
of time,thenturnoffautomatically
Afterthe oven turnsoff,the end-of-cycle tone
will sound
[_] TouchtheClear/Offpadto clearthe display
if necessaryRemovethefoodfromthe
oven Remember,eventhoughtheoven
turnsoffautomatically,foodleftinthe oven
will continuecookingafterthe oventurnsoff
TouchtheStart pad
17
0
ul
:::i :::: :)7::::_7,_
!:iiI:i:!:i:::::::
:(i_ :,-.z __:::
( ::i :> _:h:__
!__}'_"?:i":(""::5
c:o_ :-, :! !_
:: ¸:•¸:::::¸¸:7
r_ _
0
0
0
I/I
I.I
Itt
: ii:iiii i iii!
%!_i:ii</
•:::i::i:::•_:::i ¸
l_ ,'lff,
i
Ill I
o I
o I
l,tl I
o t
. ll*ll t
o t
III t
o t
tj 1
Using the probe, ransomemodels
,,,,,,,,,i,,,llul ,,i ,ill i
ff gour model has a door latch, do not tacktheoven door with the latch while cooking with theprobe The btch isused
for self-cleaning only
Formany foods,especially roosts end poultry, internot food temperature is the best test fordoneness The temperature
probe takes theguesswork out ofcooking foods tothe exact doneness you wont,
Thetempe_aluteprobehas
askewer-likeplebeatoneend
andaptugat_heo_herendthat
goesintothe outle[in _heoven
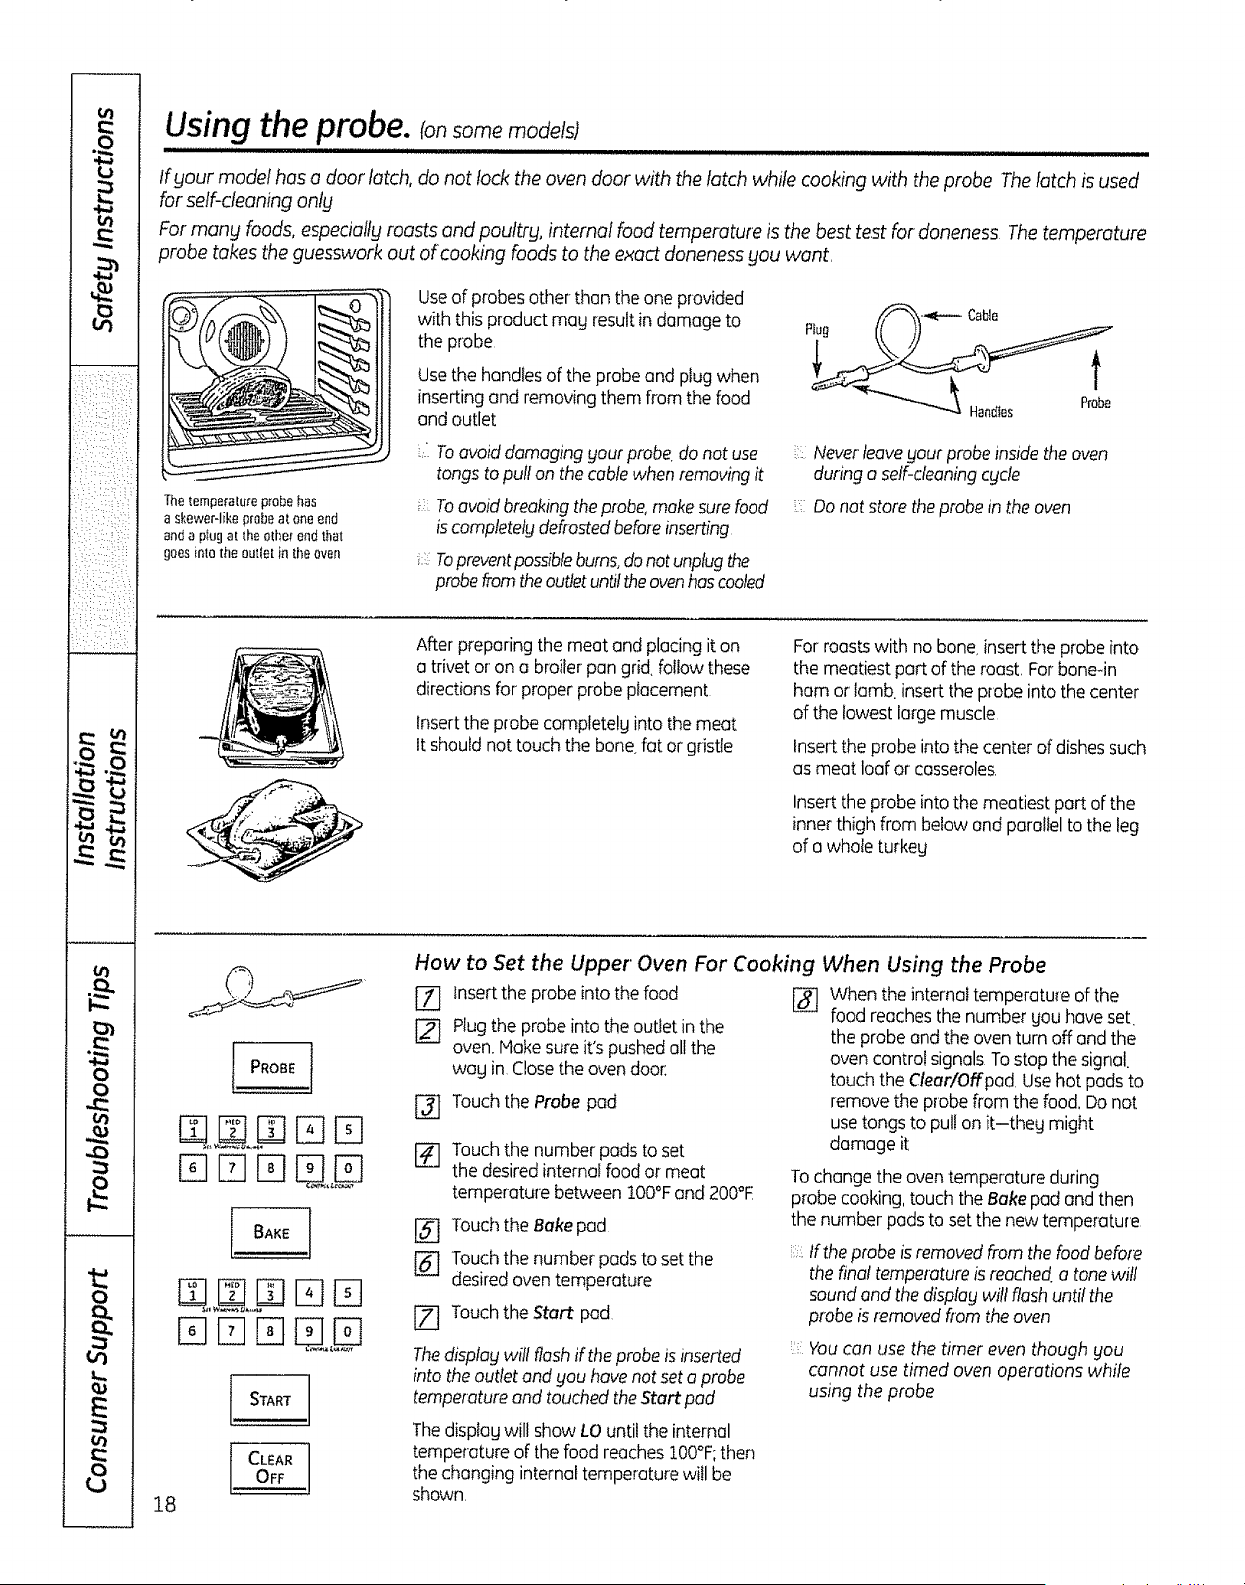
Useofprobes otherthanthe one provided
with this product magresultin damage to
the probe
Usethehandles of theprobe and plug when
insertingand removingthem from thefood
and outlet
To avoid damaging gout probe, donot use
tongs to pullon the cable when removing it
:, Toovoidbreakingthe probe,makesurefood
iscompleteigdefrostedbeforeinserting
Topreventpossibleburns,donot unplugthe
probefromtheoutletund theovenhascooled
Neverleaveyourprobeinsidethe oven
during a self-cleaningc_lcle
Do not store the probe in the oven
Afterpreparing themeat and placing iton
a trivetor on a broilerpan grid, followthese
directionsforproper probe placement
Inserttheprobe completelginto themeat
It should nottouch thebone fat or gr ste
For roosts with no bone, insert the probe into
the meatiest part of the roast, Forbone-in
ham or lomb. insert the probe into the center
of the lowest large muscle
Insert theprobe into thecenter of dishessuch
as meat loaf or casseroles,
Insert theprobe into themeatiest partof the
innerthighfrom belowand paralleltotheleg
ofa whole turkeg
18
,NN D E]
I !
How to Set the Upper' Oven For Cooking When Using the Probe
Insert the probe into the food [_
r_ Plug the probe into the outlet in the
oven. Make sure it's pushed all the
wag in Close the oven doo_:
TouchtheProbe pad
[_ Touchthenumber padsto set
thedesiredinternal foodor meat
temperaturebetween 100°Fand 200°F
[_ Touch the Bake pod
[_ Touchthenumberpads toset the
desiredoven temperature
iZ] TouchtheStart pad
The displag will flashifthe probe is inserted
into the outlet and you have not set a probe
temperature and touched the Start pad
Whentheinternal temperatureof the
foodreachesthe numbergou have set.
theprobeand theoven turnoff and the
ovencontrol signals Tostop thesignal
touch theCleur/Offpad Usehotpads to
removetheprobe from thefood,Do not
usetongs to pullon it-theg might
damage it
To change the oven temperature during
probe cooking, touch the Bake pad and then
the number pads to setthe new temperature
: tfthe probe isremovedfrom the food befo[_
thefinal temperatureis reached a tone will
sound and the disp!ugwill flushuntilthe
probeis removedfiom the oven
Youcanusethetimer eventhough _lOU
cannot usetimed ovenoperations while
usingtheprobe
Thedisplag willshow LOuntil theinternal
temperatureofthe foodreaches100°F;then
the changinginternal temperaturewill be
shown,
Using the convection oven. tonsomemodels)
GEAppliances_com
If your model hasa door latch, do not lock the ovendoor with thelatch during convection cooking The latch isused
for selFcfeaning only
The convection oven fan shuts off when theoven door isopened,,DO NOT@ave thedoor open forlong periods oftime
while usingconvection cooking
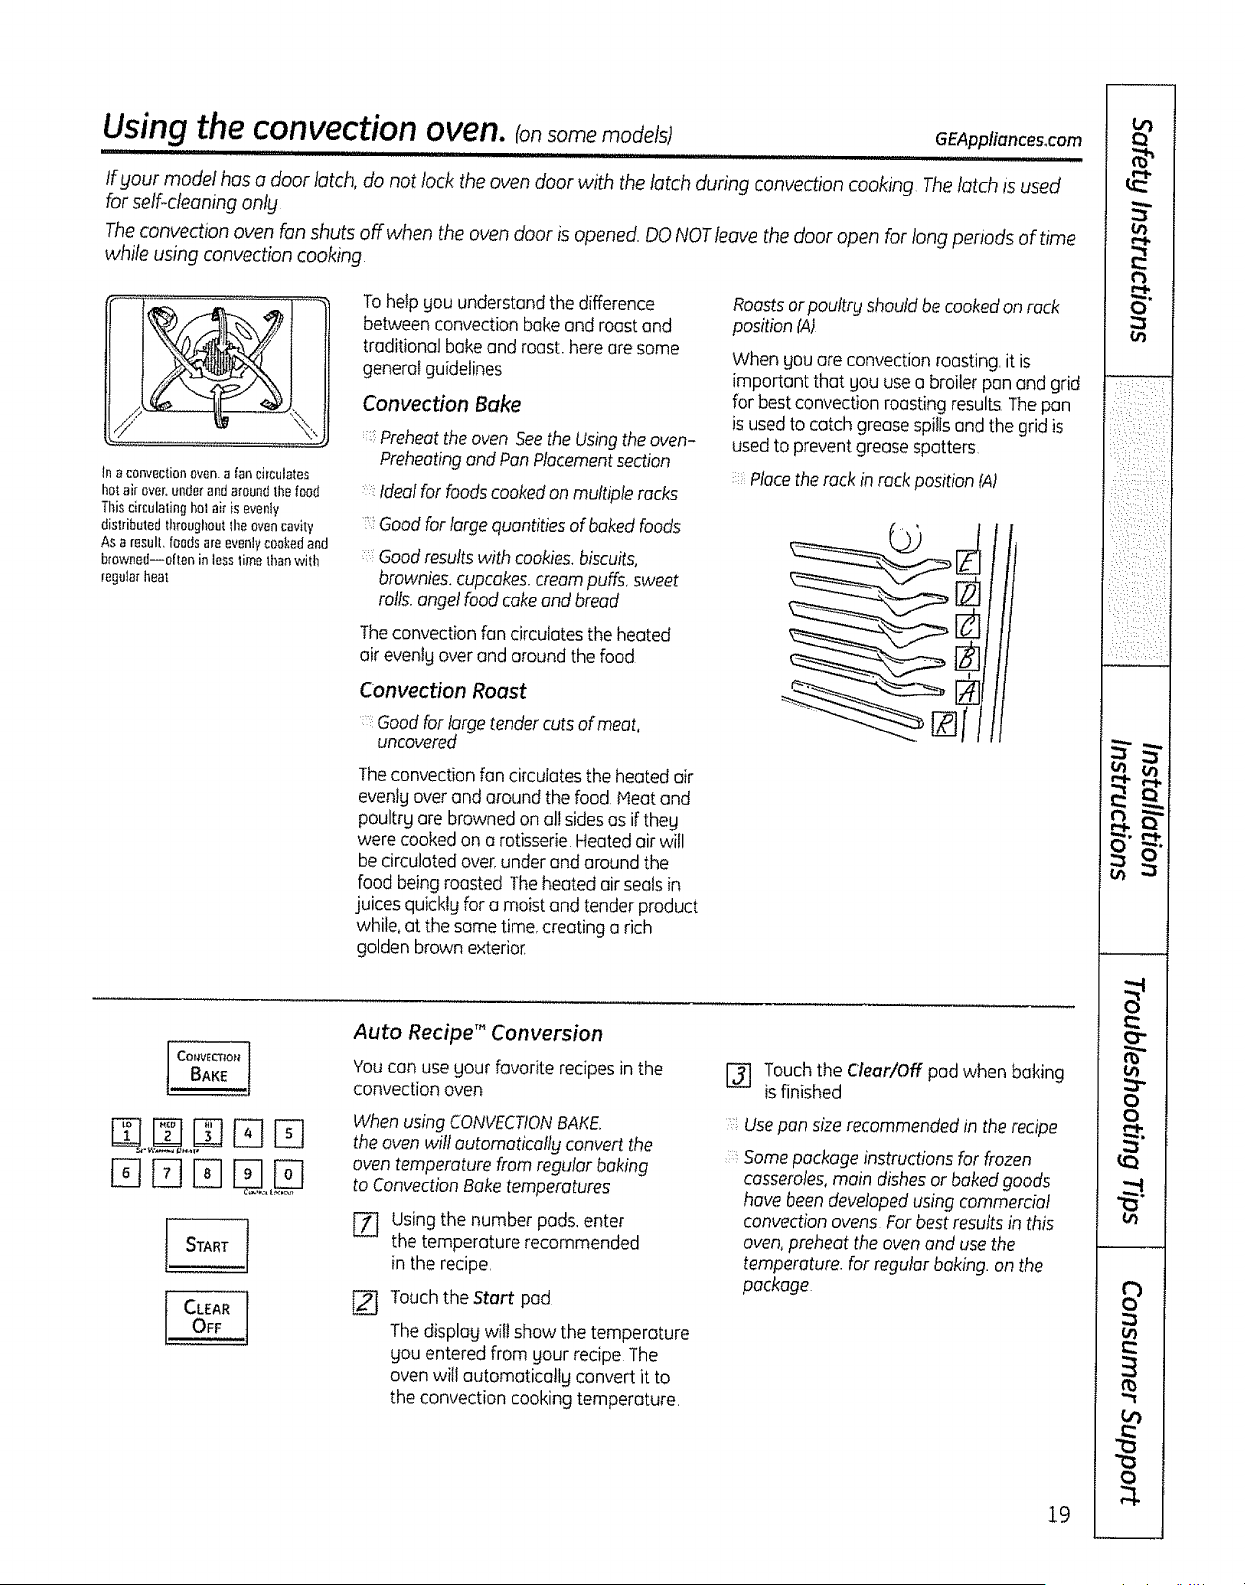
Ina convectionoven.afan@cables
hot.airover,underandaroundthe food
Thisd[cula|inghotakisevenly
distributedthroughoutlheovencavity
AsaresulI,foodsareevenlycookedand
browned--ofteninlesslimethanwilh
[eguta_heal
Tohelp youunderstandthedifference
between convectionbake and roostend
traditional bake and roast hereare some
generatguidelines
convection Bake
Preheat the oven See the Using the oven-
Preheating and Pan Placement section
::::Ideal for foods cooked on multiple racks
_ Good for large quantities of baked foods
Goodresults with cookies,biscuits,
brownies, cupcakes, cream puffs, sweet
rolls,angel food cakeand bread
Theconvection fan circulates the heated
airevenly over end around the food
Convection Roast
Goodfor large tendercutsofmeat,
uncovered
Theconvectionfancirculatesthe heated air
evenlyover and around thefood.Heat and
poultry are browned on al! sidesasif they
werecookedon a rotisserieHeatedair will
becirculated over,under andaround the
foodbeing roasted Theheatedairsealsin
juices quickly fora moist and tenderproduct
while,atthesametime,creating a rich
golden brownexterior.
Roastsorpoultrgshouldbe cookedon rack
positionf4)
When youare convectionroasting itis
importantthat youuse a broiler pan and grid
for best convectionroasting resultsThepan
is usedtocatchgreasespillsand thegridis
usedtopreventgrease spatters
::; Placethe rackin rackposition IA)
!
D D D U..,D
l CLEA"t
Auto Recipe" Conversion
Youcanuseyourfavoriterecipesin the
convection oven
When using CONVECTIONBAKE,
the oven will automatically convert the
oven temperature from regular baking
to Convection Bake temperatures
[Z] Using the number pads, enter
the temperature recommended
in the recipe,
TouchtheStart pad
Thedisplogwillshow thetemperature
youenteredfrom gour recipe The
oven willautomaticatlg convert it to
the convection cooking temperature,
I_ Touch theClear/Off pod whenbaking
isfinished
Usepan sizerecommended in the recipe
Some package instructions for frozen
casseroles, main dishes or baked goods
have been developed using commercial
convection ovens For best results in this
oven,preheat the oven and use the
temperature, for regular baking, on the
package
19
O"
::,j! ,kk: ::
:7:: :__&x",/:
C}_/b_{_:i_:
, :"-L'7!_XL
:i::0}3:/:< :://
:{%}:T}::}::,/£
:R"S:k :::p:i
£b::: :(< Y,//,
0
O
t,Ar'j}
1/1
a
_,:(:i::_i:::!i:::•I
•_i,_ _:, ::
Li:! ::i!•ii
n
-,,i_ u
S
0
E
e'l
8
Using the convection oven.consomemodels)
Cookware for Convection Cooking
Before usinggour convectionoven,check
tosee if goutcookware leavesroomforair
circulation in the oven If youare baking with
severalpans,leave spacebetween them
Also,be surethepans do nottouch each
otheror the walls of theoven
Paper'and Plastic
Heat-resistantpaperand plasticcontainers
that arerecommended foruse in regular
ovenscanbe usedin convectionovens
Plasticcookwarethat is heat-resistantto
temperaturesofa00°Fcanalso be used
whenovenisbelow400°F
t,'letal and Glass
Anytype ofcookware will work in gout
convectionoven However,metal pans heat
thefastest and are recommended for
convectionbaking
i: Darkenedor matte-finishedpans willbake
fasterthan shingpans
Glassor ceramicpans cookmore slowly
When baking cookies,youwilI get thebest
resultsifyouuse a flat cookiesheet instead
ofa pan with low sides
For recipeslike oven-bakedchicken,use a
pan with law sides Hot air cannot circulate
well around foodina panwith high sides
DDDG U
I, CLEAROFF 'I
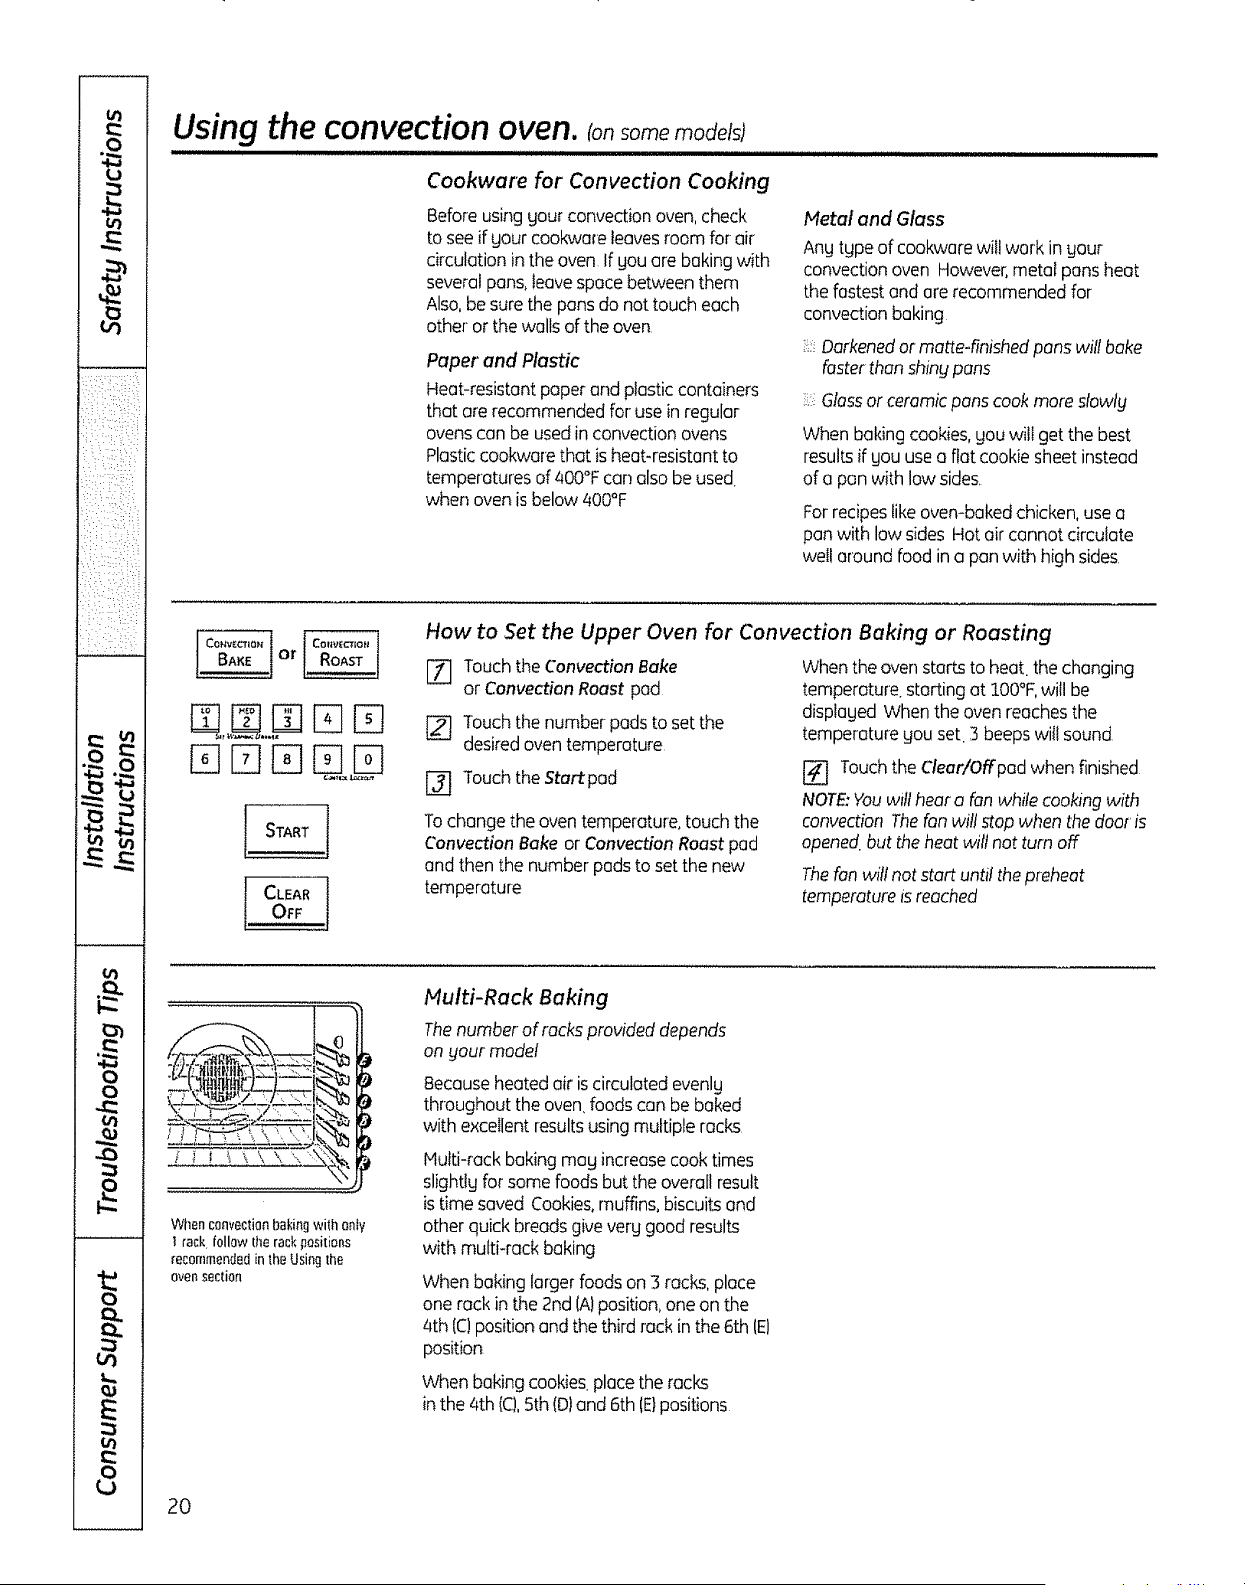
How to Set the Upper Oven for Convection Baking or Roasting
[_ TouchtheConvectionBake
orConvectionRoastpad
[] Touchthenumber pads toset the
desired oventemperature
[-_Touch theStart pad
To change theoven temperature,touch the
Convection Bakeor Convection Roast pad
and thenthenumber pads tosetthenew
temperature
Whentheoven startstoheat. the changing
temperature,starting at lO0°F,willbe
displayed When theoven reachesthe
temperature youset. 3 beepswillsound
[_] TouchtheClear/Offpad whenfinished
NOTE:YOuwiltheara fan while cookingwith
convectionThefan willstop whenthe dooris
opened,buttheheatwilt not turnoff
Thefan willnotstart untilthe preheat
temperatureisreached
Whenconvection[)ekingwith only
!rack follow rtlerackpositions
recommendedin',heUsingthe
ovensection
Multi-Rack Baking
Thenumber ofracks provided depends
an gour model
Becauseheated air is circulated evenly
throughout theovenfoods canbe baked
with excellent resultsusing multipleracks
Hulti-rack baking may increasecooktimes
slightty for some foods butthe overall result
is time saved Cookies,muffins,biscuitsand
otherquick breadsgive very good results
with multi-rack baking
When bakinglargerfoods on3 racks,place
one rack in the 2nd (A)position,one on the
/4th(C)positionand the third rack in the 6th(El
position
Whenbaking cookies,place the racks
intheath(C),5th (D)and 6th rE)positions
2O
........ GEAppliancesocom
ff gour model has a door latch, do not lock the oven door with the latch during convection cooking The latch isused
for self-cleaning only
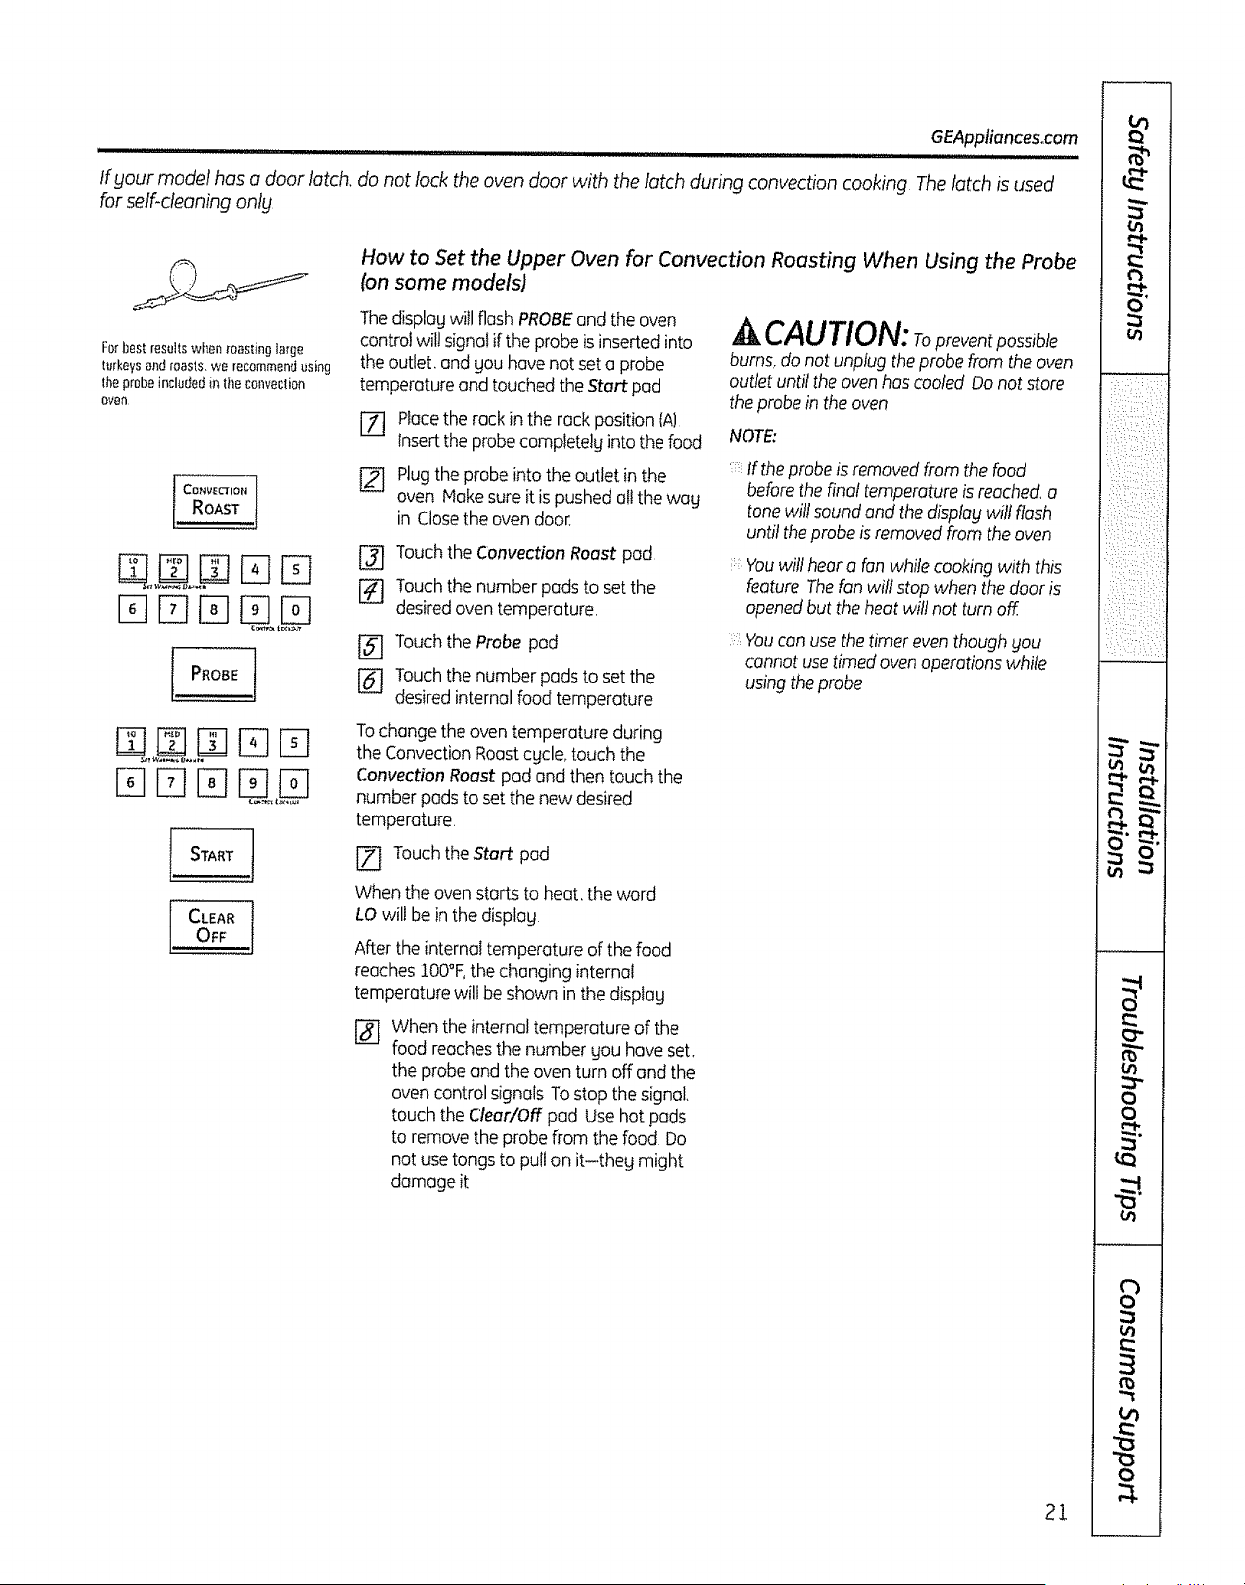
Forbest resultswhen _oastinglarge
lurkeys anJ roasts, we recommendusing
lhe probe inclu[Jedin lile convection
OVeN
!,R° sTt
D D
EBD
CLEAR
j
How to Set the Upper Oven for Convection Roasting When Using the Probe
(on some models)
ThedisplagwillflashPROBEand the oven
controlwil!signalif theprobeis insertedinto
the outlet, and you have not set a probe
temperatureand touchedthe Start pod
E_ Placetherackin therack position(A)
Inserttheprobecompletelginto the food
[] Plugthe probeinto theoutlet in the
oven Hake sureitis pushed at!the wag
in Closetheoven door.
[] TouchtheConvection Roastpod
[_ Touchthenumber pods tosetthe
desiredoven temperature,
[] Touchthe Probe pad
[_ Touchthe numberpods tosetthe
desiredinternal foodtemperature
Tochange the oven temperatureduring
the ConvectionRoastcycle,touch the
ConvectionRoastpod and thentouch the
number pads tosetthenewdesired
temperature.
^ CAUTION:Topreventpa,s,ble
burns,do not unplug the probefrom theoven
outlet until the ovenhas cooledDo notstore
the probein the oven
NOTE:
Iftheprobe isremoved from the food
before the finaltemperature isreached a
tone will sound and the displagwillflash
until theprobe is removedfrom the oven
::You willhear a fan while cooking with this
feature Thefan will stop when the door is
opened but the heat wil!not turn off
::::You con use the timer even though £ou
cannot usetimed oven operations while
using the probe
['77TouchtheStart pod
When the oven starts toheat. theword
LO will be in the display
After the internal temperature ofthe food
reachestOO°F,thechanginginternal
temperature will be shown in the display
Whenthe internal temperatureof the
foodreachesthenumbergou have set.
theprobeand the oven turn off and the
oven control signals Tostop the signal
touch theClear/Off pod Usehotpads
toremovetheprobe from thefood Do
notuse tongstopull on it-theg might
damage it
21
:
1/I
O'
i}::iii{_ii:,!,yl
::: .! :4: p J,
zr:::. ::/
.: hxc: c h
'!}iii_:i%:::£
/:L-: ::,:q
:iq/:,:x (: (
va ,rr..
0
0
{.(:1
m
v
0
a
:..... ::,:::
i:ii%_!:::!!:::::/
"_ 0
,.as
--4
l:m
0
0
o
E
8
Using the convection oven. consom mod sl
Meats
Beef
Pork
Ham
Lamb
Seafood
Poultry
Rib{3to5 Ibsi
BonelessRib.TopSirloin
BeefTenderloin
P0tRoos[(2,ii/2,,to,,3,lbsJChuck, rump
Bone-in(3to 5 lbs.}
Boneless13to S Ibs,}
PorkChops(W' tO1"thick)
Conned Btbs. fultg cooked) ,,,
Butt (5Ibs,fuilg cooked)
Shank (5 tbs,fullg cooked)
Bone-in13to 5 Ibs]
Boneless13to 5 Ibs }
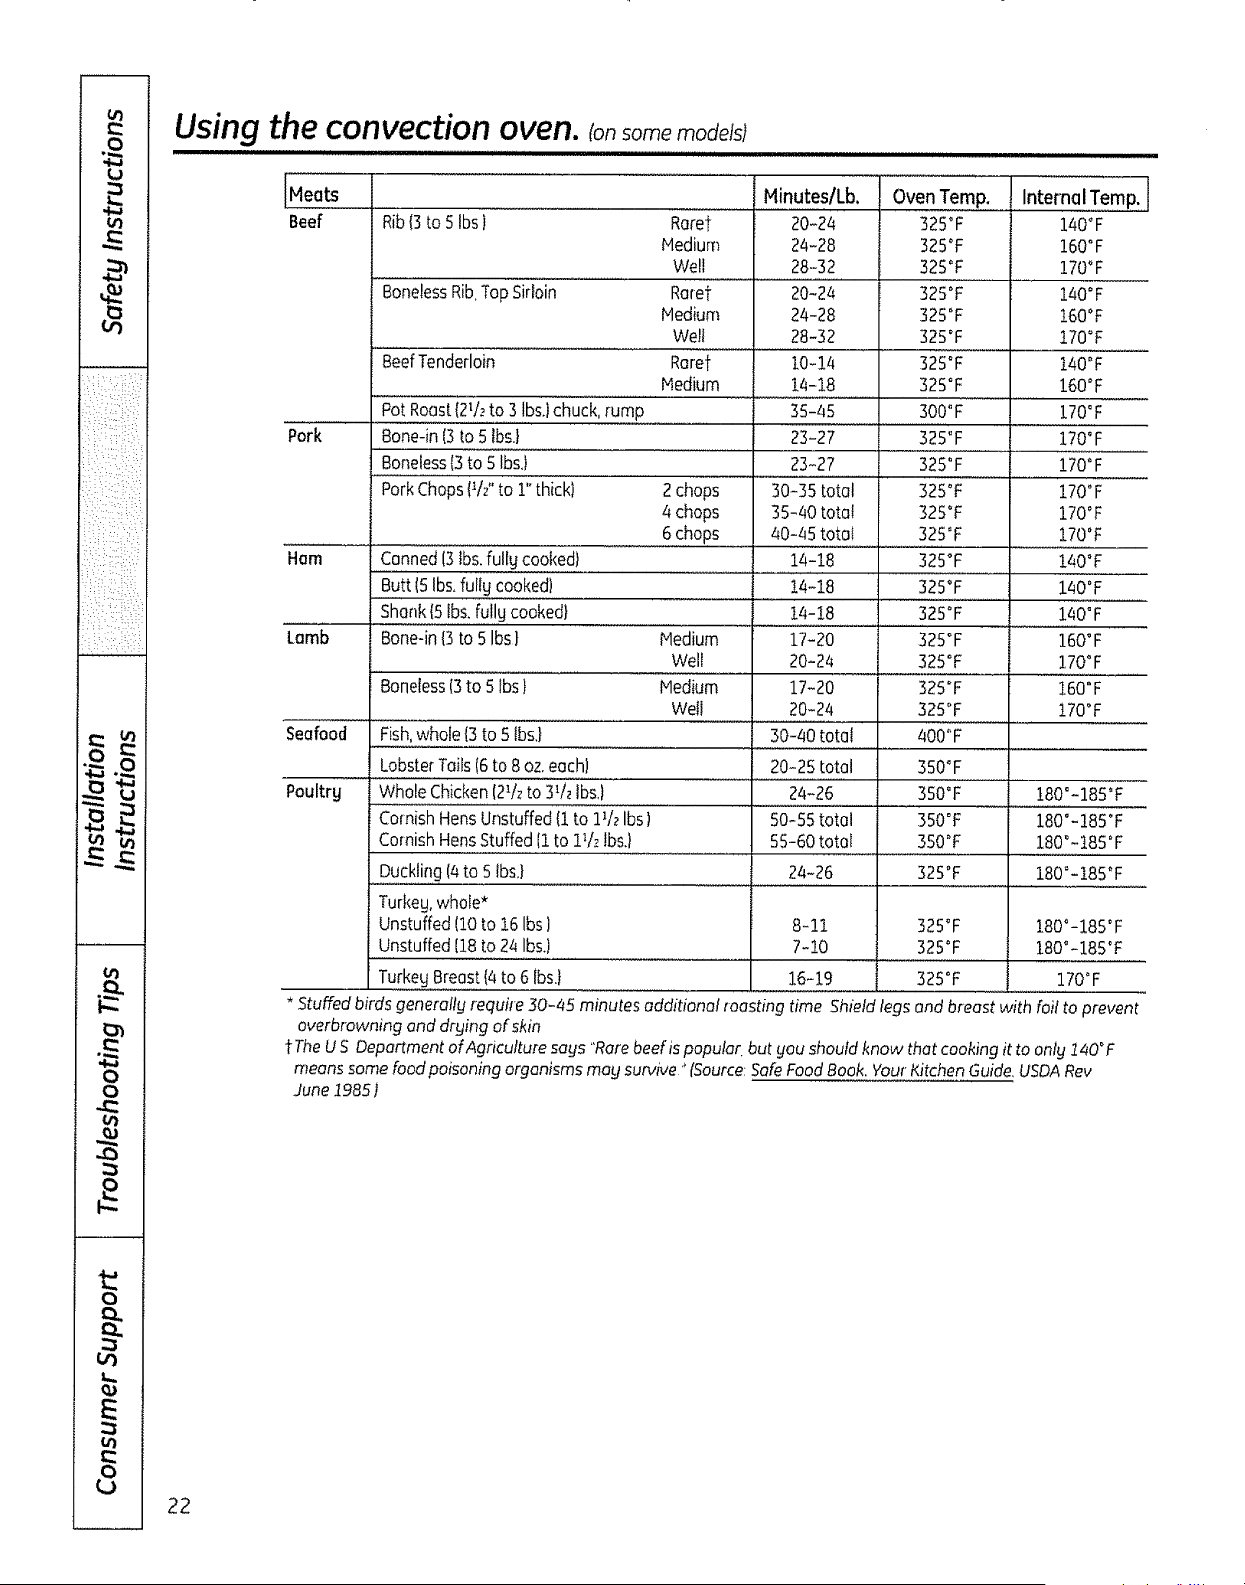
......................Minutes/Lb. Oven Temp. : Internal Temp:
Rarer 20-24 325 °F 140°F
Medium 24-28 325°F 160°F
Well 28-32 325°F 170°F
Rarer 20-24 325°F 140°F
Medium 24-28 325°F 160°F
Well 28-32 325°F 170°F
Rarer 10-14 325°F ........t40_F"...........
Medium 1/4718 32S°F ............. 160_F
35-45 300°F 170°F
2chops
4 chops
6chops
Medium
Well
Medium
Well
23-27
23-27
30-35 total
35-40 total
40-45total
14-18
Fish,whole 13to 5 tbs]
Lobster Tails16to8 oz,each)
Whole Chicken12V_to311_Ibs,)
CornishHens Unstuffed (1 to 1Vz Ibs)
CornishHens Stuffed 11to 1Vz lbs]
Duckling14to 5 Ibs,)
Turkeg, whole*
Unstuffed 110to 16Ibs ]
Unstuffed 118to 24Ibs]
TurkegBreast {4to6lbs.}
.........................e .......
14-18
14-18
17-20
20-24
17-20
20-24
30-40 total
:
20-25 total
24-26
50-55 total
55-60 total
325°F
325°F
325°F
325°F
325°F
325°F
325°F
325O'F
325°F
325°F
325°F
325°F
400°F
350°F
350°F
350°F
3SO°F
170°F
170°F
170°F
170_F
170°F
140°F
140°F
140°F
160°F
170°F
160°F
170°F
180°-185°F
180°-185°F
180_-t85°F
24-26 325_F
8-11 325°F
7-10 325°F
16-19 325°F
180°-IB5°F
180°-185°F
180°-185°F
170°F
* Stuffed birds generatlg require 30-45 minutes additiona! toasting time Shield legs and breast with foil toprevent
overbrowning and drging ofskm
f The U S Department of Agriculture sags _'Rarebeef is popular but gou should know that cooking ittoonlg 140_F
meanssome foodpoisoning organismsmag survive _÷(Source:Safe Food Book.YourKitchenGuide. USDARay
June 19851
22
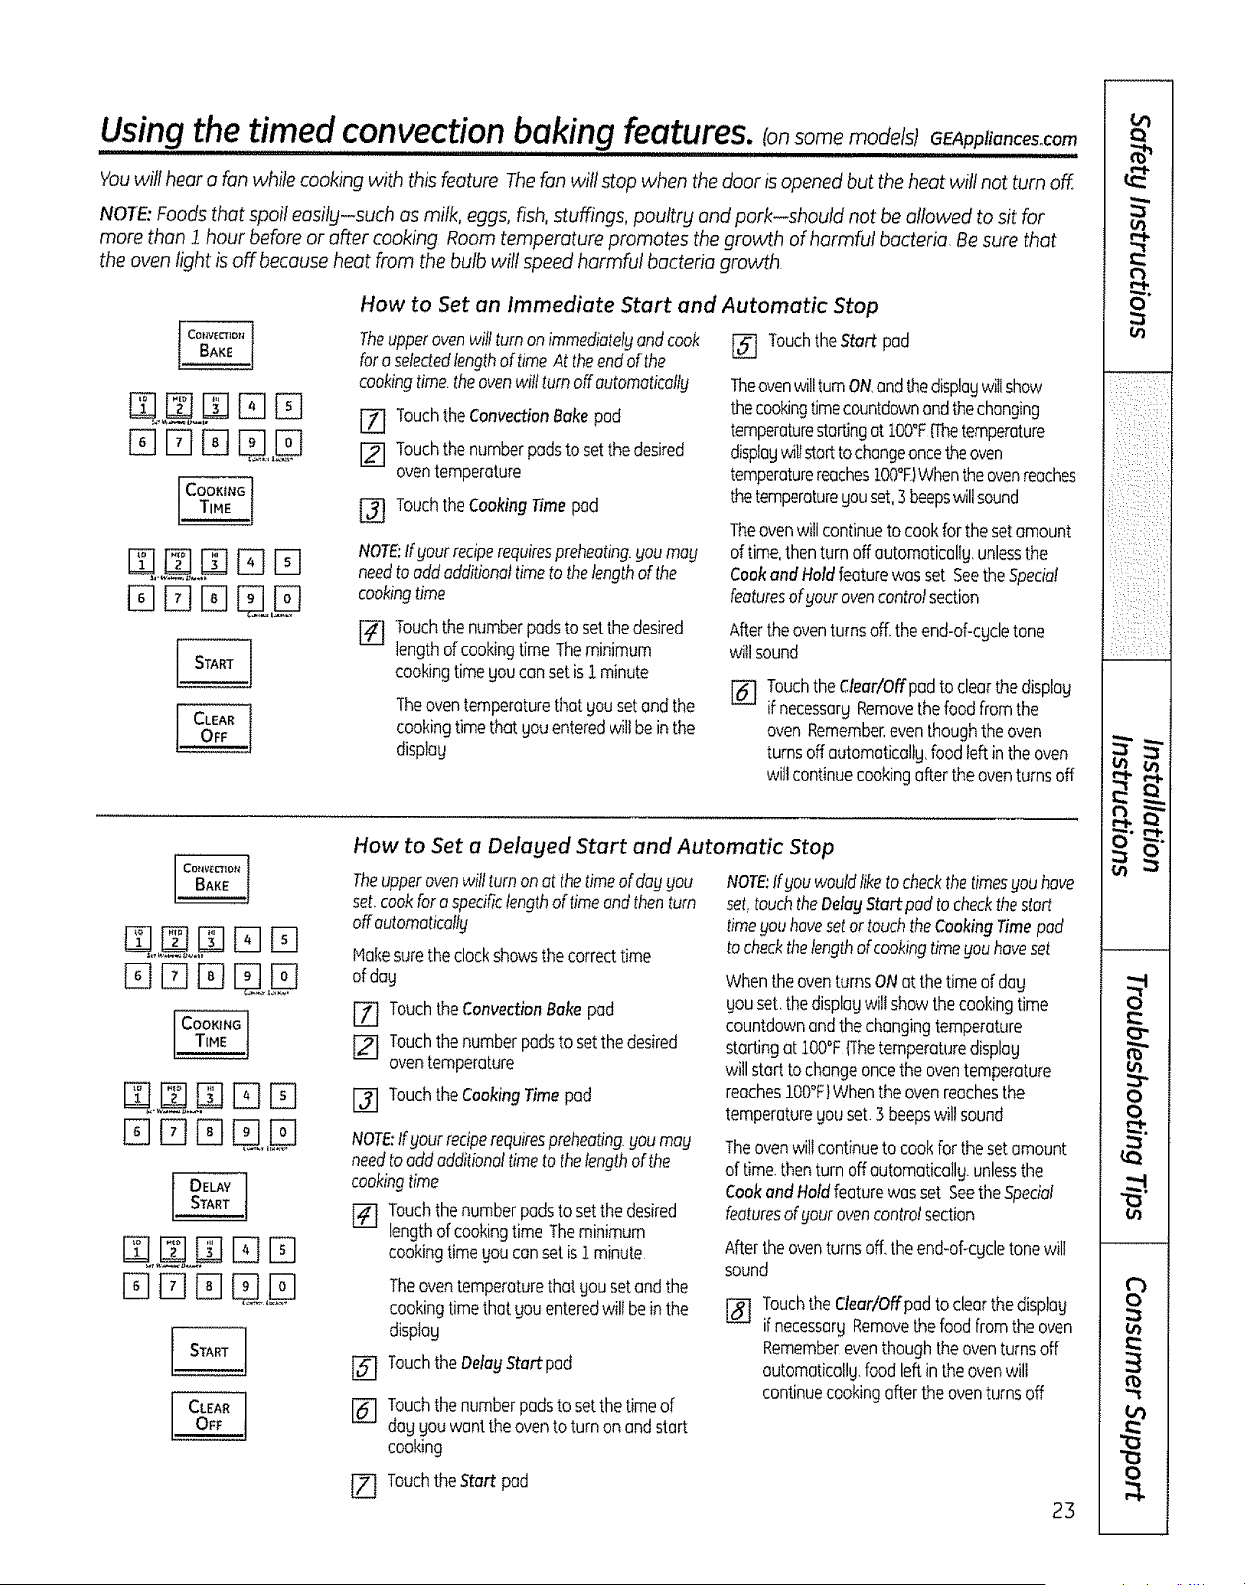
Using the timed convectionbaking features. (onsome models)GEAppliances.com
i1,11111,1111,1,1,,,11 iii, ,i ,, i , i I [ III..................................................... iuui 'UUl_
Youwillhear a fanwhile cooking with this feature Thefanwillstop when thedoor is opened buttheheat will not turnoff,
NOTE: Foods that spoil easilg-such asmilk, eggs, fish, stuffings, pouitrg and pork-should not be allowed tosit for
more than i hour before or after cooking Room temperature promotes thegrowth ofharmful bacteria, Be surethat
the ovenlight isoff because heat from the bulb wil! speedharmful bacteria growth,
.NN N N
How to Set an Immediate Start and Automatic Stop
Theupper ovenwill turnonimmediately and cook
foro selededlength oftime At theend of the
cooking time.the ovenwilt turnoffautomatically
F_ Touchthe ConvectionBake pad
r21 Touchthe numberpods to set the desired
oventemperature
[_ TouchtheCookingTimepod
NOTE:tfgourreciperequirespreheating,goumag
needtoaddadditionaltimeto thelengthof the
cookingtime
[_ Touchthe Star pad
Theovenw411turnON,andthedisplagwillshow
thecookingtimecountdownandthechanging
temperaturestartingat 100°Fffhetemperature
displaywillstarttochangeoncetheoven
temperaturereaches!00°E)Whentheovenreaches
thetemperaturegouset,3beepswillsound
Theovenwillcontinueto cookfor thesetamount
oftime,thenturn offautomaticellgunlessthe
CookandHoldfeaturewasset SeetheSpecial
featuresofgoutovencontrolsection
r_ Touchthenumberpadsto setthedesired
lengthof cookingtimeTheminimum
cookingtimegoucansetis 1minute
Theoventemperaturethatgousetandthe
cookingtimethatgouenteredwil!beinthe
disp!ay
Aftertheoventurnsoff.theend-of-cgcletone
willsound
[_ Touchthe Clear!Offpad toclear thedisplay
ifnecessarLjRemovethe foodfromthe
oven Remember,even thoughtheoven
turnsoff automoticaltg, foodleft in the oven
wil! continue cooking offerthe oven turnsoff
E]
EBrqr-qU,,D
[3 rq
Drq
How to Set a Delaged Start and Automatic Stop
Theupperovenwillturnonatthetimeofdugyou
set.cookforo specificlengthoftimeandthenturn
offautomatically
Hakesurethe clockshowsthecorrecttime
of dag
[7] TouchtheConvectionBakepod
[] Touchthe numberpadstosetthedesired
oventemperature
[] Touchthe CookingTimepad
NOTE:Ifyourreciperequirespreheating,youmay
needto addadditionaltimetothelengthof the
cookingtime
[] Touchthenumberpadstosetthe desired
lengthof cookingtime Theminimum
cookingtimegoucansetis1minute
Theoventemperaturethatgousetandthe
cookingtimethatyouenteredwiltbeinthe
disptag
[_ Touchthe BelayStartpad
[_ Touchthe numberpadsto setthetimeof
doggouwanttheovento turnonandstart
cooking
NOTE:Ifgouwould liketo checkthetimesgou have
set,touch theDelay Start pad to checkthestart
timeyou hovesetortouchtheCooking Timepad
tocheck the length of cooking time you have set
Whenthe oven turnsONatthetime of dug
gou set,thedispleg wilt showthe cooking time
countdown and the changing temperature
starting at J00°F{Thetemperaturedisplag
will start tochange once the oven temperature
reaches 100°F}Whenthe oven reaches the
temperature gou set 3 beepswill sound
Theovenwillcontinueto cookfor thesetamount
of time thenturn offoutomaticollgunlessthe
Cookand Holdfeaturewasset SeetheSpecial
featuresof goutovencontro!section
Aftertheoventurnsoff.theend-of<gcletonewill
sound
[_ TouchtheClear/Offpadto clearthedisplag
if necessargRemovethefoodfromthe oven
Remembereventhoughtheoventurnsoff
automaticollg,foodleftintheovenwill
continuecookingaftertheoventurnsoff
[7] Touchthe Start pod
23
O"
}ii:::i:k:y::
:'///'/i : i/i "
.F ::,b _ :"
:h,'T :i _
L,%:::Y'i_
:x: ...... :,
i:{i:iil}!}}:
k" q->/X _}/
vj
trl
O
O
rb
O
O
;q.
o
= • • •,• 7:
::: ::: :: :
•:. ::2::: :
v:: • %-?!i•:
:,_i: ii_ii::i
:-z • ::, !:::,
: V,_ _::,:
!V?:%:
e.. {.o
0
0
E I
0
_J
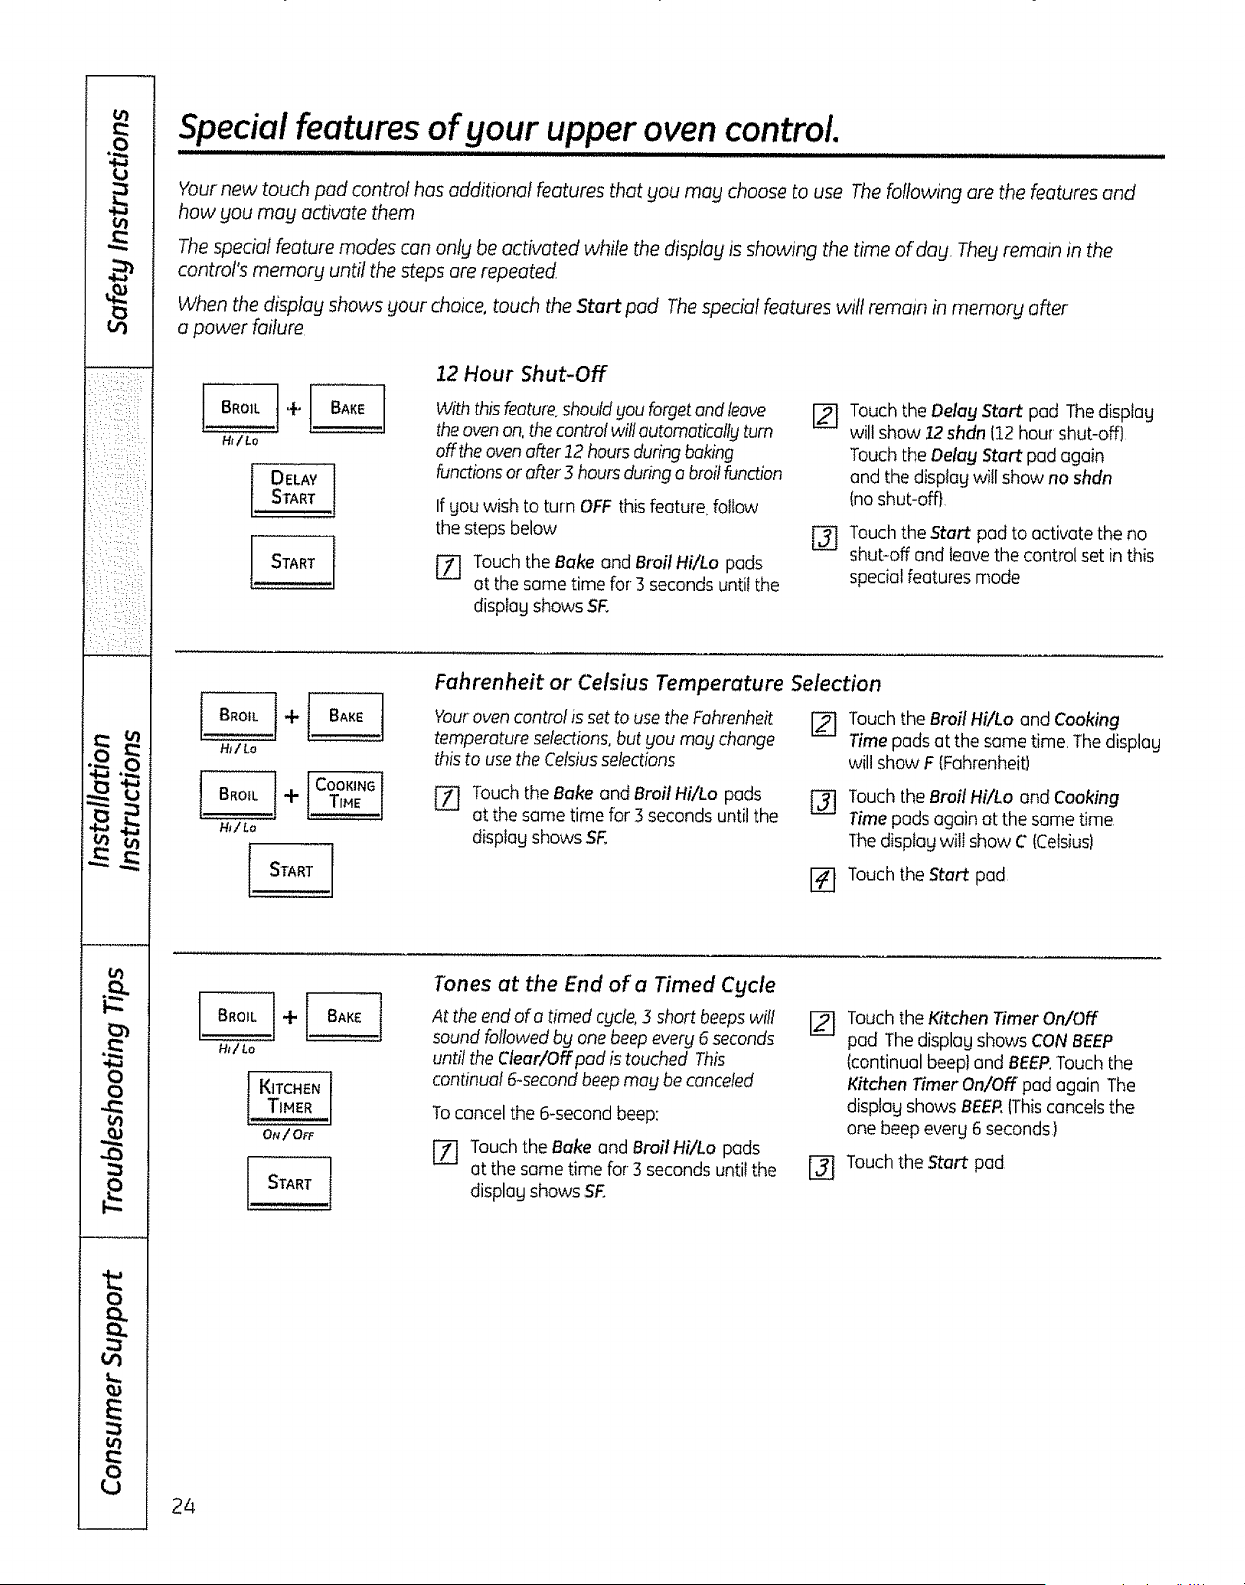
Special features of gour upper oven control.
Your new touch pad contro! has additional features that gou may choose to use The following are the features and
how you may activate them
The specbl feature modes can only be activated while the display is showing the time of dog, Theg remain in the
control's memorg until the steps are repeated
When the display shows your choice, touch the Start pad The special features wilt remain in memory after
a power failure
HMLo
DELAY
START
12 Hour Shut-Off
With this feature, shouldyou forget and leave
theovenan,thecontrolwillautomatically tum
off theovenafter 12 hoursduringbaking
functionsor after3hours duringa broilfunction
If gou wish to turn OFF thisfeature follow
the steps below
[Z] TouchtheBakeand Broil Hi/Lo pads
atthesame time for3 seconds until the
displag shows SF.
[]
@
TouchtheDelag Start pad Thedisplag
willshow/2 shdn112hour shut-off)
TouchtheDelagStart pad again
and the displag will show no shdn
(noshut-off}
Touch the Start pod to activate the no
shut-off and leave the control set inthis
special features mode
START
Fahrenheit or Celsius Temperature Selection
Your oven control isset to use the Fahrenheit
temperature selections, but you may change
this to use the Celsius selections
[_ Touchthe Broil Hi/Lo and Cooking
Timepads atthesame time The displag
will show F{Fahrenheit)
[Z] Touch the Bake and Broil Hi/Lo pads _ Touch the Broil Hi/Lo and Cooking
at the same time for 3 seconds until the Time pads again at the same time
dispIag shows SF_ Thedisplay willshow C [Celsius)
[_ TouchtheStart pad
Ht/Lo
KITCHEN l
TIMER I
Ou /Or_
Tones at the End of a Timed Cycle
At the end of otimed cycle,3 short beeps will
sound followed bg one beep everg 6 seconds
until the Clear/Off pad istouched This
continual 6-second beep mug becanceled
Toconcelthe 6-secondbeep:
Touchthe Bakeand Broil Hi/Lo pads
atthesometime for3 secondsuntil the
displag shows SF.
[2---ITouchthe Kitchen Timer On/Off
pod Thedisplag shows CONBEEP
(continualbeep]and BEEP,Touchthe
Kitchen TimerOn/Off pod again The
displag shows BEER(Thiscancelsthe
one beepeverg 6 seconds)
[_ Touchthe Startpod
24
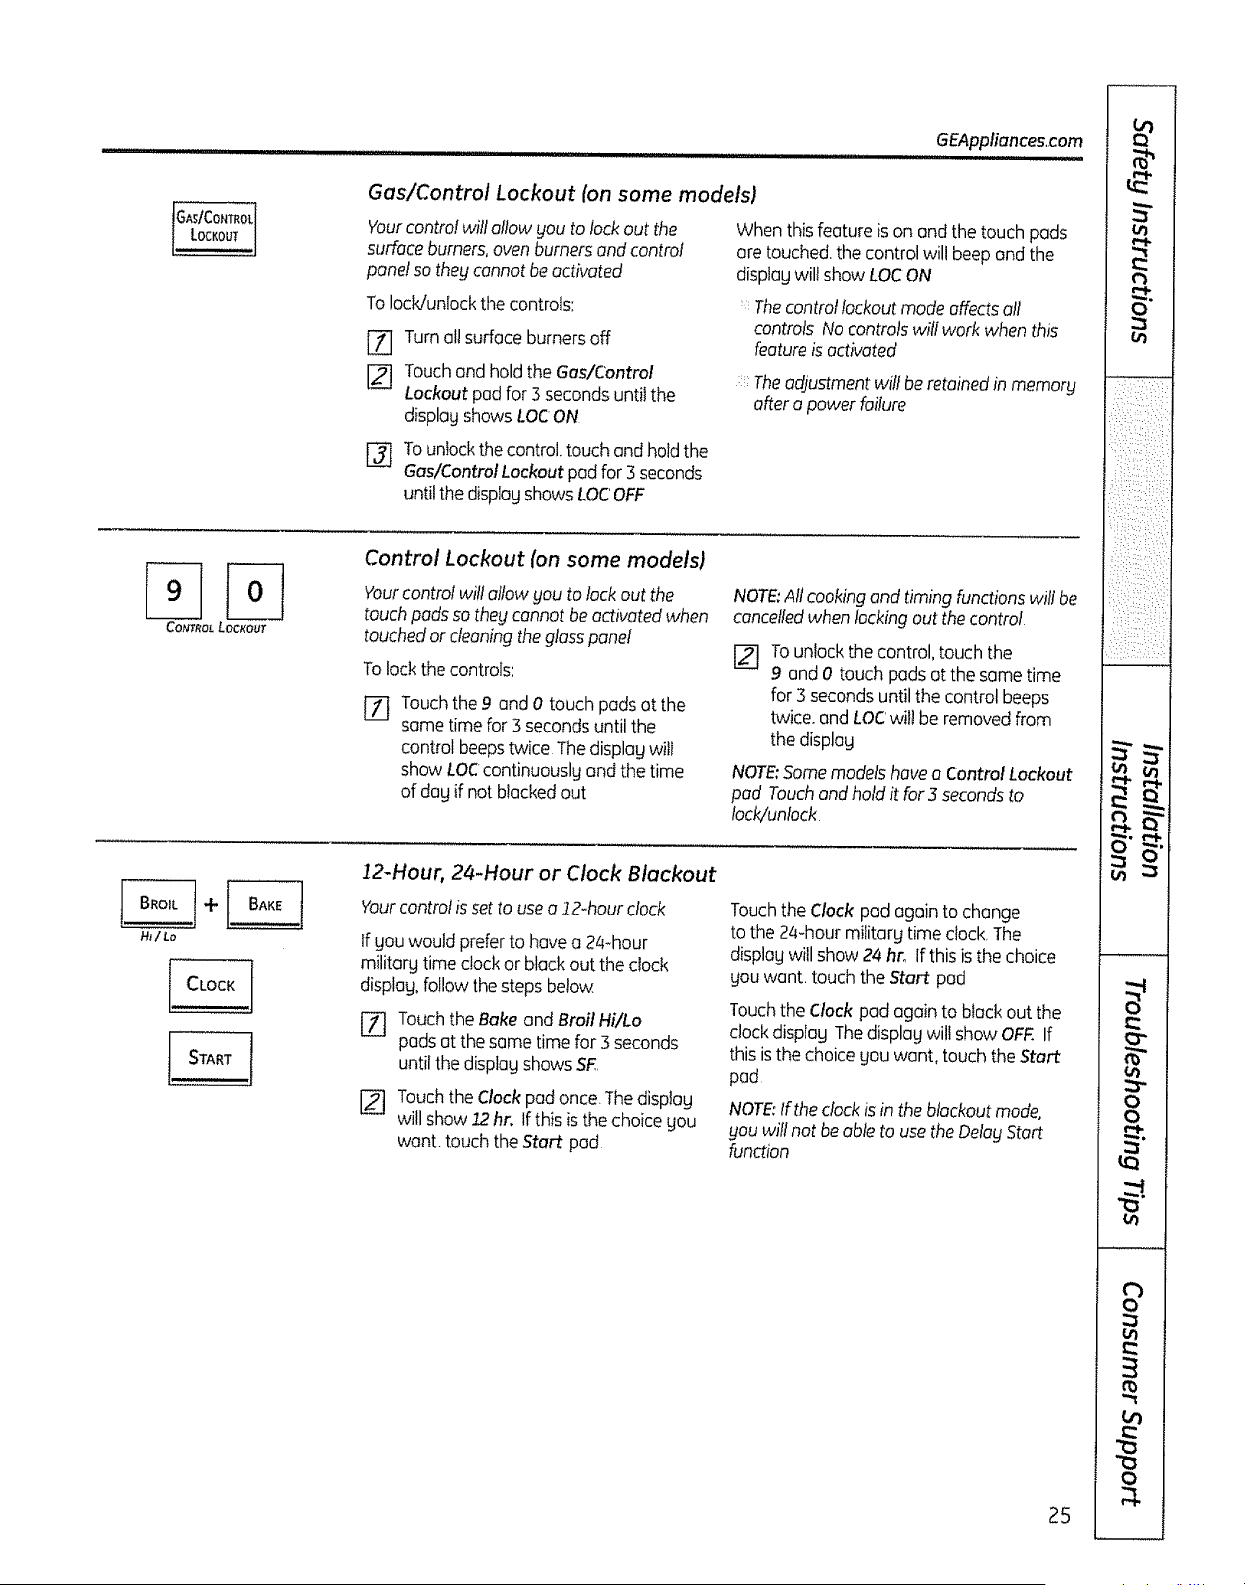
GEAppliances,,com
Gas/Control Lockout (onsome models)
Yourcontrol wiltallow gou totackout the
surface burners, oven burners and control
panel so theg cannot be activated
To lock/unlock the controls:
[Z] Turnal! surface burnersoff
[_ Touchand holdtheGas/Control
Lockoutpadfor3 secondsuntil the
displagshows LOCON
When thisfeature is on and thetouch pads
ore touched,thecontrol willbeepand the
displogwil! show LOCON
Thecontrol!ockoutmode affectsall
controls Nocontrols will work when this
featureis activated
Theadjustmentwil! beretainedin memory
after a power failure
[_ To uniockthe control,touch and holdthe
Gas/ControlLockout pad for3seconds
until thedisplagshowsLOg'OFF
Control Lockout (on some models)
Yourcontrolwillallow gou tolockout the
touchpads so thegcannot beactivatedwhen
touchedor cleaningthe glasspanel
To lockthe controls:
rT] Touch the 9 and 0 touch pads at the
same time for 3 seconds until the
control beeps twice Thedisplay witl
show LOC continuouslg and the time
of dag if not blocked out
NOTE:All cookingend timing functions wilt be
cancelled when locking out the control
[] Tounlock the control, touch the
9 and 0 touch pads at thesame time
for3seconds until thecontrol beeps
twice,and LOC'willbe removedfrom
the displag
NOTE:Somemodelshave a Control Lockout
pad Touchandhold itFor3 secondsto
lock/unlock
HJiLo
12-Hour, 24-Hour or Clock Blackout
Your control isset to use a 12-hour clock
If gou would prefer tohave a 24-hour
militarg time clock or blackouttheclock
display,follow the steps below
[] TouchtheBake and Broil Hi/Lo
pads at thesame time for3seconds
until thedisplagshows SF,,
1_] TouchtheClockpad once.Thedisplag
willshow/2 hr. If this is the choice gou
want.touch the Start pad
TouchtheClockpod again to change
to the24-hour militarg time clock.The
displogwill show 24hro If this is the choice
gouwant.touch theStart pod
TouchtheClockpod again toblack out the
clock displagThedisplag will show OFF.If
this isthechoiceyouwant, touch the Start
pad
NOTE: If the clock isin the blackout mode,
gou will not be able to use the Delag Start
function
25
ol
t_
0
01
::i:_:/::::, (!
Lh/o,: ,'h::':
Z:(:!:::IIII_I'I:_
i:i!ilfli;i:i:i_,:',
01
0
0
0
0
e_
01
0
£ i
to I
"0 i
0 I
o
(:/:: _:i::i!:L
i_'!::.;:/ii,:::i
_2: 7/:¸¸¸
// •. L_ :: V:
:/7: ::-):_:::•
v A
.m L
_m r_
.-- L
0
0
0
L..
E
8
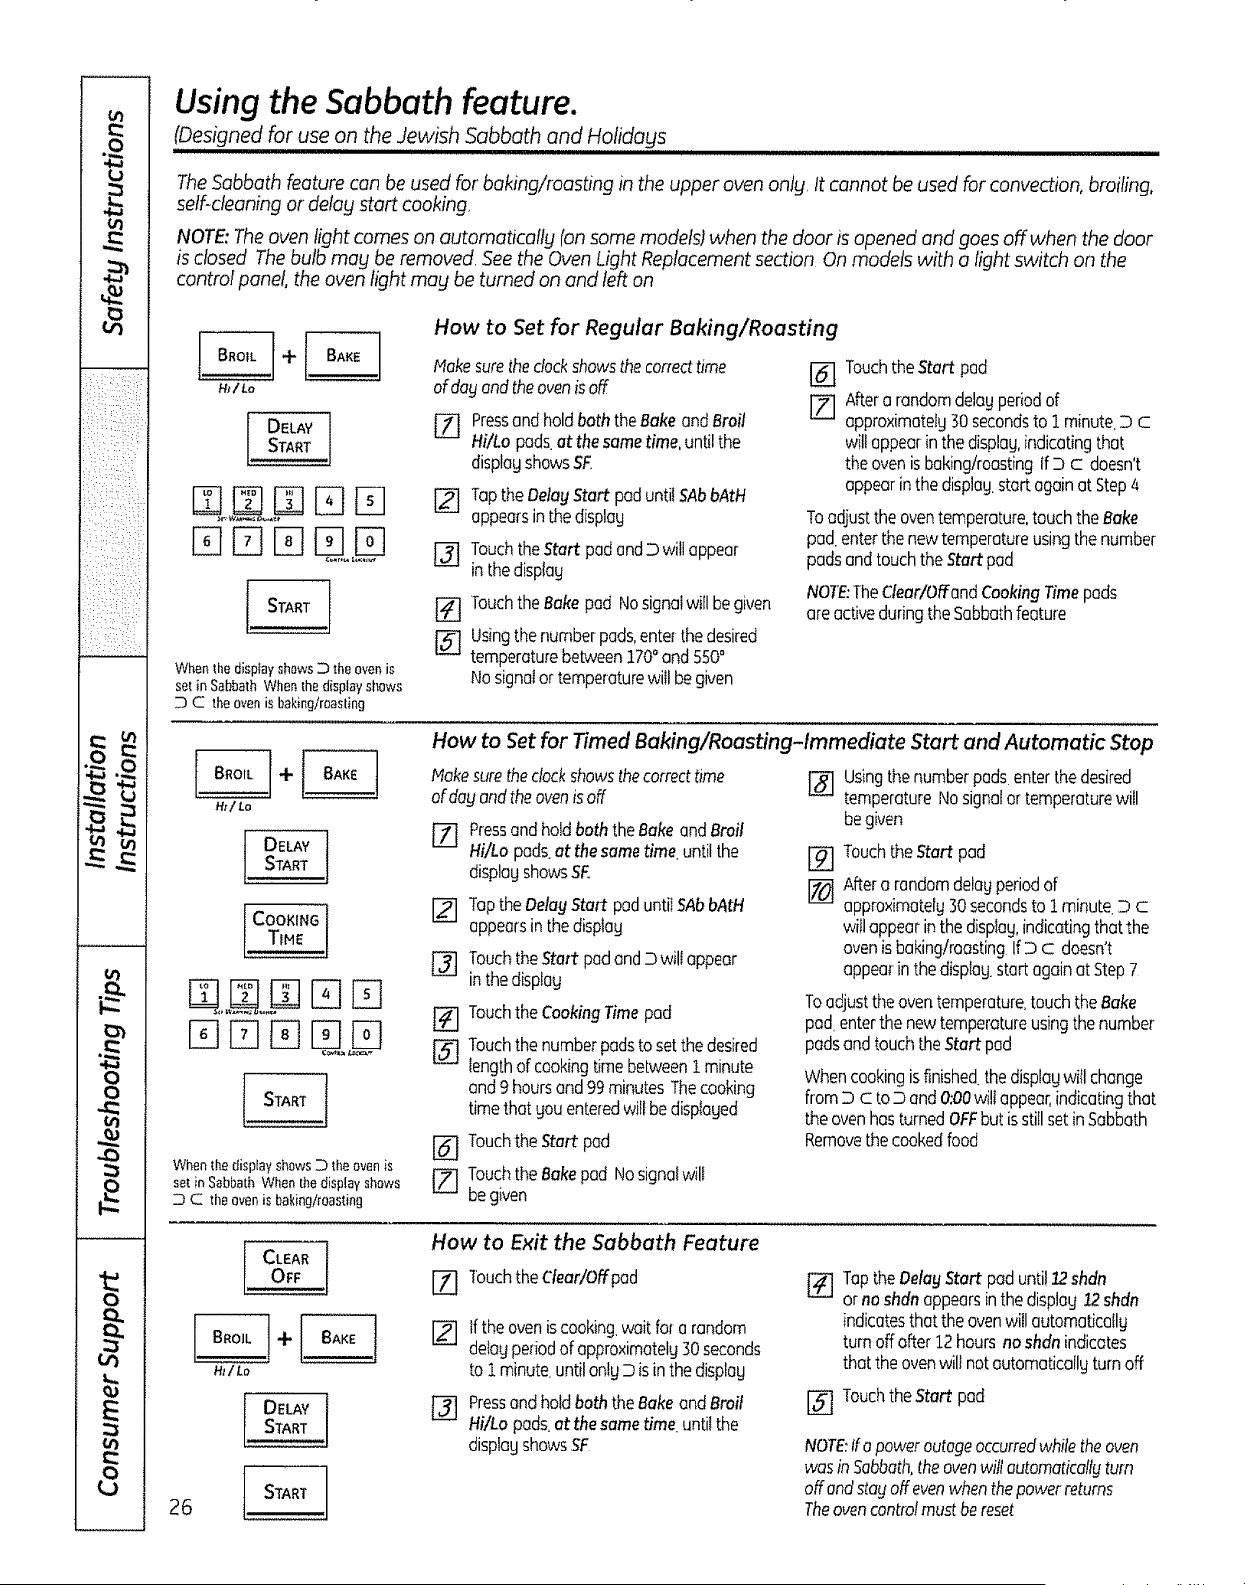
Using the Sabbath feature.
,(Designed for use on the Jewish Sabbath and Holidays
The Sabbath feature can be usedfor baking/roasting in the upper oven only, It cannot be used forconvection, broiling,
self-cleaning or delay start cooking
NOTE: The oven light comes on automatically (onsome models) when the door is opened and goes off when the door
is closed The bulb may be removed. See the Oven Light Replacement section On models with a light switch on the
control panel, the oven l_tht may be turned on and left on
HMLo
{ ELAY
START
WhenlhedisplayshowsD the ovenis
set in SabbathWhenthe displayshows
D C theovenisbaking/roasting
How to Set for Regular Baking/Roasting
Nakesure thedockshows thecorract time
ofdab and theovenis off
Pressand hold both the Bake and Broil
Hi/Lo pads.at the same time, until the
displagshowsSE
[_ TaptheDelayStartpoduntilSAbbAtH
appearsinthedisplag
TouchtheStartpadandD willappear
inthe displag
TouchtheBakepad Nosignalwill begiven
[_ Usingthenumberpads,enterthedesired
temperaturebetween170°and550°
Nosignalortemperaturewill begiven
TouchtheStart pad
[Z] Aftera randomdelogperiodof
approximatelg 30 secondsto I minute D c
will appear in thedisplag,indicatingthat
the oven isbaking/roosting If Dc doesn't
appearin the displag,start ago n at Step a,
Toadjust the oventemperature, touch the Bake
pad. enter thenewtemperature using thenumber
pads and touch the Start pad
NOTE:TheClear/OffandCookingTimepads
oreactiveduringtheSabbathfeature
IZ]÷
Ht/Lo
DELAY ]
, START I
COOKING ]
TIME I
DDD .D
Whenthe displayshowsD fie ovenis
set fnSabbathWhenthedisplayshows
D C theovenisbaking/roasting
How to Set for Timed Baking/Roasting-Immediate Start and Automatic Stop
lake suretheclockshowsthecorrecttime
of dayandtheovenisoff
1-_ Pressendholdboth theBakeandBroil
Hi/Lo pads.atthesametime untilthe
displagshowsSE
[_ TaptheDelayStart poduntilSAbbAtH
appearsinthedisplag
TouchtheStart padandD willappear
inthedisplay
TouchtheCookingTimepad
[_ Touchthenumberpadsto setthedesired
lengthd cookingtimebetween1minute
and9 hoursand99minutesThecooking
timethatgouenteredwiltbedisplaged
[_ TouchtheStart pad
[Z] TouchtheBakepad Nosignalwilt
begiven
[_] Usingthenumber pads enter the desired
temperature No signalor temperature will
begiven
[_ Touchthe Start pad
Aftera random delag period of
approximatelg 30 secondsto I minute. D c
will appearin the displag,indicatingthat the
oven isbaking!roasting If:DC doesn't
appearin the displag, startagain atStep 7
Toadjusttheoventemperature,touchtheBake
pad enterthe newtemperatureusingthe number
padsandtouchtheStart pad
Whencookingisfinishedthedisplagwill change
flomDc to 3 and0:00wiltappear,indicatingthat
theovenhasturnedOFFbutisstillsetinSabbath
Removethecookedfood
26
CLEAR ]
OFF [
Ht/Lo
DELAY]
[ START_
How to Exit the Sabbath Feature
[Z] ]ouchtheCfear/Offpad
Ifthe oveniscooking,waitfor arandom
detagperiodof approximotelg30seconds
toI minute,untilonlyD isinthedisplag
PressandholdboththeBakeandBroil
Hi/Lopads,at thesametime unt the
displogshowsSF
[_] TaptheDelayStart paduntilI2shdn
ornoshdnappearsinthe displog12shdn
indicatesthattheovenwillautomatically
turnoffafter12hoursnoshdnindicates
thattheovenwill notautomaticallgturnoff
TouchtheStart pod
NOTE:Hapoweroutage occurredwhile theoven
was in Sabbath,theovenwill automaticallg turn
offand stagoff evenwhenthepower returns
Theovencontrol must bereset
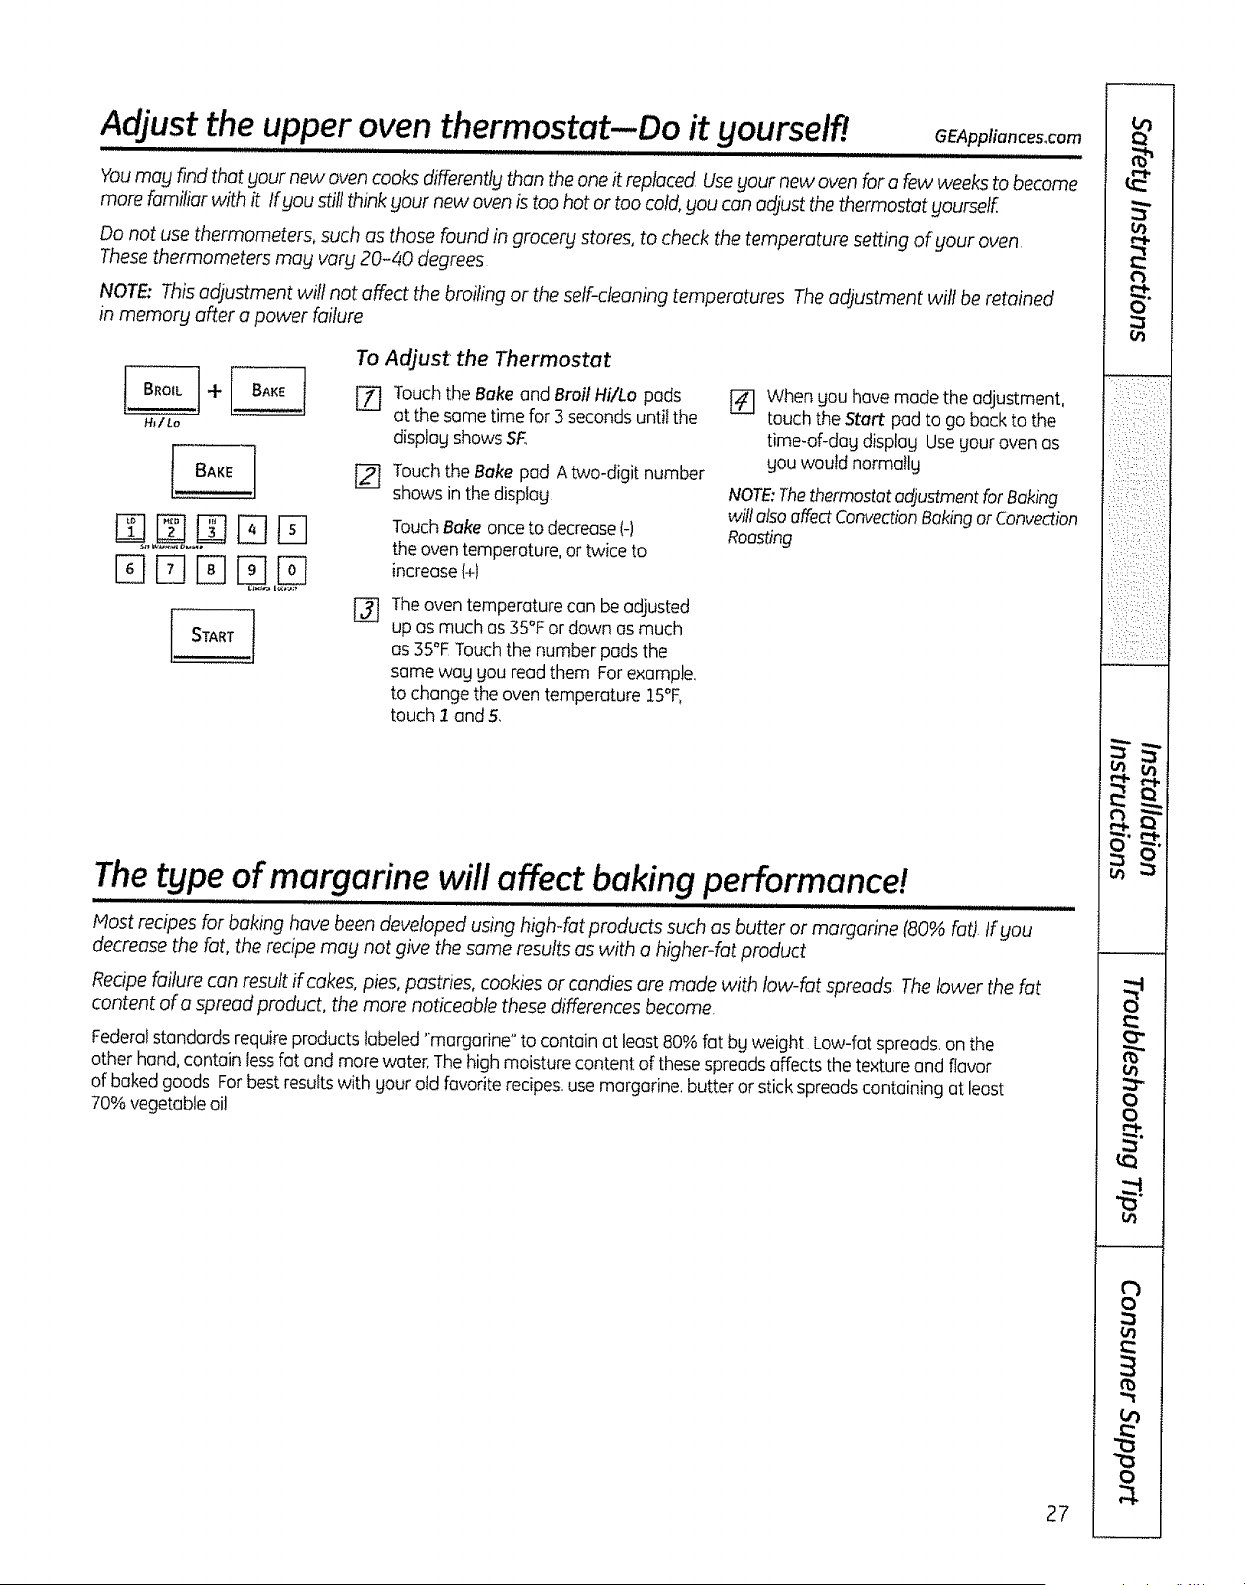
AdJust the upper oven thermostat-Do ityourselfl
GEAppliances_com
Youmay findthat your new ovencooks differenthjthan the one it replaced Useyour newovenfora few weekstobecame
morefamiliar with it If you stillthink your new ovenis toohotor toocold,you can adjust thethermostat yourself.
Do not usethermometers, such asthose found in grocery stores, to check thetemperature setting of your oven
Thesethermometers may vary 20-40 degrees
NOTE: This adjustment will not affect the broifing or theself-cleaning temperatures Theadjustment will be retained
in memory after a power failure
Hti Lo
To AdJust the Thermostat
[] TouchtheBake and Broil Hi/Lo pods
atthesame time for3seconds untitthe
displogshowsSR
F_ TouchtheBakepad A two-digitnumber
showsinthedisplog
TouchBake once to decrease(-)
the oven temperature,or twice to
increase(+)
[]
Theoventemperature canbeadjusted
up as much as 35°Fordown as much
as 35°F Touchthenumberpads the
same wagyouread them Forexample,
tochange theoven temperature15°E
touch 1 and 5.
[] When gou hovemodetheadjustment,
touch theStart pod togo back tothe
time-of-dogdisplagUsegoutoven as
gou wouldnormatlg
NOTE:Thethermostatadjustmentfor Baking
willalsoaffectConvectionBakingor Convection
Roasting
The type ofmargarine will affect baking performance!
Most recipes for baking have been developed usinghigh-fat products such asbutter or margarine (80% fat) tf you
decrease thefat, the recipemay not give thesame resultsaswith a higher-fat product
Recipefailure can result ifcakes, pies, pastries, cookiesor candies are made with low-fat spreads Thelower the fat
content of a spread product, the more noticeable these differences become.
Federalstandards requireproducts labeled"margarine"to containat least80%fat bg weight Low-fatspreads,on the
otherhand, contain lessfat and more water,The high moisturecontentofthesespreadsaffectsthe texture and flavor
ofbaked goods Forbest resultswith gour aid favoriterecipes,use margarine,butter or stick spreadscontaining atleast
70% vegetableoi!
27
| I
| I
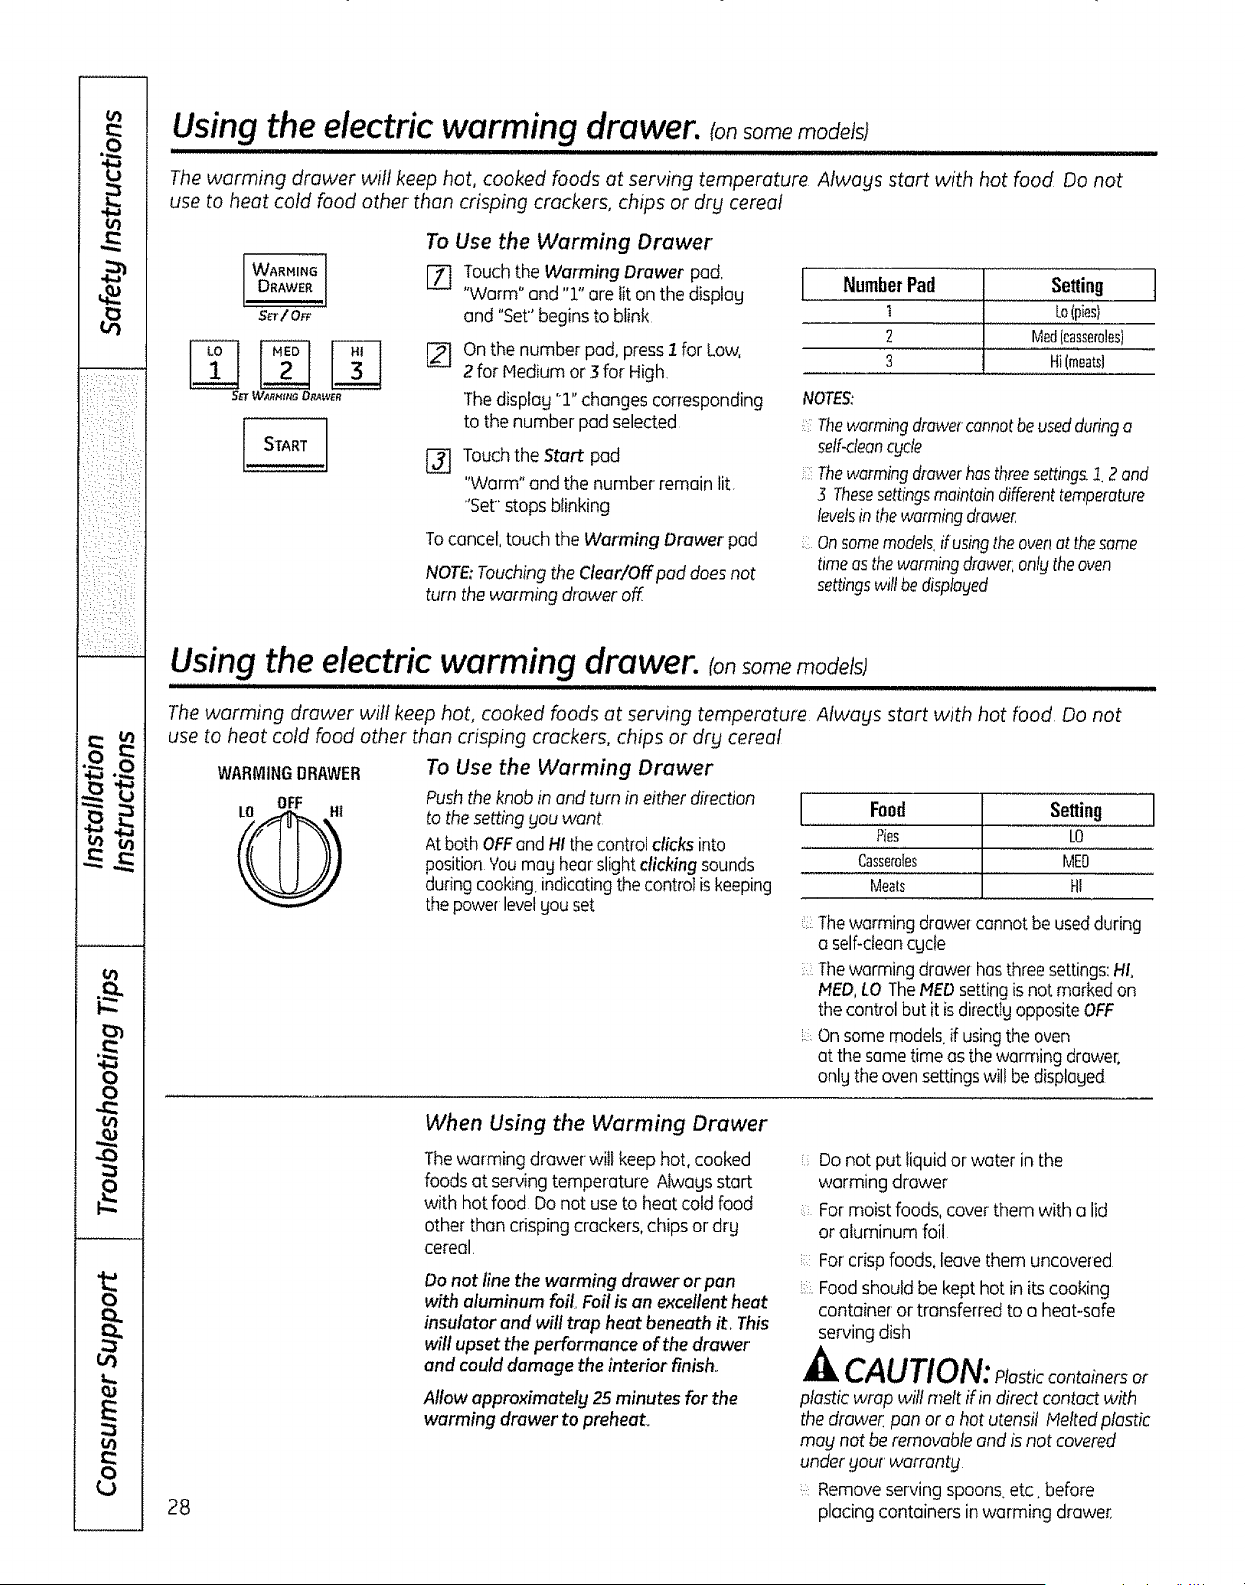
U3
£
,,e,,,a
u0
'
/:_,i;! ,:C_i_:i:i
,::!::b:::i_i¸:_i
: iJ:• :!iC::!
:!':?:?:iLi!;'
r'_
v A
w - .
. L
tal i/'l
u_
0
0
uo
.f3
E
= i
J
0 i
LJ I
Using the electric warming drawer. (onsomemode s)
Thewarming drawer will keep hot, cooked foods at serving temperature Always start with hot food Do not
use to heat cold food other than crisping crackers, chips or dry cereal
WARMIN6
DRAWER
S_r/ O_
To Use the Warming Drawer
[] Touch the Warming Drawer pad.
"Warm" and "1" ore iiton tile display
and "Set"begins to blink
S_f WARH_Na D_Wfn
On the numberpad, press1forLow,
2 forHedium or ] forHigh,
Thedisplag "1" changes corresponding
tothenumberpad selected
[_ Touch the Start pad
"Warm" and the number remain lit,
'Set" stops blinking
To cancel, touch the Warming Drawer pad
NOTE: Touching the Clear/Off pod does not
turn the warming drawer off
I NumberPad Setting ]
t Lo(pies}
2 Mad[casseroles}
3 Hi(meats]
NOTE£
Thewarmingdrawercannotbeusedduringo
self-deancycle
Thewarmingdrawerhasthreesettings.1.2 and
3 Thesesettingsmaintaindifferenttemperature
levelsinthewarmingdrawer
;! Onsomemodelsifusingtheovenat thesame
timeasthewarmingdrawer;onlgtheoven
settingswrlibedisploged
Using the electric warming drawer. (onsome models)
Thewarming drawer will keep hot, cooked foods at serving temperature Alwags start with hot food Do not
use to heat cold food other than crisping crackers, chips or dry cereal
WARMINGDRAWER To Use the Warming Drawer
Push theknob in and turn in either direction
tothe setting you want
Atboth OFFand HIthe control clicks into
position You may hear slight clicking sounds
during cooking indicating the control iskeeping
the power level you set
Food Setting
Pies LO
Casseroles MED
Meats HI
Thewarming drawer cannot be used during
a self-clean cycle
Thewarming drawer hasthree settings:HI,
PIED,LOTheMEDsetting is not marked on
the control but it isdirectly opposite OFF
_: Onsome models if using the oven
at the same time as the warming drawer,
onlg the oven settings wil!bedisplayed
28
When Using the Warming Drawer
The warming drawer will keep hot, cooked
foods at serving temperature Alwags start
with hot food Do not use to heat cold food
other than crisping crackers, chips or dry
cereal.
Do not fine the warming drawer or pan
with aluminum foil, Foil is an excellent heat
insulator and will trap heat beneath it, This
will upset the performance of the drawer'
and could damage the interior finish,.
Allowapproximately 25minutes forthe
warming drawerto preheat,
Do notputliquid or water in the
warming drawer
For moist foods, coverthem with a lid
or aluminum foil
For crisp foods, leave them uncovered
Food should be kept hot in its cooking
container or transferred to a heat-safe
serving dish
CAUTION: PIasticcontainersor
plastic wrap will melt if in direct contact with
the drawer, pan or a hot utensil Melted plastic
may not beremovable and isnot covered
under gout warrantg
Remove serving spoons, etc. before
placing containers inwarming drawer,
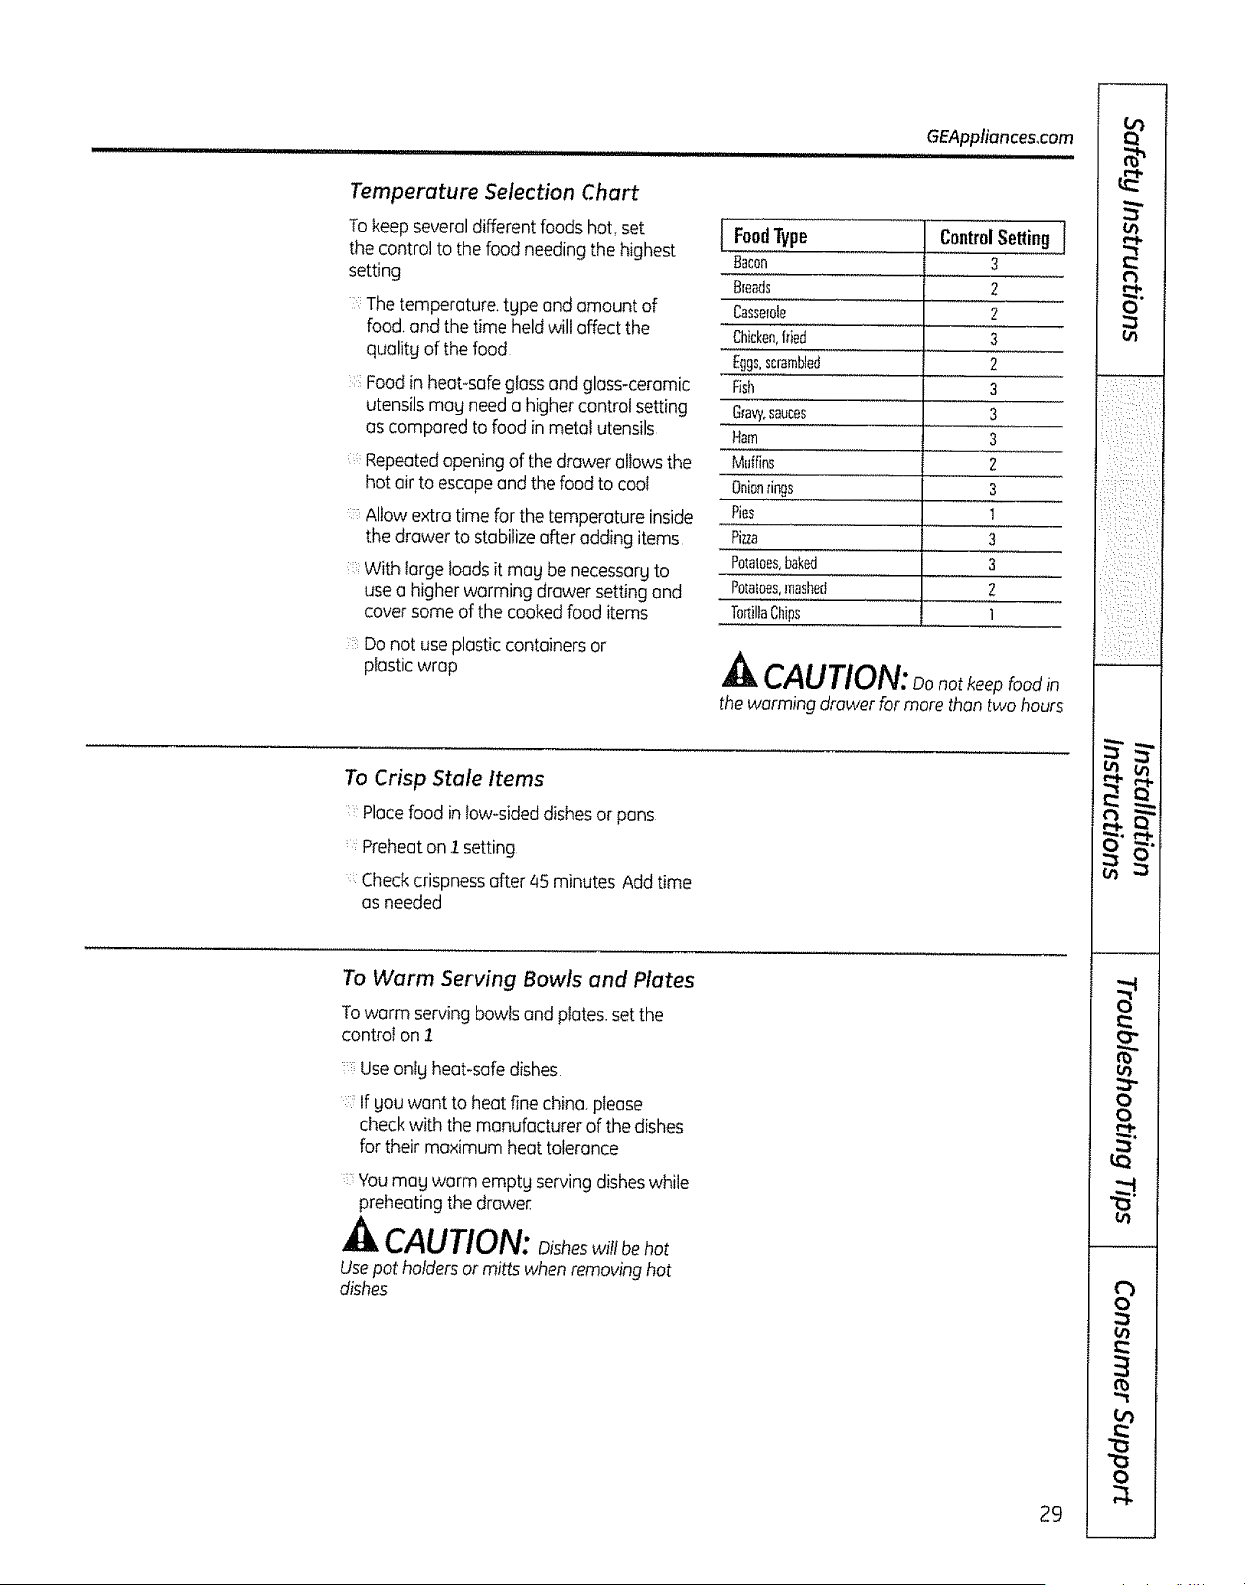
GEAppliances_com
Temperature Selection Chart
To keep several different foods hot, set
the control to the food needing the highest
setting
Thetemperature,tgpeand amount of
food.and the time heldwillaffect the
qualitg ofthefood
Food in heat-safe gloss and gloss-ceramic
utensils mag need a higher control setting
as compared tofood in metal utensils
Repeatedopeningofthe drawer allowsthe
hotair toescapeand the food tocoal
Allow extra time forthetemperature inside
thedrawertostabilizeafteradding items
With large loads it mag be necessarg to
use o higher warming drawer setting and
cover some of the cooked food items
Do not use plostic containers or
plastic wrop
[FoodType
Bacon
Breads
Casserole
Chicken,flied
Eggs,scrarnble_
Fish
6ravy.sauces
Ham
Muifins
Onionrings
Pies
Pizza
Polaloes,baked
Potaloes,mashed
TortillaChips
ControlSetting
3
2
2
3
2
3
3
3
2
3
1
3
3
2
1
CAUTION: Donotkeepfoodin
the warming drawerfor morethan two hours
To Crisp Stale Items
Placefoodintow-sideddishesor pans
Preheaton2 setting
:: Checkcrispnessafter 45 minutes Addtime
asneeded
To Warm Serving Bowls and Plates
To warm servingbowls andplates, setthe
controton2
Useonlg heat-safedishes
':: If gOUwant toheatfine china,please
checkwith the manufacturer of thedishes
for theirmaximum heattolerance
:::::Youmagwarm emptg servingdisheswhile
preheating thedrawe[
_tkCAUTION: Oisheswi!lbehot
Usepotholdersor mitts when removinghot
dishes
29
u_
q-
th
O"
:%:i¸::!_%:
_ic__,_:_:.:::-
:{q:ji_k/!ik:i
!:Lk,:::,: /:::
:k:L!;::,:::I:{i_
v
0
0
o I
m I

a
]::!: :::)]_:_::ii;_:_,
!iii::!:}:!i{(ii!!i:i
• : ¸::•_:i::>7:¸
K,,L :,!_ii
A
w - .
.-- L
0
0
4_
l,.rl
8i
J
___J
Using the loweroven drawer, ran
The lower ovendrawer mag be used tobake foods using the same times and temperatures asa standard oven Foods
ideal for baking in thelower oven drawer include pizza, frozen foods,casseroles,biscuits,rolls and mang desserts.
Push in and turn the lower oven drawer
knob to any desired setting
To Use the Lower Oven Drawer
[7] Pushin and turn thelower oven drawer
knob toang desiredsetting
[_ Allowthelower oven drawer topreheat
TheONsignal light islocated on the upper
right side ofthe knob end glows when the
knob isin the ON position It remains ON
until the knob is moved to the OFFposition
The "Heating" signal light islocated below
the ONsignar light and glows when the
heating elements areactive, Preheat is
complete after the "Heating signal has
turned off for the first time each use
NOTES:
Atwags usethe includeddrawerrack when
usingthelower ovendrawer,
:::Thelowerovendrawercannot beused
during a self-cleancycle of theupper oven
::::Do notputfood, foil or cookware directtg
on the bottom ofthe lower oven drawer,
Alwags usethe includeddrawerrack
If foodsrequirea cove( useonlyfoil or lids
able to withstand baking temperatures
Do notuseplastic
Maximum height of foodsthat can be
placedinthelowerovendrawer is4"
Do not put liquidor water in thelower
ovendrawer,
:::::Neverplaceplastics,paper;canned foods
orcombustiblematerial in the loweroven
drawer,
Thelowerovend_aweruseslessenergythantheupperoven
Allow thefollowing approximatetimes for preheating:
Desired Lower Preheat
OvenTemperature Time
WARM 10minutes
350°F 20minutes
425°F 30minutes
When Using the Lower Oven Drawer
The WARM ZONEof the lower oven drawer
will keep hat cooked foodsat serving
temperatures Alwags start with hot food
Do nat use the WARN ZONE toheat cold food
other than crisping crackers, chipsor drg
cereal
Warm Zone
Pushin andturn the control knob
tothedesiredsetting within the warm
zone (indicatedbg the red line}
LO , Pies
NEDfUN Casseroles
(mid-positiononthe line)
HI , Meats
30

GEAppliances,com
Using the self-cleaning upperoven.
,,I,N,I,I i m ii .................................
lf gour model has a door latch, never force the latch handle Forcing the handle willdamage the door tack mechanism
The oven door must be closed and all controls set correctly for the cgcle to work properly
Wipeup heavysoilonthe ovenbottom
Before a Cleon Cycle
Forthefirstsell-cleancgcle we recommend
venting gourkitchenwith an openwindow
or using a ventilationfan orhood
Removeang broilerpan.broiler grid,all
cookware,probe and ang aluminum foil
from theoven-they cannot withstand the
high cleaningtemperatures
Donot clean the gasket The fiberglass
material of the oven door gasket cannot
withstand abrasion It isessential forthe
gasket to remain intact Ifgou notice it
becoming worn or ffaged, replace it
Wipe up ang heovg spil!oversonthe oven
bottom
NOTE:
::::;:If gour oven isequippedwith nickel
oven racks,removethem before gou
begin the self-clean cgcle
If gourovenisequippedwith grog
porcelain-coatedovenracks,thegmay be
left intheoven duringtheself-cleancode
Soilon the front frame of the range and
outside the gasket on the door willneed to
be cleaned bg hand Clean these areas with
hot water, soap-filled scouring pads or
cleansers such as SoftScrubS?Rinse welt
with clean water and drg
Hake suretheovenlight bulb cover is in
placeand the oven lightisoff
IMPORTANT"Thehealth ofsome birds
isextremely sensitive to the fumes given
off during the self-cleaning cgcle of any
range Hove birds to another welt-ventilated
room
NOTE;Usecautionwhenopeningtheupper
ovenafter theself-cleancycle has ended
Theovenmag stil!be hot
D D rqU..,D
How to Set the Upper Oven for Cleaning
[] On models with Gas/Control Lockout,
touch and hold the Gas/Control Lockout
pad for 3seconds toturn itoff
NOTE: The surface burners must be turned
off prior to the self-dean start time
[_ When the LOCKED DOOR light is off,
slide the latch handle to the left as far
as it will go and open the door, Ifgour
range does not have a Iotch. the door
will unlock outomoticaltg
[] if gour model has a latch, Iatch the door.
[_ Touch the Self Clean pad
[_ Using the number pads, enter the
desired clean time, ifa time other than
4 hours isneeded
Cleancgcletime isnormallg .4hoursYoucan
change thecleantime to ang time between
3 hours and 5 hours,dependingon howdirtg
goutoven is
[] Touch the Start pad
:::The words LOCKDOORwillflash and
theovencontrol will signal ifgou set
the clean cgcleand forget toclosethe
oven dooror forget tolatch thedoor
on modelswith a latch,
:: To stop a clean cgcle,touch the Clear/Off
pad When the LOCKEDDOOR light goes
off. indicating the oven has cooled below
the locking temperature, unlatch the door
(onmodels with a latch) and open the door.
Onmodelswithouta door latch, thedoor
locksautomaticallg The displagwillshow
the clean time remaining It will notbe
possibleto opentheovendoor until
thetemperature drops belowthe lock
temperatureand the LOCKEDDOOR
light goes off
Theovenshutsoff automaticallg whenthe
clean cgcleis complete
3t
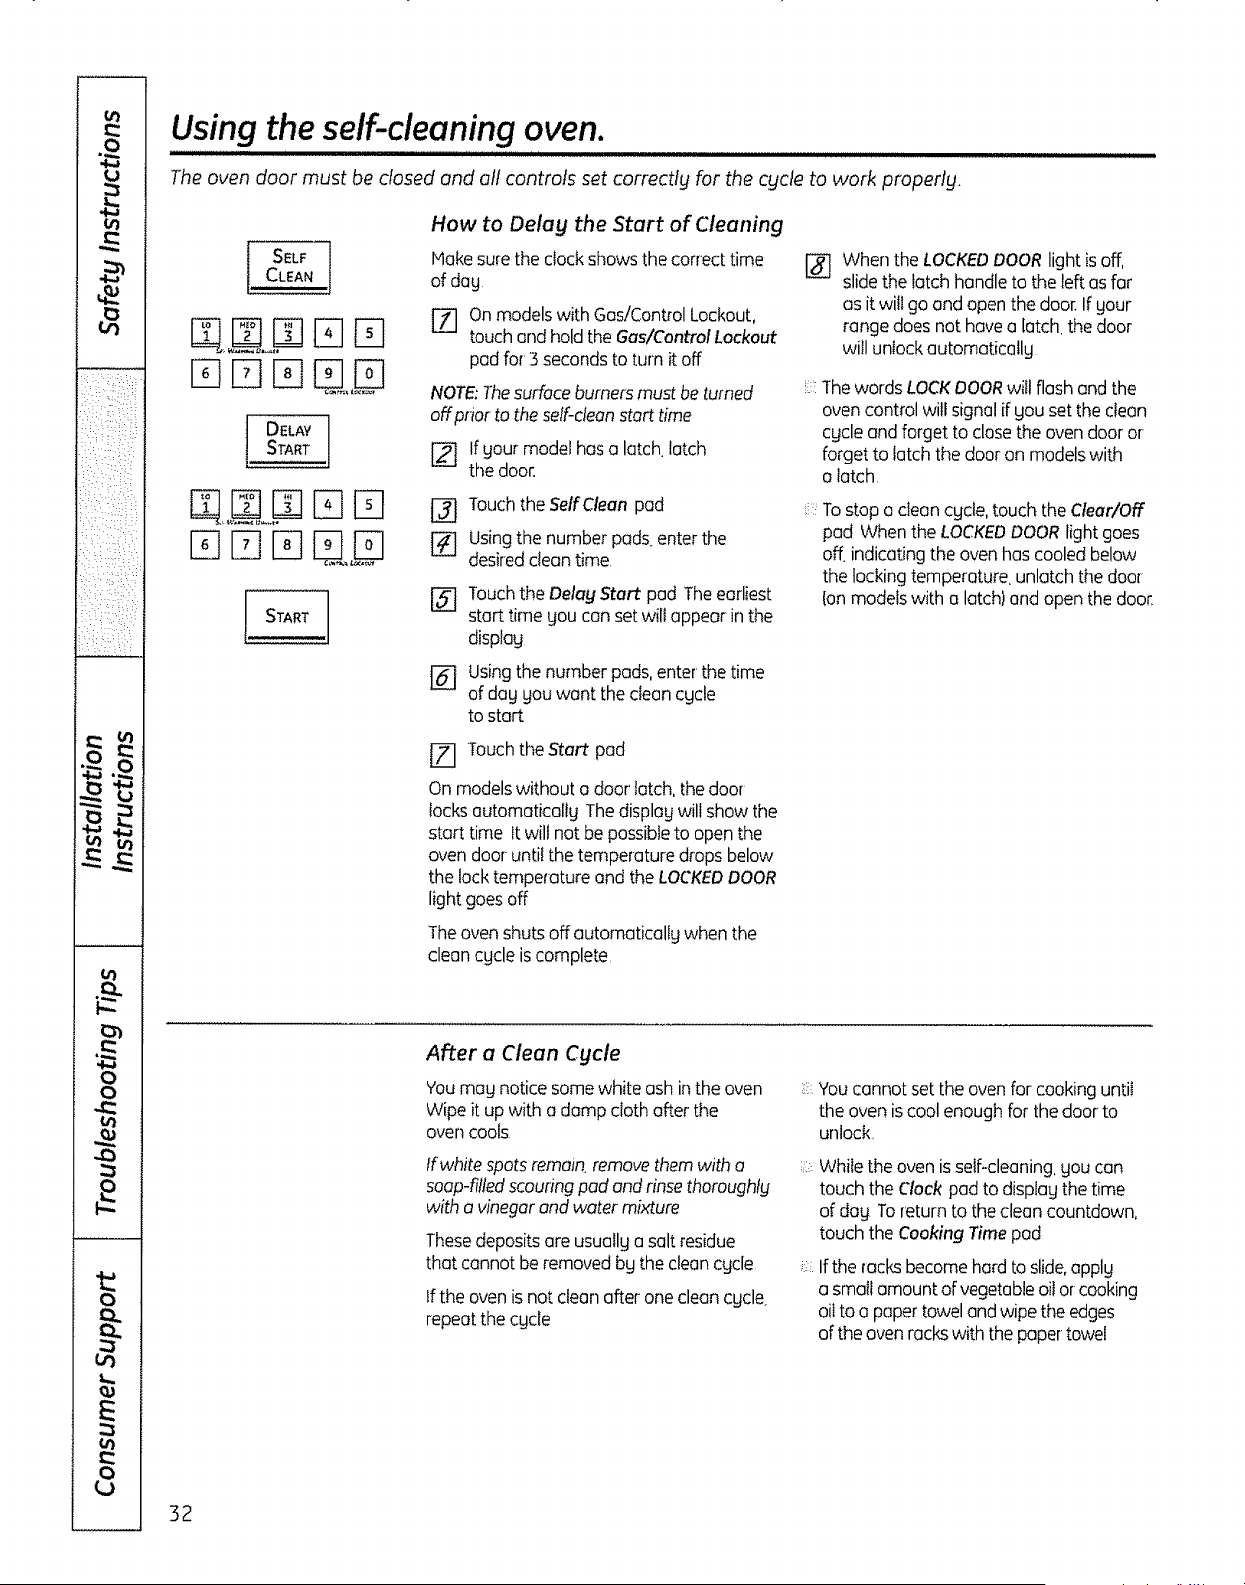
01
.g
ca
01
a
v
.. L
ol
0
0
01
4_
0
E
01
8
Usingthe self-cleaning oven.
The oven door must be closed and ott controls set correctfg for the cgcte to work properly,
SELF
1CLEANI
D D D
DELAY
D D
D D D U,.U
How to Delay the Start of Cleaning
Hake sure the clock shows the correct time
of dog
[Z] Onmodels with Gas!ControlLockout,
touch end holdtheGas/ControlLockout
pad for3 seconds toturnit off
NOTE:Thesurfaceburnersmustbeturned
off pnor tothe selFcleanstarttime
l_ If yourmodelhas a atch latch
thedoor.
TouchtheSeffClean pad
[_] Usingthenumberpadsenter the
desireddean time.
@
TouchtheDelay Start pad Theearliest
starttime youcansetwillappear inthe
display
Usingthe numberpads,enter thetime
ofdayyou want the clean cgcle
to start
[_] When theLOCKEDDOORlightis off,
slidethelatch handletotheleft as far
as itwill go and openthedoor.If gour
range does nothave a latch, the door
willunlockautomaticatlg
The words LOCKDOORwill flash and the
oven control will signal ifyousettheclean
cycle and forget toclosetheoven door or
forgetto latch thedoor on modelswith
a latch
i£::
Tostop o dean cycle, touch theClear/Off
pad When theLOCKEDDOORlightgoes
off. indicatingtheoven has cooled below
thelockingtemperature,unlatch thedoor
[on modelswith a latch)and open thedoor.
Touchthe Start pad
On modelswithout a door latch,thedoor
locks automatically The displaywillshow the
starttime It willnot be possibleto openthe
oven door-until the temperaturedrops below
thelocktemperatureend theLOCKEDDOOR
light goes off
Theoven shuts off automatically when the
cleon cycle is complete.
After a Clean Cycle
Youmay notice some white ash inthe oven
Wipe itup with a damp cloth after the
oven cools
ff white spots remain, remove them with a
soap-rifled scouring pad and rinse thoroughly
with a vinegar and water mixture
Thesedeposits are usually a saltresidue
that cannot be removedbg thecleancycle
Iftheoven is notclean after oneclean cycle
repeat the cycle
i!•:j:}
i_:{{:
;ilZ
You cannot set theoven for cooking until
the oven iscool enough for the door to
unlock
While theoven is self-cleaningyoucan
touch theClockpad todisplaythetime
ofday Toreturntothe clean countdown,
touch theCooking Timepad
Iftheracksbecomehard toslide,apply
a smallamount of vegetableoilor-cooking
oiltoo papertowel andwipethe edges
of the oven rackswith the papertowel
32
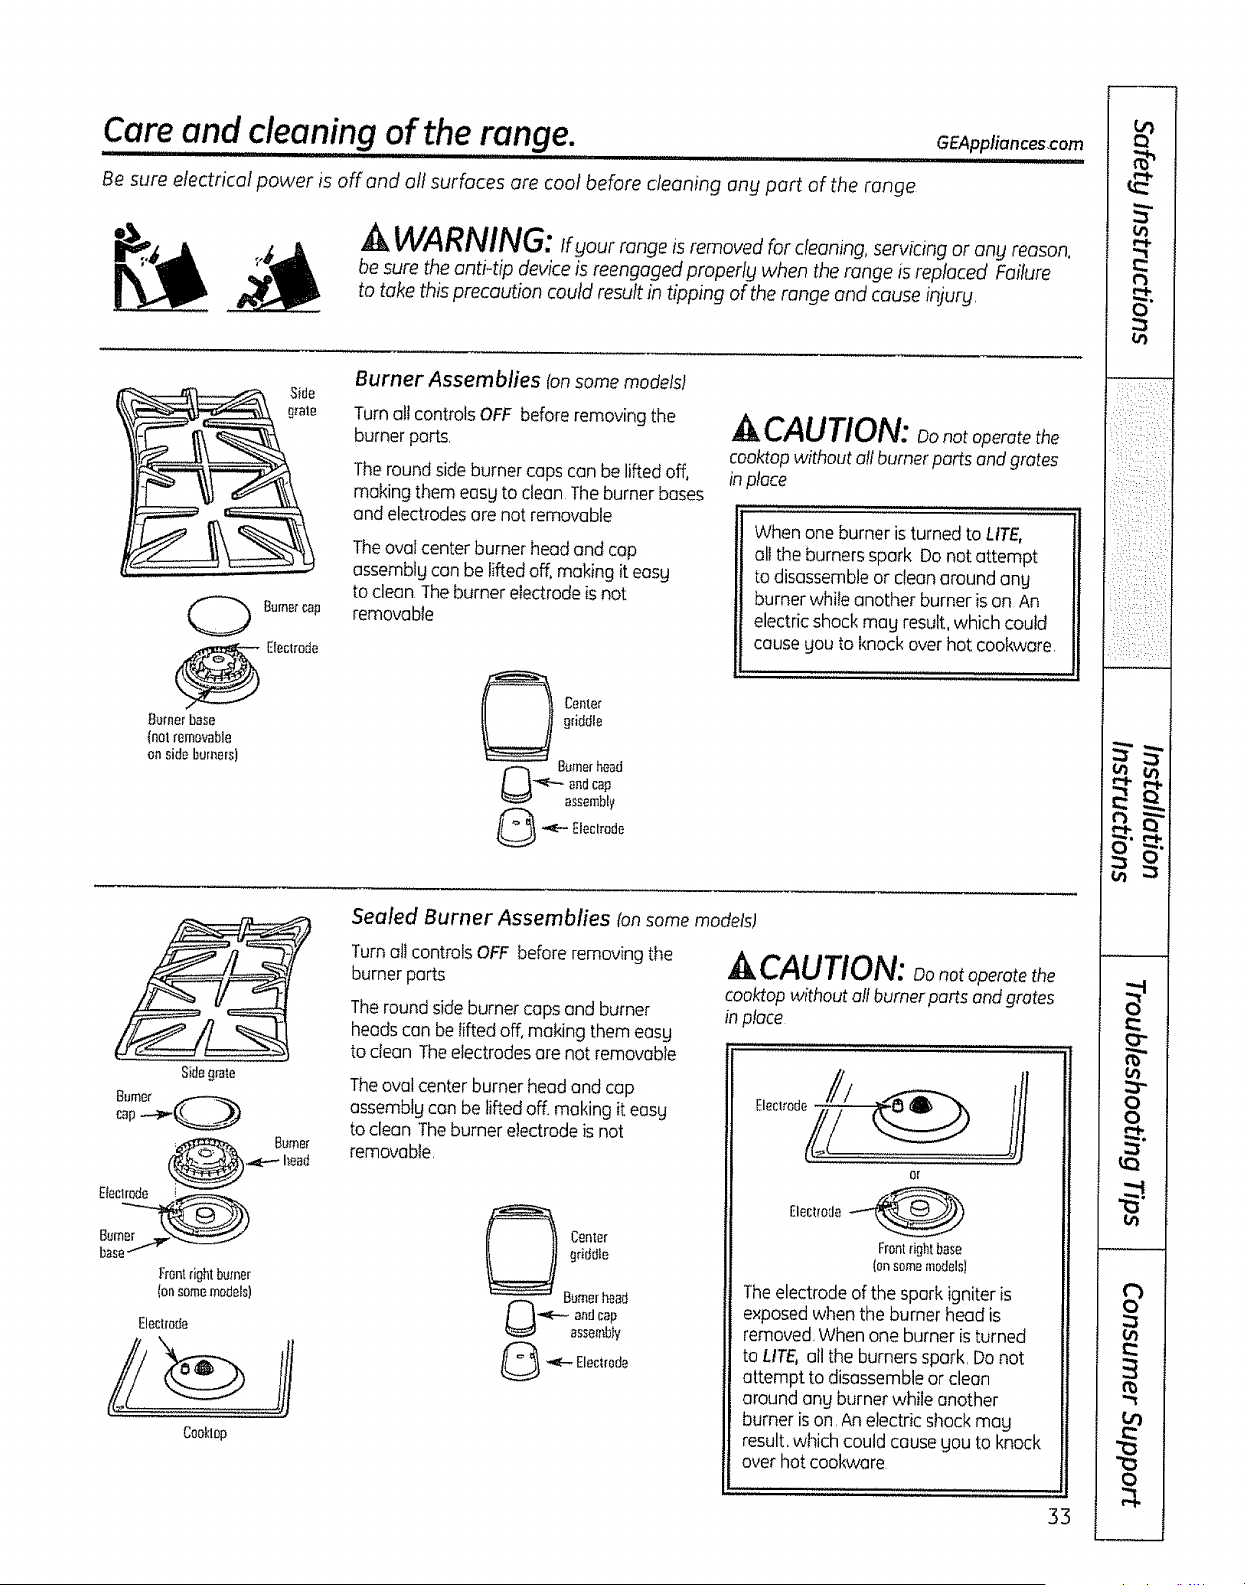
Careand c!eaning of the range. .....
GEAppfiunces,com
Be sure electrical power isoffend alt surfaces are cool before cleaning any part of the range.
_kWARNING: Ifyourrangeisremovedforcleaning,serv,cingoranyreason,
be sure theanti-tip device isreengaged properly when therange is replaced Failure
to take this precaution could result in tipping of therange and cause injurg,
Side
Burnerbase
(hal removable
onsideburners)
Burner Assemblies fansame models)
Turnalt controls OFF beforeremoving the
burnerparts,
The roundside burner capscanbe liftedoff,
makingthem easg tocleanTheburner bases
and electrodesore not removable
The ovai centerburner head and cop
assemblgcan be lifted off, making it easg
to clean,Theburner electrodeis not
removable
griddle
iiiE°
*-_- Eleclrode
A_,CAUTION: Donotoperatethe
cooktop without a!l burner parts and grates
in place
Whenoneburner is turnedtoLITE,
alltheburnersspark Da notattempt
to disassembleor cleon around ang
burnerwhile anotherburner is on An
electric shock may result,which could
cause gou toknockoverhotcookware,
Sidegmte
FrOntright burner
(onsomamodels}
Electrode
//
Cooklop
Sealed Burner Assemblies ion some models)
Turneli controls OFF before removingthe
burnerports
Theround sideburner caps and burner
heads can be lifted off,making themeasg
tocleanTheelectrodesare notremovable
Theoval center burnerhead and cap
assemblgconbe liftedoff, making iteasg
to clean Theburner electrodeis not
removable,
9.,,_._B Center
griddle
-_- Electrode
^,,_CAUTION: Da_otoperatethe
coo_opwithoutall burnerparts end grates
inplace
Or
Electrode
Frontrightbase
(an some models]
Theelectrodeofthesparkigniteris
exposedwhen theburner head is
removed,When one burneris turned
toLifE, all theburners spark, Donot
attempt todisassembleor cleon
around any burnerwhileanother
burner is on, Anelectric shock may
result,which couldcauseyoutoknock
overhot cookware
33

Care andcleaning of the range.
Burnercapis BurnercapisNOT
properlyseated properlysealed
Burner Caps, Bases and Heads
Beforeremovingtheburner caps andheads (on
somemodels),remember theirsizeand location
Replacethem inthesome locationafter cleaning
NOTE:Donot usesteelwoolorscouringpowders
to cleontheburnerports
Burner caps
Liftoffwhen cool Washburnercapsinhot,soapg
waterandrinsewithcleanwater.Youmegscour
withaplasticscouringpadto removeburned-on
foodparticles
Burnerbases(ansamemodels}
@
Theburnerbases(onsomemodels}arenot
removableOniythecapsmayberemoved
forcIeaning
Burnerheads(onsomemodets)
Theburnerheads(onsomemodels)are
removableSimplyliftthemoff therange
forcieaning
Front-righthead(onsomemodels}
Burner
head
Electrode
Makesuretheholeintheburnerhead
ispositio_dowr theelectrodeandthat
theburnerheadisPJilyinserledinside
theburnerbaseA smallgapbetween
thebaseandheadisnormal
Front-righthead(onsomemodels[
[ronFle[_.head,back-dghthead
andback,lefthead
Stability chamber U_ea._e,,.d_
x''_¥'%, n.>_dle__,_,';',-_
base,,'-'- Electrodet_._d,
Makesuretheslotin theburnerhead
ispositionedoverthe electrode
Theovalburnerhead/capassemblyisremovable
Simplyliftit offtherangeio_cleaningUsea
sew_ngneedleortwlsHietounclog',.he_all
hateinlheburrerheads.
Burner Bases{onsomemodels)
Theroundburnerbasesorenot removableOnly
thecapsmayberemovedforcleaning
Tocleantheburnerbases,usesoapgwateranda
plasticscouringpadWipecleanwitho dampcloth
Hakesurethatnowatergetsintotheburner
bases,Allowthemto drgfullgbeforeusing
Burner Heads tansome models)and Oval
iCon:eft Burner Head/Cap Assembly
Theburnerheadsand the oval burnerhead/cap
assemblgareremovable Simplylift them offthe
range for cleaning
Forproperignitionmakesurethesmallhole
inthesectionthatfitsovertheelectrodeiskept
openAsewingneedleorwifetwist-tieworks
wellto unclogit
Theslitsinthe burnerheads must be keptclean
atallttmesforaneven unhamperedflame
Cloggedordirtgburnerportsorelectrodes
will notallowthe burnertooperateproperlg
Angspillonoraroundanelectrodemust
becarefullgcleanedTakecareto not hitan
electrodewithangthinghardor it couldbe
damaged
Clean the burner heads _outJnelg,especiallg after
bad spillovers which could clog the openings Lift
off when coot
Toremoveburned-onfood,soakthe burnerheads
inasolutionof mildliquiddetergentandhotwater
for 20-30minutes.Formorestubbornstains,use
o toothbrush
After deaning
Beforeputtingtheburnercaps.headsIonsome
models)andovaIhead!capassemblgback,shake
out excesswaterandthendrgthemthoroughtg
bgsettinginawarmovenfor 30minutes
34
Replacement
Burner'Heads{onsomemodelsl
Replaceburnerheadsove_the electrodeson
the cooktopinthecorrectlocationsaccordingto
theirsizeThereisonesmall,onemediumone
largeandoneextraqargeburnerhead
Hakesuretheslotorhole(dependingon model)in
theburnerheadispositionedovertheelectrode
Hole..4_,._
Electrode;4f' Slot
Oval ICenteflBurner Head/CapAssemblg
Replacetheovallcenter]head/capassemblgover
theelectrodeonthe cooktop
Ovalheadand cap Makesurethe slot in the
assembly burnerheadispositionedover
tl .....
Frontofrange Electrode
Caps
Replacethematchingsizecapsontothe burner
basesorheads.
Largecap I .. ,..... ,,, .. ! Extra-largeeap
Ran[ at range
Hakesurethattheheads(onsomemodels)and
capsorereplacedinthecorrectlocations
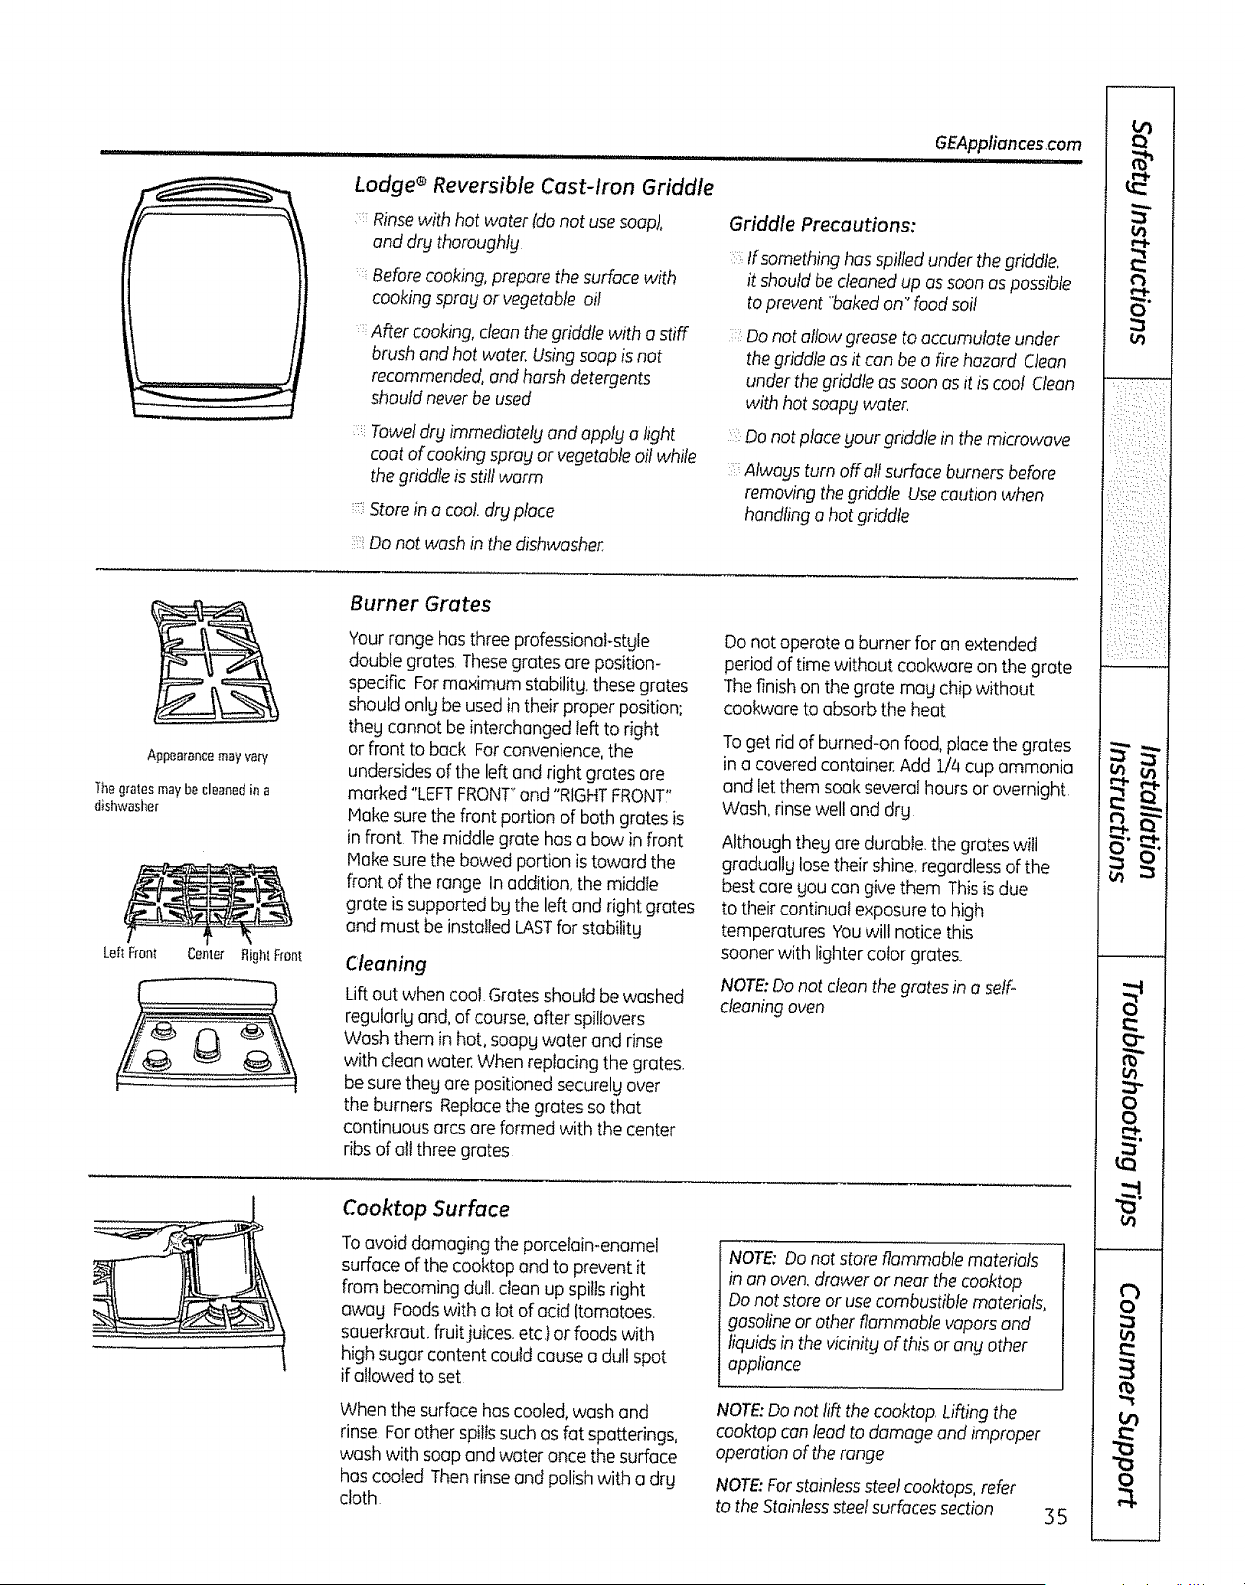
Appearance mayvary
!he g_mes mayb_ _l_ared in a
dishwasher
Left Front Cenler
GEAppliancescom
Lodge e Reversible Cost-Iron Griddle
Rinsewith hot water [do not use soap),
and drythoroughly
Beforecooking,preparethe surfacewith
cookingspray or vegetableoil
: After cooking,clean thegriddle with a stiff
brushand hotwater,Usingsoap is nat
recommended,andharsh detergents
should neverbeused
Toweldryimmediatelgandapplya light
coat ofcookingspray or vegetableoil while
thegriddleis still warm
Storein a coat.dr9 place
Griddle Precautions:
:: tfsomethinghas spilledunderthe griddle,
itshould becleanedup as soonas possible
to prevent"bakedon" food soi!
: Danotallow greasetoaccumulateunder
the griddleas itcanbea fire hazard Clean
underthe griddleussoon asitis coa! Clean
with hotsoapywater.
Da not place your griddle in the microwave
Always turn off attsurface burners before
removing the griddle Use caution when
handling o hot griddle
::':Do notwash in thedishwasher
RightFront
Burner Grates
Yourrange has three professional-stgle
doublegrates Thesegratesare position-
specific Formaximum stabilitg,these grates
should only be used intheirproper position;
theg cannot beinterchangedleft toright
or front toback Forconvenience,the
undersidesoftheleft and rightgratesare
marked"LEFTFRONT"and"RIGHTFRONT"
Hake surethefront portionofboth grates is
infront Themiddle gratehas a bowin front
Makesurethebowedportion is toward the
front of therange In addition,the middle
grateis supported bg theleftand rightgrates
and must be installedLASTfor stabilitg
Cleaning
Liftoutwhen cool Gratesshould bewashed
regularly and,ofcourse,after spillovers
Wash them in hot, soapywater and rinse
with cleanwater, When replacingthegrates.
be sure they ore positionedsecurelyover
theburners Replacethe grates so that
continuous arcsare formed with thecenter
ribsofattthree grates
Donot operate a burner foran extended
period of time without cookware on the grate
Thefinish on the grate may chipwithout
cookware to absorb the heat
Togetrid ofburned-onfood, placethegrates
in a coveredcontainer.Add 1/4 cupammonia
and let them soakseveralhours or overnight
Wash,rinsewelland drg
Although theg are durable,thegrateswill
gradua!lglose their shine,regardlessof the
best care gou can give them Thisis due
totheir continual exposuretohigh
temperatures Youwillnoticethis
soonerwith lighter colorgrates.
NOTE:Donot clean the grates inaself_
cleaning oven
Cooktap Surface
Toavoid damagingtheporcelain-enamel
surface ofthe cooktop and topreventit
from becomingdull. clean up spillsright
awag Foodswith a totofacid[tomatoes.
sauerkraut,fruitjuices, etc.}or foods with
high sugar contentcould causea dull spot
ifallowed toset
When thesurface has cooled,wash and
rinse Forother spillssuchas fat spatterings,
wash with soap andwater once thesurface
has cooledThen rinseand polishwith a drg
cloth
NOTE: Donot store flammable materials
in on oven,draweror near the caoktop
Donot store or usecombustiblematerials,
gasolineor other flammable vaporsand
liquids inthe vicinity of this ar any other
appliance
NOTE:Donotlift the coaktop,Liftingthe
cooktopcan lead to damage and improper
operation of the range
NOTE: For stainless steel cooktops, refer
to theStainlesssteel surfaces section
35
O"
i:•::•:::i!::i:i
wx tin,
v
0
0
_ u
!
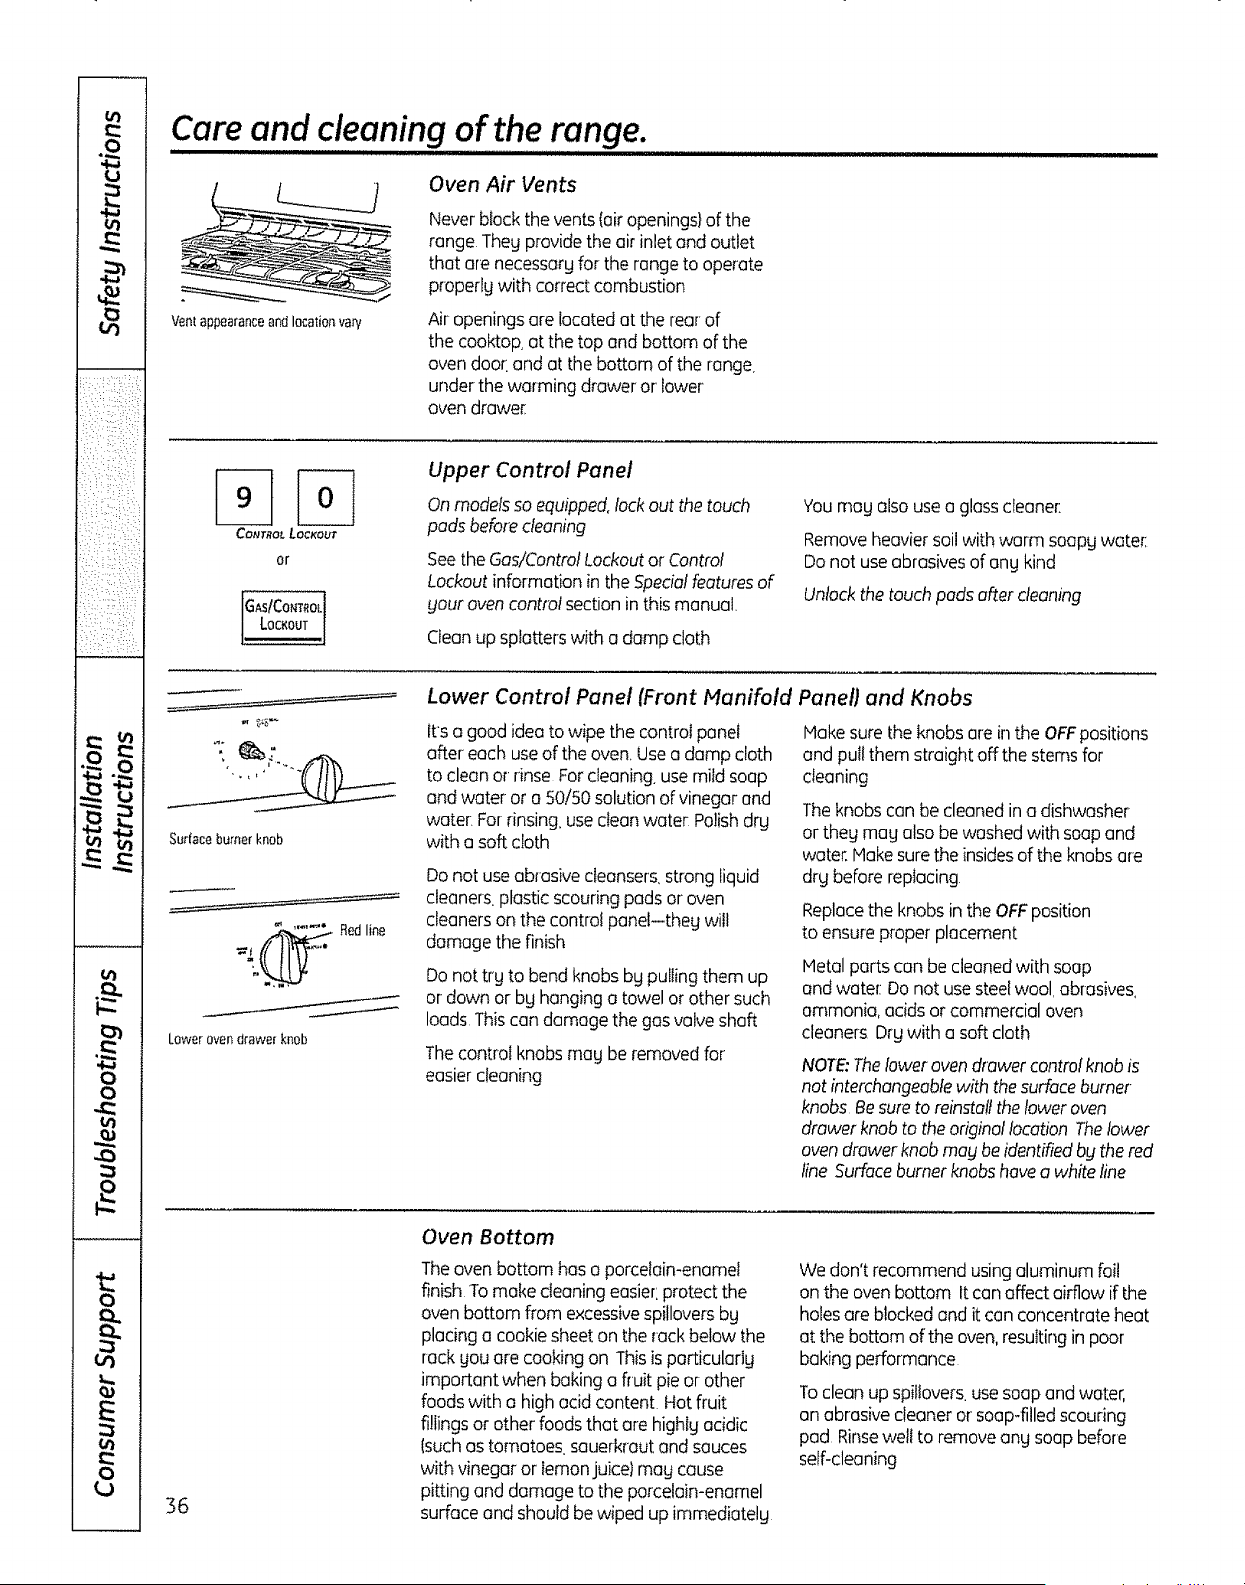
l/1
l,j
ill
0",-i
• .£i
O ,'l'ff_
]
I
i
o l
o I
0 1
o 1
I,tl 1
o 1
£., ,
Care and cleaning oftherange.
Vent appearance and location va_
Oven Air Vents
Neverblock the vents (airopenings)ofthe
range•Theg provide the air inlet and outlet
that are necessaryfortherange tooperate
properlgwith correct combustion
Airopenings are locatedattherear of
thecooktop,at thetopand bottomof the
oven door:and atthebottomoftherange.
under the warming drawer or lower
oven drawer_
or
Upper Control Panel
Onmodelsso equipped,lockoutthe touch
pads before cleaning
Seethe Gas/ControlLockoutor Control
Lockout informationin theSpecia!featuresof
youroven controlsection in this manual.
Cleanup splatterswith a dampcloth
Yournag also use a glasscteaner:
Removeheavier soilwith warm soapg water:
Donot useabrasivesofanykind
Unlockthetouchpads after cleaning
Surfaceburnerknob
'...... Redline
Lower oven drawer knob
Lower Control Panel [Front Manifold
Its a good idea to wipethecontrol panel
offer each useoftheoven Usea dampcloth
toclean or rinseForcleaning,use mild soap
and water or a 50/50solutionofvinegar and
water. Forrinsing,usedean water Polishdry
with a soft cloth
Do notuse abrasivecleansers,strong liquid
cleaners,plastic scouring pads or oven
cleanerson the controlpane!-theg will
damage thefinish
Do not try to bend knobsbypullingthem up
or downor bg hanginga towel or other such
loadsThiscandamagethe gas valve shaft
Thecontrol knobsmagbe removedfor.
easier cleaning
Panel_ and Knobs
Makesure theknobsare in theOFFpositions
and pull them straightoffthe sternsfor
cleaning
Theknobscanbe cleaned ina dishwasher
or thegmag alsobewashed with soap and
water.Hakesuretheinsidesoftheknobsare
drg before replacing
Replacetheknobs in the OFFposition
toensure proper placement
Metalparts canbe cleanedwith soap
andwater: Do notuse steelwool.abrasives,
ammonia, acidsor commercial oven
cleaners Drg with a soft cloth
NOTE: Thelower ovendrawer control knob is
nat interchangeable with the surface burner
knobs Be sure to reinstall the lower oven
drawer knob to the original location The lower
oven drawer knob may be identified bg the red
line Surface burner knobs have a white line
36
Oven Bottom
The oven bottomhasa porcelain-enamel
finish To make cleaningeasier:protect the
ovenbottomfrom excessivespilloversby
placing a cookiesheeton the rack belowthe
rack youare cooking on Thisis particularlg
importantwhen baking a fruit pie or other
foods with o high acid content Hot fruit
fillingsor otherfoods that are highlgacidic
(suchastomatoes sauerkraut and sauces
with vinegaror lemonjuice} magcause
pitting and damage totheporcelain-enamel
surface and should be wipedup immediately
We don't recommend usingaluminum foil
on theoven bottom Itcanaffect airflow if the
holesare blockedand itcan concentrateheat
atthebottomof theoven,resultingin poor
baking performance
To clean up spil!overs,use soap and water,
an abrasivecleaneror soap-filledscouring
pad Rinsewelt toremoveang soap before
self-cleaning
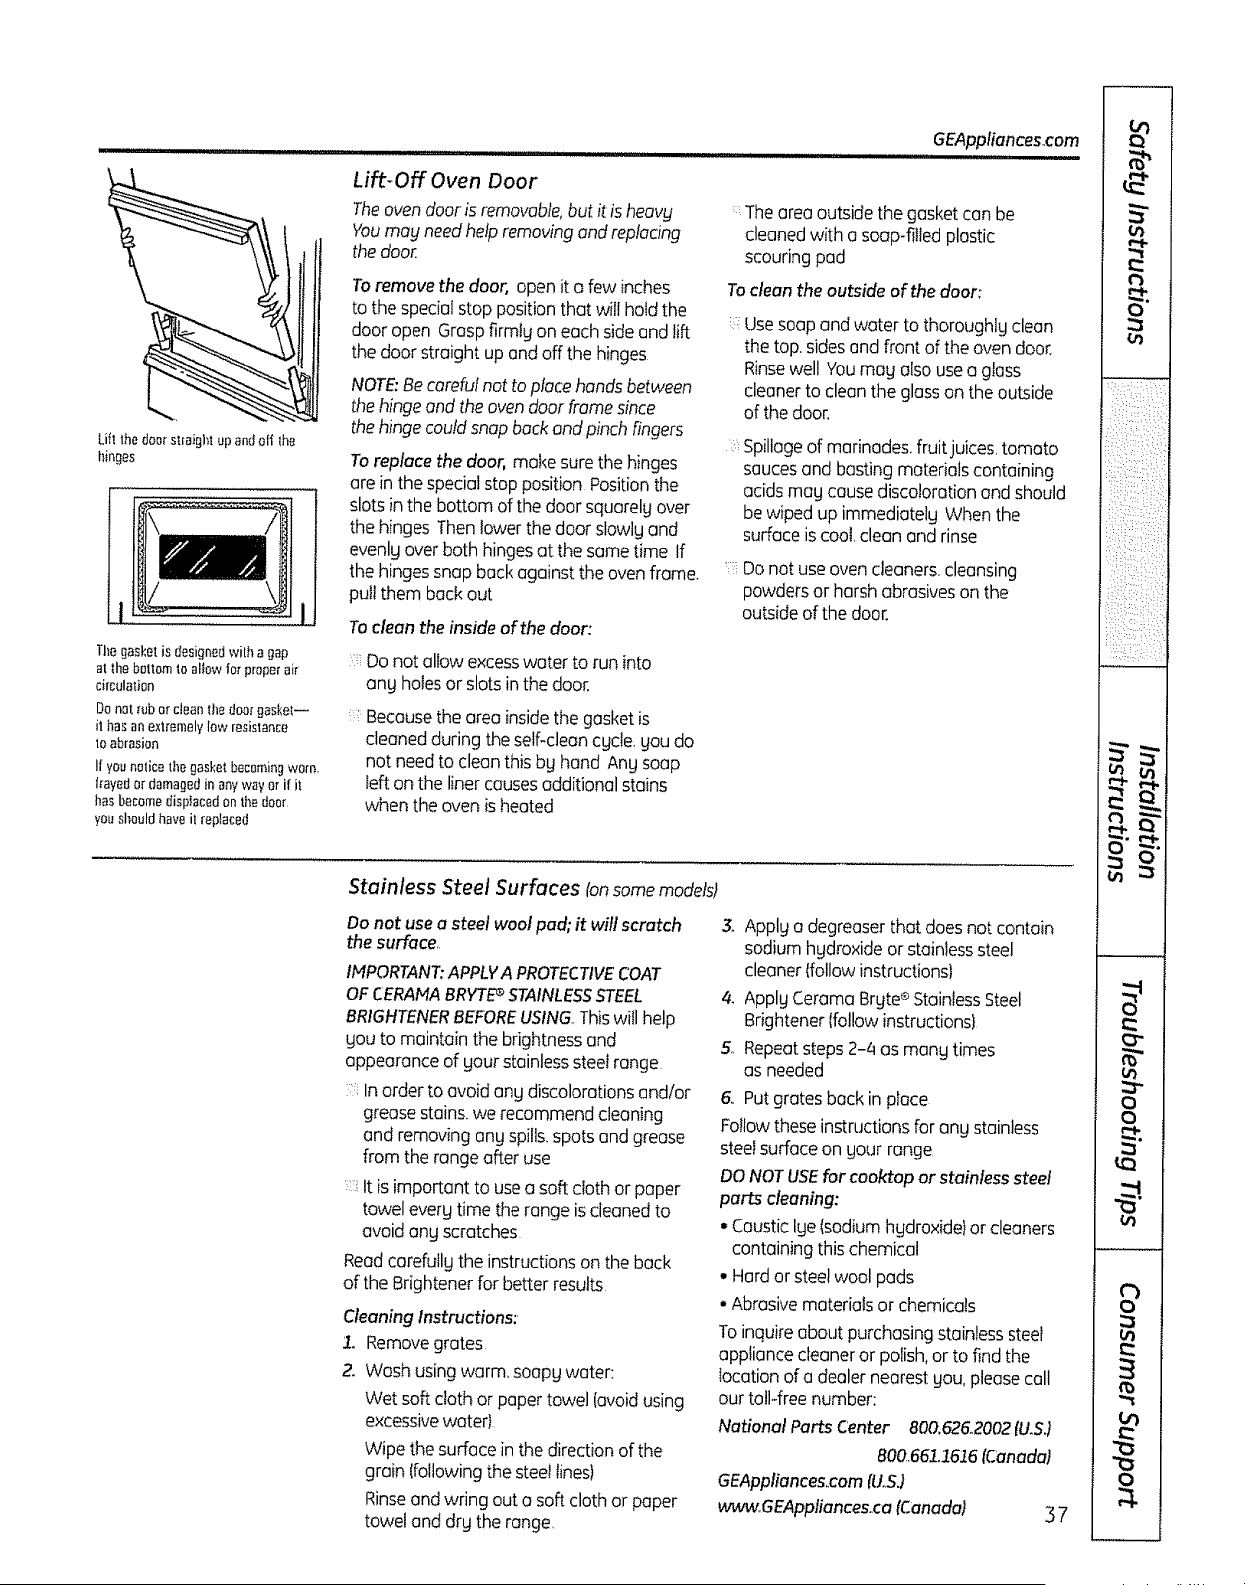
Lift-Off Oven Door
GEApp/ioncescom
i,,i , ul,,,, i
Lift lhedoorstraightup andoff !ha
binges
Thegasket is designed with agap
at the bottom toaltow forproper air
circulation
Do nat nJborcleanthe door gasl_et--
it has an extremely low resistance
to abrasion
I1you notice the gasket becoming worn.
frayed or damaged in anyway or if it
has becomedisplaced on thedoor
you should have it replaced
Theovendoor is removable,butit is heavy
Youmay needhelp removingand replacing
the door
Toremove thedoor, open it a few inches
tothespecialstop positionthat wil! holdthe
door open Graspfirmlyon each side and lift
thedoor straightup andoff thehinges
NOTE:Becarefulnot to place hands between
the hingeand the oven doorframe since
the hingecould snap backand pinch fingers
Toreplacethedoor,make surethehinges
are inthespecialstopposition Positionthe
slots in thebottomofthe door squarelgover
thehingesThen lower the door slowlg and
evenlg over bothhingesatthesometime If
thehingessnapbackagainst the oven flame.
pull them backout
To clean the inside ofthe door:
Do notallowexcesswater torun into
ang holesor slotsin thedoor.
Because the area inside the gasket is
cleaned during the self-clean cgcle, gou do
not need to clean thisby hand Ang soap
left on the liner causes additional stains
when the oven isheated
: Thearea outsidethegasket can be
cleanedwith a soap-filledplastic
scouringpad
To cleon the outside of the door:
Usesoap and water tothoroughlg clean
the top. sidesand front of theoven door,
Rinsewell Youmay also use a gloss
cleanertoclean theglasson the outside
ofthedoor.
Spillage of marinades, fruit juices, tomato
sauces and basting materiels containing
acids mug cause discoloration and should
be wiped up immediatelg When the
surface is coo!, clean and rinse
;:;Do not useoven cleaners, cleansing
powders or harsh abrasives on the
outside of the door.
Stainless Steel Surfaces Ionsomemodels)
Do not use a steel woolpad;it wi!l scratch
thesurface,,
IMPORTANT:APPLY A PROTECTIVECOAT
OF CERAMABRYTE_ STAINLESSSTEEL
BRIGHTENERBEFOREUSING, This willhelp
gou to maintain the brightness and
appearance of gour stainless steet range
:: In order to avoid ang discolorations and/or
grease stains, we recommend cleaning
and removing ang spills,spots and grease
from the range after use
It isimportant to usea soft cloth or paper
towel everg time the range iscleaned to
avoid ang scratches
Read carefutlg the instructions on the back
of the Brightener for better results
CleaningInstructions:
Io Removegrates
2. Wash using warm, soapg water:
Wet softcloth or paper towel (avoidusing
excessivewater}
Wipe thesurface in the direction of the
grain (followingthe steellines)
Rinseand wringout o soft cloth or paper
towel and drg therange.
3. Applga degreaserthat does notcontain
sodiumhgdroxide or stainlesssteel
cleaner(followinstructions)
& ApplgCeramaBrgte®StainlessSteel
Brightenertfol!owinstructions)
5.. Repeatsteps 2-/4asmangtimes
asneeded
6. Putgrates back in place
Followthese instructionsforang stainless
steelsurface on gour range
DONOTUSEforcooktapor stainless steel
paps cleaning:
• CausticIge(sodiumhgdroxide)or cleaners
containingthis chemical
• Hardor steelwool pads
• Abrasivematerialsor chemicals
Toinquireaboutpurchasingstainlesssteel
appliancecleaner or polish,or tofind the
locationofa dealer nearestgou, pleasecall
ourtol!-free number:
National Parts Center 800.6262002 (U.S.)
800.661.:Z616(Canodal
GEApplionces.,com (UoSJ
www_GEAppliancesoca fCanada) 3 7
0
1:1!!::::: :/i)::
L: :::: ::
:: [:::
;.4,_
O
1:::
(3"
u_
::3-
0
0
:::::i"
L_
:::l
"t
g
0
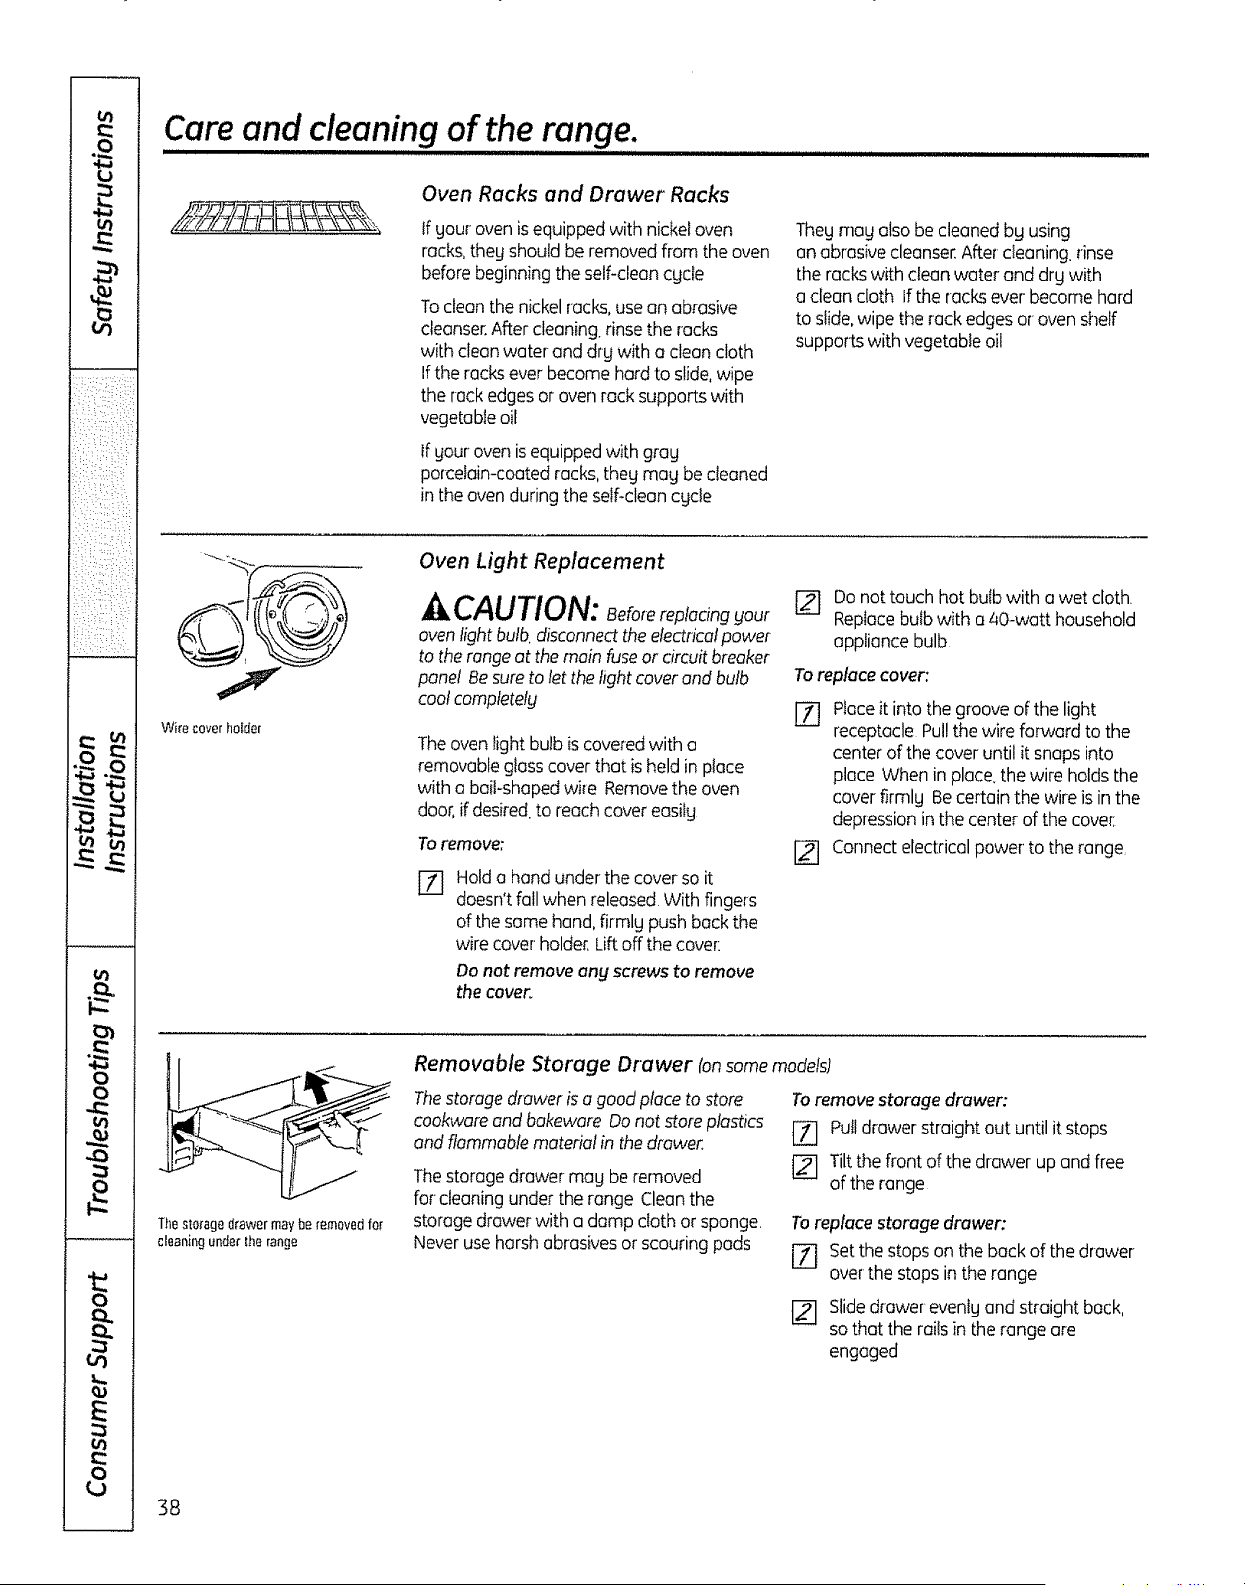
Careand cleaning of the range.
,111 i i iiiiiiiiiiiiiiiiiiiiiiiii i ............................
Oven Racks and Drawer Racks
If youroven is equippedwith nickeloven
racks,they should be removedfrom theoven
before beginningtheself-cleancgde
Toclean thenickelrocks,use an abrasive
cleanser.After cleaning,rinse theracks
with clean water and drywith a clean cloth
Ifthe racksever become hardto slide,wipe
therackedges or oven rock supports with
vegetableoil
If your oven is equippedwith gray
porcelain-coatedracks,thegmay be cleaned
in the oven during theself-cleancgde
They may alsobecleaned by using
anabrasivecleanser.After-cleaning,rinse
the racks with clean water and drywith
a cleancloth Iftheracks ever become hard
toslide,wipethe rack edges or ovenshelf
supports with vegetableoil
Wkecoverholder
Oven Light Replacement
^ CAUTION: Beforereplacingyour
oven light bulb disconnect the electricalpower
to the range at the main fuse or circuitbreaker
panel Be sure tolet the light cover and bulb
coo!completely
The oven light bulb is coveredwith a
removableglosscover that is held in place
with a bait-shapedwi_eRemovetheoven
door,ifdesired,toreach cover easilg
To remove:
Holda hand underthe coversoit
doesn't fall whenreleased With fingers
of thesame hand,firmly push back the
wirecover holder,Lift off the cover:
Do not removeany screws to remove
the cover.
[-2-1 Do not touch hotbulbwith awet cloth.
RepIocebulb with a aO-watt household
appliance bulb
To replace cover:
[Z] Placeitinto thegroove ofthelight
receptacle Pul!the wireforward tothe
center of thecover untilit snaps into
placeWhenin place,thewireholds the
coverfirmlyBecertain the wire is in the
depressioninthe center of thecovet:
Connectelectrical powertothe range,
Thesto_agedrawermayberemovedfat
cleaningunderthe range
Removable Storage Drawer (onsome models)
The storage drawer is a good place to store
caokware and bakeware Do not store plastics
and flammable material inthe drawer
Thestorage drawermay be removed
forcleaning under the range Cleanthe
storage drawer with a dampcloth or sponge.
Neveruse harsh abrasivesor scouring pads
Toremovestorage drawer:
[_ Putldrawerstraightoutuntilit stops
Tiltthefront ofthedrawerup and free
oftherange
To replace storage drawer:
F_ set the stops on the back of the drawer
over the stops in the range
Slidedrawerevenly and straightback,
so that therails in ihe range are
engaged
38
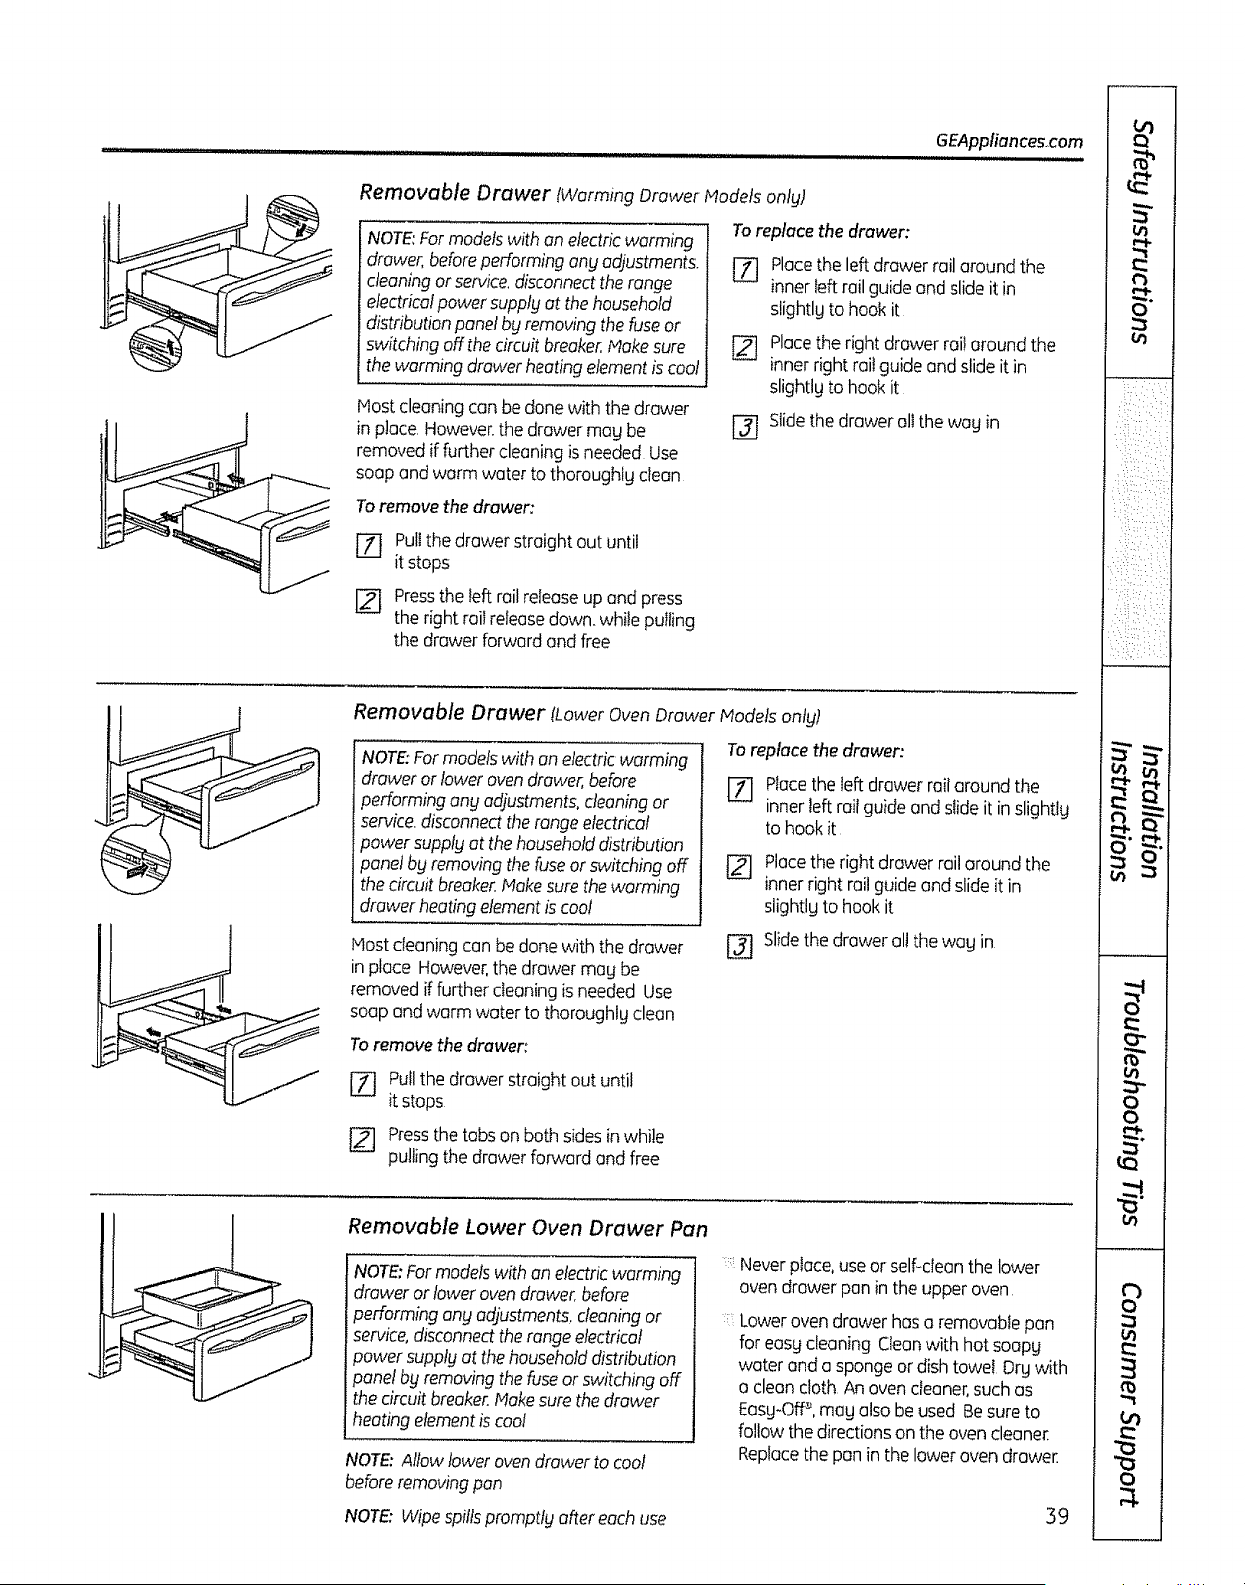
GEAppliances.com
iiiii i i IIIIIII Jl ii ii
Removable Drawer {Warming Drawer Models onlg)
NOTE:Formodelswith an electricwarming
drawer,beforeperforming any adjustments.
cleaningor service,disconnectthe range
electricalpowersupplgatthe household
distributionpanelb_!removingthe fuseor
switching offthe circuit breaker.Makesure
the worming drawerheatingelementis cool
Hostcleaningcanbedone with thedrawer
inplace.However.thedrawer may be
removediffurther cleaningis needed Use
soapand warm water tothoroughlg clean
To remove the drawer:
Toreplace thedrawer:
[]
[]
@
Placethe left drawer rail around the
innerieft rail guideand slide itin
slightlgtohook it
Placethe rightdrawer rail around the
inner right railguide and slide it in
slightlgtohook it
Slidethe drawerelithewagin
Pullthe drawer straight out until
[-_ it stops
['_ Press the left railrelease up and press
the right rail release down. while pulling
the drawer forward and free
J
/
Removable Drawer ILower Oven Drawer Models ontyt
NOTE:For modelswith an electricworming
draweror lower ovendrawer,before
performing ang adjustments,deaning or
service,disconnecttilerangeelectrical
powersupplgatthe householddistribution
panel by removingthe fuseor switchingoff
thecircuitbreaker,Hakesure the warming
drawerheatingelementis coal
Hostcleaning can be donewith thedrawer
in place However,the drawermagbe
removediffurther cleaningis needed Use
soap and warm water tothoroughly clean
Toremove the drawer:
To replace thedrawer:
[_ Placetheleft drawer rail around the
innerleft railguide and slideitin slightlg
tohook it
[_] Placethe rightdrawerrailaround the
innerrightrailguide and slideit in
slightigtohookit
[] Slidethedrawer al! the wagin
Pullthedrawer straight outuntil
[_ itstops
[_] Pressthe tabs on bothsidesin while
pulling thedrawer forward and free
Removable Lower Oven Drawer Pan
_ madelswith an electricwarming
drawerorlowerovendrawer,before
performinganyadjustments,cleaningor
! service,disconnectthe range electrical
power supplg atthe householddistribution
panel by removingthe fuseor switching off
the circuit breaker.Makesurethe drawer
: heating elementis coo/
NOTE: Allow lower oven drawer to cool
before removing pan
NOTE: Wipe spillspromptly after each use
::::Neverplace,use or self-deanthelower
ovendrawer pan in theupperoven
Lower oven drawerhas a removablepan
foreasg cleaningCleanwith hot soapg
water and a sponge ordish towel Drg with
a clean cloth An oven cleaner,suchas
Easg-Off'_,magalso beused Besure to
follow thedirectionson theoven cleaner.
Replacethepan in the lower ovendrawer.
39
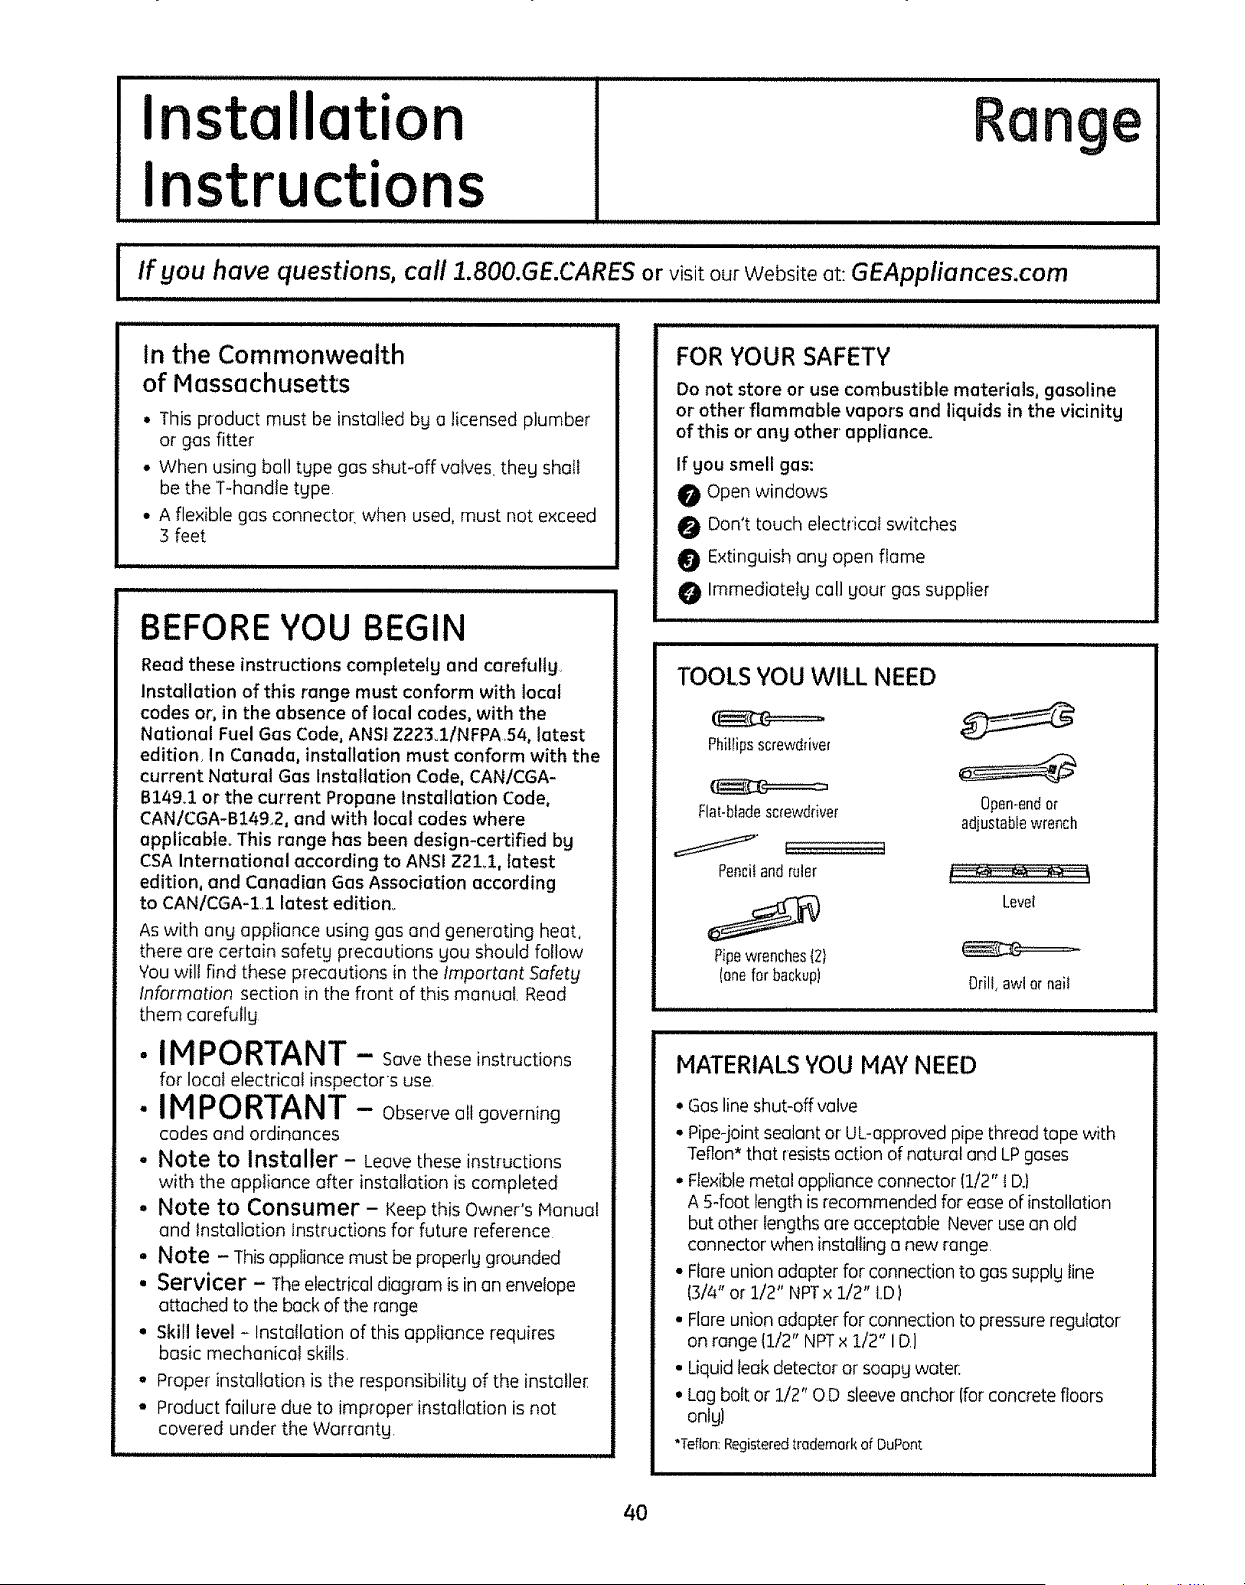
Installation
Instructions
e
l lfgou have questions, call 1.800.GE.CARES or visit our Website at: GEAppliances.com ....................I
in the Commonwealth
of Massachusetts
• This product must be installed by o licensed plumber
or gas fitter
• When using ball tgpe gas shut-off valves theg shatl
be the T-handle tgpe
• A flexible gas connector, when used, must nat exceed
3 feet
BEFOREYOU BEGIN
Read these instructions completelg and carefully
installation of this range must conform with local
codes or, in the absence of local codes, with the
National Fuel Gas Code, ANSI Z223ol/NFPA 54, latest
edition In Canada, installation must conform with the
current Natural Gas Installation Code, CAN/CGA-
B149.1 or the current Propane Installation Code,
CAN/CGA-B149,2, and with local codes where
applicable_ This range has been design-certified by
CSA International according to ANSI Z21_1, latest
edition, and Canadian Gas Association according
to CAN/CGA-1 1 latest edition.
As with any appliance using gas and generating heat,
there are certain safety precautions you should follow
You will find these precautions in the Important Safety
Information section in the flont of this manual Read
them carefully
• IMPORTANT - Savetheseinstructions
for local electrical inspectors use.
• iN PORTANT - Observeallgoverning
codes and ordinances
o Note to Installer - Leave these instructions
with the appliance after installation iscompleted
° Note to Consumer - Keepthis Owner's !anual
and lnstallotion instructions far future reference
° Note - This appliance must be properlg grounded
• Servicer - Theelectrical diagram isin an envelope
attached ta the back of the range
° Skill level - Installation of this appliance requires
basic mechanical skills,
° Proper installation is the responsibilitg afthe installer
° Product failure due to improper installation is not
covered under the Warrantg.
FOR YOUR SAFETY
Do not store or use combustible materials, gasoline
or other flammable vapors and liquids in the vicinitg
of this or ang other appliance.
If you smell gas:
0 Open windows
Don't touch electrical switches
Extinguish ang open flame
Immediotetg call gaur gas supplier
[111111111111111111 iiiiii iiii iiiii iii
TOOLS YOU WILL NEED
Philtipsscrewdriver
Flat-bladescrewdriver
Pencilandruler
0pen-end or
adjustable wrench
Level
Pipewrenches{2}
(onefor backup)
Drill,awlor nail
.i HI..,. q l
.i... ul uiull, uli
MATERIALS YOU MAY NEED
• Gaslineshut-off valve
• Pipe-joint sealant or UL-approved pipe thread tape with
Teflon* that resists action of natural and LP gases
• Flexible metal appliance connector 11/2" ID,)
A 5-feat length isrecommended for ease of installation
but other lengths are acceptable Never use an old
connector when installing a new range
• Flare union adapter for connection to gas supplg line
(314"or 112" NPTx 1t2" ID)
• Flare union adapter far connection to pressure regulator
on range 11/2" NPT× 1/2" I D]
• Liquid leak detector or soapg water:
• Lag bolt or :1/2" 0 D sleeve anchor (for concrete floors
onlg)
•Teflon:Registeredtrademarkof DuPont
4O
Installation Instructions
WARNING!
INSTALLATION SAFETY
INSTRUCTIONS
Read these instructions compIetelg andcarefu!lg.
Improper installation, adjustment, alteration, service
or maintenance can cause injury or property
damage. Refer to this manual. For assistance or
additional information, consult a qualified installer,
service agencg, manufacturer (dealer) or the gas
supplien
Never reuse old flexible connectors The use
of old flexible connectors can cause gas leeks and
personal injure Always use NEW flexible connectors
when installing a gas appliance,
IMPORTANT - Remove all packingmaterial
and literature from oven before connecting gasand
electrical suppfg to range
CAUTION - Donotattempt tooperate
the ovenof this range during a power failure (Electric
Ignition models onlg}
IE!Have gour range installed bg a qualified installer.
i@Your range must be electricalIg grounded in
accordance with Ioca!codes or, in theabsence
of localcodes,in accordance with the National
ElectricalCode (ANSt/NFPA70, latestedition)
In Canada. electrical grounding must be in
accordance with the current CSAC22 1 Canadian
ElectricalCodePart I and/or local codes See
Electrical Connections in this section
[] Beforeinstalling gour range on linoleum or ang other
sgnthetic floor covering, make surethe floor covering
canwithstand 180°Fwithout shrinking,warping or
discoloring Do notinstall the range overcarpeting
unless e sheet of 1/4" thick plgwood or similar
insulator is placed between the range and carpeting
I1 Hake surethewall coverings around the range can
withstand heat generated bg therange up to200°F
m
W
Avoidplacingcabinets above the range To reduce
thehazard caused bg reaching over the open flames
ofoperating burners, install o ventilation hood over
therange that projectsforward at least S" begond
thefront ofthe cabinets
The ventilating hood must be constructed
of sheet metal not less than 0 0!22" thick
Insta!l above the cooktop with a clearance of not less
than t/4" between the hood and the underside of the
combustible material or metal cabinet The hood
must be at least as wide as the appliance and
centered over the appliance Clearance between the
cooking surface and the ventilation hood surface
MUST NEVERBE LESS THAN 24 INCHES
EXCEPTION:Installation ofa listed microwave oven or
cooking appliance overthecooktop shallconform to
the installation instructions pocked with that appliance
[]
If cabinetsore placedabove the range.
allow a minimum clearance of30" between the
cooking surface and the bottom ofunprotected
cabinets
[]
If a 30" clearance between cooking surface and
overhead combustible material or metal cabinets
cannot be maintained, protect the underside of the
cabinets above the cooktop with not Iess than 1/4"
insulating millboard covered with sheet metal not less
than 0 0122" thick Clearance between the cooking
surface and protected cabinets MUST NEVER BE LESS
THAN 24 INCHEE
[] The vertical distance from the plane of the cooking
surfaceto the bottom ofadjacent overhead cabinets
extending closer than t" to the plane of therange
sides must notbe lessthan 18" ISee theDimensions
and Clearancesillustration in this section}
[] A CAUTION - Itemsofinterestto
children should not be stored in cabinets above
a range or on the backsplash ofa range-children
climbing on the range toreach itemscould be
seriouslg injured
41
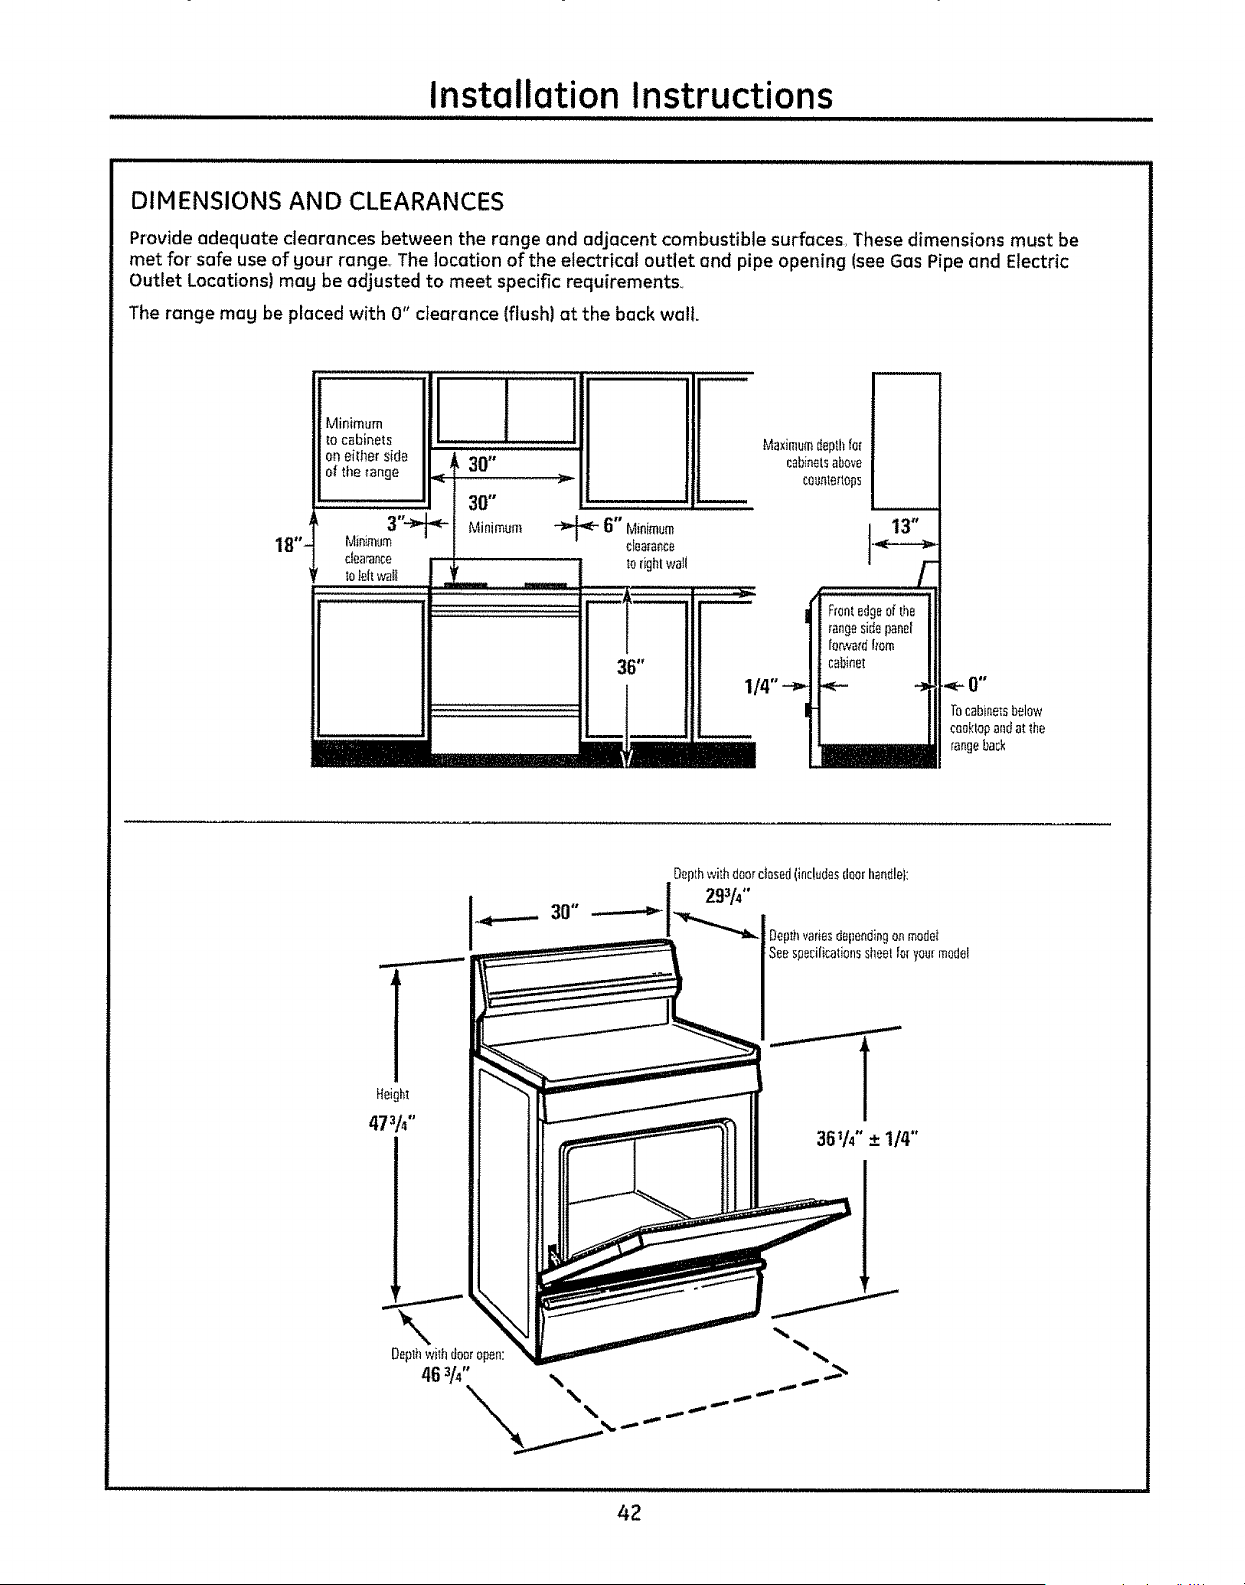
Installation Instructions
DIMENSIONS AND CLEARANCES
Provide adequate clearances between the range and adjacent combustible surfaces, These dimensions must be
met for safe use of gour range,, The location of the electrical outlet and pipe opening (see Gas Pipe and Electric
Outlet Locations) mag be adjusted to meet specific requirements_
Therange mag be placed with 0" clearance (flush) at the back walt.
mm
Tocabinetsbelow
¢ooktopandat_he
rangeback
I
Height
361h" -+1/4"
iiiiiiiiiiiiiiiiiiiiiiiiiiiiiiiiiiiiiillllliil llillif ii
42
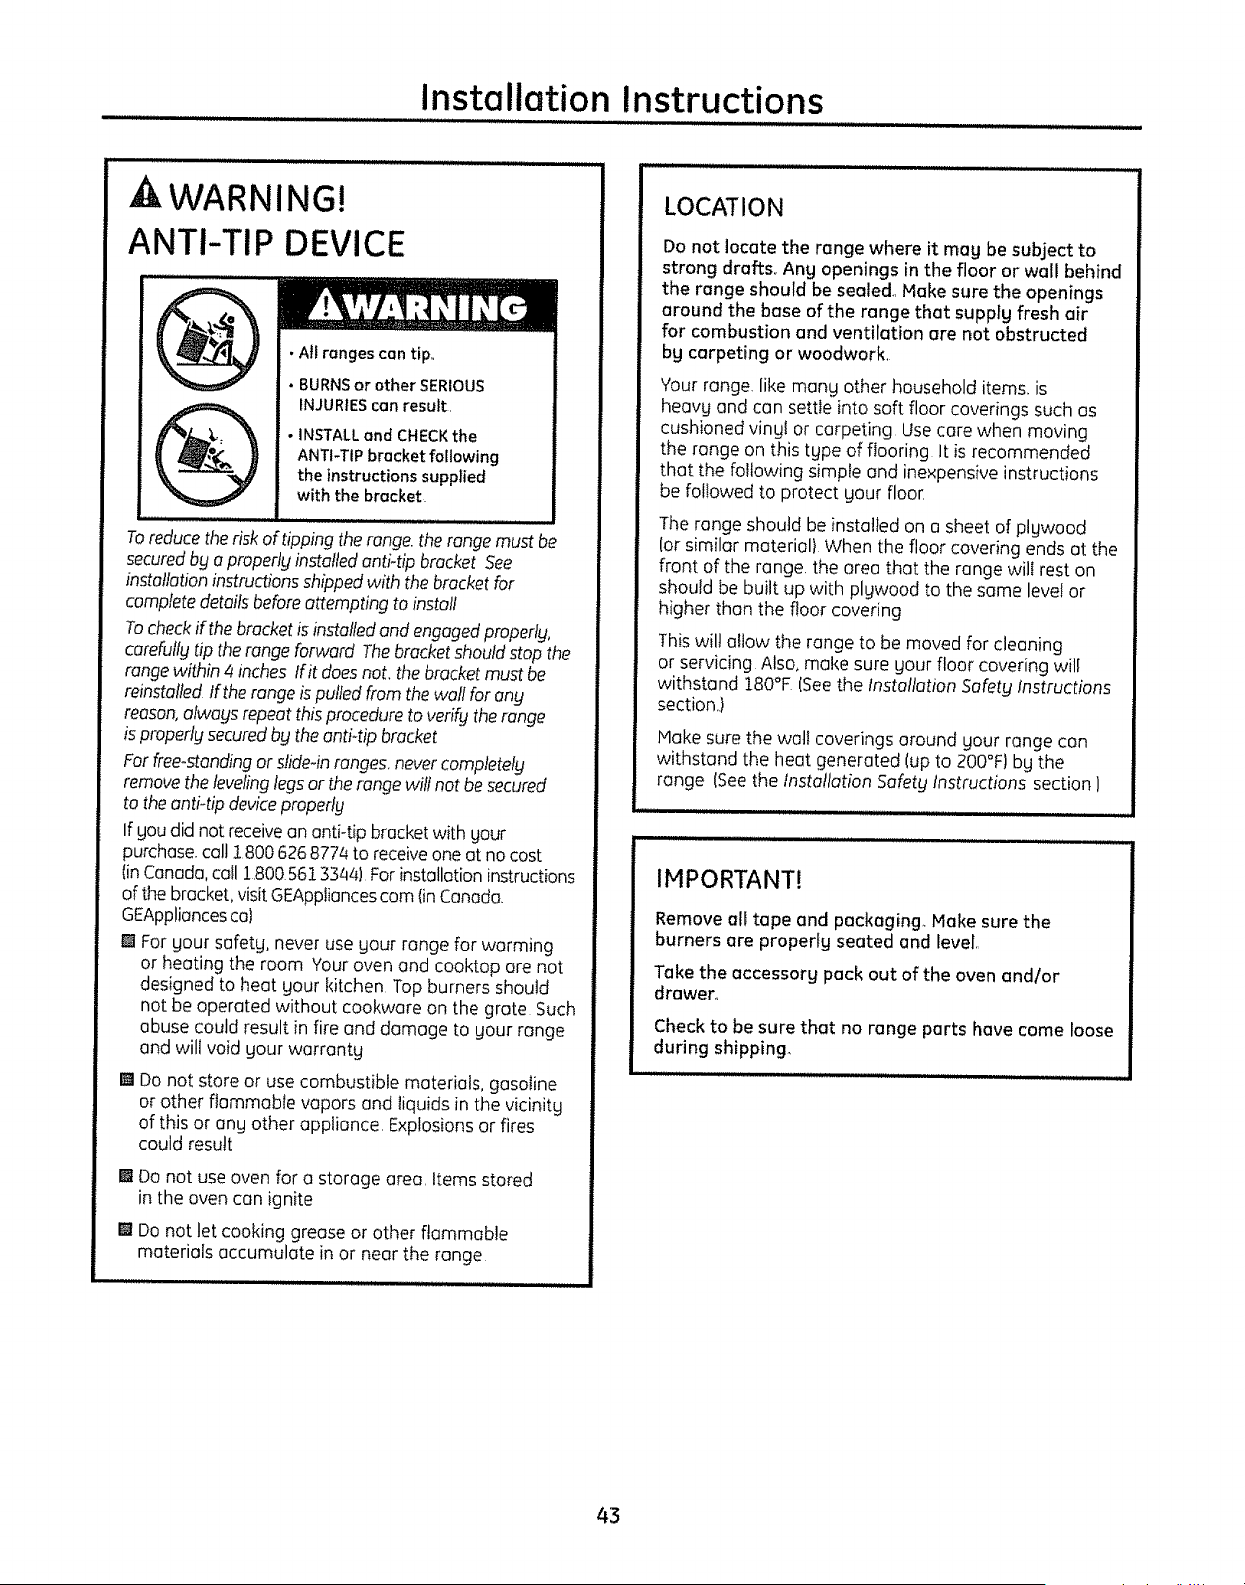
installation Instructions
WARNING!
ANTI-TIP DEVICE
• All ranges can tip,,
• BURNS or other SERIOUS
INJURIES can result,
• INSTALL and CHECK the
ANTI-TIP bracket following
the instructions supplied
with the bracket,
Toreducethe riskoftipping the range,the rangemustbe
securedbyaproperlyinstalledanti4ip 6rocketSee
installationinstructionsshipped with thebracketfor
completedetailsbeforeattempting to install
Tocheckifthebracket is installedand engagedproperly,
carefully tip the range forward Thebracketshould stop the
rangewithin 4 inches Ifitdoesnot. thebracketmust be
reinstalledIf the rangeis pulled fromthe wellforany
reason,alwaysrepeatthisproceduretoverify the range
is properly securedbg the anti4ipbracket
Forfree-standingor slide-inranges,nevercompletely
removethe levelinglegsor tilerangewilt notbesecured
tothe anti-tip deviceproperly
If you did notreceivean anti-tip bracket with your
purchase,call1800 626877/4toreceiveone atno cost
(inCanada,call1.8005613344)For installation instructions
of thebracket,visit GEAppliancescam iinCanada.
GEAppliancescol
I_ For your safety, never use your range for worming
or heating the room Youroven and cooktop ore not
designed toheat your kitchen Topburners should
notbe operated without cookware on the grate Such
abusecould result in fireand damage to your range
and will voidyour warranty
WIDo not store or use combustible materials, gasoline
or other flammable vapors and liquids in the vicinity
of this or any other appliance, Explosions or fires
could result
B Donot use oven fora storage area,Items stored
in theoven canignite
llmDonot letcooking greaseor other flammable
materials accumulate in or near the range
LOCATION
Do not locate the range where it may be subject to
strong drafts, Any openings in the floor or wall behind
the range should be sealed., Hake sure the openings
around the bose of the range that supply fresh air
for combustion and ventilation are not obstructed
by carpeting or woodwork,
Your range, like many other household items, is
heavy and con settle into soft floor coverings such as
cushioned vinyl or carpeting Use care when moving
the range on this type of flooring It is recommended
that the following simple and inexpensive instructions
be followed to protect your floor.
The range should be installed on a sheet of plywood
(or similar material)When the floor covering ends at the
front of the range, the area that the range will rest on
should be built up with plywood to the same level or
higher than the floor covering
This wilt allow the range to be moved for cleaning
or servicing Also, make sure your floor covering will
withstand 180°E (Seethe Installation Safety Instructions
section,,)
Hake sure the wall coverings around your range con
withstand the heat generated (up to 200°F) by the
range (Seethe Installation Safety Instructions section )
IMPORTANT!
Removeall tape and packaging, Make sure the
burners are properly seated and level.,
Take the accessory pack out of the oven and/or
drawer.,
Checkto be sure that no range parts have come loose
during shipping,
43

Installation Instructions
PROVIDE ADEQUATE GAS SUPPLY
Your range is designed to operate at a pressure of 5"
of water column on natural gas or, if designed for LP
gas (propane or butane), 10" of water column.
Hake suregou are supplying gour range with thetype
of gasforwhich itisdesigned
This range isconvertible for use on natural or propane
gas If gou decideto use this range on LPgas. conversion
must be made by a qualified LPinstaller before
attempting to operate the range on that gas
For proper operation the pressure of natural gas supplied
to the regulator-must be between 5" and 13" of water
column
For LPgas, the pressure supplied must be between
!0" and 13" of water column
When checking for proper operation of the regulate[
the inlet pressure must be at least 1" greater than the
operating (manifold} pressure as given above
The pressure regulator located at the inlet of the range
manifold must remain in the supply line regardless of
whether natural or LPgas is being used
A flexible metal appliance connector usedtoconnect the
range tothe gassupplg line should havean IDof 1/2"
and be 5 feet in length for ease of installation In Canada
flexible connectors must be singlewall metal connectors
no longer than 6 feet in length
l_ CONNECT THE RANGE TO GAS
Shut off the main gas supply valve before
disconnecting the old range and leave it off until
the new hookup has been completed. Don't forget
to relight the pilot on other' gas appliances when
gou turn the gas back on.
Because hard piping restricts movement ofthe range,
the useof o CSAInternational-certified flexible metal
appliance connector isrecommended unless localcodes
require a herd-piped connection
Never use an old connector when installing a new range,
If the hard piping method is used, you must carefully
align the pipe; the range cannot be moved after the
connection is made
To prevent gasleaks, put pipe-joint compound on,
or wrap pipe-thread tapewith Teflon* around,all male
(external} pipe threads
A,Install a manual gasline shut-off valve in thegas line
in an easily accessed location outside ofthe range
Hake sureevergone operating the range knows where
and how to shut off the gassupply to therange
B,Install male 1/2" flare union adapter to the 1/2" NPT
internal thread at inlet of regulate[ Use a backup
wrench on the regulator fitting to avoid damage
When installing the range from the front, remove
the 90°elbow for easierinstallation
C,
g_
lnstoll male 1/2" or 3/4" flare union adapter to the
NPT internal thread of the manual shut-off valve.
taking care to back up the shut-off valve to keep it
from turning
Connect flexible metal appliance connector to the
adapter on the range Position range to permit
connection at the shut-off valve
E.When all connections have been made make sure
oil range controls are in theoff position and turn on the
main gassupplgvalve Usea liquid leakdetector at oil
joints end connections to checkfor leaks in the system,
WARNING: DO NOT USE A FLAME
TO CHECK FOR GASLEAKS.
When using test pressures greater than 1/2 psigto
_ressuretest the gassupply system ofthe residence,
disconnect the range and individual shut-off valve from
the gas supply piping Whenusingtest pressures of 1/2
psig or lessto test the gassupplg system, simply isolate
the range from the gassupply system bg closing the
individual shut-off valve
*Teflon: Registered trademark of DuPont
44
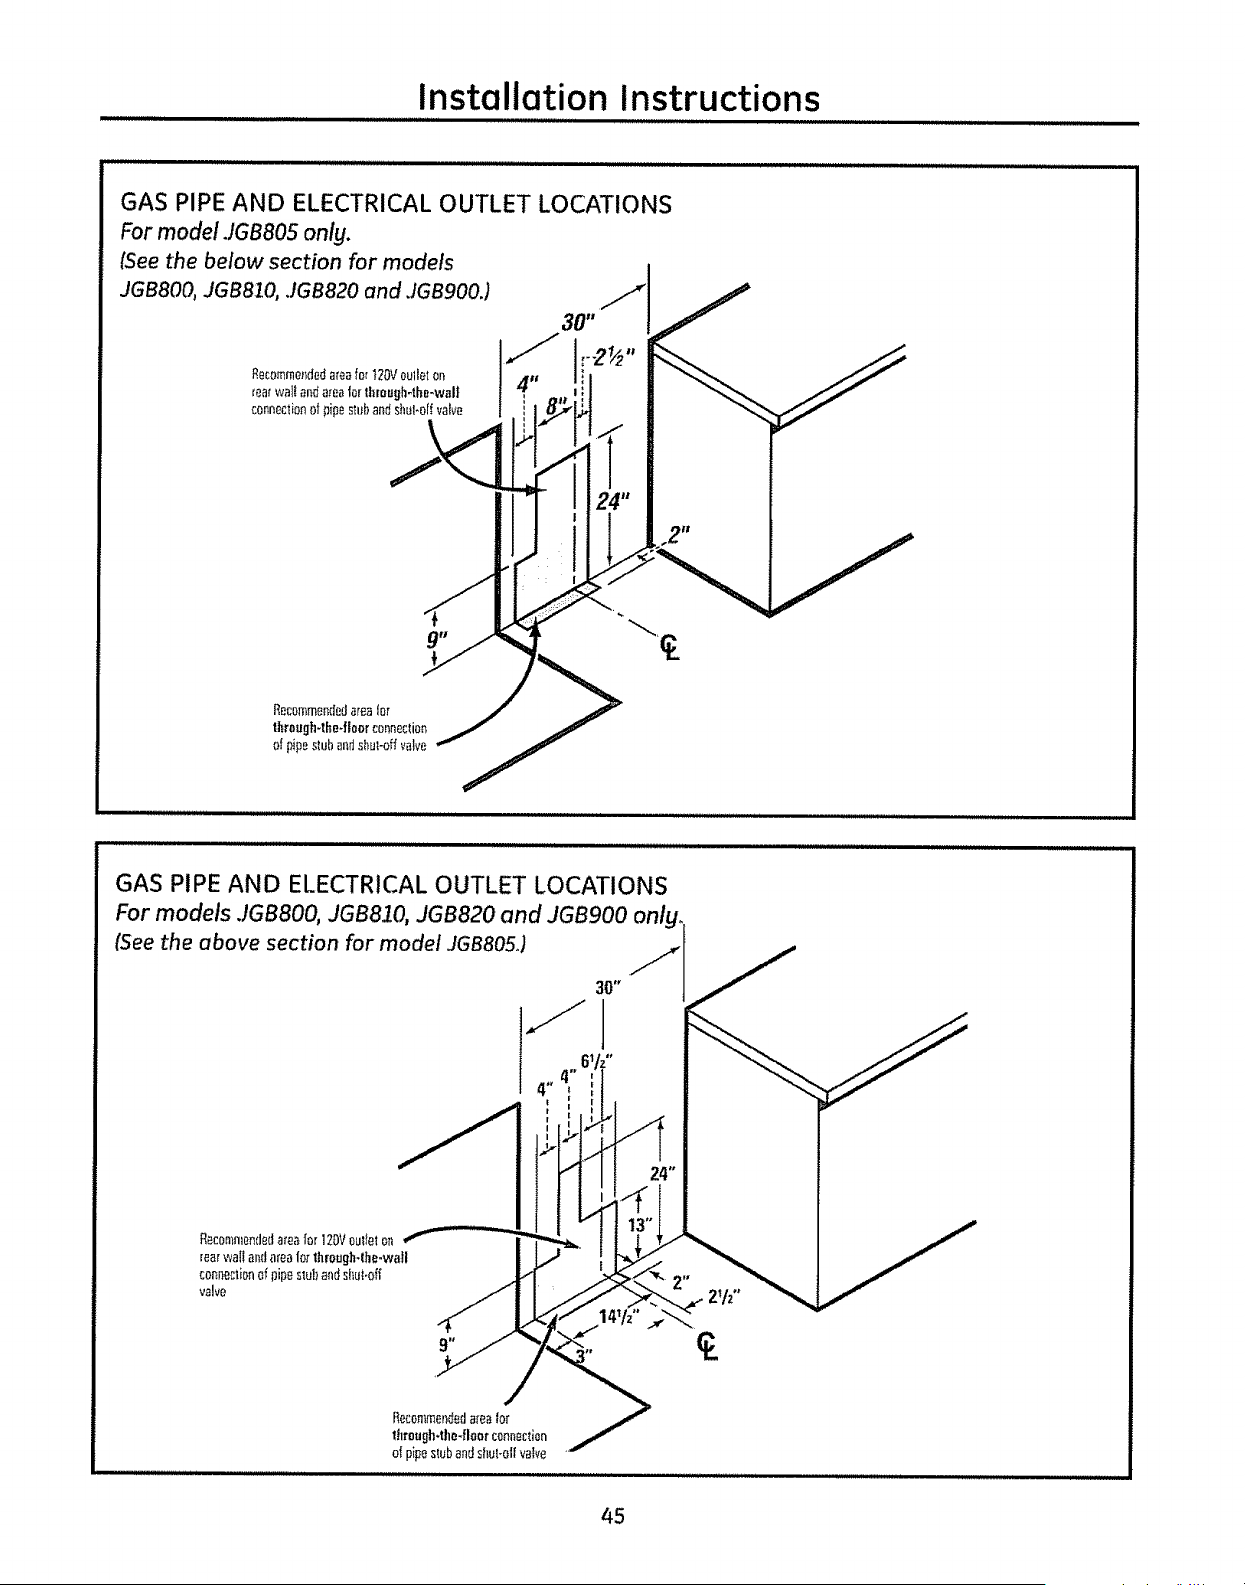
Installation Instructions
GAS PIPEAND ELECTRICAL OUTLET LOCATIONS
For model.JGB805only.
[See the below section for models
JGB800, JGB820, JGB820 and JGB900.)
30"
GAS PIPE AND ELECTRICAL OUTLET LOCATIONS
For models JGB800, JGB810, JGB820 and JGB900
(See the above section for model JGB805o)
Recemmel)dedarealot
through*the-floorconnection
of pipeslobandshuFo|I valve
45
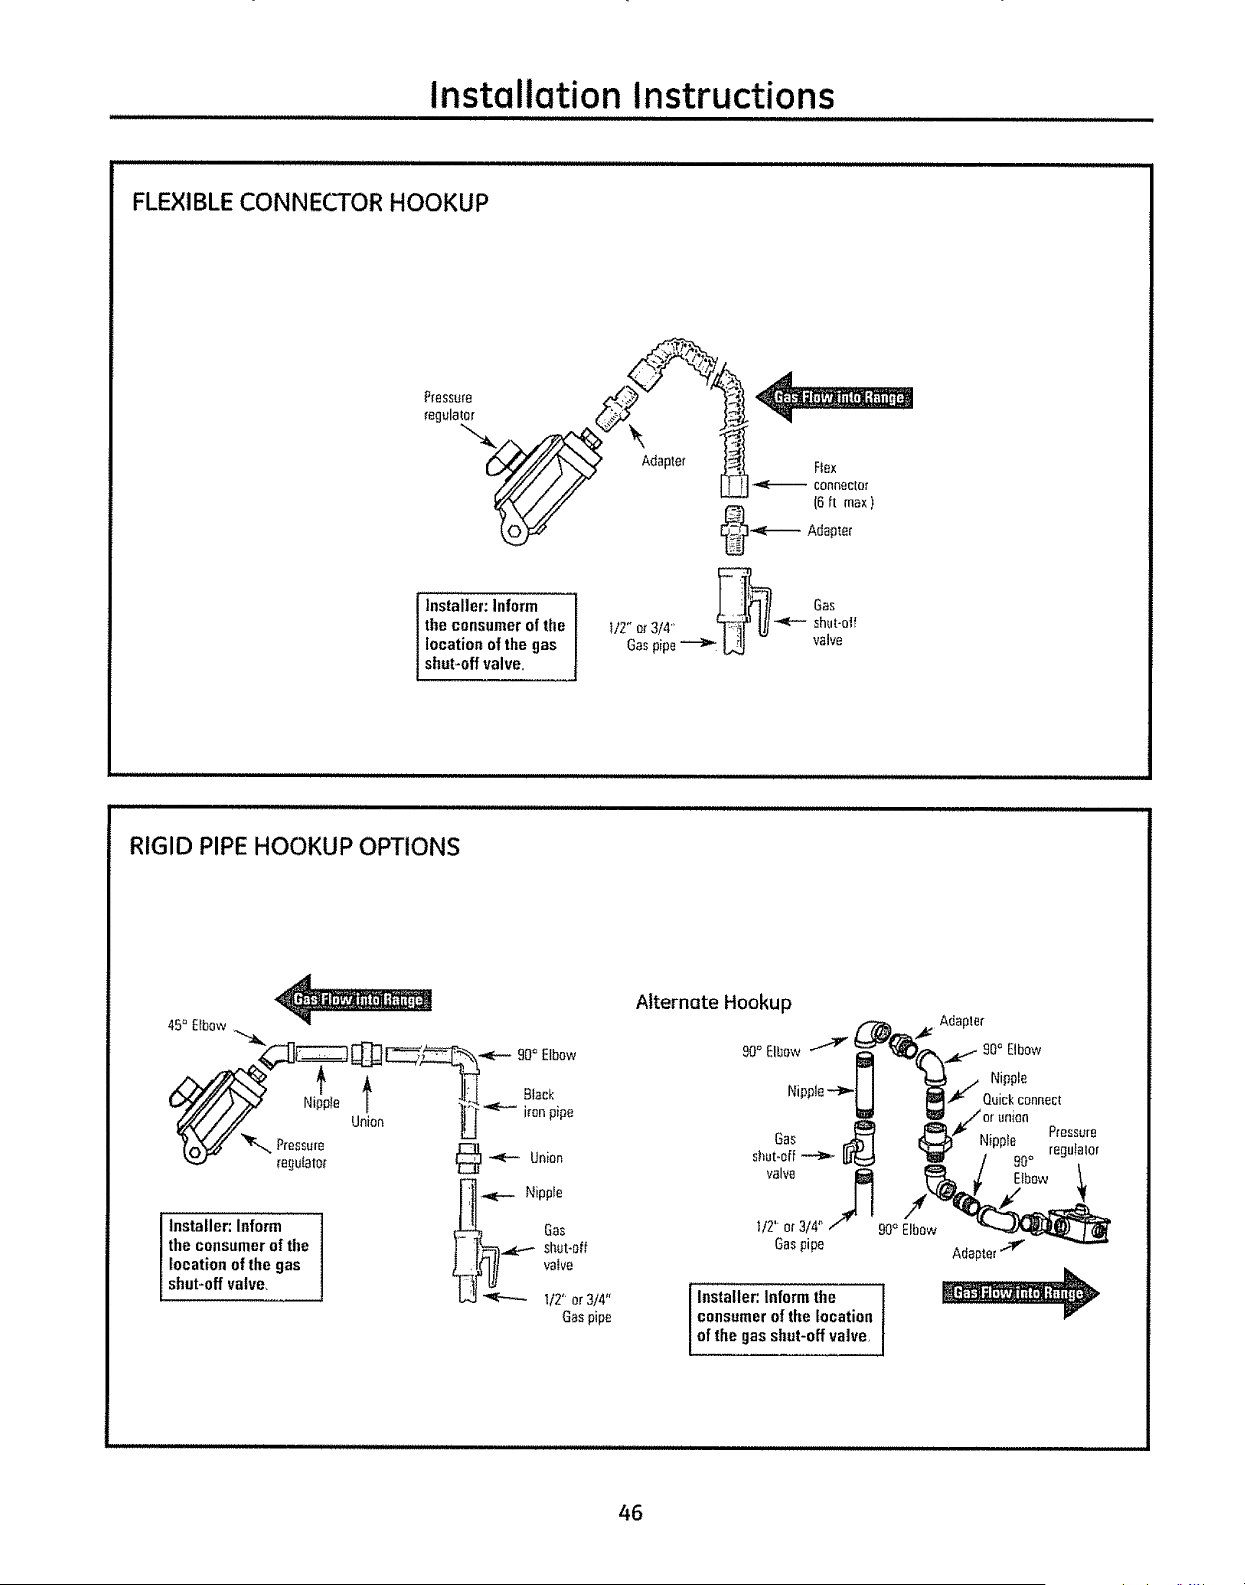
Installation Instructions
FLEXIBLE CONNECTOR HOOKUP
Installer: Inform
the consumer of the
location of the gas
shut-off valve,
Gas
t12" or314' _ shut-off
Gas pipe_ valve
RIGID PIPE HOOKUP OPTIONS
45" £tbow _ o
regulate[
e-- Nipple
Installer: inform _ Gas
the consumer of the ] |_:_-],,_p_ shut-off
location of the gas ) ,I,(1!t vaIve
shut-off valve,
77F_
L,JJ",_ 112"or3/4"
Gaspipe
Alternate Hookup
90° Elbow
Adapler
Elbow
Installer: Inform the |
consumer of the location
t
of the gas shut-off valve,
Nipple
Quickconnect
I_/or UniOn
Nippy9 Pressure
0° regulator
Bbow
Adapter
46
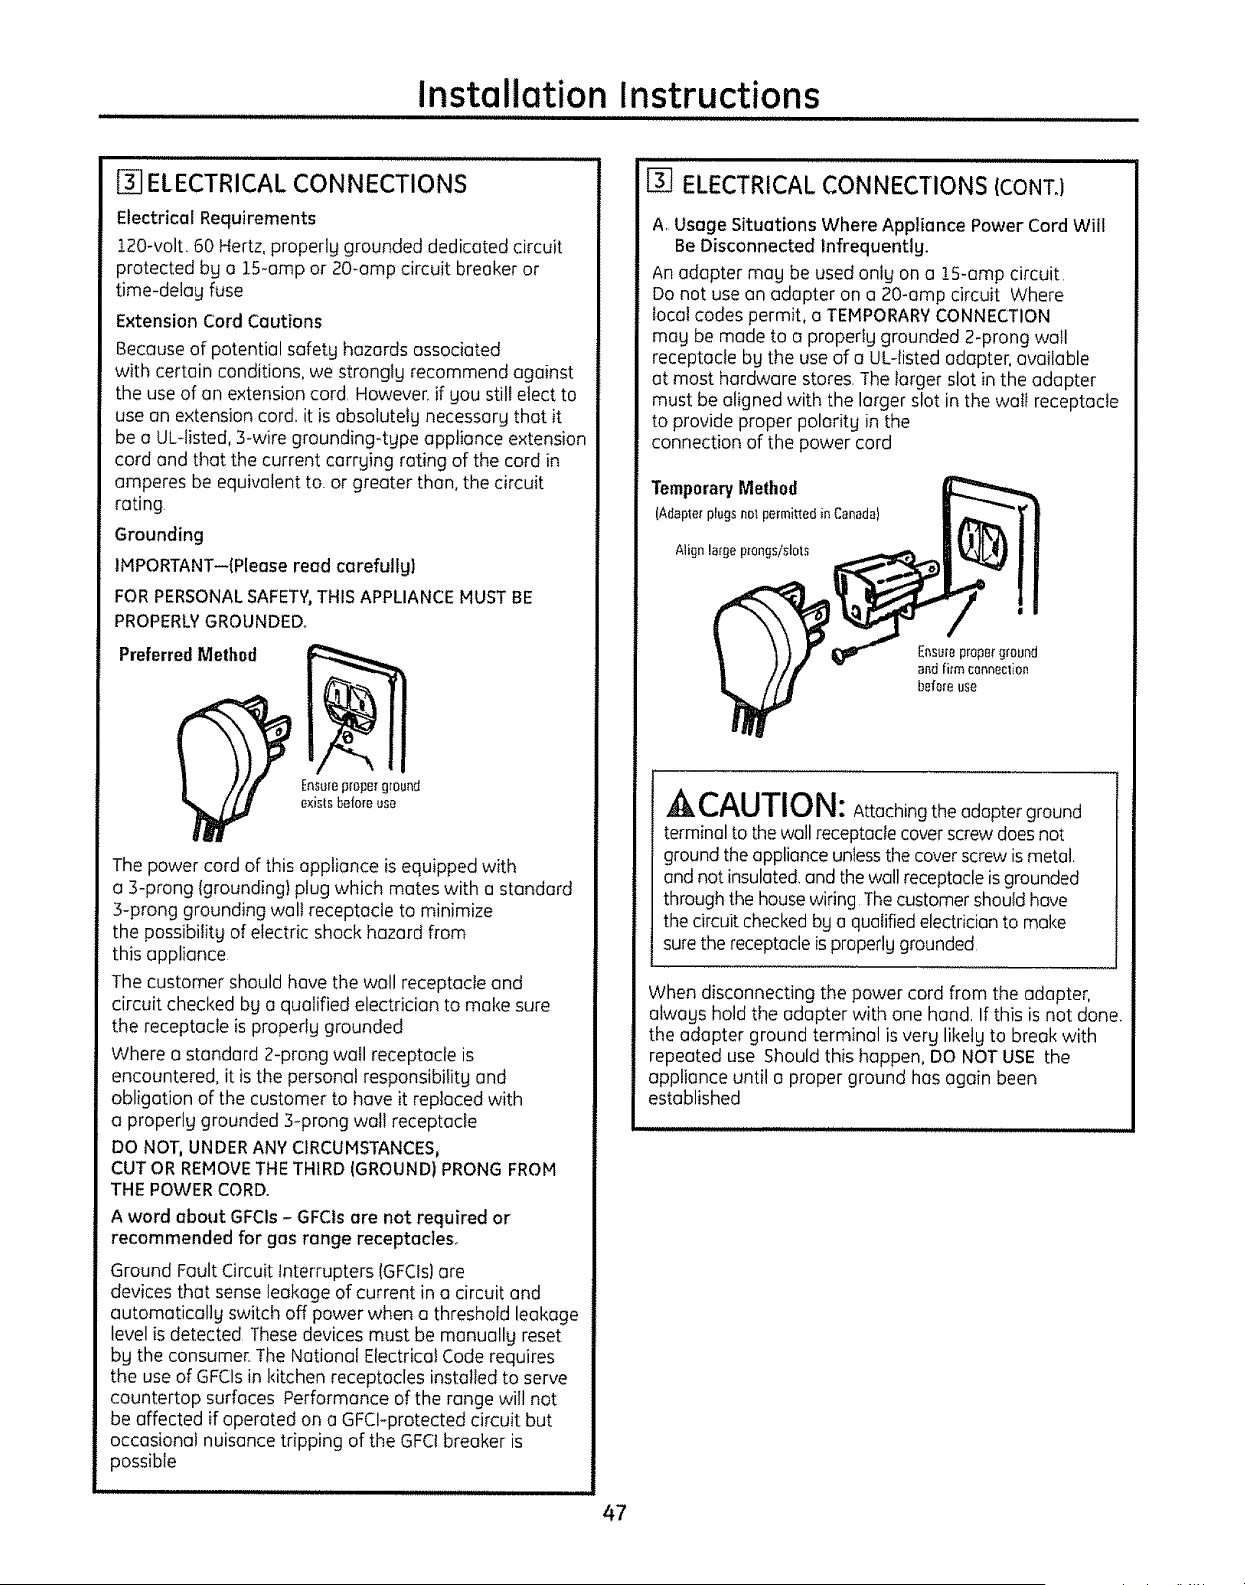
Installation Instructions
t,ll,iJlUlltJit,JiiiJJJJJJJJuwJ,J,ii i i i
ELECTRICAL CONNECTIONS
Electrical Requirements
12a-vaiL60 Hertz, properly grounded dedicated circuit
protected by o 15-amp or 2a-amp circuitbreakeror
time-delag fuse
Extension Cord Cautions
Because of potential safetg hazards associated
with certain conditions, we strongtg recommend against
the use of an extension cord, However, if gou still elect to
use an extension cord, it isabsolutefg necessarg that it
be a ULqisted, 3-wire grounding-type appliance extension
cord and that the current carrging rating of the cord in
amperes be equivalent to. or greater than, the circuit
rating
Grounding
IMPORTANT--(Please read corefullg)
FOR PERSONAL SAFETY, THIS APPLIANCE MUST BE
PROPERLY GROUNDED°
Preferred Method
Ensurep[oper ground
exists before use
Thepowercord ofthis appliance is equipped with
a 3-prong (grounding) plug which mates with a standard
3-prong grounding walt receptacle to minimize
the possibilitg ofelectric shockhazard from
this appliance
Thecustomer should havethewall receptacle and
circuit checked bg a qualified electrician tomake sure
the receptacle isproperlg grounded
Where a standard 2-prong wail receptacle is
encountered, itisthe personalresponsibilitg and
obligation of the customer to haveit replaced with
a properly grounded 3-prong wall receptacle
DONOT,UNDERANY CIRCUMSTANCES,
CUT OR REMOVETHETHIRD (GROUND)PRONGFROM
THE POWERCORD.
A word about GFCIs- GFCtsore not required or
recommended for gas range receptacles.
Ground Fault Circuit Interrupters (GFCIs) are
devices that sense leakage of current in a circuit and
automatically switch off power when a threshold leakage
level is detected These devices must be manuallg reset
bg the cansume_ The National Electrical Code requires
the use of GFCIs in kitchen receptacles installed to serve
countertop surfaces Performance of the range wilI not
be affected if operated on a GFCI-protected circuit but
occasional nuisance tripping of the GFCt breaker is
possible
47
[]_] ELECTRICAL CONNECTIONS (CONT.)
A Usage Situations Where Appliance Power CordWill
Be Disconnected Infrequently.
An adapter mag be usedonlg on a 1G-amp circuit.
Do not usean adapter on a 20-amp circuit Where
localcodes permit, a TEMPORARYCONNECTION
mag be made to a properlg grounded 2-prong wall
receptacle bythe useofa UL-listedadopter, available
at most hardware stores.Thelarger slot in the adapter
mustbe aligned with the larger slot in the wall receptacle
to provide proper polarity in the
connection ofthe power cord
TemporaryMethod
(Adapterplugsnot permRtedin Canada)
Align large prongs/slots
Ensumproperground
and firmconneclion
beforeuse
A CAUTION: Attachingthe adapterground
terminaltothewallreceptaclecoverscrewdoes not
ground the appliance unless the cover screw ismetal.
and not insulated, and the wal! receptacle is grounded
through the house wiring The customer should have
the circuit checked bga qualified electrician to make
sure the receptacle isproperly grounded.
When disconnecting the power cord from the adapter,
alwags hold the adapter with one hand If this isnot done.
the adapter ground terminal isvery likelg to break with
repeated use Should this happen, DO NOT USE the
appliance until a proper ground has again been
established
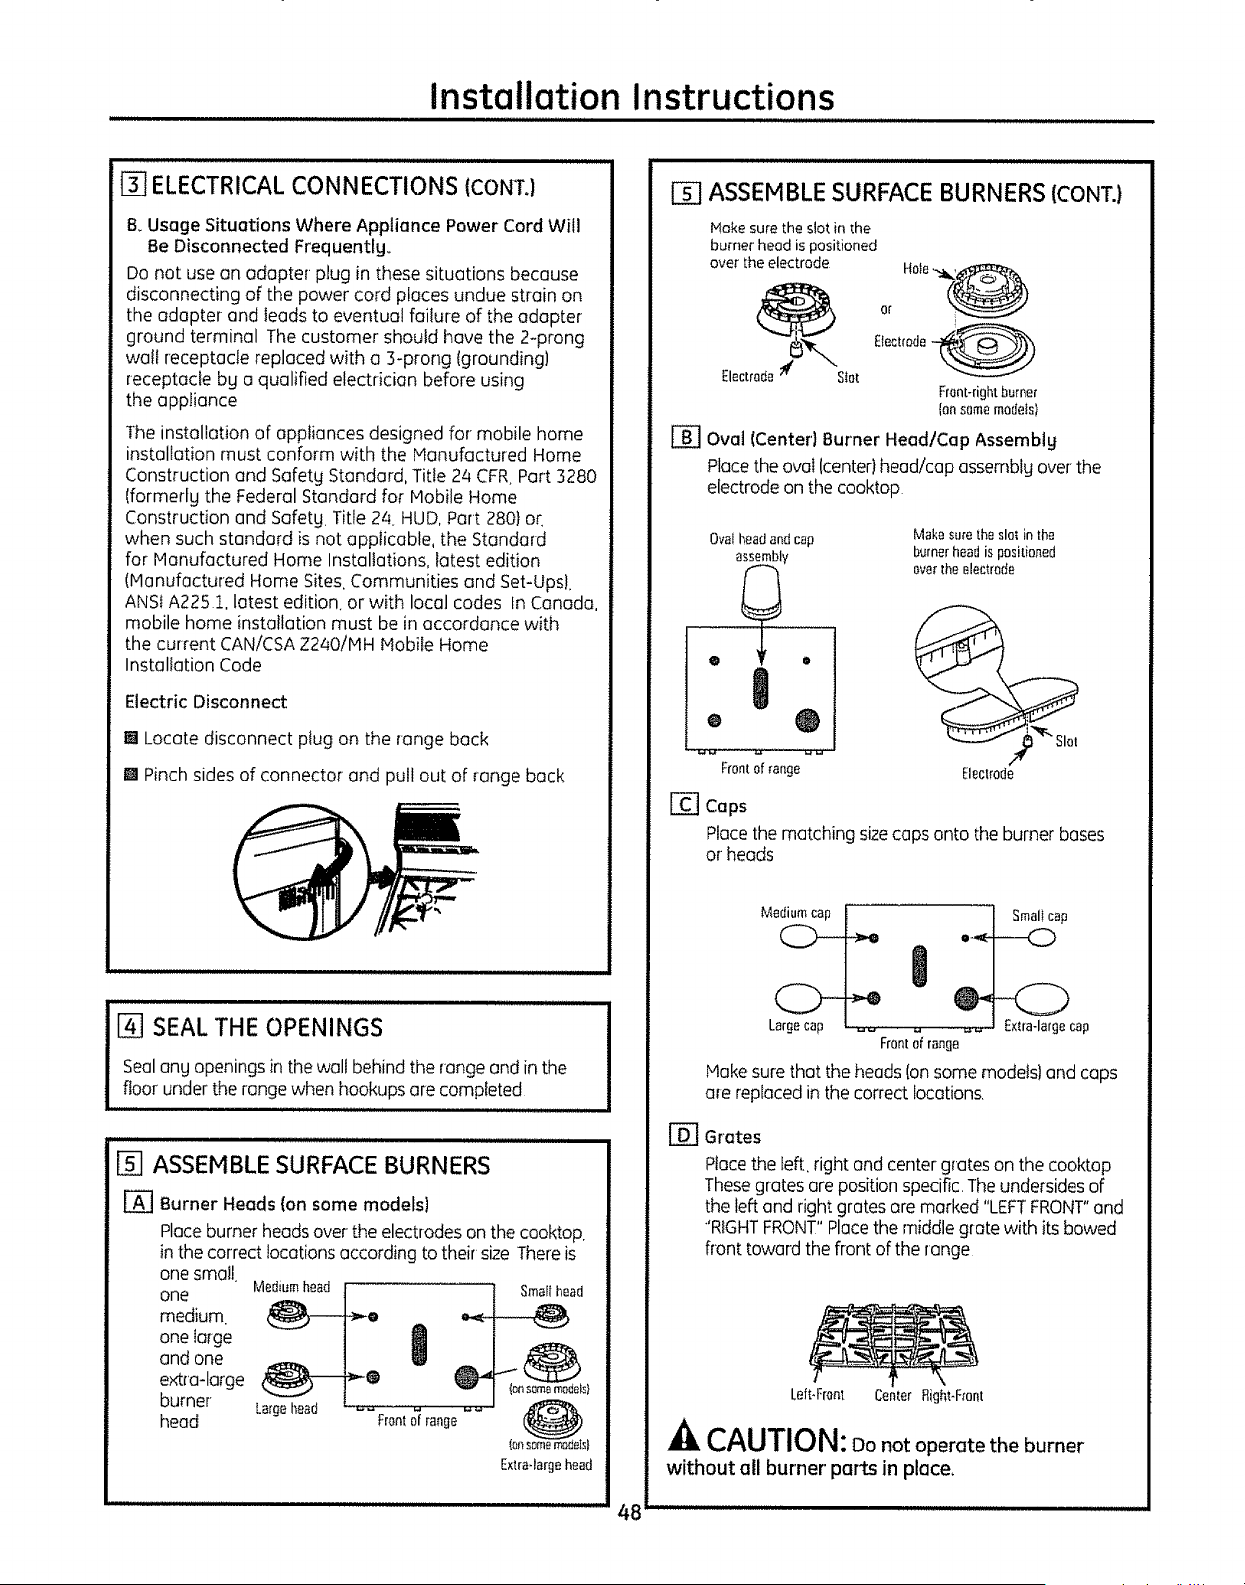
Installation Instructions
J_ ELECTRICAL CONNECTIONS lCONTJ
& Usage Situations Where Appliance Power Cord Will
Be Disconnected Frequentlgo
Donot usean adapter plug in these situations because
disconnecting of the power cord places undue strain on
theadapter and leads to eventual failure of theadapter
ground terminal The customer should have the 2-prong
walt receptacle replacedwith a 3-prong (grounding)
receptacle bg a qualified electrician before using
the appliance
The installation of appliances designed for" mobile home
installation must conform with the Hanufactured Home
Construction and Safetg Standard, Title 24 CFR.Part 3280
(formerfg the Federal Standard for Mobile Home
Construction and Safetg. Title 24 HUD, Part 280} or
when such standard isnot applicable, the Standard
for Manufactured Home Installations, latest edition
(Manufactured Home Sites, Communities and Set-UpsL
ANSi A225 1. latest edition, or with local codes In Canada,
mobile home installation must be in accordance with
the current CAN/CSA Z240!MH Mobile Home
Installation Code
Electric Disconnect
!_1Locate disconnect plug on the range back
m Pinch sides of connector and pull out of range back
[_] SEAL THE OPENINGS
Sealang openingsin the wallbehindtherange and inthe
floorunder the range whenhookupsare completed
[_ ASSEMBLE SURFACE BURNERS
[A]Burner Heads (on some models)
Placeburner headsover theelectrodes on the cooktop,
inthecorrectlocationsaccording totheirsize Thereis
onesmall
Medium heed SmaFlhead
one
medium.
one large
and one
extra-large
burner Largehead
head Front of range
Extra-large head
iiiiiiiiiiiiiiiiUl,,<: iiJJlll lJ
E] ASSEMBLE SURFACE BURNERS (CONT.)
Makesure the slotin the
burner head ispositioned
over the electrode
or
Electrode
Slot
Front-right burner
Ion samemodels}
[] Oval (Center'} Burner Head!Cap Assemblg
Placetheoval (center)head/cap assemblgover the
electrodeon thecaoktop
Oval headand cap Make ,Sucretheslat in the
assembly burner head ispositioned
over the electrode
Frontofrange Electrode
[] Caps
Placethe matchingsizecaps ontotheburner bases
or heads
Hake sure that theheadsIon some models)and caps
are replaced in the correctlocations.
[] Grates
Placetheleft, rightand center grateson thecooktop
Thesegrates arepositionspecific Theundersidesof
theleft and rightgratesare marked "LEFTFRONT"and
'RIGHTFRONT"Placethemiddle grate with its bowed
front toward thefront oftherange
Left-Front CenterRigflt-Fmnt
CAUTION: Dooatoperatetheburner
without all burner' parts in place.
8 .........................
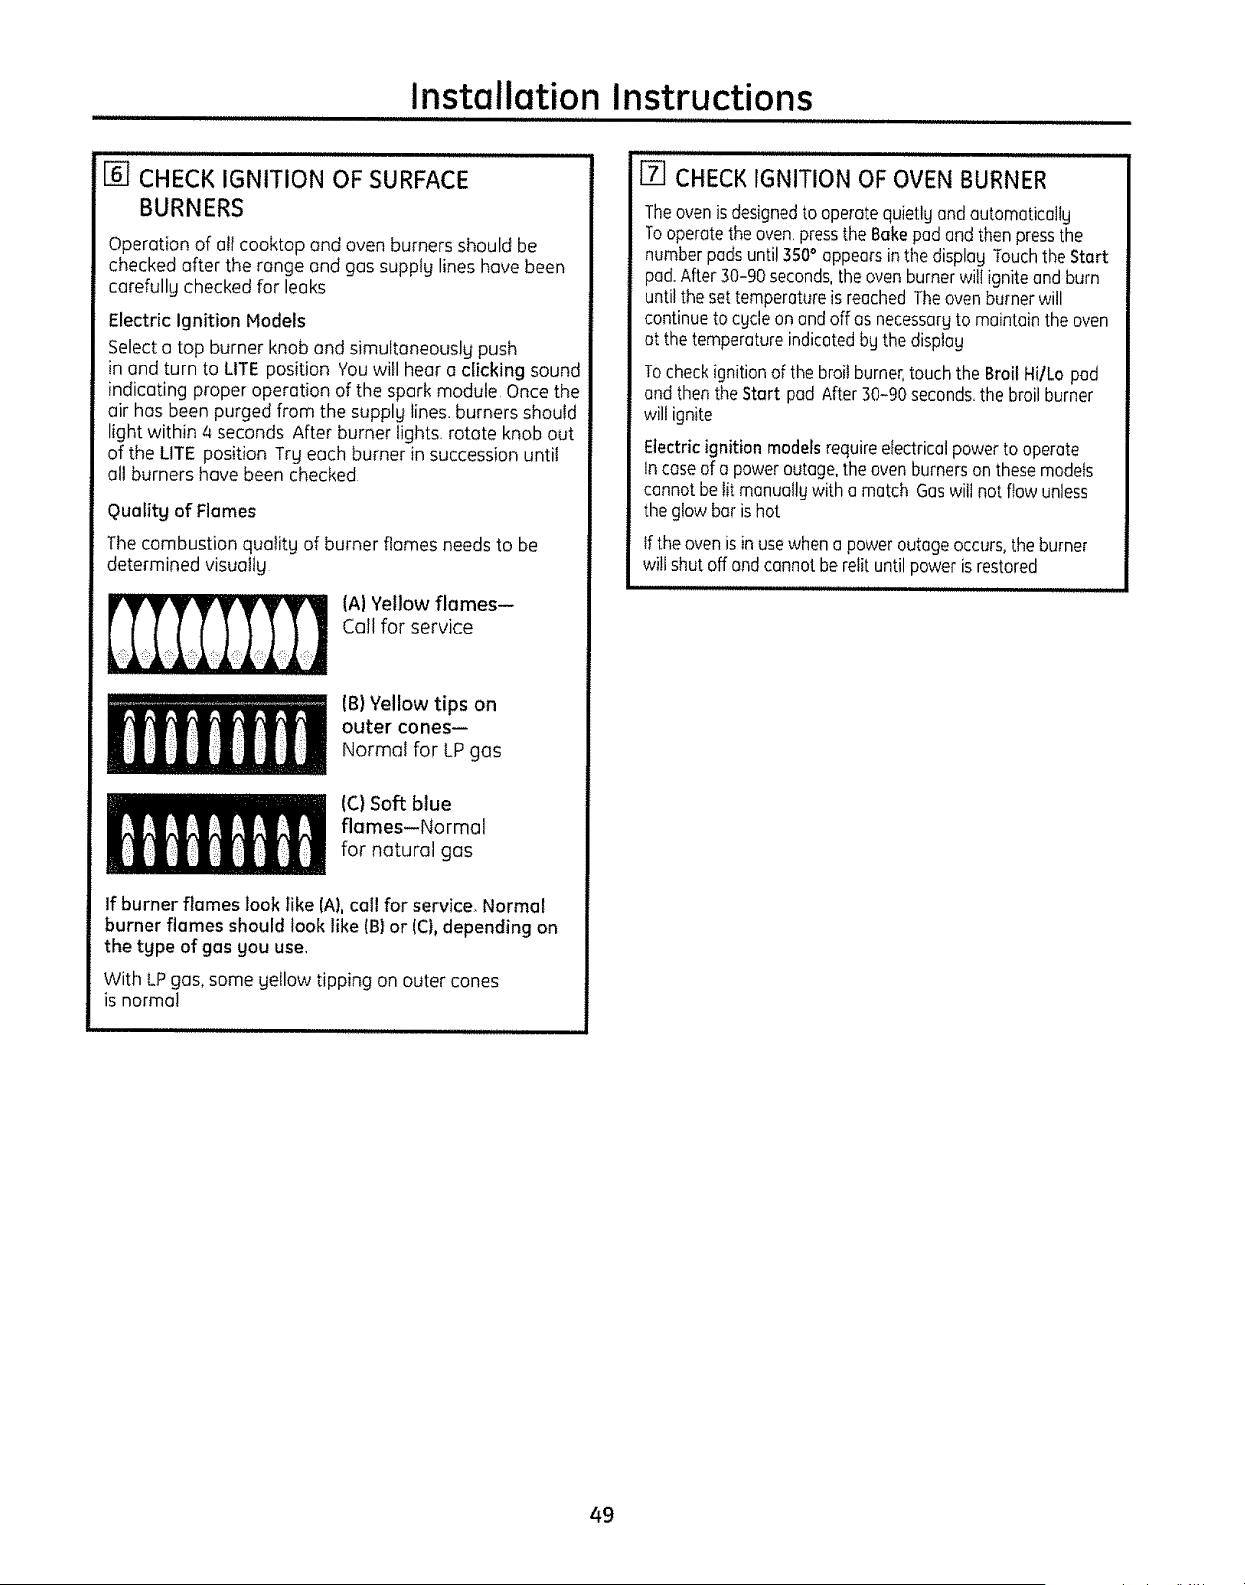
Installation Instructions
HlIJIH'""' "'"""
[] CHECK IGNITION OF SURFACE
BURNERS
Operation of all cooktop and ovenburnersshould be
checkedafter the range and gas supptg lineshavebeen
carefullg checkedfor leaks
Electric Ignition Models
Selecta top burner knoband simultaneouslg push
in and turn to LITE position Youwill hear a clicking sound
indicating proper operation of thespark module, Once the
air hasbeen purged from thesupply lines,burners should
lightwithin 4 seconds After burner lights,rotate knobout
ofthe LITE position Trgeachburner in succession until
oil burners havebeen checked
Qualitg of Flames
The combustion quaiitg of burner flames needs to be
determined visualtg
(A) Yellow flames--
Call for service
IB)Yellow tips on
outer cones--
Normal for LPgas
(C)Soft blue
flames--Normal
for natural gas
If burner flames look like [A), call for service, Normal
burner flames should look like (B} or (C), depending on
the tgpe of gas you use,
With LPgas, some gellow tipping on outer cones
isnormal
[7] CHECK IGNITION OFOVEN BURNER
Theoven isdesigned to operate quietlg and automaticaiig
To operate the oven, pressthe Bake pad and then press the
number pads until 350° appears in the displag Touch the Start
pad.After 30-90 seconds, theoven burner will ignite and burn
until the settemperature isreached Theoven burner will
continue to cgcle onand off as necessargto maintain the oven
atthe temperature indicated bgthe disptag
Tocheckignitionof thebroilburner,touchtheBroilHi/Lo pad
endthen the Start pad After30-90 seconds,thebroilburner
willignite
Electricignitionmodelsrequireelectricalpowertooperate
incaseof a poweroutage,the ovenburnersonthesemodels
cannotbelitmanuaflgwith a match Gaswill notflowunless
the glow bar is hot
If the ovenis inusewhen a poweroutageoccurs,the burner
will shutoff andcannotbe relit untilpower is restored
49
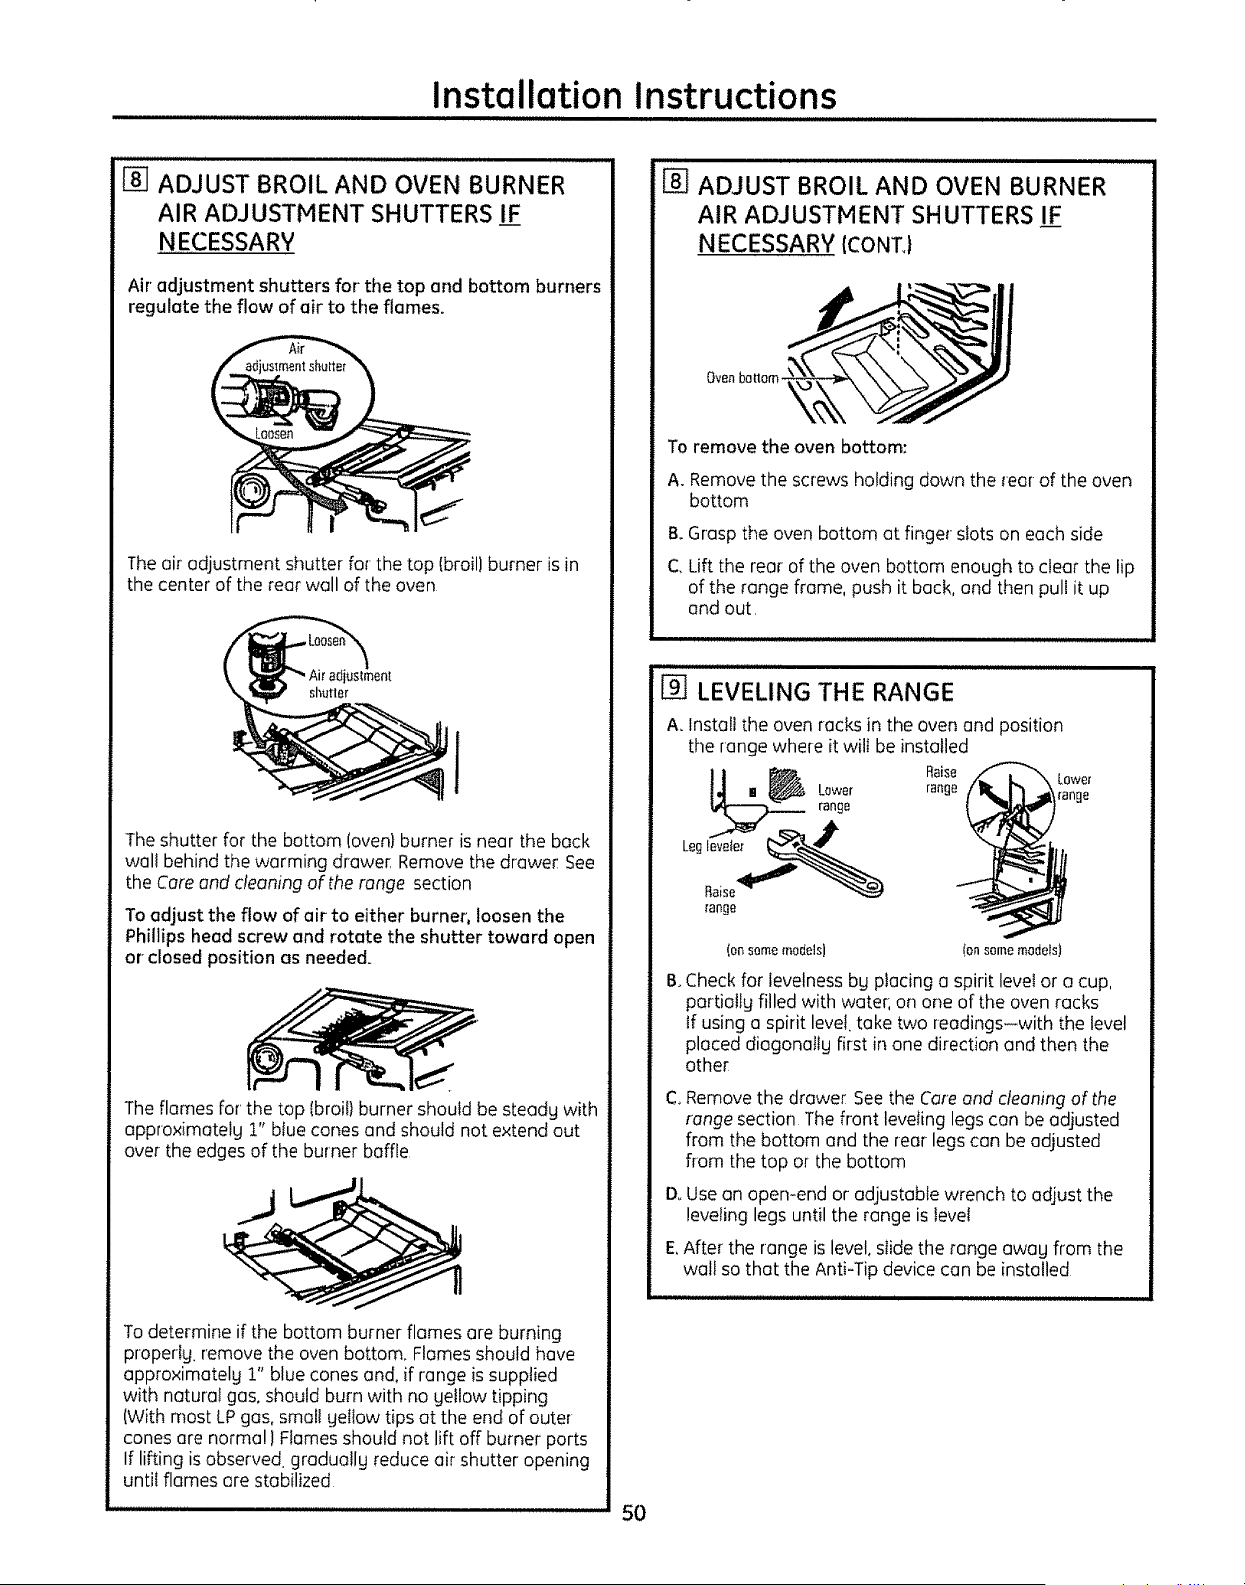
Installation Instructions
"H'H
[] ADJUST BROIL AND OVEN BURNER
AIR ADJUSTMENT SHUTTERS IF
NECESSARY
Air' adjustment shutters for the top and bottom burners
regulate the flow of air to the flames.
The air adjustment shutter forthe top fbroil}burner isin
the center of the rear well ofthe oven
Theshutter for the bottom (oven) burner isnear the back
wall behind thewarming drawer. Remove the drawer See
the Care and cleaningof therange section
To adjust the flow of air to either burner, loosen the
Phillips heed screw and rotate the shutter toward open
or closed position as needed.
The flames for thetop (broil)burner should be steadg with
approximatelg 1" blue cones and should not extend out
overthe edgesof theburner baffle
Todetermine ifthe bottom burner flames are burning
properly, remove the oven bottom. Flames should have
approximately 1" blue cones and,if range issupplied
with natural gas, should burn with no Mellowtipping
(With most LPgas, small gellow tips at the end ofouter
cones are normal} Flamesshould not lift off burner ports
If lifting is observed graduallg reduceair shutter opening
until flames are stabilized
iiiii iiii
[_ ADJUST BROIL AND OVEN BURNER
AIR ADJUSTMENT SHUTTERS IF
NECESSARY{CONT_}
To remove the oven bottom:
A. Remove the screws holding down the rear ofthe oven
bottom
& Grasp the oven bottom at finger slotson eachside
C. Lift the rear ofthe oven bottom enough to clearthe lip
ofthe range frame, push it back,and then pull it up
and out.
tUll,UlllllltilliiiJ iiuiJliiii ii iiii
I_] LEVELING THE RANGE
A.Installthe ovenracks in theoven and position
the range where itwilt be installed
Raise Lower
range range
range
(onsomemodels) (onsomemodels)
B.Checkfor levelnessbg placinga spirit levelor a cup,
partiollg filled with water,on one of theoven racks
tf using a spirit level,take two readings-with the level
placed diagonatlg first in one direction and then the
other
C,Removethe drawer See the Ca_eand cleaning ofthe
range section The front leveling legscan be adjusted
from the bottom and the rear legs can be adjusted
flom the top or the bottom
DoUsean open-end or adjustable wrench to adjust the
levelinglegs untilthe range is level
E,After the range islevel, slide the range awag from the
wall sothat the Anti-Tip device can be installed
..............50
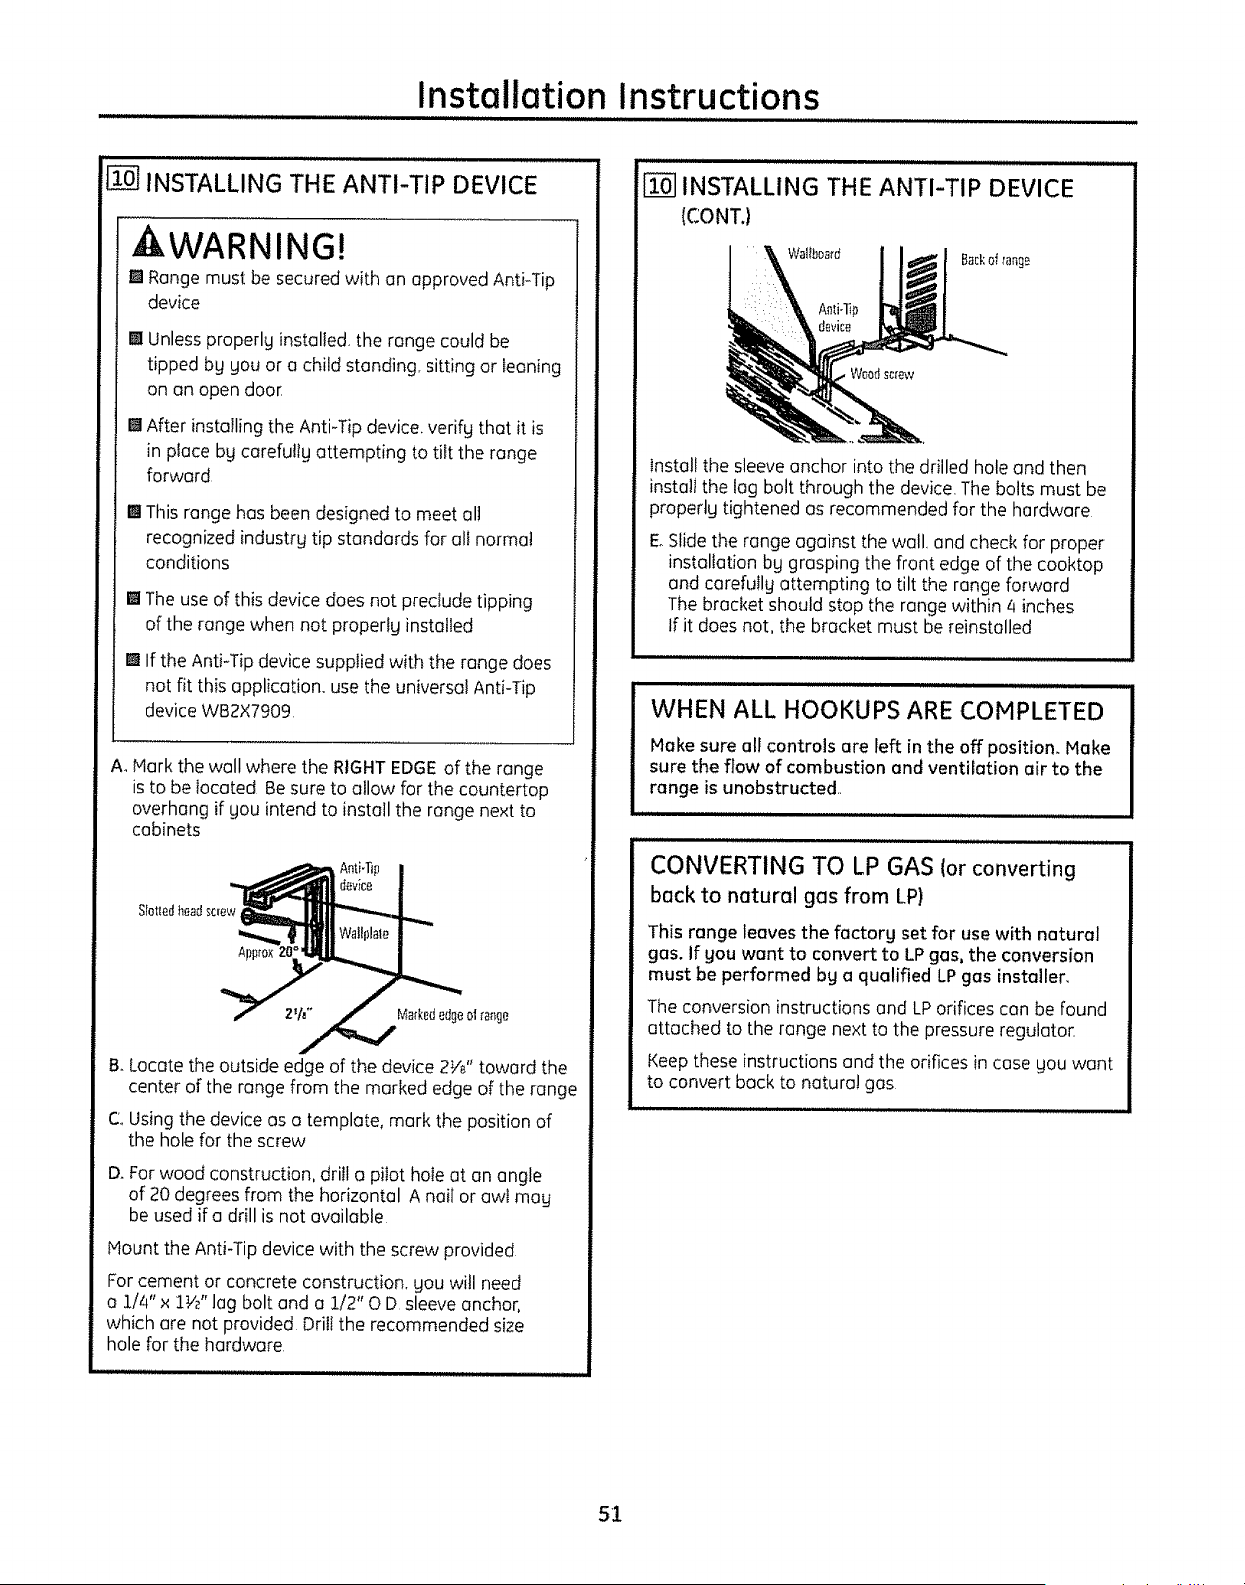
Installation Instructions
,,L,ii,u i i
'[_ INSTALLING THE ANTI-TIP DEVICE
WARNING!
m Range must be secured with an approved Anti-Tip
device
IWUnless properlg installed, the range could be
tipped bg gou or a child standing, sitting or leaning
on on open door
[] After installing the Anti-Tip device, verifg that it is
in place bg carefuttg attempting to tilt the range
forward
[] This range hasbeen designed to meet al!
recognized industrg tip standards for all norma!
conditions
[] The use of this device does not preclude tipping
of the range when not properly installed
[] If the Anti-Tip device supplied with the range does
not fit this application, use the universal Anti-Tip
device WB2X7909
A_Hark the wall wherethe RIGHTEDGE ofthe range
is to be located Besure toallow forthe countertop
overhang ifgou intend to install the range next to
cabinets
B.Locate the outside edge of the device 2Ve" toward the
center of the range from the marked edge of the range
CoUsing the device as a template, mark the position of
the hole for the screw
DrFor wood construction, drill a pilot hole at an angle
of 20 degreesfrom thehorizontal A nail or awI may
be used if a drill is not available
Haunt the Anti-Tip device with the screw provided
For cement or concrete construction, you will need
o 1/4" x1W' lag boltand a 1/2" O D sleeve anchor,
which are notprovided Drillthe recommended size
hole for the hardware
i
[] INSTALLING THE ANTI-TIP DEVICE
(CONT.)
B_ckd _ang_
Install the sleeveanchor intothe drilled hole and then
install the lag bolt through the device, The bolts must be
propertg tightened asrecommended forthe hardware
E_Slide the range against the wall, and check for proper
installation bg grasping the front edge of the cooktop
and carefuIIg attempting to tilt the range forward
The bracket should stop the range within/4 inches
If it does not, the bracket must be reinstalled
WHEN ALL HOOKUPS ARE COMPLETED
Hake sure all controls are left in the off position. Hake
sure the flow of combustion and ventilation air to the
range is unobstructed..
CONVERTING TO LP GAS (or converting
back to natural gas from LP)
This range leaves the factorg set for use with natural
gas. If gou want to convert to LPgas, the conversion
must be performed bg a qualified LPgas installer,
Theconversion instructions and LPorificescon be found
attached to the range next to the pressure regulator_
Keepthese instructions and the orificesin case gou want
to convert back to natura! gas
5!
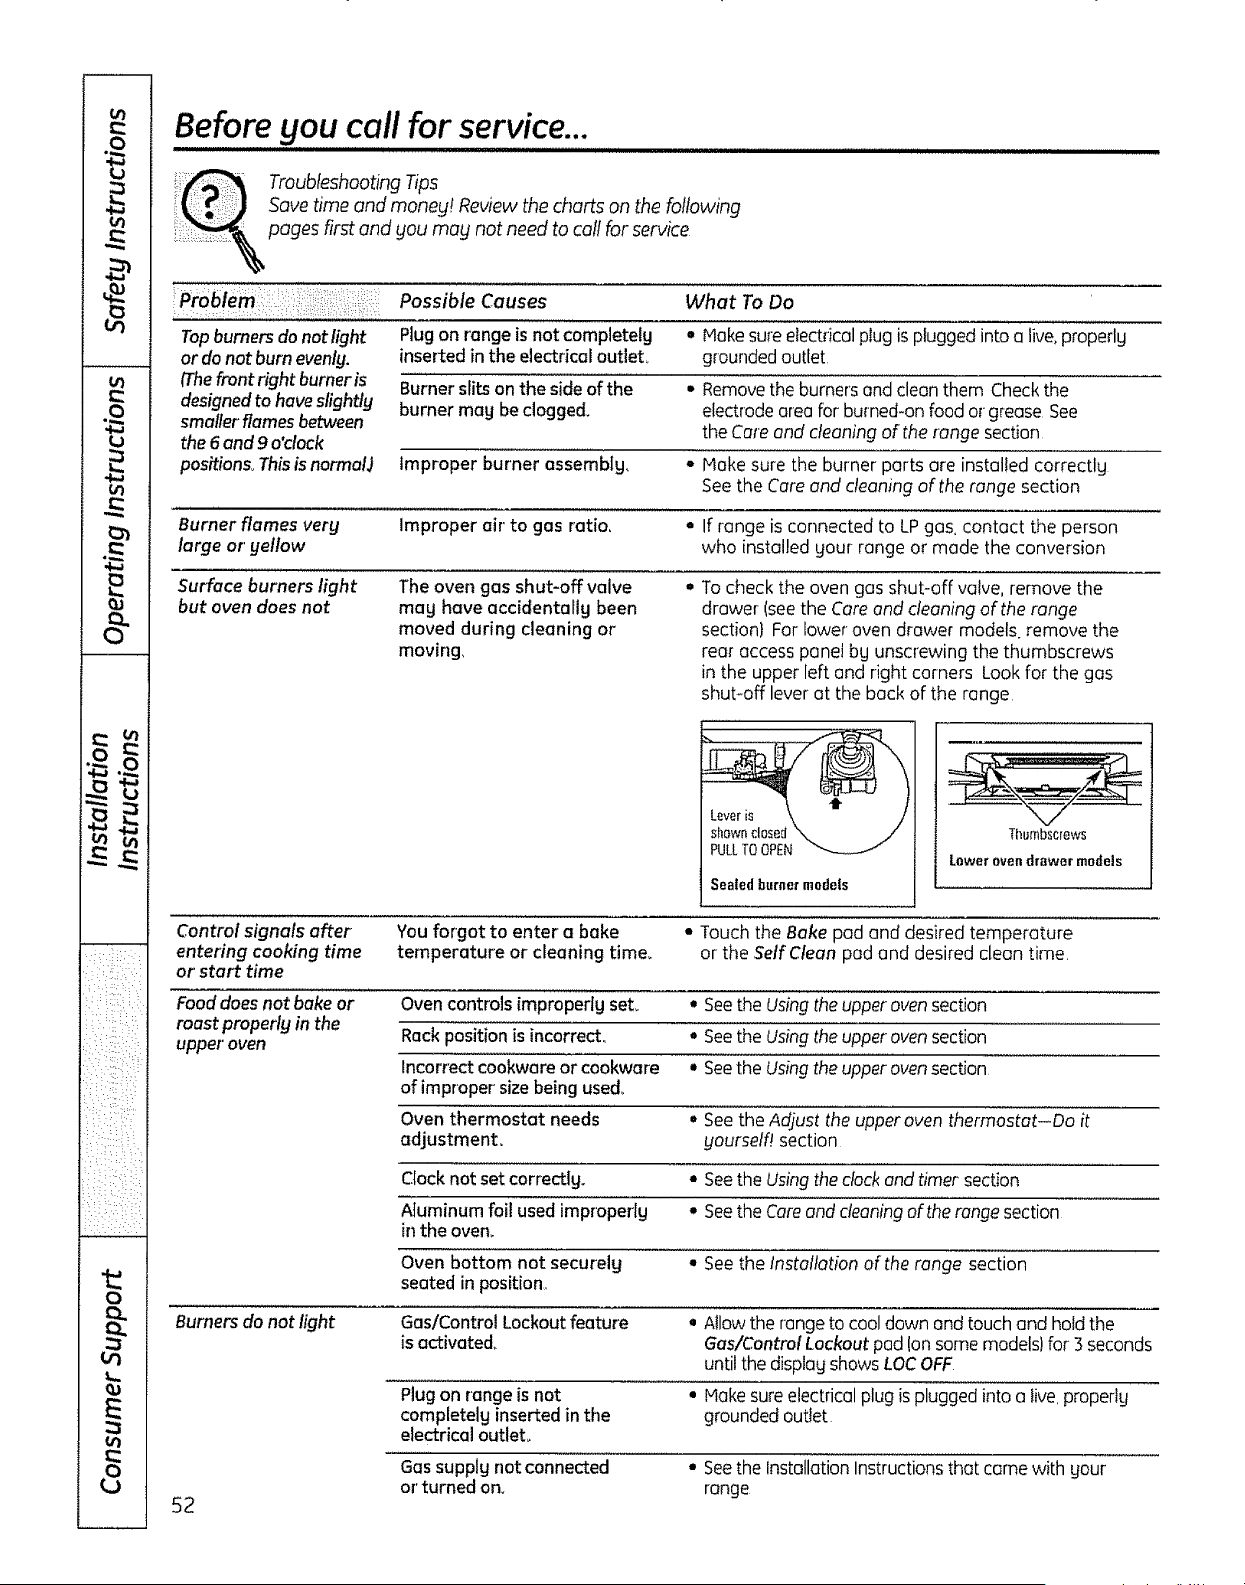
Beforegou call for service...
Troubleshooting Tips
Save time and money! Reviewthecharts on thefollowing
pages firstend you mug notneed tocallfor service
Possible Causes What To Do
Topburners do not light Plug on range is not completelg • Hake sureelectrical plug isplugged into o live,properly
or do not burn evenlg, inserted in the electrical outlet, grounded outlet
(Thefront right burner is Burner slits on the sideof the • Remove the burners end clean them Check the
designed to have slightly burner mag be clogged, electrode area for burned-on food of grease See
smallerflames between the Care and cleaning of the range section
the 6 and 9o'clock
positions° This isnormalJ Improper burner assemblg. • Hake sure the burner parts ore installed correctly
See the Care and cleaning of the range section
Burner flames verg Improper air' to gas ratio. • If range is connected to LP gas, contact the person
large or'gellow who installed gour range or made the conversion
Surface burners light The oven gas shut-off valve • To check the oven gas shut-off valve, remove the
but oven does not mug have accidentallg been drawer (seethe Care and cleaning of the range
moved during cleaning or section} For lower oven drawer models remove the
moving, rear access panel bg unscrewing the thumbscrews
in the upper left and right corners Look for the gas
shut-off lever at the back of the range
t
PULLTOOPEN
Sealedburner models
Thumbscrews
Lower even drawer models
Control signals after You forgot to enter a bake * Touch the Bake pod and desired temperature
entering cooking time temperature or cleaning time. or the ,SelfClean pad and desired cleon time.
or start time
Food does not bake or Oven controls improperlg set° ° See the Usingthe upper oven section
roast properlg in the
upper' oven Rack position isincorrect. ° See the Using the upper oven section
Incorrect cookware or cookware • Seethe Using the upper oven section
of improper size being used_
Oven thermostat needs • Seethe Adjust the upperoven thermostat-Do it
adjustment, gourselft section
Clock not set correctlg. ° See the Using the clock and timer section
Aluminum foil used improperlg o See the Care and cleaning of the range section
in the oven.
Oven bottom not securelg ° See the Installation of the range section
seated in position,,
Burners do not light Gas/Control Lockout feature • Allow the range to cool down and touch and hold the
isactivated. Gas/Control Lockout pad Ion some models) for 3 seconds
until the displag shows LOC OFF
Plug on range is not ° Hake sure electrical plug isplugged into o five, properkj
completelg inserted in the grounded outlet
electrical outlet
52
Gassupplg not connected
or' turned on.
• Seethe InstallationInstructionsthat come with gour
range
GEAppliancesocom
:Pr_blerniii::ii _: i iii i i: PossibleCauses WhatToDo
Burners do not light Afuse in your home mag be • Replace the fuse or reset the circuit breaker
fcontJ blown or the circuit breaker
tripped°
Burner parts not replaced • See the Care and cleaning ofthe range section
correctly.
Gas/Control Lockout • If LOC ON appears in the display, the range control is
or Control Lockout locked Turn this feature off to usethe range See the
feature is activated Gas/Control Lockout or Control Lockout section
Food does not broil Oven controls improperly set,, ° Hake sure you touch the Broil Hi/Lo pad
properly in the upper oven Oven door not closed° o See the Using the upper oven section
Improper rack position o See the Broiling Guide
being used,,
Food being cooked ° For best results, usea pan designed for broiling
in a hot pan, Hake sure it iscool,
Cookware not suited ° For best results,use a pan designed for broiling
for broiling.
Oven bottom not securely • See the Installation of the range section
seated in position.
Upper oven temperature Oven thermostat o See the Adjust the upper oven thermostat-Do it
too hot or too cold needs adjustment,, yourself! section
Clock and timer Plug on range is not completelg ° Hake sure electrical plug isplugged into a live, properly
do not work inserted in the electrical outlet° grounded outlet,
A fuse in gour home may be ° Replace the fuse or reset the circuit breaker,
blown or the circuit breaker
tripped,,
Oven controls improperly set,. . Seethe Using theclock and timer section
Upper oven light does Light bulb is loose or defective,. ° Tighten or replace the bulb
not work
Plug on range is not completely - Hake sureelectrical plug isplugged into a tire. properly
inserted in the electrical outleL grounded outlet
Upper oven will not The oven temperature is too ° Allow the range to coo! to room temperature and
self-clean high to set a self-clean operation° reset the controls
Oven controls improperly set. ° See the Using the self-cleaning upper oven section,
On models with a door latch, • Hake sure you move the door latch handle oil the wag
the oven door isnot in the to the right
locked position.,
"Crackling" or This isthe sound of the • This isnormal,
"popping" sound metal heating and cooling
during both the cooking and
cleaning functions,,
53
u_
O"
2
g
g.
(¢1 '._
o,i I
£
(,t}
(J
ul
ul
{j
u_
ej
v
*.#J t_
_,:::i ¸::i:1:¸i:¸
:i i i;::i:iii:iii ::!i
:ILL ":_i: :
• . 4_ ¸
:!i::if_!(:!_i
,i;i:_:_z;_!:;:!!!!/i:
0
Ul
E
ul
8
Beforeyou call for service...
Troubleshooting Tips
Possible Causes What ToDo
Excessivesmoking Excessivesoil,, oTouchtheClear/Off pad. Openthewindows to
rid theroom ofsmokeWait until theLOCKEDDOOR
light goes off Wipeup the excesssoil and resetthe
dean cycle
Oven door willnot open Oventoo hot. t Allow the oven tocoo! below locking temperature°
after a cleancycle Do notlockthedoor with the door latch except when
using tileself-cleanfeature
Oven not cleanafter a Ovencontrolsnot properlyset, • SeetheUsingthe self-cleaningupperovensection
cleancycle Oven was heavily soiled, * Cleanup heavy spitloversbefore starting theclean
cycle Heavily soiledovensmay needtoself-clean
againor fora longer periodoftime
"Door" appearsin the Latch handlewas moved to the • Hove thelatch handle to therightonly when setting
display {onmodels right buta program other than the self*cleaningcycle
with a door' latchl self-cleanwas selected.
"LOCKDOOR"flashes
in thedisplay
LOCKEDDOORlight
is on when you want
to cook
Theself-cleancyclehas been
selectedbutthe door is not
closedand on models with a latch,
the latch was not moved all the
wag to theright,,
• Closetheoven door and on modelswith a latch, move
thelatch all the wag tothe right
The ovendoor islocked
becausethetemperature
inside theoven has not
dropped below the
locking temperoture,
• TouchtheClear/Off pad Allow the ovento cool
and then, on modelswith a door latch, unlock thedaD[
"F--" and a numberor
letter"flashin the display
On models with a door"latch,
ifa function error code appears
during theself-cleaning cycle,
checktheovendoor latch°
,,The latch may have beenmoved, even if onlyslightly.
from thelockedposition,Hake surethelatch is moved
totheright as far as it willgo
Youhave a function error code • TouchtheClear/Off pod.Allow theoven tocootfor
one hour.Puttheoven back intooperation
If the function coderepeats, • Disconnectall power totherange far5 minutes
and thenreconnect power:If the functionerror
code repeats,call forservice
The nickel racks (if so equipped) ° Apply a small amount of vegetableoil toa paper
werecleanedin a self-cleancycle., towel and wipe the edgesof the ovenrocks with
The gray porcelain-coated racks thepapertowel Do notspray with Pame or other
(if soequipped)were improperly lubricant sprays
cleaned,
Oven racks are
difficulttoslide
"Probe" appears in This is reminding you to enter a ° Enter' a probe temperature
the display {somemodels) probe temperature after' plugging
in the probe,
LOCshowsin the
display
TheGas/ControlLockout feature • Besurethesurface burner controIsare turnedOFF
is activate& Turn this featureoff tousethe range SeetheGas!Control
Lockoutsection
54
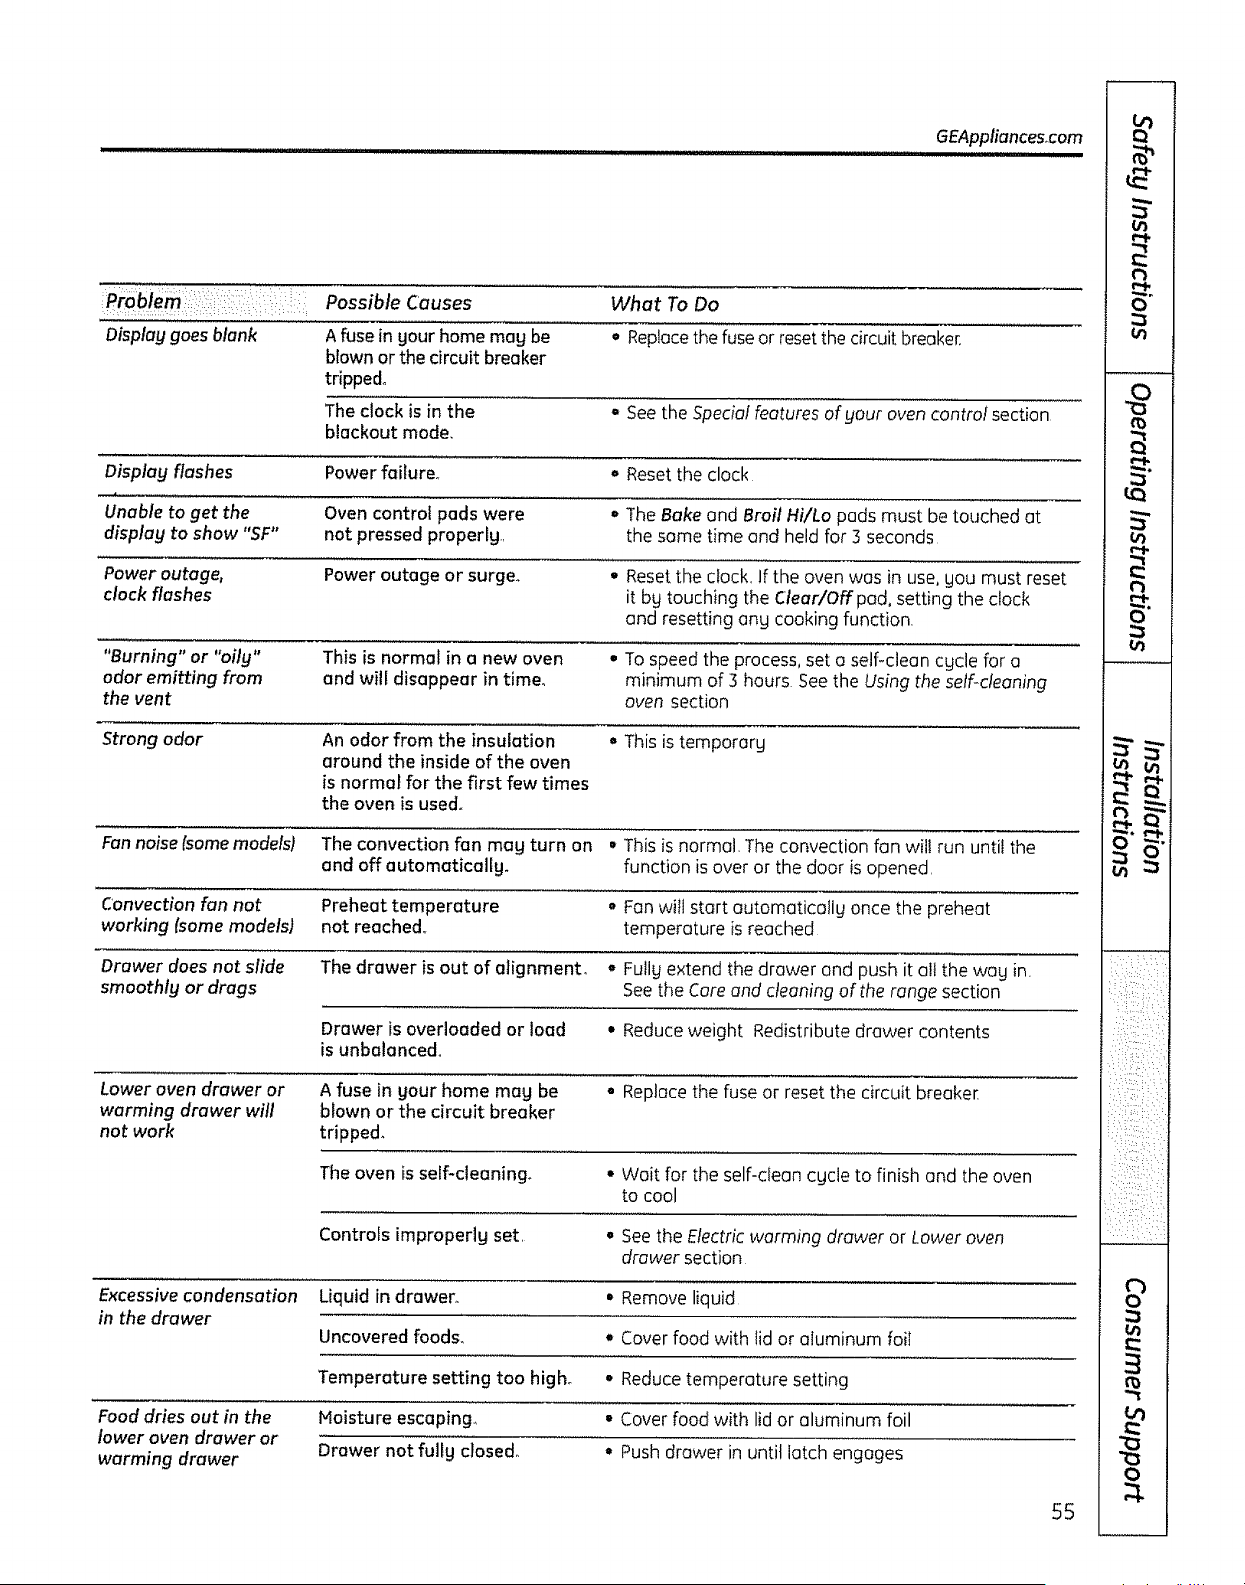
GEAppliances_com
:::::::::::::::::::::::::::::::::::::::: WhatTooo
Display goes blank A fuse in your home may be • Replace the fuse or reset the circuit breaker.
blown or the circuit breaker
tripped.,
The clock is in the o See the Special features of gout oven control section
blackout mode,
Display flashes Power failure.. • Reset the clock
Unable to get the Oven control pads were , The Bake and Broil Hi/Lo pads must be touched at
display to show "SF" not pressed properly., the some time and held for 3 seconds
Power outage, Power outage or surge° • Reset the cfock_If the oven was in use, you must reset
clock flashes it bg touching the Clear/Off pad, setting the clock
and resetting any cooking function
"Burning" or "oily" This is normal in a new oven ° To speed the process, set a self-clean cycle for a
odor emitting from and will disappear in time_ minimum of 3 hours See the Using the self-cleaning
the vent oven section
Strong odor An odor from the insulation o This istempororg
around the inside of the oven
is normal for the first few times
the oven is used°
Fannoise {some models) The convection fan mag turn on ° This is normal. The convection fan will run until the
and off automatically, function isover or the door is opened.
Convection fan not Preheat temperature o Fan will start automatically once the preheat
working fsome models) not reached., temperature isreached
Drawer does not slide The drawer is out of alignmenL ° Fully extend the drawer and push it all the wag in.
smoothly or drags See the Care and cleaning of the range section
Drawer is overloaded or load ° Reduce weight Redistribute drawer contents
is unbalanced..
Lower oven drawer or A fuse in gout home mag be ° Replace the fuse or reset the circuit breaker
warming drawer will blown or the circuit breaker
not work tripped_
The oven is self-cleaningo • Wait for the self-cleon cgcle to finish and the oven
to cool
Controls improperly set. e See the Electric warming drawer or Lower oven
drawer section
Excessive condensation Liquid in drawer, mRemove liquid
in the drawer
Uncovered foods_ • Cover food with lid or aluminum foiT
Temperature setting too high° ° Reduce temperature setting
Food dries out in the Noisture escaping., • Cover food with lid or aluminum foil
lower oven drawer or
warming drawer Drawer not fully closed. • Push drawer in until latch engages
0
u_
2
¢b
tQ
ul
t_
O"
_i:_i_:i:_i:i_ii_i__"_::/:i
;/,_://;: i_/:_:_:
: • :•4:••
_ii::i::)i_,,::_::
0
55
¢t)
A
w_
tt_
oj
v
__ f .
vJ I_
c_
0
0
oJ
A
w
E
Notes.
56
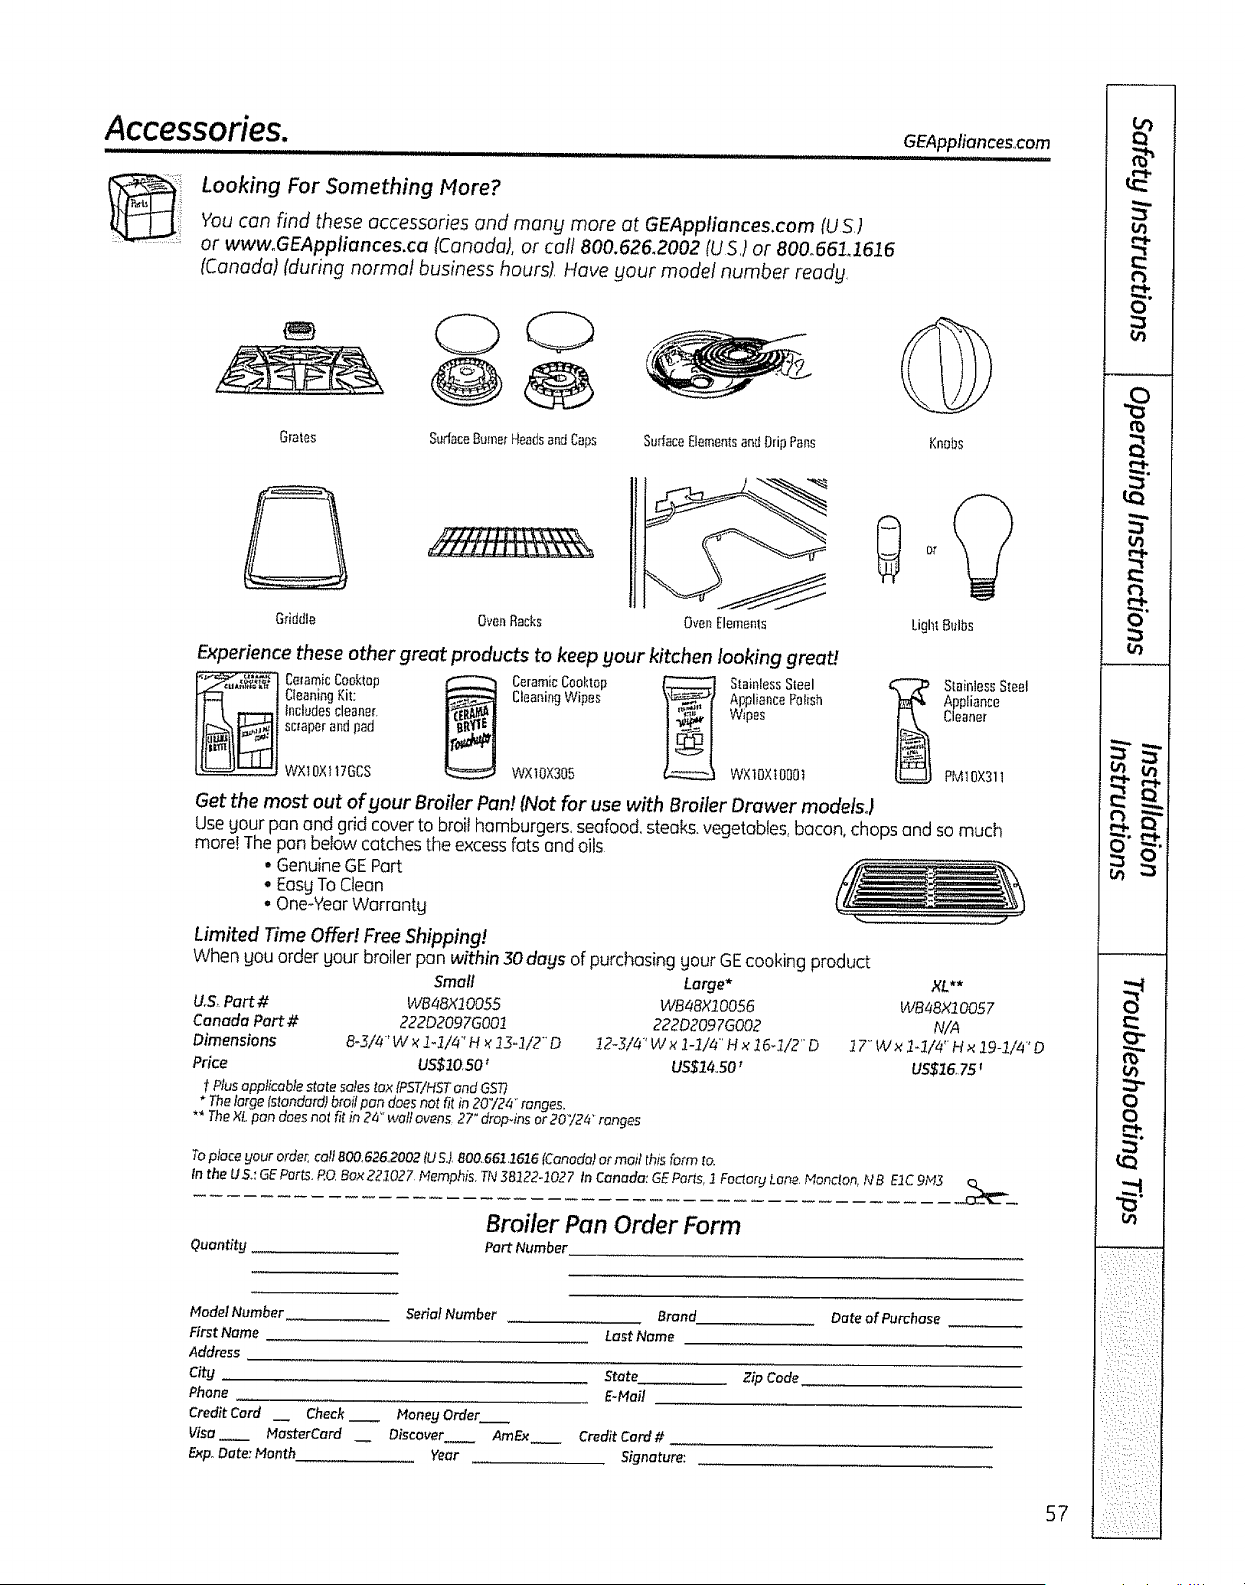
Accessories.
Looking For Something More?
You can find these accessories and many more at GEAppliances.com fUS,)
or wwwoGEAppliances.ca (Canada), or call 800.626,2002 (US,) or 800,66£1616
(Canada) (during norma! business hours), Have your model number ready,
GEAppfiances.,com
,,,J,i,,i............
Grate_
Sur{ac_ElementsandDripFans
Griddle OvenRacks OvenElements
LigN £ulbs
Experience these other great products to keep gout kitchen looking great,W
........ ] Cleaningk'it; CleaningWipes AppliancePa_ish
I t _-"t_{ Includeselea_,ef. Wipes
If_x_i sc,aperandpad
t_L_------J ! WXtOXt176CS WXI0X305 W×IDX;DOO'_
Get the most out ofyour Broiler Pan!(Not for use with Broiler Drawer models.)
StainlessSteel
Appliance
Cleaner
PM1OX31t
Usegoutpan and grid coverto broi}hamburgers,seafood,steaks,vegetables,bacon,chopsand so much
more!The pan beIowcatchestheexcessfatsand oils
• GenuineGEPart
- EasgToClean
, One-YearWorrantg
Limited Time Offe!! FreeShipping!
When gou order pour broilerpan within 30dogsofpurchasingpour GEcooking product
Small
Uo& Part # WB48X10055
Canada Pert# 222D2097G001
Dimensions 8-3/4' W ×1-1/4" H _ 13-1/2"" D
Price US$I0, 50
t Plusapplicable statesalestax IPST/HSTand GST?
* Thelargeistandard)broilpandoesnot fit in20724"ranges,
Large* XL**
WB48X20056 WB48X1005 7
222D2097G002 N/A
t2-3/4"W_l-]/4"H×16q/2"D 27"Wxl*]/4"Hx!9-1/4"D
U5114,,50' U551675 '
*" TheXLpan doesnot fit in 24" waltovens 27"drop4ns or20724' ranges
Toplaceyour order,coil 800,6262002 tUSJ,80055£1616 (Canada)ormait thisformta
Inthe US,: GEParts,RQBox221027. Memphis.TN38122-!027 In Canada: GEPert& I Focterg Lone,Mane!on,NB E1C9M3
Broiler Pan Order Form
quontitg PartNumber
Mode/Number SerialNumber Brand
First Name Lust Name
Address
City State
Phone E-Hail
Credit Card __ Check _ Money Order__
Visa _ MusterCard _ Discover AmF.x Credit Card#
ExpoDote: Month. Year Signature:
ZipCode
Dateof Purchase
57
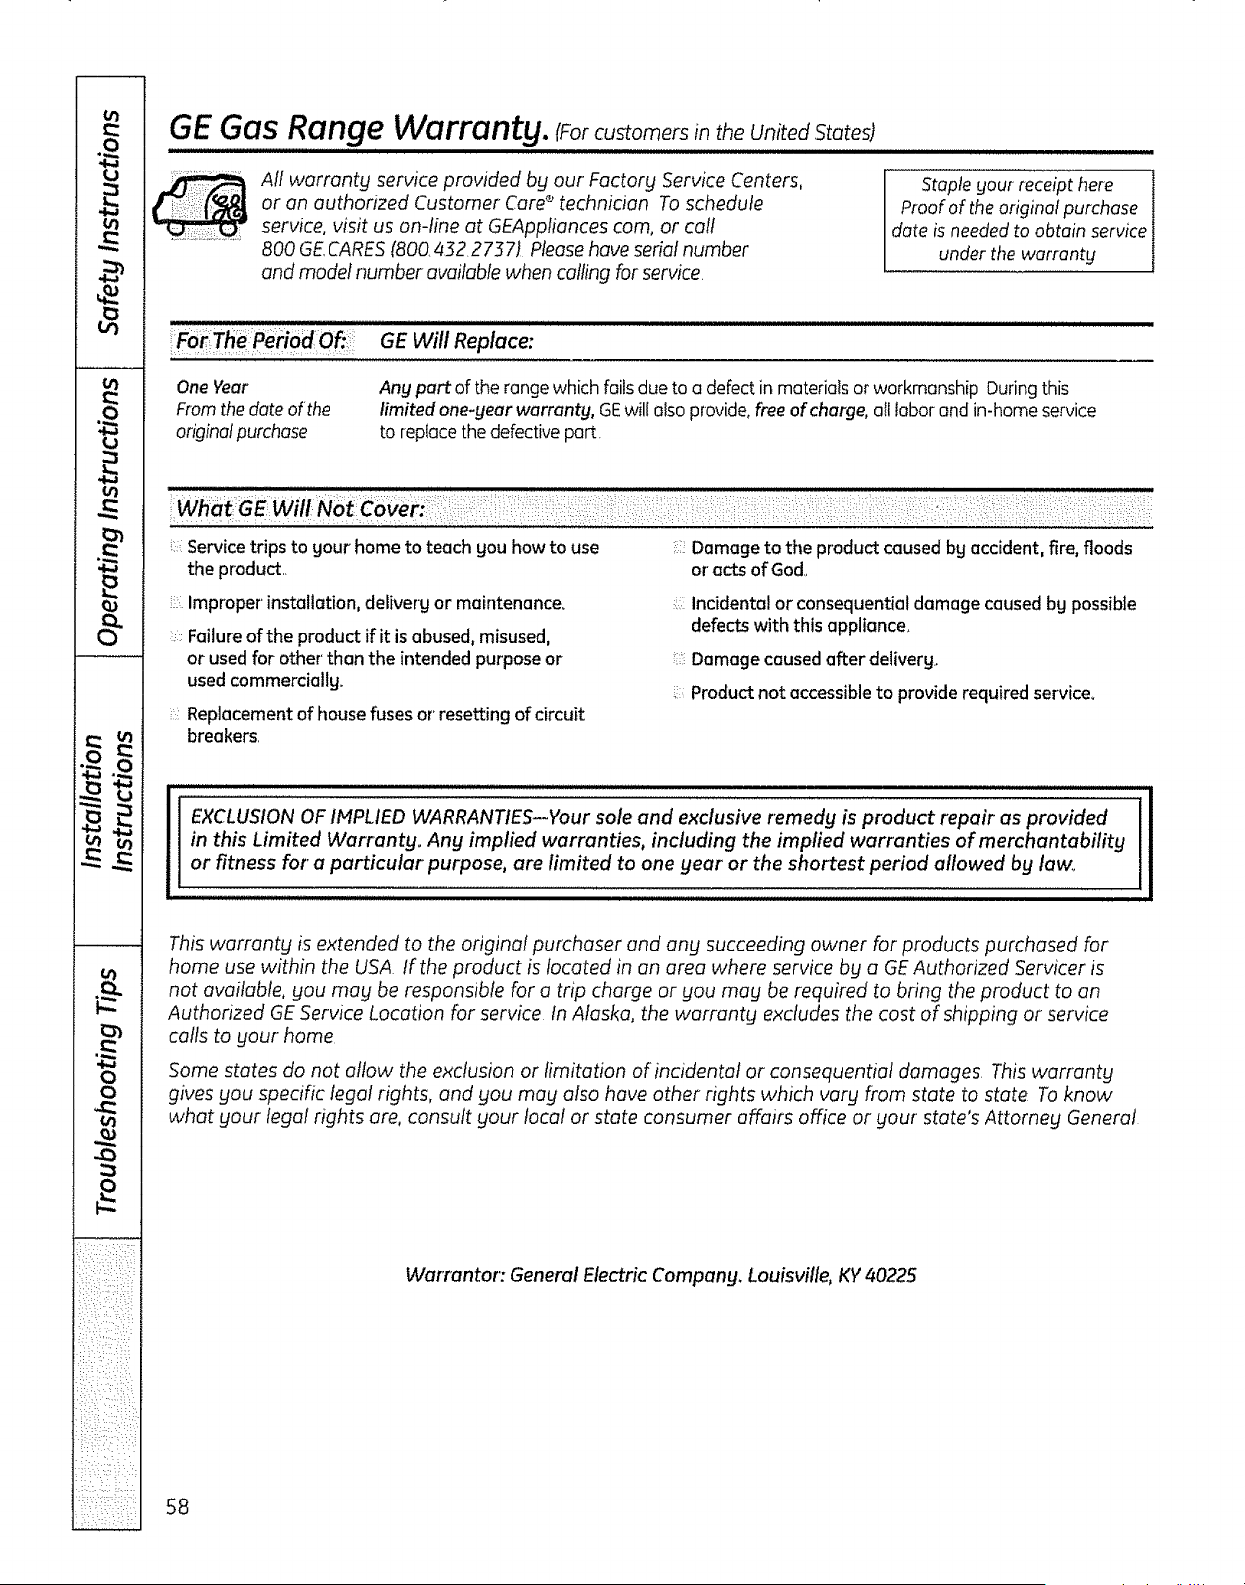
) ",_i
.Oi
o I
o I
0 1
GEGas Range Warranty. rForcustomersintheUnited States)
iii nlnnnl nnnnnl nnnnnnl nn n IIIIIII IIIIIIIIIIIIIIIIIII III III IIIII IIIIIIIIIII I II I
_ II warranty service provided by our Factory Service Centers,
or an authorized Customer Care_ technician Toschedule
.............................service, visit us on-line at GEAppliances cam, or call
800 GE,CARES(8004322737) Please haveserial number
and model number available when calling for service.
Staple gout receipt here
Proof of the original purchase
date is needed to oOtain service
under thewarrantg
GE Will Replace:
One Year
Fromthe date of the
originalpurchase
Anypart oftherangewhich foilsdue toa defect in materials or workmanship Duringthis
limited one-gear warranty, GEwill also provide,free ofcharge, all labor and in-home service
toreplacethedefectivepart.
Service trips to your home to teach you how to use
the product..
Improper installation, deliverg or maintenance.
::_:Failure ofthe product if it isabused, misused,
or used for other' than the intended purpose or
used commercially.
::::Replacement of house fuses or'resetting of circuit
breakers
Damage to the product caused bg accident, fire, floods
or"acts of God,
::::incidental or consequentialdamage causedbg possible
defects with this appliance,
::::Damage caused after deliverg.
.: Product not accessibleto providerequired service.
EXCLUSION OFIMPLIED WARRANTIES--Your sole and exclusive remedy is product repair as provided
in this Limited Warranty. Ang implied warranties, including the implied warranties of merchantability
or fitness for' a particular purpose, are limited to one gear"or the shortest period allowed bg law.
This warranty is extended to the original purchaser and any succeeding owner for products purchased for
home use within the USA tf the product is located in an urea where service by a GEAuthorized Servicer is
not available, you mug be responsible for a trip charge or you may be required to bring the product to an
Authorized GEService Location for service In Alaska, the warranty excludes the cost of shipping or service
calls to your home
Some states do not allow the exclusion or limitation of incidentaf or consequential damages This warranty
gives you specific legal rights, and you mag also have other rights which vary from state to state To know
what your legal rights are, consult your local or state consumer affairs office or your state's Attorneg General
Warrantor: General Electric Company. Louisville, KY40225
58

GE Gas Range Warranty. cForcustomerscanada)
All warranty service provided by our Factory Service Centers
or an authorized Customer Care _ technician. For service,
calf t 800551 3344 Please have serial number and model
number available when calling for service
Staple your receipt here j
Proof of the original purchase J
date is needed to obtain service]
under the warranty [
H,UH iIIIm
: : ::: Mabe Will Re ace:
One Year
Fromthe date of the
originalpurchase
Any part of the range which fails due to a defect inmaterials or workmanship During this
limited one-gear warranty, Habe will also provide, free of charge, all labor and in-home service
to replace the defective part
:;:::Servicetrips to your home to teach you howto use
theproduct°
:::Improper installation, delivery or maintenance,
Failure of the product if it isabused, misused,
or used for other than the intended purpose or
used commercially,
Replacement of house fuses or resetting of circuit
breakers°
:::Damage tothe product caused byaccident, fire, floods
or actsof God..
incidental or consequentialdamage caused bypossible
defects with this appliance.
Damage causedafter deliverg.
:: Product notaccessibleto provide required service°
EXCLUS!ON OFIMPLIED WARRANTIES--Your sole and exclusive remedy isproduct repair as provided
in this Limited Warranty. Any implied warranties, including the implied warranties of merchantability
or fitness for a particular purpose, are limited to one year or the shortest period allowed by law.
This warranty is extended to the origina! purchaser and any succeeding owner for products purchased in
Canada for home use within Canada In-home warranty service will be provided in areas where it is available
and deemed reasonable by Mabe to provide
Some provinces do not allow the exclusion or limitation of incidental or consequential damages, so the above
exclusion may not app!y to you This warranty gives you specific legal rights, and you may also have other
rights which vary from province to province To know what your legal rights are in your province, consult
your local provincial consumer affairs office
Warrantor: Mabe Canada Inco
Burlington, Ontario
59
o_
t_
O
2
a
11
O"
vn i_
v
u
4n
o_
O
O
_.
WI_://_,: :i

Consumer Support.
1
GE Appliances Website
In theUS' GEAppliances.com
Havea question or needassistancewith goutappliance?TrgtheGEAppliancesWebsite24 hours a dog.
ang dog ofthegear! For greaterconvenience and faster service,gou cannowdownload Owner'sManuals,
order parts or even scheduleserviceon-line InCanada:www,GEAppliances.ca
Schedule Service +ntheUS.:GEAppliances.com
Expert6E repairservice isonlgonestepawagfrom gour door:Geton-lineand schedulegour serviceatgour
convenience ang dag of thegear!Ofcall 800GECARES(8004322737}during normalbusinesshours.
In Canada, call:I..800561,3344
Real Life Design Studio
In the US,: GEAppliances.com
GE supports the Universal Design concept-products, services end environments that con be used bg people of all
ages sizes and capabilities We recognize the need to design for a wide range of physical and mental abilities and
impairments For details of GE'sUniversal Design applications, including kitchen design ideas for people with disabilities,
check out our Website todag For the hearing impaired please call 80OTDD GEAC!800833.8522}
In Canada, contact Manager, Consumer Relations, Mabe Canada Inc
Suite 310, 1 Factorg Lane
Moncton NB E1C9H3
Extended Warranties
tn the U.S.: GEAppliances.com
Purchasea GEextendedwarrantg and learnaboutspecialdiscountsthat are availablewhilegourwarrantg is still
in effect Youcanpurchaseit onqine angtime, or call 800626 2224during normalbusinesshoursGEConsumer Home
Serviceswitlstill bethereafter gour warrantg expires in Canada,call :L8882612:1.3:3
Parts andAccessories
In the U.S: GEAppliances.com
Individualsqualified toservicetheirownappliancescanhave parts oraccessoriessent directlgtotheirhomestVtSA
MasterCardand Discovercardsare accepted}Orderon-line todag,24 hours evergdog or bg phoneat
800 6262002 during normalbusinesshours
Instructions contained in thismanua! cover procedures to beperformed by ang user.Otherservicinggenerally
should bereferredto qualified servicepersonnel Caution mustbe exercised,sinceimproper servicingmag cause
unsafe operation.
Customersin Canada should consult thegeilow pages for thenearest Mabeservice center:orcall 1800661 1616
Contact Us
In theU,S:GEAppliances.com
If gou are not satisfied with the service gou receive from GE, contact us on our Website with all the details including
gour phone number, orwrite to: General Manager, Customer Relations
GE Appliances. Appliance Pork
Louisville KY40225
tnCanada: www+GEAppliances.ca, orwrite to: Director: Consumer Relations, Mobe Canada Inc
Suite 310 1 Factorg Lane
Moncton, N B EIC 9M]
Register YourAppliance
Inthe US: GEAppliances.com
Register gout' newapplianceon-line--at gour convenience! Timelgproduct registration will allowfarenhanced
communication and prompt service underthetermsofgour warrantg, should theneedarise Youmagalso mail
in thepre-printedregistrationcardincludedin thepackingmaterial InCanada:www+GEAppliances,ca
Printedin _4exico
Thisbook isprinted on iec_jcledpaper,

