

2
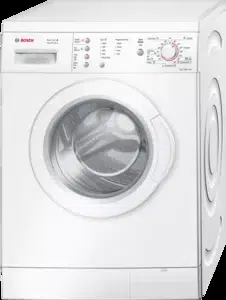
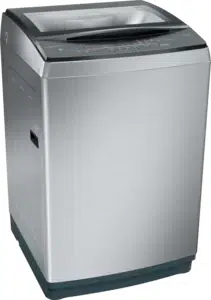
Your new washing machine
You have chosen a Bosch washing
machine.
Please take a few minutes to read and
become familiar with the advantages of
your washing machine.
To meet the high quality demands
required by Bosch, every washing
machine that leaves our factory is
carefully checked to ensure that it
functions correctly and is in perfect
condition.
For more information on our products,
accessories, replacement parts and
services, see our website www.bosch-
home.com or contact our after-sales
service centres.
If the operating and installation
instructions describe different models,
any differences will be pointed out at the
relevant points in the text.
Read these operating and installation
instructions before switching on the
washing machine.
Display rules
: Warning!
This combination of symbol and signal
word indicates a possibly dangerous
situation. Not heeding the warning can
cause death or injuries.
Caution!
This signal word indicates a possibly
dangerous situation. Not heeding the
caution can cause property and/or
environmental damage.
Note/tip
Information about the optimum use of
the appliance/any other useful
information.
1. 2. 3. / a) b) c)
The steps are represented by numbers
or letters.
■ / -
Lists are represented by a small box or
a dash.

en
3
Contents
enInstruction Manual and Installation Instructions
5 Installing and connecting the
appliance . . . . . . . . . . . . . . . . . . .4
Included with the appliance: . . . . . . . . 4
Installing the appliance . . . . . . . . . . . . 4
Connecting the appliance. . . . . . . . . . 6
Levelling the appliance . . . . . . . . . . . . 9
Before using the appliance for
the first time . . . . . . . . . . . . . . . . . . . . 9
9 Quick reference guide . . . . . . . .10
* Familiarising yourself with your
appliance . . . . . . . . . . . . . . . . . .11
Appliance overview. . . . . . . . . . . . . . 11
Panel . . . . . . . . . . . . . . . . . . . . . . . . 12
Y Display . . . . . . . . . . . . . . . . . . . .13
/ Programme overview . . . . . . . .14
0 Buttons . . . . . . . . . . . . . . . . . . . .16
Z Laundry. . . . . . . . . . . . . . . . . . . .18
Preparing the laundry . . . . . . . . . . . . 18
Sorting laundry . . . . . . . . . . . . . . . . . 18
1 Operating the appliance . . . . . .19
Switching on the appliance
and setting a programme . . . . . . . . . 19
Programme settings . . . . . . . . . . . . . 19
Placing the laundry into the drum . . . 19
Adding detergent and fabric care
products . . . . . . . . . . . . . . . . . . . . . . 20
Starting a programme. . . . . . . . . . . . 21
Childproof lock . . . . . . . . . . . . . . . . . 21
Pausing programmes and adding
more laundry . . . . . . . . . . . . . . . . . . 21
Cancelling the programme . . . . . . . . 21
Resuming the programme when the
programme status is Rinse Stop . . . 21
Programme end . . . . . . . . . . . . . . . . 22
Removing laundry and switching off
the appliance . . . . . . . . . . . . . . . . . . 22
H Sensors . . . . . . . . . . . . . . . . . . . 22
Unbalanced load detection system . .22
Continuous automatic load
adjustment function . . . . . . . . . . . . . .22
D Cleaning and maintenance. . . . 23
Cleaning/Maintenance . . . . . . . . . . .23
Cleaning the drum. . . . . . . . . . . . . . .24
Descaling the appliance . . . . . . . . . .24
Cleaning the drain pump. . . . . . . . . .24
Cleaning the lint filter. . . . . . . . . . . . .25
3 What to do in the event
of a fault . . . . . . . . . . . . . . . . . . . 26
Help with the appliance . . . . . . . . . . .26
Filter in water supply blocked . . . . . .28
L Transporting the appliance . . . 29
{ Technical specifications. . . . . . 30
4 After-sales service . . . . . . . . . . 31

en Installing and connecting the appliance
4
5 Installing and
connecting the
appliance
Install ing and connecti ng the appli ance
Included with the appliance:
1. Remove any packaging and
protective covers completely from
the appliance.
2. Remove the protective film from the
control panel.
3. Remove the appliance from the base
padding.
Note: Operating the appliance on
the base padding is strictly
forbidden.
4. Open the cover on the appliance
and take out all the accessories.
You can now install and connect the
appliance.
Caution!
Risk of material damage/damage to the
appliance
Objects remaining in the drum that are
not designed for operation with the
appliance may result in material
damage and damage to the appliance.
Remove these objects, along with all
accessories, from the drum.
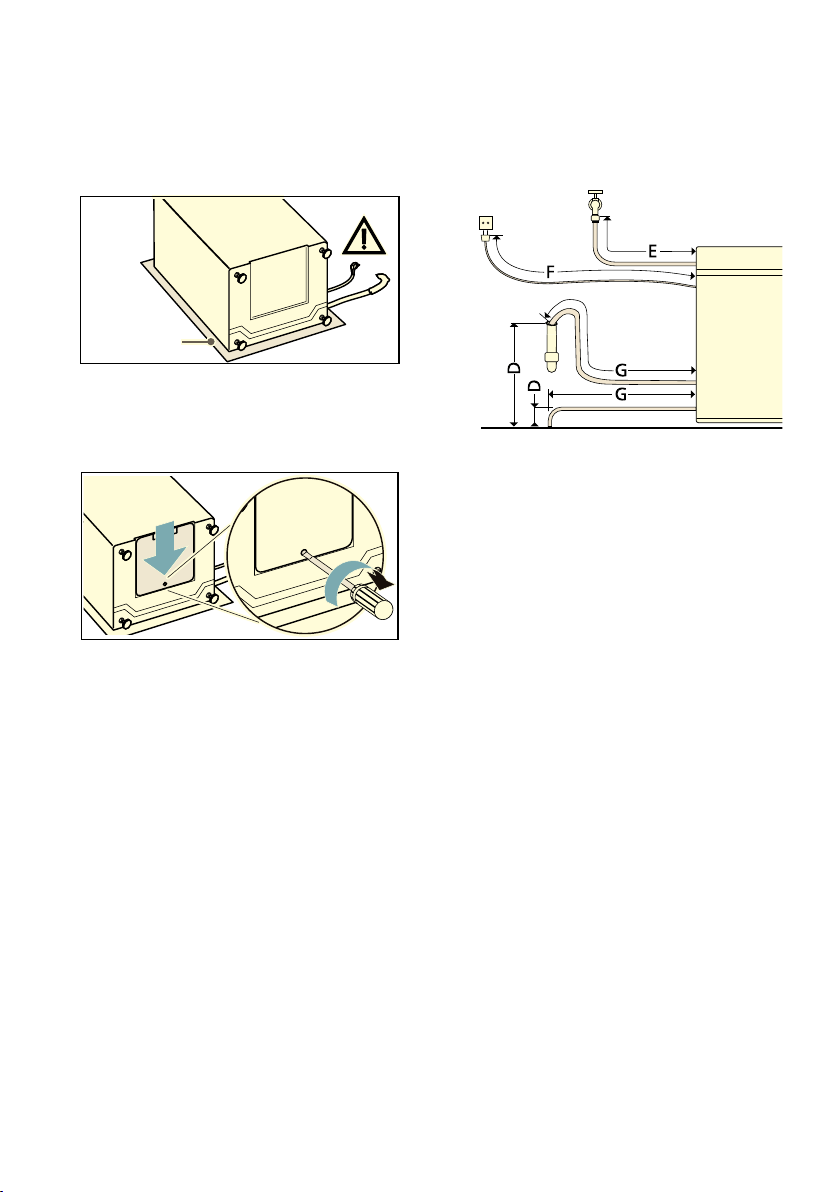
Installing the appliance
:Warning
Risk of injury!
■ The appliance is very heavy. Lifting it
may result in injury.
Do not lift the appliance on your
own.
Risk of injury!
■ The appliance has sharp edges on
which you could cut your hands.
Do not take hold of the appliance by
its sharp edges. Wear protective
gloves to lift it.
Risk of injury!
■ If the hoses and mains cables are
not correctly routed, they may
constitute a tripping hazard, which
may result in injury.
Route hoses and cables such that
they do not constitute a tripping
hazard.
( Water drain hose*
0 Mains cable
8 Water drain hose*
@ Water supply hose
H Second water supply hose
(identified by a red marking) on
models with a hot water supply
hose*
P Snap connector*
X Bottom plate
* Depending on the appliance
specifications
#
+
3
;
Installing and connecting the appliance en
5
Installing the bottom plate
1. Lay the appliance down with its front
panel resting on a piece of soft
material.
2. Push the bottom plate onto the
underside of the appliance and
screw it in place.
Installation surface
Caution!
Risk of damage to the appliance
Frozen hoses may rupture or burst.
Do not install the appliance in areas that
may be exposed to frost or outdoors.
Note: The appliance must be stable so
that it does not "wander".
■ The surface on which the appliance
is installed must be firm and level.
■ Soft floors/floor coverings are not
suitable.
■ All four of the appliance's feet must
stand firmly on the ground.
Hose and pipe lengths
■ Connecting
Model with pump:
Model without pump:
3LHFHRI
VRIWPDWHULDO
D Min. 86 cm - max. 100 cm
E 140 cm
F Max. 190 cm
G 150 cm
D Max. 15 cm
E 140 cm
F Max. 190 cm
G Max. 100 cm
en Installing and connecting the appliance
6
Connecting the appliance
Caution!
Risk of material damage/damage to the
appliance
■ If the water pressure is too high or
too low, the appliance may not be
able to operate properly, and this
may also result in material damage
or damage to the appliance.
Ensure that the water pressure in the
water supply facility is at least 30
kPa (0.3 bar), and does not exceed
800 kPa (8 bar).
Material damage/damage to the appliance
■ If the water hoses are altered or
damaged, this may result in material
damage or damage to the
appliance.
The water hoses must not be kinked,
crushed, altered or severed.
Material damage/damage to the appliance
■ The use of hoses supplied by other
brands to connect to the water
supply may result in material
damage or damage to the
appliance.
Use the hoses supplied with the
appliance or genuine spare part
hoses only.
Notes
■ In addition to the information listed
here, the local water and electricity
supplier may have special
requirements.
■ If in doubt, have your appliance
connected by a professional.
Water supply hose
Notes
■ When using a spanner, use the
correct size and apply controlled
force.
■ Only operate the appliance using
mains water.
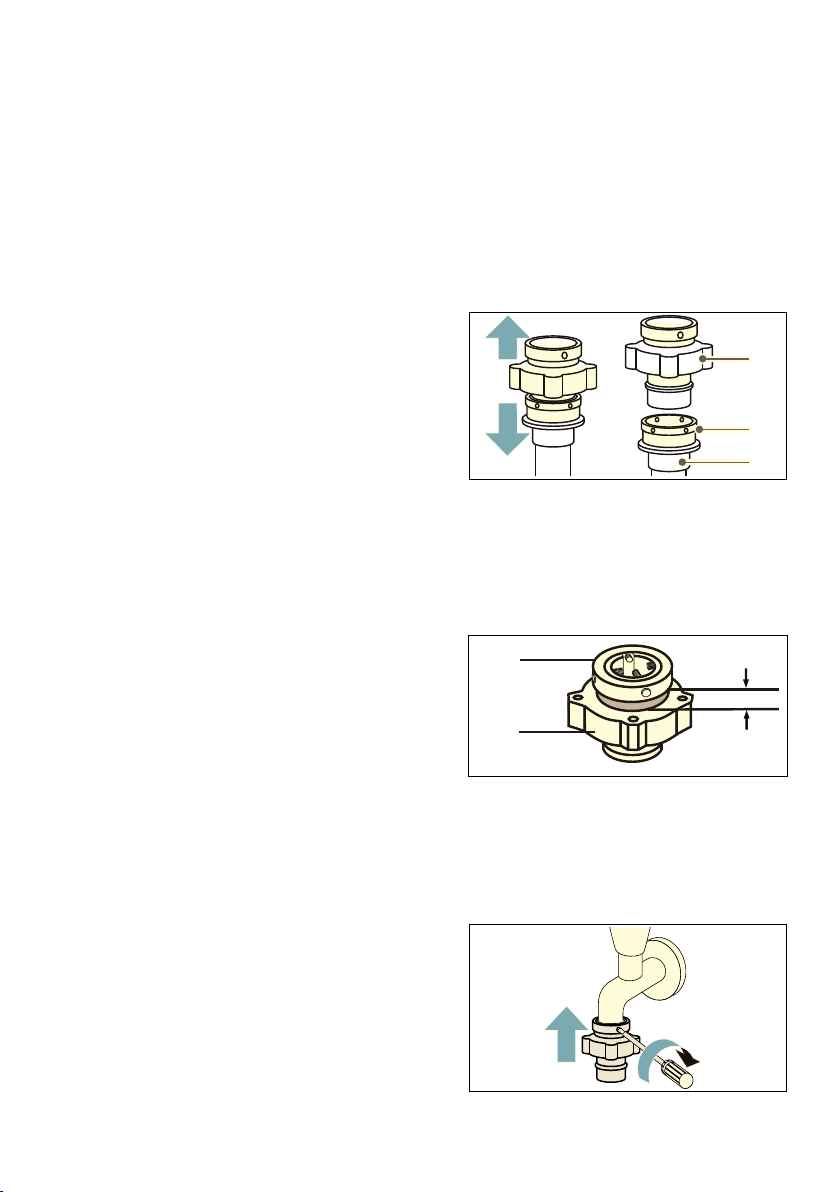
Connection to the universal tap
adapter
Note: When connecting to a threadless
tap, fit the supplied adapter first.
1. Slide the sliding sleeve downwards
from the snap connector (all balls
must be exposed) and then
disconnect the snap connector from
the connection socket.
2. Turn part B of the connection socket
until the clearance between part A
and part B is at least 5 mm.
3. Unscrew all of the screws from
part A.
4. Slide the connection socket over the
tap opening and then screw the
screws tightly back into part A.
( Connection socket
0 Exposed balls
8 Snap connector
âPP
$
%
Installing and connecting the appliance en
7
Note: Ensure the following:
■ The tap's opening is smooth and
even.
■ The seal is positioned centrally with
respect to the tap opening.
5. Retighten part B.
6. Slide the sliding sleeve downwards
from the snap connector (all balls
must be exposed), insert the snap
connector into the connection socket
and slide it upwards.
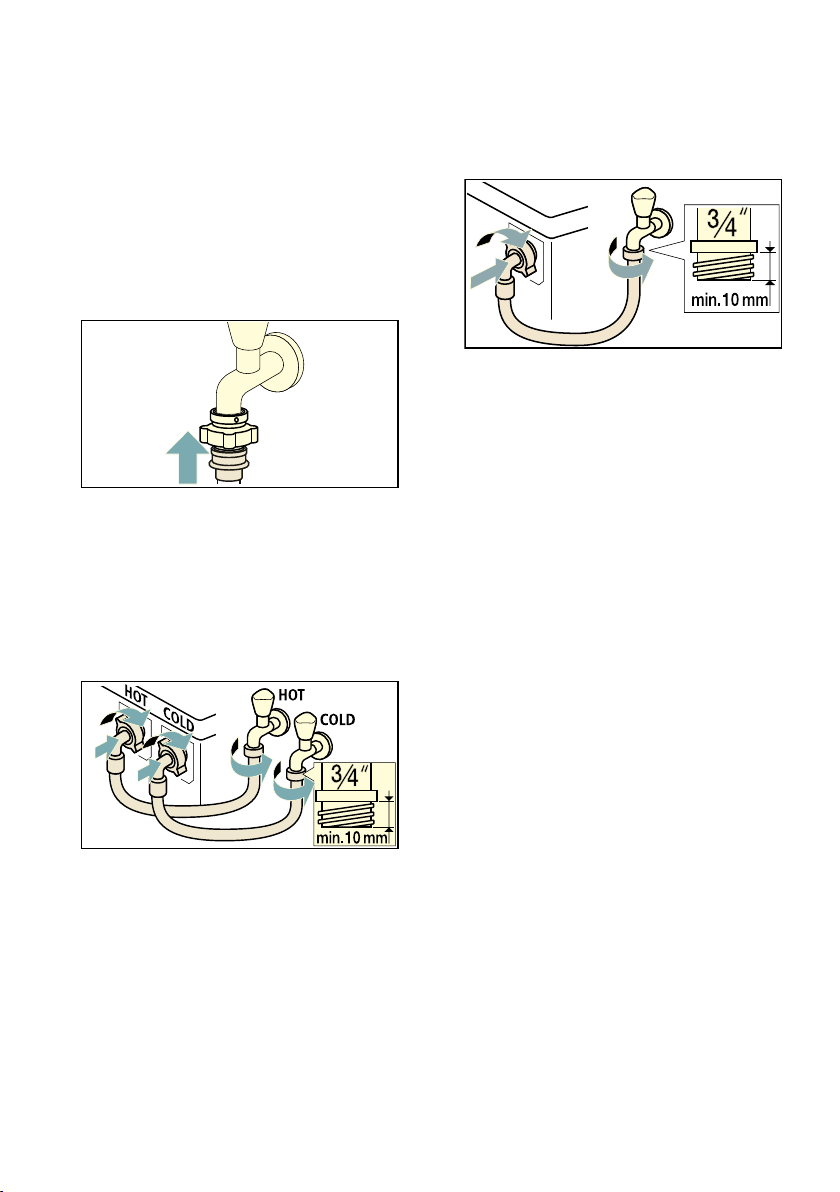
Model with hot water supply:
1. Connect the red-marked hot water
supply hose to the hot water tap (¾";
max. 60 °C) and to the red valve on
the appliance, and connect the blue-
marked cold water supply hose to
the cold water tap (¾") and to the
blue valve on the appliance.
2. Carefully turn on the taps and check
that there are no leaks.
Notes
– The threaded connection is
subject to high water pressures.
– Both hoses must be connected in
order for the appliance to work
correctly.
Model without hot water supply:
1. Connect the water supply hose to
the tap (¾") and to the valve on the
appliance.
2. Carefully turn on the taps and check
that there are no leaks.
Note: The threaded connection is
subject to high water pressures.
Water drainage
Caution!
Water damage
When water is being pumped away, the
drain hose is under high water pressure
and may slip out of the wash basin or
connection point.
Secure the drain hose so that it cannot
slip out.
Caution!
Damage to the appliance/laundry
If the end of the drain hose is immersed
in the drained water, water may be
sucked back into the appliance and
may damage the appliance/laundry.
Make sure that:
■ The wash basin outlet is not blocked,
■ The end of the drain hose is not
immersed in the drained water,
■ The water drains away quickly
enough.
en Installing and connecting the appliance
8
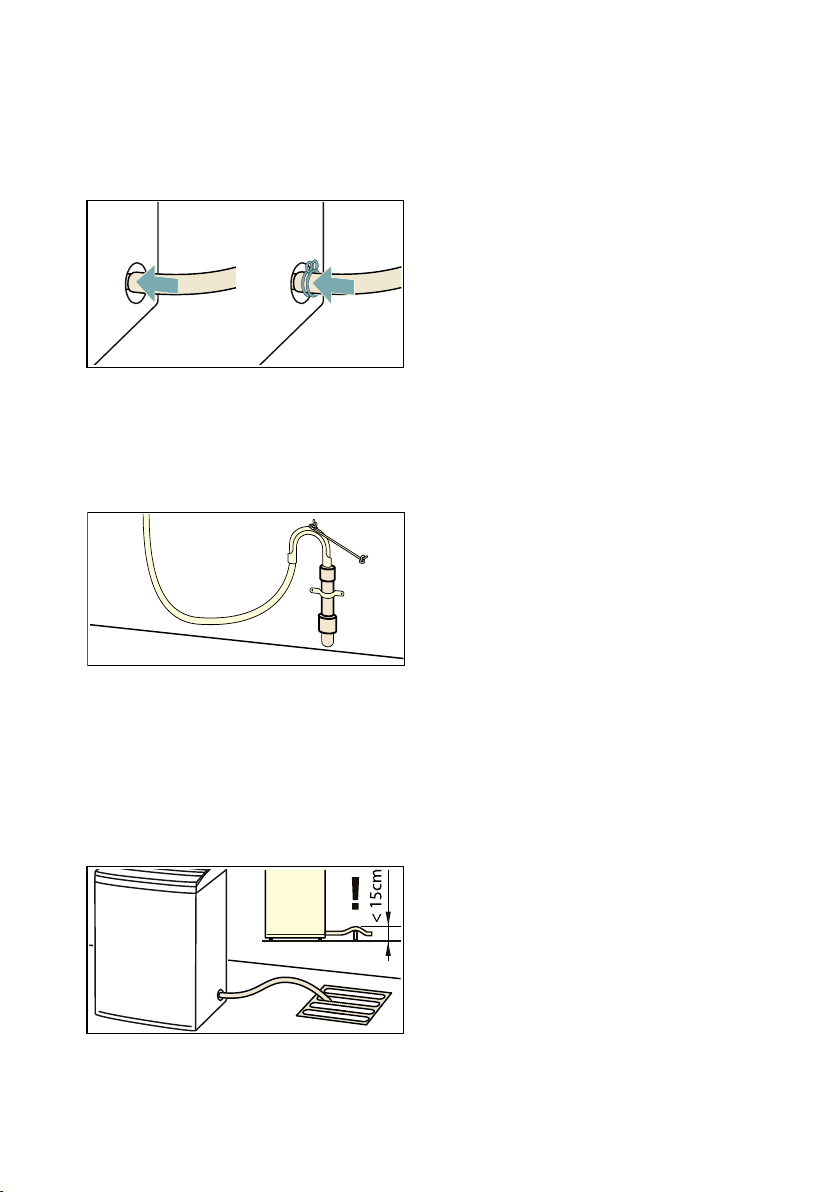
Connect the water drain hose as
follows:
1. Use the spring clip to secure the
water drain hose to the outlet on the
appliance.
Note: Only for appliances with a
separate water drain hose.
2. Second end of the water drain hose
– For models with a pump, attach it
to a waste pipe or hang it in a
wash basin.
Note: The height difference between
the surface on which the appliance
is installed and the drain pipe must
be between 86 and 100 cm,
depending on the product
variant.~ Page 5
– For models without a pump,
secure it in a floor drain.
Notes
– The height difference between
the surface on which the
appliance is installed and the
water drain hose should be no
more than 15 cm.
– If you extend the drain hose, its
total length should be no more
than 3 m. Otherwise, the water
will not be able to drain away
properly.
Electrical connection
:Warning
Risk of electric shock/fire/material
damage/damage to the appliance!
If the appliance is not installed properly,
this may lead to a dangerous situation.
Ensure the following:
■ The mains voltage on your power
socket must match the rated voltage
specified on the appliance
(identification plate). The connected
loads and the required fuse
protection are specified on the
identification plate.
■ The appliance must only be
connected to alternating voltage via
a protective contact socket that has
been correctly installed. This plug
socket must be freely accessible at
all times.
■ The mains plug and the protective
contact socket must match and the
earthing system must be correctly
installed.
■ The installation must have an
adequate cross section.
■ The mains plug must be freely
accessible at all times. If this is not
possible, in order to comply with the
relevant safety regulations, a switch
(all pole disconnection) must be built
into the permanent installation in
accordance with electrical
installation regulations.
Installing and connecting the appliance en
9
■ If using a residual current circuit
breaker, only use one that bears the
following mark: z. The presence of
this mark is the only way to be sure
that it fulfils all the applicable
regulations.
Connect the appliance to the mains
power supply as follows:
1. Plug the appliance's mains plug into
the designated socket.
2. Check that the mains plug is in
securely.
Levelling the appliance
Level the appliance as follows:
Adjust the height of the appliance feet
to level the appliance. Tighten the lock
nuts on all the appliance's adjustable
feet against the housing. As you do so,
hold the foot tight and do not adjust its
height. Use the spirit level to check
whether the appliance is level.
Note: If the appliance is ever moved,
check that it is still level and re-level it if
necessary.
Before using the appliance for
the first time
Before you switch on the appliance:
Check that there is no visible damage to
the appliance. Do not operate the
appliance if it is damaged. Should you
have any problems, please contact your
specialist dealer or our after-sales
service.
Your appliance has been thoroughly
tested before leaving the factory. To
remove any water that may be left over
from testing, run the first wash cycle
without any laundry.
Run a program without laundry as
follows:
1. Press # to switch on the appliance.
2. Set the Tub clean/Tub Clean
program.
3. Open the appliance lid (but do not
place any laundry inside).
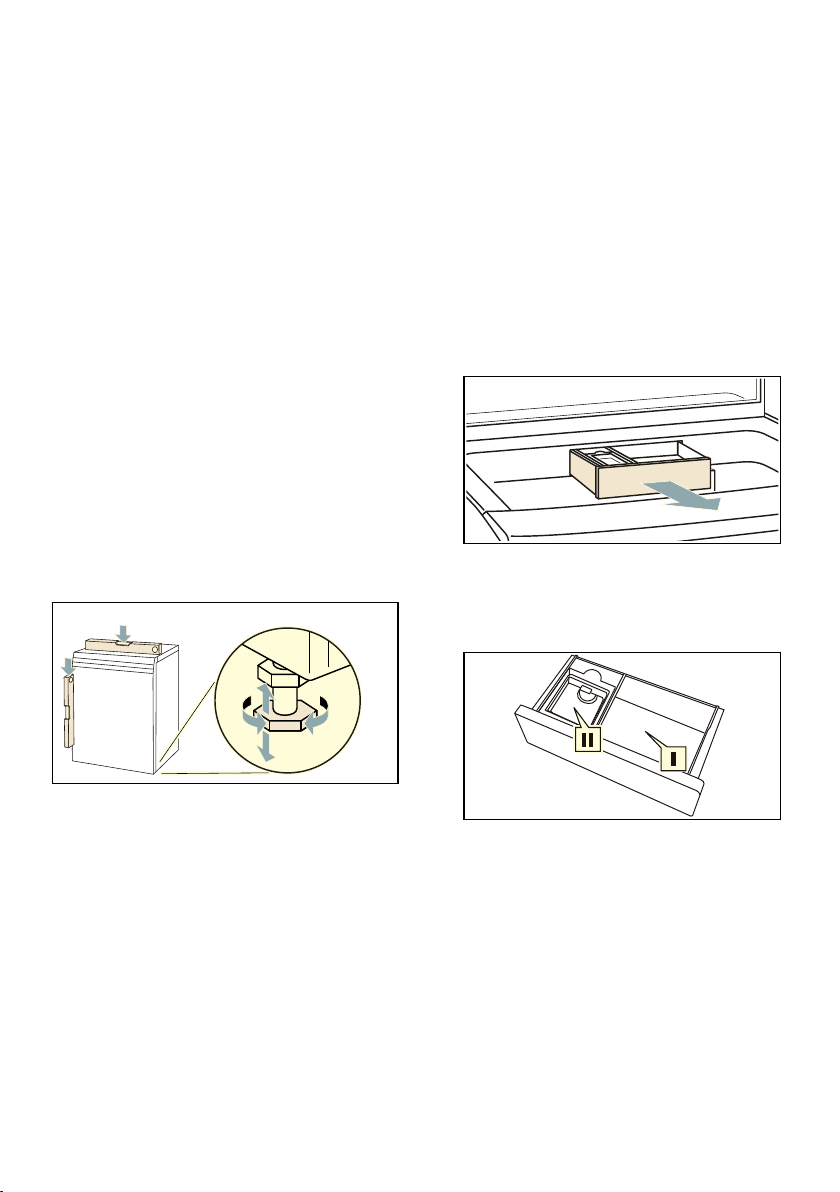
4. Pull out the detergent drawer.
5. Fill compartment I with washing
power, or fill compartment II with
liquid detergent.
6. Close the detergent drawer.
7. Press A.
The program will start.
8. Switch off the appliance at the end of
the program.
Your appliance is now ready to use.
en Quick reference guide
10
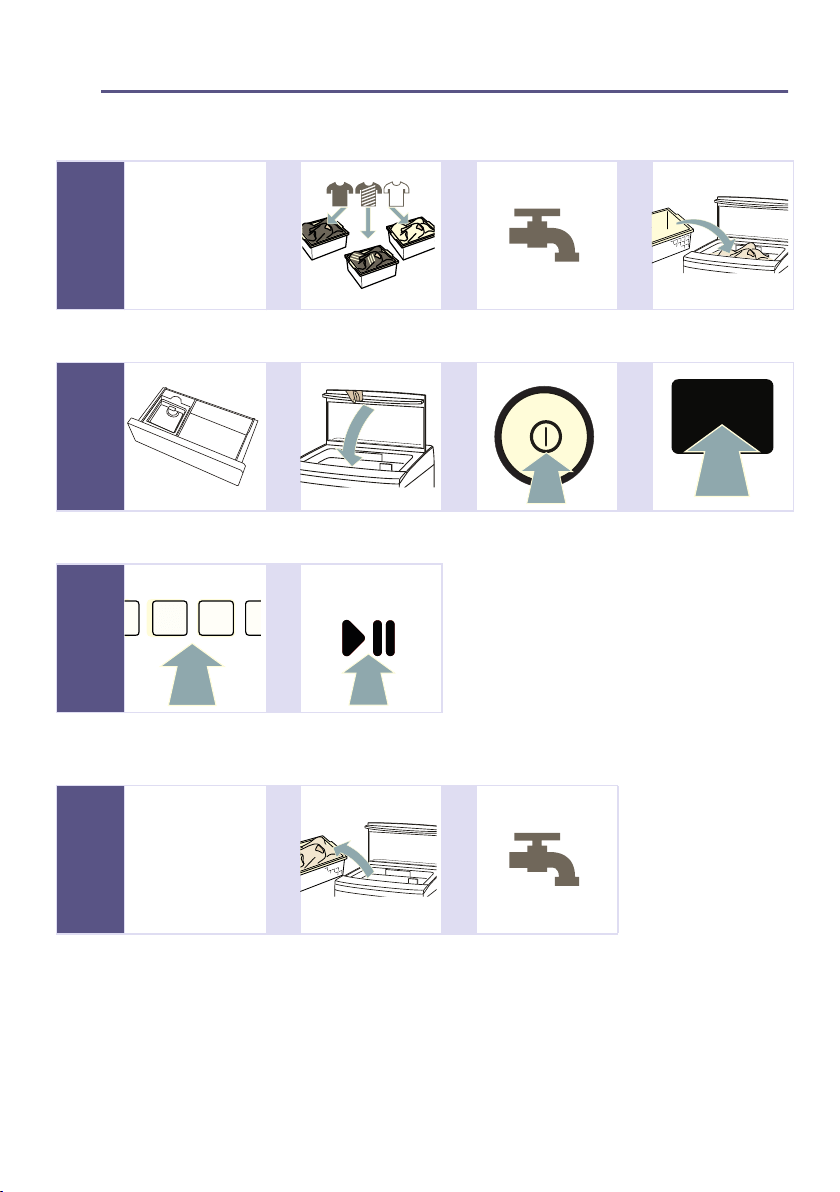
9 Quick reference guide
Quick reference guide
--------
--------
--------
--------
1
Before starting
the program:
@ @ @
Sort the laundry. Turn on the water
tap.
Load the laundry.
2 @ @ @
Add detergent. Close the appliance
lid.
Switch on the
appliance.
Set a program.
3 @
If necessary, adjust
the programme
settings.
Start the
programme.
4
Once the
programme has
ended:
@ @
Open the lid and
remove the laundry.
Turn off the tap.

Familiarising yourself with your appliance en
11
* Familiarising yourself with your appliance
Familiari sing yourself with your appliance
Appliance overview
#
( Control and display panel
0 Filter bag
8 Detergent drawer
@ Appliance lid
en Familiarising yourself with your appliance
12
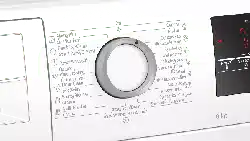
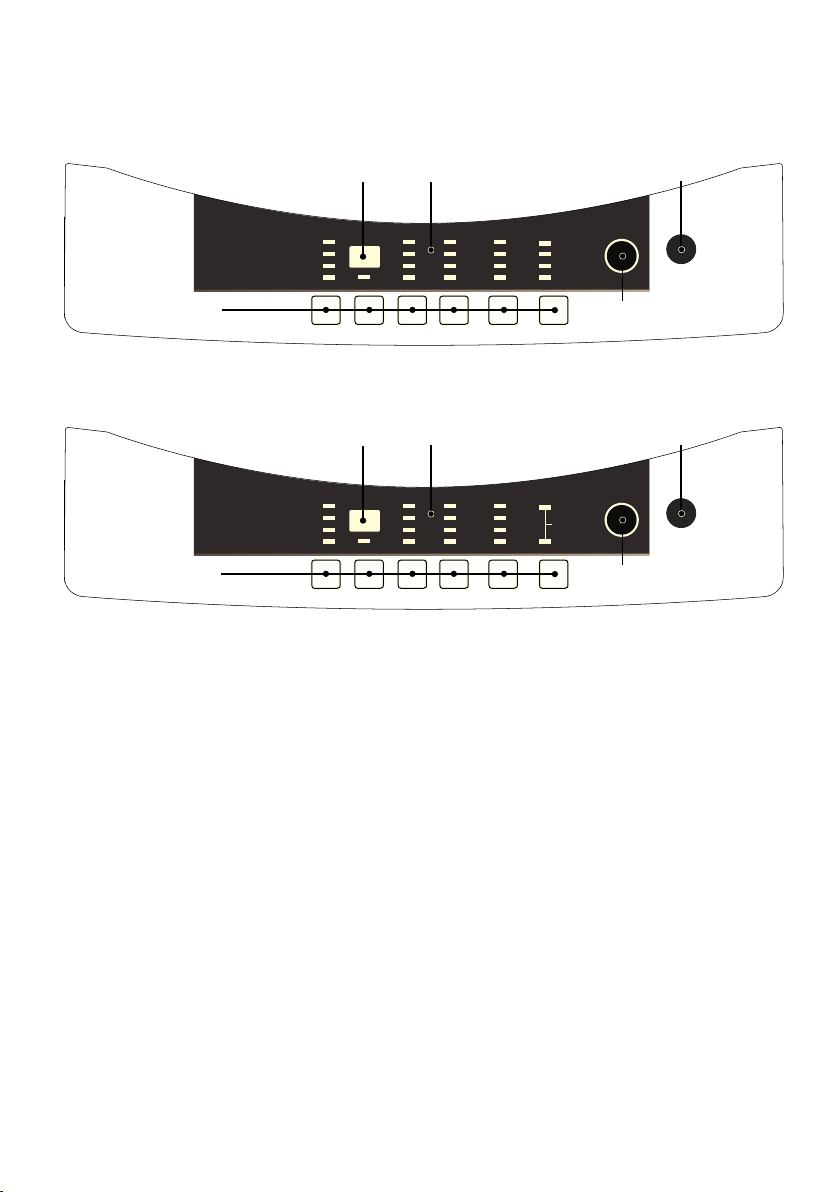
Panel
Model without a hot water supply hose:
Model with a hot water supply hose:
#
+
#
+
( Main switch
Press this button to switch the appliance on or off.
0 Display
Displays settings and information. ~ Page 13
8 Display panel
Displays settings and information.
@ Buttons
To set a program and adjust the program settings.~ Page 16
H Start button
To start or interrupt a program or select the automatic program.

Display en
13
Y Display
Display
--------
Number/code Description Information
e.g. 50 Program duration Expected program duration in minutes.
e.g. 04 Program start
delay
Delay to the program start in hours if you have activated the Delay
start/Delay Start program setting.
E1 Water supply The machine is not filling with water properly (unable to reach default
water level). Make sure that:
■ The tap is fully open.
■ The supply hose is not kinked or trapped.
■ The filter in the water supply is not blocked. ~ Page 28
E2 Water outlet The drain pump or drain hose/drain pipe is blocked:
■ Clean the drain pump ~ Page 24
■ Clean the drain hose/drain pipe
E3 Open lid The lid must be fully closed when a program is in progress.
■ Close the lid and press the Start button
■ Remove any trapped laundry
E4 Unbalanced load ■ The laundry is not evenly distributed in the drum, creating an
imbalance.
Note: The appliance has an unbalanced load detection system,
which interrupts the spin cycle when the laundry is unevenly dis-
tributed.
Redistribute the laundry by hand to eliminate the imbalance.
■ Adjust the height of the appliance feet to level the appliance.
~ Page 9
CL Note The lid has been opened while the child lock/Child Lock/Child
lock was active.
1. Switch off the appliance.
2. Wait 5 seconds.
3. Switch the appliance on again.
F0-F8 Other faults 1. Switch off the appliance.
2. Wait 5 seconds.
3. Switch the appliance on again.
If the fault occurs repeatedly, call the after-sales service.

en Programme overview
14
/ Programme overview
Programme overview
Note: You can only adjust the duration of the wash and spin cycle on models
without a hot water supply hose.
Program/type of laundry/information Load size
Name of program
Brief explanation of the program and the items for which it is suitable.
Recommended load (in
relation to the maxi-
mum load
~ Page 30)
Cotton/Daily Wash
Hard-wearing items made of cotton, linen or blended fabrics
Full load
Delicates/Soft
For delicate washable items, e.g. made of satin, synthetic fibres or blended fab-
rics.
Note: Use a detergent that is suitable for machine-washing delicate fabrics.
1/2 load
Quick/Quick Wash
Suitable for small items of lightly soiled laundry.
1/3 load
Jeans
For dark-coloured items made of cotton or easy-care fabrics.
Note: Turn items inside-out before washing.
Full load
Blanket/Bed sheets
For washing large items of laundry, e.g. bedding and curtains. For synthetic fab-
rics and curtains.
Notes
■ To prevent excessive foaming, remove air from laundry items by rolling them
up before you wash them.
■ Use a detergent that is suitable for machine-washing curtains.
■ Use a detergent that is suitable for machine-washing delicate fabrics and use
sparingly.
Full load
Intensive
Hard-wearing items made of cotton, linen or blended fabrics. Program with a high
water level and long wash, rinse and spin cycles. Suitable for heavily soiled laun-
dry.
Full load
Soak/Dynamic Soak/Refresh
Before the main wash cycle starts, the laundry remains in the water for 30 min to
remove heavy soiling. To be used for particularly stubborn soiling.
Note: To avoid discolouration, only soak laundry of the same colour together.
Full load
Allergy +/Hygenic Wash/Baby Wash
Program with an extended rinsing time for reducing detergent residue. Suitable
for washing baby clothes.
1/3 load

Programme overview en
15
--------
Tub clean/Tub Clean
Program for cleaning and caring for the drum and the impeller, e.g. before run-
ning the first wash cycle or if an odour has developed after an extended period of
non-use.
Notes
■ We recommend running this program once a month.
■ Run the Tub clean/Tub Clean program without any laundry.
■ Use standard washing powder or a detergent that contains a bleaching
agent. To prevent foaming, only use half the amount of detergent recom-
mended by the detergent manufacturer. Do not use detergents intended for
woollens or delicates.
Empty
Drum drying
Program for drying the drum in order to prevent odours developing as a result of
residual water.
Empty
Auto Start/One Touch Start
The washing program and water level are set automatically depending on the
load.
Note: The washing program starts immediately and the program duration is
shown on the display. Ensure the following beforehand:
■ The laundry is placed into the drum.
■ The detergent has been added.
Setting Auto Start/One Touch Start:
1. Press # to switch on the appliance.
2. Press A.
Note: If laundry is heavily soiled, chose a program suitable for the type of fabric.
-
Rinse
Laundry is rinsed and then spun, and the rinsing water is pumped away.
Setting the Rinse program:
1. Press # to switch on the appliance.
2. Press O Rinse.
3. On models without a hot water supply hose: Use the N wash/Wash button
to select the duration of the wash cycle.
On models with a hot water supply hose: Use the Function button to dese-
lect the wash/Wash program step.
4. Press A.
-
Spin
Laundry is spun only, and the rinsing water is then pumped away.
Setting the Spin program:
1. Press # to switch on the appliance.
2. Press 0 Spin.
3. Press A.
-

en Programme overview
16
0 Buttons
Program setting Function
Once you have set a program, you will be shown default program settings. These are recommendations for
the set program and may vary. Depending on the program, you can adjust or activate/deactivate the pro-
gram settings to optimise the washing process for your laundry.
You can find out how to adjust program settings on ~ Page 19
N wash/Wash Once the programme has been set, the wash cycle's preset duration will be dis-
played.You can adjust the duration of the wash cycle.
Function Selecting and deselecting program steps:
Once you have set the program you require, the default program steps are displayed.
You can select and deselect program steps.
Setting the Spin program:
Once you have switched on the appliance, you can press this button to set the Spin
program.
O Rinse Adjusting the number of rinse cycles:
Once the program has been set, the preset number of rinse cycles will be displayed.
You can adjust the number of rinse cycles if required.
Rinse Hold:
If final spinning is not selected, the laundry will remain in the water after the final
rinse.
For reducing creasing when the laundry is not taken out of the appliance immediately
after the program ends.
Note: To drain the water and spin the laundry, select the Spin program.
0 Spin Adjusting the duration of the spin cycle:
Once the program has been set, the spin cycle's default duration will be displayed.
You can adjust the duration of the spin cycle if required.
Program When you switch on the appliance, the Auto Start/One Touch Start program is set
by default. If required, you can change the program before the program starts.
Water Level Once the program has been set, the program's default water level will be displayed.
You can adjust the water level if required.
Notes
■ If the water level is not shown on the display, the program you are using is one in
which the appliance automatically adjusts the water level according to the size of
the load. You can still manually adjust the water level when using these programs
if you need to.
■ Only set a low water level for light loads.

Programme overview en
17
--------
Temp. cold/Cold: Draw water from the cold water supply hose only.
warm/Warm: Draw water from the hot and cold water supply hoses.
hot/Hot: Draw water from the hot water supply hose only.
Note: Depending on the appliance specifications, water may be drawn from both hot
and cold water supply hoses in the hot/Hot setting.
Delay start/Delay
Start
You can use the Delay start/Delay Start button to delay the time at which
the program starts by up to 24 hours.
Your chosen time in hours, e.g. 8 h, is shown on the display and counts down until the
program starts. Once the program has started, the program duration will be dis-
played.
Note: If you activate the Delay start/Delay Start program setting, the Auto Start/
One Touch Start function will not be available.
en Laundry
18
Z Laundry
Laundry
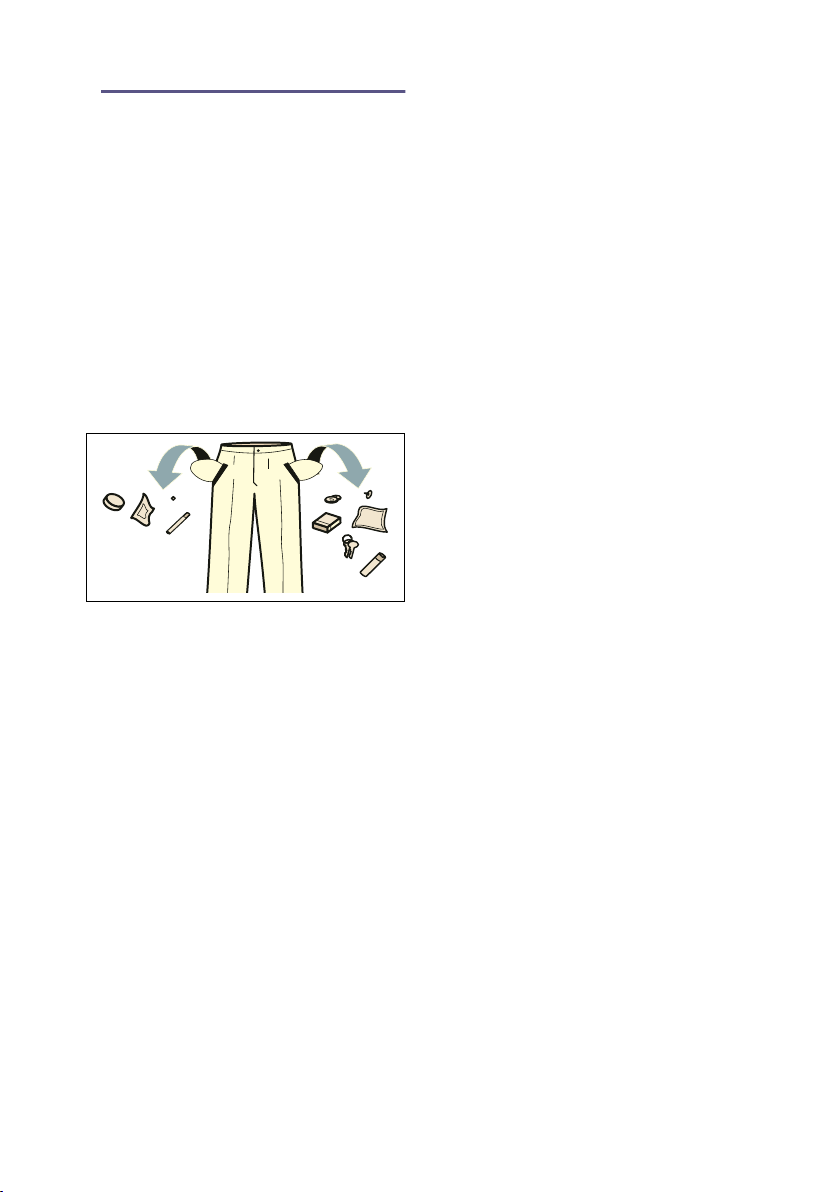
Preparing the laundry
Caution!
Risk of damage to the drum and
laundry
Leaving objects in the pockets of your
clothing can cause damage to the drum
and laundry when the appliance is in
operation. Remove all objects (e.g.
metal items) from clothing pockets.
Prepare the laundry as follows:
■ Empty all pockets.
■ Tie cloth belts, apron strings, etc.
together.For small items of laundry,
such as socks and stockings, use a
laundry bag.
■ Always wash small and large items
of laundry together.
■ Close any zips, Velcro, hooks, loops
or buttons.
■ Brush sand out of pockets and
collars.
■ Remove curtain fittings or place
curtains in a laundry bag.
■ Pre-treat stains while they are fresh.
First, dab stains with soapy water
without rubbing them.
Note: Stubborn or dried-in stains
can sometimes only be removed by
washing several times.
Sorting laundry
Sort your laundry according to the care
instructions and the manufacturer's
information on the care labels, using the
following criteria:
■ Type of fabric/fibre
■ Colour:
Laundry may become discoloured.
Wash white and coloured laundry
separately. Wash new coloured
items on their own the first time you
wash them.
■ Soiling:
Wash laundry with the same level of
soiling together.
■ Care labels:
The following symbols tell you which
programs you can and cannot use.
The numbers in the symbols indicate
the maximum recommended
washing temperature.
M Suitable for a normal washing
process, e.g. the Cotton/Daily
Wash program.
N A gentle washing process is
required, e.g. the Delicates/
Soft program.
O A particularly gentle washing
process is required, e.g. the
Delicates/Soft program.
Ž Do not machine wash.

Operating the appliance en
19
1 Operating the
appliance
Operating the appliance
Switching on the appliance
and setting a programme
Note: The appliance must be correctly
installed and connected. ~ Page 4
1. Press # to switch on the appliance.
2. Press Program repeatedly to set the
washing program you require.
Note: To set the Rinse, Spin und
Auto Start/One Touch Start
programs, follow the instructions in
the program overview.~ Page 14
The corresponding indicator light will
light up/flash and the default
program settings will be shown on
the display panel.
3. Adjust the programme settings if
required.
Programme settings
Once you have set a program, you will
be shown default program settings.
Before the program starts, you can
adjust or activate/deactivate the
settings that can be selected. An
overview of all the settings that can be
selected can be found from
~ Page 16 onwards.
You can do the following to program
settings:
■ Activate/deactivate them
■ Adjust them
Adjusting or activating/deactivating:
Press the button for the relevant
programme setting repeatedly.
The indicator lights for the activated
programme settings will be continuously
lit/will flash and the values shown on the
display may change.
Placing the laundry into the
drum
Note: Do not exceed the appliance's
maximum load. If you overload the
appliance, it will not be able to wash the
laundry as effectively and the laundry is
more likely to crease.~ Page 30
1. Prepare and sort the laundry.
2. Open the lid.
Check that the drum is completely
empty. Empty it if necessary.
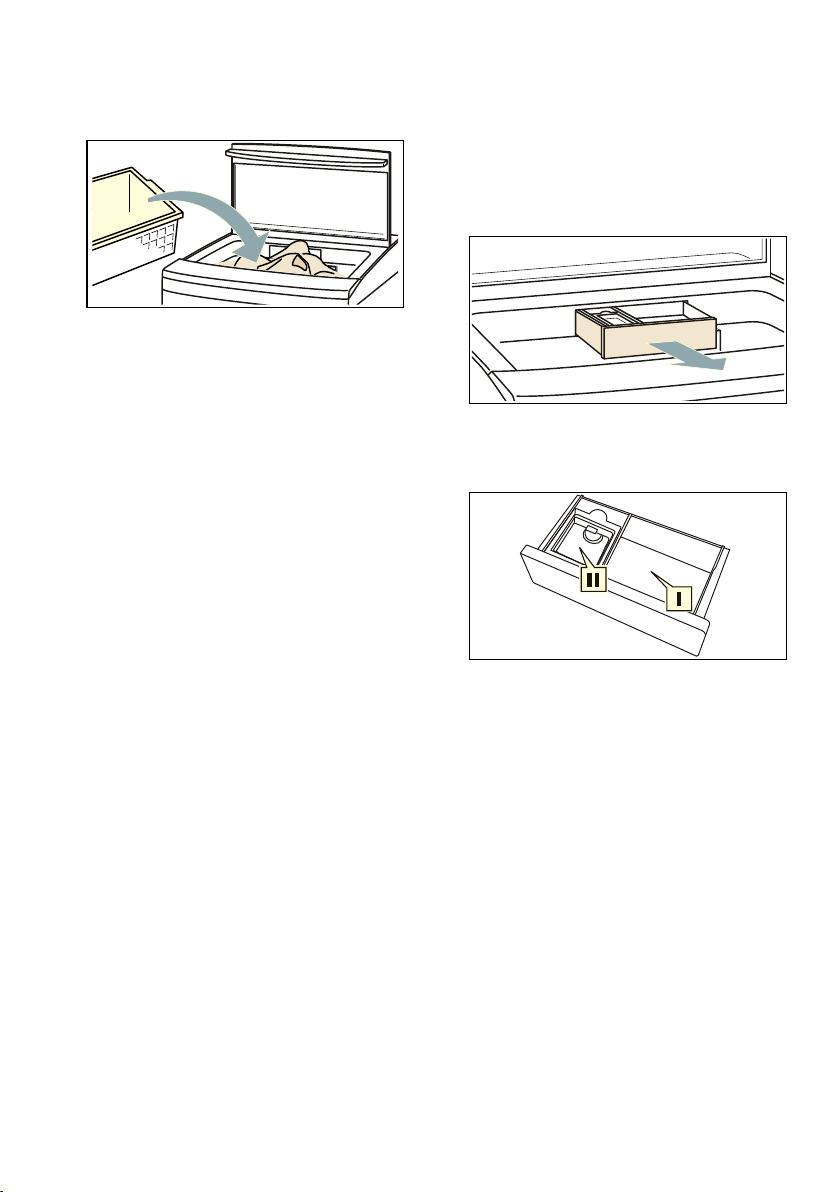
en Operating the appliance
20
3. Load the laundry unfolded into the
drum.
4. Close the lid.
Caution!
Risk of material damage to the
appliance or laundry.
Make sure that laundry is not
trapped in the lid.
Adding detergent and fabric
care products
Caution!
Risk of material damage and damage
to the appliance
If you use the wrong quantity of
detergent or cleaning product, this may
cause material damage or damage to
the appliance.
Use detergents/care products/cleaning
products in accordance with the
manufacturers' instructions.
Caution!
Risk of material damage and damage
to the appliance
Cleaning products and products for pre-
treating laundry (e.g. stain removers,
prewash sprays, etc.) may cause
damage if they come into contact with
the surfaces of the appliance. Therefore
please note:
■ Do not allow these products to come
into contact with the surfaces of the
appliance.
■ Clean the appliance with nothing but
water and a soft, damp cloth.
■ Remove all detergent residue, spray
residue or other residues
immediately.
1. Pull out the detergent drawer.
2. Add detergent and/or laundry care
products.
3. Push in the detergent drawer.
Notes
■ Do not mix different detergents.
■ Follow the detergent dosage
instructions on the label on the
detergent packaging.
I Compartment for washing
powder, water softener,
bleaching agent and stain
remover
II Compartment for liquid
detergent.

Operating the appliance en
21
Starting a programme
Press A.
Either the programme duration or, if you
have delayed the programme start, the
Delay start/Delay Starttime, is shown in
the display.
Note: If you want to prevent the
programme from being adjusted
inadvertently, you can activate the
childproof lock.
Childproof lock
Once the program has started, you can
lock the appliance to prevent the
functions you have set from being
changed inadvertently. To do this,
activate the childproof lock.
Activating/deactivating the child lock/
Child Lock/Child lock:
Press and hold the N wash/Wash//
Program and O Rinse buttons at the
same time for approximately 3 seconds.
The child lock/Child Lock/Child lock
indicator light changes depending on
the previous status.
Notes
■ If you open the lid while the
childproof lock is activated, a signal
will sound and the error code E3 will
be displayed. If the lid is not closed
and the A button pressed within 20
seconds, the appliance will
automatically pump water away and
display the error code CL until you
switch off the appliance.
■ When the childproof lock is active,
the appliance can be switched off
via the main switch. The childproof
lock will be deactivated when the
appliance is switched off.
Pausing programmes and
adding more laundry
1. Press A.
The appliance will pause the
program.
2. If you need to, you can add more
laundry or remove laundry.
3. Press A to resume the program.
Notes
■ If you pause the appliance for more
than 1 hour, it will automatically
switch off.
■ When the wash and spin cycles are
in progress, make sure that you
pause the appliance before opening
the lid.
Cancelling the programme
Once the program has started, you can
cancel it at any time:
1. Press # to switch off the appliance.
2. Press # to switch the appliance
back on.
3. Open the lid and remove the laundry
or start a new program.
Notes
■ When you start a new program, the
appliance will first check the current
water level and, if necessary, pump
some of the water away.
■ If the water level is high or there is a
high level of residual moisture in the
laundry, run the Spin program
before taking out your laundry.
Resuming the programme
when the programme status is
Rinse Stop
1. Press # to switch on the appliance.
2. Press 0 Spin to set the Spin
program and to adjust the duration
of the spin cycle.
3. Press A.

en Sensors
22
Programme end
At the end of the program, a signal will
sound and then the appliance will
switch off automatically.
Removing laundry and
switching off the appliance
1. Remove the laundry.
2. Turn off the tap.
Notes
■ Risk of rusting: Remove any foreign
objects from the drum.
■ Leave the lid and detergent drawer
open so that residual water can
evaporate.
H Sensors
Sensors
Unbalanced load detection
system
The automatic unbalanced load
detection system detects imbalances
and ensures that laundry is distributed
evenly by repeatedly starting to spin the
drum and activating additional rinse
cycles.
Note: Mix items of laundry of varying
sizes. Laundry items of different sizes
distribute themselves better during the
spin cycle. Individual laundry items may
cause an unbalanced load.
Continuous automatic load
adjustment function
The continuous automatic load
adjustment function adjusts the water
level according to the load in the drum.

Cleaning and maintenance en
23
D Cleaning and
maintenance
Cleaning and maintenance
Cleaning/Maintenance
:Warning
Risk of death!
The appliance is powered by electricity.
There is a risk of electric shock if you
come into contact with live components.
Therefore please note:
■ Switch off the appliance. Disconnect
the appliance from the power supply
(pull out the plug).
■ Never take hold of the mains plug
with wet hands.
■ When removing the mains plug from
the socket, always take hold of the
plug itself and never the mains
cable, otherwise this may damage
the mains cable.
■ Do not make any technical
modifications to the appliance or its
features.
■ Repairs and any other work on the
appliance must only be conducted
by our customer service or by an
electrician. The same applies for
replacing the mains cable (when
necessary).
■ Spare mains cables can be ordered
from our customer service.
:Warning
Risk of poisoning!
Poisonous fumes may be given off by
cleaning agents that contain solvents,
e.g. cleaning solvent.
Do not use cleaning agents that contain
solvents.
:Warning
Risk of electric shock/material
damage/damage to the appliance!
If moisture penetrates the appliance,
this may cause it to short circuit.
Do not use a pressure washer, steam
cleaner, hose or spray gun to clean
your appliance.
:Warning
Risk of injury/material damage/
damage to the appliance!
The use of spare parts and accessories
supplied by other brands is dangerous
and may result in injury, material
damage or damage to the appliance.
For safety reasons, use genuine spare
parts and accessories only.
Caution!
Material damage/damage to the
appliance
Cleaning agents and agents for
pretreating laundry (e.g. stain removers,
prewash sprays, etc.) may cause
damage if they come into contact with
the surfaces of the appliance. Therefore
please note:
■ Do not allow these agents to come
into contact with the surfaces of the
appliance.
■ Clean the appliance with nothing but
water and a soft, damp cloth.
■ Remove any detergent, spray or
other residues immediately.
en Cleaning and maintenance
24
Cleaning the drum
To prevent odours from developing and
to clean the drum:
■ Run the Tub clean/Tub Clean
program, adding standard washing
powder but not any laundry.
Note: Do not use steel wool or
cleaning products containing
chlorine.
■ Make sure that the area in which the
appliance is installed is well
ventilated.
Descaling the appliance
Descaling should not be necessary if
the detergent is measured out correctly.
If you still wish to use descaler, follow
the manufacturer's instructions for use.
Caution!
Risk of material damage/damage to the
appliance
Unsuitable descaling agents, e.g.
dishwasher tablets or coffee machine
descalers, can cause material damage
and damage to the appliance.
Do not use unsuitable descaling agents
for this appliance. You can order
suitable descaling agents from our
website or from our after-sales service.
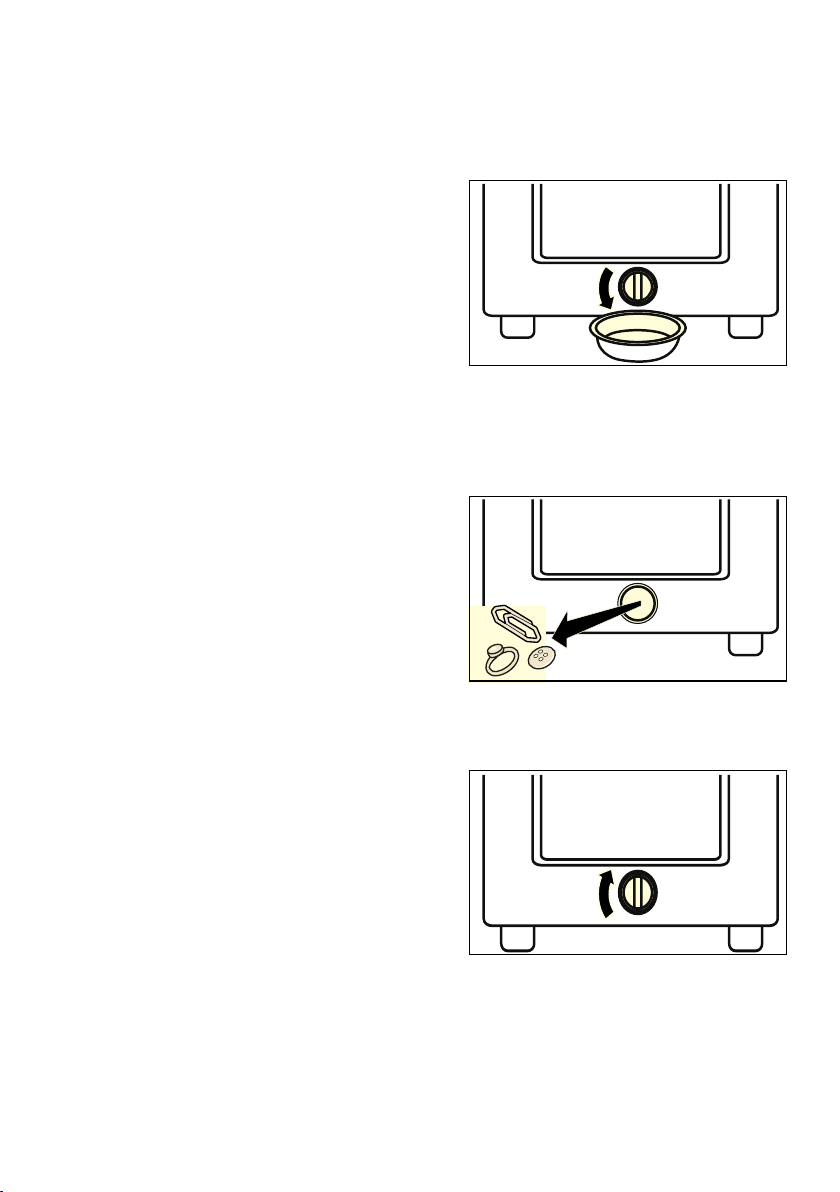
Cleaning the drain pump
Note: Only for appliances with a drain
pump and a maximum load of less than
14 kg.
1. Turn the pump cover on the back of
the appliance anti-clockwise to
remove it, and drain the washing
water into a suitable container.
2. Clean the inside and the thread on
the pump cover and pump housing.
Note: The impeller in the drain
pump must be able to rotate.
3. Put the pump cover back in place
and screw it back on fully.
You have now successfully cleaned the
drain pump.

Cleaning and maintenance en
25
Cleaning the lint filter
During the wash cycle, washing powder
residue and lint accumulate in the
drum's filters. Clean these filters after
every wash, as follows:
1. Remove the filter from the holder.
2. Remove the net bag,
*
clean it and
put it back in.
3. Place the filter back into the holder.
You have now successfully cleaned the
filter.
* Depending on the appliance
specifications

en Cleaning and maintenance
26
3 What to do in the event of a fault
:
Warning
Risk of injury!
If you reach into the drum while it is still rotating, you risk injuring your hands.
Wait until the drum has stopped rotating.
Help with the appliance
Faults Cause/remedy
The appliance will not start. Check the mains plug and the fuses.
The appliance is not filling with
water.
Check that:
■ You have pressed A.
■ The tap has been turned on and the water pressure is not too low.
■ The filter in the water supply is not blocked. ~ Page 28
■ The supply hose is not kinked or trapped.
The washing water is not drain-
ing.
Make sure that:
■ The drain pump has been cleaned. ~ Page 24
■ The drain pipe and the drain hose are clean.
■ Rinse Hold is not set.
■ The maximum height difference between the surface on which the
appliance is installed and the water drain hose has not been
exceeded. ~ Page 5
The program will not start. Make sure that:
■ The lid is closed.
■ You have pressed A.
Note: If the program start has been delayed by setting Delay start/
Delay Start, the program will start later.
Water is leaking from the
machine.
■ Make sure that the drain hose is properly secured and is not dam-
aged.
■ Check the threaded joint on the supply hose, and tighten it if neces-
sary.
More detergent than usual is
accumulating in the filter bag
and drum.
You have been using too much detergent. Make sure you follow the
detergent manufacturer's instructions.
There is detergent residue on
the laundry.
■ Some phosphate-free detergents contain water-insoluble residue.
■ Start the Rinse program.
The machine spins the drum
back and forth several times.
Not a fault – the unbalanced load detection system is adjusting an imbal-
ance.
Note: If the error E4 appears on the display, redistribute the laundry by
hand to eliminate the imbalance.

Cleaning and maintenance en
27
--------
Loud noises, vibrations or
machine movement during the
spin cycle.
Make sure that the appliance is completely level. ~ Page 9
Odours in the washing
machine.
Run the Tub clean/Tub Clean program.
Add standard washing powder or a detergent that contains a bleaching
agent.
Note: To prevent foaming, only use half of the amount of detergent rec-
ommended by the detergent manufacturer. Do not use detergents intend-
ed for woollens or delicates.
If you cannot rectify a fault yourself (after switching the appliance off and then on again) or a repair is re-
quired:
■ Switch off the appliance and pull the mains plug out of the socket.
■ Turn off the tap and call the after-sales service.
en Cleaning and maintenance
28
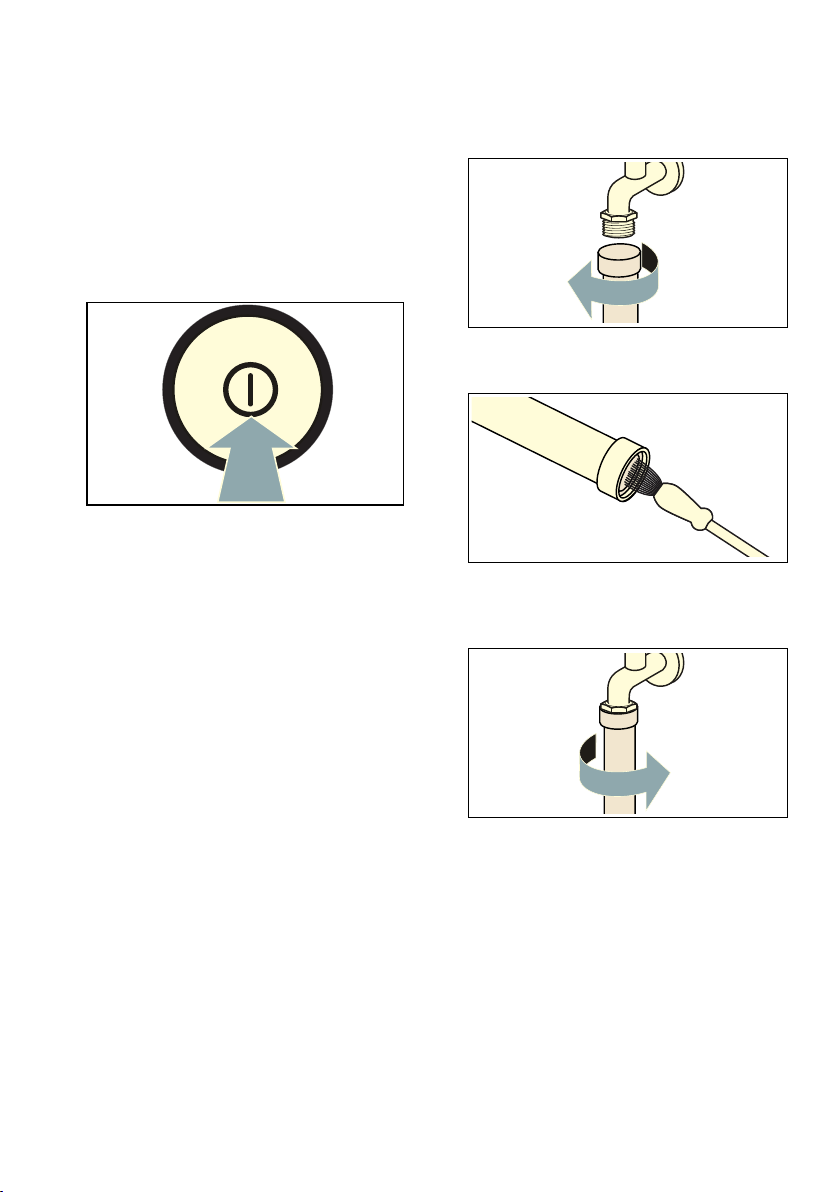
Filter in water supply blocked
Preparation:
1. Turn off the tap.
2. Set any programme (except Rinse/
Spin).
3. Press A.
Allow the programme to run for
approximately 40 seconds.
4. Press # to switch off the appliance.
5. Disconnect the appliance's mains
plug from the power supply.
Clean the filter on the tap as follows:
1. Disconnect the hose from the water
tap.
2. Clean the filter with a small brush.
3. Connect the hose and check for
leaks.
Transporting the appliance en
29
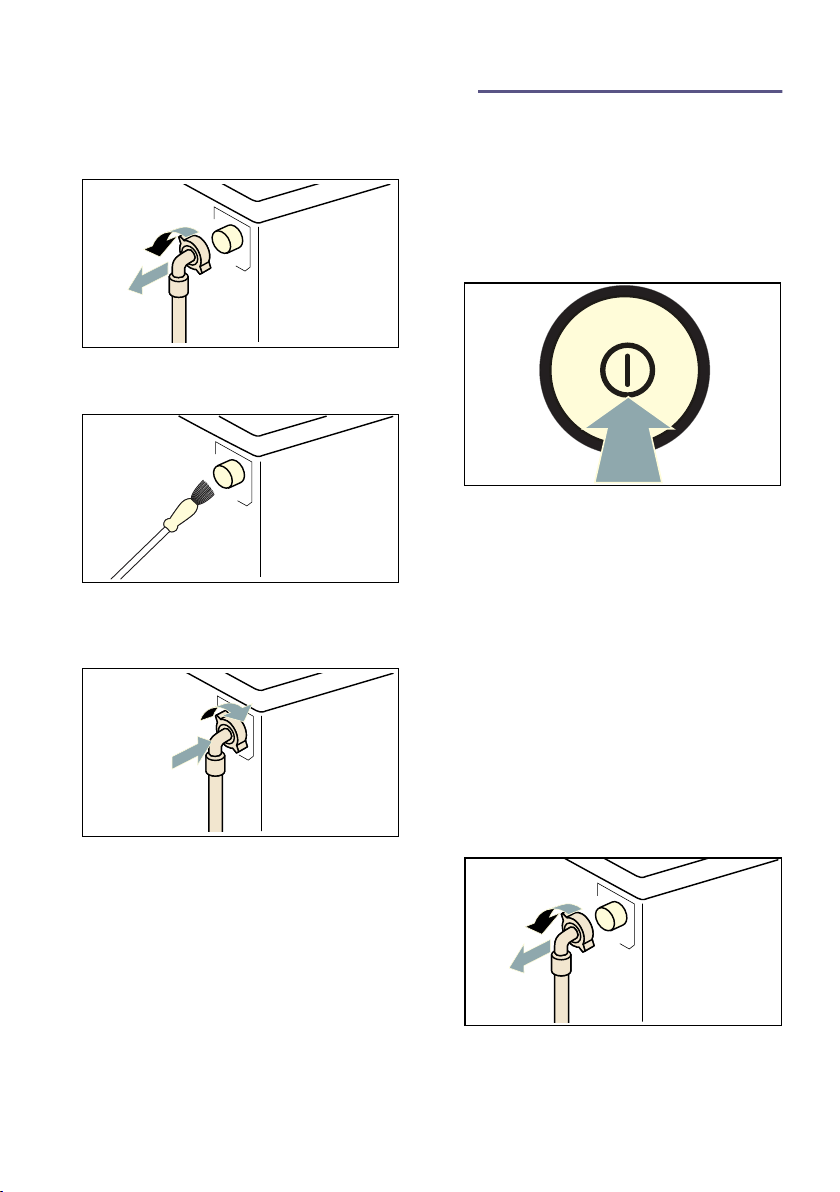
Clean the filter on the back of the
appliance:
1. Remove the hose from the rear of
the appliance.
2. Clean the filter with a small brush.
3. Reconnect the hose at the rear of
the appliance and check for leaks.
L Transporting the
appliance
Transport i ng the appliance
Prepare the appliance for
transportation as follows:
1. Turn off the tap.
2. Press # to switch on the appliance.
3. Run the Spin program without any
residual water or laundry.
~ Page 14
Note: For models without a pump,
place the drain hose on the floor and
drain the water.
4. Disconnect the appliance's mains
plug from the power supply.
5. For models with a drain pump, drain
the remaining washing water.
~ Page 24
Note: For models with a drain pump
and a maximum load of more than
13 kg, place the drain hose on the
floor and drain the water.
6. Remove the hoses.
Note: Always transport the appliance
upright.

en Technical specifications
30
{ Technical specifications
Technical specifications
Note: Check the voltage, frequency and maximum load on your appliance's rating
plate.
Models:
Water pressure (for all models):
0.3 - 8 bar
Dimensions
(in mm)
Weight
(in kg)
Rated voltage
(in V)
Rated power
(in W)
Rated
frequency
(in Hz)
Maximum
load
(in kg)
515 x 525 x 918 31 120 / 240 360 50 / 60 6.5
550 x 565 x 920/960 38 / 40 120 / 240 460 50 / 60 8
580 x 596 x 968 40 120 / 240 390 - 500 50 / 60 10
601 x 630 x 975 43 120 / 240 550 - 600 50 / 60 13

After-sales service en
31
4 After-sales service
After- sales service
If you cannot rectify the error yourself by
turning the appliance off and on again,
please contact our after-sales
service.~ Enclosed after-sales service
directory
We will always find an appropriate
solution and, where possible, prevent
the need for an engineer to visit.
Please provide the after-sales service
with the product number (E no.) and the
production number (FD) of the
appliance.
You can find this information:
On the inside of the lid and on the back
of the appliance.
You can trust in the manufacturer's
expertise.
Contact us for assistance. This will
ensure that the repair is carried out by
trained service engineers with genuine
spare parts.
E no. Product number
FD Production number
(1U )'

Robert Bosch Hausgeräte GmbH
Carl-Wery-Straße 34
81739 München, GERMANY
*9001345018*
9001345018 (9709)
Contact information for all countries can be found in the enclosed after-sales
service directory.