
Read and review instructions to understand operation and use of product.
Indicates the presence of a hazard that can cause personal injury, death or substantial
property damage if the warning included with this symbol is ignored.
Avoid contact with hot surface. Always use hand protection to avoid burns.
For outdoor use only.
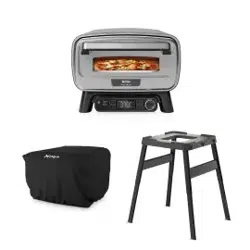
WOODFIRE OUTDOOR OVEN
OO101UK | Instructions
IMPORTANT SAFETY INSTRUCTIONS
HOUSEHOLD USE ONLY • READ ALL INSTRUCTIONS BEFORE USE
WARNING Failure to follow these instructions could result in electric shock, fire or
burn hazard which could cause property damage, personal injury, or death. When using electrical
appliances, basic safety precautions should always be followed, including the following:
1 To eliminate a choking hazard for young children, discard all packaging materials immediately upon
unpacking.
2 DO NOT use this appliance for anything other than its intended use.
3 DO NOT use in moving vehicles or boats. Misuse may cause injury.
4 DO NOT use indoors. This oven is designed for OUTDOOR USE ONLY in a well-ventilated area. If used
under any overhead cover, toxic fumes, including carbon monoxide, may accumulate and cause serious
bodily injury or death.
5 This appliance can be used by persons, including children, with reduced physical, sensory, or mental
capabilities or lack of experience and knowledge if they have been given supervision or instruction
concerning use of the appliance in a safe way and understand the hazards involved
6 To avoid property damage from flame or heat maintain a minimum distance of 92cm (3 feet) from rear,
sides and top to walls, rails or other combustible constructions.
7 Ensure the surface is level, stable, clean and dry. DO NOT place the appliance near the edge of the
surface the oven is placed on during operation.
8 Use care when opening the oven to avoid burns. ALWAYS open door partway before fully opening to
check for any flare up as some foods may cause fats, oils or grease to splash and create flare up or flame.
9 Children should be supervised to ensure that they do not play with the appliance. Keep the appliance and
its cord out of reach of children. DO NOT allow the appliance to be cleaned or maintained by children.
10 The appliance should be supplied through a residual current device (RCD) having a rated residual
operating current not exceeding 30mA. The appliance is to be connected to a socket-outlet having an
earthing contact.
11 A short power-supply cord is provided to reduce the risk of children grabbing the cord or becoming
entangled and to reduce the risk of people tripping over a longer cord. Longer detachable power-supply
cord or extension cords are available and may be used if care is exercised in their use.
12 To avoid property damage and burn injury from flame or heat, ALWAYS maintain a minimum safe
distance of at least 30cm (1 foot) from the pellet box during smoking. Small flames can come out from
the pellet box if the oven lid is lifted in windy conditions.
13 To avoid burn injury, ALWAYS use pellet scoop when adding pellets to smoker box. DO NOT add pellets
by hand.
14 To avoid burn injury and property damage, make sure the lid of the smoke box is fully closed to prevent
flames from escaping out of the smoke box.
15 Pellets may continue to burn after cook time is complete. Do not touch or remove the smoke box until
the oven has stopped smoking, pellets have completely burnt out and the smoke box has cooled.
16 To avoid personal injury and burns allow to cool before cleaning, disassembly, putting in or taking off
parts and storage.
TECHNICAL SPECIFICATIONS
Voltage: 220-240V~, 50-60Hz
Power: 2400W
RECORD THIS INFORMATION
Model Number: ��������������������
Serial Number: ���������������������
Date of Purchase: �������������������
(Keep receipt)
Store of Purchase: ������������������
REGISTER The PURCHASE
ninjakitchen.co.uk/registerguarantee
Scan QR code using mobile device
THANK YOU for purchasing the Ninja® Woodfire Outdoor Oven
www.ninjatestkitchen.eu
ninjakitchen.co.uk
Illustrations may dier from actual product. We are constantly striving to improve our products, therefore
the specifications contained herein are subject to change withoutnotice.
NINJA is a registered trademark in the United Kingdom of SharkNinja Operating LLC.
© 2023 SharkNinja Operating LLC
SharkNinja Europe Limited,
3150 Century Way,
Thorpe Park,
Leeds,
LS15 8ZB, UK
ninjakitchen.co.uk
SharkNinja Germany GmbH,
Rotfeder-Ring 9,
60327 Frankfurt am Main,
Germany
ninjakitchen.eu
OO101UK�IB�MP�230703�Mv2
Read and review instructions to understand operation and use of product.
Indicates the presence of a hazard that can cause personal injury, death or substantial
property damage if the warning included with this symbol is ignored.
Avoid contact with hot surface. Always use hand protection to avoid burns.
For outdoor use only.
WOODFIRE OUTDOOR OVEN
OO101UK | Instructions
IMPORTANT SAFETY INSTRUCTIONS
HOUSEHOLD USE ONLY • READ ALL INSTRUCTIONS BEFORE USE
WARNING Failure to follow these instructions could result in electric shock, fire or
burn hazard which could cause property damage, personal injury, or death. When using electrical
appliances, basic safety precautions should always be followed, including the following:
1 To eliminate a choking hazard for young children, discard all packaging materials immediately upon
unpacking.
2 DO NOT use this appliance for anything other than its intended use.
3 DO NOT use in moving vehicles or boats. Misuse may cause injury.
4 DO NOT use indoors. This oven is designed for OUTDOOR USE ONLY in a well-ventilated area. If used
under any overhead cover, toxic fumes, including carbon monoxide, may accumulate and cause serious
bodily injury or death.
5 This appliance can be used by persons, including children, with reduced physical, sensory, or mental
capabilities or lack of experience and knowledge if they have been given supervision or instruction
concerning use of the appliance in a safe way and understand the hazards involved
6 To avoid property damage from flame or heat maintain a minimum distance of 92cm (3 feet) from rear,
sides and top to walls, rails or other combustible constructions.
7 Ensure the surface is level, stable, clean and dry. DO NOT place the appliance near the edge of the
surface the oven is placed on during operation.
8 Use care when opening the oven to avoid burns. ALWAYS open door partway before fully opening to
check for any flare up as some foods may cause fats, oils or grease to splash and create flare up or flame.
9 Children should be supervised to ensure that they do not play with the appliance. Keep the appliance and
its cord out of reach of children. DO NOT allow the appliance to be cleaned or maintained by children.
10 The appliance should be supplied through a residual current device (RCD) having a rated residual
operating current not exceeding 30mA. The appliance is to be connected to a socket-outlet having an
earthing contact.
11 A short power-supply cord is provided to reduce the risk of children grabbing the cord or becoming
entangled and to reduce the risk of people tripping over a longer cord. Longer detachable power-supply
cord or extension cords are available and may be used if care is exercised in their use.
12 To avoid property damage and burn injury from flame or heat, ALWAYS maintain a minimum safe
distance of at least 30cm (1 foot) from the pellet box during smoking. Small flames can come out from
the pellet box if the oven lid is lifted in windy conditions.
13 To avoid burn injury, ALWAYS use pellet scoop when adding pellets to smoker box. DO NOT add pellets
by hand.
14 To avoid burn injury and property damage, make sure the lid of the smoke box is fully closed to prevent
flames from escaping out of the smoke box.
15 Pellets may continue to burn after cook time is complete. Do not touch or remove the smoke box until
the oven has stopped smoking, pellets have completely burnt out and the smoke box has cooled.
16 To avoid personal injury and burns allow to cool before cleaning, disassembly, putting in or taking off
parts and storage.
TECHNICAL SPECIFICATIONS
Voltage: 220-240V~, 50-60Hz
Power: 2400W
RECORD THIS INFORMATION
Model Number: ��������������������
Serial Number: ���������������������
Date of Purchase: �������������������
(Keep receipt)
Store of Purchase: ������������������
REGISTER The PURCHASE
ninjakitchen.co.uk/registerguarantee
Scan QR code using mobile device
THANK YOU for purchasing the Ninja® Woodfire Outdoor Oven
www.ninjatestkitchen.eu
ninjakitchen.co.uk
Illustrations may dier from actual product. We are constantly striving to improve our products, therefore
the specifications contained herein are subject to change withoutnotice.
NINJA is a registered trademark in the United Kingdom of SharkNinja Operating LLC.
© 2023 SharkNinja Operating LLC
SharkNinja Europe Limited,
3150 Century Way,
Thorpe Park,
Leeds,
LS15 8ZB, UK
ninjakitchen.co.uk
SharkNinja Germany GmbH,
Rotfeder-Ring 9,
60327 Frankfurt am Main,
Germany
ninjakitchen.eu
OO101UK�IB�MP�230703�Mv2

1 2
ninjakitchen.co.uk
ninjakitchen.co.uk
17 DO NOT allow pellets to overflow the pellet box. Doing so will introduce oxygen leading to
combustion, flame and damage to the unit which may result in burn injury.
18 DO NOT touch hot surfaces. Appliance surfaces are hot during and after operation. To prevent burns
or personal injury, ALWAYS use protective hot pads or insulated oven gloves and use available handles
and knobs. Recommend use of long handled utensils for adding or removing ingredients.
19 DO NOT touch accessories during or immediately after cooking. The basket will become extremely hot
during the cooking process. Avoid physical contact while removing the accessory from the appliance.
To prevent burns or personal injury ALWAYS use care when using with product. We recommend use of
long handed utensil and protective hot pads or insulated oven gloves.
20 ALWAYS ensure the oven is completely cool before releasing and removing the cooking plates or
moving the to avoid burns or personal injury.
21 DO NOT use the appliance without either the pizza stone or roasting tin installed.
22 To protect against electric shock, cord and extension cord should be arranged so that they will not
drape over the worktop or table top where they can be pulled on by children or tripped over. Keep the
cord connection dry and DO NOT immerse cord, plugs or main unit housing in water or other liquid.
23 Regularly inspect the appliance and power cord. DO NOT use the appliance if there is damage to the
power cord or plug. If the appliance malfunctions or has been damaged in any way, immediately stop
use and call Customer Service.
24 NEVER use socket below worktop surface.
25 NEVER connect this appliance to an external timer switch or separate remote-control system.
26 DO NOT place appliance and let cord touch hot surfaces.
27 Only use recommended accessories included with this appliance or authorised by SharkNinja. The use
of accessories or attachments not recommended by SharkNinja may cause a risk of fire or injury.
28 Before placing any accessory into the oven, ensure it is clean and dry.
29 DO NOT move the appliance when in use.
30 DO NOT cover the air intake vent or air outlet vent while unit is operating. Doing so will prevent even
cooking and may damage the unit or cause it to overheat.
31 DO NOT place anything on top of the product when the lid is closed during use.
32 Ensure the grill plate is correctly inserted and securely locked into position.
33 DO NOT use this appliance for deep-frying
34 Should a grease fire occur or the unit emits black smoke, unplug immediately. Wait for smoking to stop
before removing any cooking accessories.
35 Socket voltages can vary, affecting the performance of your product. To prevent possible illness,
ALWAYS use an external food thermometer to check that your food is cooked to the recommended
temperatures.
36 Use ON LY genuine food grade wood pellets from Ninja in your unit.
37 NEVER use heating fuel pellets, hardwood, charcoal, liquid fuels or any other combustible material
except Ninja pellets in the Smoker.
38 Keep hands and face away from Smoker Box when unit is in use and hot.
39 ALWAYS keep a fire extinguisher suitable for electrical fires accessible while operating the smoker.
40 ALWAYS store wood pellets in a dry location, away from heat-producing appliances and other
fuel containers.
41 Keep your grill clean and do not allow excess grease or ash to collect inside or on the smoke box and
cartridge. Doing so significantly increases the chances of a grease fire and additional smoke which can
taint the flavour of your food.
42 Please refer to the Cleaning & Maintenance section for regular maintenance of the appliance.
43 To disconnect, press the power button to turn the unit off, then unplug from socket when not in use
and before cleaning.
44 DO NOT clean this product with a water spray or the like.
45 DO NOT clean with metal scouring pads. Pieces can break off the pad and touch electrical parts,
creating a risk of electric shock.
46 Store indoors when not in use for long periods.
47 Store out of reach of children.
48 DO NOT keep uncovered grill exposed to elements. ALWAYS use grill cover when stored outdoors.
IMPORTANT SAFETY INSTRUCTIONS
FOR OUTDOOR USE ONLY • READ ALL INSTRUCTIONS BEFORE USE
SAVE THESE INSTRUCTIONS.
PARTS & ACCESSORIES
H
A Assembled Main Unit
(power cord not shown)
B Accessory Frame
C Pizza Stone
D Pro- Heat Tray
E Roast Rack
F Smoke Box
G Pellet Scoop
H Power Cord and RCD Plug
I ON/OFF Switch
A
B
C
D
E
F G
1
Remove all packaging material and tape from the oven.
2
Remove all accessories from the package and read this manual carefully. Please pay particular
attention to operational instructions, warnings, and important safeguards to avoid any injury or
property damage.
3
Rinse the Accessory Frame, Pro-Heat Tray, and Roast Rack in warm, soapy water. Rinse and dry
thoroughly.
4
DO NOT use abrasive brushes or sponges on the cooking surface. Damage to the coating can occur.
To order replacement or additional parts and accessories, visit ninjakitchen.co.uk
BEFORE FIRST USE
NOTE: DO NOT get the Pizza Stone wet or put it in the dishwasher. Place it in the oven after removing
all packaging.
I (Fig. A)
We recommend placing all accessories inside the oven and running
it on the Bake function for 20 minutes at 370°C without adding food.
This removes any residue and is not detrimental to the performance of the oven.
Continue following instructions on page 3 before attempting to do this.
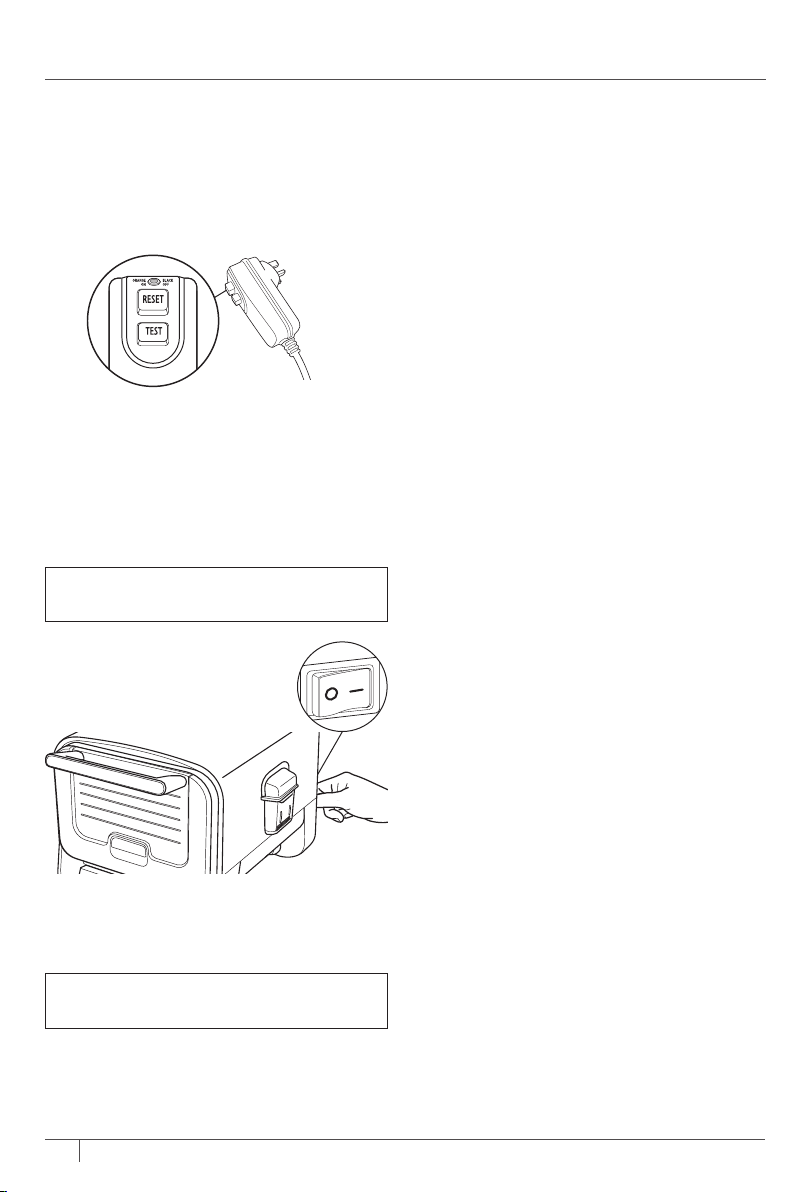
POWERING THE OVEN
1 Plug the RCD into electrical socket. Switch
socket on.
2 Press RESET button on the RCD. The circle above
the RESET button should be illuminated orange.
If this isn’t the case, try a dierent socket. Note:
It may be dicult to see the orange if in direct
sunlight.
3 Press the TEST button on the RCD. The circle
should now show black. This means the RCD is
functioning correctly. If pressing the TEST button
does not change the circle to black then contact
customer services.
4 After establishing if the RCD is functioning
correctly once again press RESET. The orange
illumination should re-appear. The unit can now be
switched on.
NOTE: RCD Light;
ORANGE = RCD is ON ; BLACK = RCD is OFF
5 Press the on/o switch on the back
of the control panel. Switch is on
when the side with the line is
pressed down.
6 Now turn the dial on the front of the control panel
and turn it to the desired function. The display
should illuminate to reveal times or temps. The
oven is now ready to use.
NOTE: The RESET button on the RCD will need
to be pressed every time the unit is unplugged or
the socket switched o.
EXTENSION CORD
If using an extension cord, ensure it is suitable for
use outdoors with outdoor appliances. Using the
incorrect cord could lead to the cord overheating,
melting and/or a drop in voltage. A drop in voltage
can increase preheat times and impact cooking
performance and/or cook times.
3 4
ninjakitchen.co.uk
ninjakitchen.co.uk
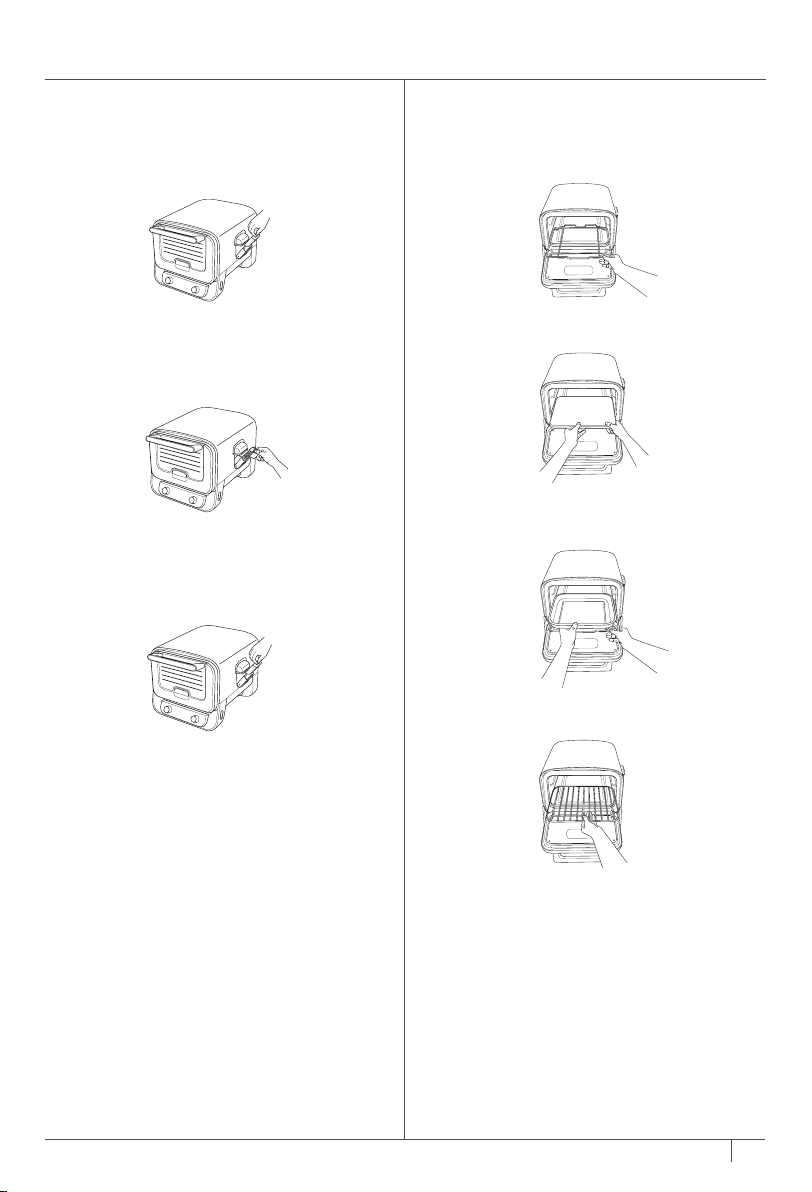
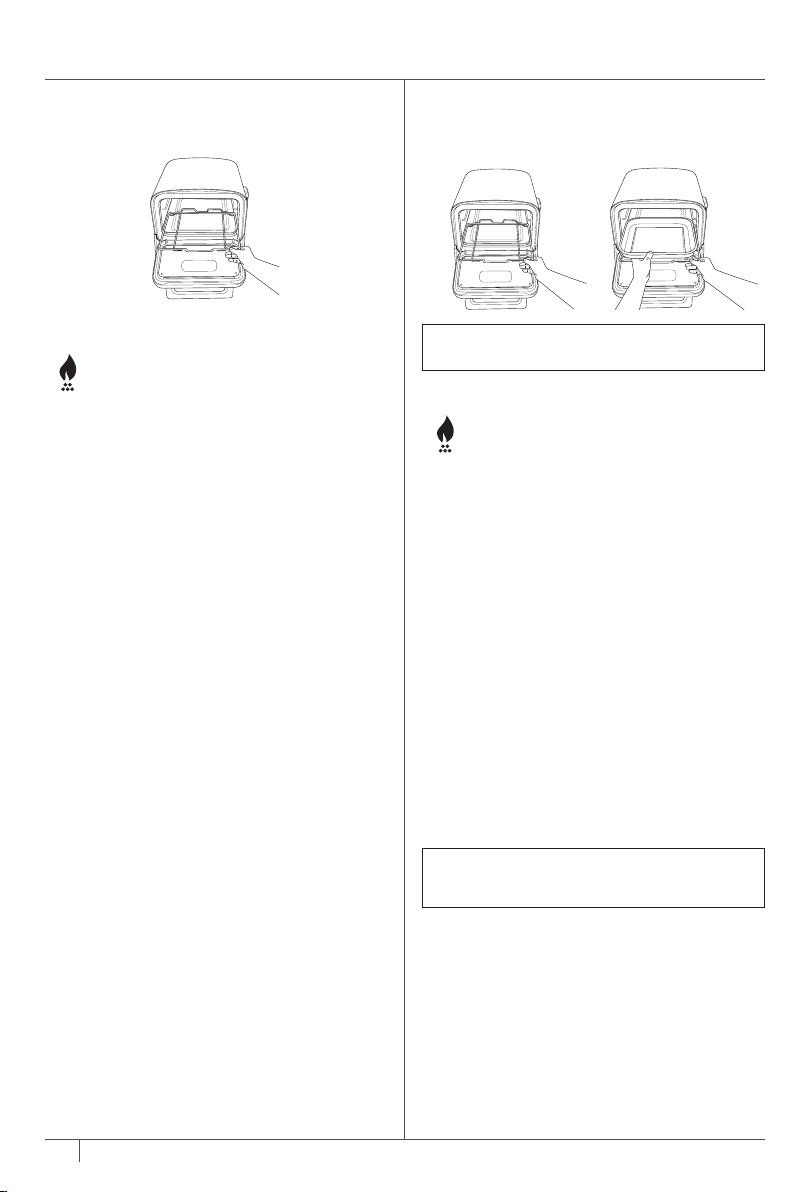
SMOKE BOX
Installing the smoke box:
To install, open by
putting your finger on the side insert to hold the
box open and insert the removable smoke box so
it sits firmly in place.
Adding Ninja Woodfire Pellets:
Fill the pellet
scoop to the top and level o to avoid spilling.
While holding the smoke box lid open, pour
pellets into the smoke box until filled to the top.
Then, close the smoke box lid.
For best results, performance, and flavour, use
only Ninja Woodfire Pellets.
Removing and cleaning the smoke box:
To
avoid burns, allow pellets to cool completely
before removing from the oven and cleaning.
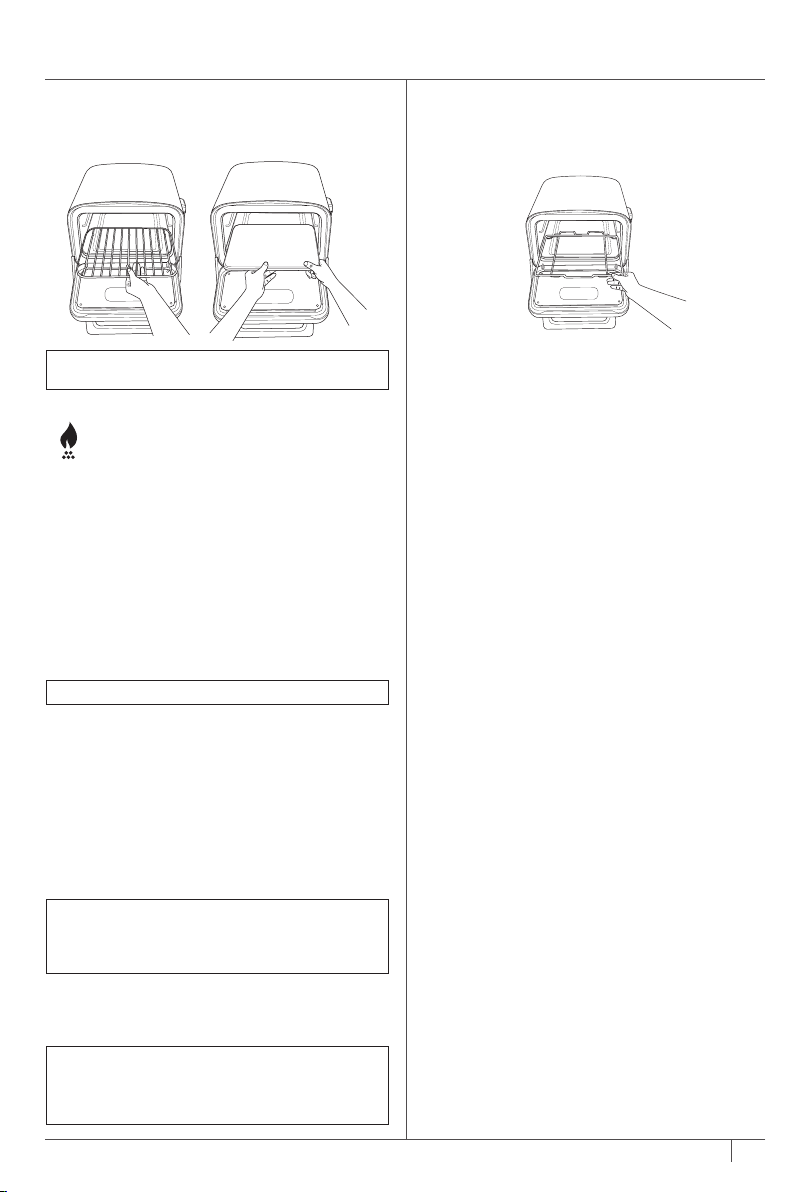
HOW TO INSTALL THE ACCESSORY FRAME:
1
Install Accessory Frame in the bottom
level of the oven (top level if using the Grill
function).
2
If cooking pizza, place the Pizza Stone on
the Accessory Frame.
3
For all other functions, remove the Pizza
Stone and place the Pro-Heat Tray in the
Accessory Frame.
4
If using the Roast Rack, nest it in the
Pro -Heat Tray.
BEFORE FIRST USE – CONT’D
POWERING THE OVEN
1 Plug the RCD into electrical socket. Switch
socket on.
2 Press RESET button on the RCD. The circle above
the RESET button should be illuminated orange.
If this isn’t the case, try a dierent socket. Note:
It may be dicult to see the orange if in direct
sunlight.
3 Press the TEST button on the RCD. The circle
should now show black. This means the RCD is
functioning correctly. If pressing the TEST button
does not change the circle to black then contact
customer services.
4 After establishing if the RCD is functioning
correctly once again press RESET. The orange
illumination should re-appear. The unit can now be
switched on.
NOTE: RCD Light;
ORANGE = RCD is ON ; BLACK = RCD is OFF
5 Press the on/o switch on the back
of the control panel. Switch is on
when the side with the line is
pressed down.
6 Now turn the dial on the front of the control panel
and turn it to the desired function. The display
should illuminate to reveal times or temps. The
oven is now ready to use.
NOTE: The RESET button on the RCD will need
to be pressed every time the unit is unplugged or
the socket switched o.
EXTENSION CORD
If using an extension cord, ensure it is suitable for
use outdoors with outdoor appliances. Using the
incorrect cord could lead to the cord overheating,
melting and/or a drop in voltage. A drop in voltage
can increase preheat times and impact cooking
performance and/or cook times.
3 4
ninjakitchen.co.uk
ninjakitchen.co.uk
SMOKE BOX
Installing the smoke box:
To install, open by
putting your finger on the side insert to hold the
box open and insert the removable smoke box so
it sits firmly in place.
Adding Ninja Woodfire Pellets:
Fill the pellet
scoop to the top and level o to avoid spilling.
While holding the smoke box lid open, pour
pellets into the smoke box until filled to the top.
Then, close the smoke box lid.
For best results, performance, and flavour, use
only Ninja Woodfire Pellets.
Removing and cleaning the smoke box:
To
avoid burns, allow pellets to cool completely
before removing from the oven and cleaning.
HOW TO INSTALL THE ACCESSORY FRAME:
1
Install Accessory Frame in the bottom
level of the oven (top level if using the Grill
function).
2
If cooking pizza, place the Pizza Stone on
the Accessory Frame.
3
For all other functions, remove the Pizza
Stone and place the Pro-Heat Tray in the
Accessory Frame.
4
If using the Roast Rack, nest it in the
Pro -Heat Tray.
BEFORE FIRST USE – CONT’D
5 6
ninjakitchen.co.uk
ninjakitchen.co.uk
BAKE, DEHYDRATE, WARM
1 Install the Accessory Frame in the bottom of
the oven.
2
Turn the left-hand dial to select BAKE,
DEHYDRATE or WARM.
3
If you plan to use the WOODFIRE FLAVOUR,
pull the smoke box open and use the pellet
scoop to fill the smoke box to the top with
Ninja Woodfire Pellets. DO NOT overflow
the smoke box. Then press the WOODFIRE
FLAVOUR button.
4 Press the TEMP button, then use the right-
hand dial to set the temp. Press the TIME
button, then use the right-hand dial to set
the time.
5 Press START/STOP to begin preheating.
Estimated preheat time is 5 to 25 minutes
depending on set temperature. If using
Woodfire Flavour, the pellets will
go through an ignition cycle (IGN), then the
oven will begin preheating (PRE).
6
While oven is preheating, start prepping
ingredients.
7
When the oven is preheated, ADD FOOD,
PRS START will appear on the display.
8 Use oven gloves to pull out the frame and
place pan with ingredients onto frame.
9 Press START/STOP to begin cooking. The
timer will begin counting down.
10
When cook time is complete, the oven will
beep and DONE will display.
11
Use oven gloves to remove food from the
oven. Let it rest, then serve.
USING THE COOKING FUNCTIONS
NOTE: There is no preheat time for the WARM
and DEHYDRATE functions.
NOTE: The WOODFIRE FLAVOUR button
cannot be used with BAKE.
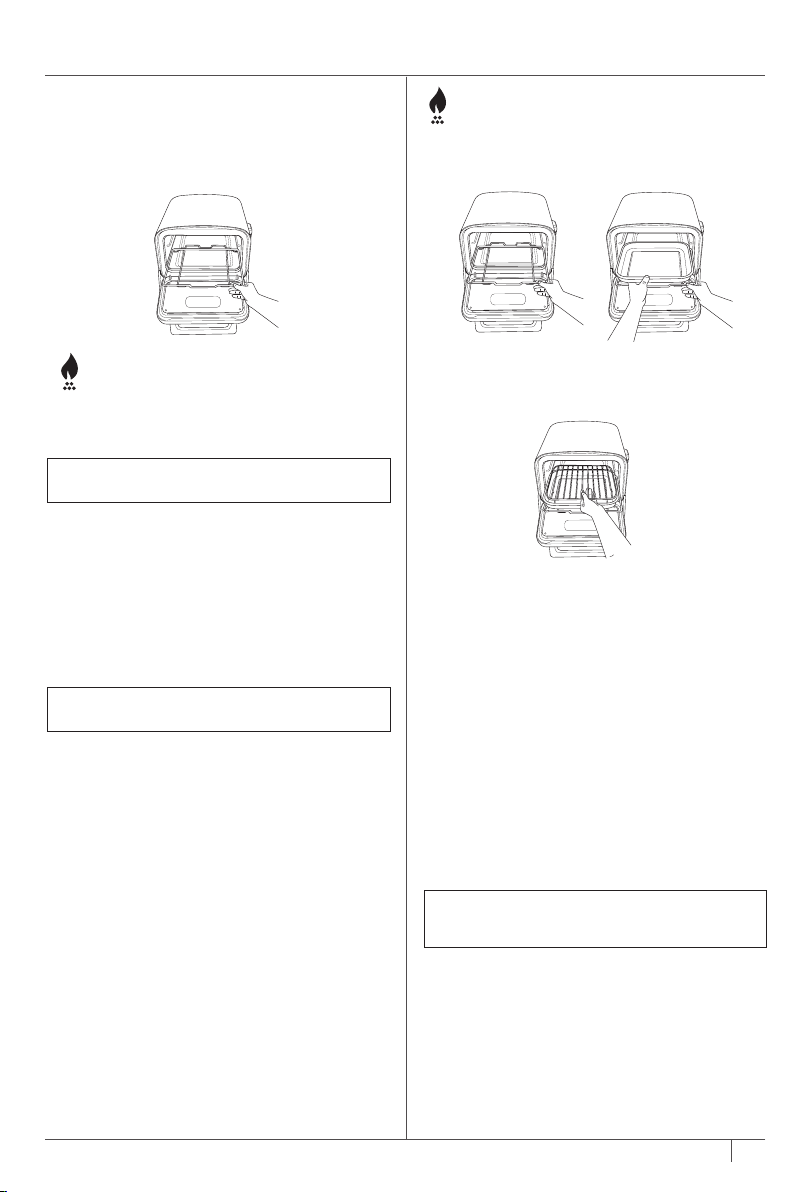
SMOKER
1
Install the Accessory Frame in the bottom of
the oven, then place the Pro-Heat Tray on top
of it. Place the Roast Rack in the pan (optional).
2
Turn the left-hand dial to select SMOKER.
3
Place ingredients on the Roast Rack or
Pro-Heat Tray.
4 Pull the smoke box open and use the pellet
scoop to fill the smoke box to the top with
Ninja Woodfire Pellets. DO NOT overflow the
smoke box.
5 Press the TEMP button, then use the right-
hand dial to set the temp. Press the TIME
button, then use the right-hand dial to set
the time.
6
Press START/STOP to begin cooking. There is
no preheat time for the Smoker function. The
pellets will go through an ignition cycle (IGN)
for 3–4 minutes, then the oven will begin
cooking and the timer will begin counting
down.
7
When cook time is complete, the oven will
beep and DONE will appear on the display.
8
Use oven gloves to remove food from the
oven. Let it rest, then serve.
NOTE: Woodfire Technology will not ignite if
Pellets are not filled to the top of the smoke
box
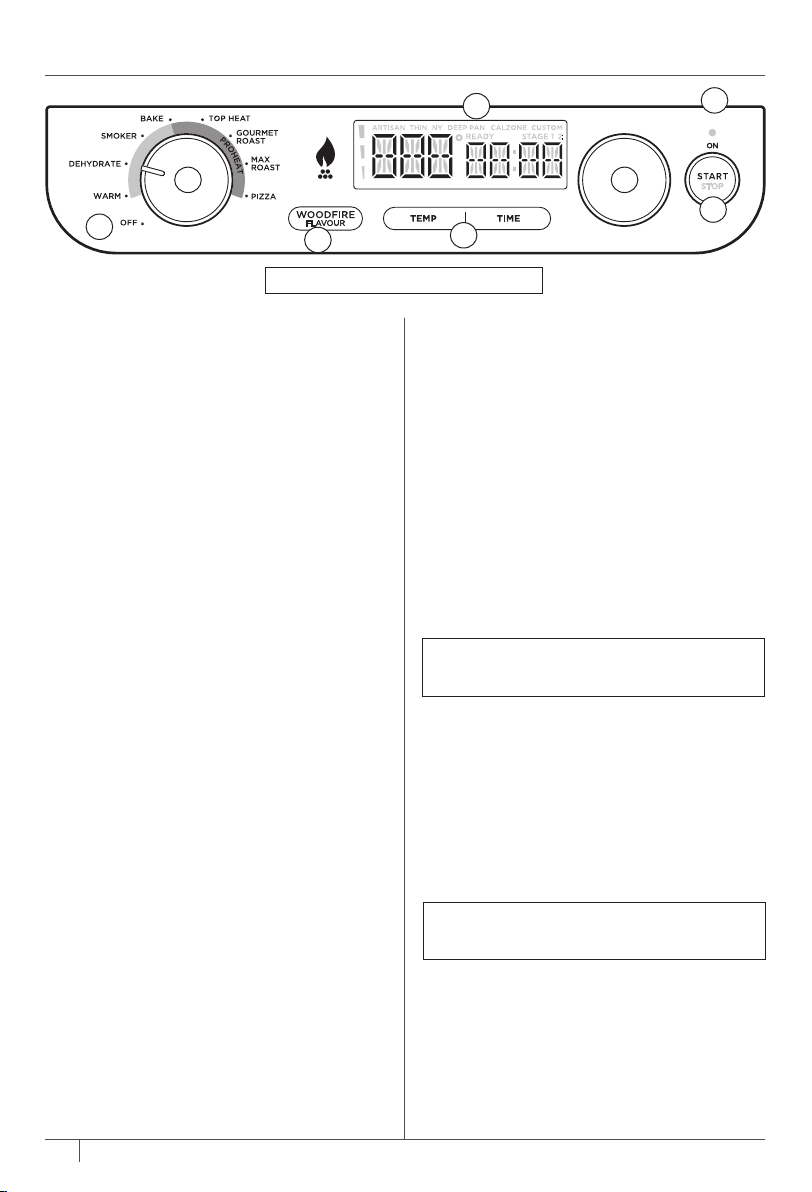
GETTING TO KNOW THE CONTROL PANEL
FUNCTIONS
Turn the left-hand dial to select the desired
function or to turn o the oven.
WARM: Keep meals warm and ready to eat after
cooking.
DEHYDRATE: Gently remove moisture for snacks
like jerky and dried fruit.
SMOKER: Low and slow cooking to tenderize
large cuts of meat.
BAKE: Create baked goods with crispy crusts and
fluy centres.
TOP HEAT: Quickly melt toppings or create
beautifully browned exteriors
GOURMET ROAST: Start high and finish low for a
crisp outside and juicy inside.
MAX ROAST: Get charred, crispy, caramelized
results a traditional oven can’t create.
PIZZA: Make your favourite pizza styles at home
from fresh to frozen
Artisan – Artisan-style pizzas have char on the
outside of the thin, crispy crust and are piled
high with fresh mozzarella cheese.
Thin – A thinner crust supports a smattering
of thinly sliced ingredients that cook quickly.
Pan – A thicker crust and use of a deep-style
pan means you can pile on your ingredients
since it bakes longer than a thin crust.
New York Style – Thinner crust with lots of
low-moisture mozzarella cheese piled on top.
The cheese extends close to the edge of the
dough, leaving about an inch exposed to
handle the slice while eating.
Calzone – For best results, follow the
instructions on the box.
Custom – Use your favourite style crust and
add your favourite ingredients to create your
own custom pizza.
OPERATING BUTTONS/DIALS/INDICATOR
LIGHTS
1. OFF:
When unit is not in use, ensure dial is in
the OFF position.
2. LEFT-HAND DIAL:
Use this dial to select
desired cook function.
3. TEMP/TIME BUTTONS: Press the
TEMP button,
then use the right-hand dial to select desired
temperature. Press the TIME button, then use
the right-hand dial to select desired time.
4. RIGHT-HAND
DIAL: Use this dial along with
the TEMP and TIME buttons to adjust the
temperature and time and to choose pizza
type.
5.
START/STOP BUTTON:
Press START/STOP
button to start or stop the current cook
function.
6.
READY: When cooking multiple pizzas, the
READY indicator will illuminate, indicating
the Pizza Stone is at temperature
to
cook the
next Pizza.
7.
ON: If the oven is on and not set to the OFF
position, this light will illuminate, indicating the
oven is still on and hot. When the oven is not in
use, turn the left-hand dial to OFF.
8.
WOODFIRE FLAVOUR: Press to add Woodfire
Flavour to food. (Cannot be used for WARM).
7
5
6
3
8
42
1
NOTE:
Functions may vary by model.
NOTE:
While not recommended, preheating
can be skipped by pressing and holding the
right-hand dial for 4 seconds.
NOTE: Woodfire Technology will not ignite if
Pellets are not filled to the top of the smoke
box
5 6
ninjakitchen.co.uk
ninjakitchen.co.uk
BAKE, DEHYDRATE, WARM
1 Install the Accessory Frame in the bottom of
the oven.
2
Turn the left-hand dial to select BAKE,
DEHYDRATE or WARM.
3
If you plan to use the WOODFIRE FLAVOUR,
pull the smoke box open and use the pellet
scoop to fill the smoke box to the top with
Ninja Woodfire Pellets. DO NOT overflow
the smoke box. Then press the WOODFIRE
FLAVOUR button.
4 Press the TEMP button, then use the right-
hand dial to set the temp. Press the TIME
button, then use the right-hand dial to set
the time.
5 Press START/STOP to begin preheating.
Estimated preheat time is 5 to 25 minutes
depending on set temperature. If using
Woodfire Flavour, the pellets will
go through an ignition cycle (IGN), then the
oven will begin preheating (PRE).
6
While oven is preheating, start prepping
ingredients.
7
When the oven is preheated, ADD FOOD,
PRS START will appear on the display.
8 Use oven gloves to pull out the frame and
place pan with ingredients onto frame.
9 Press START/STOP to begin cooking. The
timer will begin counting down.
10
When cook time is complete, the oven will
beep and DONE will display.
11
Use oven gloves to remove food from the
oven. Let it rest, then serve.
USING THE COOKING FUNCTIONS
NOTE: There is no preheat time for the WARM
and DEHYDRATE functions.
NOTE: The WOODFIRE FLAVOUR button
cannot be used with BAKE.
SMOKER
1
Install the Accessory Frame in the bottom of
the oven, then place the Pro-Heat Tray on top
of it. Place the Roast Rack in the pan (optional).
2
Turn the left-hand dial to select SMOKER.
3
Place ingredients on the Roast Rack or
Pro-Heat Tray.
4 Pull the smoke box open and use the pellet
scoop to fill the smoke box to the top with
Ninja Woodfire Pellets. DO NOT overflow the
smoke box.
5 Press the TEMP button, then use the right-
hand dial to set the temp. Press the TIME
button, then use the right-hand dial to set
the time.
6
Press START/STOP to begin cooking. There is
no preheat time for the Smoker function. The
pellets will go through an ignition cycle (IGN)
for 3–4 minutes, then the oven will begin
cooking and the timer will begin counting
down.
7
When cook time is complete, the oven will
beep and DONE will appear on the display.
8
Use oven gloves to remove food from the
oven. Let it rest, then serve.
NOTE: Woodfire Technology will not ignite if
Pellets are not filled to the top of the smoke
box
GETTING TO KNOW THE CONTROL PANEL
FUNCTIONS
Turn the left-hand dial to select the desired
function or to turn o the oven.
WARM: Keep meals warm and ready to eat after
cooking.
DEHYDRATE: Gently remove moisture for snacks
like jerky and dried fruit.
SMOKER: Low and slow cooking to tenderize
large cuts of meat.
BAKE: Create baked goods with crispy crusts and
fluy centres.
TOP HEAT: Quickly melt toppings or create
beautifully browned exteriors
GOURMET ROAST: Start high and finish low for a
crisp outside and juicy inside.
MAX ROAST: Get charred, crispy, caramelized
results a traditional oven can’t create.
PIZZA: Make your favourite pizza styles at home
from fresh to frozen
Artisan – Artisan-style pizzas have char on the
outside of the thin, crispy crust and are piled
high with fresh mozzarella cheese.
Thin – A thinner crust supports a smattering
of thinly sliced ingredients that cook quickly.
Pan – A thicker crust and use of a deep-style
pan means you can pile on your ingredients
since it bakes longer than a thin crust.
New York Style – Thinner crust with lots of
low-moisture mozzarella cheese piled on top.
The cheese extends close to the edge of the
dough, leaving about an inch exposed to
handle the slice while eating.
Calzone – For best results, follow the
instructions on the box.
Custom – Use your favourite style crust and
add your favourite ingredients to create your
own custom pizza.
OPERATING BUTTONS/DIALS/INDICATOR
LIGHTS
1. OFF:
When unit is not in use, ensure dial is in
the OFF position.
2. LEFT-HAND DIAL:
Use this dial to select
desired cook function.
3. TEMP/TIME BUTTONS: Press the
TEMP button,
then use the right-hand dial to select desired
temperature. Press the TIME button, then use
the right-hand dial to select desired time.
4. RIGHT-HAND
DIAL: Use this dial along with
the TEMP and TIME buttons to adjust the
temperature and time and to choose pizza
type.
5.
START/STOP BUTTON:
Press START/STOP
button to start or stop the current cook
function.
6.
READY: When cooking multiple pizzas, the
READY indicator will illuminate, indicating
the Pizza Stone is at temperature
to
cook the
next Pizza.
7.
ON: If the oven is on and not set to the OFF
position, this light will illuminate, indicating the
oven is still on and hot. When the oven is not in
use, turn the left-hand dial to OFF.
8.
WOODFIRE FLAVOUR: Press to add Woodfire
Flavour to food. (Cannot be used for WARM).
7
5
6
3
8
42
1
NOTE:
Functions may vary by model.
NOTE:
While not recommended, preheating
can be skipped by pressing and holding the
right-hand dial for 4 seconds.
NOTE: Woodfire Technology will not ignite if
Pellets are not filled to the top of the smoke
box
7 8
ninjakitchen.co.uk
ninjakitchen.co.uk
TOP HEAT
1
Install the Accessory Frame in top level of the
oven, then place the Pro-Heat Tray on top of it.
Place the Roast Rack in the pan (optional).
2
Turn the left-hand dial to select TOP HEAT.
3 Press the TEMP button, then use the right-
hand dial to set the temp. Press the TIME
button, then use the right-hand dial to set
the time.
4
Place ingredients on the Roast Rack or
Pro -Heat Tray.
5
Press START/STOP to begin cooking. There is
no preheat time. The oven will begin cooking
and the timer will begin counting down.
6
When cook time is complete, the oven will
beep and DONE will display.
7
Use oven gloves to remove food from the
oven. Let it rest, then serve.
USING THE COOKING FUNCTIONS – CONT’D
PIZZA
1
Install the Accessory Frame in the bottom of
the oven, then place the Pizza Stone on top.
2
Turn the left-hand dial to select PIZZA.
3
If you plan to use the WOODFIRE FLAVOUR,
pull the smoke box open and use the pellet
scoop to fill the smoke box to the top with
Ninja Woodfire Pellets DO NOT overflow
the smoke box. Press the WOODFIRE
FLAVOUR button.
4
Use the right-hand dial to select the
desired
preset pizza type (Artisan, Thin, Pan, New
York Style, Frozen, or Custom).
5
Press START/STOP to begin preheating.
Estimated preheat time is 10–25 minutes
depending on set temperature. If using
Woodfire Flavour, the pellets will go through
an ignition cycle (IGN), then the oven will
begin preheating (PRE).
6
Use the right-hand dial to set TIME. Setting
TIME is dierent for PIZZA. This sets the pizza
cook timer (similar to an oven timer). When
time has ended, the oven will stay on for up to
one hour for cooking back-to-back pizzas.
7
Once the oven has reached temperature, ADD
FOOD PRS STRT will display. Place pizza
directly on the stone.
8
Press START/STOP again and the timer will
begin counting down.
9
When cook time is complete, the oven will beep
and GET FOOD will appear on the display. Use
pizza peel to remove pizza from oven.
NOTE:
If cooking Deep Pan Pizza, you will need
to prepare in a deep-dish pan (not included).
NOTE:
Temp can only be set using MANUAL.
NOTE:
We recommend using the Ninja Pizza
Peel, sold separately. If you do not have a pizza
peel, use the cutting board or underside of a
bake pan with flour to place pizza on stone.
NOTE: COOKING BACK-TO-BACK PIZZAS –
For best results, wait until READY appears on
the display. This indicates the stone is back
up to temperature. Then add the next pizza.
MAX ROAST
1 Install the Accessory Frame in the bottom of the
oven, then place the Pro-Heat Tray on top of it.
2
Turn the left-hand dial to select MAX ROAST.
3
If you plan to use the WOODFIRE FLAVOUR,
pull the smoke box open and use the pellet
scoop to fill the smoke box to the top with
Ninja Woodfire Pellets. DO NOT overflow
the smoke box. Then press the WOODFIRE
FLAVOUR button.
4 Press the TEMP button, then use the right-
hand dial to set the temp. Press the TIME
button, then use the right-hand dial to set
the time.
5 Press START/STOP to begin preheating.
6 While oven is preheating. Start prepping
ingredients. Estimated preheat time is
15-20 minutes depending on set temperature.
7 When the oven is preheated, ADD FOOD
PRS START will appear on the display.
8 Use oven gloves to pull out the frame and
place ingredients on the pan.
9 Press START/STOP to begin cooking. The
timer will begin counting down.
10 When cook time is complete, the oven will
beep and DONE will display.
11
Use oven gloves to remove food from the
oven. Let it rest, then serve.
GOURMET ROAST
1 Install the Accessory Frame in the bottom of
the oven.
2
Turn the left-hand dial to select GOURMET
ROAST.
3
If you plan to use the WOODFIRE
FLAVOUR, pull the smoke box open and
use the pellet scoop to fill the smoke box to
the top with Ninja Woodfire Pellets. DO
NOT overflow the smoke box. Press the
WOODFIRE FLAVOUR button.
4
Stage 1 LED will illuminate; this is the high
temperature setting.
5 Press the TEMP button, then use the right-
hand dial to set the temp. Press the TIME
button, then use the right-hand dial to set
the time.
6 Push the right-hand dial and Stage 2 LED will
turn on. Repeat the previous step to program
Stage 2.
7 Press START/STOP to begin preheating.
Estimated preheat time is 15-20 minutes
depending on set temperature. If using
Woodfire Flavour, the pellets will go through
an ignition cycle (IGN), then the oven will
begin preheating (PRE).
8 When the oven is preheated, ADD FOOD
PRS START will appear on the display.
9 Pull the Accessory Frame forward and place
pan with ingredients onto frame. Close the
door.
10 Press START/STOP to start timer. Stage 1
temp and time will display and timer will begin
counting down. The oven will automatically
switch to Stage 2 settings when Stage 1 is
complete.
11 When cook time is complete, the oven will
beep and DONE will display on the oven.
12
Use oven gloves to remove food from the
oven. Let it rest, then serve.
IMPORTANT: Pro-Heat Tray should be installed
as it needs to preheat with the oven.
NOTE:
The unit will beep and display FLIP
for 30 seconds. Flipping is optional, but
recommended.

9 10
ninjakitchen.co.uk
ninjakitchen.co.uk
TROUBLESHOOTING GUIDE
WARNING: To reduce the risk of shock and unintended operation, turn power o and unplug
unit before troubleshooting.
• My unit won't turn on?
1 Check the residual current device (RCD) is fully
plugged in and the reset button has been pressed.
The circle above the RESET button will be
illuminated orange.
2 Ensure the press switch is turned to the ON
position (the line will be pressed down).
Make sure the dial is not in the OFF position.
If your unit doesn't turn on after taking the steps
above, please contact Customer Service at
0800 862 0453.
• “Add Food” appears on the control panel display.
The unit has completed preheating and it is now
time to add your ingredients.
• “E” appears on the control panel display.
The unit is not functioning properly. Please contact
Customer Service at 0800 862 0453.
So we may better assist you, please register your
product online at ninjakitchen.co.uk and have the
product on hand when you call.
• "CLD" appears on the control panel display.
Cold Smoking is to be used to provide smoke flavour
to foods, this is not intended for cooking. When used
on meat, poultry, or fish, this process should always
be used in conjunction with a separate step to bring
food up to food-safe internal temperatures. Refer to
the local food standards authority for recommended
food safe temperatures.
• Should I add my ingredients before or after
preheating?
For best results, let the unit preheat before adding
ingredients.
• Do I need to completely fill the smoke box with
pellets?
Yes, always fill the smoke box to the top. We've
perfected the amount of pellets needed for each
smoke session, regardless of the function or food
load, the unit will burn through them appropriately.
• When do I press the Woodfire Flavour button?
Press the Woodfire Flavour button before pressing
start when wanting to add smoke using the
Dehydrate, Hi/LO, Sear, Grill, Roast, Bake and Pizza
functions. You do not need to press the Woodfire
Flavour button when using the Smoker function.
Woodfire cannot be used with WARM.
• Why are flames coming out from the pellet box?
Small flames can come out from the pellet box if the
grill lid is lifted in windy conditions.
• Where should I keep my pellets stored?
Always store pellets in a dry area. Any moisture in
the pellets can compromise ignition and quality of
smoke flavour.
• How do I dispose of burnt pellets after a cook
cycle?
Pellets may continue to burn after cook time is
complete. Do not touch or remove the smoke box
until the grill has stopped smoking, pellets have
completely burnt out and the smoke box has cooled.
Then, remove the smoke box and safely discard
cooled ash contents.
• Can I use oils to cook in my oven at high
temperatures?
Use the recommended fats/oils below sparingly,
only use the “Not Recommended fat/oils” when
called out in Ninja recipe (refer to “Best Practices
when Cooking Above 260°C” for approved fats/oils
included in packaging).
• How do I avoid fire in my oven while batch cooking
at high temperatures?
Remember to empty the fat/oil from the roasting tin
preventing spill over. Ensure tin is washed thoroughly
before each use. This will prevent grease from
burning and causing smoke.
• How do I avoid flare-up from opening the oven?
When cooking at high heat temperatures, specifically
when searing foods, open the door slowly and at an
arm’s length distance. Remember to empty the fat/
oil from the bake tray preventing spillover. This will
help prevent billowing smoke and flare-ups.
• Why is preheat taking so long?
Preheat times vary by function and unit temperature.
SMOKER, DEHYDRATE, WARM No preheat.
If adding Woodfire Flavour, ignition time will add an
additional 3-4 minutes.
Using the unit in inclement weather with heavy rain
could cause longer preheat times.
If using an extension cord, ensure it is suitable for
use outdoors with outdoor appliances. Using the
incorrect cord could lead to the cord overheating,
melting and/or a drop in voltage.
While preheating is strongly recommended for best
results, you can skip it by pressing and holding the
START/STOP button for 3 seconds. "ADD FOOD"
will flash across the screen. Open the lid and place
ingredients in unit. Once the lid is closed, cooking will
begin and the timer will start counting down.
• Can I turn o Woodfire Flavour?
If you pressed Woodfire Flavour and already started
your cooking function by pressing START, you can
press the Woodfire Flavour button again to turn it
o if the ignition cycle is less than 75% complete
(indicated by the progress bar on the display
screen). If pellets have fully ignited and the grill has
transitioned to the preheat cycle (indicated on the
display screen), you cannot turn Woodfire Flavour
o.
• Can I add more pellets during a cook cycle?
When using the SMOKER function, you can add
more pellets once the first batch has fully burned.
Press and hold the Woodfire Flavour button for 4
seconds to ignite new full box of pellets. If running
back-to-back smoking sessions, we recommend
refilling the smoke box using the pellet scoop when
half the pellets have burned. DO NOT refill more than
2 times. DO NOT re-ignite pellets.
CLEANING & MAINTENANCE
Pizza Stone
Allow the pizza stone to cool completely before
cleaning. The pizza stone can crack or break if it
comes in contact with cold water while it’s hot.
1 Scrape lightly . DO NOT use a metal spatula or
knife, as these can scratch the pizza stone.
2 Wipe any remaining debris o the stone using
a soft cloth.
Roast Rack/Accessory Frame
1 Allow the oven to cool before removing the
racks. The racks are dishwasher safe.
2 If washing by hand, use dish soap, warm
water, and the rough side of a sponge to
remove any baked-on food.
3 Rinse the racks and towel-dry.
Pro-Heat Tray
1 Allow the Pro-Heat Tray to cool. DO NOT put
the Pro-Heat Tray in the dishwasher.
2 Use dish soap, warm water, and the rough
side of a sponge to remove any remaining
discoloration. DO NOT use steel wool or
other abrasive scrubbers as this may scratch
the cookware.
3 Rinse the tray and dry it with a towel.
NOTE: DO NOT get the Pizza Stone wet.
CLEANING THE OVEN
1 The oven should be cleaned thoroughly after
each use. ALWAYS let the appliance and
accessories cool before cleaning.
2 Unplug the grill from power source before
cleaning. Keep the door open after removing
food to allow the oven to cool quicker.
3 Use soap and water to clean the inside of
oven with a nylon brush.
CLEANING THE ACCESSORIES
Smoke box
Remove smoke box and safely discard all
contents after every use.
Cleaning the smoke box after every use is not
required. Use a wire brush to remove extra
creosote after every 10 uses.
NOTE: DO NOT use liquid cleaning solution on
the smoke box.

11 12
ninjakitchen.co.uk
ninjakitchen.co.uk
MANUFACTURER’S GUARANTEE
The Ninja 2 Year Guarantee
When a consumer buys a product in the UK, they get the benefit of legal rights relating to the quality
of the product (your “legal rights”). You can enforce your legal rights against your retailer, including
Ninja if you bought your Ninja kitchen appliance from ninjakitchen.co.uk. However, at Ninja we are so
confident about the quality of our products that we give the owner an additional, free parts and labour
manufacturer’s guarantee of up to 2 years.
The guarantee it comes with is an important consideration - and reflects how much confidence the
manufacturer has in its product and manufacturing quality.
The manufacturer’s guarantee does not aect your legal rights.
How long are new Ninja machines guaranteed for?
Our manufacturer’s guarantee lasts for one year from the date of purchase as standard, or for two years
if you register your purchase with us within 28 days.
How do I register my Ninja guarantee?
If you have purchased your Ninja kitchen appliance directly from ninjakitchen.co.uk your guarantee is
registered automatically. If you bought it from anywhere else in the UK, you can register your guarantee
online within 28 days of purchase.
• To register online, please visit www.ninjakitchen.co.uk/register-guarantee or scan the QR code on the
back cover.
• Keep a note of the date you purchased the machine.
IMPORTANT:
• Keep your receipt if you bought your Ninja kitchen appliance from anywhere except ninjakitchen.co.uk.
You will need it to claim under your guarantee.
• The free Ninja guarantee only applies in the UK.
What are the benefits of registering my free Ninja guarantee?
When you register your guarantee, you will get an extra year of cover. We’ll also have your details to
hand if we ever need to get in touch. If you further agree to receive communications from us, you can
also receive tips and advice on how to get the best out of your Ninja kitchen appliance and hear the
latest news about new Ninja technology and launches.
What is covered by the free Ninja guarantee?
Repair or replacement (at Ninja’s discretion) of your Ninja machine, including all parts and labour.
What is not covered by the free Ninja guarantee?
• Normal wear and tear.
• Accidental damage or faults caused by negligent use or care, misuse, neglect, careless operation or
handling of the Ninja kitchen appliance which is not in accordance with the Ninja Operating Manual
supplied with your machine.
• Damage caused by use of the Ninja kitchen appliance for anything other than normal domestic
household purposes.
• Damage caused by use of parts not assembled or installed in accordance with the operating
instructions.
• Damage caused by use of parts and accessories which are not Ninja Genuine Components
• Faulty installation (except where installed by Ninja).
• Repairs or alterations carried out by parties other than Ninja or its agents.
How can I claim under the free Ninja guarantee?
Contact our customer service helpline on 0800 862 0453. For service hours please visit our website
under ‘Contact Us’. It’s free to call, and you’ll be put straight through to a Ninja representative. You’ll
also find online support at https://support.ninjakitchen.co.uk/. The Ninja representative will go through
some troubleshooting with you, and if we conclude that the item has failed, we will send you a
replacement part or a returns label to send the defective item back to us free of charge. When you
have delivered the defective product to us, we will send you a replacement.
Please remember that the item will need to be boxed when you return it to us. It can be any suitable
box, it does not have to be the original packaging.
Where can I buy genuine Ninja spares and accessories?
Ninja spares and accessories are developed by the same engineers who developed your Ninja kitchen
appliance. You’ll find a full range of Ninja spares, replacement parts and accessories for all Ninja
machines at www.ninjakitchen.co.uk. Please remember that damage caused by the use of non-Ninja
spares may not be covered under your guarantee.

13 14
ninjakitchen.co.uk
ninjakitchen.co.uk
NOTES NOTES

13 14
ninjakitchen.co.uk
ninjakitchen.co.uk
NOTES NOTES