Manual Pairing
If Auto Pairing is unsuccessful:
1. Ensure Bluetooth
®
, Wi-Fi, and GPS are activated on
your mobile device.
2. Ensure the fan has been powered off for 10 seconds
or more, then power on the fan.
3. Press and hold the OSC/WIFI button on the fan's
control panel for 5 seconds, until the red indicator
light is flashing. The device is now pairing mode.
Note: if pairing is not completed within 2-3 minutes,
the device will exit pairing mode and step 3 will
need to be repeated.
4. On your mobile device, click "add device", then
select "add manually" at the top of the screen.
Click the fan icon.
5. When the fan is successfully found by Bluetooth
®
,
click the green "+" on the fan icon that appears.
6. Enter your Wi-Fi name and password.
7. Wait for the connection to be established (green
checkmark), then press Next.
8. Press done (top right-hand corner).
The fan is now available to control
from your smartphone.
CONTROLLING THE FAN
WITH THE HOLMES APP
The Holmes
®
App has the same
functionality as the remote control,
as well as additional features.
1. Power
2. Fan Speed
3. Oscillation
Note: The control panel display on
the tower fan will change to match
the setting selected in the app.
1. POWER: Press to turn ON/OFF
2. SPEED: Slide your finger across
the speed level scroll bar to increase
or decrease fan speed.
3. OSCILLATION: Press to turn
ON/OFF.
4. MODE: Press icons to select
preferred mode.
• Breeze - Alternating Fan Speed
• Normal - Steady Fan Speed
• Sleep - Low Fan Speed
5. TIMER:
To set your fan for auto-shutoff, select
a run-time from 1 hour to 15 hours.
• The default setting is 1 hour.
• To run for 15 hours, press "stay
on-15 hours."
6. SCHEDULE
To Set Schedule:
1. Press Schedule.
2. Select Add on the next page.
3. Select the time of day the fan
should turn on. Be sure to choose
the hour, minutes and AM/PM.
4. Click on Timer and select how
long the fan will stay on.
Choose between 1 and 15 hours.
5. Click on“Repeat” and select which
day of the week the schedule will
be active.
6. Click the "<" to save selection and return to the
previous menu.
7. Press Save in the top right corner.
8. Your saved schedule will appear on the Schedule
screen.
9. To turn OFF the schedule, press the slider button to
the right. It will change from red to gray to indicate
the schedule is off. To turn ON the schedule, press
the slider button again. It will change from gray to
green to indicate the schedule is ON.
REPLACING THE PLUG FUSE
If the (2.5 Amp, 125 Volt) replaceable fuse blows,
please visit our website at
www.getholmesfans.com to order a new fuse.
User Servicing Instructions
1. Unplug your fan. Grasp plug and remove from the
receptacle or other outlet device. Do not unplug by
pulling on cord.
2. Open fuse cover, located on the top of the plug, by
using your thumb or a flathead screwdriver to slide
the cover down towards the prongs.
NOTE: Ensure that the fuse cover is completely
open before attempting
to remove fuse.
3. Remove fuse carefully by
using a small screwdriver
to pry the fuse from the
compartment by the
metal ends of the fuse.
(see Figure 6)
4. Place plug on a solid, flat surface. Insert new
2.5 Amp, 125 Volt fuse into fuse compartment and
use a small screwdriver to secure the metal ends of
the fuse into the compartment.
CAUTION: Risk of fire. Replace fuse only with
2.5 Amp, 125 Volt fuse.
5. Slide fuse cover closed completely.
If fuse cover is difficult to close, make sure fuse is
secured in place completely by pressing the metal
ends of the fuse
6. Risk of fire. Do not replace attachment plug. Contains
a safety device (fuse) that should not be removed.
Discard product if the attachment plug is damaged.
CLEANING
• Always unplug the fan before cleaning.
• Do not allow water to drip on into fan housing.
• Be sure to use a soft cloth moistened with a mild
soap solution.
• Do not use gasoline, thinner or benzene as a
cleaner.
Clean the fan grill, housing and base with a soft, damp
cloth.
Do not attempt to remove the fan blade. Please use
caution around the motor housing area. Do not allow
the motor or other electrical components to be exposed
to water.
STORAGE
• Store the fan in a clean, dry location between
seasons or when not in use for an extended period.
• Keep the fan head protected from dirt and dust
during storage.
• Remove battery from the remote control before
storage or disposal.
FCC STATEMENT
Potential for Radio/Television interference
This device complies with Part 15 of the FCC Rules. Operation is subject to the following two conditions:
(1) This device may not cause harmful interference, and
(2) this device must accept any interference received, including interference that may cause undesired operation.
This product has been tested and found to comply with the limits for a Class B digital device, pursuant to part 15
of the FCC rules. These limits are designed to provide reasonable protection against harmful interference in a
residential installation. The product generates, uses, and can radiate radio frequency energy and, if not installed
and used in accordance with the instructions, may cause harmful interference to radio communications. However,
there is no guarantee that the interference will not occur in a particular installation. If the product does cause
harmful interference to radio or television reception, which can be determined by turning the product on or off,
the user is encouraged to try to correct the interference by one or more of the following measures:
• Reorient or relocate the receiving antenna.
• Increase the separation between the product and the receiver.
• Connect the product into an outlet on a circuit different from that to which the receiver is connected.
• Consult the dealer or an experienced radio/TV technician for help.
• Changes or modifications not expressly approved by the party responsible for compliance could void the
user’s authority to operate the equipment.
FCC STATEMENT
WARRANTY INFORMATION
CLEANING AND MAINTENANCE
PLEASE READ AND SAVE THESE IMPORTANT INSTRUCTIONS
Instruction Manual
36'' DIGITAL TOWER FAN
with
WIFI CONNECTED APP
VOICE ASSISTANT INSTRUCTIONS MOBILE APP INSTRUCTIONS
Figure 6
Fuse
Metal ends
Fuse cover
If you have any questions regarding your product
or would like to learn more about other Holmes
®
products, please visit our website at
www.getholmesfans.com or call customer service:
1-866-769-3166 (8:30 am - 5:00 pm E.S.T.) or send
an email to info@getholmesfans.com.
For inquiries regarding recycling and proper
disposal of this product, please contact your local
waste management facility.
Printed In China
© 2022 Sunbeam Products, Inc. All rights reserved. HOLMES
®
is a registered trademark of
Sunbeam Products, Inc. used under license.
Distributed by Star Elite Inc., Montreal, Canada H3B 3X9
SEH004-022322
3 YEAR LIMITED WARRANTY
This device has a limited warranty of 3 year from the original date of purchase against workmanship and defects
in material. If under normal use, your product fails to operate, please contact our customer service department at
info@getholmesfans.com. A refund or replacement will be provided to you with proof of purchase. Star Elite Inc.
may deny claims of damage caused by misuse or modications of this product.
How to Obtain Warranty Service
If you have any problems, please do not contact the store.
Contact our customer service at 1-866-769-3166 (8:30 am - 5:00 pm EST) Monday - Friday
or contact us at info@getholmesfans.com.
Our customer service will be happy to assist you.
www.getholmesfans.com
Item: 17037
Model: 32510020
SETTING UP VOICE ASSISTANT
To pair the Tower Fan with Amazon Alexa and Google Voice Enabled Devices:
1. Open the Holmes App.
2. Select the device you wish to connect to a voice assistant.
3. In the top right corner of the screen select the pencil icon.
4. Choose the icon of the Voice Assistant you wish to connect.
5. Follow the instructions that appear.
Voice Assistant Functionality
Use the following command sequence for Amazon Alexa & Google Voice Enabled Devices:
“Alexa, “Primary Command” + “Device Name” + “Secondary Command”(if applicable)
For example, “Alexa, Activate Holmes Fan” or “Alexa, Turn Up Holmes Fan speed by 3”
Note: The default “Device Name” is “Holmes Fan”. To personalize the device name, see below.
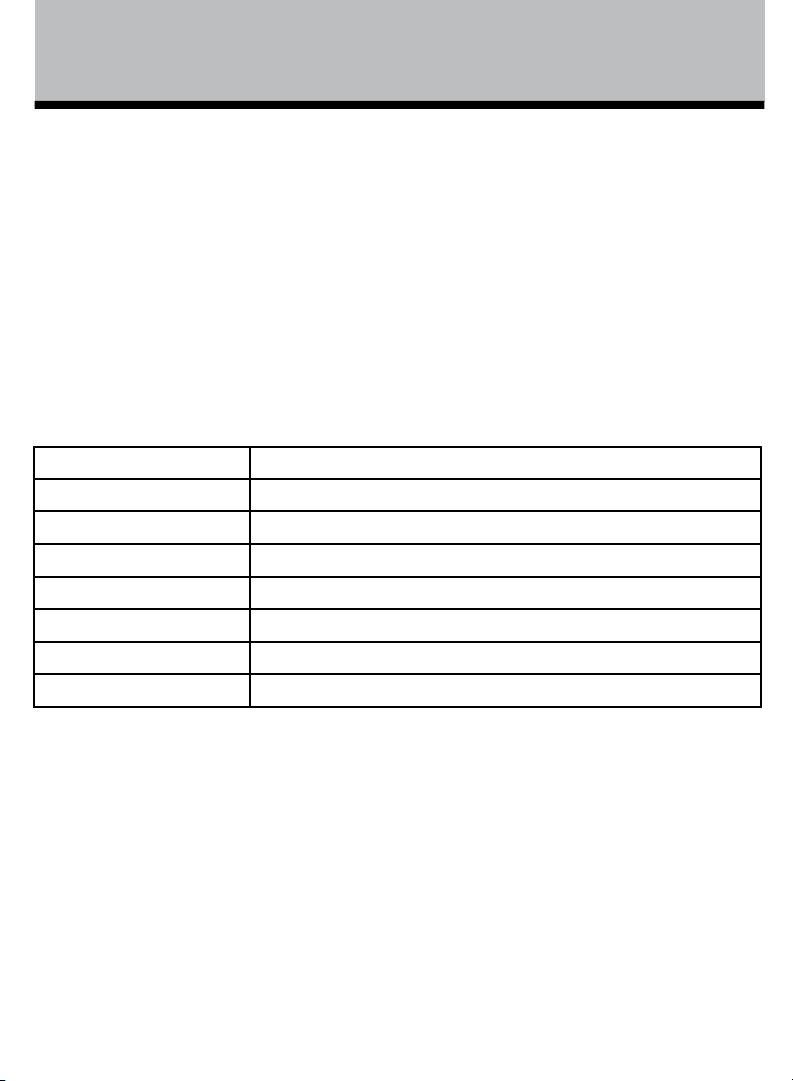
Action Command
Turn the fan On “Activate,” “Power On,” “Turn on,” “Start”
Turn the fan Off “Power Off,” “Turn Off,” “Deactivate,”
Increase the speed Primary Command: “Turn Up,” “Raise,” “Increase”
Decrease the speed Primary Command: “Turn Down,” “Lower,” “Decrease”
Set the timer Primary: “Set,” “Change”
Oscillation On “Turn On Oscillation,” “Start Oscillation,” “Activate Oscillation”
Oscillation Off “Turn Off Oscillation,” “Stop Oscillation,” “Deactivate Oscillation”
PERSONALIZING THE DEVICE NAME
To personalize the fan name for easier voice commands:
1. Open the Holmes App.
2. Select the product name you wish to change.
3. Select the pencil icon in the top right corner.
4. On the following screen, click on or tap the name of the product.
5. Tap the current name of the fan.
6. Rename the product and press save.
Note: The name will automatically update for both Amazon Alexa and Google Voice Enabled Devices.
Google is a trademark of Google LLC.
Amazon, Alexa and all related logos are trademarks of Amazon.com, Inc. or its affiliates.
App Store is a service mark of Apple Inc.
Google Play and the Google Play logo are trademarks of Google LLC.
4. Mode
5. Timer
6. Schedule

To activate SLEEP mode, press the MODE button
again.
This function slows the BREEZE setting by
one level every half hour until it reaches LOW.
7. To adjust airflow direction, position the air vent
tabs (Figure 1, F) on the fan housing up or down to
desired angle.
8. To turn the fan OFF press the POWER button (A).
NOTE: Lights on the control panel will indicate the
corresponding functions you have selected.
REMOTE CONTROL
NOTE: THIS UNIT INCLUDES ONE LITHIUM BATTERY,
CR2025/3V. PLEASE REMOVE THE PROTECTIVE STICKER
FROM THE REMOTE CONTROL BATTERY BEFORE OPERATION.
To operate the fan with the remote control, aim it toward
the control panel on top of the fan tower.
The remote control can operate from a distance up to
approximately 5 meters/feet from the fan body and at
an angle variation of 15-20 degrees.
Avoid exposing the display panel to direct sunlight, as it
may interfere with signal transmission.
Replacing the Remote Control Battery
The cells should be disposed of properly, including
keeping them away from children. Even used cells may
cause injury.
a) Locate the battery compartment on the back of the
remote control handset. Press tab and pull out
battery.
b) Remove old battery.
c) Place new battery into
battery compartment.
d) Slide battery
compartment into the
remote control
handset.
NOTES:
• Remove the battery
from the remote when
it is not in use for an extended period.
• Remove the battery before discarding the remote
at the end of its useful product life.
• Do not discard used batteries into household trash
containers. Contact your local government for
disposal or recycling practices in your area.
SETTING UP THE HOLMES MOBILE APP
Note: A 2.4 GHz Wi-Fi network is required.
1. Download the Holmes App from Google Play, the
Apple App Store or the QR code located on the back
of this Instruction Manual.
2. Create an account by following
the steps in the App.
3. Enter the verification code you
received to confirm your account
and create a password.
4. Select "Add Device" or the plus
(+) sign in the top right corner.
Auto Pairing (Recommended
Method)
1. Ensure Bluetooth
®
, Wi-Fi, and
GPS are activated on your
mobile device.
2. Press and hold the OSC/WIFI button on the
fan's control panel for 5 seconds, until an audible
beep is heard and the red indicator light is flashing
which indicates the device is in pairing mode. Note:
if pairing is not completed within 2-3 minutes, the
device will exit pairing mode and step 2 will need to
be repeated.
3. Select “Auto Scan” at the top of the screen.
You should see an icon for the fan that has been
found.
4. Click "Next."
5. Input your Wi-Fi name and password.
6. Wait for the connection to be established.
7. Press "Done" (top right-hand corner).
Your fan is now available to control from your
smartphone.
PLEASE READ AND SAVE THESE
IMPORTANT SAFETY INSTRUCTIONS
PLEASE READ AND SAVE THESE
IMPORTANT SAFETY INSTRUCTIONS
When using electrical appliances, basic safety precautions
should always be taken including the following:
1. Read all instructions before using this appliance.
2. Use fan only for purposes described in the instruction
manual. This fan is not for continuous operation or
equivalent.
3. To protect against electrical shock do not immerse unit,
plug or cord in water or spray with liquids and plug
the appliance directly into a 120V AC electrical outlet.
4. Close supervision is necessary when any appliance is
used by or near children.
5. Unplug from outlet when not in use, when moving fan
from one location to another, before putting on or
taking off parts and before cleaning.
6. Avoid contact with moving parts.
7. Do not operate in the presence of explosive and/or
flammable fumes.
8. To avoid fire hazard, NEVER place the cord under rugs
or any parts near an open flame, cooking or other
heating appliance.
9. Do not operate any appliance with a damaged cord or
plug after the appliance malfunctions, or has been
dropped/damaged in any manner. Discard fan or
contact customer service.
10. Do not run cord under carpeting. Do not cover cord
with throw rugs, runner, or similar coverings. Do not
route cord under furniture or appliances. Arrange cord
away from traffic area and where it will not be tripped
over.
11. The use of attachments not recommended or sold by
the appliance manufacturer may cause hazards.
12. Do not let the cord hang over the edge of a table,
counter or come in contact with hot surfaces or leave
exposed to high traffic areas.
13. Do not use outdoors.
14. To disconnect, grip plug and pull from wall outlet.
Never yank on cord.
15. Always use on a dry, level surface.
16. Do not operate fan until fully assembled with all parts
properly in place.
17. This product is intended for household use ONLY and
not for commercial or industrial applications.
18. WARNING: To reduce the risk of electrical shock and
injury to persons, do not use in window.
19. WARNING: To reduce the risk of fire or electric shock,
do not use this fan with any solid-state speed control
device.
20. This product employs overload protection (fuse).
A blown fuse indicates an overload or short-circuit
situation. If the fuse blows, unplug the product from
the outlet. Replace the fuse as per the user servicing
instructions (follow product marking for proper fuse
rating) and check the product. If the replacement fuse
blows, a short circuit may be present and the product
should be discarded or contact customer service.
21. Use the fan in a well-ventilated area. When in use,
place the fan at least 8" from any walls to ensure
proper air flow. The fan must not be located
immediately below or beside a curtain.
22. Do not obstruct the airflow with any objects or place
anything inside the fan opening.
23. Do not use in areas where curtains could be sucked in.
24. Do not use in extreme temperatures, humidity, or dusty
environments.
25. Do not place heavy objects on the fan.
26. Do not place the fan directly below a power outlet or
you risk the cord being sucked in.
27. When the fan is oscillating do not manually turn the
fan to avoid damage.
28. Children under 8 should not operate the fan.
29. This appliance is not intended for use by persons
(including children) with reduced physical, sensory or
mental capabilities, or lack of experience and
knowledge, unless they have been given supervision or
instruction concerning use of the appliance by a person
responsible for their safety.
!
WARNING: Chemical Burn Hazard. Keep batteries
away from children. This product contains a lithium
button/coin cell battery. If a new or used lithium button/
coin cell battery is swallowed or enters the body, it can
cause severe internal burns and can lead to death in as
little as 2 hours. Always completely secure the battery
compartment. If the battery compartment does not close
securely, stop using the product, remove the batteries, and
keep it away from children. If you think batteries might
have been swallowed or placed inside any part of the body,
seek immediate medical attention.
PLEASE READ AND SAVE
THESE IMPORTANT SAFETY
INSTRUCTIONS
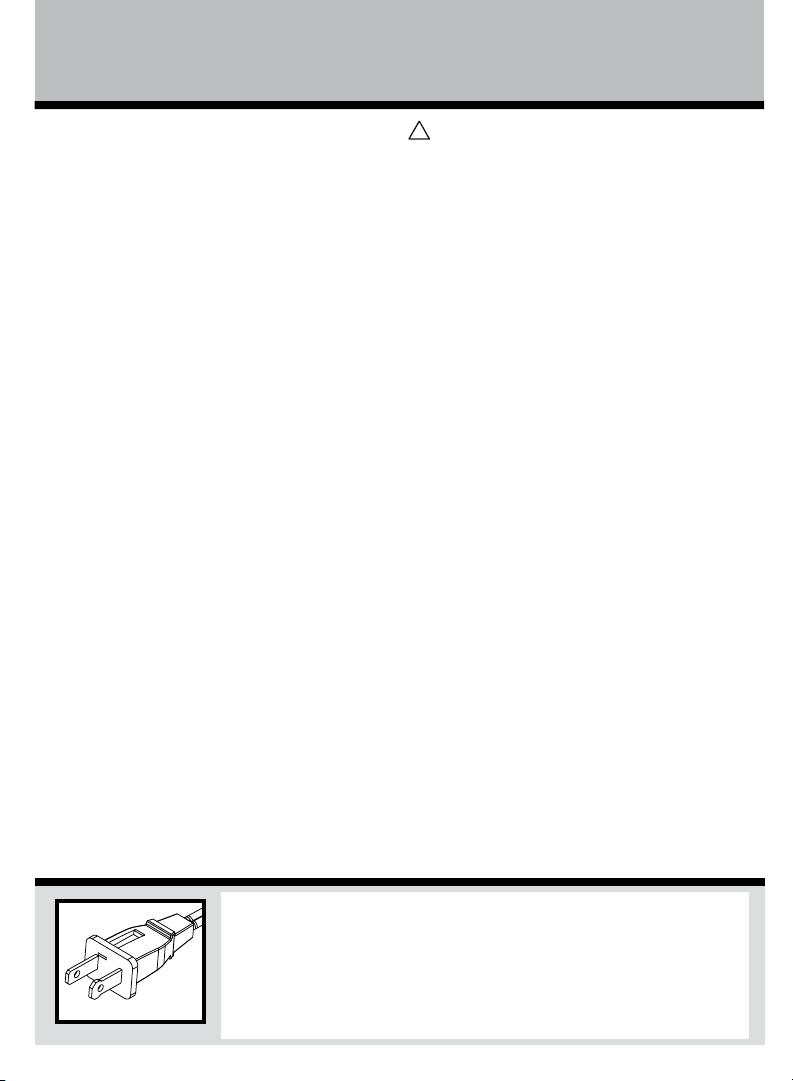
THIS APPLIANCE HAS A POLARIZED PLUG (one blade is wider than the
other). To reduce the risk of electric shock, this plug is intended to fit in
a polarized outlet only one way. If the plug does not fit fully in the
outlet, reverse the plug. If it still does not fit, contact a qualified
electrician to install the proper outlet.
DO NOT ATTEMPT TO MODIFY THIS PLUG OR DEFEAT THIS
SAFETY FEATURE IN ANY WAY.
REMOTE CONTROL AND MOBILE APP
INSTRUCTIONS
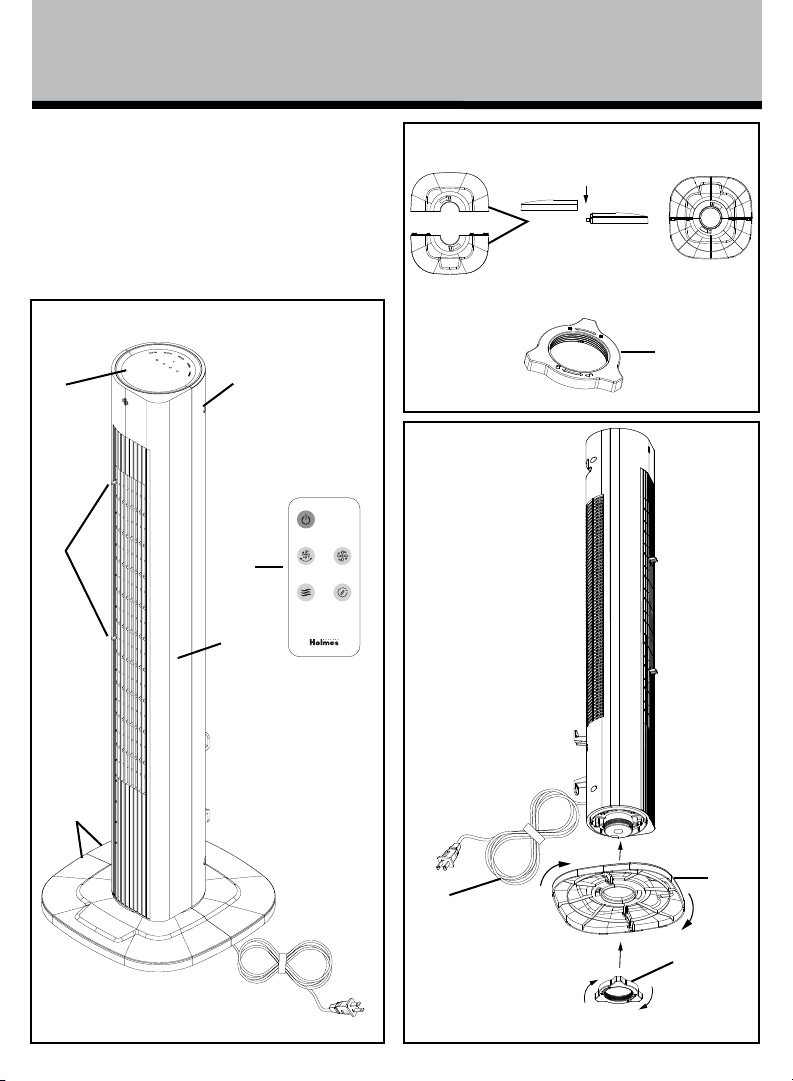
ASSEMBLY
Estimated assembly time: 5-10 minutes
No tools required.
NOTE: MAKE SURE YOU REMOVE ALL CONTENTS FROM
THE PACKAGE. PLEASE CHECK PACKAGING MATERIALS
FOR PARTS THAT COULD BE REQUIRED TO OPERATE YOUR
FAN.
1. Align and press together the base halves (figure 2).
2. Remove the lock nut from the fan housing by
rotating counterclockwise (Figure 2, 3).
3. Place the base onto the bottom of the fan housing
and rotate to secure.
4. Place the lock nut onto the bottom of the base and
rotate clockwise to tighten (Figure 3).
5. Place fan upright on a dry, level surface.
OPERATING INSTRUCTIONS
1. Plug the cord into a standard 120 Volt AC outlet.
2. To turn the fan ON, press the POWER button (A)
located on the control panel or remote control.
The fan will start running in the lowest setting "I"
(LOW).
3. Press the SPEED button (C) to cycle through the 3
speed settings in sequence.
The corresponding indicator light will illuminate to
confirm the selection:
I-Low
II-Medium
III-High
4. To turn OSCILLATION ON and OFF, press the
Oscillation (B) button.
5. To set automatic shutoff, press the TIMER button (E).
When set, the fan will run and automatically shut
off after the set duration of time (1-15 hours) has
expired.
Note: To set the timer for 15 hours, press the timer
button until all four lights (1H, 2H, 4H, 8H) are
illuminated.
6. To activate BREEZE mode, press the MODE
button (D).
The fan will cycle through alternating speeds with
brief pauses to simulate a natural outdoor breeze:
LOW BREEZE: Cycles through low and medium
speeds.
MEDIUM BREEZE: Cycles through medium and low
speeds.
HIGH BREEZE: Cycles through medium, high and
low speeds.
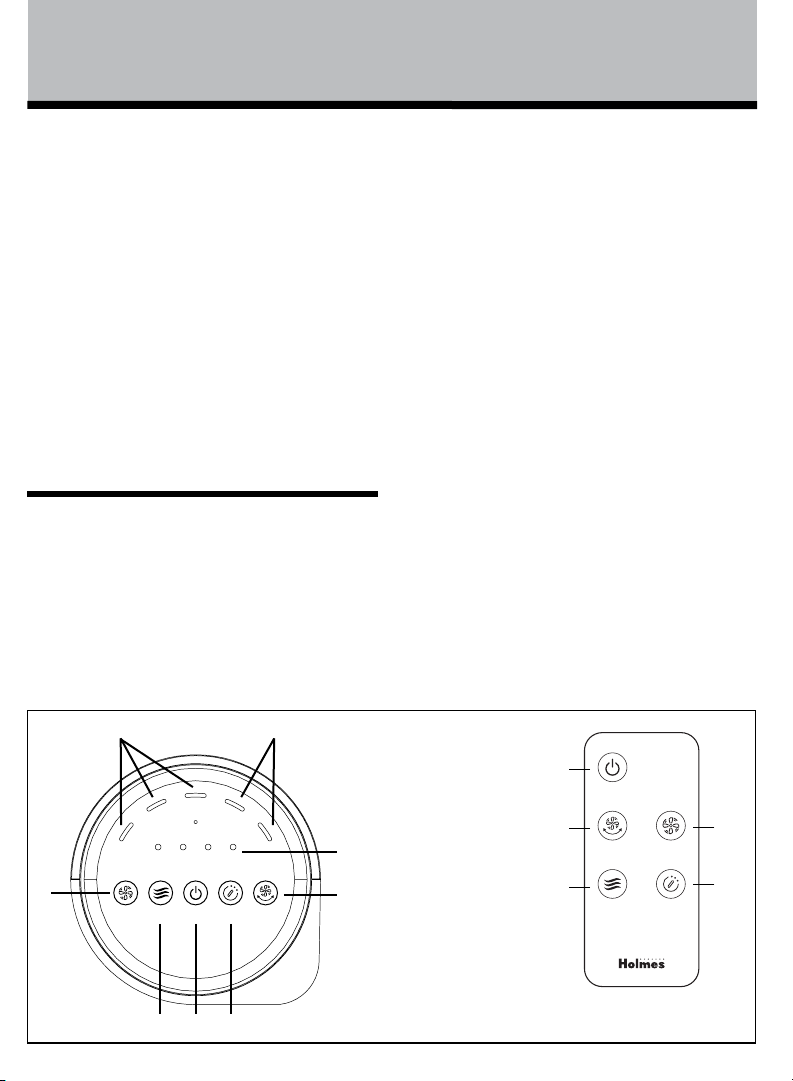
A. Power Button
B. Oscillation / WIFI Button
C. Speed Button
D. Mode Button
E. Timer Button
F. Speed Setting Indicator Lights
G. Timer Indicator Lights
H. Mode Indicator Lights
POWER
TIMER
MODE
OSC SPEED
A
B
D
C
E
1H 2H 4H 8H
BREEZE
SLEEP
III
II
I
SPEED MODE POWER TIMER OSC
WIFI
B
C
D A E
G
F H
POWER
TIMER
MODE
OSC SPEED
A
F
D
E
B
C
A. Control Panel
B Fan Housing
C. Base Halves
D. Remote Control
Storage
E. Remote Control
F. Air Vent Tabs
Figure 1
C
Lock Nut
C
Lock Nut
Figure 2
Figure 3
Power
Cord
Figure 5
ASSEMBLY AND OPERATING
INSTRUCTIONS
PARTS AND ASSEMBLY
Figure 4
To activate SLEEP mode, press the MODE button
again.
This function slows the BREEZE setting by
one level every half hour until it reaches LOW.
7. To adjust airflow direction, position the air vent
tabs (Figure 1, F) on the fan housing up or down to
desired angle.
8. To turn the fan OFF press the POWER button (A).
NOTE: Lights on the control panel will indicate the
corresponding functions you have selected.
REMOTE CONTROL
NOTE: THIS UNIT INCLUDES ONE LITHIUM BATTERY,
CR2025/3V. PLEASE REMOVE THE PROTECTIVE STICKER
FROM THE REMOTE CONTROL BATTERY BEFORE OPERATION.
To operate the fan with the remote control, aim it toward
the control panel on top of the fan tower.
The remote control can operate from a distance up to
approximately 5 meters/feet from the fan body and at
an angle variation of 15-20 degrees.
Avoid exposing the display panel to direct sunlight, as it
may interfere with signal transmission.
Replacing the Remote Control Battery
The cells should be disposed of properly, including
keeping them away from children. Even used cells may
cause injury.
a) Locate the battery compartment on the back of the
remote control handset. Press tab and pull out
battery.
b) Remove old battery.
c) Place new battery into
battery compartment.
d) Slide battery
compartment into the
remote control
handset.
NOTES:
• Remove the battery
from the remote when
it is not in use for an extended period.
• Remove the battery before discarding the remote
at the end of its useful product life.
• Do not discard used batteries into household trash
containers. Contact your local government for
disposal or recycling practices in your area.
SETTING UP THE HOLMES MOBILE APP
Note: A 2.4 GHz Wi-Fi network is required.
1. Download the Holmes App from Google Play, the
Apple App Store or the QR code located on the back
of this Instruction Manual.
2. Create an account by following
the steps in the App.
3. Enter the verification code you
received to confirm your account
and create a password.
4. Select "Add Device" or the plus
(+) sign in the top right corner.
Auto Pairing (Recommended
Method)
1. Ensure Bluetooth
®
, Wi-Fi, and
GPS are activated on your
mobile device.
2. Press and hold the OSC/WIFI button on the
fan's control panel for 5 seconds, until an audible
beep is heard and the red indicator light is flashing
which indicates the device is in pairing mode. Note:
if pairing is not completed within 2-3 minutes, the
device will exit pairing mode and step 2 will need to
be repeated.
3. Select “Auto Scan” at the top of the screen.
You should see an icon for the fan that has been
found.
4. Click "Next."
5. Input your Wi-Fi name and password.
6. Wait for the connection to be established.
7. Press "Done" (top right-hand corner).
Your fan is now available to control from your
smartphone.
PLEASE READ AND SAVE THESE
IMPORTANT SAFETY INSTRUCTIONS
PLEASE READ AND SAVE THESE
IMPORTANT SAFETY INSTRUCTIONS
When using electrical appliances, basic safety precautions
should always be taken including the following:
1. Read all instructions before using this appliance.
2. Use fan only for purposes described in the instruction
manual. This fan is not for continuous operation or
equivalent.
3. To protect against electrical shock do not immerse unit,
plug or cord in water or spray with liquids and plug
the appliance directly into a 120V AC electrical outlet.
4. Close supervision is necessary when any appliance is
used by or near children.
5. Unplug from outlet when not in use, when moving fan
from one location to another, before putting on or
taking off parts and before cleaning.
6. Avoid contact with moving parts.
7. Do not operate in the presence of explosive and/or
flammable fumes.
8. To avoid fire hazard, NEVER place the cord under rugs
or any parts near an open flame, cooking or other
heating appliance.
9. Do not operate any appliance with a damaged cord or
plug after the appliance malfunctions, or has been
dropped/damaged in any manner. Discard fan or
contact customer service.
10. Do not run cord under carpeting. Do not cover cord
with throw rugs, runner, or similar coverings. Do not
route cord under furniture or appliances. Arrange cord
away from traffic area and where it will not be tripped
over.
11. The use of attachments not recommended or sold by
the appliance manufacturer may cause hazards.
12. Do not let the cord hang over the edge of a table,
counter or come in contact with hot surfaces or leave
exposed to high traffic areas.
13. Do not use outdoors.
14. To disconnect, grip plug and pull from wall outlet.
Never yank on cord.
15. Always use on a dry, level surface.
16. Do not operate fan until fully assembled with all parts
properly in place.
17. This product is intended for household use ONLY and
not for commercial or industrial applications.
18. WARNING: To reduce the risk of electrical shock and
injury to persons, do not use in window.
19. WARNING: To reduce the risk of fire or electric shock,
do not use this fan with any solid-state speed control
device.
20. This product employs overload protection (fuse).
A blown fuse indicates an overload or short-circuit
situation. If the fuse blows, unplug the product from
the outlet. Replace the fuse as per the user servicing
instructions (follow product marking for proper fuse
rating) and check the product. If the replacement fuse
blows, a short circuit may be present and the product
should be discarded or contact customer service.
21. Use the fan in a well-ventilated area. When in use,
place the fan at least 8" from any walls to ensure
proper air flow. The fan must not be located
immediately below or beside a curtain.
22. Do not obstruct the airflow with any objects or place
anything inside the fan opening.
23. Do not use in areas where curtains could be sucked in.
24. Do not use in extreme temperatures, humidity, or dusty
environments.
25. Do not place heavy objects on the fan.
26. Do not place the fan directly below a power outlet or
you risk the cord being sucked in.
27. When the fan is oscillating do not manually turn the
fan to avoid damage.
28. Children under 8 should not operate the fan.
29. This appliance is not intended for use by persons
(including children) with reduced physical, sensory or
mental capabilities, or lack of experience and
knowledge, unless they have been given supervision or
instruction concerning use of the appliance by a person
responsible for their safety.
!
WARNING: Chemical Burn Hazard. Keep batteries
away from children. This product contains a lithium
button/coin cell battery. If a new or used lithium button/
coin cell battery is swallowed or enters the body, it can
cause severe internal burns and can lead to death in as
little as 2 hours. Always completely secure the battery
compartment. If the battery compartment does not close
securely, stop using the product, remove the batteries, and
keep it away from children. If you think batteries might
have been swallowed or placed inside any part of the body,
seek immediate medical attention.
PLEASE READ AND SAVE
THESE IMPORTANT SAFETY
INSTRUCTIONS
THIS APPLIANCE HAS A POLARIZED PLUG (one blade is wider than the
other). To reduce the risk of electric shock, this plug is intended to fit in
a polarized outlet only one way. If the plug does not fit fully in the
outlet, reverse the plug. If it still does not fit, contact a qualified
electrician to install the proper outlet.
DO NOT ATTEMPT TO MODIFY THIS PLUG OR DEFEAT THIS
SAFETY FEATURE IN ANY WAY.
REMOTE CONTROL AND MOBILE APP
INSTRUCTIONS
ASSEMBLY
Estimated assembly time: 5-10 minutes
No tools required.
NOTE: MAKE SURE YOU REMOVE ALL CONTENTS FROM
THE PACKAGE. PLEASE CHECK PACKAGING MATERIALS
FOR PARTS THAT COULD BE REQUIRED TO OPERATE YOUR
FAN.
1. Align and press together the base halves (figure 2).
2. Remove the lock nut from the fan housing by
rotating counterclockwise (Figure 2, 3).
3. Place the base onto the bottom of the fan housing
and rotate to secure.
4. Place the lock nut onto the bottom of the base and
rotate clockwise to tighten (Figure 3).
5. Place fan upright on a dry, level surface.
OPERATING INSTRUCTIONS
1. Plug the cord into a standard 120 Volt AC outlet.
2. To turn the fan ON, press the POWER button (A)
located on the control panel or remote control.
The fan will start running in the lowest setting "I"
(LOW).
3. Press the SPEED button (C) to cycle through the 3
speed settings in sequence.
The corresponding indicator light will illuminate to
confirm the selection:
I-Low
II-Medium
III-High
4. To turn OSCILLATION ON and OFF, press the
Oscillation (B) button.
5. To set automatic shutoff, press the TIMER button (E).
When set, the fan will run and automatically shut
off after the set duration of time (1-15 hours) has
expired.
Note: To set the timer for 15 hours, press the timer
button until all four lights (1H, 2H, 4H, 8H) are
illuminated.
6. To activate BREEZE mode, press the MODE
button (D).
The fan will cycle through alternating speeds with
brief pauses to simulate a natural outdoor breeze:
LOW BREEZE: Cycles through low and medium
speeds.
MEDIUM BREEZE: Cycles through medium and low
speeds.
HIGH BREEZE: Cycles through medium, high and
low speeds.
A. Power Button
B. Oscillation / WIFI Button
C. Speed Button
D. Mode Button
E. Timer Button
F. Speed Setting Indicator Lights
G. Timer Indicator Lights
H. Mode Indicator Lights
POWER
TIMER
MODE
OSC SPEED
A
B
D
C
E
1H 2H 4H 8H
BREEZE
SLEEP
III
II
I
SPEED MODE POWER TIMER OSC
WIFI
B
C
D A E
G
F H
POWER
TIMER
MODE
OSC SPEED
A
F
D
E
B
C
A. Control Panel
B Fan Housing
C. Base Halves
D. Remote Control
Storage
E. Remote Control
F. Air Vent Tabs
Figure 1
C
Lock Nut
C
Lock Nut
Figure 2
Figure 3
Power
Cord
Figure 5
ASSEMBLY AND OPERATING
INSTRUCTIONS
PARTS AND ASSEMBLY
Figure 4

Manual Pairing
If Auto Pairing is unsuccessful:
1. Ensure Bluetooth
®
, Wi-Fi, and GPS are activated on
your mobile device.
2. Ensure the fan has been powered off for 10 seconds
or more, then power on the fan.
3. Press and hold the OSC/WIFI button on the fan's
control panel for 5 seconds, until the red indicator
light is flashing. The device is now pairing mode.
Note: if pairing is not completed within 2-3 minutes,
the device will exit pairing mode and step 3 will
need to be repeated.
4. On your mobile device, click "add device", then
select "add manually" at the top of the screen.
Click the fan icon.
5. When the fan is successfully found by Bluetooth
®
,
click the green "+" on the fan icon that appears.
6. Enter your Wi-Fi name and password.
7. Wait for the connection to be established (green
checkmark), then press Next.
8. Press done (top right-hand corner).
The fan is now available to control
from your smartphone.
CONTROLLING THE FAN
WITH THE HOLMES APP
The Holmes
®
App has the same
functionality as the remote control,
as well as additional features.
1. Power
2. Fan Speed
3. Oscillation
Note: The control panel display on
the tower fan will change to match
the setting selected in the app.
1. POWER: Press to turn ON/OFF
2. SPEED: Slide your finger across
the speed level scroll bar to increase
or decrease fan speed.
3. OSCILLATION: Press to turn
ON/OFF.
4. MODE: Press icons to select
preferred mode.
• Breeze - Alternating Fan Speed
• Normal - Steady Fan Speed
• Sleep - Low Fan Speed
5. TIMER:
To set your fan for auto-shutoff, select
a run-time from 1 hour to 15 hours.
• The default setting is 1 hour.
• To run for 15 hours, press "stay
on-15 hours."
6. SCHEDULE
To Set Schedule:
1. Press Schedule.
2. Select Add on the next page.
3. Select the time of day the fan
should turn on. Be sure to choose
the hour, minutes and AM/PM.
4. Click on Timer and select how
long the fan will stay on.
Choose between 1 and 15 hours.
5. Click on“Repeat” and select which
day of the week the schedule will
be active.
6. Click the "<" to save selection and return to the
previous menu.
7. Press Save in the top right corner.
8. Your saved schedule will appear on the Schedule
screen.
9. To turn OFF the schedule, press the slider button to
the right. It will change from red to gray to indicate
the schedule is off. To turn ON the schedule, press
the slider button again. It will change from gray to
green to indicate the schedule is ON.
REPLACING THE PLUG FUSE
If the (2.5 Amp, 125 Volt) replaceable fuse blows,
please visit our website at
www.getholmesfans.com to order a new fuse.
User Servicing Instructions
1. Unplug your fan. Grasp plug and remove from the
receptacle or other outlet device. Do not unplug by
pulling on cord.
2. Open fuse cover, located on the top of the plug, by
using your thumb or a flathead screwdriver to slide
the cover down towards the prongs.
NOTE: Ensure that the fuse cover is completely
open before attempting
to remove fuse.
3. Remove fuse carefully by
using a small screwdriver
to pry the fuse from the
compartment by the
metal ends of the fuse.
(see Figure 6)
4. Place plug on a solid, flat surface. Insert new
2.5 Amp, 125 Volt fuse into fuse compartment and
use a small screwdriver to secure the metal ends of
the fuse into the compartment.
CAUTION: Risk of fire. Replace fuse only with
2.5 Amp, 125 Volt fuse.
5. Slide fuse cover closed completely.
If fuse cover is difficult to close, make sure fuse is
secured in place completely by pressing the metal
ends of the fuse
6. Risk of fire. Do not replace attachment plug. Contains
a safety device (fuse) that should not be removed.
Discard product if the attachment plug is damaged.
CLEANING
• Always unplug the fan before cleaning.
• Do not allow water to drip on into fan housing.
• Be sure to use a soft cloth moistened with a mild
soap solution.
• Do not use gasoline, thinner or benzene as a
cleaner.
Clean the fan grill, housing and base with a soft, damp
cloth.
Do not attempt to remove the fan blade. Please use
caution around the motor housing area. Do not allow
the motor or other electrical components to be exposed
to water.
STORAGE
• Store the fan in a clean, dry location between
seasons or when not in use for an extended period.
• Keep the fan head protected from dirt and dust
during storage.
• Remove battery from the remote control before
storage or disposal.
FCC STATEMENT
Potential for Radio/Television interference
This device complies with Part 15 of the FCC Rules. Operation is subject to the following two conditions:
(1) This device may not cause harmful interference, and
(2) this device must accept any interference received, including interference that may cause undesired operation.
This product has been tested and found to comply with the limits for a Class B digital device, pursuant to part 15
of the FCC rules. These limits are designed to provide reasonable protection against harmful interference in a
residential installation. The product generates, uses, and can radiate radio frequency energy and, if not installed
and used in accordance with the instructions, may cause harmful interference to radio communications. However,
there is no guarantee that the interference will not occur in a particular installation. If the product does cause
harmful interference to radio or television reception, which can be determined by turning the product on or off,
the user is encouraged to try to correct the interference by one or more of the following measures:
• Reorient or relocate the receiving antenna.
• Increase the separation between the product and the receiver.
• Connect the product into an outlet on a circuit different from that to which the receiver is connected.
• Consult the dealer or an experienced radio/TV technician for help.
• Changes or modifications not expressly approved by the party responsible for compliance could void the
user’s authority to operate the equipment.
FCC STATEMENT
WARRANTY INFORMATION
CLEANING AND MAINTENANCE
PLEASE READ AND SAVE THESE IMPORTANT INSTRUCTIONS
Instruction Manual
36'' DIGITAL TOWER FAN
with
WIFI CONNECTED APP
VOICE ASSISTANT INSTRUCTIONS MOBILE APP INSTRUCTIONS
Figure 6
Fuse
Metal ends
Fuse cover
If you have any questions regarding your product
or would like to learn more about other Holmes
®
products, please visit our website at
www.getholmesfans.com or call customer service:
1-866-769-3166 (8:30 am - 5:00 pm E.S.T.) or send
an email to info@getholmesfans.com.
For inquiries regarding recycling and proper
disposal of this product, please contact your local
waste management facility.
Printed In China
© 2022 Sunbeam Products, Inc. All rights reserved. HOLMES
®
is a registered trademark of
Sunbeam Products, Inc. used under license.
Distributed by Star Elite Inc., Montreal, Canada H3B 3X9
SEH004-022322
3 YEAR LIMITED WARRANTY
This device has a limited warranty of 3 year from the original date of purchase against workmanship and defects
in material. If under normal use, your product fails to operate, please contact our customer service department at
info@getholmesfans.com. A refund or replacement will be provided to you with proof of purchase. Star Elite Inc.
may deny claims of damage caused by misuse or modications of this product.
How to Obtain Warranty Service
If you have any problems, please do not contact the store.
Contact our customer service at 1-866-769-3166 (8:30 am - 5:00 pm EST) Monday - Friday
or contact us at info@getholmesfans.com.
Our customer service will be happy to assist you.
www.getholmesfans.com
Item: 17037
Model: 32510020
SETTING UP VOICE ASSISTANT
To pair the Tower Fan with Amazon Alexa and Google Voice Enabled Devices:
1. Open the Holmes App.
2. Select the device you wish to connect to a voice assistant.
3. In the top right corner of the screen select the pencil icon.
4. Choose the icon of the Voice Assistant you wish to connect.
5. Follow the instructions that appear.
Voice Assistant Functionality
Use the following command sequence for Amazon Alexa & Google Voice Enabled Devices:
“Alexa, “Primary Command” + “Device Name” + “Secondary Command”(if applicable)
For example, “Alexa, Activate Holmes Fan” or “Alexa, Turn Up Holmes Fan speed by 3”
Note: The default “Device Name” is “Holmes Fan”. To personalize the device name, see below.
Action Command
Turn the fan On “Activate,” “Power On,” “Turn on,” “Start”
Turn the fan Off “Power Off,” “Turn Off,” “Deactivate,”
Increase the speed Primary Command: “Turn Up,” “Raise,” “Increase”
Decrease the speed Primary Command: “Turn Down,” “Lower,” “Decrease”
Set the timer Primary: “Set,” “Change”
Oscillation On “Turn On Oscillation,” “Start Oscillation,” “Activate Oscillation”
Oscillation Off “Turn Off Oscillation,” “Stop Oscillation,” “Deactivate Oscillation”
PERSONALIZING THE DEVICE NAME
To personalize the fan name for easier voice commands:
1. Open the Holmes App.
2. Select the product name you wish to change.
3. Select the pencil icon in the top right corner.
4. On the following screen, click on or tap the name of the product.
5. Tap the current name of the fan.
6. Rename the product and press save.
Note: The name will automatically update for both Amazon Alexa and Google Voice Enabled Devices.
Google is a trademark of Google LLC.
Amazon, Alexa and all related logos are trademarks of Amazon.com, Inc. or its affiliates.
App Store is a service mark of Apple Inc.
Google Play and the Google Play logo are trademarks of Google LLC.
4. Mode
5. Timer
6. Schedule
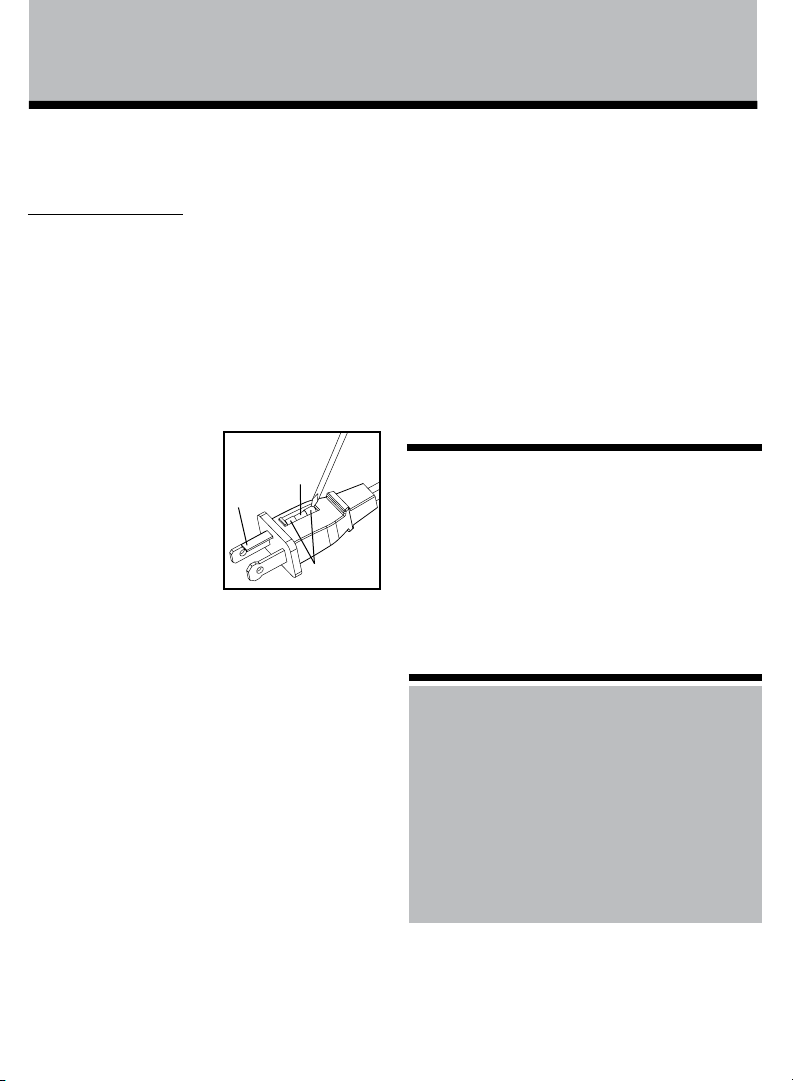
Manual Pairing
If Auto Pairing is unsuccessful:
1. Ensure Bluetooth
®
, Wi-Fi, and GPS are activated on
your mobile device.
2. Ensure the fan has been powered off for 10 seconds
or more, then power on the fan.
3. Press and hold the OSC/WIFI button on the fan's
control panel for 5 seconds, until the red indicator
light is flashing. The device is now pairing mode.
Note: if pairing is not completed within 2-3 minutes,
the device will exit pairing mode and step 3 will
need to be repeated.
4. On your mobile device, click "add device", then
select "add manually" at the top of the screen.
Click the fan icon.
5. When the fan is successfully found by Bluetooth
®
,
click the green "+" on the fan icon that appears.
6. Enter your Wi-Fi name and password.
7. Wait for the connection to be established (green
checkmark), then press Next.
8. Press done (top right-hand corner).
The fan is now available to control
from your smartphone.
CONTROLLING THE FAN
WITH THE HOLMES APP
The Holmes
®
App has the same
functionality as the remote control,
as well as additional features.
1. Power
2. Fan Speed
3. Oscillation
Note: The control panel display on
the tower fan will change to match
the setting selected in the app.
1. POWER: Press to turn ON/OFF
2. SPEED: Slide your finger across
the speed level scroll bar to increase
or decrease fan speed.
3. OSCILLATION: Press to turn
ON/OFF.
4. MODE: Press icons to select
preferred mode.
• Breeze - Alternating Fan Speed
• Normal - Steady Fan Speed
• Sleep - Low Fan Speed
5. TIMER:
To set your fan for auto-shutoff, select
a run-time from 1 hour to 15 hours.
• The default setting is 1 hour.
• To run for 15 hours, press "stay
on-15 hours."
6. SCHEDULE
To Set Schedule:
1. Press Schedule.
2. Select Add on the next page.
3. Select the time of day the fan
should turn on. Be sure to choose
the hour, minutes and AM/PM.
4. Click on Timer and select how
long the fan will stay on.
Choose between 1 and 15 hours.
5. Click on“Repeat” and select which
day of the week the schedule will
be active.
6. Click the "<" to save selection and return to the
previous menu.
7. Press Save in the top right corner.
8. Your saved schedule will appear on the Schedule
screen.
9. To turn OFF the schedule, press the slider button to
the right. It will change from red to gray to indicate
the schedule is off. To turn ON the schedule, press
the slider button again. It will change from gray to
green to indicate the schedule is ON.
REPLACING THE PLUG FUSE
If the (2.5 Amp, 125 Volt) replaceable fuse blows,
please visit our website at
www.getholmesfans.com to order a new fuse.
User Servicing Instructions
1. Unplug your fan. Grasp plug and remove from the
receptacle or other outlet device. Do not unplug by
pulling on cord.
2. Open fuse cover, located on the top of the plug, by
using your thumb or a flathead screwdriver to slide
the cover down towards the prongs.
NOTE: Ensure that the fuse cover is completely
open before attempting
to remove fuse.
3. Remove fuse carefully by
using a small screwdriver
to pry the fuse from the
compartment by the
metal ends of the fuse.
(see Figure 6)
4. Place plug on a solid, flat surface. Insert new
2.5 Amp, 125 Volt fuse into fuse compartment and
use a small screwdriver to secure the metal ends of
the fuse into the compartment.
CAUTION: Risk of fire. Replace fuse only with
2.5 Amp, 125 Volt fuse.
5. Slide fuse cover closed completely.
If fuse cover is difficult to close, make sure fuse is
secured in place completely by pressing the metal
ends of the fuse
6. Risk of fire. Do not replace attachment plug. Contains
a safety device (fuse) that should not be removed.
Discard product if the attachment plug is damaged.
CLEANING
• Always unplug the fan before cleaning.
• Do not allow water to drip on into fan housing.
• Be sure to use a soft cloth moistened with a mild
soap solution.
• Do not use gasoline, thinner or benzene as a
cleaner.
Clean the fan grill, housing and base with a soft, damp
cloth.
Do not attempt to remove the fan blade. Please use
caution around the motor housing area. Do not allow
the motor or other electrical components to be exposed
to water.
STORAGE
• Store the fan in a clean, dry location between
seasons or when not in use for an extended period.
• Keep the fan head protected from dirt and dust
during storage.
• Remove battery from the remote control before
storage or disposal.
FCC STATEMENT
Potential for Radio/Television interference
This device complies with Part 15 of the FCC Rules. Operation is subject to the following two conditions:
(1) This device may not cause harmful interference, and
(2) this device must accept any interference received, including interference that may cause undesired operation.
This product has been tested and found to comply with the limits for a Class B digital device, pursuant to part 15
of the FCC rules. These limits are designed to provide reasonable protection against harmful interference in a
residential installation. The product generates, uses, and can radiate radio frequency energy and, if not installed
and used in accordance with the instructions, may cause harmful interference to radio communications. However,
there is no guarantee that the interference will not occur in a particular installation. If the product does cause
harmful interference to radio or television reception, which can be determined by turning the product on or off,
the user is encouraged to try to correct the interference by one or more of the following measures:
• Reorient or relocate the receiving antenna.
• Increase the separation between the product and the receiver.
• Connect the product into an outlet on a circuit different from that to which the receiver is connected.
• Consult the dealer or an experienced radio/TV technician for help.
• Changes or modifications not expressly approved by the party responsible for compliance could void the
user’s authority to operate the equipment.
FCC STATEMENT
WARRANTY INFORMATION
CLEANING AND MAINTENANCE
PLEASE READ AND SAVE THESE IMPORTANT INSTRUCTIONS
Instruction Manual
36'' DIGITAL TOWER FAN
with
WIFI CONNECTED APP
VOICE ASSISTANT INSTRUCTIONS MOBILE APP INSTRUCTIONS
Figure 6
Fuse
Metal ends
Fuse cover
If you have any questions regarding your product
or would like to learn more about other Holmes
®
products, please visit our website at
www.getholmesfans.com or call customer service:
1-866-769-3166 (8:30 am - 5:00 pm E.S.T.) or send
an email to [email protected].
For inquiries regarding recycling and proper
disposal of this product, please contact your local
waste management facility.
Printed In China
© 2022 Sunbeam Products, Inc. All rights reserved. HOLMES
®
is a registered trademark of
Sunbeam Products, Inc. used under license.
Distributed by Star Elite Inc., Montreal, Canada H3B 3X9
SEH004-022322
3 YEAR LIMITED WARRANTY
This device has a limited warranty of 3 year from the original date of purchase against workmanship and defects
in material. If under normal use, your product fails to operate, please contact our customer service department at
info@getholmesfans.com. A refund or replacement will be provided to you with proof of purchase. Star Elite Inc.
may deny claims of damage caused by misuse or modications of this product.
How to Obtain Warranty Service
If you have any problems, please do not contact the store.
Contact our customer service at 1-866-769-3166 (8:30 am - 5:00 pm EST) Monday - Friday
or contact us at info@getholmesfans.com.
Our customer service will be happy to assist you.
www.getholmesfans.com
Item: 17037
Model: 32510020
SETTING UP VOICE ASSISTANT
To pair the Tower Fan with Amazon Alexa and Google Voice Enabled Devices:
1. Open the Holmes App.
2. Select the device you wish to connect to a voice assistant.
3. In the top right corner of the screen select the pencil icon.
4. Choose the icon of the Voice Assistant you wish to connect.
5. Follow the instructions that appear.
Voice Assistant Functionality
Use the following command sequence for Amazon Alexa & Google Voice Enabled Devices:
“Alexa, “Primary Command” + “Device Name” + “Secondary Command”(if applicable)
For example, “Alexa, Activate Holmes Fan” or “Alexa, Turn Up Holmes Fan speed by 3”
Note: The default “Device Name” is “Holmes Fan”. To personalize the device name, see below.
Action Command
Turn the fan On “Activate,” “Power On,” “Turn on,” “Start”
Turn the fan Off “Power Off,” “Turn Off,” “Deactivate,”
Increase the speed Primary Command: “Turn Up,” “Raise,” “Increase”
Decrease the speed Primary Command: “Turn Down,” “Lower,” “Decrease”
Set the timer Primary: “Set,” “Change”
Oscillation On “Turn On Oscillation,” “Start Oscillation,” “Activate Oscillation”
Oscillation Off “Turn Off Oscillation,” “Stop Oscillation,” “Deactivate Oscillation”
PERSONALIZING THE DEVICE NAME
To personalize the fan name for easier voice commands:
1. Open the Holmes App.
2. Select the product name you wish to change.
3. Select the pencil icon in the top right corner.
4. On the following screen, click on or tap the name of the product.
5. Tap the current name of the fan.
6. Rename the product and press save.
Note: The name will automatically update for both Amazon Alexa and Google Voice Enabled Devices.
Google is a trademark of Google LLC.
Amazon, Alexa and all related logos are trademarks of Amazon.com, Inc. or its affiliates.
App Store is a service mark of Apple Inc.
Google Play and the Google Play logo are trademarks of Google LLC.
4. Mode
5. Timer
6. Schedule

Manual Pairing
If Auto Pairing is unsuccessful:
1. Ensure Bluetooth
®
, Wi-Fi, and GPS are activated on
your mobile device.
2. Ensure the fan has been powered off for 10 seconds
or more, then power on the fan.
3. Press and hold the OSC/WIFI button on the fan's
control panel for 5 seconds, until the red indicator
light is flashing. The device is now pairing mode.
Note: if pairing is not completed within 2-3 minutes,
the device will exit pairing mode and step 3 will
need to be repeated.
4. On your mobile device, click "add device", then
select "add manually" at the top of the screen.
Click the fan icon.
5. When the fan is successfully found by Bluetooth
®
,
click the green "+" on the fan icon that appears.
6. Enter your Wi-Fi name and password.
7. Wait for the connection to be established (green
checkmark), then press Next.
8. Press done (top right-hand corner).
The fan is now available to control
from your smartphone.
CONTROLLING THE FAN
WITH THE HOLMES APP
The Holmes
®
App has the same
functionality as the remote control,
as well as additional features.
1. Power
2. Fan Speed
3. Oscillation
Note: The control panel display on
the tower fan will change to match
the setting selected in the app.
1. POWER: Press to turn ON/OFF
2. SPEED: Slide your finger across
the speed level scroll bar to increase
or decrease fan speed.
3. OSCILLATION: Press to turn
ON/OFF.
4. MODE: Press icons to select
preferred mode.
• Breeze - Alternating Fan Speed
• Normal - Steady Fan Speed
• Sleep - Low Fan Speed
5. TIMER:
To set your fan for auto-shutoff, select
a run-time from 1 hour to 15 hours.
• The default setting is 1 hour.
• To run for 15 hours, press "stay
on-15 hours."
6. SCHEDULE
To Set Schedule:
1. Press Schedule.
2. Select Add on the next page.
3. Select the time of day the fan
should turn on. Be sure to choose
the hour, minutes and AM/PM.
4. Click on Timer and select how
long the fan will stay on.
Choose between 1 and 15 hours.
5. Click on“Repeat” and select which
day of the week the schedule will
be active.
6. Click the "<" to save selection and return to the
previous menu.
7. Press Save in the top right corner.
8. Your saved schedule will appear on the Schedule
screen.
9. To turn OFF the schedule, press the slider button to
the right. It will change from red to gray to indicate
the schedule is off. To turn ON the schedule, press
the slider button again. It will change from gray to
green to indicate the schedule is ON.
REPLACING THE PLUG FUSE
If the (2.5 Amp, 125 Volt) replaceable fuse blows,
please visit our website at
www.getholmesfans.com to order a new fuse.
User Servicing Instructions
1. Unplug your fan. Grasp plug and remove from the
receptacle or other outlet device. Do not unplug by
pulling on cord.
2. Open fuse cover, located on the top of the plug, by
using your thumb or a flathead screwdriver to slide
the cover down towards the prongs.
NOTE: Ensure that the fuse cover is completely
open before attempting
to remove fuse.
3. Remove fuse carefully by
using a small screwdriver
to pry the fuse from the
compartment by the
metal ends of the fuse.
(see Figure 6)
4. Place plug on a solid, flat surface. Insert new
2.5 Amp, 125 Volt fuse into fuse compartment and
use a small screwdriver to secure the metal ends of
the fuse into the compartment.
CAUTION: Risk of fire. Replace fuse only with
2.5 Amp, 125 Volt fuse.
5. Slide fuse cover closed completely.
If fuse cover is difficult to close, make sure fuse is
secured in place completely by pressing the metal
ends of the fuse
6. Risk of fire. Do not replace attachment plug. Contains
a safety device (fuse) that should not be removed.
Discard product if the attachment plug is damaged.
CLEANING
• Always unplug the fan before cleaning.
• Do not allow water to drip on into fan housing.
• Be sure to use a soft cloth moistened with a mild
soap solution.
• Do not use gasoline, thinner or benzene as a
cleaner.
Clean the fan grill, housing and base with a soft, damp
cloth.
Do not attempt to remove the fan blade. Please use
caution around the motor housing area. Do not allow
the motor or other electrical components to be exposed
to water.
STORAGE
• Store the fan in a clean, dry location between
seasons or when not in use for an extended period.
• Keep the fan head protected from dirt and dust
during storage.
• Remove battery from the remote control before
storage or disposal.
FCC STATEMENT
Potential for Radio/Television interference
This device complies with Part 15 of the FCC Rules. Operation is subject to the following two conditions:
(1) This device may not cause harmful interference, and
(2) this device must accept any interference received, including interference that may cause undesired operation.
This product has been tested and found to comply with the limits for a Class B digital device, pursuant to part 15
of the FCC rules. These limits are designed to provide reasonable protection against harmful interference in a
residential installation. The product generates, uses, and can radiate radio frequency energy and, if not installed
and used in accordance with the instructions, may cause harmful interference to radio communications. However,
there is no guarantee that the interference will not occur in a particular installation. If the product does cause
harmful interference to radio or television reception, which can be determined by turning the product on or off,
the user is encouraged to try to correct the interference by one or more of the following measures:
• Reorient or relocate the receiving antenna.
• Increase the separation between the product and the receiver.
• Connect the product into an outlet on a circuit different from that to which the receiver is connected.
• Consult the dealer or an experienced radio/TV technician for help.
• Changes or modifications not expressly approved by the party responsible for compliance could void the
user’s authority to operate the equipment.
FCC STATEMENT
WARRANTY INFORMATION
CLEANING AND MAINTENANCE
PLEASE READ AND SAVE THESE IMPORTANT INSTRUCTIONS
Instruction Manual
36'' DIGITAL TOWER FAN
with
WIFI CONNECTED APP
VOICE ASSISTANT INSTRUCTIONS MOBILE APP INSTRUCTIONS
Figure 6
Fuse
Metal ends
Fuse cover
If you have any questions regarding your product
or would like to learn more about other Holmes
®
products, please visit our website at
www.getholmesfans.com or call customer service:
1-866-769-3166 (8:30 am - 5:00 pm E.S.T.) or send
an email to info@getholmesfans.com.
For inquiries regarding recycling and proper
disposal of this product, please contact your local
waste management facility.
Printed In China
© 2022 Sunbeam Products, Inc. All rights reserved. HOLMES
®
is a registered trademark of
Sunbeam Products, Inc. used under license.
Distributed by Star Elite Inc., Montreal, Canada H3B 3X9
SEH004-022322
3 YEAR LIMITED WARRANTY
This device has a limited warranty of 3 year from the original date of purchase against workmanship and defects
in material. If under normal use, your product fails to operate, please contact our customer service department at
[email protected]. A refund or replacement will be provided to you with proof of purchase. Star Elite Inc.
may deny claims of damage caused by misuse or modications of this product.
How to Obtain Warranty Service
If you have any problems, please do not contact the store.
Contact our customer service at 1-866-769-3166 (8:30 am - 5:00 pm EST) Monday - Friday
or contact us at [email protected].
Our customer service will be happy to assist you.
www.getholmesfans.com
Item: 17037
Model: 32510020
SETTING UP VOICE ASSISTANT
To pair the Tower Fan with Amazon Alexa and Google Voice Enabled Devices:
1. Open the Holmes App.
2. Select the device you wish to connect to a voice assistant.
3. In the top right corner of the screen select the pencil icon.
4. Choose the icon of the Voice Assistant you wish to connect.
5. Follow the instructions that appear.
Voice Assistant Functionality
Use the following command sequence for Amazon Alexa & Google Voice Enabled Devices:
“Alexa, “Primary Command” + “Device Name” + “Secondary Command”(if applicable)
For example, “Alexa, Activate Holmes Fan” or “Alexa, Turn Up Holmes Fan speed by 3”
Note: The default “Device Name” is “Holmes Fan”. To personalize the device name, see below.
Action Command
Turn the fan On “Activate,” “Power On,” “Turn on,” “Start”
Turn the fan Off “Power Off,” “Turn Off,” “Deactivate,”
Increase the speed Primary Command: “Turn Up,” “Raise,” “Increase”
Decrease the speed Primary Command: “Turn Down,” “Lower,” “Decrease”
Set the timer Primary: “Set,” “Change”
Oscillation On “Turn On Oscillation,” “Start Oscillation,” “Activate Oscillation”
Oscillation Off “Turn Off Oscillation,” “Stop Oscillation,” “Deactivate Oscillation”
PERSONALIZING THE DEVICE NAME
To personalize the fan name for easier voice commands:
1. Open the Holmes App.
2. Select the product name you wish to change.
3. Select the pencil icon in the top right corner.
4. On the following screen, click on or tap the name of the product.
5. Tap the current name of the fan.
6. Rename the product and press save.
Note: The name will automatically update for both Amazon Alexa and Google Voice Enabled Devices.
Google is a trademark of Google LLC.
Amazon, Alexa and all related logos are trademarks of Amazon.com, Inc. or its affiliates.
App Store is a service mark of Apple Inc.
Google Play and the Google Play logo are trademarks of Google LLC.
4. Mode
5. Timer
6. Schedule