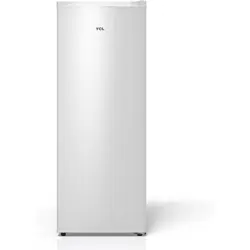

Upright Freezer
KS-35F
KISMILE

NOTE: If the freezer has been placed in a horizontal or tilted position for any
period of time wait 24 hours before plugging the unit in.
1. Use this appliance only for its intended purpose as described in
this use and care guide.
2. This freezer must be properly installed in accordance with the
installation instructions before it is used. See grounding
instructions in the installation section.
3. Never unplug your freezer by pulling on the power cord. Always
grasp the plug firmly and pull straight out from the outlet.
4. Repair or replace immediately, all electric service cords that have
become frayed or otherwise damaged. Do not use a cord that
shows cracks or abrasion damage along its length, the plug or the
connector end.
5. Unplug your freezer
before cleaning or before making any repairs.
6. Do not use any electrical device or any sharp instrument in
defrosting your freezer.
7. If your old freezer is not being used, we recommend that you
remove the doors. This will reduce the possibility of danger to
children.
8.
WARNING:
After your freezer is in operation, do not touch the
cold surfaces in the freezer compartment, particularly when
hands are damp or wet. Skin may adhere to these extremely cold
surfaces.
9. Do not refreeze foods, which have been thawed completely. The
United States Department of Agriculture in Home and Garden
Bulletin No. 69 reads: “…You may safely refreeze frozen foods that
Read all of the instructions before using this appliance. When using this
appliance, always exercise basic safety precautions, including the following:
WARNING
1
IMPORTANT SAFETY INSTRUCTIONS

Risk of child entrapment. Before you throw away your old
refrigerator or freezer, take off the doors. Leave the shelves in
place so that children may not easily climb inside.
DANGER
2
IMPORTANT SAFETY INSTRUCTIONS
have thawed if they still contain ice crystals or if they are still
cold-below 40˚F”.
“…Thawed ground meats, poultry, or fish that have any off-odor
or off-color should not be refrozen and should not be eaten.
Thawed ice cream should be discarded. If the odor or color of
any food is poor or questionable, discard it. The food may be
dangerous to eat.”
“…Even partial thawing and re-freezing reduce the eating quality
of foods, particularly fruits, vegetables, and prepared foods. The
eating quality of red meats is affected less than that of many
other foods. Use refrozen foods as soon as possible, to save as
much of its eating quality as you can.
10. This freezer should not be recessed or built-in an enclosed
cabinet. It is designed for freestanding installation only.
11. Do no
t operate your freezer in the presence of explosive fumes.
SAVE THESE INSTRUCTIONS
HOUSEHOLD USE ONLY
PRODUCT REGISTRATION
Thank you for purchasing our
product. This easy-to-use manual will
guide you in getting the best use of
your product.
Remember to record the model and
serial numbers. They are on a label
inside of the unit.
Model number
Serial number
Date of purchase
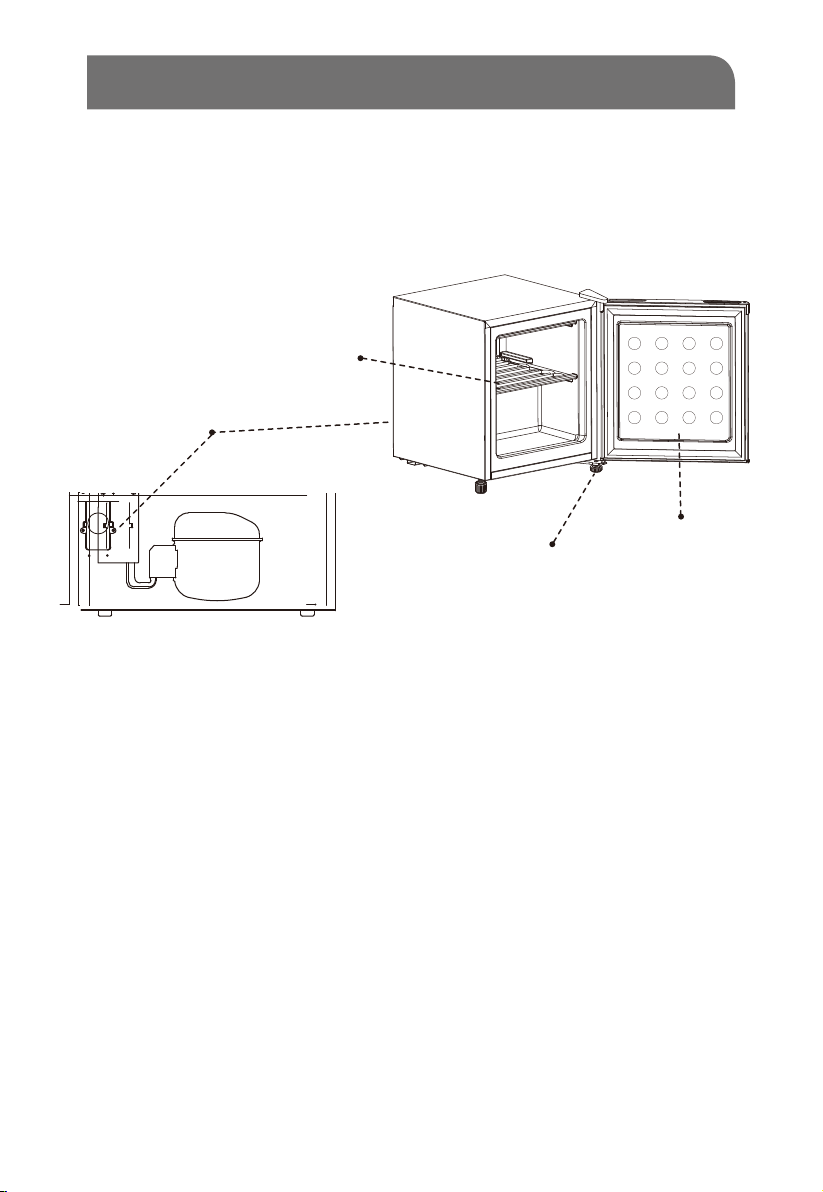
PARTS & FEATURES
3
adjustable
temperature
control
back of freezer
door
adjustable feet
fixed grid shelf

4
INSTALLING YOUR FREEZER
UNPACKING YOUR FREEZER
1. Remove all packaging material. This includes the foam base and all adhesive
tape holding the freezer accessories inside and
outside.
2. Inspect and remove any remains of packing, tape or printed
materials before powering on the freezer.
ADJUSTING YOUR FREEZER
• Your freezer is designed for freestanding installation only. It should not be
recessed or built-in.
• Place the freezer on a surface strong enough to support it fully loaded.
• When moving the freezer, never tilt it more than a 45-degree angle.
This could damage the compressor and the sealed system.
• If the freezer is tilted let it stand in an upright position for at least 24 hours
prior to plugging in. This is to allow the refrigerant to settle.
PROPER AIR CIRCULATION
• To assure your freezer works at the maximum efficiency it was designed for,
you should install it in a location where there is proper air circulation, plumbing
and electrical connections.
• The following are recommended clearances around the freezer:
Sides……………4” (102mm)
Back..................4” (102mm)
Top....................4” (102mm)

INSTALLING YOUR FREEZER CONT.
5
ELECTRICAL REQUIREMENT
• Make sure there is a suitable power Outlet (115 volts, 15 amps
outlet) with proper grounding to power the freezer.
• Avoid the use of three plug adapters or cutting off the third grounding in order to
accommodate a two plug outlet. This is a dangerous
practice since it provides no effective grounding for the freezer and may result in
shock hazard.
USE OF EXTENSION CORD
• Avoid the use of an extension cord because of potential safety hazards under
certain conditions. If it is necessary to use an extension cord, use only a 3-wire
extension cord that has a 3-blade grounding plug and a 3-slot outlet that will
accept the plug. The marked rating of the extension cord must be equal to or
greater than the electrical rating of the appliance. DO NOT USE EXTENSION
CORD LONGER THAN 12 FT.
INSTALL LIMITATIONS
• Do not install your freezer in any location not properly insulated or heated e.g.
garage etc. Your freezer was not designed to operate in temperature settings
below 55˚ Fahrenheit.
• Select a suitable location for the freezer on a hard even
surface away from direct sunlight or heat source e.g. radiators,
baseboard heaters, cooking appliances etc. Any floor unevenness should be
corrected.
ELECTRICAL REQUIREMENT - SHOCK HAZARD
WARNING
WARNING
USE OF EXTENSION CORDS- POTENTIAL SAFETY HAZARD

6
FREEZER FEATURES AND USE
TEMPERATURE CONTROL
ICE CUBE TRAY
NORMAL OPERATING SOUNDS YOU MAY HEAR
• Boiling water, gurgling sounds or slight vibrations that are the result of the refrigrant
sirculating through the cooling coils.
• The thermostat control will click when it cycles on and off.
1. The Temperature Control Dial is located at the back of the unit.
2. The first time you turn the unit on, set the temperature control to the maximum
position.
NOTE: The temperature range is from "1" the warmest, to "7" the coldest.
3. After 24 - 48 hours, adjust the temperature to suit your needs. The setting of "4"
should be appropriate for most needs.
4. To turn the freezer off, turn the Temperature Control Dial to the "0" position.
NOTE: This only turns off the cooling cycle - not the power.
5. If the freezer is unplugged, turned off, or without power for any reason, do not
re-connect for at least five minutes to allow the circuits to reset. Damage may
occur if it is re-connected too soon.
6. The inside temperature of the freezer will vary depending on the frequency of
the door opening and the amount of food.
1. Recommended thermostat setting for ice making is position “7”.
2. Fill the ice cube tray 2/3 full, with cold water or with any liquid suitable for freezing
and place the tray on the bottom of the freezer to freeze properly.
3. Dry the bottom of the tray, to avoid it sticking to the bottom of the freezer.
4. The best method to get ice cubes out of the tray is to hold the tray under cold tap
water for a second.
5. To eject the ice cubes from the tray, place over the ice bucket and twist slightly.

FREEZER FEATURES AND USE CONT.
7
DEFROSTING
• For most efficient operation and minimum energy consumption, defrost when-
ever the frost becomes 1/4” thick. Never use a sharp or metallic instrument to
remove the frost, as it may damage the cooling coils. (A punctured coil will void
the warranty). Use only a plastic scraper. Do not use boiling water as it may
damage the unit.
•
Remove frozen food from the freezer and place it in a cooler to protect the
food.
• Turn the temperature control to “0” position and unplug the unit. Defrosting
usually takes a few hours. To defrost faster keep the freezer door open.
DEFROST DRAIN
Place a narrow defrost pan (not included) in front of the freezer, gently slide the
defrost drain outward. Water that has accumulated at the bottom of the freezer
during defrosting will drain into the pan.
NOTE: Monitor the defrost pan to avoid overflow.
• When defrosting is complete, wipe the interior of the freezer with a soft cloth.
Plug in power cord back into the electrical outlet.
• Reset the temperature control to the desired setting.
• Return the food into the freezer.

8
FREEZER FEATURES AND USE CONT.
LEVELING YOUR FREEZER
• Your freezer has two leveling legs which are located in the front bottom
corners of your freezer. After properly placing your freezer in its final
position, you can level your freezer.
• Leveling legs can be adjusted by turning them counterclockwise to raise your
freezer or by turning them clockwise to lower your freezer. The freezer door
will close easier when leveling legs are extended.

FREEZER FEATURES AND USE CONT.
9
FOOD STORAGE INFORMATION
Frozen Food:
• Wipe containers before storing to avoid needless spills.
• Hot food should be allowed to cool before storing in the freezer. This will prevent
unnecessary energy use.
• When storing meats, keep in the original packaging or rewrap as necessary.
• Proper freezer storage requires correct packaging. All foods must be in packages,
which do not allow the flow of air or moisture in, or out. Improper storage will
result in odor and taste transfer and will result in the drying out of the improperly
packaged food.
• Follow package or container instructions for proper storage.
• Packaging Recommendations:
Plastic containers with air tight lids
Heavy duty aluminum foil
Plastic wrap made from saran film
Self-sealing plastic bags
• Do
not refreeze defrosted/thawed foods.
• It is recommended that the freezing date be marked on the
packaging.
These are some suggestions for safe storage:
• TV Dinners 3 - 4 Months
• Fresh Shrimp, scallops, crawfish 3 - 6 Months
• Hamburger & stew meats 3 - 4 Months
• Ground Turkey, veal, pork 3 - 4 Months
• Chops 4 - 6 Months
• Steaks 6 - 12 Months
• Chicken or turkey, whole 1 year

10
PROPER FREEZER CARE AND CLEANING
CLEANING AND MAINTENANCE
GENERAL:
• Prepare a cleaning solution of 3-4 tablespoons of
baking soda mixed with warm water. Use sponge or soft cloth, dampened with
the cleaning solution, to wipe down your freezer.
• Rinse with clean warm water and dry with a soft cloth.
• Do not use harsh chemicals, abrasives, ammonia, chlorine bleach,concentrated
detergents, solvents or metal scouring pads. SOME of these chemicals may
dissolve, damage and/or discolor your freezer.
DOOR GASKETS:
• Clean door gaskets every three months according to general instructions.
Gaskets must be kept clean and pliable to assure a proper seal.
• Petroleum jelly applied lightly on the hinge side of gaskets will keep the gasket
pliable and assure a good seal.
WARNING
To avoid electric shock always unplug your freezer before cleaning.
Ignoring this warning may result in death or injury.
CAUTION
Before using cleaning products, always read and follow manufacturer’s
instructions and warnings to avoid personal injury or product damage.

PROPER FREEZER CARE AND CLEANING CONT.
11
POWER INTERRUPTIONS
• Occasionally there may be power interruptions due to thunderstorms or
other causes. Remove the power cord from AC outlet when a power outage
occurs. When power has been restored, replug power cord to AC outlet.
If outage is for a prolonged period, inspect and discard spoiled or thawed
food in freezer. Clean freezer before reusing.
VACATION AND MOVING CARE
• For long vacations or absences, empty food from freezer, move the temperature
DIAL to the “0” position and clean the door gaskets according to “General cleaning”
section. Prop doors open, so air can circulate inside. When moving always move the
freezer vertically. Do not move with the unit lying down. Possible damage to the
sealed system could occur.
WARNING
If outage is for a prolonged period, inspect and discard spoiled
or thawed food in freezer. Clean freezer before reusing.
12
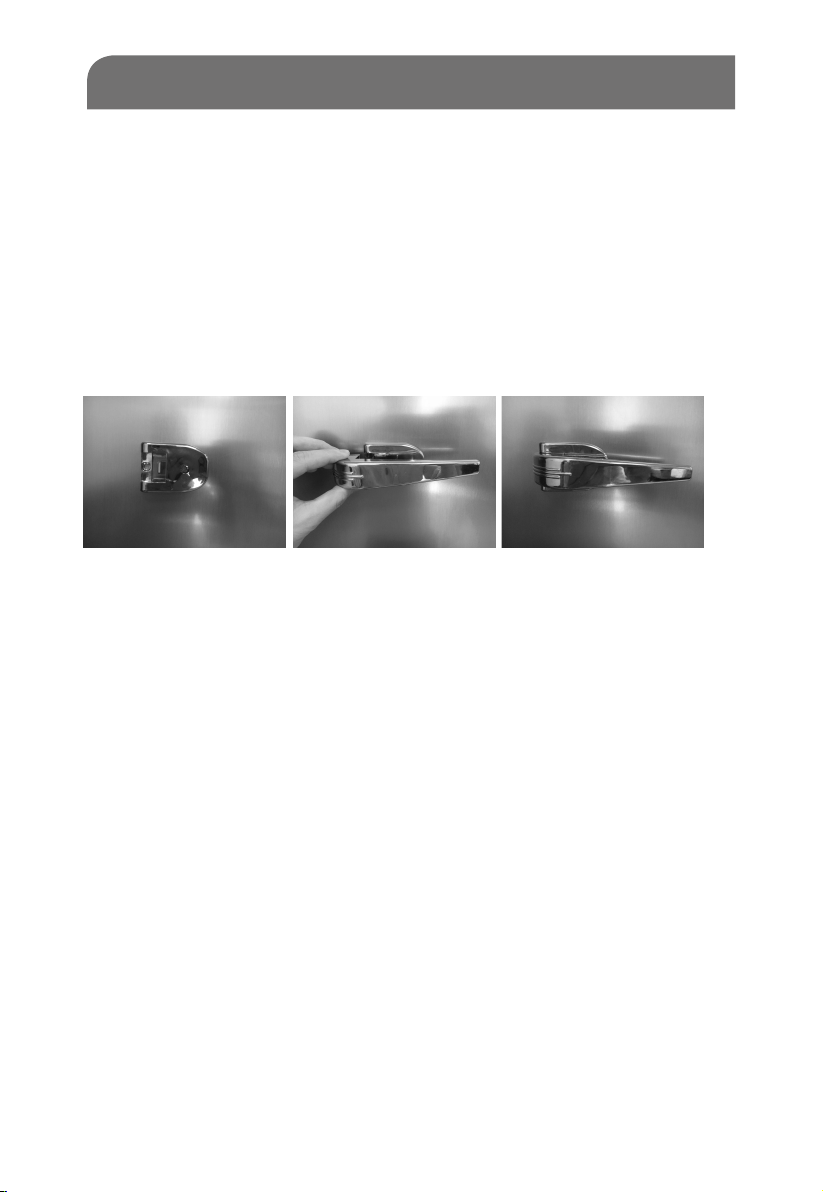
HANDLE INSTALL INSTRUCTION
•
•
•
•
Take out the handle from the unit and remove the package (two handle part and two
screws).
Use a screwdriver to fix the handle bottom on the door using the two screws.
Push the handle horizontally until it clicks in.
Push and pull the handle to make sure that it is installed completely.

13
TROUBLESHOOTING
FREEZER DOES NOT OPERATE:
• Check if thermostat control is not in the “0” position.
• Check if freezer is plugged in.
• Check if there is power at the ac outlet, by checking the circuit breaker. if there is power at the ac outlet, by checking the circuit breaker.
• Wait for 30-40 minutes to see whether freezer will start. Compressor cycle must
be complete to operate.
FOOD TEMPERATURE APPEARS TOO WARM:
• Frequent door openings.
• Allow time for recently added warm food to reach
freezer temperature.
• Check gaskets for proper seal.
• Clean condenser coils (for models with exposed condenser coils).
• Adjust temperature control to colder setting.
FOOD TEMPERATURE IS TOO COLD:
• If temperature control setting is too cold, adjust to a warmer setting
and allow several hours for temperature to adjust.
COMPRESSOR RUNS TOO FREQUENTLY:
• This may be normal to maintain constant temperature during
high temperature and humid days.
• Doors may have been opened frequently or for an extended
period of time.
• Check gasket for proper seal.
• Check to see if doors are completely closed.
• Check freezer compartment for blockage from
frozen food packages, containers, etc.
FREEZER HAS AN ODOR:
• Interior needs cleaning.
• Foods improperly wrapped or sealed are giving off odors.


IMPORTANT
Do not return this product to the store.
Simply call our customer service department for any questions or concerns:
213-4467172
(8:30am - 5:30pm P.S.T.)
(8:30am - 5:30pm P.S.T.)
(8:30am - 5:30pm P.S.T.)
DATED PROOF OF PURCHASE REQUIRED FOR WARRANTY SERVICE.
AVIS
Ne pas retourner ce produit au magasin.
Veuillez appeler le service à la clientèle pour toutes questions au:
213-4467172
PREUVE D’ACHAT ORIGINALE REQUISE POUR SERVICE DE GARANTIE.
IMPORTANTE
No devuelva este producto a la tienda.
Sólo hay que llamar nuestro departamento de servicio
al cliente en caso de tener preguntas o inquietudes:
213-4467172
SE REQUIERE PRUEBA DE COMPRA CON FECHA PARA SERVICIO BAJO GARANTÍA.
Add:9733 Topanga Canyon Blvd. APT310, Chatsworth, CA 91311
Phone: 213-4467172
Thank you for purchasing this product! If you have quesons about the product such as missing parts,
damaged products, product assembling and operaon etc., please contact us via
Amazon Message or
customer service phone:
213-4467172