GE Monogram ®
Use and Care Guide
Component
Cooktop System

Consmner In%rmation
Co,q:o_e_t Cool, to/: Syste,:
Your new Monogram cooktop makes an eloquent statement of style, ( onvenience and kitchen
planning flexibility. Whether you (hose it for its purity of design, assiduous mtemion to derail-
or for bod_ of these reasons-you'll find that your Monogram ( ooktop's superior blend of form
and tim(don will deligb you for years to (ome.
Your Monogrm_ ( ooktop was designed to provide the flexibilit 7 to blend in with your kitchen
(abineuy. I_s sleek design (an be beautifully imegn_ed imo fi_e kid(hen.
The infl)rmafion on fi_efollowing pages will help you operme and maintain your (ook_op properly.
Kvou have _myofi_er questions-please (all fi_e GE Answer (emer _÷800.626.2000.
Contents
Care and Cleaning
Brushed Stainless S_eel Finish .............. 23
(me of Componems ................... 93-28
Comrol Panel and Knobs .................. 23
(;as Burner Assembly ..................... 26
GreaseJm:s ............................... 27
Grill Componen_ ......................... 27
Halogen/Radian_ Cook_op ............. 24, 25
PorcelNn Enm_el Grease Well ............. 27
Veto Fibers .............................. 28
Veto Grille ............................... 28
Veto System .............................. 28
Consumer Services
Impormm Phone Numbers ............. 33, 36
Model m_d Serial Number ............... 3, 3(i
Problem Solver. ....................... 29-31
Produ( _Regis_rmion ................... 35, 36
SaDty InsUu( tions ....................... 4-7
Warramy ................................ 34
Using Your Cooktop
(;as Burner Component ................ 15-17
Grill Componen_ ...................... 18-21
Halogen/Radian_ Componen_ ......... lO-I3
Home Canning Tips ...................... 14
Optional ( omponems ................... 8, 9
Veto System .............................. 22
WARNING: If the information in this
guide is not followed exactly, a fire or
explosion may result causing property
damage, personal injury or death.
-- Do not store or use gasoline or other
flammable vapors and liquids in the
vicinity of this or aW other appliance.
WHAT TO DO I17YOU SMELL GAS
•Do not try to light any appliance.
•Do not touch aW electrical switch; do
not use aW phone in your building.
•Immediately call your gas supplier from
a neighbor's phone. Follow the gas
°If you cannot reach your gas supplier,
call the fire department.
-- Installation and service must be
performed by a qualified installer, service
agency or the gas supplier.
Before
using" your
cooktop
system
Read this guide careflflly. It is intended to help
you operate and maintain your new ( ooktop
(omponents properly.
Keep it handy for answers to your questions.
If you don't understand something or need
more help, call:
GE Answer Center ®
800.626.2000
24 hours a day, 7 days a week
Write
down the
model &
serial
n U TfI !) _S
You'll find them on a label on the bottom of
each compot_etlt.
These numbers are also on the (_onsumer
Product Ownership Registration Card
included in this guide.
Before sending in this card, please write these
numbers here:
Model Number
Serial Number
Use these numbers in any (orresponden(e or
service calls concerning your cooktop.
If you
received
damaged
components
hnmediately contact the dealer (or builder)
that sold you the cooktop system.
Save time
& money
Befi)re you request service, check the Problem It lists causes of minor operating problems that
Solver in the back of this guide, you can correct yourself.
If you
need
service
To obtain service, see the Consumer Services
page in the back of this guide.
We're proud of our service and want you to be
pleased. If fi)r some reason you are not happy
with the service you receive, here are three
steps to ti)llow tin flnther help.
FIRST, contact the people who serviced your
appliance. Explain why you are not pleased. In
most cases, this will solve the problem.
NEXT, if you are still not pleased, write all the
details-including your phone mmlber-to:
Manager, Consumer Relations
GE Appliances
Appliance Park
Louisville, KY 40225
FINALLY, if your problem is still not resolved,
writ e:
Major Appliance Consumer
Action Program
20 North Wacker Drive
( hi(ago, IL 60606
IMPORTANT SAFETY INSTRUCTIONS
IMPOR 7½NT SAF TY NO TICE
• The Callfomla Safe Drinking Water and
Toxic Enforcement Act _e(pfires the
Gove_ nor of (alifb_ nia _o publish a lis_ of
subslances known lo d_e sm{e {o (a!lse
cancer, bhth del>cts or other reproductive
harm, and requhes bush_esses to warn
(1]s[on]ers of po{enfial exposure to su(h
subsmn( es.
• Gas appliances can cause minor exposure to
four of these substances, namely benzene,
{arbon monoxide, fo_ maldehyde and soot,
_aused primarily by the incomplete
_ombusfion of natural gas or LP fuels.
Properly adjusted burners, indicated by a
bluish rather than a yellow tlame, will
minimize incomplete combustion. Exposure
_o these substances can be minimized fhrd_er
by vendng wid_ an open window or using a
ventilation fire or hood.
SAFE TY PRE CA UTIONS
When using d_e componem _ook_op system,
basic safe_y precautions should be followed,
including d_e following:
°Use this cooktop system only for its intended
use as described in dfis guide.
°If the cooktop is located near a window, do
not use long curtains, which could blow over
the gas bmners or surf_ce units, creating a
fhe hazard.
°Have your cooktop installed and properly
grounded by a quafifled installer in
accordance wid_ d_e Installation Insu'ucfions.
Any adjusm_en_ an d service should be
performed only by qualified gas and electric
appliance installers or service technicians.
°Have the installer show you the location of
the circuit breaker or fuse. Mark i_ fbr easy
reference.
• Have the installer show you the location of
the gas cut-off vane and how to shut it off if
necessary.
°Do not attempt to repair or replace any part
of the component cooktop system unless it is
specifically recommended in this guide. A nv
a(_jusm_em and service shouk_ be performed
only by qualified electric and gas range
installers or service _echnicians.
°BEFORE PERFORMING ANY SERVICE,
DISCONNECT THE COOKTOP SYSTEM
POWER SUPPLYAT THE HOUSEHOLD
DISTRIBUTION PANEL BY REMOVING
THE FU SE OR SWITCHING OFF THE
CIRCUIT BREAKER.
°Do not leave children alone-children should
no_ be lefl alone or unauended in an area
where an appliance is in use. They should
never be allowed _o si_or stand on any pan of
the cook_op system.
•Avoid installing cabinets above the cooktop
system.
°To reduce the hazard caused by reaching into
cabinets over hot surface units, the open
flames of operating burners and hot
cookware, install a metal ventilation hood
over the cooktop components that projects
forward at least 5 inches beyond the front of
the cabinets.
°If cabinets are placed above the cooktop
components, allow a minimum clearance
of 30 inches between the cooking surface and
the bottom of unprotected cabinets.
SAFE TY PRE CA UTIONS
• CAUTION: ITEMS OF INTEREST TO
CHILDREN SHOULD NOT BE STORED IN
CABINETS INSTALLED ABOVE THE
COOKTOP SYSTEM--CHILDREN
CLIMBING ON THE COOKTOP SYSTEM
TO REACH ITEMS COULD BE
SERIOUSLY INJURED.
• Never wear loose-fitting or hanging garments
while using the cooktop system. Be careflfl
when reaching for items stored in cabinets
over tile cooktop system. Flammable material
could be ignited if brought in contact with
hot surtace units or gas burners and may
cause severe bllins.
• Use only dry pot holders-moist or damp pot
holders on hot surtaces may resuh in burns
fiom steam. Do not let pot holders touch the
hot surtime units or gas burners and grates.
Do not use a towel or other bulky cloth in
place of a pot holder.
• For your safety, never use any electric or .gas
components of the cooktop system for
warming or heating the room.
• Do not store flammable materials in an oven
or near the cooktop system components.
• Do not store or use combustible materials,
gasoline or other flammable vapors and
liquids in the vicinity of this or any other gas
or electric appliance.
• Do not let cooking ,grease or other flammable
materials accumulate in or near the cooktop
system components.
• Never leave the kitchen while using the grill.
• Do not replace the grease collector jar with a
mayonnaise jar which could break when hot
grease drips into it. Replace _dth any _dde
inouth canning jar.
• Do not use water on grease fires. Never pick
up a flaming pan. Turn tile controls off.
Smother a flaming pan on a surface unit by
covering the pan completely with a well-
fitting lid, cookie sheet or flat tray. Use a
muhi-purpose dry chemical or fi)am-/ype fire
extinguisher.
Flaming grease outside a pan can be put out
by covering it with baking soda or, if
available, by using a muhi-purpose dry
chemical or foam-type fire extinguisher.
• Keep the grill drip pan and grease well clean
to reduce smoking and avoid grease fires.
• To control flame-ups, turn down the heat
setting to low, rather than off (O). This keeps
tile downdrafl vent blower on. Or, mrn tile
Variable Speed Vent blower to HI, then turn
the grill off (0).
Use a long-handled utensil to careflflly
remove the tood flom the grill.
These steps should control tile flame until it
eventually goes out. If it does not, cover tile
entire grill module with a cookie sheet or the
lid tiom a large roasting pan. Use a pot
holder to remove this later because it will be
hot.
• Do not touch the surface units. These
sufihces may be hot enough to burn even
though they are dark in color. During and
after use, do not touch, or let clothing or
other flammable materials contact the
surlhce units, cooktop smthces or areas
nearby tile smthce units. Allow sufficient time
ti)r cooling of the cooking surtaces.
Potentially hot surtaces include the grill
grates and all components with electric
cooking elements or gas burners and grates.
•When cooking pork, tollow tile directions
exactly and always cook tile meat to an
internal temperature of at least 170°F. This
assures that, in tile remote possibility that
trichina may be present in the meat, it will be
killed and the meat will be sati_to eat.
iMPORTANT SAFETY iNSTRUCTiONS
USING YOUR COMPONENT COOKTOP
• Use woper part size-rids ( ooktop system has
components equipped with electric sm_ce
units or gas bmners. Select cookware hax_ng
flat bottoms large enough to cover d_e selected
smf_ce mdt or bmner. The use ofm_dersized
cookware will expose portions of d_e surk_ce
units or gas burners to dhect contact >rod may
rea_lt in ignition of clod_ing. Proper
relationship of cookware to d_e smfhce unit or
the bmTner will also improve efficiency.
°Only certain types of glass, glass/ceramlc,
earthenware or other glazed containers are
suitable for cooMop service; od_ers may break
because of d_e sudden change in temperature.
°Never leave the surface units or gas burners
unattended at high heat settings. Boilovers
cm_se smoking and greasy spillovers d_at may
catch fire.
°To minimize the posslbillty of burns, ignition
of flammable materials and spillage, d_e
handles of cookware should be turned wid_out
extending over nearby smfi_ce units or burners.
°Always turn the electric surface unit or gas
burner controls off (O) before removing the
cookware.
"Watch foods belrtg fried at high or medium-
high heat settings.
"When flaming foods are under the exhaust
hood, turn the hood fan off. The hood fan, if
operating, may spread the flame.
. Foods for frying should be as dry as possible.
Frost on fi:ozen roods or moisture on flesh
foods can (m_se hot fi_t to bubble up and over
°Use tittle fat for effective shallow or deep fat
Dying° Filling the pan too fi_ll offht (an (m_se
spillovers when food is added.
• If a combination of oils or fats MR be used irt
frying, stir toged_er befi)re heating, or as fi_ts
°Be sure the downdraft veto g_rilleis not
covered. Be sure the filter is in place, its
absence th_ring cooking could damage blower
parts.
°Do not cover or block the area around the
cooktop system knobs. This area must be kept
clear fbr proper yen tilatio n an d burn er
°Keep all plastics away from cookmp surface
units and burners.
"Do not operate the halogen/radiant surface
units if the glass is broken. Spillovers or
cleaning solution may penetrate a broken
cooktop and create a risk of electrical shock.
Contact a qualified technician immediately
should your glass cooktop become brokem
•Avoid scratching the glass cooktop surface°
The cooktop (;an be scratched wid_ items such
as shar 1)instruments, rings or od_erjeweh-y and
rivets on clothing.
°Never use the glass cooktop surface as a
cutting board°
°Do not place or store items on top of the glass
cooktop surface when it is not irt use.
°Do not stand on the glass cookmp°
• Be careful when placing spoons or other
stirring utensils on the glass cookmp surface
when it is in use. They may become hot and
could cm_se burns.
°Use care when touching the cooktop° The glass
smti_ce of the (ooktop will retain heat after the
controls have been turned off.
. To avoid possible damage m the cooking
surface, do not apply Cooktop CDaning
Cream to the glass smfai:e when it is hot,
°Always heat fat sloMy, and watch as it heats.
°Use a deep-fat thermometer whenever possible
to prevent overheating f?_tbeyond d_e smoking
point.
USING YOUR COMPONENT COOKTOP
•After cleaning, use a (hy cloth oi paper towel to
remove all Cooklop (leaning Cream residue.
• Read and follow all instruction and warnings
on Cooktop Cleaning Cream labels.
• Clean the cooktop with caution. If a wet sponge
oi cloth is used to _dpe spills oi1 a hot surtilce
unit, be carefifl to avoid steam burns. Some
cleaners can produce noxious fimms if applied
to a hot surlhce.
When the cooktop is cool, use only Cooktop
Cleaning Cream brand cleaner to clean the
cooktop.
• Do not use a wok on the gas burners if the wok
has a round metal ring which is placed over the
burner grate to support the wok. This ring acts
itsa heat trap that may &anage the burner
grate and burner head. Also, it mW cause the
burner to work improperly. This may cause a
carbon monoxide level above that allowed by
current standards, resulting in a heahh hazard.
• ff you smell gas, turn off the gas to the cooktop
at the gas cutoffvalve and call a qualified
sevvice technician. Never use an open flame to
locate a leak.
• Do not operate the gas burners without all
burner parts and grate in place.
• Let the gas burner grate and other surfaces
cool before touching them.
• Do not leave grates removed from any
component where children can reach them.
• Never leave gas burners unattended at high
flame settings, goilovers cause smoking and
greasy spillovers that may catch on fire.
•For your safety, never use your gas burners for
warming or heating the room. Prolonged use of
the cooktop in this way can be hazardous.
• Do not clean the cooktop system with
flammable or volatile cleaning fluids. See the
Cme and Cleaning section.
• Do not clean anypart of the cooktop system
when the appliance is in use.
• If you are using an overhead exhaust hood,
keep its grease filters clean to maintain good
venting and to avoid grease fires.
• Clean onlyparts listed in this Use and
Care Guide.
• Clean the cooktop with caution. If a wet sponge
oi cloth is used to wipe spills oi1 a hot cooklop,
be carefifl to avoid steam burns.
SAVE THESE INSTRUCTIONS
Optional C(mlponents
( ompo_..'_t Cool<t@ Sy.m.'m
Gene cd
Some of the components must be cured or
preconditioned before using them for the first
time.
( ompouems aud a( ( essofies sho_fld be
deaued afle_ each use. The louger a soil
remaius, _he harder J_Js _o cleau. See each
compouem section h_ _he Care and Cleaning
secfiou _hr specific Jus_rucfious.
Never immerse any electric surface unit or
plug in water.
( ompouems available are dis(ussed iu dfis
section. You may only have some iusmlled iu
yore khcheu. All compouems are permaueudy
iusmlled wid_ d_e excepfiou of the grill.
Read each component section for specific
instructions.
To purchase additional components, contact
your nearest GE Appliances dealer or service
center. Part numbers for additional[
components are listed in this guide.
You ums_ couside_ he_t _]p and (ool down
times for d_e smfi_ce units wheu determiuiug
cookiug times. Hea_ up and cool dowu times
depeud on iuifial temperature se_fiugs, d_e
type of cookware used and d_e amom_t of thod
Smr_ cookiug a_ a higher se_fiug _o hea_d_e
s!ll_ce llui_ l[as_elF, _heli_ [ulu U) a ]o_,k el seHiug
_o finish cookiug.
Remember, cooking continues after the surface
unit is turned off, so train yourself to turn the
heat down or off before cooking is done.
Monogram (ore)oueul oas cooktops (used
wi_h eifl_er updra[t or dowudrafl vetoing) are
desigued _o operale on uamral gas a_ 4" water
The do_udrafi veto compouem features an
imegral xariable-speed blower comrol swhch
aud a po_ erfi_l (:eu_rifi_gal blower.
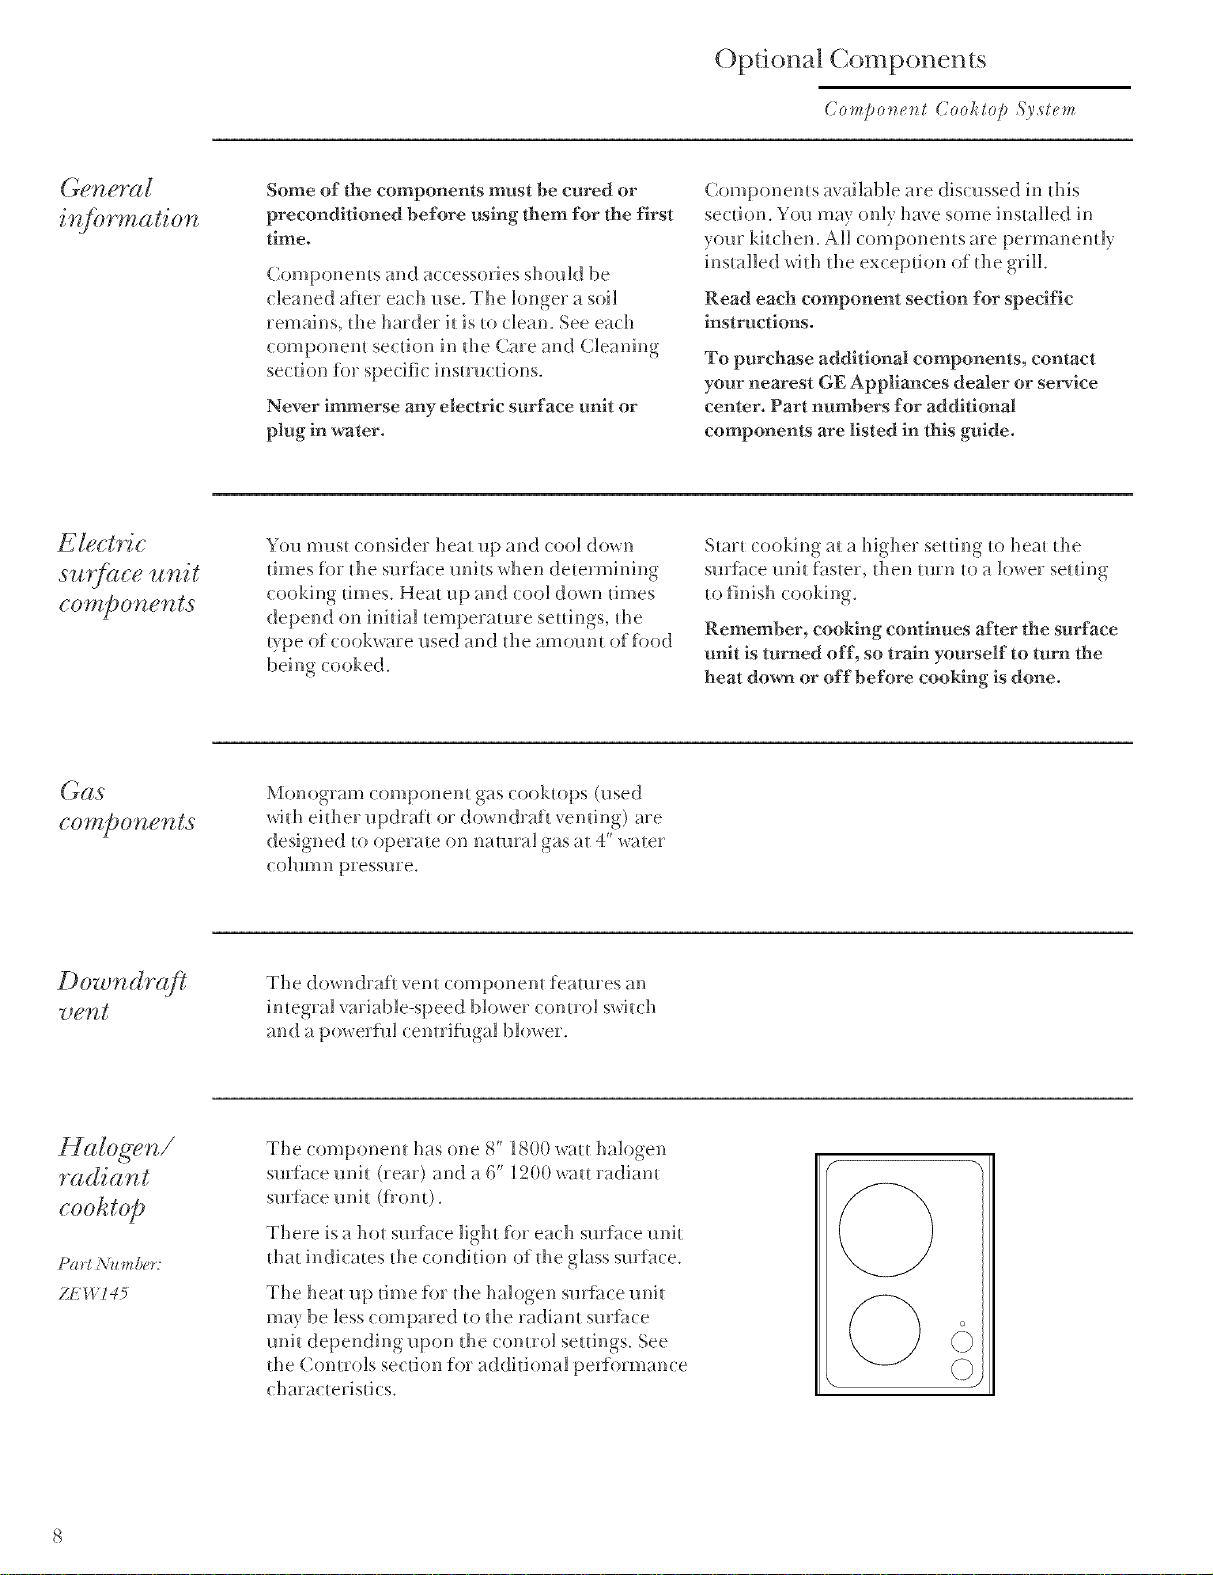
H(dogen,/
cookt@
ZEIV!45
The compoueu_ has one S" 1800 wa_l halogeu
surface m_fi_ (rear) and a 6" 1200 wa_ radiam
smface mfi_ (flou0.
There is a hot smtace ligh_ for each smface mfi_
d_al iudicales Ihe (:oudifiou of fl_e glass smface.
The hea_ up time for d_e halogeu s_rfi_ce mfi_
m_y be less compared _o d_e radiam smfi_ce
uui_ depeudiug upon d_e comrol se_fiugs. See
the Comrols section for additional pe_tormauce
charac[erisfics.
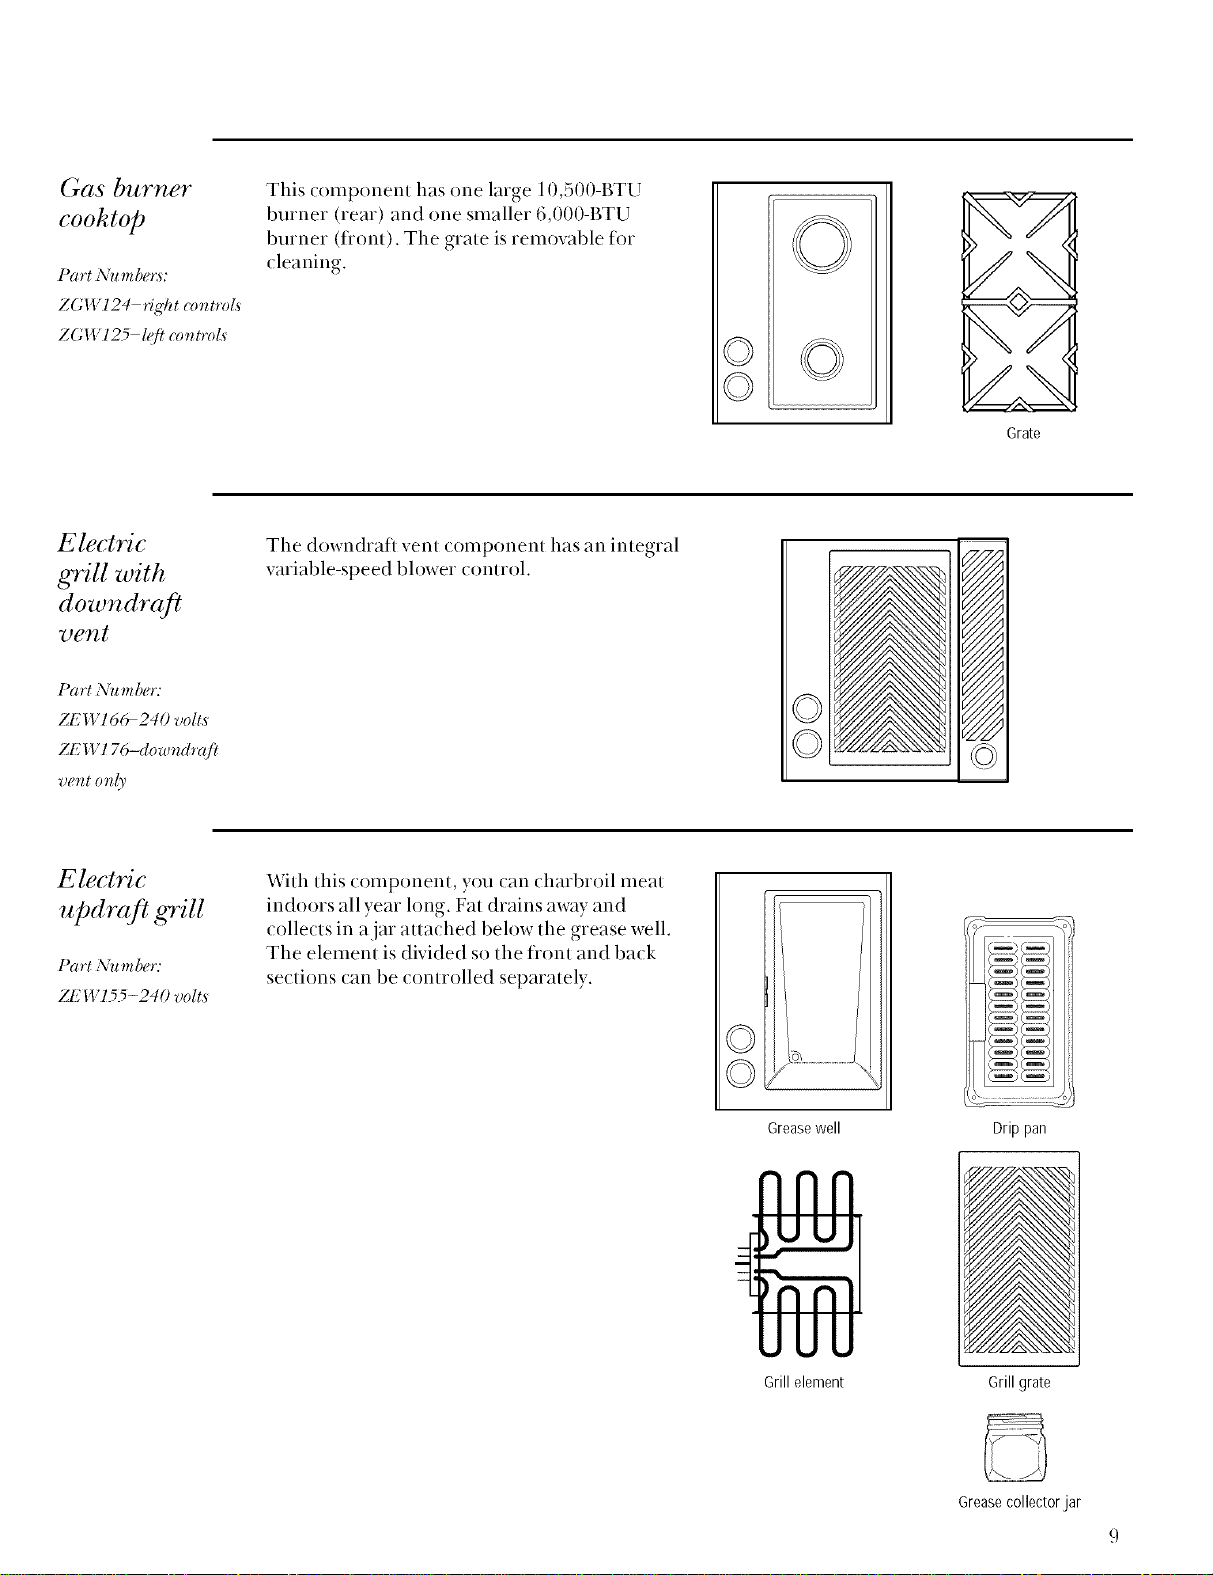
Gas burner
cooktop
Part Nu m be):_:
ZGW124 fight controls
ZGW125 lqfi controls
This component has one large 10,500-BTU
burner (rear) and one smaller 6,000-BTU
burner (fiont). The grate is removable fbr
cleaning.
©
©
<
/\
<
Grate
Electric
gTill with
downdraft
vent
Part ,\:tl _n[uo7
ZL'W16¢_ 2 40 voll,s
ZL'W176-dowmh'afi
_?(,llt oldy
The downdrafl vent component has an integral
variable-speed blower ( ontrol.
©
©
Electric
updraft grill
Part ;\'u m bet:
ZE W155- 2 40 volt,s
With this component, you can charbroil meat
indoors all year long. Fat drains away and
collects in ajar attached below the grease well.
The element is divided so the fiont and back
sections can be controlled separately.
©
©
Greasewell
Drip pan
Grill element
Grill grate
Greasecollector jar
9
Halogen/Radiant Component
( ompo_e_g Cookto/_ System
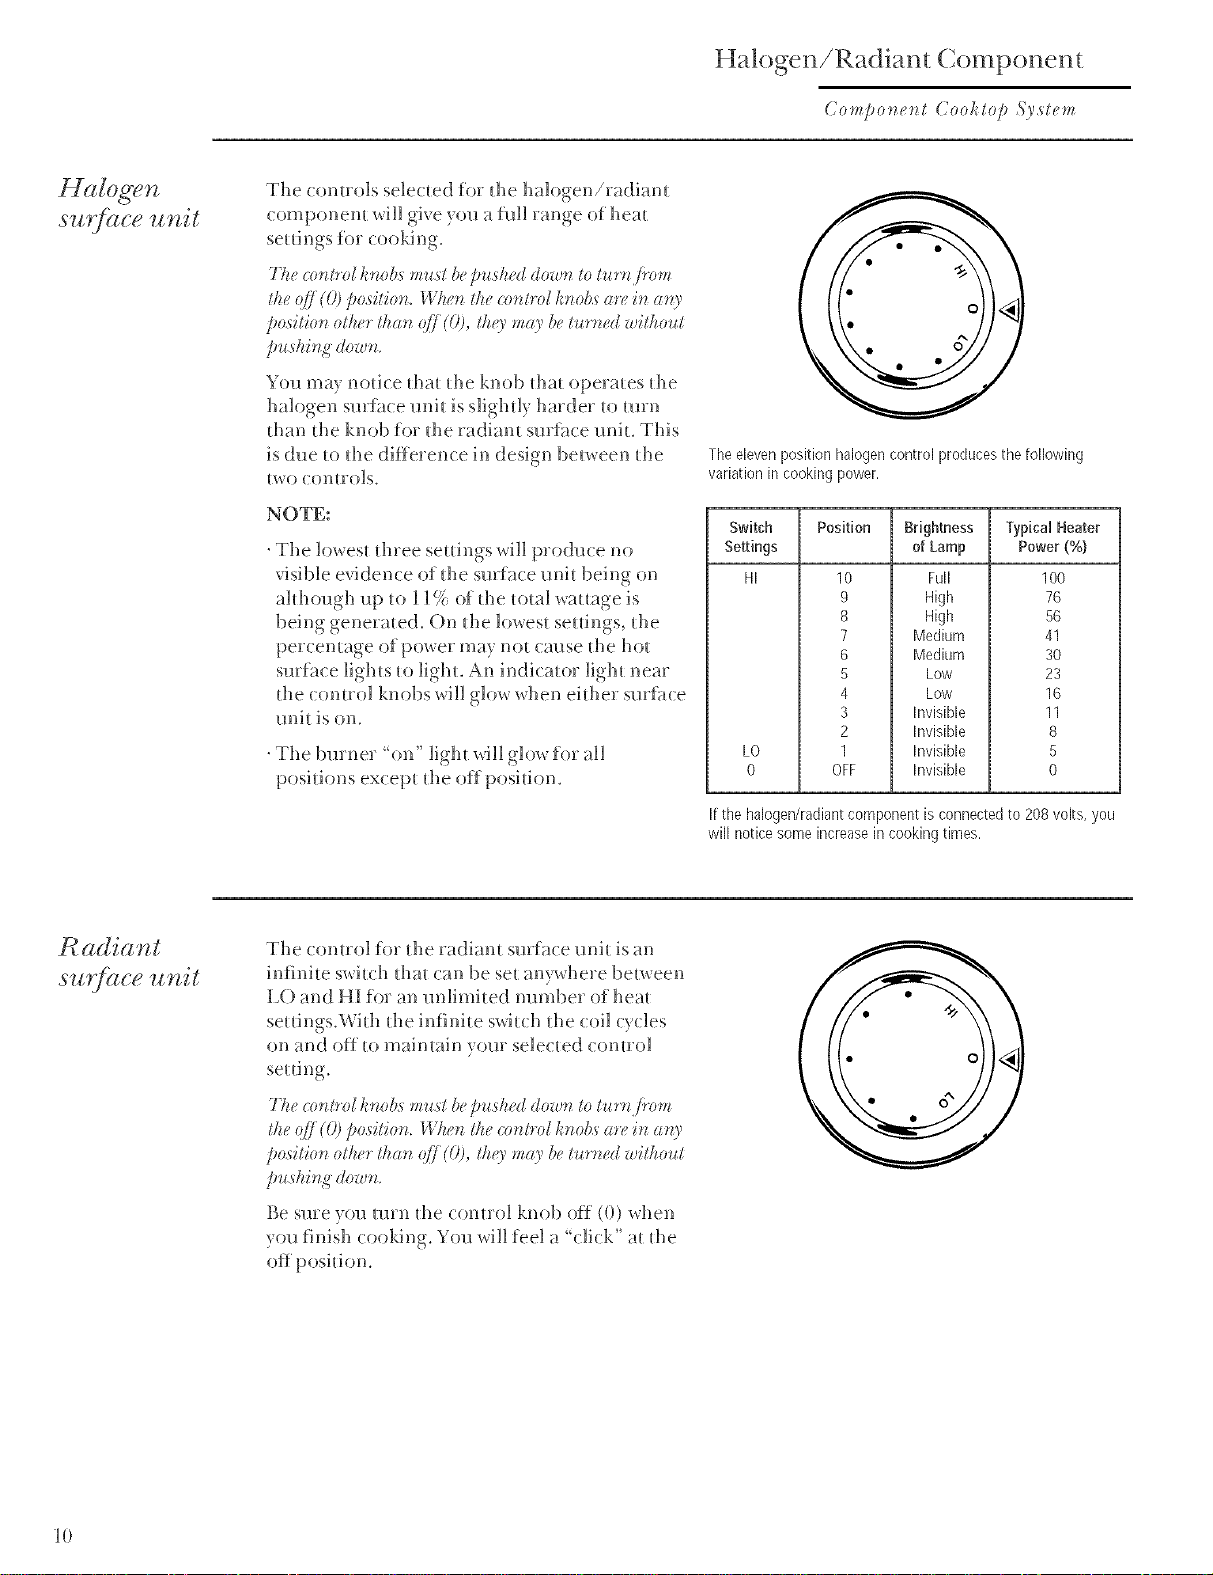
The ( omrols selected for the halogen/radiam
(omponem will give you a fifll range of heat
seuings %r (ooking.
77:er_mO'rdkrtohs,rest bepushed dow_ to turr: fi'r,,
the q{,)'(O)position. Wf:ert :/':er_mt*>[knobs are in arO'
pasitio, other thar_ o//(0), thU ,:a'_' ben_r_ed without
p,cshir<_"do_.r_.
You may notice dm_ d_e knob dm_ operates d_e
halogen sur_hce llnil is slighdy harder u) mrn
than die knob _or die radiant surf)ice unit. This
is due _o d_e difference in design between _he
lwo ( omrols.
NOTE:
. The lowes_ d_ree seUings will produ( e no
visible evidence of d_e s!lrJt]_ce!_ni[ being on
ahhough up _o 11% o_ the _oml wauage is
being gene_a_e(L On d_e lowes_ seuings, d_e
percentage of power may no_ (ause d_e ho_
surface ligbs _o lighL An indicator ligb near
the comrol knobs will glow when eid_er surf_ce
uni_ is on.
. The burner 'on" ligb xdll glow for all
positions excep_ _l_eoff position.
o
The elevenposition halogen control produces the following
variation in cooking power,
Switch Position
Settings
HI
LO
0
10
9
8
7
6
5
4
3
2
1
OFF
Brightness
of Lamp
Full
High
High
Medium
Medium
Low
Low
Invisible
Invisible
Invisible
Invisible
Typical Heater
Power (%)
100
76
56
41
30
23
16
11
8
5
0
It the halogen/radiant component is connected to 208 volts, you
will notice some increase in cooking times.
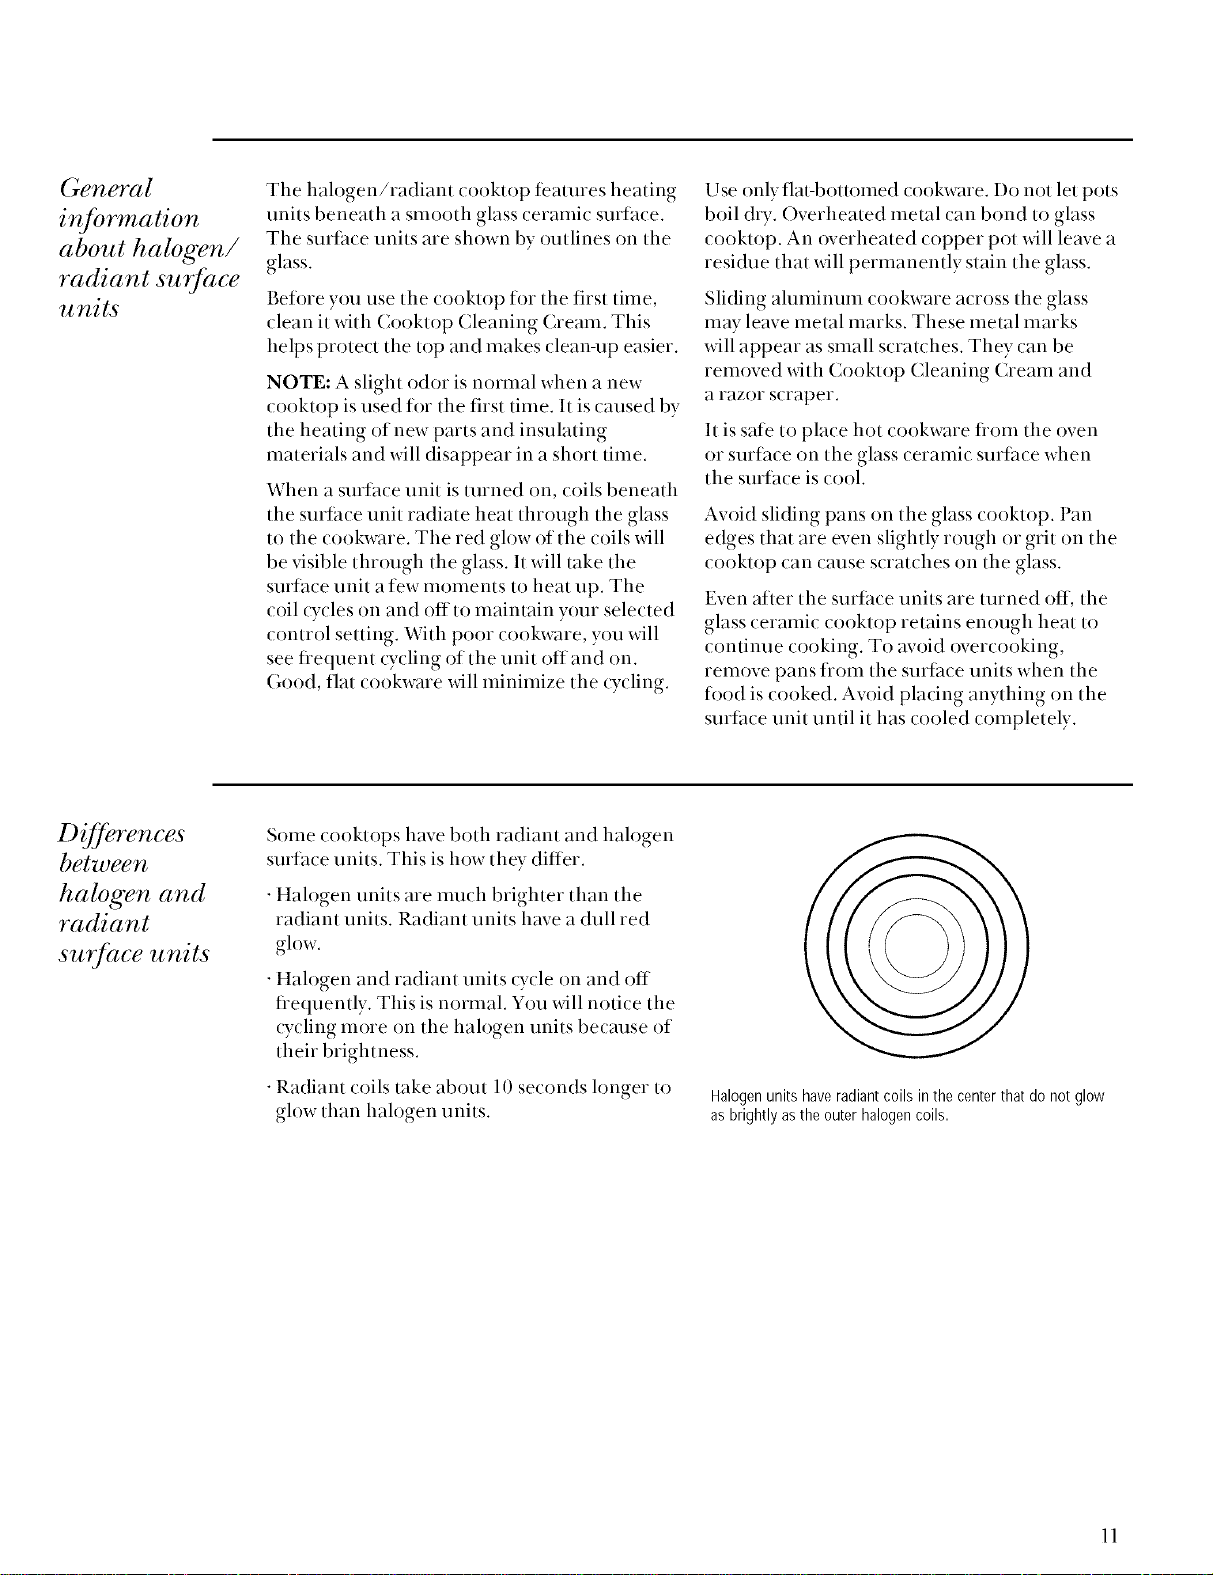
su@ce wnit
The control ibr the radiant suri_ce unh is an
infinite swiuh dm_ (an be set anywhere between
LO and HI for an unlimited number oi heat
se_fings.Whh d_e infinhe switch d_e (:oil cycles
on and off to maintain your selected comrol
77:er_mtrrdknobs must be/:ushed down to tur_tfi'r..
the q{,i(@/:r:sitirm. _.W_enthe r_mtrrdknrA_ art. _n a_ly
pa_itirm other than @'(0), thO' .:a'_'beturboedwithout
pushir<g"down.
Be sure you turn d_e conuol knob o_] (0) when
you finish cooking. You will _eel a "( lit k" at d_e
_o
(_rencFal
information
about halogen/
radiant surface
units
The halogen/radiant cooktop teatures heating
units beneath a smooth glass ceramic surtace.
The surthce units are shown by outlines on the
glass.
Betore you use the cooktop for the first time,
clean it with Cooktop (leaning Cream. This
helps protect the top and makes clean-up easier.
NOTE: A slight odor is normal when a new
cooktop is used for the first time. It is caused by
the heating of new parts and insulating
materials and will disappear in a short time.
When a surthce unit is turned on, coils beneath
the surt, tce unit radiate heat through the glass
to the cookware. The red glow of the coils will
be visible through the glass. It will take the
surthce unit a tew moments to heat up. The
coil cycles on and off to maintain your selected
control setting. With poor cookware, you will
see fiequent cycling of the unit off and on.
Good, flat cookware _dll minimize the cycling.
Use onlyfla/-bot/omed cookware. Do not let pots
boil dry. Overheated metal can bond to glass
cooktop. An overheated copper pot will leave a
residue that will permanently stain the glass.
Sliding ahmfinum cookware across the glass
may leave metal marks. These metal marks
will appear as small scratches. They can be
removed with ( ooktop Cleaning (ream and
a razor scraper.
It is safe to place hot cookware tiom the oven
or surtace on the glass ceramic surtace when
the surtace is cool.
Avoid sliding pans on the glass cooktop. Pan
edges that are even slightly rough or grit on the
cooktop can cause scratches on the glass.
Even after the surthce units are turned off, the
glass ceramic cooktop retains enough heat to
continue cooking. To avoid overcooking,
remove pans tiom the surthce units when the
tood is cooked. Avoid placing anything on the
surtace unit until it has cooled completely.
Differences
between
halogen and
radiant
surface units
Some cooktops have both radiant and halogen
surthce units. This is how they differ.
•Halogen units are much brighter than the
radiant units. Radiant units have a dull red
glow.
•Halogen and radiant units cycle on and off
tiequently. This is normal. You will notice the
cycling more on the halogen units because of
their brightness.
•Radiant coils take about 10 seconds longer to
glow than halogen units.
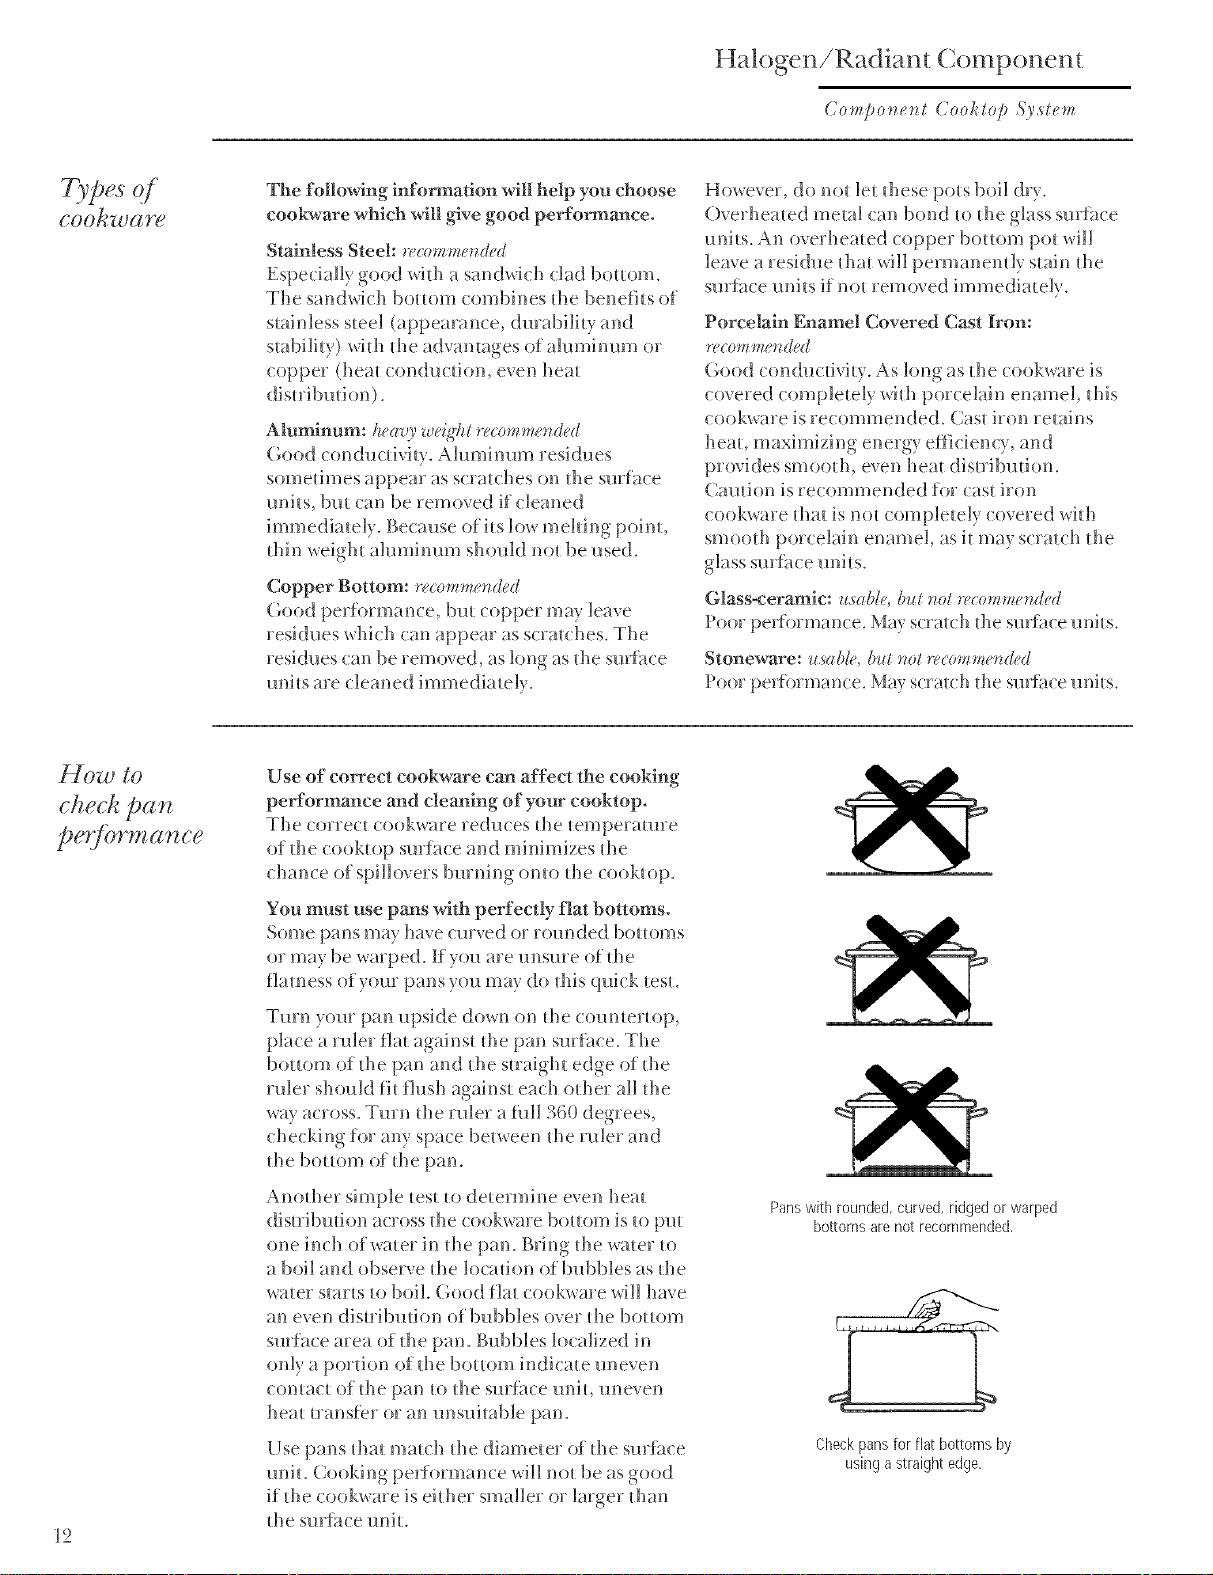
Halogen units have radiant coils in the center that do not glow
as brightly as the outer halogen coils.
11
Halogen/Radiant Component
(7o,_po_e_t Cooktop Syste,_
The following information will help you choose
cookware which will give good performance.
Stainless Steel: r(,(:ommended
Especially good whh a sandwich (lad bouom.
The sandwich boHom combines d_e benefits of
stainless steel (appearance, durability and
stability) with the advantages of abm_inum or
topper (heat ( ondm fion, even heat
Aluminum: heavy weigYltr(.com,te_ded
Good (ondut dvi_y. Aluminum residues
sometimes appear as s(ra_ches on d_e suvf>_ce
units, bm (an be removed if (leaned
immediately. Because of i_s low inching poinL
thin weigh_ ahmfinum should no_ be used.
Copper Bottom: r_.co,_*,e_ded
Good perio_ mance, bu_ (oppev m W leave
residues whi(h can appear as sc;a_ches. The
residues can be removed, as long as d_e smf_ce
mfi_s are ( leaned immediately.
However, do nol le_ diese pols boil d_y.
Overheated me_al can bond _o d_e glass smthce
units. An overheated copper bouom po_ will
leave a residue _ha_will permanendy s_ain d_e
smy_ce units if no_ removed immediately.
Porcelain Enamel Covered Cast Don:
r(.'com,_e_ded
Good con(h_cfivi_y. As long as d_e cookware is
cove_ ed completely wid_ porcelain enamel, riffs
( ookware is re( ommended, (as{ iron re{ains
heal maximizing energy efficiency, and
provides smood_, even hea_ disuibmion.
Caution is re( ommended for cas_ iron
cookw_re d_a_is no_ completely covered wid_
smood_ por(elain enamel, as i_ may scratch d_e
Glass-ceramlc: ,soble. but _ot r¢.co,_,_e_vded
Poor peffovman(e. May s(ra_(h d_e sub{hoe mfi_s.
Stoneware: ,sabl(., b,t _ot r(.co,_,_e_ded
Poor pe_fbrman( e. May s(ra{( h d_e smfhce units.
How to
ch.ec pan
ped w. a , ce
2
Use of cmwect cookware cart affect the cooking
performance and cleaning of your cooktop.
The (olyre(_ (ookware redu( es the _empera_uve
of d_e cook_op suHace and minimizes d_e
( hance of spillovevs burning omo d_e cook_op.
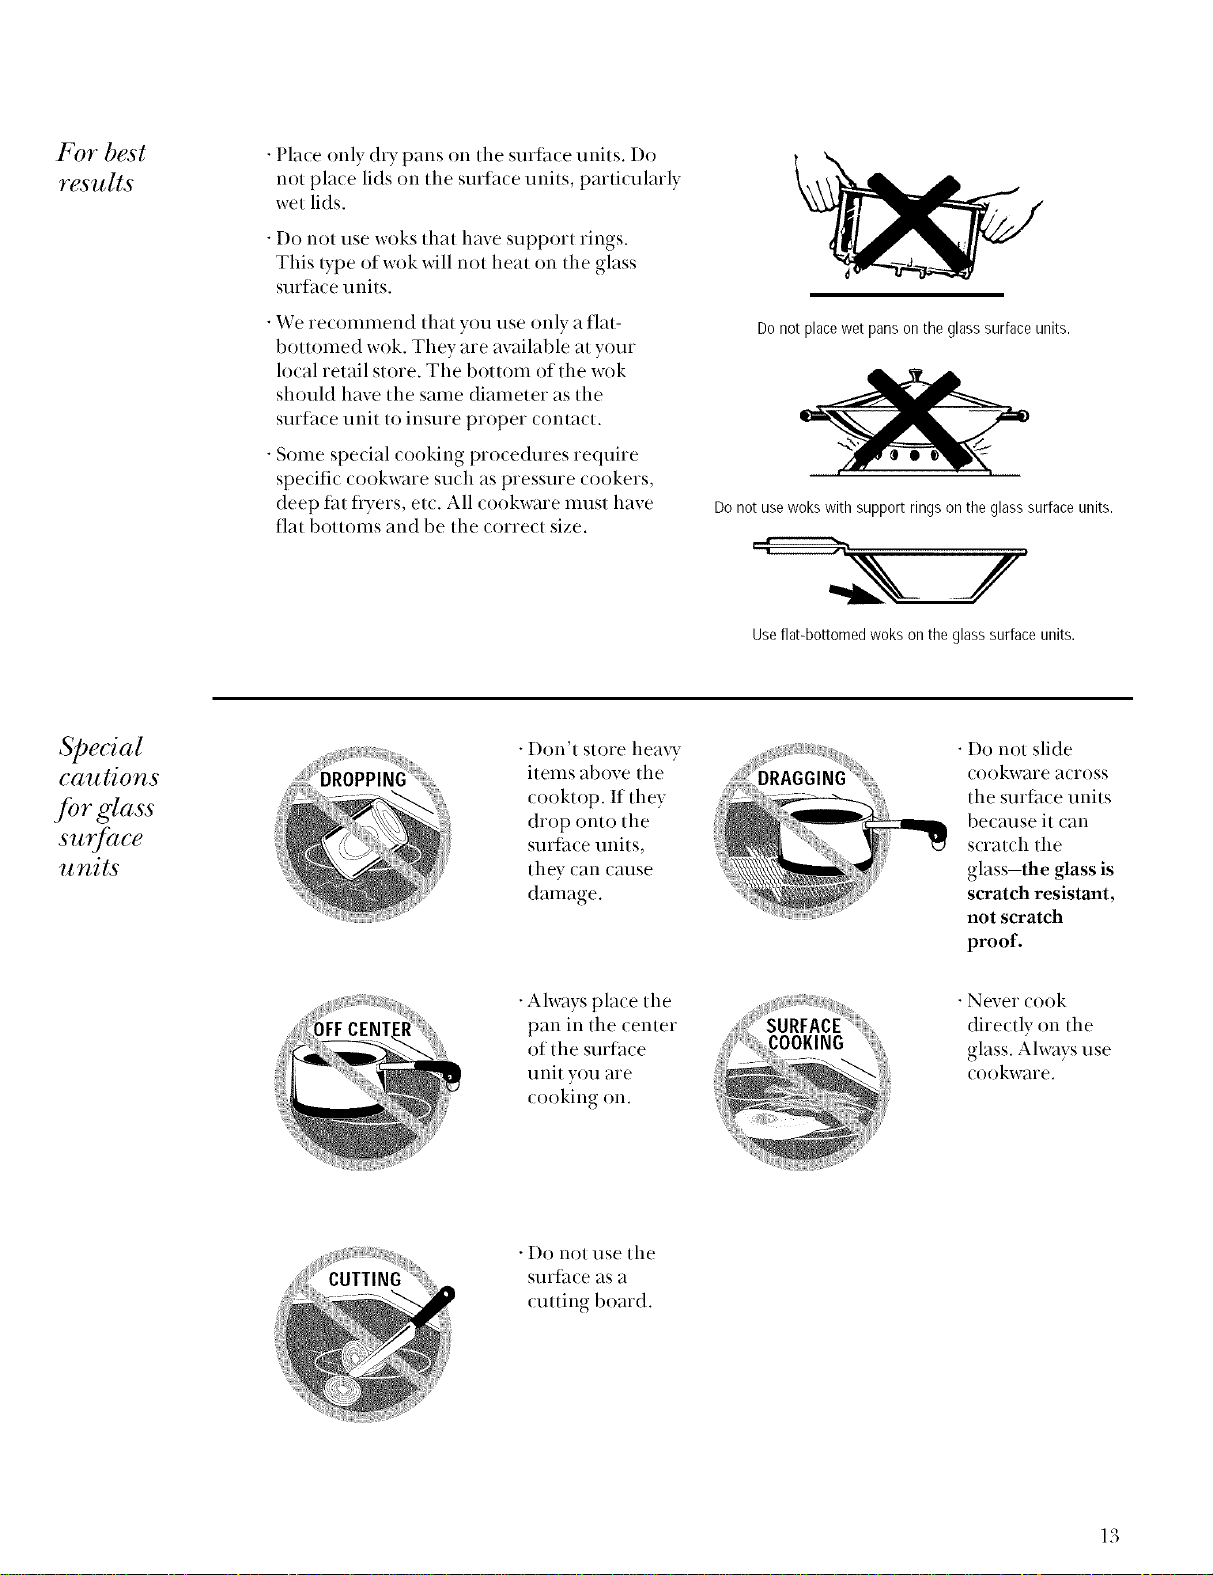
You must use parts with perfectly flat bottoms.
Some pans may have (urved or rounded boHoms
or may be warped. K you are m_sme of d_e
fiamess of yore pans you may do dfis quick _es_.
Turn yore pan upside down on d_e com_{er{op,
place a vule_ fia_ agains_ d_e pan surface. The
bottom of d_e pan and d_e s_raigbl edge of d_e
ruler should fi_ ilush agains_ eath olher all _he
way across. Twyn _he 17u]er a _!_11gO0 deg;ees,
( becking for any space between d_e ruler anti
d_e bottom of the pan.
Anod_e; simple _es_ _o de_ermine even heat
distribution across d_e (ookware bouom is _opu_
one inch ofwmer in d_e pan. Bring d_e wmer _o
a boil and obsevve d_e location ofbubbles as d_e
wa_er s_ar_s to boil. (;ood flat ( ookware will have
an even dis_ribmion of bubbles over _he boHom
suriace area of d_e pan. Bubbles localized in
only a portion of d_e bouom indicate uneven
(omac_ of _he pan _o d_e surf)_( e mill uneven
hea_ uansfer ov an unsuitable pan.
Use pans d_a_ma_ch d_e diameter of the smf_ce
mfi_.Cooking performance will no_ be as good
if the ( ookware is eid_e; smaller or larger d_an
the sur_)_( e uniL
Panswith rounded, curved, ridged or warped
bottoms are not recommended.
Checkpans for fiat bottoms by
using astraight edge.
For best
results
•Place only dty pans on tile surface units. Do
not place lids on the surface units, particularly
wet lids.
• Do not use woks that have support rings.
This/ype of wok _dll not heat on the glass
smfitce units.
• We recommend that you use only a fiat-
bottomed wok. They are available at your
local retail store. The bottom of the wok
should have the same diameter as the
smfitce unit to insure proper contact.
• Some special cooking procedures require
specific cookware such as pressure cookers,
deep tat flyers, etc. All cookware must have
flat bottoms and be the correct size.
Donot placewet pans on the glass surface units.
Do not use woks with support rings on the glass surface units.
Use flat-bottomed woks on the glass surface units.
Special
cautions
glass
surface
units
!i! !iiiiii!
• Don't store hea W
items above the
cooktop. If they
drop onto the
surtace units,
they can cause
damage.
• Do not slide
cookware across
the surt, tce units
because it can
scratch the
glass-the glass is
scratch resistant,
not scratch
proof.
•Ahvays place the
pan in the center
of the smthce
unit you are
cooking on.
• Never cook
directly on the
glass. Always use
cookware.
• Do not use the
SUI'l{ilce as a
cutting board.
13
Home Canning Tips
( ompon(.'nt Cookt@ S),st(.'m
Obse Je the
Note: Flabbottomed
canners are required
tor glass surface
units,
NOTE: Canning cannot be done on the grill
component,
Safe canning _equi_ es d_a_ hmmfifl
microorg_misms are destroyed and d_ d_e
jars are serried completely. When canning
foods in _ wmer-bad_ c_mner, a gende but
s_e_dy boil must be maintained _br d_e
required time. When canning foods in _
pressure c_mne_,the p_essure mus_ be
n_aimained for the _equi_ed dine.
Since ):o!1 lnlls_ m_ke sule _o process _he
canningjm sfo_ die presoibed time, widl no
imer_upfion in p_ocessing time, do not c;m on
any _ooktop surf;_ e uni_ if your _mner is no_
flat.
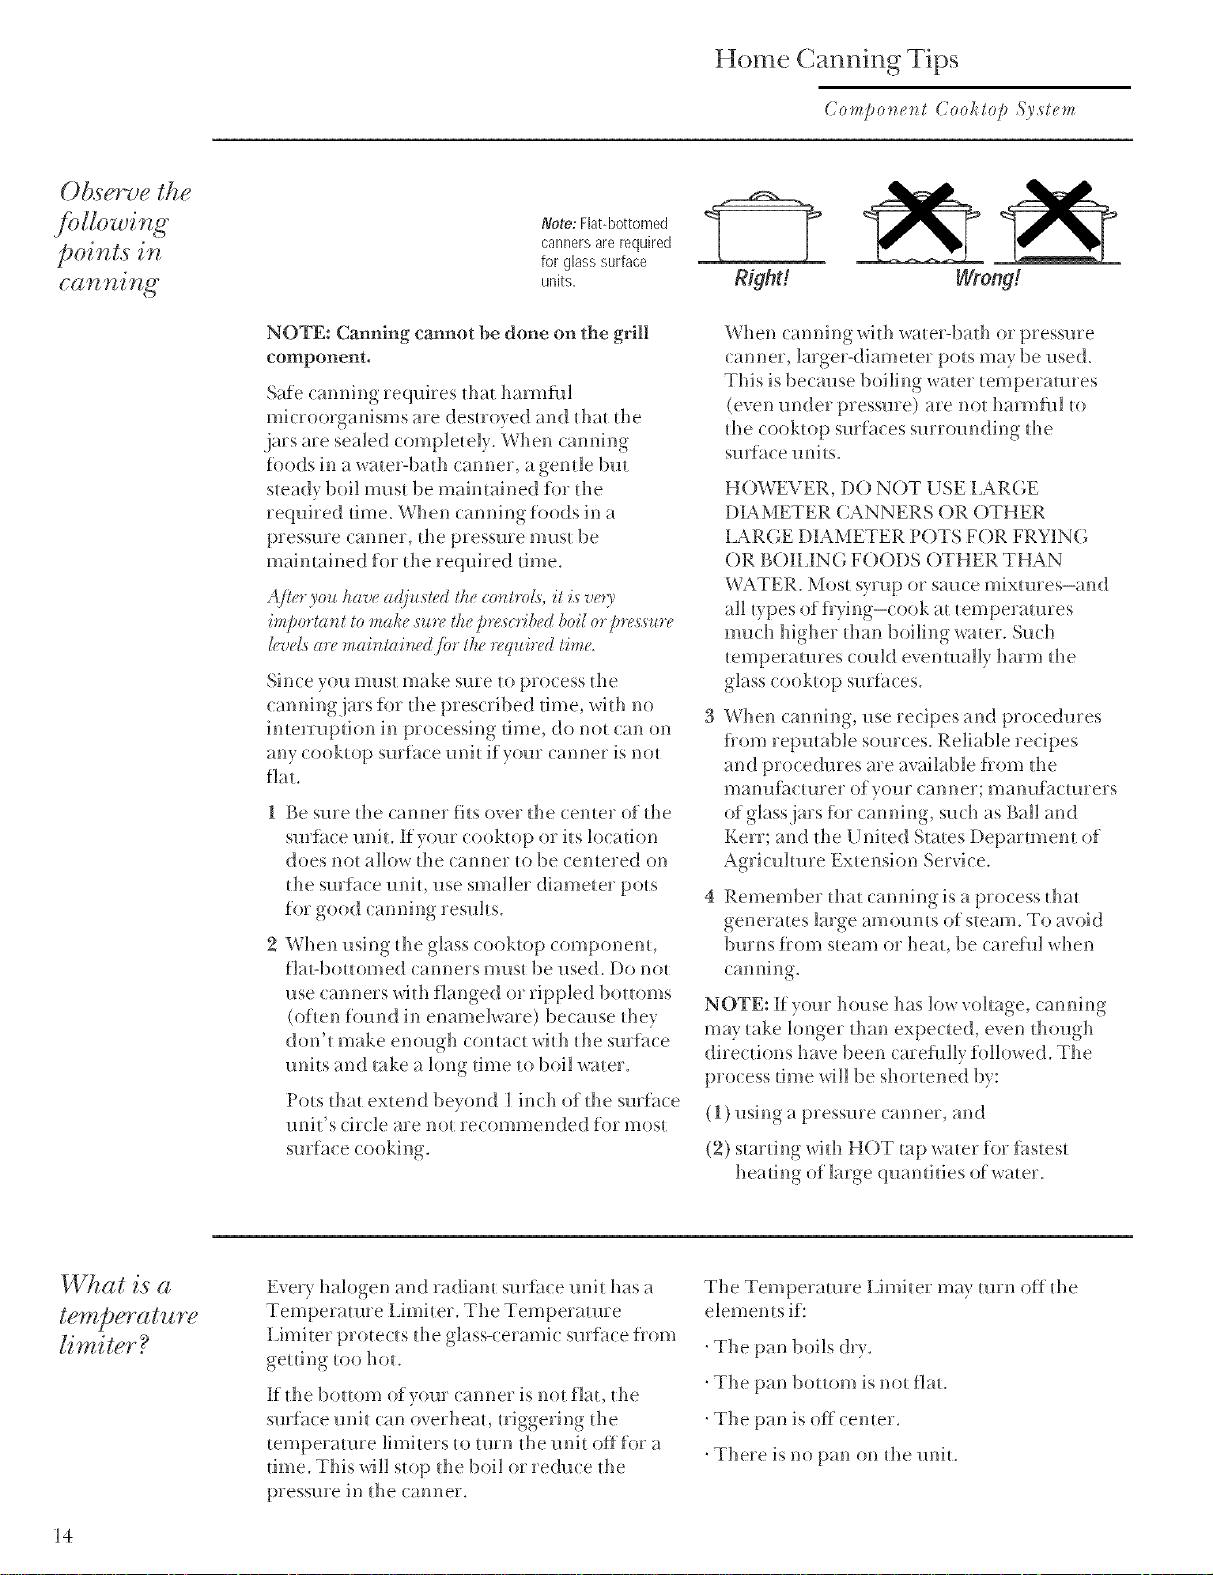
l{e SllIe the tanner fils over the (enler ofthe
surB_ce uniu Ifyore (ook_op or ils locadon
does not allow the canner to be centered on
the surf_ce unil, use smaller diameter pols
When using tile glass (ooktop componem,
fla_-bouomed canners mus[ be used. 1-)ono_
use canners widl flanged or rippDd bo_oms
(often found in enamelware) because they
don'_ make enough comac_ widl die surf_ce
units and take a long time to boil water.
Pots thai extend beyond i inch of the surface
unit's circle are no_ recommended for mos_
surfhce ( ooking.
Right! Wrong!
When canning widl wa_er-badl or pressure
canner, larger-diameter po_s may be used.
This is because boiling wa_er _emperamres
(even under pressure) are no_ harmfl_l _(_
die cook_op surf)_ces surrounding die
suff_ce units.
HOWEVER, DO NOT USE LARGE
DIAMETER CANNERS OR OTHER
LARGE DtAMETER POTS FOR FRYIrNG
OR BOtLING FOODS OTHER THAN
WATER. Mos_ syrup oi sauce mixtures-and
all _ypes of frying-cook at _emperamres
nmch higher dlan boiling wa_er. Such
_emperamres could eventually harm die
glass cook_op surfi_ces.
When canning, use recipes and procedures
flom reputable sources. Reliable recipes
and procedures are available fiom die
man!lf_( [llrer of vo!lr canner; Hlanllf)_cl!lrers
of' glass jars %r canning, such as Ball and
Kerr; and die United States l-)eparm_ent of
Agriculture Extension Service.
Remember dla_ canning is a process dla_
generates large amoums of s_eam. To avoid
burns fl:om s_eam oi heat, be carefifi when
NOTE: if your house has low voltage, canning
may rake longer than expected, even dlough
direcdons have been carefully folh)wed. The
process time will be shortened by:
(1) using a pressure canner, and
(2) smrdng _idl HOT tap wa_er for fhstest
hea tin g of large quart _i_ies of wa_er.
What is a
temperature
Eve_T halogen and radiam surface unit has a
Temperature Limiter. The Temperature
Limi_er protects the glass-ceramic surfm:e flom
geuing too hoL
If die bottom of your canner is not flat, die
surf_ce uni_ can overheaL u:iggering die
temperature limi_ers _o mrn die unit off for a
dine. This will s_op die boil or reduce die
pressure in die canner.
The Temperature Limiter m_y mrn off tile
e]emems if:
. The [)an boils (hT.
. The pan bottom is not flat.
' There is no pan on tile uniU
14
Gas Burner Component
Component Cool, top System
Before
using" your
gas burners
The ZGW124 and ZGW125 g_s cooktops are not
convertible to LP g_s. They are designed to operate
on natural ,gas only.
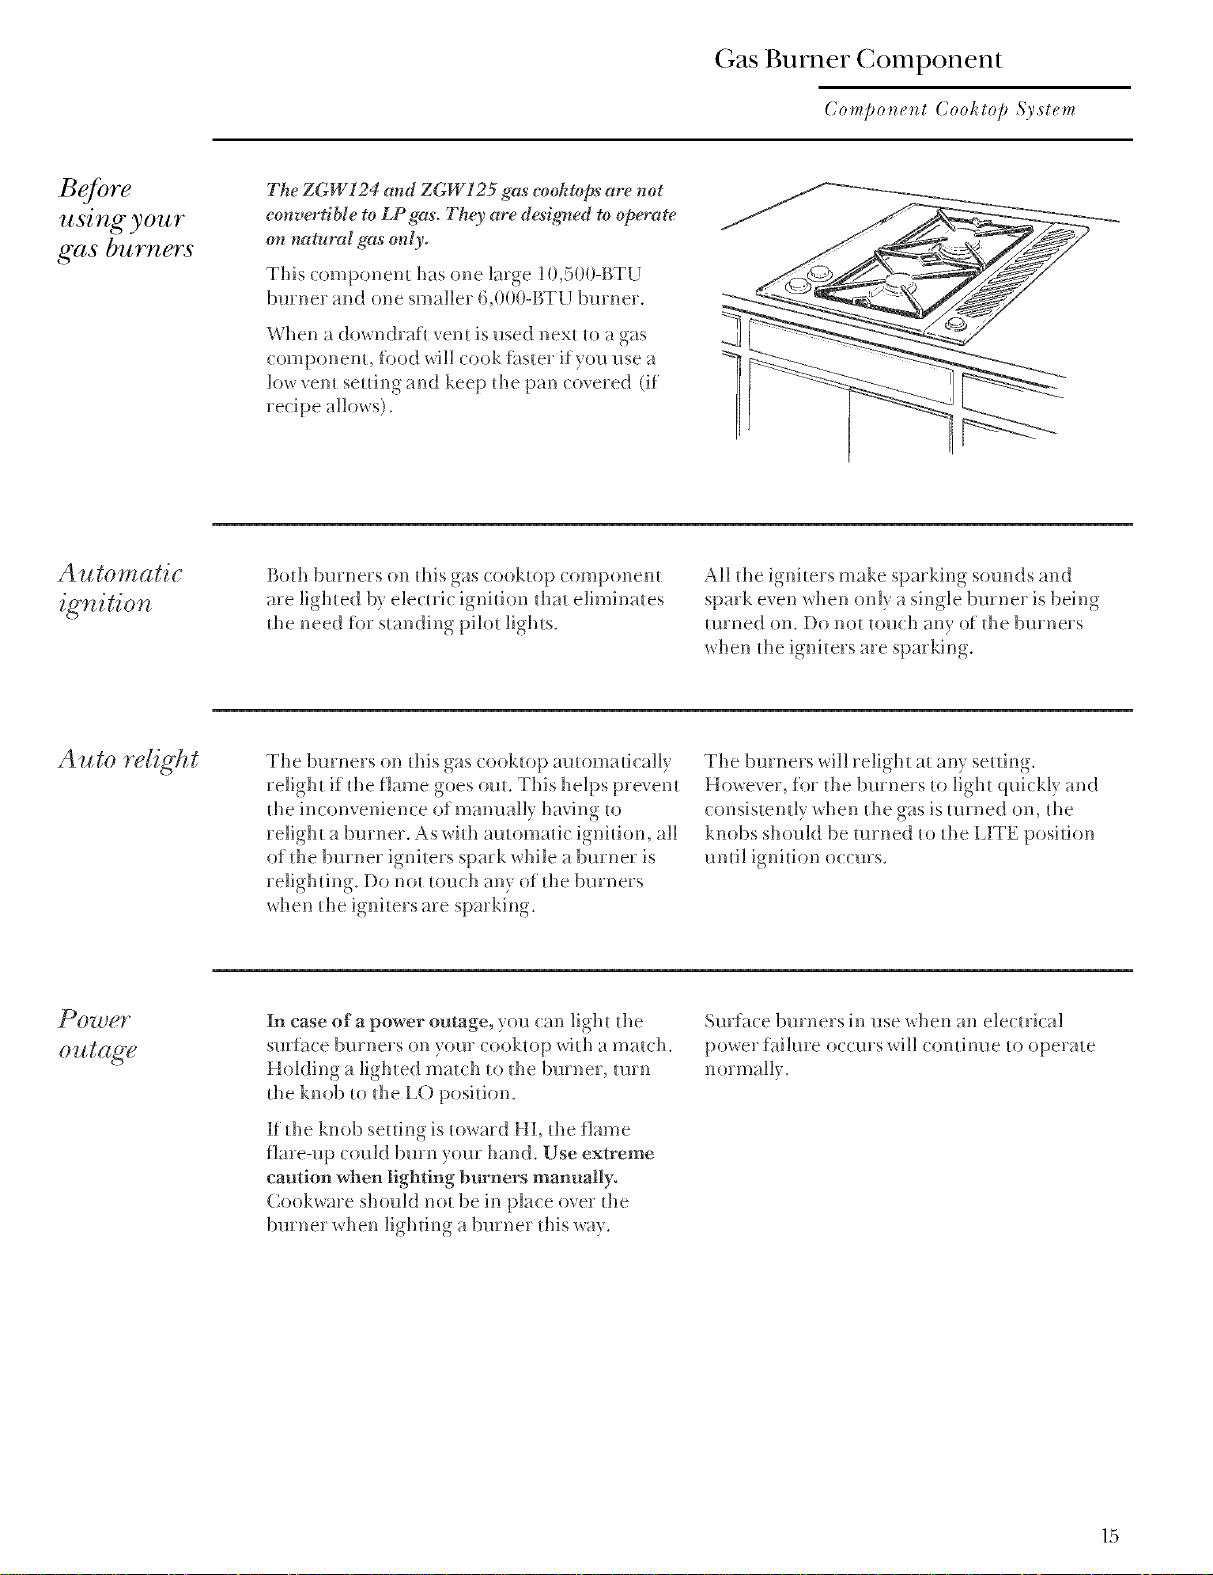
This (omponem h_s one lmge 10,500-BTU
burner and one smaller 6,000-FiTU bmner.
When a downdraft vent is used next to a gas
( omponent, food will (ook faster ifyou use a
low vent setting and keep the pan covered (if
Automatic
Bod_ burners on this gas (ooktop (omponem
are lighted by eDc{ric ignhion that eliminates
the need for standing pilot lights.
All the igniters make sparking strands and
spark even when only a single burner is being
turned on. Do not touch any of the bmners
when the ignhers are sparking.
Auto rdight The burners on this gas cooktop automatically
relight if the flame goes out. This helps prevent
the inconvenience of manually having to
relight a bmner. As with automatic ignition, all
of the bmner igniters spark while a burner is
relighting. 1-)onot touch any of the burners
when the igniters are sparking.
The burners will relight at any setting.
Hox_ever, for the burners to light quickly and
consistendy when the gas is turned on, d_e
knobs should be turned to the LITE position
until ignition occurs.
In case of a power outage, you can light the
surf_ce bmners on yore cooktop with a match.
Holding a lighted match to the burner, turn
the knob to the LO position.
K tile knob setting is toward HI, the flame
flare-up could bm:n yore: hand. Use extreme
caution when lighting burners manually°
Cookware shoukt not be in place over the
burner when lighting a burner this way.
Surface bmners in use when an electrical
power failure occms will continue to operate
15
Gas Burner Component
( ompo,e_g Cooktop Sy.s_em
To light a
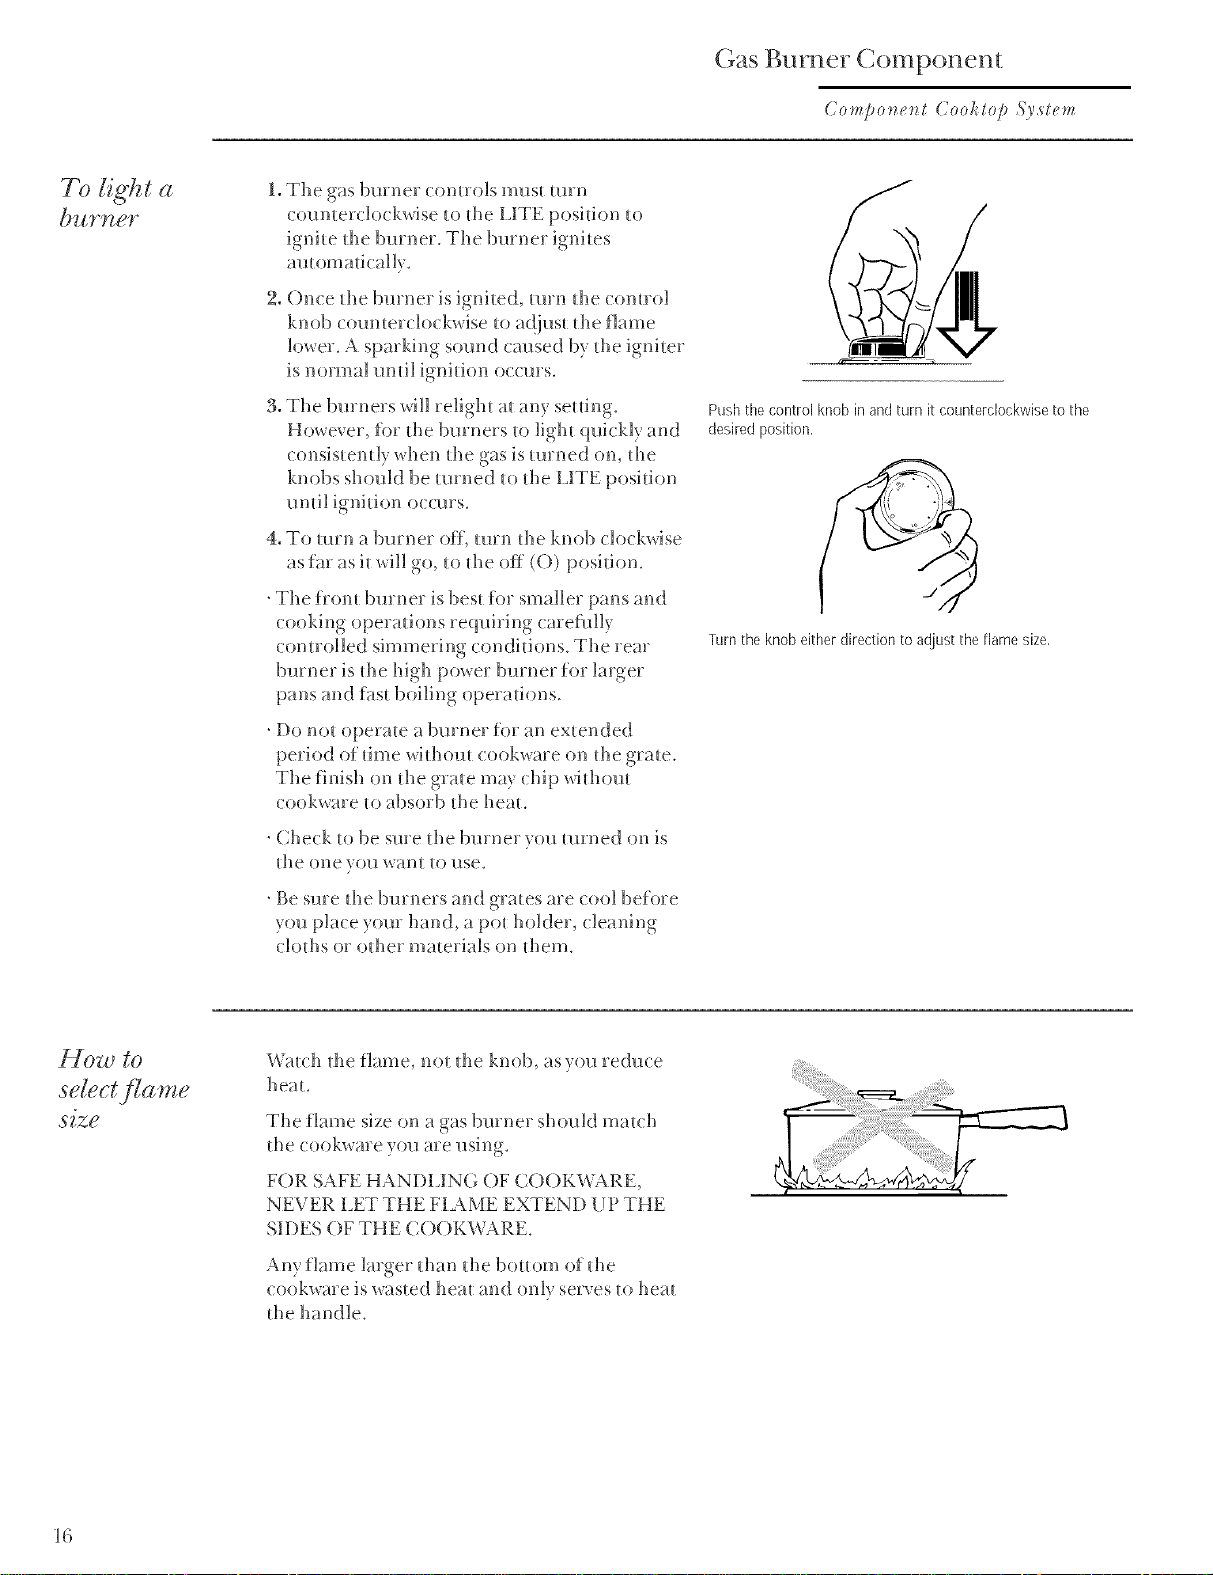
1, The oas burner conH'ols must H_rn
o
(:om_er(:lo(:kxdse _(_the 1JTE position _(_
ignite d_e lmrner. The bmner ignites
2, Once the bmner is ignited, turn the (omrol
knob com_ter( lockwise to adjust the fimne
lower. A spinking som_d eal_sed by the igniter
is normal m_fil ignition o( (ms.
3, The bmners will religh_ al any setting.
However, for _he bmne_ s _o ligh_ quk kly and
consis_endy when d_e gas is turned on, d_e
knobs should be turned _o the LITE position
until ignition ocrms.
4, To turn a bmTner off, turn tl_e knob clo(k_dse
as far as i_will go, t(__he off (()) position.
'The _?om burner is bes_ tbr smaller pans and
cooking operations requiring carefi_lly
comrolled simmering conditions. The rear
burner is d_e high power bmner for larger
pans and _i_s_boiling operations.
. l-)o no_ operate a bmner for an ex_ended
period of time _dd_om cookx_are on d_e gra_e.
The finish on d_e gra_e ma) chip wid_om
(:ookware u) absorb d_e heal
' Check u) be sme the 1)mner you turned on is
[he one V()ll wan[ [() !lse.
' Be sule _he bul ne_ s and gra_es are (ool befo_ e
xou pla(e yore hand a po_ homer, cleaning
(:lolhs or olher malerials on lhenL
Push the control knob in and turn it counterclockwise to the
desired position,
Turn the knob either direction to adiust the flame size,
Hozd _o
8e[ect fla me
Wau:h d_e flame, no_ d_e knob, as )ou reduce
heal
The flm_e size on a gas bmner shouk] mau:h
Ihe (ook_are you are using.
FOR SAFE HANI-)IJNG ()F C()()KWARE,
NEVER LET THE FiAME EXTEND UP THE
sIr)ES ()F THE C()()KWARE,
Any flame larger than the bottom of the
cookware is xxasted heat and onl) serves to heal
ll_e handle.
_6

Coo]_waYe
Aluminum: Medium-weight cookware is
recommended because it heats quickly and
evenly. Most ti)ods brown evenly in nil
aluminum skillet. Use saucepans with tight-
fitting lids tin cooking with minimum amounts
of water.
Cast Iron: If heated slowly, most skillets will
give satistacto U resuhs.
Enamelware: Under some conditions, the
enamel of some cookware may meh. Follow
cookw, ue illanllJ[_lC[lliei"s iecolillilendations
fin" cooking methods.
Glass: There are 2 types of glass cookware-
those for oven use only and those fi)r surfhce
cooking (saucepans, coffee and teapots).
Glass conducts heat ve_y slowly.
Heatproof Glass Ceramic: Can be used fin
either surthce or oven cooking. It conducts
heat ve,y slowly and cools ve,y slowly. Check
cookware manufacturer's directions to be sure
it can be used on gas cooktops.
Stainless Steeh This metal alone has poor
heating properties, and is usually combined
with copper, aluminum or other metals for
improved heat distribution. ( ombination
metal skillets generally work satistactorily if
they are used at medium heat as the
manutacmrer recommends.
Wok
cooking"
We re(ommend that you use only a fiat-
bottomed wok. They are available at your local
retail store.
Do not use woks that have support rings.
Use of these types ofwoks, with or without tile
ring in place, can be dangerous. Placing tile
ring over the burner grate may cause the burner
to work improperly resuhing in carbon
monoxide levels above alh)wable current
standards. This could be dangerous to your
heahh. Do not t_y touse such woks without tile
ring. You could be seriously burned if the wok
tipped over.
Use only flat-bottomed woks.
Donotusew0kswithsupportrings.
Stove top
g'rills
Do not use stove top grills on your sealed gas
burners. If you use the stove top grill on the
sealed gas burner it will cause incomplete
combustion and can resuh in exposure to
carbon inonoxide levels above allowable
current standards. This can be hazardous to
your heahh.
17
Grill Component
( on_po,_.'_t Cookto/_ Sy.m-,n_
BeJbre
NOTE: Tile grill grate must be preconditioned
before ushlg it for tile first time. To
pre( ondifion, first wash it in soap and water.
Dry with a soft ( loth. Then use a papel towel to
apply a small _m_omlt of no-sfi(k ( ooking spray
to tile g_ate. Remove excess with a (lean papel
towel.
Use tile grill fbr prepming meals with tile
appearance and flaw_ ok (ommer(ially (hat-
broiled meats. Tile grill must be very hot for this
type of (ooking anti smoke and spatter is to be
expe(ted.
Be sme to Hse vom _entino system when g_iHing
_o help minimize smoke,
YO_.] sho_ak] ha'_e either a (omponent downdFaft
veto inaalled into die cooktop s}s_emor a high-
capaci b _ent hood.
G dl
contro/
Most cooking on the grill is done at the HI
setting. Each haft of _he grill component is
[-[o_) lo
assemble the
gvill module
1,
2.
3,
4,
5,
Be sme both tile controls for tile grill are
off (()).
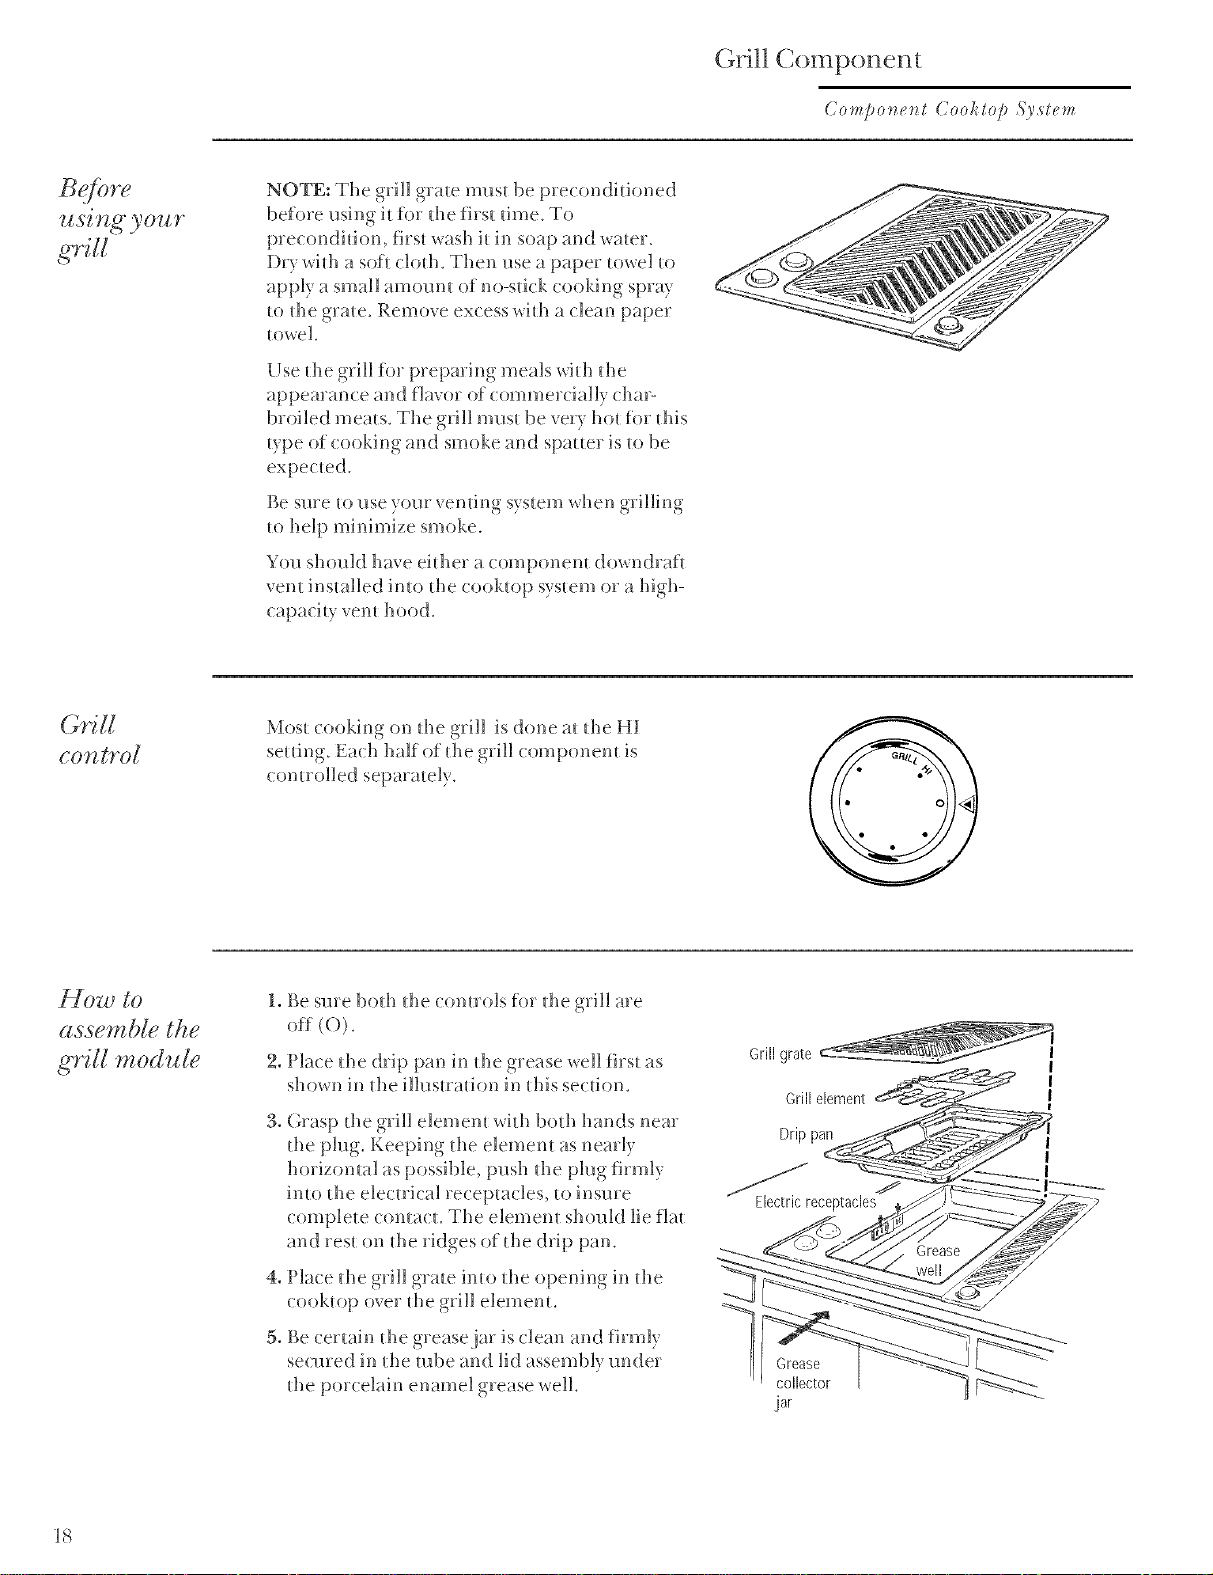
Place the drip pan in the grease well first as
shown in tile illustration in this section,
Grasp tile gFill element with both hands near
tile plug. Keeping tile element as nemly
horizomal as possible, push die plug firmly
into tile electrical recepta(les, to insme
( omplete conta( t. Tile element should lie flat
an(] rest on tile ridges oktile drip pan.
Place tile grill grale into the opening in tile
t ooktop over the _'ill element,
Be certain tile grease jar is ( lean and firml_
setmed in the robe and lid assembl} under
the por(:ela, in enamel grease _ell.
Grill grate
I
I
Grill element I
Drip pan
Electric receptacles
Grease
collector
jar
_8
C;, illtips
•The grill must be preheated to get the grill
components hot enough to seat the meat and
seal in the juices. Preheat the grill fi)r 10
minutes at HI heat setting, then turn to the
desired setting fi)r cooking.
•The grill element is divided so the flont and
rear sections are controlled separately.
•You can heat both sections to the same
temperature ti)r cooking large amounts of the
same ti)od, or you can vaty the temperatures
on flont and rear fi)r cooking/wo different
fi)ods. Also, you can save energy when cooking
small amounts oftood by turning only one
section on and leaving the other off entirely.
• Do not leave grill unattended while it is in use.
•Remove accumulated grease fiom the non-
removable grease well af/er each use to lessen
smoking and odors. Be sure opening to grease
robe is clean. Grease buildup can become a
fire hazard.
•Make sure the removable grease collector jar
and drip pan are clean and in place befi)re
using the grill.
•Remove grease flom the grease collector jar
after each use to avoid spillovers.
•The grates should be oiled or sprayed with a
non-stick coating befi)re cooking to prevent
sticking. Remove the grate betore spraying
and spray only while cool. Spraying directly
onto a hot grill may cause a fire.
•Trim the fat flom meat befine placing on the
grill. This will reduce smoking and lessen
grease buildup in the drip pan, grease well
and grease jar.
•Allow space between fitocls when placing
them on the grill. Air and heat need to
circulate around the fi)od fi)r best cooking
resuhs.
• Occasionally rearrange toods on the grill to
prevent sticking and provide better browning.
What to do
if a flame-
@ OCCI_TS
7)_eonlrol flame-@s, ,setheat ,settling"at LO, rather
lha_ ((]' (0). !/'you have a bad flame-u!J a_d there is
da_g'er o/'lhe fire spreadi_g; lake the /bllowir_gsle!),_
immediately:
1. Turn the grill controls to off (O), and turn
the downdraf/vent control to HI.
!/'you are u,_i*_g"an overhead @drqfi vent hood,
tu*v_it qff until the flame-@ st@,s.
2. Use a hmg-handled utensil to remove the
titocl ti'om the grill. Be car@d *_ottoget bur*_ed.
The fire should start to go out. If it does not,
smother the flames by covering the entire
grill with a large cookie sheet or the lid tiom
a large roasting pan.
A CA UTION!
•NEVER USE WATER ON A GREASE FIRE.
Water will spread the flames.
•Never line the grill grate or the porcelain
enamel grease well with aluminum foil. Doing
so may block drainage of grease, causing
excessive smoking, fire or component
dalnage.
•It is recommended that you have a city
chemical, toam or Halon/ype fire
extinguisher where you can easily reach it in
case of a cooking fire.
•Never try to use charcoal or flavored wood
chips in the well under the grill grate. Use of
charcoal indoors without proper ventilation
produces carbon monoxide that can be tatal.
Also, burning charcoal in the well will
permanently damage the porcelain coating in
the well.
•NEVER LEAVE THE KITCHEN while grilling
meats or other juicy foods. Fats and juices
drip on the hot grill element and may cause
flame-ups. When grilling, you should ahvays
be present to control flame-ups so they do not
get out of hand.
19
Grill Component
Q. When cooking many individual foods, what
can I do to insure that foods will cook
evenly?
A.
When cooking foods of various sizes and
dficknesses, start larger or dficker pieces
firs_ and add quicker-cookir_g smaller pieces
later. Press meat lighdy _o lie fla_ on grill
Slash d_e fat on edges of steaks and chops to
prevent curling. Break d_ejoints of spli_
chickens so they wiII lie flat.
Q. My glrilled meats sometimes come out drier
than they should. What can I do to help
prevent this?
A. Season meats after cooking rather than
before-sah can draw om juices and dry ou_
meat. Use tongs _o mrn and rearrange
mea_s on d_e grilk forks will pierce d_e mea_
Q. I follow the cooking times suggested, but my
foods don't get done properly. Is there
something wrong with my grill?
A. Probably not. Suggested cooking times
should be used only as a general guide.
Variables in food (:anchange d_e cooking
Q. How can ]Ikeep barbecued meats from
developing all unattractive burned look
and taste?
A. Sau(es (onmining sugar will often burn if'
used during the emire cooking time. If your
f_wori_e sauce contains sugar, _ryadding it
only during d_e last 15 to 20 minutes of
cooking time for best results.
Q. Foods cooked on my grill are not browr_ing
as much as I would llke. What could cause
this?
A. A longer preheating and grill time may be
necessary to achieve the desired results.
2O
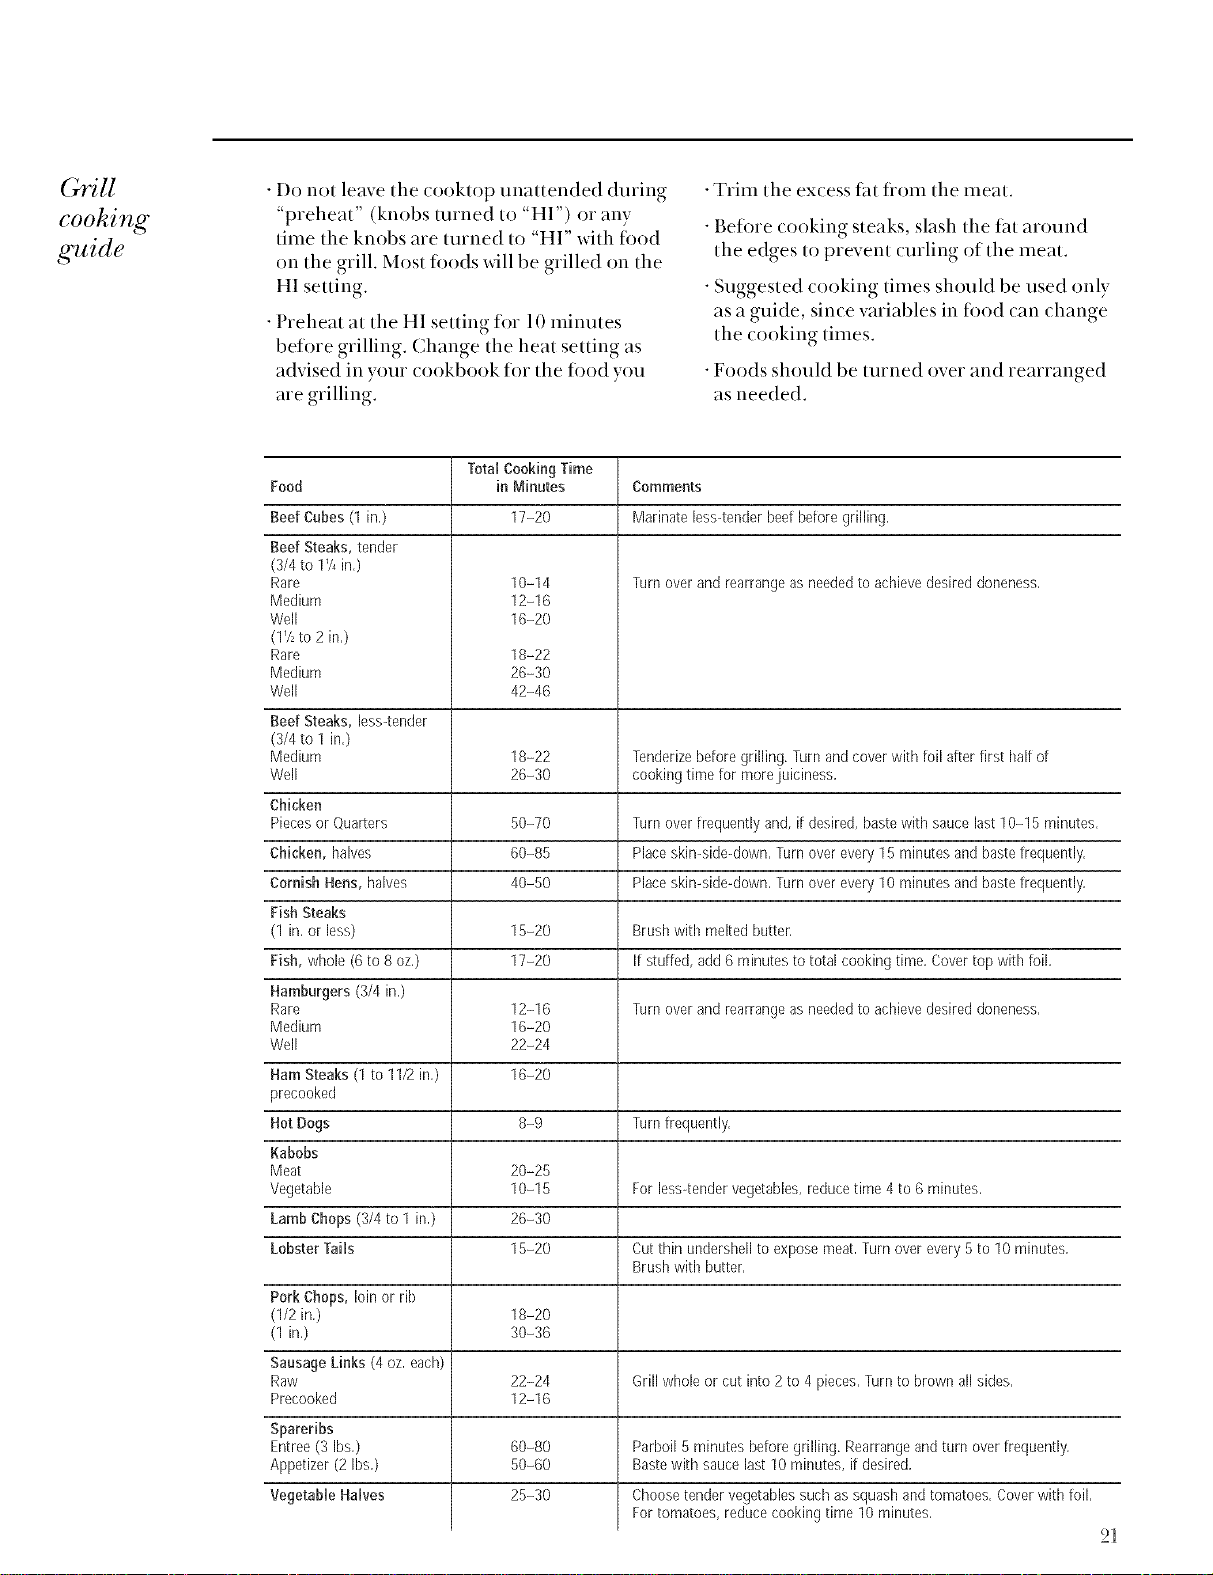
Grill
cooking"
g'uide
• Do not leave the cooktop unattended during
"preheat" (knobs/urned to "HI") or any
time the knobs are turned to "HI" with ti)o(1
on the grill. Most fi_ods _dll be grilled on the
HI setting.
•Preheat at tile HI setting tor 10 minutes
before grilling. Change the heat setting as
advised in your cookbook for the fi)od you
are grilling.
•Trim the excess fat flom tile meat.
• Before cooking steaks, slash tile fat around
the edges to prevent curling of the meat.
• Suggested cooking times should be used only
as a guide, since variables in fi)od _an _hange
the _ooking times.
•Foods should be turned over and rearranged
as needed.
Total CooMng Time
Food in Minutes Comments
17-20 Marinate less-tender beef before grilling.
Beef Cubes (1 in,)
Beef Steaks, tender
(3/4 to 17_in,)
Rare
Medium
Well
(1>to 2 in,)
Rare
Medium
Well
10-14
12-16
16-20
18-22
26-30
42-46
Turn over and rearrange as neededto achieve desired doneness,
Beef Steaks, less-tender
(3/4 to 1 in,)
Medium 18-22 Tenderizebefore grilling. Turn and cover with foil atter first half of
Well 26-30 cooking time for morejuiciness,
Chicken
Pieces or Quarters 50-70 Turn over frequently and, if desired, baste with sauce last10-15 minutes,
Chicken, halves 60-85 Place skin-side-down, Turn over every 15 minutes and bastefrequently,
Cornish Hens, halves 40-50 Place skin-side-down, Turn over every 10 minutes and bastefrequently,
Fish Steaks
(1 in, or less) 15-20 Brush with melted butter:
Fish, whole (6 to 8 oz,) 17-20 If stuffed, add6 minutes to total cooking time, Cover top with toil,
Hamburgers (3/4 in,)
Rare 12-16 Turn over and rearrange as neededto achieve desired doneness,
Medium 16-20
Well 22-24
Ham Steaks (1 to 11/2in,) 16-20
precooked
Hot Dogs 8-9 Turn frequently,
Kabobs
Meat 20-25
Vegetable 10-15 For less-tender vegetables,reduce time 4 to 6 minutes,
LambChops (3/4 to 1 in,) 26-30
Lobster Tails 15-20 Cutthin undershell to expose meat, Turn over every 5 to 10 minutes,
Brush with butter,
Pork Chops, loin or rib
(1/2 in,) 18-20
(1 in,) 30-36
Sausage Links (4 oz, each)
Raw 22-24 Grill whole or cut into 2 to 4 pieces, Turn to brown all sides,
Precooked 12-16
Spareribs
Entree(3 Ibs,) 60-80 Parboil 5 minutes betore grilling. Rearrange andturn over frequently,
Appetizer (2 Ibs,) 50-60 Bastewith sauce last 10 minutes, if desired,
Vegetable Halves 25-30 Choosetendervegetablessuchassquashandtomatoes,Coverwith foil,
Fortomatoes,reducecookingtime 10minutes,
21
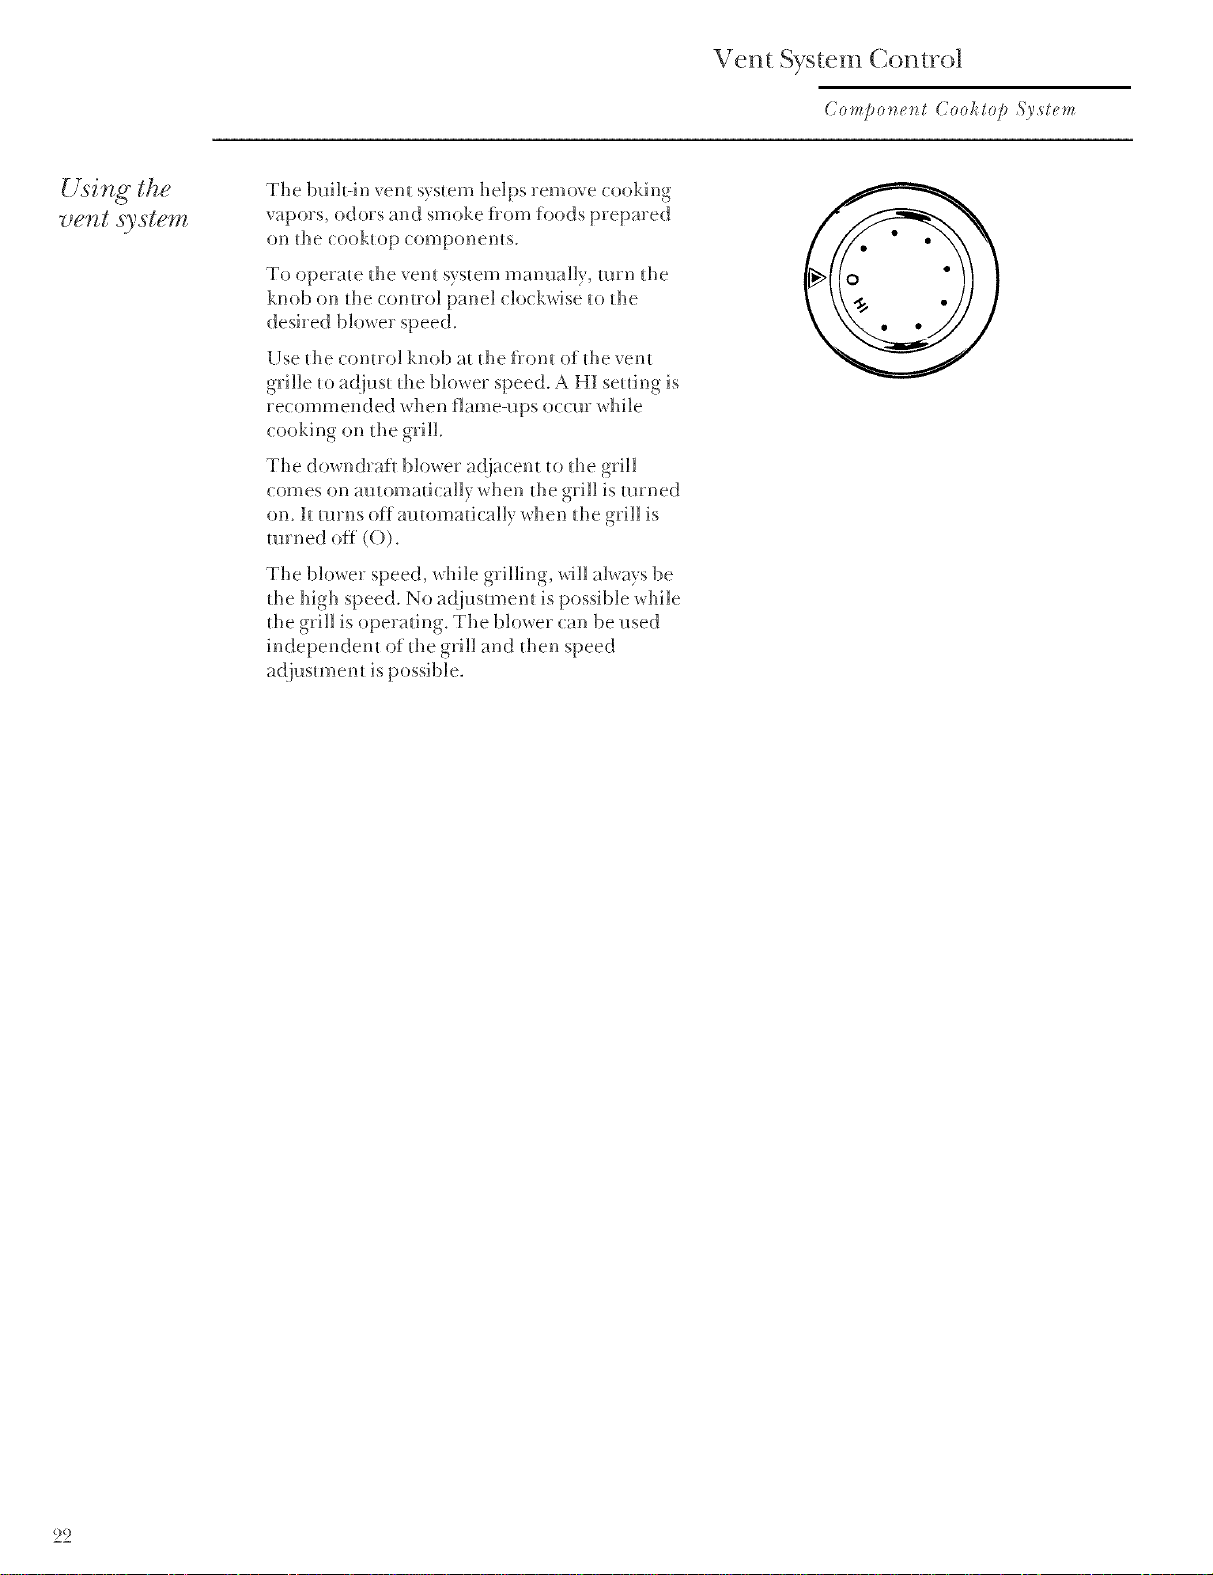
Vent System Control
( ompo_..'_t Cooktop Sy._.'m
The buil_-in xen_ system helps remo_ e cooking
vapors, odors and smoke f_om foods prepared
on d_e (:ooktop (:omp(ments.
To operate the xem s_stem mam_ally turn the
knob on d_e control panel clockwise to the
desired blo_er speed.
Use the control knob at the fi-om of tl_e ,_em
grille to adjust d_e blower speed. A HI setting is
recommended when flame-ups o(:(ur while
(:ooking (m d_e grill.
The downdra_ blower adjacem to d_e grill
comes on automatically when d_e grill is turned
on. It turns off automatically when d_e grill is
turned off (0).
The blower speed, while grilling, will always be
the high speed. No adiusm_ent is possible while
d_e grill is operating. The blower can be used
independent of d_e grill and d_en speed
adiusm_ent is possible.
22
Ca -e and (;leaning
Co mpo _e_t {7001"top System
Proper care and cleaning are important so
your Component Cooktop System _dll give you
efficient and satisthcto_y se_xice. Follow these
directions careflflly to help assure safe and
proper maintenance.
BE SURE ELECTRICAL POWER IS OFF
BEFORE CLEANING ANY COMPONENTS.
Some of the components must be cured or
preconditioned before using them for the
first time.
Components and accessories should be
cleaned after each use. The longer a soil
remains, _he harder i_is _o clean. See each
componem's section in _his guide for speciiic
ius[ruc[ious.
Brushed
stainless
stee[ finisk
Wash with soap and wa_er. For heavy soils, firs_
cover wi_h a damp cloth and le_ soak 30
minutes. A stainless s_eel cleaner may be used.
To remove fingerprims, apply a li_le baby oil
or cooking oil wi_h a cloth or paper _owel. Rub
in _he same dire(_ion as the brush marks in _he
stainless s_eel finish.
Stubborn baked-on food residue or stains on
_he smirdess s_eel surfa( es (an be removed by
using pa(Mype oven cleaners. For your safe_x
use ex[reme (amion. ()xeu cleaners are (:ausd(
aud cau dail?age or discolor ll?()s[ o[her sur[_lces,
Do no_ use spray-_ype oven ( leaners. Overspray
will damage nearby suri_ces. Use newspaper
and masking rope to (;over surf)_ces such as
back wall, comrol panel, range sides,
coumer_op, e_c. Remove gra_es, grill elemem
or porcelain enamel drip pan.
Control
pane[ and
knobs
(;Dan up any spills or spa_ers with a damp cloth.
Remove heavier soil wi_h warm, soapy water.
(;Dan _he comrol panel wi_h mik_ liquid dish
de_ergem and a sof_ cloth. Rub _he comrol
CAUTION: Do no_ use abrash es of any kind
on _he (:ou_rol panel.
The comrol knobs may be removed %r easier
cleaning.
To remove a knob, pull i_s_raigh_ off _he s_em.
Wash _he knobs in soap and wa_er but do no_
soak.
Do nol allow xsaler _o F_n do'_xn i_si(]e [he
surf_(:e of _he panel xd_ile (leaning. After
d_o'iug, return _he knobs Io _he cook_op,
making sure _o ma_(:h _he fla_ area on _he knob
_o _he shah.
23
Care and Cleaning
( ompone_g Coof_t@ System
Gene al
su f zce units
Before you use the cooktop for the first time,
clean the glass surface units with cleaning
cream° This helps protect them top and makes
clean-up easier.
Proper ca_e and (leaning are hnpo_ mm so
yore cook_op will give you ef_iciem an(]
satis_c_ory servi( e.
K soil, mine_ al deposits tom evaporated water
spills or mere] rub-off flom a]umimm_
( ookware is no_ _emoved, it will bmn on the
glass smTf_ce units and (ause pem_anem
discoloration.
Follow d_e directions in dfis section (arefi_ll} in
caring f(a the glass smii_ce mfi_s _o assme safe
,_H_d }3Fo}3eF maintenance.
cleaning of
the glass
S{Z_,f(gC€
Use only a re(:onm_ended (leaning- (ream,
such as ( erama Bri_e (a ( (a_k_op Cleaning
(ream, on _he glass surf_ce raft{s.
light soil on
the glass
1 Rub a few drops (less is be_er) of d_e cleanh_g
(ream omo soiled area using a damp paper
towel. Buffwid_ a dry paper towel m_fil all soil
and (ream are _emoved. Frequem (leaning
leaves a pro_ecfive (oaring which is essential
in preventing s(ra_( hes and abrasions.
2 Clean d_e smface mfi_s wid_ d_e cleaning
(:ream afler each use,
soil on the
glg ss
S_f(tL'g
1
2
Apply a fev, drops of die cleaning cream _o
d_e (cool) soiled area,
Using a damp paper _owel, rub the cream
imo d_e bmned-on area. As wid_ any
bm ned-on spill, _]fis may require some e_br_
Ca_efully s<rape soil whh razor s(raper.
Hold scrape_ a_a 30 ° angle agains_ d_e
glass smf>_ce units.
4 Kany soil remains, repeat die s_eps listed
above_ For additional pro_e( fion, a_ier all
soil has been _emoved, polish die entire
sm f>_ceuni_ wid_ d_e (leaning (ream.
5 Buff wid_ a dry paper towel.
NOTE:
, Be sure to use a new, sharp razor s(raper. Do
no_ use _ dull or nicked blade,
' Store the razor scraper out of reach of children.
24

Special care
of the glass
surface
units
Sugary spillovers (such as jellies, fl_dge, candy
syrups) or melted plastics can cause pitting of
the surtace units of your cooktop (not covered
by the warramy) unless the spill is removed
while still hot. Special care should be taken
when removing hot substances. Follow these
instructions careflflly and remove soil while
spill is still hot.
i i
1 Turn offall surihce units afti_cted by the
spillover. Remove hot pans.
2 Wearing an oven mitt, hold the razor scraper
at a 30 ° angle to the cooktop and scrape hot
spill to a cool area outside the suriace unit.
3 With the spill in a cool area, use a dry paper
towel to remove a W excess. Any spillover
remaining should be left until the surface of
the cooktop has cooled.
Do not continue to use the soiled surlhce unit
until all of the spillover has been removed.
Follow the steps under Hea W Soil to continue
the cleaning process.
J
Note: Using a razor scraper will not damage the glass
surface units if the 30° angle is maintained,
Precau tions
for the glass
surface
units
•If pots with a thin overlay of ahmfinum,
copper or enamel are allowed to boil city, the
overlay may bond with the glass surtace units
and leave a black discoloration. This should
be removed immediately beti)re heating again
or the discoloration may be permanent.
• Water stains (mineral deposits) are removable
using the (leaning _ream or tifll strength
white vinegar.
• Use of window cleaner ulay leave an iridescent
tihn on the glass surtace units. The cleaning
cream will remove this discoh)ration.
•If you slide aluminum or copper cookware
across the glass surtace units of your cooktop,
they may leave metal markings which appear
as scratches. If this should happen, use
the razor scraper and cleaning cream to
remove these markings. Faihne to remove
these residues immediately may leave
permanent marks.
•Most cleaners contain ammonia, chemicals
and abrasives which can damage the surt, tce
units. Use only the recommended cleaning
cream for proper cleaning and protection of
your glass surface units.
•Read and follow all instructions and warnings
on the cleaning cream lal_els.
Future care
of the glass
surface
units
• Do not use dishwashing detergents. They
_dll remove the protective coating and
therefore make the surface units inore
susceptible to staining.
To conveniently order more cream and/or
scrapers for cleaning your glass surface units,
please call our toll free number:
National Parts Center 800-626-2002
Cleaner
Scraper
Cream and scraper kit
# WX 10X300
# WXSX1614
# WB64XS027
25
Care and Cleaning
Componeng Cookt@ S2.stem
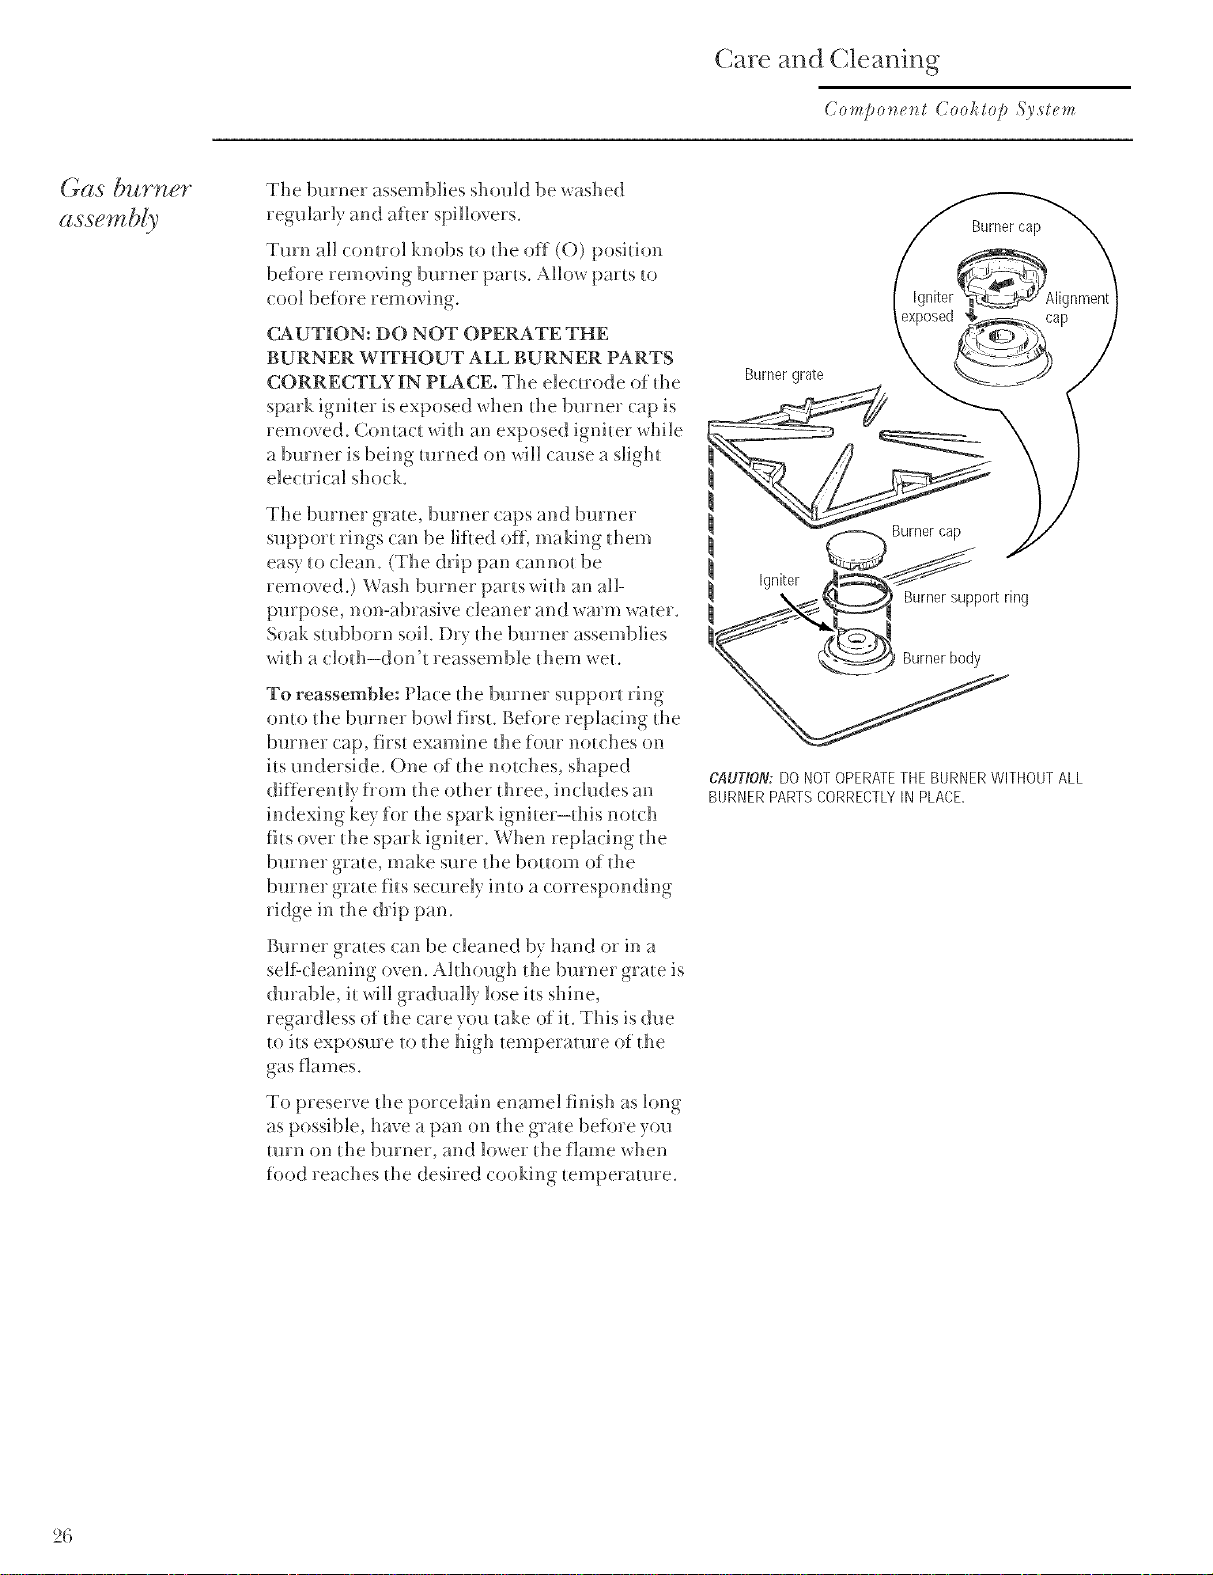
The burner assembhes shouk] be washed
regularly arid afler spillove_ s.
Tmn all _omrol knobs _o die off (O) posilion
before removing bmner par_s. Allow pm_s to
tool before removing.
CAUTION: DO NOT OPERATE THE
BURNER WITHOUT ALL BURNER PARTS
CORRECTLY IN PLACE. The ele_ _rode of d_e
spark ignher is exposed when d_e burner cap is
removed. Comac_ wi_h an exposed igrfi_er while
a bmner is being turned on will cause a sligh_
elecuical shock.
The bmner grate, burner Cape and b!_rner
suppor_ _ings can be lifled off, making d_em
easy _o dean. (The (hip pan cmmo_ be
removed.) Wash burner par_s wid_ an all-
purpose, non-abrasive cleaner and warm wa[er.
Soak stubborn soil. Dry d_e burner assemblies
wid_ a clod_-don'_ reassemble d_em weL
To reassemble: Place d_e burner suppor{ ring
omo d_e bmner bowl firsL Before replacing d_e
bmner cap, firs[ examine the four notches on
i_sunderside. One of the nou:hes, shaped
differemly from d_e od_er d_ree, includes an
indexing key for d_e spark igrfi_er-dfis no_ch
fi_sover d_e spark igniter. Wher_ replacing d_e
burner gra_e, make sure the bouom of d_e
burner gra_e fi_s seemely imo a corresponding
ridge in d_e drip pan.
Burner gra_es can be (leaned by hand or in a
self:cleaning oven. Ahhough d_e bin:her gra_e is
dinable, i_will gradually lose i_s shine,
regardless of the care you rake of iL This is due
_o i_sexposure _o d_e high _emperamre of d_e
_p
Burner qrate
, ,)
7
Igniter
! X__ Burnere.ppo_tring
CAUTION: r)O NOTOPERATETHE BURNERWITHOUTALL
BURNERPARTSCORRECTLYIN PLACE,
To preserve the porcelain enamel finish as long
as possible, have a pan on d_e gra_e before you
turn on d_e burrmr, and lower d_e flame when
food reaches d_e desired cooking _emperamre.
26
Grill
component
Clean tile grill componem after every use. Do
not put the element into water. It cleans itself
when heated dinlug normal use. To remove
any charred soil, clean with a dry, stiff brush
when the element is cool.
Never use steel wool or metal scouring pads
because they may damage the outer casing of
the element.
Wash the grill grate in the sink in soap and
water. The grate m W be soaked in a solution of
dishwasher detergent and hot water. Use a
non-metal scouring pad if necessm y. Do not
use abrasive cleaning products. The grill grate
can also be cleaned in a seltZcleaning oven.
From time to time, you should recondition the
grate with no-stick cooking spray. See the Grill
Component section.
Wash the porcelain enamel drip pan in the
sink with soap and water, or put it in the
dishwasher. Soak stubborn stains, then rub
gently with a scouring pad.
Do not put the drip pan in the oven during a
self-cleaning cycle. Doing so will cause
discoloration and damage the finish.
Porcelain
e _t_ _te l
g_rease well
Porcelain enamel can crack or chip with
misuse. It can stain if spillovers of foods with a
high acid content (such as tomatoes or lemon
juice) are not cleaned up quickly.
When cleaning a porcelain enamel grease well,
be careful not to get the electrical receptacles
wet. Do not try to fill the well with water when
cleaning. Be sure the drain hole and tube in the
grease well are not clogged.
Grectse jctrs On the underside of the grill cooktop
component, a grease jar is mounted to catch
tat and drippings.
The lid of the jar is permanently mounted to
the bottom of the cooktop component box.
The lid is connected by a robe to a spout at the
flont of the grease well. The jar can be
unscrewed flom the lid to be emptied and
cleaned or to be replaced. The jar is a standard
1-pint jar. Quart canning jars may also fit.
Do not use thin-walled glass or plastic jars, such
as those having contained food products. Such
jars could fracture.
Dittereut foods give dittereut amounts of tat
and drippings, so you should inspect the jar
each time it is used. If the jar is not emptied or
replaced often enough, the tat and drippings
may overflow. Be sure the drain hole and robe
in the grease well are not clogged.
27
Care and Cleaning
( o_npo_e_g Cookto/_ Sy.ste_n
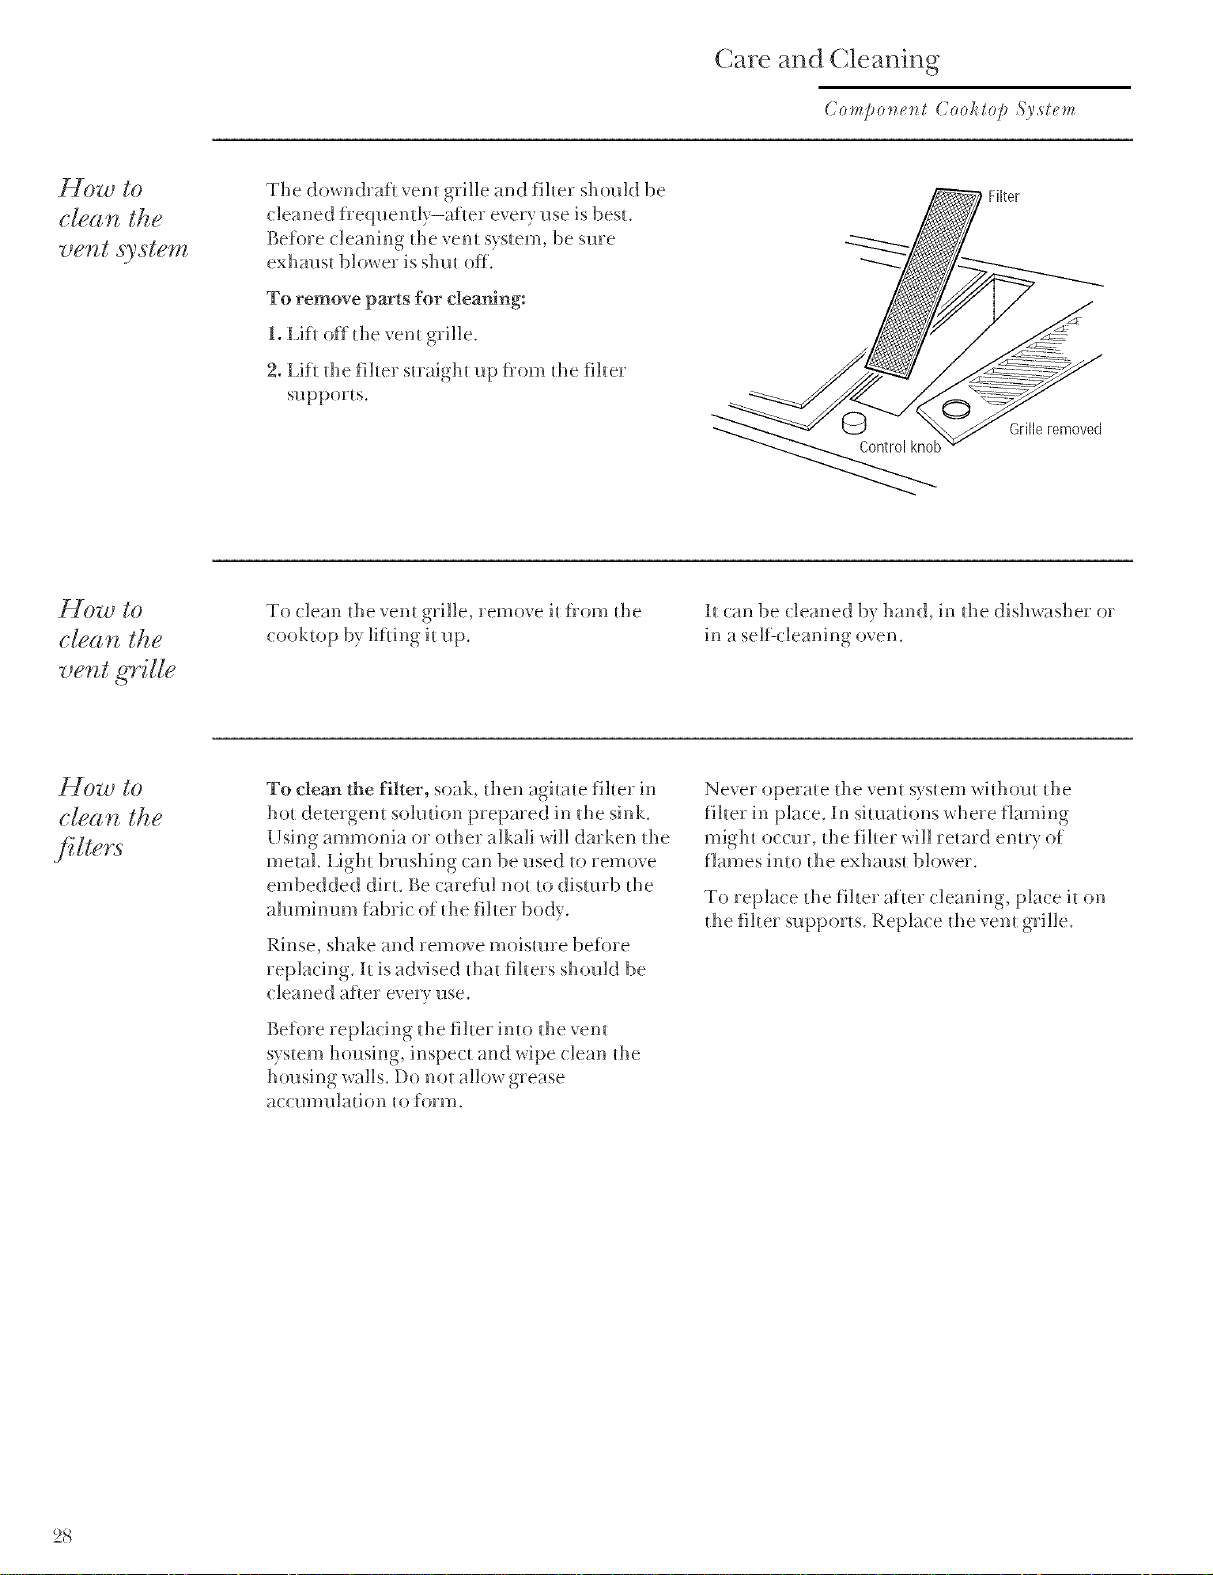
Liow to
clean the
vent .%stem
The downdraf_ veto grille and fiber should be
(:leaned frequendy-af_er every use is besL
Before cleaning d_e _em s)s_em, be sure
exhaus_ blower is shin off.
To remove parts for cleaning:
1. Lif_off the veto grille.
2. Lif_ d_e filter maigh_ up flom d_e fihe;
supports.
Filter
Grille removed
clean the
ver._t ,_ille
To (:lean d_e veto grille, remove h flom d_e
(:ook_op by ]ihing i_up.
h can be cleaned b) hand, in d_e dishx, asher or
_[()_) to
clean the
.filters
To clean the filter, soak, d_en agitate fil_er in
ho_ de_ergem soludon p;epared in d_e sink.
Using ammonia or o_her alkali will darken _he
me_aL Ligh_ brushing can be used _o remove
embedded dh_. Be (aret_d no_ _o disturb the
ahm_hmm f_d)ric of _he fiber body.
Rinse, shake and remove moisture before
rep]ach_g, h is adGsed _ha_ fibers should be
Never operate _he ven_ system wi_ho_H _he
fil_er in pla(:e. In si{ua{i()ns xd_ere _laming
migh{ oc(ur, Ihe filler x%i]]revar(] en{ry of
f]ai_es into _]le exhalls_ bloweY.
To replace ihe fiber after cleaning, pia(:e il on
d_e fiber supports. Replace d_e ,_em grille.
Before rep]a(:ing lhe fiber into lhe venl
system housing, inspec_ and wipe (:Dan d_e
housing x_alls. Do no_ allo_ grease
a(r(rumubafion .) form.
28
The Problem Solver
(70mpo_e_l Cooklop Syslem
Questions ?
Use this
problem
solver!
PROBLEM POSSIBLE CAUSE
COMPONENTS
ARE NOT
FUNCTIONING
PROPERLY
HALOGEN/RADIANT
SURFACE UNITS
WILL NOT MAINTAIN
A ROLLING BOIL OR
FRYING RATE IS NOT
FAST ENOUGH
HALOGEN/RADIANT
COOKTOP FEELS HOT
FOODS COOK
SLOWLY ON
HALOGEN/RADIANT
COOKTOP
TINY SCRATCHES
(may appear as cracks)
OR ABRASIONS ON
HALOGEN/RADIANT
COOKTOP GLASS
SURFACE
METAL MARKINGS
(may appem as scratches
on halogen/radiant
cooktop glass surface)
• Difticuhy may be in tile main distribution panel of your house caused
by a blown circuit fllse, a tripped circuit breaker, the main tuse or the
main circuit breaker, depending on the nature of the power supply.
If a drcuit breaker is involved, reset it. If the control box uses fllses,
the circuit fllse (a cartridge-/ype) should be changed, BUT ONLY
BY SOMEONE FAMILIAR WITH ELECTRICAL CIRCUITS.
If, after performing one of these procedures, tile fllse blows or circuit
breaker trips again, call for service.
NOTE: Apartment tenants or condominium owners should request
their building management perti)rm this check beti)re calling ti)r
service.
• Controls are not properly set or x_Tong control is set ti)r the component
or surtace unit you are using.
• Grill element is not plugged in properly.
• ( onsider the possibilfiy of interruption in gas or electric service fiom
the utilfiy source.
• You must use pans which are absolutely fiat. If light can be seen
bemeen the pan bottom and a straight edge, the halogen/radiant
surfilce units will not transfer heat properly.
•Pan bottoms should closely match the diameter of the surtace unit
selected.
•Tile halogen/radiant cooktop may seem hotter than you are used to.
This is normal.
•Make sure flat-bottomed pans are used.
• Using the vent will help keep the halogen/radiant cooktop cooler.
•hnproper cookware being used. Pan bottoms should be fiat, tairly
hea W weight and the same diameter as the surtace unit selected.
•Incorrect cleaning methods have been used, cookware with rough
bottoms have been used or coarse particles (salt or sand) were
be/ween the cookware and the surtace of cooktop. Use recommended
cleaning procedures, be sure cookware bottoms and cookware are
clean betore use and use cookware with smooth bottoms. Tiny
scratches are not removable but will become less visible in time as a
resuh of cleaning.
• Do not slide ahmfinum cookware across the suit_tce. U se tile
recommended cleaning procedure to remove marks.
•Incorrect cleaning materials have been used, encrusted boilovers or
grease spatters remain on the surthce. Use a razor scraper and the
recommended cleaning procedure.
29

The Problem SoDer
Questions ?
Use this
problem
soIver.P
PROBLEM
DARK STREAKS
OR SPECKS ON
HALOGEN/RADIANT
COMPONENT
AREAS OF
DISCOLORATION
ON HALOGEN/
RADIANT SURFACE
COOKTOP
FREQUENT CYCLING
OFF AND ON OF
HALOGEN/RADIANT
SURFACE UNITS
HOT SUGAR
MIXTURES/PLASTIC
MELTED TO THE
HALOGEN/RADIANT
SURFACE
CONTROL KNOB
WILL NOT TURN
SPARKING SOUND
PERSISTS AFTER
BURNER LIGHTS
POSSIBLE CAUSE
Use _ l"2_zof S(l_pel _lr_(] le( ol_?i_?ended cle2H_in_ plocedllle,
Marks from ahm_inum and coppe5 pans as _ell as mineral deposits
from waler 5)5food can be removed wifi_ Cooktop Cleaning Cream.
ln(orrec_ cook_sare used. Use onl} fla_ cook_sare _o minimize c}cling.
Turn the surf)_ce unit to LO, wipe the hot ( ooktop with several dry
paper _owels. Use a razor scraper held at a 30 ° angle _o _he cook_op
to scrape the hot spill to a cool area outside the surL_ce unit. Let the
cooktop f:ool. Clean with Cooktop Cleaning Cream.
When fi_e knob is a_ fl_e off (()) position, i_mus_ be pushed in before
it can be turned.When the knob is at an? other position, i_can be
turned _dfi_om being pushed in.
Sparking of the igniter is normal. Air (urrems in the ki_( hen tiom
an open window or a person moving quickly can imerrup_ _he flame,
causing automatic religh_ sparking. As fi_e bin:net warms, the
sparking is less likely to occm:. If the sparking persists fi_r a long time,
(:all for service.
SPARKING SOUND Be sure the control knobs are in the off (O) position. If the sparking
PERSISTS AFTER sound persists (:all tier service.
BURNER IS OFF
BURNERS DO
NOT LIGHT
Make sure electrical plug is plugged into a li_e po_ er outlet.
(;as supply no_ connected or not turned on.
Orifice in burner body may be clogged (see fl_e (;as Burner
Component section). Remove the obstruction.
Bmner parts no_ replaced correctly (see _he (;as Burner Componen_
Counter unit not properl) grom-sded 555polarized. This can aErect
Soil clogging hods in burner cap. Remove and clean.
Cooktop burner 15)13not repl;-_ced correctl?.
30
PROBLEM POSSIBLE CAUSE
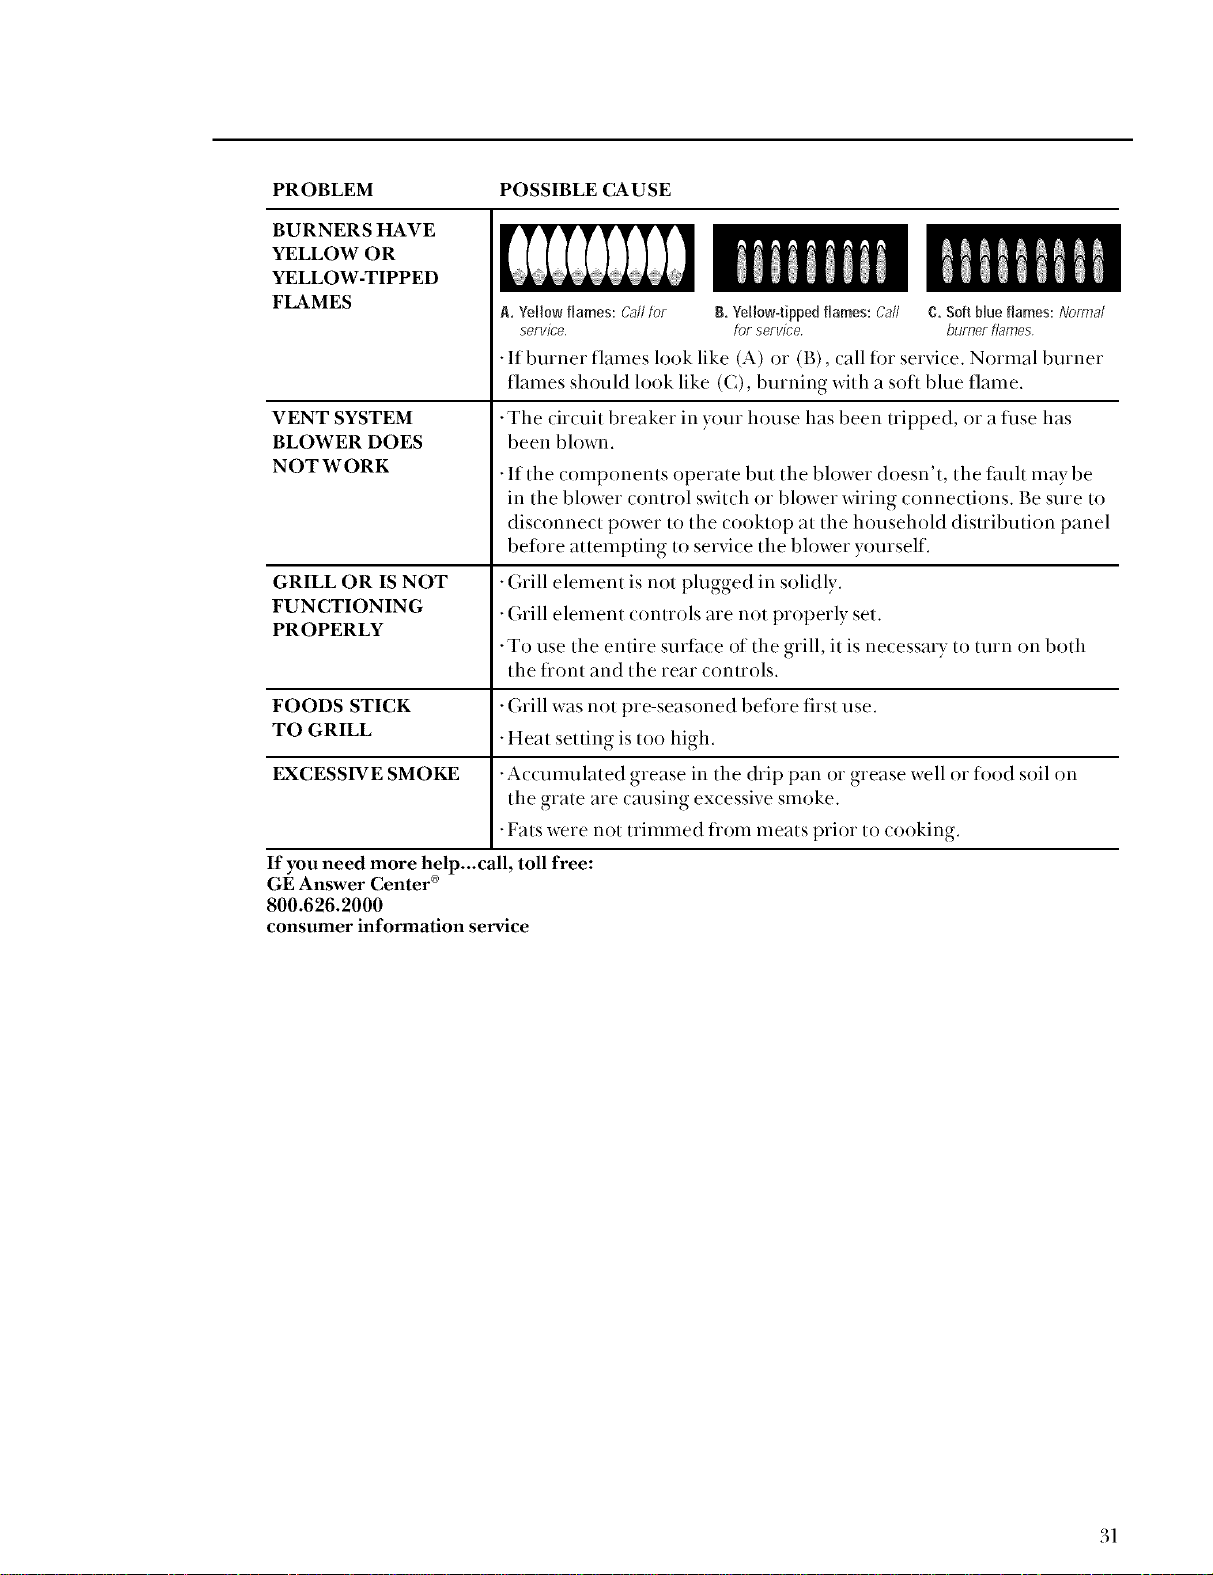
BURNERS HAVE
YELLOW OR
YELLOW-TIPPED
FLAMES
B, Yellow-tipped flames: Call
for service.
A. Yellow flames: (,'alltor C. Soft blue flames: IVom;al
service. _uriqer flames.
•If burner flames look like (A) or (B), call for service. Normal burner
flames should look like (C), burning with a soft blue flame.
VENT SYSTEM •The circuit breaker in your house has been tripped, or a fllse has
BLOWER DOES been blown.
NOT WORK •If the components operate but the blower doesn't, the tauh may be
in the blower control sxdtch or blower wiring connections. Be sure to
disconnect power to the cooktop at the household distribution panel
before attempting to service the blower yourself.
GRILL OR IS NOT • Grill element is not plugged in solidly.
FUNCTIONING • Grill element controls are not properly set.
PROPERLY
•To use the entire surface of the grill, it is necessa_ y to turn on both
the flont and the rear controls.
FOODS STICK • Grill was not pre-seasoned befi)re first use.
TO GRILL •Heat setting is too high.
EXCESSIVE SMOKE •Accumulated grease in the drip pan or grease well or food soil on
the grate are causing excessive smoke.
•Fats were not trimmed flom meats prior to cooking.
If you need more help...call, toll free:
GE Answer Center ®
800.626.2000
consumer information service
31

Notes
co,_po_e_t Cooktop _y.ste,_
32

Consumer Services
With the purchase of your new Monogram appliance, receive the
assurance that if you ever need infi_rmation or assistance fi'om GL
we'll be there. All you have to do is call-toll-fi_ee!
GE Answer
Center ®
800.626.2000
Whatever yore question abom any Monogram m>!ioi appliance, GE Answer ( enler :_
in_o_marion service is available _o help. Yore call-and your question-will be answered
promptly and cou_ _eously. And you can call any time. GE Answer Cen_ev :÷service is open
24 horns a day, 7 days a week.
In-Home Repair
Service
800-444-1845
A (;E _onsumer service professional will provide exper_ repair service, scheduled a_a time
that's _onveniem for you. Many GE Consume_ Se_Tvicecompany-ope_:a_ed locations offer
you service _oday or _omo__ow, or a_yore7 convenience (7:00 a.m. to 7:00 p_m. weekdays,
9:{t{ta.m_ _o 2:{t{tp.m_ Samrdays)_ ()ul fa{ _ou-_rained _echnicians know youl applian{ e
inside and ore-so mos_ repairs {>anbe handled in,}us_ one visit.
For Customers
With Special
Needs...
800.626.2000
SECWON A-A
(;E offers, free of (barge, a brochure _o assis_ in planning a baffle>
free kitchen for persons x_ifi_lh33i_edmobili U.
Cons13meFs xki{h imDailTed heaFin_ OFspee(b who ha_e access _o a
TDD ova conventional _ele_ype_li_e_ ma_ (all 800-TDD-(;EAC
(800-833-4322) _o _eq_tes_ in_o_mafion O_"se,-vice.
Service Contracts
800-626-2224
You can have fl_e secme feeling _ha_ (;E Consm33ev Sevxi<e will still be _heve af_eFyour
wa_wamy expi_es. 1 rechase a (_E com_ac_ while )ou_ wavFamy is still in e_ec_ and you 11
vecei_ e a substantial discoum. Wifi_ a multiple-year con_vacL }ou've assured of fim3ve
Parts and
Accessories
800-626_002
lndivk]uals qualified _o ser\{ce _heir own appliances can have pa_{s or act essofies senl dhecfiy
_o fl_eh home. The GE par_s system provides access _o over 47,000 pm_s_.an(] all GE Genuine
Renewal Par_s are _k311ywar_amed. VISA, Mas_erCard and Dis(over ca_Tdsa_Tea( ( ep_ed.
User maintenance instructions contained in this guide cover procedures intended to be
performed by any user. Other se_"vlclng generMly should be referred to qualified service
personnel. Caution must be exercised, since improper servicing may cause unsafe operation.
33
YOUR ;VLONOGRAIVI CO_/IPONENT COOKTOP WARRANTY
Staple sales slip or cancelled cheek here° Prm_of original
purchase date is needed to obtain service under warranty.
WHA T IS
COVERED
FULL ONE-YEAR WARRANTY
For one yeai flom date of original pm chase,
we will provide, flee of (hmge, parts m_d
se_vk e labor in your home to repair or
rep]a( e any pa_4 9Qhe eooMop that fills
because oi _ mamff_cmring detect.
FULL FIVE-YEAR WARRANTY
(on some models) For five years from the
(late of original purchase, we will provide,
flee of charge, parts and service labor in
your home to repair or replace the glass
. Cracking (if the glass ( ooktop due to
thermal shock
. Discoloration of the glass cooktop
. Wear off of the pattern on the glass cooktop
' Cracking ()f the rubber seal between the
glass cooktop and the porcelain edge
. Burn out of any of the radiant or halogen
surf_ce units.
This warranty is extended to the original
purchaser and any suc(eeding owner fllr
products purchased for ordinary home use
in the 48 mainland states, Hawaii and
Washington, D.C. In Alaska the warranw is
the same except that it is LIMITED because
you must pay to ship the product to the
service shop or for the service technician's
travel costs to your home.
All warranty sel vice will be provided by our
Fadory Service Centers or by our authorized
Customer Care: servicers during normal
working hours.
Should your appliance need servi(e, during
warranty period or beyond, call 800-444-1845.
WHAT 1S NOT
COVERED
. Service trips to your home to teach you how
to use the product.
Read your Use and Care material.
If you. then have any questions about
opeladug the produ( t, please ((lnta(t)our
dealer or our C(lnsumer Afl_firs office at
the address below, or (;all, toll flee:
GE Answer Center ®
800.626.2000
consumer information service
'Repia( ement of' house fl_ses or resetting of
circuit breakers.
. Failure of the produ( t ifit is used for other
than its intended purpose or used
. Damage to the glass surfhce units (m_sed
bv the use of cleaners other than the
recommended cleaning cream.
. Damage to the glass star)l( e units caused
by hardened spills of sugary materials
o1 melted plasdc that are not (leaned
according to the directions in the Use
and Care Guide.
. Improper installation.
Kvou have an installation problem, contact
for providing adequate electrical gas,
exhausting and other connecting facilities
as described in the Installation Instructions
provided with the product.
. Damage to the product caused by accident,
fire, floods or acts of' God.
'r)amage to the product due to misuse
or :d)!lse.
WARIL_kNTOR IS NOT RESPONSIBLE
FOR CONSEQUENTIAL I)AMA GES.
Some states do not allow the exclusion o1 limitation ofincidental or consequential damages,
so the above limitation or exclusion may not apply to you. This warranty gives you specific
legal rights, and y(lu may also have other rights which vary fion_ state to state.
To know what your legal rights are in your state, consuh your local or state consumer af_idrs
office or your state's Attorney General.
Warrantor: General Electric Compaw. If further help is needed concerning this warranty,
write: Manager--Consumer Affairs, GE Appliances, Louisville, KY 40225
ZEW145 ZEW166 ZGW124
34 ZEW155 ZEW176 ZGW125

A_pqL I_.sI_
saaueHddv 39
!
Pl_ce
I st (lass
Letter
Stamp
Here
GenerM Electric Company
Warranty Registration Department
P.O. Box :34070
Louis_dlle, KY 40232°4070
,D

Consumer Product Ownership Registration
[) ea r (;u s_55mer:
Thank )sin for pmchashsg 5mr produc_ and d_ank you for pk_cing yore csmfidersce in us, We are proud _o
ha_e }5)!1 as _! (!lsHsmeF!
Follow these three steps to protect your new appliance investment:
After completing this
registration, write your
model and serial nmlabe_
in this guide. You will
5_eed this information
should you require
service. ()ur servk:e
mmfl)er is 800_t44-1845.
G_fide" carefully° it will
help you operate your new
appliance properly. If you
have questions, 551"need
more inli)rl'_littioi) call
the GE Answer Center ®
800.626°2000.
Important: To ensure that your product is registered, fold and mail this form. No envelope is needed.
Consumer Product Ownership Registration
@_ Product Model Serial
Component Cooktop System
v. [] ;Is. [] Mrs. [] Miss []
First _ Last
Nam eName
Stree!
Address
Apt. #
I I Zip 1 I
(;it} Sta_e _ Code
1) ire PI t(ed
_ e_5[" L_ N uI2(sl)el?l'hotle __[ | , ]__
GEAppliances
General Electric Company
Loulsville, Kentucky 40225
C{JT HERE
Louisville, KY40225
D-953-0555-000
Part No. 164D3333P077
Pub No. 49°8835
6-97 CG
Printed in the United States

