Operating Instructions
Portable 2 Burner with Trolley
Model: GBQ60

SPIDER AND INSECT WEBS
Extremely important please read
Some times spiders, ants and other insects climb into the tube burners, gas lines and other areas
of the BBQ. The insects can spin webs, build nests and lay eggs. The webs or nests can be very
small, but they are very strong and can block the flow of gas.
To avoid this occurring, clean burners prior to use, after storing, at the beginning of your BBQ
season or after a period of one month without use.
Guards are on the air intakes in an effort to reduce this problem, but it will not eliminate it. An
obstruction can result in a “flashback” (a fire in the burner tubes).
The burner may still light, but the obstruction does not allow full gas flow to the burners.
NOTE: Complications arising from spider and insect webs build up inside gas lines and tube
burners are expressly excluded from Warranty
Read Me First
Page 2

BBQ
Please read these instructions & user manual carefully.
o Take extra care when unpacking and assembling your Goldair BBQ. Some edges
may be sharp from the manufacturing process and may result in cuts if not handled
with care.
o Before attempting to assemble your Goldair BBQ, ensure all parts are correct and
contained within the box as per the components list.
o Goldair suggests laying out all components on a large flat surface and removing any
plastic or protective material before assembling your BBQ.
o If your BBQ has lockable castors ensure these are locked before attempting to
assemble otherwise the BBQ may move during assembling resulting in injury.
o Do not dispose of packaging until completely satisfied with assembly of your BBQ
Please refer to your user manual for operating instructions, further information or trouble
shooting before you call the Customer Service number listed within the user manual.
o Lid must be in open position before lighting.
o When cooking with hood closed, all burners should be on low and never exceed
maximum temperature of 250ºC (450ºF).
o Caution: hood maybe hot, avoid contact.
o Warning all surfaces are hot.
If your BBQ has any Stainless Steel please note the following:
Note: Stainless Steel will rust.
Failure to store with a BBQ cover, and to clean & maintain your BBQ regularly will result
in Stainless Steel ‘tea staining’ & rusting. Consequently it will not be covered by the
warranty.
Goldair recommends the use of stainless steel protectors & cleaners to also pro-long the
life of your BBQ.
For use with ULPG.
Please refer to your user manual.
Read Me First
Page 3
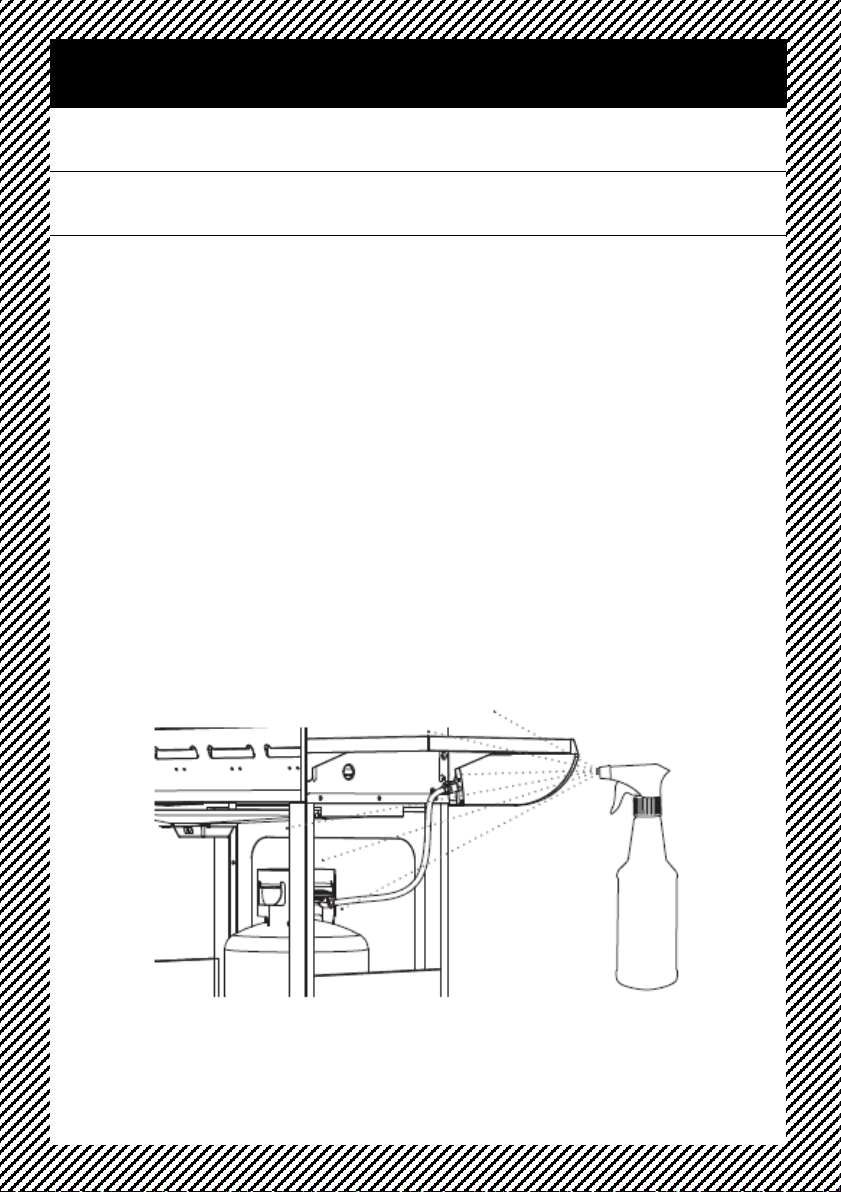
GAS LEAK TESTING
It is important that you leak test the BBQ before first use and every time the gas
cylinder is refilled and reconnected to the BBQ.
To complete a Leak Test:
• Make sure all the control knobs are OFF.
• In a small container, mix up a solution of water and detergent/soap.
Mix the solution well (about the same concentration as washing up water).
• Turn the cylinder ON by rotating the knob to the open position.
• Using a brush or spray bottle apply the soap solution to the gas line and each join in the gas
line including:
• The gas connection at the inlet of the BBQ
• The gas hose
• The gas connection at the gas cylinder
• If bubbles appear, there is a gas leak.
• If the leak is at the connection, re-tighten and re-seal.
• If the leak is anywhere else or you cannot resolve the leak by tightening the connection DO
NOT PROCEED.
• Replace gas hose and regulator.
• Replacement hose and regulators can be purchased from your local BBQ retail specialist
Read Me First
Page 4

Safety Guide
Page 5
• Do not operate this BBQ before reading the instruction booklet
• Do not place articles on or against this BBQ
• Do not use or store flammable or combustible materials, chemicals or spray
aerosols near your BBQ
• Do not operate this BBQ indoors; the BBQ is for outdoor use only
• Do not obstruct any ventilation of the BBQ
• Do not light or operate with cover on
• Never store a spare ULPG cylinder under or near your BBQ. This could cause
excess pressure to be expelled through the relief valve resulting in fire,
explosion, or severe personal injury including death
• ULPG gas is heavier than air and will collect in low areas, proper ventilation is
extremely important
• Keep the ventilation opening of the ULPG cylinder enclosure free and clear
from obstruction and debris
• Do not insert any foreign objects into the valve outlet. Damage may result,
causing a leak, possible explosion, fire, severe bodily harm or death
• Children and adults should be alerted to the hazards of high surface
temperature, burns and clothing ignition
• Never leave children unattended in the area where the BBQ is being used.
• Do not store items of interest to children around, below or in the shelf of the
BBQ
• Never allow children to sit or stand on any part of the BBQ
• Some users prefer cooking on Hotplates. You must always have at least 1 Grill
plate to ensure adequate air flow. Fully covering your BBQ will create a safety
hazard.
• PLEASE RETAIN THIS MANUAL FOR FUTURE USE
Safety Guide
Always choose a safe location for the BBQ, keeping in mind the safety precautions
outlined. Ensure all packaging has been removed from the unit before use.
NOTE
This BBQ shall only be used in an above ground
open air situation with natural ventilation,
without stagnant areas, where gas leakage and
products of combustion are rapidly dispersed by
wind and natural convection.
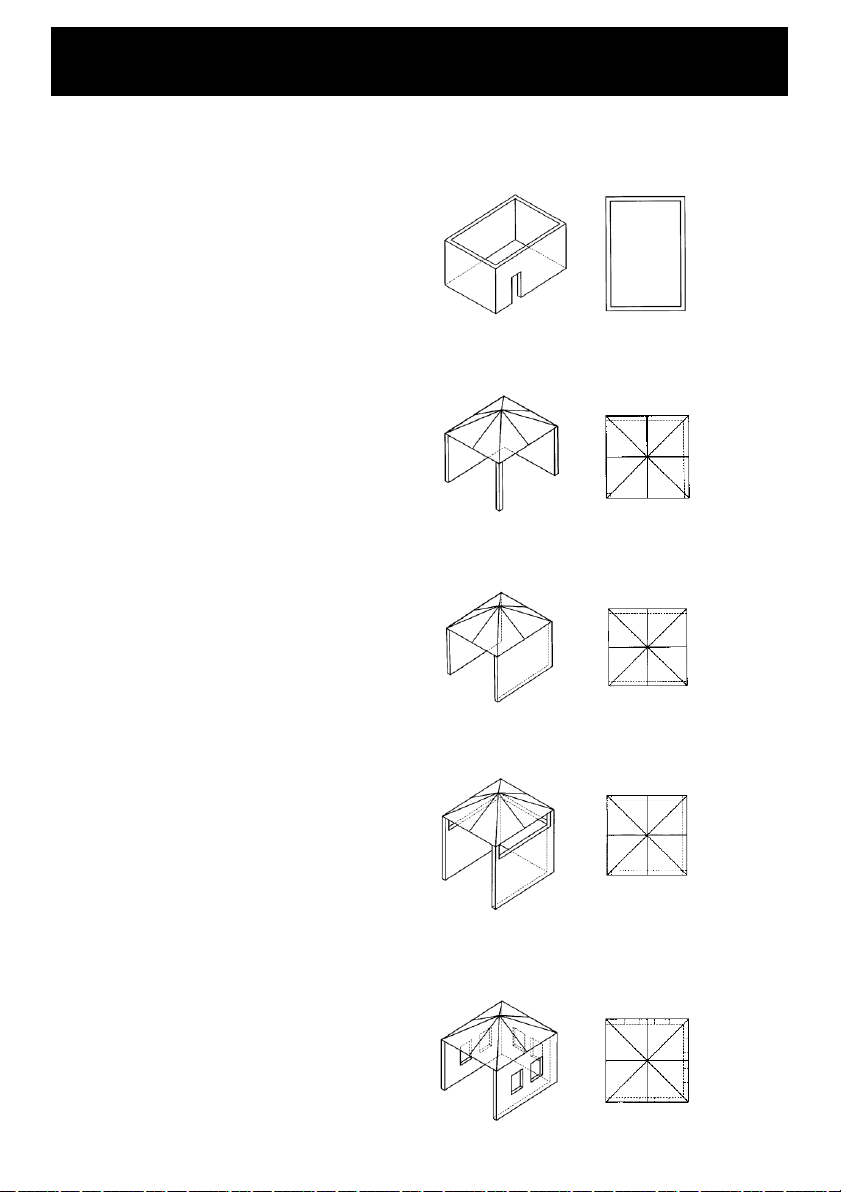
Any enclosure in which the BBQ is used shall
comply with one of the following:
An enclosure with walls on all sides, but at least
one permanent opening at ground level and no
overhead cover. (Refer to Figure 1).
Within a partial enclosure that includes an
overhead cover and no more than two walls.
(Refer to Figure 2 and Figure 3).
Within a partial enclosure that includes an
overhead cover and more than two walls, the
following shall apply:
• At least 25% of the total wall area is
completely open, (refer to Figure 4), and
• At least 30% of the remaining wall area is
open and unrestricted, (refer to Figure 5)
In the case of balconies, at least 20% of the total
wall area shall be and remain open and
unrestricted.
Figure 1 - Enclosure with walls on all sides but no
overhead cover
Figure 2 - Partial Enclosure with overhead cover and
no more than two walls
Figure 3 - Partial Enclosure with overhead cover and
no more than two walls
Figure 4 - Open side at least 25% of total wall area.
30% or more in total of the remaining wall area is
open and unrestricted.
Figure 5 - Open side at least 25% of total wall area.
30% or more in total of the remaining wall area is
open and unrestricted.
Page

Safety Guide
A strong gas smell or hissing sound of escaping gas indicates a serious problem with the BBQ or
ULPG cylinder. Failure to immediately follow the steps listed below could result in a fire or
explosion that could cause serious injury, death or property damage.
• Shut off gas supply at cylinder
• Turn the control knobs of the BBQ to the off position
• Extinguish any open flame
• Open the BBQ hood
• Get away from the ULPG cylinder
• Do not try and fix the problem yourself
• If gas odour continues or you cannot extinguish fire, call fire brigade
To prevent fire and smoke damage, remove all packaging material before operating BBQ.
HOSE ASSEMBLY AND SAFETY
A leak test (Procedure located on Page 2 of this manual) must be carried out prior to using the BBQ
for the first time and each time the gas cylinder is refilled, or each time the gas hose and gas
regulator have been disconnected. Check all gas hose and line connections for damage, cuts or
cracks each time you use the BBQ.
If the hose shows signs of deterioration or damage, complete a leak test to identify any leaks
and if required replace the hose.
The hose must remain free of kinks and sharp bends. Never puncture or put stress on the hose
or fittings. Hose connection is located at the lower front area on the right side wall of the main
body of the BBQ.
Replacement hose and regulators can be purchased from your local BBQ retail specialist. Leak
Test procedure is located on Page 2 of this manual.
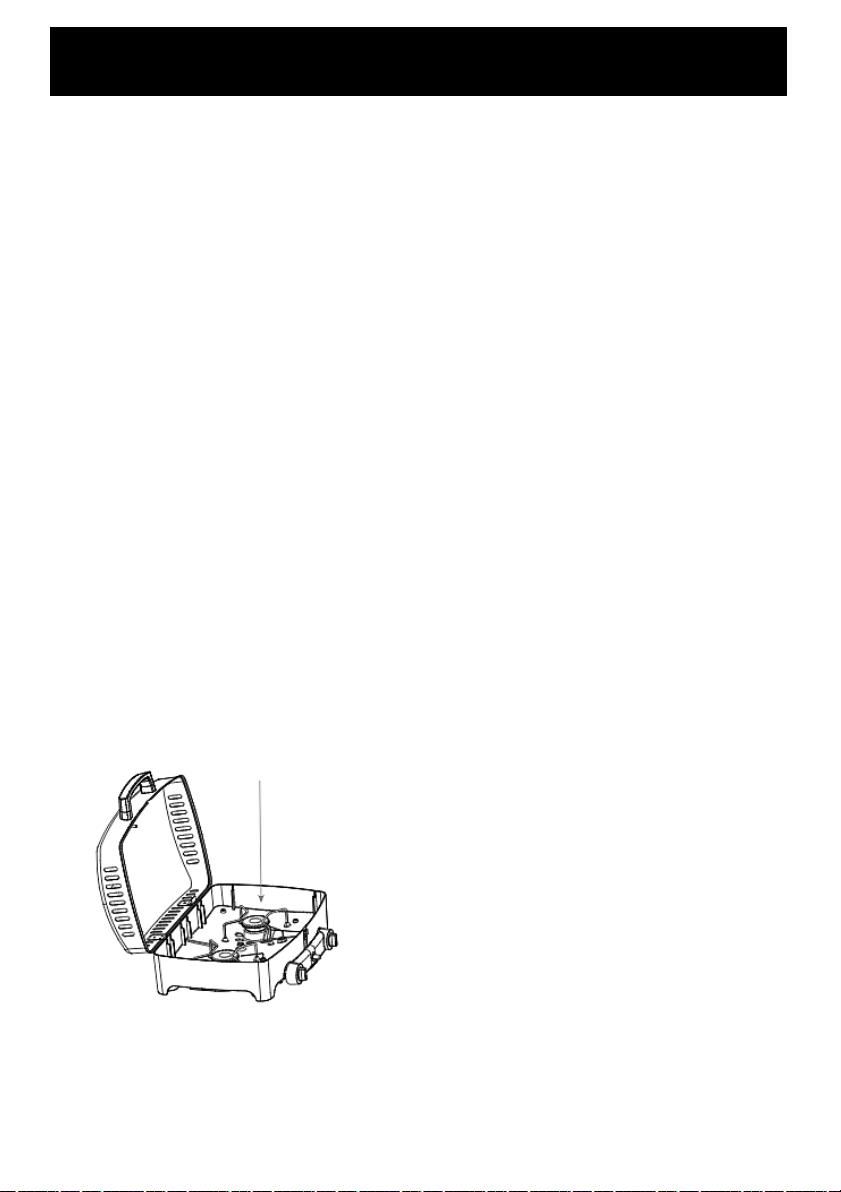
BURNERS
The location of the tube burner to the jet is vital for safe operation. Check to assure the jets are
inside the burner tubes before using the gas BBQ
Page 7
GAS CYLINDER INFORMATION
1. This BBQ is designed to be used with a gas cylinder not exceeding 9KG.
2. The gas cylinder supply valve must be turned off when the BBQ is not in use.
3. Gas cylinders must be stored outdoors, out of reach of children and must not be stored in a
building, garage or any other enclosed area.
4. The gas cylinder used must incorporate a safety collar to protect the valve assembly.
5. Never store a spare cylinder under the BBQ shelves or inside the trolley housing. Any ULPG
cylinder not attached to the BBQ for use should be stored outdoors and well away from the
BBQ.
IMPORTANT
1. When disconnecting and removing the gas cylinder for the purpose of refilling, always follow
these procedures.
2. Ensure that all gas control valves on the BBQ and the gas cylinder are turned off before
disconnecting the regulator from the cylinder.
3. Do not smoke or use a naked flame near the BBQ or gas cylinder while disconnecting the gas
line between the BBQ and gas cylinder.
4. Remove the gas cylinder from the enclosure before disconnecting the regulator from the BBQ.
5. Tighten all connections before placing the gas cylinder back in to place.
6. The gas leak testing procedure should be conducted every time the gas cylinder is refilled and
reconnected to the BBQ prior to using the BBQ (Procedure located on Page 2 of this manual).
Safety Guide
For safe use of your BBQ and to avoid serious injury:
DO NOT let children operate or play near the BBQ.
KEEP BBQ area clear and free from materials that burn.
DO NOT block holes in bottom or back of BBQ.
Check burner flames regularly.
Use BBQ in well-ventilated space. NEVER use in enclosed spaces such as a carport, garage, porch,
covered patio, etc.
DO NOT use charcoal or ceramic briquettes in a gas BBQ.
Warning
Page 8
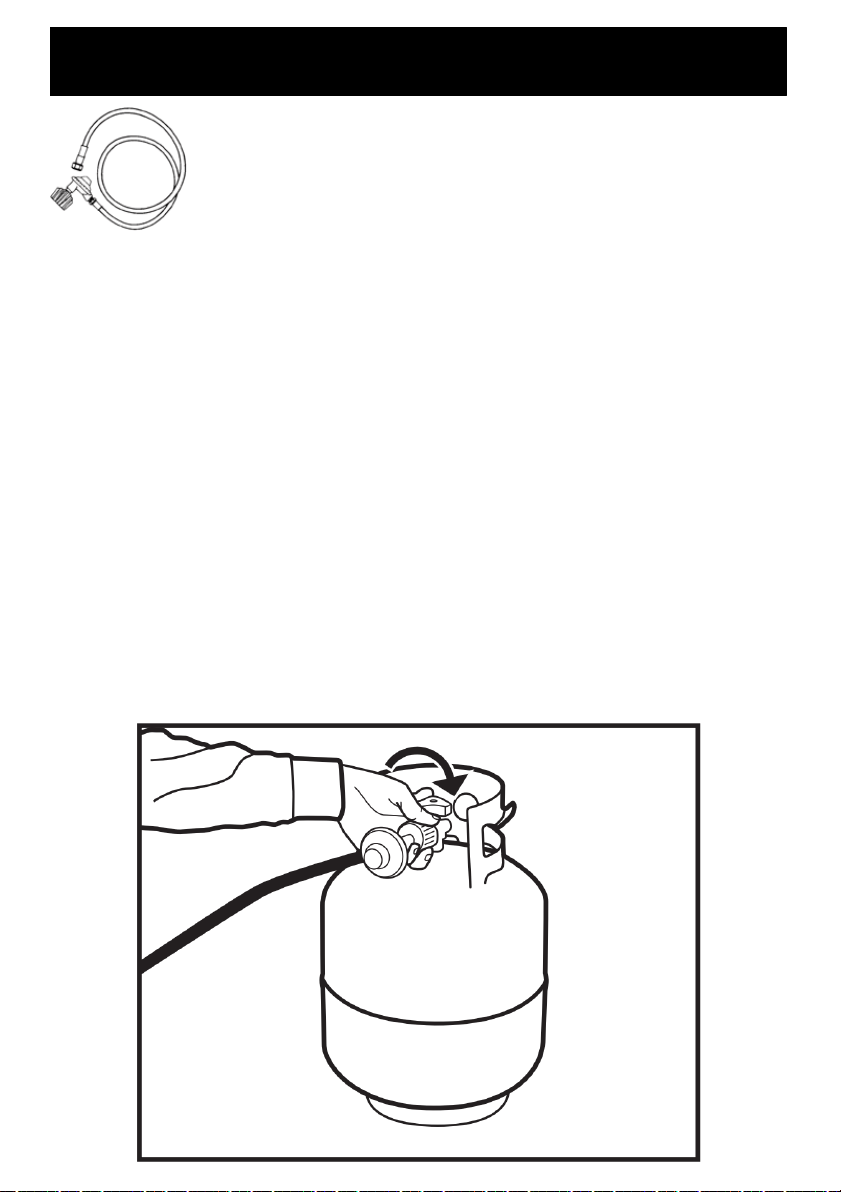
REGULATOR CONNECTION
1. Check that all control knobs are in the ‘Off’ position.
2. Make sure the cylinder valve is off.
3. Remove the protective cap from the cylinder, if present.
4. Leak test the connection with a soapy water solution (Procedure located on Page 3 of this
manual)
NOTE
1. Never use a rusty or dented gas cylinder with a damaged gas valve
2. Never fill the gas cylinder beyond 80% capacity
3. Always have the gas cylinder filled by an authorized ULPG supplier
4. If you have any questions concerning assembly or operation, consult your dealer or ULPG Gas
Company.
5. When used always place the BBQ and cylinder on flat level ground.
6. You will need to have the ULPG cylinder serviced or replaced every ten years. The date of the
last service should be stamped on the neck of the bottle.
7. Always use a spanner to tighten all gas fittings.
Safety Guide
Page 9

• Do not leave food unattended on the BBQ.
• In case of a fat fire turn gas off at cylinder immediately.
• Particular care must be taken when removing the fat drip tray. Hot fat can cause serious
burn injuries.
• Proper clearance from combustible materials must be maintained at all times. The
minimum clearances is as follows: Side: 1 metre Rear: 1 metre Ceiling: 1 metre
• Turn off all gas valves including cylinder after use.
• Do not allow build up of unburned gas.
• Cool the BBQ before replacing the lid or cover.
• Accessible parts maybe very hot. Always keep children away from the BBQ.
• Always wear protective gloves when handling hot components.
• Never lean over BBQ when lighting.
• Never use BBQ with any cover on.
• Never dismantle control valves.
• Never modify the construction of the BBQ or the size of any burner, injector orifice or any
other components. This will void your Warranty.
• Never move the BBQ during use.
• The use of unauthorised parts will void your Warranty and can create an unsafe
environment and conditions of use.
• Never use charcoal or any other solid fuel in this BBQ.
• Never disconnect any gas fittings while the BBQ is in use.
• In the event that a burner goes out and gas escapes, turn off the burner knobs, open the
BBQ hood fully and let it air out. Wait 5 minutes before attempting to relight the BBQ.
• Never let clothing, pot holders or other flammable materials come in contact with or close
to any grill, burner or hot surface until it has cooled. Fabric may ignite and result in personal
injury. Certain materials or items, when stored under or near the BBQ, will be subjected to
radiant heat and could be seriously damaged.
• Clothing or other combustible materials should not be hung from the BBQ, or placed on or
near the BBQ. Combustible materials are considered to be wood, compressed paper, plant
fibres, plastic or other materials capable of being ignited and burned.
Safety Guide
Page 10
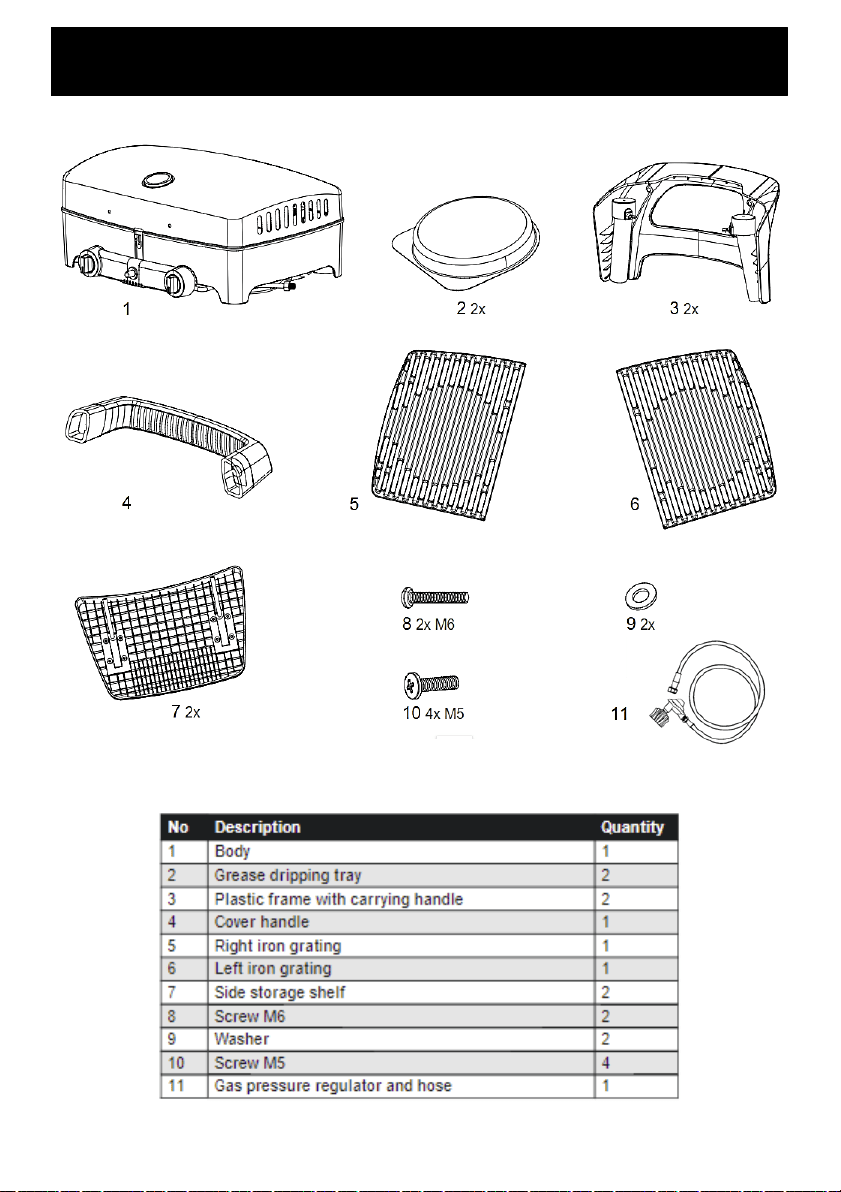
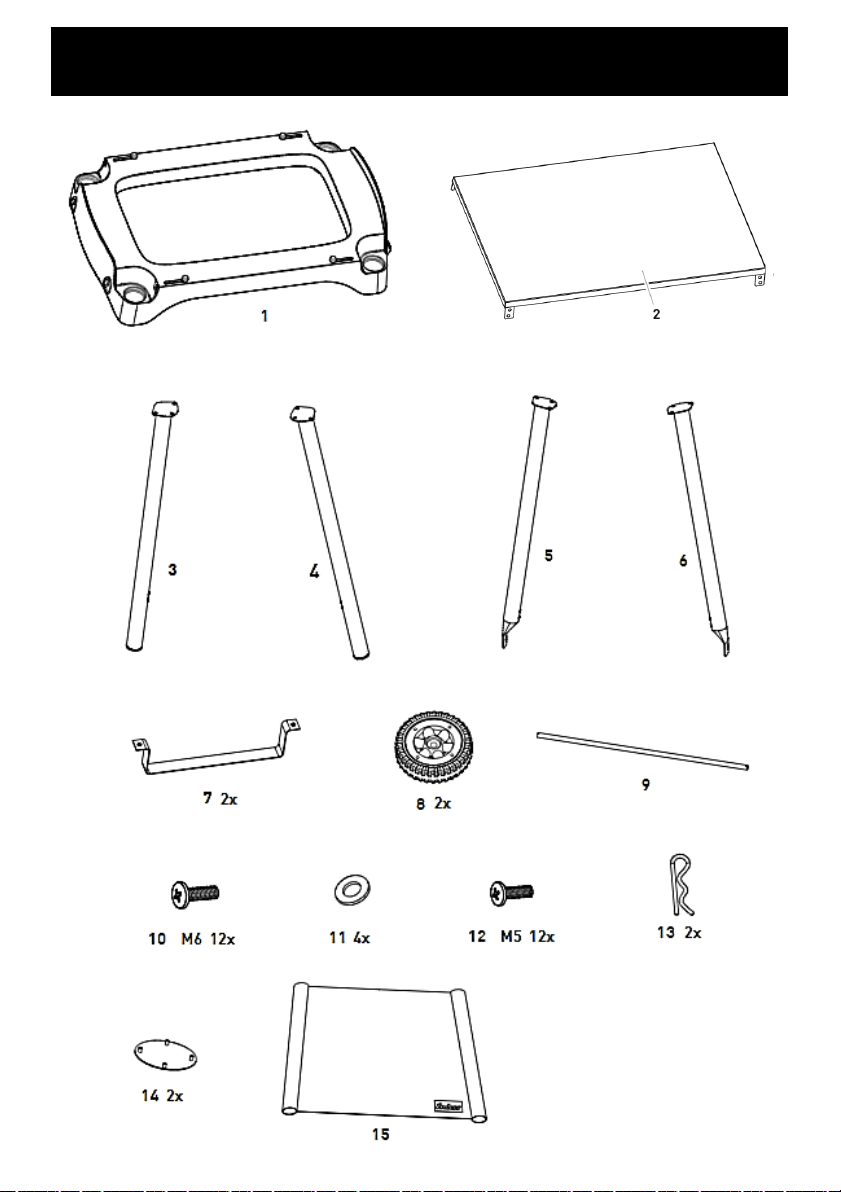
Parts Diagram
Page 11
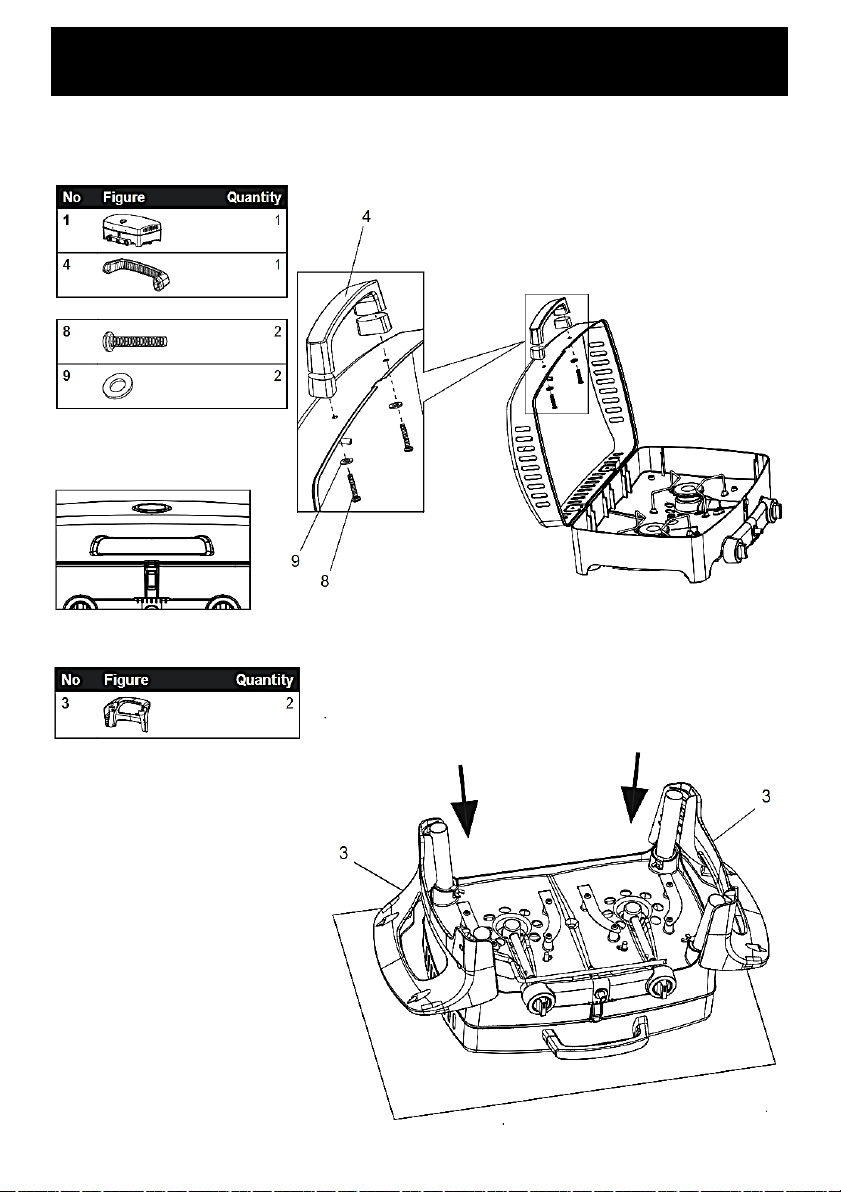
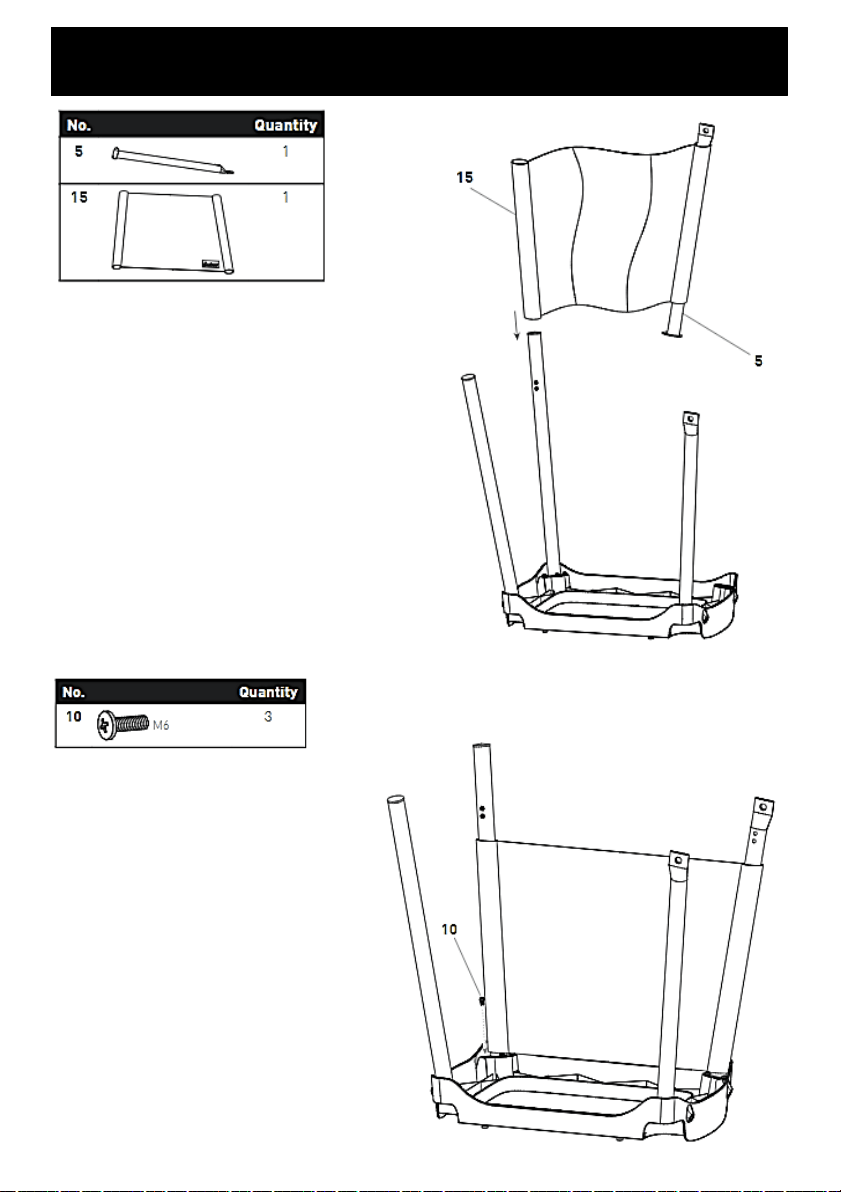
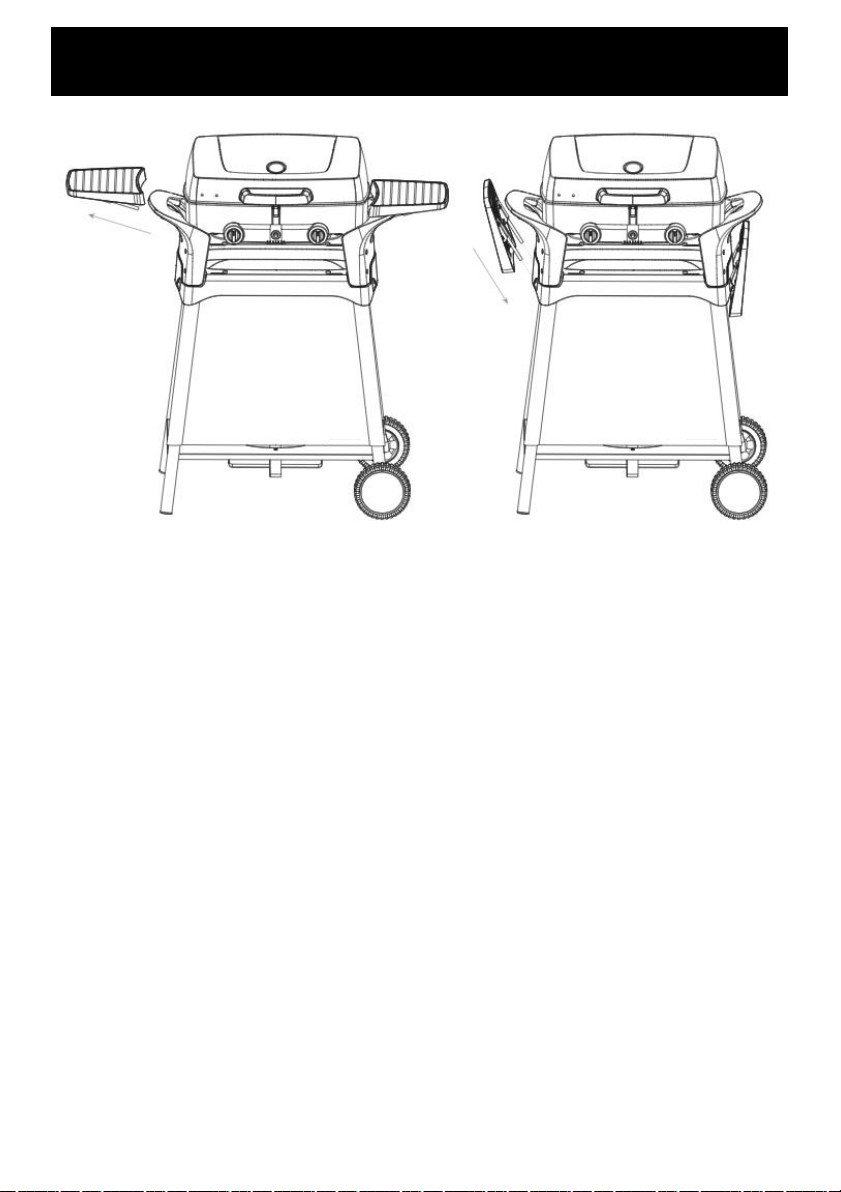
Assembly Procedure
Note: Tools required for assembly - 1 x adjustable spanners, 1 x medium Philips
screwdriver.
Page 12
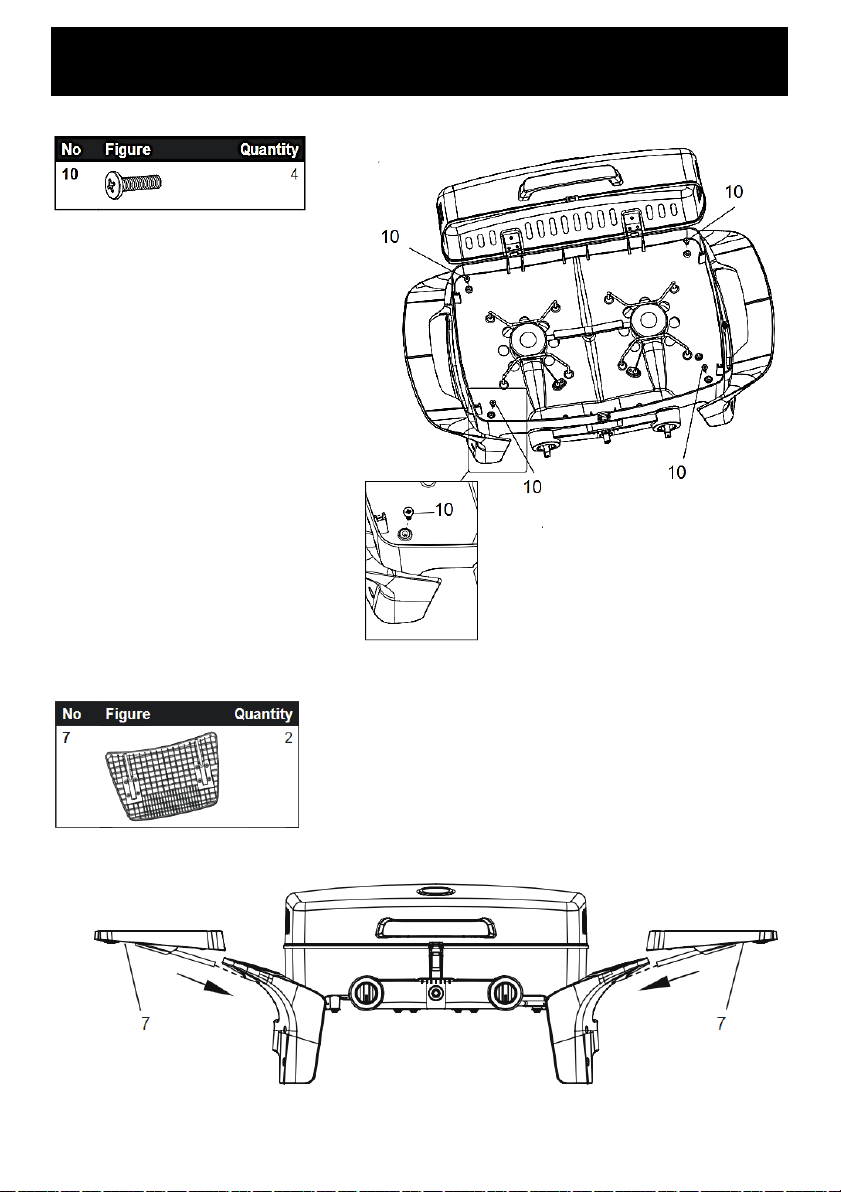
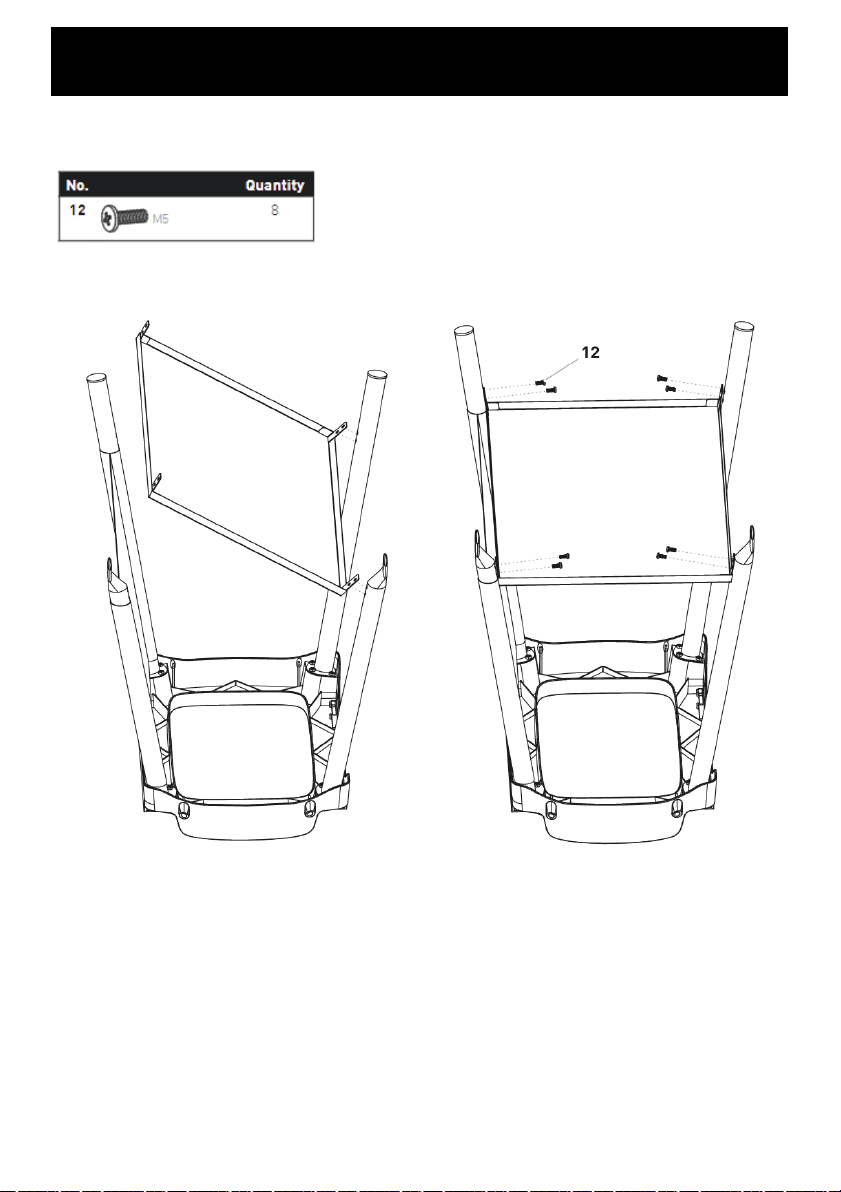
Assembly Procedure
Page 13
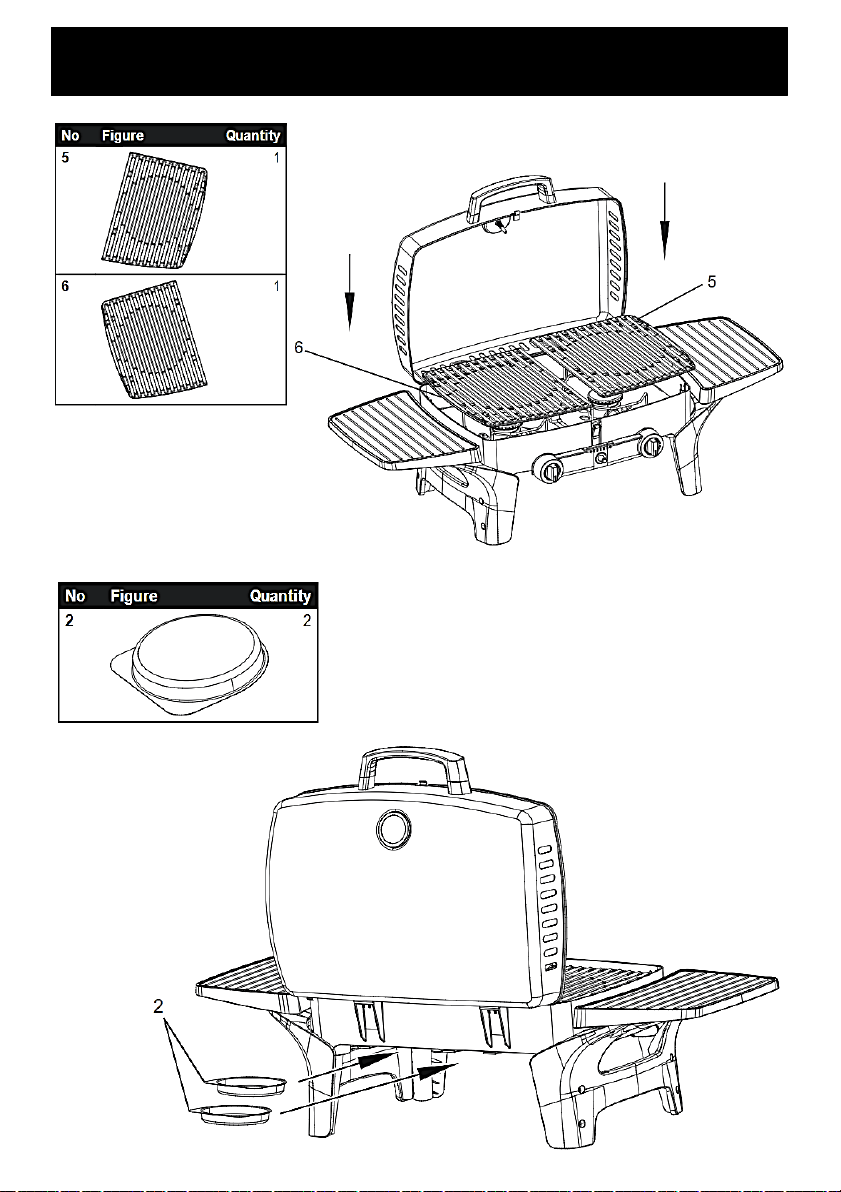
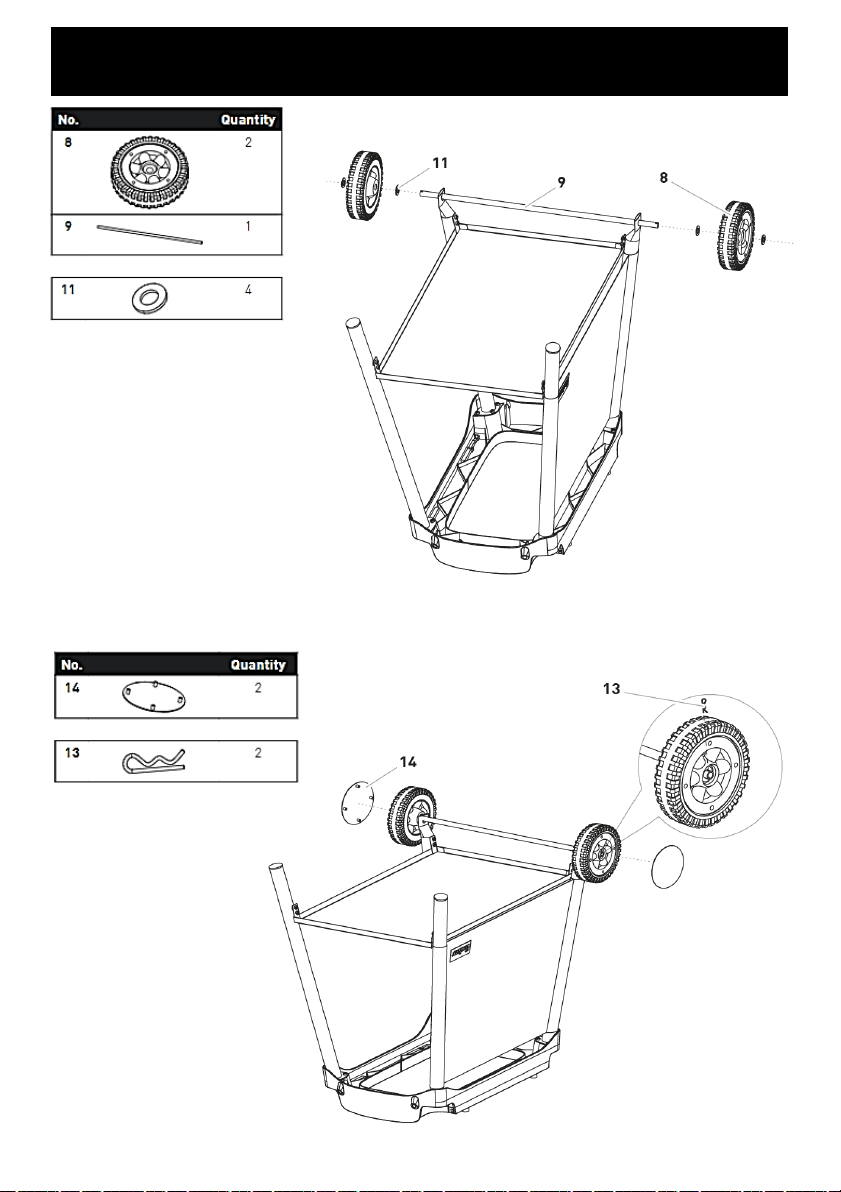
Assembly Procedure
Page 14

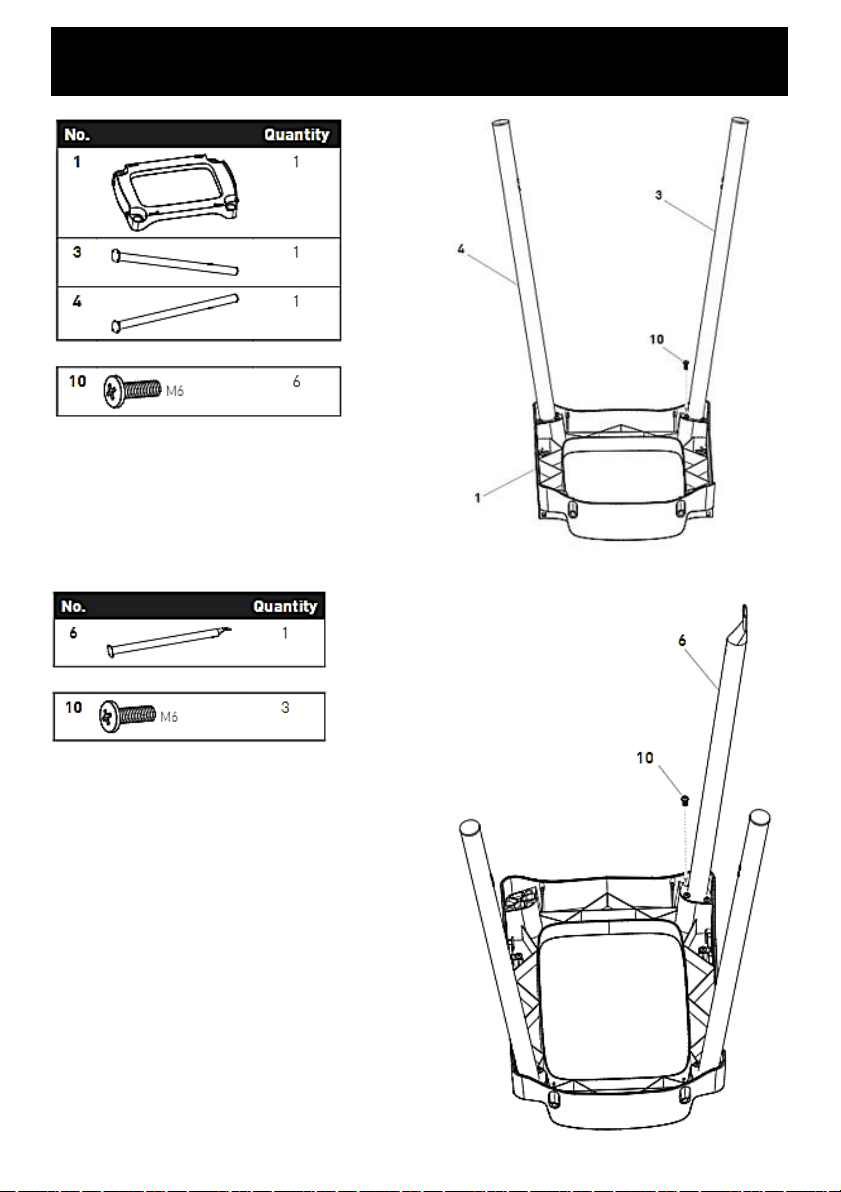
Assembly Procedure
Page 15
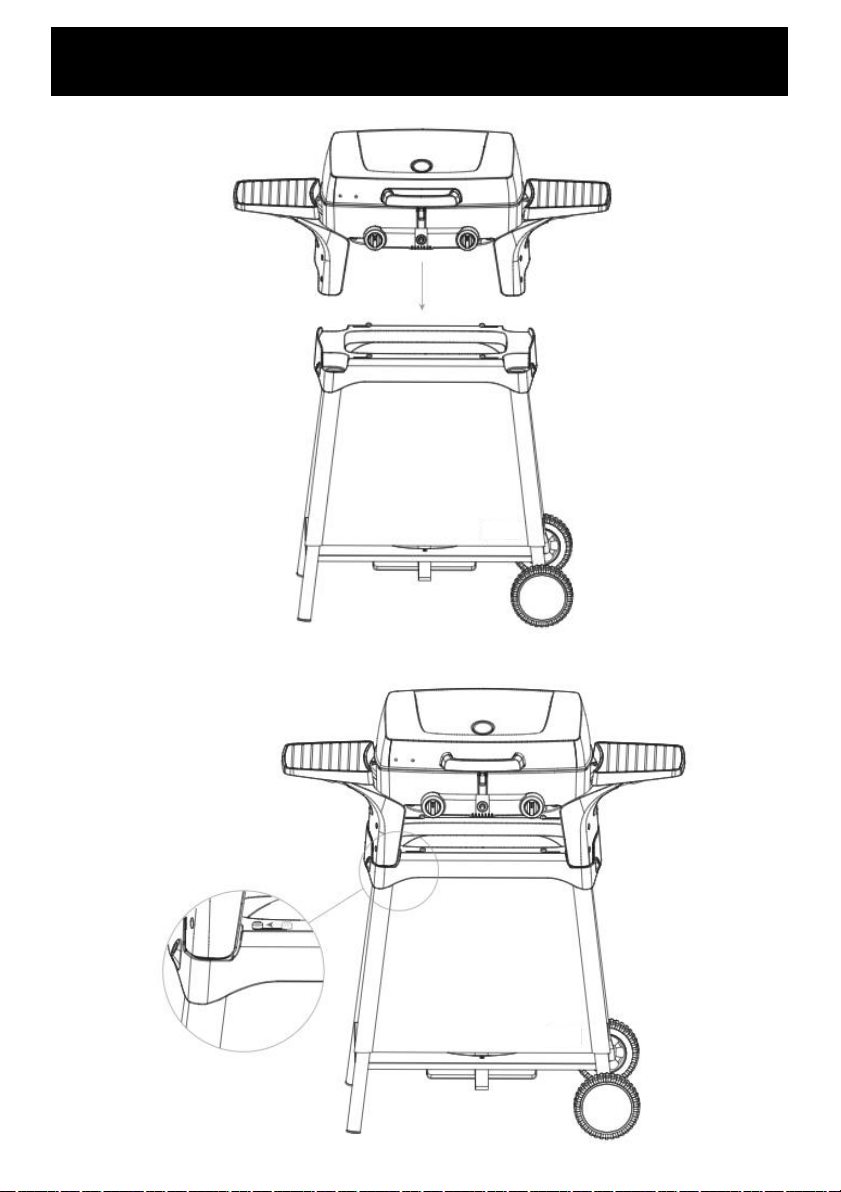
Assembly Procedure
Page 16
Assembly Procedure
Page 17
Assembly Procedure
Page 18
Assembly Procedure
Page 19
Assembly Procedure
Page 20
Assembly Procedure
Page 21
Assembly Procedure
Page 22

• Never leave burners on high for more than 10 minutes unless actually cooking. If the burner
makes hissing sounds when lit, it may be burning inside. Turn burner off, allow it to cool and
try again.
• Close the gas cylinder valve after each use.
• Never use plastic or glass utensils on the BBQ.
• Never use the BBQ in strong winds.
• Never lay the gas cylinder down (always keep upright).
• Never allow the flexible gas supply hose or any electrical cord to come in contact with any
heated surface of the BBQ.
• Never lean heavily on the side shelves of your BBQ or attempt to transport your BBQ by
lifting it from the side shelves.
• Before you start cooking for the first time, clean the BBQ thoroughly with hot soapy water.
This is necessary to remove residuals and solvents, oil and grease, which may have remained
from the manufacturing process. The hotplate and grill should be thoroughly cleaned in the
same manner.
Operating your BBQ
Page 23
Operating your BBQ
Page 24
Before using the BARBECUE for the first time, allow the burners to burn for 15 minutes with the
lid closed without any food so as to remove preservation deposits.
This can produce a slight smell but it is nothing to be concerned about.
Make sure there is sufficient ventilation.
The colour inside the BARBECUE can change slightly. However this is a natural process and is no
reason for concern.
1. Open the lid on the grill.
2. The burners can be lighted independently of one another.
3. Ensure burners knobs are in the OFF position.
4. Press one of the control buttons and turn it anti-clockwise to the highest position.
5. Press the piezoelectric igniter. The burner ignites.
6. If the burner does not ignite, repeat this step 3–4 times.
7. WARNING: If the burner does not ignite, turn the control button clockwise to the OFF
position and close the valve of the gas canister.
8. Wait for 5 minutes and then begin with step 4.
9. When the one burner has ignited, repeat step 4 to ignite the other burners.
10. Regulate the heat by turning the control button to any setting between the highest level
and the lowest level.
To turn off the barbecue, close the valve on the gas cylinder and turn all control buttons to the
OFF position.
Note: ‘Blowback’ is a situation where the flame burns inside the burner, towards the front. It
can be recognised by a sharp roaring sound coming from the burner. It is not dangerous unless it
is allowed to persist. If this occurs, simply turn the burner off, wait a few seconds then relight.
In order to use the barbecue as a cooker, simply remove the two grill racks.
The recommended saucepan sizes have a minimum diameter of approx. 16 cm and a maximum
diameter of approx. 20 cm.

Before first use - Curing the cast iron
During manufacturing, the cooking surfaces (plates and grills) were coated with a non-toxic paint.
If paint is missing in small areas this is not a fault. This paint will come off completely over time.
Its purpose is to help protect your BBQ during transport and storage. Coat the top of the
hotplates and grills with canola oil or something similar. Light the BBQ as described earlier.
Leave the BBQ with all burners on low for about 30 minutes. Paint may come off at this time.
Now clean the surfaces with water and a brush.
Be careful of steam coming off the cast iron surface while doing this. The hotplates and grills are
now cured and ready for use. This process only needs to be done the first time you use the BBQ.
For on-going protection of the cooking surfaces, follow the procedures in the ‘Maintenance’
section of this manual.
Controlling flare up
Flare-ups are sudden bursts of flame that come up over the top of the grill. They are caused by
natural cooking juices from your food falling onto the flame tamer and then burning.
A little bit of flare-up, as well as the resulting smoke, is a good thing. It’s what gives BBQ’d food
that unique outdoor flavour. But if it happens too often, or if the flame last more than a couple of
seconds, your food will char, so you need to control it.
First of all, cooking very fatty foods will cause a lot of flare up. You should trim excess fat off your
meat. Also, excess flaring usually means your controls are up too high. Try turning them down.
Finally, moving the meat away from flaring will help reduce the problem. Some really fatty foods
can only be cooked on the hotplate.
Turning off
When you’ve finished cooking, leave the burner controls on high for a maximum of 5 minutes to
burn off excess grease from the flame tamer, the burner and other surfaces. To turn the BBQ off,
it is best to turn the cylinder off first, and allow the gas left in the hose to burn off. This will only
take a couple of seconds. Then turn off all burner controls. If your BBQ is connected to piped
ULPG, you can simply turn the burner controls off. It’s okay to leave the cylinder connected to
your BBQ while it’s not in use.
Note: Failure to follow these shutdown procedures correctly can lead to a hazardous condition.
Operating your BBQ
Page 25

Cooking with your BBQ
Page 26
PREHEATING THE BARBECUE
Before starting the actual grilling, it is important to preheat the barbecue sufficiently. For this, follow
the step in this manual to ignite the grill, then close the cooking lid and preheat the grill. The
preheating duration at full power takes approx. 10-15 minutes, depending on external influences
such as e.g. temperature and wind. Then you can enjoy the benefits of the appliance. Enjoy the
advantages of the iron grating (it stores the heat perfectly and distributes it equally; impressive
branding of barbecued food).
DIRECT GRILLING
During direct grilling, the food is cooked directly over the gas burner/flame. First switch both burners
to full power and close the cooking lid to preheat the rack to the right temperature. Then position
your food on the rack and set the burner to the desired heat.
Due to the high temperatures generated at the rack, this barbecue is ideally suitable for searing meat
that is cooked within a short time - for instance steaks, sausages or lamb chops. The searing of the
meat surface causes roasting aromas to arise, which caramelise sugar on the surface while the food
inside cooks and stays juicy.
Direct grilling is of course also suitable for the preparation of chicken breast, fish fillet, seafood and
vegetables.
You can choose two kinds of direct grilling. During direct grilling, food is cooked on the barbecue at
higher temperatures and different temperatures with the lid open.
Direct grilling is also possible with the lid closed, thus reducing cooking time.
Thanks to the temperature indicator you can regulate the temperature accordingly.
During the cooking process, you should only open the lid to turn the food over or check whether it is
done.
BAKING/INDIRECT GRILLING
For indirect grilling your BBQ is simply converted into an oven.
Indirect grilling is suitable above all for larger pieces of meat that need to be cooked at
moderate temperature, e.g. roasts, ribs or whole poultry items.
During indirect grilling, the food is positioned above the switched off burner to make use of the
indirect heat. The other burner is heated, so that the food is evenly cooked at low/moderate heat
over a longer period of time underneath the lid.
The food is therefore kept away from the direct heat and is gently cooked or grilled.
Of course, other dishes can also be cooked using the baking function: A crispy pizza, or your first
home-made bread can be prepared using the BBQ. These are all cooked with the lid closed, just as in
a conventional oven, so that convection heat is generated.
You can increase this experience even further by using a pizza stone. For this, please preheat the
pizza stone for approx. 10 -15 minutes at about 180 -200 degrees before cooking your pizza or other
pastries.
COOKING
Also use your BBQ as a practical cooker and prepare your soups, sauces or side dishes freshly on the
camping site, balcony or patio. You can use the cooker in only a few steps. Take off the grill rack; put
the saucepans (max. diameter 20 cm) onto the saucepan racks, set the regulator buttons to full
power and off you go.
The burners are protected against wind due to the special design of the housing. However, you
should still make sure that the appliance is positioned in a place protected from the wind as far as
possible.

• Do not perform any repair or servicing on the BBQ yourself. This includes internal
adjustment of the regulator and gas valves. This must only be carried out by authorised
technicians. Your BBQ should be serviced annually by a certified gas service agent.
• Clean the drip tray regularly.
• “Burning off” the BBQ after every use (for approx 15 minutes) will keep excessive food
residue to a minimum.
• The pressure regulator and hose assembly supplied with the BBQ must be used.
Replacement pressure regulator and hose assembly must be those specified by the
manufacturer. Replacement parts may be obtained from the manufacturer or your local BBQ
retail specialist.
• Storage of this BBQ indoors is permissible only if the cylinder is disconnected and removed
from the BBQ.
• Please note that the Goldair BBQ Cover (if supplied with this model) is not covered under
your Warranty. The BBQ is for portable outdoor use and is not intended for permanent
installation or installation in vehicles or boats.
Storing your BBQ
Your BBQ is designed to be used outdoors. However, just like a car, you will prolong the life of
the BBQ if you store it out of direct exposure to the elements when not in use.
This can be done in many ways including the use of a waterproof cover. These are available from
most BBQ retailers.
BBQ Covers
All BBQ’s must be stored with a BBQ cover when not in use (regardless of whether the BBQ is
stainless steel or powder coated) as per the Warranty. After use, allow your BBQ to cool
completely before fitting the cover (the BBQ cover may melt or burn if placed onto a hot BBQ).
Also condensation can occur when the BBQ cools down under the cover which can foster rust
growth. Please note, a cover can foster a “micro-environment” where moisture, salts and fat
deposits can develop when stored for long periods of time (typically this will occur during the
Winter months when your BBQ is not used). During these longer periods of non-use a BBQ can
develop stains and/or rust marks. It is important to check regularly (monthly) for any signs of
these stains/rust and clean if needed. If surface stains and rust are left, over time they develop
and can become very hard to remove, this is expressly excluded from your Warranty.
• Move the BBQ to a covered location. If you are storing it in a closed room (eg shed or garage)
you should keep the cylinder away from any other cylinders or any cars, boats, motorcycles
or any other petrol engines.
• If you don’t intend to use it for a few months, lightly spray all the surfaces with canola oil.
This will help protect against corrosion.
Rust on your BBQ from lack of protective agents or misuse are expressly excluded from
Warranty.
Maintenance
Page 27

On-going Maintenance
Your BBQ requires regular maintenance (interior and exterior). The use on a BBQ cover in
conjunction with the instructions below will help to ensure it remains in proper working order
and maintains its appearance.
Powder Coated BBQ’s
Overtime grease, fat and other cooking oils may build up on your BBQ. To clean, wash with
warm/hot soapy water. Wash off soapy water with warm/hot clean water, leave to air dry in the
sun if possible. Once dry, use a BBQ exterior cleaner, this will apply a protective coating on the
exterior of the BBQ and assist in repelling the elements. Always you use a soft cloth to clean your
BBQ.
Never use abrasive heavy duty sponges or scouring pads on the exterior of your BBQ, these
products will begin to remove the powder coated finish resulting in an uneven surface and may
result in rusting in the future.
Interior:
Plates and Grills
The best way to clean your BBQ plates/grills is to light-up the BBQ and leave it on with the hood
down to warm-up for 10-15 minutes. After this time, remove excess fat, oils, cooking residue
with paper towels or a cotton rag from plates/grills then take a long handled brush and a scraper
and remove remaining oil and food scraps. You should use an oven mitt to avoid burning
yourself This can also be completed after each time you use your BBQ.
Depending on how often you use your BBQ you should also wash your plates/grills bi-monthly.
After you have completed the steps above and have allowed time for the BBQ to cool, remove
the plates/grills and wash with warm/hot soapy water. Wash off soapy water with warm/hot
clean water, leave to air dry thoroughly and then lightly coat the plates/grills with canola oil
before placing back into the BBQ.
Burners
Over time fat, marinades, juices, etc. can build-up and cover the port holes in your burners. This
reduces gas and flame flow and may result in fires within the BBQ during cooking. Leaving the
burners on for a maximum of 5 minutes with the hood open after you’ve finished cooking will
remove most of this. However, you should check the burners periodically for any sort of blockage.
In particular, you should ensure that the aeration vents are free of insect nests and spider webs.
To clean the burners, let them cool down, then remove and inspect them. If any of the holes are
clogged, gently tap the burner onto a hard surface to remove residue. Use a wire brush to unclog
the holes. Then lightly coat the burners with canola oil for on-going protection
Maintenance
Page 28

Problem Possible Cause Prevention/Solution
Burner(s) will not
light using ignition.
Wire and/or electrode covered
with cooking residue.
Electrode cracked or broken
"sparks at crack”.
Electrode tip not in proper
position.
Wires are loose or disconnected.
Wires are shorting (sparking)
between ignition and electrode.
Dead battery.
Clean wire and/or electrode with rubbing
alcohol and clean swab.
Replace electrode(s).
Reconnect wires or replace electrode/wire
assembly.
Replace ignition wire/electrode assembly.
Replace with a new AA battery.
Burner(s) will not
Light using match
stick.
No gas flow.
Coupling nut and regulator not
fully connected.
Obstruction of gas flow.
Disengagement of burner to valve.
Is grill assembled correctly?
Check to see if ULPG tank is empty. If ULPG
tank is not empty, refer to "Sudden drop in
gas flow".
Turn the coupling nut until solid stop.
Clear burner tube(s).
Reengage burner and valve.
Check steps in assembly instructions.
Sudden drop in
gas flow or low
flame.
Out of gas.
Excess flow valve tripped.
Check for gas in ULPG tank.
Turn off knobs, wait 30 seconds and light grill.
If flames are still low, turn off knobs and
ULPG tank valve. Disconnect regulator.
Reconnect
regulator and leak test (Procedure located on
Page 2 of this manual). Turn on ULPG tank
valve, wait 30 seconds and then light grill.
Flames blow out. High or gusting winds.
Low on ULPG gas.
Excess flow valve tripped.
Turn front of grill to face wind or increase
flame height.
Refill ULPG tank.
Refer to "Sudden drop in gas flow" above.
Flare-up. Grease buildup.
Excessive fat in meat.
Excessive cooking temperature.
Clean grill.
Trim fat from meat before grilling.
Adjust (lower) temperature accordingly.
Persistent grease
fire.
Grease trapped by food buildup
around burner system.
Turn knobs to OFF. Turn gas off at ULPG
tank. Leave lid in position and let fire burn out.
After grill cools, remove and clean all parts.
Flashback
(fire in burner
tube(s).
Burner and/or burner tubes are
blocked.
Turn knobs to OFF. Clean burner and/or
burner tubes.
Troubleshooting
Page 29

Problem Possible Cause Check Procedure Prevention/Solution
No sparks appear at
any electrodes when
ignition button is
pushed; no noise can
be heard from spark
module.
Not installed properly. Check battery orientation Install battery (make sure
that “+” and “-”
connectors are oriented
correctly, with “+” end up
and “-” end down.
Dead battery Has battery been used
previously?
Replace battery with new
AA-size alkaline battery.
Button assembly not
installed properly.
Check to ensure threads
are properly engaged.
Button should travel up
and down without
binding.
Unscrew button cap
assembly and reinstall,
making sure threads are
aligned and engaged
fully.
Faulty spark module. If no sparks are
generated with new
battery and good wire
connections, module is
faulty.
Replace spark module
assembly.
No sparks appear at
any electrodes when
ignition switch is
pushed; noise can be
heard from spark
module.
Output lead connections
not completed.
Are output connections
on and tight?
Remove and reconnect
all output connections at
module and electrodes.
Sparks are present
but not at all
electrodes and/or not
at full strength.
Output lead connections
not complete.
Are output connections
on and tight?
Remove and reconnect
all output connections at
module and electrodes.
Arcing to grill away from
burner(s)
If possible, observe grill
in dark location. Operate
ignition system and look
for arcing between output
wires and grill flames.
If sparks are observed
other than from burner(s),
wire insulation maybe
damaged. Replace wires.
Electrodes are wet Has moisture
accumulated on
electrode and/or in
burner ports?
Use paper towel to
remove moisture.
Electrodes cracked or
broken “sparks at crack”
Inspect electrodes for
cracks.
Replace cracked or
broken electrodes.
Troubleshooting-Electronic Ignition
Page 30
Thank you for purchasing this Goldair product. Your product is warranted against faults and manufacture when used in normal
domestic use for a period of one year. In non-domestic use Goldair limits the voluntary warranty to three months.
Goldair undertake to repair or replace this product at no charge if found to be defective due to a manufacturing fault during the
warranty period.
This warranty excludes damage caused by misuse, neglect, shipping accident, incorrect installation, or work carried out by anyone
other than a qualified electrical service technician.
PLEASE KEEP YOUR RECEIPT AS THIS WILL HELP VERIFY YOUR WARRANTY.
The benefits given to you by this warranty are in addition to other rights and remedies available to you under law in relation to the
goods or services to which this warranty relates.
In Australia, our goods come with guarantees that cannot be excluded under the Australian Consumer Law. You are entitled to a
replacement or refund for a major failure and compensation for any other reasonably foreseeable loss or damage. You are also
entitled to have the goods repaired or replaced if the goods fail to be of acceptable quality and the failure does not amount to a
major failure.
In New Zealand this warranty is additional to the conditions and guarantees of the Consumers Guarantee Act (1993).
One Year Warranty
Goldair One Year Warranty (IMPORTANT: Please complete and retain this warranty card)
Name
Address
Place Of Purchase Date of Purchase
Name Of Product Model Number
Attach a copy of the purchase receipt to this warranty card
Due to continual design improvements, the product illustrated in this User Manual may differ slightly from the actual product.
Goldair – New Zealand
CDB Goldair
PO Box 100-707
N.S.M.C
Auckland
Phone +64 (0)9 917 4000
Phone 0800 232 633
www.goldair.co.nz
Goldair – Australia
CDB Goldair Australia Pty
PO Box 574
South Morang
Victoria, 3752
Phone +61 (0)3 9365 5100
Phone 1300 GOLDAIR (1300 465 324)
www.goldair.com.au

Goldair – New Zealand
Monday – Friday 8am-5pm
Phone +64 (0)9 917 4000
Phone 0800 232 633
Goldair – Australia
Monday – Friday 8am-5pm
Phone +61 (0)3 9365 5100
Phone 1300 465 324
SUPPORT AND TECHNICAL ADVICE
TECHNICAL SPECIFICATION
Model No: GBQ60
Gas Type: ULPG
Gas Pressure: 2.75 kPa
Total Gas Consumption: 4.4kW
Main Burner Gas Consumption: 2.2kW (2)
Injector Size: 0.72mm for Main


New Zealand
PO Box 100707,
North Shore Mail Centre,
Auckland, 0745
www.goldair.co.nz
Australia
PO Box 574,
South Morang,
Victoria, 3752
www.goldair.com.au
