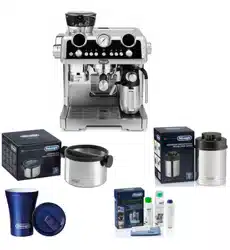
De’Longhi Appliances via Seitz, 47 31100 Treviso Italia www.delonghi.com
5713246971_00_0720
COFFEE MAKER
Instructions for use
Instructions videos available at:
http://EC9665.delonghi.com
EC96XY

2
B1
B11B15B19
B2 B3 B4 B5 B6 B7 B8 B9 B10
B14
B13
B12
B18
B17
B16
De’Longhi Appliances s.r.l.
Via L. Seitz, 47 31100 Treviso - ITALY
Tel. +39 0422 4131
5413218631/04.15
Decalcificante per macchine da caffè
Descaler for coffee machines
Détartrant pour machines à café
Entkalker für Kaffeemaschinen
C3
C2
C4
C1
C11
C5
C8
C10
C6
D1D4
D5 D6
D2
D3
D7
D8
C9
SoftBalls
C7*
3
A21
A1
A19
A2 A3
A5
A7
A8
A6
A4
B
A9
A10
A12
A11
A13
A14
A15
A16
A17
A20

4
Before using the appliance, always read the safety warnings.
This appliance shall not be used by children.
Keep the appliance and its cord out of reach
of children.
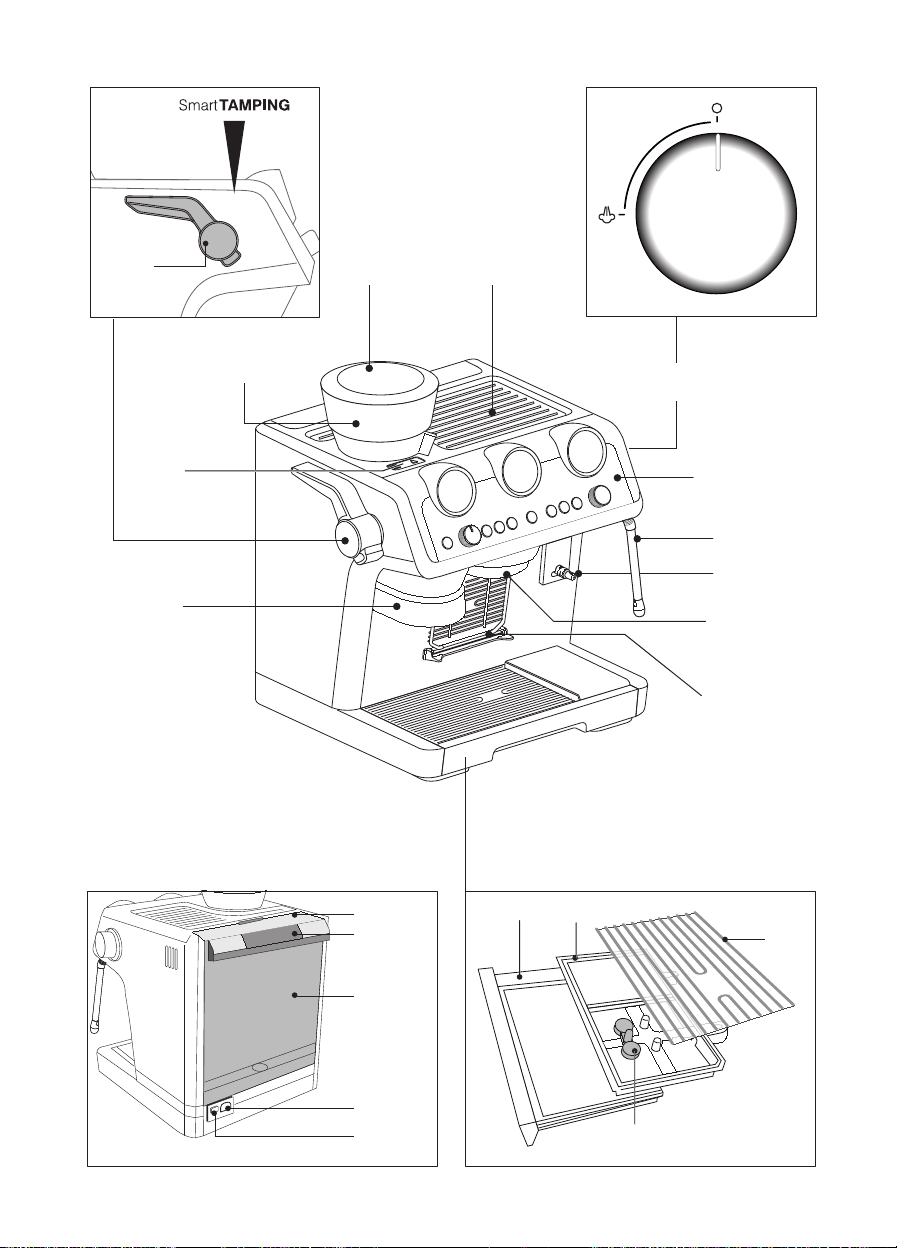
1. DESCRIPTION
1.1 Description of appliance - A
A1. Beans container
A2. Beans container lid
A3. Cup tray
A4. Steam dial
A5. Steam wand
A6. Lattecrema System connection
A7. Coee outlet
A8. Cup grille for espresso
A9. Cup grille for glasses or mugs
A10. Drip tray grille
A11. Drip tray
A12. Drip tray water level indicator
A13. Water tank lid
A14. Water tank extraction handle
A15. Water tank
A16. Power cord connector socket
A17. Main switch (ON/OFF)
A18. Coee mill outlet (tamping station)
A19. Cover to access the
coee mill coee guide
A20. Presser lever
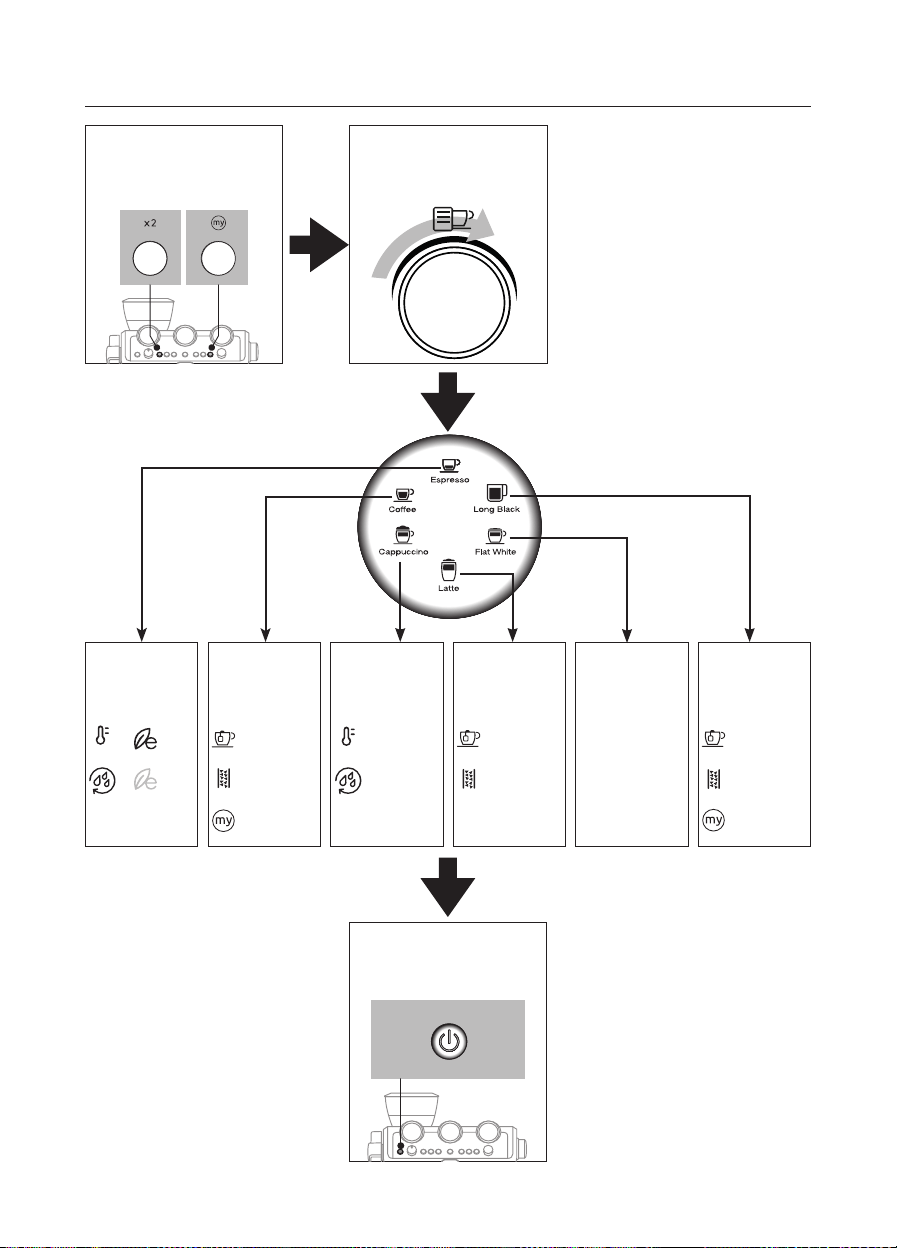
1.2 Description of control panel - B
B1. ON/Standby button
B2. Coee dose dial
B3. “X2” button: to use the 2 coees lter
B4. Coee Temperature button
B5. “Acive Rinse” button
B6. “OK” button: to deliver the beverage/conrm
B7. Hot water button
B8. “Descaling” button
B9. “My” button: to customise beverage quantity
B10. Beverage selector dial
B11. Beverage selected light:
Espresso based beverages
• Espresso
• Long Black
• Coee
Milk based beverages
• Cappuccino
• Flat White
• Latte
B12. “Milk clean” light
B13. “No beans container” light
B14. “General alarm” light
B15. Pressure gauge
B16. “No water” light
B17. Beans container empty light
B18. “Energy saving” light
B19. Led module process:
• Indicates the operation the appliance is running
• The setting of the dose level
• The infusion temperature setting
1.3 Description of accessories - C
C1. Portalter
C2. 1-cup coee lter
C3. 2-cups coee lter
C4. “Water hardness test “ indicator paper
C5. Descaler
C6. Descaling accessory
C7. Softballs (*some models only)
C8. Removable power cord
C9. Tube brush
C10. Coee outlet cleaning disk accessory
C11. Cloth
1.4 Description of LatteCrema System - D
D1. Milk container lid
D2. Milk container connector
D3. Lid release button
D4. Milk spout (adjustable height)
D5. Froth selection knob
D6. Knob housing
D7. Milk intake tube
D8. Milk container
5
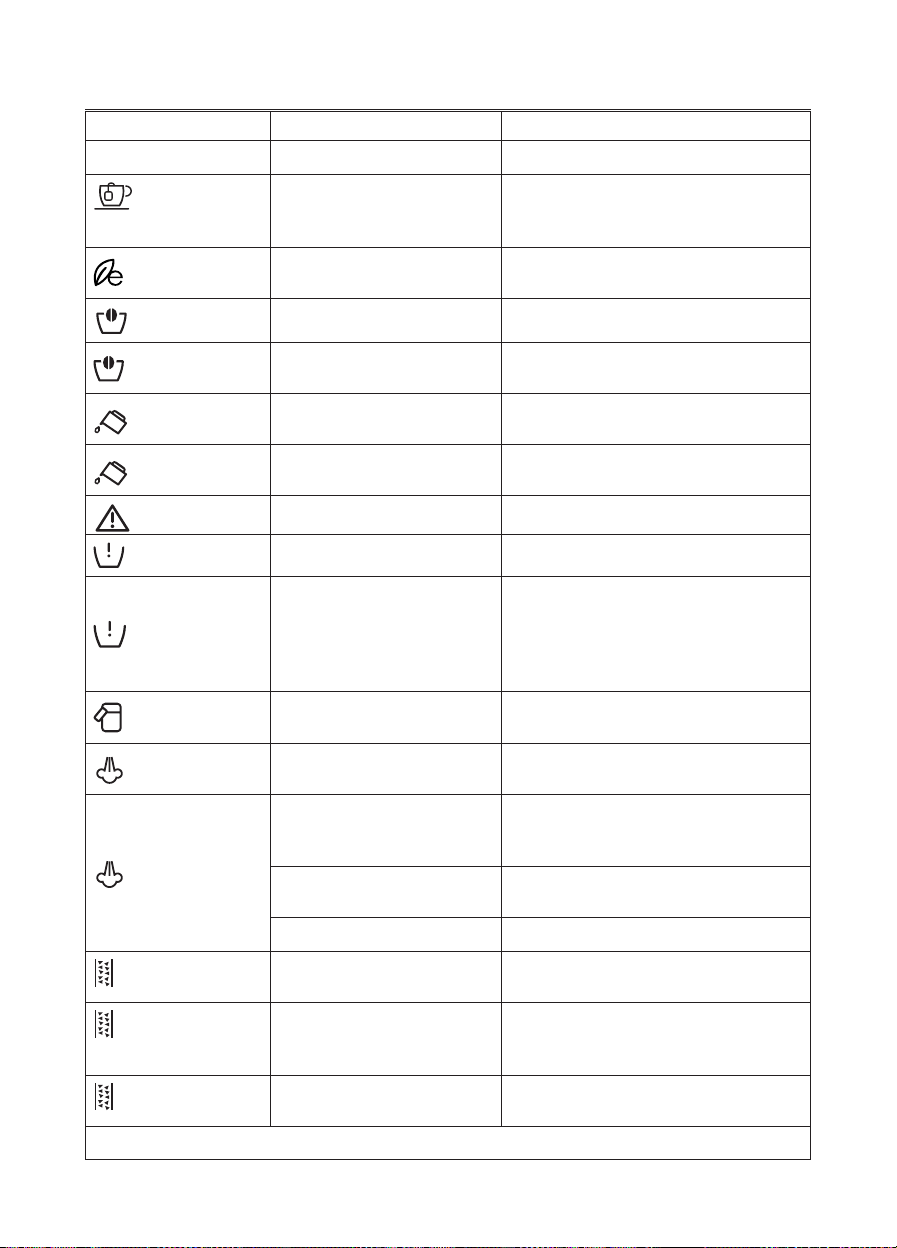
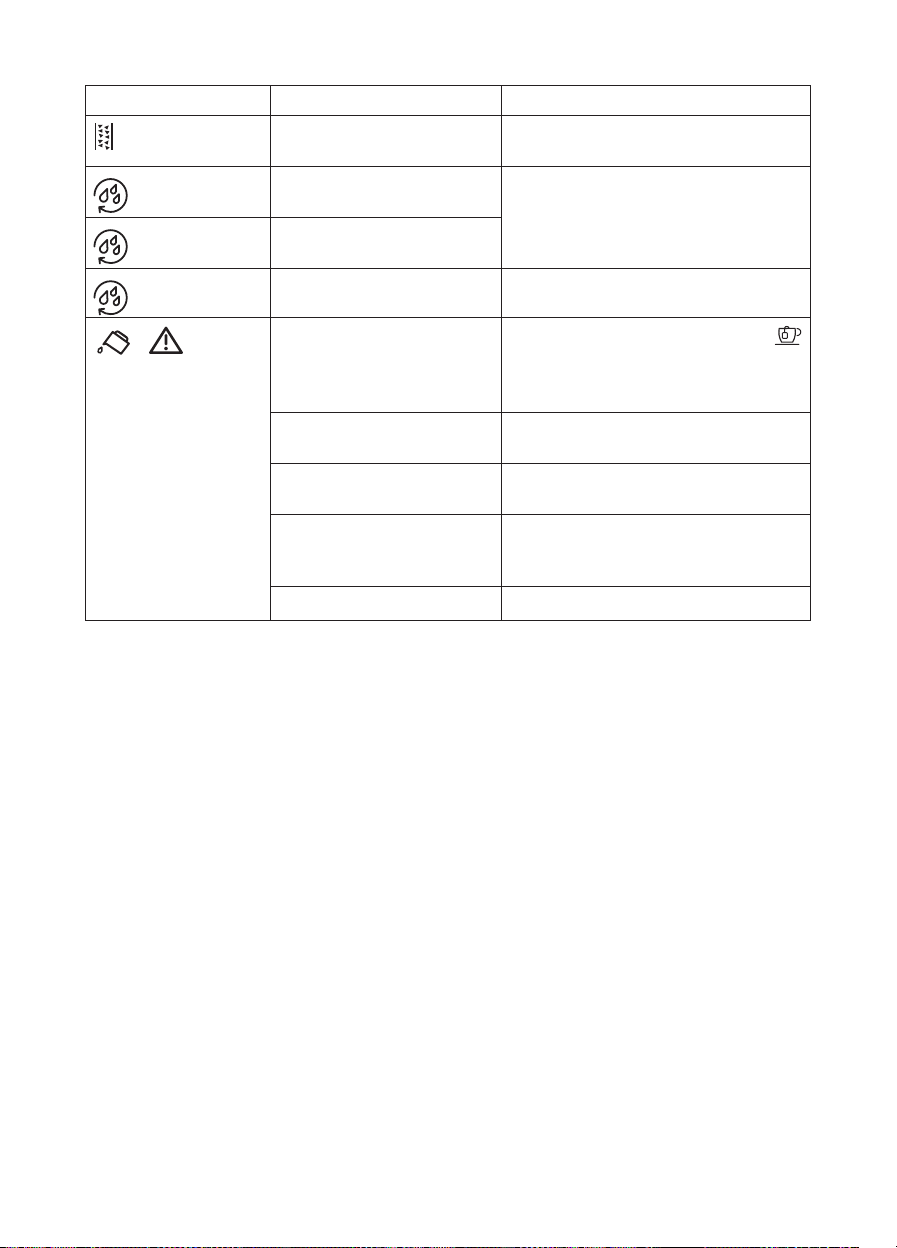
2. EXPLANATION OF LIGHTS
LIGHTS EXPLANATION OF LIGHTS OPERATION
All the lights ash briey Turning the machine on Self-diagnosis
on
The appliance is being turned on for the
rst time and the water circuit must be
lled
Proceed as described in section “Setting la specialista
for rst use” of the quick guide.
on
Energy saving is enabled If you want to disable the function, see section “3.
Menù settings”
on
The beans container is empty Fill the beans container
ashing
You are trying to deliver a beverage but
the beans container is empty
Fill the beans container
on
Insucient water in tank or water tank
not inserted correctly
Fill the tank or extract the tank and put it back
correctly
ashing
You are trying to deliver a beverage but
water tank is empty
Fill the tank
on
General alarm Contact Customer Services
on
The bean container is not inserted Insert bean container
ashing
The ness of the grind regulation is
incorrect
Move the selector within the 8 levels from coarse to
ne, kepping in mind to:
• Always adjust the coee mill while in operation
• Adjust one grinding level at a time and make at
least 5 coees before adjusting again
on
After every use, the LatteCrema System
must be cleaned
When all the milk drinks are ready, proceed with au-
tomatic cleaning turning the knob to Clean
on
The appliance is on and ready for use The appliance is at the right temperature to deliver
steam. To deliver steam, turn the steam dial (A4)
ashing
The appliance is on and energy saving
is enabled. The steam dial (A4) is in the
steam delivery position
The light ashes to indicate that the appliance is pre-
paring to deliver steam. Delivery begins as soon as
the appliance is at temperature
The appliance is heating up to be ready
for use
The appliance is at temperature when the light re-
mains on steadily
The appliance is delivering steam
on (orange)
Descaling must be performed Descale the appliance as described in section “7.
Descaling”
ashing (orange)
Descaling is underway Complete the operation as described in section “7.
Descaling”: the light comes white when the rinsing
cycle of descaling is underway
on (white)
The rinsing cycle of descaling must be
performed
…
→
6
LIGHTS EXPLANATION OF LIGHTS OPERATION
ashing (white)
The rinsing cycle of descaling is
underway
on (orange)
Cleaning of the coee outlet must be
performed
See section
ashing (orange)
Cleaning of the coee outlet is
underway
ashing (white)
The active rinse is underway
+ ashing
If the water softener lter (C7) is
present, an air bubble may have been
released inside the circuit, obstructing
delivery
Press the button (B7) corresponding to the
light. Delivery begins and stops automatically.
The grinding is too ne and the coee is
delivered too slowly or not at all
Extract the lter holder and repeat the operations to
make the perfect dose.
The coee lter is blocked. Clean as described in section “5.4 Coee lter clean-
ing and maintenance”.
The tank has been inserted incorrectly
and the valves on the bottom are not
open
Press the tank down lightly to open the valves on the
bottom
Scale in the water circuit Descale as described in section “7. Descaling”
7
Press both buttons for 5 seconds
to enter setting menu
Enter the setting menu
Turn the knob to select the drink
light corresponding to the fun-
ction to set
Select the setting
Press button to set:
➡9 minutes
➡
1,5 hours
➡
3 hours
Press button to set:
➡soft
➡
medium
➡
hard
Press button to set:
➡ ON
➡ OFF
Press button to set:
➡Beep ON
➡Beep OFF
Press button to set:
➡1
st
range
➡ 2
nd
range
Energy saving Auto o Beep
Extra grinding
adjustment
Keep pressed
OK button
for 5 seconds,
until led stay xed
Water hardness
Default values
Press the ON/Standby button to
conrm.
Save new settings:
3. MENÙ SETTINGS
8
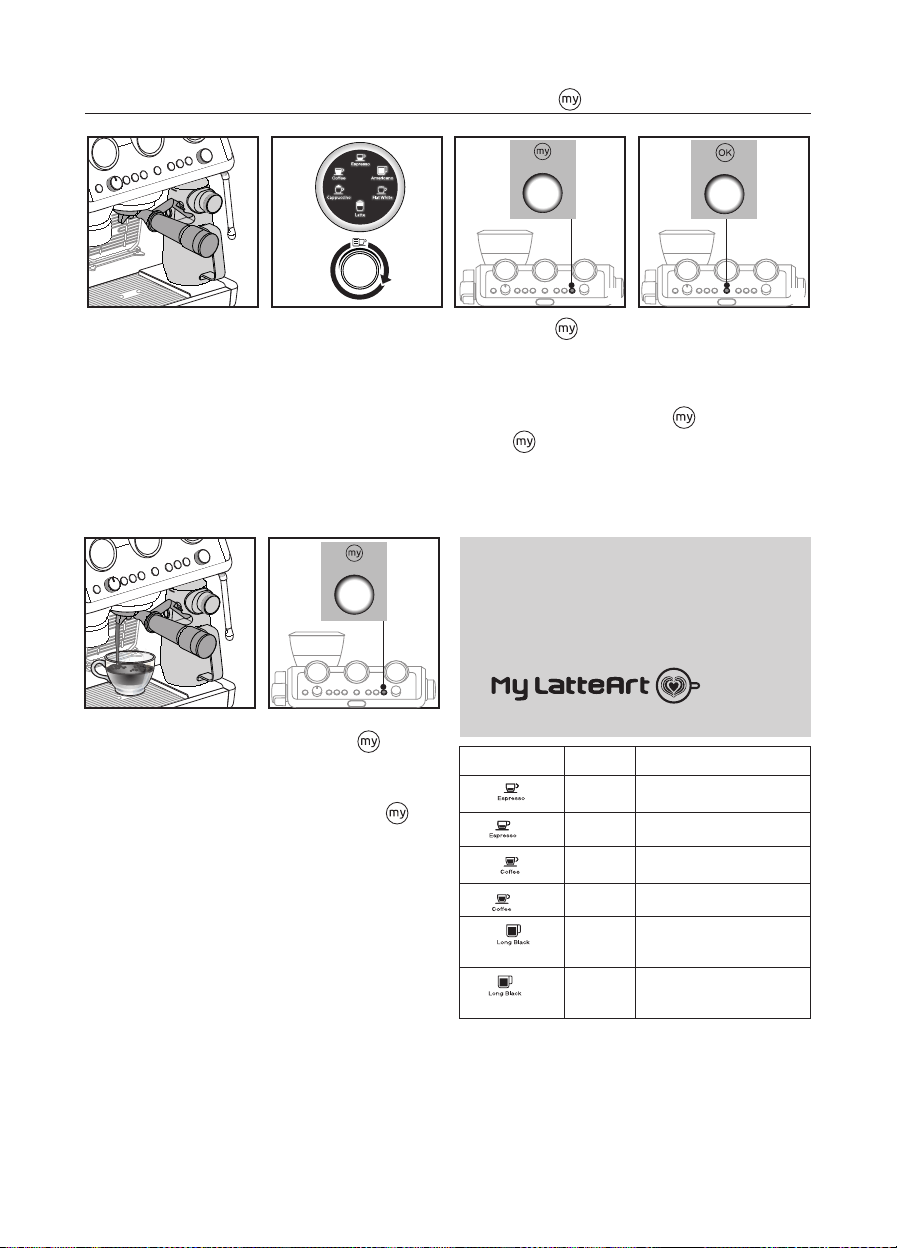
4. CUSTOMISING THE QUANTITY OF COFFEE BEVERAGES WITH THE BUTTON (B9)
1. Prepare the appliance to
deliver the beverage you
want to make. Prepare the
coee dose and attach the
portalter to the coee
outlet: if you have to cus-
tomise a milk based bev-
erage, prepare and attach
the Lattecrema System .
2. Turn the dial (B10) to
select the drink to be
programmed.
3. Press the button:
the light corresponding
to the OK button (B6)
comes on steadily and the
light corresponding to
the
button ashes.
4. Press the OK button to
start delivering the bev-
erage. The lights corre-
sponding to the OK and
buttons ash.
5. When you have reached
the desired quantity of
the beverage, press the OK
button again. If the recipe
includes another ingre-
dient, it starts delivery:
when you have reached
the desired quantity, press
the OK button again.
6. Press the button to
save the new setting. The
appliance is ready for use
again and the
but-
ton remains on.
If you do not want to save the
new setting, press any other
button.
Please note:
• You can programme coee beverages, but not steam and
hot water.
• Programming changes the quantity of the beverages, but
not the amount of coee ground.
• “X2” beverages can be programmed separately.
•
is not
programmable.
1
5
2
6
3 4
Coee Recipe Quantity Programmable quantity
35 cc from 25 to 90 cc
X2
70 cc from 50 to 180 cc
80 cc from 50 to 120 cc
X2
160 cc from 120 to 240 cc
100 cc • water: from 25 to 60 cc
• espresso: from 25 to 120 cc
X2
200 cc • water: from 50 to 240 cc
• espresso: from 50-120 cc
9
5. CLEANING AND MAINTENANCE
5.1 Cleaning the machine
The following parts of the machine must be cleaned regularly:
- drip tray (A11) complete with cup grille (A9) and drip tray
grille (A10);
- espresso cup grille (A8);
- coee lters (C2) and (C3);
- the beans container (A1);
- the coee mill burrs;
- the coee mill outlet (A18) (smart tamping station);
- boiler outlet (A7);
- water tank (A15);
- steam wand (A5);
- Lattecrema system (D).
Important!
• Do not use solvents, abrasive detergents or alcohol to clean
the coee machine.
• Do not use metal objects to remove encrustations or coee
deposits as they could scratch metal or plastic surfaces.
• None of the components of the appliance can be washed in
a dishwasher with the exception of the drip tray (A11) and
cup grilles (A8) and (A9).
• If the appliance is not used for more than a week, before
using it again, we recommend you perform a rinse cycle.
Danger!
• While cleaning, never immerse the coee maker in water. It
is an electrical appliance.
• Before cleaning the outside of the appliance, turn it o,
unplug from the mains socket and allow to cool.
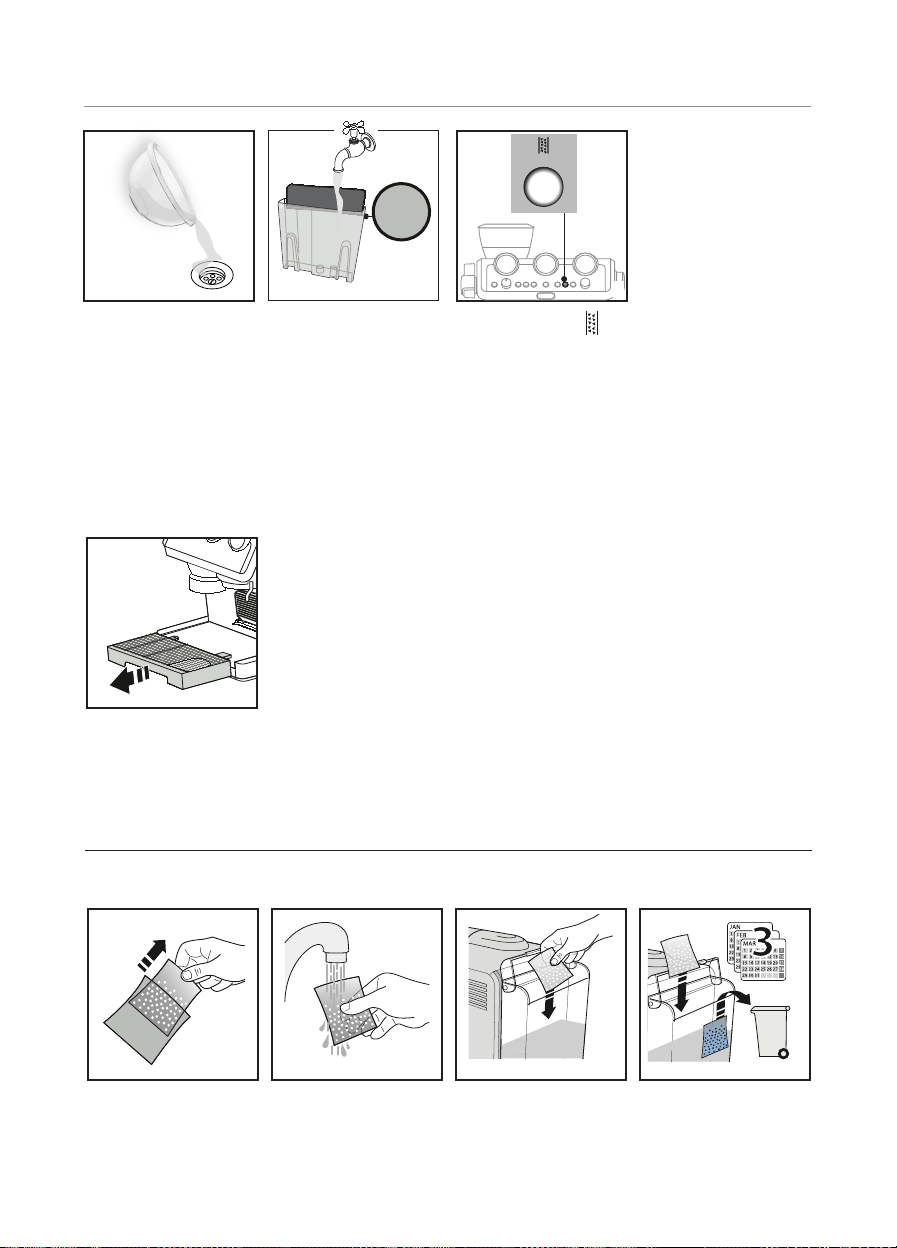
5.2 Cleaning the drip tray
The drip tray is tted with a level indicator (A12) (g. 7) showing
the amount of water it contains. Before the indicator protrudes from
the cup tray, the drip tray must be emptied and cleaned, otherwise
the water may overow the edge and damage the appliance, the
surface it rests on or the surrounding area.
7 8
1. Remove the drip tray (g. 8).
2. Remove the cup grille (A9), drip tray grille (A10) and level
indicator (A12), empty the water and clean all the compo-
nents with a cloth, then reassemble the drip tray.
3. Put the drip tray back in place.
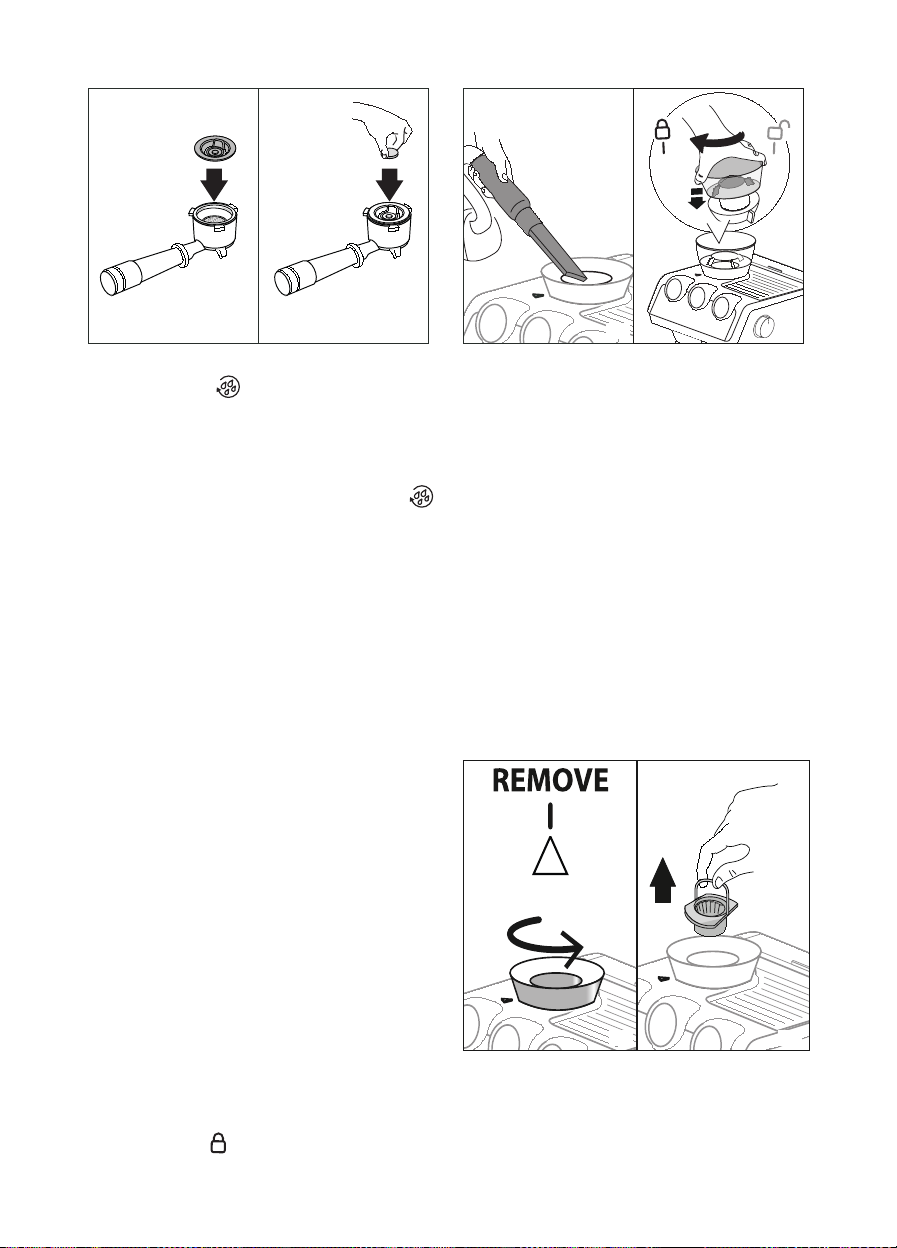
5.3 Cleaning the espresso cup grille
1. Extract the grille (A8) by pulling it from the left, then re-
moving it from the support (g. 9).
2. Clean the support with a cloth and wash the grille (dish-
washer safe).
3. Put the grille back on the support from the right side, then
push until it is correctly attached (g. 10).
9 10
1
2
1
22
2
1
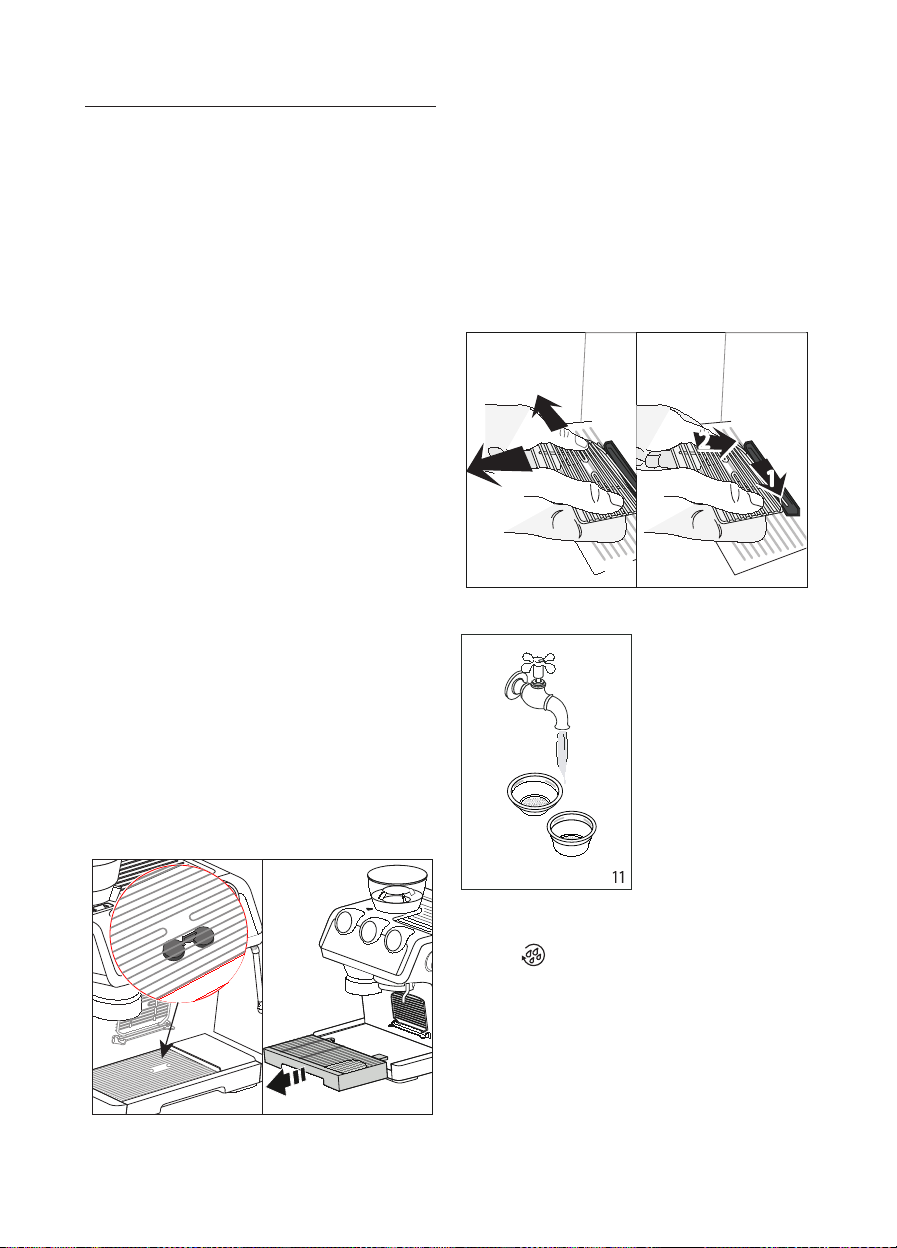
5.4 Coee lter cleaning and maintenance
The coee lters are designed to
obtain the best possible coee
extraction and crema. For best
results, the lters must always
be clean and free from all coee
residues.
After using the appliance, al-
ways rinse the lters under
abundant running water (g.
11) or by Active Rinse function
(B5).
5.5 Cleaning of the coee outlet
When the
light comes on (orange) (B5), you have to pro-
ceed cleaning the coee circuit. To run the cleaning, you have to
purchase dedicated cleaning tabs for coee makers.
Proceed as follows:
1. Insert the 1-cup coee lter (C2) in the portalter (C1);
2. Put on the coee lter the special disk accessory (C10) (g.
12) and press it to the bottom;
3. Put on the accessory the cleaning tab (g. 13);
4. Attach the portalter to the coee outlet (A7);
10
12 13
5. Fill the water tank (A15);
6. Keep pressed the
button, until the related light start
blinking (orange);
7. After few minutes the cleaning stops automatically;
8. Remove the portalter;
9. Remove and empty the drip tray.
After the cleaning cycle, make a rinse by pressing the
button.
5.6 Cleaning the water tank
1. Remove the softballs pack (*if present) and rinse with run-
ning water.
2.
Clean the water tank regularly (about once a month) with
a damp cloth and a little mild washing up liquid, then rinse
thoroughly.
3.
Replace the softballs (*if present), ll the tank with fresh
water and replace the tank.
Danger!
While cleaning, never immerse the coee maker in water. It is an
electrical appliance.
5.7 Cleaning the beans container
Without extracting it, clean the beans container regularly with
a cloth.
For more thorough cleaning, proceed as follows:
1. Make sure the beans container (A1) is empty. If necessary,
operate the coee mill without beans to empty it:
2. Release the beans container by turning it anticlockwise and
extract from the appliance;
3. Wash the container and lid (A2) with warm water. Do not
wash the components in a dishwater or use washing up
liquid! Dry all accessories thoroughly before using again.
4. Remove coee residues (g. 14) using a vacuum cleaner;
5. Clean the beans container housing with a damp cloth and
dry;
6. Put the container back inserting it in the coee mill (g.
15). The container is correctly inserted when the arrow is
lined up with the
symbol and you hear a “click”.
14 15
5.8 Cleaning the burrs
When cleaning the beans container, clean the container housing
and upper burr with a damp cloth. The burr can be removed and
replaced by an authorised customer services centre.
You may also need to remove the burr if it becomes blocked with
foreign matter. If this occurs, clean as follows:
1. Empty the beans container (if necessary, using a vacuum
cleaner to remove any remaining beans).
2. Attach the portalter and operate the mill without beans
to free the coee guide, then attach the portalter to the
outlet of the coee mill (A18), lining it up with “INSERT”,
then turning it to the right. Grinding begins when the por-
talter reaches the CLOSE position and stops automatically;
3. Turn the appliance o;
4. Release the beans container by turning it anticlockwise and
extract from the appliance;
5. Turn the grinding selector anticlockwise as far as it will go
to the “REMOVE” position (g. 16).
16 17
6. Extract the upper burr, gripping it by the handle (g. 17).
7. Clean the burr with a brush (not included) (g. 18) and re-
move the coee residues using a vacuum cleaner (g. 14).
8. Put the upper burr back in place:
11
18 19
• Insert the burr in its hous-
ing (g. 19);
• Turn the selector to select
the desired grinding level
(g. 20);
• Make sure the burr is in-
serted correctly by pulling
it by the handle. If it is
correctly inserted, it will
not move;
9. Clean the beans container
housing with a damp cloth
and dry;
10. Put the container back (g. 15).
5.9 Replacing the burrs
When the quantity of coee becomes even less, contact a cus-
tomer services centre to have the burrs replaced, then adjust
the mill again as follows entering the setting menu (“3. Menù
settings”) and selecting the rst range of the “Extra grinding
adjustment”.
Then turn the ground coee quantity dial (B2) to minimum posi-
tion and set the dose like a rst use (see Quick Guide).
5.10
Cleaning the “Smart tamping station”
To guarantee top quality grinding, clean the “Smart tamping
station” regularly as follows:
1. Clean the attachment area with a brush (g. 21).
21 22
2. Pull the
lever
(A20) as far
as it will go and clean the
presser cylinder with a
brush (g. 22). Then rele-
ase the lever.
3. Use the tube brush (C9)
to clean the coee funnel
(g. 23).
5.11 Cleaning the LatteCrema System
Clean the milk container each time you prepare milk as de-
scribed below:
1. Push the release button (D3) and lift the milk container lid
(D1) (g. 24);
2. Remove the milk spout (D4) and milk intake tube (D7) (g.
25);
24 25
3. Turn the froth adjustment dial (D5) counter-clockwise to
the “Insert” position (g. 26) and pull;
20
12
26 27
INSERT
4. A
ll components of the lid
are dishwasher safe, plac-
ing them in the top bas-
ket. If you do not have a
dishwasher, wash by hand
as described in the note at
the end of the section.
5. Make sure there are no
milk residues on the hol-
low and groove under the
dial (g. 27):
if necessary,
scrape the groove with a
toothpick;
6. Rinse inside the froth adjustment dial seat with running
water (g. 28);
7. Check that the intake tube and spout are not clogged with
milk residues;
8. Reassemble all the lid components;
9. Carefully wash and rinse the milk container (D8) ;
10. Attach the lid back on the milk container.
Please note: washing by hand
Washing the lid in a dishwasher guarantees the perfect hygiene
of all the components. When washing by hand, wash all compo-
nents of the milk container lid thoroughly with hot water and
immerse them in a basin of hot water for 30 minutes before pro-
ceeding as described in point (5).
5.12 Other cleaning operations
1. Do not use solvents or abrasive detergents to clean the cof-
fee maker. Use a soft damp cloth only;
2. Clean the portalter;
3. You are recommended to use De’Longhi detergent.
28
6. WATER HARDNESS
6.1 Water hardness
The descale light (B8) comes on after a period of time es-
tablished according to water hardness. The machine can also
be programmed according to the actual hardness of the water
supply in the various regions, in which case descaling may be
required less frequently.
Proceed as follows:
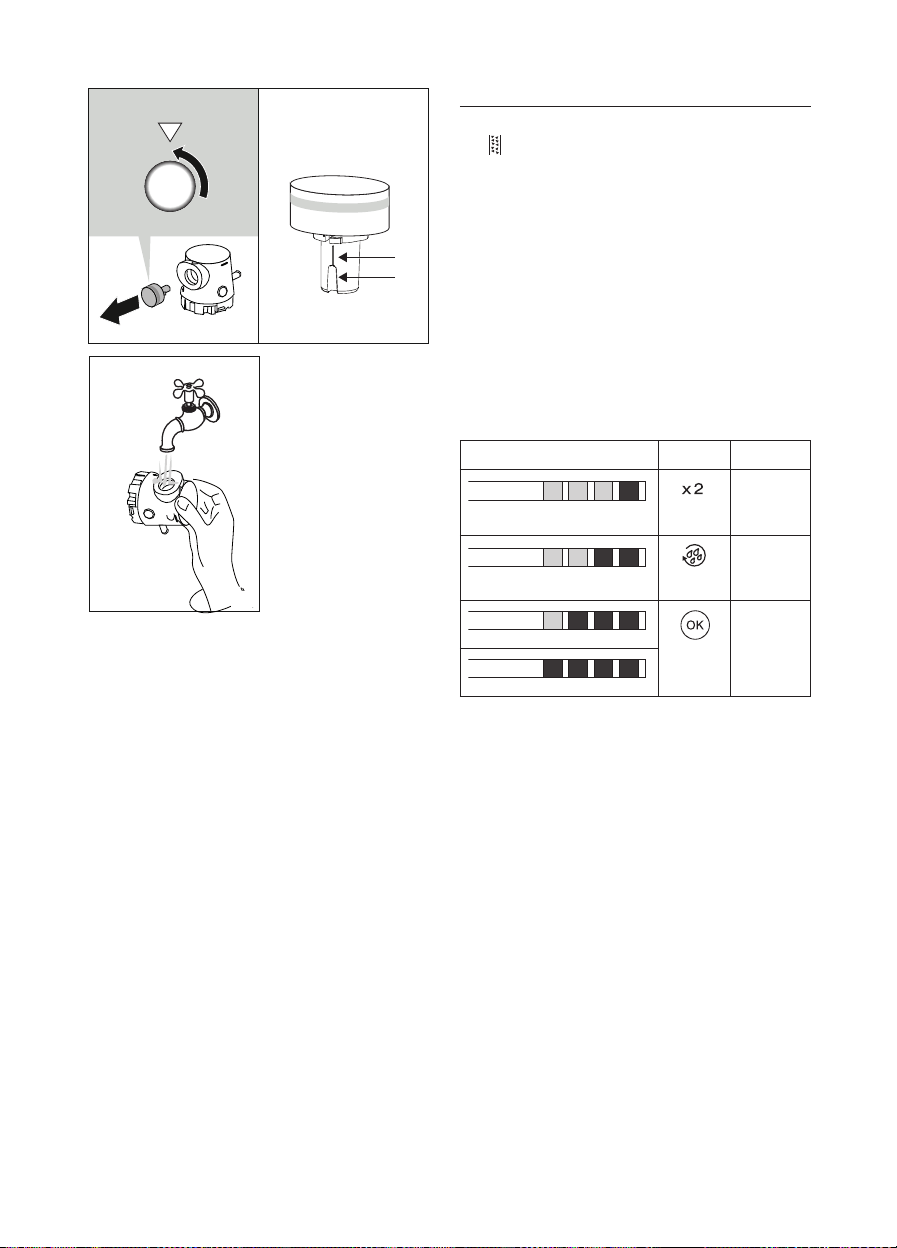
1. Remove the “TOTAL HARDNESS TEST” indicator paper (C4)
from its pack.
2. Immerse the paper completely in a glass of water for one
second.
3. Remove the paper from the water and shake lightly. After
about a minute, 1, 2, 3, or 4 red squares form, depending
on the hardness of the water. Each square corresponds to
one level.
Total Hardness Test result Button Level
1
soft water
2
medium
water
3
hard or
very hard
water
4. Set the appliance as indicated in section “3. Menù settings”.
13
A
B
7. DESCALING
Descale the appliance when
the
light (B8) comes on
(orange).
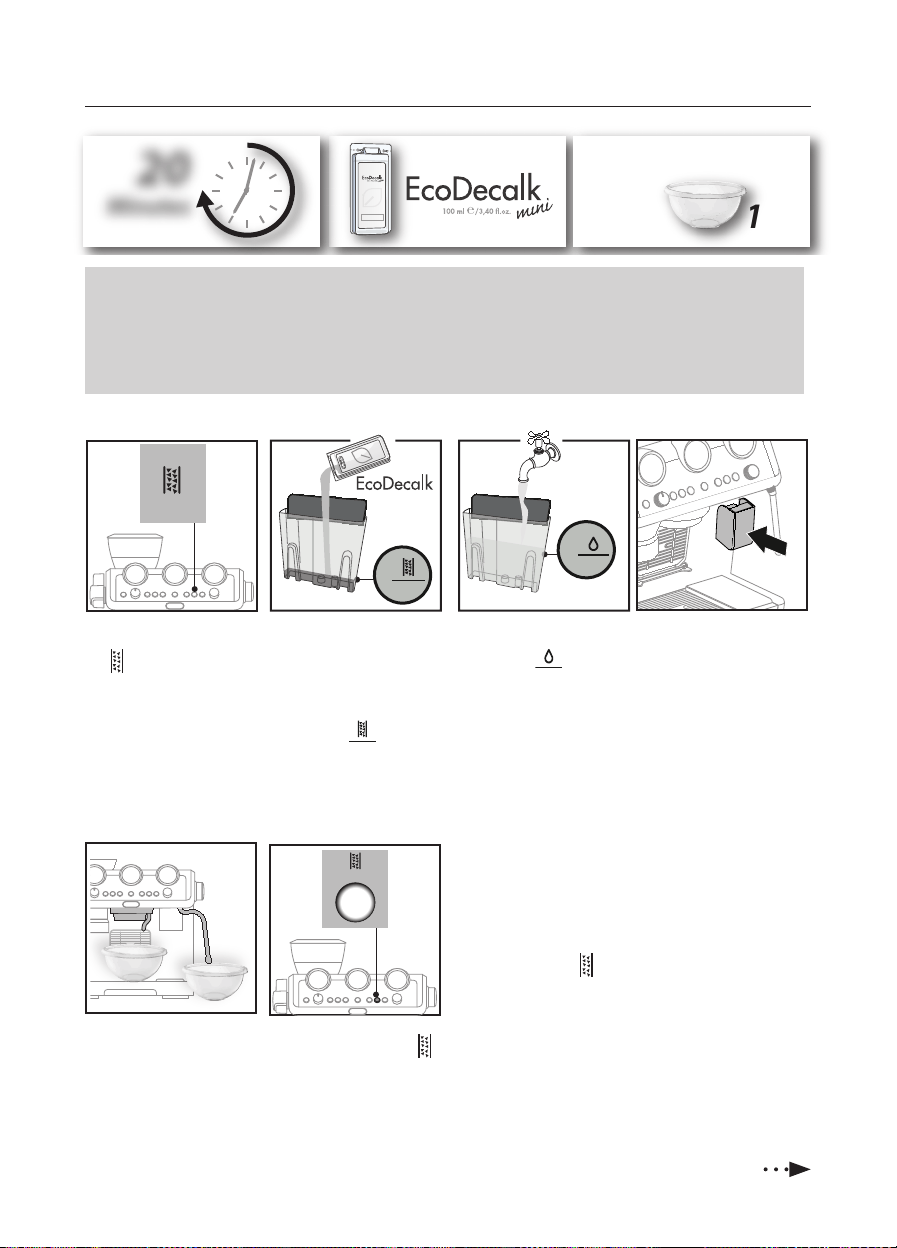
1. IF PRESENT, REMOVE
THE WATER SOFTENER
FILTER.
Pour the des-
caler into the tank up to
the level A marked
inside the tank (equal to
one 100ml packet).
2. A
dd water (500 ml) up to
t
he level B .
Then put the water tank back
in the appliance.
3. Insert the dedicated ac-
cessory (C6) to the Latte
Crema connection (A6).
4. Make sure the portalter is
not attached and position a
recipient under the coee
outlet, hot water spout
and the other recipiente
under the steam wand.
5. Keep pressed the
button until the cor-
responding light start
blinking: descaling
starts.
Please note
• Before use, read the instructions and the labelling on the descaler pack.
• It is important to use De’Longhi descaler only. Using unsuitable descaler and/or performing descaling incorrectly may result
in faults not covered by the manufacturer’s guarantee.
• Descaler could damage delicate surfaces. If the product is accidentally spilt, dry immediately.
4
1
5
2 3
Or
ange
20
Minutes
De’Longhi Appliances s.r.l.
Via L. Seitz, 47 31100 Treviso - ITALY
Tel. +39 0422 4131
5413218631/04.15
Decalcificante per macchine da caffè
Descaler for coffee machines
Détartrant pour machines à café
Entkalker für Kaffeemaschinen
1 L
2x
6. The descale programme starts and the descaler liquid comes
out of the steam wand and coee outlet. The descale pro-
gramme removes limescale deposits from inside the appliance
by automatically performing a series of rinses and pauses until
the tank is empty.
Delive
ry stops and th
e
light turns to white. This indicates that it is
necessary to proceed with rinsing: see next page.
14
7. DESCALING
7
7. Empty the recipients used
to collect the descaler
solution and replace them
empty.
8. Remove the water tank,
empty any residues of
descaler solution, rinse
with running water and
ll with fresh water up
to the MAX level. Put the
tank back in its housing.
9. Keep pressed the
but-
ton until the correspond-
ing light start blinking:
rinsing starts.
10. When rinsing is complete,
delivery stops and the
appliance prepares to be
used again.
11. Empty the recipients used
to collect the rinse water.
12. Extract and empty the drip
tray, then put back in the
appliance.
MAX
8 9
12
Now the appliance is ready to
use.
8. USING THE SOFTBALLS
Softballs is an innovative system that extends the life of the machine, without altering the sensory properties of the water, guaran-
teeing consistenly creamy and aromatic coee.
1 2 3 4
1. Extrat the softballs from
the packaging.
2. Rinse with tap water the
softballs.
3. Deep into the water tank. 4. Change softballs every 3
months.
15
9. TROUBLESHOOTING
PROBLEM CAUSE SOLUTION
No espresso coee is delivered No water in the tank (A15) Fill the tank
The
light is on to indicate that the
coee or steam circuit is empty
Press the button corresponding to the
light to ll the circuit
The coee lter is blocked Clean as described in section “5.4 Coee l-
ter cleaning and maintenance”
The tank has been inserted incorrectly
and the valves on the bottom are not
open
Press the tank down lightly to open the
valves on the bottom
Scale in the water circuit Descale as described in section “7. Descaling”
Coee grind too ne Adjust coee dose and grinding (refer to
Quick Guide)
The portalter cannot be attached to
the appliance
The ground coee has not been pressed
or is too much
Repeat grinding with new settings
The espresso coee drips from the
edges of the portalter rather than the
holes
The portalter is inserted incorrectly Attach the portalter correctly and rotate
rmly as far as it will go
The espresso boiler gasket has lost elas-
ticity or is dirty
Have the espresso boiler gasket replaced by
Customer Services
The coee lter is clogged Clean as described in section “5.4 Coee l-
ter cleaning and maintenance”
The coee crema is too light (delivered
from the spout too fast)
The appliance settings need reviewing Refer to coee guide for suggestions
The coee crema is too dark (delivered
from the spout too slowly)
The appliance settings need reviewing Refer to coee guide for suggestions
No milk froth is formed when making
cappuccino with LatteCrema System
Milk not cold enough Always use milk at refrigerator temperature
The LatteCrema System is dirty Clean the cappuccino maker as described
in section “5.11 Cleaning the LatteCrema
System”
Scale in the water circuit Descale as described in section “7. Descaling”
At the end of descaling, the appliance
requests a further rinse
During the rinse cycle, the water tank
has not been lled to the MAX level
Repeat the rinse cycle from point (8) of section
“7. Descaling”
The appliance does not grind the coee There is foreign matter that cannot be
ground in the coee mill
Clean the burrs as described in section “5.8
Cleaning the burrs”, making sure you remove
all the beans from the beans container (A1)
before extracting it.
Before putting the burr back, vacuum all resi-
dues from the housing (g.14)
…
→
16
PROBLEM CAUSE SOLUTION
If you want to change the type of coee You must remove all the beans present
in the machine
• Empty the beans container (if neces-
sary, operate the coee mill without
beans or use a vacuum cleaner to re-
move any remaining beans)
• Attach the lter holder and operate
the coee mill a number of times
without beans to free the coee guide.
Attach the lter holder to the outlet
of the grinder (A18), lining it up with
"INSERT", then turning it to the right.
Grinding begins when the lter holder
reaches the CLOSE position and stops
automatically. Repeat until the lter is
empty
• Place the new coee in the beans
container
• If the amount of coee ground is not
enough to reach the perfect dose, pro-
ceed setting the appliance as for the
rst use
After grinding, the coee lter is empty The coee grinder coee funnel is
clogged
Clean as described in section “5.10 Cleaning
the “Smart tamping station””. If the problem
persists, access the guide by opening the hatch
and free it using the brush)
After grinding, there is too much coee
in the lter
After grinding, the ground coee in the
lter does not reach the “perfect dose”
The "Smart Tamping Station" needs
cleaning
Clean as described in section “5.10 Cleaning
the “Smart tamping station”, then grind again
The quantity of ground coee needs
adjusting
Adjust the quantity of coee with the dial
(B2). If the dial is already in the max. position,
proceed as described in section “Extra grinding
adjustment”
Over time the burrs wear down
Replace the burrs as described in section “5.9
Replacing the burrs”