Loading ...
Loading ...
Loading ...
STEP
2:
PREPARE
THE
VENTING
SYSTEM
NOTE:
The
ductwork
you
need
for
outside
ventilation
is
not
included
with
your
oven.
The
standard
ductwork
fittings
and
length
Sears
recommends
are
shown
in
Figure
9,
page
9.
AX
WARNING-FIRE
HAZARD
ZY
THIS
OVEN
MUST
BE
PROPERLY
VENTED!
You
may
vent
your
oven
in
one
of
three
ways:
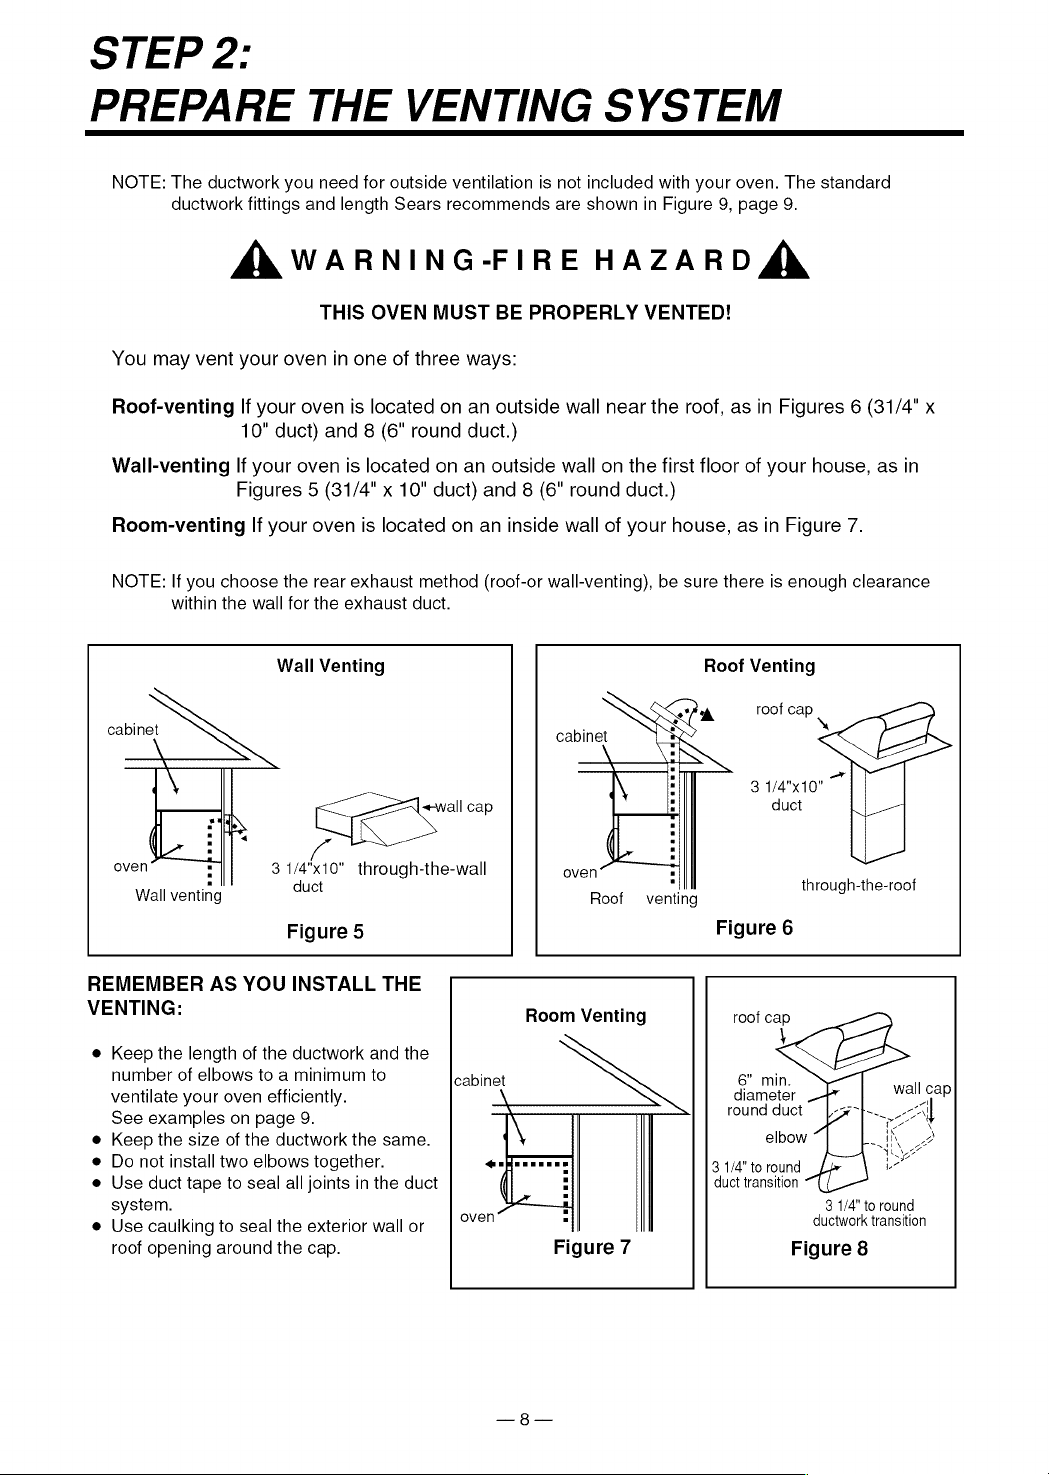
Roof-venting
If
your
oven
is
located
on an
outside
wall
near
the
roof,
as
in
Figures
6
(31/4"
x
10"
duct)
and
8
(6"
round
duct.)
Wall-venting
lf
your
oven
is
located
on an
outside
wall
on
the
first
floor
of
your
house,
as
in
Figures
5
(31/4"
x
10”
duct)
and
8
(6"
round
duct.)
Room-venting
If
your
oven
is
located
on an
inside
wall
of
your
house,
as
in
Figure
7.
NOTE:
If
you
choose
the
rear
exhaust
method
(roof-or
wall-venting),
be
sure
there
is
enough
clearance
within
the
wall
for
the
exhaust
duct.
Wall
Venting
Roof
Venting
ek
roof
cap
cabinet
cabinet
a
3
1/4"x10"
duct
i
oven
3
1/4"x10"
through-the-wall
oven
Wall
venting
duct
Roof
venting
through-the-roof
Figure
5
Figure
6
REMEMBER
AS
YOU
INSTALL
THE
VENTING:
Room
Venting
roof
cap
e
Keep
the
length
of
the
ductwork
and
the
number
of
elbows
to
a
minimum
to
cabinet
6”
min.
ventilate
your
oven
efficiently.
diameter
.
wall
cap
See
examples
on
page
9.
\
round
duct
fy
All
e
Keep
the
size
of
the
ductwork
the
same.
;
elbow
~|
K
2
e
Do
not
install
two
elbows
together.
nfeereees
3
1/4"
to
round
oe
e
Use
duct
tape
to
seal
all
joints
in
the
duct
:
duct
transition
system.
2
3
1/4"
to
round
e
Use
caulking
to
seal
the
exterior
wall
or
|
°Y°"
.
ductwork
transition
roof
opening
around
the
cap.
Figure
7
Figure
8
Loading ...
Loading ...
Loading ...